LG LP6000ER User Manual PACKAGE UNIT Manuals And Guides 1006362L
User Manual: LG LP6000ER LP6000ER LG PACKAGE UNIT - Manuals and Guides View the owners manual for your LG PACKAGE UNIT #LP6000ER. Home:Heating & Cooling Parts:LG Parts:LG PACKAGE UNIT Manual
Open the PDF directly: View PDF ![]() .
.
Page Count: 40
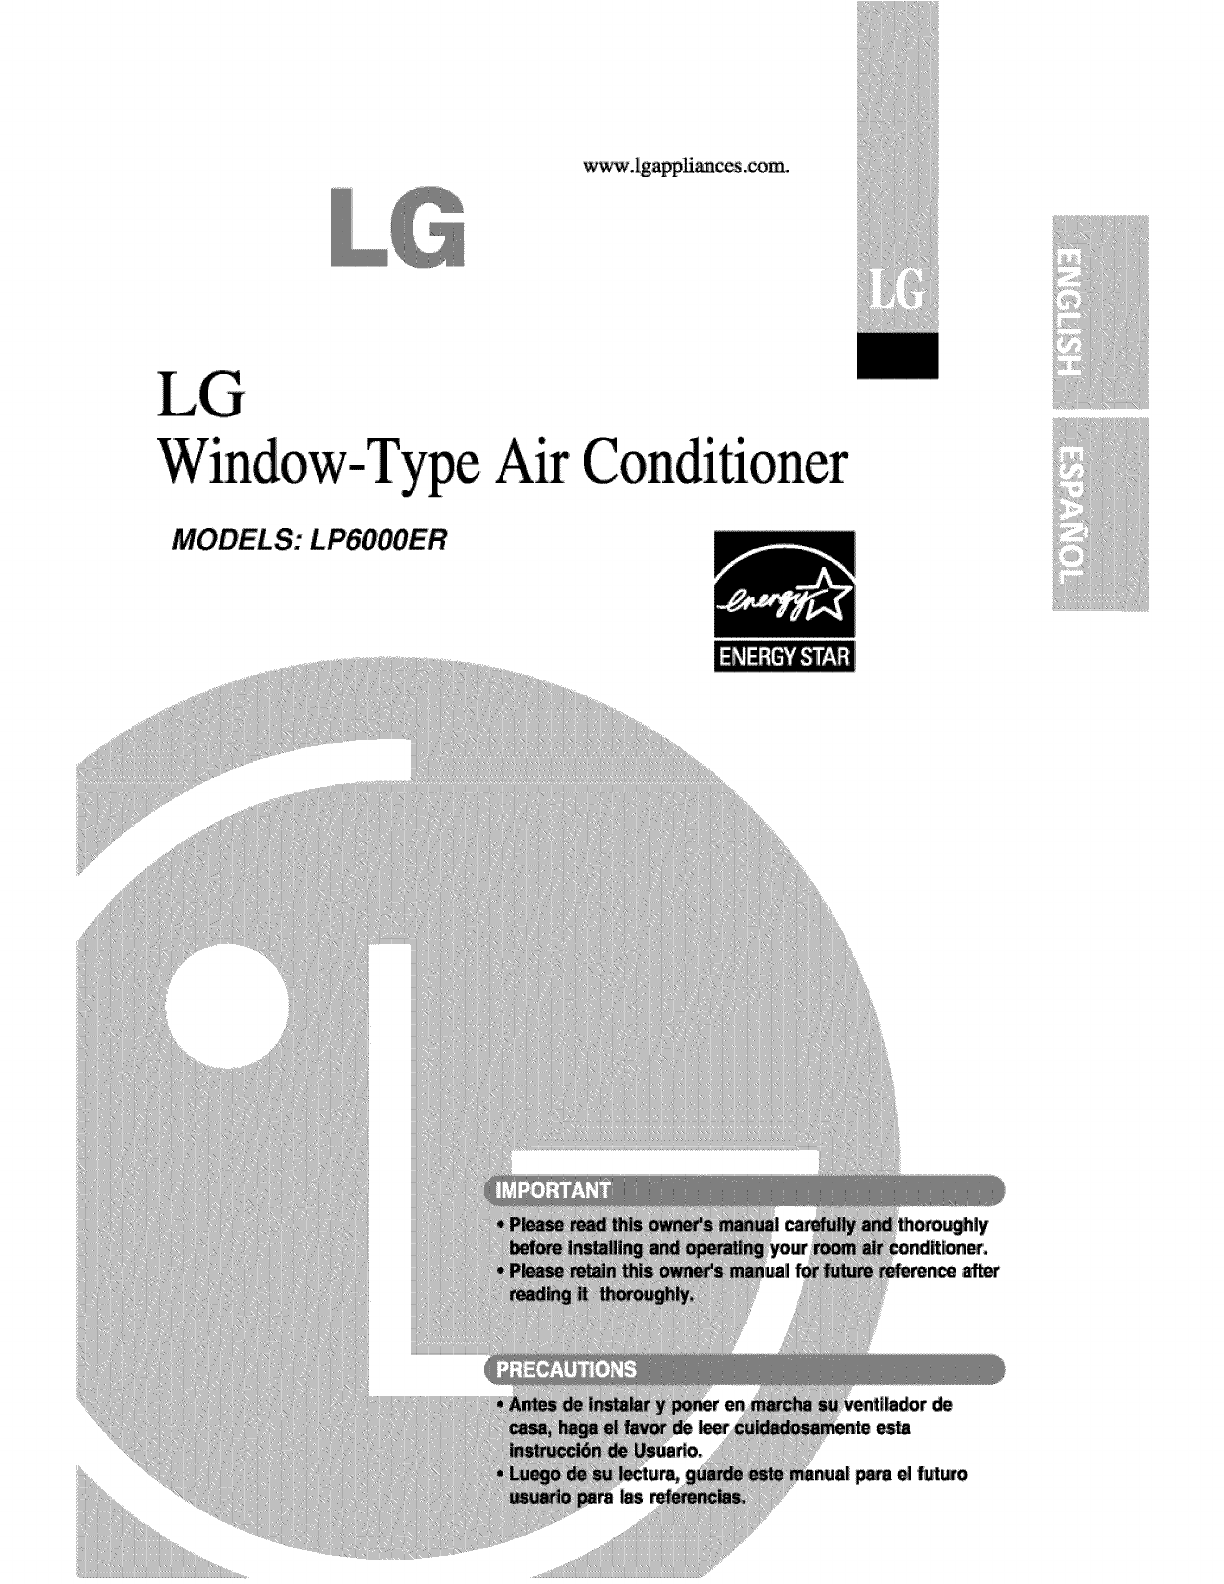
w,_.Igapp_ces.com_
MODELS: LP6OOOER
Your Records
Write the _! and serial numbershere:
Mode! #
Serial #
You can find them on a,label on the,side of each ulnit,
_ale¢s Name
Date Purcha_d
This Manual
Inside you wiL!find many hetpfui hints on _w _ use
_d mdn_in your air o_nditior_rproperly: Just a little
preventive care on >'our part can save you a great
deal oil time and money over the fife of your air
conditioner,
You'll find many answers to common problems m the
chart of troubleshooti_ tips. ff you review our chart o,f
Troubleshooting _ps firsL you may not n_ to call
for se_ice at all,,
CA UTIO'N
• Contact the authorized' se_ice technicianfor repair
or maintenance of this un#.
,,Contact the installer for installation oil this unit.
•Th.eair ,con,dition'_is not intended for use by young
chi_re,n or inva'fids withoutsupe_'ision.
• You_ chi_ren should _ su_is_ to,ensure that
they do not play with the air _nditioner.
Topreventinjuryandprope_ydamage,followthe_ i_truc_ions,
Incorrectoperationdue to ignoring instructions miglht cause h_m or damage, the _rious_ss, of which is
indicated by the following symbol&
[................................,,,everOo ,li
Always Do This j!i
[] The foHowin9 items are classified by these symbols,
* Doing so may cause elect_fic
shock or fire,due to heat
generation or e_ectricshock,
• _ing so maycameelectricshockor
fire dueto he_ generation
•No grounding may cau_ e/ectdc
shock (See installation Manual)
• Such a unit may pose a dsk of
fire or eie_ic shock a_ident
• _ing so may cause e_ectric
shock or fi#e due to heat
.,_ing so may cause e_ectric
shock,
• _ing so may cause f_ilure of
machine ,orelectric shock,
* Doing_ _y c_ e_ic sh_ o_i_e,.
.ff1hes_l/c_ is_ma_, itrnu__ _e#_
bylhema_r_., _emara_&Jr_'ss_e
_e_ ora_mi_ q_ _s® ino_e
• This could damage your hea_th.
• Failure to install fnese m_y'cause
fire ,orelectric shock accident,
• _ing so may cause fire or
eiectric sh_k • It may cause electric sh_k,,
.,_ing so may cause fire or' • Doing so may lead 'toan
•Operating the air conditioner in the presence of gas
, They are sharp and may cause
., _3ing so may cause failure or elect_c shock,
J J
oWater may enter the unit and
degrade the insuiation, It a!so
may cause :anelectric sh_k
• Since the f_ rotate_,_thigh speed
duringo_ration, it may_use
injury if=activatedwhile cleaning,
•Ope_tion with 'windows open_
may cause we_ing of indoor and
soaking dhousehold furniture
, Doing so may c_se failure of
appliance or accident.
• This could injure the pet or pl&r_t
•_mproperh_d_ing may cause
electjficshock or damage,
• if the previous air conditioner
damaged _e console, _ere is a
risk of the new unit failing
,_he,rw_ethepr_uc_ _pea_ancemay
bedamag_du,etochan_ed p_u,_
col,0rer_Jatchingof_ _#aceo
• Treating the power cord
c_elessly poses a danger of fire
or e_ectricsh_k
• An oxygen sho_age may
otherwise occur.
• It may cause damage of animus
or veg_ables or loss of prope_y
• Doing so can prolong _e _if,eof
the produ_,
• Operation without filters will
cause failure.
• Itcontains contaminants that
would make you sick
_ ContactaninstallationspecialistforinstaHa_on,
Piugin_e powerplugproperly.
_Do notsharet_esameoutletwitho_erappliances
Donotuseanextensioncord,
Donots4a_'stopoperationbyplugging!unpluggingthe_wercord
Ifcordp/ugisdamaged,replaceonlywithanauthorizedpa_,
Beingex_sedtodirect_#lowforanextendedperiodoftimecouidbehazardoustoyourhealth_ not
exposeoccupants_peR,orplantstodirectairflowforextendedperiodsoftime.
Duetothe_ssibiiityofoxygendeficiency,ventilatetheroomwhenusingtog_herwithstovesorother
hea_ngdevices.
Donotusethisairconditionerfornon-specifiedsp_ialpu_oses(eg.presewn£precisondevices,
food,pets,Ipl_ts,and_: obiects),Usagein,suchamanner_ui,dharmsuchproperty,
Donot:touchthemetalpartsoftheun_whenremovingthefilter°Injuriescanoccurwhenhandlingsharp
metaledges
DonotusewatertocleaninsidetheairconditionerExposuretowatercandestroytheinsu_a_on,leading
topossibleelectricsh_k
Whencieaningtheunit,fir_makesurethatthepowerandbreakeraretum_ off,Thefanrot_esata
ve_highspeedduringoper_ionThereisapossibili_ofiniuryiftheun_'spowerisaccidentally
triggeredonwhilec_eaninginnerIpa_softheunit,
For repair and maintenance, contact your authoriz_ sewice dealer..

The remote control and contro/ _l wilt took like those repm_t_ in the following pictures.
POWER
. To _Jrn_e air conditioner ON, push this button,
To turn the air conditioner OFF, push _e bu_on
• This button takes priority over any ,o_er button
• When you first #Jrnit on, _e unit is in cool mode,
high fan speed, temperat_Jreset_ng at 72_F
TEMPERATURE S_IING
•Use _is button to automatica!_lycontro! the
temperature of _e room,
The temperature can be set within a range of
60_ to 86_ by increments of 1_,
MODE
- Every time you push _is bu'_on,,it will cycle
_rough _e b!lowin 9 modes: COOL, ENERGY
SAVER, FAN and DRY,
°ENERGY SAVER
* The fan stops when the _mpressor stops
cooli% Approximately ,eve_ 3 minutes:_e fan
wiil #Jrn on and the un_ wilicheck _e room airto
determir_eif coo_ingis needed
FAN SPEED
,,Eve_ time you push _his bu_on_it advances the
setting as follows: {High(F3) Low(F1}
Ned(F2} High(F3)}
TIMER
-SHUT-OFF TIME
.i You wiil usually use shutoff time whiie you
'i With un_ running, use Timerto set number of
hours until shutoff
. For your sleeping _mfoR, once Time is set, the
Tempera_Jre se_ng will raise 2_ after 30 rain,
and 2_ after'an¢_er 30 rain,
.i Eve_ time you push Timer b_on, it _dvances
_e Timer se_ing as bilows: 1 Hour......2 Hours _-.
etc, _ 12 Hours maximum,
- START TIME
, With unit not running, use timer to set number of
hours before unit sta_s
• Every time you push T_merb_on, it advances
t_e Timer setting as bllows: i Hour_ 2 Hours _
etc _. 12 Hours maximum,
REMOTE CONTROL SENSOR
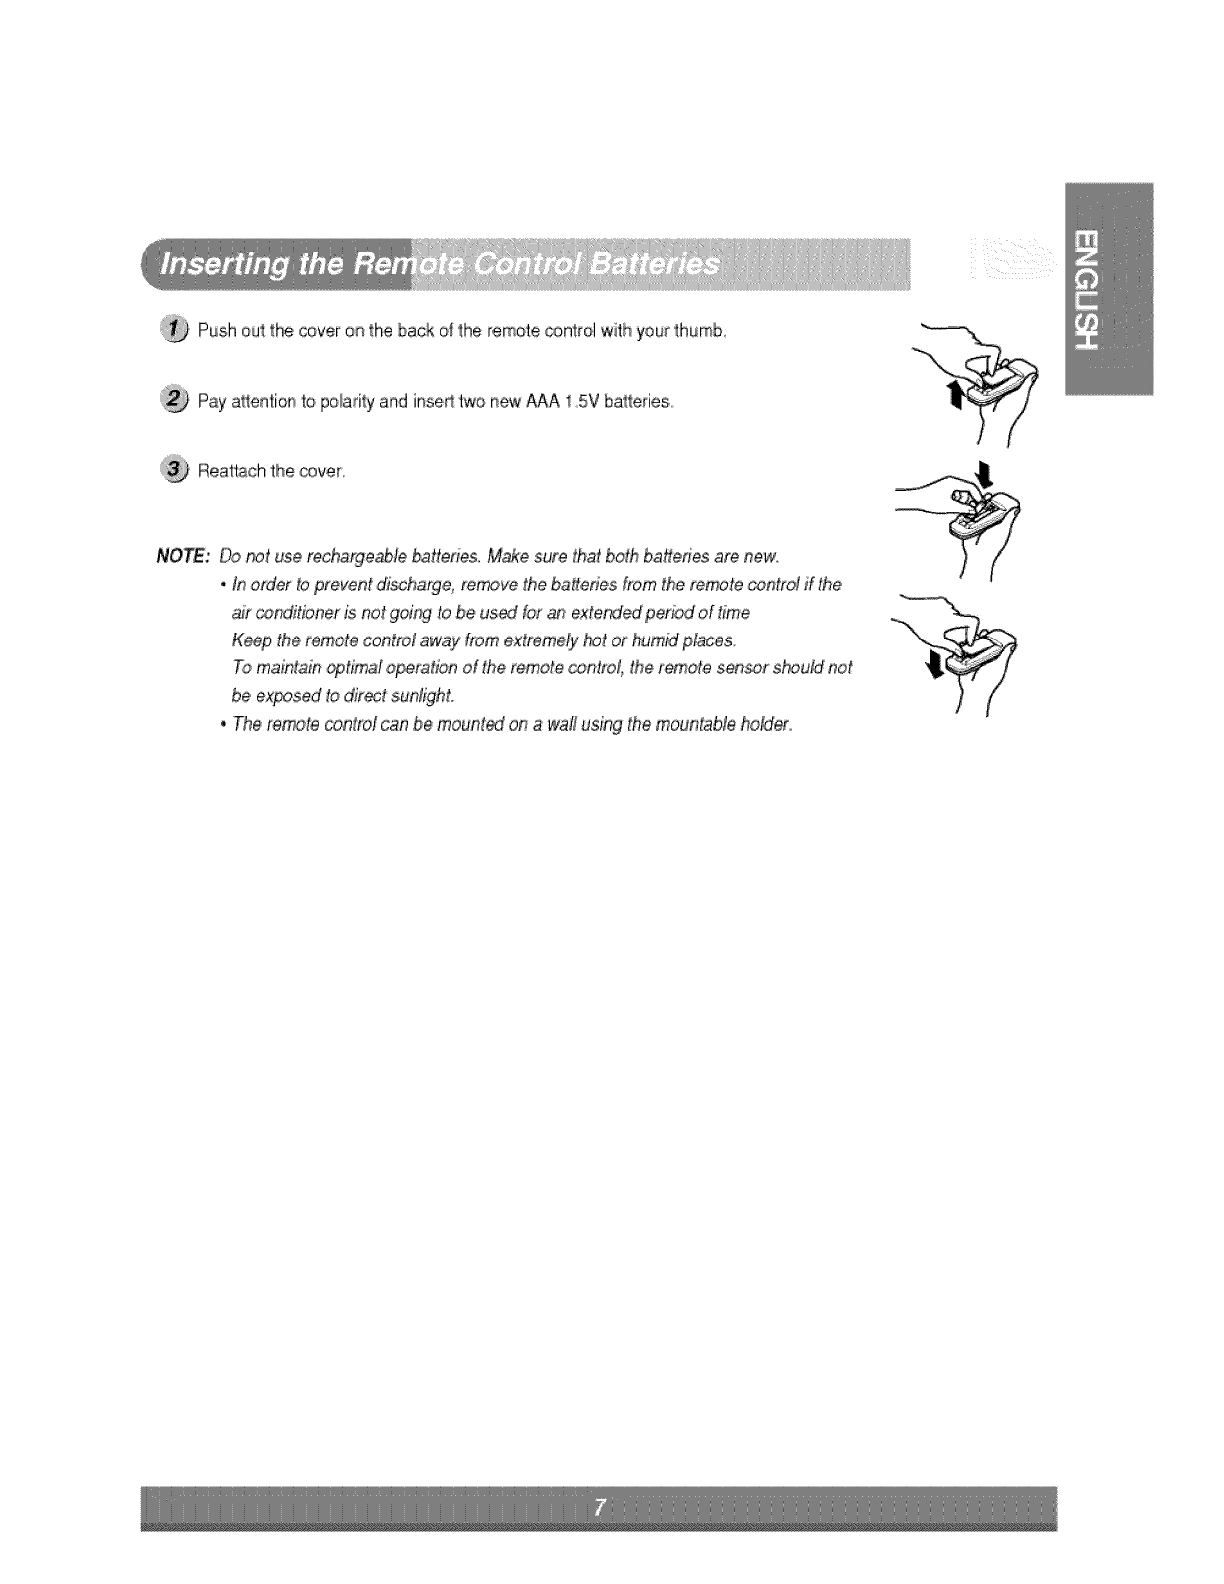
Pushout the coveron the back of 1:heremoteGgntrolwith yourlhumb,
Pay attentior_ to poladty and insed:two rsewAAA 1,SVbatl:erieso
Reat_ch the cover,
NOTE: Do not use rec#_rge_le batteries, M_e sure that both bakeries are new.
*ff_order to prevent e, remove the baffef_es from the remote _ntrd ff the
aft _nditioner Jsnot 9dr_g to be us_ for _exte_ period of t_me
K_p the remote control away from extteme_ hot or humM #_ceso
To mainta)n _timal o_ration of the remote _;mtrof, t,hererr_ote ser}_r s_uld not
be ez_sed to direr sun#2hL
.The re_te contrd can be mount_ on ,awaif using the mountabb ho_er,
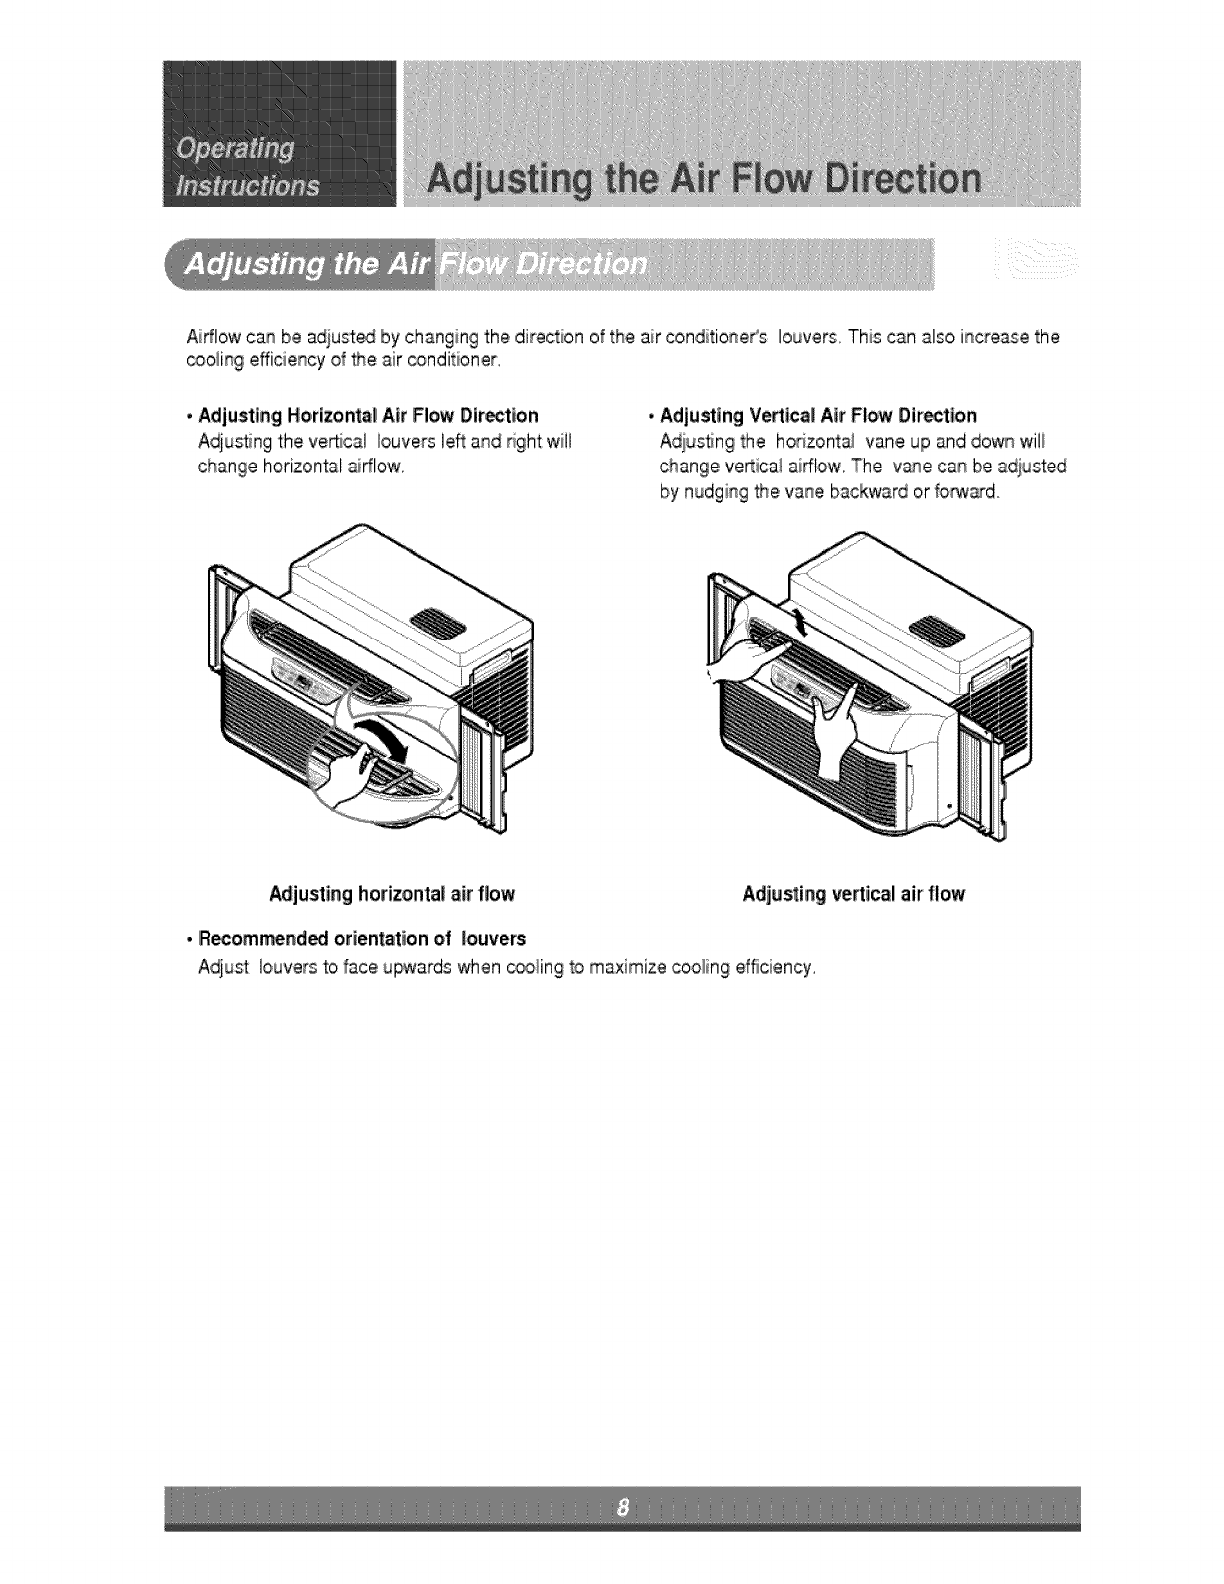
Airflow can be adiusted by changing the direction of the air conditioneCs louvers, This can also increase the
cooling efficiency of _e air _nditioner,
Adjusting H,o,rizonta_Air F!ow Dir_tion
Adjusting the ve_cal louvers left and _ght will
change horizontal _rflow,
Adjusting Vertical Air Flow Oir_tion
Adiustn 9 the hodzont_ vane up and dowL_wili
change ve_ica_airflow, The v_qe can be adjusted
by nudging _e vane backward or forw_do
Adjusting horizonta! air flow Adjusling vertical air flow
•R_ornmendi_ orientation of louvers
Adjust louvers to face upwards when _ling to maximize cool,in9 efficiency,
Turnthepower offand u_iug t_ power plug _fom ci_af_lRg _e air conditioner;
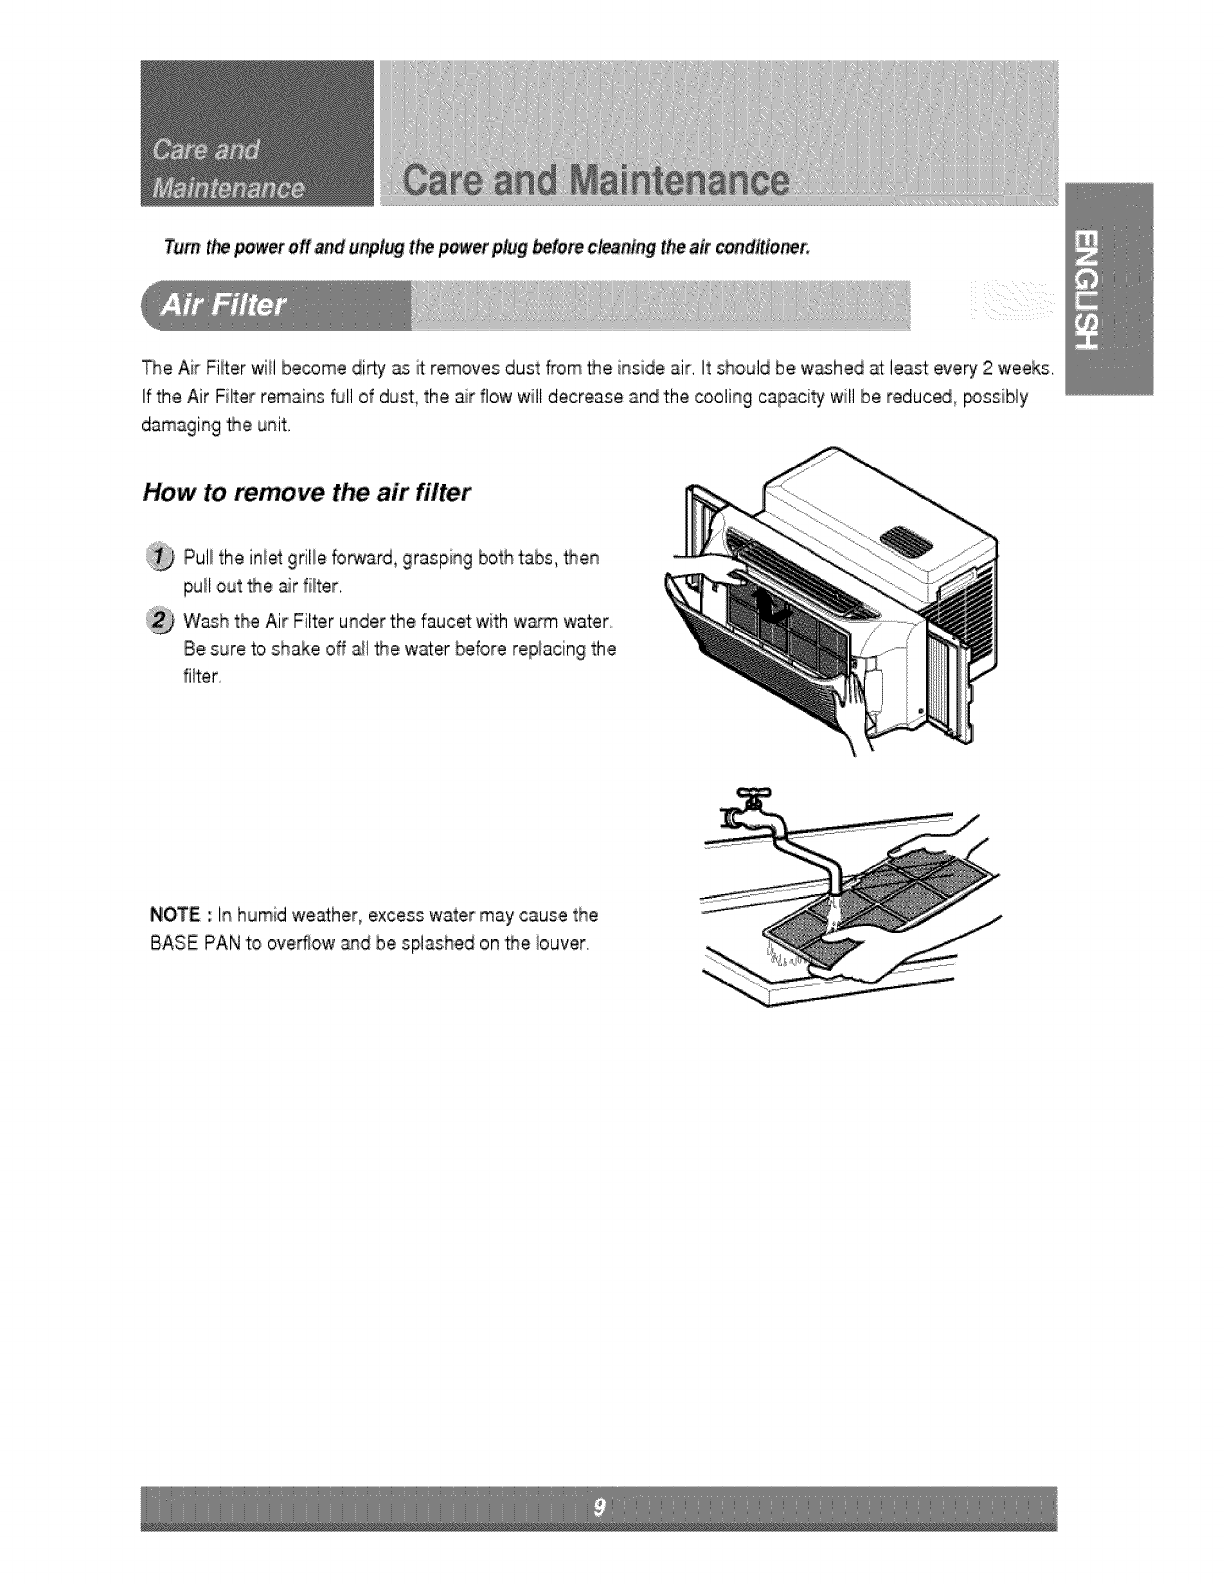
The Air Fiiter wiilbecome di_ _ ff removes dust from the inside air, It should be washedat least every 2 weeks,
If the Air Filter remains full of dust, the air flow will decrease and the cooling capacity will be reduce, _ssibly
damaging Me unit,
How to remove the,air filter
Pul_the iniet grille forward, grasping both tabs, Men
pull out Me air filter,
Wash the Air Filter under the faucet with ws_ water
Besure to shake off a_lMe water before replacing the
filter,
NOTE : In,humid weather, excess water may cause the
BASE PAN to overflow arid be splashed on Me iouver.
z_ CAUTION
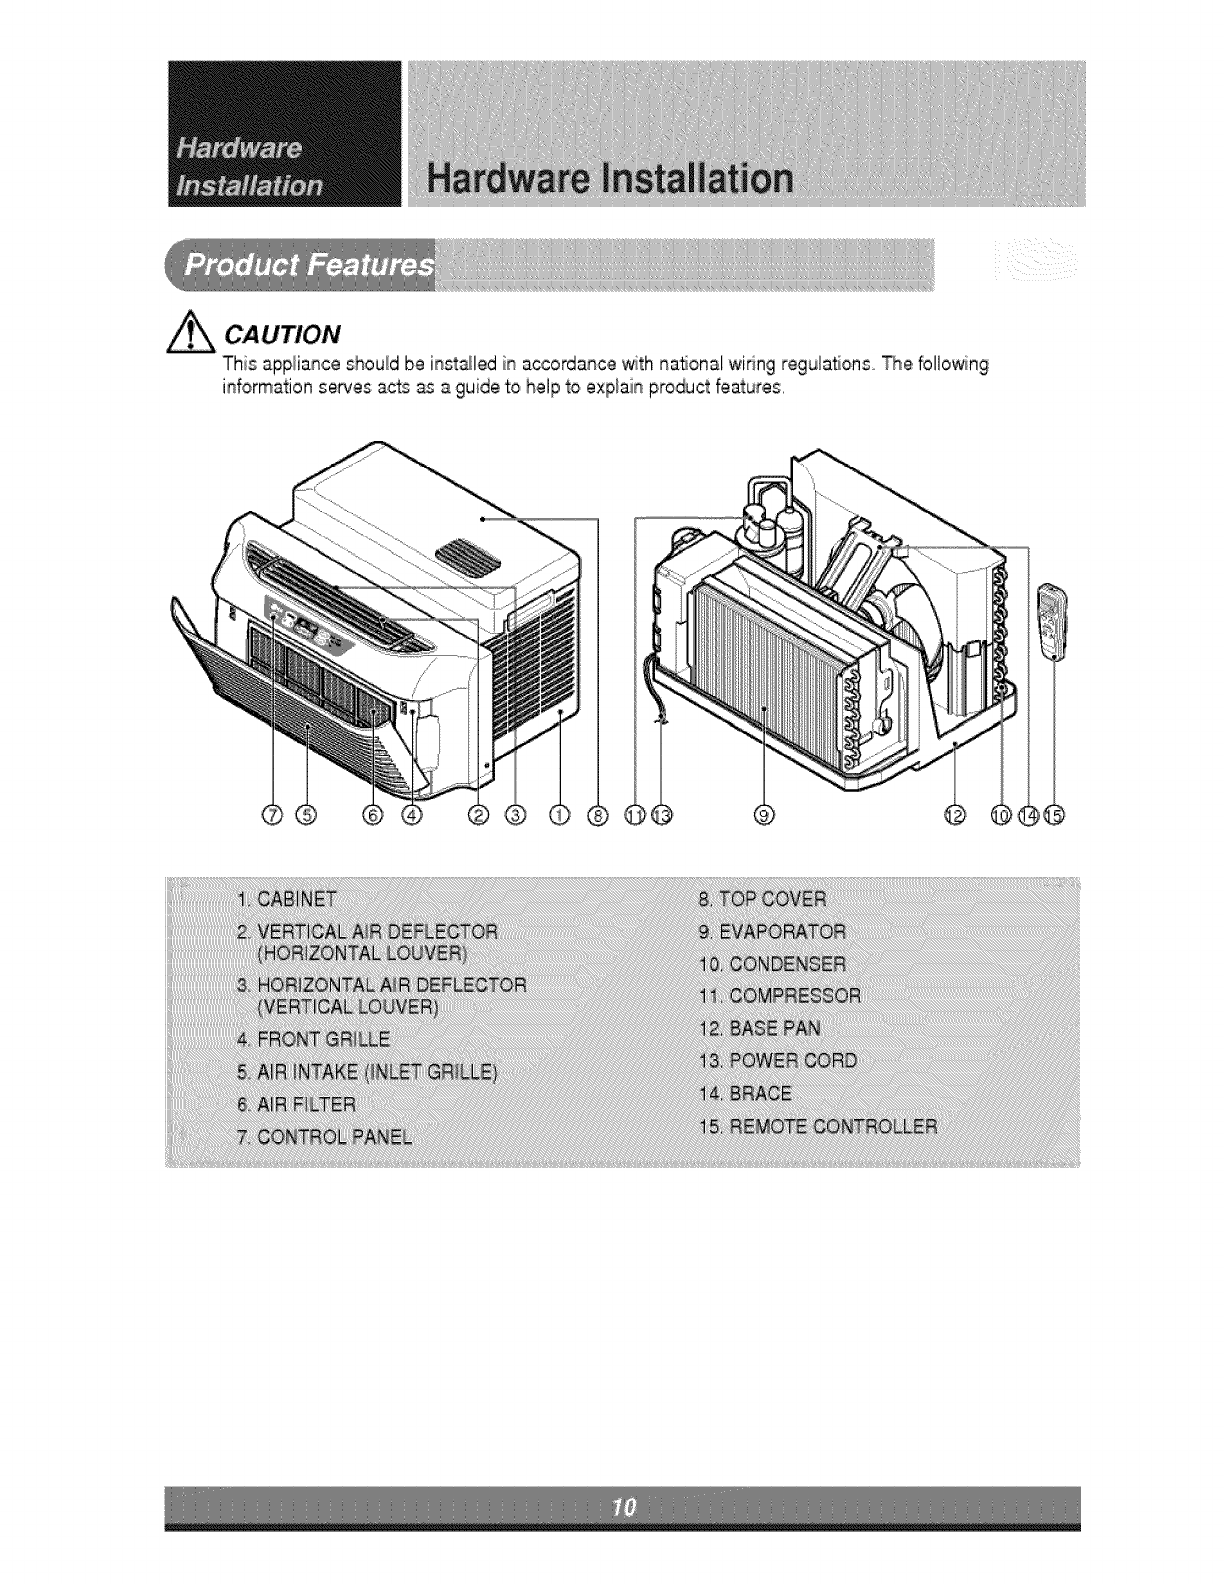
This appliance should be inst_led in accordance with na_onal wi_ng regula_ons _e, follo_ng
information sewes ads _ a guide to help to ,explainproduct features,
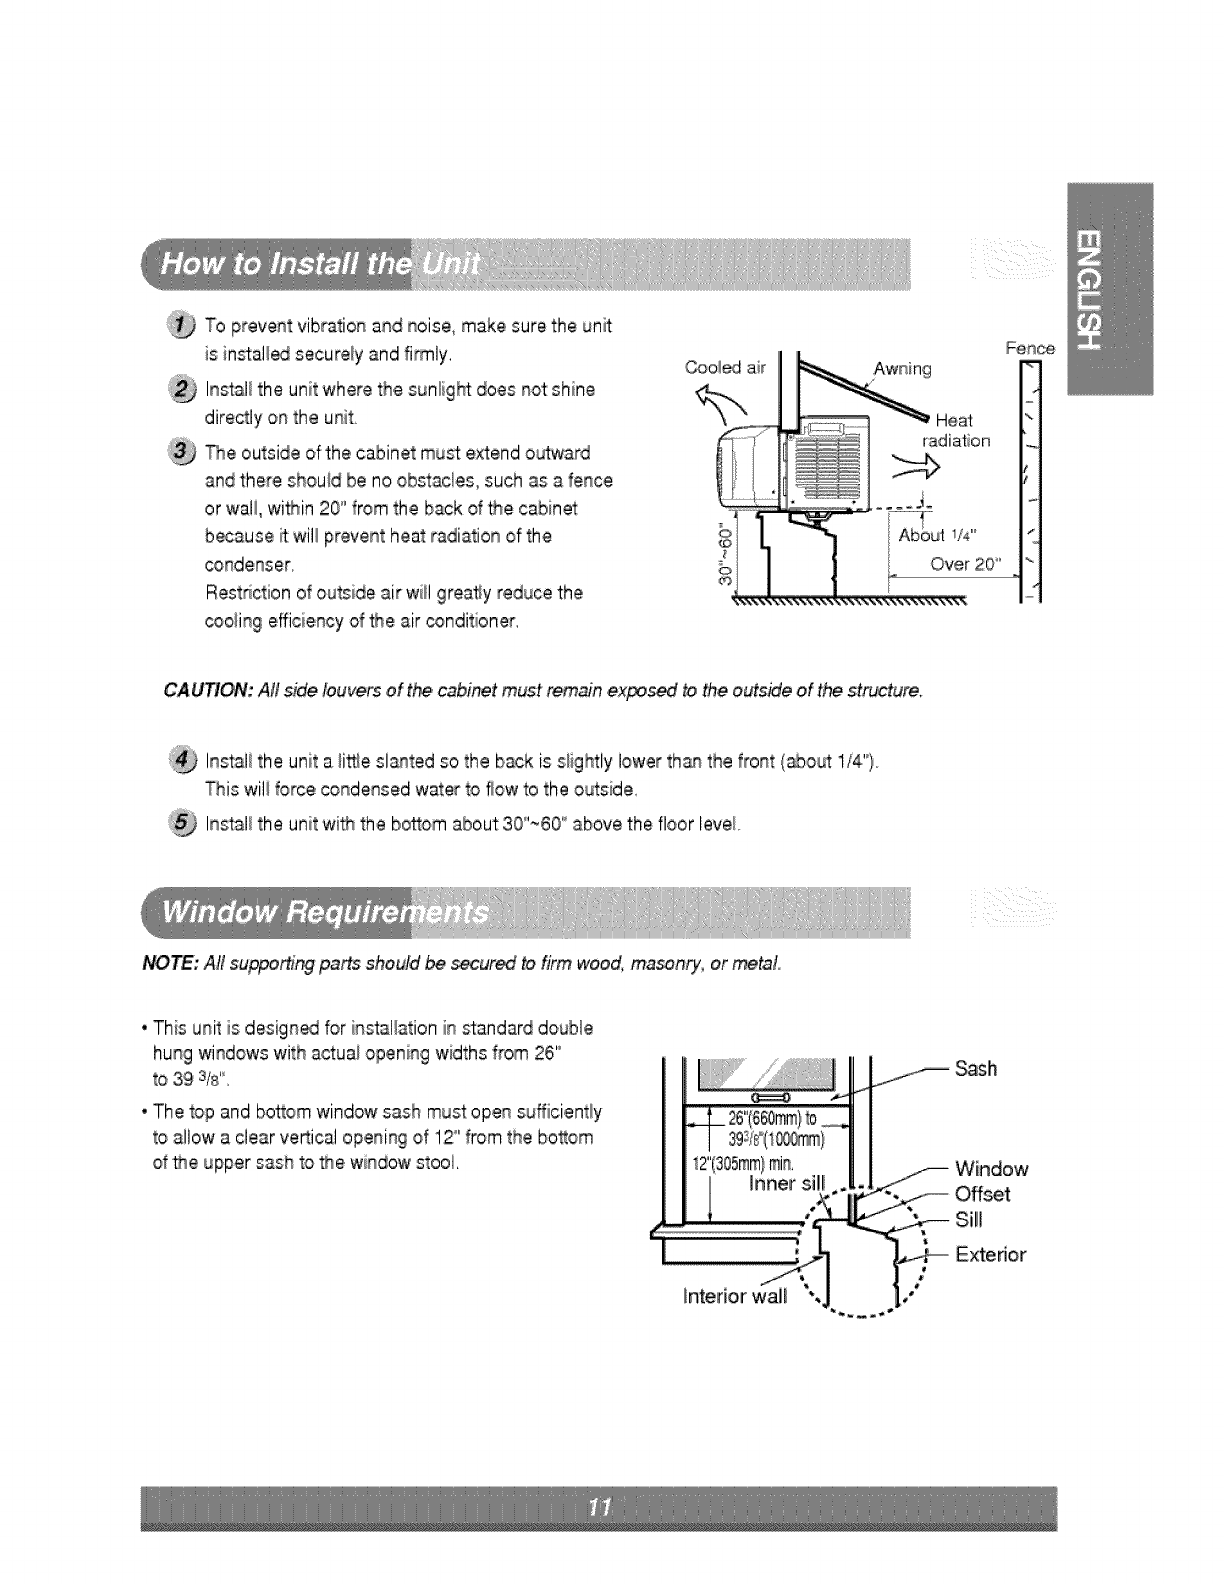
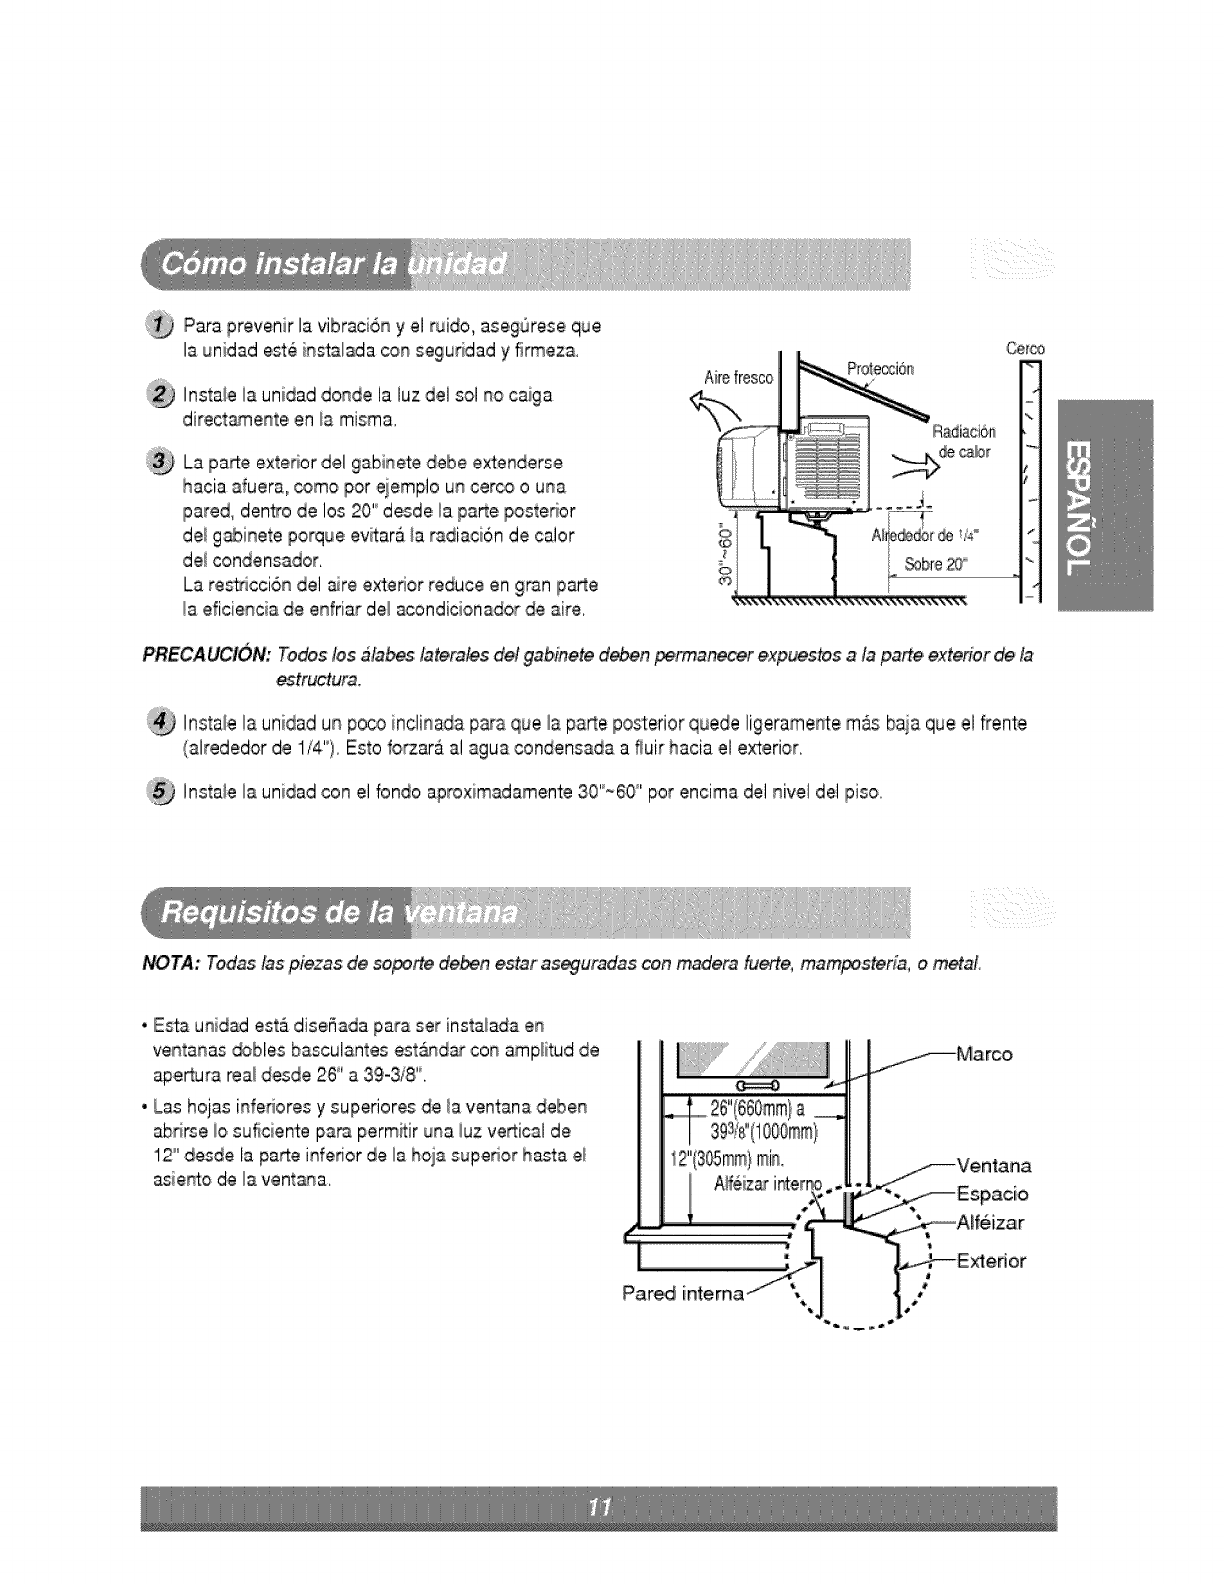
Topreventvibrationandnoise,makesuretheun_
i ii_ x
is instal/_ securely and firmly.
Install the unit where the sunligN does not shine
directly on the unit
The outside of the cabinet must extend o_ard
and there should be no obstacles, such as a fence
or wali, wi_in 20" from the back of Me cabm_
b_ause _ will prevent heat radiation of the
condenser.
Restriction of outside air will greasy reduce the
coo_ingefficiency of the air conditioner.
Heat
radiation
Se_c@
%
I
I
%,
CAUT_ONi,: All side iouve_ of t_ cabi_t must reJmaln ,expo$_ to _e o_s_e of the strum
Instali the unit a li_e sl_ted so the back is slig_ly lower tha/nthe front {about:1/4"}.
This wili force condensed water to flow to the outside
Install the unit wi_ the bottom about 30"_60'' above 'thefloor I,evel.
NOTE: All suppofli_ parts should _, secured to firm wood, mason,O/,o,rmetal.
• This unit s design_ for installation in standard double
hung windows with actuai opening widths from 26'_
to 39 fs,
. The top and bosom window sash mu_ open sufficientiy
to allow a clear veRical opening of 12" from the bosom
of _e upper sash to the window stool. I2"(305mm)min,
Innersil!!
interior wall
Sash
Window
Offset
Sill
Exterior
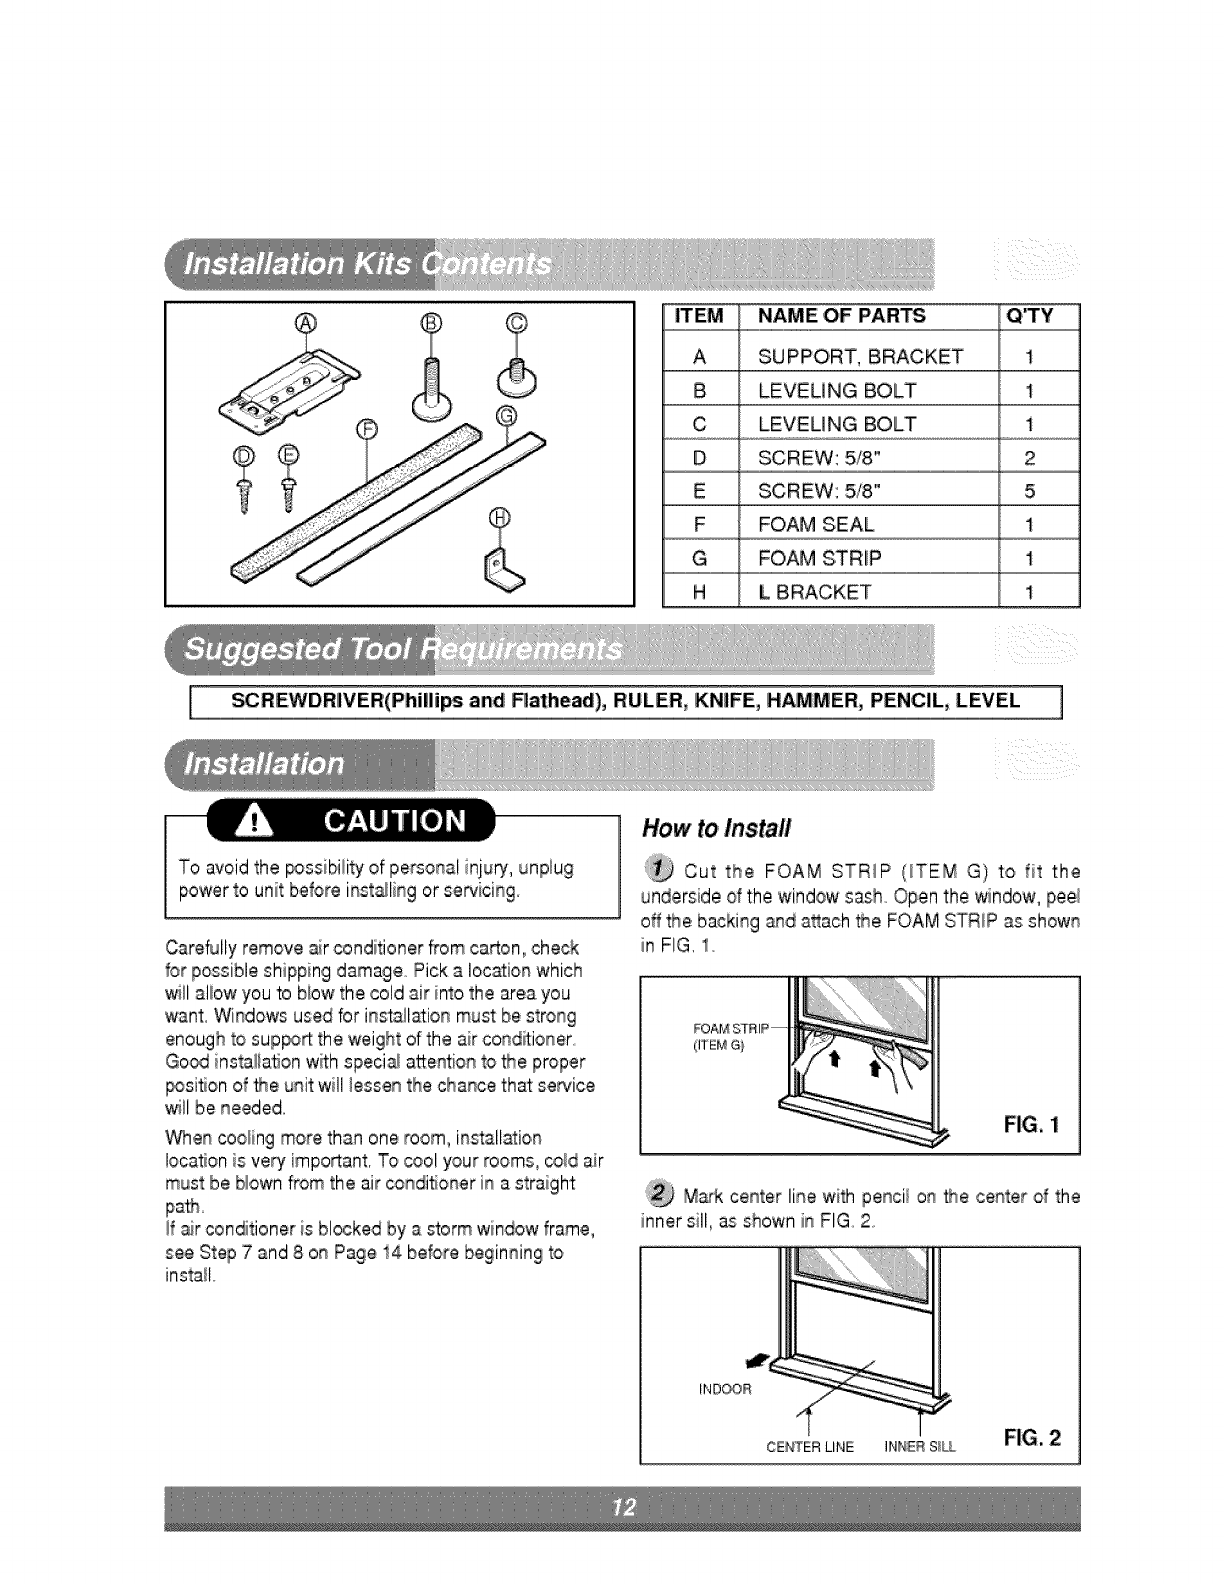
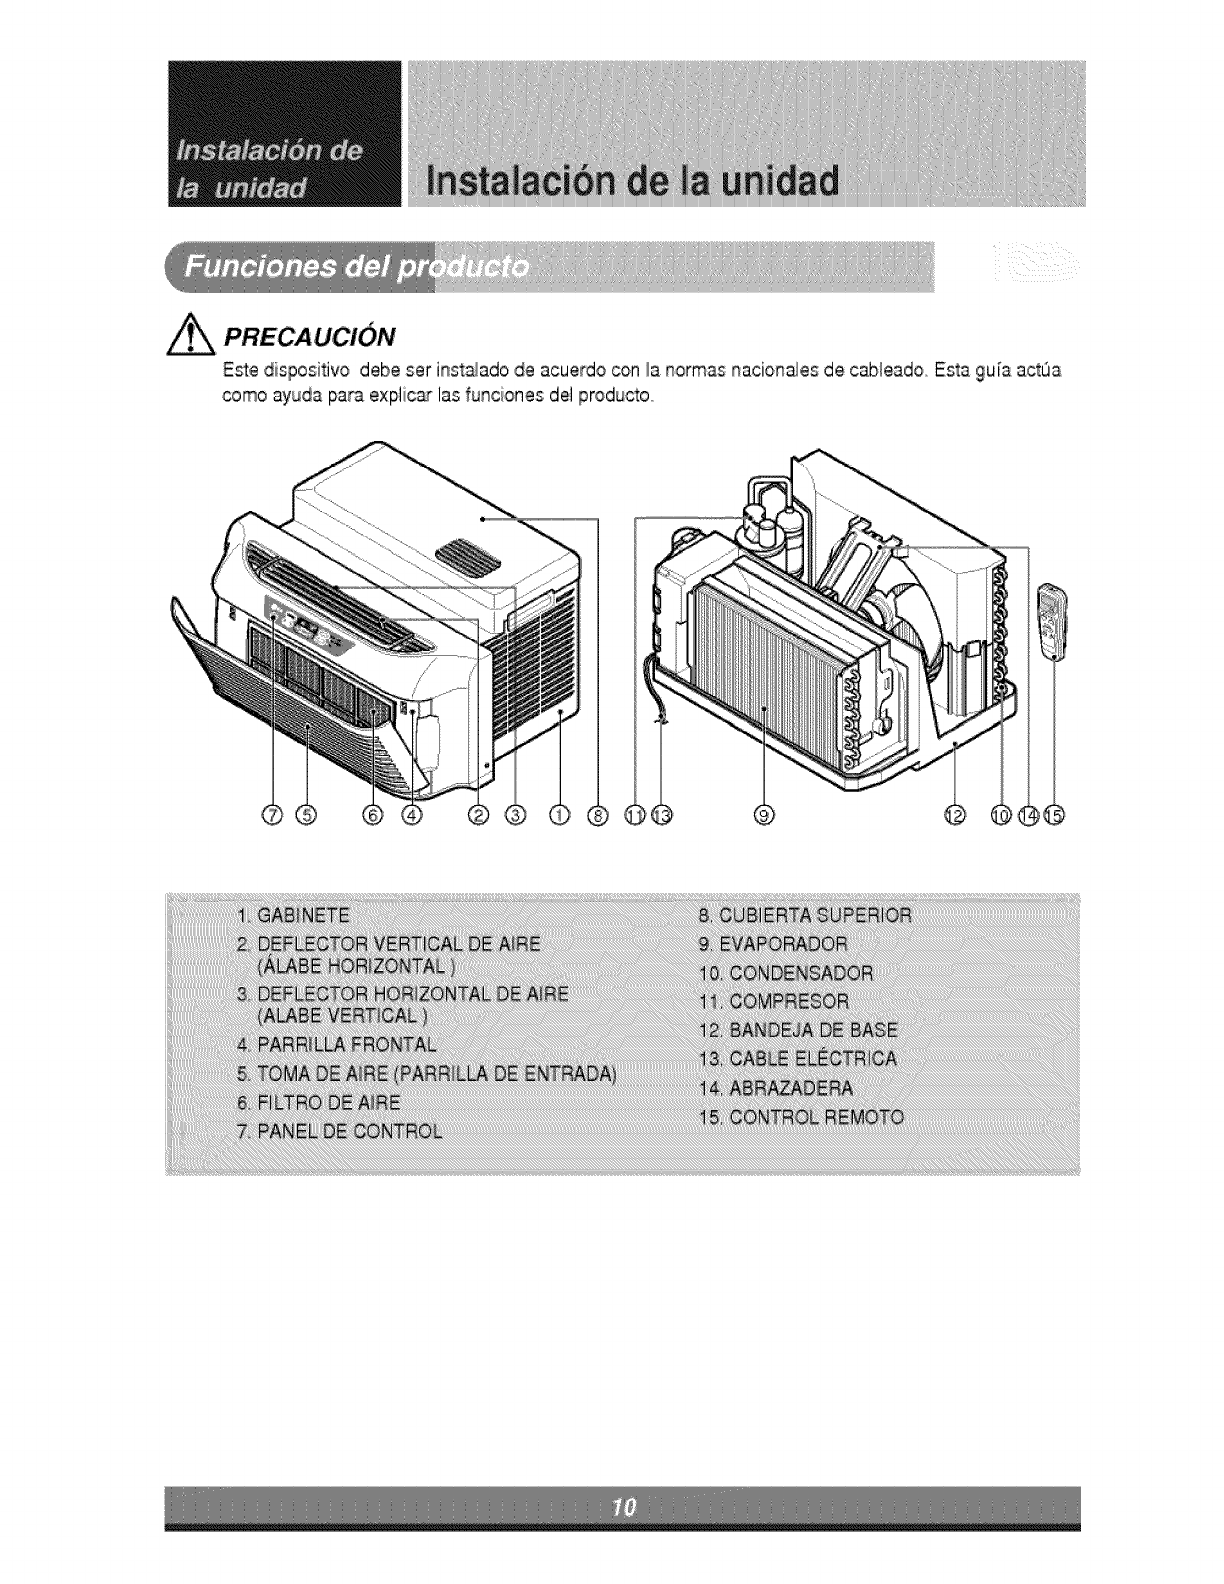
iTEM NAME OF PARTS Qi'Ty
A SUPPORT, BRACKET !
B LEVEUNG BOLT 1
'C LEVEUNG BOLT 1
D SCREW: 5/8" 2
E SCREW: 5/8" 5
F FOAM SEAL 1
G FOAM STRIP 1
H L BRACKET 1
SCREWDRIVER(Philli_ and Rathead), RULER, KNIFE, HAMMER, PENCIL: LEVEL ]I
To avoid the _ssibility of persona! inju_, unplug
power to unit [beforeinst_ling or se_icingi
Carefully remove _r conditioner from carton, check
for possible shipping damage Pick a location which
will albw you to biow the cold air into the area you
w_nt. Windows used for install_ion must be strong
enough to sup_rt the weight of the air conditioner
Go_ installation with speci_ attention to _e proper
_siton of _e unit will lessen the chance that sewice
will be needed.
When coo_ingmore than one room, install_ion
location is very important. To cool your rooms, _d air
must be blown from the air _ndi_oner in a straight
path
If air conditioner is blocked by a storm window frame,
see Step '7 and 8 on Page 14 before beginning to
insta&
How to,Instal
Cut the FOAM STRIP (_TEM G) to fit the
underside of 'the window sash Open the window, peel
off the backing and a_ach _e FOAM STR_Pas shown
in FIG, 1
(ITB,_ G}
FIG, 1
M_k center line with penci_ on _e center dthe
inner sill, as shown in FIG, 2,
_ND_R_"
CENTER LINE INNER S_LL FIG, 2
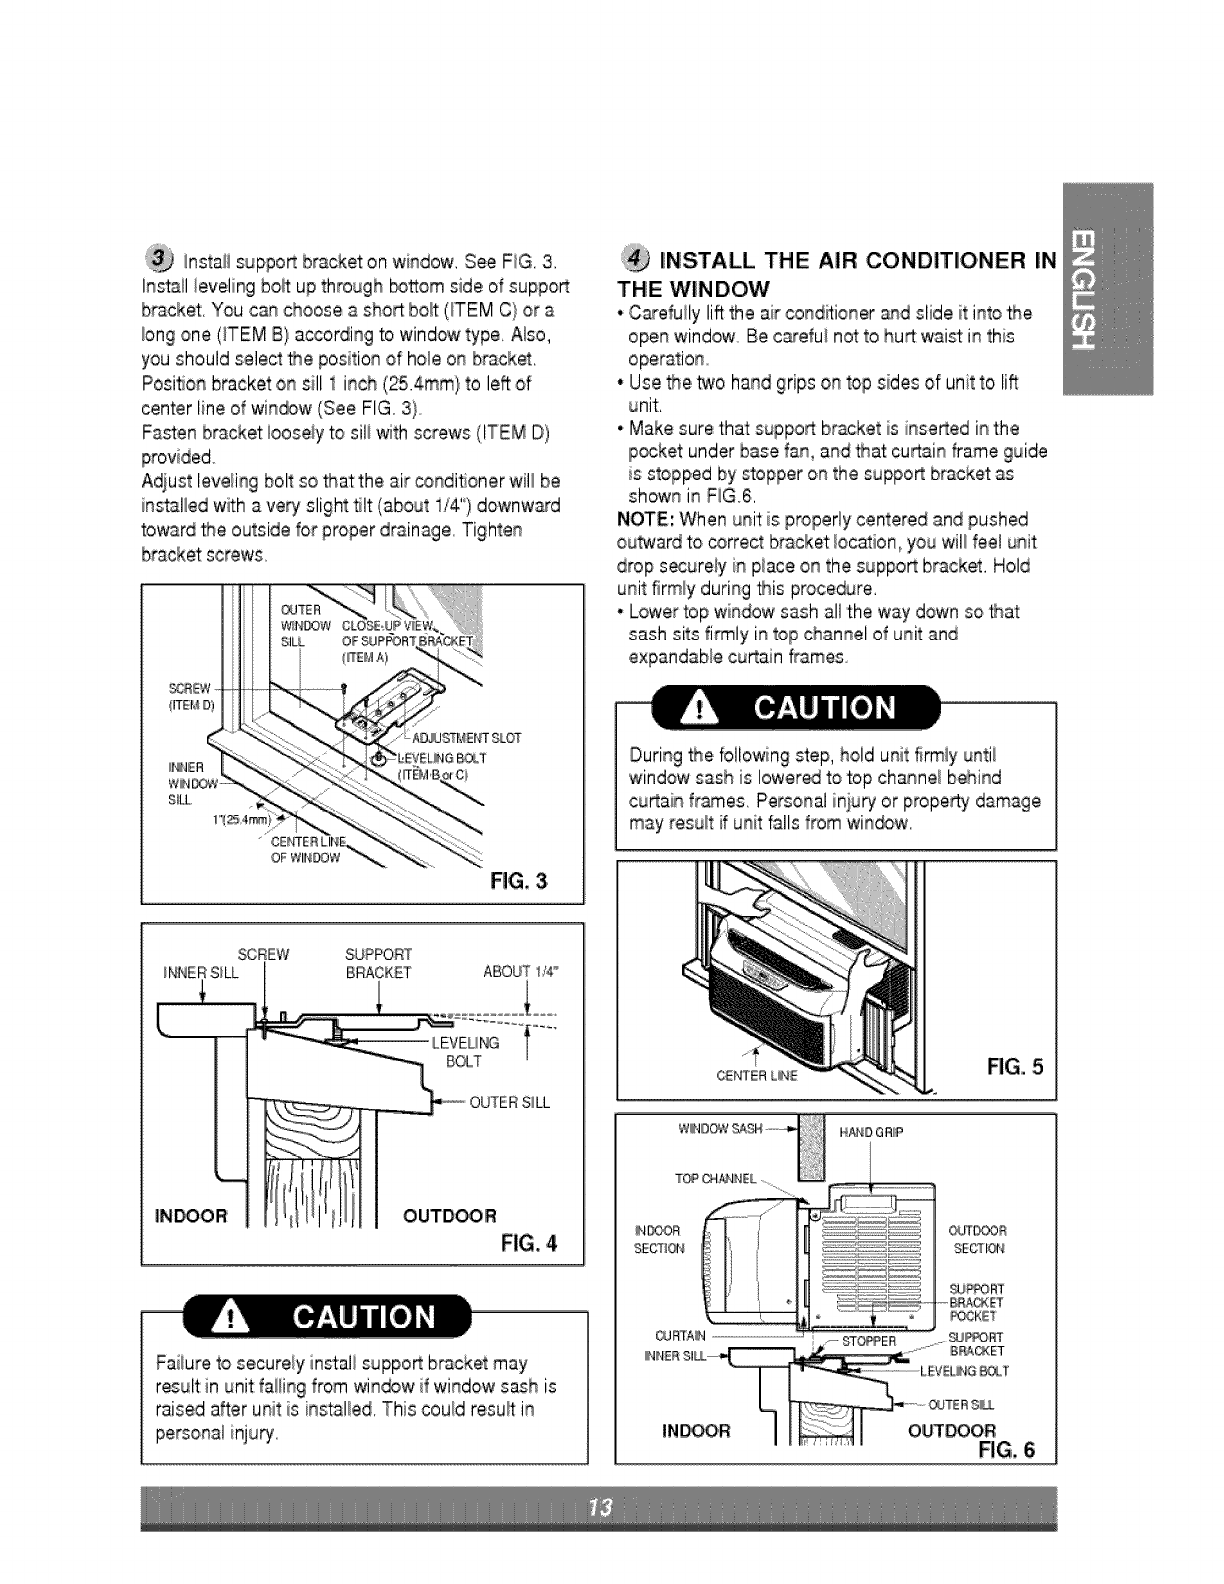
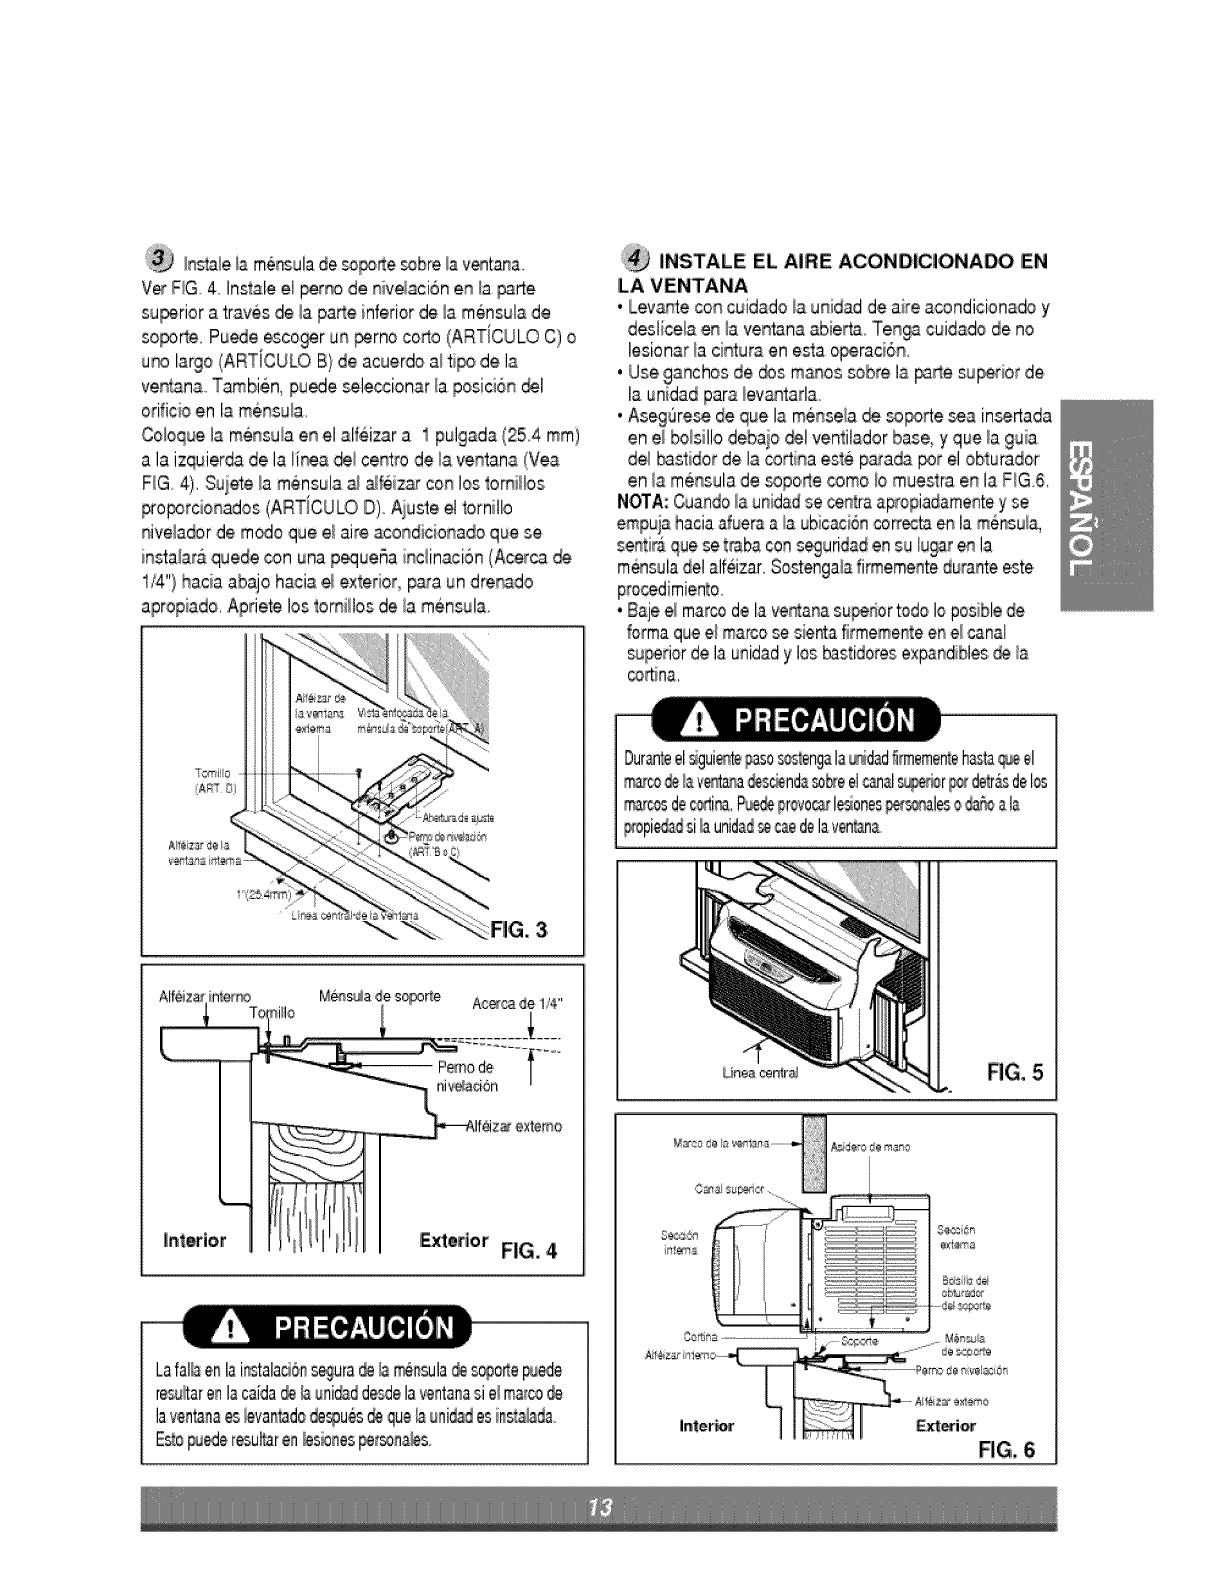
Install support bracket on window, See FiG. 3,
Install _evelingbo_tup through _ttom side of support
bracket, You c&n choose a short bolt (_TEMC} or a
bng one (_TEMB} according to window type, Also,
you should select he position of hole on bracket,
Posi_on bracket on sill I inch (25.4mm) to left of
center !ine of win®w (See FIG, 3}
Fasten bracket iooseiy to sili with screws (ITEM D)
Adjust leve_ingbolt so hat the air condiSoner will be
installed w_h a veT slight _l't,{about1/4") downwald
toward _e outside for proper drainage. Tighten
bracket screws,
SIL,L
FIG. 3
_iREW SUPPORT
iNNERS_LL | BRACKET ABOUT 1,4°
/;t- f ........
FIG.4
Faiiure to securely instali support bracket may
result in unit failing from win_w if window sash is
raised after unit is installed This could result in
personal injury',
INSTALL THE AIR CONDITIONER IN
THE WIN DOW
•Carefully lift the air cond_ioner and slide it into _e
open window Be c_efui not:to hurt:waist:in this
• Use fhe _o hand grips on top sides of unit to lift
unit.
, Make sure that suppo_ bracket is inse_ed in the
Ip_ke't under base fan, and _at curtain frame guide
is stopped by stopper on the support bracket as
shown in FIG6.
NOTE: When unit is properly centered and pushed
ou_ard to correct bracket _ocation,you will feel _Jnit
drop se;ure!y in p_aceon the support bracket. Ho!d
unit firmly during _is procedure,.
, Lower top window sash all the way down so that
sash sits fi_ly in top channel of unit and
expandaNe curtain frames
During the b!iowing step, hold unit firmiy unti!
'windowsash is lowered to top channe_behind
cu_ain frames Personal iniu_ or property damage
may result if unit falls from win_w
RGi, 5
T_ _4N_EL ...............
_JRTAN
14ANOGRIIP
__i;i _¸ i_
:::::::::::::::::::::::::::::::::::::::::::::
SU_R_
_K_'T
RG, 6
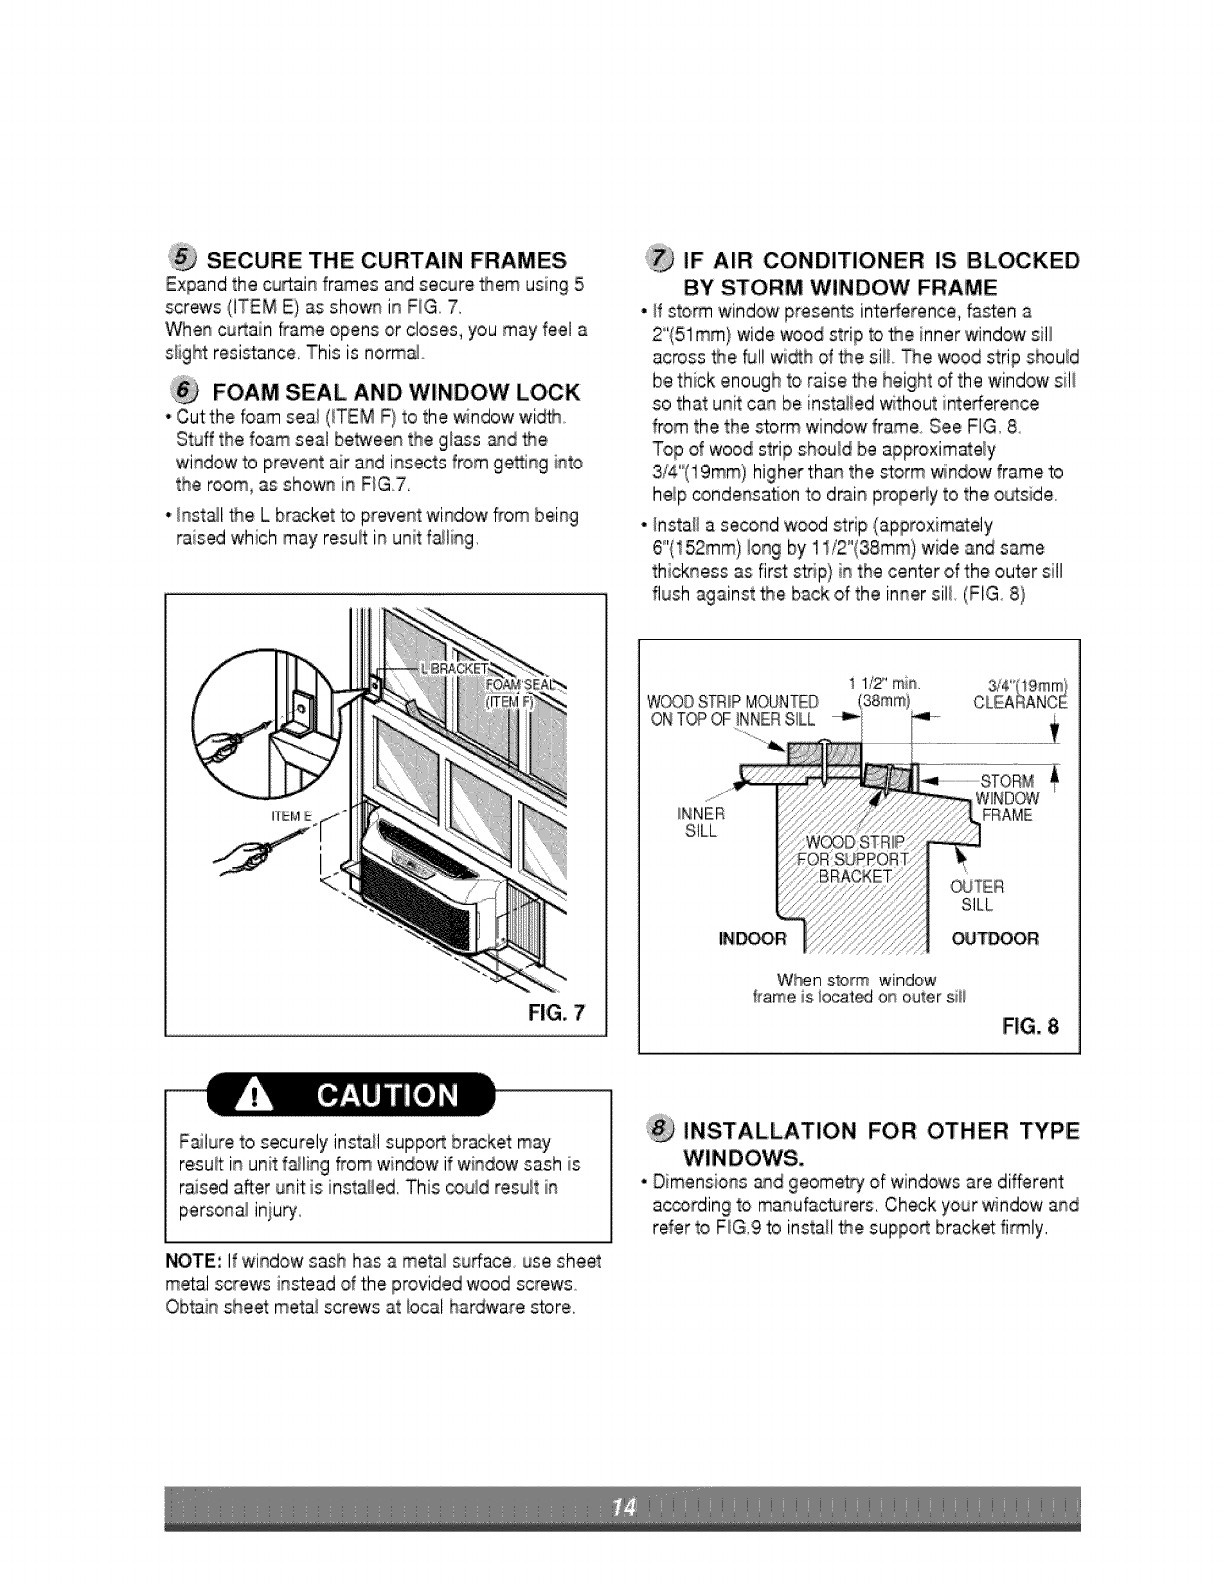
SECURE THE CURTAIN FRAMES
Expand the cu_ain frames and secure _em using 5
screws (iTEM E) as sho_ in FIG 7,
When cu_ain frame opens or closes, you may feel a
sliglN resistance, This is norma_
FOAM SEAL AND WINDOW LOCK
• Cut the foam seai (ITEM F} to the windowwid_o
Stuff the foam seal be_een the glass and _e
window b prevent air and insects from geeing into
the room, as shown in F_G,,7,
.,Inst_l _e L bracket # prevent window from being
raised which may result:in unit fa_ling,
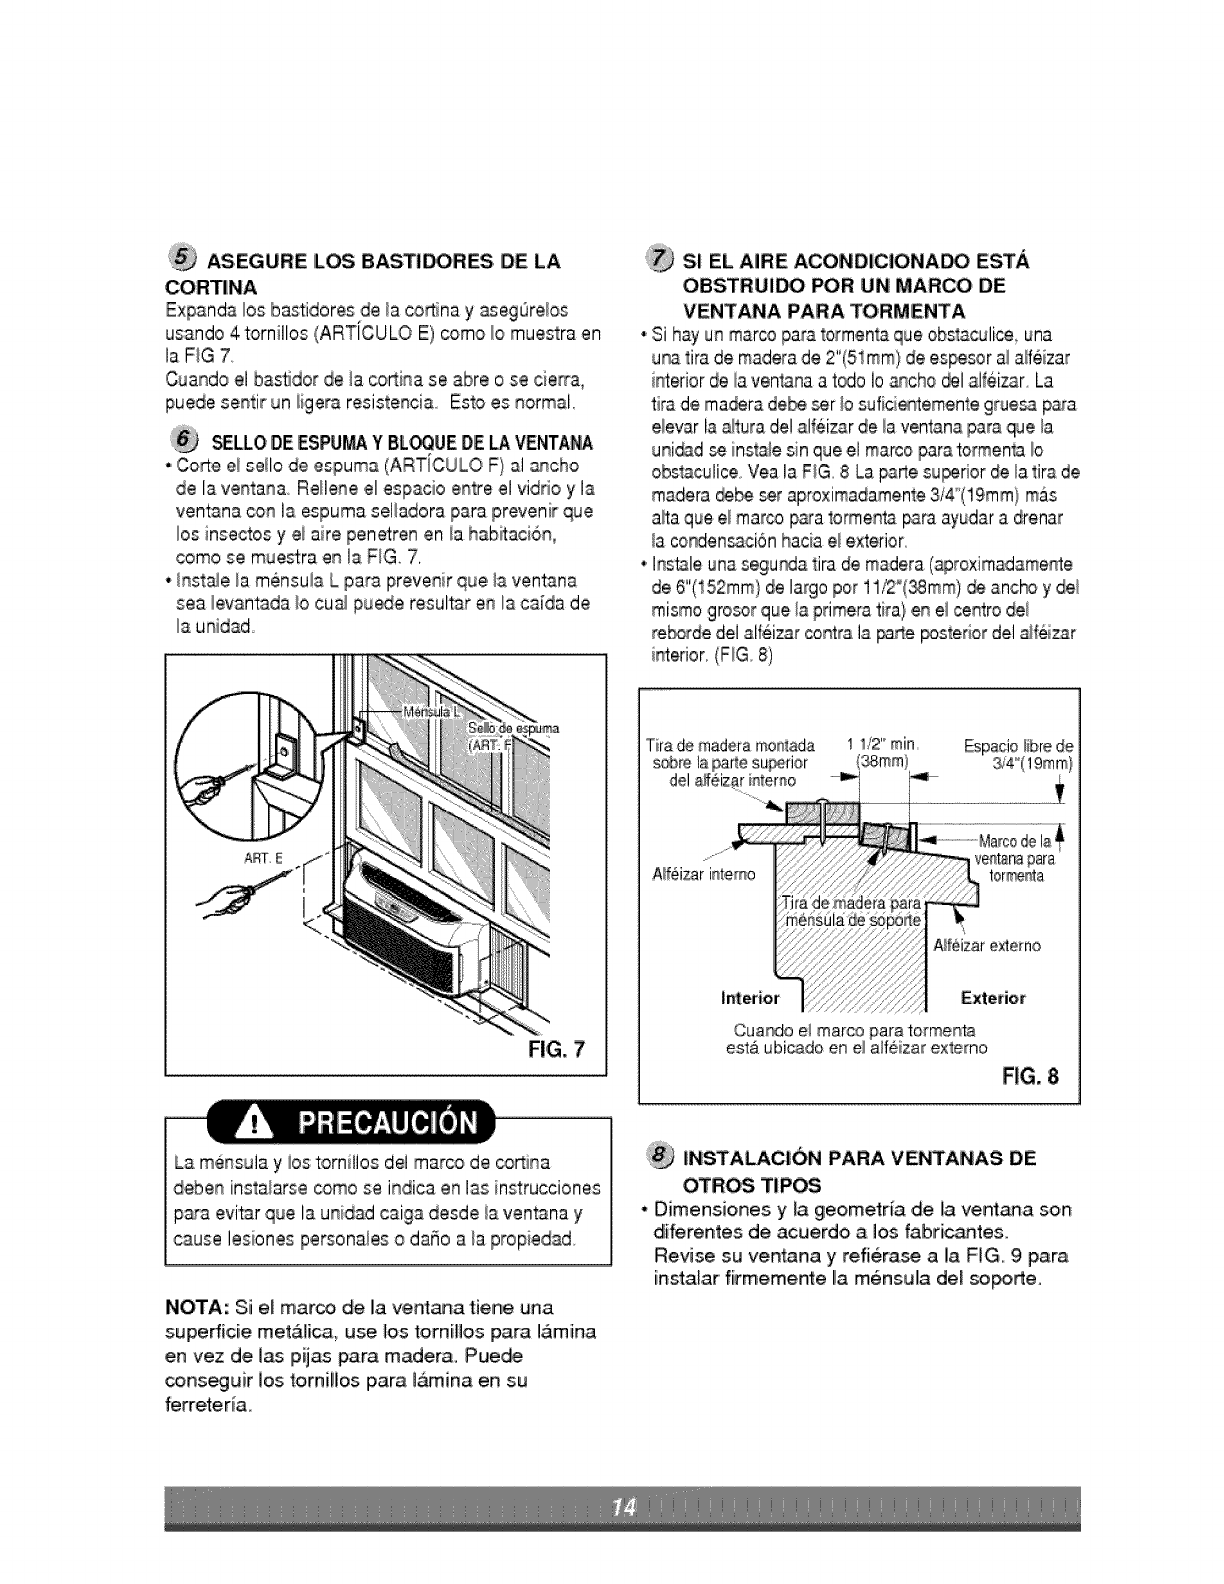
IF AIR CONDITIONER IS BLOCKED
BY STORM WINDOW FRAME
•ff storm window presents intefferencm fasten a
2"(51ram} wide _od strip to the inner window sill
across _e _J!!wi_h of the si!! _e woodstrip shou!d
be thick enough to raise _e height of the window sil_
so that unit can be instai_edwithout interference
from the the storm window frame See FIG, 8
Top of wood strip should be approximately
3/4"(19ram) higher than the _orm window frame to
he_pcondensation to drain propedy to the o_side,
•Install a second wood strip (approximately
6"'{152ram)long by 11/2"(38mm) wide and same
thickness as first st_.ip)in the center of the outer sill
flush against _e back of the inner sill (FIG 8}
II_M
FIG. 7
ilZ'mi_.
W_O Sm!P MOUNTED
Or T OF!!!! ERSILL-'- r-
.............LY.................................
_...........................................STORM
,NNE41
SILL /:
/:; :::FOR:SUP£ORT:::: !
[ SlLIo
W_n storm window
frame is i;ocated on ouier siii[
FIG. 8
Failure to securely install suppo_ bracket may
result in unit f_ling from window if window sash is
raised a_er unit is insta/ied, This _uid result in
persona_iniu_,
NOTE: Ifwindow sash has a metal surface use sheet
metal screws inslead of the provided wood screws
Obtain slheet rect!! acres at local hardware store,
INSTALLATION FOR OTHER TYPE
•Dimensions_d geomet_ ofwindowsaredifferent
ac_rding to manufacturers, Check your windowand
refer to FIG,9 to instail the suppo_ bracket firmly,
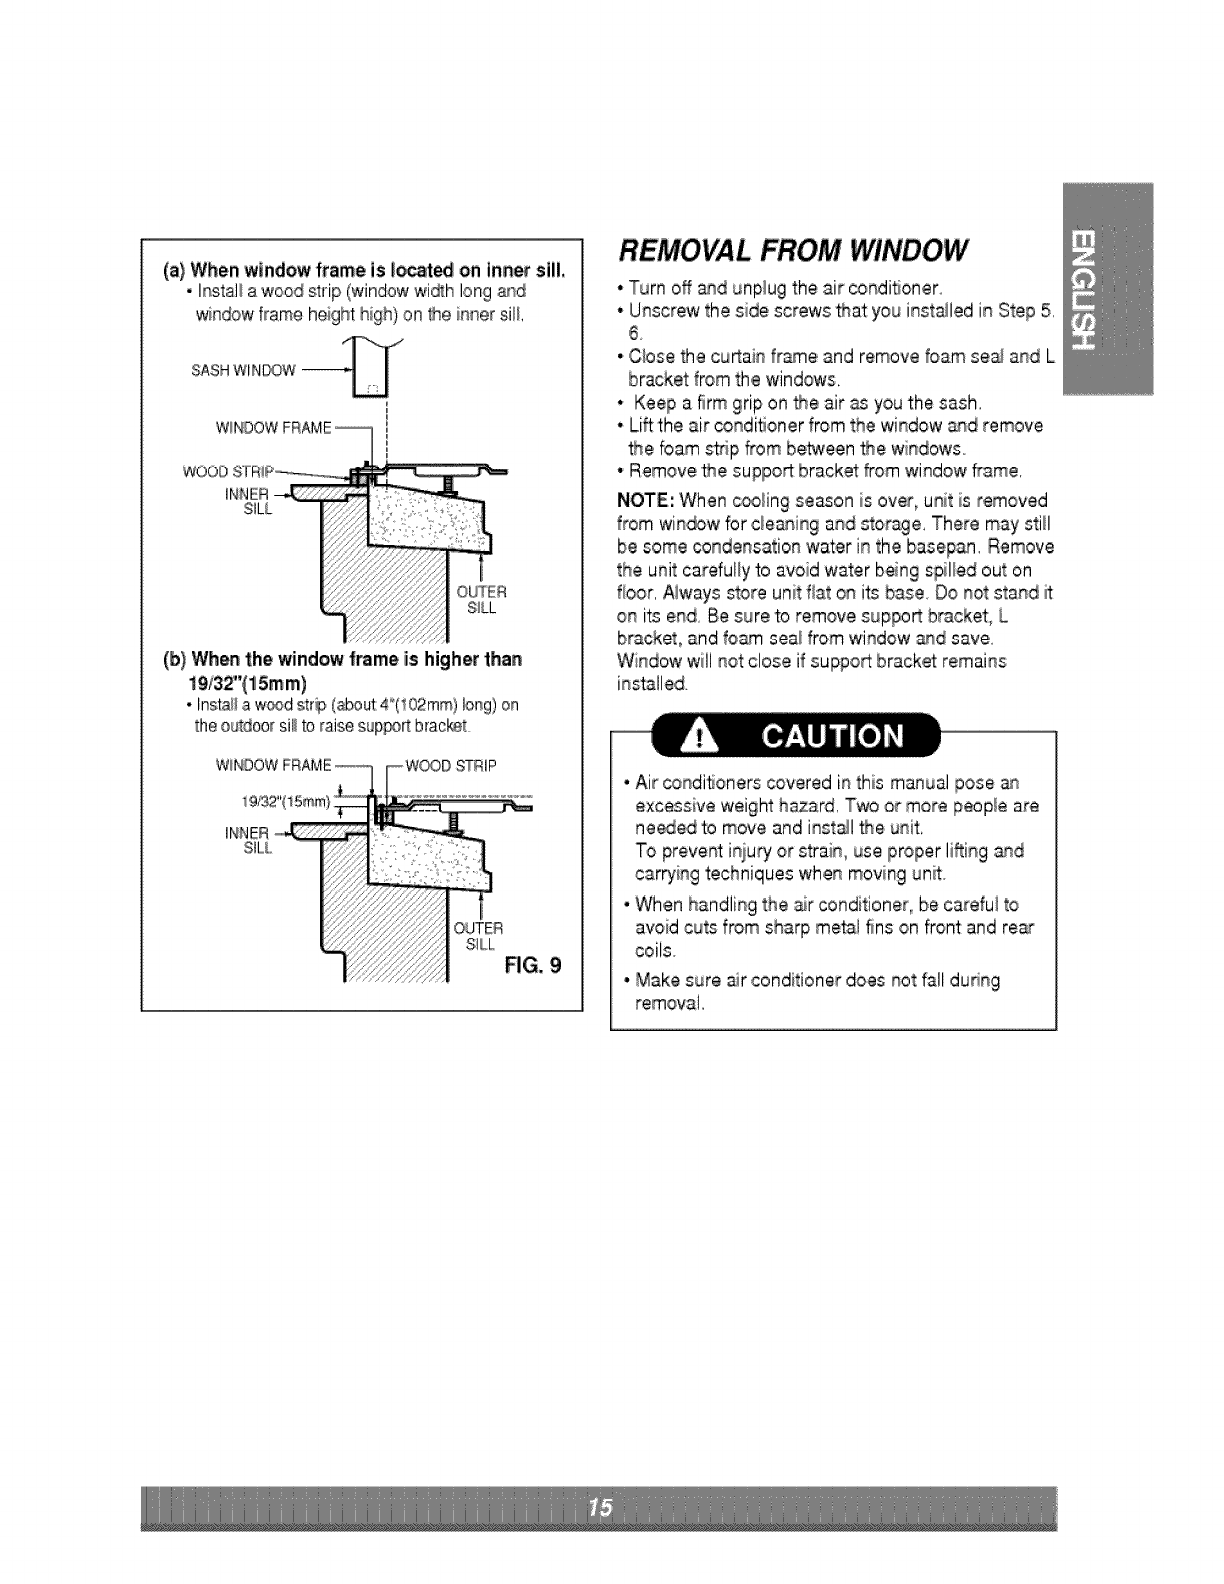
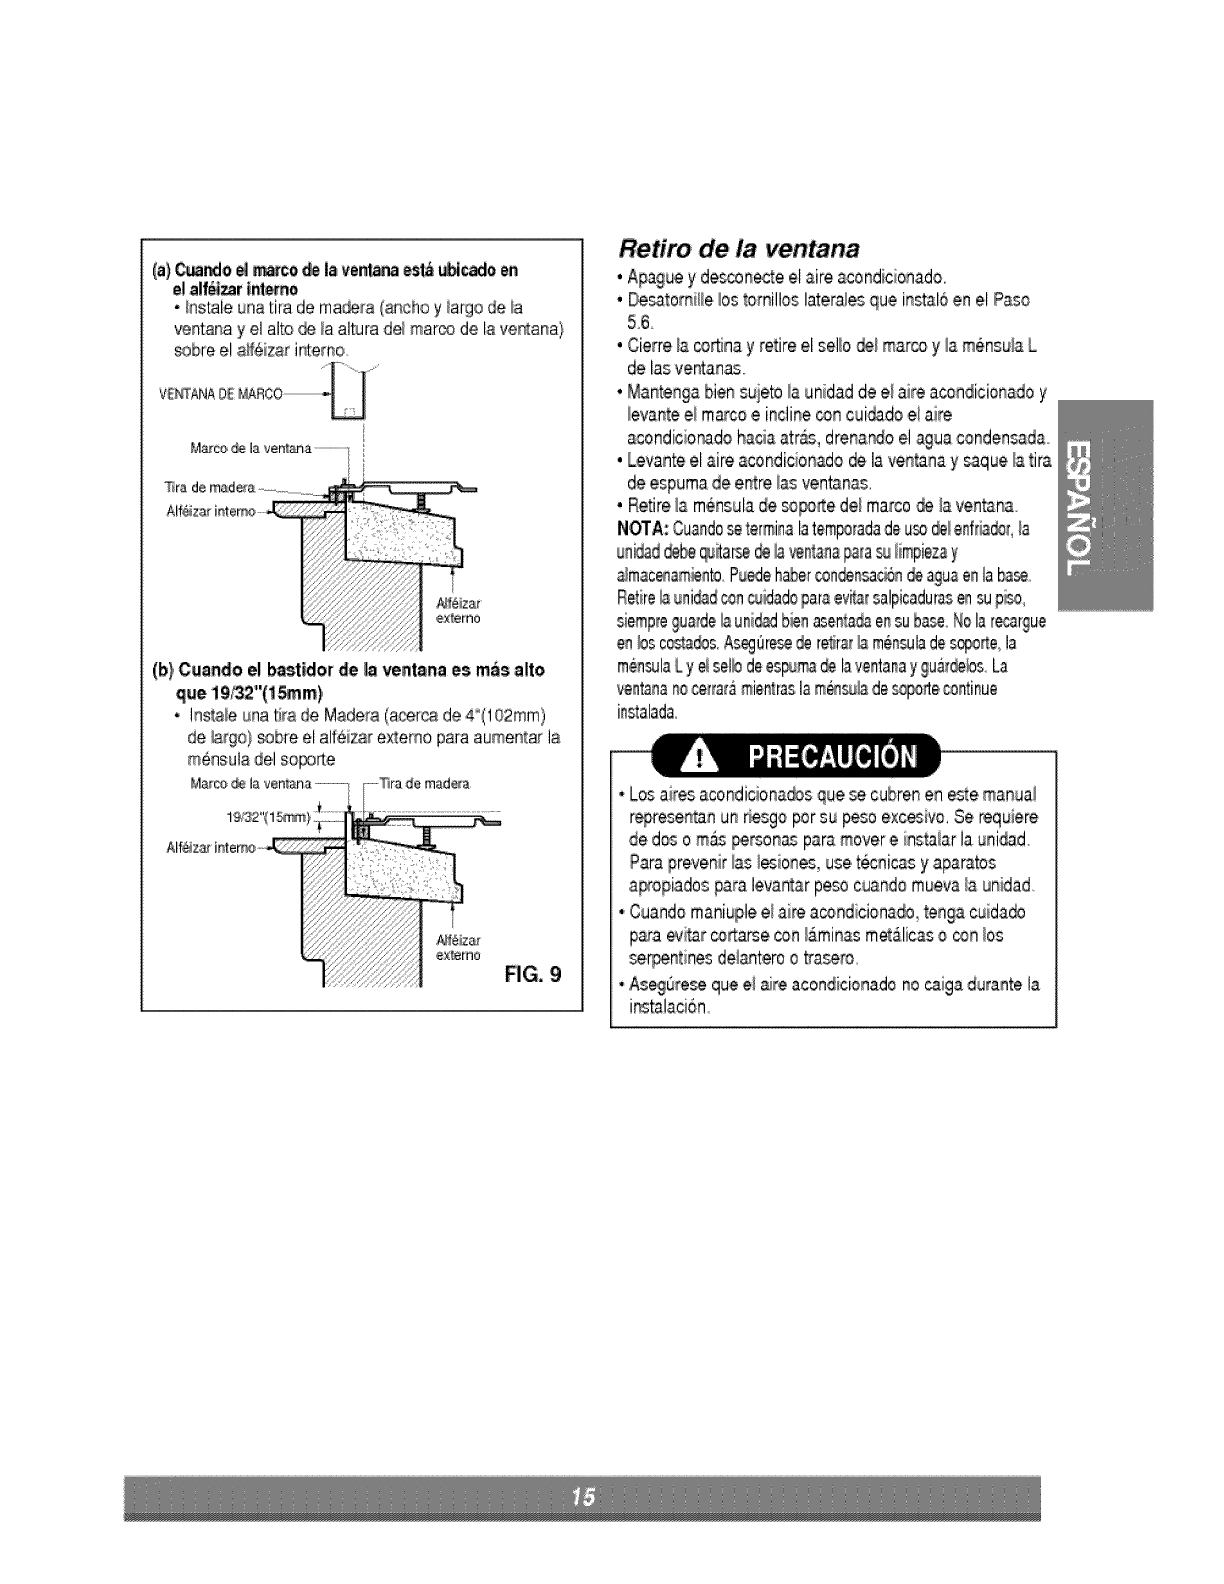
(a} When window frame is _a_ed on inner sill.
• I_s,tal_a weed s_rip(windowwi_h long _d
windowframe h_ght high)on 1theinnersill
SASH WINDOW --_
W!NDOW FRAME
WOOD S] R_IP_,_o_ ................................................-"
INNER _
SILL,
;;,: :: =
(b) When the win,dew frame is higher than
19/32"{15mm)
theoutdoo_sillto raisesup_rt brack_
INNER
SIL_
OUTER
SILL
RG, 9
REMOVAL FROM WINDOW
*Turn off and unplug the air _ndi_oner
.Unscrew the side screws _at you inst_led in Step 5,
6
* ,Cbse the cu_ain fr_e and remove foam se_ and L
bracket from the windows,
. Keep a firm grip on _e air ss you the sash,
. Lift the air conditioner from the window and remove,
_e barn sthp _m ibe_een _e windows.
Remove the suPlPO_bracket from window frame,
NOTE: When c_/ing season is over, unit is removed
from win_w br c_e_qin9and stooge, There may still
be some condensation water in the basepa,n,Remove
the unit carefully to avoid w_er being spilled out on
floor, Aiways store unit flat on its base. Do not stand it
on its end Be sure to remove suppor_b_cket, L
bracket, and fo_m sea_from window _qd save
Window wili not close if supper bracket remains
ins_lled
•Air conditioners covered in this manual pose
excessive weighthazard, Twoor more people are
ne_ed to move and inst_l the unit,
To preve_ iniury or strain, use ppoperlifting _qd
car_ing techniques when moving unit
• When handling the air conditioner, be carefui to
avoid cuts from sharp metal fins on front and rear
coils
Make sure _r conditioner does not fall dudng
removal,
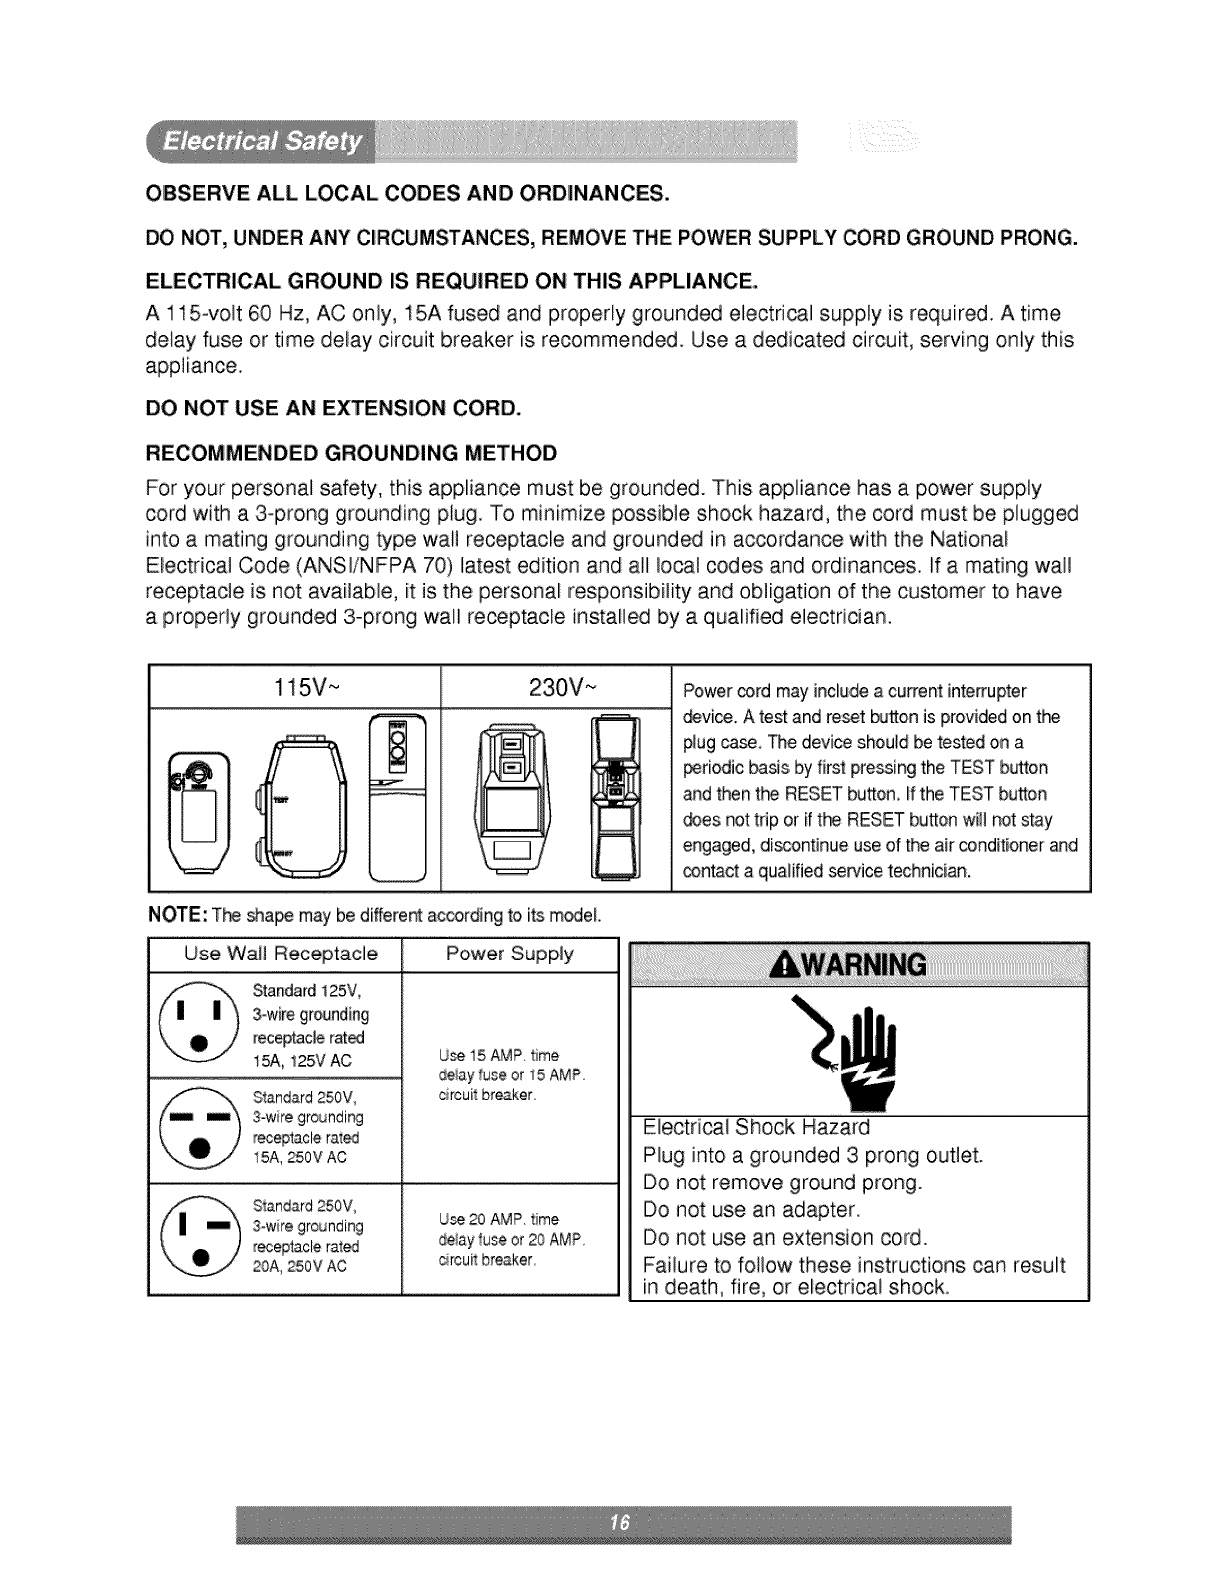
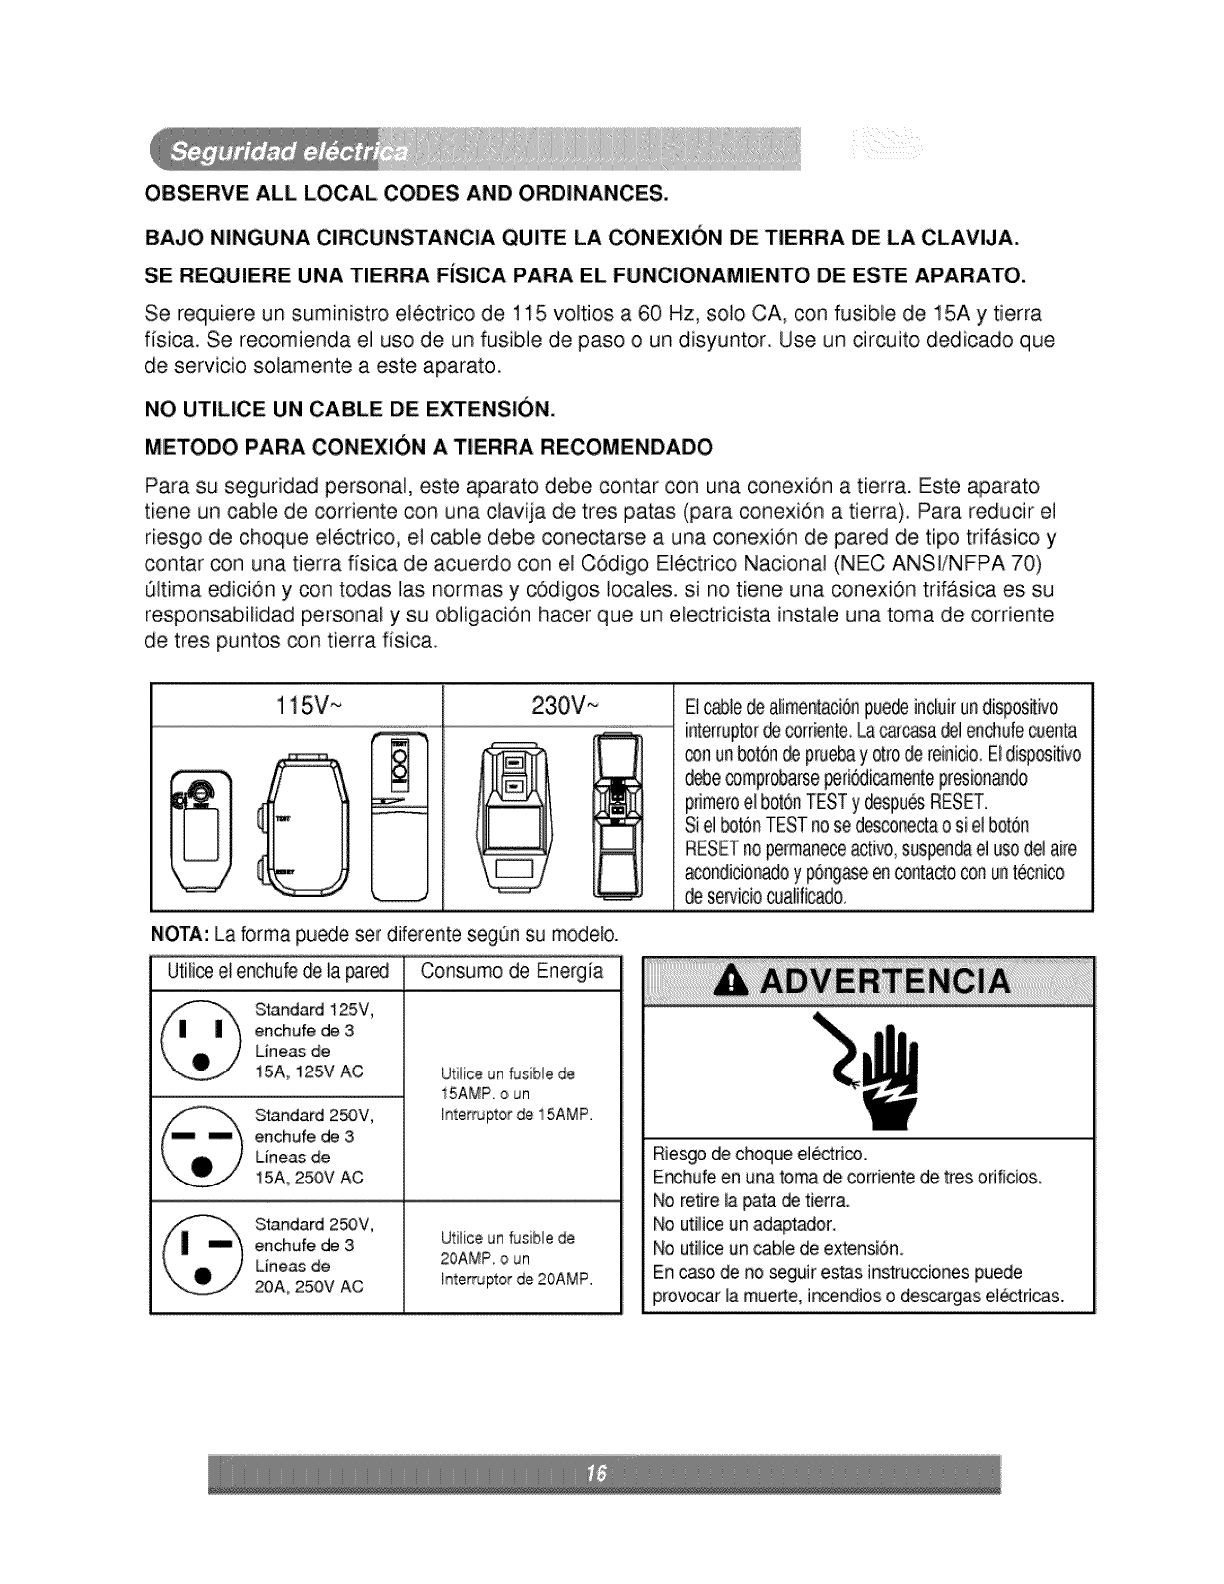
OBSERVE ALLLOCALCODESAND ORDINANCES.
DO NOT, UNDER ANY CIRCUMSTANCe, REMOVE THE POWER SUPPLY CORD GROUND PRONG.
ELECTRICAL GROUND IS REQUIRED ON THIS APPLIANCE..
A 115-volt 60 Hz, AC only, 15A fused and properly grounded electrical supply is required. A time
delay fuse or time delay circuit breaker is recommended. Use a dedicated circuit, serving only this
appliance.
DO NOT USE AN EXTENSION CORD.
RECOMMENDED GROUNDING METHOD
For your personal safety, this appliance must be grounded. This appliance has a power supply
cord with a 3-prong grounding plug, To minimize possible shock hazard, the cord must: be plugged
into a mating grounding type wall receptacle and grounded in accordance with the National
Electrical Code (ANSI!NFPA 70) latest edition and all local codes and ordinances. If a mating wall
receptacle is not available, it is the personal responsibility and obligation of the customer to have
a properly grounded 3oprong wall re_ptacle installed by a qualified electrician.
115V~ 230W Power cord mayinclu,dea current interrupter
device. A test and re_t buttonis providodon tt-_
p_ugcasesThe device should be tested on a
_riodic _s. by first pressingthe TEST button
andthen the RESETbutton, ffthe TEST button
does not trip or if tb_ RESETbuttonwill not stay
engaged,discontinue use of the air conditionerand
con_ct a qualified service technician.
NOTE: T_ sha_ may be differentaccordingto its m_el.
Use Wall Receptacle Power Supply
Standard 125V,
3-wiregrounding
receptaclerated
15A, 125V AC
S_ndard 250V,
3-wire grounding
receptacle rated
15A, 250V AC
Standard 250V,
3-wire grounding
receptacle raled
20A, 250V AC
Use 15 AMP. time
deiay fuse or 15 AMP
circuit breaker.
Use 20 AMP, time
de_ayfuse or 20 AMP
circuit breaker,
Electrical Shock Hazard
Plug into a grounded 3 prong outlet.
Do not remove ground prong.
Do not use an adapter.
Do not use an extension cord.
Failure to follow these instructions can result
in death, fire, or electrical shock,
(PLEASE READ CAREFULL Y)
FOR THE USER'S PERSONAL SAFETY, THIS
APPLIANCE MUST iBEPROPERL Y GROUNDED
The _wer cord of this _p_iance is equipped with a
three-prong (grounding} plug. Use this wi_ a st_dard
three°siot (grounding} wa_ipower outlet: (FIG.,10}to
minimize the hazard of electric shock, The customer
should have the wall r_eptacle and circuit check_ by
a qualified e_ectricianto make sure the r',eceptac_eis
properly ground_,
PREFERRED M_HOD
Because of _tential safe_ hazards, we strongly
discourage the use of an adapter plfug.However, if you
wish to use an adorer, a TEMPORARY
CONNECTION may be made. Use ULqisted adapter,
available from most Ioca_hardware stores ,(FIG.11).
The iarge siot in the adapter must be aligned w_th_e
_arges_otin _e receptacle to assure a proper polarity
connection.
CAUTION: Attaching the adapter ground tem_inalto
the wa#receptacle _ver screw does not
ground the appfia_ uniess the cover
screw is metal, and not insulated, and the
wall recep_cfe is grounded through the
hou_ winng, The customer sho,u_ have
the circuit checked _¢ a quafified n
to make sure _e ret'_ptac_ is properly
Disoonn_t the power cord from _e adapter, using one
hand on each. Otherwise, the adapter ground terminal
might break..DO NOT USE the appliance wi_ a
broken ad_ter plug,
exiss _fere use
FIG. 10
NOT CUT ORiREMOVE THE THIRD (GROUND)
PRO_ FROM THE _WER PLY.
AoSITUATIONS WHEN THE APPLIANCE WILL BE
DISCONNECTED OCCASIONALLY:
B, SITUATIONS WHEN THE APPLIANCE WILL BE
DISCONNECTED OFEN,
Do not use _'_adapter p_ugin _ese situations.
Unplugging the power _rd frequently can !,eadto an
eventual breakage of the ground termin_. The wa_l
power ou_et should be replaced by a three-s_ot
(grounding) outlet instead
Me_alscrew
USE OF EXTENSION CORDS
Because of _ten_al safety hazards, we s_ngly
discourage the use of an extension _rd. However, if
you wish to use an extension cord use a CSA
ce_fied/UL4ist_ 3owire ,(grounding)extension cord,
rated at 15A, 125V,
Receptacle cover
FIG. 11
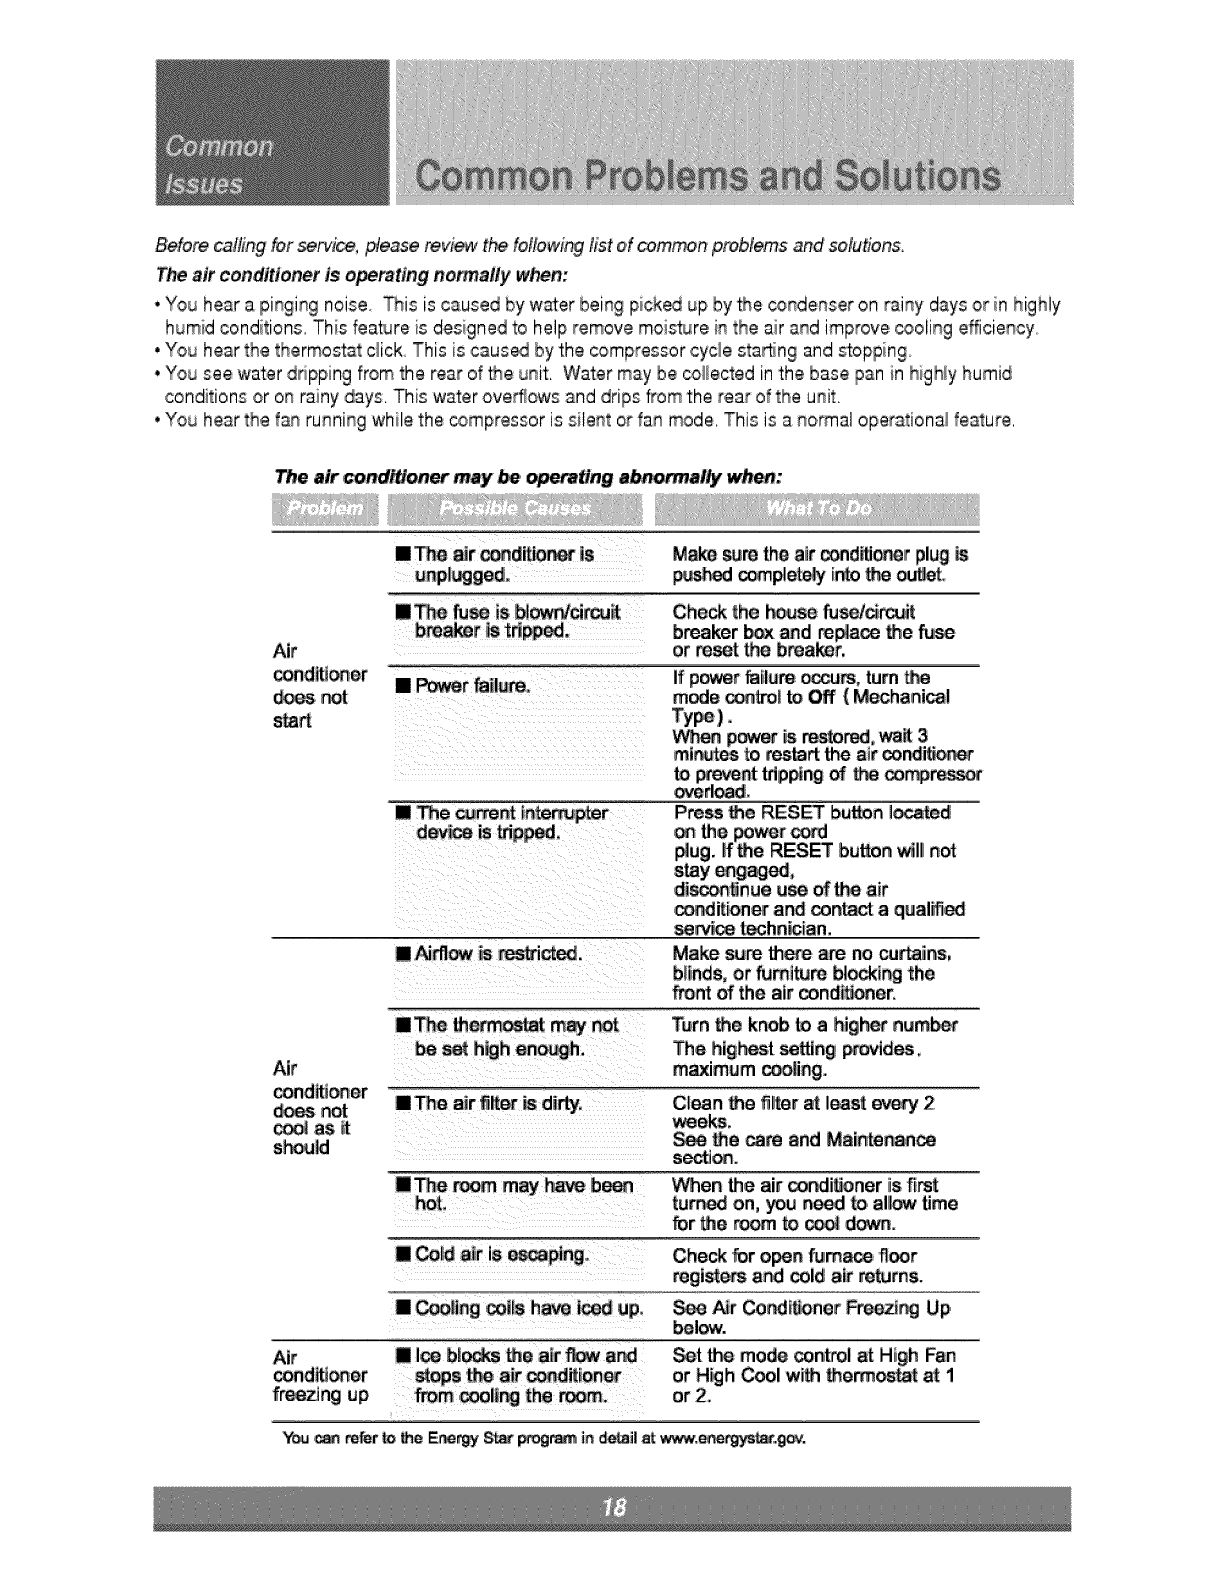
Before calling .forserv_e, please review the following list o.fcommon problems and solutions.
The air condttlo_r is operating normally w_n:
,'"Youhear a pinging noise_ This is caused by water being pick_ up by _e _ndenser on rainy day'sor in highly
humid conditions,, Ths feature is designed to help remove moi_ure in the air and improve _oling efficiency,,
,,You hear the thermostat c)ick, This is caus_ by the compressor cycle sta_ng and stopping.
. You see water ddpping from the rear of 'the unit, Water may be _llFected inthe base pan in higNy humid
conditions or on rainy days, This water ove_ows and drips from the rear of the unit,
,,You hear the f_ running while the compressor is silent or fan mode, This is a normal operationa) feature,
The air co_,l_ may be op_ting abnonnal_ when:
[] The air _ditio_ is Make sure the air conditio_r plug
p_ complet_ into the o_t.
_t
_nd_er
_ not
start
[]_ fuseis b_owrJci_it
[] _r _ilure,.
Check the _use fus_/d_ff
breaker _ and re_a_ _e fiJ_
or reset _ b_a!_t,
If power failure _J_, rum t;%
m_e _) to _ ( M_hani_l
Ty_).
Air
cond_-ler
not
c_! as
s_JM
Air
_ndit_er
freezing up
[] The _rtent )_ I_r
_e ztrip_ng _ _ _re_
Press _e REa._ burn located
the power
_ug. if the RESET burn _ll not
[] ict .
die, hue use of _ ,air
,_dit_ner and _nt_. aq_al_
_ techn_ian,
Make sure thereare no cu_ns,
blinds, er _mi_m blo_i_ the
front of the air condt_er.
[]_e th_m_at m_ _ Turn the knob _ ahig_ num_
The highesi setting _ides.
m_imum cooling..
C!_n the fi!_lr a_lea_ _ 2
wee_.
thee _ and Mainte_en_
s_o_.
[]The _ may have been _en the air _i_ner is first
tur_ on, you ine_ _. _ll_ time
_r _e r_ to _ down.
[]_[d air is _ping. Check _r open fu!mace floo,r
mgis$_ a_ _ld air _ms.
[] =i=s have i_ up, See Air Condi_nor Freezi_ Up
below.
[]I_ b)_ _e air ) and Set th_ mode _nt_tol at High Fan
or H_h Cool with thermostat at 1
or 2.
Y_ ,_ refer_the Er_ S_ _, in _il a_,wv#w,e_rgys_.gov.

"'"" " d ''p
Aconalclonaaorealretl o ventana
MODELOS: LP6OOOER
Tenga a Nen I_r cuidla,dosamente este manual° Contlene
informaclbn valiosa acerca del acondicton_or de a_re, Este
manual pu_e ayudarlo a ahorrar tiempo y dinero; ,describe
manten|m|ento adecuado de| _condicion_dor y como evitar
su uso incor_c_o.
PreNe at_,ci6n alas precauciones a fin de pr_enlr rlesgos
potenciales y da_o causado pot real us,o oinstalactbn
inadecuada. LG no se responsabiliza pot ningan da_o
causado pot el rnal uso del _ondicionador.
ara su arcihivo
Escriba e! modelo y numerode sefie aqui:
Modelo #
_ie #
_e e_contra_se#unae#quetaalcostadodecadaunidad,
Nomb_ dei pro,veedor
este Manual
En et ibm#or encontrara muchas sugerencias uti/es
sobre come usar y mantener adecuadamente su
acondicionador de aire. $6;to un _co de cuidado
preventive per su parte, le puede ahorrar touche
tiempo y dTnero,con respite a ta vida util de su
acondiciena_r
Encontrara muchas respuestas a preble, mas
comunes en el cuadro de soiuci6n de problemas, Si
previamen_ revisa nuestro cuadro _cias
de soiuci6t_ de problemas, po,dria no necesitar
ttamaral _vicio,
•Contacte al tecnico de servicio autorizado para
reparaci6n e mantenimiento _esta unidad,
•Contacte ai t_nico, instala_r para la mstalacidn de
esta un_ad.
•El acondicio,nadorde aire, no e,sta hecho para u_
die nifios p,equeffois o personas invafidas sin
•Los nif,os pequefios deben set vigilados para
asegurarse de que no con el
a,coi_icioRadof.
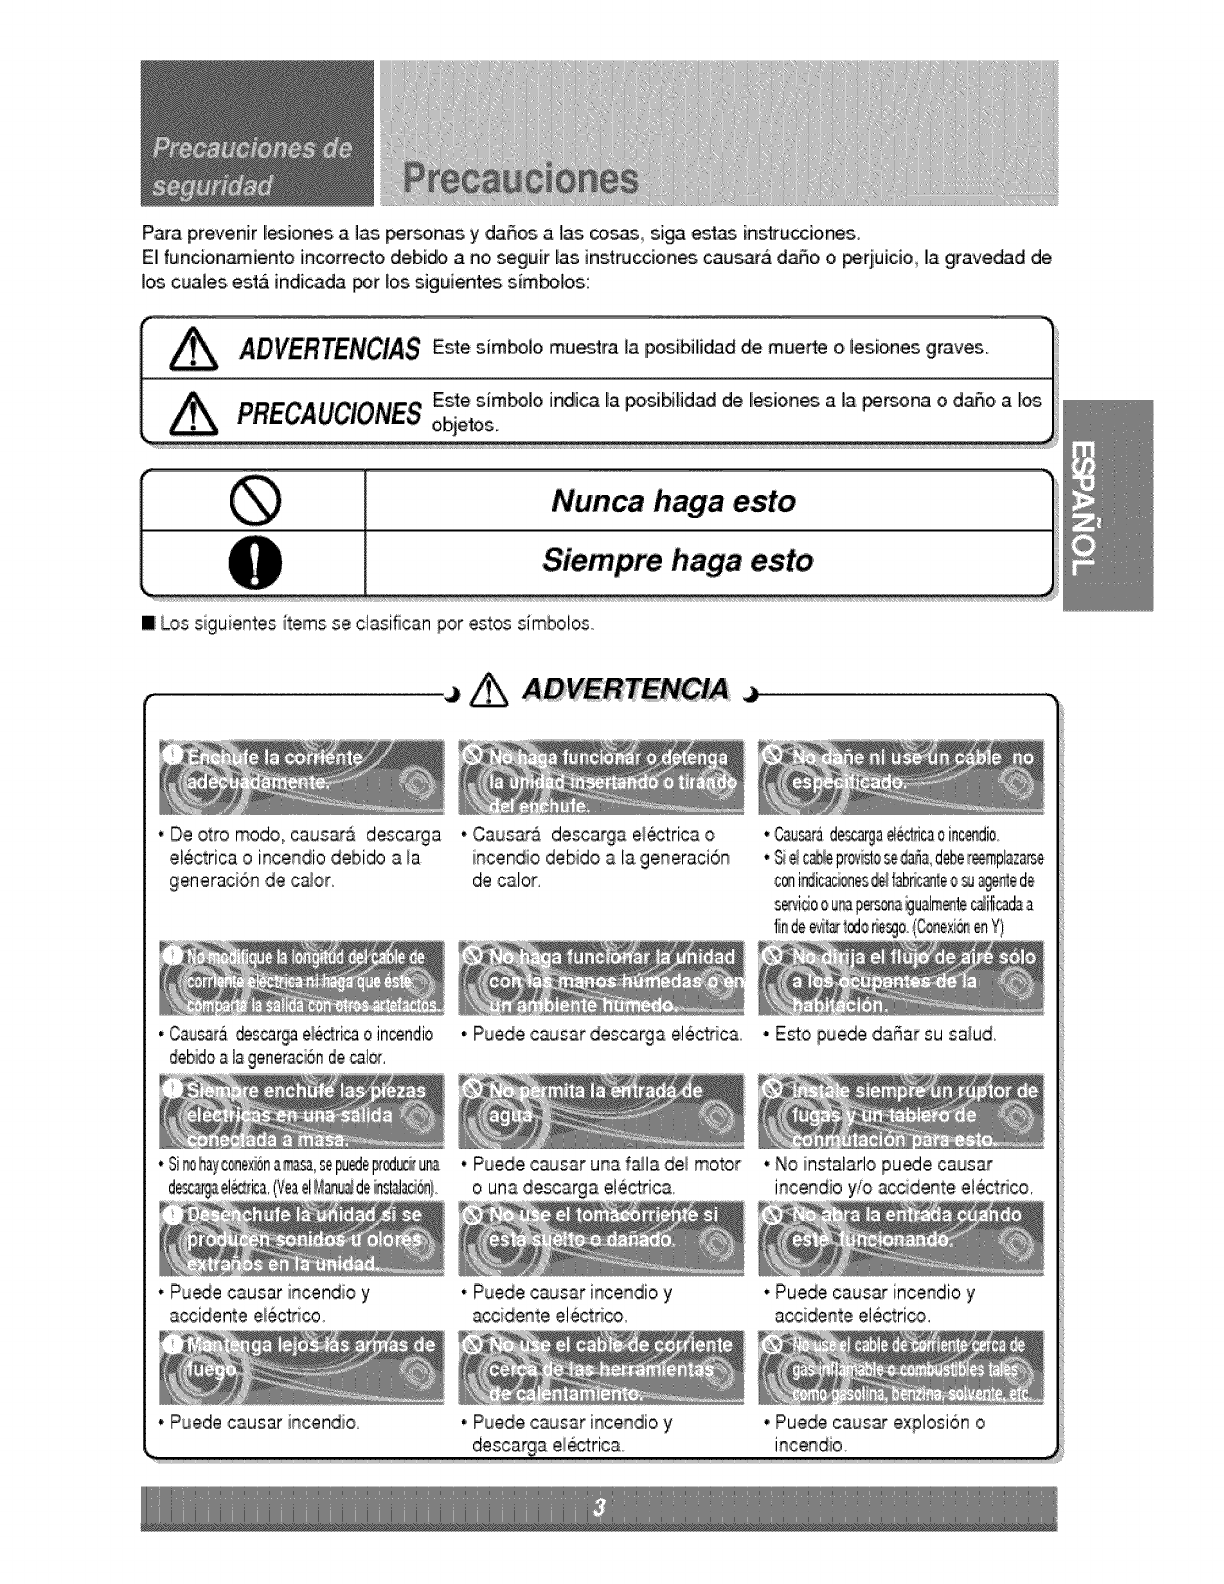
Pica prevenir lesio,_s alas _r'_nas y daffo,s a las _s siga estas ins_ucciones.
E[ funcionamiento incorrecto debi_ a no, seguir las Jnstwccion_ caus_a daho o _riuicio, _agravedad de
los cuales es.ta indicada _r los siguient_ similes:
ADVERTENCIASEste simbolo mu_tra la p_ibilidad de muette o lesio,nes graves.
Este simbelo indica la po.si_lidad .de lesion_ a la _mena o dazzle,a I_
PRECAUCIONESobietos.
Nunca haga ,esto
Siempre haga esto
[] Los siguien'tes items se clasifican per estos simbolos..
• De otto mode, caus_ descarga
electrica o incendio debido a la
9eneraci6n de ca/or.
* Causaradescar£_ae_e_ri_o in_ndio
deb_oa lageneriac_ndecal_,
•Si_ hayc®ex_n_._sa,se_e F_ u_
•Causar& descarga ei_trica o
incendio debido a la generaci6n
de calor,
.,Puede causarde_carga elec_ica.
•Puede ca_Jsaru_a f_la de/motor
o una desca,rga elec_ica,
, Causar&,de_rga_ica oinc_di0
•_ _ c_ pr_islo_a d_er_plazar_oe
c®i_icac_es_ tab_e e_ _e de
s_i_o ou_ p_s®a_ualm_ c_Hi_daa
• Pu_e causar incendio y
accidente e_ectrico,,
•Puede causari_cendio.
•Puede causar incendio y
accidente electrico,
•Esto puede da_ar su sa/ud,
• No instalarlo puede causar
incen,dioyfo accidente electrioo.
•Puede causar incendio y
acci,de_teelectrico.
.,Puede causar ince_dio y •Puede caus&r explosi6n o
i_ce_dioo
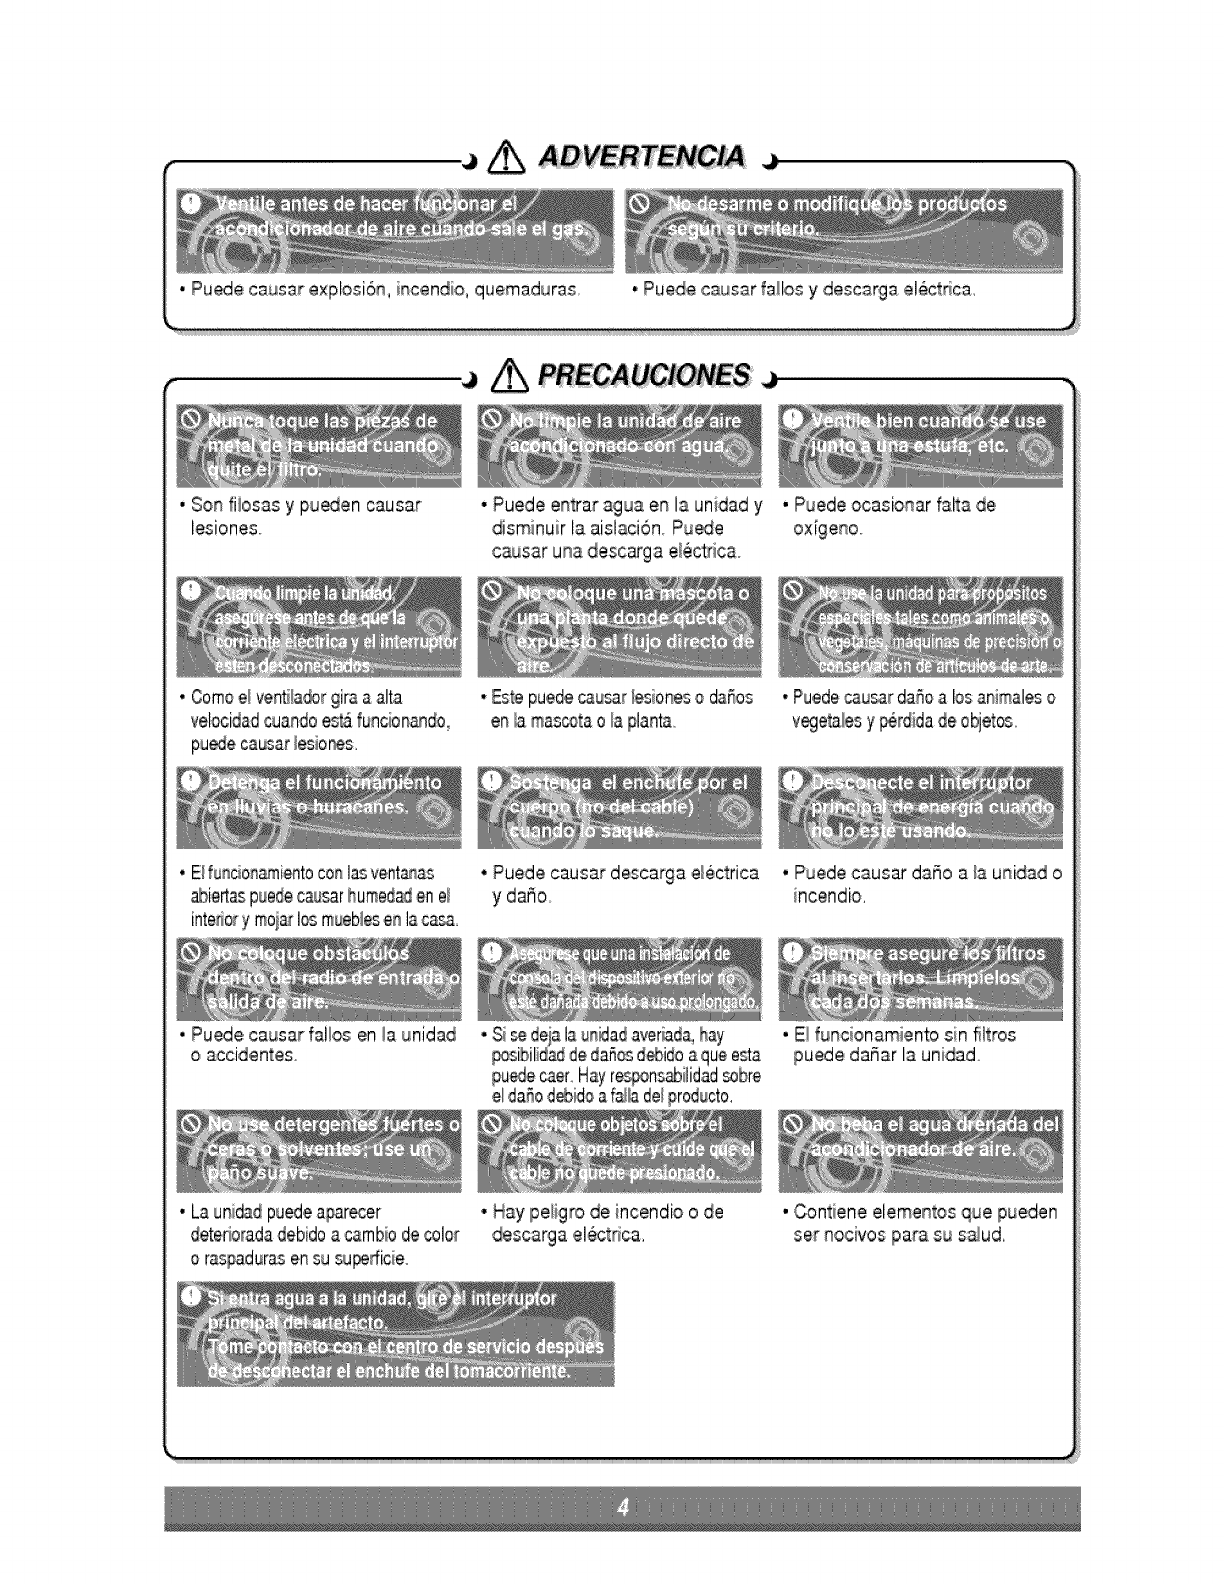
j, AO j
•Puede causar explosi6n, incendio, quemaduras .,Puede causar fa_los y descarga el6cttdca
, Son fiiosas y pu_en causar
lesione&
•Comoe_veafl_a@r9iraaalta
velocidadcuandoesta,'Iuncion_do,
.Puede entrat sgua en Is unidad y
disminuir la ais!sci6n Pu_e
csusar una descarga electfics,
• Elfuncion_iento conli_ vent&has
_iert_ puedecausarhumed_ enel
interiory moia_I_ mueblesen laca_,
•Puede causar falios en ia unidad
o accidentes
.Estepuedecausar_ion_ o daSos
en lamascJatao _aplanta
•Puede causar descarga e{6c_rica
y daSo
•Si_ dejalaun_adaverHd&hay
'Puede ocasionar falta de
• PuedecausardiaS,oa los animaleso
v_,eta/_ y _rdida de objetos,
•Puede causar daSo a _aunidad o
incendio,
•Launidadpuedeaparecer
detedoradadebidoa cambiodecolor
o r_paduras ensu su_fficieo
• Hay Ipeligrode incendio o de
descarga electdca,
•E! funcionami,entosin filtros
puede daSar la unidad,,
• Contiene elementos que pueden
set nocivos para su sa_ud,
_ Costactar un especialista p_a Is issta/aci6s
Coioque el enchufe correctamente.
_No compa_a la salida con ot_osa_ef_os.
No use us cable de extensi6s
_No arras,que!d_enga e_funcionamiento eschufasdo!desenchufando e_cane de corrieste ,electrica,
_Sii cuerd&/tap6n se daSa, reemplace s61ocon usa parte autorizada
Estar expuesto al fluio directo de aire por us per[_o l_go de tiempo puede @nstituir un riesgo pars su
sa_ud, No exposga a _aspersonas, mascotas o plsr_tasa_flujo directo _r pedo@s largos de tiempo
Debido a la posibilidad de falta de ox[geso, ven_le la habitaci6s cua#do se ruseal mismo tiempo que
estu_as u otros dispositivos de ca/efa_i6n.
No use este acondicionador de _re pars prop6sitos determinados no especificados (_r ej. presewar
dispositivos de precisi6s, _imentos, cachorros, p_antasy objetos de a_e), Us_do de esta m&_era
puede dash- tales elemestos.
No toque _aspartes de metal de Is usidad cuando quite e_filtro. Puede las_marse cuando manipu_e
bordes filosos de metal
No use agua pars limpiar adentro del acosdiciosador La exposici6n @agua puede destruir _aais_aci6s
y esto a su vez prov_ar usa descarga e_ectrica.
Cuando limpie la usidad, asegOres,eque la corrier_tey e_interruptor est_Sndesconecta_s E_venti_a.dor
gira a muy alta vetocidad cu_do esta funciosando. Existe ia posibiiidad de iesionas'sesi _aenergia se
@secla accidestaime#te cu_,do este !impias@ ias piezas intemas de la unidad
Pars reparaci6s y mastesimiento, _nta,cte a su proveedor de servicio,
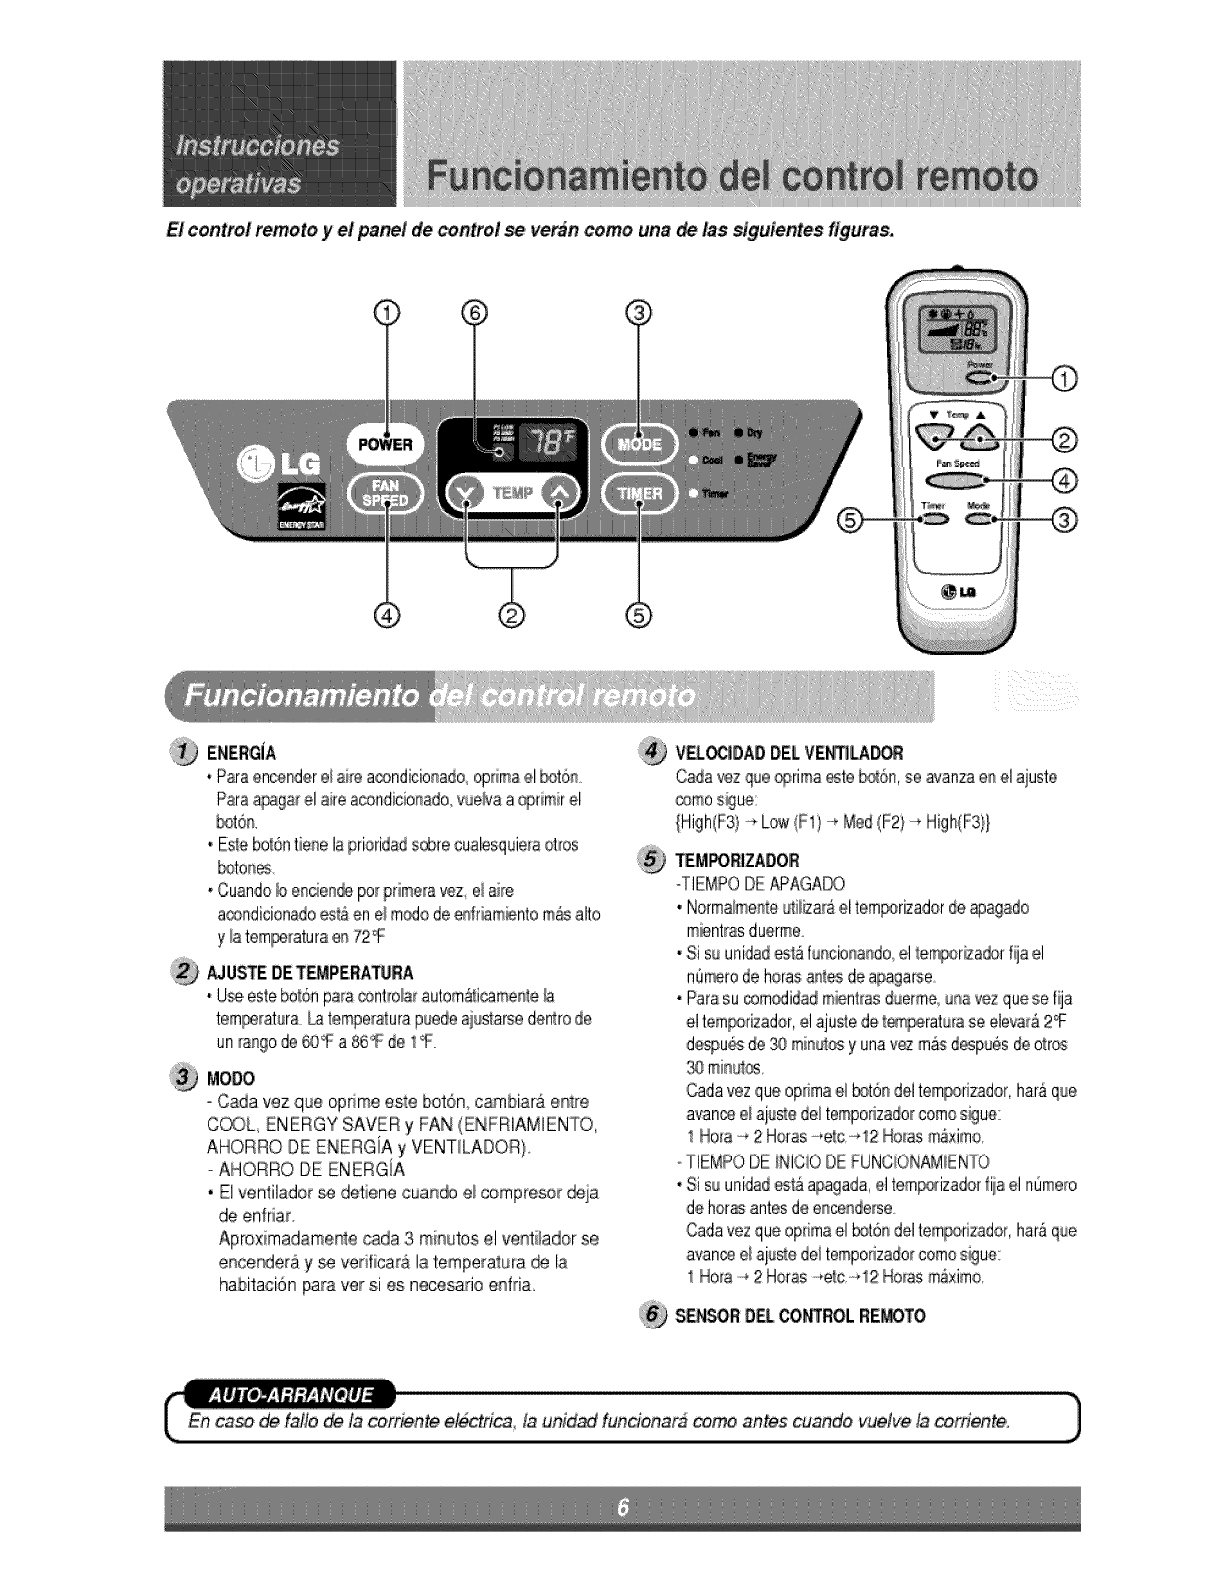
El control remoto y el _ne/ de control se ver_n como una _/as siguientes flgura&
EN£R,GJA
• Para enc÷nderel aidea,_n,dicionadeoFima el _t6n:_
Paraa_ga_ el aire acondicio_ado,vueNaa _rimir el
_t6_.
• Esle bol6n tie_e la prioridads_re cualesquie_aethos
L_to_
, Cuandob encien@,popprimerav,ez_el aire
a®ndicionado _la en e_m_o de _#r_m_nto masalto
AJUSTE DET_P£,RATURA
• U_ este bo_6npapa@nbo_a_automali_me_te _a
tem_atura _ _empe_a_urapuedeai_s_arsede,re de
un rangede@_Fa 86_ de 1_F
Mooo
- Carla vez que oprime este bot6n c_mbiara er_lre
C@L, ENERGY SAVER y FAN (ENFRIAMIENTO,
AHORRO DE ENERGiA y VENT[ILADOR)
- AHORRO DE ENERGIA
•El venlilador_ ,detiene cua_ e! compresor deja
de enfriar
Aproximadame_:e _da .3minutes el venti_ador se
ence_dera y ._ ve_ifioara la temperalura de !a
habitaciSn para vet si es necesafi,o enfria
V_,_|DAD DEL VEN_ILAD_
Cada vez que@rima _te _,6n se avanza eael ajuste
IHigh(F3} * L_ {F1} * Med (F2)* High(F3}}
T_M_IZADO_
-TIEMPO DEAPAGAE©
• Norma_me_te_iliza[a el tem_rizador deapagado
m_ntras duerme
•Si su unidad_ta f_cio_ando_ e.I_e_or_a_r fijael
nOr_ro dehorasa_t_ ,dea_ga_e
• Para su comodi@d m_nt_asduerme__navez que se fija
e! tem_rizador, el ajuste de _T_ratu_a se ,eleva_ 2_
de_u_ de _J/miLr_/L4_y unavez mas despuesdeotros
30 minute,
@da vez que optimael b_t61_del tem_rizador,ha4 q_e
avan,_ el aju_edelte_porizado_comoe_ue:
Hora-_2 Horas_elc,-_-q2Ho_asm_xirno
,.TIEMPO DE iNICiO DE FUNC_ONAMiENTO
, Si su unidad_la apagada,el tem_izador ilia el nOme_o
de hor_ antes de e_ce_de_se
Cada vez que optimael t:x_t6ndel temp_rizador, har_que
avan_ el aju_e dei temporizado[come s_ue:
1 Ho_ra-÷2 Horas--,e_c.--q2Ho_asm_ximo
SEN_R O_ CONTROLRE_TO'
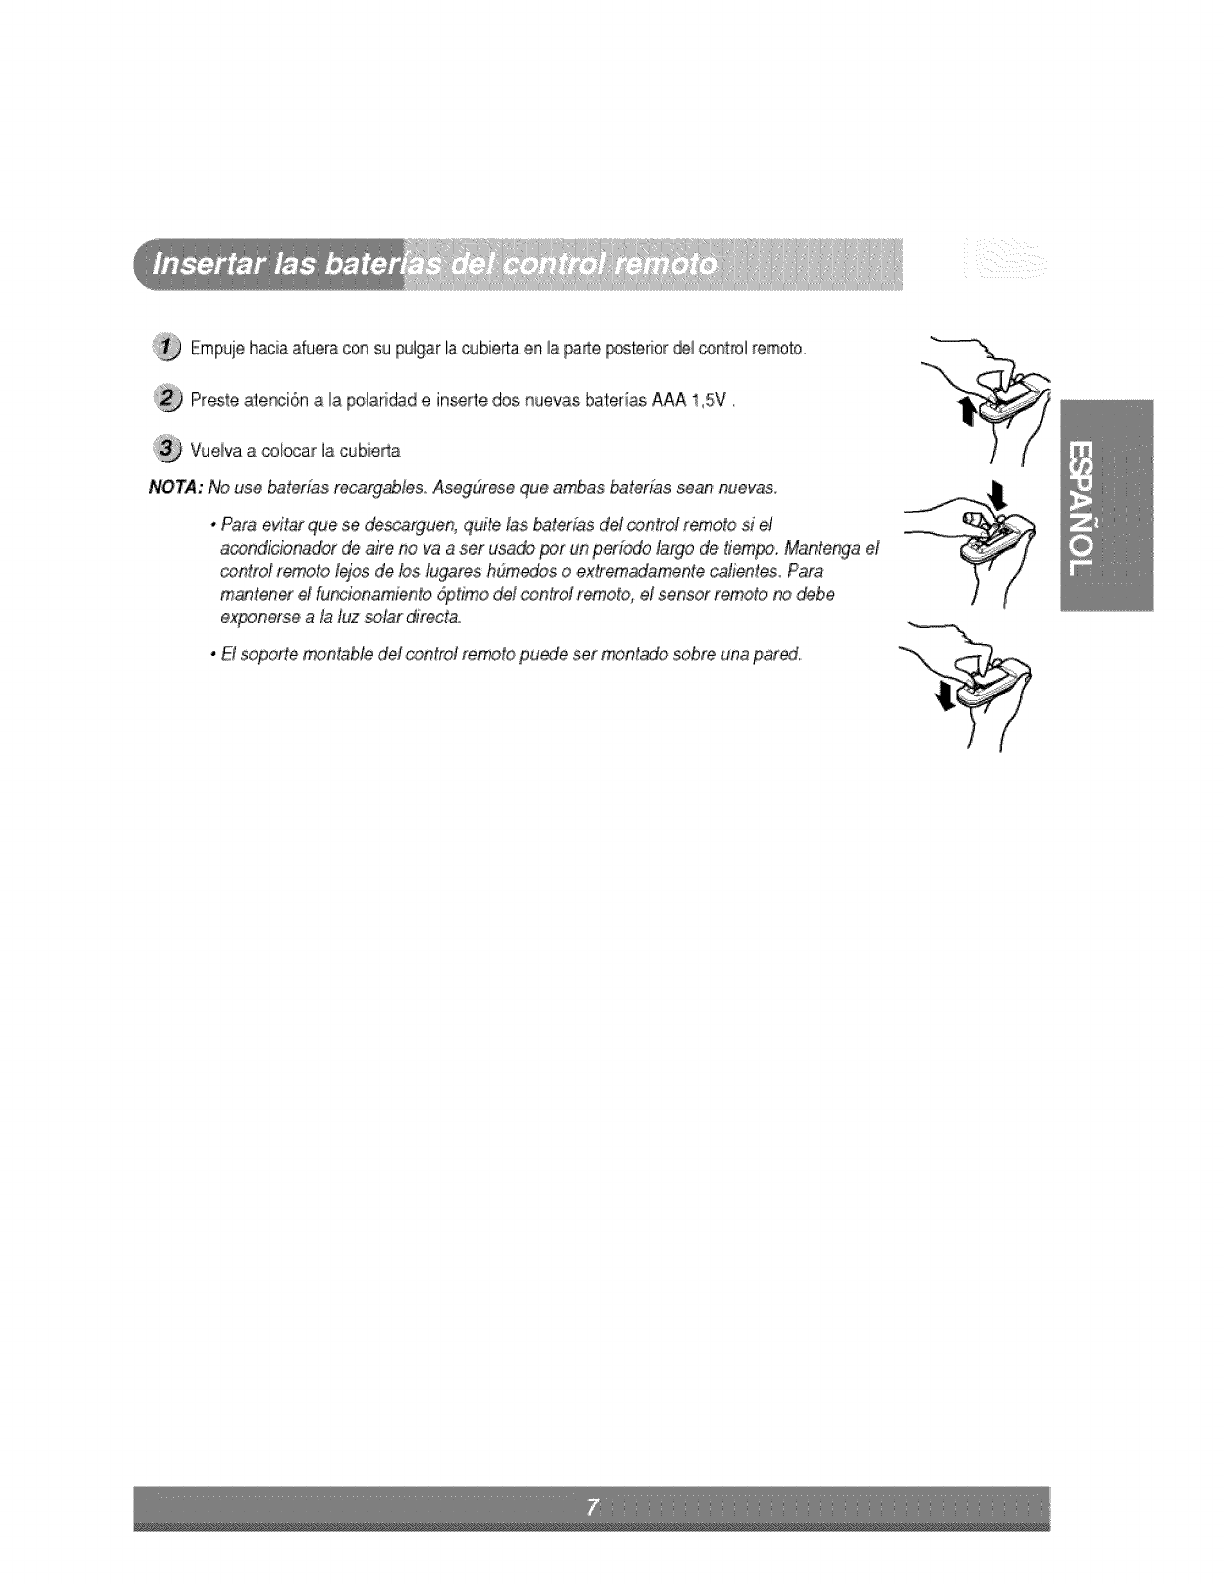
Empuje hacia afuem con su pulgar la _bierta en _a_e _sterior _ ®ntml remoto
P_est:eate£_i6n ,a !a polaridad e in_rte dos nuevas ba_er as AAA 1,SV,
:i_ Vueiva a ®locar la cubieda
NOTA: No use baterias recargabies Asegbrese que ambas baterfas se_ nu,evas,
•Para edtaf,que se de_arguen, quite Ias ba_erfas dd _,ntrot remo_o s_e¢
ac._ndiciona_ de tire no va a set usacb _t un pe[f_o ,targo de #e'r_FJ. Mante_a d
_trot _emoto _ejosde bs lugares hdm_tos o exttem_amente cahentes. Para
mantener' d fu_ionamien_o @_Jrnodd _ntrd remdo, el sensor rernoto no debe
exponerse a ta fuz sdar d_rect&
.E! sopor_e _)ntabl,e de,tc_ntrol re_t,o pu_te set mont_o sob,'e una par_,

El flujo de aire puede set _ustado cambia_do la direcci6n d,e_asreiil_asde ventilaci6n de_acondic ona@r de
aire. IEstopuede tambi@nincremeintar _aeficacia del acondiicionador de _re.
• A|ustar |a dir_i6n de flujo de aire horizontal.
Ajustar _asreiiHasve_cales hacia la izquierda y
derecha cambiara e_fluio horiz,ol_tal.
•Ajustar la di_cibn del _lujo de aire ve_i,cal
Ajustar el alabe Ihorizo_al hacia arriba y ab_jo
cambiara el flujo de aire ve_ica_ El alabe puede
ser aiu_ado moviendo la parte posterior del a.iabe
hacia ar_ba o abajo.
Ajustar _ flujo de air,eIhorizontal Ajustar ellfllujo de aire, v_ica|
• Orlentacl6n _com_dada de !;_ rejillas
Ajuste !as reiilias hacia arriba para i!evar _ m&ximo la eficacia dei fresco_

D'escon_tela e_ia y de_nchufe _unldadantesde/impiar el acondicio_or de aire.
El fil#o de sire se ensucis ys qu,eretra el polvo del sire interior. Debe lavarse _ menos cads 2 semana.s.S el
fi_trode sire se queda Ile_o de polvo, el %jo de sire disminuye y Is cspacidsd de en_rismientose reduce, y
puede d_arse Is unidad.
Como quitar el filtro de aire
Jale Is rqil_a de entrada hscis adelsnte, sujetando
pot smbss pestaSasm y lu,egojaie el filtro de sire
Lave el fiitro de sire directsmente en ei chorro de
sgus tibia. AsegOrese de sscudir toda el sgua
antes de vo_vers celocat el filtro.
NOTA: En clim_ h_medos, es posible que la BANDEJA
EVAPORADORA se iiene de sgua y sa_piqOeseen
PERSIANA LATERAL.
Z_ PRECAUCI6N
Es4edispositivo debe ser inst_ado ,deacuerdo con la _ormas nacionales de cab_eado,Esta 9u[s act, s
como ayuda pars explicsr !as funciones del product:o
@
Para prevenir la vibraci6n y el ruido, aseg_rese que
la unidad este inst:aladacon seguddad y firm,eza,
Insta!e Is unidad donde ia luz del sol no caiga
direct_ente en Is misma,
La parte extedor del gabinete debe extenderse
hacia afuera, como por eiemplo un cerco o una
pared, dentro de los 20' desde is parte posterior
del g_inete porque evitara Is radiaci6n de calor
dei condensador,
La res_cciSn del _re exterior reduce en £ran pa_,e
Waeficiencia de enfriar del acondicionador de aire,
Airefresco
Oer_9
%
I
PRECAUCiON: Todoslos a/abes tatem_,s del gabin,eted_,n _rmanecer expues_s ala p,a,rteexterior de/a
est'r_t'ura,
Instate Is unidad un poco inc!i_ada pare que la pa_e posterior quede ligerame_te mas baia que e! f_ente
(alrededor de 114'°),Esto forzara al ague condensada a fluir hacia el e_erior,
Instate la unidad con el fondo aproximadamente 30"~60" pot encima del nivel del piso,,
i i i _ii
NOTA, Todas tas piezas de soporte dean estar as_uradas con _era fuerte, marnposteria, o _a't.
•IEstaunidad est_ diseSada pare set insta_adaen
venta_as _bles basculantes est_dar con amp_itudde
ape_ura rea_desde 26" a 39-3/8 '°,
• Las hojas infedores y superiores de !a ven'tanadeben
abdrse Io suficien'tepa_ permitir una iuz ve_ical de
12°'dearie la pa_e infedor de la hoia supedor haste el
_iento de Is ventana,
Pared

CUL0
A
B=
C
D'
E
F
G
H
_MBRE DE LAPA_
PERNO NJVELADOR
PERNO NIVELADOR
TORNtLLO: 5/8"
TORN_LLO: 5/8"
SELLO DE ESP'UMA
CINTA DE ESPUMA
MENS,ULA L
CANT
!
1
1
2
5
1
1
1
DESTORN|LLADOR(+_ o)_REGLA_ CUCH|LLO_ MARTILLO_ _P|Z_ NIVEL
Saque _n cuidado el aire acondicionado de su caja,
revise que no tenga daSos pot ,elembarque_
Seleccione ia ubicaci6n que le permitir& sopiar ei aire
frio ai intedor del &rea que dese& Las ventanas que
se utiiicen para instalaci,6ndeben set io
suficientemente fuertes p_a sopo_ar el peso del aire
acondiciona_, Una buena instalaci6n con esp_ial
atenci6n al posicionamiento apropiado de la unidad
r_u,cir& los seHici,os necesa_os,
A! enfriar m&s de una habitaci6n, la ubicaci6n de la
insta!aci6n es muy impo_a_te., Pa,ra enfriar sus
habitaciones, ei aire frio debe set soplado desde e/
aire acondicionado en un patente directo,
Si el aire aoondicionado se b/_uea pot un marco de
ventana para torments, consuite el P_o 7, 8 en _a
pagina 14 antes de comenzar _ainstalaci6no
C6,mo instalario
Co_e la T/RA DE ESPUMA (ART[CULO G} para
ajustarse,a la pa,_einlerior del marco de la ventana
Abra _a,vventana, quite la protecci6n po_erior de ia
tira y una Is TIRA DE ESPUMA como se mues_a en
la F!G, 1,
FIG,, 1
;i_ Marque ia linea d,ei centro ,con un lapiz en el
int,edordel alfeizar, como se muestra en _aFIG 2.
j
INTERNA INTERIOR
FIG, 2
instalela mensuladeso_e _bre laventana
V_ F_G4 InsOleel _ de niv_aci6n en la p;:irte
su_rior a traves de la parte inferior de la merlsuliado
so_Mo, Puedeesco_r un _rno code (ARTiCULOC) o
u_ lar£o (ARTiCULQB)de acuerdoa_ripede la
venlan& Tambi6n,pu_o seleccionar !a p_ici6n _1
orificioen ia mensula,
Coloque la m_sula en el al_ei_r a 1pulgada(25.4,ram)
a la izquierdade la !i_a del ce#trode la ve_ana (Voa
FIG,,4), Suiote _amensula_ _teiz_ con los lomi_los
pr,o_rcionados (ARTiCULOD) Aiuste eltornillo
_ive_a_r de m_o que e_aireacondicionadoquo se
instabr& quedecon una p_ueSa inclinaciSn(Acerca
1/4")hacia abajehacia _ exteror, I>_raundre_do
apropiado,Apriete los1orniltosde !a mensula
Lafal_enlai_talad6_segura_ b me_sula_ s_oAe_e
re_tar ealacaida_ {auni&_ddesdelaventanasi elrna_
iavea_aaesia_a_ado_ues _ queI_uai_d esin_h_
Es__e r,esu_ar_n_sbn_s_as_s
INSTALE EL AIRE ACOND|CIONADO EN
LA VENTANA
, Levite co_ cuidado la u_idadde aire acondicionadoy
desli_celaon ia ven_na _ier_ Ten_a c_idado de no
lesionar_acir_turaen estao_ci6n,
.Useganchosde _s manessobre la _e sunder do
la unidadpar,aIovar4ada
, Aseg_re_ de que la menseia@ so.de sea insertada
en el boisillodebajo @1ventilador base,yque ia guia
do__stidot de la ,_dina osle p_a@ _r el oblurador
en !a m@nsuiade _po_e come Iomuestra en la FIG6,
NOTA:Cuandolaunidadso centraapropiadamentey se
empujahaciaduera a la _bicaci6ncort_ta e_la mer_sula,
soffit& quese trabacons_uridad en su !u_r e,nla
measuladelalfeizar,Sostenga_afi_emente durante,e_te
p_o_dimie_o.,
° Bajee/marco de lave_a_a sunder todo Io posiblede
formaquee_marcose sientafirmementee_e/ca_al
s_rior dela _nidady los _s_idorosexpandibles_/a
Dur_teel_gui_eF_sos_s_ngala_d_ fi_memer_ehasta@_el
_co _ _av,_3 _nda _e elcanal_¢_r 1_d_r&sdeI_
_ de_ba, _ _rwoc_!_ones_°_les o_ ala
_opi_adsiAunidad_ caedelaven#_a,
Unea _n_raJ FIG, 5
_bdero _e r_,_#e
RG, 6
ASEGURE LOS BASTI_RES DE LA
_RTINA
Expands los bastidores de _aco_na y _eg0relos
usando 4 tornillos (ART[CULO E) oomo Io muestra en
la F_G7.
Cuando el bastidor de la co,ins se abre o se cierr&
puede sentir un iige_ resistencia Esto es normal.
SELLODE ESPUMAYBL_UE DE LAVENTA_
'i Corte el SJ@ilOde espuma (ARTiCULO F) sl _c/ho
de la v,entana Rellene el espacio entre el vidrio y Is
ven_na con Is espuma selladora para prevenir que
los insectos y el sire penetren en ia hab_aci6n,
come se mue_ra en la F!G 7.
* Instate la mensula L pars prevenir que _aventana
sea levantada b cu_ pu_e resultar e_ Is caida de
la unidad
SI EL AIRE ACONDICIONA_ ESTA
OBSTRUI_ POR UN MARCO DE
VENTANA PARA TORMENTA
* Si hay un marcopars lo_menlaque obstaculi_ una
u_ tira de made_ade 2"(51mm}de es_sor al aff6iza_
i_erior de ia ven_na a t_o Io aacho _1 ali_eizarLa
tira de ma_ra debe _r _osuficientementegruesa para
eievar laaltura del alfeizarde _avenlana pats que _a
uni@d _ instatesin queel marcopars tormen_ io
o_culice. Veala FIG. 8 La parte su_rior de latira de
madera @_ _ aproximadamente3i4_ggmm} mas
aRaque e_marco p_a torme_ pars ayudar a drenar
la condenssci6nhacia e_e_erior.
, InsOleuna segu_a tira de madera (aproximadamertte
de 6"(152mm}de largo per 11/2_{%mm)@ ancho y del
mismo gresor que la primerstits} _ ei ce_r'o del
rebotde del al_eizarco_trala _rte _steriet del a_f_zar
interior. (FIG 8)
Tiradem.aderamo_tada 11/2'rain Espacio_ibrede
s@relapartes.u_rior (_m_) S,4'°('19mm}
FIG. 7
re,tanspara
A#e,izar is_,emo tor_eata
I#ierior Exterior
Cuar_o el marc_pars torme_te
est&ubicade en ,e!a!feiza_ex,temo
FIG, 8
ILamensula y ios t,ornillos del marco de @Rina
deben insta_ars:,ecome se indica en las instrucciones
ps_ evitar que la unidad caiga desde is vent:anay
cause lesiones Ipersona_eso daSo a la propiedad
NOTA: Si el marco, de Ilaven4ana tiene usa
supefficie met&lics, use _ostornillos pars I&mina
en vez de i_ pij_ pars maders. Puede
conseguir los tornillos pars la.mina en su
ferreteria_
INSTALAC|6N PARA VEt_ANAS DE
OTR_, TiPOS
*Dimensiones y _ageome¢ria de la ve#tana son
diiferentes de acuerdo a los fabricantes.
Revise su ventana y refierase ala FIG, 9 pars
instalar firmemente la mensula del so_rte.
Ial_r_o _ _co,_ lave_ esta_cado en
elalf_r Int_no,
- lnstaleunatira dema_a (anchoy iargode ia
ventanay elalto @ _aal_ra de_marcode laventana}
_bre e! a_6izarirtemo
VE_ANA DE _RCO 4 I
i
(b} Caandoel bastidotde _ ventanaes mas alto
que 19_32"(i_m),
,hs_aleunat_irade Ivladera(acercade,4(!02rnrn)
de _go} _bre elalf6iza_ex_ernoparaaumer_taria
m_nsulade,Iso_Jte
Retiro de la ventana
.Apaguey descon_e etaireacondicionado,
. _satomiWle_ostomilloslateralesqueir_stal6en et Paso
&6
• Cierrela_rtina y retireelsel/o_ marc_y _am6nsu_aL
de lasverdant,,
, Ma_enga bie_suietola u_idaddee_aireacondicio_adoy
levar_teel rn_oo e i_cli_e_a cui_do ei aire
aco_dicio_do haciaatras,dre,t_a_oelaguacondensadao
° Levanteel aireacondicion_o delaverona y saquela,tira
doespurnade e_re i_sventanas,
° RetireIa rnensulade _e del marco_/a ven_a
NOTA:Cuaado_ t_[_irli_latem_radadeu_ _l eaft_, _a
uai@d_ @J_ar__ h ve_taaapapa_; limpiezay
almac_am_ntoPu_e haber_ade_sac_n_ aguaealaba_,
Retire_ _ai_d _n cu_ado£araevi_ salpica,duras_ sup_,
siemp_e9uatde_ u_i_ b_a_e_a_ e_suba_oNola[_r9ue
eabs c_s. As_ore"__ r_3ra__ m6_sulades_#e,, la
measulaLy _ sel_,dees_ _ laveata_ay gu&_bs La
veat,_aano_t_a_&mienlrasliam_ de_Ae _ati_ue
iastalada.
°Los;airesacondiciona_s quese cubrenenestema,nual
r_reser_tanundesgopersu p_o exc_i_o, Se requiere
ded_ om_ _rson_ paramovere instaiarlaunidad
Paraprevenirias _iones, use,t_nicas y aparatos
ia_ogiiadosparaleva_ar p_o cuandornueva/a_nidad
,,Cuand,omaniuplee_aireacondicionadotongacuidado
p_a ev¢_arco_arse_n/arnin_ rn_licas o oonlos
inesdel_tero o ttasero,
, ,As_Oresequee_mireiacondicionadono _iga durantela
ir_talaciSn
OBSERVEALL LOCAL CODES AND ORDINANCES.
BAJO N|NGUNA CIRCUNSTANCIA QUITE LA CONEXION DE TIERRA DE LA CLAVIJA.
SiE REQUIERE UNA TIERRA FlSlCA PARA EL FUNClONAMIENTO DE ESTE APARATO,
Se requiere un suministro el6ctrico de 115 voltios a 60 Hz, solo CA, con fusible de 15A y tierra
fisica. Se recomienda el uso de un fusible de paso o un disyuntor. Use un circuito dedicado que
de servicio solamente a este aparato.
NO UTILICE UN CABLE DE E_ENSION.
METODO PARA CONEXION A TIERRA RECOMENDADO
Para su seguddad personal, este aparato debe contar con una conexi6n a tierra. Este aparato
tiene un cable de cordente con una clavija de tres paras (para conexion a tierra). Para reducir el
riesgo de cheque electrico, el cable debe conectarse a una conexi6n de pared de tipo trifasico y
contar con una tierra fisica de acuerdo con el C6digo EI6ctrico Nacional (NEC ANSI/NFPA 70)
01tima edici6n y con todas las normas y c6digos locales, si no tiene una conexi6n trifAsica es su
respons.abilidad personal y su obligaci6n hacer que un electricista instale una toma de corriente
de tres puntos con tierra fisica
115V ~ 230W
I
B cablede alimentaci6npue_ induir undispositivo
interruptor@ corriente._ car_sa @1endlufe cuen_
_n unboton@ prue_ y ottodereinido Eldisp_itJvo
debecomprabarseperi_i_mente presion_do
prirneroel bot6nTESTy @spuesRESET.
Siel _t6n TESTnose desconectao si elbot6n
RESETnopenmaneceactivo,sus_n_ el usodd aire
acondidonadoy p6ng_e encontado conunt6cnico
desewiciocualificado
NOTA:: La forma pu_e set diferente seg0n su model&
Utiliceel enchufede la par_ Consumo de Energfa
Standard 125V,
enchufe de 3
Lineas de
15A,, 125V AC Utilice un fusible de
15AMP o _n
Standard 250V, I_terruptor de 15AMP
enchufe de 3
Lineas de
15A, 250V AC
Standard 2_V,
enchufe de 3 Utilice un fusible de
Lineas de 20AMP, o un
20A, 250V AC l_terruptor de 20AMP,
Riesgode cheque ei6ddco.
E_hufe en una toma de corrientede tres odficios.
No retire la pata de tierra.
No utiliceun adaptador.
No utiliceun cable de extensi6n.
En c_o de no seguir estas instrucciones puede
provocarla muerte, incendioso de_argas el6ctricas.

(POR FAVOR LEA CUIDADOSAMENTE)
PARA LA SEGUR/DAD PERSONAL OEL USUAR!O,
ESTA UN/DAD DEBE SER CORRECTAMENTE
CONECTADA AMASA
El cane de alimentaci6n de este a_efacto est&
_uipa_ con un enchufe de tres claviias {_
co_exi6n a masa} Use ,estecol_u_a sa_idaen un
tomacorriente estandar ,de par_ an tres ranuras (a
m_a) (FIG. 10) para minimizar ei peiigro de descargs
electri,ca. El usuario debe tenet un tom_corde_e de
pared y u_ circui_ocontrol_ pot un e_ec_ricista
c_ificado para asegurarse de que eltomacorrie_4e se
halla debid_e_te descatgado a masa.
M_O_O PREFERI_
AsegOrese de que e×iste la
de_;a_ga {;o_,ecla a [T_a_a
ant÷sde usat
FIG. 10
A causa de desgos _tencia/es de seguridad,
advedimos setiamente que se debe usar un
adapt_3dorde enchufe..SiR embargo, si desea usar u#
adaptador, se puede hater una CONEX!ON
TEMPORARiA, Use un adaptador enumerado en UL,
Is ranura grande e_ ei toma_rriente pars as_urar
u#a conexion de polaridad correcta.
masa al torniflo_ Is c_'efta dei
tomacoffiente _descarga el a_efacto
a masa a me_s que el tomfllo de,la
cu_ela sea de metal y no
er_uentre aislado, y el temacorriente
se halle _nectado amasa'a traves
del _la cas& El usuafio
d_ hair _ontt°olarel c_rcuitopot un
e_ctricista c_ficado para asegura_'se
que e! tomacornente se halta
deb_amente conecta_ amas&
Des_ecte el cable de alimentaci6n del adaptador,
usando _unama#o e_ cada unooDe,otro modo, la
te_i_sl a masa del adaptador puede romperse
NO USE el artefacto con un adapt:adoral enchde
roto
CORTE 0 QUITE LA TERCERA CLAV/JA
(MASA )DEL ENCHUFE DE ALIMENTAC_ONDE
A,,CIRCU_TANCIAS EN LAS Q_E EL
ARTEFACTO DEB£ SER DESCONECTADO
OCASIONALMENqrE:
METO_, TEM_RAR|O
Enchufe adaptador_
demeta_
C_bieda
del toma_rrient8
FIG. 11
8, CIRCUNSTANiCIAS EN LAS Q_E iEL
ARTEFACTO DEBE SER DESCONECTADO A
MiENUDO,
No use un _d_tador a_enchufe en estas
circunst_nci_
Desenchufar e_cane de a/imentaci6n frecuentemente
pu_e I_ewr a una rotura eventual de_polo _ mas&
El tomscorriente de p_red debe ser re,emplazadopor
otto de tres ranuras
_SE DE CABLES DE EXTENSION
A causa de desgos de seguridad potenciales
desaconseiamos seriamente el uso de cables de
extensi6n, No obstante si desea utilizar un cable de
extensi6n, use un csble de extensi6n CSA ,ce_ifica_
ilistado en UL de 3 po!os ,(_masa), oo/nun rango de
15A, 125V
Antes de llarnar al servicio, tenga a bien revisa_la siguiente lista de probl_as y sus solucion_,
El acondictonador de aire est_ functonando normalmente _ando,:
• Escucha un sonido met_i_o Lo causa el a.guaque recta e! ,con,densa_r en d_as liuviosos o en condiciones
de mucha humedad Esta caracter[s_ca esta diseSada para ayudar a.quitar ia hum_ad en ei aire y m,ejer_ !a
capacidad de enfriamiento,
,.eye un clic en el termostato, Lo causa el cicio dei compresor qua comienza y se detiene
,.Ve gotear agua de _apa_e _slerior de _aunidad El agua puede set r_ogida ,anla _ndeja de baseeirl
co_dicionesde mucha hum,_ad o dias de Iluvia, Esta agua des_rda y 9otea desde _apare _sterior de la unidad
• eye f_Jncionarel venti_adormien#as el compresor est&sile_qcioso Esto es una caracter[sScaoperativa _ormal,
El acendicionador de aim pue_ estar funcionando ano_almente, cuando:
El aire
a_ndld,oaa
do no
_ciende
El aire
a_ndiideaa
do no anna
_rto
debiera
• @_ _ 'f_NeM_pto,r dlela
casay _ern_a_ _osNsibles e
_es_ezca _ interrupterde en,_ia.
E! ai_ 'Elijael mo_e_i del _l,_er High
de _ia Fa_ne en#_de a_ High Cool _n e!
demasi_o _r_ en e_n_me_e! .o2,
* Us_edp_ ref_l_ al EaSy 8,_ prima _ _odode_l_ _ _.ener_star.gov,
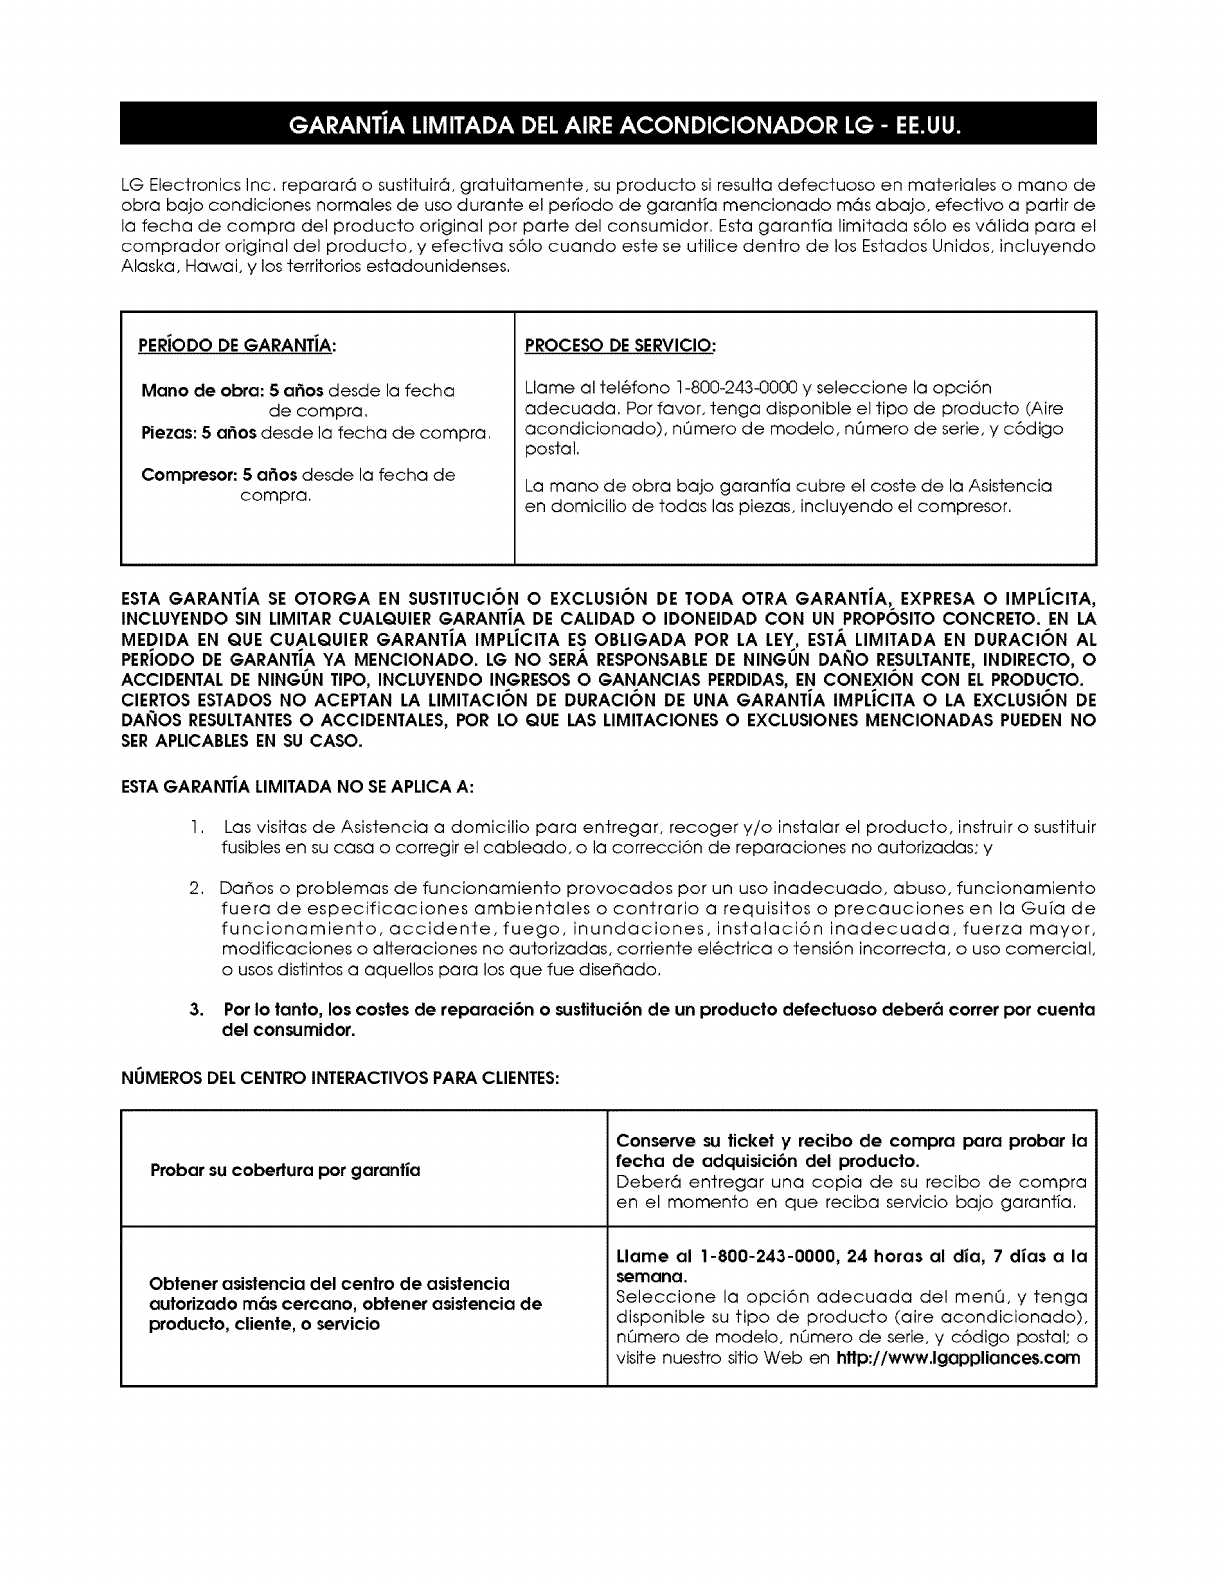
LG Electronics Inc, reparar6 o sustituir6, gratuitamente, su producto si resulta defectuoso en materiales o mano de
obra bajo condiciones normales de uso durante el periodo de garant_a mencionado m6s abajo, efectivo a partir de
la fecha de compra del producto original por parte del consumidor. Esta garantia limitada s61o es v61ida para el
comprador original del producto, y efectiva s61o cuando este se utilice dentro de los Estados Unidos, incluyendo
Alaska, Hawai, y los territorios estadounidenses.
PERiODO DEGARANT|A:
Mano de obra: 5 argos desde la fecha
de compra.
Piezas: 5 argos desde la fecha de compra.
Compresor: 5 ar_osdesde la fecha de
compra,
PROCESO DE SERVICIO:
Llame al tel6fono 1-800-243-0000 y seleccione la opci6n
adecuada. Por favor, tenga disponible el tipo de producto (Aire
acondicionado), nOmero de modelo, nOmero de serie, y c6digo
postal.
La mano de obra bajo garantia cubre el coste de la Asistencia
en domicilio de todas las piezas, incluyendo el compresor.
ESTA GARANTiA SE OTORGA EN SUSTITUCION OEXCLUSION DE TODA OTRA GARANTIA, EXPRESA O IMPLiCITA,
INCLUYENDO SIN LIMITAR CUALQUIER GARANTiA DE CALIDAD O IDONEIDAD CON UN PROPOSITO CONCRETO. EN LA
MEDIDA EN QUE CUALQUIER GARANTiA IMPLiCITA ES OBLIGADA POR LA LEY, EST._ LIMITADA EN DURACION AL
PERiODO DE GARANTIA YA MENCIONADO. LG NO SER._RESPONSABLEDE NINGUN DANO RESULTANTE,INDIRECTO, O
ACCIDENTAL DE NINGUN TIPO, INCLUYENDO INGRESOSO GANANCIAS PERDIDAS,EN CONEXI6N CON EL PRODUCTO.
CIERTOS ESTADOS NO ACEPTAN LA LIMITACION DE DURACION DE UNA GARANTIA IMPLICITA O LA EXCLUSION DE
DANOS RESULTANTESO ACCIDENTALES, POR LO QUE LAS LIMITACIONES O EXCLUSIONES MENCIONADAS PUEDEN NO
SERAPLICABLESEN SU CASO.
ESTAGARANTiA LIMITADA NO SEAPLICA A:
1. Las visitas de Asistencia a domicilio para entregar, recoger y/o instalar el producto, instruir o sustituir
fusibles en su casa o corregir el cableado, o la correcci6n de reparaciones no autorizadas; y
2. Da_os o problemas de funcionamiento provocados por un uso inadecuado, abuso, funcionamiento
fuera de especificaciones ambientales o contrario a requisitos o precauciones en la Guia de
funcionamiento, accidente,fuego, inundaciones, instalaci6n inadecuada,fuerza mayor,
modificaciones o alteraciones no autorizadas, corriente el6ctrica o tensi6n incorrecta, o uso comercial,
o usos distintos a aquellos para los que fue diser_ado.
3. Por Io tanto, los costes de reparacibn o sustituci6n de un producto defectuoso deber6 correr por cuenta
del consumidor.
NUMEROS DELCENTROINTERACTIVOS PARA CLIENTES:
Probar su cobertura por garantia
Obtener asistencia del centro de asistencia
autorizado m(_scercano, obtener asistencia de
producto, cliente, o servicio
Conserve su ticket y recibo de compra para probar la
fecha de adquisici6n del producto.
Deber6 entregar una copia de su recibo de compra
en el momento en que reciba servicio bajo garantfa,
Llame an 1-800-243-0000, 24 horas al dia, 7 dias a la
semana.
Seleccione la opci6n adecuada del menO, y tenga
disponible su tipo de producto (aire acondicionado),
nOmero de modelo, nOmero de serie, y c6digo postal; o
visite nuestro sitio Web en http://www.lgappliances.com
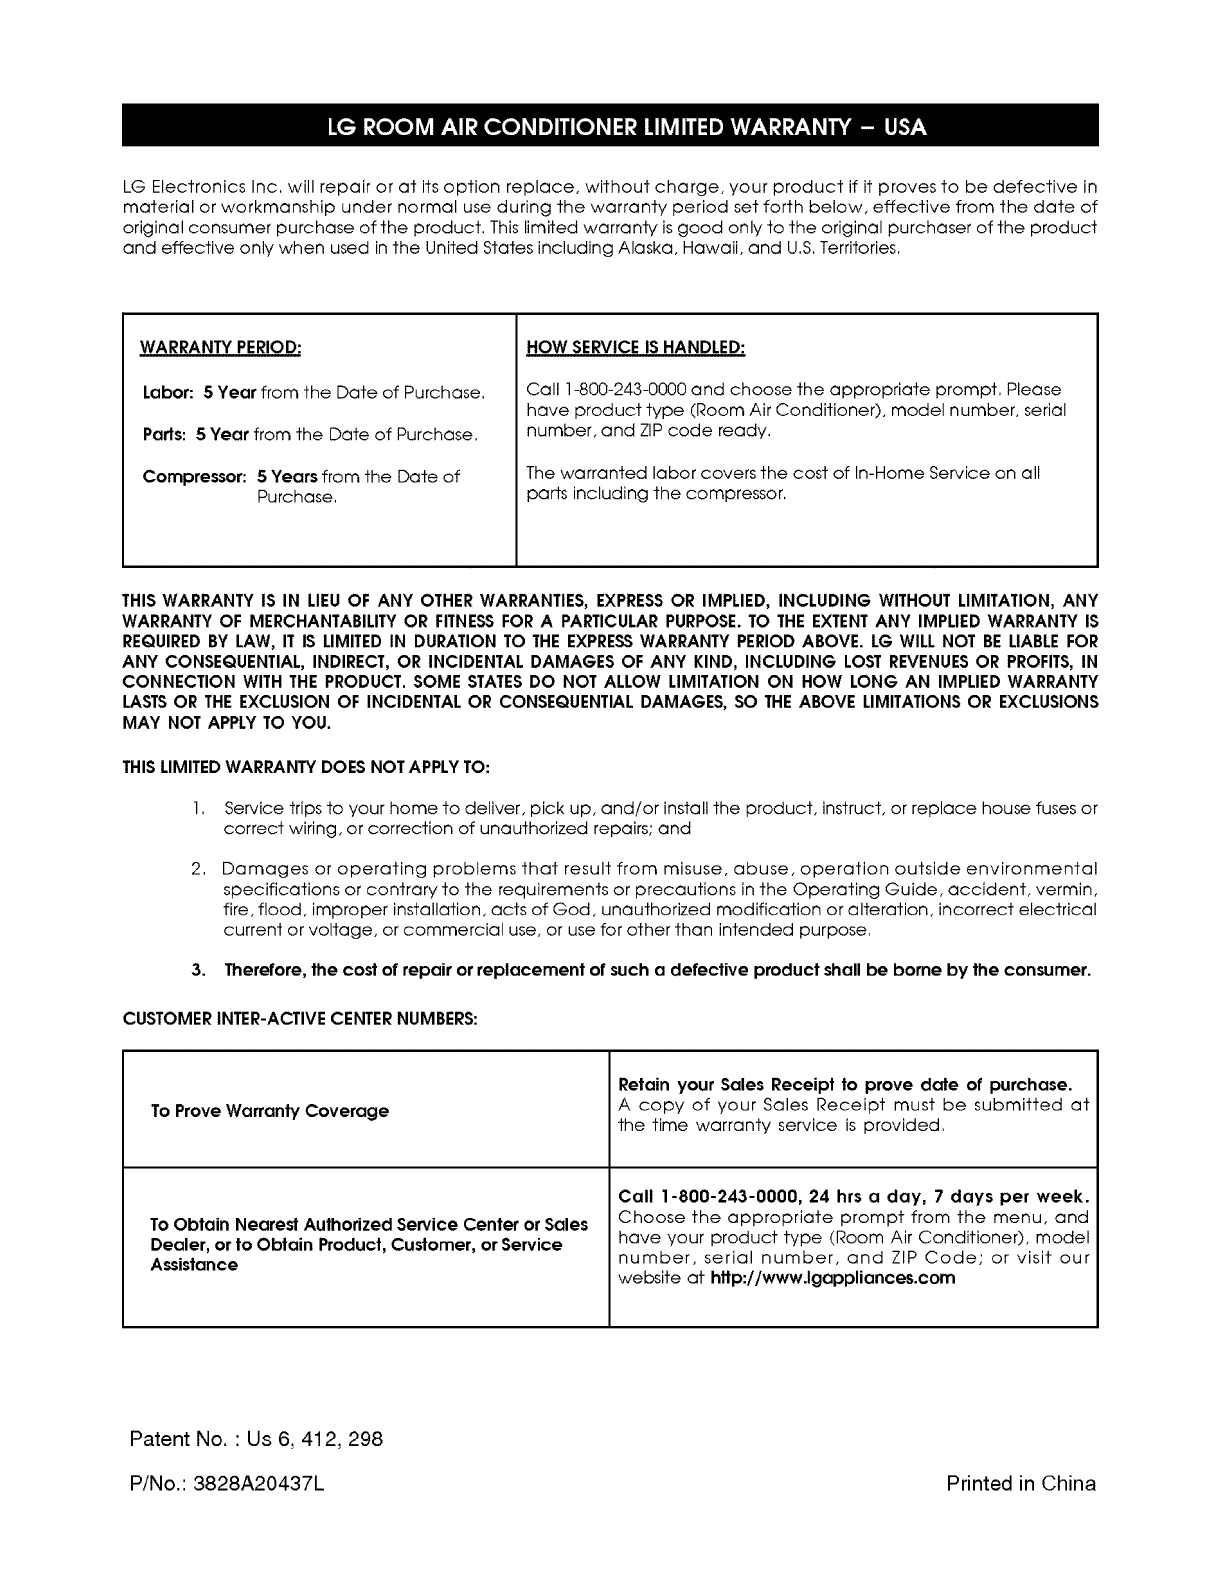
LG Electronics Inc, will repair or at its option replace, without charge, your product if it proves to be defective in
material or workmanship under normal use during the warranty period set forth below, effective from the date of
original consumer purchase of the product, This limited warranty is good only to the original purchaser of the product
and effective only when used in the United States including Alaska, Hawaii, and U,S,Territories,
WARRANTY PERIOD:
Labor: 5 Year from the Date of Purchase.
Parts: 5 Year from the Date of Purchase,
Compressor: 5 Years from the Date of
Purchase.
HOW SERVICE IS HANDLED:
Call 1-800-243-0000 and choose the appropriate prompt, Please
have product type (Room Air Conditioner), model number, serial
number, and ZIP code ready,
The warranted labor covers the cost of In-Home Service on all
parts including the compressor,
THIS WARRANTY IS IN LIEUOF ANY OTHERWARRANTIES, EXPRESSOR IMPLIED, INCLUDING WITHOUT LIMITATION, ANY
WARRANTY OF MERCHANTABILITYOR FITNESSFOR A PARTICULARPURPOSE.TO THE EXTENTANY IMPLIED WARRANTY IS
REQUIREDBY LAW, IT IS LIMITEDIN DURATION TO THE EXPRESSWARRANTY PERIOD ABOVE. LG WILL NOT BE LIABLEFOR
ANY CONSEQUENTIAL, INDIRECT, OR INCIDENTAL DAMAGES OF ANY KIND, INCLUDING LOST REVENUESOR PROFITS,IN
CONNECTION WITH THE PRODUCT. SOME STATESDO NOT ALLOW LIMITATION ON HOW LONG AN IMPLIED WARRANTY
LASTSOR THEEXCLUSION OF INCIDENTAL OR CONSEQUENTIAL DAMAGES, SO THE ABOVE LIMITATIONSOR EXCLUSIONS
MAY NOT APPLY TO YOU.
THISLIMITEDWARRANTY DOES NOT APPLYTO:
2,
Service trips to your home to deliver, pick up, and/or install the product, instruct, or replace house fuses or
correct wiring, or correction of unauthorized repairs; and
Damages or operating problems that result from misuse, abuse, operation outside environmental
specifications or contrary to the requirements or precautions in the Operating Guide, accident, vermin,
fire, flood, improper installation, acts of God, unauthorized modification or alteration, incorrect electrical
current or voltage, or commercial use, or use for other than intended purpose,
3. Therefore, the cost of repair or replacement of such a defective product shall be borne by the consumer.
CUSTOMERINTER-ACTIVE CENTERNUMBERS:
To Prove Warranty Coverage
ToObtain Nearest Authorized Service Center or Sales
Dealer, or to Obtain Product, Customer, or Service
Assistance
Retain your Sales Receipt to prove date of purchase.
A copy of your Sales Receipt must be submitted at
the time warranty service is provided.
Call 1-800-243-0000, 24 hrs a day, 7 days per week.
Choose the appropriate prompt from the menu, and
have your product type (Room Air Conditioner), model
number, serial number, and ZIP Code; or visit our
website at hltp://www.lgappliances.com
Patent No. ' Us 6, 412, 298
P/No.: 3828A20437L Printed in China
