LG LRSC26910SW User Manual SXS REFRIGERATOR Manuals And Guides L1004197
LG Side by Side Refrigerator Manual L1004197 LG Side by Side Refrigerator Owner's Manual, LG Side by Side Refrigerator installation guides
User Manual: LG LRSC26910SW LRSC26910SW LG SXS REFRIGERATOR - Manuals and Guides View the owners manual for your LG SXS REFRIGERATOR #LRSC26910SW. Home:Kitchen Appliance Parts:LG Parts:LG SXS REFRIGERATOR Manual
Open the PDF directly: View PDF ![]() .
.
Page Count: 32
User°s Guide
Please read tl-_s guide thoroughly
before operating and keep it handy for
at _1 times.
TEUR
m_uel
le
esms
Suggestion on
Food Storage
Care and
Table,of ntents
Important Safety Instruction
Identification of Parts
Where to Install
Door Removal
Do(jr Replacement
Water Pipe Installation
Water Connection Instruction Guide
Operation Instruction Guide
Height Adjustment
Adjusting the Temperatures and functions
(Dispenser/Automatlc Icemaker)
Shelf
Wine Holder
Can Server Adjustment
Egg Bin
Humidity Control in the Vegetable Compartment
Convert Into aVegetable or Meat Compartment
Opfichill Temperature Transition Cx)rner
Temperature Change, at Optichill
Location of Foods
S_oring _ds
How to Dismantle Parts
General Information
Ac_ssibility of
Supply Plug
Supply Cord
The model and serial numbers are found on the imler _or b_k of refrigerator
compartment of this unit. Thee num_ a_ unique to this unit and not
available to o fiaersi. You should record _quested information here and _tain
this guide as a _rmanent record of your purcha_. Staple yoiur :receipt here.
Date of: purch_e
Dealer
Dealer _dress
Dealer phone no.
Model no.
_rial no.
Important safety in,ruction
Before use, this refdgeraor must be properly instaJled and Iocaed in accordan_ w ith
the instaJlaion instructions in this m_uaL
Never unplug your refr£erator by pulling on the power _rd Always grip the plug firmly
_d pull it straight out from the outleL
When moving your _pliance aw_ from the wa_l, be careful not to roll over the power
_rd or to dam_e Stin _y way. Do not crush or da'n_e the water line.
After your refrigerator is in operation, do not touch the cold su_l_acesin the freezer
compartment, paliculaly when your hands are damp or wet. _[n could _here to
these extremely cold surf,s.
Unplug the power cord from the power outlet for dewing or other requirements. Never
to_h it with wet hands because you can get an electric shock or _ injured.
Never d_e, bend, kink, pull out, or twist the power cord b_se dam_e to the
_wer cord ca_ _se p_u_ failure, fire, or electric sh_. If you h_e doubts the
_pli_ is properly grounded, _nsult a qualified electrician.
Never place glass products in the freezer bec._se they may be broken from expansion
when their contents are frozen.
Never put your hands within the i_ storage bin of the automatic icemaker. You can
injured by the operation of the automaic i_m_er.
_e applian_ is not intended for use by young children w ithout supervision.
"Youngchi_ren shou_ be supervi_ to ensure that they do not pl_ with the appli_.
Never _low anyone to climb, sit, stand, or hang on the door. _ese actions may
damage the refrigerator and even tip it over, causing severe _rsona_ injuq_'.
Before you move y_r refrigerator into its final _.,atbn,
it is im_rtant t:omake sure you have the proper electrical connectbn:
A 115 'dolt, 60 Hz, AC only 15, or 20 ampere fused, grounded
electri_ supply is required. It is recornmended th8 aseparate cir_Jit
ser¢ing onJyyour refrigerator be provided. Use an outlet th8 cannot
be turned off by a switch. _ not use anextension _rd.
The refrigerator-freezer should be so _ition_ th_ the supp_ plug
_essible for qui_ disconnection in the event dan emergency.
If the supply _rd is damaged, it must _ repl_ by the
manufacturer or its service _ent or a simila_'lyqualified person in or_r to avoid any h_d.
Child Entrapment
Don't Store
Grounding (Earthing)
_er Rack
Aulom_ic
Icem_er
L_p
Shelf ...........
(steel or gl_)
Freezing
_er Rack
Drawer ............
_or Rack
DANGER: Ri_ of child entr_menL
Before you throw away your old refrigerator or freezer:
Take off the doors but leave the shelves in pl_e so that cHdren m_! not eesily climb
inside.
De appliaqce is not intended for use by young chi_ren w ithout supervision.
Young children shou_ be supervised to ensure that they do not play w ith the applian_,
Don't store or u_ g_oline or other flammable v_or and Iquids. in the vicinity of this or
any other _pliance.
In the event dan electric shod circuit, grounding (e_hing) redu_s the risk delectric
shock by providing an es_e wire for the electric current.
In order to prevent possible electr_ sh_k, this _plianc_ must be grounded,
impro_r use of the grounding plug can result in _ electric shock. Consult a qu_#ied
electrici_ or servia person if the grounding instructions are not completely
understood, or if you have doubts on whether the _plianc_ is properly grounded.
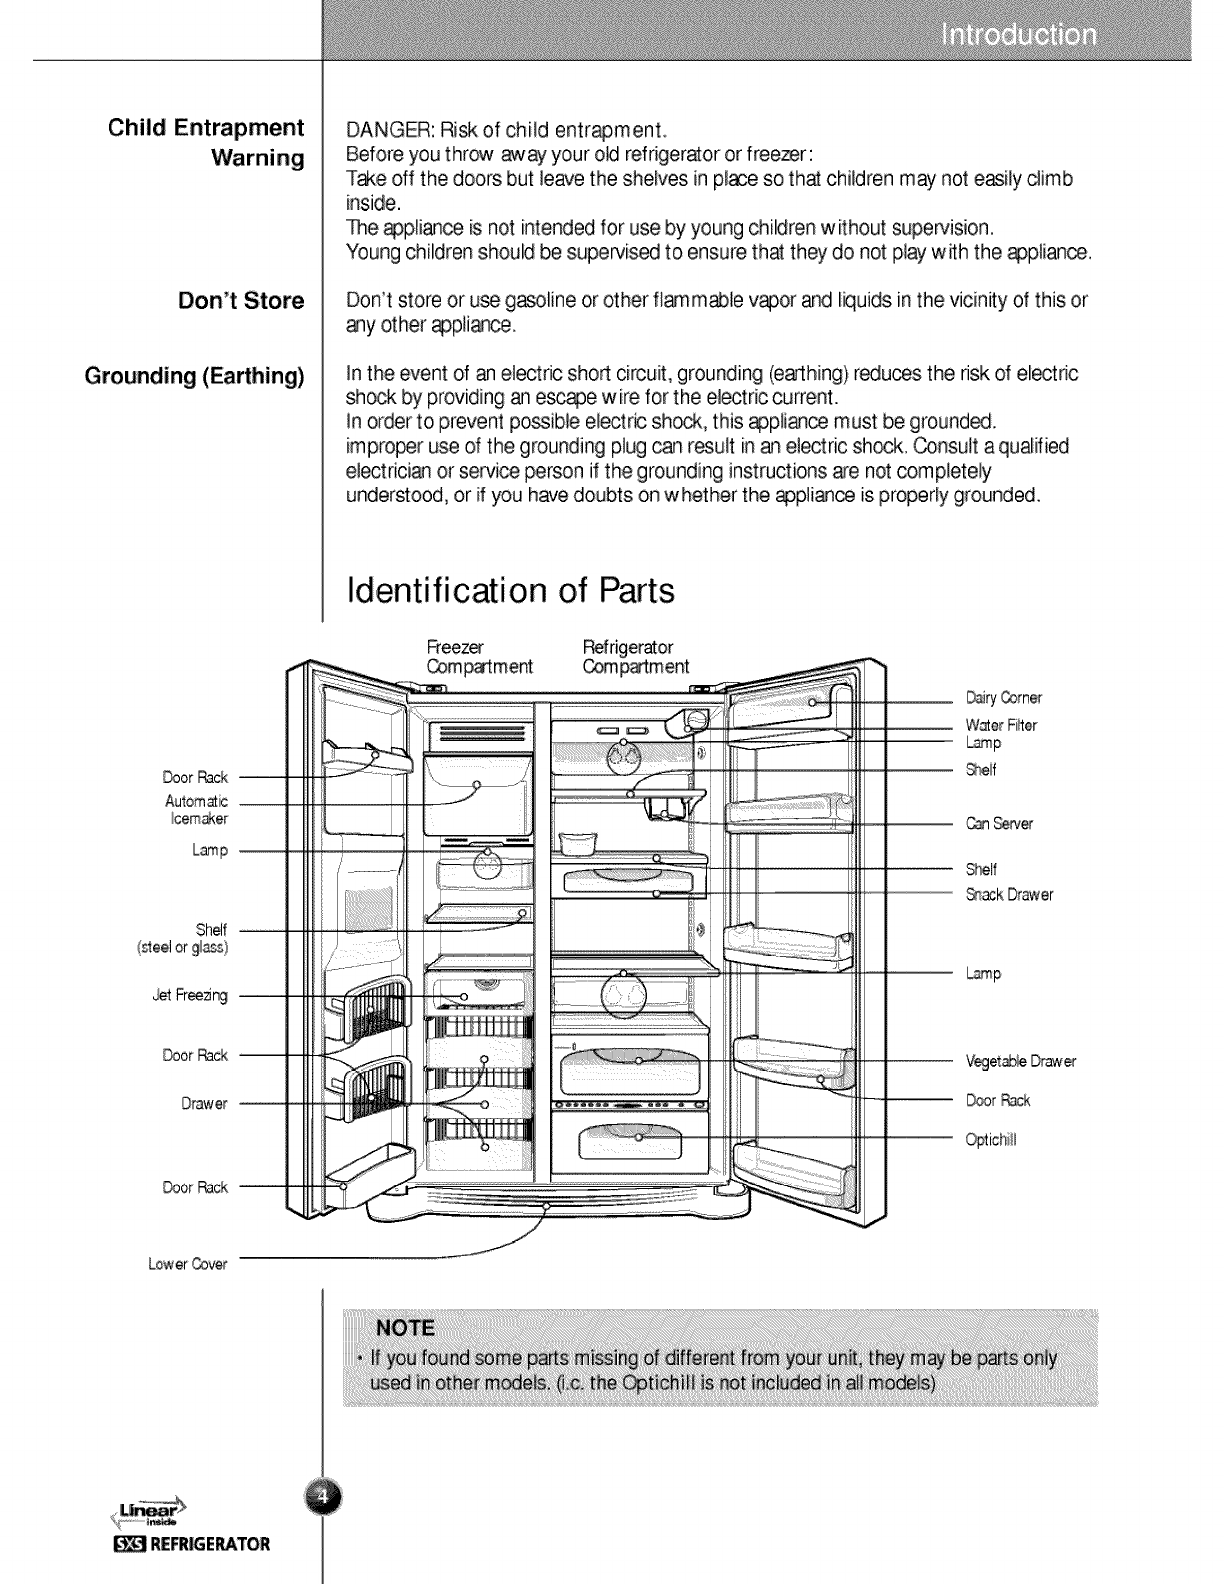
Identification of Parts
Ffeez_ P_friger_or
_mp_me_ Comp_ment
DairyComer
Waer Fi_er
b3mp
9_e/f
Can_rv_
Shelf
_k Dr_er
_mp
Veg_ Drawer
D_r Pe_
Optichiii
_er Ce_r
_lect a Good
Where to Locate
t. Pi_e your appliance where it is easy to use.
2, Avoid pl_ing the unit: new heat sources, direct sunlight, or moisture.
3. To avoid vibrations, the appliance must be levebd.
4. Do not instgl this refrigerator in a_eas where the ambient temperature is below 41°F.
it will have an _verse effect on performance.
Warning
Remove Lower
Cover and
Water Feed Tube
Remove the
Remove the
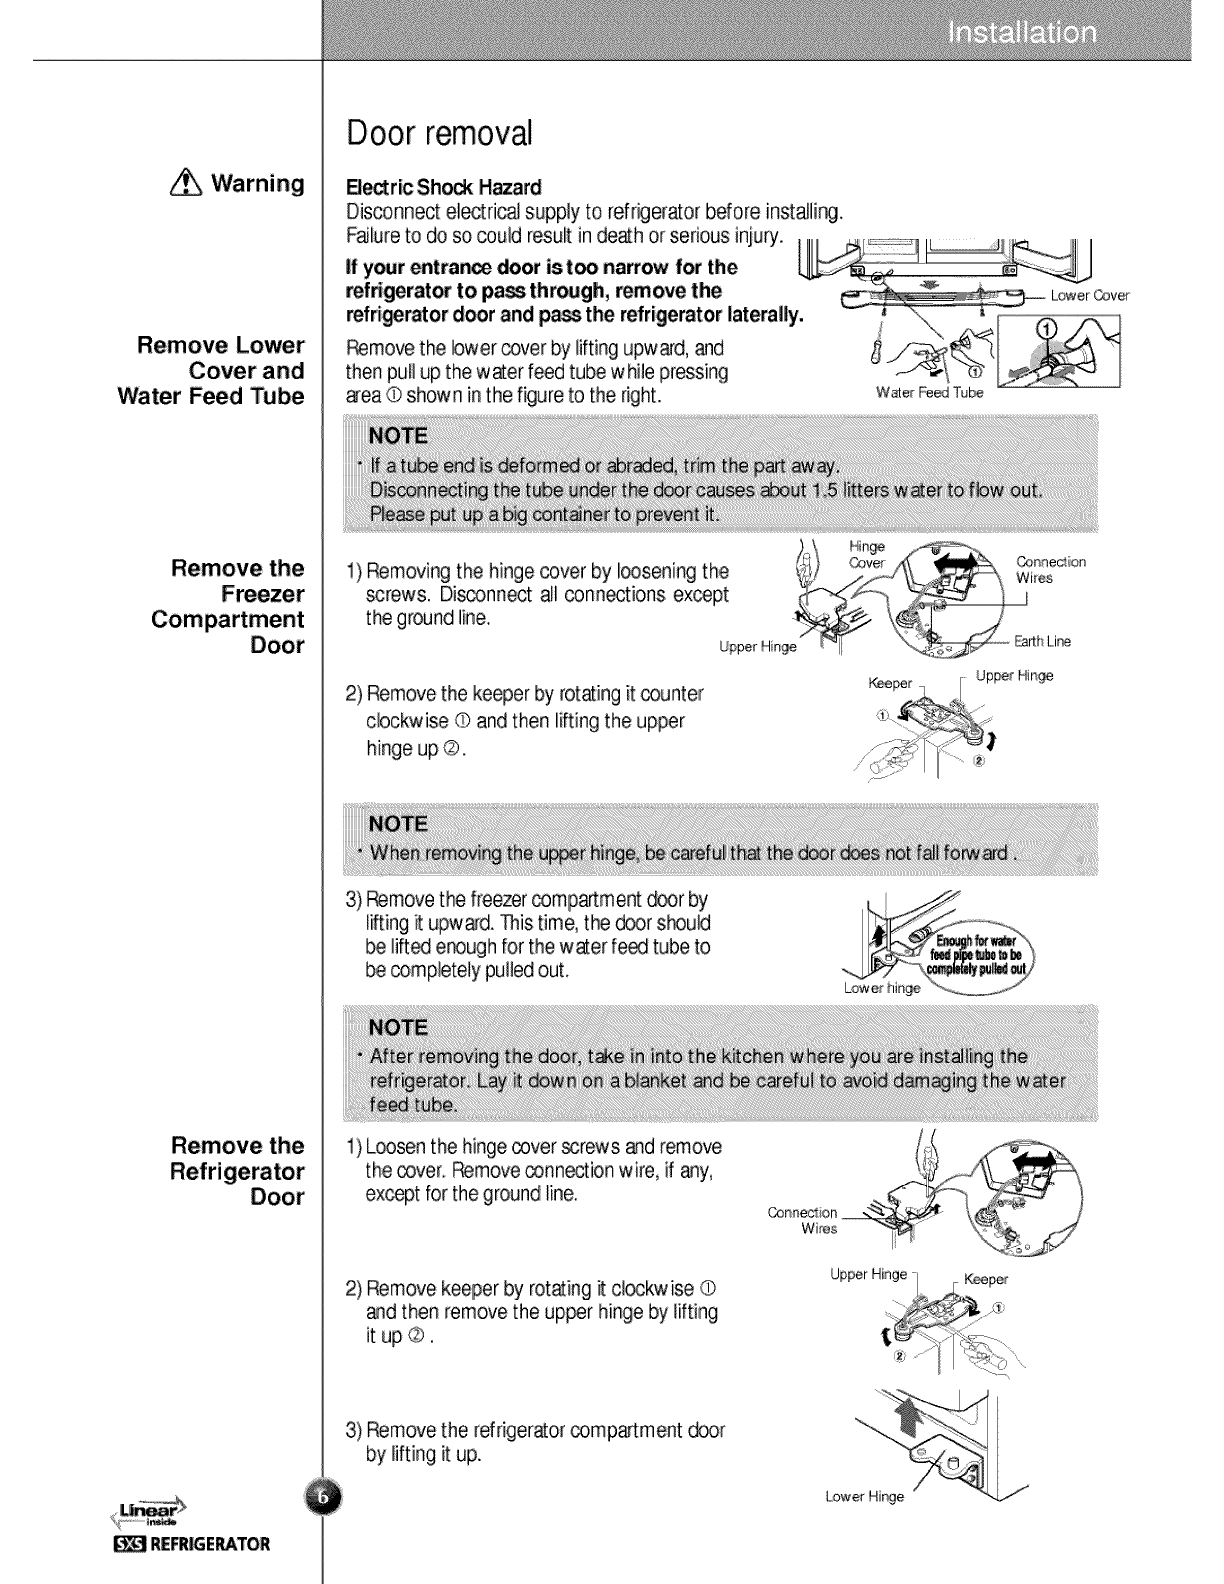
Door removal
B_ric Shock Hazard
Disconnect eiectdc_ supply to refrigerator before instaJlir_,
then pulJup the water feed tube whiie pressing
pea @ shown in the figure to the right. W_er FeedTube
1) Removing the hinge cover by loosening the
screws. Disconnect _i connections except
the ground line,
2) Remove the keeper by rotating it counter
clockwise ® and then lifting the upper
hinge up ®.
} @ @nne_;en
Wires
Upper Hinge F_rth Line
_r 1 ._ Up_r Nin_
3) _move the freezer compartment d_r by
lifting R upwa'd. This time, the dc_r s_uld
be lift_ enough for the water feed tube to
be completely pulled out.
1) Loosen the hinge cover _rews and remove
the cover. _move connexion wire, if any,
except for the ground line.
2) Remove keeper by rotating it cl_kwise ©
and then remove the upper hinge by lifting
it up ©.
3) Remove the refrigerator comp&rtment _r
by lifting it up.
Lower Hi_e
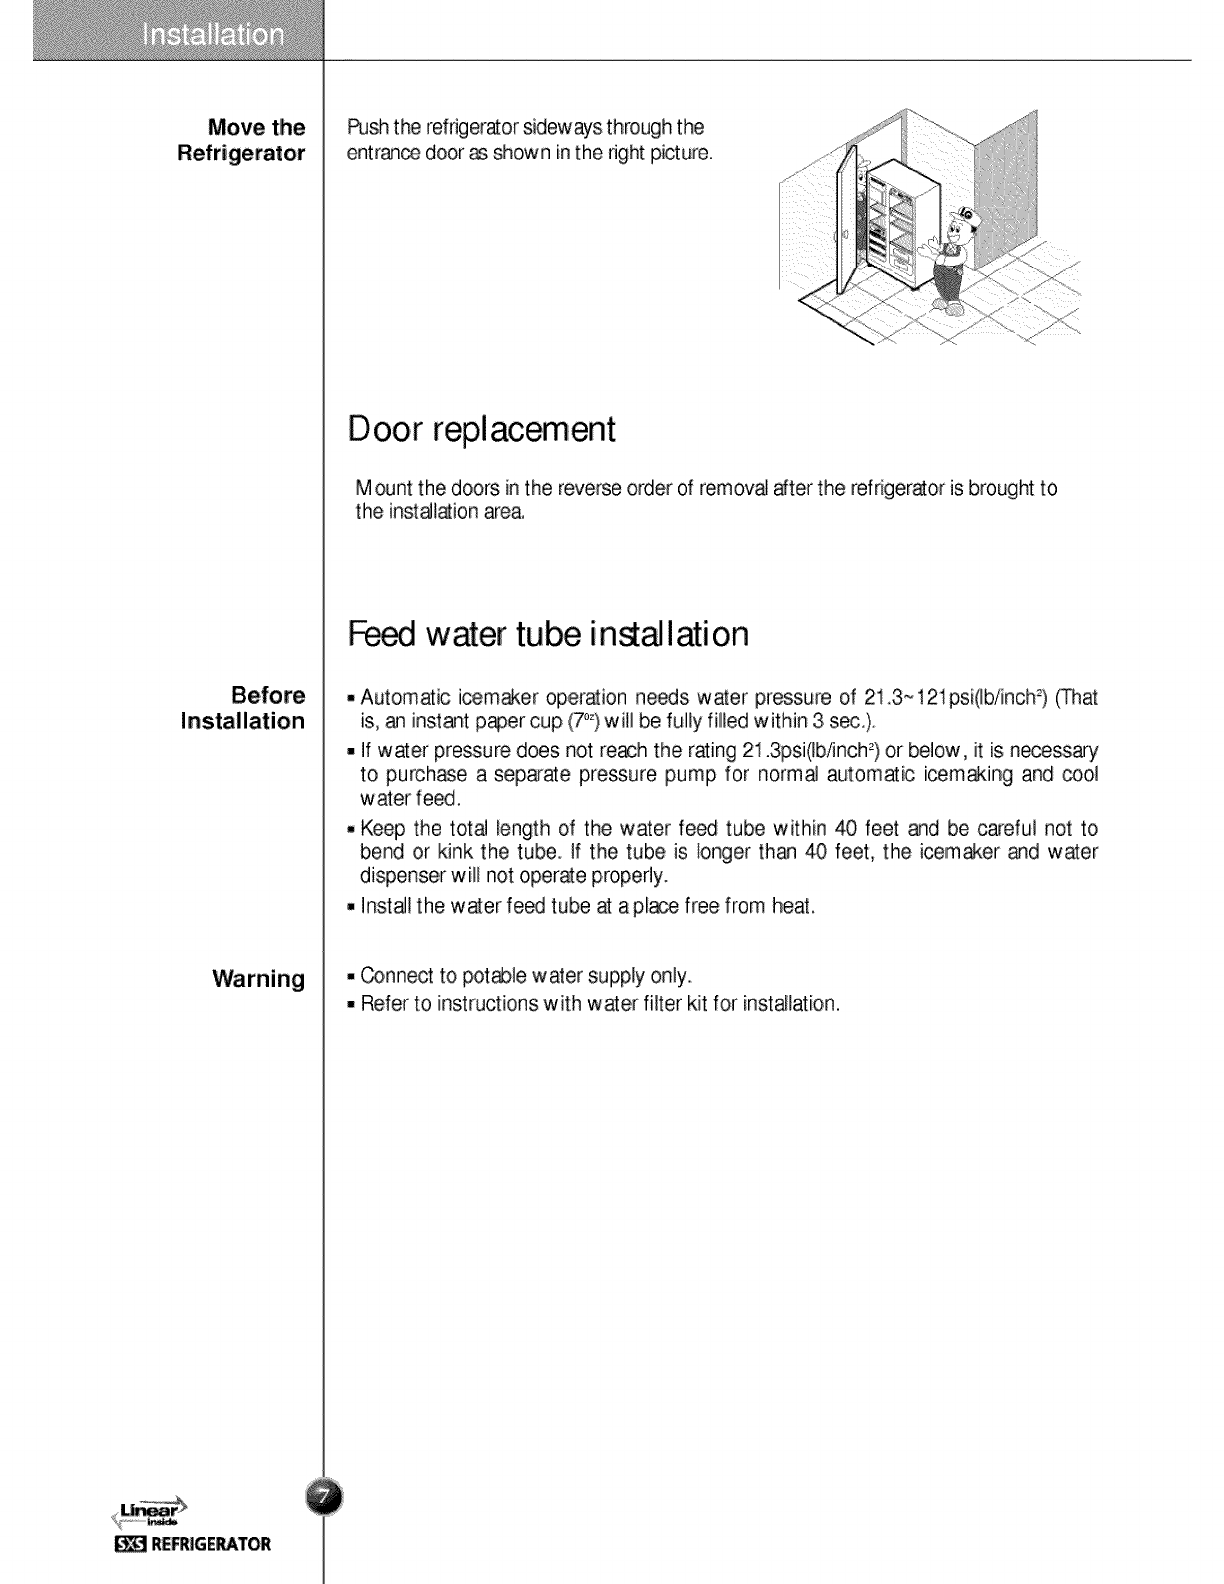
Move the Push the refngerator sideways through the
entran_ door _ shown inthe right picture.
Door replacement
Mount the doors in the reverse order of removal after the refrigerator is brought to
the inst_lation area.
w er tube in lation
,, Automatic i_maker operation needs water pressure of 213~121psi(lbiincM) _hat
is, an inst_t p_er cup (7_9will be fully filled within 3 sec.).
-If water pressure does not re_h the rating 21.3psi(]b/inch =)or below, it is n_essa'y
to purchase a separate pressure pump for normal automatic icem_ing and _ol
water feed.
- Keep the total length of the water fe_ tube within 40 feet _d be careful not to
bend or kink the t:ube, tf the tube is longer th_ 40 feet, the icemaker and water
dispenser wiil not operate properly.
, install the water feed tube at apl_ free from heat.
-_nnect to potable water supply only.
- Refer to instructions with water filter kit for installation.
the Refri_rator
to a WaterSource
Tools Required
Cold Water Supply
Water nn tion In,ruction
Read all directions carefully before you begin.
Guide
Conn_ to potable water _pply only.
- Standard screwdriver
-7/16-inch and 1/2°inch open-end wrenches or two _justable wrenches
,, 1/4-inch nut driver
,, 1/4-inch drill bit
- Hand drill or electric drill (properly grounded)
_e icemaker waer valve contains a flow w_her which is us_ _ a water
pressure regulator.
_e i_maker needs to be connected to a cold water line with water pressure
30 _-120psi(Ib/inch _)
the Tubing to
Water Line
REFRIGERATOR
1. Unplug refrigerator or disconnect power.
2. Turn OFF main water supply. Turn on the nearest fau_t to relieve the pressure
on the line. It may help to open an outside hydrant to allow the water to dran
from the line in the house,
3. Find a 1/2-in_ to 1-1i44nch verti_ _LD water pipe near the refrigerator
4. To determine the length dcopper tubing you will ne_, measure from the
connection on the lower left rear dthe refrigerator to the water pipe. Add 7
feet (2,1 m) to allow for moving refrigerator for clewing, Use 1/4-inch OD,
(outside diameter) copper tubing, Be sure both ends of _pper tubing are cut
_uare.
5. Using a drilll, drill a 1/44nch hole in the cold water pipe you have selectS.
6. Fasten shut-off valve to _ld water pipe with pipe clamp, Be sure outlet end is
solidly in the 1i44nch drilled hole in the water pipe _d that the washer is
under the pipe clamp. _ghten packing nut. _ghten the pipe clamp screws
cardully and evenly so washer makes a watertight seal. Do not overtighten or
you may crush the copper tubing, especially if salt (coiled) copper tubing is
used. Now you are rely to connect the copper tubing.
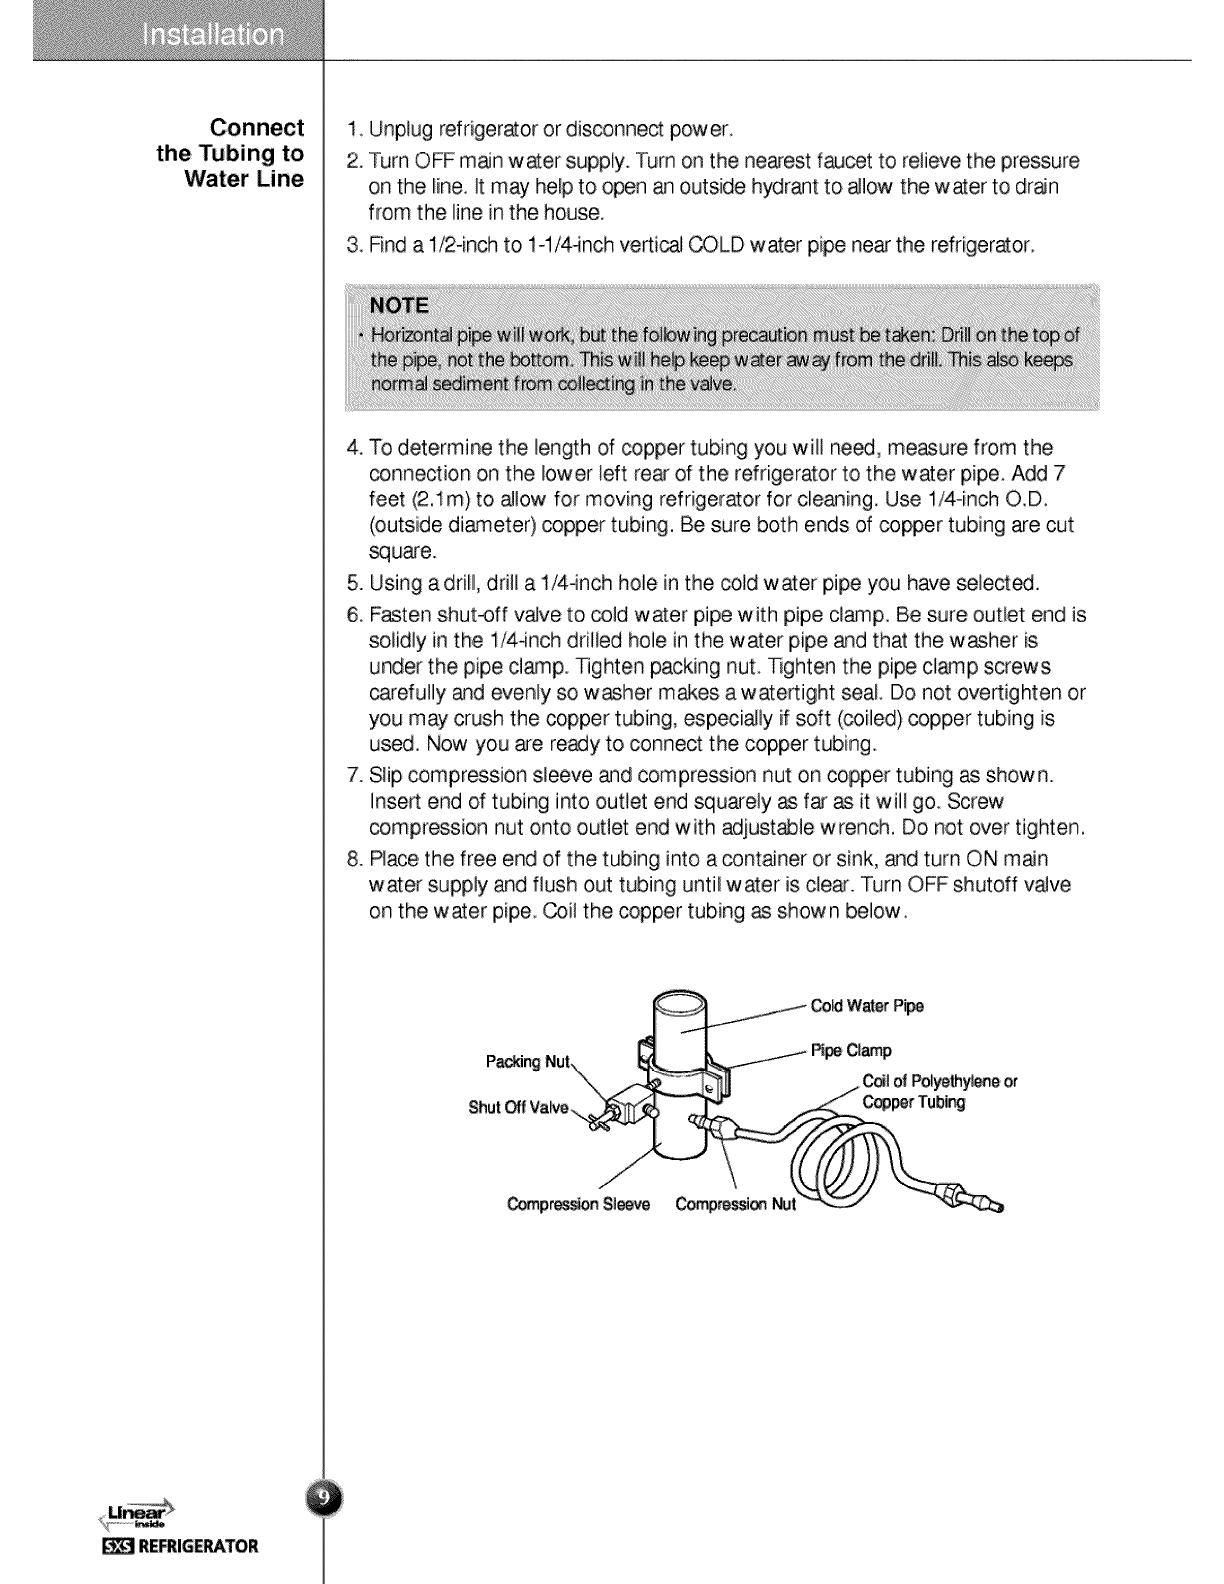
7. Slip compression sleeve and compression nut on copper tubing as shown.
Insert end dtubing into outtet end squarely as far as it will go. Screw
compression nut onto outlet end with adjustable wrench, Do not over tighten,
8. Place the free end of the tubing into a container or sink, and turn ON m_n
water supply and flush out tubing until water is clear. Turn OFF shutoff valve
on the water pipe. Coil the _pper tubing as shown below.
Connectthe Tubing
to the Refri_rator
Turn the Water On at
the Shutoff Valve
Automatic Ice maker
Operation In,ruction Guide
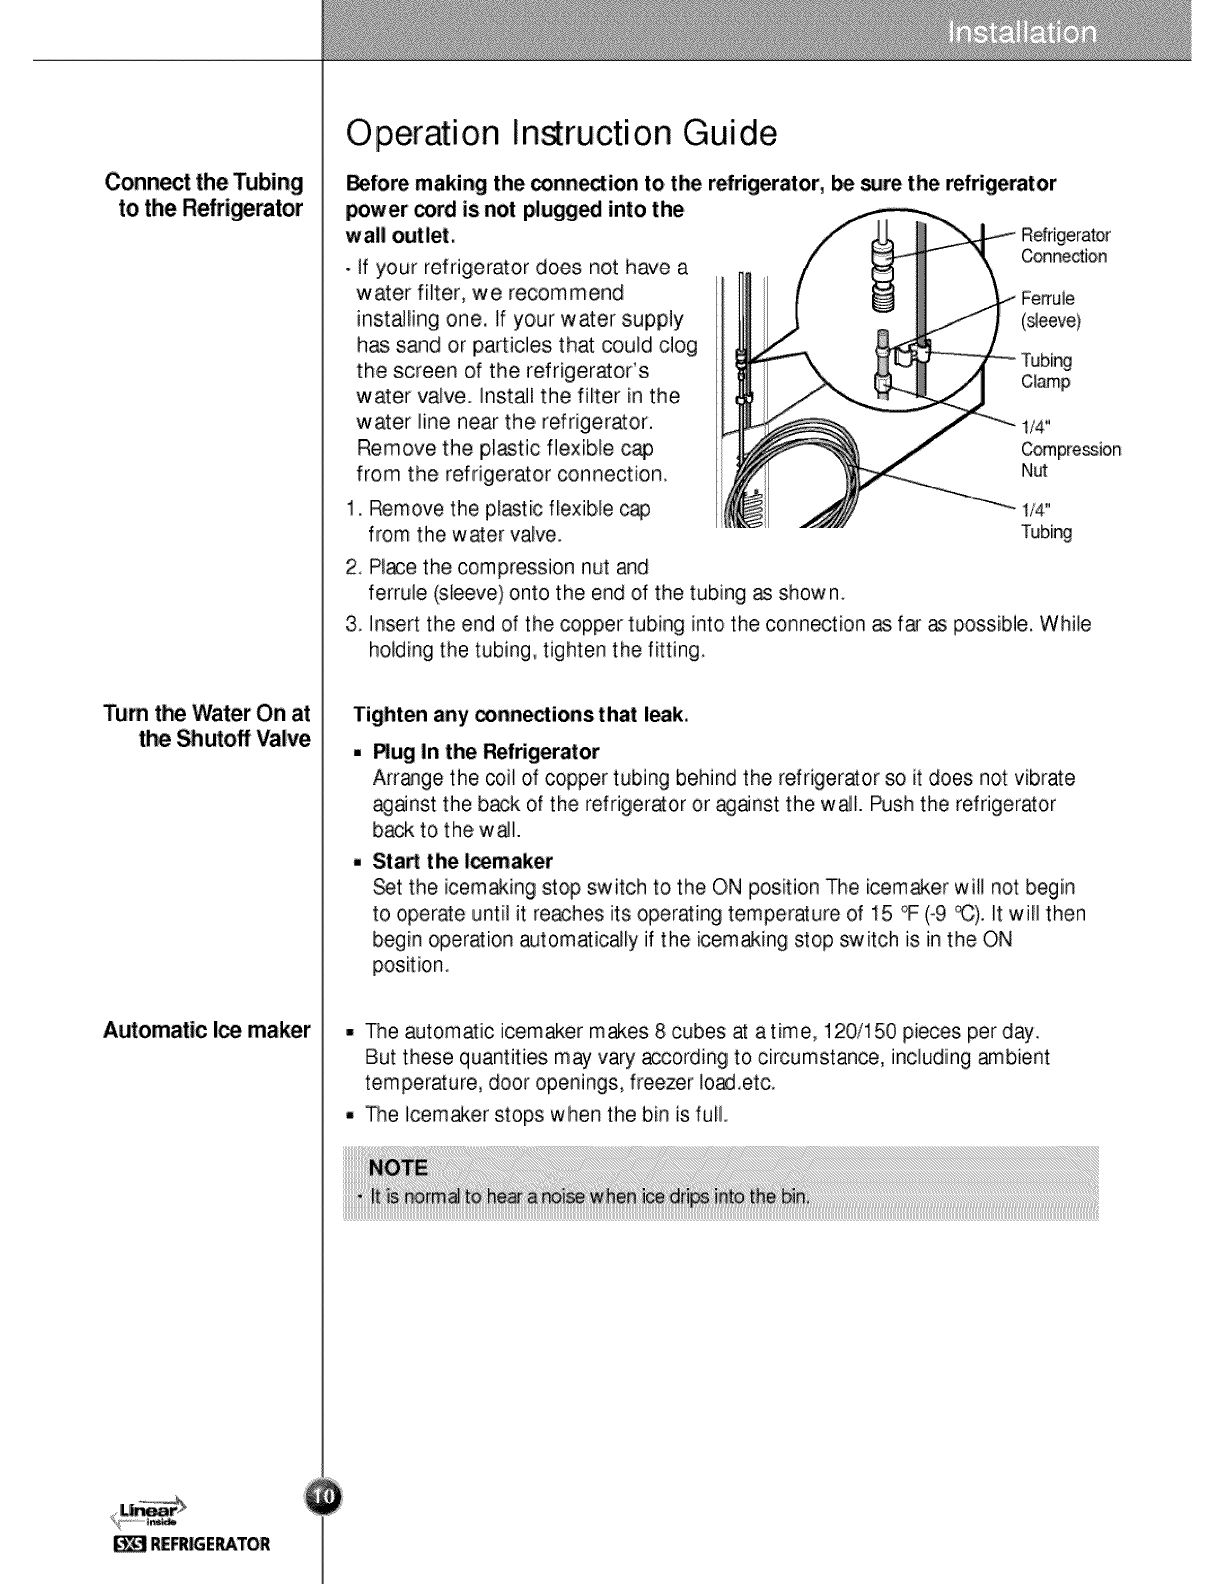
Before making the connection to the refrigerator, _ _re the refrigerator
power cord is not plugged into the
wall outlet,
. if your refrigerator does not have a
water filter, we recommend
installing one. if your water supply
has sand or particles that couid clog
the screen of the refrigeratoCs
water valve. Install the filter in the
water line near the refrigerator.
Remove the plastic flexible c_
from the refrigerator connection.
1. Remove the plastic flexible cap
from the water valve.
Conne_on
(sleeve)
1/4"
_mpre_ion
Nut
1/4°
Tubing
2. Place the compression nut and
ferrule (sleeve)onto the end of the tubing as shown.
3. lnsert the end of the copper tubing into the connection as far _ possible. While
holding the tubing, tighten the fitting.
Tighten any _nne_ions that leak,
,, Rug In the Refrigerator
Arr_ge the coil of copper tubing behind the refrigeraor so it does not vibrate
against the back of the refriger_or or against the wall. Push the refrigerator
back to the wail.
-Sta_ the Icemaker
_t the icemaking stop switch to the ON position The icemaker will not begin
to operate until it re_hes its operating temperature of 15 • (-9 _). It will then
begin operation automatically if the icemaking stop switch is in the ON
position.
-The automatic icemaker makes 8 cubes at a time, 120/150 pieces per day.
But these quantities may vary according to circumstance, including ambient
temperature, door openings, freezer Io_.etc.
,, The Icemaker stops when the bin is full.
When _emaker
_s NotOperate
REFRIGERATOR
Ice is clumped together
-When ice is clumped together, take the ice clumps out of the ice storage bin,
break them into small pieces, and then place them into the ice storage bin
again,
- When the i_maker produ_s too small or clumped ice, the amount of water
supplied to the ice m_er must be adjusted. _ntact the service center.
, if ice is not used frequently, it may clump together.
Power failure
,Water may drop into the freezer compartment Take the ice storage bin out and
discard all the i_ Dr,./the bin and replace [L
Me unit is newly in.ailed
-it takes about 12 hours for a newly installed refrigerator to m_e ice.
_row away the ice,
The first ice and water may include particles or _or from the feed waer pipe or
feed water box
7his is _so necessary if the refrigerator has not been us_ for a long time.
Never store bever_e _s or other foods in ice storage bin for the pu_ose of rapid
cooling.
_ch actions may damage the _tomaic ice maker.
Never remove the icem_er cover.
_ake the bin o_asional]y to cause the ice to settle.
ice may' pile up lust around the icemaker causing the icemaker to think that the ice
storage bin is full.
if di_lored ice is dispensed, contact an Authorized Service _,nter immediately.
Do not use the ice or water until the problem is corrected.
If the freezer
compa_ment door
is lower than the
compartment door
If the freezer
compartment door
is higher than the
compartment door
After leveling the
door height
Height Adju ment
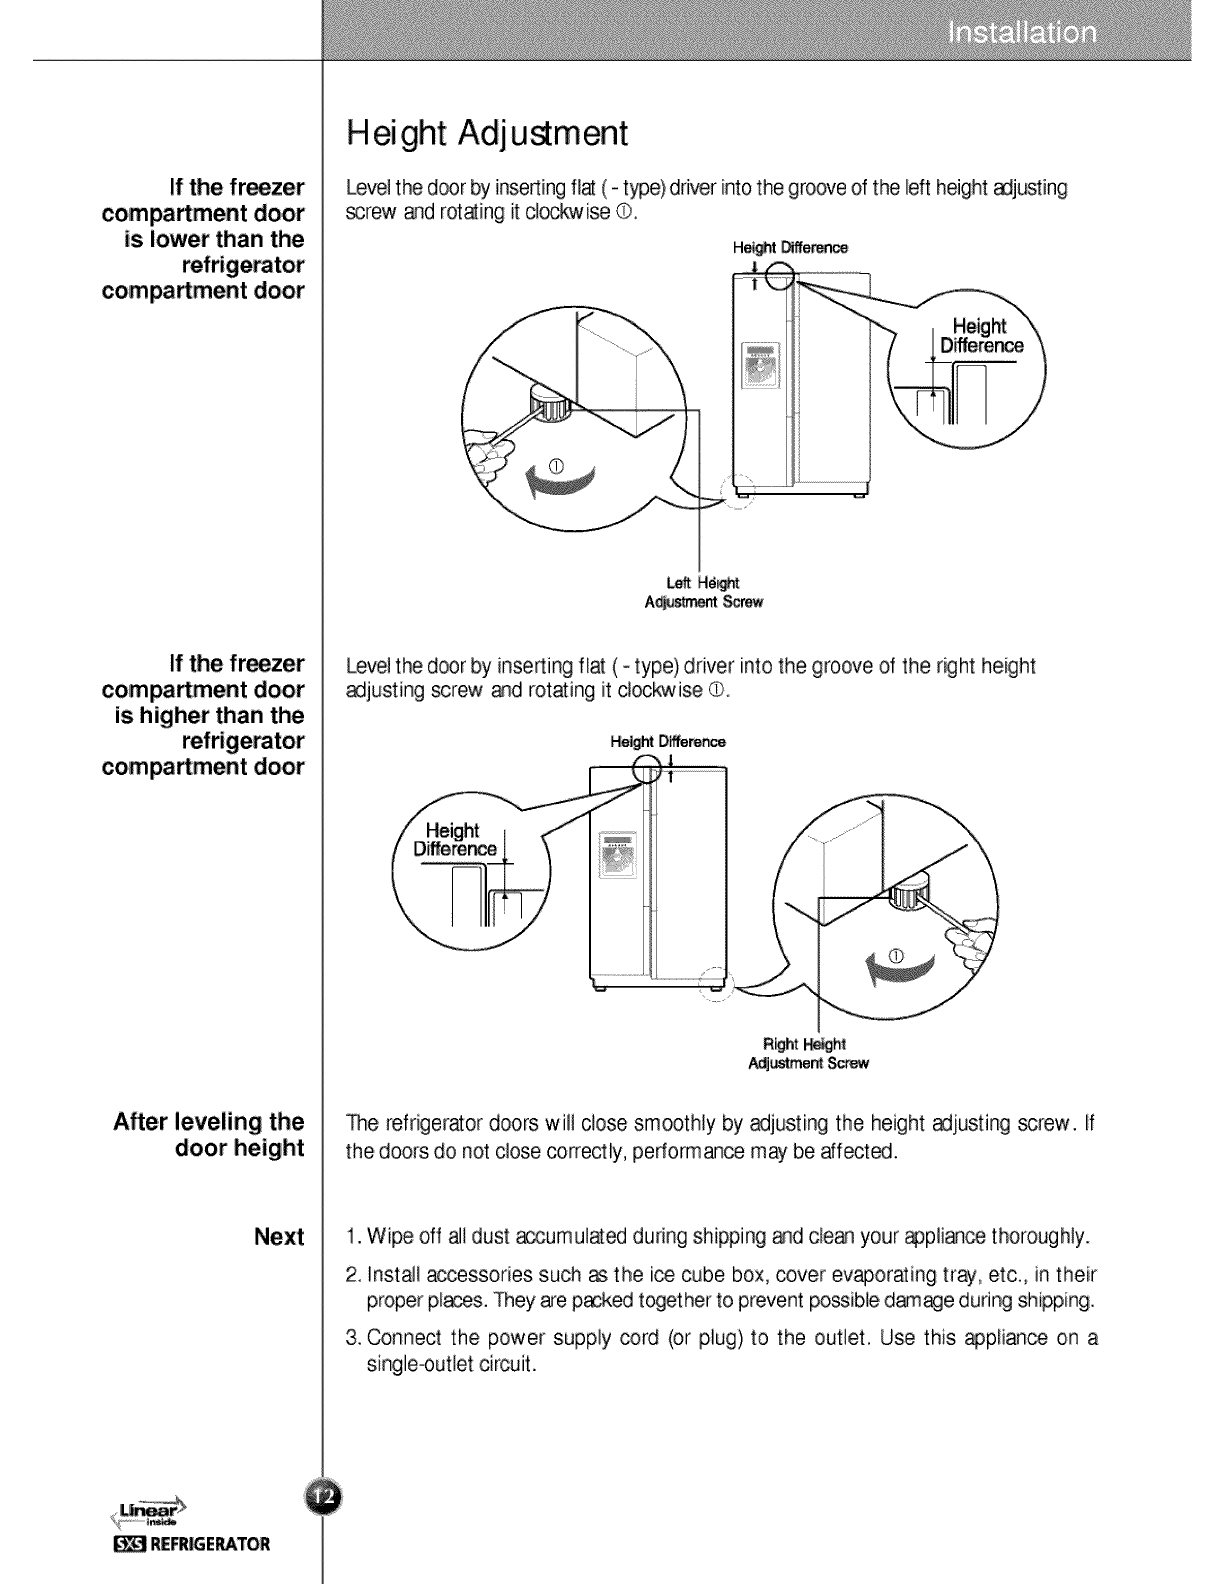
Level the door by insertingflat ( _type) driver intothe groove of the left height adjusting
screw and rotating it c!_skwise G,
He_t _ff_
Hd_
A_J_ Screw
Level the door by inserting flat ( - type) driver into the groove of the right height
_justing screw and rotating it clockwise 0.
_lg_ D_mr_.,e
R_ht_
_me_ S_ew
_e refriger_or doors wilt close smoothly by adjusting the height _justing screw. If
the doors do not dose _rrectiy, perform_ce m Wbe affectS.
1. Wipe off aJldust _sumu]ated during shipping and clean your @pliance thoroughly.
2, install accessories such _ the ice cube box, cover evaporating trw, etc., in their
proper pl#s. They are p_ed together to prevent possible dam_e during shipping.
& _nnect the power supply cord (or plug) to the outleL Use this appli_ce on a
sing]e4utlet circuit.
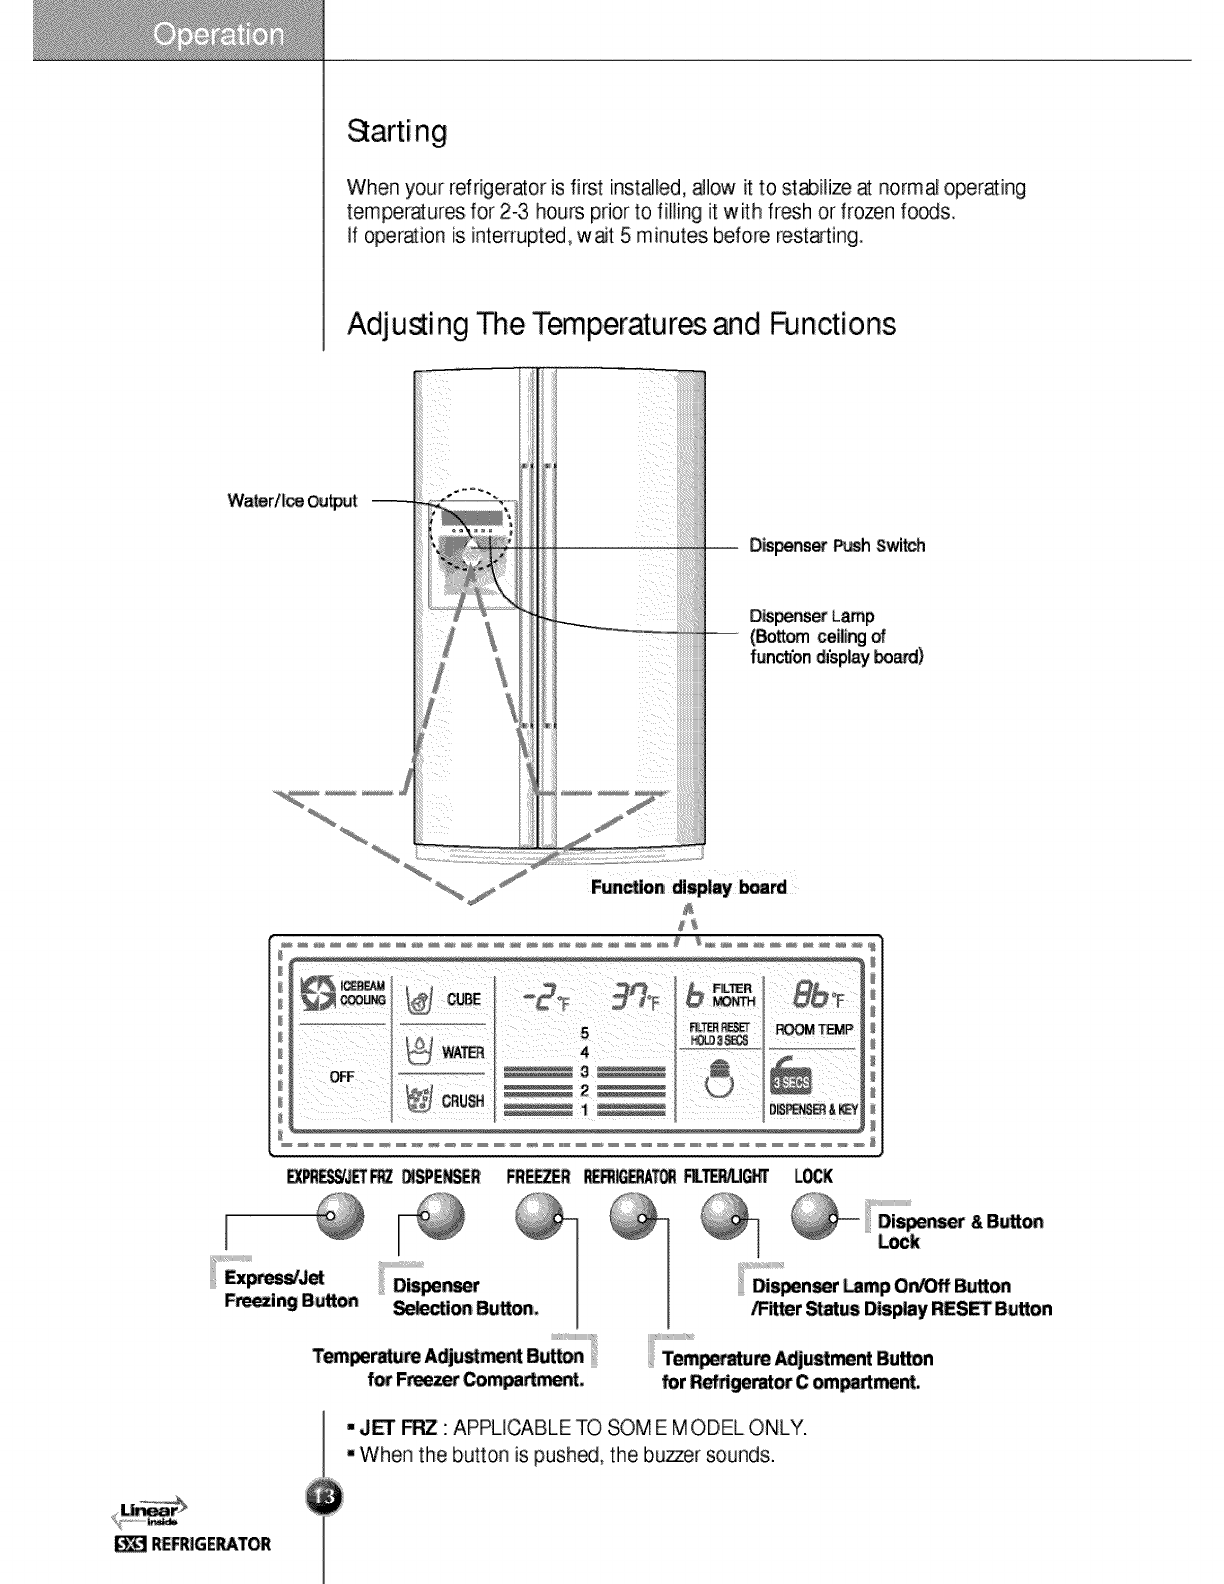
_arting
When your refrigerator is first installed, allow it to stabilize at norm_ operating
temperatures for 2-3 hours prior to filling it with fresh or frozen fo_s.
If operation is interrupted, wat 5 minutes before rests_ting.
Adjuring Re Temperatur_ and RJnctions
FR_R _RAT_ FIL_ _K
Lock¸
_i_ BU_
for F_ Com_dmenL
_r Slatus Disp_y RES_ Button
for R_gemt_ C ompadment.
•J_ FRZ APPLICABLE TO _M E MODEL ONLY.
When the button is push_, the buyer sounds.
How to adjust the
temperature in
the freezer
How to adjust the
temperature in
the refrigerator
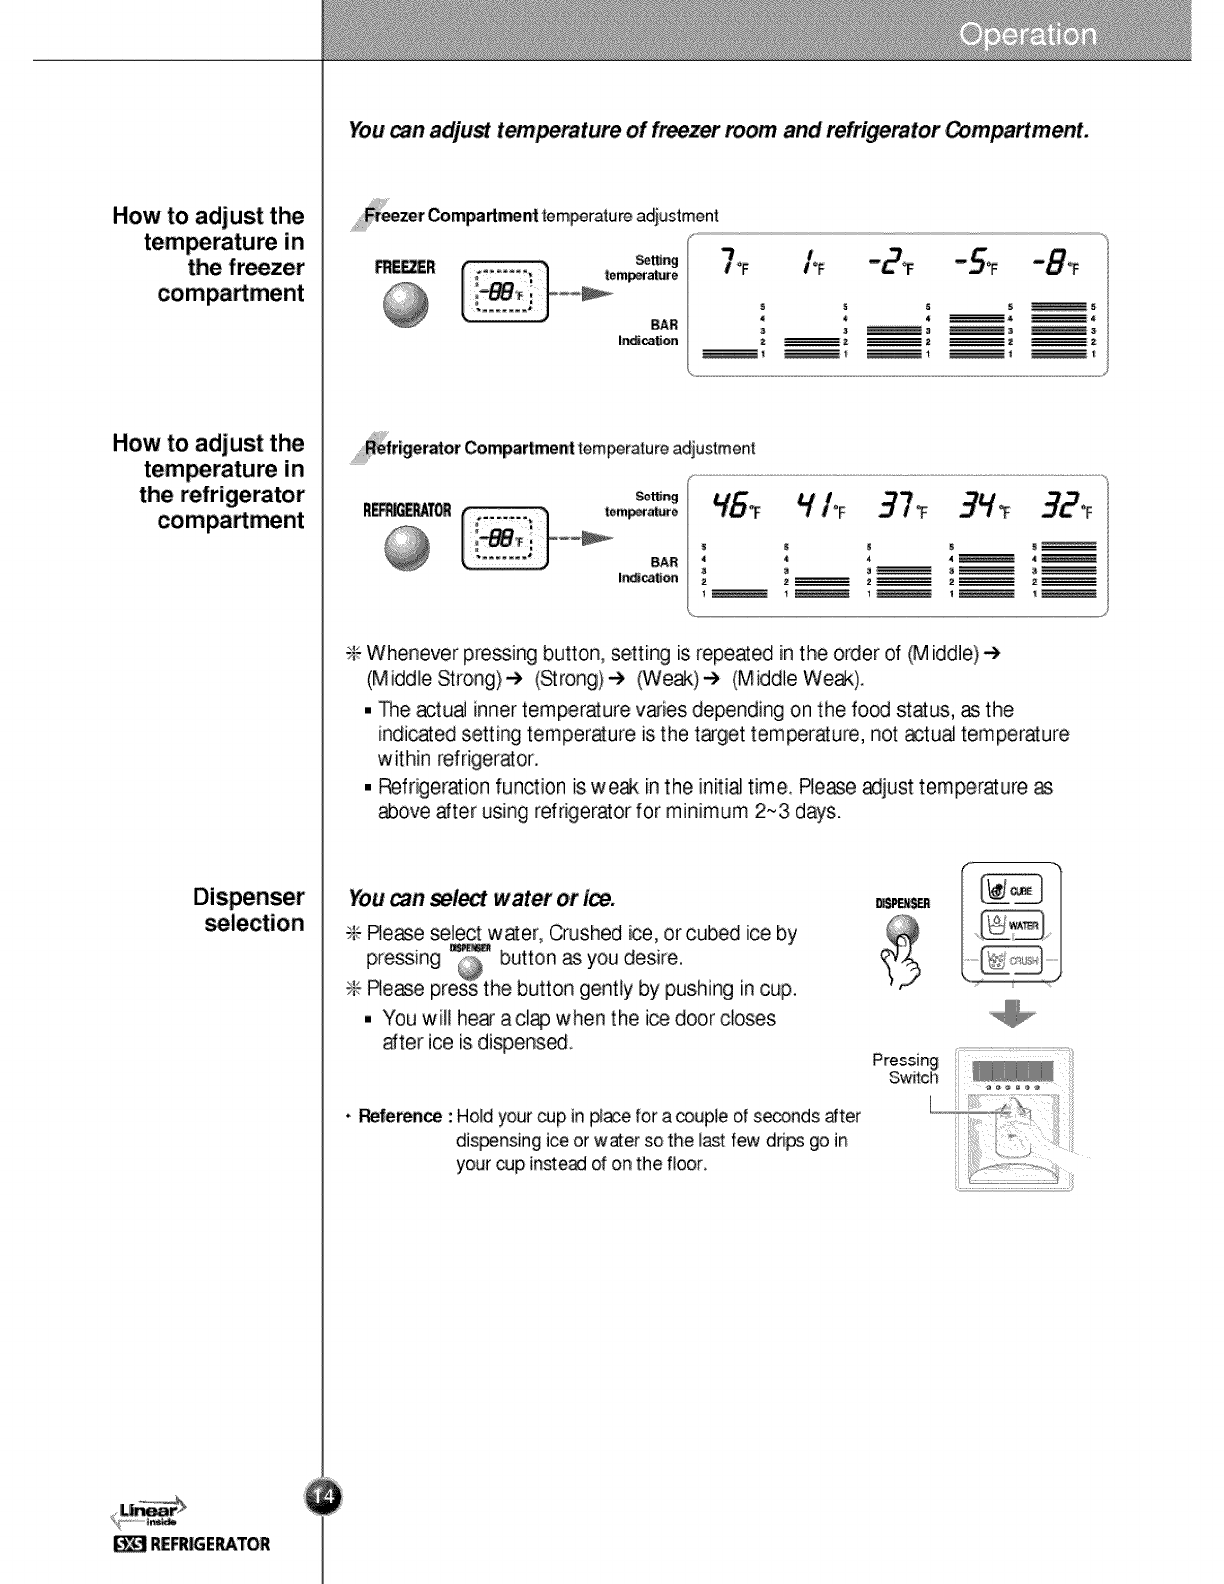
Youcan adjust t_perature of freezer room and refrigerator _mpa_ment.
_ER
BAR
-/
_efrigerator Compa_ment temperature adjustment
_ffing
RE_._RA_
BAR _ _ 4, 4 _ 4
In.cat,on
_ Whenever pressing button, se{t[ng is repeated in the order of (M [ddle)
(Middle Strong)') (Strong)_ (Weak)-) (Middle We_).
• _e actual inner temperature varies depending on the food status, as the
indicated setting temperature is the target temperature, not actu_ temperature
within refrigerator.
• Refrigeration function is we_ inthe initi_ time, Rease adjust temperature as
above after using refrigerator for minimum 2~3 day's.
You can select water 0¥ ice.
-_ Re_e select w_er, Crushed ice, or cubed ice by
pressing _ button as you desire.
_F_Rease press the button gently by pushing incup.
• "Youwill hear adap when the ice door closes
after ice is dispense.
, Referen_ : Hold your cup inpl_e for a couple of seconds after
dispensingice or water so the last few drips go in
your cup inste_ of on the floor,
When ice maker
does not operate
Jet Freezer
,, _e automatic icemaker can automatically make 8 cubes at atime,
120 ~ 150 pieces per day. This quantity m_ v_ by circumstance, including _bient
temperature, door opening, freezer load. etc.
,, Icemaking stops when the ice stor_e bin is full.
- If you don't w_t to use automatic [cemaker, turn the icemaker switch to
OFF.
if you w_t to use automatic ice-maker _ain, change the switch to ON.
I_ is lum_ t_ether
- if the ice lumps togetlher, take it out, break it _art, and put it back into the stor_e
bin.
,When the ice maker produces too smaJ] or lumped together ice, the amount of
water supplied to the ice maker needs to adjusted. _ntact the service center.
÷If ice is not used frequently, it may lump together.
- ice may drop into the freezer _mpartment. Take the ice stor_e bin out and discard
aJlthe ice then dry it and place it b_k. After the machine is powered ag_n, crushed
ice will be a.utomatic_ly selected.
The unit is newly in.ailed
-it takes _out I2 hours for a newly installed refrigerator to make ice.
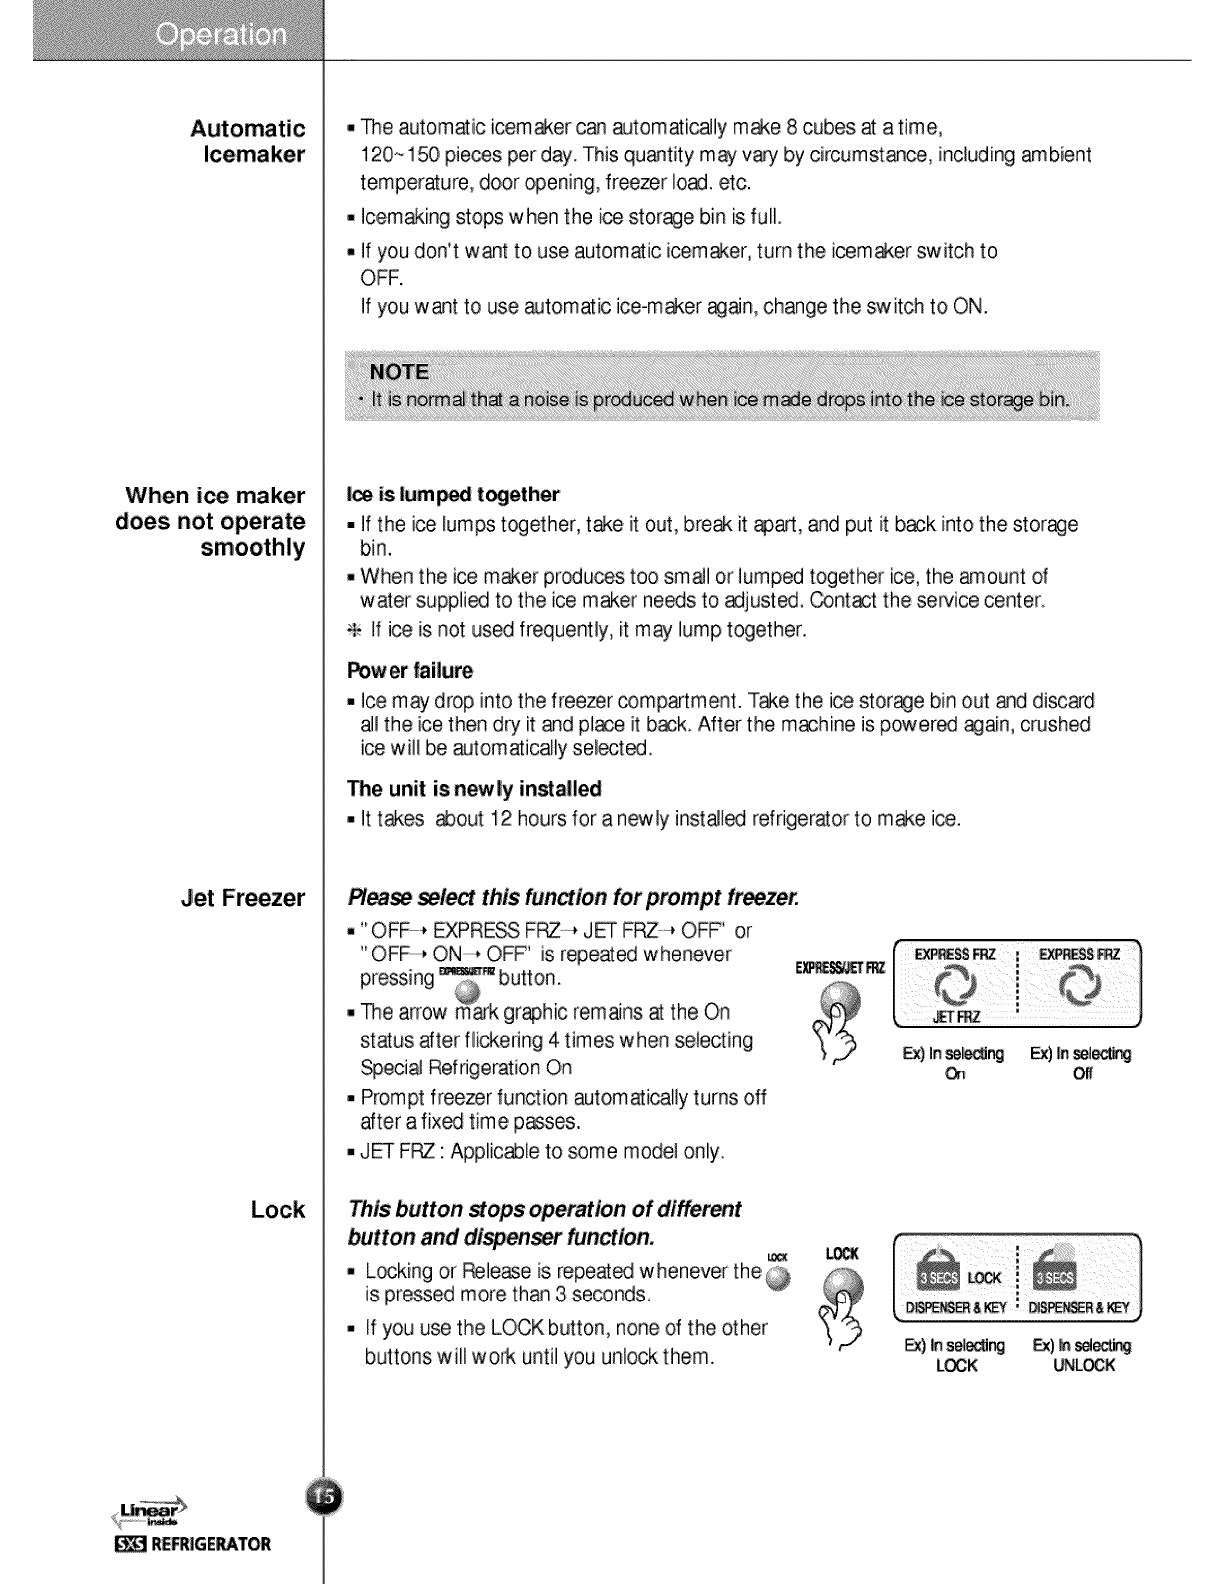
Please select this function for prompt freezer.
,, "OFF, EXPRESS FPZ -, JET FRZ, OFF' or
"OFF, ON, OFF' is repeated whenever
remains at the On
status after flickering 4 times w hen selecting
_ecial Refrigeration On
- Prompt freezer function automatically turns off
after a fixed time p_ses.
- J_ FRZ: Applicable to some mode] only.
Ex)Inse_ng Ex)_n_
This button stops operation of different
-Locking or Rele_e is repeated whenever the@
is pressed more than 3 seconds
iIf you use the LOCK button, none of the other
buttons will woA until you unlock them. Ex)_ se{_ Ex)h sel_
LOCK UNLOCK
The Other
How Ice/Cold
Water is Supplied
How to U_
Ambient Temperature Display Window.
- Temperature is displ_ed only between 16°F ~ 120°R
-Temperature less than 15°F is [ndicat_ with LO and
temperature more than 121°F is indited with HL
Door open warning
-A warning tone will sound 3times at thi_y-s_nd interv_s ffthe, refrigerator or freezer
door is left open for more than sixty seconds.
,, Rease contact with the 1_ sep,,ice center ff warning continue to sound even after
closing the door.
Diagnosis (failure detection) function
•Di_nos_s function automat_aJly detects failure when failure is found in product dud_
the use of refrigerator.
- if your refrigerator f_ls, do not turn off the power, InsteP, _ntact a ioc_ Authorized
service center or _l our support line for assistance, Turning off the _piiance w ill
make it more difficult for the service technician to determine the problem.
Water is cooled while stored in the water tank in freezer door, and then sent to the
dispenser.
ice is m_e in the automatic icemadKerand sent to the dispenser divided into crush_
or cub_ i_.
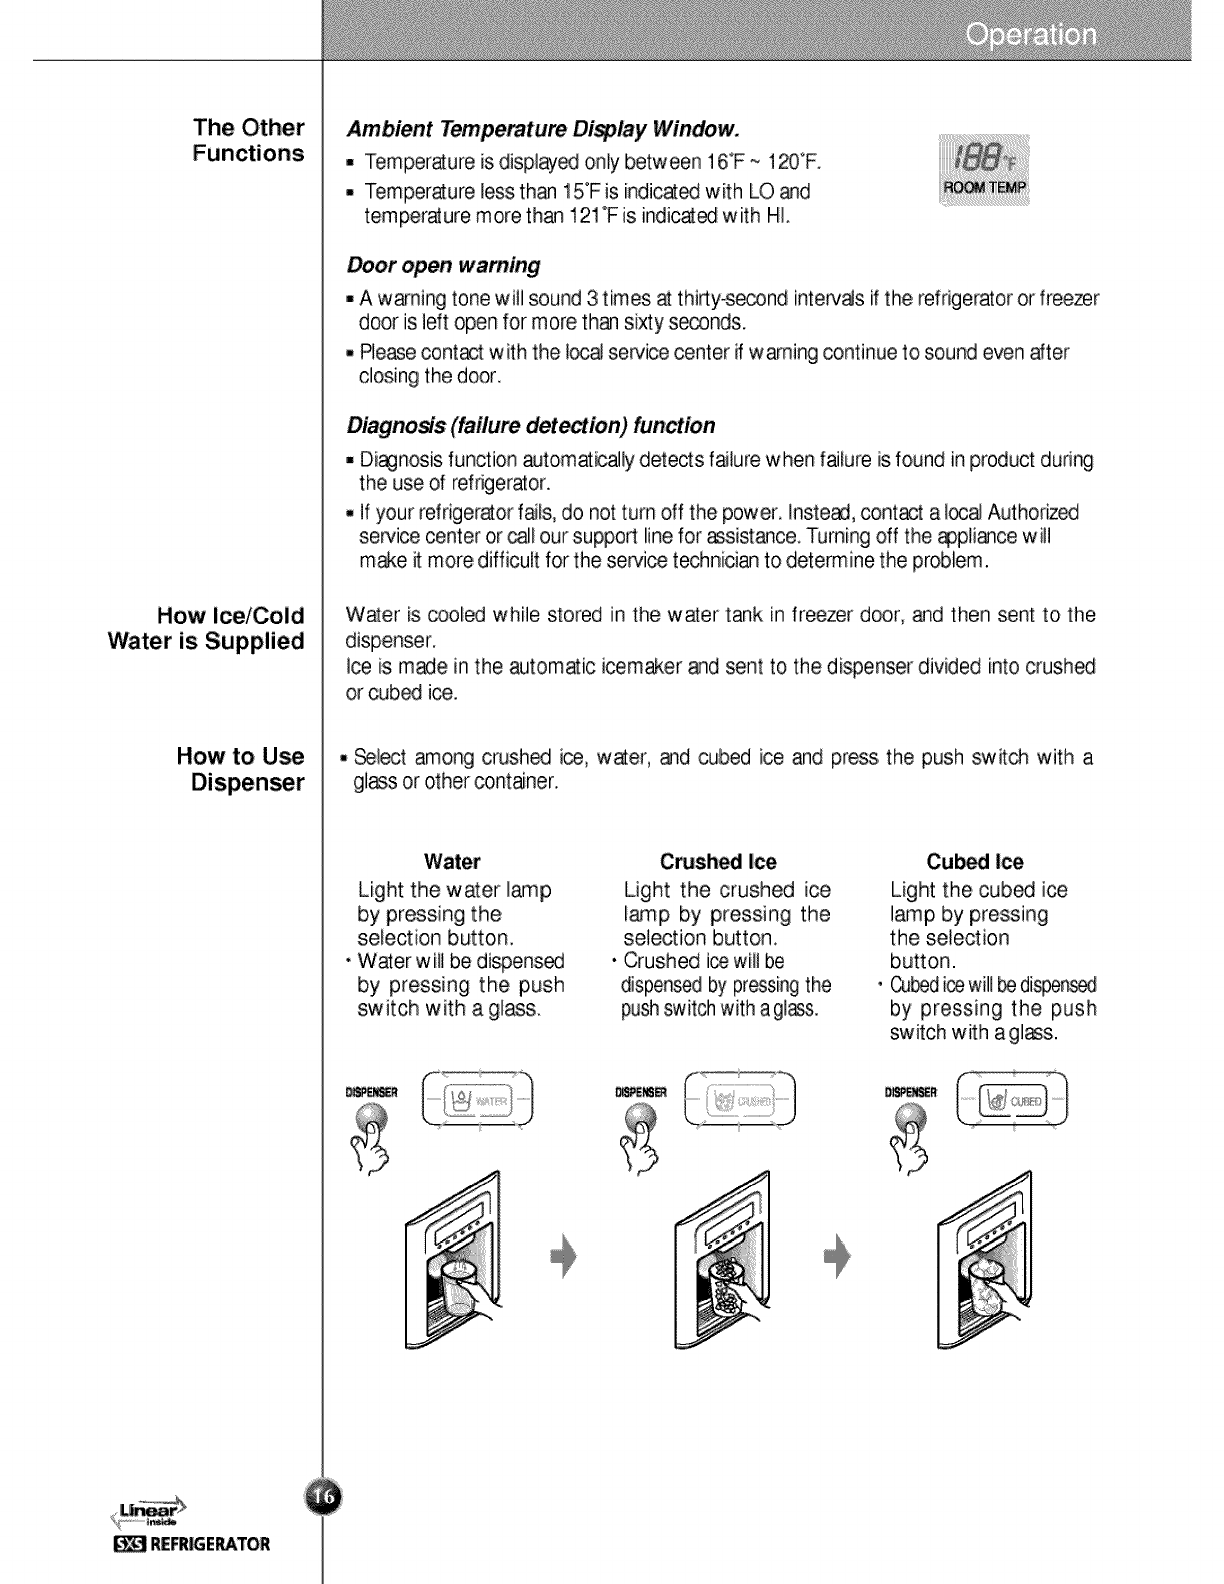
._lect among crushed ice, water, and _bed ice and press the push switch with a
gl_s or other contaner.
Water Crushed Ice Cu_ Ice
Light the water I_p
by pressing the
selection button.
• Water w ill be dispensed
by pressing the push
switch with a glass.
Light the crushed ice
lamp by pressing the
selection button
' Crushed i_ will be
dispensed by pressing the
push switch with a g]_.
Light the cub_ i_
lamp by pressing
the selection
button.
•Cubed ice will _ dispensed
by pressing the push
switch with a gl_s.
_R
Automatic Ice
When I_ Maker
Does Not
• he automatic i_maker can automatically make 8 cubes at a time, 120-150 pi_s
per day. his quantity may vary by circumstan_, including ambient temperature,
door openings, freest load. etc.
• Ic,emaking stops when the i_ storage bin is fulL
,, if you don't want to use automatic icemaker, turn the icemaker switch to OFF.
If you decide you want to use the [cemaker, turn the switch to ON.
I_ is lum_d t_ether
• When ice is lumped together, take the ice out of the ice storage bin, break if into
s.mall pieces, and then pl_e them into the ice storage bin again.
. When the ice maker produces too smaJ] or lumped together ice, the amount of
water suppli_ to the ice maker need to adjusted. _ntact the service center.
,.£ if i_ is not used frequently, it may lump togetlher.
Power lailure
- ice marydrop into the freezer compartment. Take the i_ storage bin out and discard
aJ]the ice then dry it and p]_e it b_k. After the machine is powered _a[n, crushed
ice will be automatically selected.
The unit is newly installed
- it takes _out 12:hours for a newly inst_led refrigerator to make ice in the freezer
compa_ment
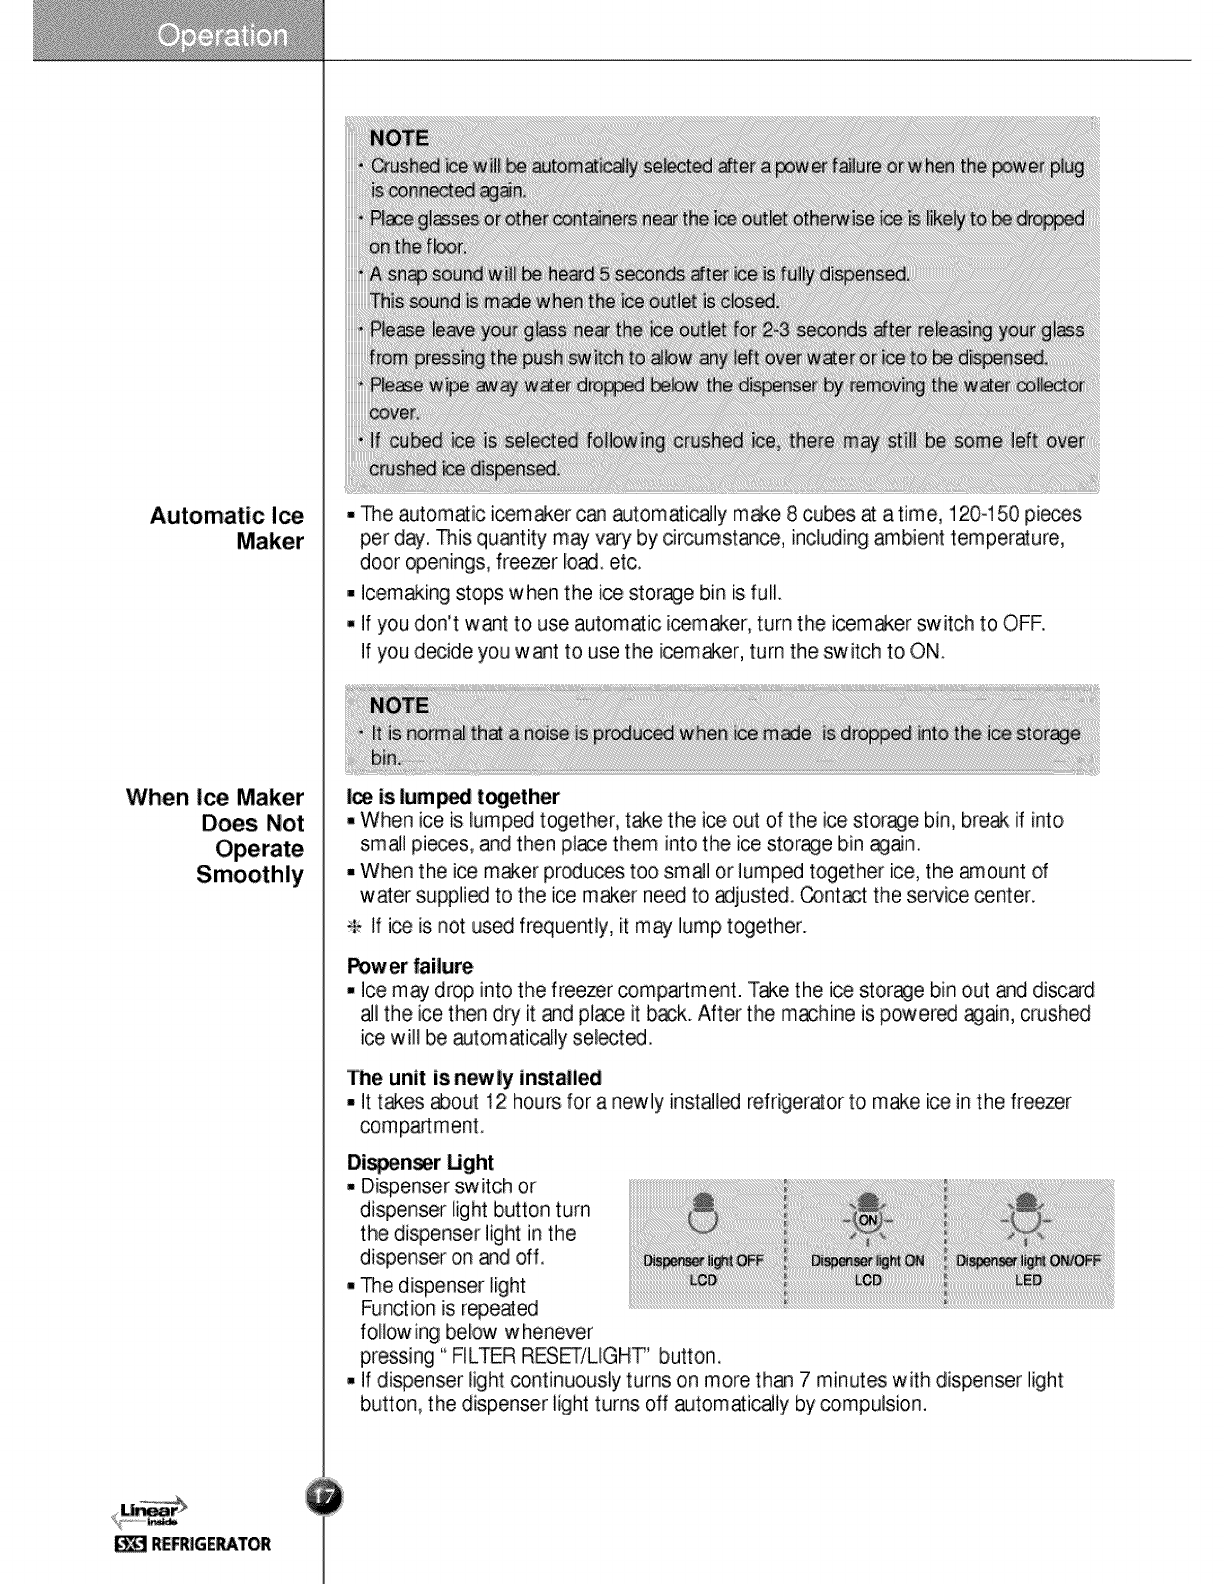
Di_n=r Ught
, Dispenser sw itch or
dispenser light button turn
the dispenser light in the
dispenser on and off.
• he dispenser light
Function is repeated
follow ing below whenever
pressing "FILTER RESET/LIGHT" button.
,if dispenser lightcontinuously turns on more than 7 minutes with dispenser light
button, the dispenser light turns off automatically by compulsion.
6 FilterCondition
cycle) Disp_y
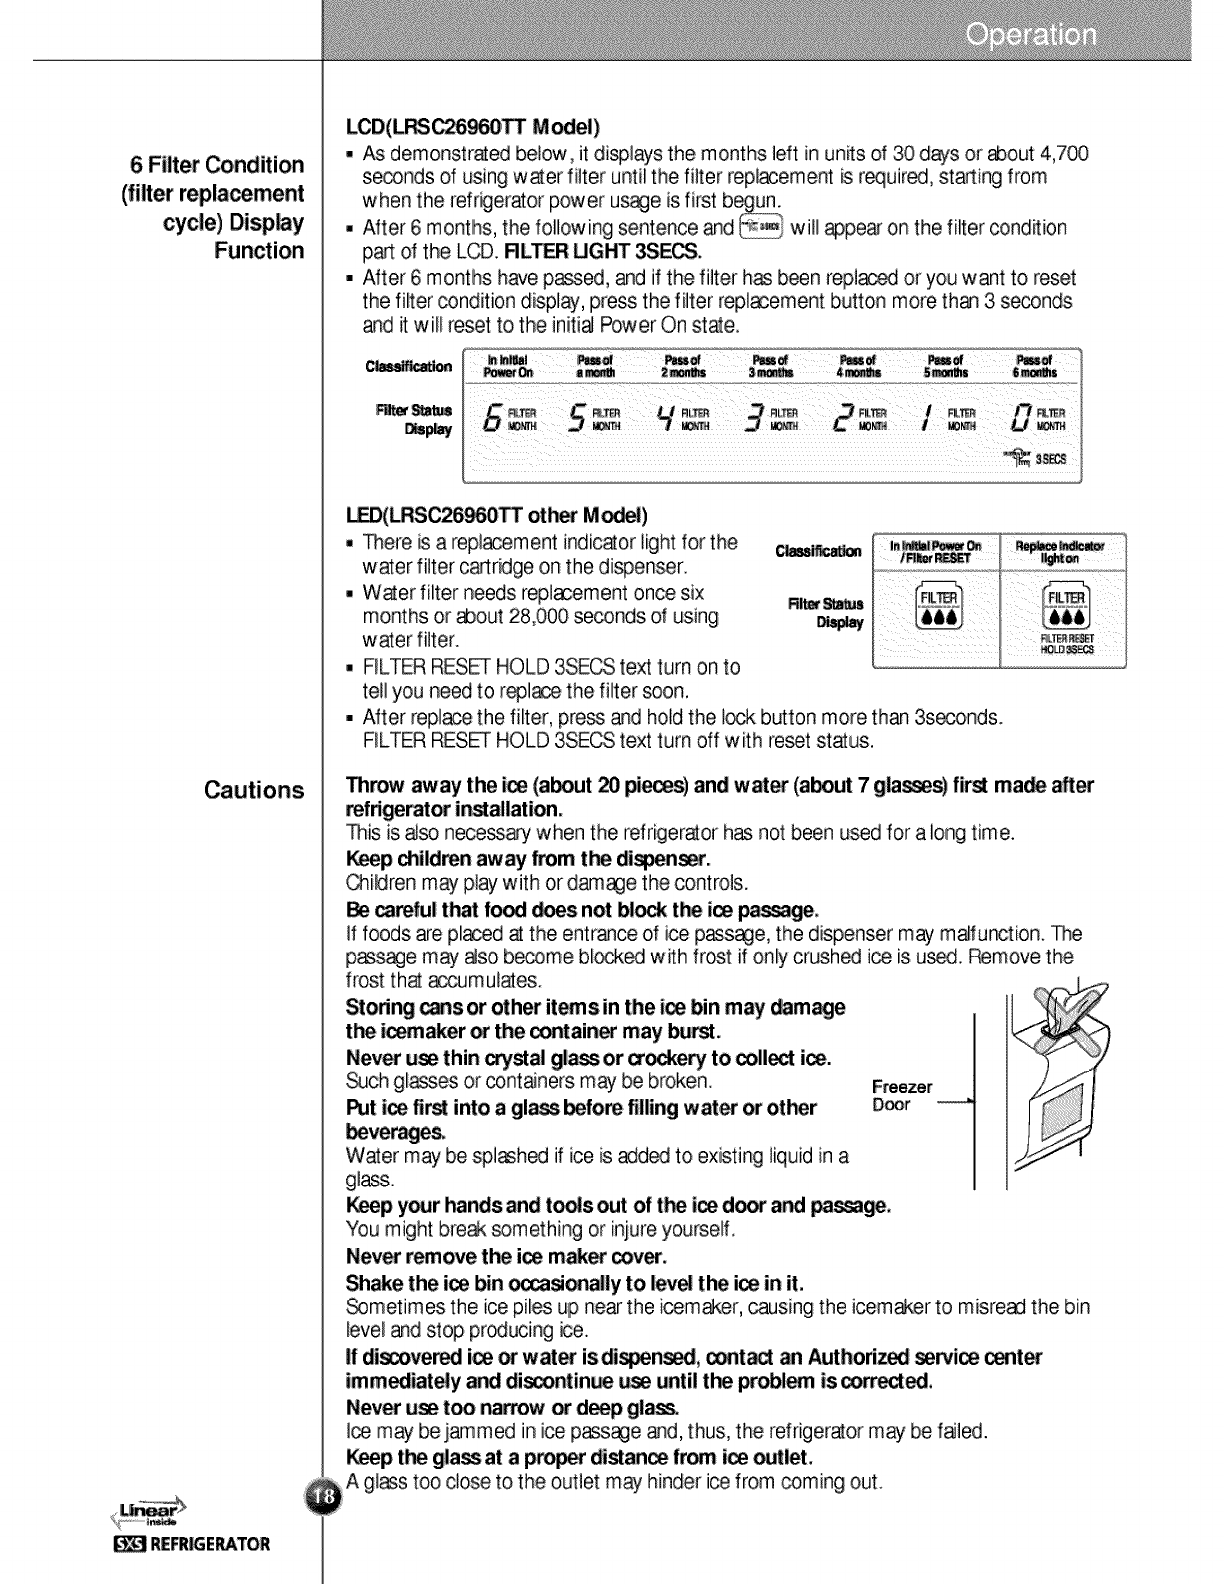
LCD(L_ Model)
• As dernonstrated below, it di_lays the months left in units of 30 days or about 4,700
se_nds of using water filter until the filter repl_ement is required, st_ing from
when the refrkgerator power us_e is first b
• After 6 montlhs, the following sentence and will appear on the fi_er condition
part of the LCD. RLTER UGHT 3SECS.
•After 6 months have p_ed, and if the filter has been repi_ or you want to reset
the fi_er condition display, press the filter repI_ement button more th_ 3 seconds
and it will reset to the initi_ Power On Hate.
C_on
_(_SC_O_ ott'_ M _)
• _ere is a repl_ement indicator light for the
water filter cartridge on the dispenser.
,, Water filter needs replacement once six
months or about 28,000 seconds of using
water filter.
• FILTER RESF HOLD 3SECS text turn on to
tell you need to r_lar_ the filter soon.
=
R_ Sta_us
After replace the filter, press and hold the I_ button more than 3seconds.
FILTER RESF HOLD 3SECS text turn off with reset status.
Throw away the i_ (about 20 pieces) and w_er (about 7 glasses) first ma_ after
refdgerat_ installation.
_is is also necessary when the refrigerator has not been used for a long time.
_p children away from tl_ di_n_.
_i_ren may play with or d_e the _ntrols.
careful that food _s not bl_ t_ ice _,
if foods are placed a the entrance of ice p_s_e, the dispenser may malfur_tion. _e
p_s_e may 8so become blecked with frost if only crushed ice Msused. Remove the
frost tha _cumulate&
Storing _s or other items in the ice bin may damage
t_ i_aker _ the container may _rst,
Never u_ thin crystal gl_ or Crockery to _llect ice.
_ch glasses or containers may be broken. Freezer
Put ice fir_ into a gla_ before filling water or other D_r --_
Water may be splashed if ice is _d_ to existing liquid in a
glass.
_p your hands and t_s out of tl_ ice door and _ssa_,
You might break _mething or injure yourselfi
Never remove the ice maker cover.
Shake the ice _n _onal|y to level the ice in it.
_metimes the ice piles up near the icem_er, causing the icemaker to misread the bin
level _d stop pr_ucing ice.
If discove_ ice _water isdi_n_, cent_ an Authod_ _rvice _ter
immediat_y and discontin_ use until the _lem is correctS,
Never use too narrow _deep glass.
I_ may be j_med in i_ pass_e and, thus, the refrigerator may be faled.
_p t_ gla_ at ap_ distance _m ice outlet,
A gI_s too close to the outlet may hinder ice from _ming out.

Shelf Height
Wine Holder
Can Server
_e refrigerator comp_ment shelf is movable so that you can pl_ it at a height
_rding to space r_uirement of foods.
H_ to _rate a_f :
Lift the shelf a the dir_tion of Arrow@,then
remove it from the rack by pulling it in the
direction of Arrow @,
How to install a _f :
Holding the shelf up at the front, insert the
tab at the desir_ he£ht and lower the shelf
into place.
Q
Ill
Wine Holder
(Applic_le to _me modelsonly)
Bottles _ be stored on their sides in this
wine rack. it can be attached to any shelf.
Wine holder adju_ment :
Wine holder c_ be separat_ by pulling
it straight out and instal_ by placing it at
the end of the shelf you want and pushing
inward.
C_ _rver adju_ment
(Applic_le to _me modelsonly)
Cans be stored on their sides out of the w_.,
using the can-sever, it c_ be att_hed to an
upper sheff only,
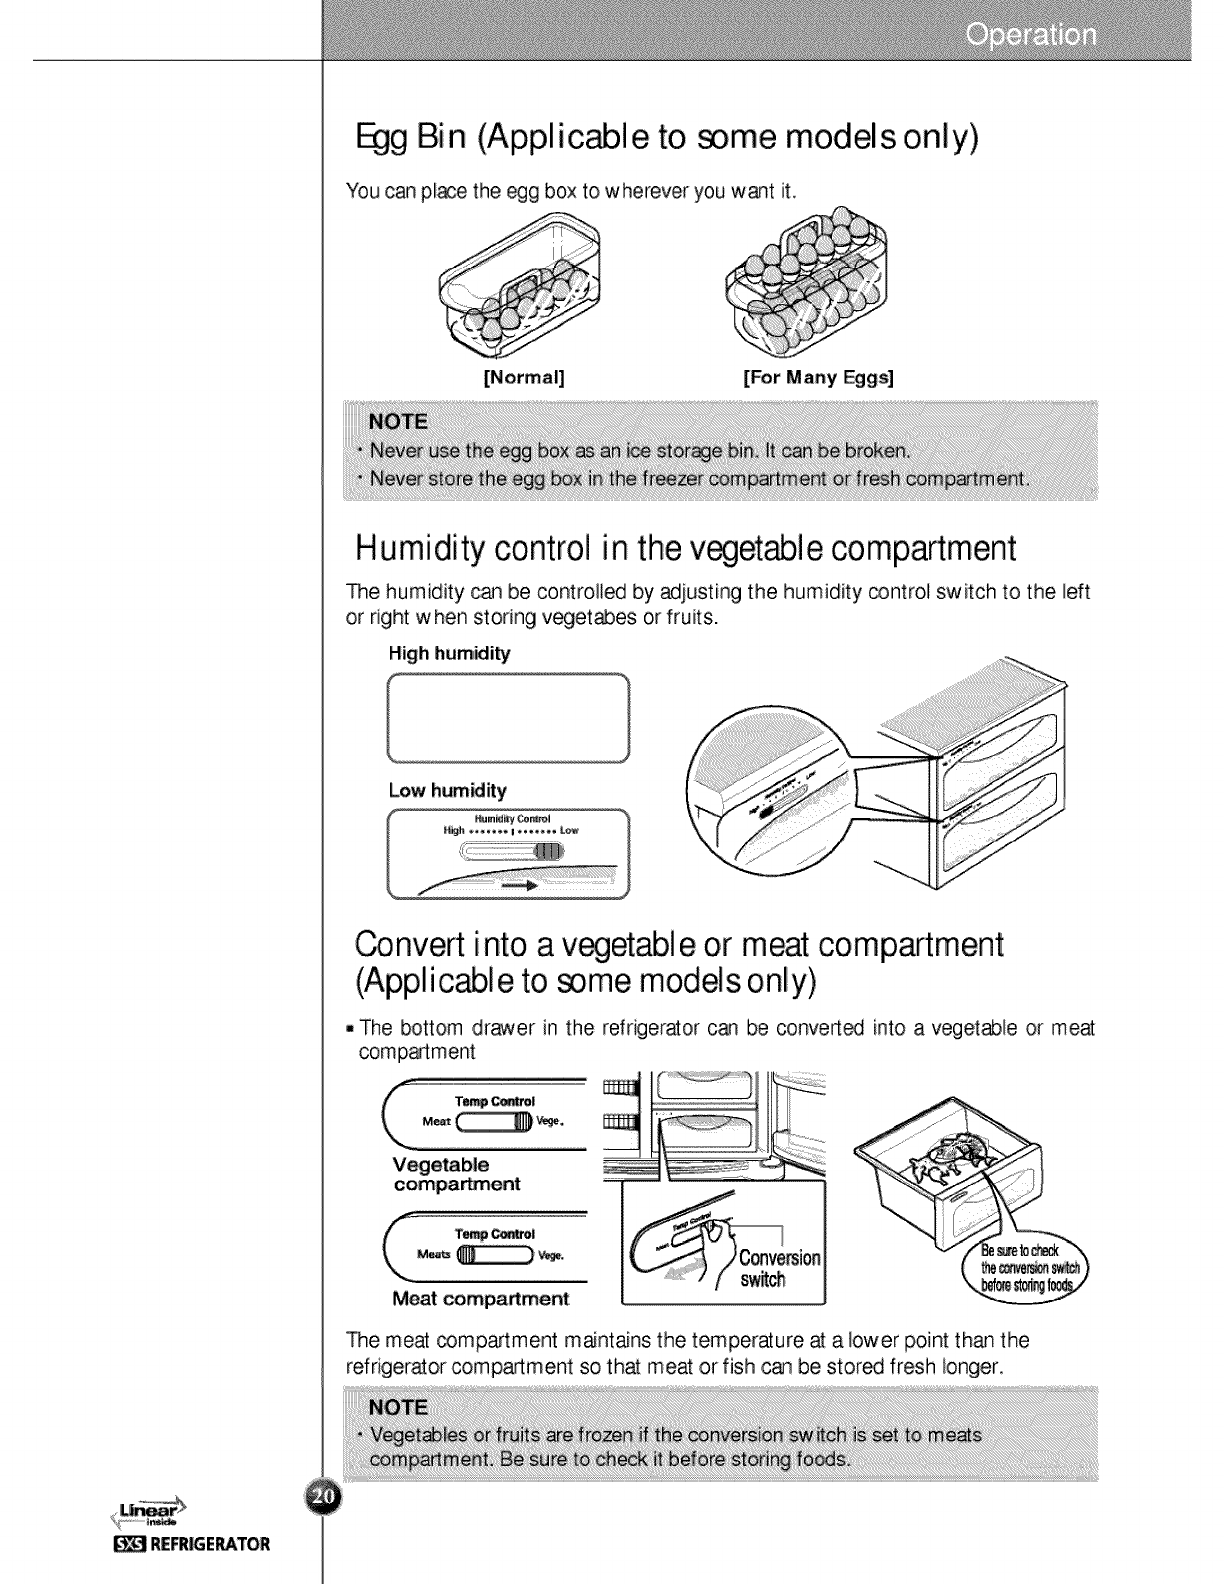
_g Bin (Applic_le to _me models only)
You can pl_ the egg box to wherever you want it.
[For Many Eggs]
Humidity control in the v_et_le compartment
_e humidity can be controlled by adjusting the humidity control switch to the left
or right when storing vegetabes or fruits.
High humidity
Low humMity
Convert into a v_etabie or meatcompa_ment
(Applic_le to _me modelsonly)
- The bottom drawer in the refrigerator can be convert_ into a vegetable or meat
compartment
Meat compa_ment
_e meat compartment mant_ns the temperature at a lower point tha_qthe
refrigerator compartment so that meat or fish can be stor_ fresh longer.
Method to Use
When Removing
When Installing
REFRIGERATOR
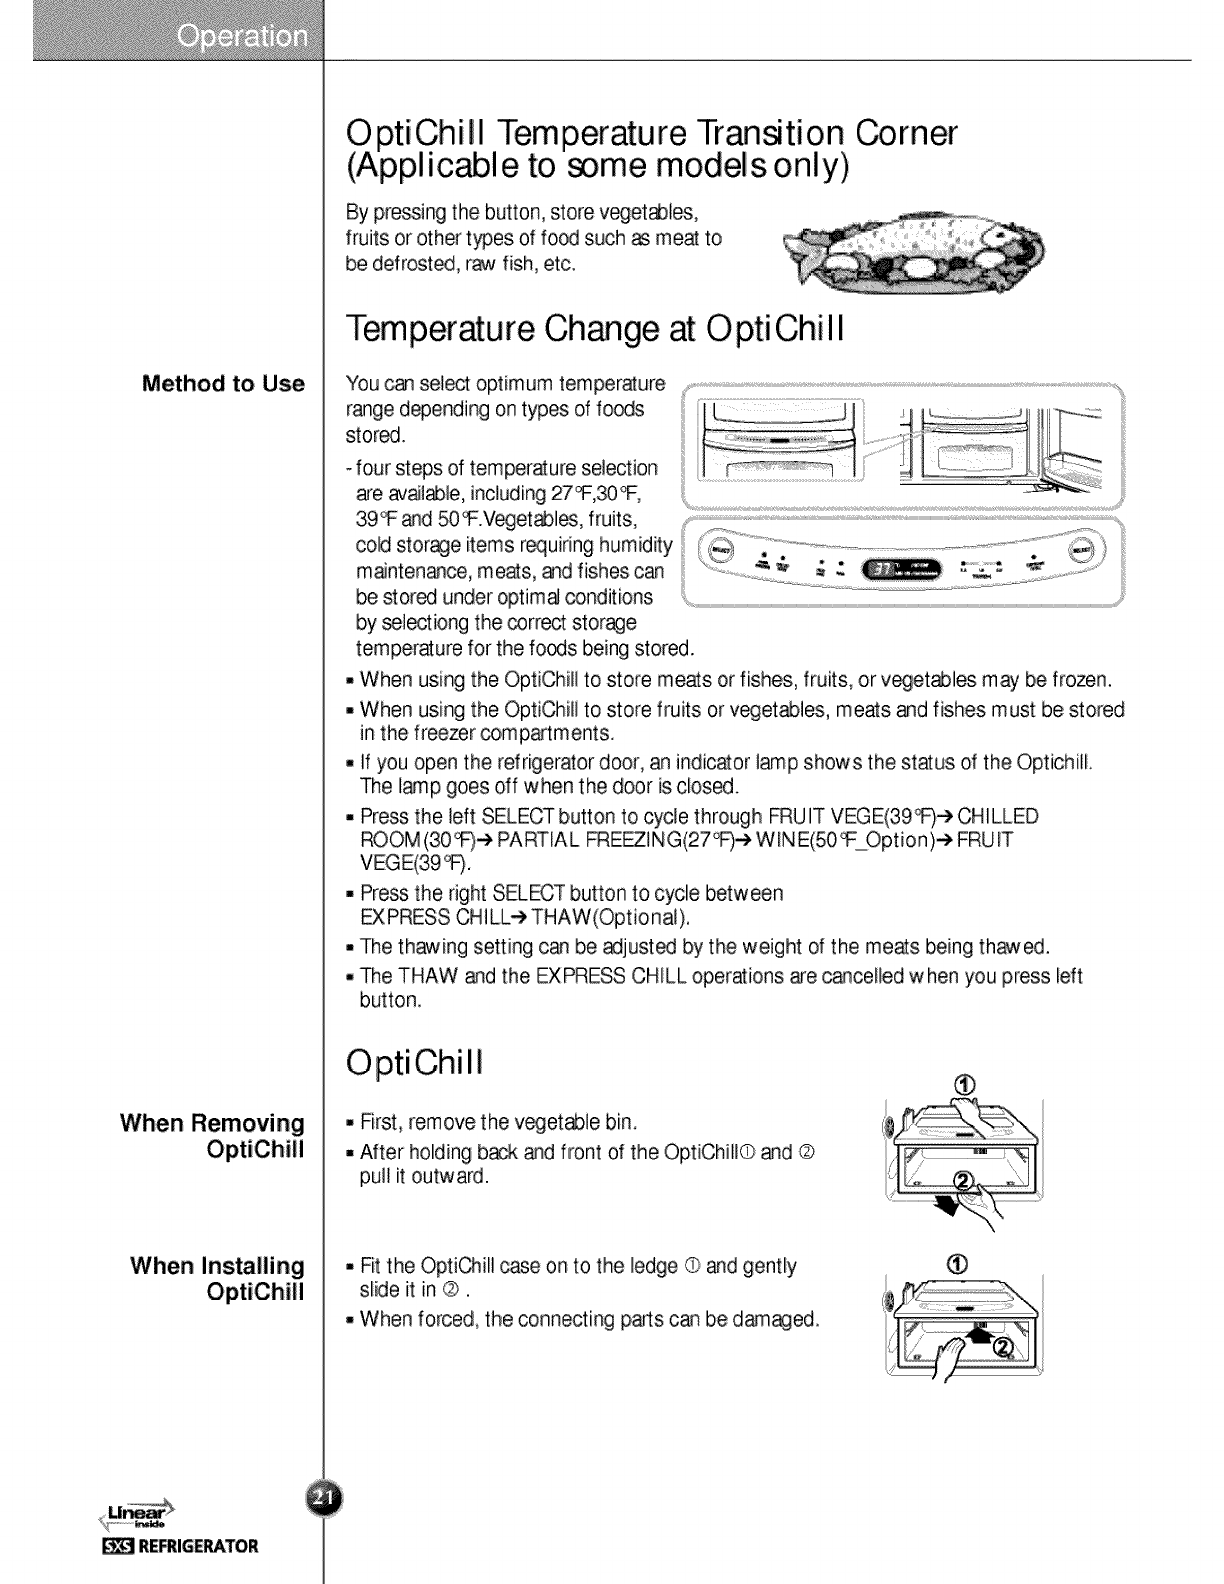
Opt!Chill Temperature Trandtion Corner
(Applicable to models only)
By presising the button, store v_et_les,
fruits or other t_es of food such _ meat to
be defrosted, r_ fish, etc.
Temperature Change at Opt! Chill
You can select optimum temperature
range depending on types of foods
stored.
- four steps of temperature selection
are _,_l_le, including27_,30_,
39_Fand 50 _.Veget_les, fruits, ...............................................................................................................
co_stor_eitems r_uiring humidity _ ..........:........................................................................................................................................................_ ):
maintenance, meats, and fishes can -.........................- = -o,,_ o.:: ..................
be acted under optima conditions
by _lectiong the corre_ storage
temperature for the foods being stored.
- When using the OptiChill to store meats or fishes, fruits, or vegetables may be frozen.
- When using the OptiChill to store fruits or v_etables, meats and fishes must be stored
in the freezer _mpartments.
,, If you open the refrigerator door, an indicator lamp shows the status dthe Opt!chilL
The lamp goes off when the door is closed.
• Press the left SELECT button to cycle through FRU IT VEGE(39_-..)CHILLED
ROOM (30 _e PARTIAL FREEZlN G(271:)e WIN E(50 _F Option)e FRU IT
VEGE(39_.
- Press the right SELECT button to cycle between
EXPRESS CHILL-) THAW(Optional),
• The thawing setting can be adjusted by the weight of the meas being th_ed.
,, The THAW and the EXPRESS CHILL operations are cancelled w hen you press Idt
button,
Opt!Chill
,, Rrst, remove the veget_le bin.
• After holding b_k and front of the OptiChiIK_ and ®
pul! it outward.
®
-Fit the OptiOhill case on to the ledge Q and gently
slide it in ¢_.
- When forced, the connecting p_s can be damaged.
@
Wine Holder
Snack Drawer
Door Rack
Milk Product
Egg Bin
Door Rack
Vege_ble Drawer
/Meat Drawer
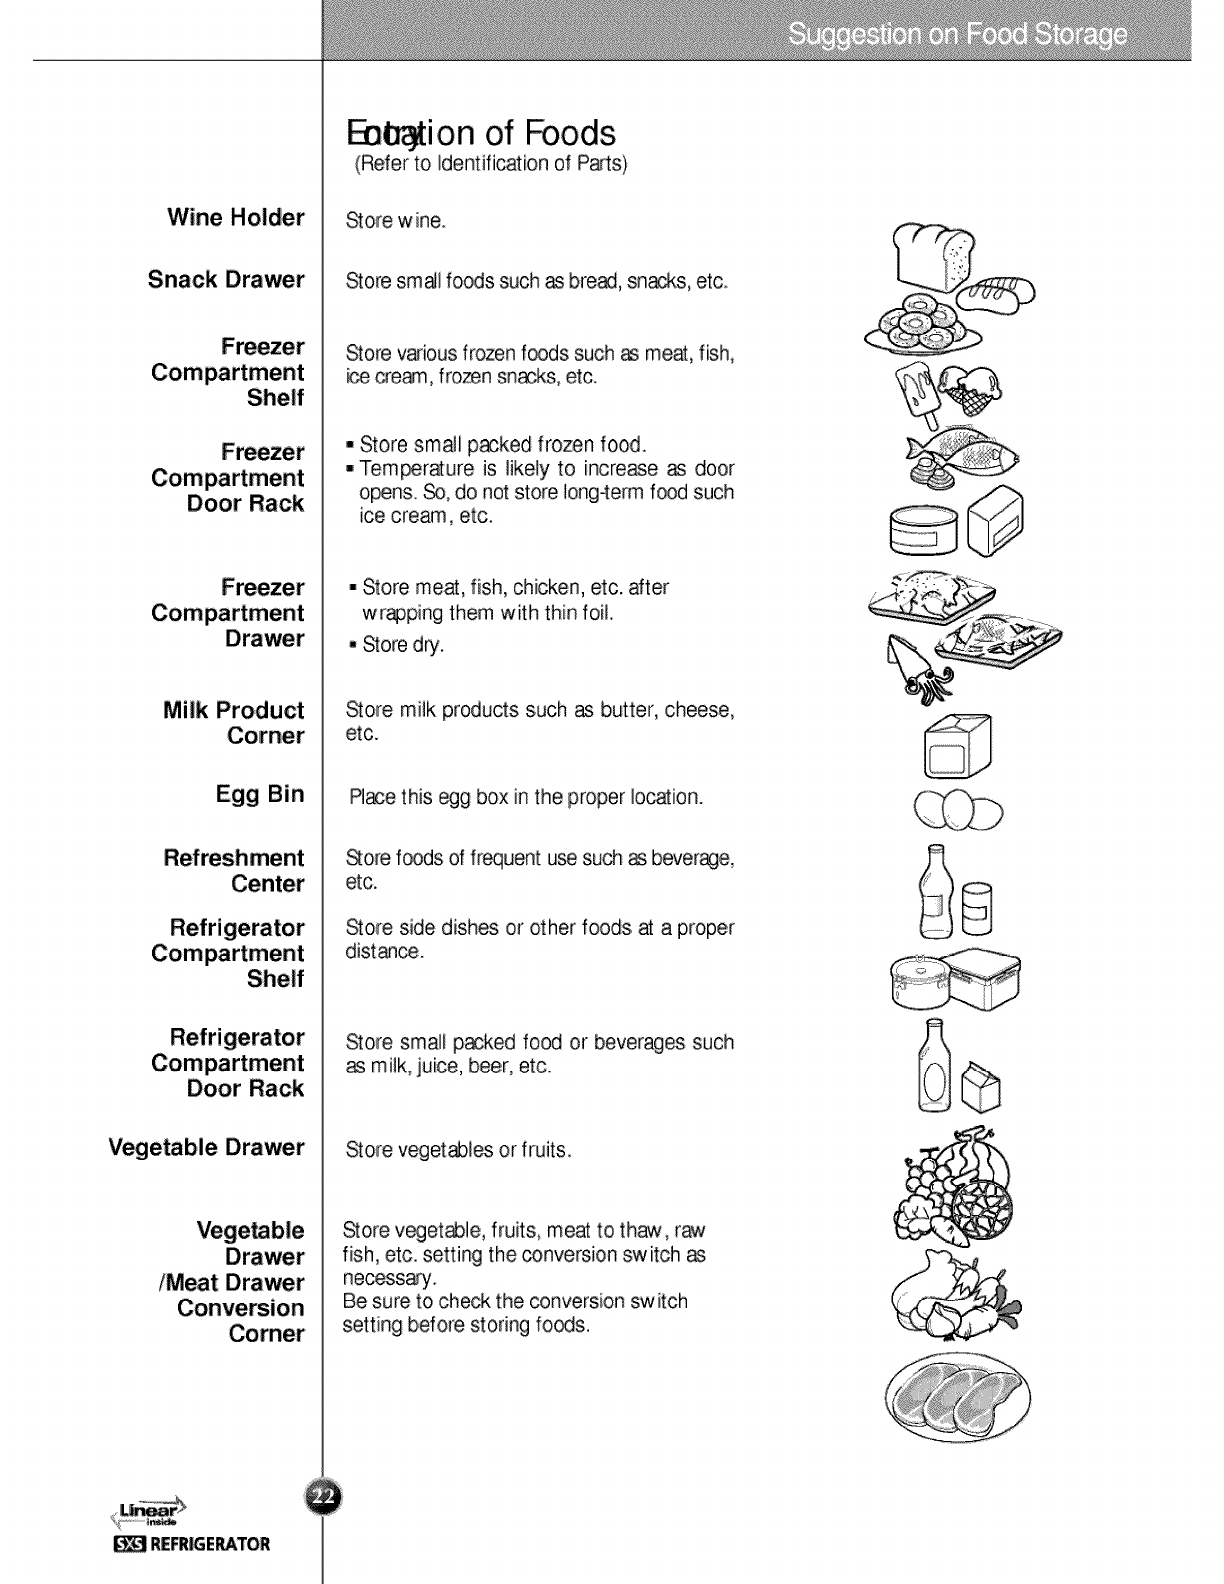
ajtion of Foods
(Refer to Identification of Parts)
Store w ine.
Store smgt foods such as bread, snac_s, etc,
Store various frozen foods such as me_, fish,
cream, frown sn_ks, etc.
- Store smaJl p_ked frozen food.
-Tem_r_ure is likely to increase as door
o_ns. _ do not store Iong4erm food such
ice cream, etc.
• Store meat, fish, chicken, etc. after
wr_ping them with thin foiL.
• Store d_.
Store miik products such as butter, cheese,
etc.
R_e this egg box inthe proper location.
_ore foods of frequent use su_ _ beverage,
etc.
Store side dishes or other foods, at a proper
dist&q_.
Store small p_ked food or beverages such
as milk, juice, beer, etc.
Store veget_les or fruits.
Store veget_le, fruits, me_ to thaw, raw
fish, etc. setting the _nversion sw itch
necess_y.
Be sure to check the conversion switch
setting before storing fo_s.
£oring ,ods
- _ore fresh food in the refrigerator comp_ment. How food is frozen and th&_ed is an
important factor in maintaining its freshness and flavor,
, Do not store food which spoils easily at low temperatures., such as bananas and
melons.
- Allow hot food to cool prior to storing, placing hot food in the refrigerator @uld spoil
other food, _d le_ to higher energy consumption,,
• When storing the food, cover it with vinyl wr_ or store in a container with a lid_This
prevents moisture from evaporating, and helps food to keep its taste and nutrients
- Do not blo_ air vents with food Smooth circulation of chilled air keeps refrigerator
temperatures even.
- Do not open the door frequently. Opening the door lets w_ air enter the refr£erator,
and c_se temperatures to rise.
-Never keep too much food in door rack because they may push against by inner racks
so that the door cannot be fully closed.
, Do not store bottles in tlhe freezer comp_ment -they may bre_ when frozen.
- Do not refreeze food that h_ been the:wed. This causes loss. of t_te and nutrienL
• When storing frozen food like ice cream for a long period, place it on the free_r
shelf, not in the door r_k.
-Avoid placing moist food in top refrigerator shelves, it could freeze from direct
contact w ith chilled air.
,, Always clean food prior to refrigeration. Vegetables and fruits should be w_hed and
wiped, and packed food should be wiped, to prevent adjacent food from spoiling.
• When storing eggs in their storage r_ or box, ensure tha they are fresh, and a_ays
store them in an updght position, which keeps them fresh longer..
Dispenser Lamp
Door Rack and
Ice Storage Bin
After Dispenser
Is Used
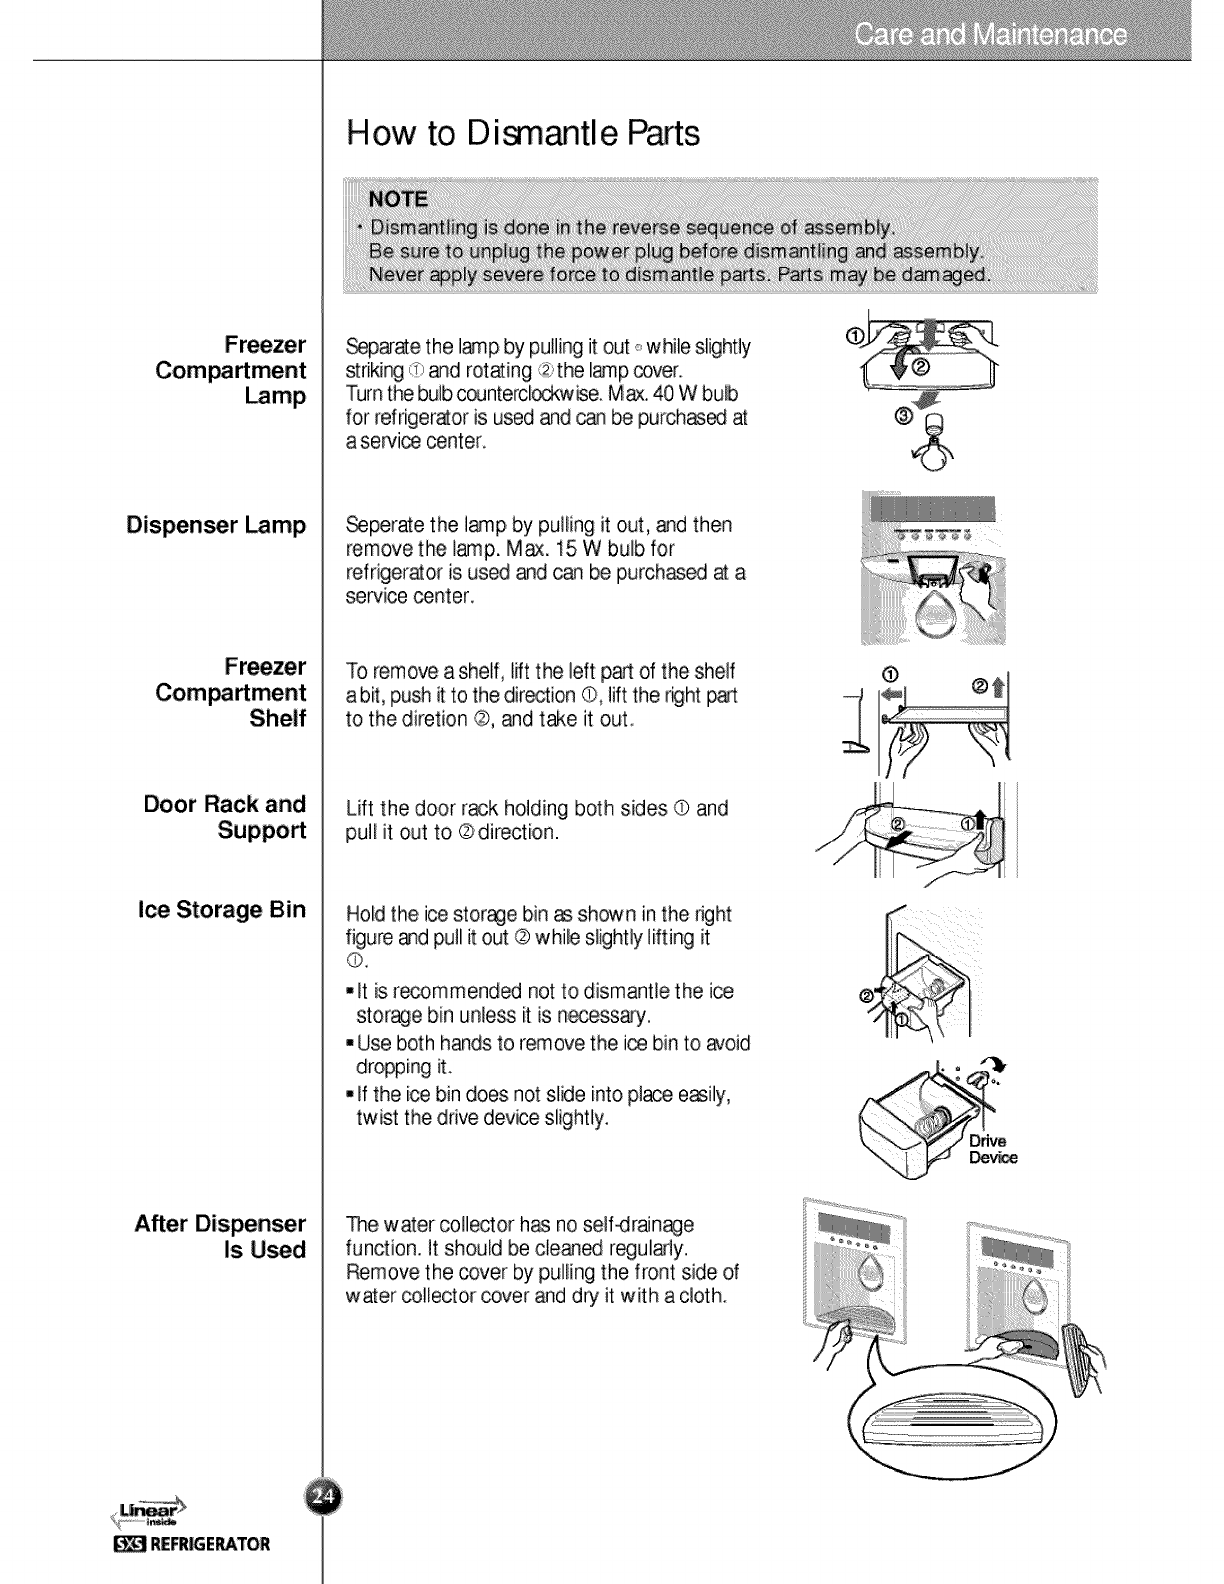
How to D e rts
_pa-ate the lamp by pulling it out _.while slightly
striking ,_ and rotating ':2;,thelap coven
Turn the bulb counterclockwise. Max. 40 W bulb
for refrigerator is used and _ be purchas_ at
a service center
_perate the I_p, by pulling it out, and then
remove the lamp. Max. 15 W bulb for
refrigerator is usa and _ be purchas_ a a
service center.
To remove a shelf, lift the left part of the shelf
a b_, push it to the dir_tion O, lift the r£ht part
to the diretion ®, and t_e it out.
Lift the door rack holding both sides © and
pull it out to ®direction.
Hold the ice storage bin as shown in the right
figure and pull it out ® while slightly lifting it
,, It is recommended not to dismantle the i_
storage bin unless it is necessan/.
- Use both hands to remove the ice bin to _oid
dropping it.
,, If the ice bin does not slide into place easily,
twist the drive dev_e slightly.
_e water collector h_ no self_raJn_e
function. It should be clean_ r_ulafly.
Remove the cover by pulling the front side of
waer collector cover and dr/it with a cloth.
/
Lamp in To remove the lamp cover, press the protrusion under the lamp cover to the front and
then puil the lamp cover out,
Turn the bulb counterclockwise. M_. 40 W bulb for refrigerator is used and can be
purchased at a service _nter,
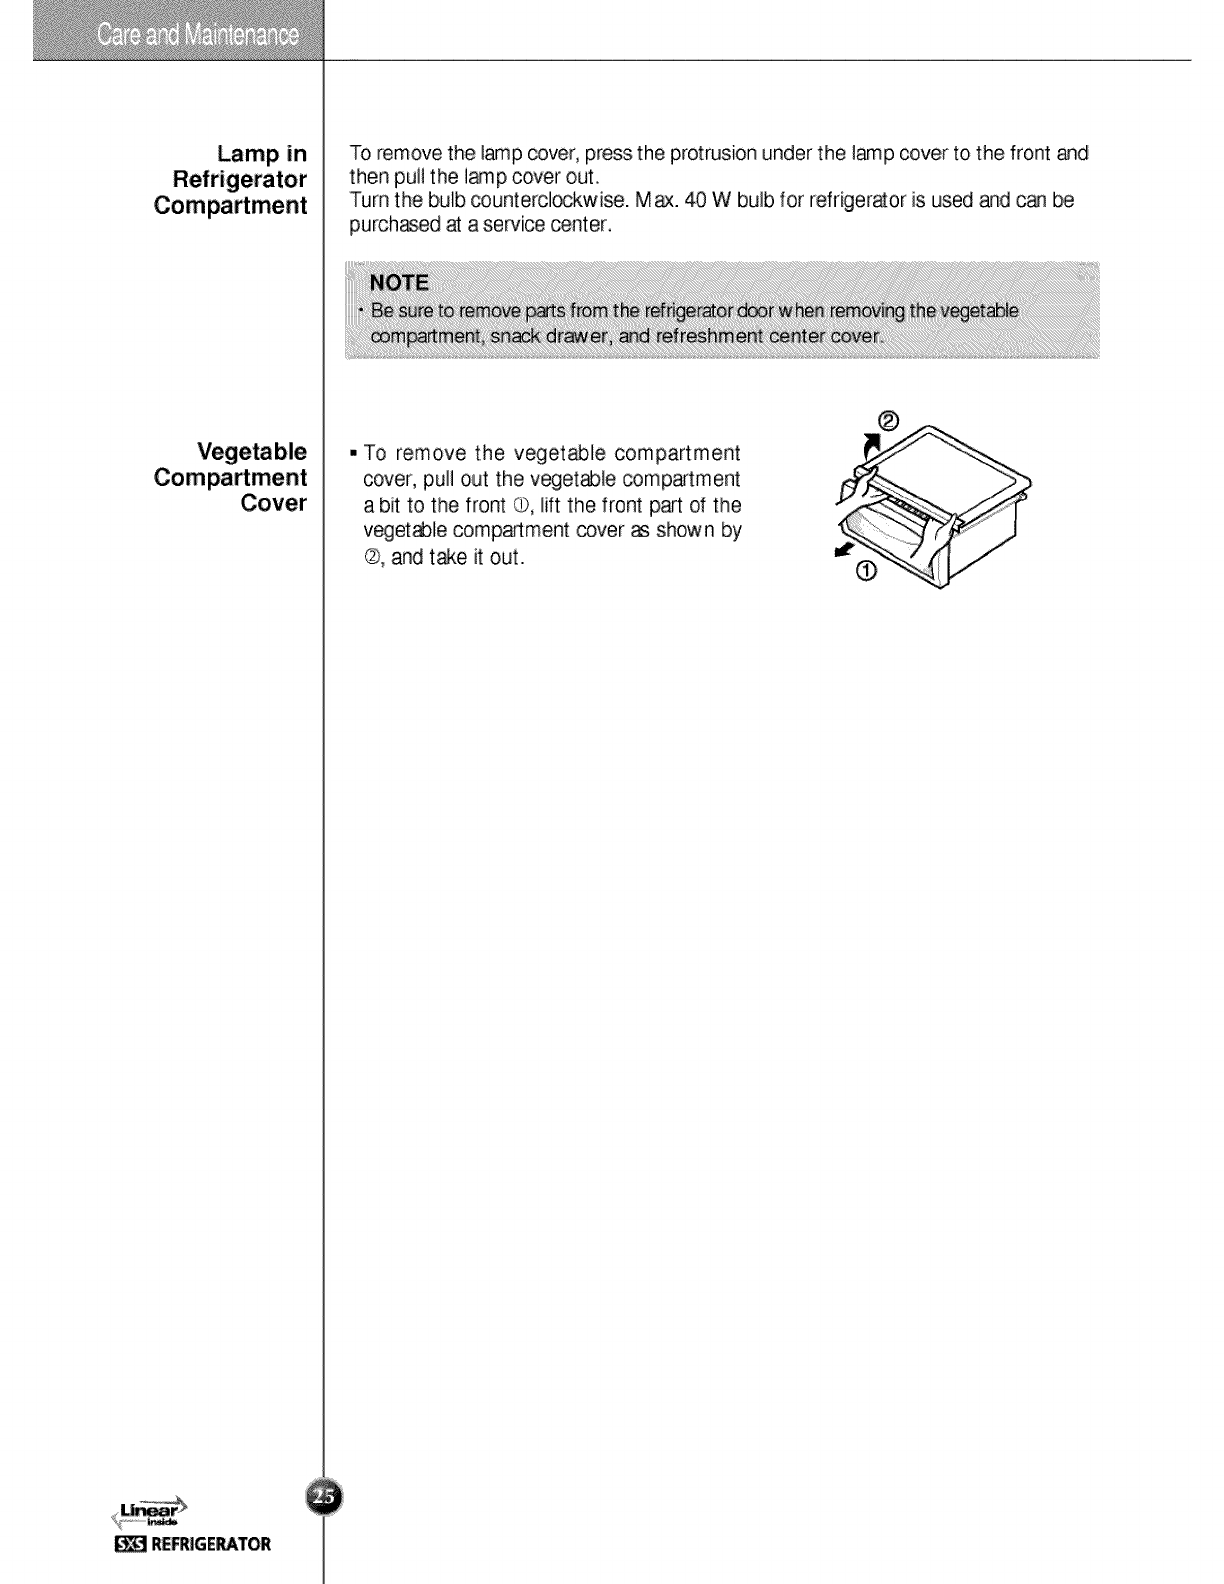
• To remove the veget_le compartment
cover, pull out the veget_le compartment
a bit to the front ()), Uiftthe front p_t of the
veget_le comp_ment cover as shown by
®, and take it out.
Vacation Time
Power Failure
If You Move
After Cleaning
General Information
During _er_e length vacations, you will probably find it best to leave the refrigerator
in operation Place freebie items in freezer for longer life.
When you plan to store the refrigerator, remove all food, disconnect the power cord,
clean the interior thoroughly, and Bl_k the doors open to prevent mold and mildew.
Be _rt_n the stored refrigerator does not present a child entrapment danger.
Most power failures that are corrected in an hour or two will not affect your
refrigerator temperatures.
However you should m inim ize the number of door openings while the power is off.
Remove or securely fasten down all loose items inside the refrigerator.
To avoid dam_ing the height adjusting screws., turn them all the way into the base,
The outside wall of the refngerator cabinet m_ry sometimes get warm, especially just
after installation.
Don't be alarmed This is due to the anti_ondensation pipe, which pumps hot
refriger_t to prevent sweating on the outer cabinet wail.
it is impo_ant that your refrigerator be kept clean to prevent undesirable _ors. _illed
food should be wip_ up immediately, since it max' acidify and stain plastic surfaces if
allow_ to settle.
Use a lukew_m solution of mild soap or detergent to clean the durable finish of your
refrigerator. Wipe with a clean damp cloth and then dry
Regular cleaning is r_ommended. Wash _l compartments a b_ing soda solution or a
mild dete_ent and warm water. Rinse and dry.
Rease verify that the power cord is not damaged, power plug is not overheated, or
power plug is well inserted into the power _nsent.
Always remove power cord from the wail outlet prior to cleaning in the vicinity of
electrical parts (l_mps, sw _ches, controls, etc).
Wipe up excess moisture with a sponge or cloth to prevent water or liquid from
getting into any electrica_ part and causing an electric shock.
Never use metallic _uring p_s, brushes, _arse abrasive cieaJTers, strong alkaline
solutions, flammable or toxic cleaning liquids on any surface.
Do not touch frozen surfaces with wet or damp hands, because damp obje_ will stick
or _here to extremely _ld surfaces.
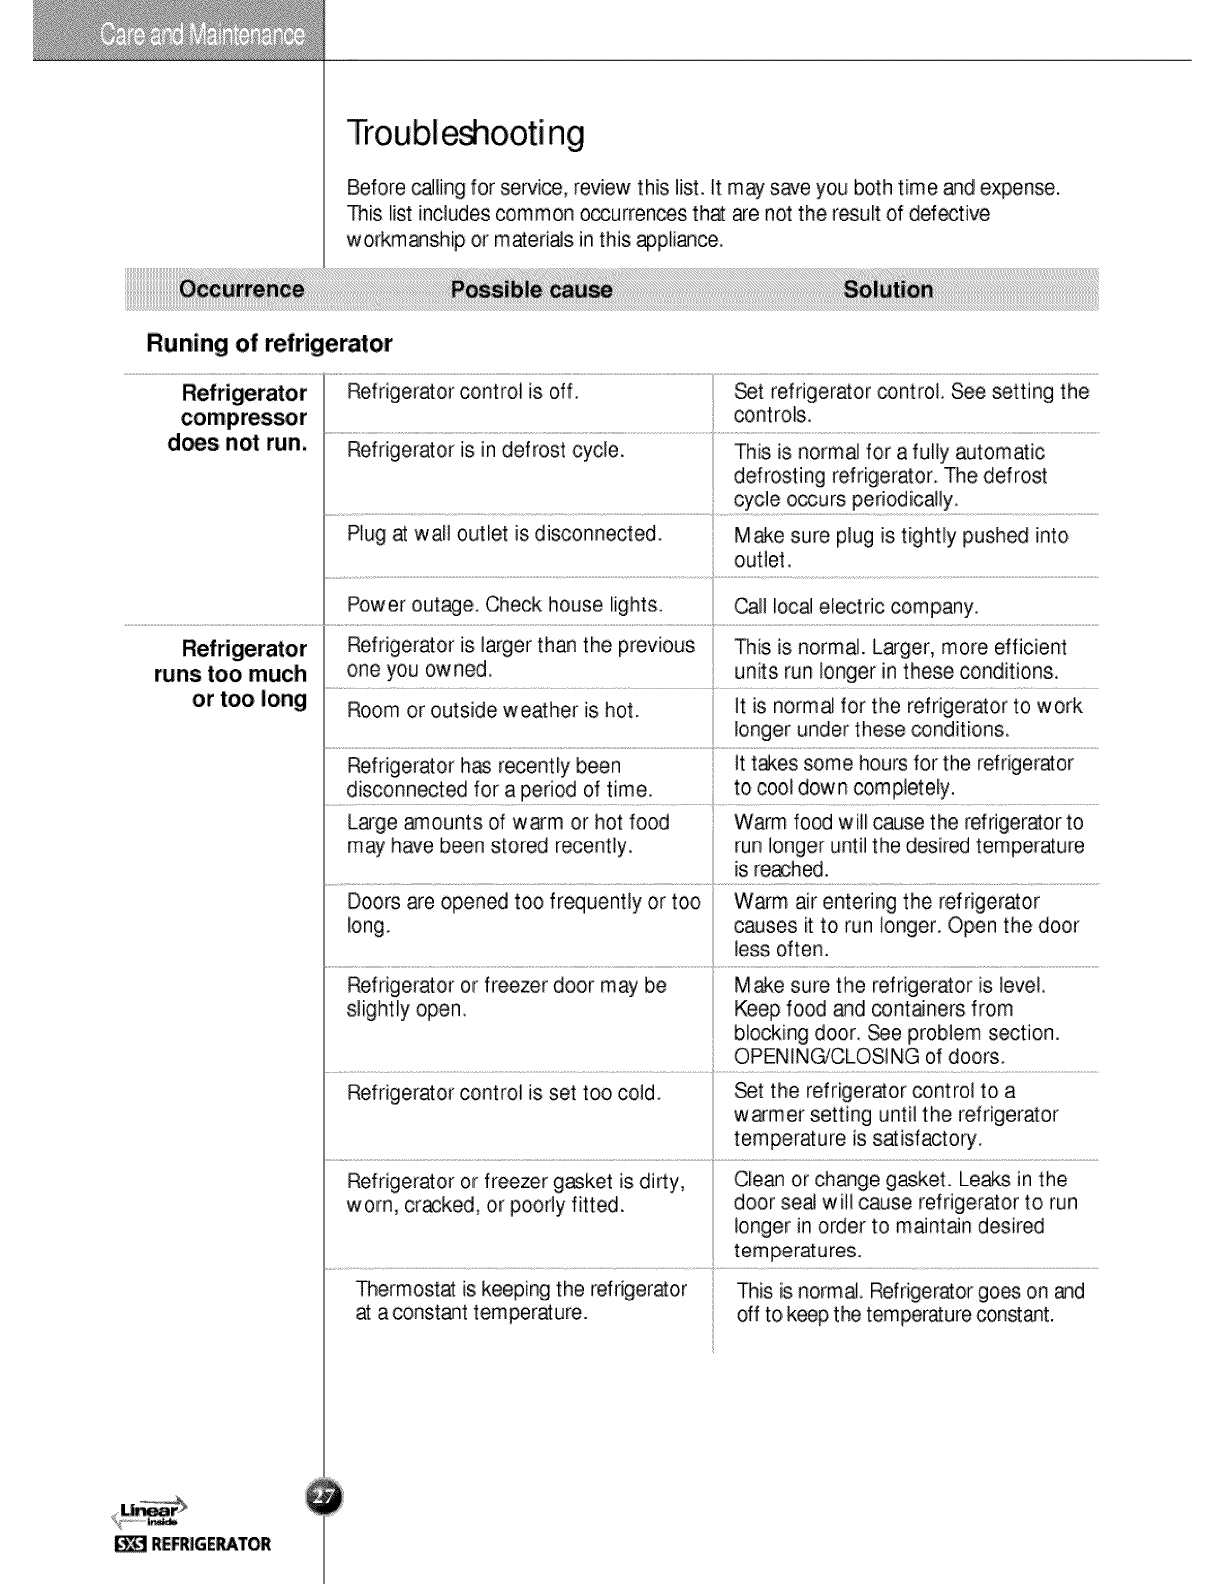
Trouble ooting
Before caJling for servia, review this list. It may satve you both time and expense.
Dis list includes common o_urrences that are not the result of def_tive
workmaqship or materials in this _pliance.
Runing of refrigerator
d_s not run,
cycle occurs periodicaJly,
Plug at wall outlet is disconnected. Make sure plug is tiglhtly pushed into
outlet,
Power outage. Check house lights. Call local electric company.
Refrigerator is larger than the previous This is normal Larger, more efficient
runs too much ..........one you owned. ............... units run longer in these conditions,
or too long Room or outside weather is hot. It is normal for the refrigerator to work
longer under these _nditions.
Refrigerator has recently been it t_es some hours for the refrigerator
disconnected for a period of time. to cool down _mpletely.
Large amounts of warm or hot food Warm food will _se the refrigerator to
may have been stored recently, run longer until the desired temperature
is re_hed.
Doors are opened too frequently or too W_m air entering the refrigerator
long. causes it to run longer. Open the door
less often.
Refrigerator or freezer door may be Make sure the refrigerator is level,
slightly open Keep food and cont_ners from
blocking door, See problem section.
OPENING/CLOSING of doors.
Refrigerator control is set too cold. _t the refrigerator control to a
warm er setting until the refrigerator
temperature is satisfacto_.
Refrigerator or freezer gasket is dirty, Clean or change gasket. Leaks in the
worn, cr_ked, or poorly fitted, door seal witl cause refrigerator to run
longer in order to maint_n desired
temperatures.
Thermostat is keeping the refrigerator This is normal. Refrigerator goes. on and
at a _nstant temperature, off to keep the temperature constant.

_ermostatiskeepingthe refrigerator
ataconstanttemperature. Thisisnormal.Therefrigeratorgoeson
andofftokeepthetemperatureconstant.
Tem_ratures are too cold
Temperature in the Freezer _ntrol is set too cold Set the freezer control to a warmer
_eezer is too _d setting until the freezer temperature is
but the re_gerator satisfactory.
temperature is
Tem_ra_re in the Refrigerator control is set too cold. Set the refrigerator control to a
refrigerator is too warmer setting
cold and the freezer
is satisfactory.
Food stored in Refrigerator control is set too coid, See above solution
drawers freezes,
Meat stored in Meat should be stor_ at a temper_ure it is normaJ for ice crystals to form due
fresh meat ju_ bel_ the freezing point of water (32°F, to the moisture content of meat.
0"C) for maximum fr_h sterne time,
Tem_ratures are too warm
Temperatures in Freezer control is set too w _m. Set the freezer or refrigerator control to
the refrigerator a colder setting until the freezer or
or freezer are refrigerator temperature is satisf_to%
too warm. ............................................................................................................................................................................................................................................................................
Refrigerator control is set too warm Set the freezer or refrigerator _ntrol to a
Refrigerator control h_ some effect on colder setting until the freezer or
freezer temperature, refrigerator temperature is satisf_tory.
............................................................................................................................................................................................i............................................................................................................................................................................................................................
Doors are opened too frequently or too Warm air enters the refrigerator/freezer
long. whenever the door is open_.
Open the door less often.
Door is slightly open. Close the door completely.
Large amounts of warm or hot food Wait until the refrigerator or freezer
may have been stored recently, h_ a ch_ce to re_h its selected
temperature,
Refrigerator has recently been A refrigerator requires some hours to
disconnected for a period of time. cool down completely.
fem_rature in the Refrigerator control is set too warm. Set the refrigerator control to a colder
is too wa_ but setting.
the keezer
temperature is
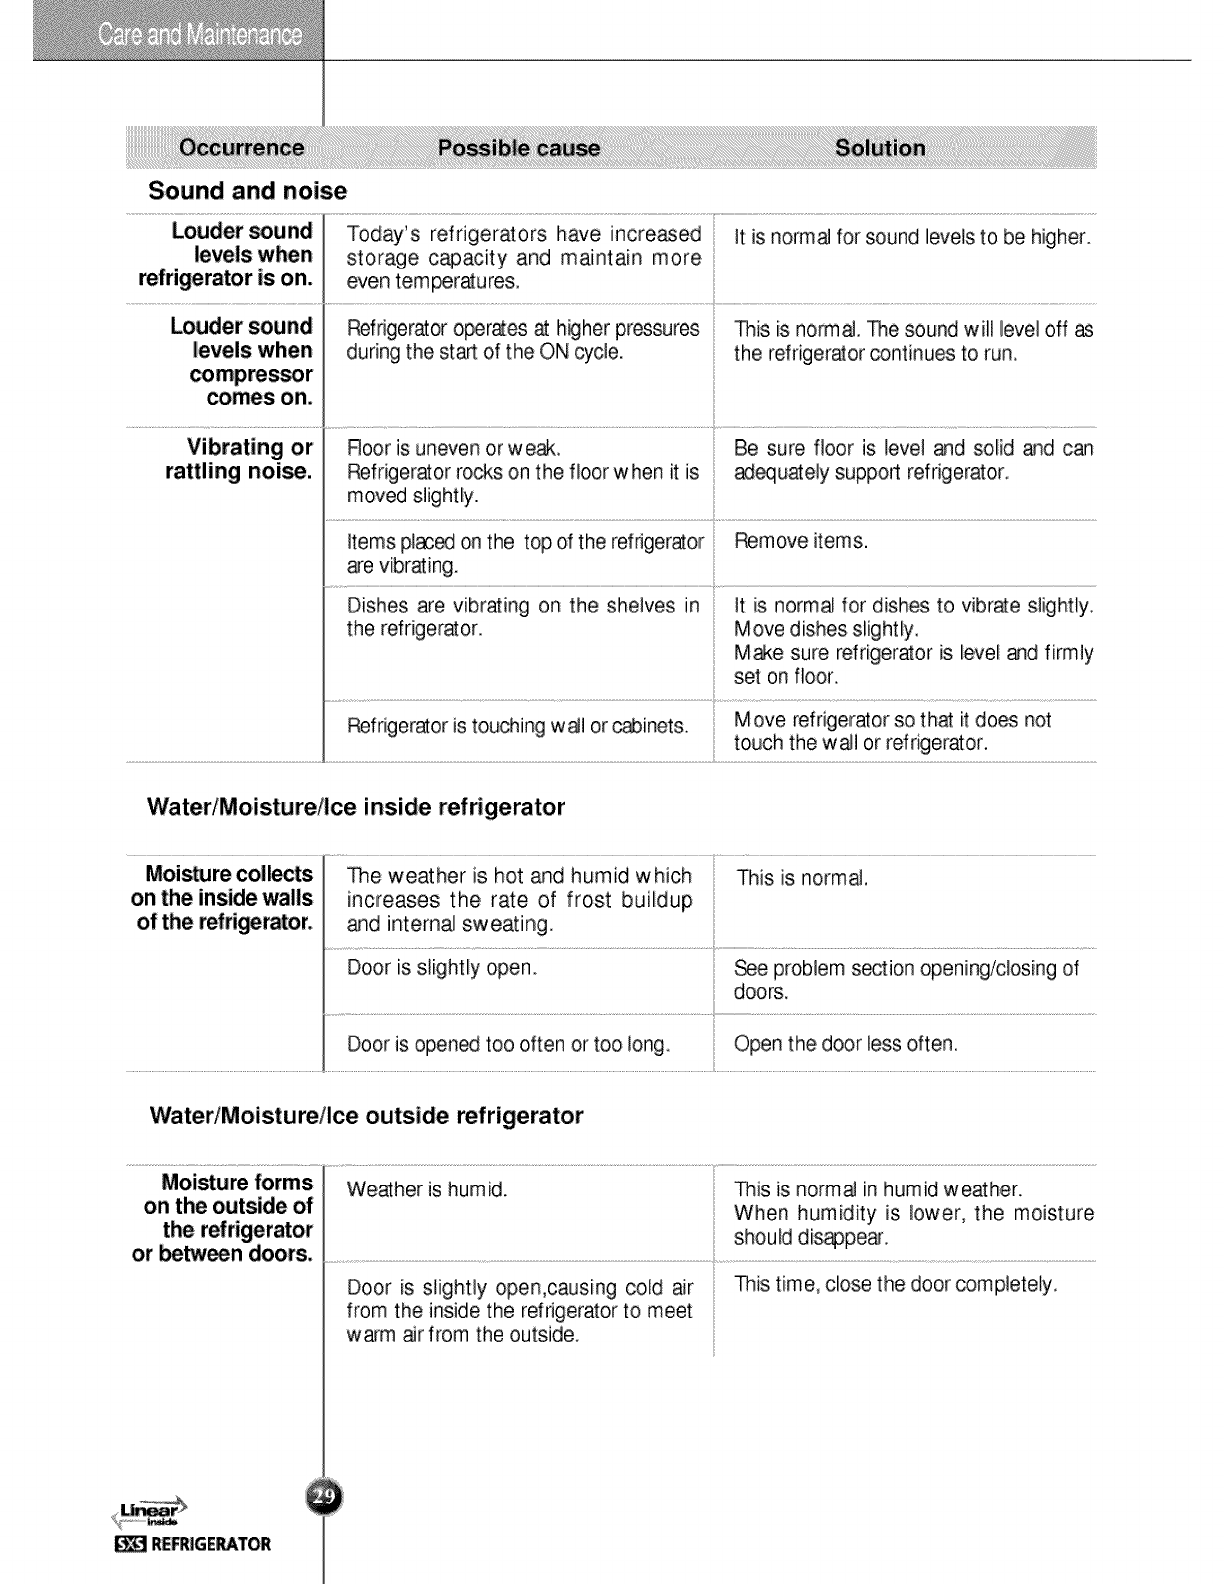
Sound and noise
Louder _und Today's refrigerators have incre_ed tt is normal for sound levels to be higher,
levels when storage capacity and maintain more
refrigerator is on. even tem_ratures.
Refrigerator operates at h_her pressures This is normal. The sound will level off
levels when during the start of the ON cycle, the refrigerator _ntinues to run.
comes on,
Vibrating or Roor is uneven or weak_ Be sur,e floor is level and solid and can
rattling noise. Refrigerator rocks on the floor when it is _uately support refrigerator.
moved slight:ly.
Items pl_ on the top of the refrigerator
are vibrating.
Dishes are vibrating on the shelves in
the refrigerator.
Remove items.
It is norm_ for dishes to vibrate slightly.
Move dishes slightly,
Make sure refrigerator is level and firmly
set on floor,
Refrigerator is touching w_l or _inets. M eve refrigerator so that it does not
touch the wail or refrigerator.
Water/Moist:ureilce inside refrigerator
The weather is hot and humid which This is normal,
on the inside walls increases the rate of frost buildup
of the refri_rator, and internal sweating.
Door is slightly open. _e problem section opening/closing of
doors,
Door is open_ too often or too long Open the door less often.
Water/Moisture/Ice outside refrigerator
Moi_ure forms
on the outside of
the refrigerator
or _tw_n doors,
Weather is humid. This is normal in humid weather.
When humidity is lower, the moisture
should dis_pear.
Door is slightly open,causing cold air This time, ciose the door completely.
from the inside the refrigerator to meet
warm air from the outside,
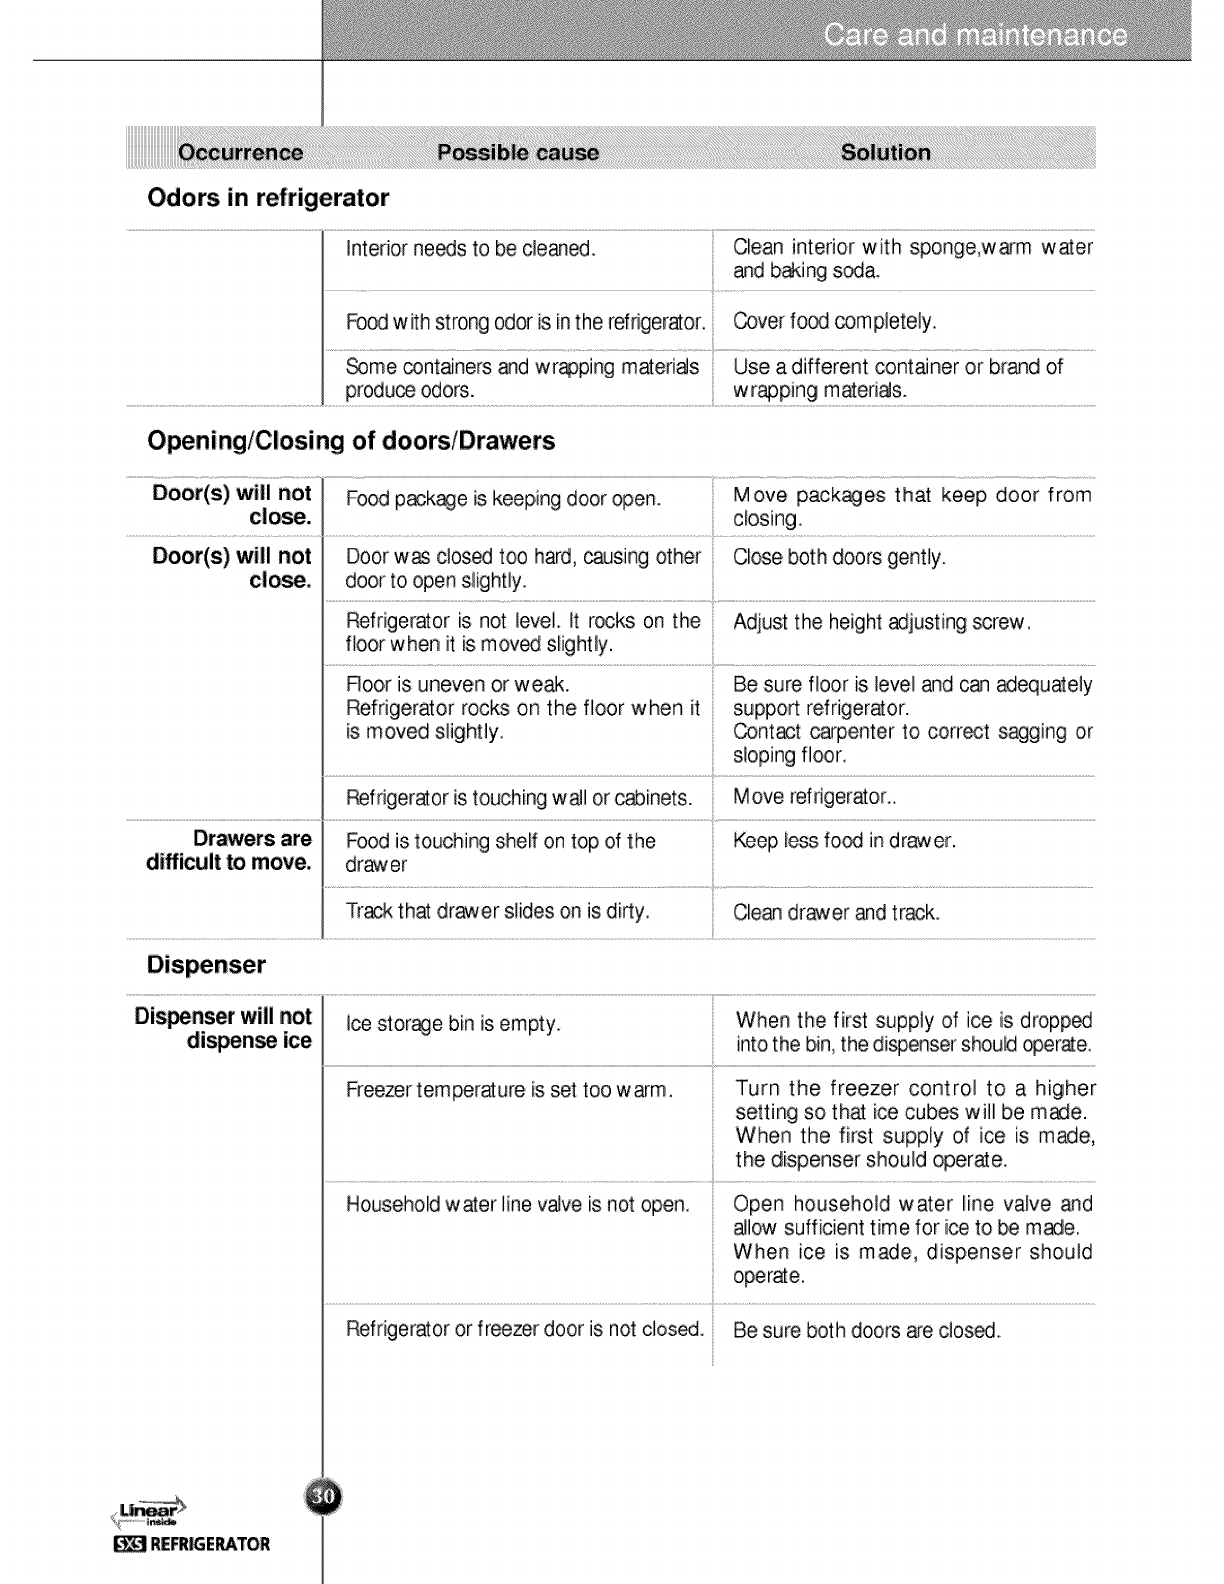
Odors in refrigerator
interior needs to be cleaned. Clean interior with sponge,w_m water
and b_.ing s_a.
Food with strong odor is inthe refrigerator. Cover fo_ _mpletely.
_me cont_ners and wr_ping maeri_s Use a different cont_ner or brand of
.................................................................................................................................................P 0d ors:...................................................................................................................................................................................w,: p!n ae ! S:...................................................................................................................................
OpeninglCIosing of doors/Drawers
Door(s) will not Food pack_e is keeping door open. Move pack_es that keep door from
closing
Door(s) will not Door w_ dosed too hard, _sing other Close both doors gently.
door to open slightly
Refrigerator is not level it rocks on the Adjust the height adjusting screw,
floor when it is mov_ slightly.
Roor is uneven or weak. Be sure floor is level and c_ _equately
Refrigerator rocks on the floor when it support refrigerator.
is moved slightly. _ntact carpenter to correct sagging or
sloping floor.
Refrigeraor istouching wall or cabinets. Move reffigeraor_
Drawers are Food is touching shelf on top of the Keep less fo_ in drawer.
difficult to move, dr_er
Track that drawer slides on is dirty Clean drawer and track.
Dis_nser will not ice stor_e bin is.empty. When the first supply of ice is dropp_
dispense ice into the bin, the dispenser shou_ _er_e_
Freezer temperature is set too warm. Turn the freezer control to a higher
setting so that ice cubes will be made.
When the first supply of ice is made,
Household water line valve is not open. Open household water line valve and
allow sufficient time for ice to be made.
When ice is made, dispenser should
operate.
Refrigeraor or freezer door is not close. Be sure both doors are closed.
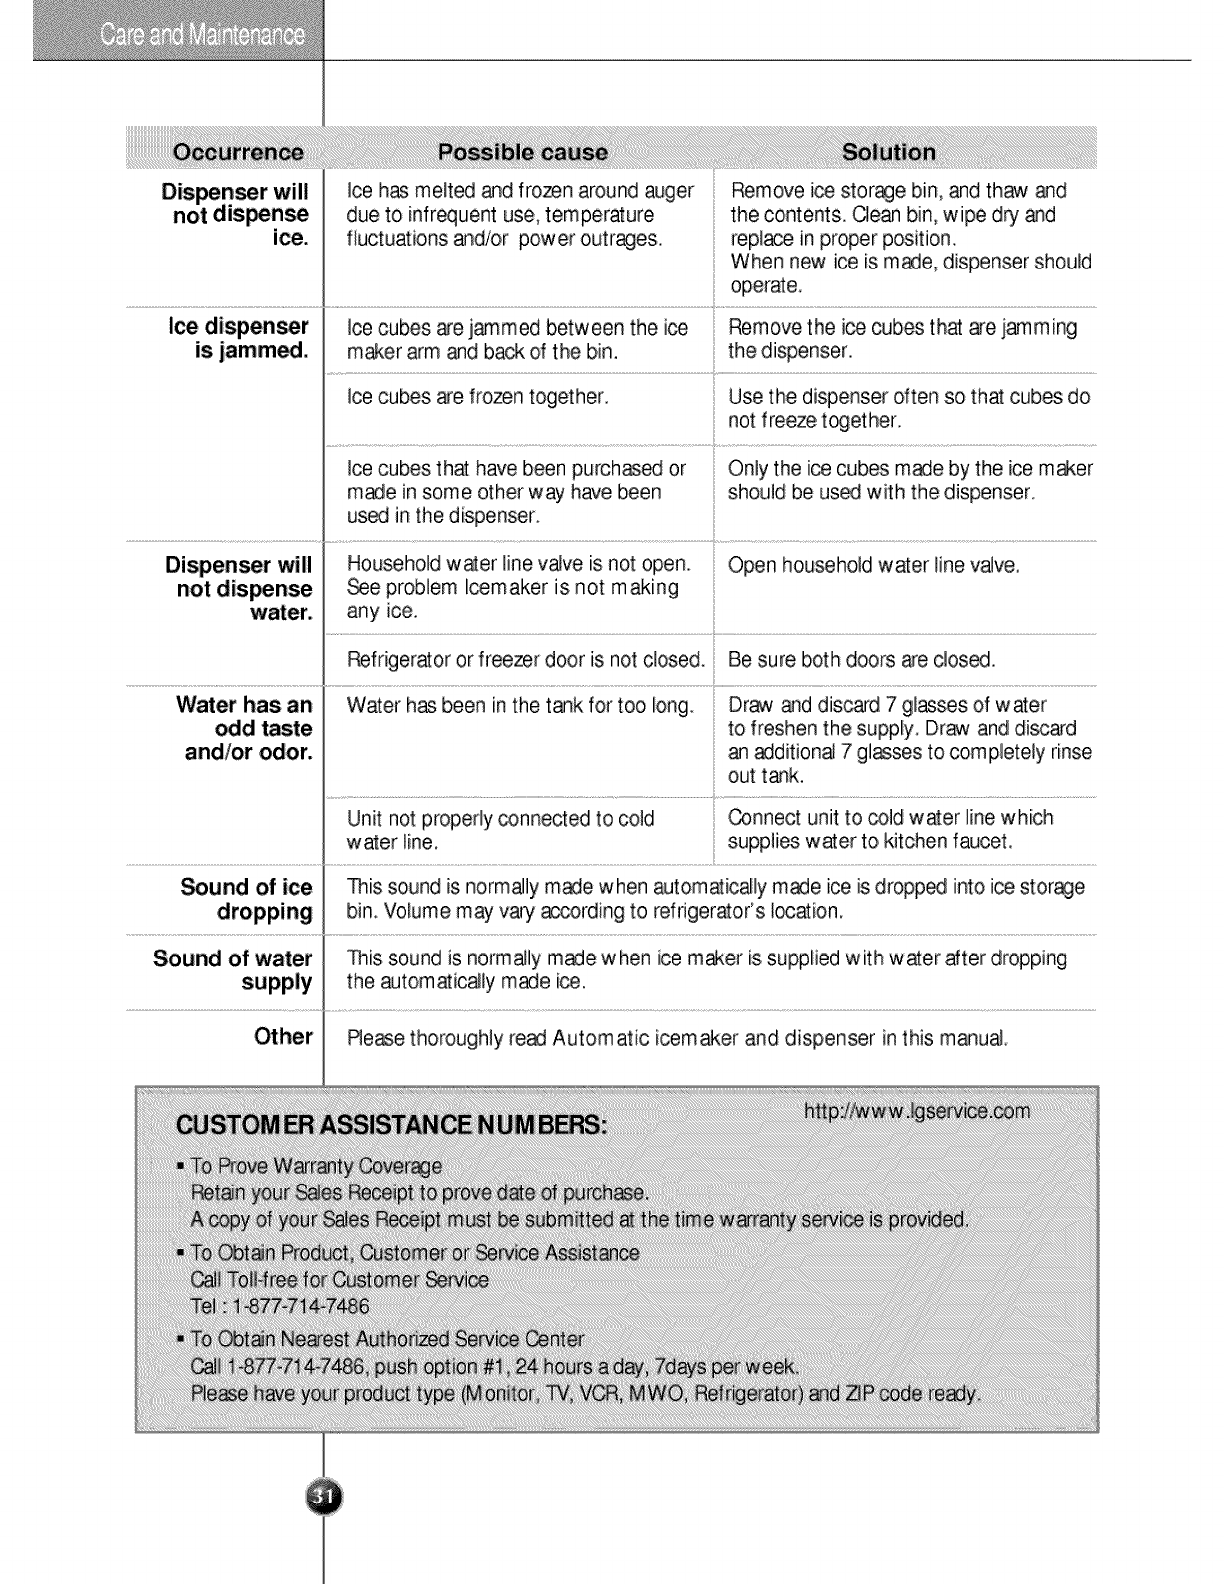
Dispenser will Ice has melted and frozen around auger
not disp,en_ due to infrequent use, temperature
fluctuations and/or power outrages,
Ice dispenser Ice cubes are jammed between the ice
is, jammed, maker arm and back of the bin.
Remove i_ storage bin, and tha,w and
the contents, Oean bin, wipe dry and
repl_ in proper position.
When new ice is m_e, dispenser should
operate.
Remove the i_ cubes that aye jamming
the dispenser.
Ice cubes are frozen together, Use the dispenser dten so that cubes do
not freeze t_ether.
Ice cubes that have been purch_ed or Only the ice cubes made by the ice maker
made in some other way have been should be us_ with the dispenser.
us_ in the dispenser.
Dispenser will Household water line vaJve is not open. Open household water line vaJve.
not dispense _e problem Icemaker is not m aking
water, any ice.
Refrigerator or freezer door is not closed. Be sure both doors are closed.
Water has an Water h_ been in the tank for too long. Draw and discard 7 gl_ses of water
odd taste to freshen the supply_ Draw and discard
and/or odor. an addition_ 7 gl_ses to completeiy rinse
out tank,
Unit not properly _nnected to cold _nnect unit to cold water line which
water line, supplies water to kitchen faJJcet,
_und of ice _is sound is normaJly made when _tomatic_ly made ice is dropp_ into ice storage
bin. Volume may vary acc.ording to refrigerator's legation,
Sound of water This sound is norrnaJly m_e w hen ice m_er is supplied with water alter dropping
the _tomatically made ice,
Re_e thoroughly read Autom atic icem aker and dispenser in this manual.

LG Electronics Inc.
LG Twin Tower, 20, Yoido-Dong,
Youngdungpo-Gu, Seoul, 150-721, Korea.
http://www.lge.com
P/NO •3828JD8587G Printed in Korea
