LG LRSPC2331T User Manual REFRIGERATOR Manuals And Guides L0301136
LG Side by Side Refrigerator Manual L0301136 LG Side by Side Refrigerator Owner's Manual, LG Side by Side Refrigerator installation guides
User Manual: LG LRSPC2331T LRSPC2331T LG REFRIGERATOR - Manuals and Guides View the owners manual for your LG REFRIGERATOR #LRSPC2331T. Home:Kitchen Appliance Parts:LG Parts:LG REFRIGERATOR Manual
Open the PDF directly: View PDF ![]() .
.
Page Count: 27

WARNINGS AND PRECAUTIONS FOR SAFETY
Please observe the following safety precautions in order to
use safely and correctly the refrigerator and to prevent
accident and danger dudng repair.
1. Be care of an electric shock. Disconnect power cord
from wall outlet and wait for more than three minutes
before replacing PWB parts. Shut off the bower
whenever replacing and repairing electric components.
2. When connecting power cord, please wait for more than
five minutes after power cord was disconnected from the
wall outlet.
3. Please check if the power plug is pressed down by the
refrigerator against the wall. If the power plug was
damaged, it may cause fire or electde shock.
4. Ifthe wall outlet is over loaded, it may cause fire. Please
use its own individual electrical outlet for the refrigerator.
5. Please make sure the outlet is properly earthed,
parficulady in wet or damp area.
6. Use standard electrical components when replacing
them.
7. Makesure the hook is correctlyengaged.
Remove dust and fore=gnmaterials from the housing
and connecting parts.
8. Do not fray, damage, machine, heavily bend, pull out,
or twist the power cord.
9. Please check the evidence of moisture intrusion in the
electrical components. Replace the parts or mask it
with insulation tapes if moisture intrusion was
confirmed.
10. Do not touch the icamaker with hands or tools to
confirm the operation of geared motor,
11. Do not let the customers repair, disassemble, and
reconstruct the refrigerator for themselves. It may
cause accident, electric shock, or fire.
12. Do not store flammable materials such as ether,
benzene, alcohol, chemicals, gas, or medicine in the
refrigerator.
13. Do not put flower vase, cup, cosmetics, chemicals.
etc., or container with full of water on the top of the
refrigerator.
14. Do not put glass bottles with full of water into the
freezer. The contents shall freeze and break the glass
bottles.
15. When you scrap the refrigerator, please disconnect the
door gasket first and scrap it where children are not
accessible.
-3-

SPECIFICATIONS
3. Ref No. : GR-L247
ITEMS
DIMENSIONS (ram)
NET WEIGHT (kg)
COOLING SYSTEM
TEMPERATURE CONTROL
DEFROSTING SYSTEM
SPECIFICATIONS
890(W)x840(D)X1750(H)
125
Fan Cooling
Mieam Control
FullAutomatic
Heater Defrost
ITEMS
CAPILLARY TUBE
FIRST DEFROST
DEFROST CYCLE
DEFROSTING DEVICE
ANTI SWEAT HEATER
SPECIFICATIONS
MOLECULAR SIEVE XH-7
4- 5 Hours
13 - 15 Hours
Heater, Sheath
Heater, L-Cord
Dispenser Duct Door Heater
INSULATION
COMPRESSOR
EVAPORATOR
CONDENSER
REFRIGERANT
LUBRICATING OIL
DRIER
Cyclo-Pentane
P.T.C. Starting Type
Fin Tube Type
Wire Condenser
R134a (1859)
FREOL @15G (320 ec)
1_0,83
ANTI-FREEZING HEATER
FREEZER LAMP
REFRIGERATOR LAMP
DISPENSER LAMP
Dispenser Heater
Water Tank Heater
Damper Heater
40W (1 EA)
40W (1 EA)
15W (1 EA)
"_ III
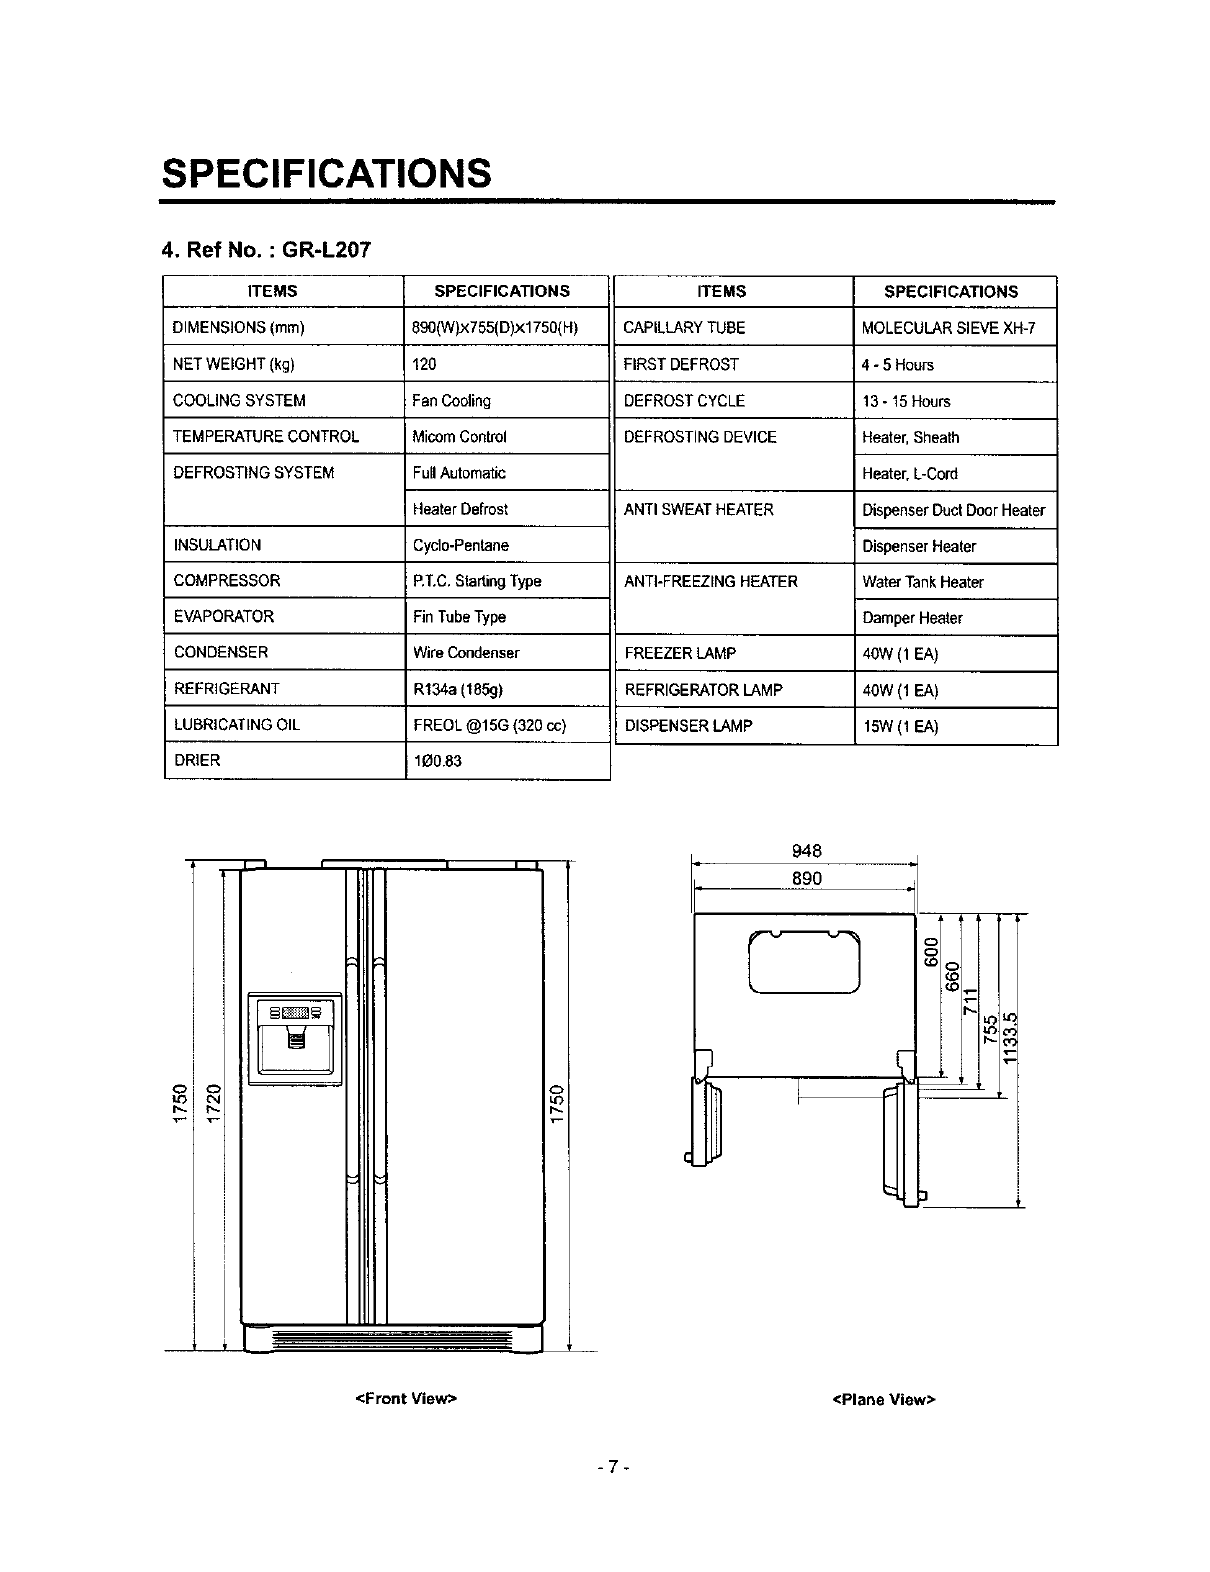
<Front View>
948
890
O
<Plane View>
-6-
SPECIFICATIONS
4, Ref No. : GR-L207
ITEMS
DIMENSIONS (ram)
NET WEIGHT (kg)
COOLING SYSTEM
TEMPERATURE CONTROL
DEFROSTING SYSTEM
SPECIFICATIONS
890(W)x755( D)x1750(H)
120
Fan Cooling
Micom Control
Full Automatic
Heater Defrost
ITEMS
CAPILLARY TUBE
FIRST DEFROST
DEFROST CYCLE
DEFROSTING DEVICE
ANTI SWEAT HEATER
SPECIFICATIONS
MOLECULAR SIEVE XN-7
4-5 Hours
13 - 15 Hours
Heater, Sheath
Heater, L-Cord
Dispenser Duct Door Heater
INSULATION
COMPRESSOR
EVAPORATOR
CONDENSER
REFRIGERANT
LUBRICATING OIL
DRIER
Cydo-Pentane
P.T.C. Starting Type
Fin Tube Type
Wire Condenser
R134a (185g)
FREOL @15G (320 cc)
100,83
ANTI-FREEZING HEATER
FREEZER LAMP
REFRIGERATOR LAMP
DISPENSER LAMP
Dispenser Heater
Water Tank Heater
Damper Heater
40W (1 EA)
40W (1 EA)
15W(t EA)
i
t
!
J
i
LO ¢-q
i
i
!
]
J
E
i
I
I
O
LO
T-
948
890
Q
O
(.O
)
Lt3
L
<Front View> <Plane View>
-7-
PARTS IDENTIFICATION
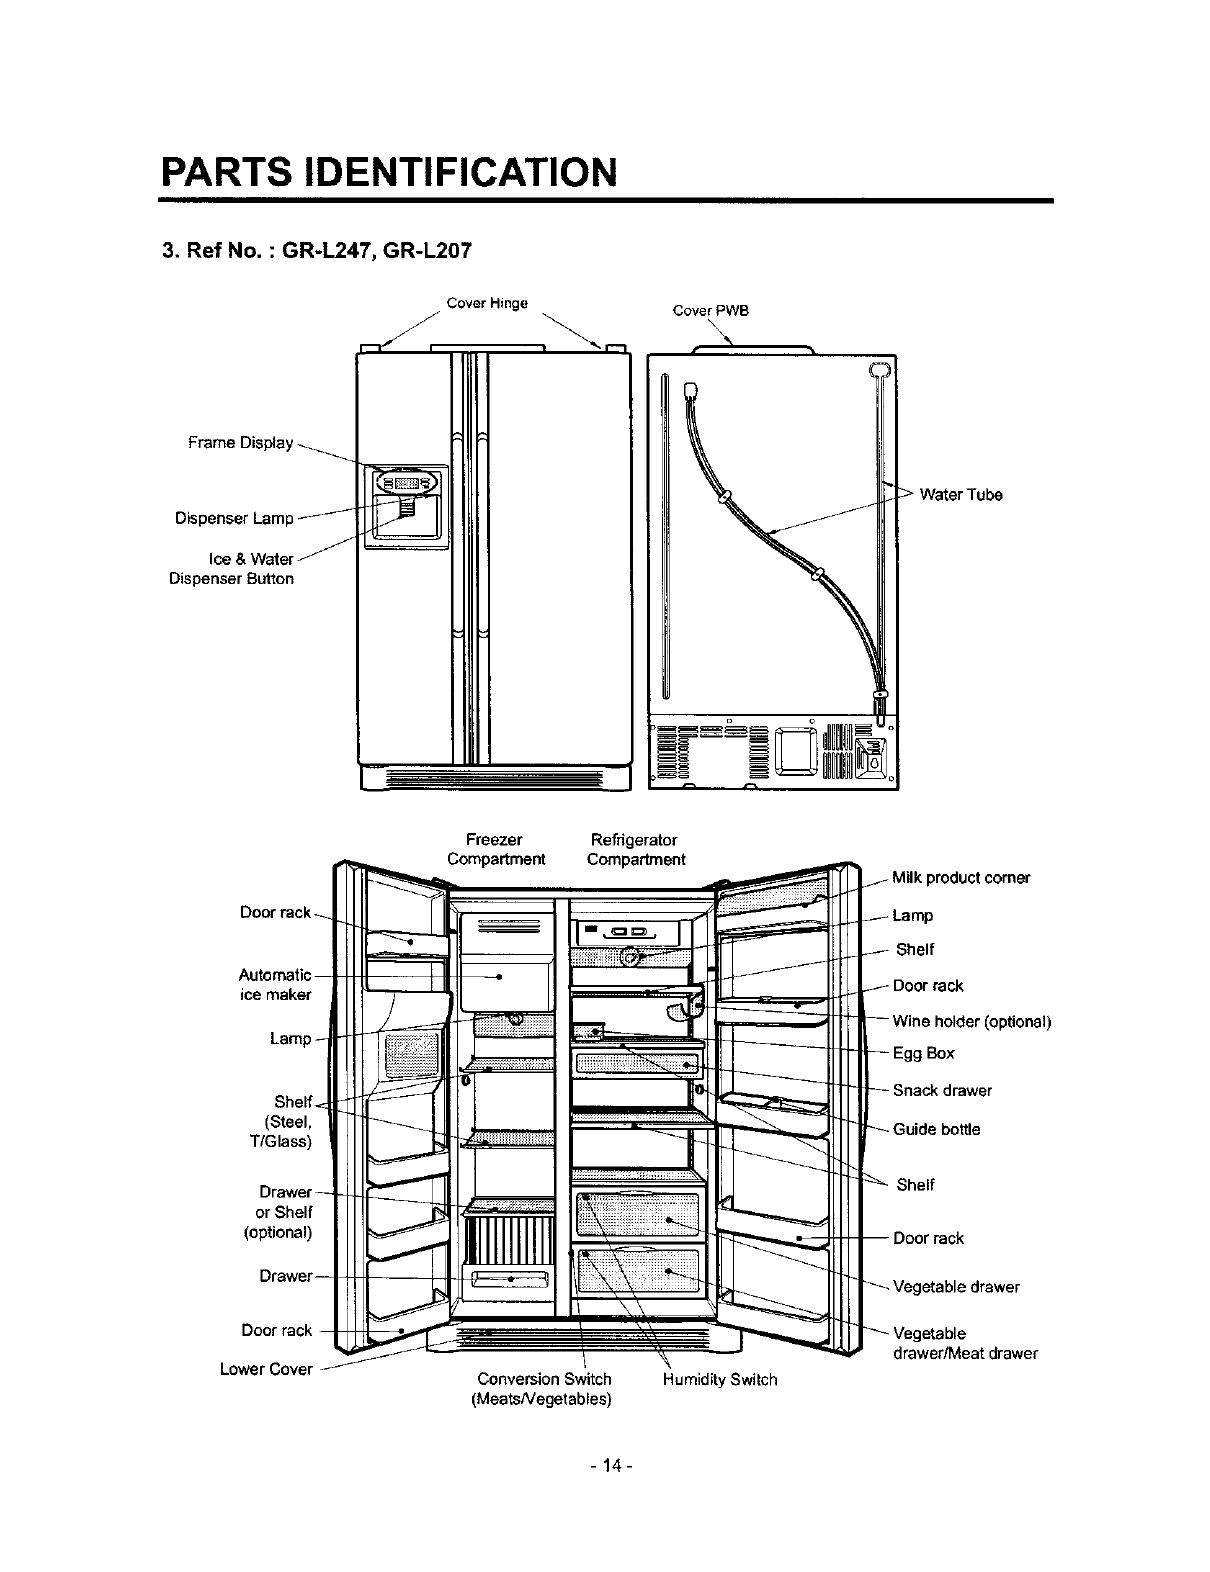
3. Ref No. : GR-L247, GR-L207
Cover Hinge
/Cover PWB
\
Dispenser
Dispenser Bu_ton
Freezer Refrigerator
Compartment Compartment
Automatic
ice maker
Lamp-Ioptional)
Box
(Steel,
T/Glass)
Drawer -
or Shelf
(optional)
Shelf
Door rack -
Lower Cover Conversion Switch
(MeatsNegetables)
Humidity Switch
etable drawer
etable
drawer/Meat drawer
- 14-

PARTS IDENTIFICATION
4. Ref No. : GR-L247, GR-L207
Cover Hinge Cover PWB
\\
Frame Display _-_
Dispenser Lam
Dispenser Button
0 I
Water Tube
Freezer Refrigerator
Compartment Compartment
ice maker
Sheff
Box
(optional)
Shelf.
(Steel,
T/Glass)
Drawer
or Shelf
(optional)
Shelf
Door rack
Door rack
Lower Cover Conversion Switch
(MeatsNegetables)
Humidity Switch
drawer/Meat drawer
-15-

TROUBLE DIAGNOSIS
1. TROUBLE SHOOTING
CAUSES AND CHECK POINTS. HOW TO CHECKCLAIMS.
1. Faulty start 1) No power on outlet.
2) No power on cord.
Bad connection between adapter and outlet. (faulty adapter)
The thnerdiameter of adapter.
-The distance between holes.
The distance between terminals.
-The thickness of terminal.
Bad connection between plug and adapter (faulty plug).
The distance between pins.
Pin outer diameter.
3) Shorted start circuit.
Nogeweron -Dlsconnactedcopperwire. rpowrcordlsdlsconnected.
powercord. L Faulty,_der_.
I_err_l elsc_icalshofL
- Fo_tyterminatcontacL -Lcosecontact
-Laged'_tancebe_een
mde terminal,
-1]in femalsterminal,
-Termiqaldisconnected.
-Bad_eveasse_b_
-Dlscoenact_.F Weakconnac_on.
_ Sho_tlssatedcord_.
L Womout_odbtade.
O.L.Pm oil. Capa:ilyofO.LPissrr_l.
- Cha'acte_is_csofO.LPisba_
_Badcennec_on.
-Po_s InnarI_wim blowsout
_,sconnect_l.Badintemalco_ecti_.
Faultyterminah::au_ng(Cuvaeiscut).
•Badsoldeing.
- Noelectricpowerco oompress_.- Faultycompress_.
-FaultyPTC. Powerdcesnotconduol.- Damage.
Bad_. - Ini_ resistancelsbig.
Bedc_aec_ withFTOObose.
compressor. LAssen'_ isnotpossible.
•Bedterminalccon_oa.
4) Duringdefrost. FStart automatic defrost,
LCycle was set at defrost when the refrigerator
was produced.
* Measuring instrument :
Multi tester
•Check the voltage.
If the voltage is within _+85%
of the rated voltage, it isOK.
• Check the terminal
movement.
• Check both terminals of
power cord.
Power conducts :OK.
No power conducts : NG
•Check beth terminals of
O.LE
If power conducts : OK.
If not :NG.
•Check the resistance of both
terminals,
At normal temperature6 :
OK.
If disconnected :_.
-72 -

TROUBLE DIAGNOSIS
CLAIMS. CAUSES AND CHECK POINTS. HOW TO CHECK
2. No cooling. 2) Refrigeration system is clogged.
Moisture
clogged.
-No_
poweron
IJlerm-
ostat
Residual
_theevamrat_ - .AirBlow_9- Notpedom,_l.
Tooshod.
-Impos_e mois_m
(:onfin_.
Lowar pressure.
- Leaveit intheair, _ Dun_ rest _',e.
L,_en_K
- Capsam missed,
-Residualmoisture.- Notdriedinthecompresso_
Elapsedmorethan6 monO_Biterd_ng
- Capsaremissed.
-Nopressurewhenitisopen.
' -Insul_ent drier
capadty. [ D_ drier- Driertemperature.
Leaveitinthe ai_ _ on package
omdiiion.
.Goedsto,_eafar
r_r_ng.
-Residualmo_ure
inpipes. - calm m_sed.FDumg_,r_,
• Ouli_ work.
L P_I_l.
Toa sl_me.
Lowairpres,,_re,
.Lessd=yai-,
-Moislure_ -Leavaitinthe_ - Moisturepene_a_n.
i_o the_Ta_on ol.
Sho_p_t
-W_joint F_oegaps,rToolarge.
clogged. L[3_rnagedpipos.
Toomu_ sold_
-Tlle ¢api_alylube _ depth.-Toomuah.
-D_ do.oil. _be_-Overheat
Ck_edwithf_ge matedaJs.Oes_,:_powd_
-Weld ogde&
i-I:_era_le,
Reducedmosssec_n byc_ng. - Squeezed.
Fcompressor_ isdsoo_cted.
Foraige ma_al dogging. LFore_ matarialsareinthe i_Pe,
•Check the clogged
evaporator by heating (as
soon as the cracking sound
begins, the evapo,'ator start
freezing)
•The evaporator does not coo
from the beginnig (no evidec,
of misture attached).
The evaporator is the same
as before even heat is
applied.
- 73 -

TROUBLE DIAGNOSIS
CLAIMS,
3. Refrigeration
is weak.
CAUSES AND CHECK POINTS.
1) Refrigerant Partly leaked. [- Weldjcintleak
LPartsleak.
2) Poor defrosting capacity.
Drain path(pipe)ck:_ged, -Inject P/U intodrainhese._ InjectIJ_oughthe
hole.
-- Sealw_ drein.
-Fore_ rr_terials-- PM lumpinput.
pene_on -- So_wq_ut
inp_
Cap dr'_nis notdisconcected.
-Defros[heaterdoesnot Pads
generateheat. disconnected.-Rate
heater
Wireiscut.
-HeaUngwire.
be_e_hea_ng
andelec_ic'_re.
- Dentby_ evaporate.
-I:_orternmalcontadis.
-Cord - W_iscut
heater - Leadwire.
-Hea_gw_e.
-Cmtactpo_t
= betweenhea_g a_d
eiec_icwim.
- He_ngwre_c_0de_
-Water_.
I- Badtemina_conned_on.
HOWTO CHECK
• Check visually.
• Check terminal
ConductJon: OK.
No conduction:NG.
ifwire is not cut, refer to
resistance,
P=Power
V=Voltage
R=Resistance
p=__
R
R=__
P
- 74 -

TROUBLE DIAGNOSIS
CLAIMS.
3. Refrigeration
is weak.
CAUSES AND CHECK POINTS. HOW TO CHECK
ReskJual
frost -Weak heatfrom I'eate_ FSheath i-lealer, raled.
t-H_e-rated
LHeateroold-L- latnd.
-Badhe_te-ass_rnbly, L Heaterp_ate [ No contacttodrain,
Lc_ened stoppe-cord
Heatermrd-L F NCtc&qtacltothe
LI_oca_Jmofassembly
(topand midale).
Defrost,Sense.
-Tcosho_tdefr_ _ne, [- Faulty_.
- Seat_(rn_s_g,bca_m._).
-S_uc_ralfaull [ Gasketgap,
LA__fbwU_:x_jh_e fanmotor.
Badinsulationofcasedoo_
- Noautomat d6_o6_j.
- D_'ro_ dcos nolmtum,
3) Cooling air leak.
- [_:_',_. B,_l a_,_n.
[W_k _di_ f_ at_ree.
4) NO cooling air circulation.
-Faultyfanmo_r. -Faumo_ FSelf_ked.
[-W_ is c_L
m _1 _v_nal conlact
[_r s_t_.
i
-Faults, Con_ct distance,
-- Buttonpie&sure.
Meltedconlad_
-- Contact.
- Rm_era_ a'd freezerm,@_ m_m_l.
-Bul_o_lisnot pressed. Poordool
attachment.
- DoorIin_
C,en_-ac_ninner
line_
M_nment
Badterrnin_
cconec_n.
P/U liquidleak,
• Check the fan motor
conduction: OK.
Noconduction:NG,
-75-

TROUBLE DIAGNOSIS
CLAIMS.
3. Refrigeration
is weak.
CAUSES AND CHECK POINTS.
4) No cooling air circulation.
r Faulty fan motor.-- Fanis F Fan shroudcontact,-Clanrano_.
/cons_ined _-Oam_nge_porat_c_ta_
L AccumulatedresidualfmsL
L Small cootingair insufifdant F Fanoverload.- Fanntsuse.
discharge, motor RPM _BadlowtermperatureRPMsharacterklJcs.
_ Rat_ N_r rn_susa.
I._volta_.
-- F_yf_. i-Fan misuse,
_Bad shape.
I-Loose_an, -N__ _ed.
Llnsert depth.
Shorud.-- Bent,
-- Iceand_eign rnate_ts an rota_ngparts.
5) Compressorcapacity. F Ra_grn_se.
p smu:_hac_
L Lowva_ge.
6) Refrigerant F _ ofcha_m9c_
too much ortoo little. _- Wmngset_gofref_gem_
Inaulf_iantcompressor.- Faultyco_presso_
7) Continuous operation
-No contact of temperature controller. - Foreign materials,
8) Damper opens continuously.
i Foreign materials F-- P/Uliquddump.
jammed. _ EPSwat_ sedime_
_- S_ew,
Failed sensor. - Position of sensor.
Characteristics {_ Bad characteristics of its own temperatue.
of damper. _ Parts misuse.
/
L_ Charge of temperature - Impact.
characteristics.
9) Food storing place. - Near the outlet of cooling air.
HOW TO CHECK
• Check visually after
disassembly.
• Checkvisuallyafter
disassembly.
- 76 -

TROUBLE DIAGNOSIS
CLAIMS. HOW TO CHECK
4. Warm
refrigerator
compartment
temperature.
5. No automatic
operation.
(faulty
contacts.)
6. Dew and
ice formation.
CAUSES AND CHECK POINTS.
1) Colgged cooling path.
[ P/U ak.
Foreign materials.-- P/U dump r_uid.
2) Food storate. T Storehctfood.
Storetoo rnucha__ce.
Dooropen.
_ Pack_es b_k airItow.
1) Faulty temperature sensor in freezer or refrigerator compartment.
Faultycontact.
Faultytemperature characteds_Jcs.
2) Refrigeration load is too much.
3) Poor insulation.
Food. F T0omuchfood.
LI-_ food.
_J_ koper_anda_g.
4) Bad radiation. THi_ambient ternS.
_ Spaceissecluded.
5) Refrigerant leak.
6) Inadequate of refrigerant.
7) Weak compressor discharging power. _ DifferentralJn(:j.
L Sinai capadly.
8) Fan does not work.
9) Button is positioned at "strong."
1) Ice in freeezer compartment.
-Externalairinflow.-- Rubber molu assem_ dRctior(reveree).
-Dooropens -- Weak d_x dos_g pow_
L _d Nn6_ d_r cl_ng.
- Gaparound gasket -- _, distor_n, k:,:_e,doortwisted, come" not
fullyh'l_ed,
-Focd vapec -- Storinghotfood.-- Ur:_ealedfsod.
2) Condensation in the refrigerator compartment.
Ixtt n_t Oc_. Door sag.
_ F_I h_lem dc_r _slng.
Gasketgap.
3) Condensation on liner foam.
-Csol air le_ i- Not rumyIliad., Tooptablepart.
and_u_sm_. /L-OUtPlateP_I-Pat
_Gask_gap.
• inspect parts measurements
and check visually.
- 77 -

TROUBLE DIAGNOSIS
CLAIMB.
6. Dew and
ice formation.
7. Sounds
CAUSES AND CHECK POINTS.
4) Dew on door.
Dew on the duct door. - Duct door heater is cut.
Dew on the dispense P RecessHea_is cut.
recess. L Ductdo_is opefl.!Foreignmatel_ doggng.
-- Dew on the door surface. I- Not fully filled. T Surface. 7 ..
| LCormer. _, _shxfage
L P/U liquid contraction. _ _ie_
-- Dew on the TBadwingadheslon.[-Wingsag(Iowefpad).
gasket surface. [ LDOOrr_e_shapemismatch.
Ccrne_-- ]-Toomud__tch.
[HomeBarheaterisc_LBn:_'er"
5) Water on the floor.
-- Dew in the refrigerator compartment.
Defrosted water overflows. -- Clogged discharging hose.
-- Discharging hose Evaporation tray located at wrong place.
location.
Tray drip. I_ Damaged.
I_ Breaks, holes.
Small Capacity.
-- Position of drain.
1) Compressor compartment operating sounds.
-- Compressor sound TSound from machine itself.
inserted. L_ Bound from vibration.
-- Restrainer.
-Rubber_-Too hard.
seat. _Distorted.
_Aged.
L_ Burnt.
-Stopper.--Bed Stopper, Not fit
assembly, j(inner
J diameter
|of stopper).
_'i31ted.
_-Not
- Compressor base not connected.
-Bad welding compressor stand(fallen).
Foreign materials in the compressor
compartment.
O.LP. sound. -- Chattering sound.
Insulation paper vibration.
-- Capacitor noise. _ Pipe contacts each other. - Narrow interval.
Pipe sound. _ No vibration damper.l- Damping rubber-Q.
_ Damping mbber-S.
Capillary tube unattached.
HOW TO CHECK
- 78 -

TROUBLE DIAGNOSIS
i
CLAIMS. _CAUSES AND CHECK POINTS. HOW TO CHECK
7. Sounds 1) Compressor compartment operating sounds.
-- Transformer sound. _ Itsown fauJt.-- Coregap.
Badcoanection.-- C_Tectscrewmanec_n.
-- Ddp tray vibration sound Badassembly
- Fore_jnmate_ts inside.
-- Back cover machine sound. 7- Badcoanec_an.
L Par_ydamaged
-- Condenser drain sound. _ Not connecled.
L Badp_ calking.
2) Freezer compartment sounds.
-- Fan motor sound. _- Normalopeta_ngsound.
L _br',t_ons::xJnd._ Aged_seat
_-- Bad to_lue_ assemblingmotor
bracket.
-- Sounds from fan _ Fan guide contact.
contact. _- ShroudI_rr contact.
LDarm__co_a_
Residualf_ostcantanL_Poorb'eabne_Cordheat_
LNam:_evaporat_intewal.
-- Unbalance fan sounds., _. -- - Surface_ e_d=_ns.
FandistorS_.
B_
-Iceonthefan.--Airintake(oppositetomotor
ru_oerassertS)
-- Motor shaft --F- Suppederdisoded.
contactsounds. _- Tireddudngmotorassembly.
-- Resonance.
-- Evaporatornoise. Ev-'_ p_ec_qtacL-- NOdampingevaporato_
Somdfr_n _t. -- Strausss_d p_eshoe in
acc_lxJ_:or.
-- Soundfromfinevalx_aorandpipedudngexpans_
andemir_c_on.
3) Bowls and bottles make contact on top shelf.
4) Refrigerator roof contact.
5) Refrigerator side contact.
6) Insufficient Lubricants on door hinge.
- 79-

TROUBLE DIAGNOSIS
CLAIMS. CAUSES AND CHECK POINTS, HOW TO CHECK
8. Faulty lamp
(freezer and
refrigerator
compartment).
9. Faultyinternal
voltage(short).
1) Lamp problem. --7 Filament blows out.
Glass is broken.
Not inserted.
2) Bad lamp assembly. L_ Loosened by vibration,
3) Bad lamp socket.
-- Disconnection._ Bad soldedng.
Bad rivet contact.
--Short. Water penetration-- Lowwater
level in tray.
:Bad elasticity of contact.
-- Bad contact(corrosion).
4) Door switch.-- -- Its own defect.
-- Refrigerator and freezer switch is reversed.
-- Tray]el distance.
-- Bad connection.
-- Bad terminal contact.
P/U liquid leak.,
1) Lead wire is damaged.
-- Wire damage when assembling P.T.C. Cover.
Outlet burr in the bottom plate.
Pressed by cord heater, lead wire, evaporator pipe.
2) Exposed terminal.
-- Compressor Compartment terminal. - Touching other
components.
-- Freezer compartment terminal. - Touching evaporator pipe.
3) Faulty parts.
- Transformer. -_ Coil contacts cover.
I _Welded terminal parts contact cover.
'-Compressor. -- Sad coil insulation.
-Plate heater,
- Melting fuse. -- Sealing is broken. Moisture penetration.
- Cord heater. T Pipe damaged. --Moisture penetration.
L-- Bad sealing.
- Sheath heater.
•Connect conductionand
no_duction parts and
check withl_ster.
Conduction: NG.
Resistance=: OK,
- 80 -

TROUBLE DIAGNOSIS
CLAIMS.
10. S_u_ure,
appearance
and othem.
CAUSES AND CHECK POINTS. HOW TO CHECK
1) Door foam.
Sag _
We_torque of _ Bdt isbosened dunng
h_jacor._c_ L _ansm_a_,
L- Screwv,_mout.
We_ gasket -- Adhesionsurface.
adhesion.
F_edtape -- Notwell_xed.
--Noise during-- Hn:je_. T B_ doorfoam.
operation. _ H_ _ed-Poor _ess.
Nowashe_.
_No greasea_d n0{enough
quan_y
i
LMalfunction. T Not dosed Interferenceb_'weendoor_andinner
Re_iger'_r-- I--S_opp_rnout_
co_e_s I--Badfre_z_'oor_ d_or
cornp_is _- Nos_opper,
dosed(fauh,s'_pper).
2) Odor,
--Temperature of-- Fr_h._ Faultydampe_controt.
refrigerator _Buttonissetat"w_l#.
compartment. _ Do_"isopen('_erFarenceby
-- Deodorizer. _ No deoderiz_.
_-- Poorcmadty
Food Storage. 7- Seatcondi_
b s_e_odoro=fo_
L_ Longtermst_age.
--Others. Odorsfromchemicalp_0cucts,
-81 -

i
FO
2. Faults
2-1. Power
Problems
No power on
outlet.
Fuse blows out.
Causes
- Power cord cut.
- Faulty connector insertion.
- Faulty connection between plug
and adapter.
-Short circuit by wrong connection.
- Low voltage products are
connected to high voltage.
- Short circuit by insects.
.Electricity leakage.
- High voltage.
. Short cimuit of components
(tracking due to moisture and dust
penetration).
Checks
- Check the voltage with tester.
Check visually.
- Check visually.
- Check the fuse with tester
or visually.
-Check the input volt are with tester
(between power cord and products)
- Check the resistance of power cord
with tested (if it is 0_;;_,it is shorted).
•easures
-Replace the components.
-Reconnect the connecting parts.
- Reconnect the connecting parts.
- Find and remove the cause of
probtam(ex, short, high voltage,
low voltage).
-Replace with rated fuse.
2-2. Compressor
Problems
Compressor - Faulty PTC.
does not
operate,
Causes
-Compressor is frozen,
Checks
-Check the resistance.
Vlaue:_o is defective,
- If compressor assembly parts are
normal(capacitor, PTC, OLP),
apply power directly to the
compressor to force operation.
(_ Auxiliarywinding__
OLP It starts as soon as it is
contacted.
•easures
-If resistance is infinite, replace it
with new one.
- If it is not infinite, it is normal,
- Check other parts.
- During forced operation:
- Operates: Check other parts.
- Not operate: Replace the frozen
compressor with new one, weld,
evacuate, and recharge refrigerant.
• Refer to weld repair procedures.
Remarks
-Replace with rated
fuse after confirming
its specification.
• If fuse blowns out
frequently, reconfirm
the cause and prevent.
Remarks
..-I
F.

2-3, Temperature
Problems Causes Checks Measures Remarks
- Replace fan motor.
High
temperature
in the freezer
compartment.
Poorcool air circulation due to faulty
fan motor.
Faulty fan motor due to faulty door
switch operation.
Bad radiation conditions in
compressor compartment.
- Lock-- Check resistance with a
tester,
0_: short.
_: cut,
- Rotate rotor manually and check
rotation.
- Wire is cut.
-Bad terminal contact: Check
terminal visually.
- Fan constraint. - Fan shroud
contact: Confirm
visually.
- Fen icing:
Confirm visually.
- iced button (faulty) operation:
Press button to check
- Faulty button pressure and contact:
Press button to check operation.
*Door cannot press door switch
button: Check visually.
- Check the clearance between the
refrigerator and wall (50 mm in
minimum).
- Check dust on the grill in
compressor compartment.
- Check dust on the coils condenser.
-Reconnect and reinsert.
- Maintain clearance and remove ice
(RepaLr and/or replace shroud if fan
is constrained by shroud
deformation),
- Confirm icing causes and repair.
-Replace door switch.
-Door sag: fix door.
- Door liner bent:replace door or
attach sheets.
- Keep clearance between
refrigerator and walls (minimum
50ram).
- Remove dust and contaminants
from gdl] for easy heat radiation,
- Remove the dust with vacuum
cleaner from the coils condenser
while the refrigerator is off,
-The fan may be
broken if cleaning
performs while the
refrigerator is on.
F.
o

t
2-4, Cooling
Problems Checks
High
temperature
in the freezer
compartment.
Causes
Refrigerant leak.
Shortage of refrigerant.
Check seouence
1. Check the welded parts of the
dner inlet and outl_ and dder
auxiliary in the compressor
compartment (high pressure side).
2. Check the end of compressor
sealing pipe (low pressure side).
3. Check silver soldered parts.
(Cu + Fe /Fe ÷Fe).
4. Check bending area of wire
condenser pipe in compressor
compartment (cracks can
happen during bending).
5. Check other parts (compressor
compartment and evaporators in
freezer compartment).
Check frost formation on the surface
of evaporator in the freezer
compartment.
- If the frost forms evenly on the
surface, it is OK.
- If it does not, it is not good.
Measures
Weld the leaking part, recharge the
refrigerant.
-Find out the leaking area, repair,
evacuate, and recharge the
refrigerant.
i" NO leaking, remove the remaining
refrigerant, end recharge new
rethgeranf.
Remarks
Drier must be replaced.
Drier must be replaced.
o
o

;o
O1
Problems Checks Measures Remarks
Direr must be replaced.
High
temperature in
the freezer
compartment.
Causes
Cycle pipe is clogged.
Leakat loop pipe weldjoint
(discharge) in compressor.
Faulty cooling fan in the compressor
compartment.
Check sequence.
1. Check temperature of condenser
manually.
tf it is warm, it is OK.
If it is not, compressor discharging
joints might be clogged.
2. Manually cheek whether hot line
pipe is warm.
if it is warm, it's OK.
If it is not, condenser outlet weld
joints might be eolgged.
Check sequence.
1. Manually check whether
condenser is warm, It is not warm
and the frost forms partly on the
evaporator in the freezer
compartment.
Check sequence.
1. Check cooling fan operation.
2. Check that cooling fan is
disconnected from the motor.
- Heat up compressor discharging
weld joints with touch, disconnect
the pipes, and check the clogging.
Remove the causes of clogging,
weld, evacuate, and recharge
the refrigerant.
-If it's warm, it's OK. If it's not,
condenser discharging line weld
joints might be clogged,
Disconnect with torch, remove the
causes, evacuate, and recharge
seal refrigerant.
Replace the compressor, weld,
evacuate, and recharge refrigerant.
- Replace if motor does not operate,
- If fan is disconnected, check fan
damage and reassemble it.
• Refer to fan motor disassembly
and assembly sequence,
Drier must be replaced.
F.
o

;o
cn
2-5, Defrosting failure
Problems Causes Checks Measures Remarks
No defrosting. Heater does not generate heat as
the heating wire is cut or the circuit
is shorted.
1) Heating wire is damaged when
inserting into the evaporator.
2) Lead wire of heater is cut.
3) Heating wire at lead wire contacts
is cut.
Sucking duct and discharging hole
are clogged:
1. Impurities,
2. Ice.
Gap between Sucking duct and
Heater plate(Ice in the gap).
Wrong heater rating (or wrong
assembly),
1, Check the resistance of heater.
O_;_:Short. _: Cut.
Tens to thousands _: OK,
2. Check the resistance between
housing terminal and heater
surface.
OQ: Short, o=Q:Cut.
Tens to thousands _]: Short.
1. Confirm foreign materials. In case
of ice, insert the copper line
through the hole to check,
2. Put hot water into the drain
(check drains outside).
1. Confirm in the Sucking duct.
1. Check heater label,
2. Confirm the capacity after
substituting the resistance value
into the formula.
p= _ (V: Rated voltage of user country)
R (R: Resletanceof tester[Q])
-- Compare P and level capacity,
Tolerance: ±7%
Heating wire is short and wire is cut.
•Parts replacement: Refer to paris
explanations,
1) Push out impurities by inserting
copper wire. (Turn off more than
3hours and pour in hot water if
frost is severe.)
2) Put in hot water to melt down frost
3) Check the water outlet.
4) Push the heater plate to sucking
duct manually and assemble the
disconnected parts.
1) Turn offthe power, confirm
impunfies and ice in the gap, and
supply hot water until the ice in the
gap melts down.
2) Push the Heater plate to drain
bottom with hand and assemble
the disconnected parts.
Faults:replace,
- How to replace: Refer to main parts.
Seal the lead wire with
insulation tape and heat
contraction tube if the cut
lead wire is accessible to
repair.
o

t
Oo
Problems Causes Checks Measures Remarks
No defrosting - Check melting fuse with tester. - Faullty parts: parts replacement,
If O_;t:OK. - Check wire color when maeasurthg
If ={_: wire is cut, resistance with atester.
1. Check the inner duct with mirror.
Melting fuse blows out.
1) Lead wire is cut.
2) Bad soldering.
tce in the Sucking duct. 1) Tom power off.
1) Icing by foreign materials in the
duct.
2) Icing by cool air inflow through
the gap of heater plate.
3) Icing by the gap of heater plate.
2) Raise the front side(door side),
support the front side legs, and let
the ice melt naturally. (If power is
on, melt the frost by forced
defrosting.)
Bad cool air inflow and discharge,
and bad defrosting due to faulty
contact and insertion (bad connector
insertion into housing of heater,
melting, fuse and motor fan).
2. Check by inserting soft copper
wire into the duct (soft and thin
copper not to impair heating wire).
1. Turn on power, open or close the
door, check that motor fan
operates (If it operates, motor fan
is OK).
2. Disconnect parts in the refrigerator
compartment, check the connection
around the housing visually,
defrost, and confirm heat generation
on the heater. Do not put hands on
the sheath heater.
3. Check the parts which have faults
described in 1, 2 (mechanical
model: disconnect thermostat
from the assembly).
3) Reassemble the heater plate.
t) Check the faulty connector of
housing and reassemble wrongly
assembled parts.
2) If the parts are very damaged,
remove the parts and replace it
with a new one.
o

2-6. Icing ,_
Problems Causes Checks Measures Remarks
CO
Co
Icing in the
refrigerator
compartment.
- Damper icing.
-Pipe icing.
Discharging
pipe icing.
1) Bad circulation of cool air.
-C]ogged intake port in the
refrigerator compartment.
- Sealing is not good.
- Too much food is stored and clogs
the discharge port.
- Bad defrosting.
2) Faulty door or refrigerator
compartment.
- Faulty gasket.
- Faulty assembly.
3) Overcooting in the refdgerator
compartment.
-Faulty damper in the refrigerator
compartment,
- Faulty MICOM (faulty sensor)
4) Bad defrosting
- Heater wire is cot.
- Defective defrost sensor.
- Defrosing cycle.
5) Customers are not familiar with
this machine.
- Door opens.
-High temperature, high moisture,
and high load.
- Check the food is stored properly
(check discharge and intake port
are clogged).
Check icing on the surface of
baffle and cool air path (pipe) after
dissembling the container box.
- Check icing at intake ports of
freezer and refrigerator
compartment.
- Check gasket attached conditions.
- Check door assembly conditions.
-Check refrigerator compartment
is overcooled (when button
pressed on "weak").
- Check parts are faulty.
-Check frost on the evaporator
after dissembling shroud and fan
gdlle.
- Check ice on intake port of freezer
and refrigerator compartment.
- Check food interferes with door
closing.
- Check ice on the ceilings,
- Be acquainted with how to use.
* Sealing on connecting parts.
- Check the damper and replace
it if it has defects.
- Check defrost. (After forced
defrosting, check ice in the
evaporator and pipes.)
-Correct the gasket attachment
conditions and replace it.
- Door assembly and replacement.
- Replace faulty parts.
-Check parts related to defrosting.
- Check defrosting. (Check ice on the
evaporator and pipe.)
- Be acquainted with how to use.
- Check the defrost
related parts if problem
is caused by faulty
defrosting.
-Replacement should
be done when it
cannot be repaired.
-Moisture cannot frost
on the evaporator but
can be sucked into the
refrigerator, being
condensed and iced,
interferes with cool air
circulation, and
suppresses sublimation.
F.
z
o

Problems Causes Checks Measures Remarks
Ice in the freezer
compartment.
Surface of fan
gdlle.
- Wall of freezer
compartment.
Cool air
discharging port
Basket(rack)
area.
Food surface.
Icing in the
shute.
1) Bad cooling air circulation.
- Intake port is colgged in the freezer
compartment.
- Discharging port is Clogged.
- Too much food is stored.
-Bad defrosting.
2) Bad freezer compartment door
- Faulty gasket
- Faulty assembly
3) Over freezing in the freezer
compartment.
- Faulty MICOM.
4) Bad defrosting.
Heater wire is cut.
Faulty defrost sensor.
Defrosting cycle
5) User is not familiar with how to
use.
Door opens.
High moisture food(water) is stored.
- Check food storage conditions
visually.(Check clogging at intake
and discharging port of cooling air.)
- Check food occupation ratio in
volume(Less than 75%).
- Check frost on the evaporator after
dissembling shroud and fan gdlle.
Check icing at intake port of
refrigerator compartment.
- Check gasket attachment
conditions.
Check door assembly conditions.
Refrigerator operates pull down.
(Check if it is operated
intermittently)
The Temperature of freezer
compartment is satisfactory, but
over freezing happens in the
refrigerator compartment even
though the notch is set at "weak".
- Check frost on the evaporator after
dissembling shroud and gdlie.
-Check ice on the intake port in the
refrigerator compartment.
-Check food holds door open.
- Check ice on the ice tray.
-Be acquainted with how to use.
- Check defrost (Check ice on the
evaporator and pipes after forced
defrosting).
- Correct the gasket attachement
conditions and replace it.
- Door assembly and replacement.
-Replace defective parts.
-Check parts related to defrosting.
- Check defrosting.(Check ice on the
evaporator and pipes after forced
defrosting.)
-Be acquainted with how to use.
Check the parts related
to defrosting if the
problem is caused by
the faulty defrosting.
-Replace when it can not
be repaired.
-N
F.
o

i
_JP
2-7, Sound
Problems Checks Measures Remarks
"Whizz" sound
Causes
1. Loud sound of compressor
operation.
2. Pipes resonat sound which is
connected to the compressor.
3. Fan operation sound in the freezer
compartment.
4. Fan operation soundinthe
compressor compartment.
1.1 Check the level of the
refrigerator.
1.2 Check the rubber seat
conditions (sagging and aging),
2.1 Check the level of pipes
connected to the compressor
and their interference.
2.2 Check rubber inserting
conditions in pipes,
2.3 Touch pipes with hands or screw
-driver (check the change of
sound).
3.1 Check fan insertion depth and
blade damage,
i3.2 Check the interference with
structures.
3.3 Check fan motor.
3.4 Check fan motor rubber insertion
and aging conditions.
4.1 Same as fan confirmation in the
refrigerator.
4.2 Check drip tray leg insertion.
4.3 Check the screw fastening
conditions at condenser and
drlp tray.
1) Maintain horizontal level.
2) Replace rubber and seat if they
are sagged and aged.
3) Insert rubber where hand contact
reduces noise in the pipe.
4) Avoid pipe interference.
5) Replace defective fan and fan
motor,
6) Adjust fan to be in the center of
bell mouth of the fan guide.
7) Levea clearance between
interfering parts and seal gaps in
the structures,
8) Reassemble the parts which make
sound.
9) Leave a clearance if evaporator
pipes and suction pipe touch
freezer shroud.
Fn
_o
O)

i
Problems
Vibration sound.
("Cluck")
Irregular sound.
("Click").
Causes Checks Measures Remarks
1-1. Remove and replace the
shelves in the refrigerator
1-2. Check light food and container
on the shelves.
2-1. Touch pipes in the cempressore
compartment with hands.
2-2 Check capillary tube touches
cover back.
I-1 Check compressor stopper
vibration.
4-1 Check vibration of front and rear
moving wheels.
5-1 Touch other structures and parts.
1. Vibration of shelves and foods in
the refi'igerator.
2. Pipes interference and capillary
tube touching in the compressor.
compartment.
3. Compressor stopper vibration.
4. Moving wheel vibration.
5. Other structure and parts
vibration.
1. It is caused by heat expansion
and contraction of evaporator.
shelves, and pipes in the
refrigerator.
1-1 Check time and place of sound
sources.
1) Reassemble the vibrating parts
and insert foam or cushion where
vibration is severe.
2) Leave a clearance where parts
interfere with each other.
3) Reduce vibration with rubber
and restrainer if it is severe.
(especially, compressor and pipe).
4) Replace compressor stopper if it
vibrates severely.
1) Explain the principles of refrigeration
and that the temperature difference
between operation and defrosting
can make sounds.
2) If evaporatorpipecontacts withother
structures,leave a clearancebetween
them (freezer shroud or innercase).
-..I
F.
o_
(/)

Problems Checks Measures Remarks
Sound "Burping"
(almost the same
as animals crying
sound).
Waterboilingor
flowingsound.
Sound of whistle
when door
closes.
Causes
It happens when refrigerant expands
at the end of capillary tube.
It happens when refrigerant passes
orifice in accumulator internal pipesby
the pressure differencebetween
condenser and evaporator.
When door closes, the internal pressure
of the refrigerator decreases sharply
)elowatamosphere and sucks air into
the refrigerator, making the whistle
;ound,
- Check the sound of refrigerant at the
initialthsta]lafloo.
- Check the sound when the refrigerator
starts operalJon after forced defrosting.
- Check the restrainer attachment
conditions on the eval_xator and
capillary tube weld joints.
-Check the sound when compressoris
tamed on.
- Check the sound when compressor is
turned off.
- Checkthesoundbyopeningand
closingthe refdgeratororfreezerdoors.
- Check the restrainer attached on the
evaporator and capillary tube weld
joints and attach another restrainer.
- If if is continuous and servere, insert
capillary tube again (depth:15±3mm)
- Fasten the capillarytube to suction
pipes ordetach in the compressor
compartment.
-Explain the principles of freezing
cycles.
-Explain the principles of freezing cycles
and refrigerant flowing phenomenon by
internal pressure difference.
- If sound is servere, wrap the
accumulator with foam and restrainer.
-Broaden the cap of discharge hose for
defrosting in the compressor
compsdment.
- Seal the gap with sealant between out
and inner cases of hinge in door.
--t
F.
_o
(/)

2-8, Odor .,_
Problems Checks Measures Remarks
i
t.O
(.o
Food Odor.
Plastic Odor.
Odor from the
deodorizer.
Causes
Food (garlic, kimchi, etc)
Odors of mixed food and plastic
odors.
Odor from the old deodorizer.
- Check the food is not wrapped.
-Check the shelves or inner
wall are stained with food juice.
-Check the food in the vinyl wraps.
-Chedk food cleanliness.
- Check wet food is wrapped with
plastic bowl and bag.
- It happens in the new refrigerator.
- Check the deodorizer odors.
- Dry deodorizer in the shiny and
windy place.
- Store the food in the closed
container instead of vinyl wraps,
- Clean the refrigerator and set
button at "strong".
- Clean the refrigerator.
- Persuade customers not to use
plastic bag or wraps with wet food
or odorous foods.
- Dry the deodorizer with dryer and
then in the shiny and windy place.
- Remove and replace the
deodorants.
*Deodorizer : option
F.
z
