LG LW1210HR User Manual AIR CONDITIONER Manuals And Guides 1111347L
User Manual: LG LW1210HR LW1210HR LG AIR CONDITIONER - Manuals and Guides View the owners manual for your LG AIR CONDITIONER #LW1210HR. Home:Heating & Cooling Parts:LG Parts:LG AIR CONDITIONER Manual
Open the PDF directly: View PDF ![]() .
.
Page Count: 44
website http:Hwww,I
Window-TypeAir
MODELS, MODELOS: LW1210HR
_s valuable
may
proper air
rnproper use.
order to prevent
iisuse, or improper
for any damages
tioner.
@
,o
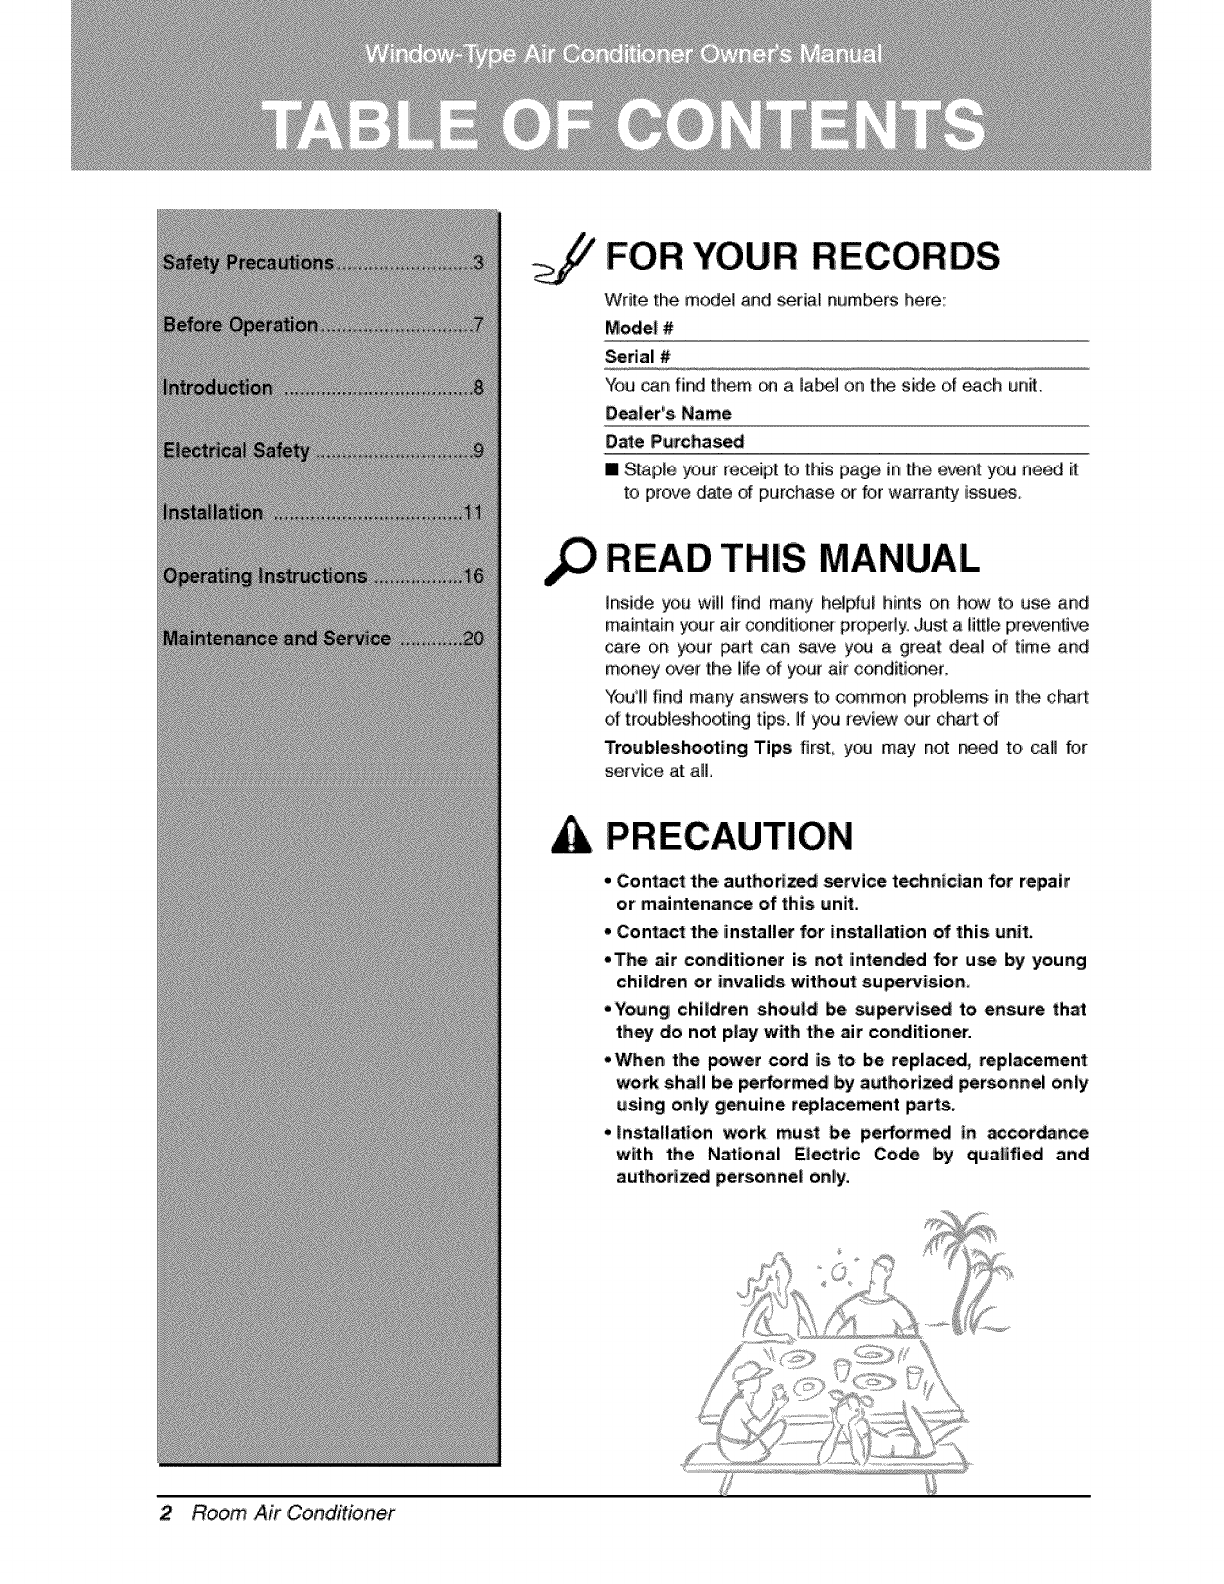
FOR YOUR RECORDS
Write the model and seria_ numbers here:
Mode| #
_rial #
You can fir_ them _ a label on the side of each un_o
Oea|er_si Name
Dale Purchas_
II Sl:ap,_eyou_ receip[ to [his page in I[he e_t_t you _e_ it
to prove date of purchase or for w_ranty issu_
READ THIS MANUAL
Inside you will find many heip_tul hints on h_to use and
maintain _ur air conditione_ pro_dy, ,Just a _i_le p_evenllive
care on y_ur pa_t can _ y_ a great deal of time and
money _er the li_eo{ your air conditioner,
You1! find many anewe{s to c,omm_l pro,blems in the c_rt
of t_c_b_h,o_ing tips. if you [_i_ our ch_t of
Troubleshootingi Tips first you may not _ed to ca_] for
serv_e at a&
• Contact the, author_d _rvice t_hn|cian for repair
or maintenance of th|s unit.
• Contac_ the |installer for installation ,of this unit.
•The air conditioner is net linten_d for use by young
children or invalids withou_ supervisio_
• Young chi|dten sho_|e be, s_rvis_ to e_sure that
tlhey _o not play with the air conditioner.
• Whe_ the power cord is _o be repla_d, repl_cemen_
work shah be _rfo_m_ by aethori_i person#el only
_si_g only ,g_uine r_lacement p_r_s.
•|nstall_ion work must be performed tn _corea#ce
w_th the National Elec_ri.e Code [by q_;_l_fi_ and
authorized personnel on|y,
2Room Air Conditioner
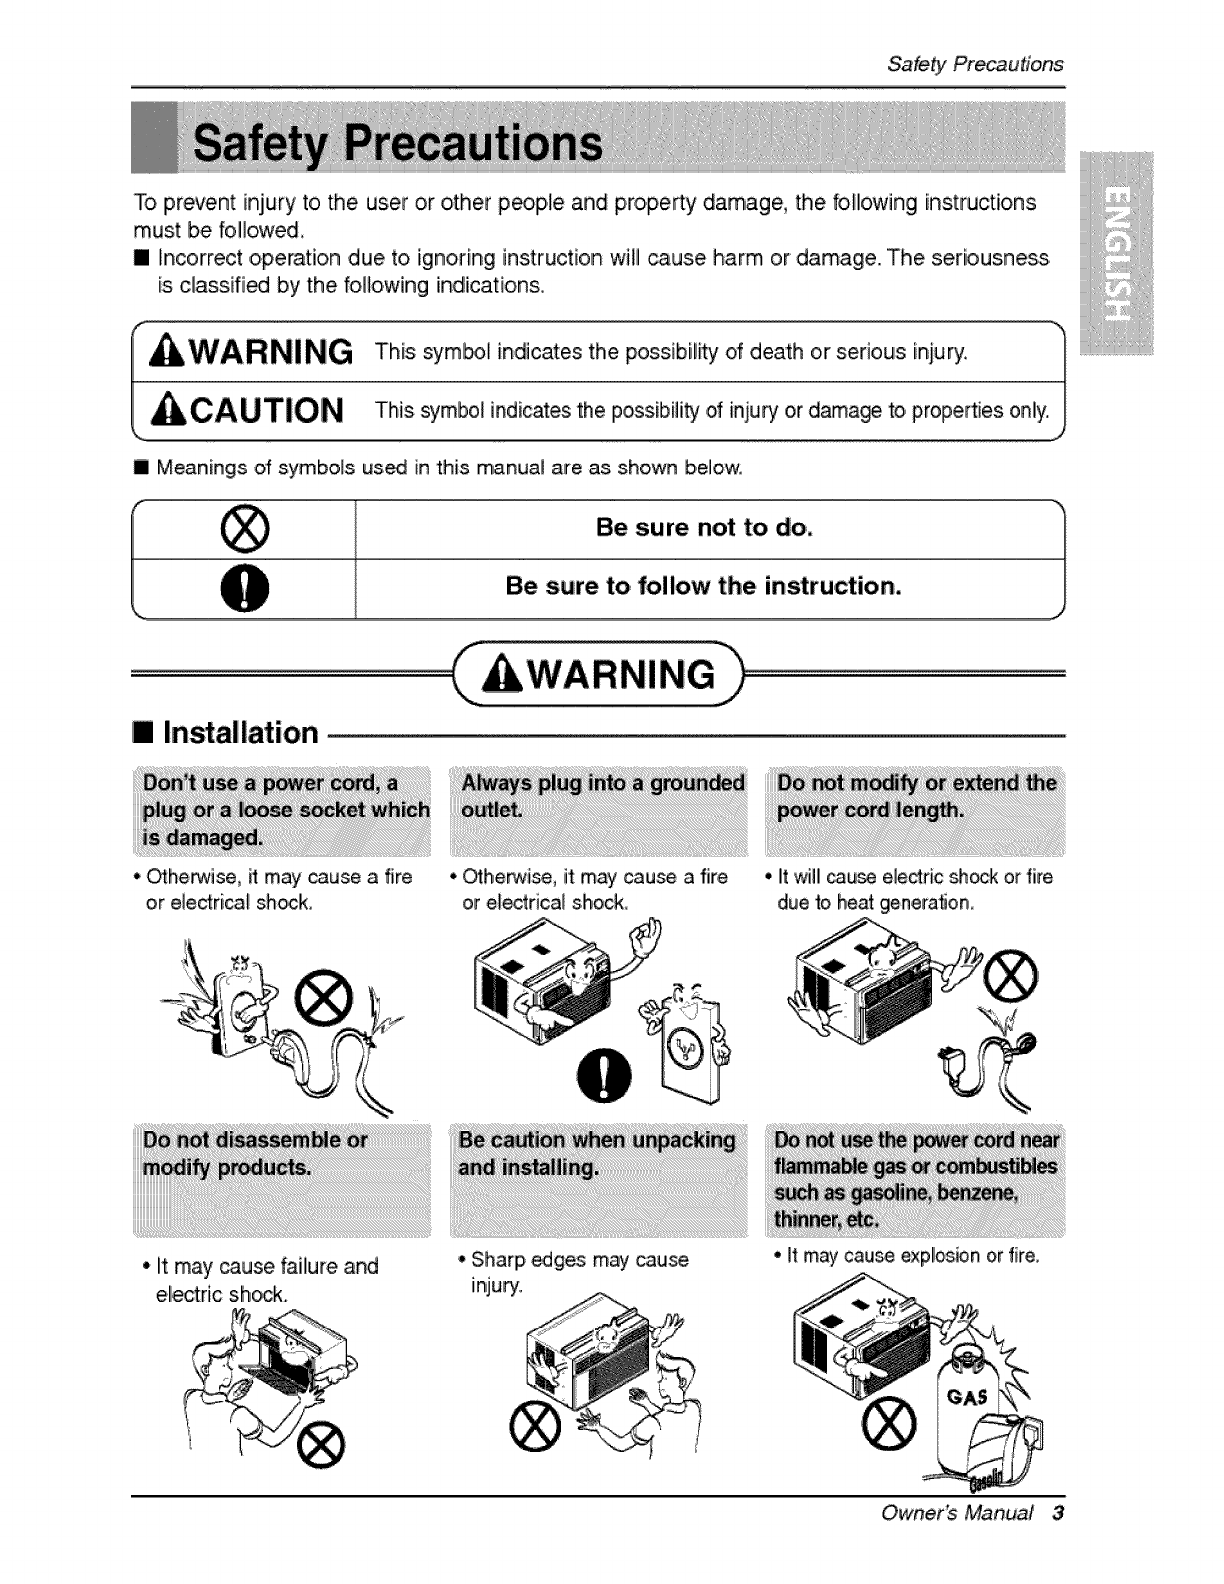
To prevent injury to the user or other p_ple and property damage, the bHowing instructions
must be followed,
[] Incorrect operation due to ignoring instruction will _us.e harm or damage. The seriousness.
is classifi_ by the bllowing indication&
This syml_l indicates the possibil_y of death or serious inju_:
This _mbo_ indicates the possibility dinjury or di_a_ to properties only.
J
i Meanings of symbols us_ in this manual are as shown below.
Be sure not to do,,
Be sure to follow the instruction,
iiiiiiiiiiiiiiiiiiiiiiiiiiiiiiiiiiiiiiiiiiiiiiiiiiiiiiiiiiiiiiiiiiiiiiii_
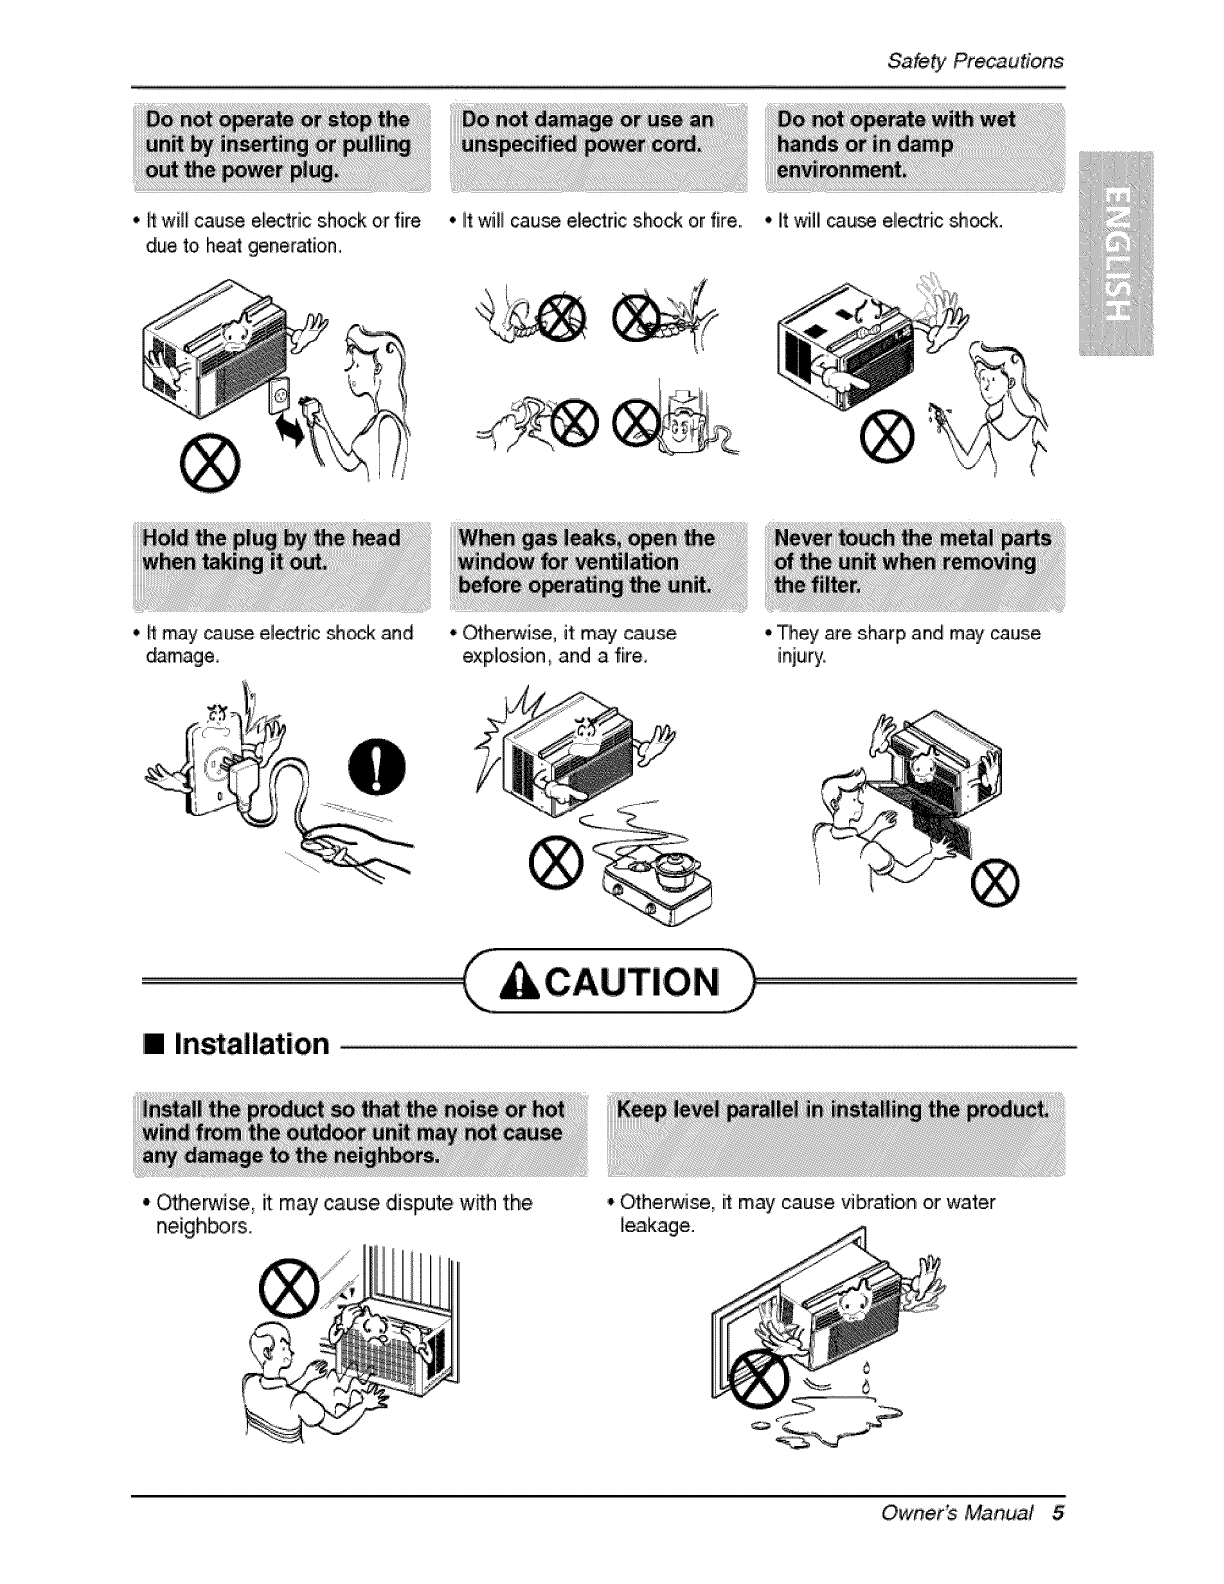
[] Installation
° _herwise, ff may cause a fire
or eledrica_ shock,
! I
• It may cause failure and
electric sh_k.
° Otherwise, it may cau_ a fire
or electrical shock,
•Sharp _ges may cau_
injury.
°It will _u_ electric _ock or fire
due _ heat generation
•It may cau_ exp!osbn or fire_
Owner_ Manual 3
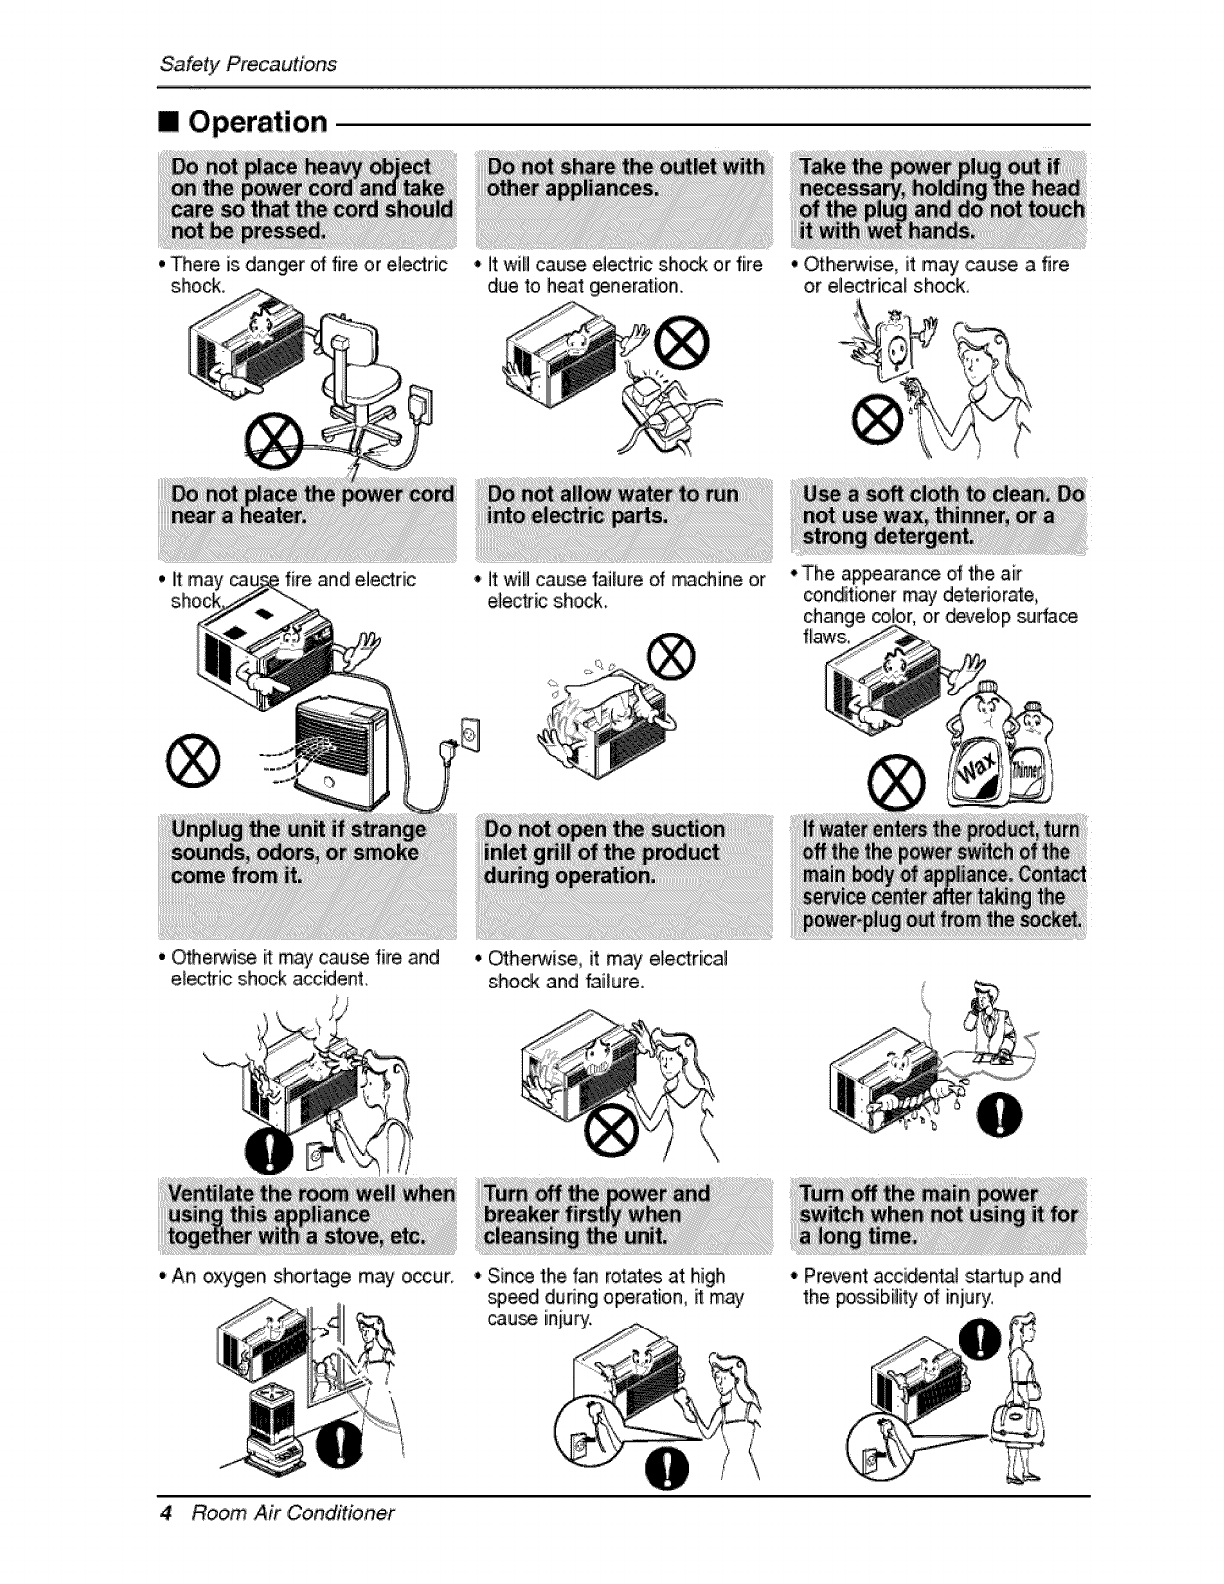
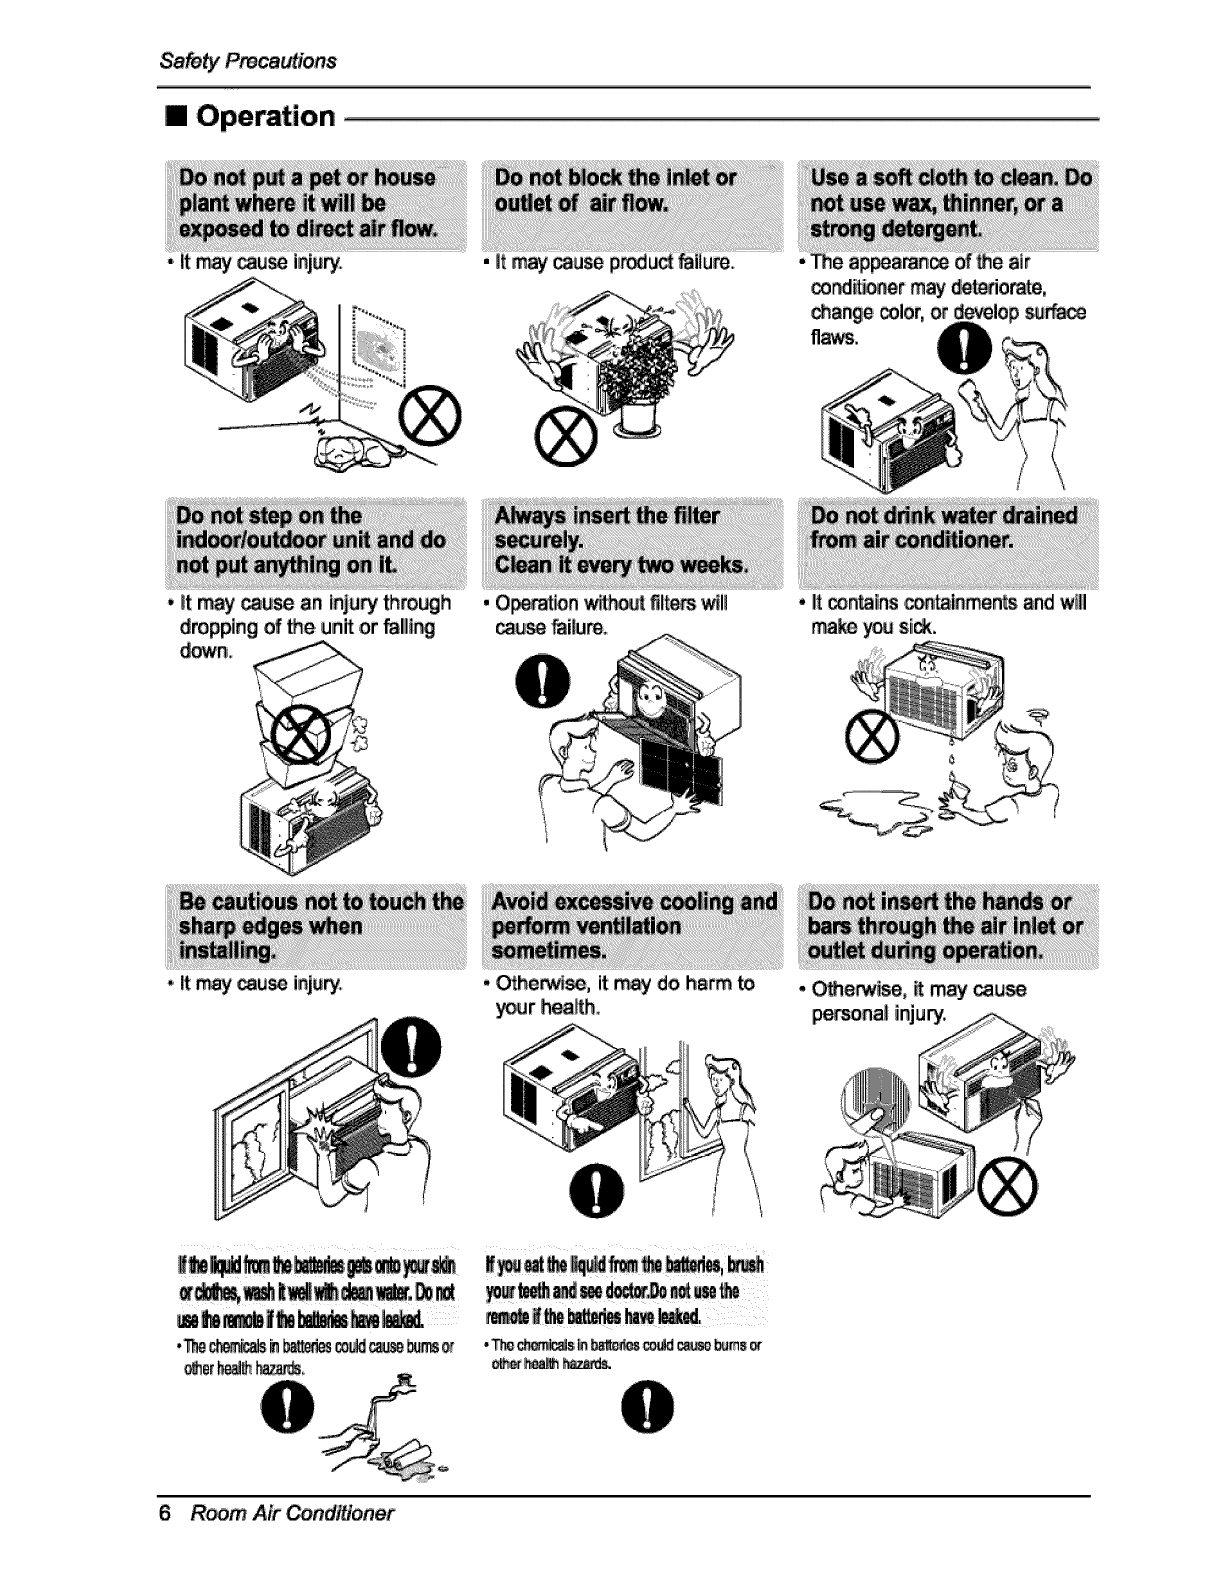
[] Operation
• There is danger of fire or electric
shock
* it may_ fire and electric
•it will cause ele_ric shod,; or fire
due lo heat _neration
•It will cause failure of machine or
e_e_ic shock
•_herwise, it may _use afire
or electrica_ sh_k
* The ap_arance of the air
C n _''"
o amoner may de_dorate
chang4 _r,or devebp surface
f_aws
• O_e_i_ it may cau_ fire and • Othe_i_ it may e_ectrical
el_tric shock acc_ent_ sho_: and failure, f,
• An oxygen shortage may occur • Since the f,anrotates at high
_,_d dudng operation, it may
cau_ injury:
4 Room Air Conditioner
° Prevent accidenta! star_Jp and
the po_bility of iniury
Safety Pr_autions
• Hwi]f cau_ el_tric shock or fire
due to he_ generation,
•tt may cause etedr{c _k and
_mage
•litwilil cau_ ele_ric shock or fire.,
* 01he_ise, it:mw cause
exp,lo,sion, and a fire,
•litwill _u_ elle_ric sh_k.
• _ey are sharp and may cause
injury,
IInstallation
• Ot_herwi_, it may' cause dispute w_h the
neigh_rs. t°O,the_ise, iit may cause vibration or water
leakage.
Owner_ Manual 5
[] Operation
•, It _y _u_ injury.
•it may _use an injury thigh
dropping _ _e unit ,or_llli_
"i It _y _use injury
_er h_
*Othe_, it m_ do harm to
_r heaRh,
6Room Air _nditioner
•_ _n_ins ,c_in_nts and will
Before Operation
1. Contact an installation specialist for installation.
2. Plug in the power plug properlly,
3. Use a dedicated circuit.
4. Do not use an extension cord.
5. Do not s_r_stop operation by plugging/unplugging the _wer _rd.
6. If the cordlplug is damaged, replace it with only an authorized replacement
part.
ii_ Being exposed to direct airflow for an extended period of time could be
hazardous to your health. Do not expose _cupants, pe_, or plants to direct
airflow for extended periods of time.
2i_Due to the _ssibilib/of oxygen deficiency, ventilate the r_m when used
together with stoves or other heating device&
3 Do not use this air conditioner for nonospecified special purposes (e.g.
preserving precision devices, foed, pets, plants, and a_ objects). Such u_ge
could damage the items.
1_ Do not touch the metal parts of the unit when removing the filter. Injuries can
_ur when handling sharp metal edges.
2. Do not use water to clean inside the air cx)nditioner. Exposure to ,water can
destroy the insulation, leading to possible electric shock.
3i. When cleaning the unit, first make sure that the _wer and breaker are turned
off. The fan rotates at a very high speed during operation. There is a
_ssiibili_ of iniury if the unit's power is a_identally triggered on while
cleaning inner parts of the unit.
For repair and maintenance, contact your authorized service dealen
Owner_ Manual 7
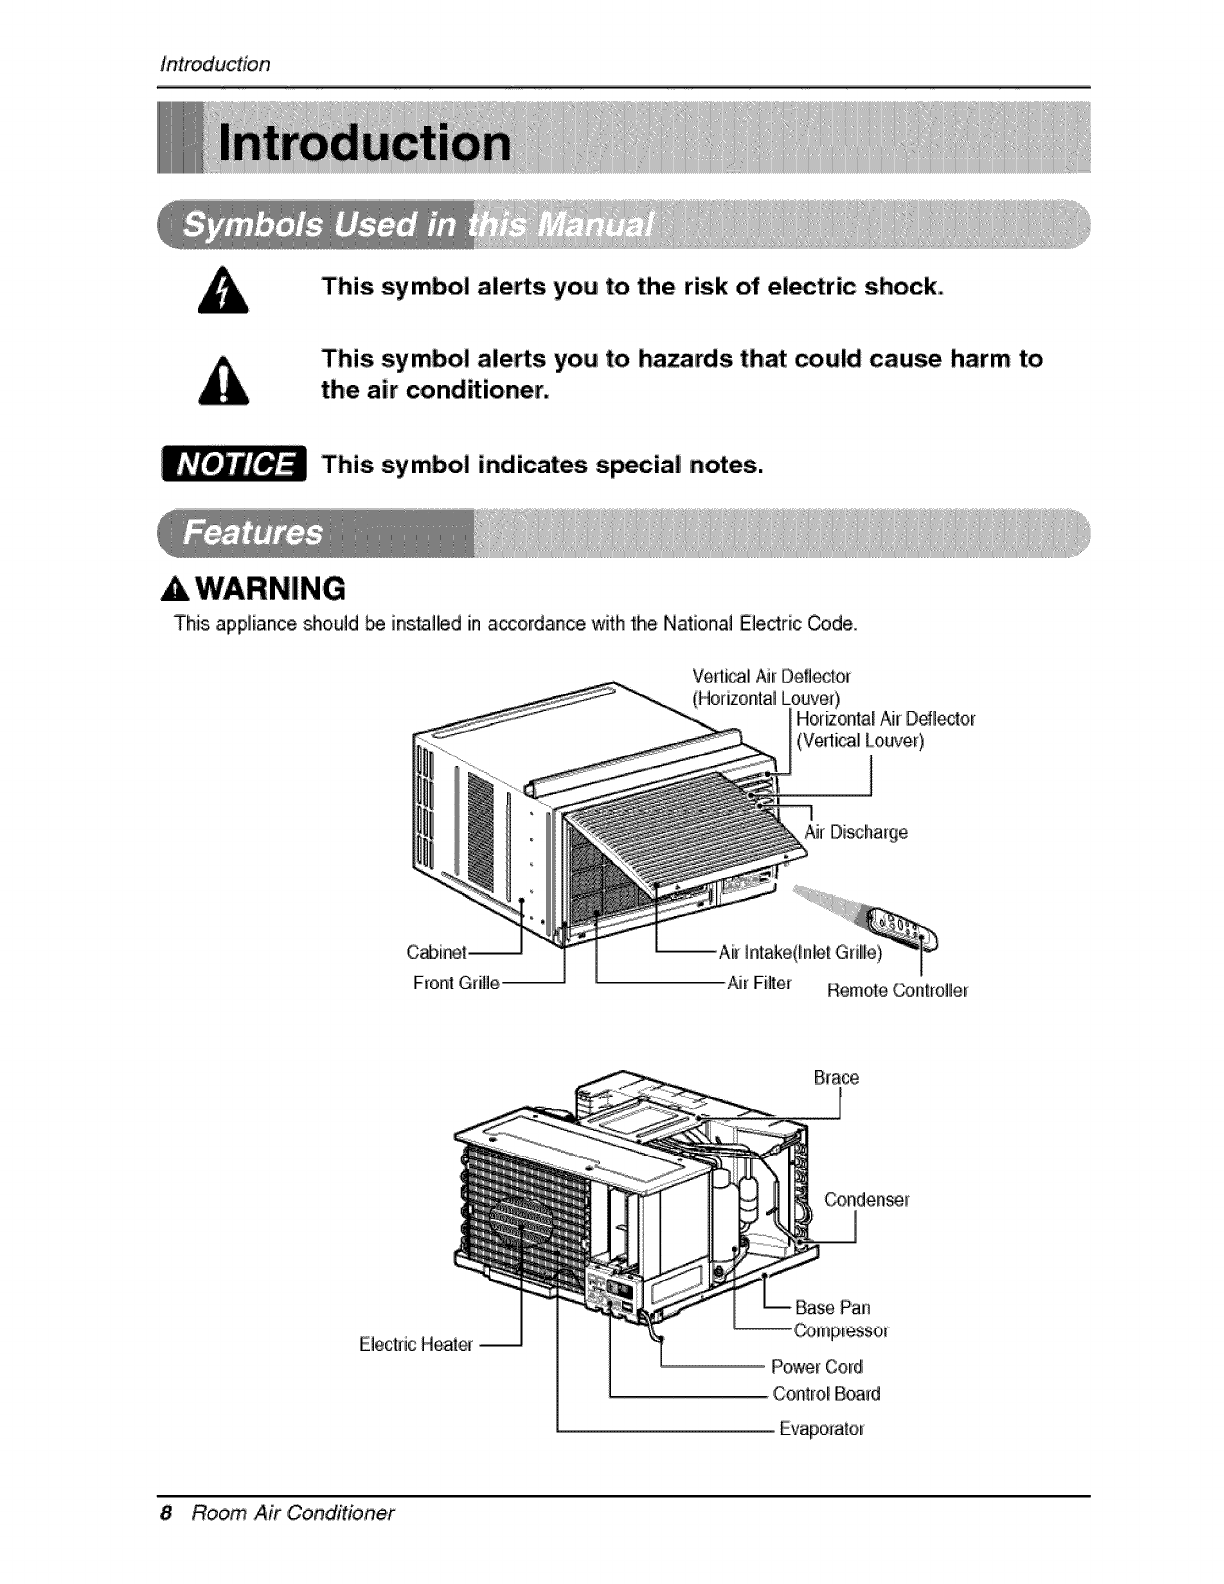
Introduction
This. symbol ale,s you to the risk of el_tric shock,.
This symbol aleAs you to hazards that could cause harm to
the air cond_ioner.
This symbol indicates sp_ial notes.
This appliance _ould _ ins_Hed in accordance with the National Electric _de.
Base PaR
8 Room Air Conditioner
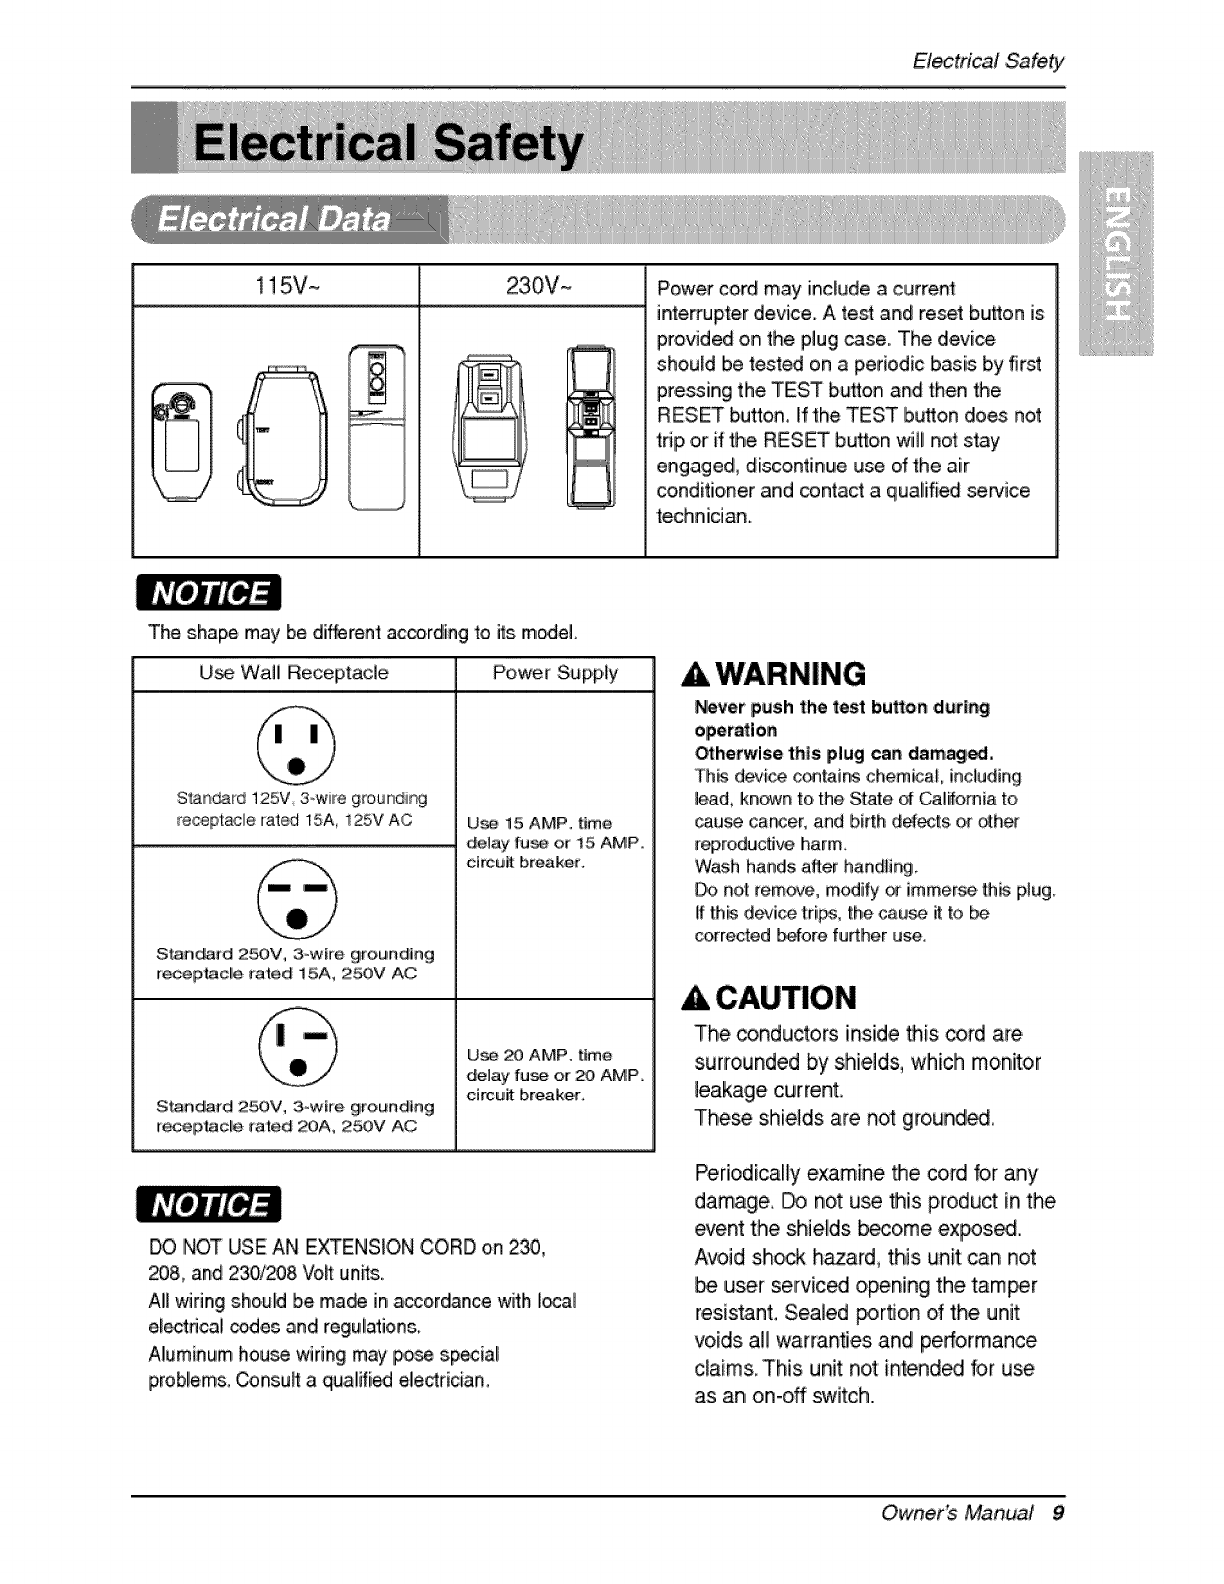
Et_trical iS_fety
115V~ 230V~ Power cord may include a current:
interrupter device. A test and reset button Js
provided on the piug case. The dlevi_
should Ibe tested on a periodic basis b,yfirst
p#essing the, TEST button and then the
RESET button ff the TEST button does not
trip or if the RESET butlon will not stay
engage& disco,ntinue use of the ,air
conditioner and contact a qualified service
technician.
The, shape may be dif_rent accerdling to its model
U_ Wall Receptacle Power Supply
Standard 125V, 3,wire grounding
receptacle lat_ 15A, 125V AC
S_ndard 25OV, 3ow[re grounding
receptacl!e rated 15A, 250V AC
Standard 2_V, 3owtre grounding
rre,ceptacle rated _)A, 250V AC
U_ 15 AMP, t_me
de_ay fu_ or t5, AMP,,
c#cu_t breaker°
U_ 20 AMP, time
delay fu_ or :20, AMP.
circuit bre,ak,e,r,
DO NOT USE AN E_ENSION CORD on 2_,
_8, and 230/_8 Vo_ un_s.
AI__ring sho.uM be ma_ in accor_nce with local
el_rical codes and regulation&
Aluminum hou_ wiring may p,osesp_ial
problem& Consu_ a qu.alified ele_rician.
A WARNING
Never push the test burton ,during
_hetwise this plug can damaged,
Th_ devi_ c_ins chemical including
lead, kn_n to, the State _ _li_omia to
cau_ car_er, and b,irth dd_ts or _h_
rep,roductJt_ harm,
Wash hands a_er handl#_,
Do na_ rem@_, modify _ immerse thb p_ug_
If this device trips, the cau_ _ to be
corrected _fore fu_her use.
A CAUTION
The conductors inside this cord are
surrounded by shields, whiclh mo,nitor
leakage current_
These shields are not g_ound_.
Periodically examine the cord for any
damage, _ not use this product in the
event the shields b_o,me expos._.
Avoid sh_k hazard, this unit: can not
user serviced opening the tamer
resistant. Sealed _rflon dthe unit
voids a!l warranties and performance
claims, This unit not intended for use
as an on-off switch.
Owner_ Manual 9
(PLEASE READ CAREFULLY)
FOR THE USER'S PERSONAL SAFET_ THIS
APPLIANCE MUST BE PROPERLY GROUNDED
The _er cord _ his appliance is equip_d with a
threo-pro_ (gr®nding)i IP]ug.U_ thJiswith a standard
thr_,,,,sl,ot (grinding), wal_ _er o,uUet to minimize the
hazard of e[_tric shc_ko The c_tomer sho,uM haw the
wall receptac# and circuit chec_d by a qualifi_
e_e@ician to make sure the r_eptacle is pro_dy
NOT CUT OR REMOVE THE THIRD (GROUND)
PRONG' FROM THE P_ER PLUG,
A, SilTUAT_ONS WHENCE APPLIANCE WILL BE
DISCONNECTED OCCASIONALLY:
Because _ ;_tentia_ _fety hazard& we stronglly
discourage the use of an adat:_ _ug_ H_ver_ ff you
wish to u_ an adaptor, a TEMPORARY CONNECTION
may _ made. Use UL-listed adapter, availabl_ from
most I_al hardware stores.
The large s_o{ in the adapter must _ a_n_ w_h the
large slot in the receptacle to assure a _ep_ _ladty
conn,ecti®,
; Atta_i_ _e adaptu ground termina|to the wal!
r_tac|e coversct_ do_ notground the applianco
unless the covet screw is _tal, and not Insu|_ed, and
_e waYi_receptacle is groundedthroughthe house
wiring,The custom_ sho,u_ havethe circuitchoked
by a quatifiedelectti_an to makesure_e r_eptacle
is proper_ grounded,
Di_o,nn_t '[he _Jer _rd from the a_,pter, using ,one
hand on each, Ot:_rwi_, the a_pter girou_ temir_]
m_ht break, DO NOT USE the ap#i_ce with a broken
adapter p_ugi.
8. StTIJAT_ONSi WHENTHE APPLIANCE WILL BE
DISCONNE_ED OFTEN,i
not use an ada_Ier pk_; in thee. situ,alions_
Unplugging the _wer cord frequently can _ead to an
_entuai breakage of the ground terminal, 3"_e waB
_wer outlet should _ rep_acc_ by a three-slot
(@'ounding) outlet instead,
USE OF EXTENSION CORDS
Because d_t_tial _fety hazards, we strongl/y
discourage the use of an ext_sion cord. H_e_/er0 if
you wish to use an extension cord, _e a C:SA
cortifie@qJL-listed 3-wire (grounding) extensbn cord
rated at 15A 125V,
10 Ro,_m, Air Conditioner
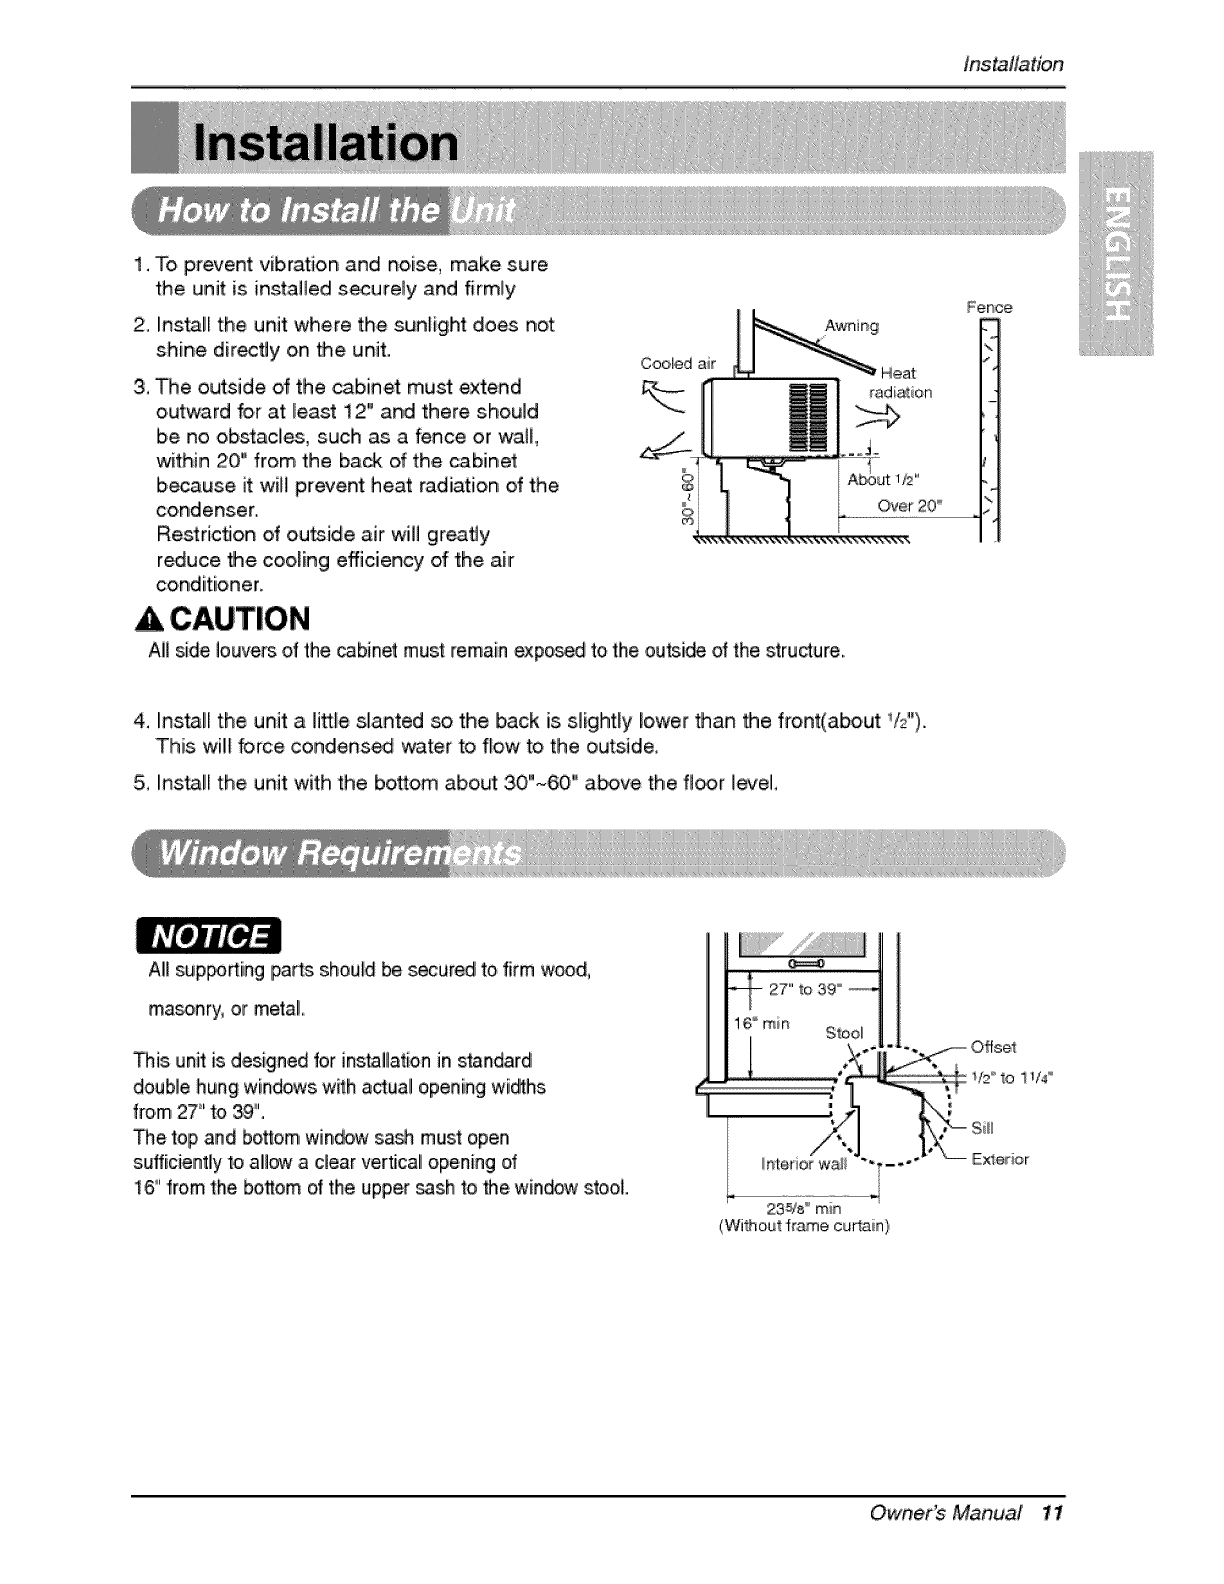
Ins_llation
1. To prevent vibration and no.[se, make sure
the unit is installed s_urely and firmly
2, Instil the unit where the sunlight does not
shine directly on the unit, Cooled air
Awn ing
3, The outside of the cabinet must extend
outward for at least 12" and there should
ibe no ob,stad_, such as a fence or wail,
within 20" from the ba_ of the cabinet
because it will prevent heat radiation .of the
condenser.
Restriction of outside air will greatly
r_uce the cooling efficiency of the air
conditioner.
&CAUTION
Ai[ side louversof the _binet must remain expo_d to the ou_ide of the structure.
1/2"
Over 20 °
Fence
<'
4. Install the unit a littb slanted so the back is slightly lower than the front(about Y_").
This wil! force condensed water to flow to the ou_ide,
5, Install the unit with the bo._om .about 30"~60" a_ve the fi_r level,
All supposing parts should be _cured to firm wood,
ma:_nry, or metal,
_is unit is designed for installation in standard
double hung windows wffh a_uall opening widths
from 27" to 39".
The top and bottom window sash must open
sufficJenl]y to allow a clear verticall opening o1'
16" #ore the bottom dthe upper _sh to _e window stool
27" Io 39 °
16 ° rain Stool
ii_terio_ w_#
23_8 ° rain
(Without fr,_e curtain}
O_ner_ Manual 11
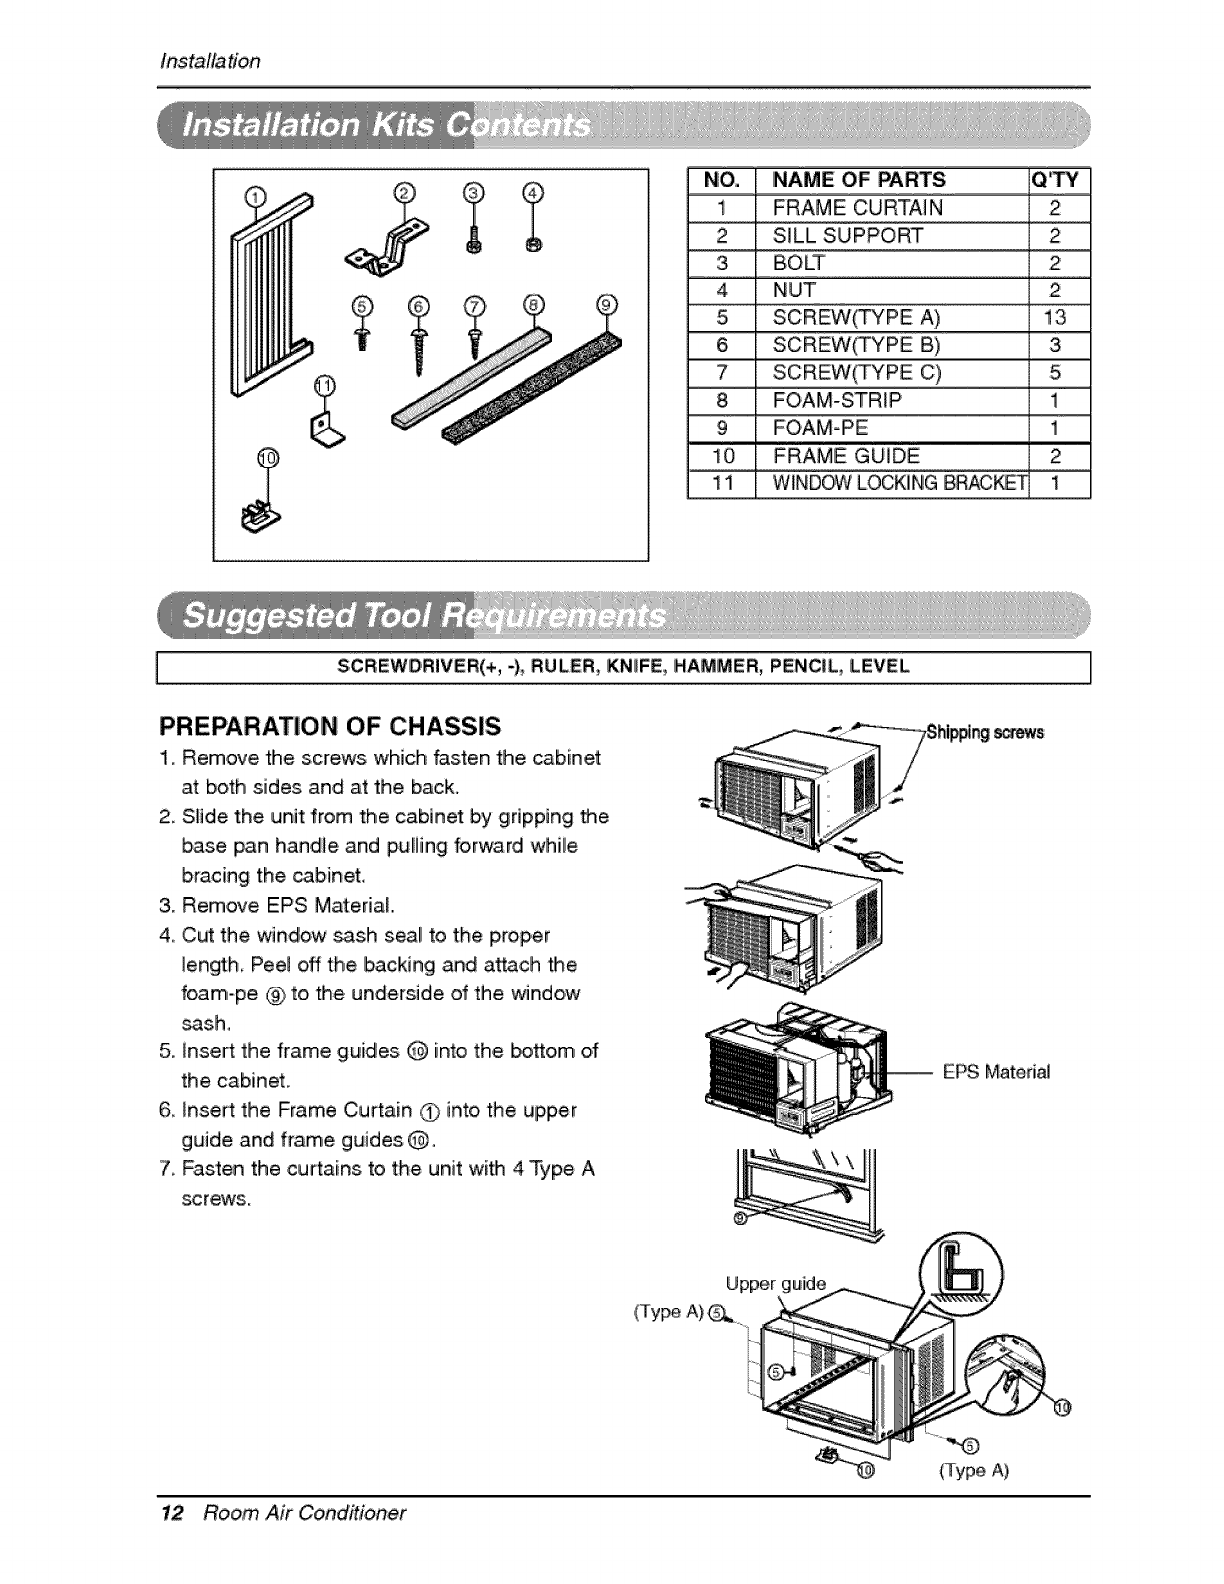
Installation
NOi. NAME OF PARTS Q'TY
1 FRAME CURTAIN 2
2 SILL SUPPO_ 2
3, BOLT 2
4, NUT 2
5, SCREW_YPE A) 13
6 SCREW_YPE B) 3
7 SCREW_PE C) 5
8i FOAM-STR_P 1
9 FOAM-PE 1
10 FRAME GUIDE 2
11 WINDOW LOCKING BRACKET 1
]SCREWDRIVER(+,-), RULER, KN[IFE, HAMMER, PENCIL, LEVEL
PREPARATION OF CHASSIS
1_ Remove the screws which fasten the cabinet
at both sides and at the back,
2. Slide the unit from the cabinet by gripping the
_se pan handle and pulling forward whiUe
bracing the _binet,,
3. Remove EPS Material,.
4, Cut the window _sh seaUto the proper
length Pee_ off the backing and attach the
foam-pe ¢_ to, the underside of the window
sash,
5, Ensert the frame guides Q into the _om of
the cabinet,
6, insert the Frame Curtain _) into the upper
guide and frame guides Q.
7, Fasten the curtains to the unit with 4 Type A
screws.
_ew8
EPS Material
Upper guide
,(Type A)
12 Room, Air Conditioner
(Type A)
Ins_llation
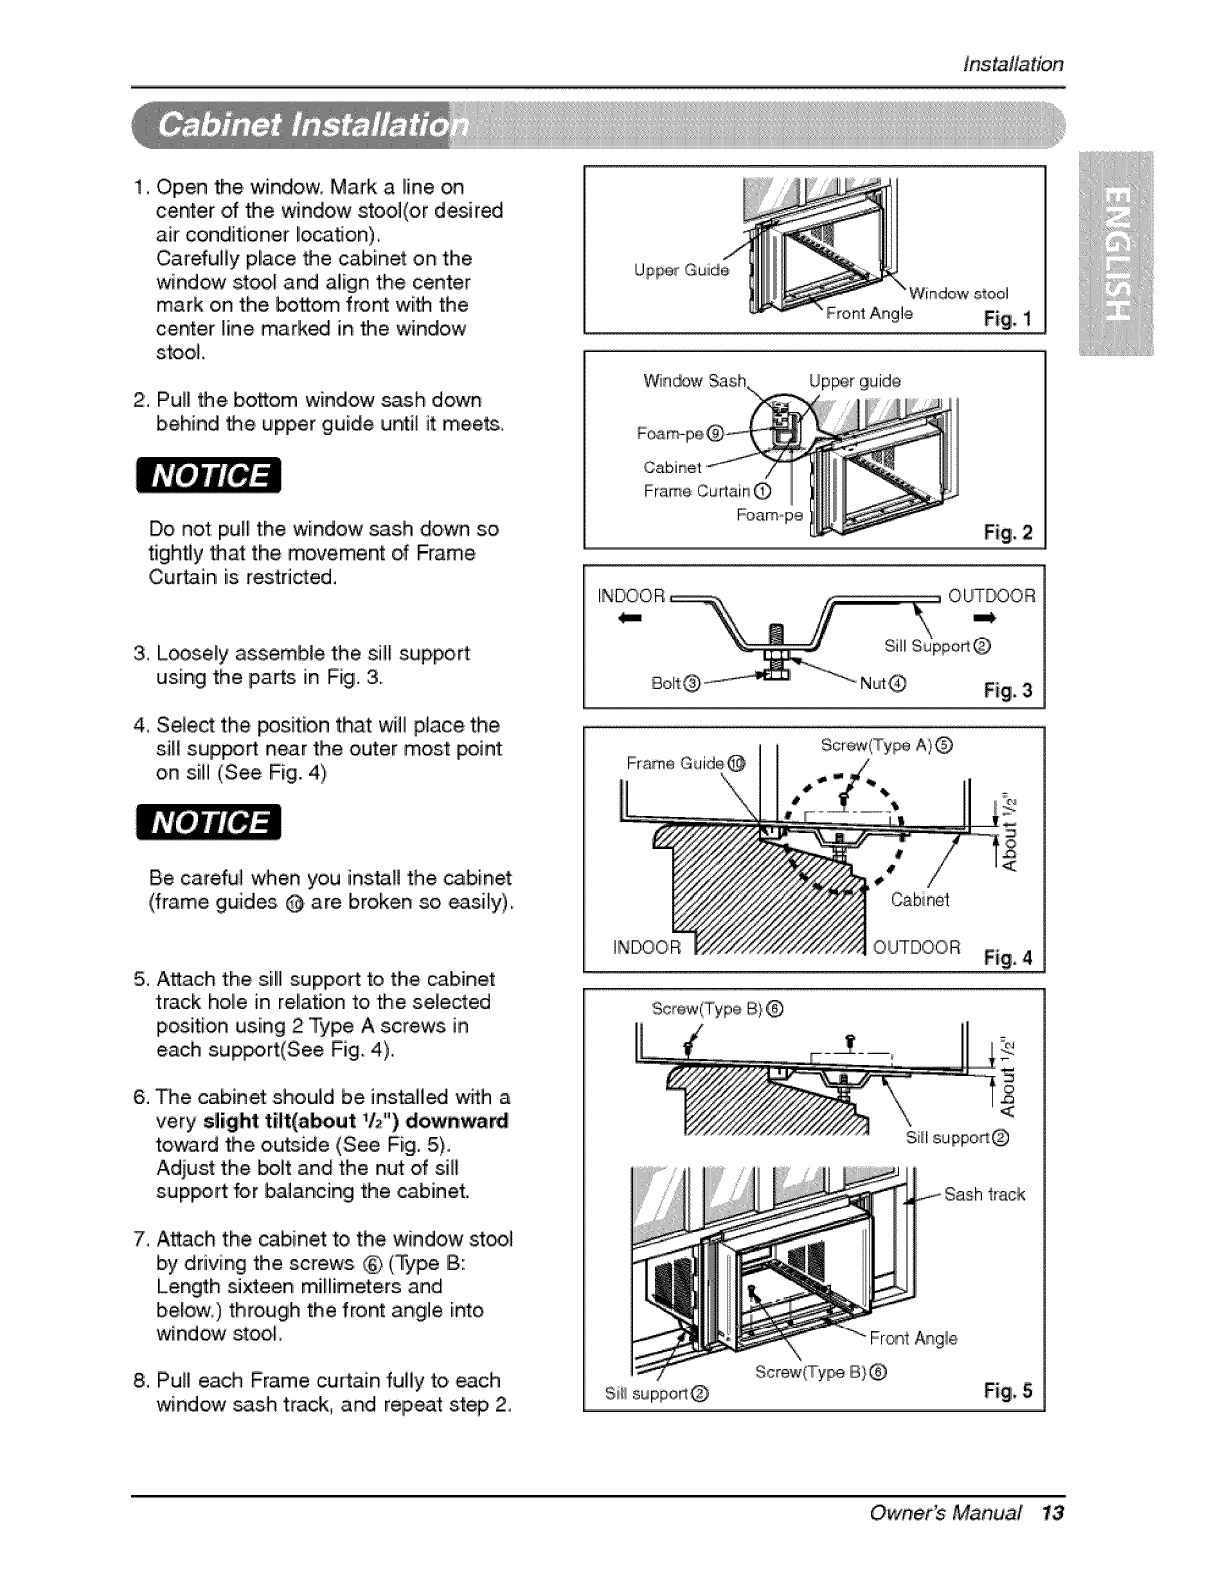
t_ Open the window, Mark a line on
center of the window stool(or desired
air conditioner location),
Carefully pllace the cabinet on the
window stool and aUign the center
mark on the _om front with the
cen_er line mark_ in the window
stool
2, Pull the bottom w[nd,ow sash down
behind the upper guide until it mee_,
Do not pull the window sash down so
tightly that the movement of Frame
Cur_in is restri_ed.
3, L_sely assemble the sill support
using the parts in Fig, 3,
4, SeIe_ the position that wi]] place the
sii_ suppo_ near the outer most point
oin s[l[I(See Fig.. 4)
Bie careful when you install the cabinet
(frame guides @, are broken so easily).
5. Attach the sill support to the cabinet
track hole in relation to the se[e_ed
p,osition using 2 Type A screws, in
each support(See Fig. 4),.
6. The cabinet should be ]ns_lled w_h a
very slight tilt(a_ut VP') downwa_
toward the outside (,See Fig, 5).
Adjust the _lt and the nut of sill
support for balancing the cabinet.
7, Attach the cabinet to the window st_]
iby driving the screws ® (Type B:
Length sixteen millimeters and
b,elow:) through the fron¢ angle into
window stool
8. Pull each Frame curta[n fully to each
window _sh track, and repeat step, 2,
Up_r Guide
Window stool
Front Angle Fi_, 1
Frame Curlai_
Foamope Fig, 2
INDOOR
Si!l
OUT.OR
Fig, 3
INDOOR
#
Cabinet
OUTDOOR
Scr÷w(Type B}@
Sash track
Screw(Ty+ B}@Fig, 5
O_ner_ Manual 13
Instaltation
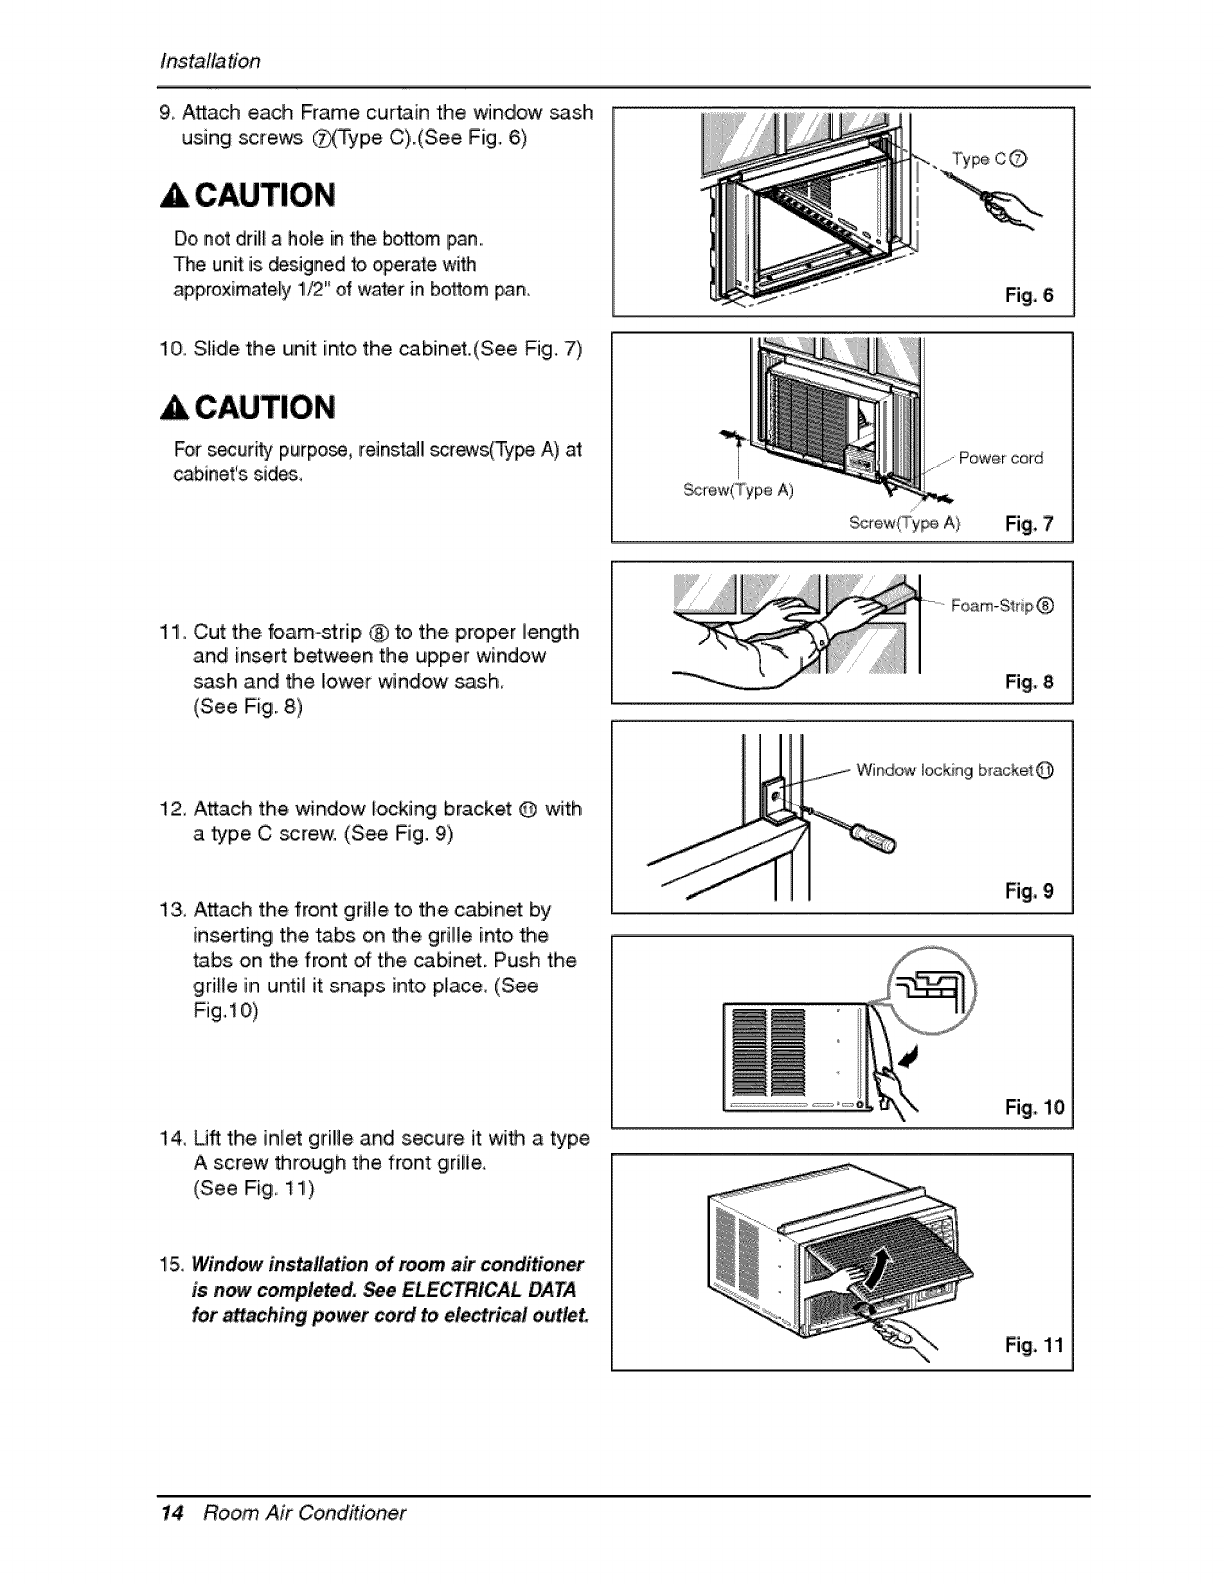
9, Attach each Frame curtain the window _sh
using screws @_Type C),.(See Fig. 6)
Do not driil_a ho_ein the bottom pan.,
The unff:is _signed to ,operate with
app,roximately 1/2" of water in bottom p_n.
10. Slide the unit into the cabinet.(See Fig. 7)
For secur_y purpo_, rein,stall screws(Type A) at
cabinet's, sides,
Type CO
Fig, 6
_rew(Type A)
JPower cord
/
_rew(l"y_ A} Fig, 7
11,,Cut the foam-striilp (_ to the proper length
and insert between the upper window
sash and Me lower window sash,
(See Fig., 8)
Fig, 8
12, Attach the window locking bracket @ with
a _pe C _rew, (See Fig. 9)
13, Attach the front grille to Me cabinet by
inserting the tabs on the grille into the
tabs on the front of the cabinet, Push the
grille iin until it snaps into place, (See
Fig,t0)
! 4_U'ff the intet grille and secure it wi_ a type
A screw _rough the front grille,
(See Fig, 11)
15. Window installa#on of room air conditioner
is n_ completed. _e ELECTPJCAL DATA
for attaching power cord to electrical outleL
Fig, 9
Fig, 10
Fig, 11
14 Ro,_m, Air Conditioner
Installation
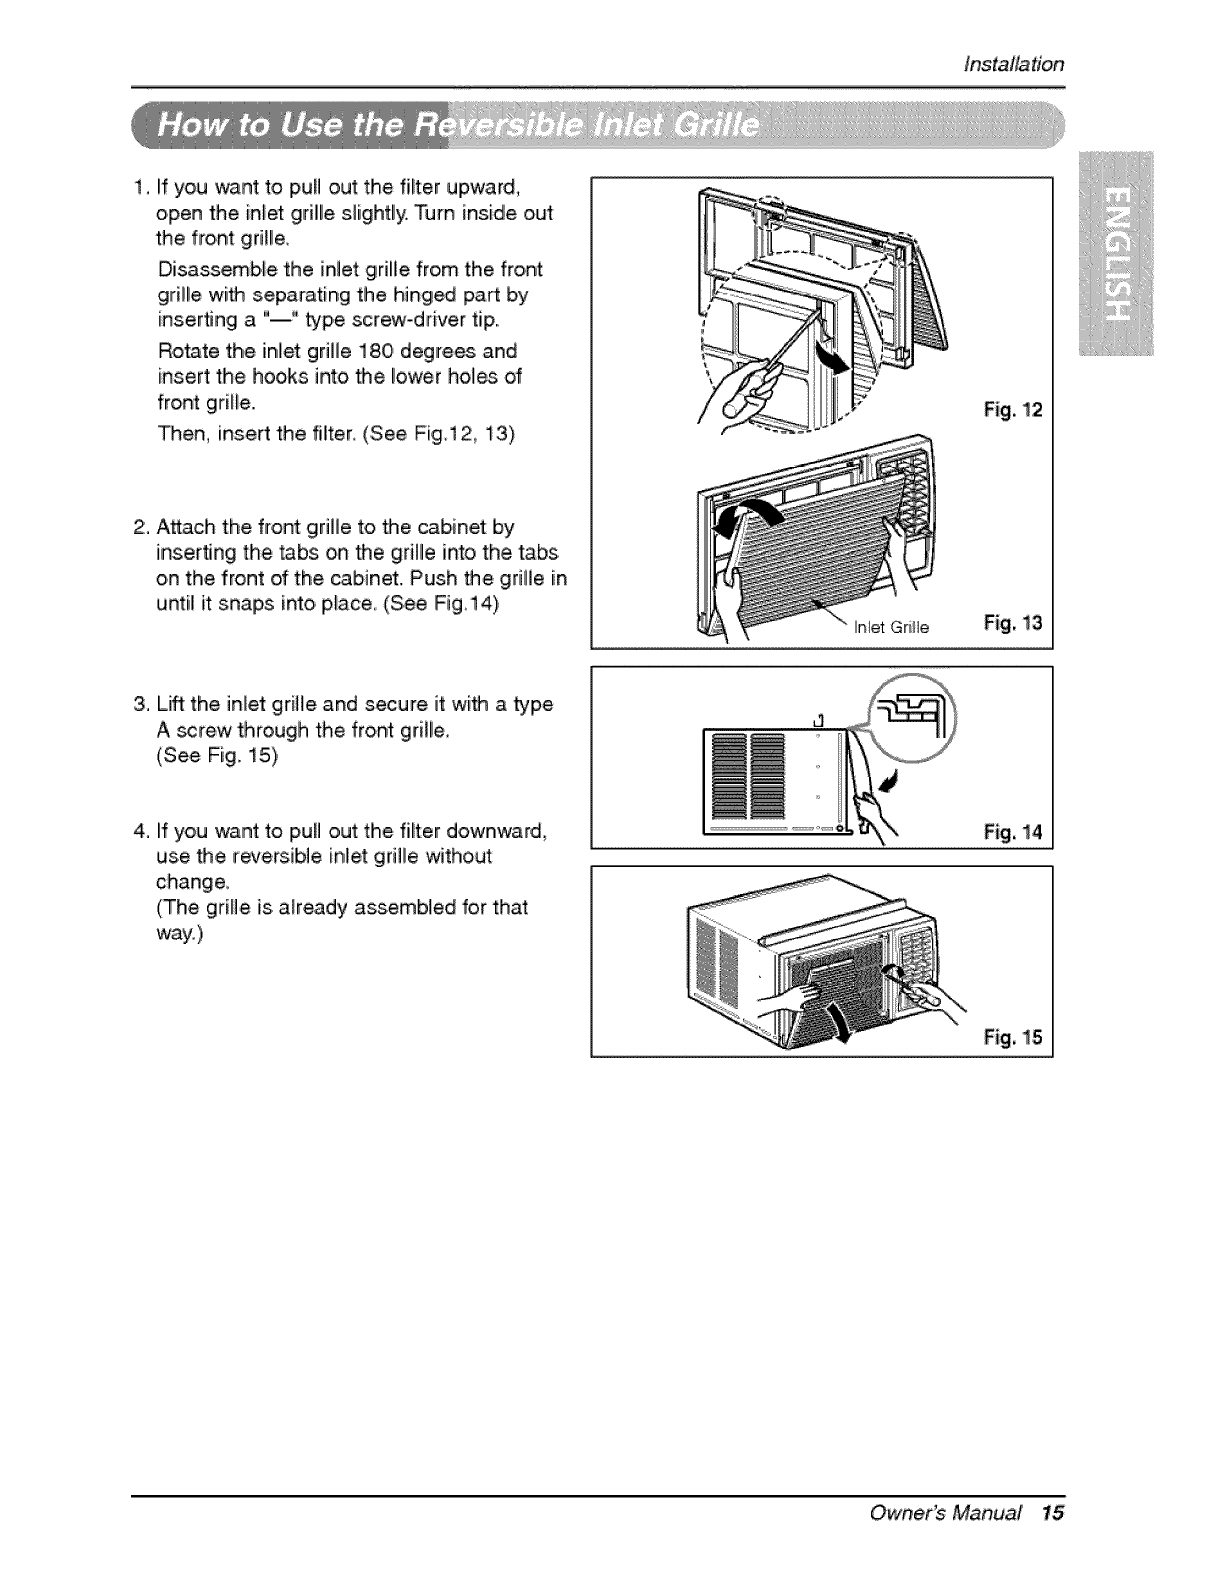
t, If you _nt to pull out: the filter upward,
open the in_et grille slightly, Turn inside out
the front gri_le,
Disasisemble the inlet gdlllie from the front
grille with separating the hinged part by
inserting a °--" type screw-driver tip..
RoUte the inlet gdHe 180 degre_ and
insert the hooks into the lower holes of
front grille.
Then, insert the filter, (.See Fig,l 2, !3)
2. Attach the front grille to the cabinet by
inserting the _bs on the grillle into the tabs
on the front oF the cabinet. Push the grille iin
until it snaps into, p_ace, (See Fig,l 4)
Fig. 12
3, Lift the inlet grille and secure it with a _pe
A screw through the front gdHe,
(See Fig. 15)
4. if you want to pull out the filter downward,
use the reversible inlet grille without
(The grille is akeady assembled for that
way,}
Fig. 14
Fig, 15
Oweer_ Manual 1_
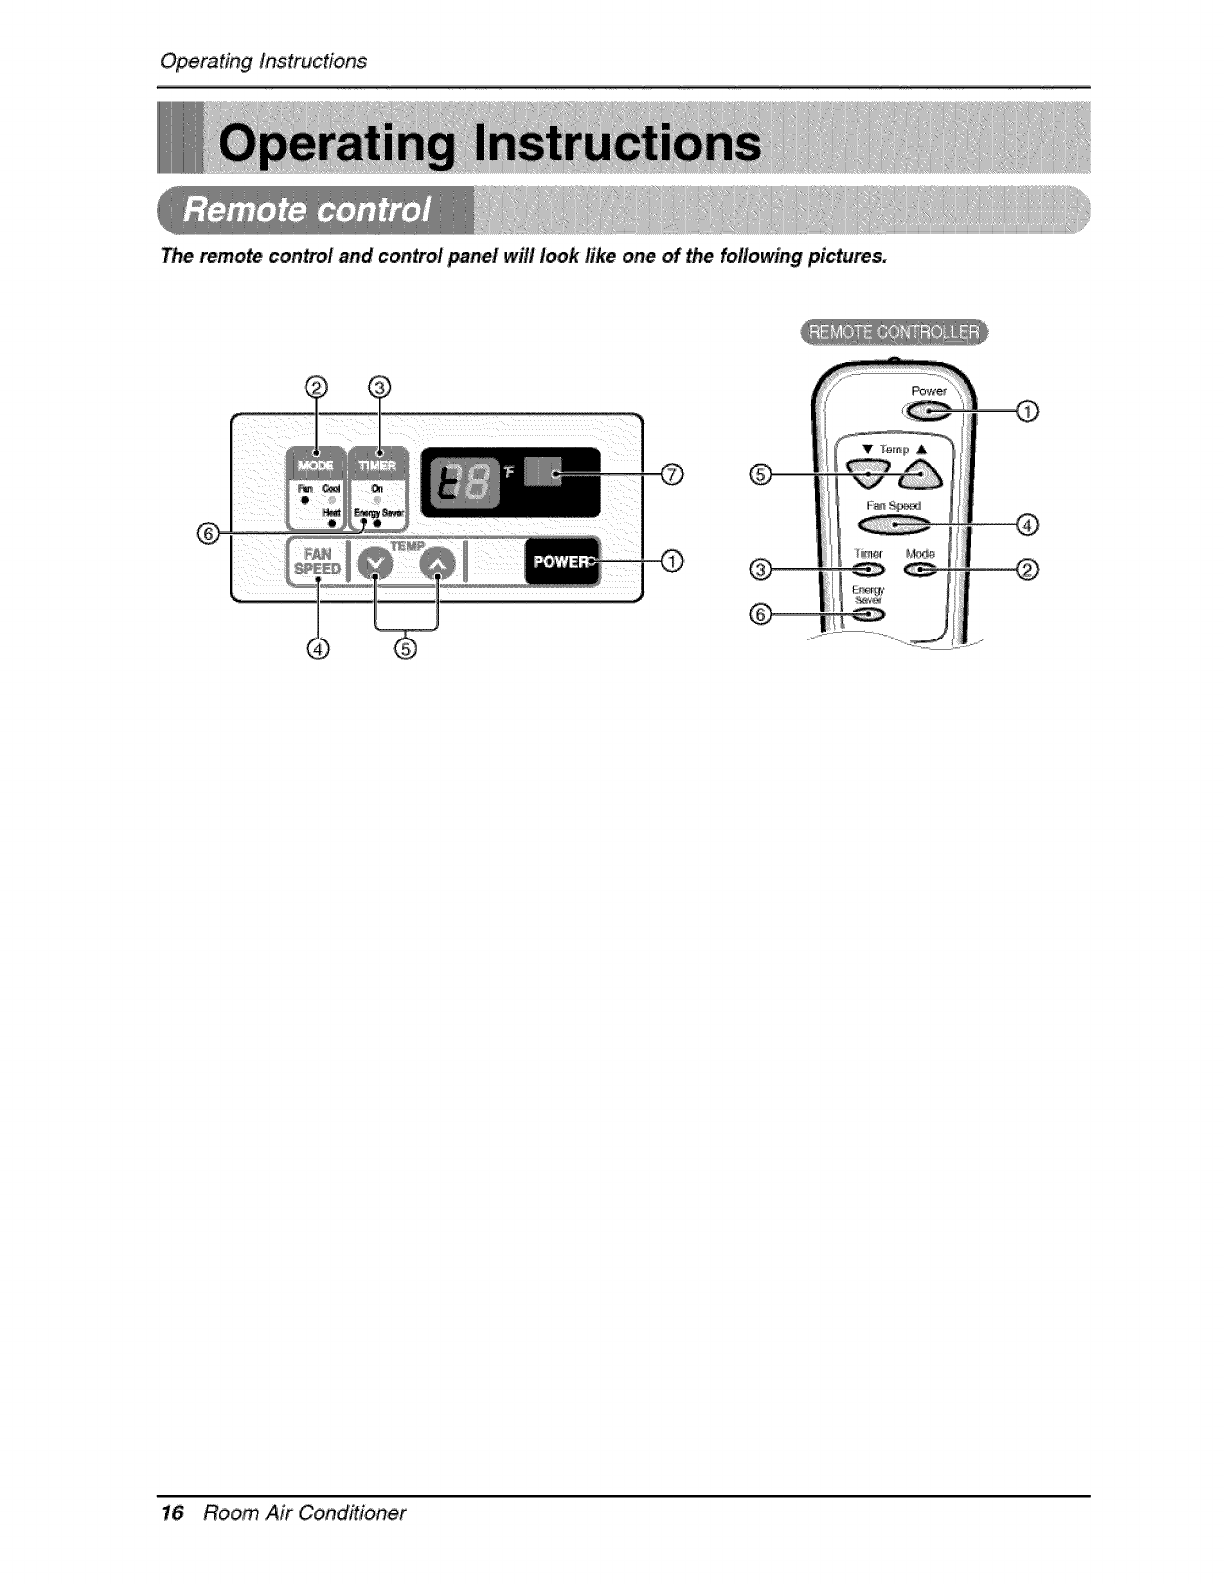
Operatinginstructions
Theremote control and control panel will look like one of the following pictures.
16 Room, Air Conditioner
Operating Instructions
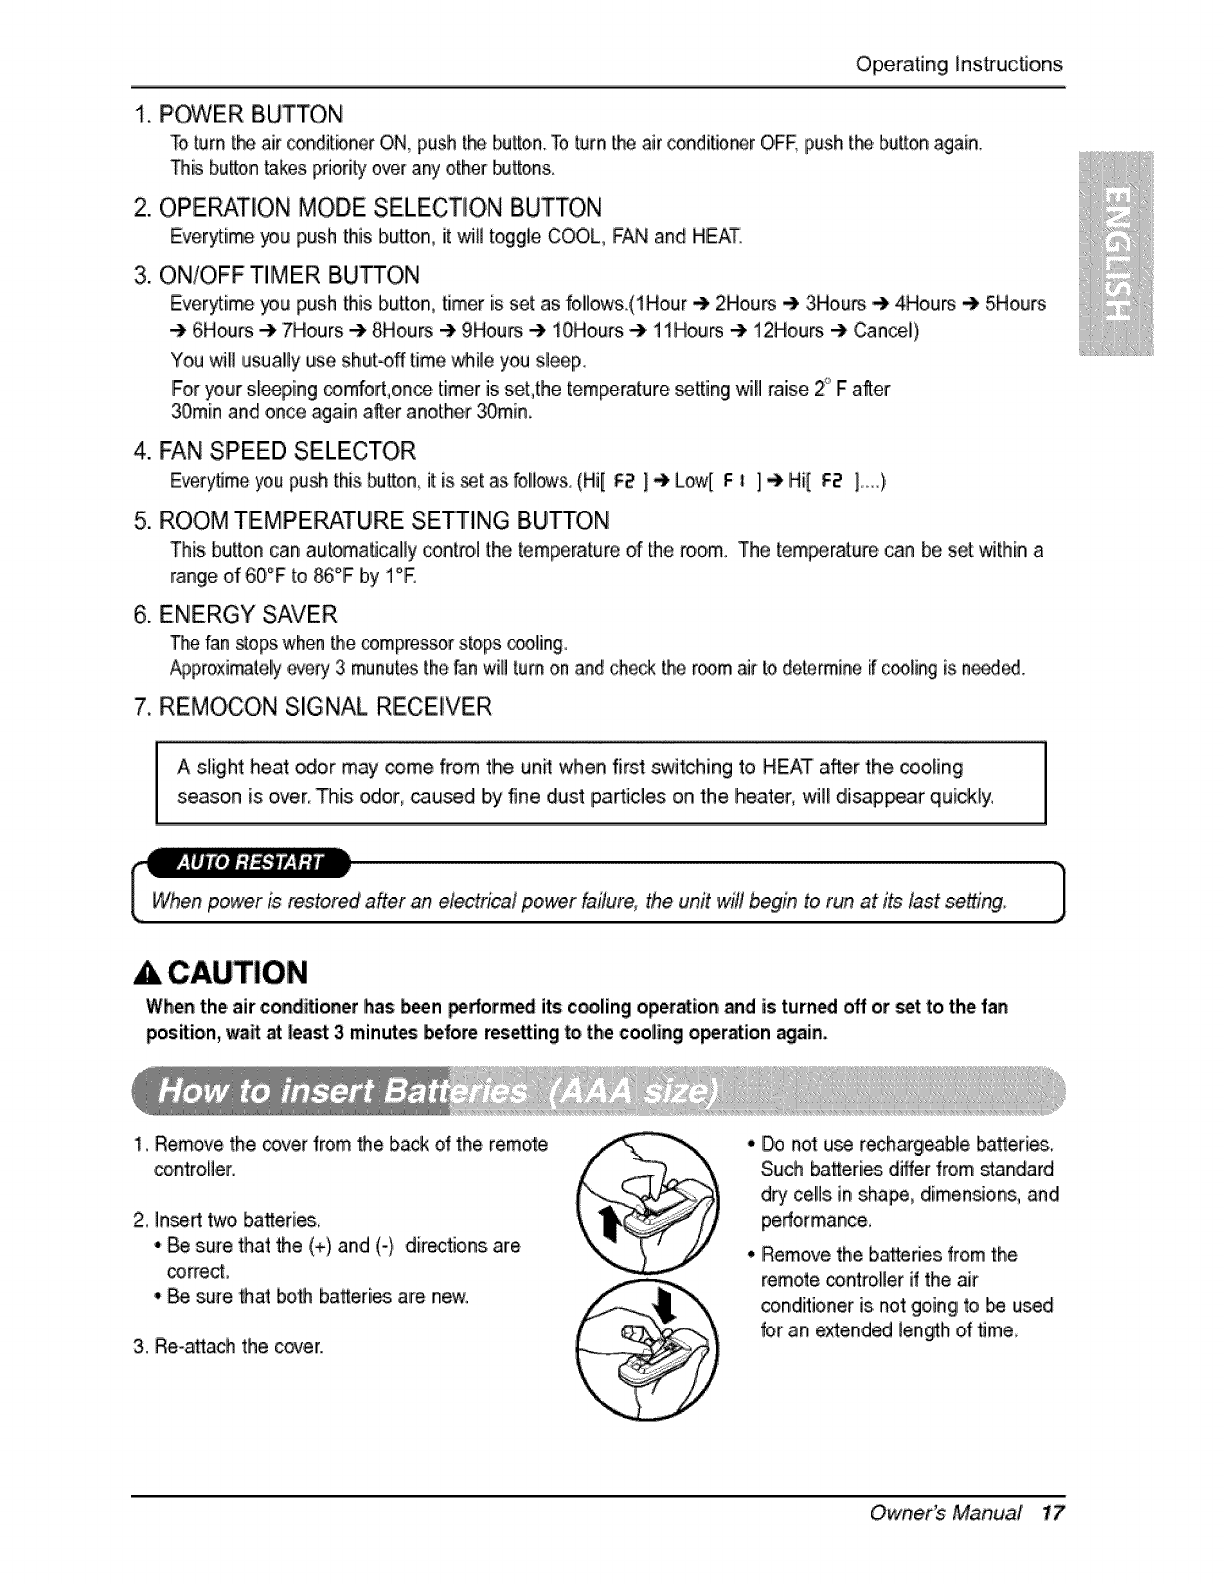
1, P'CMIER BUTTON
To turn the air conditioner ON_push [_ button. To _rn the air conditioner OFE push t_ bu_0,nagain.
This bu_o,n_kes priority over any other buEons.
2. OPERATION MODE SELECTION BUTTON
Everytime you push this button, it _B toggle COOL, FAN and HEAT,
3. ON/OFF TIMER BUTTON!
Everytime _u push this butlon, timer is set as follows.(1Hour _ 2Hours -_ 3Hou_ _ 4Hours _ 5,Hours
-) 6Hours _ 7Hours-) 8Hours _ 9Hou_-_ 10Hours-_ llHours _ 12Hours -.) Cancel),
You will usually use shut-off time while you sleep.
For your sl_piing comfort,once timer is set,the [empera[ure setting wiB raise 2° F after
30,min and once again after another 30rain.
4. FAN SPEED SELECTOR
EverytJmeyou push thusbutton it is _[ as folil_s, (Hi[ F2 ] _ Low[ FI 1_ Hi[ F2 !...)
5. ROOM TEMPERATURE SETTING BUTTON
This butto,n can au[oma_call[y _ntro, I the temperature of the room. The tem_mture _n be set within a
range of 60°F to _'F by I°F.
6. ENERGY SAVER
The fan stops when the compressor stops oo,oling.
A_proximatel!y,_#ery3 munutesthe fan will turn on and check the room air to determine if cooling is n_,ded.
7. REMOCON SIGNAL RECEIVER
iiiiiiii_iiiiiiiiiiiiiiiil;
A slight heat odor may come from the unff when first switching to HEAZ after the cooling
season is over_This odor, _used by fine dust particles on the Iheater, will dlisap_ar quickly.
after an electrical power _Jlure, the unit wilt begin to run at itslast se_ir_.
When the air conditioner has been _rformed its c_ling operation and is t:urn_ off or set:to the fan
position, wait _ least 3minutes betore resetting to the cooling o_r_ion again,
1, Remove,the cover from the back of 'the remote
controller.
2, In_rt two batteries,
* _ sure that the (+) and (-) directions are
corre_,
° _ sure _at bo_ batteries are new.
3. Reoattach the cover.
* Da not u_ rechargeab_e batteries_
Such batteries d_fer from standard
dry cobs in shape_ dimen_ons, and
performance,
°i Remove the bakeries from the
remote controBer if the air
conditioner is not going to be u_d
for an extended JengC[hof time,
Owner_ Manual 17
Operating Instructions
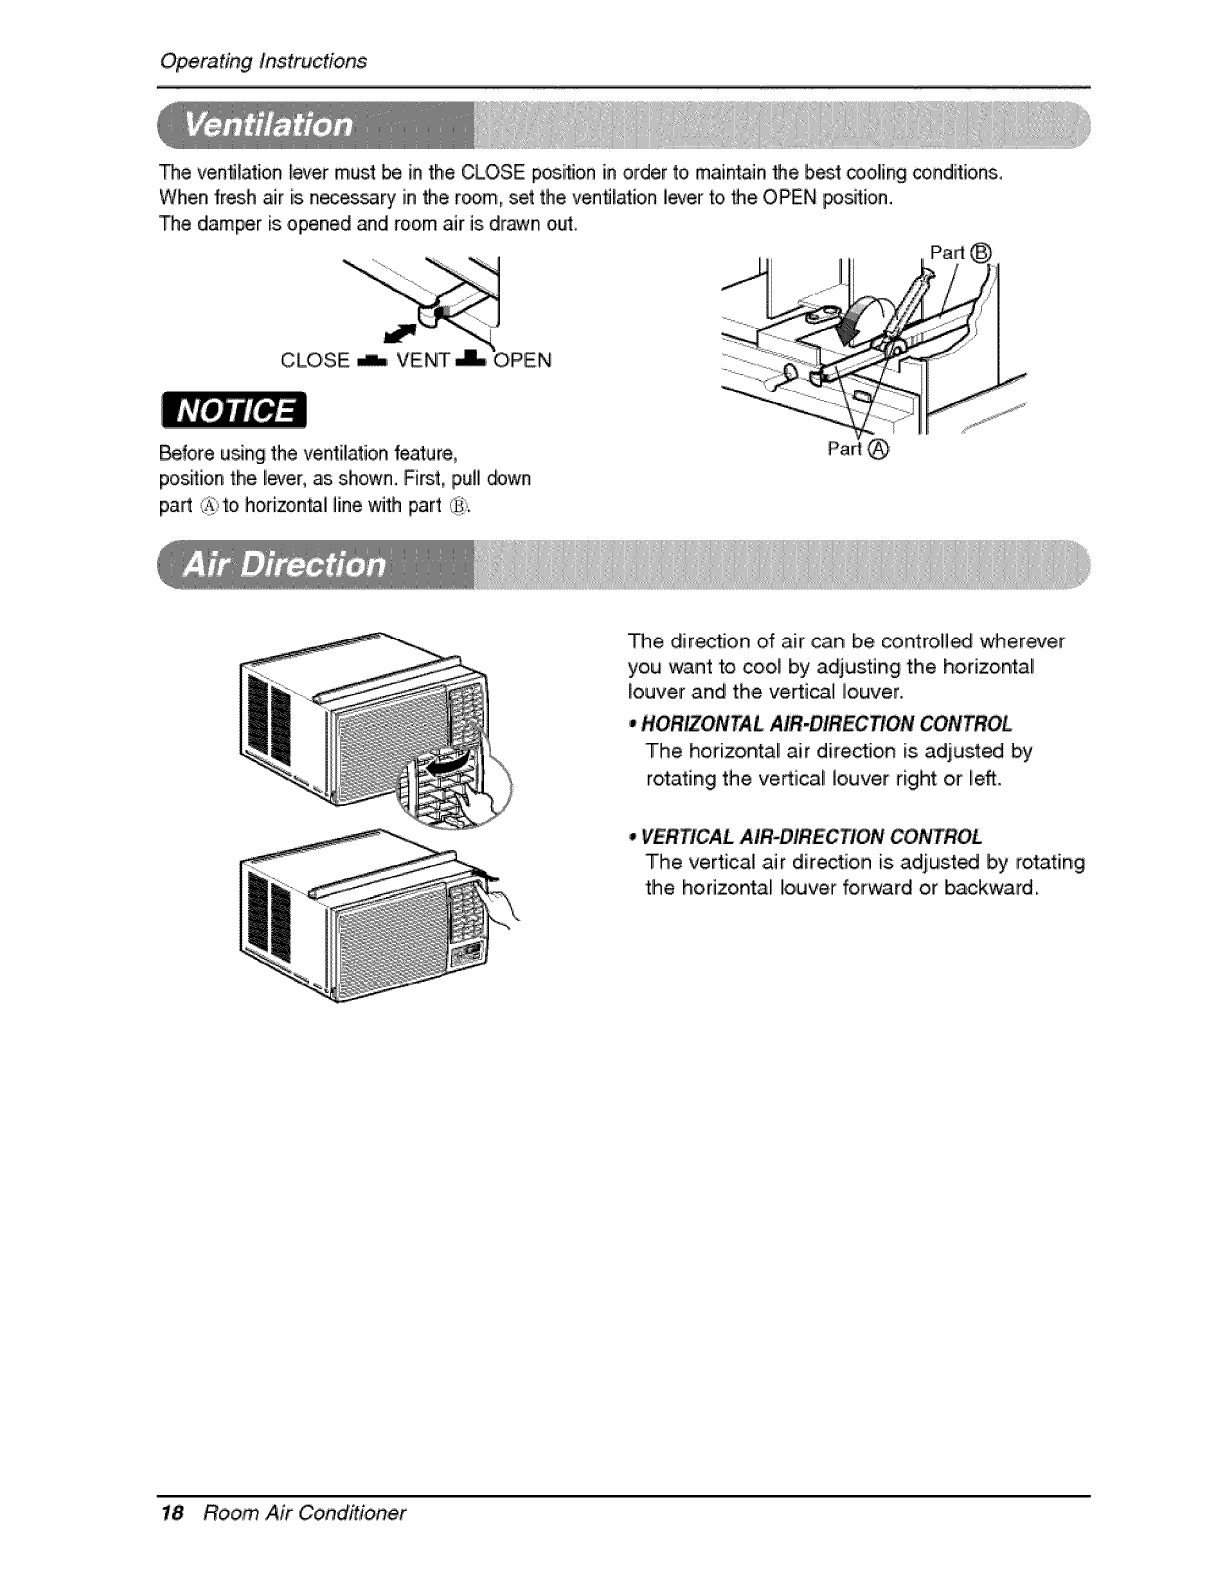
The ventilation _evermust be in the CLOSE position in order to maintain _e best cooling conditions,
When fresh air is n_es_ry in the ram, set the venflEation iever to the OPEN _sition.
The damper is opened and room air is drawn out_
Before u_ng the ventilation feature,
position the le,¢er,as shown. First, p,ull down
part ,_;_:,to horizon_l line with part @:
l i ,P'a.@1
:ii km .............'i
Part@
The direction of air can be controll_ _ereve_
you want to coo_ by adjusting the horizontal
louver and the verti_l _ouver.
* HORIZONTAL AIR_IREC_ON iCONTROL
The horizontal! air direction is adjusted by
rotating the vertical louver right or lefto
* VERTICAL AIR-DIRECTION CONTROL
The vertical ,air diredion is adiusted by rotating
the horizo,nta_ louver forward or backward
18 Ro,_m, Air Conditioner
Operatinginstructions
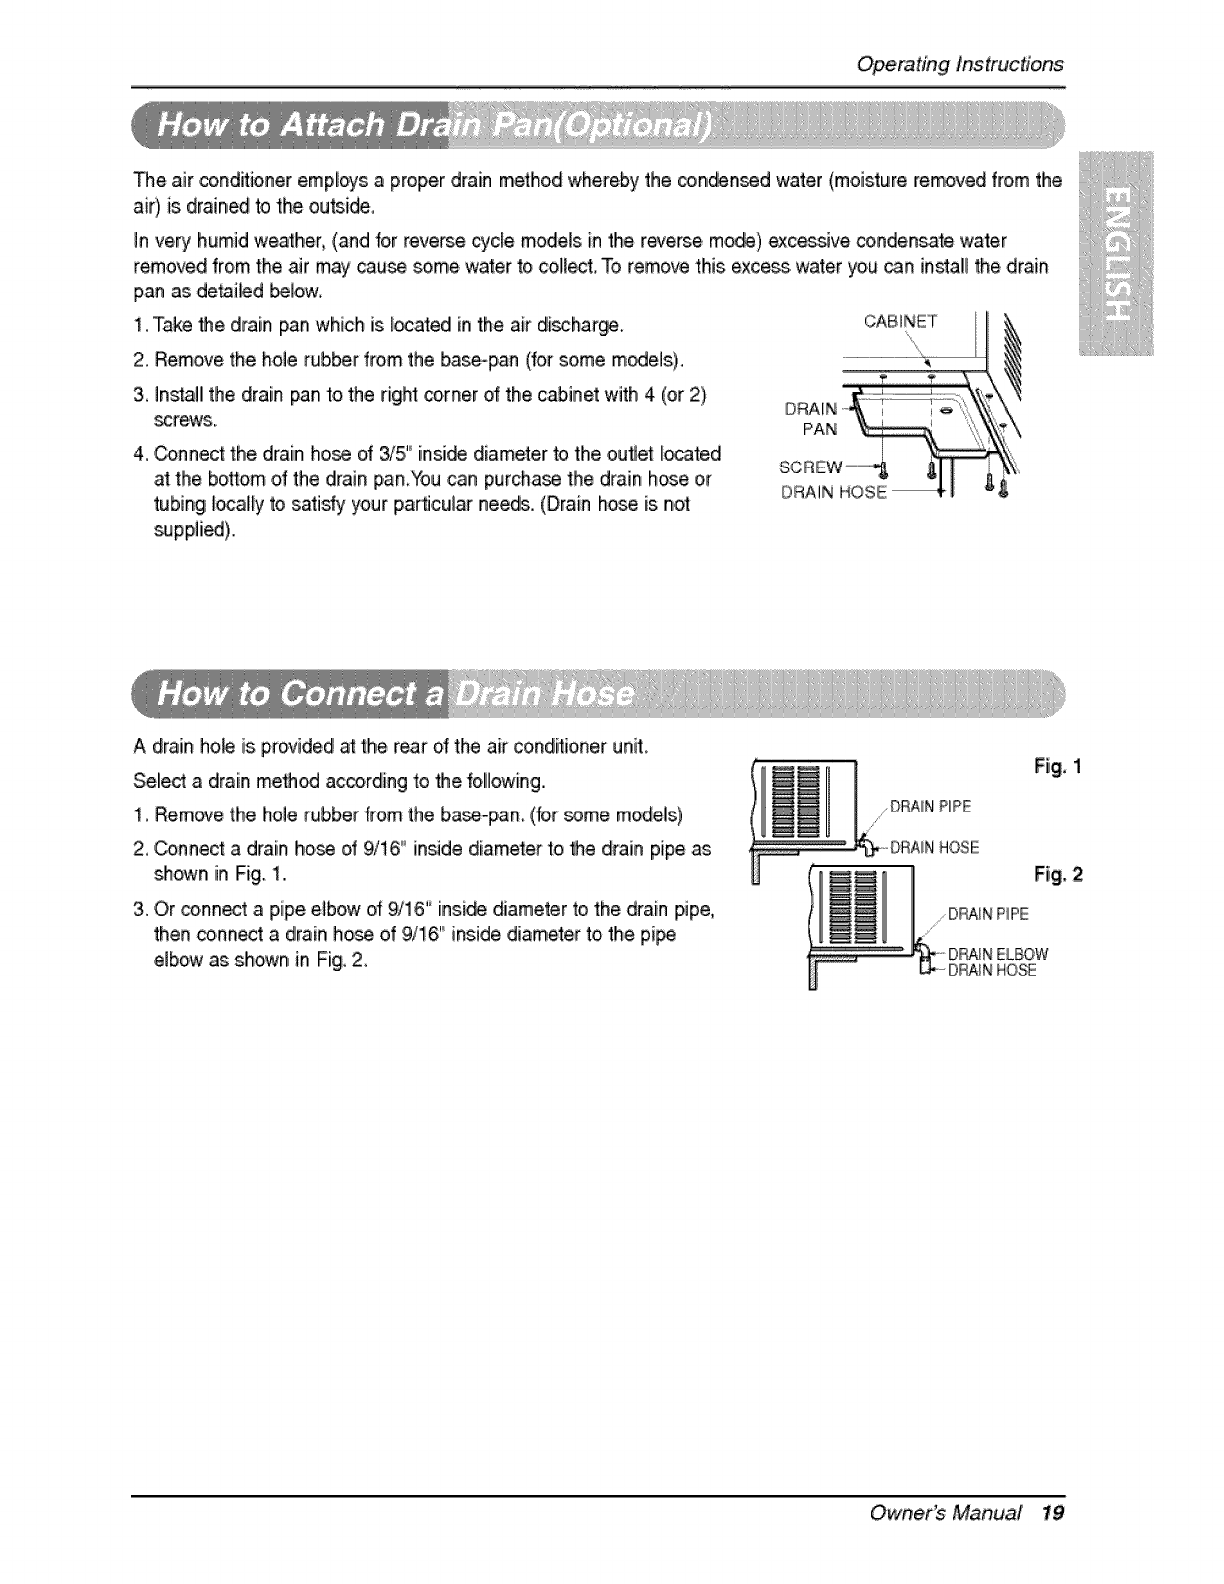
_e air conditbner employs a proper drain method whereby the conden_d water (moisture re_ved from the
air) is drained to the outside,
in very humid weather, (and for reverse cycle mode_s in the reJerse mo_) exce_ve coinden_f_ water
removed from the air my cause _me water to collect, To remove this excess water you can install the drain
pan as de_i_d below,
i, Take Me drain pan which is [_ated in the air di_bar_
2. Remove the hoi,erubber from the base-pan (for some m_els),,
CABINET
3, Insta!l the drain pan to the right corner of the cabinet with 4 (or 2)
_rews.
4,,Connect the drain ho_ of 3/5" insi_ diameter to the outer i_ated
at the bottom of the drain pan You can purcha_ the ,drain hose or
tubing locally to satiny your par_,cular needs. (Drain bose is not
_Jppli_).
DRAIN
PAN
DRAIN HOSE
A drain ho_ is provided at the rear of the air conditioner un&
Select a drain me_od according to Me following..
!_ Remove the hole rubber from the baseopan (for some models)
2, Connect a drain ho_ of 9/t6 °'inside diameter to Me drain pipe as
_own in Fig, 1..
3. Or conn_ a pipe elbow o_9/16' insi_ diameter b the drain pipe,
then connect a drain ho_ of 9/16" inside diameter to the pi_
elbow as shown in Fig, 2,
,DRAINPIP_ Fig, 1
....... DRAINHOSE
DRA_NIELBOW
U.................... -DRA_NHOSE
O_r_er_ Manual 19
MaintenanceandService
TURN THE AiR CONDITIONER OFF AND REMOVE THE PLUG FROM THE POWER OUTLET.
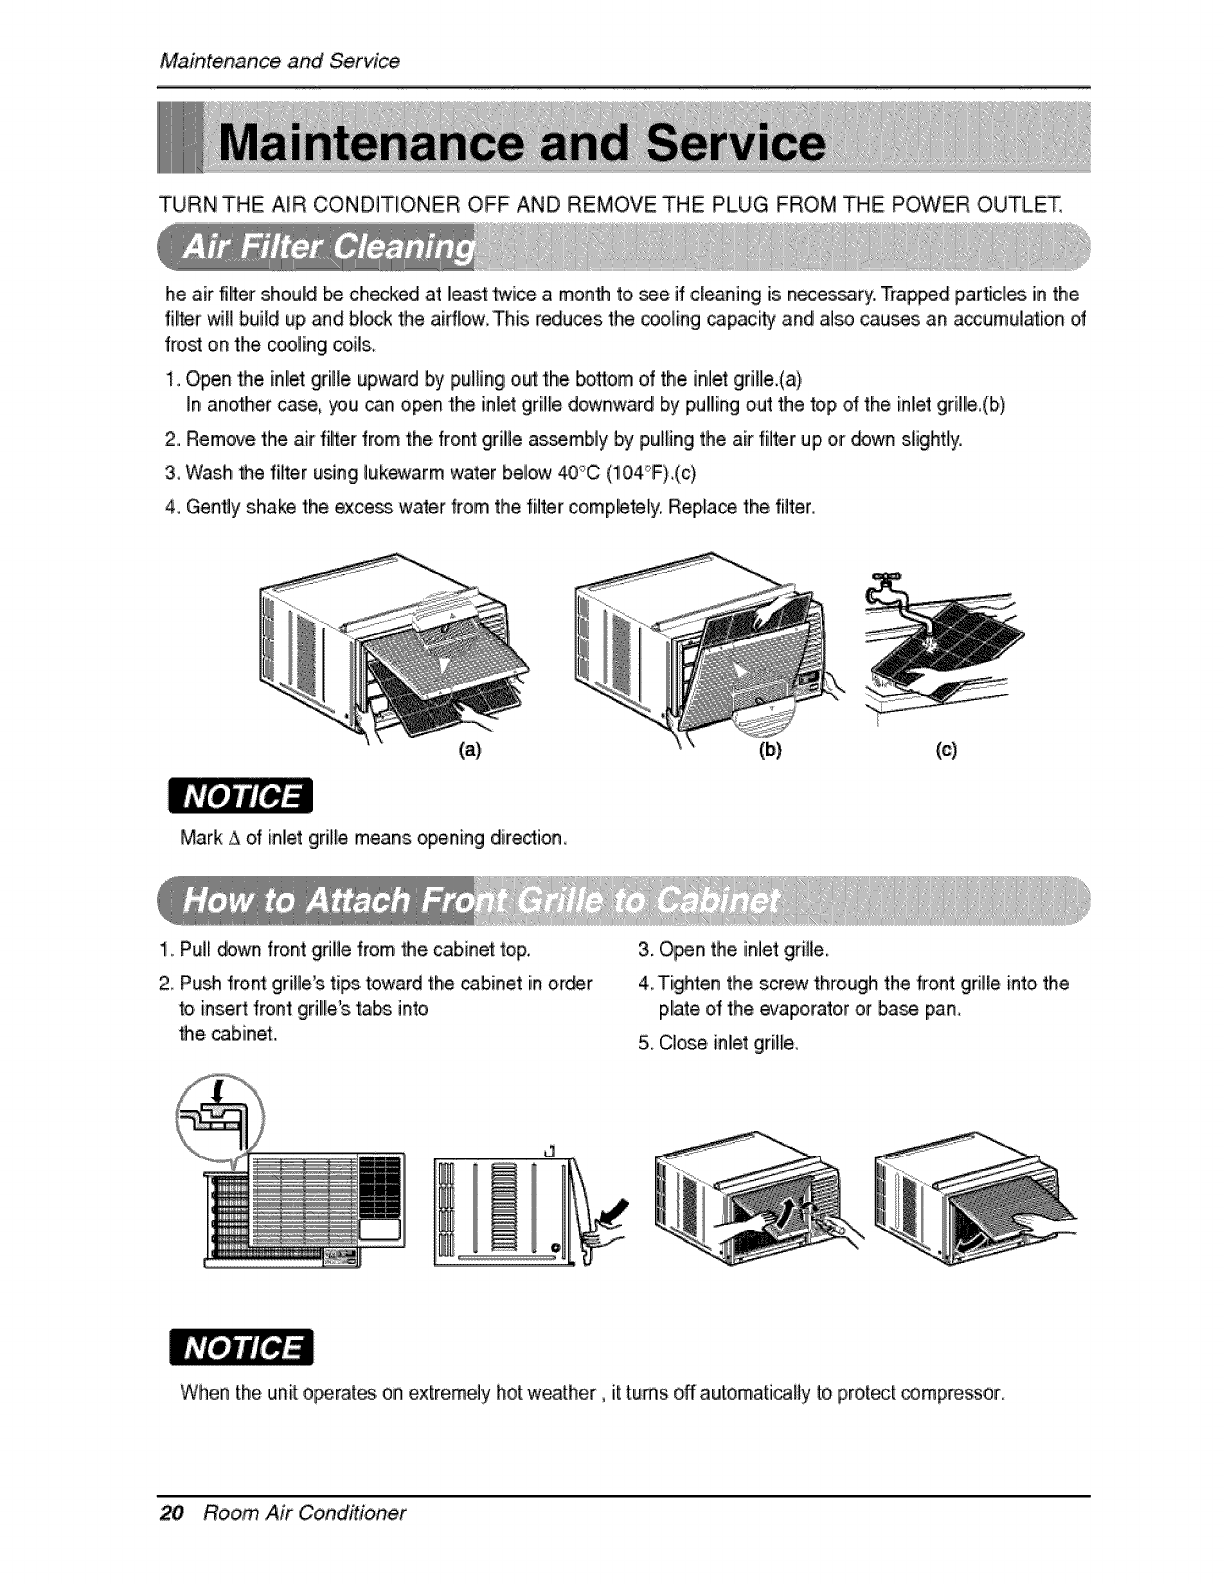
he air fillter shouEdbe choked at Ileast twice a monh toi see if cleaning is neces_ry,. Trapped particles iinthe
fluterwill build up and block the aidlow, This reduces the ooo_ingcapaci_ and aim causes an accumulation o_
f_ on the c_ling coil&
1. Open the inllet grille upward by pulling out the bottom of the inlet grille.(a)
In another case, _ui _n open the in_et,grille downward by pul!ling out the top of the inlet grill!e,(b)
2..Remove the air filter from the front grille a_,mbly by pul_ingthe air filter upio,i"_wn slightly.
3, Wash he filter using lukewarm water below 40°C (10,4°F),(c)
4, Gently shake the excess water from the filter comp_etely_Repla_ the filter,
(a) (b) (c)
Mark A of inlet gri_e means opening diredion,
1,.Pullidown front gdile from he cabinet top.
2, Push front, grille's,ti_. toward the ,cab,in,stin or_r
_oi insert front grille's ta_. into
the,cabinet..
3. O_n the inlet grille.
4 Tighten the screw through the front grille into the
plate of the e_aporator or base, pan,
5, Close inlet grille_
When the unit o_ra_es on extremely hot weather, i[ turns off automati_Hy to pro,[_[ _mpressor
20 Ro,_m, Air Conditioner

MaintenanceandSe_/ice
Before calling for service, please review the bBowing lid of common proNems and solutbns.
The air conditioner is _ting normally where
• You hear a pinging noi_. _is is cau_d by water being picked up by the _n_nser on rainy days or in
higNy humid conditions. This.feature is designed to help remove, moisture in the air and improve cooling
efficiency.
• You hear the thermostat dick,.This is caused by the compressor cycle starting and stopping.
°Yoiu _,e water dripping from the rear of the unit, Water ma_ybe collected in the ba_ pan in h_Ny hum_
conditions o,r,on rainy days Thiis 'water overflc_wsand drips from the rear o! the unit,
• You hear the fan running while the compressor is silent, This is a norma_ operational feature,
The air conditioner may _oper_ng abnormally when:
i ....
° Make sure the plug is completelly plugg_ into the
o_let
The air conditioner,,,
does not operate
at _11
Air conditioner
does not cool
Ice appears on the
air cone_ioner.
fu_ or reset the breaker
° In the event of a power failure, set the power control
to OFR When the power _ restored, wait 3 minutes
to restart the air conditioner fo prevent the
,comp,re_r from over!oading
• Pre_. the RESET button located on the power cord
p_ug.if the RESET huron wi_fnot stay engaged,
di_ontinue use of the air conditioner and contac_ a
qual!ified _w_e technician,
° Make sure there are no cu_ains, blinds, furniture or
other obslades in front of the air conditioner
Set the TEMP control to a lower number,
• Clean the fiffer at least every 2 weeks. Refer to the
°Maintenance and Se_ice " section dthe manual
give the air conditioner _me time to,cool the room.
•'When the air conditioner is,first turned o,n
you need to a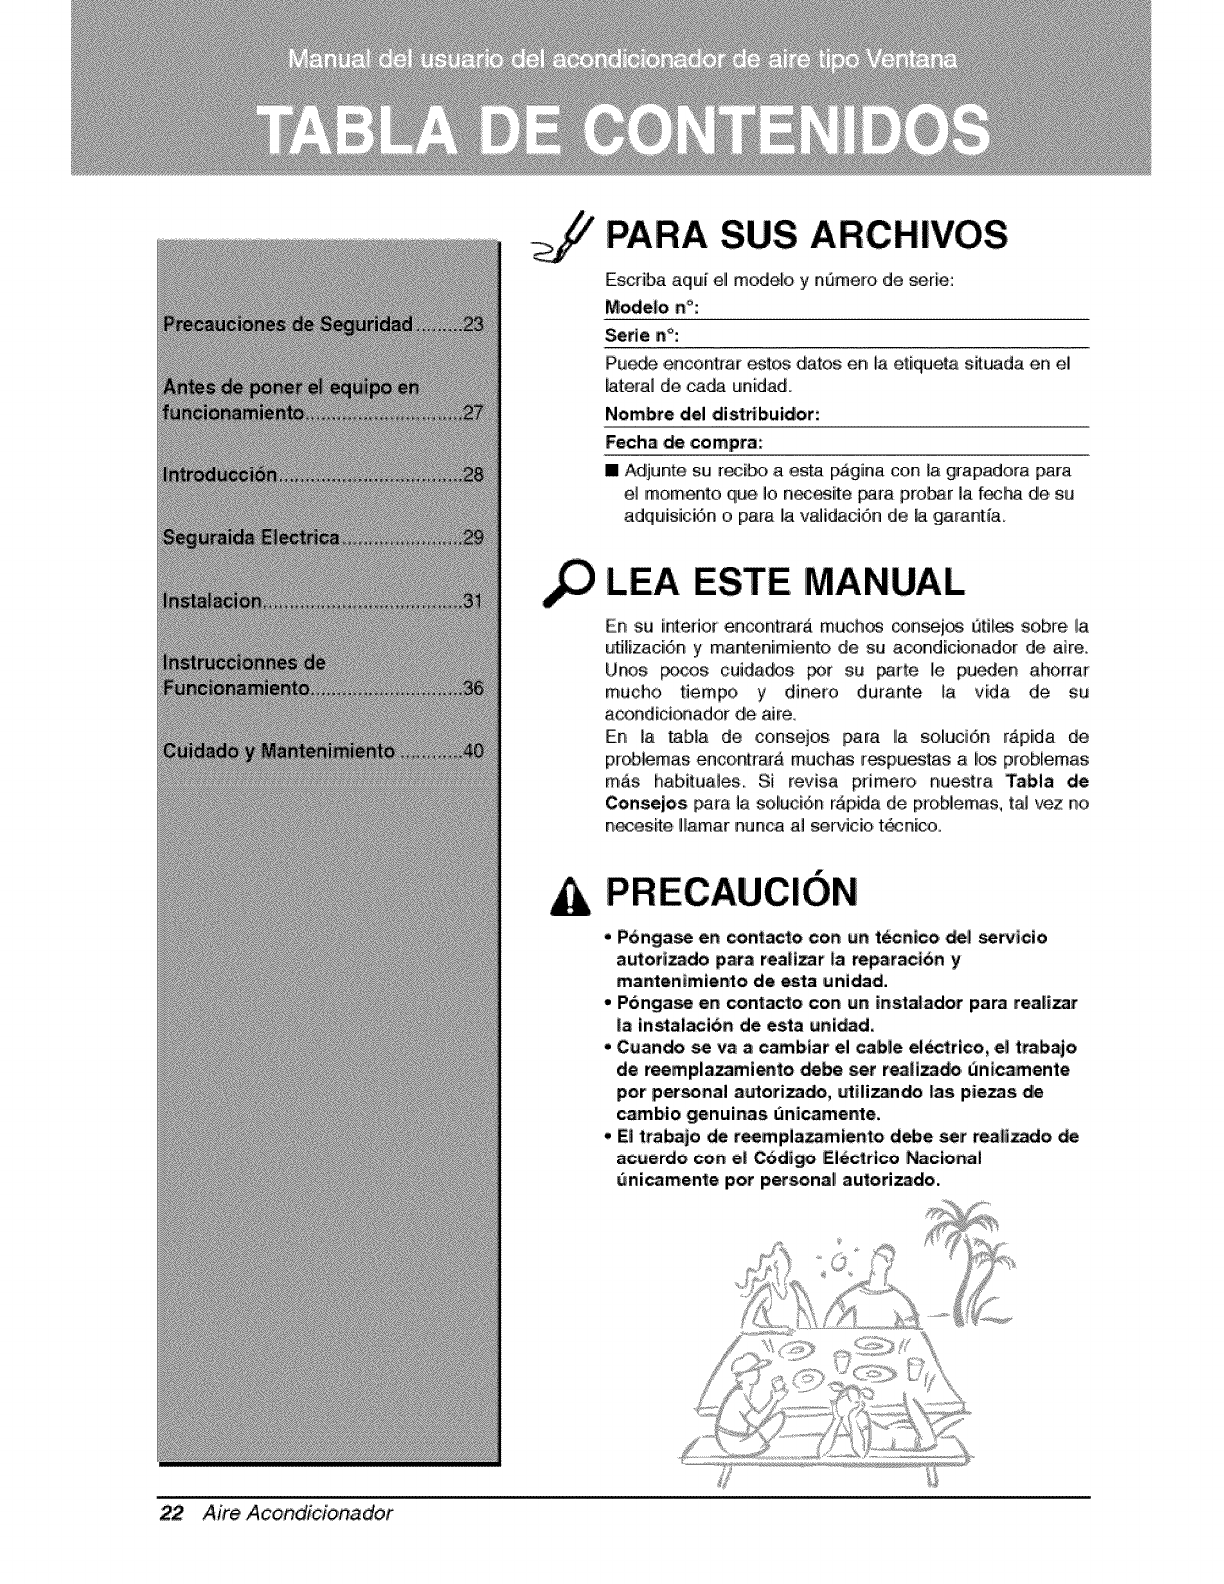
PARA SUS ARCHIVOS
Escfiba aqui[ ell modelo y nBmero de serie:
Mode|o n°:
Sefle n_:
PUi_ enconhar _t_ datos en _aet[queta sit_ada en e_
_teral de ca_ un[dad.
Nombre del dist_buidor:
Fecha _compra:
[] Adjunte su r_i_ aes_ p_gina con _agrapado_-a para
el momento qlue Io ne¢÷sifte _ra probar la fecb_ d!e su
adquisici6n o para la v_[daci6n de A garantia.
LEA ESTE MANUAL
En su iintefior encont_ara much_ consei_ _tJ_ sob_'e la
u_lizaci6n y mantenim[ento de su a_ndic_nador de aire,
U_s _)cos cui,dados _r su _le ile pu_en ahorrar
mucho tiempo y dineto durante la. v[da d,e su
acondicioa,ador de aire,
En ma tab,la de consejos para Ila soluci6,n rAp[da de
pr_m,a,s enco,ntra_ muchas [_pi_j_tas a _ p[o,Nemas
m_s habituates. Si revisa pHmero _uestra Tabla de
Consejos _ra la soluci6,n Ap/[da de probiemas, tal vez no
necesite Hamar nunca al senAcio t_n[co,
* P6ngia_ en coitl_ac_ocon un tdcnlco _ _w_cio
autoH_do para readier |a repataci6n y
manten_miento de esta _nidad.
,P6nga_ en contacl_o con _n insta|ador para rea|i_r
|a instalaci6n de esta _i._d.
, C_ando _va acamb_ar el cable el_c_rico, e_ ttab_o
de r_mpla_mi_to _be _t r_|i_do. _ntcamente
por personal a_oriza_, _t_liz_ndo |as pie_s de
carnbio genuinas unicamente.
. E| ttaba_o de t_mplazamienlto debe set rea|_do
ac_erdo c,o_ e| C6d_ _l_a_rico Nacio_ai
uni_men_e pot pe_na_ autotiz_do.
22 Aire Acondicionador
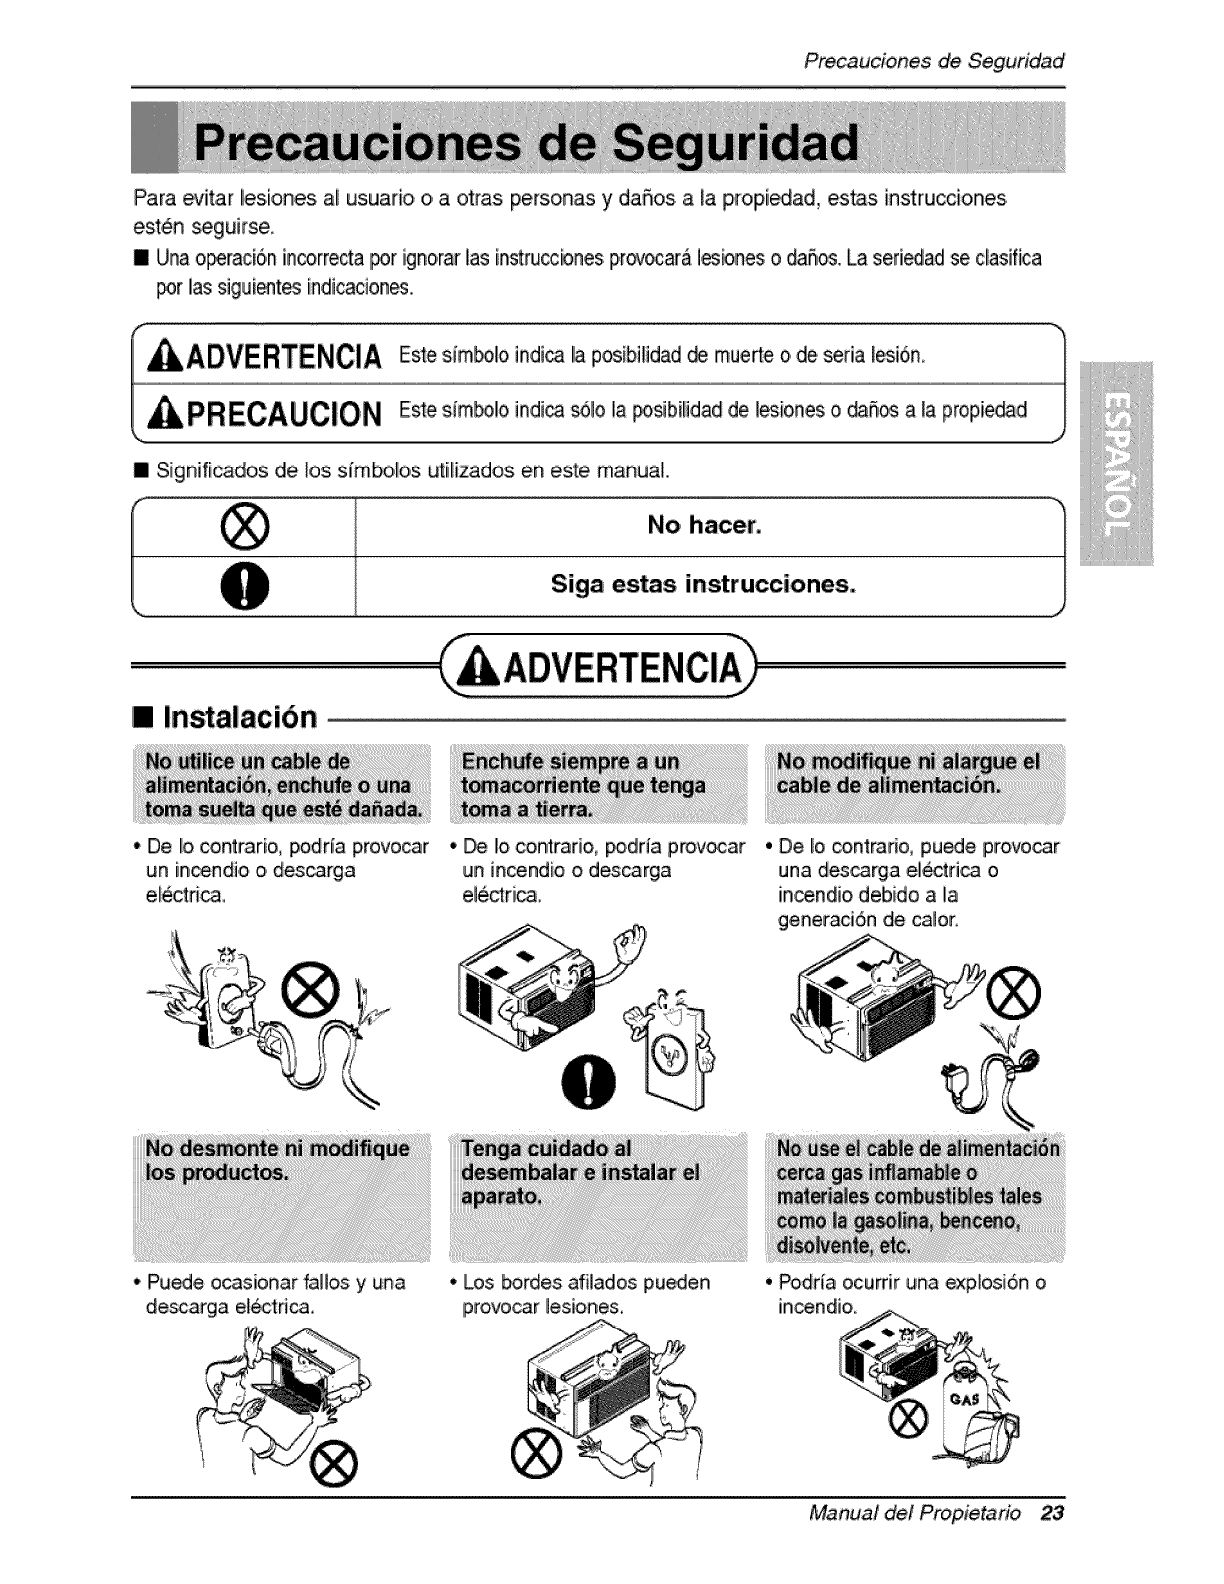
PrecaucionesdeSeguridad'
Para _itar les.iones ai us.uario o, a otras personas y daSos, a lap, ropi_ad, estas instrucciones
est_n _gukse
II Una o_raci6n incorrecta _r igno,rar las ins_ru_bnes pr_ocara i,esbnes o daffy. La seri_ad se dasifica
_r Ilassi,guient_ indiicacion_.
ill Significados dle los. s_mbo,bs utilizados en este manual..
No hacer,
Siga estas instrucciones.
[] Instaiacibn
• De Io contr,ario, podria p,rovocar
un incendio o. descarga
e_ectri_
• _ !o contrari,o_ _dria pro,v_ar
un incendio o descarga
ele,ctrica
•De Io contrario, pu_e provo_r
una descarga el_ri_ o
in_ndio debido a la
generaci6n de caloro
•Pu_e ocasionar _llos y una
descarga electric&
•Los _rdes afilados pu,_en
provo_r lesione&
•Podda ocumr una expiosi6n o
incendio,
Manual det Prop4etario 23
Precauciones de. Seguridad
[] O,peracibn
• P'u_e ocasionar una explosi6n
o descarga e_ect:rica. • De 1ocontmrio, puedeprovocaruna
_sc:a@3el@ct_cao incendio_bido
a _ageneraciSnde calor,
• Puede ocasionar un incendio y
una descarga e[ectrica.
• De !o contrado, puede _urdr
•Puede provocar fallos en el
producto o descargas
electricas,
• De io contrarb, podffa provocar un
inc_ndio o _scarga el_ctr_a.
un incendio y runa_idente _ir
• De Io contrario, pueden _u_ir
descargas ,e!6_dcas y fall!os,
•_ido a que e_v,entila_r gira a
a_tave_o¢idaddu_anteel
funcionamiento, _drla o,casionar
lesiones.
24 Aire Acondicionador
• Evitar,& e[ a_anque accidental y
[a posibilidad de lesio.nes.
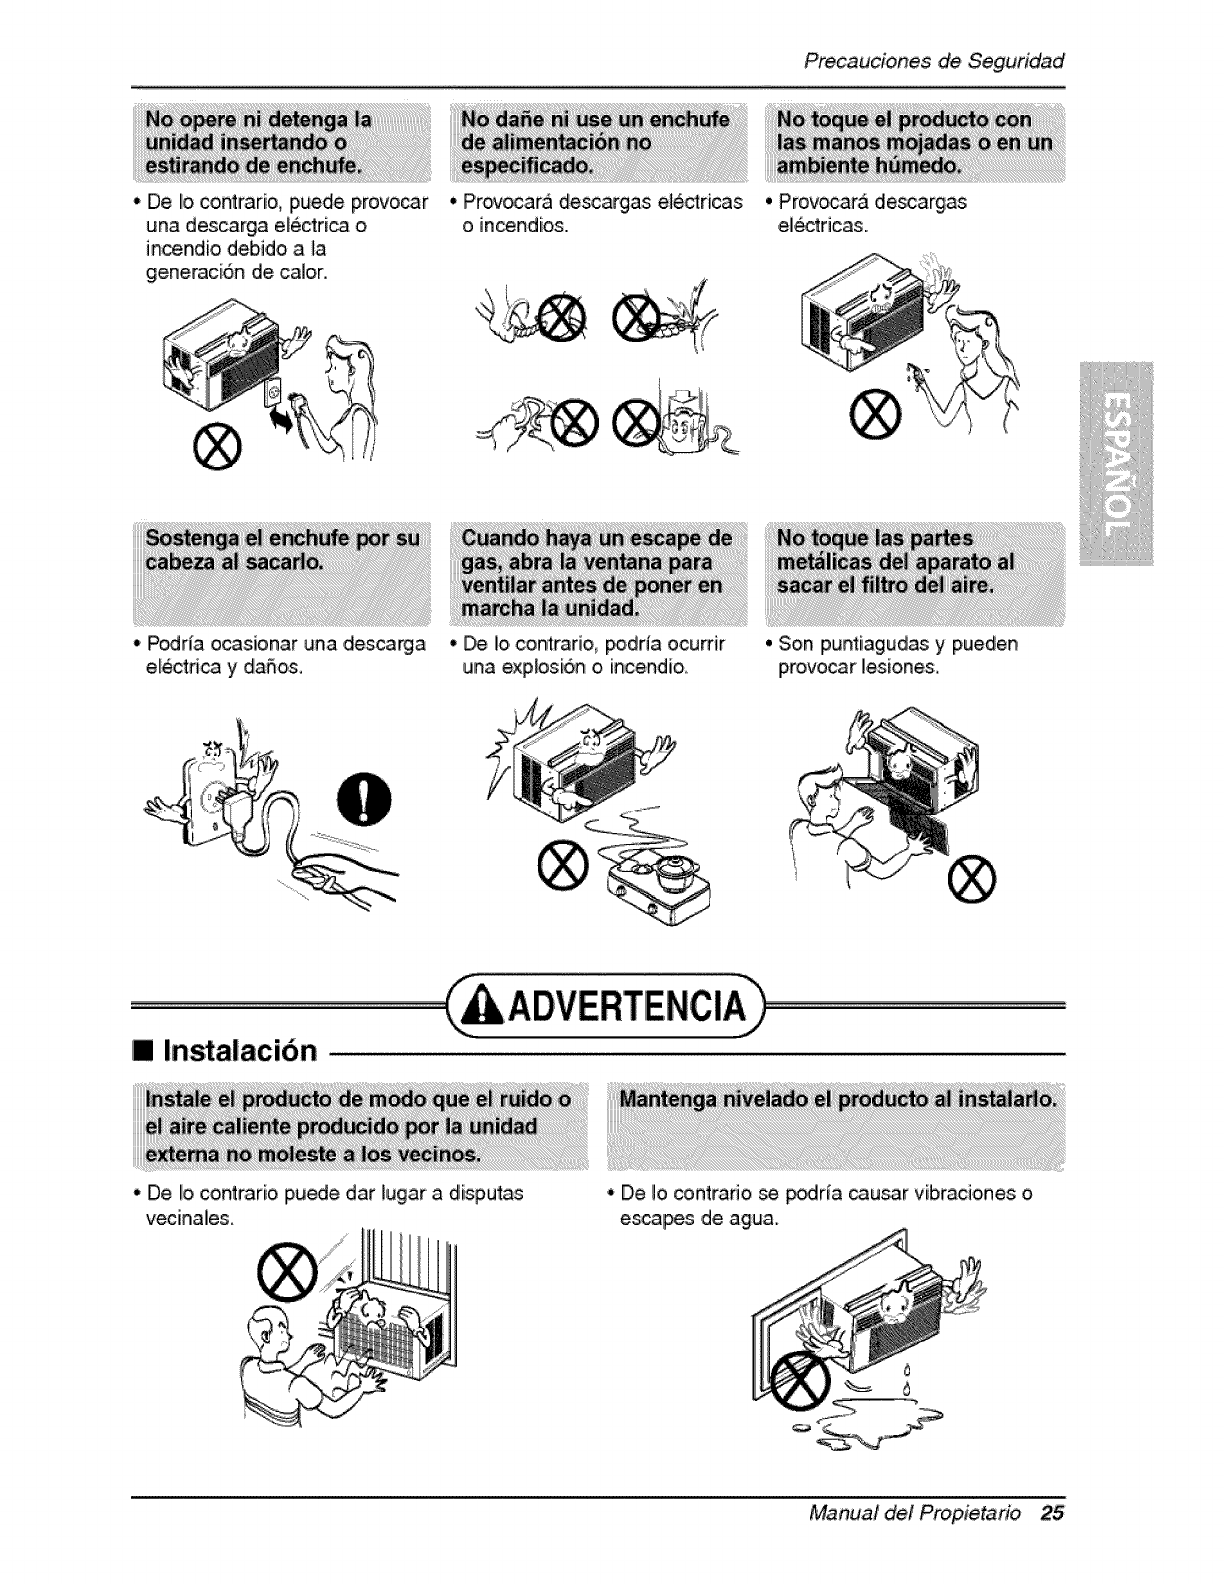
Precauciones de Seguridad
• De Io contrario, puede provocar
una descarga efectri_ o
incendio debido a _a
gen,eraci6n de calor,
• Provocara de_argas el6ctricas
o incendios..
o P_rla ocasionar una ,descarga
electri_ y daSos,
•_ Io,contrario, _,drla ocumr
•Provocar& desca,rgas
el_tricas.
una explosi6n o incendio_
[] Instalacion
• De Io co.ntrario gu_e dar lugar a disl3utas
vecinalies. i
• Son iPumi,agudas y pueden
provocar lesioRes:,
* De Io contrado se _rla cau_r vibr,aciones o
escapes ,de agua.
Manual det Propietario 25

PrecaucionesdeSeguridad
• Operacibn
aparato,
. Pu_e i_iio,Rarse al (_er_ del
aparato o al caerse los objeto,s
que haya ,co]_adio,
E] funcionamiento sin fiitros
©
a ocas_onar es_ones
puedie p,rovocar _llos.
saiud, fesiom_s p,e_nales.
,an ocumr
26 Aire Acondicionador
Antesdeponerel_uipo en funcionamiento
1. P6ngas,e ,en contacto con un especialis_ para realizar la instalaci6n.
2. Enchufe correctamente la toma de, alimentaci6n..
3.. Utilice un oiircuito dedicado.
4_ No utilice un cable aiargador.
5..No inicie/cese el funcionamiento enchufando/desenchufando el cable
el6ctrico.
6. Si el cabileienchu[e esta daffado, sustitQyalo solo _r una pieza autorizada.
1, Estando expuesto a la circulaci6n dir_ta de aire dumnte un extenso perl_o
de tiempo _drla resultar peligroso pare su sa!ud, No exponga alas personas,
animales dom6sticos, o a las plantas a la circulaci6n de aire durante largos
periodos de tiempo,
2. Debido a la probabi!idad de fal_ de oxfgi,eno, ventile el cuarto cuando est_
utilizado el aparato junto con estufas u otros a_mtos de ,calefa,_i6n.
3. No utilice este aire acondicionado con propositos esp_iales no especificados
(_.: conservaci6n de dispositivos de pr_isi6n, comida, animales dom6sticos,
plantas y objetos de a_e). Tal uso p,_rta daSar los articulos.
1 No toque las pi,ezas metAli,cas de la unidad al retimr el fiitro Manejar aristas
afiladas de metal puede causar lesione&
2, No utilice el agua _ra iimpiar el interior .del aire a_ndicionado. La ex_sici6n
a[ iagua p,u_e destruir el aislamiento, oonduciendo a _sibles descargas
el_tricas.
3, Ai limpiar la unidad, aseg_rese antes: de que la el_tricidad y el interruptor
est,_n apagados. Ell ventilador rota a muy alta velocidad durante el
funcionamiiento del _ui_. Existe la posibilidad de lesiones si acciona
accidentalmente la el_tricidad de la unidad mientms limpia e.I interior de la
Pare cuestiones de re_raci6n y mantenimiento, _ngase en contacto con su
distribuidor de servicio, autorizado.
Manual det PropJetario 27
lntroduccidn
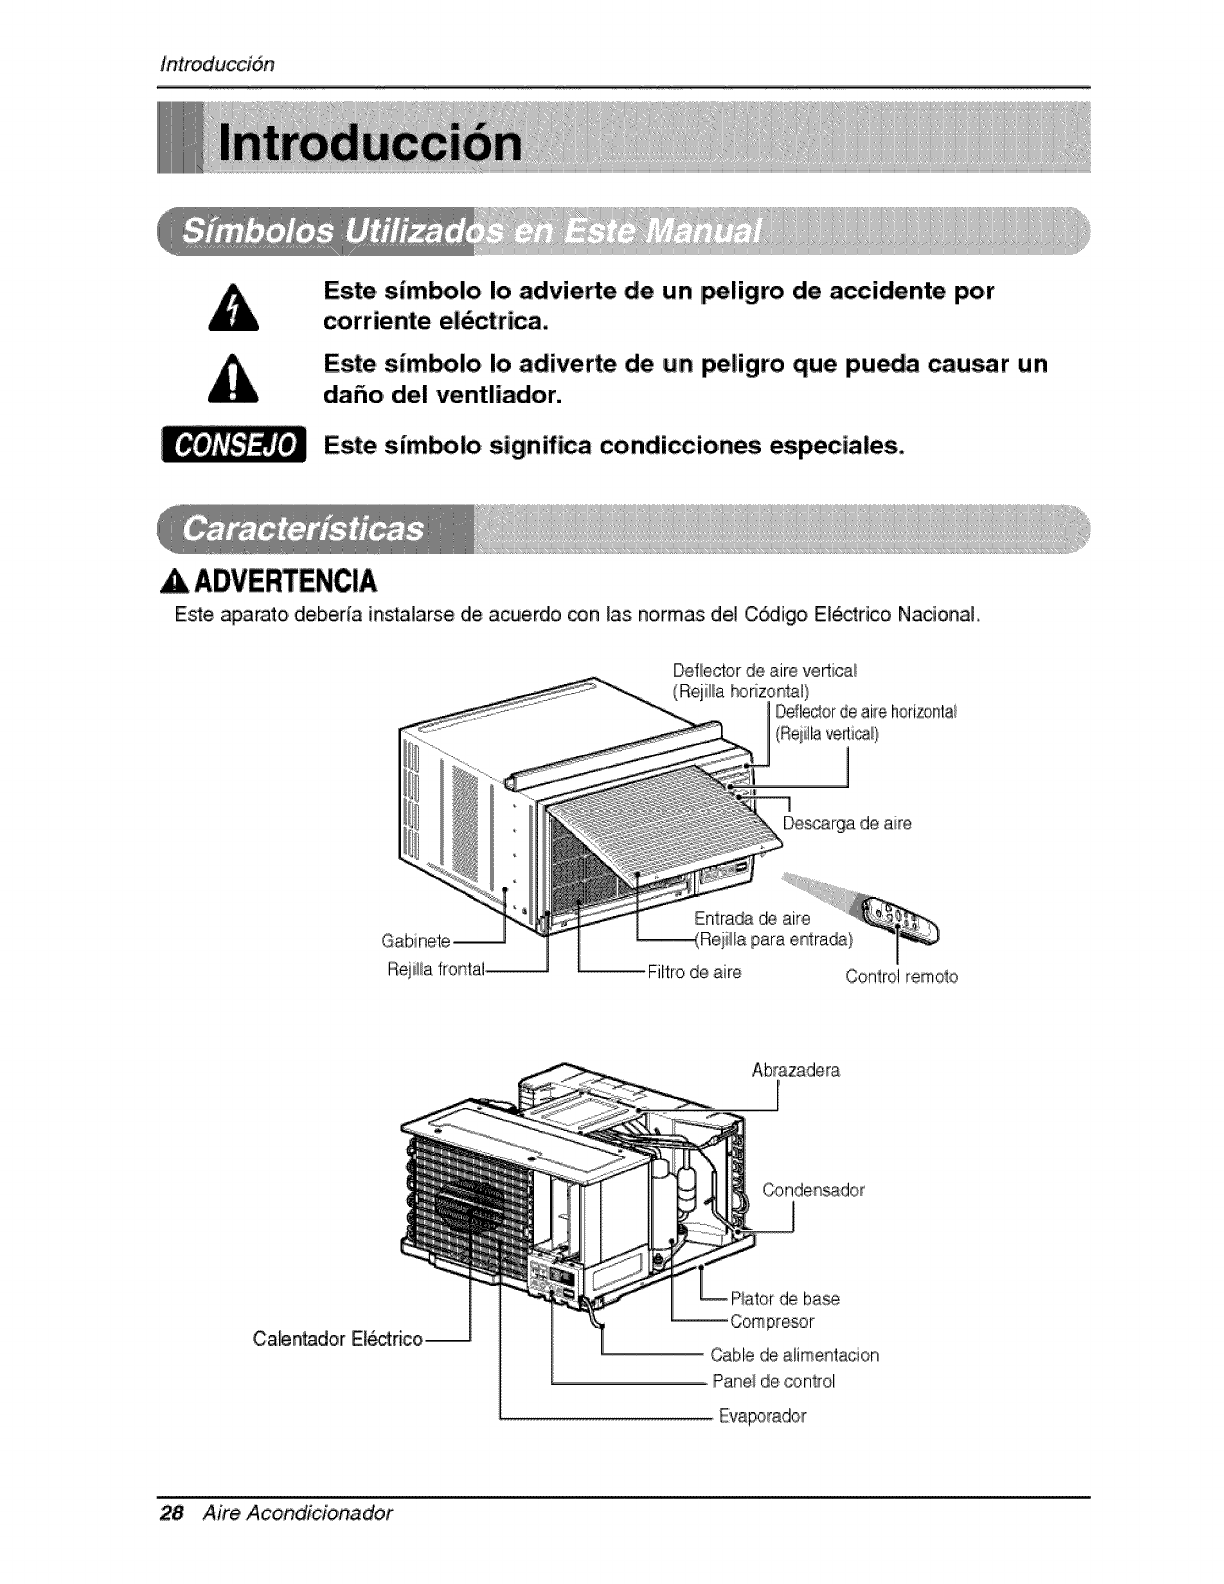
Este slm_lo Io advie_e de un I_ligro, de accidente por
corriente el,_ctrica,
Este sim_lo io adiveirte de an peligro que pu_a causar un
daho, del ventliador.
Este sim_lo significa condicciones es,peciales.
E_e apamto deberia instal,arse de acuerdo con _as normas del C_igo El_ctrico Nacional,
Deflector de aire vertica_
(Reji_la Ih_rizontal}
Ddlec_orde ,aidehorizenta_
1
De_carga de aire
Gabinete
Entra_ de aire
_ Filtro de aire Contro! remo!o
Abrazadera
Ca_r_dor
ba_
Cable de alimentacion
Pane/de @nlrel
28 Aim Acondicionador
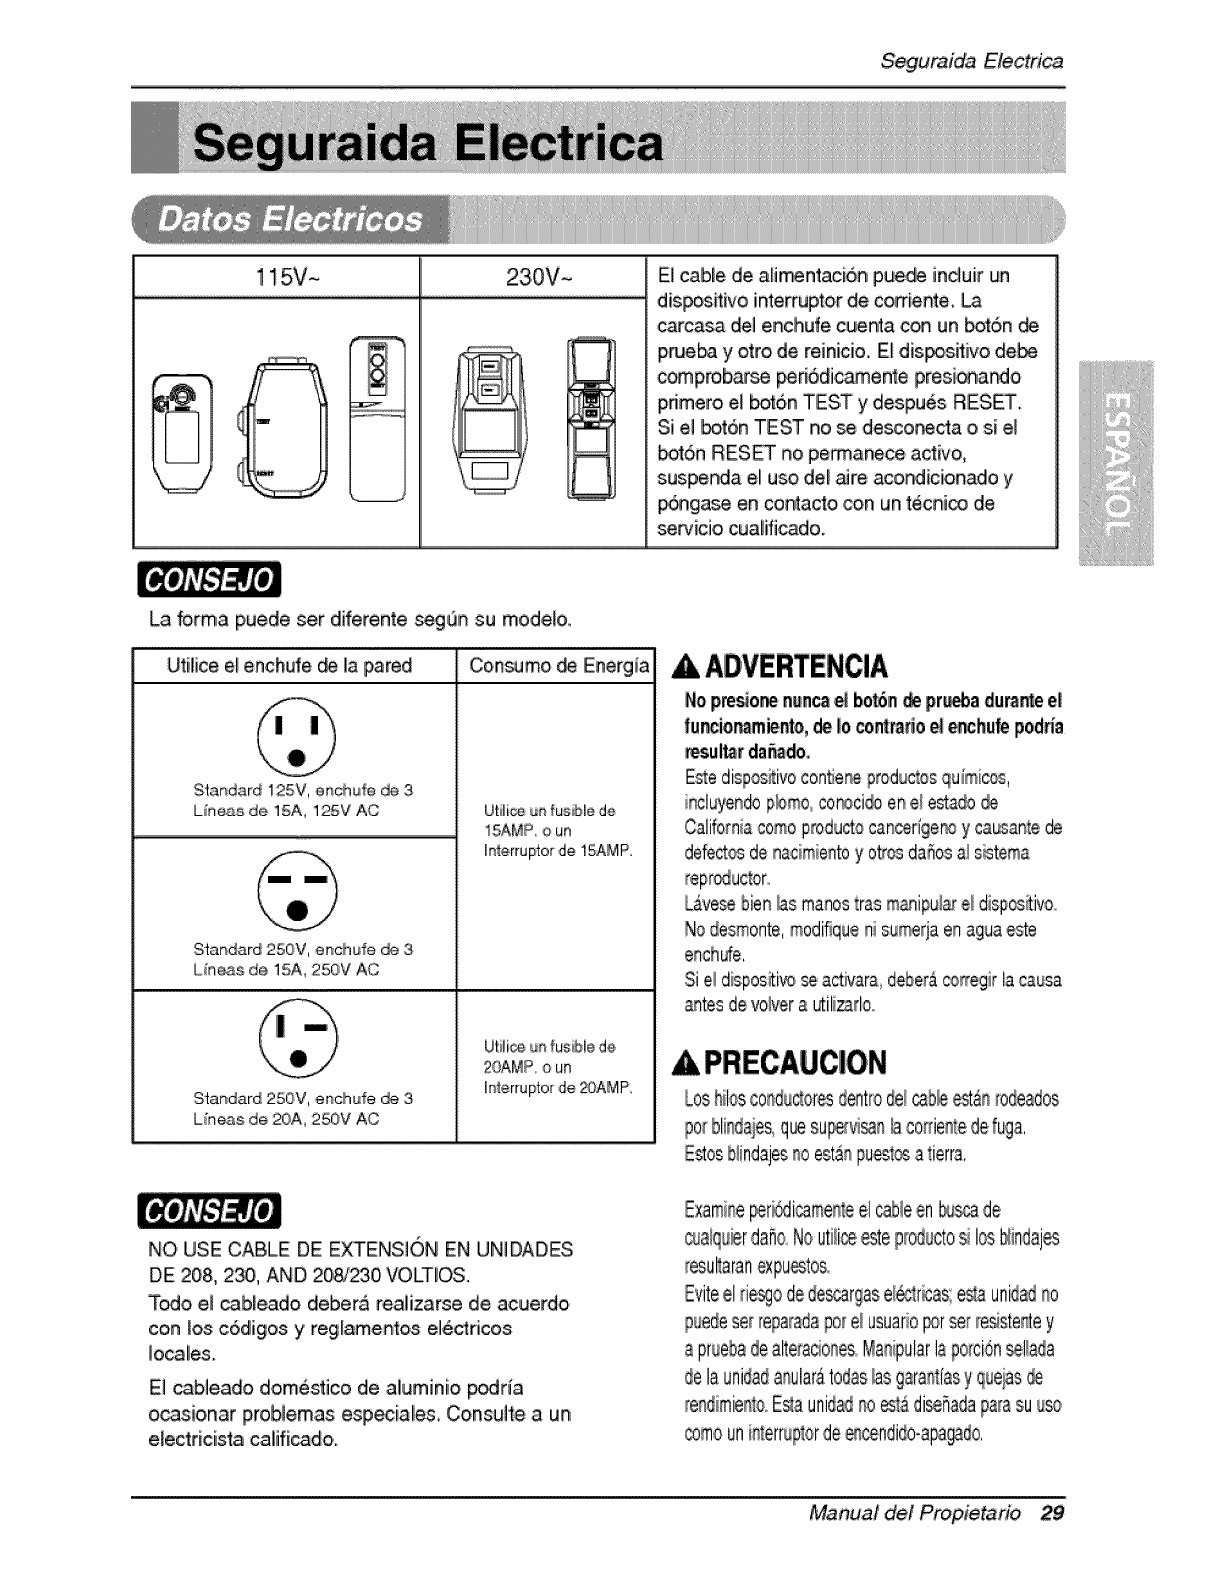
SeguraidaElecfrica
115V~ 230V_
.,.illi.J
El cable de ali_entaci6n pue,_ induir un
dispos_ivo inte_uptor de co_ie_e La
carcasa ,de1enchufe cuen_a con un bot6n
prueba y otto de reinicio.. El dis#_ivo de_
comp_bar_ _n6di_,ente presJ_ar_o
primero el _6n TESZ y diespues RESET.
Si el bot6n TEST no se desconecta o si el
bot6n RESET no pe_anece activo,
suspe_a e! u_ del _re acondicionado y
_gase en contacto con un tecnJco de
_r'¢icio cualificado.
La _rma puede ser diferente seg_Snsu modelo.
Utilice el enchufe _ [a pared Con_mo _ Energla
Standard 125V, enchute _a 3
L_e_s de 15A_ 12gV A©
Standard 250V, enchufe _ 3
Lfneas de 15A, 250V AC
Standard 250V, enchufe _ 3
Uneas de 20A, 250V AC
Utiii_ u_ _u8ib[iede
15AMP, o, un
Ir_,errupto_de 15AMP,
Utili® ut_fusible de
20,AMP,o un
I_errupto_de 20AMP,
No p_siol_ nunca_ bot6n_pr_a dura_ el
|u_io_m_nto, _ _oco_r_no _ _chufe podffa
_uitar daffado°
Estedis_itivo con_er_eproductosquimic_,
inclu_ndo pbmo ,cor_ci_ ene! estado@
Californiacomop_ductocancerige_ y ca_santede
defectosde nacimientoy o_osdaSosals_tema
_ve_ bienAs manostras _qipu!_ ' e_dispositivo
Nodesmoate,modifiqu,enisumerjaeaaguaeste
enchde.
Si,eldispos_ivosea_ivara deber_,co_egirla ,causa
_tes devoh,er a _ilizado_
Loshit_ c0_ductor_dentr'ode_cab__t_ rodeados
_o_bli_daie&,quesu_vi_ la,co_ie_ltede_uga,
Estosblindajes_oest_ puest_a ti,erra,
NO USE CABLE DE E_ENSION EN UNIDADES
DE 208, 230, AND 20&_230,VOLTIOS.
Todo e_cableado deber,_ r_lizarse de acuerdo
con _os c6dligos y reglamentos el_ricos
locales.
El cableado do,mestico de aluminio podria
o_sionar prob_emas esp_ia[es, Consul'te a un
e[ectricista caliificado.
E×ami_e_r_di_me_e elc,ab!een _ d,e
_alquierd,affo_Noutili_ este;roductosi i,_ blindaj_
_esultaranexpu_to&
Evitee!rie_o dede_rgas e_r_cas: e_a unidad_o
puedese__e£aradapot eiusuario_r setire_ster_tey
apr_ebadealte_a_o_esManipularlapo[ci6n_l!ada
delaunidada_ulia_4todasAs gara_flasy que_s@
rendimiemoE_aunidad_o_t,i di_5ad,a_atasu uso
comouni_terr_tord,e_ndido-apagad0,
Manual det Prop,ietario 29
Seguraida Electrica
(FAVORLEA CON ATENCION)
POR LA SEGURIDADPERSONALDEL USUARIO,ESTE
APARATODEBE SEll DEBfDAMENTENEUTRALtZA_.
NO CORTE0REMUEVALA TERCERAPATA(GROUND)
OEL ENCHUFE.
A. SmTUACJONESEN LAS CUALES EL APARATO
ES DESCONECTADO OCASIONALMENTE:
Et cord6n de energia _este aparato esta _uipado
con tr_ iPa_s(cable atierra)oL,ffili_ _ste con un
enchufe de pared _ kes salidas(a tie,a) para
minimi_r el peligro _ choque electrico, El cliente
de_ revi_ar el r_eptor de pared y e_circui_ pot un
eledrici_a ca_ificado para a_gurarse que ia
rece_i6n esta _lbidamen'_ neutrali_.
Debii_ a_peliigro_tencia_, no_otros no
recomendamos e,_u_, de adaptado,res, Sin embargo,
si usted desea utitizar un adaptador, una CONEXiON
TEMPORAL, puede _
efectuada. Utili_ adap_adores UL, disponibles en la
mayor/a de los estab_ecimientos, de
herramientas. La pata mas grande deJadaptador
_be ser a[/neada con [a pata mas gran_ _l
inter_uptor para as_urarse una po_ari_dSn
adecuada.
Adap_r la terminal del gm.und deJ adap_dor a
la cubier_ de la _red con un
tomilio no neutralliza el aparato a _nos que _a
cubie_ de_tomil_o sea de metal, uno sea
in_ada, y e_r_eptor de pared este
ne_li_do a t_av_s ,del alambrado deli _acasa.
El c_iente _ebe hacer venficar el ¢ircui'_ por un
e_ectricista calificado para ase_urar_ que e_
receptor es_ debidamente neutr_lizado.
Descor_.cte el cor_n _ e_rgla ,_l adaptation,
_liza_ una _no en cada uno. De Iiocon_raxb,_a
terminal del a_dor pue_ _omi_e, NO,UTILI!CEel
aparato con un er_h_e rote.
B, S_TUACIO,NESEN LAS CUALES EL APARATO
ES DESCONECTADO CON
FRECUENC_A.
No _i_ic_ un adaptado_ en estas circunstancias,
Desconectar el o_rd6n de enet:gfa con kecuencia _o
Hevar_al m,entual t'ompimiento de la terminal
neu_alizaci6n, La _uda de energia de la pared
_be ser reemp._azadapot una salida de t_es
patas(ne u!tralizada).
USO DE EXTENS_ONES
Debi_ al _ligiro _tencial, no reco.men_mos la
uti_izaci6.ndle extensiones.. Sin embark, si usted
_sea utili_r una extensi6n, utili_ aria
_ca_ por CSA/UL de try. alambres,
_tabgada 15A, 125V.
30 Aire Acondicionador
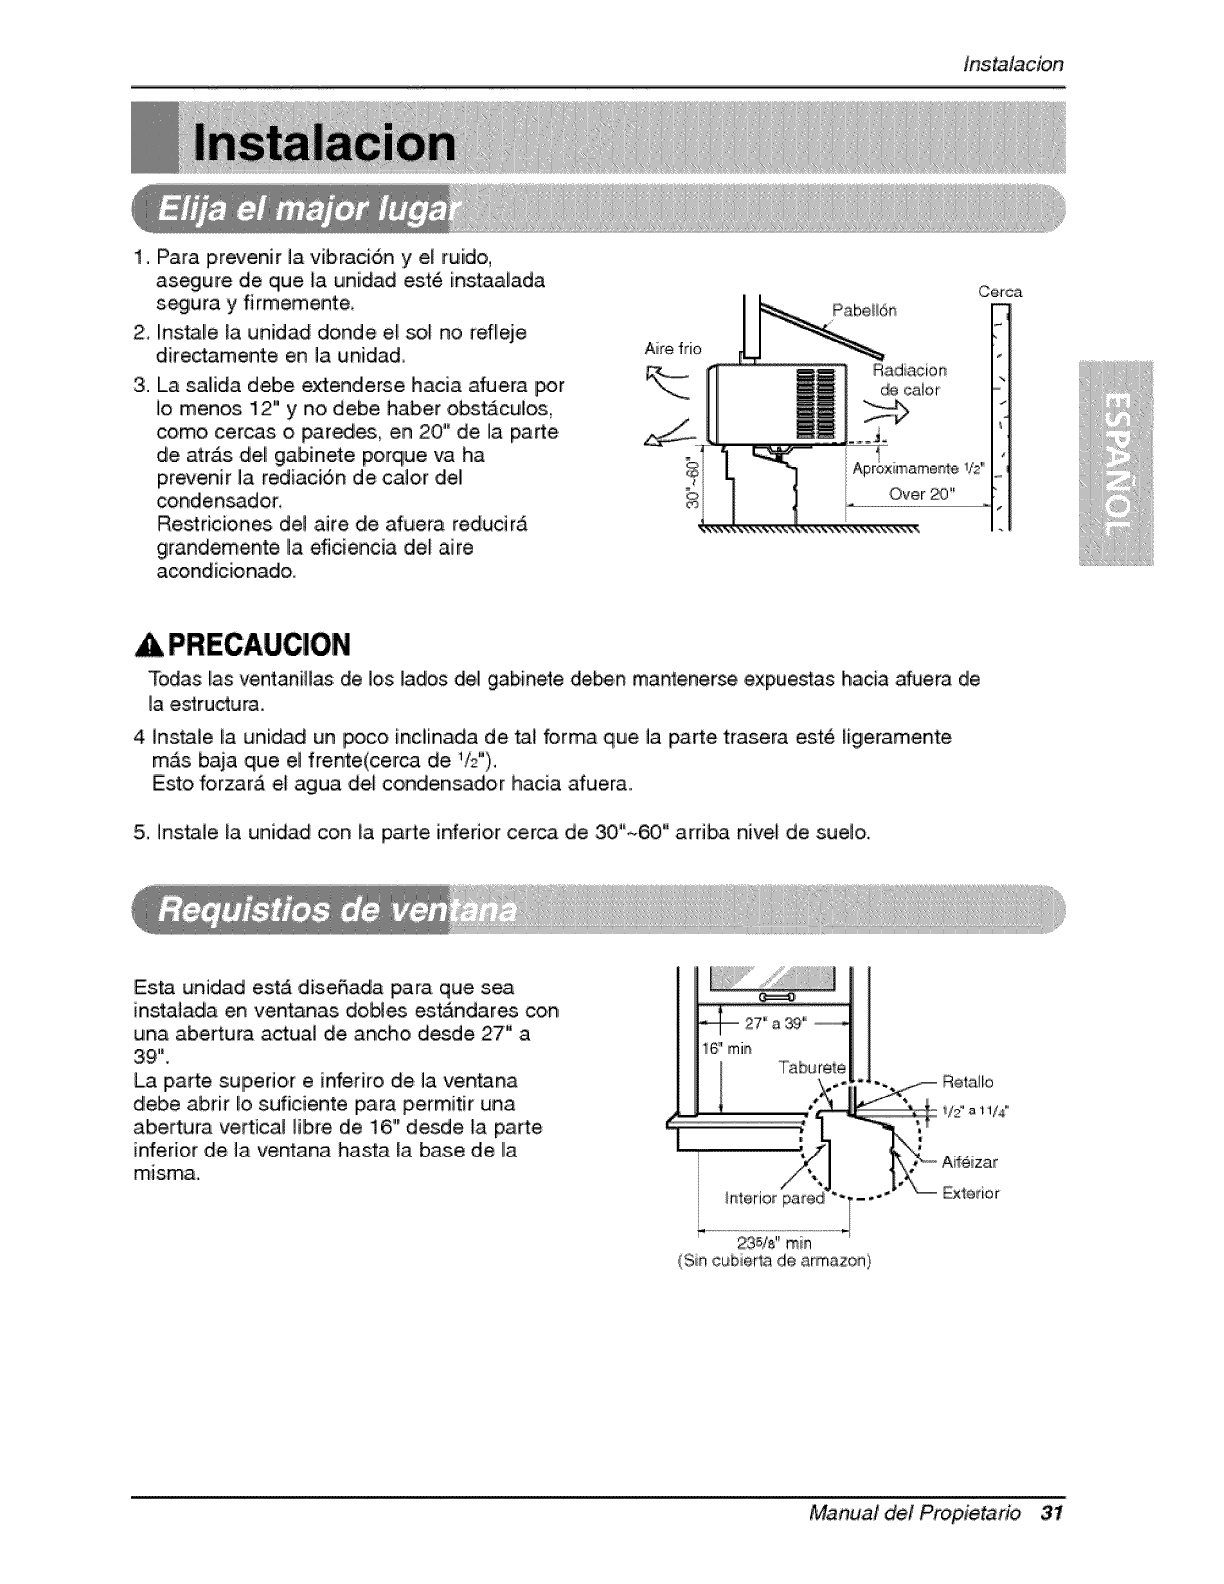
1. Para prevenir ]a v[brac[6n y e[ ru[do,
Ins_lacion
asegure de que [a un[dad est_ instaaUada
s_iura y firmemente,
2, I!nsta[e Ja un[dad d[onde e! so[ no refleje
directamente en ]a unidad,
3. La sa]ida debe extenderse hacia afuera _r
[Iomen,os 12" y no debe hab,er obs_culos,
como cercas o _r_es, en 20" de la parte
de atr&s de[ gab[nete porque va ha
prevenir ]a rediaci6n de ca]or del
conden_dor,
Restficiones del .aire de afuera reducir&
girandemente la eficiencia de[ aire
acondicionado.
Pabei!6n
C@rc_
Todas {as ventaniHas de lois lados del gab,inete deben mantenerse expuestas hacia afuera de
]a e_ructura.
4]nsta]e I[aun[dad un poco incil[nada de tal forma que ]a parte trasera est_ [igeramente
mAs baia que el frente(cerca de V2"),.
Esto forzar& el agua de[ condensador hacia afuera..
5. ]nsta]e la un[dad con la parte inferior cerca de 30"_ ° arfiba hive[ de sue_o.
Esta unidad estA diseffada para qu!e sea
[nsta]ada en ventanas domes est&ndare_s con
una abertura actual de ancho desde 27" a
39".
La parte sup,erio,r e [nfefiro de la ventana
debe ab,fi_rIo suficiente para permitir una
abe_ura ve_ica] ]ibre de 16" desde la pa_e
inferior de ]a ventana hasta [a base de Ila
raisin&
_terioF pare_
235/8"rain
(Sa c_bierla de armazon}
Aifeizar
£×lerior
Manual det Propietario 31
Instaladon
NO, NOMBRE LA PARTE CN_D
1 PANEL GU[A 2
3, TO,RN]LLO 2
4 TUERCA 2
5 TO,RN]LLO(TIPO A) 13
7 TOiRN]LLO(TIPO C) 5
8 TIRA DE GOMA 1
9 BANDA ADHESlVA 1
i0 GU!iA MARCO 2
DESARMAIDOR (+_ _)_REGiLA_ CUCH_LLO,, MAR_ILO_ LApi_z_ NIVEL ]
PRE,PARACION DEL CHASlS
1. Remueva los tornillos cuales sujetan el
gabinete a ambos lados yen la pa_e de
atrgs,
2. Desiice la unidad fuera del gabinete tomando
eU,agarradero de ],abandeja y hale hacia e!
frente mientras manflene el gabinete,
3, Remueva et material EPS,
4. Corte el marco de la ventana con el [argo
apro, piado. Desprenda la parte de atr,_s y
sujete e] foamolP'E @ en la parte inferio,rrdell
marco de la ven_na,,
5. inserta la guia n_rco @ en la parte inferior
de] gabinete.
6. Inserte los Ipane[es gu[as (_ en la guia
superior yen la guia marco.
7. Sujete el arm_on a la unidad con 4
tomillos.(T[po A)
/_pode
EPS
32 Aire Acondicionador
(Ti_ A)

lnstalacion
1, Abra _aven4ar_ia. Marque una h'nea en el
centr,o del banqiueta de la ventana(o la
ubicaci6n deseada de_ a[re aco,ndicionado),.
Cuidadosamente ubique el gabinete en la
banqiueta de la ventana y alinee la marc:a
central en el frente inferior con e] centre de
la H'nea marcada en la banque_ de la
ventan,a
2, Hale hacia abajo ]a parte inferior de la
'venCtan,ahasta que se una detrAs de la gula
No halle ]a ven_na hacia abajo tan
apretadamente que e] movim[ento dell panell
guia sea restfing[do
3 Ugeramente ensamble el soporte deU alfe[zar
us.ando las partes de la fig 3,
4. Se_cio,ne la pos[c[6n que ubicarA e]
so_rte de_ alf_izar ,cer_ de! punto mAs
exterior dell alf_izar,('Ver Fig. 4)
Tenga ,cuidad!o a] ins,talar e! gabinete(las
gu/as marco, @ se rompen fAcflmente).
5. Pegue el so_rte antepJecho a los fielies de
la c.aja en relacion a la posicion des.eada
usando dos tomillos Tipo A en cada sopo, rte,
(Vet Fig 4)
6, El gab[nete debe set instalado con una
pequeSa caida(cerca de 112") hacia abajo
haciia afuera (Vet Fig. 5,}.
7. Adjunte e] gabinete all banquete de la
ventana atorniflando los tomi]]o,s ®_i_ B:
Largo diecis_is milimetros y menos,) a trav6s
de] A.ngu]o frontal en la banqueta de la
ventana,
& Hale _da iPanell gufa completamente a _da
Iiado de ]a ventana y repita dell paso 2.
,Gul'a Su
Angub de _lante
Taburete de la
Ventana Fig, 1
Banda adh,esiva
Interior
Temi!b_
E×iefior
So_rt,e del AIf6izar_,
Guia Marco (
Tomi llo(Tipo A}
Interior Exterior
Tomillo(Tipo B) @
de
Marco
ulo de DJ@ia_t,@
Tornillo(Tipo B) @
Fig, 5
Manual det Prop,ietario 33

Instalacion
9, Adjunte cada panel guia a _da lado de la
ven_na usando tornillos _Ti_ C)..
(Vet Fig, 6)
No pe_,re la charola de! rondo, La unidad est&
di_Sada para operar con aproximadamente
1/2" de agua en EacharoJa de1fondio,
10, Deslice el chasis dentro del gabine_e
(Ver Fig, 7)
£or razones de _uddad, re instale los tomillos
_i_ A) en l_; lados de! gabinete, Tornillo(T_po A}
Conr_n
Aliment_cion
Tomillo(Tipo A) Fig. 7
11. Corte la tira de goma _) a la, m_ida
ap,ropiada e introdQzcalla entre la pa_e
supenor e inferior de la ventana,
(Ver Fig. 8) Fig, 8
12. Suiete la chapade sop,orte en el marco de
la ventana @ con untomiHo tipo C.
(vet Fig, 9)
13, Pegue el panel frontal a la _ja insertando
los fijadores en el pane_ adentro los del
panel de la caja. (Vet Fig. 10)
14, Levante la _rri!l!a de entmda y aj_stela
con torniffos Tipo A, atrav_s de la Iparrilla
frontal. (Vet Fig. 11)
15, Ahora ta ins_taciSn de/aim acondicionado
en la ven_na es completada; Vea los DATOS
insta/ar el'cable de
ali_#t_6n en la toma _corriente.
Chapa _ soporla _ra
Fig, 9
Fig, 10
Fig, 11
Aim Acondicionador
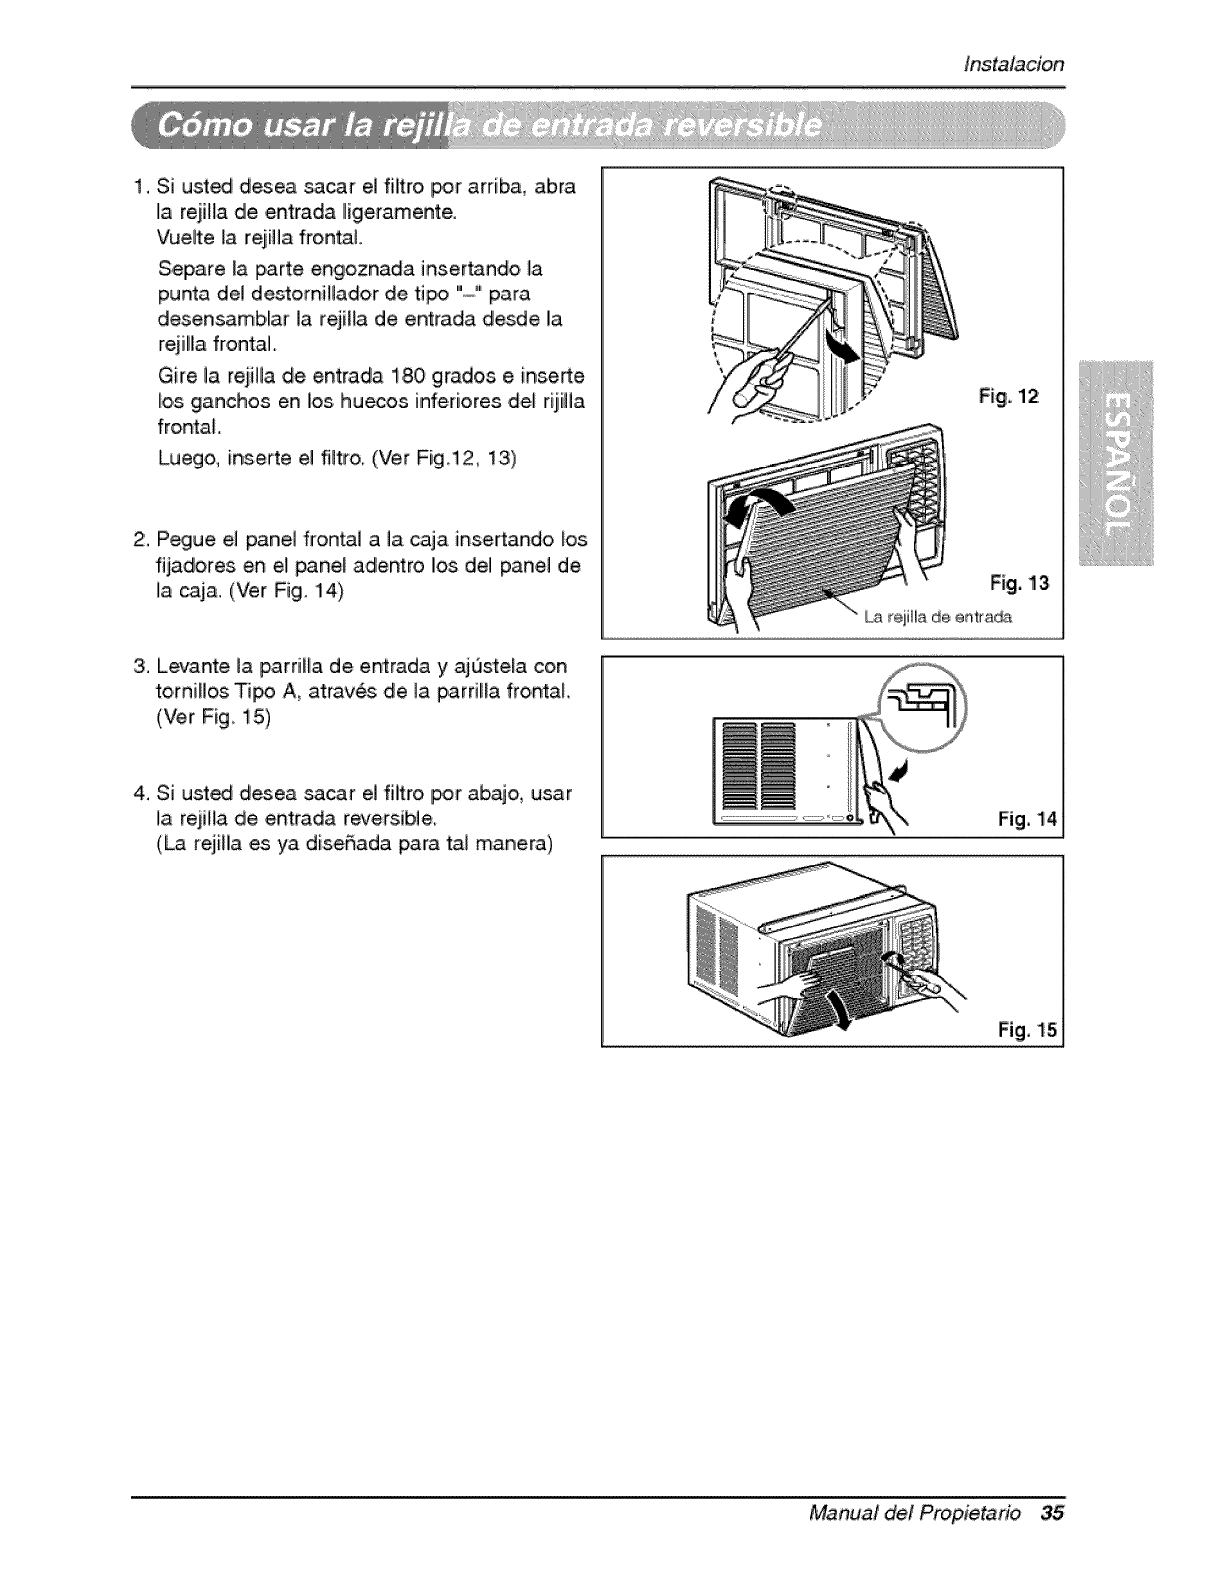
lnstalacion
1. Si ust_ d_ea _car e] fiitro, _r arriba, abra
Ila rejiHa die entrada Iligeramente.
Vuelte la rejilla frontal
Separe la iParte engoznada inser_ndo ]a
punta de] destomitlador de tipo ".°..°..!'para
desensamblar ].arejiHa de entrada desde I!a
re]ilia frontal
Gire la re]ilia de entrada 1,80 grados, einserte
los ganchos en los. huecos infer[ores def rij[Ha
frontal
inserte el filtro (Ver Fig !2, 13)
2. P,_ue e] pane] frontal a ]a caja insertando _os
fijadores en el pane_ adentro los de] panel de
la caj& (Vet Fig. 14)
3. Levante Is parrilla de entrada y ajQste[a con
to,miHos _ A, atrav_s de ]a parfiHa frontal
(Vet Fig, 15)
4. Si ust_ desea sacar e] filtro _r ab,ajo, usar
la reiifla de entrada reversible.
,(_ rejilla es ya dise_ada para ta_ manera)
Fig, 12
Fig. 14
Fig. 15
Manual det Prop,ietario 35
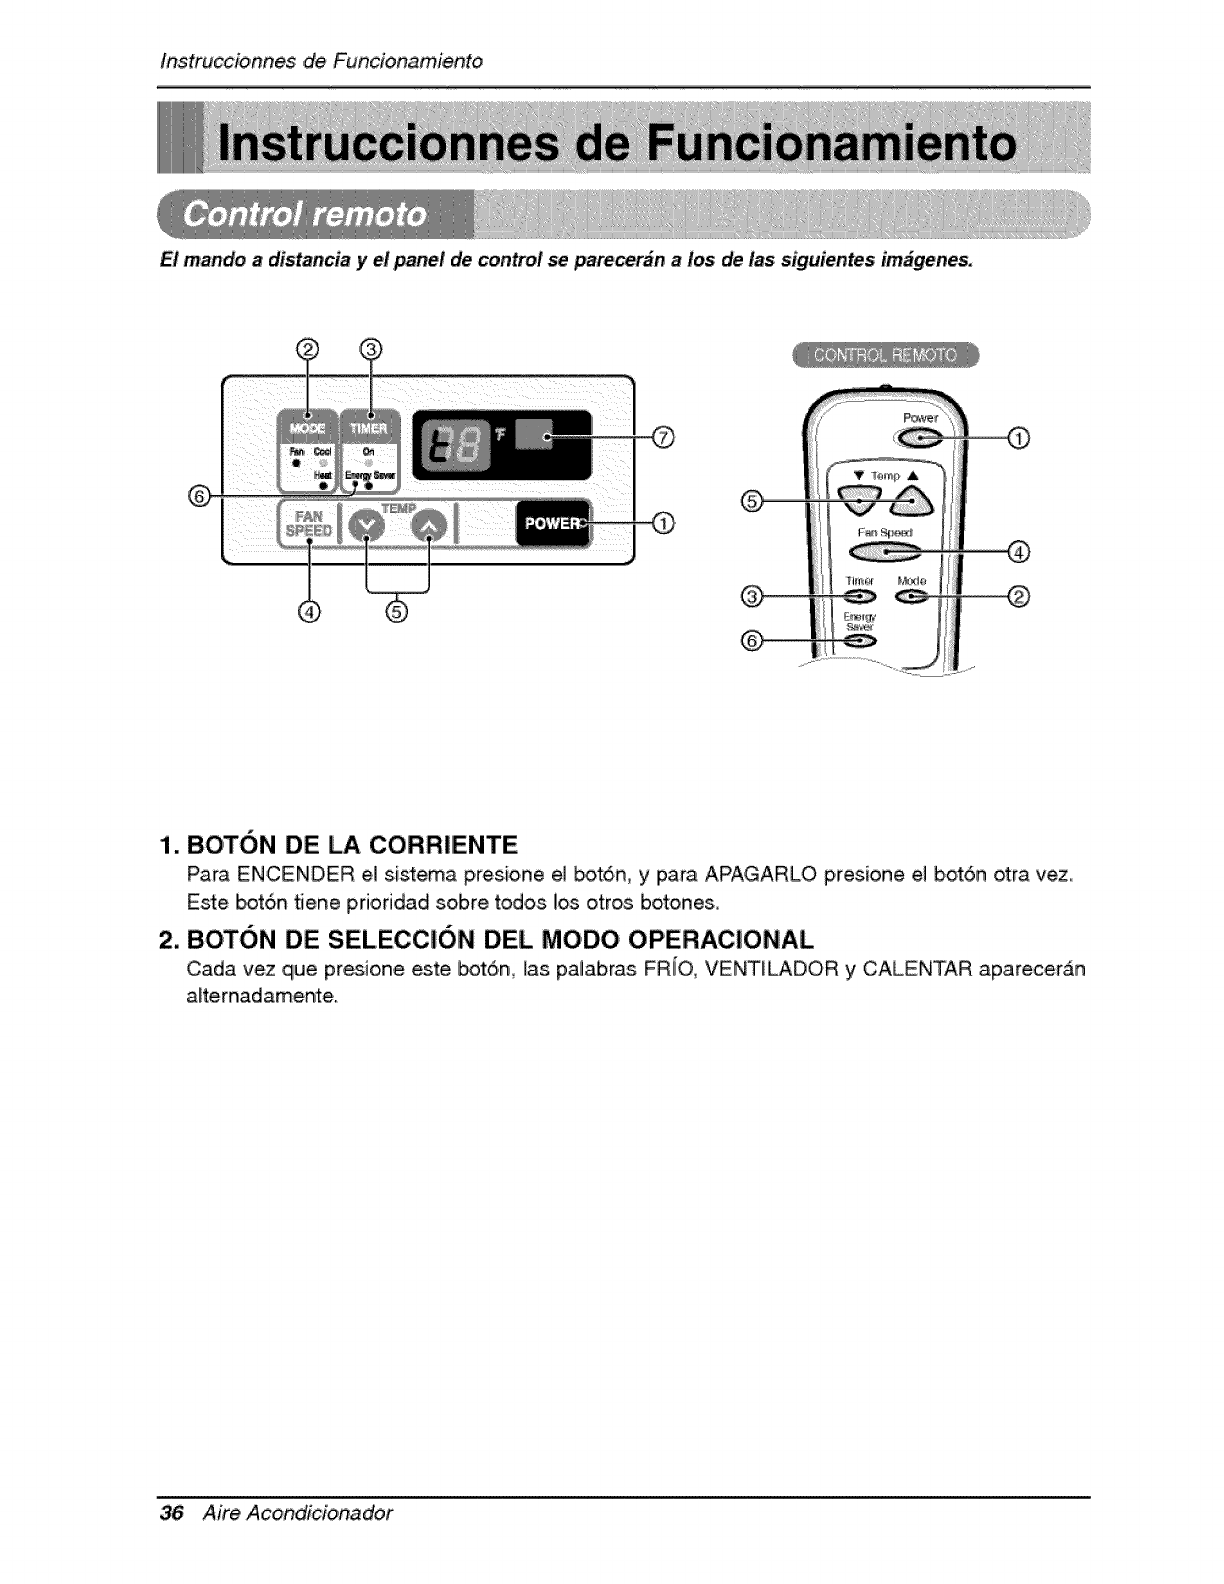
Instru_io, nnes ,de Funcionamiento
El mando a distancia y ielpa'_l de control se pare_r_n a los de las siguientes im_genes,
1. BOT6N DE LA CORR|IENTEi
Para ENCENDER eJ s.istema presione el _t6n, y para APAGARLO presione el bot6n otra vez_
Este _tSn _ene prioddad sobre todos Uosotros botones,
2. BOTON DE SELECCION DElL MODO OPERACIONAL
Cada vez que presione este botSn, ras palabras FRIO, VENTILADOR y CALENTAR aparecera'n
alternadamente.
36 Aire Acondicionador
instruccionnes de Func[onamiento
3,. BOTON ON/OFF TIMER
Cada vez que presione este bot6n, e_ marcador de tiem_ se ajustar_ de Ila siigMiente manera:
(1Hora _ 2 Horas _ 3 Horas _ 4 Horas _ 5 Horas _ 6 Horas _ 7 Horas
8 Horas _ 9 Horas _ 10 Horas _ 11 Horas _ 12 Horas -) C:ance.lar)
N0rma_menteu<i_izara'el temporizad0r de apagad,0mien_as du,erme.
Parasu _m_idad mientrasduerrne,unavez que _ fija el temp0dzado,
e_aiustedetemperatu_ _ elevar_2T despuesde 30 minut0sy una
vezn_s despuesde 0tr_ 99minut0s,
4, SELECTOR DE _ VELOCIDAD DEL VENTILADOR
Cada vez que presione este bot6n, e_ajuste es como s.igue.
(Alto[ F2 ] _ Biajo[ F !] _ Alto[ F2 ]-.)
5. BOTON DE SELECC:ION DE LA TEMPERATURA DE LA HABITAC! ON
Este bot6n puede controilar la temperatura del cuarto automaticamenteo La temperatura
puede ajusLar de grado en grad,o, desde 60°F has_ 8.6T @sda ! _R
6 A,HORRADOR DE ENERGIA
El ven_lador se detie.ne cuando el c_mpressor no sigiue e.rffriando.
Ap,roximadamente cada 3 minutos el ventilador se encender_, y n_esi_r_ verifier la
temp, eratu_a del cuarto _ra saber si es nece_rio m_s, en#iamiento,
7. RECEPTOR DE SE!qAL
Un lece oJor _ria des_irse de ia unidad la pdmera vez que enciende HEAT (Calentar) al
terminal _atempo, rada de enfriarnie,nlo., IEse o_or es _r ihaberse depositado un p_, de polvo
sobre el calentad,or y va a desaparecer rd_p,idamente,
7
d,'e,spu#sde un corte en el suministro, ta unidad empezar# a |
J
C_ndo el alre aco_lc_oP_do ha estado _ra_ b_ _{_e, _ _fr_mlento y se _aga o se ajes_ I_ po_c_on de,
rendition, espere pot _omenos, 3_|nutos, _ntes de rein_ _opera¢16n_ _fr_mle_to,
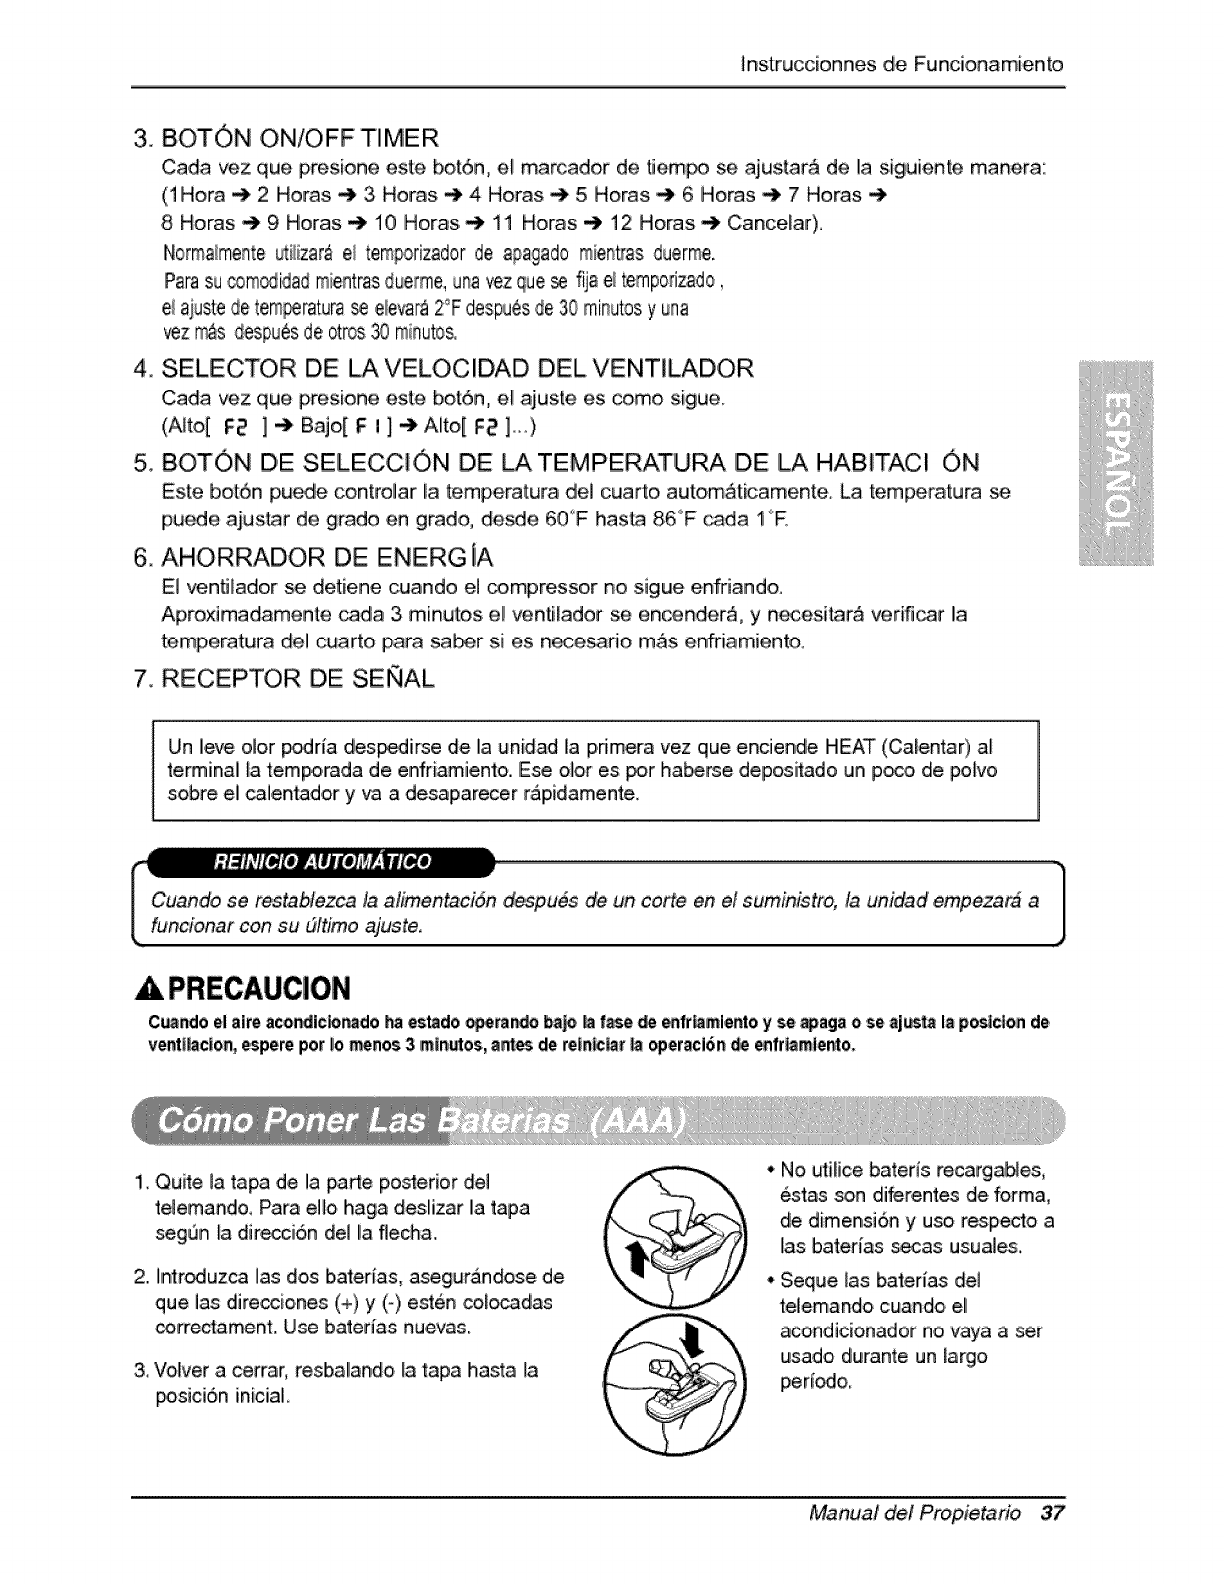
1, QuRe ]a tapa de la parle posterior del
itelemando, Para eHo haga desl[zar la tapa
_,gQn _adirecci6n della flech&
2. ihntroduzca ilas dos biaterias0 asegurandose de
que las dire_i,o, nes ,(+)y (-),este_ _locadas
correctament. Use baterlas nuevas.
3, Volver a cerrar, resbal!a_do la tapa hasta la
_sici6n inicial,
• No utiHce bateris recargables,
estas son diferentes de form&
de dime_si6n y uso respecto a
las baterias secas usuales,,
• Seque las balerias del
telemando cuando ,el
acondicionador n,ovaya a ser
usado durante un largo
Manual det Propietario 37
Instru_io,nnes ,de Funcionamiento,
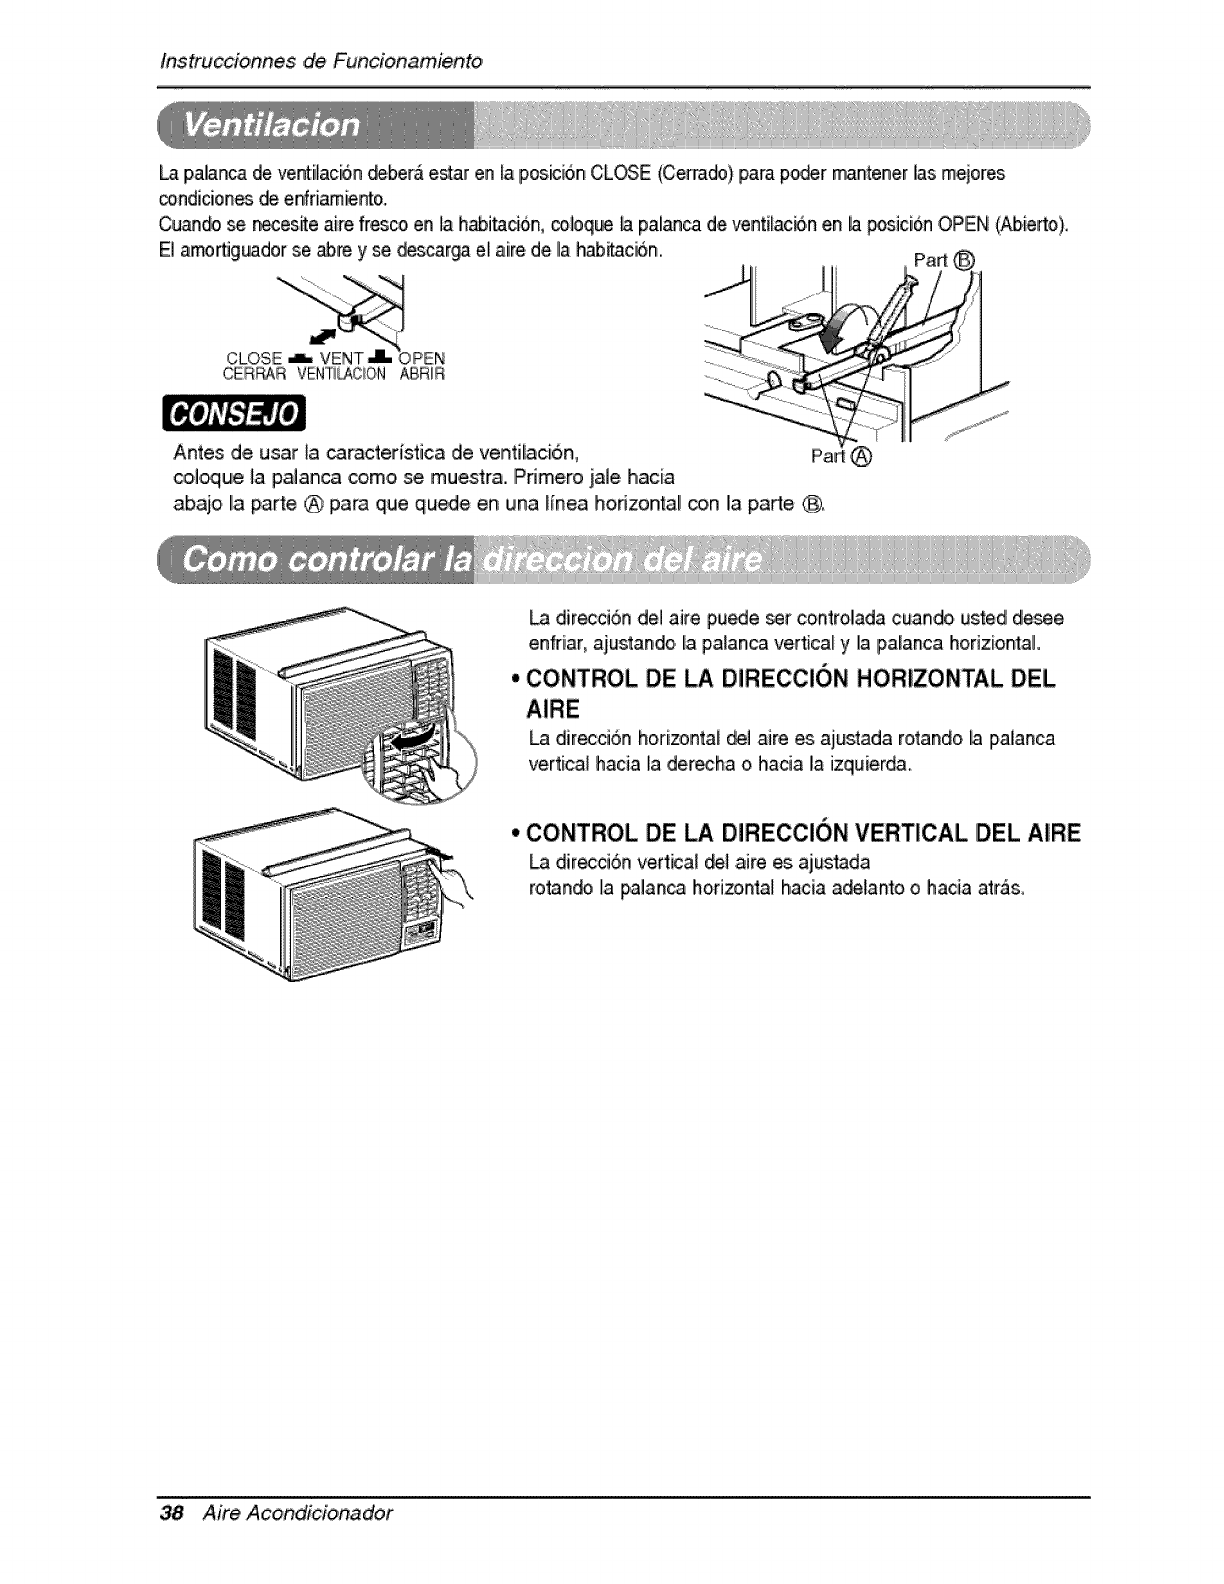
palanca de ve_ilacbn _bera e_r en [a pos_i6n CLOSE (Cerrado) para po,_:r mantener las mejores
_ndicion_ _ enfri_nto.
Cu_, _ n_es_e aire fresco,en Wah_itad6n, coioq_ _ pal_ca de venti[ac_,n en _a_ici6n OPEN (Abiel_o),
El _ortJg_dor se abre y se _car_ e_aiirede ilah_cbn..
CER£AR VENTi_CION ABRIR
Antes de usar _acaractedstica de venfi[aci6n,
ool.oque la palanca como _ muestra., iPrimero .iale hacia
abajo Ila parte ® para que quede en tuna ffnea hodzonta! ,_n I.apa_e ®,
direcci6n de! aire pu_e _r controllada cuando ustedldlesee
enfriar, ajustande la £alanca verticaJ y la palanca horiziontal.
' CONTROL DE LA DIRECOION HORIZONTAL DEL
La dir_d6n horiz.onta[ del aire es ajustada rotando _ palanca
vertical hacia [a derecha o hada la izquierda°
• CONTROL DE LA DIRECClION VERTICAL DEL AIRE
La dir_ci6n vertical _l .aire es ajus_Ada
ro_n_ la _o.alan_horizonta_ hacia a_lanto o hacia atr&s_
38 Aire Acondicionador
InstruccionnesdeFundonamiento
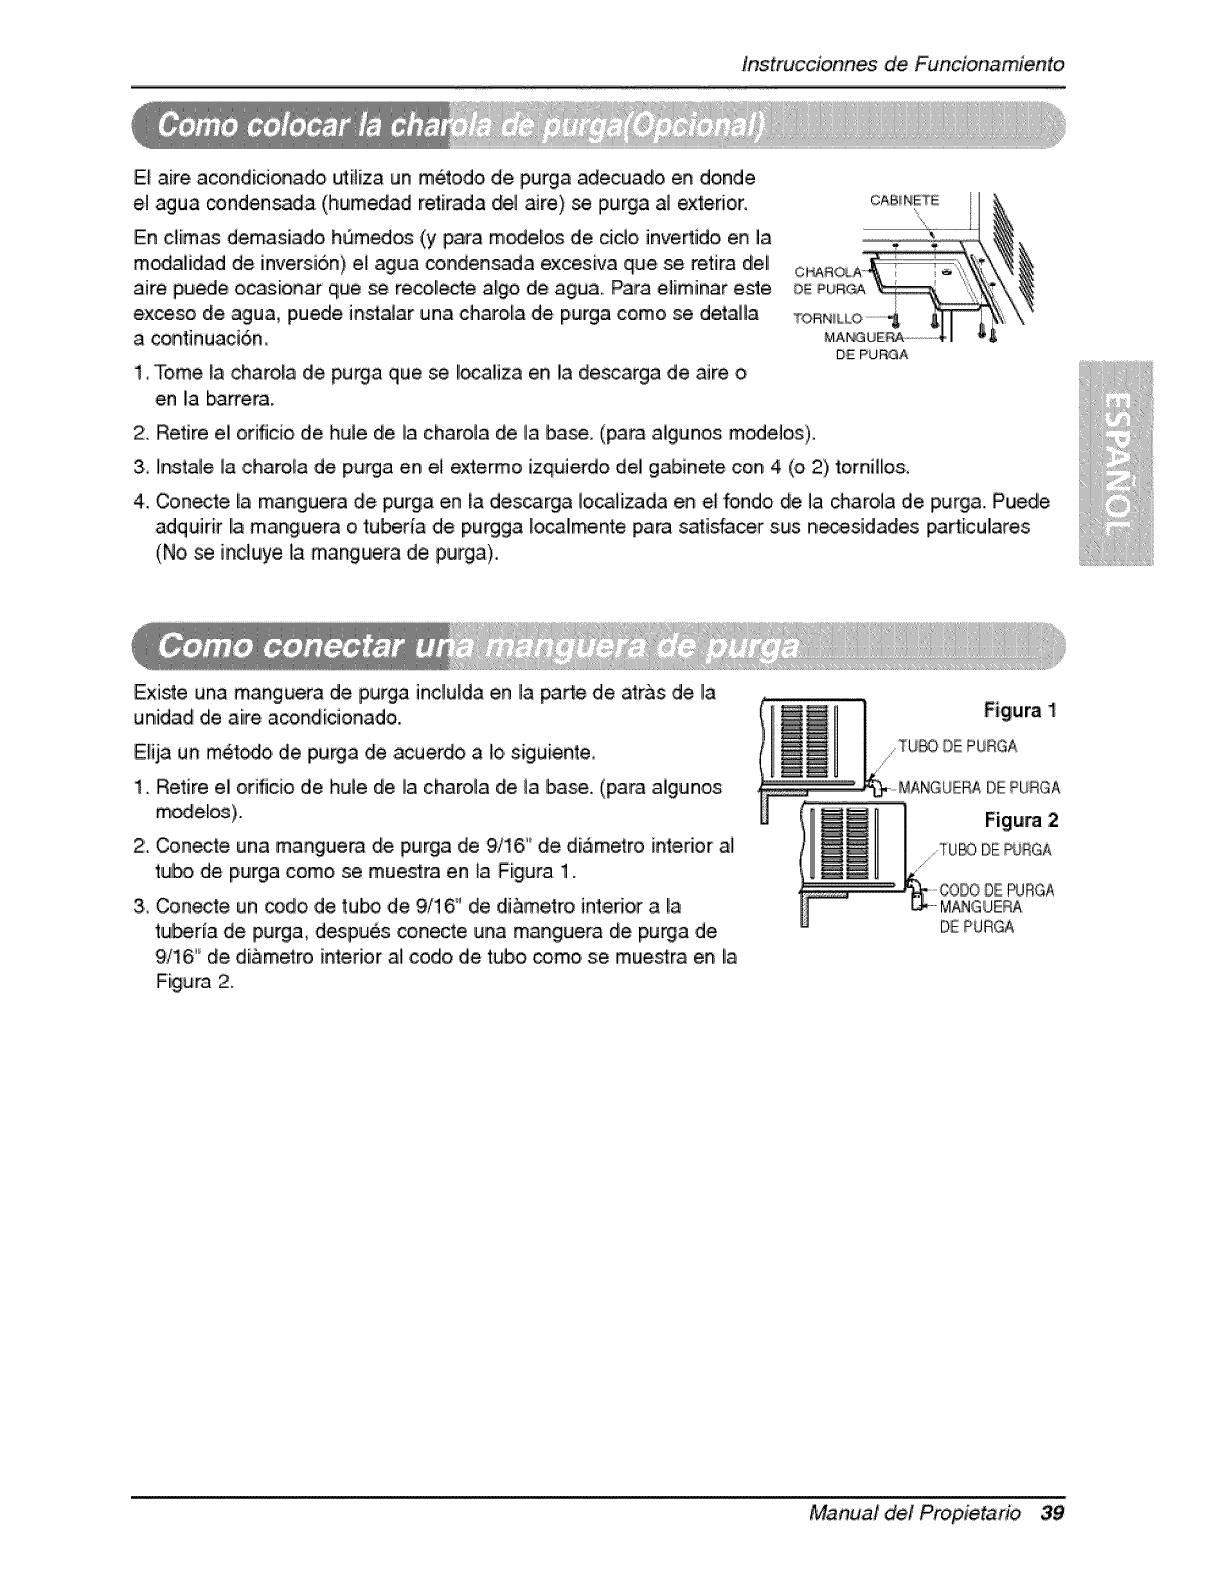
E[ aire acondidonado uti_iza un metod,o de purga adecuado en donde
el agua condensada. (humedad retirada de_ aJre) se purga a] exterior,
En dimas demasiado hQm_os (y para m_e_,os de dale invertido en ]a
m_alidad de inversion) e[ agua co,nden_da excesiva que _ retira de[
aire pu_e ocasionar que _ recellede algo de agua. Para e]iminar este
exceso de agua, puede in_a]ar una charo,_ade purga come se detaHa
a continuaciSn,
1, Tome la charola de purga que se [oca[iza en I!adescarga de aire o
en la barrera.
CAB_NETE
DE PU_A
2. Retire el ofificio de hu]e de la charo_a de la ba_. (para algunos m_e],os).
3, instate ]a ,charo!a de, purga ,en e] extermo izquierdo del gabinete con 4 (o 2) tornillos,
4. Conecte la manguera de purga en la descarga I,ocalizada en el fondo de la charola ,de purga. Puede
ad,quirir I!amanguera o tubeda de purgga Io_lmente para safisfacer sus necesidades particulates
(No,se Jnduye la manguera de purga).,
ExJMe una manguera de purga inclulda en Ila _rte de atr&s de la
unidad de aire acondicionado.
E_ija un m_todo, de IPurga de acuerdo a Io,siguiente,
1. Retire el orificio de huie de la charo_a de ia base. (para aigunos
mode_os).
2:, Conecte una manguera de purga de 9/16 '°de diametro inferior a_
tulbo de purga come se muestra en ta Figura 1.
3., Conecte un code de, tube ide 9/16 °' de di_metro int,edor a Iia
ltuberia de purga, despues eonecte una manguera de p,u_a de
9/16' de di&melro interior al code de tube come se muestra en la
Figura 2.
DE PURGA
Manual det Propietario 39
y Mantenim_ento
AP_UE EL AI_ ACON_A_ Y _JE EL E_HUF£ _L _ CORRIEN_ _ _ _RED.
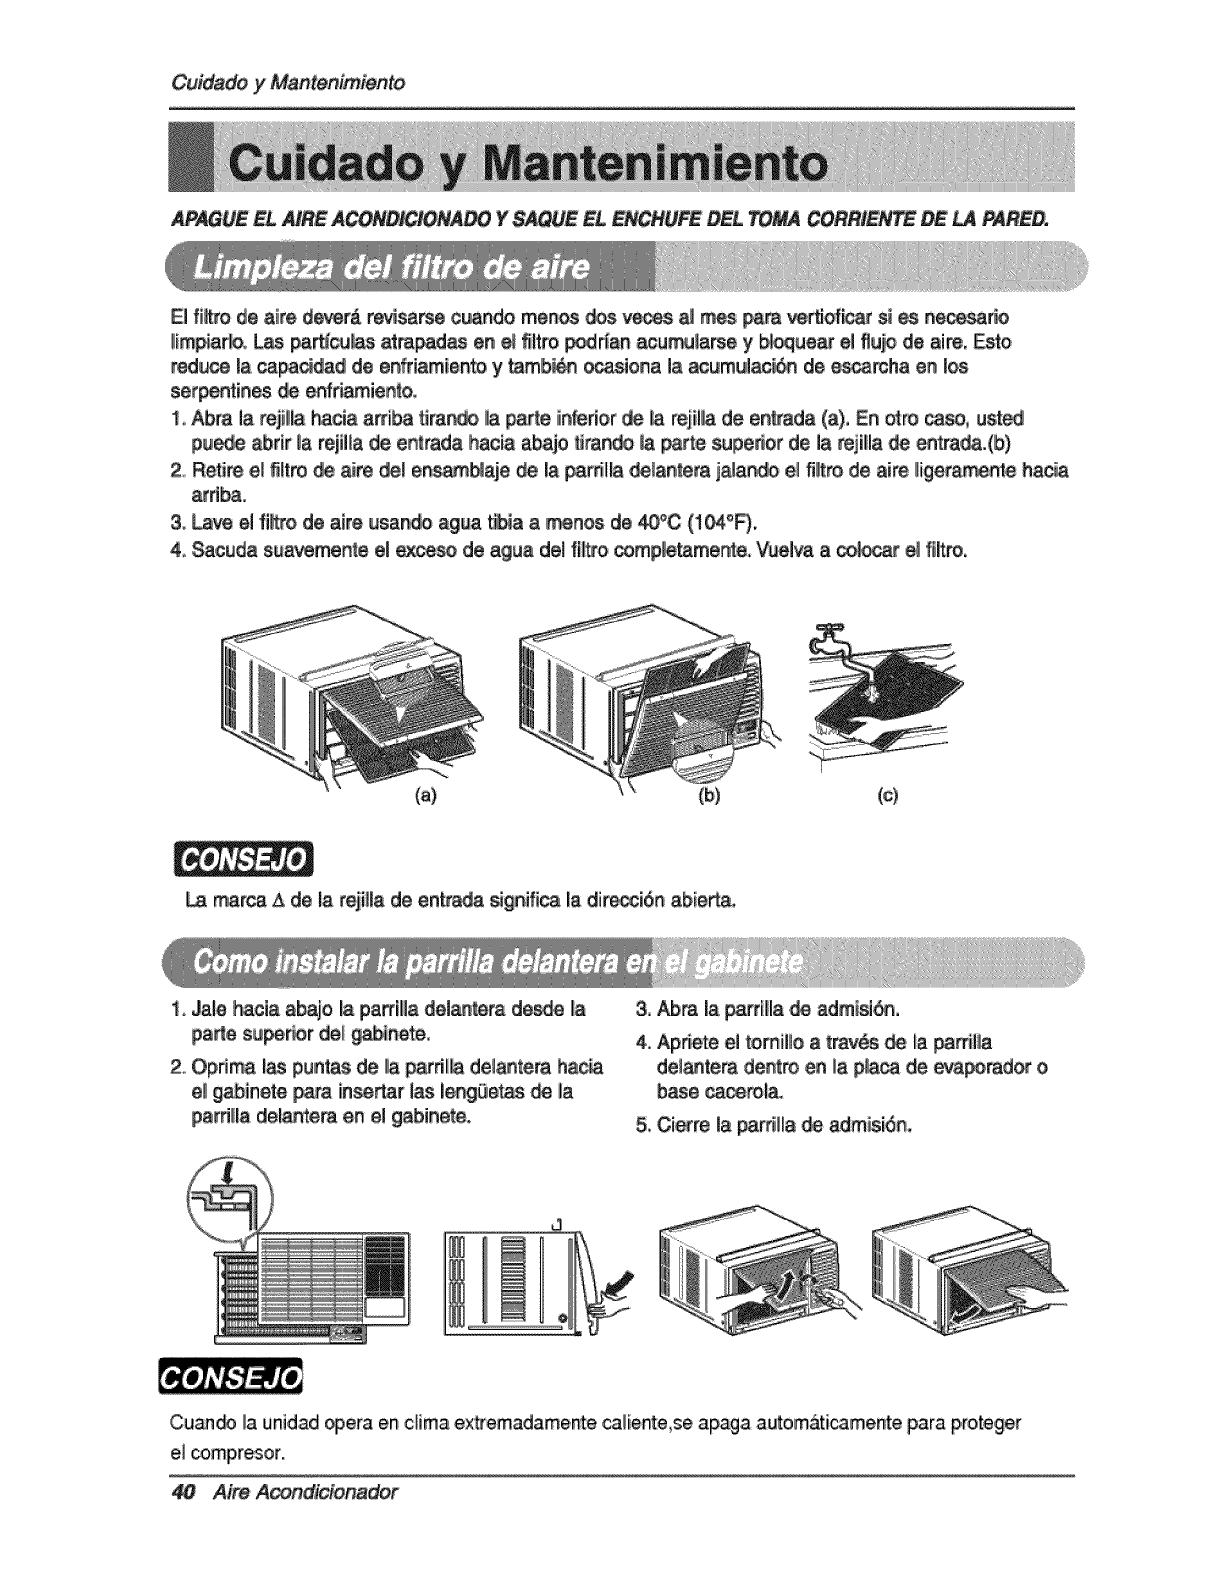
El flare de aiire deverA r_sa_e cu_de me_s _e v_ a_ms pare _,rtiofi_ si _ necesa¢_
I!im_r_, _ par#cal_ _rapad_ en _ _lt_ _dr_an _umularse y_ueair el flu_ de aire0 Esto
retire la ca_ad de enfriamiento y_mb_n or,,asiona la _umu!laci_ de _rcha en los
ser_tines _ enfdLamiento,
1,1Abra la rejilile hacia a_i_ t_ira_, iA pare infedor _ A reiilA de en_rede (a). En _ro _o. ustedl
pu_ _rir la reji[la de entrada hacia abajo _ran_ A iparte _!pe#or de la reji_la_ emm,_.(b)
2,,Retire el _ltro de aire _l e_,_aje de la par_Ha _an,_em, ja_a_ el fl_ de aire _ige_amentehanna
_d_,.
3__ el fil_o de ai[e _sa_ ag_ t_ia a menos de _C (I_°F).
4, Sacuda suaveme_|e el e_,c_ de _#ua del fl_o com£_etamen_e, V_elva a _ _1fl_.
marca & de la reii_la de entr_ _g_ific4_ la dir_i6# abiert_,
i, Jale }_cia aba_o la papilla _lante_a d_e lie
parle s_r_r eel _nete,,
2. Opdma i_ p,untas de ii,ap_dl_ dei_tera ha_
el gabinete _a in_ar l_ i_g_etas _ _la
pe_rillladelantera e_ el gabineteo
3, Abm la _rflUa ,_ adm_sl_.
4, Apnete el te,milile a trav_s _ _a_rr_llia
del_tem dentro en la p_acade _rad_' e
base ca_rola, o
5, Cierre la _rti!la _. admisi6n,
Cu_ la unid.ad _era en clima extremadameute caliente,se apaga automaticamenCe para p,roteger
e,Icomp,r_or.
Aire Aoond_nader
Cuidadoy Mantenimiento
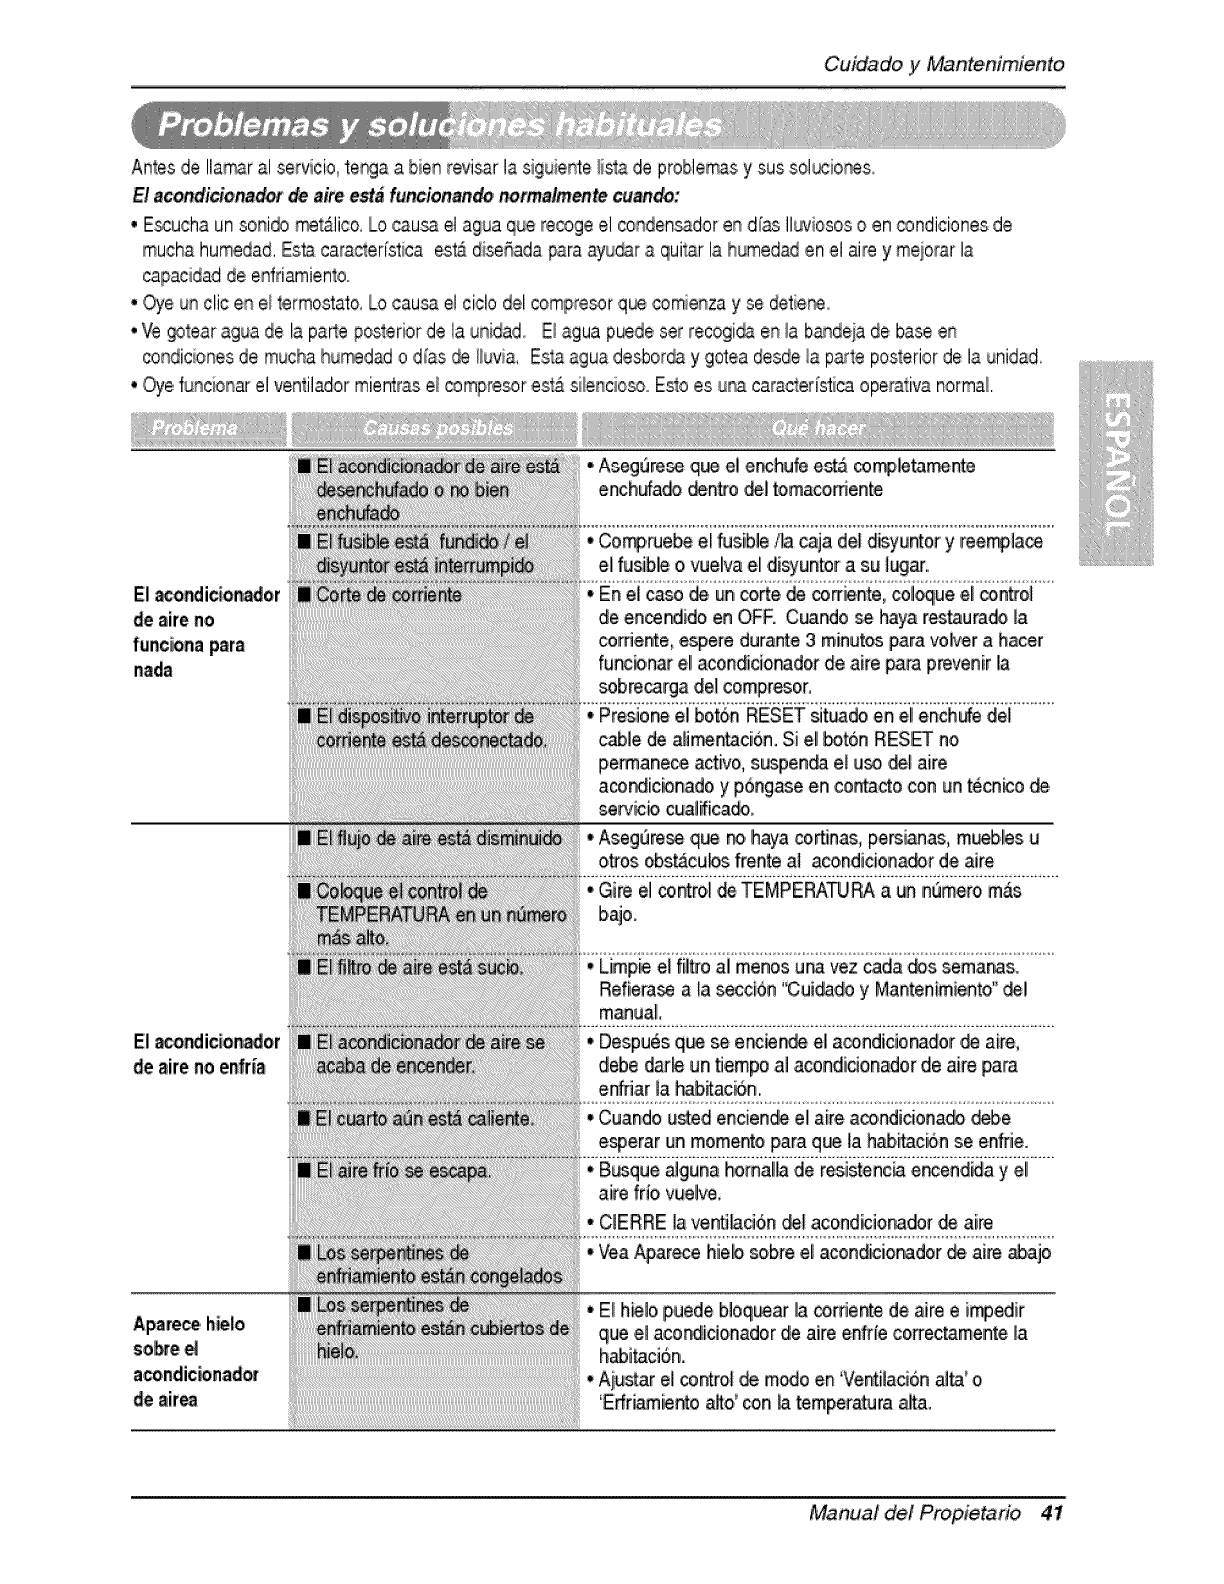
Anles de Ilarr_r al sewicio, te_a a bien revi_r la siguiente!ista de problemasy sus sol_ior_&
El acondiciona_ _aim esta funcionan_ normalmente cu_do:
• Escuchaun soni_ _{ic.o, Locausa et agua que re_ge el cenden_dor en diss II_Jiesoso en _ndiciones de
mucha humedad.Esta cara_er[stica es_ diseSadatparaayudar iaquitar la humedad en el airey meiorar la
capacidadde edtiamientoo
° eye un cli,cen e/termestato, Locau_ el ciclo del compre._r que comienza y se detie_
• Ve _lear agua de la parte posteriorde la unidad,. El agua puedeset recegi_ en la b_deia de base en
condicionesde muchahum,dad o d_as_ [l!uvia, Estaagua desborday gotea desde !a parle posteriorde la unidad
•Oye funcionarel ventilador mier_as e_,_mpre_r est_ silenciosooEstoes u_ cara_eri'stica operativa normal.
enchufa_ _n#o _l t,o,ma_iente
el fu_b,le o vuelva el disyuntor a su {ugh.,
de aire no de en_ido en OFF. Cuando _ hwa restaura_ {a
funciona p.ra colrrien,te,espere durante 3 minutes para volver_ hacer
nada funcbnarel!acoadiicio_dor de aire para prevenir la
_[[[[[[[[[[[[[_rri_:: c_{e de a_im_n_ci6n. Si el b,o,tonRES_ no
pe_aneee act.o, s_pen_ el u_ ,_,l aire
a_nrdicbnado y pongase en conta_o con un tecn_o _,
sePvicb cua_i_ica_,
• AsegQreseq_ _ haya co_n_, persian._,, m_b, les u
otros obs_cubs frente a{ acondiciona_r de aJre
• Gire el contrel _ TEMPERATURAa un nQrneromas
bajo.
E{_ondicion_or
de _ire no enfr{_
• Limp_ el filtro a{ menos u_ vez cada _s sema_s.
Refiera_ a la secciOn"C:uidadoy Ma_tenimiento" _1
manual
• Despu_s q_ _ encien_ e! a_ndicionador ,_ aire,
debe d_ un flempo al acondicie,nador de aire para
enffiiar{a h_,_acbn.,
• Cuando usted enciende el aire aco,ndicionado_,e
e_erar un memento para q_ la hab_acii6nse en#ie.
• B,_que a_giunahomaHade resistencA e_endMa y el
aire frio vuelve,
• C{ERRE {aventJ_ci6n _1 acond_ionador _ aire
•Yea#43arecehielo _bre el acond_ionador _ aire iabajo
sobre
aeondic_nad=
de _ir_
• El h_lo puede bioq_ar Ila_ffier_e de aire e impediir
que el aco_iidonador dleaire en#_eco#ectamente la
h_itaci6n.
• Aiu_ar e{control _ im_o en 'Ve_Haci6n alta' o
'EffriaJ-nientoalto' con h temperatura aJta.
Manual det Propietario 41
Nota
42 Aire Acondicionador
LG Electronics Inc, reparar6 o sustituir6, gratuitamente, su producto si resulta defectuoso en materiales o mano de
obra bajo condiciones normales de uso durante el periodo de garantTa mencionado m6s abajo, efectivo a parfir de
la fecha de compra del producto original pot parte del consumidor. Esta garantia limitada s61o es vdlida para et
comprador original del producfo, y efectiva s61o cuando este se utilice dentro de los Estados Unidos, incluyendo
Alaska, Hawai, y los territorios estadounidenses.
PERIODO DEGARANTIA:
Mano de obra: 5 argos desde la fecha
de compra.
Piezas: 5 a_os desde la fecha de compra.
Compresor: 5argosdesde la fecha de
compra.
PROCESO DE SERVIClO:
Llame al tel6fono 1-800-243-0000 y seleccione la opci6n
adecuada. Por favor, tenga disponible el fipo de producto (Aire
acondicionado), nOmero de modelo, nOmero de serie, y c6digo
postal.
La mano de obra bajo garantia cubre el coste de la Asistencia
en domicilio de todas las piezas, incluyendo el compresor.
ESTA GARANTIA SE OTORGA EN SUSTITUCION O EXCLUSION DE TODA OTRA GARANTIA, EXPRESA O IMPLIClTA,
INCLUYENDO SIN LIMITAR CUALQUIER GARANTIA DE CALIDAD O IDONEIDAD CON UN PROPOSITO CONCRETO. EN LA
MEDIDA EN QUE CUALQUIER GARANTiA IMPLiCITA ES OBLIGADA POR LA LEY, EST,&. LIMITADA EN DURACION AL
PERJODO DE GARANTiA YA MENCIONADO. LG NO $ER,&, RESPONSABLEDE NINGI)N DANO RESULTANTE,INDIRECTO, O
ACCIDENTAL DE NINGON TIPO, INCLUYENDO INGRESO$ O GANANCIA$ PERDIDA$, EN CONEXION CON EL PRODUCTO.
ClERTO$ ESTADOS NO ACEPTAN LA LIMITACION DE DURACION DE UNA GARANTIA IMPLiCITA O LA EXCLUSION DE
DANOS RESULTANTE$O ACClDENTALES, POR LO QUE LA$ LIMITACIONE$ O EXCLUSIONE$ MENCIONADA$ PUEDEN NO
$ER APLICABLESEN $U CASO.
ESTAGARANTIA LIMITADA NO $EAPLICA A:
I.
2.
3.
Las visitas de Asistencia a domicilio para enfregar, recoger y/o instalar el producto, instruir o sustituir
fusibles en su casa o corregir el cableado, o la correcci6n de reparaciones no autorizadas; y
Da_os o problemas de funcionamiento provocados por un uso inadecuado, abuso, funcionamiento
fuera de especificaciones ambientales o contrario a requisitos o precauciones en la Guia de
funcionamiento, accidente,fuego,inundaciones, insfalaci6n inadecuada,fuerza mayor,
modificaciones o alteraciones no autorizadas, corriente el_ctrica o tensi6n incorrecta, o uso comercial,
o usos distintos a aquellos para los que fue dise_ado.
Por Io tanto, los costes de reparaci6n o sustituci6n de un producto defectuoso deber6 correr por cuenta
del consumidor.
NOMEROS DELCENTRO INTERACTIVO$ PARA CLIENTES:
Probar su cobertura por garantia
Obtener asistencia del centro de asistencia
autorizado m6s cercano, obtener asistencia de
producto, cliente, o servicio
Conserve su ticket y recibo de compra para probar la
fecha de adquisici6n del producto.
Deber@ entregar una copia de su recibo de compra
en el momento en que reciba servicio bajo garanf_a,
Llame al 1-800-243-0000, 24 horas al dia, 7dias a la
semana.
Seleccione la opci6n adecuada del menQ, y tenga
disponible su tipo de producto (aire acondicionado),
nQmero de modelo, nQmero de serie, y c6digo postal; o
visite nuestro sitio Web en http://www.lgappliances.com
LG Electronics Inc. will repair or at its option replace, without charge, your product if it proves to be defective in
material or workmanship under normal use during the warranty period set forth below, effective from the date of
original consumer purchase of the product. This limited warranty is good only to the original purchaser of the product
and effective only when used in the United States including Alaska, Hawaii, and U.S.Territories,
WARRANTY PERIOD:
Labor: 5 Year from the Date of Purchase.
Parts: 5 Year from the Date of Purchase.
Compressor: 5 Years from the Date of
Purchase,
HOW SERVICE IS HANDLED:
Call 1-800-243-0000 and choose the appropriate prompt, Please
have product type (Room Air Conditioner), model number, serial
number, and ZIP code ready.
The warranted labor covers the cost of In-Home Service on all
parts including the compressor.
THIS WARRANTY IS IN LIEUOF ANY OTHERWARRANTIES, EXPRESSOR IMPLIED, INCLUDING WITHOUT LIMITATION, ANY
WARRANTY OF MERCHANTABILITYOR FITNESSFOR A PARTICULARPURPOSE.TO THE EXTENTANY IMPLIED WARRANTY IS
REQUIREDBY LAW, IT IS LIMITEDIN DURATION TO THE EXPRESSWARRANTY PERIOD ABOVE. LG WILL NOT BE LIABLEFOR
ANY CONSEQUENTIAL, INDIRECT, OR INCIDENTAL DAMAGES OF ANY KIND, INCLUDING LOST REVENUESOR PROFITS,IN
CONNECTION WITH THE PRODUCT. SOME STATESDO NOT ALLOW LIMITATION ON HOW LONG AN IMPLIED WARRANTY
LASTSOR THEEXCLUSION OF INCIDENTAL OR CONSEQUENTIAL DAMAGES, SO THE ABOVE LIMITATIONSOR EXCLUSIONS
MAY NOT APPLY TO YOU.
THISLIMITEDWARRANTY DOES NOT APPLYTO:
2,
Service trips to your home to deliver, pick up, and/or install the product, instruct, or replace house fuses or
correct wiring, or correction of unauthorized repairs; and
Damages or operating problems that result from misuse, abuse, operation outside environmental
specifications or contrary to the requirements or precautions in the Operating Guide, accident, vermin,
fire, flood, improper installation, acts of God, unauthorized modification or alteration, incorrect electrical
current or voltage, or commercial use, or use for other than intended purpose,
3. Therefore, the cost of repair or replacement of such a defective product shall be borne by the consumer.
CUSTOMERINTER-ACTIVE CENTERNUMBERS:
To Prove Warranty Coverage
ToObtain Nearest Authorized Service Center or Sales
Dealer, or to Obtain Product, Customer, or Service
Assistance
Retain your Sales Receipt to prove date of purchase.
A copy of your Sales Receipt must be submitted at
the time warranty service is provided,
Call 1-800-243-0000, 24 hrs a day, 7 days per week.
Choose the appropriate prompt from the menu, and
have your product type (Room Air Conditioner), model
number, serial number, and ZIP Code; or visit our
website at http://www.lgappliances.com.
Patent No. " Us 6, 412,298
P/No.: MFL41938703 Printed in China
