LG LWHD1807HR User Manual ROOM A/C Manuals And Guides L1005152
User Manual: LG LWHD1807HR LWHD1807HR LG ROOM A/C - Manuals and Guides View the owners manual for your LG ROOM A/C #LWHD1807HR. Home:Heating & Cooling Parts:LG Parts:LG ROOM A/C Manual
Open the PDF directly: View PDF ![]() .
.
Page Count: 44
website http://www.I
Window-TypeAir
'S
MODELS, MODEL O'S: LWHD 2400HR', LINHD 1807HR
_s valuable
may
proper air
_pmper use.
order to p_vent
isuseor improper
for any damages
tioner.
FOR YOUR RECORDS
Write the model and serial numbers here:
Mode| #
_rial #
You can fir_ them _ a label on the side of each ua_.
Dea_eCs Name
Date Purchas_
II 8[ap[e you_ re_ip[ to [his page #_[t'_,ee_ant yc_ ne_ it
to prove date of purchase or for warranty issue.
READ THIS MANUAL
Inside _,u will find many h_p|ul hints o,n hc_v to use and
maintain _ur air cor_ditio,n_ pro_dy. Just a [i_le preventive
care on _3ur _[t _n _v_ y_ a great: deal ol time and
money over 'the life of your ai_ conditioner,
YouH find many an_w_s toi c,ommoa problems in the c_rt
of t_¢_b_ho_ing tips. if _u revi_ our ch_t d
Troubleshooting Tips first you may no_ _ to cal_ fo,r
serv_e at a&
• Contact: the, author{_d service t_hnician for repai_
or maintenance of this unit,
•Contact the install_ for installation ,of this unit.
•The air conditioner is not intendied for use by young
children o,r invalids without s,upervision.
• Yo_n_ chi|dten shoei_ be _rvis_ to e_s, ure that
they _o not play with the air conditioner:
• Whe_ tlhe power cord is to be repla_d, repla_ment
work shah be _rformed by aethorizedi personnel only'
_si#g o_ly g_uine r_lacement parts.
•|nstall_lon work musl be performed in _cor_a#ce
with the National Electric Code [by quailfi_ and
authorized personnel on|y,
2Room Air Conditioner
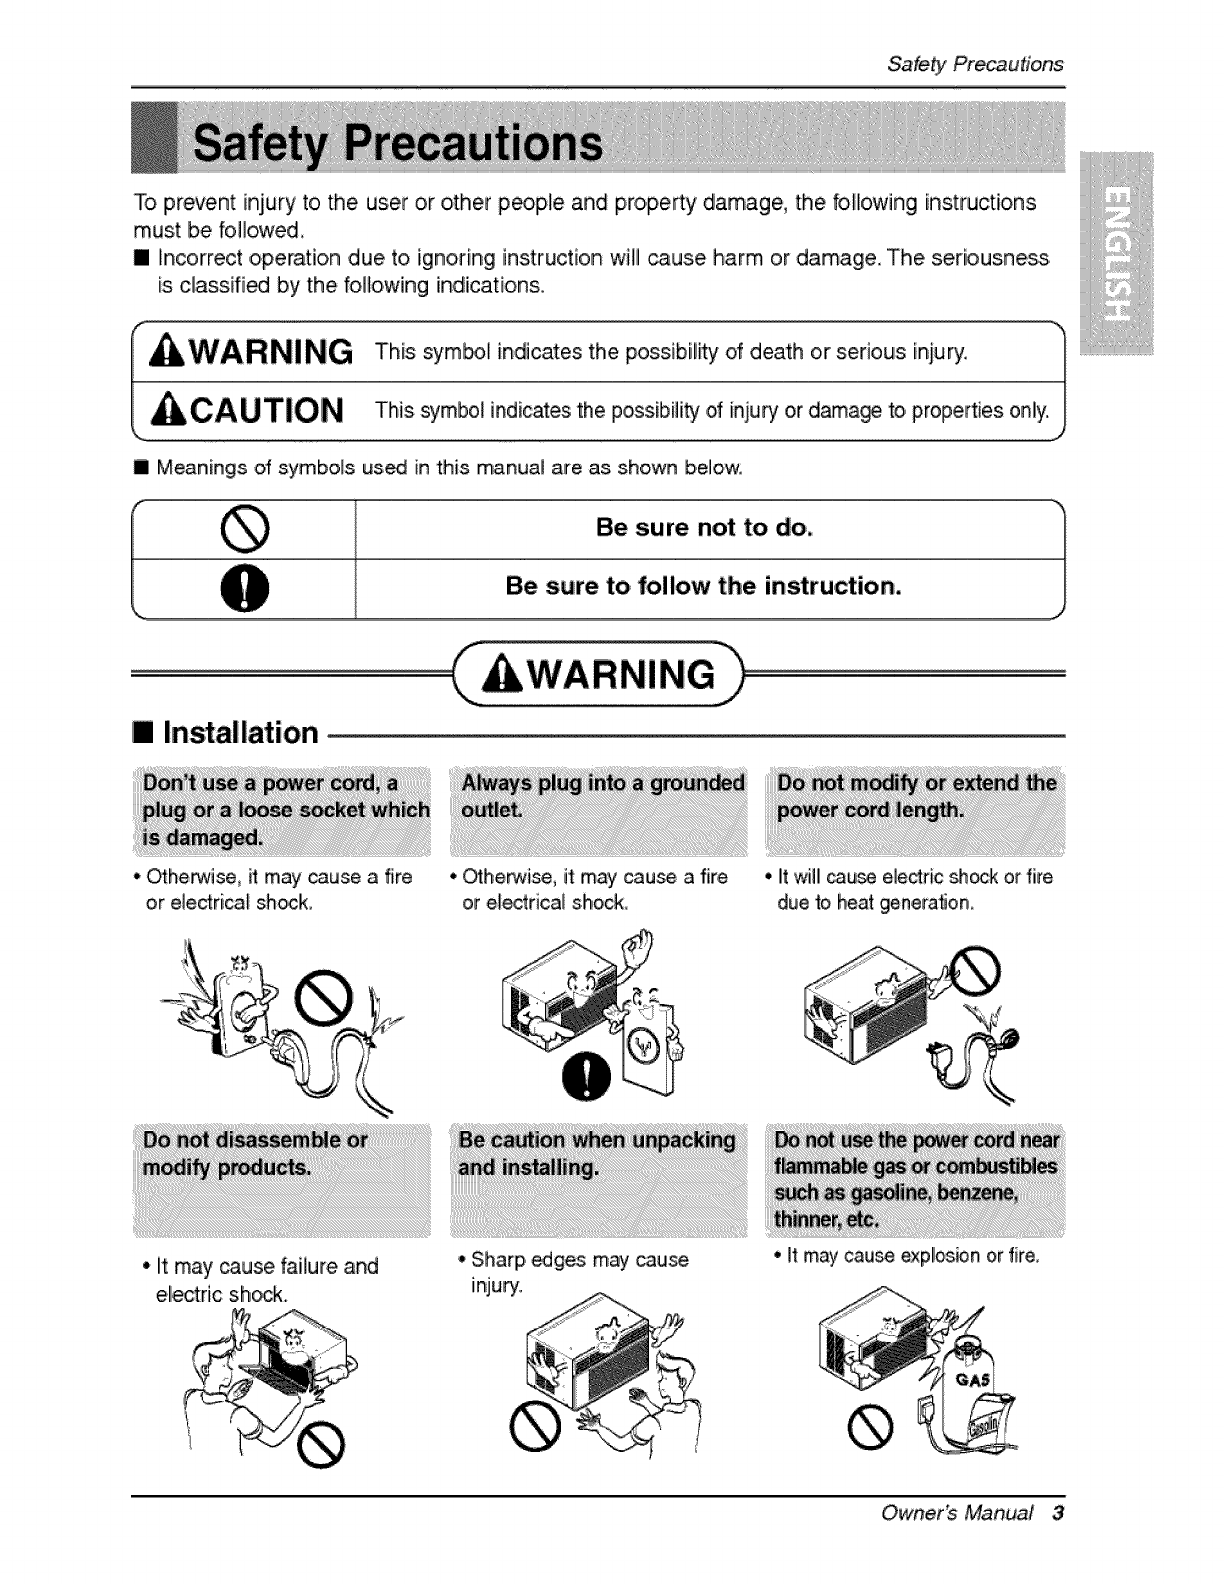
To prevent injjury i tOthe user or other people and property damage, the b_liowing instructions
must be fo!lowed,
[] Incorrect operation due to ignoring instruction will _use harm or damage. The seriousness
is cliassifi_ by the fol!oiwing indications,
I.......oz .s Ooss'O". o'deo' irso.'ou 'o.o 1
[. CAUTION This symbo_indicates the possibility of injury or d_a_ to properties only.J
ii Meanings of symbols us,_ in this manual are as shown below,
Be sure. not to ,do,
Be sure to follow the instruction,
[] Installation
, O_herwise, it may _use a fire
or electrica_ sh_k,
•It may _use failure and
ellectnc shako
•Otherwi_, it may cause a fire
or eEectrica[Ishock,
°Sharp, _ges may cau_
injury.
• It will _u_ electric _k or fire
due _ heat genera_on,
• It may cau_ exp!osbn or fire,
Owner_ Manual 3
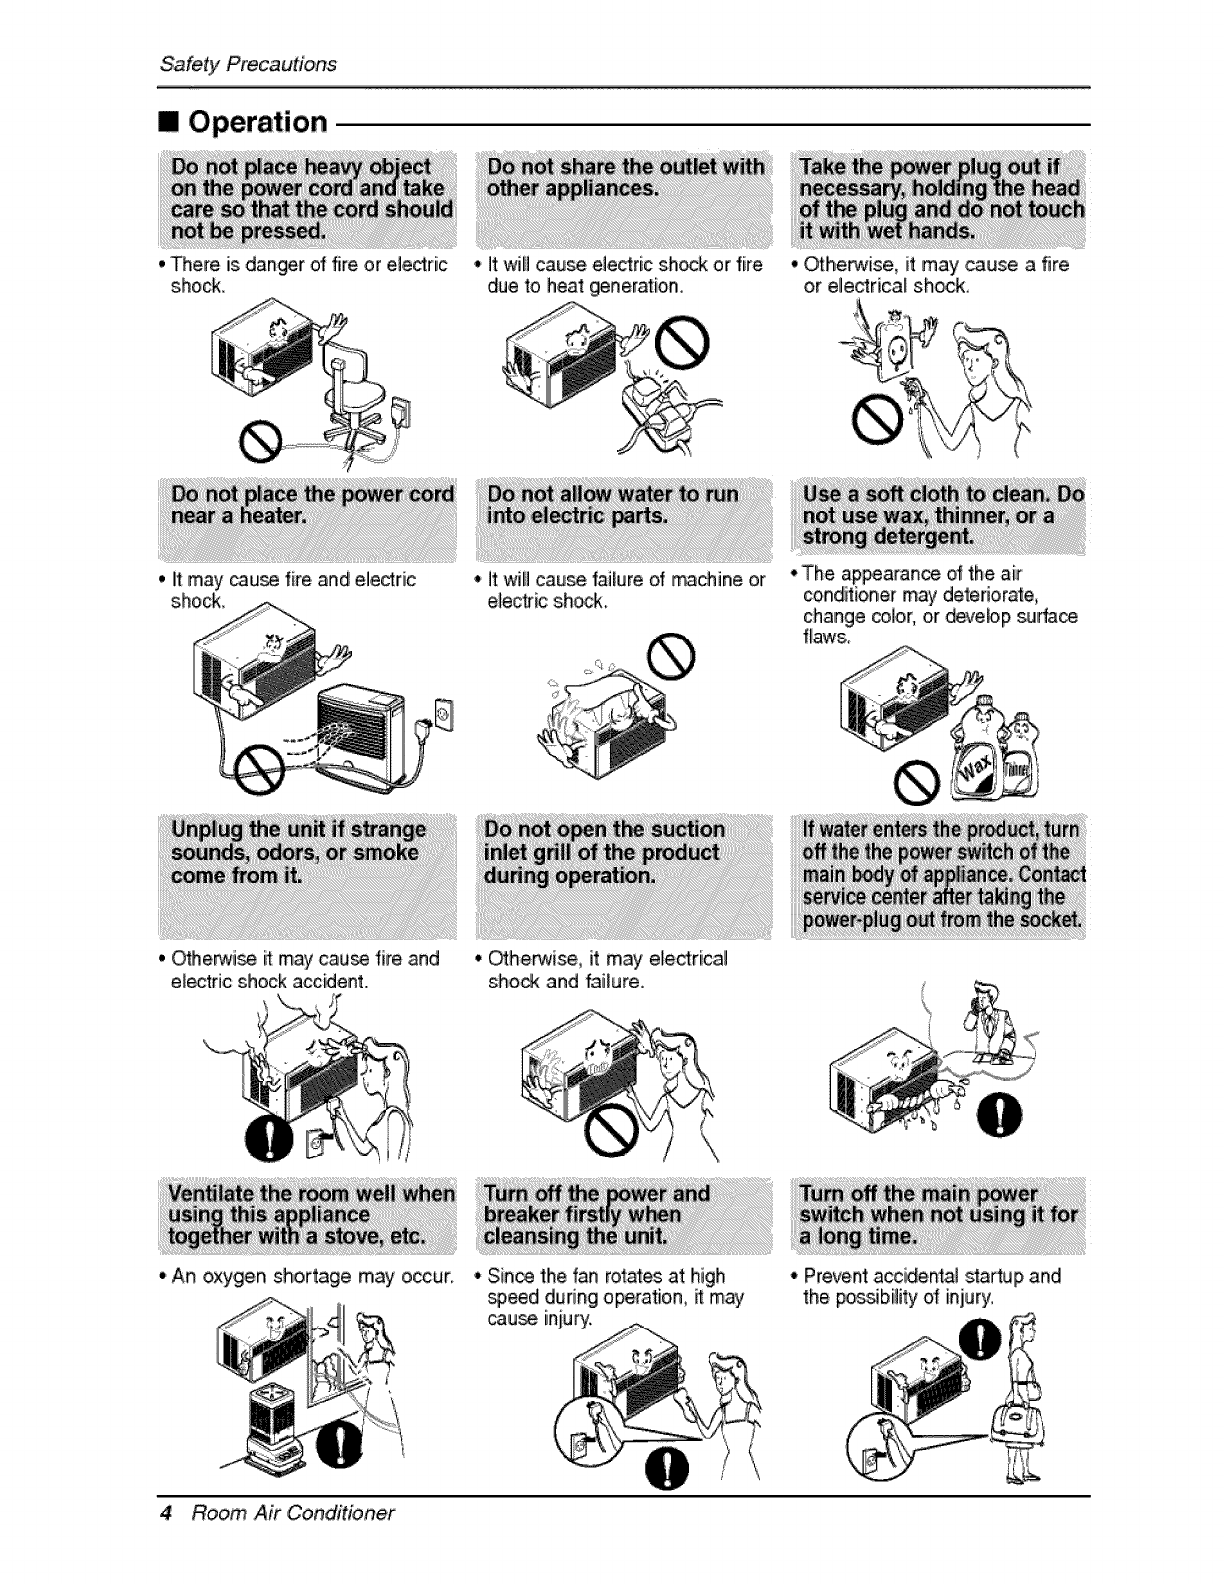
Il! Operation
• There ='sdanger of fire or electric
shocL
• _erwi_ it may cauce fire and
el_tric shock acc_ent.
• An oxygen shortage may occur,
•It will cause electric sh_ or fire
due to heat generation
•It will cause _aiiure of ma_ine or
ele_Eic sh_k_
° _henNi_, it m_y electrical
sho_ and failure.
° _herwise, it may _use a fire
or elect:rica_ sh_k,
• The ap_arance of the air
cond_ioner may deteriorate,
change color, or devebp surfa_
f_aws,_
° Since the fan rot_es at high
_,_d during operation, it may
cause iniury:
4 Room Air Conditioner
° Prevent accidenta! startup and
the,potability Of iniury,
Safety Precautions
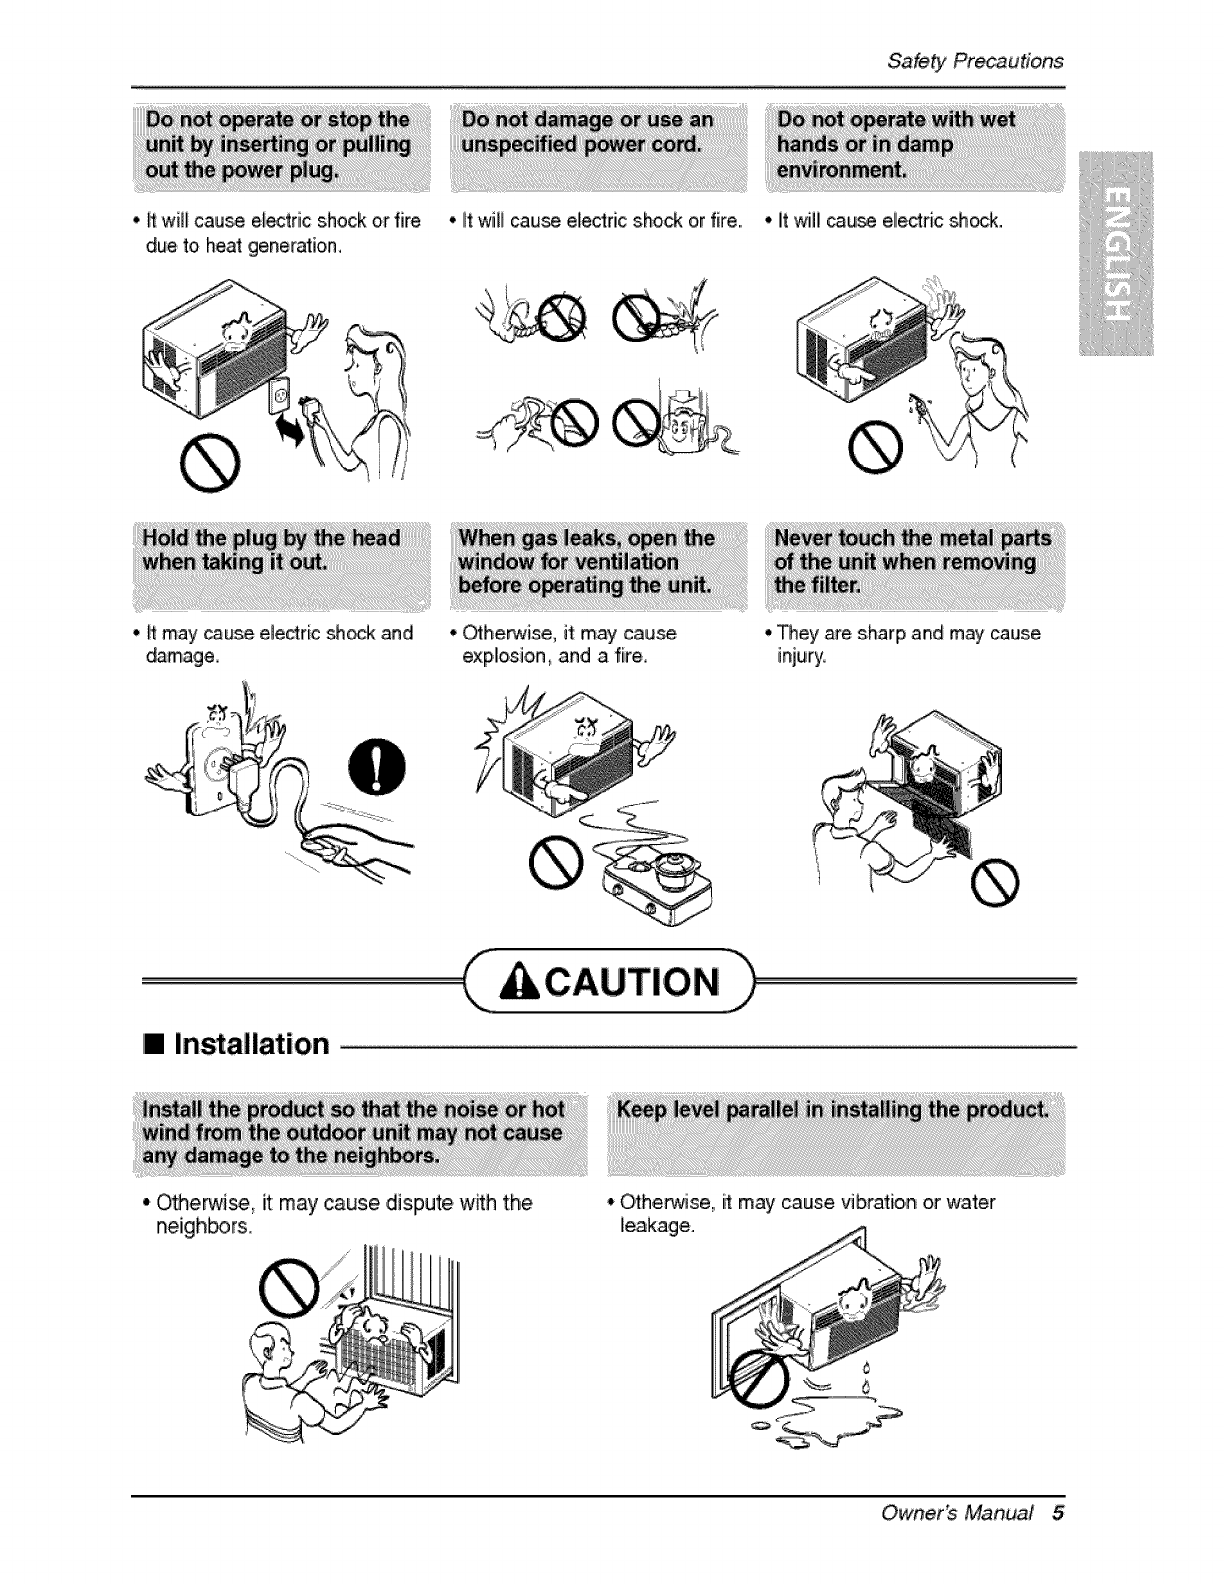
•Hwill cause e_ectric shock or fire °litwill cau_ elleclric shock or fire.. •It will _ui_ electric _ock.
due to heat generation_
• ff may cause etedric sh_ and
_mage •Othe_ise, it:m_y cau_
explosion, and a fire, • _ey are sharp and may cause
injury,
III In allatio, n
• O_erwi_, it may cause dispute w_h the
neigh_rs.
•O_he_ise, it may cause vibration or water
[leakage.
Owner_ Manual 5
SafetyPrecautions
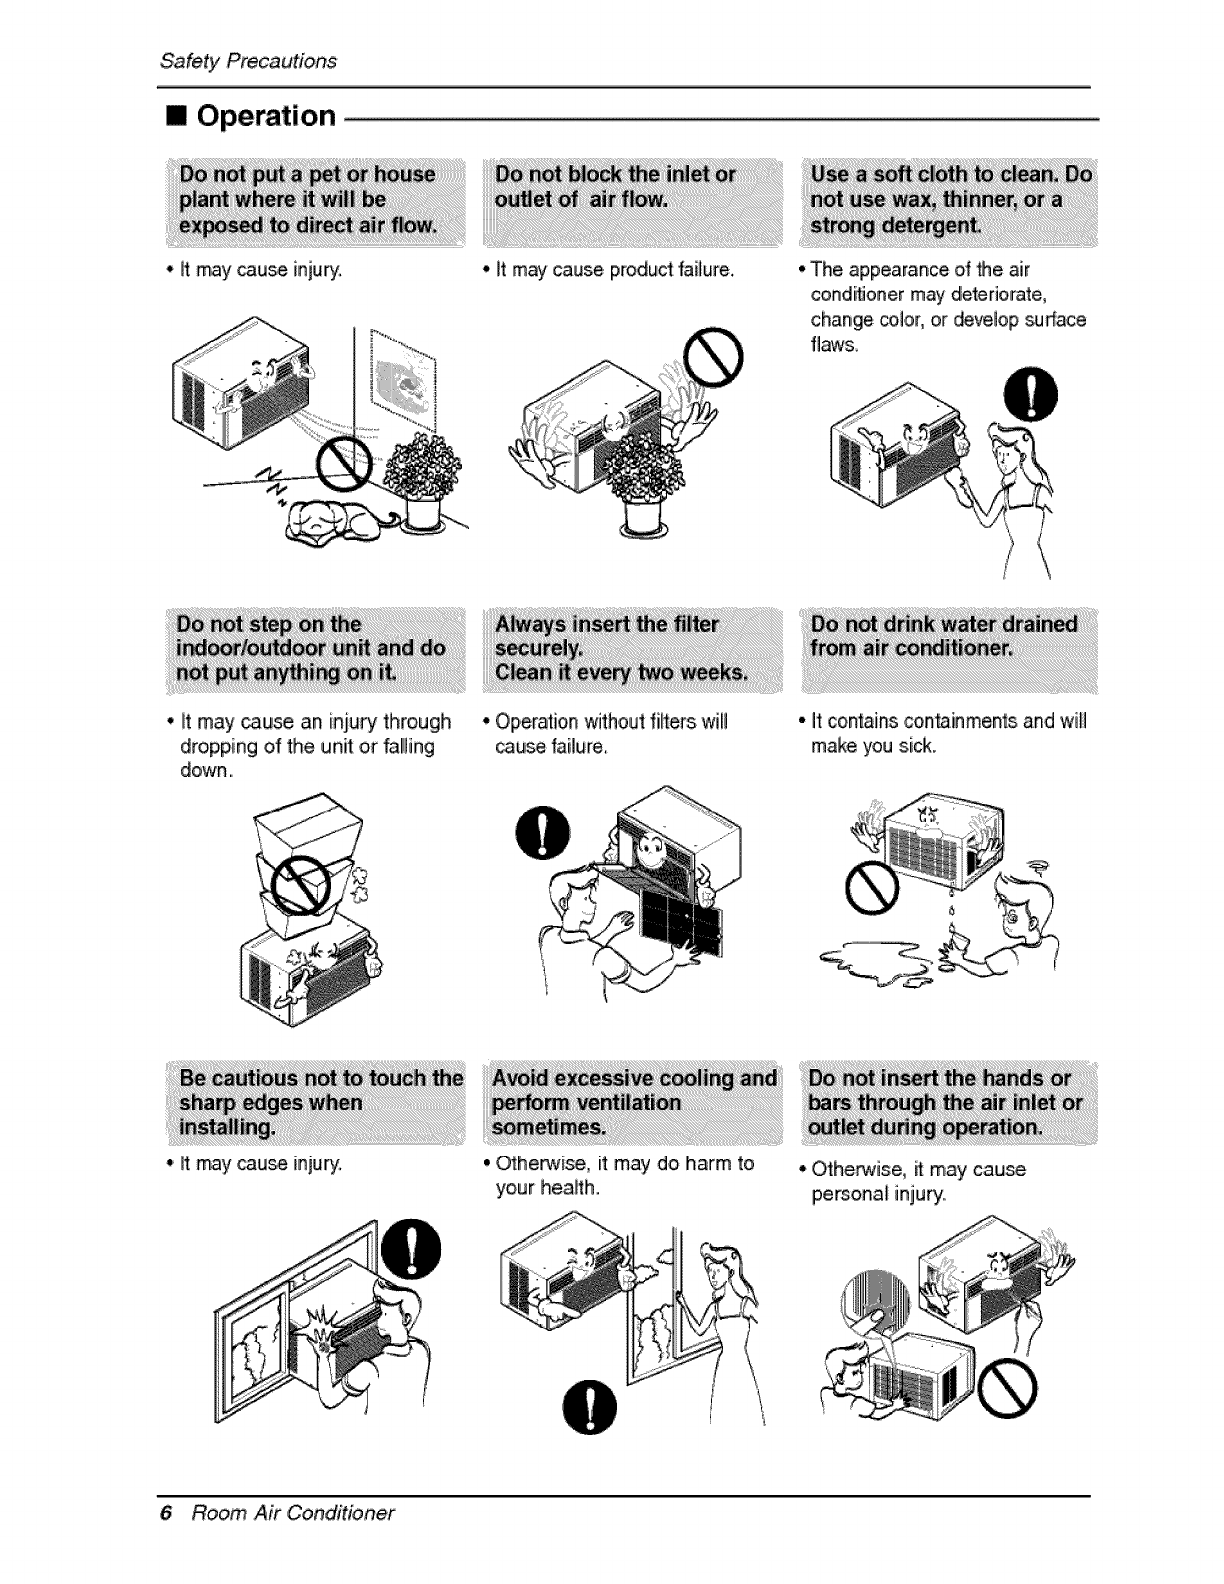
[] Operation
•it my cause injury. •, it m_ cause produ_ failure. •The appearance o1He air
conditioner m_ dietedorate,
change co.l.or,.ordevelop _rface
•It may _use an injury through
dropping of the unit or fa!lling
down.,
•' _tmay cause injury.
* Operation without fillers will
_use 'failure
•_herwise, it may do harm to
your hea_:h.
• it conlains con_inmer4s and will
make you sick.
* OthepMse, it may cau_
pe_onal injury.
6Room Air Conditioner
BeforeOperation
1. Contact an installation specialist for installation.
2. Plug in the power plug properly.
3. Use a dedicat_ circuit.
4. Do not use an extension cord.
5. Do not start/stop operation by plugging/unplugging the _wer cord.
6. If the _rd!plug is damage, replace it with only an authorized replacement
part.
iL!!Wii!ii!iiiiiiiiiiii'_'_
1i_ Being expos_ to direct airflow for an extend_ period of time could be
hazardous to your health. Do not expose _cupants, pets, or plants to direct
airflow for extended periods of time.
2i. Due to the _ssibilibt of oxygen deficiency, ventilate the r_m when used
together with stoves or other heating device&
3 Do not use this air conditioner for nonospecified special purples (e.g.
preserving precision devices, fo_, pets, plants, and art objects). Such u_ge
could damage the items.
1 Do not touch the metal _rts of the unit when removing the filter, Injuries can
occur when handling sharp metal edges.
2. Do not use water to clean inside the air oonditioner. Exposure to water can
destroy the insulation, leading to possible electric shock.
3i_When ,cleaning the unit, first make sure that the _wer and breaker are turn,_
off. The fan rotates at a very high speed during operation. There is a
_ssibiliby of injury if the unit's power is a_identally trigger_ on while
cleaning inner parts of the unit,
For repair and maintenance, contact your authorized service dealen
Owner_ Manual 7
Introduction
This symbol alerts you to the, risk of el_tric shock,.
This symbol alerts you to hazards that could cause harm to,
the air cond_ione, r.
This symbol indicates sp_ial notes.
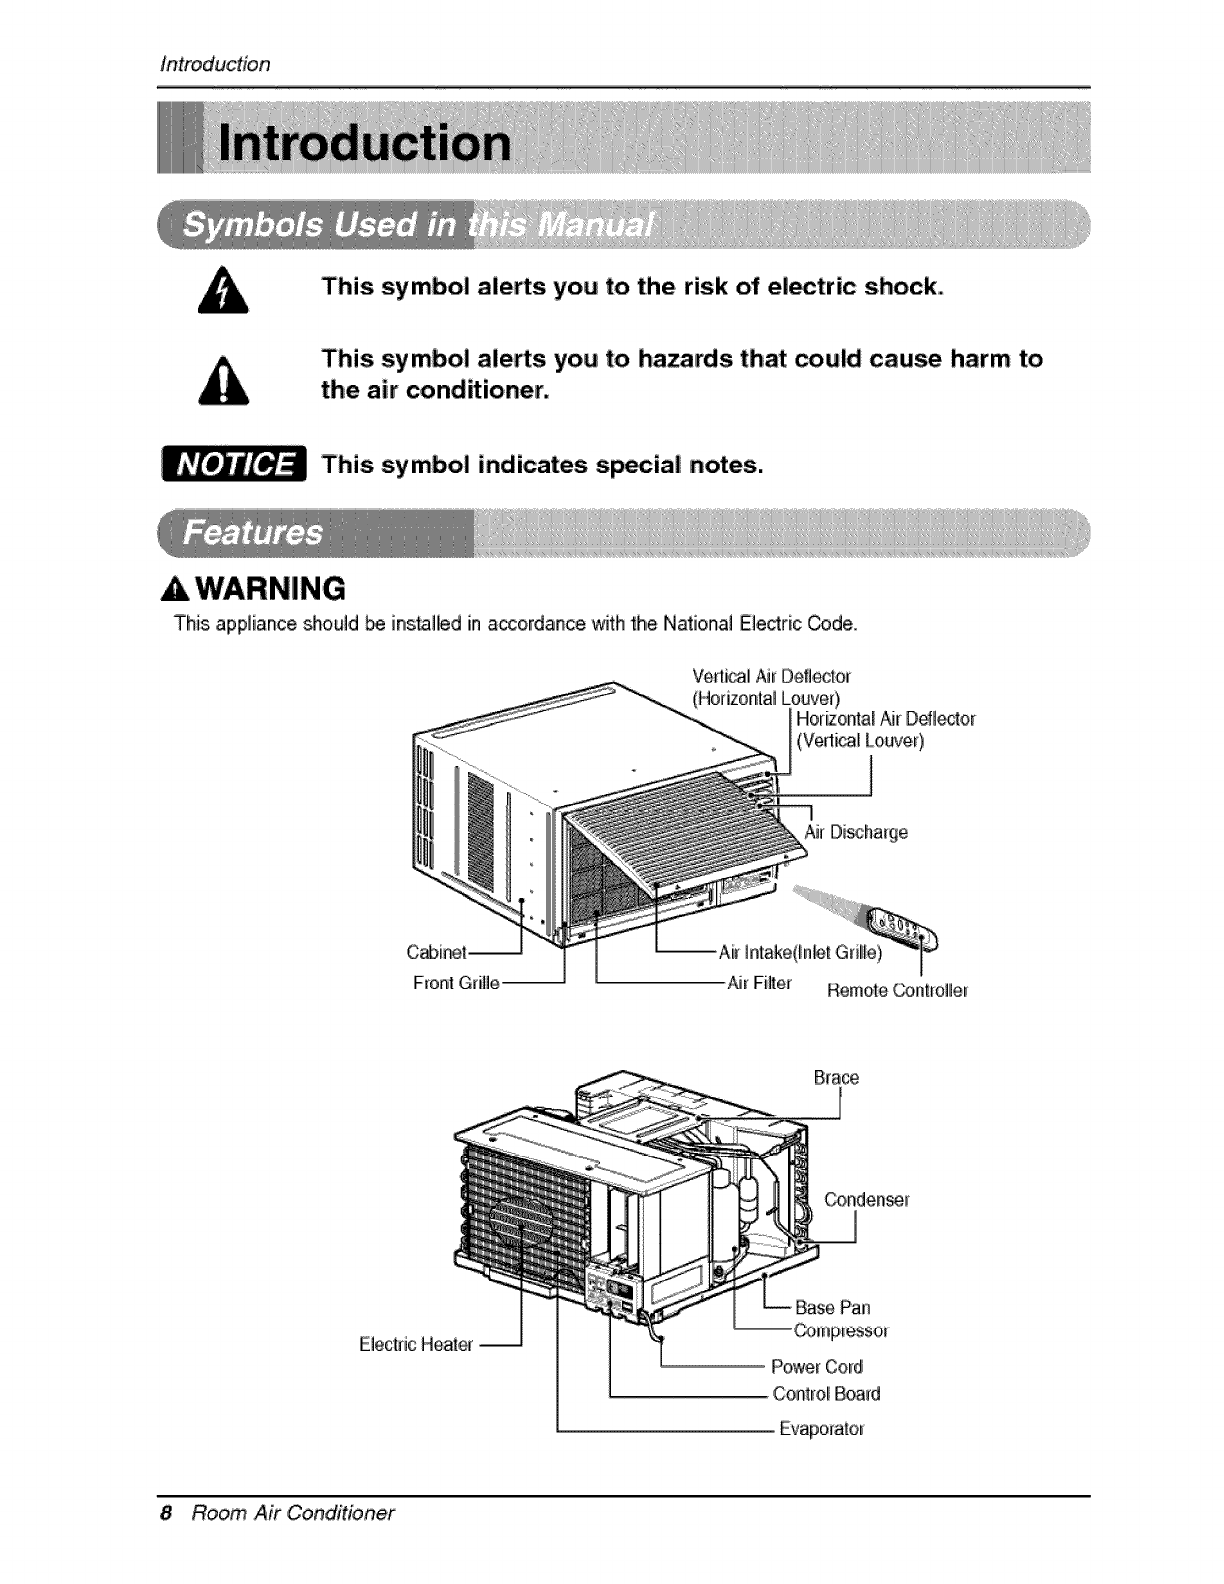
This, appliance should _ installed in accordance _th the National Electric _de.
Air Filter
Eiec'_icH,eate
Base Pan
Power Cord
Control Board
8 Room Air Conditioner
El_trical Safety
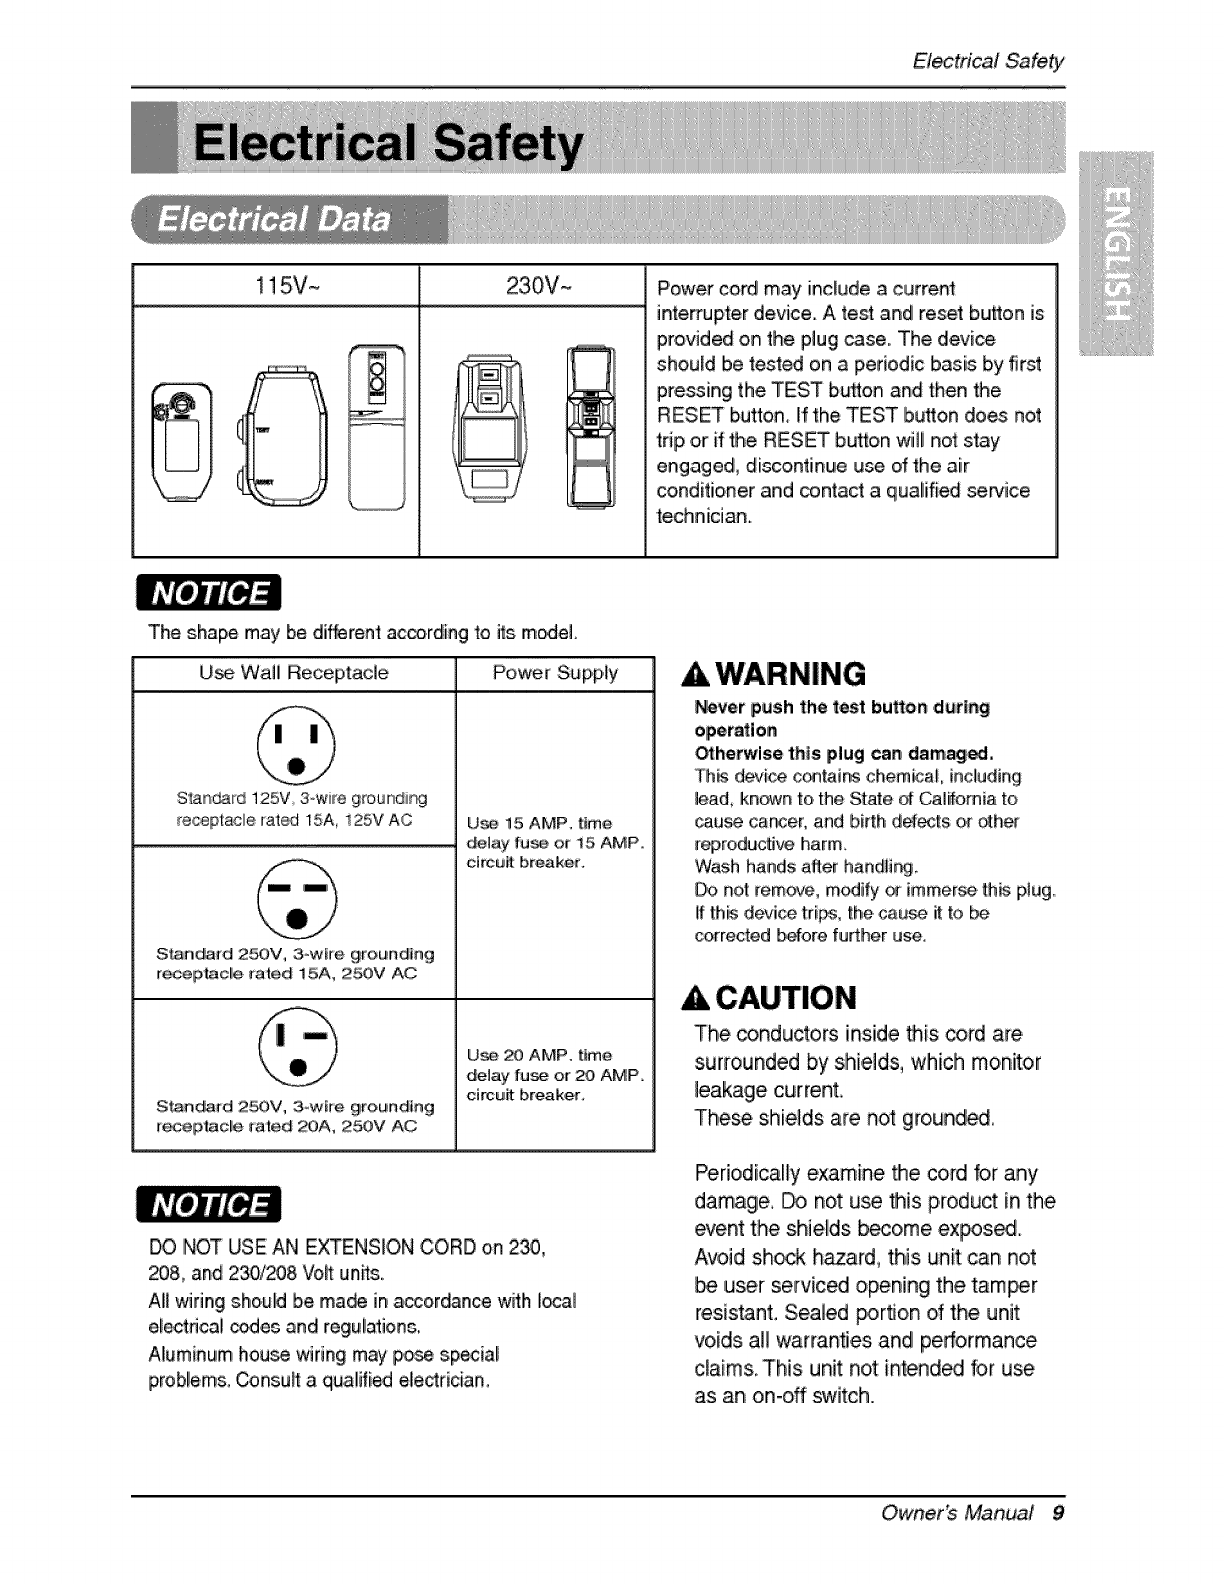
! 15V~ 230V- Power cord may include a current
inle,_upter device. A test and reset bu_on is
provided on the piug use. The device
should Ibe te_ed on a periodic basis by first
pressing the TEST b_on and then the
RESET button, If the TEST button does not
tdp or if the RESET button will not stay
engage& discontinue use of the ,air
conditioner and contact a qualified service
technician.
The shape may be dif_rent according to its model.
U_ Wall Receptacle Power Supply
S'_Rdard 125V, 3owire grounding
receptacle rat_ 15A, i25V AC
S_ndard 250V, 3_wire grounding
r_ept_acl!e rated 15A, 2_:)V AC
SlPJn_rd 2_V, 3_wtre grounding
_ecep|ade rated _A, 250V AC
U_ 15 AMP, time
de_ay fu_ or !5 AMP,,
c#cu_t breaker°
U_, 20 AMP. time
de_ay fuse or :20, AMP,
circu_ breaker,
DO NOT USE AN EXq'ENSIO,NCORD on 2_,
_8, and 23_208 Vo_ un_s.
Alilwiring shouM be ma_ in accordance with local
electrical codes and regulations,
Aluminum house wiring may p_e sp_ia!
problem& _nsuff a qu,al#i_ eleddcian.
AWARNING
_vet push the test burton ,during
_herwise this plug can damage,
Th_ deJi_ c_ias chemical including
lead, kn_n to, the State d _li_omia to
cau_ car_er, and birth dd_Is or _h_
r_,roductive harm
Wash ha,ads aHer handfi_
Do not re,m_ve, modify _ immerse, th_ plug,
if th_ de_o4cetrips, the cau_ i_to be
corrected _fore further use.
CAUTION
The conductors inside this cord are
surrounded by shields, which moinitor
leakage current.
These shields a_e not ground_,
Periodically examine the co_d br any
damage, _ not u_ this p,mduct in the
event the shields become expos._.
Avoid sh_k hazard, this unit can not
user serviced opening the tamer
resistant. Sealed _rflon dthe unit
voids a!! warranties and! performance
claims, This unit not intended for use
as an on-off s"witch.
Ownerb Manual 9
(PLEASE READ CAREFULLY)
FOR THE USER'S PERSONAL SAFET_ THIS
APPLIANCE MUST BE PROPERLY GROUNOED
-[he' _#er cord _ _is appliance is equip_d with a
threo-pror_ (grounding) _ug. U_ thiis with a standard
th:_os|oi (grounding) wall _er out_et to minimize the
h_a_d of el[_tdc sh@ckoThe c_tomer shoul!d have the
wall receptac_ and circui! checked by a qualified
electrician to make sure the r_eptade is pro_dy
DO NOT CUT OR REMOVE THE THIRD (GROUND)
PRONG FROM THE P_ER PLUG,
A. SI_ATIONS WHEN'_E APPLIANCE WILL BE
DISCONNECTED OCCASIONALLY:
Because, _ IPot_tia_ safety hazards, we stronglly
discourage the use of an ada_ _ug_ H_ever, if you
wish to u_ an adapter, a TEMPORARY CONNECTION
may _ made. Use UL-iisted ada_er, availab_ from
most ]_al h_dvva_e stores.
....[he _arge s]o_ in the adapter must b_ a]kjned w_h the
large slot in _he re_ptade to assure a _op_" _larity
conn,ect[®.
: Attachi_ _e adapter g_o,und terminall to _e walt
receptacle covet' screw do_ not ground the applian_
unless the cover sc_ is _1, and not Insu|a_ed, and
_e wa|i_r_ptacle is grounded through the house
wiring. The custom_ sho.u_ h_e the circuit choked
by a qualified electd_an to make sum _e receptacle
is properP] ground_,
Di_o=nn_t '|he _er _rd from the a_3,pter, using ,one
hand _ each. Otl_i_, the a_pte_ grou_ t_mir_]
m_ht break. DO NOT USE the ap_i_ce with a broken
adaple_ p_ugi.
_, SI'FUATI[ONS WHEN'THE APPLIANCE WILL BE
DISCONNECTED, OFTEN,i
C_ not use an ad@ter pi_ in thee, situations.
Unplugging the power oord frequently can lead to an
eventual breakage of the ground terminal The wan
power outlet should _ replaced by a |hr.-slot
(grounding) o_iet instead,
USE OF EXTENSION CORDS
Because d_t_tia_ _|ety hazards, we strongly
discourra,ge the use of an ext_sion cord. H_er, if
you wish to use an extension cord, _e. a CSA
certified_JL-[isted 3-v_re (grounding} extensbn cord
rated at i 5.A, 125V,
10 Ro,_m Air Coeditioner
Ins_llation
I/4 Bubbie
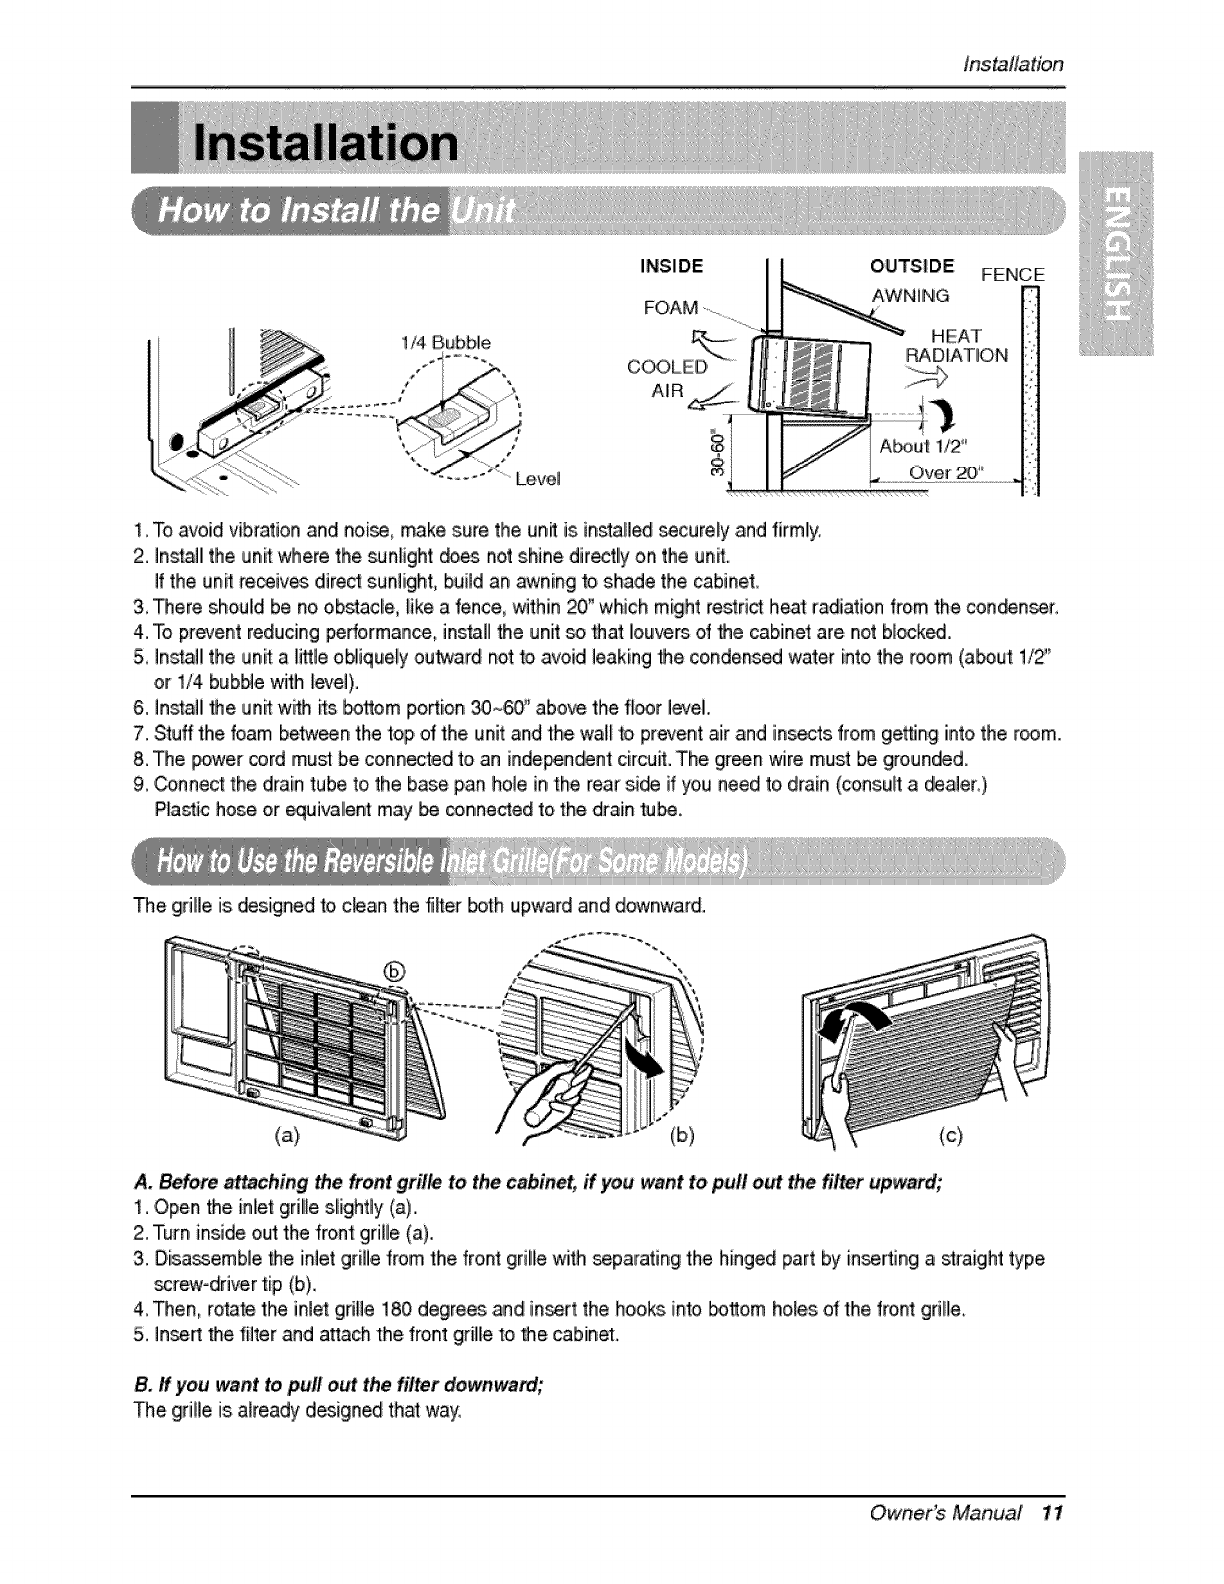
INSIDE
FOAM ...........
COOLED RADIATION
iL!!Wii!ii!iiiiiiiiiiii'_'_
1. To avoid vibration and noi_, make sure the unit is instaBed _curely and firmly.
2. In_alll the unit Sere the _nlight _es. not shine dir_lly on the unit.
If the unit re_iv_, direct sunlight, buBdan awning to,shade the cabinet,
3, _ere should be no ob_acle, like a fence, within 20'°which might re_rict heat radiation from the con_n_r,
4. To prevent reducing performance, instal[Ithe unit oo that louvers dthe cabinet are not blocked.
5, Install the unit a !_le obliquely outward not _ avoid leaking _e condensed water into the room (about 1/2"
or 1/4 bubble with level).
6. Installi _e unit wi_ its bottom potion _~60" ab,o_ the fl_r level.
7. Stuff the foam between the top dthe unit and the wall to prevent air and ins_ts from getting into the room.
8,.The power _rd mum be conneded to an inde_n_nt circuff. The green wire must be groiunded,
9, Connect the drain tube to the base pan hole in the rear si_ if you need to drain (consult a dealen),
Plastic hose or _uivallent may _ connected to the drain tu_.
The grilile is designed to.c_an the rifler both upward and downward.
(a) (b) (c)
A, Before a_aching the front grille to ithe cabinet, ff _u want to pull o_ the filter upward;
1,.Open the inlet grille slightly (a).
2, Turn inside out the front griBe (a),
3. Disa_emble the tiniergrille from the fro,_ griBewith _parating the hinged part by in,fling a straight type
_rew.-dri_r tip (b).
4, Then, rolate the inlet gdil,e 180 degrees .andinsert the hooks into bottom holes of the front gdlle.
5. Inert _e filter and attach the front griBeto _e cabinet.
B, ff you want to p_i_ IO_ the filter downward;
The grili!,eis,already designed that way.
Owner_ Manual 11
Installation
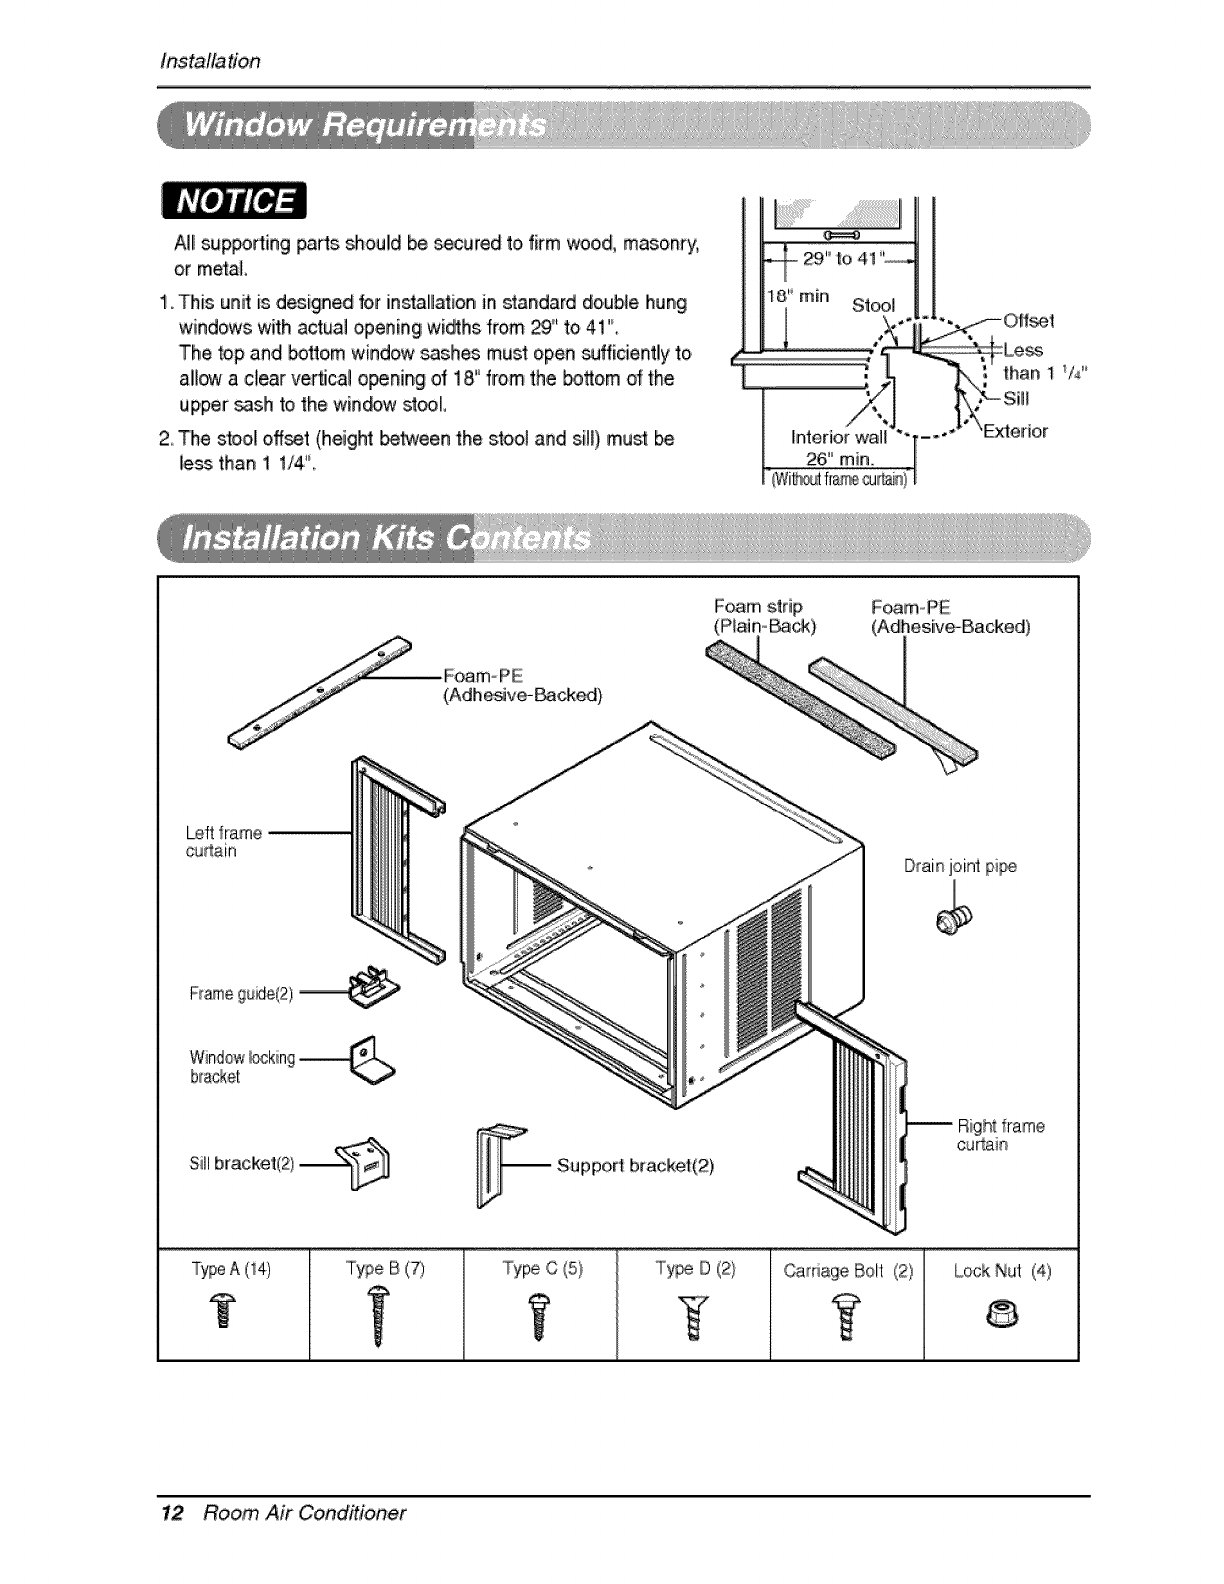
All sup_rting pads should be _cured to,firm wood, masonry,
or metal
1. This unit is designed for instalation in standard doubi_ehung
windows with actual opening wi_hs from 2'9°'to 4!"
The top and bottom window sashes must open _fliciently to
all_ a ,clearvertical opening of 18" from the _ttom of the
upper _sh to the win_w st_L
2 TInestool off_t (height between the stool and sill),must be
le_ than 1 1/4.",
iF_ml strip Fc_m.,,PE
(Adhesive-Backed)
Type,C(5}
tTy_ O (2}
YCarnageBoll: (2') Lock Nut (4)
12 Ro,om, Air Co,nditioner
Ins_llation
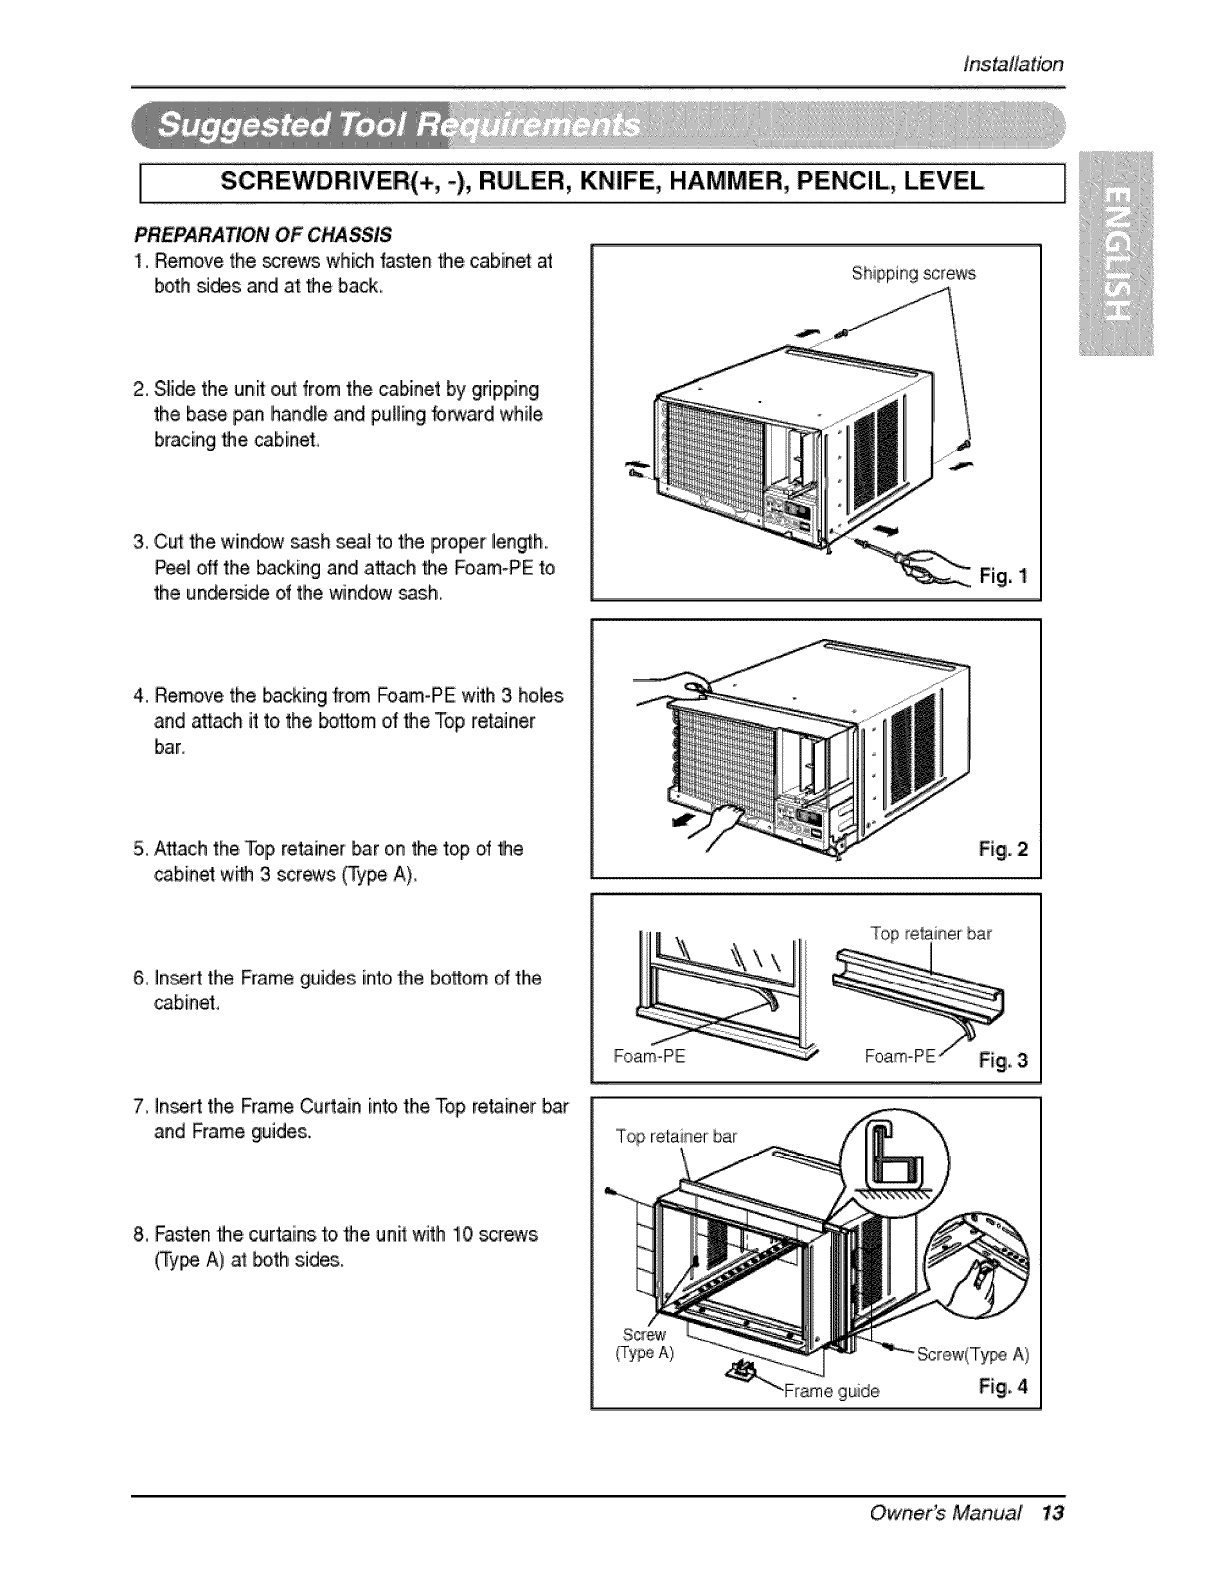
S,CREWDR|VER(+,,-), RULER, KN|FE, HAMMER, PENCIL, LEVEL
PREPARATION OF CHASSIS
1. Remove the _rews which _asten the cabinet at
both _des ,and at the back_
2. Slide the unit out from the cabinet by gdppingl
the base pan handle and pulling_ard while
bracing the cabinet,
3. C_ the win_w sash _al to the proper length,,
Peel off the backing and ,attach the Foam°PE to
the un_r_de of the window sash.
Shipping screws
Fig. 1
4,.Remove the backing from _am-PE with 3, holes
and attach it to,the _ttom o_the Top retainer
bar,
5, Attach the,"Topretainer bar on the top of the
cabinet w_ 3 screws (T_,,peA)
6. In_rt the Frame guides into,the bottom of the
cabinet,
7. Inert the Frame Curtain into the Top retainer bar
and Frame guides.
8,,Fasten the,curtains to the,unit with 10 screws
(Type A) at _th sides.
Top relainer bar
Foam-PE
....Fop retainer bar
S_,_
(TypeA)
"Fr&m e guide
Screw(Tyt_ A)
Owner_ Manual 13
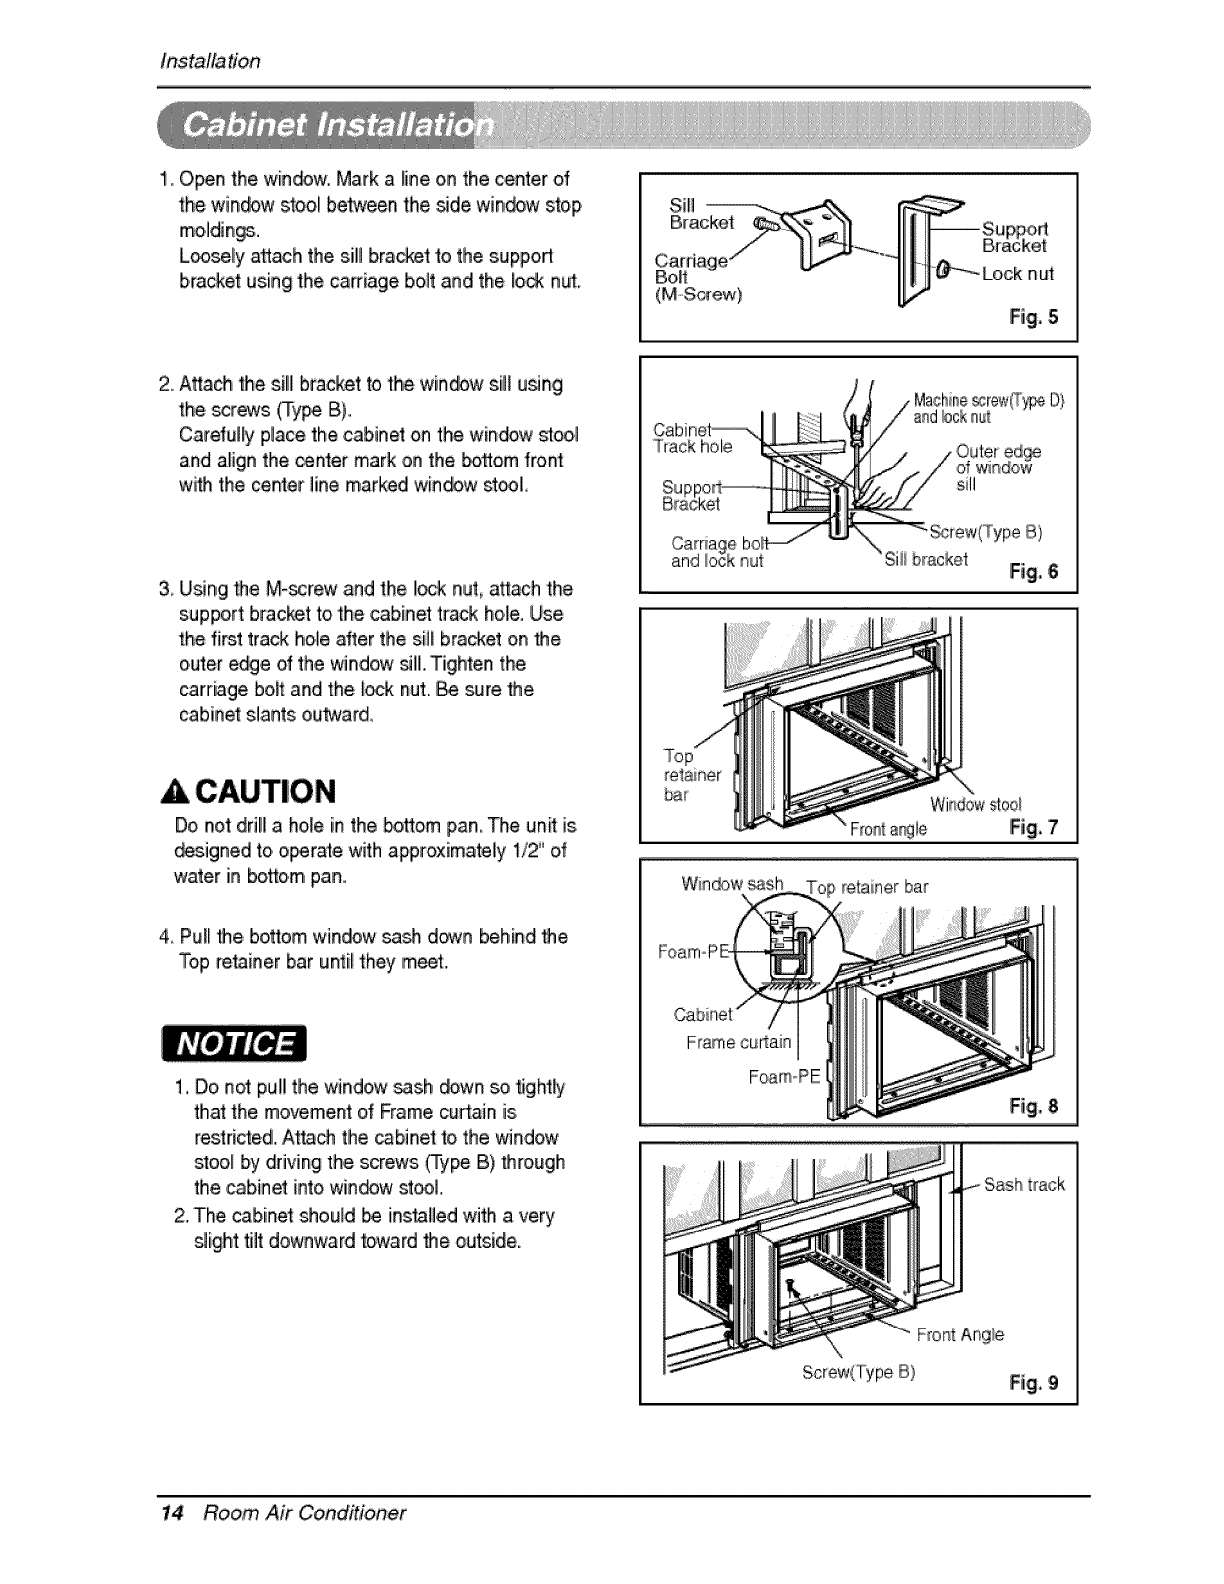
Installation
1, Open the window: Mark a line o,n the center of
the window stool be_een the _de window stop
moildin_.
L_sely attach the sill bracket to the support
bracket using the carriage bo_tand the lock nut:_
2. Attach the silll bracket to the window sill u_ng
thie _et, s (Type B)..
Carefulty p_acethe cabinet on the window stool
and align the _nter mark on the #attain front
with the center line marked window st_L
3 Using Me M-_rew and the I_k nut, attach the
support bracket to the cabinet track hole.Use,
the first track hob after the sBfbracket on Me
outer ewe of the window all. Tighten the
carriage bo._and the [_k nut..Be sure Me
cabinet slants ou_ard,
Do not drill a hole in the bottom pan, The unff is,
designed to operate with approximately 1/2" of
water in bottom pan,.
4, Purl Me bottom window sash down behind Me
Top re_iner bar until they"meet.
1. Do not pul! the window _sh down so flgN_,
that the movement o_ Frame curtain is
restricted. Attach the _binet _ the window
sloo.[ by driving the screws (Type B) through
the ,cabinet into window stool
2..The cabinet should I_ inslalled with a very
_ight tilt downward toward Me outside.
I Sill ' I
Bra Supped
. _.,/ [[_'----__IIIII Bracket
71H -- oo.o°,
(M-oScrew) [Ji'"
Cabinet_-,
Track hole
Machine_rew(Ty_ D}
bck nu_
sill
and bracket
Win_w _sh retainer bar
Frame cuRain
Foam PE
track
14 Ro,_m, Air Co#ditioner
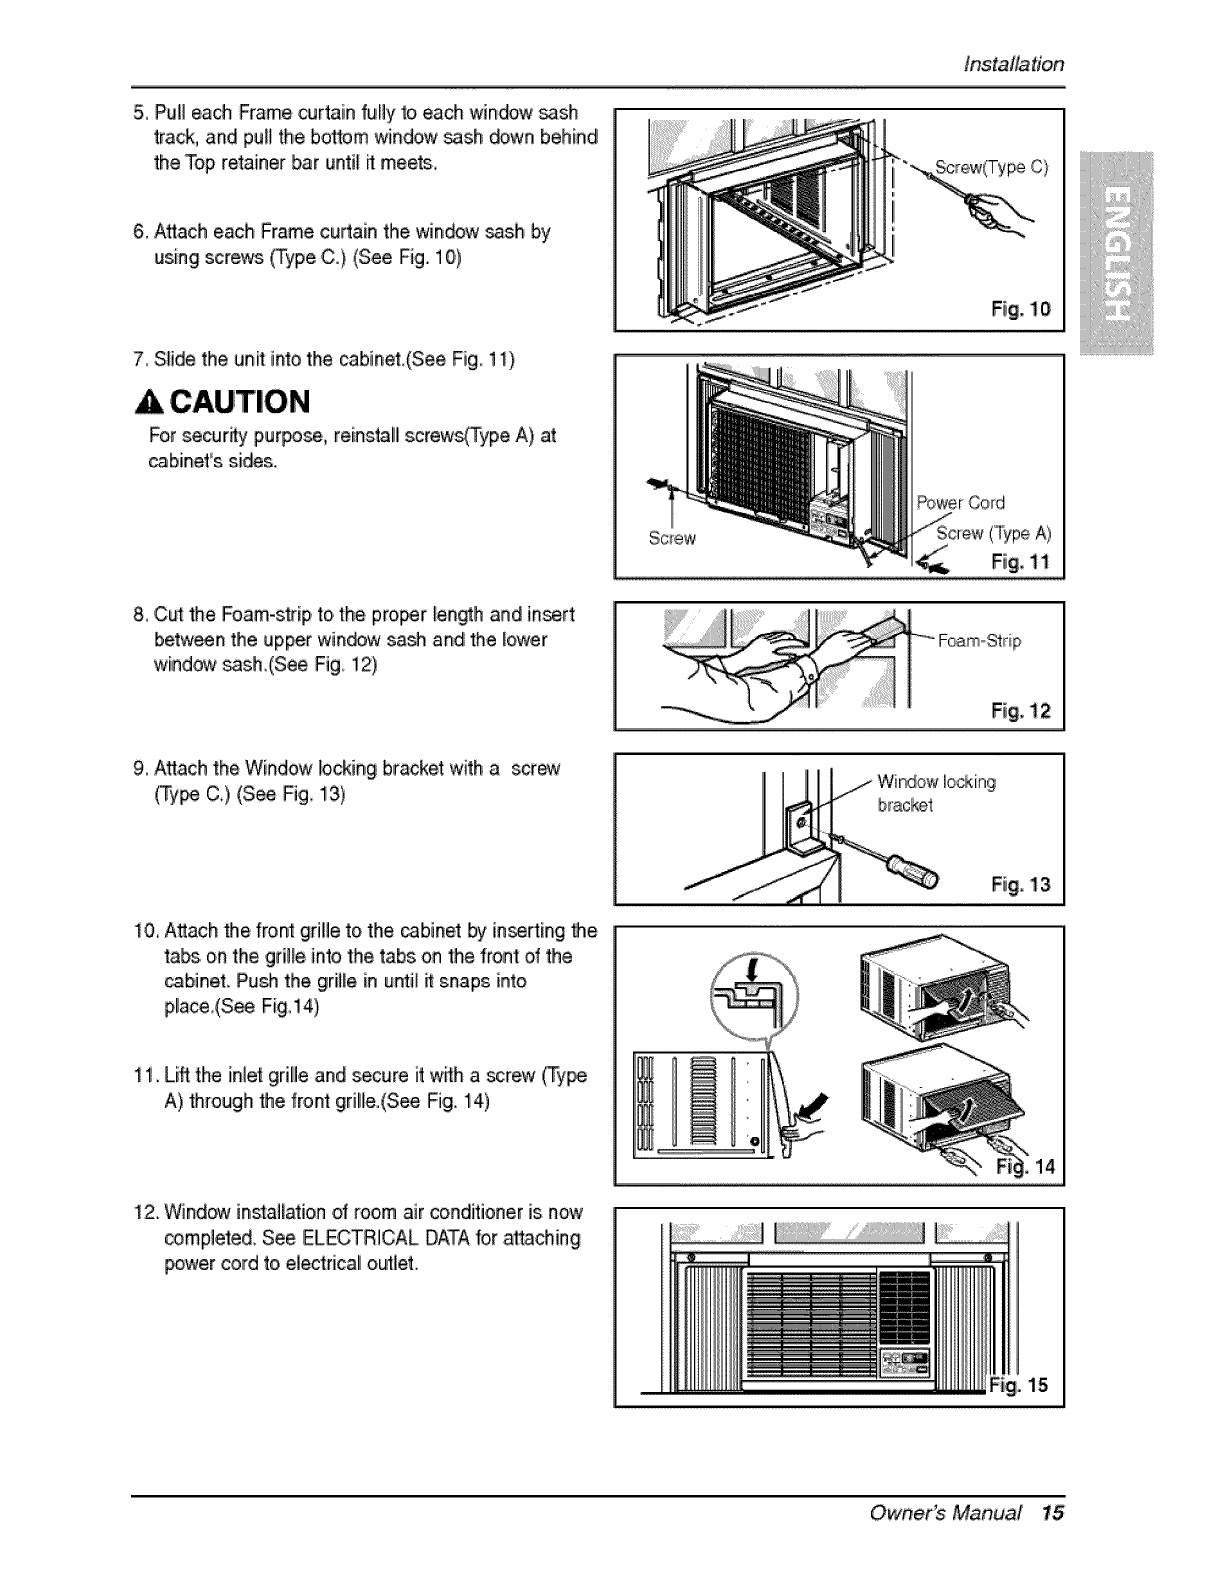
Installation
5, PuBeach Frame curtain ruby _, each window _3sh
track, and pub the bosom window sash _wn behind
the Top retainer bar untff it meets,
6. Attach each Frame cudain the window _sh by
using screws, (Type C.) (See iFig.1O)
7, Sfide the unit into the cabinet (See Fig 1i)
CAUTION
For secudty pi_[_se, reinstall screws_ype A) at
_binet's si_s.
& C_ the Foam-strip to the pro_r [en@h .and insert
betw_n the upper win_w sash and the lower
win,d{_w_s&(See Fig 12)
L,,iiiiiii'i'{iiii!iiiiiiiiiii'@iiiii/i
9_A_ach the Window locking bracket with a scr_
(Type C,) (See Fig, 13)
10. Attach _e front grili!,eto the _bine_ by in_r'ting '_e
ta_. on the gdiffeinto the tabs on the front of the
_binet. Pu@ the griffe in until it snaps into
place.(S_ Fig.14)
11. Lff_tthe inlet grille and secure it wffh a screw (Type
A) through _e front grille.(See Fig. 14)
I2. Wind_ instaffation of room air conditioner is now
compbted, See ELECTRICAL DATAfor .attaching
_wer cord to ele_ricali outlet.
14
15
Owner_ Manual 15
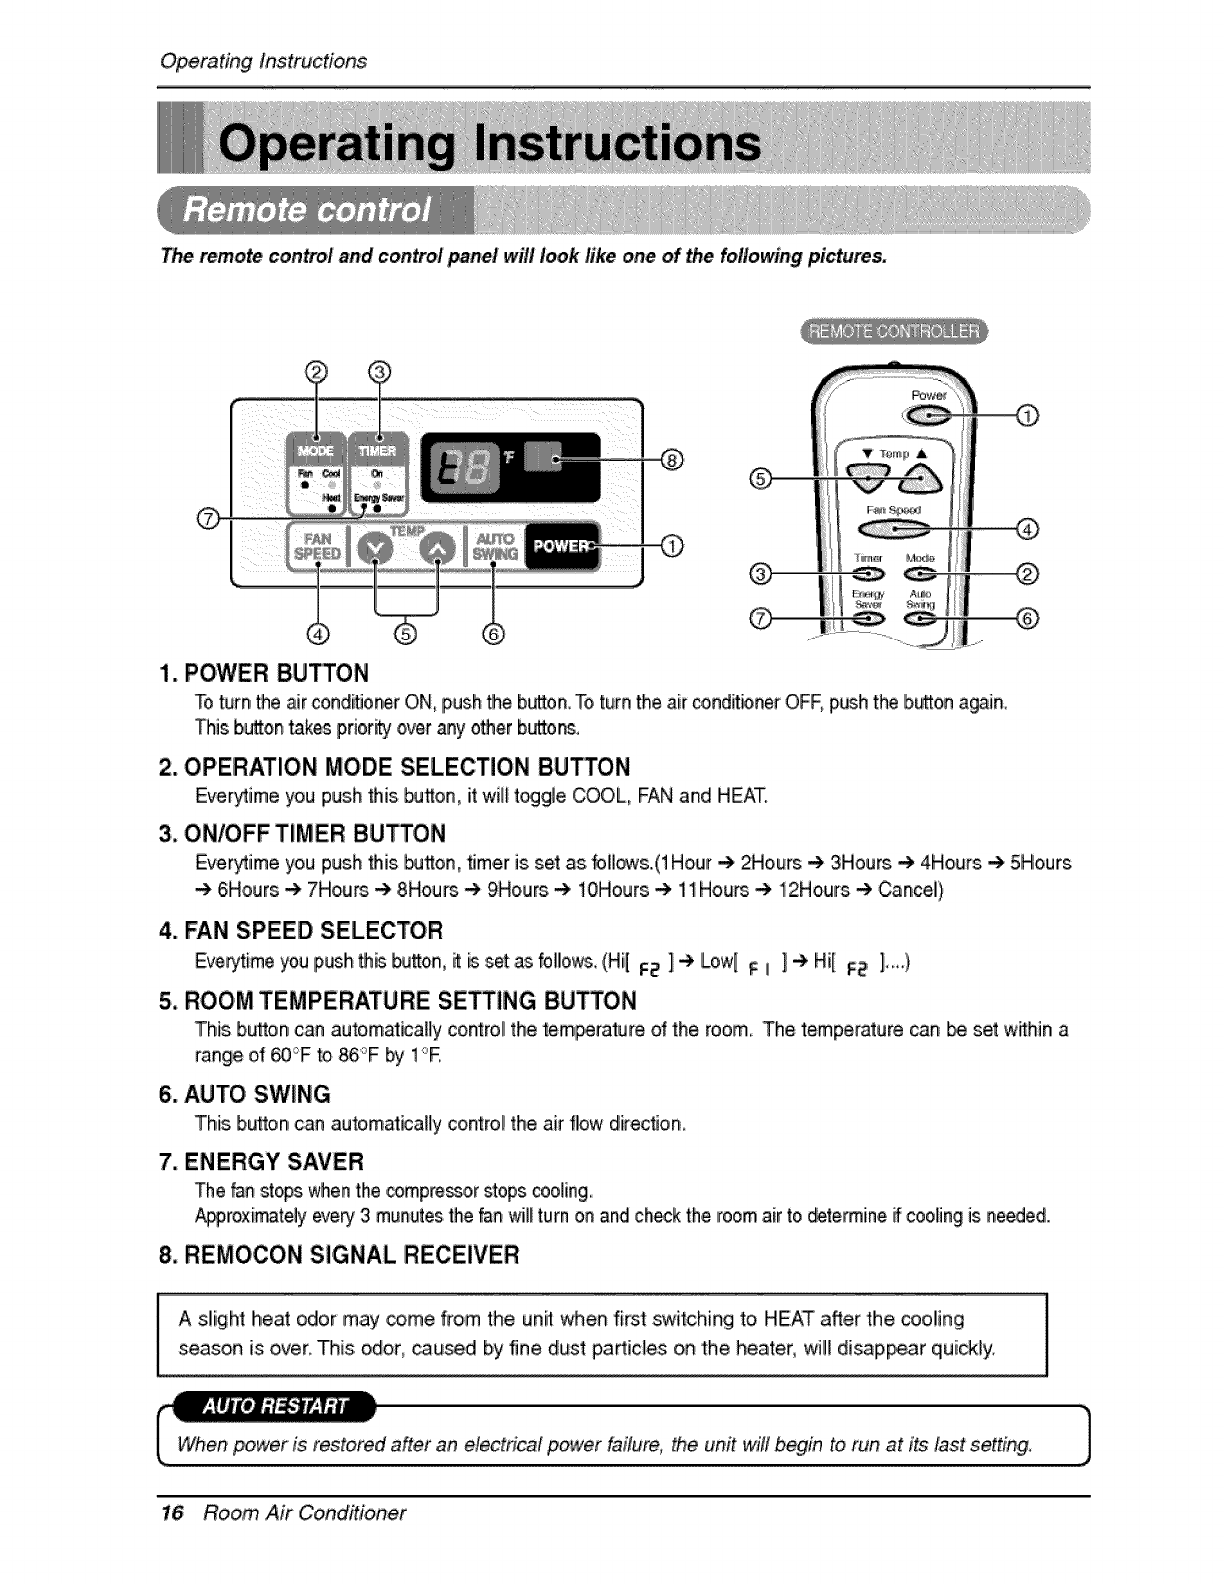
OperatingInstructions
The remote control and con_ol panel will look like one of _e following picture&
1. POWER BUTTON
To _rn he air conditioner ON_push the b_on_ To turn the air conditbner OFF, p_h the button again_
This button takes p.rior_, overany otherbutton.
2. OPERATION MODE SELECTION BUTTON
Everytime you push this bu_on, it wil_t_gle COOL, FAN and HEAT,
3, ON/OFFTiMER BU_ON
Ever_iime you push his Ibu_on,timer is se_as.bll_s..(1 Hour _ 2Hours _ 3Hours _ 4Ho.urs .-) 5Hours
-) 6Hours -)7Hours -) 8Hours _ 9Hou_ -) lOHours -)11Hours -) 12Hours -) CanceO
4. FAN SPEED SELECTOR
Eveqytimeyou [pushh_ _J_on, i{ _ set .asfo_!o_. (Hi[ Fe' ] e Lowl 'F_ ] e Hi[ Fe ]'-_)
5, ROOM TEMPERATURE SETTING BUTTON
This button can automatically control the tem_rature _ the room The temperature can be set wffhin a
range of _°F to 86'_'F_ 1°E
6. AUTO SWING
This button can autoimatica_lycontrol the air fl!ow direc_on,
7. ENERGY SAVER
The _n stops when the _mpre_r stops cooling,,
A_,roximately eve_ 3munutes the _n wilf turn ca and ch_k the room air to _te_mine ifcooling is needed.
8, REMOCON SIGNAL RECEIVER
A slight heat odor may come from the uni'_when fir_ switching to HEAT after the cooling
season is over, This odor_ _used by fine drust particles on the heater, will disappear quickly.
[_d after an electrical power failure, the unit wifl begin to run at its last setting,
16 Ro,_m, Air Conditioner
Operatinginstructions
When the air ,conditioner has been _ffotmed i_ c_lin,g oper_ion and iisturn_ off or set to the fan
position, wait _least 3 minutes before resetting to tlhecoo_ingo_ration again,
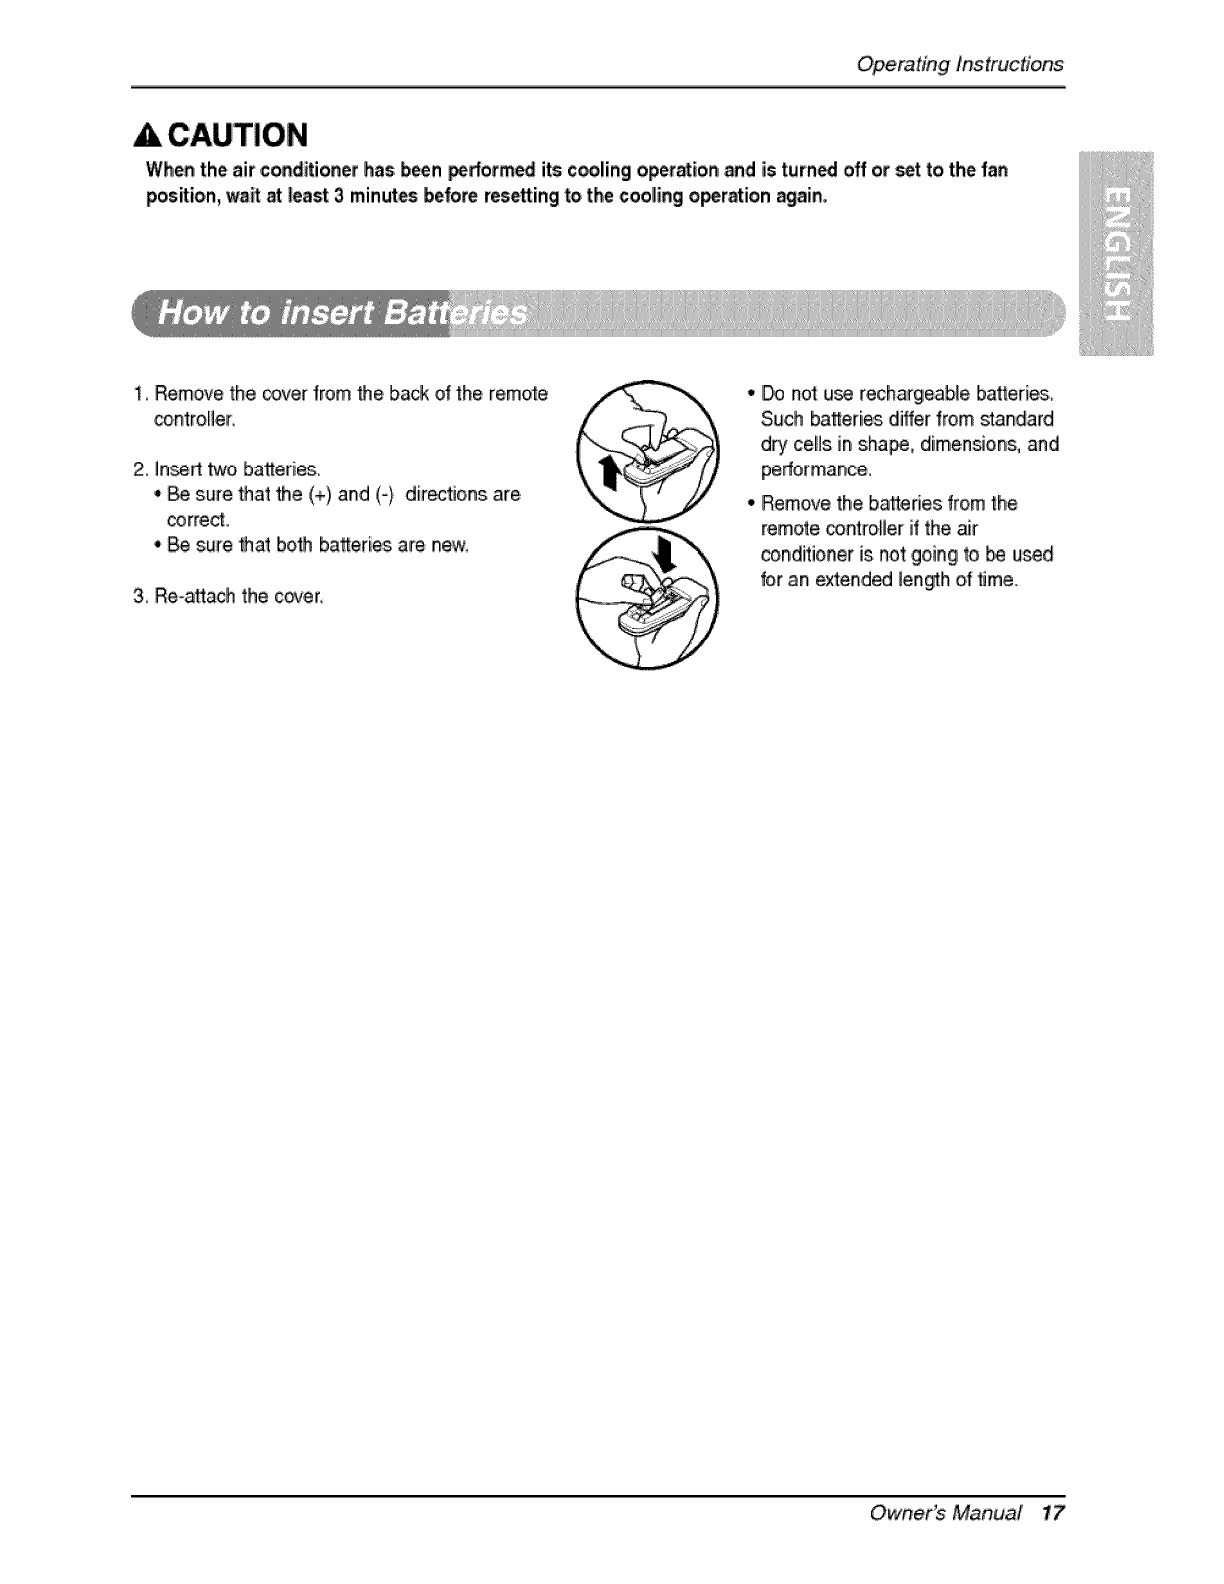
1, Remove the _ver from the back of the remote
controller:
2, inert two batteries
* _ sure that the (+),and (o) directions are,
corre_.
._ sure that both batteri_, are new.
3, Re-a_ach the cover,
• I_ not u_ rechargeabUebatteri_,,
Such batteries, differ f:mm standard
dry ceils in shape, dimensions, and
performance,
• Remove the b,atter[es from the
remote controller if the aiir
_nditioner is not going to be u_d
for an extend_ lengtho__me,
Owner_ Manual 17
Operating Instructions
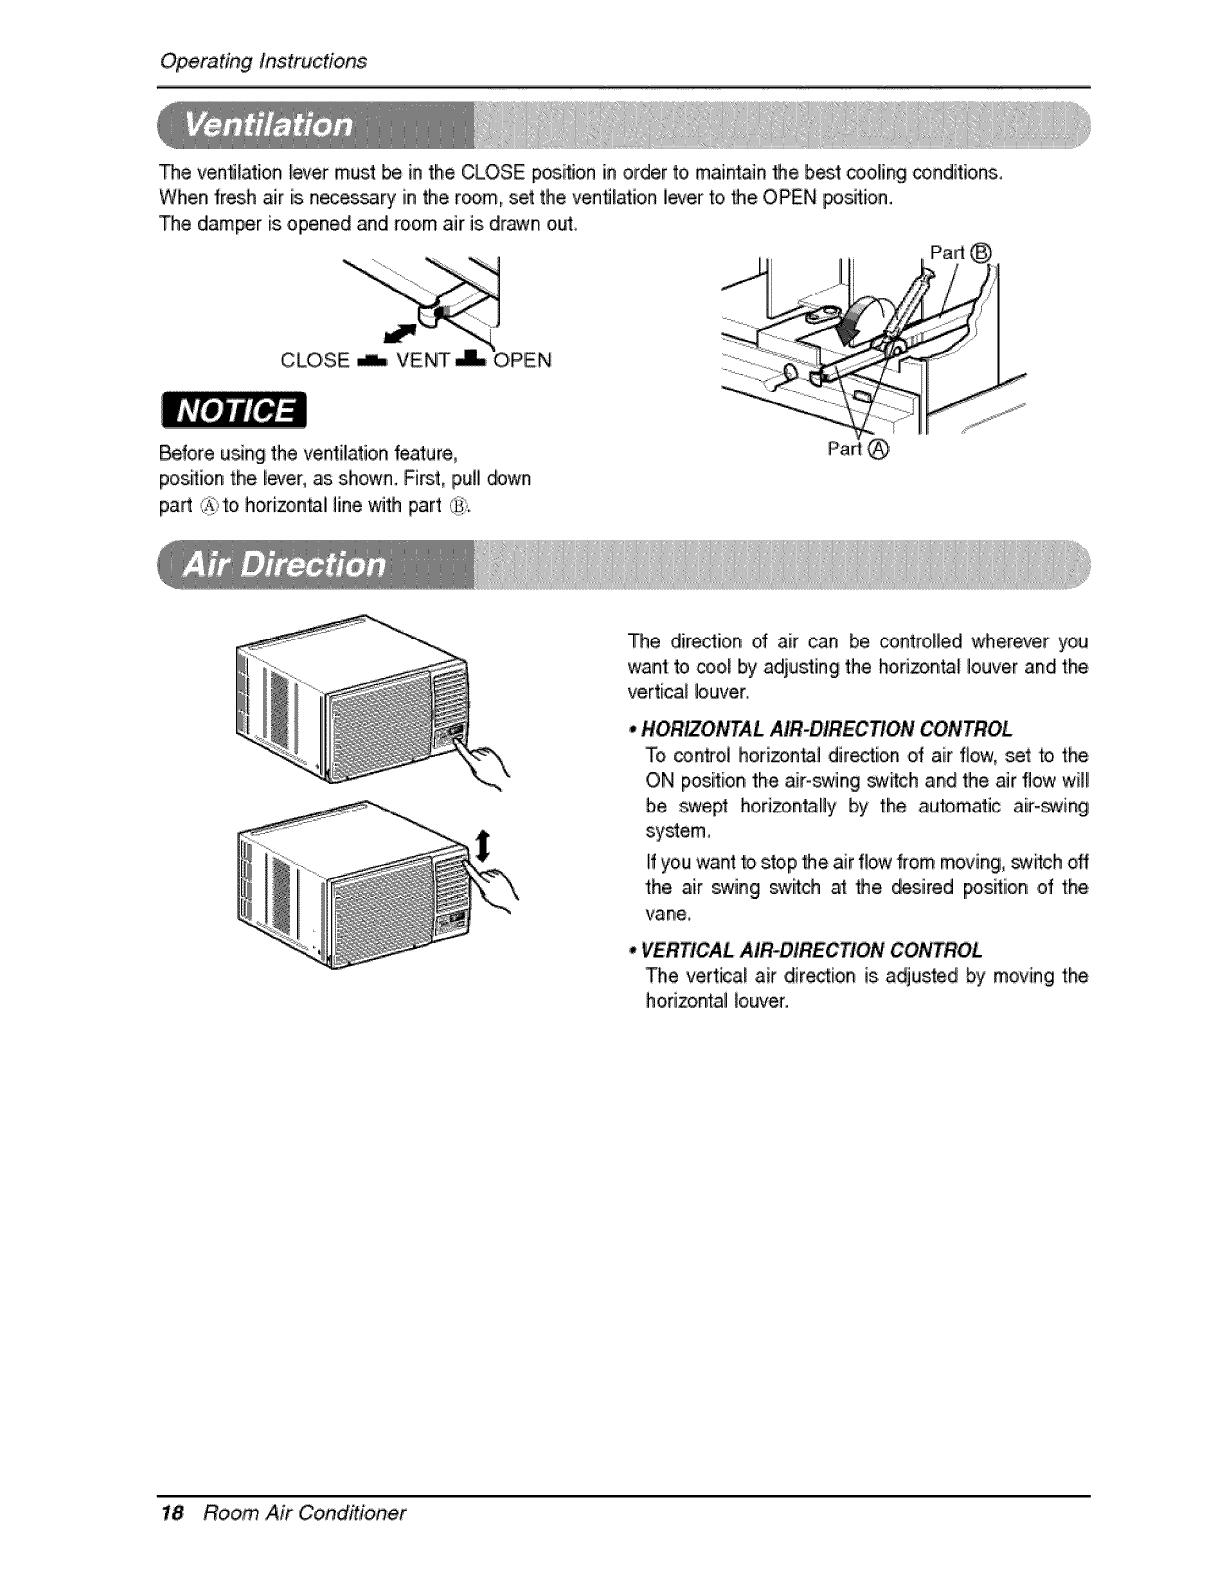
De ventilation _evermust be in the CLOSE posP_onin order to.maintain Me best cooling conditions,
When fresh air is necessary in the r_m, set the ventilation iever t,oMe OPEN _sition.
The damper is opened and room air is drawn oiuL
i _ ,Pa__
Before u_ng the ventilation feature,
pos_io.nthe le,ter, as shown. First, p,ull _wn
pa_ j_ t,ohorizon_l line with part ,:i_;;
De direction of air can be controlled wherever you
want to cool by adiusting the horizontal louver and the
vertical louver.
• MORIZO_AL AIR-DIRECTION COI',iTROL
To control horizontal direction of air flow, set to the,
ON position the air-swing swish and the air flow will
be swept horizon_llly by the automatic air-_ing
If you want _ stop Me air flow #om moving, _h off
the air swing switch at Me _sired position .of the
va he,
VERTICAL AIR-DIRECTION COI'._ROL
The vertica! air dire_ion is adjusted by moving the
horizontal _ouver.
18 Ro,om, Air Co,nditioner
Operatinginstructions
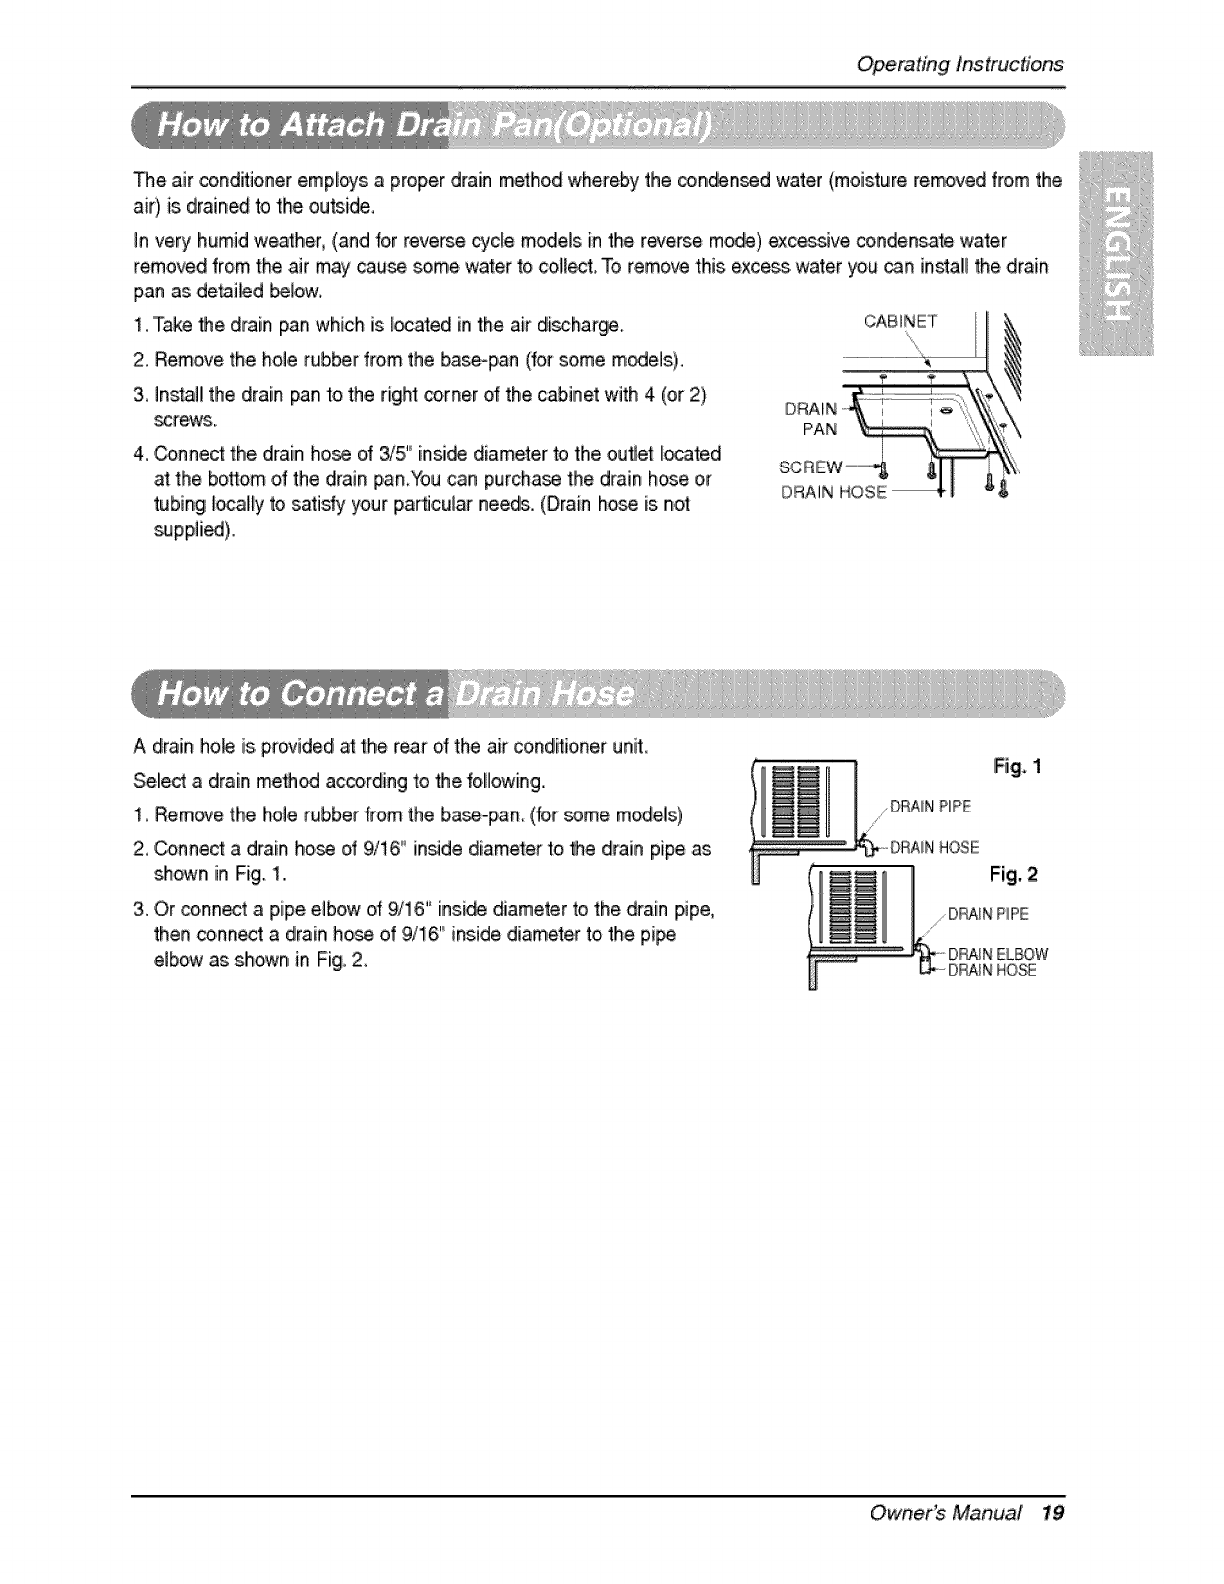
_e air conditioner employs a proper drain melhod whereby the condensed water (moisture re_ved from the
air) is,drained to the ou_ide,
In very humid weather, (and for reverse cycle models in the reverse mo_) excessive, condensate water
removed from the, air may cause _me water to collect, To remove this excess, water you can install the drain
pan as detai_d _low.
1, Take Me drain pan which is bcated in the air di_harge
2. Remove the hole rubber from the base-pan (for some m_els),.
CABINET
3, Install the drain pan to the right corner of the cabinet with 4 (or 2)
_rews.
4. Conned the drain ho,_ of 315' insi_ diameter to the outlet l_ated
at the bottom of the drain pan You can purcha_ the drain hose or
tubing locally to satiny your particular needs. (Drain hose is not
supplied),.
DRAIN
PAN
DRAIN HOSE
A drain ho_ is.provided at the rear dthe air conditio,ner unit
Select a drain me_hod according to Me folilowing.
1, Remove the hole rubber kom the b,a_-pan (for _me models)
2, Conned a drain ho,_ of 9/t6 °'indde diameter to Me @ain pipe,as
_own in Fig. 1..
3. Or conned a pipe elbow d9/16" insid_ diameter to the drain pipe,
then conned .adrain ho_ of 9/16" inside diameter to the pi_
elbow as shown in Fig.,2, DRAIN HOSE
Owner_ Manual 19
MaintenanceandService
TURN THE AIR CONDITIONER OFF AND REMOVE THE PLUG FROM THE POWER OUTLET.
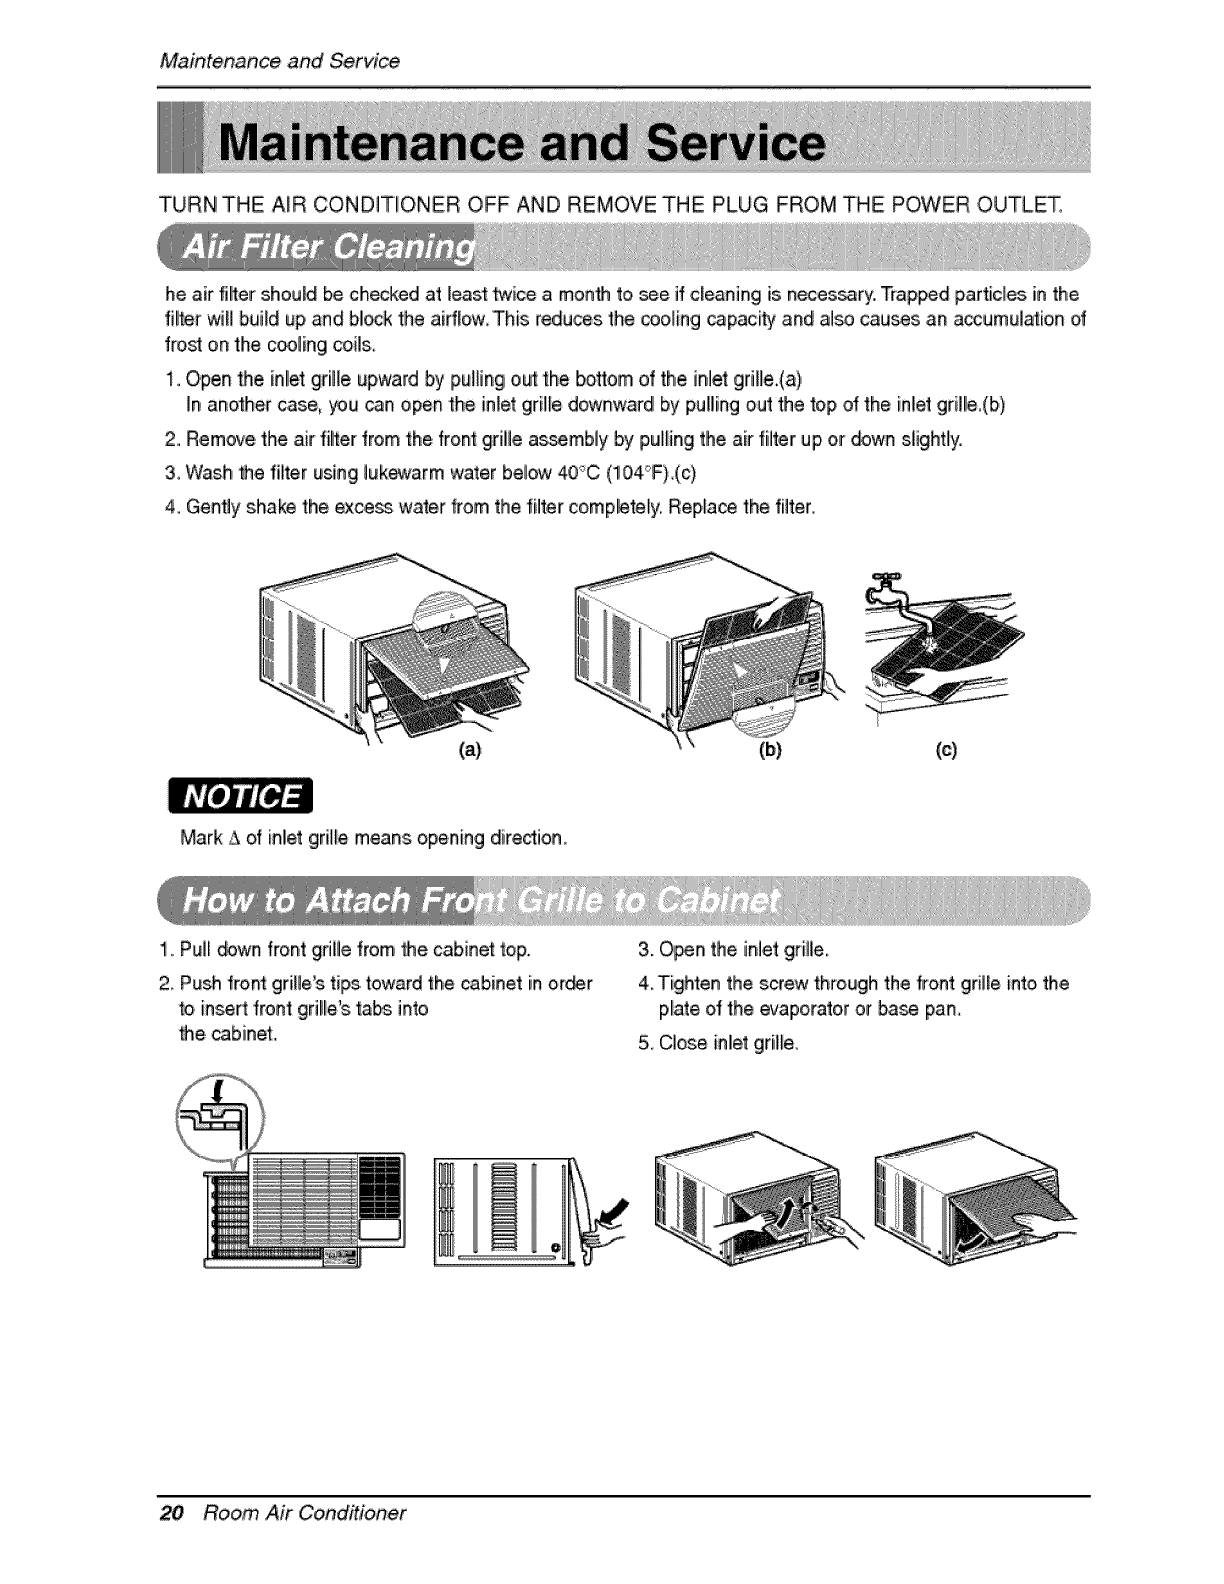
he air filltershould be choked! at least Mice a menh toi see if cleaning is n_es_ry,, Trapped particles in the
filter will build up and block the airflow, This reduces the _oling _paci_ and also cauls an accumulation of
ffo,_ on the c_ling coils.
1,,Open the inlet grille upward by pulling out the bottom of the inlet grille.(a)
In another c,ase_you _n open the inUet,gri_edownward by pulling out the top of the inlet grill!e,(b)
2,.Remove,the air filter #om the, front grille assembly by pulling the air filter upior down slightly.
3, Wash he filter using lukewarm wmer below 40°C (10,4°F),(c)
4, Gent_'yshake the exce_ water kom the filter comp_tely. RelPla_ the filter,
(a) (b) (c)
Mark i_ o_inlet grille means opening diredion_
1,,Pull down front gdile from he cabinet top.
2 Push front grille's,tips, toward the cabinet in ordor
toi inert 'front grilWs ta_, into
_hecabinet,,
3. O_n the inlet grille.
4 Tighten the screw through the kont grille into the
plate ot the evaporator or baH, pan.
5,,Close inlet gri_{e,
20 Ro,_m, Air Conditioner
MaintenanceandService
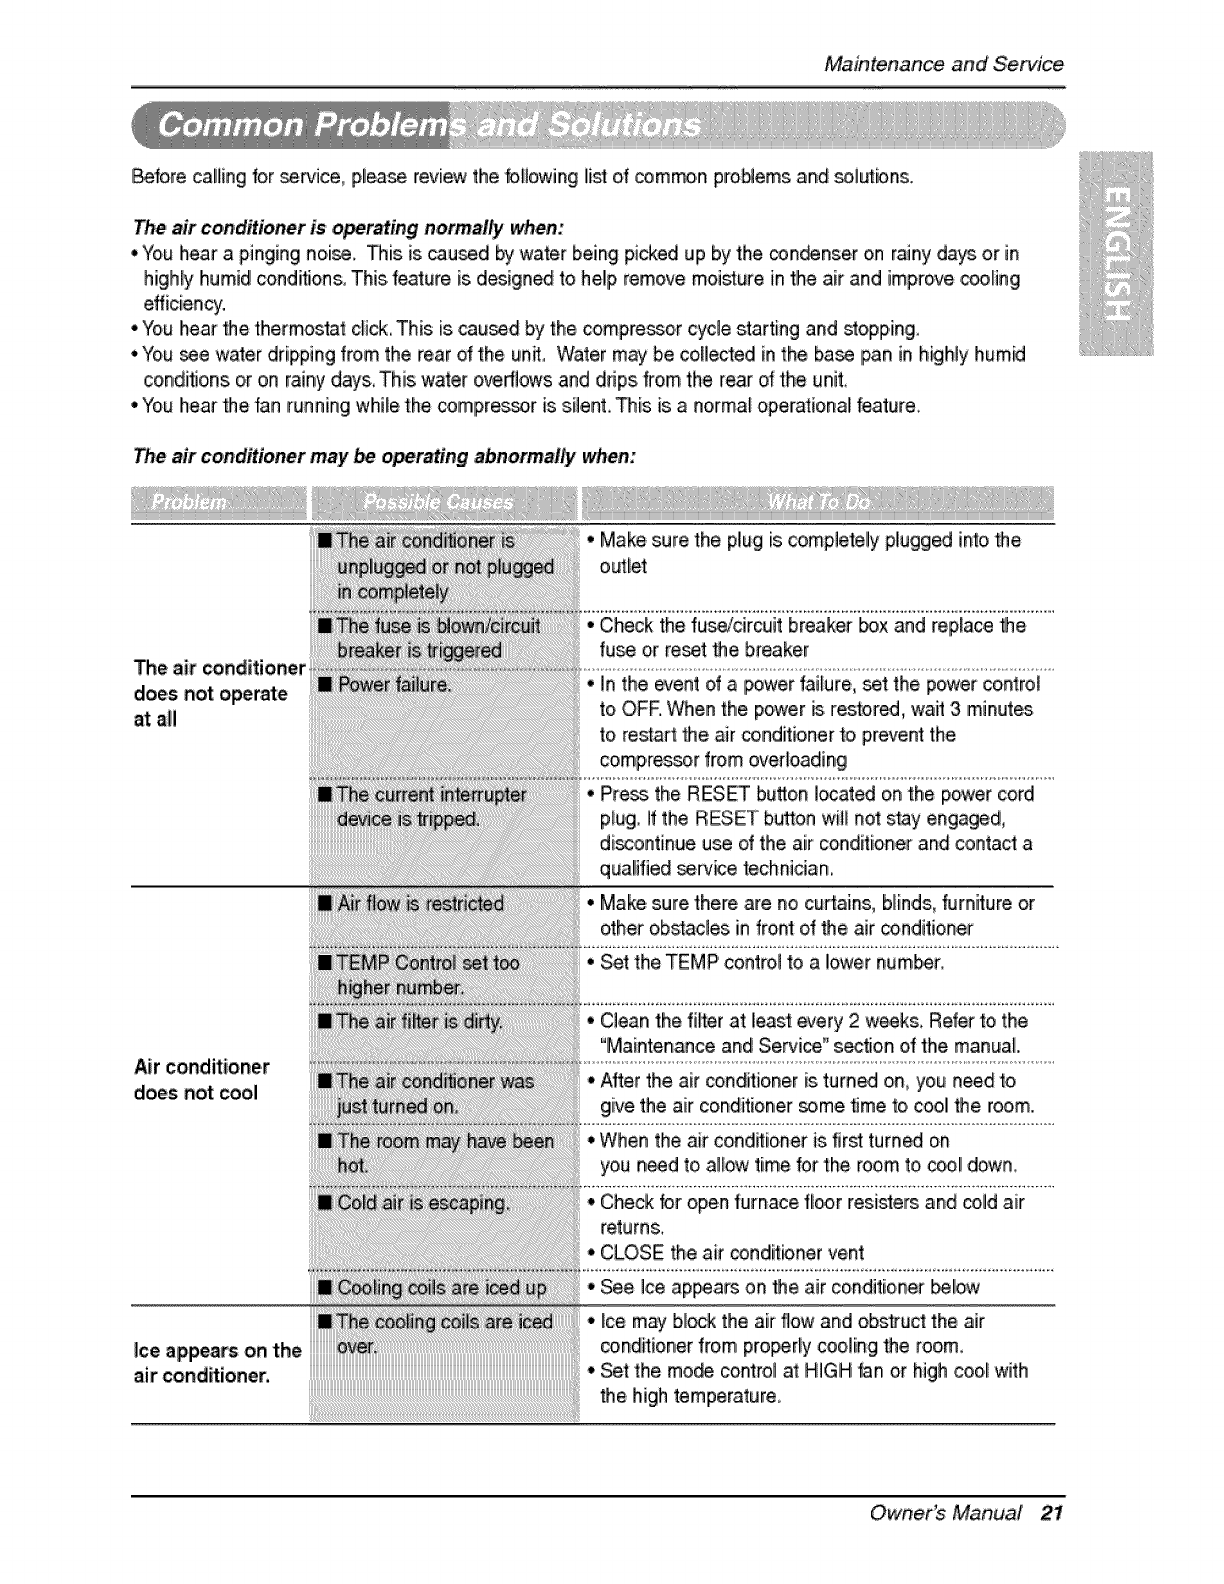
Before calling for _ice, ple_3sereview the bHowing li_ of _mmo.n proNems and _.h,_bns.
The air conditioner is operating normally when,:
*You hear a pinging noise. _is is cau_d by water being picked up by the con_nser ,on rainy days or in
highly humid conditions. This,feature is designed to help remove moisture in the air and improve cooling
efficiency.
.,You hear the thermostat c_ick.This is cau_d by the, compressor cycle starting and stopping.
°You _e water dripping from the rear of the unit, Water mw be cohered in the ba_ pan in h_Ny hum_
conditions, o,r,on rainy d_s, This 'wateroverflc_wsand drips from the rear of the unit,
.You hear _e fan running while the compre_or is silent This is a norma_ operationall feature.
T_ air co,nd#ioner may _ oper_ng abnormally when,:
• Make sure the plug is completelly plugg_ into _e
o_let
The air conditioner
does not operate
at all
Air conditioner
does not cool
Check the fuse/circuit breaker _x and replace the
fu_ or reset _e breaker
•In the event of a power failure, set the power contro_
to OFE When the power is,restored, wait 3 minutes
to restart _e air conditioner _oprevent the
oomp,r_sor from over!oading
• Press the RESET button located on the power cord
p_ug.if the RESET huron wiJ{not stay engaged,
di_.ontinue u_ of the air conditioner and contact a
qualified _e technidan.
• Make sure there are no curtains, blinds, Nmiture or
o_herobstacles in front of _e air conditioner
Set:the TEMP control to a lower number.
Clean the fiRer at least every 2 w_ks. Refer to the
"Maintenance and Servi_ _s_tio.n of the manual
•, After the air conditioner is turn_ o,n,you need to
give the air conditioner _me _me to,cool the room.
• When the air condffioner jsifirst turned on
you n_d to a_ow time for the room to c_! down.
returns,,
•CLOSE the air _nditioner vent
° See Ice appears on _e air conditioner _low
° _ce m,,_ybl_k the air flow and obst_u_ t:heair
conditioner from pro_r_y cooling the room,
°,Set the mo_ control at HiGH fan or high cool with
'the high temperature
Owner_ Manual 21
PARA SUS ARCHIVOS
Escfiba aqui ell mode_o y n_mero de serie:
Mod,e|o n°:
Serie n_:
Pu_ encon_ar est_ datos en _a etique_a situada en e_
Atera] de ca_ un[dado
Niombre del dist_buidor:
Fecha _compra:
[] Adjunte su recibo a es_ p_gina con _agrapado_-a p_ra
e_ momento q!ue ]o n_ifte para p,ro_r ]a fec_ de su
adquisici6n o para la vaJ[dacidn d,e A garantia.
LEA ESTE MANUAL
En su interior encont_a_A muchos conseios _tJl_ sobre la
u_lizaci6n y mantenimiento de su a_ndicbnador de aire,.
U_3s F)_s ouidados Fx)r su _de lie pu_e# ahorra[
mucho tiempo y dir_eto dgran'_e la, v[da de su
acondicion,ador de aJre,
En _a tab_a de consejos para Ila soliuci6n rApiida de
p[_m,a,s enco,nl[ra[A muchas r_piu_las a k_ p[o,bliemas
mAs habit_aies, Si #evisa pHmero r_gestra Tabla de
Consejos _ra la sol_Jci6r_rApk:_a de problemas, ta] vez no
neces_te Hamar nunca a] _rvicio t_ni_,
22 Aire Acondicionador
PrecaucionesdeSeguridad
Pare m,itar les.iones al usuario o, a ot_as personas y dafios, a la p,_opi_ad, est_s instrucciones
est6n _gukse
II Una operaci6n incorrecta _r ignora[ las in_rucciones p,r_ara i,esbnes o dash. La seri_ad se c_asifica
_r Iiassi,guient_ indiicacion_.,
Este stm_° indi_ I!aP°s[bilidad _ mue_e °' de _da !_i61" 7
,Pfaa_d C_d eUlC,_O 1Nbo_ilt_ tilti_a_ I°sin_ic_sll I°m2_U°_,bi_idadde I_iOnes O _' a la prOp'ie_d J
[ ® ................................................................,0 ...................................................................1
QSiga estas ilnstrucciones,. ]
iiiJiiiiiiiiiiiiiiiiiiiiiiiiiiiiiiiiiiiiiiiiiiiiiiiiiiiiiiiiiiiiiiiiiiii_Ji_:
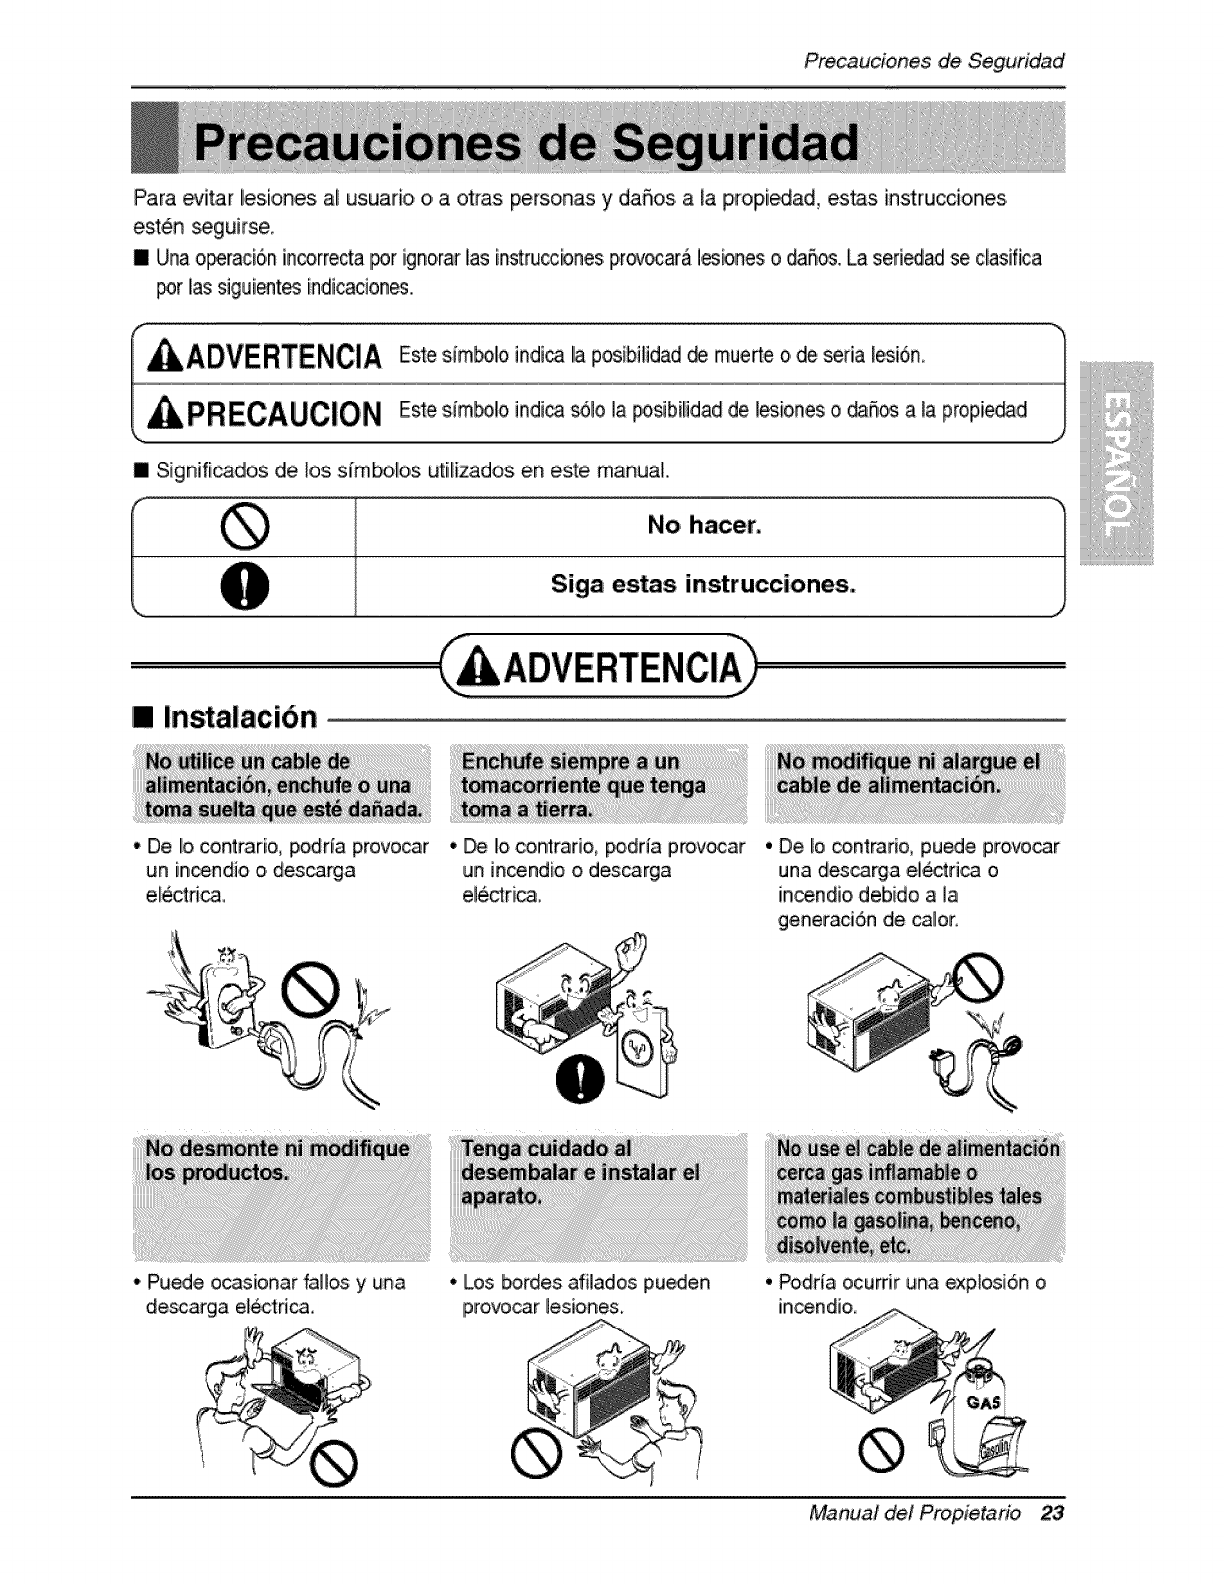
[] Instalacibn
• De Io conlt_ar'io,podda provocar
un in_ndio o descarga
electri_
• _ Io conirari,o, _,dria provocar
un incendio o descarga
• De Io _ntrario, puede provo_r
una des_rga el_ri_ o
in_ndio debido a la
generaci6n de ca_oro
•Pu_e ocasionar _Hos y una
de_arga el_ctdca,
• Los b,ordes afilados pu,_en
provo_r lesiones,
•Podria ocurrir una exp!osi6n o
incendio,
Manual del Propietario 23
Precaucionesde,Seguridad
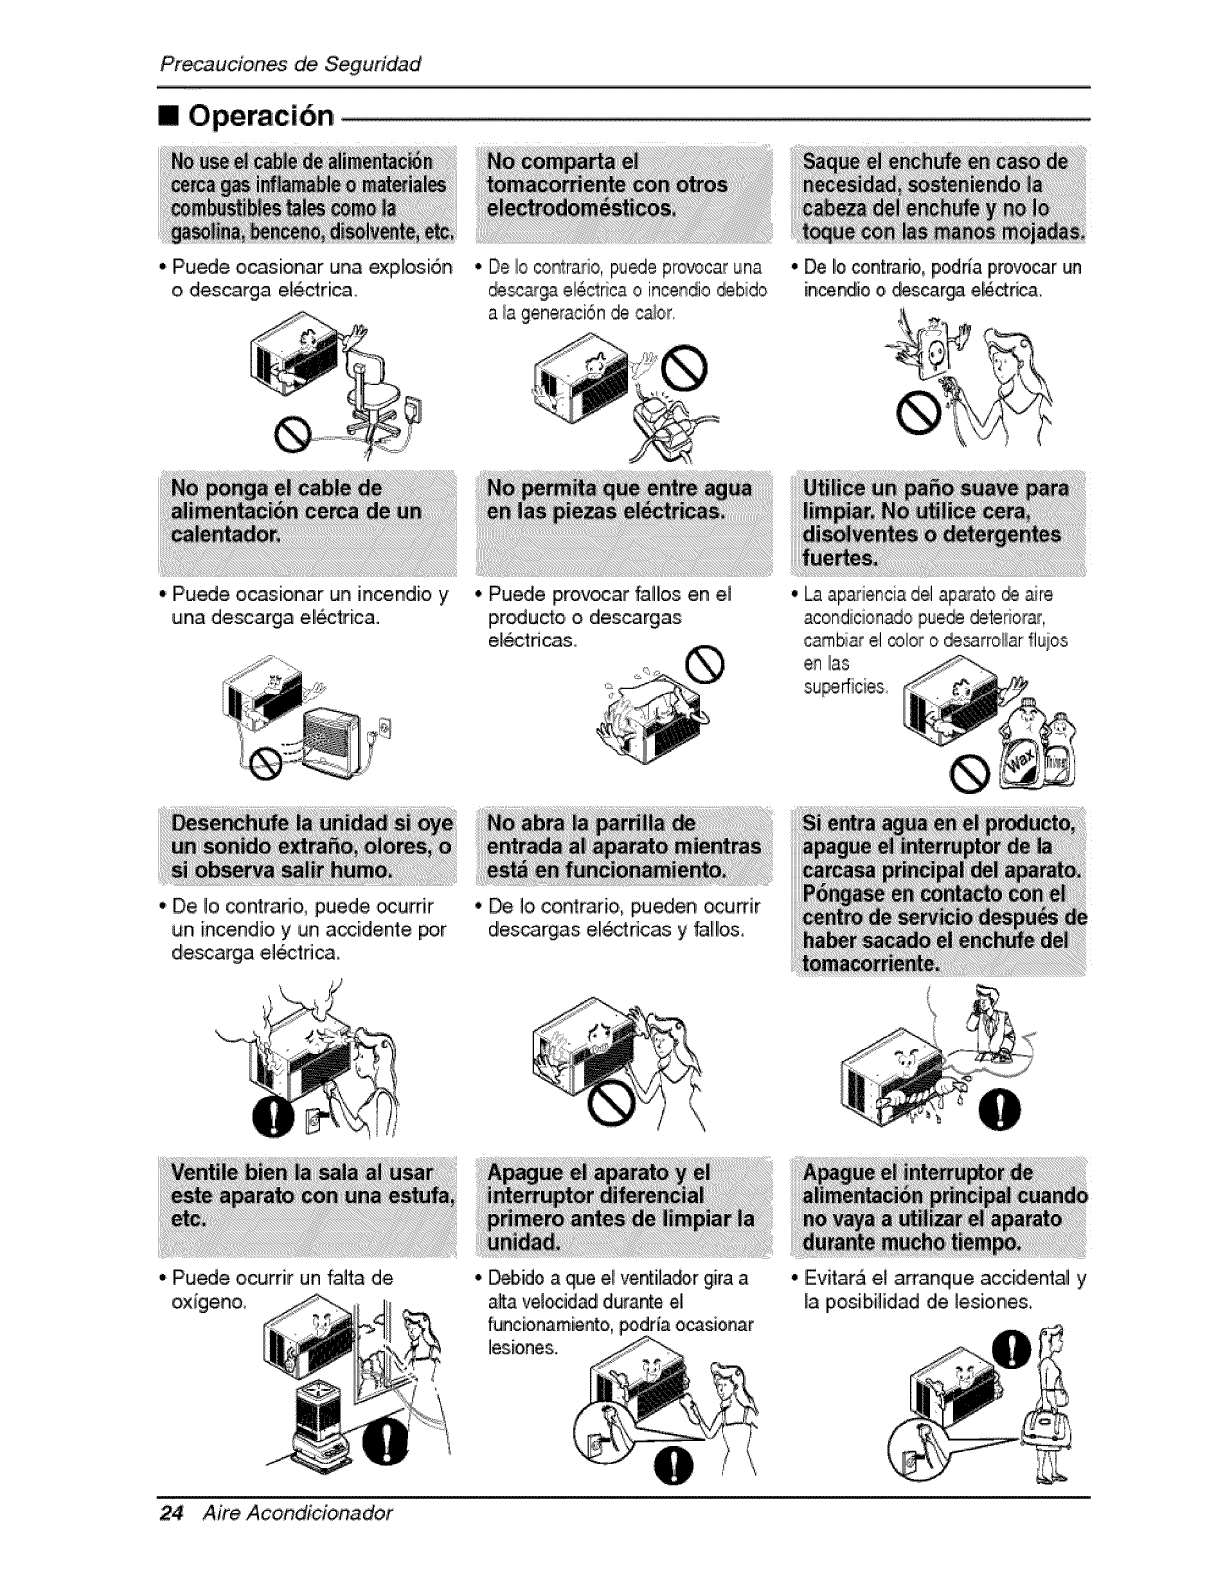
[] O,peracibn
* Pu_e ocasionar una explosi6n
o descarga e_ectdc& • De lo co_rado pu_e provocaruna
_c&,_ el_ctdca o in_ndio _bido
a la generaci6nde cabr
• Puede ,ocasionar un incendie y
una descia_a electrica.
• De Io contrado, puede _urdr
• Puede provocar fallios en el
producto o descargas
el_tricas,
• De io contrarb,, podria provocar un
incendio o descarga ele_r_a.
• Laapa_ienciadel ap_3to _ _re
acondicionadopue_ detedors,,
carnbiarel _lor o _,_rroiiar fluios
ea !as
un incendio y un a_idente _r
• Pu_e ocurrir un falta de
oxlgeno
• De Io co.ratio, pueden ocu_ir
descargas e!6_dcas y _ll!os0
•_ido a que el ventila_r gira a
alta velocidad dum_e eli
furncionamiento,_drla ocasionar
lesiones.
24 Aire Acondicionador
• Evitara el arranque accidental y
la posibilidad de lesiones
Precauciones de Seguridad
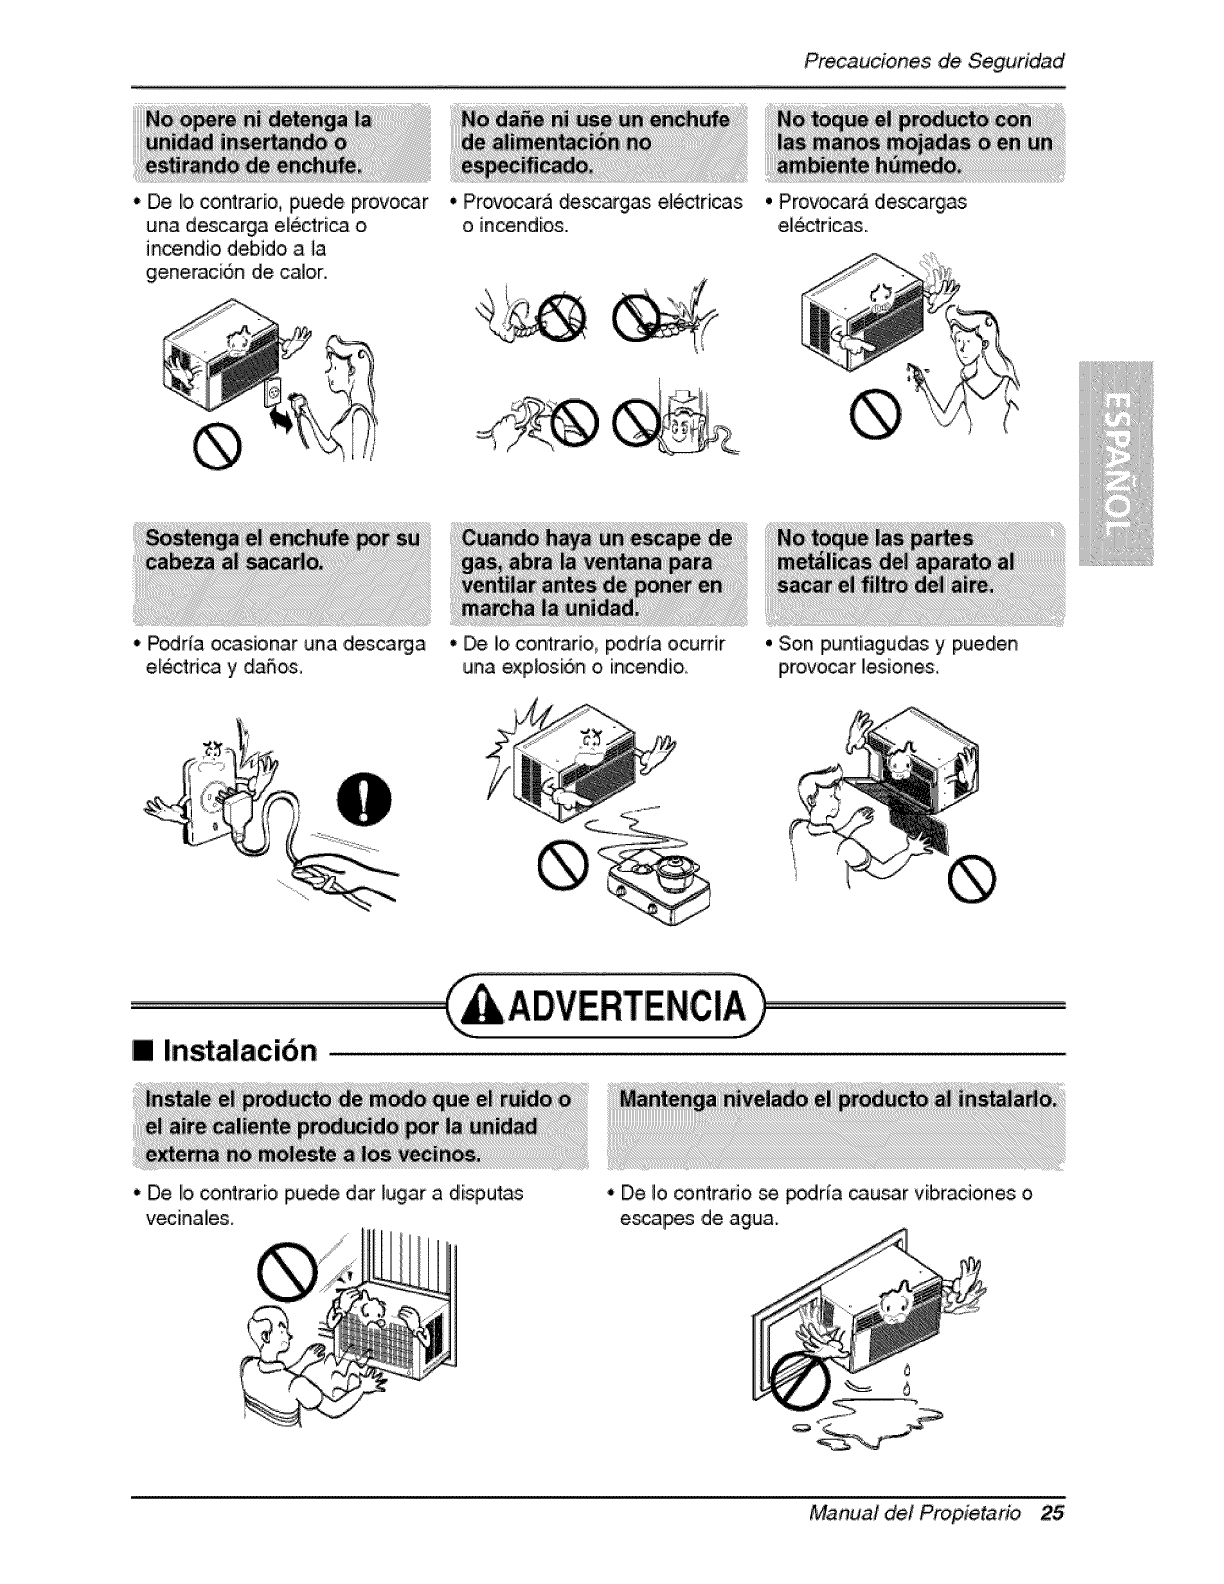
• De Io contrario, £uede provocar
una descarga efectrica o
incendio, debido a ]a
generaci6n de ca]or.
• P_r[a ocasionar una ,descarga
e_ectri_ y daSos,
• Provocara de_argas e]6ctricas
o incendios..
"_ _0 i COmr_r_O, _dr{a ocu_ir
una exp_osi6n o incendio,
•Provocar& descargas
el_ficas.,
• Son punti,agudas y pueden
provocar lesiones
[] Instalacion
o De Io cont_ario pu_e dar Irugar a disputas
vecinalies. i• De Io contrado se _rla cau_r vibr.aciones o
escapes ,de agua.
Manual del Propietario 25
PrecaucionesdeSeguridad
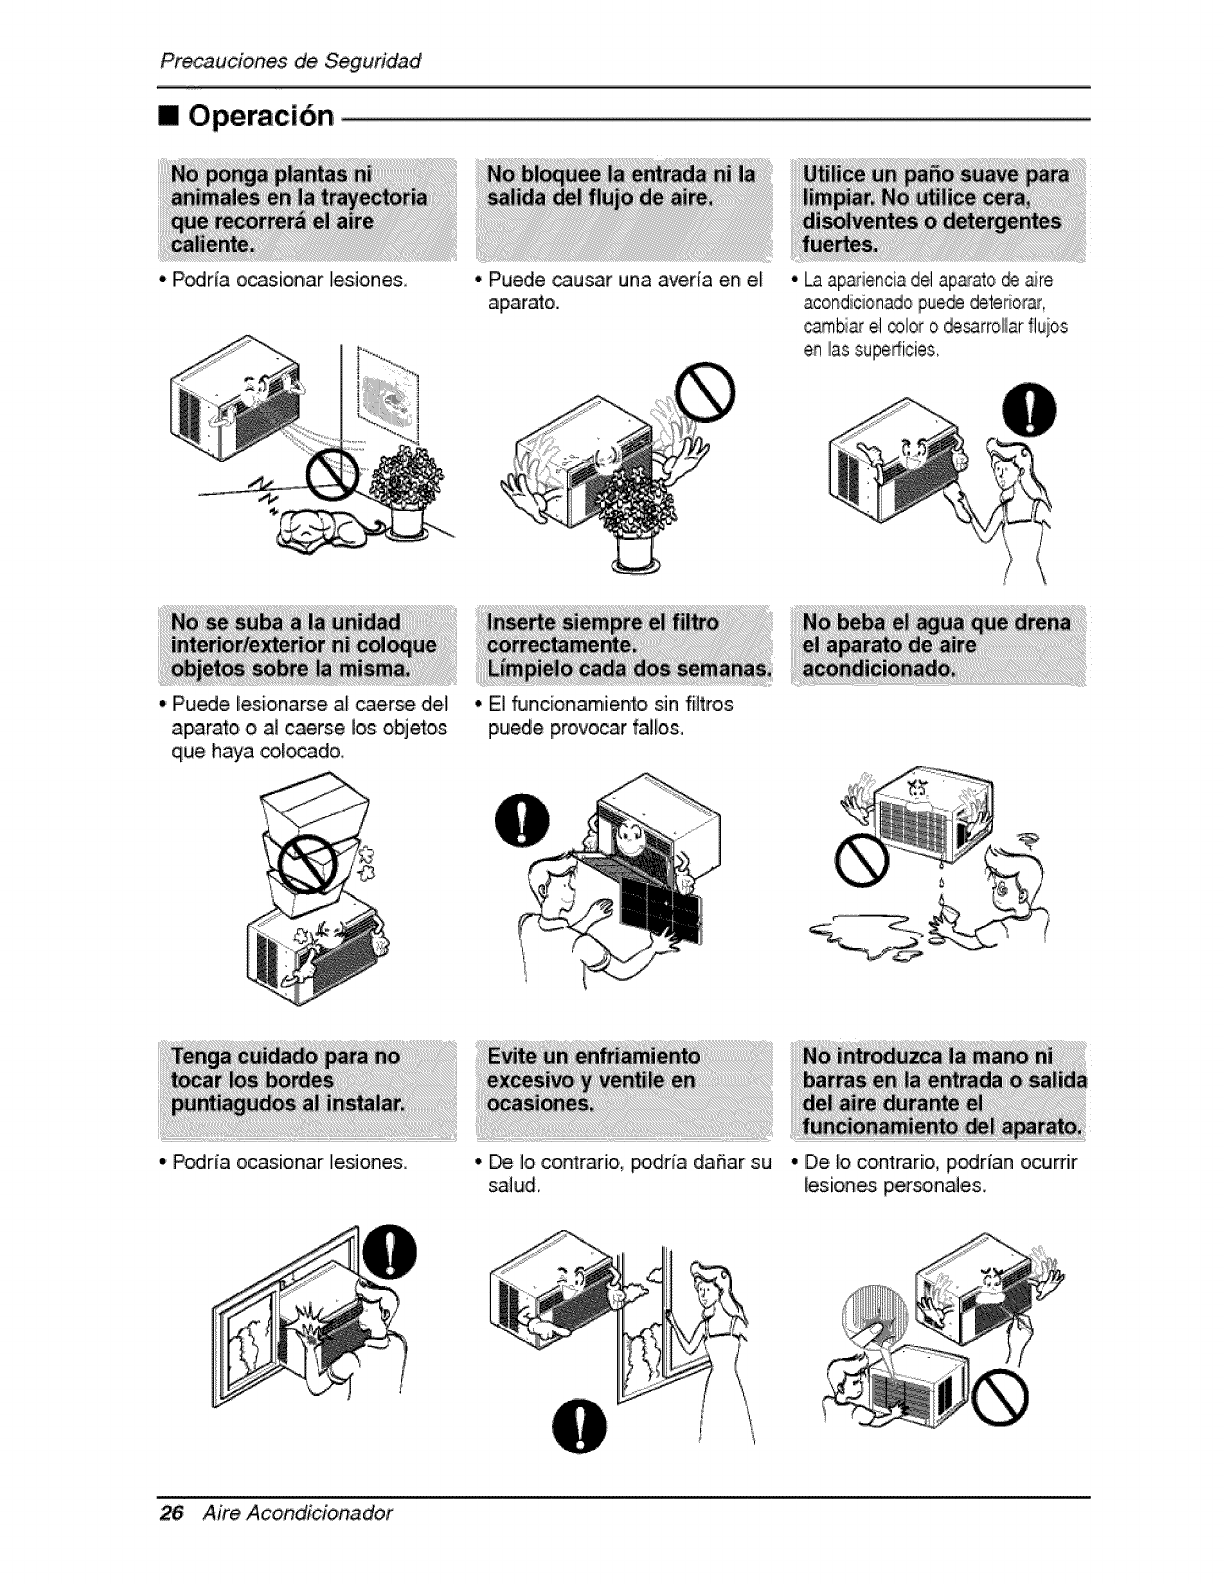
[] O,peracibn
=P_da ocasionar les:io,nes. •Puede _usar una averfa en el
aparato.
• Laaparienciadel aparao _ aire
acondicionadopue_ deterior_r,
cambiarel _lor o _rrol/ar fluios
en las supedicies,
i" Puede lesionarse al _erse del
aparalo oal ,caerse los obje_os
que haya col_do.
• Podda ocasionar lesienes.
•El _ncionamienl_o sin filtrois
puede provocar falto&
•_ Jo contrado0 _dria da_ar su
sa_ud.
26 Aire Acondicionador
•De _ocont_rio,, Ip_rian ocumr
lesiones p,ersonales,
Antes de poner el equipo en funcionamiento
1. Pongase en contacto con un especialis_ para realizar la instalaci6n.
2. Enchufe correctamente la toma de alimentaci6n.
3., Utilice un cirouito dedicado.
4. No utilice un _ble aiargado, r.
5.,No inicie/cese el funcionamiento enchufando!desenchufando el cable
el6ctrico.
6. Si el _bileienchufe esta daRado, sustiitQyalo solo _r una pieza autorizadia,,,
1. Estando expuesto a la circulaci6n dir_ta de aire dumnte un extenso perl_o
de tiernpo _drla resu!tar peligroso pare su salud. No exponga alas personas,
anirnales dorn6sticos, o a las plantas a la circulaci6n de aire dumnte largos
periodos de tiempo.
2. Debido a la probabilidad de fain de oxigeno, ventile el cuarto cuando est_
utilizado el aparato junto con estufas u otros apamt_ de ,calefa,_i6n.
3. No utilice este aire acondicionado con prop6sitos esp_iales no especificados
(Ej.: conservaci6n de dispositivos de pr_isi6n, comida, animales dom6sticos,
plantas y objetos de arte). Tal uso p_rfa daSar los articulos.
1. No toque las pi,ezas met_li,cas de la unidadi al retimr el fiitro Manejar aristas
afiladas de metal puede causar lesiones.
2. No utiiice el agua para limpiar el interior dell aire acondici,onado. La exposici6n
al agua pu_e destruir el aislarniento, _nduciendo a _sibles descargas
el_tricas.
3. Ai limpiar la unidad, aseig_rese antes de que ila eil_tricidad y el interruptor
est,_n apagados. Ell ventilador rota a rnuy alta velocidad diurante ell
funcionarniento del equipo. Existe la posibilidad de lesiones si acciona
accidentalrnente ia el_tricidad de I!a unidad rnientms lirnpia el interior de la
Para cuestiones de reparaci6n y mantenirniento, _ngase en contacto con s:u
distribuidor de servicio, autorizado.
Manual de/Propietario 27
lntroducci6n
"1
Este slm_lo Io advie_e de un I_ligm, de accidente po,r
corriente el,_ctrica,
Este sim_olo !o adiverte de un peligro que pu_a causar un
daho, del ventliador.
Es,te sim_lo significa condi_iones es,peciales.
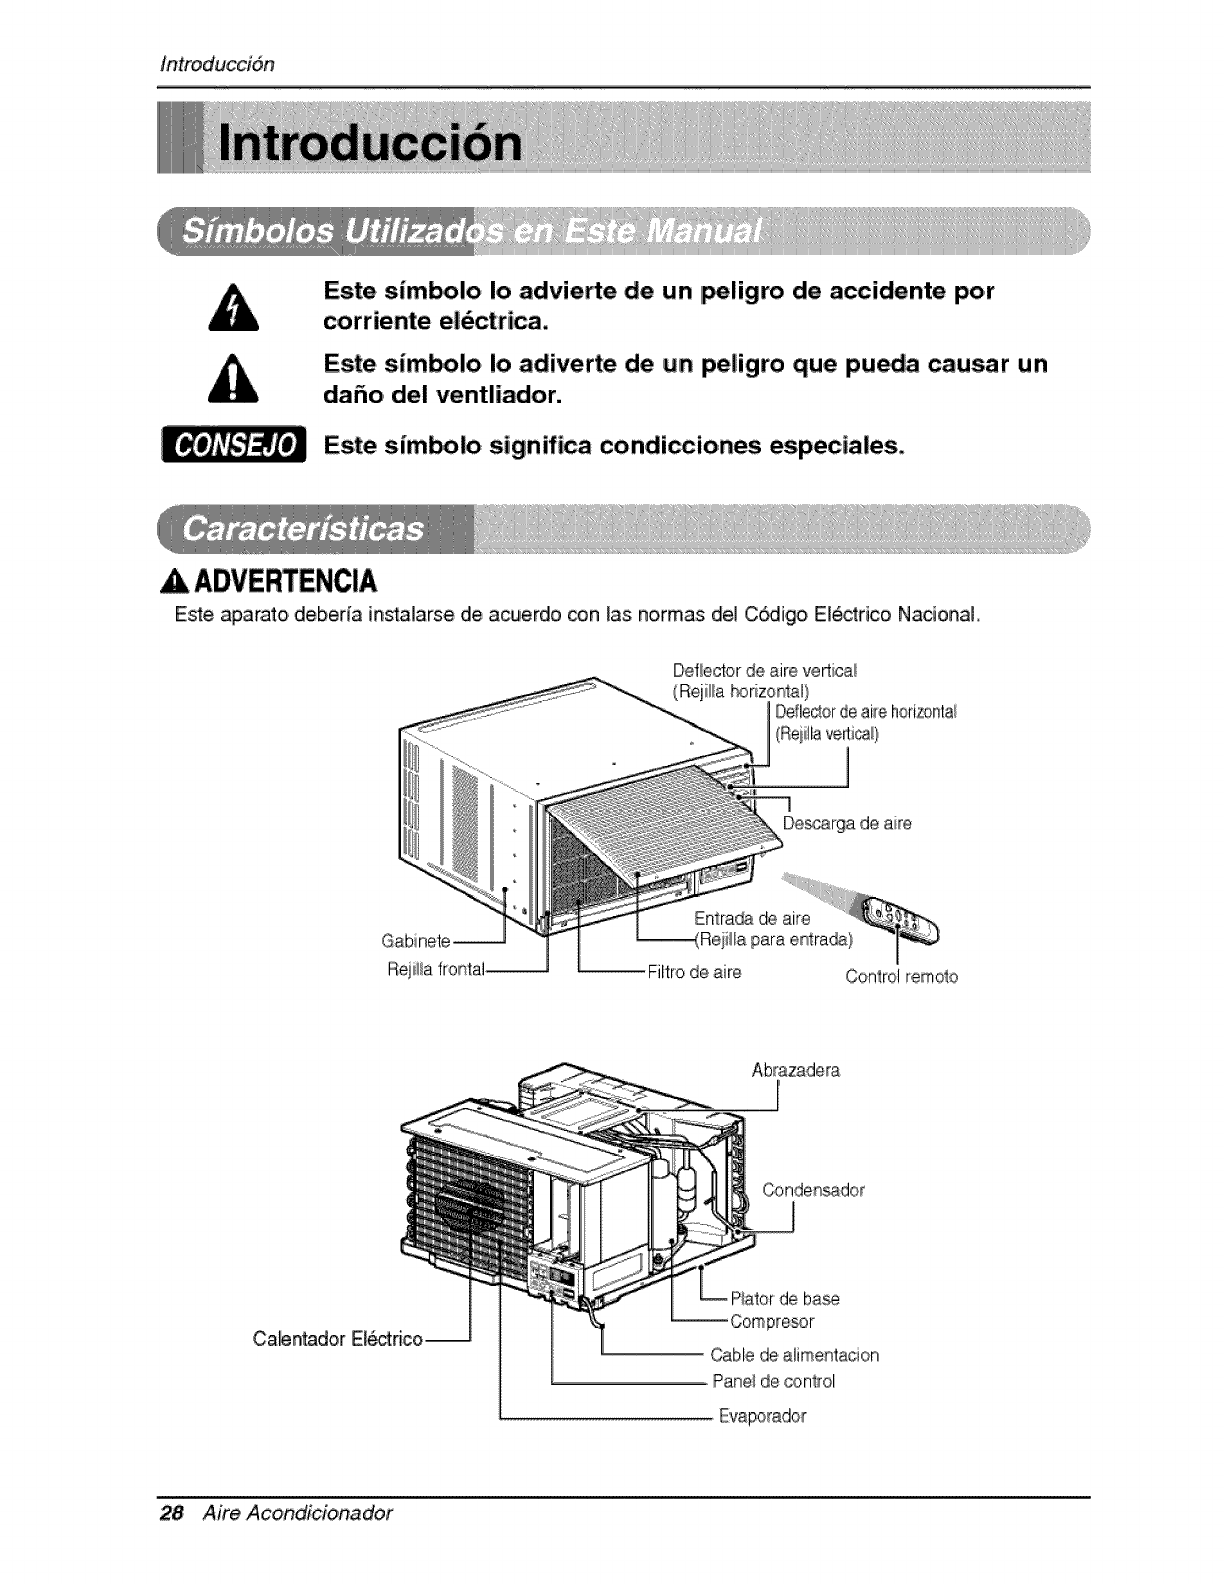
Este aparato debefia instai,arse de acuerdo con _as normas de] C_igo El_ctfico Naciona]
Deflector de sire vertical
(RojiHa _rizonIsl}
Defleclorde ,aidehorizonta_
1
De_carga de sire
Gabinete
Filtro de sire Control remo!o
Abrazadera
Ca_n_dor
ba2_
Cable de slime tacion
Pane_de cz,nlrol
28 Aim Acondicionador
SeguraidaElectrica
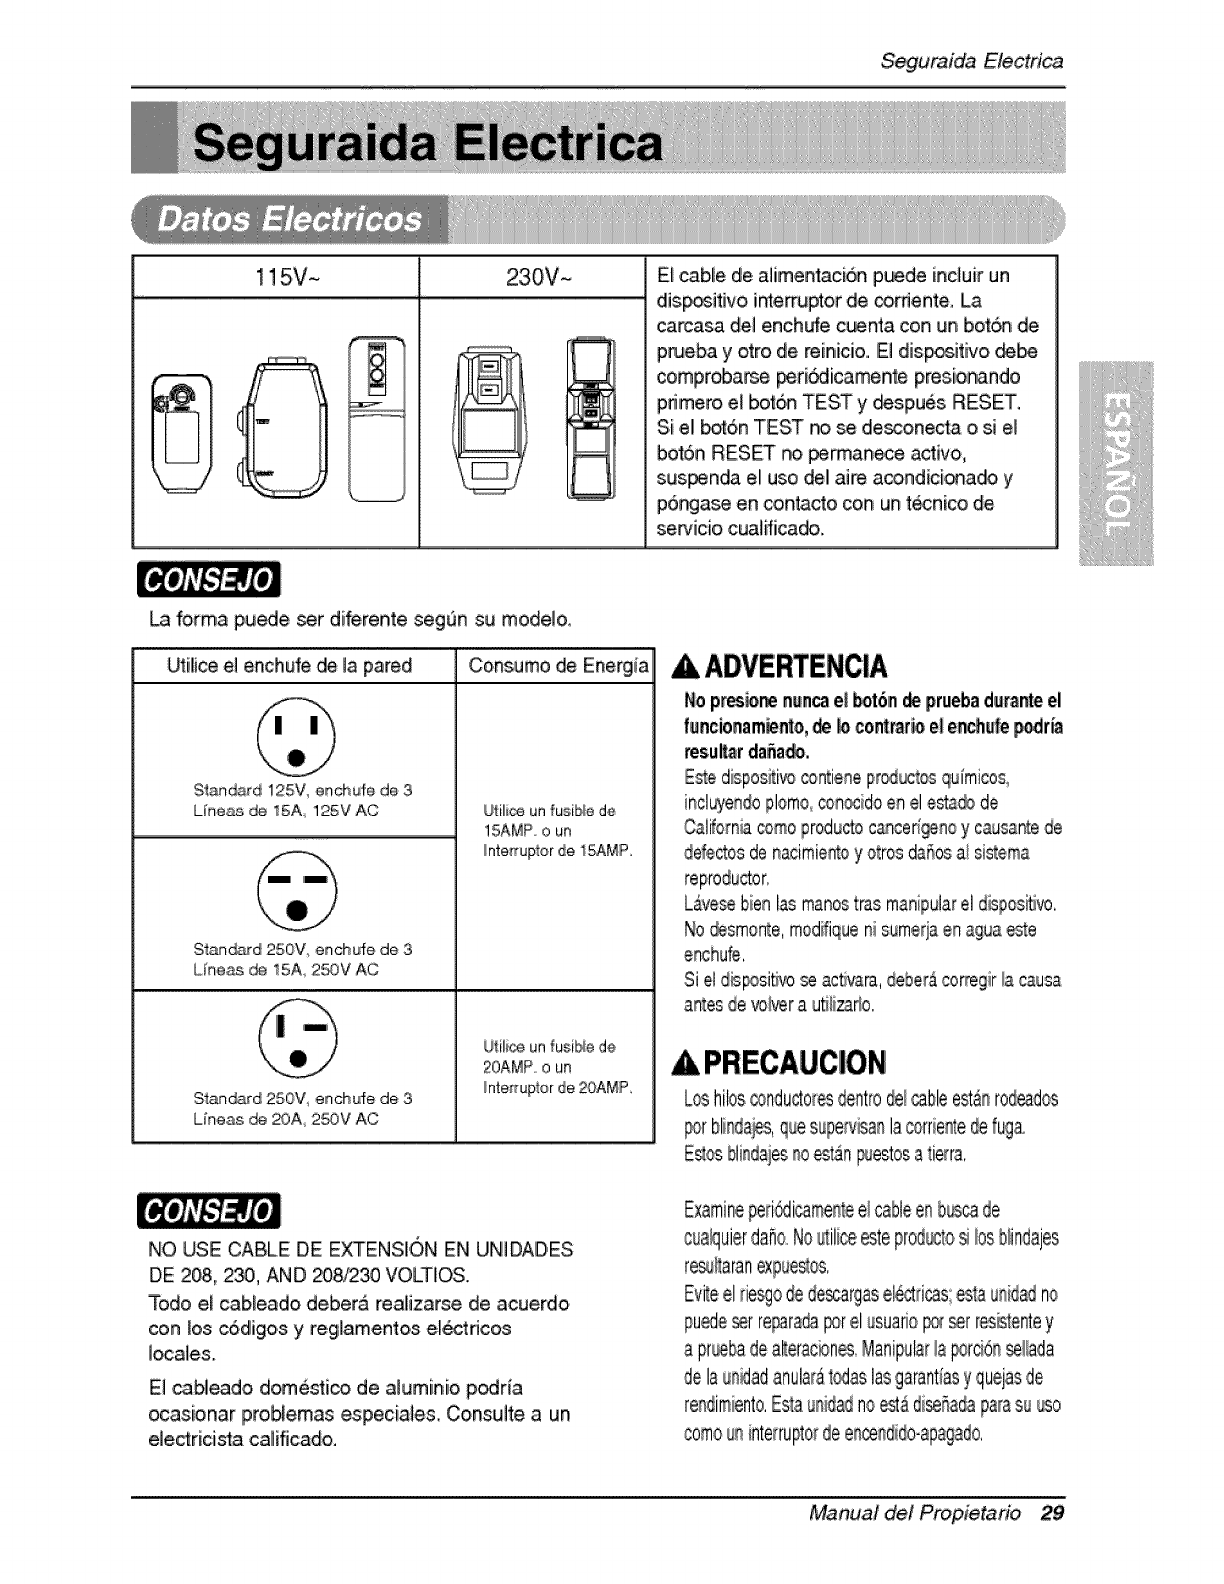
115V~ 230V~
%ii..J
E_cablie de alimenta,ci6n puede induir un
dis_itivo inte_uptor de _mente, La
carcasa del enchufe c_nta con un bot_ de
prueba y otro de reinicio.. El dispositivo _be
comprobame peri_icamen_ presionando
primero el bol._ TESZ y _spues RESET,
Si el! _6n TEST no se desconecta o si el
boron RESET _ _anece ac_ivo,
sus_nda e! uso del aire a_ndici_a_ y
p6ngase en c-on_o corn un t_nico de
ser,dcio cualificado.
La forma pu_e ser diferente seg_n su modelo,
_ilice e[ enchufe de la pared Consumo de Energiia
S1at_srd 125V, ench_fe de 3
Line as _ 15A, 125V AC
Stan_,d 250V enchL_fe de 3
Lt'neas de 15A 2_2©VAC
SIan_d 250V enchufe de 3
Line.as _ _3A 2_9V AC
U_.iiiceun _usiNe de
15Ai'_P o un
_nte_ruptor de 15AMP.
U_ili_ unfusiNe de
20AMP,o un
_nte_rup_orde 20AMP,
Nop_ nun_ el bot6n de pruebaduranteel
f_ncionam_nto,,_ _ co_r_r_ el en_ule _dr_
resuil_rda_a_o.
Estedispos_ivoco_iene pr_uctos quimicos
incluyendoplomo con_ido enel esta_ de
Cal_omacomo_roductoc&qced_no y causantede
d_e,ctosde nacimientoy otrosdaffosa! sistema
reproductor,
L&ve_ bienInsmanostras manipularel,d_p,ositivo,
No_sm,onte,m,0d_ifi,quenisumedaenagua_te
enchufe,
Si ,eldis_si_vo se acflvara,debe_aco_gir [a ,ca_sa
a_es de wirer a uS_izado.
L_shitos_ndu_ores dentrodel_ble est_ rod_d_
_r bli#da_, ques_#pe_v_anla®rrie_e de_uga
E_ bli_da}es_o_t_n Destosa tie_ra,
NO USE CABLE DE EXTENSION IENUIN!IDADES
DE 2_, 2_, AND 208/230 VOLTilOS.
Todo el cableado deber,_ realiizarse de acuerdo
con los e6digos y #e,glamentos e_dcos
[_ales.
E__bleado domestico de a_uminio podria
ocasionar problemas especia_es, Consulte a un
eledrici_a calificado.
Examineged6dicame_ee!cablee_b_ca de
cua_uierd,a_oNoutiiiceesteprod_to silos blindajes
re_aP_ranexpue_os,
Eviteelde_o dede_rgas el_"tdcas;estau_idadno
pu_e _r re_ra_ potel esuario_ _r r_tente y
a pr_ dealteracbn_,Manipular!a _rci6_ _!l_da
de lau_ad anula_t0daslasga_antiasy quejasde
re_dimiento.Es_au_idadno_a di_Sadapatasu _o
comou_interrupto_deen_dido-apagado,
Manual del Prop ietario 29
SeguraidaElectrica
ii i i i _i
(FAVORLEA CON ATENCION)
POR _SEGUR_D_ PERSOiNA_ _EL _SUAR_O, _ST_
APARATODEBESERDEB[DAMENTENEUTRALIZADO.
NO CORTE0REM'UEVALA TERCERAPATA(GRO,UND)
OELENCHUFE,
A. SITUAC_iO'NESEN LAS CUALES EL APARATO
ES DESCONECTADO OCASIONALMENTE:
El cord6n de energia _ _ste aparato, esta equipado
con tr_ pata_cab_e a tierra). _ili_ este con un
enchufe de pared _ _es _li_s(a tie.a) para
minimi_r el peligro _ cheque el@trice. El diente
de_ revi_r e_receptor de pared y el circuffo per un
e_ectdci_a caHficado para a_gura_ quie lia
rece_i,6n esta _bidarnen'te neutrali_.
Debi_ allpeligro _tenciaL nosotros no
recomendamos e_u:_ de adap'_adoires.Sin embargoi,
si usted desea atitizar un adaptador, una CONEXl6N
TEMPORAL, puede _r
efectuada_ Utilice adap_adores UL di_,onib_es en la
mayoria de los estab.le cimientos
herramientas, _ pa_ mas grande del adaptador
_be ser a_ineada con la pata mas grande del
inte_uptor _ra as_urar_ ana polarizaci,Sn
adecuadia.
Adaptar la terminal del ground del adaptador a
la cubierta de la _red con un
tornillo no neutraliza el aparato a _nos que la
cubie_ del _rnillo, sea de me_l, u no sea
in_lada, ye__eptor de pa_ este
n.eu_li_do a tray,s del alambrado d.e_la casa.
El c|iente _ebe hater verifica_ el circuito per un
e_ectricista calificado para a_gurarse que e_
receptor est_ debidame_te neutr_li_do.
_COi_ el cor_n de e_rg{a _1 adaptador;
utjliza_ una mane en cada uno. De Io colnt_arb,la
termina_del a_tador pue_ rom_me. NO,UTILICE el
apa_to con u_ er_hufe rote,
B. S_TUAC]IONESEN LAS CUALES EL AIPARATO
ES DESCONECTADO CON
No _i_i_ an adaptador en estas circunslancias.
De_onectar e,Ic_rd6nJde energia con ffecuencia to
Illeva[,_al eventual rompimiento, de _aterminal _
neutralizaci6n. La _uda de energia _ la pared
_be set reemplazada per _na sa_idade tres
patas(neurt_a_i_da),
use DE EXTENS{ONES
Debi_ alipeligro _te_ciaL no recome_damos ia
uti_izaci6n _ extensione& Sin embark, si _sted
_sea utilii_ una extensiSn, utilice una
ce_ifica_ per CSNUL de tres a_ambres,
catabgada 15A, 125V.
30 Aim Acondicionador
Ins_lacion
BARDA
FOAM .......................
AIR CALOR
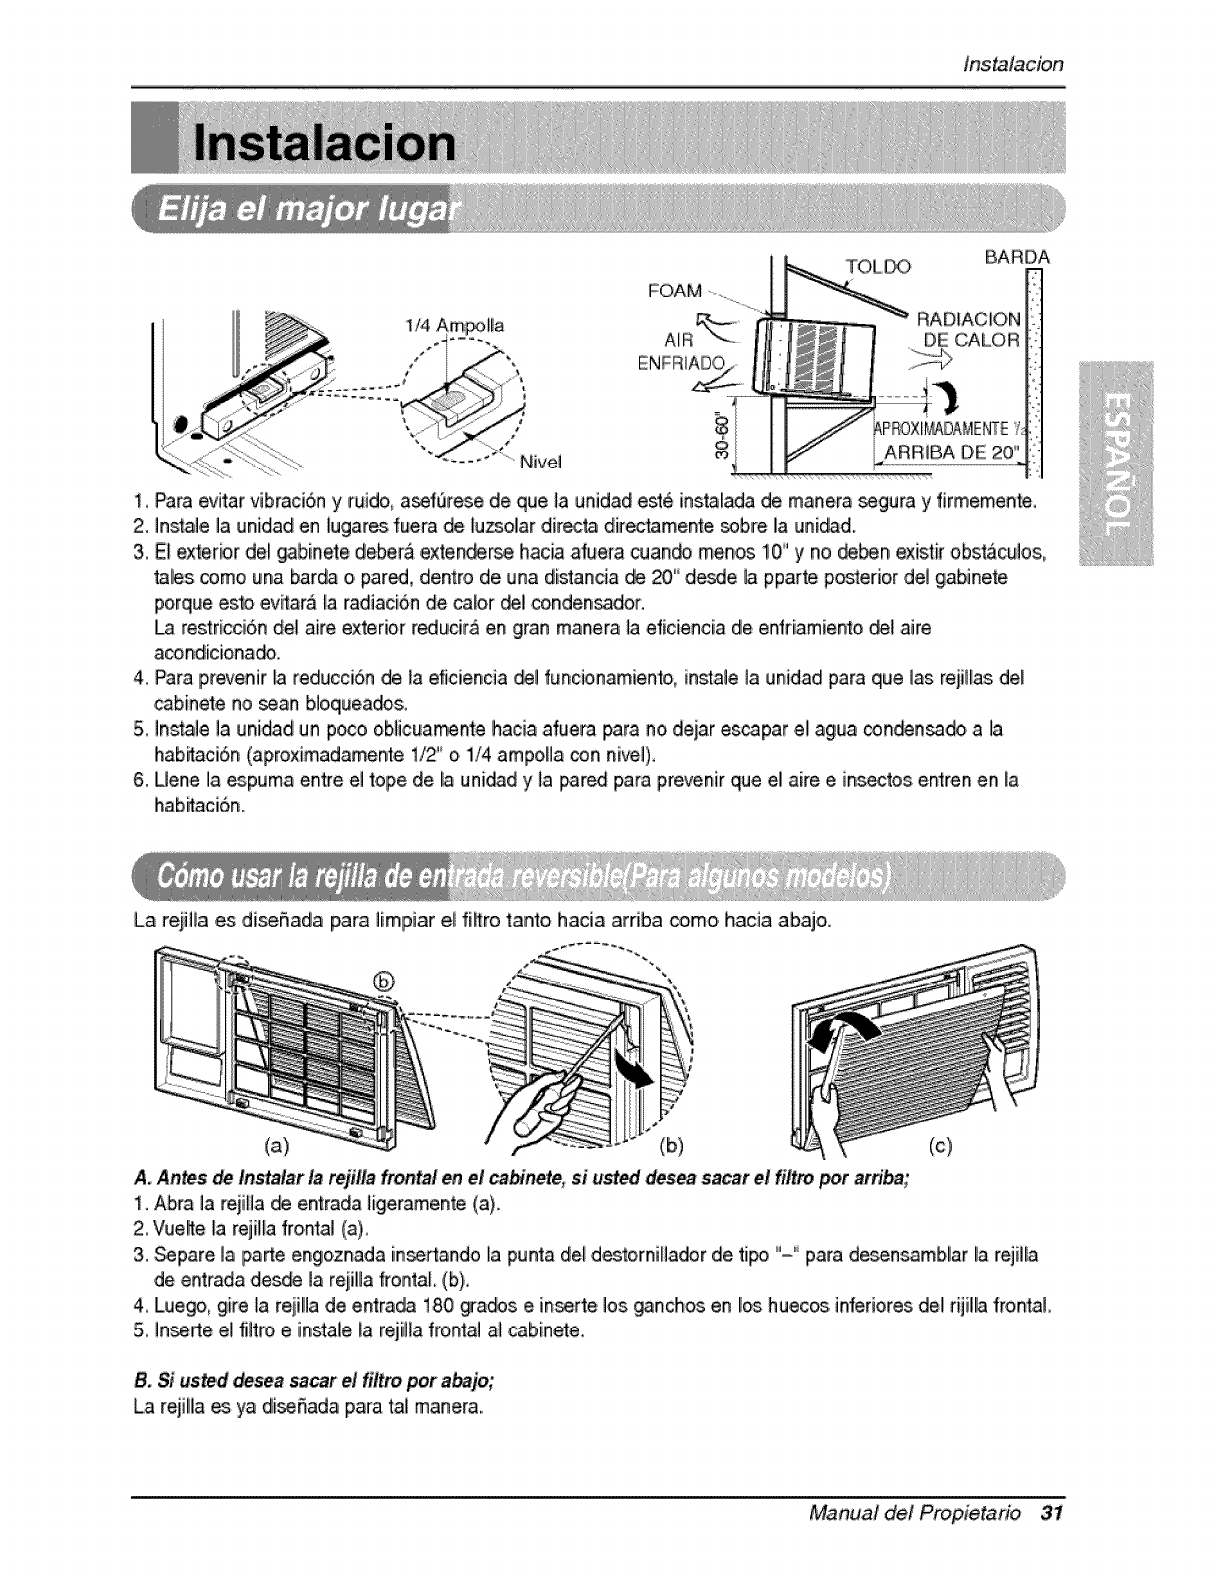
!, Pare evitar vibmci6n y ruido_ase_Qrresede que la unidad est_ instalada de manem _gum y firmemente,
2. Insta]e ]a unidad en lugares fuera de lu_oliar dir_ta diredamente _bre Iia unidad,
3, EI exterbr del _binete debe,ra ,exSen_rse hacia afuera cuan_ menos 10°'y no _n existir ebs_cuies,
tales _m,o una barda o,par_, dientro de una distanda de 20" de_e la pparte posterior de_gabinete
porque eslo ev_ara la radiaci6n de caior _l condensador.
restricci6n de! aire exterior reducir_ en gran manera la eficiencia de enfriamiento _! aire
acondicionado.
4, Para prevenir _ reducci6n de la eficiencia _l funcionamiento, ins_ale I.aunidad para que Ins rejillas del
cabinete no _an b!oqiueado&
5, Ins'tale la unidad un poco oNicuamente hacia afuiera para no, deiar es_par el! agua con_n_do a la
habi_taci6n(aproximadamenle 1/2" o 1/4 ampoHa con nivel),
6. Uene la _purna entre el tope de la unidad y la pared para prevenir que el aire e insures entren en la
hab_aci6n.
La rejilla es diseSada piara limlpiar el fikro tanto hacia arriba come hacia abajo.
(a) (b) (c)
A,,Antes de Instala_ la rejilla frontal en el cabinete, si usted desea sacar el filtro_arfiba;
1. Abra la reiiHa _ en_rada ligeramente (a).
2, Vuelte la rejil_afrontal (a),,
3. _pare la [parte engoznada inserlando fa punta del desto,rniiladOr de ti_ '-'_ para desensamblar la rejilla
de entrada des_ la reiillla frontal (b),
4, Lue,go,gire la rejilla de entrada 180 _a_s e in_rte los _nchos en los huecos, inieriores de,I rijillla frontal
5.,in_rte el filtro e instale fa rejilla frontal a_cabinete_
B. $i used desea sacar el fittro _r abajo;
La reiilla _ ya diiseSada para tai manera,,
Manual de/Propietario 3i
tnstalacion
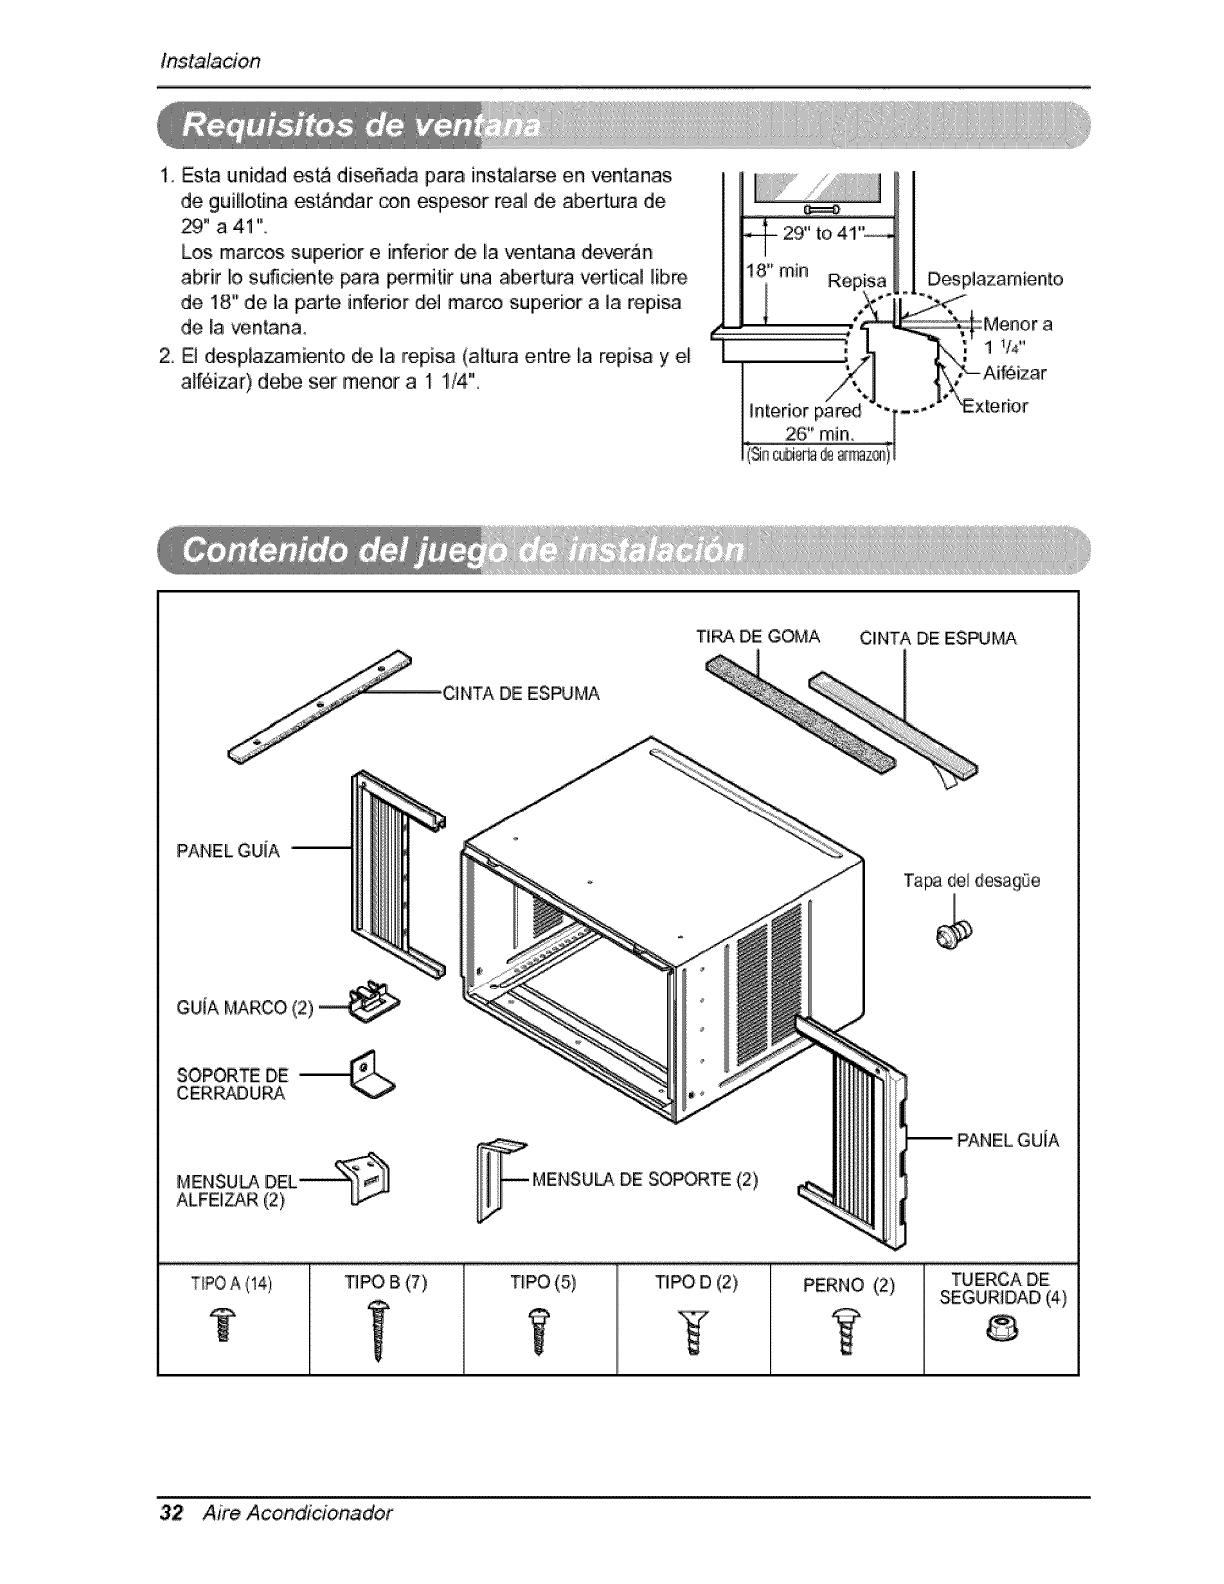
1, Esta uniidiad _t_ diiseffada para ins,ta[arse en ventanas
de guiHotina estandar con esp,_r real de abertura de
29," a 41'L
Los marc_ superior e inferior de [a ventana dever&n
ab,rir [o sufidente F_m permitir una abertura vertical [[bre
de, 18" de _aparte inferior de1marco superior ala repi_
de la _n_na_
2. El despi_azamiento de [la repi_ (a[tura entre _arepisa y e[
alf6i_r) debe s,er menor a 1 1/4"..
TiM DE GOMA CI!NTA DE ESPUMA
/,
TI:POA {14) Tl_ 8 (7) T[PO(5i:_ t_ D (2) PERNO (2) TUERCADiE
SEGURIDAD(4)
32 Aire Acond_cionador
lnstalacion
DESARMADOR (+. o). REG.. CUCHiiLLO. MA_LO. LAPIZ. NIVEL
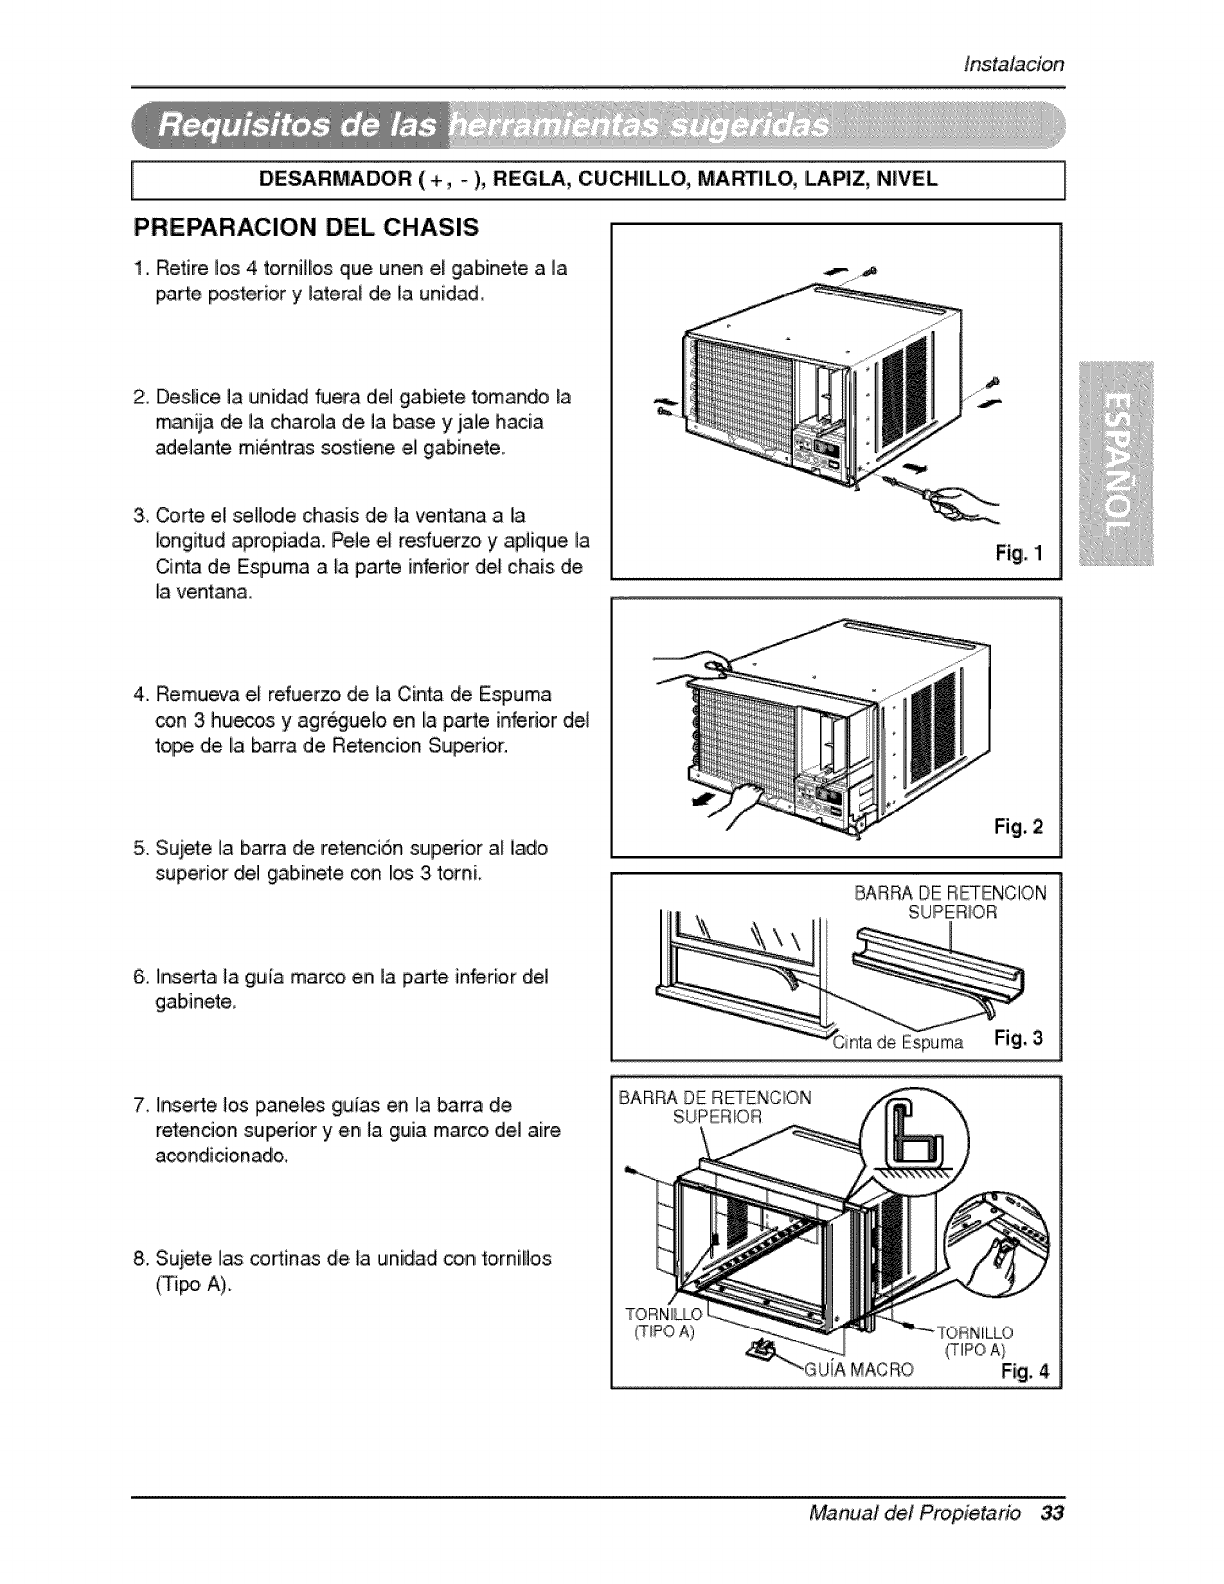
PREPARACION DEL CHASIS
1. Retire los 4 tomillos que unen el gabinete a la
parte posterior y iatemf de Uaunidaid_
2 Des_ice la runidad fuera del gabiete tomando la
manija de la charoila de la base y jiale hacia
adelante mientras sostiene ,el gabinete.
3, Corte el sell_e chasis de la vent:ana a la
iongitud apropiada., Pele,ef resfuerzo y aplique la
Cinta de Espuma ,a fa paMe inferior del chais de
la ventana.
l
Figi,1
4. Remu_a el refuerzo, de la Cinta de Espuma
con 3 hu,_os y agreguelo en la paMe inferior del
tope de la barra de Retencio,n Superior.
5. Sujete la barra de retenci6n supedor al lado
sup,erioir del galbinete con los 3 total,
Fig, 2
BARRADE R!_ENC!ON
SUPERIOR
6. InseMa la guia mar_ ein la p,a_e inferior del
g,abinete
de Espama Fig, 3
7, InseMe los paneles gulas en la barra de
ret:enci,o,n_sui_rior yen la guia marco del aire
acendicionado,
8. Sujete las cortinas de la unidad con tornililos
(_po A).
BARRADE RETENCION
SUPERIOR
TORNadO
(TIPO ,A)
MACRO
TORNiLLO
_IPO A)
Fig, 4
Manual del Prop,ietario 33

Instalacion
1, Abm la ventan& Marque una Ifne,a en e! centre
de la repisa de la venltana enltre las molduras de
tope de la ventana lateral
Coloque sin ap,retar la m_nsul!a del aff_izar en la
mensula d,e sopo_e _:ilizando el pemo y la
tuerca de s_utidad,
MENSUIADEL
ALFEI_R
BULON
D8 SOPORTE
SEGURiDA
Fig° 5
2, Coloque la mensula del alif_izar en el alf_iza,r de
la ventana ultilizando bs tomilbs (Tipo B),.Apriete
el pemo y la tuerca de seguridad_
Repisa de la venltan,a y alin_ la marca central en
e! frente de! rondo con la iinea ,cenltral marcada
en la repisa d!e la venltan&
ORIFICIODE
CARRILDE,GABINETE
DE SO_RTE
TORNILLOPARA
BOR_ E_ERIOR
DEIJ_VENTANA
©EL ALFEi_R
(TIPOB)
Fig° 6
3. UtiBzando el torniBo M y Ila tuerca de seguridad
col_ue la mensula de sopoNe en el orfficio de la
guia del gabinete Use el primer orificio de la guia
despues de la mensula del alfezar en el borde,
exterior del alfeizar de la ventana,
Aprieie e,I_rno y la tuerca de seguridad.
A_Qrese de que el gabinelte este inclinado
hacia afuera.
No !perfore la charola dei fort,do. _ unidad eslta
diseSad,a para o_rar con aproximadiamenlte 1/2"
de agua en la charola ,d,elfond&
1, No hale e! marco de la venltana hacia abajo tan
apretado q!u,ese restdnja el movimiento de Io,s
deslizado, res. Sujete el gabinete a Iiarepisa de
la ventana insstalandio Ilostornillos OiipoA o B)
a traves del gabinete en la repisa de la ventana.
2,,El gabiinete de_ra ser instaiado, ligeramente
incBnado hacia abajo hacia el exterior,
qEPISADEVENTANA
Fig, 7
MARCO DIEEX BARRADE
RETENCIONSUPERIOR
CINTA DE-
ESPUMA
GABtNFE
PANSL
,GUIA
CINTA DE
ESPUMA Fig. 8
Parte FrontalInterior
TORNILLO_PO B) Fig. g
34 Aire Acondicionador
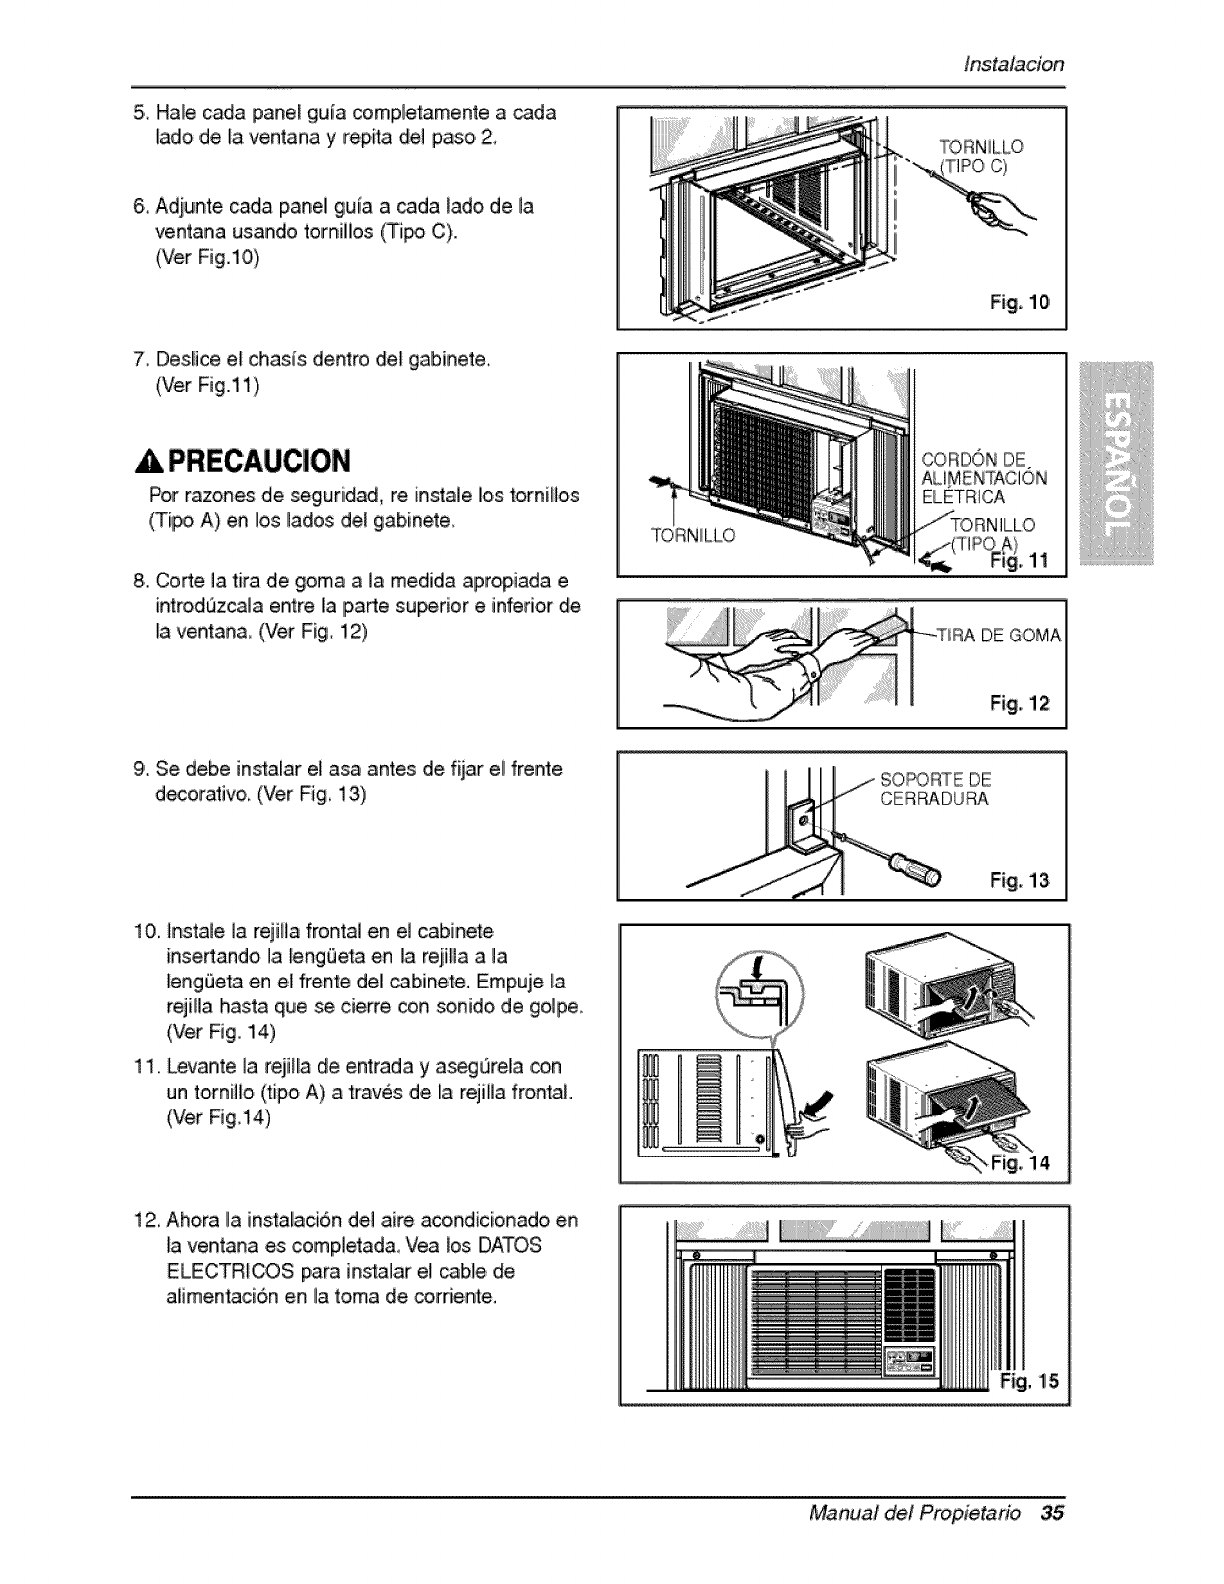
5,_Hale cada panel gula comple_mente a _da
lado ,de la ventana y repi'_ del paso, 2,
6, Adjunte cada panel gui,a a cada _adode la
ventana us:ando tomillos (Ti_ C).
(Ver Fig.lO)
7 IDesUiceel chasis: dentro del gabinete,
(Ver Fig..11}
Pot razones de seguridad., re, instale los torniHos
(Tipo A) en Ilos lados del gabinet&
8. Corte ia tira de goma a la medida apropiada e
introd_zcala entre la iParte su_rior e inferior de
la ventana, (Ver Fig, !2)
TORN_LLO
lnstalacion
TORNiLLO
'CORDONDE
ELFTRICA
11
DE GOMA
Fig. 12
@@i iii
9. Se debe in_alar el asa antes de fijar el frente
d_orativo, (Ver Fig 13)
10, tnstale la rejitla frontal en el ,cabinete,
insertando !.aleng_eta en I.arejiHa a la
leng_ela en el frente del cabinete, Empuje _a
rejill.a hasta que _ cierre con sonido de golpe
(Vet Fig, 14)
11. Levante la rejilla de entrada y a_Srela ,con
un tornillo Oipo A), a trav6s de _arejiHa frontal
(Ver Fig,14)
12, Ahora la instalaci6n del aire acondicion.ado en
la ventana es comp,btad& Vea bs DATOS
ELECTRI@S para in_lar el cable de
alimen'taci6n en [la to,ma de, _,rriente,
,,.i'-"__ SOPORTE DE
CERRADURA
__ Fig, 13
115,
Manual del Prop,ietario 35

Instruccionnes ,de Funcionamiento
El mando a y ie_pa_l de control se parecer_n a los de las siguientes im#genes,
1. BOTON DE LA CORR|ENTE
Para ENCENDER el sistema p,resione el _t6n, y para APAGARLO p,resiorne el bot6n otra vez.
E_e botSn _ene prioridad s.obre todos los otros botones,
2. BOTON DE SELECC|ON DEL MODO OPERACIONAL
C.ad.a vez que presione este bot6n, las palabras FRIO, VENTILADOR y CALENTAR ap.arecerAn
a[ternadamente.
3. BOTON ON/OFF TIMER
C.ad.a vez qiue presioilr_e este botSn, el marcador de tiempo se ajus_r& de la siguiente manera:
(1 Hora _ 2 Horas _ 3 Horas _ 4 Horas _ 5 Horas _ 6. Horas _ 7 Horas
8 Horas -_ 9 Horas -_ 10 Horas -_ 11 Horas _ 12 Horas -) Cance_ar),.
4. SELECTOR DE LA VELOCIDAD DEL VENTILADOR
C.ada vez que presione este botSn, e! ajuste es co_ sigue
(Nto[ F2 ] _ Bajo[ F|] _ Alto[ F2' ]-_)
5. BOT6N DE SELECC!ON DE LA TEMPERATURA DE LA HABITACION
Este _tSn puede controlar la temperatura del cuarto autom_ticamente, La temperatura se
puede ajustar de grado en grado, desde 60_"F Ihasta 86"F cada 1°E
6, AUTOGIRO
Este _tSn puede controlar autom,'_ticament [a direcciSn del flujo de aire.
7. AHORRADOR DE ENERG|A
E[ ventiliador se detiene cuando eli compressor no sigue enfriando.
Aproximadlamen4e cada 3 mia_os el ventilador se encendler.A y ae,cesitarA verificar la
temperatura de! cuarto para saber si es necesario m&s enfriamiento
8. RECEPTOR DE SENAL
36 Aim Acondicionador
tnstruccionnesdeFuncionamien_o
Un I!_ o]or _rfa desp_[rse de Uaunidad la pdmera vez que enciende HEAT (Ca_entar) al
te_inall _atem_rada de enfriamiento Ese o]or es _r h,aberse depos[tado un pc.co de polvo
sobre el _]enltador y va a desaparecer r&p,idamente
de,spues de un co_e en el suministro, la unidad e,m#eza_ a I
C_ndo el aire aco_ic_or,_do ha est_do _rar_, Iba_, _f_e _ _fr_miento y se _aga o se ajes_ la pos_on de
ven_i_cion, espere pot IIiomenos 3 mlnutos_ antes de rein_t _ operaci6n _ _fr_mien_o,
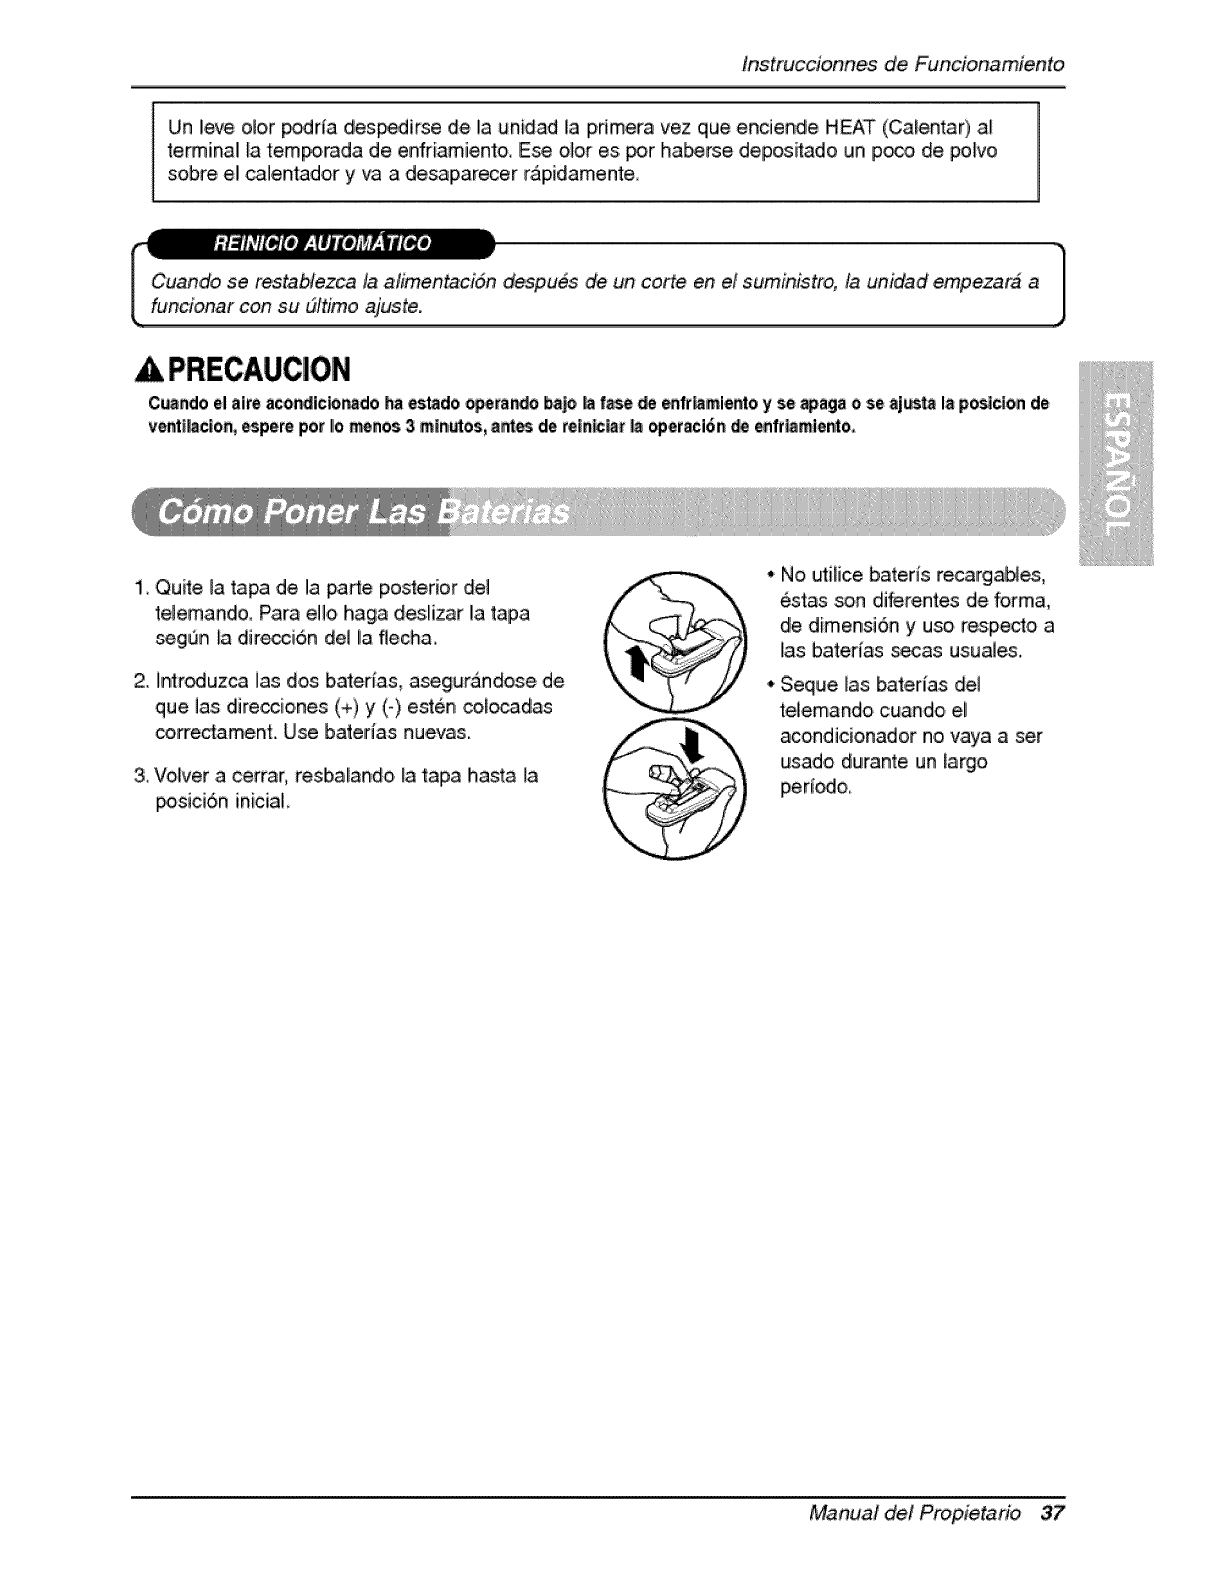
1_Quite ]a tapa de la parte posterior de]
telemando Para e]]o haga deslizar la tapa
_gf_n [a diir_.;ci6.n del i.a flecha.
2. imr_uzca las dos baterias, asegurandose de
que ]as direccio.nes (+) y (-) est6n col_das
_.rrectament. Use bater{as nuevas.
3_Vo!ver a cerrar, resbalando [a tapa basra la
_sici6n iniciaL
•No uti[ice bater{s recargables,
estas _n diferentes de form&
de dimensi6n y u_ respecto a
las baterias s_as usuales.
*Seque fas baterias de]
telemando cuando el
acondicio.nador n.oviay_ aser
usad.o dulrante un largo
Manual del Propietario 37

Instruccionnes ,de Funcionamiento,
palanca de ventilacbn _bera estar en ia Iposi_i6nCLUE (Cer_do) par.apo_er mantener 1asmeiores
c_ndicion_de enfri_nto.
,Cuan_, _ n_es_e aire fr_co, en la h_i_d6n, cobque _ palanca de venti[acbn en _a_sici6n OPEN (_,ierto),
El _ortJg_dor se abre y se _car_ ei aiirede la h_cibn..
CERLBARVENTI_CDN ABRIR
Antes de usar la caracteristica de venti[aci6n,
colo,qule la palanca come se muestra, iPrimere .iale hacia
abajo la parte O para que qu_e en un.a IInea ho,dzonta[ ,con I.apa_e ®
dire_i6n _! ai#e p,ue_ con4rola_ hacia _nde usted de_e
enffiar ajustand,o la _rs_ana ho.rizontal y la _rdana vertical.
"CONTROL DE LiA DIRECClON HORIZONTAL
DEL iAIRE
Para contro[ar [a direcci6n horizontal del f[uio del aire, coloque e[
interrugtor de, oscilaci6n de aire en la p_,_i6n ON y el flujo
aire soplar_ horizontalmente per medio _1 sistema de oscilaci6n
autom_tica de aire,
Si d_a detener ellflujo _ aire, c_oloqueel interrupter d_
oscilad,6n de aire en la posici6n de_ada de la aleta..
• CONTROL DE LA DIRECCION VERTICAL IDELAIRE
dir_ci6n de aire verti_l es a.iustada moviendo la rejila
horizontal,.
38 Aim Acondicionador
tnstruccionnesdeFuncionamient,o
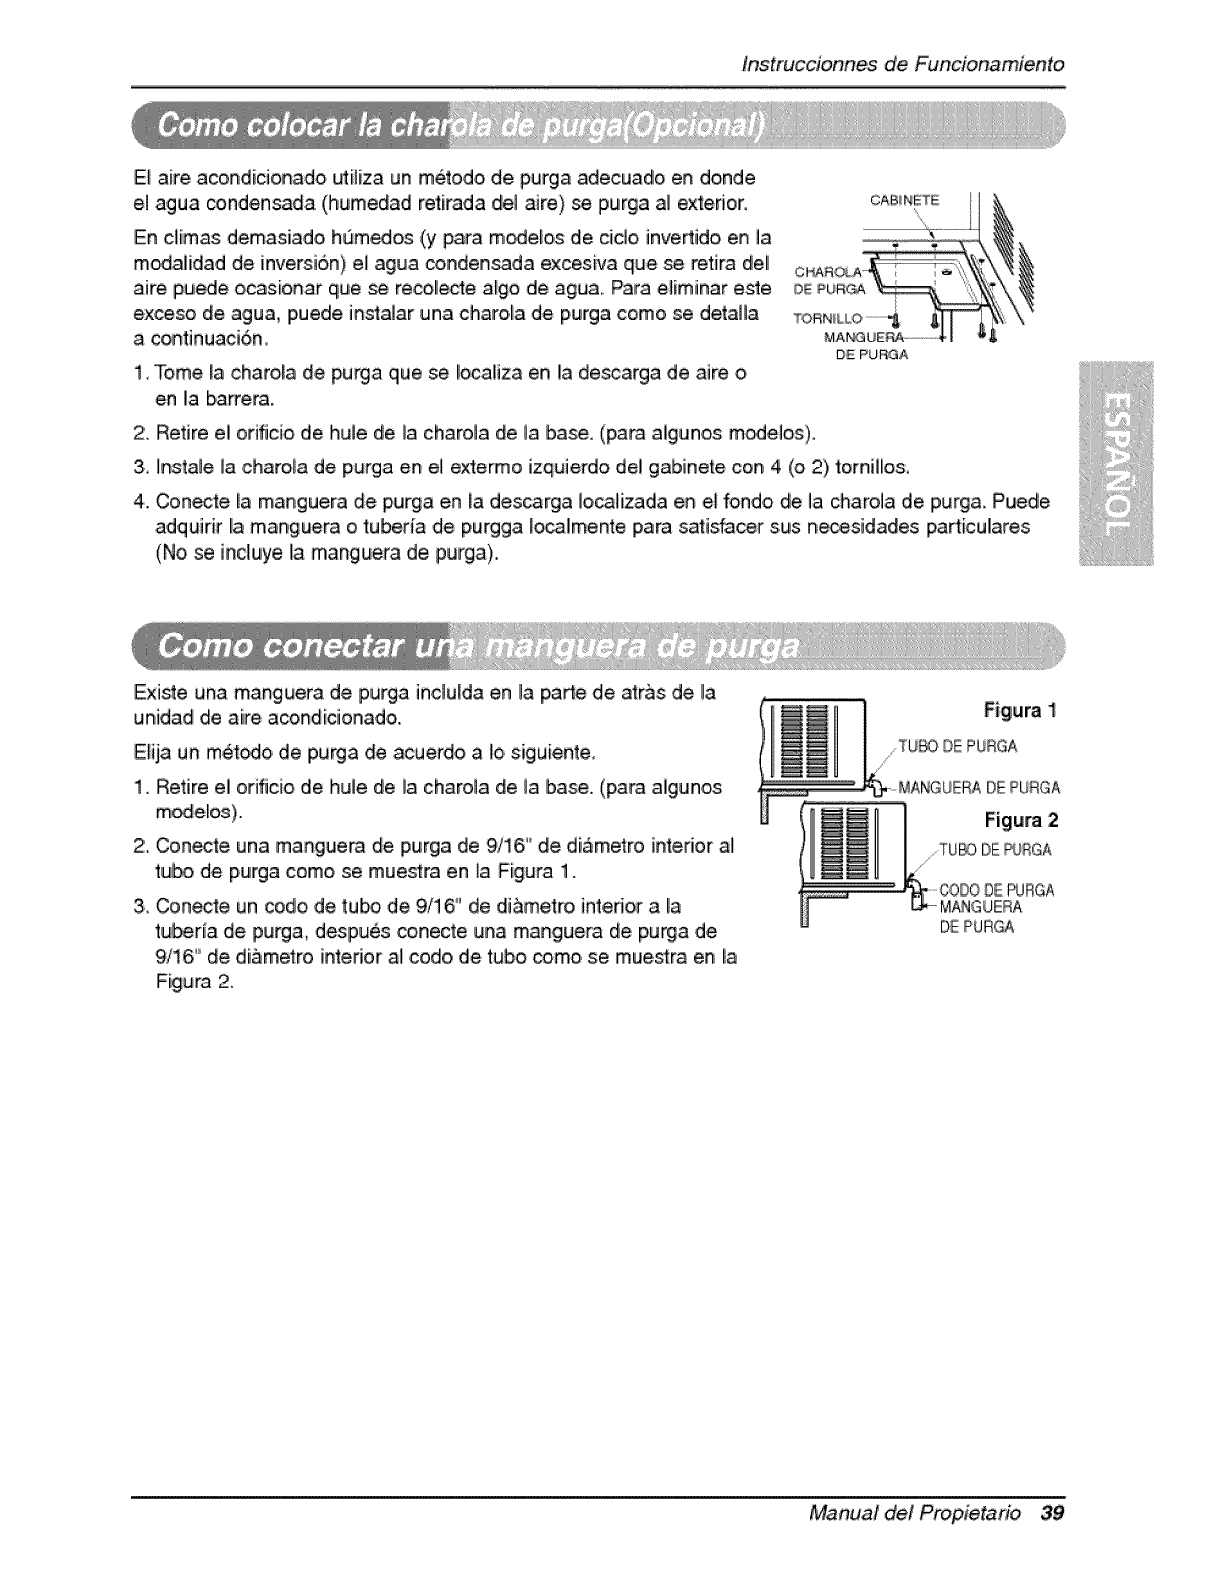
E[ aire acondidenado utiHzia un meted,o,de purga adecuadlo en donde
el agua condensada. (humedad retirada del aire) se prurga al exterior,
En climas demasiado, hum_os (y para m_e_,os de cido invertido, en la
m_alidad de inversion) e[ agua conden_da excesiva que _ retira dell
aire pu_e ocasionar que _ recollecte a[go de agua. Para eIiminar este
excese de agua, puede in_alar una charo,_ade purga come se detaHa
a contJnuaci6n_
1, Tome la charoia de purga que se !oca!iza en la de_arga de aire o
en Iiabarrera.
DEPUBGA
2. Retire el orificio de huJe de la charola de la ba_. (para algunos m_eios).
3_ instale la ,charola de purga ,en el extermo izquierdo del gabinete con 4 (o 2) torniHos,
4. Cene_e [a manguera de purga en la descarga Iocaliza.da en el fondo de Ja charola ,de purga. Puede
ad,quirir [a manguera o tuberta de purgga _o_lmente para safisfacer sus n_sidades particulates
(No,se Jnduiye Ila manguera de purga).,
Existe una manguera de purga inclulda en Ila _Me de atr&s de Ila
unidad de aire acondicionado,..
Elija un m6todo de purga de acuerdo a Io,siguiente,
1. Retire el orificio de hule de la charola de la base. (para aigunos
modelos),.
2:. Conecte una manguera de purga de 9/'16 '°de diametro interior al
tube de p,urga come se mue_ra en la Figura 1.
3i Conecte un code de tu_, de 9/16" de di_metro interior a [a
tuberia de purga, deslpu6s conecte una manguera de purga de
9/16" de diametro interior al code de tube come, se muestra en Iia
Figura 2.
DEPURGA
Manual del Prop,ietario 39
Cuidadoy Mantenirniento
APAGUE EL AIRE ACONDICIONADO Y SAQUE EL ENCHUFE DEL TOMA CORRIENTE DE _PARED,
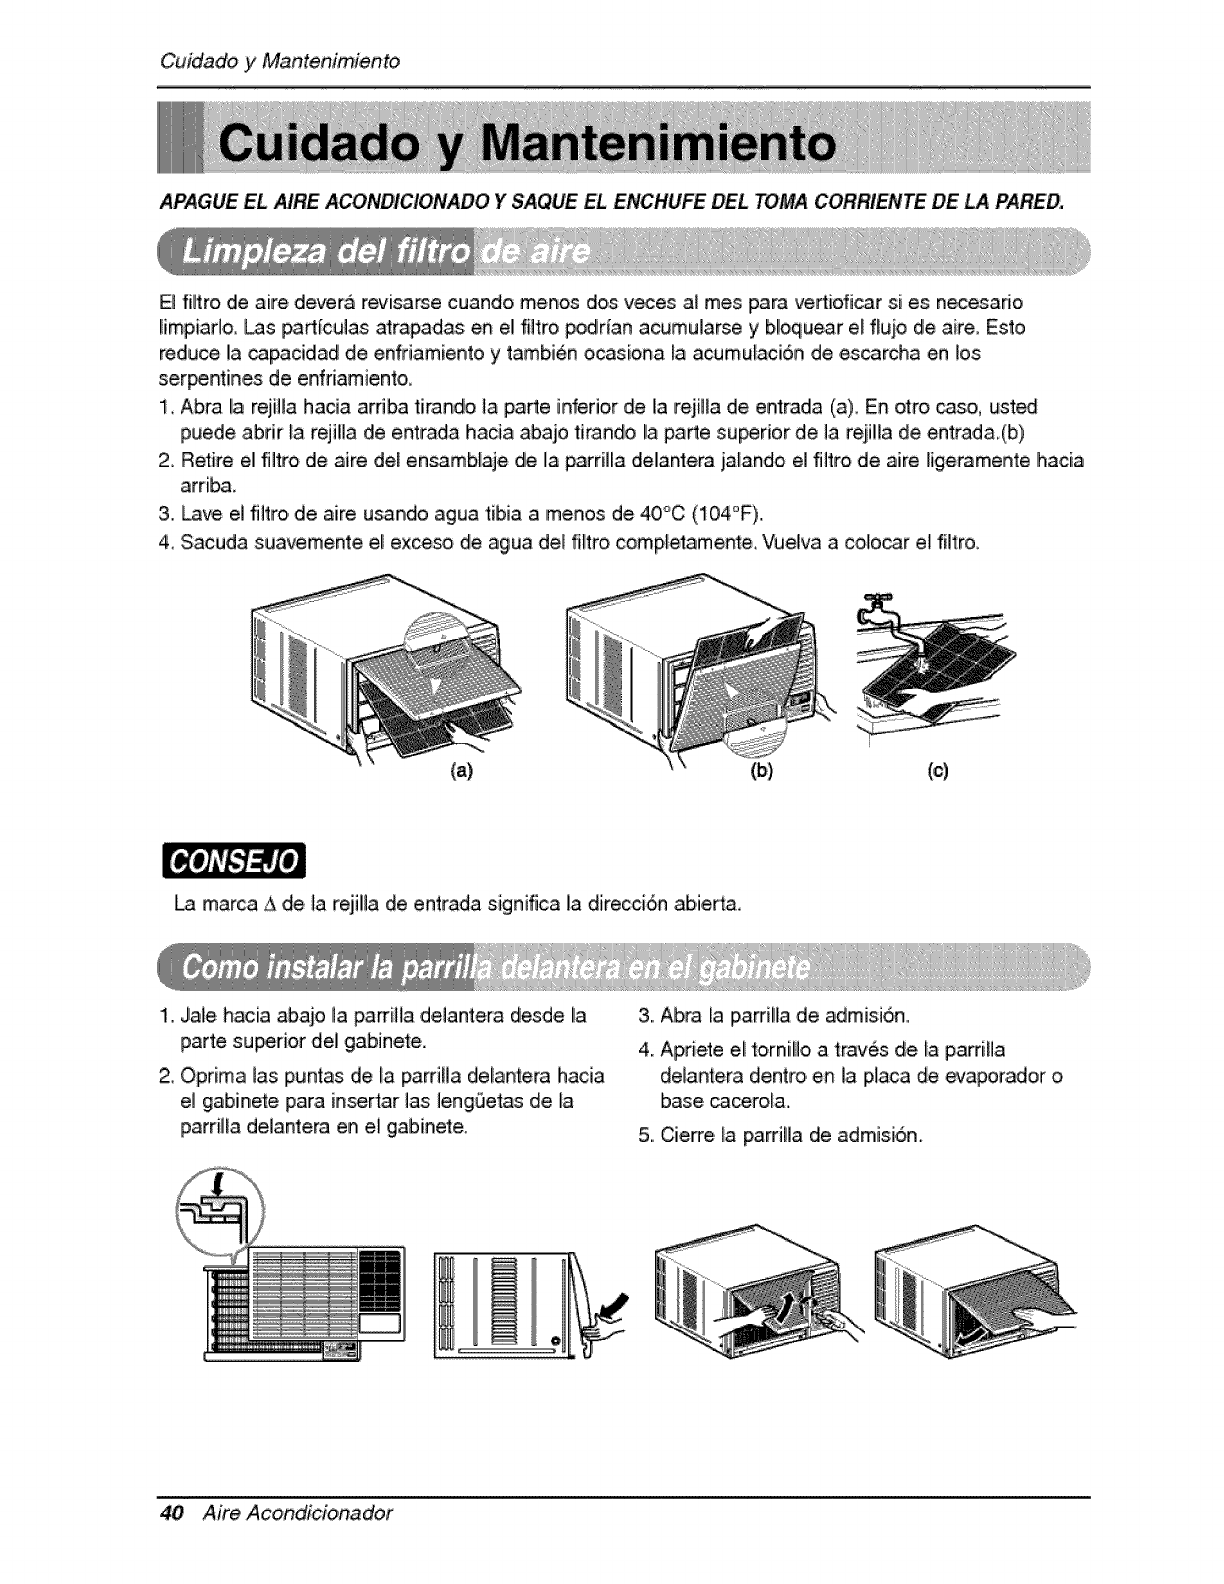
El filtro de aire devera revisarse cuando menos dos veces al mes para ve_ioficar si es n_esado
limpiado, Las padlculas atrapadas en e! filtro podrfan .acumularse y b!oquear e_f_uio de aire, Esito
reduce la _pacidad de enfri.amiento y tambi,6n o,casiona la .acumulaci6n de escarcha en los
ser_ntin,es de enfriamient, o,,
1, Abra I!arejiHa hada arriba tirando la parte inferior de la reji_a de entrada (a), En o'_ro_so, usted
puede abrir la rejiHa de entrada hada abaio tirando la parte su_rior de la reiilla de entrada (b)
2, Retire el filtro de aire del en_mbfaje die IlaparriHa delantera ja_ando el flltro de aJre ligeramente hacia
arriba.
3. _ve el filtro, de aire u_ndo agua tibia a menos de 40°C (104°F),.
4_Sacuda suavemente e! exceso i_e agua del fi_tro comp_e_amen_e,Vuelva a colo,_r e_filtr&
(a) (b) (c)
La marca A de _areji!la de entrada significa la direcci6n ab,ie_a,
1. Jaie hacia abaic la £arriHa delantera desde la
parte su_rior del gabinete.
2_Optima _as [puntasde _apapilla dlelantera hacia
el gabinete paria insertar las _engSetas de _a
parri_la delantera en e_gabinete.
3. Abra la parrilla de admisi6n,.
4. Apriete el _ornillo, a trav6s de _aparrilla
delantera deRt[o ien i,a placa de evaporador oi
base _cerola.
5. Cierre _aparrilla de admisi6n.
40 Aire Acondicionador
Cuidadoy Mantenimien_o
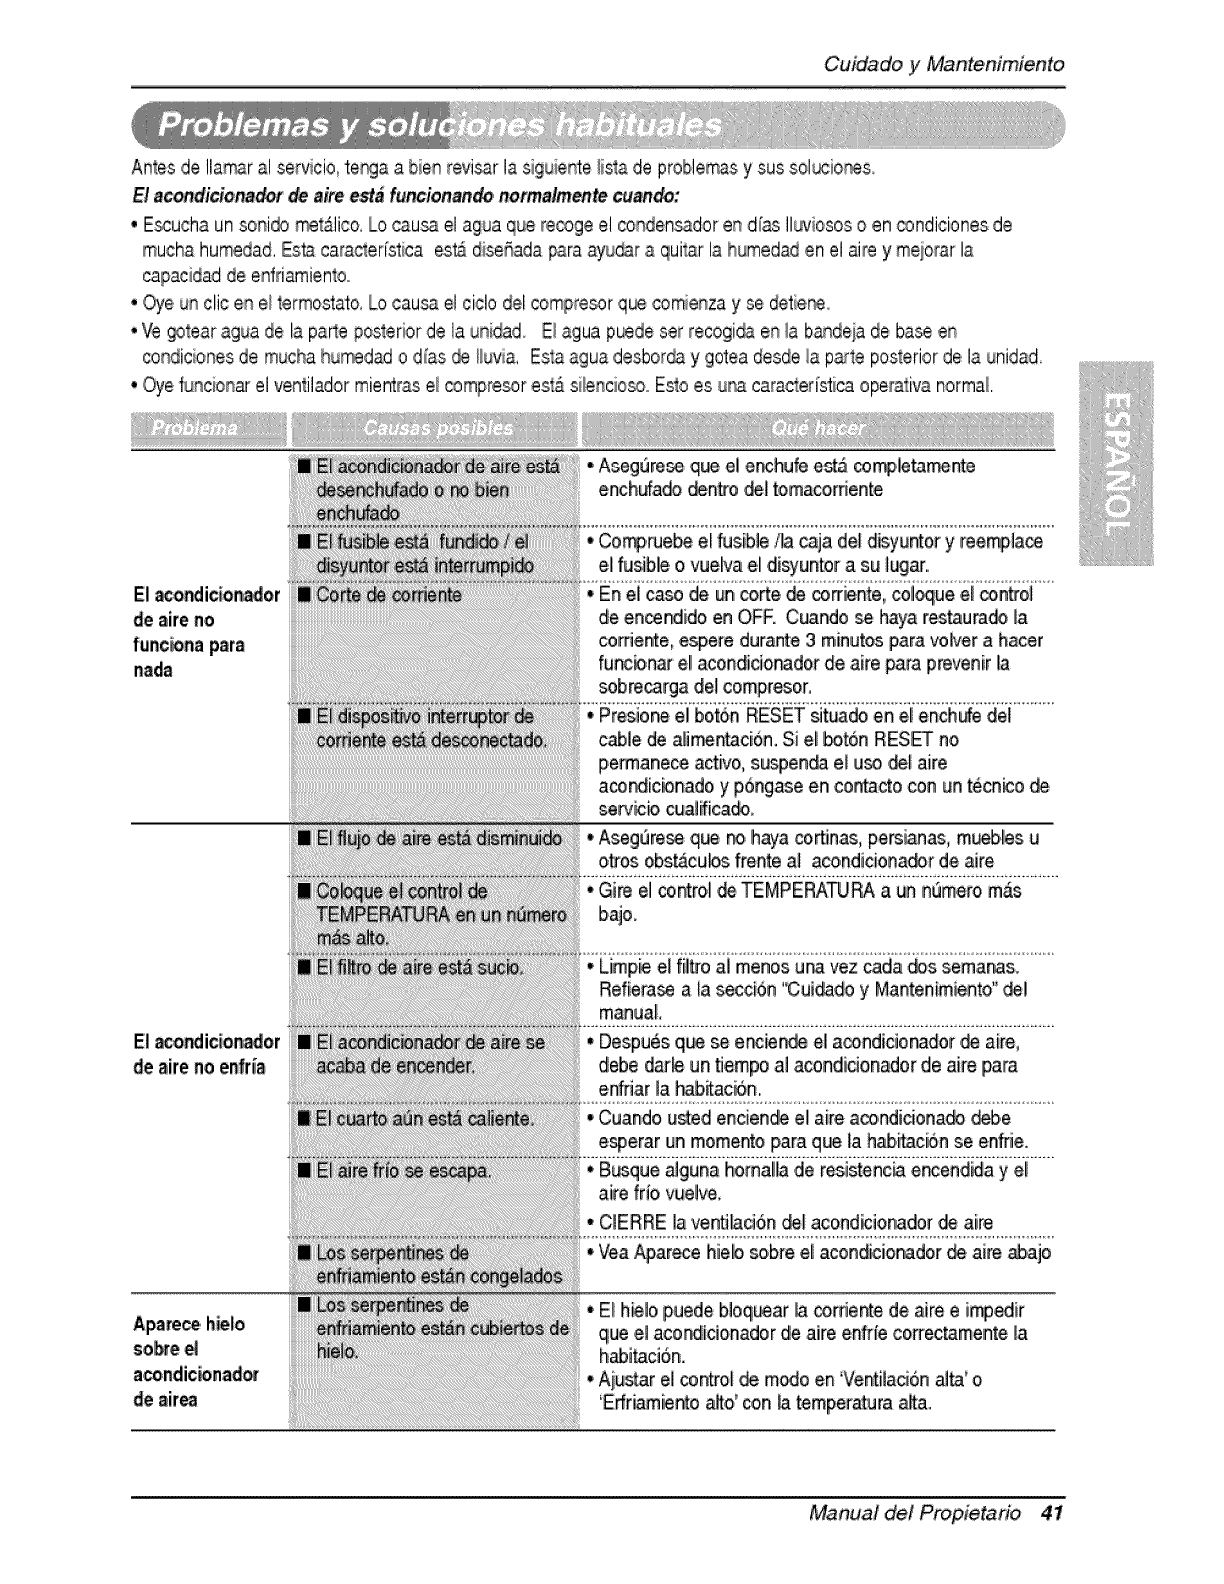
Antes de Ila_r al sewicio, terra a bien revi_r la siguiente!ista de problemasy sus sol_.io_&
El acondicio_a_ _aire esta funcionando,normalmente cuando:
• E_ucha un so_i_ rr_lico, Locausa el agua qf_ere_ge el conden_dor en dias II_viesoso en _ndiciones de
mucha humedad.Esta caracler[stica est&diseSadapara ayu_r a quitar la humedad en el airey meiorar la
capacidadde eafriamientoo
° Oye un clic en e_termostato,becau_ el ciclo del compre._r que _mienza y se detie_
• Ve _tear a.guade la parte poslerior de la usidad El agua puedeset recogi_ en la bandejade base en
condicionesde muchahuM,dad o ,dias_ _!uvia, Esla agua d,esborday g,oteadesde !a p_te p,osteri,orde la unidad
• ,_e fur_cionarel ventilador mientrasell®mpre_r est_ silenciosooEslo es u_s cara_ed'sticaopera,ira normal.
El _ondicionador
de aire no
funcionapara
nada
El _ondidon_or
de aire no enfr_a
•Co_._e_ el 'fusible/la caja del disyuntor y teen,ace
el fusible o vuelva el disyur_tora su _:.
•En el ease de un corte de _nie, nte, col_uie el _oir_el
de e_ce_ido en OF£ Cuando _ haya r_taurado _a
corfiente, _pere durante 3 minutes para vo_'er a hacer
funcb,nat el!acondidorador de aire para prevenir la
sobre_rga del compresor,
• Presione el bot6n RESET _tuado en el ench_ del
c_le de alirnentaci6n, Si e_boton RES_ no
pe_anece act_o, s_pen_ el u_ ,_.l ai[e
aco_dicbnado y p6ngaseen contacto con un tecn_o
servicb c_alifica_
• Asegt_re_ que _ haya co_n.as, persianas, m_bl!es u
otros obs_cubs frente ai aco,ndiciona_r de aim
• Gire el contrel _ TEMPERATURAa un namero m_
baio.
•Limp_ e_filt_oal menos u_ vez cada _s seman_s.
Refiera_ a _asecci6n %:uid_do y Mantenimientd' _1
manual
• Despu_s q_ _ encie_ e! a_ndiciona_orr ,_ aire,
debe d_% un _empo al acondicio,nador de aidepara
e_iar la h_,_aci6n..
• Cuando usted enciende el aire aco,ndiciona_ _,e
e_erar un memento para q_ la hab_acii6nse en_ie.
• B_que alguna homalllade resistenc_ e_end_a y el
aidefrio vuelve,
• C_ERREla ventJ#_ci6.n_1 acond_ionador de aim
• Vea#43arecehielo sobre el acondicionador _ aideabaje
sob_e
acondic_nad=
de _ir_
Manual del Propietario 41
Note
42 AireAcondicionador
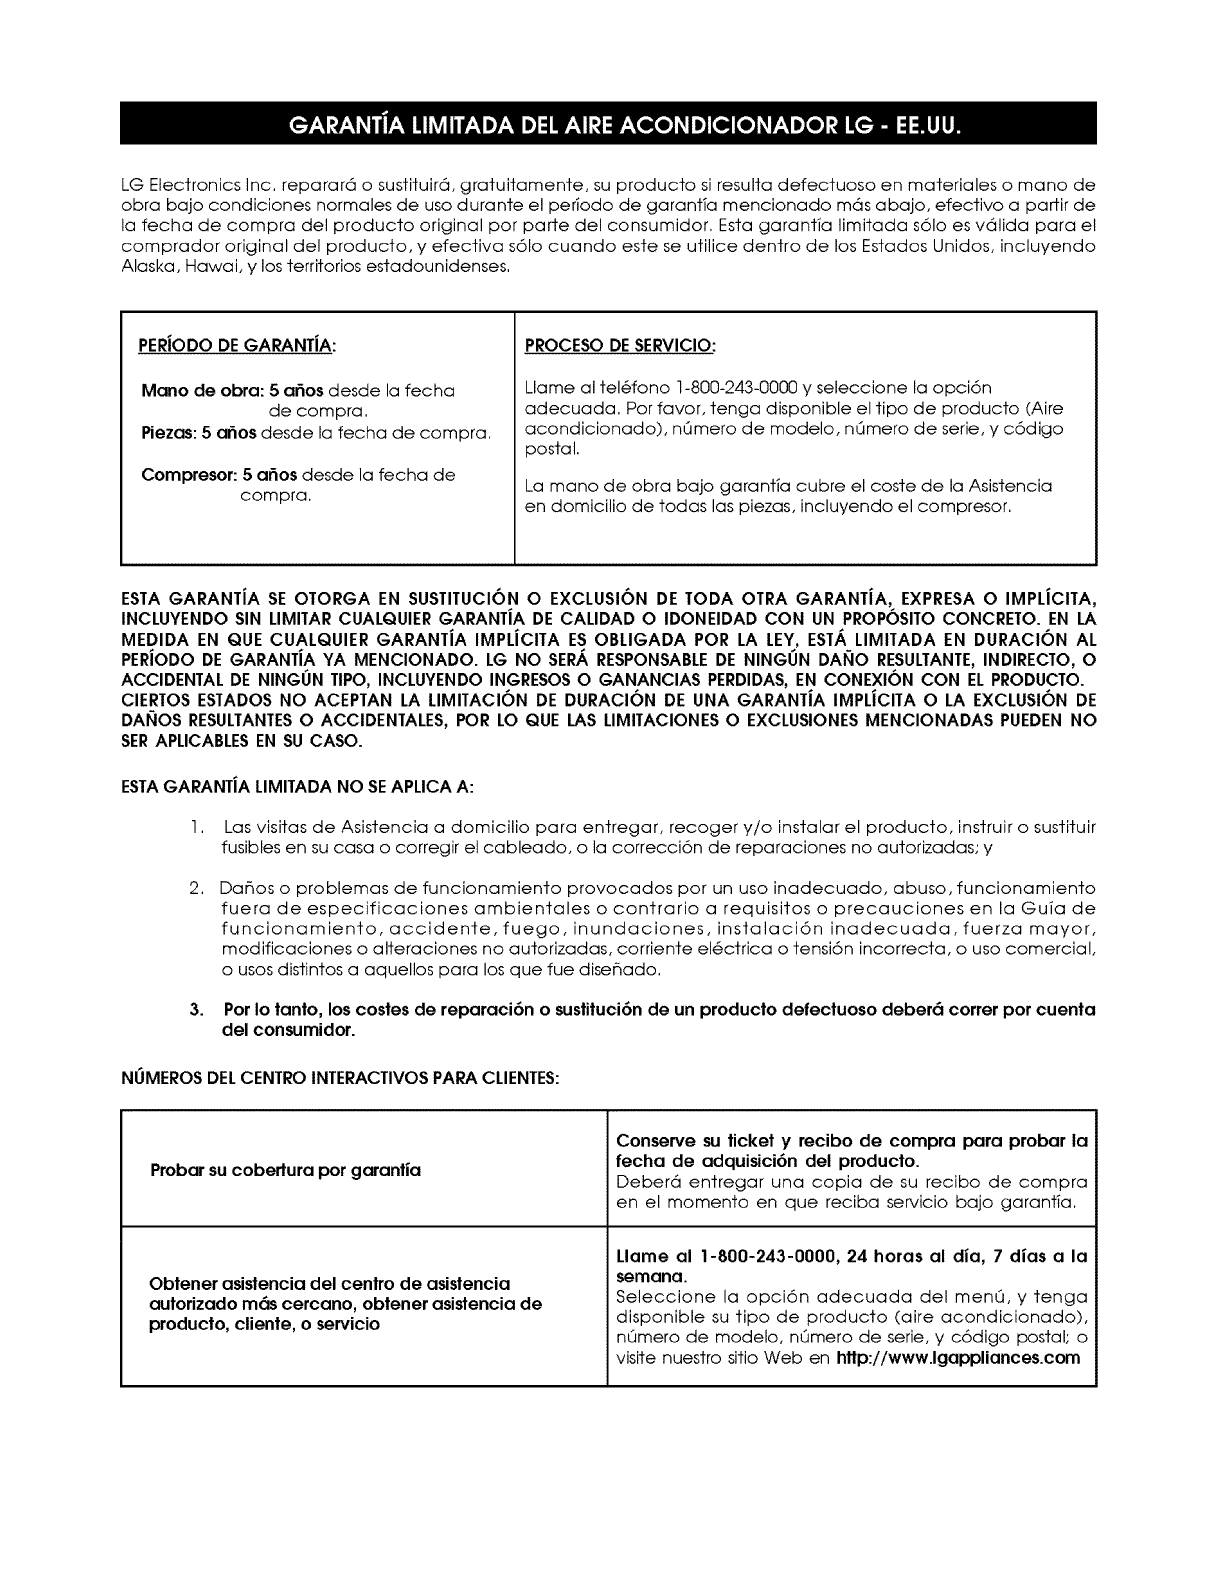
LG Electronics Inc, reparar6 o sustituird, gratuitamente, su producto si resulta defectuoso en materiales o mano de
obra bajo condiciones normales de uso durante el periodo de garantTa mencionado m6s abajo, efectivo a parfir de
la fecha de compra del producto original pot parte del consumidor. Esta garantia limitada s61o es vdlida para el
comprador original del producfo, y efectiva s61o cuando este se ufilice dentro de los Estados Unidos, incluyendo
Alaska, Hawai, y los territorios estadounidenses.
PER[ODO DEGARANTiA:
Mano de obra: 5argos desde la fecha
de compra.
Piezas: 5a6os desde la fecha de compra.
Compresor: 5 a6os desde la fecha de
compra.
PROCESO DE SERVICIO:
Llame al tel6fono 1-800-243-0000 y seleccione la opci6n
adecuada. Por favor, tenga disponible el fipo de producto (Aire
acondicionado), nOmero de modelo, nOmero de serie, y c6digo
postal.
La mano de obra bajo garantia cubre el coste de la Asistencia
en domicilio de todas las piezas, incluyendo el compresor.
ESTA GARANT[A $E OTORGA EN SUSTITUClON O EXCLUSION DE TODA OTRA GARANTiA, EXPRESA O IMPL[ClTA,
INCLUYENDO SIN LIMITAR CUALQUIER GARANT[A DE CALIDAD O IDONEIDAD CON UN PROPOSITO CONCRETO. EN LA
MEDIDA EN QUE CUALQUIER GARANTiA IMPLiCITA ES OBLIGADA POR LA LEY, EST/_ LIMITADA EN DURACION AL
PERiODO DE GARANTiA YA MENCIONADO. LG NO SERA.RESPONSABLEDE NINGUN DANO RESULTANTE,INDIRECTO, O
ACCIDENTAL DE NINGUN TIPO, INCLUYENDO INGRESOSO GANANCIA$ PERDIDAS,EN CONEXION CON EL PRODUCTO.
CIERTOS ESTADOS NO ACEPTAN LA LIMITACION DE DURACION DE UNA GARANTiA IMPLiCITA O LA EXCLUSI6N DE
DANO$ RESULTANTESO ACCIDENTALES, POR LO QUE LAS LIMITACIONE$ O EXCLLISIONE$ MENCIONADAS PUEDEN NO
SERAPLICABLESEN SU CASO.
ESTAGARANT|A LIMITADA NO SEAPLICA A:
I.
2.
3.
Las visitas de Asistencia a domicilio para enfregar, recoger y/o instalar el producfo, instruir o sustituir
fusibles en su casa o corregir el cableado, o la correcci6n de reparaciones no autorizadas; y
Da_os o problemas de funcionamiento provocados por un uso inadecuado, abuso, funcionamiento
fuera de especificaciones ambientales o contrario a requisitos o precauciones en la Guia de
funcionamiento, accidente,fuego,inundaciones, insfalaci6n inadecuada,fuerza mayor,
modificaciones o alteraciones no autorizadas, corriente el_ctrica o tensi6n incorrecta, o uso comercial,
o usos distintos a aquellos para los que fue dise6ado.
Por Io tanto, los costes de reparaci6n o sustituci6n de un producto defectuoso deber6 correr por cuenta
del consumidor.
NUMEROS DELCENTRO INTERACTIVOS PARA CLIENTES:
Probar su cobertura por garantia
Obtener asistencia del centro de asistencia
autorizado m6s cercano, obtener asistencia de
producto, cliente, o servicio
Conserve su ticket y recibo de compra para probar la
fecha de adquisici6n del producto.
Deber6 enfregar una copia de su recibo de compra
en el momento en que reciba servicio bajo garanf_a,
Llame an 1-800-243-0000, 24 horas al dia, 7 dias a la
semana.
Seleccione la opci6n adecuada del menU, y tenga
disponible su tipo de producto (aire acondicionado),
n0mero de modelo, n0mero de serie, y c6digo postal; o
visite nuestro sitio Web en http://www.lgappliances.com
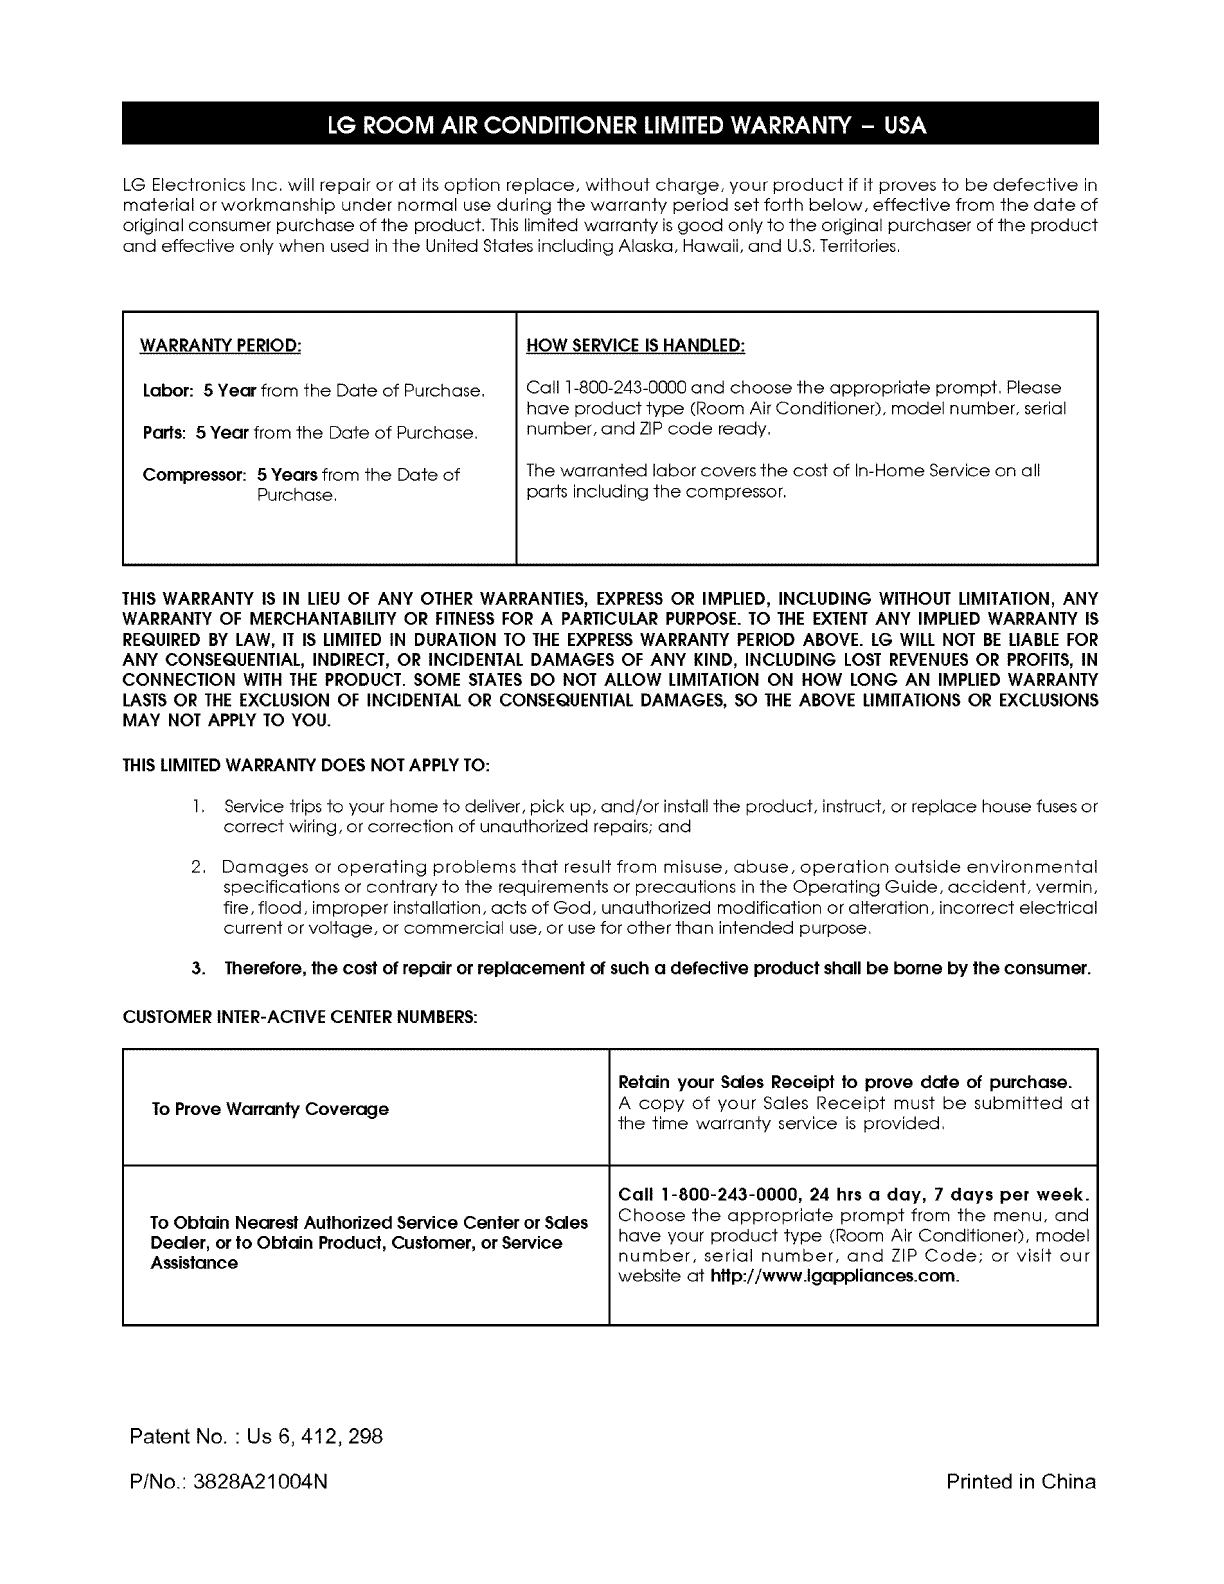
LG Electronics Inc, will repair or at its option replace, without charge, your product if it proves to be defective in
material or workmanship under normal use during the warranty period set forth below, effective from the date of
original consumer purchase of the product. This limited warranty isgood only to the original purchaser of the product
and effective only when used in the United States including Alaska, Hawaii, and U.S.Territories.
WARRANTY PERIOD:
Labor: 5 Year from the Date of Purchase.
Palls: 5 Year from the Date of Purchase.
Compressor: 5Years from the Date of
Purchase,
HOW SERVICE IS HANDLED:
Call 1-800-243-0000 and choose the appropriate prompt, Please
have product type (Room Air Conditioner), model number, serial
number, and ZIP code ready.
The warranted labor covers the cost of In-Home Service on all
parts including the compressor.
THIS WARRANTY IS IN LIEUOF ANY OTHERWARRANTIES, EXPRESSOR IMPLIED, INCLUDING WITHOUT LIMITATION, ANY
WARRANTY OF MERCHANTABILITYOR FITNESSFOR A PARTICULARPURPOSE.TO THE EXTENTANY IMPLIED WARRANTY IS
REQUIREDBY LAW, IT IS LIMITEDIN DURATION TO THE EXPRESSWARRANTY PERIOD ABOVE. LG WILL NOT BE LIABLEFOR
ANY CONSEQUENTIAL, INDIRECT, OR INCIDENTAL DAMAGES OF ANY KIND, INCLUDING LOST REVENUESOR PROFITS,IN
CONNECTION WITH THE PRODUCT. SOME STATESDO NOT ALLOW LIMITATION ON HOW LONG AN IMPLIED WARRANTY
LASTSOR THEEXCLUSION OF INCIDENTAL OR CONSEQUENTIAL DAMAGES, SO THE ABOVE LIMITATIONSOR EXCLUSIONS
MAY NOT APPLY TO YOU.
THISLIMITEDWARRANTY DOES NOT APPLYTO:
2,
Service trips to your home to deliver, pick up, and/or install the product, instruct, or replace house fuses or
correct wiring, or correction of unauthorized repairs; and
Damages or operating problems that result from misuse, abuse, operation outside environmental
specifications or contrary to the requirements or precautions in the Operating Guide, accident, vermin,
fire, flood, improper installation, acts of God, unauthorized modification or alteration, incorrect electrical
current or voltage, or commercial use, or use for other than intended purpose.
3. Therefore, the cost of repair or replacement of such a defective product shall be borne by the consumer.
CUSTOMER INTER-ACTIVE CENTERNUMBERS:
To Prove Warranty Coverage
ToObtain Nearest Authorized Service Center or Sales
Dealer, or to Obtain Product, Customer, or Service
Assistance
Retain your Sales Receipt to prove date of purchase.
A copy of your Sales Receipt must be submitted at
the time warranty service is provided,
Call 1-800-243-0000, 24 hrs a day, 7 days per week.
Choose the appropriate prompt from the menu, and
have your product type (Room Air Conditioner), model
number, serial number, and ZIP Code; or visit our
website at http://www.lgappliances.corn.
Patent No. " Us 6, 412,298
PINo.: 3828A21004N Printed in China
