LIDL US SWK360A1 360 wifi panoramic camera User Manual
Lidl US Trading, LLC 360 wifi panoramic camera Users Manual
LIDL US >
Users Manual
SWK 360 A1
User Manual
1
Content
Preparing For Using.................................................................................................... 3
Parts Of The Camera.............................................................................................3
Charging The Battery.............................................................................................4
Inserting The Memory Card.................................................................................. 5
Installing The Mounts.............................................................................................6
Points For Attention..............................................................................................12
Basic Operation......................................................................................................... 15
Turning On And Off The Camera....................................................................... 15
Changing The Mode Of Camera........................................................................19
Recording Video................................................................................................... 19
Taking Still Photos................................................................................................21
Making connections.................................................................................................. 22
Connecting The Camera To A PC......................................................................22
Wi-Fi Connecting..................................................................................................23
2
Windows PC Application..................................................................................... 24
Share Pictures In Smartphone APP.................................................................. 25
Share Videos To Youtube And Facebook......................................................... 27
Remote Control Connection............................................................................... 28
How To Use The PC Camera Function..................................................................29
Specification............................................................................................................... 30
FCC Warning..............................................................................................................32
3
Preparing For Using
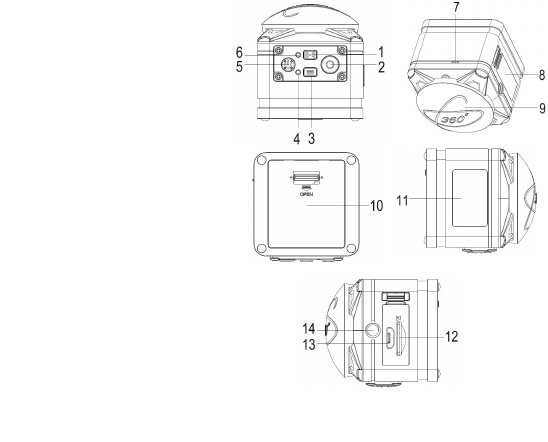
Parts Of The Camera
1. WiFi/Up Button
2. Shutter/OK Button
3. Down Button
4.Charging/Status
Indicator Light
5. Power/Mode Button
6. WiFi Indicator Light
7. Microphone
8. Jack/Card Slot Cover
9. Lens Cover
10. Battery Cover
11. LCD Screen
12. TF Card Slot
13. USB Jack
14. Tripod Slot
4
Charging The Battery
The camera has a dismountable and rechargeable lithium battery. Please follow below
steps to charge the battery when in first use or in low power.
1. Long press the power button to turn off the camera.
2. Open the cover on the side of camera and find the USB slot.
3. Connect the camera to the computer or a power adapter by the USB cable for
charging.
4. The indicator light will turn red during charging.
5. Once the charging completed,the indicator light will go out. Please unplug the USB
cable.
Notice: The camera body may get warmer after using for long time.This is normal.
CAUTION:
RISK OF EXPLOSION IF BATTERY IS REPLACED BY AN INCORRECT TYPE.
DISPOSE OF USED BATTERIES ACCORDING TO THE INSTRUCTIONS.

5
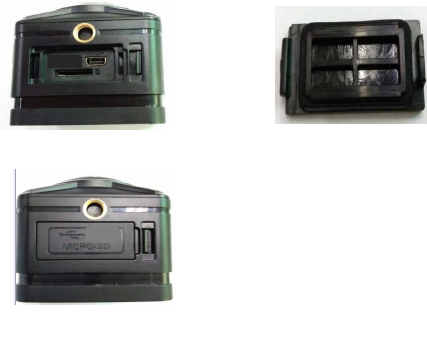
Inserting The Memory Card
This camera is not equipped with an internal memory card. For normal operation,please
prepare a micro SD card (at least class 8) first and follow below steps to insert the card.
1. Turn off the camera.
2. Open the cover on the side of the camera and find the micro SD card slot. Then insert
the card in correct direction.You will hear a “click” sound if the memory card has been
inserted into the camera successfully.
Notice
1. Please format the micro SD card before using.Make sure the camcorder
is turned off before inserting or removing the card.
2. Using poor quality or counterfeit memory card will lead to many
problems such as crashing,can not taking photo or video,damaging the
files and so on.Suggest to use brand memory card for improving the
stability of camcorder.It has higher requirement for micro SD card when in
moving or long-time continuous shooting.
3. It is important to keep micro SD card clean.Do not adhere any
liquid,dust and particles on the surface of card.
6
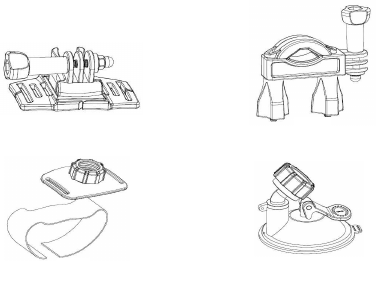
Installing The Mounts
In order to use the camera more convenient outdoors and in the water, we provide some
mounts to fix the camera.
There are four kinds of mounts packaged in this camera as below. A is helmet mount, B
is bike mount, C is wrist mount, D is
car suction cup mount.
A
B
C
D
7
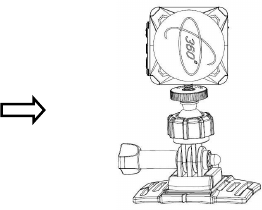
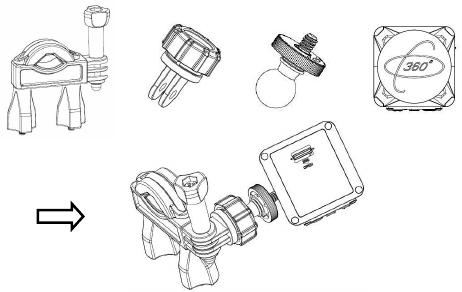
By installing these mounts, the camera can fix to helmets,bikes,cars and your wrist.
Please refer to below steps to install the mounts.
Fix the camera to a helmet
1. Fix connector
to mount A.
2. Unscrew the cap of connector
, then push the orbicular end of connector
into
connector
. Tighten up the cap of connector
.
3. Connect the camera to the screw end of connector
.
4. After fix the camera to the mounts is complete, please adjust the length of strap
according to helmet’s size. Then tie up the strap to your helmet
+
+
+
8
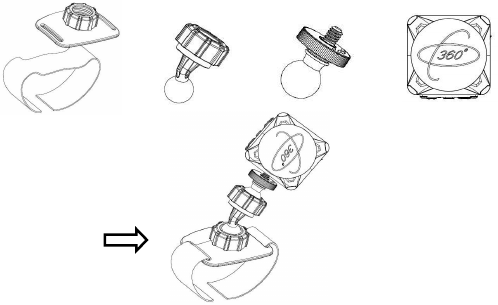
Fix the camera to a bike
1. Find mount B, fix it to the handlebar of a bike by placing the rubber pad, and rotating
screws.
2. Fix connector
to mount B.
3. Unscrew the cap of connector
, then push the orbicular end of connector
into
connector
.Tighten up the cap of connector
.
4. Connect the camera to the screw end of connector
.
9
Fix the camera to your wrist
1. Unscrew the screw cap of mount C, push the orbicular end of connector
into mount
C. Then tighten up the screw cap of mount C.
2. Unscrew the cap of connector
, then push the orbicular end of connector
into
connector
.Tighten up the cap of connector
.
+
+
+
10
3. Connect the camera to the screw end of connector
.
4. Adjust the strap of mount C and wear it on your wrist or arms.
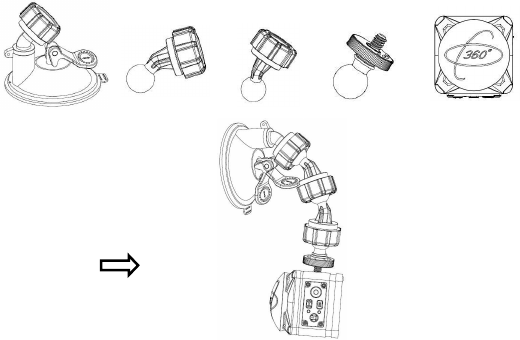
Fix the camera to a car
1. Unscrew the screw cap of mount D , push the orbicular end of connector ④(bigger
than connector
) into mount D. Then tighten up the screw cap of mount D.
2. Unscrew the cap of connector ④, then push the orbicular end of connector
into
connecto r④.Screw up the cap of connector
.
+
+
+
11
3. Unscrew the cap of connector
, push the orbicular end of connector
into
connecto r
.Screw the cap of connector
.
4. Connect the camera to the screw end of connector
.
5. Install the suction cup to the front windshield of car.
+
+
+
+
④
12
Points For Attention
1. The waterproof depth of this camera is 2 meters within 10 minutes.
2. The camera should be stored in cool environment indoors. It can not be stored in high
temperature higher than 45oC and the time can not be longer than 2 hours.
3. For using under the water, please check if the battery cover and jack/card slot cover
are tight.
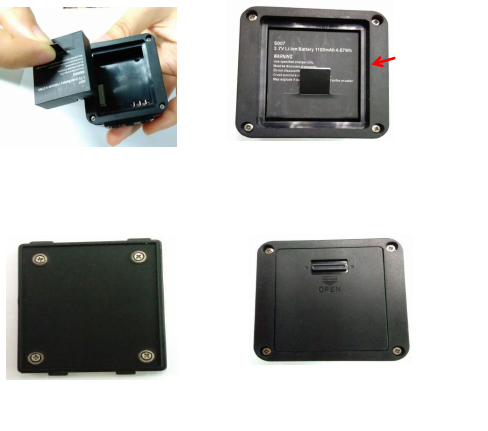
A. For battery installation.
1) Install the battery as per picture a. Please make sure the direction is right.
2) Press the battery gently to install it in place.
3) Check if the battery is installed in place.The battery place should be lower than around
waterproof frame of the battery box.(picture b)
4) Check if the waterproof slicone is damaged and if there is any attachments. Clean it
carefully before using under water each time. Then close the battery cover.(picture c)
5) Install the battery cover and press gently in place.
6) Check if the lock is in place, make sure the center of the lock is on the same straight
line with the two pits of battery door as shown in picture d.
13
a
b
Waterproof
frame
c
d
14
B. For jack/card slot cover installation.
1) Check if the waterproof frame is damaged and if there is any attachments. Clean it
carefully before using under water each time. Then close the cover.(picture e)2) Check if
the waterproof slicone is damaged and if there is any attachments. Clean it carefully
before using under water each time. Then close the cover.(picture f)
3) Check if the lock is in place as shown in picture g.
f
e
g
15
Basic Operation
Turning On And Off The Camera
1. Long press the Power button to turn on the camera.
2. Long press the Power button to turn off the camera.
Tips: The working indicator light will keep blue after turning on the camera.
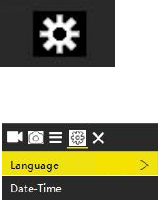
System Setup
1. Turn on the camera.
2. Press Mode button to switch to the setting screen as below.
3. Press OK button to enter the function setting screen.
4. Then press Mode button to chose the system setting menu screen as below.
5. Press Up/Down button to scan all menu options.
6. Press OK button to chose the target menu.

16
7. Press Up/Down button to scan all submenu and press OK button to confirm the option.
8. Press Mode button to switch to icon ,the screen will show “ Press OK To Exit ”.Then
press the OK button to exit.
System setup menu list as below:
Menu
Function
Language
Set the language on the screen.
Options:【Simplified Chinese】/【Traditional Chinese】/【English】/
【Japanese】/【Korean】/【Russian】/【German】/【French】/【Italian】
/【Spanish】/【Polish】/【Dutch】/【Portuguese】.
Date-Time
Set the date and time.
Format
Formatting your micro SD card will delete all files including the
protected files.Please copy the important files before formatting.
Options:【Confirmation】/【Cancel】.
Reset To
Factory
Settings
Restore the camera to factory default settings.
Options:【Confirmation】/【Cancel】.
17
Firmware
Version
Look up the Firmware information including the model, version and
manufacturer.
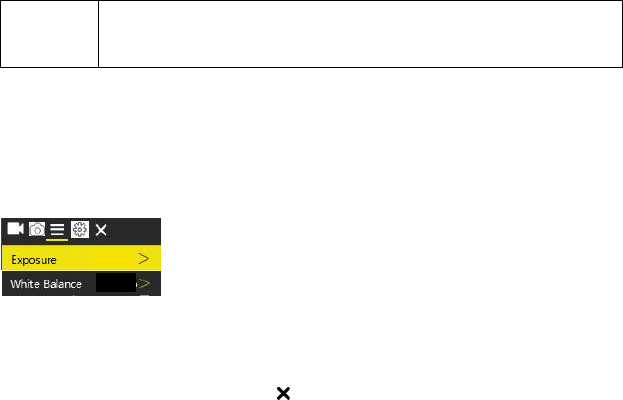
Function Setup
1. Turn on the camera.
2. Press Mode button to switch to the setting screen.
3. Press OK button to enter the function setting screen.
4. Then press Mode button to switch to the function setting menu screen as below.
5. Press Up/Down button to scan all menu options.
6. Press OK button to chose the target menu.
7. Press Up/Down button to scan all submenu and press OK button to confirm the option.
8. Press Mode button to switch to icon ,the screen will show “ Press OK To Exit ”.Then
press the OK button to exit.

18
Function setup menu list as below:
Menu
Function
Exposure
Set the exposure value to compensate light.Solve the problems of
shooting under poor or strong light.
Options:【-3】/【-2】/【-1】/【0】/【1】/【2】/【3】.
White
Balance
Set the white balance to adapt to different light sources. Options:
【Auto】
/
【Sunny】
/
【Cloudy】
/
【Incandescent Light】
/
【Fluorescent
Light】.
WiFi
Open/Close WiFi.Press OK button to chose or cancel.
Image
Rotation
The content on display screen will be inverted.You can invert the
camera to shoot.Press OK button to chose or cancel.
Driving
Mode
Open/Close the function of driving recorder.Press OK button to chose
or cancel.
Light Source
Frequency
Set the light source frequency according to your region. Options:
【Auto】/【50Hz】/【60Hz】.
LED
Indicator
Light
Open/Close the LED indicator light.Press OK button to chose or
cancel.
Auto
Screensaver
Set the auto screen saver.
Options:【Close】/【10s】/【20s】/【30s】.
19
Auto
Shutdown
For saving power,the camcorder will close automatically after a pried
of time if not using.
Options:【Close】/【1minutes】/【3minutes】/【5minutes】.
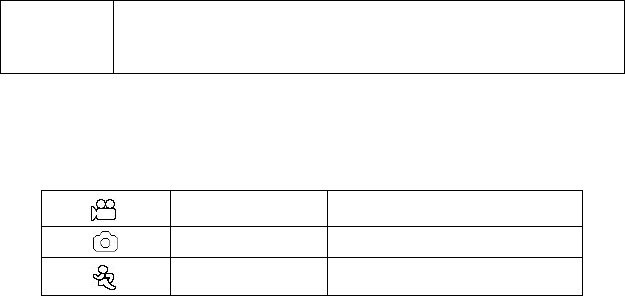
Changing The Mode Of Camera
The camera has 3 different modes : video mode, capture mode and slow motion mode.
Repeatedly press the Mode button to select one mode.
Recording Video
1.Turn on the camera,press the Mode button to switch to video mode.
2.Start to record video.
- Let the lens toward to the subject you will record.
- Press the Shutter button to start recording.
- The record duration will be shown on the LCD display.
3.Finish recording.
Video Mode
For recording video.
Capture Mode
For taking still photos.
Slow Motion Mode
For recording slow motion video.

20
- Press the Shutter button again to stop recording.
- The camcorder will stop recording automatically once capacity of the memory card is
full.
Video mode menu list as below:
Menu
Function
Video
Resolution
Set the video resolution.
Options:【2448P 30FPS】/【2048P 30FPS】/【1440P 60FPS】/【1440P
30FPS】/【1072P 60FPS】/【1072P 30FPS】.
Recording
Sound
Open/Close the sound during recording video.Press OK button to
chose or cancel.
Time-lapse
Set the time-lapse recording.
Options:【Close】/【0.5s】/【1s】/【2s】/【5s】/【10s】/【30s】
/【60s】.
Loop
Recording
Set the time of loop recording.
Options:【Close】/【2minutes】/【3minutes】/【5minutes】.
Slow Motion
Set the slow motion resolution.
Options:【1440P 60FPS】.

21
Taking Still Photos
1.Turn on the camera,press the Mode button to switch to capture mode.
2.Start to take a still photo.
- Let the lens toward to the subject.
- Press the Shutter button to take a photo.
Capture mode menu list as below:
Menu
Function
Photo
Resolution
Set the size or resolution of still photos.
Options:【5M】/【8M】/【12M】/【16M】.
Timed
Set timed photographing.Press shutter button,camera will take a photo
after automatic countdown.
Options:【Close】/【3s】/【5s】/【10s】/【20s】.
Auto
Set automatic photographing.Press shutter button,camera will take
photos continuously after automatic countdown.
Options:【Close】/【3s】/【10s】/【15s】/【20s】/【30s】.
Drama
Shot
Set this function to take several photos in one second.
Options:【Close】/【3P/S】/【5P/S】/【10P/S】.
22
Making connections
Connecting The Camera To A PC
There are two ways to download files from the memory card to a computer.
1. Insert the memory card into a card reader.
2. Connect the camera to a computer through the supplied USB cable.
Using a Card Reader
1. Take out the memory card from the camera,then insert it into a card reader which is
connected to a computer.
2. Open [My Computer] or [Windows Explorer] and double-click the removable disk icon
that represents the memory card.
3. Copy the files to the chosen directory in the computer.
Connecting Camera to a PC by the USB Cable
1.Connect camera to a computer through the supplied USB cable, then turn the camera
on. The screen will display”USB Mode”,”PC Camera”,”Charging Mode”.Press Up/Down
button to choose”USB Mode”,then press OK button to enter USB mode.
2.Open [My Computer] or [Windows Explorer]. A"Removable Disk" appears in the drive
list. Double-click the "Removable Disk" icon to view its contents.Still photos are stored in

23
the folder named "Photo".Movie Clips are stored in the folder named "Video".
3.Copy the files to the chosen directory in the computer.
Wi-Fi Connecting
Download and install APP in Pad or smartphone, you can operate camera remotely.The
functions include shooting, setting the camera and preview photos or videos, it will be
more convenient to control.
Step 1: Download the APP "XDV360”.
Search and download APP named "XDV360" from “Apple App Store “or “Google Play
“.Then install it on your Pad or smartphone.
Step 2: Open camera’s Wi-Fi.
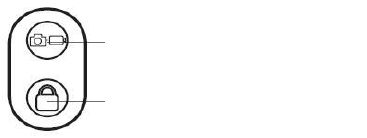
Press Wi-Fi button,the screen will appear icon .Waiting for at least 5 seconds,Wi-Fi
information will show on the screen. Wi-Fi account:X360_XXXX,password:12345678.At
this time ,the Wi-Fi indicator light will turn red and flicker.
Step 3: Connect camera’s Wi-Fi
Open Wi-Fi search on smartphone or Pad.Search camera’s Wi-Fi account.Input the
initial password "12345678".Then click to link.

24
Step 4: After connection is successful, the Wi-Fi indicator light will keep red.Open APP
"XDV360" on the smartphone or Pad.You can take photos,record videos, playback files
and set the camera parameters on phone.
Step 5: Press Wi-Fi button will exit Wi-Fi.
Windows PC Application
For this camera, once you insert memory card and turn on the camera, there will be a
text document written on the TF card automatically.
1. Connect camera to a computer through the supplied USB cable, then turn on the
camera. The screen will display”USB Mode”,”PC Camera”,”Charging Mode”. Press
Up/Down button to choose”USB Mode”,then press OK button to enter USB mode.
2. Open [My Computer] or [Windows Explorer]. A"Removable Disk" appears in the drive
list. Double-click the "Removable Disk" icon to view its contents as below. Double click
the “WindowsManual”.

25
3. You will find a download address in this text document. Open the url and download the
application.
4. Open the camera’s Wi-Fi. Search its account on computer and click link.
5. Open application “XDV360.exe”,it will show connecting.
6. Once connection is successful,the application window will show the main
interface.The operation is same as smartphone APP.
Video Transcoding
For saving and sharing the videos, users need to transcode the previous videos.
1. Find and open the video files in the folder path.
2. Choose the mode you need, then click icon“ ” for saving.
3. If users want to share the video with VR drag effect to Youtube or Facebook, you
should choose the last VR transcode mode “ ” and save it. The saved filename is
VR_XXXX.mp4.
Share Pictures In Smartphone APP
For IOS user:
1. Connect your phone to the internet via Wi-Fi.
2. Open APP ”XDV360” and click ” ”, then enter the offline mode.

26
3. Find pictures in “Media”-”Phone”. (If there is no picture in phone, please download
pictures from the camera to your phone first.)
4. Open a picture and click the fish-eye icon “ ” to choose one mode.
5. Then click share icon ” ” to share pictures.
If pictures have been saved in photo albums of smartphone, you can find the pictures
in the albums to share.
IOS supports share platforms: Wechat,Wechat Moments,QQ, Facebook,Instagram
and Email.
For Android user:
1. Connect your phone to the internet via Wi-Fi.
2. Open APP ”XDV360” and click ” ”, then enter the offline mode.
3. Find pictures in “Media”-”Phone”. (If there is no picture in phone, please download
pictures from the camera to your phone first.)
4. Open a picture and click the fish-eye icon “ ” to choose one mode.
5. Then click share icon ” ” to share pictures.
If the pictures have been saved in photo albums of smartphone, you can find the
pictures in the albums to share.
If click the Email icon to sharing,users can share the picture on all of the share
27
platforms which have already been installed in your smartphone.
Share Videos To Youtube And Facebook
Share videos to Youtube:
1. Visit the website at https://www.youtube.com/.
2. Landing Youtube account first.Then click “upload”,drag the video you want to share to
the webpage. After uploading completed,the video is released successfully. (The video
files must be transcoded to VR mode first.Filename is VR_XXXX.mp4.)
3. Open the uploaded files to watch the video and enjoy the VR effect.
Share videos to Facebook:
1. Visit the website at https://www.facebook.com/.
2. Landing Facebook account first.Then click “Photos/Video”, choose the files you want
to upload. After uploading finished,click release. (The video files must be transcoded to
VR mode first.Filename is VR_XXXX.mp4.)
3. Refresh the webpage, then you can see the shared video files.
28
Remote Control Connection
The remote control can be connected to the camera automatically when camera is in
start-up status.
Note: If the camera is in Wi-Fi mode, the remote control can not be connected. Please
close the Wi-Fi function before using the remote control.
Capture/Recording Button:
1. Taking a picture: Press the button once to take a photo.The status indicator light will
flash once.
2. Recording a video clip: Press and hold on the button for 3 seconds,the camera will
start to record a video clip. The status indicator light will flash continuously and
slowly.Press this button again to stop recording. The status indicator light will stop
flashing.
Capture/Recording Button
Turn On/Off The Screen Button
29
Turn On/Off The Screen Button:
In working mode, press this button once, the camera screen will turn off.
Press this button again, the camera screen will turn on.
How To Use The PC Camera Function
1. Connect camera to a computer through USB cable.
2. Turn on the camera.Press Up/Down button to choose “PC Camera”.The screen will
appear camera lens.
3. In Window XP system,open [My Computer],double click “USB video tool”.The camera
will work as PC camera.In Window Vista, 7 and 8 system, the PC camera function can
only be used for communication software (Skype,QQ etc.)
4. Press Power button to exit PC camera mode.
30
Specification
Image Sensor
Sony 8Mega pixels Digital Camera
LCD display
0.96" Lattice Screen
Resolution
Image:16M /12M /8M /5M
Video: 2448×2448 30fps (1:1); 2048×2048 30fps (1:1);
1440×1440 60fps/30fps (1:1); 1072×1072 60fps/30fps (1:1)
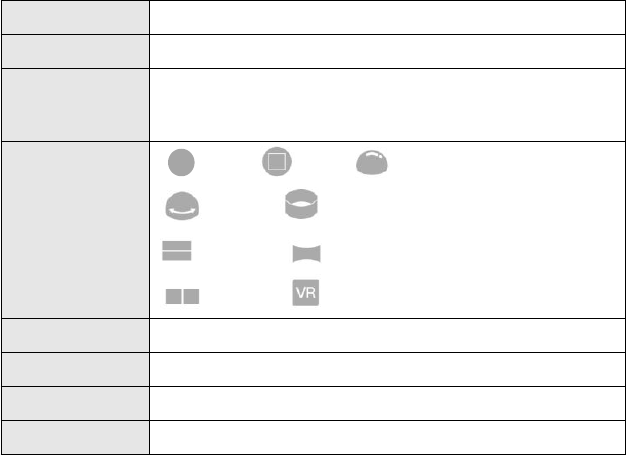
Unfold Mode
round , square, hemisphere,
inner ring , annular ,
2 in 1 mode, 360 panoramicmode,
VR mode, VR transcode mode
Aperture
F 2 f=1mm
Lens feature
360°x 230° Large panoramic fisheye lens
Focus
1.5m~infinity
White balance
Auto,Sunny,Cloudy, Incandescent Light,Fluorescent Light

31
Exposure
+3.0 EV ~ -3.0 EV in 1.0EV increment
PC Camera
Yes
PC interface
Micro USB 2.0
Microphone
Built-in
Speaker
Built-in
Storage
Micro SD card, up to 64GB
Power source
Dismountable Li-ion rechargeable battery 1050mAh (Battery
model: S007; Manufacturer: SHENZHEN KAILIANYIN
TECHNOLOGY CO.,LTD)
Android APK,
apple APP
Search "XDV-360" ,Support android 4.2or above,ios 7 or
above
windows APP
Support windows xp,windows 7,windows 8.,windows 10
Dimension& Net
Weight
48.0x50.0x52.5mm/85g
32
Statement
This device complies with part 15 of the FCC Rules. Operation is subject to the following
two conditions:
(1) This device may not cause harmful interference, and
(2) this device must accept any interference received, including interference that may
cause undesired operation.
FCC Warning
This equipment has been tested and found to comply with the limits for a Class B digital
device, pursuant to part 15 of the FCC Rules. These limits are designed to provide
reasonable protection against harmful interference in a residential installation. This
equipment generates, uses and can radiate radio frequency energy and, if not installed
and used in accordance with the instructions, may cause harmful interference to radio
communications. However, there is no guarantee that interference will not occur in a
particular installation. If this equipment does cause harmful interference to radio or
television reception, which can be determined by turning the equipment off and on, the
user is encouraged to try to correct the interference by one or more of the following
measures:
33
— Reorient or relocate the receiving antenna.
— Increase the separation between the equipment and receiver.
— Connect the equipment into an outlet on a circuit different from that to which the
receiver is connected.
— Consult the dealer or an experienced radio/TV technician for help.
MODIFICATION: Any changes or modifications not expressly approved by the grantee of
this device could void the user’s authority to operate the device.