LINKSYS DMC350 Conductor-Wireless-N Digital Music Center User Manual DMC350 User manua
LINKSYS LLC Conductor-Wireless-N Digital Music Center DMC350 User manua
LINKSYS >
Contents
- 1. User manual 1 of 5
- 2. User manual 2 of 5
- 3. User manual 3 of 5
- 4. User manual 4 of 5
- 5. User manual 5 of 5
User manual 4 of 5
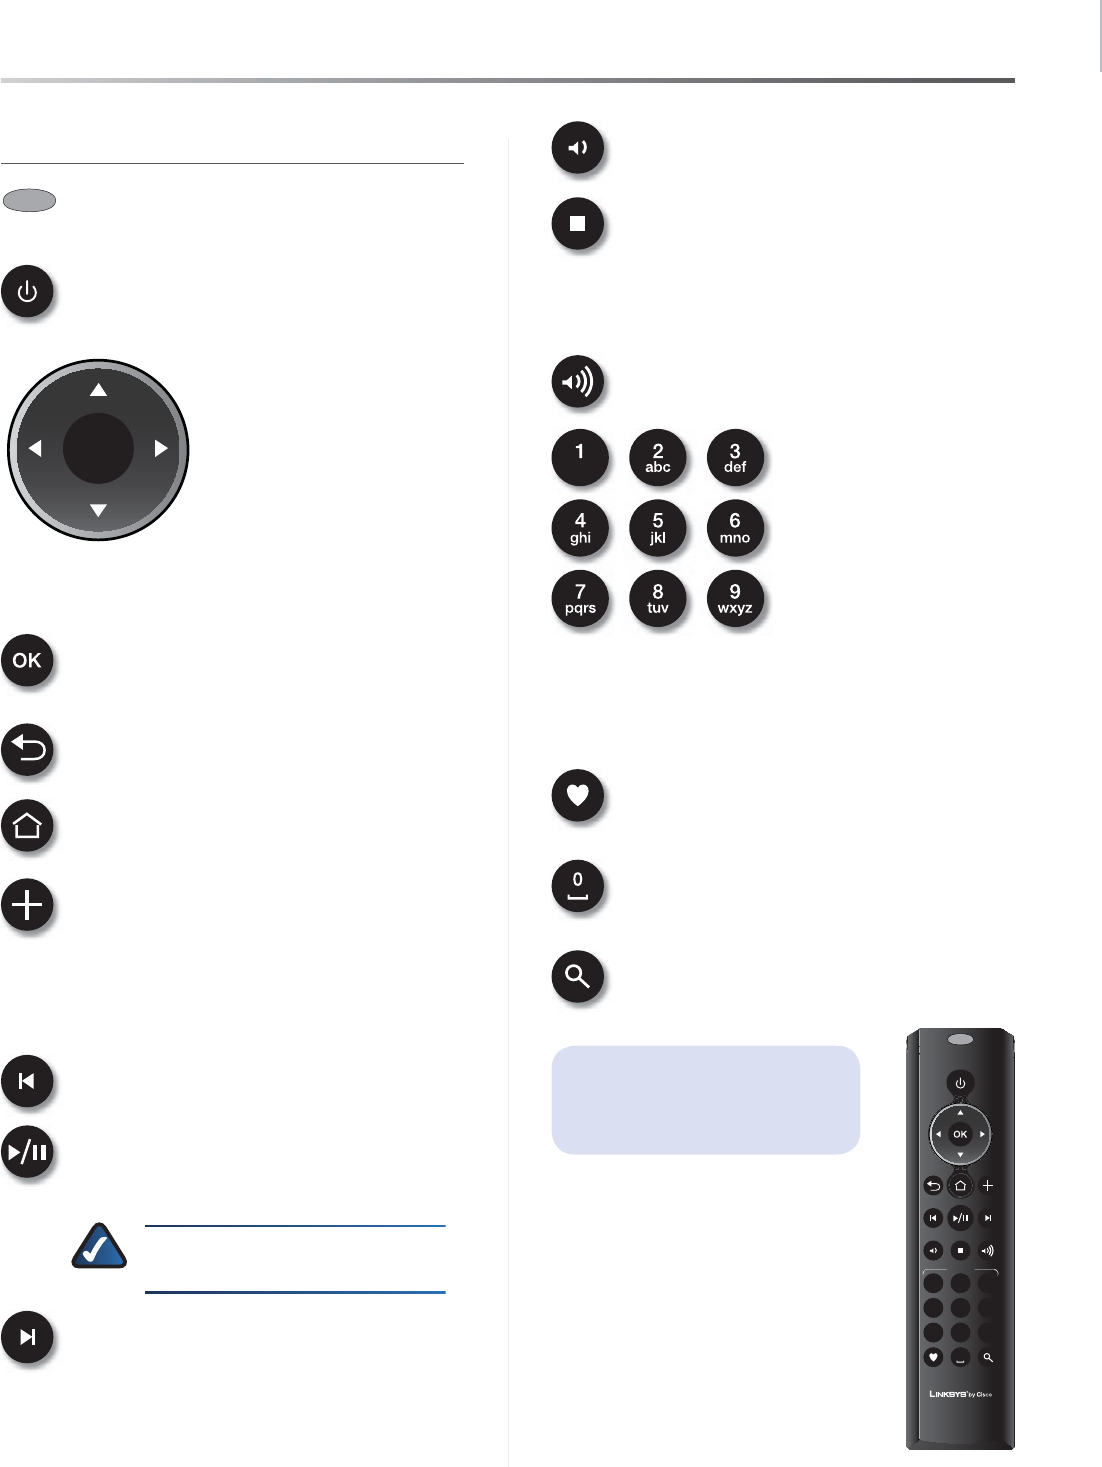
IR Remote Control Functions
9
Wireless Home Audio
Conductor/Wireless-N Digital Music Center
IR Remote Control Functions
Infrared Lens/LED This is the area that transmits
the remote functions to the device. For optimal
use, point the remote directly at the device.
Power/ Standby Toggles between Power On
and Standby for your Conductor, Director, or
Player.
OK
Up Moves up in a list menu.
Down Moves down in a list
menu.
Left Moves left in the carousel
menu.
Right/Options Moves right
in the carousel menu. It is
also used to access additional
options in the user interface
on your Conductor or Director.
OK Selects and opens items that are highlighted
in the user interface. In the Song menu, clicking
OK will play that song.
Back Returns to the previous screen.
Home Press this button once from the Home
menu or twice from any other menu to go to the
Now Playing screensaver.
Add to Now Playing Queue When music is
highlighted (Genre, Playlists, Artist, Album, or
Song), the selected item will be added to the
queue on the Now Playing screen. The queued
item will be added to the bottom of the queue
and will not begin playing even if it is the only
item in the queue.
Previous Press this to play the previous track in
the queue.
Play/Pause This button toggles between
playback and a paused state. If nothing is playing,
pressing this button when music is selected starts
playback of the selected music.
NOTE: You can not pause streaming
Internet music.
Next Plays the next song in the queue.
Volume Down Decreases the volume level of
the music that is currently playing.
Stop Stops the current music selection (playing
or paused music) and moves the first item
played to the top of the queue which is then
highlighted. The user is then brought to the Now
Playing screen. The Stop button does not clear
the queue.
Volume Up Increases the volume level of the
music that is currently playing.
Alpha-Numeric Keypad/
Presets Numeric Keypad
is the default mode. In
Search and Setup modes,
the keypad can be used
for text entry similar to
cell phones without a
full keyboard, including
numbers, letters and
symbols. To begin playing
a preset, press the
Favorites button and then
press the number that you
selected for the preset.
Favorites This button is a shortcut to favorites.
Play a favorite track by pressing this button and
the preset number.
Zero/Space This button functions as 0 in the
preset list and as a space button when used in a
text input field.
Search This button will open the Search field in
the on-screen menu.
Click on this page to launch
an interactive overview of the
remote control functions.
0
123
456
789
abc def
ghi jkl mno
pqrs tuv wxyz
presets
Setting Up Your Conductor
10
Wireless Home Audio
Conductor/Wireless-N Digital Music Center
Setting Up Your Conductor
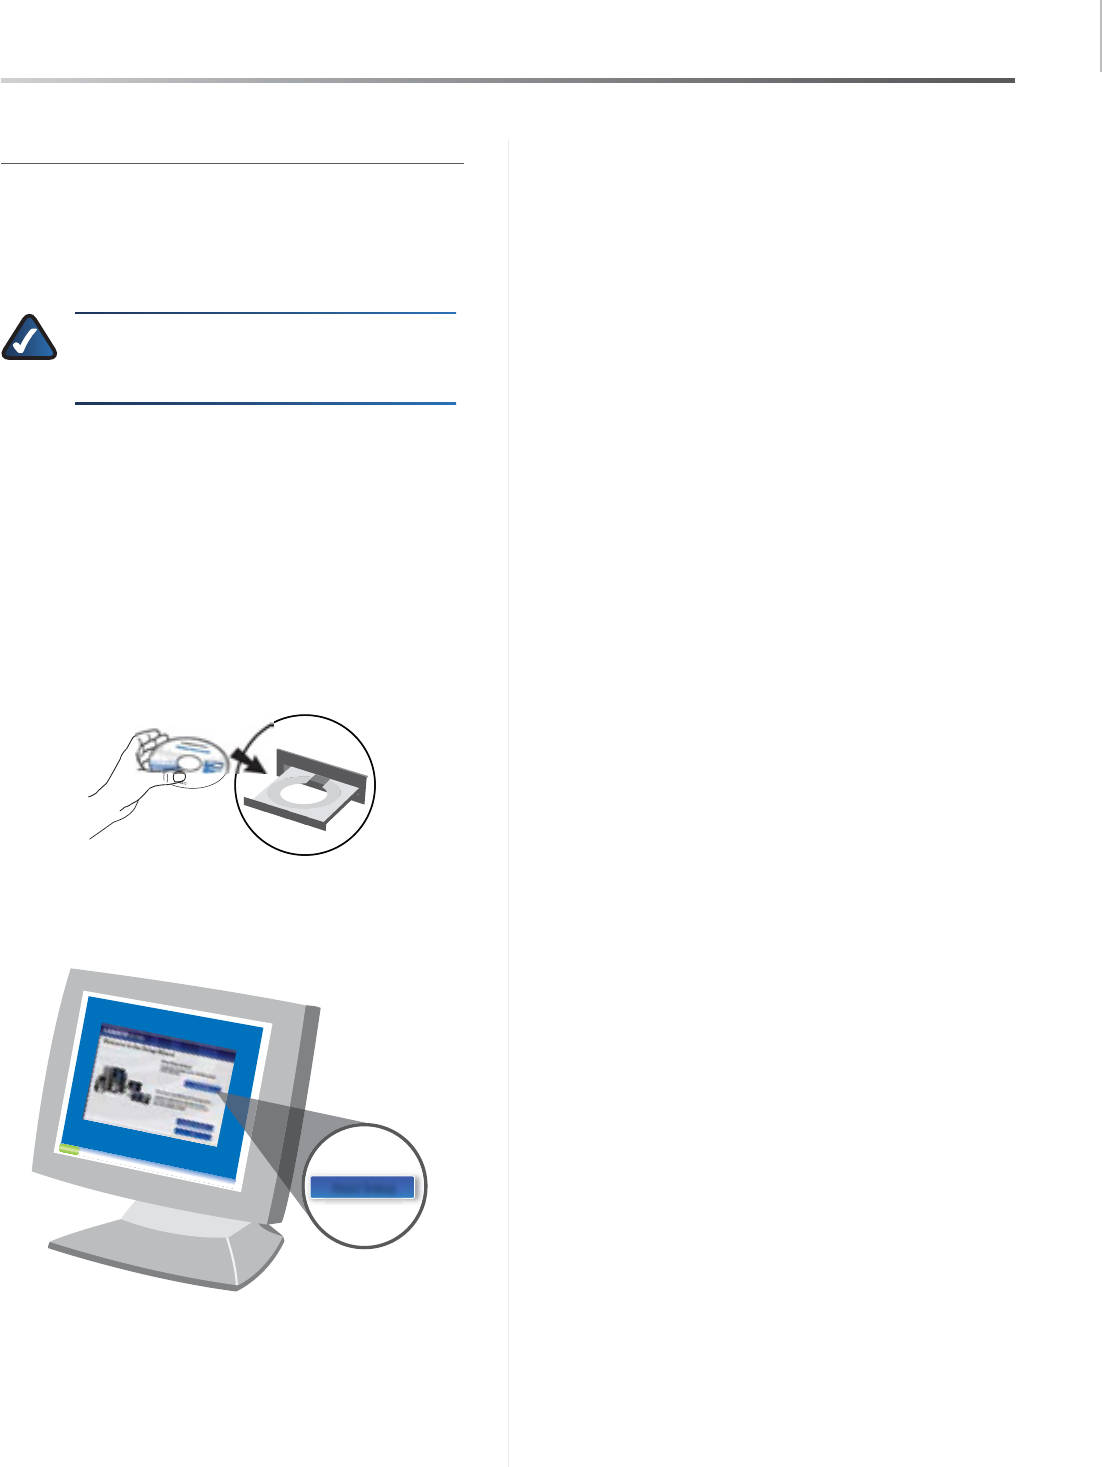
Setup with EasyLink Advisor
The Wireless Home Audio Installer will guide you through
the setup of your Linksys by Cisco Wireless Home Audio
devices.
NOTE: The initial setup of the Conductor
requires you to use the CD-ROM to setup your
Internet services.
Below is an overview of the steps required to get up and
running.
Install EasyLink Advisor
s
Install Cisco Media Center software for your computers
Configure your Wireless Home Audio Devicess
Create your Cisco account and register for music s
services
To begin, insert the CD into your CD-ROM drive. 1.
Click the 2. Start Setup button and follow the on-screen
prompts to configure your Wireless Home Audio
devices.
Start Setup
Common Uses
11
Wireless Home Audio
Conductor/Wireless-N Digital Music Center
Common Uses
The Common Uses section contains details on some of the
most commonly used features of your Conductor. Below is
an overview of the contents of this section:
Playing Your Music
sHow do I Play Music from My iPod?,page 12
sHow Do I Play Music From My PC or iTunes Library?,
page 12
sHow Do I Connect External Audio Devices?,page
13
sHow Do I Access Music on My USB Drive?,page 13
Internet Music and Radio Stations
sRhapsody ,page 14
sRadioTime ,page 14
Managing Music Libraries
sCreating and Using Favorites,page 15
sPlaying a Favorite,page 16
sCreating Playlists,page 17
sUsing the Queue,page 18
sAdding Music to the Queue,page 18
sRemoving Music from the Queue,page 18
sShuffle,page 19
sRepeat,page 19
General Functions
sPlaying to Multiple Rooms,page 19
sVolume Control,page 20
sControlling the Volume on a Single Device,
page 20
sControlling the Volume on Multiple Devices ,
page 20
sThe Now Playing Screensaver,page 21
sPower On/Off and Standby Modes,page 21
Using the Cisco Media Software
sStarting the Cisco Media Server Manually,page 22
sAdding Music Folders to the Cisco Media Server,
page 22
sUsing the Cisco Media Player,page 23
sZones,page 23
sFavorites,page 25
sMenu,page 26
sMedia Sources,page 26
sMenu Options,page 26
Common Uses
12
Wireless Home Audio
Conductor/Wireless-N Digital Music Center
Playing Your Music
The Linksys by Cisco Wireless Home Audio system provides
you with an extensive assortment of source options for
playing audio throughout your home.
How do I Play Music from My iPod?
The optional Docking Station for iPod® (MCCI40) lets
you connect your iPod to the Conductor and play your
iTunes music throughout your home. Play any song that
is available on your iPod, even songs that were purchased
from the iTunes store with Digital Rights Management
(DRM). Music is played directly from your iPod and
available to all of your Wireless Home Audio devices.
Navigate to the Devices icon on the Controller or 1.
Conductor on-screen menu and select it on your
remote by clicking OK.
A list of options will appear. You can now navigate 2.
through the music and audio on your iPod from the
Controller or Conductor. Use the up and down
buttons on the IR remote to navigate the list and press
OK to select.
Audio is sorted by Playlist, Artist, Album, Genre, Track,
Podcast, Composer, and AudioBook.
For details on connecting your Docking Station for iPod,
please refer to Docking Station for iPod,page 7.For
additional details on browsing content on your iPod,
please refer to Devices (Accessing Your iPod),page 32.
How Do I Play Music From My PC or
iTunes Library?
Installing the Cisco Media Server software on your
computer allows you to play music from your computer
on your Director, Conductor, or Player. The Cisco Media
Player software allows you to control playback of your
Wireless Home Audio devices from your computer.
During installation of the Cisco Media software, the
application allows you to include your My Music and
iTunes libraries. This will share the content located in those
folders with your Wireless Home Audio system when the
Cisco Media Server is launched.
NOTE: Some iTunes files may not be available.
Songs purchased from iTunes† may be protected
with Digital Rights Management (DRM); DRM
files cannot be played to your Wireless Home
Audio devices directly from your PC. The
optional Linksys by Cisco Docking Station for
iPod (MCCI40) will allow you to connect your
iPod to your Conductor and play back all of the
songs from your iPod.
iTunes Plus files are not protected†
For additional details, refer to Using the Cisco Media
Software,page 22.
Common Uses
13
Wireless Home Audio
Conductor/Wireless-N Digital Music Center
How Do I Access Music on My USB Drive?
When you connect a USB drive to the Conductor, a USB
drive icon will appear on the carousel.
Once you select this option, you will be able to sort
through the songs on the drive by Artist, Album, or Genre.
You can also Browse through the folders or Search by
Artist, Album, or Song title.
For details on searching through the content on your USB
drive, refer to Artists,page 30,Albums,page 31,Genres,
page 31,Search,page 31, and Browse Folders,page
32.
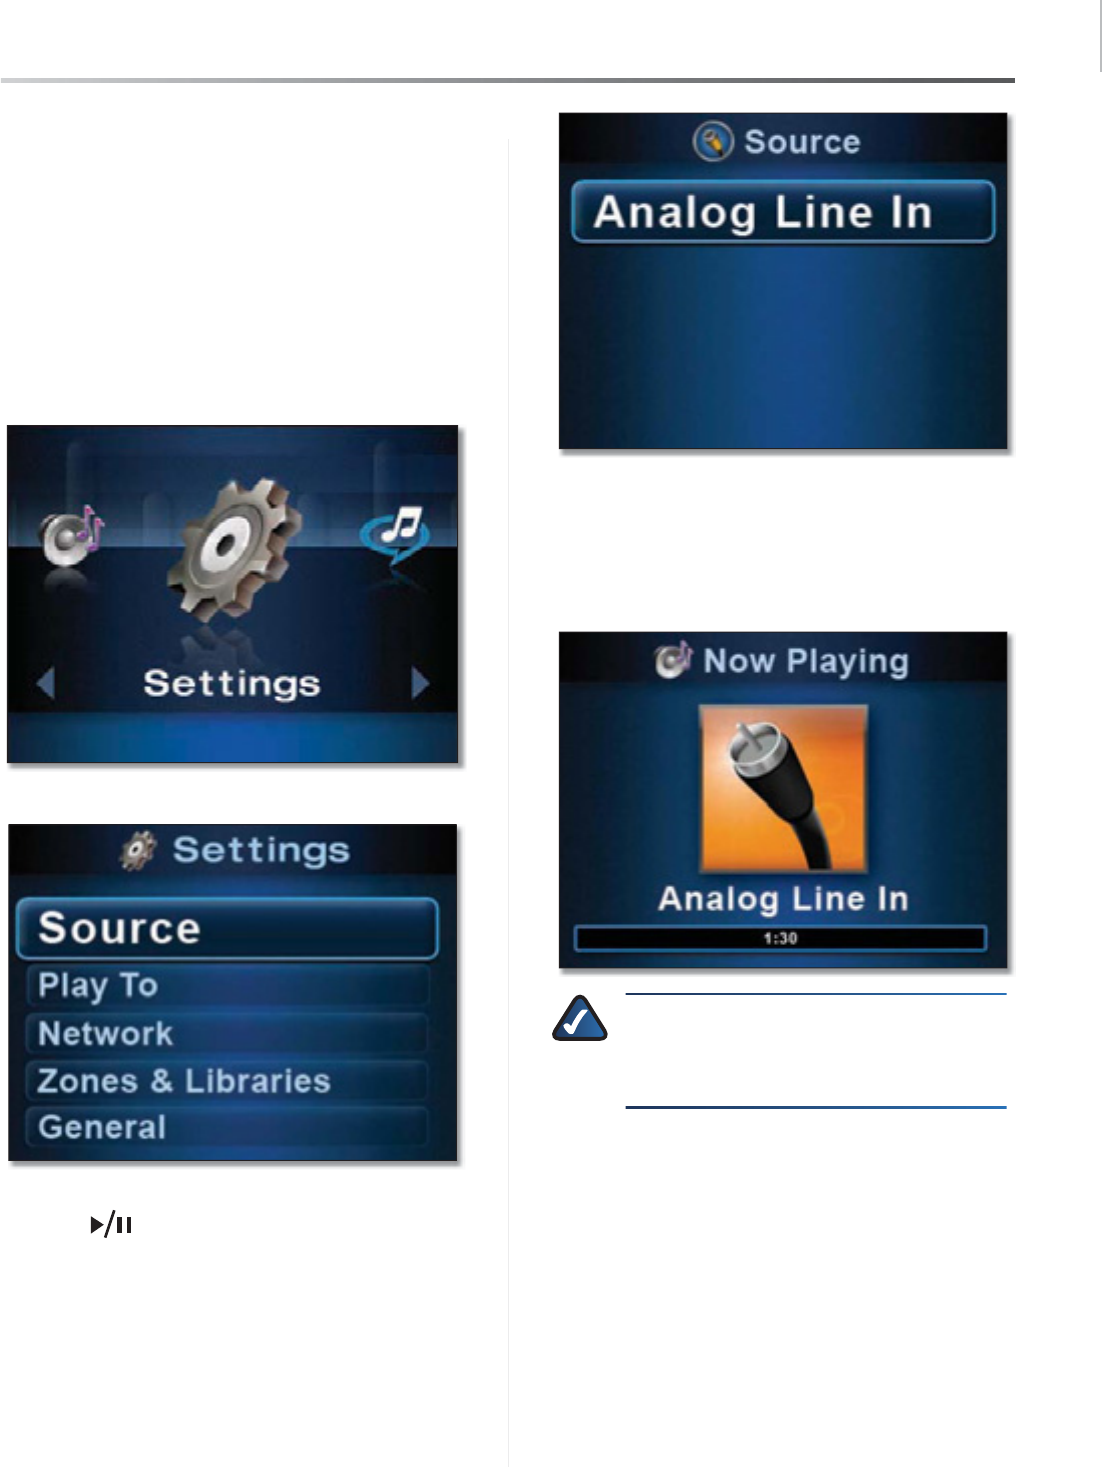
How Do I Connect External Audio
Devices?
You can connect any external analog audio source to your
Wireless Home Audio network using the RCA input jacks
on the back of your Director or Player and play the music
to all the devices in your home.
This allows you to stream music from sources such as
turntables, stereo systems, and MP3 players.
To play external analog audio, ensure that the RCA outputs
are connected from your external device to the RCA inputs
of the Director and perform the following steps:
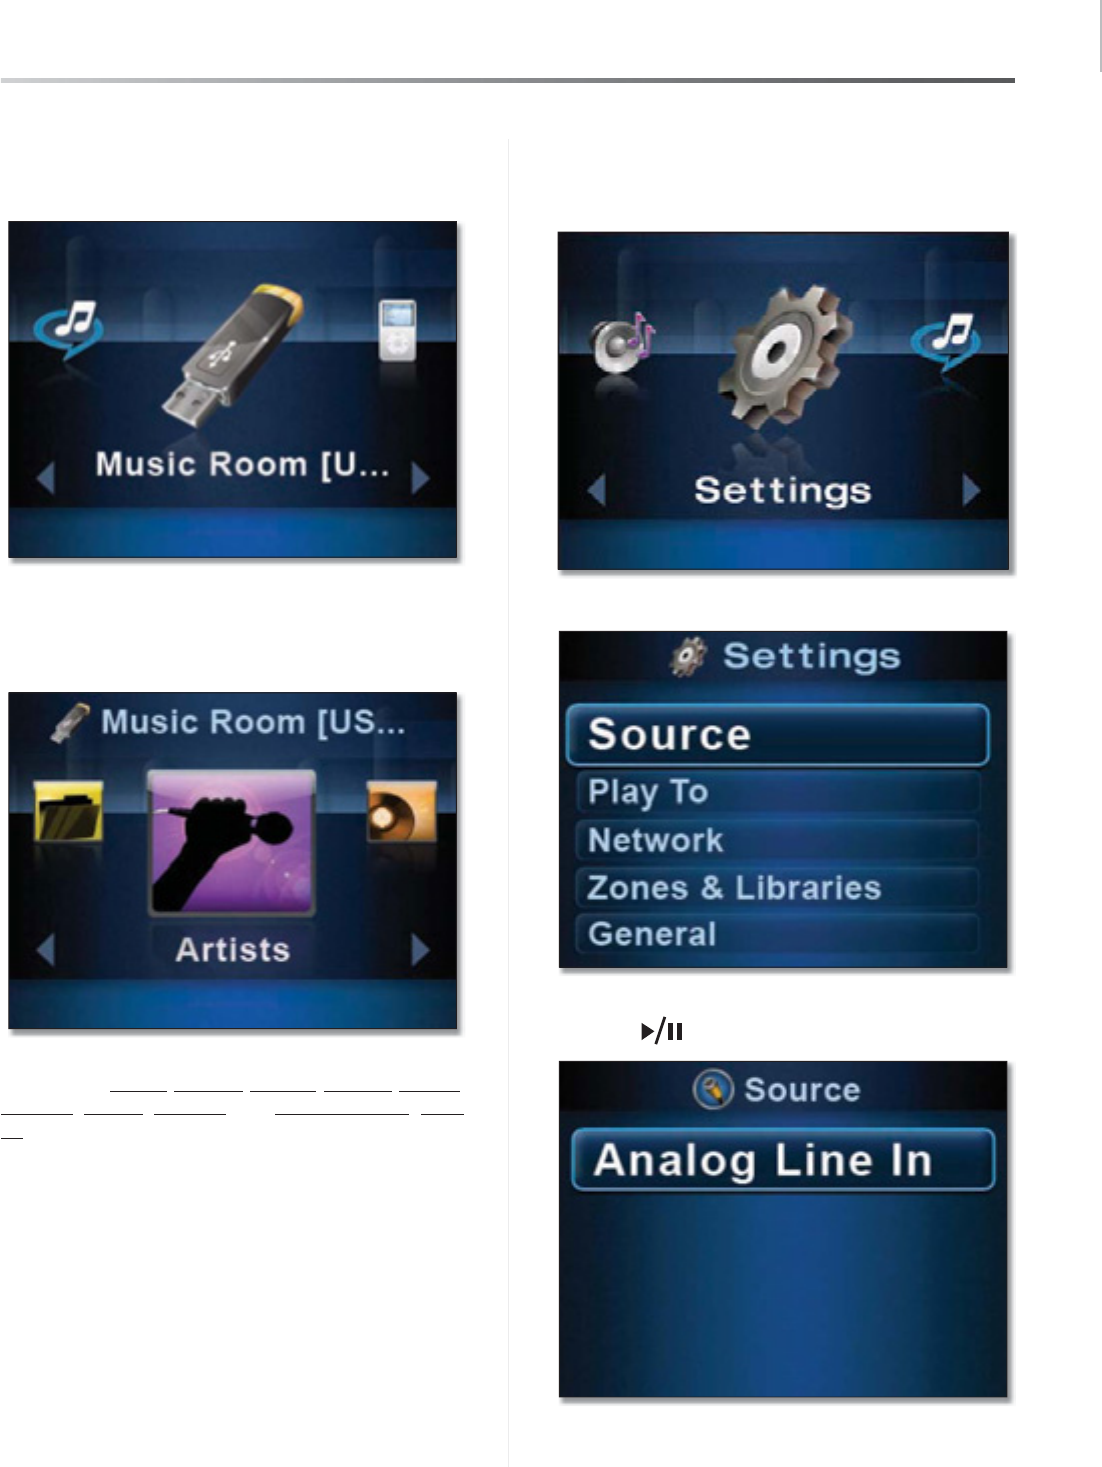
Select 1. Settings from the main menu.
Select 2. Source from the Settings menu.
Analog Line In3. will appear on the screen. Press the OK
or Play button.
Common Uses
14
Wireless Home Audio
Conductor/Wireless-N Digital Music Center
Internet Music and Radio Stations
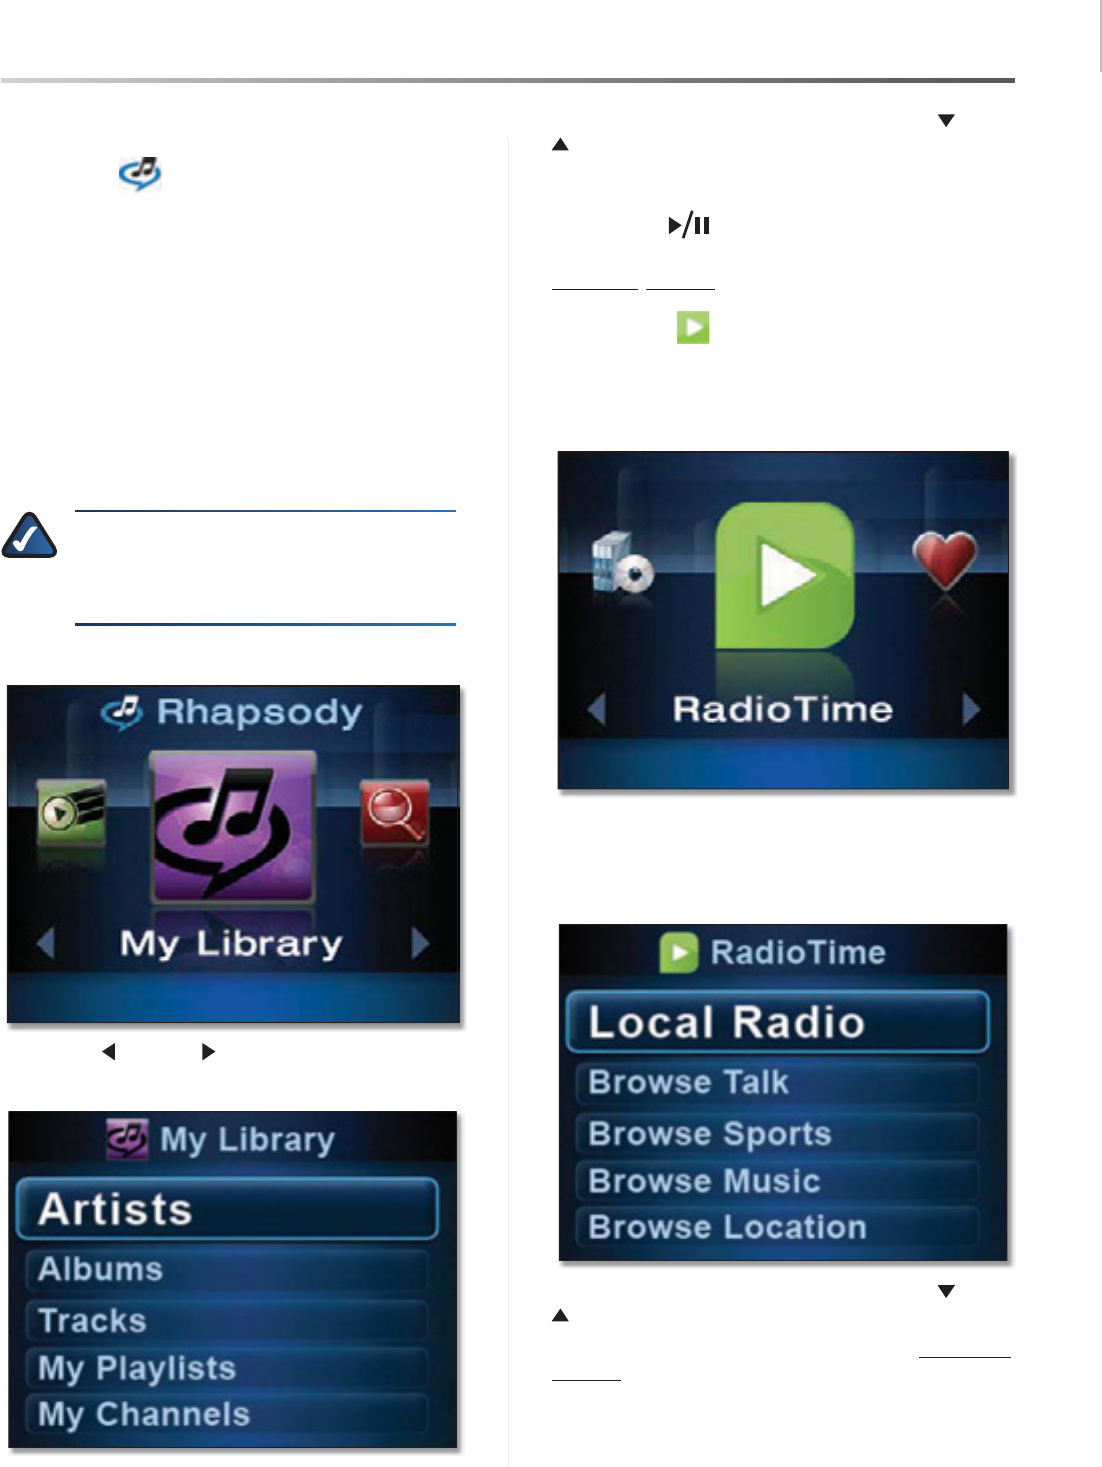
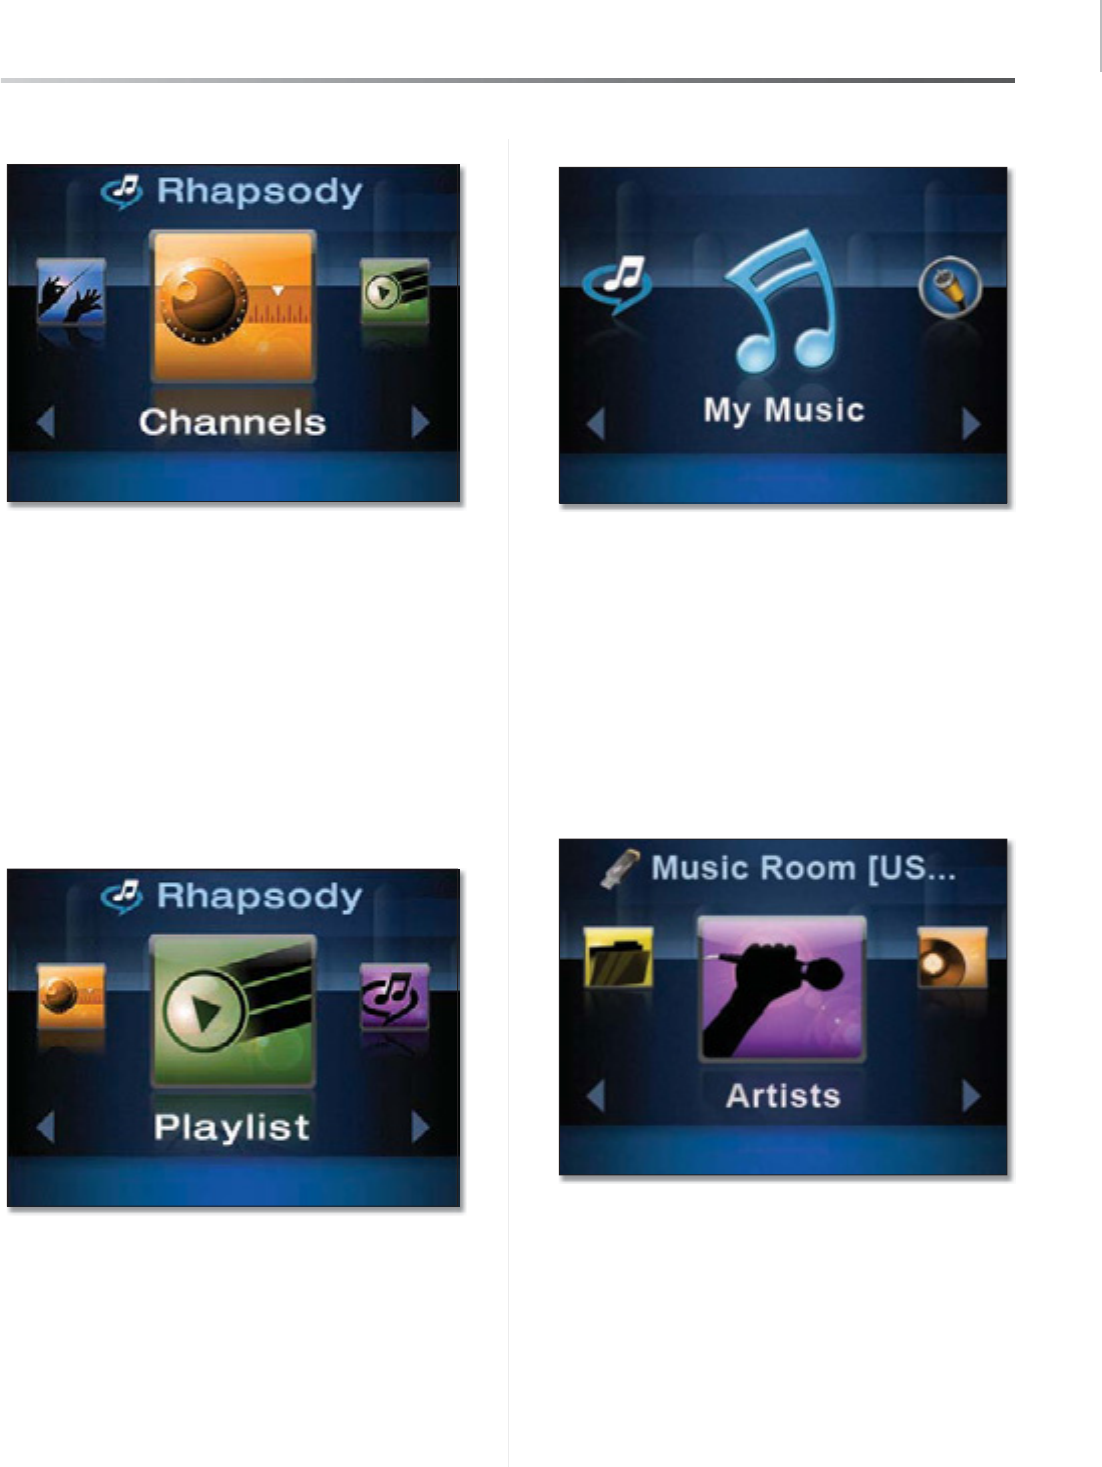
Rhapsody
Rhapsody is the critically-acclaimed digital music service
that provides its members unlimited access to millions of
full-length tracks. With Rhapsody and your new Linksys by
Cisco Wireless Home Audio product you will have instant
access to all of your favorite music. Listen whenever you
want, play continuous music with Rhapsody Channels
and discover new music and old favorites.
You can access Rhapsody Online from your Computer
and bookmark your favorite artists, tracks, and albums.
You can also create playlists of your favorite tracks. These
bookmarks and playlists can be accessed from your
Conductor via My Library in the Rhapsody menu.
NOTE: In order for your Rhapsody service to
work properly with the Conductor, you must
have used the Linksys by Cisco EasyLink Advisor
CD-ROM to setup your Conductor.
The initial Rhapsody menu is a carousel menu.
Use the left and right buttons to move through the
menu items. Press OK to select an item.
Navigate through list menus by using the down and up
buttons. Press OK to view tracks in an album, playlist,
or associated with an artist and press the Back button to
return to the title.
Press the Play button to start playing a selection.
For additional details on the Rhapsody menus, refer to
Rhapsody,page 28.
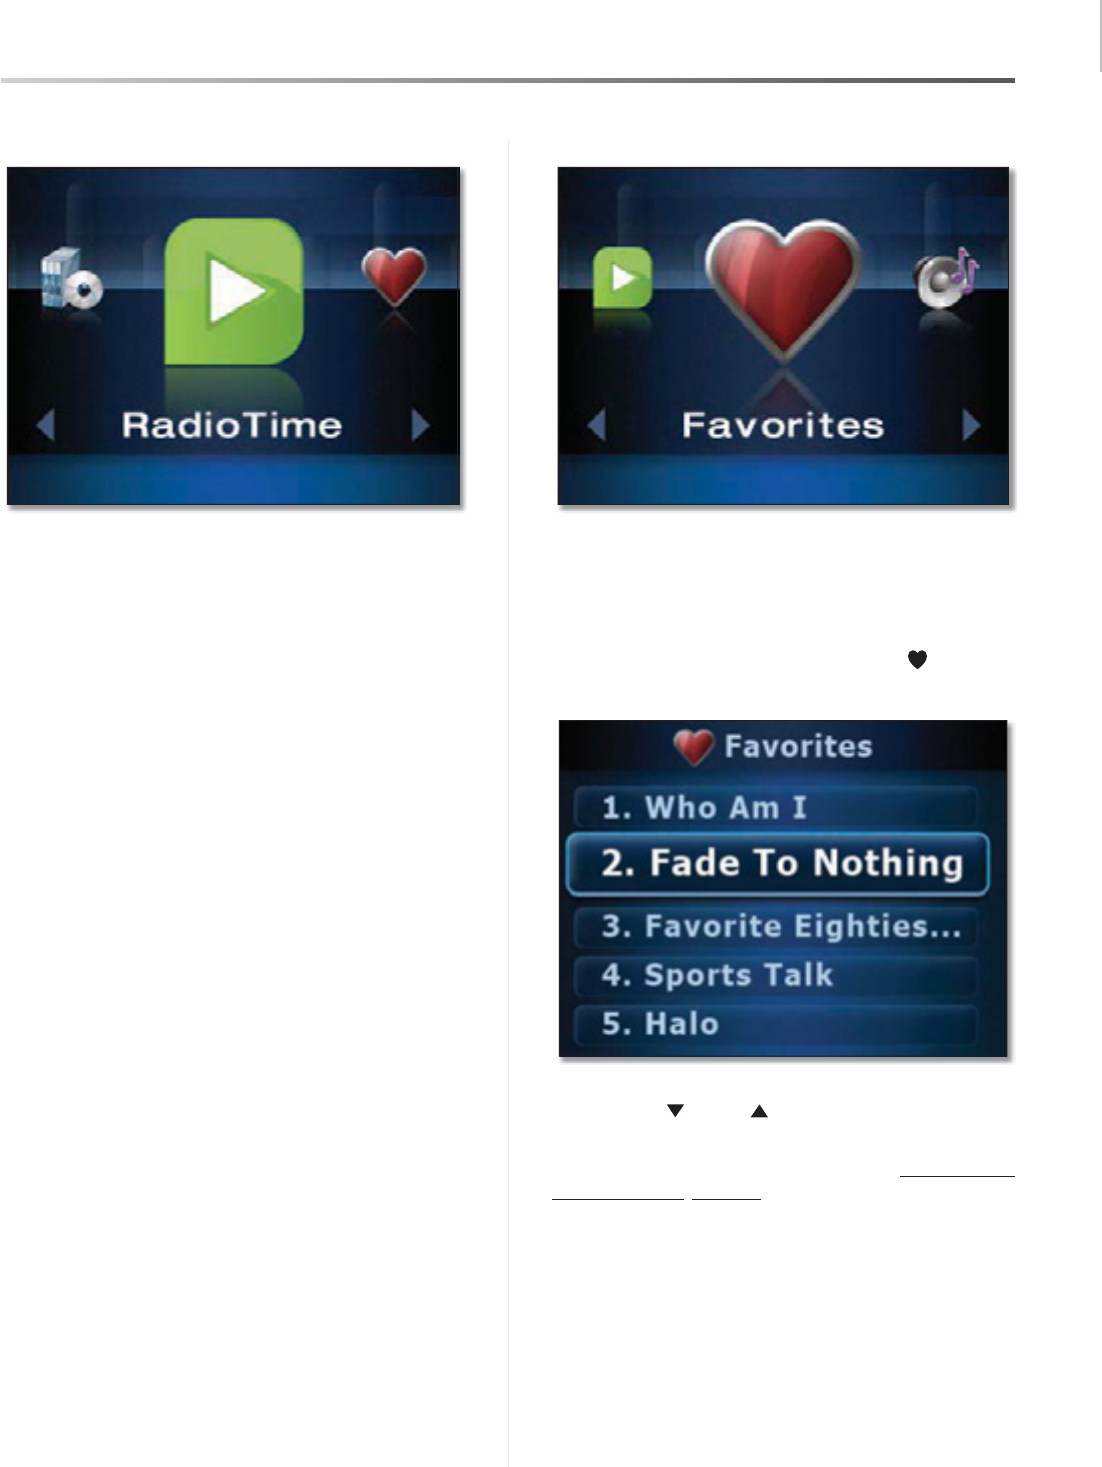
RadioTime
Radiotime provides streaming access to over 100,000
radio stations and shows. You can locate shows based on
location, topic, or music genre.
When you select RadioTime, a list menu will appear with
options that allow you to browse local radio stations,
talk shows, sports shows, music genres, and stations in
locations across the world.
Navigate through list menus by using the down and up
buttons. Press OK to make a selection.
For additional details on RadioTime, refer to RadioTime,
page 34.
Common Uses
15
Wireless Home Audio
Conductor/Wireless-N Digital Music Center
Managing Music Libraries
The way you interact with your music content is highlighted
in this section. You will find out how useful Favorites are
and how to use the queue functionality.
sCreating and Using Favorites,page 15
sPlaying a Favorite,page 16
sCreating Playlists,page 17
sUsing the Queue,page 18
sAdding Music to the Queue,page 18
sRemoving Music from the Queue,page 18
sShuffle,page 19
sRepeat,page 19
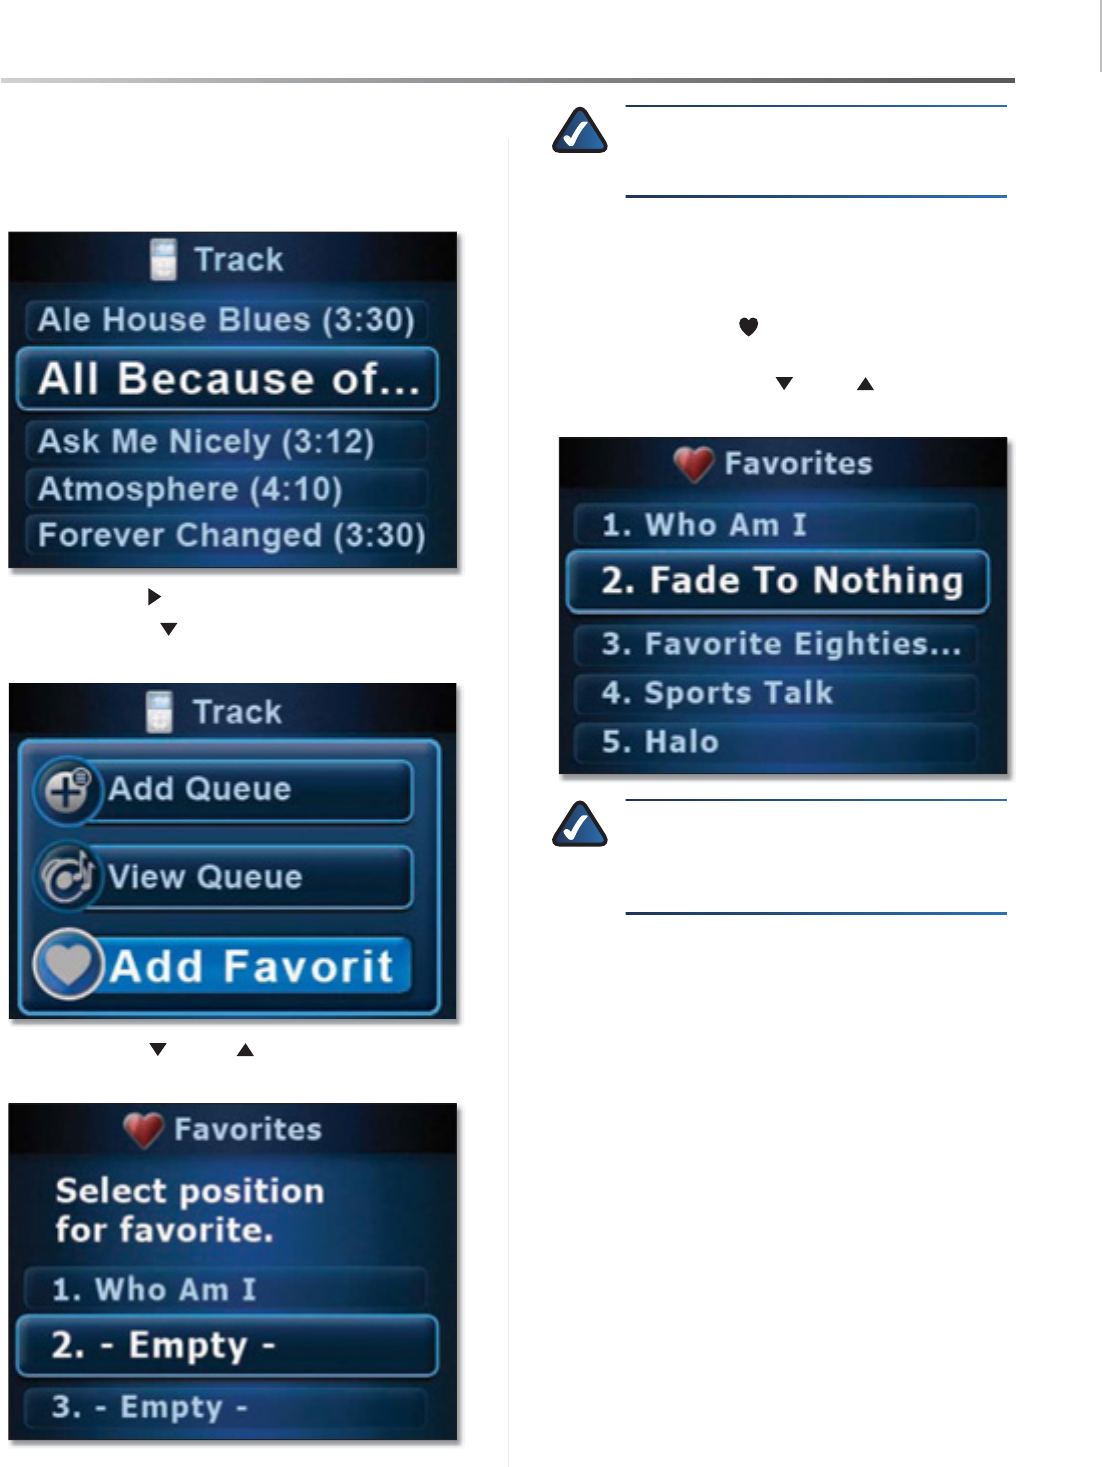
Creating and Using Favorites
Favorites allow you to quickly and easily access music and
channels that are meaningful to you.
Some examples of how favorites can be used:
One favorite can be assigned to your favorite album on
Rhapsody, another can be assigned to your favorite radio
station on RadioTime, and another can be assigned to your
favorite playlist on your iPod (with the MCCI40 Docking
Station for iPod). You can even add all of the songs in your
Now Playing Queue as a Favorite. You can then access your
favorites at any time by pressing the Favorites button
and the assigned favorite number.
There are 10 favorite positions that can be set. You can
assign favorite tracks, albums, playlists, genres, artists or
channels. When you select an album, playlist, genre, or
artist, a playlist of available tracks is created at the time
you add the favorite. If you add or remove tracks from the
album, playlist, genre, or artist you will need to add it as a
favorite again to update it.
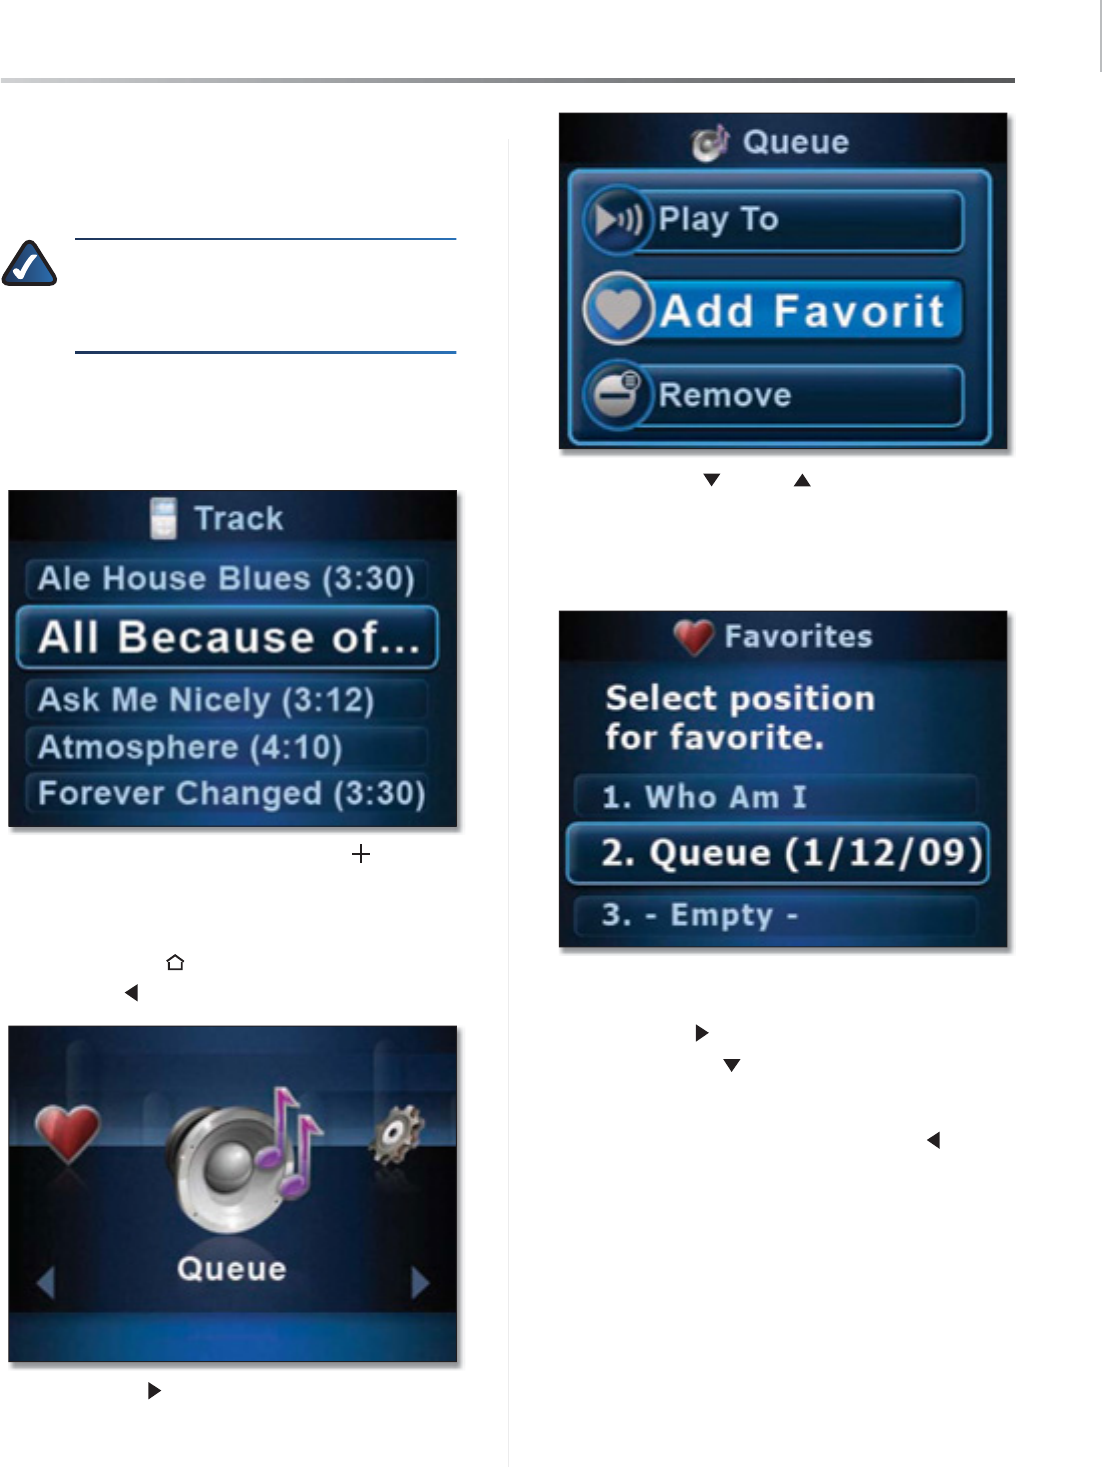
Track
sIndividual tracks can be assigned to favorites
so that the desired track plays when the associated
favorite is selected.
Album
sEntire albums can be added by selecting the
album as a favorite. When the favorite is played, the
entire album will be added to the Now Playing Queue.
Artist
sAdding an artist creates a playlist of every
track available from the selected artist on the selected
media at the time the favorite is created.
For example, if you select an artist in Rhapsody, a
playlist containing their entire catalog at the time
of the selection will be created. Any time that you
select this Favorite, this playlist will be added to the
Now Playing Queue. If the artist releases a new song or
album and you want to add it to the existing favorite,
simply overwrite the existing favorite by adding this
artist as a favorite again.
If you select an artist from your iPod, a playlist will be
created containing all of the tracks from the selected
artist located on your iPod at the time that the favorite
is created. Playing the favorite will add these tracks to
the Now Playing Queue. If you add additional songs
from the artist to your iPod and want to add them
to the existing favorite, simply overwrite the existing
favorite by adding this artist as a favorite again.
Playlist
sPlaylists can be assigned to a favorite for easy
selection. When the favorite is created it generates a
new playlist for the favorite based upon the selected
playlist.
If a song is added or deleted from the selected playlist
after it has been added as a favorite, the changes
aren’t reflected in the favorite unless you overwrite
the existing favorite by adding the playlist as a favorite
again.
Genre
sAdding a genre creates a playlist of every track
available from the selected genre on the selected
media at the time the favorite is created.
For example, if you have a USB drive attached and
select the Alternative genre on the USB drive, a playlist
will be created that contains all of the music on the
USB drive that is tagged as alternative.
Channel
sA channel can be designated as a favorite
for quick and easy selection of a favorite Rhapsody or
RadioTime channel. You can not add music to the Now
Playing Queue when a channel is playing since the
channel is continuously playing music.
Common Uses
16
Wireless Home Audio
Conductor/Wireless-N Digital Music Center
To create a favorite using the IR Remote, perform the
following steps:
Locate and highlight the track, album, playlist, genre, 1.
or artist that you want to set as a favorite.
Press the right 2. button.
Press the down 3. button to go to Add Favorite and
select OK.
Use the down 4. and up buttons to navigate and
press OK to select a favorite position.
NOTE: If you select a favorite that is currently
in use, it will be overwritten with the new
favorite.
Playing a Favorite
To play a favorite using the IR Remote, perform the
following steps:
Press the 1. Favorites button.
Press the number of the favorite on the numeric 2.
keypad or use the down and up buttons to move
through the list of favorites and press OK to select.
NOTE: Selecting a favorite, clears the current
tracks in the Now Playing Queue and adds the
track(s) associated with the currently selected
favorite.
Common Uses
17
Wireless Home Audio
Conductor/Wireless-N Digital Music Center
Creating Playlists
Playlists can be created on your Conductor by adding
music to the Now Playing Queue and saving the queue as
a favorite.
NOTE: Playlists can also be created in Rhapsody
and iTunes. For details on configuring playlists
in Rhapsody and iTunes, please refer to the help
files located in those applications.
To create a playlist on your Conductor using the IR Remote,
perform the following steps:
Locate a song, album, artist, genre, or existing playlist 1.
that you want in your new playlist.
Press the 2. Add to Now Playing Queue button on
the remote.
Repeat steps 1 and 2 until you’ve added all that you 3.
wanted to your playlist.
Press the 4. Home button on the remote.
Use the left 5. button to go to Queue and select OK.
Press the right 6. button.
Select 7. Add Favorite.
Use the down 8. and up buttons to move to the
position that you want to use and press OK to select.
The playlist will be created as a favorite titled Queue 9.
with the date displayed in parenthesis as part of the
name.
If you want to rename this newly created preset,
perform the following steps:
Press right
s on the remote.
Use the down
s button to locate Rename. Press
OK to select it.
A blank text field will appear. Use the numeric
s
keypad to enter a new title. Use the left button if
you need to delete a character.
Press
sOK to save the new title.
Common Uses
18
Wireless Home Audio
Conductor/Wireless-N Digital Music Center
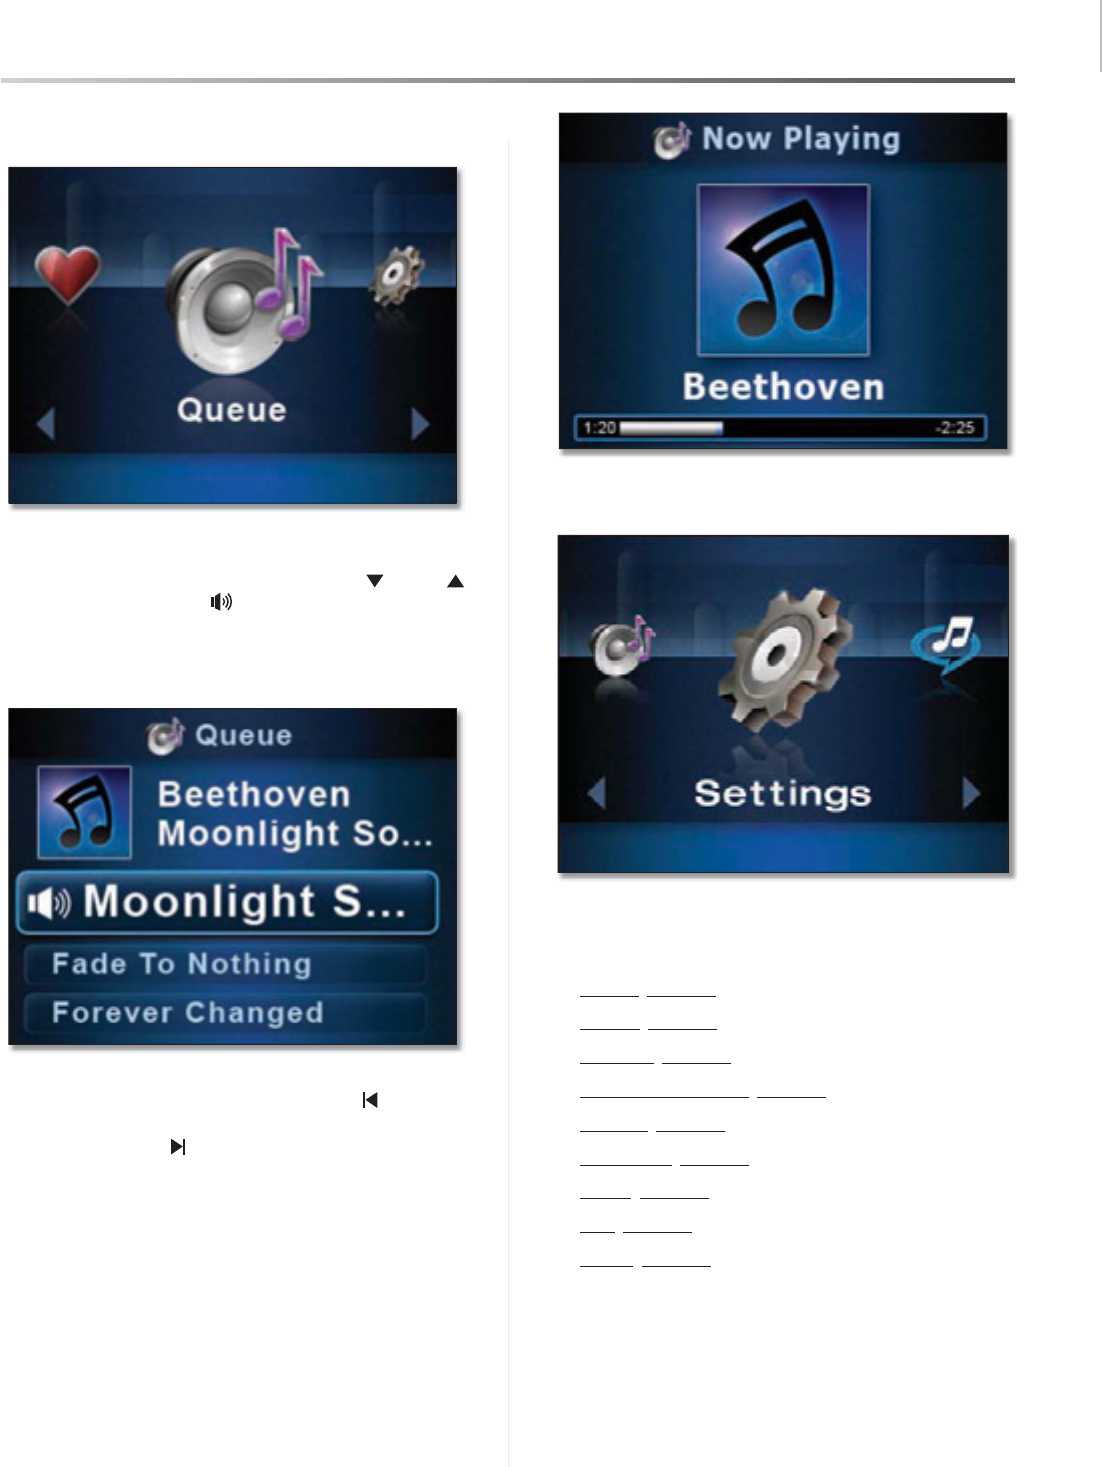
Using the Queue
The Queue contains the track that is currently playing and
any additional tracks that have been added to the queue.
Adding songs to the queue allows you to play songs
continuously without interruption. The songs are played
in the order that they were added to the queue unless
you select Shuffle. You can also turn on Repeat which will
continuously repeat the tracks that are in the queue.
Adding Music to the Queue
The Add to Now Playing Queue button allows you
to add a track, album, playlist, genre, or artist to the Now
Playing Queue. When you select the Add to Now Playing
Queue button, all of the available tracks on the
selected media are added to the queue.
NOTE: You must use the Add to Now Playing
Queue button to add music to the queue.
Pressing the Play button will immediately
clear out the queue and replace the queue
contents with the item you selected.
Whenever you select content with the Play button,
it clears out the current queue and adds the content that
you’ve chosen to play to the queue. If you don’t want to
immediately clear out your queue, you need to use the
Add to Now Playing Queue button when you make
your selection instead of using the Play button.
NOTE: You can not add music to the queue
when playing RadioTime or Rhapsody Channels
since the channels continuously play music.
To add music to the Now Playing Queue using the IR
Remote, perform the following steps:
Locate and highlight the track, album, playlist, genre, 1.
or artist that you want to add to the queue.
Press the 2. Add to Now Playing Queue button on
the remote.
A message will appear indicating that the tracks have 3.
been added to the queue.
You can view the queue pressing the Home
button on the remote twice or by selecting Queue in
the carousel main menu.
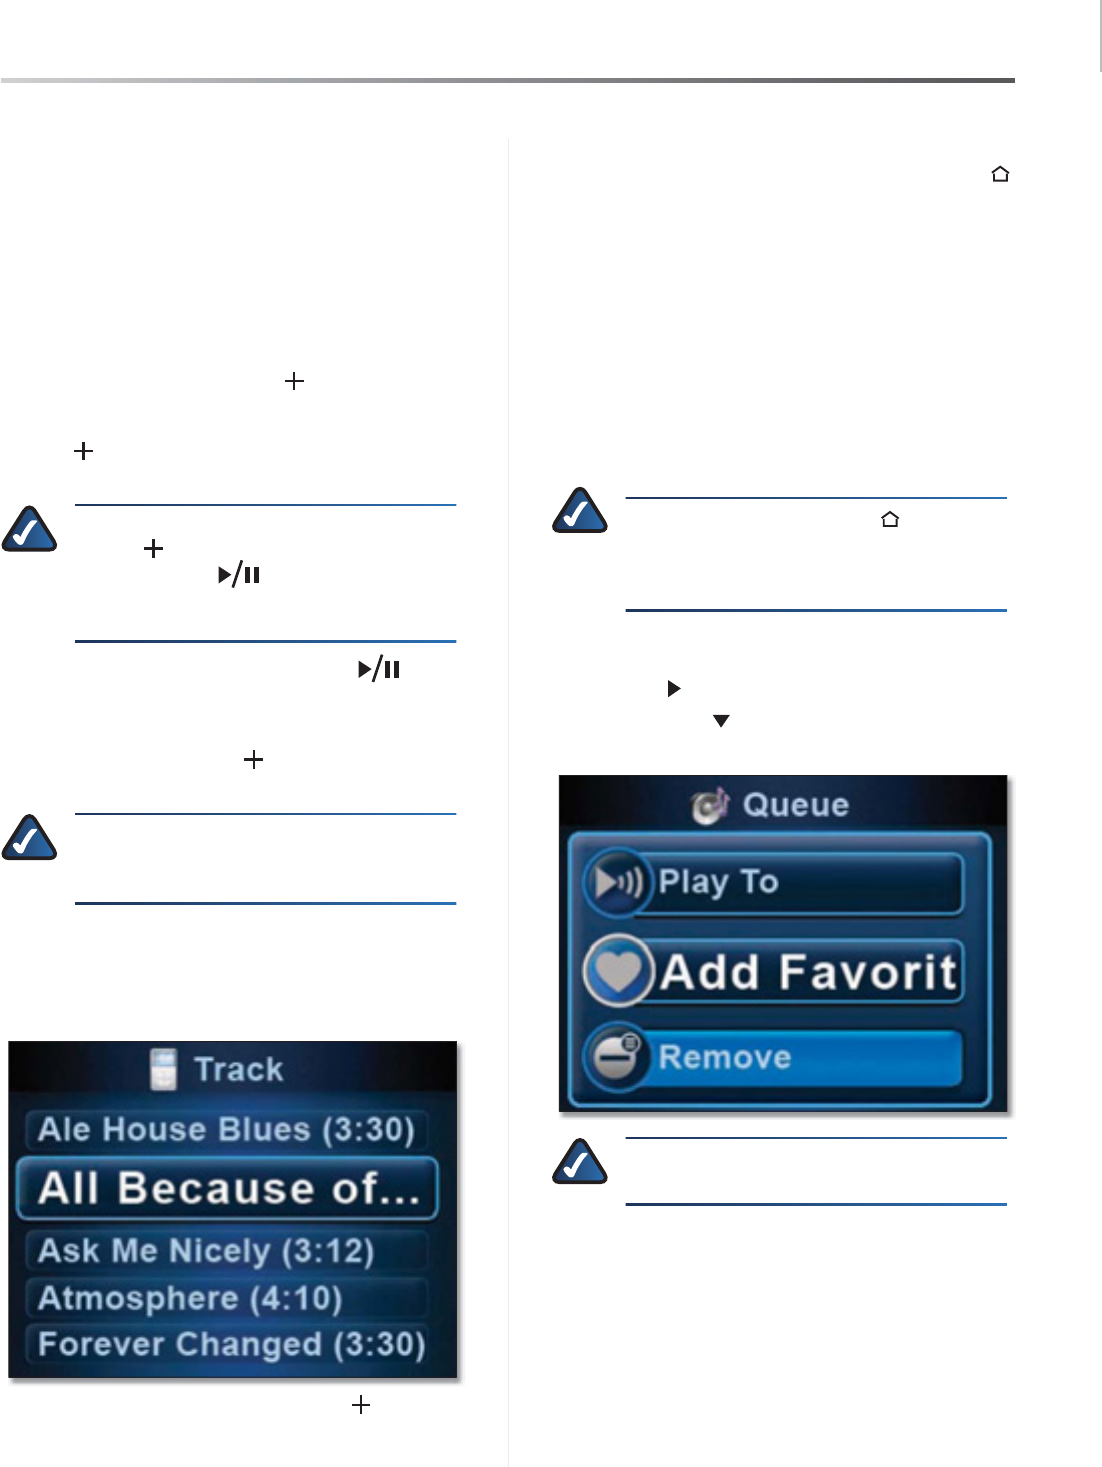
Removing Music from the Queue
The Queue is cleared whenever you select to play an item
(track, album, artist, genre, or playlist) instead of adding it
to the queue. The item that was selected will be added to
the Now Playing Queue.
To remove individual tracks from the queue using the IR
Remote, perform the following steps:
Go to the 1. Now Playing Queue.
NOTE: You can press the Home button once
from the main menu or twice from anywhere
else within the interface to go the Now Playing
Queue.
Locate and highlight the track that you want to remove 2.
using the scroll.
Press right 3. on the remote.
Press the down 4. button, select Remove, and press
OK.
NOTE: You can remove all tracks from the queue
by selecting Clear Queue.
Common Uses
19
Wireless Home Audio
Conductor/Wireless-N Digital Music Center
Shuffle
Shuffle generates a random playback order of the tracks in
the queue. When you select Shuffle, it
To shuffle the order, perform the following steps:
Go to the 1. Now Playing Queue.
Press right 2. on the remote.
Move down 3. the list and select Shuffle.
Repeat
Repeat allows you to continuously play the music in the
queue. Once the end of the queue is reached, the track at
the top of the queue will begin playing and playback will
be continuous until you stop music playback.
Go to the 1. Now Playing Queue.
Press right 2. on the remote.
Move down 3. the list and select Repeat.
To turn Repeat off, follow the same steps. The Repeat
button will indicate Repeat Off.
General Functions
Some of the general functions that you will find useful are
detailed in this section.
sPlaying to Multiple Rooms,page 19
sVolume Control,page 20
sControlling the Volume on a Single Device,
page 20
sControlling the Volume on Multiple Devices ,
page 20
sThe Now Playing Screensaver,page 21
sPower On/Off and Standby Modes,page 21
Playing to Multiple Rooms
Party Mode (Play To All) allows you to link up all of your
Wireless Home Audio devices to play the same music
throughout your home. To enable party mode, perform
the following:
Navigate to 1. Play To and press OK.
Arrow down to 2. Play To All and press OK.
A message will appear stating that the linking has been
successful. To unlink the devices, select Play To Local.
Common Uses
20
Wireless Home Audio
Conductor/Wireless-N Digital Music Center
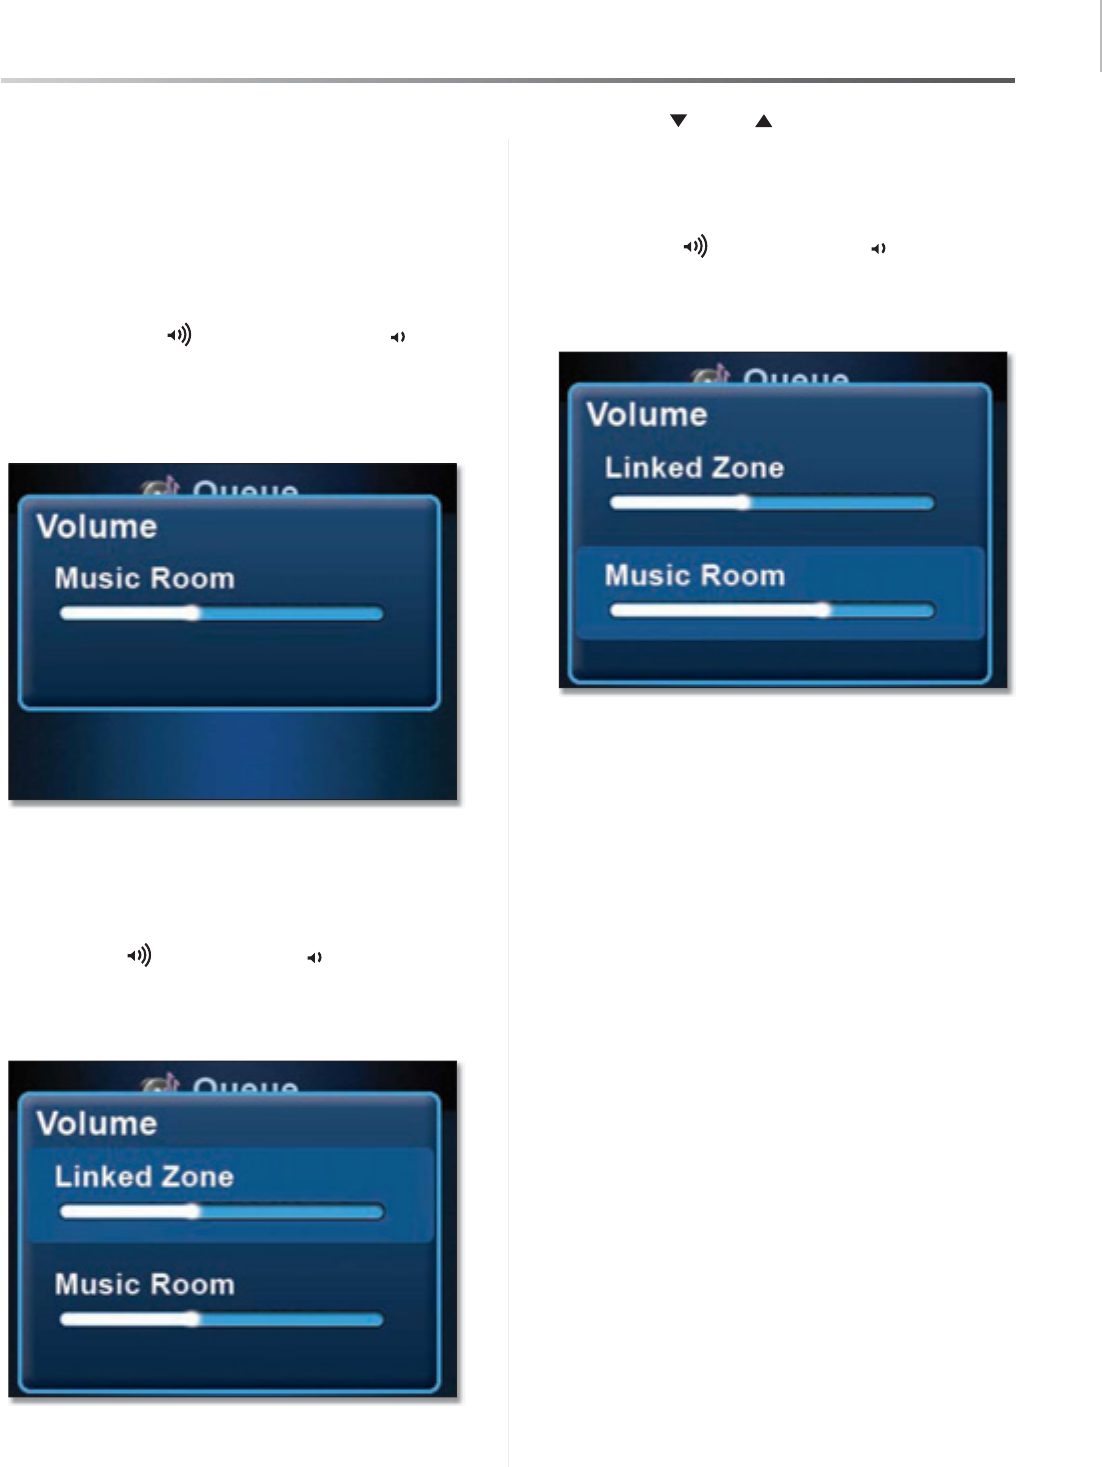
Volume Control
Using the IR Remote, you can control the volume on
individual devices such as the Player or control multiple
devices when using the IR Remote with the Conductor.
From the Conductor, you can control individual or linked
zones.
Controlling the Volume on a Single Device
Press the Volume Up button or Volume Down button
on the IR Remote. The glowing indicator will move up or
down with each button press. Adjust the volume to a
comfortable level and the Volume window will disappear
once you’ve stopped making adjustments.
Controlling the Volume on Multiple Devices
When your devices are synchronized in Party Mode (Play
To All), you will have the option to control the volume on
all devices by adjusting the volume for the Linked Zone.
The Volume Up and Volume Down buttons on the IR
Remote will increase or decrease the volume for all devices
when adjusting the Linked Zone volume. The glowing
indicator will move up or down with each button press.
Use the down and up buttons to navigate between
the Linked Zone (master volume level) and individual
zones. If you want to raise or lower the volume for a
specific device only, highlight the specific zone to make
volume adjustments.
The Volume Up and Volume Down buttons on the
IR Remote will increase or decrease the volume for the
selected zone. The glowing indicator will move up or
down with each button press.
Common Uses
21
Wireless Home Audio
Conductor/Wireless-N Digital Music Center
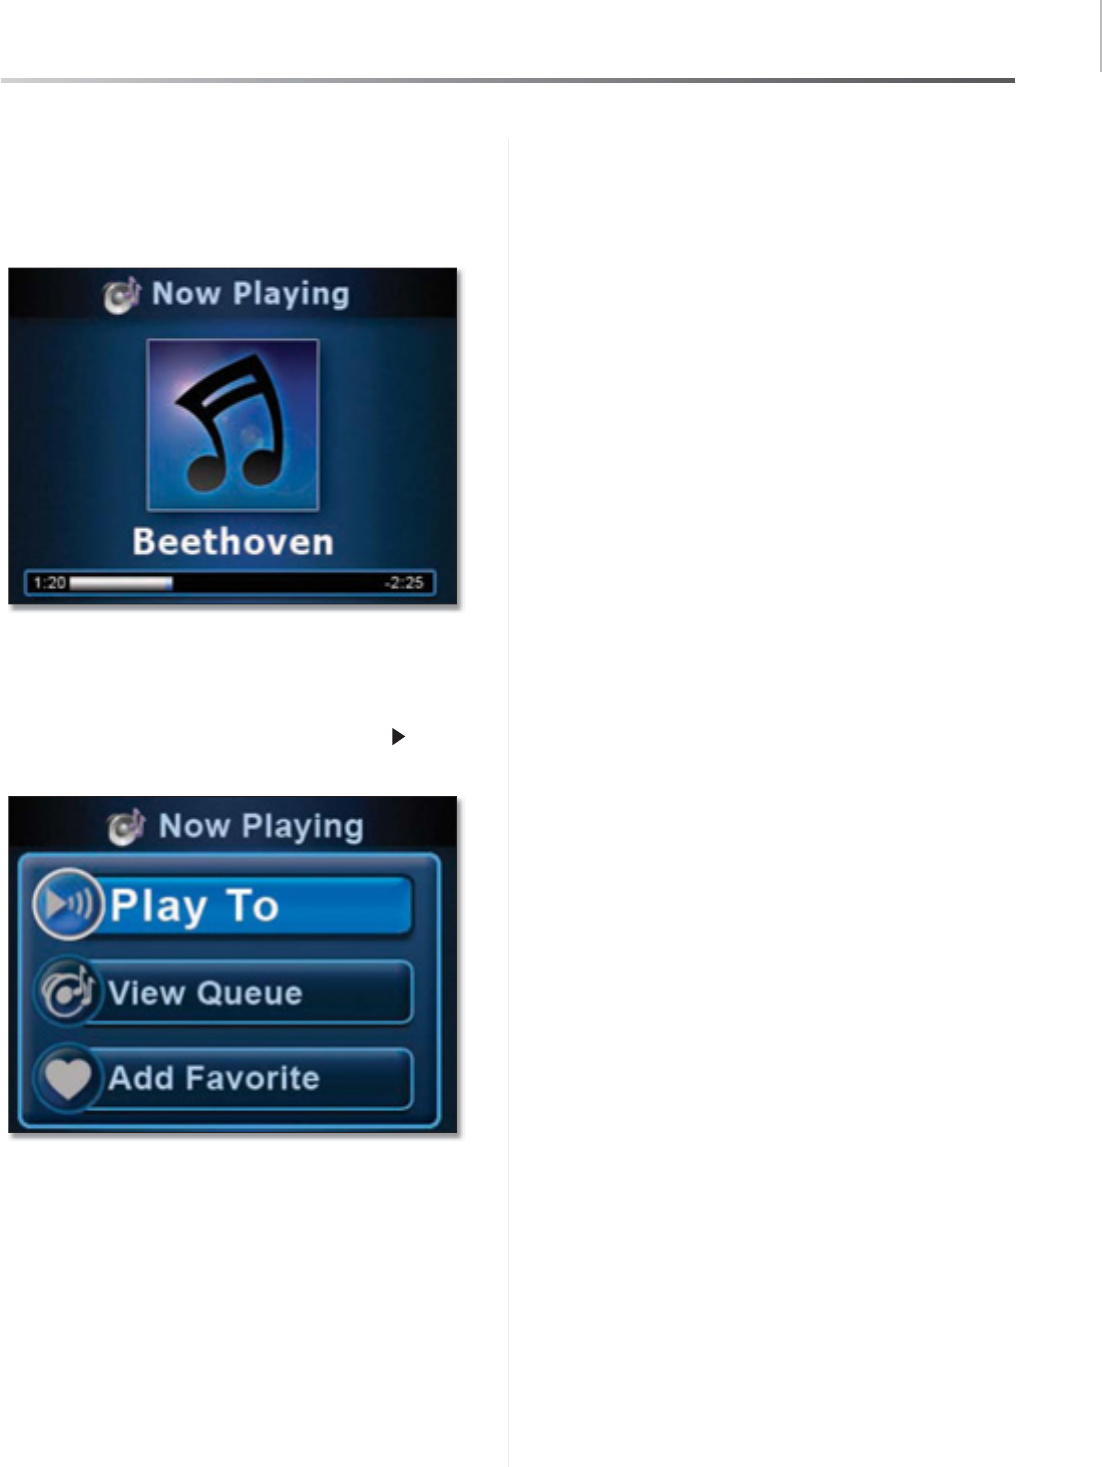
The Now Playing Screensaver
The Now Playing screensaver appears (unless disabled)
after the time configured in Settings > General >NPS
Setup. This screen displays the album artwork, artist
name, song title, and a track duration progress bar.
When the Now Playing screensaver is active, press the
Back button to return to the screen that you were last
viewing.
The Quick Action menu can be selected while the Now
Playing screensaver is active by pressing the right button
on the remote. Move down the list for additional options.
Power On/Off and Standby Modes
Pressing the Power button on the remote toggles between
Power on and standby mode. Standby mode minimizes
the power consumed by your Wireless Home Audio device
when not in use. Standby mode allows you to power on
your unit using the remote control or power button on
the front panel.
If you need to completely power off your Conductor, there
is a power switch located on the back of the unit. When
you turn it off completely, you must power it back on
using the power switch on the back of the unit.
Common Uses
22
Wireless Home Audio
Conductor/Wireless-N Digital Music Center
Using the Cisco Media Software
The Cisco Media Server software and Cisco Media Player
software are installed on your computer when you run the
installation program from the CD-ROM.
The Cisco Media Server software allows you to share the
library of music from your computer’s hard drive with your
Wireless Home Audio devices.
NOTE: Some iTunes files may not be available.
Songs purchased from iTunes† may be protected
with Digital Rights Management (DRM); DRM
files cannot be played to your Wireless Home
Audio devices directly from your PC. The
optional Linksys by Cisco Docking Station for
iPod (MCCI40) will allow you to connect your
iPod to your Conductor and play back all of the
songs from your iPod.
iTunes Plus files are not protected†
Below is an overview of what is covered in this section:
sStarting the Cisco Media Server Manually,page 22
sAdding Music Folders to the Cisco Media Server,
page 22
sUsing the Cisco Media Player,page 23
sZones,page 23
sFavorites,page 25
sMenu,page 26
sMedia Sources,page 26
sMenu Options,page 26
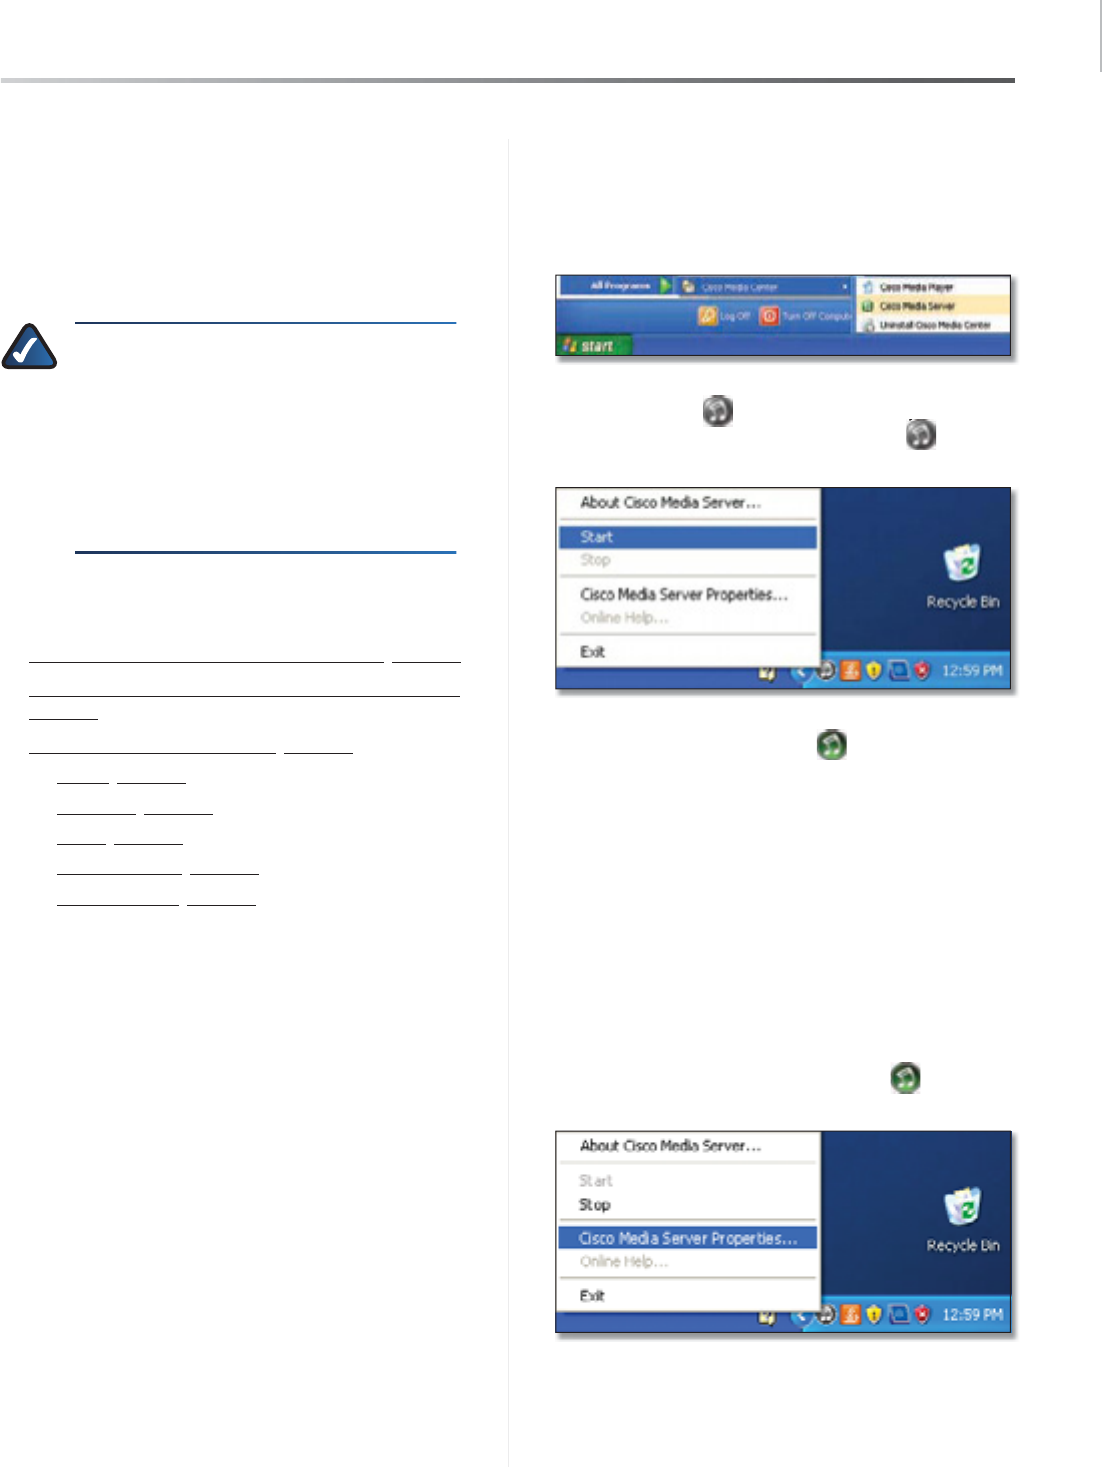
Starting the Cisco Media Server Manually
The Cisco Media Server software should start automatically
but if you need to start it manually, follow these steps:
Go to 1. Start > Programs > Cisco Media Center > Cisco
Media Server.
The Cisco Media Server will launch and a gray 2. Cisco
Media Server icon will appear on your taskbar.
Right-click on the Cisco Media Server icon and
select Start.
The Cisco Media Server will launch and you will see 3.
a green Cisco Media Server icon indicating it is
ready. Once the Cisco Media Server is launched, you
will not see any other windows indicating what music
is being shared or providing any further control. You
can view the shared library from your Wireless Home
Audio Devices or launch the Cisco Media Player on
your computer to view the shared libraries.
Adding Music Folders to the Cisco Media
Server
During the initial configuration, you are asked to select
directories where your music is stored. To change or add
additional directories, perform the following steps:
Right-click on the 1. Cisco Media Server icon on the
taskbar and select Cisco Media Server Properties.
Common Uses
23
Wireless Home Audio
Conductor/Wireless-N Digital Music Center
Modify or type in a new directory in the 2. Local Media
Directory field by typing in the entire path such as
C:\Documents and Settings\username\My
Documents\My Music;
Additional directories are separated by a semicolon. If
you want to change the name that appears on your
network, you can modify the UPnP Friendly Name.
Click OK after all updates are complete.
Right-click on the 3. Cisco Media Server icon on the
taskbar and select Stop.
Once the Cisco Media Server has stopped and the icon 4.
has turned gray, right-click on the Cisco Media Server
icon and select Start to start the server again.
The additional music should now be accessible from your
media library.
Using the Cisco Media Player
The Cisco Media Player allows you to control your Wireless
Home Audio devices from a computer. You can play music
to individual zones, link zones, add songs to the queue
and control the volume.
To launch the Cisco Media Player software, go to Start >
Programs > Cisco Media Center > Cisco Media Player.
The Media Player Interface contains several regions used
for navigation, selection, and control of your Wireless
Home Audio devices and libraries.
Menu
Options Zones
Show/Hide
Menu
Favorites Media Sources
Search
Menu &
Details
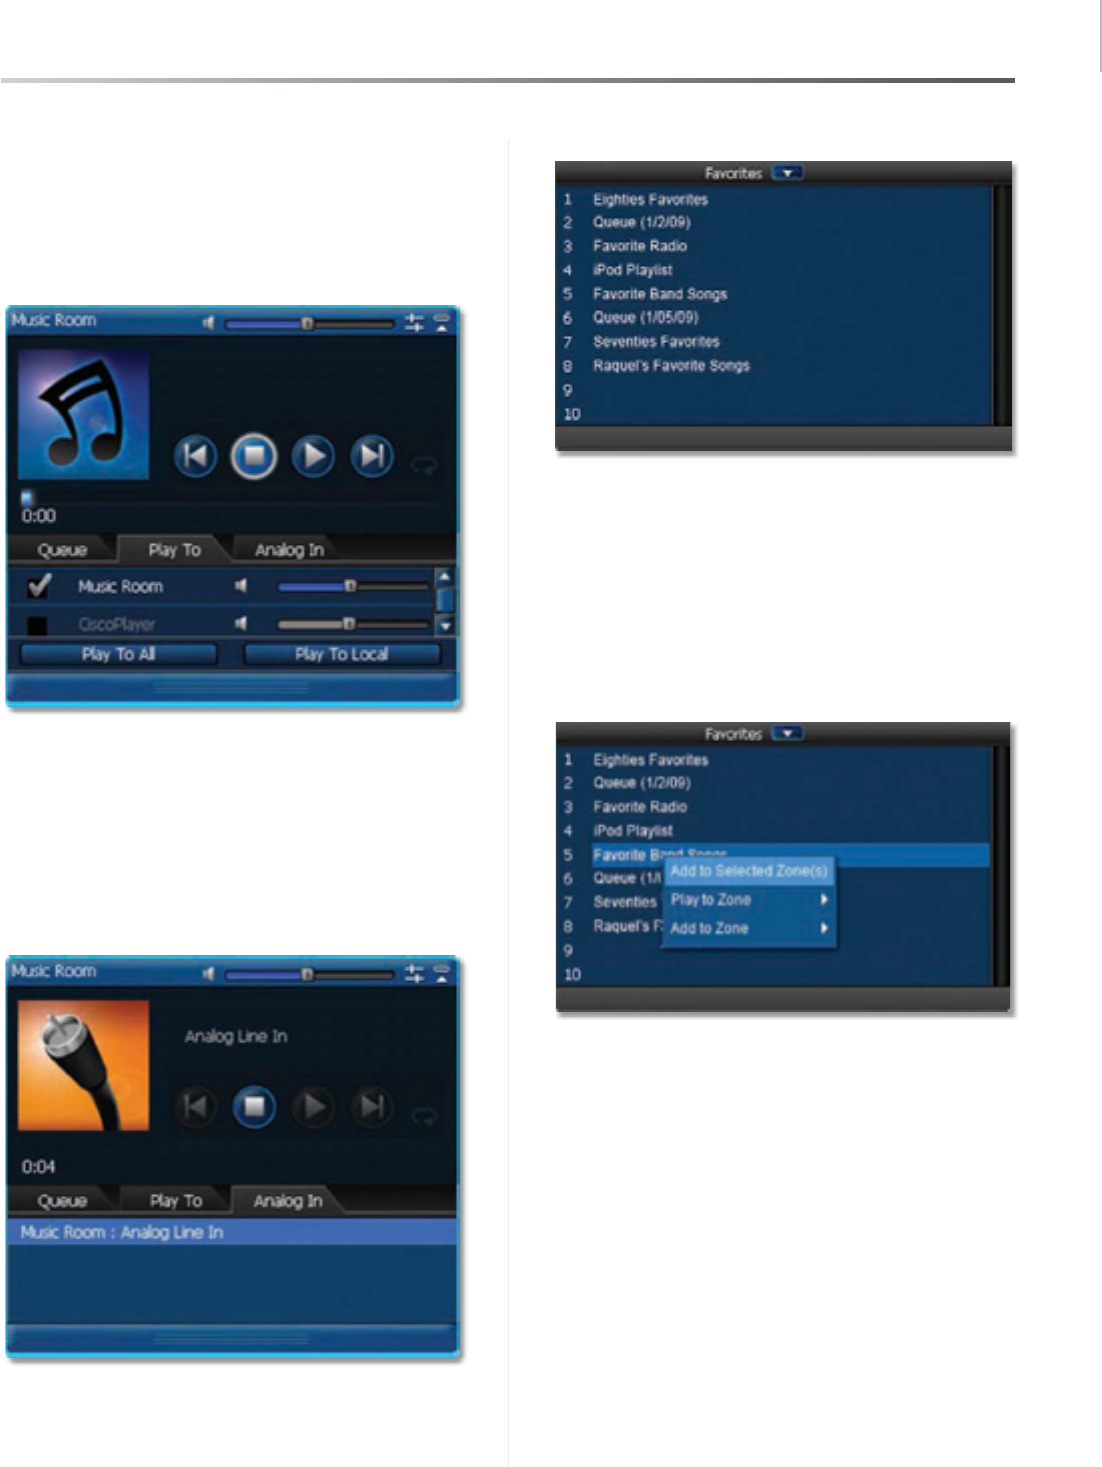
Zones
Zones are displayed on the left side of the interface. A zone
is selected when it is highlighted with a cyan border (as
shown in the following image). The zone window displays
playback controls, album art, a track progress bar, and the
Queue, Play To, and Analog In tabs.
Common Uses
24
Wireless Home Audio
Conductor/Wireless-N Digital Music Center
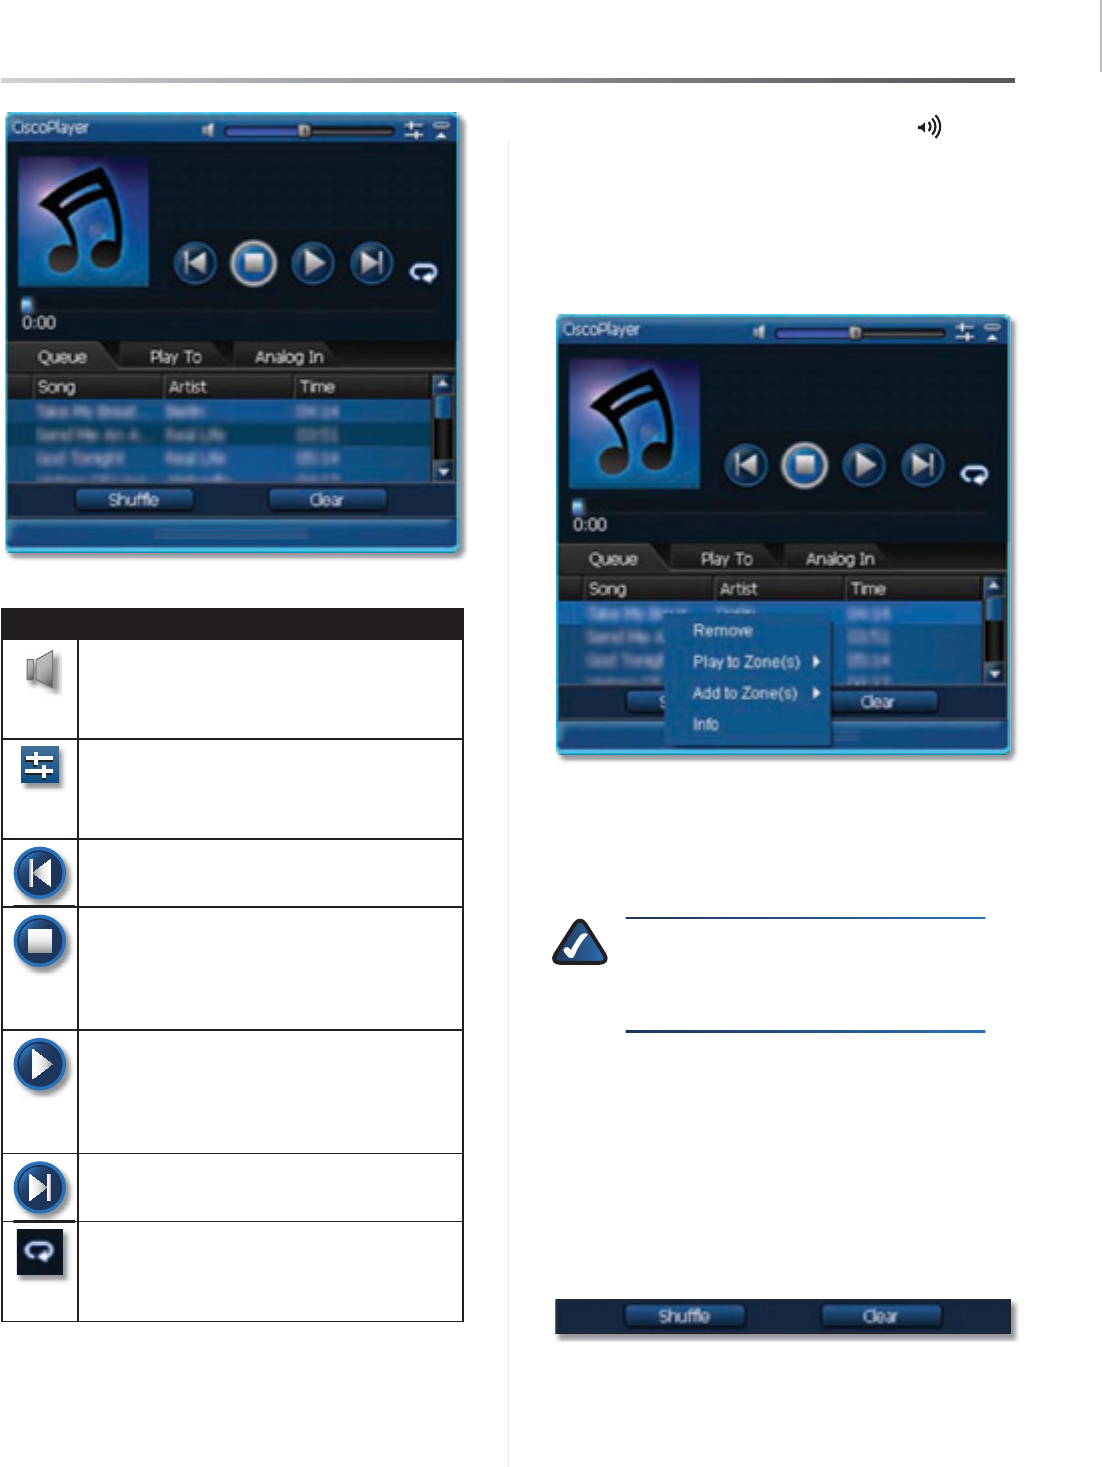
Playback Control Functions
Button Function
Volume Control The Volume Control slider
allows you to adjust the volume for the selected
device. You drag the slider up to increase the
volume or down to lower the volume.
Bass/Treble Adjustment The upper right
corner of the zone window displays an icon
that allows brings up a the adjustment sliders
for the bass and treble audio settings.
Previous Press this to play the previous track
in the queue.
Stop Stops the current music selection
(playing or paused music) and moves the first
item played to the top of the queue which is
then highlighted. The Stop button does not
clear the queue.
Play/Pause This button toggles between
playback and a paused state. If nothing is
playing, pressing this button when music
is selected starts playback of the selected
music.
Next Plays the next song in the queue.
Repeat Now Playing Queue When this
option is enabled, the Now Playing Queue will
start playing again once the end of the queue
has been reached.
Queue The Queue tab displays a list of the songs in the
order they appear in the queue with the Song title, Artist
name, and duration (Time) of the song.
When a track is being played, a Now Playing icon will
appear to the left of the track title. You can double-click
on another song title to play that song instead of the
track that is currently playing and move to that spot in the
queue.
You can right-click on a track in the queue for additional
track options:
RemovesThis option will remove the selected track
from the queue.
Play To Zone
sThis option will clear the queue of the
zone that you select and begin playing the selected
track immediately.
NOTE: Playing a track to another zone will not
sync the music to that of the current zone. To
synchronize the music, you must select Play
To All from the Play To tab.
Add To Zone
sThis option will add the selected track
to the end of the queue in the zone that you select.
If there are no tracks currently in the queue, the song
will begin playing immediately.
Info
sThe Info option displays the album artwork, Artist
name, Album title, track Title., Genre,Duration,Track
Number,Year, and Bit Rate information.
The Queue tab also contains two buttons at the bottom of
the window:
ShufflesThis is a one time action that shuffles the
queue contents into a random order.
Common Uses
25
Wireless Home Audio
Conductor/Wireless-N Digital Music Center
ClearsClears all of the tracks in the queue of the
selected zone.
Play To The Play To tab displays the available zones with
a checkmark indicating which zone is currently being
controlled. The volume level can be controlled by using
the volume slider on the Play To tab or at the top of the
Zone window.
Play To AllsEnables Party Mode and plays the music or
other audio to all zones.
Play To Local
sSets the Play To mode back to individual
zone control.
Analog In The Analog In tab allows you to select and play
audio from the analog input on the back of the device you
are controlling. Double-click Device : Analog Line In to
replace the existing queue with the analog line in option.
Favorites
The Favorites window displays all of the Favorites that
have been created on your Wireless Home Audio system.
Double-click a favorite to add it to the queue of the
selected zone.
You can create a Favorite in the Cisco Media Player
interface by selecting a track or multiple tracks (use shift
to select multiple tracks) from the details portion of the
interface and dragging it to a Favorite position.
You can right-click on a favorite for additional options:
Add To Selected Zone(s)sThis option will add the
selected track to the end of the queue in the zone that
is currently selected. If there are no tracks currently in
the queue, the song will begin playing immediately.
Play To Zone
sThis option will clear the queue of the
zone that you select and add the track(s) associated
with the favorite to the queue. The favorite will begin
playing immediately.
Add To Zone
sThis option will add the track(s)
associated with the favorite to the end of the queue
in the zone that you select. If there are no tracks
currently in the queue, the favorite will begin playing
immediately.

Common Uses
26
Wireless Home Audio
Conductor/Wireless-N Digital Music Center
Menu
The Menu options vary depending upon the Media
Source selected. The Menu allows you to navigate through
libraries and channels.
Media Sources
Media Sources are displayed and can be selected from this
area. Click on the Media Source that you want to browse
and select content from.
Menu Options
File
Go to File and select Exit when you want to exit the Cisco
Media Player or use the X in the upper right corner to close
the application.
Zone
When these options are selected, the functions are
performed on the zone that is highlighted (cyan border).
Play Plays the current track in the queue.
Pause Pauses the music and the song will continue once
play is selected.
Stop Stops the current music selection (playing or paused
music) and moves the first item played to the top of the
queue which is then highlighted. Stop does not clear the
queue.
Next Plays the next song in the queue.
Previous Select this option to play the previous track in
the queue.
Shuffle This is a one time action that shuffles the queue
contents into a random order.
Toggle Repeat Turns on or off the repeat function.
Increase Volume Raises the volume level.
Decrease Volume Lowers the volume level.
Mute Selected Zones This will mute the audio so that you
do not hear any music playing. The music will continue to
play but will not be audible.
Unmute Selected Zones This restores the audio from a
muted state.
Tools
Rediscover Zones & Sources Use this option if a zone
or library is not appearing. This will search for all available
zones and sources.
Reset Error Notification Resets error notification.
Manage Account Details This is used to modify your
Cisco Username and Password.
View
The View menu toggles the interface options that are
displayed on the screen.
Collapse All Zones
s
Expand All Zoness
Show Sources Trays
Show My Librariess
Show USB Librariess
Show Other Librariess
Show RadioTimes
Show Rhapsodys
Show Devicess
Help
Learn More Links to the Internet for additional
information.
Downloads Links to the Internet for downloads for the
Wireless Home Audio devices.
About Displays version information.
Using Your Conductor
27
Wireless Home Audio
Conductor/Wireless-N Digital Music Center
Using Your Conductor
The Conductor has a touchscreen interface that allows
you to navigate through the user interface. It also includes
a remote control so you can control the Conductor from
across the room. The Conductor includes the DMRIR500
IR Remote Control or you can purchase the optional
Controller – Wireless-N Touchscreen Remote (DMRW1000)
for the optimal experience.
Use the remote control to navigate and select options.
Use the up and down buttons to navigate through
options. Press the OK button to select an option or press
the left button to return to the previous screen. Use the
Home button to return to the home screen.
Press the Home button on the remote control once
from the Home menu or twice from any other menu to go
to the Now Playing screensaver.
Home Screen
The Home screen is a carousel menu that contains the
main menu options for the Conductor.
sRhapsody,page 28
sMy Music,page 30 The My Music icon only appears
when you have a shared library available from your
Cisco Media Software.
sUSB Media,page 32 The USB Media icon only appears
when a USB drive is connected to the Conductor.
sDevices (Accessing Your iPod),page 32 The Devices
option only appears when an iPod is connected using
the Docking Station for iPod (MCCI40)
sAll Libraries,page 33
sRadioTime,page 34
sFavorites,page 34
sNow Playing Queue,page 35
sSettings,page 35
Carousel
Using the IR Remote to navigate through the carousel, use
the left and right buttons to navigate and press OK to
select an item.
Lists
Using the IR Remote to navigate through a list, use the
up and down buttons to navigate through options.
Press the OK button to select an option or press the left
button to return to the previous screen. Use the Home
button to return to the home screen.
When you locate an item that has more than one track
associated with it such as an album, playlist, genre, or
artist, you can select OK to view the details of the item or
press the Play button to clear the current queue and
begin playback of the selection or add it as a favorite.
NOTE: Pressing right on the IR Remote in a list
menu displays the Quick Action menu.
Using Your Conductor
28
Wireless Home Audio
Conductor/Wireless-N Digital Music Center
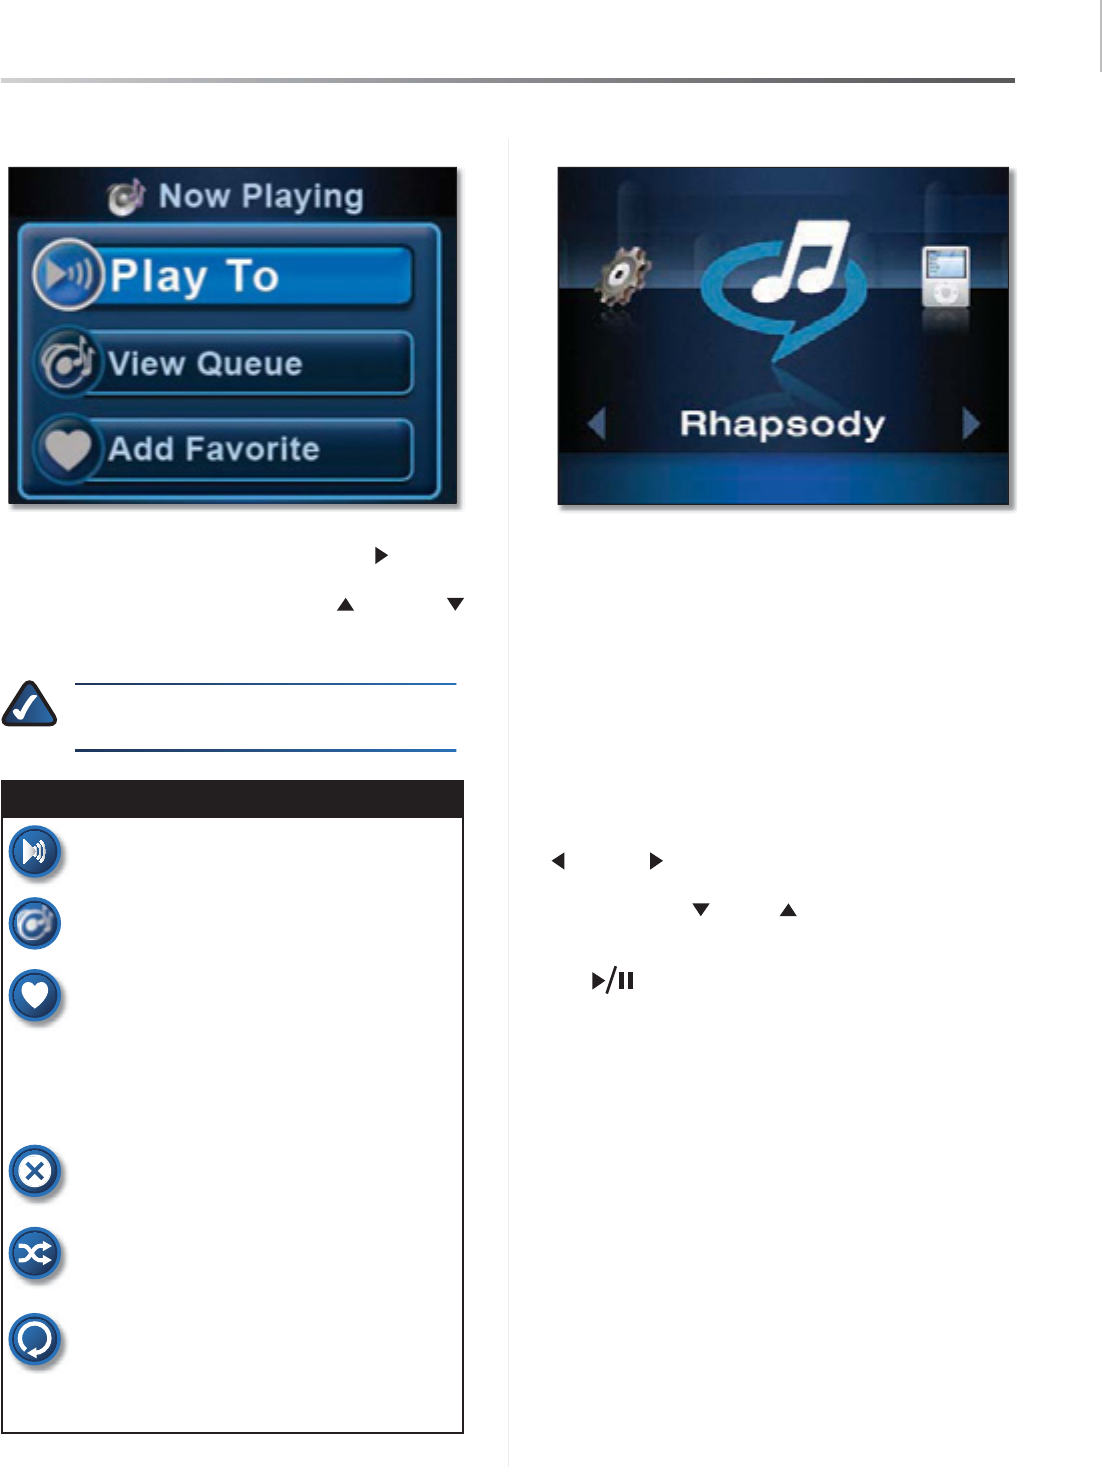
Action Menus
Action Menus provide advanced functionality that can
be applied to the selected item. Pressing right on the IR
Remote from a list menu displays the quick action options.
You can select an action by using the up and down
buttons to navigate and pressing OK to select an action.
Below is a list actions you will encounter.
NOTE: The Quick Action menu options vary
depending upon your location in the interface.
Action Menu Functions
Play To Use this button to select the zones to
play the music to.
View Queue Displays the Now Playing Queue.
Add Favorite Adds the selected items to your
list of favorites. You can add tracks, albums, or
playlists to your favorites. Once you select this
option you will be prompted to assign a favorite
position number to the selection. You can press
the touchscreen to select a number or scroll
and select.
Clear Queue Stops the track currently playing
and clears it and all other tracks from the Now
Playing Queue.
Shuffle Select this option to randomly shuffle
the playback order of the tracks in the Now
Playing Queue.
Repeat This option will repeat the tracks in
the Now Playing Queue once all of tracks in
the queue have been played. To turn repeat
off, return to the Quick Action menu and select
Repeat off.
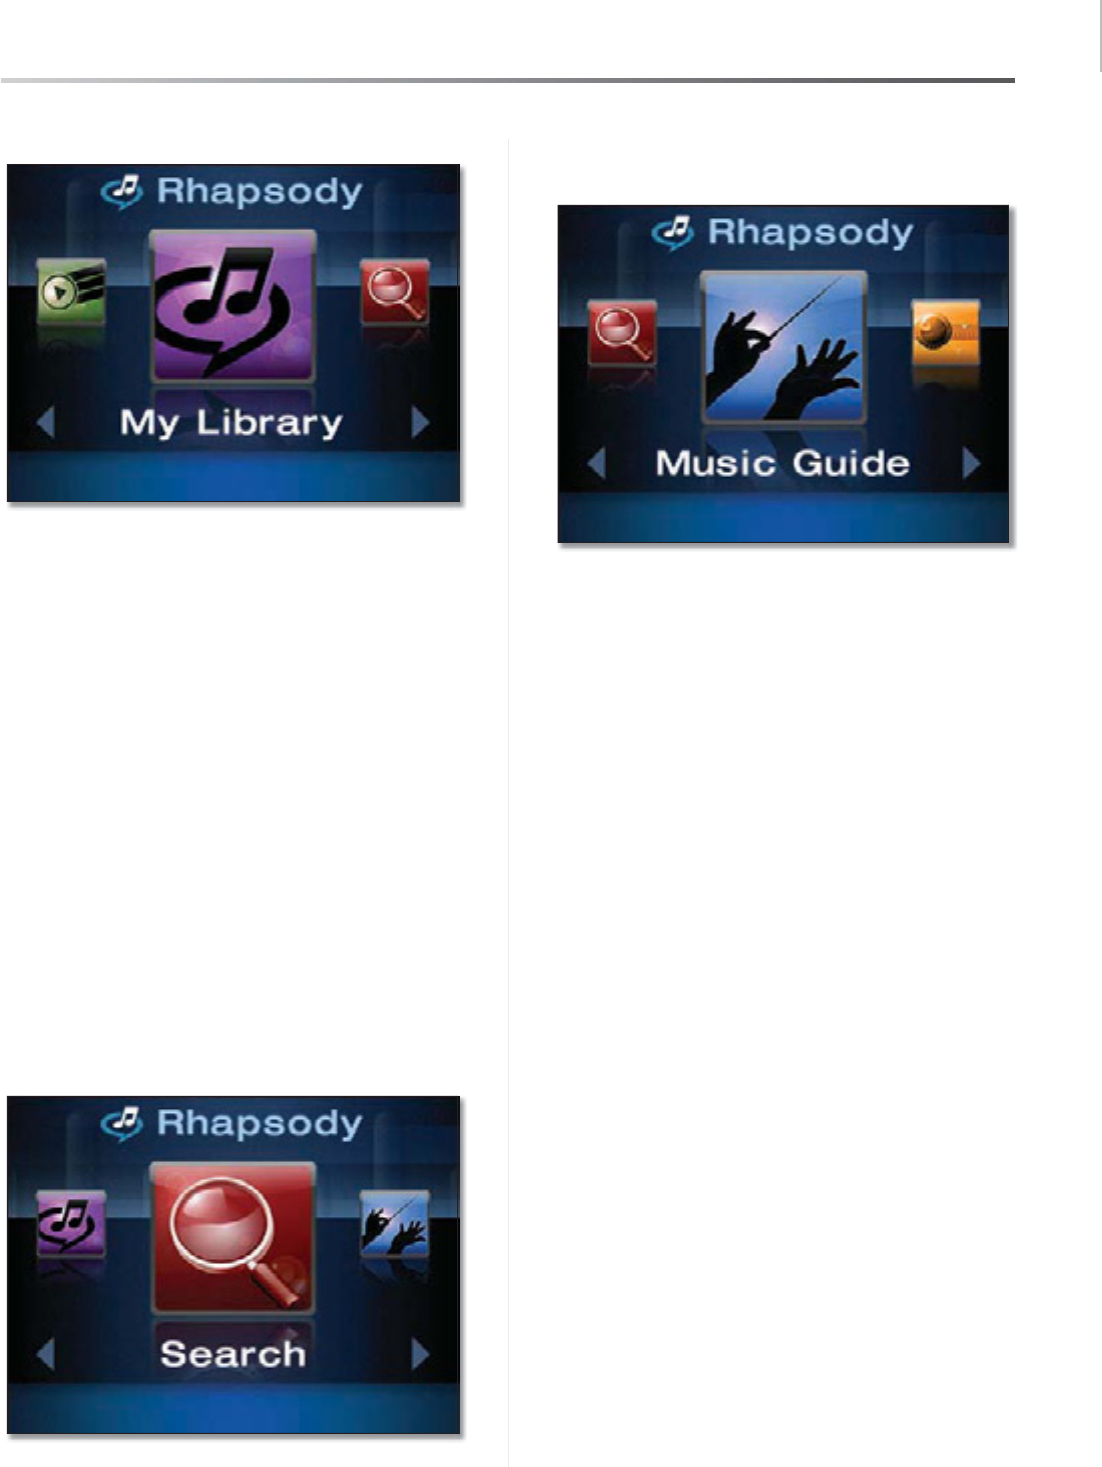
Rhapsody
Rhapsody is a digital music service that lets you listen to
their entire catalog for one monthly price. Rhapsody’s
catalog contains millions of songs and thousands of
artists.
You can search content on Rhapsody from the Wireless
Home Audio devices by using the Search option to search
artists, albums, or songs. You can also browse Rhapsody’s
Music Guide, Playlists and Channels. The My Library option
allows you to find music that you’ve associated with your
Rhapsody account on your computer.
Browsing and Content Playback
The initial Rhapsody menu is a carousel menu. Use the left
and right buttons to move through the menu items.
Press OK to select an item. Navigate through the lists by
using the down and up buttons. Press OK to view
tracks in an album, playlist, or associated with an artist
and press the Back button to return to the title. Press the
Play button to start playing a title.
Using Your Conductor
29
Wireless Home Audio
Conductor/Wireless-N Digital Music Center
My Library
My Library allows you to connect to favorite tracks and
albums that you’ve bookmarked in Rhapsody’s extensive
online music library. To bookmark tracks and albums in
Rhapsody Online, you need to access Rhapsody Online
from your computer and locate a track or album that you
want to add. To add the album or track, click the + (plus
sign) next to it and select Add to My Library.
Artists
sDisplays an alphabetical list of all of the artists
that have been added to My Library.
Albums
sDisplays an alphabetical list of album titles
that have been added to My Library.
Tracks
sAn alphabetical list of track titles that have
been added to My Library.
My Playlists
sDisplays an alphabetical list of playlists
that have been created in Rhapsody Online. Add
favorite playlists from Playlist Central or create your
own playlists in Rhapsody Online and play them here.
My Channels
sDisplays a list of channels associated
with My Library.
Search
Allows you to search by Artist, Album, or Track.
Music Guide
Music Guide provides access to new releases, Rhapsody’s
staff picks, exclusive content that you will only find on
Rhapsody, featured albums and music/artists ranked by
popularity.
New Releases
sThe most significant recent releases.
Staff Picks
sThis week’s staff selections.
Just Added
sAlbums that have just been added to
Rhapsody.
Exclusives
sMusic you won’t find anywhere else.
Genres
sDisplays a list of musical genres. Select a genre
to view key tracks by key artists in the genre.
Charts
sView music selections by the Top Artists, Top
Albums, or Top Tracks.
Using Your Conductor
30
Wireless Home Audio
Conductor/Wireless-N Digital Music Center
Channels
Rhapsody Channels play continuous streams of music
and are similar to radio station channels but without
commercials.
All Channels
sAllows you to view all available
channels.
Top Channels
sDisplays a list of the channels that are
accessed the most.
Channels by Genre
sDisplays a list of music channels
categorized by music genre.
My Channels
sChannels you’ve selected as favorites.
Playlist
Rhapsody has an area for playlists called Playlist Central
that features playlists compiled by Rhapsody users and
celebrities as well as playlists categorized by genre, artist,
decade, and other themes. The top playlists and featured
playlists can be accessed from this option.
Top Playlists
sDisplays a list of the most played
playlists.
Featured Playlists
sDisplays a list of featured playlists.
My Music
Once the Media Server software has been installed
and configured on a computer, you can control
playback of music on the computer from within the
Wireless Home Audio Director interface.
The My Music icon will appear with a title below the
icon based on the name given on your computer. Once
selected, a carousel menu is displayed that allows you
to browse music by artist, album, genre, or browse the
folders located on the selected media. You also have the
option to search by artist, album, or genre.
Artists
Selecting Artists will display an alphabetical list of artists
that are available on the selected media.
Highlighting an artist name and pressing OK brings up a
screen with an option titled All and options for each album
title available on the selected media from the selected
artist. Pressing the OK button with All highlighted will
display all track titles by the selected artist on the selected
media. Pressing OK with an album title selected will
display the tracks from the album that are located on the
selected media.
Using Your Conductor
31
Wireless Home Audio
Conductor/Wireless-N Digital Music Center
Highlighting an artist name and pressing the Play
button will add all of the tracks located on the selected
media by the selected artist to the queue. The first track
by the artist will begin playing immediately.
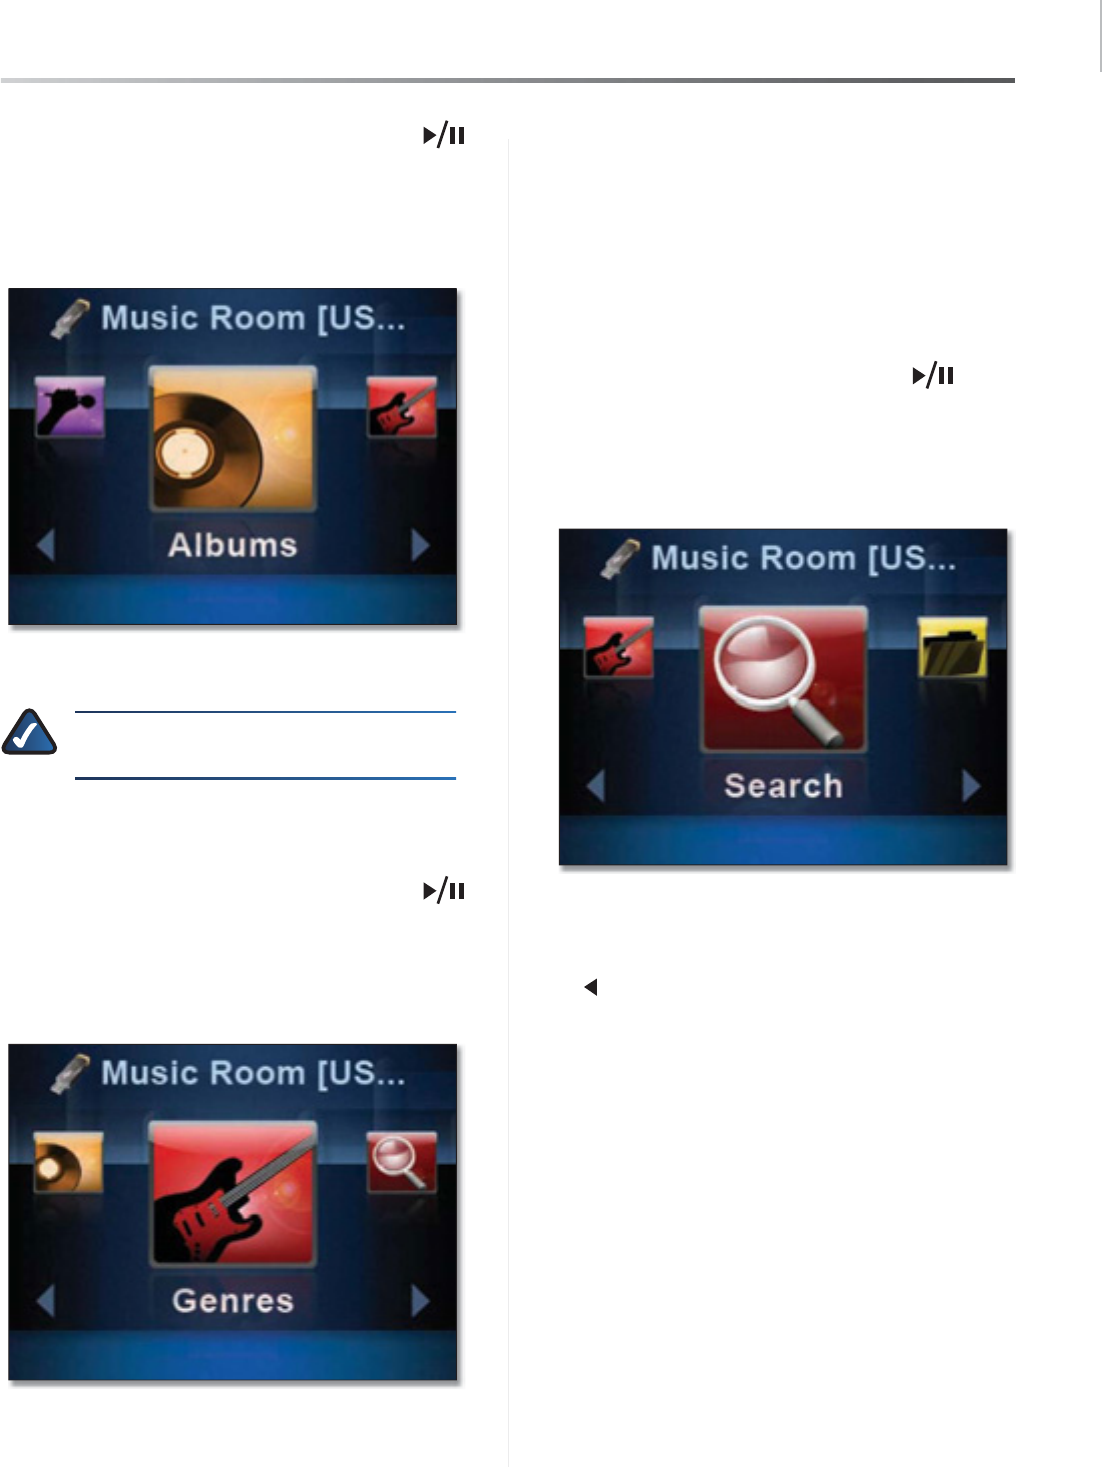
Albums
Selecting Albums will display an alphabetical list of album
titles that are available on the selected media.
NOTE: Album titles are included even if there is
only one song on the device from the album.
Highlighting an album title and pressing the OK button
will display all of the track titles from the selected album
available on the selected media.
Highlighting an album title and pressing the Play
button will add all of the tracks located on the selected
media from the selected album to the queue. The first track
available from the album will begin playing immediately.
Genres
Selecting Genres will display an alphabetical list of musical
genres that are available on the selected media. The genre
must be tagged properly in the audio file for this to work
correctly. All tracks that do not have a genre tagging will
be listed under Unknown Genre.
Highlighting a genre and pressing OK brings up a screen
with an option titled All and options for each artist in the
selected genre available on the selected media. Pressing
the OK button with All highlighted will display all track
titles associated with the genre on the selected media.
Pressing OK with an artist selected will display the tracks
from the artist that are located on the selected media.
Highlighting a genre and pressing the Play button
will add all of the tracks located on the selected media
of the selected genre to the queue. The first track in the
genre will begin playing immediately.
Search
Search allows you to locate music by artist, album, or
song. Once you select artist, album, or song, a search field
will appear on the screen. Use the numeric keypad on the
IR remote to enter the title or a portion of the title. Use the
left button to delete characters. Press OK once you’ve
entered in the title.
Using Your Conductor
32
Wireless Home Audio
Conductor/Wireless-N Digital Music Center
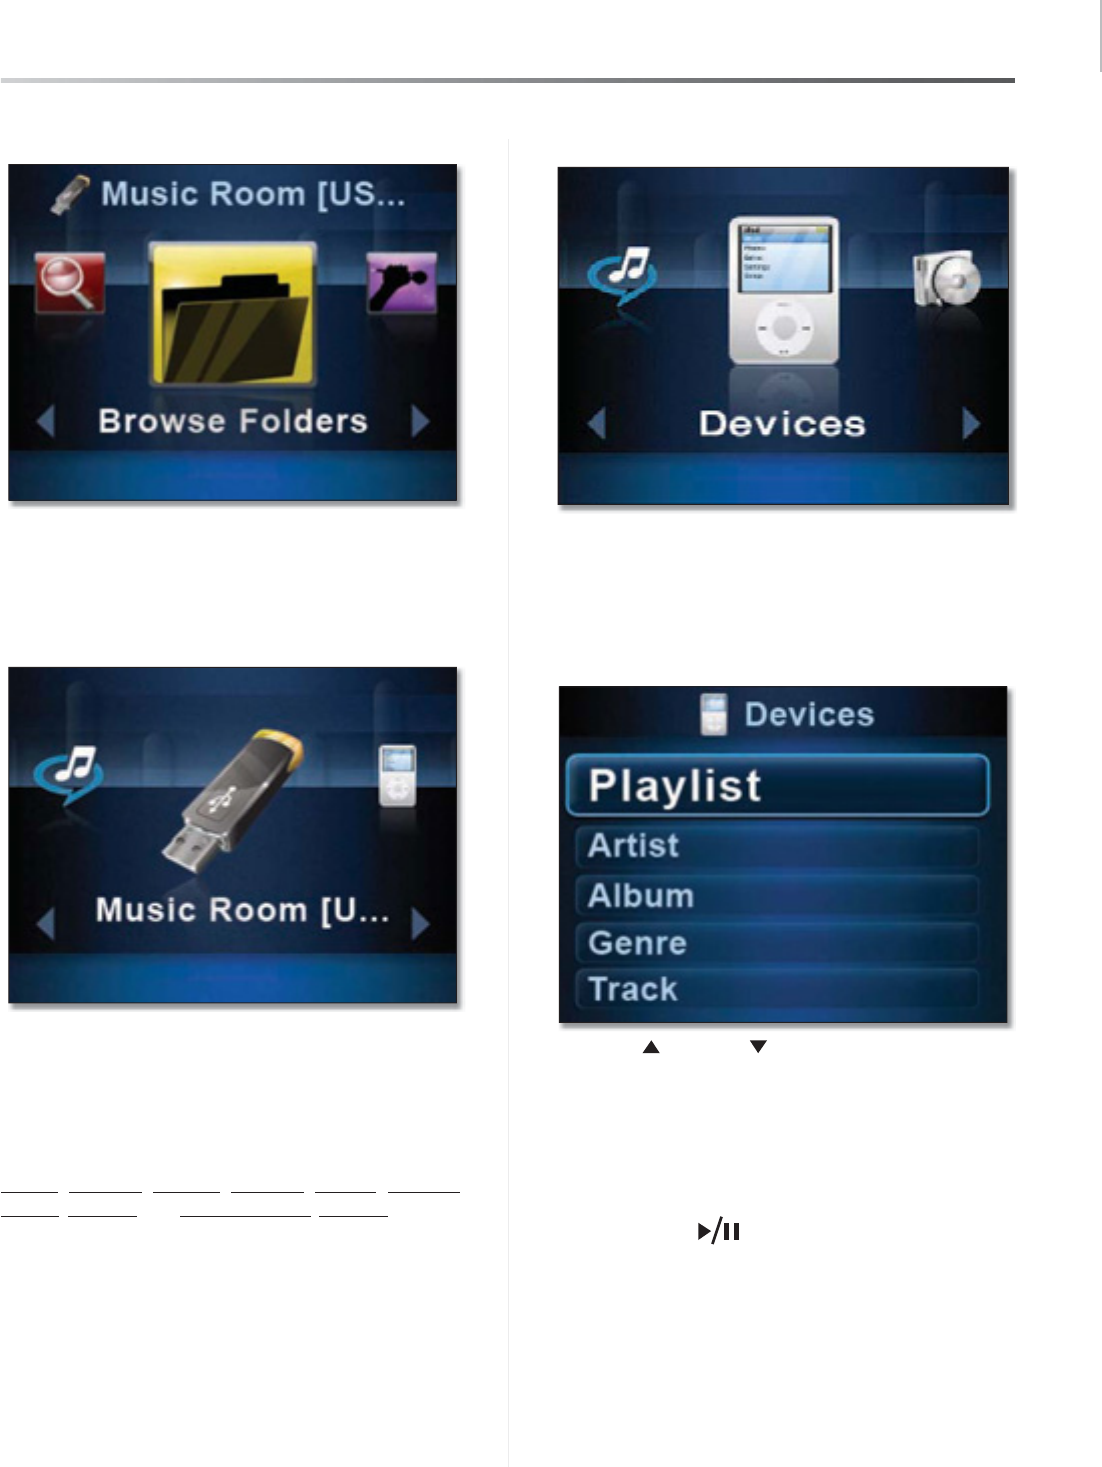
Browse Folders
The Browse Folders option allows you to browse all of
the folders located on your selected media. Folders will be
displayed even if they do not contain any music.
USB Media
When you connect a USB device to the Conductor, a
carousel menu is displayed that allows you to browse
music by artist, album, genre, or browse the folders located
on the USB device. You also have the option to search by
artist, album, or genre.
For details on searching through library content, refer to
Artists,page 30,Albums,page 31,Genres,page 31,
Search,page 31, and Browse Folders,page 32.
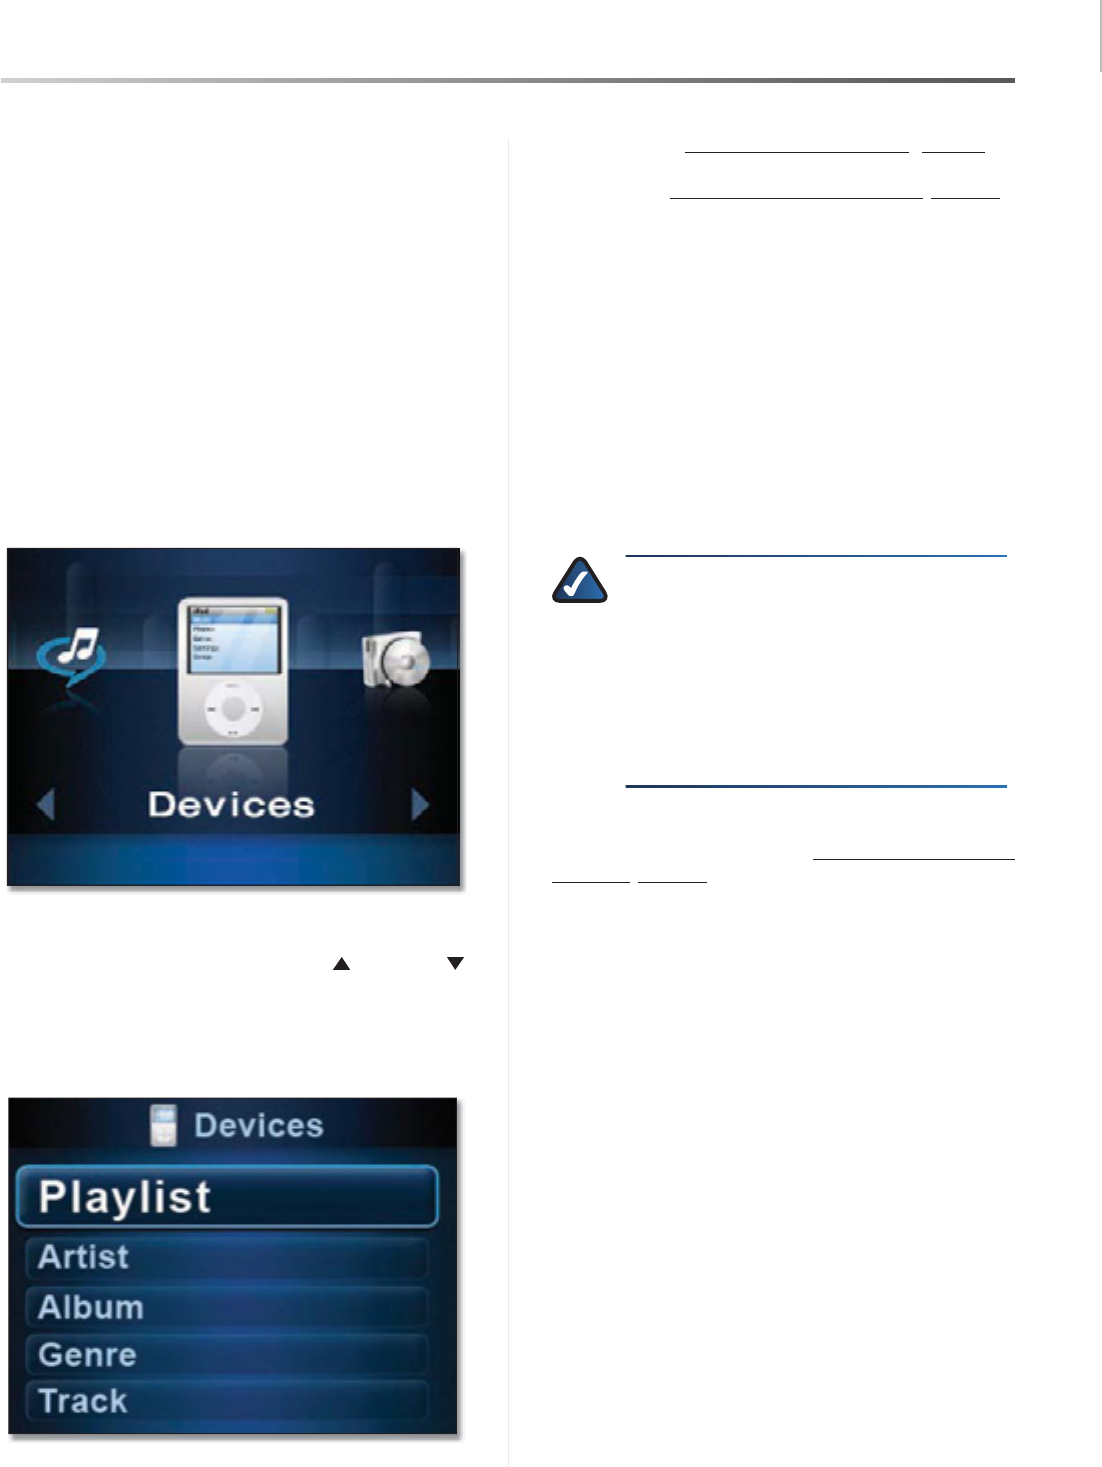
Devices (Accessing Your iPod)
When you have an iPod connected to your Conductor
using the optional Docking Station for iPod (MCCI40),
you find music in the same manner that you do on your
iPod. A list menu is displayed with the options to view by
playlist, artist, album, genre, track, podcast, composer, or
audiobook.
Use the up and down buttons to navigate the list
and press OK to select.
Playlist Displays a list of playlists created on your
computer using iTunes.
Highlight a playlist title and press
sOK to view the tracks
in the playlist.
Press the
sPlay button with a playlist highlighted
to begin playing the playlist and add all of the tracks in
the playlist to the queue.
Artist Displays a list of artists available on your iPod.
Press
sOK with an artist selected to view the album titles
available from the artist. Press OK with an album title
selected to view a list of tracks from the album that are
located on the iPod.
Using Your Conductor
33
Wireless Home Audio
Conductor/Wireless-N Digital Music Center
Press the sPlay button with the artist selected to
add all tracks by the artist found on the iPod to the
queue and begin playing the first track.
Album Displays an alphabetical list of album titles that
are available on your iPod.
NOTE: Album titles are included even if there is
only one song on the device from the album.
Highlighting an album title and pressing the
sOK button
will display all of the track titles from the selected
album available on your iPod.
Highlighting an album title and pressing the
sPlay
button will add all of the tracks located on your
iPod from the selected album to the queue. The first
track available from the album will begin playing
immediately.
Genre Displays an alphabetical list of musical genres that
are available on your iPod.
Highlighting a genre and pressing the
sOK button will
display all of the album titles from the selected genre
on the iPod. Pressing OK with an album title selected
will display the tracks that are available from the album
on the iPod.
Highlighting a genre and pressing the
sPlay
button will add all of the tracks located on your iPod
from the selected genre to the queue. The first track
from the genre will begin playing immediately.
Track Displays an alphabetical list of all track titles
located on your iPod. Pressing the OK or the Play
button will begin playing the track immediately and add
it to the queue.
Podcast Displays an alphabetical list of podcasts available
for playback.
Composer Displays an alphabetical list of all composers
of the songs on your iPod.
AudioBook Displays an alphabetical list of audiobooks
available for playback.
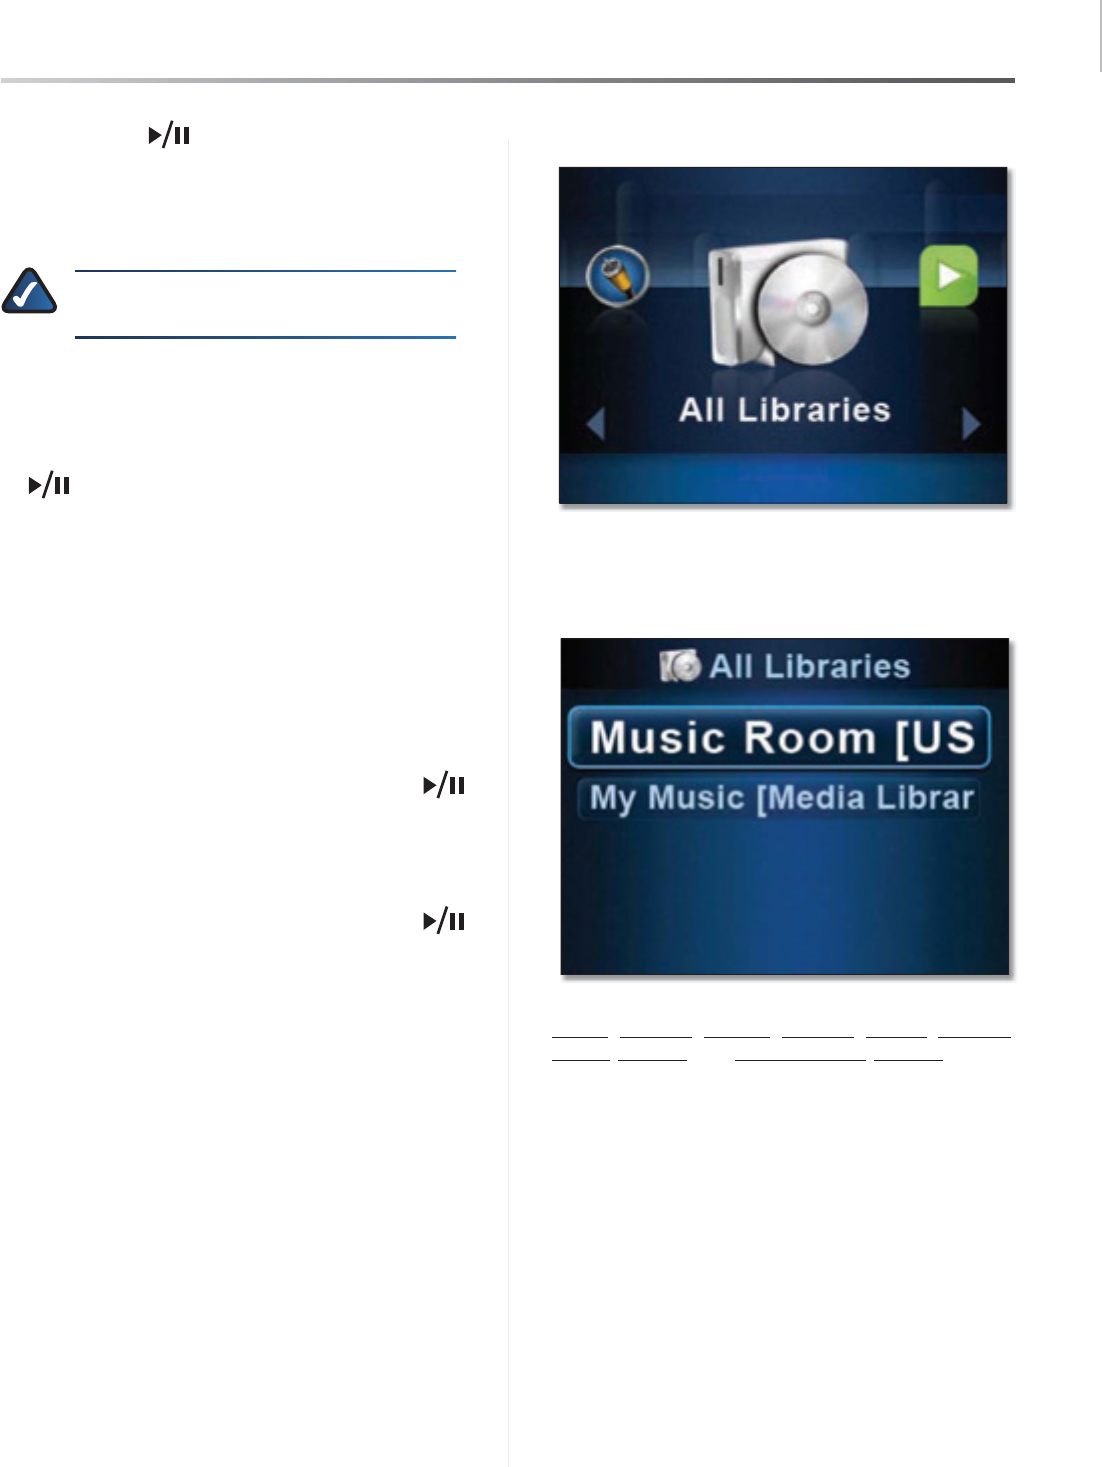
All Libraries
The All Libraries option will display all of your media
volumes that are available for playback. This includes any
USB drives and media being shared using the Cisco Media
Server software.
For details on searching through library content, refer to
Artists,page 30,Albums,page 31,Genres,page 31,
Search,page 31, and Browse Folders,page 32.
Using Your Conductor
34
Wireless Home Audio
Conductor/Wireless-N Digital Music Center
RadioTime
RadioTime provides streaming Internet radio broadcasts
from all over the world. Station titles are displayed with
location listed in parenthesis. When a syndicated talk
show is selected, a list of affiliates carrying the broadcast
is available for selection.
Local Radio Displays a list of local FM and AM band radio
stations that are accessible via RadioTime.
Browse Talk Brings up a list of various talk radio topics
for selection. Select a topic and then you can bring up a
list of stations that fit that category.
Browse Sports Provides links to radio stations that offer
sports programming available on RadioTime.
Browse Music Select from a list of music categories. Once
you select a category of music, a list of stations playing
music that fits within that category appears.
Browse by Location Use this to find radio stations located
all over the world. Stations are categorized by region.
Favorites
There are 10 favorite positions that can be used to
store favorite tracks, albums, playlists, genres, artists or
channels.
Selecting Favorites from the main menu will bring up the
list of favorites that have been configured. This list can
also be accessed by pressing the Favorites button on
the IR remote.
Press the number of the favorite on the numeric keypad or
use the down and up buttons to move through the
list of favorites and press OK to select.
For details on creating favorites, refer to Creating and
Using Favorites,page 15.
Using Your Conductor
35
Wireless Home Audio
Conductor/Wireless-N Digital Music Center
Now Playing Queue
The Now Playing Queue displays the current track that is
playing and the songs that are next up in the queue. You
can move through the queue using the down and up
buttons. The Now Playing icon indicates which track in
the queue is currently playing. If you want to immediately
play another track in the queue, highlight the track and
press OK to begin playing the track.
From anywhere in the interface you can play the previous
track in the queue by pressing the Previous button on
the IR remote. You can skip to the next track in the queue
by pressing the Next button on the IR remote.
The Now Playing screensaver appears (unless disabled)
after the time configured in Settings > General >NPS
Setup. This screen displays the album artwork, artist
name, song title, and a track duration progress bar.
Settings
The Settings option contains many configuration options
for your Conductor. Following is a list of settings that are
configured with details on the following pages:
sSource,page 36
sPlay To,page 37
sNetwork,page 37
sZones and Libraries,page 38
sGeneral,page 39
sBrightness,page 40
sAudio,page 41
sUSB,page 41
sAbout,page 41
Using Your Conductor
36
Wireless Home Audio
Conductor/Wireless-N Digital Music Center
Source
You can connect any external analog audio source to your
Wireless Home Audio network using the RCA input jacks
on the back of your Director or Player and play the music
to all the devices in your home. This allows you to stream
music from sources such as turntables, stereo systems,
and MP3 players.
To play external analog audio, ensure that the RCA outputs
are connected from your external device to the RCA inputs
of the Director and perform the following steps:
Select 1. Settings from the main menu.
Select 2. Source from the Settings menu.
Analog Line In3. will appear on the screen. Press the OK
or Play button.
The audio from your RCA inputs will be played on the
device. If you want it to play throughout your home, be
sure you have your zones linked. If you have your Now
Playing screensaver enabled, the screen will indicate that
the Analog Line In is being played.
NOTE:You cannot add tracks to the queue while
analog line in is playing in the queue. Selecting
to play a track will stop playing the analog line
in audio.
Using Your Conductor
37
Wireless Home Audio
Conductor/Wireless-N Digital Music Center
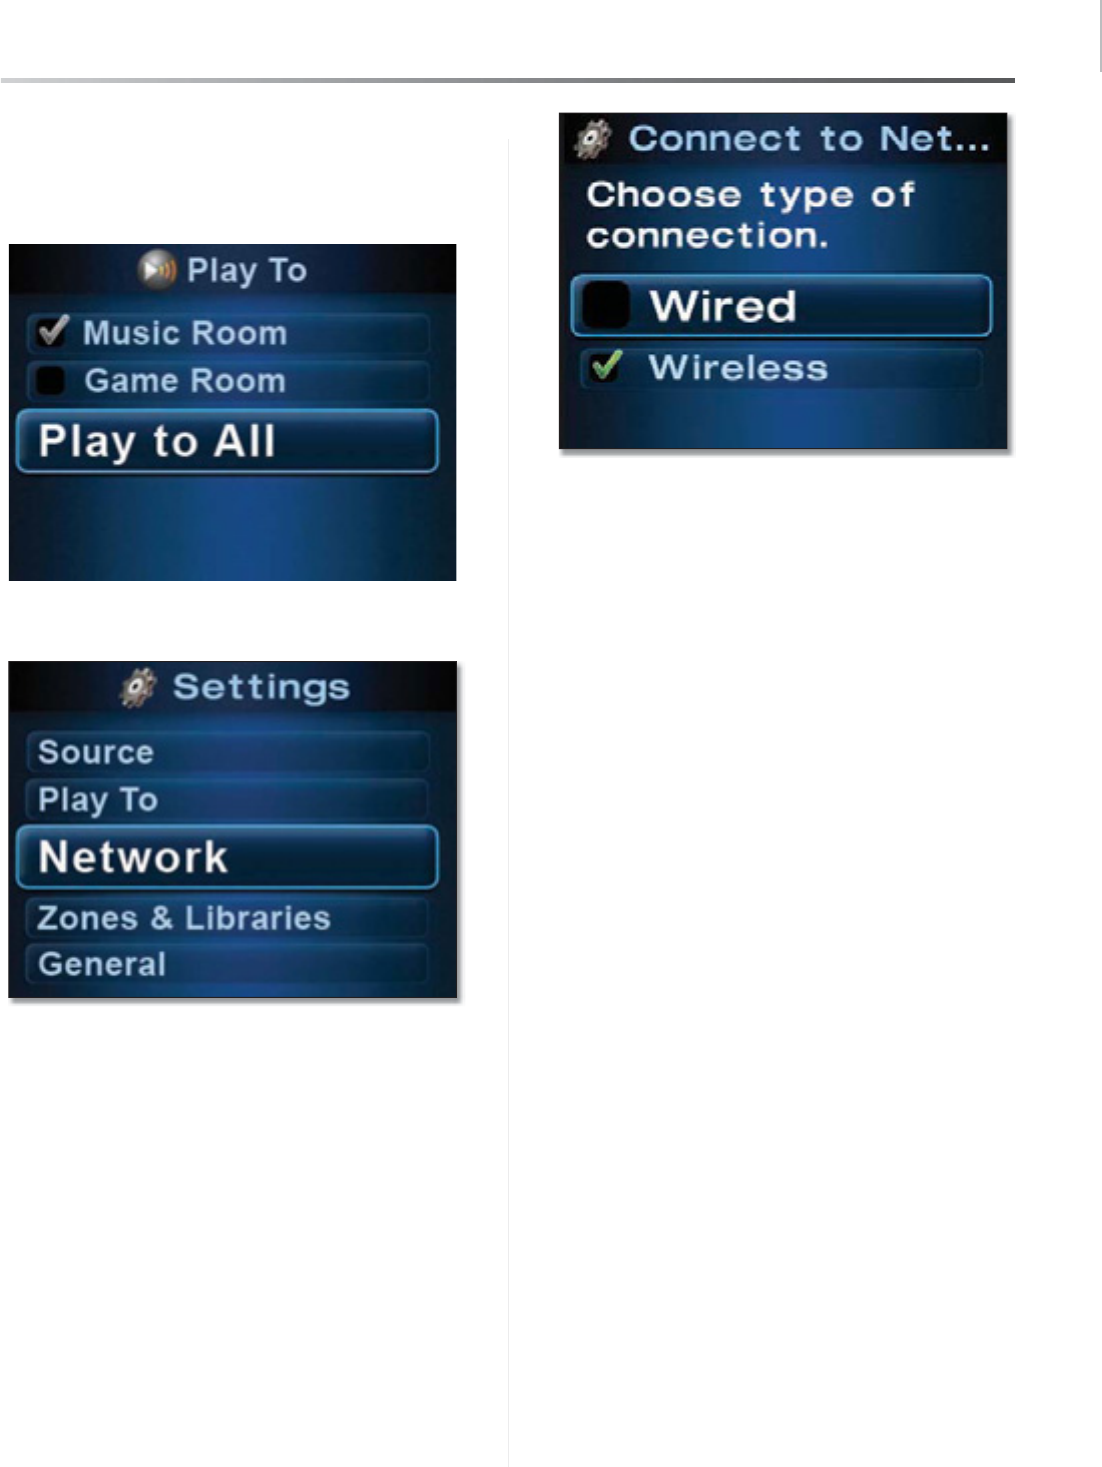
Play To
The Play To option allows you to link zones so that your
music or radio stations are played to multiple rooms
perfectly in sync.
Network
The network option allows you to modify your Conductor’s
wired or wireless network settings. This should not be used
for initial configuration of your Conductor. It is necessary
to use the LELA CD-ROM to setup your Conductor to setup
your Internet services.
Connect to Network
Select the connection method that will be used to connect
the Wireless Home Audio Director to the network.
Wired
Advanced This option is used for IP configuration. A
dynamic or static IP address can be selected here.
Dynamic IP
sThe dynamic IP option should be selected
if your router or network connection automatically
provides an IP address to devices on the network.
Once this option is selected, the Details screen can be
used to verify that an IP address has been obtained.
Static IP
sSelecting Static IP will prompt you to enter
the IP address. To enter the IP address using the
remote control, remove the existing address by using
the left arrow on the Navigation Halo. Numbers can be
entered manually using the keypad or arrow up and
down on the Navigation Halo to scroll through the
number selections. To move to the next digit, use the
right arrow on the Navigation Halo. To enter a dot (.)
or period in the IP address, press the zero (0) button
twice.
Details This option displays the current network
connection settings including the wireless network name,
wireless security type, DHCP status, IP address, subnet
mask, gateway, and DNS information.
Wireless
Select Network Use this option to select a wireless
network name (also known as an SSID) from the list of
available networks or enter a wireless network name
manually by selecting Enter Network Name. To enter
the name manually, use the alphanumeric keypad on the
remote control to select the appropriate characters or use
the up and down arrows on the Navigation Halo to scroll
through the list of characters. To enter the next character,
use the right arrow on the Navigation Halo.
Using Your Conductor
38
Wireless Home Audio
Conductor/Wireless-N Digital Music Center
NOTE: The wireless network name is
case-sensitive. Capital letters can be found
immediately after the group of lowercase
letters.
Once the wireless network name has been selected, a
screen will appear asking for the wireless security mode
utilized on the network.
Open
sIf your network doesn’t have wireless security
enabled, the open option should be selected.
NOTE: Linksys recommends using some form
of wireless security on your network to help
safeguard your personal information. Wireless
security is typically configured on your router.
Refer to the documentation included with your
router for details on enabling wireless security.
Shared
sIf your network uses WEP security, select
this option and enter in WEP key number 1. Enter the
appropriate number of hexadecimal characters (“0” to
“9” and “A” to “F”). For 64-bit encryption, enter exactly
10 hexadecimal characters. For 128-bit encryption,
enter exactly 26 hexadecimal characters.
WPA
sSelect TKIP or AES and enter the network’s
Passphrase (also called a pre-shared key) of 8-63
characters.
WP2
sSelect TKIP or AES and enter the network’s
Passphrase (also called a pre-shared key) of 8-63
characters.
Wi-Fi Protected Setup™ Discovery
sThis option is
used to connect to your router using the Wi-Fi Protected
Setup™ button on the Wireless Home Audio Director
and the Wi-Fi Protected Setup™ button on your
router..
Wi-Fi Protected Setup™ Pin Setting
sSelect this
option to enter the Wireless Home Audio Director’s
PIN number on the router.
Advanced This option is used for IP configuration. A
dynamic or static IP address can be selected here.
Dynamic IP
sThe dynamic IP option should be selected
if your router or network connection automatically
provides an IP address to devices on the network.
Once this option is selected, the Details screen can be
used to verify that an IP address has been obtained.
Static IP
sSelecting Static IP will prompt you to enter
the IP address. To enter the IP address using the
remote control, remove the existing address by using
the left arrow on the Navigation Halo. Numbers can be
entered manually using the keypad or arrow up and
down on the Navigation Halo to scroll through the
number selections. To move to the next digit, use the
right arrow on the Navigation Halo. To enter a dot (.)
or period in the IP address, press the zero (0) button
twice.
Details This option displays the current network
connection settings including the wireless network name,
wireless security type, DHCP status, IP address, subnet
mask, gateway, and DNS information.
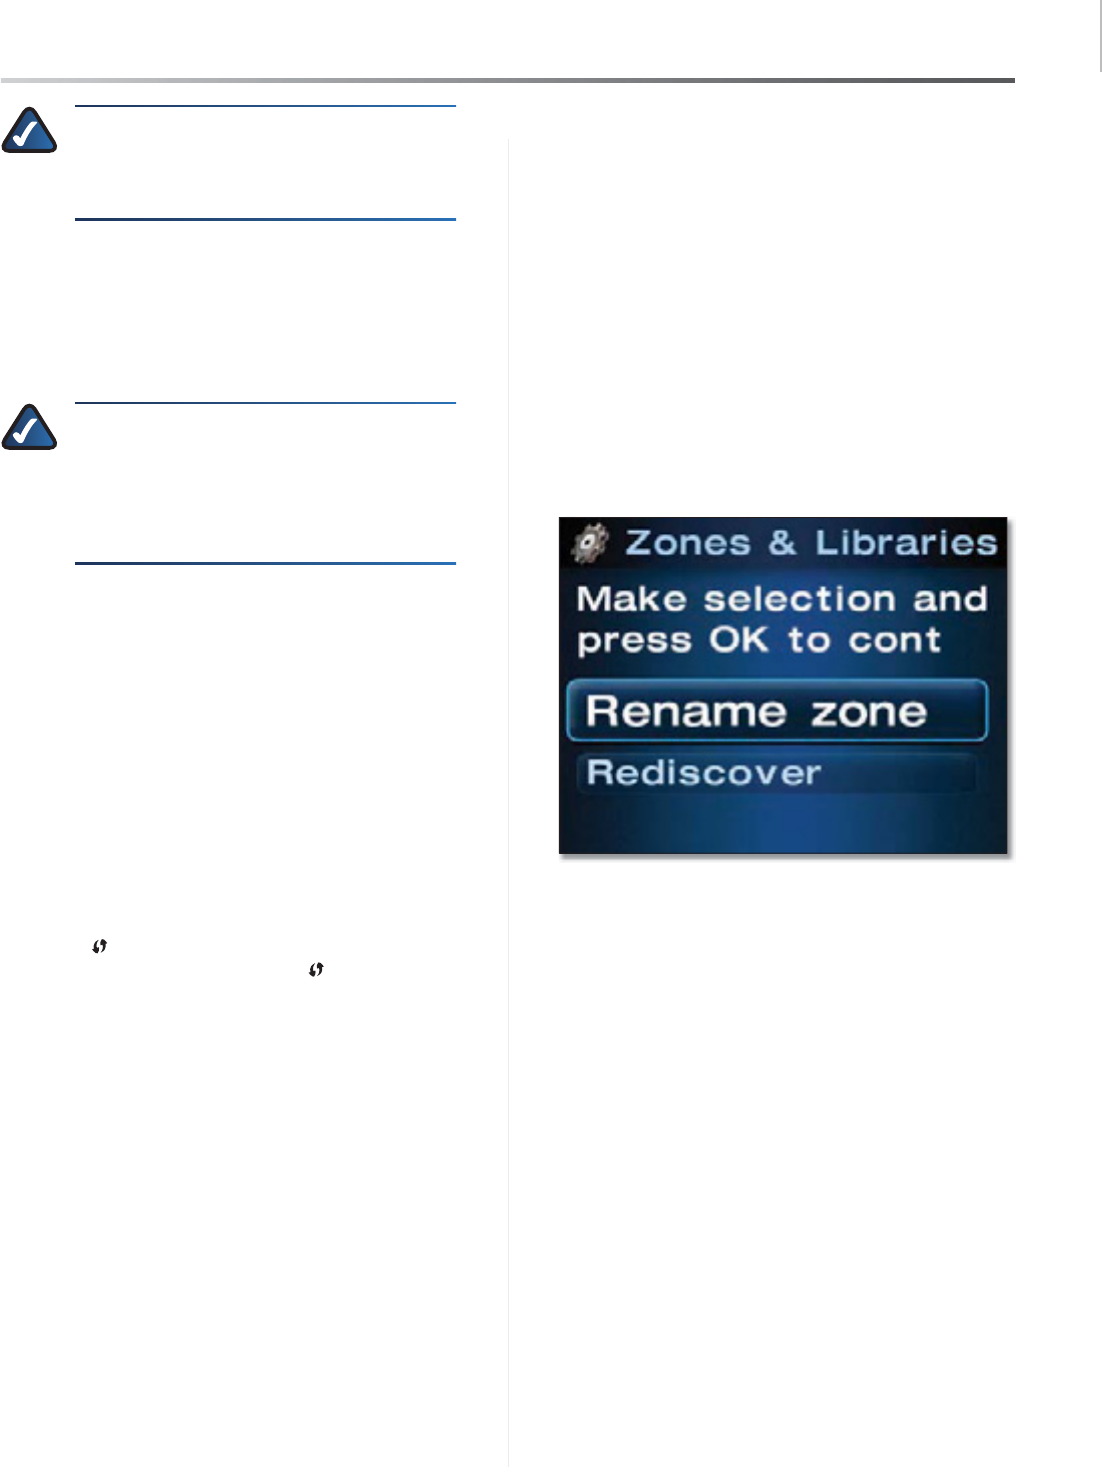
Zones and Libraries
Rename Zone This option is used to rename a device
with a name that will allow you to know where it is located
in your home. This makes it much easier to select which
areas to play music to or link.
Rediscover If one of the Wireless Home Audio devices or
one of your libraries on the network is not appearing, use
this option to rescan for any devices or libraries that are
not showing up.
Using Your Conductor
39
Wireless Home Audio
Conductor/Wireless-N Digital Music Center
General
The General option allows you to configure general
devices settings for your Conductor.
Date/Time
Auto update When this option is enabled, the date and
time settings are automatically updated via the Internet.
Set Time A series of screens will appear allowing you to
enter the month, day, year, and time manually.
Set Time Zone Select your local time zone.
Daylight saving This option should be selected when
observing daylight saving time.
Time Format This allows you to select a 12 hour or 24 hour
time format. The 12 hour format is the default setting.
Date Format Allows you to specify the order that the day,
month, and year are displayed.
Screen Saver
The screen saver can be turned OFF or set to start after an
idle period of 15, 30, or 60 minutes.
NPS setup
The NPS setup option configures the Now Playing
screensaver. The Now Playing screensaver displays the
album artwork, artist name, song title, and a track duration
progress bar of the track that is currently being played.
This feature can be disabled by selecting Never or set to
appear after 15, 30, or 60 seconds of idle time.
Using Your Conductor
40
Wireless Home Audio
Conductor/Wireless-N Digital Music Center
Home button
This option configures the screen that will appear when
the Home button on the IR remote is pressed once
from the main menu or pressed twice from any other
menu. The following are the screen options:
Play Queue
sThis is the default setting. This option
displays all of the tracks that are currently in the queue
including the track that is currently playing. You have
the option to navigate through the list of songs and
play another track should you choose to.
Now Playing Screen
sWhen this is selected, the Now
Playing screensaver will be displayed instead of the
queue. The Now Playing screensaver displays the
album artwork, artist name, song title, and a track
duration progress bar of the track that is currently
being played.
NOTE: Pressing right on the remote from
the Now Playing screensaver brings up a list
of options including Play To, View Queue, Add
Favorite, Clear Queue, Shuffle, and Repeat.
OK button
This option defines that action that will occur when the
OK button is pressed on the IR remote. The options are
the following:
Play
sThis is the default setting. When you highlight an
item and press the OK button on the IR remote, the
item will begin playing immediately and any existing
tracks will be cleared from the queue. If the item you
selected was an album, playlist, genre, or artist, all
tracks associated with selection will be added to the
queue. If the item selected was a track or channel, only
the single item will appear in the queue.
Add to Queue
sThis option changes the functionality
of the OK button on the IR remote when you select an
item. With this option enabled, items are added to the
queue instead of playing immediately. This eliminates
any disruption of playback and also keeps the existing
tracks in the queue.
Brightness
Use the up and down buttons on the IR remote to
adjust the brightness level of the viewing screen. After a
few seconds of idle time the brightness adjustment slider
window will close or press the back button to return to the
list of settings.
Using Your Conductor
41
Wireless Home Audio
Conductor/Wireless-N Digital Music Center
Audio
Treble Setup Use the up and down buttons on the
IR remote to adjust the high frequency audio playback
level on the Conductor. After a few seconds of idle time
the treble adjustment slider window will close or press the
back button to return to the list of settings.
Bass Setup Use the up and down buttons on the IR
remote to adjust the low frequency audio playback level
on the Conductor. After a few seconds of idle time the
bass adjustment slider window will close or press the back
button to return to the list of settings.
USB
This feature is used to allow safe removal of a USB device
attached to the Conductor. Select Safely Eject and wait
for the message that indicates You may safely remove your
USB device and then you can disconnect your USB drive
from the back of the Conductor.
For additional details, refer to Disconnecting USB Drives,
page 43.
About
Version Displays the version of the software installed on
the Wireless Home Audio Director.
Autoupdate This feature will automatically check
online for updates to the software installed on the
Wireless Home Audio Director.
Check for updates This option can be used to check
manually for an update to the software installed on the
Wireless Home Audio Director.

Troubleshooting
42
Wireless Home Audio
Conductor/Wireless-N Digital Music Center
Troubleshooting
Do I need to run the CD to congure my Wireless Home
Audio devices?
Yes. Basic settings can be applied on some devices via
their screens, but in order to fully configure your Wireless
Home Audio devices you must use the CD.
How do I share my music from additional computers and
allow them to control my Wireless Home Audio devices?
Run the CD on your additional computers and select the
Connect Computers option on the first screen.
Where do I nd the Cisco Media Center software after
installation is complete?
Go to Start > Programs and select Cisco Media Center.
You can start the Cisco Media Player from here.
What do I do if my iTunes library or other audio les are
not found by Cisco Media Center?
Some iTunes files may not be available. Songs purchased
from iTunes* may be protected with Digital Rights
Management (DRM); DRM files cannot be played to your
Wireless Home Audio devices directly from your PC. The
optional Linksys by Cisco Docking Station for iPod (MCCI40)
will allow you to connect your iPod to your Conductor and
play back all of the songs from your iPod.
*iTunes Plus files are not protected†
During the initial configuration, you are asked to select
directories where your music is stored. To change or
add additional directories, right-click on the icon
on the taskbar and select Properties. Modify or type
in a new directory by typing in the entire path such as
C:\Documents and Settings\username\My Documents\
My Music; in the Local Media Directory field. Additional
directories are separated by a semicolon. Click OK after all
updates are complete.
How do I start the Cisco Media Server software?
For details on starting the Cisco Media Server software,
refer to Starting the Cisco Media Server Manually,page
22.
My Cisco Media Server content is not appearing on
my Wireless Home Audio devices but it seems to be
running.
You may need to reconfigure of disable yours Windows
firewall.
My devices are not showing up on the main menu
carousel.
Perform each of the following steps until you are able to
locate the devices on your main menu.
Go to
sSettings > Zones and Libraries and select
Rediscover.
Go to Standby mode by pressing the power button on
s
the front of the unit.
If using the Docking Station for iPod, verify that the
s
connector is properly attached.
If using a USB device, verify that the USB connector is
s
completely connected.