LINKSYS EA3500 High Performance Dual-Band N Router User Manual E Series Router Cert E3500

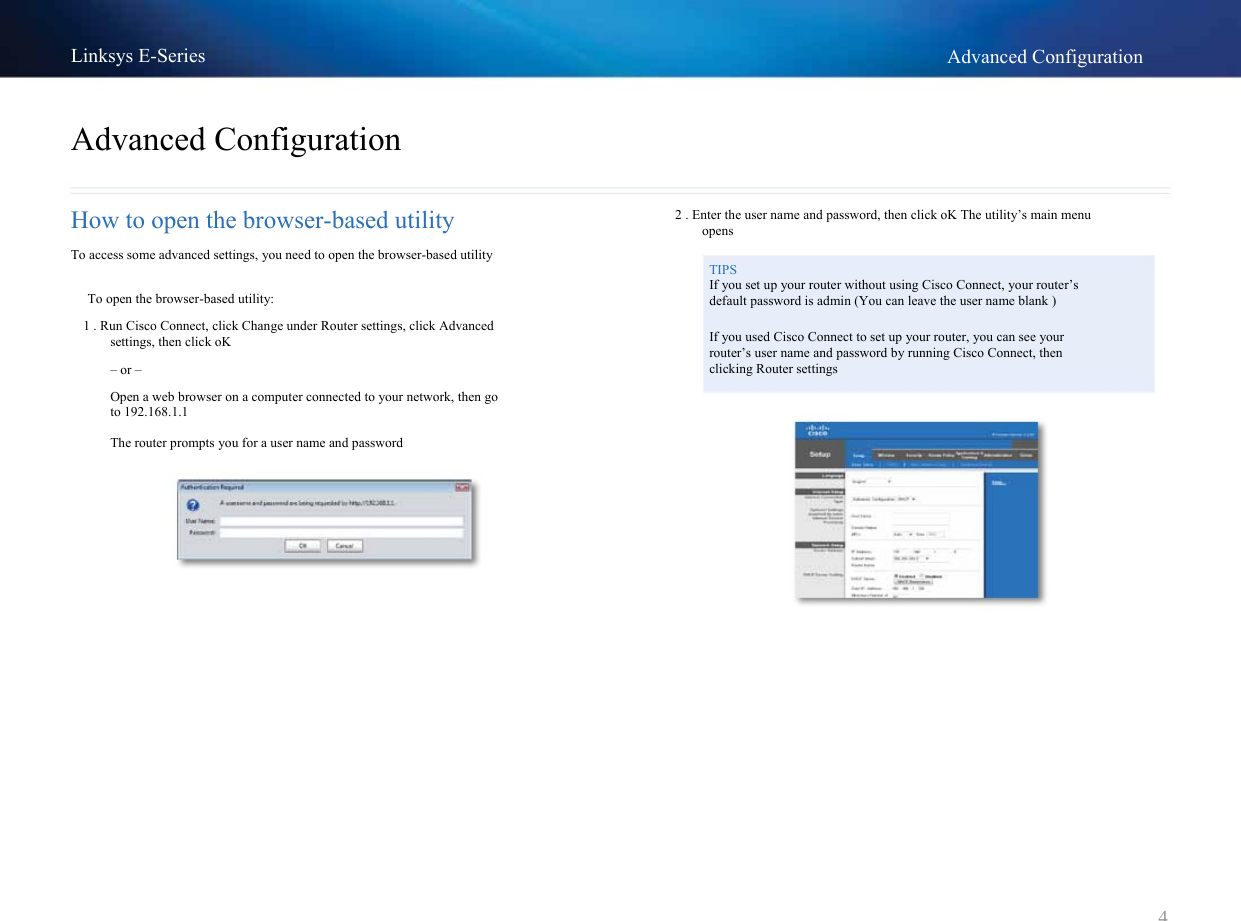
LINKSYS LLC High Performance Dual-Band N Router E Series Router Cert E3500

Contents

User Manual - Operation

Linksys E-Series Routers
Linksys E-Series Table of ContentsTable of Contents Product overview E1200/E1500/E2500/E3500 Back view Bottom view Wireless Security 111Wireless > Wireless SecurityPersonal optionsOffice options Option settings888 8E4200 Top view Back view 222Troubleshooting How to run Cisco Connect after setup Your router was not successfully set up Get Windows XP Service Pack 3 message Your Internet cable is not plugged in message Cannot access your router message Device not found message1112 12 13 14 15Setting Up Your E-Series Router Where to find more help How to set up your router How to start Cisco Connect Use Cisco Connect to manage your router 3333How to manually set up your router 3Advanced Configuration How to open the browser-based utility Setup > Basic Setup Language Internet Setup Specifications 4555Wireless > Basic Wireless Settings Wireless Settings 66Linksys E1200Linksys E1500 Linksys E2500 Linksys E3500 Linksys E42001718 19 20 21i
Linksys E-Series Product overview•Product overview E1200/E1500/E2500/E3500 Back view Power indicator—Stays on steadily while power is connected andfollowing a successful Wi-Fi Protected Setup connection Flashes slowly during bootup, during firmware upgrades, and during a Wi-Fi Protected Setup connection Flashes quickly when there is a Wi-Fi Protected Setup errorPower—Connect the included AC power adapter to this portCAUTIONUse only the adapter that came with your router ••Power button—Press | (on) to turn on the router Bottom viewPower portUSB port (E3500 only) Ethernet ports Internet port Power indicatorWi-Fi Protected Setup button Your router’s appearance may vary • • USB port (E3500 only)—To easily share disk storage with other users onyour network or on the Internet, connect a USB drive to this port Ethernet ports—Connect Ethernet cables (also called network cables) to these Fast Ethernet (10/100, for E1200 and E1500) or Gigabit (10/100/1000, for E2500 and E3500) ports, color coded blue, and to other wired Ethernet network devices on your network Internet port—Connect an Ethernet cable (also called a network or Internet cable) to this port, color coded yellow, and to your modem Wi-Fi Protected Setup™ button—Press this button to easily configure wireless security on Wi-Fi Protected Setup-enabled network devices For more information, see “Wireless Security” on page 8 •Your router’s appearance may vary • Reset button—Press and hold this button for 5-10 seconds (until theport lights flash at the same time) to reset the router to its factory defaults You can also restore the defaults using the browser-based utility1
Linksys E-Series Product overviewBack viewE4200 Top view Ethernet ports Internet port Wi-Fi Protected Setup button Power portReset buttonUSB port•Indicator lightEthernet ports—Connect Ethernet cables (also called network cables)to these Gigabit (10/100/1000) ports, color coded blue, and to other wired Ethernet network devices on your network Internet port—Connect an Ethernet cable (also called a network orInternet cable) to this port, color coded yellow, and to your modemWi-Fi Protected Setup™ button—Press this button to easily configurewireless security on Wi-Fi Protected Setup-enabled network devices For more information, see “Wireless Security” on page 8 USB port—To easily share disk storage with other users on your networkor on the Internet, connect a USB drive to this port Reset button—Press and hold this button for 5-10 seconds (until theport lights flash at the same time) to reset the router to its factory defaults You can also restore the defaults using the browser-based utilityPower—Connect the included AC power adapter to this portCAUTIONUse only the adapter that came with your router ••• Indicator light—Stays on steadily while power is connected and following a successful Wi-Fi Protected Setup connection Pulses slowly during bootup, during firmware upgrades, and during a Wi-Fi Protected Setup connection Flashes quickly when there is a Wi-Fi Protected Setup error ••••Power button—Press | (on) to turn on the router 2
Linksys E-Series Setting Up Your E-Series RouterSetting Up Your E-Series Router Where to find more help In addition to this User Guide, you can find help at these locations: • • • To start Cisco Connect for the first time: 1 . Insert the CD into your CD or DVD drive 2 . Click Set up your Linksys RouterIf you do not see this:••Linksys.com/support (documentation, downloads, FAQs, technical support, live chat, forums) Cisco Connect help (run Cisco Connect, then click Learn More where available) Browser-based utility context-sensitive help (open the utility, then clickHelp in the right-side column ) For Windows, click Start, Computer, then double-click the CD driveand the Setup iconFor Mac, double-click the CD icon on your desktop, then double-clickthe Setup icon3 . Follow the on-screen instructions to complete your router setupHow to set up your router The easiest and fastest way to set up your router is to run the Cisco Connect setup software Use Cisco Connect to manage your router After your router has been set up and Cisco Connect has been installed, youcan use Cisco Connect to easily manage many of your router’s settings such as:•••••How to start Cisco Connect When you run the setup CD, Cisco Connect (your router’s setup software) is automatically installed onto your computer You can then use Cisco Connect to easily manage your router NOTE: If you lose your setup CD, you can download the software from Linksys.com/support Connect devices to your network Test your Internet connection speed Configure parental controlsSet up guest accessChange your router’s name and password How to manually set up your router After setting up the router with the setup software (located on the CD), therouter will be ready for use If you would like to change its advanced settings, or if the software does not run, use the router’s browser-based utility You can access the utility with a web browser on a computer connected to the router For more information on using the utility, see “How to open the browser-based utility” on page 43
Linksys E-Series Advanced ConfigurationAdvanced Configuration How to open the browser-based utility To access some advanced settings, you need to open the browser-based utility To open the browser-based utility: 1 . Run Cisco Connect, click Change under Router settings, click Advanced     settings, then click oK – or – Open a web browser on a computer connected to your network, then goto 192.168.1.1 The router prompts you for a user name and password 2 . Enter the user name and password, then click oK The utility’s main menu    opensTIPSIf you set up your router without using Cisco Connect, your router’s default password is admin (You can leave the user name blank )If you used Cisco Connect to set up your router, you can see yourrouter’s user name and password by running Cisco Connect, then clicking Router settings4
Linksys E-Series Advanced ConfigurationLanguageSelect your language To use a different language, select one from the drop-down menu The language of the browser-based utility will change five seconds after you select another languageSetup > Basic Setup The first screen that appears is the Basic Setup screen This allows you to changethe router’s general settings Internet SetupThe Internet Setup section configures the router to your Internet connectionMost of this information can be obtained through your Internet Service Provider (ISP)Internet Connection TypeSelect the type of Internet connection your ISP provides from the drop-downmenu The available types are:••••••Automatic Configuration - DHCP Static IPPPPoEPPTPL2TPTelstra CableAutomatic Configuration - DHCP The default Internet Connection Type is Automatic Configuration - DHCP(Dynamic Host Configuration Protocol) Keep the default only if your ISP supports DHCP or if you connect using a dynamic IP address (This option usually applies to cable connections )Static IPIf you are required to use a fixed IP address to connect to the Internet, selectStatic IPPPPoEIf you have a DSL connection, check whether your ISP uses Point-to-PointProtocol over Ethernet (PPPoE) If so, select PPPoE 5
Linksys E-Series PPTP Point-to-Point Tunneling Protocol (PPTP) is a service that generally applies toconnections in Europe If your PPTP connection supports DHCP or a dynamic IP address, then select obtain an IP Address Automatically If you are required to use a fixed IP address to connect to the Internet, then select Specify an IP Address and configure the options below Advanced ConfigurationWireless > Basic Wireless Settings The basic settings for wireless networking are set on this screenNOTEAfter you set up the wireless network(s), set up the wireless security settingsL2TP Layer 2 Tunneling Protocol (L2TP) is a service that generally applies to connections in Israel Wireless SettingsTelstra Cable Telstra Cable is a service that generally applies to connections in Australia Connect on Demand or Keep Alive The Connect on Demand and Keep Alive options let you choose whether the router connects to the Internet only as needed (useful if your ISP charges for connect time), or if the router should always be connected Select the appropriate option network Mode Select the wireless standards your network will support••••••Mixed If you have Wireless-N (2 4 GHz), Wireless-G, and Wireless-B devicesin your network, keep the default, Mixed Wireless-B/G only If you have both Wireless-B and Wireless-G (2 4 GHz)devices in your network, select Wireless-B/G only Wireless-B only If you have only Wireless-B devices, select Wireless-BonlyWireless-G only If you have only Wireless-G devices, select Wireless-GonlyWireless-n only If you have only Wireless-N (2 4 GHz) devices, selectWireless-n onlyDisabled If you have no Wireless-B, Wireless-G, and Wireless-N (2 4 GHz)devices in your network, select Disabled NOTEIf you have a dual-band router, you can select Mixed, Wireless-A Only, Wireless-N Only, or Disabled for the 5 GHz bandIf you are not sure which mode to use, keep the default, Mixed6
Linksys E-Series network name (SSID) The Service Set Identifier (SSID) is the network name shared by all devices in a wireless network It is case-sensitive and must not exceed 32 keyboard characters The default is Cisco followed by the last 5 digits of the router’s serial number, which is found on the bottom of the router If you used the setup software for installation, then the default Network Name is changed to an easy-to-remember name NOTE If you restore the router’s factory default settings (by pressing the Reset button or using the Administration > Factory Defaults screen), the Network Name will return to its default value Change the Network Name back to its original name, or you will have to reconnect all devices on your wireless network to the new network name Channel Width For best performance in a network using Wireless-B, Wireless-G and Wireless-N (2 4 GHz) devices, select Auto (20 MHz or 40 MHz) For a channel width of 20 MHz, keep the default, 20 MHz only Channel Select the channel from the drop-down list for Wireless-B, Wireless-G,and Wireless-N (2 4 GHz) networking If you are not sure which channel to select, then keep the default, Auto SSID Broadcast When wireless clients survey the local area for wireless networks to associate with, they will detect the SSID broadcast by the router To broadcast the router’s SSID, keep the default, Enabled If you do not want to broadcast the router’s SSID, then select Disabled Advanced Configuration7
Linksys E-Series Wireless SecurityWireless Security Wireless > Wireless Security The wireless security settings configure the security of your wireless network(s)The router supports the following wireless security options: WPA2/WPA Mixed Mode, WPA2 Personal, WPA Personal, WPA2/WPA Enterprise Mixed Mode, WPA2 Enterprise, WPA Enterprise, WEP, and RADIUS (WPA stands for Wi-Fi Protected Access WEP stands for Wireless Equivalent Privacy RADIUS stands for Remote Authentication Dial-In User Service ) Option settingsWPA2/WPA Mixed Mode, WPA2 Personal, WPA PersonalNOTESIf you select WPA2/WPA Mixed Mode as your Security Mode, each device in your wireless network MUST use WPA2/WPA and the same passphraseIf you select WPA2 Personal as your Security Mode, each devicein your wireless network MUST use WPA2 Personal and the same passphrasePersonal options Security option WPA2 Personal WPA2/WPA Mixed Mode WPA Personal WEP Strength Strongest WPA2: Strongest WPA: Strong Strong Basic If you select WPA Personal as your Security Mode, each devicein your wireless network MUST use WPA Personal and the same passphraseOffice options The office options are available for networks that use a RADIUS server for authentication The office options are stronger than the personal options because WPA2 or WPA provides encryption while RADIUS provides authentication Security option WPA2 Enterprise WPA2/WPA Enterprise Mixed Mode WPA Enterprise RADIUS Passphrase Enter a passphrase of 8-63 characters The default is password Ifyou used the setup software for installation, then the default is changed to a unique passphrase, which you can find by running Cisco Connect, then clicking Router settingsStrength Strongest WPA2: Strongest WPA: Strong Strong Basic 8
Linksys E-Series WPA2/WPA Enterprise Mixed Mode, WPA2 Enterprise, WPA Enterprise These option is used in coordination with a RADIUS server (These should onlybe used when a RADIUS server is connected to the router ) NOTES If you select WPA2/WPA Enterprise Mixed Mode as your Security Mode, each device in your wireless network MUST use WPA2/WPA Enterprise and the same shared key If you select WPA2 Enterprise as your Security Mode, each device in your wireless network MUST use WPA2 Enterprise and the same shared key If you select WPA Enterprise as your Security Mode, each device in your wireless network MUST use WPA Enterprise and the same shared key Wireless SecurityWEPWEP is a basic encryption method, which is not as secure as WPANOTE:If you select WEP as your Security Mode, each device in your wireless network MUST use WEP and the same encryption and shared keyEncryption Select a level of WEP encryption, (40/64-bit 10 hex digits) or104/128-bit (26 hex digits) The default is 40/64-bit (10 hex digits)Passphrase Enter a passphrase to automatically generate WEP keys Thenclick GenerateKey 1-4 If you did not enter a passphrase, enter the WEP key(s) manuallyRADIUS Server Enter the IP address of the RADIUS server RADIUS Port Enter the port number of the RADIUS server The default is 1812Shared Key Enter the key shared between the router and the server TX Key Select a default TX (Transmit) Key to use The default is 19
Linksys E-Series RADIUS This option features WEP used in coordination with a RADIUS server (This should only be used when a RADIUS server is connected to the router ) NOTE: If you select RADIUS as your Security Mode, each device in your wireless network MUST use RADIUS and the same encryption and shared key Wireless SecurityDisabledIf you choose to disable wireless security, you will be informed that wirelesssecurity is disabled when you first attempt to access the Internet You will given the option to enable wireless security, or confirm that you understand the risks but still wish to proceed without wireless security RADIUS Server Enter the IP address of the RADIUS server RADIUS Port Enter the port number of the RADIUS server The default is 1812Shared Secret Enter the key shared between the router and the server Encryption Select a level of WEP encryption, (40/64-bit 10 hex digits) or 104/128-bit (26 hex digits) The default is 40/64-bit (10 hex digits) Passphrase Enter a passphrase to automatically generate WEP keys Then click Generate Key 1-4 If you did not enter a passphrase, enter the WEP key(s) manually TX Key Select a default TX (Transmit) Key to use The default is 1 10
Linksys E-Series TroubleshootingTroubleshooting This chapter can help you solve common setup issues and connect to the Internet Your router’s CD includes Cisco Connect, the router setup software that makes it easy to connect network devices, change router settings, control guest access, enable parental controls, and connect to the Internet Cisco Connect is also installed onto your computer during setup If Cisco Connect is prevented from completing the setup, this chapter will guide you through finding solutions How to run Cisco Connect after setup When you run the setup CD, Cisco Connect is automatically installed onto yourcomputer You can then use Cisco Connect to easily manage your networkTo start Cisco Connect on a Windows computer: 1 . Click Start, All Programs, then click Cisco Connect The Cisco Connect main menu opens To start Cisco Connect on a Mac oS X computer: 1 . Open Finder and click Applications in the left panel 2 . Double-click the Cisco Connect icon You can find more help from our award-winning customer support at linksys.com/support. The Cisco Connect main menu opens 11
Linksys E-Series Troubleshooting•Your router was not successfully set up Temporarily disable your computer’s firewall (see the security software’sinstructions for help), then run the Setup program again on the router’s CDIf you have another computer, use that computer to run the Setupprogram again on the router’s CD •Get Windows XP Service Pack 3 message On Windows XP computers, Cisco Connect requires Service Pack 3 in order towork If you receive a “Get Windows Service Pack 3” message when setting up your router for the first time, follow these troubleshooting stepsIf Cisco Connect did not complete the setup, you can try the following: • Press and hold the Reset button on your router with a paperclip or pin for 10-15 seconds, then run the Setup program again on the router’s CDIf the currently installed Service Pack is older than version 3, you need todownload and install Service Pack 3TIPTo temporarily connect to the Internet and download the required Service Pack, you can use the included Ethernet cable to connect your computer directly to your modem To install Service Pack 3:1 . Click the link in the Cisco Connect error message or connect to the    Microsoft Update website (update.microsoft.com/windowsupdate)2 . Follow the instructions on the website or contact Microsoft if you need    further helpYour router’s appearance may vary 3 . After downloading and installing Service Pack 3, run the Setup program    on your router’s CD12
Linksys E-Series TroubleshootingYour Internet cable is not plugged in message If you get a “Your Internet cable is not plugged in” message when trying to setup your router, follow these troubleshooting steps Back view of cable modem Back view of DSL modem 2 . Make sure that your modem is connected to power and is turned on If it        has a power switch, make sure that it is set to the on or l position3 . If your Internet service is cable, verify that the cable modem’s CABLE port        is connected to the coaxial cable provided by your ISP To fix the problem: 1 . Make sure that an Ethernet or Internet cable (or a cable like the one         supplied with your router) is securely connected to the yellow Internet         port on the back of the router and to the appropriate port on your         modem This port on the modem is usually labeled Ethernet, but may     be named Internet or WAn Or, if your Internet service is DSL, make sure that the DSL phone line isconnected to the modem’s DSL port 4 . If your computer was previously connected to your modem with a USB    cable, disconnect the USB cable 5 . Return to the Cisco Connect window and click next to try again If the        window has already been closed, run the Setup program again on the     router’s CDBack view of router 13
Linksys E-Series Troubleshooting3 . Click your own network name, then click Connect In the example        below, the computer was connected to another wireless network named         JimsRouter The name of the Linksys E-Series network, BronzeEagle in this     example, is shown selectedCannot access your router message If you cannot access your router because your computer is not connected to your network, follow these troubleshooting steps To access your router, you must be connected to your own network If you currently have wireless Internet access, the problem may be that you have accidentally connected to a different wireless network To fix the problem on Windows computers: 1 . On your Windows desktop, right-click the wireless icon in the system tray4 . If you are prompted to enter a network key, type your password (Security        Key) into the network key and Confirm network key fields, then click     Connect2 . Click View Available Wireless networks A list of available networks     appears Your computer connects to the network, and you should now be able toaccess the router14
Linksys E-Series To fix the problem on Mac computers: 1 . In the menu bar across the top of the screen, click the AirPort icon A list         of wireless networks appears Cisco Connect has automatically assigned     your network a name In the example below, the computer was connected to another wireless network named JimsRouter The name of the Linksys E-Series network, BronzeEagle in this example, is shown selectedTroubleshootingDevice not found message If you get a “Device not found” message when trying to connect a networkdevice (such as an iPhone, iPod, or smartphone), follow these troubleshooting steps2 . Click the wireless network name of your Linksys E-Series router     (BronzeEagle in the example) 3 . Type your wireless network password (Security Key) into the Password     field, then click oK TIPFor a stronger signal during initial setup, move your wireless devices near your router Long distances make it harder for the router to detect the devicesTo fix the problem:1 . Run Cisco Connect15
Linksys E-Series 2 . Click Computers and devices The Computers and other devices window     appears 3 . Click other Wireless devices TroubleshootingExample: On your Smartphone or other wireless device, locate the Wi-Fi menu and search for available wireless networks In this example, using the network information provided by Cisco Connect shown in the previous screen, click BronzeEagle Android iPhone4 . Enable your wireless network device’s Wi-Fi connection, then search for        your wireless network name See your device documentation for help NOTE Your wireless device must support WPA/WPA2 5 . On the wireless network device, select the network name of your router         and enter the password (Security Key) 6 . In Cisco Connect, click next 7 . Enter the password (Security Key) provided by Cisco Connect In this    example, the security key is B6eM9UkCjz NOTEThe password is case sensitive Make sure that you enter letters in the correct case8 . When your wireless device is successfully connected to your wireless        network, enter a name for the device in Cisco Connect, then click Finish16
Linksys E1200 SpecificationsSpecifications Linksys E1200 Model Name Description Model Number Standards Ports Buttons LEDs Cabling Type Transmitted Power Linksys E1200 Wireless-N Router E1200 802 11n, 802 11g, 802 11b, 802 3u Power, Internet, and Ethernet (1-4) Reset, Wi-Fi Protected Setup™ Power/Wi-Fi Protected Setup, Internet, Ethernet (1-4) CAT 5e 802 11n (20 MHz): 15 0 ± 1 5dBm @ CH6, MCS 0~4, MCS 8~12 13 5 ± 1 5dBm @ CH6, MCS 5~7, MCS 13~15802 11n (40 MHz): 14 0 ± 1 5dBm @ CH6, MCS 0~4, MCS 8~12 13 5 ± 1 5dBm @ CH6, MCS 5~7, MCS 13~15802 11g: 14 5 ± 1 5dBm @ CH6, all rates 802 11b: 16 5 ± 1 5dBm @ CH6, all rates Antenna Gain UPnP Wireless Security Security Key Bits ≤2 5 dBi, ≤4 0 dBi (2 antennas) Supported Wi-Fi Protected Access™ 2 (WPA2), WEP, wireless MAC filtering Up to 128-bit encryption Operating TempStorage TempOperating HumidityStorage HumidityPowerCertificationsEnvironmentalDimensions 188 7 × 151 7 × 31 2 mm (7 43” × 5 97” × 1 23”) Unit Weight 252 7g (8 91 oz )12V, 0 5A FCC, UL/cUL, ICES-003, RSS210,CE, Wi-Fi (IEEE 802 11b/g/n), WPA2™, WMM®, Wi-Fi Protected Setup, Windows 7 0 to 40°C (32 to 104°F) -20 to 60°C (-4 to 140°F) 10 to 80% non-condensing 5 to 90% non-condensing NOTESFor regulatory, warranty, and safety information, see the CD that came with your router or go to Linksys.com/support Specifications are subject to change without notice Maximum performance derived from IEEE Standard 802 11specifications Actual performance can vary, including lower wireless network capacity, data throughput rate, range and coverage Performance depends on many factors, conditions and variables, including distance from the access point, volume of network traffic, building materials and construction, operating system used, mix of wireless products used, interference and other adverse conditions17
Linksys E1500 SpecificationsEnvironmentalLinksys E1500 Wireless-N Router with SpeedBoost E1500 802 11n, 802 11g, 802 11b, 802 3u Power, Internet, and Ethernet (1-4) Reset, Wi-Fi Protected Setup Power/Wi-Fi Protected Setup, Internet, Ethernet (1-4) CAT 5e 802 11n (20 MHz): 17 0 ± 1 5 dBm @ CH6, MCS 0~4, MCS 8~12 16 0 ± 1 5 dBm @ CH6, MCS 5~7, MCS 13~15802 11n (40 MHz): 15 5 ± 1 5 dBm @ CH6, MCS 0~4, MCS 8~12 14 0 ± 1 5 dBm @ CH6, MCS 5~7, MCS 13~15802 11g: 18 0 ± 1 5 dBm @ CH6, 6 Mbps 17 0 ± 1 5 dBm @ CH6, 54 Mbps 802 11b: 18 0 ± 1 5 dBm @ CH6, all rates Operating TempStorage TempOperating HumidityStorage HumidityDimensionsUnit WeightPowerCertifications188 7 × 151 7 × 31 2 mm (7 43” × 5 97” × 1 23”) 254 1g (8 96 oz ) 12V, 0 5A FCC, UL/cUL, ICES-003, RSS210,CE, Wi-Fi (IEEE 802 11b/g/n), WPA2, WMM, Wi-Fi Protected Setup, Windows 7 0 to 40°C (32 to 104°F) -20 to 60°C (-4 to 140°F) 10 to 80% non-condensing 5 to 90% non-condensing Linksys E1500 Model Name Description Model Number Standards Ports Buttons LEDs Cabling Type Transmitted Power NOTESFor regulatory, warranty, and safety information, see the CD that came with your router or go to Linksys.com/support Specifications are subject to change without notice Maximum performance derived from IEEE Standard 802 11specifications Actual performance can vary, including lower wireless network capacity, data throughput rate, range and coverage Performance depends on many factors, conditions and variables, including distance from the access point, volume of network traffic, building materials and construction, operating system used, mix of wireless products used, interference and other adverse conditionsAntenna Gain UPnP Wireless Security Security Key Bits ≤3 0 dBi, ≤4 0 dBi, ≤4 5 dBi (3 antennas) Supported Wi-Fi Protected Access 2 (WPA2), WEP, wireless MAC filtering Up to 128-bit encryption 18
Linksys E2500 SpecificationsEnvironmentalLinksys E2500 Advanced Dual-Band N Router E2500 802 11n, 802 11a, 802 11g, 802 11b, 802 3,802 3u, 802 3ab 4 total, 2 internal antennas per each 2 4 GHz & 5 GHz radio band No 802 11b: CCK, QPSK, BPSK 802 11g: OFDM 802 11a: OFDM 802 11n: BPSK, QPSK, 16-QAM, 64-QAM 2 4 GHz 802 11b: -87 dBm @ 11 Mbps 802 11g: -70 dBm @ 54 Mbps 802 11n 20 MHz: -70 dBm @ MCS15 802 11n 40 MHz: -66 dBm @ MCS15 5 GHz 802 11a: -70 dBm @ 54 Mbps 802 11n 20 MHz: -66 dBm @ MCS23 802 11n 40 MHz: -62 dBm @ MCS23 DimensionsUnit WeightPowerCertificationsOperating TempStorage TempOperating HumidityStorage Humidity225 x 35 x 180 mm (8 86” x 1 38” x 7 09”) 452 g (15 94 oz) 12V, 1A FCC, IC, CE, Wi-Fi A/B/G/N0 to 40°C (32 to 104°F) -20 to 60°C (-4 to 140°F) 10 to 80%, relative humidity,non-condensing 5 to 90% non-condensing Linksys E2500 Model Name Description Model Number Standards # of Antennas Detachable (y/n) Modulation Receive Sensitivity (Typical) NOTESFor regulatory, warranty, and safety information, see the CD that came with your router or go to Linksys.com/support Specifications are subject to change without notice Maximum performance derived from IEEE Standard 802 11specifications Actual performance can vary, including lower wireless network capacity, data throughput rate, range and coverage Performance depends on many factors, conditions and variables, including distance from the access point, volume of network traffic, building materials and construction, operating system used, mix of wireless products used, interference and other adverse conditionsAntenna Gain in dBi 2 4 GHz: Antenna 1 (right rear): ≤2 94 dBi Antenna 2 (front right): ≤3 78 dBi 5 GHz: Antenna 1 (right front): ≤5 86 dBi Antenna 2 (front left): ≤4 88 dBi UPnP Security features Security key bits Supported WEP, WPA, WPA2 Up to 128-bit encryption 19
Linksys E3500 SpecificationsStorage File System Support FAT, and NTFS, and HFS+ Linksys E3500 Dual-Band N750 Router with Gigabit and USBE3500 6 total, 3 internal antennas per each 2 4 GHz & 5 GHz radio band No 10/100/1000 Mbps Internet, Ethernet (1-4), USB, Power Reset, Wi-Fi Protected Setup Power, Ethernet (1-4) 802 11b: CCK, QPSK, BPSK 802 11g: OFDM 802 11a: OFDM 802 11n: BPSK, QPSK, 16-QAM, 64-QAM2 4 GHz 802 11b: -87 dBm @ 11 Mbps (Typical) 802 11g: -77 dBm @ 54 Mbps (Typical) 802 11n (20 MHz): -71 dBm @ MCS15 (Typical) 802 11n (40 MHz): -68 dBm @ MCS15 (Typical)5 GHz 802 11a: -75 dBm @ 54 Mbps (Typical) 802 11n 20 MHz: -70 dBm @ MCS15 (Typical) 802 11n 40 MHz: -67 dBm @ MCS15 (Typical)Linksys E3500 Model Name Description Model Number # of Antennas Detachable (y/n) Switch Port Speed Ports Buttons LEDs Modulation EnvironmentalDimensionsUnit WeightPowerCertificationsOperating TempStorage TempOperating HumidityStorage Humidity6 69” x 0 98” x 7 48” (170 x 25 x 190 mm) 7 62 oz (216 g) 12V, 2A FCC, IC, CE, Wi-Fi A/B/G/N32 to 95°F (0 to 35°C) -4 to 140°F (-20 to 60°C) 10 to 80% relative humidity,non-condensing 5 to 90% non-condensing Receive Sensitivity NOTESFor regulatory, warranty, and safety information, see the CD that came with your router or go to Linksys.com/support Specifications are subject to change without notice Maximum performance derived from IEEE Standard 802 11specifications Actual performance can vary, including lower wireless network capacity, data throughput rate, range and coverage Performance depends on many factors, conditions and variables, including distance from the access point, volume of network traffic, building materials and construction, operating system used, mix of wireless products used, interference and other adverse conditionsAntenna Gain 2 4 GHz (Dipole Antennas) Antenna 1 ≤ 2.69 dBi (right) Antenna 2 ≤ 3.67 dBi (left) Antenna 3 ≤ 4.95 dBi (front) 5 GHz (Dipole Antennas) Antenna 1 ≤ 4.73 dBi (right) Antenna 2 ≤ 3.32 dBi (left) Antenna 3 ≤ 3.88 dBi (front) UPnP Security features Security key bits Supported WEP, WPA, WPA2 Up to 128-bit encryption 20
Linksys E4200 SpecificationsSupported File Systemsfor Storage DeviceLinksys E4200 Maximum Performance Wireless-N RouterE4200 802 11n, 802 11a, 802 11g, 802 11b, 802 3,802 3u, 802 3ab 2 4 and 5 GHz 10/100/1000 Mbps (Gigabit Ethernet) Power, USB, Internet, Ethernet (1-4) Reset, Wi-Fi Protected Setup Top panel: Power Back panel: Internet, Ethernet (1-4) 6 total, 3 internal antennas per each 2 4 GHz and 5 GHz radio band No 802 11b: CCK, QPSK, BPSK 802 11g: OFDM 802 11a: OFDM 802 11n: BPSK, QPSK, 16-QAM, 64-QAM2 4 GHz 802 11b: -87 dBm @ 11 Mbps (Typical) 802 11g: -77 dBm @ 54 Mbps (Typical) 802 11n: 20 MHz: -70 dBm @ MCS23 (Typical) 802 11n: 40 MHz: -66 dBm @ MCS23 (Typical)5 GHz 802 11a: -74 dBm @ 54 Mbps (Typical) 802 11n: 20 MHz: -67 dBm @ MCS23 (Typical) 802 11n: 40 MHz: -64 dBm @ MCS23 (Typical)UPnPSecurity FeaturesSecurity Key BitsLinksys E4200 Model Name Description Model Number Standards Radio Frequency Switch Port Speed Ports Buttons LEDs Number of Antennas Detachable (y/n) Modulations FAT32, NTFS, and HSF+ Supported WEP, WPA, WPA2 Up to 128-bit encryption EnvironmentalDimensionsUnit WeightPowerCertificationsOperating TempStorage TempOperating HumidityStorage Humidity8 86” x 0 98” x 6 30” (225 x 25 x 160 mm) 12 7 oz (0 36 g) 12V, 2A FCC, IC, CE, Wi-Fi a/b/g/n,Windows 7, DLNA 32 to 104°F (0 to 40°C) -4 to 140°F (-20 to 60°C) 10 to 80% relative humidity,non-condensing 5 to 90% non-condensing Receive Sensitivity NOTESFor regulatory, warranty, and safety information, see the CD that came with your router or go to Linksys.com/support Specifications are subject to change without notice Maximum performance derived from IEEE Standard 802 11specifications Actual performance can vary, including lower wireless network capacity, data throughput rate, range and coverage Performance depends on many factors, conditions and variables, including distance from the access point, volume of network traffic, building materials and construction, operating system used, mix of wireless products used, interference and other adverse conditionsAntenna Gain in dBi 2 4 GHz (3 internal PIFA antennas) PIFA 1 ≤ 3 31 dBi (Right) PIFA 2 ≤ 3 45 dBi (Front) PIFA 3 ≤ 1 96 dBi (Left) 5 GHz (3 internal PIFA antennas) PIFA 1 ≤ 3 71 dBi (Right) PIFA 2 ≤ 3 60 dBi (Front) PIFA 3 ≤ 4 27 dBi (Left) 21
 Visit linksys.com/support for award-winning 24/7 technical support                 Cisco, the Cisco logo, and Linksys are trademarks or registered trademarks of Cisco and/or its affiliates in the United States and other countries A listing of Cisco’s trademarks can be found at www cisco com/go/trademarks All other trademarks mentioned in this document are the property of their respective owners © 2011 Cisco and/or its affiliates All rights reserved3425-01547

Navigation menu