LINKSYS HGA5T-3 Wireless-B Broadband Router User Manual
LINKSYS LLC Wireless-B Broadband Router
UserManual.wiki
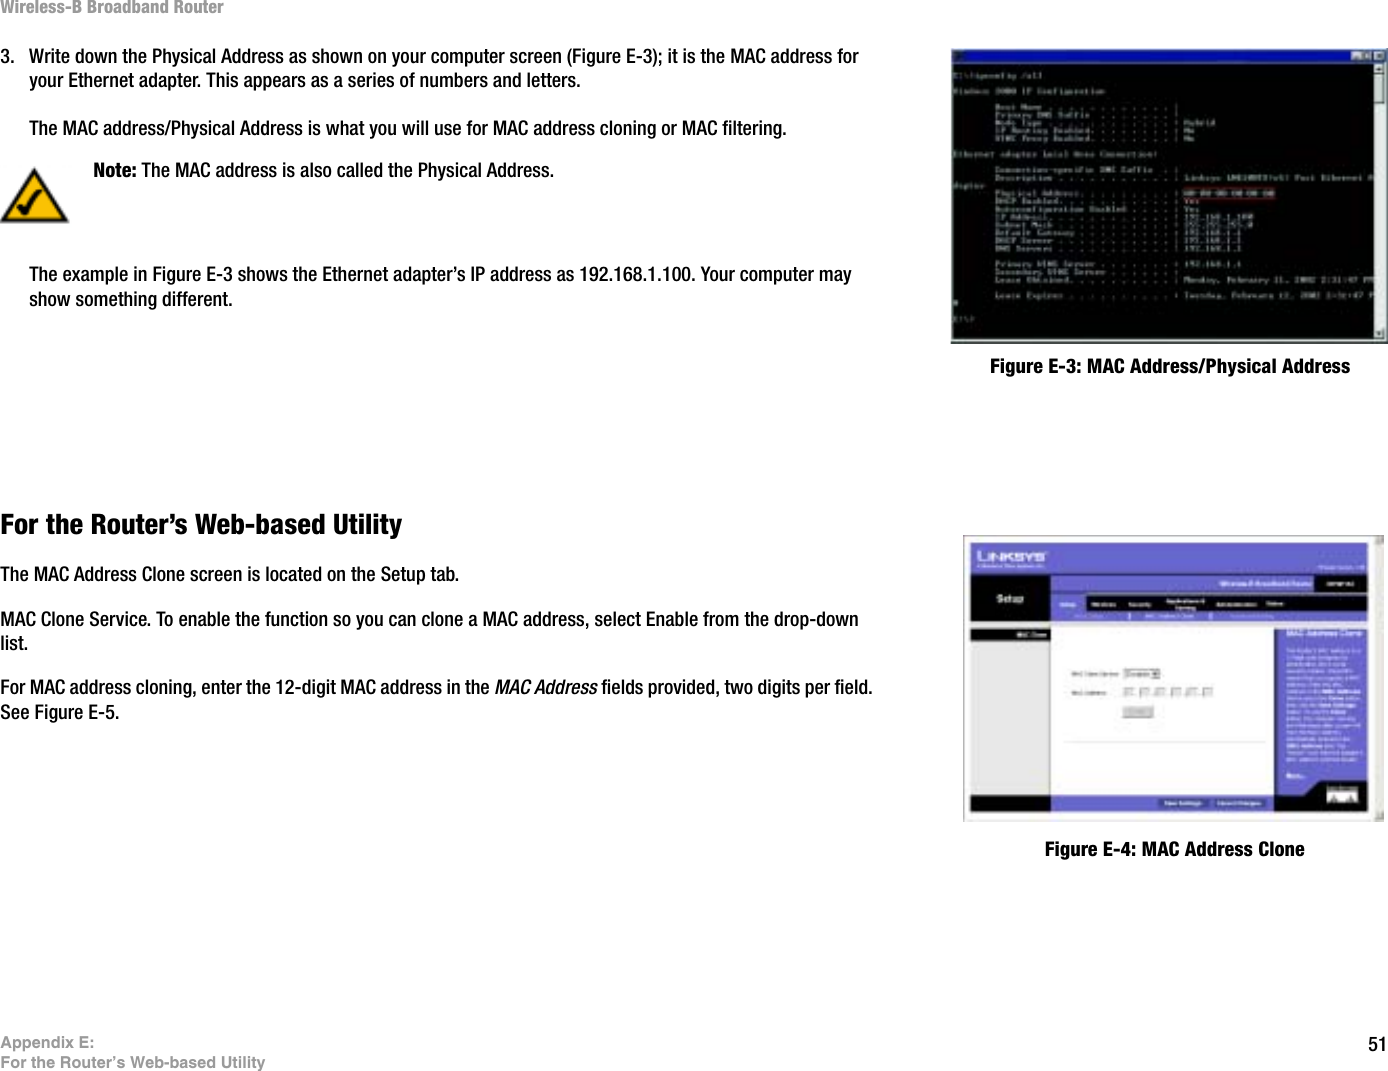
>
LINKSYS
>
HGA5T 3 User Manual
user manual
Navigation menu
Upload a User Manual
Namespaces
Wiki Guide
HTML
PDF
Info
Views
User Manual
Discussion / Help
Navigation
![39Appendix A: TroubleshootingFrequently Asked QuestionsWireless-B Broadband RouterDoes the Internet connection of the Router support 100Mbps Ethernet? The Router’s current hardware design supports up to 100Mbps Ethernet on its Internet port; however, the Internet connection speed will vary depending on the speed of your broadband connection. The Router also supports 100Mbps over the auto-sensing Fast Ethernet 10/100 switch on the LAN side of the Router. What is Network Address Translation and what is it used for? Network Address Translation (NAT) translates multiple IP addresses on the private LAN to one public address that is sent out to the Internet. This adds a level of security since the address of a PC connected to the private LAN is never transmitted on the Internet. Furthermore, NAT allows the Router to be used with low cost Internet accounts, such as DSL or cable modems, when only one TCP/IP address is provided by the ISP. The user may have many private addresses behind this single address provided by the ISP.Does the Router support any operating system other than Windows 98, Windows Millennium, Windows 2000, or Windows XP? Yes, but Linksys does not, at this time, provide technical support for setup, configuration or troubleshooting of any non-Windows operating systems.Does the Router support ICQ send file? Yes, with the following fix: click ICQ menu -> preference -> connections tab->, and check I am behind a firewall or proxy. Then set the firewall time-out to 80 seconds in the firewall setting. The Internet user can then send a file to a user behind the Router.I set up an Unreal Tournament Server, but others on the LAN cannot join. What do I need to do? If you have a dedicated Unreal Tournament server running, you need to create a static IP for each of the LAN computers and forward ports 7777, 7778, 7779, 7780, 7781, and 27900 to the IP address of the server. You can also use a port forwarding range of 7777 ~ 27900. If you want to use the UT Server Admin, forward another port. (Port 8080 usually works well but is used for remote admin. You may have to disable this.) Then in the [UWeb.WebServer] section of the server.ini file, set the ListenPort to 8080 (to match the mapped port above) and ServerName to the IP assigned to the Router from your ISP.Can multiple gamers on the LAN get on one game server and play simultaneously with just one public IP address? It depends on which network game or what kind of game server you are using. For example, Unreal Tournament supports multi-login with one public IP.How do I get Half-Life: Team Fortress to work with the Router? The default client port for Half-Life is 27005. The computers on your LAN need to have “+clientport 2700x” added to the HL shortcut command line; the x would be 6, 7, 8, and on up. This lets multiple computers connect to the same server. One problem: Version 1.0.1.6 won’t let multiple computers with the same CD key connect at](https://usermanual.wiki/LINKSYS/HGA5T-3/User-Guide-478786-Page-46.png)


![61Appendix I: Regulatory InformationWireless-B Broadband RouterCaution: This equipment is intended to be used in all EU and EFTA countries. Outdoor use may be restricted to certain frequencies and/or may require a license for operation. Contact local Authority for procedure to follow.Note: Combinations of power levels and antennas resulting in a radiated power level of above 100 mW equivalent isotropic radiated power (EIRP) are considered as not compliant with the above mentioned directive and are not allowed for use within the European community and countries that have adopted the European R&TTE directive 1999/5/EC. For more details on legal combinations of power levels and antennas, contact Linksys Corporate Compliance.• Linksys vakuuttaa täten että Wireless-B Broadband Router tyyppinen laite on direktiivin 1999/5/EY oleellisten vaatimusten ja sitä koskevien näiden direktiivien muiden ehtojen mukainen.• Linksys Group déclare le Routeur d'accès sans fil-B est conforme aux conditions essentielles et aux dispositions relatives à la directive 1999/5/EC.• Belgique:Dans le cas d'une utilisation privée, à l'extérieur d'un bâtiment, au-dessus d'un espace public, aucun enregistrement n'est nécessaire pour une distance de moins de 300m. Pour une distance supérieure à 300m un enregistrement auprès de l'IBPT est requise. Pour une utilisation publique à l'extérieur de bâtiments, une licence de l'IBPT est requise. Pour les enregistrements et licences, veuillez contacter l'IBPT.• France F: 2.4 GHz Bande : les canaux 10, 11, 12, 13 (2457, 2462, 2467, et 2472 MHz respectivement) sont complétement libres d'utilisation en France (en utilisation intérieur). Pour ce qui est des autres canaux, ils peuvent être soumis à autorisation selon le départment. L'utilisation en extérieur est soumis à autorisation préalable et très restreint. Vous pouvez contacter l'Autorité de Régulation des Télécommunications (http://www.art-telecom.fr) pour de plus amples renseignements.INDIN"Operation is subject to the following two conditions: (1) this device may not cause interference, and (2) this device must accept any interference, including interference that may cause undesired operation of the device.""This device has been designed to operate with an antenna having a maximum gain of [x] dB. Antenna having a higher gain is strictly prohibited per regulations of Industry Canada. The required antenna impedance is [ y] ohms." "To reduce potential radio interference to other users, the antenna type and its gain should be so chosen that the equivalent "Operation is subject to the following two conditions: (1) this device may not cause interference, and (2) this device must accept any interference, including interference that may cause undesired operation of the device.""This device has been designed to operate with an antenna having a maximum gain of [x] dB. Antenna having a higher gain is strictly prohibited per regulations of Industry Canada. The required "Operation is subject to the following two conditions: (1) this device may not cause interference, and (2) this device must accept any interference, including interference that may cause undesired operation of the device.""This device has been designed to operate with an antenna having a maximum gain of [x] dB. Antenna having a higher gain is strictly prohibited per regulations of Industry Canada. The required antenna impedance is [ y] ohms." "To reduce potential radio interference to other users, the antenna type and its gain should be so chosen that the equivalent isotropically radiated power (EIRP) is not more than that required for successful communication"."To prevent radio interference to the licensed service, this device is intended to be operated indoors and away from windows to provide maximum shielding. Equipment (or its transmit antenna) that is installed outdoors is subject to licensing."INDUSTRY CANADA (CANADA)](https://usermanual.wiki/LINKSYS/HGA5T-3/User-Guide-478786-Page-68.png)