LINKSYS HGA7S-3 Wireless-G VPN Broadband Router User Manual Book
LINKSYS LLC Wireless-G VPN Broadband Router Book
LINKSYS >
Contents
Users Manual Part 5
72
Appendix C: Configuring IPSec between a Windows 2000 PC and the Router
How to Establish a Secure IPSec Tunnel
Wireless-G VPN Boradband Router
How to Establish a Secure IPSec Tunnel
Step 1: Create an IPSec Policy
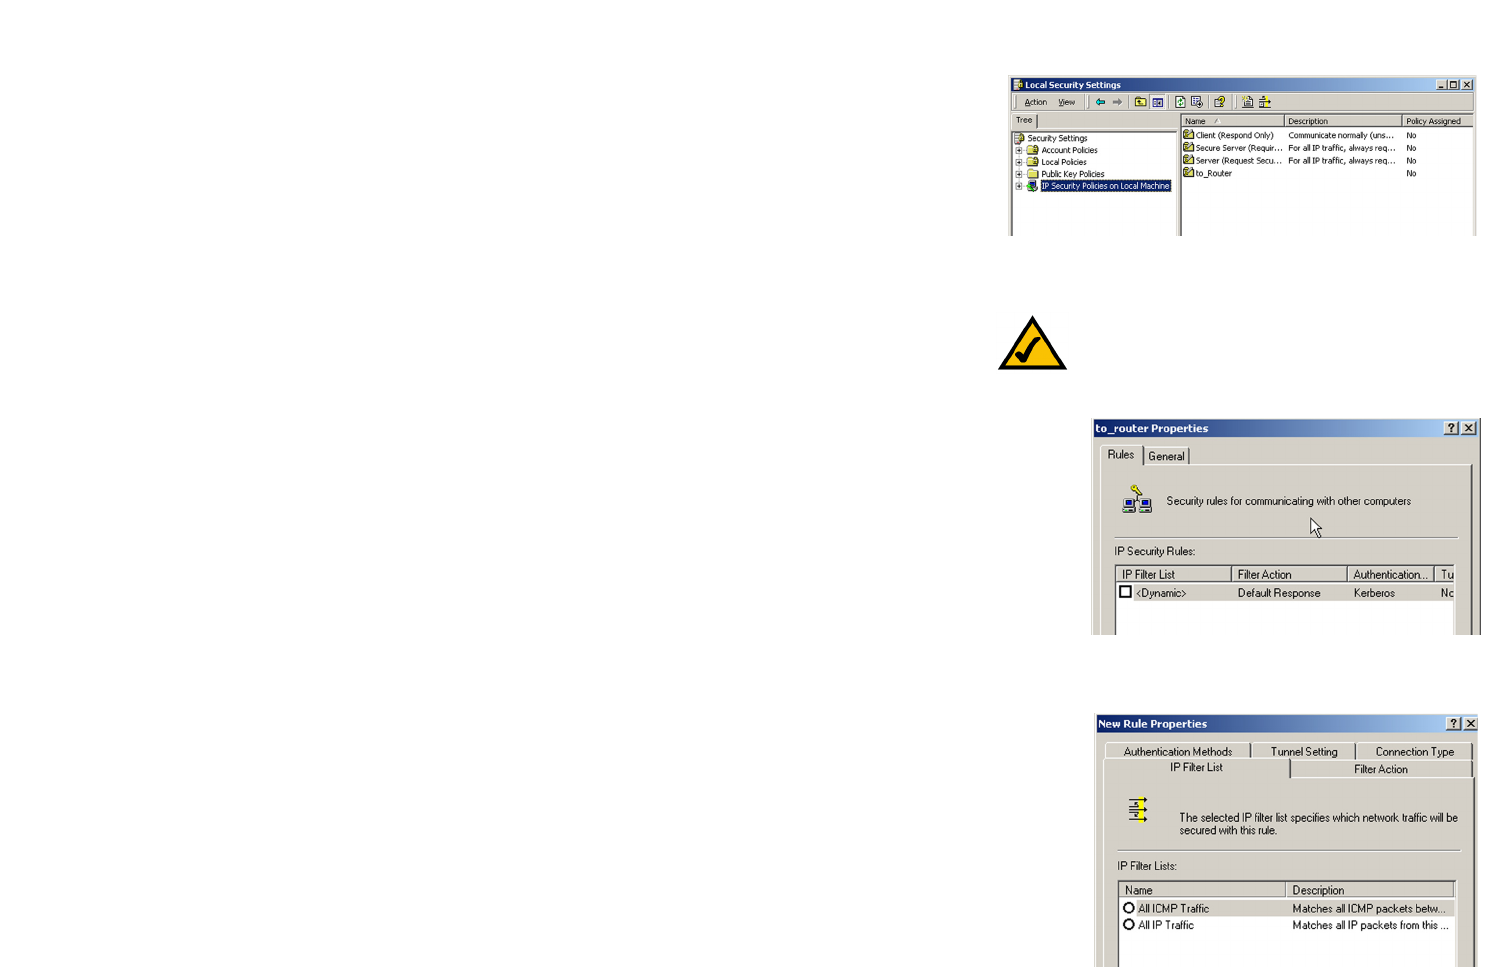
1. Click the Start button, select Run, and type secpol.msc in the Open field. The Local Security Setting screen
will appear as shown in Figure C-1.
2. Right-click IP Security Policies on Local Computer, and click Create IP Security Policy.
3. Click the Next button, and then enter a name for your policy (for example, to_router). Then, click Next.
4. Deselect the Activate the default response rule check box, and then click the Next button.
5. Click the Finish button, making sure the Edit check box is checked.
Step 2: Build Filter Lists
Filter List 1: win->router
1. In the new policy’s properties screen, verify that the Rules tab is selected, as shown in Figure C-2. Deselect
the Use Add Wizard check box, and click the Add button to create a new rule.
2. Make sure the IP Filter List tab is selected, and click the Add button. (See Figure C-3.)
NOTE: The references in this section to “win” are
references to Windows 2000 and XP.
Figure C-1: Password Screen
Figure C-2: Setup Tab
Figure C-3: IP Filter List Tab
73
Appendix C: Configuring IPSec between a Windows 2000 PC and the Router
How to Establish a Secure IPSec Tunnel
Wireless-G VPN Boradband Router
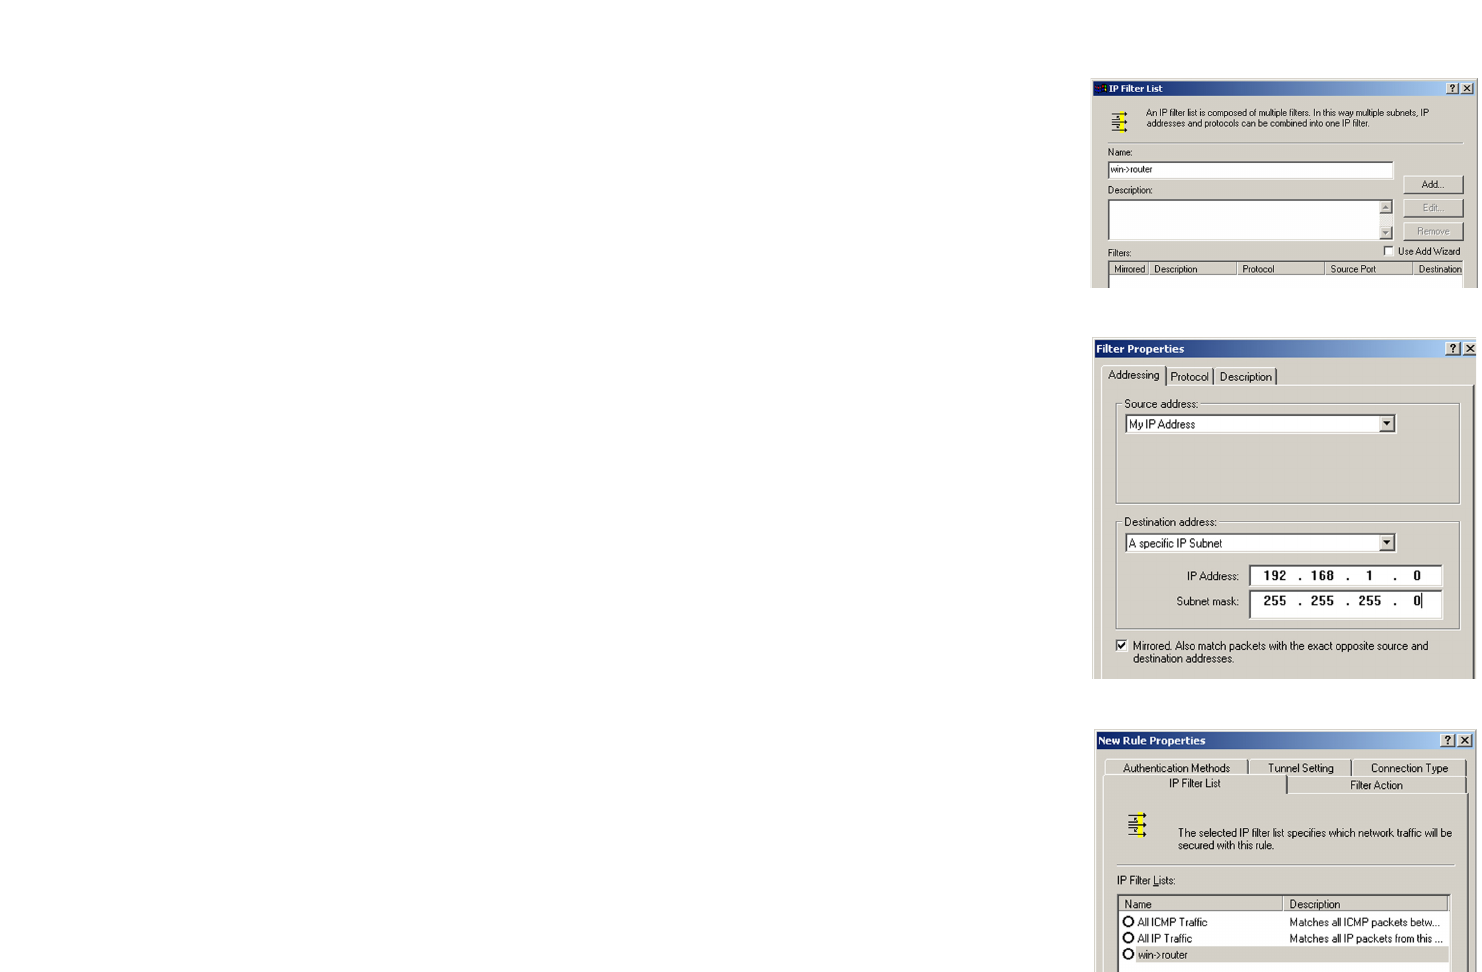
3. The IP Filter List screen should appear, as shown in Figure C-4. Enter an appropriate name, such as win-
>router, for the filter list, and de-select the Use Add Wizard check box. Then, click the Add button.
4. The Filters Properties screen will appear, as shown in Figure C-5. Select the Addressing tab. In the Source
address field, select My IP Address. In the Destination address field, select A specific IP Subnet, and fill in the
IP Address: 192.168.1.0 and Subnet mask: 255.255.255.0. (These are the Router’s default settings. If you
have changed these settings, enter your new values.)
5. If you want to enter a description for your filter, click the Description tab and enter the description there.
6. Click the OK button. Then, click the OK (for Windows XP) or Close (for Windows 2000) button on the IP Filter
List window.
Filter List 2: router=>win
7. The New Rule Properties screen will appear, as shown in Figure C-6. Select the IP Filter List tab, and make
sure that win -> router is highlighted. Then, click the Add button.
Figure C-4: IP Filter List
Figure C-5: Filters Properties
Figure C-6: New Rule Properties
74
Appendix C: Configuring IPSec between a Windows 2000 PC and the Router
How to Establish a Secure IPSec Tunnel
Wireless-G VPN Boradband Router
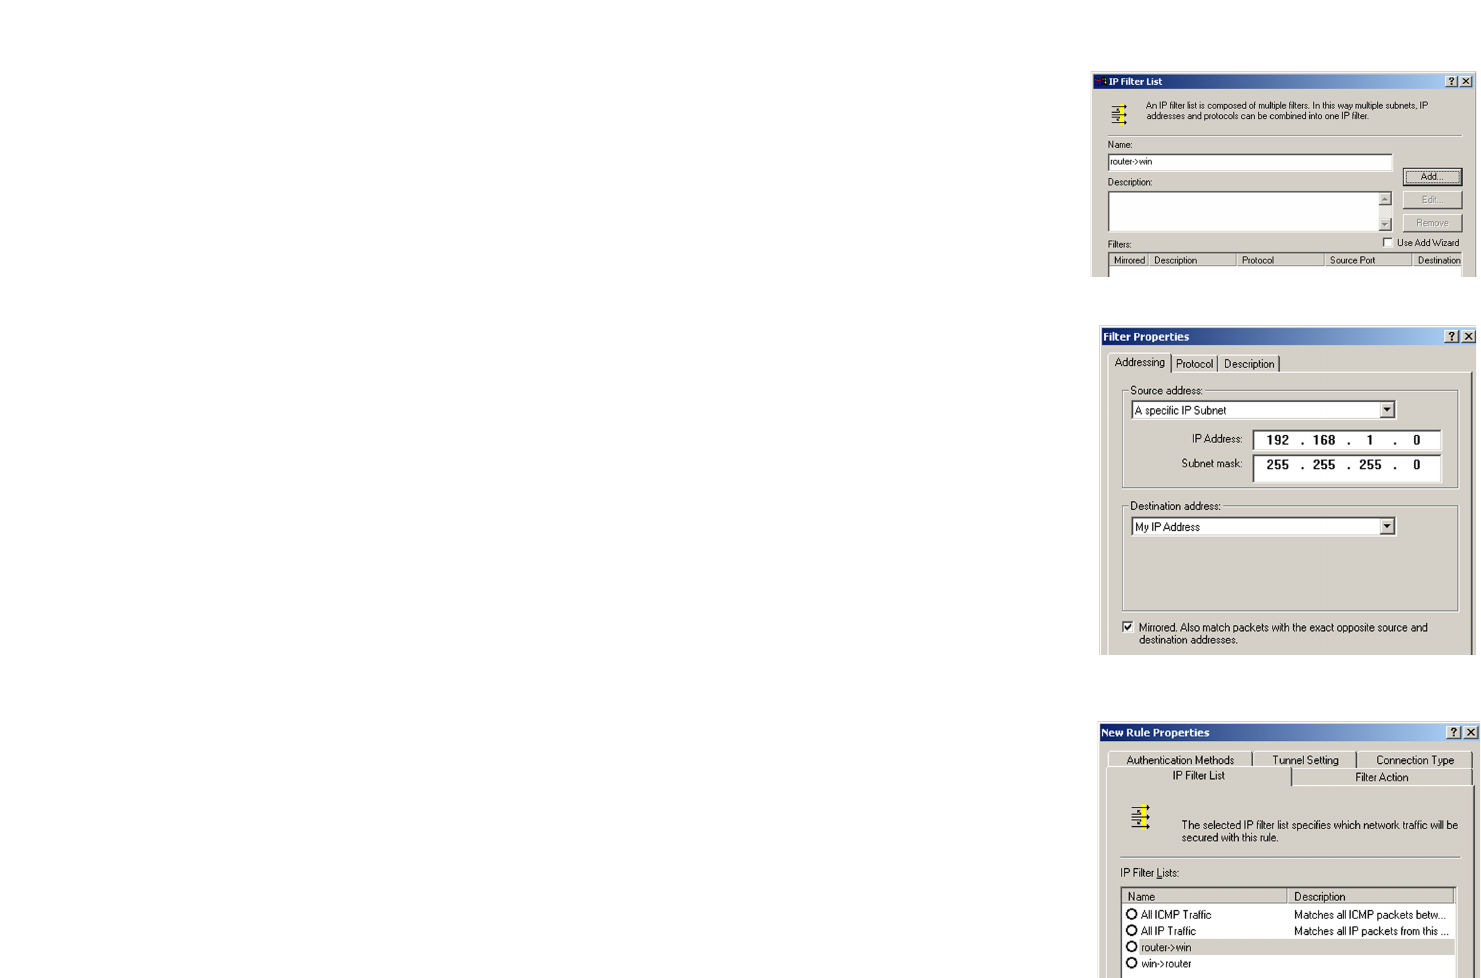
8. The IP Filter List screen should appear, as shown in Figure C-7. Enter an appropriate name, such as router-
>win for the filter list, and de-select the Use Add Wizard check box. Click the Add button.
9. The Filters Properties screen will appear, as shown in Figure C-8. Select the Addressing tab. In the Source
address field, select A specific IP Subnet, and enter the IP Address: 192.168.1.0 and Subnet mask:
255.255.255.0. (Enter your new values if you have changed the default settings.) In the Destination address
field, select My IP Address.
10. If you want to enter a description for your filter, click the Description tab and enter the description there.
11. Click the OK button and the New Rule Properties screen should appear with the IP Filer List tab selected, as
shown in Figure C-9. There should now be a listing for “router -> win” and “win -> router”. Click the OK (for
WinXP) or Close (for Win2000) button on the IP Filter List window.
Figure C-7: IP Filter List
Figure C-8: Filters Properties
Figure C-9: New Rule Properties
75
Appendix C: Configuring IPSec between a Windows 2000 PC and the Router
How to Establish a Secure IPSec Tunnel
Wireless-G VPN Boradband Router
Step 3: Configure Individual Tunnel Rules
Tunnel 1: win->router
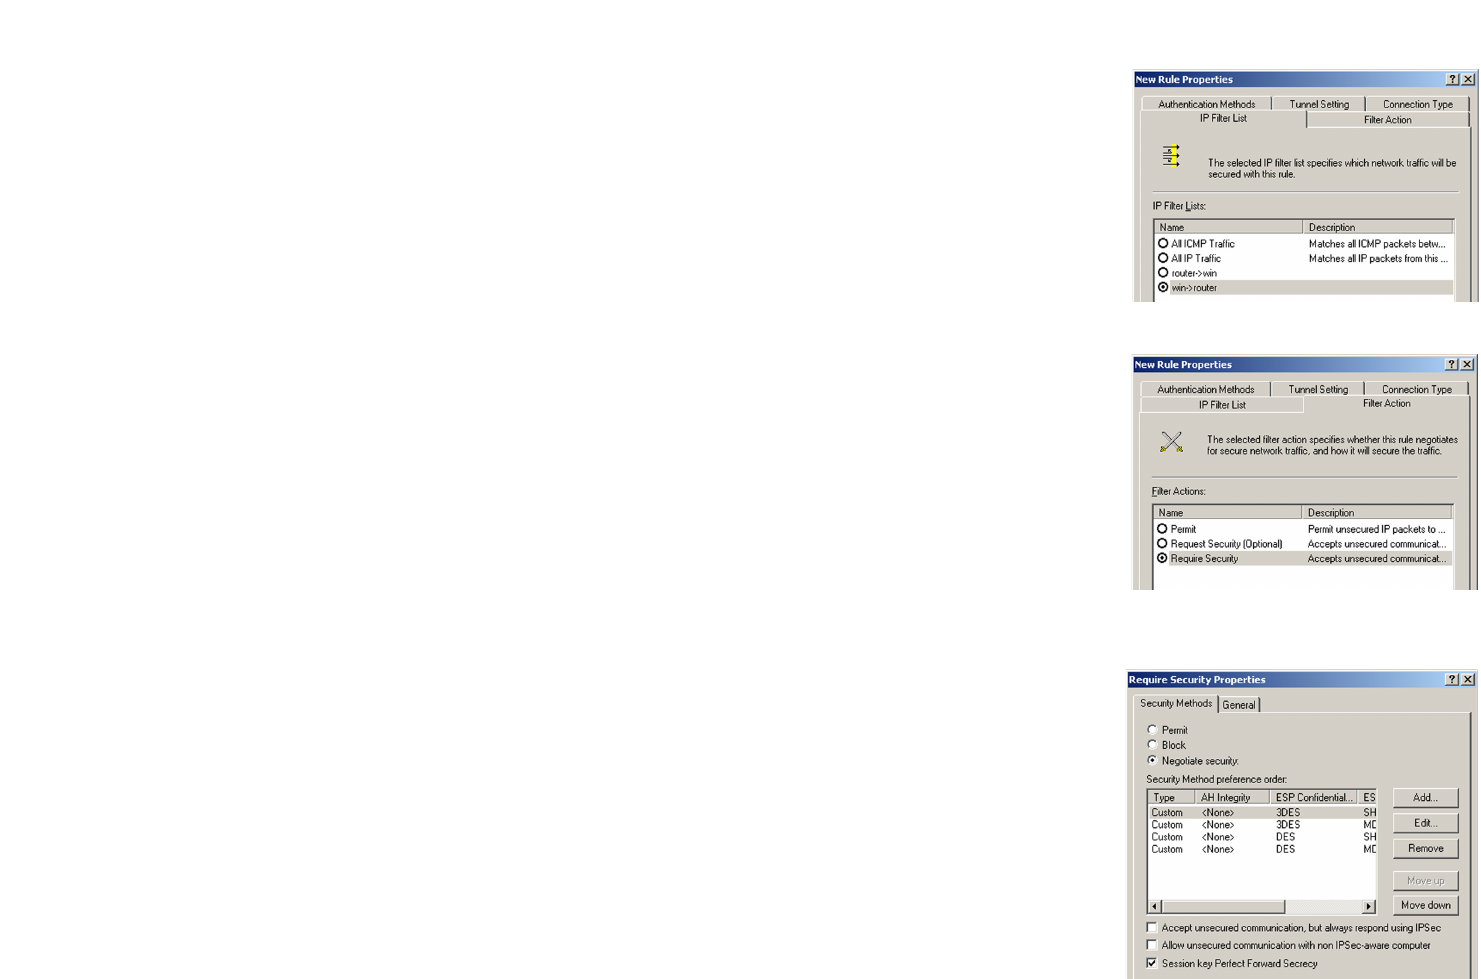
1. From the IP Filter List tab, shown in Figure C-10, click the filter list win->router.
2. Click the Filter Action tab (as in Figure C-11), and click the filter action Require Security radio button. Then,
click the Edit button.
3. From the Security Methods tab, shown in Figure C-12, verify that the Negotiate security option is enabled, and
deselect the Accept unsecured communication, but always respond using IPSec check box. Select
Session key Perfect Forward Secrecy, and click the OK button.
Figure C-12: Security Methods Tab
Figure C-11: Filter Action Tab
Figure C-10: IP Filter List Tab

76
Appendix C: Configuring IPSec between a Windows 2000 PC and the Router
How to Establish a Secure IPSec Tunnel
Wireless-G VPN Boradband Router
4. Select the Authentication Methods tab, shown in Figure C-13, and click the Edit button.
5. Change the authentication method to Use this string to protect the key exchange (preshared key), as
shown in Figure C-14, and enter the preshared key string, such as XYZ12345. Click the OK button.
6. This new Preshared key will be displayed in Figure C-15. Click the OK or Close button to continue.
Figure C-14: Preshared Key
Figure C-13: Authentication Methods
Figure C-15: New Preshared Key
77
Appendix C: Configuring IPSec between a Windows 2000 PC and the Router
How to Establish a Secure IPSec Tunnel
Wireless-G VPN Boradband Router
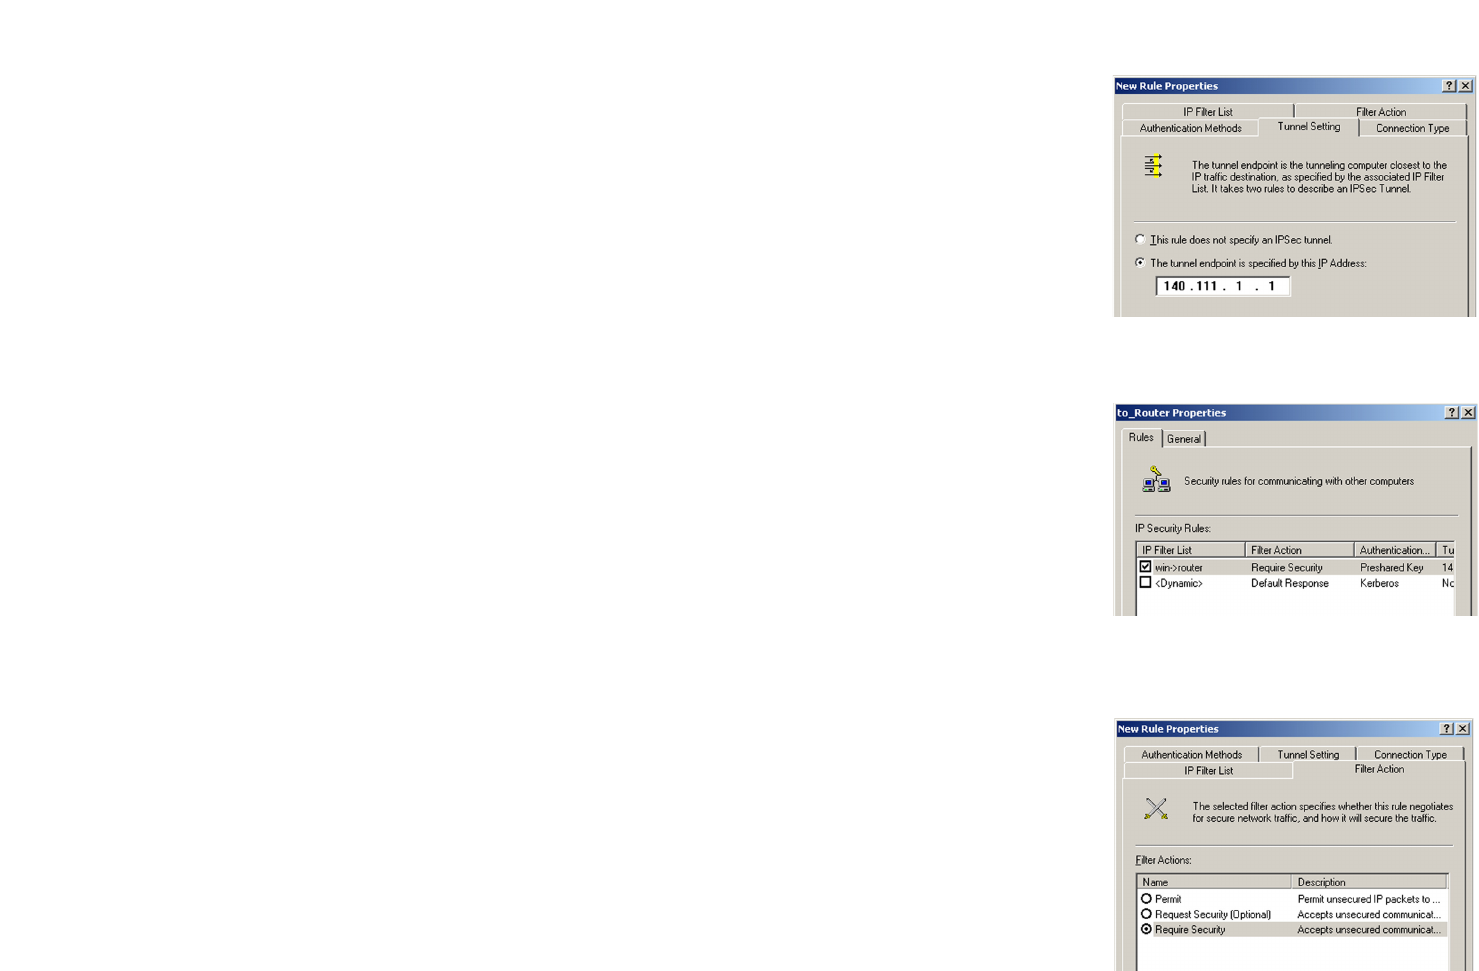
7. Select the Tunnel Setting tab, shown in Figure C-16, and click The tunnel endpoint is specified by this IP
Address radio button. Then, enter the Router’s WAN IP Address.
8. Select the Connection Type tab, as shown in Figure C-17, and click All network connections. Then, click
the OK or Close button to finish this rule.
Tunnel 2: router->win
9. In the new policy’s properties screen, shown in Figure C-18, make sure that “win -> router” is selected and
deselect the Use Add Wizard check box. Then, click the Add button to create the second IP filter.
Figure C-16: Tunnel Setting Tab
Figure C-17: Connectin Type Tab
Figure C-18: Properties Screen
78
Appendix C: Configuring IPSec between a Windows 2000 PC and the Router
How to Establish a Secure IPSec Tunnel
Wireless-G VPN Boradband Router
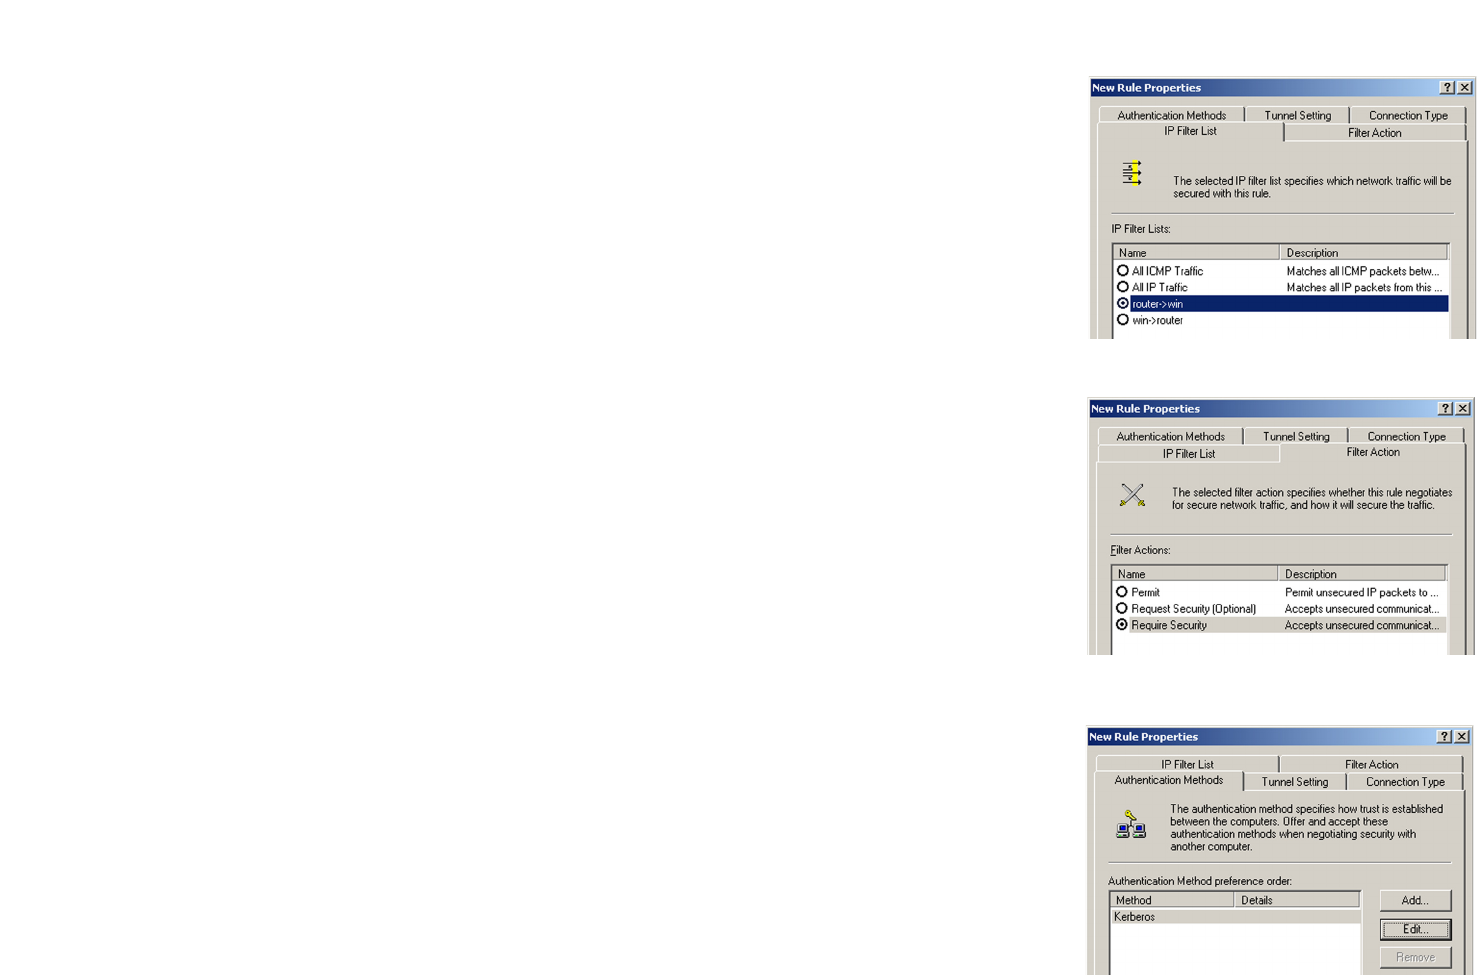
10. Go to the IP Filter List tab, and click the filter list router->win, as shown in Figure C-19.
11. Click the Filter Action tab, and select the filter action Require Security, as shown in Figure C-20. Then, click
the Edit button.
12. Click the Authentication Methods tab, and verify that the authentication method Kerberos is selected, as
shown in Figure C-21. Then, click the Edit button.
Figure C-19: IP Filter List Tab
Figure C-20: Filter Action Tab
Figure C-21: Authentication Methods Tab
79
Appendix C: Configuring IPSec between a Windows 2000 PC and the Router
How to Establish a Secure IPSec Tunnel
Wireless-G VPN Boradband Router
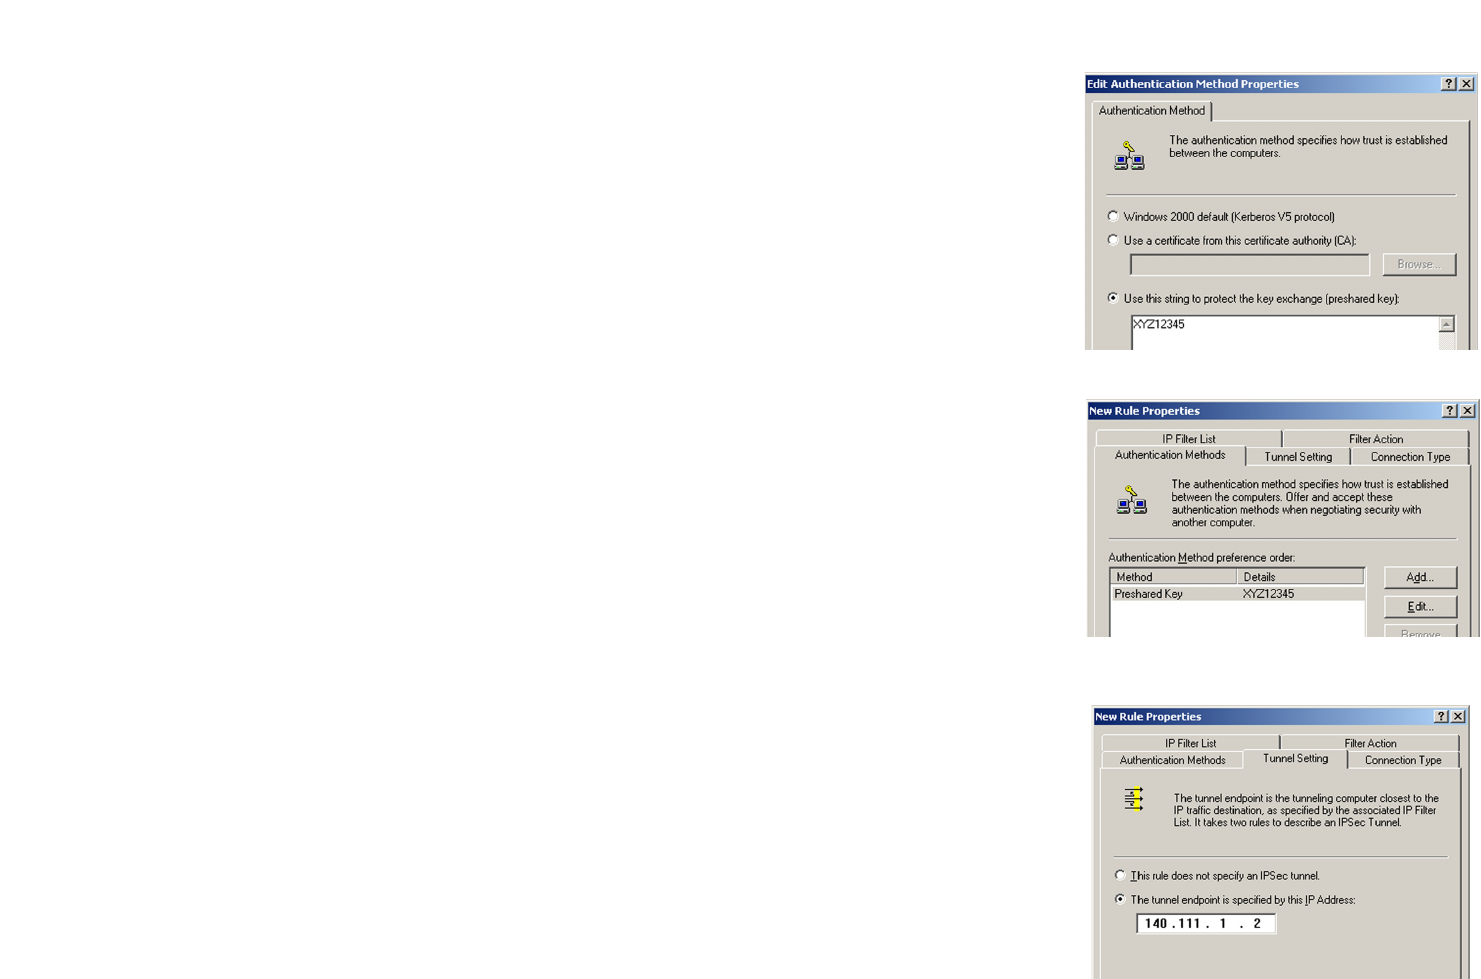
13. Change the authentication method to Use this string to protect the key exchange (preshared key), and
enter the preshared key string, such as XYZ12345, as shown in Figure C-22. (This is a sample key string.
Yours should be a key that is unique but easy to remember.) Then click the OK button.
14. This new Preshared key will be displayed in Figure C-23. Click the OK button to continue.
15. From the Tunnel Setting tab, shown in Figure C-24, click the radio button for The tunnel endpoint is
specified by this IP Address, and enter the Windows 2000/XP computer’s IP Address.
Figure C-24: Tunnel Seting Tab
Figure C-22: Preshared Key
Figure C-23: New Preshared Key
80
Appendix C: Configuring IPSec between a Windows 2000 PC and the Router
How to Establish a Secure IPSec Tunnel
Wireless-G VPN Boradband Router
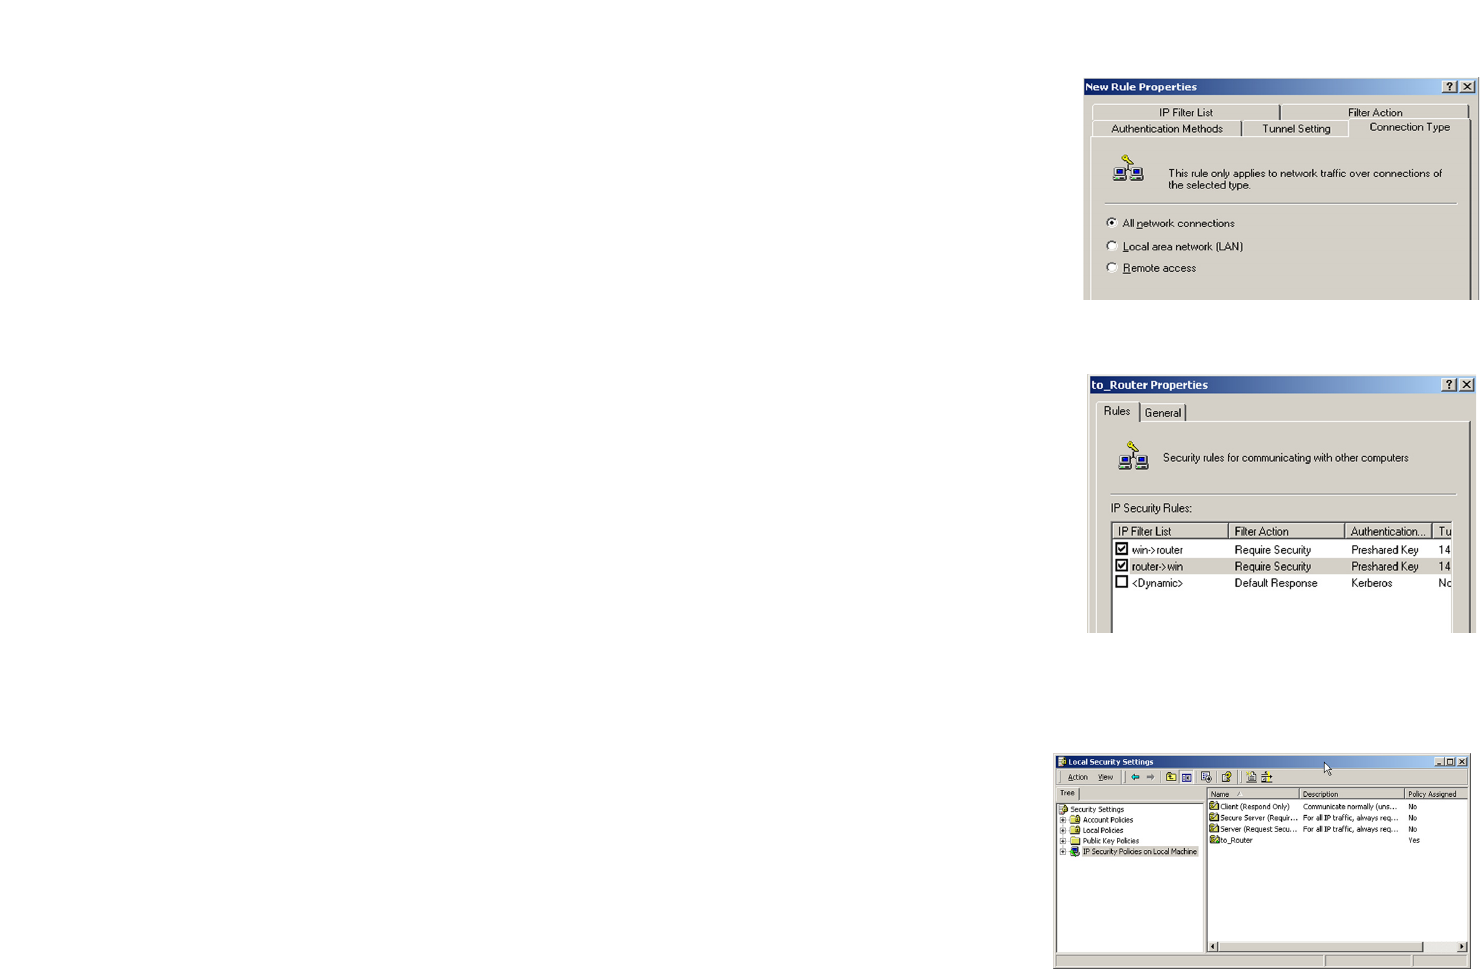
16. Click the Connection Type tab, shown in Figure C-25, and select All network connections. Then click the
OK (for Windows XP) or Close (for Windows 2000) button to finish.
17. From the Rules tab, shown in Figure C-26, click the OK button to return to the secpol screen.
Step 4: Assign New IPSec Policy
In the IP Security Policies on Local Computer window, shown in Figure C-27, right-click the policy named
to_router, and click Assign. A green arrow appears in the folder icon. Figure C-25: Connection Type
Figure C-26: Rules
Figure C-27: Local Computer
81
Appendix C: Configuring IPSec between a Windows 2000 PC and the Router
How to Establish a Secure IPSec Tunnel
Wireless-G VPN Boradband Router
Step 5: Create a Tunnel Through the Web-Based Utility
1. Open your web browser, and enter 192.168.1.1 in the Address field. Press the Enter key.
2. When the User name and Password field appears, enter the default the user name and password admin.
Press the Enter key.
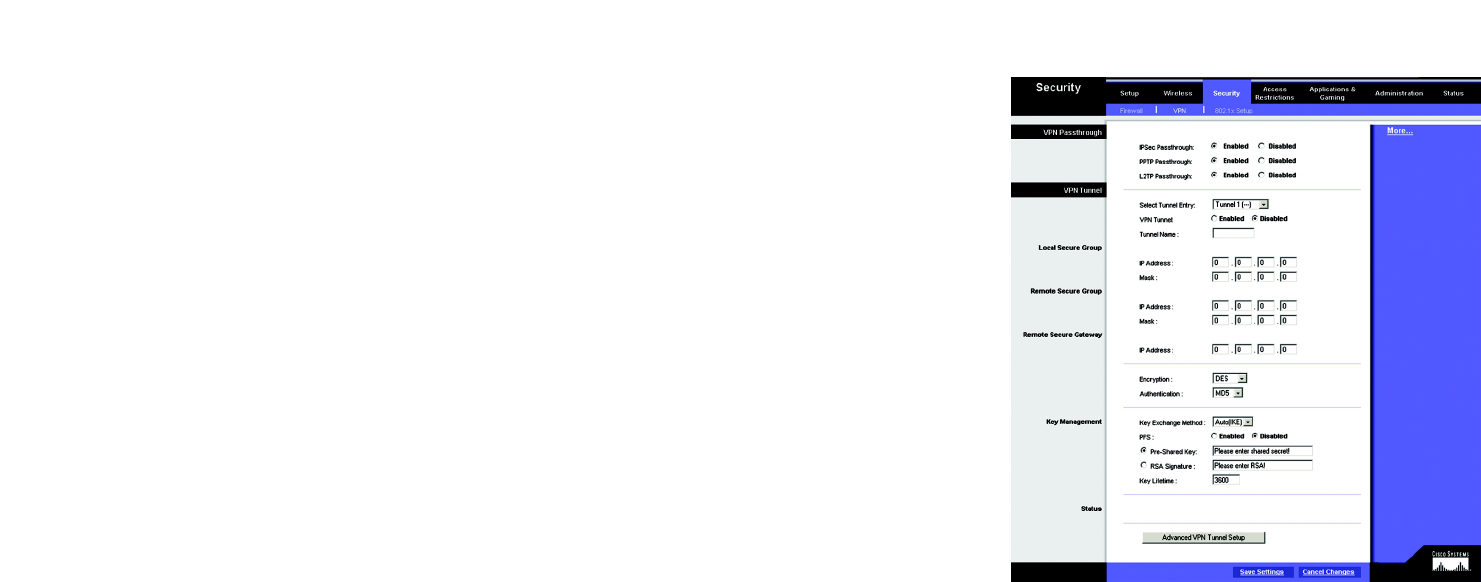
3. From the Setup tab, click the VPN tab.
4. From the VPN tab, shown in Figure C-28, select the tunnel you wish to create in the Select Tunnel Entry drop-
down box. Then click Enabled. Enter the name of the tunnel in the Tunnel Name field. This is to allow you to
identify multiple tunnels and does not have to match the name used at the other end of the tunnel.
5. Enter the IP Address and Subnet Mask of the local VPN Router in the Local Secure Group fields. To allow
access to the entire IP subnet, enter 0 for the last set of IP Addresses. (e.g. 192.168.1.0).
6. Enter the IP Address and Subnet Mask of the VPN device at the other end of the tunnel (the remote VPN Router
or device with which you wish to communicate) in the Remote Security Gateway fields.
7. Select fromtwo different types of encryption: DES or 3DES (3DES is recommended because it is more secure).
You may choose either of these, but it must be the same type of encryption that is being used by the VPN
device at the other end of the tunnel. Or, you may choose not to encrypt by selecting Disable.
8. Select from two types of authentication: MD5 and SHA (SHA is recommended because it is more secure). As
with encryption, either of these may be selected, provided that the VPN device at the other end of the tunnel
is using the same type of authentication. Or, both ends of the tunnel may choose to Disable authentication.
9. Select the Key Management. Select Auto (IKE) and enter a series of numbers or letters in the Pre-shared Key
field. Check the box next to PFS (Perfect Forward Secrecy) to ensure that the initial key exchange and IKE
proposals are secure. You may use any combination of up to 24 numbers or letters in this field. No special
characters or spaces are allowed. In the Key Lifetime field, you may optionally select to have the key expire at
the end of a time period of your choosing. Enter the number of seconds you’d like the key to be useful, or
leave it blank for the key to last indefinitely.
10. Click the Save Settings button to save these changes.
Your tunnel should now be established.
Figure C-28: VPN Tab