LINKSYS RE4100W Wi-Fi repeater User Manual MAN RE4100W 20141119 x

LINKSYS LLC Wi-Fi repeater MAN RE4100W 20141119 x
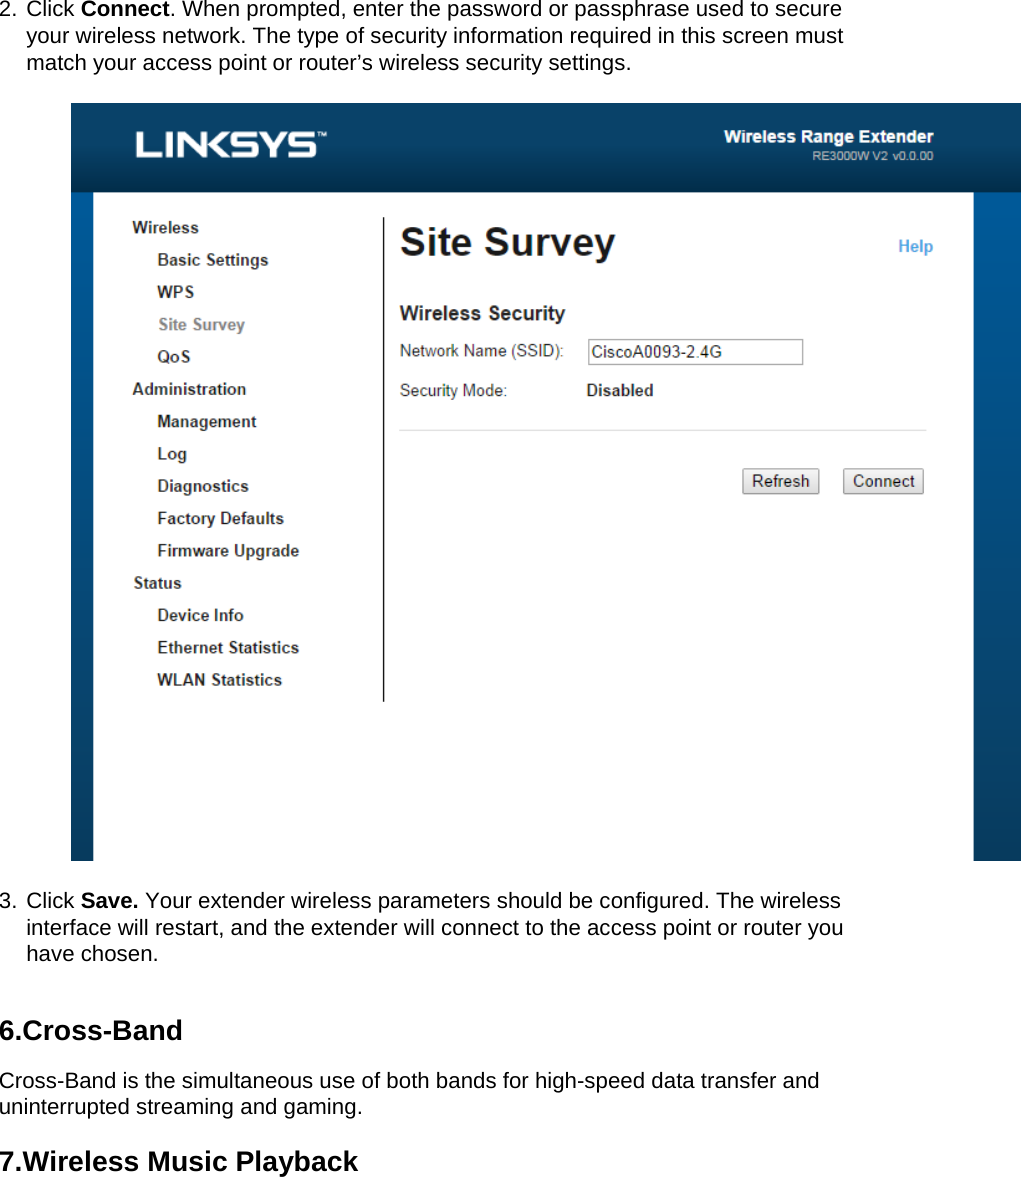
Contents

User Manual-1

User Guide RE4100W
Introduction  This User Guide can help you connect the extender to your network and solve common setup issues. You can find more help from our award-winning, 24/7 customer support at Linksys.com/support. Contents  Overview . . . . . . . . . . . . . . . . . . . . . . . . . . . . . . . . . . . . . . . .  1 How to install the range extender................   2 How to access the browser-based utility ..........  5 Using range extender settings …………… X Using Wi-Fi Protected Setup.....................  7 How to use Site Survey..........................  9 Troubleshooting................................  10 Specifications..................................  13
Overview Front   The light on the front of the range extender gives you information about power and Wi-Fi Protected Setup. Use Wi-Fi Protected Setup to automatically and securely connect compatible wireless devices such as wireless printers.  Power Light  Status/ description Blinking Green • Powered on • Resetting to factory defaults • Upgrading its firmware Solid Green • Ready to use Solid amber • Weak connection with the router Fix: Unplug the extender,  and move it closer to the router Blinking Orange • Cannot establish a connection • Other error Fix: Unplug the extender, plug it back in, wait two seconds, reconnect to your network
Side  Power Switch European versions only. Audio Port Connect the extender to your speaker. Wi-Fi Protected Setup Button Use Wi-Fi Protected Setup to automatically and securely add compatible wireless devices to your network. Refer to Using Wi-Fi Protected Setup on page 7. Reset Press and hold for about five seconds to reset to factory defaults. You can also restore the defaults from the Administration > Factory Defaults screen in the extender’s browser- based utility.  Bottom   Ethernet (blue) Connect wired devices to your wireless network with Ethernet (network) cables. The green light turns on when an Ethernet device is connected and active on this port. The light blinks when the extender is sending or receiving data over the Ethernet port.
 How to install the range extender Beforesetup,unplugordisconnectanyrangeextendersonthenetwork.1.  Plug in the range extender midway between your router and the area without Wi-Fi. Be sure you have at least 50% of your router’s Wi-Fi signal at that point on the device you will use for setup. The setup software will help you find the best spot if you have trouble. 2.  Wait for a solid light on the cover of the range extender. It could take up to two minutes. On a computer, phone or tablet, connect to the Wi-Fi network “Linksys Extender Setup.” •  Windows 7 and Windows 8 will ask you, “Do you want to set up your network?” Click the link, “Connect to network without setting it up.” 3.  If setup doesn’t start automatically, open a browser to http://extender.linksys.com TIP You can also connect the range extender by using Wi-Fi Protected Setup. For more information, see “Using Wi-Fi Protected Setup” on page 7. How to access the browser-based utility After setting up the extender use the extender’s browser-based utility to change any settings. Windows XP: TIP To follow these instructions, enable UPnP: 1.  Click Start, Control Panel, Add or Remove Program, then click Add/Remove Windows Components. 2.  Select Network Services, then click Details. 3.  Select UPnP User Interface, then click OK.  1. Open Windows Explorer. Click My Network Places on the left panel. 2. Look for the RE4100W icon on the right panel. (You might be required to change the firewall settings to allow the display of networked computers. Refer to your operating system’s help for instructions.) 3. Double-click the RE4100W icon. A web browser will open and prompt you to enter your User name and Password. 4. Leave the User name field blank, and enter the default password “admin.” 5. Click OK.  Windows 8, Windows 7, or Vista:
1. Open Windows Explorer (File Explorer in Windows 8). Click Network. Look for the RE4100W icon on the right panel. (You might be required to change the firewall settings to allow the display of networked computers. Refer to your operating system’s help for instructions.) 2. Right-click the RE4100W  icon. Click Properties. Click on the address link in Device webpage. A web browser will open and prompt you to enter a User name and Password. 3. Leave the User name blank, and enter the default password “admin.” 4. Click OK. Mac OS X: 1. Open Safari. Click the book icon. Click Bonjour on the left panel. Look for the RE4100W icon on the bottom right panel. 2. Double-click the RE4100W icon. 3. Leave the User name blank, and enter the default password “admin.” 4. Click OK.  Using range extender settings Click Help on the right side of the screen for additional information on the screen’s options. Changes to settings will not be effective until you click Save Settings at the bottom of the screen. You also can click Cancel Changes to clear any changes.
Using Wi-Fi Protected Setup Wi-Fi Protected Setup™ makes it easy to connect your extender to your network, and connect other devices to your network through the extender. Wi-Fi Protected Setup light activity WPS Light  Status/ description Blinking Green • When WPS connection is in process Solid Green  • When WPS connection is successful Blinking amber for two minutes • When WPS cannot establish connection or encounters a problem Fix: wait a few seconds after LED stops blinking and try again  Connecting the extender to an existing access point If your access point or router supports it, you can use Wi-Fi Protected Setup to connect the range extender to the access point or router. Choose from the setup methods below to connect the extender. NOTE If you have an access point or a router that does not support Wi-Fi Protected Setup, note the wireless settings, and then manually configure the extender.
  Connecting with the Wi-Fi Protected Setup Button Use this method if your router or access point has a Wi-Fi Protected Setup button.   1. Press the Wi-Fi Protected Setup button on the extender. 2. Click the Wi-Fi Protected Setup button on the router’s Wi-Fi Protected Setup screen (if available), OR press and hold the Wi-Fi Protected Setup button on the router for one second. When the connection is complete, the Wi-Fi Protected Setup light on the extender will be solid. 3. If you used the extender’s Wi-Fi Protected Setup screen, click OK in that screen within two minutes. NOTE  If you have a dual-band router and wish to connect to both bands, you will have to perform the WPS setup twice. The first connection will be on the 2.4 GHz band.
Connecting with the range extender’s PIN The Wi-Fi Protected Setup PIN (Personal Identification Number) can be found on the product label on the back of the extender. You can use this method only if your router’s administration utility has a Wi-Fi Protected Setup menu.  1. Enter the extender’s PIN into the appropriate field on the router’s Wi- Fi Protected Setup screen. Click Register. When the connection is complete, the Wi-Fi Protected Setup light on the extender will be solid. 2. Click OK. Connecting devices to your network through the extender Choose from the methods below to connect devices that support Wi-Fi Protected Setup to your network.  NOTE Repeat the instructions for each client device that supports Wi-Fi Protected Setup.
ConnUse1. Pres2. ClickscreeextenSetu3. If usiminuConnUse thisIdentific1. EnteSetu2. Clickconn3. Clickwill hConnUse this1. On thscreeconn2. ClickHowSite Suwithin raecting we this methoss the Wi-Fi k the Wi-Fi en, OR presnder for onep light on thing the exteutes or you wecting ws method if cation Number the PIN frp screen. k Register onection is cok OK on thehave to starecting ws method if he client deen. (It is alsnection is cok OK on thew to uservey gives aange of thewith the Wod if your cliProtected SProtected Sss and holde second. Whe extenderender’s Wi-Fwill have towith the cyour client ber). rom the clieon the extenomplete, thee extender’srt over. with the eyour client evice, enter so listed on omplete, thee extender’se Site Sa snapshot e extender. Wi-Fi Proient device Setup buttoSetup buttod the Wi-Fi PWhen the cor will be soliFi Protected start over.client devdevice hasnt device innder’s Wi-Fe Wi-Fi Prots Wi-Fi Proteextender’device asksthe PIN listthe producte Wi-Fi Prots Wi-Fi ProteSurveyof all neighotected Shas a Wi-Fon on the clion on the exProtected Sonnection isid. d Setup screvice’s PI a Wi-Fi Pro n the field onFi Protected tected Setuected Setup’s PIN s for the exted on the et label on thtected Setuected Setupy hboring acceSetup Bui Protected ent device.xtender’s WSetup buttons complete, een, be surN otected Setn the extend Setup screp light on thp screen wixtender’s PINextender’s Whe back of thp light on thp screen wiess points autton Setup butto  Wi-Fi Protectn on the sidethe Wi-Fi Pre to click Otup PIN (Peder’s Wi-Fi een. When the extenderthin two minN. Wi-Fi Proteche extendehe extenderthin two minand wirelesson. ted Setup e panel of tProtected OK within twrsonal Protected the r will be solinutes or yocted Setup r.) When thr will be solinutes. s routers the o id. u e id.
To open the Site Survey page: 1. Log in to the browser-based utility (see “How to access the browser- based utility” on page 5). 2. Click the Wireless tab. Click the Site Survey page. 3. Select—To connect to a wireless network, click the button next to the wireless network name (SSID) in the Select column, and click Connect. 4. SSID—Displays the name of neighboring wireless networks. 5. GHz—Displays the  radio  band  (in GHz) of the  neighboring wireless networks 6. Signal  Strength—Displays  the  relative  position  of the  neighboring access points  by indicating the power of the wireless signal received: 1 bar= 20%,2 bars=40%, 3 bars=60%, 4 bars=80%, 5 bars=100%. If no bar is displayed, the extender is located too far away from the upstream access point. Try to keep the signal strength between 60% and 100% for optimum performance. 7. Security—Displays the mode of security in use by the neighboring APs. If a network supports Wi-Fi Protected Setup, the Wi-Fi Protected Setup icon is also displayed.  To connect your extender with an access point or router in Site Survey, you will need to know the password or passphrase of the network on that device. 1. Select the network name (SSID) that you want to repeat with your extender by clicking the corresponding button in the Select column.
2. Click Connect. When prompted, enter the password or passphrase used to secure your wireless network. The type of security information required in this screen must match your access point or router’s wireless security settings.    3. Click Save. Your extender wireless parameters should be configured. The wireless interface will restart, and the extender will connect to the access point or router you have chosen.  6.Cross-Band Cross-Band is the simultaneous use of both bands for high-speed data transfer and uninterrupted streaming and gaming.  7.Wireless Music Playback
  The extender allows you to stream music on your network and play on speakers through the audio port. This list of supported media players is subject to change with the release of new software or mobile apps. •  Windows users can stream music with Windows Media Player12.  •  Mac users can stream music with proprietary software or the SofaPlay app.. •  Android users can stream music with MediaHouse, UPnPlay, Skifita, ArkMC, BubbleUPnP, Pixel Media, and 2Player 2.0. •  IOS devices including iPhone, iPad or iPod can stream music with proprietary software or other apps such as, , ArkMC, Smartstor Fusion, , Mconnect, and DK UPnP/DLNA. •  The extender supports MP3, FLAC, WAV, WMA and AAC file formats, as long as those formats are supported by the device and app doing the streaming. The 3.5mm stereo port supports earphones and powered speakers   8. Troubleshooting NOTE Your RE4100W works on 2.4GHz network. You cannot get your extender connected Check the position of your router and extender  •  For first-time setup, you may need to place the extender closer to the router. After you’ve set up your extender, you can unplug it and move it to the final location. •  To reduce signal obstructions, try alternate locations for the router and extender. •  Avoid placing the router and extender near metal objects, masonry walls, and reflective surfaces such as glass or mirrors.
• If you’rSetup iYou caTo accyou cuaccidenFor MaTo fix t1. 2.  3. Avoid placcause signre using Windicator sannot accecess your rarrently havntally connac instructiothe problemOn your WThe icon myou are ruClick View Select youcomputer The nameselected. cing the rounal interferi-Fi Protectops blinkiess your range extenve wirelessnected to aons, see “Tm on Wind Windows demight look nning. w Available ur network was connee of the coruter and exrence. cted Setup ng before range extender, you ms Internet aa different wTo fix the pows compesktop, rigdifferent d Wireless name. Clicected to anrrect netwo xtender neto connectrying to mender must be coaccess, thewireless neproblem onputers: ht-click theepending oNetworks.ck Connecnother wireork, Bronzeear other elct, wait untimake the coonnected toe problem metwork. n Mac come wireless on which vct. In the exeless netwoeEagle in thlectronics tl the Wi-Fionnection ao your ownmay be thamputers:” onicon in theversion of Wxample beork namedhis exampthat may  Protectedagain. n network. at you haven page 12.e system trWindows low, the d JimsRoutle, is d If e . ray. ter.
 4.  To fix t1. 2. 3. You shutility You haIf you are Key) into t You shoulutility. the problemIn the menLinksys Co In the exanetwork naBronzeEagSelect theType your field. Clickhould now ave intermprompted the Netword now be am on Mac cnu bar acroonnect hasmple belowamed Jimsgle in this  wireless nr wireless nk OK. be able to mittent conto enter a rk key and able to acccomputersoss the tops automaticw, the comsRouter. Texample, inetwork nanetwork paaccess thennection pnetwork keConfirm ncess the ras: p of the scrcally assigmputer washe name os selectedame of the assword (Se range exproblemsey, type yonetwork keyange extenreen, click gned your n connectedof the Linksd.  router youSecurity Kextender’s bour passwoy fields. Clder’s browthe Wi-Fi inetwork a nd to anothesys E-Serieu want to coy) into the  browser-baord (Securiick Connewser-basedcon. name. er wirelesses networkonnect to. Passwordsed setup ity ect. d s k, d
Plug in the range extender midway between your router and the area without Wi-Fi. Be sure you have at least 50% of your router’s Wi-Fi signal at that point on the device you used for setup. 9.Specifications RE4100W Model Name    Linksys RE4100W Model Description      Dual-band Wireless-N Range Extender Model Number       RE4100W  Standards  IEEE , 802.11a, 802.11n, 802.11g, 802.11b, 802.3u Ports     Fast Ethernet,  Buttons  Reset, Wi-Fi Protected Setup™, Power (European model only) LEDs  Power/Wi-Fi Protected Setup, Ethernet (link, activity) Antennas    2 internal Detachable (y/n)      No Wireless Security  Wi-Fi Protected Access™ 2 (WPA2), Wi-Fi Protected Access™ (WPA), WEP Security Key Bits                           Up to 128-bit encryption   Environmental Dimensions        2.64” x 1.49” x 4.13”  (67 x 38 x 105 mm) Weight        5.12 oz (145 g) Power         Internal AC/DC power supply 100-240V,  50/60Hz. 2.0A  Certification  FCC, ICES-003, RSS210, CE, Wi-Fi (IEEE 802.11a/b/g/n), WPA2™, WMM®, Wi-Fi Protected Setup™ Operating Temperature  32 to 104°F (0 to 40°C)
Storage Temperature                -4 to 140°F (-20 to 60°C) Operating Humidity                   10 to 80% noncondensing Storage Humidity                       5 to 90% noncondensing  Specifications are subject to change without notice.  Visit linksys.com/support for award-winning 24/7 technical support  BELKIN, LINKSYS and many product names and logos are trademarks of the Belkin group of companies. Third-party trademarks mentioned are the property of their respective owners. Licenses and notices for third party software used in this product may be viewed here: http://support.linksys.com/en-us/license. Please contact http://support.linksys.com/en‐us/gplcodecenterforquestionsorGPLsourcecoderequests.© 2014 Belkin International, Inc. and/or its affiliates. All rights reserved.  LNKPG‐00125A00

Navigation menu