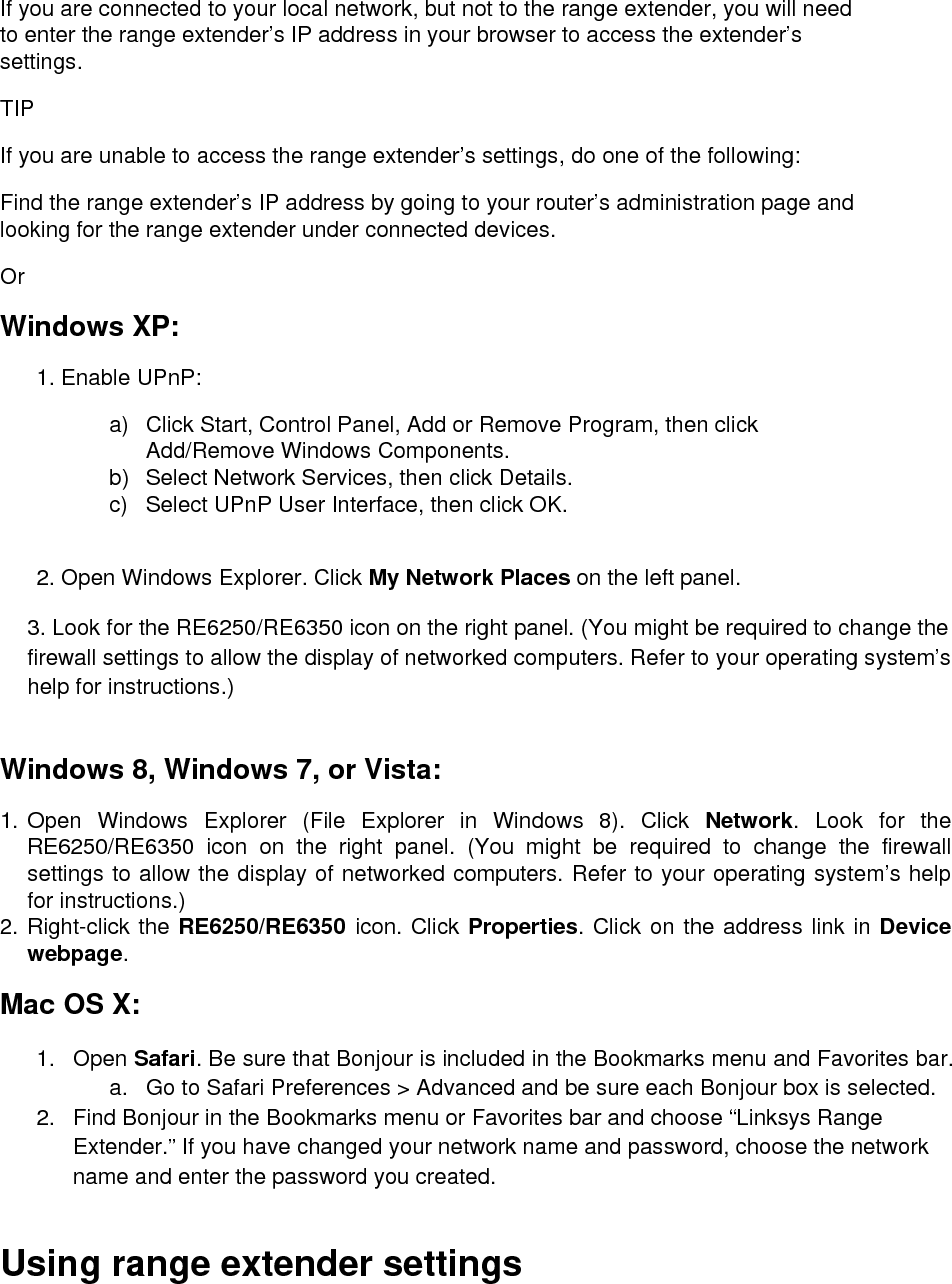
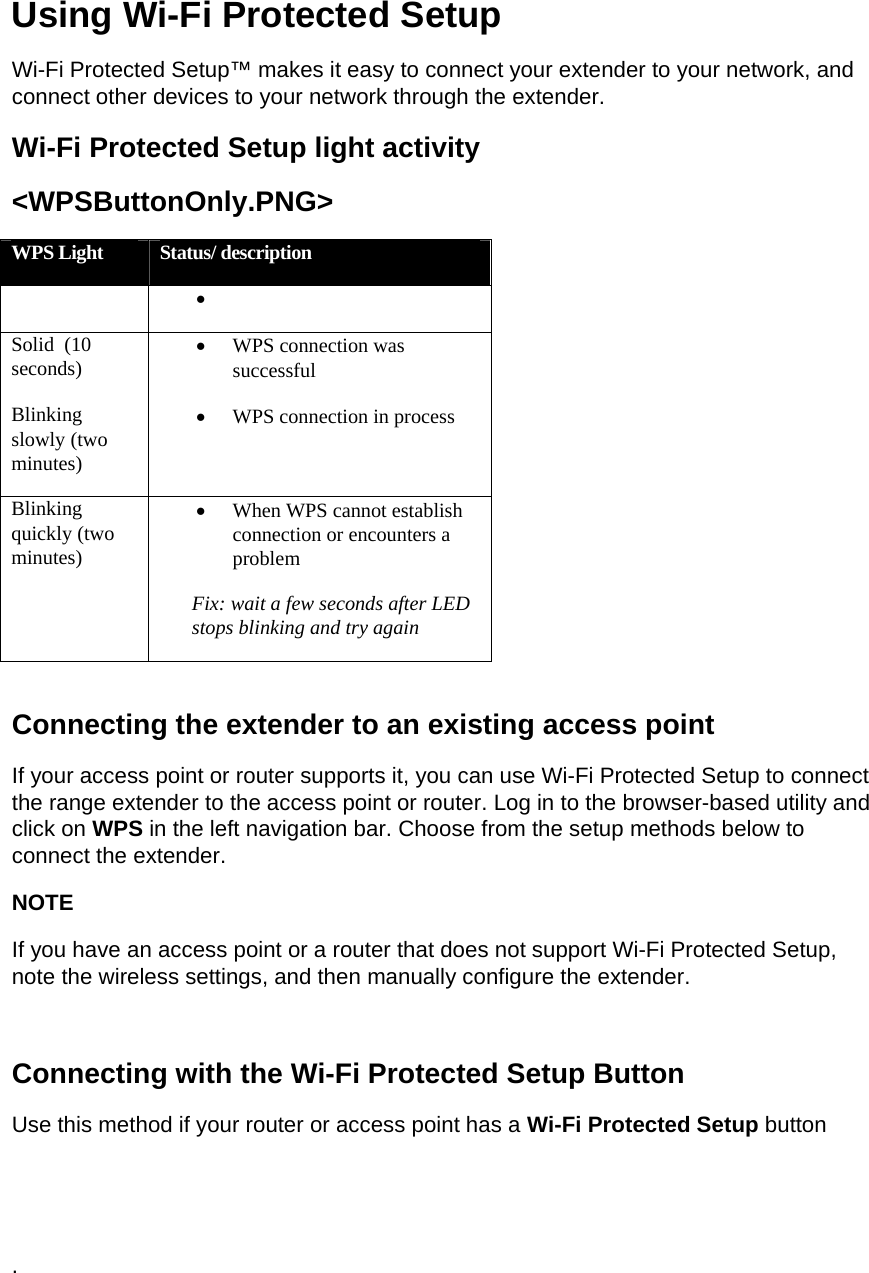
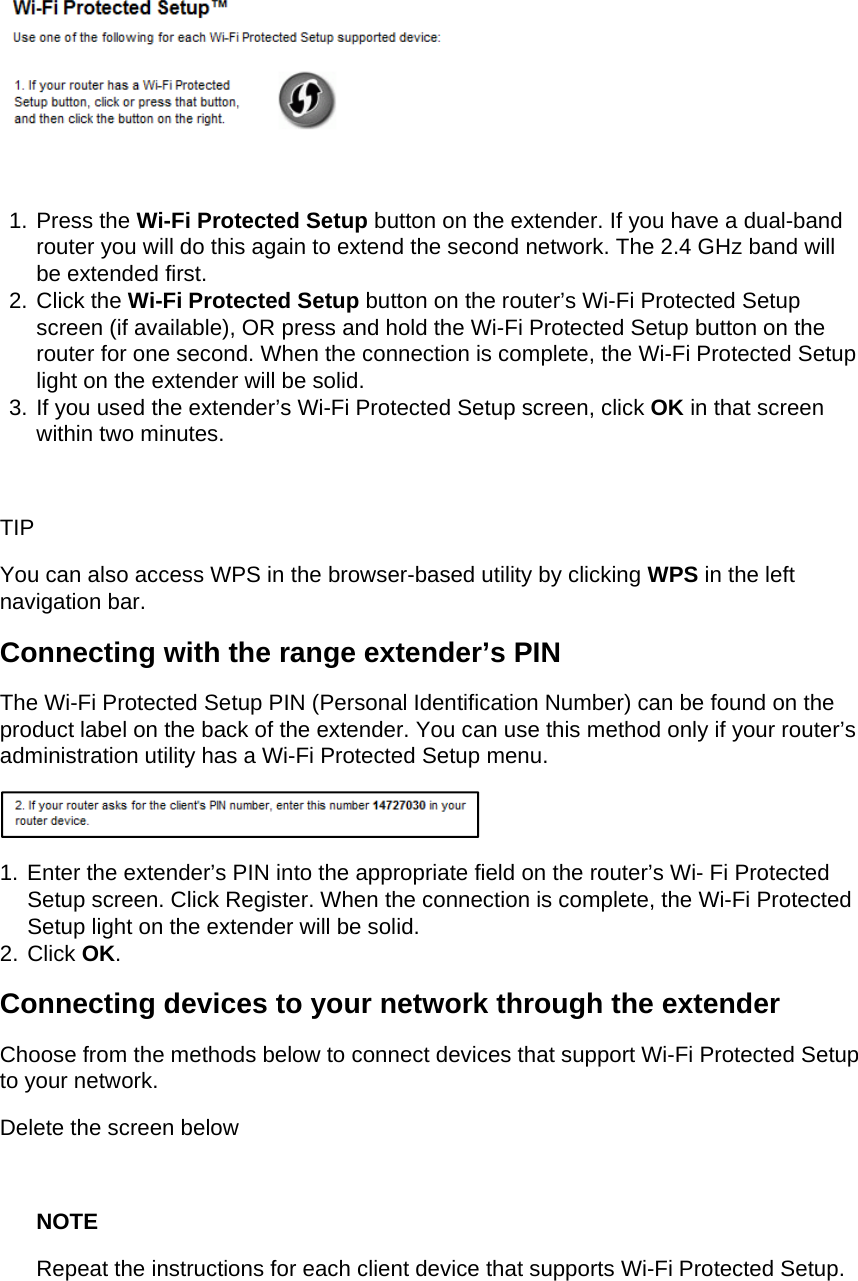
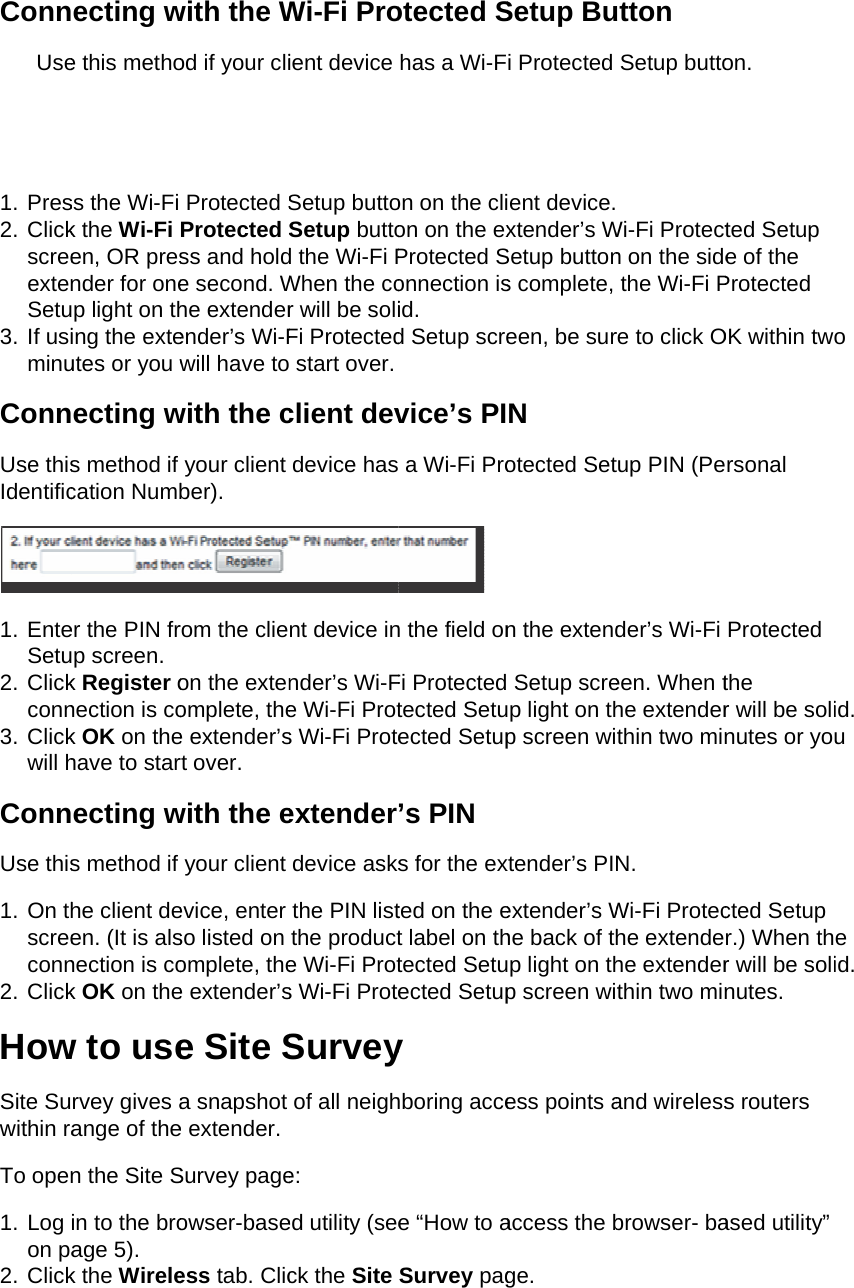
LINKSYS RE6250 WiFi repeater User Manual draft MAN RE6250 6350 170307x

LINKSYS LLC WiFi repeater draft MAN RE6250 6350 170307x

Users Manual

User Guide RE6250/RE6350
Introduction  This User Guide can help you connect the extender to your network and solve common setup issues. You can find more help from our award-winning, 24/7 customer support at Linksys.com/support. Contents  Overview . . . . . . . . . . . . . . . . . . . . . . . . . . . . . . . . . . . . . . . .  1 How to install the range extender................   2 How to access the browser-based utility ..........  5 Using range extender settings …………… X Using Wi-Fi Protected Setup.....................  7 How to use Site Survey..........................  9 Cross-Band AC Power Pass-Through Wireless Music Playback Troubleshooting................................  10 Specifications..................................  13
Overview  The light on the front of the range extender gives you information about power, updating and signal strength.    Power Light  Status/ description Blinking green  Booting up  Resetting to factory defaults  Upgrading firmware Solid green  Ready to use Solid Orange  Weak connection with the router Fix: Unplug the extender,  and move it closer to the router Blinking Orange  Not connected to the router  Other error Fix: Unplug the extender, plug it back in, wait two seconds, reconnect to your network   Power Switch European versions only. Wi-Fi Protected Setup Button and LED Use Wi-Fi Protected Setup to automatically and securely add compatible wireless devices to your network. Refer to Using Wi-Fi Protected Setup on page 7. Reset Press and hold for about five seconds to reset to factory defaults. You can also restore the defaults from the Administration > Factory Defaults screen in the extender’s browser-based utility.   How to install the range extender Beforesetup,unplugordisconnectanyrangeextendersonthenetwork.1.  Plug in the range extender midway between your router and the area without Wi-Fi. Be sure you have at least 50% of your router’s Wi-Fi signal at that point on the device
you will use for setup. The setup software will help you find the best spot if you have trouble. <Diagram> 2.  Wait for a solid light on the cover of the range extender. It could take up to two minutes. On a computer, phone or tablet, connect to the Wi-Fi network “Linksys Extender Setup.” <diagram2> 3.  If setup doesn’t start automatically, open a browser to http://extender.linksys.com. Linksys’s Spot finder technologywillhelpyoufindtherightlocationforyourrangeextenderifyouhavetrouble.Youwillbeguidedtoplacetherangeextendercloserorfartherfromyourroutertoimprovethesignal.IfyounaileditwithyourfirstplacementyouwillnotseeSpotfinderscreens. <screenshotofTooFarpage>4. Duringsetupyouwillbeaskedwhetheryouwanttherangeextendertoupdateitselfautomatically.Ifyouallowautomaticupdates,therangeextenderwilldownloadandinstallupdateswhenreleasedbyLinksys.Automaticupdateswilltakeplaceovernightsotheydonotdisruptyournetworkactivity.Youalsocandecidetomanuallyupdateyourrangeextenderatyourconvenience.<screenshot>Post set-up LED behavior mention here as well and in the QSG TIP You can also connect the range extender by using Wi-Fi Protected Setup. For more information, see “Using Wi-Fi Protected Setup” on page 7.   How to access the browser-based utility After setting up the extender use the extender’s browser-based utility to change any settings. On a computer or device that is connected to your range extender, open any browser (Internet Explorer, Chrome, Firefox, Safari, etc.), and enter extender.linksys.com in the address bar. You will be prompted to enter a user name and password. If you did not change them during setup, leave the user name  blank and enter “admin” in the password field. If you customized the SSID and password, enter those credentials.
If you are connected to your local network, but not to the range extender, you will need to enter the range extender’s IP address in your browser to access the extender’s settings. TIP If you are unable to access the range extender’s settings, do one of the following: Find the range extender’s IP address by going to your router’s administration page and looking for the range extender under connected devices.  Or  Windows XP: 1. Enable UPnP: a)  Click Start, Control Panel, Add or Remove Program, then click Add/Remove Windows Components. b)  Select Network Services, then click Details. c)  Select UPnP User Interface, then click OK.  2. Open Windows Explorer. Click My Network Places on the left panel. 3. Look for the RE6250/RE6350 icon on the right panel. (You might be required to change the firewall settings to allow the display of networked computers. Refer to your operating system’s help for instructions.)  Windows 8, Windows 7, or Vista: 1. Open Windows Explorer (File Explorer in Windows 8). Click Network. Look for the RE6250/RE6350 icon on the right panel. (You might be required to change the firewall settings to allow the display of networked computers. Refer to your operating system’s help for instructions.) 2. Right-click the RE6250/RE6350 icon. Click Properties. Click on the address link in Device webpage.  Mac OS X: 1. Open Safari. Be sure that Bonjour is included in the Bookmarks menu and Favorites bar. a.  Go to Safari Preferences > Advanced and be sure each Bonjour box is selected. 2.  Find Bonjour in the Bookmarks menu or Favorites bar and choose “Linksys Range Extender.” If you have changed your network name and password, choose the network name and enter the password you created.  Using range extender settings
Click Help on the right side of the screen for additional information on the screen’s options. Changes to settings will not be effective until you click Save at the bottom of the screen. You also can click Cancel to clear any changes.
Using Wi-Fi Protected Setup Wi-Fi Protected Setup™ makes it easy to connect your extender to your network, and connect other devices to your network through the extender. Wi-Fi Protected Setup light activity <WPSButtonOnly.PNG>  WPS Light  Status/ description    Solid  (10 seconds)  WPS connection was successful Blinking slowly (two minutes)  WPS connection in process Blinking quickly (two minutes)  When WPS cannot establish connection or encounters a problem Fix: wait a few seconds after LED stops blinking and try again  Connecting the extender to an existing access point If your access point or router supports it, you can use Wi-Fi Protected Setup to connect the range extender to the access point or router. Log in to the browser-based utility and click on WPS in the left navigation bar. Choose from the setup methods below to connect the extender. NOTE If you have an access point or a router that does not support Wi-Fi Protected Setup, note the wireless settings, and then manually configure the extender.  Connecting with the Wi-Fi Protected Setup Button Use this method if your router or access point has a Wi-Fi Protected Setup button   .
  1. Press the Wi-Fi Protected Setup button on the extender. If you have a dual-band router you will do this again to extend the second network. The 2.4 GHz band will be extended first. 2. Click the Wi-Fi Protected Setup button on the router’s Wi-Fi Protected Setup screen (if available), OR press and hold the Wi-Fi Protected Setup button on the router for one second. When the connection is complete, the Wi-Fi Protected Setup light on the extender will be solid. 3. If you used the extender’s Wi-Fi Protected Setup screen, click OK in that screen within two minutes.  TIP You can also access WPS in the browser-based utility by clicking WPS in the left navigation bar. Connecting with the range extender’s PIN The Wi-Fi Protected Setup PIN (Personal Identification Number) can be found on the product label on the back of the extender. You can use this method only if your router’s administration utility has a Wi-Fi Protected Setup menu.  1. Enter the extender’s PIN into the appropriate field on the router’s Wi- Fi Protected Setup screen. Click Register. When the connection is complete, the Wi-Fi Protected Setup light on the extender will be solid. 2. Click OK. Connecting devices to your network through the extender Choose from the methods below to connect devices that support Wi-Fi Protected Setup to your network. Delete the screen below  NOTE Repeat the instructions for each client device that supports Wi-Fi Protected Setup.
ConnUse  1. Pres2. ClickscreeextenSetu3. If usiminuConnUse thisIdentific1. EnteSetu2. Clickconn3. Clickwill hConnUse this1. On thscreeconn2. ClickHowSite Suwithin raTo open1. Log on pa2. Clickecting we this methoss the Wi-Fi k the Wi-Fi en, OR presnder for onep light on thing the exteutes or you wecting ws method if cation Number the PIN frp screen. k Register onection is cok OK on thehave to starecting ws method if he client deen. (It is alsnection is cok OK on thew to uservey gives aange of then the Site Sin to the broage 5). k the Wirelewith the Wod if your cliProtected SProtected Sss and holde second. Whe extenderender’s Wi-Fwill have towith the cyour client ber). rom the clieon the extenomplete, thee extender’srt over. with the eyour client evice, enter so listed on omplete, thee extender’se Site Sa snapshot e extender. Survey pageowser-baseess tab. ClicWi-Fi Proient device Setup buttoSetup buttod the Wi-Fi PWhen the cor will be soliFi Protected start over.client devdevice hasnt device innder’s Wi-Fe Wi-Fi Prots Wi-Fi Proteextender’device asksthe PIN listthe producte Wi-Fi Prots Wi-Fi ProteSurveyof all neighe: ed utility (seeck the Site otected Shas a Wi-Fon on the clion on the exProtected Sonnection isid. d Setup screvice’s PI a Wi-Fi Pro n the field onFi Protected tected Setuected Setup’s PIN s for the exted on the et label on thtected Setuected Setupy hboring accee “How to aSurvey pagSetup Bui Protected ent device.xtender’s WSetup buttons complete, een, be surN otected Setn the extend Setup screp light on thp screen wixtender’s PINextender’s Whe back of thp light on thp screen wiess points aaccess the bge. utton Setup butto Wi-Fi Protectn on the sidethe Wi-Fi Pre to click Otup PIN (Peder’s Wi-Fi een. When the extenderthin two minN. Wi-Fi Proteche extendehe extenderthin two minand wirelessbrowser- baon. ted Setup e of the Protected OK within twrsonal Protected the r will be solinutes or yocted Setup r.) When thr will be solinutes. s routers ased utility” o id. u e id.
3. Select—To connect to a wireless network, click the button next to the wireless network name (SSID) in the Select column, and click Connect. 4. SSID—Displays the name of neighboring wireless networks. 5. GHz—Displays the  radio  band  (in GHz) of the  neighboring wireless networks 6. Signal  Strength—Displays  the  relative  position  of the  neighboring access points  by indicating the power of the wireless signal received: dot only = 25%, dot + one wave = 50%, dot + two waves = 75%, dot + three waves = 100%. If no waves are displayed, your extender is too far from the upstream access point or the signal is blocked. Try to keep the signal strength between 60% and 100% for optimum performance. 7. Security—Displays the mode of security in use by the neighboring APs. If a network supports Wi-Fi Protected Setup, the Wi-Fi Protected Setup icon is also displayed.  To connect your extender with an access point or router in Site Survey, you will need to know the password or passphrase of the network on that device. 1. Select the network name (SSID) that you want to repeat with your extender by clicking the corresponding button in the Select column. 2. Click Connect. When prompted, enter the password or passphrase used to secure your wireless network. The type of security information required in this screen must match your access point or router’s wireless security settings. TIP: For dual-band networks, be sure to connect to both bands, 2.4 GHz and 5 GHz.    3. Click Save. Your extender wireless parameters should be configured. The wireless interface will restart, and the extender will connect to the access point or router you have chosen. __ Cross-Band Cross-Band is the simultaneous use of both bands for high-speed data transfer and uninterrupted streaming and gaming.  __ Troubleshooting NOTE Your RE6250/RE6350 works on 2.4GHz and 5 GHz networks. You cannot get your extender connected Check the position of your router and extender
    If you’rSetup iYou caTo accyou cuaccidenFor MaTo fix t1. 2.  3. For first-timAfter you’vlocation. To reduceAvoid placand reflectAvoid placcause signre using Windicator sannot accecess your rarrently havntally connac instructiothe problemOn your WThe icon myou are ruClick View Select youcomputer The nameselected. me setup, yve set up ye signal obscing the routive surfaccing the rounal interferi-Fi Protectops blinkiess your range extenve wirelessnected to aons, see “Tm on Wind Windows demight look nning. w Available ur network was connee of the coryou may nyour extendstructions, uter and exces such asuter and exrence. cted Setup ng before range extender, you ms Internet aa different wTo fix the pows compesktop, rigdifferent d Wireless name. Clicected to anrrect netwoneed to plader, you catry alternaxtender nes glass or mxtender neto connectrying to mender must be coaccess, thewireless neproblem onputers: ht-click theepending oNetworks.ck Connecnother wireork, Bronzece the extean unplug iate locationear metal omirrors. ear other elct, wait untimake the coonnected toe problem metwork. n Mac come wireless on which vct. In the exeless netwoeEagle in thender closit and movns for the robjects, malectronics tl the Wi-Fionnection ao your ownmay be thamputers:” onicon in theversion of Wxample beork namedhis examper to the rove it to the frouter and asonry wallthat may  Protectedagain. n network. at you haven page 12.e system trWindows low, the d JimsRoutle, is outer. final extender.ls, d If e . ray. ter.
 4.  To fix t1. 2. 3. If you are Key) into t You shoulutility. the problemIn the menLinksys Co In the exanetwork naBronzeEagSelect theType your field. Clickprompted the Netword now be am on Mac cnu bar acroonnect hasmple belowamed Jimsgle in this  wireless nr wireless nk OK.  to enter a rk key and able to acccomputersoss the tops automaticw, the comsRouter. Texample, inetwork nanetwork panetwork keConfirm ncess the ras: p of the scrcally assigmputer washe name os selectedame of the assword (Sey, type yonetwork keyange extenreen, click gned your n connectedof the Linksd.  router youSecurity Keour passwoy fields. Clder’s browthe Wi-Fi inetwork a nd to anothesys E-Serieu want to coy) into the ord (Securiick Connewser-basedcon. name. er wirelesses networkonnect to. Passwordity ect. d s k, d
You shYou haPlug in sure yoused fo          SpeciRE625Model Model NumbeStandaPorts hould now ave intermthe range eou have at leor setup. ifications50/RE6350Name  Descriptioer    ards   be able to mittent conextender mieast 50% ofs 0 n access thennection pdway betwef your route Link Dua           REIEE802  e range exproblemseen your roer’s Wi-Fi sigksys RE62al-band W6250/RE6EE 802.11a2.11b,  xtender’s bouter and thegnal at that 250/RE635i-Fi Range350 ac, 802.11a browser-bae area withopoint on the50 e Extendera, 802.11nsed utility. out Wi-Fi. Be device yoModel n, 802.11g,Be ou ,
Buttons  Reset, Wi-Fi Protected Setup™, Power (European model only) LEDs  Power/Wi-Fi Protected Setup, Ethernet (link, activity) Antennas    2 internal (non-detachable) Wireless Security  Wi-Fi Protected Access™ 2 (WPA2), Wi-Fi Protected Access™ (WPA), WEP Security Key Bits                          Up to 128-bit encryption  Environmental Dimensions         (67 x 38 x 105 mm) Weight     (125 g) Power         100-240V  /  0.5A  Certification  FCC, ICES-003, RSS-247, CE, Wi-Fi (IEEE 802.11a/b/g/n), WPA2™, WMM®, Wi-Fi Protected Setup™ Operating Temperature  32 to 104°F (0 to 40°C) Storage Temperature                -4 to 140°F (-20 to 60°C) Operating Humidity                   10 to 80% noncondensing Storage Humidity                       5 to 90% noncondensing  Specifications are subject to change without notice.  Visit linksys.com/support for award-winning 24/7 technical support  BELKIN, LINKSYS and many product names and logos are trademarks of the Belkin group of companies. Third-party trademarks mentioned are the property of their respective owners. Licenses and notices for third party software used in this product may be viewed here: http://support.linksys.com/en-us/license. Please contact http://support.linksys.com/en‐us/gplcodecenterforquestionsorGPLsourcecoderequests.© 2015 Belkin International, Inc. and/or its affiliates. All rights reserved.
       FederalCommunicationCommissionInterferenceStatementThisdevicecomplieswithPart15oftheFCCRules.Operationissubjecttothefollowingtwoconditions:(1)Thisdevicemaynotcauseharmfulinterference,and(2)thisdevicemustacceptanyinterferencereceived,includinginterferencethatmaycauseundesiredoperation.ThisequipmenthasbeentestedandfoundtocomplywiththelimitsforaClassBdigitaldevice,pursuanttoPart15oftheFCCRules.Theselimitsaredesignedtoprovidereasonableprotectionagainstharmfulinterferenceinaresidentialinstallation.Thisequipmentgenerates,usesandcanradiateradiofrequencyenergyand,ifnotinstalledandusedinaccordancewiththeinstructions,maycauseharmfulinterferencetoradiocommunications.However,thereisnoguaranteethatinterferencewillnotoccurinaparticularinstallation.Ifthisequipmentdoescauseharmfulinterferencetoradioortelevisionreception,whichcanbedeterminedbyturningtheequipmentoffandon,theuserisencouragedtotrytocorrecttheinterferencebyoneofthefollowingmeasures:‐ Reorientorrelocatethereceivingantenna.‐ Increasetheseparationbetweentheequipmentandreceiver.‐ Connecttheequipmentintoanoutletonacircuitdifferentfromthattowhichthereceiverisconnected.‐ Consultthedealeroranexperiencedradio/TVtechnicianforhelp.FCCCaution:Anychangesormodificationsnotexpresslyapprovedbythepartyresponsibleforcompliancecouldvoidtheuser'sauthoritytooperatethisequipment.Thistransmittermustnotbeco‐locatedoroperatinginconjunctionwithanyotherantennaortransmitter.Operationsinthe5.15‐5.25GHzbandarerestrictedtoindoorusageonly.
RadiationExposureStatement:ThisequipmentcomplieswithFCCradiationexposurelimitssetforthforanuncontrolledenvironment.Thisequipmentshouldbeinstalledandoperatedwithminimumdistance20cmbetweentheradiator&yourbody.Note:Thecountrycodeselectionisfornon‐USmodelonlyandisnotavailabletoallUSmodel.PerFCCregulation,allWiFiproductmarketedinUSmustfixedtoUSoperationchannelsonly.   Canada Statement  This device complies with Industry Canada’s licence-exempt RSSs. Operation is subject to the following two conditions: (1) This device may not cause interference; and (2) This device must accept any interference, including interference that may cause undesired operation of the device.  Le présent appareil est conforme aux CNR d’Industrie Canada applicables aux appareils radio exempts de licence. L’exploitation est autorisée aux deux conditions suivantes : (1) l’appareil ne doit pas produire de brouillage; (2) l’utilisateur de l’appareil doit accepter tout brouillage radioélectrique subi, même si le brouillage est susceptible d’en compromettre le fonctionnement.  The device meets the exemption from the routine evaluation limits in section 2.5 of RSS 102 and compliance with RSS-102 RF exposure, users can obtain Canadian information on RF exposure and compliance.  Le dispositif rencontre l'exemption des limites courantes d'évaluation dans la section 2.5 de RSS 102 et la conformité à l'exposition de RSS-102 rf, utilisateurs peut obtenir l'information canadienne sur l'exposition et la conformité de rf.
This transmitter must not be co-located or operating in conjunction with any other antenna or transmitter. This equipment should be installed and operated with a minimum distance of 20 centimeters between the radiator and your body.  Cet émetteur ne doit pas être Co-placé ou ne fonctionnant en même temps qu'aucune autre antenne ou émetteur. Cet équipement devrait être installé et actionné avec une distance minimum de 20 centimètres entre le radiateur et votre corps.  the device for operation in the band 5150-5250 MHz is only for indoor use to reduce the potential for harmful interference to co-channel mobile satellite systems  les dispositifs fonctionnant dans la bande 5150-5250 MHz sont réservés uniquement pour une utilisation à l’intérieur afin de réduire les risques de brouillage préjudiciable aux systèmes de satellites mobiles utilisant les mêmes canaux; Users should also be advised that high-power radars are allocated as primary users (i.e. priority users) of the bands 5250-5350 MHz and 5650-5850 MHz and that these radars could cause interference and/or damage to LE-LAN devices.  les utilisateurs de radars de haute puissance sont désignés utilisateurs principaux (c.-à-d., qu'ils ont la priorité) des bandes de 5 250 à 5 350 MHz et de 5 650 à 5 850 MHz et, d’autre part, que ces radars pourraient causer du brouillage et/ou des dommages aux dispositifs de RL-EL.

Navigation menu