LINKSYS WAP55AGV2 Wireless A+G Access Point User Manual Book
LINKSYS LLC Wireless A+G Access Point Book
LINKSYS >
Contents
Users manual 2

5
Chapter 2: Planning your Wireless Network
Network Layout
Dual-Band Wireless A + G Access Point
Network Layout
The Dual-Band Wireless A + G Access Point has been designed for use with 802.11g and 802.11b products. With
802.11g products communicating with the 802.11b standard, products using these standards can communicate
with each other. The Access point is compatible with 802.11g and 802.11b adapters, such at the PC Cards for
your laptop computers, PCI Card for your desktop PC, and USB Adapters for when you want to enjoy USB
connectivity. These wireless products can also communicate with a 802.11g or 802.11b wireless PrintServer.
When you wish to connect your wired network with your wireless network, the Access Point’s network port can
be used to connect to any of Linksys's switches or routers.
With these, and many other, Linksys products, your networking options are limitless. Go to the Linksys website at
www.linksys.com for more information about wireless products.
6
Chapter 3: Getting to Know the Dual-Band Wireless A + G Access Point
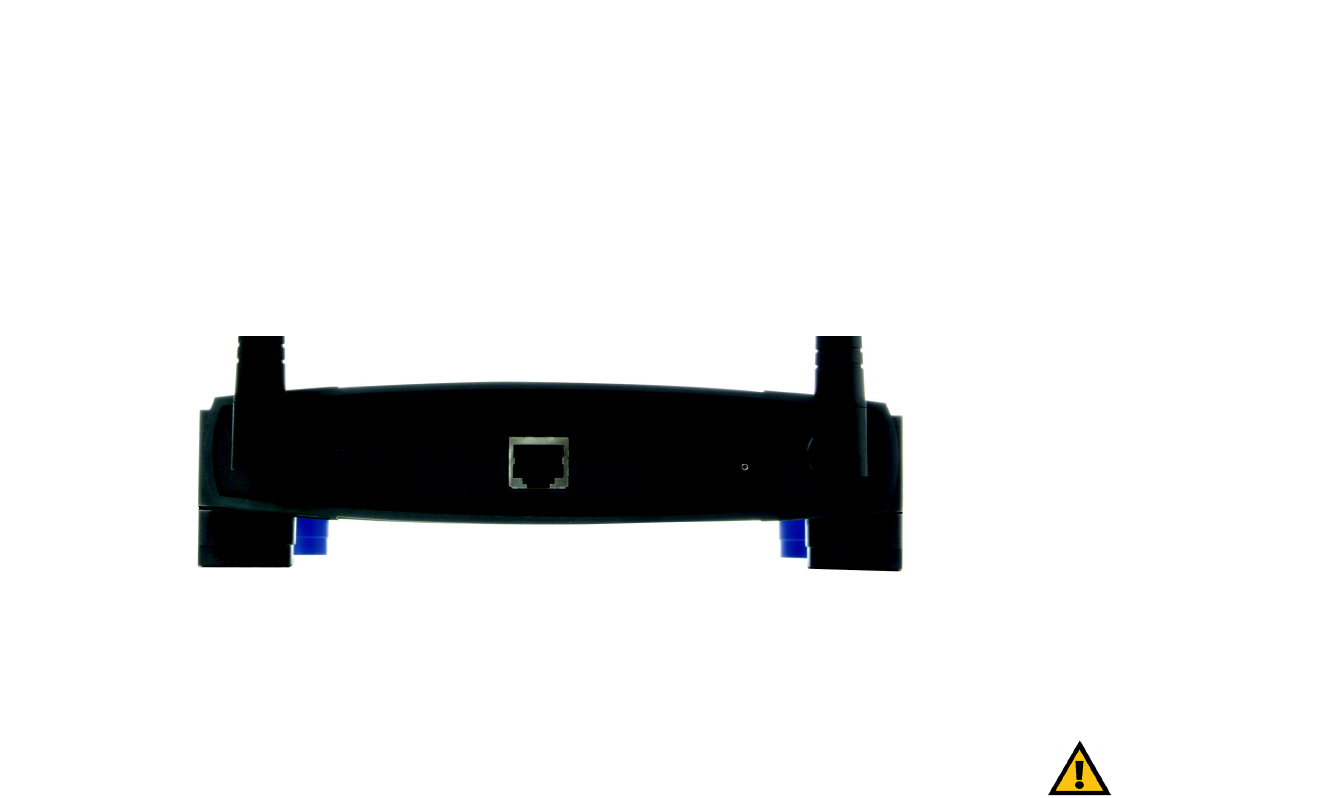
The Back Panel
Dual-Band Wireless A + G Access Point
Chapter 3: Getting to Know the Dual-Band Wireless A + G
Access Point
The Back Panel
The Access Point's ports, where the power cord and network cable are connected, are located on the back panel.
Ethernet The Ethernet port connects to Ethernet network devices, such as a switch or router.
Power The Power port is where you will connect the power adapter.
Reset Button There are two ways to Reset the Access Point's factory defaults. Either press the Reset
Button, for approximately ten seconds, or restore the defaults from the Administration tab in
the Access Point's Web-Based Utility.
With these, and many other, Linksys products, your networking options are limitless. Go to the Linksys website at
www.linksys.com for more information about products that work with the Access Point.
Important: Resetting the Access Point will
erase all of your settings (Wireless Security,
Wireless and LAN settings, etc.) and replace
them with the factory defaults. Do not reset
the Access Point if you want to retain these
settings.
Figure 3-1: The Access Point’s Back Panel port: the connection point on a computer or networking
device used for plugging in cables or adapters

7
Chapter 3: Getting to Know the Dual-Band Wireless A + G Access Point
The Front Panel
Dual-Band Wireless A + G Access Point
The Front Panel
The Access Point's LEDs, where information about network activity is displayed, are located on the front panel.
Power Green. The Power LED lights up when the Access Point is powered on.
Wireless-A WLAN Green. When the WLAN LED is blinking, the Wireless-A network is operating.
Wireless-G WLAN Green. When the WLAN LED is blinking, the Wireless-G network is operating.
Ethernet Green. The Ethernet LED serves two purposes. If the LED is continuously lit, the Access Point
is successfully connected to a device through the Ethernet port. If the LED is flickering, it is an
indication of any network activity.
Figure 3-2: Front Panel

8
Chapter 4: Connecting the Dual-Band Wireless A + G Access Point
Hardware Installation
Dual-Band Wireless A + G Access Point
Chapter 4: Connecting the Dual-Band Wireless A + G
Access Point
Hardware Installation
1. Locate an optimum location for the Access Point. The best place for the Access Point is usually at the center
of your wireless network, with line of sight to all of your PCs and wireless accessories.
2. Fix the direction of the antenna. Try to place it in a position that will best cover your wireless network.
Normally, the higher you place the antenna, the better the performance will be. The antenna's position
enhances the receiving sensitivity.
3. Connect a standard Ethernet network cable to the Access Point. Then, connect the other end of the Ethernet
cable to a switch or router. The Access Point will then be connected to your wired Network.
4. Connect the AC Power Adapter to the Access Point's Power port and to an electrical outlet. Only use the
power adapter supplied with the Access Point. Use of a different adapter may result in product damage.
Now that the hardware installation is complete, proceed to Chapter 5: Setting Up the Dual-Band Wireless A + G
Access Point, for directions on how to set up the Access Point.
tcp/ip: a set of instructions PCs use to communicate
over a network.
HAVE YOU:Enabled TCP/IP on your PCs? PCs
communicate over the network with this
protocol. Refer to Appendix D: Windows Help
for more information on TCP/IP.
hardware: the physical aspect of
computers, telecommunications, and
other information technology devices
NOTE: If you are setting up an Infrastructure
Network, all of your wireless devices must be
in Infrastructure mode in order to function
within the network. Similarly, if your network
is an Ad-Hoc Network, all of your wireless
devices must operate in Ad-hoc mode in order
for all other wireless devices to communicate.
9
Chapter 5: Setting Up the Dual-Band Wireless A + G Access Point
Setup Wizard
Dual-Band Wireless A + G Access Point
Chapter 5: Setting Up the Dual-Band Wireless A + G
Access Point
Setup Wizard
This Setup Wizard will take you through all the steps necessary to set up and configure the Access Point.
1. Insert the Setup Wizard CD into your PC's CD-ROM drive. Your PC must be on your wired network to set up the
Access Point.
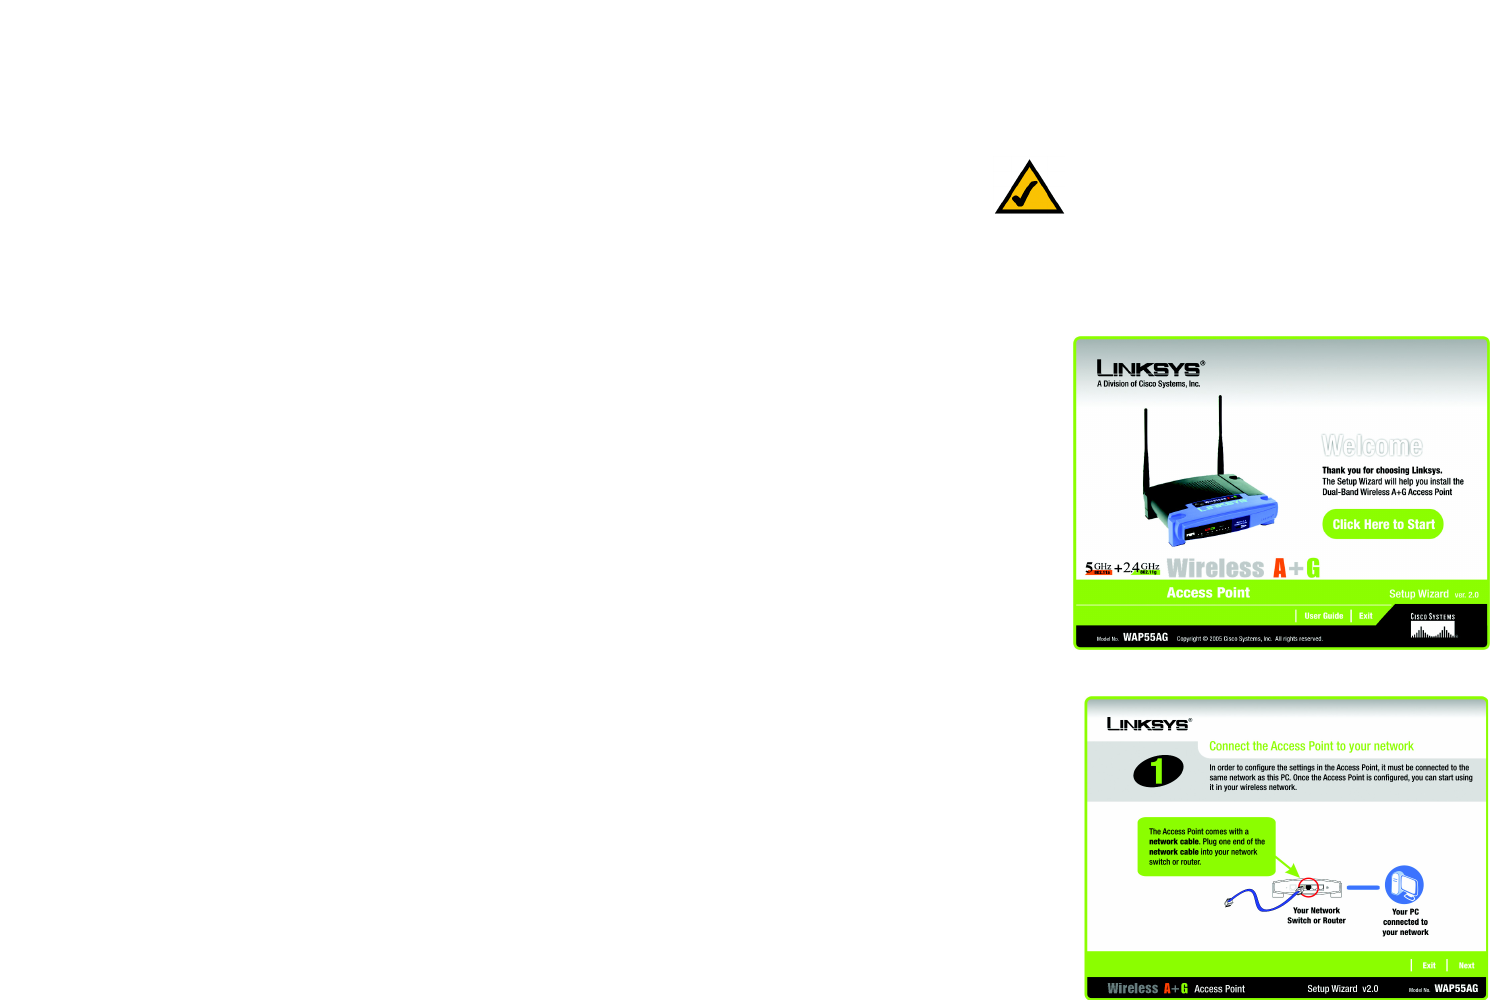
2. The Setup Wizard's Welcome screen should appear on your monitor. If it does not, this means the Setup
Wizard is not automatically running as it should. Start the Setup Wizard manually by clicking the Start button,
selecting Run, and typing d:\setup.exe (where "D" is your PC's CD-ROM drive). Click the Click Here to Start
button to continue this Setup Wizard. Clicking the User Guide button opened this User Guide. To exit this
Setup Wizard, click the Exit button.
3. The next screen shows how to start connecting the Access Point. Optimally, you should perform this setup
through a PC on your wired network. Connect one end of the network cable to your network switch or router.
Click the Next button to continue or Exit to exit the Setup Wizard.
Figure 5-1: The Setup Wizard’s Welcome Screen
Note: The Access Point will be set up in the Setup
Wizard through a wired network connection. You may
refer to Chapter 4: Connecting the Dual-Band Wireless
A + G Access Point.
Figure 5-2: Connect to the Router
10
Chapter 5: Setting Up the Dual-Band Wireless A + G Access Point
Setup Wizard
Dual-Band Wireless A + G Access Point
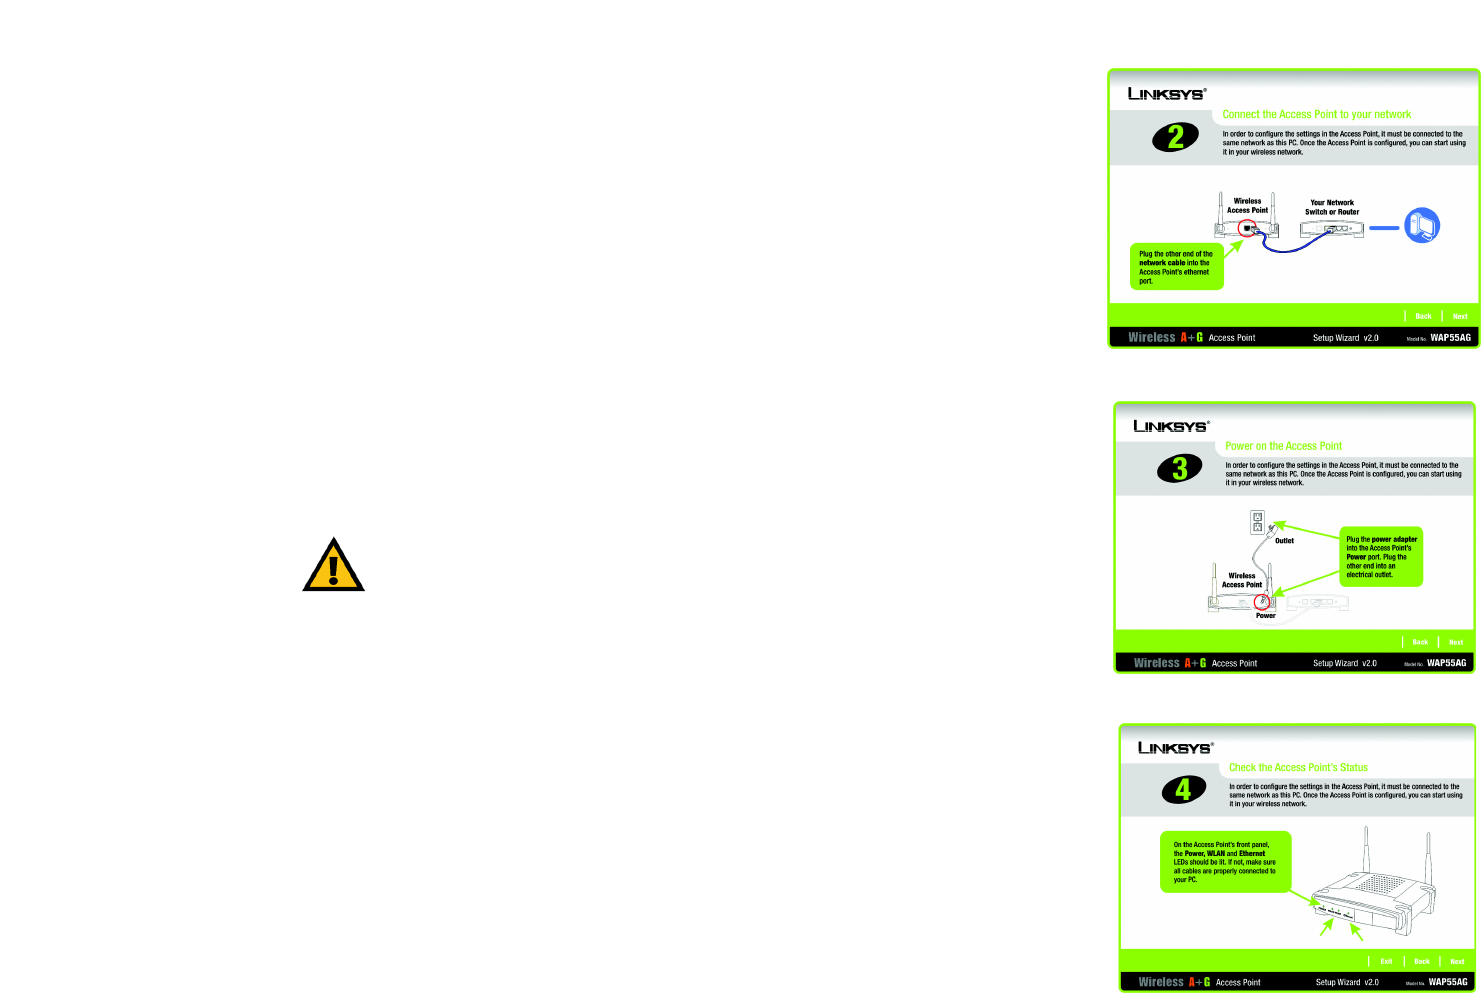
4. Connect the other end of the network cable to the Ethernet port on the back of the Access Point.
Click the Next button to continue, or the Back button to return to a previous screen.
5. Connect the power adapter to the Access Point’s Power port. Then connect the other end to an electrical
outlet. Only use the power adapter supplied with the Access Point. Use of a different adapter can cause
product damage.
Click the Next button to continue, or the Back button to return to a previous screen.
6. The Access Point’s LEDs should be lit. If not, re-check the connections.
Click the Next button to continue or Exit to exit the Setup Wizard.
Figure 5-4: Connect to the Power
Figure 5-3: Connect to the Ethernet Port
IMPORTANT: Make sure that you use the power
adapter that is supplied with the Access Point.
Use of a different power adapter could damage
the Access Point.
Figure 5-5: Check the LEDs

11
Chapter 5: Setting Up the Dual-Band Wireless A + G Access Point
Setup Wizard
Dual-Band Wireless A + G Access Point
7. The Setup Wizard will run a search for the Access Point within your network and then display a list along with
the status information for each access point. If there are more than one displayed, select the Access Point by
clicking on it and click the Next button to continue, the Back button to return to a previous screen, or Exit to
exit the Setup Wizard.
8. You will be asked to sign onto the Access Point you've selected. Enter the Password you've assigned. If none
has been assigned, enter the default password: admin. Then, click the Enter button. (This password can be
changed on the next screen.)
Figure 5-7: Enter the Password
Figure 5-6: Select the Access Point

12
Chapter 5: Setting Up the Dual-Band Wireless A + G Access Point
Setup Wizard
Dual-Band Wireless A + G Access Point
9. The Basic Settings screen will appear next. Enter the Device Name and new Password. Then, click the Next
button to continue or Back to return to the previous page.
• Device Name. The Device Name is a unique name given to the Access Point to prevent confusion when
using multiple Access Points.
• Password. Enter a new password that will be used to access the web-based utility or Setup Wizard.
• Network. Select Automatically if your network has a router or DHCP server. Select Static IP if your
network requires a static IP address.
• IP Address. This IP address must be unique to your network. (The default IP address is 192.168.1.246)
Leave the default IP address, unless you know your network’s IP address is different.
• Subnet Mask. The Access Point's Subnet Mask must be the same as your Ethernet network. Leave the
default Subnet Mask, unless you know your network’s subnet mask is different.
• Default Gateway. This IP address should be the IP address of the gateway device that allows for contact
between the Internet and the local network. Leave the default Default Gateway blank, unless you know
your network’s default gateway.
10. The Wireless-A Settings screen should now appear. Enter your wireless 802.11a network's SSID, select the
channel at which the network broadcasts its wireless signal, and select the security. Then, click the Next
button to continue or Back to return to the previous page.
• SSID. The SSID is the unique name shared among all points in a wireless network. The SSID must be
identical for all points in the wireless network. It is case sensitive and must not exceed 32 characters,
which may be any keyboard character. Make sure this setting is the same for all points in your wireless
network.
• Channel. Select the appropriate channel from the list provided to correspond with your network settings.
All devices in your wireless network must broadcast on the same channel in order to communicate. If you
want the Router to automatically scan for a clear channel, then select Auto (DFS)
• SSID Broadcast. When wireless clients survey the local area for wireless networks to associate with, they
will detect the SSID broadcast by the Access Point. To broadcast the Access Point's SSID, keep the default
setting, Enabled. If you do not want to broadcast the Access Point's SSID, then select Disabled.
• Security. Two wireless security methods are available: WEP (Wired Equivalent Privacy) and PSK (Pre-
Shared Key), which is the stronger security method. Select WEP or PSK from the drop-down menu. All
devices in your wireless network must use the same security method. Figure 5-9: Wireless-A Settings
ip address: the address used to identify a computer or
device on a network
gateway: a device that interconnects networks with
different, incompatible communications protocols
Figure 5-8: Basic Settings