LINKSYS WMP11V4 Wireless-B PCI Adapter User Manual WMP11v4 UG Rev A
LINKSYS LLC Wireless-B PCI Adapter WMP11v4 UG Rev A
LINKSYS >
Part 2
Wireless-B PCI Adapter
13
Instant Wireless®Series
12
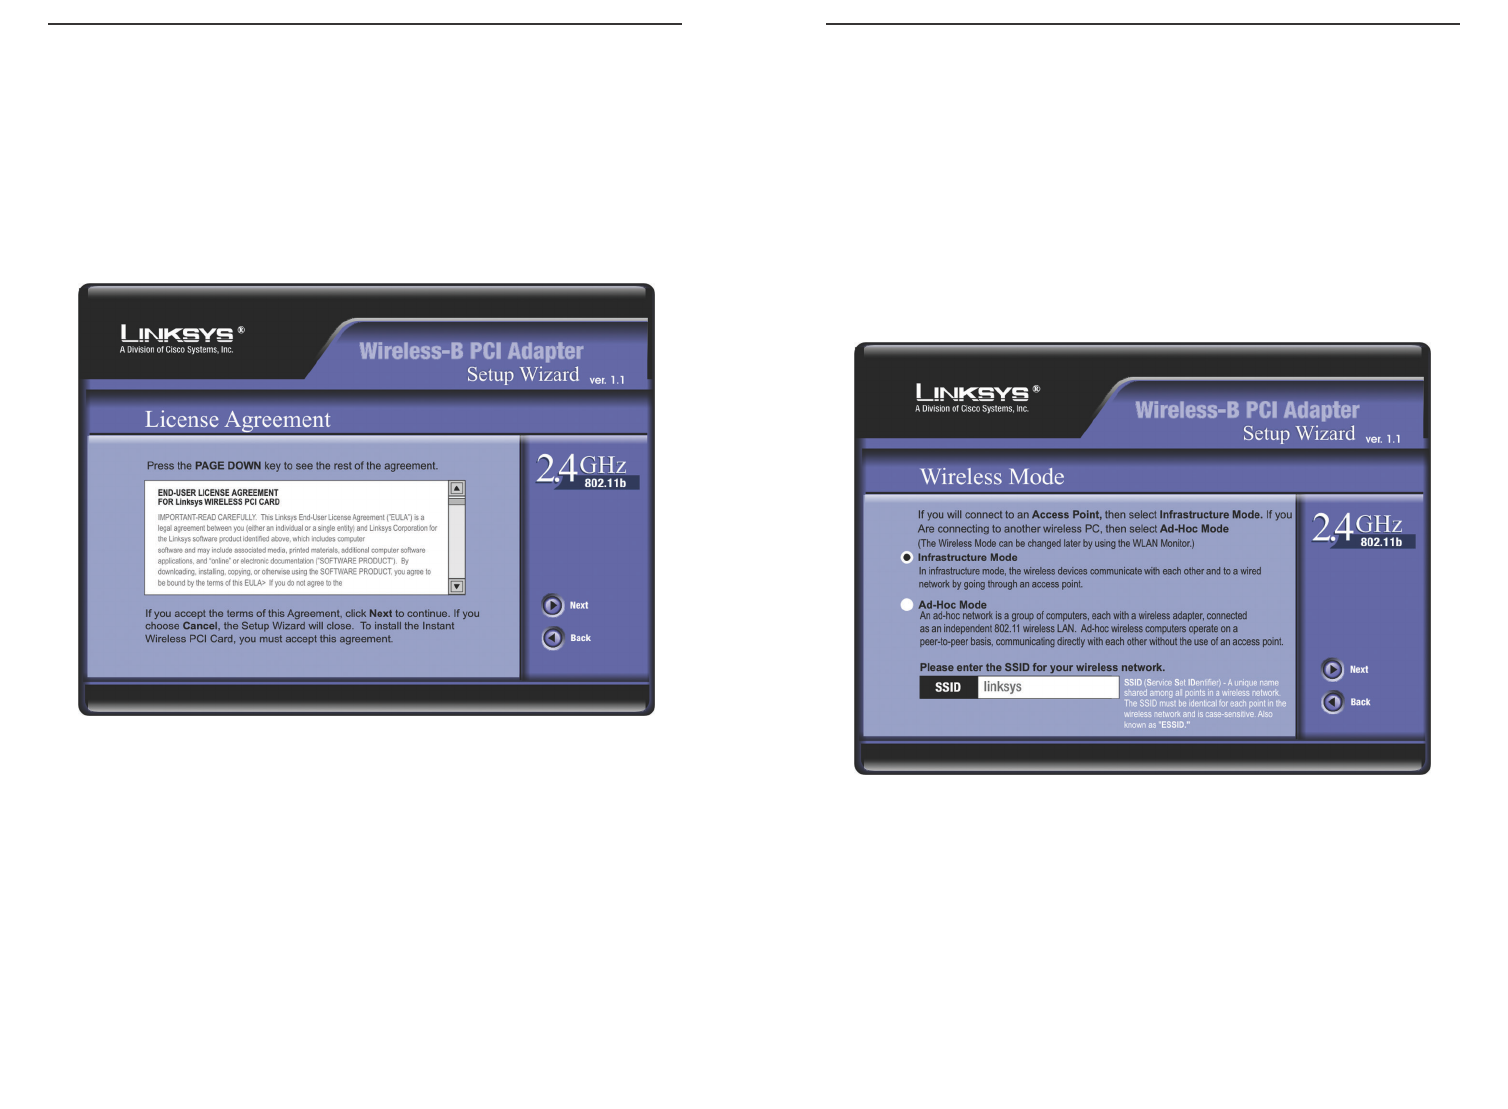
3. The Setup Wizard will ask you to choose a wireless mode, as shown in
Figure 5-3. Click the Infrastructure Mode radio button if you want your
wireless computers to network with computers on your wired network using
a wireless access point. Click the Ad-Hoc Mode radio button if you want
multiple wireless computers to network directly with each other. Do not use
the Ad-Hoc mode if you want your wireless computers to communicate with
computers on your wired network.
In the SSID field, enter the SSID of your wireless network. The SSID must
be identical for all devices in the network. The default setting is linksys (all
lowercase). Click the Next button.
Figure 5-3
•Install - Click the Install button to begin the software installation process.
•User Guide - Click the User Guide button to open the PDF file of this User
Guide.
•Exit - Click the Exit button to exit the Setup Wizard.
1. To install the Adapter, click the Install button on the Welcome screen.
2. After reading the License Agreement, shown in Figure 5-2, click the Next
button if you agree, or click the Cancel button to end the installation.
Figure 5-2
Wireless-B PCI Adapter
15
Instant Wireless®Series
14
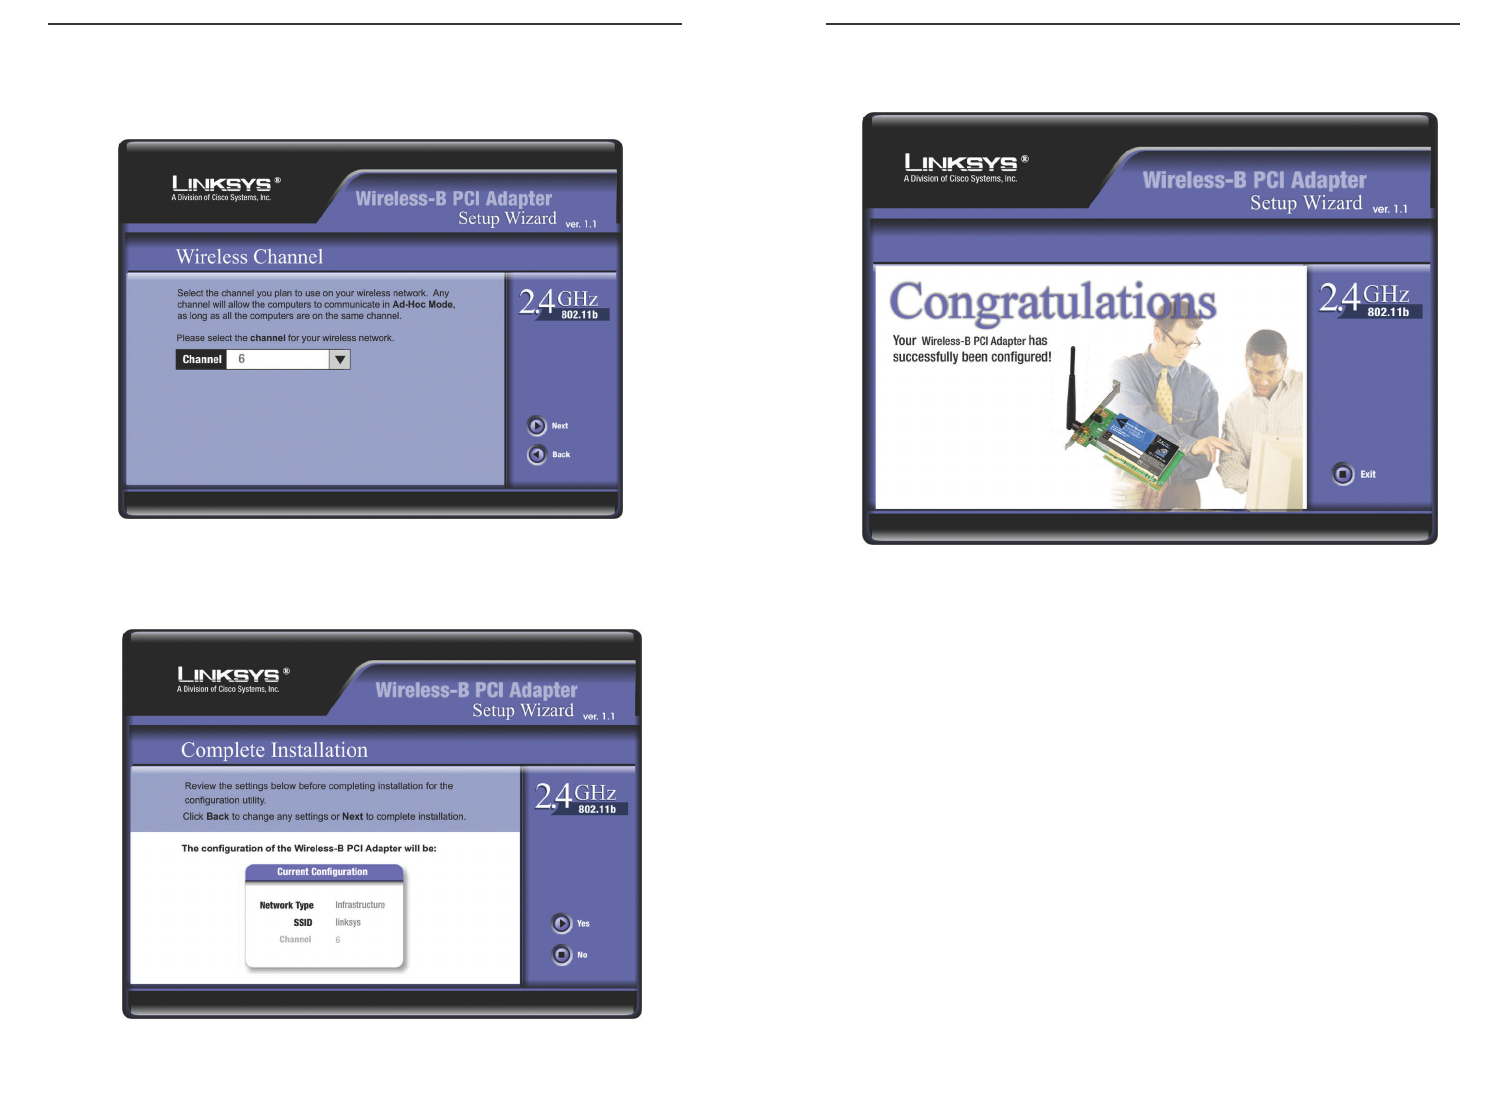
6. After the files have been successfully copied, the screen in Figure 5-6 will
appear. Click the Finish button.
Proceed to “Chapter 6: Hardware Installation for Windows 98SE, Me,
and 2000.”
Figure 5-6
4. If you chose Infrastructure Mode, go to Step 5 now. If you chose Ad-Hoc
Mode, , as shown in Figure 5-4, select the correct operating channel for your
network. The channel you choose should match the channel set on the other
devices in your wireless network. Click the Next button, and go to Step 5.
5. The screen shown in Figure 5-5 will ask you to review your settings before
it starts to copy files. Click the Next button to save these settings, or click
the Back button to change any settings.
Figure 5-4
Figure 5-5
Wireless-B PCI Adapter
17
Instant Wireless®Series
16
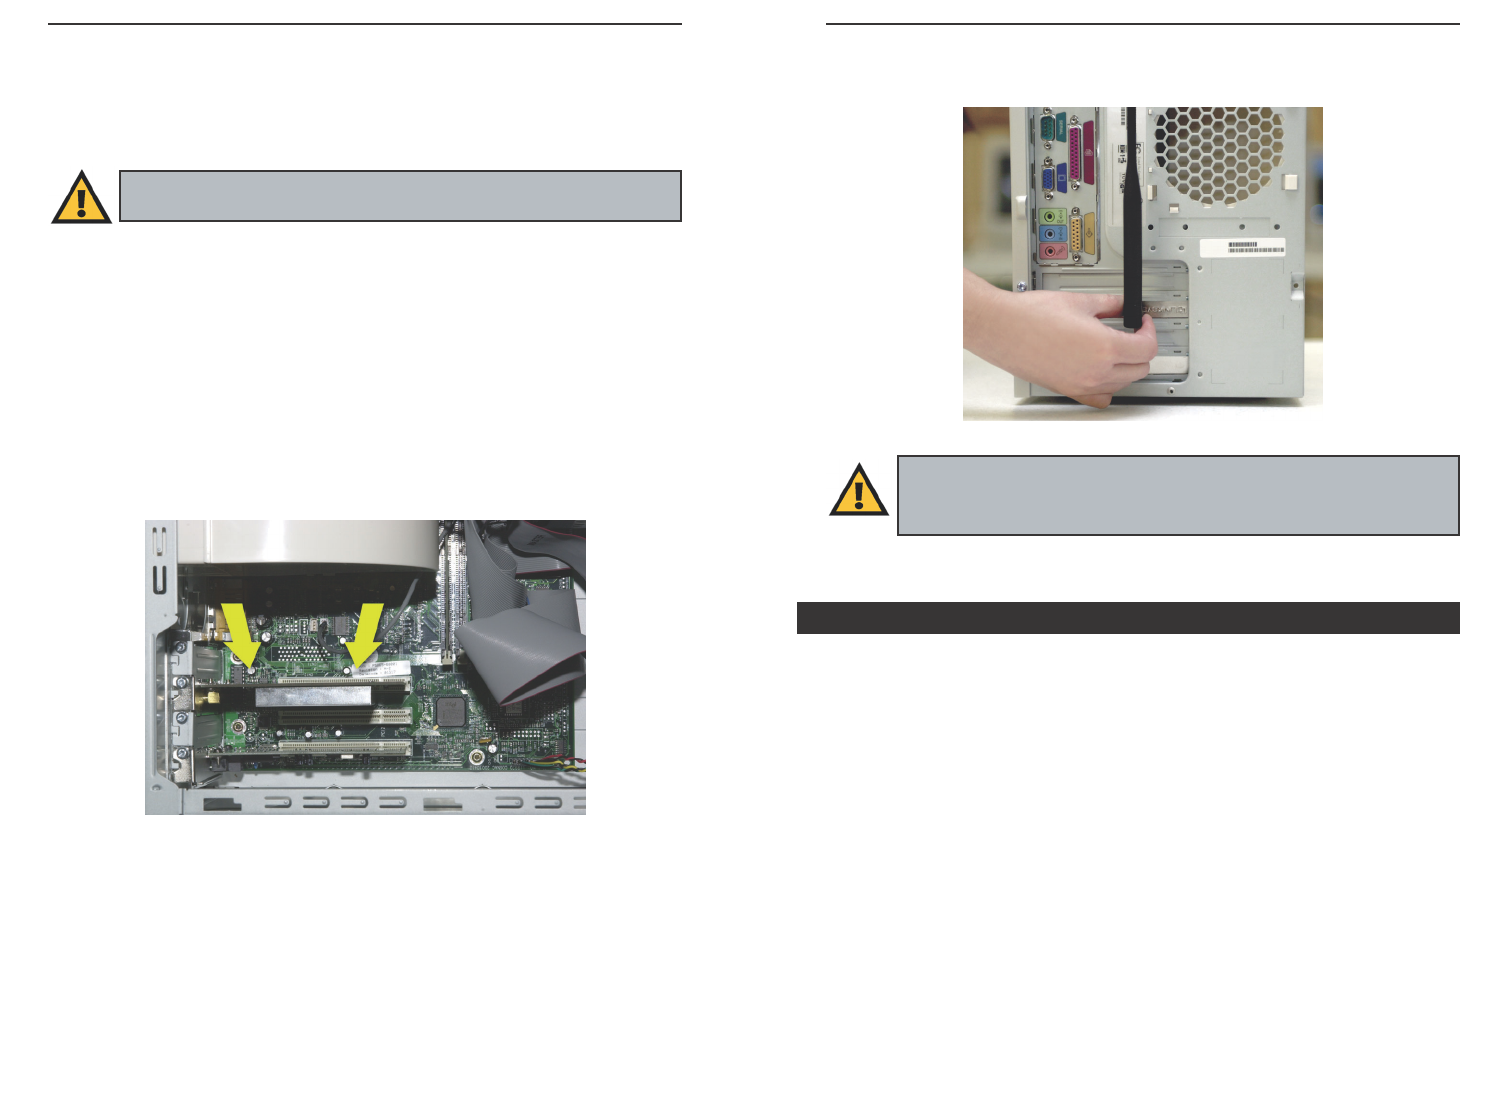
5. Attach the external antenna to the Adapter’s antenna port, as shown in Figure
6-2.
5. Power on your desktop PC.
After the Adapter has been physically connected to your computer, Windows
will detect the new hardware.
Windows will begin installing the driver files in your operating system. If
Windows asks you for the original Windows CD-ROM, insert the CD-ROM,
and direct Windows to the proper location for the CD-ROM (e.g., D:\).
Congratulations! The installation of the Wireless-B PCI Adapter is
complete.
If you want to check the link information, search for available wireless
networks, or make additional configuration changes, proceed to
“Chapter 7: Using the WLAN Monitor for Windows 98SE, Me, and
2000.”
Figure 6-2
Hardware Detection for Windows 98SE, Me, and 2000
Important: Make sure the antenna is positioned straight up into the
air, at a 90º angle from the Adapter (see Figure 5-2). This will ensure
optimum wireless operating range and performance.
Chapter 6: Hardware Installation
for Windows 98SE, Me, and 2000
1. Remove any CDs or disks from their drives, and turn off your desktop PC.
2. Open your PC’s case, and locate an available PCI slot on the motherboard.
Check with your computer manufacturer for instructions.
3. Slide the Adapter into the PCI slot, as shown in Figure 6-1. Make sure that
all of its pins are touching the slot’s contacts. You may have to apply a bit of
pressure to slide the Adapter all the way in.
4. After the Adapter is set firmly in place, secure its fastening tab to your PC’s
chassis with a mounting screw. Then close your PC’s case.
Make sure that you do Chapter 5 and install the software with the
Setup Wizard before you install the hardware.
Figure 6-1
Wireless-B PCI Adapter
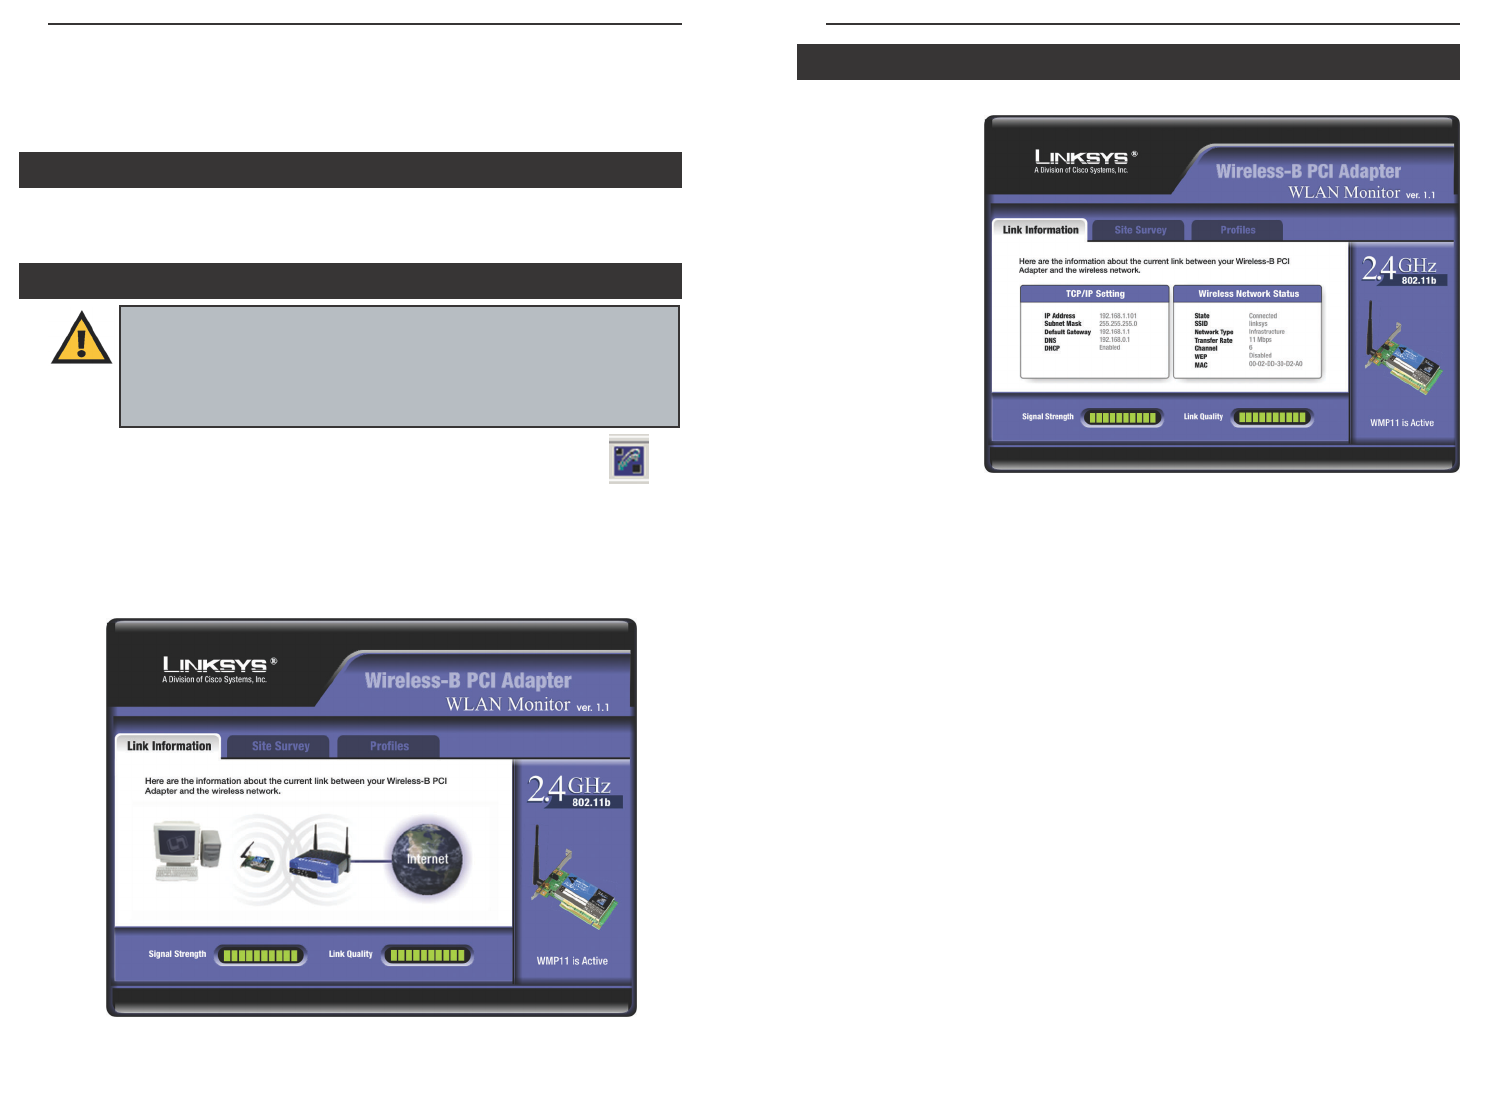
The Link Information screen (Figure 7-3) shows you the settings of your cur-
rent connection.
TCP/IP Setting
IP Address - The IP Address of the Adapter.
Subnet Mask - The Subnet Mask of the Adapter.
Default Gateway - The Default Gateway address of the Adapter.
DNS - The DNS address of the Adapter.
DHCP - The status of the DHCP client.
Wireless Network Status
State - The status of the wireless network connection.
SSID - The SSID of the wireless network.
Network Type - The wireless mode currently in use.
Transfer Rate - The data transfer rate of the current connection.
Channel - The channel to which the wireless network devices are set.
WEP - The status of the WEP encryption security feature.
MAC - The MAC address of the wireless network’s access point.
Signal Strength - The Signal Strength bar indicates signal strength, from 0 to
100%.
Link Quality - The Link Quality bar indicates the quality of the wireless net-
work connection, from 0 to 100%.
Click the X (Close) button in the upper right corner to exit the WLAN Monitor.
19
Instant Wireless®Series
18
Link Information
Figure 7-3
Chapter 7: Using the WLAN Monitor
for Windows 98SE, Me, and 2000
Use the WLAN Monitor to check the link information, search for available
wireless networks, or make additional configuration changes.
After installing the Adapter, the Wireless-B PCI Adapter WLAN
Monitor icon will appear in your system tray. Double-click the
icon (see Figure 7-1).
The Link Information screen will appear, displaying the settings for your cur-
rent wireless connection. To search for available wireless networks, click the
Site Survey tab. To perform configuration changes, click the Profiles tab.
Figure 7-1
Figure 7-2
Important for Windows XP users: Windows XP has a built-in
configuration tool. Use the Windows XP Wireless Zero Configuration
(in the system tray at the bottom of your screen) to configure the
Adapter. See “Chapter 6: Driver Installation and Configuration for
Windows XP.”
Starting the WLAN Monitor
Overview
Wireless-B PCI Adapter
Connect - To connect to one of the networks on the list, select the wireless net-
work,and click the Connect button to connect. If the wireless network has
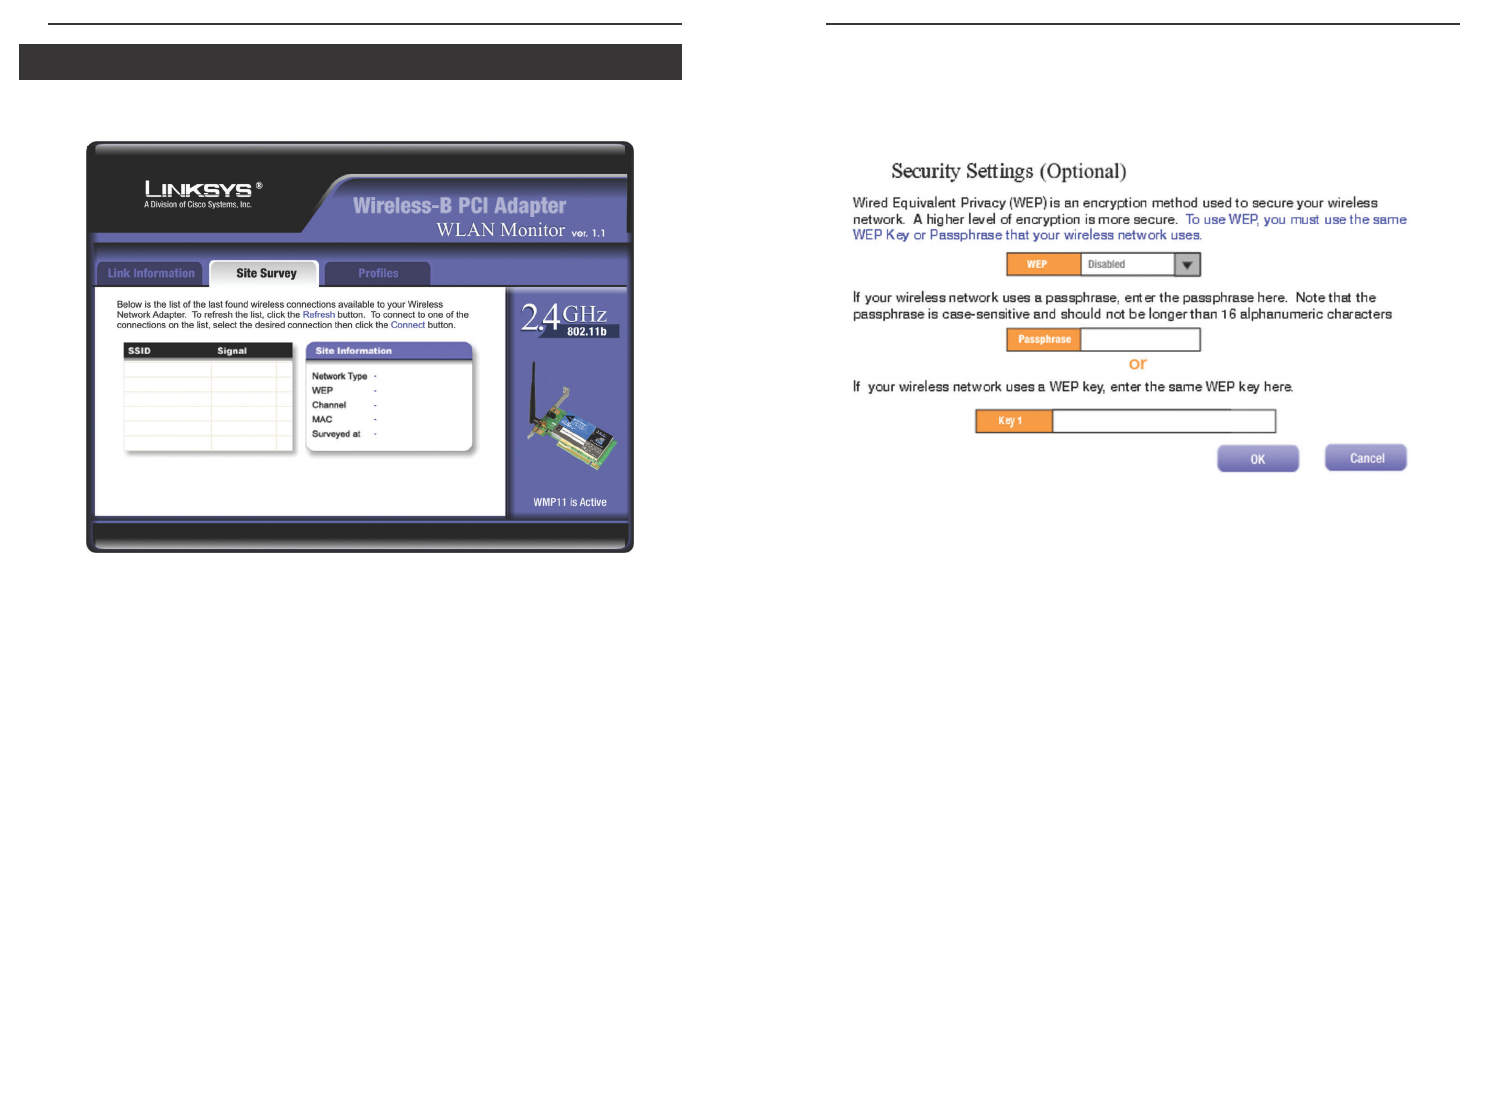
WEP encryption enabled, you will see the screen shown in Figure 7-5.
In the WEP drop-down box, select the type of WEP encryption used by the
wireless network: 64-bit or 128-bit WEP.
If the wireless network uses a passphrase, enter the passphrase in the
Passphrase field. If the wireless network uses a WEP key, enter the WEP key
in the Key 1 field.
Click the OK button to complete the network connection and return to the Site
Survey screen, or click the Cancel button to cancel the network connection and
return to the Site Survey screen.
On the Site Survey screen, click the X (Close) button in the upper right corner
to exit the WLAN Monitor.
21
Instant Wireless®Series
20
Figure 7-5
The Site Survey screen, shown in Figure 7-4, displays a list of infrastructure and
ad-hoc networks available for connection.
SSID - The SSID of the wireless network.
Signal - The percentage of signal strength, from 0 to 100%.
Site Information
Network Type - The wireless mode currently in use.
Channel - The channel to which the wireless network devices are set.
WEP - The status of the WEP encryption security feature.
MAC - The MAC address of the wireless network’s access point.
Surveyed at - The time at which the wireless network was scanned.
Refresh - Click the Refresh button to perform a new search for wireless
devices.
Figure 7-4
Site Survey
Wireless-B PCI Adapter
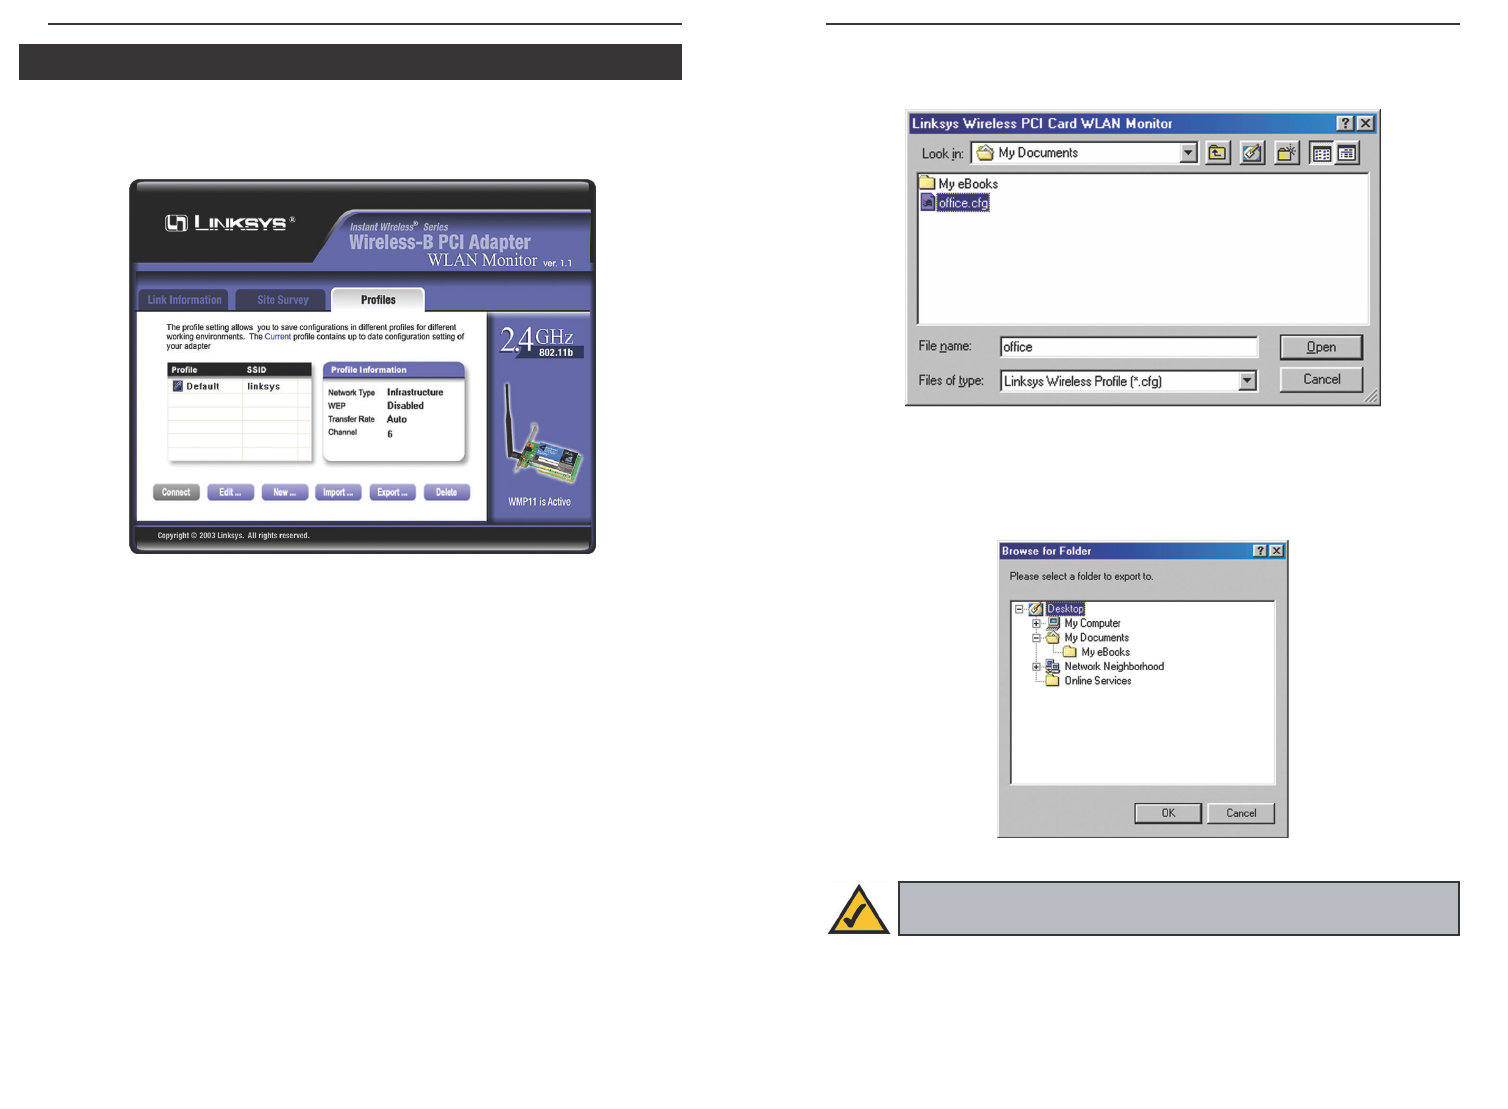
• Import - Click the Import button to import a profile that has been saved
in another location. Select the appropriate file, and click the Open button.
• Export - Select the profile you want to save in a different location, and
click the Export button. Direct Windows to the appropriate folder, and
click the OK button.
• Delete - Click the Delete button to delete a profile.
Click the X (Close) button in the upper right corner to exit the WLAN Monitor.
23
Instant Wireless®Series
22
Figure 7-7
Figure 7-8
Note: If you want to export more than one profile, you have to export
them one at a time.
The Profiles screen lets you save different configuration profiles for different
network setups. You can also import or export profiles. The default profile
holds the initial configuration saved when you installed the Adapter.
Profile - Name of the connection profile.
SSID - The wireless network’s SSID, as set in the connection profile.
Profile Information
Network Type - The wireless mode currently in use.
Transfer Rate - The data transfer rate of the current connection: 1Mbps,
2Mbps, 1 or 2Mbps, 5.5Mbps, 11Mbps, or Auto (in Auto mode, the Adapter
dynamically shifts to the fastest data transfer rate possible at any given time).
Channel - The channel to which the wireless network devices are set.
WEP - The status of the WEP encryption security feature.
Connect - To connect to a wireless network using a specific profile, select the
profile,and click the Connect button. If the wireless network has WEP encryp-
tion enabled, you will see the screen shown in Figure 7-7.
Edit - Select a profile, and click the Edit button to change an existing profile.
New - Click the New button to create a new profile. See the next section,
“Creating a New Profile.”
Figure 7-6
Profiles
Wireless-B PCI Adapter
25
Instant Wireless®Series
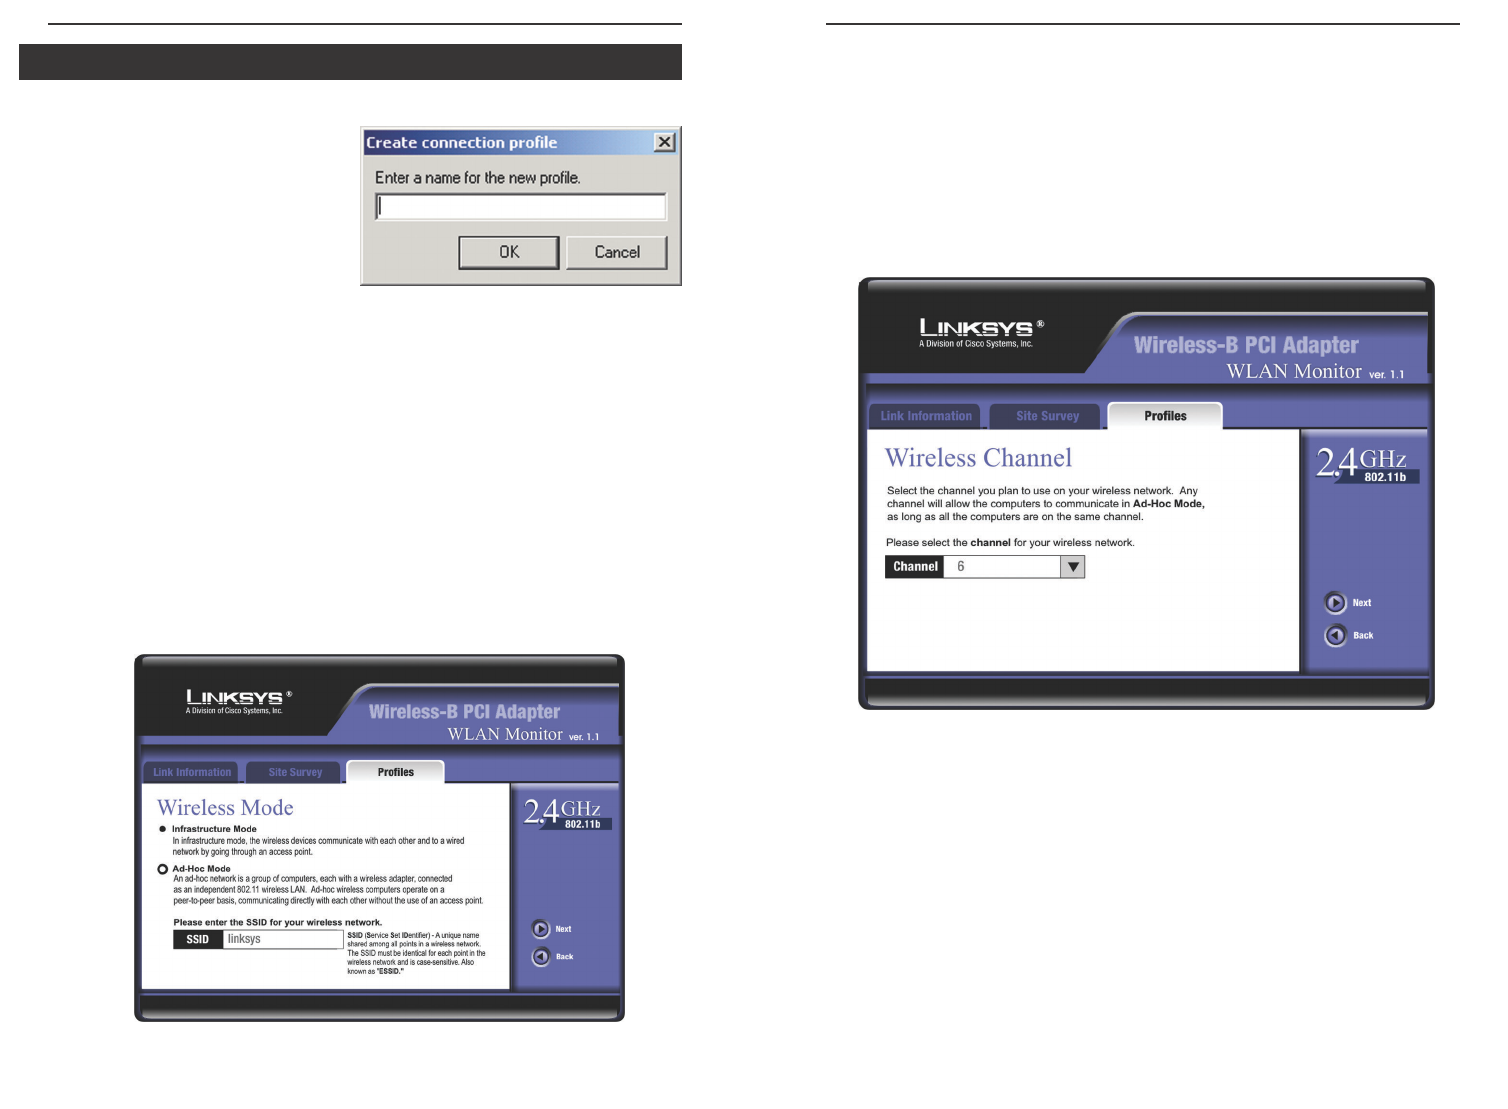
1. On the Profiles screen, shown in Figure 7-6, click the New button to create
a new profile.
2. When the Create connection pro-
file screen appears (Figure 7-9),
enter a name for the new profile.
Click OK to save the profile
name or click Cancel to return to
the previous screen.
3. The Wireless Mode screen (Figure 7-10) shows a choice of two wireless
modes. Click the Infrastructure Mode radio button if you want your wire-
less computers to communicate with computers on your wired network via
a wireless access point. Click the Ad-Hoc Mode radio button if you want
multiple wireless computers to communicate directly with each other. Click
the Next button to continue or the Back button to return to the previous
screen.
Infrastructure Mode - This mode allows wireless and wired networks to
communicate through an access point.
Ad-Hoc Mode - This mode allows wireless-equipped computers to com-
municate directly with each other. No access point is used.
24
4. The Wireless Channel screen (Figure 7-11) will appear. If you chose
Infrastructure Mode, go to Step 5 now. If you chose Ad-Hoc Mode, select
the correct operating channel for your network from the Channel drop-
down menu. Click the Next button, and go to Step 5. Click the Back but-
ton to change any settings.
Channel - The channel you choose should match the channel set on the
other devices in your wireless network. If you are unsure about which chan-
nel to use, select the default channel (Channel 6).
Figure 7-11
Creating a New Profile
Figure 7-9
Figure 7-10