LINKSYS WRE54GV2 Wireless-G Range Expander User Manual Part 1
LINKSYS LLC Wireless-G Range Expander Users Manual Part 1
LINKSYS >
Contents
- 1. Users Manual Part 1
- 2. Users Manual Part 2
- 3. Users Manual Part 3
Users Manual Part 1
A Division of Cisco Systems, Inc.
®
Model No.
Range Expander
Wireless-G
WRE54G ver. 2
User Guide
GHz
2.4
802.11g
WIRELESS
Chapter 1: Introduction
Welcome
WRE54G Wireless-G Range Expander is a standard WLAN repeater device. It can repeat and extend wireless signal
coverage on Linksys wireless AP/router.
Features
z Supports 64 / 128 bit WEP encryption in 802.11b/802.11g wireless LAN.
z Wireless operation provides data rate at 11, 5.5, 2, and 1Mbps with auto fallback for 802.11b WLAN card and also
provide rate at 6, 9, 12, 18, 24, 36, 48, and 54Mbps for 802.11g WLAN card.
z Configurable through your networked PC’s Web browser
z Configurable through Setup Wizard
z Backup and restore configuration
z Support auto-configuration and infrastructure operation modes. Under auto-configuration operation mode, WRE54G
will detect and connect to the Linksys wireless AP/Router with strongest signal in the environment. Infrastructure
operation mode allows user configure the WRE54G via setup wizard.
z Password protected configuration or management sessions for web access
z Built-in HTTP Server for setup and management via any browser easily
z Support 64/128 bit WEP encryption.
Chapter 2: Planning your Wireless Network
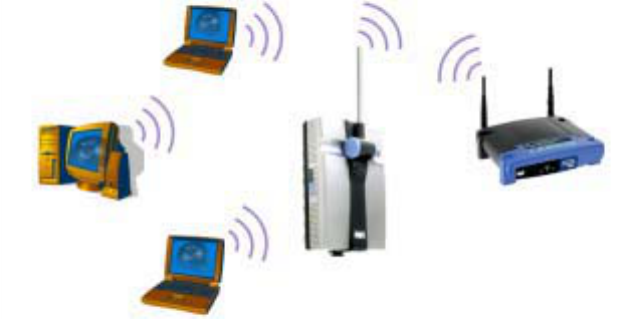
The Repeater’s Functions
Simply put, the Wireless-G Range Expander can increase the coverage
area of an ESS.
Network Topology
A wireless local area network (WLAN) is exactly like a regular local area
network (LAN), except that each computer in the WLAN uses a wireless
device to connect to the network. Computers in a WLAN share the same
frequency channel and SSID, which is an identification name for wireless
devices.
Ad-Hoc versus Infrastructure Mode
Unlike wired networks, wireless networks have two different modes in
which they may be set up: infrastructure and ad-hoc. An infrastructure
configuration is a WLAN and wired LAN communicating to each other
through an access point. An ad-hoc configuration is wireless-equipped computers communicating directly with each other. Choosing between these
two modes depends on whether or not the wireless network needs to share data or peripherals with a wired network or not. If the computers on the
wireless network need to be accessed by a wired
network or need to share a peripheral, such as a printer, with the wired network computers, the wireless network should be set up in infrastructure
mode.
The basis of infrastructure mode centers around an access point, which serves as the main point of communications in a wireless network. Access
points transmit data to PCs equipped with wireless network cards, which can roam within a certain radial range of the access point. Multiple access
points can be arranged to work in succession to extend the roaming range.
If the wireless network is relatively small and needs to share resources only with the other computers on the wireless network, then the ad-hoc
mode can be used. Ad-hoc mode allows computers equipped with wireless transmitters and receivers to communicate directly with each other,
eliminating the need for an access point. The drawback of this mode is that, in Ad-Hoc mode, wireless-equipped computers are not able to
communicate with computers on a wired network. And, of course, communication between the wireless-equipped computers is limited by the
distance and interference directly between them.
Chapter 3: Getting to Know the Wireless-G Range
Expander
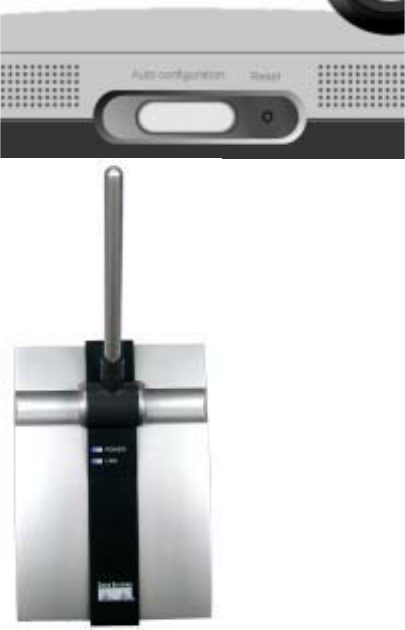
The Side Panel
Auto configuration port is where you will connect the power adapter.
Reset Button You can use an object, such as a stretched paper clip, to press the Reset
button and then release the button to reset the device to its factory-default settings.
The Top Panel
The LEDs on the top panel of the Wireless-G Range Expander indicate the information about
power and network activity.
Power Blue. The Power LED lights up when the Wireless-G Range Expander is powered on.
Link Blue. The Link LED lights whenever there is a successful wireless connection.
Chapter 4: Connecting the Wireless-G Range
Expander
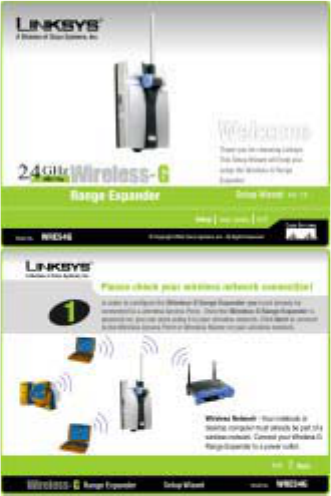
The Setup Wizard will take you through all the steps necessary to configure the Wireless-G
Range Expander. Before you start it, your notebook or desktop computer must already be part
of a wireless network.
1. Power on your Access Point and make sure cables are properly connected.
2. In order to configure the Wireless-G Range Expander you mush already be connected to a
wireless Access Point.
3. Power on your Wireless-G Range Expander by connecting your Wireless-G Range Expander
to a power outlet.
4. Once the Wireless-G Range Expander is powered on, you can access it in your wireless
network.
5. Insert the Setup Wizard CD into the CD-ROM driver of your PC or notebook that has already
be part of a wireless network.
6. The screen should appear on your monitor. If it does not, this means the auto-run is not
functioning. Start the auto-run manually by clicking the Start button, selecting Run, and typing
D:\setup.exe (if “D” is your CD-ROM drive). Click the Setup button to run the Setup Wizard.
7. Click the Next button to continue or Exit to exit the Setup Wizard.
8. The next screen to appear will display a list of the access points on your network, along with
the status information for each access point. If there is only one access point on your
network, it will be the only one displayed. If there are more than one displayed, select the
Access Point you want to connect to. Once you have connected to an Access Point, the
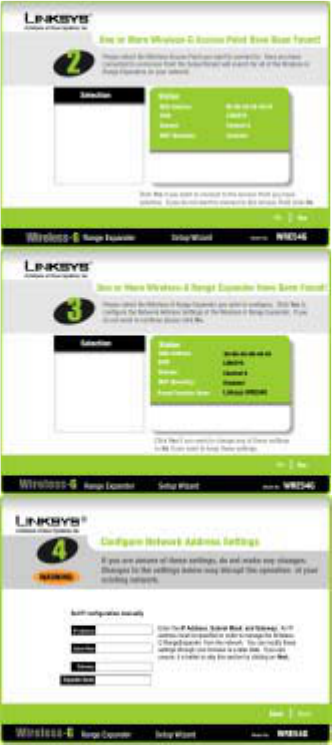
Setup Wizard will search for all of the Wireless-G Range Expanders on your network.
9. Click the Yes button to continue or No to exit the Setup Wizard.
10. The Security screen shows the WEP key. If you would like to use Wired Equivalent Privacy
(WEP) encryption for your wireless network., enter the required information on the screen.
z WEP. In order to utilize WEP encryption, select the WEP setting from the pull-down
menu, 64-bit (10 hex digits) or 128-bit (26 hex digits). If you do not wish to utilize
WEP encryption, make sure Disabled is selected. The Access Point’s WEP
encryption is unique to Linksys and may conflict with other vendors’ WEP encryption.
z Passphrase. Instead of manually entering WEP keys, you can enter a Passphrase.
This Passphrase is used to generate one or more WEP keys. It is case-sensitive and
should not be longer than 16 alphanumeric characters. (The Passphrase function is
compatible with Linksys wireless products only. If you want to communicate with
non-Linksys wireless products, you will need to enter your WEP keys manually on
the non-Linksys wireless products.)
11. If you entered a passphrase, then the Key 1 field will display the automatically generated
WEP key. If you did not enter a passphrase, then enter a WEP key in the Key 1 field. Each
device in your wireless network must use the same WEP key for the network to function
properly.
z Key 1. WEP keys enable you to create an encryption scheme for wireless LAN
transmissions. If the WEP key hasn’t been automatically generated, then manually
enter a set of values. (Do not leave the field blank, and do not enter all zeroes. These
are not valid key values.) If you are using 64-bit WEP encryption, then each key must
consist of exactly 10 hexadecimal characters. If you are using 128-bit WEP
encryption, then each key must consist of exactly 26 hexadecimal characters. Valid
hexadecimal characters are “0”-“9” and “A”-“F”.
12. Next button to continue or Back to return to the previous page.
13. Select the Wireless-G Range Expander you want to configure. Click Yes to configure the

Network Address Settings of the Wireless-G Range Expander. If you do not want to continue,
click No.
14. You can manually set IP configuration. Enter an IP Address, Subnet Mask, Gateway, and
Expander Name appropriate for your network. If you are unsure of these settings, you can
skip this selection by just clicking on Next.
15. Click the Next button to continue or Back to return to the previous page.
16. The next screen will allow you to review your settings. If these settings are correct, click the
Yes button to save these settings. If there are any problems with the settings, click the No
button to exit the Setup Wizard.
17. Congratulations! At this point, the configuration performed with the Setup Wizard is
complete. Click the Exit button to exit the Setup Wizard.

.
cnI
,
s
met
sy
S
ocsi
C f
o no
i
siviD
A
®
.
oN
l
edoM
n
oi
t
a
l
l
a
t
sn
I
kc
i
uQ
.
oN
l
edoM
s
s
e
l
er
iW
G
4
5
E
R
W
r
e
dnapxE
eg
naR -ss
e
l
e
r
iW G
A no
i
taco
l
mumit
p
o
n
a et
a
coL
e
h
T
.
re
dn
a
p
x
E
egnaR
e
h
t rof
ta
yll
a
u
s
u
s
i
t
nemec
a
lp
t
s
eb
-t
en
ssel
er
iw ruo
y
fo
e
g
d
e eh
t
.krow
B eht fo n
o
it
c
erid
eht x
i
F
a ni
t
i
e
cal
p
ot
yrT
.annet
na
re
v
o
c
t
s
eb lliw taht
n
oitiso
p
-roN .krow
t
e
n
ss
e
ler
i
w
r
u
o
y
e
h
t
ecalp
uoy
r
ehgi
h
eht ,yllam
,annetna s’redn
a
p
x
E egn
a
R
ll
i
w
e
c
namr
of
r
ep e
ht
retteb
e
ht
no
i
ti
sop
s'annetna ehT .eb
-isnes gniviecer eht sec
na
hne
.
yt
ivit
C etairpo
r
ppa eht tcennoC
ot
t
i
t
c
e
nno
c dn
a
etal
p re
w
o
p
dluohs
uoY .t
e
l
tuo re
w
o
p a
gni
krowten r
u
o
y
gul
p
s
yawl
a
.rotcetorp egrus a otni ra
e
g
Deht sserP AAuuttoo ccoonnffiigguurraattiioonn
-
i
ta
m
o
tu
a
n
e
h
t lli
w
t
I .
nott
u
b
-ten ss
el
eriw ruoy tceted yllac
h
t
iw
f
le
st
i
erug
i
fnoc dna
krow
.
s
gnittes
e
so
h
t
B
:T
N
A
T
R
OPM
I t
uoht
iw
s
k
r
ow
ten
n
i
d
e
s
u
y
lno
si
n
ott
ub
n
oi
tarug
ifno
c
ot
uA
e
h
T
r
oF
.
d
elbane yti
r
u
c
eS PEW ev
a
h
s
ya
wla
dluo
h
s u
o
Y
.
delbane
y
t
ir
uc
e
S
PE
W
apxE egnaR
e
ht llatsni ,ytiruces r
e
taerg nw
o
hs s
a
,draziW
p
ute
S
eht
htiw red
n
.edis etisop
p
o eht no
s
tnetn
oC eg
ak
ca
P
re
d
na
p
x
E
eg
na
R G-s
se
l
e
r
i
W
en
O
•
r
e
tpa
d
A re
wo
P
C
A e
n
O
•
e
d
iu
G re
s
U
ht
iw DC
d
r
a
z
i
W pu
t
e
S en
O
•
no
i
t
a
l
l
atsnI
kci
uQ e
n
O
•
dr
ac
no
i
t
a
rt
s
i
ge
r
en
O
•
:
TNAT
R
OPM
I egnaR eht l
l
atsn
i
u
o
y fI
e
ht
h
tiw
k
ro
w
ten ruoy ot
ni
r
e
dn
a
p
xE
u
oy ,
n
ot
t
ub noi
ta
r
u
gif
n
oc
o
t
u
A
sa( ytili
t
U beW eht
ot
n
i o
g
dluoh
s
dna )ediuG resU eht ni debirc
s
ed
.
n
o
it
pyrcne P
EW
elbane
H
G
z
4
.2
g1
1.
20
8
not
t
u
b
n
o
i
ta
rugi
f
noc
o
t
u
A eh
t g
n
i
sU