LINKSYS WRT160N Wireless-N Broadband Router User Manual Linksys WRT160N User Guide
LINKSYS LLC Wireless-N Broadband Router Linksys WRT160N User Guide
LINKSYS >
Contents
Manual 5
Chapter 3 Advanced Configuration
23
Wireless-N Broadband Router
Summary
This lists the QoS entries you have created for your
applications and devices.
Priority This column displays the bandwidth priority of
High, Medium, Normal, or Low.
Name This column displays the application, device, or
port name.
Information This column displays the port range or
MAC address entered for your entry. If a pre-configured
application or game was selected, there will be no valid
entry shown in this section.
Remove Click this button to remove an entry.
Edit Click this button to make changes.
Click Save Settings to apply your changes, or click Cancel
Changes to cancel your changes.
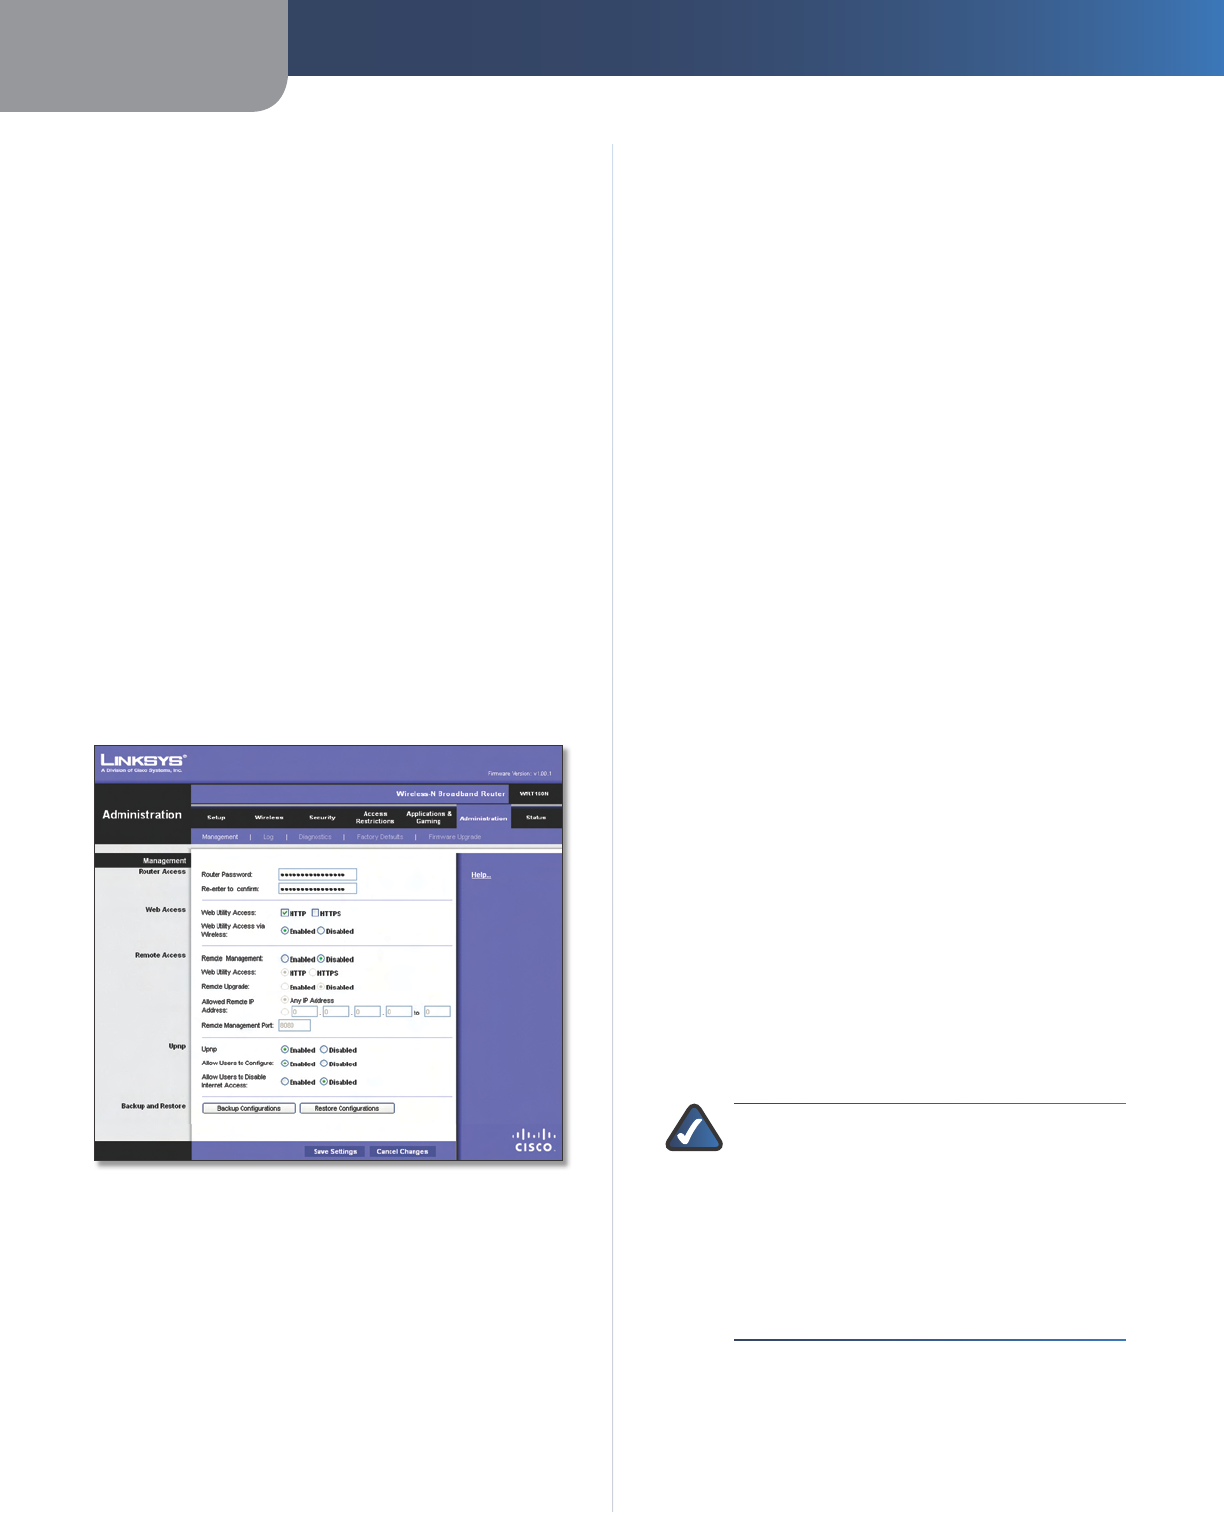
Administration > Management
The Administration > Management screen allows the
network’s administrator to manage specific Router
functions for access and security.
Administration > Management
Management
Router Access
To ensure the Router’s security, you will be asked for your
password when you access the Router’s web-based utility.
The default is admin.
Router Password Enter a new password for the Router.
Re-enter to confirm Enter the password again to
confirm.
Web Access
Web Utility Access HTTP (HyperText Transport Protocol)
is the communications protocol used to connect to servers
on the World Wide Web. HTTPS uses SSL (Secured Socket
Layer) to encrypt data transmitted for higher security.
Select HTTP or HTTPS. HTTP is the default.
Web Utility Access via Wireless If you are using the
Router in a public domain where you are giving wireless
access to your guests, you can disable wireless access to
the Router’s web-based utility. You will only be able to
access the utility via a wired connection if you disable
the setting. Keep the default, Enabled, to allow wireless
access to the utility, or select Disabled to block wireless
access to the utility.
Remote Access
Remote Management To permit remote access of the
Router, from outside the local network, select Enabled.
Otherwise, keep the default, Disabled.
Web Utility Access HTTP (HyperText Transport Protocol)
is the communications protocol used to connect to servers
on the World Wide Web. HTTPS uses SSL (Secured Socket
Layer) to encrypt data transmitted for higher security.
Select HTTP or HTTPS. HTTP is the default.
Remote Upgrade If you want to be able to upgrade the
Router remotely, from outside the local network, select
Enabled. (You must have the Remote Management
feature enabled as well.) Otherwise, keep the default,
Disabled.
Allowed Remote IP Address If you want to be able to
access the Router from any external IP address, select Any
IP Address. If you want to specify an external IP address or
range of IP addresses, then select the second option and
complete the fields provided.
Remote Management Port Enter the port number that
will be open to outside access.
NOTE: When you are in a remote location
and wish to manage the Router, enter
http://<Internet_IP_address>:port or
https://<Internet_IP_address>:port,
depending on whether you use HTTP or HTTPS.
Enter the Router’s specific Internet IP address in
place of <Internet_IP_address>, and enter the
Remote Management Port number in place of
the word port.
UPnP
Universal Plug and Play (UPnP) allows Windows Me and XP
to automatically configure the Router for various Internet
applications, such as gaming and videoconferencing.
Chapter 3 Advanced Configuration
24
Wireless-N Broadband Router
UPnP If you want to use UPnP, keep the default setting,
Enabled. Otherwise, select Disabled.
Allow Users to Configure Keep the default, Enabled,
if you want to be able to make manual changes to the
Router while using the UPnP feature. Otherwise, select
Disabled.
Allow Users to Disable Internet Access Select Enabled,
if you want to be able to prohibit any and all Internet
connections. Otherwise, keep the default setting,
Disabled.
Backup and Restore
Backup Configurations To back up the Router’s
configuration settings, click this button and follow the on-
screen instructions.
Restore Configurations To restore the Router’s
configuration settings, click this button and follow the on-
screen instructions. (You must have previously backed up
the Router’s configuration settings.)
Click Save Settings to apply your changes, or click Cancel
Changes to cancel your changes.
Administration > Log
The Router can keep logs of all traffic for your Internet
connection.
Administration > Log
Log
Log To disable the Log function, select Disabled. To
monitor traffic between the network and the Internet,
keep the default, Enabled. With logging enabled, you can
choose to view temporary logs.
View Log To view the logs, click View Log.
Log > View Log
Log
Type Select Incoming Log, Outgoing Log, Security
Log, or DHCP Client Log.
<Type> Log The Incoming Log will display a
temporary log of the source IP addresses and
destination port numbers for the incoming Internet
traffic. The Outgoing Log will display a temporary
log of the local IP addresses, destination URLs/IP
addresses, and service/port numbers for the outgoing
Internet traffic. The Security log will display the login
information for the web-based utility. The DHCP
Client Log will display the LAN DHCP server status
information.
Click Save the Log to save this information to a file
on your PC’s hard drive. Click Refresh to update the
log. Click Clear to clear all the information that is
displayed.
Click Save Settings to apply your changes, or click Cancel
Changes to cancel your changes.
Administration > Diagnostics
The diagnostic tests (Ping and Traceroute) allow you to
check the connections of your network devices, including
connection to the Internet.
Administration > Diagnostics
•
•
Chapter 3 Advanced Configuration
25
Wireless-N Broadband Router
Diagnostics
Ping Test
The Ping test checks the status of a connection.
IP or URL Address Enter the address of the PC whose
connection you wish to test.
Packet Size Enter the packet size you want to use. The
default is 32 bytes.
Times to Ping Enter many times you wish to test it.
Start to Ping To run the test, click this button. The Ping
Test screen will show if the test was successful. Click Close
to return to the Diagnostics screen.
Diagnostics > Ping
Traceroute Test
The Traceroute test tests the performance of a
connection.
IP or URL Address Enter the address of the PC whose
connection you wish to test.
Start to Traceroute To run the test, click this button. The
Traceroute Test screen will show if the test was successful.
Click Close to return to the Diagnostics screen.
Diagnostics > Traceroute
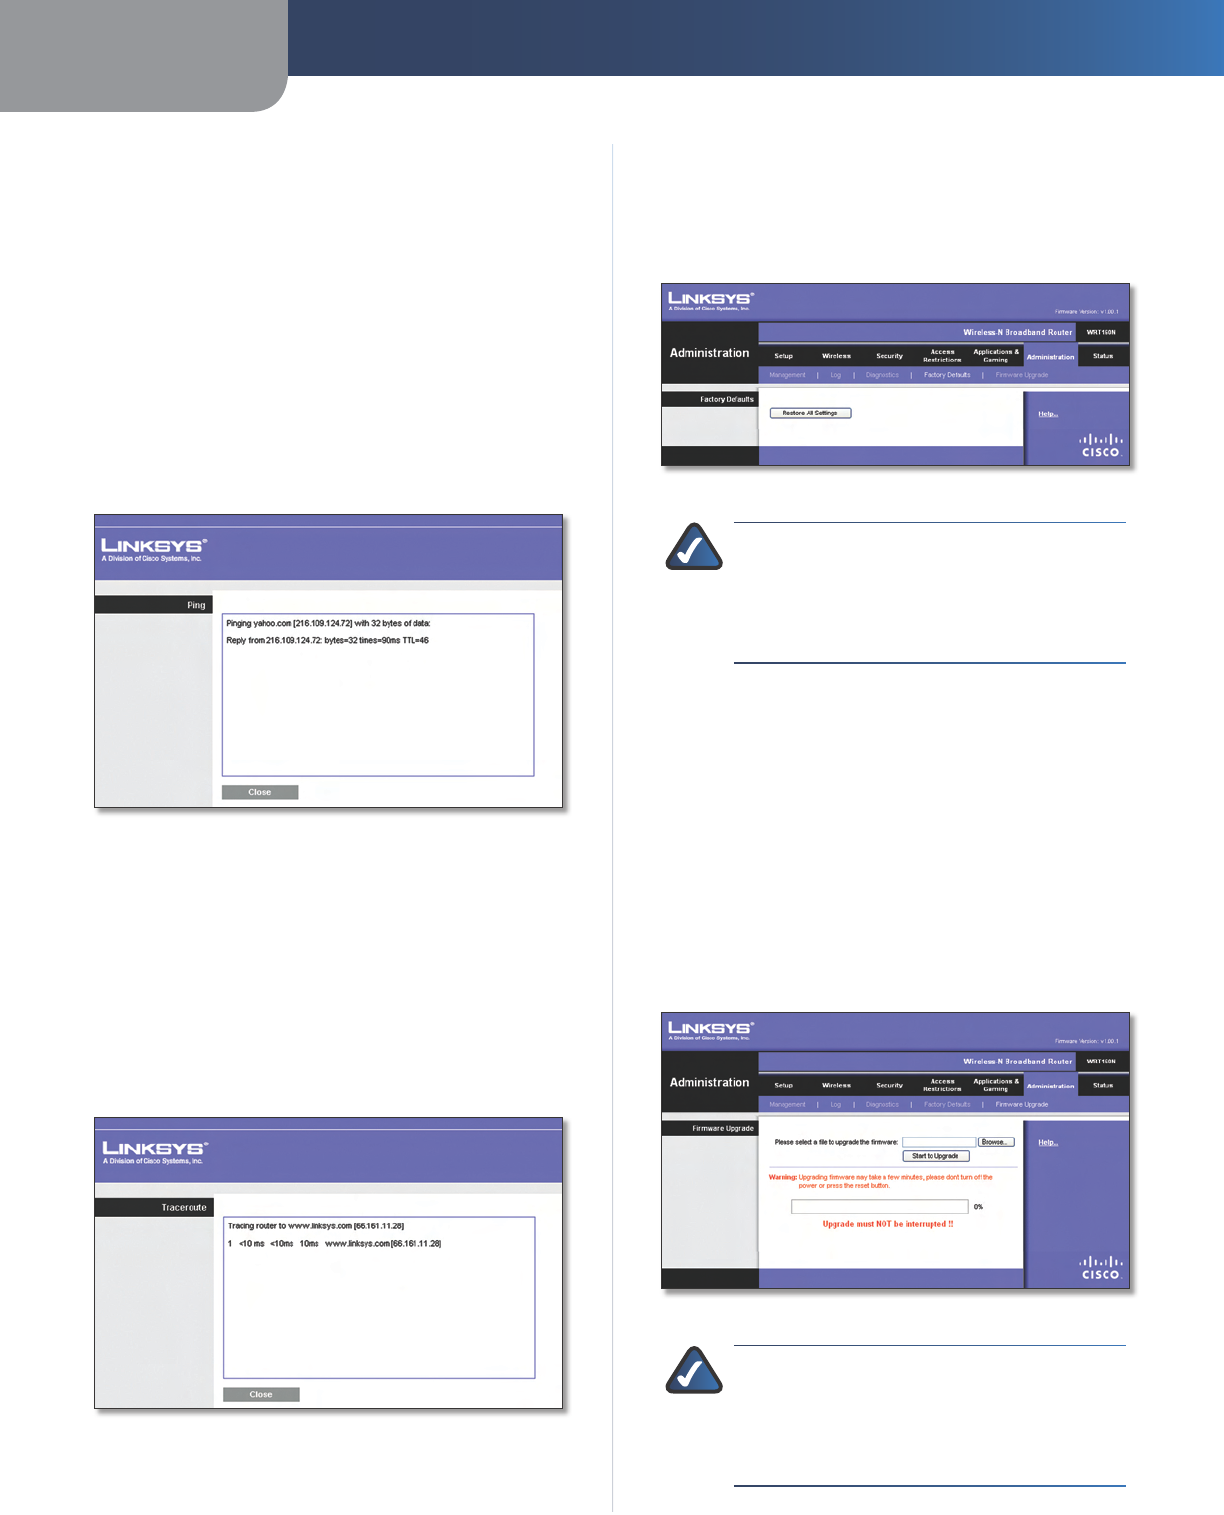
Administration > Factory Defaults
The Administration > Factory Defaults screen allows you
to restore the Router’s configuration to its factory default
settings.
Administration > Factory Defaults
NOTE: Do not restore the factory defaults unless
you are having difficulties with the Router and
have exhausted all other troubleshooting
measures. Once the Router is reset, you will have
to re-enter all of your configuration settings.
Factory Defaults
Restore All Settings To reset the Router’s settings to the
default values, click this button and then follow the on-
screen instructions. Any settings you have saved will be
lost when the default settings are restored.
Administration > Firmware Upgrade
The Firmware Upgrade screen allows you to upgrade the
Router’s firmware. Do not upgrade the firmware unless
you are experiencing problems with the Router or the new
firmware has a feature you want to use.
Administration > Firmware Upgrade
NOTE: The Router may lose the settings you
have customized. Before you upgrade its
firmware, write down all of your custom settings.
After you upgrade its firmware, you will have to
re-enter all of your configuration settings.
Chapter 3 Advanced Configuration
26
Wireless-N Broadband Router
Firmware Upgrade
Before upgrading the firmware, download the Router’s
firmware upgrade file from the Linksys website,
www.linksys.com. Then extract the file.
Please select a file to upgrade the firmware Click
Browse and select the extracted firmware upgrade file.
Start to Upgrade After you have selected the
appropriate file, click this button, and f
ollow the on-screen
instructions.
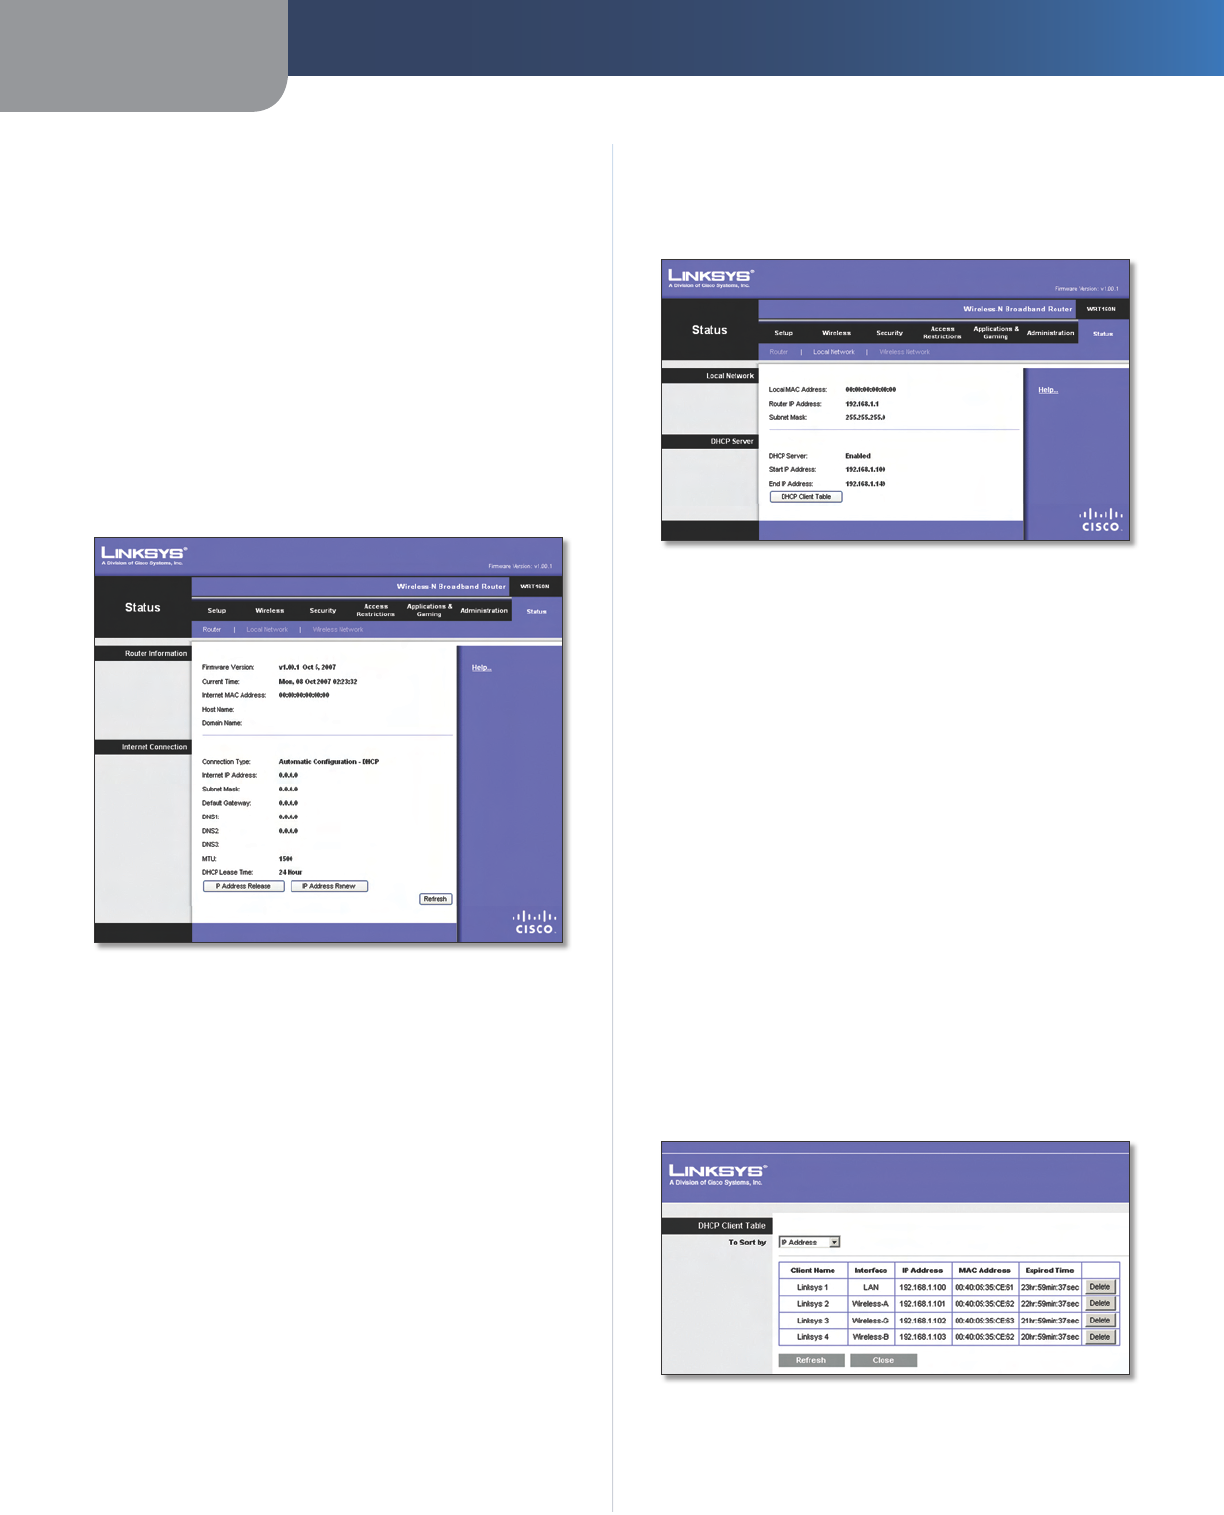
Status > Router
The Router screen displays information about the Router
and its current settings.
Status > Router
Router Information
Firmware Version This is the version number of the
Router’s current firmware.
Current Time This shows the time set on the Router.
Internet MAC Address This is the Router’s MAC Address,
as seen by your ISP.
Host Name If required by your ISP, this was entered on
the Basic Setup screen.
Domain Name If required by your ISP, this was entered
on the Basic Setup screen.
Internet Connection
This section shows the current network information
stored in the Router. The information varies depending on
the Internet connection type selected on the Basic Setup
screen.
Click Refresh to update the on-screen information.
Status > Local Network
The Local Network screen displays information about the
local, wired network.
Status > Local Network
Local Network
Local MAC Address The MAC address of the Router’s
local, wired interface is displayed here.
Router IP Address This shows the Router’s IP address, as
it appears on your local network.
Subnet Mask This shows the Subnet Mask of the Router.
DHCP Server
DHCP Server The status of the Router’s DHCP server
function is displayed here.
Start IP Address For the range of IP addresses used by
devices on your local network, the starting IP address is
shown here.
End IP Address For the range of IP addresses used by
devices on your local network, the ending IP address is
shown here.
DHCP Clients Table Click this button to view a list of PCs
that are using the Router as a DHCP server.
DHCP Clients Table
Chapter 3 Advanced Configuration
27
Wireless-N Broadband Router
DHCP Client Table
The DHCP Client Table lists computers and other
devices that have been assigned IP addresses by the
Router. The list can be sorted by Client Name, Interface,
IP Address, MAC Address, and Expired Time (how
much time is left for the current IP address). To remove
a DHCP client, click Delete. To retrieve the most up-to-
date information, click Refresh. To exit this screen and
return to the Local Network screen, click Close.
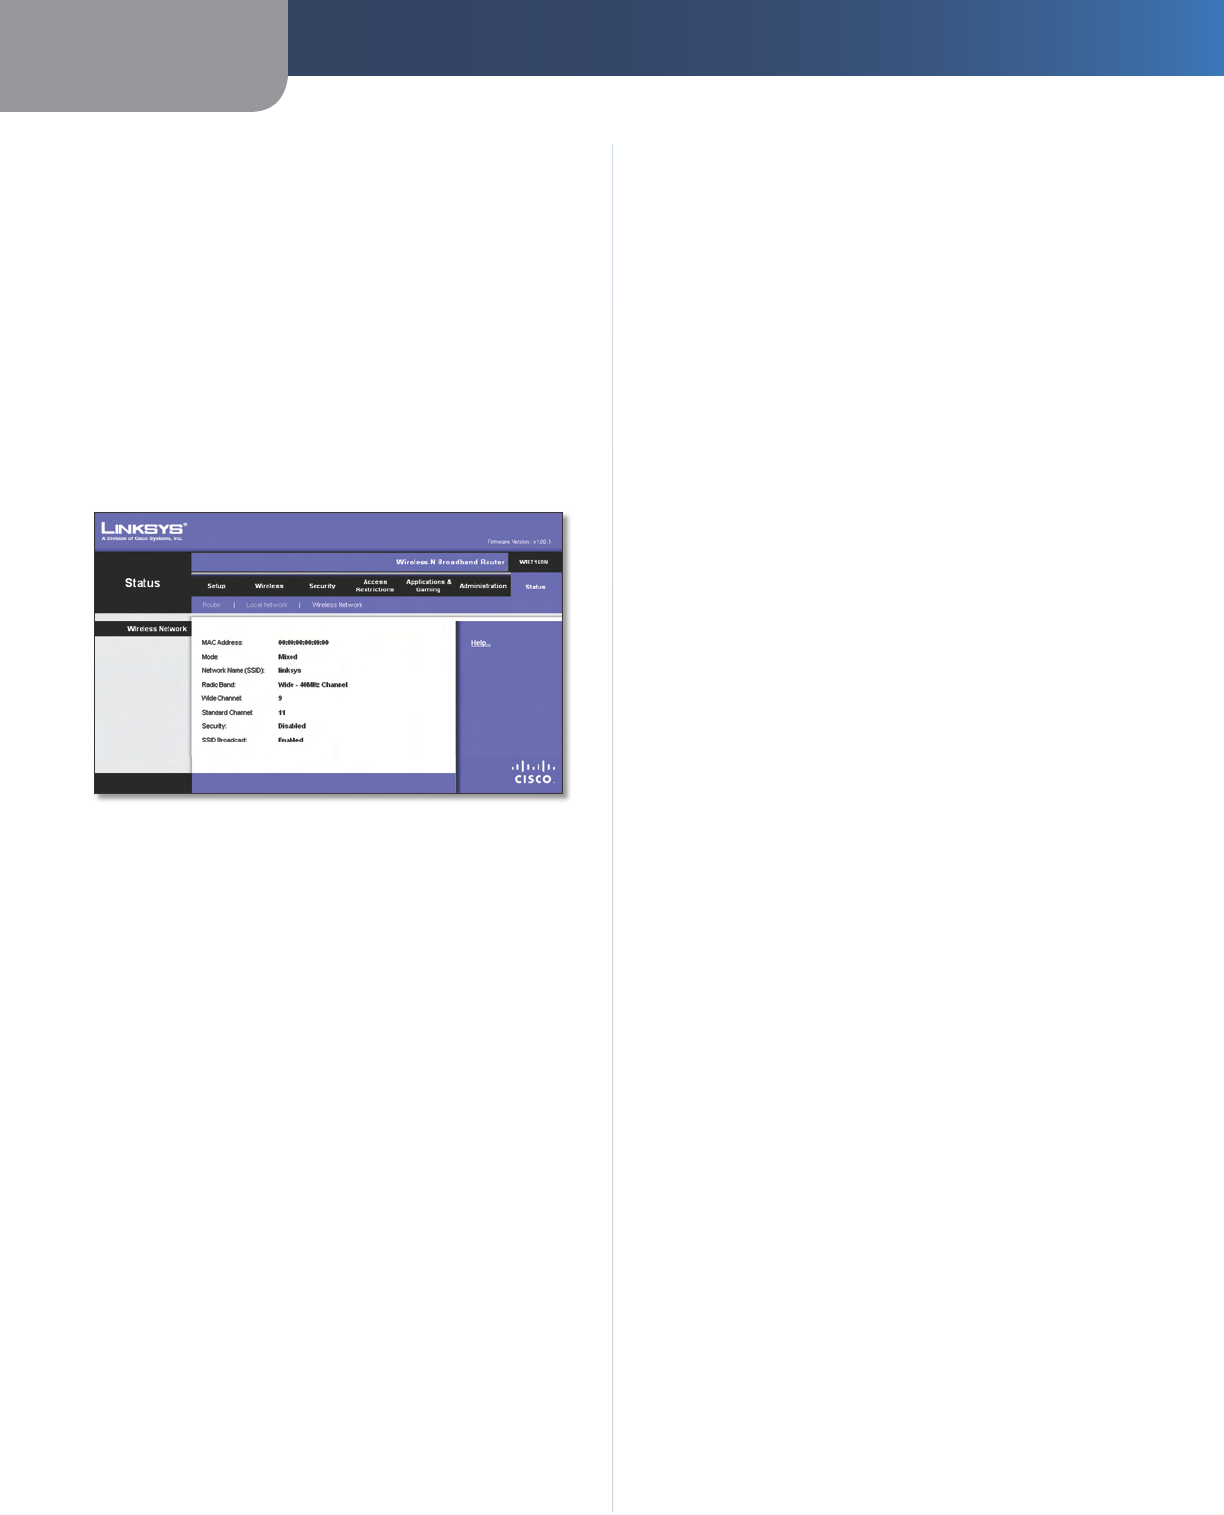
Status > Wireless Network
The Wireless Network screen displays information about
your wireless network.
Status > Wireless
Wireless Network
MAC Address The MAC address of the Router’s local,
wireless interface is displayed here.
Mode Displayed here is the wireless mode used by the
network.
Network Name (SSID) Displayed here is the name of the
wireless network, which is also called the SSID.
Radio Band Shown here is the Radio Band setting
selected on the Basic Wireless Settings screen.
Wide Channel Shown here is the Wide Channel setting
selected on the Basic Wireless Settings screen.
Standard Channel Shown here is the Standard Channel
setting selected on the Basic Wireless Settings screen.
Security Displayed here is the wireless security method
used by the Router.
SSID Broadcast Displayed here is the status of the SSID
Broadcast feature.

Appendix A Troubleshooting
28
Wireless-N Broadband Router
Appendix A:
Troubleshooting
Your computer cannot connect to the Internet.
Follow these instructions until your computer can connect
to the Internet:
Make sure that the Router is powered on. The Power
LED should be green and not flashing.
If the Power LED is flashing, then power off all of
your network devices, including the modem, Router,
and computers. Then power on each device in the
following order:
Cable or DSL modem
Router
Computer
Check the cable connections. The computer should
be connected to one of the ports numbered 1-4 on
the Router, and the modem must be connected to the
Internet port on the Router.
The modem does not have an Ethernet port.
The modem is a dial-up modem for traditional dial-up
service. To use the Router, you need a cable/DSL modem
and high-speed Internet connection.
You cannot use the DSL service to connect manually to
the Internet.
After you have installed the Router, it will automatically
connect to your Internet Service Provider (ISP), so you no
longer need to connect manually.
The DSL telephone line does not t into the Router’s
Internet port.
The Router does not replace your modem. You still need
your DSL modem in order to use the Router. Connect the
telephone line to the DSL modem, and then insert the
setup CD into your computer. Click Setup and follow the
on-screen instructions.
•
•
1.
2.
3.
•
When you double-click the web browser, you are
prompted for a username and password. If you want to
get rid of the prompt, follow these instructions.
Launch the web browser and perform the following steps
(these steps are specific to Internet Explorer but are similar
for other browsers):
Select Tools > Internet Options.
Click the Connections tab.
Select Never dial a connection.
Click OK.
The Router does not have a coaxial port for the cable
connection.
The Router does not replace your modem. You still need
your cable modem in order to use the Router. Connect
your cable connection to the cable modem, and then
insert the setup CD into your computer. Click Setup and
follow the on-screen instructions.
The computer cannot connect wirelessly to the network.
Make sure the wireless network name or SSID is the same
on both the computer and the Router. If you have enabled
wireless security, then make sure the same security
method and key are used by both the computer and the
Router.
You need to modify the settings on the Router.
Open the web browser (for example, Internet Explorer or
Firefox), and enter the Router’s IP address in the address
field (the default IP address is 192.168.1.1). When
prompted, enter the password to the Router (the default is
admin). Click the appropriate tab to change the settings.
WEB: If your questions are not addressed here,
refer to the Linksys website, www.linksys.com
1.
2.
3.
4.