LITE ON TECHNOLOGY WL100BA51 Zipit Wireless Instant Messenger User Manual Zippy Users Guide
LITE-ON Technology Corp. Zipit Wireless Instant Messenger Zippy Users Guide
USERS MANUAL
Zippy™ Instant Messenger
Getting Started Guide and Users Guide

Getting Started
___________________________________________________________________________________
2
This page intentionally left blank.

Getting Started
___________________________________________________________________________________
3
Copyright Info
Disclaimers
End User license Agreement
OEM Recognition

Getting Started
___________________________________________________________________________________
4
What you need to get started:
Wireless Internet Access – To use your Zippy Instant Messenger, you must be near
an 802.11 wireless network (frequently called a Wi-Fi network). Zippy Instant
Messenger contains an 802.11b radio and will work with both 802.11b and 802.11g
networks.
If you are using the device at home, you will need an 802.11b or g wireless access
point or router that is connected to a broadband Internet service (such as a cable or
DSL connection).
Outside the home, many businesses are now offering wireless access. Such
locations are frequently called “hotspots”. In order to use Zippy Instant Messenger
outside the home, you will need to access a “hotspot” that doesn’t require you to
pay a subscription fee. (On www.zippyim.com you will find links to websites that
provide directories of free hotspots in your area. This is not yet available.)
In businesses, your Zippy Instant Messenger may not work if your wireless
network is behind a corporate firewall. Details to be added. This will be
corrected in a future software release.
Instant Messenger Accounts – Before using your Zippy Instant Messenger, you must
have an existing IM account. (You can not setup a new account on Zippy Instant
Messenger.) If you don’t have an existing account, you can easily setup new
accounts for free on any Internet connected PC. When setting up a new account,
you will choose or be provided with a screen name and a password.
Getting Started
___________________________________________________________________________________
5
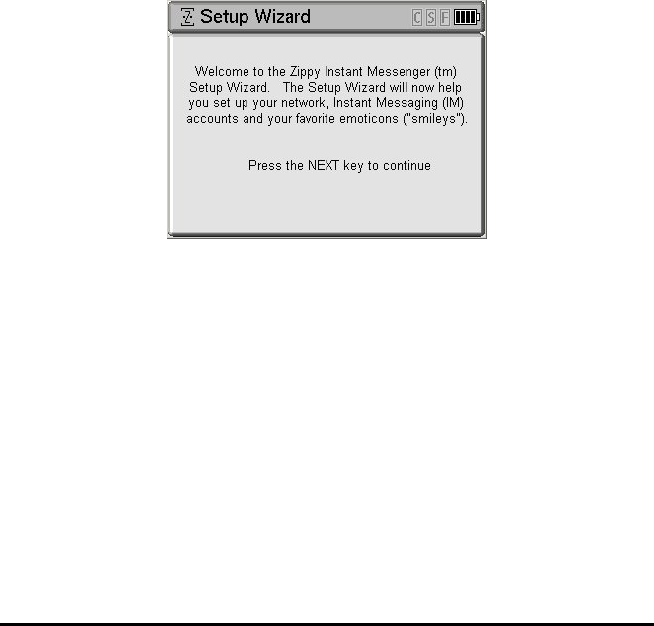
Getting Started:
The first time you turn on your Zippy Instant Messenger the Setup Wizard will guide you
through a brief setup process. During this process, you will search for and connect to
your wireless network, you will enter the screen name and password for your Instant
Messenger account, and you will define how the programmable keys on the Zippy Instant
Messenger keyboard will be used.
Step 1: Connecting to a Wireless Network (Home Network or Hotspot)
[] Turn Zippy IM On
Although wireless networks can be configured in a variety of ways, Zippy IM is designed
to make the Wireless connection process as automated and simple as possible.
When the device is turned on, Zippy will search for all available wireless networks and
sort them by type and strength. Zippy IM attempts to connect to the strongest
unencrypted networks first, followed by the strongest encrypted networks. (“For fee”
networks are not supported in the initial software release.)
If your network is unencrypted, it is likely that the connection will not require any input,
otherwise follow the on screen instructions to connect to your network. If you prefer to
manually select or configure a network, press Next while the device is searching for
networks. The steps for manually configuring your network are described in Chapter 2.

Getting Started
___________________________________________________________________________________
6
Wireless Network Basics:
Signal Strength: The strength of the connection is determined by your proximity to the
Wireless Access Point (or Wireless Router), structural interference, and device interference
(devices such as Microwave ovens or 2.4 GHz cordless phones operate on the same radio
frequency as 802.11b and g and can cause performance degradation on your wireless network).
SSID: Wireless Access Points typically broadcast a name or identifier – called an SSID – so that
the network can easily be identified and selected by wireless device users. Access points can be
configured to not broadcast the SSID so that the network is not easily available to other users. If
your network does not broadcast the SSID, you will be able to enter it manually
Encryption: Wireless Access Points can be configured to encrypt network traffic so that
unauthorized users can’t use the networks. When the Access Point is configured for encryption, a
key will be generated that can be used by wireless devices to access the network. This key is
commonly known as a WEP (Wired Equivalent Privacy) key. Only users that know the key will
be able to access the wireless network.
For Fee Hotspots: Some hotspots require the user to pay a fee or have a monthly subscription
in order to access their network. These locations typically expect the user’s device to have a web
browser where the user can enter a pin number or credit card information to pay for using the
network. These networks are not currently supported by Zippy Instant Messenger
DHCP: All networked devices must have an IP address assigned to them which lets them know
where to send and retrieve information in order to attach to the Internet. Most Wireless Access
Points will be configured to automatically provide an IP Address to devices that attempt to connect
to the network. Such devices have DHCP enabled - which allows the access point to dynamically
assign IP addresses to devices as they connect. An access point can be configured such that DHCP
is disabled and devices can only attach to the network if they know the (static) IP address required
by the Access Point.

Getting Started
___________________________________________________________________________________
7
Supported Network Configurations:
Open Network
SSID broadcast
Encrypted
DHCP enabled
Yes
No
Yes
Zippy IM will automatically connect and the Setup Wizard will
advance to Step 2
Encrypted Network
SSID broadcast
Encrypted
DHCP enabled
Yes
Yes
Yes
The Setup Wizard will ask you to enter your WEP key. After
entering the correct key, Zippy IM will connect to the network
and the Setup Wizard will advance to Step 2. The WEP key can
typically be obtained from your Access Point’s setup or
configuration screens.
Hidden Network
SSID broadcast
Encrypted
DHCP enabled
No
No
Yes
If no other networks are found, a screen will be provided asking
you to move to a new location or to enter the SSID. Also, if
other networks exist, press Next while the device is scanning for
network access points to advance to a manual configuration
screen that allows you to enter an SSID. After entering the
correct SSID, Zippy IM will connect to the network and the
Setup Wizard will advance to Step 2.
Hidden & Encrypted
Network
SSID broadcast
Encrypted
DHCP enabled
No
Yes
Yes
This scenario is the same as the one described above, except
after entering the correct SSID, Zippy IM will ask you to enter
your WEP key. After entering the correct key, Zippy IM will
connect to the network and the Setup Wizard will advance to
Step 2.
Static IP Network
DHCP enabled
No
If DHCP is not enabled, you will get a DHCP error when you try
to connect to the network (unless the device successfully
connects to another network) and will be provided with a manual
configuration screen where you must enter an IP Address,
Netmask, Gateway, and DNS. The correct values can typically
be obtained from your Access Point’s setup or configuration
screens.

Getting Started
___________________________________________________________________________________
8
Trouble shooting:
No networks found – the device was unable to detect any wireless networks
Possible causes: 1) Your device is not in range of any wireless access points
2) Available access points are not broadcasting their SSID
Solutions: 1) Move closer to known wireless access points. Also, make sure that your
wireless access point is turned on and is functional.
2) Manually enter the SSID of the network in the space provided (the SSID
can be found in the setup/configuration page of the access point).
Unable to auto-connect – The device was able to detect one or more networks, but was unable to
automatically connect to any of them.
Possible causes: 1) You may have entered an invalid SSID (we will be able to detect this in a
future software load)
2) You may have entered an invalid WEP key
3) The Access Point has been configured to disable DHCP
4) The Internet connection may be down
5) The DHCP server may be providing incorrect network information (rare)
6) The only networks available are “for fee” Hotspots.
Solution: From the “Uh Oh” screen, select the network that you want to access. You
will be given a brief list of the possible reasons for the failure and a method to
correct the failure condition.
Failed to connect due to a DHCP error – Zippy was unable to connect to a wireless access point
Possible causes: 1) You may have entered an invalid SSID (we will be able to detect this in a
future software load)
2) You may have entered an invalid WEP key
3) The Access Point has been configured to disable DHCP
4) The DHCP server may be providing incorrect network information (rare)
Solution 1) From the DHCP error screen, press Next to verify the SSID and WEP
information.
2) Verify that your Access Point has DHCP enabled. If not, enable it and re-
scan or press Next after verifying the SSID and WEP to enter the Static IP
configuration screen. The required information can be obtained from
your Access Point.

Getting Started
___________________________________________________________________________________
9
Failed to connect due to a DNS error – Zippy successfully connected to a wireless access point but
was unable to connect to the Internet.
Possible causes: 1) Your Internet service provider is having a service outage
2) Your cable or DSL modem is turned off or is malfunctioning
3) The DHCP server on your access point has provided incorrect data (this is
rare).
Solutions: 1 and 2) Verify that you can access the Internet from a PC. If not, check the
status of your cable or DSL modem to see if it is receiving data from the
Internet. (Status lights are typically provided.) 3) ???
Failed to connect because you are unauthorized to access this network – Zippy could not
connect to the network because it requires a subscription service or hourly fee.
Note: After the first successful connection to a wireless network, Zippy IM will always attempt to
connect to networks it has previously connected to before attempting to connect to new networks.
Getting Started
___________________________________________________________________________________
10
Step 2: Checking for Software Updates
Each time the device connects to the Internet, it will query the Zippy server to determine if a new
software load is available. If a software load is available, the device will automatically download it
and then re-start.
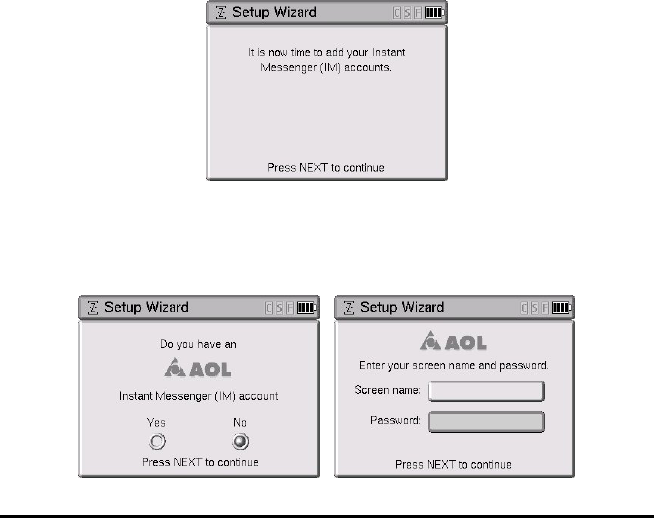
Step 3: Connecting to an Instant Messenger Service
After successfully connecting to the Internet and checking for software updates, you will
need to setup your Instant Messenger accounts.
Remember: Before using your Zippy Instant Messenger, you must have an existing IM account.
The Setup Wizard will automatically ask you if you have an AOL account and a Yahoo account.
You will then be asked to enter your Screen Name and Password for your accounts.

Getting Started
___________________________________________________________________________________
11
Step 4: Configuring the Programmable Keys
The final step in the Setup Wizard guides you through programming the P1-P3 keys (current demo
s/w shows four keys) on the keyboard. These keys enable you to assign your favorite Emoticons
(Smiley faces) to the keyboard. After Setup, when you press these keys, the keyboard will send out
the appropriate sequences to generate the correct Emoticon for the IM service you are using.
(Character generation codes vary between Instant Messaging services. The Zippy Instant Messenger
software translates and sends the appropriate keys to the appropriate service.) See “Section _._” to
learn which Emoticons can be assigned to the programmable keys.
Note: The keyboard also has three dedicated keys that enable you to quickly enter your favorite
Emoticons. The Emoticons provided on the Zippy Instant Messenger keyboard are the Smiley Face,
Sad Face, and Surprised Face.
This is done through the following screens:
Once the Setup Wizard is complete, you will see the following screen:
“Finished Setup Wizard”

Chapter 1
___________________________________________________________________________________
12
Chapter 1 – Turning the Unit On and Off, Charging, etc.
Turning the device On: The power switch is located on the right hand side of the unit. To turn the
device On, press the power button briefly and release.
Suspending the Unit: (Not implemented in the demo software load) The device can be placed in a
low power mode that allows it to stay connected to the network and to receive messages. The power
consumption drops significantly when the device is Suspended – significantly lengthening the
battery life. While in the suspended state, the green LED indicator on the right hand side of the
device will flash when a new message is received.
Turning the device Off: To turn the device Off, press and hold the power button for about 2 seconds
and release.
Charging the Unit: Plug the AC-Adapter into the DC jack on the back side of the unit and into an AC
Power outlet. The unit can be used while it is being charged.
Battery Status Indicator:
Battery Life Estimates:
< chart to be added >

Chapter 2
___________________________________________________________________________________
13
Chapter 2: Menus and Navigation
Once connected to the Internet and to the Instant Messenger services, the device is ready for Instant
Messaging.
Buddy Button – open and closes the Buddy List.
Prev and Next:
• During chatting, used to cycle through chat windows.
• When the Buddy List is displayed, used to scroll one page a time through the list of screen names.
• During Setup, used to move backwards and forwards among screens.
Up and Down Cursor:
• During chatting, used to scroll up and down through the text history window.
• When the buddy list is displayed, used to move the highlight between screen names.
Left and Right Cursor:
• During chatting or text entry, used to move the active cursor one character at a time.
Shift Key:
Capital letters can be accessed pressing the Shift key prior to pressing a letter key. The “S” icon is highlighted in
the header bar when Shift is enabled. Caps-Lock is enabled by pressing Shift twice. The “S” icon is underlined in
the header bar when Caps-Lock is enabled.
Control Key:
When a Control function is needed, press the Control key and release it. The “C” icon in the top right portion of
the screen will appear indicating that the next key pressed will activate a Control Function. Press the desired alpha
key to complete the Control sequence.
Alt Key:
The alternate (blue) characters at the top of each key can be accessed by pressing the Alt Key prior to pressing a
key. The “A” icon is highlighted in the header bar when Alt is enabled. The Alt function can be locked by
pressing Alt twice. The “A” icon is underlined in the header bar when Alt Lock is enabled
Alt-⌧ – closes a chat window
Ctrl-S – open and close the system menu
Ctrl-A – switch to and from the Music Player demonstration application.

Chapter 3
___________________________________________________________________________________
14
Chapter 3: Chatting
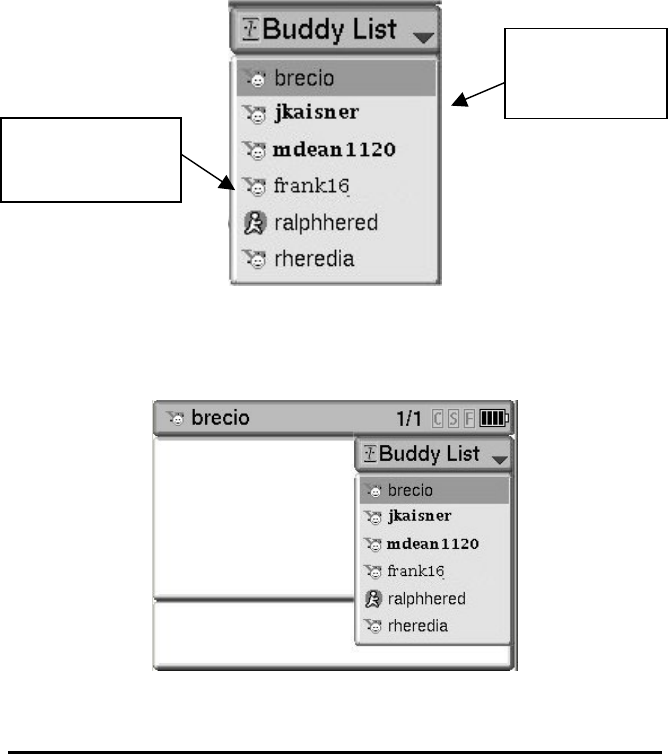
Using the “Buddy” List
The Buddy List is a pop-up window that displays the screen names of buddies that are currently
logged on to the instant messenger service that you are using. The Buddy List is activated by
pressing the Buddy Button™ key on the keyboard. You can also close the Buddy List at any time
by pressing the Buddy Button key.
To start a new conversation, press the Buddy Button to open the Buddy List, highlight the desired
buddy using the Up and Down cursor keys, and press Enter.
When at least one conversation is in progress, the top portion of the Buddy List will display the list
of buddies, in alphabetical order, that you currently have engaged in conversations. This list is
useful when you are engaged in a number of simultaneous conversations and want to jump to a
specific conversation without having to page through each conversation one at a time.
The bottom portion of the Buddy List will display an alphabetical list of the buddies that are
currently logged into the IM service that you are using but that you have not currently engaged in
conversation.
Shortcuts:
To quickly select a buddy from the list, type the first character of the buddy’s screen name and the
highlight will jump to the first screen name that begins with that character. Additional characters
can be entered (must be within a second of each other) in order to quickly zero-in on the desired
screen name.
While the Buddy List is displayed, you can use PREV and NEXT to scroll up and down through the
list a page at a time.
Chapter 3
___________________________________________________________________________________
15
Active
Conversations
Online Buddies –
N
o conversation
active.

Chapter 3
___________________________________________________________________________________
16
Conversation Window
Once a buddy is selected and the buddy list is closed, a new chat window is created that
uses the entire screen. Each IM chat session utilizes a full screen window. When multiple
sessions are running concurrently, windows are stacked in numerical order based on when
they were originally opened.
The “full screen” Chat Window is divided into three sections:
1) Header
2) History Window
3) Text Entry Window
History
Window
Text Entry
Window
Header Bar:
Buddy ID,
Window Counter,
Special Keys &
battery meter.

Chapter 3
___________________________________________________________________________________
17
Header Bar:
The Header Bar provides helpful information – such as the screen name and the service for the
currently visible chat window, the position of the active chat window relative to the other chat
windows, the number of active conversations, an incoming message indicator, special character
status, and remaining battery life.
Screen Name - The left side of the status bar contains the Service Logo and Screen Name for the
currently visible chat session. If the Screen Name of the buddy is longer than the number of
characters that the field can display, the first 12 characters of the Screen Name will be displayed
followed by “…”.
Window Counter - The middle section of the header contains the numerical order of the window and
the total number of active windows in an x/y format – where x indicates when the window was
opened relative to all other active windows and y represents the total number of active windows.
When the first chat screen opened is active (visible), the counter will display “1/1”. When a second
chat screen is opened and active, the counter will display “2/2”. If the first window is then activated,
the counter will display “1/2”.
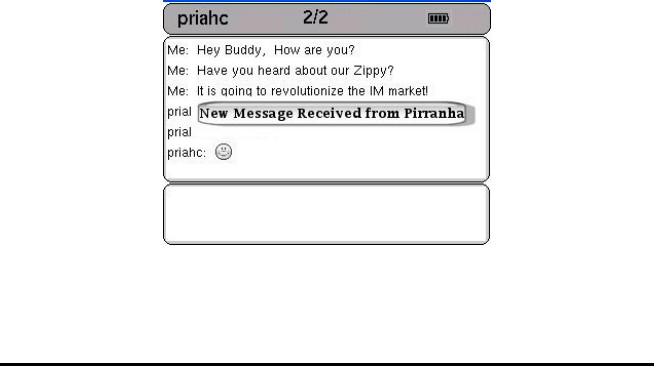
Animated “Z” Logo – An animated logo will be used to indicate that a new message has been
received from at least one person on their buddy list. When the logo is blinking, pressing the Buddy
Button will display the Buddy list and highlight the screen name of users that have sent new
messages. The list will have animated icons next to the screen names of all users who have sent new
messages. When a new message is viewed, the animated icon will be removed from that user’s
screen name in the buddy list and the highlight will move to the screen name of the buddy that sent
the next most recent message. The “Z” logo on the header bar will blink until all unread messages
have been viewed.
Special Keys – To the right of the Window Counter and the Zippy Logo, the state of special keys is
displayed. The special keys are used for putting the keyboard in Caps, Caps-Lock, Control,
Alternate, or Alternate-Lock mode.
Battery Meter –The far right portion of the header contains a graphical battery meter. The battery
meter contains 4 segments – each corresponding to approximately 25% of the capacity of the battery.
The four segments will be “On” when the battery is full. When the battery capacity reaches 75% or
less, the 4th segment is turned off. The 3rd segment is turned off after reaching 50% capacity and the

Chapter 3
___________________________________________________________________________________
18
2nd segment is turned off after reaching 25% capacity. When the battery capacity reaches 10% or
less, the last segment will start to flash slowly (approximately 1 flash / second). When the battery
reaches critical stage, it will start to flash faster (approximately twice / second) and the unit will
enter standby as soon as possible.
History Window:
The History Window displays lines of text typed by you and your buddy in the order that they were
entered. The screen name of the buddy or the text “Me” – depending on who entered the text – will
precede each line of text. The up and down cursor keys can be used to scroll back and forth through
the conversation history. The window will accommodate 12-15 lines of scrollable text – depending
on the font size and special characters used.
Text Entry Window:
The Text Entry Window displays the message as you type it. As long as the chat window is in the
foreground, the cursor focus is always in the Text Entry Window. Therefore, if you type any letter,
even while scrolling back through the History Window, the letter will automatically be entered in the
Text Entry Window.
The Text Entry Window is large enough to display two lines of text, but will automatically scroll up
if you type a message that is longer than two lines. While typing, you can use the left and right
cursor keys to scroll through all of the text in this buffer. As soon as you press Enter, the text
message is sent to the desired buddy, erased from the Text Entry Window, and displayed in the
History Window.
MamasBoy: hoops today?
Me: Can’t. Homework. Yuk.
MamasBoy: kk
Chapter 3
___________________________________________________________________________________
19
Switching Between Active Conversations
The Prev and Next keys on the keyboard allow you to switch between active chat windows. The
chat windows can be accessed in the order they were added relative to the chat window that is
currently in the foreground. For example, if there are 10 open chat windows, and you are viewing
window 5 of 10, pressing Prev will display chat window 4 of 10. Pressing Next will display chat
window 6 of 10. When the last window is active, pressing Next will display the first window. When
the first Window is active, pressing Prev will display the last window.
“Shortcut tip:” Another method of switching between conversations is to press the Buddy Button
and select the desired user from the list of active screen names. Selecting a screen name from the
Buddy List always displays that user’s conversation window.
IMessage Alert™
When a new message is sent from a buddy, a pop-up dialog will be displayed on the screen to alert
you. The dialog is displayed in the center of the screen and disappears after 3 seconds. This enables
the active conversation to continue without interruption but still enables you to know who has sent a
new message. A “Swoosh” sound is also played to notify you that a new message has arrived.
Following is an example of the popup dialog:
Chapter 3
___________________________________________________________________________________
20
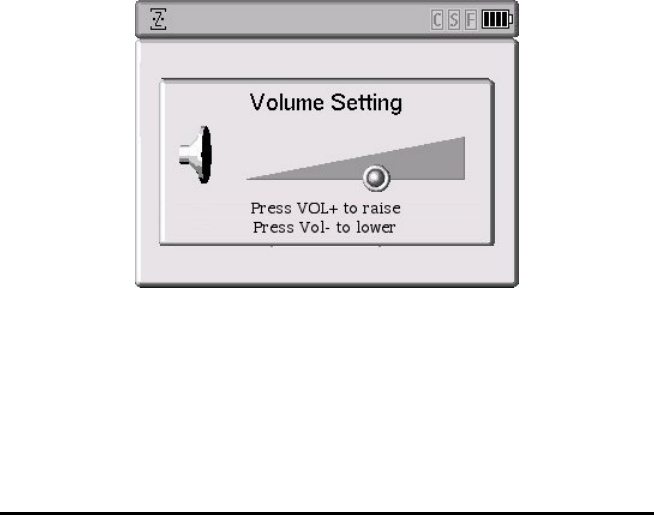
Volume Control
To raise and lower the volume on Zippy Instant Messenger, press the Shift key followed by either
the up or down cursor keys. A pop-up window will be displayed showing a volume bar that can be
adjusted up or down with the cursor keys. The pop-up window will disappear 2 seconds after the
last key press or immediately if you press NEXT.
Note: Pressing CTRL-M at any time during chat or volume adjustments will toggle Mute on and off.
If you change the volume while the audio is muted, the volume will change and the audio will un-
mute automatically. (Not functional in current software load.)
The volume bar will go up or down in preset increments of 10%.

Chapter 4
___________________________________________________________________________________
21
Chapter 4: Audio Playback (Current Demo Load Only)
Note: Streaming Audio playback is currently a demonstration feature. This is an early version of
the software and has not been optimized. You may experience lock ups or instability that will not be
in the final software load.
The current demo load supports UPnP WI-FI audio playback from a UPnP music server that is on
the same local area network as Zippy. To demonstrate streaming Audio, you need to install and run
MusicMatch Jukebox 8.2 on a PC that will connect to the same network as Zippy IM. Once you
have installed MusicMatch on the PC, you need to have MP3 music in the music library. You then
need to enable the UPnP server from the Options/Settings menu. Click the CD Lookup/Connectivity
tab under the settings menu and click on the check box “Enable Music Server”.
To demonstrate the Wi-Fi UPnP audio functionality on the current demo load, press the Control key
then the “A” key.
Click this check
box to enable
the UPnP Server

Chapter 4
___________________________________________________________________________________
22
At this point a new screen that looks like a grid is displayed and, in less than a minute, the
MusicMatch server name should appear in the grid. If you see an empty grid and do not see the
MusicMatch server in the grid, do the following:
1) Make sure that the server is on the same sub network as Zippy. In other words, make
sure that Zippy and the PC with MusicMatch are connected to the same Router/Access
point.
2) Un-Check the Enable Music Server and then recheck the box to Enable the UPnP Server.
This will restart the server.
Once the server shows up on Zippy’s Music screen, you can select the server with the Enter key.
Zippy will scan the UPnP server and then return a list showing all of the available categories –
including playlists, artists, songs, and genres.
Select a category by pressing the Enter key to display a list of content in that category. You can
press the Play button on the keyboard to start playing the selected item.
The following additional keys are recognized by the audio application:
Music:
Left Navigate back
Right Select (navigate Right)
Enter Select (navigate Right)
Alt-Prev Play prev track
Alt-Next Play next track
While in music player:
“M” toggles between Headphone and Speaker
When the music starts playing, Zippy will display a player screen with song information and a
counter that displays the elapsed time for the song being played. Press Cntrl-A to toggle back to the
Instant Messaging mode to continue chatting with buddies. Note: When you return to IM mode,
you may hear a skip in the music – however the music should continue to play. You can now chat
as usual while listening to music.

Appendix
___________________________________________________________________________________
23
Appendix: Errata
List of Major Errata as of 6/16/04:
Mechanical:
1) The lid hinge is too weak - therefore the lid doesn't stay in place. This will be corrected in the
next version. Due date 6/25/04
2) The keys on the keyboard are too short making it harder than desired to type. Also, the
contacts do not provide sufficient tactile feel. While the keyboard is clearly usable, it is clearly
not yet meeting our requirements. These issues will be corrected in the next mechanicals.
3) The power button can sometimes pop out of position. Please don’t push it too hard. It also can
be pressed inadvertently and turn the unit on when not intended. This will be corrected in the
next version.
Software
1) The Buddy List does not scroll – preventing you from accessing buddies beyond those visible
in the initial buddy screen.
2) Network validation/connection times are longer than they should be. This is a driver issue that
should be corrected in our next release.
3) The device may intermittently lose the connection to the network during conversations or
during music playback and automatically start trying to reconnect. This is an algorithm issue
that will be fixed in the next revision. If it happens, power the unit off and then back on.
4) Occasionally the Buddy List will be displayed without any contacts – even when buddies are
online. This can sometimes be corrected by closing and then re-opening the Buddy List.
5) If you access Accounts in the Setup Menu (CNTRL-S), after entering a new account the
system may lockup or become unstable. Power the unit off and then on and it should work fine.
6) Occasionally, when multiple chat sessions are in progress, the header may show incorrect
information about the window (such as 2/1) and the window can not be closed. However, all
other functions continue to operate as expected.
7) The Menu key is not enabled yet. This will be corrected in the next version.
8) We have seen (although rarely) start up issues where the unit turns itself off shortly after
you've turned the unit on. If this happens, just press the Power button again. Corrected as
soon as we figure out the root cause.
Otherwise, the unit is very solid. The IM function is very stable. You should be able to hold several
conversations at once. You can also demonstrate the music function. Read the last few pages of the
Users Guide for instructions.

Chapter 4
___________________________________________________________________________________
24
FEDERAL COMMUNICATIONS COMMISSION
This device complies with Part 15 of the FCC Rules. Operation is subject to the following two
conditions:(1) this device may not cause harmful interference, and (2) this device must accept any
interference received, including interference that may cause undesired operation.
Changes or modifications not expressly approved by the party responsible for compliance could void
the user‘s authority to operate the equipment.
NOTE
This equipment has been tested and found to comply with the limits for a Class B digital device,
pursuant to Part 15 of the FCC Rules. These limits are designed to provide reasonable protection
against harmful interference in a residential installation. This equipment generates, uses and can
radiated radio frequency energy and, if not installed and used in accordance with the instructions,
may cause harmful interference to radio communications. However, there is no guarantee that
interference will not occur in a particular installation If this equipment does cause harmful
interference to radio or television reception, which can be determined by turning the equipment off
and on, the user is encouraged to try to correct the interference by one or more of the following
measures:
-Reorient or relocate the receiving antenna.
-Increase the separation between the equipment and receiver.
-Connect the equipment into an outlet on a circuit different from that to which the receiver is
connected.
-Consult the dealer or an experienced radio/TV technician for help.
This device and its antenna(s) used for this transmitter must not be co-located or operating in
conjunction with any other antenna or transmitter.

Appendix
___________________________________________________________________________________
25
This EUT is incompliance with SAR for general population /uncontrolled exposure limits in
ANSI/IEEE C95.1-1999 and had been tested in accordance with the measurement methods and
procedures specified in OET Bulletin 65 Supplement C. This equipment complies with FCC
radiation exposure limits set forth for an uncontrolled environment. This equipment should be
installed and operated with minimum distance 1.5cm between the radiator & your body.