LOFTYNN INTELLIGENCE 610R Baby Monitor User Manual E610
SHENZHEN LOFTYNN INTELLIGENCE TECHNOLOGY CO., LTD. Baby Monitor E610
User Manual

Model-E610
('(?354/:58/49:8;):/543'4;'2
:3
List
1
2
3
4
5
Safety Instruction
Set up & Use
Features & Components
¬¬¬¬¬¬¬¬¬
¬¬¬¬¬¬¬¬¬
¬¬¬¬¬¬¬¬¬
¬¬¬¬¬¬¬¬¬
¬¬¬¬¬¬¬¬¬
Troubleshooting
After-sell service & Warranty card
Please read the following instructions and warnings carefully. For technical
support see last page. For adult use only,this product is not a toy. Reminder:
The installation requires parents to complete, do not let children near the
installation. Thank you for purchasing the AXVUE Baby Monitor MS43M1. Now
you can observe and listen to the baby is sleeping and playing in another
room. Please refer to the manual's instructions for installation and use.
Manual does not mention, not removable or change any product components
Operation is subject to the following two conditions:
(1) This device may not cause harmful interference, and
(2) this device must accept any interference received, including interference that may
cause undesired operation.
NOTE: This equipment has been tested and found to comply with the limits for a Class
B digital device, pursuant to Part 15 of the FCC Rules. These limits are designed to
provide reasonable protection against harmful interference in a residential installation.
This equipment generates, uses and can radiate radio frequency energy and, if not
installed and used in accordance with the instructions, may cause harmful
interference to radio communications. However, there is no guarantee that
interference will not occur in a particular installation. If this equipment does cause
harmful interference to radio or television reception, which can be determined by
turning the equipment off and on, the user is encouraged to try to correct the
interference by one or more of the following
-- Reorient or relocate the receiving antenna.
-- Increase the separation between the equipment and receiver.
-- Connect the equipment into an outlet on a circuit different from that to which the
receiver is connected.
-- Consult the dealer or an experienced radio/TV technician for help.
WELCOME USE AXVUE PRODUCT
This device complies with part 15 of the FCC Rules.
measures:

Battery Warning͵
Safety Instruction
This product cannot replace responsible adult supervision.
1. Use only the original rechargeable battery provided.
2. For replacement battery, please contact us.
Contact information can be found on P.10 of these instructions.
3. Clean battery and product contacts prior to battery installation.
Do not short-circuit supply terminals. Remove battery when product
is stored for long periods of time or when battery is exhausted
4. Keep all betteries away from children.
1. Strangulation Hazard - Children have STRANGLED in cords. Keep this cord out of
reach of children (more than 1m away from the crib). Use enclosed Security Clips to
help secure cord away from baby’s reach. Never use extension cords with AC Adapters.
Only use the AC Adapter provided.
2. When an Adaoter us plugged into an electrical outlet, do not touch the exposed end.
Test monitor before first use, periodically, and when changing location of the Camera.
3. Do not use monitor near water (such as bathtub,sink,etc.)
4. Keep monitor away from heat sources (such as stoves,radiators, etc).
5. Make sure there is proper ventilation around all monitor components.
Do not place on sofas, cushions, bed, etc. which may block ventilation. This product is
not a toy. Donot allow children to play with it. This product contains small part. Adult
assembly required. Exercise care when unpacking and assembling the product.
Note:
The manufacturer is not responsible for any radio or TV interference caused by
unauthorized modifications to this equipment. Such modifications could void the user’s
authority to operate this equipment
Changes or modifications not expressly approved by the party responsible for
compliance could void the user's authority to operate the equipment.
The EDE\PRQLWRUshall be installed and used should maintain the distance above 20
cm
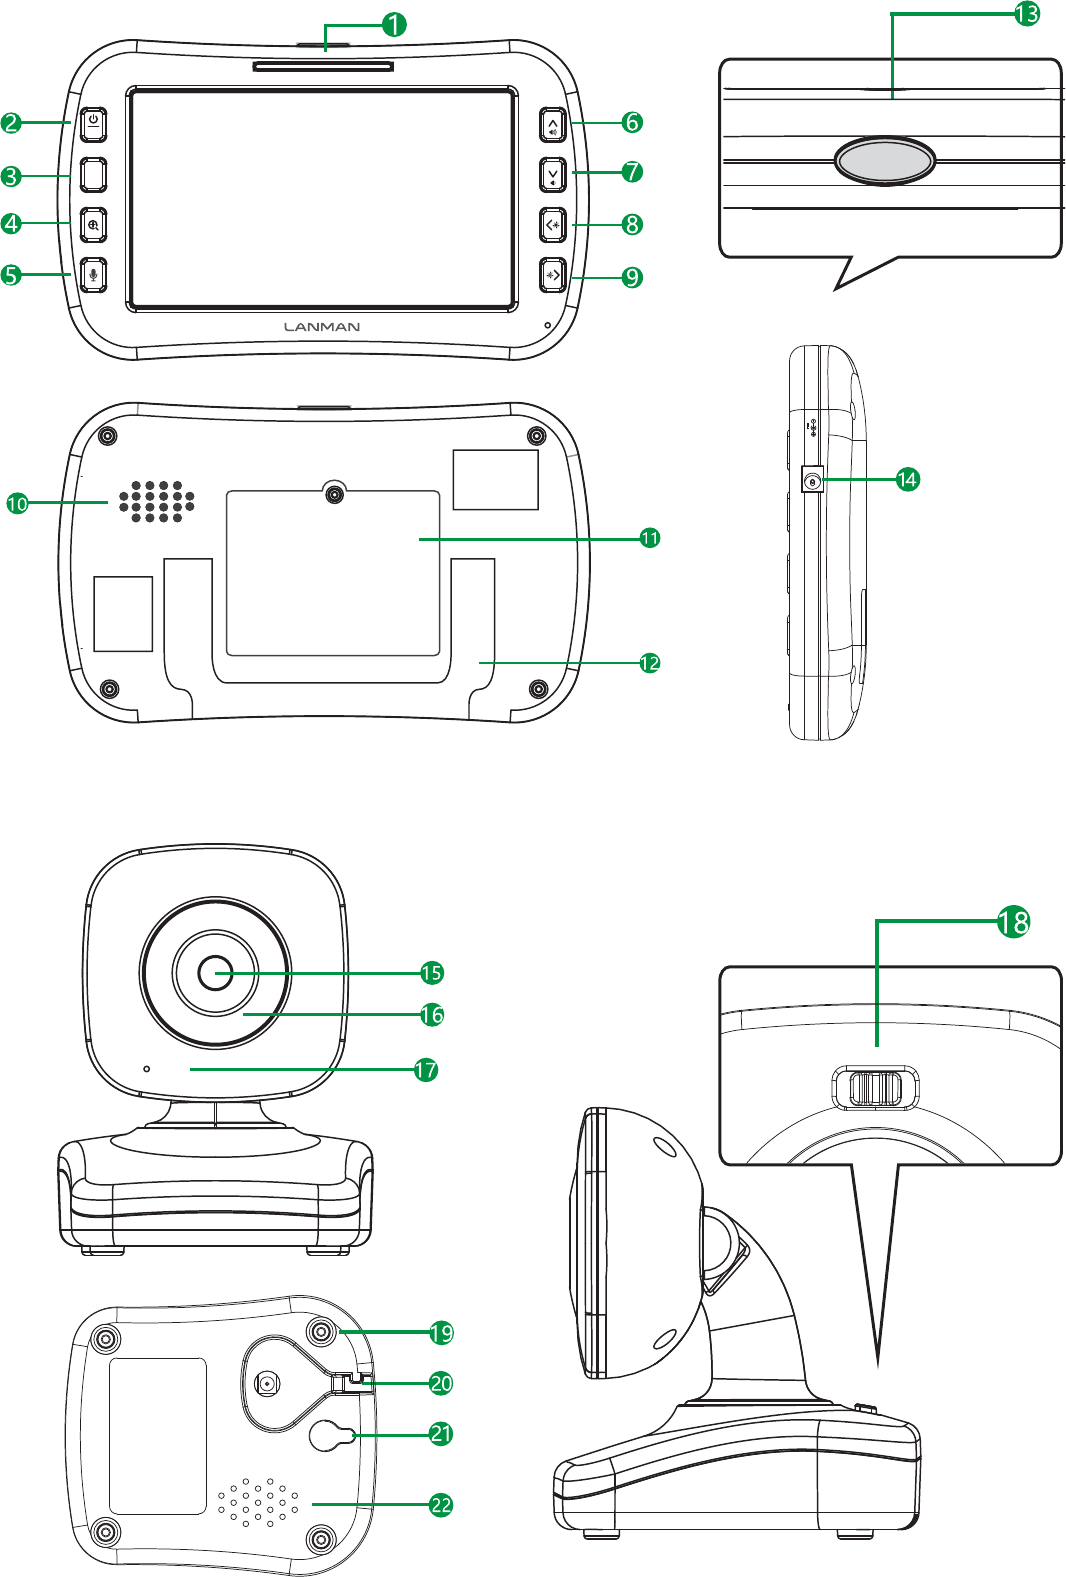
menu
OK
500mA
DC-7.5V
video
ON/OFF
Power / Menu
ENTER
Zoom/Select
Green light indicates that the device is turned on. When the low battery flashes
Volume indicator, the greater the volume, the more lights
Press six seconds switching equipment, short look into the menu mode
Confirm the arrow keys Options
Zoom in or resume the normal screen
Press and hold the camera with the end of the one-way intercom
Turn up the volumeʡlevel
Turn down the volume level
Increase the brightness level, enter the menu mode, select the left
Decrease the brightness level, enter the menu mode, select the right
Volume level or above may receive when the camera came on
Monitor battery protection
After opening the display in position
Turn on or off the display, press any key to re-open
Display on for three minutes it will automatically shut down to save power
Battery Light
Talk-back
UP Key
DOWN Key
Left Key
Right Key
Speaker
Battery Compartment
Kickstand
Video On/Off
Adapte Jack
Features Components
Plug in the power adapter, you can use to monitor the charging and maintenance
Transferring images
Camera Lens
Nighttime Night mode automatically when turned on, does not affect the baby sleep heliocentric
Microphone Send Sound
Power On/Off Camera Power turn on/off
Screw Fixed monitor internal parts, do not open the screw
Plug in the power adapter and charge the battery after the opening of electricity use
and maintain
Wall hole Wiring can buckle and screw the camera fixed on the wall
Speaker The monitor receives for outgoing voice
Adapter Jack
Product and Parts List
4.3' Monitor 1pcs Wireless Camera 1pcs Monitor Battery 1pcs Power Adapter 2p
1
2
3
4
5
6
7
8
9
10
11
12
13
14
15
16
17
18
19
20
21
22
Set up & Use
Please refer to the manual carefully instructions to set up and use
Wall Mounting:(choose to buy)
1 Pre-drill a hole in the wall, a 4.8mm drill bit..
2 Insert the wall anchor included into the holo and with a hammer
tap gently on the end until the wall anchor is flush with the wall
3 Tighten screw until only 6.2mm of the screw is exposed.
4 Insert camera Adapter into the camera’s adapter jack.
5 Sile the back of the camera down onto the screw until the camera
is secure to the wall.
6 Plug the Adapter into a standard electrical outlet.
7 Secure the cord to the wall using the security clips included to keep
cord away from baby’s reach.
Step1: To test reception, determine a location for the
camera that will provide the best view fo your baby in the
crib (note: do not mount camera in permanent location
until initial set up test completed). Plug Adapter into wall
outlet and turn camera power on.
Testing Inital Setup: Before useing AXVUE Baby
Monitor, charging the 6-8 hours . Note:
STRANGULATION HAZARD - Children have STRANGLED in
cord out of reach of children, (more than 1m away
from the crib) Use enclosed Security Clips to help
secure cord away from baby’s reach. Never use
extension cords with Adapters. Only use the Adapters
provided.
Step2: Press and hold POWER/MENU button on monitor
for 5-seconds unit AXVUE the logo interface and power
on screen. Video should immediately appear on screen.
If video does not appear, go refer to "set up and use "checking
the installation is complete, (Note: use only the
supplied power adapter, Model: P50750500)
Note: If video appears, the initial set up test is
complete.
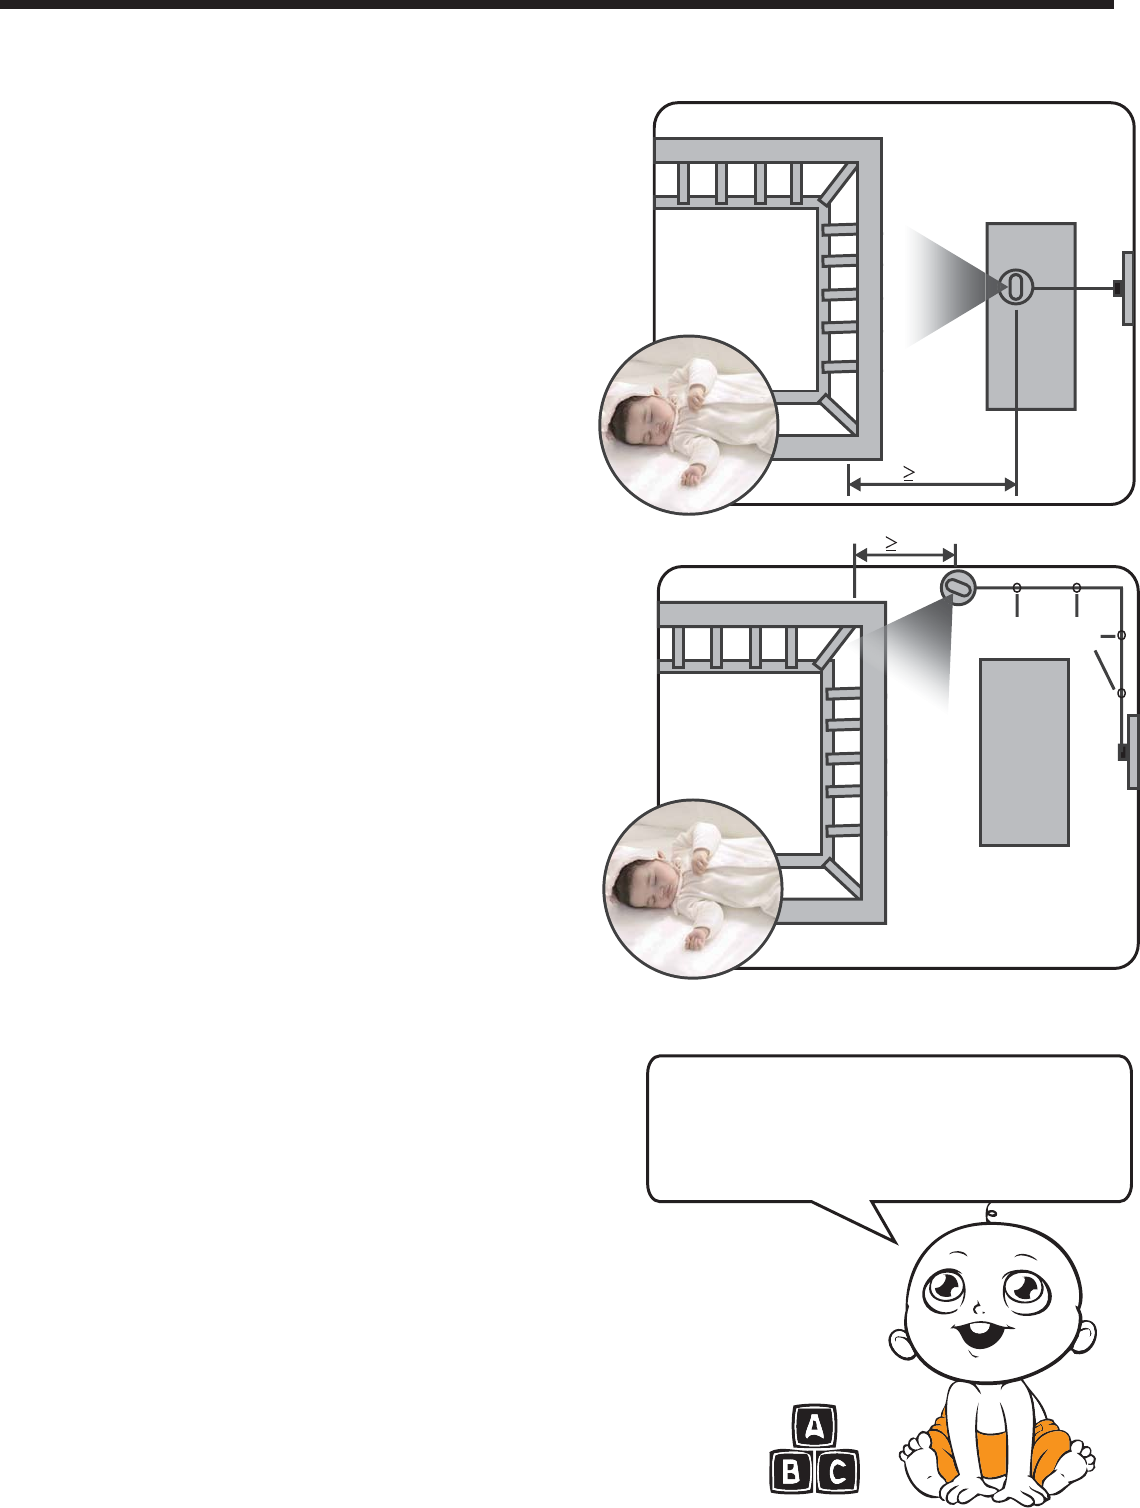
Installation Camera: Place the camera on a flat
surface,such as a bureau or shelf (Picture 1) or mount the
camera on a wall(Picture 2) for example: on the desk or
cabinet or fixed to the wall, make sure that at least 1
meter from the crib, power lines should be placed
above or behind the camera, adjust the camera
angle, until the display see the entire crib, or do you
think the best line of sight.
Fixing cable with clip
P
P
Picture1
Picture2
Tipsϟ
Installation and use 1
Since most users choose desktop display camera
for the sake of environmental protection, product
packaging is not included in the wall and screw clips
and, if necessary, to buy at the official website of the
company or .
Monitor Use
Monitor display of the portable use
Set the monitor complaints bedroom or living room a fixed position, the compact power adapter
plug to the monitor and the other end connected to a power outlet. Press the power / open key for
5 seconds until the green light on the full screen, see AXVUE interface and power display
completed open.
If you just listen to the sound, press the key to open the top of the video turns off the display
Such as the need to shut down the monitor, please press the screen until you see the progress bar
is red, it means that has been shut down
Please charge the battery before use 4-5 hours
Please connect plug of the power adapter to charge the power plug
monitor and the other end connected to a power outlet
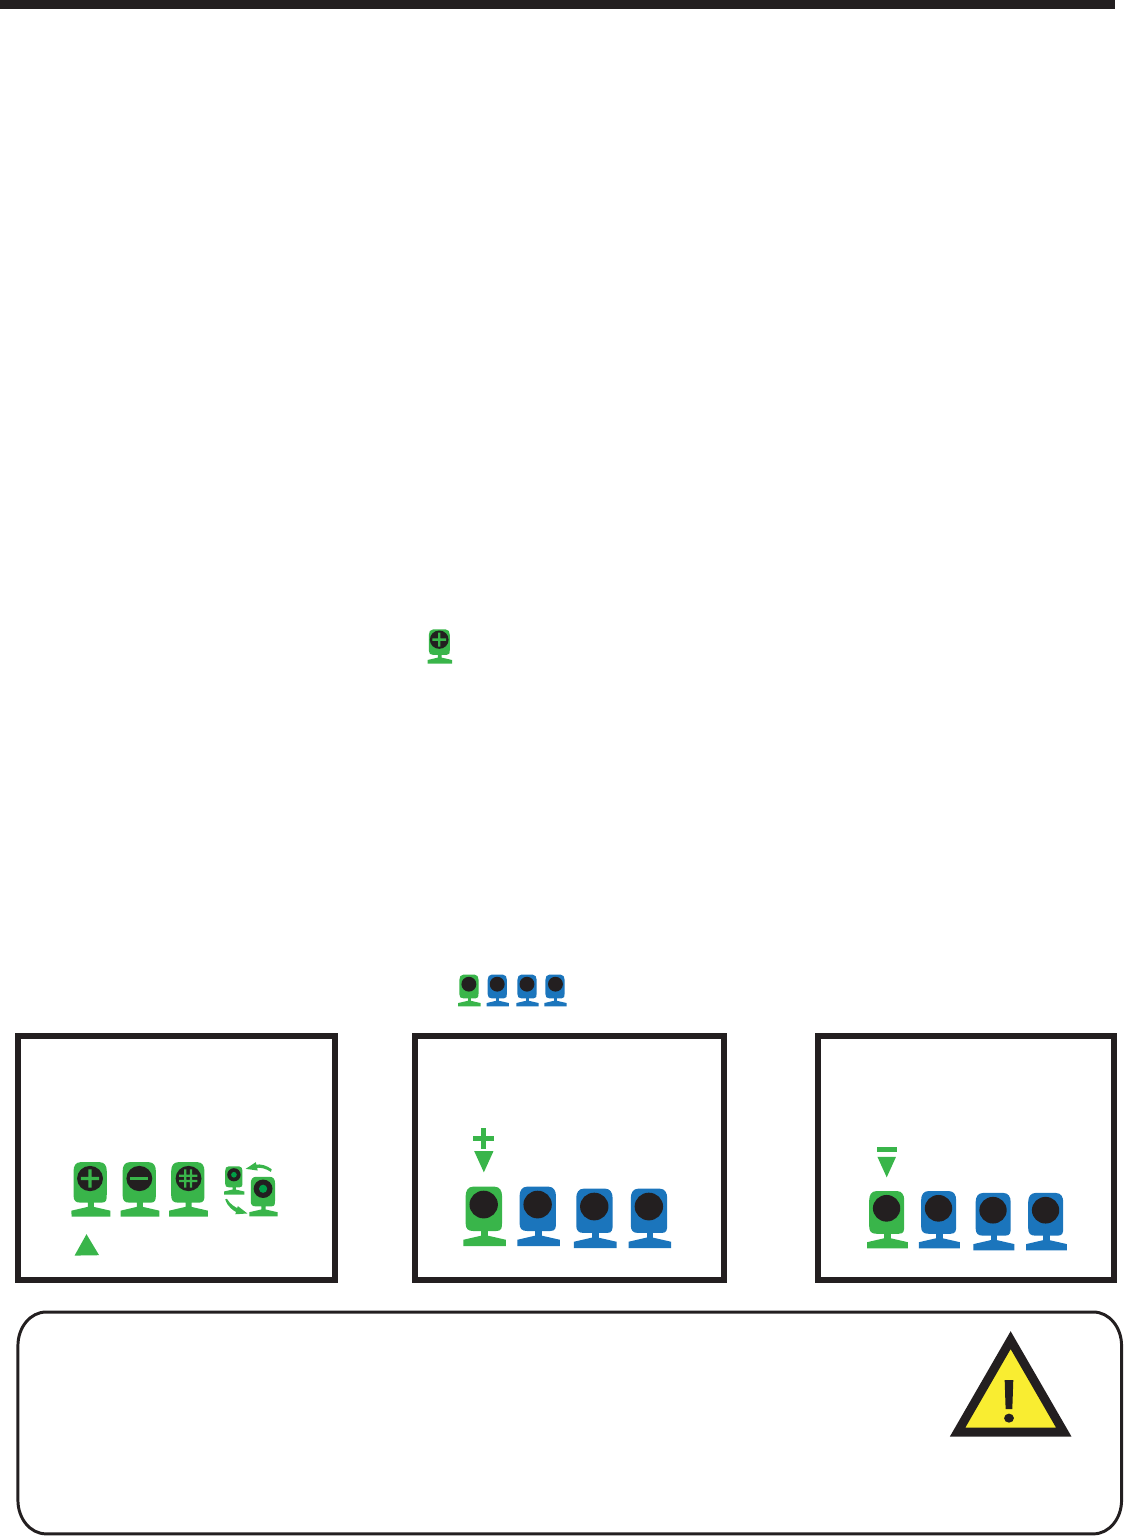
Monitor and Camera on the correspond
Clear Monitor and Camera correspond
Step 1: At the same time turned.
Step 2: (Reference Picture 5) Switch on 'Power/Menu', appear three or four options, moving
the arrow choose a icon, then press 'OK' cancelled correspond. The icon from green to
gray, it means that has been “cleared"
1 2 3 4 1 2 3 4
1 2 34
Picture:3 Picture:4 Picture:5
Installation and Use 2
Step 1: Monitor and Camera in the same room, camera power after the power switch to the off
Step 2: Camera turn on switch 'Power/Menu' , appear three or four options, moving the arrow
choose a icon (Reference Picture 3) then press 'OK' add the new monitor (Reference Picture
4) Display icon '+', the option of adding a camera. After you press OK, the indicator light
flashes, then immediately operate the camera, push the power switch to 'ON, that is, to start
pairing. If it is not successful, please repeat steps 1 and 2.
Tips!: Monitor display low battery when charging, often repeated charge will result
in shorter battery life. The battery indicator light turns red, indicating low battery,
recharge as soon as possible. Do not use this product for a long time, remove the
battery when the battery fluid leakage, please remove the battery.Waste battery
classified lost to designated collection points (Note: use only the supplied power
adapter Model: P50750500)

Pairing or adding a camera: (Buy more cameras have this function)
Installation and Use 3
Product Function 1
Product Function 1
Can be configured to monitor up to four cameras with scanning
capabilities can be every 8 seconds automatically switches to receive
another Camera, sound and image transmission: Step1: the monitor
and camera are turned “ON” mode, both the distance of not more
than 100 meters; Step2: Monitor operation, short press "Power /
Menu key” to open, four options appear, press to select the camera
and then OK button to select the icon conversion lens
Adjustable brightness Using the “Left and Right” arrows on the front of
the monitor, adjust the brightness for lighter or darker video.
Adjustable sound Volume adjustements allow higher volume settings to
hear every little sound, while lower volume settings monitor the louder
sounds and cries from baby.Brightness can be adjusted, as well based
on the level of light in the room.
Automatic night vision Rest assured knowing you can see your baby day
and night, including overnight, with automatic night vision. Infrared
automatically adjust to the level of light in the room and transmit a clear
black ad white image in low-night and darkened room conditions.
Sound indicator light 5 Sound indicator on the monitor will be in
accordance with the size of the baby sound light, the greater the
volume, the more light. This function is able to help parents
distinguish the sound of the baby in the room size Language louder
environment.
Power saving function
Monitor in the boot state, you can press the display key to open the
top of the video, turn off the video display, you can conserve power
and extend battery life, video switch is pressed again to turn on the
display screen. Standby mode, more than 210 seconds, the monitor
will turn off automatically.
Enlarge show
Press the zoom button, to change the level of zoom for increasingly
closer views on screen.

Tips!
This product package including one monitor, one camera and parts, if necessary,
to buy at the official website of the company or authorized agents.
In case the problem can be resolved in accordance with the following method specification
Common Problems and Solutions
No picture or sound
1. Make sure the camera and monitor are paired
2. Make sure the camera and the monitor are turned on
Squealing sound coming from speaker on monitor
1. The need to monitor and camera distance of 1 m or more
2. Turn the volum down using Volume Control
1. Press the video On-Off button once to turn on video mode. Check to make sure nothing is
blocking the camera
2.Test reception by moving the monitor and/or camera to different locations
3.Make sure the camera and monitor are paired
Sound but no picture
1. Turn up the volum using Volume Control
2. Power the monitor completely off, remove and re-insert the bturn monitor back on.
3. Make sure the camera and monitor are paired arrey, then
Picture but no sound
6UYOZOUTZNKSUTOZUXIRUYKXZUZNKIGSKXG
2. Move the monitor away from other electronic devices, cordless phone, etc. Test reception
by moving the monitor and/or camera to different locations
3. Adjust the brightness using the Brightness Control
Picture not clear
Tone: When the battery is low, the monitor will emit a continuous sound
three times, until no battery or recharge the battery. When the distance
between the monitor and the camera is too far or interference caused
not normally receive the signal, the display will show 'OUT OF RANGE',
and issued three consecutive sound, plug the monitor from the camera
to get closer to the position.
Tips!
Products are not available or there may be a method other problems first check the specification
process, can't handle if you have questions, please contact us to follow up
1. Follow the instructions to use the product
2. Do not disassemble, open, chopped or metal piercing the product
3. Product power when not using the product for a long time, at least
once a week to charge this product
4. Prohibition of the product is exposed to heat or fire, the ban into the fire,
avoid direct exposure to sunlight.
5. Once the leak, do not touch the skin, eyes and other parts, such as inadvertent contact, rinse
with plenty of water contact position, and seek immediate medical attention.
6. Requests the ambient temperature 0-45 degrees, relative humidity
of 20-70% using Rh situation, and away from moisture, heat, water and fire.
7. The appearance of damage, burning smell, leakage, smoke, please
stop using it immediate
Notice
After-sell service &ʡWarranty card
Contact us:
Loftynn Intelligence Technology Co, Ltd
Address:Room301,Xindonging Commercial Center, Liuxian 2nd Road
Tel:0755-26608994 www.loftynn.com
"Including but not limited to, the following circumstances are all not
maintenance free:(Serviceable but the corresponding parts and l abor costs
to charge a fee)1. Human factors, damage caused by force majeure.2. Under
non-work environment, do not follow the instru ctions to use the case of
damage, and so on.3. Non-formal channels to buy, can’t provide product
brochures warranty card, and purchase receipt.4. The non-public service
department or authority servi ce user serviceable, in the case of
disassembly.Note: The company has a product description can do the
interpretation and amendment, the final interpretation of branded products"
AXVUE Baby Monitor After-sell service:
Where to buy this product users are eligible for after-sales service: If you
purchased the product itself quality problems, were not in the man-made
damage, without overhaul, under paragraph damaged packaging, within 7
days after purchase for replacement.

Maintenance card - charging products
User information:
Product Information: :
Color:Ƒ6LOYHUƑ%ODFNƑ2WKHU
Purchase date and dealer:______________________________________
&DXVHRILVVXHƑ0RQLWRUFDQQRWGLVSOD\
Ƒ8QDEOHWRFRQQHFWWKHPRQLWRUƑ7KHPRQLWRUFDQ¶WVWDUW
Ƒ&DQ¶WJLYHSURGXFWVFKDUJHƑ6SHDNHUQRVRXQG
Ƒ3UHVVPDGHQRUHVSRQVH
Ƒ2WKHUBBBBBBBBBBBBBBBBBBBBBBBBBBBBBBBBBBBBBBBBBBBBBBBBBBBBBB
Name :______________________________________________________
Tel:_________________________________________________________
Zip Code:____________________________________________________
E-mail:______________________________________________________
Wechat No :__________________________________________________
Address:_____________________________________________________
3URGXFW1DPHƑ%DE\0RQLWRUƑ%DE\&DPHUDƑ&KDUJLQJFDEOH