LRE Medical Esterline 8047000 Laboratory Equipment with RFID User Manual
LRE Medical GmbH Esterline Corporation Laboratory Equipment with RFID
user manual
Astute140TMMeterPN:300005SRev:B2012AstuteMedical,Inc.2012/03/17
[Company Logo]
ASTUTE140TM METER
[PHOTO HERE]
User Manual

Astute140
TM
MeterPN:300005SRev:BAstuteMedical,Inc.20122012/03/20
2
For performance evaluation only.
Manufactured for Astute Medical, Inc.
3550 General Atomics Ct.
Building 2
San Diego, CA 92121
USA
MDSS GmbH
Schiffgraben 41
30175 Hannover, Germany
CONTACT INFORMATION:
info@astutemedical.com
Phone: +1 (858) 792-3544
Fax: +1 (858) 882-0449
[Add 800 number]
[Add international number]
Astute140TMMeterPN:300005SRev:BAstuteMedical,Inc.20122012/03/20
3
TableofContents
INTRODUCTION......................................................................................................................................................5
INTENDEDUSE........................................................................................................................................................................5
PRINCIPLESOFOPERATION...................................................................................................................................................5
METERKITCOMPONENTS.....................................................................................................................................................6
MATERIALSNEEDEDBUTNOTPROVIDED.........................................................................................................................7
OPTIONALACCESSORIES........................................................................................................................................................7
CONTACTINGASTUTEMEDICAL,INC.(TECHNICALSUPPORT)......................................................................................7
PRODUCTSPECIFICATIONS....................................................................................................................................................7
WARNINGS,HAZARDS,PRECAUTIONS,ANDLIMITATIONS..............................................................................................8
SafetySymbols..........................................................................................................................................................................8
SafetyInformation..................................................................................................................................................................9
Limitations...............................................................................................................................................................................10
METERFEATURES.................................................................................................................................................................11
USERTYPES...........................................................................................................................................................................13
Operator....................................................................................................................................................................................13
Supervisor................................................................................................................................................................................14
INSTALLATION.....................................................................................................................................................14
ACPOWERSUPPLY...............................................................................................................................................................14
INSTALLATIONANDREPLACEMENTOFBATTERIES........................................................................................................15
INSTALLINGORCHANGINGTHEPAPER..............................................................................................................................16
POWERINGONTHEMETER.................................................................................................................................................17
SUPERVISORINSTRUCTIONS:CONFIGURATIONANDSETTINGS....................................................................................18
AddingtheFirstSupervisorUser...................................................................................................................................18
SetorchangeTime...............................................................................................................................................................20
SetorChangeDate..............................................................................................................................................................21
SetorChangetheLanguage............................................................................................................................................22
UpdatingSystemSoftware...............................................................................................................................................23
UpdateMeterLanguages..................................................................................................................................................23
METEROPERATION...........................................................................................................................................23
STARTUP.................................................................................................................................................................................23
PowerontheMeter..............................................................................................................................................................23
Login..........................................................................................................................................................................................24
RFIDCARDSFORDEVICEANDLOTREGISTRATION.......................................................................................................24
EQCDEVICEREGISTRATION...............................................................................................................................................24
ELECTRONICQUALITYCONTROL(EQC)..........................................................................................................................26
LIQUIDCONTROLLOTREGISTRATION..............................................................................................................................28
EXTERNALLIQUIDQUALITYCONTROL(LQC)................................................................................................................30
TESTLOTREGISTRATION....................................................................................................................................................32
TESTINGAPATIENTSAMPLE..............................................................................................................................................34
REVIEWANDMANAGETESTRESULTS..............................................................................................................................37
PatientResults.......................................................................................................................................................................37
LQCResults..............................................................................................................................................................................38
EQCResults..............................................................................................................................................................................40
SendResultstoLIS...............................................................................................................................................................41
SHUTDOWN............................................................................................................................................................................42
CAREANDMAINTENANCE...............................................................................................................................42
Astute140TMMeterPN:300005SRev:BAstuteMedical,Inc.20122012/03/20
4
CLEANINGANDDECONTAMINATION.................................................................................................................................42
CHANGINGTHEPAPER..........................................................................................................................................................43
CHANGINGTHEBATTERIES.................................................................................................................................................43
DISPOSINGOFTHEBATTERIES............................................................................................................................................43
DISPOSINGOFTHEMETER..................................................................................................................................................43
LABELSANDSYMBOLS.........................................................................................................................................................43
TROUBLESHOOTINGTIPS...................................................................................................................................................45
ERRORMESSAGES.................................................................................................................................................................47
ENDUSERLICENSEAGREEMENT...................................................................................................................48
GLOSSARYOFTERMS(LISTEDALPHABETICALLY)................................................................................50
APPENDIX..............................................................................................................................................................53
MAINMENUSTRUCTURE.....................................................................................................................................................54
REVIEWDATAMENUSTRUCTURE.....................................................................................................................................55
OPERATORMENUSTRUCTURE...........................................................................................................................................56
SUPERVISORMENUSTRUCTURE........................................................................................................................................57
Astute140TMMeterPN:300005SRev:BAstuteMedical,Inc.20122012/03/20
5
Introduction
IntendedUse
The Astute140TM Meter is a bench top instrument intended to be used by trained
medical professionals as an in vitro diagnostic device in a laboratory environment for
the measurement of fluorescence in various assays manufactured by Astute Medical,
Inc.
The Astute140 Meter is used in conjunction with a test cartridge to measure the
concentration of a target analyte (such as a protein marker) in a sample.
Please refer to the assay-specific Product Insert for detailed test information.
PrinciplesofOperation
The Astute140 Meter uses an optical system to measure the fluorescent signal
generated from the test sample in the test cartridge. After the test cartridge containing
the sample is inserted into the Meter, the Meter converts the fluorescent signal from the
immunoassay test into a concentration and provides a test result. Intensity of the
fluorescent signal corresponds to the concentration of the target analyte. If a specific
test has more than one immunoassay, the fluorescent signals from each immunoassay
are converted into concentrations, and these concentrations may be combined into a
single test result or reported independently. Multiple quality control procedures are
performed to ensure that the test results are accurate (see “Electronic Quality Control
(EQC)”, p. XX and “External Liquid Quality Control (LQC)”, p. XX for details).
Results of the test are displayed on the Meter’s LCD screen, and may be printed using
the Meter’s internal printer or electronically transmitted to a laboratory information
system (LIS), if connected.

Astute140TMMeterPN:300005SRev:BAstuteMedical,Inc.20122012/03/20
6
MeterKitComponents
Inspect the shipping container for obvious shipping damage prior to opening. Unpack
the shipping container and inspect the contents for damage. The following components
are included in the Astute140 Meter Kit (For re-ordering information, visit
www.astutemedical.com or contact your Astute Medical, Inc. sales representative):
Astute140 Meter Kit component Part number for re-ordering
Astute 140 Meter
AC power adapter pack (includes
AC power cord, switching power
supply, and country specific
adapter)
100007
USB cord 100002
Astute140
TM
Electronic Quality
Control (EQC) Device
400001
Astute140
TM
Electronic Quality
Control (EQC) RFID card
400001
Astute140 User Manual 300005
Quick Start Guide 300007
Instructional DVD 300006
Printer paper rolls (2) 100000
AA batteries (4)
If the shipping container or its contents are damaged, or if any components are missing,
contact Astute Medical, Inc. Technical Support (For contact information, see “Contacting
Astute Medical, Inc.” o p. X ).
NOTES:
DO NOT use any other power adapter with the Astute140 Meter or you may damage
the Meter.

Astute140TMMeterPN:300005SRev:BAstuteMedical,Inc.20122012/03/20
7
Batteries are not intended to be used as the main power source for operation of the
Astute140 Meter and should only be used as a backup power source if there is no
electrical output available. See “Batteries”, p. X for further details.
MaterialsNeededbutNotProvided
The following materials are required for testing patient samples and may be purchased
and shipped separately from Astute Medical, Inc:
Test Kits
Liquid Control Set
For a list of approved tests and corresponding liquid controls for use with the
Astute140 Meter, go to www.astutemedical.com or consult your Astute Medical, Inc.
sales representative.
OptionalAccessories
Optional accessories that may be used with the Meter include an external barcode
reader and an external keyboard. External barcode readers and external keyboards are
not available from Astute Medical, Inc. and must be purchased elsewhere.
ContactingAstuteMedical,Inc.(TechnicalSupport)
For Technical support, please contact Astute Medical, Inc. at Astute Medical, Inc.,
3550 General Atomics Ct., Building 2, San Diego, CA 92121, USA.
ProductSpecifications
Astute140
TM
Meter Information
Product Number:
Dimensions:
Weight:
Power Requirements
AC Power Supply Output Voltage: 6 V DC and 4.16 A
AC Power Supply Input
Voltage/Voltage Range
100V to 240 V, 47Hz – 63 Hz
Battery Operation: 4 x LR6 – AA batteries
Astute140
TM
MeterPN:300005SRev:BAstuteMedical,Inc.20122012/03/20
8
Operating Environment
Altitude:
Temperature: +15C – 30C
Humidity: 30% - 80% rH, non-condensing at 15C
operating temperature
15% - 80%, rH, non-condensing at
30C
Storage Environment
Temperature: -20C to +60C
Humidity: 20% - 85% rH, non-condensing
Warnings,Hazards,Precautions,andLimitations
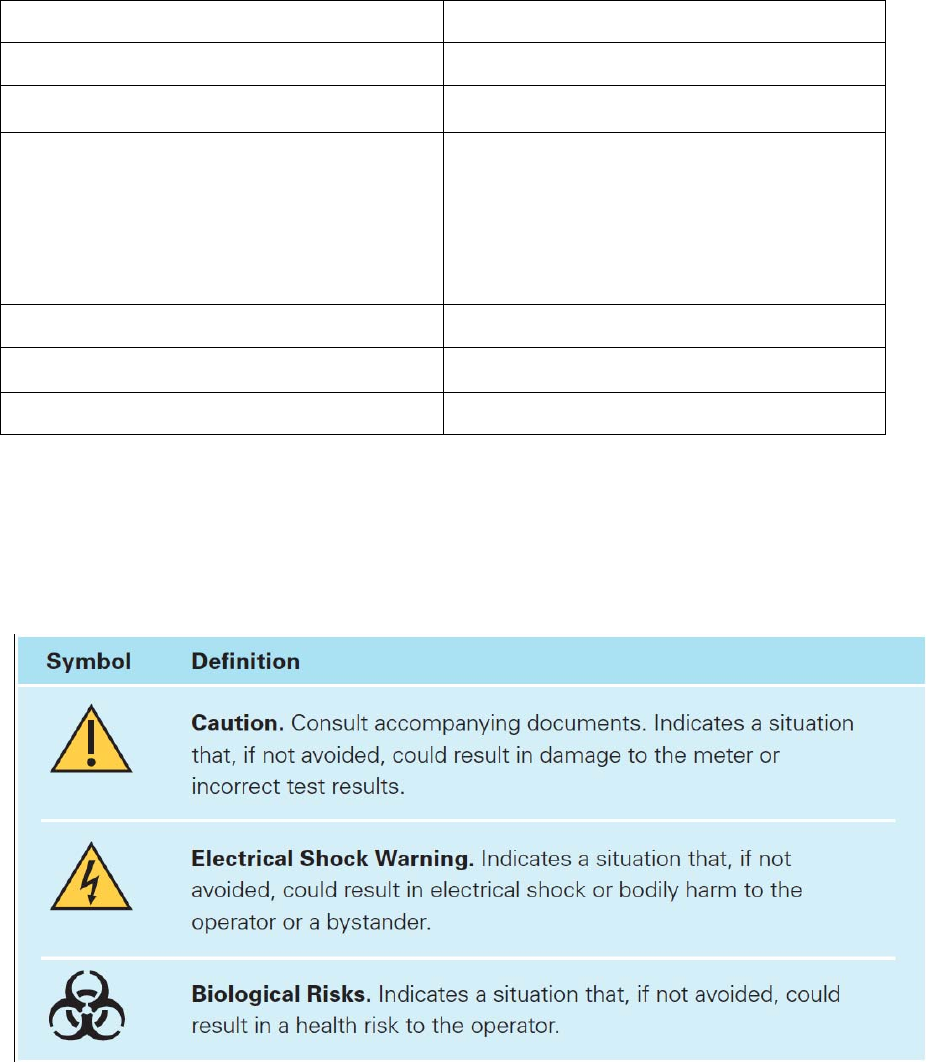
SafetySymbols

Astute140
TM
MeterPN:300005SRev:BAstuteMedical,Inc.20122012/03/20
9
SafetyInformation
Operate the Astute140™ Meter on a level, dry surface.
Do not move the Astute140™ Meter while a test is running.
Do not drop the Astute140™ Meter.
The Astute140™ Meter is designed to provide safe and reliable operation when
used according to this User Manual. If the Meter is used in a manner not specified in the
User Manual, the protection provided by the equipment will be impaired.
Use only the AC power adapter supplied with the Astute140™ Meter.
Do not immerse the Astute140™ Meter in water or any other liquids.
Unplug the AC power adapter from the power supply before cleaning.
Handle and dispose of test cartridges and patient specimens in accordance with
federal, state, and local requirements regarding biohazardous materials.
Handle the Astute140™ Meter in accordance with federal, state, and local
requirements regarding biohazardous materials.
Due to potentially infectious nature of the samples used with the Astute140™
Meter, users should wear gloves.
FCC Testing
This device complies with Part 15 of the FCC Rules. Operation is subject to the
following two conditions:
(1) This device may not cause harmful interference, and
(2) This device must accept any interference received, including interference that
may cause undesired operation.

Astute140
TM
MeterPN:300005SRev:BAstuteMedical,Inc.20122012/03/20
10
Changes or modifications not expressly approved by the party responsible for
compliance could void the user’s authority to operate the equipment.
NOTE: This equipment has been tested and found to comply with the limits for a Class
A digital device, pursuant to part 15 of the FCC Rules. These limits are designed to
provide reasonable protection against harmful interference when the equipment is
operated in a commercial environment. This equipment generates, uses, and can
radiate radio frequency energy and, if not installed and used in accordance with the
instruction manual, may cause harmful interference to radio communications. Operation
of this equipment in a residential area is likely to cause harmful interference in which
case the user will be required to correct the interference at his own expense.
Electromagnetic Capability (EMC)
The electromagnetic environment should be evaluated prior to operation of the
Meter. The Meter generates radio frequency (RF) energy. Do not use this device in
close proximity to sources of strong electromagnetic radiation (e.g. unshielded
intentional RF sources), as these may interfere with proper operation.
Any equipment connected to data ports must be certified to EC61010. If any
equipment is connected that is not recommended it must comply with this standard. For
questions or additional information, please contact Astute Medical, Inc. Technical
Support (for contact information, see “Contacting Astute Medical, Inc.” on p. X).
Limitations
The Astute140 Meter does not contain a “batch mode” function. The Meter times the
incubation period for the test, and only one test can be run at a time; therefore, each
test cartridge must be run immediately after being inoculated with the patient sample or
liquid control. The time delay in testing that would result from inoculating more than one
cartridge at a time may lead to inaccurate test results.

Astute140TMMeterPN:300005SRev:BAstuteMedical,Inc.20122012/03/20
11
MeterFeatures
[Photo of front of Meter here with labels]
Feature Function
1 Printer Cover Covers the printer
2 LCD Display User interface -- displays screens for
navigating, entering data, and
reviewing data
3 Paper Feed Key Advances the paper roll
4 Eject Button Opens the drawer
5 Main Menu Key Used to return to the Main Menu
6 Navigation Keys Used to navigate up, down, left, and
right within menu screens
7 Left Soft Key Used to select the menu option
displayed above the key
8 Right Soft Key Used to select the menu option
displayed above the key
9 Numeric Keypad Used to enter numerical values into
menus and screens
10 Decimal Point Used to add decimal points to
numerical values
11 Backspace Key Deletes the character to the left of the
cursor
12 Drawer Used to insert a test cartridge and the
electronic quality control cartridge into
the Meter
13 Battery cover Covers the battery compartment
[Photo of back of Meter here with labels]
Astute140TMMeterPN:300005SRev:BAstuteMedical,Inc.20122012/03/20
12
1 PS/2 Port Used to connect the optional external
barcode reader and/or keyboard to the
Meter
2 Ethernet Port Used to connect the Meter to a LIS or
to a computer to download software
3 AC Power Adapter Port Used to connect the AC power adapter
to the Meter
4 USB Port Used to connect the Meter to a
computer to download new software
versions or manage the meter
5 On/Off Switch Used to power the Meter on and off
[Photo of bottom of Meter here with labels]
1 Battery Cover Covers the battery compartment
2 Serial Number Unique number used to identify the Meter
3 In-Vitro Diagnostic device labels and
symbols
Regulatory labels and symbols used to
provide information about the Meter and its
proper use (See “Labels and Symbols”, p.
XX, for definitions)
[Photo of Main Menu screen here]
All Meter functions are grouped under six icons found on the Main Menu (for menu
structures, see the Appendix):
1 Run Patient Select to run patient tests
2 Run LQC Select to run high and low liquid controls
3 Review Data Select to manage patient, LQC and EQC
test results
4 Run EQC Select to run EQC
5 Operator Select to manage (register or delete) test

Astute140TMMeterPN:300005SRev:BAstuteMedical,Inc.20122012/03/20
13
lots, liquid control lots, and EQC devices;
temporarily change non-permanent
settings, and view error logs
6 Supervisor Select to set/change general Meter
settings, manage users, obtain Meter
information, or view error logs
UserTypes
There are two types of users defined for the Meter, Supervisor and Operator.
Supervisors and Operators are permitted to perform different functions, as described
below.
Operator
Users logged in as Operators may perform the following functions:
Power the Meter on/off
Run electronic quality control (EQC)
Run liquid quality control (LQC)
Test patient samples
Review and print data (Patient test results, QC test results)
View error log
Operators may perform the following functions only if a Supervisor grants permission
in the default settings:
Manage (register/delete/print) test lots
Manage (register/delete/print) LQC lots
Manage (register/delete/print) EQC devices
The Operator may change the following settings temporarily while using the Meter; the
settings will return to the default settings programmed by the Supervisor when the Meter
is switched off or the Operator is logged out.
Date format
Time format
Language
Astute140TMMeterPN:300005SRev:BAstuteMedical,Inc.20122012/03/20
14
Beeper (On/Off)
Supervisor
Users logged in as Supervisors may perform all of the Operator functions and the
following additional functions:
Set or change all default system settings (Time, Date, Language, Log On Setup,
registering lot/control permissions, QC settings)
Set or change LIS settings
Set PC Mode (on/off)
Set or change network settings
Set or change print headers
Manage Users (change/add/delete)
View Meter information (hardware/firmware/bootware/serial number/IP address)
Installation
ACPowerSupply
The Meter is generally meant to be powered by plugging the AC power adapter into a
power source; however, power may be supplied temporarily by four AA batteries when
an electrical power source is unavailable (see “Batteries” on p. X.).
To connect the AC power adapter:
1. Locate the AC power adapter pack containing the AC power cord, the switching
power supply, and the country specific adapter, and connect them as shown:
[Show picture depicting connection of the 3 cords]
2. Insert the end of the country-specific adapter into a power source
[Show picture depicting connection of the country-specific adapter into a power
source]
Astute140TMMeterPN:300005SRev:BAstuteMedical,Inc.20122012/03/20
15
3. Insert the cylindrical end of the switching power adapter into the AC power
adapter port on the back of the Meter.
[Show picture depicting insertion of the switching power adapter into the port on
the back of the Meter]
NOTE: To avoid damage to the Meter from a potential power surge, always plug the
AC power adapter into the electrical power source prior to connecting it to the Meter.
When removing power, disconnect the AC power adapter from the Meter prior to
unplugging it from the electrical power source.
InstallationandReplacementofBatteries
The Meter is generally meant to be powered by plugging the AC power adapter into an
electrical power source (see “AC Power Adapter, p. X); however, power may be
supplied for a limited period of time by four AA batteries when an electrical power
source is unavailable (for example, in the event of a electricity failure or if the Meter
must be operated in a location where there is no electric output).
When using alkaline or Li batteries under a temperature operating range of 20o to 25o C,
the Meter will allow approximately 15 user tests to be performed before requiring battery
replacement.
The Meter includes a low battery indicator.
[Insert picture depicting the low battery indicator unlit]
The batteries should be changed when the low battery indicator is lit.
[Insert picture depicting the low battery indicator when lit]
When the low battery indicator is lit, the Meter can run at least 3 additional tests within 1
hour under the same operating conditions before the batteries will need to be replaced.
Astute140TMMeterPN:300005SRev:BAstuteMedical,Inc.20122012/03/20
16
To install or replace four AA batteries into the Meter or change the batteries:
1. Press the Eject Button to the left of the LCD display to open the Meter drawer
and ensure there is not a cartridge in the Meter.
2. Power off the Meter.
3. Gently turn the Meter over so the bottom is facing up and place it on a flat
surface.
[Insert image depicting Meter turned upside down, and placed on a flat surface]
4. Open the battery cover by pressing your thumb on the center of the battery cover and
sliding it in the direction shown below:
[Insert image showing bottom of Meter with thumb pressing on and sliding battery cover
to the left]
5. If replacing the batteries, remove the old batteries and properly discard them (see
“Disposing of the batteries”, p. XX).
6. Insert 4 AA 1.5 volt batteries, making sure that the ends of the batteries facing up
correspond to the + and – signs diagrammed in the battery compartment,
[Insert diagram of the battery compartment with symbols visible]
7. Replace the battery cover by sliding it back into position as shown until it snaps firmly
in place.
8. Turn the Meter right side up.
InstallingorChangingthePaper
To install or change the internal printer paper, perform the following steps:
1. Remove the printer cover by pulling up on the blue handle on top of the cover.
2. If changing the paper, remove the empty spool and any unused paper.
Astute140TMMeterPN:300005SRev:BAstuteMedical,Inc.20122012/03/20
17
3. Place the paper roll into the holder with the end of the paper coming from under the
roll toward the Meter display.
[INSERT PHOTO DEPICTING STEP 3]
4. Holding the end of the paper, replace the printer cover as shown below until it snaps
into place.
[insert photo depicting step 4]
5. To feed the paper further out the top of the printer press [paper button].
PoweringOntheMeter
To power on the Meter, locate the power switch on the back of the Meter and toggle it
upwards, holding it in position until the self-test screen appears.
[Insert screen shot of self-test screen]
When all systems pass, the Log In screen will then automatically appear, indicating that
the Meter is ready for use.
[Insert screen shot of Log In screen]
If the self-test fails, an error message will be displayed. Press the right soft key to
select OK and close the error message, and then restart the Meter by turning it off and
back on again (to power off the Meter, toggle the power switch upwards and it should
immediately shut down). If after restarting the Meter the self-test fails again, contact
Asute Medical, Inc. Technical Support (See “Contacting Astute Medical, Inc.” on p. X).
Astute140TMMeterPN:300005SRev:BAstuteMedical,Inc.20122012/03/20
18
SupervisorInstructions:ConfigurationandSettings
AddingtheFirstSupervisorUser
The first Supervisor user must be added to the Meter before any default settings may be
set or changed. The Meter comes from the factory with a default Supervisor login ID
(1234) that will allow the first Supervisor user to log in and create a user profile. Once
the new profile is created, the user must log out of the system and log back in with the
new user information before performing any additional functions.
Perform the following steps to add the first supervisor user:
1. After powering on the Meter, the Log In screen will be displayed after a brief self
test (see “Powering on the Meter” on p. X for details.)
[Insert screen shot of Log In screen]
2. When the Log In screen is displayed, User ID is highlighted. Enter 1234 using
the numeric keypad or an external keyboard, if connected.
3. After entering your user ID, use the [down arrow navigation key] key to highlight
the Password field.
4. Use the numeric keypad or an external keyboard, if connected, to enter 1234.
Press the right soft key to accept all entries.
5. After logging in, the Main Menu will be displayed. Use the navigation keys to
highlight the Supervisor Menu icon. Press the right soft key to display the
Supervisor Menu.
[Insert screen shot of Main Menu with Supervisor icon highlighted]
6. When the Supervisor Menu is displayed, General Meter Settings is highlighted.
Use the [down arrow navigation key] key to highlight Manage Users and press
the right soft key.
Astute140TMMeterPN:300005SRev:BAstuteMedical,Inc.20122012/03/20
19
7. The screen should read Existing User List across the top; however, no users
should be listed. Press the right soft key to display the Options pop-up menu.
[Insert screen shot of #7]
8. When the Options pop-up menu is displayed, use the [down arrow navigation
key] key to highlight Add User and press the right soft key to display the Create
New User screen.
9. When the Create New User screen is displayed, Mode will be highlighted. Use
the [right and left arrow navigation keys] keys to toggle between operator and
Supervisor. Select Supervisor.
10. After selecting Supervisor, use the down arrow navigation key to highlight Name.
Use the numeric keypad or an external keyboard, if connected, to enter a user
name.
11. Use the down arrow navigation key to highlight ID. Use the numeric keypad or
an external keyboard, to enter a numeric ID.
12. Once a numeric ID is entered, use the down arrow navigation key to highlight
Password. Use the numeric keypad or an external keyboard, if connected, to
enter a password.
13. After entering a password, use the [down arrow navigation key] key to re-enter
the password.
14. Confirm that the correct information is displayed. To make changes to the
entries, use the [up and down arrow navigation keys] keys to highlight the field to
be changed. Use the [backspace key] key to delete the incorrect entry, and then
use the numeric keypad or an external keyboard, if connected, to change the
entries. To clear all entries on the screen, press the left soft key. Once the
correct entries have been made, press the right soft key to accept all entries.
15. After accepting the new user information entered, the Existing User List screen
will again be displayed. The user information just created should now appear in
the list, including the user ID, Name, and Mode (Supervisor or Operator).
16. Press the left soft key to return to the main Supervisor menu.
Astute140TMMeterPN:300005SRev:BAstuteMedical,Inc.20122012/03/20
20
17. Press the left soft key to return to the Main Menu.
18. Press the left soft key to log out of the system.
19. After logging out, the Log In screen will appear and User ID will be highlighted.
Enter your new user ID using the numeric keypad or an external keyboard, if
connected.
20. After entering your user ID, use the [down arrow navigation key] key to highlight
the Password field.
21. Use the numeric keypad or an external keyboard, if connected, to enter your new
password.
22. Confirm that the correct log in information is displayed. To make changes to the
entries, use the [up and down arrow navigation keys] keys to highlight the field to
be changed. Use the [backspace key] key to delete the incorrect entry, and then
use the numeric keypad or an external keyboard, if connected, to change the
entries. Press the right soft key to accept all entries.
SetorChangeTime
The Supervisor can set or change the time by performing the following steps:
1. Press the [picture of menu button] key to display the Main Menu.
2. Use the navigation keys to highlight the Supervisor Menu icon.
[Insert screen shot of Main Menu with Supervisor Icon highlighted]
3. Press the right soft key to display the Supervisor Menu.
4. When the Supervisor Menu is displayed, General Meter Settings is highlighted.
Press the right soft key to display the General Meter Settings screen.
5. When the General Meter Settings screen is displayed, Default Settings is
highlighted. Press the right soft key to display the Default Settings screen.
6. When the Default Settings screen is displayed, Time & Time Format is
highlighted. Press the right soft key to display the Time & Time Format screen.
7. When the Time & Time Format screen is displayed, Time Format is highlighted.
Use the [left and right arrow navigation keys] to choose either a 12- or 24-hour
time format for display on the screen and printouts.
Astute140TMMeterPN:300005SRev:BAstuteMedical,Inc.20122012/03/20
21
8. After the desired time format is selected, use the [down arrow navigation key]
key to highlight the Hours field.
9. Use the numeric keypad to enter the correct hour.
10. After the correct hour is entered, use the [down arrow navigation key] to highlight
the Minutes field.
11. Use the numeric keypad to enter the correct minutes.
12. After entering the correct minutes, use the [down arrow navigation key] to
highlight the AM or PM field.
13. Use the [left and right arrow navigation keys] to select AM or PM.
14. After confirming that the correct time information is displayed, press the right
soft key to accept all entries. To make changes to the entries, use the [up and
down arrow navigation keys] to highlight the field to be changed and use the [left
and right arrow navigation keys] to toggle between options, or use the numeric
keypad to change numeric entries. To clear all entries on the screen, press the
left soft key.
SetorChangeDate
The Supervisor can set or change the date by performing the following steps:
1. Press the [picture of menu button] key to display the Main Menu.
2. Use the navigation keys to highlight the Supervisor Menu icon.
[Insert screen shot of Main Menu with Supervisor icon highlighted]
3. Press the right soft key to display the Supervisor Menu.
4. When the Supervisor Menu is displayed, General Meter Settings is highlighted.
Press the right soft key to display the General Meter Settings screen.
5. When the General Meter Settings screen is displayed, Default Settings is
highlighted. Press the right soft key to display the Default Settings screen.
6. On the Default Settings screen, use the [down arrow navigation key] key to
highlight Date & Date Format.
7. Use the [left and right arrow navigation keys] to scroll through the available date
formats for display on the screen and printouts.
Astute140TMMeterPN:300005SRev:BAstuteMedical,Inc.20122012/03/20
22
8. After the desired date format is displayed, use the [down arrow navigation key]
key to highlight the Day field.
9. Use the numeric keypad to enter the day of the month.
10. After the correct day of the month is entered, use the [down arrow navigation
key] to highlight the Month field.
11. Use the numeric keypad to enter the month of the year.
12. After the correct month of the year is entered, use the [down arrow navigation
key] to highlight the Year field.
13. Use the numeric keypad to enter to correct year.
14. After confirming that the correct date information is displayed, press the right soft
key to accept all entries. To make changes to the entries, use the [up and down
arrow navigation keys] to highlight the field to be changed and use the [left and
right arrow navigation keys] to toggle between date format options, or use the
numeric keypad to change numeric entries. To clear all entries on the screen,
press the left soft key.
SetorChangetheLanguage
The Supervisor can change the default language by performing the following steps:
1. Press the [picture of menu button] key to display the Main Menu.
2. Use the navigation keys to highlight the Supervisor Menu icon.
[Insert screen shot of Main Menu with Supervisor icon highlighted]
3. Press the right soft key to display the Supervisor Menu.
4. When the Supervisor Menu is displayed, General Meter Settings is highlighted.
Press the right soft key to display the General Meter Settings screen.
5. When the General Meter Settings screen is displayed, Default Settings is
highlighted. Press the right soft key to display the Default Settings screen.
6. On the Default Settings screen, use the [down arrow navigation key] key to
highlight Language.
7. Press the right soft key to display the Language Menu
Astute140TMMeterPN:300005SRev:BAstuteMedical,Inc.20122012/03/20
23
8. When the Language menu is displayed, use the [up arrow navigation key] or
[down arrow navigation key] keys to highlight the desired default language.
9. Press the right soft key to select the highlighted default language.
UpdatingSystemSoftware
Software updates for the Meter will be required periodically. When updates are
available, Astute Medical, Inc. will send written notifications by email and postal service
including a description of the software update and downloading instructions.
Supervisors can download software updates through the USB and/or Ethernet port.
UpdateMeterLanguages
When new languages for the Meter become available, Astute Medical, Inc. will send
written notifications by email and postal service of the newly available languages and
downloading instructions. Supervisors can update the Meter languages by downloading
language updates through the USB and/or Ethernet port.
MeterOperation
Startup
PowerOntheMeter
To power on the Meter, locate the power switch on the back of the Meter and toggle it
upwards, holding it in position until the self-test screen appears.
[Insert screen shot of self-test screen]
When all systems pass, the Log In screen will then automatically appear, indicating that
the Meter is ready for use.
[Insert screen shot of Log In screen]
If the self-test fails, an error message will be displayed. Press the right soft key to
select OK and close the error message, and then restart the Meter by turning it off and
Astute140TMMeterPN:300005SRev:BAstuteMedical,Inc.20122012/03/20
24
back on again (to power off the Meter, toggle the power switch upwards and it should
immediately shut down). If after restarting the Meter the self-test fails again, contact
Astute Medical, Inc. Technical Support (See “Contacting Astute Medical, Inc.” on p. X).
Login
After successfully powering on the Meter, the Log In screen will automatically appear.
Perform the following steps to log in to the system:
1. When the Log In screen is displayed, User ID is highlighted. Enter your user ID
using the numeric keypad or an external keyboard, if connected.
2. After entering your user ID, use the [down arrow navigation key] key to highlight
the Password field.
3. Use the numeric keypad or an external keyboard, if connected, to enter your
password.
4. Confirm that the correct log in information is displayed. To make changes to the
entries, use the [up and down arrow navigation keys] to highlight the field to be
changed. Use the [backspace key] key to delete the incorrect entry, and then
use the numeric keypad or an external keyboard, if connected, to change the
entries. Press the right soft key to accept all entries.
RFIDCardsforDeviceandLotRegistration
Each new EQC device, Liquid Control lot, and test lot must be registered prior to first
use. Operators may register EQC devices, Liquid Control lots, and test lots only if
Supervisors grant registration permission to Operators in the default settings; otherwise,
Supervisors must carry out registrations. To register an EQC device, Liquid Control lot
or test lot, see “EQC Device Registration” (p. X), “Liquid Control Set Registration” (p. X),
and Test Lot Registration” (p. X).
EQCDeviceRegistration
The EQC procedure verifies the calibration of the Meter, including the positioning
system, optical system, and other internal systems of the Meter to confirm that the
Meter is functioning properly.

Astute140TMMeterPN:300005SRev:BAstuteMedical,Inc.20122012/03/20
25
When not in use, the EQC Device should be stored in its original packaging away from
light. If lost, a replacement EQC device may be ordered from Astute Medical, Inc. at
www.astutemedical.com or by contacting your Astute Medical, Inc. sales representative.
The EQC device must be registered prior to first use. Operators may register the EQC
device only if the Supervisor granted registration permission in the default settings;
otherwise, Supervisors must register the EQC device.
To register the EQC device, locate the EQC RFID card included in the Meter Kit and
perform the following steps:
1. Press the [picture of menu button] key to display the Main Menu (if registering
the EQC device immediately after successful log in, the Main Menu will
automatically be displayed).
2. Use the navigation keys to highlight the Operator icon.
[Insert screen shot of Main Menu with Operator icon highlighted]
3. Press the right soft key to display the Operator Menu.
4. When the Operator Menu is displayed, Manage Lots is highlighted. Press the
right soft key to display the Manage Lots screen.
5. When the Manage Lots screen is displayed, Manage Test Lots is highlighted.
Use the [down arrow navigation key] key to highlight Manage EQC Devices and
press the right soft key to display the Registered EQC Devices screen.
[Insert screen shot of the Registered EQC Devices screen]
6. On the Registered EQC Devices screen, press the right soft key to display the
Options pop-up menu.
[Insert screen shot of Options pop-up menu]
Astute140TMMeterPN:300005SRev:BAstuteMedical,Inc.20122012/03/20
26
7. When the Options pop-up menu is displayed, Print List is highlighted. Use the
[down arrow navigation key] key to highlight Register Device and press the right
soft key.
8. When prompted, hold the RFID card for the EQC device next to or against the
numeric keypad to register the EQC Device information and select “OK” by
pressing the right soft key.
9. If registered correctly, a screen indicating that the EQC device number was
successfully read from the RFID card will appear. Press the right soft key to
select “Accept”. The EQC device that was just registered should now appear in
the list of registered EQC devices.
10. If registered incorrectly, an error message will appear. Press the right soft key to
select OK and close the error message. Repeat steps 8-9. If registered
incorrectly a second time, contact Astute Medical, Inc. Technical Support (for
contact information, see “Contacting Astute Medical, Inc.” on p. XX).
11. After use, return the RFID card to it’s sleeve and store it with the EQC device in
its original packaging.
ElectronicQualityControl(EQC)
The EQC procedure verifies the calibration of the Meter, including the positioning
system, optical system, and other internal systems of the Meter to confirm that the
Meter is functioning properly.It is recommended that the EQC procedure be run at a
frequency in accordance with to the best practices of your institution. The required
frequency for running EQC may be set by a Supervisor in the general Meter default
settings (for instructions on setting the required frequency, see “Quality Control
Settings”, p. X).
Prior to running the first EQC procedure, the EQC Device must be registered (For
instructions on registering the EQC device, see “EQC Device Registration”, p. X).
To run the EQC procedure, perform the following steps using the EQC Device provided
with the Meter:
Astute140TMMeterPN:300005SRev:BAstuteMedical,Inc.20122012/03/20
27
1. Press the [picture of menu button] key to display the Main Menu if needed. .
2. Use the navigation keys to highlight the Run EQC icon.
3. Press the right soft key to select Run EQC. The Meter drawer will automatically
open.
4. When prompted, place the EQC device into the recess inside the Meter drawer in
the direction of the arrow marked on the EQC device and gently close the drawer
until it clicks.
[Insert photo of gloved hand inserting EQC device into the open drawer of the Meter]
5. After closing the drawer, a temporary screen will appear indicating that the Meter
is running the EQC procedure and the amount of time remaining until test
completion will be displayed.
[Insert photo of temporary screen showing EQC procedure countdown here]
6. When the EQC procedure completes, press the eject button to open the drawer.
The results will be displayed along with the word “passed” if the Meter passed
the EQC procedure or “failed” if it did not. If the EQC procedure failed, run the
EQC procedure again following the steps below:
a. Press the right soft key to display the Options pop-up menu.
b. Use the [down arrow navigation key] key to highlight Next Control and
press the right soft key.
c. Repeat steps 4-5. When the EQC procedure completes, the the results
will be displayed along with the word “passed” if the Meter passed the
EQC procedure or “failed” if it did not. If the procedure failed, contact
Astute Medical, Inc. Technical Support (for contact information, see
“Contacting Astute Medical, Inc.” on p. XX). Press the eject button to
open the drawer.
7. To manually print the EQC results if Autoprint is disabled:
a. Press the right soft key to display the Options pop-up menu.

Astute140TMMeterPN:300005SRev:BAstuteMedical,Inc.20122012/03/20
28
b. When the options menu is displayed, Print is highlighted. To print the
EQC results, press the right soft key.
c. To hide the Options Menu, use the [down arrow navigation key] key to
highlight Hide Options and press the right soft key.
d. To return to the Main Menu, press the left soft key.
8. After completing the EQC procedure, store the EQC Device in its original
packaging away from light.
LiquidControlLotRegistration
High and low liquid controls must be run to verify the precision and accuracy of the
assay procedure, including the performance of the test cartridges and assay-specific
reagents.
Each assay-specific liquid control set includes a high and a low liquid control. Each
liquid control in the set must be registered prior to first use. Operators may register the
liquid controls only if the Supervisor granted registration permission in the default
settings; otherwise, Supervisors must register the liquid controls.
See the assay-specific controls product insert for storage instructions when the liquid
control set is not in use. Additional liquid controls may be ordered from Astute Medical,
Inc. at www.astutemedical.com or by contacting your Astute Medical, Inc. sales
representative.
For each liquid control set, the liquid control registration process must be carried out
twice: once for the high liquid control and once for the low liquid control. To register
each control, perform the following steps:
1. Locate the RFID card for the liquid control lot to be registered (i.e. the high liquid
control RFID card if registering the high liquid control, or the low liquid control
RFID card if registering the low liquid control).
Astute140TMMeterPN:300005SRev:BAstuteMedical,Inc.20122012/03/20
29
2. Press the [picture of menu button] key to display the Main Menu (if registering
the liquid control lot immediately after successful log in, the Main Menu will
automatically be displayed).
3. Use the navigation keys to highlight the Operator icon.
[Insert photo of Main Menu with Operator icon highlighted]
4. Press the right soft key to display the Operator Menu.
5. When the Operator Menu is displayed, Manage Lots is highlighted. Press the
right soft key to display the Manage Lots screen.
6. When the Manage Lots screen is displayed, Manage Test Lots is highlighted.
Use the [down arrow navigation key] to highlight Manage LQC Lots and press
the right soft key to display the Registered LQC Lots screen.
7. On the Registered LQC Lots screen, press the right soft key to display the
Options pop-up menu.
8. When the Options pop-up menu is displayed, Print List is highlighted. Use the
[down arrow navigation key] key to highlight Register Lot and press the right soft
key.
9. When prompted, hold the RFID card for the liquid control to be registered next to
or against the numeric keypad to register the liquid control lot information and
press the right soft key to select OK.
10. If registered correctly, a screen indicating that the liquid control lot number was
successfully read from the RFID card will appear, and the lot number will be
displayed. Press the right soft key to select Accept. The lot that was just
registered should now appear in the list of Registered LQC lots.
11. If registered incorrectly, an error message will appear. Press the right soft key to
select OK and close the error message. Repeat steps 9-10. If registered
incorrectly a second time, contact Astute Medical, Inc. Technical Support (for
contact information, see “Contacting Astute Medical, Inc.” on p. XX).
12. After use, return the RFID card to its sleeve and store with the corresponding
liquid control.
Astute140TMMeterPN:300005SRev:BAstuteMedical,Inc.20122012/03/20
30
13. To register the second liquid control in the set, or to register another liquid control
set from a different lot, repeat steps 7-12.
ExternalLiquidQualityControl(LQC)
High and low liquid controls must be run to verify the precision and accuracy of the
assay procedure, including the performance of the meter, test cartridges and assay-
specific reagents.
It is recommended that LQC be performed at the following times:
Every 30 days
With each new lot number of test cartridges
With each new shipment of test kits
In accordance with the laboratory’s standard quality control procedures
The required frequency for running LQC may be set by a Supervisor in the general
Meter default settings (for instructions on setting the required frequency, see “Quality
Control Settings”, p. X).
Prior to running the first LQC procedure, both the high and low liquid controls in the
liquid control set must be registered if they are from a new liquid control lot (for
instruction on registering liquid controls, see “Liquid Control Registration”, p. X).
The LQC procedure must be run twice: once with the high liquid control and once with
the low liquid control. Both high and low liquid controls must have passed for a given lot
of test cartridges within the time window set in the default settings before patient
samples can be run using test cartridges from that lot.
To run the LQC procedure, perform the following steps and repeat for the second
control in the liquid control set:
1. Press the [picture of menu button] key to display the Main Menu if needed.
2. Use the navigation keys to highlight the Run LQC icon.
Astute140TMMeterPN:300005SRev:BAstuteMedical,Inc.20122012/03/20
31
[Insert screen shot of Main Menu with Run LQC icon highlighted]
3. Press the right soft key to select Run LQC.
4. A screen showing all liquid control lots previously registered and their expiration
dates will be displayed. Controls displayed as “Control +” correspond to high
liquid controls and those displayed as “Control –“ correspond to low liquid
controls.
[{Insert photo showing screen shot of “Run LQC – Select Lot” screen]
5. Use the [up and down arrow navigation keys] keys to highlight the correct liquid
control lot being tested and press the right soft key. If the liquid control lot is not
listed, register the liquid control lot to be tested by following the steps outlined in
“Liquid Control Lot Registration” on p. XX. After the lot is registered, repeat steps
1-6.
6. After selecting the liquid control lot to be tested, the Meter drawer will
automatically open.
7. Prepare the test cartridge with the liquid control (high or low) as instructed in the
assay-specific Control Product Insert.
8. When prompted, place the prepared test cartridge into the recess inside the
Meter drawer in the direction of the arrow marked on the test cartridge, and
gently close the drawer until it clicks.
[Insert photo of gloved hand correctly inserting the cartridge into the Meter]
9. After closing the drawer, a temporary screen will appear indicating that the Meter
is running the LQC procedure and the amount of time remaining until test
completion will be displayed.
10. When the LQC procedure completes, the Meter drawer will automatically open
and the results will be displayed along with the word “passed” if the procedure
Astute140TMMeterPN:300005SRev:BAstuteMedical,Inc.20122012/03/20
32
passed or “failed’ if it did not. If the LQC procedure failed, run the LQC
procedure again following the steps below:
a. Press the right soft key to display the Options pop-up menu.
b. Use the [down arrow navigation key] key to highlight Next Control and
press the right soft key.
c. Repeat steps 4-9. When the LQC procedure completes, the results will be
displayed along with the word “passed” if the Meter passed the LQC
procedure or “failed” if it did not. If the procedure failed a second time,
contact Astute Medical, Inc. Technical Support (For contact information,
see “Contacting Astute Medical, Inc.” on p. X). Press the eject button to
open the drawer.
11. Remove the cartridge from the Meter drawer and discard according to the
laboratory’s standard practices for the type of biological sample used.
12. To manually print the LQC results if Autoprint is disabled:
a. Press the right soft key to display the Options pop-up menu.
b. When the options menu is displayed, Print is highlighted. To print the
LQC results, press the right soft key.
c. To hide the Options Menu, use the [down arrow navigation key to highlight
Hide Options and press the right soft key.
d. To return to the Main Menu, press the left soft key.
13. To run the next liquid control (high or low) after viewing or printing the LQC
results, press the right soft key to display the Options pop-up menu. Use the
[down arrow navigation key] key to highlight Next Control and press the right
soft key. Repeat steps 4-12.
TestLotRegistration
Assay-specific test cartridges that are uniquely compatible with the Astute140 Meter are
used to test patient samples. The test cartridges approved for use with the Astute140
Meter should not be used with any other testing device. Similarly, only test cartridges
approved for use with the Astute140 Meter can be used with the Meter. For a list of
approved tests for use with the Astute140 Meter and to purchase assay-specific test

Astute140TMMeterPN:300005SRev:BAstuteMedical,Inc.20122012/03/20
33
cartridges, go to www.astutemedical.com or consult your Astute Medical, Inc. sales
representative.
Each new test lot must be registered prior to use of any test cartridges from that lot.
Operators may register the test lot only if the Supervisor granted registration permission
in the default settings; otherwise, Supervisors must register the test lot.
See the assay-specific product insert for test cartridge storage instructions.
To register a test lot, perform the following steps:
1. Locate the RFID card included in the test kit from the test lot to be registered.
2. Press the [picture of menu button] key to display the Main Menu if needed.
3. Use the navigation keys to highlight the Operator icon.
[Insert Main Menu screen shot with Operator icon highlighted]
4. Press the right soft key to display the Operator Menu.
5. When the Operator Menu is displayed, Manage Lots is highlighted. Press the
right soft key to display the Manage Lots screen.
6. When the Manage Lots screen is displayed, Manage Test Lots is highlighted.
Press the right soft key to display the Registered Test Lots screen.
7. On the Registered Test Lots screen, a list of all the previously registered test
lots will be displayed. If the lot being registered appears on the list, it has already
been registered and need not be registered again. Press the left soft key to
return to the Main Menu. If the test lot does not appear on the list, proceed to
step 8.
8. On the Registered Test Lots screen, press the right soft key to display the
Options pop-up menu.
9. When the Options pop-up menu is displayed, Print List is highlighted. Use the
[down arrow navigation key] key to highlight Register Lot and press the right soft
key.

Astute140TMMeterPN:300005SRev:BAstuteMedical,Inc.20122012/03/20
34
10. When prompted, hold the RFID card for the test lot next to or against the numeric
keypad to register the test lot information and select “OK” by pressing the right
soft key.
11. If registered correctly, a screen displaying the test lot number, the test type, and
the analytes detected by the test will appear. Press the right soft key to select
“Accept”. The test lot that was just registered should now appear in the list of
registered test lots.
12. If registered incorrectly, an error message will appear. Press the right soft key to
select OK and close the error message. Repeat steps 10-11. If registered
incorrectly a second time, contact Astute Medical, Inc. Technical Support (for
contact information, see “Contacting Astute Medical, Inc., Inc.” on p. XX).
13. After use, place the RFID card in its sleeve and return it to the test cartridge kit
from which it came. Once all the cartridges in the kit have been used, the RFID
card and the test cartridge kit may be discarded.
14. To register another test lot, locate the RFID card for the test lot to be registered
and repeat steps 7-13.
TestingaPatientSample
Assay-specific test cartridges that are uniquely compatible with the Astute140 Meter are
used to test patient samples. The test cartridges approved for use with the Astute140
Meter should not be used with any other testing device. Similarly, only test cartridges
approved for use with the Astute140 Meter can be used. For a list of approved tests for
use with the Astute140 Meter and to purchase assay-specific test cartridges, go to
www.astutemedical.com or consult your Astute Medical, Inc. sales representative.
Each new test lot must be registered prior to use of any test cartridges from that lot. For
test lot registration instructions, see “Test Lot Registration” on p. X.
To test a patient sample, perform the following steps:
Astute140TMMeterPN:300005SRev:BAstuteMedical,Inc.20122012/03/20
35
1. Press the [picture of menu button] key to display the Main Menu (if running
patient sample immediately after successful log in, the Main Menu will
automatically be displayed).
2. When the Main Menu is displayed, use the navigation keys to highlight the Run
Patient icon. Press the right soft key to select Run Patient.
[Insert screen shot of Main Menu with Run Patient icon highlighted]
3. When the Run Patient screen is displayed, Patient ID will be highlighted. Enter
the Patient ID manually using the numeric keypad or an external keyboard (if
connected), or, if applicable, by scanning the barcode on the patient sample with
the optional barcode scanner (if connected).
4. If available, a Sample ID may be entered; otherwise, this field may be left blank.
To enter a Sample ID, use the [down arrow navigation key] key to highlight
Sample ID and enter the Sample ID manually using the numeric keypad or an
external keyboard (if connected), or, if applicable, by scanning the barcode on
the patient sample with an optional barcode scanner (if connected). NOTE: an
external keyboard and barcode scanner are optional devices that are not
included with the Astute140 Meter kit.
5. After confirming that the correct Patient ID and/or Sample ID have been entered,
press the right soft key to select Run Patient.
6. After selecting Run Patient, the Meter drawer will automatically open.
7. Prepare the test cartridge with the patient specimen according to the assay-
specific Product Insert for the test to be run.
NOTE: Each test cartridge must be run immediately after inoculation with the
patient sample, and the next cartridge should not be prepared until testing on the
first has completed. The Meter times the incubation period for the test, and only
one test can be run at a time; therefore, inoculating additional samples before
testing on the first has completed may result in inaccurate test results due to a
time delay in testing after inoculation.
Astute140TMMeterPN:300005SRev:BAstuteMedical,Inc.20122012/03/20
36
8. When prompted, place the prepared test cartridge into the recess inside the
Meter drawer in the direction of the arrow marked on the test cartridge, and
gently close the drawer until it clicks.
[Insert photo of gloved hand correctly inserting the cartridge into the Meter]
9. After closing the drawer, a temporary screen will appear indicating that the Meter
is reading the test lot information to determine if the test lot is registered and
whether high and low LQC measurements have passed for the test kit lot.
[Insert screen shot of temporary screen “Reading Test Lot Info Please Wait”]
a. If the lot has not been registered, an error message will appear. Press
the right soft key to select OK and close the error message. Register the
lot (see “Test Lot Registration”, p. X) before running the test again.
b. If the lot has been registered, but high and low LQC measurements have
not passed for the test kit lot, the patient test will not be run and a
message indicating that passed LQC measurements are required will be
displayed.
[Insert screen shot of error message showing “Cassette Lot Locked”]
If high and low LQC measurements are required, follow these steps:
1. Press the right soft key to select OK and close the error message.
2. Discard the test cartridge prepared with the patient sample
3. Run high and low LQC measurements (for instructions, See “External
Liquid Quality Control”, p. X).
4. When high and low LQC measurements have passed, repeat steps 1-
9.
Astute140TMMeterPN:300005SRev:BAstuteMedical,Inc.20122012/03/20
37
10. If LQC measurements for the cartridge test lot have passed, a screen indicating
the amount of time remaining until test completion will be displayed. To abort the
test for any reason, select Cancel by pressing the left soft key.
11. Once the test is complete, the Meter drawer will automatically open and test
results will be displayed.
12. To manually print the patient test results if Autoprint is disabled:
a. Press the right soft key to display the Options pop-up menu.
b. When the options menu is displayed, Print is highlighted. To print the
patient test results, press the right soft key.
c. To hide the Options Menu, use the [down arrow navigation key] key to
highlight Hide Options and press the right soft key.
d. To return to the Main Menu, press the left soft key.
13. Remove the cartridge from the Meter drawer and discard according to the
laboratory’s standard practices for the type of biological sample used.
14. To run the next patient sample after viewing or printing the patient test results,
press the right soft key to display the Options pop-up menu. Use the [down
arrow navigation key] key to highlight Next Patient and press the right soft key.
Repeat steps 4-13.
ReviewandManageTestResults
Patient, LQC, and EQC test results can be recalled, printed, or sent to the LIS at any
time. To perform these functions, follow the instructions below.
PatientResults
1. Press the [picture of menu button] key to display the Main Menu.
2. Using the navigation keys, highlight the Review Data icon and press the right
soft key.
[Insert screen shot of Main Menu with Review Data icon highlighted]
3. When the Review Data menu is displayed, Patient Results is highlighted. Press
the right soft key to display the Patient Results screen.
Astute140TMMeterPN:300005SRev:BAstuteMedical,Inc.20122012/03/20
38
4. On the Patient Results screen, patient results can be selected by entering a
range of dates, a range of test sequence numbers, or by entering a specific
patient ID, sample ID, or Operator ID. Use the [up and down arrow navigation
keys] keys to select the desired data elements, and enter the data using the
numeric keypad or an external keyboard, if connected. (Note: date fields must
be entered in the format specified in the default settings)
5. Once the selection criteria are entered, press the right soft key to display a list of
the patient results meeting the selection criteria.
a. To print the list of patient test results
i. Display the Options pop-up menu by pressing the right soft key.
ii. Use the [down arrow navigation key] key to highlight Print List.
iii. After printing is complete, the list of patient results will again be
displayed.
b. To display and/or print detailed test results for a particular patient
sample
i. Use the [up and down navigation keys] to highlight the test of
interest.
ii. Press the right soft key to display the Options pop-up menu.
iii. When the Options pop-up menu is displayed, Show Details will be
highlighted. Press the right soft key to select Show Details.
iv. Details of the patient test results will be displayed. To print the test
results, press the right soft key to select Print.
v. After printing is complete, press the left soft key to return to the list
of patient results.
LQCResults
1. Press the [picture of menu button] key to display the Main Menu.
2. Using the navigation keys, highlight the Review Data icon and press the right
soft key.
[Insert screen shot of main menu with review data icon highlighted]
Astute140TMMeterPN:300005SRev:BAstuteMedical,Inc.20122012/03/20
39
3. When the Review Data menu is displayed, Patient Results is highlighted. Use
the [down arrow navigation key] key to highlight Liquid QC Results and press
the right soft key to display the Review LQC Results screen.
4. On the Review LQC Results screen, LQC results can be selected by entering a
range of dates, or by selecting a specific control lot or test lot number.
a. To select LQC results using a range of dates
i. Start date will be automatically highlighted. Use the numeric
keypad or an external keyboard, if connected, to enter a date (Note:
date fields must be entered in the format specified in the default
settings.)
ii. Use the [down arrow navigation key] key to highlight End Date and
enter the end date in the same manner and format.
b. To select LQC results from a specific control lot
i. Use the [down arrow navigation key] key to highlight Control Lot.
ii. The default selection is to display LQC results from all control lots.
To select a specific control lot, use the [left and right navigation
keys] keys to display the desired control lot.
c. To select LQC results from a specific test lot
i. Use the [down arrow navigation key] key to highlight Test Lot.
ii. The default selection is to display LQC results from all test lots. To
select a specific test lot, use the [left and right navigation keys] keys
to display the desired test lot.
5. Once all selection criteria are entered, press the right soft key to display a list of
the LQC results meeting the selection criteria.
a. To print the list of LQC test results
i. Display the Options pop-up menu by pressing the right soft key.
ii. Use the [down arrow navigation key] key to highlight Print List.
iii. After printing is complete, the list of LQC results will again be
displayed.
b. To examine and/or print test results for a particular patient sample
Astute140TMMeterPN:300005SRev:BAstuteMedical,Inc.20122012/03/20
40
i. Use the [up and down navigation keys] to highlight the LQC result
of interest.
ii. Press the right soft key to display the Options pop-up menu.
iii. When the Options pop-up menu is displayed, Show Details will be
highlighted. Press the right soft key to select Show Details.
iv. Detailed LQC results for the selected test will be displayed. To
print the detailed results, press the right soft key to select Print.
v. After printing is complete, press the left soft key to return to the list
of patient results.
EQCResults
1. Press the [picture of menu button] key to display the Main Menu.
2. Using the navigation keys, highlight the Review Data icon and press the right
soft key.
[[Insert screen shot of Main Menu with Review Data icon highlighted]
3. When the Review Data menu is displayed, Patient Results is highlighted. Use
the [down arrow navigation key] key to highlight Electronic QC Results and
press the right soft key to display the Review EQC Results screen.
4. On the Review EQC Results screen, all EQC controls can be selected, a
specific EQC control can be selected, or multiple results can be displayed by
entering a range of dates, as follows.
a. The default selection is for all EQC control results to be displayed. To
display all EQC control results, press the right soft key.
b. To select a specific EQC control device, use the [right and left arrow
navigation keys] keys to display the desired control device and press the
right soft key.
c. To select EQC results falling within a range of dates:
i. Use the down arrow navigation key to highlight Start Date. Use the
Astute140TMMeterPN:300005SRev:BAstuteMedical,Inc.20122012/03/20
41
numeric keypad or an external keyboard, if connected, to enter a
start date (Note: date fields must be entered in the format specified
in the default settings).
ii. Use the [down arrow navigation key] key to highlight End Date and
use the numeric keypad or an external keyboard, if connected, to
enter an end date (Note: date fields must be entered in the format
specified in the default settings).
5. Once all selection criteria are entered, press the right soft key to display a list of
the EQC results meeting the selection criteria.
a. To print the list of EQC test results
i. Display the Options pop-up menu by pressing the right soft key.
ii. Use the [down arrow navigation key] key to highlight Print List.
iii. After printing is complete, the list of EQC results will again be
displayed.
b. To examine and/or print test results for a particular EQC result
i. Use the [up and down navigation keys] to highlight the EQC result
of interest.
ii. Press the right soft key to display the Options pop-up menu.
iii. When the Options pop-up menu is displayed, Show Details will be
highlighted. Press the right soft key to select Show Details.
iv. Detailed EQC results for the selected test will be displayed. To
print the detailed results, press the right soft key to select Print.
v. After printing is complete, press the left soft key to return to the list
of patient results.
SendResultstoLIS
1. Press the [picture of menu button] key to display the Main Menu.
2. Using the navigation keys, highlight the Review Data icon and press the right
soft key.
[Insert screen shot of Main Menu with Review Data icon highlighted]
Astute140
TM
MeterPN:300005SRev:BAstuteMedical,Inc.20122012/03/20
42
3. When the Review Data menu is displayed, Patient Results is highlighted. Use
the [down arrow navigation key] key to highlight Send Results (LIS) and press
the right soft key.
4. On the Send Results to LIS screen, results for all patients, unsent patients, all
LQC, unsent LQC, all EQC, and unsent EQC may be sent to the LIS. Results for
all patients will be automatically highlighted. To choose any of the other types of
results to send to the LIS, use the [down arrow navigation key] key to highlight
the desired results and press the right soft key.
5. Once sending to the LIS is complete, the Send Results to LIS screen will again
be displayed. Repeat step 4 to send additional results to the LIS.
6.
Once all desired results have been sent to the LIS, press the left soft key to
return to the Review Data menu.
Shutdown
To power off the Meter, toggle the power switch on the back of the Meter upwards, and
the Meter should immediately shut down.
CareandMaintenance
No maintenance is required other than routine external cleaning, changing the paper,
and changing the batteries.
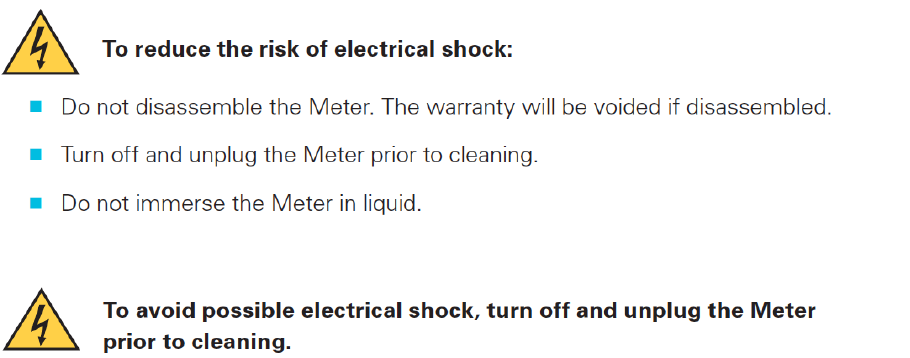
Remove batteries to reduce risk of electrical shock.
ClCleaningandDecontamination
Astute140TMMeterPN:300005SRev:BAstuteMedical,Inc.20122012/03/20
43
Gently wipe only the external surface of the Meter and the inside of the Meter drawer
with a soft cloth slightly dampened with disinfectant (70% alcohol or 0.5% bleach
solution). Do not clean with soap or other solutions. To open the Meter drawer,
press the eject button on the left side of the LCD display.
[Insert photo of the eject button with label]
ChangingthePaper
To change the paper in the internal printer, see instructions for “Installing and Changing
the Paper” on page XX.
ChangingtheBatteries
For information on when and how to change the batteries in the Meter, see “Batteries”
on page XX.
DisposingoftheBatteries
In conformance with Directive 2006/66/EC of the European Parliament and of the
Council of 6 September 2006 on batteries and accumulators and waste batteries and
accumulators, (also known as the EU Battery Directive), batteries are to be removed
from the Asute140 Meter and disposed of or recovered separately. Do not dispose of
the batteries in municipal waste; please check with your local waste disposal authorities
for specific requirements for battery disposal.
DisposingoftheMeter
In conformance with the WEEE (Waste Electrical and Electronic Equipment) Directive,
the Meter should be considered infectious waste. Dispose of the Meter according to the
Laboratory’s best practices for disposal of biohazardous waste.
LabelsandSymbols
The following table defines the symbols located on the bottom of the Meter.
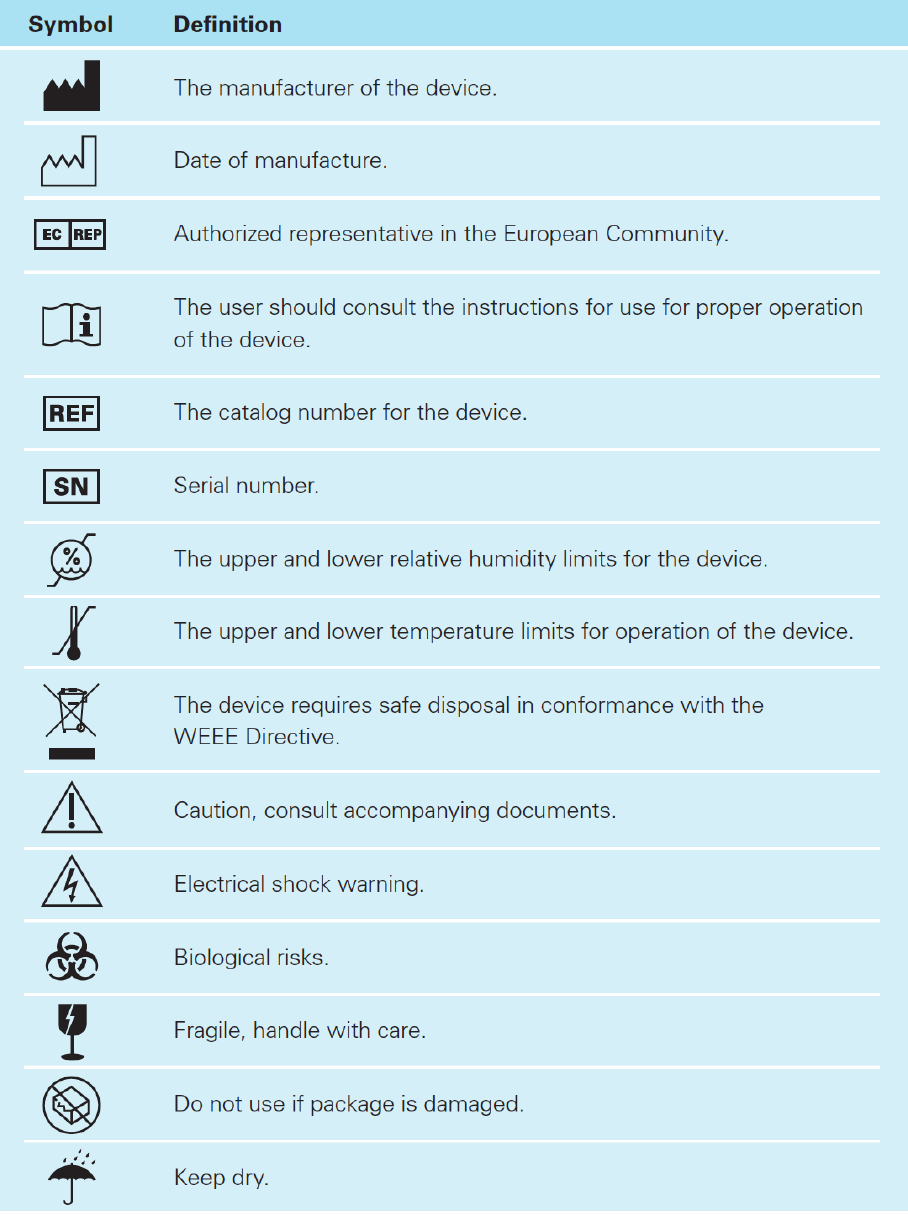
Astute140
TM
MeterPN:300005SRev:BAstuteMedical,Inc.20122012/03/20
44

Astute140TMMeterPN:300005SRev:BAstuteMedical,Inc.20122012/03/20
45
TroubleShootingTips
Problem Action to Take
Meter will not power on When AC power is being used:
1. Ensure that the proper AC power adapter is connected
correctly and securely to a power source and to the
meter.
2. If the problem continues, connect the AC power
adapter to a different power source
3. If the problem persists, call Astute Medical, Inc.
Technical Support (for contact information, see
“Contacting Astute Medical, Inc.” on p. X.
When battery power is being used:
1. Disconnect the AC power adapter from the meter.
2. Ensure that the 4 AA batteries are correctly installed,
with the ends of the batteries facing up according to
the + and – signs diagrammed in the battery
compartment (see p. X).
3. If the problem continues, replace the 4 AA batteries
4. If the problem persists, call Astute Medical, Inc.
Technical Support (for contact information, see
“Contacting Astute Medical, Inc.” on p. X.
Test cartridge drawer is
jammed
Press the Eject button.
Do not pull or force the drawer open or closed. Reset the
meter by disconnecting the AC power adapter (or removing
the AA batteries if the power adapter is not being used). Wait
30 seconds and reconnect the AC power adapter (or reinsert
the batteries if the AC power adapter is not being used). If
the drawer is still jammed, insert a paper clip into the small
hole on the back of the meter to manually open the drawer.
[Insert photo of paper clip being inserted into small hole]
If the drawer still does not open, call Astute Medical, Inc.
Technical Support (for contact information, see “Contacting
Astute Medical, Inc.” on p. X.).
Keypad and/or Power
On/Off button do not
respond
Reset the meter by disconnecting the AC power adapter (or
removing the AA batteries if the power adapter is not being
used). Wait 30 seconds and reconnect the AC power
adapter (or reinsert the batteries if the AC power adapter is
not being used). If the keypad still does not respond, call
Astute Medical, Inc. Technical Support (for contact
information, see “Contacting Astute Medical, Inc.” on p. X.).

Astute140TMMeterPN:300005SRev:BAstuteMedical,Inc.20122012/03/20
46
Unable to register
cartridge lot
Operators can only register a cartridge lot if permission has
been granted by the Supervisor in the default settings. If
logged in as an Operator, contact the Supervisor to verify
registration permissions. If Operator permission has been
granted, or if logged in as a Supervisor, and a cartridge lot
still cannot be registered, memory capacity may be full.
Delete a registered cartridge lot and try to register a new
cartridge lot. If this approach fails, then call Astute Medical,
Inc.Technical Support (for contact information, see
“Contacting Astute Medical, Inc.” on p. X.).
Unable to register an EQC
Device
Operators can only register an EQC device if permission has
been granted by the Supervisor in the default settings. If
logged in as an Operator, contact the Supervisor to verify
registration permissions. If Operator permission has been
granted, or if logged in as a Supervisor, and an EQC device
still cannot be registered, memory capacity may be full.
Delete a registered EQC device and try to register a new
EQC device. If this approach fails, then call Astute Medical,
Inc.Technical Support (for contact information, see
“Contacting Astute Medical, Inc.” on p. X.).
Unable to register a liquid
control lot
Operators can only register a liquid control lot if permission
has been granted by the Supervisor in the default settings. If
logged in as an Operator, contact the Supervisor to verify
registration permissions. If Operator permission has been
granted, or if logged in as a Supervisor, and liquid control lot
still cannot be registered, memory capacity may be full.
Delete a registered LQC lot and try to register a new LQC lot.
If this approach fails, then call Astute Medical, Inc. Technical
Support (for contact information, see “Contacting Astute
Medical, Inc.” on p. X.).
Unable to run EQC Make sure the EQC device has been registered. If the device
has not been registered, register it and try running EQC again
(See “EQC Device Registration” on p. X for registration
instructions). If the device has been properly registered and
EQC will not run, call Astute Medical, Inc. Technical Support
(for contact information, see “Contacting Astute Medical, Inc.”
on p. X.).
Unable to run LQC Make sure both high and low liquid control lots have been
registered. If the liquid control lots have not been registered,
register them one at a time and try to run LQC again (See
“Liquid Control Lot Registration” for registration instructions).
If both high and low liquid control lots have been registered
and LQC will not run, call Astute Medical, Inc. Technical
Support (for contact information, see “Contacting Astute
Medical, Inc.” on p. X.).

Astute140TMMeterPN:300005SRev:BAstuteMedical,Inc.20122012/03/20
47
ErrorMessages
Error Type What it Means Action to Take
Start-up/Self-test Error Hardware, initialization,
or check firmware errors
during start-up.
Power the Meter off and then on
again. If the self-test fails a
second time, discontinue use and
call Astute Medical, Inc. Technical
Support (for contact information,
see “Contacting Astute Medical,
Inc.” on p. X.).
Login Error The user ID or password
is incorrect, or the user is
expired or disabled.
Carefully re-enter a valid user ID
and password. If the Error
persists, call Astute Medical, Inc.
Technical Support (for contact
information, see “Contacting
Astute Medical, Inc.” on p. X.).
Cartridge Errors
Barcode reader error The barcode was not
read properly.
Check that the barcode is not
damaged or incomplete, and
rescan. If the barcode repeatedly
cannot be read, retest with a
cartridge with a valid barcode. If
the problem persists, call Astute
Medical, Inc. Technical Support
(for contact information, see
“Contacting Astute Medical, Inc.”
on p. X.).
No such test lot error The test lot is not
registered.
Register the test lot (See “Test
Lot Registration, p. X). If the
problem persists, call Astute
Medical, Inc. Technical Support
(for contact information, see
“Contacting Astute Medical, Inc.”
on p. X.).
Test lot expired error The test lot is expired. Properly discard the expired test
lot and use a valid test lot.
Test Lot Locked Passing positive and
negative LQC
measurements for the
test cartridge lot is
required.
Perform LQC for the test lot. If the
problem persists, call Astute
Medical, Inc. Technical Support
(for contact information, see
“Contacting Astute Medical, Inc.”
on p. X.).
Measurement Errors
Measurement Locked A passing EQC
measurement is
required.
Perform an EQC measurement. If
it fails repeatedly call Astute
Medical, Inc. Technical Support

Astute140TMMeterPN:300005SRev:BAstuteMedical,Inc.20122012/03/20
48
(for contact information, see
“Contacting Astute Medical, Inc.”
on p. X.).
Print Errors
Printer out of paper error The internal printer is out
of paper.
Refill printer with paper. See
“Installing or Changing the Paper”
on p.X for instructions.
There is a paper jam in
the internal printer.
Open internal printer cover and
remove the paper roll. Reinsert
the roll according to instructions
given on p. X.
EndUserLicenseAgreement
PURCHASE AND/OR USE OF THIS PRODUCT SHALL CONSTITUTE
ACKNOWLEDGMENT AND ACCEPTANCE OF THESE TERMS AND CONDITIONS.
Astute Medical, Inc. hereby grants to the purchaser of this product the limited license to
use this product solely for the purpose as specified on the approved label therefor. You
hereby agree that you shall use this product solely for such purpose and for no other
purpose.
If you do not agree each of the terms and conditions set forth in this End User License
Agreement, please contact Astute Medical, Inc. within ten (10) days after receipt of this
product to return the unused and unopened product for a full refund.
LIMITED WARRANTY. FOR THE APPLICABLE WARRANTY PERIOD, ASTUTE
MEDICAL WARRANTS THAT THIS PRODUCT SHALL BE (A) OF GOOD QUALITY
AND FREE OF MATERIAL DEFECTS, (B) FUNCTION IN ACCORDANCE WITH THE
MATERIAL SPECIFICATIONS REFERENCED IN THE PRODUCT MANUAL, AND
(C) APPROVED BY THE PROPER GOVERNMENTAL AGENCIES REQUIRED FOR
THE SALE OF PRODUCTS FOR THEIR INTENDED USE (THE “LIMITED
WARRANTY”). IF THIS PRODUCT FAILS TO MEET THE REQUIREMENTS OF THE
LIMITED WARRANTY, THEN AS CUSTOMER’S SOLE REMEDY, ASTUTE MEDICAL
SHALL EITHER REPAIR OR REPLACE, AT ASTUTE MEDICAL'S DISCRETION, THIS
PRODUCT. EXCEPT FOR THE LIMITED WARRANTY STATED IN THIS SECTION,

Astute140TMMeterPN:300005SRev:BAstuteMedical,Inc.20122012/03/20
49
ASTUTE MEDICAL DISCLAIMS ANY AND ALL WARRANTIES, EXPRESS OR
IMPLIED, INCLUDING BUT NOT LIMITED TO, ANY WARRANTY OF
MERCHANTABILITY, FITNESS FOR A PARTICULAR PURPOSE AND NON-
INFRINGEMENT REGARDING THIS PRODUCT. ASTUTE MEDICAL'S MAXIMUM
LIABILITY WITH ANY CUSTOMER CLAIM SHALL NOT EXCEED THE NET
PRODUCT PRICE PAID BY CUSTOMER. NO PARTY SHALL BE LIABLE TO ANY
OTHER PARTY FOR SPECIAL, INCIDENTAL OR CONSEQUENTIAL DAMAGES,
INCLUDING, WITHOUT LIMITATION, LOSS OF BUSINESS, PROFITS, DATA OR
REVENUE, EVEN IF A PARTY RECEIVES NOTICE IN ADVANCE THAT THESE
KINDS OF DAMAGES MIGHT RESULT.
The Limited Warranty above shall not apply if this product has been subjected to
physical abuse, misuse, abnormal use, use inconsistent with the Product Manual or
Insert, fraud, tampering, unusual physical stress, negligence or accidents. Any warranty
claim by the purchaser pursuant to the Limited Warranty shall be made in writing within
the applicable Limited Warranty period.
You agree to shall use this product in strict accordance with all applicable local, state
and federal laws, regulations and guidelines, and industry practices.
You further agree that you shall not resell or otherwise transfer this product to any other
person or entity, without the prior express written approval of Astute Medical, Inc.
Information about commercial resale or distribution of the products of Astute Medical,
Inc. may be obtained by e-mailing us at info@astutemedical.com or by writing to us at
Astute Medical Inc., General Atomics Court, MS 02/641, San Diego, CA, 92121, USA.
This End User License Agreement sets forth the complete and entire agreement of the
parties with respect to the subject matter hereof and supersedes and terminates all prior
representations, agreements and understandings between the parties. No amendment
or addition to this End User License Agreement shall be binding upon the parties unless
reduced to writing and signed by the respective authorized officers of the parties.

Astute140TMMeterPN:300005SRev:BAstuteMedical,Inc.20122012/03/20
50
NephroCheck™ products and/or the technology incorporated therein and their use may
be covered by one or more patents or pending patent applications. For more
information, please visit www.astutemedical.com..
ASTUTEMEDICALTM,theAstuteMedicalLogo,NEPHROCHECKTM,andASTUTE140TMare
trademarksofAstuteMedical,Inc.
GlossaryofTerms(listedalphabetically)
Analyte A substance or chemical constituent
that is undergoing analysis.
Assay Analysis to determine the presence,
absence, or quantity of one or more
components of a substance
Barcode A code consisting of a group of printed
and variously patterned bars and
spaces and sometimes numerals that
is designed to be scanned and read
into computer memory and that
contains information (as identification)
about the object it labels
Barcode Reader An electronic device for reading printed
barcodes
Calibration The act of checking, adjusting, or
determining the graduations of a
quantitative measuring instrument by
comparison with a standard.
Electronic Quality Control (EQC) A procedure to checks the calibration,
alignment, optical system, and other
internal systems of the Meter to confirm
that the Meter is functioning properly.
Immunoassay A technique of identifying a substance

Astute140TMMeterPN:300005SRev:BAstuteMedical,Inc.20122012/03/20
51
by its ability to bind to an antibody
In Vitro Diagnostic Any medical device which is a reagent,
reagent product, calibrator, control
material, kit, instrument, apparatus,
equipment, or system, whether used
alone or in combination, intended by
the manufacturer to be used in vitro for
the examination of specimens,
including blood and tissue donations,
derived from the human body, solely or
principally for the purpose of providing
information:
Concerning a physiological or
pathological state, or
Concerning a congenital
abnormality, or
To determine the safety and
compatibility with potential
recipients, or
To monitor therapeutic
measures”
Liquid Quality Control (LQC) Positive and negative external quality
control procedures to verify the
precision and accuracy of the assay
procedure, including the performance
of the meter, test cartridges and assay-
specific reagents.
Operator User Type of user with privileges to perform
day to day meter operations.
Quality Control (QC) An aggregate of activities designed to
ensure adequate quality, especially in

Astute140TMMeterPN:300005SRev:BAstuteMedical,Inc.20122012/03/20
52
manufactured products, or accuracy,
reliability, and consistency of data,
assays, or tests.
RFID card Radio Frequency Identification: A data
collection technology that uses tags for
storing data. The RFID card contains
information that can be automatically
transmitted to the Meter via an internal
reader.
Supervisor User Type of user with privileges to perform
advanced meter operations, in addition
to operator user functions
Test Cartridge A module that holds the biological
sample and is designed to be inserted
into the meter for testing. The cartridge
contains reagents that react with the
biological sample, allowing the Meter to
detect the level of the analyte present
in the sample.
Astute140TMMeterPN:300005SRev:BAstuteMedical,Inc.20122012/03/20
53
Appendix
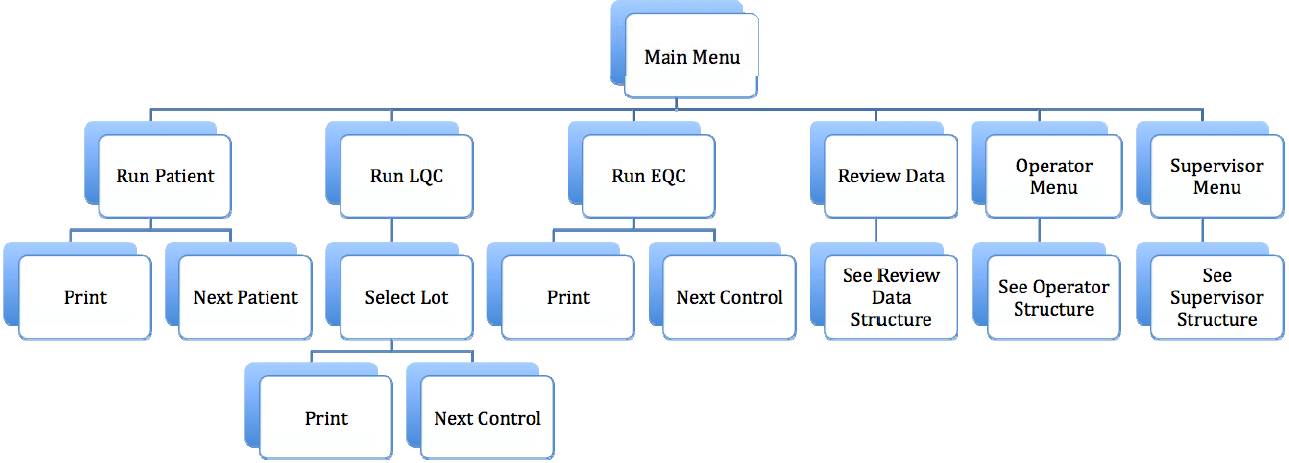
Astute140
TM
MeterPN:300005SRev:BAstuteMedical,Inc.20122012/03/20
54
MainMenuStructure
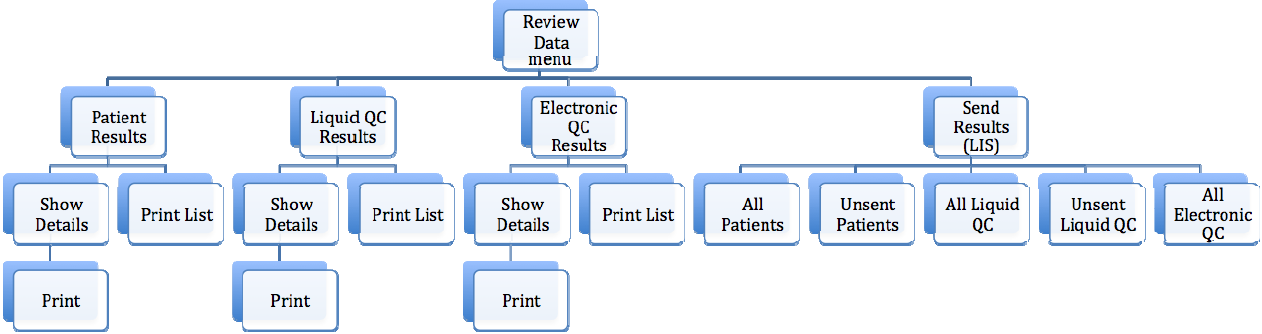
Astute140
TM
MeterPN:300005SRev:BAstuteMedical,Inc.20122012/03/20
55
ReviewDataMenuStructure

Astute140
TM
MeterPN:300005SRev:BAstuteMedical,Inc.20122012/03/20
56
OperatorMenuStructure
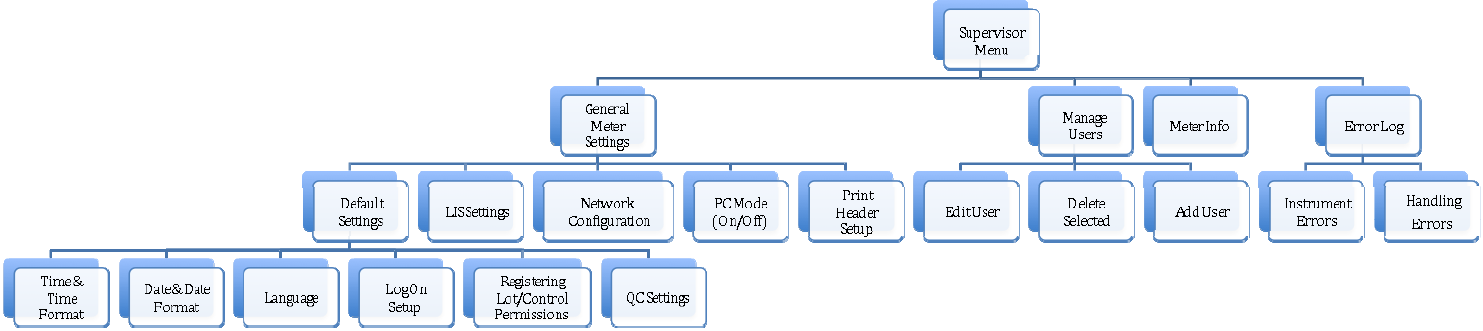
Astute140
TM
MeterPN:300005SRev:BAstuteMedical,Inc.20122012/03/20
57
SupervisorMenuStructure

Astute140
TM
MeterPN:300005SRev:BAstuteMedical,Inc.20122012/03/20
58
Manufactured for Astute Medical, Inc.
3550 General Atomics Ct.
Building 2
San Diego, CA 92121
USA
MDSS GmbH
Schiffgraben 41
30175 Hannover, Germany