La Crosse Technology TX141TH-A In/Out Thermometer User Manual manual update 308 1711 TX141TH A
La Crosse Technology Ltd. In/Out Thermometer manual update 308 1711 TX141TH A
Users Manual
1
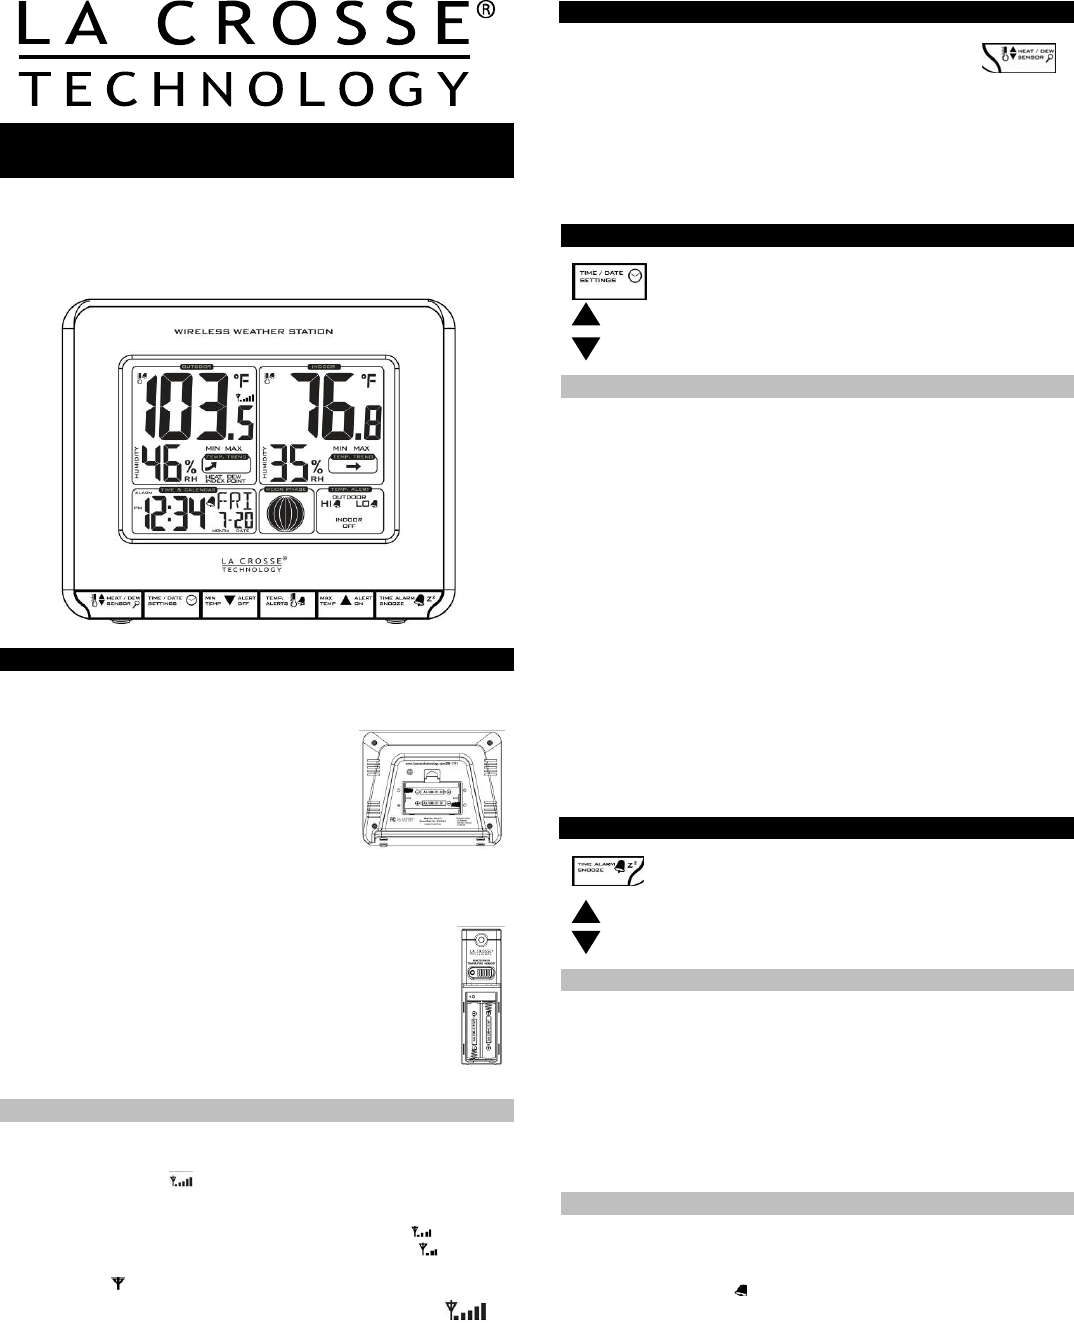
Wireless Weather Station
Model 308-1711 | Quick Setup Guide
The Wireless Weather Station features manual set time, date, time alarm,
Outdoor/Indoor temperature alerts, and moon phase. Monitor temperature
and humidity, track temperature trends and set customizable temperature
alerts--all in one convenient device. Wireless transmission range of over
200 feet (60 meters) in open air, from transmitter to weather station.
SETUP INSTRUCTIONS STEP BY STEP
STEP 1:
• Remove battery cover from the weather station. Slide tab down and pull
out to remove the battery cover.
• Insert 2 NEW AA batteries (not included) into
the back of the weather station. Observe the
correct polarity (see marking inside the battery
compartment). The weather station will light up
and show, indoor temperature, humidity and
time.
• Do Not Mix Old and New Batteries
• Do Not Mix Alkaline, Standard, Lithium or Rechargeable Batteries
STEP 2:
• Ensure that the transmitter is within 10 feet of the Weather
Station.
• To remove battery cover from TX141TH-A transmitter, slide the
battery cover down and lift off the front of the transmitter.
• Insert 2 NEW AA batteries (not included) into the transmitter.
Observe the correct polarity.
• Within 3 minutes the weather station will show readings in the
outdoor temperature area on the LCD.
• Note: Allow the weather station and the transmitter to stay
within 10 feet of each other for the first 15 minutes of set up.
TRANSMITTER SIGNAL STRENGTH
z After the batteries are inserted, the weather station will search for the
outdoor temperature/humidity transmitter for 3 minutes.
z The antenna symbol will flash during reception, and temperature
display will be dashes “---“.
z The antenna symbol will scroll during signal synchronization.
z If synchronization fails once, the antenna will lose one bar.
z If synchronization fails twice, the antenna will lose two bars.
z If reception continuously fails to receive 5 times, the antenna symbol will
be shown as .
z The antenna will show full display with successful RF (radio
frequency) reception.
TROUBLESHOOTING
z If the outdoor temperature is not displayed after three
minutes, hold the SENSOR button on the weather station
for three seconds to search for outdoor transmitter.
z Next, press the TX button on the outdoor transmitter to send signal.
z If it still does not receive the outdoor temperature, remove batteries from
both the weather station and the transmitter for 15 minutes then repeat
the setup instructions from step 1.
z The maximum transmitting range in open air is over 200-feet (60
meters). Obstacles such as walls, windows, stucco, concrete, and large
metal objects can reduce the range.
TIME/DATE
The TIME/DATE button will move through the program
menu and confirm settings.
Use the UP ARROW button to increase a value.
Use the DOWN ARROW button to decrease a value.
SET TIME AND DATE
Hold the TIME/DATE button for three seconds to enter time set mode.
z YEAR: The Year will flash. Use the ARROW buttons to choose the year,
and press the TIME/DATE button to confirm and move to the month.
z MONTH: The Month will flash, use the ARROW buttons to choose the
month, and press the TIME/DATE button to confirm and move to the
date.
z DATE: The Date will flash. Use the ARROW buttons to choose the date,
and press the TIME/DATE button to confirm and move to 12/24 hour
time format.
z 12/24-HOUR: The time format 12/24 will flash. Use the ARROW buttons
to choose 12-hour or 24-hour time format and press the TIME/DATE
button to confirm and move to hour.
z HOUR: The Hour will flash. Use the ARROW buttons to choose the hour,
and press the TIME/DATE button to confirm and move to minutes.
z MINUTES: The Minutes will flash. Use the ARROW buttons to choose
the minutes, and press the TIME/DATE button to confirm and move to
Fahrenheit/Celsius.
z FAHRENHEIT/CELSIUS: °F or °C will flash. Use the ARROW buttons
button to select Fahrenheit or Celsius. Press and release the
TIME/DATE button to confirm and exit the program menu.
Note: When no buttons are pressed for ten seconds, the weather station
will save the last change and default back to normal time and
temperature display mode.
TIME ALARM
The TIME ALARM button moves through the alarm setting
mode and confirms the final setting.
Use the UP ARROW button to increase a value.
Use the DOWN ARROW button to decrease a value.
SET TIME ALARM
From normal time and temperature display mode, press and release the
TIME ALARM button once to show alarm time. Hold the TIME ALARM
button for three seconds to enter alarm set mode.
z HOUR: The Hour will flash. Use the ARROW buttons to set the hour,
and press TIME ALARM button to confirm and switch to minutes.
z MINUTES: The Minutes will flash. Use the ARROW buttons to set the
minutes, and press TIME ALARM button to confirm.
z Press the TIME/DATE button to return to normal mode
Note: When no buttons are pressed for ten seconds, the weather station
will save the last change and default back to normal mode.
ACTIVATE/DEACTIVATE TIME ALARM
z From normal time and temperature display mode, press and release the
TIME ALARM button once to show alarm time.
z Press and release the TIME ALARM button repeatedly to turn ON/OFF
alarm. The alarm icon appears when alarm is activated.
Note: The alarm will ring for 2 minutes then turn off.
2
SNOOZE
• When the alarm sounds, press the TIME ALARM button to snooze the
alarm for 10 minutes.
• The snooze option can be repeated three times.
Note: While the alarm sounds, press any button except the TIME ALARM
button to turn the alarm off.
TEMPERATURE TREND ARROWS
The indoor and outdoor temperature trend
indicators will update every 30 minutes or less.
These trends represent temperature changes
over the past three hours.
UP: Temperature rising more than 2°F /1°C in the past three hours
RIGHT: Temperature has not changed more than 2°F /1°C in the past
three hours.
DOWN: Temperature falling more than 2°F /1°C in the past three hours
MIN/MAX TEMPERATURES
The weather station will show the daily minimum and maximum
temperatures each day starting at midnight (12:00 AM). The weather station
automatically resets the min/max temperatures at midnight (12:00 AM).
• View MIN data: Press and release the MIN TEMP button to view the
minimum Indoor and Outdoor Temperatures.
• Reset MIN data: Hold the MIN TEMP button for 5
seconds and the Indoor and all Outdoor Minimum Temperatures will be
reset to current temperatures.
• View MAX data: Press and release the MAX TEMP button to view the
maximum Indoor and Outdoor Temperatures.
• Reset MAX data: Hold the MAX TEMP button for 5
seconds and the Indoor and all Outdoor Maximum
Temperatures will be reset to current temperatures.
Note: When no buttons are pressed for ten seconds, the weather station
will return to display the current temperature.
TEMPERATURE ALERTS
Alert values are set when they flash in the outdoor and indoor temperature
areas. Temperature alerts are turned on or off in the Temperature Alert box.
From normal time and temperature display mode, press and release the
TEMP ALERT button to select:
o Outdoor HI
o Outdoor LOW
o Indoor HI
o Indoor LOW
One or all the temperature alerts may be set.
z Range for indoor temperature alert: +32°F to +122°F (0°C to 50°C)
z Range for outdoor temperature alert: -40°F to 140°F (-40°C to 60°C)
SET ALERTS
Hold the TEMP ALERT button for three seconds, until the
weather station beeps, to enter alert setting.
z OUTDOOR HI alert will flash in the outdoor temperature area. Press the
ARROW buttons to set the alert value, and press the TEMP ALERT
button to confirm. Then press the TEMP ALERT button again switch to
OUTDOOR LOW setting.
z OUTDOOR LOW alert will flash in the outdoor
temperature area. Press the ARROW buttons to set the
alert value, and press the TEMP ALERT button to
confirm. Then press the TEMP ALERT button again switch to INDOOR
HI setting.
z INDOOR HI alert will flash in the indoor temperature area. Press the
ARROW buttons to set the alert value, and press the TEMP ALERT
button to confirm. Then press the TEMP ALERT button again switch to
INDOOR LOW setting.
z INDOOR LOW display will flash in the indoor
temperature area. Press the ARROW buttons to
choose the value, and press the TEMP ALERT button
to confirm and exit.
TEMPERATURE ALERTS ON/OFF
z From normal time and temperature display mode, press and release the
TEMP ALERT button to toggle between:
o Outdoor HI
o Outdoor LOW
o Indoor HI
o Indoor LOW
z Press the MAX TEMP button to turn the selected alert ON. The alert icon
appears when alarm is activated.
z Press the MIN TEMP button to turn the alert OFF.
Note: When no temperature alerts are set, the
Temperature Alert area will show ALERTS OFF.
TEMPERATURE ALERT RINGS
z When a temperature alert is ringing, the corresponding alert symbol
will flash.
z The alert will ring for five seconds every minute, until the
temperature is out of alert range.
z Press any button to stop alert. The alert symbol will still
show.
z Turn Alert OFF: In normal mode, press and release the TEMP ALERT
button to select the alert to turn off. With HI or LOW alert selected, press
the MIN button to turn that alert OFF.
HEAT INDEX & DEW POINT TEMPERATURE
HEAT INDEX
Heat Index combines the effects of heat and humidity. It is the apparent
temperature of how hot it feels to a human being. As humidity increases,
the body is unable to cool effectively. The temperature will feel warmer.
View Heat Index: From normal time and temperature display mode, press
the HEAT/DEW button once and Heat Index will show instead of the
outdoor ambient temperature.
Note: Heat index will be the same number as the
temperature until the outdoor temperature is above 80
degrees °F (26.7°C)
DEW POINT TEMPERATURE
Dew Point Temperature is the saturation point of the air, or the temperature
to which the air has to cool in order to create condensation. The higher the
dew points, the higher the moisture content of the air at a given temperature.
View Dew Point Temperature: From normal time and temperature display
mode, press the HEAT/DEW button twice and Dew Point will show instead
of the outdoor ambient temperature. The words Dew Point
will show near outdoor temperatures.
Note: Dew Point is lower than the actual temperature.
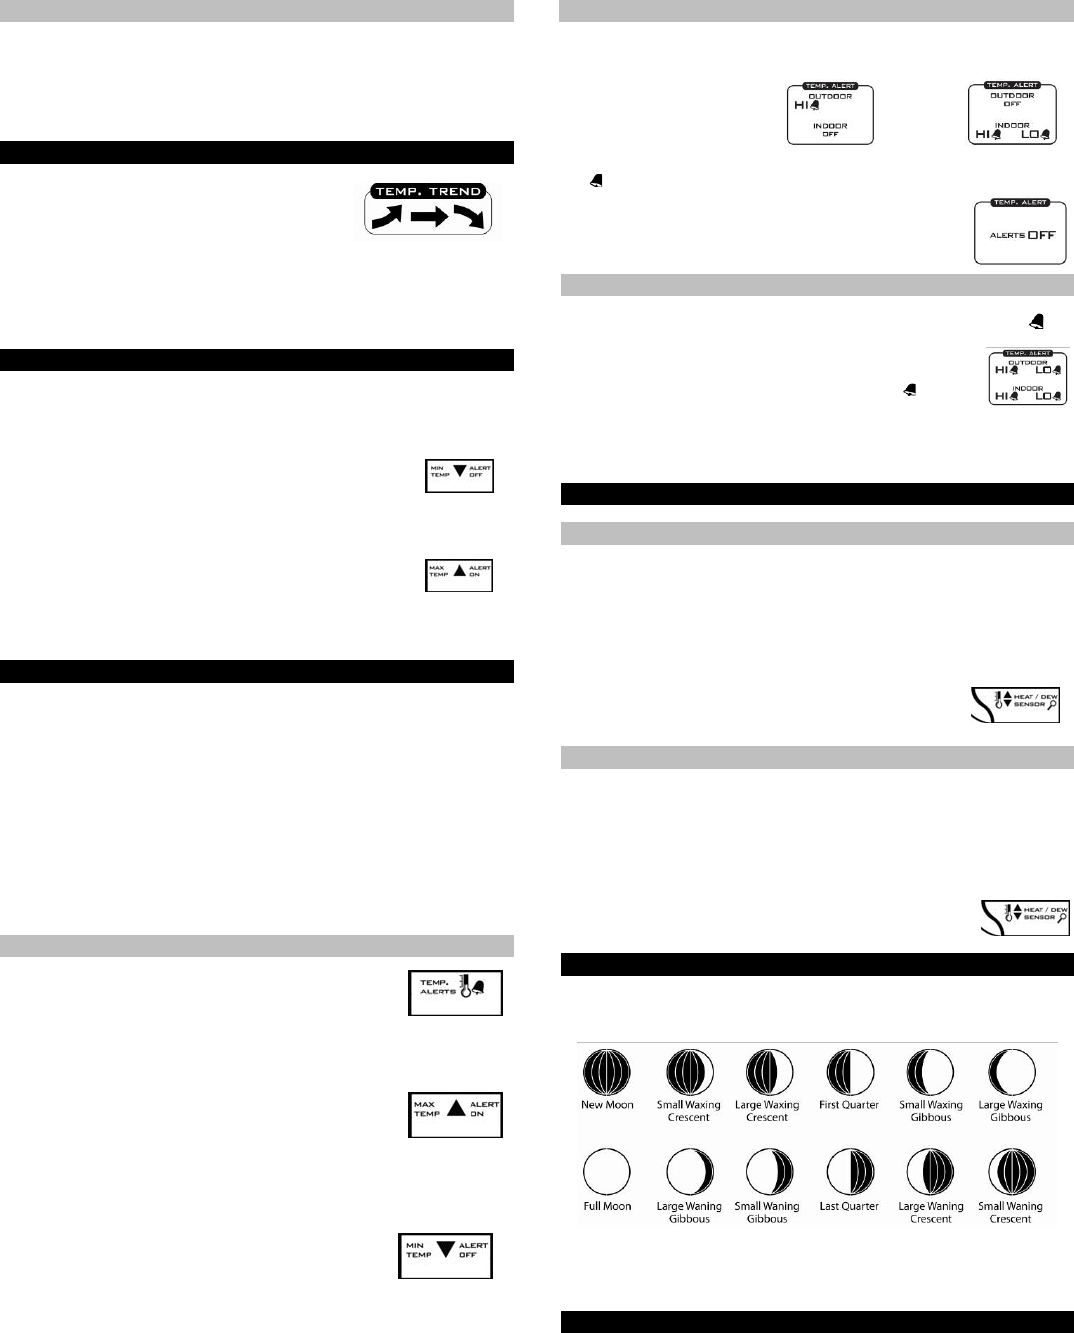
MOON PHASE
The Moon Phase is based on the date manually set on the weather station.
The moon is divided by 6 sections, showing a total of 12 phases of the
moon.
LOW BATTERY
3
• When this low battery icon appears in the indoor (IN) reading section,
replace the batteries in the weather station.
• When this low battery icon appears in the outdoor (OUT) readings
section, replace the batteries in the outdoor transmitter.
POSITION THE WEATHER STATION
Choose a location for the weather station that is within range (200 feet, 60
meters) of the outdoor transmitter. The weather station has a build in base
stand to sit on a table or desk.
• Choose a location 6 feet or more from electronics such as
cordless phones, gaming systems, televisions, microwaves,
routers, baby monitors, etc., which can prevent signal
reception.
• Be aware of electrical wires and plumbing within a wall.
• Best reception is achieved when the front or the back of the
weather station is facing the outdoor transmitter. This allows
a larger portion of the antenna to receive a signal.
POSITION THE WIRELESS OUTDOOR TRANSMITTER
Once the weather station shows the outdoor temperature/humidity, place it
and the transmitter in the desired locations and wait approximately one hour
before permanently mounting the transmitter to ensure that there is proper
reception. The transmitter should be mounted vertically, in a shaded,
protected area, at least 6 feet from the ground to avoid damage and ensure
accurate readings. The transmitter is water resistant, not waterproof and
should not be placed anywhere it will become submerged in water or
subject to standing water or snow.
Choose a location for the transmitter that is within range of
the Weather station and under an overhang for accuracy.
The maximum transmitting range in open air is over 200-feet
(60 meters).
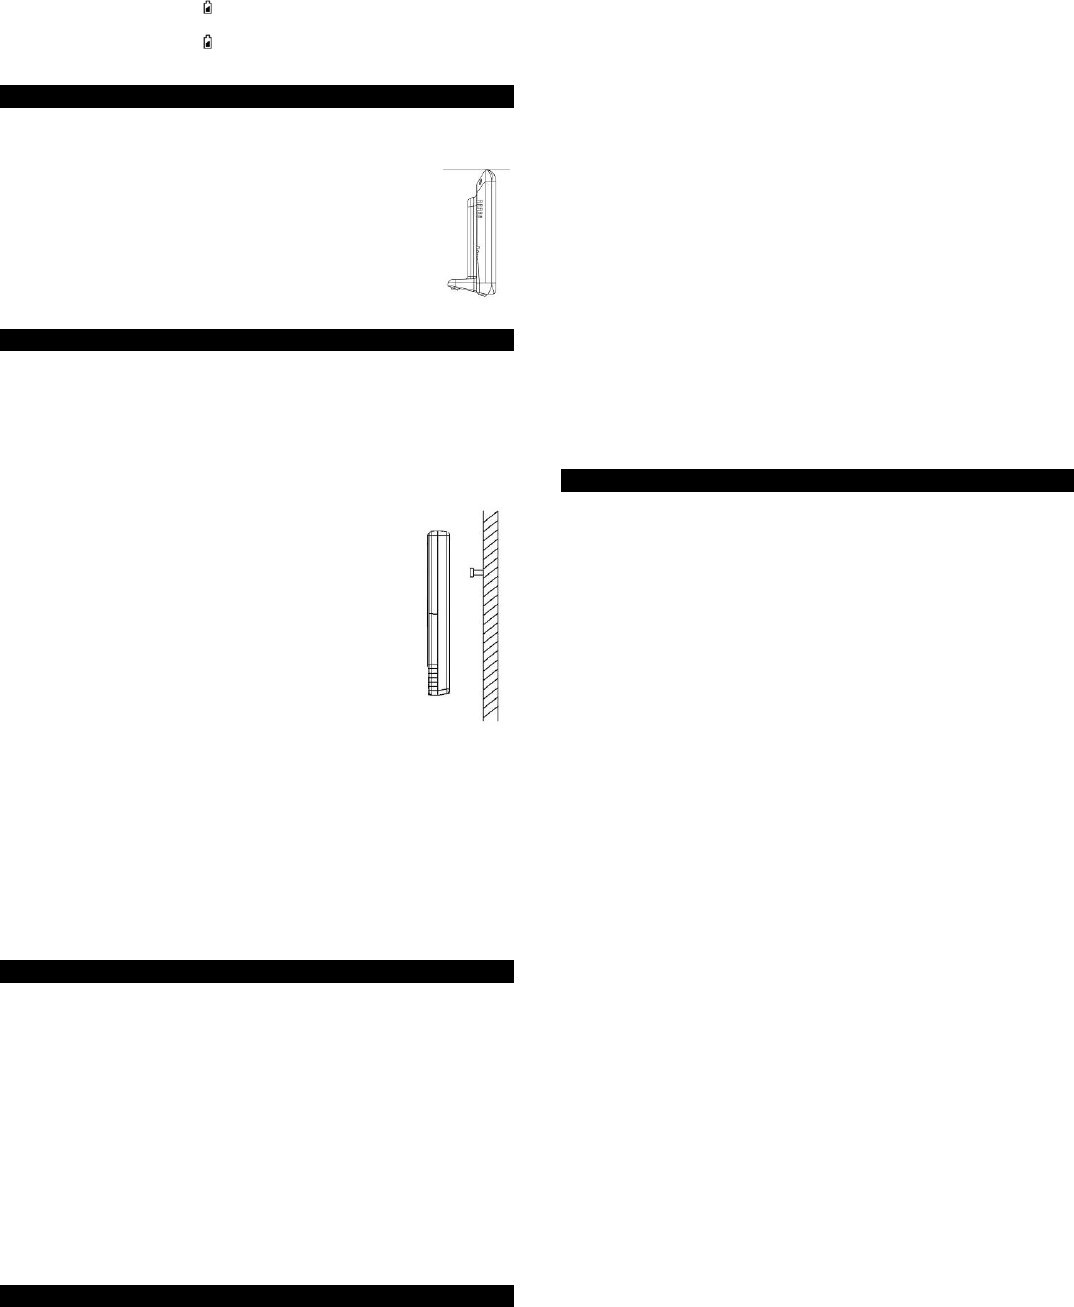
Option 1:
• Install one mounting screw (not included) into a wall
leaving approximately ½ of an inch (12.7mm) extended.
• Place the transmitter onto the screw, using the hanging
hole on the backside.
• Gently pull the transmitter down to lock the screw into
place.
Option 2:
• Insert the mounting screw (not included) through the front of the
transmitter and into the wall.
• Tighten the screw to snug (do not over tighten).
To achieve a true temperature/humidity reading, mount where direct
sunlight cannot reach the outdoor transmitter. Mount the outdoor
transmitter on a North-facing wall or in any well shaded area. Under an
eave or deck rail work well. The maximum transmitting range in open air is
over 200-feet (60 meters). Obstacles such as walls, windows, stucco,
concrete, and large metal objects can reduce the range. Place the
transmitter at least 6 feet in the air to improve signal transmission.
CARE AND MAINTENANCE
• Do Not Mix Old and New Batteries
• Do Not Mix Alkaline, Standard, Lithium or Rechargeable Batteries
• Do not expose the weather station to extreme temperatures, vibration or
shock.
• Keep weather station dry.
• Clean weather station with a soft damp cloth. Do not use solvents or
scouring agents.
• The weather station is not a toy. Keep it out of reach of children.
• The weather station is not to be used for medical purpose or for public
information; it is for home use only.
• The specifications of this weather station may change without prior notice.
• Improper use or unauthorized opening of housing will void the warranty.
• If the weather station does not work properly, change the batteries.
SPECIFICATION
Indoor:
Temperature Range: +32°F to +122°F (0°C to 50°C)
Interval: About every 30 seconds
Outdoor:
Temperature Range: -40°F to 140°F (-40°C to 60°C)
Distance: Over 200 ft. (60 meters)
RF 433MHz (open air)
Interval: About every 50 seconds
Power:
Weather Station: 2-AA, IEC, LR6 batteries (not included)
TX141TH-A Transmitter: 2-AA, IEC, LR6 batteries (not included)
Battery Life:
TX141TH-A Transmitter
Battery Life: Battery life is over 24 months when
using reputable Alkaline battery brands.
Weather Station
Battery Life: Battery life is over 12 months when
using reputable Alkaline battery brands.
Dimensions:
Weather Station: 5.40” L x 1.68” W x 4.40” H
(137.2 mm L x 42.8 mm W x 111.8 mm H)
TX141TH-A Transmitter: 1.57" L x 0.79" W x 5.12" H
(40 x 20 x 130 mm)
WARRANTY INFORMATION
La Crosse Technology, Ltd provides a 1-year limited warranty on this
product against manufacturing defects in materials and workmanship.
This limited warranty begins on the original date of purchase, is valid only
on products purchased and used in North America and only to the original
purchaser of this product. To receive warranty service, the purchaser must
contact La Crosse Technology, Ltd for problem determination and service
procedures. Warranty service can only be performed by a La Crosse
Technology, Ltd authorized service center. The original dated bill of sale
must be presented upon request as proof of purchase to La Crosse
Technology, Ltd or La Crosse Technology, Ltd’s authorized service center.
La Crosse Technology, Ltd will repair or replace this product, at our option
and at no charge as stipulated herein, with new or reconditioned parts or
products if found to be defective during the limited warranty period specified
above. All replaced parts and products become the property of La Crosse
Technology, Ltd and must be returned to La Crosse Technology, Ltd.
Replacement parts and products assume the remaining original warranty,
or ninety (90) days, whichever is longer. La Crosse Technology, Ltd will
pay all expenses for labor and materials for all repairs covered by this
warranty. If necessary repairs are not covered by this warranty, or if a
product is examined which is not in need or repair, you will be charged for
the repairs or examination. The owner must pay any shipping charges
incurred in getting the La Crosse Technology, Ltd product to a La Crosse
Technology, Ltd authorized service center. La Crosse Technology, Ltd will
pay ground return shipping charges to the owner of the product to a USA
address only.
The La Crosse Technology, Ltd warranty covers all defects in material and
workmanship with the following specified exceptions: (1) damage caused by
accident, unreasonable use or neglect (including the lack of reasonable and
necessary maintenance); (2) damage occurring during shipment (claims
must be presented to the carrier); (3) damage to, or deterioration of, any
accessory or decorative surface; (4) damage resulting from failure to follow
instructions contained in the owner’s manual; (5) damage resulting from the
performance of repairs or alterations by someone other than an authorized
La Crosse Technology, Ltd authorized service center; (6) units used for
other than home use (7) applications and uses that this product was not
intended or (8) the products inability to receive a signal due to any source of
interference.
This warranty covers only actual defects within the product itself, and does
not cover the cost of installation or removal from a fixed installation, normal
set-up or adjustments, claims based on misrepresentation by the seller or
performance variations resulting from installation-related circumstances.
LA CROSSE TECHNOLOGY, LTD WILL NOT ASSUME LIABILITY FOR
INCIDENTAL, CONSEQUENTIAL, PUNITIVE, OR OTHER SIMILAR

4
DAMAGES ASSOCIATED WITH THE OPERATION OR MALFUNCTION
OF THIS PRODUCT. THIS PRODUCT IS NOT TO BE USED FOR
MEDICAL PURPOSES OR FOR PUBLIC INFORMATION. THIS
PRODUCT IS NOT A TOY. KEEP OUT OF CHILDREN’S REACH.
This warranty gives you specific legal rights. You may also have other
rights specific to the State. Some States do not allow the exclusion of
consequential or incidental damages therefore the above exclusion of
limitation may not apply to you.
For warranty work, technical support, or information contact:
La Crosse Technology, Ltd
2817 Losey Blvd. S.
La Crosse, WI 54601
Contact Support: 1-608-782-1610
Product Registration:
www.lacrossetechnology.com/support/register
The complete instruction manual is available at:
www.lacrossetechnology.com/308-1711
Protected under U.S. Patents:
5,978,738
6,076,044
6,597,990
FCC/IC STATEMENT
This equipment has been tested and found to comply with the limits for a
Class B digital device, pursuant to part 15 of the FCC Rules. These limits
are designed to provide reasonable protection against harmful interference
in a residential installation. This equipment generates, uses and can radiate
radio frequency energy and, if not installed and used in accordance with the
instructions, may cause harmful interference to radio communications.
However, there is no guarantee that interference will not occur in a
particular installation. If this equipment does cause harmful interference to
radio or television reception, which can be determined by turning the
equipment off and on, the user is encouraged to try to correct the
interference by one or more of the following measures:
—Reorient or relocate the receiving antenna.
—Increase the separation between the equipment and receiver.
—Connect the equipment into an outlet on a circuit different from that to
which the receiver is connected.
—Consult the dealer or an experienced radio/TV technician for help.
This device complies with part 15 of the FCC Rules and Industry Canada
licence-exempt RSS standard (s). Operation is subject to the following two
conditions: (1) This device may not cause harmful interference, and (2) this
device must accept any interference received, including interference that
may cause undesired operation.
Any Changes or modifications not expressly approved by the party
responsible for compliance could void the user’s authority to operate the
equipment.
This device complies with Industry Canada licence-exempt RSS standard
(s). Operation is subject to the following two conditions: (1) this device may
not cause interference, and (2) this device must accept any
interference,including interference that may cause undesired operation of
the device.
Le présent appareil est conforme aux CNR d'Industrie Canada applicables
aux appareils radio exempts de licence.
L'exploitation est autorisée aux deux conditions suivantes:
(1) l'appareil ne doit pas produire de brouillage, et
(2) l'utilisateur de l'appareil doit accepter tout brouillage radioélectrique subi,
même si le brouillage est susceptible d'en compromettre le fonctionnement.
Caution!
The manufacturer is not responsible for any radio or TV interference caused
by unauthorized modifications to this equipment. Such modifications could
void the user authority to operate the equipment.
All rights reserved. This handbook must not be reproduced in any form,
even in excerpts, or duplicated or processed using electronic, mechanical
or chemical procedures without written permission of the publisher.
This handbook may contain mistakes and printing errors. The information
in this handbook is regularly checked and corrections made in the next
issue. We accept no liability for technical mistakes or printing errors, or
their consequences.
All trademarks and patents are acknowledged.
Printed in China