Lab Partners Associates PW3-004 Remote Flash Control Transceiver User Manual Exhibit D Users Manual per 2 1033 b3
Lab Partners Associates Inc Remote Flash Control Transceiver Exhibit D Users Manual per 2 1033 b3
Exhibit D Users Manual per 2 1033 b3

Quick Guide
MiniTT1™/FlexTT5™ for Canon
340 – 354 MHz, US FCC/IC
FlexTT5™
All equipment should be turned OFF
when making connections. Unwanted
triggering may occur.
First exposure after making initial
connections/powering on may not
be properly exposed. First shot is
a camera calibrations shot. Always
test twice.
Review product manuals for your
camera/flash system. For most
basic functions when using Canon’s
system or PocketWizard’s, operation
is identical.
You may use a FlexTT5 as a
transmitter instead of a MiniTT1 in
all scenarios.
Make sure all PocketWizard
units are set to same
PocketWizard Channel.
PocketWizard Channel is used
instead of Canon channel.
See LEARN Mode section.
Basic Wireless E-TTL: MiniTT1 00 FlexTT5
No flash on Camera
1. Slide MiniTT1 Transmitter onto camera.
2. Slide remote Speedlite onto FlexTT5 Transceiver. Repeat for each remote Speedlite.
All remote E-TTL flashes will be treated as one zone of light.
3. Make sure all your PocketWizard units are on the same Channel and trigger normally.
This mode is like using Canon ST-E2 (non-ratio mode) or 580EX (I or II, master mode,
main flash off, non-ratio) in camera shoe.
Basic Wireless E-TTL: MiniTT1 00 FlexTT5
Flash on Camera
1. Slide MiniTT1 Transmitter onto camera.
2. Slide Canon 580EX Speedlite onto MiniTT1 unit. Set for MASTER = ON.
3. Slide remote Speedlite onto FlexTT5 Transceiver. Repeat for each remote Speedlite.
All remote E-TTL flashes will be treated as one zone of light.
4. Make sure all your PocketWizard units are on the same Channel and trigger normally.
Ratio Wireless E-TTL: MiniTT1 00 FlexTT5
Flash on Camera
1. Slide MiniTT1 Transmitter onto camera.
2. Slide Canon 580EX Speedlite onto MiniTT1 unit. Set for MASTER = ON. Enable Zones
per flash instructions. Canon Speedlite Transmitter ST-E2 may also be used.
3. Set remote FlexTT5 unit to desired Canon Ratio Zone (A, B, C) using FlexTT5 Zone Switch.
4. Slide remote Speedlite onto FlexTT5 Transceiver. Set for regular E-TTL mode (not SLAVE
or MASTER). Repeat for each remote Speedlite. All remote E-TTL flashes on same
FlexTT5 Zone will be treated as one zone of light.
5. Adjust ratios using MASTER Speedlite flash controls.
6. Make sure all your PocketWizard units are on the same Channel and trigger normally.
Setting Canon E-TTL to normal flash (WIRELESS = OFF) when in shoe of MiniTT1 will
disable all remote flash. This operation mirrors Canon functionality.
IMPORTANT: Canon flash units set to SLAVE = ON and connected to FlexTT5 units will have
slave mode automatically turned off, but will still function as slaves correctly. Set desired
Canon Ratio Zone via remote FlexTT5 Zone Switch. PocketWizard Channel is used instead of
Canon channel.
ISO, aperture, flash exposure compensation (FEC), and other settings will track exposure
normally when E-TTL via the PocketWizard ControlTL system.
Thank you for buying a PocketWizard MiniTT1/FlexTT5 system for
Canon DSLR E-TTL cameras and flashes. To help you get started please
read this quick guide and familiarize yourself with the system.
Check www.PocketWizard.com for the latest firmware and full user manual, as
well as the PocketWizard Utility which enables setting additional features for your
ControlTL™ radio slave.
MiniTT1™E-TTL
MAKE IT POSSIBLE™
READ ME
FIRST:
Locking Ring
(on bottom foot)
Locking Ring
(on bottom foot)
Status LED
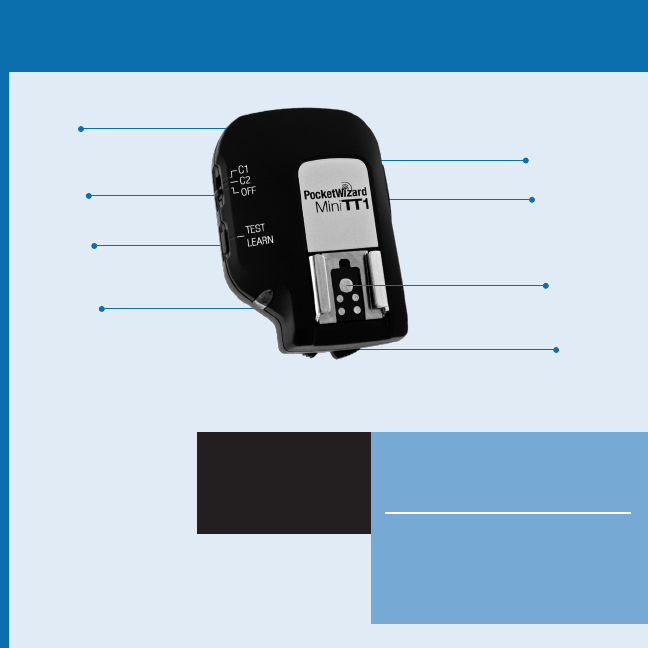
Configuration/Channel 1
Configuration/Channel 2
Power Off
Internal Antenna
TEST/LEARN Button
Battery Compartment
(on bottom)
USB Connector
(under rubber cover)
Canon-style Hot Shoe
with Pass Through
Configuration/Channel 1
Configuration/Channel 2
Power Off
Battery Compartment
(2 AA [IEC:LR6])
TEST/LEARN Button
Adjustable Antenna
Zone Selector
Lanyard Loop
USB Connector (behind antenna)
1/4-20 mount
(on bottom)
Status LED
Remote Studio or other
flash Triggering Port
Remote Camera Triggering Port
Canon-style Hot Shoe
with Pass Through

Thank you for purchasing a PocketWizard product,
the most advanced photographic wireless control system available.
To get the most out of your new product spend some time on www.PocketWizard.com
where you will find information on all aspects of your new PocketWizard. Specifically, our
Support page contains some vital information and tools for your new PocketWizard.
www.pocketwizard.com/support/
CONFIGURATION:
Your new PocketWizard runs on very sophisticated software we call ControlTL
™
. This software
can be configured to your specific needs using a PocketWizard Utility program that can be
downloaded online.
REGISTRATION:
ControlTL
™
software is designed to be “Future Proof” and will be upgraded from time-to-time.
Please register your product online to be notified when updates are available.
MANUALS:
Included in the box is a Quick Guide to get you going fast. For the complete story, there is an
in-depth manual that can be read or downloaded online.
MAKE IT POSSIBLE
™
Have fun pushing the boundaries of your creativity!

WARNING
Changes or modifications to this unit not expressly approved by the party responsible
for compliance could void the user’s authority to operate the equipment.
NOTE: This equipment has been tested and found to comply with the limits for a Class B
digital device, pursuant to Part 15 of the FCC rules. These limits are designed to provide
reasonable protection against harmful interference in a residential installation. This
equipment generates, uses, and can radiate radio frequency energy, and, if not installed
and used in accordance with the instructions, may cause harmful interference to radio
communications. However, there is no guarantee that interference will not occur in a
particular installation. If this equipment does cause harmful interference to radio or television
reception, which can be determined by turning the equipment off and on, the user is
encouraged to try to correct the interference by one or more of the following measures:
1. Reorient or relocate the receiving antenna.
2. Increase the separation between the equipment and the receiver.
3. Consult the dealer or an experienced radio or television technician for help.
This device complies with Part 15 of the FCC rules and also with RSS-210 of Industry Canada. Operation is subject to
the following two conditions: (1) This device may not cause harmful interference, and (2) This device must accept any
interference received, including interference that may cause undesired operation.
MiniTT1 FCC ID Number: KDS-PW3-004
FlexTT5 FCC ID Number: KDS-PW3-005
MiniTT1 CANADA IC: 2170A-PW3004
FlexTT5 CANADA IC: 2170A-PW3005
The FCC wants you to know:
MAKE IT POSSIBLE™
V1.0 – January 2009 – LPF395
Quick Guide
MiniTT1™/FlexTT5™ for Canon
340 – 354 MHz, US FCC/IC
FlexTT5™
All equipment should be turned OFF
when making connections. Unwanted
triggering may occur.
First exposure after making initial
connections/powering on may not
be properly exposed. First shot is
a camera calibrations shot. Always
test twice.
Review product manuals for your
camera/flash system. For most
basic functions when using Canon’s
system or PocketWizard’s, operation
is identical.
You may use a FlexTT5 as a
transmitter instead of a MiniTT1 in
all scenarios.
Make sure all PocketWizard
units are set to same
PocketWizard Channel.
PocketWizard Channel is used
instead of Canon channel.
See LEARN Mode section.
Basic Wireless E-TTL: MiniTT1 00 FlexTT5
No flash on Camera
1. Slide MiniTT1 Transmitter onto camera.
2. Slide remote Speedlite onto FlexTT5 Transceiver. Repeat for each remote Speedlite.
All remote E-TTL flashes will be treated as one zone of light.
3. Make sure all your PocketWizard units are on the same Channel and trigger normally.
This mode is like using Canon ST-E2 (non-ratio mode) or 580EX (I or II, master mode,
main flash off, non-ratio) in camera shoe.
Basic Wireless E-TTL: MiniTT1 00 FlexTT5
Flash on Camera
1. Slide MiniTT1 Transmitter onto camera.
2. Slide Canon 580EX Speedlite onto MiniTT1 unit. Set for MASTER = ON.
3. Slide remote Speedlite onto FlexTT5 Transceiver. Repeat for each remote Speedlite.
All remote E-TTL flashes will be treated as one zone of light.
4. Make sure all your PocketWizard units are on the same Channel and trigger normally.
Ratio Wireless E-TTL: MiniTT1 00 FlexTT5
Flash on Camera
1. Slide MiniTT1 Transmitter onto camera.
2. Slide Canon 580EX Speedlite onto MiniTT1 unit. Set for MASTER = ON. Enable Zones
per flash instructions. Canon Speedlite Transmitter ST-E2 may also be used.
3. Set remote FlexTT5 unit to desired Canon Ratio Zone (A, B, C) using FlexTT5 Zone Switch.
4. Slide remote Speedlite onto FlexTT5 Transceiver. Set for regular E-TTL mode (not SLAVE
or MASTER). Repeat for each remote Speedlite. All remote E-TTL flashes on same
FlexTT5 Zone will be treated as one zone of light.
5. Adjust ratios using MASTER Speedlite flash controls.
6. Make sure all your PocketWizard units are on the same Channel and trigger normally.
Setting Canon E-TTL to normal flash (WIRELESS = OFF) when in shoe of MiniTT1 will
disable all remote flash. This operation mirrors Canon functionality.
IMPORTANT: Canon flash units set to SLAVE = ON and connected to FlexTT5 units will have
slave mode automatically turned off, but will still function as slaves correctly. Set desired
Canon Ratio Zone via remote FlexTT5 Zone Switch. PocketWizard Channel is used instead of
Canon channel.
ISO, aperture, flash exposure compensation (FEC), and other settings will track exposure
normally when E-TTL via the PocketWizard ControlTL system.
Thank you for buying a PocketWizard MiniTT1/FlexTT5 system for
Canon DSLR E-TTL cameras and flashes. To help you get started please
read this quick guide and familiarize yourself with the system.
Check www.PocketWizard.com for the latest firmware and full user manual, as
well as the PocketWizard Utility which enables setting additional features for your
ControlTL™ radio slave.
MiniTT1™E-TTL
MAKE IT POSSIBLE™
READ ME
FIRST:
Locking Ring
(on bottom foot)
Locking Ring
(on bottom foot)
Status LED
Configuration/Channel 1
Configuration/Channel 2
Power Off
Internal Antenna
TEST/LEARN Button
Battery Compartment
(on bottom)
USB Connector
(under rubber cover)
Canon-style Hot Shoe
with Pass Through
Configuration/Channel 1
Configuration/Channel 2
Power Off
Battery Compartment
(2 AA [IEC:LR6])
TEST/LEARN Button
Adjustable Antenna
Zone Selector
Lanyard Loop
USB Connector (behind antenna)
1/4-20 mount
(on bottom)
Status LED
Remote Studio or other
flash Triggering Port
Remote Camera Triggering Port
Canon-style Hot Shoe
with Pass Through

Channels can be taught via PocketWizard Utility or from any
PocketWizard Transmitter using LEARN mode:
IMPORTANT: Hold units at least 2 feet apart when teaching/learning.
1. Turn MiniTT1 or FlexTT5 unit ON and select Channel to be taught.
2. Press and hold TEST for several seconds until LED blinks amber, then release TEST.
3. Quickly press and hold TEST on teaching Transmitting unit (MiniTT1, FlexTT5, Plus II
or MultiMAX). When LED blinks green, channel is learned. Connected flash may
trigger during LEARN.
1 green blink = Low Legacy Channel learned (1 through 16)
2 green blinks = High Legacy Channel learned (MultiMAX 17 through 32)
3 green blinks = ControlTL Channel learned (ControlTL 1 through 20)
For remote TTL systems, teach MiniTT1 unit to be used as primary transmitter first,
then use it to teach all FlexTT5 units.
MiniTT1 and FlexTT5 units send out both ControlTL and Legacy triggers every time
they are triggered. For remote TTL to function, ControlTL channel must be learned.
If you see only 1 or 2 green blinks, and you desire TTL, teach again with MiniTT1
or FlexTT5 unit. Look for 3 green blinks to verify ControlTL is learned.
To teach all units Legacy channels, use Legacy Transmitter as teaching unit for all
learning units, including MiniTT1 unit to be used as primary transmitter.
To avoid inadvertent flashing from remote units that have already been taught or
have already had channel set, turn them OFF.
MiniTT1 00 Plus II, MultiMAX, Integrated, or FlexTT5
connected to manual flash
Remote flash with or without TTL flash on camera
1. Slide MiniTT1 Transmitter onto camera.
2. If desired, slide Canon E-TTL Speedlite (MASTER = ON) onto MiniTT1 unit.
3. Make sure all your PocketWizard units are on the same Channel and trigger normally.
Note: Manual remote flashes are not calculated as part of the E-TTL exposure.
Be sure to set on-camera FEC if remote flash is illuminating same subject as
your E-TTL flash.
ZeroSync™ occurs automatically. Trigger “as fast as a wire” with all PocketWizard radios.
Use PocketWizard Utility to engage HyperSync™ and explore faster than X-sync shutter
speeds. See user manual at www.pocketwizard.com for more information.
Auto-Relay Mode
A FlexTT5 unit in camera’s shoe and connected with motor drive cord to P1 can receive
a radio trigger, trigger the camera’s motor drive which in turn triggers a remote flash.
The channel used for relay transmit is 1 higher than taught channel, unless set via
PocketWizard Utility.
Example: if you taught FlexTT5 unit Channel 3 then relay transmit occurs on Channel 4.
Press TEST on hand-held trigger unit to begin relay sequence.
Status LED
Normal “waiting for trigger” operation = short blink every 2 seconds.
Normal short blink color indicates Battery Level:
Green Good battery
Amber Warning – battery low
Red Very low battery – change immediately
Steady red LED in sync with TEST indicates normal transmission.
(Hold for 10 seconds to teach – see LEARN mode)
Short red blink in sync with trigger indicates normal reception.
Rapid red blinking when not triggering or half-pressing camera indicates error condition.
Power off the unit, reseat all connections, and power back on.
Manual FlashLEARN Mode Other Functions
Specifications
Trigger Delay = 0 seconds – “fast as a wire”
Batteries: MiniTT1 = CR2450 or CR2354 (100s of hours)
FlexTT5 = 2 x AA (IEC:LR6) (60 hours)
Powerable via USB AC adapter (powering from computer USB port not recommended)
Maximum FPS: Up to 12 (varies with camera, E-TTL usage reduces FPS)
E-TTL: E-TTL I & E-TTL II (DSLR only, not for film TTL)
Operating Temperature: Above -15 C (5 F) and below 50 C (120 F)
Storage Temperature (without battery): Above -30 C (-22 F) and below 85 C (185 F)
For more information on this product,
including detailed features, specifications
and the complete user manual, go to
www.pocketwizard.com.
This product is covered under a warranty. For more information
on the warranty and to register your product, please go to
www.pocketwizard.com/support.
This US FCC/Canada IC frequency
PocketWizard radio slave is compatible with
all US frequency PocketWizard products. It is
not frequency compatible with CE or JAPAN
PocketWizard products. Verify frequency
compatibility before purchasing.
© 2009 LPA Design, Inc. All rights reserved. Product features and
specifications are subject to change without notice. PocketWizard,
ControlTL, MiniTT1, FlexTT5, HyperSync, ZeroSync, Plus II and MultiMAX
are either trademarks or registered trademarks of LPA Design, Inc.
All other trademarks contained herein are the property of their
respective owners.
US Patent: 5,359,375 and Patents Pending
V1.0 – January 2009 – LPF374
www.pocketwizard.com
MAKE IT POSSIBLE™
RESET to Default Settings
RESET A: To reset Learned Channels, hold TEST on power up. LED blinks green twice
to indicate reset. Release TEST. Advanced Features set via USB are retained.
A: Default Channels
C1 = ControlTL Channel 1, Legacy Channel 1
C2 = ControlTL Channel 2, Legacy Channel 2
RESET A & B: To reset all Advanced Features and Learned Channels to FACTORY DEFAULTS,
hold TEST on power up for longer than 10 seconds. When LED blinks green
4 times, release.
B: Default Advanced Features
Auto ISO and Aperture Tracking Enabled
Exposure Compensation Center Value = 3.5
HyperSync Offset = -250 microseconds
Remote TTL Flash Sleep Mode = Disabled
Camera Model = Auto
All settings may be configured using the PocketWizard Utility available from www.pocketwizard.com