Lab Partners Associates PW3-007 Remote Flash Control Transceiver User Manual Exhibit D Users Manual per 2 1033 b3
Lab Partners Associates Inc Remote Flash Control Transceiver Exhibit D Users Manual per 2 1033 b3
UserManual.wiki
>
Lab Partners Associates
>
PW3 007 User Manual
Exhibit D Users Manual per 2 1033 b3
Navigation menu
Upload a User Manual
Namespaces
Wiki Guide
HTML
PDF
Info
Views
User Manual
Discussion / Help
Navigation
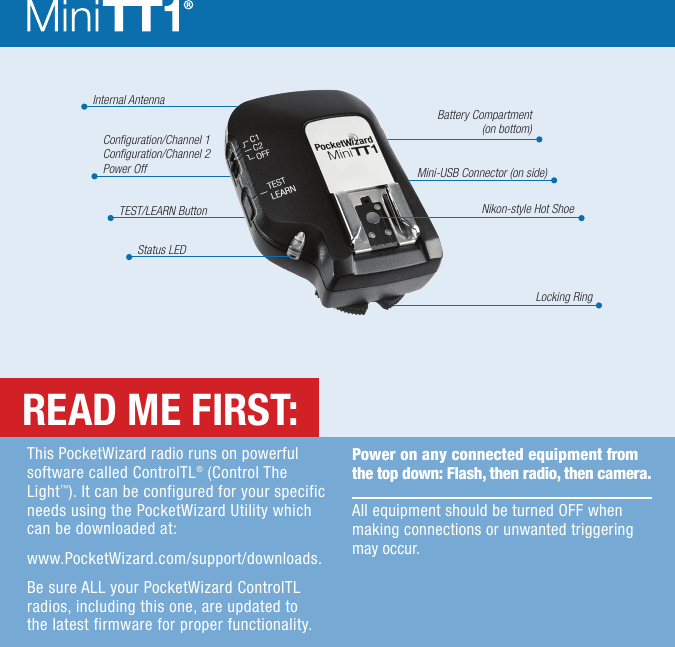
![aPocketWizard recommends powering your Speedlights with high-capacity rechargeable batteries. If operation is not optimal, check Speedlight batteries first.Review product manuals for your camera and flash system. For most basic functions when using Nikon’s system or PocketWizard radios, operation is identical.You may use a FlexTT5 as a transmitter instead of a MiniTT1 in all scenarios. Make sure all PocketWizard radios are set to the same PocketWizard channel. PocketWizard channels are used instead of Nikon channels. See Learn Mode section.Locking RingBatteries 2 AA [IEC:LR6]Adjustable AntennaLanyard LoopMini-USB Connector (behind antenna)1/4-20 Mount(on bottom)Remote Flash Triggering PortRemote Camera Triggering PortNikon-style Hot ShoeStatus LEDTEST/LEARN ButtonConguration/Channel 1Conguration/Channel 2Power OffZone Switch](https://usermanual.wiki/Lab-Partners-Associates/PW3-007/User-Guide-1388307-Page-3.png)