LabelZone Labeldirect Howto User Manual Label Direct How To
2017-09-15
User Manual: LabelZone Labeldirect Howto
Open the PDF directly: View PDF ![]() .
.
Page Count: 11
How To Do It: Software
LabelDirect
NOTE: These instructions are all based on LabelDirect version.3. Later versions of the software may differ in
detail.
Design a die cut label
Q. How do I design a die cut label?
A. Referring to the pictures below, do as follows:
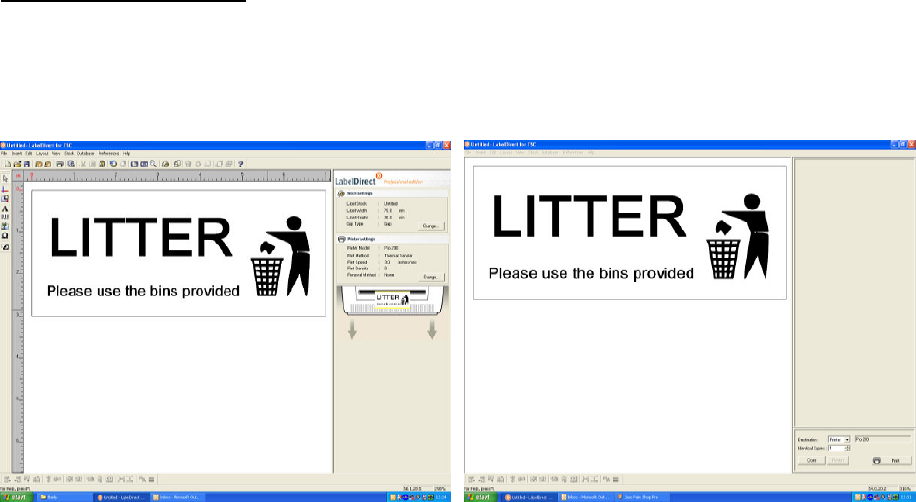
Design window Print Preview window (later versions only)
1. In the LabelDirect design window, under ‘Printer Settings’ (right of screen) click the ‘Change’
button.
2. In the resulting dialogue box, under ‘Label Removal’ set ‘Removal Method’ to ‘None’ (unless
you have a cutter fitted). Also, under ‘Print Method’ select ‘Thermal Transfer’ (unless you are
printing on Direct Thermal type paper labels).
3. Click ‘OK’ to exit the dialogue box.
4. Unpack a roll of labels, measure their size and the gap between them (in millimetres) then fit
the roll into your printer along with a ribbon. Switch the printer on.
5. Returning to the Design window, under ‘Stock Settings’ (right of screen) click the ‘Change’
button.
6. In the resulting ‘Label Stock’ dialogue box, click ‘New’.
7. In the resulting dialogue box, enter the measurements you have just made, as follows:
Width: (label width).
Height: (label height).
Gap Type: Gap (unless your label stock is Black Line type).
Gap Size: (gap size).
Number Across: 1.
8. Finally set everything else to zero.
9. Exit by clicking ‘OK’ then ‘Yes’ then ‘OK’.
10. Click the ‘A’ button (left of screen) then create a text box by immediately clicking somewhere in
the label area.
11. Under ‘Text’ (right of screen) delete the words ‘Sample Text’ and type your required text.
Notes:
(i) You cannot edit the text box itself.
(ii) You can change the font type and size at this stage.
10. Click the ‘Print’ button.
11. In the resulting print preview window, click ‘Print’.
Note: If you have LabelDirect version 1.3 or later, the print preview window might be skipped.
Adjust print density/darkness (temperature)
Q. How do I increase/decrease the print darkness of my labels?
A. Increasing/decreasing the print density (often called 'darkness') of your labels is a matter of
adjusting the temperature of the print head, as follows:
LabelDirect Design window
Printer Settings 'Change' button > ‘Print Density’ (0-15)
NOTE: Surprisingly, a good dark print at setting 8 can become faint and patchy at setting 15, so it’s
not always a question of turning up the temperature to improve the print quality.
CAUTION: Setting the temperature very high combined with a slow print speed can cause the ribbon
to break.
Design a continuous label
Q. How do I design a continuous label?
A. Do as follows:
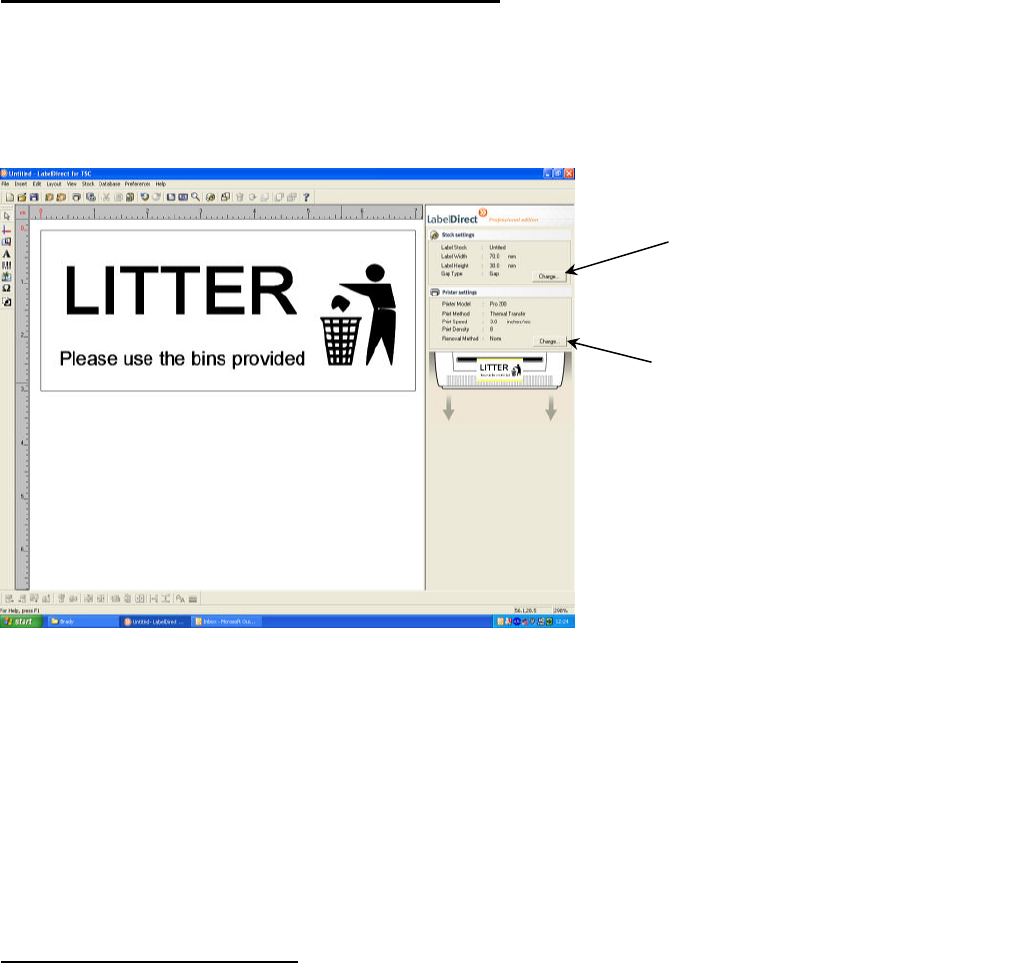
1. In the LabelDirect design window, under ‘Printer Settings’ (right of screen) click the
‘Change’ button.
PRINTER SETTINGS CHANGE BUTTON
STOCK SETTINGS CHANGE BUTTON

2. In the resulting dialogue box, under ‘Label Removal’ set ‘Removal Method’ to ‘None’
(unless you have a cutter fitted). Also, under ‘Print Method’ select ‘Thermal Transfer’
(unless you are printing on ‘Direct Thermal’ type paper label).
3. Click ‘OK’ to exit the dialogue box.
4. Unpack a roll of labels, measure the size, then fit the roll in your printer along with a ribbon.
5. Switch the printer on.
6. Returning to the computer, under ‘Stock Settings’ (right of screen) click the ‘Change’
button.
7. In the resulting ‘Label Stock’ dialogue box, click ‘New’.
8. In the resulting dialogue box, enter the measurements you have just made, as follows:
Width: (label width)
Height: (height of the label you wish to create)
Gap Type: None
Number Across: 1
9. Finally set everything else to zero.
10. Exit by clicking ‘OK’ then ‘Yes’ then ‘OK’.
11. Click the ‘A’ button (left of screen) then create a text box by immediately clicking
somewhere in the label area.
12. Under ‘Text’ (right of screen) delete the words ‘Sample Text’ and type your required text.
Notes:
(i) You cannot edit the text box itself.
(ii) You can change the font type and size at this stage.
13. Click the ‘Print’ button.
14. In the resulting print preview window, click ‘Print’. If you have LabelDirect version 1.3 or
later, the print preview window might be skipped.
Design a horticultural label
Q. How do I design a horticultural label?
A. Easier to use one of our ready-made templates. See our Templates page.
Design a wire-wrap label
Q. How do I design a wire-wrap ID label for electrical work?
A. Easier to use one of our ready-made templates. See our Templates page.
Change default measuring units
Q. How do I change the default measuring units in the software?
A. See below:
Click ‘Layout’ (menu) > ‘Ruler’ > ‘Ruler’ (Tab)
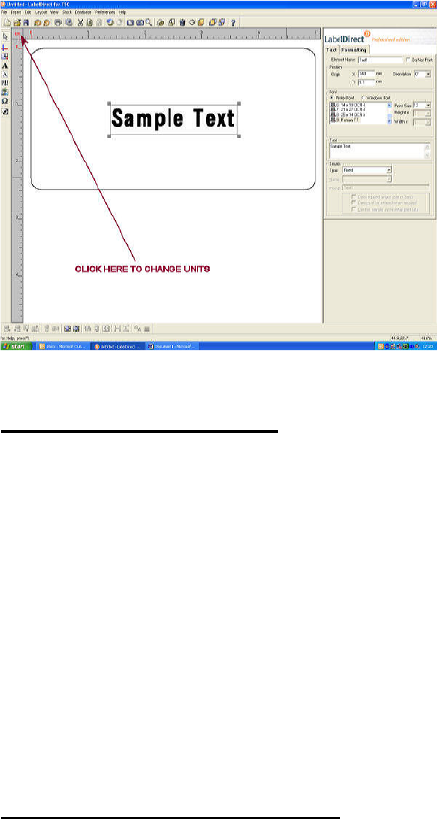
Aquicker way is to click the button where the vertical and horizontal rulers intersect (top left corner)
which toggles LabelDirect between centimetres and inches. See below.
Fix the size of a text box
Q. How can I fix the size of a text box so that it does not expand with extra text?
A. Select the text element you wish to be fixed in size, open the Formatting tab in the design window
and tick ‘Copy Fit Text Within Frame’.
If you want the text to wrap to more than one line rather than reduce in size when it outgrows the box
then set the minimum point size and the maximum point size to the same figure (the size you want
the text to be) and specify how many lines of text the box may contain. Now set the box size using
mouse-drag.
Change the size of a bar code
Q. How do I change the size of a bar code?
A. Do as follows:
1. Select the barcode.
2. Click the ‘Formatting’ Tab.
3. In the ‘Styles’ list-box, choose ‘High Density’ or ‘Low ‘Density’.
If the resulting size of the barcode is still unsuitable then you can create your own style, as follows:
1. Click ‘New’.
2. Set the ‘X Dimension’. See Note 2.
3. Give the style an appropriate name (for future use).
4. Click ‘OK’.
NOTES:
The width of the barcode symbol reflects the size of the number it represents, so when laying out
your label don’t forget to allow sufficient space for larger numbers.
The following rules apply to the popular Code 39 barcode format:

•The X-Dimension is the width of the narrowest bar.
•The minimum X-Dimension if you want your barcode to be universal (readable by scanners
outside your company) is 7.5 mils (0.19 mm)
•1mil = 1/1000 inch = 0.00635 mm
•The widest bar is always a fixed multiple of the narrowest, the ratio usually being between 2.0
and 3.0 times.
•If the narrowest bar is less than 20 mils wide then the ratio must be between 2.0 and 2.2
•The height of the barcode must be at least 0.15 times the length and never less than 0.25 in.
(6.35 mm)
•Searching the Internet will usually reveal a wealth of information on this subject, including a
number of sites with handy Code 39 instant size calculators.
Lock labels against unauthorised editing
Q. How do I lock labels against unauthorised editing?
A. Use the print only mode, called ‘Direct Print’. This runs very much like a separate application and
works only with labels you have previously created.
To run Direct print, click: ‘Start’ > ‘Programs’ > ‘LabelDirect’ > ‘TSC’ > ‘Direct Print’. Then browse to
the label you wish to print. Labels for Direct Print must reside in the following folder:
C:\Program Files\LabelDirect for LabelStation (assuming C to be your hard drive)
NOTES
When transferring a label file to the Direct Print gallery, if it contains a graphic or is connected to a
database then you must do so using LabelDirect’s Zip function (‘File’ > ‘Export As Zip’ and ‘File
Import From Zip’) to retain all the label's components. Remember to tick the appropriate inclusions in
the Zip dialogue box.
Alternatively, an Administrator program can be run by selecting ‘Start’ > ‘Programs’ > ‘LabelDirect’
and choosing ‘Administrator’. Running this program allows a manager to establish password control
over the application, so that some operators are disallowed from operating the full LabelDirect
program or the Print Only version. The Administrator function also allows data logging which builds a
history of the labels printed.
Password control can be limited to specific labels by right-clicking a label and selecting ‘Properties’
then selecting ‘Security’.
Which version of LabelDirect?
Q. How do I tell which version of LabelDirect I have?
A. With LabelDirect open, click ‘Help’ and select ‘About LabelDirect’.
Avoid wasting labels on multi-column rolls
Q. Iam using LabelDirect v.3. How do I avoid wasting labels on multi-column rolls?

A. The only way to avoid waste when printing just one or two labels at a time on rolls of three or four
columns width is to create a single template covering all labels in the row or connect your label to a
database.
Upgrade LabelDirect from Basic to Professional
Q. How do I upgrade LabelDirect from Basic to Professional edition?
A. This is only necessary if you have LabelDirect version 2.xx or later. Purchase an Edition Upgrade
licence number from Advanced Labelling and type it into the dialogue box that appears when you
click:
‘Help’ > ‘Upgrade’ or ‘Web Services’ > ‘Modify Licence’
NOTE: An edition upgrade may also permit a version upgrade.
Transfer LabelDirect to different PC
Q. How do I move my copy of LabelDirect from one PC to another?
A. Versions 1 and 2 may be uninstalled from one PC and reinstalled on another. Version 3 is
licensed to one PC only, further installations being limited to a 30 day trial unless a second licence is
purchased. Versions 4 onwards may be deregistered from the original PC and moved to another but
is still licensed to only one PC at a time.
Sequential/serial numbers
Q. How do I produce sequential/serial numbers?
A. Do as follows:
1. In the label design window insert a text element.
2. Under ‘Source’, for ‘Type’ deselect ‘Fixed’ and select ‘Incrementing Number’.
3. In the resulting dialogue box, for ‘Start Value’ select ‘From Keyboard Using Prompt’.
4. Enter a suitable prompt, such as ’Enter Start Number’ which will appear at print time.
5. Click ‘Next’
6. To accept the default settings click ‘Next’ again, then click ‘Finish’.
7. Click the ‘Print’ button to see the result of your settings in the print preview window. Note that
nothing changes in the design window.
8. In the print preview window, do as follows:
9. In the right-hand side panel, at the very top, you will see your prompt, e.g. ’Enter Start
Number’. Respond to this by typing ‘001’ or whatever is the first number of the series you wish
to print. This numbering system is alpha-numeric so you can type something like ‘ABC001’ if
you wish. The letters will increment too.
10. Set ‘Identical Copies’ to 1 (unless you need more than one copy of each label)
11. Set ‘Serialised Batch’ to the number of unique labels you need. E.g. for a set of labels running
from 5 to 10 inclusive, set ‘Serialised Batch’ to 6.
12. Click the 'Print' button.
NOTES: If you want to print another batch during the same session but not starting with the next
number following on from your last batch, click the 'Restart' button and re-enter the details. If you
intend to rewind your printed labels for convenient dispensing later, and you want the sequential
numbers to come off this roll lowest first, then print your series beginning with the highest number
and set LabelDirect to ‘Decrement’ instead of ‘Increment’. E.g. the labels come out of the printer: 9,
8, 7, instead of 7,8,9.
Print ‘mirror image’ text
Q. How do I print ‘mirror image’ text?
A. Do as follows:
Click the ‘Printer Settings’ ‘Change’ button then select ‘Mirror Image’.
Special characters not on keyboard
Q. How do I print special characters, such as ä, é and â which are not on the keyboard?
A. You can only do this by entering the character code of the special character. The following table
shows some of these codes. You can discover more by opening a document in Microsoft Word and,
in any regular font, clicking the 'Insert' menu followed by 'Symbol' then 'Symbols'. Click on any
symbol/special character to see its code number.
Character Alt + (use numeric keypad only)
À0192
Á0193
Â0194
Ä0196
Ã0195
à0224
á0225
â0226
ä0228
ã0227
è0232
é0233
ê0234
ë0325
Ö0214
Ò0210
Ó0211
Ô0212
Õ0213
ö0246
ò0242
ó0243
ô0244
õ0245
Ù0217
Ú0218
Ü0220
Û0219
ù0249
ú0250
ü0252
û0251
Ý0221
ý0253
ÿ0255
Linking to a database
Q. How do I link a label to an Excel spreadsheet or other database?
A. For this you must have the Professional edition of LabelDirect. Click ‘Help’ > ‘About LabelDirect’
to see which version you have. Contact Advanced Labelling Ltd for upgrade details.
Choosing the database type:
With LabelDirect Professional you may choose one of the database options below:
1. Data Store (inherent part of LabelDirect)
2. Microsoft Excel (external database)
Which database type is best for you?
If you do not have Excel installed on your computer then LabelDirect’s Data Store is your only option.
With DataStore, the following limitations apply:
•You cannot edit the database independently of LabelDirect (unless you have Microsoft Access
installed)
•You cannot add extra fields to the database for non printing/administrative purposes (unless you
have Microsoft Access installed)
• A separate database is required for each label template. In other words, all your LoopLock labels
would be printed from one database and all your StickIn labels from another etc.
NOTE: Because DataStore uses the Microsoft Access format to save its data, labelling software
supplied with other brand-name printers may be connected.
If you have Microsoft Excel installed on your computer then the Excel solution might be best. The
following advantages apply:
•You can edit the data independently of LabelDirect, using Excel itself.
•You can add extra fields to the database for administrative purposes, even though the information
they contain would not appear on a label.
•You can keep all your records (for every type of label) in just one database.
•You can link other labelling systems to your database.
If you choose this option, do as follows:
Connect the label to the database:
1. Launch LabelDirect and create a label to your required dimensions.
2. Click the 'Database' menu and select 'Connect'. Click ‘Disconnect’ first if the label has
previously been connected to a different database.
3. Select 'Excel' from the drop-list and click 'Next'.
4. Browse your hard drive and select the Excel workbook you created as your database. Click
'Next'.
5. From the drop-list, select the worksheet which contains the data you need. Click 'Next'.
6. Select the field by which you would like the records to be alphabetically sorted when viewing
the database in LabelDirect.
7. Click 'Finish'. Your label is now linked to the database.
Link the label’s elements (text boxes) as follows:
1. If you have not already done so, insert a text element on your label and leave it selected.
2. Make this a 'variable data element' (an element that is populated with information at print time)
by changing 'Source Type' from 'Fixed' to 'Database'.
3. Click 'Yes' to the question about sample data.
4. Change 'Source Field' to the field which contains the data you wish to populate this text
element.
5. Change 'Source Prompt' to the name of the field. Do likewise with 'Element Name'. Don’t
worry that the field name now appears in three places, it doesn’t matter.
6. Repeat these steps for each variable data element on the label.
7. Add whatever other elements are necessary to complete the label.
Print the label as follows:
Notes: Data is not imported to the label until you click to print, at which point a ‘print preview' window
appears showing the imported data. See below for screen layouts.

1. Click the 'Print' icon and note that the preview window has two 'Print' buttons. The lower
button simply prints whatever label is showing at the time. The upper button prints a label for
each record in the database (entire database) unless you have created a print list, in which
case it prints the labels listed.
2. Click the 'Make a Print List' button.
3. Select the records you wish to print (upper pane) using the 'Add' button to build up your print
list in the lower pane.
4. Click 'OK' to return to the Print Preview window.
5. To complete the job, use the 'Print' buttons as described in Step 1.
6. To dismiss a print list and print the entire database, click 'Restart' followed by 'Print All'.
7. To speed things up when creating a print list you can use Shift+Click to select a block of
records, and Ctrl+Click to make a random selection.
8. If you think you will need to print a particular collection of records again, you can save the
selection as a named print list.
9. LabelDirect does not carry the pound Sterling symbol (£) from your database to your label. If
you have a label element that displays a product price, for example, format this element as
currency. Use the Format' tab (top-right of screen). The label element then displays the
pound Sterling symbol and format the price to two decimal places. For this reason it is not
necessary to use the £ symbol in your database.
10. Don’t forget to make a regular back-up of your database and keep this off site. If you are
using DataStore, the database file is named after its associated label and suffixed 'mdb'. In
other words it is a Microsoft Access file.
Vertical numbers
Q. How do I get a number to read vertically?
A. This requires a macro, for which the user needs some knowledge of the programming language
BASIC or at least a logical mind. The example below produces a number comprising four characters
but can be extended if required.
EXAMPLE:
1. On the label, insert a very small text box called 'DataSource' (actually this can be any name
you like) and set it to non-printing so that it only shows on screen. This text box is exists to
drive a vertically aligned copy of itself which, in this case, comprises four characters. Each

character appears in its own text box (which does print) so that it may be positioned vertically
with the others.
2. Create a text box for the first digit and set it to Macro, adding the following code:
Char$ = Mid$(DataSource$, 1, 1)
Return Char$
3. Create a text box for the second digit and set it to Macro, adding the following code:
Char$ = Mid$(DataSource$, 2, 1)
Return Char$
4. Create a text box for the third digit and set it to Macro, adding the following code:
Char$ = Mid$(DataSource$, 3, 1)
Return Char$
5. Create a text box for the fourth digit and set it to Macro, adding the following code:
Char$ = Mid$(DataSource$, 4, 1)
Return Char$
Make life easier by naming these macros and their text boxes to reflect their purpose and order.
Bar Code 128
Q. What’s Code 128 A, B and C?
A. In LabelDirect, Code 128 A, B or C is not available explicitly. Code 128 Auto is effectively code
set B with the ability to switch automatically between all three code sets to minimise the size of the
bar code. Code set A encodes 00 to 5F hex (including control codes and upper case characters
only). Code set B encodes 20 to 7F hex (all printable characters, no control codes including lower
case). Code set C encodes numbers only (numeric pairs which take up half the space). It is
recommended that the end user creates a sample of this type of bar code to check that the reader
will decode it successfully.
