Laerdal Medical AS FST1908 Vital Signs Simulator Transceiver User Manual VitalSim DfU Arild
Laerdal Medical AS Vital Signs Simulator Transceiver VitalSim DfU Arild
Users Guide
- 1 -
VitalSim
Directions for Use
Overview and Intended use.
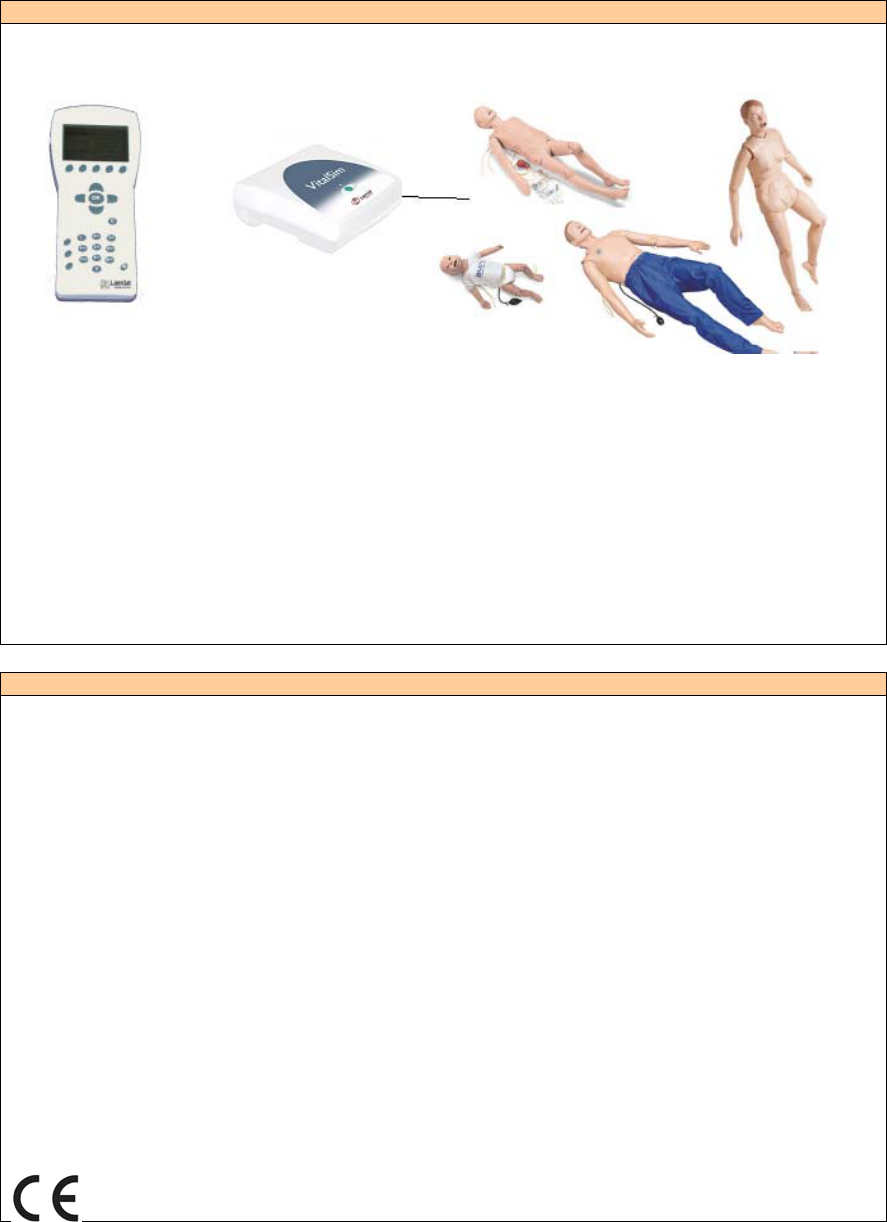
The VitalSim Base Unit and Remote Control are intended to be used in conjunction with an approved
manikin to simulate vital signs on the manikin.
The system consists of a Base Unit, connecting to a manikin, and a radio controlled Remote Control for
device operation. Both the Base Unit and the Remote Control are battery operated. The Base Unit can also
be used with an AC wall adapter.
VitalSim System includes:
Carry Case
Base Unit including battery case and batteries (6 C-cell)
Remote Control including batteries (4 AA-cell)
Remote Control to Base Unit connection cable
USB cable for connection to PC
DC power supply
Direction for Use
Operating Software on CD-ROM
Important Information
This device complies with Part 15 of the FCC Rules. Operation is subject to the following two conditions:
(1) this device may not cause harmful interference, and (2) this device must accept any interference received,
including interference that may cause undesired operation.
NOTE: This equipment has been tested and found to comply with the limits for a Class B digital device,
pursuant to Part 15 of the FCC Rules. These limits are designed to provide reasonable protection against
harmful interference in a residential installation. This equipment generates, uses and can radiate radio
frequency energy and, if not installed and used in accordance with the instructions, may cause harmful
interference to radio communications. However, there is no guarantee that interference will not occur in a
particular installation. If this equipment does cause harmful interference to radio or television reception, which
can be determined by turning the equipment off and on, the user is encouraged to try to correct the interference
by one or more of the following measures:
-- Reorient or relocate the receiving antenna.
-- Consult the dealer or an experienced radio/TV technician for help.
-- Increase the separation between the equipment and receiver.
-- Connect the equipment into an outlet on a circuit different from that to which the receiver is connected.
-- Consult the dealer or an experienced radio/TV technician for help.
Caution: Changes or modifications not expressly approved by Laerdal could void the user's authority to
operate this equipment.
Hereby, Laerdal Medical declares that when carrying the CE-mark, the VitalSim product is in
compliance with the essential requirements and other relevant provisions of Directive 1999/5/EC.

- 2 -
Use with Laerdal Manikins
The VitalSim is designed to work with a variety of manikins manufactured by Laerdal. The manikins range
from adult, child and infant advance life support manikins to nursing manikins. The VitalSim will detect
which type of manikin is connected and adjust physiological and menu functions accordingly.
Selection of manikin can be overridden from the Setup Menu.
Features
ECG/Defib/Pacing
Extensive ECG library. Running rhythm and a Waiting Rhythm that can be activated on command or after a
defibrillation
External pacing detection with settable pacing threshold 20 – 200 mA
External defibrillation (10-360 J), may affect preprogrammed scenario or lead to direct ECG rhythm change
Heart, Lung, Bowel and Spoken Sounds
Heart Sounds synchronized with ECG. Lung sounds synchronized with adjustable breathing rate, 0 – 60 BPM.
Individual lung or bilateral sound selection. Normal and abnormal bowel sounds.
Computer generated sounds, mixed with voice input via microphone.
Blood Pressure
Auscultated and palpated blood pressure simulator. Korotkoff sounds synchronized with ECG.
Systolic and diastolic pressure individually settable in steps of 2 mmHg up to 300 mmHg.
Auscultative Gap, On / Off feature. Calibration function.
Palpated Pulses
Controls Brachial, Radial, and Carotid pulses. Pulses synchronized with ECG and pulse strengths dependent
on BP.
Systolic BP can be palpated on radial pulse. Only 2 pulses active at a time, to save power. Brachial pulse
turned off when BP cuff inflated (to avoid sound interference).
Scenario Function
Possible to program, upload, and run scenarios on the VitalSim Base Unit. Using a PC Scenario editor.
Up to 10 programmable scenarios at one time.
Logging
Generate 25 logs for after action review. Log(s) can be retrieved by a PC through the USB connection
- 3 -
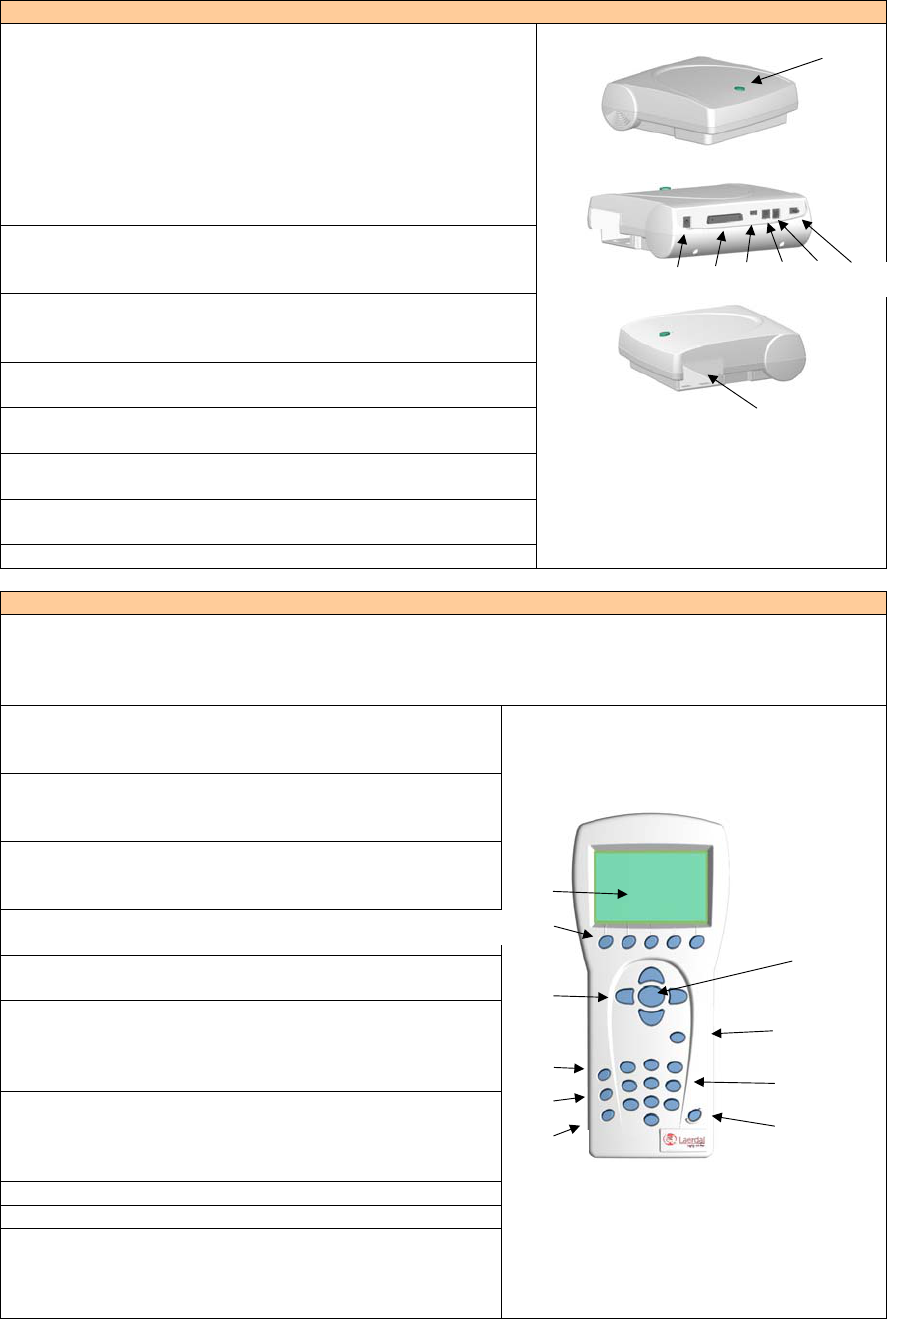
Overview VitalSim Base Unit
A. On/Off button and Indicator. The button turns the unit
on and initiates pre-set vital signs. Press once to turn the
unit on. Press again to turn the unit off.
The indicator is steady green if it has contact with the
Remote Control. If there is no contact with the Remote
Control the indicator will be blinking green.
If battery needs to be replaced, the indicator will blink,
alternating between green and orange.
B. DC power supply: Use this feature for stationary
training and to limit battery consumption. The DC power
supply is supplied with VitalSim
C. Manikin Connector: Connects the Base Unit to the
manikin or peripheral accessories. Supplied with
manikins.
D. Microphone: External microphone attachment, sold
separately.
E. USB port: Used for downloading scenarios and up-
loading of log’s.
F. Remote connector: Used for direct communication with
the Remote Control.
G. Blood Pressure connector: Connects the blood pressure
hose from BP-cuff.
H. Battery: Holds (6) replaceable C-cell batteries.
Overview VitalSim Remote Control
The Remote Control communicates with the VitalSim Base Unit via a short-range radio link. Range from
Remote control is approximately 10m / 30 ft.
5 Different channels can be selected to improve immunity to interference and allowing for use of several units
within the same area.
I. LCD display: Displays vital information and
activated features such as ECG, Sounds, Blood
pressure, Scenarios, Logging, etc.
J. Function keys: Use these keys to implement quick
functions, i.e. set Rate, Volume, PEA, activate
waiting rhythm, etc.
K. Navigation keys: Use these keys to navigate your
way through programming phases of operation and
to select various functions.
L. OK / Select key: Use this key to activate specific
desired functions and to execute programming.
M. Cancel/Back key: Go back from sub menus
without any changes.
N. Numerical keys: Use these keys to program user
name for logging, or to select numerical entries.
Example: To set volume level to (9), simply touch
the number key (9) to initiate.
O. Menu/Setup: Use this key to set up your VitalSim
to specific manikins, i.e. adult, child and infant.
Also sets up user features such as backlight and
disables functions.
P. Scenario key: Use this button to start scenarios.
Q. Shift key
R. On/Off key: Turns the unit. Press once to turn the
unit on. Press again to turn the unit off.
Remote Control can be turned off and back on
without affecting the
A
H
B G F E D C
I
L
O
N
M
K
J
P
Q R
- 4 -
Start
Once your manikin has been connected to the
VitalSim, turn the Base Unit and Remote Control
on.
The VitalSim will automatically detect the
connected manikin and set the initial parameters
accordingly.
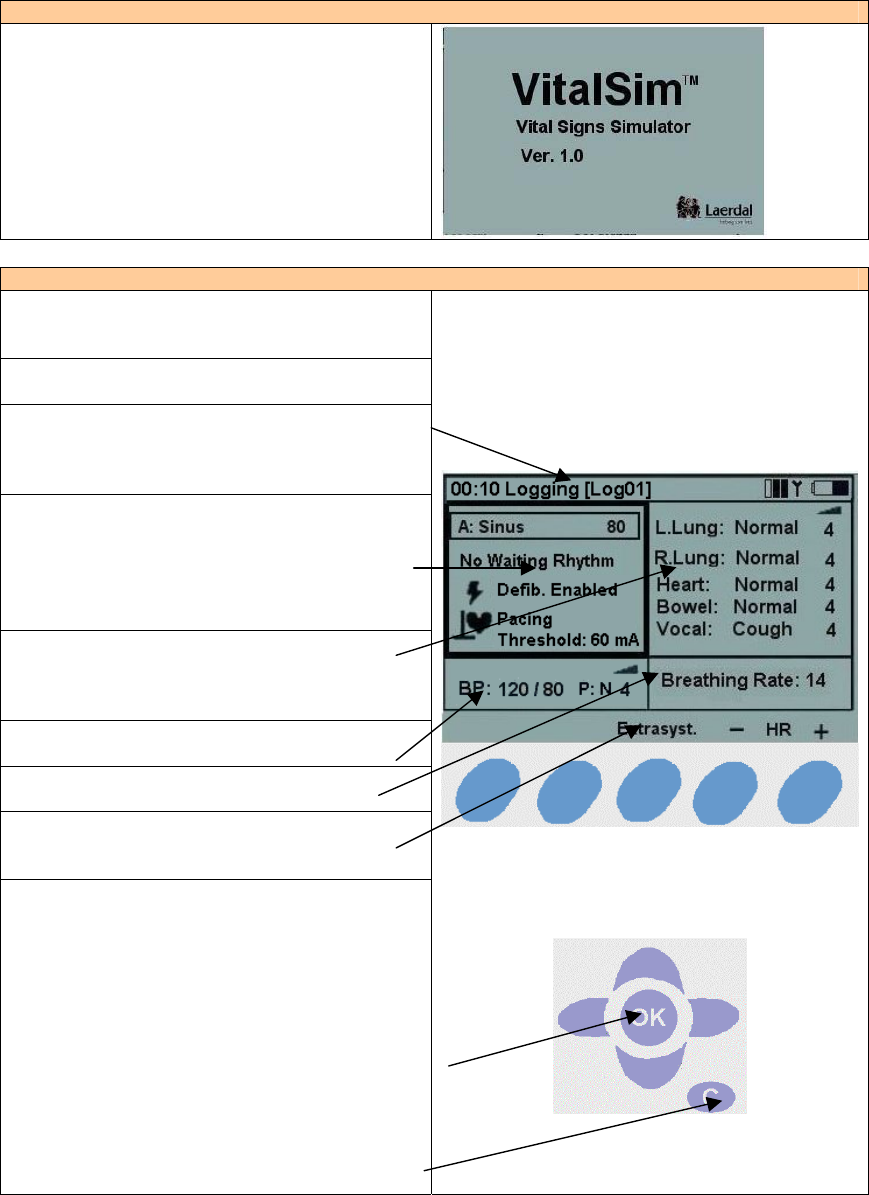
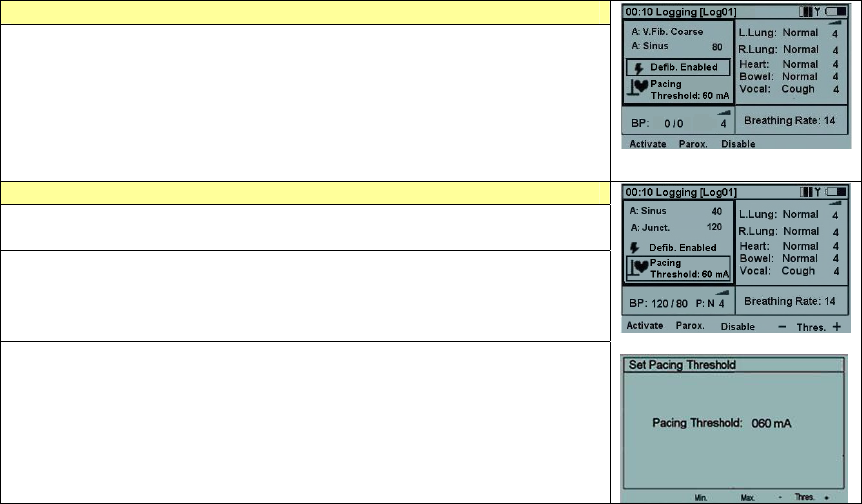
Main Display
The main presents the current status, and allows for
modifying some parameters directly using the
function keys.
The main display is divided into five functional
areas and a function key area.
The upper area is the Logging and Scenario status
area. The log status and clock is presented here
together with the Remote Control battery status and
a Radio reception indicator.
The ECG section is indicating Running Rhythm on
the first line, Waiting Rhythm on the second line.
“Defib. Enabled” allows change to Waiting rhythm
when a defibrillatory shock is given.
Pacing capture can be enabled / disabled and if
enabled the threshold for capture can be set.
The sounds section control the selected Lung,
Heart, Bowel and _Vocal (spoken) sounds.
Volume of each sound can be controlled
individually.
The BP Section shows the set BP, pulse strength
and the Korotkoff sound volume.
The breathing rate sections shows the set breathing
rate.
At the bottom of the display are the function keys
menus. The functions will change dependent on
which function area is selected.
Using left to right navigation keys, highlight the
desired functional area of the display.
Once the desired function area is highlighted, use
the up and down navigation keys to scroll through
to the desired selection.
Once the desired selection is highlighted, push the
OK key to edit the settings.
When the selection is complete, press the “OK”
button to implement the new selection and return to
the main display.
To cancel the selection, press “C” and return to the
main display with the previous setting unchanged.
- 5 -
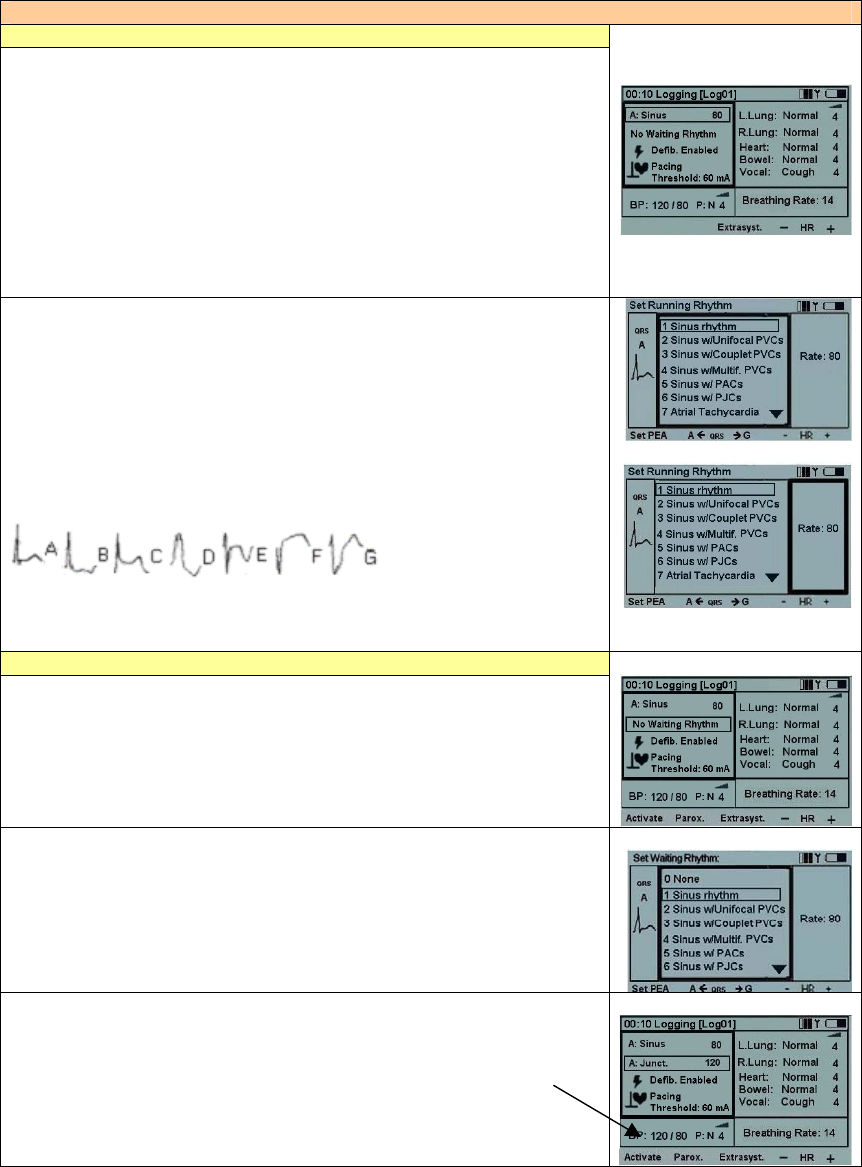
Programming ECG
Set Running Rhythm
On the main display; using the left / right navigation keys highlight the
ECG functional area and press the OK key to edit the rhythm.
Note: you are also able to change some functions using the function keys
instead of entering the functional area:
• “HR+” and “HR–“ Changes the heart rate up and down.
• “Extrasyst.” generates an extrasystole of the selected kind (on
Sinus rhythms only), immediately after the button is pushed.
If no extrasystole is selected, a Unifocal PVC will be generated.
The ECG rhythm can be selected using the Up / Down keys or the
numerical keys. The arrow on the bottom right of the selection field
indicates that there are more selections than presented on the screen.
Rate and QRS type can be modified using the function keys,
OR
By highlighting the QRS or Rate area using the Left / Right keys and then
use the numeric pad or up/ down keys.
QRS types can be set to A through G:
Available rates are dependent on the selected rhythm.
Setting PEA sets the BP to 0.
Set Waiting Rhythm
On the main display; using the left to right navigation keys highlight the
ECG functional area and scroll down to Waiting rhythm; push the OK
key to edit the selection.
Select a Waiting rhythm in the same manner that the Running rhythm is
selected. Not that Waiting rhythm has “None” as an option.
When a Waiting rhythm is selected, 2 additional function keys appear on
the ECG menu:
• “Activate” Actives the Waiting rhythm, substituting the Running
with the waiting.
• “Parox.” Activates the Waiting rhythm, and exchanges the
Waiting rhythm with the running.
- 6 -
Enable / Disable the Effect of Defibrillation
When “Defib. Enabled” is selected; the Waiting rhythm will be
automatically activated and replace the Running rhythm when a shock is
delivered to the manikin.
When the “Defib Enable” field is selected, Enable /Disable is selected by
toggling the “OK” button or the function key labeled “Disable” / “Enable”
Pacing
If pacing is enabled, pacing pulses on the manikin with a current higher or
equal to the set threshold will activate heartbeats.
Pacing threshold can be adjusted directly from the main display using the
“Thres. +/-“ function keys when the “Pacing” field is selected.
Pressing the “OK” button, the Pacing threshold can also be adjusted in a
sub menu.
Threshold can be adjusted using the Up/ Down keys, the “Thres.+/-“ keys
(steps of 10) or entered directly using the numerical keys.
- 7 -
Sounds
On the main display; using the left / right navigation keys highlight the
sounds functional area.
The sound volume for the selected / highlighted sound can be set directly
from the main display using the “-“ and “+” function keys.
The selected Vocal sound can be activated using the function key.
(When Cough is the selected vocal sound, the function key would be
labeled “Cough”.)
The “Recall” function key reactivates the previously selected sound for
the highlighted sound category.
Set Lung Sounds
Normally Right and Left lung sounds are highlighted together indicating
that the sound for the right and left lung is set the same (bilateral).
To set Right and Left sounds individually, press the “Set Unilat.”
function key.
When the sounds are reset to bilateral, the sound in the Right lung will be
used for both lungs.
To alter a lung sound, highlight the sound and press the “OK” button.
This will activate the sound selection sub-menu.
The sounds can be selected using the Up/Down keys or using the numeric
keypad.
The arrow on the bottom right of the selection field indicates that there
are more selections than presented on the screen.
Volumes can be set using the “+” / “-“ function keys, or by highlighting
the volume field and use the up/down keys or the numeric keypad.
“Set LL” and “Set RL” function keys are alternative ways to select
individual (unilateral) lung sounds.
Press “OK” to implement the new selection And return to the main
screen.
Press “C” to return without any changes.
Set Heart Sounds
Heart sounds are set in the same manner as Lung sounds.
On the main display; using the left to right navigation keys highlight the
sounds functional area. Scroll down to the Heart sound.
Use the “+”/”-“ keys to alter volume directly, or “Recall” to recall the
previously selected Heart sound.
Press the OK key to get to the Heart sounds selection menu.
Set Bowel Sounds
Bowel sounds are set in the same manner as Lung and Heart sounds.
On the main display; using the left to right navigation keys highlight the
sounds functional area. Scroll down to the Bowel sound.
Use the “+”/”-“ keys to alter volume directly, or “Recall” to recall the
previously selected Bowel sound.
Press the OK key to get to the Bowel sounds selection menu.
- 8 -
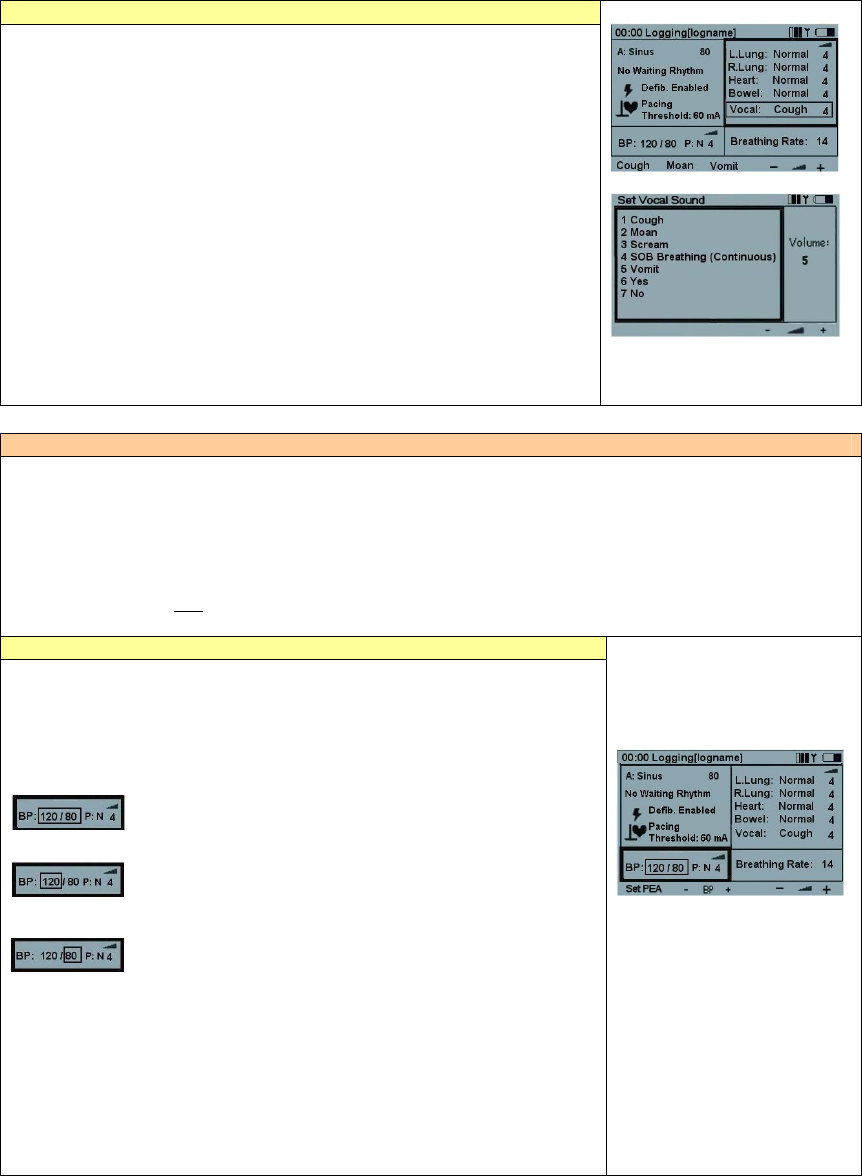
Set Vocal Sounds
On the main display; using the left to right navigation keys highlight the
Sounds functional area.
Notice that whenever the Sounds area is selected, the selected Vocal
sound can be activated using the Function key. Most sounds are activated
once. The continuous sounds are toggled on off.
To alter the Vocal sound, scroll down and highlight “Vocal”.
Note that when “Vocal” is selected, the three last used sounds are
available as function keys.
Use function keys to activate a new sound directly or press the OK key to
get to the Vocal sounds selection menu.
Some vocal sounds are continuous. A continuous sound will be repeated
until the sound is selected again or another sound is activated.
Use the “+”/”-“ keys to alter volume directly.
Blood Pressure and Pulse
Blood pressure and pulse are related as described in specifications.
The “Normal” pulse can in addition be adjusted to 3 levels, Weak, Normal or Strong. If the pulse is set to
be normally weak, a weak pulse because of low BP will be almost impossible to detect.
If an ECG rhythm with no BP is set (i.e. VF, or Asystole) as the Running rhythm, BP will automatically be
set to 0/0. The BP is not automatically set back to normal if a perfusing rhythm is chosen.
Set Blood Pressure
On the main display, using the left to right navigation keys highlight the
Blood Pressure functional area.
Press the OK key to activate the BP menu or adjuste BP directly using the
BP +/- function keys:
Using the BP+/- keys:
When both Systolic and Diastolic are highlighted, both
pressures will change and maintain difference.
When systolic is highlighted, only systolic will change,
but diastolic will be kept 10 mmHg below systolic.
.
When diastolic is highlighted, only diastolic will change,
but systolic will be kept 10 mmHg above diastolic.
The Up/ Down keys are used to change selection.
“Set PEA” function key will set BP to 0/0. “Reset PEA” will set the BP
back to what it was before “Set PEA” was selected.
Use the “+”/”-“ keys to alter volume of Korotkoff sounds directly.
Pulse strength is indicated as “P:N” (Normal), “P:W” (Weak) or
“P:S” (Strong)
- 9 -
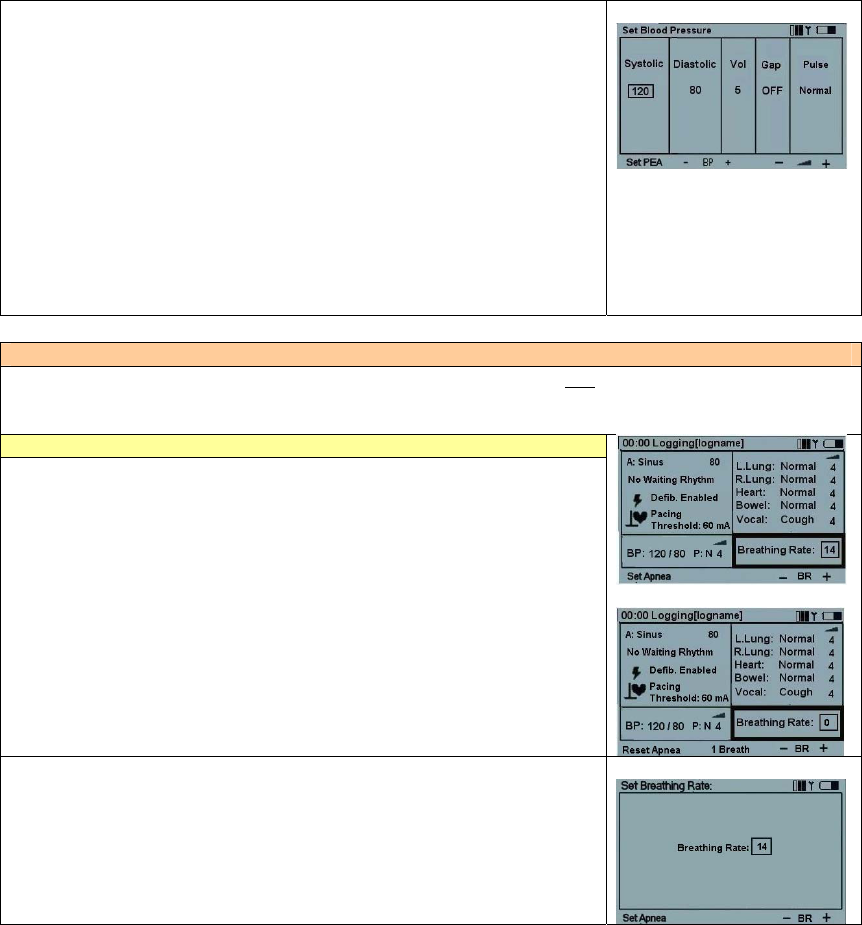
Set BP menu:
Use Left / Right keys to select function.
Systolic and Diastolic BP can be adjusted using the Up/ Down keys, the
“BP +/-“ keys or entered directly using the numerical keys.
If running rhythm is VF or Asystole, BP cannot be set.
Volume can be adjusted using the “+/-“ or the Up/ Down keys or directly
through the numeric keypad.
Auscultatory Gap (Korotkoff sound disappears in part of Phase II) can be
toggled On / Off using the Up/ Down keys.
Pulse strength can be adjusted using the Up/ Down keys.
Breathing Rate
Breathing rate is automatically set to 0 is BP is 0. The breathing rate is not automatically set back to normal
if a BP set.
Breathing rate can be adjusted between 0 and 60 breaths per minute.
Set Breathing Rate
On the main display; using the left to right navigation keys highlight the
Breathing rate functional area.
Press the OK key to activate the Breathing rate menu or adjust BR directly
using the BR +/- function keys.
“Set Apnea” function key will set breathing rate to 0. “Reset Apnea” will
restore the previously set breathing rate.
When Breathing rate is 0, the function key “1 Breath” becomes available.
This function will activate one breath cycle, allowing for generating breath
sounds on the manikin in synchronism with forced ventilations.
Breathing rate can be adjusted using the Up/ Down keys the “BR +/-“
keys (steps of 5) or entered directly using the numerical keys.
- 10 -
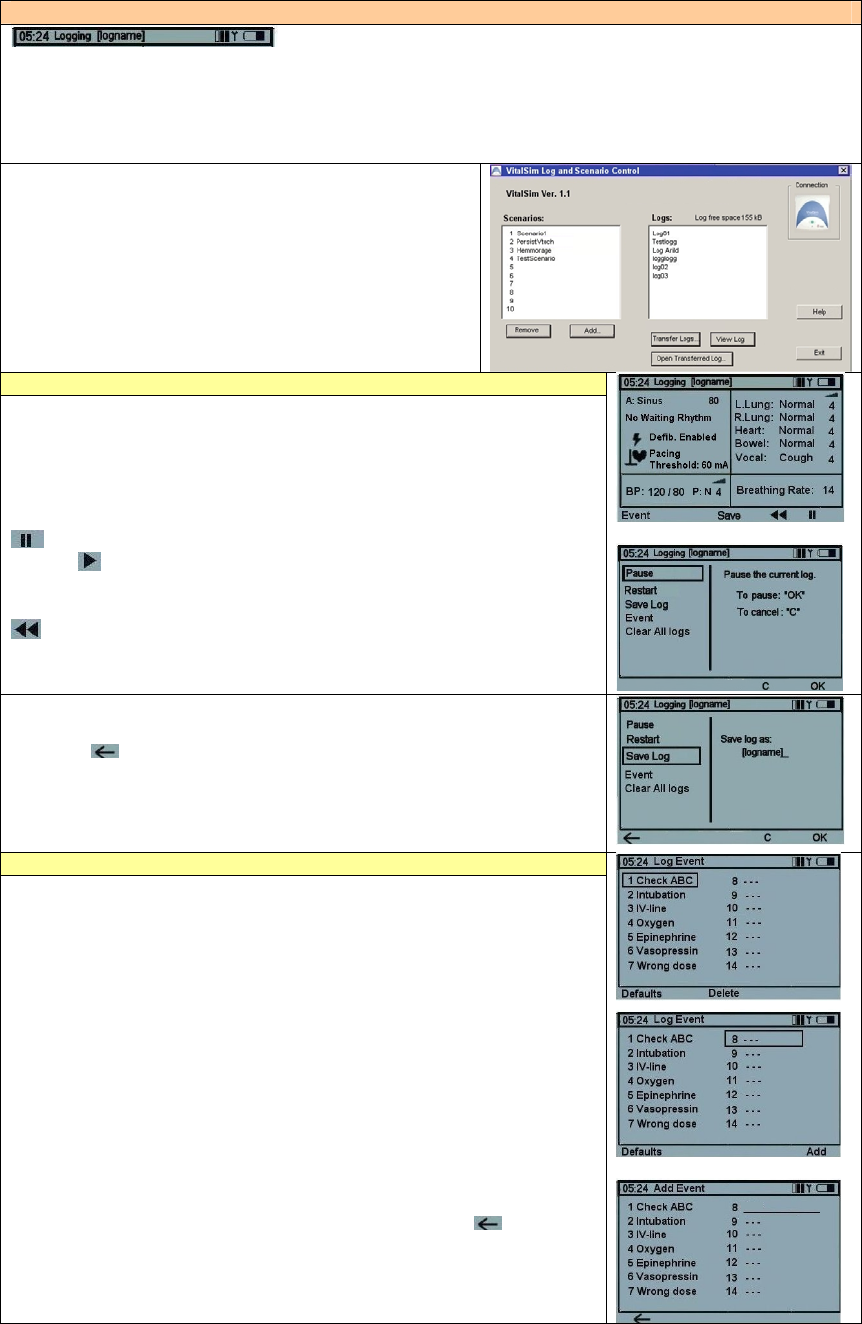
Log
The top section of the main display controls log and scenario.
The VitalSim automatically generates a log of events from it is turned on. Elapsed time and name for the
current log is displayed in the upper left corner of the display.
Unless saved, the log will be erased when the Base unit is turned off. The Log / Scenario section have
controls for Pause and Resume, Restart and Save logs. In addition it is possible to log “Manual” events
from the Remote Control.
Saved logs can be retrieved later using the VitalSim PC
utility program. Logs can be transferred to the PC for
permanent storage, addition of comments and printing.
Log Controls
On the main display; using the left to right navigation keys highlight the
logging functional area.
Press the OK key to activate the Log Control menu or select functions
directly from function keys.
Pause. Stops the clock. Any events or changes in settings will not be
logged. Resume logging and clock.
Restart. Restart the log. Erase current log.
Save Log. Saves the current log. Log is given a default name by VitalSim,
“Logxx”, where xx is a sequential number. This name can be modified,
using the backspace function key and the alphanumeric keyboard.
Up to 25 logs can be saved. Logs are erased when transferred to PC, or
they can be erased using the “Clear All Logs” function.
Log Events
The Event function allows for entering an event into the log.
The events are chosen from a list of up to 14 events stored in the Remote
Control.
To log an event, select the event using the arrow keys, and press the OK
button.
The first seven events are preprogrammed. They can be deleted using the
“Delete” function key then be reprogrammed by the user.
The “Default” function key restores the factory setting of preprogrammed
events.
The last seven events are left open (“---“) for the user to program.
To program an empty event, highlight the event and press the “Add”
function key.
Enter the event name using the alphanumeric keys and the t backspace
function key. The shift key is functional. Up to 13 characters can be used
for the event name.
- 11 -
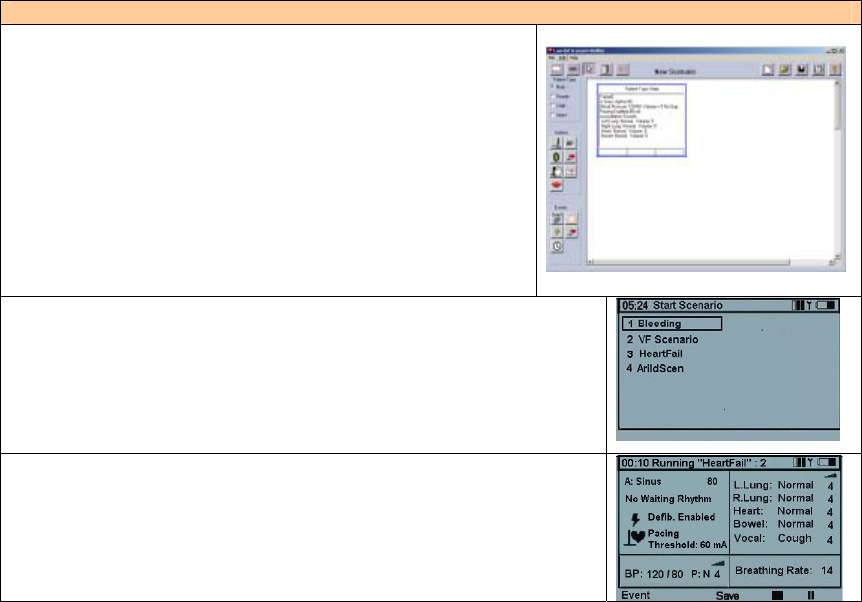
Scenario
The VitalSim can run preprogrammed scenarios, generated on a
PC-based scenario builder program.
These scenarios can be transferred too the Base unit using the
VitalSim PC utility program.
Execution of a scenario is started using the “Scen” button on the
Remote Control.
Logs and Scenarios are synchronized in the following manner:
• A new log is started when a scenario is started.
• Pause and Resume affects both scenario and log.
To start a scenario, press the “Scen” button.
It usually takes a little time to transfer all the scenario information to the
Remote Control.
Select the desired scenario and press OK.
The scenario will start, the clock is set to 0 and a new log is started.
The current log will be erased.

- 12 -
Specifications
Remote Control:
Batteries: 4 AA type (LR6) Alkaline batteries.
Battery life: Approximately 20 hours.
LCD display: High Resolution B&W LCD display.
Backlight can be turned On / Off in Setup menu.
Base Unit:
Batteries: 6 C type (LR14) Alkaline batteries
DC input: 9V DC, 1.5 A max
Sound input: Line input level.
Cuff pressure input: 0 – 300 mm Hg.
RF Communication:
Frequency ranges. Europe version 868,0 – 868,6 MHz
US version 915,5 – 916,4 MHz
Operation range: 10 m (30 ft) max.
ECG rhythms:
Available ECG Rhythms:
Rhythm Adult Manikin Child Manikin Infant Manikin
Rates
Default
Rate Rates Default
Rate Rates Default
Rate
Sinus 20-200 80 20-200 90 20-200 100
Sinus w/ Unifocal PVCs* 20-200 80 20-200 90 20-200 100
Sinus w/ Couplet. PVCs* 20-200 80 20-200 90 20-200 100
Sinus w/ Multifocal PVCs* 20-200 80 20-200 90 20-200 100
Sinus w/ PACs* 20-200 80 20-200 90 20-200 100
Sinus w/ PJCs* 20-200 80 20-200 90 20-200 100
Atrial Tachycardia 140-260 180 140-320 180 140-320 180
Atrial Flutter 75-150 100 75-150 100 75-150 100
Atrial fibrillation* 60-200 160 60-320 160 60-320 160
Junctional 30-160 50 30-160 50 30-160 50
Idioventricular 10-60 40 10-60 40 10-60 40
Ventricular Tachycardia 120-240 180 120-320 180 120-320 180
Ventricular Fibrillation
V-Coarse,
Coarse,
Std,
Fine,
V- Fine
N/A
V-Coarse,
Coarse,
Std,
Fine,
V- Fine
N/A
V-Coarse,
Coarse,
Std,
Fine,
V- Fine
N/A
Asystole N/A N/A N/A N/A N/A N/A
1º AV-Block 20-200 80 20-200 80 20-200 80
2º AV-Block type 1 **
50 @3:1
60 @3:1
75 @ 2:1
60
50 @3:1
60 @3:1
75 @ 2:1
60
50 @3:1
60 @3:1
75 @ 2:1
60
2º AV-Block type 2 **
60 @3:1
70 @3:1/2:1
90 @1:1
60
60 @3:1
70 @3:1/2:1
90 @1:1
60
60 @3:1
70 @3:1/2:1
90 @1:1
60
3º AV-Block
- Wide QRS on rate 30 30, 50, 60 50 30, 50, 60 50 30, 50, 60 50
Pacemaker
- Ventr. Pacemaker.
- No atrial activity.
80 80 80 80
* Rates are nominal ventricular rates. Actual rate may vary with occurrences of extrasystoles.
** Rates are nominal atrial rates. Effective ventricular rate will be lower. “@ 2:1” indicates ratio between
conducted and not conducted p-waves.
- 13 -
Specifications
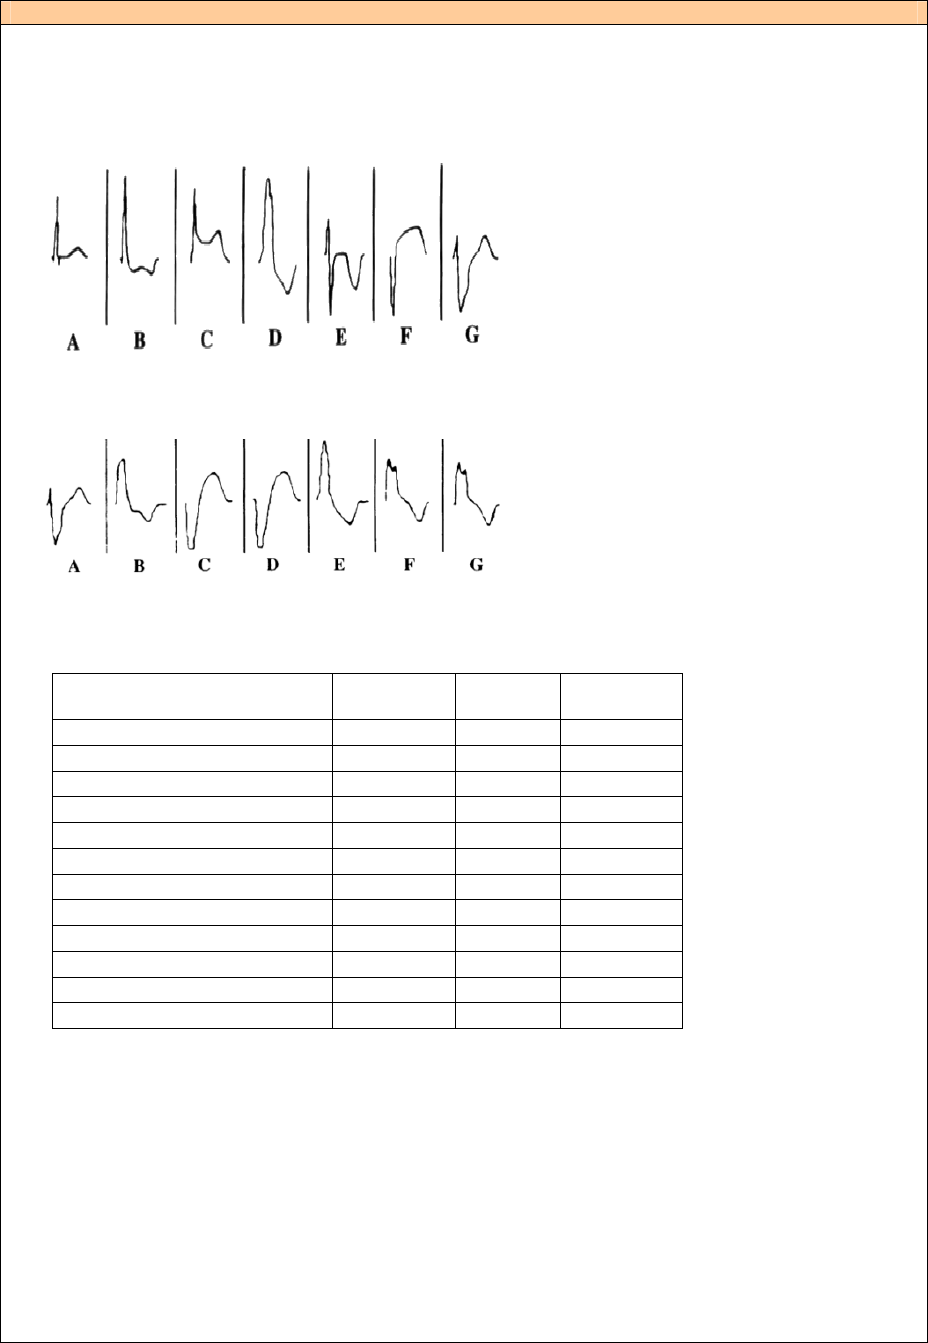
QRS Types:
There are seven different QRS waveforms named “A” to “G” which can be selected. Available QRS types vary
with each Basic rhythm.
Supraventricular QRS types for: Sinus, A-tach, A-flutt, A-fib, Junctional, 1°AVB, 2°AVB types 1 and 2,
3°AVB (high rates), Atrial Pacemaker, PACs and PJCs
A. Normal upright QRS-T.
B. Upright QRS with ST depression and T
inversion.
C. Upright QRS with ST elevation.
D. BBB. Broad R-wave with T inversion.
E. Biphasic QRS with T inversion.
F. QS with ST elevation.
G. BBB. Broad R-wave with upright T.
Ventricular QRS types for: Idioventricular, V-Tach and PVCs:
A. Broad rS wave.
B. Broad R wave.
C. Broad QS wave
D. Broad QS wave. Same as C.
E. Broad R wave.
F. Broad Rr Wave.
G. Broad Rr Wave. Same as F.
Heart sounds:
Heart sounds are synchronized to ECG.
Available Heart sounds.
Heart sounds:
Adult
Manikin
Child
Manikin
Infant
Manikin
Normal √ √ √
Aortic Stenosis √ √ √
Austin Flint Murmur √ √ √
Mitral Valve Prolapse √
Systolic Murmur √ √ √
Diastolic Murmur √
Friction Rub √
Opening Snap @70 msec √
Stills Murmur √ √
Atrial Septal Defect (ASD) √ √
Ventricular Septal Defect (VSD) √ √
Pulmonary Stenosis √

- 14 -
Specifications
Lung sounds:
Lung sounds are synchronized to breathing rates, adjustable from 0 – 60 breaths / min.
Available Lung sounds.
Lung sounds:
Adult
Manikin
Child
Manikin
Infant
Manikin
Normal Breath Sounds √ √ √
Fine Crackles √ √ √
Coarse Crackles √ √ √
Pneumonia √ √ √
Wheeze √ √ √
Stridor √ √ √
Pleural Rub √
Rhonchi √ √ √
Bowel sounds:
Available bowel sounds.
Adult Manikin
Bowel sounds: Male Female
Child
Manikin
Infant
Manikin
Normal √ √ √ √
Borborygmus √ √ √ √
Hyperactive √ √ √ √
Hypoactive √ √ √ √
Fetal Normal 140 BPM √
Fetal Brady 100 BPM √
Fetal Tachy 200 BPM √
Vocal sounds:
Vocal sounds are adjusted for age and gender of manikin.
Male
Manikin
Female
Manikin
Child
Manikin
Infant
Manikin
Vomit Vomit Vomit Cry
Cough Cough Cough Scream
Moan Moan Moan Content
SOB
Breathing
SOB
Breathing
SOB
Breathing
Hickup
Scream Scream Scream
Yes Yes Yes
No No No

- 15 -
Specifications
Blood Pressure:
Pressure range 0 - 300 mmHg
Accuracy +/- 4 mmHg
Calbration: Pressure sensor must be calibrated to sphygmomanometer. See Setup menu.
Pulse:
Available pulses: Carotid, Brachial and Radial
Only 2 pulses can be palpated simultaneously. (Power considerations).
Palpated BP: Radial pulse turns off at systolic BP.
Brachial pulse turns off at 20 mmHg, to prevent noise generation in
auscultation area.
Pulses are adjusted to BP as follows:
Systolic BP Carotid Pulse Radial/Brachial Pulse
>= 88 Normal Normal
< 88 Normal Weak
< 80 Normal Absent
< 70 Weak Absent
< 60 Absent Absent