Landis Gyr Technology EC6R3S2 Commercial Gas Meter Module User Manual Installation Guide Part 2
Landis+Gyr Technology, Inc. Commercial Gas Meter Module Installation Guide Part 2
Contents
- 1. Installation Guide Part 1
- 2. Installation Guide Part 2
Installation Guide Part 2
![5015 B.U. Bowman Drive Buford, GA 30518 USA Voice: 770-831-8048 Fax: 770-831-8598 Certification Exhibit FCC ID: R7PEC6R3S2 IC: 5294A-EC6R3S2 FCC Rule Part: 15.247 IC Radio Standards Specification: RSS-210 ACS Report Number: 08-0493 - 15C Manufacturer: Cellnet Technology, Inc. Model: 25-1079 Installation Guide (Part 2)](https://usermanual.wiki/Landis-Gyr-Technology/EC6R3S2.Installation-Guide-Part-2/User-Guide-1069549-Page-1.png)
![`çããÉêÅá~ä=~åÇ=fåÇìëíêá~ä=jÉíÉê=jçÇìäÉ=fåëí~ää~íáçåSJNO `ÉääåÉí=d~ë=jçÇìäÉ=~åÇ=jÉíÉê=fåëí~ää~íáçå=dìáÇÉ12 Installnewtampersealsovertwoscrewsusingtheplasticsleeveprovided(optional).Figure 6.20 Rockwell/Equimeter/Sensus: center test dial, counter installed, or index13 UtilizetheRFBustertoverifymoduleistransmitting,holdRFBusterwithmagnetsidetothetopupperleftquadrantofthemoduleplasticandholdthebuttonuntil10beepsarereceived.SeeAppendix C,UsingtheRFBusterformoreinformation.14 Cleanupanydebrisfromtheretrofitandinstallationprocessesandtieanyloosecableswithtiewraps.15 Proceedtothenextinstallationsite.16 Attheendoftheday,returntotheCrossDockforthecheck‐inprocess.Turnininventoryofunused,defective,orbrokengasMeterModules.Checkinallhandheldcomputersissued.Youmustreconcileanydiscrepanciesinthechangeoutdatabeforethecheck‐inprocesscanbecompleted.MeterModuleswillnotbecheckedouttoaninstallerwhohasnotcompletedthepreviousdayʹscheck‐inprocess.Sprague/Actaris Meter Module InstallationFigure 6.21 Sprague/Actaris: Indexes before installation](https://usermanual.wiki/Landis-Gyr-Technology/EC6R3S2.Installation-Guide-Part-2/User-Guide-1069549-Page-2.png)
![`çããÉêÅá~ä=~åÇ=fåÇìëíêá~ä=jÉíÉê=jçÇìäÉ=fåëí~ää~íáçå`ÉääåÉí=d~ë=jçÇìäÉ=~åÇ=jÉíÉê=fåëí~ää~íáçå=dìáÇÉ SJNP1FollowthestepsinʺToBeginC&IMeterModuleInstallationʺonpage 6‐1.2Removethetampercapsandindexcoverfromtheoriginalmeter.Removealloftheoriginalgasketmaterial.Cleanthegasketsurfaceonthemeterwithawirebrushandgasketscraper.3OpenthepackagecontainingtheMeterModule,screws,andbattery.Figure 6.22 Sprague/Actaris: screw kit4Openthebagcontainingthebattery.Carefullyremovethebattery.5OpentheMeterModule,takingcaretoavoidpullingonthecables.6 ConnectthebatterytotheMeterModule.Assemblethebatteryintotheretainingcliponthemetalbracket.7 ConnecttheprogrammingcablefromthehandheldcomputertotheprogrammingportonthereplacementMeterModule.ProgramtheMeterModule.Checkthehandheldforsuccessfulprogramming.8Slidethemetalbracket(notthegreencircuitboard)intotheslotsoftheclamshell(oneoftheclamshellhalveshasslotsonoppositesidesoftheinterior).Ifyouarelookingdownintotheslots,thebatteryclipshouldbetowardsthetop‐thelargecapacitorsonthecircuitboardgodeepintotheclamshell.AssembletheMeterModulehalvestogetherwiththefoursmallself‐tappingscrewsprovided.Thetorquerequirementis6‐10inchpounds.Ensurethatthegasketisinplaceandthewiresarenotpinched.Installthetamperseals.9Slidethebracketbetweentheindexcoverandthemeter.Check condition of the index for looseness of index pointers on shaft, cracks on faceenamel, or peeling. Replace the index if dials are loose or if enamel is cracked or loose.](https://usermanual.wiki/Landis-Gyr-Technology/EC6R3S2.Installation-Guide-Part-2/User-Guide-1069549-Page-3.png)
![`çããÉêÅá~ä=~åÇ=fåÇìëíêá~ä=jÉíÉê=jçÇìäÉ=fåëí~ää~íáçåSJNQ `ÉääåÉí=d~ë=jçÇìäÉ=~åÇ=jÉíÉê=fåëí~ää~íáçå=dìáÇÉ10 Installthenewgasket(ifrequired)andindexcovertothefrontoftheindex.Handletheindexcarefully.Thetorquerequirementis30‐40inchpounds.Thescrewsgothroughtheindexcoverandbracket,andfastenintothemeter.Figure 6.23 Sprague/Actaris: installing Index cover11 Installnewtamperseals.Figure 6.24 Sprague/Actaris: installed tamper sealsEnsure that the counter is aligned with proving dial (on top).](https://usermanual.wiki/Landis-Gyr-Technology/EC6R3S2.Installation-Guide-Part-2/User-Guide-1069549-Page-4.png)
![`çããÉêÅá~ä=~åÇ=fåÇìëíêá~ä=jÉíÉê=jçÇìäÉ=fåëí~ää~íáçå`ÉääåÉí=d~ë=jçÇìäÉ=~åÇ=jÉíÉê=fåëí~ää~íáçå=dìáÇÉ SJNR12 UtilizetheRFBustertoverifymoduleistransmitting,holdRFBusterwithmagnetsidetothetopupperleftquadrantofthemoduleplasticandholdthebuttonuntil10beepsarereceived.SeeAppendix C,UsingtheRFBusterformoreinformation.Figure 6.25 Sprague/Actaris: meter with module installed13 Cleanupanydebrisfromtheretrofitandinstallationprocessesandtieanyloosecableswithtiewraps.14 Proceedtothenextinstallationsite.15 Attheendoftheday,returntotheCrossDockforthecheck‐inprocess.Turnininventoryofunused,defective,orbrokengasMeterModules.Checkinallhandheldcomputersissued.Youmustreconcileanydiscrepanciesinthechangeoutdatabeforethecheck‐inprocesscanbecompleted.MeterModuleswillnotbecheckedouttoaninstallerwhohasnotcompletedthepreviousdayʹscheck‐inprocess.](https://usermanual.wiki/Landis-Gyr-Technology/EC6R3S2.Installation-Guide-Part-2/User-Guide-1069549-Page-5.png)
![`çããÉêÅá~ä=~åÇ=fåÇìëíêá~ä=jÉíÉê=jçÇìäÉ=fåëí~ää~íáçåSJNS `ÉääåÉí=d~ë=jçÇìäÉ=~åÇ=jÉíÉê=fåëí~ää~íáçå=dìáÇÉSchlumberger/Actaris Meter Module InstallationFigure 6.26 Schlumberger/Actaris: before installationFigure 6.27 Schlumberger/Actaris: meter with short base1FollowthestepsinʺToBeginC&IMeterModuleInstallationʺonpage 6‐1.Only Schlumberger meters with the taller base (shown above) can accommodate CellnetMeter Modules. Meters with the shorter base (shown below) will need to be retrofitted witha taller index bracket prior to module retrofit.](https://usermanual.wiki/Landis-Gyr-Technology/EC6R3S2.Installation-Guide-Part-2/User-Guide-1069549-Page-6.png)
![`çããÉêÅá~ä=~åÇ=fåÇìëíêá~ä=jÉíÉê=jçÇìäÉ=fåëí~ää~íáçå`ÉääåÉí=d~ë=jçÇìäÉ=~åÇ=jÉíÉê=fåëí~ää~íáçå=dìáÇÉ SJNT2Removethetampercapsandindexcoverfromtheoriginalmeter.Removethegasketifitisunserviceable.Cleantheworkareaswithawirebrushorscraperasneeded.Figure 6.28 Schlumberger/Actaris: Index cover removed3OpenthepackagecontainingtheMeterModule,screws,andbattery.4Openthebagcontainingthebattery.Carefullyremovethebattery.5OpentheMeterModule,takingcaretoavoidpullingonthecables.6 ConnecttheprogrammingcablefromthehandheldcomputertotheprogrammingportontheMeterModule.ProgramtheMeterModule.Checkthehandheldforsuccessfulprogramming.7 ConnectthebatterytotheMeterModule.Assemblethebatteryintotheretainingcliponthemetalbracket.8Slidethemetalbracket(notthegreencircuitboard)intotheslotsoftheclamshell(oneoftheclamshellhalveshasslotsonoppositesidesoftheinterior).Ifyouarelookingdownintotheslots,thebatteryclipshouldbetowardsthetop‐thelargecapacitorsonthecircuitboardgodeepintotheclamshell.AssembletheMeterModulehalvestogetherwiththefoursmallself‐tappingscrewsprovided.Thetorquerequirementis6‐10inchpounds.Ensurethatthegasketisinplaceandthewiresarenotpinched.Installthetamperseals.9Installthenewindexcover.Gentlyslidethecoverovertheindextoavoidbreakingthecounter.Becarefulnottodamagethedials.Check condition of the index for looseness of index pointers on shaft, cracks on faceenamel, or peeling. Replace the index if dials are loose or if enamel is cracked or loose.](https://usermanual.wiki/Landis-Gyr-Technology/EC6R3S2.Installation-Guide-Part-2/User-Guide-1069549-Page-7.png)
![`çããÉêÅá~ä=~åÇ=fåÇìëíêá~ä=jÉíÉê=jçÇìäÉ=fåëí~ää~íáçåSJNU `ÉääåÉí=d~ë=jçÇìäÉ=~åÇ=jÉíÉê=fåëí~ää~íáçå=dìáÇÉ10 AttachthebracketandMeterModuletothemeter.Notetheorderofinstallation:indexcover,bracket,tampercap,andscrew.Thetorquerequirementis30‐40inchpounds.Figure 6.29 Schlumberger/Actaris: meter with bracket and meter module11 Installnewtampercapsoverthescrewsusingtheplasticsleevesprovided.12 UtilizetheRFBustertoverifymoduleistransmitting,holdRFBusterwithmagnetsidetothetopupperleftquadrantofthemoduleplasticandholdthebuttonuntil10beepsarereceived.SeeAppendix C,UsingtheRFBusterformoreinformation.13 Cleanupanydebrisfromtheretrofitandinstallationprocessesandtieanyloosecableswithtiewraps.14 Proceedtothenextinstallationsite.15 Attheendoftheday,returntotheCrossDockforthecheck‐inprocess.Turnininventoryofunused,defective,orbrokengasMeterModules.Checkinallhandheldcomputersissued.Youmustreconcileanydiscrepanciesinthechangeoutdatabeforethecheck‐inprocesscanbecompleted.MeterModuleswillnotbecheckedouttoaninstallerwhohasnotcompletedthepreviousdayʹscheck‐inprocess.](https://usermanual.wiki/Landis-Gyr-Technology/EC6R3S2.Installation-Guide-Part-2/User-Guide-1069549-Page-8.png)
![`çããÉêÅá~ä=~åÇ=fåÇìëíêá~ä=jÉíÉê=jçÇìäÉ=fåëí~ää~íáçå`ÉääåÉí=d~ë=jçÇìäÉ=~åÇ=jÉíÉê=fåëí~ää~íáçå=dìáÇÉ SJNV](https://usermanual.wiki/Landis-Gyr-Technology/EC6R3S2.Installation-Guide-Part-2/User-Guide-1069549-Page-9.png)
![Notes:SJOM `ÉääåÉí=d~ë=jçÇìäÉ=~åÇ=jÉíÉê=fåëí~ää~íáçå=dìáÇÉ`çããÉêÅá~ä=~åÇ=fåÇìëíêá~ä=jÉíÉê=jçÇìäÉ=fåëí~ää~íáçå](https://usermanual.wiki/Landis-Gyr-Technology/EC6R3S2.Installation-Guide-Part-2/User-Guide-1069549-Page-10.png)
![`ÉääåÉí=d~ë=jçÇìäÉ=~åÇ=jÉíÉê=fåëí~ää~íáçå=dìáÇÉ TJNCHAPTER 7 CELLNET PULSE RECORDER METER MODULE INSTALLATIONTOOLS AND EQUIPMENTThissectionoutlinesthenecessarytoolsandequipmentforinstallingaCellnetPulseRecorder.EquipmentThefollowingtablecontainsallrequiredequipment:Table7.1EquipmentImage Description`mo=EbñíÉêå~ä=sáÉïF`mo=EfåíÉêå~ä=sáÉïF_~ÇÖÉê=cáÉäÇ=péäáÅÉ=háí=SOMUQJMMN√péäáÅÉ=båÅäçëìêÉ√qáÉïê~éë√Pj=pÅçíÅÜäçâëI=jçÇÉä=rvO=çê=bèìáî~äÉåíaçï=`çêåáåÖ=Q=bäÉÅíêáÅ~ä=fåëìä~íáåÖ=`çãéçìåÇ=Eçê=Éèìáî~äÉåíFjpap=~î~áä~ÄäÉ=~í=ïïïKÇçïÅçêåáåÖKÅçãK](https://usermanual.wiki/Landis-Gyr-Technology/EC6R3S2.Installation-Guide-Part-2/User-Guide-1069549-Page-11.png)
![`ÉääåÉí=mìäëÉ=oÉÅçêÇÉê=jÉíÉê=jçÇìäÉ=fåëí~ää~íáçåTJO `ÉääåÉí=d~ë=jçÇìäÉ=~åÇ=jÉíÉê=fåëí~ää~íáçå=dìáÇÉaçï=`çêåáåÖ=lpJO=páäáÅçåÉ=`äÉ~åÉê=Eçê=Éèìáî~äÉåíFjpap=~î~áä~ÄäÉ=~í=ïïïKÇçïÅçêåáåÖKÅçãKmfkJfkJqlouoÉèìáêÉë=~=qlou=ÇêáîÉê=ëáòÉ=qNM=ïáíÜ=~=ÜçäÉ=Ñçê=íÜÉ=mfk^ÇÇáíáçå~ä=Å~ÄäÉpéÉÅáÑáÅ~íáçåW=OOJ^td=pçäáÇ=`çééÉê`çäçêëW=oÉÇLdêÉÉåL_ä~Åâms`=g~ÅâÉít~ääJãçìåí=háí=mkW=QRJMMVMçêOJPÒ=máéÉJjçìåí=háí=QRJMMUMpÅêÉïë=Ñçê=ãÉíÉê=áåÇÉñÉëImage Description](https://usermanual.wiki/Landis-Gyr-Technology/EC6R3S2.Installation-Guide-Part-2/User-Guide-1069549-Page-12.png)
![`ÉääåÉí=mìäëÉ=oÉÅçêÇÉê=jÉíÉê=jçÇìäÉ=fåëí~ää~íáçå`ÉääåÉí=d~ë=jçÇìäÉ=~åÇ=jÉíÉê=fåëí~ää~íáçå=dìáÇÉ TJPToolsThefollowingtablecontainsallrequiredtools:Table7.2ToolsImage Descriptionoc=_ìëíÉê=j~ÖåÉíéLå=OSJNMRMpÅêÉïÇêáîÉêë=EÑä~í=~åÇ=mÜáääáéëFtáêÉ=`ìííÉê=~åÇ=píêáééÉêpÅçíÅÜäçâ®=bJVv=`êáãéáåÖ=qççä=çê=bèìáî~äÉåíïïïKPjKÅçãp~ÑÉíó=dçÖÖäÉëe~åÇeÉäÇ=`çãéìíÉê=ïïïKÇ~éKÅçãNJt~ó=jçÇìäÉ=mêçÖê~ããáåÖ=`~ÄäÉj~ÖåÉí=äçÅ~íÉÇ=çå=íçé =ä ÉÑí](https://usermanual.wiki/Landis-Gyr-Technology/EC6R3S2.Installation-Guide-Part-2/User-Guide-1069549-Page-13.png)
![`ÉääåÉí=mìäëÉ=oÉÅçêÇÉê=jÉíÉê=jçÇìäÉ=fåëí~ää~íáçåTJQ `ÉääåÉí=d~ë=jçÇìäÉ=~åÇ=jÉíÉê=fåëí~ää~íáçå=dìáÇÉSAFETY AND ENVIRONMENTPrerequisite TrainingInstallersshouldbeinstructedinthefollowingsafetyelementsaswellasanysite‐specificsafetyissues:• HazardCommunication(EmployeeRighttoKnow)•Lifting•Safedriving•Useofhandtools• ConfinedspacePreliminary ChecksTheinstallershouldalreadybeabletooperatetheHandHeldcomputer.Additionally,theinstallershouldalreadyhaverouteinformationandtherequirednumberofendpoints.•Verifythatyouareatthecorrectsite,specifiedonthehandheldcomputerorworkorder.•Verifythatthesiteissafeforyouandyourequipment.•Notifythecustomerofyourpresence.Tellthecustomerthatyoumusthaveaccesstothemeter.Ifnecessary,havethecustomersigntheworkorder.•Wheninstallingmeters,followanyguidelinesissuedbyyourcompanyinadditiontothosegiveninthisguide.• Neverperformaninstallationduringalightningstormorunderexcessivelywetconditions.Site RequirementsThesitemustcomplywiththefollowingcriteria:•Thereisnochancethatanotherobjectwillbesetovertheantenna.•Someinstancesmayrequireadditionalcable.•Maximumcablelengthisalways200feet.](https://usermanual.wiki/Landis-Gyr-Technology/EC6R3S2.Installation-Guide-Part-2/User-Guide-1069549-Page-14.png)
![`ÉääåÉí=mìäëÉ=oÉÅçêÇÉê=jÉíÉê=jçÇìäÉ=fåëí~ää~íáçå`ÉääåÉí=d~ë=jçÇìäÉ=~åÇ=jÉíÉê=fåëí~ää~íáçå=dìáÇÉ TJRFCC INFORMATIONSeeAppendix F,CPRInformation,formoreinformation.INSTALLING THE CELLNET PULSE RECORDERThefollowingincludesinformationaboutinstallingtheCPRendpoint.Mounting the CPRTheCPRendpointshouldbemountedaboveground,outdoors,facingthenearestconcentrator.Identifying the Register for InstallationRefertotheGasModuleCompatibilityChartforcompatibilityandspecificpartsneeded.Connecting the PRECO Switch to the CPR1InstallthePRECOswitchonthegasmeterindexaccordingtotheinstructionsincludedwiththePRECOkit.2RoutethecablefromthePRECOswitchtotheCPRmountinglocation.Splicetheadditionalcableasnecessary.Whenusingadditionalcable,alwaysmatchcolors:PRECObluetoCPRwhite(viagreenextensionwire),PRECOredtoCPRred,PRECOwhitetoCPRblack(viablackextensionwire).3Ifyouneedtoaddcableforaremotewall‐mountedCPR,followtheinstructionshereforremovingtheMolexconnectors(ifpresent)andsplicingadditionalcable.Preparecableendsforcrimping:aUsingthecuttingbladeportionoftheWireCutterandStrippertool,cutthewireattheMolexconnector(ifpresent)comingfromthePRECOswitch.ThewireattachedtothePRECOswitchcontainsthreewires.Figure 7.1 3-Wire CableDo not damage internal wire insulation when removing external insulation.](https://usermanual.wiki/Landis-Gyr-Technology/EC6R3S2.Installation-Guide-Part-2/User-Guide-1069549-Page-15.png)
![`ÉääåÉí=mìäëÉ=oÉÅçêÇÉê=jÉíÉê=jçÇìäÉ=fåëí~ää~íáçåTJS `ÉääåÉí=d~ë=jçÇìäÉ=~åÇ=jÉíÉê=fåëí~ää~íáçå=dìáÇÉbBeforeproceedingwithsplicing,usetheWireCutterandStrippertocuttheMolexconnectoroffoftheCPRPulseInputConnector(identifiedbywhitewire).Figure 7.2 Molex Connector (as shipped)cSplicewiresfromCPRtoPRECOswitch.Matchcolorscarefully,accordingtothetablebelow.CPR ships with a female Molex connector at the loose end of the communicationcable.CPR Pulse Input Co nn ectorwith white wire](https://usermanual.wiki/Landis-Gyr-Technology/EC6R3S2.Installation-Guide-Part-2/User-Guide-1069549-Page-16.png)
![`ÉääåÉí=mìäëÉ=oÉÅçêÇÉê=jÉíÉê=jçÇìäÉ=fåëí~ää~íáçå`ÉääåÉí=d~ë=jçÇìäÉ=~åÇ=jÉíÉê=fåëí~ää~íáçå=dìáÇÉ TJTTable7.3WireColorMatching4SeeAppendix A:CrimpingWires,forinstructionsoncrimpingwires.Programming CPR Endpoint for Operation with PRECO SwitchYoumustprogramtheCPRwiththeHandHeldcomputer(the“HandHeld”).1 ConnecttheCPRProgrammingCabletotheCPRSerial/PowerConenctor(yellowwire)below.Figure 7.3 CPR Programming Cable Attached2FollowtheHandHeldpromptstoprogramtheendpoint.3Whenprogrammingiscomplete,disconnecttheprogrammingcablefromtheCPR.EncoderRegister PRECOWirecolor/CPRWireColorPRECObluetogreenextensiontoCPRwhitePRECOredtoredextensiontoCPRredPRECOwhitetoblackextensiontoCPRblackblue whitered redwhite blackConnect only three wires using the color matching above.ProgrammingCableCPRSerial/PowerConnector](https://usermanual.wiki/Landis-Gyr-Technology/EC6R3S2.Installation-Guide-Part-2/User-Guide-1069549-Page-17.png)
![`ÉääåÉí=mìäëÉ=oÉÅçêÇÉê=jÉíÉê=jçÇìäÉ=fåëí~ää~íáçåTJU `ÉääåÉí=d~ë=jçÇìäÉ=~åÇ=jÉíÉê=fåëí~ää~íáçå=dìáÇÉ4 ConnectthebatterytotheCPR.5DressthewiresandcrimpinsidetheCPRenclosureasshown.Figure 7.4 CPR Battery Connector Connected to CPRProceedtoʺTestingtheEndpointʺonpage 7‐8.TESTING THE ENDPOINTAfteryouhavecompletedtheinstallationprocess,testtheinstallationbypassinganRFBustermagnetneartheCPR’ssensor.TheRFBusterdetectsthetransmission,beepsandlightstheLED.1 ActivatetheCPRbypassingtheRFBustermagnetagainstthesideoftheCPRhousingasshown.Figure 7.5 CPR Activation Using RF BusterCrimpedWiresTieWrapCPRSerial/PowerConnectorBatteryConnectoroc=_ìëíÉê=j~ÖåÉíeçäÇ=íÜÉ=oc=_ìëíÉê=ã~ÖåÉí=~Ö~áåëí=íÜáë=ëáÇÉ=çÑ=íÜÉ=`mo](https://usermanual.wiki/Landis-Gyr-Technology/EC6R3S2.Installation-Guide-Part-2/User-Guide-1069549-Page-18.png)
![`ÉääåÉí=mìäëÉ=oÉÅçêÇÉê=jÉíÉê=jçÇìäÉ=fåëí~ää~íáçå`ÉääåÉí=d~ë=jçÇìäÉ=~åÇ=jÉíÉê=fåëí~ää~íáçå=dìáÇÉ TJV2PressandholdthebuttonontheRFBuster.PositiontheRFBusterlessthansixinchesawayfromtheleftsideoftheCPR.TheRFBustermakesaudiblebeepsandtheLEDflashestoconfirmtransmissionoftheRFpacketsfromtheendpoint.3IftheRFBusterdetectspacketswithinoneminute,theinstallationisgood.IftheRFBusterdoesnotbeep,refertoʺTroubleshootingʺonpage 7‐9.4 Attachthecoverusingthefourscrewsincludedinthehardwarekit.5Cleantheareaandremovealldisposablematerials.ENDPOINT REPLACEMENTPleasefollowtheinstructionsbelowtoreplaceanendpoint:1OpenthefaceoftheCPR.2Writedownthecolortranslation.3Carefullycutanytiewraps.4CutoffScotchloksnearthecrimp.5 UnmounttheCPR.6 Disconnectthebattery.ProceedtoʺConnectingthePRECOSwitchtotheCPRʺonpage 7‐5.TROUBLESHOOTINGRF Buster Does Not Beep When Testing 1First,verifythatthebatteryisproperlyconnected,redwiretoredwire.2DoestheRFBusterbeepandlighttheLEDwhentheswitchisinitiallypressed?Ifnot,thebatteryintheRFBusterisdead.ReplacetheRFBusterbattery,oruseanotherRFBuster.3AfteractivatingthemagneticswitchontheCPR,holdtheRFBusterswitchoncontinuously.PointtheLEDendoftheRFBustertowardthefrontoftheCPR.HoldtheRFBusterbetween6”and12”fromthefrontoftheCPR.Waittenseconds.IftheRFBusterdoesnotbeep,replacetheCPRbattery.Customer SupportToreachCustomerSupportatCellnet:Email:customersupport@cellnet.comTelephone:1‐800‐791‐2567.Hoursofoperation‐8:00a.m.ETto5:00p.m.ETDo not use a cell phone or any other RF device while conductingthis test.](https://usermanual.wiki/Landis-Gyr-Technology/EC6R3S2.Installation-Guide-Part-2/User-Guide-1069549-Page-19.png)
![`ÉääåÉí=mìäëÉ=oÉÅçêÇÉê=jÉíÉê=jçÇìäÉ=fåëí~ää~íáçåTJNM `ÉääåÉí=d~ë=jçÇìäÉ=~åÇ=jÉíÉê=fåëí~ää~íáçå=dìáÇÉ](https://usermanual.wiki/Landis-Gyr-Technology/EC6R3S2.Installation-Guide-Part-2/User-Guide-1069549-Page-20.png)
![`ÉääåÉí=d~ë=jçÇìäÉ=~åÇ=jÉíÉê=fåëí~ää~íáçå=dìáÇÉ UJNCHAPTER 8 METER EXCHANGE OR MODULE RETROFIT CONCLUSIONPriortoleavingthepremise,verifythatalldebrisfromtheretrofitand/orexchangeprocessiscleanedandremoved.Leaveadoorhangertagwithanyappropriateinformationfilledin.RETURNING MATERIAL Attheendoftheday,installerswillreturntotheCrossDockwithallequipmentandanynewmetersormodulesthatwerenotinstalled.Eachinstallermustaccountforeverymetertheywereassigned.Turnininventoryofunused,defective,orbrokengasMeterModules.Youmustreconcileanydiscrepanciesinchangeoutdatabeforethecheck‐inprocesscanbecompleted.Metersandmoduleswillnotbecheckedouttoaninstallerwhohasnotcompletedthepreviousdayʹscheck‐inprocess.](https://usermanual.wiki/Landis-Gyr-Technology/EC6R3S2.Installation-Guide-Part-2/User-Guide-1069549-Page-21.png)
![Notes:UJO `ÉääåÉí=d~ë=jçÇìäÉ=~åÇ=jÉíÉê=fåëí~ää~íáçå=dìáÇÉjÉíÉê=bñÅÜ~åÖÉ=çê=jçÇìäÉ=oÉíêçÑáí=`çåÅäìëáçå](https://usermanual.wiki/Landis-Gyr-Technology/EC6R3S2.Installation-Guide-Part-2/User-Guide-1069549-Page-22.png)
![`ÉääåÉí=d~ë=jçÇìäÉ=~åÇ=jÉíÉê=fåëí~ää~íáçå=dìáÇÉ VJNCHAPTER 9 GAS METER PREPARATION PROGRAM (GPREP)TheGasMeterPreparationProgram(GPrep)isasoftwaretoolthatfacilitatesCellnetprocesses.ItalsorunswithwaterCPRmodules.ThedatacapturedbyGPrepissenttoRIMStoupdatetheCellnetandutilitiesdatabases.GPrepwasdevelopedforResGas,C&IGas(Diaphragm),C&IGas(Rotary),andCPR(gasandwater)modulesto:• DisassociateModuleIDsfromMeterIDs‐“MRB(MaterialRepairBoard)Mode”Thisfeaturemostcommonlycapturestherecordofdisassociationwhenremovingamodulefromthefield.• ValidatetheprogrammedLANAddresswiththePowerLANAddresslabelandverifythattheoperationalprogrammedparametersmatchthoserequired.‐“InspectMode”.ThisfeatureismostcommonlyusedwhenreceivingmetersfromthefactorywithCellnetmodulesalreadyinstalled(OEMMeters)orwhenreceivingCellnetretrofitmodulesdirectlyfromCellnet’smanufacturer.Differentutilitiesusedifferentsamplingprocedures.ThemetershopshouldverifyapercentageofinboundmodulestoensurethattheLANAddressthatisprogrammedintothegasmoduleandmatchestheLANAddressonthelabeloutsideofthemodulehousing.ThemodulescanalsobeinspectedtoverifythatthecorrectMeterIDformatwasused,thattherolloverpointiscorrect,andthatthemeterconstantiscorrect.•Programthemodulewithoperationalparameters,includingthemeter‐specificvaluessuchasmeterID,rolloverpoint,meterconstant,anddialindexreading(whichforgasmeterscanbenon‐zero)‐“ProgramNeworRe‐ProgramOldMode”.ThisfeatureisusedwhenassemblingCellnetmodulesonmetersinthemetershopandinthefield(fortheO&MProcesses).•Savetheinspection,programming,MRBdisassociationrecordandindexreadresultsinseparatefilesfordeliverytoCellnetandtheutility.Thiscanbeanautomaticprocessoryoucanturneditoffforaparticularfeaturewhenitisnotnecessarytosavetheresults.YoucanuseGPrepinametershop,atafixedlocation,orinthefield.YoucanuseaPCorlaptopcomputer.CloselymonitorGPrepusage,andmakethedatafileseasilyaccessible.GPrepisoftenusedwithoperationsandmaintenance(O&M)Each of these functions are steps in Cellnet processes. You should fully understand howdata flows within the Cellnet network and what data needs to be captured from orprogrammed into a module before using this software.](https://usermanual.wiki/Landis-Gyr-Technology/EC6R3S2.Installation-Guide-Part-2/User-Guide-1069549-Page-23.png)
![d~ë=jÉíÉê=mêÉé~ê~íáçå=mêçÖê~ã=EdmêÉéFVJO `ÉääåÉí=d~ë=jçÇìäÉ=~åÇ=jÉíÉê=fåëí~ää~íáçå=dìáÇÉprocesses.ThischapterassumesthattheuserfullyunderstandstheseO&Mprocesses,andatwhichstepsintheseprocessesGPrepcapturesdataandprogramsitintoCellnetmodules.GPreprequiresselectivefunctionalitydependingonthesitewhereitisinuse,sothereareadministrativeprivilegesforconfiguringoptionsduringsoftwareinstallationandsetup.](https://usermanual.wiki/Landis-Gyr-Technology/EC6R3S2.Installation-Guide-Part-2/User-Guide-1069549-Page-24.png)
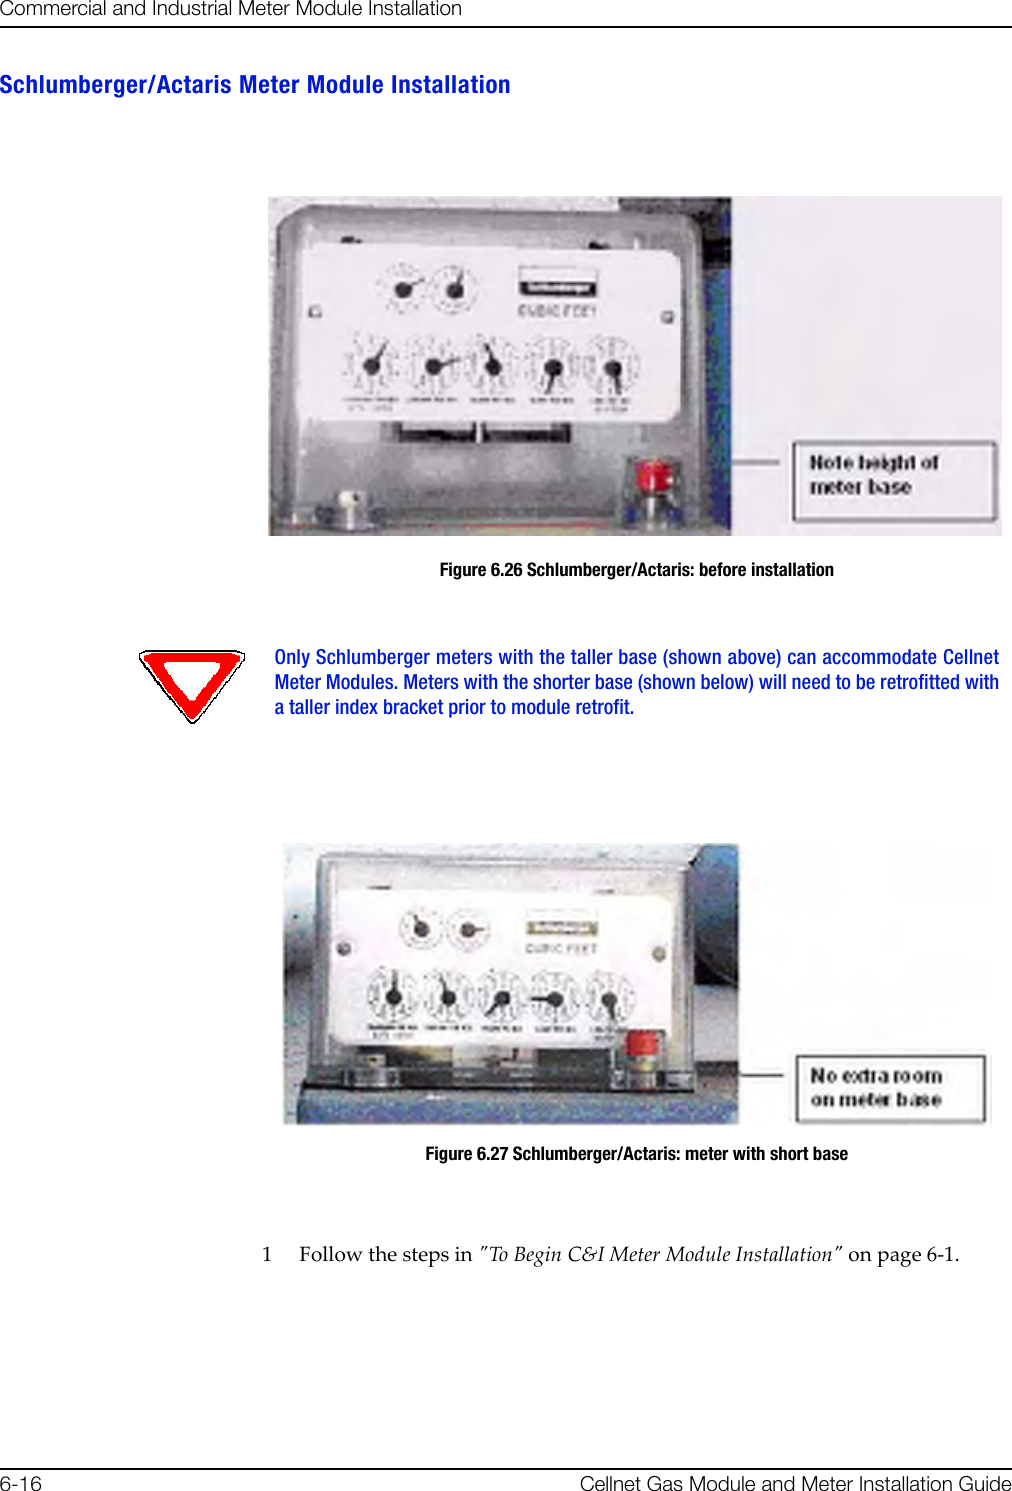
![d~ë=jÉíÉê=mêÉé~ê~íáçå=mêçÖê~ã=EdmêÉéF`ÉääåÉí=d~ë=jçÇìäÉ=~åÇ=jÉíÉê=fåëí~ää~íáçå=dìáÇÉ VJPREQUIRED TOOLSThefollowingisalistofrequiredtoolstooperateGPrep,alongwithaPC/operatingsystemrecommendation:•DesktopPCwithWindows2000orhigher(WindowsNTisnotrecommendedwhenusingalaptopcomputersincetherearesometimesproblemsconfiguringtheports)•CopyofGPrepv.2.3ormostrecentversiononarequiredtoolsCD• ShooterBoxwithACpowercord,partnumber26‐3500andgasshootercableor1‐WayModuleProgrammingCablePN26‐1179• Battery,partnumber40‐1032or40‐1590•Laptop/PC•DB9toDB9cable(maleononeendfemaleontheother)straightthrough(RS232).Roles•GPrepAdministrator‐isthelocalexpertonGPrep.TheAdministratorisfamiliarwiththeentirefunctionalityofGPrep.TheAdministratorknowshowtoconfigureallinternalfiles,andhowtograntcertainpermissions.TheAdministratorknowshowtocleanallfilesofbadrecordsandsupersedes.Howtoarchiveallfilesande‐mailthemtotheappropriatedatabaseadministratororRIMSanalystandhowtotrainthedaytodayusersofGPrep.ThispersonhasthedailytaskofmaintainingGPrepanditsfiles.•GPrepUser‐needstoknowthefundamentalsofGPrep.Theyneedtoknowhowtologin,howtomarryameterwithamodule,andhowtoinspectamoduletoensurethatitisproperlyprogrammed,andwhattodoifitisnot.PROCEDURES FOR GPREP ADMINISTRATOR1Verifyyourtools.GPrepdoesnotoperatewithoutallofthetoolslistedintheRequiredToolssection.2UnzipGPrepfilestoyourPCorlaptop.aCustomizeGPrep.TheGPrepinstallationfoldercontainsafilenamedGPREP.INI.Thisfiledefinesallconfigurationparametersinits[Control]sectionandmaintainssettingsfromthelastGPrepruninits[Default]section.•Ifthisisanewinstallation,GPREP.INImustbecopiedtotheGPrepinstallationdirectory.Before copying files go to “View” on the menu bar of your PC, select “FolderOptions”. Under a section titled “Advanced Settings” there is a folder called“Hidden files”, under that folder choose “show all files”, then click on the OKbutton.](https://usermanual.wiki/Landis-Gyr-Technology/EC6R3S2.Installation-Guide-Part-2/User-Guide-1069549-Page-25.png)
![d~ë=jÉíÉê=mêÉé~ê~íáçå=mêçÖê~ã=EdmêÉéFVJQ `ÉääåÉí=d~ë=jçÇìäÉ=~åÇ=jÉíÉê=fåëí~ää~íáçå=dìáÇÉ•Ifthisisanupgrade,thenyoucanusetheexistingGPREP.INIfiletomodifyanyconfigurationparametersasnecessary.bEdittheGPREP.INIfileusingNotepadoranyotherASCIIfileeditor.cFollowtheinstructionsinthatfiletospecifytherequiredpatternforMeterIDs,file(s)forloggingoperations,menuselectionsthatareavailabletotheoperatorandthemaximummemoryusedtotrackpreviouslogfileassociations.FollowingisanexampleofaGPREP.INIfile.; The Default section remembers GPrep settings from the last run. These should; not be changed manually.; ------------------------------------------------------------------------------[Default]; The Control section contains GPrep operational parameters.; ------------------------------------------------------------------------------; Operator Meter Type selections are controled by variables:;; RGAS for ResGas; CIGD for C&I Gas (Diaphragm); CIGR for C&I Gas (Rotary); CPRG for CPR Gas (Rotary);; Setting any of these to "No" disables the menu item. The default is "Yes".;; Example:; RGAS=No; CIGR=Yes; Disables "ResGas" selection, leaving both C&I and CPR selections enabled.; ------------------------------------------------------------------------------; Operator Mode selections are controled by variables:;; Inspect; ProgramNew; ProgramOld; IndexRead; MRBMode;; Setting any of these to "No" disables the menu item. The default is "Yes".;; Example:; ProgramOld=No; Inspect=Yes; MRBMode=NoIf you run GPrep in different modes and/or it requires different configuration settings at thesame operator station, then install multiple copies of GPrep in different directories.](https://usermanual.wiki/Landis-Gyr-Technology/EC6R3S2.Installation-Guide-Part-2/User-Guide-1069549-Page-26.png)
![d~ë=jÉíÉê=mêÉé~ê~íáçå=mêçÖê~ã=EdmêÉéF`ÉääåÉí=d~ë=jçÇìäÉ=~åÇ=jÉíÉê=fåëí~ää~íáçå=dìáÇÉ VJR; Disables "Re-Program Old" and "MRB" selections, leaving "Inspect",; "Program New" and "Index Read" modes enabled.; ------------------------------------------------------------------------------; Operator Port selections are controled by variables:;; COM1, COM2, COM3 and COM4;; Setting any of these to "No" disables the menu item. The default is "Yes".;; Example:; COM4=No; COM3=No; COM1=Yes; Disables "COM3" and "COM4" selections, leaving "COM1" and "COM2" enabled.; ------------------------------------------------------------------------------; MeterID is a pattern string for scanned (or entered) Meter IDs. The length; of the pattern gives the number of characters required and each character; in the pattern corresponds to a character in the Meter ID; if it's:;; # - The character must be a decimal digit (0 - 9); $ - The character must be alphabetic (A - Z); _ - The character must be a blank; ? - The character may be anything; All other characters must match exactly.;; Note: If MeterID is not given then no pattern matching is done.;; Examples:; MeterID=ABC### - IDs must must be 6 characters long, and start with; "ABC" followed by 3 digits; MeterID=Q???##_$$### - IDs must be 12 characters long, start with a "Q",; followed by any 3 characters, then 2 digits, a space,; 2 alphabetic characters, and end with 3 digits.; MeterID=- IDs are not checked against a prototype, only for; valid characters.; ------------------------------------------------------------------------------; ProgramLog is the full path and file name for logging each time a module is; programmed. If not given, then no program log file is written.;; Examples:;; ProgramLog=c:\gprep\program.txt - program.txt in the gprep directory on drive C:; ProgramLog=program.txt - program.txt in the GPrep program directory; ProgramLog=program - program.txt in the GPrep program directory; ProgramLog=- Do not write a program log file; ------------------------------------------------------------------------------; InspectLog is the full path and file name for logging each time a module is; inspected. If not given, then no inspection log file is written.](https://usermanual.wiki/Landis-Gyr-Technology/EC6R3S2.Installation-Guide-Part-2/User-Guide-1069549-Page-27.png)
![d~ë=jÉíÉê=mêÉé~ê~íáçå=mêçÖê~ã=EdmêÉéFVJS `ÉääåÉí=d~ë=jçÇìäÉ=~åÇ=jÉíÉê=fåëí~ää~íáçå=dìáÇÉ;; Examples:;; InspectLog=c:\gprep\inspect.txt - inspect.txt in the gprep directory on drive C:; InspectLog=inspect.txt - inspect.txt in the GPrep program directory; InspectLog=inspect - inspect.txt in the GPrep program directory; InspectLog=- Do not write an inspection log file; ------------------------------------------------------------------------------; MRBLog is the full path and file name for logging each time a module is; inspected in MRB Mode. If not given, then no MRB log file is written.;; Examples:;; MRBLog=c:\gprep\mrblog.txt - mrblog.txt in the gprep directory on drive C:; MRBLog=mrblog.txt - mrblog.txt in the GPrep program directory; MRBLog=mrblog - mrblog.txt in the GPrep program directory; MRBLog=- Do not write an MRB log file; ------------------------------------------------------------------------------; ReadLog is the full path and file name for logging each time a module is; inspected in Index Read Mode. If not given, then no read log file is written.;; Examples:;; ReadLog=c:\gprep\readdlog.txt - readdlog.txt in the gprep directory on drive C:; ReadLog=readdlog.txt - readdlog.txt in the GPrep program directory; ReadLog=readdlog - readdlog.txt in the GPrep program directory; ReadLog=- Do not write an inspection log file; ------------------------------------------------------------------------------; MaxAssociations is the maximum number of LANAddress / Meter ID associations; checked from the log file to assure that duplications are not assigned.; This requires 24 bytes of memory per association. Set to 0 to disable.;; Examples:;; MaxAssociations=1000 - Previous 1000 records are checked (memory = 24,000); MaxAssociations=10000 - Previous 10000 records are checked (memory = 240,000); MaxAssociations=0 - Disables duplication association checking.; ------------------------------------------------------------------------------Mode=ReProgramModuleClass=1RolloverPoint1=1000000MeterConstant1=0.050000SerialPort=1Operator=BillLocation=xdcsuUtility=SCGRolloverPoint0=10000](https://usermanual.wiki/Landis-Gyr-Technology/EC6R3S2.Installation-Guide-Part-2/User-Guide-1069549-Page-28.png)
![d~ë=jÉíÉê=mêÉé~ê~íáçå=mêçÖê~ã=EdmêÉéF`ÉääåÉí=d~ë=jçÇìäÉ=~åÇ=jÉíÉê=fåëí~ää~íáçå=dìáÇÉ VJTMeterConstant0=0.020000RolloverPoint3=100000MeterConstant3=1.000000RolloverPoint2=100000MeterConstant2=0.100000MeterConstant4=0.250000ProgramMode=YesProgramDial=YesRolloverPoint=100000MeterConstant=1.000000LastFile=WCPR.SET[Control]meterID=?????????DeviceID=?????RGAS=yesCIGD=yesCIGR=yesCPRANT=yesCPRAWT=yesCPRCWT=yesWCPR=yesInspect=yesProgramNew=yesProgramOld=yesMRBMode=yesIndexRead=NProgramLog=c:\programlog.txtinspectLog=c:\inspectlog.txtMRBLog=c:\MRBlog.txtReadLog=c:\readlog.txtwProgramLog=c:\wprogramlog.txtwinspectLog=c:\winspectlog.txtwMRBLog=c:\wMRBlog.txt[RGAS]MeterConstantCount=4MeterConstant1=.01MeterConstant2=.0112MeterConstant3=.02MeterConstant4=.0225RollOverPointCount=5RollOverPoint1=100RollOverPoint2=1,000RollOverPoint3=10,000RollOverPoint4=100,000RollOverPoint5=100000000[CPRAWT]MeterConstantCount=9MeterConstant1=.01MeterConstant2=.01121MeterConstant3=.02MeterConstant4=.0225MeterConstant5=.05MeterConstant6=.0562MeterConstant7=.1](https://usermanual.wiki/Landis-Gyr-Technology/EC6R3S2.Installation-Guide-Part-2/User-Guide-1069549-Page-29.png)
![d~ë=jÉíÉê=mêÉé~ê~íáçå=mêçÖê~ã=EdmêÉéFVJU `ÉääåÉí=d~ë=jçÇìäÉ=~åÇ=jÉíÉê=fåëí~ää~íáçå=dìáÇÉMeterConstant8=.112MeterConstant9=1.0RollOverPointCount=6RollOverPoint1=100RollOverPoint2=1,000RollOverPoint3=10,000RollOverPoint4=100,000RollOverPoint5=100,00000RollOverPoint6=100,000000[CPRANT]MeterConstantCount=10MeterConstant1=.01MeterConstant2=.01121MeterConstant3=.02MeterConstant4=.0225MeterConstant5=.05MeterConstant6=.0562MeterConstant7=.1MeterConstant8=.112MeterConstant9=1.0MeterConstant10=2.0RollOverPointCount=5RollOverPoint1=100RollOverPoint2=1,000RollOverPoint3=10,000RollOverPoint4=100,000RollOverPoint5=100,000,000[CPRCWT]MeterConstantCount=9MeterConstant1=.01MeterConstant2=.01121MeterConstant3=.02MeterConstant4=.0225MeterConstant5=.05MeterConstant6=.0562MeterConstant7=.1MeterConstant8=.112MeterConstant9=1.0RollOverPointCount=5RollOverPoint1=100RollOverPoint2=1,000RollOverPoint3=10,000RollOverPoint4=100,000RollOverPoint5=99999999[CIGR]MeterConstantCount=5MeterConstant1=.05MeterConstant2=.0562MeterConstant3=.1MeterConstant4=.112MeterConstant5=1.0RollOverPointCount=5RollOverPoint1=100RollOverPoint2=1,000RollOverPoint3=10,000RollOverPoint4=100,000](https://usermanual.wiki/Landis-Gyr-Technology/EC6R3S2.Installation-Guide-Part-2/User-Guide-1069549-Page-30.png)
![d~ë=jÉíÉê=mêÉé~ê~íáçå=mêçÖê~ã=EdmêÉéF`ÉääåÉí=d~ë=jçÇìäÉ=~åÇ=jÉíÉê=fåëí~ää~íáçå=dìáÇÉ VJVRollOverPoint5=100,0000[CIGD]MeterConstantCount=5MeterConstant1=.05MeterConstant2=.0562MeterConstant3=.1MeterConstant4=.112MeterConstant5=1.0RollOverPointCount=5RollOverPoint1=100RollOverPoint2=1,000RollOverPoint3=10,000RollOverPoint4=100,000RollOverPoint5=100,0000[WCPR]MeterConstantCount=1MeterConstant1=1RollOverPointCount=5RollOverPoint1=100RollOverPoint2=1,000RollOverPoint3=10,000RollOverPoint4=100,000RollOverPoint5=100,0000SaveyourupdatestotheGPrep.inifile.GPrepisreadytouse.DATA TRANSFERAlocalRIMSanalystperformsthisprocess.TheRIMSAnalystuploadsMRBandProgramfilestotheserverviaFTP.Server Side ProcessThepersonusingGPrep,orthelocaladministrator,poststheprogramlogandMRBfilestoCellnetʹsFTPServer.YoucanuseanySFTPTooltopostfilesfromgasandwaterprocesses.TheGPREP.inifiledeterminesthenameandpathofthefilesgeneratedinthelocalmachine.EachUtilityshoplocationcanpostmultiplefiles,aslongaseachfileisuniquelyidentified.Thelocalsitecanuseanylogictonamethesefiles,preferablytoincludedateandtime.Oncethesefilesareposted,theDESservervalidatesfileformatandcleanupactivitiesbyeliminatingduplicateentriesandstoringtheprogramlogsandMRBdatainstagingtables.Theserveremailssubscribersfromsourcelocation.RIMSCRONrunsnightly,processingmetersandupdatingthelatestassociationstoOCDB.](https://usermanual.wiki/Landis-Gyr-Technology/EC6R3S2.Installation-Guide-Part-2/User-Guide-1069549-Page-31.png)
![d~ë=jÉíÉê=mêÉé~ê~íáçå=mêçÖê~ã=EdmêÉéFVJNM `ÉääåÉí=d~ë=jçÇìäÉ=~åÇ=jÉíÉê=fåëí~ää~íáçå=dìáÇÉUSING GPREPThissectiondetailsthestepstakenbytheendusertooperateGPreponadailybasis.Thissetofproceduresassumesthefollowing:•YourGPrepadministratorhasconfiguredthe.inifile.•YouhavebasicknowledgeoftheprocessthatyouaretryingtoperformandunderstandatwhichstepoftheprocessyouneedtouseGPrep.• Shooterboxor1‐wayprogrammingcableIfyouareusingtheprogrammingcable(usuallyinthefield):1Installdriversandsetupthecableperinstructionsinthe1‐WayModuleProgrammingCableGettingStartedGuide.2Plugoneendofthecableintothemodule.3PlugtheUSBintothelaptoporPC.Figure 9.1 1-Way Programming CableIfyouareusingtheshooterbox(usuallyintheofficeorshop):1Plugthebatteryintotheshootercable.2Powertheshooterbox.3 ConnecttheshooterboxtoaCOMportonyourPC,andchoosethecorrectCOMportfromthedropdownmenuonGPrep(oritdefaultstothatport).4Plugtheshootercableintotheshooterboxandthemodule.Figure 9.2 Shooter boxUSB ConnectorModule Connector](https://usermanual.wiki/Landis-Gyr-Technology/EC6R3S2.Installation-Guide-Part-2/User-Guide-1069549-Page-32.png)
![d~ë=jÉíÉê=mêÉé~ê~íáçå=mêçÖê~ã=EdmêÉéF`ÉääåÉí=d~ë=jçÇìäÉ=~åÇ=jÉíÉê=fåëí~ää~íáçå=dìáÇÉ VJNNLogging OnTheLogOnwindowdisplayswhenyoulaunchtheprogram.Enteryournameandlocationintheappropriatefields.Alltasksyouperformforagivenmetertype(moduleinspection,newmoduleprogrammingandoldmodulereprogramming,MRBandindexread)willberecorded.Figure 9.3 Log On screenAccessing the Main MenuThemainmenuscreendisplaysafteryoulogon.Figure 9.4 GPrep Menu BarTheGPrepmenubarincludesthefollowingoptions:Port:enablestheoperatortoselectthePCport(usuallyCOM:1).Metertype:Enablestheoperatortoselectmetertypefromdropdownlist.TheoptionsconsistofResGas,C&IGas(Diaphragm),C&I(Rotary),CPRFormANoTamper,CPRFormBTamper,CPRFormCTamper,andCPRWater.ProgramType:SelectIntervalorConsumptiontypedata.Mode:providesthefollowingchoices:Certain sites may not utilize all options.](https://usermanual.wiki/Landis-Gyr-Technology/EC6R3S2.Installation-Guide-Part-2/User-Guide-1069549-Page-33.png)
![d~ë=jÉíÉê=mêÉé~ê~íáçå=mêçÖê~ã=EdmêÉéFVJNO `ÉääåÉí=d~ë=jçÇìäÉ=~åÇ=jÉíÉê=fåëí~ää~íáçå=dìáÇÉ•Inspect:VerifiesthattheprogrammedLANAddresshasthesamevalueasthePowerLANAddresslabel.Inaddition,“Inspect”permitsvalidatingtheotherpre‐configuredoperationalparameters.Discrepanciesarenotedthroughmessagewindowsandtheresultsofinspectionsarecapturedinassociatedfiles.•ProgramNew:providesthecapabilitytoprogramanewmeterforaspecifiedrolloverpointandameterconstantforaspecificutilitymeterIDformat.•Re‐ProgramOld:providesthecapabilitytoprogramameterwithanon‐zeroindex.Thisoptionwasdesignedforutilitymetershopstoreprogrammeter‐modulespulledfromthefieldorprogramanon‐zeroindexread.AllotherfeaturesforthisoptionaresimilartotheProgramNewmode.The“programlog.txt”filealsoincludestheindexreadenteredduringtheprogrammingstepasthefield“openingread”.•MRB:capturesthedisassociationrecordformetersreturnedfromthefield.ThisoptionismainlydesignedformetershopuseduringtheO&Mphase.Thefollowingscreensshowhowtheoperatorhastheoptionofchoosinginspect,programnew,andindexreadwhenResGasischosenastheMeterType.The unique meter ID format for a given utility is defined in the “.ini” file. Anydiscrepancy in the meter ID format is noted in a message window, whichprompts the operator to re-enter the meter ID prior to module programming. Theassociation record of meter ID, module LAN Address, date, operator’s name, andresult of operation is captured in the file “programlog.txt”.](https://usermanual.wiki/Landis-Gyr-Technology/EC6R3S2.Installation-Guide-Part-2/User-Guide-1069549-Page-34.png)
![d~ë=jÉíÉê=mêÉé~ê~íáçå=mêçÖê~ã=EdmêÉéF`ÉääåÉí=d~ë=jçÇìäÉ=~åÇ=jÉíÉê=fåëí~ää~íáçå=dìáÇÉ VJNPFigure 9.5 Choose ResGas as the meter typeFigure 9.6 Indicate the Program TypeFigure 9.7 Modes to choose from are “Inspect” or “Program New”•Control:providesthecapabilitytologonandoff.Theprogramsettingremainsthesamewhenanewoperatorlogson.•Help:providesadescriptionofGPrepfunctionalityforeachmodeofoperation(notyetfullyimplemented).](https://usermanual.wiki/Landis-Gyr-Technology/EC6R3S2.Installation-Guide-Part-2/User-Guide-1069549-Page-35.png)
![d~ë=jÉíÉê=mêÉé~ê~íáçå=mêçÖê~ã=EdmêÉéFVJNQ `ÉääåÉí=d~ë=jçÇìäÉ=~åÇ=jÉíÉê=fåëí~ää~íáçå=dìáÇÉMODULE INSPECTIONThisfeatureismostcommonlyusedwhenreceivingmetersfromthefactorywithCellnetmodulesalreadyinstalled(OEMMeters)orwhenreceivingCellnetmodulesfromCellnet’smanufacturer.Differentutilitiesusedifferentsamplingprocedures.CellnetrecommendsthatthemetershopverifyapercentageofinboundmodulestoensurethattheLANAddressthatisprogrammedintothemodulematchestheLANAddressontheoutsideofthemodulehousing.ThemodulescanalsobeinspectedtoverifythatthecorrectMeterIDformatwasused,thattherolloverpointiscorrect,andthatthemeterconstantiscorrect.1SelectInspectfromtheModedropdownwindowinthemainmenu.Thefollowingscreendisplays.Figure 9.8 GPrep “Inspect Mode” screenTherearetwodistinctsectionsonthescreen.ThetopsectionistheLANAddressfieldwherethemodulepowerLANlabeliseitherscannedortyped.Different modes of operation for ResGas modules are provided in detail. All other meter/module types follows the identical functionality and operations, except as noted for WaterCPR.The program automatically truncates the leading zeros and any blank spaces in the LANAddress field. GPrep left justifies the value in this field.](https://usermanual.wiki/Landis-Gyr-Technology/EC6R3S2.Installation-Guide-Part-2/User-Guide-1069549-Page-36.png)
![d~ë=jÉíÉê=mêÉé~ê~íáçå=mêçÖê~ã=EdmêÉéF`ÉääåÉí=d~ë=jçÇìäÉ=~åÇ=jÉíÉê=fåëí~ää~íáçå=dìáÇÉ VJNRThelowersection,“currentparameters”,displaystheoperationalparametersandmoduleprogrammedvalues.2 Connecttheshootercabletothemoduleprogrammingport.Thefollowingscreendisplays.Figure 9.9 “Inspect Mode” Screen With Module Plugged InGPrepautomaticallyreadsanddisplaysthecurrentparametersprogrammedintothemodule.If the Meter Type selected does not match the module under test, GPrep displays a dialogbox indicating “wrong module Type” along with a blinking “Module reject” message.GPrep does not allow the operator to continue with this function.If the current parameters do not match the predetermined values, a warning messagedisplays. (This is normal for new modules because a module coming from themanufacturer is programmed with test parameters).Module PCB ID (board ID) is populated during manufacturing. Upon verification of moduleinspection, this value is saved in combination with the module Power LAN Address in theInspect file along with date, operator’s name and location of inspection.](https://usermanual.wiki/Landis-Gyr-Technology/EC6R3S2.Installation-Guide-Part-2/User-Guide-1069549-Page-37.png)
![d~ë=jÉíÉê=mêÉé~ê~íáçå=mêçÖê~ã=EdmêÉéFVJNS `ÉääåÉí=d~ë=jçÇìäÉ=~åÇ=jÉíÉê=fåëí~ää~íáçå=dìáÇÉ3Scan(enter)theModuleIDinLANAddressfield.Figure 9.10 “Inspect Mode” With Power LAN Scanned InGPrepcomparestheModuleIDenteredinthisfieldwiththeLANAddressprogrammedintothemodule.Ifthepopulatedfieldmatchestheprogrammedvalue,amessagedisplays“addressverified”.Iftheenteredvaluedoesnotmatchtheprogrammedvalueadialogboxdisplays,statingthe“LANAddressdoesnotmatchtheprogrammedvalue”andinstructstheoperatortoreenterthepowerLANlabelvalue,duetoamisinterpretationormis‐enteredvalue.GPrepinstructstheoperatortoroutethemoduletoMRBforfurtherdispositioniftheenteredvaluesdonotmatchagain.IfthepowerLANvaluedoesnotmatchtheprogrammedvalue,arecordisalsogeneratedinthe“inspectfile”showingtheinspectionhasfailed.ModulesthatfailinspectionmustbesegregatedandroutedtoMRB.If the result of the inspection is verified, a record in the “inspect file” is created showingthat the module Inspection is successful. It also captures the PCB ID of the module in thesame record.](https://usermanual.wiki/Landis-Gyr-Technology/EC6R3S2.Installation-Guide-Part-2/User-Guide-1069549-Page-38.png)
![d~ë=jÉíÉê=mêÉé~ê~íáçå=mêçÖê~ã=EdmêÉéF`ÉääåÉí=d~ë=jçÇìäÉ=~åÇ=jÉíÉê=fåëí~ää~íáçå=dìáÇÉ VJNTMODULE PROGRAMMINGTherearetwomodesforprogrammingthemodules.ProgramNewisusedwhenamoduleisinstalledonanewmeterwithanindexthatreadszero,andRe‐programoldisusedforprogrammingamodulethatisbeinginstalledonameterthathasanindexwithavalueotherthanzero.Thisvalueisprogrammedintothemoduletologinthestartingreadforametertobeinstalled.(Anexampleofthisisaperiodicmetercheckinwhichameteristakenfromaresidence,inspectedandthenre‐deployedagainintoanotherresidence).Program New1SelectProgramnewfromthemodedropdownwindowinthemainmenu.Thefollowingscreendisplays.Therearetwodistinctsectionsinthisscreenaswell.Thetopsectioncontainsthefollowingfieldswhichcanbemodifiedbytheuser:•MeterIDfield•LANAddress•Roll‐overpoint•Meterconstant.Figure 9.11 “Program New” ScreenIf you are programming a Water CPR module, Device ID replaces Meter ID. A CPR module isprogrammed with 10-digit left-justified(zero) Module ID as MeterID. Water CPRprogramming also captures optional Encoder ID information.](https://usermanual.wiki/Landis-Gyr-Technology/EC6R3S2.Installation-Guide-Part-2/User-Guide-1069549-Page-39.png)
![d~ë=jÉíÉê=mêÉé~ê~íáçå=mêçÖê~ã=EdmêÉéFVJNU `ÉääåÉí=d~ë=jçÇìäÉ=~åÇ=jÉíÉê=fåëí~ää~íáçå=dìáÇÉ2 Connectthe1‐WayProgrammingCableorshootercabletothemoduleprogrammingport.Thefollowingscreendisplays.Figure 9.12 “Program New” Screen with Module Plugged InGPrepautomaticallyreadsanddisplaysthecurrentparametersprogrammedintothemodule.3ScanorenterthemeterIDinappropriatefield.SincethemeterIDfieldisutilityspecific,thereareprovisionswithinGPreptospecifythemeterIDformat.Therefore,ifthemeterIDformatenteredinthisfielddoesnotmatchthespecifiedutilityformat,adialogwindowdisplaysindicating“meterIDfieldcontainsinvalidcharacters”andtheoperatorisinstructedtoIf the Meter Type selected on the menu bar does not match the module type under test,GPrep displays a dialog box indicating “wrong module Type” and a blinking “Modulereject” message. GPrep does not allow the operator to resume the programming function.If the current parameters do not match the predetermined value, a warning message,”reject parameters” displays. Upon successful completion of module programming, GPreppopulates the “current parameter” fields with correct operational values.](https://usermanual.wiki/Landis-Gyr-Technology/EC6R3S2.Installation-Guide-Part-2/User-Guide-1069549-Page-40.png)
![d~ë=jÉíÉê=mêÉé~ê~íáçå=mêçÖê~ã=EdmêÉéF`ÉääåÉí=d~ë=jçÇìäÉ=~åÇ=jÉíÉê=fåëí~ää~íáçå=dìáÇÉ VJNVeitherrescanorre‐enterthemeterIDvalueinthisfield.ModuleprogrammingcannotberesumeduntilthemeterIDfieldpopulatedmatchestheutilityspecificformat.Figure 9.13 Error Message Displayed when The Wrong Meter ID Format Is Entered4Scan(enter)thepowerLANlabelintheLANAddressfield.“GPrep”comparesthevalueenteredinthisfieldwiththeLANAddressprogrammedinthemodule.Similartotheinspectionsection,anydiscrepanciesinthevaluesarerejected.Figure 9.14 Error Message Displayed if The Scanned Power LAN Does Not Match ProgrammedSelecttheRolloverPointandMeterConstant(meterspecificvalues)priortoprogrammingthemodulefromthedropdownwindows.GPrepdisplaysamessagewindowverifyingthattheoperatorintendstochangetheRolloverpointandmeterconstant.GPrepkeepsthelastvalueenteredintherolloverpointandmeterconstantfieldsasthedefaultvalue.If you do not know what to enter for the Rollover Point or Meter Constant STOP!Contact someone that does know or contact Cellnet Customer Support. The wrongdata entered in these fields significantly affects the billing read provided to theutility.](https://usermanual.wiki/Landis-Gyr-Technology/EC6R3S2.Installation-Guide-Part-2/User-Guide-1069549-Page-41.png)
![d~ë=jÉíÉê=mêÉé~ê~íáçå=mêçÖê~ã=EdmêÉéFVJOM `ÉääåÉí=d~ë=jçÇìäÉ=~åÇ=jÉíÉê=fåëí~ää~íáçå=dìáÇÉUponsuccessfulprogramming,amessage“programverified”displays.GPrepalsodisplaysagreensquareindicatoratthelowerleftcornerofthescreenshowingprogramminghasbeensuccessful.Figure 9.15 Display when parameters are verifiedArecordofthemeterandmoduleassociationisautomaticallycapturedinthe“programfile”includingthedateandtheoperator’sname.The“Programlog”onlycompilestherecordswhensuccessfulprogrammingisverified.IfaMeterIDrecordalreadyexistsinprogramlog,thefollowingmessagedisplays..Figure 9.16 Error Message Indicating that a Meter ID Already Exists in the Programlog•IfyouselectʺYesʺ,anewrecordisinsertedwithatimestamp.Itisavalidnewrecordiftheprogramindicatesʺsuccessfulʺ.IfyouselectʺNoʺ,theoldrecordremains.](https://usermanual.wiki/Landis-Gyr-Technology/EC6R3S2.Installation-Guide-Part-2/User-Guide-1069549-Page-42.png)
![d~ë=jÉíÉê=mêÉé~ê~íáçå=mêçÖê~ã=EdmêÉéF`ÉääåÉí=d~ë=jçÇìäÉ=~åÇ=jÉíÉê=fåëí~ää~íáçå=dìáÇÉ VJON•IfarecordalreadyexistintheprogramlogforascannedmodulePowerLANAddress,GPrepdisplaysthefollowingmessage:Figure 9.17 Duplicate Power LAN Address•Ifyouselect“yes”,indicatingthatyouenteredthewrongmoduleID,thenre‐enterthemeterIDfieldandPowerLANAddresstocorrectpossiblemis‐enteredvalues.•Ifyouselect“No”,indicatingthemoduleIDhasbeenenteredcorrectly,GPrepdisplaysablinkingmessage“routetoMRB”.TheresultofthisoperationisnotcapturedintheGPrepprogramlogfile.RE-PROGRAM OLDTheinstructionsandproceduresforRe‐ProgramOldarethesameasthoseforProgramNew,withtheadditionalfield“Dial”.Populateitwiththeindexreading(dialreading).ThismodeismainlyutilizedduringtheO&Mphasetoprogrammeterswithnon‐zeroindices.1SelectRe‐ProgramOldfromthemodedropdownwindowinthemainmenu.Thefollowingscreendisplays.Figure 9.18 “Re-Program Old” ScreenTherearetwodistinctsectionsinthisscreenaswell.Thetopsectioncontainsthefollowingfieldswhichcanbemodifiedbytheuser:](https://usermanual.wiki/Landis-Gyr-Technology/EC6R3S2.Installation-Guide-Part-2/User-Guide-1069549-Page-43.png)
![d~ë=jÉíÉê=mêÉé~ê~íáçå=mêçÖê~ã=EdmêÉéFVJOO `ÉääåÉí=d~ë=jçÇìäÉ=~åÇ=jÉíÉê=fåëí~ää~íáçå=dìáÇÉ•MeterIDfield•LANAddress•Dial•Roll‐overpoint•Meterconstant2 Connectthe1‐WayProgrammingCableorshootercabletothemoduleprogrammingport.Thefollowingscreendisplays.Figure 9.19 Re-Program Old With Module Plugged InGPrepautomaticallyreadsanddisplaysthecurrentparametersprogrammedintothemodule.Thisfunctionalityensuresthatthecorrectmetertypeischosenforagivenmeter.3Scan(enter)themeterIDinappropriatefield.SincethemeterIDfieldisutilityspecific,thereareprovisionswithinGPreptospecifythemeterIDformat.Therefore,ifthemeterIDfieldformatenteredinThese are the only fields that can be populated. If the current parameters do not match the predetermined value, a warning message,“reject parameters” displays. Upon successful completion of module programming,“GPrep” populates the “current parameter” fields with correct operational values.If the meter type selected from the “meter type” drop down menu does not match themodule type, GPrep displays a message “wrong module type” and a blinking message“reject module”.](https://usermanual.wiki/Landis-Gyr-Technology/EC6R3S2.Installation-Guide-Part-2/User-Guide-1069549-Page-44.png)
![d~ë=jÉíÉê=mêÉé~ê~íáçå=mêçÖê~ã=EdmêÉéF`ÉääåÉí=d~ë=jçÇìäÉ=~åÇ=jÉíÉê=fåëí~ää~íáçå=dìáÇÉ VJOPthisfielddoesnotmatchthespecifiedutilityformat,adialogwindowdisplaysindicating“meterIDfieldcontaininvalidcharacters”andtheoperatorisinstructedtoeitherrescanorre‐enterthemeterIDvalueinthisfield.ModuleprogrammingcannotberesumeduntilthemeterIDfieldpopulatedmatchestheutilityspecificformat.4Scan(enter)theModuleIDinLANAddressfield.GPrepcomparesthevalueenteredinthisfieldwiththeLANAddressprogrammedinthemodule.Similartoinspectionsection,anydiscrepanciesinthevaluesarerejected.5Entertheindexdialvaluesbyreadingthedialsandenteringthevaluesreadfromrighttoleft.Figure 9.20 Error Message Displayed when Entered Read is too large for the Rollover PointSelect the Rollover point and meter constant (meter specific values) prior to programmingthe module from the drop down windows. “GPrep” displays a message window verifying ifindeed the operator intends to change the Rollover point and meter constant. “GPrep”keeps the last value entered in rollover point and meter constant fields as default value.If you do not know what to enter for the Rollover Point or Meter Constant STOP!Contact someone that does know or contact Cellnet Customer Support. The wrongdata entered in these fields significantly affects the billing read provided to theutility.The value entered in the dial field is programmed into the module as the starting meterread at installation. Consumption is based on the initial read programmed into the module.It is very important to be accurate on the dial index read. Note also that the dial fieldrequires the number of digits that correspond to the roll over point.Example: If the roll over point is set at 10,000, then a four digit dial read would need to beentered.The index must have four dials if the roll over point of 10,000 is correct. Otherwise, the rollover point must be changed accordingly. If the index read number contains more digitsthan the corresponding rollover point, GPrep displays the following message prompting theoperator to reenter the index read and a blinking message in the main screen “dialrejected” is also displayed.](https://usermanual.wiki/Landis-Gyr-Technology/EC6R3S2.Installation-Guide-Part-2/User-Guide-1069549-Page-45.png)
![d~ë=jÉíÉê=mêÉé~ê~íáçå=mêçÖê~ã=EdmêÉéFVJOQ `ÉääåÉí=d~ë=jçÇìäÉ=~åÇ=jÉíÉê=fåëí~ää~íáçå=dìáÇÉSelecttheproperMeterConstantfromthedropdownbox.YoucantypicallydeterminetheMeterConstantfromthemeterindex.Uponsuccessfulprogrammingamessage“programverified”displays.GPrepalsodisplaysagreensquareindicatoratthelowerleftcornerofthescreenshowingthattheprogramminghasbeensuccessful(thisisthesameasthe“verified”screenforProgramNew).Arecordofmeterandmoduleassociationisautomaticallycapturedinthe“programlog”includingtheindexreadenteredbyoperatorasopeningread.MRB MODEMRB(MaterialRepairBoard)Modecapturestherecordofmeter‐moduledisassociationdisassemblyasthemodulesareremovedfromthemeters.1Selectthemetertypefromthemenubarcorrespondingtothemeter–modulecombination.2SelectMRBfrommodeinthemenubar.Thefollowingscreendisplays.Figure 9.21 MRB Mode Main MenuTherearetwodistinctsectionsonthisscreenaswell.Thetopsectioncontainsthefollowingfields:•LANAddress•DialThese are the only fields that can be populated.](https://usermanual.wiki/Landis-Gyr-Technology/EC6R3S2.Installation-Guide-Part-2/User-Guide-1069549-Page-46.png)
![d~ë=jÉíÉê=mêÉé~ê~íáçå=mêçÖê~ã=EdmêÉéF`ÉääåÉí=d~ë=jçÇìäÉ=~åÇ=jÉíÉê=fåëí~ää~íáçå=dìáÇÉ VJOR3 Connectthe1‐WayProgrammingCableorshootercabletothemoduleprogrammingport.Thefollowingscreendisplays.Figure 9.22 MRB Screen with Module Plugged In4Scan(enter)theModuleIDinLANAddressfield.GPrepcomparesthevalueenteredinthisfieldwiththeLANAddressprogrammedinthemodule.GPreprejectsanydiscrepanciesinvalues,andpromptsyoutore‐entertheLANAddressorrejectthemodule.5Entertheindexdialvaluesbyreadingthedialsandenteringthevaluesreadfromrighttoleft.If the Meter Type selected on the menu bar does not match the module type under test,GPrep displays a dialog box indicating “wrong module Type” and a blinking “Modulereject” message. GPrep does not allow the operator to resume programming function.If the current parameters do not match the predetermined value, a warningmessage,”reject parameters” displays.The value entered in the dial field are be compared with the module’s programmed read.GPrep displays the following screen if there is any discrepancy and provides the option tochange the dial read if the operator has entered the wrong value](https://usermanual.wiki/Landis-Gyr-Technology/EC6R3S2.Installation-Guide-Part-2/User-Guide-1069549-Page-47.png)
![d~ë=jÉíÉê=mêÉé~ê~íáçå=mêçÖê~ã=EdmêÉéFVJOS `ÉääåÉí=d~ë=jçÇìäÉ=~åÇ=jÉíÉê=fåëí~ää~íáçå=dìáÇÉFigure 9.23 Error Message Displayed when Entered Value Does Not Match Programmed ValueIfyouselect“Yes”,GPrepdisplaysablinkingmessagestating“Dialdiscrepancy”andthemainscreendisplaysthatthenewdialvaluehasbeenloggedinMRBlog.ThisiscapturedintheMRBlogas“dialEntered”.GPrepdoesnotcapturetheoldvaluethatwasprogrammedintothemodule.Ifyouselect“No”,GPreppromptstheoperatortoenterthecorrectvalue.UponacceptanceofenteredvaluesforLANAddressanddial,GPrepcreatesarecordintheMRBincludingtheclosingindexreadand“DialVerified”inadditiontotheassociationrecords.Thedialfieldrequiresthenumberofdigitsthatcorrespondtotherolloverpointpreviouslyprogrammedintothemodule.Example:Iftherolloverpointissetat1,000,thenafourdigitdial(orless)readwouldneedtobeentered.Theindexmusthavefourdialsiftherolloverpointof10,000iscorrect.Iftheindexreadnumbercontainsmoredigitsthancorrespondingrolloverpoint,GPrepdisplaysamessage“enteredvaluecontainstoomanydigits”promptingtheoperatortore‐entertheindexreadandablinkingmessageinthemainscreen“dialrejected”isalsodisplayed.](https://usermanual.wiki/Landis-Gyr-Technology/EC6R3S2.Installation-Guide-Part-2/User-Guide-1069549-Page-48.png)
![d~ë=jÉíÉê=mêÉé~ê~íáçå=mêçÖê~ã=EdmêÉéF`ÉääåÉí=d~ë=jçÇìäÉ=~åÇ=jÉíÉê=fåëí~ää~íáçå=dìáÇÉ VJOTMOST COMMONLY ASKED QUESTIONS1WhatdoesGPrepstandfor?GasTOMMPreparation2WhatisGPrepusedfor?GPrepisatoolthatisusedintheCrossDockormetershoptoprogramgasorwaterCPRmoduleswithouttheuseofahandheld.ItisalsousedtodisassociategasorwaterCPRmodulesfrommeters.3Whatisprogrammedintothemodule?IntheʺProgramNewʺandʺRe‐ProgramOldʺmodes,fieldoperatingparametersareprogrammedintothemodule.MeterID,RolloverPoint,DialRead,andMeterConstantaretheonlyparametersthatcanbechangedbytheoperator.4Howdoesameterconstantwork?Ameterconstantisamultiplierthatconvertsthepulses/turnsofthemoduleintocubicfeet.Thereasonforthemeterconstanttobe.02onameterwitha2ftdriveisthatforeveryrotationofthedrivedogtherehaspassed2cubicftofgas.Thisisequivalentto2%or.02or2/100thsof1pointonthesmallestofthefourdials,whichmeasureshundredsofcubicfeet.Forevery50rotationsofthe2‐ftdogdial100cubicfeetofgashaspassed.Forevery50rotations,the1,000dialhasincreased1point(100cubicfeet)andourmodule(ifithappenstotransmitatthatmoment)sendsoutapacketwithacountof50.OCDBmultipliesthe50bythemeterconstant.02togetareadof1,whichwepassontotheutilityasareadof1forthatmeter.Therefore,ifthemeterconstantwerefalselysetto.01the50rotationswouldbemultipliedby.01andwouldonlyshowthatthemeterused50cubicfeetofgas.5WhydonʹtyouprogramthemeterIDfromthefrontofthemeterintothemodule?The“UtilityBillingID”getsprogrammedintothemeter;thisisnotusuallythesameastheMeterID.6Whatisarolloverpoint,howisitused,whyisitimportanttomakesurethatitisright?Thenumberatwhichthedialsofameterturnoverandstartatzeroagain.Forafourdialmeterthenumbersonthedialscannotgoover9999,therefore,therolloverpointis10000,for5dialmeterstherolloverpointis100,000,etc.Itisimportanttoprogramthecorrectrolloverpointintothemodulesothatoursystemreadmatchesthedialplate.7WhatscreenshouldIuseinthesamplingprocess?Thereareseveraldifferenttypesofsamplingdonebythemetershop.ThemostcommonaresamplingofCellnet‐readyOEMmeters,andsamplingmodulesfromaCellnetmanufacturer,whicharedoneusingthe“inspect”mode.8Whoisresponsiblefortransferringthedatafiles,howoften,whowritesthescriptstopickupthedatafromtheserver?ThelocaldatabaseanalystisusuallyresponsiblefortransferringthedatafromGPreptoRIMS.He/sheshoulddothisdaily(aslongasthereisdatatotransfer).Someoneinthedatabasegroupwritesthescripttoautomaticallypickupthisdatadaily.](https://usermanual.wiki/Landis-Gyr-Technology/EC6R3S2.Installation-Guide-Part-2/User-Guide-1069549-Page-49.png)
![d~ë=jÉíÉê=mêÉé~ê~íáçå=mêçÖê~ã=EdmêÉéFVJOU `ÉääåÉí=d~ë=jçÇìäÉ=~åÇ=jÉíÉê=fåëí~ää~íáçå=dìáÇÉ9Howsoondoesthedatagetupdatedineachsystemafteramoduleisprogrammed?ACRONjobrunsnightlythatpicksupthedatathatisputontheCellnetserverandtransfersittoRIMS.Ataminimumthereisaonedaydelay.10 Whyshouldn’tItakeGPreptothefield?DatamanagementbecomesdifficultwhenthePCthatGPrepisbeingusedonisnotatafixedlocation.ThedatathatiscapturedbyGPrepistimesensitive,customeraccountinformationandshouldbecopiedandtransferreddaily.TheequipmentthatisusedtooperateGPrepisnotmadetobeusedoutdoors.IfGPrepistakentothefield,itisvitalthatthedatabetransferredassoonaspossibleuponreturn.11 WhatdataiscapturedbyGPrep?Thereiscurrentlynoscreenthatcapturesboththeclosingandopeningreadsonamodule(asneededforindexchanges).MRBmodeshouldbeusedtodisassociatethemodulefromthemeterandcapturetheclosingread.Program‐oldshouldthenbeusedtore‐programthemodulewiththenewindexread.12 WhataresometroubleshootingstepsifGPrepisnotworking?–Ifyouareusingtheshooterbox,checktheACpower,modulepluggedin,shooterboxturnedon,correctDB9toDB9(RS232)cable(Non‐NullModem),correctCOMport,ensuringthatyouareusingthecorrectmetertypeandmode,ex.ResGasv.commercial.–IfyouareusingUSBonewayprogrammingcable,refertothe1‐WayModuleProgrammingCablePC/LaptopGettingStartedGuide.13 Whatarethebenefitsofusingre‐programoldallofthetimeasopposedtoprogramnew?Whilesomeprogramsdothis,therearenorealbenefits.Itisalittleeasiertopreparetheprogramlogtosend,butinvolvesextraworkfortheenduser.14 Whatdoesitmeanwhenafileissuperseded?Someonemadeamistakeandhadtore‐enterameterIDorLANAddress.15 Whoisresponsibleforcleaningthesefiles(removingsupersedes,convertingintoanExcelspreadsheet,etc.)?Typicallysomeonedesignatedbytheutilityperformsthistaskbeforesendingthesefilestothedatabaseanalyst.16 WhoshouldIcontactifthereisaproblem?Firstyoushouldcontactalocaldatabaseanalyst.ThentryCellnetCustomerSupportatcustomersupport@cellnet.com.17 Whenusingdifferentscreens,whydoesthephrase“parameterreject”flashyellowwhenIpluginamodulethathasjustcomefromthemanufacturer?Whenmodulesarebeingmadetherearetestparametersprogrammedinthatallowthemanufacturertomakethemoduletransmitmorefrequentlythanevery15minutes,andallowsotherteststoberunonthemforqualityreasons.GPrep(orahandheld)replacesthesetestparameterswithfieldparameters.](https://usermanual.wiki/Landis-Gyr-Technology/EC6R3S2.Installation-Guide-Part-2/User-Guide-1069549-Page-50.png)
![`ÉääåÉí=d~ë=jçÇìäÉ=~åÇ=jÉíÉê=fåëí~ää~íáçå=dìáÇÉ ^JNAPPENDIX A ALIGNING THE NEW AMERICAN METER DRIVE DOGCellnetmodifiedthemodulewigglerinMay2005.Themodulewigglernowhasaslightlydifferentinterfacetothemeterdrivedog.Figure A.1 Meter Drive Dog aligned with 2 ft. module wiggler Insertoneofthenewprotrudingpinsthroughtheholeofa2‐footdrivewiggler.Figure A.2 Meter Drive Dog aligned with 1 ft. module wiggler Insertoneofthenewprotrudingpinsthroughtheholeofa1‐footdrivewiggler.](https://usermanual.wiki/Landis-Gyr-Technology/EC6R3S2.Installation-Guide-Part-2/User-Guide-1069549-Page-51.png)
![Notes:^JO `ÉääåÉí=d~ë=jçÇìäÉ=~åÇ=jÉíÉê=fåëí~ää~íáçå=dìáÇÉ^äáÖåáåÖ=íÜÉ=kÉï=^ãÉêáÅ~å=jÉíÉê=aêáîÉ=açÖ](https://usermanual.wiki/Landis-Gyr-Technology/EC6R3S2.Installation-Guide-Part-2/User-Guide-1069549-Page-52.png)
![`ÉääåÉí=d~ë=jçÇìäÉ=~åÇ=jÉíÉê=fåëí~ää~íáçå=dìáÇÉ _JNAPPENDIX B VISUAL INSPECTION OF INDEXESTheAmericanIndexonfarrightshowssignsoffadingfromglossyblacktoagreyblackcolor,inthiscasetheIndexMUSTBEEXCHANGED.Figure B.1 Fading American IndexOnaSpraguemeterifmetalrivetsarefoundontheindexplateasshownonthefarlefttheIndexMUSTBEEXCHANGED.Figure B.2 Metal rivets on a Sprague cover](https://usermanual.wiki/Landis-Gyr-Technology/EC6R3S2.Installation-Guide-Part-2/User-Guide-1069549-Page-53.png)
![Notes:_JO `ÉääåÉí=d~ë=jçÇìäÉ=~åÇ=jÉíÉê=fåëí~ää~íáçå=dìáÇÉsáëì~ä=fåëéÉÅíáçå=çÑ=fåÇÉñÉë](https://usermanual.wiki/Landis-Gyr-Technology/EC6R3S2.Installation-Guide-Part-2/User-Guide-1069549-Page-54.png)
![`ÉääåÉí=d~ë=jçÇìäÉ=~åÇ=jÉíÉê=fåëí~ää~íáçå=dìáÇÉ `JNAPPENDIX C USING THE RF BUSTERThisAppendixprovidesdetailedinstructionsontheproperuseoftheRFBuster.ItcoverstheproperplacementoftheRFBustertoensureactivationandtroubleshootingforCellnetgasmodules.REQUIRED TOOLSRFBuster‐partnumber26‐1050BeforeusingtheRFBuster,testit.PressthebuttonontheRFBuster.TheRFBuster’sLEDlightsred,andtheinternalspeakersoundsforapproximately½second.Ifnothinghappens,oriftheLEDlightsandthespeakersoundscontinuously,the9Vbatterymaybelow.Replaceit.](https://usermanual.wiki/Landis-Gyr-Technology/EC6R3S2.Installation-Guide-Part-2/User-Guide-1069549-Page-55.png)
![rëáåÖ=íÜÉ=oc=_ìëíÉê`JO `ÉääåÉí=d~ë=jçÇìäÉ=~åÇ=jÉíÉê=fåëí~ää~íáçå=dìáÇÉRESIDENTIAL METER MODULESAmerican Modules1PressthebuttonwiththelightfacingyouonthelowerendoftheRFBuster.2PlacethecorneroftheRFBustercontainingthemagnetbythelocationoftheReedSwitchontheMeterModule.3 Continuetopressthebutton.HoldtheRFBusterwithinaboutsixinchesofthemeter.ThemagnettriggerstenRFtransmissionsfromthegasmodule,separatedbyonesecondeachtransmission.TheRFBusterLEDlightsredandtheinternalspeakersoundsapproximately½secondforeachtransmissiondetected.IftheRFBusterdoesnotdetectatransmissionfromthemodule,removethefourcoverscrewsandplacetheRFBusterintheproperlocation.WhilepressingthePushButton,pullthecoveroffthemodule.•Ifthemoduleisfunctional,ittransmits.IftheRFBusterdoesnotrespond,considerthemoduledefectiveandfollowtheappropriateprocedure.Figure C.1 American proper placement of RF BusterRockwell/Equimeter/Sensus Modules1PressthebuttonwiththelightfacingyouonthelowerendoftheRFBuster.2PlacethecorneroftheRFBustercontainingthemagnetbythelocationoftheReedSwitchonthegasmetermodule.3 Continuetopressthebutton.HoldtheRFBusterwithinaboutsixinchesofthemeter.ThemagnettriggerstenRFtransmissionsfromthegasmetermodule,separatedbyonesecondeachtransmission.TheRFBusterLEDlightsredandtheinternalspeakersoundsapproximately½secondforeachtransmissiondetected.](https://usermanual.wiki/Landis-Gyr-Technology/EC6R3S2.Installation-Guide-Part-2/User-Guide-1069549-Page-56.png)
![rëáåÖ=íÜÉ=oc=_ìëíÉê`ÉääåÉí=d~ë=jçÇìäÉ=~åÇ=jÉíÉê=fåëí~ää~íáçå=dìáÇÉ `JPIftheRFBusterdoesnotdetectatransmissionfromthemodule,removethefourcoverscrewsandplacetheRFBusterintheproperlocation.WhileholdingthePushButton,pullthecoveroffofthemodule.•Ifthemoduleisfunctional,ittransmits.•IftheRFBusterdoesnotrespond,considerthemoduledefectiveandfollowtheappropriateprocedure.Figure C.2 Rockwell/Equimeter/Sensus RF Buster placementSprague/Schlumberger/Actaris Modules1PressthebuttonwiththelightfacingyouonthelowerendoftheRFBuster.2PlacethecorneroftheRFBustercontainingthemagnetatananglebythelocationoftheReedSwitchonthegasmetermodule(topleftcorner).3 Continuetopressthebutton.HoldtheRFBusterwithinaboutsixinchesofthemeter.ThemagnettriggerstenRFtransmissionsfromthegasmetermodule,separatedbyonesecondeachtransmission.TheRFBusterLEDlightsredandtheinternalspeakersoundsapproximately½secondforeachtransmissiondetected.IftheRFBusterdoesnotdetectatransmissionfromthemodule,removethetwocoverscrewsandplacetheRFBusterintheproperlocation.WhileholdingthePushButton,pullthecoveroffofthemodule.•Ifthemoduleisfunctional,ittransmits.Because of the proximity of the different switches on the Sprague Module board,ensure that you approach the module from the top left corner as seen in thepicture below.](https://usermanual.wiki/Landis-Gyr-Technology/EC6R3S2.Installation-Guide-Part-2/User-Guide-1069549-Page-57.png)
![rëáåÖ=íÜÉ=oc=_ìëíÉê`JQ `ÉääåÉí=d~ë=jçÇìäÉ=~åÇ=jÉíÉê=fåëí~ää~íáçå=dìáÇÉ•IftheRFBusterdoesnotrespond,considerthemoduledefectiveandfollowtheappropriateprocedure.Figure C.3 Sprague/Schlumberger/Actaris RF placement](https://usermanual.wiki/Landis-Gyr-Technology/EC6R3S2.Installation-Guide-Part-2/User-Guide-1069549-Page-58.png)
![rëáåÖ=íÜÉ=oc=_ìëíÉê`ÉääåÉí=d~ë=jçÇìäÉ=~åÇ=jÉíÉê=fåëí~ää~íáçå=dìáÇÉ `JRCOMMERCIAL GAS 3 METER MODULES1PressthebuttonwiththelightfacingyouonthelowerendoftheRFBuster.2PlacethecorneroftheRFBustercontainingthemagnetbythelocationoftheReedSwitchontheMeterModule.3 Continuetopressthebutton.HoldtheRFBusterwithinaboutsixinchesofthemeter.ThemagnettriggerstenRFtransmissionsfromtheRFBuster,separatedbyonesecondeachtransmission.TheRFBusterLEDlightsredandtheinternalspeakersoundsapproximately½secondforeachtransmissiondetected.Figure C.4 Commercial Gas RF placementIftheRFBusterdoesnotdetectatransmissionfromthemodule,removethefourcoverscrewsandthecoverandplacetheRFBusterintheproperlocationwhilepressingthePushButton.IftheRFBusterdoesnotrespond,considerthemoduledefectiveandfollowtheappropriateprocedure.Figure C.5 Commercial Gas Module uncovered](https://usermanual.wiki/Landis-Gyr-Technology/EC6R3S2.Installation-Guide-Part-2/User-Guide-1069549-Page-59.png)
![rëáåÖ=íÜÉ=oc=_ìëíÉê`JS `ÉääåÉí=d~ë=jçÇìäÉ=~åÇ=jÉíÉê=fåëí~ää~íáçå=dìáÇÉROOTS/ROMETS ROTARY CPR MODULE1PressthebuttonwiththelightfacingyouonthelowerendoftheRFBuster.2PlacethecorneroftheRFBustercontainingthemagnetbythelocationoftheReedSwitchontheCPR.3 Continuetopressthebutton.HoldtheRFBusterwithinaboutsixinchesoftheCPR.ThemagnettriggerstenRFtransmissionsfromtheCPR,separatedbyonesecondpertransmission.TheRFBusterLEDlightsredandtheinternalspeakersoundsapproximately½secondforeachtransmissiondetected.Ifthereisnoresponse,removethecoveroftheCPRforproperorientation.Figure C.6 ROOTS/Romets RG3 RF placement](https://usermanual.wiki/Landis-Gyr-Technology/EC6R3S2.Installation-Guide-Part-2/User-Guide-1069549-Page-60.png)
![`ÉääåÉí=d~ë=jçÇìäÉ=~åÇ=jÉíÉê=fåëí~ää~íáçå=dìáÇÉ aJNAPPENDIX D END OF DAY HANDHELD INSTRUCTIONSThisAppendixprovidesdetailedinstructionsondockingtheHandheld,powerrequirements,andhowtochangetheHandheldID.Thisinformationshouldonlybeusedbyexperiencedusers.DOCKING THE HANDHELD Attheendoftheday(andatothertimesforvariousreasons),docktheHandheldtouploadmeterinstallationdataandplugitintorechargethebattery.1SelectDOCKfromthefunctionsscreen.Figure D.1 Handheld after Dock has been selected2Followinstructionsonthescreen.](https://usermanual.wiki/Landis-Gyr-Technology/EC6R3S2.Installation-Guide-Part-2/User-Guide-1069549-Page-61.png)
![båÇ=çÑ=a~ó=e~åÇÜÉäÇ=fåëíêìÅíáçåëaJO `ÉääåÉí=d~ë=jçÇìäÉ=~åÇ=jÉíÉê=fåëí~ää~íáçå=dìáÇÉ3Afterdatahasbeenuploaded,plugHandheldintochargingcable.Figure D.2 Handheld DAP chargingPOWER REQUIREMENTSNeverallowthebatterytodiecompletely.Althoughtheroutedatasavestotheflashmemorycard,thereisnoEPROMmemoryintheHandheld.Youwillhavetoreloadthecodeandre‐calibratethebattery.Rebooting TherearethreewaystoreboottheHandheld:1PresstheF1,9,and0simultaneouslyforapproximatelyfiveseconds.2Pressthefollowingkeysblue,CTL,ALT,blue,DEL.3Exittheapplication(FromtheFunctionsscreenselectDock,donotplaceincradleorpluginasrequested.PresstheshiftkeyfollowedbyF5).Type“C:”thenpressENTER.Type“reset”thenpressENTER.Do not remove the battery. The batteries are not made to be replaced as with the otherHandheld’s.](https://usermanual.wiki/Landis-Gyr-Technology/EC6R3S2.Installation-Guide-Part-2/User-Guide-1069549-Page-62.png)
![båÇ=çÑ=a~ó=e~åÇÜÉäÇ=fåëíêìÅíáçåë`ÉääåÉí=d~ë=jçÇìäÉ=~åÇ=jÉíÉê=fåëí~ää~íáçå=dìáÇÉ aJPHOW TO CHANGE THE HANDHELD ID OccasionallytheHandheldIDmaybeenteredincorrectlyorthewrongHandheldIDmaybeinaHandheldbecauseofamemorycardexchange.ThissectiontellshowtochangetheHandheldIDtothecorrectnumber.1PlacetheHandheldinthecradleanddockit.2OpenupthemostrecentversionofHandheldEdit.3Select“Communication”then“TransferFiles”fromthemenuonHandheldEdit.4Ontherightsideofthepopupwindow,doubleclickonthe[CELLNET]folder.5SelectUnitinfo.datanddeleteit.Select“Yes”toverifythatyouwanttodeletethefile.6Select“OK”onthepopupwindowandcloseHandheldEdit.7TheHandheldwillthenpromptyoutoenterthelast4digitsoftheserialnumberonthebackoftheHandheld.8BeforeusingtheHandheld,makesuretheproperrouteinformationisloadedintotheHandheld.KNOWN COMMON PROBLEMS•IftheHandheldgetsjarred,thememorycardmaybecomedislodgedslightly.Thismakesitlooklikeallofthedatahasbeenlost‐butitisstillthere.UnscrewthetwoscrewsatthetopoftheHandheldbelowtheInfra‐redscanner.Re‐seatthecardandre‐tightenthecover.Youmayneedtore‐boottheHandheld.•Ifthebluekeyandthenoneofthearrowkeysispushed,partofthescreenseemstodisappear.Thescreenwasdesignedtoholdmoredata.Bluekey+arrowishowyoushiftthescreentoviewthatdata.Pushthebluebuttonandthearrowkeyintheoppositedirectionofthescreenshift.](https://usermanual.wiki/Landis-Gyr-Technology/EC6R3S2.Installation-Guide-Part-2/User-Guide-1069549-Page-63.png)
![Notes:aJQ `ÉääåÉí=d~ë=jçÇìäÉ=~åÇ=jÉíÉê=fåëí~ää~íáçå=dìáÇÉbåÇ=çÑ=a~ó=e~åÇÜÉäÇ=fåëíêìÅíáçåë](https://usermanual.wiki/Landis-Gyr-Technology/EC6R3S2.Installation-Guide-Part-2/User-Guide-1069549-Page-64.png)
![`ÉääåÉí=d~ë=jçÇìäÉ=~åÇ=jÉíÉê=fåëí~ää~íáçå=dìáÇÉ bJNAPPENDIX E DIFFICULT/NON-COMPATIBLE COMMERCIAL RETROFITSThisAppendixprovidesdetailedinstructionsoninstallingcommercialgasmodulesindifficultsettings,aswellasnon‐compatiblemoduleinstallations..INDEX BASE PLATES WITH INTEGRAL SEAL CAPS1Metersencounteredwiththeindexbaseplate(FigureE.1)requirethebaseplatereplacedwithonethatdoesnothaveintegral“towers”.TheAmericanMeterpartnumberforaBasePlatewithnotowersforDiaphragmmetersis48828P038.Refertowww.americanmeter.comformoreinformation.Figure E.1 Index Base Plate](https://usermanual.wiki/Landis-Gyr-Technology/EC6R3S2.Installation-Guide-Part-2/User-Guide-1069549-Page-65.png)
![aáÑÑáÅìäíLkçåJÅçãé~íáÄäÉ=`çããÉêÅá~ä=oÉíêçÑáíëbJO `ÉääåÉí=d~ë=jçÇìäÉ=~åÇ=jÉíÉê=fåëí~ää~íáçå=dìáÇÉPressure TabsMeterswithPressuretabsonthesurfaceneartheIndexmustberetrofittedinsuchawaythataccesstothepressuretapisnotcomprised.Figure E.2 Meters with Pressure TabsFigureE.2indicatesthelocationsofthepressuretapplugsthatwillbefoundonlargemeters.FigureE.3showsameterwithaninstalledpressurefitting,a“Pete’sPlug”.Themoduleinstallationmustnotinterferewiththemeterinstallation.Figure E.3 Pressure AdaptermêÉëëìêÉ=q~é=äçÅ~íáçå=mäìÖ=ãìëí=ÄÉ=êÉãçîÉÇ=~åÇ=éêÉëëìêÉ=ëÉåëçê=áåëí~ääÉÇKmêÉëëìêÉ=~Ç~éíÉê](https://usermanual.wiki/Landis-Gyr-Technology/EC6R3S2.Installation-Guide-Part-2/User-Guide-1069549-Page-66.png)
![aáÑÑáÅìäíLkçåJÅçãé~íáÄäÉ=`çããÉêÅá~ä=oÉíêçÑáíë`ÉääåÉí=d~ë=jçÇìäÉ=~åÇ=jÉíÉê=fåëí~ää~íáçå=dìáÇÉ bJPForallofthesemetersthetransmitterportionofthemoduleneedstobemountedsothataccessisstillavailabletothepressuretap,asshowninFigureE.4.Figure E.4 Mounting Module’s Transmitter](https://usermanual.wiki/Landis-Gyr-Technology/EC6R3S2.Installation-Guide-Part-2/User-Guide-1069549-Page-67.png)
![aáÑÑáÅìäíLkçåJÅçãé~íáÄäÉ=`çããÉêÅá~ä=oÉíêçÑáíëbJQ `ÉääåÉí=d~ë=jçÇìäÉ=~åÇ=jÉíÉê=fåëí~ää~íáçå=dìáÇÉReverse Loop InstallationsSomemeterswillbeinstalledwiththepipingreversedfromthepreferredorientation.Inthesecasestheindexisreversedtofacethebackofthemeter.ItisextremelyimportantinthesecasesthattheBasePlatebemountedsuchthattheindexdrivefromthemeterbecenteredintheholeintheBaseplate.SeeFigureE.5foranexampleoftheinsertbaseplatemountedbackwards.Figure E.5 Plate Mounted BackwardsIfthisisencountereditcanbecorrectedbyrotatingtheIndexBasePlate180degrees.Large Pipe FittingsFigureE.6showsameterthatdoesnothaveadequateclearancebetweenthePipefittingnutsandthemoduletransmitter.Ininstallationssuchasthis,themodulebracketmustberemovedbeforethemetercanberemovedfromservice.Figure E.6 Pipe Clearance](https://usermanual.wiki/Landis-Gyr-Technology/EC6R3S2.Installation-Guide-Part-2/User-Guide-1069549-Page-68.png)
![aáÑÑáÅìäíLkçåJÅçãé~íáÄäÉ=`çããÉêÅá~ä=oÉíêçÑáíë`ÉääåÉí=d~ë=jçÇìäÉ=~åÇ=jÉíÉê=fåëí~ää~íáçå=dìáÇÉ bJRProtective Index EnclosuresCellnetCommercialGasModulesarenotcompatiblewithmetersthatuseprotectiveenclosuresovertheindexes(FigureE.7).Figure E.7 Protective Index Enclosures](https://usermanual.wiki/Landis-Gyr-Technology/EC6R3S2.Installation-Guide-Part-2/User-Guide-1069549-Page-69.png)
![Notes:bJS `ÉääåÉí=d~ë=jçÇìäÉ=~åÇ=jÉíÉê=fåëí~ää~íáçå=dìáÇÉaáÑÑáÅìäíLkçåJÅçãé~íáÄäÉ=`çããÉêÅá~ä=oÉíêçÑáíë](https://usermanual.wiki/Landis-Gyr-Technology/EC6R3S2.Installation-Guide-Part-2/User-Guide-1069549-Page-70.png)
![ríáäákÉí=NJt~ó=mìäëÉ=oÉÅçêÇÉê=Ñçê=d~ë=^ééäáÅ~íáçåë cJNAPPENDIX F CPR INFORMATIONUsethisprocesstocrimpwiresfortheCellnetPulseRecorder.CRIMPING WIRES1PushthewirestobeconnectedasfaraspossibleintotheScotchlokconnector.Figure F.1 Wires Pushed into Scotchlok Connector2PlacetheScotchlokconnector(withwires)intothejawsofthecrimpingtool.Figure F.2 ScotchLok Connector in Crimping Tool JawsAlwaysuse3MParallelJawCrimpingTool3MModelE‐9Yorequivalent.](https://usermanual.wiki/Landis-Gyr-Technology/EC6R3S2.Installation-Guide-Part-2/User-Guide-1069549-Page-71.png)
![`mo=fåÑçêã~íáçåcJO ríáäákÉí=NJt~ó=mìäëÉ=oÉÅçêÇÉê=Ñçê=d~ë=^ééäáÅ~íáçåë3CrimptheScotchlokconnectorbysqueezingthehandlesuntilitdischargesgel.Continuetoapplypressureforthreeseconds.Figure F.3 Crimped Scotchloks Discharge Gel4Placetwoplasticcabletiesonwiresandtightensecurelyforstrainrelief.Removeexcesscabletiewithwirecutters.Figure F.4 Placing Plastic Ties on Cablesmä~ëíáÅ=qáÉë](https://usermanual.wiki/Landis-Gyr-Technology/EC6R3S2.Installation-Guide-Part-2/User-Guide-1069549-Page-72.png)
![`mo=fåÑçêã~íáçåríáäákÉí=NJt~ó=mìäëÉ=oÉÅçêÇÉê=Ñçê=d~ë=^ééäáÅ~íáçåë cJP5ForspliceconnectionsoutsidetheCPRenclosure,inserttheentirespliceassemblyintothesilicone‐filledspliceenclosure.Closethecoverwithleadsexitingalternatesides.Figure F.5 Inserting Splice Assembly into Silicone-filled Splice EnclosureThe 3M Gel splice connector is NOT reusable. Replace the splice ifnecessary.Cellnet strongly recommends a splice enclosure for all CPRapplications.](https://usermanual.wiki/Landis-Gyr-Technology/EC6R3S2.Installation-Guide-Part-2/User-Guide-1069549-Page-73.png)
![APPENDIXGFCCANDICCOMPLIANCEFCCCLASSBThis device complies with Part15ofthe FCC rules. Operationissubject to thefollowing two conditions:(1) This device may not cause harmful interference, and(2) This device must accept any interference received, including interference thatmay cause undesired operation.This equipment has been tested and found to comply with the limits for aClass Bdigital device, pursuant to Part J5ofthe FCC Rules. These limits are designed toprovide reasonable protection against harmful interferenceinaresidentialinstallation. This equipment generates, uses, and can radiate radio frequencyenergy and, if not installed and usedinaccordance with the Instructions, maycause harmful interference to radio communications. However, thereisnoguarantee that interference will notoccurinaparticular installation.Ifthisequipment does cause harmful interference to radioortelevision reception, whichcan be determinedbyturning the equipmentoffand on, the userisencouraged totry to correct the interferencebyoneormoreofthe following measures:•Reorientorrelocate the receiving antenna.•Increase the separation between the equipment and receiver.•Consult Cellnetoran experienced radio technician for help.ChangesormodificationstothisdevicenotexpresslyapprovedbyCellnetTechnol-ogy,Jnc.couldvoidtheuser'sauthoritytooperatetheequipment.FCC10andIndustryCanada10ComplianceLabelingResidential Gas 3metermodules include the following internalandexternal label-ingtocomplytoFCCand IndustryCanadarequirements:•Cellnet Model:printedonthePrinted CircuitBoardinternaltotheunit•FCCID: R7PEGOR3S2 (visibleonthelabelonthe frontoftheunitandprintedonthePrinted CircuitBoardinternal to the unit)•ICID: 5294A-EGOR3S2 (visibleonthelabelonthefrontoftheunitandprintedonthePrinted CircuitBoardinternaltothe unit)8-1 FCC andICCompliance](https://usermanual.wiki/Landis-Gyr-Technology/EC6R3S2.Installation-Guide-Part-2/User-Guide-1069549-Page-74.png)
![FCC andICComplianceCommercialGas 3metermodulesincludethefollowinginternal and external label-ing tocomplytoFCCandIndustryCanadarequirements:•CellnetModel:printedon alabelpermanentlyaffixed andlaminatedtothesurfaceofthePrintedCircuitBoardinternal to the unit•FCCm:R7PEC6R3S2(visibleon the label on the topofthe unit's mainplastichousingandprintedon alabelpermanentlyaffixed andlaminatedto thesurfaceofthePrintedCircuitBoardinternal to the unit)•IndustryCanadam:5294A-R7PEC6R3S2(visibleon the topofthe unit's mainplastichousingandprintedon alabelpermanentlyaffixedandlaminatedto the sur-faceofthePrintedCircuitBoardinternal to the unit)CellnetPulseRecordermodulesinclude thefollowinginternal and external labelingtocomplytoFCCandIndustryCanadarequirements:•CellnetModel:printedon alabelpermanentlyaffixed andlaminatedtothesurfaceofthePrintedCircuitBoardinternaltothe unit•FCC10:R7PEG6R3S2(visibleon theimprintedlabel on the plasticcoveroftheunit and printedonalabelpermanentlyaffixed andlaminatedto thesurfaceofthePrintedCircuitBoardinternaltothe unit)•IndustryCanadam:5294A-R7PEG6R3S2visibleontheimprintedlabelontheplasticcoverofthe unitandprintedon alabelpermanentlyaffixedandlaminatedtothesurfaceofthe PrintedCircuitBoardinternal to the unit)RFEXPOSUREInaccordancewith FCCrequirementsofhumanexposureto radiofrequencyfields,the radiatingelementshall be installed suchthataminimumseparationdistanceof20centimeterswill be maintained.ChangesormodificationstothisdevicenotexpresslyapprovedbyCellnetTechnology, Inc.couldvoid the user'sauthoritytooperatetheequipment.INDUSTRYCANADAThisClassBdigitalapparatusmeets allrequirementsoftheCanadianInterferenceCausingEquipmentRegulations.Operationissubjectto thefollowingtwoconditions:(1)thisdevicemay notcauseharmful interference, and (2) thisdevicemustacceptanyinterferencereceived, includinginterferencethatmaycauseundesiredoperation.Cetappareillagenumeriquede laclasseBrepond atoutes lesexigencesde Iinterferencecanadiennecausantdesreglementsdequipement.L'operationestsujetteaux deuxconditionssuivantes:(I)cedispositifpeut ne pascauserI'interferencenocive,et(2)cedispositifdoitacceptern'importequelleinterferencere~ue,ycomprisI'interferencequi peutcauserIoperationpeu desiree.Cellnet Gas Module and Meter Installation Guide G-2](https://usermanual.wiki/Landis-Gyr-Technology/EC6R3S2.Installation-Guide-Part-2/User-Guide-1069549-Page-75.png)
![](https://usermanual.wiki/Landis-Gyr-Technology/EC6R3S2.Installation-Guide-Part-2/User-Guide-1069549-Page-76.png)
![](https://usermanual.wiki/Landis-Gyr-Technology/EC6R3S2.Installation-Guide-Part-2/User-Guide-1069549-Page-77.png)
![Reader’s Comment FormCellnetGasMeterandModuleInstallationGuide(CO‐0089‐GB‐07.07)Pleaseusethisformonlytoidentifypublicationerrorsortorequestchangesinpublications.Yourcommentsassistusinimprovingourpublications.Directanyrequestsforadditionalpublications,technicalquestionsaboutsystems,changesinsupport,andsoon,toyourCellnetsalesrepresentative.Youmustusethisformtocommunicateyourcommentsaboutthispublication,itsorganization,orsubjectmatter,withtheunderstandingthatwemayuseordistributewhateverinformationyousupplyinanywaywebelieveappropriatewithoutincurringanyobligationtoyou.Youcansendcommentsviaemail,conventionalmail,orfax.Ifyourcommentdoesnotneedareply(forexample,pointingoutatypingerror),checkthisboxanddonotincludeyournameandaddressbelow.Ifyourcommentisapplicable,wewillincludeitinthenextrevisionofthemanual.Ifyouwouldlikeareply,checkthisbox.Besuretoprintyournameandaddressbelow.(Pleaseprint.)To send your comments via... Use this contact information...bã~áä ÅìëíçãÉêëìééçêí]ÅÉääåÉíKÅçã`çåîÉåíáçå~ä=ã~áä `ÉääåÉíI=PMMMM=jáää=`êÉÉâ=^îÉKI=pìáíÉ=NMMI=^äéÜ~êÉíí~I=d^=PMMOOc~ñ ESTUF=ORUJNRRMPage CommentsDate CompanyNameYourName MailingAddressPhoneNo.Email](https://usermanual.wiki/Landis-Gyr-Technology/EC6R3S2.Installation-Guide-Part-2/User-Guide-1069549-Page-78.png)
![cçäÇ=eÉêÉcçäÇ=eÉêÉCellnetAttn.:MarketingCommunications30000MillCreekAve.Suite100Alpharetta,GA30022](https://usermanual.wiki/Landis-Gyr-Technology/EC6R3S2.Installation-Guide-Part-2/User-Guide-1069549-Page-79.png)