Landis Gyr Technology EG6R3S2 Gas Meter Module User Manual Installation Guide Part 1
Landis+Gyr Technology, Inc. Gas Meter Module Installation Guide Part 1
Contents
- 1. Installation Guide Part 1
- 2. Installation Guide Part 2
Installation Guide Part 1

5015 B.U. Bowman Drive Buford, GA 30518 USA Voice: 770-831-8048 Fax: 770-831-8598
Certification Exhibit
FCC ID: R7PEG6R3S2
IC: 5294A-EG6R3S2
FCC Rule Part: 15.247
IC Radio Standards Specification: RSS-210
ACS Report Number: 08-0459 - 15C
Manufacturer: Cellnet Technology, Inc.
Model: 25-1078
Installation Guide (Part 1)

Cellnet Gas Module and Meter
Installation Guide

Copyright© 2008
Cellnet
All
rights reserved.
Proprietary
Rights
Notice
This
manual
is
an
unpublished
work
and
contains
the
trade
secrets
and
confidential
information
of
Cellnet,
which
are
not
to be
divulged
to
third
parties
and
may
not
be
reproduced
or
transmitted
in
whole
or
part,
in
any
form
or
by
any
means,
electronic
or
mechanical
for
any
purpose,
without
the
express
written
permission
of
Cell
net
All
rights
to
designs
or
inventions
disclosed
herein,
including
the
right
to
manufacture
are
reserved
to
Cellnet.
The
information
contained
in this
document
is
subject
to
change
without
notice. Cell
net
reserves
the
right
to
change
the
product
specifocations
at
any time
without
incuring
any
obligations.
Trademarks
Used
In
This
Manual
Cell
net
is a
registered
trademark
of
Cell
net
Innovations,
Inc.
Other
brands
or
product
names
are
the
trademarks
or
registered
trademarks
of
their
respective
holders.
Cellnet Gas Meter Module Installation Guide
<CO-0089-GB-12.08>
Cellnet
30000
Mill
Creek Avenue
Suite 100
Alpharetta, GA 30022
Tel:
(678) 258-1500
Fax:
(678) 258-1550

`ÉääåÉí=d~ë=jçÇìäÉ=~åÇ=jÉíÉê=fåëí~ää~íáçå=dìáÇÉ ááá
TABLE OF CONTENTS
PREFACE
^_lrq=qefp=drfab= K=K=K=K=K=K=K=K=K=K=K=K=K=K=K=K=K=K=K=K=K=K=K=K=K=K=K=K=K=K=K=K=K=K=K=K=K=K=K=K=K=K=K=K=K=K=K=K=K=K=K=K=K=K=K=K=K=K=K=K=K=K=K=K==mJN
tÜç=pÜçìäÇ=rëÉ=qÜáë=dìáÇÉ= K=K=K=K=K=K=K=K=K=K=K=K=K=K=K=K=K=K=K=K=K=K=K=K=K=K=K=K=K=K=K=K=K=K=K=K=K=K=K=K=K=K=K=K=K=K=K=K=K=K=K=K=K=K=K==mJN
eçï=qÜáë=dìáÇÉ=fë=lêÖ~åáòÉÇ==K=K=K=K=K=K=K=K=K=K=K=K=K=K=K=K=K=K=K=K=K=K=K=K=K=K=K=K=K=K=K=K=K=K=K=K=K=K=K=K=K=K=K=K=K=K=K=K=K=K=K=K=K=K==mJO
qvmldo^mef`^i=`lksbkqflkp= K=K=K=K=K=K=K=K=K=K=K=K=K=K=K=K=K=K=K=K=K=K=K=K=K=K=K=K=K=K=K=K=K=K=K=K=K=K=K=K=K=K=K=K=K=K=K=K=K=K=K=K=K==mJP
`lkq^`qfkd=qb`ekf`^i=prmmloq= K=K=K=K=K=K=K=K=K=K=K=K=K=K=K=K=K=K=K=K=K=K=K=K=K=K=K=K=K=K=K=K=K=K=K=K=K=K=K=K=K=K=K=K=K=K=K=K=K=K==mJQ
qÉäÉéÜçåÉ=^ÅÅÉëë=K=K=K=K=K=K=K=K=K=K=K=K=K=K=K=K=K=K=K=K=K=K=K=K=K=K=K=K=K=K=K=K=K=K=K=K=K=K=K=K=K=K=K=K=K=K=K=K=K=K=K=K=K=K=K=K=K=K=K=K=K=K=K==mJQ
bã~áä=^ÅÅÉëë= =K=K=K=K=K=K=K=K=K=K=K=K=K=K=K=K=K=K=K=K=K=K=K=K=K=K=K=K=K=K=K=K=K=K=K=K=K=K=K=K=K=K=K=K=K=K=K=K=K=K=K=K=K=K=K=K=K=K=K=K=K=K=K=K=K=K==mJQ
lêÇÉêáåÖ=mìÄäáÅ~íáçåë= K=K=K=K=K=K=K=K=K=K=K=K=K=K=K=K=K=K=K=K=K=K=K=K=K=K=K=K=K=K=K=K=K=K=K=K=K=K=K=K=K=K=K=K=K=K=K=K=K=K=K=K=K=K=K=K=K==mJQ
mìÄäáÅ~íáçå=`çããÉåíë= K=K=K=K=K=K=K=K=K=K=K=K=K=K=K=K=K=K=K=K=K=K=K=K=K=K=K=K=K=K=K=K=K=K=K=K=K=K=K=K=K=K=K=K=K=K=K=K=K=K=K=K=K=K=K=K==mJQ
obi^qba=mr_if`^qflkp==K=K=K=K=K=K=K=K=K=K=K=K=K=K=K=K=K=K=K=K=K=K=K=K=K=K=K=K=K=K=K=K=K=K=K=K=K=K=K=K=K=K=K=K=K=K=K=K=K=K=K=K=K=K=K=K=K=K=K==mJR
CHAPTER 1 PRE-INSTALLATION
p^cbqv=lsbosfbt==K=K=K=K=K=K=K=K=K=K=K=K=K=K=K=K=K=K=K=K=K=K=K=K=K=K=K=K=K=K=K=K=K=K=K=K=K=K=K=K=K=K=K=K=K=K=K=K=K=K=K=K=K=K=K=K=K=K=K=K=K=K=K=K= =NJN
d^p=jbqbo=fkpq^ii^qflk=^ka=jlarib=obqolcfq=qlli=ifpq= K=K=K=K=K=K=K=K=K=K=K=K=K=K=K=K=K=K=K=K=K=K=K=K=K=K=K=K= =NJO
oc=_rpqbop==K=K=K=K=K=K=K=K=K=K=K=K=K=K=K=K=K=K=K=K=K=K=K=K=K=K=K=K=K=K=K=K=K=K=K=K=K=K=K=K=K=K=K=K=K=K=K=K=K=K=K=K=K=K=K=K=K=K=K=K=K=K=K=K=K=K=K=K=K= =NJP
e~åÇÜÉäÇë=Ee~åÇÜÉäÇF= =K=K=K=K=K=K=K=K=K=K=K=K=K=K=K=K=K=K=K=K=K=K=K=K=K=K=K=K=K=K=K=K=K=K=K=K=K=K=K=K=K=K=K=K=K=K=K=K=K=K=K=K=K=K=K=K=K=K=K= =NJQ
fåëí~ää=j~íÉêá~ä=K=K=K=K=K=K=K=K=K=K=K=K=K=K=K=K=K=K=K=K=K=K=K=K=K=K=K=K=K=K=K=K=K=K=K=K=K=K=K=K=K=K=K=K=K=K=K=K=K=K=K=K=K=K=K=K=K=K=K=K=K=K=K=K=K=K= =NJQ
jbqbo=`ljm^qf_fifqv=K=K=K=K=K=K=K=K=K=K=K=K=K=K=K=K=K=K=K=K=K=K=K=K=K=K=K=K=K=K=K=K=K=K=K=K=K=K=K=K=K=K=K=K=K=K=K=K=K=K=K=K=K=K=K=K=K=K=K=K=K= =NJQ
`ljmif^k`b= =K=K=K=K=K=K=K=K=K=K=K=K=K=K=K=K=K=K=K=K=K=K=K=K=K=K=K=K=K=K=K=K=K=K=K=K=K=K=K=K=K=K=K=K=K=K=K=K=K=K=K=K=K=K=K=K=K=K=K=K=K=K=K=K=K=K=K=K= =NJR
CHAPTER 2 USING THE HANDHELD DEVICE
j~åìÑ~ÅíìêÉê=açÅìãÉåí~íáçå==K=K=K=K=K=K=K=K=K=K=K=K=K=K=K=K=K=K=K=K=K=K=K=K=K=K=K=K=K=K=K=K=K=K=K=K=K=K=K=K=K=K=K=K=K=K=K=K=K=K=K=K=K=K= =OJN
aáëéä~ó==K=K=K=K=K=K=K=K=K=K=K=K=K=K=K=K=K=K=K=K=K=K=K=K=K=K=K=K=K=K=K=K=K=K=K=K=K=K=K=K=K=K=K=K=K=K=K=K=K=K=K=K=K=K=K=K=K=K=K=K=K=K=K=K=K=K=K=K=K=K=K= =OJO
hÉóÄç~êÇ==K=K=K=K=K=K=K=K=K=K=K=K=K=K=K=K=K=K=K=K=K=K=K=K=K=K=K=K=K=K=K=K=K=K=K=K=K=K=K=K=K=K=K=K=K=K=K=K=K=K=K=K=K=K=K=K=K=K=K=K=K=K=K=K=K=K=K=K=K= =OJO
mêçÖê~ã=`çåîÉåíáçåë= K=K=K=K=K=K=K=K=K=K=K=K=K=K=K=K=K=K=K=K=K=K=K=K=K=K=K=K=K=K=K=K=K=K=K=K=K=K=K=K=K=K=K=K=K=K=K=K=K=K=K=K=K=K=K=K=K=K=K=K= =OJP
rpfkd=qeb=a^m=e^kaebia=K=K=K=K=K=K=K=K=K=K=K=K=K=K=K=K=K=K=K=K=K=K=K=K=K=K=K=K=K=K=K=K=K=K=K=K=K=K=K=K=K=K=K=K=K=K=K=K=K=K=K=K=K=K=K=K=K= =OJQ
dÉííáåÖ=pí~êíÉÇ=ïáíÜ=íÜÉ=e~åÇÜÉäÇ= =K=K=K=K=K=K=K=K=K=K=K=K=K=K=K=K=K=K=K=K=K=K=K=K=K=K=K=K=K=K=K=K=K=K=K=K=K=K=K=K=K=K=K=K=K=K=K=K=K=K= =OJQ
pq^ka^oa=jbqbo=fkpq^ii^qflk=^kaLlo=jlarib=obqolcfq= K=K=K=K=K=K=K=K=K=K=K=K=K=K=K=K=K=K=K=K=K=K=K=K=K=K=K=K= =OJR
`ÜÉÅâ=oçìíÉ=pí~íìë= K=K=K=K=K=K=K=K=K=K=K=K=K=K=K=K=K=K=K=K=K=K=K=K=K=K=K=K=K=K=K=K=K=K=K=K=K=K=K=K=K=K=K=K=K=K=K=K=K=K=K=K=K=K=K=K=K=K=K=K=K= =OJR
`ÜÉÅâ=^ÇÇêÉëë=K=K=K=K=K=K=K=K=K=K=K=K=K=K=K=K=K=K=K=K=K=K=K=K=K=K=K=K=K=K=K=K=K=K=K=K=K=K=K=K=K=K=K=K=K=K=K=K=K=K=K=K=K=K=K=K=K=K=K=K=K=K=K=K=K= =OJS
ríáäáíó=cáÉäÇ=a~í~=`çääÉÅíáçå==K=K=K=K=K=K=K=K=K=K=K=K=K=K=K=K=K=K=K=K=K=K=K=K=K=K=K=K=K=K=K=K=K=K=K=K=K=K=K=K=K=K=K=K=K=K=K=K=K=K=K=K=K=K=K=K= =OJU
jÉíÉê=fåÑçêã~íáçå= K=K=K=K=K=K=K=K=K=K=K=K=K=K=K=K=K=K=K=K=K=K=K=K=K=K=K=K=K=K=K=K=K=K=K=K=K=K=K=K=K=K=K=K=K=K=K=K=K=K=K=K=K=K=K=K=K=K=K=K=K=K=K= =OJV
mêçÖê~ã=íÜÉ=jÉíÉê=jçÇìäÉ= K=K=K=K=K=K=K=K=K=K=K=K=K=K=K=K=K=K=K=K=K=K=K=K=K=K=K=K=K=K=K=K=K=K=K=K=K=K=K=K=K=K=K=K=K=K=K=K=K=K=K=K=K=K=K= =OJNN
pmb`f^i=`^pbp= =K=K=K=K=K=K=K=K=K=K=K=K=K=K=K=K=K=K=K=K=K=K=K=K=K=K=K=K=K=K=K=K=K=K=K=K=K=K=K=K=K=K=K=K=K=K=K=K=K=K=K=K=K=K=K=K=K=K=K=K=K=K=K=K=K= =OJNR
jÉíÉê=oÉ~ÇáåÖ=lìí=çÑ=o~åÖÉ= =K=K=K=K=K=K=K=K=K=K=K=K=K=K=K=K=K=K=K=K=K=K=K=K=K=K=K=K=K=K=K=K=K=K=K=K=K=K=K=K=K=K=K=K=K=K=K=K=K=K=K=K=K= =OJNR
jÉíÉê=fa=`çåÑáêã~íáçå=K=K=K=K=K=K=K=K=K=K=K=K=K=K=K=K=K=K=K=K=K=K=K=K=K=K=K=K=K=K=K=K=K=K=K=K=K=K=K=K=K=K=K=K=K=K=K=K=K=K=K=K=K=K=K=K=K=K=K= =OJNT
`Ü~åÖÉ=jÉíÉê=fa= =K=K=K=K=K=K=K=K=K=K=K=K=K=K=K=K=K=K=K=K=K=K=K=K=K=K=K=K=K=K=K=K=K=K=K=K=K=K=K=K=K=K=K=K=K=K=K=K=K=K=K=K=K=K=K=K=K=K=K=K=K=K= =OJNT
pâáéë= =K=K=K=K=K=K=K=K=K=K=K=K=K=K=K=K=K=K=K=K=K=K=K=K=K=K=K=K=K=K=K=K=K=K=K=K=K=K=K=K=K=K=K=K=K=K=K=K=K=K=K=K=K=K=K=K=K=K=K=K=K=K=K=K=K=K=K=K=K=K=K= =OJNU
lqebo=cb^qrobp=K=K=K=K=K=K=K=K=K=K=K=K=K=K=K=K=K=K=K=K=K=K=K=K=K=K=K=K=K=K=K=K=K=K=K=K=K=K=K=K=K=K=K=K=K=K=K=K=K=K=K=K=K=K=K=K=K=K=K=K=K=K=K=K= =OJON
mêçÄäÉãë= =K=K=K=K=K=K=K=K=K=K=K=K=K=K=K=K=K=K=K=K=K=K=K=K=K=K=K=K=K=K=K=K=K=K=K=K=K=K=K=K=K=K=K=K=K=K=K=K=K=K=K=K=K=K=K=K=K=K=K=K=K=K=K=K=K=K=K=K= =OJON
cáåÇ= =K=K=K=K=K=K=K=K=K=K=K=K=K=K=K=K=K=K=K=K=K=K=K=K=K=K=K=K=K=K=K=K=K=K=K=K=K=K=K=K=K=K=K=K=K=K=K=K=K=K=K=K=K=K=K=K=K=K=K=K=K=K=K=K=K=K=K=K=K=K=K=K= =OJON
TABLE OF CONTENTS

q~ÄäÉ=çÑ=`çåíÉåíë
áî `ÉääåÉí=d~ë=jçÇìäÉ=~åÇ=jÉíÉê=fåëí~ää~íáçå=dìáÇÉ
CHAPTER 3 ON-SITE PREPARATION
^oofs^i=^q=fkpq^ii=pfqb= K=K=K=K=K=K=K=K=K=K=K=K=K=K=K=K=K=K=K=K=K=K=K=K=K=K=K=K=K=K=K=K=K=K=K=K=K=K=K=K=K=K=K=K=K=K=K=K=K=K=K=K=K=K=K=K=K=K=K==PJN
CHAPTER 4 GAS METER EXCHANGE
jbqbo=bu`e^kdb=mol`bpp=K=K=K=K=K=K=K=K=K=K=K=K=K=K=K=K=K=K=K=K=K=K=K=K=K=K=K=K=K=K=K=K=K=K=K=K=K=K=K=K=K=K=K=K=K=K=K=K=K=K=K=K=K=K=K=K==QJN
^êêáîáåÖ=~í=íÜÉ=içÅ~íáçå==K=K=K=K=K=K=K=K=K=K=K=K=K=K=K=K=K=K=K=K=K=K=K=K=K=K=K=K=K=K=K=K=K=K=K=K=K=K=K=K=K=K=K=K=K=K=K=K=K=K=K=K=K=K=K=K=K=K=K==QJN
sÉêáÑóáåÖ=íÜÉ=jÉíÉê=páíÉ==K=K=K=K=K=K=K=K=K=K=K=K=K=K=K=K=K=K=K=K=K=K=K=K=K=K=K=K=K=K=K=K=K=K=K=K=K=K=K=K=K=K=K=K=K=K=K=K=K=K=K=K=K=K=K=K=K=K=K==QJN
`çåÑáêãáåÖ=mêçéÉê=fåëí~ää~íáçå=`çåÇáíáçåë= =K=K=K=K=K=K=K=K=K=K=K=K=K=K=K=K=K=K=K=K=K=K=K=K=K=K=K=K=K=K=K=K=K=K=K=K=K=K=K=K=K=K=K=K=K==QJO
pÜìííáåÖ=lÑÑ=íÜÉ=pÉêîáÅÉ=K=K=K=K=K=K=K=K=K=K=K=K=K=K=K=K=K=K=K=K=K=K=K=K=K=K=K=K=K=K=K=K=K=K=K=K=K=K=K=K=K=K=K=K=K=K=K=K=K=K=K=K=K=K=K=K=K=K=K==QJO
fåëí~ääáåÖ=íÜÉ=kÉï=jÉíÉê= =K=K=K=K=K=K=K=K=K=K=K=K=K=K=K=K=K=K=K=K=K=K=K=K=K=K=K=K=K=K=K=K=K=K=K=K=K=K=K=K=K=K=K=K=K=K=K=K=K=K=K=K=K=K=K=K=K=K==QJP
oÉëíçêáåÖ=pÉêîáÅÉI=mìêÖáåÖ=íÜÉ=^áêI=~åÇ=mÉêÑçêãáåÖ=íÜÉ=iÉ~â=qÉëíK= K=K=K=K=K=K=K=K=K=K=K=K=K=K=K=K=K=K=K=K=K=K=K=K=K=K=K==QJP
oÉäáÖÜíáåÖ=^ää=^éé~ê~íìëÉë=~åÇ=`çåÑáêãáåÖ=qÜÉáê=léÉê~íáçå= K=K=K=K=K=K=K=K=K=K=K=K=K=K=K=K=K=K=K=K=K=K=K=K=K=K=K=K=K=K=K=K==QJQ
mêçÖê~ããáåÖ=íÜÉ=jçÇìäÉ==K=K=K=K=K=K=K=K=K=K=K=K=K=K=K=K=K=K=K=K=K=K=K=K=K=K=K=K=K=K=K=K=K=K=K=K=K=K=K=K=K=K=K=K=K=K=K=K=K=K=K=K=K=K=K=K=K==QJQ
mÉêÑçêãáåÖ=a~í~=`çääÉÅíáçå==K=K=K=K=K=K=K=K=K=K=K=K=K=K=K=K=K=K=K=K=K=K=K=K=K=K=K=K=K=K=K=K=K=K=K=K=K=K=K=K=K=K=K=K=K=K=K=K=K=K=K=K=K=K=K=K==QJQ
`äÉ~åáåÖ=ré=íÜÉ=tçêâ=^êÉ~= K=K=K=K=K=K=K=K=K=K=K=K=K=K=K=K=K=K=K=K=K=K=K=K=K=K=K=K=K=K=K=K=K=K=K=K=K=K=K=K=K=K=K=K=K=K=K=K=K=K=K=K=K=K=K=K==QJQ
bñáíáåÖ=íÜÉ=mêÉãáëÉ==K=K=K=K=K=K=K=K=K=K=K=K=K=K=K=K=K=K=K=K=K=K=K=K=K=K=K=K=K=K=K=K=K=K=K=K=K=K=K=K=K=K=K=K=K=K=K=K=K=K=K=K=K=K=K=K=K=K=K=K=K=K==QJQ
jlarib=obqolcfq=Efkabu=lo=obdfpqboF=obmi^`bjbkq=K=K=K=K=K=K=K=K=K=K=K=K=K=K=K=K=K=K=K=K=K=K=K=K=K=K=K=K=K=K=K=K=K==QJQ
`rpqljbo=phfm=lo=`^k`bii^qflk= =K=K=K=K=K=K=K=K=K=K=K=K=K=K=K=K=K=K=K=K=K=K=K=K=K=K=K=K=K=K=K=K=K=K=K=K=K=K=K=K=K=K=K=K=K=K=K=K=K==QJQ
fÑ=qÜÉêÉ=fë=a~ã~ÖÉ=lå=páíÉ=tÜÉå=vçì=^êêáîÉ= K=K=K=K=K=K=K=K=K=K=K=K=K=K=K=K=K=K=K=K=K=K=K=K=K=K=K=K=K=K=K=K=K=K=K=K=K=K=K=K=K=K=K==QJR
CHAPTER 5 RESIDENTIAL METER MODULE RETROFIT
ql=_bdfk=obpfabkqf^i=jbqbo=jlarib=obqolcfq= K=K=K=K=K=K=K=K=K=K=K=K=K=K=K=K=K=K=K=K=K=K=K=K=K=K=K=K=K=K=K=K=K=K=K=K=K=K==RJN
^ãÉêáÅ~å=fåëí~ää~íáçå= K=K=K=K=K=K=K=K=K=K=K=K=K=K=K=K=K=K=K=K=K=K=K=K=K=K=K=K=K=K=K=K=K=K=K=K=K=K=K=K=K=K=K=K=K=K=K=K=K=K=K=K=K=K=K=K=K=K=K=K=K==RJO
oçÅâïÉääLbèìáãÉíÉêLpÉåëìë=jÉíÉê=jçÇìäÉ=fåëí~ää~íáçå= =K=K=K=K=K=K=K=K=K=K=K=K=K=K=K=K=K=K=K=K=K=K=K=K=K=K=K=K=K=K=K=K=K=K=K==RJU
péê~ÖìÉLpÅÜäìãÄÉêÖÉêL^Åí~êáë=jÉíÉê=jçÇìäÉ=fåëí~ää~íáçå==K=K=K=K=K=K=K=K=K=K=K=K=K=K=K=K=K=K=K=K=K=K=K=K=K=K=K=K=K=K=K=K==RJNQ
i~åÅ~ëíÉêLk~íáçå~ä=jÉíÉê=jçÇìäÉ=fåëí~ää~íáçå= =K=K=K=K=K=K=K=K=K=K=K=K=K=K=K=K=K=K=K=K=K=K=K=K=K=K=K=K=K=K=K=K=K=K=K=K=K=K=K=K=K==RJOM
CHAPTER 6 COMMERCIAL AND INDUSTRIAL METER MODULE INSTALLATION
ql=_bdfk=`Cf=jbqbo=jlarib=fkpq^ii^qflk= =K=K=K=K=K=K=K=K=K=K=K=K=K=K=K=K=K=K=K=K=K=K=K=K=K=K=K=K=K=K=K=K=K=K=K=K=K=K=K=K=K=K==SJN
^ãÉêáÅ~å=`dP=fåëí~ää~íáçå= K=K=K=K=K=K=K=K=K=K=K=K=K=K=K=K=K=K=K=K=K=K=K=K=K=K=K=K=K=K=K=K=K=K=K=K=K=K=K=K=K=K=K=K=K=K=K=K=K=K=K=K=K=K=K=K=K==SJO
oçÅâïÉääLbèìáãÉíÉêLpÉåëìë=jÉíÉê=jçÇìäÉ=fåëí~ää~íáçå= =K=K=K=K=K=K=K=K=K=K=K=K=K=K=K=K=K=K=K=K=K=K=K=K=K=K=K=K=K=K=K=K=K=K=K==SJV
péê~ÖìÉL^Åí~êáë=jÉíÉê=jçÇìäÉ=fåëí~ää~íáçå= =K=K=K=K=K=K=K=K=K=K=K=K=K=K=K=K=K=K=K=K=K=K=K=K=K=K=K=K=K=K=K=K=K=K=K=K=K=K=K=K=K=K=K==SJNO
pÅÜäìãÄÉêÖÉêL^Åí~êáë=jÉíÉê=jçÇìäÉ=fåëí~ää~íáçå==K=K=K=K=K=K=K=K=K=K=K=K=K=K=K=K=K=K=K=K=K=K=K=K=K=K=K=K=K=K=K=K=K=K=K=K=K=K=K==SJNS
CHAPTER 7 CELLNET PULSE RECORDER METER MODULE INSTALLATION
qllip=^ka=bnrfmjbkq= K=K=K=K=K=K=K=K=K=K=K=K=K=K=K=K=K=K=K=K=K=K=K=K=K=K=K=K=K=K=K=K=K=K=K=K=K=K=K=K=K=K=K=K=K=K=K=K=K=K=K=K=K=K=K=K=K=K=K=K==TJN
bèìáéãÉåí= =K=K=K=K=K=K=K=K=K=K=K=K=K=K=K=K=K=K=K=K=K=K=K=K=K=K=K=K=K=K=K=K=K=K=K=K=K=K=K=K=K=K=K=K=K=K=K=K=K=K=K=K=K=K=K=K=K=K=K=K=K=K=K=K=K=K=K=K==TJN
qççäë= K=K=K=K=K=K=K=K=K=K=K=K=K=K=K=K=K=K=K=K=K=K=K=K=K=K=K=K=K=K=K=K=K=K=K=K=K=K=K=K=K=K=K=K=K=K=K=K=K=K=K=K=K=K=K=K=K=K=K=K=K=K=K=K=K=K=K=K=K=K=K=K=K==TJP
p^cbqv=^ka=bksfolkjbkq=K=K=K=K=K=K=K=K=K=K=K=K=K=K=K=K=K=K=K=K=K=K=K=K=K=K=K=K=K=K=K=K=K=K=K=K=K=K=K=K=K=K=K=K=K=K=K=K=K=K=K=K=K=K=K=K=K==TJQ
mêÉêÉèìáëáíÉ=qê~áåáåÖ= =K=K=K=K=K=K=K=K=K=K=K=K=K=K=K=K=K=K=K=K=K=K=K=K=K=K=K=K=K=K=K=K=K=K=K=K=K=K=K=K=K=K=K=K=K=K=K=K=K=K=K=K=K=K=K=K=K=K=K=K=K==TJQ
mêÉäáãáå~êó=`ÜÉÅâë==K=K=K=K=K=K=K=K=K=K=K=K=K=K=K=K=K=K=K=K=K=K=K=K=K=K=K=K=K=K=K=K=K=K=K=K=K=K=K=K=K=K=K=K=K=K=K=K=K=K=K=K=K=K=K=K=K=K=K=K=K=K==TJQ
páíÉ=oÉèìáêÉãÉåíë=K=K=K=K=K=K=K=K=K=K=K=K=K=K=K=K=K=K=K=K=K=K=K=K=K=K=K=K=K=K=K=K=K=K=K=K=K=K=K=K=K=K=K=K=K=K=K=K=K=K=K=K=K=K=K=K=K=K=K=K=K=K=K==TJQ
c``=fkcloj^qflk= =K=K=K=K=K=K=K=K=K=K=K=K=K=K=K=K=K=K=K=K=K=K=K=K=K=K=K=K=K=K=K=K=K=K=K=K=K=K=K=K=K=K=K=K=K=K=K=K=K=K=K=K=K=K=K=K=K=K=K=K=K=K=K=K==TJR
fkpq^iifkd=qeb=`biikbq=mripb=ob`loabo= =K=K=K=K=K=K=K=K=K=K=K=K=K=K=K=K=K=K=K=K=K=K=K=K=K=K=K=K=K=K=K=K=K=K=K=K=K=K=K=K=K=K==TJR
jçìåíáåÖ=íÜÉ=`mo=K=K=K=K=K=K=K=K=K=K=K=K=K=K=K=K=K=K=K=K=K=K=K=K=K=K=K=K=K=K=K=K=K=K=K=K=K=K=K=K=K=K=K=K=K=K=K=K=K=K=K=K=K=K=K=K=K=K=K=K=K=K=K==TJR
fÇÉåíáÑóáåÖ=íÜÉ=oÉÖáëíÉê=Ñçê=fåëí~ää~íáçå==K=K=K=K=K=K=K=K=K=K=K=K=K=K=K=K=K=K=K=K=K=K=K=K=K=K=K=K=K=K=K=K=K=K=K=K=K=K=K=K=K=K=K=K=K=K=K=K==TJR
`çååÉÅíáåÖ=íÜÉ=mob`l=pïáíÅÜ=íç=íÜÉ=`mo= K=K=K=K=K=K=K=K=K=K=K=K=K=K=K=K=K=K=K=K=K=K=K=K=K=K=K=K=K=K=K=K=K=K=K=K=K=K=K=K=K=K=K=K==TJR
mêçÖê~ããáåÖ=`mo=båÇéçáåí=Ñçê=léÉê~íáçå=ïáíÜ=mob`l=pïáíÅÜ= =K=K=K=K=K=K=K=K=K=K=K=K=K=K=K=K=K=K=K=K=K=K=K=K=K=K=K=K==TJT
qbpqfkd=qeb=bkamlfkq==K=K=K=K=K=K=K=K=K=K=K=K=K=K=K=K=K=K=K=K=K=K=K=K=K=K=K=K=K=K=K=K=K=K=K=K=K=K=K=K=K=K=K=K=K=K=K=K=K=K=K=K=K=K=K=K=K=K=K=K==TJU
bkamlfkq=obmi^`bjbkq==K=K=K=K=K=K=K=K=K=K=K=K=K=K=K=K=K=K=K=K=K=K=K=K=K=K=K=K=K=K=K=K=K=K=K=K=K=K=K=K=K=K=K=K=K=K=K=K=K=K=K=K=K=K=K=K=K=K==TJV
qolr_ibpellqfkd==K=K=K=K=K=K=K=K=K=K=K=K=K=K=K=K=K=K=K=K=K=K=K=K=K=K=K=K=K=K=K=K=K=K=K=K=K=K=K=K=K=K=K=K=K=K=K=K=K=K=K=K=K=K=K=K=K=K=K=K=K=K=K==TJV
oc=_ìëíÉê=açÉë=kçí=_ÉÉé=tÜÉå=qÉëíáåÖ= K=K=K=K=K=K=K=K=K=K=K=K=K=K=K=K=K=K=K=K=K=K=K=K=K=K=K=K=K=K=K=K=K=K=K=K=K=K=K=K=K=K=K=K=K=K==TJV
`ìëíçãÉê=pìééçêí= =K=K=K=K=K=K=K=K=K=K=K=K=K=K=K=K=K=K=K=K=K=K=K=K=K=K=K=K=K=K=K=K=K=K=K=K=K=K=K=K=K=K=K=K=K=K=K=K=K=K=K=K=K=K=K=K=K=K=K=K=K=K==TJV


`ÉääåÉí=d~ë=jçÇìäÉ=~åÇ=jÉíÉê=fåëí~ää~íáçå=dìáÇÉ îáá
Figure Figure Titles Page
NKN oc=_ìëíÉê=K=K=K=K=K=K=K=K=K=K=K=K=K=K=K=K=K=K=K=K=K=K=K=K=K=K=K=K=K=K=K=K=K=K=K=K=K=K=K=K=K=K=K=K=K=K=K=K=K=K=K=K=K=K=K=K=K=K=K=K=K=K=K=K=K=K= =NJP
NKO e~åÇÜÉäÇë=ïáíÜ=éêçÖê~ããáåÖ=Å~ÄäÉë =K=K=K=K=K=K=K=K=K=K=K=K=K=K=K=K=K=K=K=K=K=K=K=K=K=K=K=K=K=K=K=K=K=K=K=K=K=K=K=K=K=K=K=K=K= =NJQ
OKN a^m=m`RPOM_=e~åÇ=eÉäÇ=m`=~åÇ=ibjl=Å~ääçìí =K=K=K=K=K=K=K=K=K=K=K=K=K=K=K=K=K=K=K=K=K=K=K=K=K=K=K=K=K=K=K=K=K=K=K=K= =OJN
OKO `b=aáëéä~ó =K=K=K=K=K=K=K=K=K=K=K=K=K=K=K=K=K=K=K=K=K=K=K=K=K=K=K=K=K=K=K=K=K=K=K=K=K=K=K=K=K=K=K=K=K=K=K=K=K=K=K=K=K=K=K=K=K=K=K=K=K=K=K=K=K= =OJO
OKP a^m=hÉóé~Ç K=K=K=K=K=K=K=K=K=K=K=K=K=K=K=K=K=K=K=K=K=K=K=K=K=K=K=K=K=K=K=K=K=K=K=K=K=K=K=K=K=K=K=K=K=K=K=K=K=K=K=K=K=K=K=K=K=K=K=K=K=K=K=K= =OJO
OKQ e~åÇÜÉäÇ=ã~áå=ëÅêÉÉå =K=K=K=K=K=K=K=K=K=K=K=K=K=K=K=K=K=K=K=K=K=K=K=K=K=K=K=K=K=K=K=K=K=K=K=K=K=K=K=K=K=K=K=K=K=K=K=K=K=K=K=K=K=K=K=K= =OJR
OKR e~åÇÜÉäÇ=^ÇÇêÉëë=ïáíÜ=ëéÉÅá~ä=áåëíêìÅíáçåëK=K=K=K=K=K=K=K=K=K=K=K=K=K=K=K=K=K=K=K=K=K=K=K=K=K=K=K=K=K=K=K=K=K=K=K=K=K=K=K=K= =OJS
OKS e~åÇÜÉäÇ=ëéÉÅá~ä=áåëíêìÅíáçåë=ëÅêÉÉå =K=K=K=K=K=K=K=K=K=K=K=K=K=K=K=K=K=K=K=K=K=K=K=K=K=K=K=K=K=K=K=K=K=K=K=K=K=K=K=K=K=K=K=K=K= =OJT
OKT e~åÇÜÉäÇ=ríáäáíó=cáÉäÇ=a~í~=ëÅêÉÉå K=K=K=K=K=K=K=K=K=K=K=K=K=K=K=K=K=K=K=K=K=K=K=K=K=K=K=K=K=K=K=K=K=K=K=K=K=K=K=K=K=K=K=K=K=K=K=K= =OJU
OKU e~åÇÜÉäÇ=aá~ä=êÉ~Ç=Éåíêó=ëÅêÉÉå=K=K=K=K=K=K=K=K=K=K=K=K=K=K=K=K=K=K=K=K=K=K=K=K=K=K=K=K=K=K=K=K=K=K=K=K=K=K=K=K=K=K=K=K=K=K=K=K=K= =OJV
OKV e~åÇÜÉäÇ=åìãÄÉê=çÑ=Çá~äë=ëÉäÉÅíáçå=ëÅêÉÉå K=K=K=K=K=K=K=K=K=K=K=K=K=K=K=K=K=K=K=K=K=K=K=K=K=K=K=K=K=K=K=K=K=K=K=K=K=K=K=K= =OJNM
OKNM e~åÇÜÉäÇ=pí~êí=ÅçìåíáåÖ=Çá~äë=çå=íÜÉ=êáÖÜíK=K=K=K=K=K=K=K=K=K=K=K=K=K=K=K=K=K=K=K=K=K=K=K=K=K=K=K=K=K=K=K=K=K=K=K=K=K=K=K=K==OJNM
OKNN e~åÇÜÉäÇ=Çá~ä=êÉ~Ç=Éåíêó=ëÅêÉÉå =K=K=K=K=K=K=K=K=K=K=K=K=K=K=K=K=K=K=K=K=K=K=K=K=K=K=K=K=K=K=K=K=K=K=K=K=K=K=K=K=K=K=K=K=K=K=K=K= =OJNN
OKNO e~åÇÜÉäÇ=fåáíá~ä=éêçÖê~ããáåÖ=ëÅêÉÉåK=K=K=K=K=K=K=K=K=K=K=K=K=K=K=K=K=K=K=K=K=K=K=K=K=K=K=K=K=K=K=K=K=K=K=K=K=K=K=K=K=K=K=K=K= =OJNO
OKNP e~åÇÜÉäÇ=Éå~ÄäÉ=í~ãéÉê=ÑÉ~íìêÉ K=K=K=K=K=K=K=K=K=K=K=K=K=K=K=K=K=K=K=K=K=K=K=K=K=K=K=K=K=K=K=K=K=K=K=K=K=K=K=K=K=K=K=K=K=K=K=K= =OJNP
OKNQ e~åÇÜÉäÇ=fåëí~ää=ÅçãéäÉíÉ K=K=K=K=K=K=K=K=K=K=K=K=K=K=K=K=K=K=K=K=K=K=K=K=K=K=K=K=K=K=K=K=K=K=K=K=K=K=K=K=K=K=K=K=K=K=K=K=K=K=K=K=K= =OJNP
OKNR e~åÇÜÉäÇ=êÉÇáëéä~óë=áåÑçêã~íáçå=K=K=K=K=K=K=K=K=K=K=K=K=K=K=K=K=K=K=K=K=K=K=K=K=K=K=K=K=K=K=K=K=K=K=K=K=K=K=K=K=K=K=K=K=K=K=K=K= =OJNQ
OKNS e~åÇÜÉäÇ=oÉ~Ç=çìí=çÑ=o~åÖÉ=ëÅêÉÉåK=K=K=K=K=K=K=K=K=K=K=K=K=K=K=K=K=K=K=K=K=K=K=K=K=K=K=K=K=K=K=K=K=K=K=K=K=K=K=K=K=K=K=K=K= =OJNR
OKNT e~åÇÜÉäÇ=oÉJÉåíÉê=ãÉíÉê=êÉ~Ç =K=K=K=K=K=K=K=K=K=K=K=K=K=K=K=K=K=K=K=K=K=K=K=K=K=K=K=K=K=K=K=K=K=K=K=K=K=K=K=K=K=K=K=K=K=K=K=K=K= =OJNS
OKNU jÉíÉê=~äêÉ~Çó=ìëÉÇ=K=K=K=K=K=K=K=K=K=K=K=K=K=K=K=K=K=K=K=K=K=K=K=K=K=K=K=K=K=K=K=K=K=K=K=K=K=K=K=K=K=K=K=K=K=K=K=K=K=K=K=K=K=K=K=K=K=K= =OJNT
OKNV e~åÇÜÉäÇ=jÉíÉê=fa=`Ü~åÖÉ=ëÅêÉÉå=K=K=K=K=K=K=K=K=K=K=K=K=K=K=K=K=K=K=K=K=K=K=K=K=K=K=K=K=K=K=K=K=K=K=K=K=K=K=K=K=K=K=K=K=K=K==OJNT
OKOM léíáçåë=çå=~ÇÇêÉëë=ëÅêÉÉå K=K=K=K=K=K=K=K=K=K=K=K=K=K=K=K=K=K=K=K=K=K=K=K=K=K=K=K=K=K=K=K=K=K=K=K=K=K=K=K=K=K=K=K=K=K=K=K=K=K=K=K= =OJNU
OKON e~åÇÜÉäÇ=pâáé=ëÅêÉÉå K=K=K=K=K=K=K=K=K=K=K=K=K=K=K=K=K=K=K=K=K=K=K=K=K=K=K=K=K=K=K=K=K=K=K=K=K=K=K=K=K=K=K=K=K=K=K=K=K=K=K=K=K=K=K=K= =OJNU
OKOO e~åÇÜÉäÇ=pâáé=`çåÑáêã~íáçå=ëÅêÉÉå =K=K=K=K=K=K=K=K=K=K=K=K=K=K=K=K=K=K=K=K=K=K=K=K=K=K=K=K=K=K=K=K=K=K=K=K=K=K=K=K=K=K=K=K=K==OJNV
OKOP e~åÇÜÉäÇ=cáåÇ=pÅêÉÉåK=K=K=K=K=K=K=K=K=K=K=K=K=K=K=K=K=K=K=K=K=K=K=K=K=K=K=K=K=K=K=K=K=K=K=K=K=K=K=K=K=K=K=K=K=K=K=K=K=K=K=K=K=K=K=K= =OJON
OKOQ e~åÇÜÉäÇ=p~ãéäÉ=ëÉ~êÅÜ=äáëí K=K=K=K=K=K=K=K=K=K=K=K=K=K=K=K=K=K=K=K=K=K=K=K=K=K=K=K=K=K=K=K=K=K=K=K=K=K=K=K=K=K=K=K=K=K=K=K=K=K=K= =OJOO
RKN ^ãÉêáÅ~åW=jÉíÉê=jçÇìäÉ=ÄÉÑçêÉ=áåëí~ää~íáçå K=K=K=K=K=K=K=K=K=K=K=K=K=K=K=K=K=K=K=K=K=K=K=K=K=K=K=K=K=K=K=K=K=K=K=K=K=K=K=K=K= =RJO
RKO ^ãÉêáÅ~åW=ãÉíÉê=ïáíÜ=áåÇÉñ=~åÇ=áåÇÉñ=ÅçîÉê K=K=K=K=K=K=K=K=K=K=K=K=K=K=K=K=K=K=K=K=K=K=K=K=K=K=K=K=K=K=K=K=K=K=K=K=K=K=K=K= =RJO
RKP ^ãÉêáÅ~å=oÉãçîáåÖ=íÜÉ=fåÇÉñ=EçåÉ=ëÅêÉï=çå=É~ÅÜ=ëáÇÉF K=K=K=K=K=K=K=K=K=K=K=K=K=K=K=K=K=K=K=K=K=K=K=K=K=K=K=K=K=K=K= =RJP
RKQ ^ãÉêáÅ~åW=päáÇáåÖ=íÜÉ=fåÇÉñ=~íí~ÅÜãÉåí=Åäáé=çìí=EçåÉ=éÉê=ëáÇÉF =K=K=K=K=K=K=K=K=K=K=K=K=K=K=K=K=K=K=K=K=K=K=K=K=K=K= =RJP
RKR ^ãÉêáÅ~åW=^äáÖåáåÖ=íÜÉ=ÇêáîÉ=ÇçÖ K=K=K=K=K=K=K=K=K=K=K=K=K=K=K=K=K=K=K=K=K=K=K=K=K=K=K=K=K=K=K=K=K=K=K=K=K=K=K=K=K=K=K=K=K=K=K=K=K= =RJQ
RKS ^ãÉêáÅ~åW=^íí~ÅÜáåÖ=íÜÉ=jÉíÉê=jçÇìäÉ=çåíç=íÜÉ=ãÉíÉê=Äó=ëÅêÉïáåÖ=áå=íïç=ëí~åÇJçÑÑ=Ñ~ëíÉåÉêë =K=K= =RJQ
RKT ^ãÉêáÅ~åW=fåëí~ääáåÖ=fåÇÉñ=çå=ëí~åÇçÑÑ=ëÅêÉïë=K=K=K=K=K=K=K=K=K=K=K=K=K=K=K=K=K=K=K=K=K=K=K=K=K=K=K=K=K=K=K=K=K=K=K=K=K=K=K= =RJR
RKU ^ãÉêáÅ~åW=päáÇáåÖ=íÜÉ=fåÇÉñ=Åäáé=áå K=K=K=K=K=K=K=K=K=K=K=K=K=K=K=K=K=K=K=K=K=K=K=K=K=K=K=K=K=K=K=K=K=K=K=K=K=K=K=K=K=K=K=K=K=K=K=K= =RJR
RKV ^ãÉêáÅ~åW=`çååÉÅíáåÖ=íÜÉ=Ä~ííÉêó K=K=K=K=K=K=K=K=K=K=K=K=K=K=K=K=K=K=K=K=K=K=K=K=K=K=K=K=K=K=K=K=K=K=K=K=K=K=K=K=K=K=K=K=K=K=K=K= =RJS
RKNM ^ãÉêáÅ~åW=fåëí~ääáåÖ=íÜÉ=Ä~ííÉêó=ïáíÜ=íÜÉ=Ä~ííÉêó=Å~ÄäÉ=çå=íçé =K=K=K=K=K=K=K=K=K=K=K=K=K=K=K=K=K=K=K=K=K=K=K=K=K=K=K= =RJS
RKNN ^ãÉêáÅ~åW=mêçéÉêäó=áåëí~ääÉÇ=Ä~ííÉêóK=K=K=K=K=K=K=K=K=K=K=K=K=K=K=K=K=K=K=K=K=K=K=K=K=K=K=K=K=K=K=K=K=K=K=K=K=K=K=K=K=K=K=K=K=K=K= =RJS
RKNO ^ãÉêáÅ~åW=jÉíÉê=ãçÇìäÉ=ïáíÜ=ÅçîÉê=~åÇ=í~ãéÉê=ëÉ~äë=áåëí~ääÉÇ K=K=K=K=K=K=K=K=K=K=K=K=K=K=K=K=K=K=K=K=K=K=K=K=K=K= =RJT
RKNP oçÅâïÉääLbèìáãÉíÉêLpÉåëìëW=ãÉíÉê=ãçÇìäÉ=ÄÉÑçêÉ=áåëí~ää~íáçå =K=K=K=K=K=K=K=K=K=K=K=K=K=K=K=K=K=K=K=K=K=K=K=K=K=K= =RJU
RKNQ oçÅâïÉääLbèìáãÉíÉêLpÉåëìëW=ãÉíÉêK=K=K=K=K=K=K=K=K=K=K=K=K=K=K=K=K=K=K=K=K=K=K=K=K=K=K=K=K=K=K=K=K=K=K=K=K=K=K=K=K=K=K=K=K=K=K= =RJU
RKNR oçÅâïÉääLbèìáãÉíÉêLpÉåëìëW=jÉíÉê=ïáíÜ=í~ãéÉê=ëÉ~äë=~åÇ=áåÇÉñ=ÅçîÉê=êÉãçîÉÇ =K=K=K=K=K=K=K=K=K=K=K=K= =RJU
RKNS oçÅâïÉääLbèìáãÉíÉêLpÉåëìëW=oÉãçî~ä=çÑ=áåÇÉñ=ÅçîÉê=Ö~ëâÉí =K=K=K=K=K=K=K=K=K=K=K=K=K=K=K=K=K=K=K=K=K=K=K=K=K=K=K= =RJV
RKNT oçÅâïÉääLbèìáãÉíÉêLpÉåëìëW=jÉíÉê=jçÇìäÉ=~åÇ=áåÇÉñ=ïáíÜ=ëÅêÉïë=áå=éä~ÅÉ=êÉ~Çó=Ñçê=~ëëÉãÄäó=K= =RJV
RKNU oçÅâïÉääLbèìáãÉíÉêLpÉåëìëW=^íí~ÅÜáåÖ=íÜÉ=jÉíÉê=jçÇìäÉ=~åÇ=áåÇÉñ=íç=íÜÉ=ãÉíÉêK=K=K=K=K=K=K=K=K=K=K= =RJNM
RKNV oçÅâïÉääLbèìáãÉíÉêLpÉåëìëW=`çååÉÅíáåÖ=íÜÉ=Ä~ííÉêó =K=K=K=K=K=K=K=K=K=K=K=K=K=K=K=K=K=K=K=K=K=K=K=K=K=K=K=K=K=K=K=K= =RJNN
RKOM oçÅâïÉääLbèìáãÉíÉêLpÉåëìëW=`çêêÉÅí=Ä~ííÉêó=çêáÉåí~íáçå=EÅçååÉÅíçê=çå=íçéF=K=K=K=K=K=K=K=K=K=K=K=K=K=K=K= =RJNN
RKON oçÅâïÉääLbèìáãÉíÉêLpÉåëìëW=_~ííÉêó=éêçéÉêäó=áåëí~ääÉÇ=K=K=K=K=K=K=K=K=K=K=K=K=K=K=K=K=K=K=K=K=K=K=K=K=K=K=K=K=K=K=K= =RJNN
RKOO oçÅâïÉääLbèìáãÉíÉêLpÉåëìëW=fåëí~ääáåÖ=íÜÉ=jÉíÉê=jçÇìäÉ=ÅçîÉê =K=K=K=K=K=K=K=K=K=K=K=K=K=K=K=K=K=K=K=K=K=K=K=K= =RJNO
RKOP oçÅâïÉääLbèìáãÉíÉêLpÉåëìëW=íïçJëÅêÉï=ÅçåÑáÖìê~íáçå =K=K=K=K=K=K=K=K=K=K=K=K=K=K=K=K=K=K=K=K=K=K=K=K=K=K=K=K=K=K=K= =RJNO
RKOQ oçÅâïÉääLbèìáãÉíÉêLpÉåëìëW=`çêêÉÅíäó=áåëí~ääÉÇ=jÉíÉê=jçÇìäÉ=K=K=K=K=K=K=K=K=K=K=K=K=K=K=K=K=K=K=K=K=K=K=K=K=K= =RJNP
RKOR péê~ÖìÉLpÅÜäìãÄÉêÖÉêL^Åí~êáëW=jÉíÉê=jçÇìäÉ=ÄÉÑçêÉ=áåëí~ää~íáçå =K=K=K=K=K=K=K=K=K=K=K=K=K=K=K=K=K=K=K=K=K=K=K= =RJNQ
RKOS péê~ÖìÉLpÅÜäìãÄÉêÖÉêL^Åí~êáëW=jÉíÉê =K=K=K=K=K=K=K=K=K=K=K=K=K=K=K=K=K=K=K=K=K=K=K=K=K=K=K=K=K=K=K=K=K=K=K=K=K=K=K=K=K=K=K= =RJNQ
RKOT péê~ÖìÉLpÅÜäìãÄÉêÖÉêL^Åí~êáëW=oÉãçîáåÖ=íÜÉ=áåÇÉñ=ÅçîÉê K=K=K=K=K=K=K=K=K=K=K=K=K=K=K=K=K=K=K=K=K=K=K=K=K=K=K=K= =RJNQ
RKOU péê~ÖìÉLpÅÜäìãÄÉêÖÉêL^Åí~êáëW=oÉãçîáåÖ=íÜÉ=áåÇÉñK=K=K=K=K=K=K=K=K=K=K=K=K=K=K=K=K=K=K=K=K=K=K=K=K=K=K=K=K=K=K=K=K= =RJNR
RKOV péê~ÖìÉLpÅÜäìãÄÉêÖÉêL^Åí~êáëW=oÉãçî~ä=çÑ=áåÇÉñ=ÅçîÉê=Ö~ëâÉí=K=K=K=K=K=K=K=K=K=K=K=K=K=K=K=K=K=K=K=K=K=K=K=K= =RJNR
RKPM péê~ÖìÉLpÅÜäìãÄÉêÖÉêL^Åí~êáëW=jÉíÉê=jçÇìäÉ=éêÉJ~ëëÉãÄäÉÇ=K=K=K=K=K=K=K=K=K=K=K=K=K=K=K=K=K=K=K=K=K=K=K=K=K= =RJNS
RKPN péê~ÖìÉLpÅÜäìãÄÉêÖÉêL^Åí~êáëW=^äáÖåãÉåí=çÑ=íÜÉ=ãÉíÉê=ÇêáîÉ=ÇçÖ=~åÇ=ëÅêÉïë =K=K=K=K=K=K=K=K=K=K=K=K=K= =RJNS
RKPO péê~ÖìÉLpÅÜäìãÄÉêÖÉêL^Åí~êáëW=jÉíÉê=jçÇìäÉ=Ä~ëÉ=~íí~ÅÜÉÇ=íç=ãÉíÉêI=êÉ~Çó=íç=ëäáÇÉ=çå=Çá~äë=K= =RJNS
RKPP péê~ÖìÉLpÅÜäìãÄÉêÖÉêL^Åí~êáëW=pÉÅìêáåÖ=áåÇÉñ=~åÇ=ÅÜÉÅâáåÖ=Ñçê=ÑêÉÉ=ãçîÉãÉåí=çÑ=ïáÖÖäÉêJ =K=K= =RJNT
RKPQ péê~ÖìÉLpÅÜäìãÄÉêÖÉêL^Åí~êáëW=`çååÉÅíáåÖ=íÜÉ=_~ííÉêó=K=K=K=K=K=K=K=K=K=K=K=K=K=K=K=K=K=K=K=K=K=K=K=K=K=K=K=K=K=K= =RJNU
RKPR péê~ÖìÉLpÅÜäìãÄÉêÖÉêL^Åí~êáëW=`çêêÉÅí=_~ííÉêó=lêáÉåí~íáçå =K=K=K=K=K=K=K=K=K=K=K=K=K=K=K=K=K=K=K=K=K=K=K=K=K=K=K= =RJNU
RKPS péê~ÖìÉLpÅÜäìãÄÉêÖÉêL^Åí~êáëW=_~ííÉêó=`çêêÉÅíäó=fåëí~ääÉÇ=K=K=K=K=K=K=K=K=K=K=K=K=K=K=K=K=K=K=K=K=K=K=K=K=K=K=K=K= =RJNU
RKPT péê~ÖìÉLpÅÜäìãÄÉêÖÉêL^Åí~êáëW=c~ëíÉå=`çîÉê=pÅêÉïë=~åÇ=fåëÉêí=q~ãéÉê=ëÉ~äë =K=K=K=K=K=K=K=K=K=K=K=K= =RJNV
LIST OF FIGURES

îááá `ÉääåÉí=d~ë=jçÇìäÉ=~åÇ=jÉíÉê=fåëí~ää~íáçå=dìáÇÉ
Figure Figure Titles Page
RKPU i~åÅ~ëíÉêLk~íáçå~äW=jÉíÉê=êÉíêçÑáíí~ÄäÉ K=K=K=K=K=K=K=K=K=K=K=K=K=K=K=K=K=K=K=K=K=K=K=K=K=K=K=K=K=K=K=K=K=K=K=K=K=K=K=K=K=K=K=K==RJOM
RKPV i~åÅ~ëíÉêLk~íáçå~äW=jÉíÉê=åçåJêÉíêçÑáíí~ÄäÉ =K=K=K=K=K=K=K=K=K=K=K=K=K=K=K=K=K=K=K=K=K=K=K=K=K=K=K=K=K=K=K=K=K=K=K=K=K=K=K=K==RJOM
RKQM i~åÅ~ëíÉêLk~íáçå~äW=jÉíÉê=jçÇìäÉ=ÄÉÑçêÉ=áåëí~ää~íáçå K=K=K=K=K=K=K=K=K=K=K=K=K=K=K=K=K=K=K=K=K=K=K=K=K=K=K=K=K=K=K=K=K==RJON
RKQN i~åÅ~ëíÉêLk~íáçå~äW=jÉíÉê=K=K=K=K=K=K=K=K=K=K=K=K=K=K=K=K=K=K=K=K=K=K=K=K=K=K=K=K=K=K=K=K=K=K=K=K=K=K=K=K=K=K=K=K=K=K=K=K=K=K=K=K=K==RJON
RKQO i~åÅ~ëíÉêLk~íáçå~äW=oÉãçîáåÖ=íÜÉ=áåÇÉñ=ÅçîÉê =K=K=K=K=K=K=K=K=K=K=K=K=K=K=K=K=K=K=K=K=K=K=K=K=K=K=K=K=K=K=K=K=K=K=K=K=K==RJON
RKQP i~åÅ~ëíÉêLk~íáçå~äW=oÉãçîáåÖ=íÜÉ=áåÇÉñ =K=K=K=K=K=K=K=K=K=K=K=K=K=K=K=K=K=K=K=K=K=K=K=K=K=K=K=K=K=K=K=K=K=K=K=K=K=K=K=K=K=K==RJOO
RKQQ i~åÅ~ëíÉêLk~íáçå~äW=oÉãçî~ä=çÑ=áåÇÉñ=ÅçîÉê=Ö~ëâÉí K=K=K=K=K=K=K=K=K=K=K=K=K=K=K=K=K=K=K=K=K=K=K=K=K=K=K=K=K=K=K=K=K=K==RJOO
RKQR i~åÅ~ëíÉêLk~íáçå~äW=fåëí~ää~íáçå=çÑ=kÉï=`çìéäÉê K=K=K=K=K=K=K=K=K=K=K=K=K=K=K=K=K=K=K=K=K=K=K=K=K=K=K=K=K=K=K=K=K=K=K=K=K==RJOP
RKQS i~åÅ~ëíÉêLk~íáçå~äW=jÉíÉê=jçÇìäÉ=éêÉJ~ëëÉãÄäÉÇ K=K=K=K=K=K=K=K=K=K=K=K=K=K=K=K=K=K=K=K=K=K=K=K=K=K=K=K=K=K=K=K=K=K=K==RJOP
RKQT i~åÅ~ëíÉêLk~íáçå~äW=^äáÖåãÉåí=çÑ=íÜÉ=ãÉíÉê=ÇêáîÉ=ÇçÖ=~åÇ=ëÅêÉïë K=K=K=K=K=K=K=K=K=K=K=K=K=K=K=K=K=K=K=K=K=K=K==RJOQ
RKQU i~åÅ~ëíÉêLk~íáçå~äW=jÉíÉê=jçÇìäÉ=Ä~ëÉ=~íí~ÅÜÉÇ=íç=ãÉíÉêI=êÉ~Çó=íç=ëäáÇÉ=çå=Çá~äë K=K=K=K=K=K=K=K=K=K=K==RJOQ
RKQV i~åÅ~ëíÉêLk~íáçå~äW=`çååÉÅíáåÖ=íÜÉ=_~ííÉêó K=K=K=K=K=K=K=K=K=K=K=K=K=K=K=K=K=K=K=K=K=K=K=K=K=K=K=K=K=K=K=K=K=K=K=K=K=K=K=K==RJOR
RKRM i~åÅ~ëíÉêLk~íáçå~äW=`çêêÉÅí=_~ííÉêó=lêáÉåí~íáçå K=K=K=K=K=K=K=K=K=K=K=K=K=K=K=K=K=K=K=K=K=K=K=K=K=K=K=K=K=K=K=K=K=K=K=K=K==RJOR
RKRN i~åÅ~ëíÉêLk~íáçå~äW=_~ííÉêó=`çêêÉÅíäó=fåëí~ääÉÇ K=K=K=K=K=K=K=K=K=K=K=K=K=K=K=K=K=K=K=K=K=K=K=K=K=K=K=K=K=K=K=K=K=K=K=K=K=K==RJOS
RKRO i~åÅ~ëíÉêLk~íáçå~äW=c~ëíÉå=`çîÉê=pÅêÉïë=~åÇ=fåëÉêí=q~ãéÉê=ëÉ~äë=K=K=K=K=K=K=K=K=K=K=K=K=K=K=K=K=K=K=K=K=K=K==RJOS
RKRP i~åÅ~ëíÉêLk~íáçå~äW=oÉéä~ÅáåÖ=pÉêá~ä=kìãÄÉê=mä~íÉ=K=K=K=K=K=K=K=K=K=K=K=K=K=K=K=K=K=K=K=K=K=K=K=K=K=K=K=K=K=K=K=K=K=K==RJOT
SKN ^ãÉêáÅ~å=`dPW=jÉíÉê=ÄÉÑçêÉ=áåëí~ää~íáçå =K=K=K=K=K=K=K=K=K=K=K=K=K=K=K=K=K=K=K=K=K=K=K=K=K=K=K=K=K=K=K=K=K=K=K=K=K=K=K=K=K=K=K==SJO
SKO ^ãÉêáÅ~å=`dPWoÉãçîáåÖ=íÜÉ=ÅçîÉê=~åÇ=áåÇÉñK=K=K=K=K=K=K=K=K=K=K=K=K=K=K=K=K=K=K=K=K=K=K=K=K=K=K=K=K=K=K=K=K=K=K=K=K=K=K==SJO
SKP `çããçå=^ãÉêáÅ~å=ãÉíÉê=ãçÇìäÉ=é~Åâ~ÖáåÖ=ïáíÜ=Ü~êÇï~êÉ=çå=íÜÉ=êáÖÜíK=K=K=K=K=K=K=K=K=K=K=K=K=K=K=K=K=K=K==SJP
SKQ ^ãÉêáÅ~å=`dPW=ëÅêÉï=âáí K=K=K=K=K=K=K=K=K=K=K=K=K=K=K=K=K=K=K=K=K=K=K=K=K=K=K=K=K=K=K=K=K=K=K=K=K=K=K=K=K=K=K=K=K=K=K=K=K=K=K=K=K=K=K==SJP
SKR ^ãÉêáÅ~å=`dPW=ãÉíÉê=ãçÇìäÉ=âáí K=K=K=K=K=K=K=K=K=K=K=K=K=K=K=K=K=K=K=K=K=K=K=K=K=K=K=K=K=K=K=K=K=K=K=K=K=K=K=K=K=K=K=K=K=K=K=K=K==SJQ
SKS léÉå=^ãÉêáÅ~å=`dPW=ãçÇìäÉ=K=K=K=K=K=K=K=K=K=K=K=K=K=K=K=K=K=K=K=K=K=K=K=K=K=K=K=K=K=K=K=K=K=K=K=K=K=K=K=K=K=K=K=K=K=K=K=K=K=K=K==SJQ
SKT ^ãÉêáÅ~å=`dPW`çååÉÅíáåÖ=íÜÉ=Ä~ííÉêó=íç=íÜÉ=ãçÇìäÉ =K=K=K=K=K=K=K=K=K=K=K=K=K=K=K=K=K=K=K=K=K=K=K=K=K=K=K=K=K=K=K=K=K==SJR
SKU ^ãÉêáÅ~å=`dPW`çååÉÅíáåÖ=íÜÉ=éêçÖê~ããáåÖ=Å~ÄäÉ=íç=íÜÉ=^ãÉêáÅ~å=`çããÉêÅá~ä=ãÉíÉê=ãçÇìäÉ=K==SJR
SKV ^ãÉêáÅ~å=`dPW=ãçÇìäÉ=êçìíÉ=ïáêÉ K=K=K=K=K=K=K=K=K=K=K=K=K=K=K=K=K=K=K=K=K=K=K=K=K=K=K=K=K=K=K=K=K=K=K=K=K=K=K=K=K=K=K=K=K=K=K=K==SJS
SKNM ^ãÉêáÅ~å=`dPW=ãçÇìäÉ=fåÇÉñ=ÇÉí~áäK=K=K=K=K=K=K=K=K=K=K=K=K=K=K=K=K=K=K=K=K=K=K=K=K=K=K=K=K=K=K=K=K=K=K=K=K=K=K=K=K=K=K=K=K=K=K==SJS
SKNN ^ãÉêáÅ~å=`dPWãçÇìäÉJ=^íí~ÅÜáåÖ=íÜÉ=åÉï=fåÇÉñ=ÅçîÉê K=K=K=K=K=K=K=K=K=K=K=K=K=K=K=K=K=K=K=K=K=K=K=K=K=K=K=K=K=K=K=K==SJT
SKNO ^ãÉêáÅ~å=`dPW=í~ãéÉê=ëÉ~äáåÖ=Ñçê=fåÇÉñ=ÅçîÉê =K=K=K=K=K=K=K=K=K=K=K=K=K=K=K=K=K=K=K=K=K=K=K=K=K=K=K=K=K=K=K=K=K=K=K=K=K=K==SJT
SKNP ^ãÉêáÅ~å=`dPWä=áåëí~ääáåÖ=fåÇÉñ=K=K=K=K=K=K=K=K=K=K=K=K=K=K=K=K=K=K=K=K=K=K=K=K=K=K=K=K=K=K=K=K=K=K=K=K=K=K=K=K=K=K=K=K=K=K=K=K=K=K==SJU
SKNQ ^ãÉêáÅ~å=`dPW=ãçìåíáåÖ=Äê~ÅâÉí=ÅçåÑáÖìê~íáçåë K=K=K=K=K=K=K=K=K=K=K=K=K=K=K=K=K=K=K=K=K=K=K=K=K=K=K=K=K=K=K=K=K=K=K=K=K==SJU
SKNR ^ãÉêáÅ~å=`dPWãÉíÉê=ãçÇìäÉ=ïáíÜ=ãçìåíáåÖ=Äê~ÅâÉí=áåëí~ääÉÇ K=K=K=K=K=K=K=K=K=K=K=K=K=K=K=K=K=K=K=K=K=K=K=K=K=K=K==SJV
SKNS oçÅâïÉääLbèìáãÉíÉêLpÉåëìëW=fåÇÉñÉë=ÄÉÑçêÉ=áåëí~ää~íáçå =K=K=K=K=K=K=K=K=K=K=K=K=K=K=K=K=K=K=K=K=K=K=K=K=K=K=K=K=K=K==SJNM
SKNT oçÅâïÉääLbèìáãÉíÉêLpÉåëìëW=ëÅêÉï=~åÇ=ãÉíÉê=ãçÇìäÉ=âáíë K=K=K=K=K=K=K=K=K=K=K=K=K=K=K=K=K=K=K=K=K=K=K=K=K=K=K=K==SJNM
SKNU oçÅâïÉääLbèìáãÉíÉêLpÉåëìëW=ãÉíÉê=ãçÇìäÉ=áåëí~ääáåÖ=fåÇÉñ=ÅçîÉê=K=K=K=K=K=K=K=K=K=K=K=K=K=K=K=K=K=K=K=K=K=K=K==SJNN
SKNV oçÅâïÉääLbèìáãÉíÉêLpÉåëìëW=ëÉÅìêáåÖ=áåÇÉñ=ÅçîÉê=C=jÉíÉê=jçÇìäÉK=K=K=K=K=K=K=K=K=K=K=K=K=K=K=K=K=K=K=K=K=K==SJNN
SKOM oçÅâïÉääLbèìáãÉíÉêLpÉåëìëW=ÅÉåíÉê=íÉëí=Çá~äI=ÅçìåíÉê=áåëí~ääÉÇI=çê=áåÇÉñ=K=K=K=K=K=K=K=K=K=K=K=K=K=K=K=K=K=K==SJNO
SKON péê~ÖìÉL^Åí~êáëW=fåÇÉñÉë=ÄÉÑçêÉ=áåëí~ää~íáçåK=K=K=K=K=K=K=K=K=K=K=K=K=K=K=K=K=K=K=K=K=K=K=K=K=K=K=K=K=K=K=K=K=K=K=K=K=K=K=K==SJNO
SKOO péê~ÖìÉL^Åí~êáëW=ëÅêÉï=âáí K=K=K=K=K=K=K=K=K=K=K=K=K=K=K=K=K=K=K=K=K=K=K=K=K=K=K=K=K=K=K=K=K=K=K=K=K=K=K=K=K=K=K=K=K=K=K=K=K=K=K=K=K==SJNP
SKOP péê~ÖìÉL^Åí~êáëW=áåëí~ääáåÖ=fåÇÉñ=ÅçîÉêK=K=K=K=K=K=K=K=K=K=K=K=K=K=K=K=K=K=K=K=K=K=K=K=K=K=K=K=K=K=K=K=K=K=K=K=K=K=K=K=K=K=K=K==SJNQ
SKOQ péê~ÖìÉL^Åí~êáëW=áåëí~ääÉÇ=í~ãéÉê=ëÉ~äë K=K=K=K=K=K=K=K=K=K=K=K=K=K=K=K=K=K=K=K=K=K=K=K=K=K=K=K=K=K=K=K=K=K=K=K=K=K=K=K=K=K=K==SJNQ
SKOR péê~ÖìÉL^Åí~êáëW=ãÉíÉê=ïáíÜ=ãçÇìäÉ=áåëí~ääÉÇ =K=K=K=K=K=K=K=K=K=K=K=K=K=K=K=K=K=K=K=K=K=K=K=K=K=K=K=K=K=K=K=K=K=K=K=K=K=K==SJNR
SKOS pÅÜäìãÄÉêÖÉêL^Åí~êáëW=ÄÉÑçêÉ=áåëí~ää~íáçå K=K=K=K=K=K=K=K=K=K=K=K=K=K=K=K=K=K=K=K=K=K=K=K=K=K=K=K=K=K=K=K=K=K=K=K=K=K=K=K=K=K==SJNS
SKOT pÅÜäìãÄÉêÖÉêL^Åí~êáëW=ãÉíÉê=ïáíÜ=ëÜçêí=Ä~ëÉ =K=K=K=K=K=K=K=K=K=K=K=K=K=K=K=K=K=K=K=K=K=K=K=K=K=K=K=K=K=K=K=K=K=K=K=K=K=K==SJNS
SKOU pÅÜäìãÄÉêÖÉêL^Åí~êáëW=fåÇÉñ=ÅçîÉê=êÉãçîÉÇ=K=K=K=K=K=K=K=K=K=K=K=K=K=K=K=K=K=K=K=K=K=K=K=K=K=K=K=K=K=K=K=K=K=K=K=K=K=K=K==SJNT
SKOV pÅÜäìãÄÉêÖÉêL^Åí~êáëW=ãÉíÉê=ïáíÜ=Äê~ÅâÉí=~åÇ=ãÉíÉê=ãçÇìäÉ=K=K=K=K=K=K=K=K=K=K=K=K=K=K=K=K=K=K=K=K=K=K=K=K=K=K==SJNU
TKN PJtáêÉ=`~ÄäÉ K=K=K=K=K=K=K=K=K=K=K=K=K=K=K=K=K=K=K=K=K=K=K=K=K=K=K=K=K=K=K=K=K=K=K=K=K=K=K=K=K=K=K=K=K=K=K=K=K=K=K=K=K=K=K=K=K=K=K=K=K=K=K=K==TJR
TKO jçäÉñ=`çååÉÅíçê=E~ë=ëÜáééÉÇF K=K=K=K=K=K=K=K=K=K=K=K=K=K=K=K=K=K=K=K=K=K=K=K=K=K=K=K=K=K=K=K=K=K=K=K=K=K=K=K=K=K=K=K=K=K=K=K=K=K=K==TJS
TKP `mo=mêçÖê~ããáåÖ=`~ÄäÉ=^íí~ÅÜÉÇ=K=K=K=K=K=K=K=K=K=K=K=K=K=K=K=K=K=K=K=K=K=K=K=K=K=K=K=K=K=K=K=K=K=K=K=K=K=K=K=K=K=K=K=K=K=K=K==TJT
TKQ `mo=_~ííÉêó=`çååÉÅíçê=`çååÉÅíÉÇ=íç=`moK=K=K=K=K=K=K=K=K=K=K=K=K=K=K=K=K=K=K=K=K=K=K=K=K=K=K=K=K=K=K=K=K=K=K=K=K=K=K=K=K==TJU
TKR `mo=^Åíáî~íáçå=rëáåÖ=oc=_ìëíÉê =K=K=K=K=K=K=K=K=K=K=K=K=K=K=K=K=K=K=K=K=K=K=K=K=K=K=K=K=K=K=K=K=K=K=K=K=K=K=K=K=K=K=K=K=K=K=K=K=K==TJU
VKN NJt~ó=mêçÖê~ããáåÖ=`~ÄäÉ=K=K=K=K=K=K=K=K=K=K=K=K=K=K=K=K=K=K=K=K=K=K=K=K=K=K=K=K=K=K=K=K=K=K=K=K=K=K=K=K=K=K=K=K=K=K=K=K=K=K=K=K==VJNM
VKO pÜççíÉê=ÄçñK=K=K=K=K=K=K=K=K=K=K=K=K=K=K=K=K=K=K=K=K=K=K=K=K=K=K=K=K=K=K=K=K=K=K=K=K=K=K=K=K=K=K=K=K=K=K=K=K=K=K=K=K=K=K=K=K=K=K=K=K=K=K=K==VJNM
VKP içÖ=lå=ëÅêÉÉåK=K=K=K=K=K=K=K=K=K=K=K=K=K=K=K=K=K=K=K=K=K=K=K=K=K=K=K=K=K=K=K=K=K=K=K=K=K=K=K=K=K=K=K=K=K=K=K=K=K=K=K=K=K=K=K=K=K=K=K=K=K==VJNN
VKQ dmêÉé=jÉåì=_~ê=K=K=K=K=K=K=K=K=K=K=K=K=K=K=K=K=K=K=K=K=K=K=K=K=K=K=K=K=K=K=K=K=K=K=K=K=K=K=K=K=K=K=K=K=K=K=K=K=K=K=K=K=K=K=K=K=K=K=K=K==VJNN
VKR `ÜççëÉ=oÉëd~ë=~ë=íÜÉ=ãÉíÉê=íóéÉ =K=K=K=K=K=K=K=K=K=K=K=K=K=K=K=K=K=K=K=K=K=K=K=K=K=K=K=K=K=K=K=K=K=K=K=K=K=K=K=K=K=K=K=K=K=K==VJNP
VKS fåÇáÅ~íÉ=íÜÉ=mêçÖê~ã=qóéÉ K=K=K=K=K=K=K=K=K=K=K=K=K=K=K=K=K=K=K=K=K=K=K=K=K=K=K=K=K=K=K=K=K=K=K=K=K=K=K=K=K=K=K=K=K=K=K=K=K=K=K=K=K==VJNP
VKT jçÇÉë=íç=ÅÜççëÉ=Ñêçã=~êÉ=“fåëéÉÅíÒ=çê=“mêçÖê~ã=kÉïÒK=K=K=K=K=K=K=K=K=K=K=K=K=K=K=K=K=K=K=K=K=K=K=K=K=K=K=K=K=K=K==VJNP
VKU dmêÉé=“fåëéÉÅí=jçÇÉÒ=ëÅêÉÉå K=K=K=K=K=K=K=K=K=K=K=K=K=K=K=K=K=K=K=K=K=K=K=K=K=K=K=K=K=K=K=K=K=K=K=K=K=K=K=K=K=K=K=K=K=K=K=K=K=K==VJNQ
VKV “fåëéÉÅí=jçÇÉÒ=pÅêÉÉå=táíÜ=jçÇìäÉ=mäìÖÖÉÇ=få=K=K=K=K=K=K=K=K=K=K=K=K=K=K=K=K=K=K=K=K=K=K=K=K=K=K=K=K=K=K=K=K=K=K=K=K==VJNR
VKNM “fåëéÉÅí=jçÇÉÒ=táíÜ=mçïÉê=i^k=pÅ~ååÉÇ=fåK=K=K=K=K=K=K=K=K=K=K=K=K=K=K=K=K=K=K=K=K=K=K=K=K=K=K=K=K=K=K=K=K=K=K=K=K=K=K==VJNS
VKNN “mêçÖê~ã=kÉïÒ=pÅêÉÉå=K=K=K=K=K=K=K=K=K=K=K=K=K=K=K=K=K=K=K=K=K=K=K=K=K=K=K=K=K=K=K=K=K=K=K=K=K=K=K=K=K=K=K=K=K=K=K=K=K=K=K=K=K=K=K==VJNT
VKNO “mêçÖê~ã=kÉïÒ=pÅêÉÉå=ïáíÜ=jçÇìäÉ=mäìÖÖÉÇ=få =K=K=K=K=K=K=K=K=K=K=K=K=K=K=K=K=K=K=K=K=K=K=K=K=K=K=K=K=K=K=K=K=K=K=K=K==VJNU
VKNP bêêçê=jÉëë~ÖÉ=aáëéä~óÉÇ=ïÜÉå=qÜÉ=têçåÖ=jÉíÉê=fa=cçêã~í=fë=båíÉêÉÇ K=K=K=K=K=K=K=K=K=K=K=K=K=K=K=K=K=K=K==VJNV

`ÉääåÉí=d~ë=jçÇìäÉ=~åÇ=jÉíÉê=fåëí~ää~íáçå=dìáÇÉ áñ
Figure Figure Titles Page
VKNQ bêêçê=jÉëë~ÖÉ=aáëéä~óÉÇ=áÑ=qÜÉ=pÅ~ååÉÇ=mçïÉê=i^k=açÉë=kçí=j~íÅÜ=mêçÖê~ããÉÇ =K=K=K=K=K=K=K=K= =VJNV
VKNR aáëéä~ó=ïÜÉå=é~ê~ãÉíÉêë=~êÉ=îÉêáÑáÉÇ =K=K=K=K=K=K=K=K=K=K=K=K=K=K=K=K=K=K=K=K=K=K=K=K=K=K=K=K=K=K=K=K=K=K=K=K=K=K=K=K=K=K=K=K= =VJOM
VKNS bêêçê=jÉëë~ÖÉ=fåÇáÅ~íáåÖ=íÜ~í=~=jÉíÉê=fa=^äêÉ~Çó=bñáëíë=áå=íÜÉ=mêçÖê~ãäçÖ=K=K=K=K=K=K=K=K=K=K=K=K=K=K=K=K= =VJOM
VKNT aìéäáÅ~íÉ=mçïÉê=i^k=^ÇÇêÉëë =K=K=K=K=K=K=K=K=K=K=K=K=K=K=K=K=K=K=K=K=K=K=K=K=K=K=K=K=K=K=K=K=K=K=K=K=K=K=K=K=K=K=K=K=K=K=K=K=K= =VJON
VKNU “oÉJmêçÖê~ã=läÇÒ=pÅêÉÉå K=K=K=K=K=K=K=K=K=K=K=K=K=K=K=K=K=K=K=K=K=K=K=K=K=K=K=K=K=K=K=K=K=K=K=K=K=K=K=K=K=K=K=K=K=K=K=K=K=K=K=K=K= =VJON
VKNV oÉJmêçÖê~ã=läÇ=táíÜ=jçÇìäÉ=mäìÖÖÉÇ=få=K=K=K=K=K=K=K=K=K=K=K=K=K=K=K=K=K=K=K=K=K=K=K=K=K=K=K=K=K=K=K=K=K=K=K=K=K=K=K=K=K= =VJOO
VKOM bêêçê=jÉëë~ÖÉ=aáëéä~óÉÇ=ïÜÉå=båíÉêÉÇ=oÉ~Ç=áë=íçç=ä~êÖÉ=Ñçê=íÜÉ=oçääçîÉê=mçáåí=K=K=K=K=K=K=K=K=K=K=K=K= =VJOP
VKON jo_=jçÇÉ=j~áå=jÉåì K=K=K=K=K=K=K=K=K=K=K=K=K=K=K=K=K=K=K=K=K=K=K=K=K=K=K=K=K=K=K=K=K=K=K=K=K=K=K=K=K=K=K=K=K=K=K=K=K=K=K=K=K=K=K= =VJOQ
VKOO jo_=pÅêÉÉå=ïáíÜ=jçÇìäÉ=mäìÖÖÉÇ=få =K=K=K=K=K=K=K=K=K=K=K=K=K=K=K=K=K=K=K=K=K=K=K=K=K=K=K=K=K=K=K=K=K=K=K=K=K=K=K=K=K=K=K=K= =VJOR
VKOP bêêçê=jÉëë~ÖÉ=aáëéä~óÉÇ=ïÜÉå=båíÉêÉÇ=s~äìÉ=açÉë=kçí=j~íÅÜ=mêçÖê~ããÉÇ=s~äìÉ =K=K=K=K=K=K=K=K=K= =VJOS
^KN jÉíÉê=aêáîÉ=açÖ=~äáÖåÉÇ=ïáíÜ=O=ÑíK=ãçÇìäÉ=ïáÖÖäÉê K=K=K=K=K=K=K=K=K=K=K=K=K=K=K=K=K=K=K=K=K=K=K=K=K=K=K=K=K=K=K=K=K=K=K=K==^JN
^KO jÉíÉê=aêáîÉ=açÖ=~äáÖåÉÇ=ïáíÜ=N=ÑíK=ãçÇìäÉ=ïáÖÖäÉê K=K=K=K=K=K=K=K=K=K=K=K=K=K=K=K=K=K=K=K=K=K=K=K=K=K=K=K=K=K=K=K=K=K=K=K==^JN
_KN c~ÇáåÖ=^ãÉêáÅ~å=fåÇÉñ=K=K=K=K=K=K=K=K=K=K=K=K=K=K=K=K=K=K=K=K=K=K=K=K=K=K=K=K=K=K=K=K=K=K=K=K=K=K=K=K=K=K=K=K=K=K=K=K=K=K=K=K=K=K=K=K==_JN
_KO jÉí~ä=êáîÉíë=çå=~=péê~ÖìÉ=ÅçîÉê =K=K=K=K=K=K=K=K=K=K=K=K=K=K=K=K=K=K=K=K=K=K=K=K=K=K=K=K=K=K=K=K=K=K=K=K=K=K=K=K=K=K=K=K=K=K=K=K=K==_JN
`KN ^ãÉêáÅ~å=éêçéÉê=éä~ÅÉãÉåí=çÑ=oc=_ìëíÉê=K=K=K=K=K=K=K=K=K=K=K=K=K=K=K=K=K=K=K=K=K=K=K=K=K=K=K=K=K=K=K=K=K=K=K=K=K=K=K=K=K=K =`JO
`KO oçÅâïÉääLbèìáãÉíÉêLpÉåëìë=oc=_ìëíÉê=éä~ÅÉãÉåí =K=K=K=K=K=K=K=K=K=K=K=K=K=K=K=K=K=K=K=K=K=K=K=K=K=K=K=K=K=K=K=K=K=K=K =`JP
`KP péê~ÖìÉLpÅÜäìãÄÉêÖÉêL^Åí~êáë=oc=éä~ÅÉãÉåíK=K=K=K=K=K=K=K=K=K=K=K=K=K=K=K=K=K=K=K=K=K=K=K=K=K=K=K=K=K=K=K=K=K=K=K=K=K=K =`JQ
`KQ `çããÉêÅá~ä=d~ë=oc=éä~ÅÉãÉåíK=K=K=K=K=K=K=K=K=K=K=K=K=K=K=K=K=K=K=K=K=K=K=K=K=K=K=K=K=K=K=K=K=K=K=K=K=K=K=K=K=K=K=K=K=K=K=K=K=K =`JR
`KR `çããÉêÅá~ä=d~ë=jçÇìäÉ=ìåÅçîÉêÉÇ=K=K=K=K=K=K=K=K=K=K=K=K=K=K=K=K=K=K=K=K=K=K=K=K=K=K=K=K=K=K=K=K=K=K=K=K=K=K=K=K=K=K=K=K=K=K =`JR
`KS ollqpLoçãÉíë=odP=oc=éä~ÅÉãÉåí K=K=K=K=K=K=K=K=K=K=K=K=K=K=K=K=K=K=K=K=K=K=K=K=K=K=K=K=K=K=K=K=K=K=K=K=K=K=K=K=K=K=K=K=K=K =`JS
aKN e~åÇÜÉäÇ=~ÑíÉê=açÅâ=Ü~ë=ÄÉÉå=ëÉäÉÅíÉÇ =K=K=K=K=K=K=K=K=K=K=K=K=K=K=K=K=K=K=K=K=K=K=K=K=K=K=K=K=K=K=K=K=K=K=K=K=K=K=K=K=K=K=K==aJN
aKO e~åÇÜÉäÇ=a^m=ÅÜ~êÖáåÖ=K=K=K=K=K=K=K=K=K=K=K=K=K=K=K=K=K=K=K=K=K=K=K=K=K=K=K=K=K=K=K=K=K=K=K=K=K=K=K=K=K=K=K=K=K=K=K=K=K=K=K=K=K=K=K==aJO
bKN fåÇÉñ=_~ëÉ=mä~íÉ K=K=K=K=K=K=K=K=K=K=K=K=K=K=K=K=K=K=K=K=K=K=K=K=K=K=K=K=K=K=K=K=K=K=K=K=K=K=K=K=K=K=K=K=K=K=K=K=K=K=K=K=K=K=K=K=K=K=K=K=K= =bJN
bKO jÉíÉêë=ïáíÜ=mêÉëëìêÉ=q~Äë =K=K=K=K=K=K=K=K=K=K=K=K=K=K=K=K=K=K=K=K=K=K=K=K=K=K=K=K=K=K=K=K=K=K=K=K=K=K=K=K=K=K=K=K=K=K=K=K=K=K=K=K=K==bJO
bKP mêÉëëìêÉ=^Ç~éíÉê =K=K=K=K=K=K=K=K=K=K=K=K=K=K=K=K=K=K=K=K=K=K=K=K=K=K=K=K=K=K=K=K=K=K=K=K=K=K=K=K=K=K=K=K=K=K=K=K=K=K=K=K=K=K=K=K=K=K=K=K= =bJO
bKQ jçìåíáåÖ=jçÇìäÉÛë=qê~åëãáííÉê=K=K=K=K=K=K=K=K=K=K=K=K=K=K=K=K=K=K=K=K=K=K=K=K=K=K=K=K=K=K=K=K=K=K=K=K=K=K=K=K=K=K=K=K=K=K=K=K=K=K==bJP
bKR mä~íÉ=jçìåíÉÇ=_~Åâï~êÇë =K=K=K=K=K=K=K=K=K=K=K=K=K=K=K=K=K=K=K=K=K=K=K=K=K=K=K=K=K=K=K=K=K=K=K=K=K=K=K=K=K=K=K=K=K=K=K=K=K=K=K=K=K= =bJQ
bKS máéÉ=`äÉ~ê~åÅÉ=K=K=K=K=K=K=K=K=K=K=K=K=K=K=K=K=K=K=K=K=K=K=K=K=K=K=K=K=K=K=K=K=K=K=K=K=K=K=K=K=K=K=K=K=K=K=K=K=K=K=K=K=K=K=K=K=K=K=K=K=K=K==bJQ
bKT mêçíÉÅíáîÉ=fåÇÉñ=båÅäçëìêÉë =K=K=K=K=K=K=K=K=K=K=K=K=K=K=K=K=K=K=K=K=K=K=K=K=K=K=K=K=K=K=K=K=K=K=K=K=K=K=K=K=K=K=K=K=K=K=K=K=K=K=K=K==bJR
cKN táêÉë=mìëÜÉÇ=áåíç=pÅçíÅÜäçâ=`çååÉÅíçê K=K=K=K=K=K=K=K=K=K=K=K=K=K=K=K=K=K=K=K=K=K=K=K=K=K=K=K=K=K=K=K=K=K=K=K=K=K=K=K=K=K=K= =cJN
cKO pÅçíÅÜiçâ=`çååÉÅíçê=áå=`êáãéáåÖ=qççä=g~ïë =K=K=K=K=K=K=K=K=K=K=K=K=K=K=K=K=K=K=K=K=K=K=K=K=K=K=K=K=K=K=K=K=K=K=K=K=K=K=K= =cJN
cKP `êáãéÉÇ=pÅçíÅÜäçâë=aáëÅÜ~êÖÉ=dÉä K=K=K=K=K=K=K=K=K=K=K=K=K=K=K=K=K=K=K=K=K=K=K=K=K=K=K=K=K=K=K=K=K=K=K=K=K=K=K=K=K=K=K=K=K=K=K= =cJO
cKQ mä~ÅáåÖ=mä~ëíáÅ=qáÉë=çå=`~ÄäÉëK=K=K=K=K=K=K=K=K=K=K=K=K=K=K=K=K=K=K=K=K=K=K=K=K=K=K=K=K=K=K=K=K=K=K=K=K=K=K=K=K=K=K=K=K=K=K=K=K=K=K= =cJO
cKR fåëÉêíáåÖ=péäáÅÉ=^ëëÉãÄäó=áåíç=páäáÅçåÉJÑáääÉÇ=péäáÅÉ=båÅäçëìêÉ K=K=K=K=K=K=K=K=K=K=K=K=K=K=K=K=K=K=K=K=K=K=K=K=K=K=K= =cJP

ñ `ÉääåÉí=d~ë=jçÇìäÉ=~åÇ=jÉíÉê=fåëí~ää~íáçå=dìáÇÉ
Figure Figure Titles Page

`ÉääåÉí=d~ë=jçÇìäÉ=~åÇ=jÉíÉê=fåëí~ää~íáçå=dìáÇÉ ñá
LIST OF TABLES
Table Table Titles Page
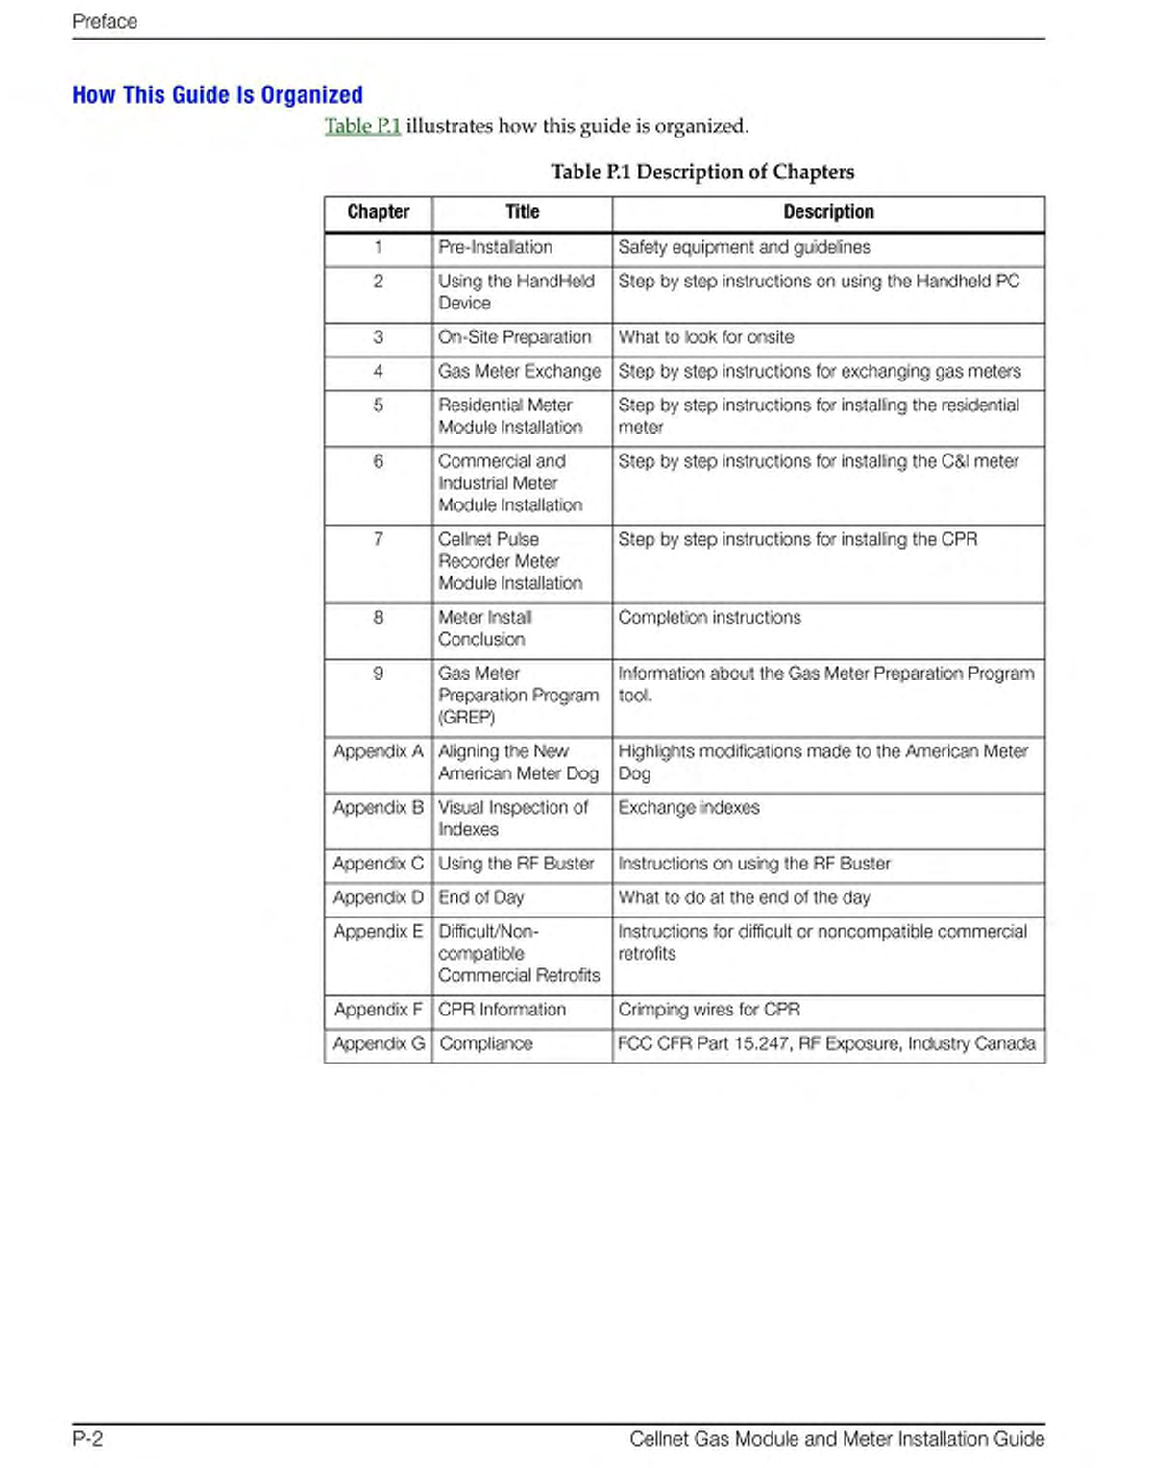
mKN aÉëÅêáéíáçå=çÑ=`Ü~éíÉêëK=K=K=K=K=K=K=K=K=K=K=K=K=K=K=K=K=K=K=K=K=K=K=K=K=K=K=K=K=K=K=K=K=K=K=K=K=K=K=K=K=K=K=K=K=K=K=K=K=K=K=K=K=K=K=K=KmJO
mKO oÉä~íÉÇ=mìÄäáÅ~íáçå K=K=K=K=K=K=K=K=K=K=K=K=K=K=K=K=K=K=K=K=K=K=K=K=K=K=K=K=K=K=K=K=K=K=K=K=K=K=K=K=K=K=K=K=K=K=K=K=K=K=K=K=K=K=K=K=K=K=K=KmJR
OKN e~åÇÜÉäÇ=léíáçåë=~åÇ=^ÅíáîÉ=hÉóë=Ñçê=`ÜÉÅâ=oçìíÉ=pí~íìë =K=K=K=K=K=K=K=K=K=K=K=K=K=K=K=K=K=K=K=K=K=K=K=K=K=K=K=K=K OJR
OKO e~åÇÜÉäÇ=léíáçåë=~åÇ=^ÅíáîÉ=hÉóë=Ñçê=oçìíÉ=pí~íìë=ëÅêÉÉå=K=K=K=K=K=K=K=K=K=K=K=K=K=K=K=K=K=K=K=K=K=K=K=K=K=K=K=K=K OJT
OKP e~åÇÜÉäÇ=léíáçåë=~åÇ=^ÅíáîÉ=hÉóë=Ñçê=péÉÅá~ä=fåëíêìÅíáçåë K=K=K=K=K=K=K=K=K=K=K=K=K=K=K=K=K=K=K=K=K=K=K=K=K=K=K=K=K=K OJT
OKQ e~åÇÜÉäÇ=léíáçåë=~åÇ=^ÅíáîÉ=hÉóë=Ñçê=jÉíÉê=oÉ~ÇáåÖ =K=K=K=K=K=K=K=K=K=K=K=K=K=K=K=K=K=K=K=K=K=K=K=K=K=K=K=K=K=K=K=K=K OJV
OKR e~åÇÜÉäÇ=léíáçåë=~åÇ=^ÅíáîÉ=hÉóë=Ñçê=kìãÄÉê=çÑ=aá~äë=ëÉäÉÅíáçå=K=K=K=K=K=K=K=K=K=K=K=K=K=K=K=K=K=K=K=K=K=K=K=K OJNM
OKS e~åÇÜÉäÇ=léíáçåë=~åÇ=^ÅíáîÉ=hÉóë=Ñçê=jÉíÉê=oÉ~ÇáåÖ =K=K=K=K=K=K=K=K=K=K=K=K=K=K=K=K=K=K=K=K=K=K=K=K=K=K=K=K=K=K=K=K OJNN
OKT e~åÇÜÉäÇ=léíáçåë=~åÇ=^ÅíáîÉ=hÉóë=Ñçê=fåáíá~ä=éêçÖê~ããáåÖ=ëÅêÉÉå =K=K=K=K=K=K=K=K=K=K=K=K=K=K=K=K=K=K=K=K=K=K=K OJNO
OKU e~åÇÜÉäÇ=léíáçåë=~åÇ=^ÅíáîÉ=hÉóë=Ñçê=mêçÖê~ããáåÖ=íÜÉ=jÉíÉê=jçÇìäÉ =K=K=K=K=K=K=K=K=K=K=K=K=K=K=K=K=K=K=K OJNQ
OKV e~åÇÜÉäÇ=léíáçåë=~åÇ=^ÅíáîÉ=hÉóë=Ñçê=oÉ~Ç=lìí=çÑ=o~åÖÉ K=K=K=K=K=K=K=K=K=K=K=K=K=K=K=K=K=K=K=K=K=K=K=K=K=K=K=K=K OJNS
OKNM e~åÇÜÉäÇ=léíáçåë=~åÇ=^ÅíáîÉ=hÉóë=Ñçê=oÉ~Ç=lìí=çÑ=o~åÖÉ K=K=K=K=K=K=K=K=K=K=K=K=K=K=K=K=K=K=K=K=K=K=K=K=K=K=K=K=K OJNS
OKNN e~åÇÜÉäÇ=léíáçåë=~åÇ=^ÅíáîÉ=hÉóë=Ñçê=jÉíÉê=^äêÉ~Çó=rëÉÇK=K=K=K=K=K=K=K=K=K=K=K=K=K=K=K=K=K=K=K=K=K=K=K=K=K=K=K=K OJNT
OKNO e~åÇÜÉäÇ=léíáçåë=~åÇ=^ÅíáîÉ=hÉóë=Ñçê=pâáéëK=K=K=K=K=K=K=K=K=K=K=K=K=K=K=K=K=K=K=K=K=K=K=K=K=K=K=K=K=K=K=K=K=K=K=K=K=K=K=K OJNV
OKNP e~åÇÜÉäÇ=léíáçåë=~åÇ=^ÅíáîÉ=hÉóë=Ñçê=pâáé=`çåÑáêã~íáçå=K=K=K=K=K=K=K=K=K=K=K=K=K=K=K=K=K=K=K=K=K=K=K=K=K=K=K=K=K=K OJNV
OKNQ e~åÇÜÉäÇ=léíáçåë=~åÇ=^ÅíáîÉ=hÉóë=Ñçê=oçìíÉ=pí~íìë K=K=K=K=K=K=K=K=K=K=K=K=K=K=K=K=K=K=K=K=K=K=K=K=K=K=K=K=K=K=K=K=K=K OJON
OKNR e~åÇÜÉäÇ=léíáçåë=~åÇ=^ÅíáîÉ=hÉóë=Ñçê=cáåÇK=K=K=K=K=K=K=K=K=K=K=K=K=K=K=K=K=K=K=K=K=K=K=K=K=K=K=K=K=K=K=K=K=K=K=K=K=K=K=K=K OJOO
OKNS e~åÇÜÉäÇ=léíáçåë=~åÇ=^ÅíáîÉ=hÉóë=Ñçê=ë~ãéäÉ=ëÉ~êÅÜ=äáëí=K=K=K=K=K=K=K=K=K=K=K=K=K=K=K=K=K=K=K=K=K=K=K=K=K=K=K=K=K=K OJOP
OKNT e~åÇÜÉäÇ=léíáçåë=~åÇ=^ÅíáîÉ=hÉóë=Ñçê=ë~ãéäÉ=ëÉ~êÅÜ=êÉÅçêÇ=K=K=K=K=K=K=K=K=K=K=K=K=K=K=K=K=K=K=K=K=K=K=K=K=K=K=K OJOP
TKN bèìáéãÉåí =K=K=K=K=K=K=K=K=K=K=K=K=K=K=K=K=K=K=K=K=K=K=K=K=K=K=K=K=K=K=K=K=K=K=K=K=K=K=K=K=K=K=K=K=K=K=K=K=K=K=K=K=K=K=K=K=K=K=K=K=K=K=K=K=K=K TJN
TKO qççäë K=K=K=K=K=K=K=K=K=K=K=K=K=K=K=K=K=K=K=K=K=K=K=K=K=K=K=K=K=K=K=K=K=K=K=K=K=K=K=K=K=K=K=K=K=K=K=K=K=K=K=K=K=K=K=K=K=K=K=K=K=K=K=K=K=K=K=K=K=K=K TJP
TKP táêÉ=`çäçê=j~íÅÜáåÖ=K=K=K=K=K=K=K=K=K=K=K=K=K=K=K=K=K=K=K=K=K=K=K=K=K=K=K=K=K=K=K=K=K=K=K=K=K=K=K=K=K=K=K=K=K=K=K=K=K=K=K=K=K=K=K=K=K=K=K TJT
LIST OF TABLES

iáëí=çÑ=q~ÄäÉë
ñáá `ÉääåÉí=d~ë=jçÇìäÉ=~åÇ=jÉíÉê=fåëí~ää~íáçå=dìáÇÉ
Table Table Titles Page
mêÉÑ~ÅÉ
`ÉääåÉí=d~ë=jçÇìäÉ=~åÇ=jÉíÉê=fåëí~ää~íáçå=dìáÇÉ mJP
TYPOGRAPHICAL CONVENTIONS
Thissectiondescribestheconventionsusedinthisguidetomakefindingand
understandinginformationeasier.Thefollowingkindsofformattinginthetext
identifyspecialinformation.
Convention Description
Allbold,initialcapital
letters
Referstofieldnames,buttons,menus,menu
options,andkeys.Examples:Devicefield,Open
button,Filemenu,orCtrlkey.
Allboldlower‐caseletters Referstotheexactkeystrokesyouenter.Whatyou
typeisalwaysshowninlowercaseletters.
Example:TypelocalintheDevicefield.
Italicizedlower‐caseword
betweenless‐thansign(<)
andgreater‐thansign(>)
Referstovariablesthatoccurinitemnames.
Example:AddSubNetworkTo<networkname>
dialog,where<networkname>referstothenameof
anetwork.
<menu>|<option>|
<option>...
Referstothesequenceofchoicesyoushouldmake
toaccessaspecificdialogormenuoption.
Examples:chooseStart|Settings|ControlPanel
orchooseFile|Open.
Plussign(+)betweenkeys Referstopressingthekeysatthesametime.
Example:Alt+B.
Comma(,)betweenkeys Referstokeyswhicharepressedsequentially.
Example:Alt,F.
Note boxes provide essential information about Cellnet Gas Meter Module and Meter
Installation.
Cautions provide information that you must read to avoid making relatively moderate errors
during Cellnet Gas Meter Module and Meter Installation.
Warnings provide special, must-read information. If you ignore a warning, you may
create a safety hazard, omit essential data or make a critical error. Warnings are in
the same format as notes, except they are shown in bold text.

mêÉÑ~ÅÉ
mJQ `ÉääåÉí=d~ë=jçÇìäÉ=~åÇ=jÉíÉê=fåëí~ää~íáçå=dìáÇÉ
CONTACTING TECHNICAL SUPPORT
Cellnettechnicalsupportisavailablebytelephoneoremail.Whenyoucontact
technicalsupport,bepreparedtogiveexactdescriptionsof:
•Theproblemyouencountered
•Whathappenedandwhatyouweredoingwhentheproblemoccurred
•Howyoutriedtosolvetheproblem
•Theexacttextofanyerrormessages
Telephone Access
TechnicalsupportisavailableMondaythroughFridayfrom8:00a.m.to5:00p.m.
(EST)bycalling800‐791‐2567.Ifallsupporttechniciansarehelpingother
customers,yourcallwillberoutedtotheCellnetSupportvoicemailsystem.
Leaveabriefmessagethatincludesthefollowinginformation:
•Yourname
•Yourcompany’sname
•Yo
urtelephonenumber
Asupporttechnicianwillreturnyourcallassoonaspossiblewithinnormal
businesshours.Techniciansreturnallcallsintheorderthattheyarereceived.
Email Access
Ifyouprefer,youmayemailadescriptionofyourproblemto:
customersupport@cellnet.com
Asupporttechnicianwillreturnyouremailassoonaspossiblewithinnormal
businesshours.Techniciansreturnallemailsintheorderthattheyarereceived.
Ordering Publications
Youcanorderpublicationsfromyoursalesrepresentative.Toorderadditional
copiesofthismanual,useordernumber:
CO‐0089‐GB‐07.07
Publication Comments
Cellnetwelcomesyourfeedbackandcomments.Ifyouhavecommentsor
suggestionsforimprovingthispublication,aformforreader’scommentsis
providedatthebackofthismanual.Ifyouwouldlikeareply,includeyour
contactinformation:
•Name
• Telephonenumberorfaxnumber
•Emailaddress
• Companynameandaddress
Besuretoincludethefollowinginformationalongwithyourcomment:
• Titleandnumberofthismanual
• Pagenumberortopicrelatedtoyourcomment

mêÉÑ~ÅÉ
`ÉääåÉí=d~ë=jçÇìäÉ=~åÇ=jÉíÉê=fåëí~ää~íáçå=dìáÇÉ mJR
RELATED PUBLICATIONS
Thefollowingdocumentsprovideimportantrelatedinformation.
Table P.2 Related Publication
Document Description
NJt~ó=jçÇìäÉ=
mêçÖê~ããáåÖ=`~ÄäÉ
mêçÖê~ããáåÖ=íÜÉ=ãçÇìäÉ=îá~=~=m`=çê=ä~éíçé=~åÇ=íÜÉ=
NJï~ó=Å~ÄäÉ
ríáäákÉí=NJt~ó=mìäëÉ=
oÉÅçêÇÉê
Ñçê=t~íÉê=^ééäáÅ~íáçåë
eçï=íç=ÅçêêÉÅíäó=áåëí~ää=~å=ríáäákÉí=NJt~ó=mìäëÉ=
oÉÅçêÇÉê=EÜÉêÉ=~ÑíÉê=êÉÑÉêêÉÇ=íç=~ë=`mo=çê=`ÉääåÉí=
mìäëÉ=oÉÅçêÇÉêFK=fí=ÅçîÉêë=ÉåÇéçáåí=áåëí~ää~íáçåI=éìäëÉ=
êÉÖáëíÉê=éêçÖê~ããáåÖI=~åÇ=íêçìÄäÉëÜççíáåÖK

mêÉÑ~ÅÉ
mJS `ÉääåÉí=d~ë=jçÇìäÉ=~åÇ=jÉíÉê=fåëí~ää~íáçå=dìáÇÉ

`ÉääåÉí=d~ë=jçÇìäÉ=~åÇ=jÉíÉê=fåëí~ää~íáçå=dìáÇÉ NJN
CHAPTER 1 PRE-INSTALLATION
Properplanningandthoroughpreparationarecriticalforsuccessfulinstallation.
Thischapteroutlinesbasicrequirementsforthepre‐installationphase.
SAFETY OVERVIEW
Priortostartingtheinstallationprocess,youmustdevelopandlaunchaninstaller
safetytrainingplanforinitial,refresherandongoingsafetytraining.Ensurethat
installersreceiveappropriateinitialandrefreshertrainingtomeettheirspecific
safety‐relatedresponsibilities.Youmustprovidesafetytrainingwhen:
•Anexistinginstallerassumesnewdutiesforwhichheorshehasnot
previouslyreceivedtraining.
•Newprocessesandmethodologiesrepresentingnewrisksareintroduced
intotheinstallationenvironment.
•Previouslyunidentifiedrisksarereported.
Theinstallationsupervisoryteamassumesresponsibilityforensuringthat
installersareproperlytrained,authorized,andcontinuallyqualifiedtoperform
theirwork.Theteammustalsotakeresponsibilityforthesafetyoftheirinstallers
andtoassuresafeworkmethodologies.Installersmustunderstandthattheir
supervisor’sresponsibilitydoesnotrelievethemfromtheirindividual
responsibilitytoperformtheworksafelyandtofollowallsafetyrulesand
proceduresapplicabletotheirwork.

mêÉJfåëí~ää~íáçå
NJO `ÉääåÉí=d~ë=jçÇìäÉ=~åÇ=jÉíÉê=fåëí~ää~íáçå=dìáÇÉ
GAS METER INSTALLATION AND MODULE RETROFIT TOOL LIST
•TorquescrewdriverwithvariousslotandPhilliptips
•5‐in‐1screwdriver
•14ʺPipewrench(2)
•18ʺPipewrench(2)
•24ʺPipewrench(1)
•14ʺChannellocks14ʺcurvejaws
•#1and#2Phillipsscrewdriver
•Screwdriver‐1/8‐inchslotblade
• HammerBallPeen
• Shovelandspade
•Crescentwrench
•WD‐40
•ThreadLubricant
• Identification
• DoorHangers
•ClipBoards
•Pe
ns/Pencils
•Safetycones
• Screwdriver‐½”slotbladex10ʺ
•Awl,Heavyduty
•Headlightflashlight
•Brassscraper1¼‐inchwide
• Diagonalcutters
•Handheld
• PersonalProtectiveEquipment
•Clipboard
• StreetAtlas
•RFBuster,P/N26‐1050
•Non‐sparkflashlight
•Cellphoneor2‐waycommunicationdevice
•WireBrush
• Dresser/RootsSwitchtester(forCPRinstalls)
•Cableties
•T‐10/T‐15Securitytorxdriver(necessaryforinstallingtheCPR)
•Jumpercables
•Leakdetectionsoap
•Pressuregages
•Greyspraypaintandpaintboard(topreventoverspraying)
•Deadblowhammer
mêÉJfåëí~ää~íáçå
`ÉääåÉí=d~ë=jçÇìäÉ=~åÇ=jÉíÉê=fåëí~ää~íáçå=dìáÇÉ NJP
•Anyrequiredspecialtytools
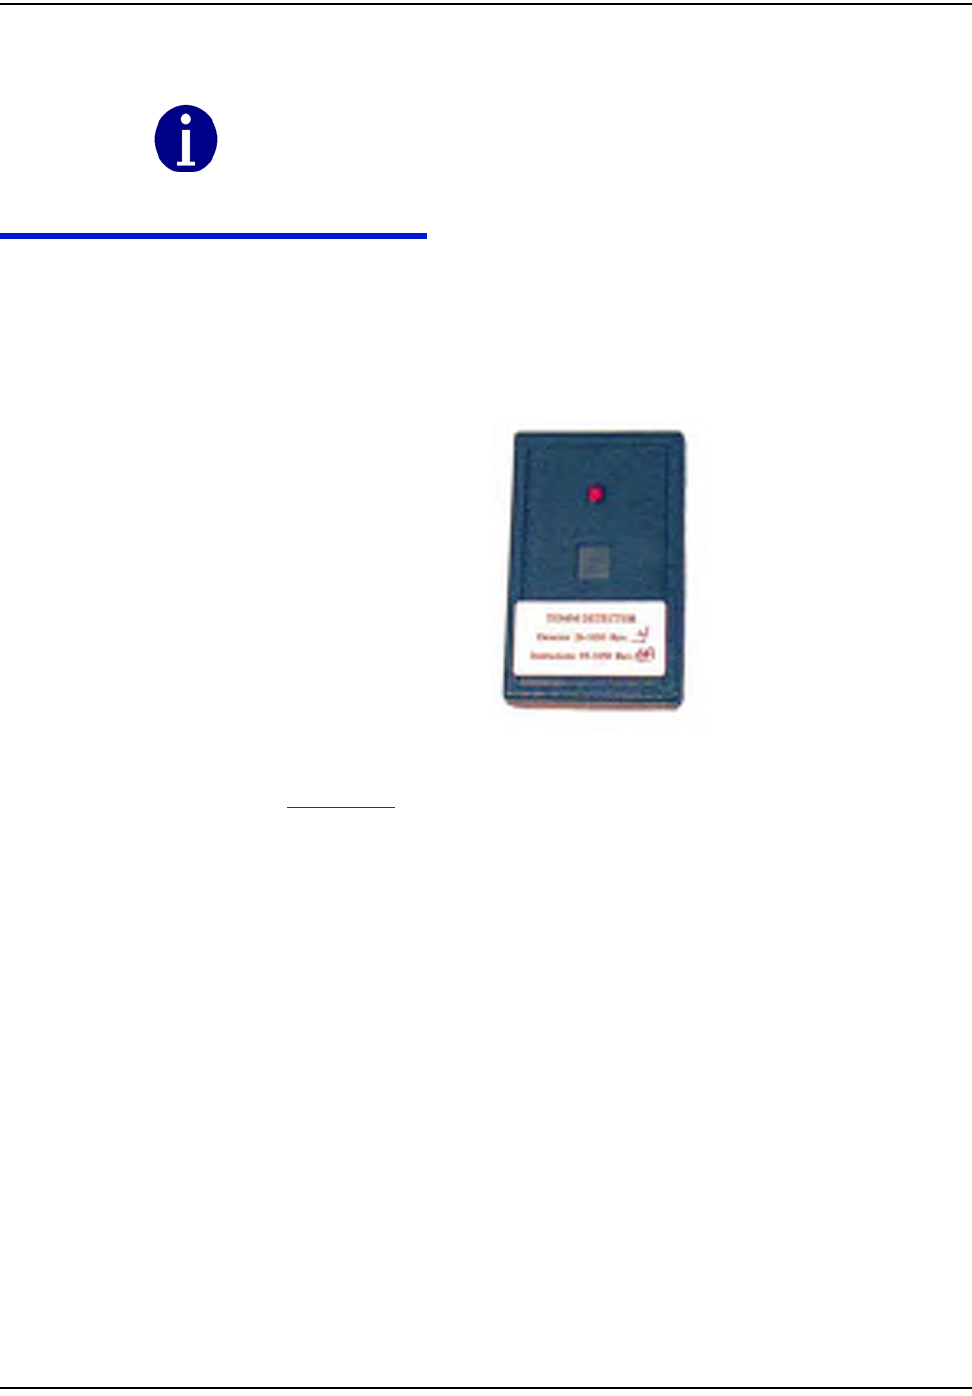
RF BUSTERS
VerifythattheRFBusterisworkingcorrectly.Pressandholdthepushbutton
Switch.TheLEDlightsred,andtheinternalspeakersoundsforapproximately1/
2second.IfnothinghappensortheLEDlightsandspeakersoundcontinuously,
thenthe9Vbatteryisprobablylowandneedstobereplaced.
Figure 1.1 RF Buster
SeeAppendix C,UsingtheRFBusterfordetailedinstructionsonhowtousethe
RFBuster.
Your supervisor carries shovels, spades, saws all, hack saws, oversized tools, large
ladders Please be careful to check the work area each time you change locations to be
certain there are no tools left behind.
mêÉJfåëí~ää~íáçå
NJQ `ÉääåÉí=d~ë=jçÇìäÉ=~åÇ=jÉíÉê=fåëí~ää~íáçå=dìáÇÉ
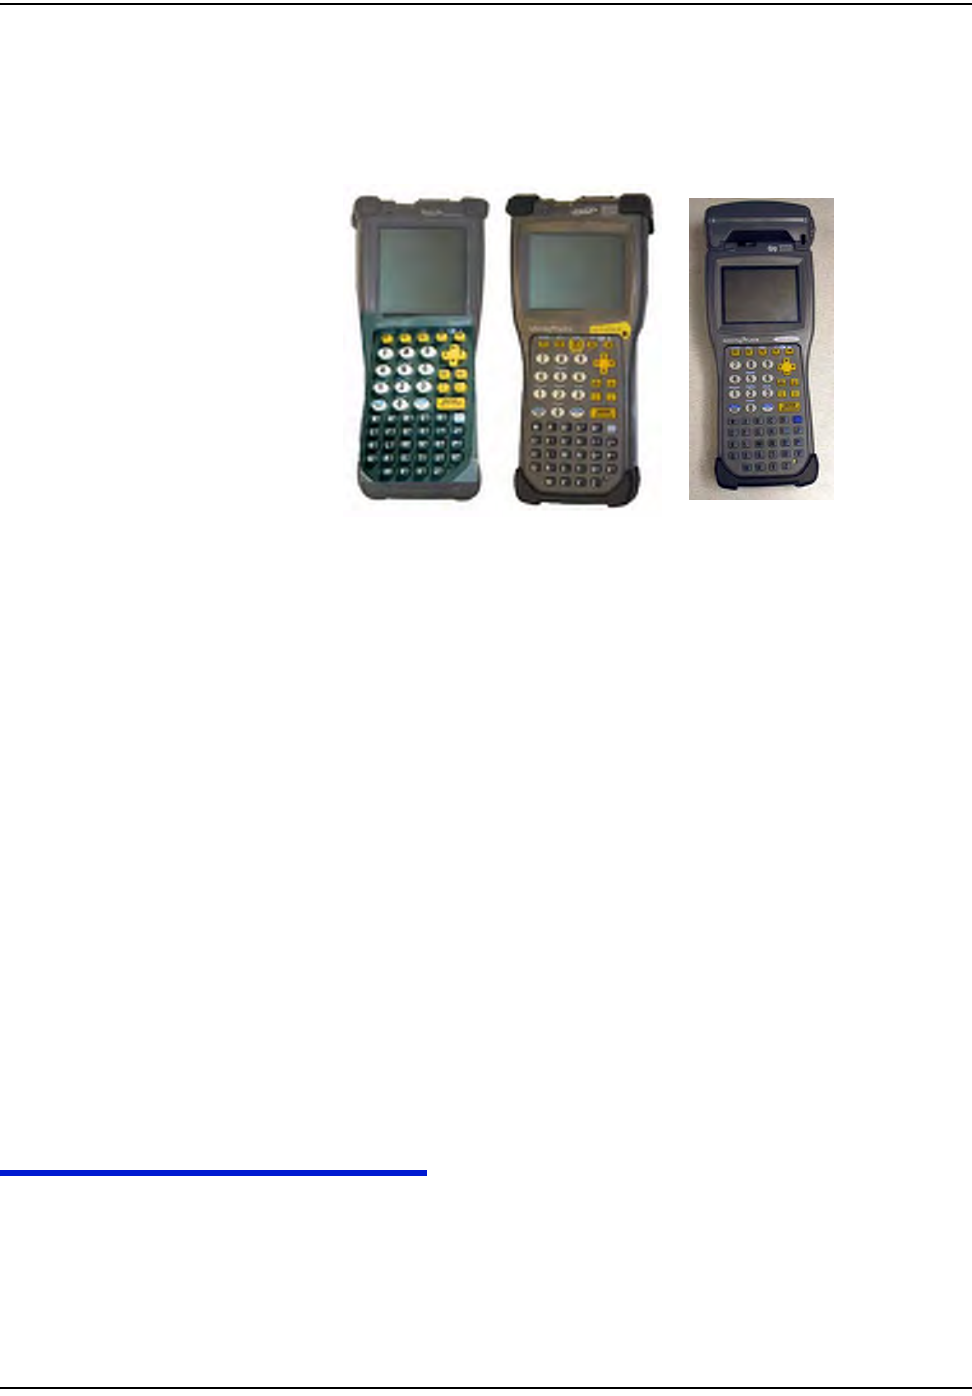
Handhelds (Handheld)
Handheldsarerugged,butyoushouldstillalwayshandlethemcarefully.Ifthe
unitfailstooperateinthefield,useyourNextelphonetopageyourSupervisor
forhelp.Ifpossible,theSupervisorwillassistincorrectingtheproblemorbringa
replacementunitouttoyou.
Figure 1.2 Handhelds with programming cables
Handheldsdifferbyprogram,buttheonesshownabovearecurrentlyinservice.
OntheleftistheDAPPC9800,aDOS‐basedHandheld.InthemiddleistheDAP
CE5320,aWindowsCE‐basedHandheld.OntherightistheDAPCE5320b,a
WindowsCE‐basedHandheld.
Install Material
TheGasMeterExchangeprocessconsistsofusingpredeterminedroute
informationthatidentifiesthemetersthatneedtoberetrofittedwiththeCellnet
GasMeterModuleandmethodsforrecordingdatatodocumenttheinstallation.
Therouteinformationdescribingtheaccountaddress,existingmeterID,
estimatedmeterreads,andanyspecialinstructionsthatdescribecircumstances
uniquetothatparticularaccountwillresideintheinstallersHandheld.
FromtheCrossDock,obtainHandheldandMeterModulestoinstall.The
HandheldwillbepreloadedbytheCrossDockwithallofthedataforthe
assignedroutes.Thepre‐loadeddataincludestheroute,address,meterID,and
estimatedreadfortheparticularmeters,plusspecificinstructionsandrequired
fieldcollectsinformation.
Eachinstallermustvalidatethatthehandheldisproperlyloadedwiththecorrect
routeinformationbeforeleavingtheCrossDock.
METER COMPATIBILITY
CellnetʹsModulefamilyiscompatiblewithspecificbrandsandmodelsofgas
meters.PleaseseethelatestlistinthedocumentGasCompatibilityList,availableat
www.cellnet.com.
mêÉJfåëí~ää~íáçå
`ÉääåÉí=d~ë=jçÇìäÉ=~åÇ=jÉíÉê=fåëí~ää~íáçå=dìáÇÉ NJR
COMPLIANCE
ThisapparatusissuitableforClassI,Division2,GroupDHazardousLocations.
Warning - Explosion Hazard - Substitution of components may impair suitability for
Class I, Division 2.
Danger - Risque d'Explosion - Le remplacement des composants peut affecter la
conformité à la Classe I, Division 2.

mêÉJfåëí~ää~íáçå
NJS `ÉääåÉí=d~ë=jçÇìäÉ=~åÇ=jÉíÉê=fåëí~ää~íáçå=dìáÇÉ
`ÉääåÉí=d~ë=jçÇìäÉ=~åÇ=jÉíÉê=fåëí~ää~íáçå=dìáÇÉ OJN
CHAPTER 2 USING THE HANDHELD DEVICE
TheDAP5320bisaportableandrechargeableHandHeldcomputerunit.Its
electriccomponentsareprotectedinhardplastichousing.
ThefeaturesoftheDAP5320binclude
•Windows‐CE‐basedcolorLCDdisplay
• Alphanumerickeypad
•Integratedbarcodescanner
•7‐pinLEMOisusedforchargingtheHandHeldoruploading/downloading
fromRIMS
•Automaticshutofftomaximizebatterylife
•H
andstrapforsecurehandling.
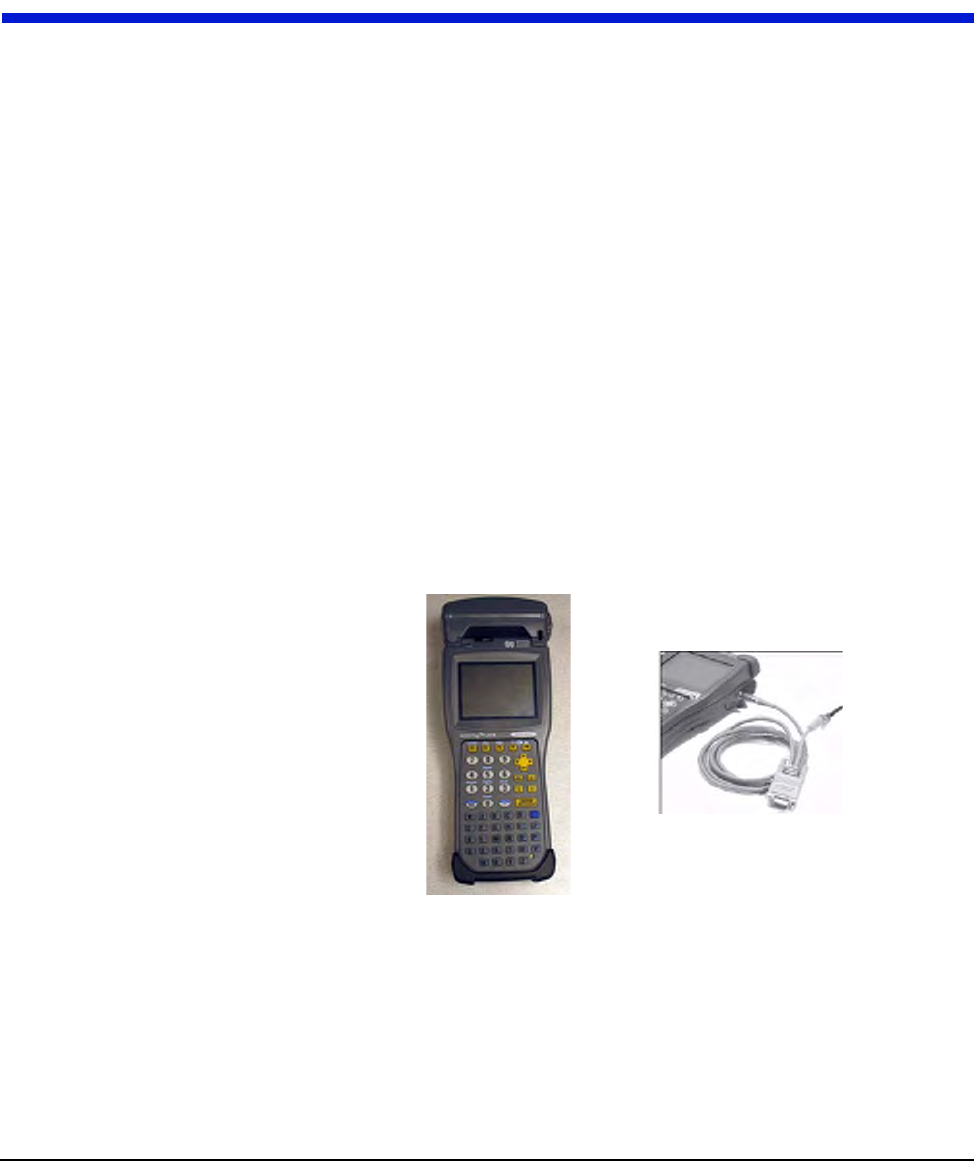
TheHandheldPC(the“Handheld”)communicateswithadesktoporlaptop
computerthroughacommunicationscradleanda7‐pinLEMOcharging/
communicationscable.Itisconfiguredtoreceiveandtransmitinstallationand
manualmeterreaddatatoandfromtheRIMSandOCDBdatabases.The
communicationscradleandcablearealsousedforrecharging(approximately2.5
hoursneededforfullcharge).
Figure 2.1 DAP PC5320B Hand Held PC and LEMO callout
Manufacturer Documentation
Formoredetail,visittheDAPwebsiteathttps://www.daptech.com/docudap/.
rëáåÖ=íÜÉ=e~åÇeÉäÇ=aÉîáÅÉ
OJO `ÉääåÉí=d~ë=jçÇìäÉ=~åÇ=jÉíÉê=fåëí~ää~íáçå=dìáÇÉ
Display
TheDAPHandheldusesaTFTliquidcrystaldisplay(LCD).
Figure 2.2 CE Display
High‐contrastcharactersareeasilyvisibleinnormallight.Instructionsforeach
screendisplayatthetopofeachscreeninblinkingredletters.TheHandheld
displaysatabbedviewwhereyouadvanceonescreenatatime.Youcangoback
asmanyscreensasyouwant.
Keyboard
Thekeysonthekeyboardarelabeledwithprimaryfunctions(suchas:PWR(I/O),
ESC,SP,BKSP),the26‐characteralphabet,0‐9numbers,andvarioussymbols.
Enterdatabypressingtheappropriatekey.Enterotherfunctionsbypressingthe
FUNC(blue)keyfirst,thenpressingthecorrespondingalphanumerickeys.
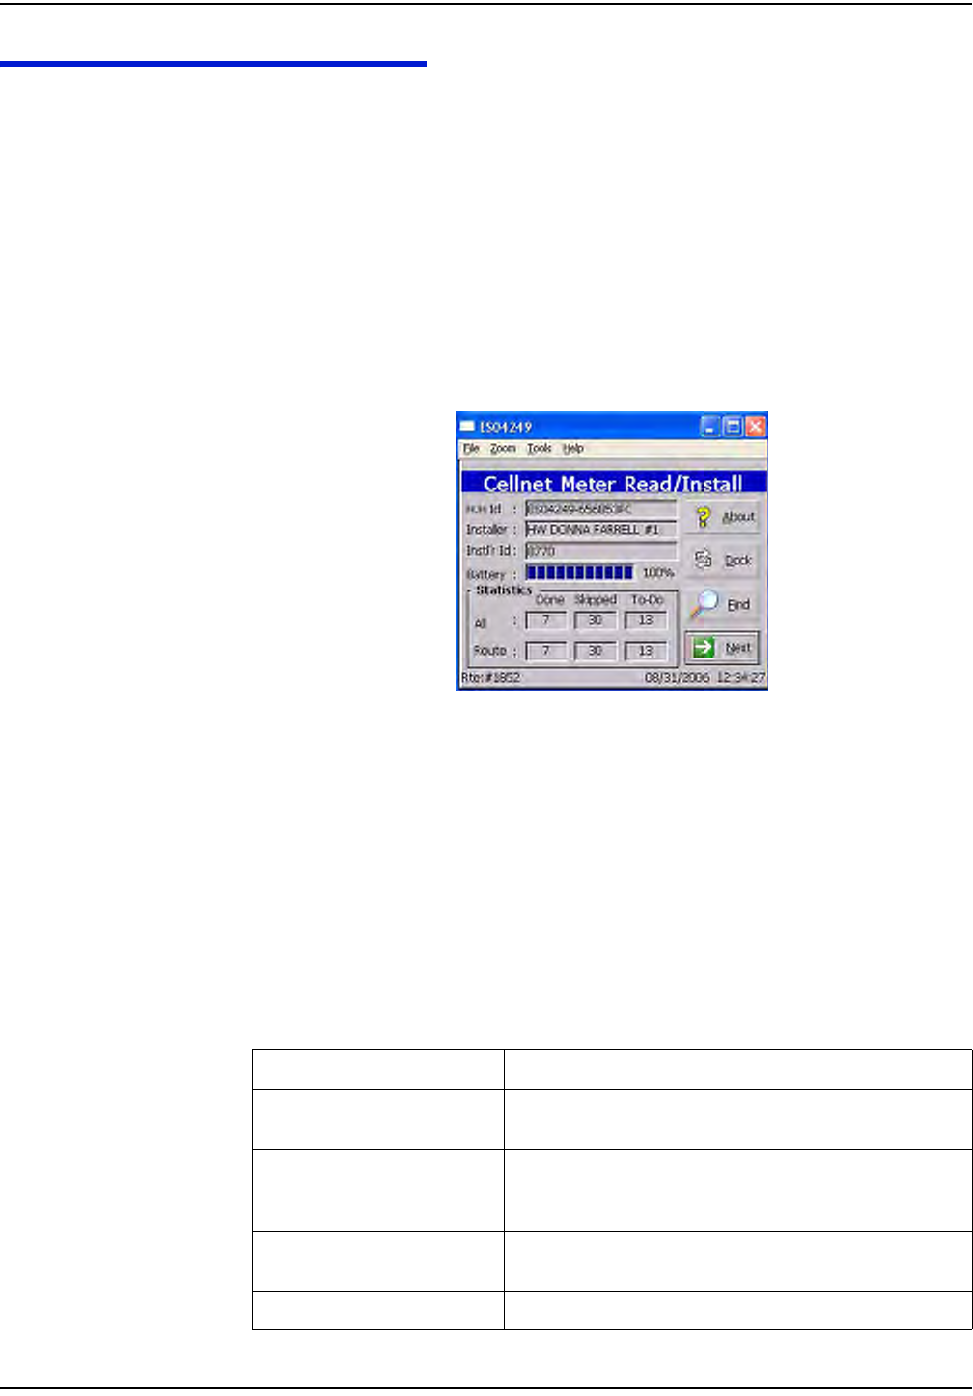
Figure 2.3 DAP Keypad

rëáåÖ=íÜÉ=e~åÇeÉäÇ=aÉîáÅÉ
`ÉääåÉí=d~ë=jçÇìäÉ=~åÇ=jÉíÉê=fåëí~ää~íáçå=dìáÇÉ OJP
1SCANButton:smallyellowF3key;initiatesscanofbarcode
2PWRkey(I/O):F1powerkey;turnsunitonandFUNCthenF1turnstheunit
off
3 ArrowCursorPadkey:changesselection,tabsup,down,leftorright
4BKSP:eraseslastcharacterenteredduringtextentry
5SP:addsspacetotextentry
6E
NTER:entersfunction;savesentryandexitsfunction
7ESC:displayspreviousscreen
8FUNC+Key:bluecoloredfunctionkeyincombinationwithotherkeys
allowstheusertoenternon‐alphacharacters,adjustthecontrast,turnonthe
backgroundlight,etc.
EntryKeys:alphanumericcharacters(A‐Z,0‐9)
CTRL/ALT:notused
9Tabkey:changesselection
10 F2:Displayscurrentbatterylife
Program Conventions
•Keysareactiveforthedisplayedfunction.Forexample,iftextisrequired,the
alphanumerickeysareactive;ifadisplayoptionistobeselected,theArrow
CursorPadmaybeusedasatabkey.Ifthereisalistordrop‐downtype
menu,therewillbesmallarrowsonthescreenindicatingthattheArrow
CursorPadshouldbeusedfortheselection.
•Mostdisplayoptionscanbeselectedbypressingthehotkey(key
correspondingtothefirstcapitalletterintheoption).Forexample,Nisthe
hotkeytoselectiNfointheaddressscreen.Pressingthehotkeyisequivalent
totabbingtothatitemandpressing“enter”.
•Ahotkeythatisnotindicatedintheon‐screentextandisavailableonthe
“Functions”menuscreenis:T‐thistakesyoutotheDate/Timemenu.
•Thefollowingkeysareavailableatmostscreens:
ARROWCURSORPADAdvancestothenextoption
ENTERSelectsandentersthehighlightedoption
ESCExitscurrentfunctionandreturnstopreviousfunction
TABKEYadvancestothenextoption
•Otherprogramconventionsspecifictoaparticularfunctionaredescribedin
theappropriatesection.
You can shut off the Handheld PC during installation with the automatic shutoff feature or
by pressing FUNC + F1 key. The unit retains existing data and remembers the last step
performed when it is turned on again.
Automatic shutoff is a sleep function. The unit shuts off after 3 minutes of inactivity. To
turn on the Handheld PC after automatic shutoff, press the F1 key.

rëáåÖ=íÜÉ=e~åÇeÉäÇ=aÉîáÅÉ
OJQ `ÉääåÉí=d~ë=jçÇìäÉ=~åÇ=jÉíÉê=fåëí~ää~íáçå=dìáÇÉ
USING THE DAP HANDHELD
ThissectiongoesthroughtheprocessofusingaDAPHandheldforthe
installationofaCellnetreadymeteratacustomeraccount.
Getting Started with the Handheld
Atypicalgasmeterinstallationrouteconsistsofthefollowingbasicsteps:
1Checkoutmeterswithmodulesalreadyinstalledandmetermodulesfor
retrofit.PickupHandheldPCandlabels.Priortometercheckout,the
HandHeldPCisprogrammedforanassignedinstallerandaninstallation
route(accountaddress,currentmeterID,meterlocation,etc.).
2Checkroute.ReviewinstallerIDroutestatus:numberofinstallationsper
routeID,installationscompletedorskipped.
3Checkaccountaddress.Verifyaddressandanyspecialcustomerinformation
uponarrivalatthecustomersite.
4CheckMeterID.VerifythatthemeterIDmatchestheoneintheHandheld.
5En
termeterread.Entermeterreadingfromexistingmeter.
6ScanmeterID.ScanmeterIDfromthechangeoutmeterlabels.
7Installchangeoutmeter.Labelexistingmeterwithachangeoutlabel.Remove
existingmeterandreplacewithchangeoutmeter.
8 Repeatsteps3to7foreachaddress.
9Checkinreplacedmeters.ReturnthemtotheCross‐Dockanddockthe
HandheldPC.
rëáåÖ=íÜÉ=e~åÇeÉäÇ=aÉîáÅÉ
`ÉääåÉí=d~ë=jçÇìäÉ=~åÇ=jÉíÉê=fåëí~ää~íáçå=dìáÇÉ OJR
STANDARD METER INSTALLATION AND/OR MODULE RETROFIT
ThissectioncoverstheinstallerstepsandHandheldscreensforthemeter
exchangeprocessorgasmoduleretrofit.
Check Route Status
1StarttheHandheldPCbypressingF1(I/O)button.Thescreenbelow
displays.Ifthisscreendoesnotdisplay,pressEnterorESCkeystogettothe
CustomerAddressscreen.
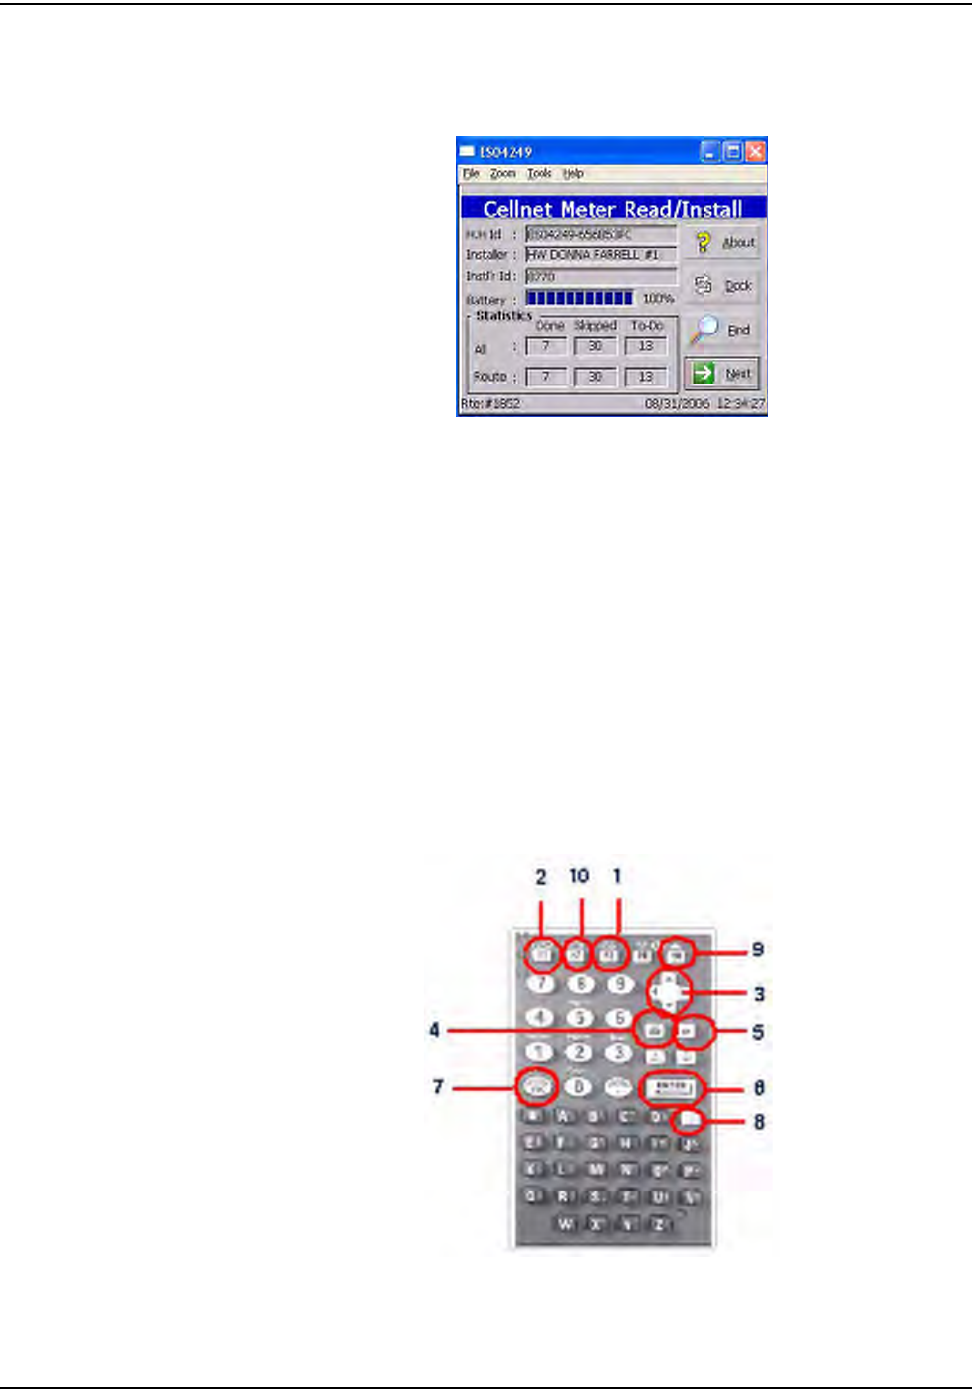
Figure 2.4 Handheld main screen
Initialbootscreendisplaysthefirstworkorder’sinformation:
•HandheldID
•Installername
•InstallerID
•Batteryinformation
•Totalroutestatistics
• Currentroutenumber
Table2.1HandheldOptionsandActiveKeysforCheckRouteStatus
Option or Active Key Function
^Äçìí aáëéä~óë=áåÑçêã~íáçå=~Äçìí=íÜÉ=ãÉíÉê=áåëí~ää=ëçÑíï~êÉ=
áåÅäìÇáåÖ=îÉêëáçåI=ÅçéóêáÖÜíI=~åÇ=ãçÇìäÉë=áåëí~ääÉÇ
açÅâ båÇë=áåëí~ää~íáçå=éêçÅÉëëX=~ää=áåëí~ää~íáçåë=~êÉ=ÅÜÉÅâÉÇK=fÑ=
ëçãÉ=áåëí~ää~íáçåë=~êÉ=åçí=ÅçãéäÉíÉÇI=~=ãÉëë~ÖÉ=~ééÉ~êë=
íç=îÉêáÑó=íÜ~í=óçì=ï~åí=íç=ÇçÅâK
Find ^ääçïë=íÜÉ=áåëí~ääÉê=íç=ëÉ~êÅÜ=Ñçê=~=é~êíáÅìä~ê=~ÅÅçìåí=Äó=
~ÇÇêÉëëI=ãÉíÉê=faI=ÅìëíçãÉê=å~ãÉI=çê=~ÅÅçìåí=åìãÄÉêK
kÉñí pÉäÉÅíë=íÜÉ=åÉñí=çéíáçå
rëáåÖ=íÜÉ=e~åÇeÉäÇ=aÉîáÅÉ
OJS `ÉääåÉí=d~ë=jçÇìäÉ=~åÇ=jÉíÉê=fåëí~ää~íáçå=dìáÇÉ
2PressENTERtodisplayfirstaddressfordisplayedroute.
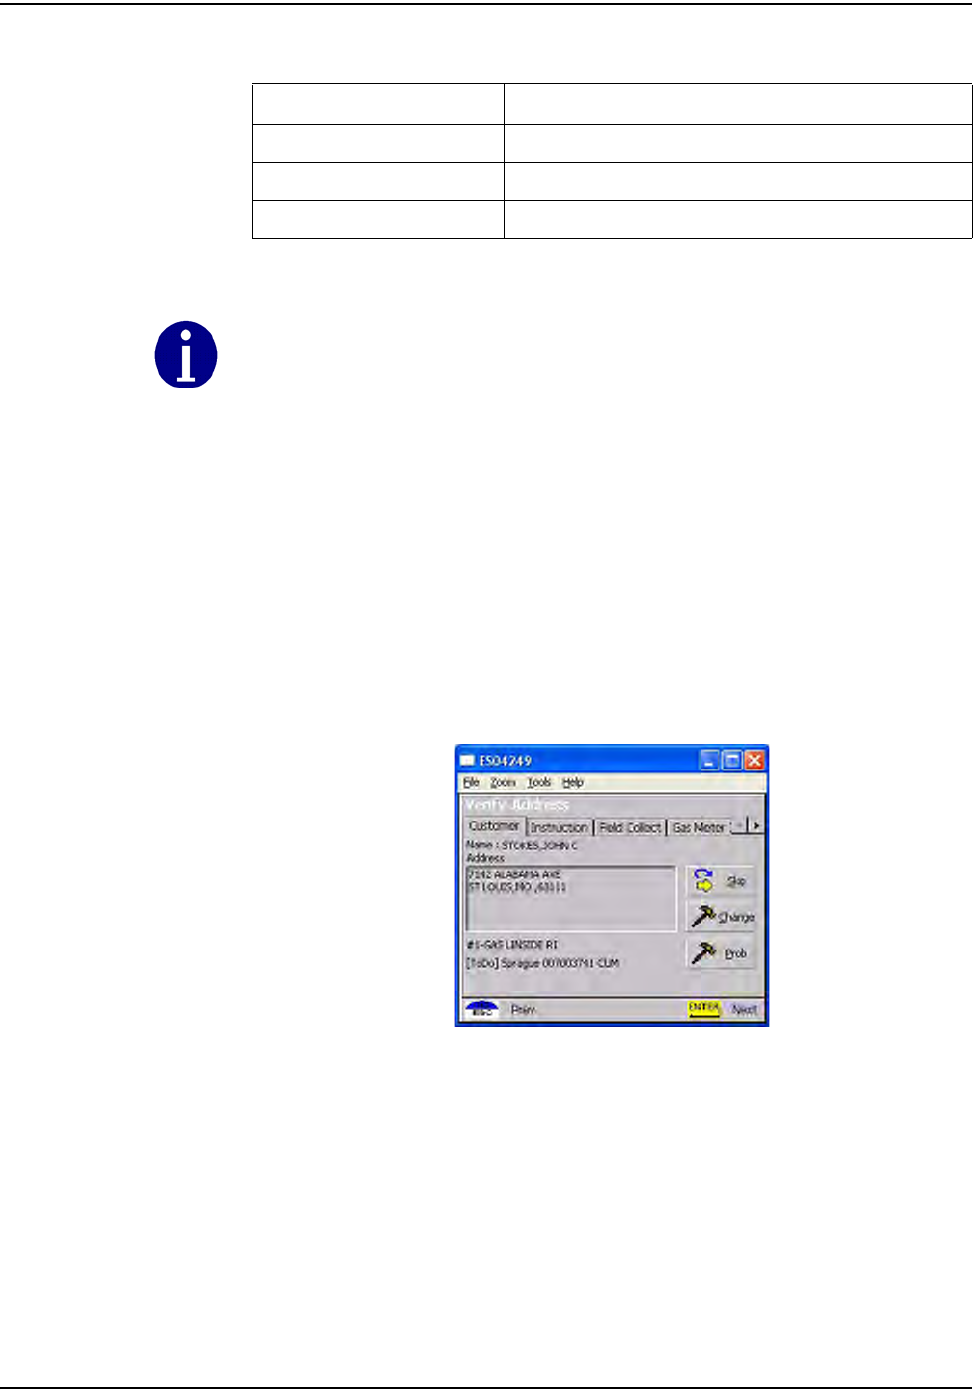
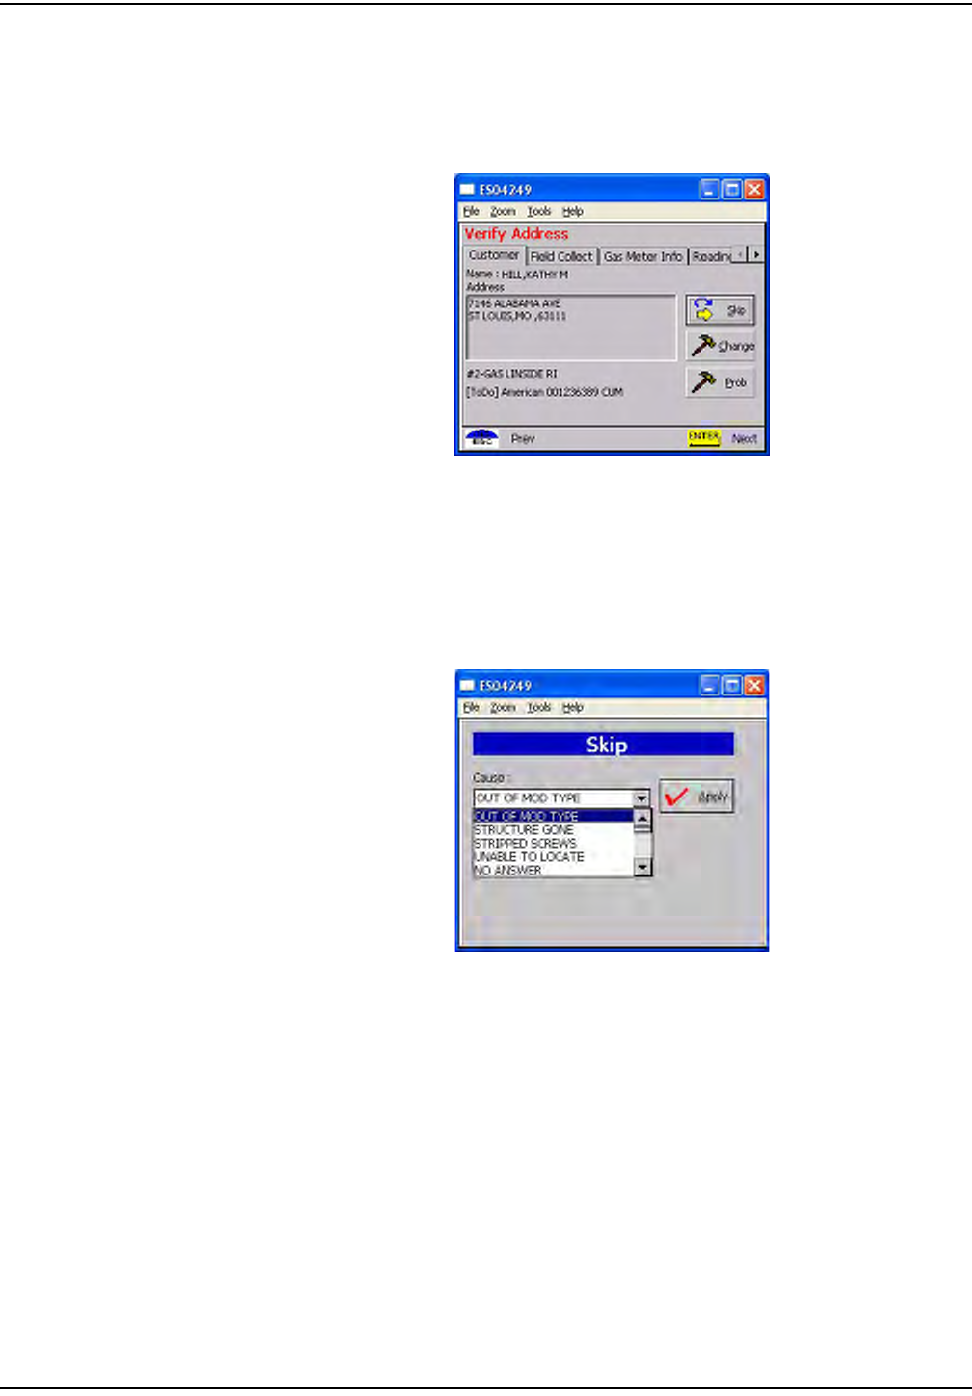
Check Address
Theaddressscreenshowstheaccount’saddressandanyotherinformation
pertinenttotheinstallationprocess.Iftherearespecialinstructionsforthe
account,thescreendisplaysaninstructionsprompt;otherwise,astandard
addressscreendisplays.
Figure 2.5 Handheld Address with special instructions
TheCustomerscreendisplays:
• Addressinformation
•Sequencenumberinlistofmeters(#1isfirstmetertobeinstalled)
•Metertype(forexample,gasmeter)
•Meterlocation(LxxorLxxx,wherexxorxxxistheutility‐specificlocation
code(forexampleL01)
•Readinstructioncode(R1xx,wherexxistheutility‐specificread)instruction
code(forexampleRI00)
•MeterIDstatusofthisrecord(ToDo,Skipped,orCompleted)
^êêçï=`ìêëçê=m~Ç eáÖÜäáÖÜíë=íÜÉ=åÉñí=çéíáçå
båíÉê p~îÉë=~åó=ÅÜ~åÖÉë=~åÇ=~Çî~åÅÉë=íç=íÜÉ=åÉñí=ëÅêÉÉåK
bp` bñáíë=íÜÉ=~ééäáÅ~íáçåK
Table2.1HandheldOptionsandActiveKeysforCheckRouteStatus
Option or Active Key Function
The Handheld PC can be shut off during installation by the automatic shutoff feature or by
the installer pressing the FUNC and then I/O key. The unit retains existing data and remains
at the last step performed until it is turned on again
rëáåÖ=íÜÉ=e~åÇeÉäÇ=aÉîáÅÉ
`ÉääåÉí=d~ë=jçÇìäÉ=~åÇ=jÉíÉê=fåëí~ää~íáçå=dìáÇÉ OJT
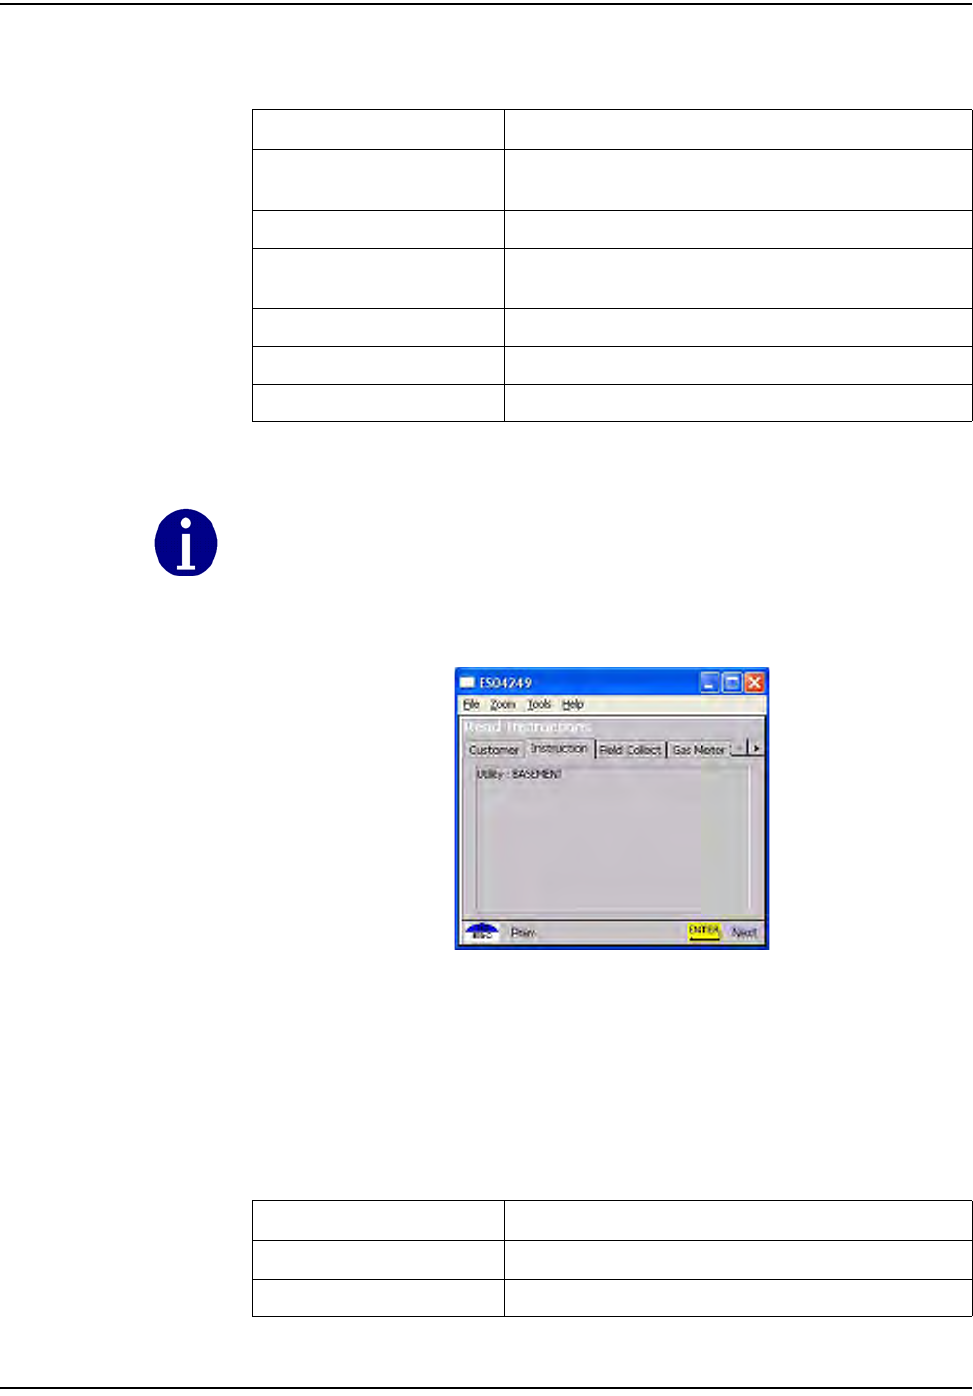
1PressENTERtoviewinstructions.
Figure 2.6 Handheld special instructions screen
Specialinstructionsmayinclude:
•Meterlocation
•Customer’smedicalcondition
• Hazardoussituation(guarddog).
Table2.2HandheldOptionsandActiveKeysforRouteStatusscreen
Option or Active Key Function
fåëíêìÅíáçåë aáëéä~óë=íÉñí=áåÑçêã~íáçå=~Äçìí=íÜÉ=~ÅÅçìåí=E_~Ç=ÇçÖI=
oáåÖ=ÇççêÄÉääI=ÉíÅKF
pâáé pâáéë=íÜÉ=ÅìêêÉåí=ïçêâ=çêÇÉê
`Ü~åÖÉ léÉåë=íÜÉ=`Ü~åÖÉ=ëÅêÉÉå=íç=ìéÇ~íÉ=ÇÉí~áäë=~Äçìí=íÜÉ=
~ÅÅçìåí
mêçÄ léÉåë=íÜÉ=mêçÄäÉã=ëÅêÉÉå=ïáíÜ=~=äáëí=çÑ=ìé=íç=Q=éêçÄäÉãë
bp` oÉíìêåë=íç=íÜÉ=mêÉîáçìë=ëÅêÉÉå
båíÉê p~îÉë=ÅÜ~åÖÉë=~åÇ=~Çî~åÅÉë=íç=íÜÉ=åÉñí=ëÅêÉÉå
If the address or instructions exceed the length of the window, vertical scroll bars display.
Arrow Cursor Pad moves the display up or down.
Table2.3HandheldOptionsandActiveKeysforSpecialInstructions
Option or Active Key Function
båíÉê ^Çî~åÅÉë=íç=íÜÉ=åÉñí=ëÅêÉÉå
^êêçï=`ìêëçê=m~Ç eáÖÜäáÖÜíë=ÅäáÉåík~ãÉ
rëáåÖ=íÜÉ=e~åÇeÉäÇ=aÉîáÅÉ
OJU `ÉääåÉí=d~ë=jçÇìäÉ=~åÇ=jÉíÉê=fåëí~ää~íáçå=dìáÇÉ
2PressENTER.TheUtilityFieldDataCollectionortheDialReadEntryscreen
displays.
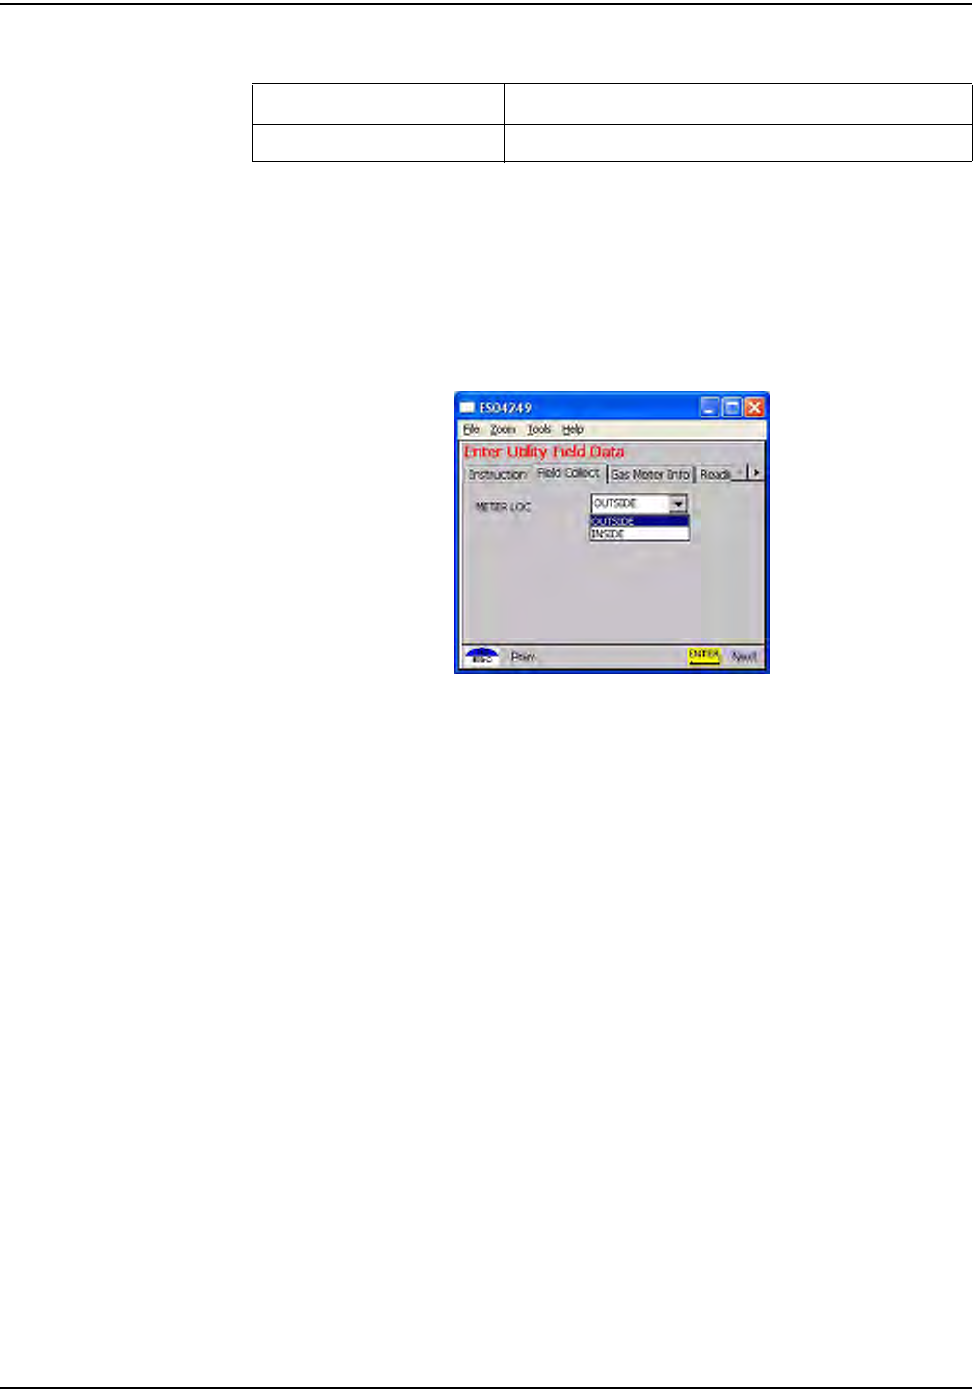
Utility Field Data Collection
Figure 2.7 Handheld Utility Field Data screen
Thisscreenvaries—orisnotused—dependingontheutility.Inthisexample,the
utilitycompanyrequiresadescriptionofmeterlocation.
1SelecttherelevantoptionandpresstheENTERkey.
bp` bñáíë=íÜÉ=~ééäáÅ~íáçå
Table2.3HandheldOptionsandActiveKeysforSpecialInstructions
Option or Active Key Function
rëáåÖ=íÜÉ=e~åÇeÉäÇ=aÉîáÅÉ
`ÉääåÉí=d~ë=jçÇìäÉ=~åÇ=jÉíÉê=fåëí~ää~íáçå=dìáÇÉ OJV
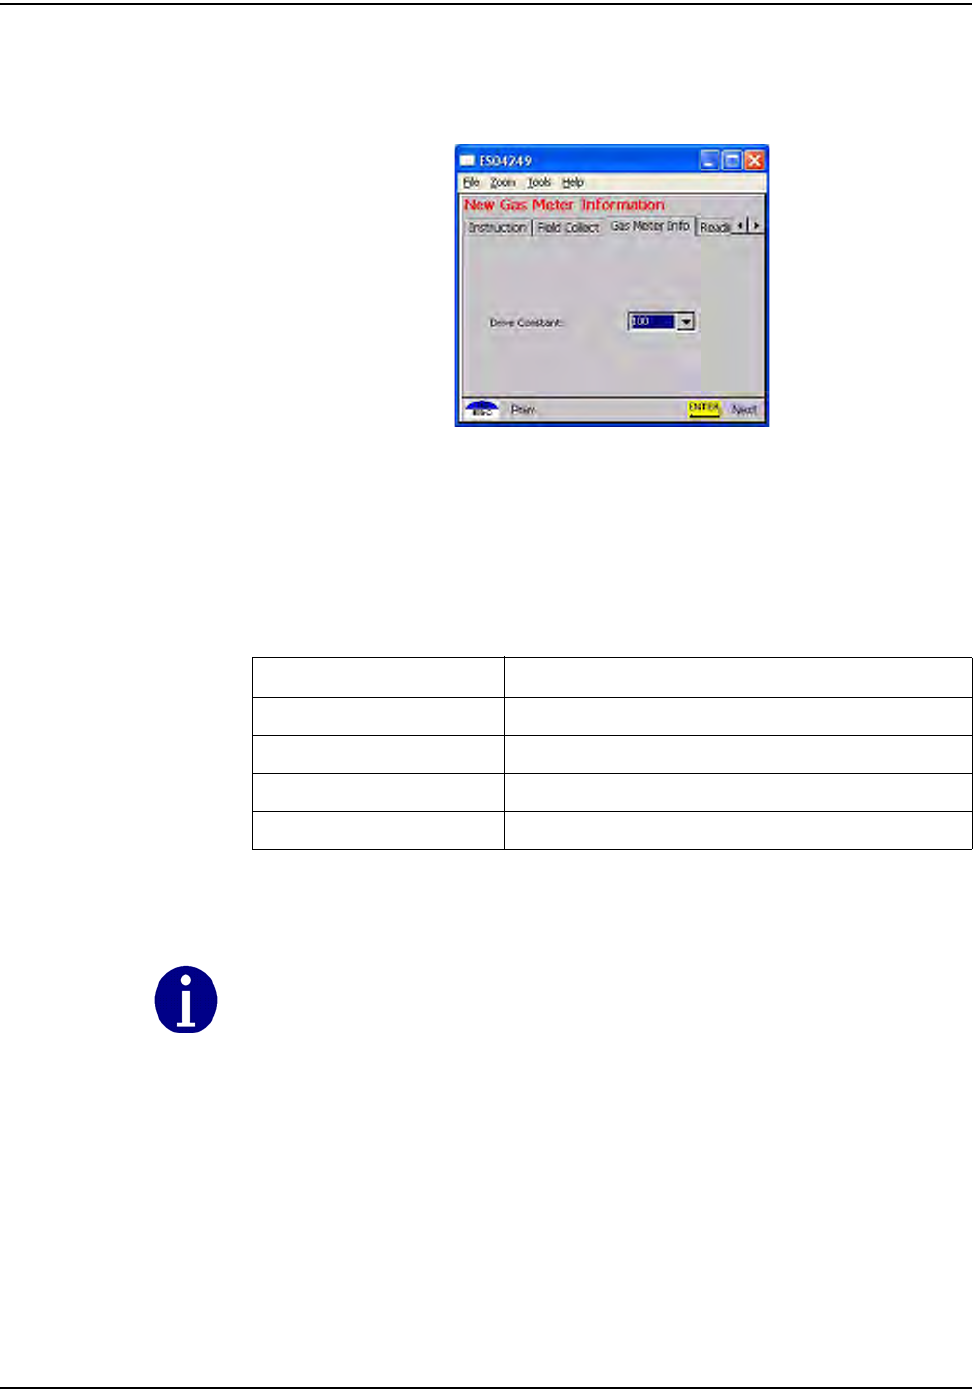
Meter Information
AfterpressingENTER,theHandheldPCdisplaysthefollowingpromptsfordrive
constantandmeterreading.
Figure 2.8 Handheld Dial read entry screen
Themeterinformationscreendisplaysvariousoptionsfordriveconstant(also
knownasthemeterconstantordrivequantity).Residentialgasmetershavea
driveconstantof1or2(defaultvalue);commercialandindustrialmetershavea
driveconstantof5,10,50,100,or500.
.
1Selecttheappropriatedriveconstant.
Table2.4HandheldOptionsandActiveKeysforMeterReading
Option or Active Key Function
aêáîÉ=`çåëí~åí båíÉêë=ÇêáîÉ=Åçåëí~åíK
^êêçï=`ìêëçê=m~Ç eáÖÜäáÖÜíë=íÜÉ=åÉñí=çéíáçå
båíÉê p~îÉë=~åó=ÅÜ~åÖÉë=~åÇ=~Çî~åÅÉë=íç=íÜÉ=åÉñí=ëÅêÉÉåK
bp` oÉíìêåë=íç=íÜÉ=êçìíÉ=ëí~íìë=ëÅêÉÉå
Installer must verify that the drive constant is the same drive constant as is noted on the
gas index.
rëáåÖ=íÜÉ=e~åÇeÉäÇ=aÉîáÅÉ
OJNM `ÉääåÉí=d~ë=jçÇìäÉ=~åÇ=jÉíÉê=fåëí~ää~íáçå=dìáÇÉ
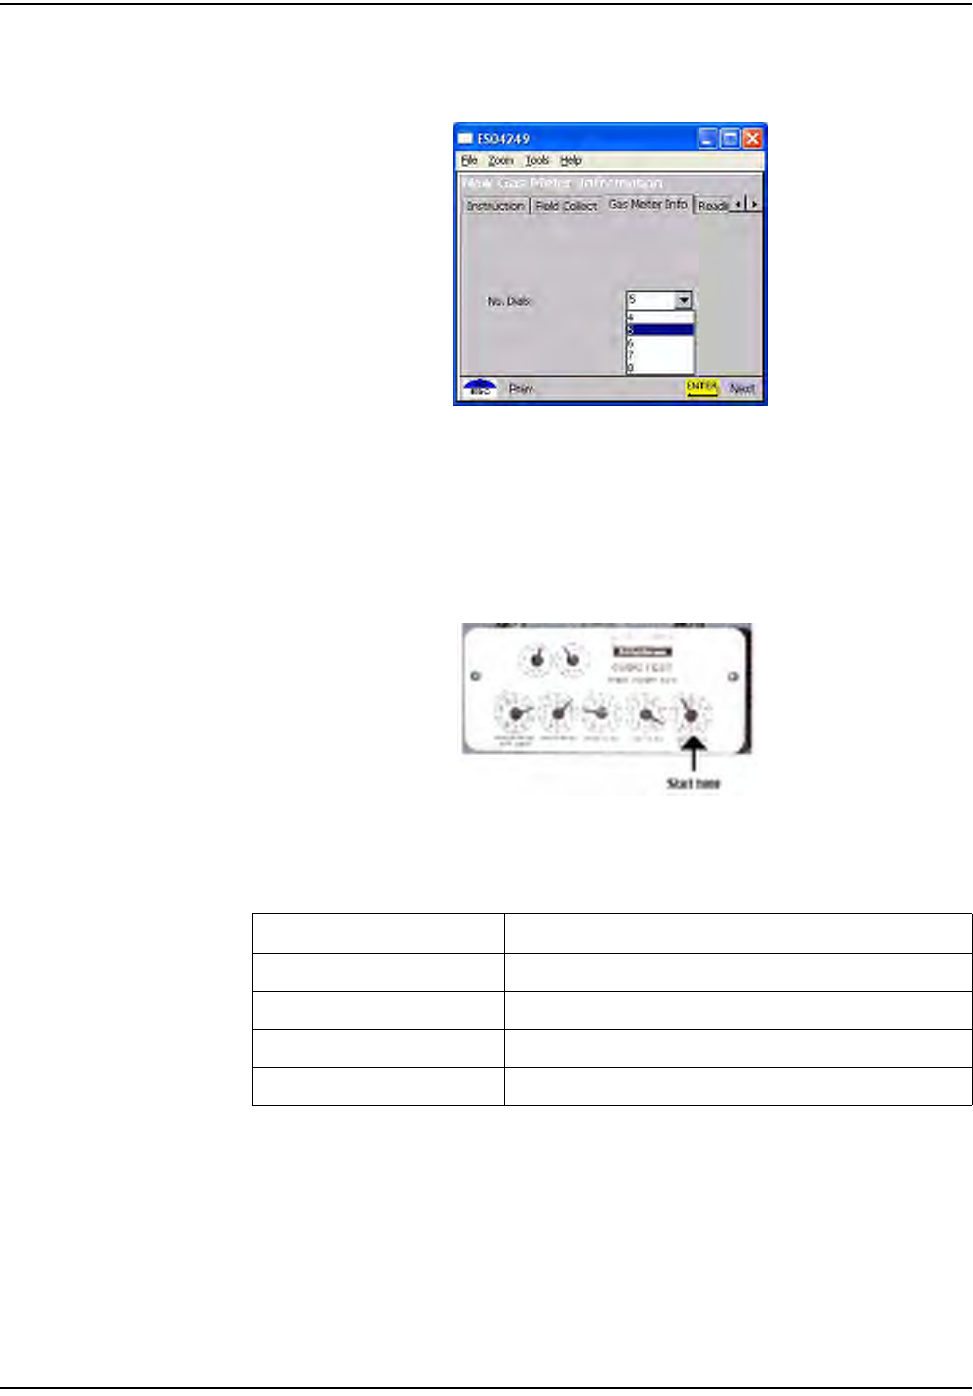
2PressENTER.TheHandheldPCdisplaysthefollowingpromptsformeter
reading.
Figure 2.9 Handheld number of dials selection screen
•Themeterinformationscreendisplaysthefollowingoptionsforthenumber
ofreadingdials:4,5,or6.
•Thefirstdialcountedisthe1,000CF/rotation.Countuptothehighestdial.
Figure 2.10 Handheld Start counting dials on the right.
Table2.5HandheldOptionsandActiveKeysforNumberofDialsselection
Option or Active Key Function
kç=çÑ=aá~äë aáëéä~óë=Çá~ä=ÅçìåíK
^êêçï=`ìêëçê=m~Ç eáÖÜäáÖÜíë=íÜÉ=åÉñí=çéíáçå
båíÉê p~îÉë=~åó=ÅÜ~åÖÉë=~åÇ=~Çî~åÅÉë=íç=íÜÉ=åÉñí=ëÅêÉÉåK
bp` oÉíìêåë=íç=íÜÉ=êçìíÉ=ëí~íìë=ëÅêÉÉå
rëáåÖ=íÜÉ=e~åÇeÉäÇ=aÉîáÅÉ
`ÉääåÉí=d~ë=jçÇìäÉ=~åÇ=jÉíÉê=fåëí~ää~íáçå=dìáÇÉ OJNN
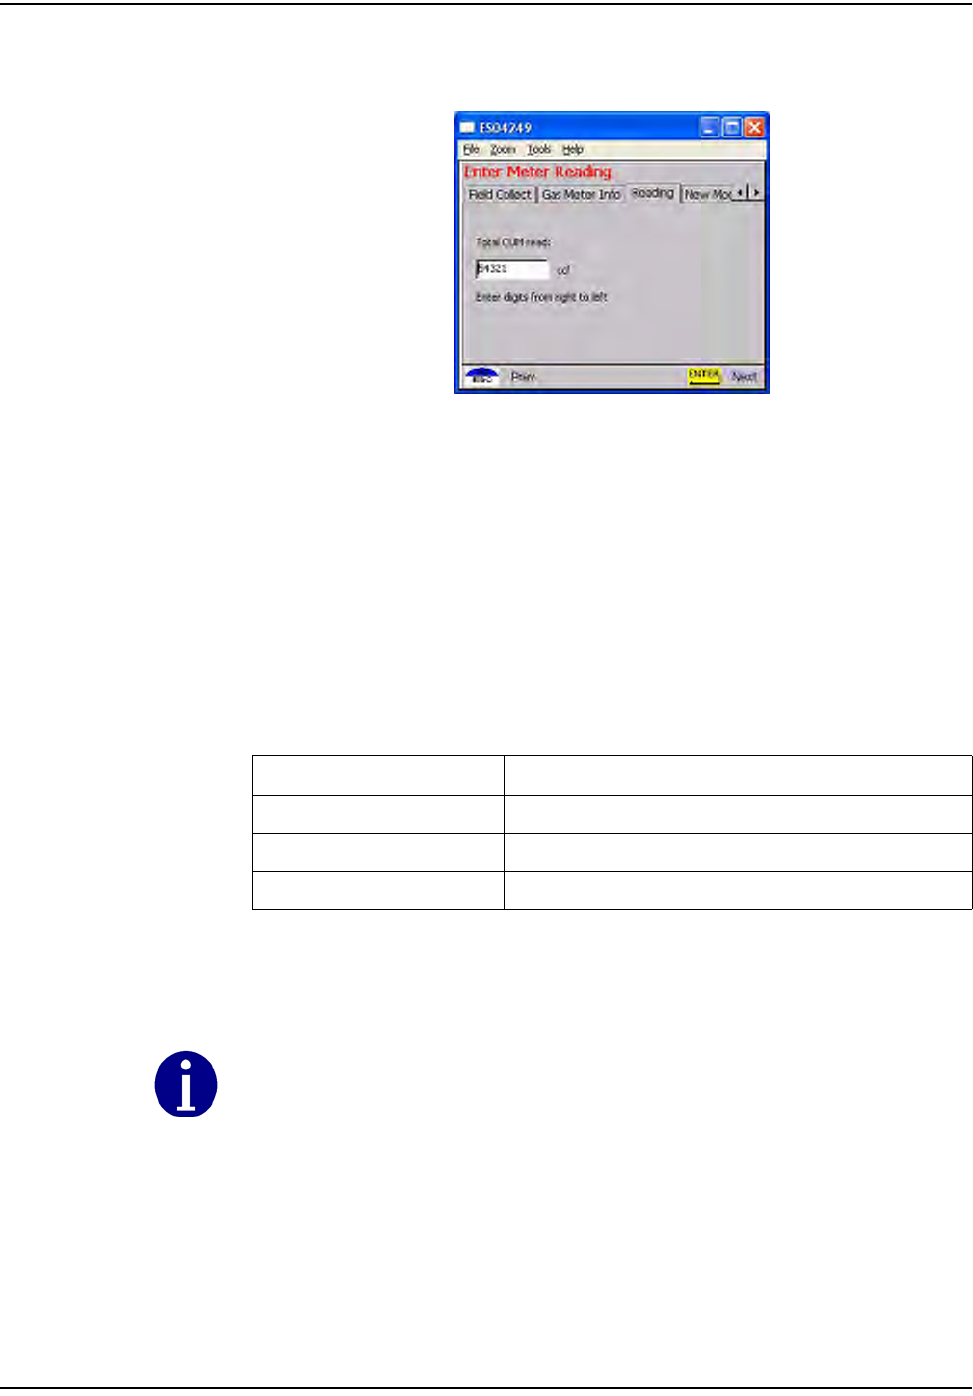
Numericfieldishighlightedformanualentryofmeterreadingfromexisting
meter.
Figure 2.11 Handheld dial read entry screen
Themeterreadingissometimesvalidatedbasedonutilityparameters,suchas:
•Previousreading
•Readdate
•Expectedrate(ccf/day)
• Allowablepercentagevariation(utilityspecific).
Ifthischeckisnotinplaceyouwillbepromptedtoenterthelastfournumbersof
themeterIDandtore‐entertheread.
.
1Enterreadingforexistingmeterinmeterreadscreen.Entervaluesfromright
toleft.
2PressENTER.Youarenowreadytoscanthechangeoutlabel.
Program the Meter Module
Thefollowingstepsapplytobothameterexchangeoramoduleretrofit.New
meterswithmodulesdonotrequireprogramming.
Table2.6HandheldOptionsandActiveKeysforMeterReading
Option or Active Key Function
MJV båíÉêë=êÉ~ÇK
båíÉê p~îÉë=~åó=ÅÜ~åÖÉë=~åÇ=~Çî~åÅÉë=íç=íÜÉ=åÉñí=ëÅêÉÉåK
bp` oÉíìêåë=íç=íÜÉ=êçìíÉ=ëí~íìë=ëÅêÉÉå
If the meter reading does not pass validation, refer to the section on Meter Reading Out of
Range.
rëáåÖ=íÜÉ=e~åÇeÉäÇ=aÉîáÅÉ
OJNO `ÉääåÉí=d~ë=jçÇìäÉ=~åÇ=jÉíÉê=fåëí~ää~íáçå=dìáÇÉ
Begininstallingthegasmodulebyfollowingtheinstructionsinlaterchaptersof
thisGuide.
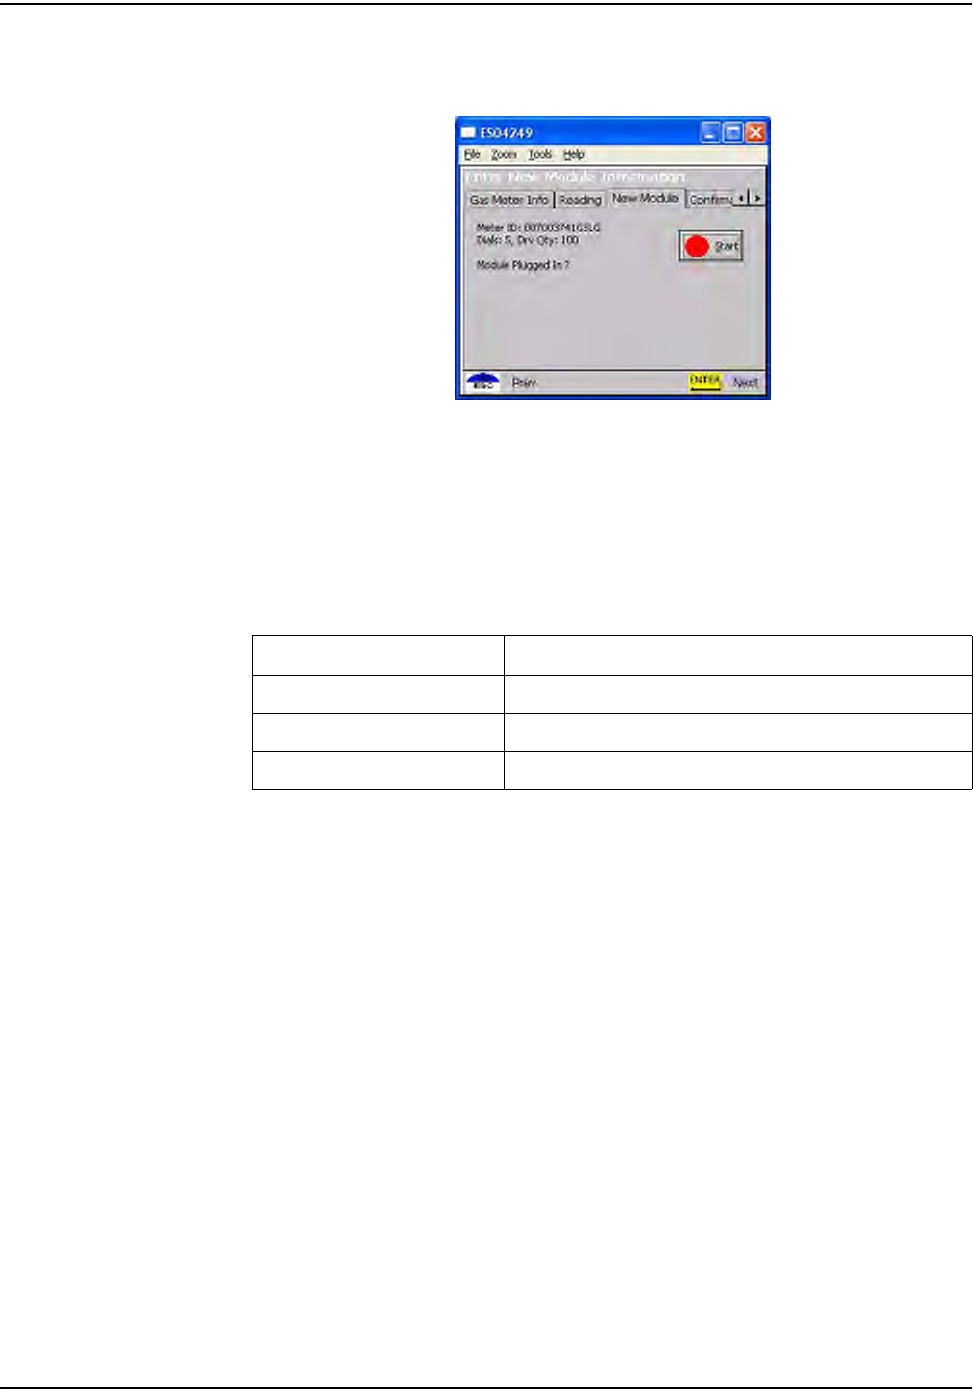
Figure 2.12 Handheld Initial programming screen
Programscreendisplaysthemeterinformationandpromptstheinstallerto
connecttothemetermodule.
.
1 ConnecttheHandheldPCtothemetermodule(refertoappropriate
installationprocedure).
2ChecktoensurethattheinformationthatyouenteredintotheHandheldis
correct,suchasdriveconstant,Indexread,andmeterID.Forexample,
dials=4,meterID=0123456G,meterconstant=2.
3PressENTERtobeginprogrammingthemetermodule.TheHandheldPC
willdisplaythefollowingscreensduringprogramming:
TheHandheldPCsearchesfortheconnectedmetermodule.Thisprocesswill
takeafewseconds.
Ifthemetermoduleisnotconnected,anerrorscreendisplays.RefertoʺSpecial
Casesʺonpage 2‐15formoreinformation.
Table2.7HandheldOptionsandActiveKeysforInitialprogramming
screen
Option or Active Key Function
pí~êí _ÉÖáåë=éêçÖê~ããáåÖ=íÜÉ=ãçÇìäÉ
båíÉê p~îÉë=~åó=ÅÜ~åÖÉë=~åÇ=~Çî~åÅÉë=íç=íÜÉ=åÉñí=ëÅêÉÉåK
bp` oÉíìêåë=íç=íÜÉ=éêÉîáçìë=ëÅêÉÉå
rëáåÖ=íÜÉ=e~åÇeÉäÇ=aÉîáÅÉ
`ÉääåÉí=d~ë=jçÇìäÉ=~åÇ=jÉíÉê=fåëí~ää~íáçå=dìáÇÉ OJNP
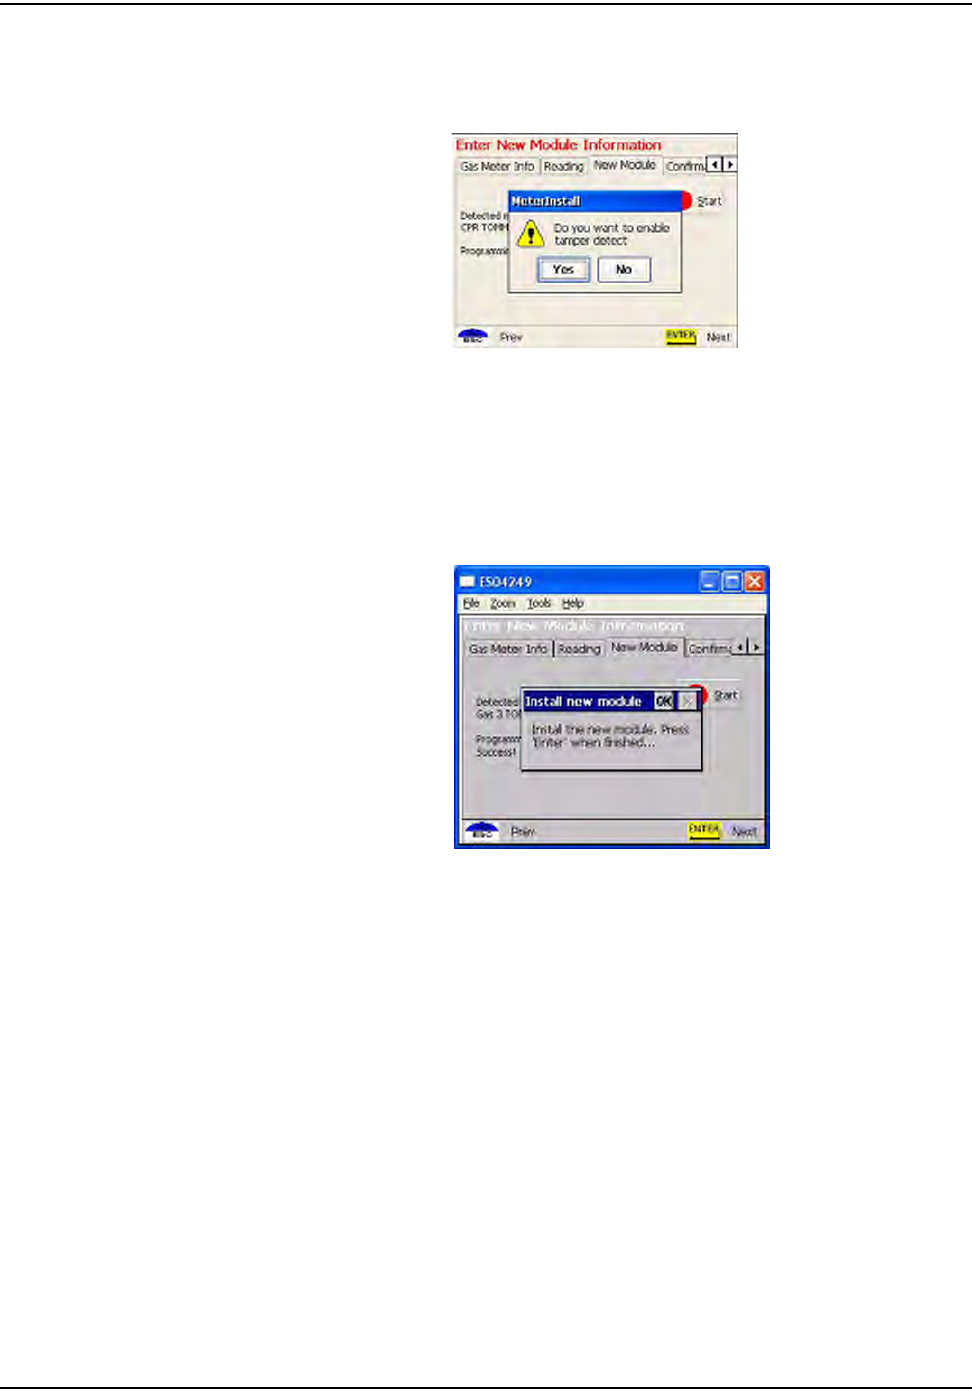
Themeterinformationisdownloadedtothemetermodule.Thisprocesstakesa
fewseconds.
Figure 2.13 Handheld enable tamper feature
IftheCPRendpointisequippedwithtampernotification,theinstallation
procedurepromptsyoutoindicatewhetheryouwanttoenableit.
Figure 2.14 Handheld Install complete
Confirmationthatprogramhasloaded.
rëáåÖ=íÜÉ=e~åÇeÉäÇ=aÉîáÅÉ
OJNQ `ÉääåÉí=d~ë=jçÇìäÉ=~åÇ=jÉíÉê=fåëí~ää~íáçå=dìáÇÉ
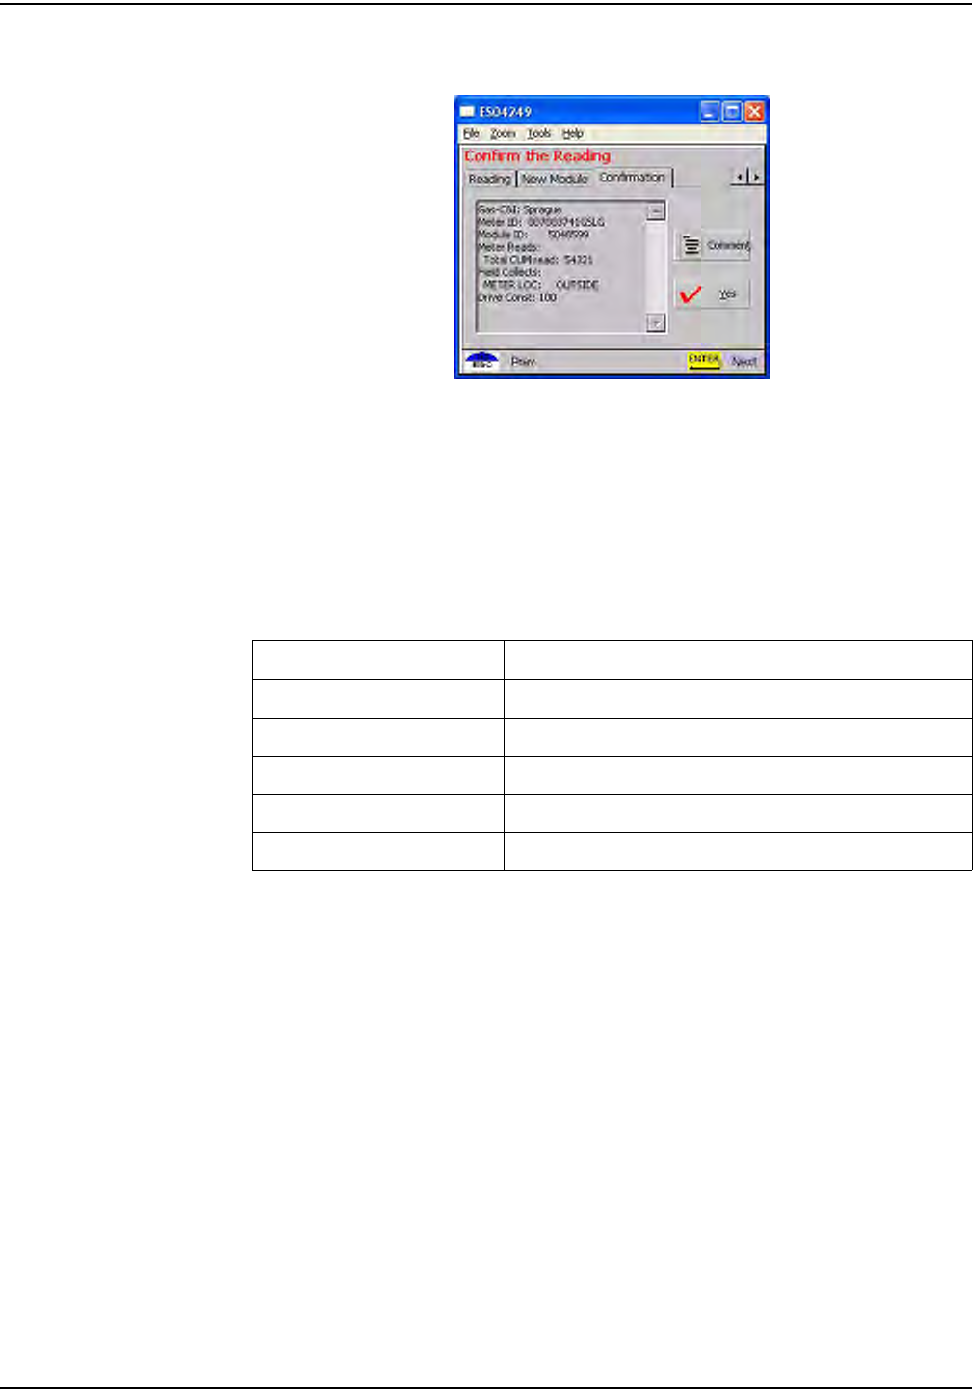
Figure 2.15 Handheld redisplays information
MeterinformationredisplaystoverifythemeterreadandmeterID.
.
Table2.8HandheldOptionsandActiveKeysforProgrammingtheMeter
Module
Option or Active Key Function
vÉë ^ÅÅÉéíë=ãÉíÉê=êÉ~ÇáåÖ=~åÇ=ÅçåíáåìÉë=íç=åÉñí=~ÇÇêÉëëK
kç oÉíìêåë=íç=íÜÉ=ÄÉÖáååáåÖ=çÑ=íÜÉ=ÅìêêÉåí=~ÇÇêÉëëK
`çããÉåí båíÉê=áÑ=êÉèìáêÉÇK
båíÉê p~îÉë=~åó=ÅÜ~åÖÉë=~åÇ=~Çî~åÅÉë=íç=íÜÉ=åÉñí=ëÅêÉÉåK
^êêçï=`ìêëçê=m~Ç eáÖÜäáÖÜíë=çéíáçåë=vÉëLkçK

rëáåÖ=íÜÉ=e~åÇeÉäÇ=aÉîáÅÉ
`ÉääåÉí=d~ë=jçÇìäÉ=~åÇ=jÉíÉê=fåëí~ää~íáçå=dìáÇÉ OJNR
SPECIAL CASES
Thissectiondetailscausesofproblemsduringaninstallation.However,thislist
maynotcoveralleventualities.
Meter Reading Out of Range
Ifthemeterreadingisoutofrangeduringstandardmeterinstallation,the
softwarepromptsforadditionalinformation(enterlastfourdigitsofmeterID,re‐
entermeterread,changemeterIDifdifferentthatexpected)beforeallowing
meterinstallation.
1VerifymetertypeandID.
aEntertheexistingmeterserialnumberintheHandheld.
bV
erifytheexistingmeterserialnumbermatchestheexistingmeterserial
numberintheHandheld.
—Iftheexistingmeterserialnumberdoesnotmatchtheexisting
meterserialnumber,intheHandheld,verifytheaddress.
2Performtechnicalreviewofmeter.
EntertheappropriatecodeinyourHandheld,andthencallyourSupervisor
forsupport.
Figure 2.16 Handheld Read out of Range screen
ThesoftwarerequeststhelastfournumbersofexistingmeterIDtoconfirmthat
themeterbelongstothisaccount.IfmeterIDdoesnotmatch,theaccountaddress
isredisplayedforverificationordependingonutility,specificinstructions
display.

rëáåÖ=íÜÉ=e~åÇeÉäÇ=aÉîáÅÉ
OJNS `ÉääåÉí=d~ë=jçÇìäÉ=~åÇ=jÉíÉê=fåëí~ää~íáçå=dìáÇÉ
.
3EnterthelastfourdigitsoftheexistingmeterID.Thesoftwarerequests
verificationofthemeterread.Thishelpstoconfirmthattheinstallerisatthe
rightlocation.
Figure 2.17 Handheld Re-enter meter read
.
4Re‐entermeterreading.
Table2.9HandheldOptionsandActiveKeysforReadOutofRange
Option or Active Key Function
^JwI=MJV båíÉêë=íÜÉ=ãÉíÉê=fa
båíÉê p~îÉë=~åó=ÅÜ~åÖÉë=~åÇ=~Çî~åÅÉë=íç=íÜÉ=åÉñí=ëÅêÉÉåK
bp` oÉíìêåë=íç=ãÉíÉê=êÉ~Ç=ëÅêÉÉåK
Table2.10HandheldOptionsandActiveKeysforReadOutofRange
Option or Active Key Function
MJV båíÉêë=íÜÉ=ãÉíÉê=fa
båíÉê p~îÉë=~åó=ÅÜ~åÖÉë=~åÇ=~Çî~åÅÉë=íç=íÜÉ=åÉñí=ëÅêÉÉåK
bp` oÉíìêåë=íç=ãÉíÉê=êÉ~Ç=ëÅêÉÉåK
rëáåÖ=íÜÉ=e~åÇeÉäÇ=aÉîáÅÉ
`ÉääåÉí=d~ë=jçÇìäÉ=~åÇ=jÉíÉê=fåëí~ää~íáçå=dìáÇÉ OJNT
Meter ID Confirmation
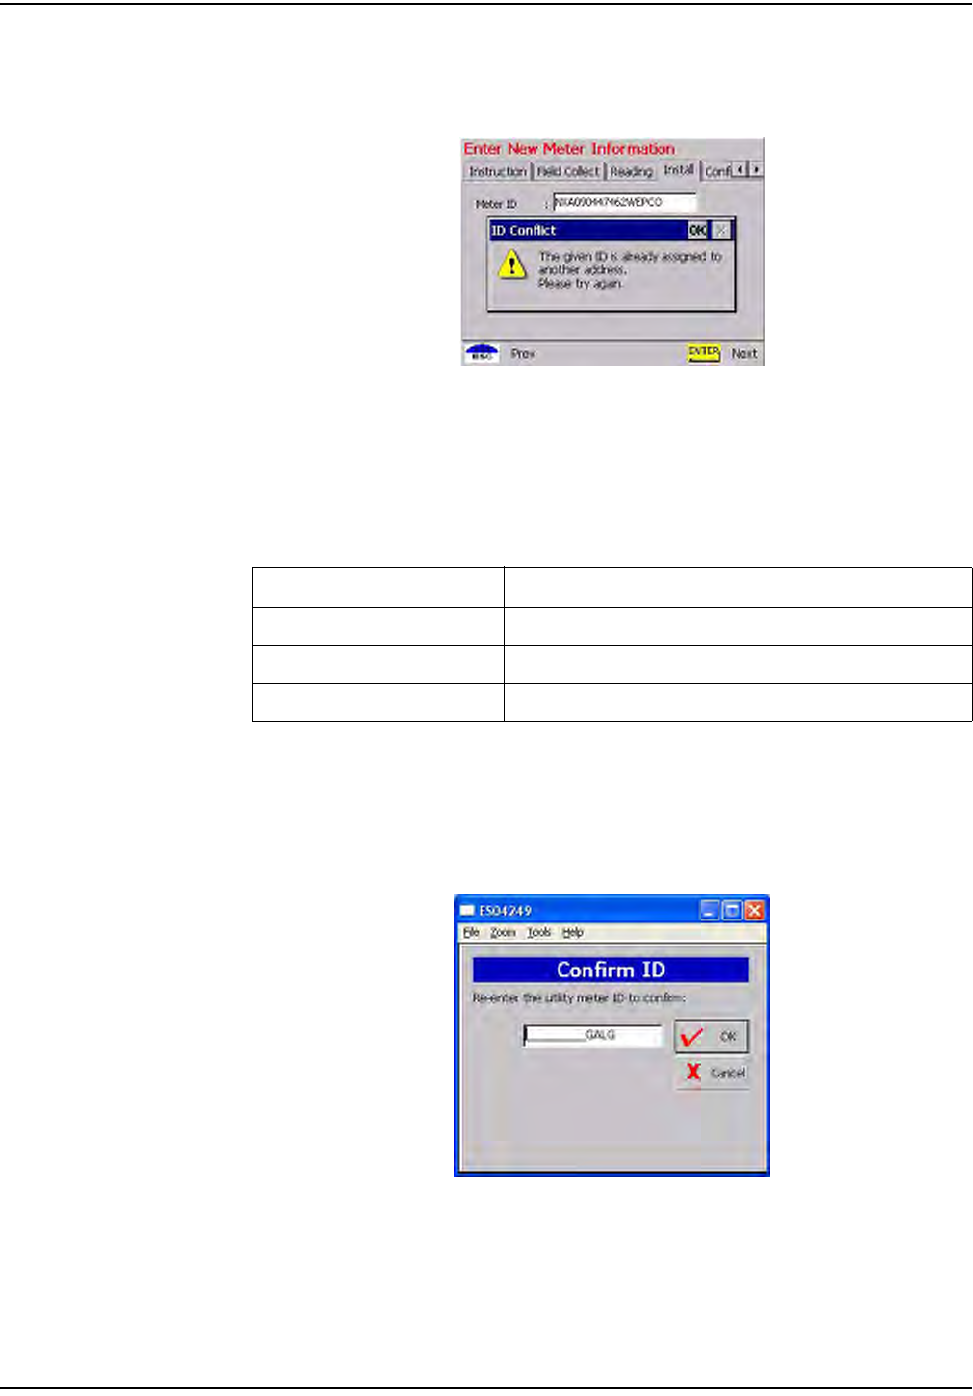
ThissectioncoverspossiblescreensgeneratedforinvalidmeterIDentries.
Figure 2.18 Meter already used
ThechangeoutmeterIDenteredwasusedonanotheraddress.
Change Meter ID
Iftheexistingmeterattheaccountaddressdoesnotmatchtheutilitydatabase,
youcanenterthecorrectmeterID.Ifso,enterskipcode“MeterIDmismatch”
andcallSupervisorforinstructions.ThisfunctionupdatestheHandHeld—even
thoughtheexistingmeterwillbereplacedwiththenewchange‐outmeter.
Figure 2.19 Handheld Meter ID Change screen
Table2.11HandheldOptionsandActiveKeysforMeterAlreadyUsed
Option or Active Key Function
lh oÉíìêåë=íç=ëÅ~å=ëÅêÉÉå
båíÉê p~îÉë=~åó=ÅÜ~åÖÉë=~åÇ=~Çî~åÅÉë=íç=íÜÉ=åÉñí=ëÅêÉÉåK
bp` oÉíìêåë=íç=ëÅ~å=ëÅêÉÉåK
rëáåÖ=íÜÉ=e~åÇeÉäÇ=aÉîáÅÉ
OJNU `ÉääåÉí=d~ë=jçÇìäÉ=~åÇ=jÉíÉê=fåëí~ää~íáçå=dìáÇÉ
Skips
Insomesituations,youcannotinstallagasmoduleorreplacetheexistingmeter.
Youmustskipit;forexample,themeterislocatedinthehouseoranenclosed
areaandrequiresyoutomakearrangementswiththecustomerforaccess.
Figure 2.20 Options on address screen
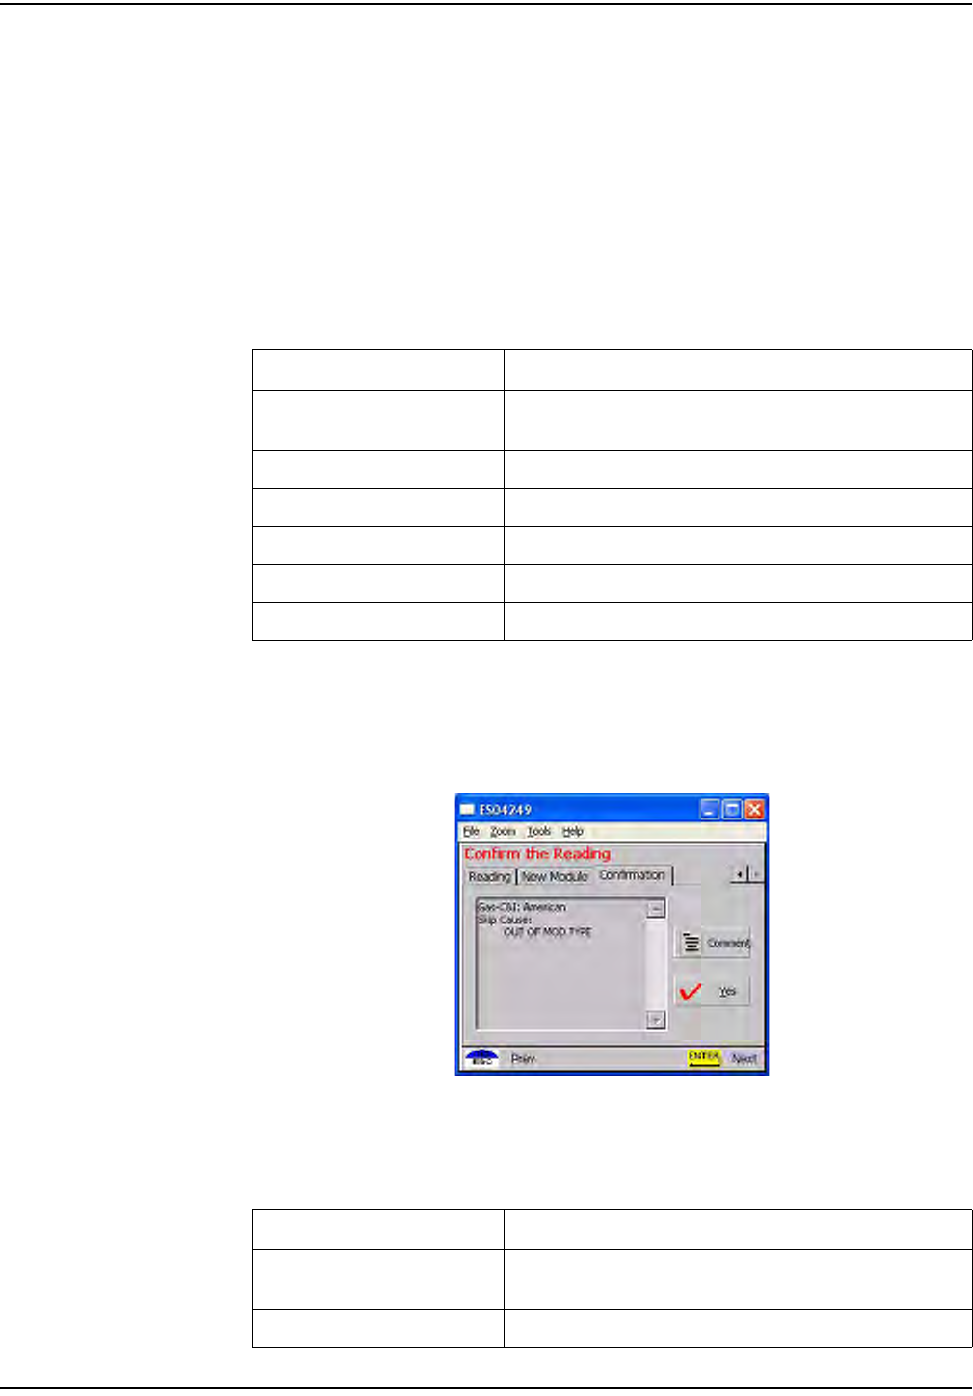
1SelecttheSkipoptionintheaddressscreenandpressENTERorS.TheSkip
screendisplays.
Figure 2.21 Handheld Skip screen
ChoicesontheSkipscreeninclude:
•Noaccess
•Keyneeded
• Lockingring
• Unsafeconditionexists
•Medical
•Dog
• Appointmentneeded
•NoMeter
•MeterDamaged
rëáåÖ=íÜÉ=e~åÇeÉäÇ=aÉîáÅÉ
`ÉääåÉí=d~ë=jçÇìäÉ=~åÇ=jÉíÉê=fåëí~ää~íáçå=dìáÇÉ OJNV
•Red/YellowTag
•Diversion
•Violencecode
•Buriedmeter
•Tiltedmeter
•Foundmeter
• DisconnectedorShutoffmeter
•Obstacle/Blocked
2SelectreasonforskippingmeterandpressENTER.
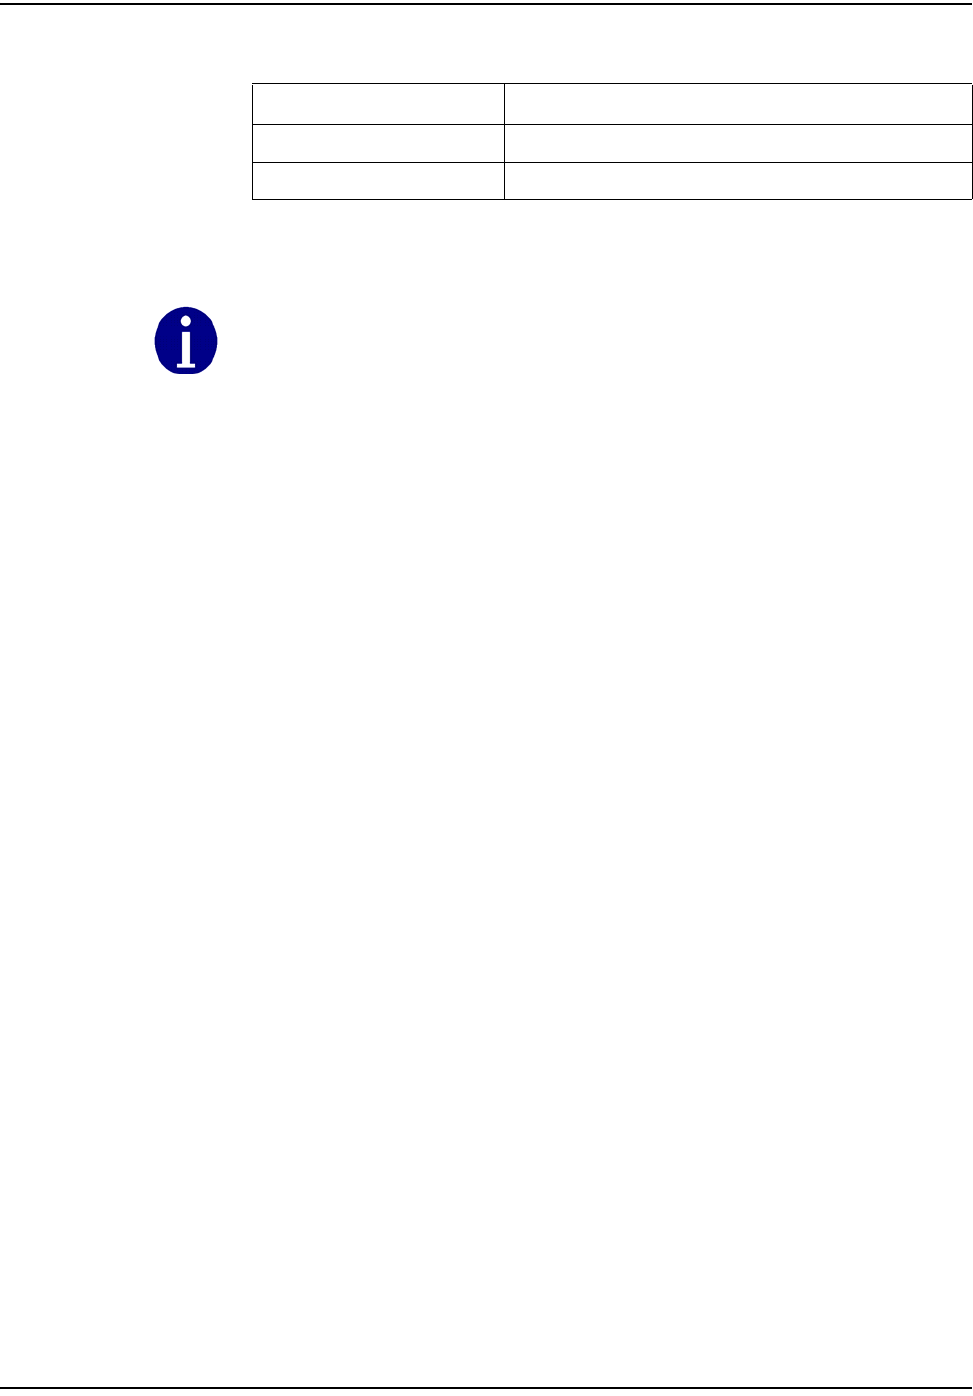
3SelectOKtoacceptreasonforskippingmeterID.Ifyouwanttoadda
comment,selecttheCommentoption.Thesoftwaredisplaystheselectedskip
causeandrequestsconfirmationtoskipmeterinstallation.
Figure 2.22 Handheld Skip Confirmation screen
Table2.12HandheldOptionsandActiveKeysforSkips
Option or Active Key Function
vÉë ^ÅÅÉéíë=éêçÄäÉãë=Çáëéä~óÉÇ=~åÇ=êÉíìêåë=íç=~ÇÇêÉëë=
ëÅêÉÉåK
kç=^ÅÅÉëë fë=íÜÉ=Ñáêëí=çÑ=~=äáëí=çÑ=ëâáé=ÅÜçáÅÉë=Çáëéä~óÉÇ=áå=íÜáë=ÑáÉäÇK
`çããÉåí ^ääçïë=íÜÉ=áåëí~ääÉê=íç=ÉåíÉê=ÅçããÉåíëK
båíÉê pÉäÉÅíë=çéíáçåë=kç=^ÅÅÉëëI=vÉëI=kçI=`çããÉåíK
^êêçï=`ìêëçê=m~Ç pÅêçääë=íÜêçìÖÜ=ëâáé=ÑáÉäÇëK
bp` oÉíìêåë=íç=~ÇÇêÉëë=ëÅêÉÉåK
Table2.13HandheldOptionsandActiveKeysforSkipConfirmation
Option or Active Key Function
vÉë ^ÅÅÉéíë=ëâáé=Å~ìëÉ=~åÇ=Çáëéä~óë=íÜÉ=åÉñí=~ÇÇêÉëë=
ëÅêÉÉåK
kç= oÉàÉÅíë=íÜÉ=ëâáé=Å~ìëÉ=~åÇ=êÉíìêåë=íç=íÜÉ=ÅìêêÉåí=~ÇÇêÉëë
rëáåÖ=íÜÉ=e~åÇeÉäÇ=aÉîáÅÉ
OJOM `ÉääåÉí=d~ë=jçÇìäÉ=~åÇ=jÉíÉê=fåëí~ää~íáçå=dìáÇÉ
4SelectYEStoskipmeterID.Thesoftwarerecordstheskipintheroutestatus
andproceedstothenextaddress.
^êêçï=`ìêëçê=m~Ç eáÖÜäáÖÜíë=vÉëLkçK
bp` oÉíìêåë=íç=ÅìêêÉåí=~ÇÇêÉëë=ëÅêÉÉåK
Table2.13HandheldOptionsandActiveKeysforSkipConfirmation
Option or Active Key Function
Medical alert is not normally used on gas (medical alert tags are commonly found on the
electric meter).
rëáåÖ=íÜÉ=e~åÇeÉäÇ=aÉîáÅÉ
`ÉääåÉí=d~ë=jçÇìäÉ=~åÇ=jÉíÉê=fåëí~ää~íáçå=dìáÇÉ OJON
OTHER FEATURES
Thefollowingfunctionsarenotdirectlyrelatedtotheinstallationprocess,butare
importantfeaturesoftheHandheldPC.
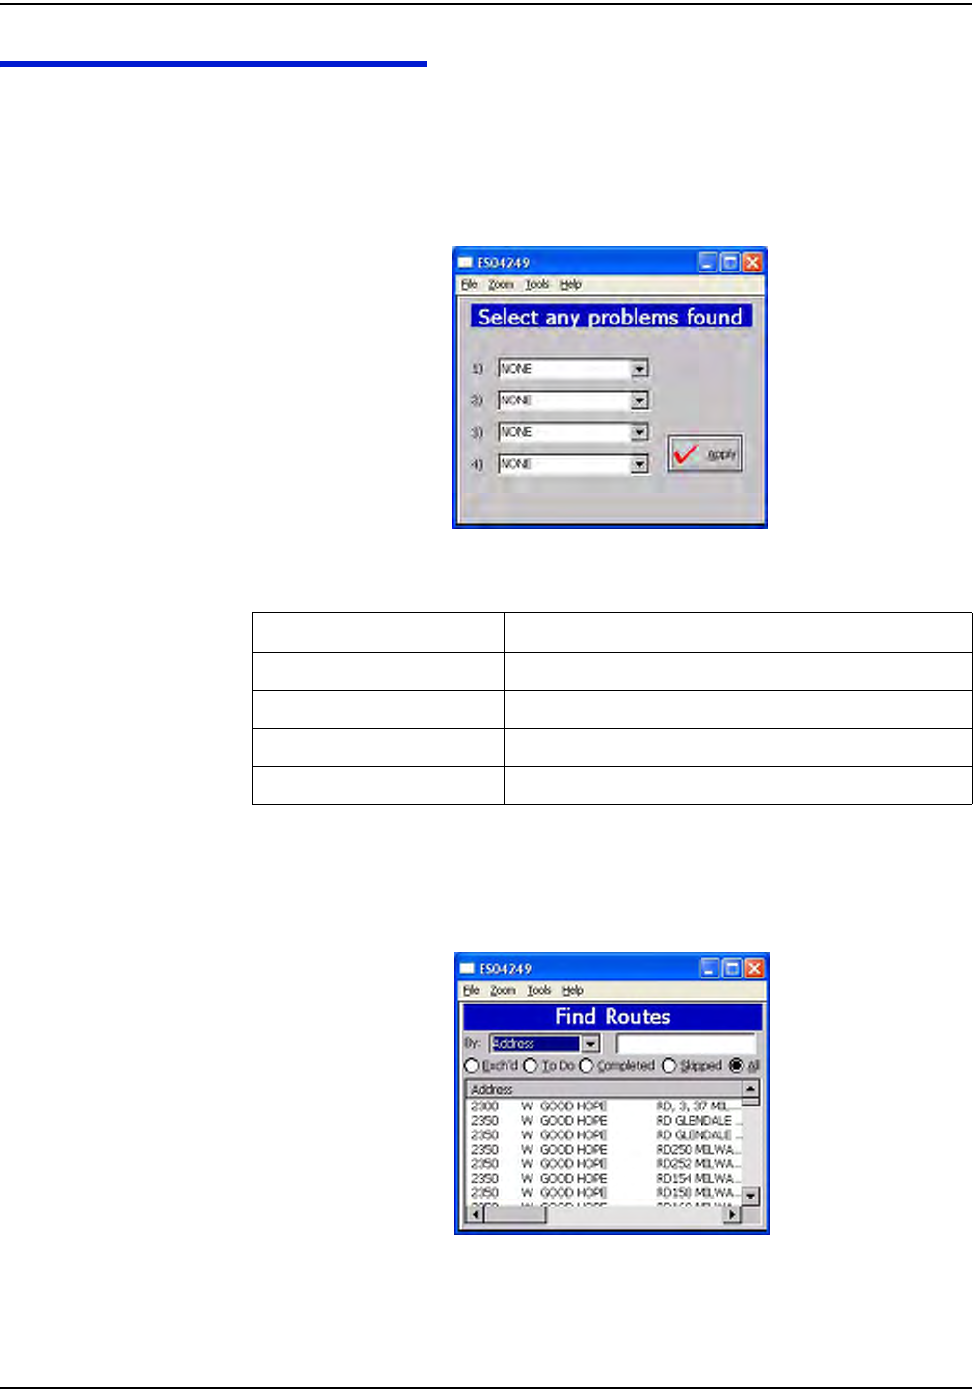
Problems
Youcanindicateuptofourproblemstorecordinaroute’srecord.
’
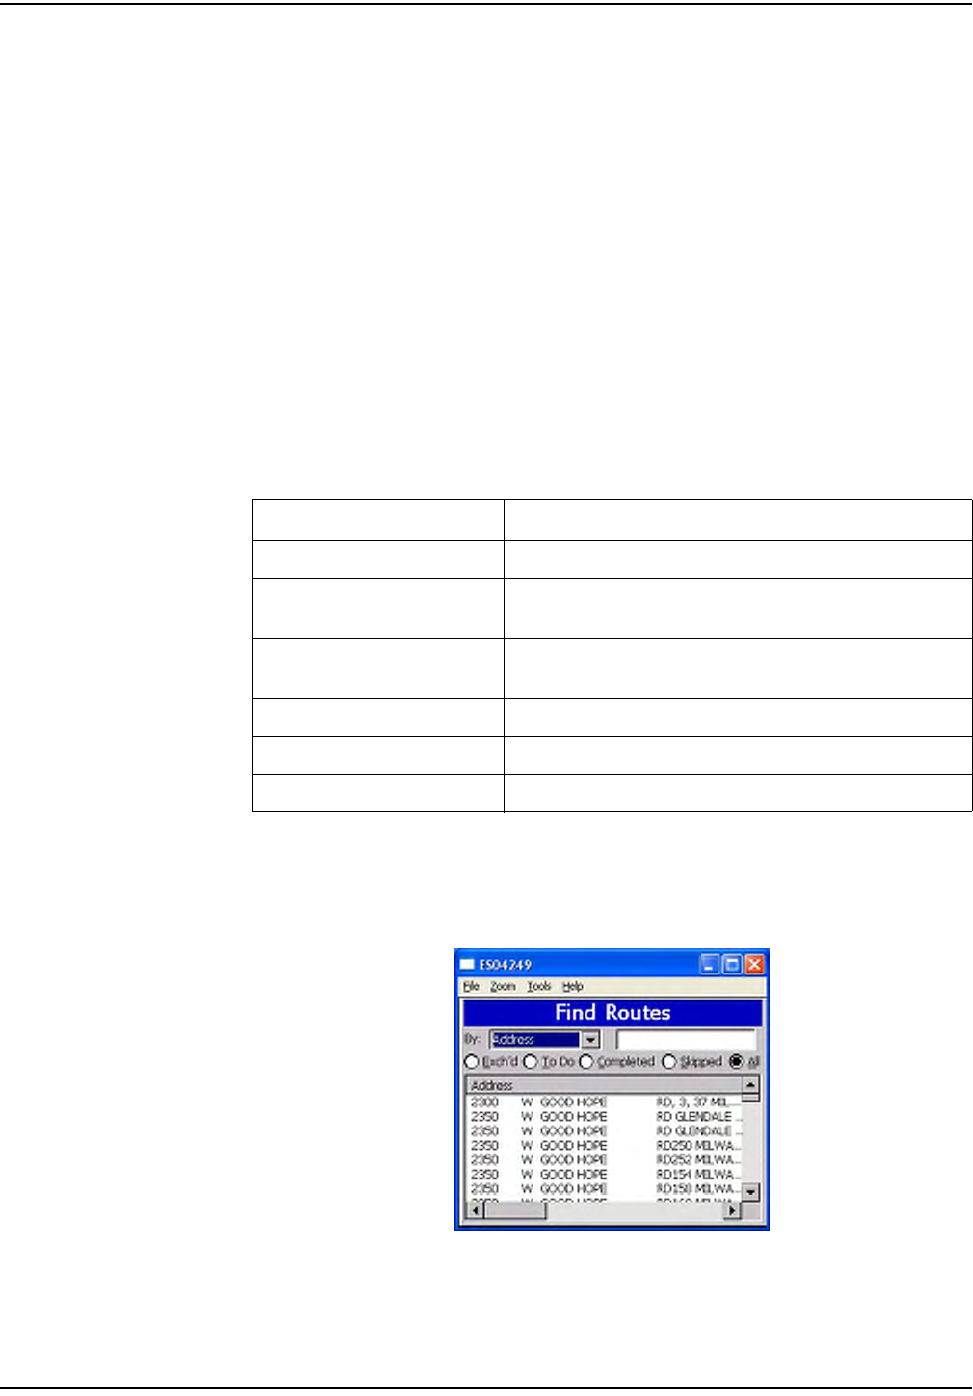
Find
UsetheFindfeaturetolookupaddresses,meterdata,androutestatistics.
1SelectFINDfromtheCustomerAddressscreen.
Figure 2.23 Handheld Find Screen
Table2.14HandheldOptionsandActiveKeysforRouteStatus
Option or Active Key Function
mêçÄäÉã=ÇêçéÇçïå=äáëí aáëéä~óë=éêçÄäÉã=çéíáçåë
^êêçï=`ìêëçê=m~Ç eáÖÜäáÖÜíë=vÉëLkçK
båíÉê p~îÉë=~åó=ÅÜ~åÖÉë=~åÇ=~Çî~åÅÉë=íç=íÜÉ=åÉñí=ëÅêÉÉåK
bp` oÉíìêåë=íç=éêÉîáçìë=ëÅêÉÉå
rëáåÖ=íÜÉ=e~åÇeÉäÇ=aÉîáÅÉ
OJOO `ÉääåÉí=d~ë=jçÇìäÉ=~åÇ=jÉíÉê=fåëí~ää~íáçå=dìáÇÉ
Meterdataoptionsinclude:
•WorkOrder
•MeterID
• Address
•CustomerName
•LANAddress
RouteStatusOptionsinclude:
• Exchanged
•All
•ToDo
•Completed
•Skipped
Selectsearchcriteria.Twosearchcriteriamustbeselected:meterdataandroute
status.Forexample,usetheArrowCursorPadtoselectAddress(meterdata)and
Completed(routestatus)tosearchalladdressesthathavebeencompleted.
Figure 2.24 Handheld Sample search list
ScreenshowsallrecordscontainingthecharactersenteredintheFindfield.
Table2.15HandheldOptionsandActiveKeysforFind
Option or Active Key Function
pÉ~êÅÜ=Äó aáëéä~óë=ãÉíÉê=Ç~í~=ëÉ~êÅÜ=çéíáçåëK
qÉñí=ÑáÉäÇ båíÉê=Ñìää=çê=é~êíá~ä=~ÇÇêÉëë=áåÑçêã~íáçå=íç=êÉÇìÅÉ=íÜÉ=äáëí=
êÉíìêåÉÇ
o~Çáç=Äìííçåë vçì=Å~å=å~êêçï=óçìê=ëÉ~êÅÜ=íç=êÉíìêå=çåäó=bñÅÜ~åÖÉÇI=qç=
açI=`çãéäÉíÉÇI=pâáééÉÇI=çê=^ää=êçìíÉëK
båíÉê pÉäÉÅíë=ÜáÖÜäáÖÜíÉÇ=çéíáçåK
^êêçï=`ìêëçê=m~Ç pÅêçääë=íÜêçìÖÜ=ëÉ~êÅÜ=ÑáÉäÇë=~åÇ=ÜáÖÜäáÖÜíë=çéíáçåë
bp` oÉíìêåë=íç=ÑìåÅíáçå=ëÅêÉÉåK
rëáåÖ=íÜÉ=e~åÇeÉäÇ=aÉîáÅÉ
`ÉääåÉí=d~ë=jçÇìäÉ=~åÇ=jÉíÉê=fåëí~ää~íáçå=dìáÇÉ OJOP
• AlphanumerickeysareactiveintheFindfield.
• Horizontalscrollbarisenabledifthetextextendsbeyondthescreen,asin
thisexample.
• ArrowkeysmovethecursorfromtheFindfieldtothedatarecords.
•Space(SP)keymovesfromaddressestoFindfield.
2SelectOKorOtoacceptsearchcriteriaanddisplaysearchrecords.
3GobacktotheSearchlist,andtypeElmtosearchalladdresseswith“Elm”in
therecord.ThenselecttherelevantonebyusingthespaceSPkeytomove
fromaddressestoFindfield.
4UsetheArrowCursorPadtomovethecursortothedatarecordsanduse
ENTERtoselectthedesiredrecord.
Fromthisscreen,additionalinformationmaydisplayoryoucanmodifythedata
record(forexample,reinstallmeter,recordproblemconditions,orchangestatus
toskipmeter).
Table2.16HandheldOptionsandActiveKeysforsamplesearchlist
Option or Active Key Function
^JwI=MJV båíÉê=ëÉ~êÅÜ=íÉñí=áåíç=íÜÉ=cáåÇ=ÑáÉäÇK
^êêçï=`ìêëçê=m~Ç pÅêçääë=íÜêçìÖÜ=ëÉ~êÅÜ=ÑáÉäÇë=~åÇ=ÜáÖÜäáÖÜíë=çéíáçå=
^ÇÇêÉëëI=qçaçI=lâK
båíÉê p~îÉë=~åó=ÅÜ~åÖÉë=~åÇ=~Çî~åÅÉë=íç=íÜÉ=åÉñí=ëÅêÉÉåK
bp` oÉíìêåë=íç=ÑìåÅíáçå=ëÅêÉÉåK
Table2.17HandheldOptionsandActiveKeysforsamplesearchrecord
Option or Active Key Function
_~Åâ oÉíìêåë=íç=cáåÇ=ëÅêÉÉå
båíÉê p~îÉë=~åó=ÅÜ~åÖÉë=~åÇ=~Çî~åÅÉë=íç=íÜÉ=åÉñí=ëÅêÉÉåK
^êêçï=`ìêëçê=m~Ç eáÖÜäáÖÜíë=çéíáçåë=Ä~Åâ=çê=fåëí~ääK

rëáåÖ=íÜÉ=e~åÇeÉäÇ=aÉîáÅÉ
OJOQ `ÉääåÉí=d~ë=jçÇìäÉ=~åÇ=jÉíÉê=fåëí~ää~íáçå=dìáÇÉ

`ÉääåÉí=d~ë=jçÇìäÉ=~åÇ=jÉíÉê=fåëí~ää~íáçå=dìáÇÉ PJN
CHAPTER 3 ON-SITE PREPARATION
ARRIVAL AT INSTALL SITE
1Uponarrivingattheinstallationsite,verifytheaddressintheHandheld.
ChecktheHandheldforspecialinstructionsforthatsite(forexample,
medicalcustomer,dog,keyrequiredforaccesstometer,meterlocation,and
soon).IfamedicalalertcodeappearsintheHandheldforthataddressthey
aretoskiptheinstallenteranappropriateskipcodeandmovetothenext
exchange.Amedicalalerttagmaybelocatedontheelectricmeter.
2Iftheinstallerscomeacrossanymeterswhereamedicalalertcodeappearsin
theHandheldforthataddresstheyaretodiscontinuetheexchange,enterthe
appropriateskipcodeandmovetothenextexchange.PriortoMeter
ExchangeorModuleRetrofit
1VerifythatthemeterIDofthemeterattheaddressisthesameasthatinthe
Handheldrecord;ifnot,verifyitasecondtime.IfthemeterIDdoesnot
match,recordtheinformationtoincludemismatchedIDonhardcopy,record
skipcodeofmeterIDmismatchandcallyourSupervisorfordirection.
2Checktoverifythatthesealisintactandpresent.Ifthemeterisunsealedand
thereisnoevidenceoftamperingcompletethemeterexchangeormodule
retrofit.Ifthereissuspectedtamperingorevidenceofdiversiondonot
completetheinstall,recorddiversiononhardcopyandenterskipcodeof
diversioninHandheldandcallyoursupervisorimmediately.
3Ifthepremiseisvacantandtheserviceisshutoffattheserviceriservalve,
completethemeterexchangeifatallpossible.Ifyouareunabletogainaccess
tothepremisefinishyourroute,thentryagainbeforereturningtotheCross
Dock.EnterappropriatecodeinHandheld.
4Inspectthemeterforanygasleaks,unsafeconditions,excessiverustingor
damage.Whileperformingthistechnicalreviewlookoverthemeterforpoor
conditionsuchasexcessesrust,tampering,orodorofgas.Ifyoujudgethe
meterisseriouslydamagedreportitthanentertheappropriatecodeinthe
Handheldandcallyoursupervisorfordirections.
5Ifitisdeterminedthatthemeterhasnounsafeconditions,youarereadyto
proceedwiththemoduleretrofit.Datawillberequiredtobeenteredintothe
Handheld.Ifthereadingisoutofrange(indicatedbyapromptonthe
Handheld),thenretypethemeteridentificationnumberʹslastfourdigitsto
re‐verifythecorrectmeter.Reenterthegasmeterindexreadintothe
Handheld.

låJpáíÉ=mêÉé~ê~íáçå
PJO `ÉääåÉí=d~ë=jçÇìäÉ=~åÇ=jÉíÉê=fåëí~ää~íáçå=dìáÇÉ
SeeʺResidentialMeterModuleRetrofitʺonpage 5‐1andʺCommercialand
IndustrialMeterModuleInstallationʺonpage 6‐1forinformationaboutmodule
exchangeinstructions.
6Ifthemeteristobeexchangedanditispartiallyburied,enteraskipcodeof
“buried”,andmovetothenextaccount.Ifatiltedmeteristobeexchanged,
performtheexchangeandcorrectthetilt.Ifamoduleistobeinstalledona
tiltedmeter,completetheinstall,andenteraskipcodeof“titled”.
7Iftheinstallercomesacrossaviolentorthreateningcustomer,immediately
leavethepremiseandcallyourSupervisor.Ifnecessary,dial911,afterwhich
youwillenterintotheHandheldandonthehardcopyaskipcodeof
“violencecode”.

`ÉääåÉí=d~ë=jçÇìäÉ=~åÇ=jÉíÉê=fåëí~ää~íáçå=dìáÇÉ QJN
CHAPTER 4 GAS METER EXCHANGE
METER EXCHANGE PROCESS
Arriving at the Location
1Theinstallerconfirmsthatheisattherightrouteaddressforthat
appointmentusingtheHandheld.Theinstallerarrivesatthelocationon‐time
andwithallthetoolsandequipmentnecessarytocompletetheinstallation
withouthavingtoreturntohisorhervehicle.Ifapplicable,locatetheoutside
shutoffvalveincaseoftroubleoremergency.
2Whenthecustomeranswersthedoor,introduceyourselfandstatethereason
foryourvisit.
–Verifythatthecustomerisatleasteighteenyearsofage.
– ShowthecustomeryourID.
3 Confirmthenatureoftheappointmentandthetimecommitmentrequired
fromthecustomer.Makesurethecustomerknowsandagreesthatitis
convenientforyoutoturnoffthegasduringtheinstallationprocess.
Verifying the Meter Site
Locatethemeterandconfirmtheexistingmeternumber,type,andsize.
–Ifthemeternumberiscorrectbuttypeandsizedonotmatchthe
equipmentthatyouhavebeenissued,callyourSupervisorandrequest
theappropriateequipment.
–Ifthemeteriddoesnotmatchtheinformationinthehandheld,callyour
Supervisorformeternumberverification.
–Ifallinformationiscorrectcontinuetheinstallationprocess.
–Priortoproceedingwiththemeterexchangeprocess,inspectthe
conditionofthegasregulator.Itmaybenecessarytoreplaceadefective
regulator.Followtheutility‐specificguidelinesforregulatorexchange.

d~ë=jÉíÉê=bñÅÜ~åÖÉ
QJO `ÉääåÉí=d~ë=jçÇìäÉ=~åÇ=jÉíÉê=fåëí~ää~íáçå=dìáÇÉ
Confirming Proper Installation Conditions
1Fortheinstallationtoqualify,confirmallofthefollowingpre‐existing
conditions:
–Visuallyexaminetheshut‐offforsignsofleakingordisrepair.
–PerformthesnifftestforsignsofgasleaksusingtheNaturalGas
DetectionDevice,andthenthesoaptestontheshutoffandcouplings.
–NoDiversionorTamperingEvident‐Visuallyinspecttheservicetothe
meterforsignsofdiversionortampering.
– AppropriateAccess‐Confirmthataccesstothemeterallowsaminimum
workareatobeestablished.Minimumworkareaincludeswrench
clearance,accesstoshut‐off.
– AppropriateService&PipingCondition‐Visuallyinspecttheservice
andpipingageandcondition.Confirmthatserviceandpipingarefitfor
theremovalandinstallationofanewmeterandthatthereisnopre‐
existingleaks.
– AppropriateMeterOrientation‐Confirmthemeterisinstalled
horizontallyorsuchthatthemeterexchangecannottakeplace.
–Ifanypre‐existingconditionsarefoundcontactyourSupervisor
immediately.TheSupervisorwillconfirmyourassessmentandgiveyou
directionforcompletingtheinstallationortoissueaskipcodeinthe
Handheld.
2Setuptheareaforinstallation.Turnallpossiblelightingon(forinsidesets).
Clearanappropriateworkspaceandlayoutalltools,equipment.Preparefor
leaksoremergencyshut‐off.
Shutting Off the Service
1Notifythecustomerthatgasservicewillbeinterrupted(reconfirmallgas
apparatusesareoff).Inspectfortheproperoperationofeachgasappliance.
Inspectthemetersetforcorrosion,burialoroverbuilding,damage,improper
installation,misalignment,outdatedregulator(Model1213Bor043R),orthe
smellofnaturalgas.
2 Connectthebondingjumperfromservicerisertothepremiseline.Verifythat
theexistingmeterisoffbyisolating(shutoff)allgasapparatusesandconfirm
thatthereisnoflowonthemeterandregister.Ifthemeterisnotfunctioning
correctly,contacttheSupervisorimmediately.TheSupervisorwillconfirm
yourassessmentandgiveyoudirection.
3Manuallyclosethecustomerʹsshutoffvalve.
–Ifyouhaveanyproblemclosingthevalve,contactyourSupervisorfor
directionwhichmayinclude,ifapplicable,usingtheoutsidecurbstopfor
shut‐off.
–Iftheoutsidecurbstopisactivated,theSupervisorwillnotifytheUtility
Supervisor.
4Removetheoriginalmeter.
aUsingapipewrenchandbackup,attempttoloosenthemetercoupling
nuts.
bUsemildtorquebuildingtomoderatesteadytorqueuntilthecoupling
nutbeginstoturn.
cDonotjerkorsnapthewrenches,ordamagecouldoccur.
d~ë=jÉíÉê=bñÅÜ~åÖÉ
`ÉääåÉí=d~ë=jçÇìäÉ=~åÇ=jÉíÉê=fåëí~ää~íáçå=dìáÇÉ QJP
d Loosenbothcouplingnutsandremovetheoldmeterfromthemeterset.
Ifyouhaveanyproblemlooseningthecouplingnutscontactyour
supervisorfordirection.
eRemovealloldgasketmaterialinthecouplingnutswhenapplicable.
Inspecttheregulatorandexchangeifitisdamagedordefective.
Installing the New Meter
1Removethenewmetertagfromthenewmeter.
2Writeinstalldate,address,andinitialsonnewmetertag.
3Placenewmetertagontheoldmeterregister.
4Insertnewgasketswhereapplicable.
5 Exchangetheregulatorifdamagedoroutdated,andexchangeanydamage
insulatingunions.Levelthemetersetifthesetistilted.
6Tightentheinlet‐couplingnut.
7Installpressuregaugetometeroutlet,slowlyopentherisevalve,andadjust
regulatortoappropriategaspressureatthemeteroutlet.
aClosetheriservalveandremovegauge.
bVerifymeteroperation.
c Reconnecttheoutletpiping.
8Beforere‐servicing‐ifservicewasshutoffpriortothemeterexchange,donot
restoreservice.
Restoring Service, Purging the Air, and Performing the Leak Test.
1Opentheshut‐offvalveveryslowly.
–IfyouhaveanyproblemopeningthevalvecontactyourSupervisorfor
direction.
2Checkthetestdialformovementtomakecertainnoleaksoccurredwhile
performingtheinstallation.
aSealtheregulator.
b Disconnectthebondingjumper.
cCleanandpaintthemeterset.
3Checkthecouplingnuts,serviceandpipingforleaksperform“leaktest”
(snifftestforsignsofgasleaksusingtheNaturalGasDetectionDevice,and
thesoaptest)andre‐tightenifnecessary.
4 Reenterthepropertyandpurgetheairfromthegaslinebybleedingthe
furthestgasapparatusfromthemeter.Youmustbleedeachindividual
apparatus.
During the installation, replace all biscuits in the outlet piping, and leave meter off “as
found”.
d~ë=jÉíÉê=bñÅÜ~åÖÉ
QJQ `ÉääåÉí=d~ë=jçÇìäÉ=~åÇ=jÉíÉê=fåëí~ää~íáçå=dìáÇÉ
Relighting All Apparatuses and Confirming Their Operation
FollowtheprocedureprovidedtoyoubytheUtilityforappliancerelighting.If
anyadverseconditionsarise,immediatelyshutoffthegas,contactyour
supervisorforinstructions,andrecordtheappropriatecommentintheHandheld
suchas,red/yellowtagdefectiveappliancesituation.EnteraSkipcodesuchas,
“red/yellowtag”intheHandheld.
Programming the Module
RefertoChapter 2,UsingtheHandHeldDevice,Chapter 5,ResidentialMeterModule
Retrofit,orChapter 6,CommercialandIndustrialMeterModuleInstallation.
Performing Data Collection
1SeeChapter 2,UsingtheHandHeldDevice.
2Sealthenewmeter.
Cleaning Up the Work Area
Cleanupallinstallationtools,equipmentanddebris.Turnoffanylightsthatyou
mayhaveturnedon.Restorethecustomerpremisetothepre‐visitcondition.
Exiting the Premise
1Doalastchecktoensurethatyouhaveallofyourequipmentandtools.
2 Thankthecustomerforallowingustoservicetheirgasmeter,exitthe
premise,andprovidethecustomerwithadoorhanger.
MODULE RETROFIT (INDEX OR REGISTER) REPLACEMENT
RefertoChapter 5,ResidentialMeterModuleRetrofitorChapter 6,Commercialand
IndustrialMeterModuleInstallation.
CUSTOMER SKIP OR CANCELLATION
Ifthecustomerʹsexistingconditionsdonotqualifyfornewmeterinstallation
notifyyourSupervisor.WaitatthesiteuntilyourSupervisorarrivesforfurther
instructions.If,intheSupervisorʹsopinion,theconditionofthecustomerʹs
existingservicepipingorappliancesissuchthatsignificantdamagewouldresult
fromattemptingtoremoveandreplacetheexistinggasmeter,yourSupervisor
willsoinformtheUtilityofthecondition.TheSupervisorwilladviseyouto:
• Informthecustomerastowhythechange‐outwillnottakeplace.
•Documentsituationinhandheld.
•Directyoutoyournextappointment.

d~ë=jÉíÉê=bñÅÜ~åÖÉ
`ÉääåÉí=d~ë=jçÇìäÉ=~åÇ=jÉíÉê=fåëí~ää~íáçå=dìáÇÉ QJR
If There Is Damage On Site When You Arrive
• CallyourSupervisorimmediately.Communicatethegravityofthesituation.
Heorshewillimmediatelyinitiateanynecessaryactions.
•Donotleavethecustomersiteuntildirectedtodoso.
•Itmaybenecessarytodial911.
IMMEDIATELY turn off the gas. This will eliminate or minimize any property
damages to customer.

Notes:
QJS `ÉääåÉí=d~ë=jçÇìäÉ=~åÇ=jÉíÉê=fåëí~ää~íáçå=dìáÇÉ
d~ë=jÉíÉê=bñÅÜ~åÖÉ
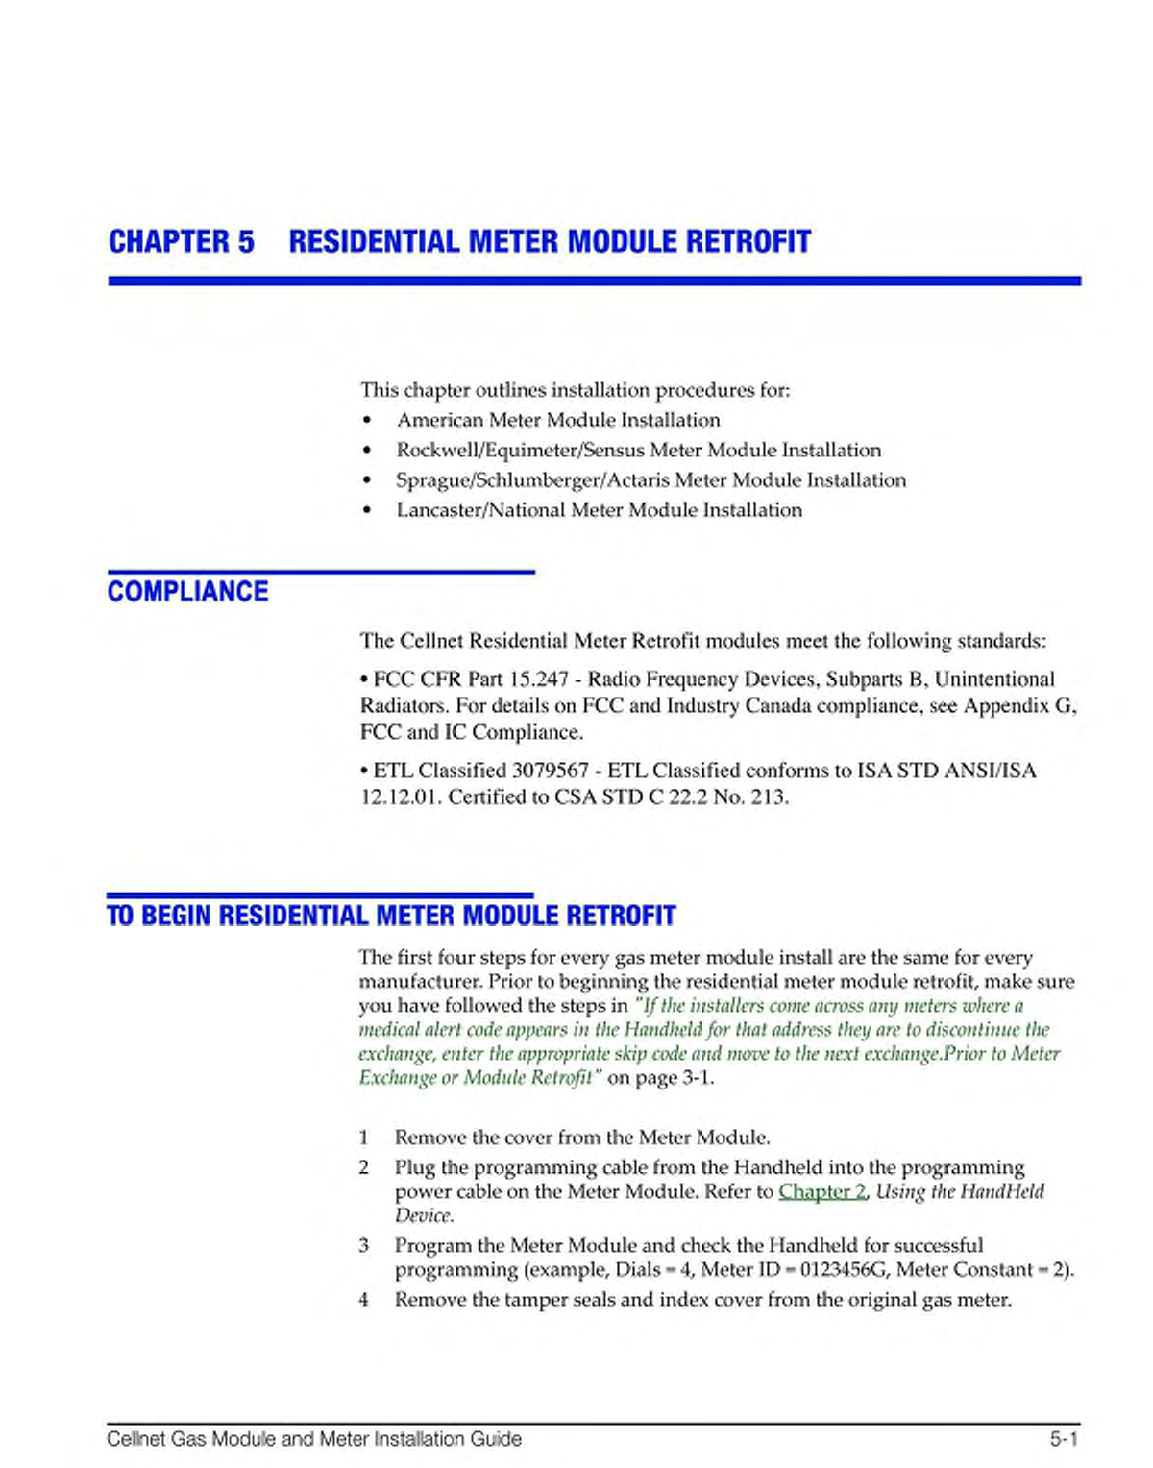
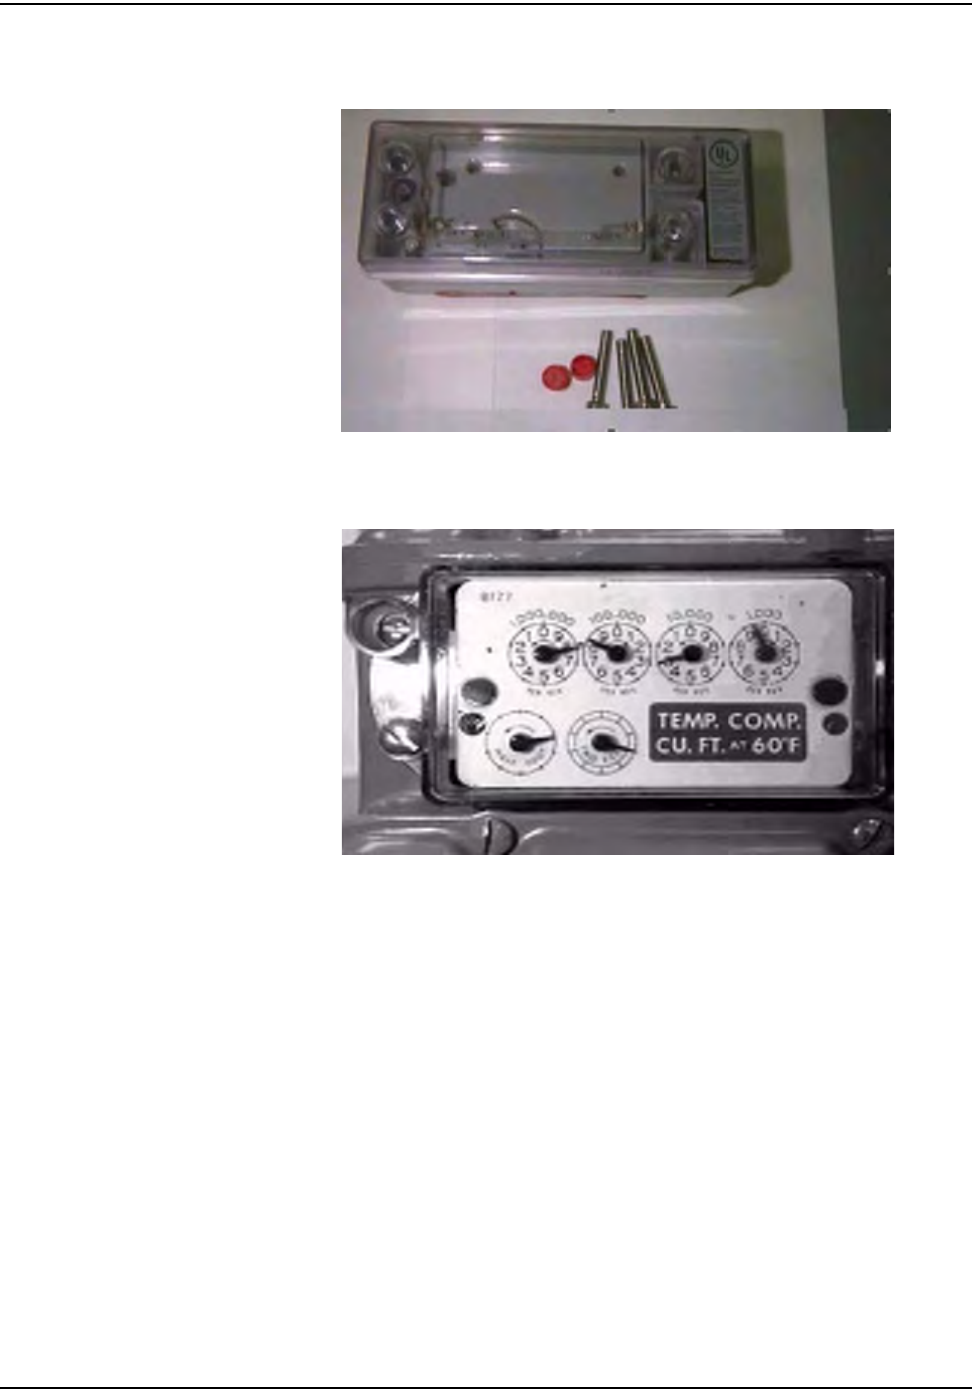
oÉëáÇÉåíá~ä=jÉíÉê=jçÇìäÉ=oÉíêçÑáí
RJO `ÉääåÉí=d~ë=jçÇìäÉ=~åÇ=jÉíÉê=fåëí~ää~íáçå=dìáÇÉ
American Installation
Figure 5.1 American: Meter Module before installation
1Followsteps1‐4inʺToBeginResidentialMeterModuleRetrofitʺonpage 5‐1.
Figure 5.2 American: meter with index and index cover
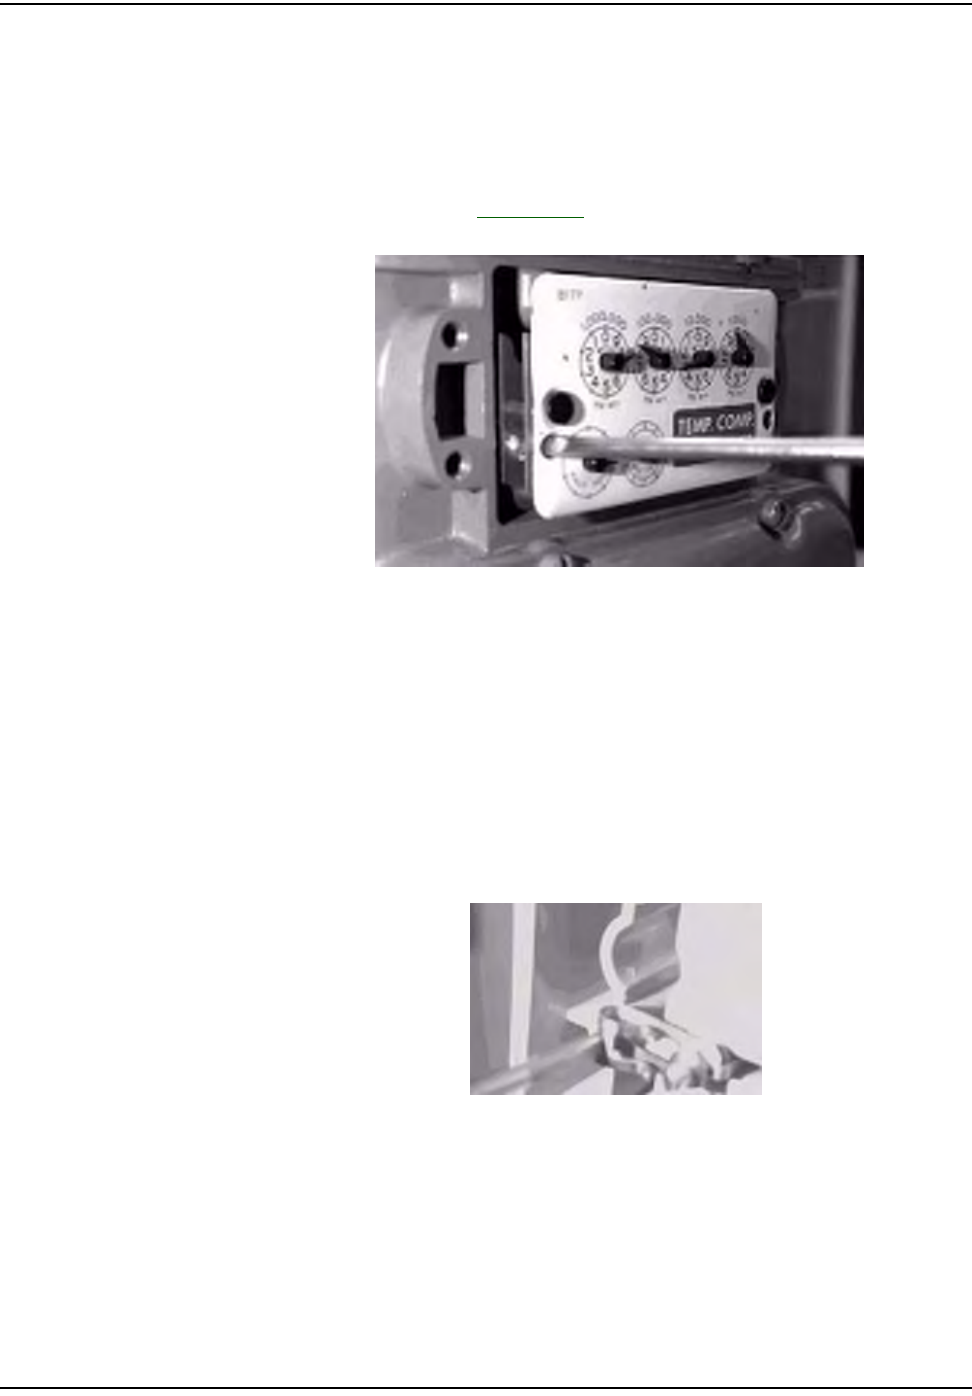
oÉëáÇÉåíá~ä=jÉíÉê=jçÇìäÉ=oÉíêçÑáí
`ÉääåÉí=d~ë=jçÇìäÉ=~åÇ=jÉíÉê=fåëí~ää~íáçå=dìáÇÉ RJP
2Removetheindexdialsfromthegasmeter.Alsoremovealloftheoriginal
gasketmaterial.Replacetheindexifitisdamagedorifthegearsare
discolored.
WHENREPLACINGANINDEXYOUMUSTENTERTHEMETERREAD
INTOTHEHANDHELDANDINTHECOMMENTSECTIONWRITE
“INDEXEXCHANGED”.ForIndexvisualverificationandexchangeon
AmericanmetersseeAppendix B,VisualInspectionofIndexes.
Figure 5.3 American Removing the Index (one screw on each side)
3Cleantheareabehindtheindexandcovergasketsurfaceonthemeterwitha
wirebrushandgasketscraper.
4Makesurethatthelocationofthedialsonthemeterisfreeofanydebristhat
mayhampermoduleinstallation.
5Slidetheindexattachmentclipsouttothesidesbeforebeginningtoinstall
moduleonmeter.
Figure 5.4 American: Sliding the Index attachment clip out (one per side)
oÉëáÇÉåíá~ä=jÉíÉê=jçÇìäÉ=oÉíêçÑáí
RJQ `ÉääåÉí=d~ë=jçÇìäÉ=~åÇ=jÉíÉê=fåëí~ää~íáçå=dìáÇÉ
6AlignthemeterdrivedogwiththemodulewigglerandinstalltheMeter
Modulebasetothemeterbyscrewinginthetwocapturedstandoffscrews.
Thetorquerequirementforfasteningthescrewsis10inch‐pounds.For
modulesmanufacturedstartinginMay2005,forproperalignmentsee
Appendix A,AligningtheNewAmericanMeterDriveDog.
Figure 5.5 American: Aligning the drive dog
Figure 5.6 American: Attaching the Meter Module onto the meter by screwing in two stand-off
fasteners
Check the wiggler on the meter module for free movement. Wiggler should turn at least 10
degrees but no greater than a 1/4 turn. If it is binding, then disassemble and realign. This is
also known as the “wiggle” test.
Improper alignment or tightening of the standoff screws may result in module or meter
failure.
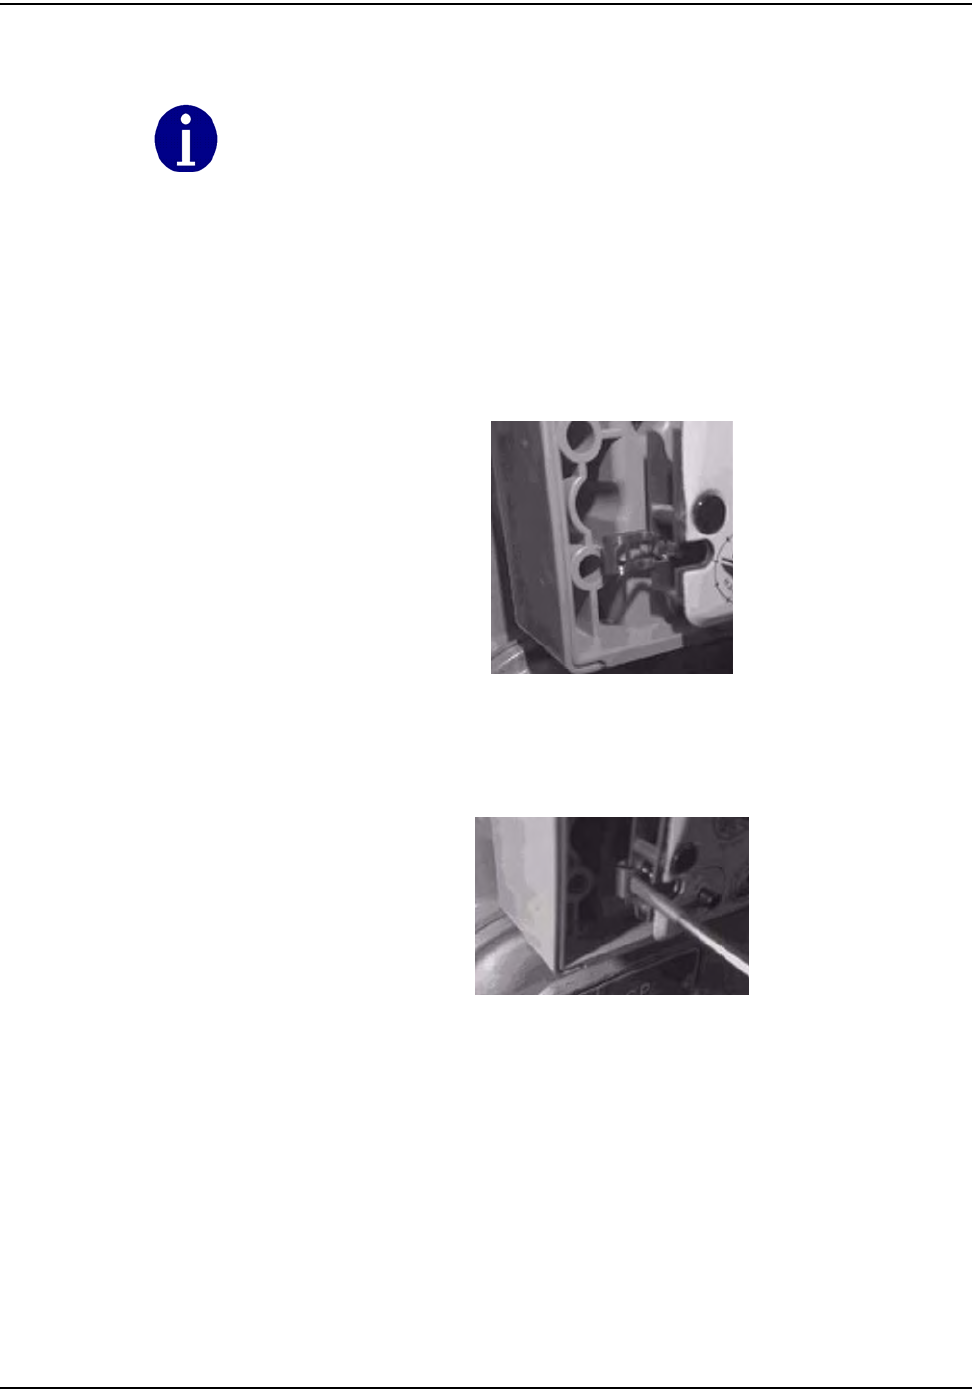
oÉëáÇÉåíá~ä=jÉíÉê=jçÇìäÉ=oÉíêçÑáí
`ÉääåÉí=d~ë=jçÇìäÉ=~åÇ=jÉíÉê=fåëí~ää~íáçå=dìáÇÉ RJR
7 AttachtheindextotheMeterModulehousingwiththecapturedclipsonthe
standoffscrews.Besurethattheclipsareextendedfullytowardstheoutside
edgeofthemodulewhenyoufittheindextothemodule,andaligntheindex
dogoftheindextothemoduleʹswiggler.Pushthetwoclipstowardsthe
insideofthemoduletosecuretheindex.Aftertheindexisinstalled,the
installermustturntheprovingdialontheindextoensuretheindexis
properlyengagedwiththemodule.
Figure 5.7 American: Installing Index on standoff screws
Figure 5.8 American: Sliding the Index clip in
Use torque screwdriver set at 10 inch-pounds to install the two captured standoff screws
for all module installations.
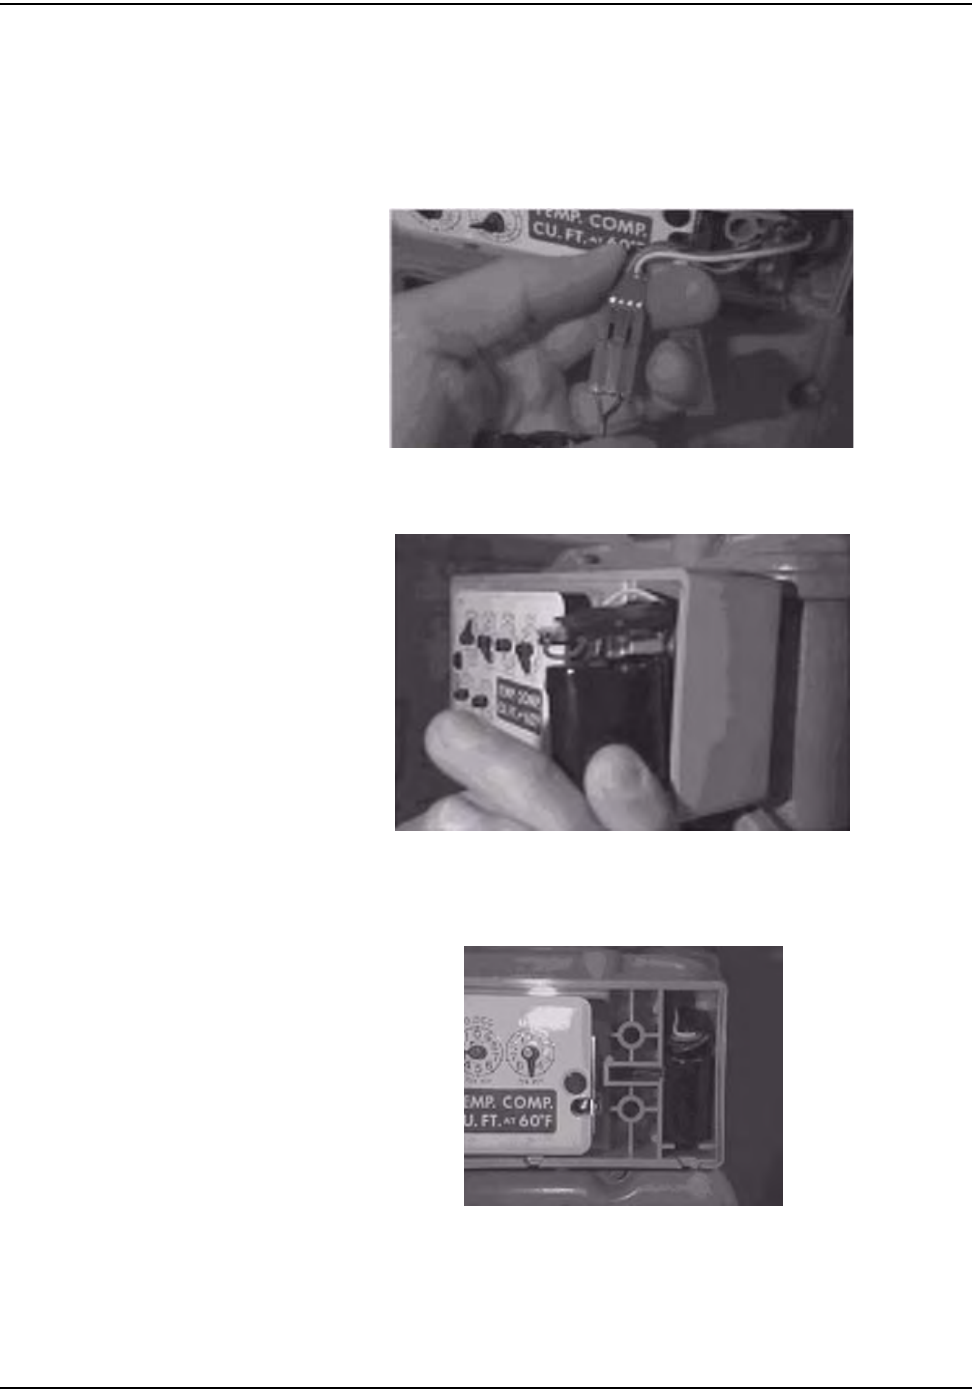
oÉëáÇÉåíá~ä=jÉíÉê=jçÇìäÉ=oÉíêçÑáí
RJS `ÉääåÉí=d~ë=jçÇìäÉ=~åÇ=jÉíÉê=fåëí~ää~íáçå=dìáÇÉ
8Plugthebatteryintotheprogrammingportpowercableandplaceitinthe
batterycompartmentwiththebatterywiresontop.
Figure 5.9 American: Connecting the battery
Figure 5.10 American: Installing the battery with the battery cable on top
Figure 5.11 American: Properly installed battery
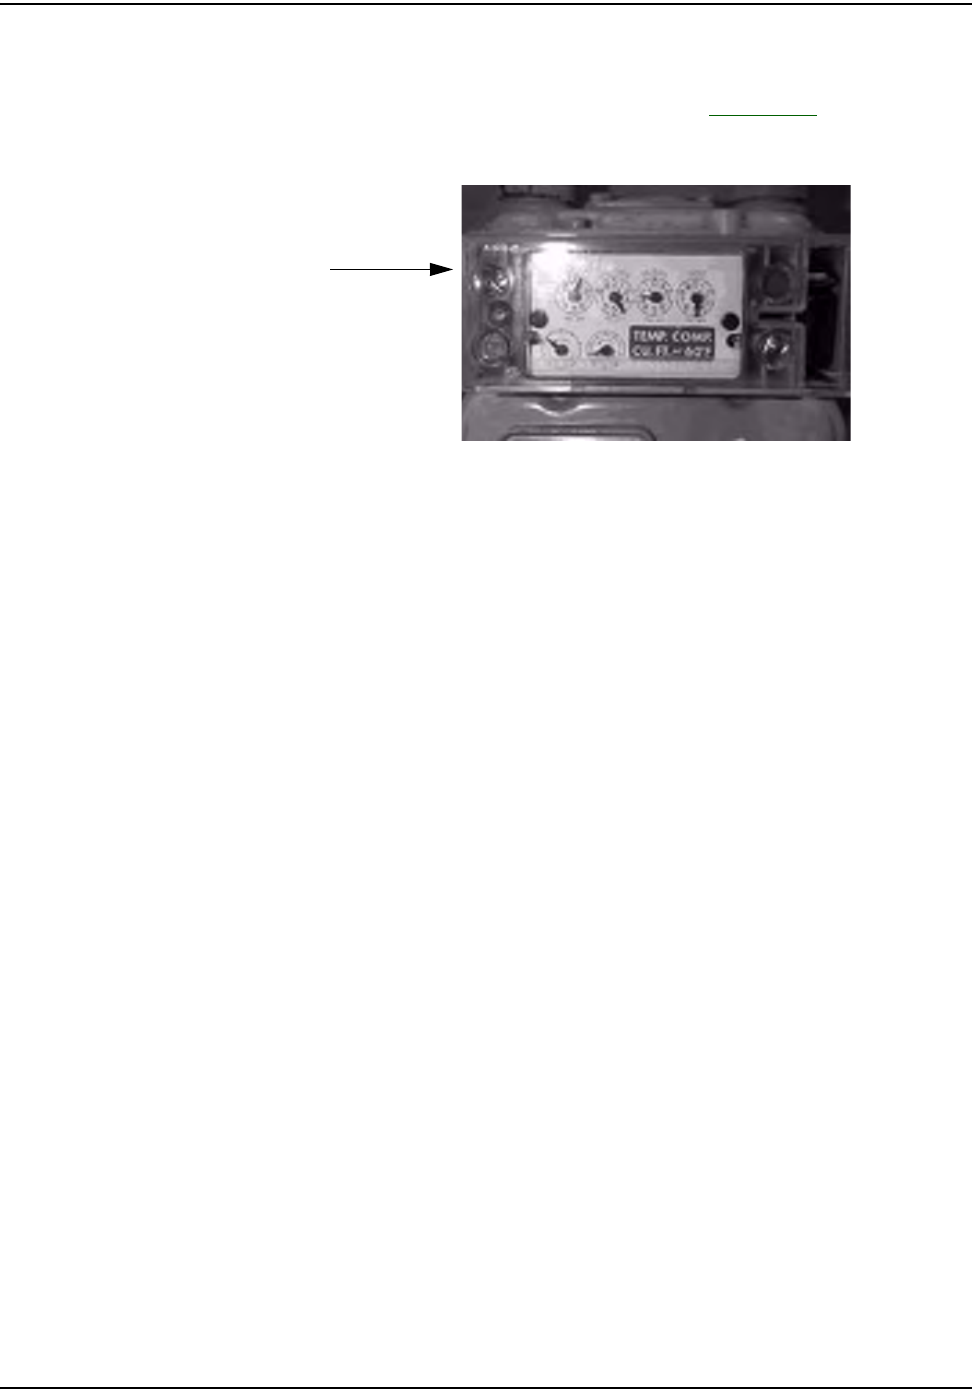
oÉëáÇÉåíá~ä=jÉíÉê=jçÇìäÉ=oÉíêçÑáí
`ÉääåÉí=d~ë=jçÇìäÉ=~åÇ=jÉíÉê=fåëí~ää~íáçå=dìáÇÉ RJT
9UtilizetheRFBustertoverifymoduleistransmitting,holdtheRFBusterwith
magnetsidetothetopupperleftquadrantofthemoduleplasticcoverand
holdthebuttonuntil10beepsarereceived.SeeAppendix C,UsingtheRF
Busterformoreinformation.
Figure 5.12 American: Meter module with cover and tamper seals installed
10 InstallthecoverontheMeterModulebase,usingthefourscrewsthatwere
provided.Tightenthescrewsuntilthecoversitssnug,thentightenan
additionalquarterturn.
11 Installnewredtampersealsovertwodiagonalscrews(upperrightandlower
left,orupperleftandlowerright).
12 Cleanupanydebrisfromtheretrofitandinstallationprocesses,andleavea
doorhangertagwithanyappropriateinformationfilledin.Makesureto
alwaysleaveadoorhanger.
13 Attheendoftheday,theinstallerreturnstotheCrossDockforthecheck‐in
process.Theinstallershouldalsoturnininventoryofunused,defective,or
brokengasMeterModules.TheInstallermustcheckinallHandheldsissued.
Theinstallerisresponsibleforreconcilinganydiscrepanciesinchangeddata
beforethecheck‐inprocesscanbecompleted.MetersModuleswillnotbe
checkedouttoaninstallerwhohasnotcompletedthepreviousdayʹscheck‐in
process.
Magnetlocation
for“busting”
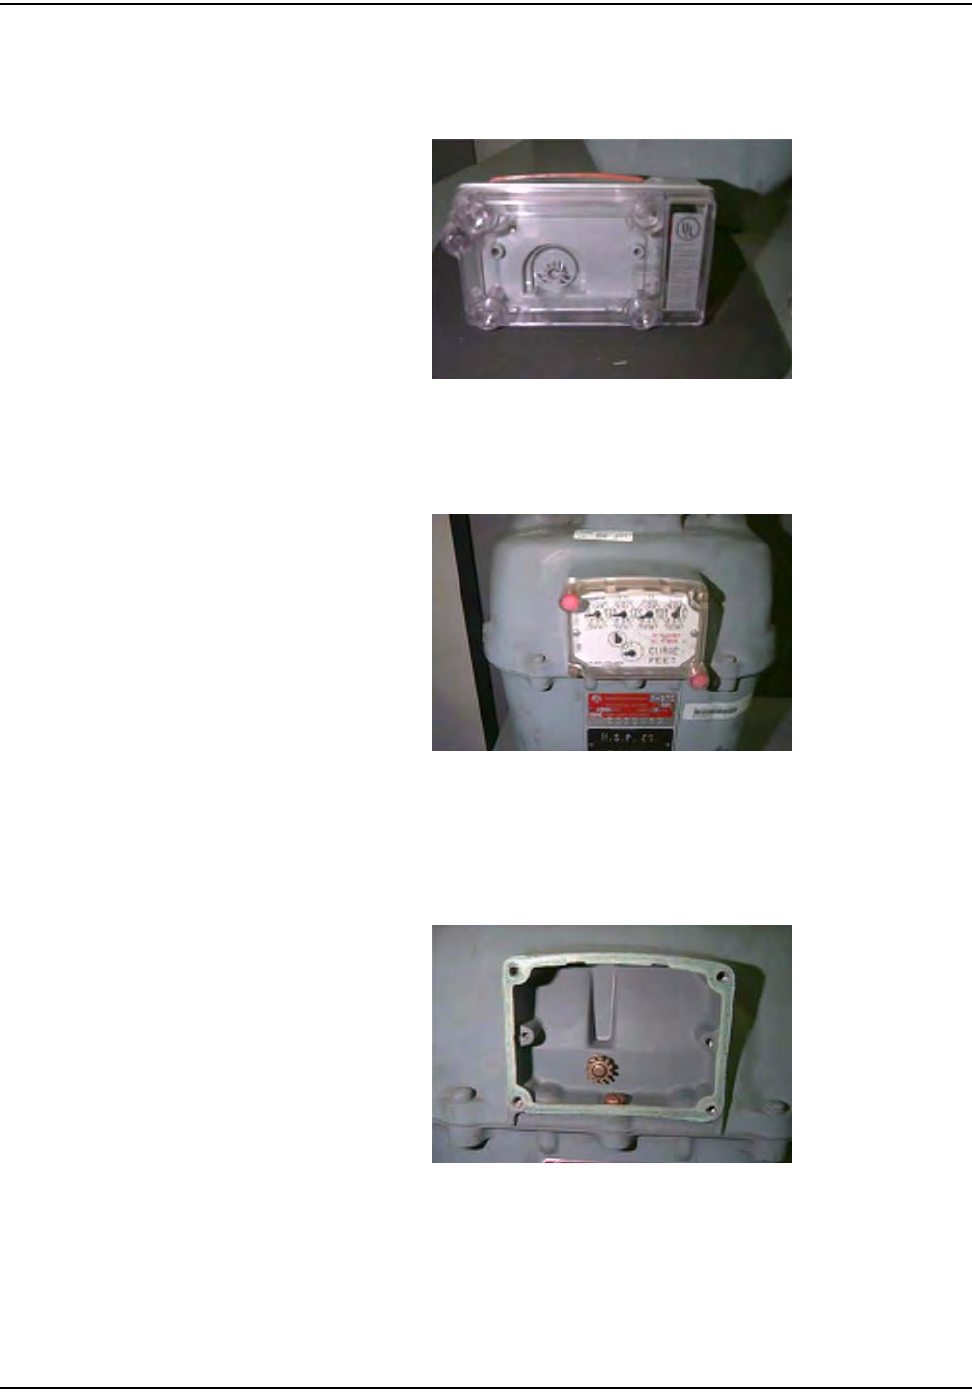
oÉëáÇÉåíá~ä=jÉíÉê=jçÇìäÉ=oÉíêçÑáí
RJU `ÉääåÉí=d~ë=jçÇìäÉ=~åÇ=jÉíÉê=fåëí~ää~íáçå=dìáÇÉ
Rockwell/Equimeter/Sensus Meter Module Installation
Figure 5.13 Rockwell/Equimeter/Sensus: meter module before installation
Figure 5.14 Rockwell/Equimeter/Sensus: meter
1Followsteps1‐4inʺToBeginResidentialMeterModuleRetrofitʺonpage 5‐1.
Figure 5.15 Rockwell/Equimeter/Sensus: Meter with tamper seals and index cover removed
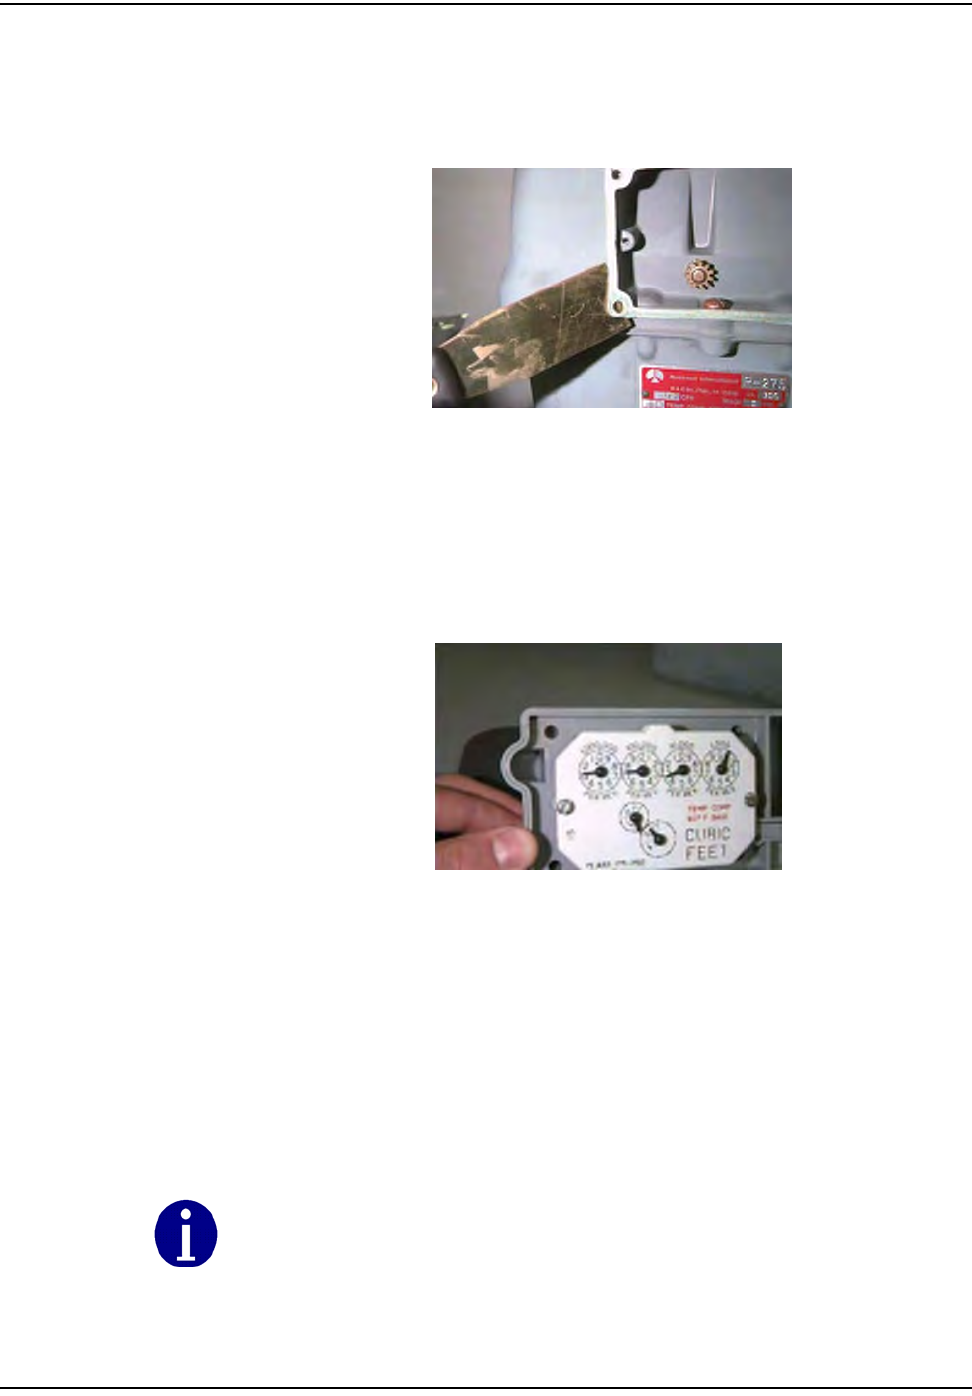
oÉëáÇÉåíá~ä=jÉíÉê=jçÇìäÉ=oÉíêçÑáí
`ÉääåÉí=d~ë=jçÇìäÉ=~åÇ=jÉíÉê=fåëí~ää~íáçå=dìáÇÉ RJV
2Removetheindexandalloftheoriginalgasketmaterial.Cleanthearea
behindtheindexonthemeterwithawirebrushandgasketscraperto
removealldebris.
Figure 5.16 Rockwell/Equimeter/Sensus: Removal of index cover gasket
3InsertthetwoscrewsthroughtheindexandthroughtheMeterModulebase.
Ensurethatthemoduleʹswigglerandthemeterdrivedogoftheindexare
properlyaligned.
Figure 5.17 Rockwell/Equimeter/Sensus: Meter Module and index with screws in place ready for
assembly
4WhileholdingtheindexandMeterModulebasetogether,alignthemeter
drivedogwiththemodulewiggler.Thetorquerequirementforfasteningthe
screwsis4‐8inch‐pounds.RefertoʺRockwell/Equimeter/Sensus:Attachingthe
MeterModuleandindextothemeterʺonpage 5‐10.
Do not over tighten the standoff screws; if module wiggler and meter drive dog are not
aligned properly it may result in a meter failure.
Check the wiggler on the meter module for free movement. The wiggler should turn at
least 10 degrees, but no greater than 1/4 turn. If it is binding, then disassemble and
realign. This is also known as the "wiggle" test.
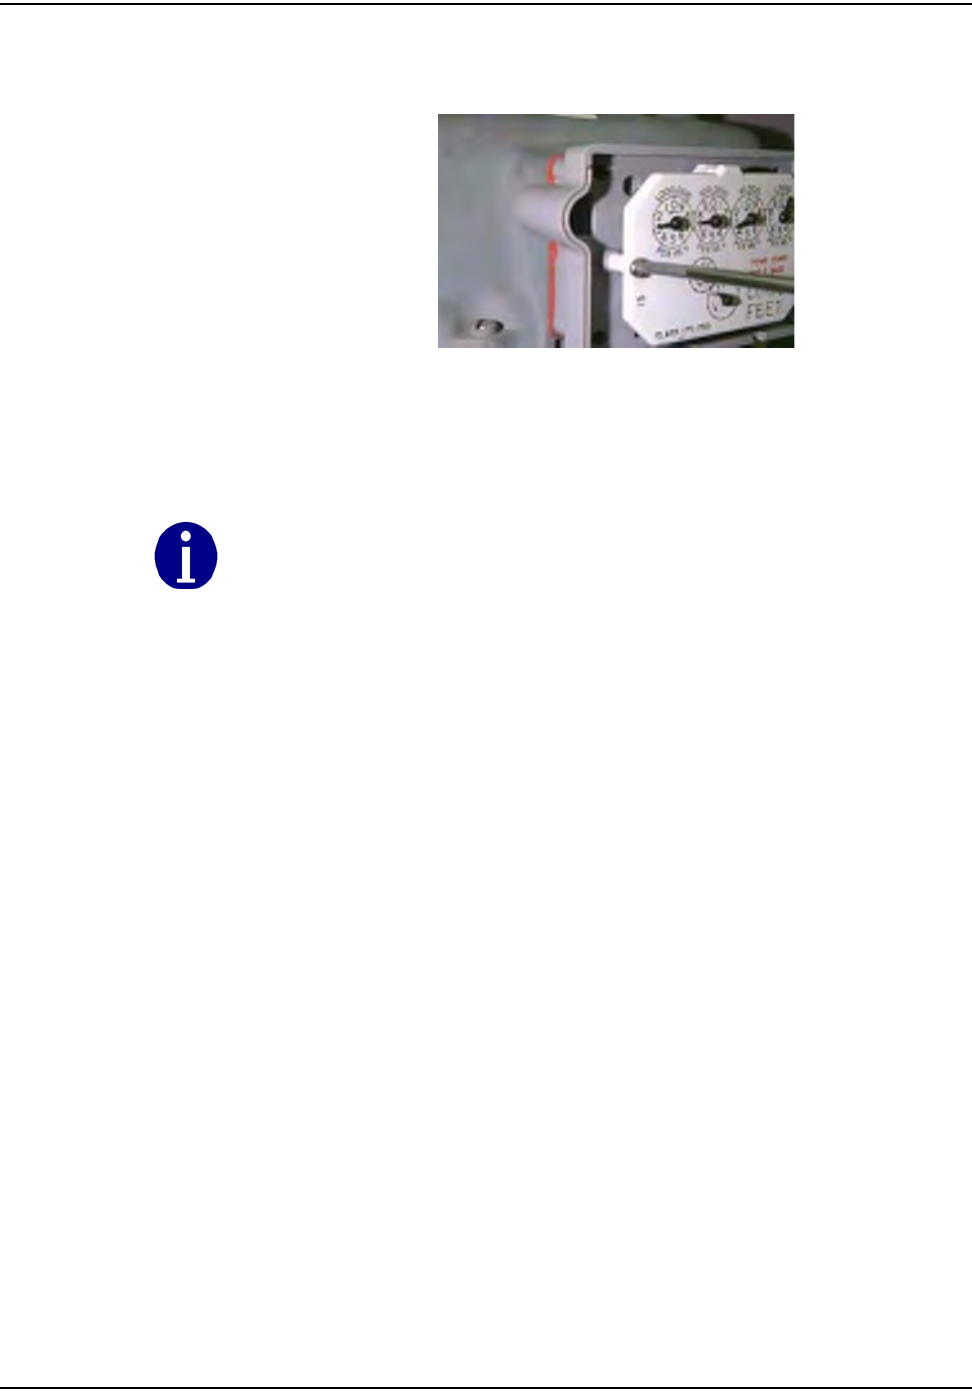
oÉëáÇÉåíá~ä=jÉíÉê=jçÇìäÉ=oÉíêçÑáí
RJNM `ÉääåÉí=d~ë=jçÇìäÉ=~åÇ=jÉíÉê=fåëí~ää~íáçå=dìáÇÉ
Figure 5.18 Rockwell/Equimeter/Sensus: Attaching the Meter Module and index to the meter
5Gentlywigglethetwo‐footprovingdialtomakesurethegearsaremeshed
properly.Thereshouldbenogreaterthan1/4turnplay.
All of the original gasket and all debris must be completely removed or it will result in a
module and meter failure.
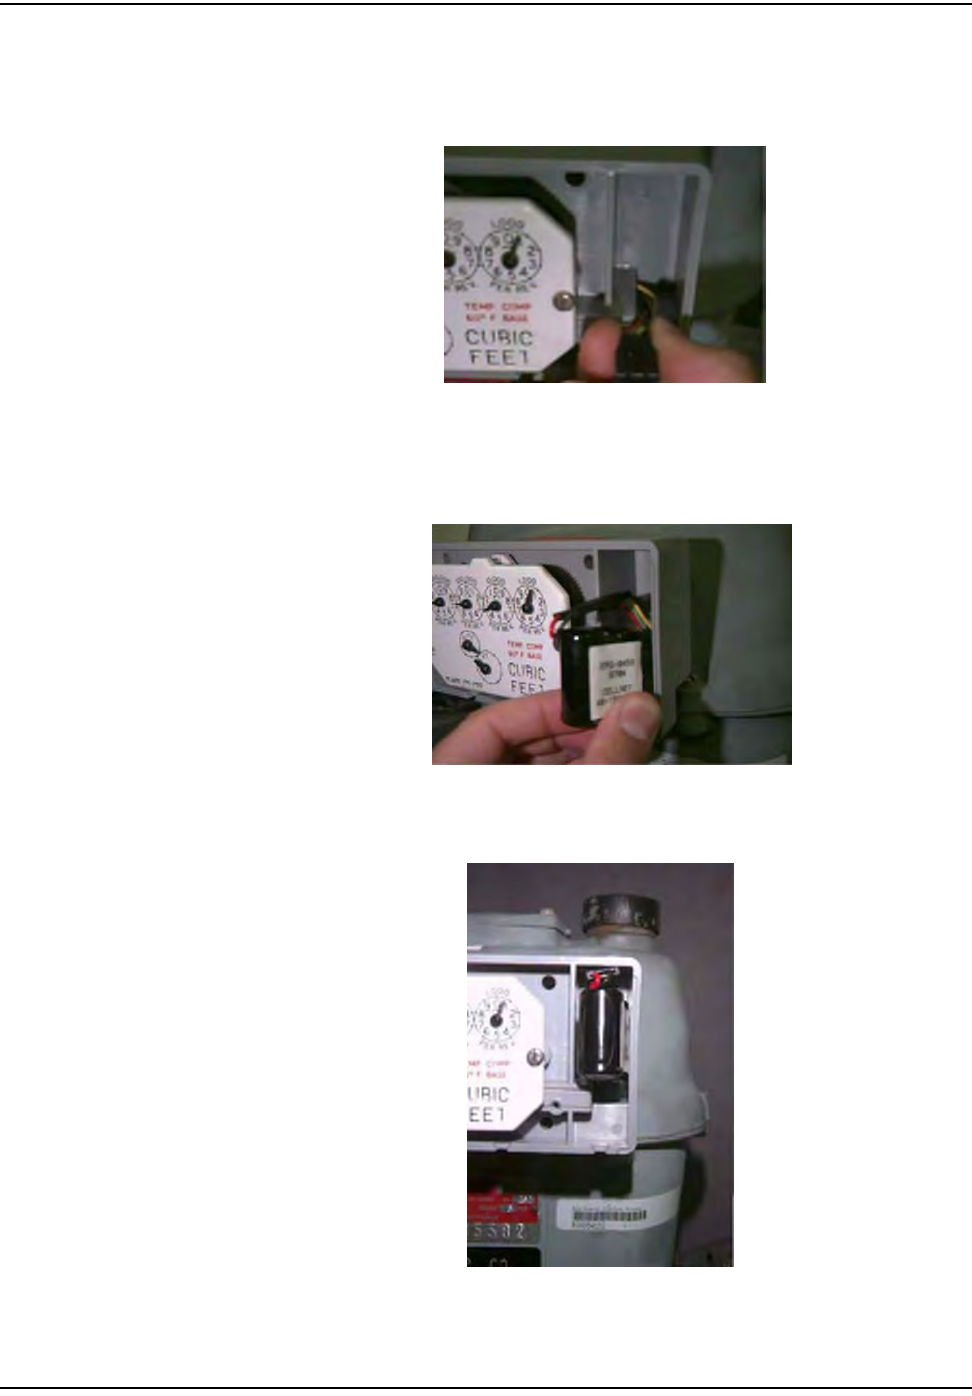
oÉëáÇÉåíá~ä=jÉíÉê=jçÇìäÉ=oÉíêçÑáí
`ÉääåÉí=d~ë=jçÇìäÉ=~åÇ=jÉíÉê=fåëí~ää~íáçå=dìáÇÉ RJNN
6Plugthebatteryintotheprogrammingpowercableandplaceitinthebattery
compartmentwiththebatterywiresontop.
Figure 5.19 Rockwell/Equimeter/Sensus: Connecting the battery
Figure 5.20 Rockwell/Equimeter/Sensus: Correct battery orientation (connector on top)
Figure 5.21 Rockwell/Equimeter/Sensus: Battery properly installed
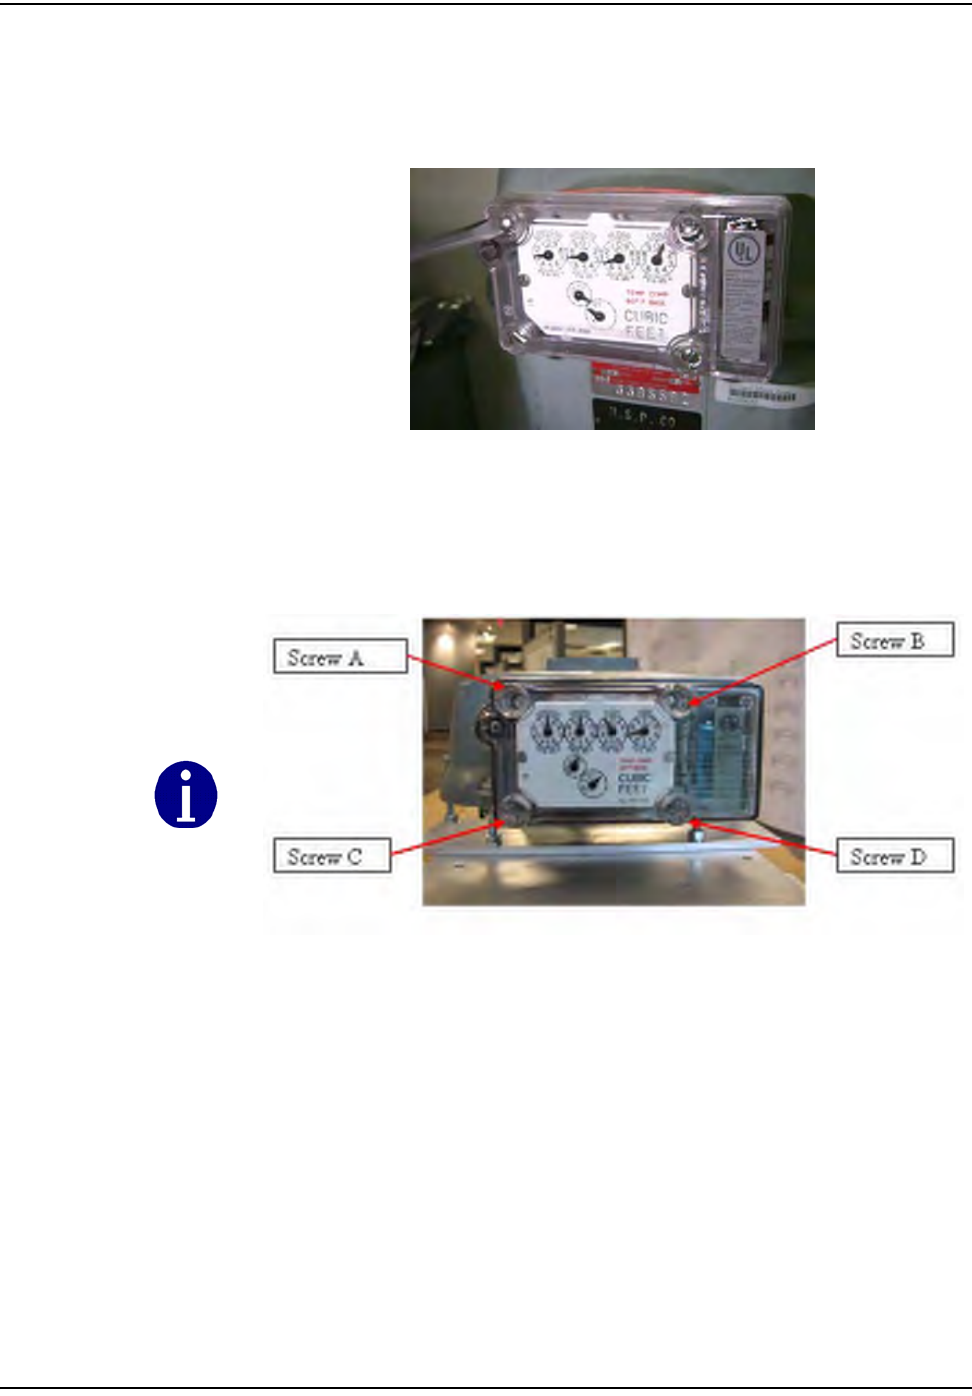
oÉëáÇÉåíá~ä=jÉíÉê=jçÇìäÉ=oÉíêçÑáí
RJNO `ÉääåÉí=d~ë=jçÇìäÉ=~åÇ=jÉíÉê=fåëí~ää~íáçå=dìáÇÉ
7UsethefourremainingscrewstoinstallthecovertotheMeterModulebase,
tighteningthescrewsuntilthecoversitssnug,thentightenanadditional
quarterturn.
Figure 5.22 Rockwell/Equimeter/Sensus: Installing the Meter Module cover
You can mount an Equimeter module to a Rockwell/Equimeter Residential Gas meter using
only two screws, as long as you use one of the following configurations (based on the
image below): A-D, B-C, or A-B. If screws cannot be properly installed, replace with
threaded inserts and 8-32 scews.
Figure 5.23 Rockwell/Equimeter/Sensus: two-screw configuration
Configurations C-D, B-D, and A-C are unacceptable. These are not strong enough to
exclude rainwater.
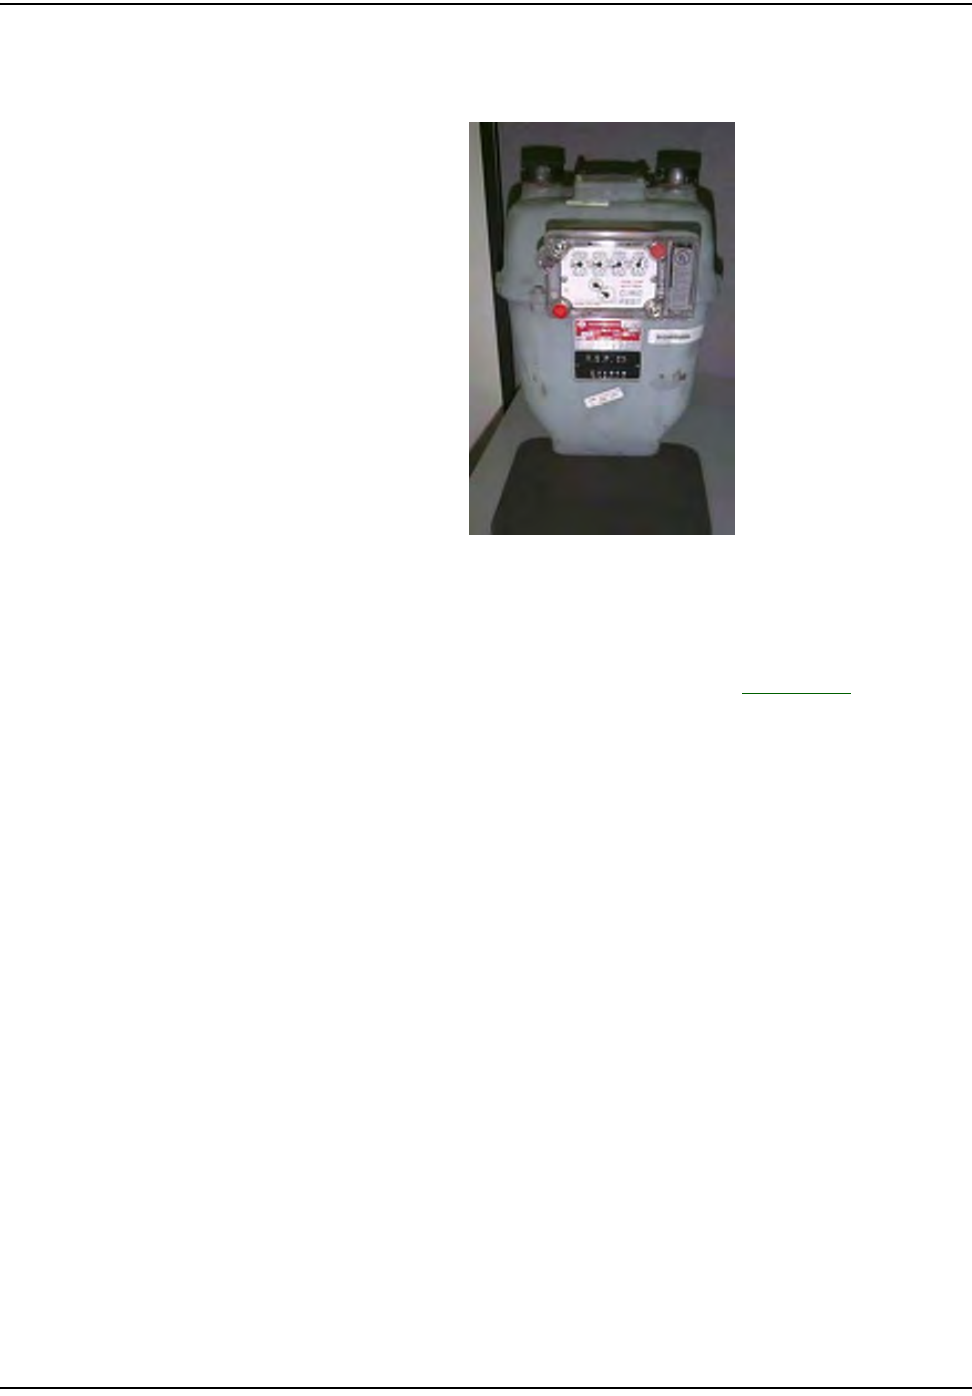
oÉëáÇÉåíá~ä=jÉíÉê=jçÇìäÉ=oÉíêçÑáí
`ÉääåÉí=d~ë=jçÇìäÉ=~åÇ=jÉíÉê=fåëí~ää~íáçå=dìáÇÉ RJNP
8Installnewredtampersealsoverdiagonalscrews(upperrightandlowerleft,
orupperleftandlowerright).
Figure 5.24 Rockwell/Equimeter/Sensus: Correctly installed Meter Module
9UtilizetheRFBustertoverifymoduleistransmitting,holdtheRFBusterwith
magnetsidetothetopupperleftquadrantofthemoduleplasticcoverand
holdthebuttonuntil10beepsarereceived.RefertoAppendix C,UsingtheRF
Buster.
10 Cleanupanydebrisfromtheretrofitandinstallationprocesses,andleavea
doorhangertagwithanyappropriateinformationfilledin,ifdoorhangers
arespecifiedduringinstallertrainingforthatutility.Makesuretoalways
leaveadoorhanger.
11 Attheendoftheday,theinstallerreturnstotheCrossDockforthecheck‐in
process.Theinstallershouldalsoreturnunused,defective,orbrokenGas3
MeterModules.TheinstallermustcheckinallHandheldsissuedatthestart
oftheshift.Theinstallerisresponsibleforreconcilinganydiscrepanciesin
changeoutdatabeforethecheck‐inprocesscanbecompleted.MeterModules
willnotbecheckedouttoaninstallerwhohasnotcompletedtheprevious
dayʹscheck‐inprocess.
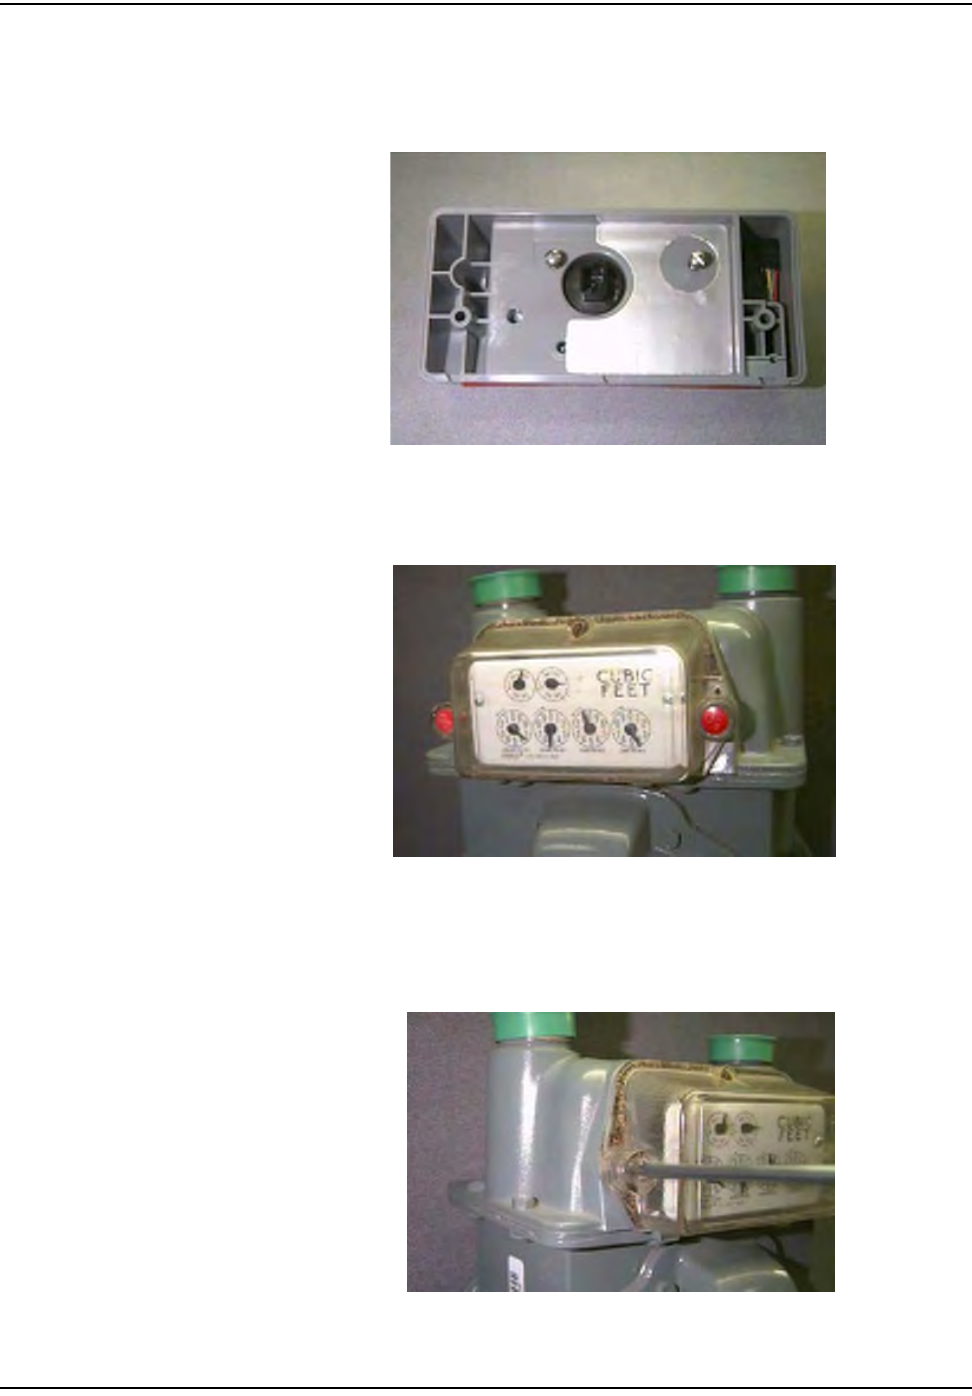
oÉëáÇÉåíá~ä=jÉíÉê=jçÇìäÉ=oÉíêçÑáí
RJNQ `ÉääåÉí=d~ë=jçÇìäÉ=~åÇ=jÉíÉê=fåëí~ää~íáçå=dìáÇÉ
Sprague/Schlumberger/Actaris Meter Module Installation
Figure 5.25 Sprague/Schlumberger/Actaris: Meter Module before installation
Figure 5.26 Sprague/Schlumberger/Actaris: Meter
1Followsteps1‐4inʺToBeginResidentialMeterModuleRetrofitʺonpage 5‐1.
Figure 5.27 Sprague/Schlumberger/Actaris: Removing the index cover
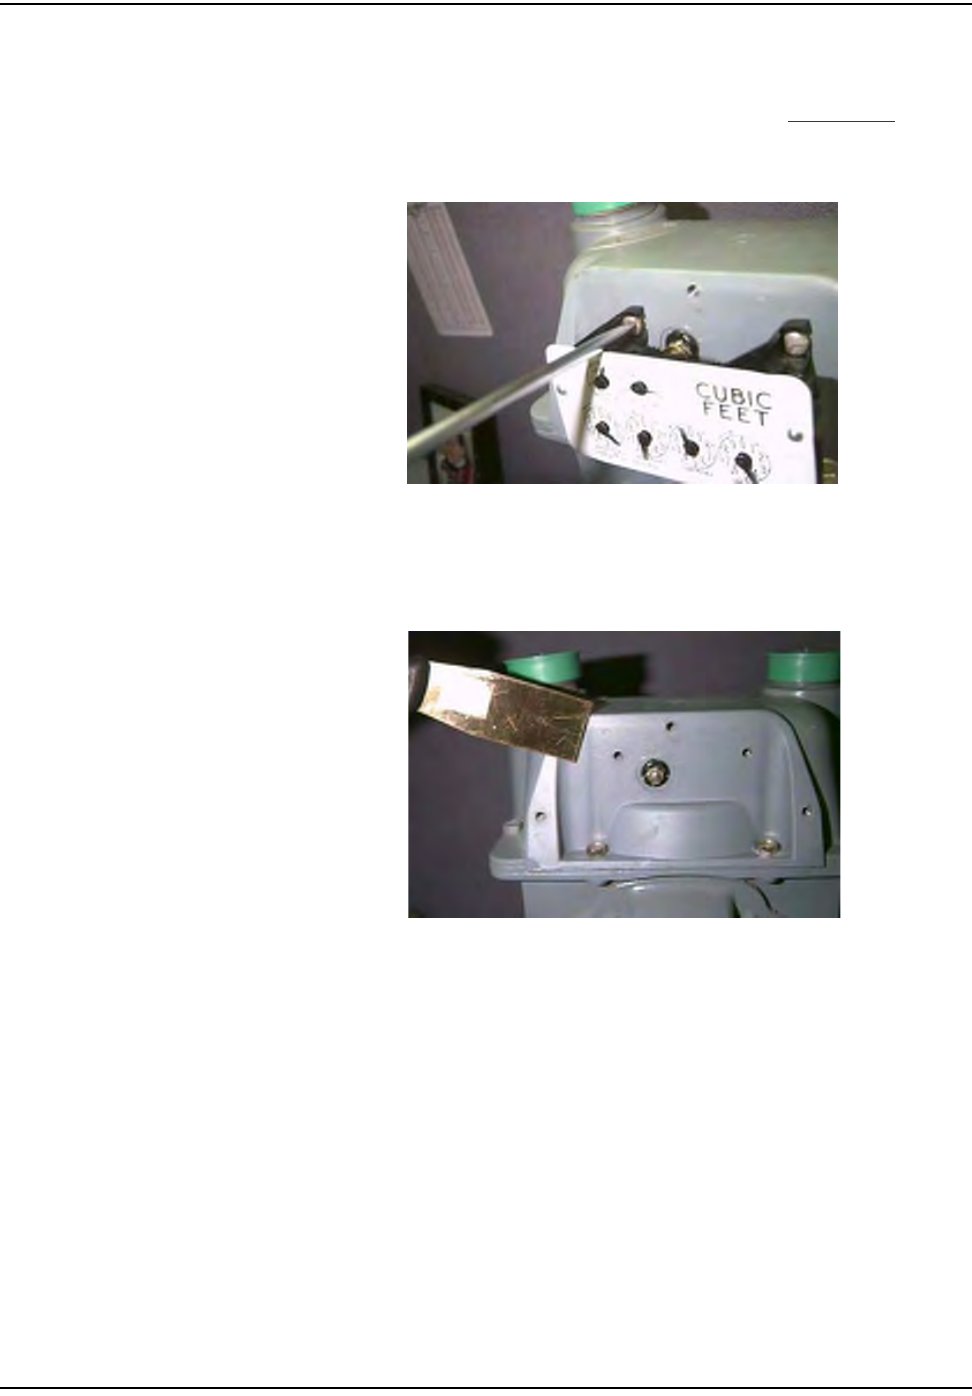
oÉëáÇÉåíá~ä=jÉíÉê=jçÇìäÉ=oÉíêçÑáí
`ÉääåÉí=d~ë=jçÇìäÉ=~åÇ=jÉíÉê=fåëí~ää~íáçå=dìáÇÉ RJNR
2Removetheindexandindexscrewsfromthemeter.Inspecttheindexforany
signsofdamage.Ifdamaged,replacetheindex.RefertoAppendix B,Visual
InspectionofIndexesformoreinformation.Alsoremovealloftheoriginal
gasketmaterial,ifany.
Figure 5.28 Sprague/Schlumberger/Actaris: Removing the index
3Cleantheareabehindtheindexandthecovergasketsurfaceonthemeter
withawirebrushandgasketscraper.Ensuretheentireareaisfreeofdebris.
Figure 5.29 Sprague/Schlumberger/Actaris: Removal of index cover gasket
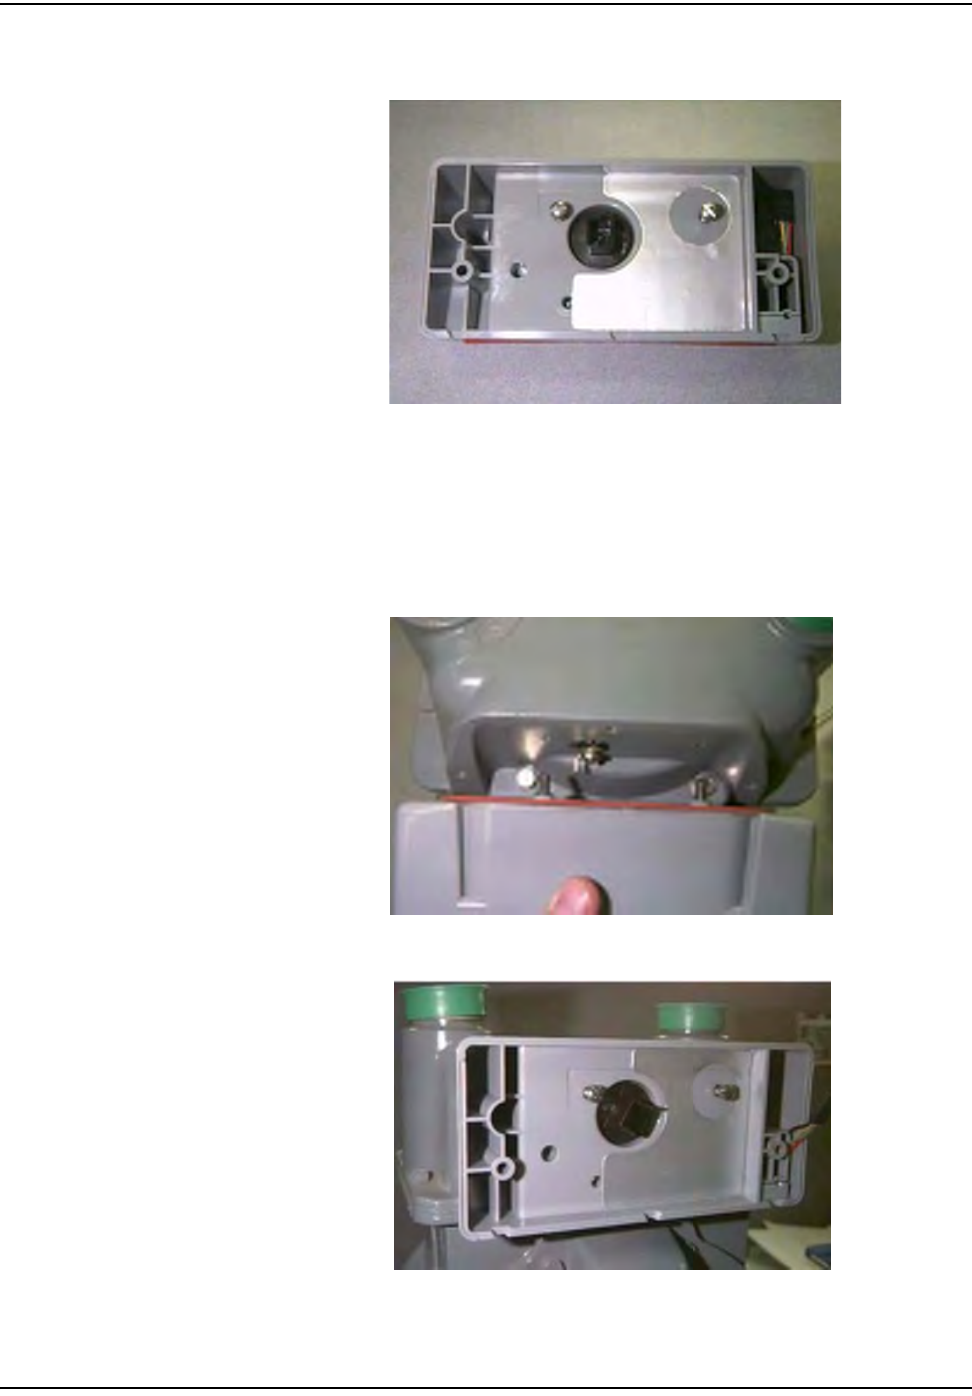
oÉëáÇÉåíá~ä=jÉíÉê=jçÇìäÉ=oÉíêçÑáí
RJNS `ÉääåÉí=d~ë=jçÇìäÉ=~åÇ=jÉíÉê=fåëí~ää~íáçå=dìáÇÉ
4InsertthetwoPhillipsheadscrewsthroughtheMeterModulebase.
Figure 5.30 Sprague/Schlumberger/Actaris: Meter Module pre-assembled
5AligntheMeterModulebasetothemeter.LeadtheIndexscrewsintothe
meter.Ensurethatthemoduleʹswigglerandthemeterʹsdrivedogarealigned
properly.Onlyengagescrews1turn,leaveclearancetoslidetheindexunder
thescrewheads.
Figure 5.31 Sprague/Schlumberger/Actaris: Alignment of the meter drive dog and screws
Figure 5.32 Sprague/Schlumberger/Actaris: Meter Module base attached to meter, ready to slide on
dials
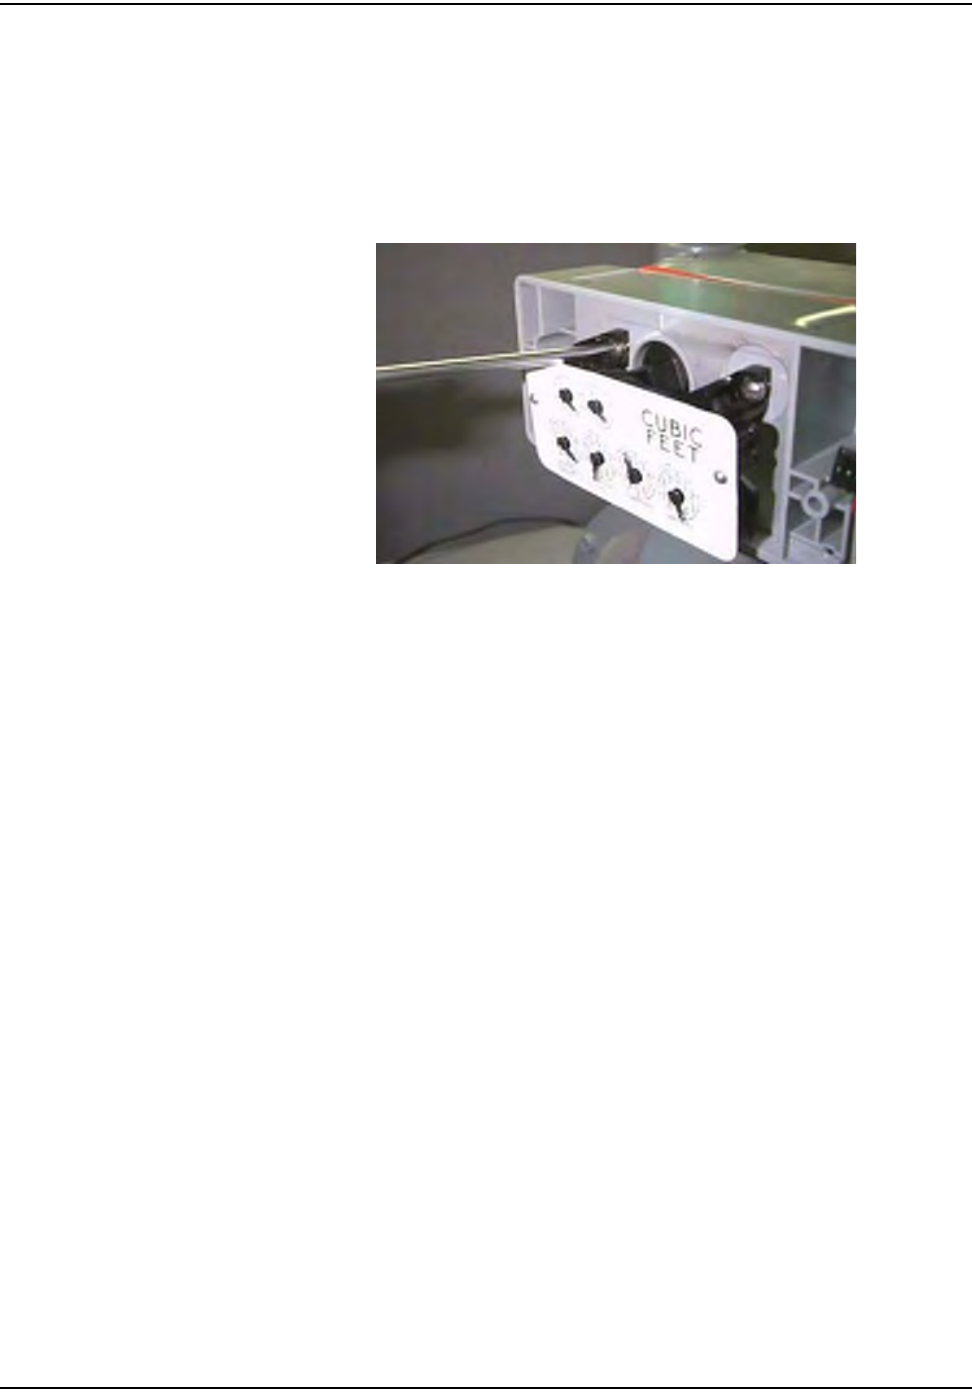
oÉëáÇÉåíá~ä=jÉíÉê=jçÇìäÉ=oÉíêçÑáí
`ÉääåÉí=d~ë=jçÇìäÉ=~åÇ=jÉíÉê=fåëí~ää~íáçå=dìáÇÉ RJNT
6Installtheindexbyslidingthetabsontheindexundertheheadsofthescrew
andtighteningthescrews.Thetorquerequirementis4‐8inch‐pounds.Ensure
thatthemoduleʹswigglerandthemeterdrivedogoftheindexareproperly
alignedbeforetighteningthescrews.Alsoensurethatthemoduleisnot
boundupbycheckingthe2Footdialtoensurethatithasbetween1/4and1/2
turnplayinit.
Figure 5.33 Sprague/Schlumberger/Actaris: Securing index and checking for free movement of
wiggler-
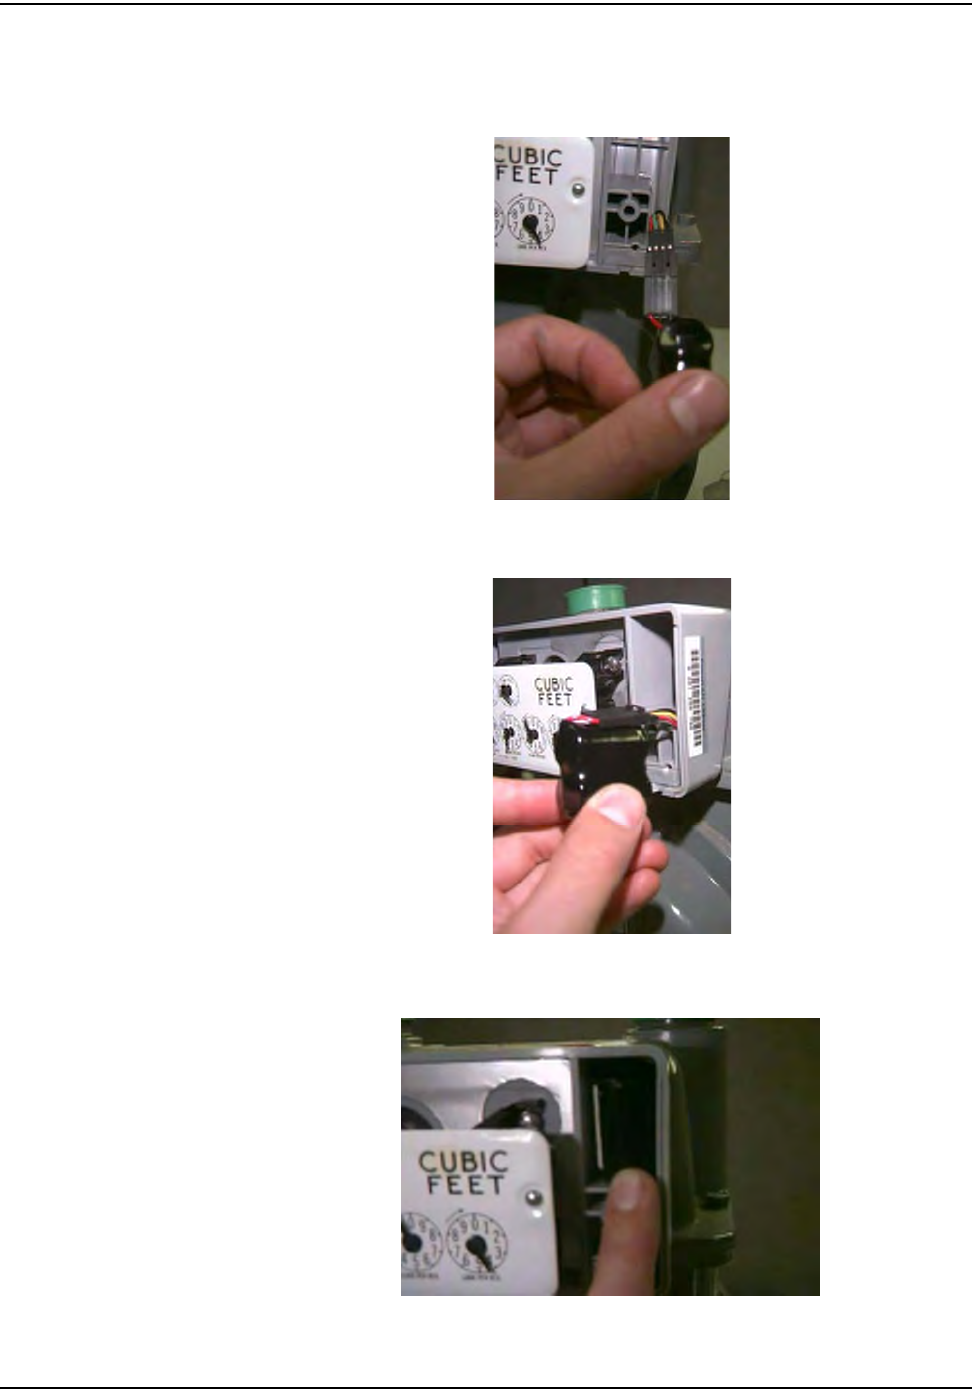
oÉëáÇÉåíá~ä=jÉíÉê=jçÇìäÉ=oÉíêçÑáí
RJNU `ÉääåÉí=d~ë=jçÇìäÉ=~åÇ=jÉíÉê=fåëí~ää~íáçå=dìáÇÉ
7Plugthebatteryintotheprogrammingpowercableandplaceitintothe
batterycompartmentwiththebatterywiresandconnectorinback(see
Figures36,37,and38).
Figure 5.34 Sprague/Schlumberger/Actaris: Connecting the Battery
Figure 5.35 Sprague/Schlumberger/Actaris: Correct Battery Orientation
Figure 5.36 Sprague/Schlumberger/Actaris: Battery Correctly Installed
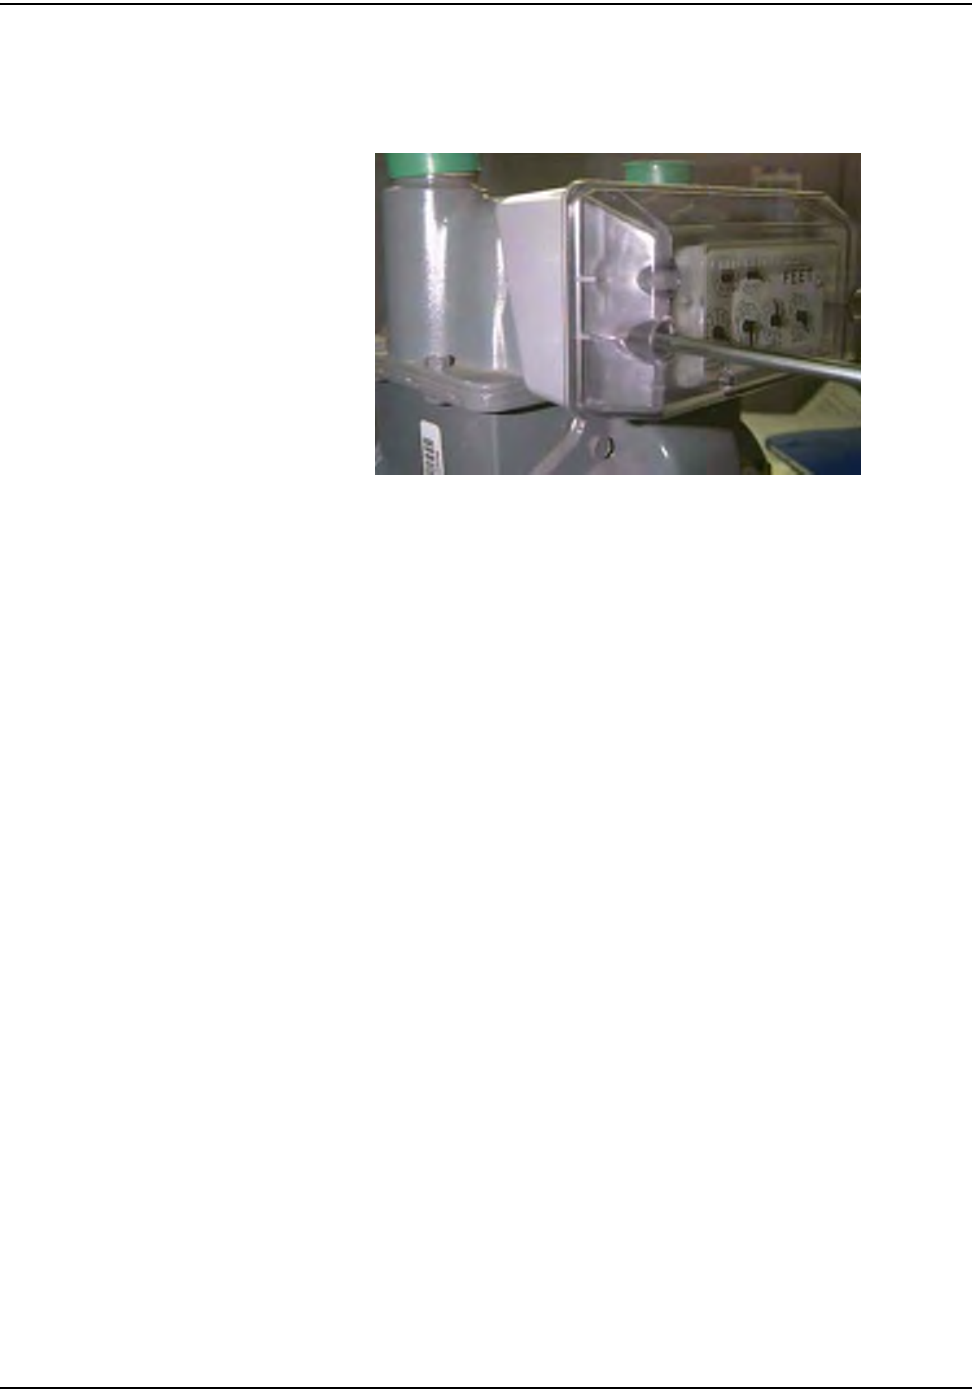
oÉëáÇÉåíá~ä=jÉíÉê=jçÇìäÉ=oÉíêçÑáí
`ÉääåÉí=d~ë=jçÇìäÉ=~åÇ=jÉíÉê=fåëí~ää~íáçå=dìáÇÉ RJNV
8UsetheremainingtwoscrewstoinstallthecoverontheMeterModule,
tighteningthescrewsuntilthecoversitssnug,thentightenanadditional
quarterturn.Insertthetworedtamperseals.
Figure 5.37 Sprague/Schlumberger/Actaris: Fasten Cover Screws and Insert Tamper seals
9UtilizetheRFBustertoverifymoduleistransmitting,holdtheRFBusterwith
magnetsidetothetopupperleftquadrantofthemoduleplasticandholdthe
buttonuntil10beepsarereceived.
10 Cleanupanydebrisfromtheretrofitandinstallationprocesses,andleavea
doorhangertagwithanyappropriateinformationfilledin,ifdoorhangers
arespecifiedduringinstallertrainingforthatutility.
11 Attheendoftheday,theinstallerreturnstotheCrossDockforthecheck‐in
process.Theinstallershouldalsoturnininventoryofunused,defective,or
brokengasMeterModules.TheinstallermustcheckinallHandheldsissued
atthestartoftheshift.Theinstallerisresponsibleforreconcilingany
discrepanciesinchangeoutdatabeforethecheck‐inprocesscanbe
completed.MeterModuleswillnotbecheckedouttoaninstallerwhohasnot
completedthepreviousdayʹscheck‐inprocess.
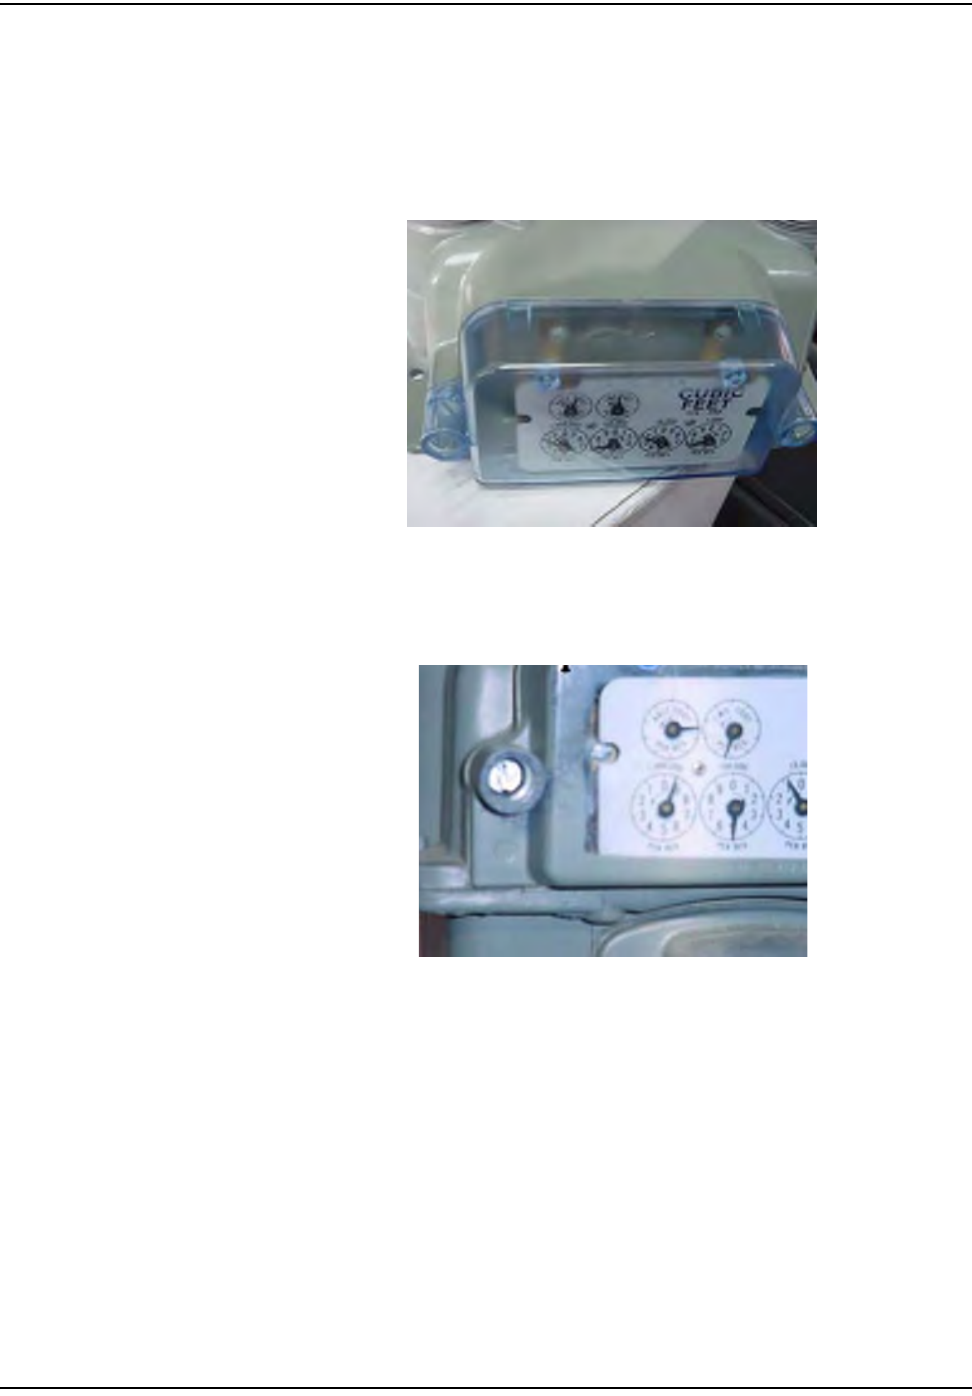
oÉëáÇÉåíá~ä=jÉíÉê=jçÇìäÉ=oÉíêçÑáí
RJOM `ÉääåÉí=d~ë=jçÇìäÉ=~åÇ=jÉíÉê=fåëí~ää~íáçå=dìáÇÉ
Lancaster/National Meter Module Installation
BeforebeginningtheLancasterretrofit,ensurethatthemeterisretrofittable.You
canidentifythisbytheplacementofthescrewsthatattachthedialstothe
module.Itisveryimportantthatyoudonotbreakthesealofthemeterdialcover
ifthisisnotaretrofittablemeter.
Figure 5.38 Lancaster/National: Meter retrofittable
Figure 5.39 Lancaster/National: Meter non-retrofittable
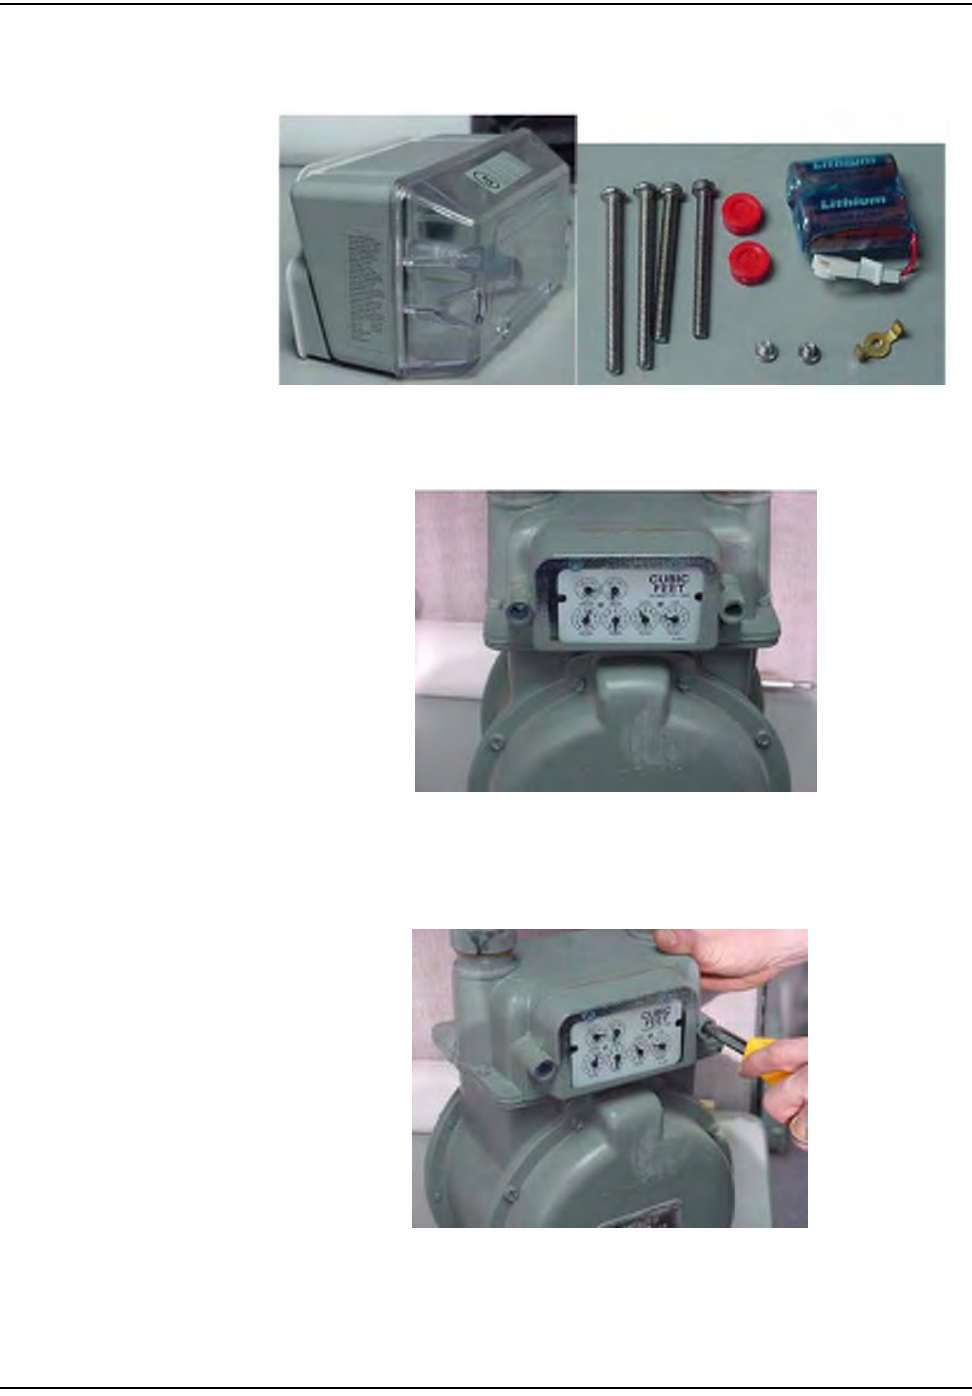
oÉëáÇÉåíá~ä=jÉíÉê=jçÇìäÉ=oÉíêçÑáí
`ÉääåÉí=d~ë=jçÇìäÉ=~åÇ=jÉíÉê=fåëí~ää~íáçå=dìáÇÉ RJON
Figure 5.40 Lancaster/National: Meter Module before installation
Figure 5.41 Lancaster/National: Meter
1Followsteps1‐4inʺToBeginResidentialMeterModuleRetrofitʺonpage 5‐1.
Figure 5.42 Lancaster/National: Removing the index cover
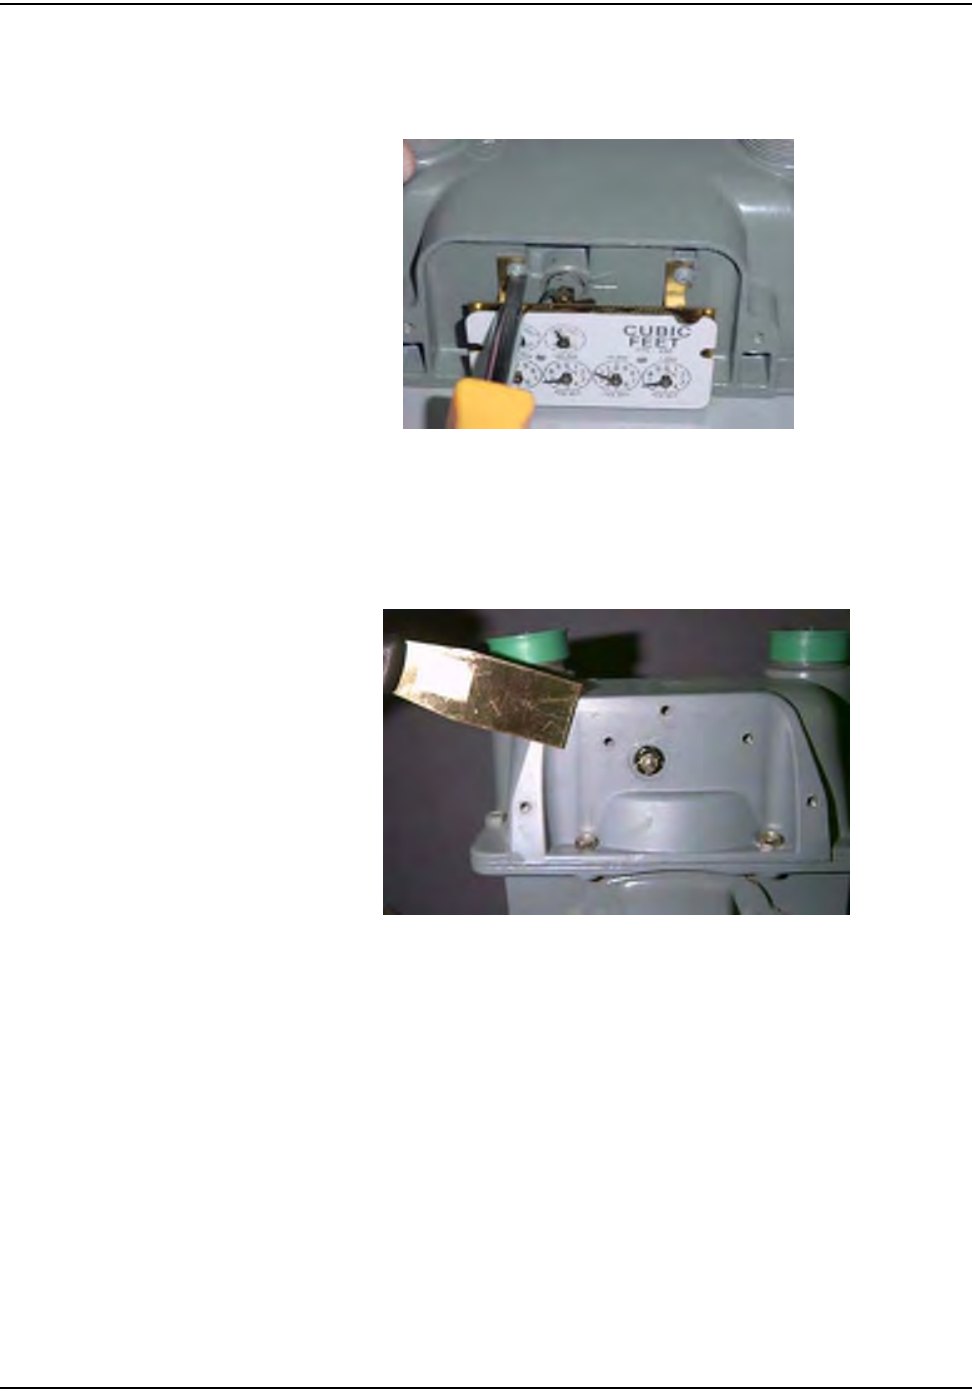
oÉëáÇÉåíá~ä=jÉíÉê=jçÇìäÉ=oÉíêçÑáí
RJOO `ÉääåÉí=d~ë=jçÇìäÉ=~åÇ=jÉíÉê=fåëí~ää~íáçå=dìáÇÉ
2Removetheindexfromthemeter.
Figure 5.43 Lancaster/National: Removing the index
3Removealloftheoriginalgasketmaterial,ifany.Cleantheareabehindthe
indexandthecovergasketsurfaceonthemeterwithawirebrushandgasket
scraper,ensurethattheentireareaisfreeofdebris.
Figure 5.44 Lancaster/National: Removal of index cover gasket
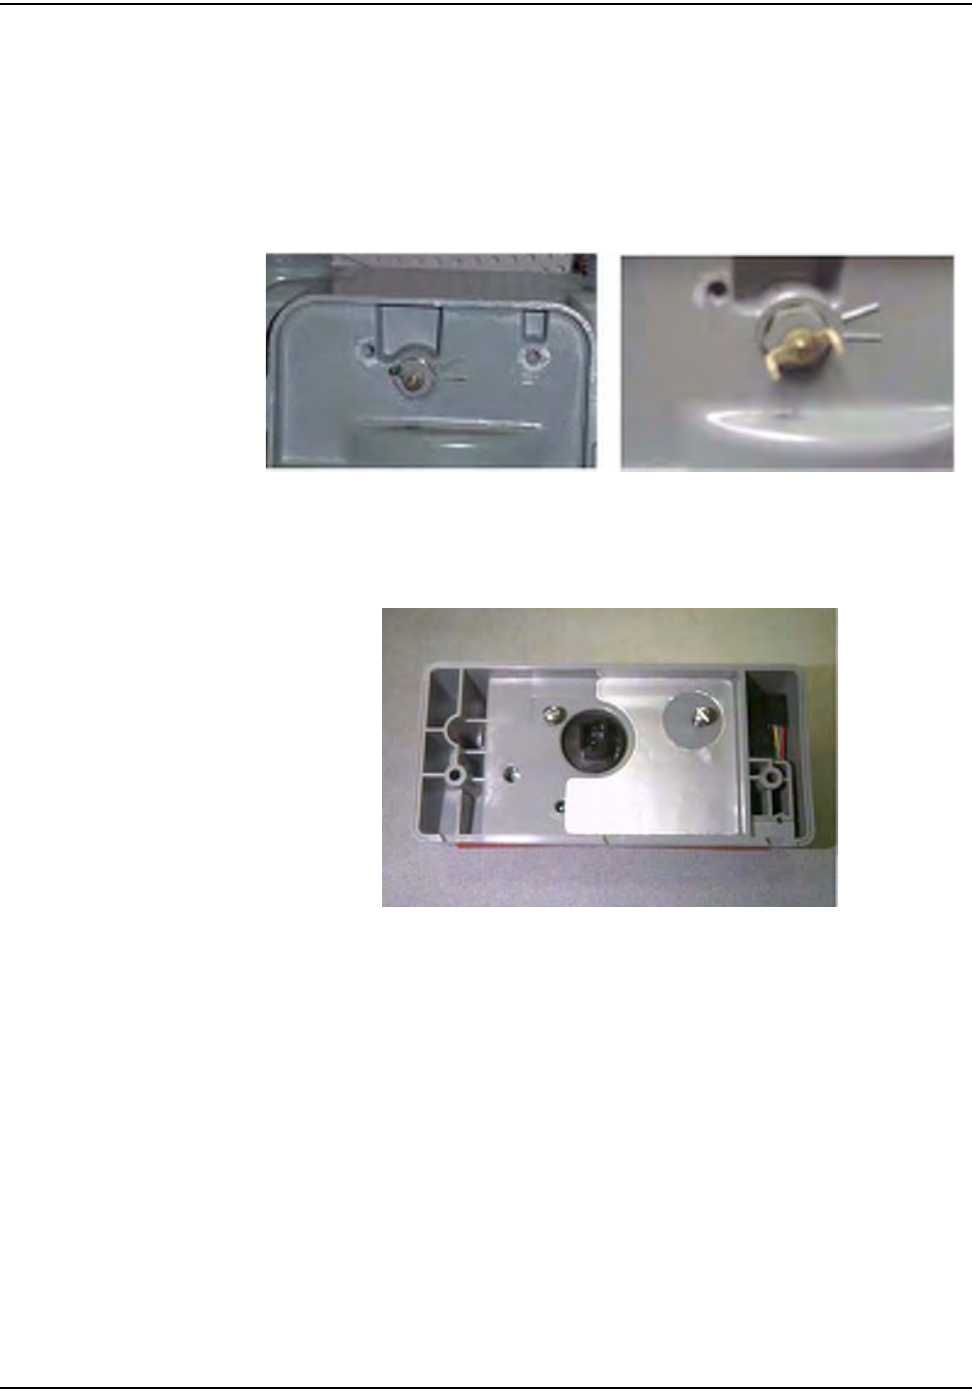
oÉëáÇÉåíá~ä=jÉíÉê=jçÇìäÉ=oÉíêçÑáí
`ÉääåÉí=d~ë=jçÇìäÉ=~åÇ=jÉíÉê=fåëí~ää~íáçå=dìáÇÉ RJOP
4Removeoriginalone‐prongcouplerandreplacewithtwo‐prongedcoupler,
beingcarefulnottocrossthethreads.Thisdoesnothavetobetightenedsince
themeterturningwillkeeptensiononthedrivedog.
Figure 5.45 Lancaster/National: Installation of New Coupler
5InsertthetwolongerscrewsthroughtheMeterModulebase.
Figure 5.46 Lancaster/National: Meter Module pre-assembled
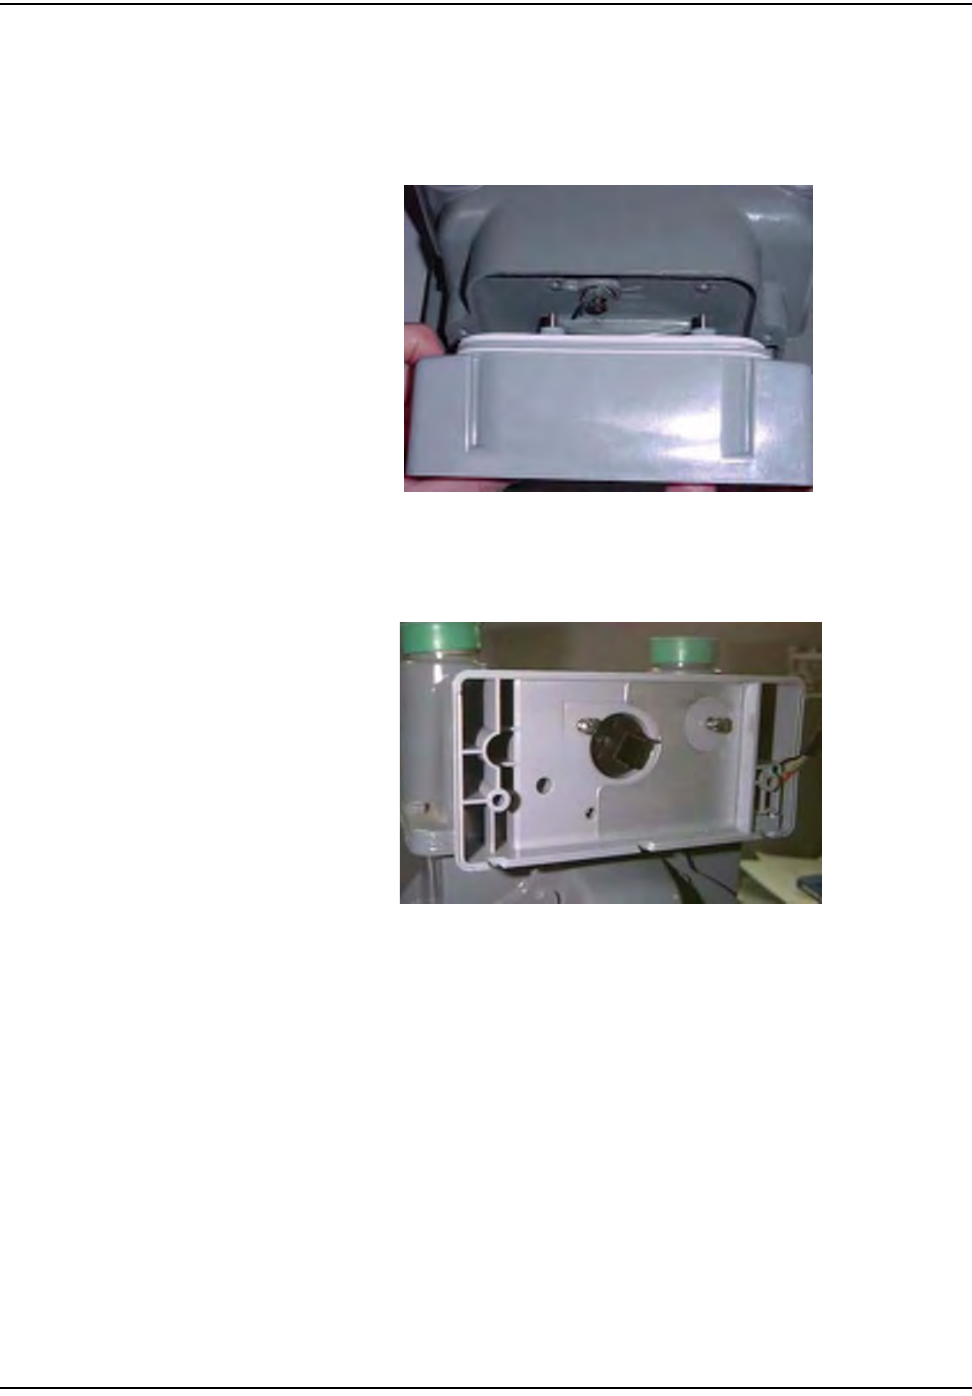
oÉëáÇÉåíá~ä=jÉíÉê=jçÇìäÉ=oÉíêçÑáí
RJOQ `ÉääåÉí=d~ë=jçÇìäÉ=~åÇ=jÉíÉê=fåëí~ää~íáçå=dìáÇÉ
6 FastentheMeterModulebasetothemeter,ensuringthatthemoduleʹs
wigglerandmeterʹsdrivedogareproperlyaligned.Onlyengagescrews1
turn.
Figure 5.47 Lancaster/National: Alignment of the meter drive dog and screws
Figure 5.48 Lancaster/National: Meter Module base attached to meter, ready to slide on dials
7Installtheindexbyslidingthetabsontheindexundertheheadsofthescrew
andtighteningthescrews.Thetorquerequirementis10inch‐pounds.Ensure
thatthemoduleʹswigglerandthemeterdrivedogoftheindexareproperly
alignedbeforetighteningthescrews.Alsoensurethatthemoduleisnot
boundupbycheckingthe2Footdialtoensurethatithasbetween1/4and1/2
turnplayinit.SecuringIndexandCheckingforFreeMovementofDrive
Dog.

oÉëáÇÉåíá~ä=jÉíÉê=jçÇìäÉ=oÉíêçÑáí
`ÉääåÉí=d~ë=jçÇìäÉ=~åÇ=jÉíÉê=fåëí~ää~íáçå=dìáÇÉ RJOR
8Plugthebatteryintotheprogrammingport/powercableandplaceitintothe
batterycompartmentwiththebatterywiresandconnectorinback.
Figure 5.49 Lancaster/National: Connecting the Battery
Figure 5.50 Lancaster/National: Correct Battery Orientation
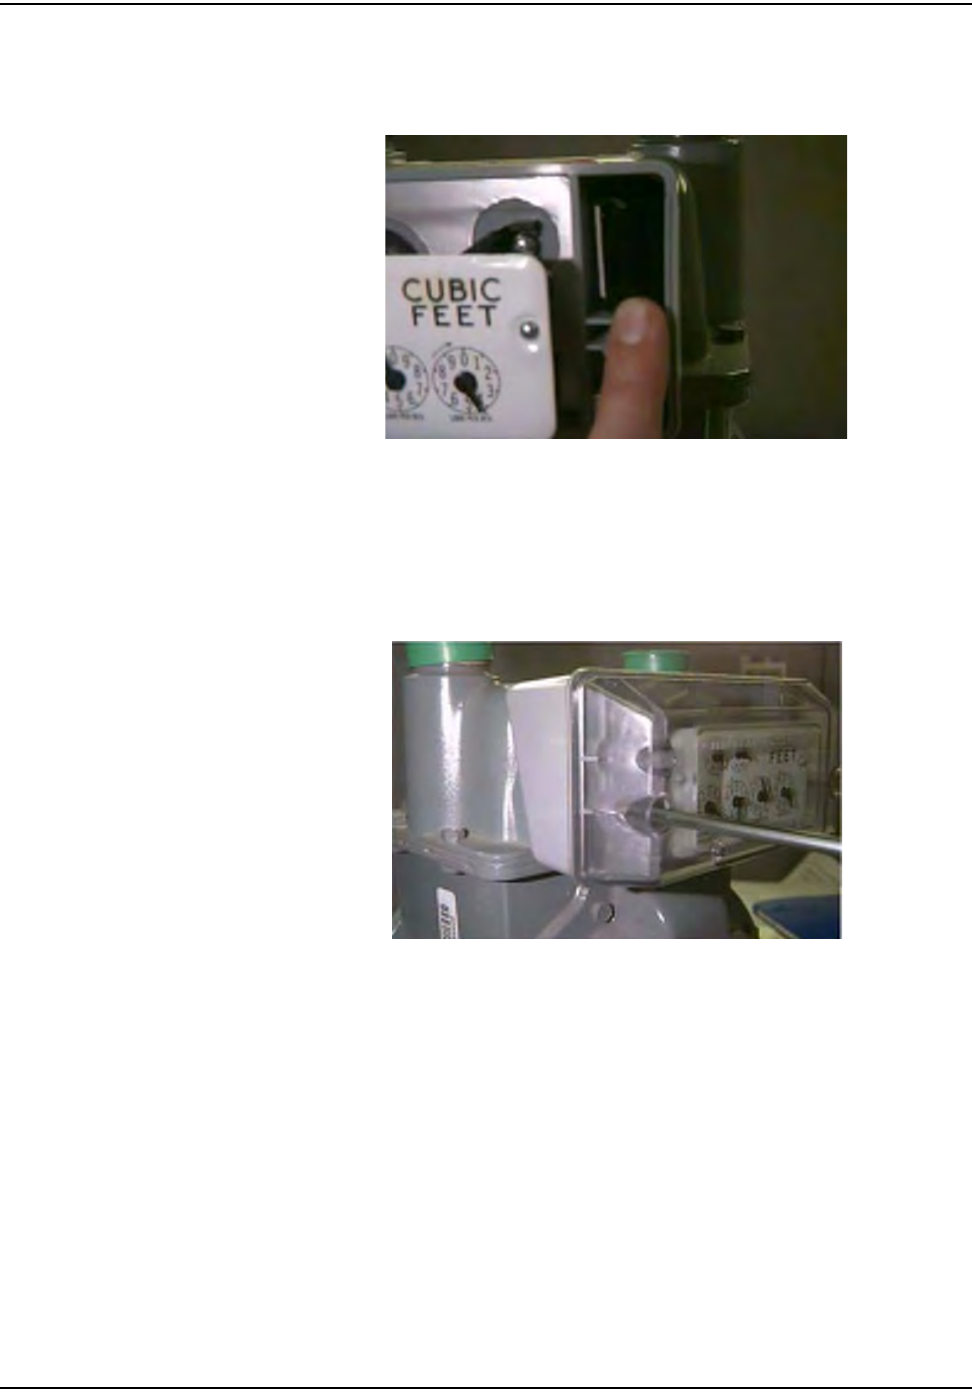
oÉëáÇÉåíá~ä=jÉíÉê=jçÇìäÉ=oÉíêçÑáí
RJOS `ÉääåÉí=d~ë=jçÇìäÉ=~åÇ=jÉíÉê=fåëí~ää~íáçå=dìáÇÉ
Figure 5.51 Lancaster/National: Battery Correctly Installed
9UsetheremainingtwoscrewstoinstallthecoverontheMeterModule,
tighteningthescrewsuntilthecoversitssnug,thentightenasadditional
quarterturn.Insertthetworedtamperseals.
Figure 5.52 Lancaster/National: Fasten Cover Screws and Insert Tamper seals
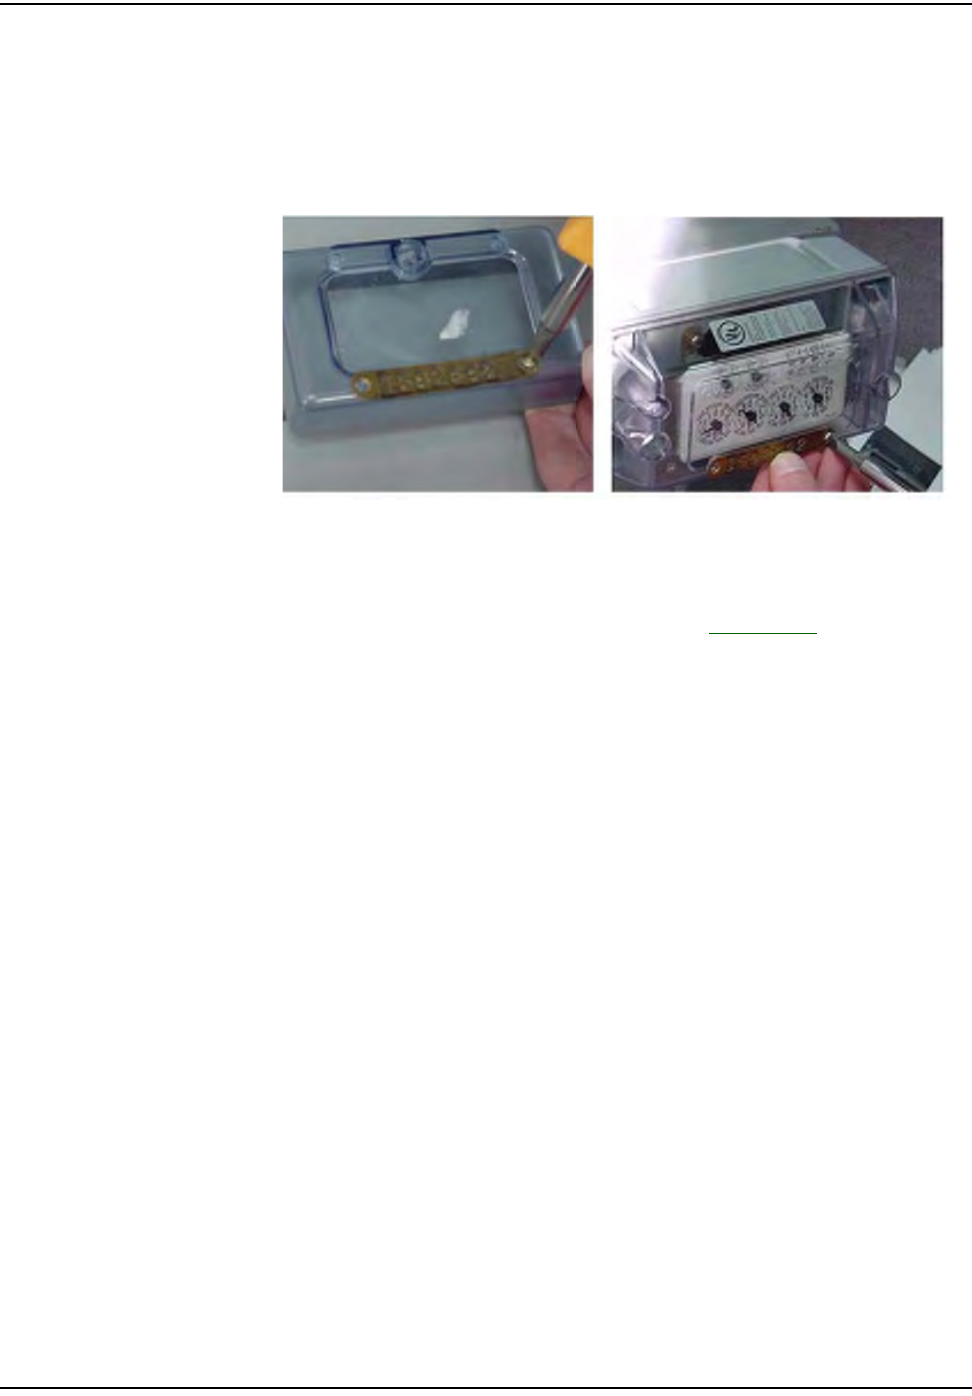
oÉëáÇÉåíá~ä=jÉíÉê=jçÇìäÉ=oÉíêçÑáí
`ÉääåÉí=d~ë=jçÇìäÉ=~åÇ=jÉíÉê=fåëí~ää~íáçå=dìáÇÉ RJOT
10 Ifneeded,removeserialnumberplatefromoriginalcoverandinstallonnew
coverwithtwosmallscrewsprovided.
Figure 5.53 Lancaster/National: Replacing Serial Number Plate
11 UtilizetheRFBustertoverifymoduleistransmitting,holdtheRFBusterwith
magnetsidetothetopupperleftquadrantofthemoduleplasticcoverand
holdthebuttonuntil10beepsarereceived.SeeAppendix C,UsingtheRF
Busterformoreinformation.

Notes:
RJOU `ÉääåÉí=d~ë=jçÇìäÉ=~åÇ=jÉíÉê=fåëí~ää~íáçå=dìáÇÉ
oÉëáÇÉåíá~ä=jÉíÉê=jçÇìäÉ=oÉíêçÑáí
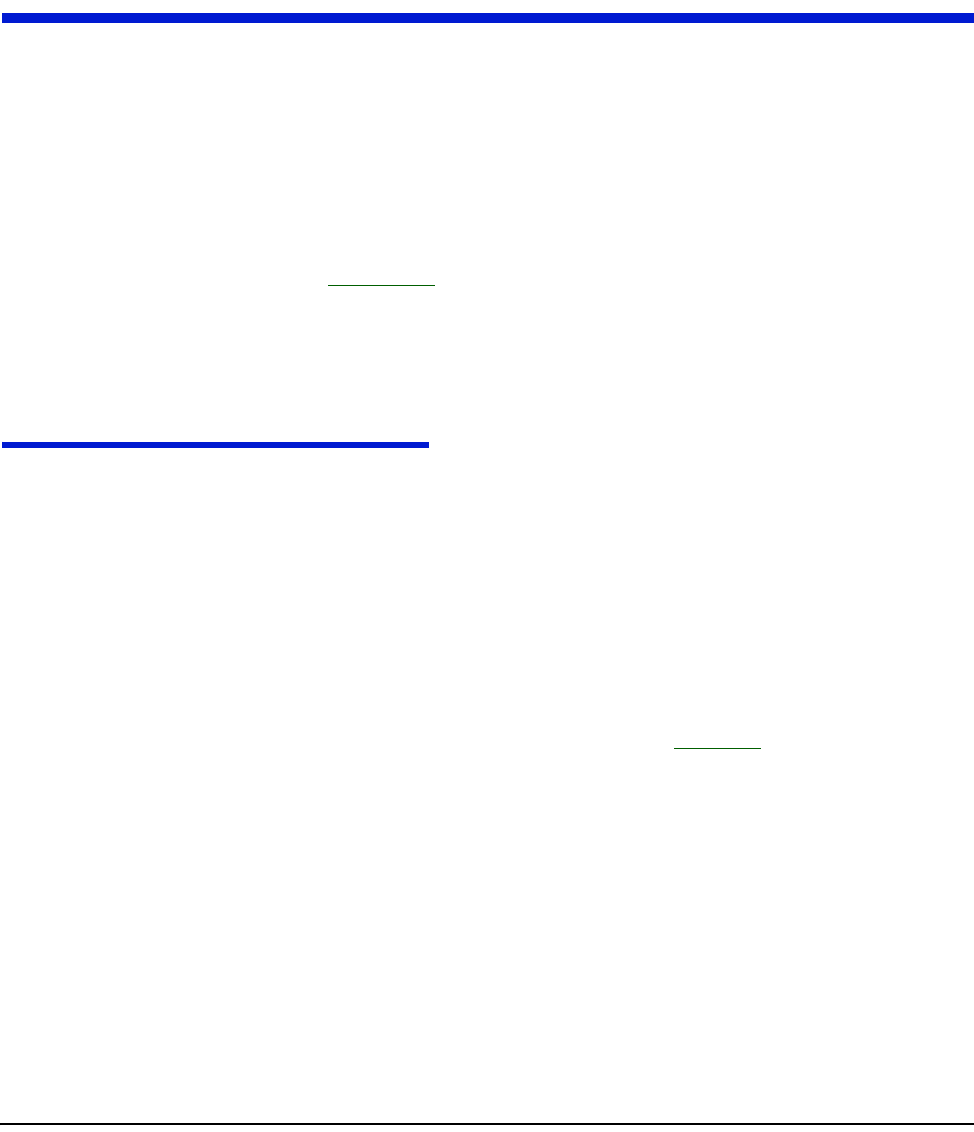
`ÉääåÉí=d~ë=jçÇìäÉ=~åÇ=jÉíÉê=fåëí~ää~íáçå=dìáÇÉ SJN
CHAPTER 6 COMMERCIAL AND INDUSTRIAL METER MODULE
INSTALLATION
Thischapteroutlineschangeoutproceduresfor:
•AmericanCG3
• Rockwell/Equimeter/SensusMeterModuleInstallation
•Sprague/ActarisMeterModuleInstallation
•Schlumberger/ActarisMeterModuleInstallation
RefertoAppendix E,Difficult/Non‐compatibleCommercialRetrofitsfordifficultand
non‐compatiblemoduleinstallationinstructions.
TO BEGIN C&I METER MODULE INSTALLATION
Thefirstfourstepsforeverygasmetermoduleinstallarethesameforevery
manufacturer.Priortobeginningthecommercialmetermoduleretrofit,make
sureyouhavefollowedthestepsinʺIftheinstallerscomeacrossanymeterswherea
medicalalertcodeappearsintheHandheldforthataddresstheyaretodiscontinuethe
exchange,entertheappropriateskipcodeandmovetothenextexchange.PriortoMeter
ExchangeorModuleRetrofitʺonpage 3‐1.
1RemovethecoverfromtheMeterModule.
2PlugtheprogrammingcablefromtheHandheldintotheprogramming
powercableontheMeterModule.RefertoChapter 2,UsingtheHandHeld
Device.
3ProgramtheMeterModuleandchecktheHandheldforsuccessful
programming(example,Dials=4,MeterID=0123456G,MeterConstant=2).
4Removethetampersealsandindexcoverfromtheoriginalgasmeter.
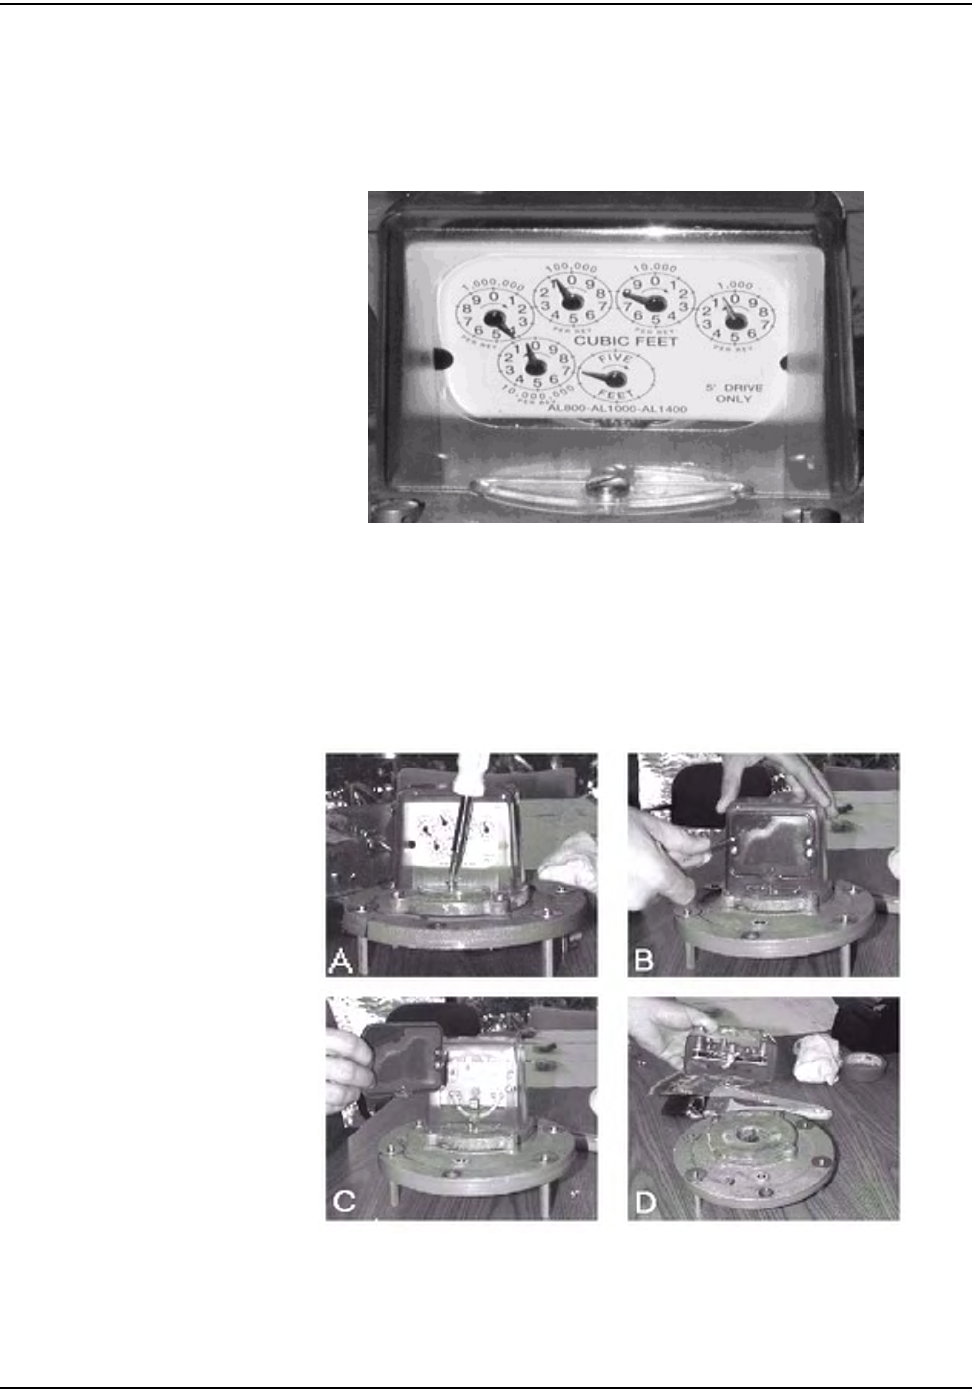
`çããÉêÅá~ä=~åÇ=fåÇìëíêá~ä=jÉíÉê=jçÇìäÉ=fåëí~ää~íáçå
SJO `ÉääåÉí=d~ë=jçÇìäÉ=~åÇ=jÉíÉê=fåëí~ää~íáçå=dìáÇÉ
American CG3 Installation
Figure 6.1 American CG3: Meter before installation
1FollowthestepsinʺToBeginC&IMeterModuleInstallationʺonpage 6‐1.
2Removethetampercapsandindexcoverfromtheoriginalmeter.Remove
theindexfromtheindexcover.Cleantheworkareaswithawirebrushand/
orscraperasneeded.Removealloftheoriginalgasketifitisunserviceable.
InspectIndexforwearandgearfading.
Figure 6.2 American CG3:Removing the cover and index
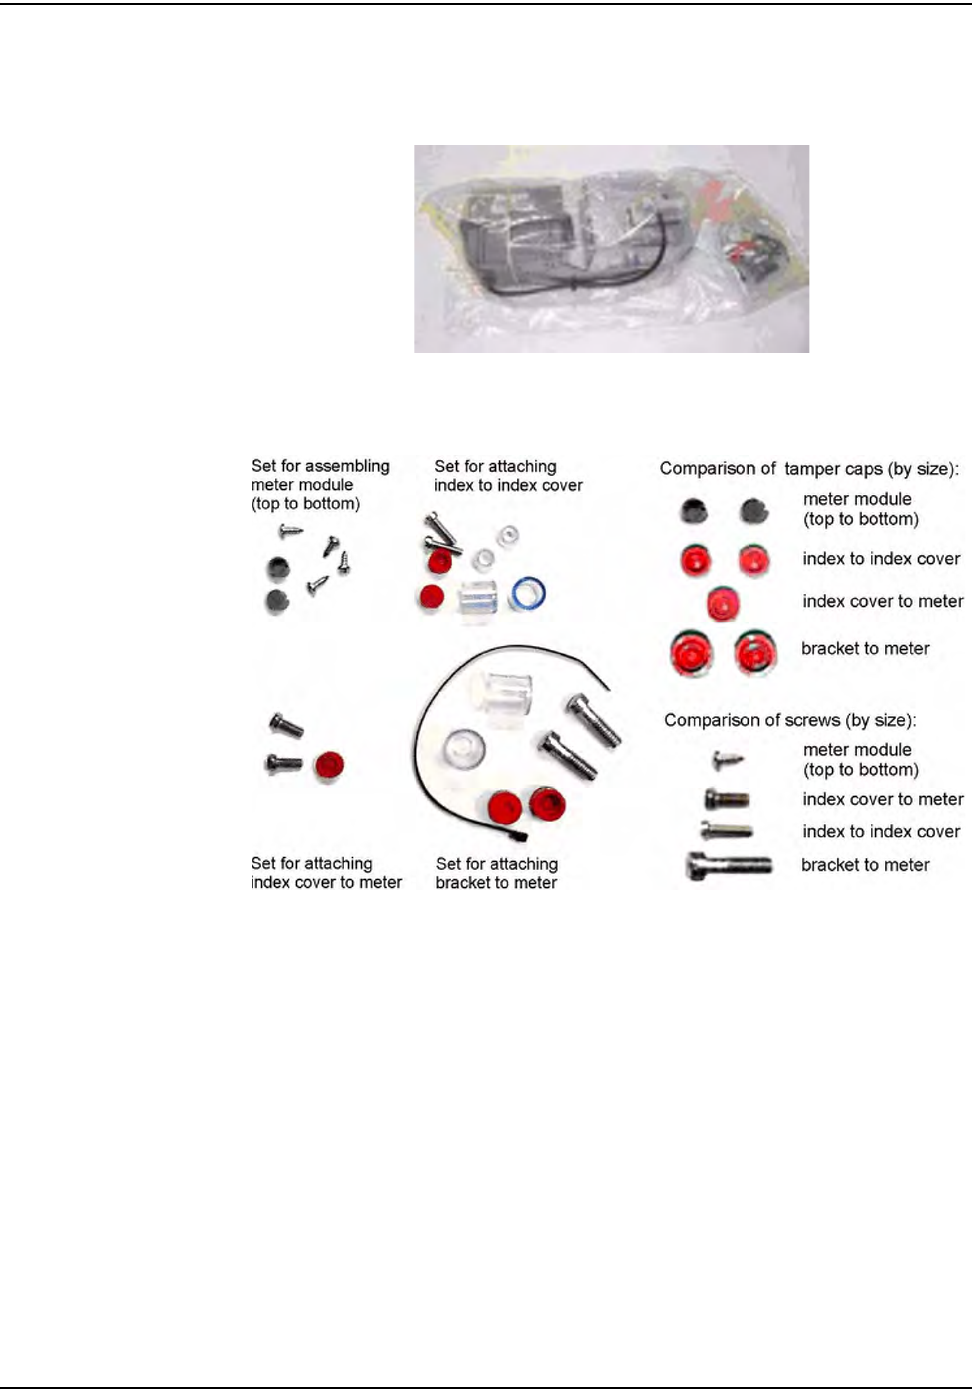
`çããÉêÅá~ä=~åÇ=fåÇìëíêá~ä=jÉíÉê=jçÇìäÉ=fåëí~ää~íáçå
`ÉääåÉí=d~ë=jçÇìäÉ=~åÇ=jÉíÉê=fåëí~ää~íáçå=dìáÇÉ SJP
3OpenthepackagecontainingtheMeterModule,screws,andbattery.
Figure 6.3 Common American meter module packaging with hardware on the right
Figure 6.4 American CG3: screw kit
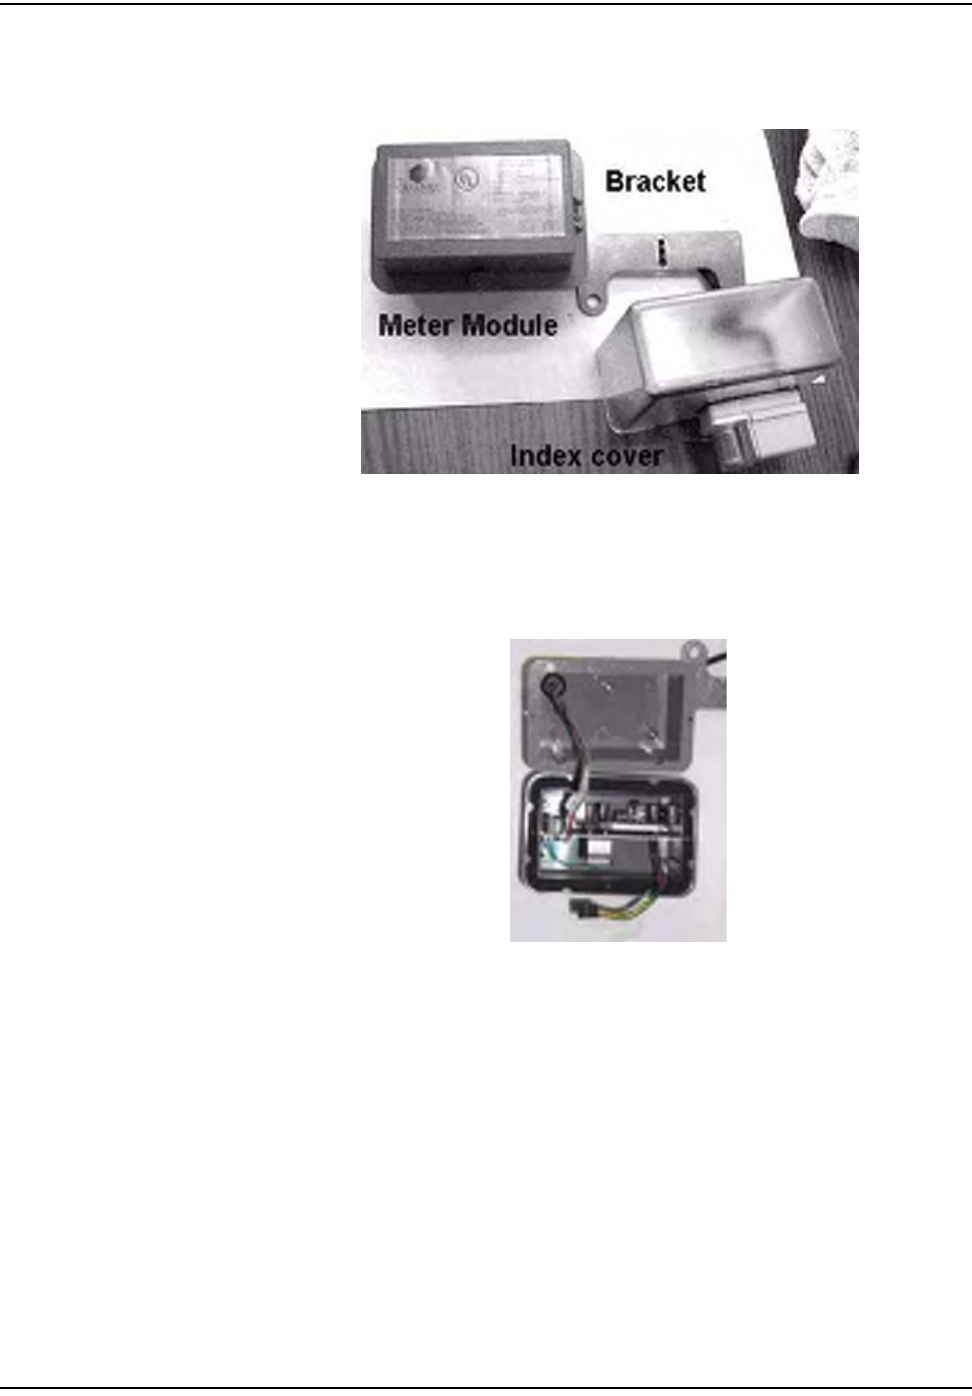
`çããÉêÅá~ä=~åÇ=fåÇìëíêá~ä=jÉíÉê=jçÇìäÉ=fåëí~ää~íáçå
SJQ `ÉääåÉí=d~ë=jçÇìäÉ=~åÇ=jÉíÉê=fåëí~ää~íáçå=dìáÇÉ
Figure 6.5 American CG3: meter module kit
4Openthebagcontainingthebattery.Carefullyremovethebattery.
5Openthemetermodule.Avoidpullingthecables.
Figure 6.6 Open American CG3: module
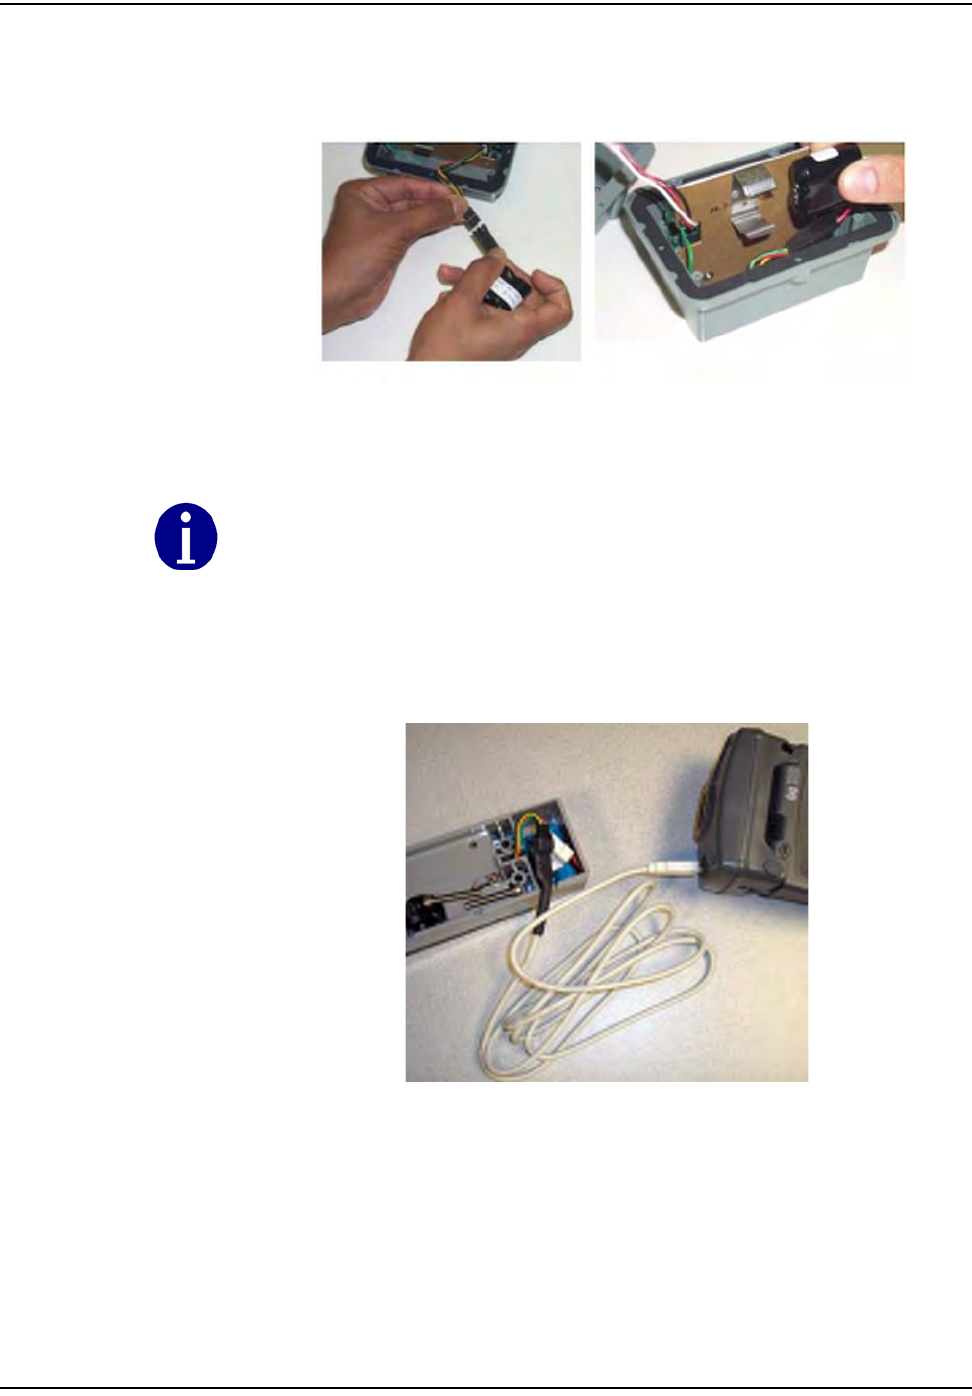
`çããÉêÅá~ä=~åÇ=fåÇìëíêá~ä=jÉíÉê=jçÇìäÉ=fåëí~ää~íáçå
`ÉääåÉí=d~ë=jçÇìäÉ=~åÇ=jÉíÉê=fåëí~ää~íáçå=dìáÇÉ SJR
6 ConnectthebatterytotheMeterModule.Assemblethebatteryintothe
retainingcliponthemetalbracket.
Figure 6.7 American CG3:Connecting the battery to the module
7 Connecttheprogrammingcablefromthehandheldcomputertothe
programmingportontheMeterModule.ProgramtheMeterModule.Check
thehandheldforsuccessfulprogramming(example‐Dials=4or5,MeterID
=0123456G,MeterConstant=5or10).
Figure 6.8 American CG3:Connecting the programming cable to the American Commercial meter
module
Route wire through cutout area so that wire is not pinched.
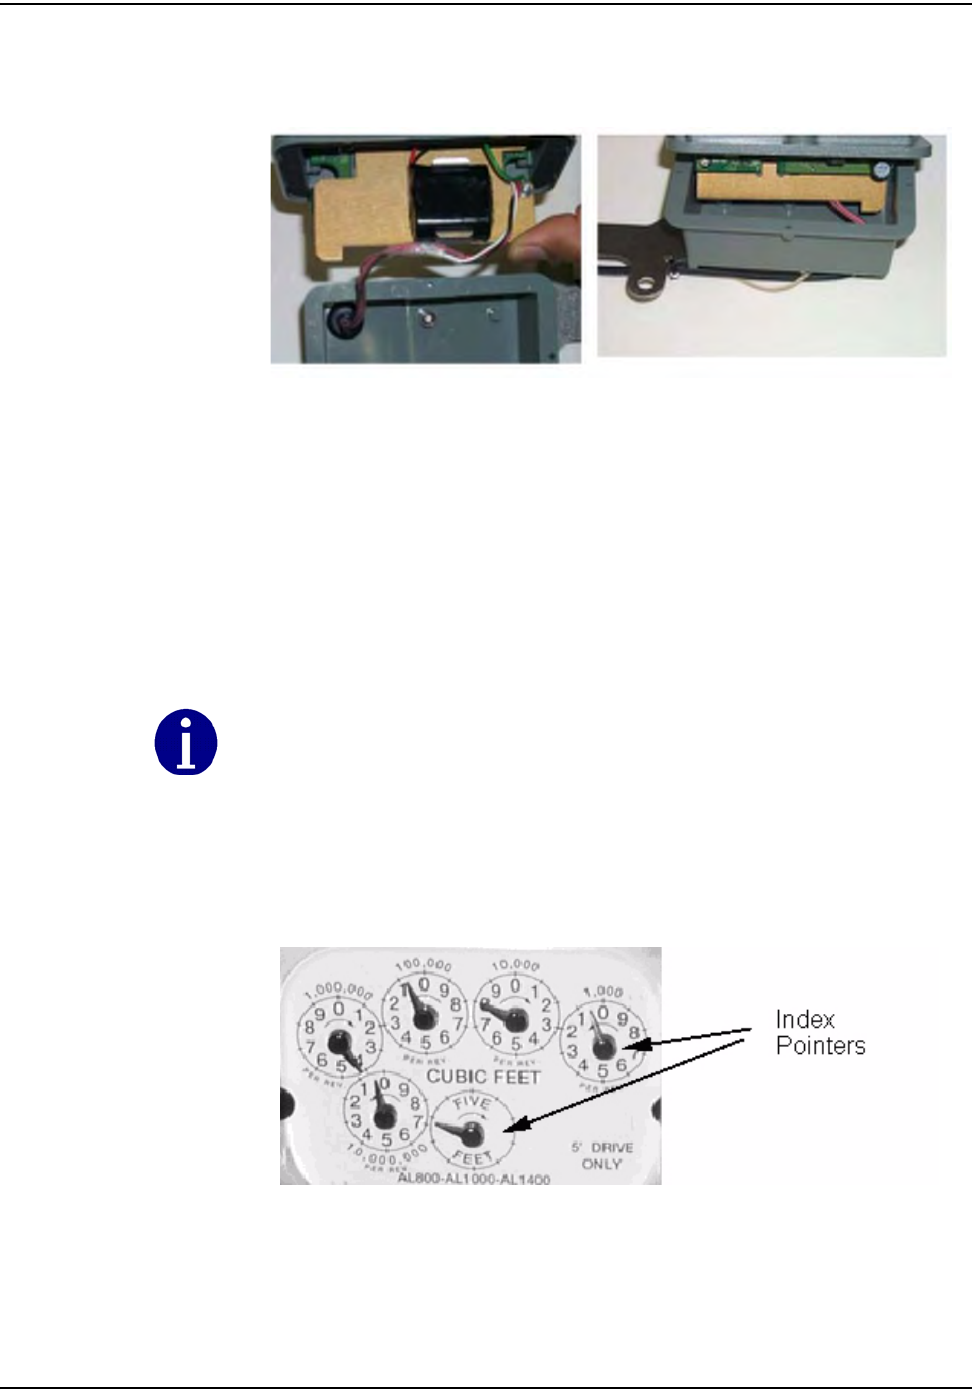
`çããÉêÅá~ä=~åÇ=fåÇìëíêá~ä=jÉíÉê=jçÇìäÉ=fåëí~ää~íáçå
SJS `ÉääåÉí=d~ë=jçÇìäÉ=~åÇ=jÉíÉê=fåëí~ää~íáçå=dìáÇÉ
Figure 6.9 American CG3: module route wire
8Slidethemetalbracket(notthegreencircuitboard)intotheslotsofthe
clamshell(oneoftheclamshellhalveshasslotsonoppositesidesofthe
interior).Ifyouarelookingdownintotheslots,thebatteryclipshouldbe
towardsthetop‐thelargecapacitorsonthecircuitboardgodeepintothe
clamshell.AssembletheMeterModulehalvestogetherwiththefoursmall
self‐tappingscrewsprovided.Thetorquerequirementis6‐10inchpounds.
Ensurethatthegasketisinplaceandthewiresarenotpinched.Installthe
tamperseals.
Figure 6.10 American CG3: module Index detail
Check condition of the index for looseness of index pointers on shaft, cracks on face
enamel, or peeling. Ensure that the index is not bound up. Replace the index if dials are
loose or locked, or if the enamel is cracked, loose or damaged.
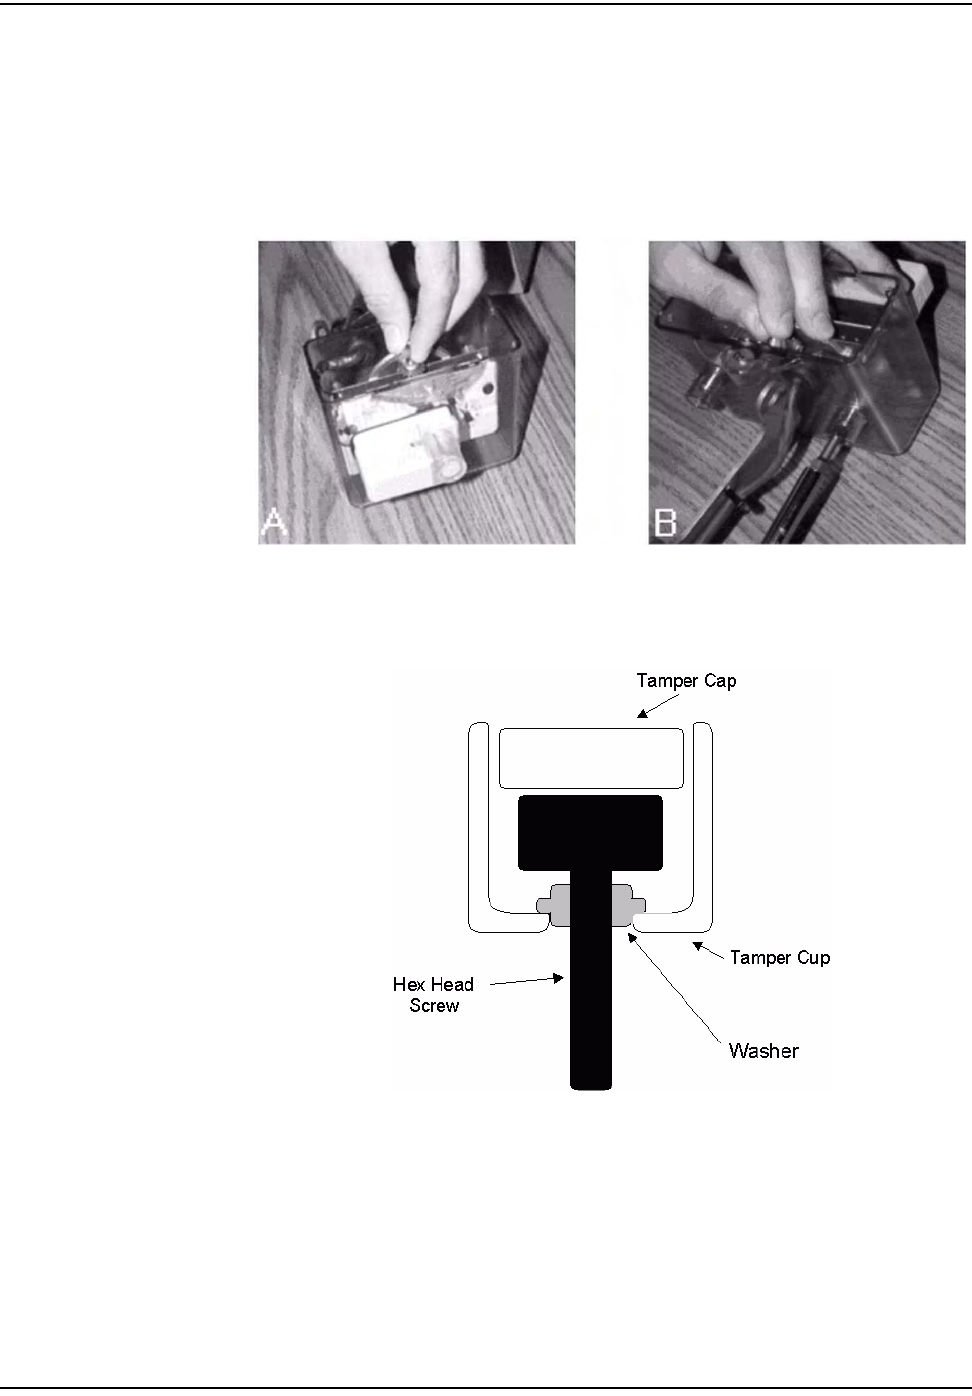
`çããÉêÅá~ä=~åÇ=fåÇìëíêá~ä=jÉíÉê=jçÇìäÉ=fåëí~ää~íáçå
`ÉääåÉí=d~ë=jçÇìäÉ=~åÇ=jÉíÉê=fåëí~ää~íáçå=dìáÇÉ SJT
9 Attachthenewindexcovertotheindexusingthescrewsprovided.The
torquerequirementis10‐inchpounds.Handletheindexcarefullytoavoid
breakingthecounterorindex.Ensurethatthecounterandindexareproperly
aligned.Verifythatthecounterisfullyengagedtotheindexpointer.
Figure 6.11 American CG3:module- Attaching the new Index cover
10 Attachtampersealsasshown.therearetwotampersealsfortheIndex‐to‐
Indexcoverconnections.
Figure 6.12 American CG3: tamper sealing for Index cover
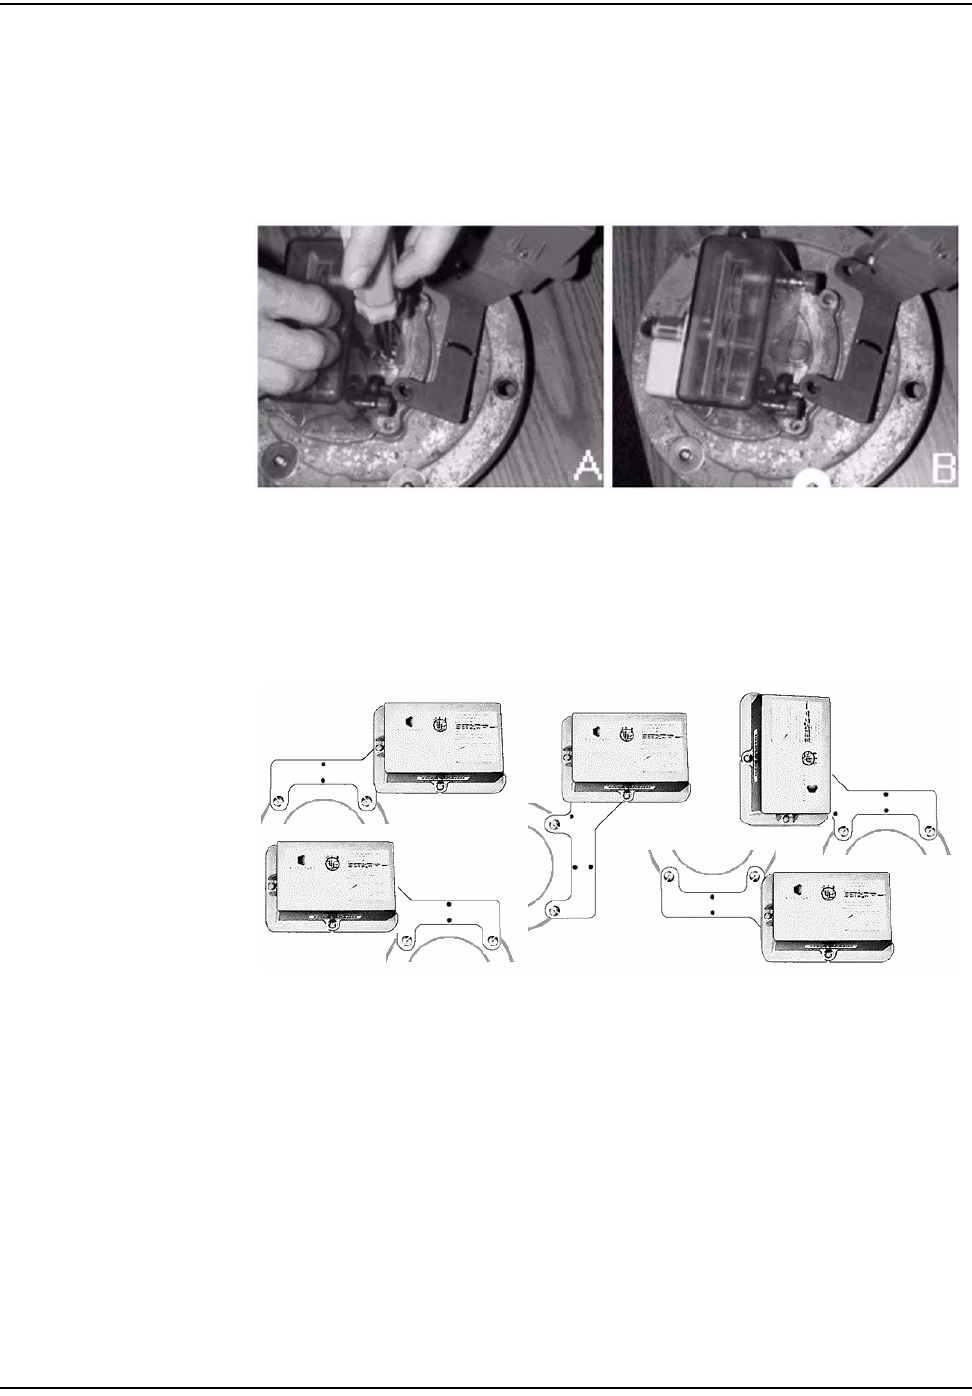
`çããÉêÅá~ä=~åÇ=fåÇìëíêá~ä=jÉíÉê=jçÇìäÉ=fåëí~ää~íáçå
SJU `ÉääåÉí=d~ë=jçÇìäÉ=~åÇ=jÉíÉê=fåëí~ää~íáçå=dìáÇÉ
11 Mounttheindexandcoverontothemeter.Placethegasketonthemeter
(replaceifnecessary),aligningtheholes.Securetheindextothemeterwith
thetwohex‐headscrewsprovided.Thetorquerequirementis20‐30inch
pounds.Installthetamperseal.
Figure 6.13 American CG3:l installing Index
12 Determinethebestorientationforthemountingbracket(seefollowing
configurations).Tochangethebracketorientation,removethetwoPhillips
headscrewsholdingthebrackettothemodule.Thebracketcanbeturnedor
flippedoverforthebestconfiguration.Cabletiemayneedtoberemoved.
Figure 6.14 American CG3: mounting bracket configurations
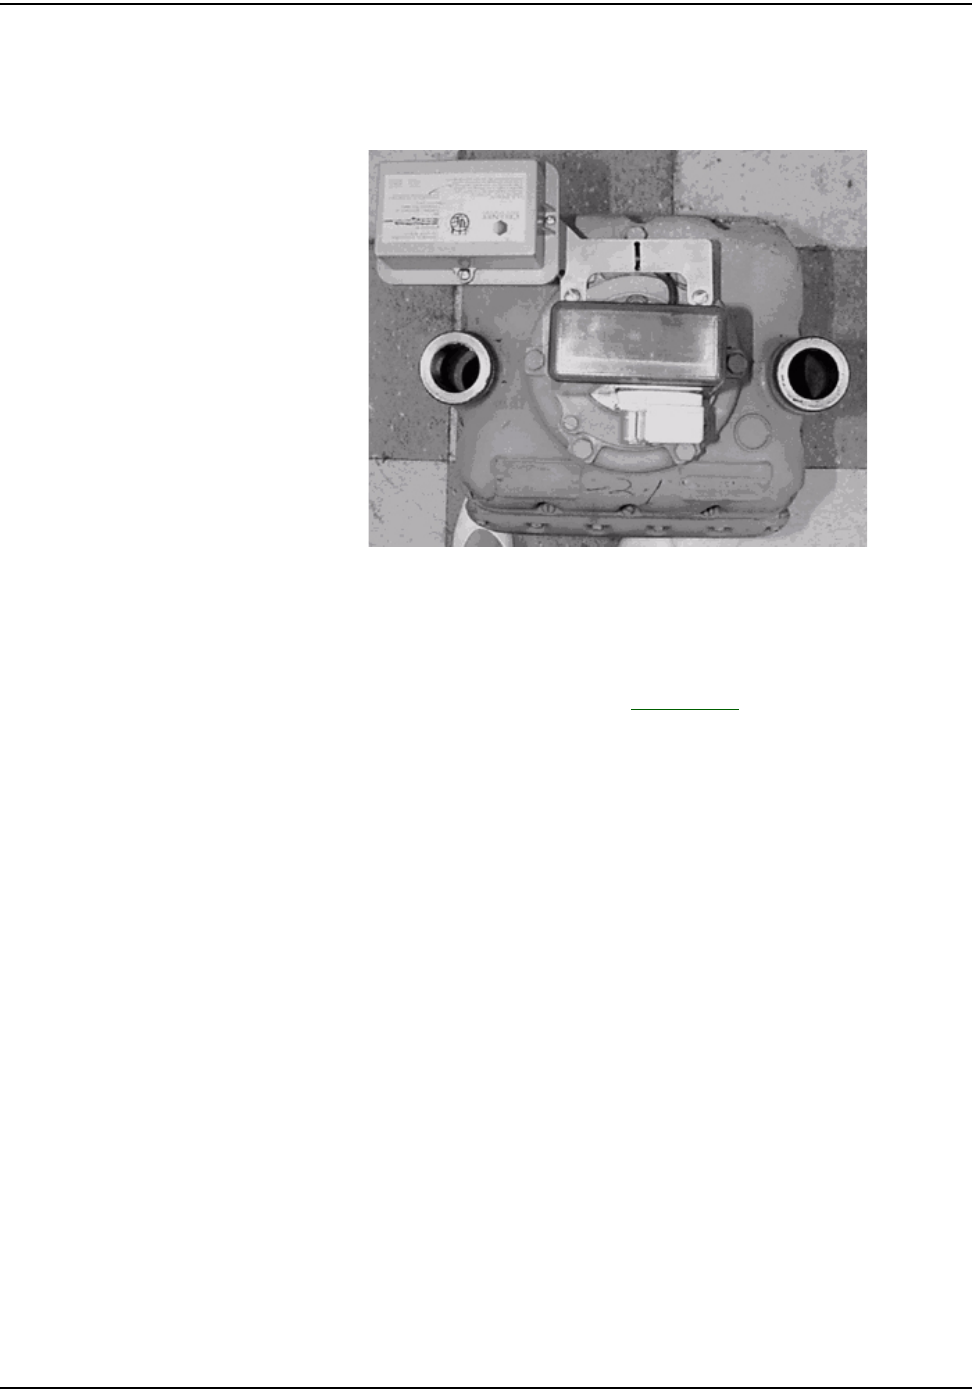
`çããÉêÅá~ä=~åÇ=fåÇìëíêá~ä=jÉíÉê=jçÇìäÉ=fåëí~ää~íáçå
`ÉääåÉí=d~ë=jçÇìäÉ=~åÇ=jÉíÉê=fåëí~ää~íáçå=dìáÇÉ SJV
13 AttachthemountingbrackettothemeterusingthelargeFillisterscrews
provided.Useatampercupsealononeortwoofthescrews.Thetorque
requirementis30‐40inchpounds.Installthetwotamperseals.
Figure 6.15 American CG3:meter module with mounting bracket installed
14 Installtampercapsoverremainingfivescrews.
15 UtilizetheRFBustertoverifymoduleistransmitting,holdRFBusterwith
magnetsidetothetopupperleftquadrantofthemoduleplasticandholdthe
buttonuntil10beepsarereceived.SeeAppendix C,UsingtheRFBusterfor
moreinformation.
16 Cleanupanydebrisfromtheretrofitandinstallationprocessesandtieany
loosecableswithtiewraps.
17 Proceedtothenextinstallationsite.
18 Attheendoftheday,returntotheCrossDockforthecheck‐inprocess.Turn
ininventoryofunused,defective,orbrokengasMeterModules.Checkinthe
handheldcomputer.Theinstallermustreconcileanydiscrepanciesinthe
changeoutdatabeforethecheck‐inprocesscanbecompleted.Thecrossdock
willnotcheckoutanyMeterModulestoaninstallerwhohasnotcompleted
thepreviousdayʹscheck‐inprocess.
Rockwell/Equimeter/Sensus Meter Module Installation
TherearetwotypesofRockwellmodules:CenterandOffset.Theleftside
illustratescenterprovingdialandtherightsideillustratesoffsetproving
dial.Verifytheappropriatetypebeforestartinginstallation.
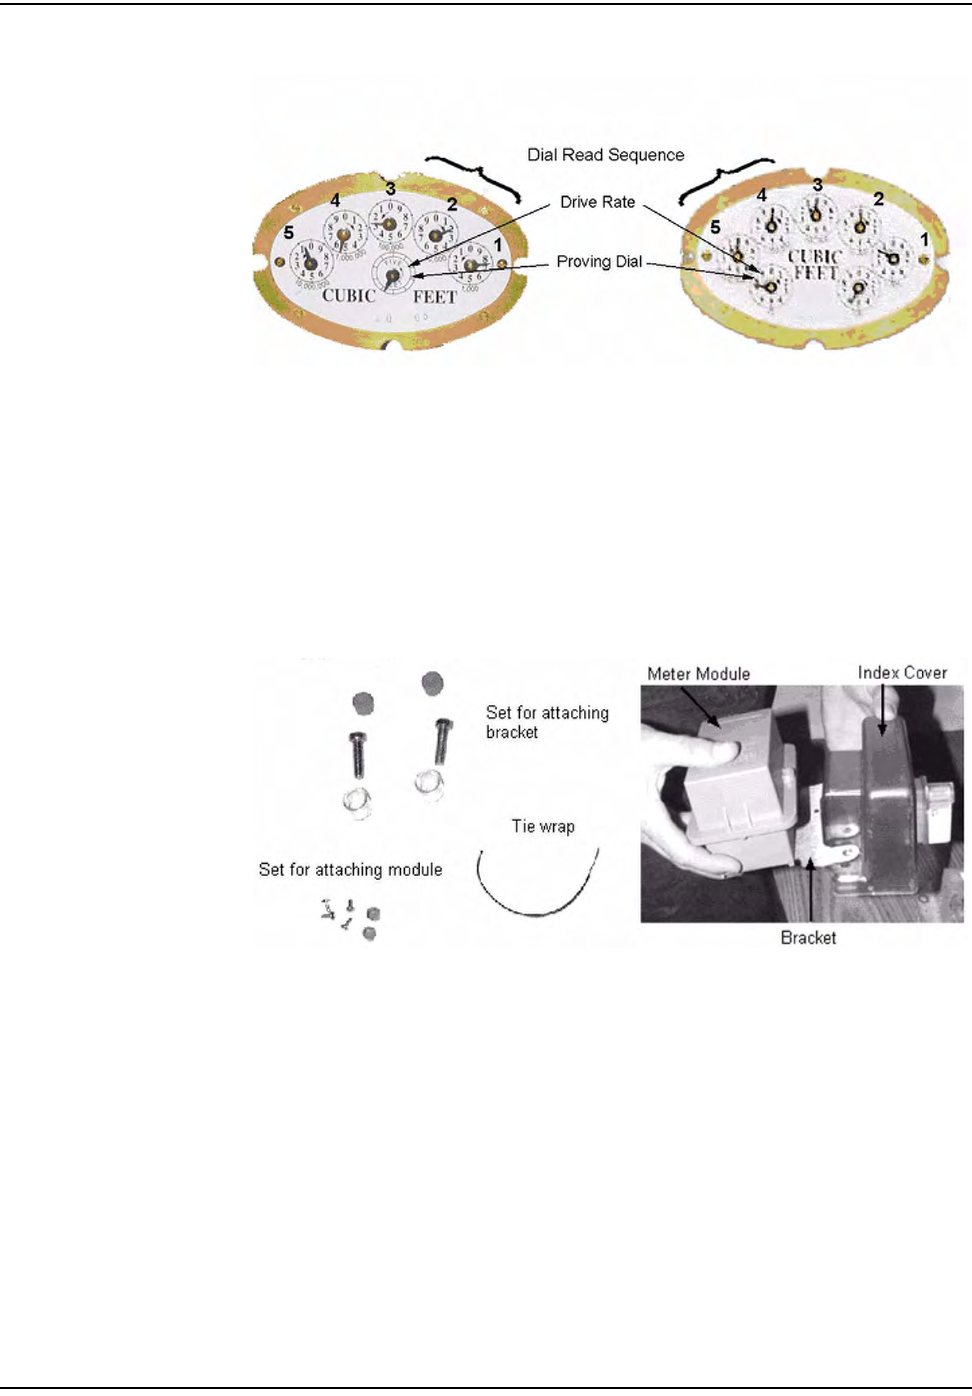
`çããÉêÅá~ä=~åÇ=fåÇìëíêá~ä=jÉíÉê=jçÇìäÉ=fåëí~ää~íáçå
SJNM `ÉääåÉí=d~ë=jçÇìäÉ=~åÇ=jÉíÉê=fåëí~ää~íáçå=dìáÇÉ
Figure 6.16 Rockwell/Equimeter/Sensus: Indexes before installation
1FollowthestepsinʺToBeginC&IMeterModuleInstallationʺonpage 6‐1.
2Removethetampercapsandindexcoverfromtheoriginalmeter.Removeall
oftheoriginalgasketifitisunserviceable.Cleantheworkareawithawire
brushandscraperifneeded.
3SelecttheappropriateMeterModule(Rockwell/EquimeterCenterorOffset).
OpenthepackagecontainingtheMeterModule,screws,andbattery.
Figure 6.17 Rockwell/Equimeter/Sensus: screw and meter module kits
4Openthebagcontainingthebattery.Carefullyremovethebattery.
5OpentheMeterModule,takingcaretoavoidpullingonthecables.
6 ConnectthebatterytotheMeterModule.Assemblethebatteryintothe
retainingcliponthemetalbracket.
7 Connecttheprogrammingcablefromthehandheldcomputertothe
programmingportontheMeterModule.ProgramtheMeterModule.Check
thehandheldforsuccessfulprogramming
8Slidethemetalbracket(notthegreencircuitboard)intotheslotsofthe
clamshell(oneoftheclamshellhalveshasslotsonoppositesidesofthe
interior).Ifyouarelookingdownintotheslots,thebatteryclipshouldbe
towardsthetop‐thelargecapacitorsonthecircuitboardgodeepintothe
clamshell.
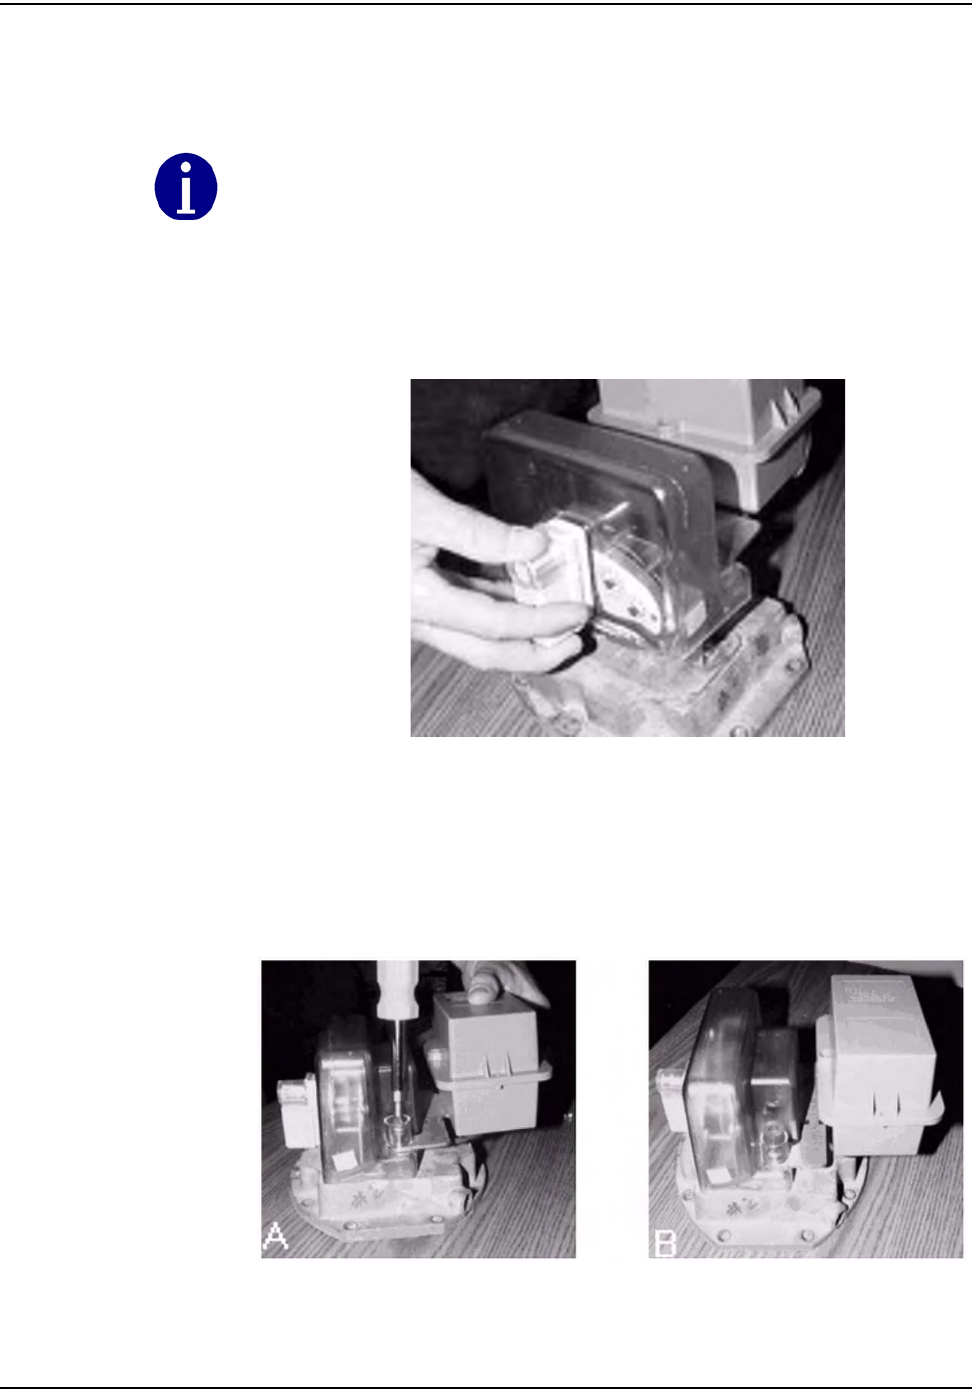
`çããÉêÅá~ä=~åÇ=fåÇìëíêá~ä=jÉíÉê=jçÇìäÉ=fåëí~ää~íáçå
`ÉääåÉí=d~ë=jçÇìäÉ=~åÇ=jÉíÉê=fåëí~ää~íáçå=dìáÇÉ SJNN
9 AssembletheMeterModulehalvestogetherwiththefoursmallself‐tapping
screwsprovided.Thetorquerequirementis6‐10inchpounds.Ensurethatthe
gasketisinplaceandthewiresarenotpinched.Installthetamperseals.
10 Installthenewindexcover.Gentlyslidethecoverovertheindextoavoid
breakingthecounter.Becarefulnottodamagethedials.Ensurethatthe
counterandindexesareproperlyaligned.Verifythatthecounterisfully
engagedtotheindexpointers.
Figure 6.18 Rockwell/Equimeter/Sensus: meter module installing Index cover
11 AttachthecoverandMeterModuletothemeter.Positionthemodule
bracketoverthecoverandalignthescrewholes.Thetorquerequirementis
30‐40inchpounds.
Figure 6.19 Rockwell/Equimeter/Sensus: securing index cover & Meter Module
Check condition of the index for looseness of index pointers on shaft, cracks on face
enamel, or peeling. Replace the index if dials are loose or bound up, or if enamel is cracked
or loose.