Lantronix Canada ULC ITCNFA324 802.11A/B/G/N/AC WiFi + Bluetooth Module User Manual eSight User Guide
Intrinsyc Technologies Corporation 802.11A/B/G/N/AC WiFi + Bluetooth Module eSight User Guide
Contents
- 1. User Manual
- 2. User Manual Regulatory Guide
- 3. Integrators Guide
User Manual
User Guide
© Copyright 2016, eSight Corporation. All rights reserved.
August 2016
No part of this publication may be reproduced without the express written
permission of eSight Corporation.
“eSight Eyewear” and “eSight” and associated images and symbols are trademarks
of eSight Corporation. “eSight” is a registered trademark in Canada and the U.S.
and may be pending or registered in other countries. Various U.S. and other
patents pending. All other trademarks, registered trademarks, product names, and
company names and/or logos cited herein, if any, are the property of their
respective holders.
eSight reserves the right to improve the contents of this User Guide without notice.

Table of Contents
i
Safety....................................................................................................... 1
About Your eSight Eyewear............................................................... 3
Contents of Your eSight Eyewear Package .......................................................4
Wearing Your eSight Eyewear........................................................... 5
Putting On the eSight Eyewear ............................................................................5
Achieving the Perfect Fit................................................................................... 6
Connecting and Disconnecting the Frames.......................................................6
Connecting and Disconnecting the Headstrap .................................................8
Securing the Controller........................................................................................ 11
Tilting the Headset ............................................................................................... 12
Powering Your eSight Eyewear.......................................................13
Getting to Know Your Controller ...................................................15
Locking and Unlocking the Controller.............................................................. 19
Getting to Know the Connections..................................................20
Maintenance ........................................................................................21
Charging Your eSight Eyewear using the Wall Charger............................... 21
Cleaning your eSight Eyewear ........................................................................... 22
Replacing the Forehead Band ............................................................................ 23
Specifications & Compliance Information.....................................26
Technical Specifications ...................................................................................... 26
Additional Safety and Regulatory Information............................................... 28


1
Safety
•Read through this entire manual before using your eSight Eyewear.
• DO NOT drive while wearing your eSight Eyewear.
• DO NOT continuously look through your eSight Eyewear while
• Walking or traveling in unfamiliar or congested areas.
• Negotiating stairs, curbs, doorways, escalators, revolving doors, and so on.
• Operating power equipment, tools, or other potentially dangerous machines.
• Looking at the sun (with or without the eSight Eyewear).
• Your eSight Eyewear can obscure your field of vision above the line of sight. Take
care to avoid objects, such as low tree branches and the tops of door frames in
automobiles.
Caution
eSight makes no claims about the fitness of the eSight Eyewear for
any specific activity.
DO NOT use your eSight Eyewear during activities requiring very
significant physical movement — such as operating a motorized
vehicle, jogging, power tool use (without specific training), or similar
activities.
See below for more details.

2
Safety
• Avoid applying foreign substances to either the headset or the controller. DO
NOT paint or use household cleaning fluids on the unit. Avoid getting sunscreen,
skin lotions, or makeup on the headset or controller. For cleaning instructions,
see “Cleaning your eSight Eyewear” on page 22.
• When using your eSight Eyewear in mobile situations, place the headset in the
bioptic position (see “Tilting the Headset” on page 12) and secure the controller.
4
About Your eSight Eyewear
Contents of Your eSight Eyewear Package
As you unpack your eSight Eyewear, make sure you have received the items below:
Once you have checked the contents of your package, charge your eSight Eyewear
battery.
Standard Contents
• eSight Eyewear (Headset and Controller) • Printed Product Documentation
• Lenseless Frame with Nosepad • Wrist and Neck Lanyards
• eSight Eyewear USB Cable • Belt Clip
• USB AC Wall Adapter • Carry Case
• SD Card, includes Electronic Product
Documentation
• Warranty Card
• Digital Video Cable
Optional Contents
• Ophthalmic Frame and Lenses with
Microfiber Bag
•5 Meter HDMI Cable
• Double USB Type A to Type C Cable
You must fully charge the battery before you can use your eSight
Eyewear for the first time. See “Charging Your eSight Eyewear using the
Wall Charger” on page 21 for information on charging the battery.
5
Wearing Your eSight Eyewear
Getting the most out of your eSight Eyewear begins with learning how to
comfortably wear your eyewear and controller and how to tilt your headset.
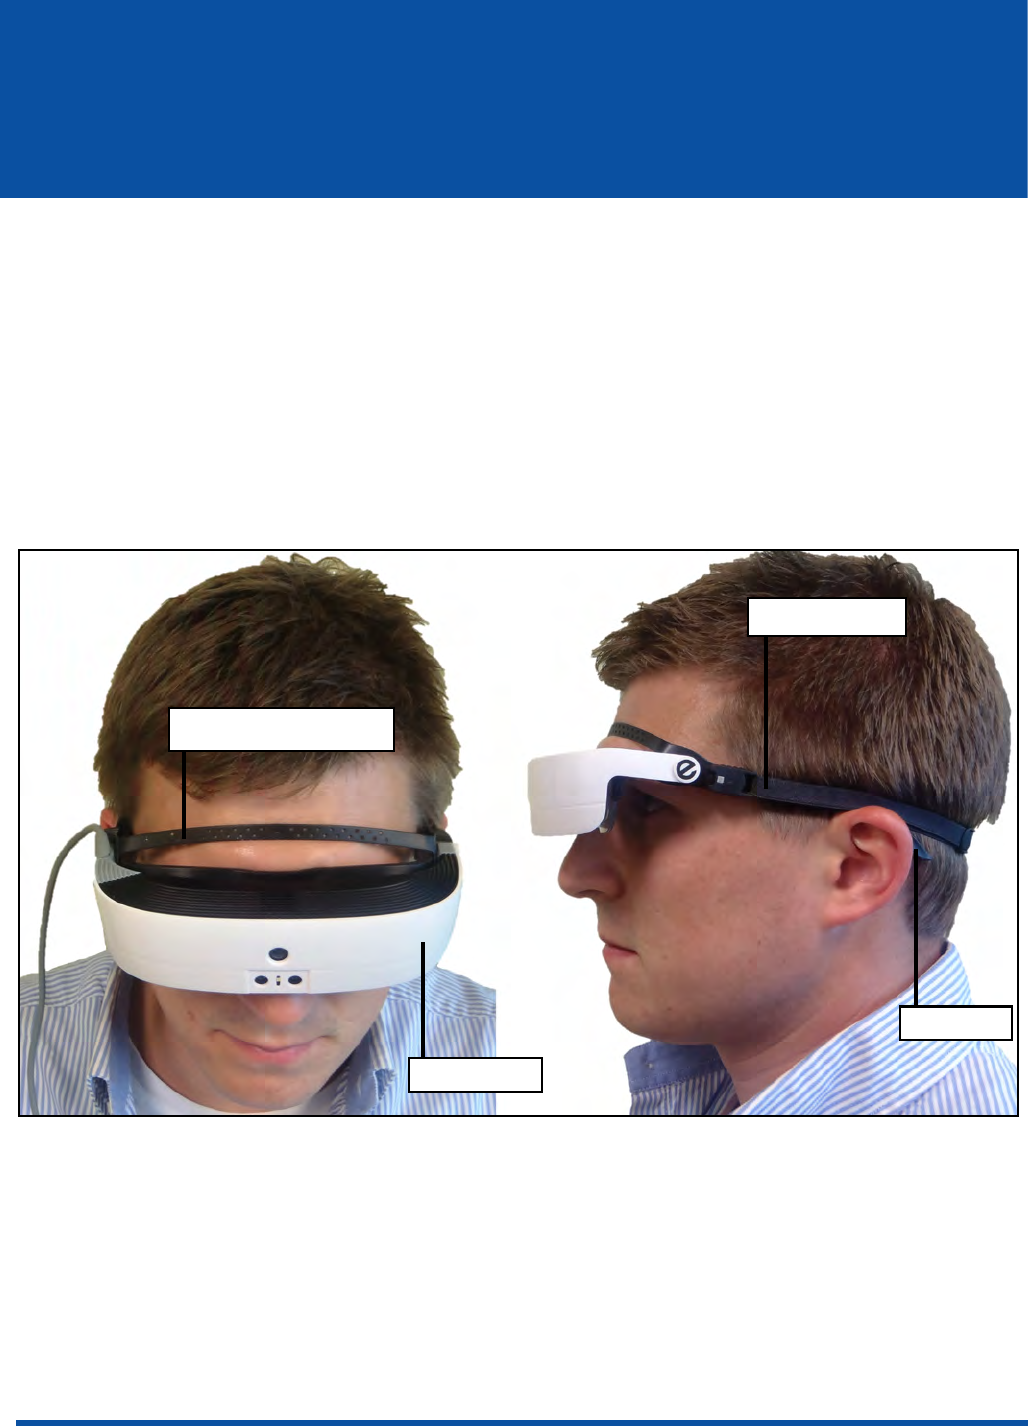
Putting On the eSight Eyewear
Your frames support the headset, so you can wear it like a pair of normal glasses.
The headstrap and forehead band lift the weight of the eyewear off the bridge of
your nose for a secure and comfortable fit.
Figure 2 Proper Wearing of the Headset
Headstrap
Headset
Forehead Band
Frames
6
Wearing Your eSight Eyewear
Achieving the Perfect Fit
You have a good fit when
• Your frames are positioned on the face like a regular pair of spectacles.
• Your forehead band fits snugly against your forehead.
• Your headband fits snugly around your head.
• Your headset and frames should feel weightless on the bridge of your nose.
• Your headset and frames should not move when you shake your head.
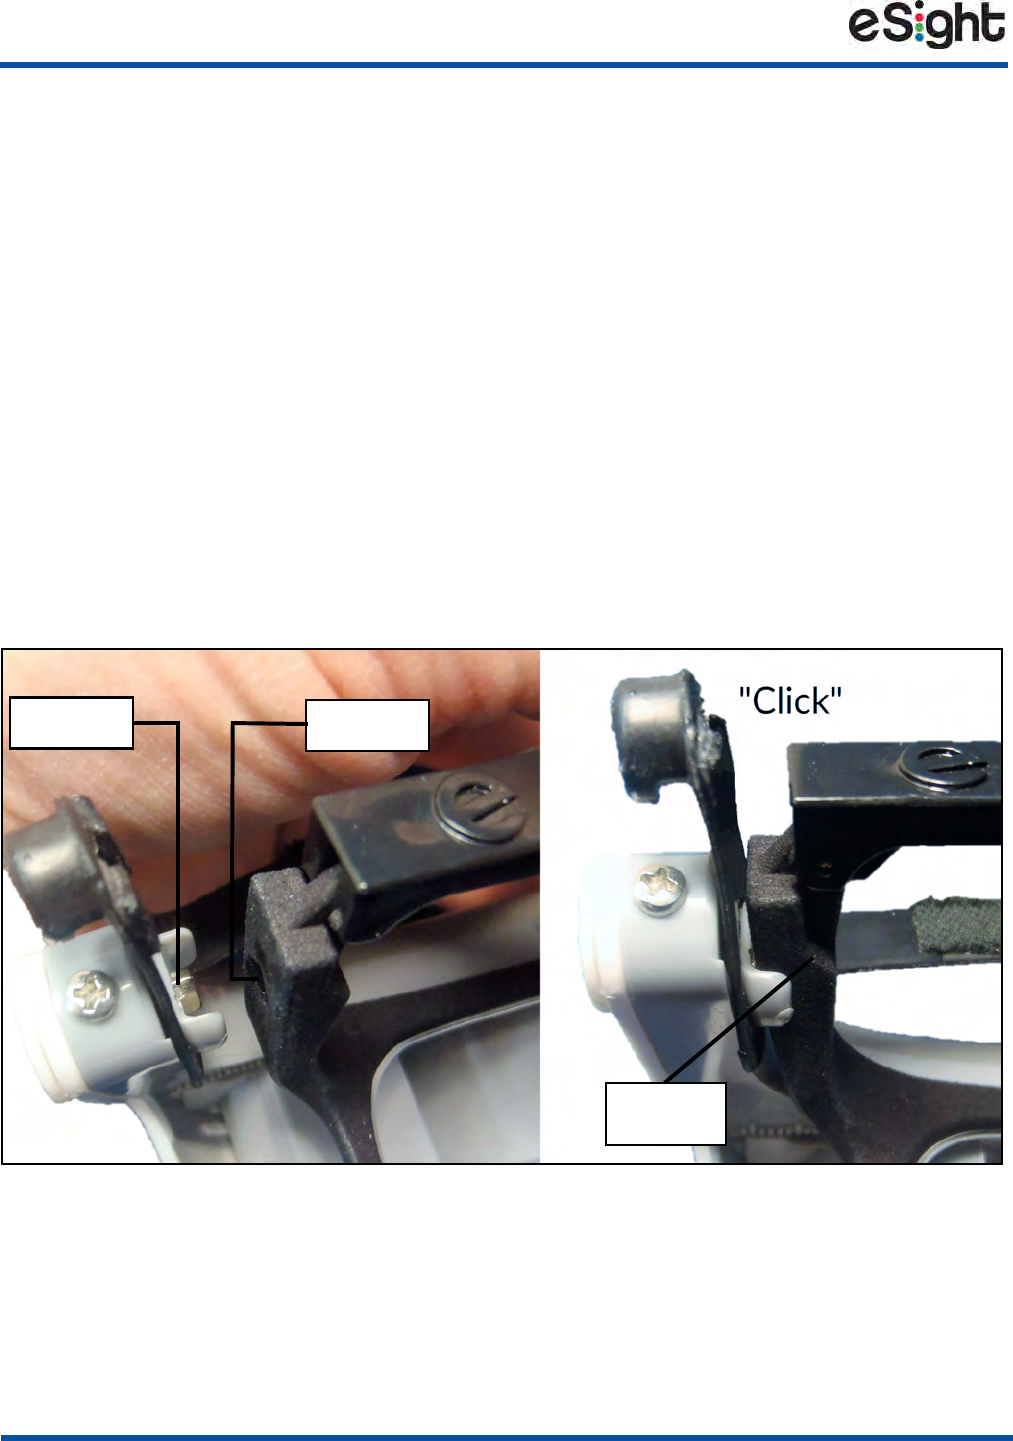
Connecting and Disconnecting the Frames
The frames connect magnetically to headset, as shown in Figure 3.
Figure 3 Connecting the Frames
To connect the frames
1. Align the magnetic recess on the frames with the magnet on the headset
(Figure 3, Left).
Magnet Recess
Flush to
Headset
Wearing Your eSight Eyewear
7
2. Gently push the frames
until they “click” into
place (Figure 3, Right).
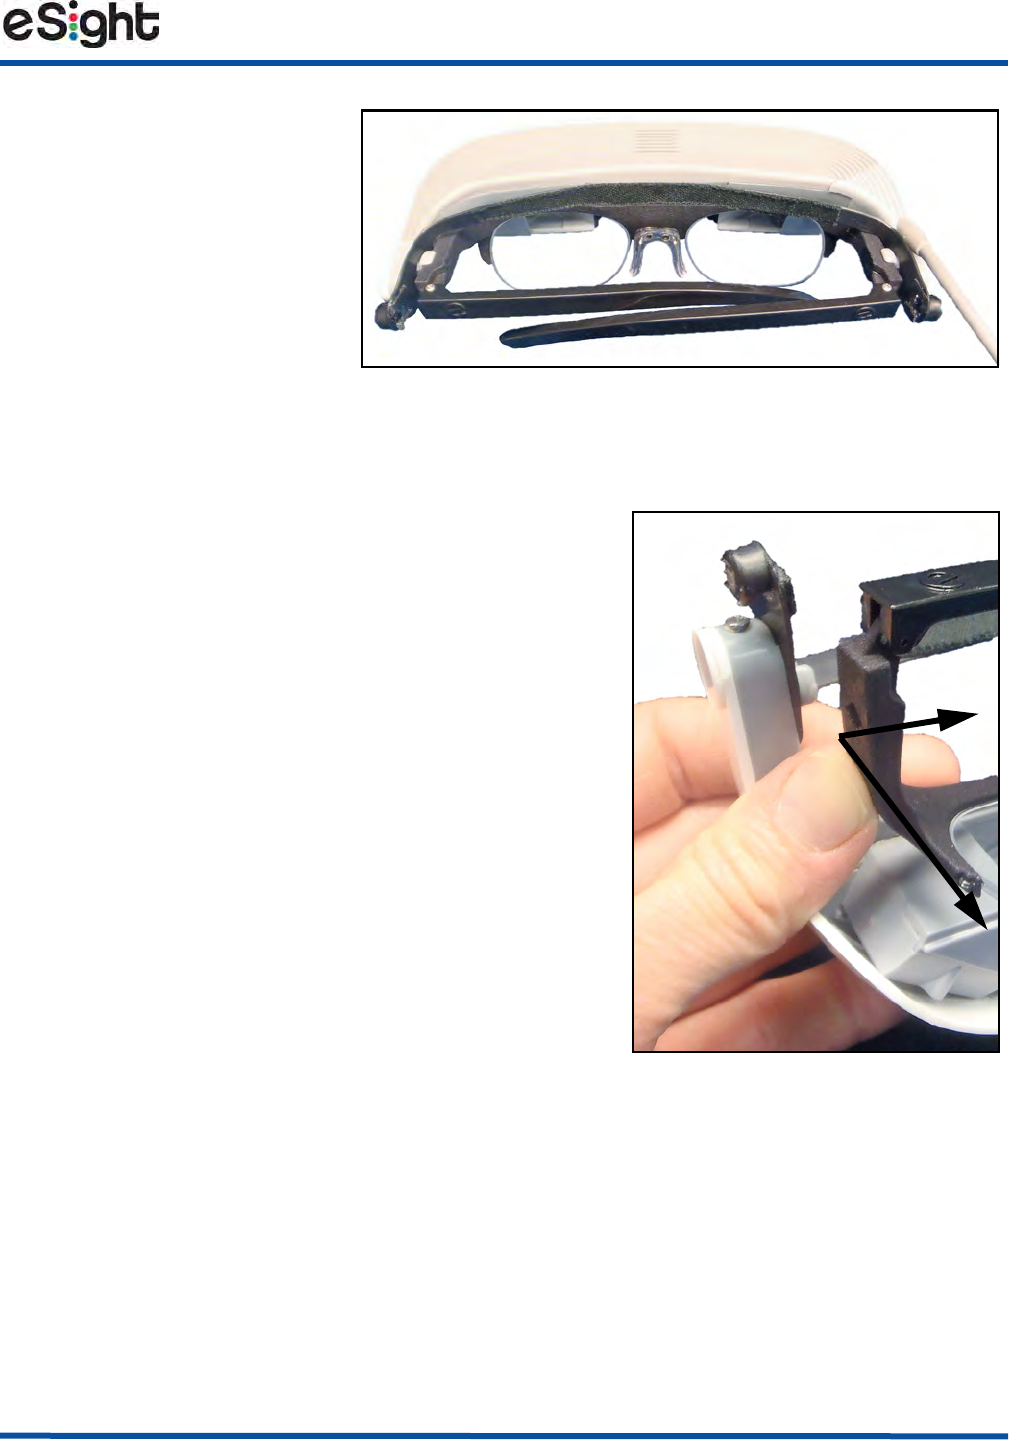
3. In the same manner, fit
the opposite side.
Both sides of the frames
are flush with the headset
(Figure 4).
To disconnect the frames
1. On one side, gently push the frames
slightly inward and then away from the
headset, as shown in Figure 5.
2. Gently pull the frames free from the
headset on the opposite side.
PLACEHOLDER
Figure 4 Frames Fitted in the Headset
Figure 5 Disconnecting the
Frames
8
Wearing Your eSight Eyewear
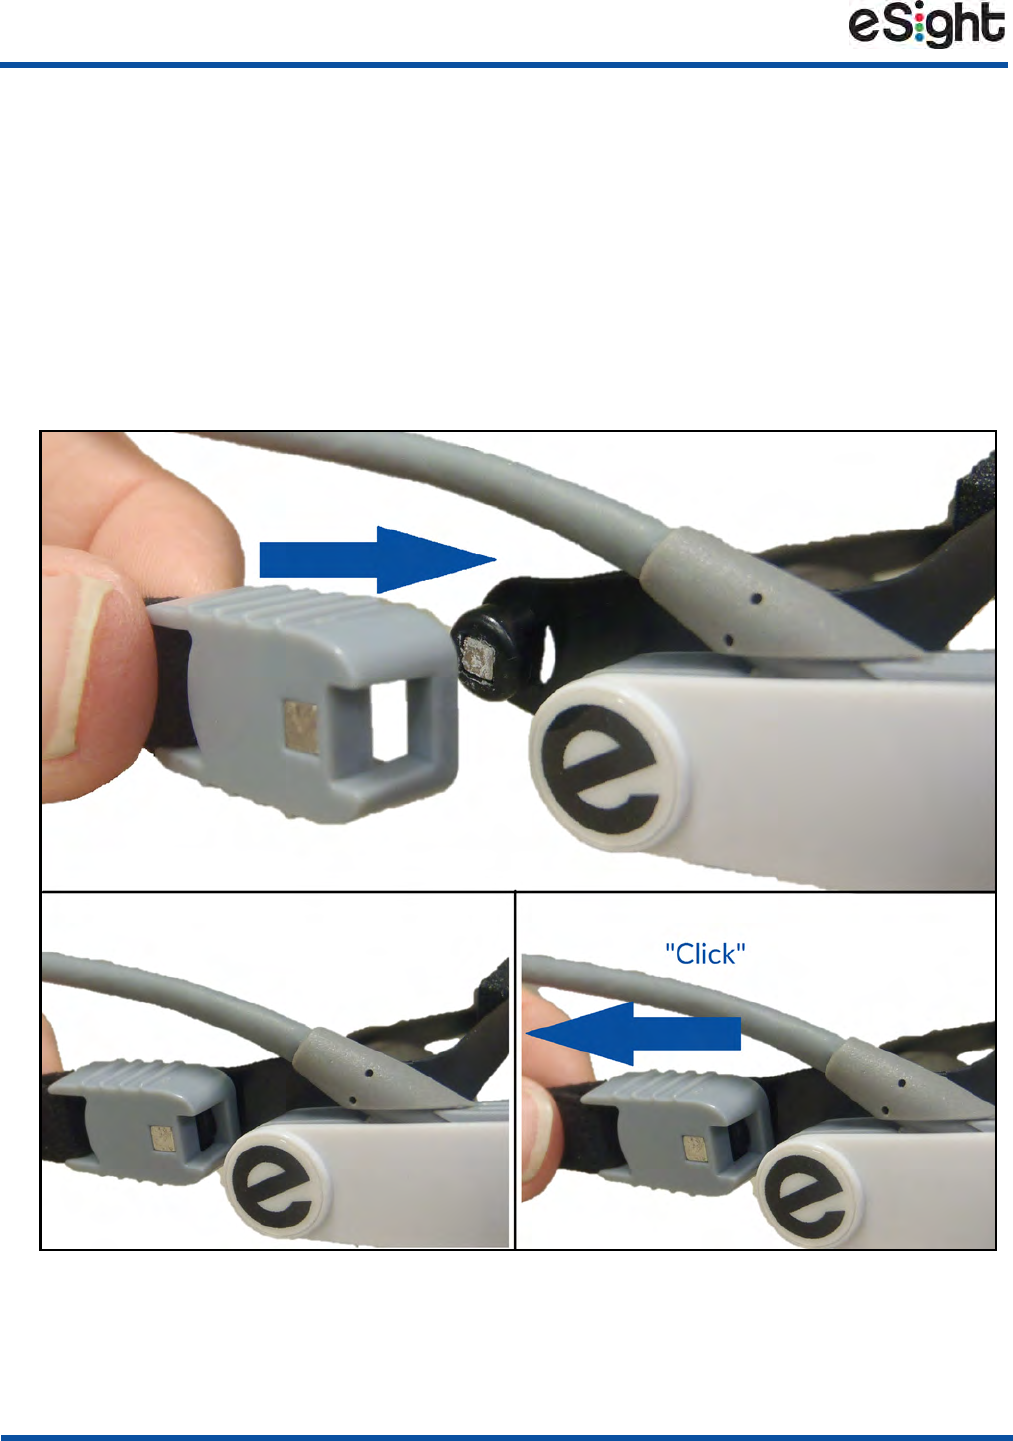
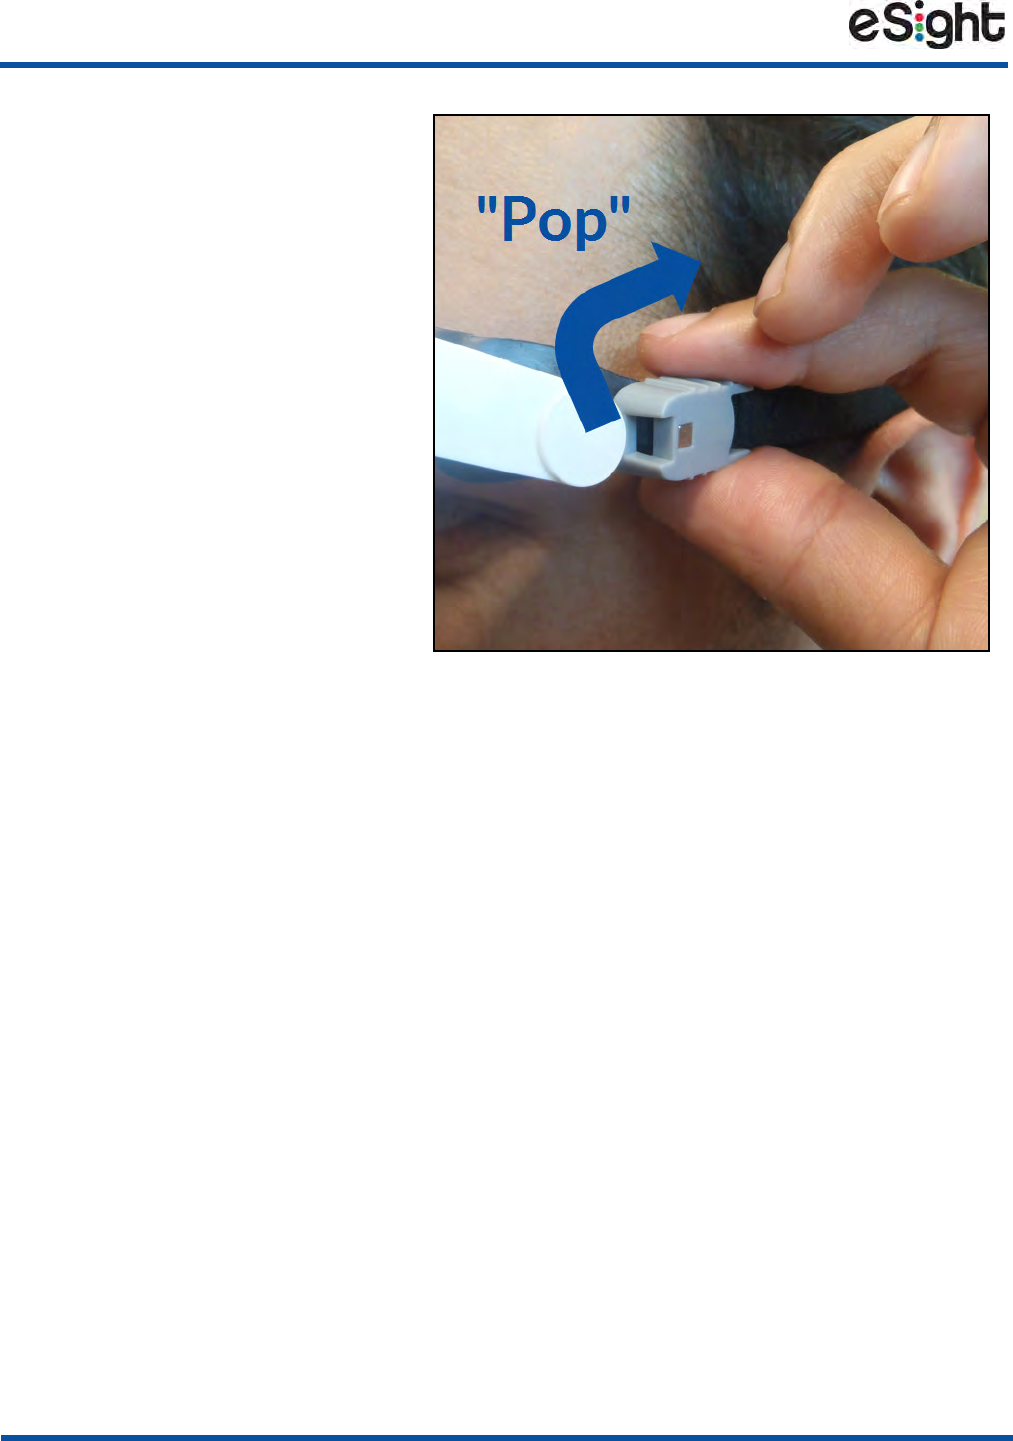
Connecting and Disconnecting the Headstrap
The headstrap connects to attachment points on the forehead band, as shown in
Figure 6.
To connect the headstrap to the eyewear
1. Attach the headstrap to the right side of the eyewear, as shown in Figure 6, and
then gently pull on the connector until it “Clicks” into place.
Figure 6 Connecting the Right Side of the Headstrap
Wearing Your eSight Eyewear
9
2. With your frames connected to the headset, put on the headset like a pair of
glasses.
3. Wrap the headstrap around your head.
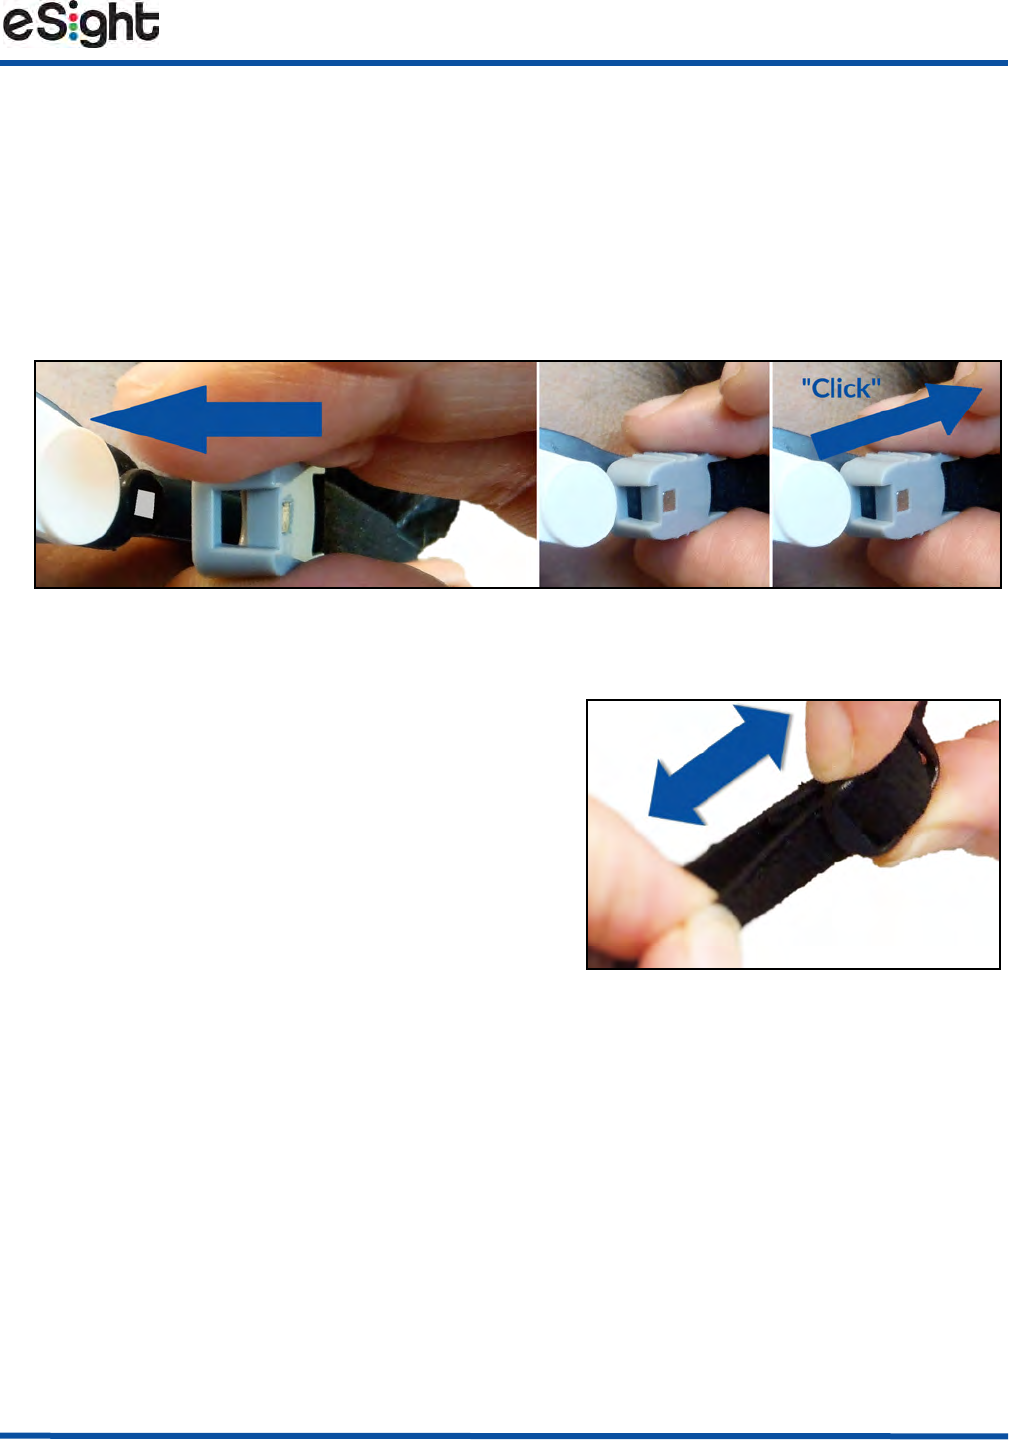
4. In the same way as you attached the right side of the headstrap, attach the left
side of the headstrap, as shown in Figure 7.
Figure 7 Connecting the Left Side of the Headstrap
5. Tighten the headstrap by sliding the strap
buckle until you have a snug fit, as shown
in Figure 8. See “Wearing Your eSight
Eyewear” on page 5.
Figure 8 Adjusting the
Headstrap
Wearing Your eSight Eyewear
11
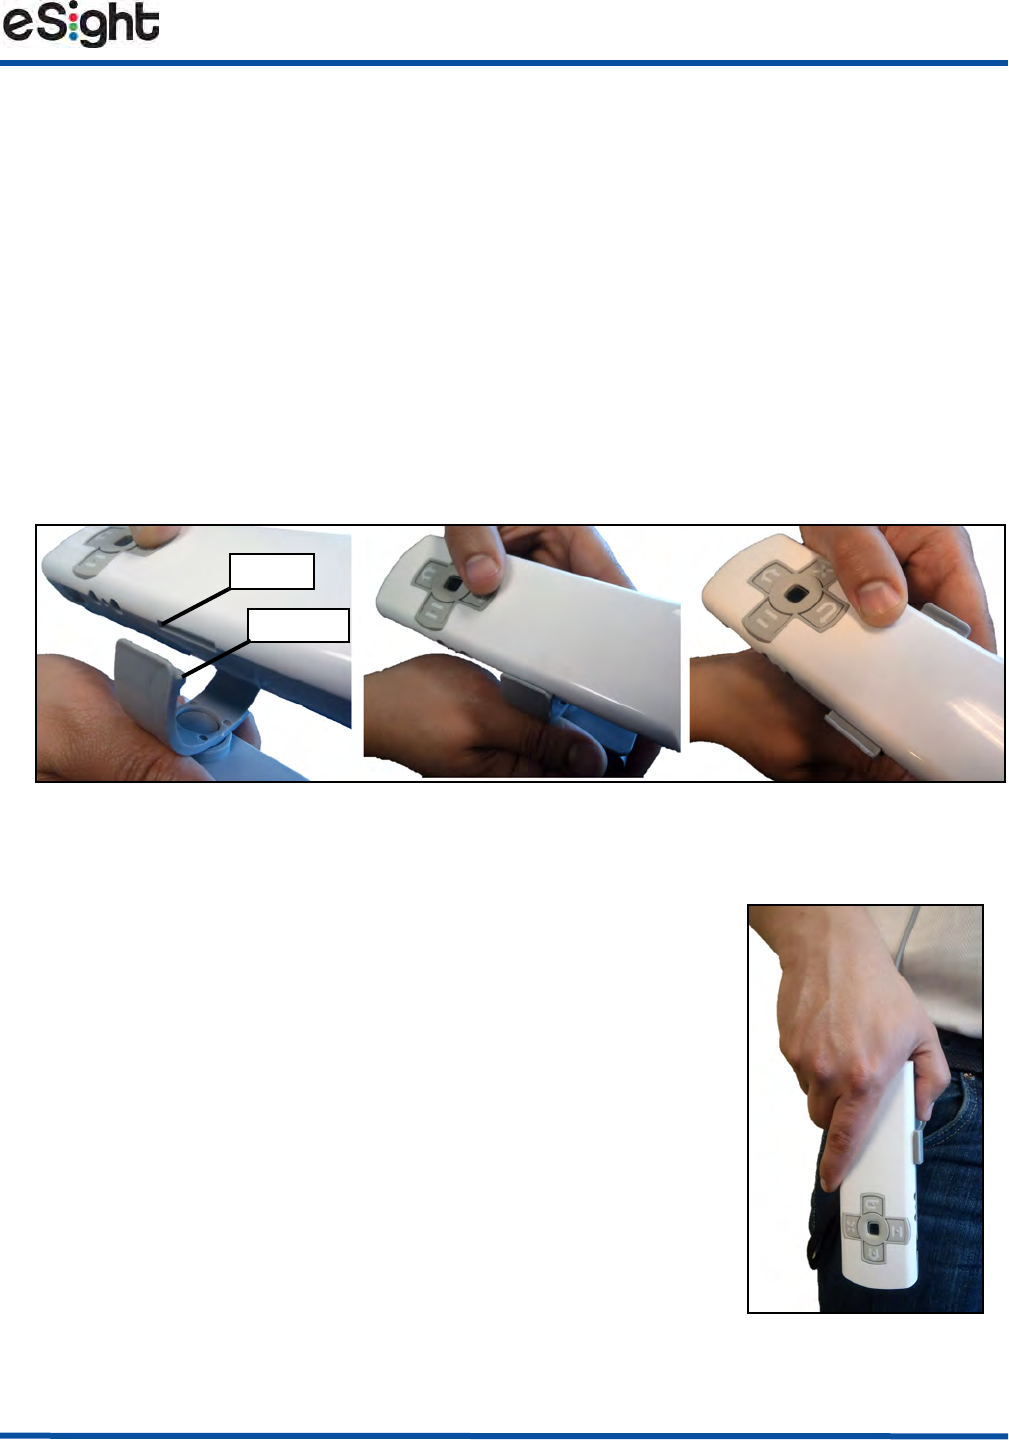
Securing the Controller
When you are using your eSight Eyewear in mobile situations, you can secure the
controller using the belt clip, wrist strap, or neck lanyard. Alternately, you can carry
the controller in your pocket or purse.
To use the belt clip
1. Fit the tooth on the belt clip cradle into the slot on the side of the controller
(Figure 10 Left and Center).
2. Push down on the controller until it snaps into the cradle (Figure 10, Right).
Figure 10 Securing the Controller
3. Secure the belt clip to your clothing, and position the
cable behind your head and back or down the front of
your chest.
4. Rotate the cradle on the belt clip, so the controls are
easily accessible when the belt clip is secured to your
clothing, as shown Figure 11.
Tooth
Slot
Figure 11 Using
the Belt Clip
PLACEHOLDER
12
Wearing Your eSight Eyewear
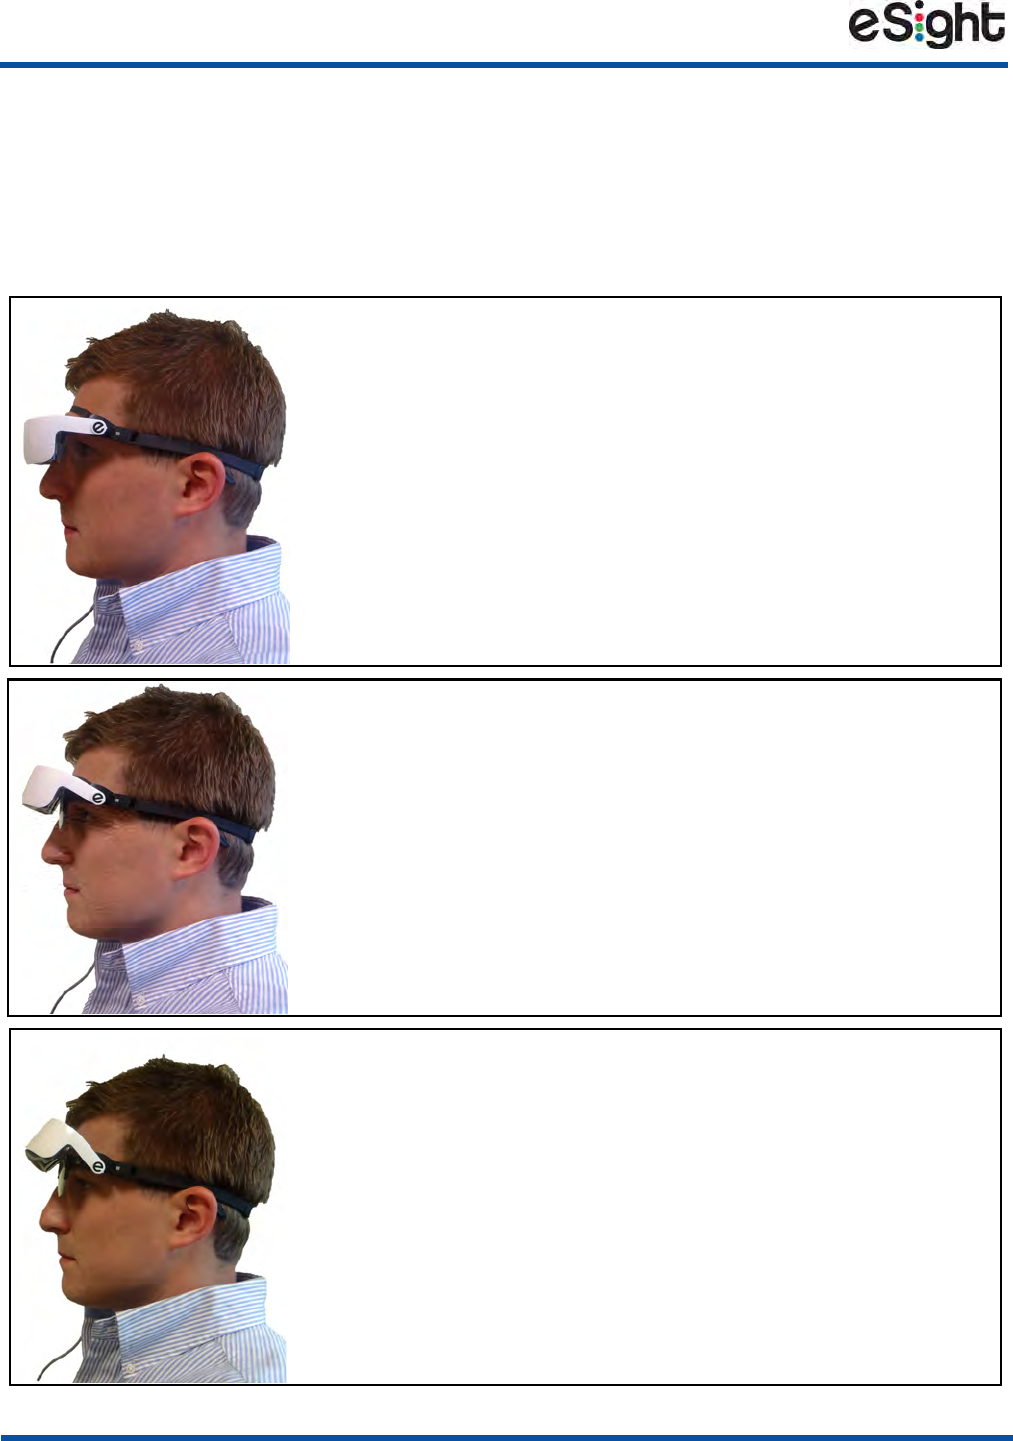
Tilting the Headset
You can tilt your eSight Eyewear through a wide range of positions. There are three
common positions: nearly immersive, bioptic, or headset up. When you use each
position depends on your activity and personal preference.
Nearly Immersive Position — Headset Fully Down
• View using mostly the displays
• Limited access to peripheral vision
• Useful for immersive activities like reading, crafts,
and watching t.v.
• Do not attempt mobile activities with your headset
fully down
Bioptic Position — Headset Partially Upright
• View using the displays and frame lenses
• Allows you to use your peripheral vision and glance
up into the headset displays for greater detail
• Useful for mobile activities, social occasions, and
working with screens
Fully Tilted Position — Headset Fully Up
• View using only your frame lenses
• Cannot view the displays
• Headset is out of the way

13
Powering Your eSight Eyewear
Your eSight Eyewear has three power modes:
•ON — Push the Power
button to turn on your
eSight Eyewear.
The light momentarily
flashes red and green as
your eyewear starts up.
When your eyewear is ready, the light indicates the power and battery status of
your eyewear. See “Getting to Know Your Controller” on page 15 for more
information about the Power/Battery Status Light.
•Standby — When your eyewear is turned on, push the Power button to
put your eyewear into Standby mode. Push the Power button again to
leave Standby mode.
In this mode, the eSight Eyewear consumes very little power, and you can
resume use of your eyewear quickly.
When your controller is in this mode, the Power/Battery Status Light is off unless
you are charging your eyewear.
To conserve power, your eSight Eyewear automatically enters standby mode if
the eyewear is resting in a stationary position for one minute.
Alternatively, push the Home Button and Menu Back/Control
Lock Button together to enter or leave Standby mode.
Power Button
Figure 12 Power Button on the Controller

14
Powering Your eSight Eyewear
•OFF — Push and hold the Power button.
Turn off your eyewear when you are not planning to use it for an extended
period.
15
Getting to Know Your Controller
This section helps you familiarize yourself with your eSight Eyewear controller.
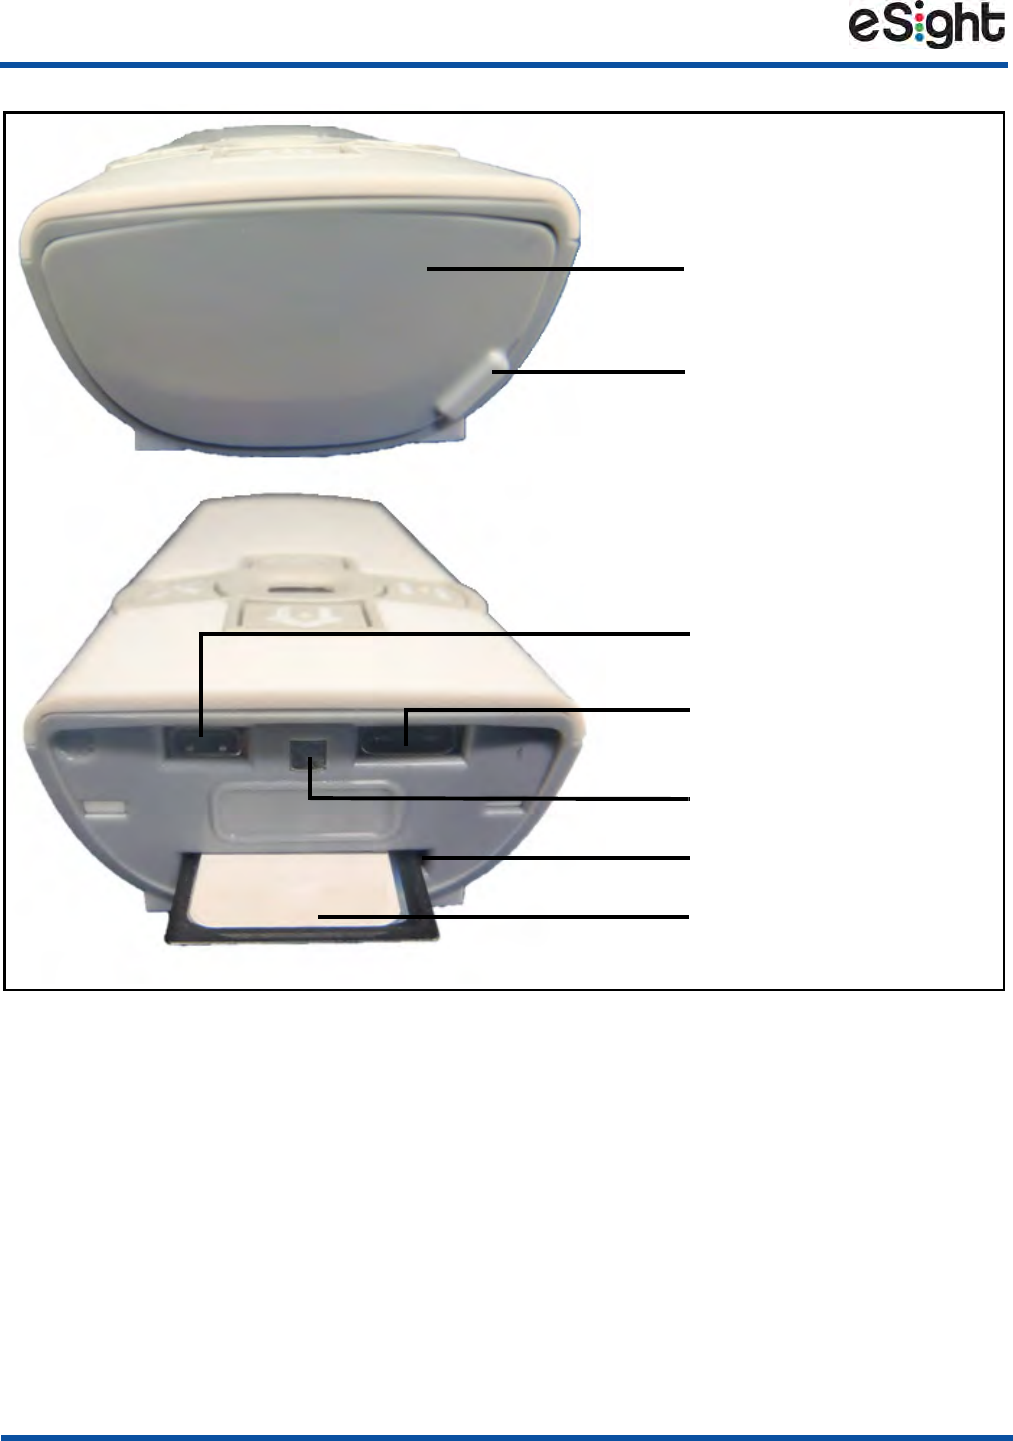
PLACEHOLDER
Zoom/Spot
Zoom Dial
Photo
Power/Battery
Status Light
Power
Left Side
Right Side
Contrast/Enhance Dial
Focus Dial
Belt Clip Slot
Strap Hole
Button
Button
16
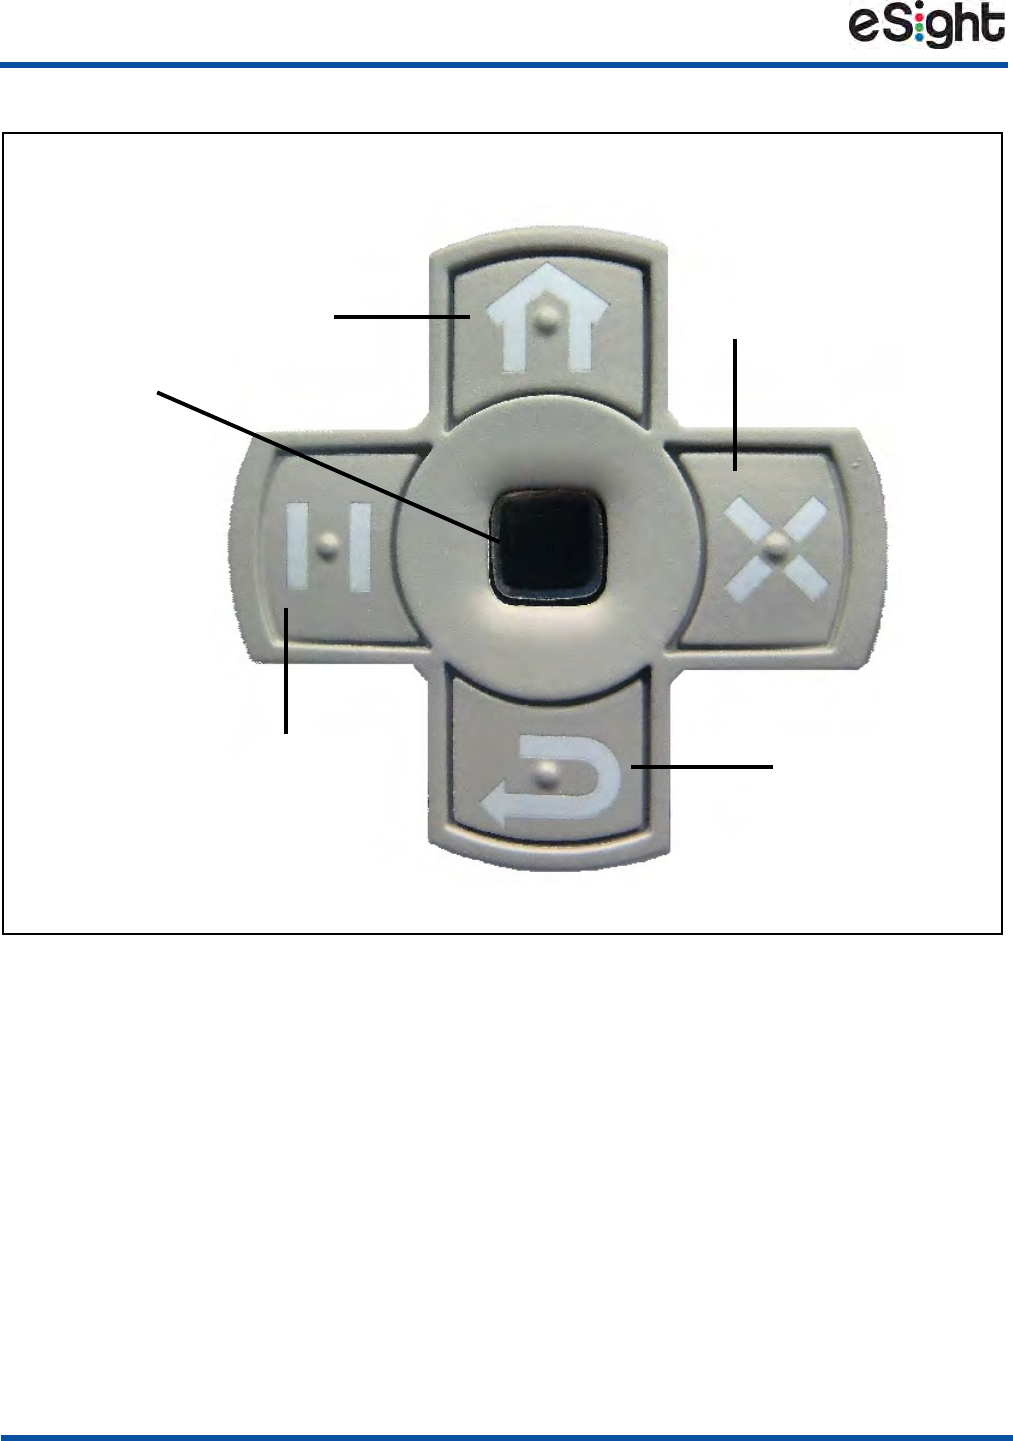
Getting to Know Your Controller
SOUTH
NORTH
Home
Menu Back/
Freeze/
WEST
EAST
Menu Button/
Trackpad
Button
Image
Stabilization/
Panning Mode
Button
Control Lock
Button
Trackpad
Resume
Video
Button

Getting to Know Your Controller
17
Battery Less Than 15 Percent Charged.
Light Meaning
Flashing Green
Battery 80-100 Percent Charged.
eSight Running on Battery Power.
Flashing Yellow
Battery 15-80 Percent Charged.
eSight Running on Battery Power.
Flashing Red
eSight Starting Up, OR
Flashing Red/Green eSight Updating.
System Fault.
Flashing Red/Yellow
Solid Green
Battery Fully Charged. eSight Plugged In.
Solid Yellow
Battery More Than 15 Percent Charged.
Solid Red
eSight Charging.
Battery Less Than 15 Percent Charged.
eSight Not Ready for Use.
eSight Charging.
eSight Running on Battery Power.
Power/Battery
Status Light
Power/Battery
Status Light
Getting to Know Your Controller
19
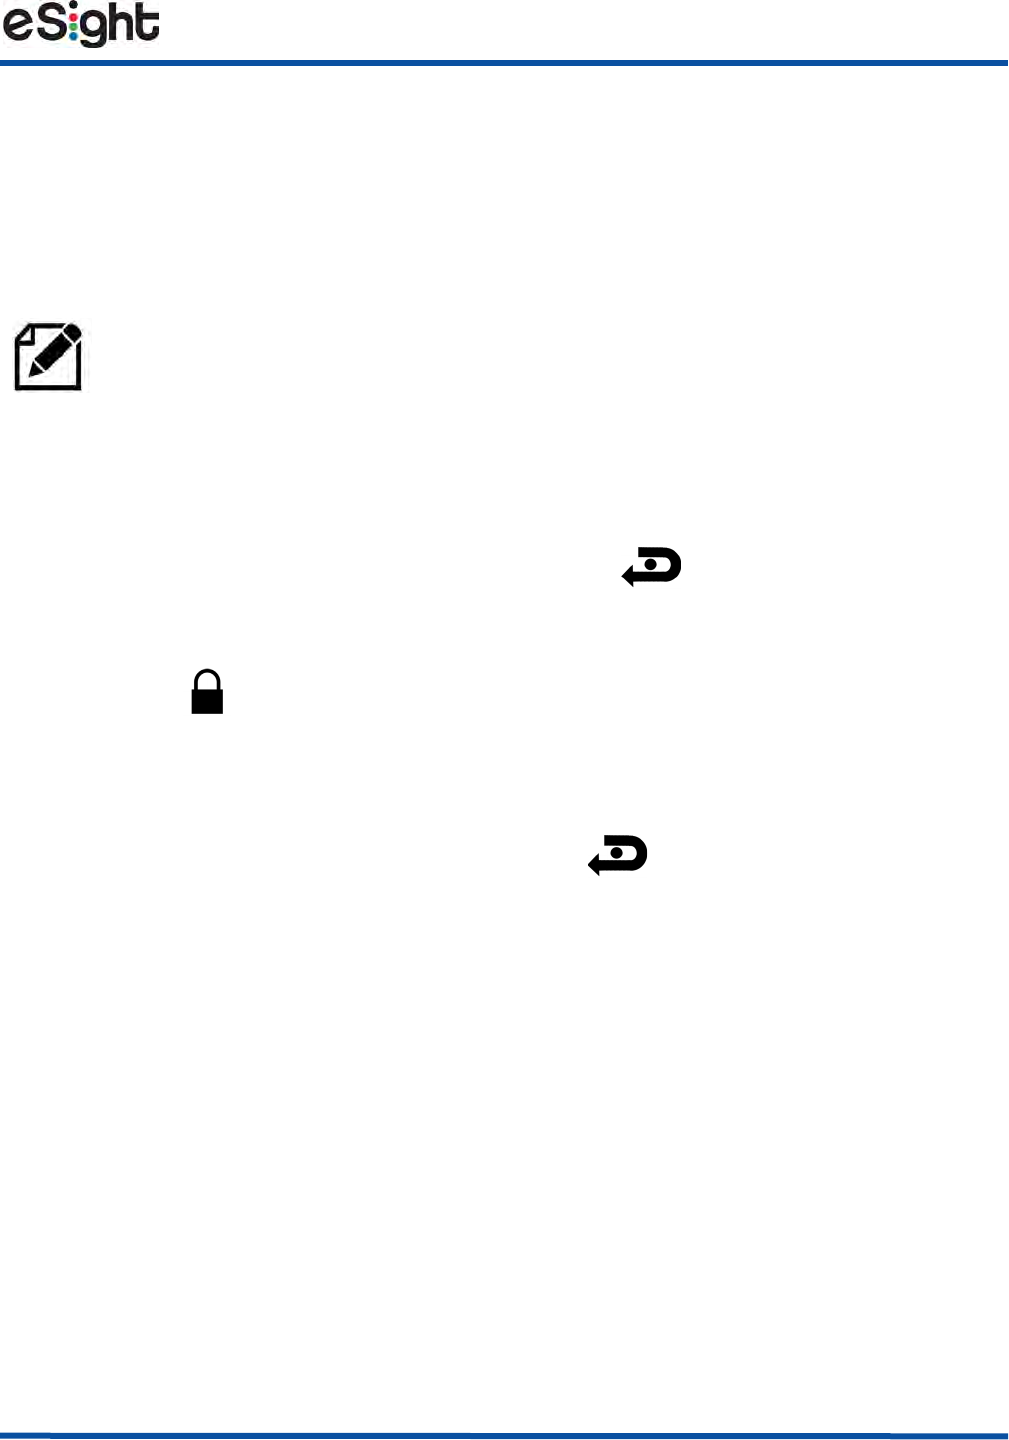
Locking and Unlocking the Controller
In some situations, you may want to lock the controller to avoid accidentally
pressing buttons or turning dials. When locked, all the controls on the eSight
controller are inoperable except the Power button.
To lock the controller
• When the controller is unlocked, press and hold for approximately 5
seconds to lock all the controls except the Power button.
A Lock icon appears when you have successfully locked the controller.
To unlock the controller
• When the controller is locked, press and hold for approximately 5 seconds
to unlock all the controls.
The Keys Unlocked message appears when you have successfully unlocked the
controller.
You cannot lock the controller while you are viewing on-screen menus.
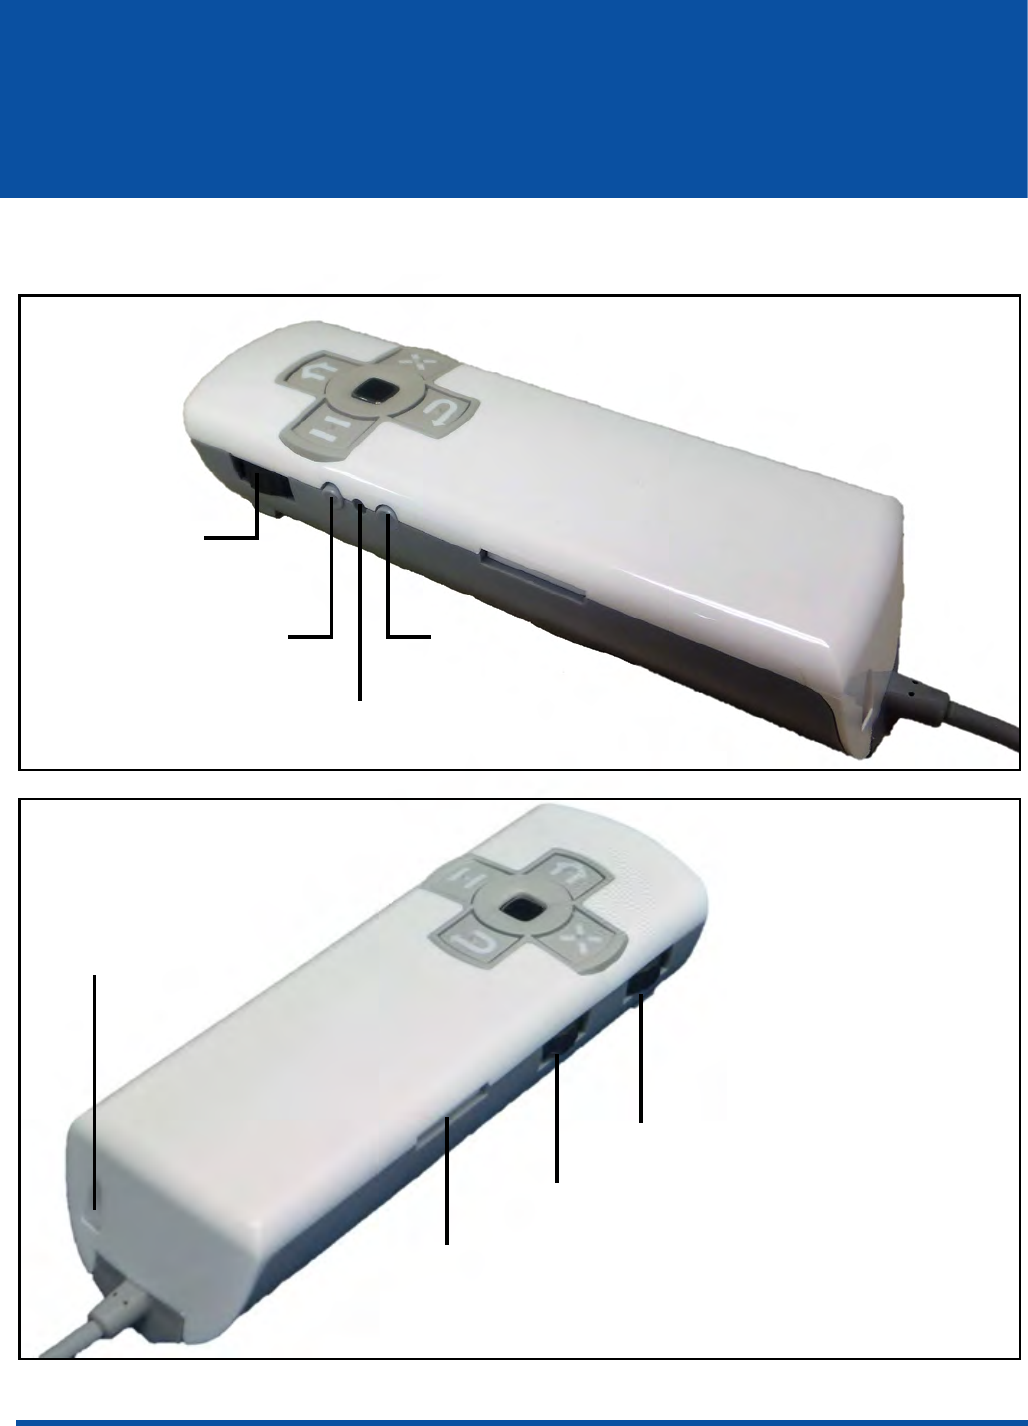
20
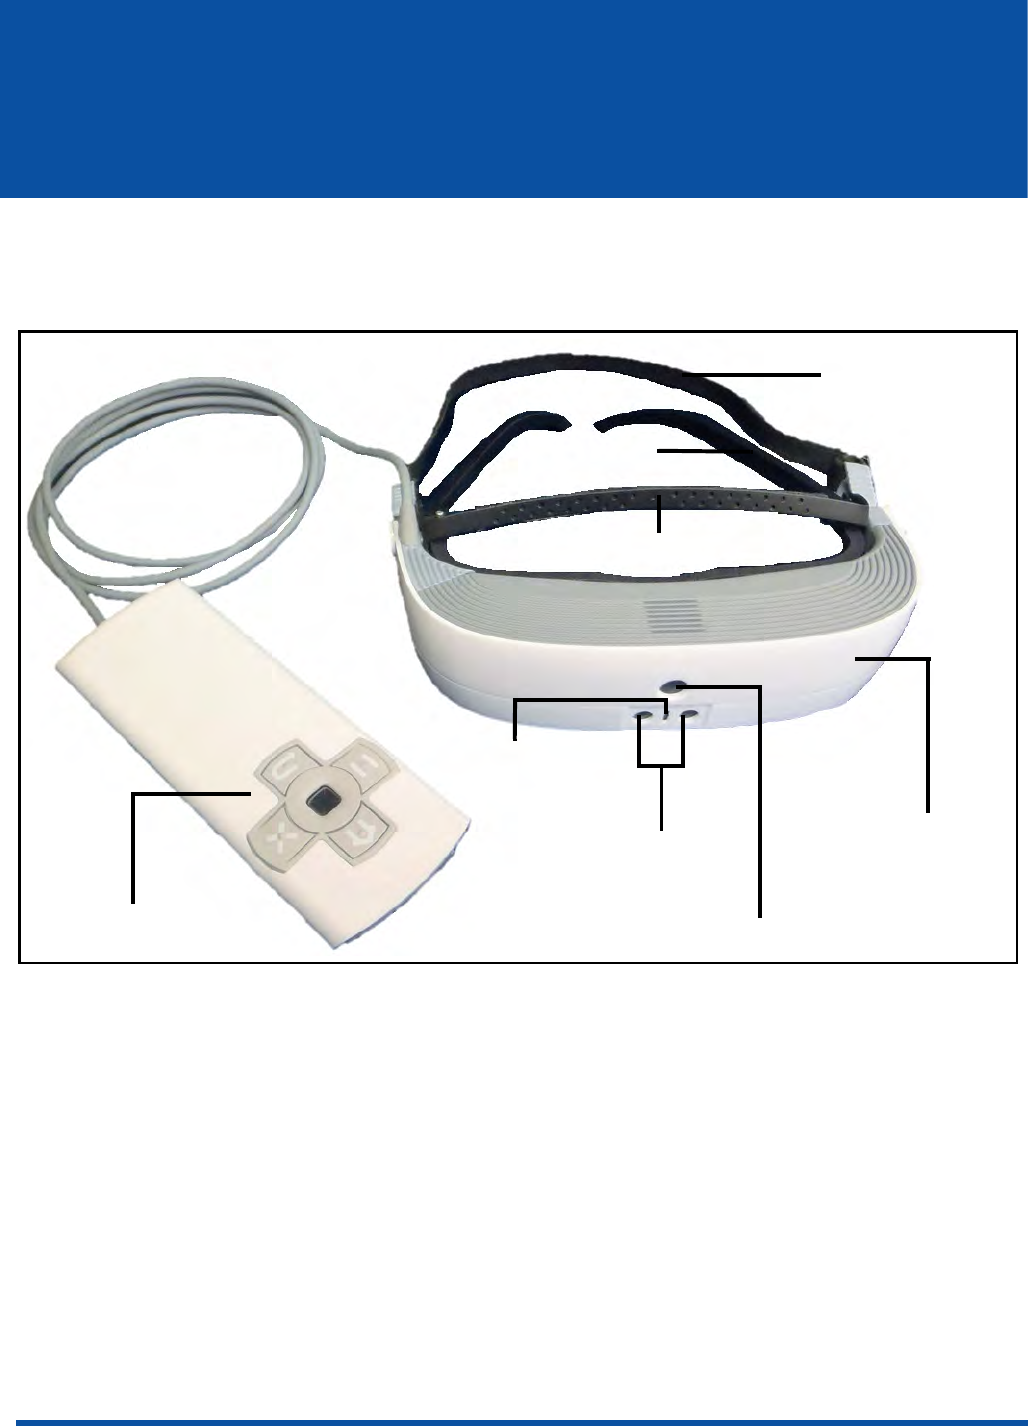
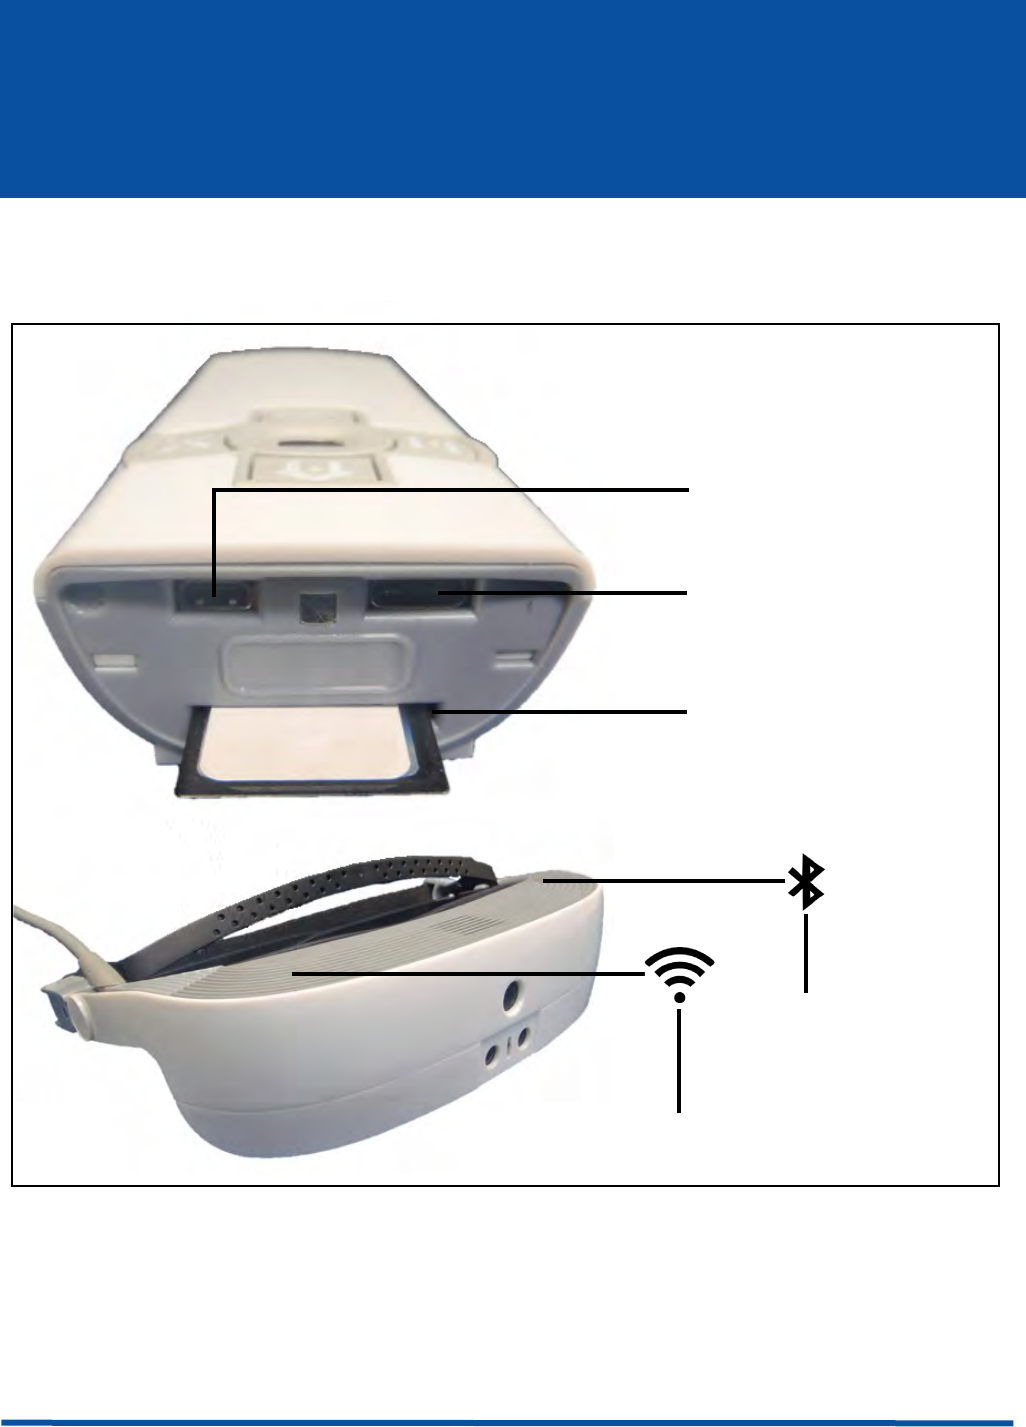
Getting to Know the Connections
Use this section to familiarize yourself with the connections on your eSight
Eyewear.
Figure 13 eSight Eyewear Connection
For more information about using these connections, consult the software manual
accompanying your eSight Eyewear.
SD Card Slot
USB Type C
Connection
Micro HDMI
Connection
Bluetooth
WiFi
21
Maintenance
Proper care of your eSight Eyewear is essential. Familiarize yourself with how to
charge the battery and how to clean the lenses, the headset, and the controller.
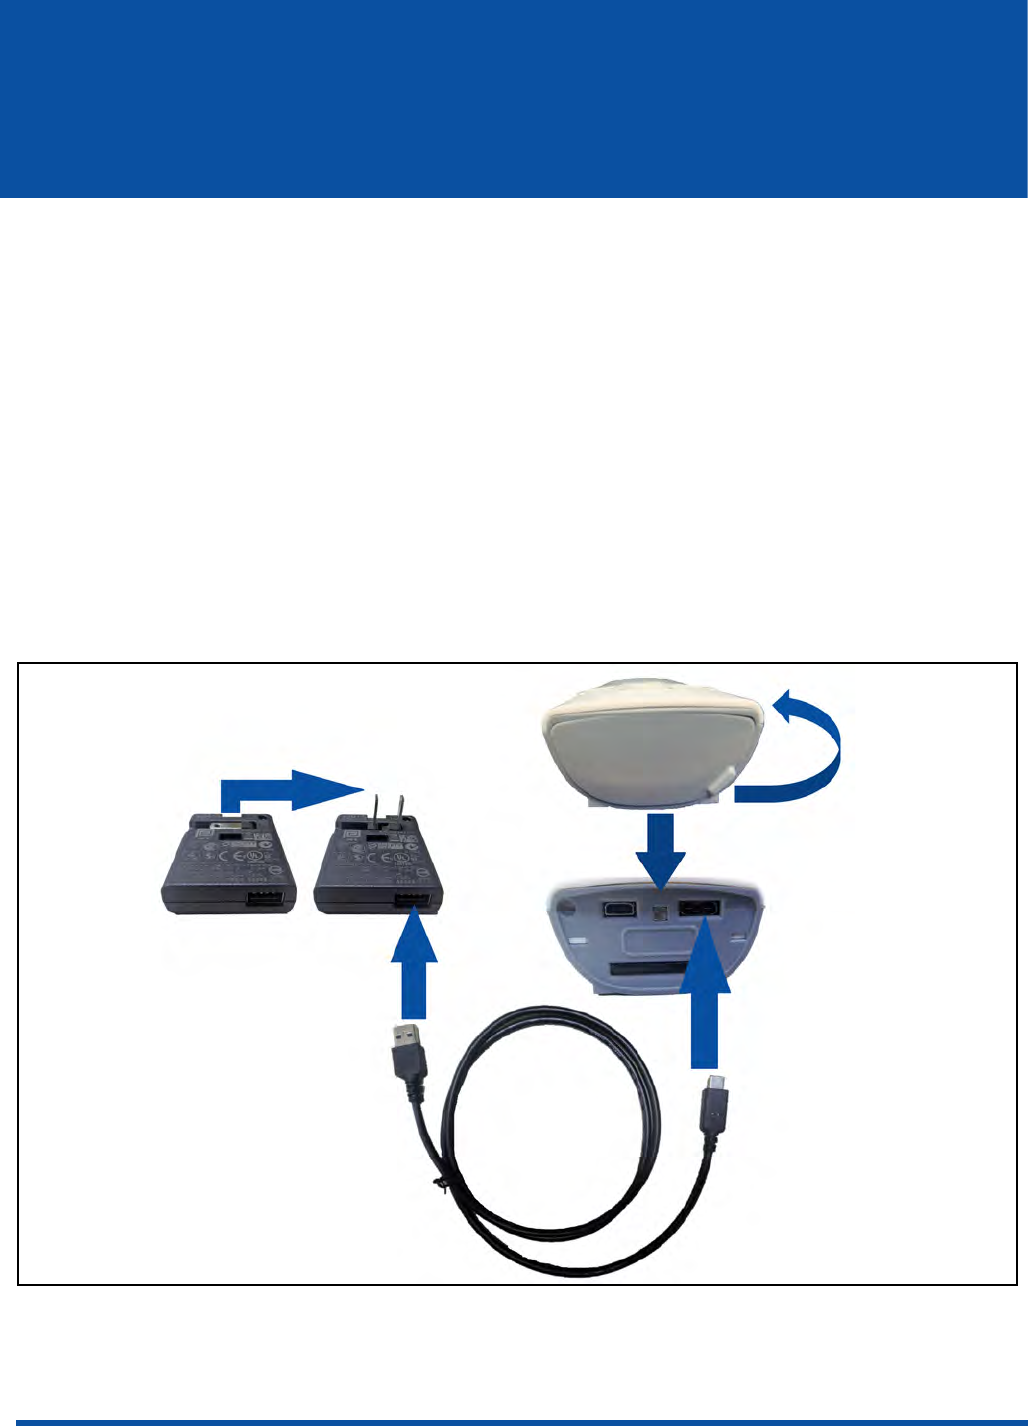
Charging Your eSight Eyewear using the Wall Charger
In order to maintain a charged battery, eSight recommends you charge your eSight
Eyewear whenever you are using it while sitting.
You can charge your eSight Eyewear using the 1 meter USB cable and the USB AC
wall adapter.
The battery is fully charged when the Power/Battery Status Light is solid green.
Figure 14 Charging the eSight Controller
22
Maintenance
To charge the battery using the wall adapter
1. Plug the large flat end of the 1 meter USB cable into the USB AC wall adapter.
2. Open the magnetic door at the top of your controller.
3. Plug the small end of the 1 meter USB cable into the USB connection on your
controller.
4. Plug the AC adapter into a power outlet.
Cleaning your eSight Eyewear
Follow the guidelines below to clean your lenses, headset, and controller:
• Disconnect the frames from the headset, and clean the lenses as you would a
regular pair of glasses using a lens cleaning cloth or the microfiber bag provided
with your ophthalmic frames.
• To clean the surface of the headset and controller, use a soft cloth dampened
slightly with mild soapy water or rubbing alcohol. Pay particular attention to
where the headset touches your face constantly.
•Clean the camera lens cover using a lens cleaning cloth.
• For hard-to-reach areas, use a cotton swab dampened slightly with mild soapy
water or rubbing alcohol.
• Allow your equipment to dry thoroughly.
Warning
Do not use solvents to clean any part of the eSight Eyewear.
Avoid getting liquids inside the headset or controller.
Maintenance
23
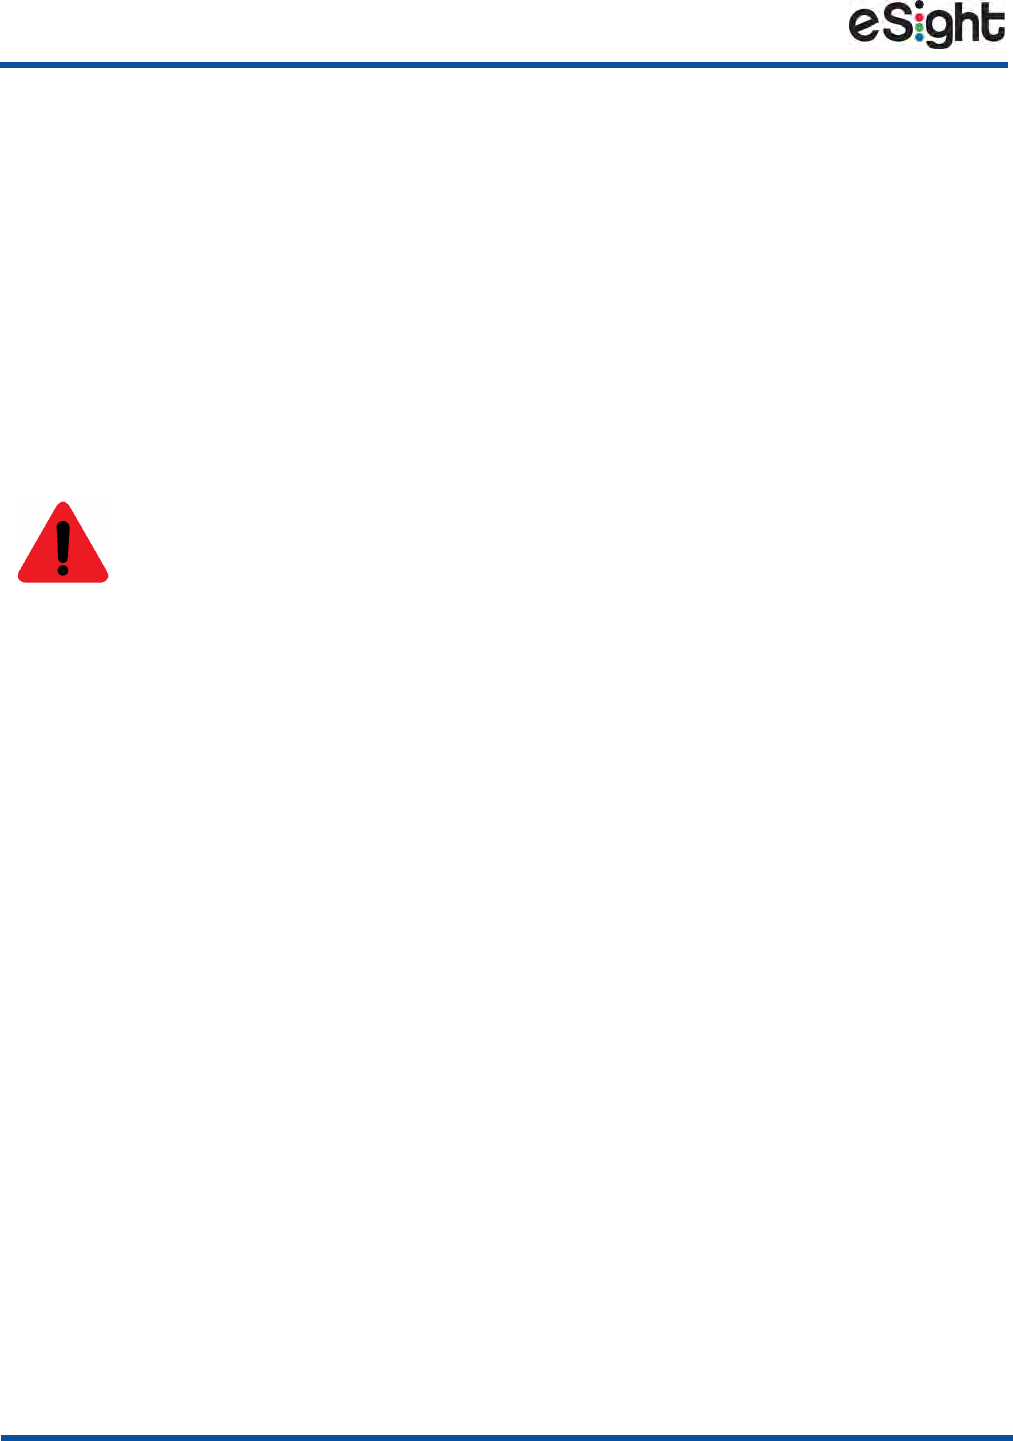
Replacing the Forehead Band
Your eSight Eyewear comes with the forehead band already attached. You can
replace the forehead band if you need a different length or if the band is damaged
due to wear and tear.
Figure 15 The Forehead Band and Headset
To replace the forehead band
1. Disconnect the frames from the headset. See “Connecting and Disconnecting the
Frames” on page 6.
Flat Edge
of Keyhole
Orientation of Forehead Band
for Fitting into the Headset
Keyhole
Slot
Pivot Heads
24
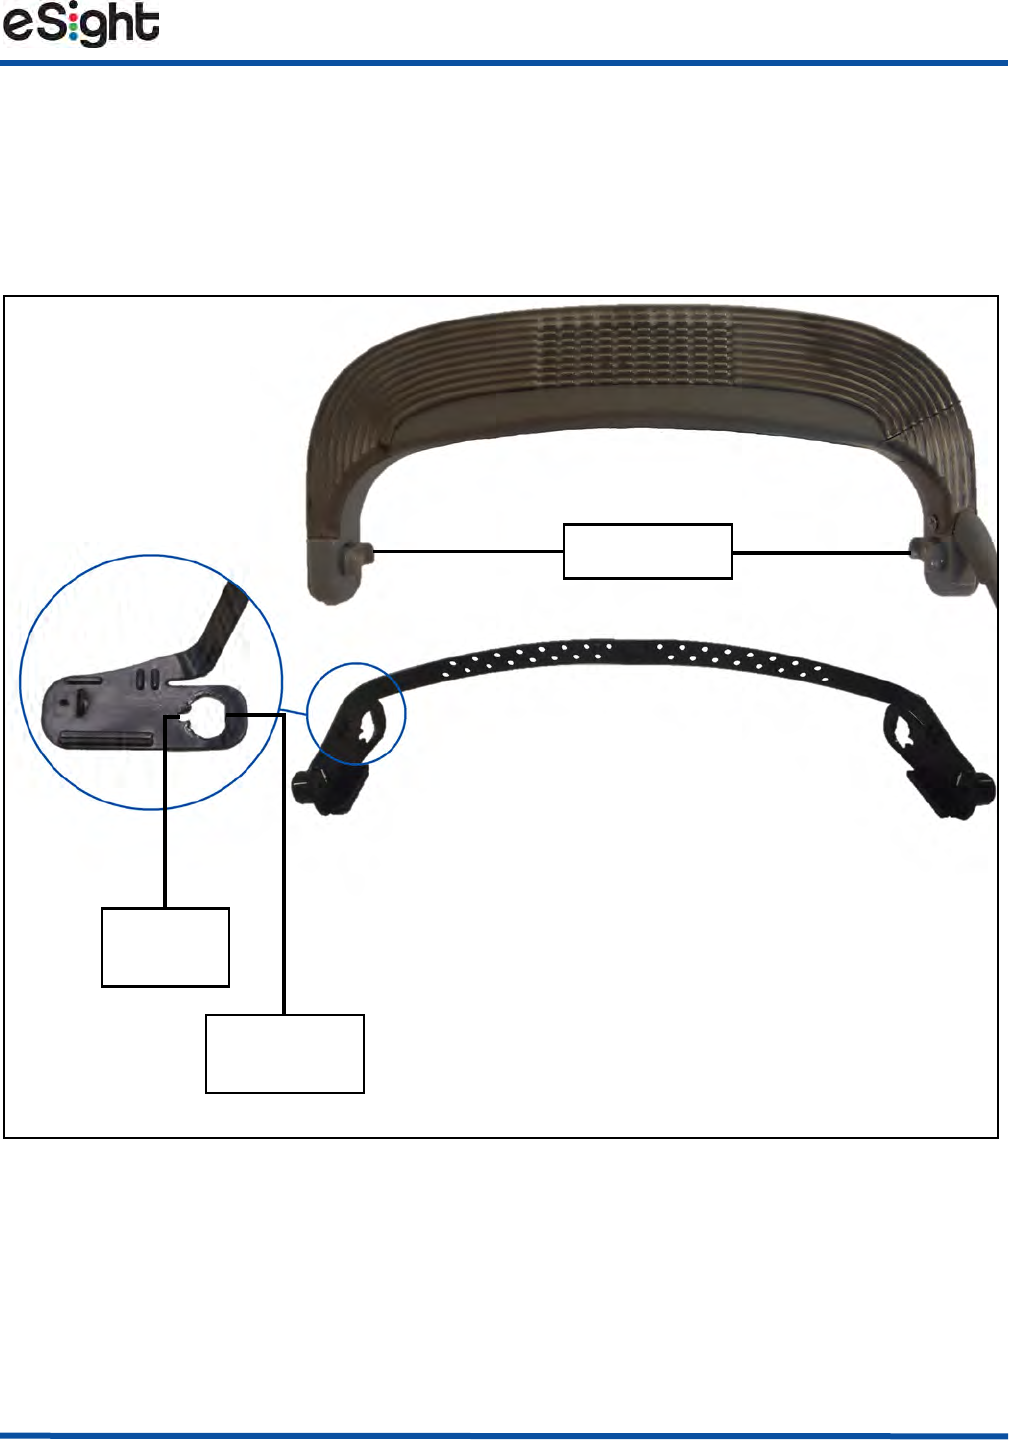
Maintenance
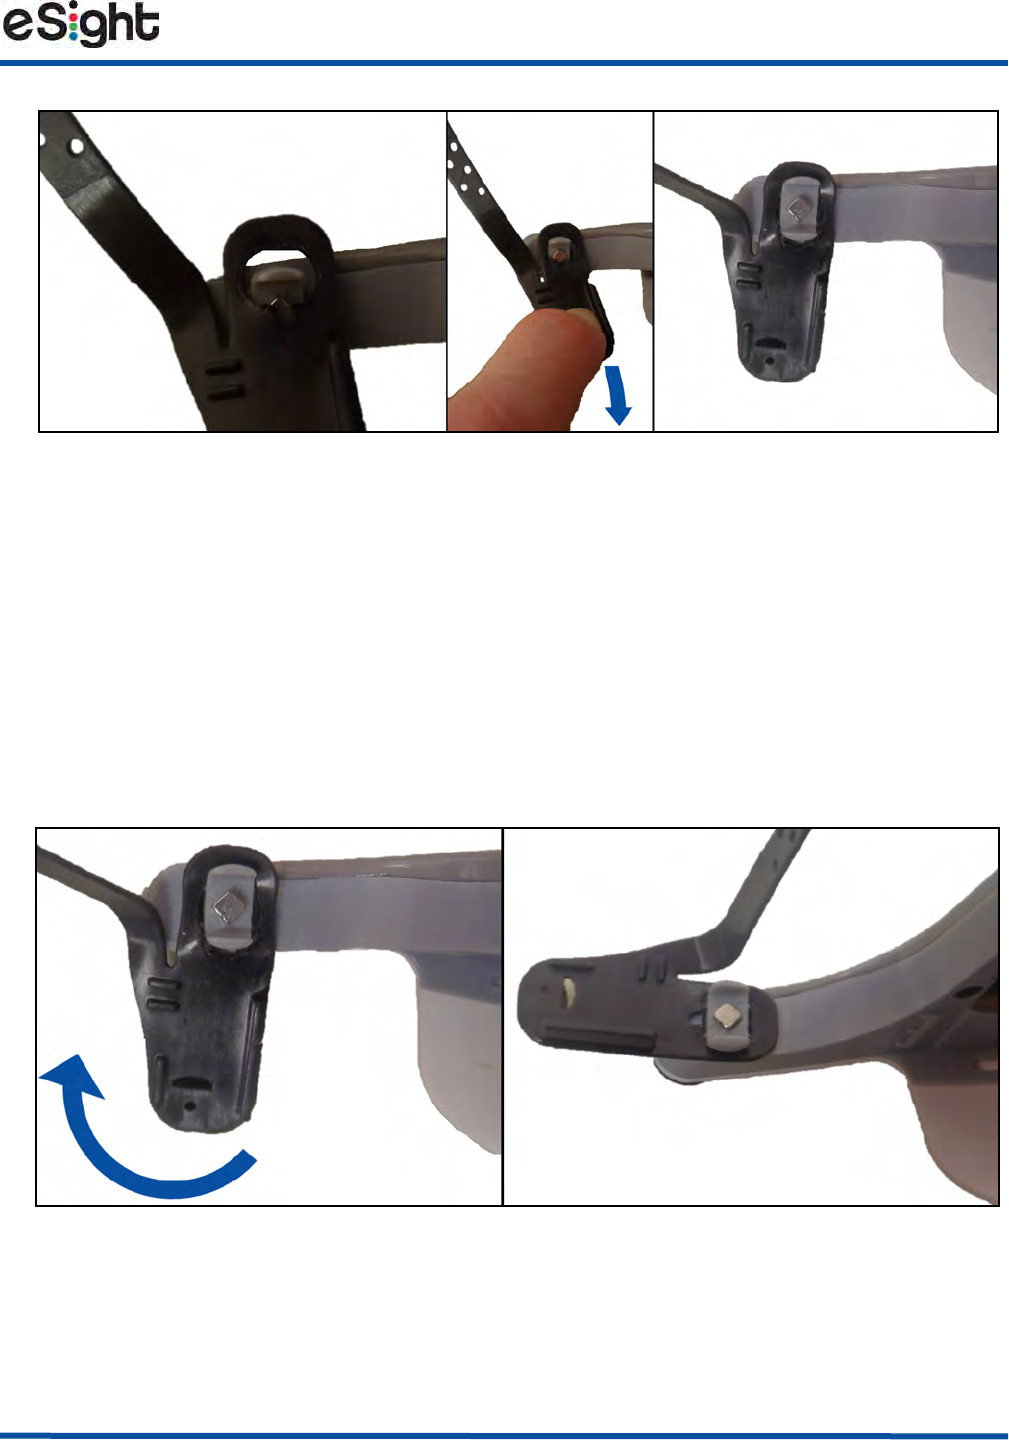
2. Rotate the forehead band until the keyhole slot aligns with the rounded end on
the pivot head of the headset (Figure 16, Right).
Figure 16 Rotating the Forehead Band Arm to Disconnect
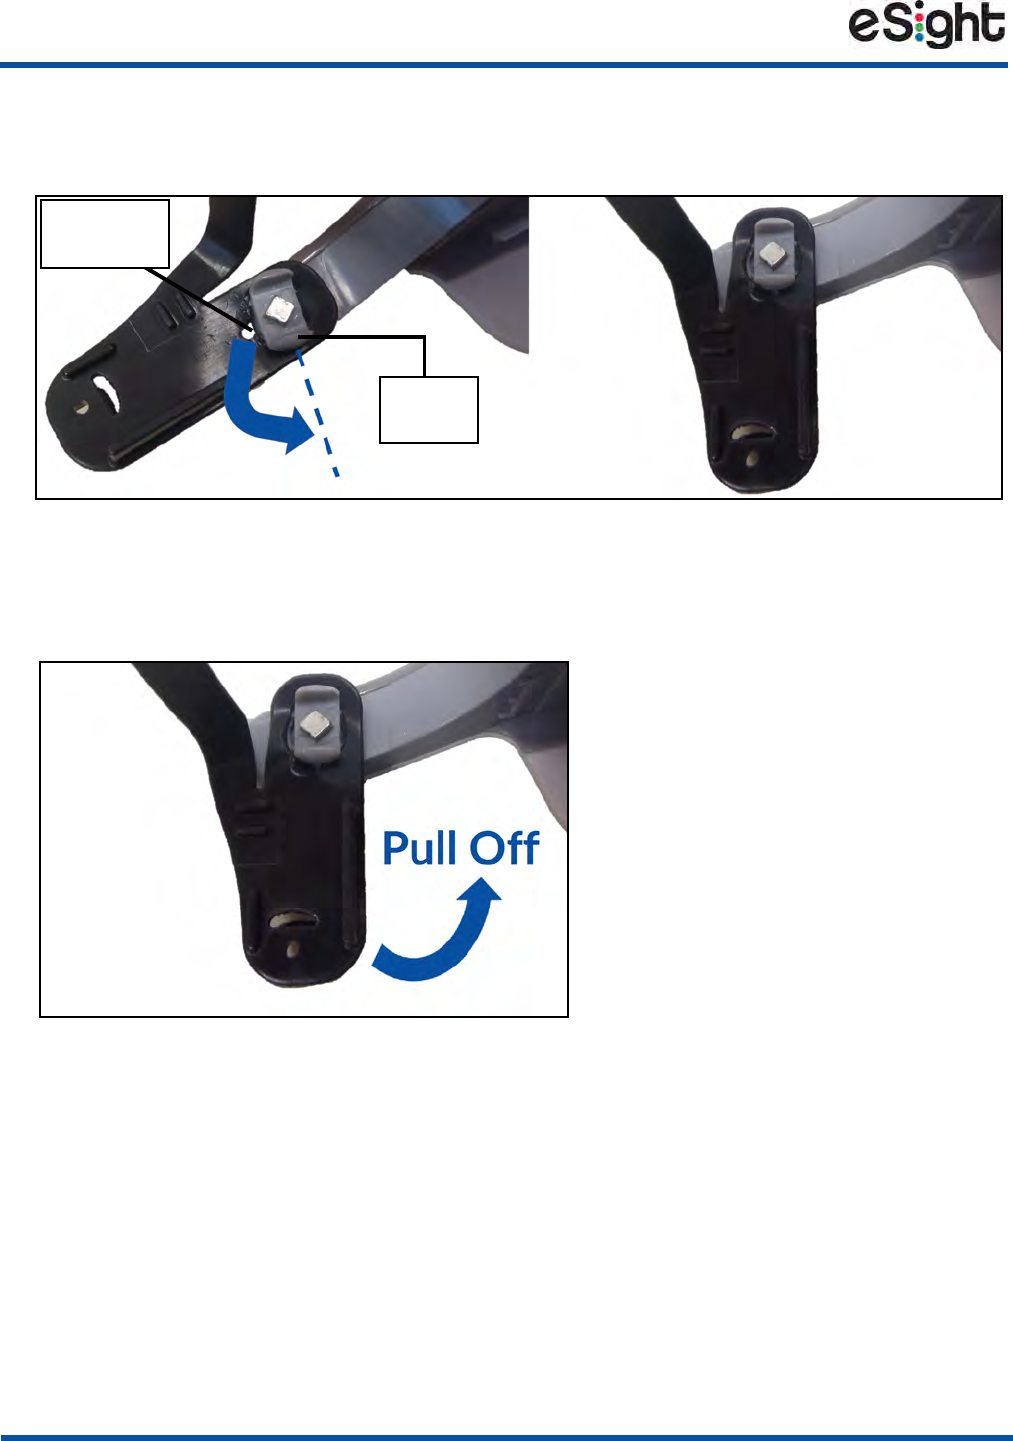
3. Gently pull the forehead band off the pivot head, as shown in Figure 17.
Figure 17 Disconnecting the Forehead Band
4. Repeat 2 and 3 on the opposite side.
5. Orient the new forehead band, so the band curves up and away from you, as
shown in Figure 15 on page 23.
Keyhole
Slot
Pivot
Head
Maintenance
25
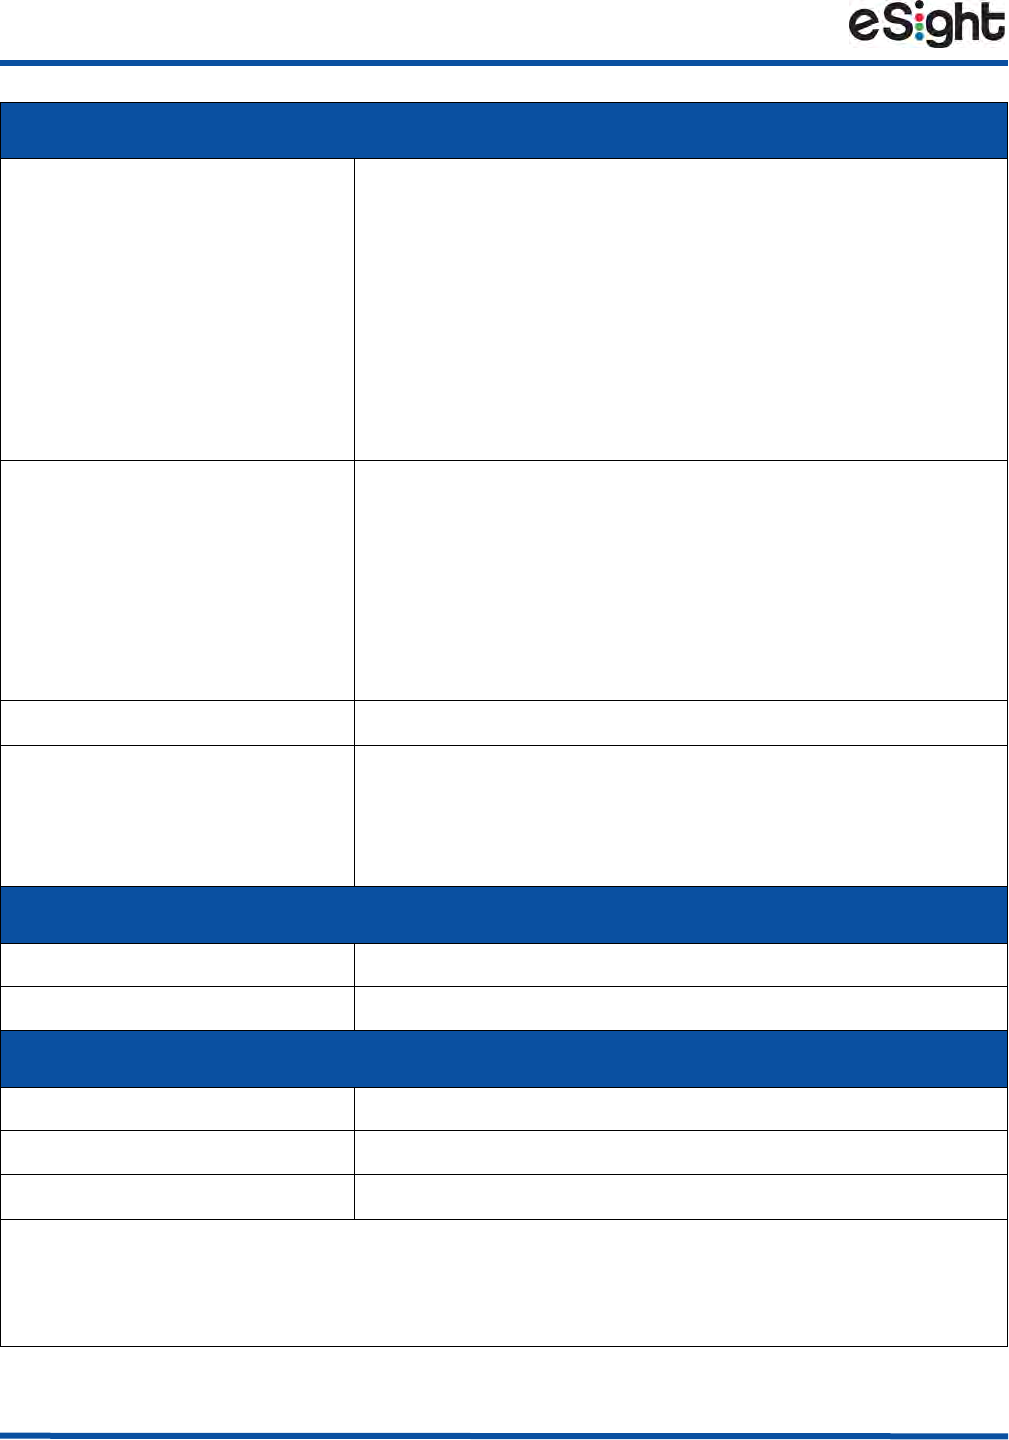
Figure 18 Connecting the Forehead Band
6. Fit the flat edge of the keyhole on the forehead band over the rounded end of
the pivot head on the headset (Figure 18, Left).
7. Pull the keyhole over the other end of the pivot head (Figure 18, Middle and
Right).
8. Rotate the forehead band until the arm of the band is parallel with the arm on
the headset (Figure 18, Right).
Figure 19 Locking Forehead Band into Position
The forehead band is locked in position.
9. Repeat steps 6 and 8 for the opposite side.
26
Specifications & Compliance Information
Technical Specifications
Display
Resolution • 1024x768 (2.36 Megapixels)
Field of View • Diagonal 37.5°
Camera
Range of Focus • 15 centimeters (6 inches) to Infinity
Image Resolution • Still Images: 21.5 Megapixels JPEG
Compressed
•Video Images: 1024x768
Power
Battery • Integrated rechargeable lithium-ion battery
• Maximum Charge Voltage & Current: 5.25V &
2.0A
• Type C USB Cable with USB AC wall adapter
• Recharge from a wall outlet
• Optional extended lithium-ion battery pack
Storage
SD Card • 8 Gigabyte Memory Card
• Stores the eSight Low Vision Software and user
data
Specifications & Compliance Information
27
Connections
HDMI • Type D HDMI input that connects to Video
Sources with HDMI Port
• Supported Resolutions and Frame Rates:
• 1080p/60 or 1080p/30
• 720p/60 or 720p/30
• 1024x768
USB • Type C USB input for power and data
• Charges the battery when used with the AC wall
adapter
• Allows video and data sharing to or from the
eyewear
Bluetooth • Pairs the headset with supported headphones
Wireless LAN • Allows video sharing to or from the eyewear
• 802.11ac, 802.11g at 2.4 GigaHertz and
802.11n at 2.4 and 5 GigaHertz
Sound
Headset Speakers • For media streaming and user interface feedback
Bluetooth Headphones • Headset pairs with compatible headphones
Operating Environment
Operating Temperature • 0°C to 40°C
Storage Temperature • 0°C to 50°C
Ingress Protection Rating • Designed to IP53, dust and water resistant
NOTE: Your eSight Eyewear is not intended for use in rain or heavy snowfall
conditions. Take the same care with your eSight Eyewear as you would a cell
phone, tablet, or any other consumer electronics device.

28
Specifications & Compliance Information
Additional Safety and Regulatory Information
Consult the Important Safety Information booklet for complete product warnings,
cautions, and statements of regulatory compliance.


4000338 Rev. 1 © Copyright 2016, eSight Corporation.