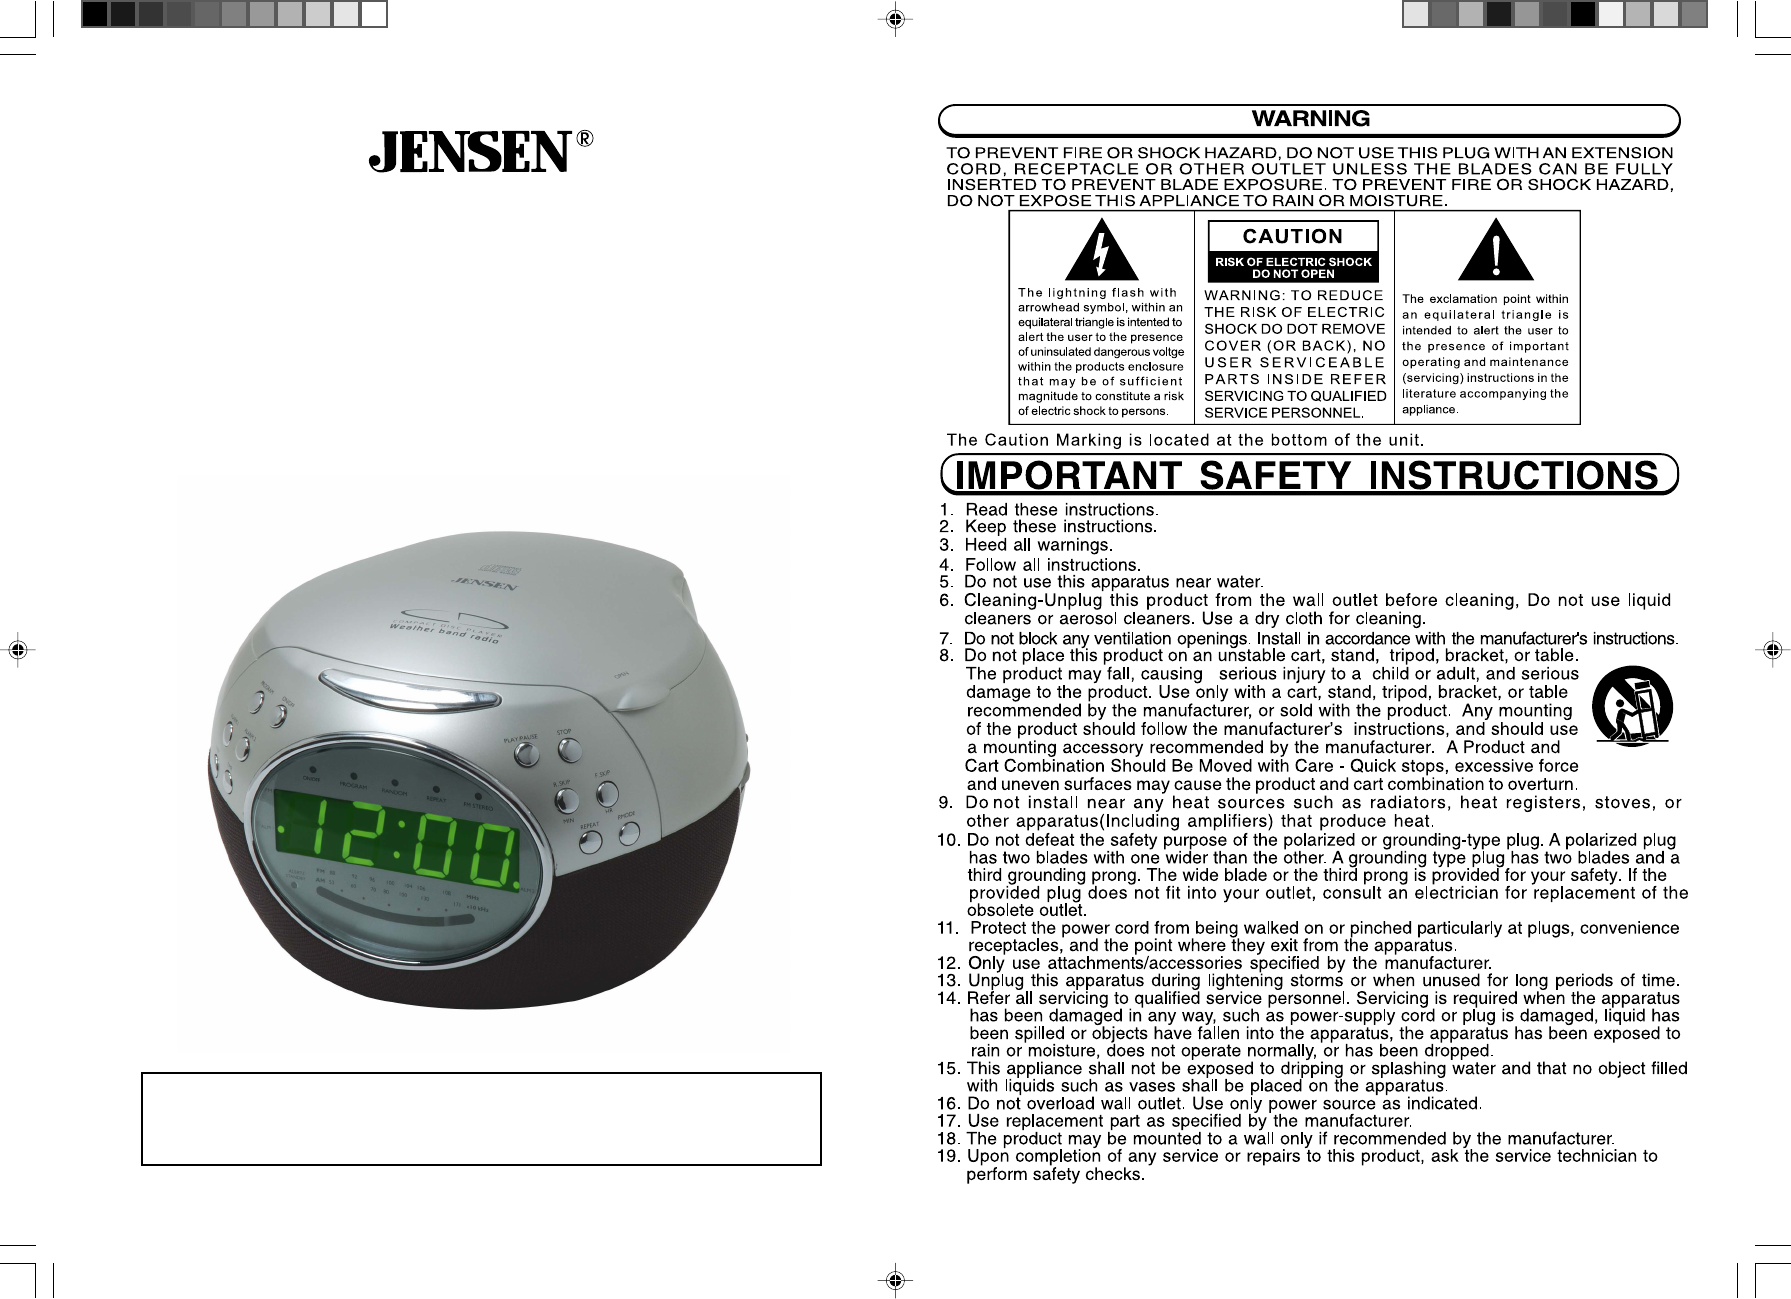
Lasco JCR535W WEATHER ALERT RADIO W/ AM/FM/CD PLAYER User Manual CRD 840W IB JENS 001 REV1 P65
Lasco Industries Limited WEATHER ALERT RADIO W/ AM/FM/CD PLAYER CRD 840W IB JENS 001 REV1 P65
Lasco >
USERS MANUAL
audio
JCR-535W
WEATHER ALERT/AM/FM
STEREO DUAL ALARM CD CLOCK RADIO
INSTRUCTION MANUAL
PLEASE READ THIS OPERATING MANUAL COMPLETELY
BEFORE OPERATING THIS UNIT AND RETAIN THIS
BOOKLET FOR FUTURE REFERENCE.
1
CRD-840W IB JENS 001 REV1.P65 4/8/2005, 2:55 PM1

CAUTION:
TO PREVENT ELECTRIC SHOCK,
MATCH WIDE BLADE OF PLUG TO WIDE
SLOT.
FULLY INSERT.
2 3
Follow the advice below for safe operations.
ON PROTECTION AGAINST LASER ENERGY EXPOSURE
· As the laser beam used in this compact disc player is harmful to the eyes, do not
attempt to disassemble the casing.
· Stop operation immediately if any liquid or solid object should fall into the cabinet.
· Do not touch the lens or poke at it. If you do, you may damage the lens and the
player may not operate properly.
· Do not put anything in the safety slot. If you do, the laser diode will be ON when the
CD door is still open.
· If the unit is not to be used for a long period of time, make sure that all power
sources are disconnected from the unit. Remove all batteries from the battery
compartment.
· This unit employs a laser. The use of controls or adjustment or performance of
procedures other
than those specified here may result in exposure to hazardous radiation.
Should any trouble occur, remove the power source and refer servicing to qualified
personnel.
1.CD door open
2.CD compartment
3.Tuning knob : To select your radio station
4.Band switch AM – FM – FM ST.
5.Volume control
6.Alarm Mode : Off – Buzzer – Auto
7.Alarm Selector : AL 1 – AL 1+2 – AL 2
8.Function Selector : CD – Radio
9.SNOOZE : Interval alarm repetition
10.Weather Band CHANNEL selector
11.Battery compartment
12.Weather Mode : Weather – Alert Standby – Off
13.Alert Test switch : On – Off
14.AC power cord
15.Weather Band Rod Antenna
16.Phones jack
17.FM Wire Antenna
18.Speakers
19.REPEAT : To play the disc continuously
20.P.MODE : To select the random or program play mode
21.R.Skip / F.SKIP (backward / forward) – HR / MIN buttons:
- CD track skip and fast search within the track
- All clock functions minute and hour setting
LOCATION OF CONTROLS
AC Outlet
AC Plug
CRD-840W IB JENS 001 REV1.P65 4/8/2005, 2:57 PM2
For best reception:
FM: Extend FM wire antenna (17).When in stereo mode and the stereo broadcast
is received.FM stereo indicator (24) will light up.
AM: This unit is equipped with a built-in directional ferrite antenna.Move and rotate the
unit.
LISTENING TO THE CD PLAYER
1. Open the CD door (1),load your disc (label up) into CD compartment (2).
2. Switch to the CD position (8).
3. Press ON / OFF (29),the Display (39) will show total track numbers.It will return to
the clock time after few seconds.
4. Press (23) to start listening from the first trackThe Display (39) will show “ ”,
then it will return to the clock time after few seconds.
NOTE : Use also this knob to suspend momentarily the playing track.
Press once again to continue playing.
5. Rotate the volume (5) to adjust the desired level.
6. Press (22) to stop listening to the disc.
OTHER CD PLAYER FUNCTIONS
R.SKIP / F.SKIP (21): Press F.SKIP to skip forward to the next track or repeatedly to
skip tracks.Press R.SKIP return to the beginning of the track, or press repeatedly to
skip backwards several tracks.Press and hold R.SKIP or F.SKIP to search quickly
within a track.
REPEAT (19) : Press once to repeat your selected track.The REPEAT indicator (25)
blinks.
Press twice to play the disc continuously, The REPEAT indicator (25)
alight.
Press again to turn off this function, The REPEAT indicator (25) goes
off.
PROGRAM (30) : To set your own musical program.
1. Insert the disc (1,2). The total number of tracks in displayed
(39).
2. Press (30),the display show “ ”.The PROGRAM indicator
(27) blinks.
3. Select with R.SKIP or F.SKIP (21) your desired track,then
press (30) to store your program in memory.Redo this operation
as many times as necessay.20 tracks can be memorized.
4. Prdss (23) to start playing.
5. Press STOP (22) to stop the disc.
6. To cancel this function,open the CD compartment.
NOTE : PROGRAM function can only be done in stop mode.
P.MODE (20) : 1. Press P.MODE (20) to select RANDOM play mode and it will play
randomly all the tracks of the CD.The RANDOM indicator (26)
alight.
2. Press again to switch off this function until the RANDOM indicator
(26) goes off.
SETTING THE ALARM AND WAKE UP MODE
This unit allows you to set two different wake-up times which you can choose to use
independently or simultansouly AL 1 or AL 2,or AL1 and2.
22.STOP : To stop playing the disc
23.PLAY / PAUSE : To start playing the CD or to stop momentarily the disc player
24.FM STEREO LED indicator
25.CD REPEAT LED indicator
26.CD RANDOM LED indicator
27.CD PROGRAM LED indicator
28.ON / OFF LED indicator
29.ON / OFF button
30.PROGRAM : To set programmable CD tracks
31.ALARM 2 button
32.ALARM 1 button
33.SLEEP button
34.TIME button
35.PM LED indicator
36.ALARM 1 LED indicator
37.ALERT STANDBY LED indicator
38.Dial scale & pointer
39.Digital Display
40.ALARM2 LED indicator
POWER SUPPLY
This CD clock radio operates on AC 120V~60Hz.It is also equipped with clock battery
back-up system,powered by an optional 9V battery type 6F22(not provided).
1. Insert the AC power cord (14) into a convenient standard AC wall outlet.
2. Connect the 9V battery inside the compartment at the bottom of the unit (11).
NOTE : An alkaline type battery is recommended. For optimum performance,this
battery should be replaced every 6 months.
BATTERY BACK-UP SYSTEM
Ensures that the unit will continue to operate as normal during AC power disruption (in
order to preserve the battery life the display will not light).All clock settings will be
kept in the memory, however,the clock time may require adjustment for exact
accuracy.If this battery is not installed,the display will blink “ ” to indicate that
you have to redo the time and alarm settings.
SETTING THE TIME
1. Press and hold TIME (34) and MINUTE or HOUR (21) to adjust to your desired
time.
2. Release TIME (34) to store your setting in memory.
LISTENING TO THE RADIO
1. Switch to RADIO position with the function selector (8).
2. Select your desired band by band switch (4).
3. Press ON / OFF (29).
4. Adjust the volume (5) to the desired level.
5. Select your desired radio station (3) and (38).
6. To stop listening to the radio,press ON / OFF (29).
4 5
CRD-840W IB JENS 001 REV1.P65 4/8/2005, 2:57 PM3

76
SETTING THE ALARM
1st Alarm (AL 1) –
2nd Alarm (AL 2) – Press and hold the ALARM 2 (31) and redo the same operation as
above.
Select your wake-up time with alarm selector (7).
WAKE UP TO THE BUZZER SOUND
Switch to the BUZZER position (6),the ALARM LED indicator (36 and/or 40) will light
up.
WAKE UP TO THE RADIO
1. Follow procedures 1 to 6 in “LISTENING TO THE RADIO” to select your desired
radio station.
2. Switch to the AUTO positon (6),the ALARM indicator (36 and/or 40) will light up.
WAKE UP TO THE CD
1. Follow procedures 1 to 6 in “LISTENING TO THE CD PLAYER”.
2. Switch to the AUTO position (6),the ALARM LED indicator (36 and/or 40) will light
up.
3. Press ON/OFF (29) and the ON/OFF indicator (28) goes off.
NOTE : If the CD play time is longer than 60 minutes,the music will stop after playing
60 minutes.
WAKE UP TO THE PROGRAMMABLE CD TRACKS
1. Switch to the CD position (8) and press ON/OFF (29).The ON/OFF indicator (28)
will light up.
2. Follow procedures 1 to 5 in “LISTENING TO THE CD PLAYER – PROGRAM”.
3. Switch to the AUTO (6) position,the alarm LED indicator (36 and/or 40) will light
up.
4. Press ON/OFF (29).The ON/OFF and PROGRAM indicators (27,28) will go off.
NOTE : The music will stop after the programmed tracks.E.g. if one track is
programmed,the alarm will stop at the end of this track.The programmed memory will
be erased once the CD door open.
STOPPING THE ALARM
The alarm is programmed to run for 60 minutes.
1. SNOOZE (9) : Press to stop the alarm temporarily,the alarm will stop and ring
again automatically after 6 minutes.
2. ON/OFF (29) : The alarm will stop,and will sound again 24 hours later.
3. ALARM MODE (6) : To turn off the alarm permanently,switch to OFF position.The
ALARM indicators (36 and/or 40) will go off.
SLEEP TO MUSIC
1. Select CD/Radio (8) for the sleep mode.
2. Press SLEEP (33),the display shows “--”.Press again to select the desired sleep
time (three Sleep time 90-60-30 minutes).It will start countdown after few
seconds.
3. If in CD mode,it needs to press PLAY/PAUSE (23) for CD playing.
4. Press ON/OFF (29) to turn off the unit.
NOTE : If the CD play time is shorter than your selected sleep time,the music will stop
at the end of the disc.
WEATHER BAND / ALERT
This product can provide weather band / alert signal for getting the emergency
weather news at any time with 7 channels for different states.
1. ALERT STANDBY : Set the unit in ‘ALERT STANDBY’ mode by WEATHER
MODE switch (12).The ALERT STANDBY indicator (37) will light up.Switch
ALERT TEST (13) to ‘ON’ to check if the alert standby mode is working well or
not.It should have buzzer signal coming out when it is working.Then switch (13) to
‘OFF’.At this moment,you can also enjoy the music (Radio / CD) by your product.
2. When emergency weather news comes,the unit will cut off your music sound
automatically and change to buzzer signal.The ALERT STANDBY indicator (37)
will flash.
3. Switch (12) to ‘WEATHER’ position to listen to the weather news.
4. After listening to the weather news,switch (12) back to ‘ALERT STANDBY’ or
‘OFF’ position.
For best reception:
Extend and rotate Weather Band rod antenna (15).
MORE INFORMATION
- Do not use your set immediately after transport from a cold place to a warm place,there
may be condensation problems.
- Make sure that you keep your set away from water and high temperatures.
- Clean the player with a soft cloth,or a damp chamois leather.Never use solvents.
NOTES ON COMPACT DISCS
- If there is a scratch,dirt or fingerprints on the CD,it may cause tracking error.Before
playing,clean the CD with a cleaning cloth.Wipe the CD from the center out.Don’t store
discs in places with high temperatures or high humidity – they can become warped.After
playing,store the CD in its case.
TECHNICAL SPECIFICATIONS
POWER SUPPLY : AC 120V ~ 60 Hz
Battery back-up - 9V type 6F22 / 006P / PP3 (not included)
RADIO : FM – 88 / 108 MHz
AM – 530 / 1700 kHz
WB – 162.400 / 162.550 MHz
NOTE : CD-Rs or CD-RWs playback capability in this player may vary depending on
quality of media, CD-Burner, speed of burning and application software.
USING HEADPHONES (NOT INCLUDED)
Inserting the plug of your headphones into the Headphone Jack (16) will enable you to
listen to the CD and Radio in private. When using headphones, the Speakers will be
disconnected automatically until the headphones are unplugged.
READ THIS IMPORTANT INFORMATION BEFORE USING YOUR HEADPHONES
1. Avoid extended play at very high volume as it may impair your hearing.
2. If you experience ringing in your ears, reduce the volume or shut off your unit.
3. Do not use while driving a motorized vehicle. This is dangerous and also illegal
in some states.
Press and hold the ALARM 1 (32),and press R.SKIP or F.SKIP (21)
to adjust your desired alarm time,then release ALARM 1 (32) to store
your setting in memory.
CRD-840W IB JENS 001 REV1.P65 4/8/2005, 2:57 PM4
CARE AND MAINTENANCE
1. Clean your unit with a damp (never wet) cloth. Solvent or detergent should never be
used.
2. Avoid leaving your unit in direct sunlight or in hot, humid or dusty places.
3. Keep your unit away from heating appliances and sources of electrical noise such
as fluorescent lamps or motors.
4. If drop-outs or interruptions occur in the music during CD play, or if the CD fails to
play at all, its bottom surface may require cleaning. Before playing, wipe the disc
from the center outwards with a good soft cleaning cloth.
5. Always clean the outside of the cabinet thoroughly if it becomes wet with moisture
or water splashes. This will help to prevent the internal parts of the unit from entry
of water and possible moisture damage.
COMPLIANCE WITH FCC REGULATIONS
This equipment has been tested and found to comply with the limits for a Radio Receiver,
pursuant to Part 15 of the FCC Rules. These limits are designed to provide reasonable
protection against harmful interference in a residential installation. This equipment
generates, uses and can radiate radio frequency energy and, if not installed and used in
accordance with the instructions, may cause harmful interference to radio communications.
However, there is no guarantee that interference will not occur in a particular installation.
If this equipment does cause harmful interference to radio or television reception, which
can be determined by turning the equipment off and on, the user is encouraged to try to
correct the interference by one or more of the following measures:
- Reorient or relocate the receiving antenna.
- Increase the separation between the equipment and receiver.
- Connect the equipment into an outlet on a circuit different from that to which the
receiver is connected.
- Consult the dealer or an experienced radio technician for help.
NOTE : The manufacturer is not responsible for any radio or TV interference caused by
unauthorized modifications to this equipment.Such modifications could void the User’s
authority to operate the equipment.
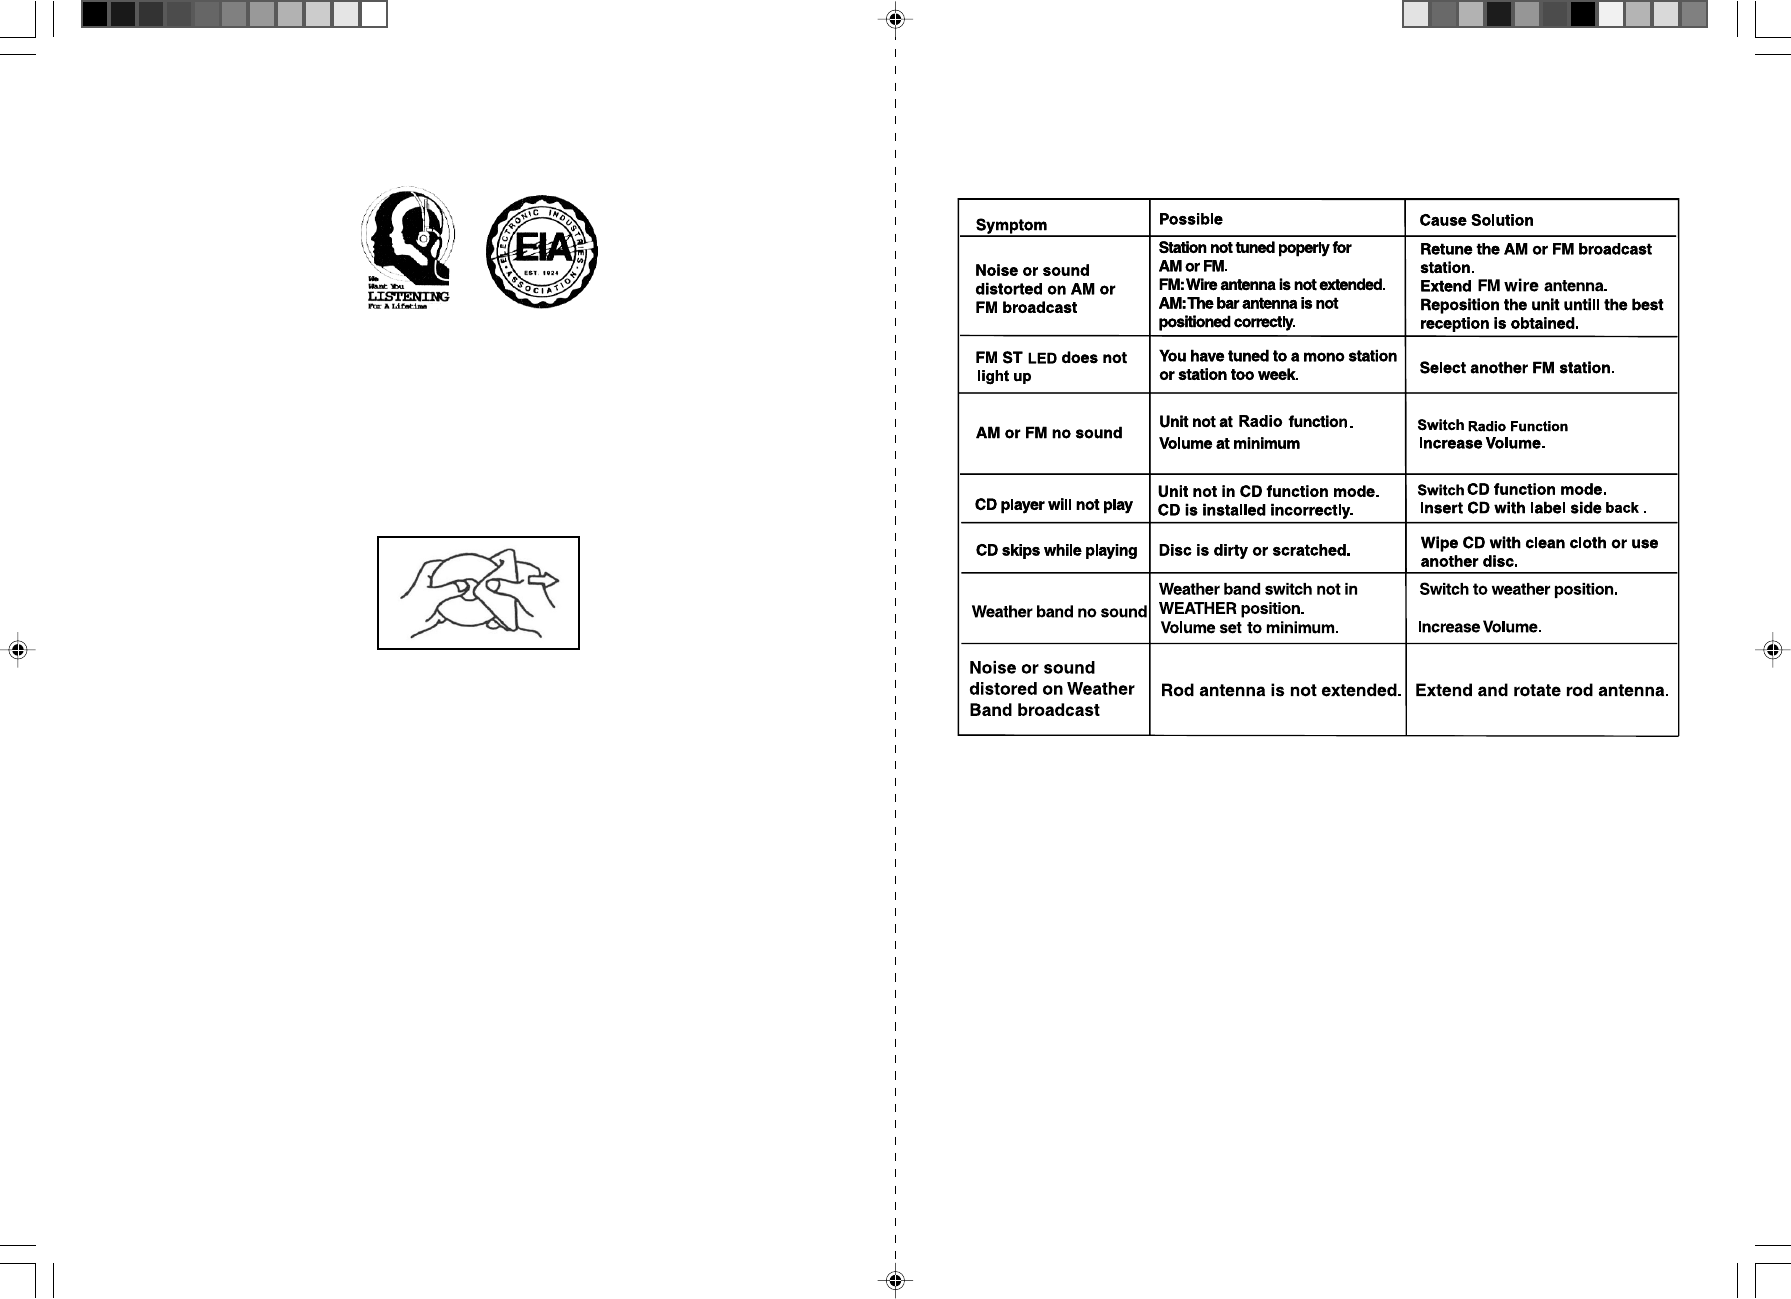
TROUBLE SHOOTING GUIDE
If you experience difficulties in the use of this music system,please check the followings
or call 1- 800 - 777 - 5331 for Customer Service.
SERVICE
Please refer to the instructions on the enclosed warranty card for returning your unit for
service. When returning the unit, please remove batteries to prevent damage to the unit
in transit and/or from possible battery leakage. We are not responsible for batteries
returned with the product or for the cost of replacement.
Distributed by:
Spectra Merchandising International, Inc.
Chicago Industry Tech Park
4230 North Normandy Avenue
Chicago, IL 60634, U.S.A.
Please have model number ready, for Customer Service, call 1-800-777-5331
Printed in China
8 9
4. Keep the volume at a reasonable level even if your headset is an open-air type
designed to allow you to hear outside sounds. Please note excessively high volume
may still block outside sounds.
CRD-840W IB JENS 001 REV1.P65 4/8/2005, 2:58 PM5