Latitude 544 2.4 GHz Heart Rate Monitor User Manual
Latitude Limited 2.4 GHz Heart Rate Monitor Users Manual
UserManual.wiki
>
Latitude
>
544 User Manual
Users Manual
Navigation menu
Upload a User Manual
Namespaces
Wiki Guide
HTML
PDF
Info
Views
User Manual
Discussion / Help
Navigation


![13.0.6 Logbook Mode - Menu 6 - Erase Session for Logbook See fig. 46fig. 46 fig. 47Press ▲ or ▼ to select a target session [ i.e. 1/30 , 2/30, 3/30… ] to erase.13.0.7 Logbook Mode - Menu 7 - View Free Memory See fig. 47](https://usermanual.wiki/Latitude/544/User-Guide-1351607-Page-47.png)
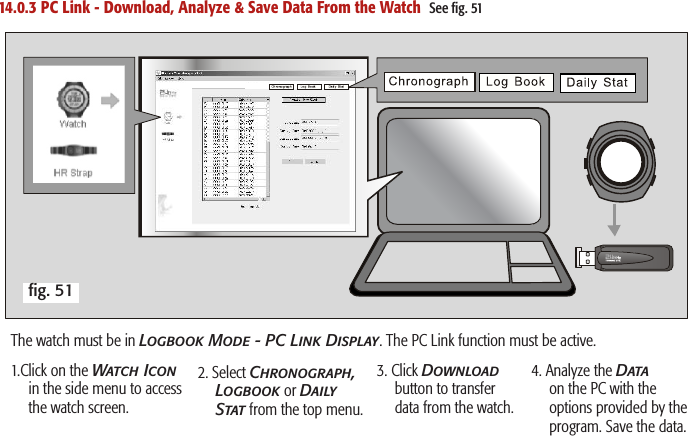
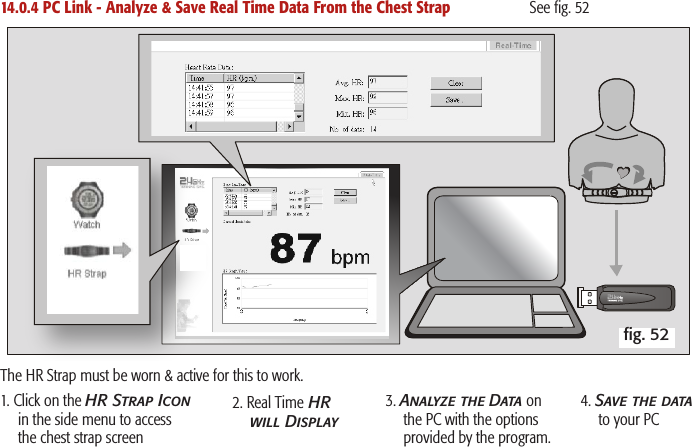
![Important: To transfer information, place the Watch or Chest Strap within 20 ft. of the PC Pod or the Pod may NOT be able to receive the data .fig. 501. The Chest Strap sends: • Real Time Heart Rate • Average Heart Rate • Minimum Heart Rate • Maximum Heart Rate2. The Watch sends: • Chrono Logs- Lap and Split Lap Time for Every Lap, Maximum, Average, Minimum and Total Lap Times • 48 Hour Logs- Altitude, Temperature and Pressure Readings • Logbook Logs- Session Info [ Start Time, Log Rate, No. of Session, Duration …] and Data Summery of Session [ Calorie count…] • Daily Statistic Logs- Data Summary for [ Speed, Distance, Calorie, HR …] 14.0.2 PC Link - Send data to a PC through the PC Pod See fig. 50](https://usermanual.wiki/Latitude/544/User-Guide-1351607-Page-50.png)
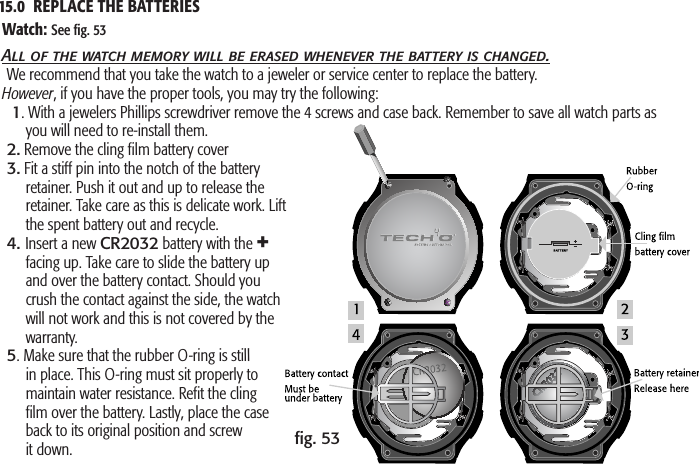
![16.0 SLEEP MODE fig. 54Chest Strap: See fig. 541. With a coin in the cover slot, turn the small cover arrow just past the strap arrow and the cover will pop up for easy removal.2. Be sure to slip the battery underneath the metal contact arm.3. Refit the battery cover, aligning the arrows, and turn clockwise to close.Note: If the chest strap fails to initialize [no signal], reset it. A. Remove the battery and turn it upside down. B. With the positive side of the battery facing down, lay it under the plus and on the minus contacts inside the battery well. This will reset the strap. C. Re-install the battery with the positive side up.When in Current Time Mode, press and hold ▼ for 5 seconds. This puts the watch in a power saving mode. The display will shut down but the time-keeping functions will continue to run.Press any button to return to normal display.](https://usermanual.wiki/Latitude/544/User-Guide-1351607-Page-54.png)