Latitude 760 LED Wrist Band User Manual Smart wrist band manual 20140509
Latitude Limited LED Wrist Band Smart wrist band manual 20140509
UserManual.wiki
>
Latitude
>
760 User Manual
User Manual
Navigation menu
Upload a User Manual
Namespaces
Wiki Guide
HTML
PDF
Info
Views
User Manual
Discussion / Help
Navigation
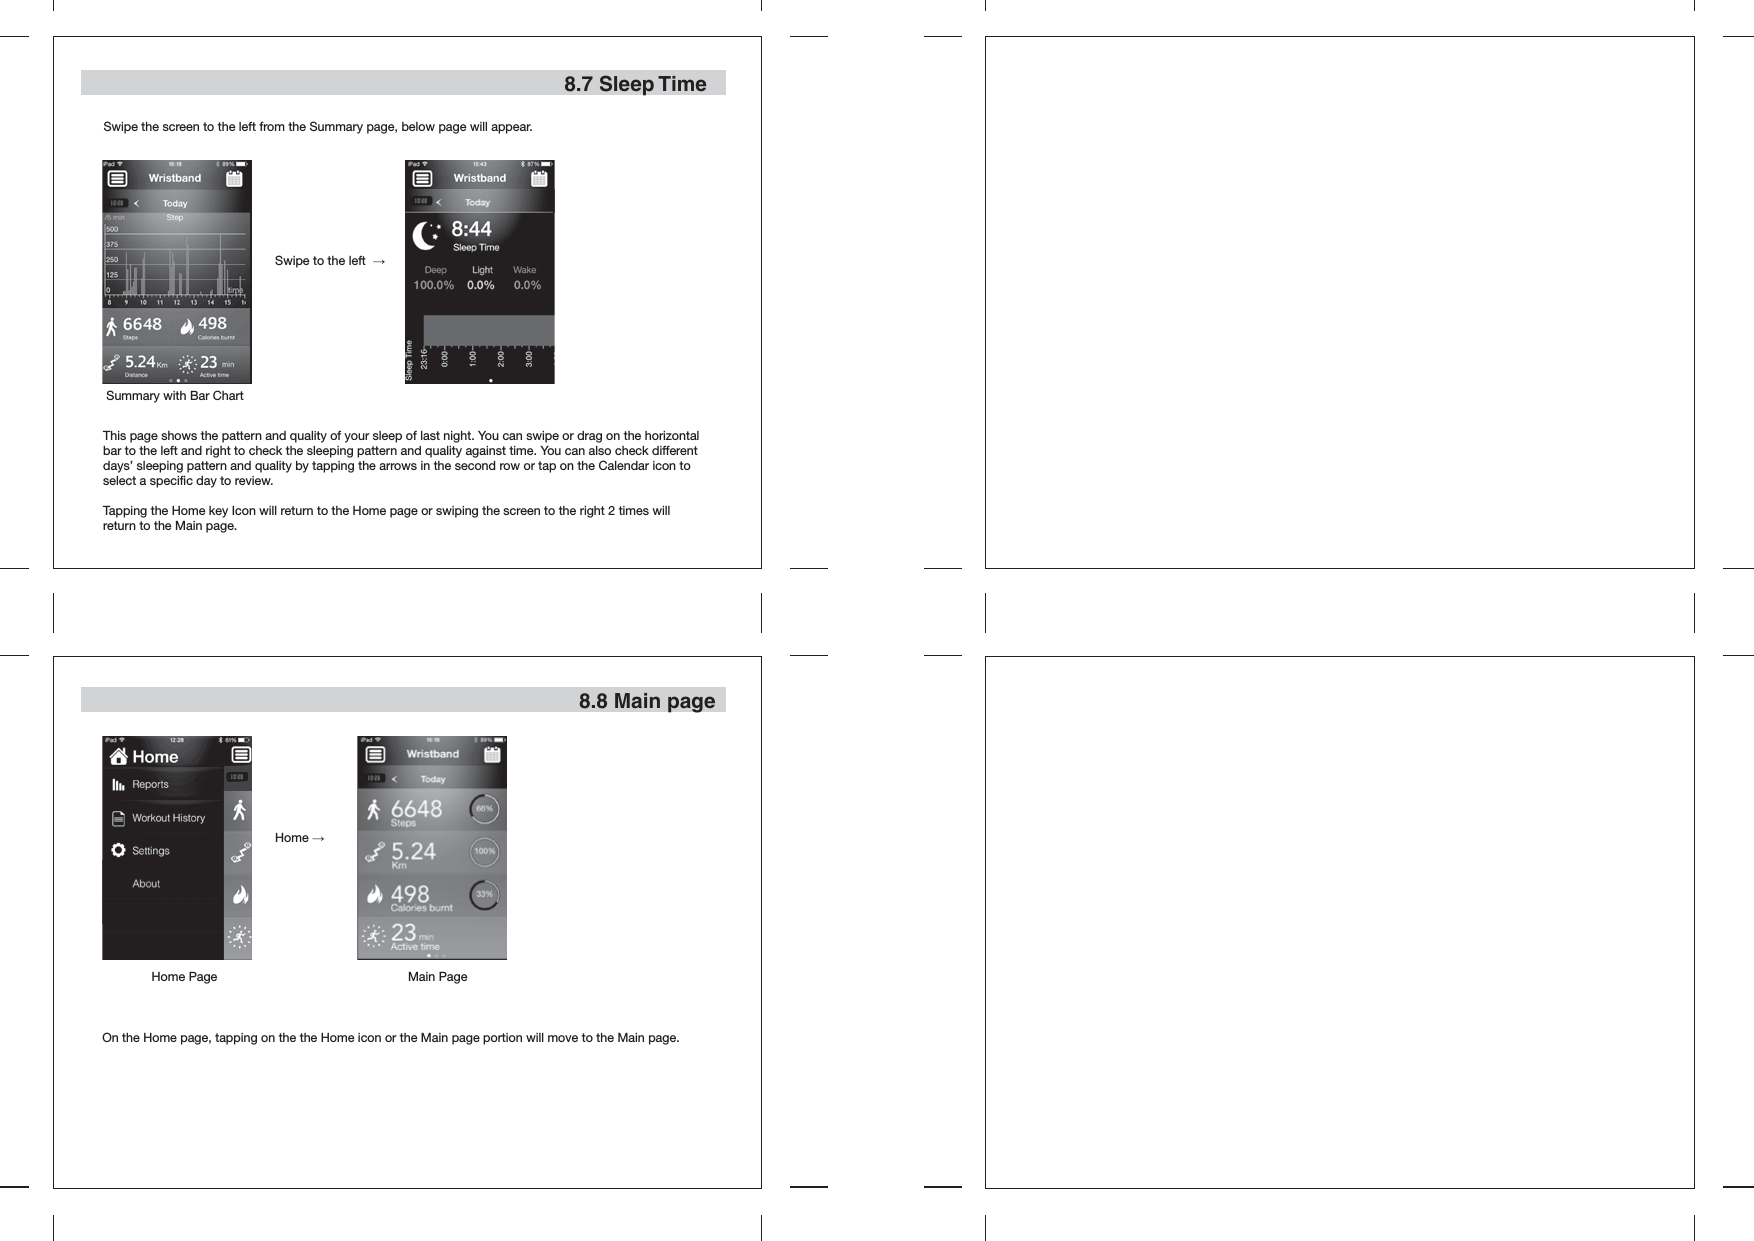
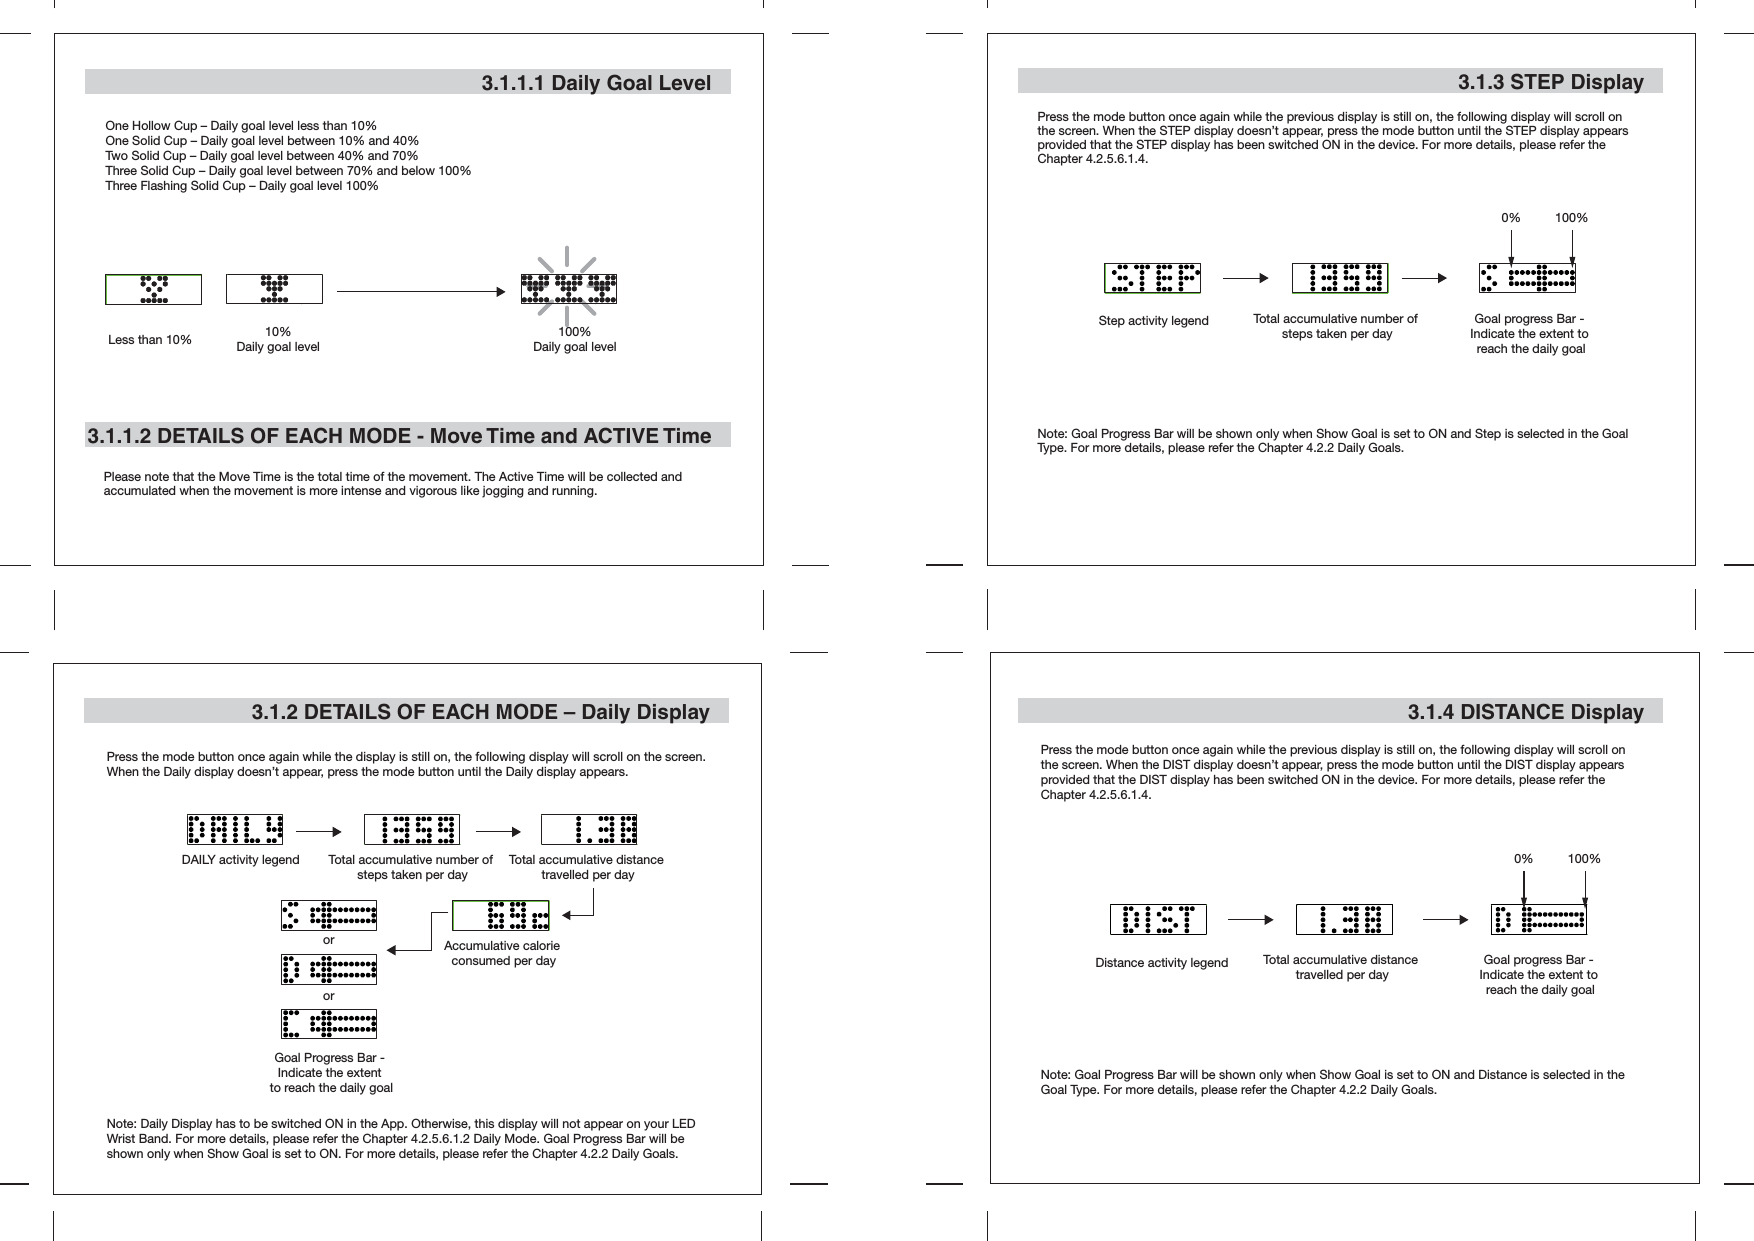
![Main unit with display Mode button [M]3.0 Description and Settings of the LED Wrist Band3.0 Description and Settings of the LED Wrist Band - ON / OFFThe LED Wrist Band has only one mode button to control all functions.To switch ON the LED Wrist Band, press and hold the mode button until “Hi! Your Name GLAD TO SEE U AGAIN” scroll on the screen. After the band is switched ON, you may set your own name in the App after pairing. For pairing, please check the chapter 4.0 for more details.To switch OFF the LED Wrist Band, press and hold the mode button of your LED Wrist Band until the word “MENU” appears and then release it. The Menu screen will scroll on your LED Wrist Band in the sequence as the Sketch below.When the Icon OFF appears, press the mode button to confirm. “SEE U LATER” will scroll on the screen and the band is switched off.3.1 Mode Selection3.1.1 DETAILS OF EACH MODE-General Information DisplayPress the mode button once, the LED Wrist Band will display General Information. When the General Information display doesn’t appear, press the mode button until the General Information display appears. Note: MOVE Time and ACTIVE Time displays can be set to ON or OFF via the App. For more details, please refer to the Chapter 4.2.5.6.1.1 Time Mode.Current time Daily goal level Accumulative time of the movement of the whole dayAccumulative time for the Active time for the whole dayDifferent modes can be selected as below sketch. When the display is scrolling, you may press the mode button once to select the next mode.Daily DisplayWhen the display of the LED Wrist Band goes off, press the mode button once to display the last mode information.Note: DAILY, STEP, DIST and CAL displays can be set to ON or OFF via the App. For more details, please refer to the Chapter 4.2.5.6.1.2 Daily Mode and Chapter 4.2.5.6.1.4 Other Modes.*Record Display[M] [M][M][M][M][M]General Information DisplaySteps DisplayDistance DisplayCalories Burnt Display](https://usermanual.wiki/Latitude/760/User-Guide-2283360-Page-4.png)
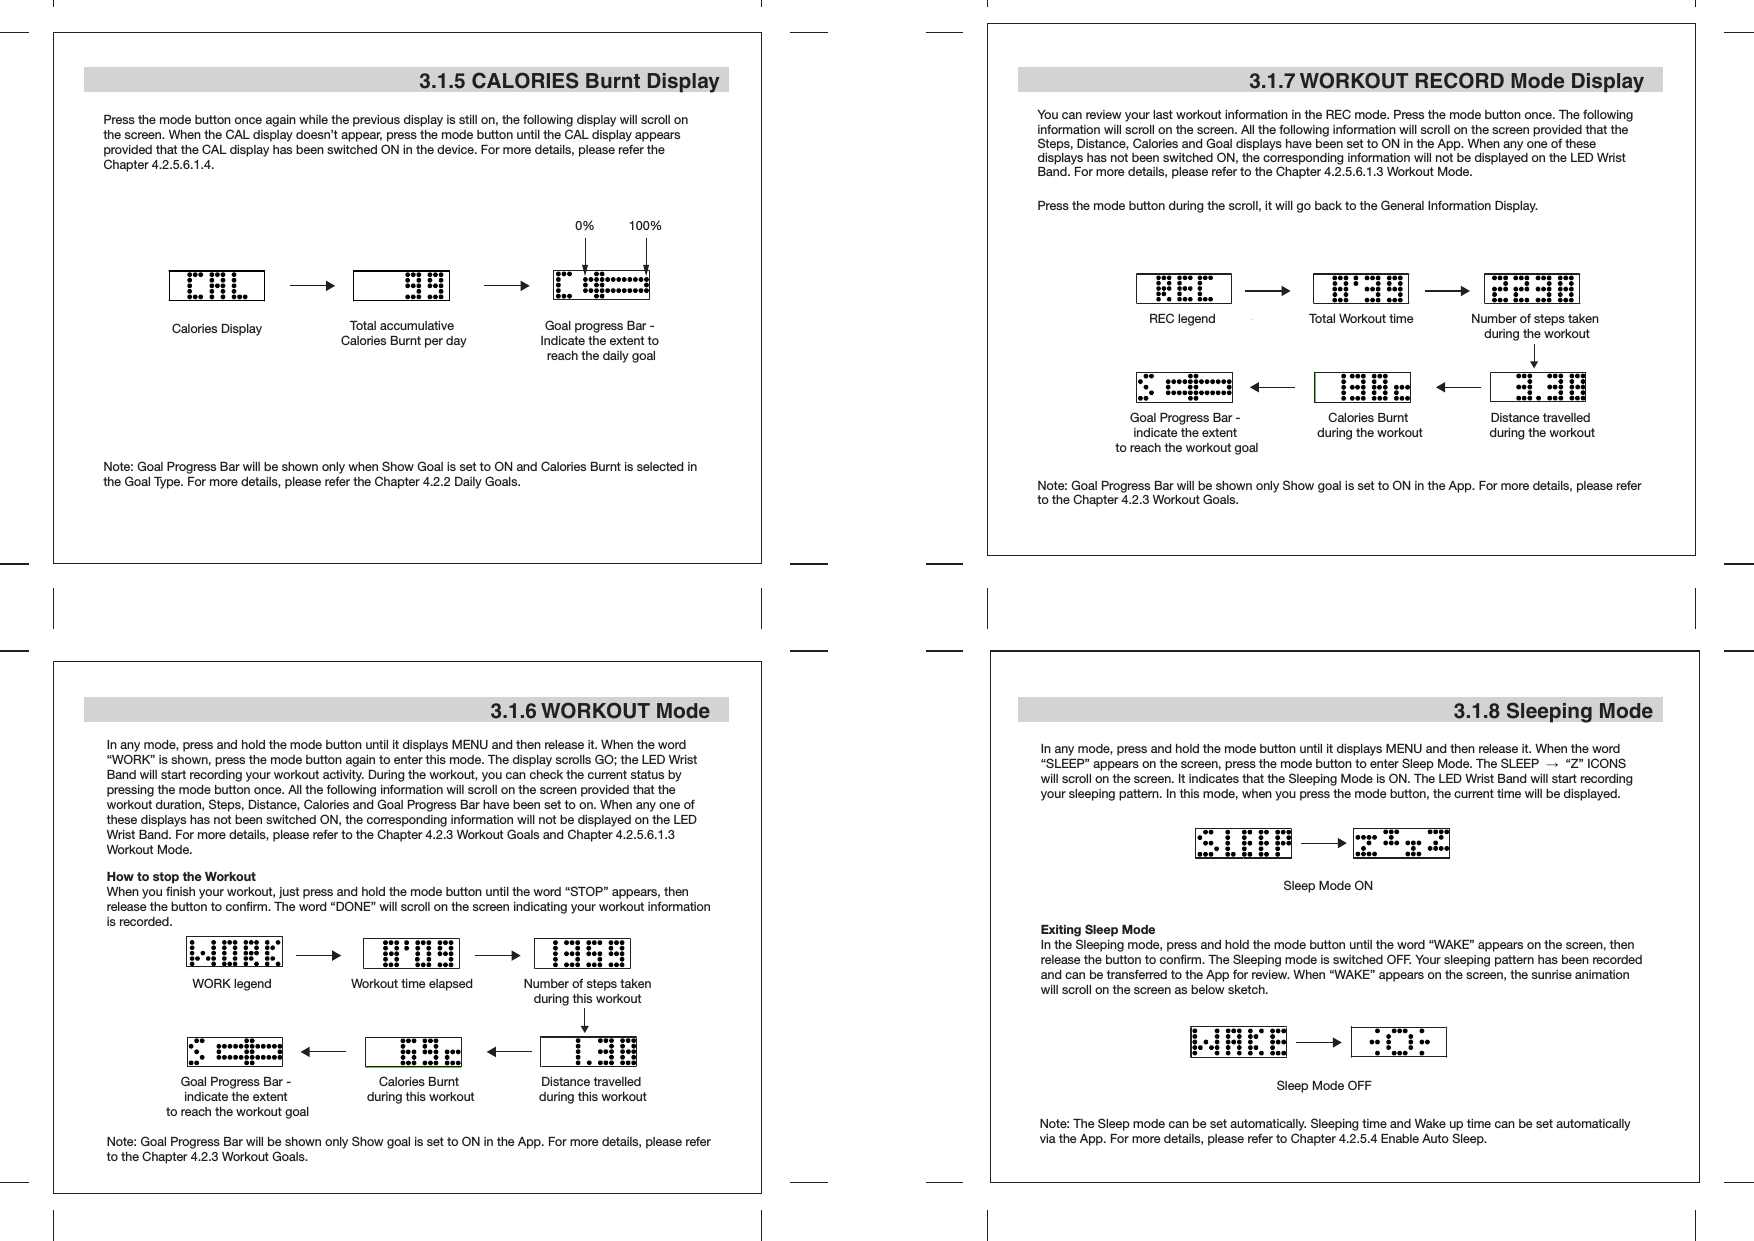
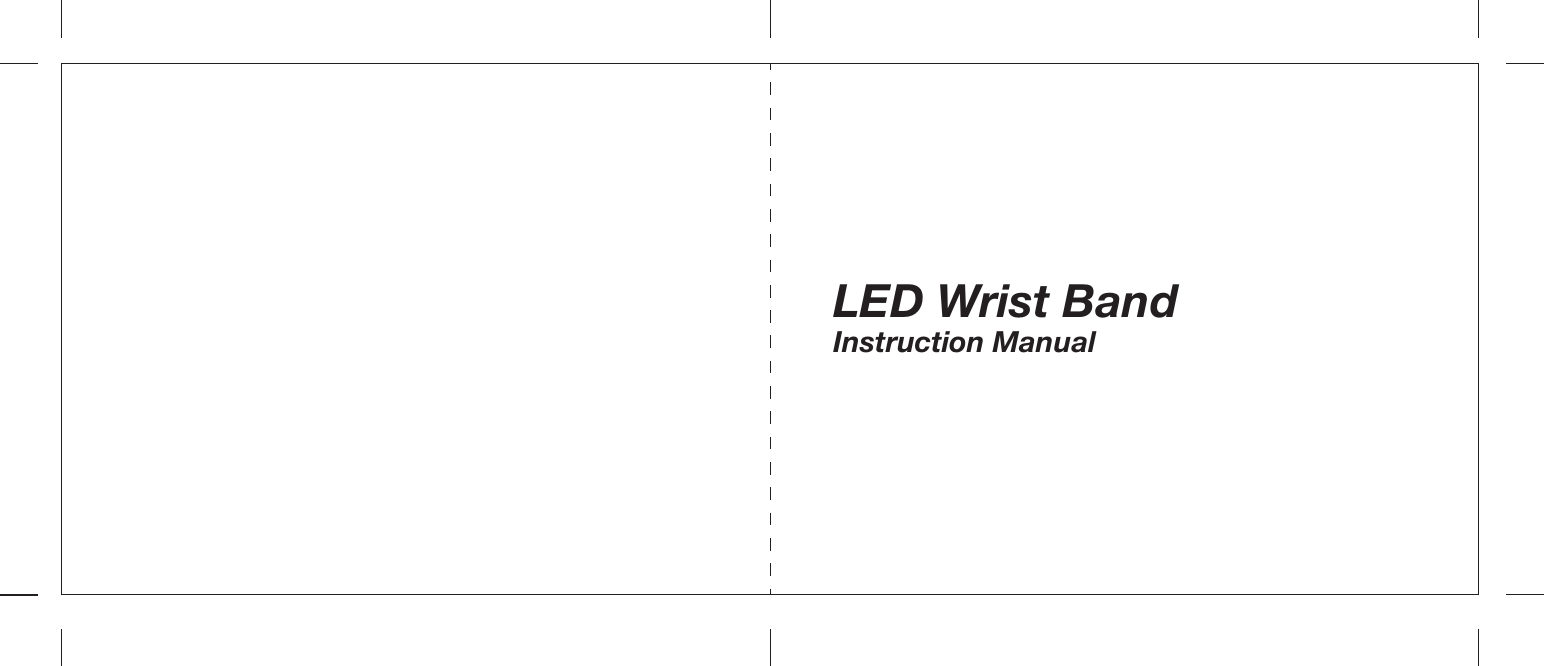
![3.1.9 Battery Status and ChargingTo fully utilize the LED Wrist Band, it has to be used in line with an iOS and Android Product for settings and tracking your daily life condition. Synchronization with an iOS and Android Product is required. Main PageHome menu Icon4.1 Setting up your own profileIn any mode, press and hold the mode button until it displays MENU and then release it. The Battery Icon will scroll on the screen. The battery status indications are as below:0-20%21-40%41-60%61-80%81-100%Select Profile at the bottom of the Settings menu to establish your own profile.Input your own name in the Name field. This name will be displayed on your LED Wrist Band.Input your Height, Weight, Gender and Birthday in the spaces provided.This information is very important for the device to calculate the Steps taken, Distance travelled and Calories burnt for the relative motion or activity you have done.For the Login and Password, please refer to the coming Chapter.4.0 Home Settings: Pairing to an iOS and Android Product 4.0 Home Settings: Pairing to an iOS Product When the battery is low, please plug the main unit into the USB-socket and plug it into any computer for charging. During charging, the battery Icon will appear on the screen of the main unit as below sketch. After a few seconds, a flashing dot will appear at the center of the display, which means charging is in progress. When the dot stops flashing and stands still, charging is completed and the battery is full.The Wristband can last for approximately 7 days for normal use. It takes about 1-2 hours for fully battery changing.Battery Status DisplayCharging in progress Battery is fully chargedSettings menu Connection ScreenIn the Settings menu, drag the screen up and tap the Wrist Band with “Not paired” on the screen, the Connection Screen will appear in above sketch. Home PageSettings PageSettings PageNOTE: Make sure the Bluetooth on your device is switched ON. Otherwise, connection cannot be established.- At the same time, tap “Pair” to start scanning for a wristband in 20 seconds.- If pair successfully, message “DONE” will be show on the Wrist Band.- Press “[M]” when “Pair” is shown.[M]tap “Pair” to start scanning- Press and hold the mode button of your LED Wrist Band until the word “MENU” appears on the screen and then release it.Select the Home menu icon in the upper left corner in below sketch; then select Settings.NOTE: The Apps interface format is a little different between iOS and Android version. SmartBandFirst, download the LED Wrist Band App ( Name: SmartBand ) from the App Store in your iOS device or Google Play in your Android device. After installation of the App, click and run the programme. Below sketch will appear in your device. Switch ON your LED Wrist Band and the Bluetooth function in your device.](https://usermanual.wiki/Latitude/760/User-Guide-2283360-Page-7.png)