Launch Tech 01DIAGUN AUTOMOTIVE DIAGNOSIS COMPUTER User Manual
Launch Tech Co., Ltd. AUTOMOTIVE DIAGNOSIS COMPUTER Users Manual
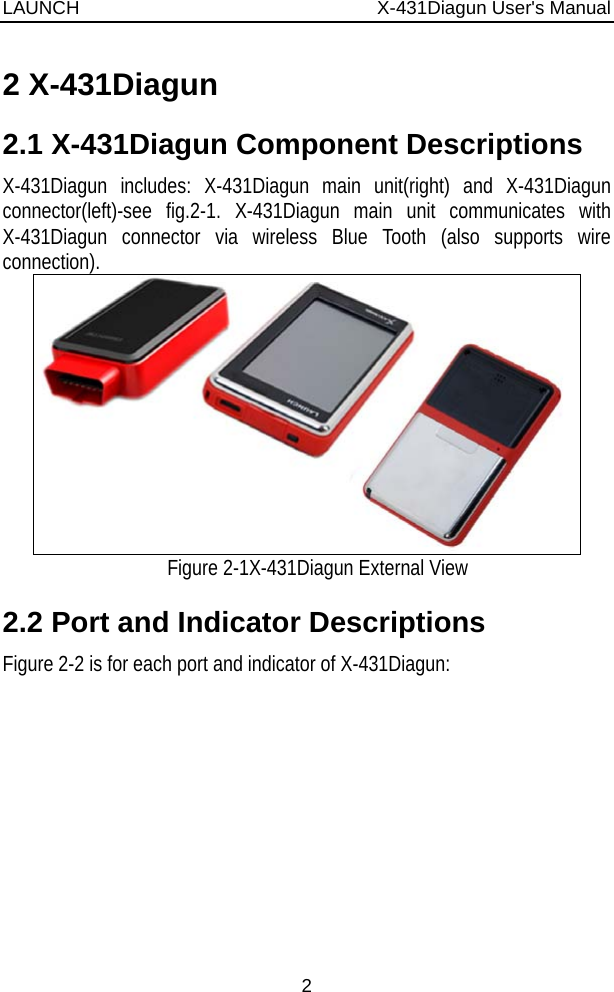
UserManual.wiki
>
Launch Tech
>
01DIAGUN User Manual
Users Manual
Navigation menu
Upload a User Manual
Namespaces
Wiki Guide
HTML
PDF
Info
Views
User Manual
Discussion / Help
Navigation
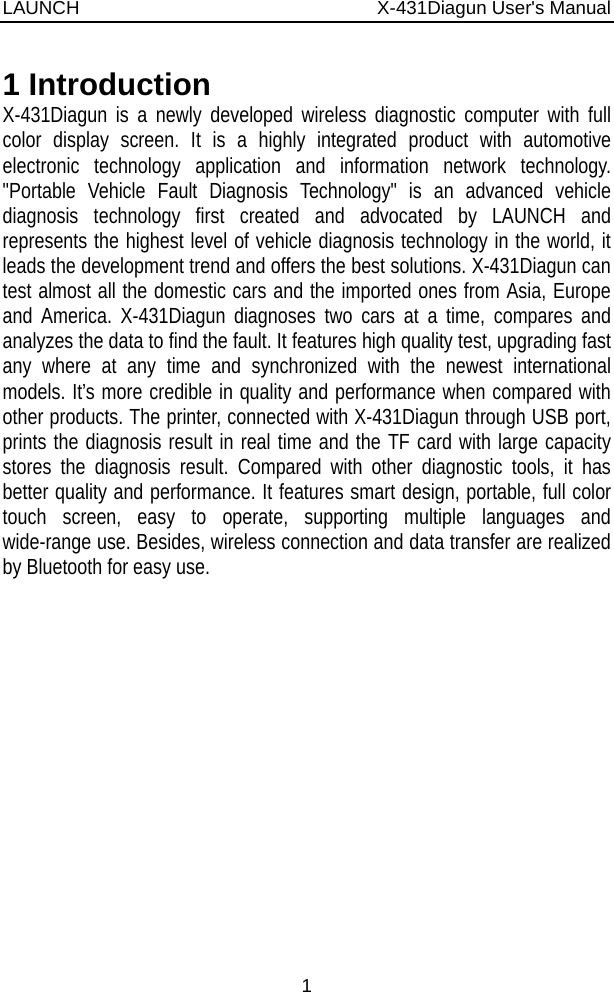
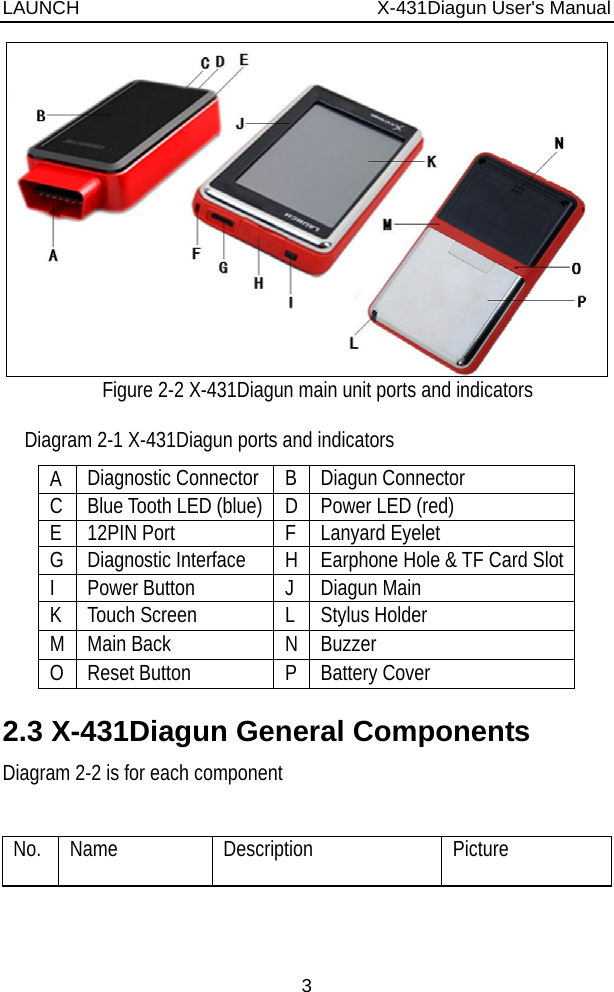
![LAUNCH X-431Diagun User's Manual 5 2.4 X-431Diagun Specifications Operating System: WIN CE 5.0 CPU: 400 MHz ARM9 Memory Card: 1G TF Card Main Unit: Universal Serial Bus/USB Main Unit Power: DC5V X-431 Diagun Connector: DC12V/24V Printer Interface: USB Display Screen: 480X272, 4.3-inch LCD with touch screen Rechargeable Battery: 1530 mAh Bluetooth: theoretically 100m, suggest 20-50m Upgrading Interface: USB Support wire communication Extendible external memory 2.5 X-431Diagun Start 2.5.1 Power on Press POWER [ ] key at the top right corner of the main unit top. Main unit screen will display initializing interface, as shown on the left. Note: Power off by pressing [ ] key for 5 seconds at least.](https://usermanual.wiki/Launch-Tech/01DIAGUN/User-Guide-1205247-Page-11.png)

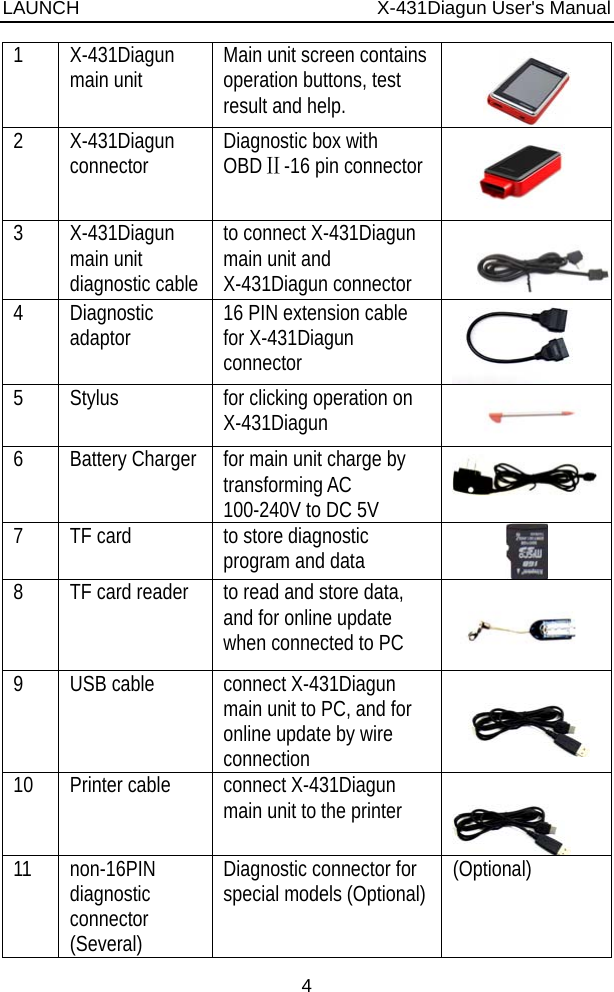
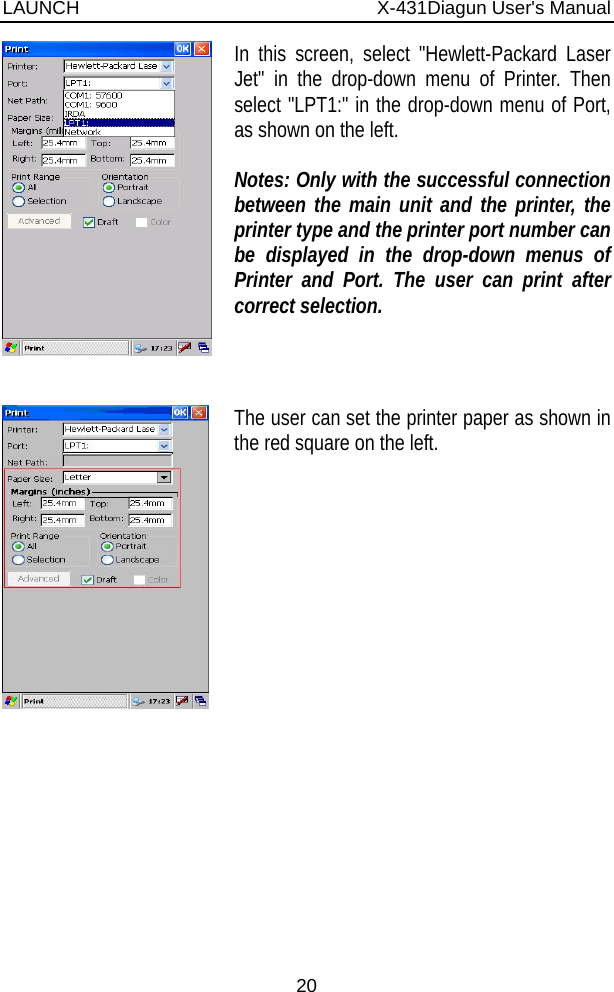
![LAUNCH X-431Diagun User's Manual 10 2.7 Settings Here we will introduce how to set "Language" and "Bluetooth match". 2.7.1 Language Click the icon "Wireless Link" or "Wire Link" on the desktop. The screen of model selection will appear, as shown on the left. Click the button [SETTING] in the bottom right-hand corner of the screen above. Then screen of language selection will appear, as shown on the left. Select the suitable language and then click the button [OK]. After that, the system will exit automatically. Click the icon "Wireless Link" or "Wire Link" on the desktop again. Language selection finished.](https://usermanual.wiki/Launch-Tech/01DIAGUN/User-Guide-1205247-Page-16.png)
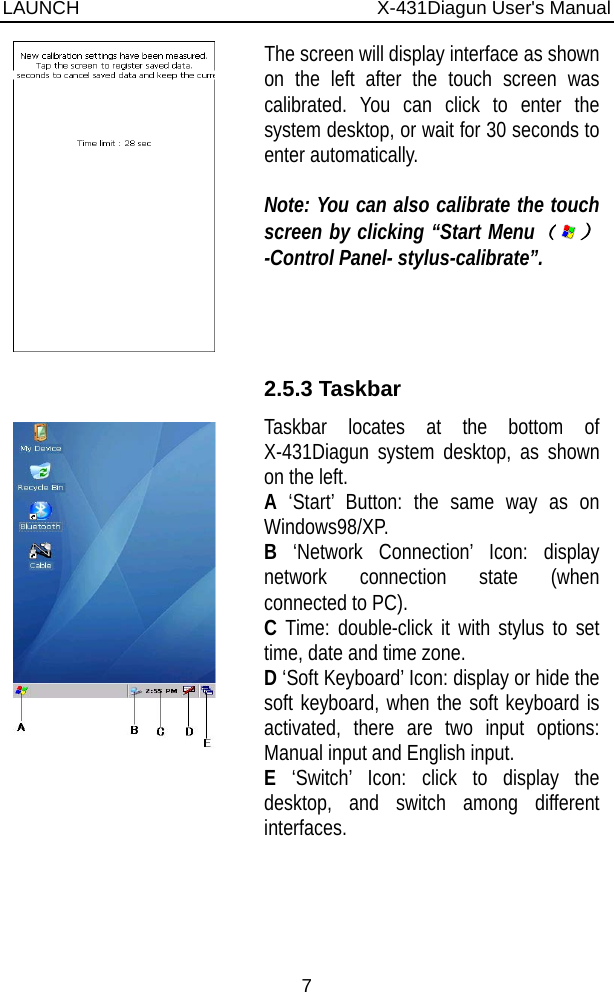
![LAUNCH X-431Diagun User's Manual 11 2.7.2 Bluetooth match Connect Connect the diagnostic connector of X-431Diagun to the vehicle DLC through "Wireless Link" (Refer to chapter 3.1.3 for details). Note: Only when the indicator lamp (red) of power on the diagnostic connector is always on and the indicator lamp of Bluetooth (blue) flashes, the connection is successful and the power has been supplied. Click the icon "Wireless Link" on the desktop to run. The screen of model selection will appear, as shown on the left. Match Click the button [SETTING] in the bottom right-hand corner of the screen, as shown on the left. Click the icon [<-->] of Bluetooth to match. Inspect the indicator lamp of Bluetooth on the diagnostic connector. If the lamp is always on, the communication is normal and the match succeeded. If the lamp flashes, the communication is abnormal and the match failed. If it failed to match, please click the icon [<-->] of Bluetooth until the lamp always on. After setting, click the button [OK].](https://usermanual.wiki/Launch-Tech/01DIAGUN/User-Guide-1205247-Page-17.png)
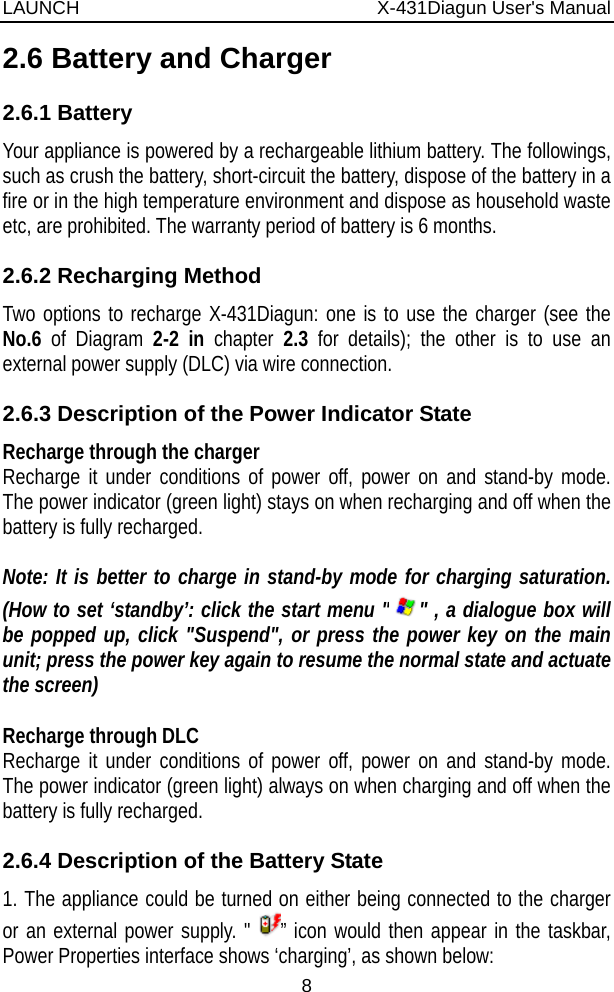
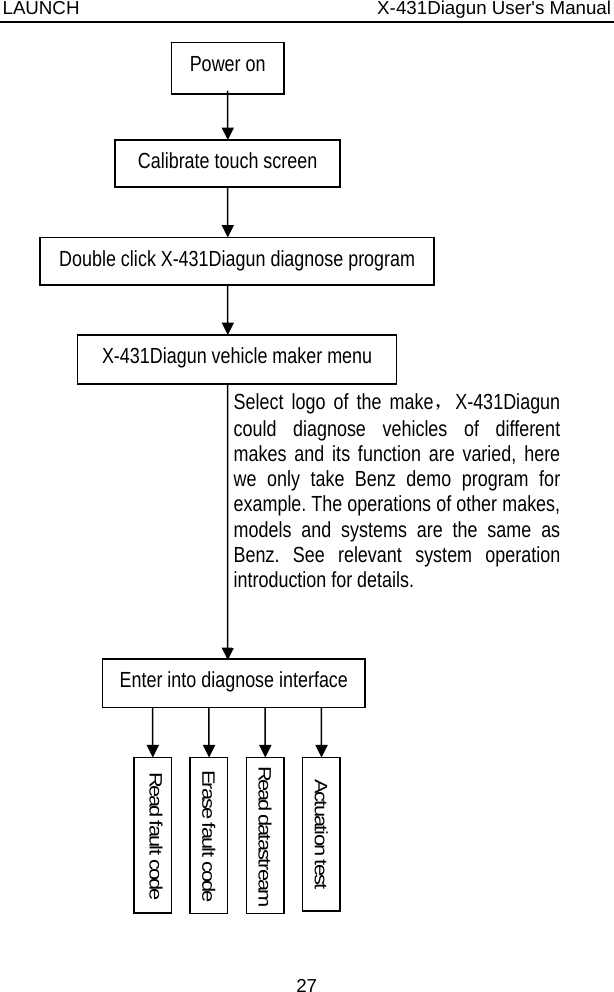
![LAUNCH X-431Diagun User's Manual 15 3.2.1 Diagnostic Program After connecting X-431Diagun (see chapter 3.1.3 for details), turn it on and press ‘ ’ button at the top right corner of the main unit to enter into calibration interface (see chapter 2.5.2). After that, with the Wince interface displayed, double click the icon "Blue Tooth (wireless)" on the desktop to operate X-431Diagun, as shown in the left figure. Vehicle Make interface will appear as shown on the left. Button Descriptions: [RETURN]: return back to the previous interface. [PREVPAGE]: show the previous page. This button is invalid and in gray if there is only one page or the first page currently. [NEXTPAGE]: show the next page. This button is invalid and in gray if there is only one page or the last page currently. [HISTORY]: view driving management record (the recorded datastream and waveform). [SETTING]: select language.](https://usermanual.wiki/Launch-Tech/01DIAGUN/User-Guide-1205247-Page-21.png)
![LAUNCH X-431Diagun User's Manual 16 Here we will take the blue tooth (wireless) and Benz demo program for example to introduce how to actuate automotive diagnosis. Click [SETING] at the bottom right of the interface as shown in the above figure. Select English and click [OK]. Button description: [<-->]: For Bluetooth communication matching (communication fails if the Bluetooth indicator flashes, then click this button to start matching, the communications resumes normal if the indicator stays on). Click Benz logo in the Make menu. The screen will display ‘Select version’ interface for Benz demo diagnosis program, select the version you need. Note: The operations of other makes and models, and systems are the same as Benz. See relevant system operation introduction for details, and here we only take Benz demo program for example. Button Descriptions: [RETURN]: return back to the previous interface. [HELP]: view the help information [DONWLOAD]: continues to test.](https://usermanual.wiki/Launch-Tech/01DIAGUN/User-Guide-1205247-Page-22.png)
![LAUNCH X-431Diagun User's Manual 17 3.3 How to Diagnose Select version "V10.01", and click [Download] to enter the diagnosis screen, as shown on the left. Note: The diagnosis screen of different makes contains the tested models, systems, diagnosis connector and DLC location. The operations are similar. Button Descriptions: [RETURN]: return back to the previous interface. [HOME]: Exit and return back to the homepage(Vehicle Make interface) when program abnormality occurs. [HELP]: show the help information. [PRINT]: print the test result (should be connected to an external printer with USB port). Click [Engine] on the tested system menu. Note: The test method for different systems is similar. Here we take [Engine] for example. After clicking, "Communication is Initialized" screen will appear as shown on the left.](https://usermanual.wiki/Launch-Tech/01DIAGUN/User-Guide-1205247-Page-23.png)
![LAUNCH X-431Diagun User's Manual 18 After successful communication, the screen enter the function menu of the diagnostic system automatically, as shown on the left: 1) Read fault code 2) Erase fault code 3) Read data stream 4) Actuation test 3.3.1 Read Fault Code Click [Read fault code] to perform this function. The test result will be displayed on the screen, as shown on the left. Button Description: [PRINT]: prints the test result. (should be connected to an external printer with USB port)](https://usermanual.wiki/Launch-Tech/01DIAGUN/User-Guide-1205247-Page-24.png)
![LAUNCH X-431Diagun User's Manual 19 After clicking, it starts to erase fault code, "clear fault code succeed" will appear if succeed, or "No fault code" will appear on the screen if all the fault codes have been cleared or no fault code in the tested system. Button Description: [OK]: returns to the function menu of the diagnostic system. 3.3.2 Print Here we take the HP printer for example to perform the printing function. Printer connection Connect one end (20PIN Male) of the printer cable with diagnostic port on X-431Diagun main unit, and the other end (USB connector) to the USB port on the printer. Start to print After connecting, click [PRINT] and the printing screen will pop up as shown on the left.](https://usermanual.wiki/Launch-Tech/01DIAGUN/User-Guide-1205247-Page-25.png)
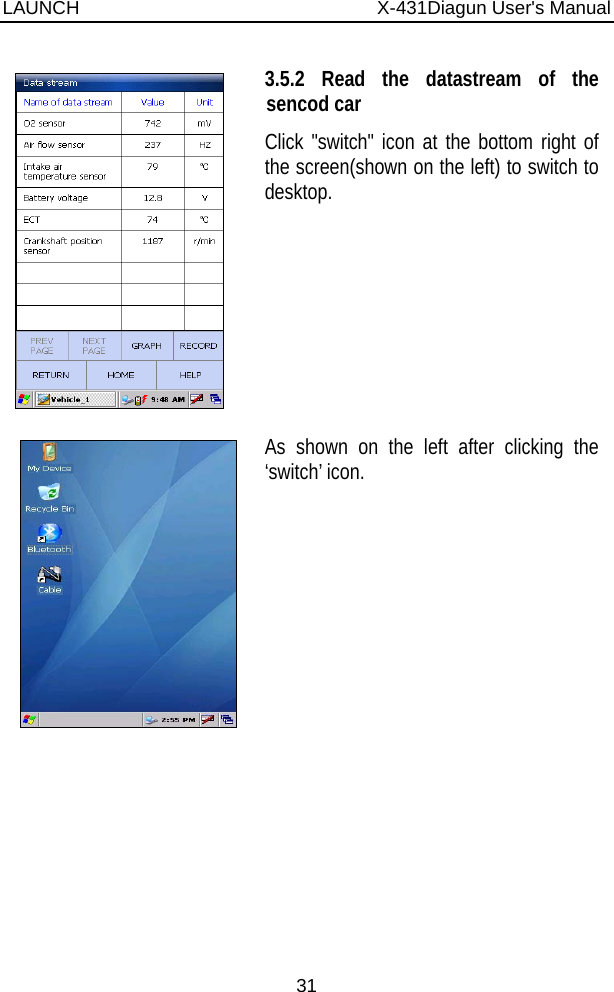
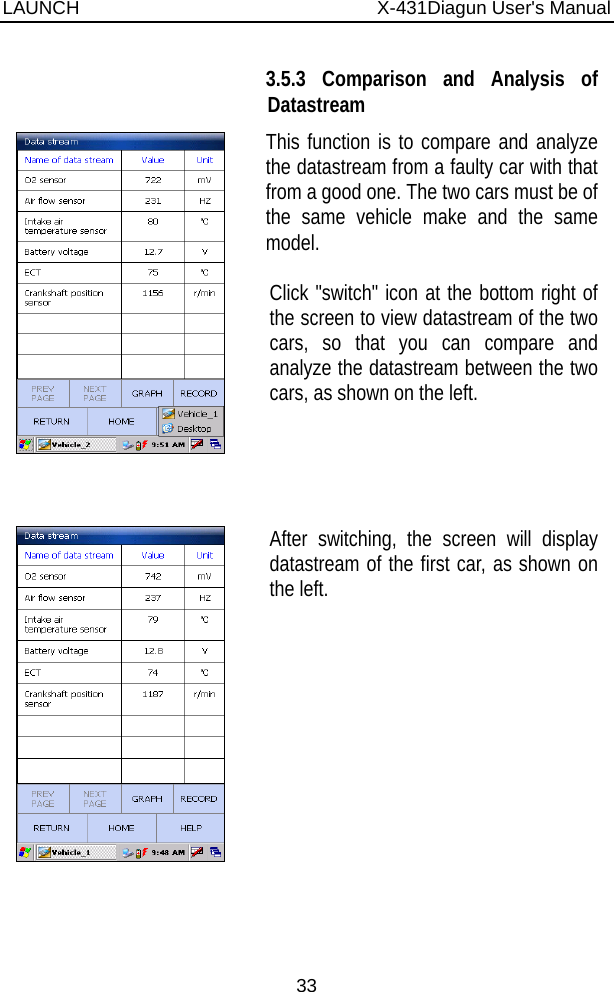
![LAUNCH X-431Diagun User's Manual 21 After setting, click [OK], as shown on the left. Then the printer operates. 3.3.3 Read Datastream Click [Read datastream] on the function menu to read the datastream from ECU, as shown on the left.](https://usermanual.wiki/Launch-Tech/01DIAGUN/User-Guide-1205247-Page-27.png)
![LAUNCH X-431Diagun User's Manual 22 The selected datastream items display with blue, as shown on the left. Button Descriptions: [NEXTPAGE]: display the datastream item on the next page. [OK]: display the dynamic data of the selected datastream. [RETURN]: return back to the previous interface. Click [OK], the dynamic data of the selected datastream item would be displayed, as shown on the left. Click [RECORD] to save dynamic datastream in a specific duration, click [Stop] to complete the record. Button Descriptions: [GRAPH]: display the waveform of a single datastream item. [RECORD]: record dynamic datastream in a specific duration (the button will shift to [Stop] after clicking it).](https://usermanual.wiki/Launch-Tech/01DIAGUN/User-Guide-1205247-Page-28.png)
![LAUNCH X-431Diagun User's Manual 23 With the datastream screen displayed, click to select the datastream, and click [GRAPH] to view the datastream waveform (not more than two in a screen) as shown on the left. 3.3.4 Actuation Test The purpose of this function is to control the operation of an on-board system, test or component. Click [Actuation test] on the function menu, as shown on the left. Note: Here take [Cylinder 1# injector] for example.](https://usermanual.wiki/Launch-Tech/01DIAGUN/User-Guide-1205247-Page-29.png)
![LAUNCH X-431Diagun User's Manual 24 Click [1# injector] as shown on the left. Note: Click [1# injector] to check if it works normally by the sound from it. Perform completed, as shown on the left. Note: If perform fails and [1# injector] cannot work normally, it indicates malfunction in the related components.](https://usermanual.wiki/Launch-Tech/01DIAGUN/User-Guide-1205247-Page-30.png)
![LAUNCH X-431Diagun User's Manual 25 3.3.5 Driving Record Administration View the saved datastream and waveform. In vehicle make interface as shown on the left., click [HISTORY]. After clicking, the screen displays a document list of datastream recorded in specific durations for the tested vehicle make, as shown on the left. Click [OK] to view the recorded datastream of the selected model in a specific duration. Button Description: [DELETE]: delete a record.](https://usermanual.wiki/Launch-Tech/01DIAGUN/User-Guide-1205247-Page-31.png)
![LAUNCH X-431Diagun User's Manual 26 Click in the box to select parameters in which you want to view the datastream, the selected items will be marked with ‘√’. You could select "CHAR" or "GRAPH" to view datastream in different form as you want, as shown on the left. After selecting, click [OK], the recorded dynamic data will appear again, as shown on the left Button Descriptions: [Left]: show the hidden datastream on the left. [Right]: show the hidden datastream on the right. 3.4 Flow chart for diagnose procedure](https://usermanual.wiki/Launch-Tech/01DIAGUN/User-Guide-1205247-Page-32.png)

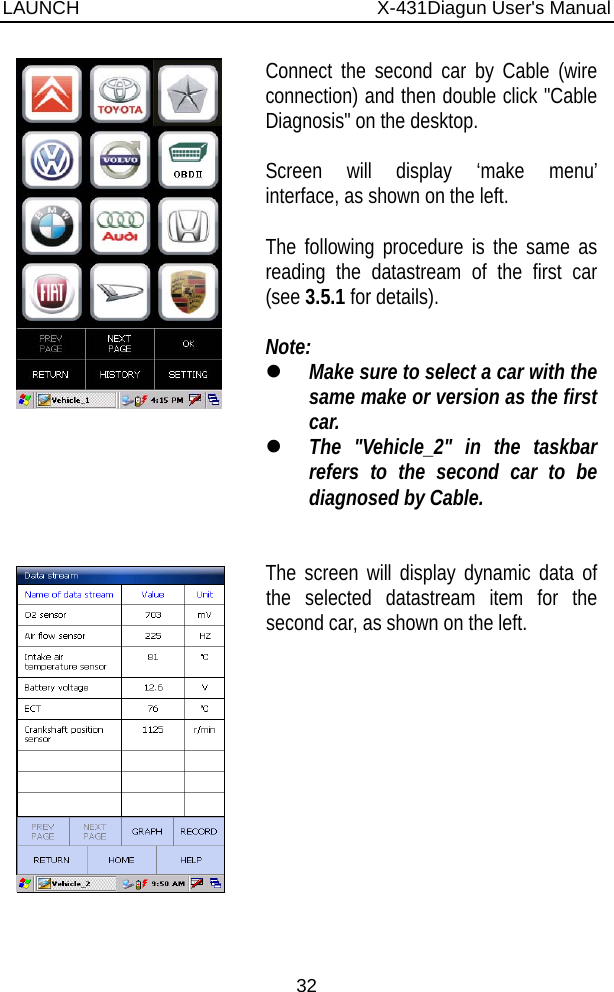
![LAUNCH X-431Diagun User's Manual 29 Then, the screen shift to "Diagnostic program version" select menu interface, select version "10.01" and click [OK]. Note: The operations of other makes, models and systems are the same as Benz. See relevant system operation introduction for details, and here we only take Benz demo program for example. Click [Read data stream] on the function menu to read the datastream from ECU, as shown on the left.](https://usermanual.wiki/Launch-Tech/01DIAGUN/User-Guide-1205247-Page-35.png)
![LAUNCH X-431Diagun User's Manual 30 The selected datastream will be highlighted with blue, as shown on the left. Click [OK] and the dynamic data of the selected datastream items will be displayed on the screen, as shown on the left. Until now, reading the datastream of the first car completed.](https://usermanual.wiki/Launch-Tech/01DIAGUN/User-Guide-1205247-Page-36.png)
![LAUNCH X-431Diagun User's Manual 34 4 Update of Diagnostic Software 4.1 User Registration Registration on www.x431.com provides users with a convenient and quick way to purchase or download software and update online. First visit www.x431.com. Click ‘Other Area’ at the lower position of the screen to enter into the homepage, as show below. Click [Register] to view terms of services.](https://usermanual.wiki/Launch-Tech/01DIAGUN/User-Guide-1205247-Page-40.png)
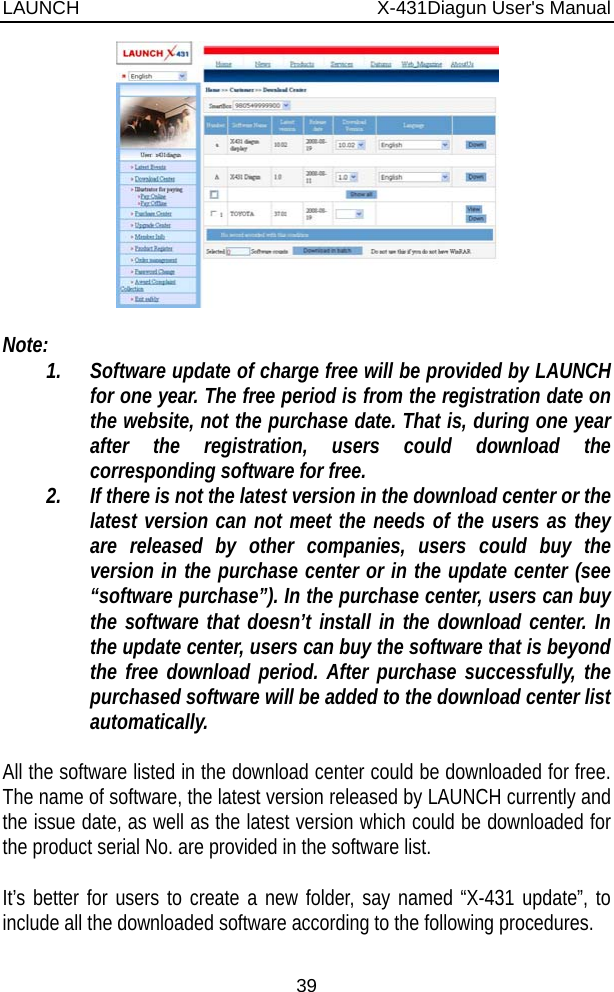
![LAUNCH X-431Diagun User's Manual 38 [Download Center]: Refer to "software download". [Purchase Center] & [Update center]: Refer to "software purchase and update" [Member Info]: Display and renew the current member information. [Product Register]: Register newly purchased product here. [Order Management]: Check or cancel the unpaid order. [Renew Password]: Input the old password correctly before renewing. [Awarded for complaint]: Users could complain their troubles and feedback to LAUNCH. Effective complaint will be awarded by LAUNCH [Logout]: Exit the registration. 4.3 Software Download The screen will enter the [download center] interface after logging in successfully.](https://usermanual.wiki/Launch-Tech/01DIAGUN/User-Guide-1205247-Page-44.png)
![LAUNCH X-431Diagun User's Manual 40 Update Tool Download Users are required to download the update tools before updating. Select language in the drop-down menu, click [download]. The screen will display the interface as shown below. Click [Save], and save the update tool in the folder “X-431 update”. Download Display Program Users are required to download display program before updating diagnostic software if the display program fitted for the latest diagnostic software is updated. Select the language in the drop-down menu, and click [download]. Click [Save] on the pop-up menu to save the program in the folder [X-431 update]. Download Diagnostic Program Select language and version (the default version is the latest version) on the drop-down menu. Click [download], then click [save] on the pop-up menu to](https://usermanual.wiki/Launch-Tech/01DIAGUN/User-Guide-1205247-Page-46.png)
![LAUNCH X-431Diagun User's Manual 41 save it in the folder [X-431 update]. Click [view] to learn the detailed information of the version. Users could download the other diagnostic program into the folder [X-431 update]. Up to now, the software that is for update is downloaded completely. 4.4 Software Update Connect card reader with TF card to PC and install drive program Necessary hardware: 1) A computer that can access the internet. 2) A TF card reader of X-431Diagun and a TF card to be updated. Necessary software: Tested model software and update tool (download from www.x431.com) Connection 1 2 3 4 5 6 7 Steps: a) Take out the TF card from the X-431Diagun main unit (press the TF card slightly and it will pop up automatically, as shown in Figure 1 and Figure 2); b) Insert the TF card into the card reader (as shown in Figure 3, the side printed with words is upward, and insert the TF card into the card reader perpendicularly, as shown in Figure 4, Figure 5 and Figure 6); c) Connect the card reader to the USB port of the computer.](https://usermanual.wiki/Launch-Tech/01DIAGUN/User-Guide-1205247-Page-47.png)
![LAUNCH X-431Diagun User's Manual 42 Install TF Card Reader Drive Program You don't need to install the drive program if the operating system of your computer is Windows Me/2000/XP, Mac OS 9.x/Mac OS X or Linux 2.4.x, but have to install if the operating system is Windows98. You can download the installation software from www.x431.com and install it according to the Installation Wizard. If card reader installation succeeds, the icon " " will appear in "My computer" automatically. Interruption may be caused for the following reasons during the update process. Please try again after solving the problem. 1) TF card reader is poor connected to the computer or the drive program of the TF card is installed incorrectly; 2) Space on TF is not enough; 3) Other reasons. Begin to Update Software Open the folder [X-431 Update], double click the icon " ", and install the X-431Diagun update tool according to the Wizard. After the installation, the update icon for the X-431Diagun will appear on the desktop. Double click the update icon for X-431Diagun on the desktop to actuate the update tool. This program will check the update file downloaded by the user automatically, including the files of diagnostic program and display program, as shown below.](https://usermanual.wiki/Launch-Tech/01DIAGUN/User-Guide-1205247-Page-48.png)
![LAUNCH X-431Diagun User's Manual 43 Select the update program version on the right, and click [UPDATE]. When update completed, an indication box will pop up. If the update program version doesn't exist on the right, clicking the icon " " to open the downloaded update program. You can click the corresponding icon " " to the G disc to view the files stored in the TF card and delete some old software versions if necessary for more available space in TF card. Click [EXIT] to exit.](https://usermanual.wiki/Launch-Tech/01DIAGUN/User-Guide-1205247-Page-49.png)
![LAUNCH X-431Diagun User's Manual 44 4.5 Purchase and Update Software If users can’t find the software they needed in download center, they should buy the software in the purchase center or updated in the update center. Log on www.x431.com to enter the interface as shown in the figure below. Click [purchase center], then you can tick the serial number to choose the software. Take the Transporter & V Class for example. Click [view] that is in the same line with the Transporter& V Class. The screen will display detailed information about the Transporter & V Class diagnostic software.](https://usermanual.wiki/Launch-Tech/01DIAGUN/User-Guide-1205247-Page-50.png)
![LAUNCH X-431Diagun User's Manual 45 Click [order] to add the selected software to your shopping cart. Click [Pay] to buy the software. The bought software will be automatically added to the user’s download center. Click [clear] to empty the shopping cart. Click [purchase other] to buy other software. The operation for update center is the same as for the purchase center. But you can only find software that beyond updated free period in the updated center, while all the available software are listed in the purchase center,](https://usermanual.wiki/Launch-Tech/01DIAGUN/User-Guide-1205247-Page-51.png)