Launch Tech RCUL golo3 User Manual
Launch Tech Co., Ltd. golo3
User Manual
golo3 User Manual

LAUNCH golo3 User Manual
ii
All rights reserved! No part of this publication may be reproduced, stored in a retrieval system or
transmitted, in any form or by any means of electronic, mechanical, photocopying and recording or
otherwise, without the prior written permission of LAUNCH.
This manual is designed only for the use of this unit. LAUNCH is not responsible for any use of this manual
on the other units.
The manual and all the samples herein can be changed without prior notice. Neither LAUNCH nor its
affiliates shall be liable to the purchaser of this unit or third parties for damages, losses, costs or expenses
incurred by purchaser or third parties as a result of: accident, misuse, or abuse of this unit, or unauthorized
modifications, repairs, or alterations to this unit, or failure to strictly comply with LAUNCH operating and
maintenance instructions.
LAUNCH shall not be liable for any damages or problems arising from the use of any options or any
consumable products other than those designated as Original LAUNCH Products or LAUNCH Approved
Products by LAUNCH.
Notice: other product names used herein are for identification purposes only and may be trademarks of
their respective owners. LAUNCH disclaims any and all rights in those marks.
This device is only for professional technicians and maintenance personnel.

LAUNCH golo3 User Manual
iii
Precautions:
z The socket-outlet shall be installed near the equipment and shall be easily accessible.
z The golo3 is a precision electronic instrument. Observe caution when handing the module. Dropping
the module can cause damage.
z Make sure that the connection between the golo3 module and DLC socket is secure and reliable
when in use,
z GPRS transmission speed depends on mobile network, communication timeout failure would be
occurred when network is busy (such as major festivals), and it also prone to happen in remote areas,
Launch would not responsible for any consequences occurred by this failure.
z ODB program is pre-installed in the factory; please go into http://mycar.x431.com/ to download the
diagnostic software corresponding with your vehicle.
z Turn off the ignition switch when connecting or disconnecting the golo3 module to the vehicle’s OBD
II Diagnostic Linking Connector (DLC).

LAUNCH golo3 User Manual
iv
CONTENT
1. Overview...........................................................................................................................................1
1.1 knowledge ...................................................................................................................................1
1.2 Features .......................................................................................................................................1
1.3 Parameters ...................................................................................................................................1
1.4 Accessories..................................................................................................................................1
1.5 Structure ......................................................................................................................................2
2. Connection and installation ............................................................................................................2
2.1 Download The golo3 App............................................................................................................2
2.2 golo3 Connection.........................................................................................................................3
2.3 Install the SIM card .....................................................................................................................3

LAUNCH golo3 User Manual
1
1. Overview
1.1 knowledge
Based on the full vehicle system data collection, Launch-developed golo product is a telematics product
integrated GPS/GPRS/3G/G-Sensor and other modules in the industry. After being connected with the
smart device through the internal Bluetooth (or WIFI, 3G), it can achieves the powerful functions such as
Remote Diagnosis, Vehicle Running Data Collection, Receive the diagnostic report, Vehicle Location,
meanwhile, making full use of the enormous advantage of mobile network environment, is integrated in the
golo3 App a IM tool that build an social circle between the car owner, the repair technician and
maintenance companies, share reports, maintenance experiences, and so on.
1.2 Features
z The full vehicle system diagnosis
z GPRS/GSM/3G communication,real-time data upload
z GPS/GPRS base station location
z Track playback
z G-sensor
z IM
z Statistics analysis
z Abnormal alarm
z Support local and remote upgrade
1.3 Parameters
z Working voltage: DC9-18V
z Working current: 120mA(DC12V 下)
z Standby current: <10mA
z Protection class: IP33
z Working temperature: -20℃~70℃
z Storage temperature: -30℃~85℃
z Net weight: 50g
1.4 Accessories
z golo
z Quick start Guide
z Password Envelope
LAUNCH golo3 User Manual
2
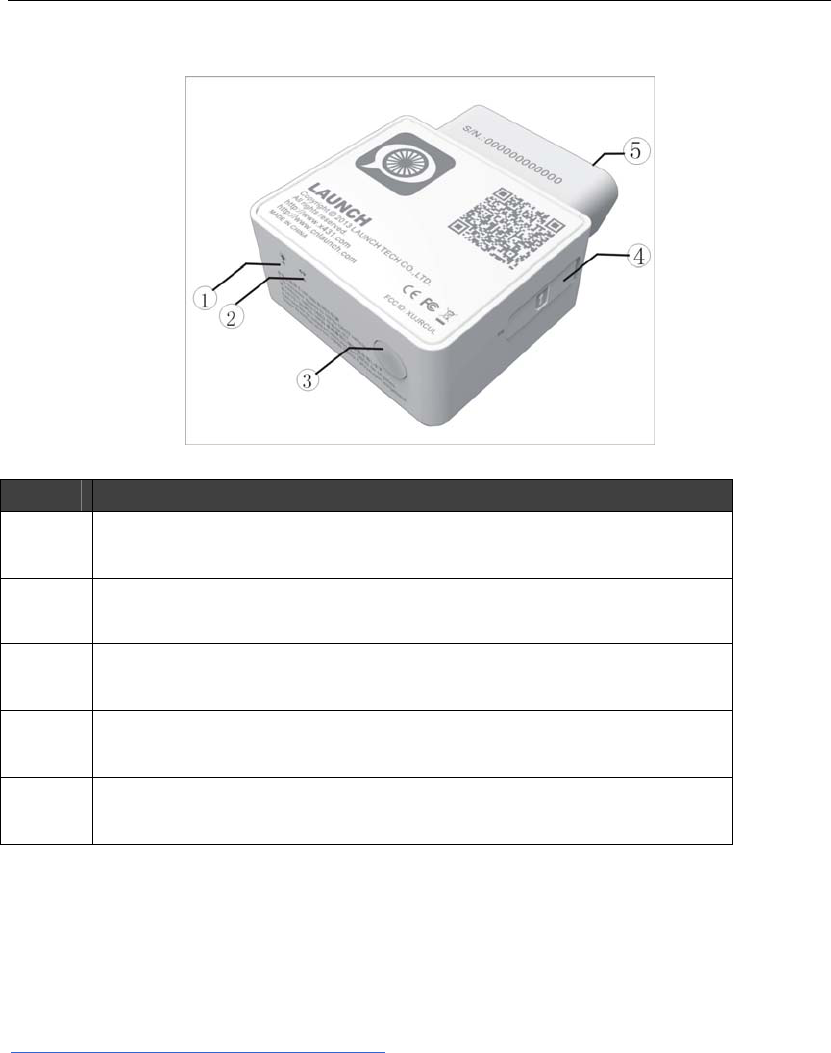
1.5 Structure
序号 功能
1 Power indicator: When turn on, it will flash alternately three times between the
red light and the green, then the green light flashes regularly
2 Communication indicator: It will flash when the golo3 module is communicating
with your smart device or the golo3 module is resetting.
3 WIFI switch
4 SIM card location
5 16 pin OBD II connector: To connect to vehicle’s OBD II diagnostic socket.
2. Connection and installation
2.1 Download The golo3 App
You can download the golo App free in Google play or scan the QR code on the product body, or go into
http://mycar.cnlaunch.com:8080/downloadCenter, to download the golo3 App as well.
Scan the QR barcode
1) Before scanning, please make sure that your Android device has already installed the QR barcode
reading application, if not, install it first.
2) Scan the QR barcode on the product package, then you will see a link to download the golo3 App.
3) Open this link and install the golo3 App(follow the on-screen instructions)
LAUNCH golo3 User Manual
3
Download in Google play
1) Turn on your Android device. Be sure you have a strong signal that links to the network.
2) Go into Google play (https://play.google.com/store) and search for “golo”, then install the golo3
App (follow the on-screen instructions).
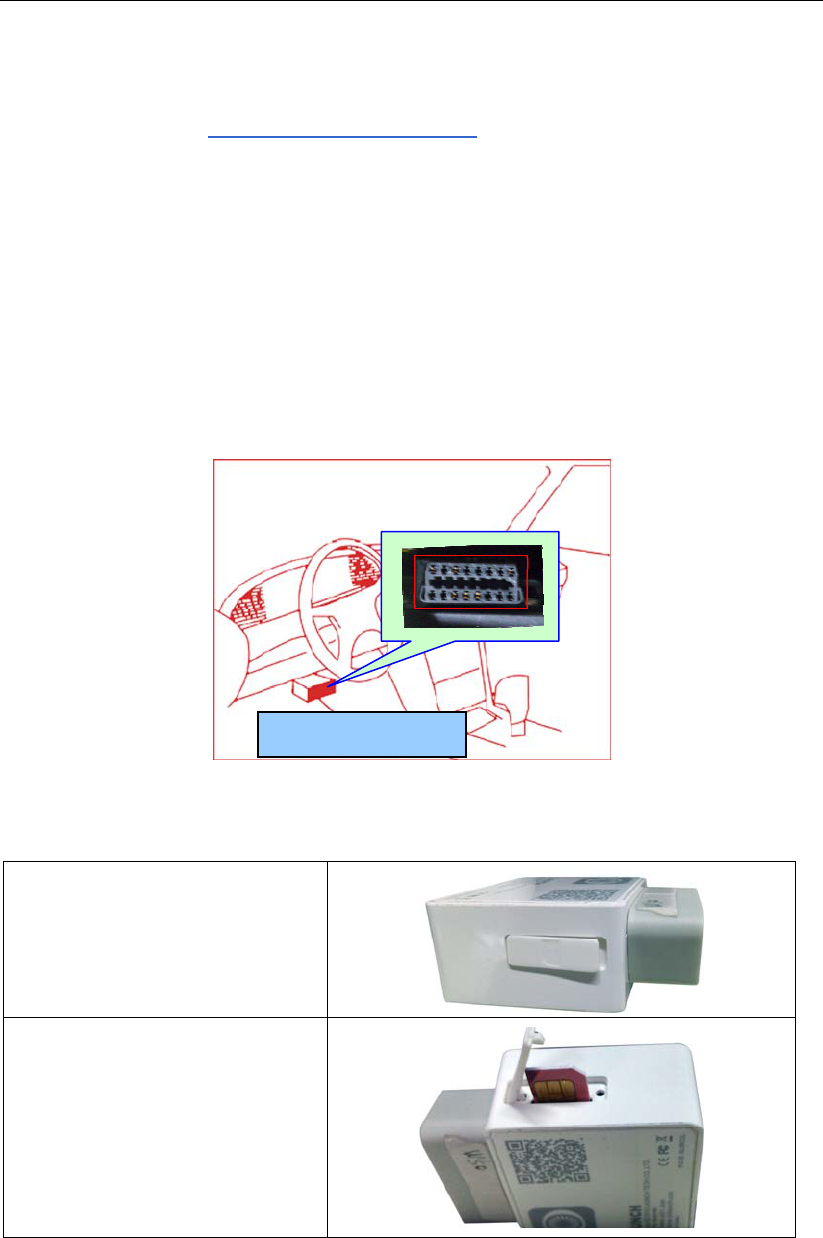
2.2 golo3 Connection
NOTE:
1. Remove the golo3 module once testing and/or diagnosis is complete;
2. Please turn off the ignition switch before connecting or disconnecting the golo3.
Step 1: Locate the vehicle’s DLC socket. It is usually located under the dashboard, towards the driver’s left
knee area.
Step 2: Plug the golo3 module into the DLC socket. The connector’s power indicator will light up and you
will hear an audible beep. .
Fig3.1
2.3 Install the SIM card
1. Uncover the rubber cover of the SIM
card
2. Plug the SIM card into the socket.
NOTE THE DIRECTION OF THE SIM
CARD CHIP
When you need to replace, press the
SIM card then release, it will pop out.
Near center of dashboard

LAUNCH golo3 User Manual
4
NOTE: This equipment has been tested and found to comply with the limits for a Class B digital
device, pursuant to Part 15 of the FCC Rules. These limits are designed to provide reasonable
protection against harmful interference in a residential installation. This equipment generates
uses and can radiate radio frequency energy and, if not installed and used in accordance with the
instructions, may cause harmful interference to radio communications. However, there is no
guarantee that interference will not occur in a particular installation. If this equipment does cause
harmful interference to radio or television reception, which can be determined by turning the
equipment off and on, the user is encouraged to try to correct the interference by one or more of
the following measures:
- Reorient or relocate the receiving antenna.
- Increase the separation between the equipment and receiver.
- Connect the equipment into an outlet on a circuit different from that to which the receiver is
connected.
- Consult the dealer or an experienced radio/TV technician for help.
§ 15.19 Labelling requirements.
This device complies with part 15 of the FCC Rules. Operation is subject to the
following two conditions: (1) This device may not cause harmful interference, and (2)
this device must accept any interference received, including interference that may
cause undesired operation.
§ 15.21 Information to user.
Any Changes or modifications not expressly approved by the party responsible for
compliance could void the user's authority to operate the equipment.
This equipment complies with FCC radiation exposure limits set forth for an uncontrolled
environment. This equipment should be installed and operated with minimum distance 20cm
between the radiator & your body.