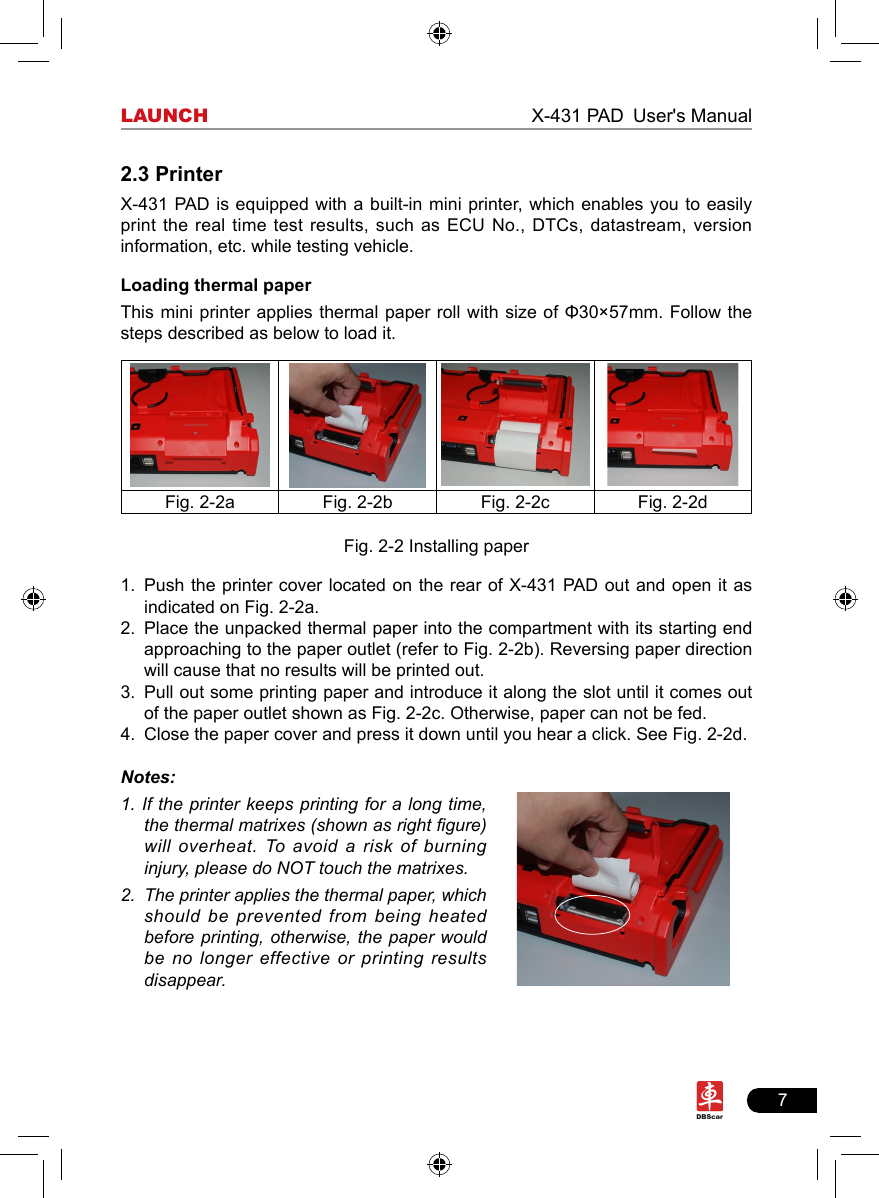
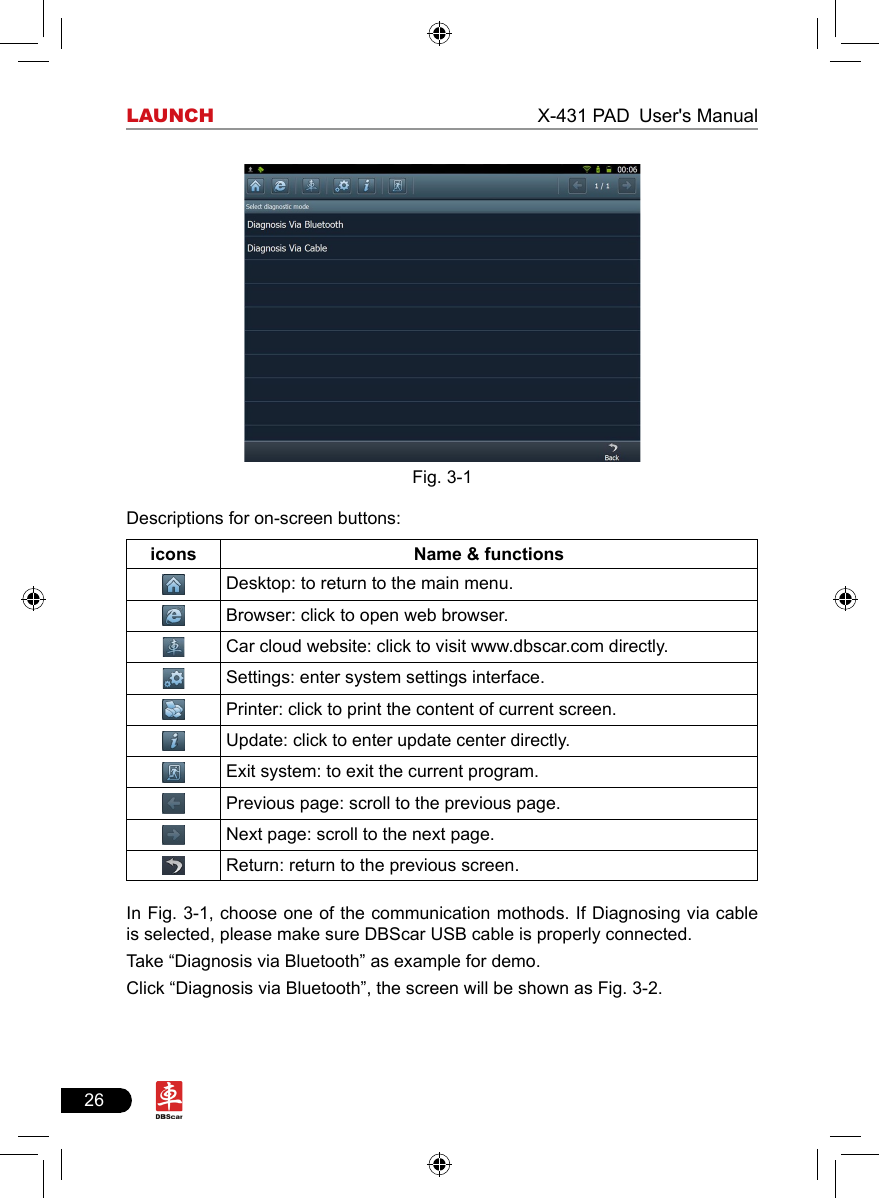
Launch Tech X431PAD Automotive Diagnosis Computer User Manual Manual
Launch Tech Co., Ltd. Automotive Diagnosis Computer Manual
UserManual.wiki
>
Launch Tech
>
X431PAD User Manual
>
Manual
Contents
1.
Manual
2.
Addendum
Manual
Navigation menu
Upload a User Manual
Namespaces
Wiki Guide
HTML
PDF
Info
Views
User Manual
Discussion / Help
Navigation


![12LAUNCH X-431 PAD User's ManualKeys Name FunctionsDelete Place the cursor next to the character, and click this key to erase it.Hide keyboard Click it to hide on-screen keyboard.Conrm the key that causes a carriage return or line feed.Space Input a space.Handwriting Switch to handwriting mode.Number/symbol toggle keyToggle between number and symbol input mode.Caps Toggle between uppercase/lowercase letters2.4.3 SettingsIt includes system settings and application setting. Language setting, Date/Time, DBScar Domain, Local Area Network, Brightness, Power, Screen Calibration and Wi-Fi setting are available in system setting, while application settings provide some settings related to applications. In main menu, click [ Settings] to enter setting interface, similar to Fig. 2-7.Fig. 2-7](https://usermanual.wiki/Launch-Tech/X431PAD.Manual/User-Guide-1828152-Page-18.png)
![14LAUNCH X-431 PAD User's ManualA. Date settingIn Fig. 2-9, click / to switch to the previous/next month. Alternatively you can also click month or year directly and choose from the pull-down list (see Fig. 2-10). Then click on the desired date to set the date. Fig. 2-10B. Time settingClick on the time display area, the cursor will blink and a on-screen keyboard will appear (For keyboard operation, refer to “2.5.2 Function items, UI layout and on-screen keyboard” for details), highlight the time to be revised, click to change the input method to number mode, then input the desired time. Or you can also click the +/- to adjust it.After setting is complete, click [OK] to save your setting. A message prompting date has been set successfully will appear, click [OK] to exit.Click [Current time] to display the current time.C. Time zone settingClick [Timezone] in Fig. 2-9, a screen similar to 2-11 will appear.](https://usermanual.wiki/Launch-Tech/X431PAD.Manual/User-Guide-1828152-Page-20.png)
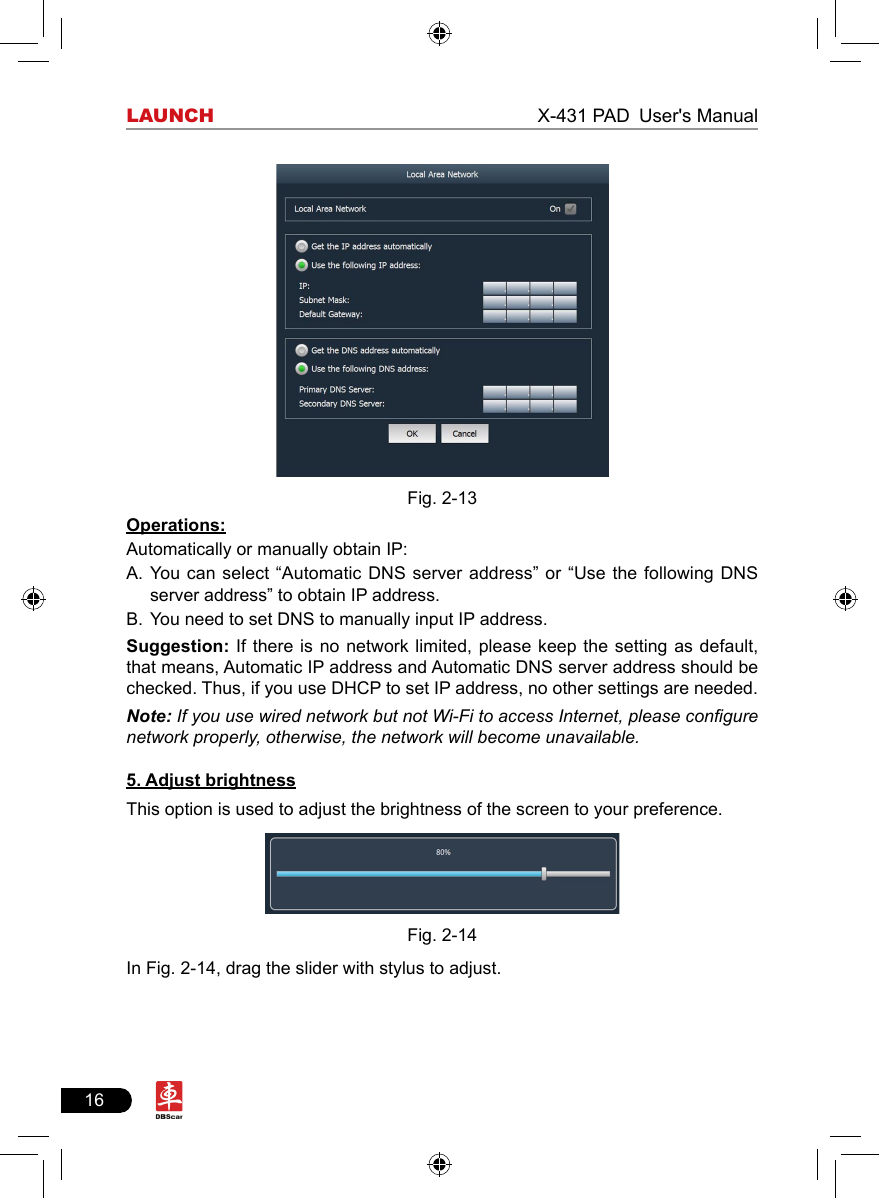
![15LAUNCH X-431 PAD User's ManualFig. 2-11Click the desired time zone, then click [Date] to switch to date setting screen, the time zone you have set will be displayed on the bottom of the screen and the system time varies with the time zone.3. DBScar domain settingThis option provide two DBScar domains for your selection. Users can choose the different domain according to your actual network status.Fig. 2-124. Local area network congurationClick “Local Area Network”, the screen will be shown as Fig. 2-13.](https://usermanual.wiki/Launch-Tech/X431PAD.Manual/User-Guide-1828152-Page-21.png)
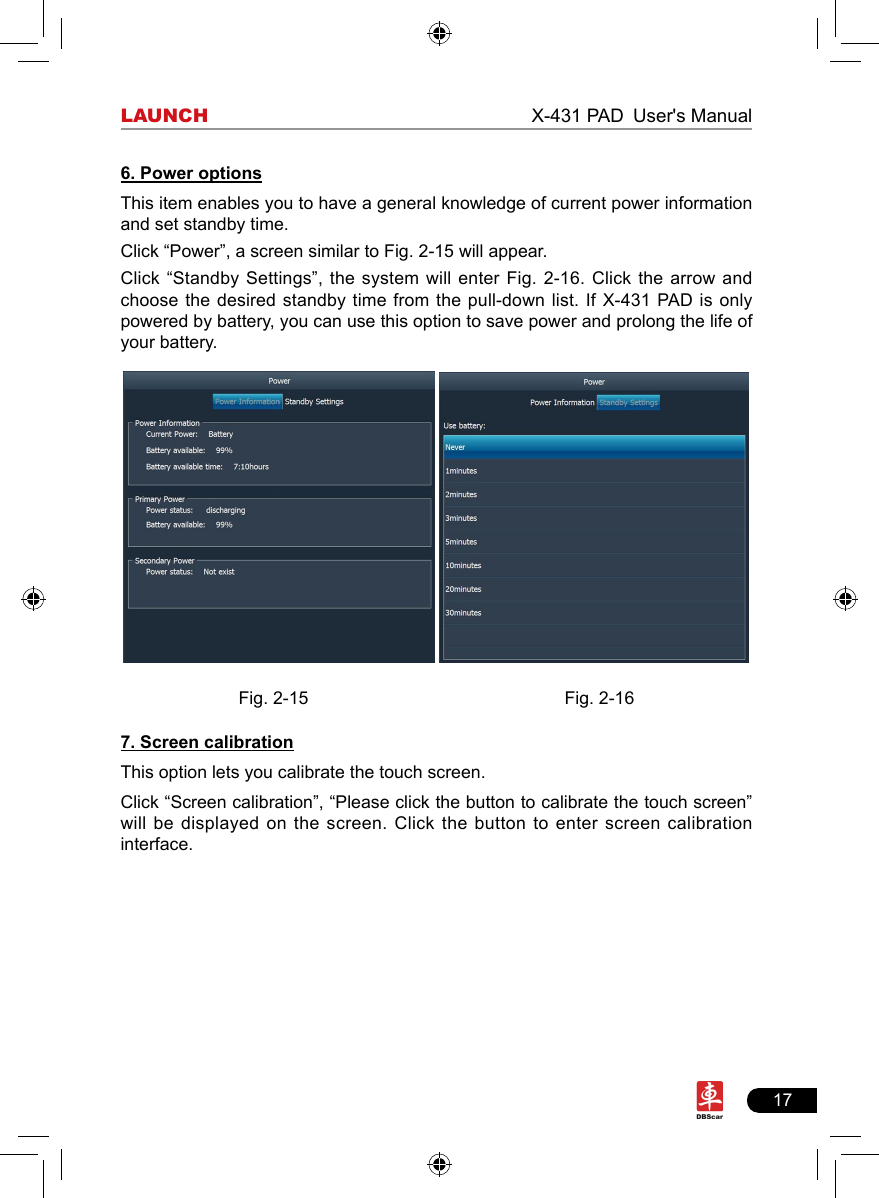
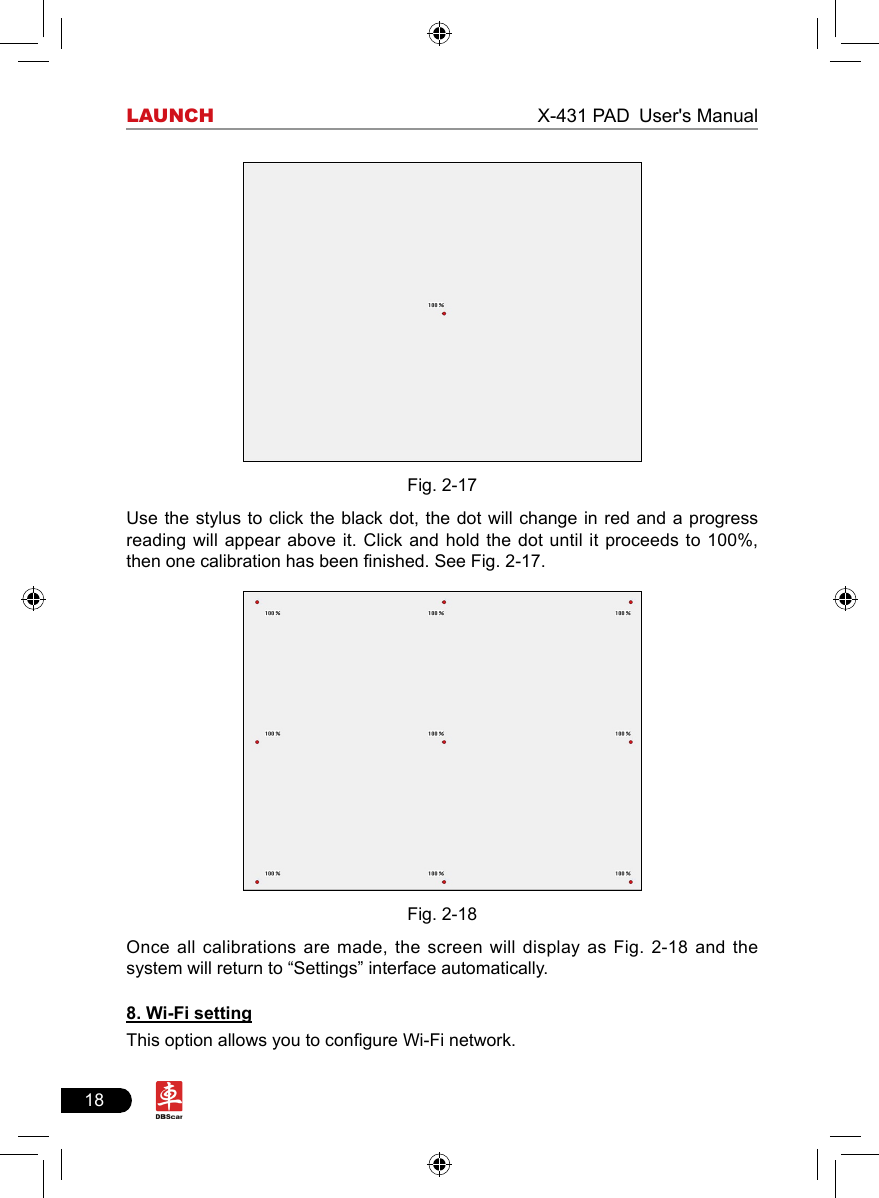
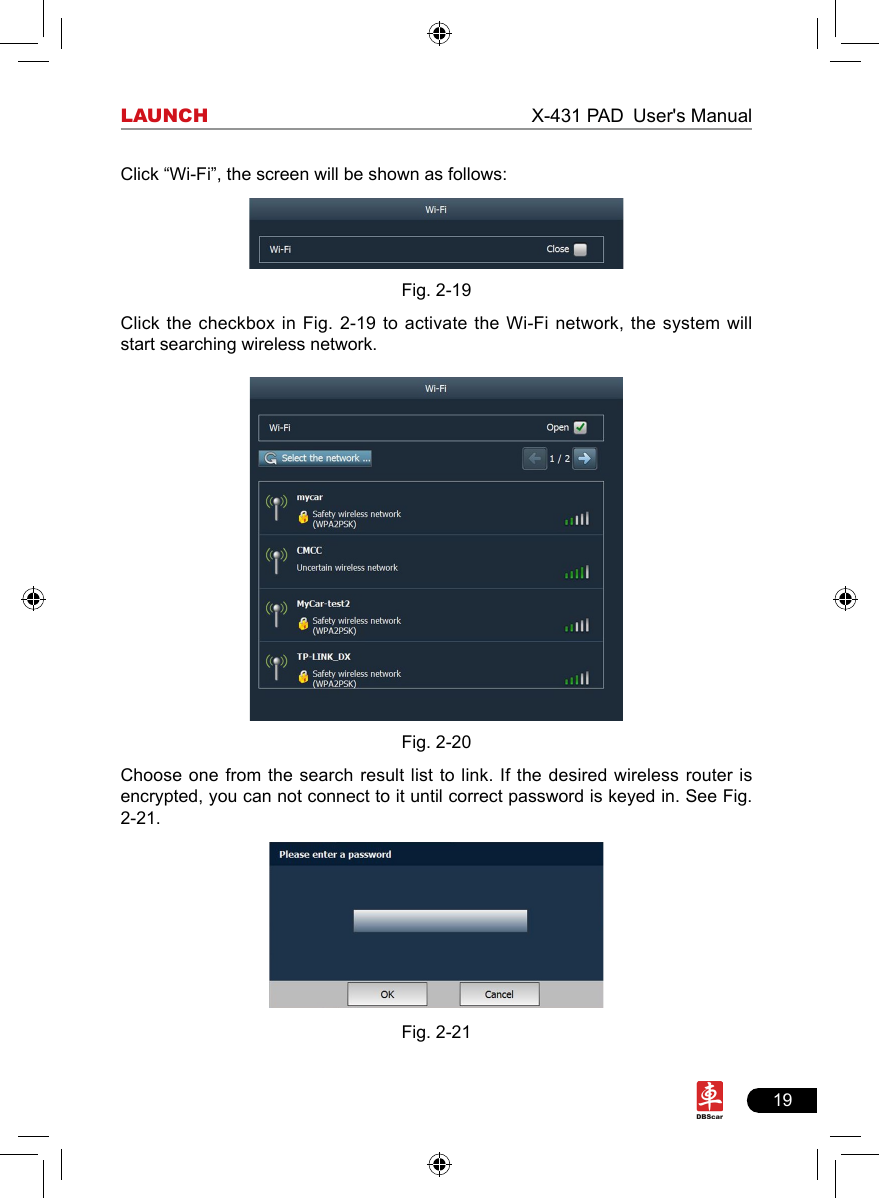
![20LAUNCH X-431 PAD User's Manual9. System informationThis option enables you to view the relevant system information.Click “System information” under the Application tab, a dialog box prompting “Please click the refresh button to get the system information” will pop up, click [Refresh], a screen identical to Fig. 2-22 will appear.Fig. 2-2210. User centerThis option allows you to set the relevant user information. Before setting this option, please make sure the X-431 PAD is properly connected to the internet.Click “User Center” under the Application tab, a screen identical to Fig. 2-23 will appear.Fig. 2-23](https://usermanual.wiki/Launch-Tech/X431PAD.Manual/User-Guide-1828152-Page-26.png)

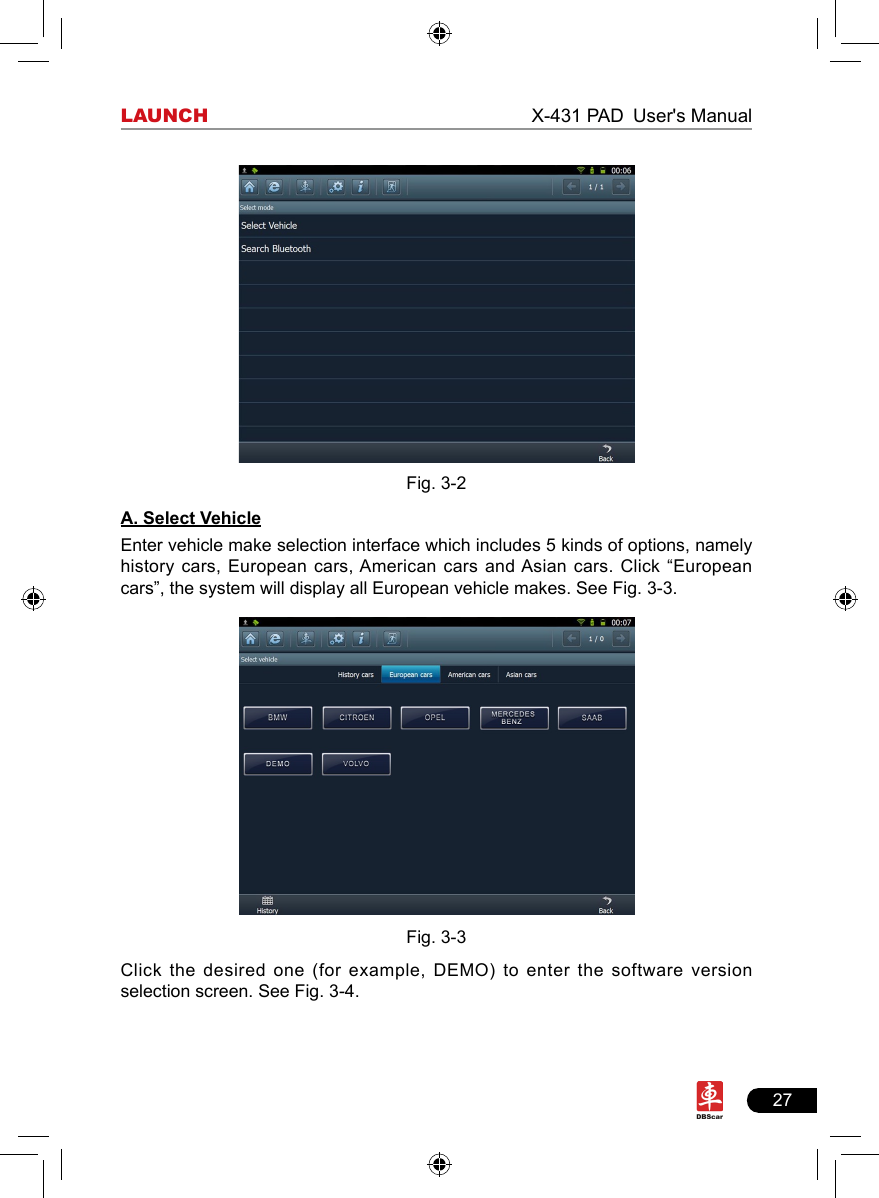
![28LAUNCH X-431 PAD User's ManualFig.3-4Choose one version, and click [OK], the system starts resetting and validate the diagnostic connector. If ok, it will enter model selection interface. Choose the desired one and start diagnosing.B. Search BluetoothTo use this function, please activate the bluetooth function. Search the diagnostic connector, then choose the desired one from the result list to pair. After pairing, the system will obtain the connector information. If existing, it requires car owner to input the authorization password, then the system will enter diagnostic system selection screen. Otherwise, it will go into the vehicle selection interface directly. Detailed operations are as follows:Click “Search Bluetooth” to enter Fig. 3-5.](https://usermanual.wiki/Launch-Tech/X431PAD.Manual/User-Guide-1828152-Page-34.png)
![29LAUNCH X-431 PAD User's ManualFig. 3-5After searching, a list of bluetooth devices will be shown on the screen. See Fig.3-6.Fig. 3-6Click the desired bluetooth device, the system will display “Pairing bluetooth, please wait...”. If ok, “Pairing bluetooth succeed! Searching port, please wait...” will be shown on the screen. Click [Back] to return to the previous screen. After linked, the system will enter vehicle selection interface if the included DBScar diagnostic connector is chosen.](https://usermanual.wiki/Launch-Tech/X431PAD.Manual/User-Guide-1828152-Page-35.png)
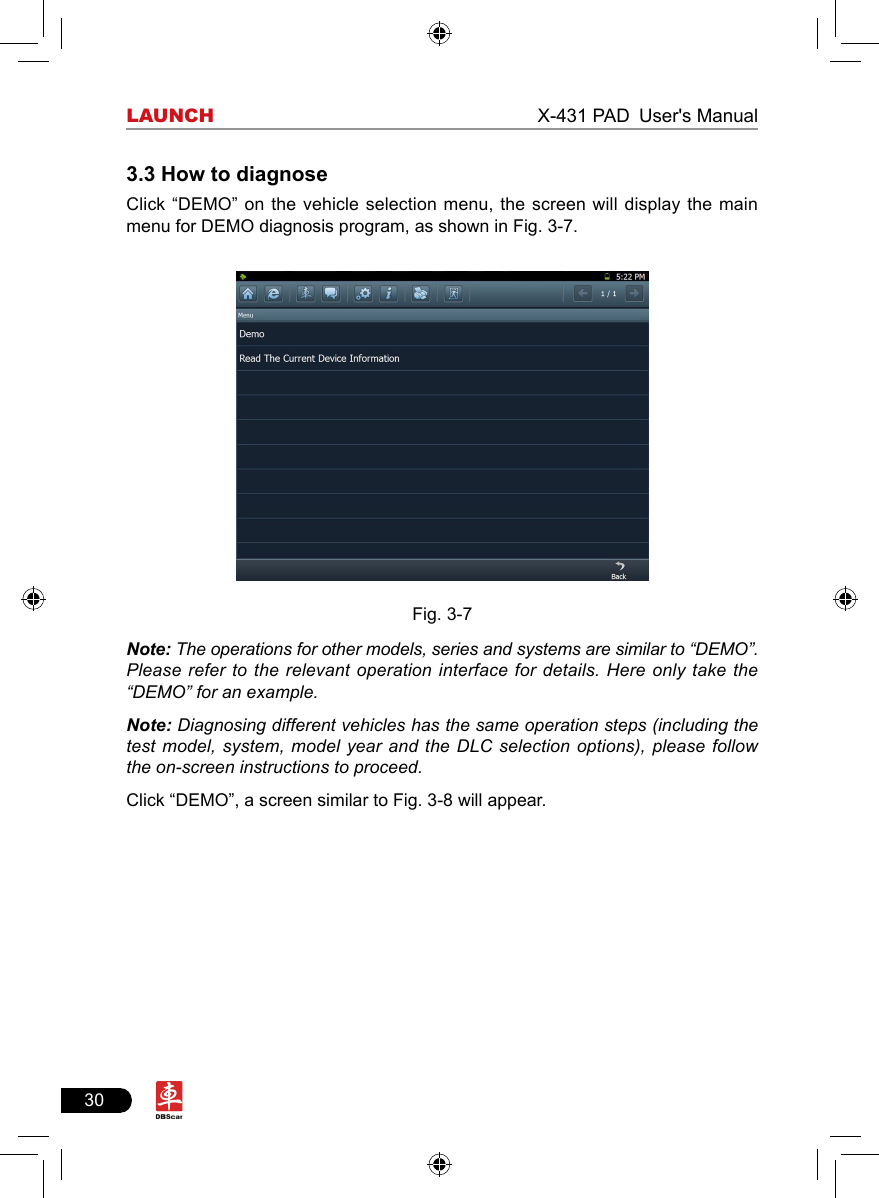
![31LAUNCH X-431 PAD User's ManualFig. 3-8Click [Engine] in Figure 3-8 (If there is more than one page of system menu, click to jump to the next page), the system message “Communication is initialized…” will appear on the screen. Note: The test method is similar for different systems, here take [Engine] for an example. After communicating, the interface will skip to the function menu of [Diagnose], as shown in Figure 3-9.Fig. 3-9](https://usermanual.wiki/Launch-Tech/X431PAD.Manual/User-Guide-1828152-Page-37.png)
![32LAUNCH X-431 PAD User's ManualIn Fig. 3-9, there are four functions of [Engine]: “Read trouble code”, “Clear trouble code”, “Read data stream” and “Special function”. 3.3.1 Read trouble codeClick [Read trouble code] in Figure 3-9, X-431 PAD starts executing this function. After testing, results will appear on screen, as shown in Figure 3-10.Fig.3-10Click to return to the previous screen.If the tested system has no DTCs, a message will appear on the screen, indicating that there are no DTCs in the system. 3.3.2 Clear trouble codeClick [Clear trouble code] as shown in Figure 3-9, all existing trouble codes will be cleared.](https://usermanual.wiki/Launch-Tech/X431PAD.Manual/User-Guide-1828152-Page-38.png)
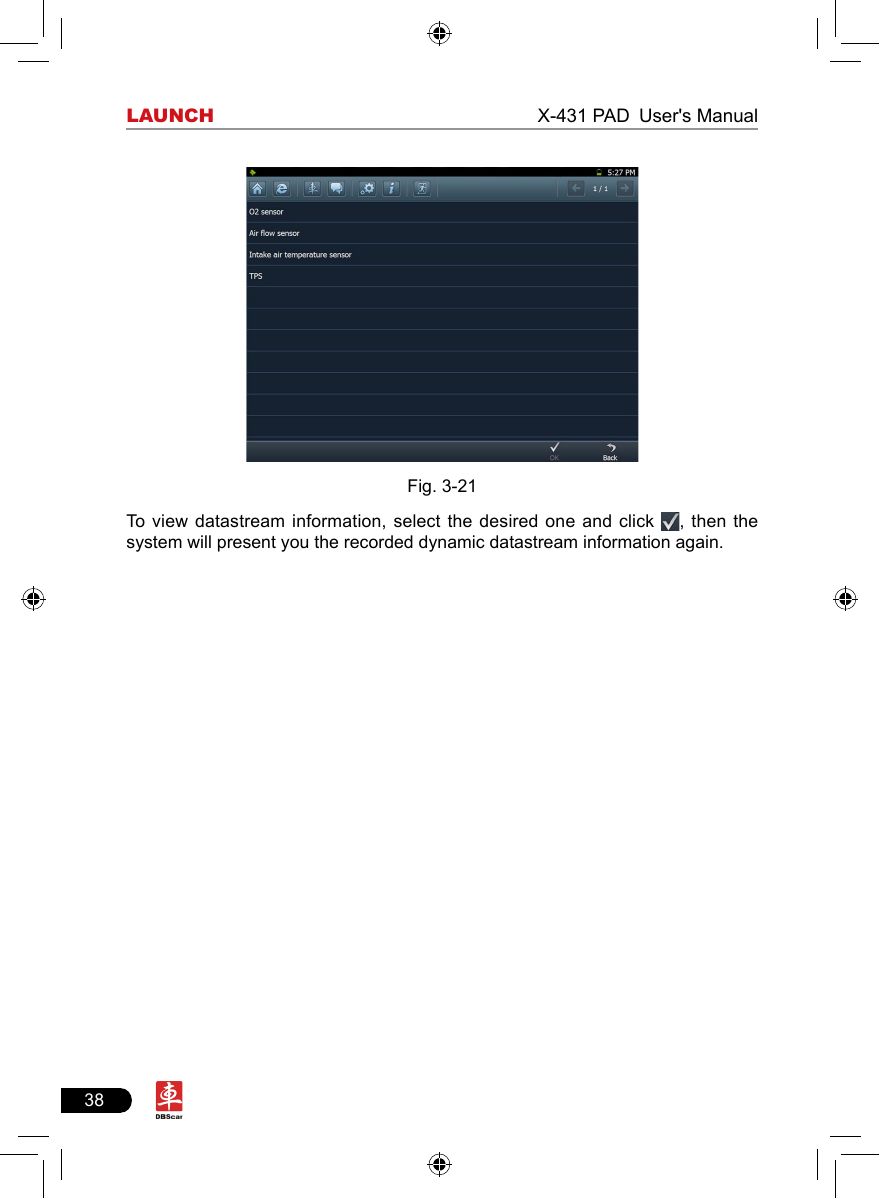
![33LAUNCH X-431 PAD User's ManualFig. 3-11If trouble codes are cleared successfully, a prompt message will appear on the screen, as shown in Figure 3-11. If all trouble codes have been cleared, or there are no trouble codes, “No DTCs” will appear on the screen. Click to return to the function menu of diagnostic system.3.3.3 Read datastreamClick [Read datastream] as shown in Figure 3-9, you can read the running parameters. See Fig. 3-12.Fig. 3-12](https://usermanual.wiki/Launch-Tech/X431PAD.Manual/User-Guide-1828152-Page-39.png)
![34LAUNCH X-431 PAD User's ManualClick to select the desired datastream item (more datastream items can be chosen), then click , dynamic data of the selected datastream will appear on screen, as shown in Figure 3-13. Fig. 3-13To view the dynamic waveform of the selected datastream, click [Record] ( and will become active) in Figure 3-14. Click to pause recording; click to stop recording. (To view the recorded datastream, refer to “3.3.5 Driving record management)Click [Plot] in Fig. 3-13, the waveform of O2 will be displayed on the screen, as shown in Fig. 3-14.Fig. 3-14](https://usermanual.wiki/Launch-Tech/X431PAD.Manual/User-Guide-1828152-Page-40.png)
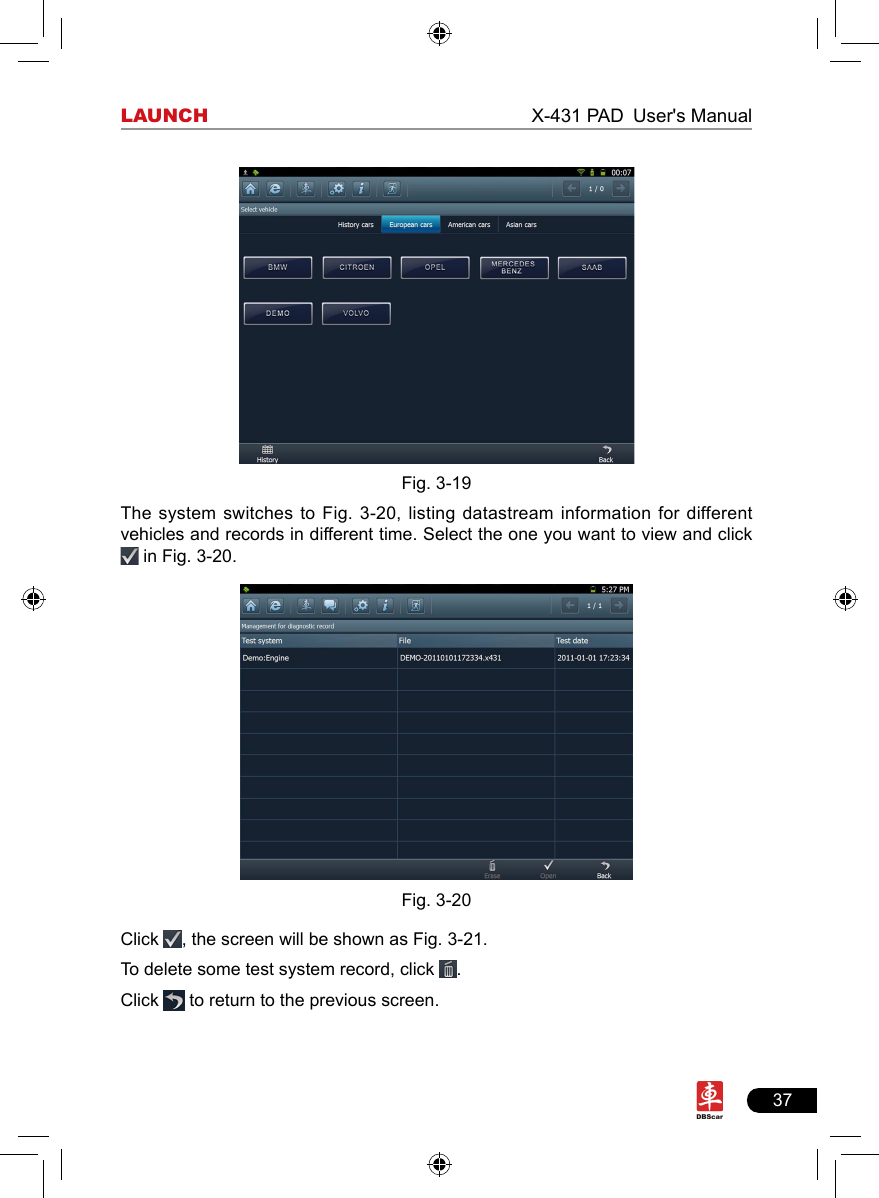
![35LAUNCH X-431 PAD User's ManualIf more datastream items are selected, click [Plot-2], [Plot-4], [Plot-6], [Plot-12] and [Combination] to switch to display in multi-view window mode. Fig. 3-15 and Fig. 3-16 represent the display effect of [Plot-4] and [Combination] respectively (Combination means to display the selected datastream items into one waveform with each datastream marking in different color for easy review and analysis). Fig. 3-15 Fig. 3-163.3.4 Special functionThis option allows you to detect whether the system parameters are normal or not.Click [Special function] in function menu, the screen will be shown as Fig. 3-17.Fig. 3-17Note: We just take [1# injector] as an example to show how to set the special](https://usermanual.wiki/Launch-Tech/X431PAD.Manual/User-Guide-1828152-Page-41.png)
![36LAUNCH X-431 PAD User's Manualfunction.To detect whether [1# injector] works normally or not, click [1# injector], the screen will be shown as Fig. 3-18.Fig. 3-18Note: If [1# injector] works abnormally, the system will fail to indicate that the part has some trouble.3.3.5 Driving record managementView the recorded and saved datastreams and waveforms (To record, click [Record] on the running interface of datastreams).On vehicle selection menu, click in Fig. 3-19.](https://usermanual.wiki/Launch-Tech/X431PAD.Manual/User-Guide-1828152-Page-42.png)
![39LAUNCH X-431 PAD User's Manual4 WebbrowserBrowser is available on X-431 PAD, which helps you retrieve and search for information sources all the time.Click [Webbrowser] to enter. Fig. 4-1In address bar, use the on-screen keyboard to input the Uniform Resource Identier (URL) of the desired resource, and click to visit it. See Fig. 4-1.In search bar, input the desired information and click to search it with google search engine.Click to open a new blank page.Click to close the page.Click Favorites to bookmark the web pages so that the user can quickly return to them in future. Click to view and maintain the favorites.](https://usermanual.wiki/Launch-Tech/X431PAD.Manual/User-Guide-1828152-Page-45.png)
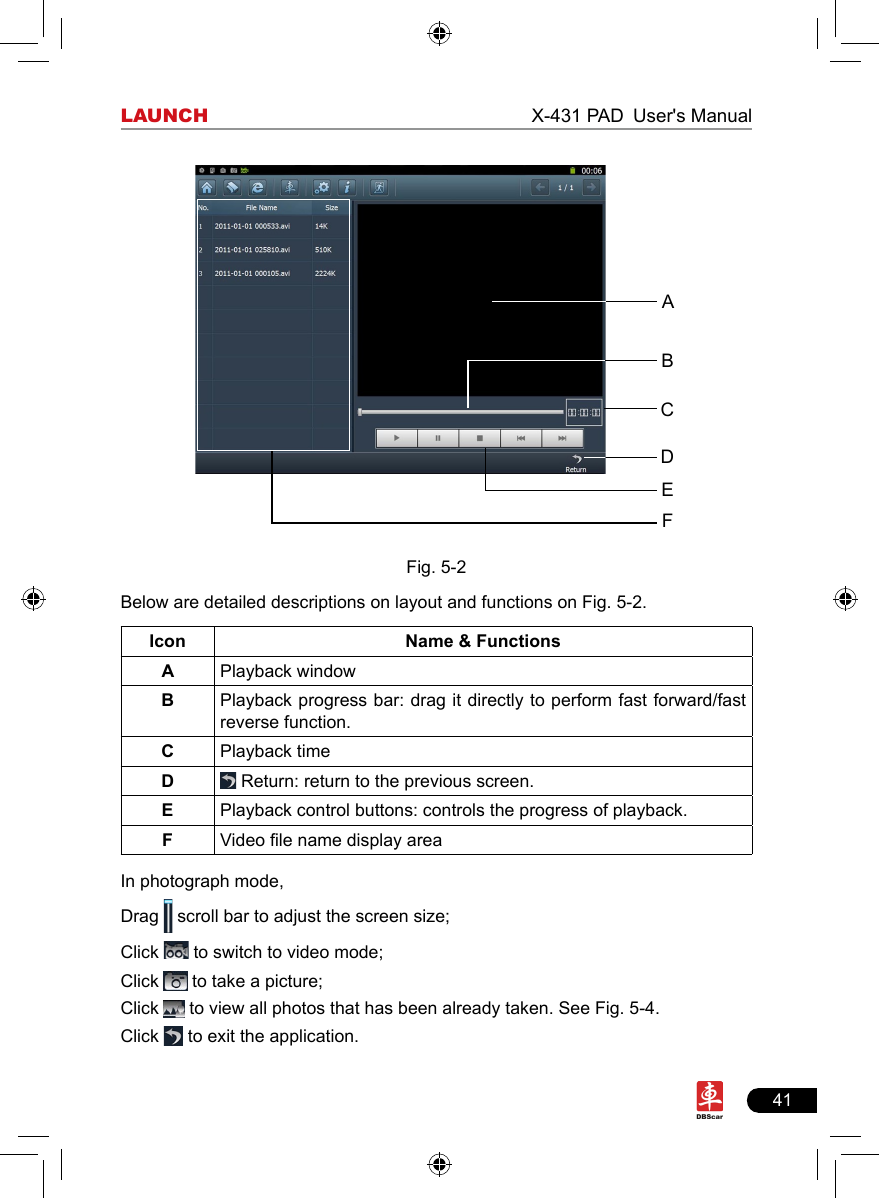
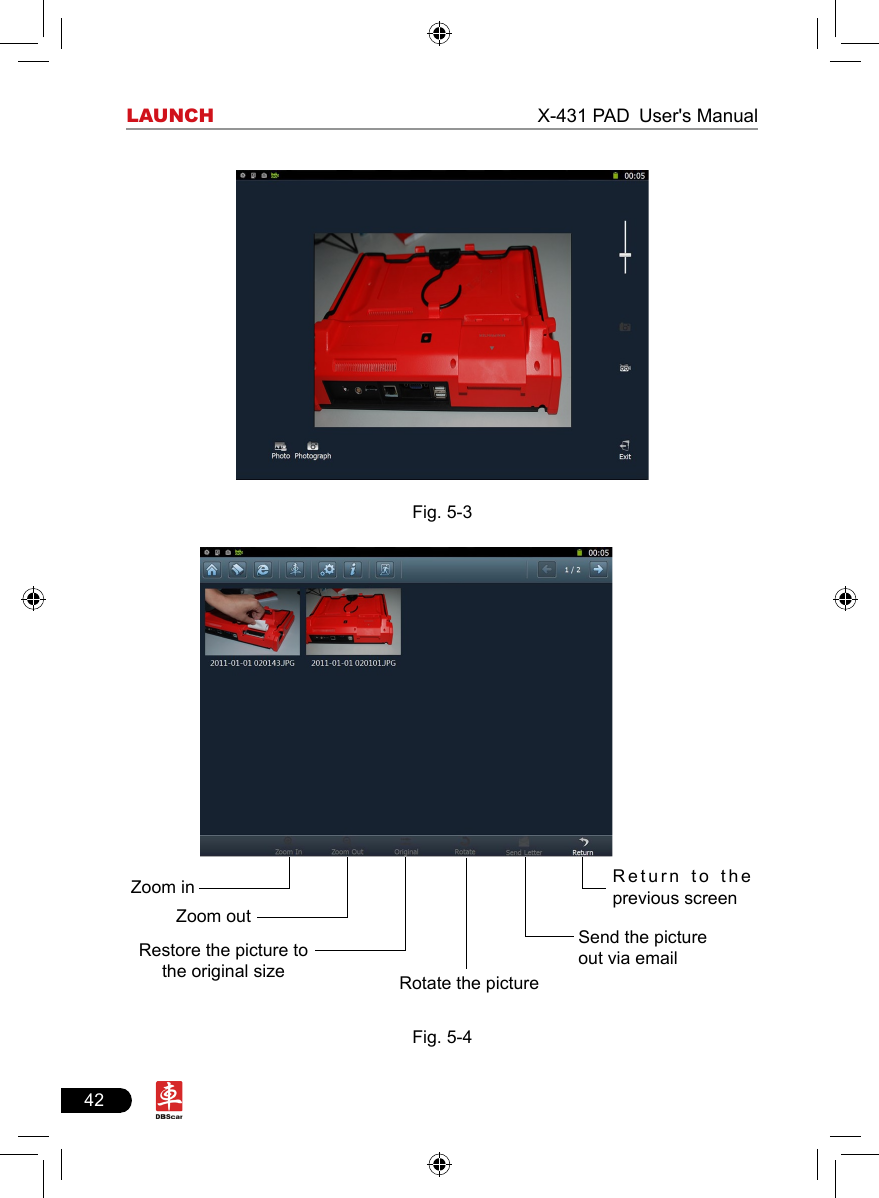
![40LAUNCH X-431 PAD User's Manual5 Photograph/Video X-431 PAD is equipped with a 2 mega pixel lens for your photographing and video recording.Click [Video], the screen will enter video recording interface as shown in Fig. 5-1.Fig. 5-1Click to view all recorded video les. See Fig. 5-2.Click to start recording. While recording, drag scroll bar to adjust the screen size.Click to switch to camera mode. See Fig. 5-3. (In video mode, you can also press directly on the X-431 PAD to enter photograph mode.)Click to exit the program.](https://usermanual.wiki/Launch-Tech/X431PAD.Manual/User-Guide-1828152-Page-46.png)
![43LAUNCH X-431 PAD User's Manual6 Launch NewsThis option enables you to obtain the latest news and software download information about the device. To perform this function, please configure your network.Click [Launch News] on the main menu, the system will enter a screen similar to Fig. 6-1.Fig. 6-1Click the desired news in Figure 6-1 detailed information will appear on the screen.Click to refresh the news page. In Figure 6-2, use / to turn pages if the information is more than one page. Select one of the software programs and click it, the system will enter the content page.](https://usermanual.wiki/Launch-Tech/X431PAD.Manual/User-Guide-1828152-Page-49.png)
![44LAUNCH X-431 PAD User's Manual7 LetterboxX-431 PAD provides mailbox function, by which you can send E-mail to us once you come across any question or problem unresolved, and we will give you professional answer in time.To use this function, make sure that you have registered a passport and product successfully and network is properly congured.7.1 Read mailClick [Letterbox] on the main menu, the system will enter a screen similar to Fig. 7-1. Fig. 7-1Input your user name/CC/Email, then click [Log In] to enter the mailbox main menu. If you have not registered a passport or your product, please click [New Register] to start registering. For details on how to register, please refer to item 8.1 Register in Chapter 8 Update. In mailbox interface, there are four items available: Inbox, Sentbox, Broadcasting messages and Draft. Select one (e.g. Read mail), and click it to read the details.7.2 New mailClick [ ] on mailbox main menu screen, mail writing interface appears on the screen, as shown in Figure 7-2.](https://usermanual.wiki/Launch-Tech/X431PAD.Manual/User-Guide-1828152-Page-50.png)
![45LAUNCH X-431 PAD User's ManualFig. 7-2Click title or content edit box, the on-screen keyboard will appear automatically, use it to input or write down the title and contents by stylus manually.Button descriptions:[Attachment]: click to add an attachment.[]: send the mail.[]: save a mail that is not nished or will be sent later.[]: return to the previous screen.When a new mail is nished, click [ ]. If the mail is sent out successfully, a prompt message will pop up. If the mail fails to send out, a dialog box will appear on the screen. Click [OK] to send the mail again, or click [Cancel] to cancel sending.](https://usermanual.wiki/Launch-Tech/X431PAD.Manual/User-Guide-1828152-Page-51.png)
![46LAUNCH X-431 PAD User's Manual8 UpdateX-431 PAD provides quick and easy software update service, by which you can enjoy all update services including download and update the software. Note: Enter the update center, vehicle software which can be updated are default to be checked, you can click [Upgrade] to perform one-key update. You can also click [Opt] to select all or deselect all. 8.1 RegisterTo operate this device, you have to experience a product registration. After entering the function modules, a service terms screen will appear. After reading all items, click [Agree], a registration page will appear automatically and once registering is complete, this page will never appear again.Note: Before registering, please check you network configuration or Wi-Fi connection.8.1.1 Register a passA. In case you have no passFig. 8-1Click the input box (items with * must be filled), use the on-screen keyboard to input user name, valid Email, Email login password and conrm password. Click to turn to the next page to input more information. After nishing, click [Register] to register.After you registered successfully, the system will offer you a CC number. See](https://usermanual.wiki/Launch-Tech/X431PAD.Manual/User-Guide-1828152-Page-52.png)
![47LAUNCH X-431 PAD User's ManualFig. 8-2. If “Authenticate Email” is checked while registering, the system will also prompt you that you have bound Email successfully.Fig. 8-2Note: If Authenticate Email is checked while registering Email information, the system will send the confidential information to your Email immediately after registering successfully. And we will notify you of the latest update information in the future. It is strongly suggested to bind with your Email.B. If you have registered a passIn this case, the system will enter the login interface as shown in Fig. 8-3.Fig. 8-3Click [Login] to enter update center.8.1.2 Register your productAfter registering a pass, the system will enter the product registration screen, as shown in Fig. 8-3.](https://usermanual.wiki/Launch-Tech/X431PAD.Manual/User-Guide-1828152-Page-53.png)
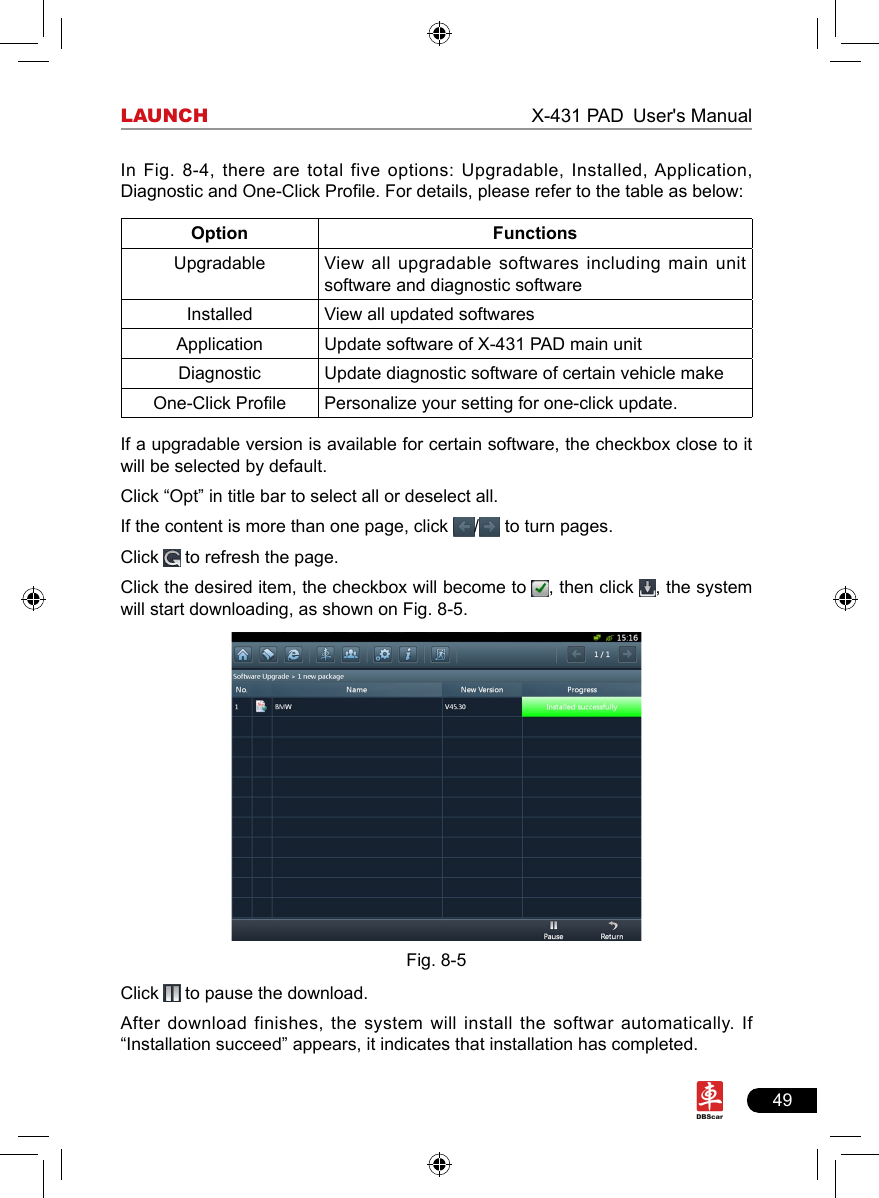
![48LAUNCH X-431 PAD User's ManualFig. 8-3Product SN is printed on the bottom of X-431 PAD. While purchasing this product, you will be offered one envelop, in which there is the register password (secret). You can obtain the dealer code from the dealer. Complete filling the information and click [Submit] to enter update center. Note: Please contact the local dealers if you can not register.8.2 UpdateWhile updating, make sure your network (wired or Wi-Fi) works properly, then click “Update Center” to enter Fig. 8-5.Fig. 8-4](https://usermanual.wiki/Launch-Tech/X431PAD.Manual/User-Guide-1828152-Page-54.png)
![51LAUNCH X-431 PAD User's Manual9 My dataThis option enables you to manage user data, including diagnostic data log, captured screen les, photos, videos. Moreover, you can perform browse, view, clear, import and export etc.In main menu of X-431 PAD, click [My data], the screen will be displayed as Fig. 9-1.Fig. 9-1In Fig. 9-1, click the desired option on the left, all files in this option will be displayed on the right window.9.1 View dataClick to zoom in.9.2 Import dataClick , the system will enter data import screen. See Fig. 9-2.Choose the desired one, and click to import.](https://usermanual.wiki/Launch-Tech/X431PAD.Manual/User-Guide-1828152-Page-57.png)
![52LAUNCH X-431 PAD User's ManualFig. 9-29.3 Export dataTake “Image/Video” as example to present how to export data.Click [Check] to select all items, then click , a dialog box will appear. Click the triangle next to the path and choose the target path that you want to save, then click [OK] to export the selected le.9.4 Delete dataChoose the desired item and click to enter Fig. 9-4. Click [Yes] to delete it; click [No] to cancel it. Click to exit the application. Fig. 9-4](https://usermanual.wiki/Launch-Tech/X431PAD.Manual/User-Guide-1828152-Page-58.png)
![53LAUNCH X-431 PAD User's Manual10 BorescopeAutomotive borescope is mainly applied to those unseen parts of engine, fuel tank, braking system. While testing a vehicle system, engine is one of the main parts to be checked. To check if the internal of a engine is qualified or not or whether internal carbon deposit and damage exists in the engine or not, we can make full use of a borescope to solve these quesitons. X-431 PAD has an optional function of borescope, which enables you to observe the parts that can not be seen or reached with the aid of borescope. In addition, the captured pictures and videos also provide you intuitive data for easy analysis. 1. ConnectionsConnect one end of the borescope (optional) to the borescope port of X-431 PAD, and extend the other end to some unseen or unreachable parts of engine, hydraulic system, nozzles etc. for illumination.2. How to useAfter connections are properly made, press on the X-431 PAD to turn it on. Wait until the system enters the main menu, click [Borescope] to activate it, then the screen will display the scene captured from the borescope lens. Adjust it until the lens stops in the desired place, then click or button on the screen to take a photo or record video.For detailed operations, please refer to user’s manual included with the borescope.](https://usermanual.wiki/Launch-Tech/X431PAD.Manual/User-Guide-1828152-Page-59.png)