Le Shi Zhi Xin Electronic Technology LEGFS-201R LeEco Wireless Arcade Joystick - Receiver User Manual
Le Shi Zhi Xin Electronic Technology (Tian jin) Limited LeEco Wireless Arcade Joystick - Receiver Users Manual
15_LeGFS-201R UserMan.pdf

LeEco Wireless Arcade Joystick
User Manual
What’s Inside:
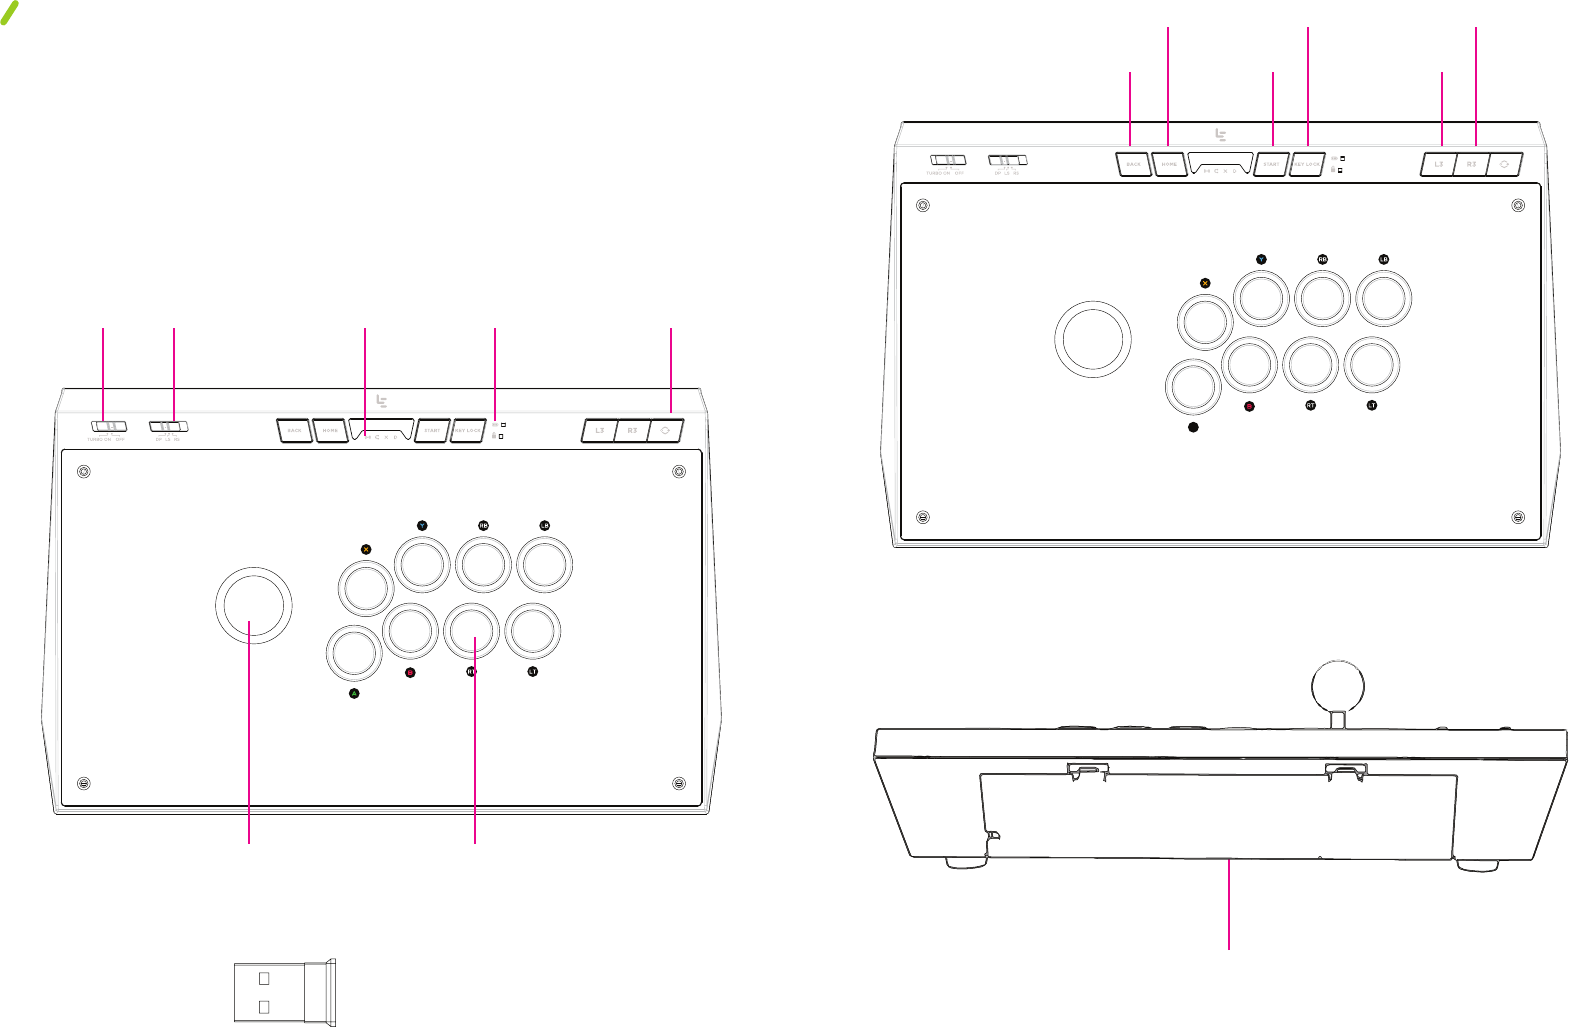
Arcade Joystick
Nano USB Receiver
Hex Tool
User Manual
Turbo
Mode
Switch
Joystick
Mode
Switch
Joystick Action
Buttons
2.4G Nano USB Receiver
Status
Indicators
Charging and
Lock Indicators
Gaming
Mode
Switch
Back
Key
Home
Key
Storage
Compartment
Start
Key
Key
Lock
L3
Key
R3
Key
Hardware illustrations shown are for example only. Actual hardware may vary depending on product.
Product Features
How to operate the device in wireless mode:
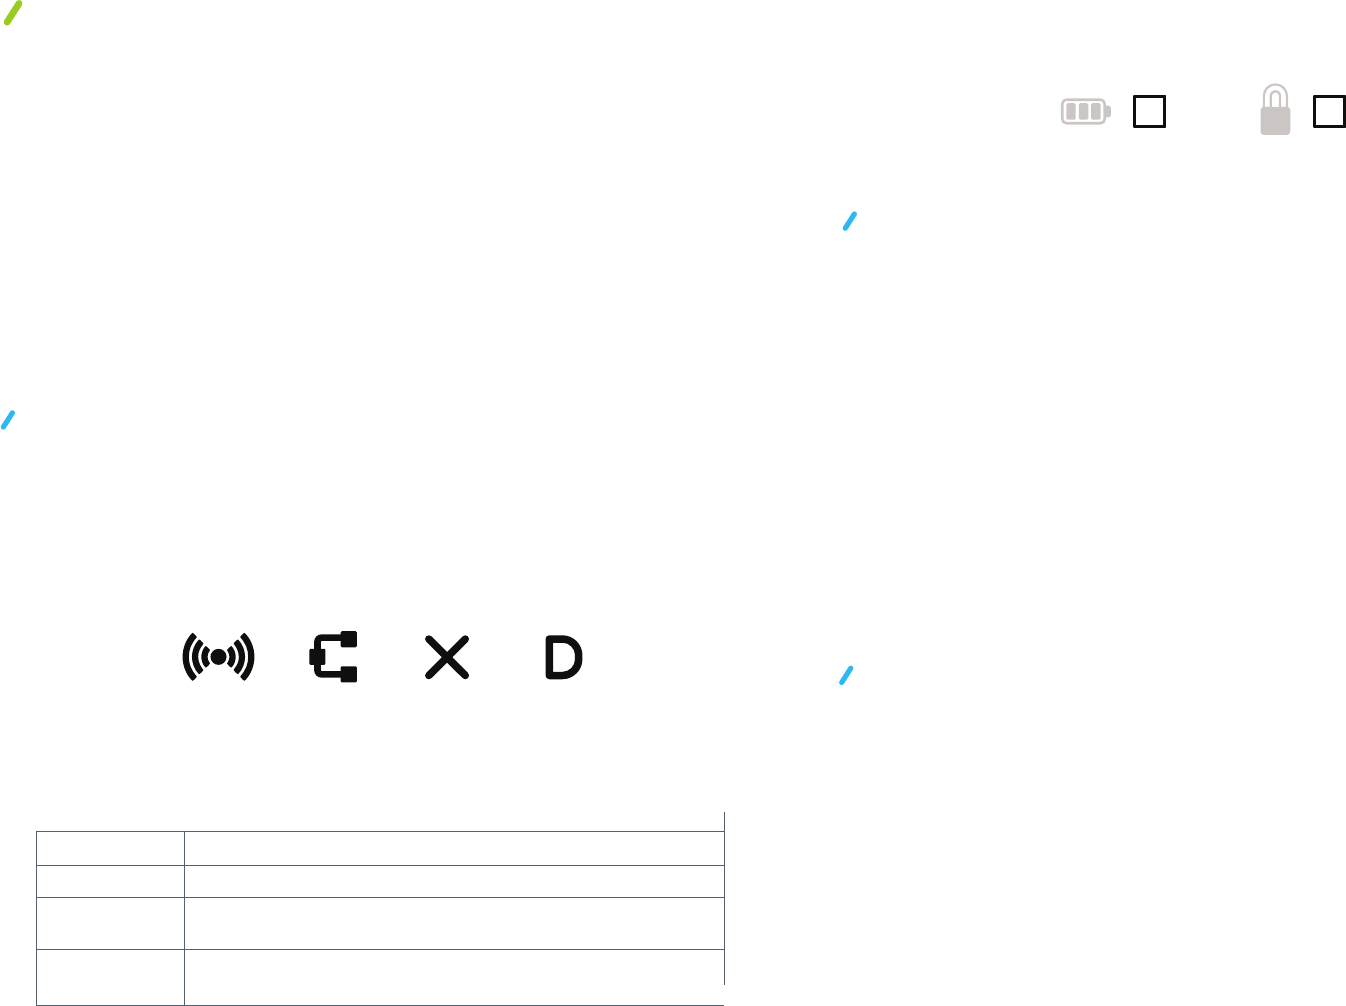
LED icons:
How to operate the device using a cable:
Wireless
Mode
Cabled
Mode
Xinput Dinput
• Compatible with Android and PC360 system.
• Choice of wireless or USB cable operation.
• Standard Vewlix 8-button layout, suitable for all fighting games.
• Turbo Mode available for all 8 action buttons.
• Authentic Sanwa Denshi joystick and action buttons.
• Key locking function to avoid play disruption.
• Joystick mode switch to change the joystick’s output mode.
• Storage compartment for hex tool, USB cable and Nano USB receiver.
There are a total of 6 LED icons on the top of the device. The 4
icons below indicate the device’s connection status and mode.
The other 2 LED icons on the right side of the key lock button indicate
the power and key lock status.
Wireless mode The device is connected wirelessly.
Cabled mode The device is connected by a cable.
Xinput
Dinput
The device is set to Xinput which supports PC 360, Steam™
OS and some Android™ games.
The device is set to Dinput which supports Android™ and
some PC games.
1. Open the storage compartment on the back of the device and
take out the 2.4G Nano USB Receiver.
2. Plug the Nano USB Receiver into the USB port of a smart TV,
set-top-box, Android™ tablet, Android™ phone or PC. (Tablets
and phones should be connected with an OTG cable, sold
separately.)
3. Press the Home Key and the device will automatically search
for and connect to the receiver. The Wireless Mode LED icon
will blink while searching.
4. When the device is connected to the receiver, the Wireless and
the Dinput icons will remain on.
5. Use the joystick to select your desired game.
1. Open the storage compartment on the back of the device and take
out the USB cable that comes with the device.
2. Plug the USB cable into the USB port of a smart TV, STB, Android
tablet, Android phone or PC. (Tablets and phones should be
connected with an OTG cable, sold separately.)
3. When the device is connected successfully, both the Cabled Mode
and the Dinput LED indicator will remain on.
4. Use the joystick to select your desired games.
NOTE: Do not plug the USB cable in during a wireless search. If
you want to use the cable, only plug it in after a wireless search is
completed.
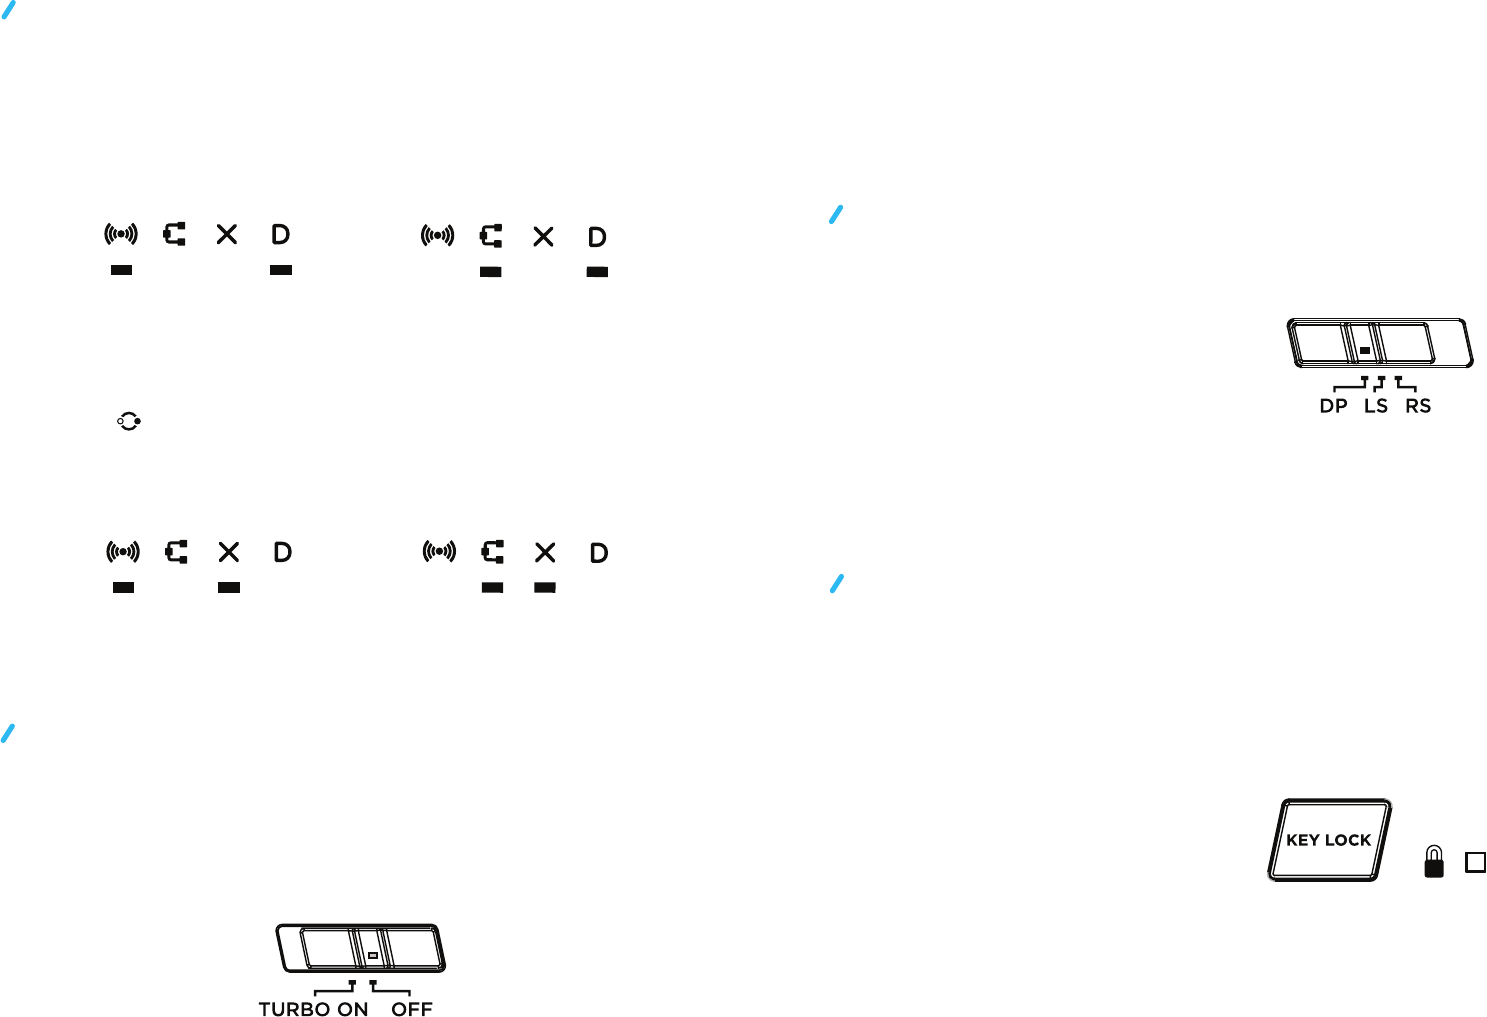
Mode selection switch:
Turbo switch
Control stick switch:
Used to switch among three modes:
Key lock switch:
With the press of a button, you can switch between Dinput mode
and Xinput mode. The default mode is Dinput.
The figure below shows the LED indicators for Dinput
Wireless Mode + Dinput Cabled Mode + Dinput
Wireless Mode + Xinput Cabled Mode + Xinput
To change from Dinput to Xinput, press the gaming mode
switch for 3 seconds.
The figure below shows the LED indicators for Xinput
The device oers a Turbo feature which can be enabled for
the 8 action buttons.
To enable Turbo: Press and hold one or more of the 8 action
buttons and flip the Turbo switch from OFF to ON. For rapid
fire, press and hold an action button.
To turn o Turbo: Flip the Turbo switch from ON to OFF.
1) DP: Directional Pad
2) LS: Left Analog Stick
3) RS: Right Analog Stick
The joystick defaults to DP mode.
1 ) Back
2) Home
3) Start
4) L3
5) R3
6) Gaming Mode Switch
To prevent accidental interruption during gaming, use the key
lock switch which works with the following keys:
Press "Key Lock" to enable locking. When the keys are locked, the LED
indicator will light up and the keys in the list above will no longer function.
Press "Key Lock" again to unlock the keys.
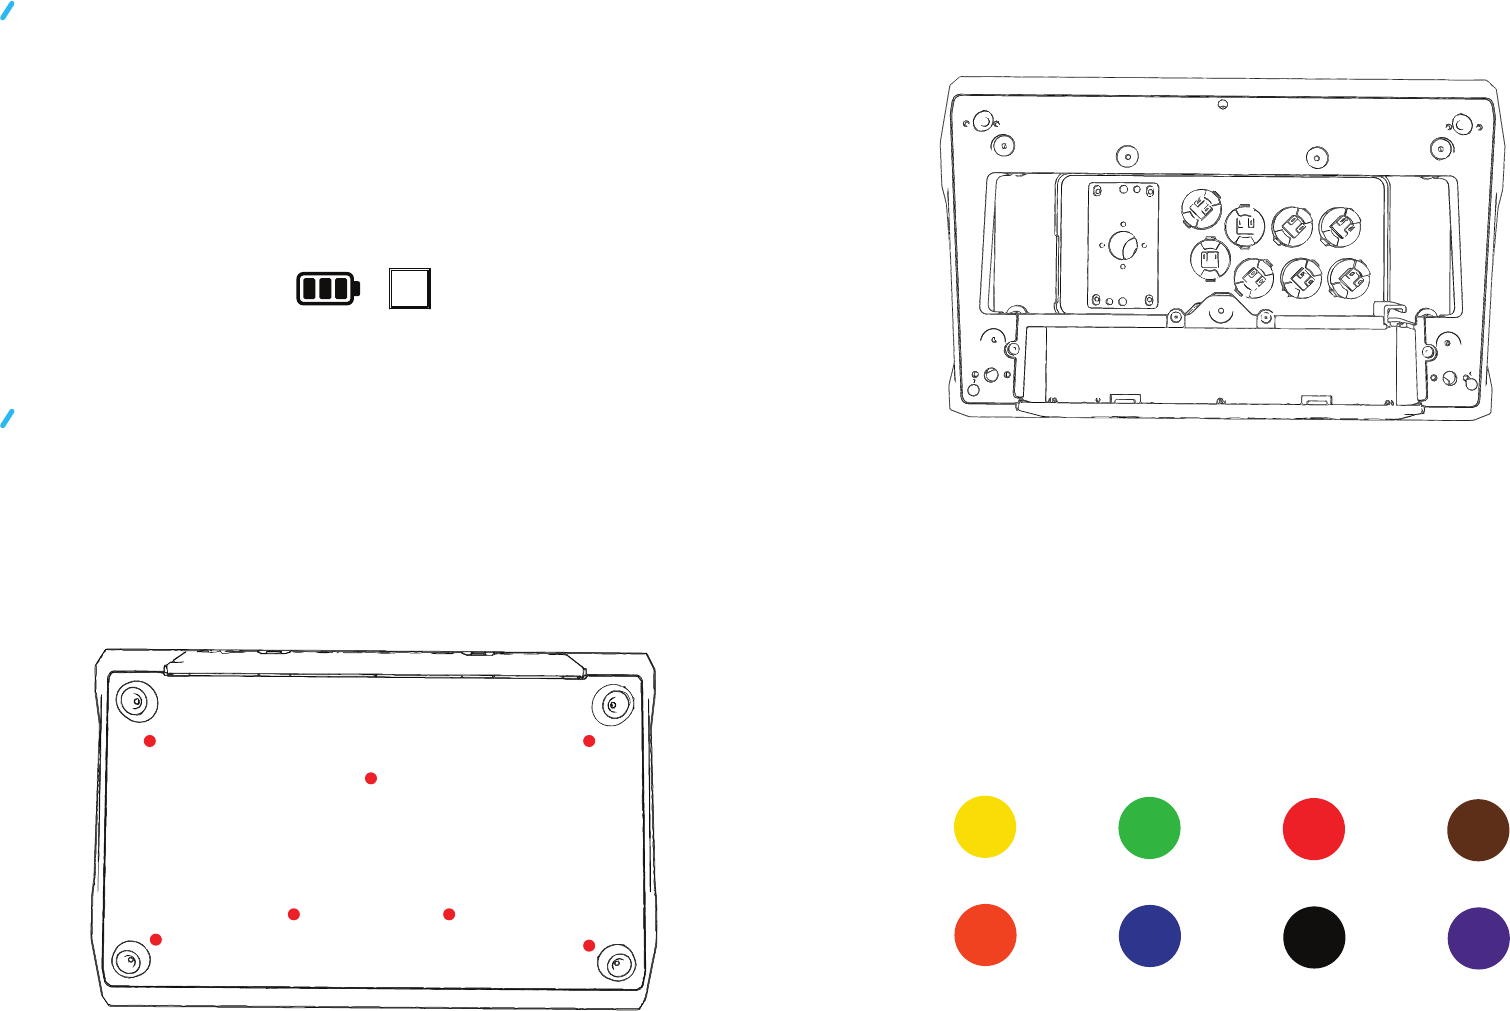
Power indication and charging:
To replace action buttons:
Yellow
LB
LT
RB
RT
Y
B
X
A
Orange
Green
Blue
Red
Black
Brown
Purple
When the battery level of the device is low, the LED Power Indicator
Light will blink slowly. Plug the USB cable into a device with a USB
port to charge. During charging, the power indicator light will blink.
When the battery is fully charged, the light will remain on.
1. Open the storage compartment on the back of the device and
use the hex tool to remove the 7 screws from the bottom of the
device. 2. Remove the connecting cable from the underside of the
button to be replaced by pressing the tabs on both sides of
the button.
3. Insert the new button and turn it until it's tightly installed.
4. Connect the corresponding cable based on the sticker color
guide inside the internal compartment.
5. Install the bottom plate and screws back on the device.

Wireless signal
Warning
If the wireless signal gets disconnected:
1. Check whether the USB Wireless Adapter has been removed.
2. Check whether the device is out of range.
3. Check if there are strong radiation sources nearby.
• Do not place heavy objects on this product.
• Keep this product far away from extreme heat sources.
• WARNING: This device contains chemicals known to the State of California to cause cancer, birth
defects or other reproductive harm.
• Except as provided in these instructions, do not disassemble or try to repair the device components
or accessories. Doing so voids the warranty.
• Do not store in any location where it may contact moisture, dirt, dust, lint, or other foreign material.
• Do not drop, hit or otherwise abuse the device, components or accessories. This may damage the
LCD screens or other precision components of the device.
• Connect ONLY accessories designed and licensed for use with the device to any external connectors.
• Do not spill liquids on the device or other components or accessories.
WARNING - Repetitive Motion Injuries and Eyestrain
Prolonged playing video games may make your muscles, joints, skin or eyes hurt. To avoid these
problems:
1. Avoid excessive play. Monitor children for appropriate play.
2. Take a 10 to 15 minute break every hour, even if you don't think you need it.
3. If your hands, wrists, arms or eyes become tired or sore while playing, stop and rest before playing
again.
If discomfort continues during or after play, stop playing and consult a medical professional.
This equipment has been tested and found to comply with the limits of a Class B digital device,
pursuant to part 15 of the FCC Rules. These limits are designed to provide reasonable protection
against harmful interference in a residential installation. This equipment generates, uses and can
radiate radio frequency energy and, if not installed and used in accordance with the instructions, may
cause harmful interference to radio communications. However, there is no guarantee that interference
will not occur in a particular installation. If this equipment does cause harmful interference to radio
or television reception, which can be determined by turning the equipment o and on, the user is
encouraged to try to correct the interference by one or more of the following measures:
• Reorient or relocate the receiving antenna.
• Increase the separation between the equipment and receiver.
• Connect the equipment into an outlet on a circuit dierent from that to which the receiver is
connected.
• If these do not correct the condition, consult the dealer or an experienced radio/TV technician for
assistance.
LeEco warrants the included hardware product and accessories against defects in materials and
workmanship for NINETY (90) DAYS from the original retail purchase. LeEco does not warrant
against normal wear and tear, damage caused by accident or abuse or damage resulting from
improper charging. This warranty is valid only in the country in which the product is purchased.
For service, contact us at 1-855-343-6688. Shipping charges may apply. You may be required to
provide proof of purchase in submission of your warranty claim. If you submit a valid claim under
this warranty, LeEco will at its option repair your device or replace it with a new or refurbished
device subject to the full terms and conditions of the warranty at www.lemall.com/us/warranty
and any applicable service policies at www.lemall.com. This warranty is in addition to rights
provided under local consumer laws.
Warranty Service
This device complies with part 15 of the FCC rules. Operation is subject to the following
two conditions:
(1) this device may not cause harmful interference, and
(2) this device must accept any interference received, including interference that
may cause undesired operation.
Changes or modifications to this unit not expressly approved by the party responsible for
compliance could void the user’s authority to operate the equipment.