Leadtek Research 8A10-1 H.264 Portable Videophone User Manual 8A10 W05G0388 C E
Leadtek Research Inc H.264 Portable Videophone 8A10 W05G0388 C E
Users Manual
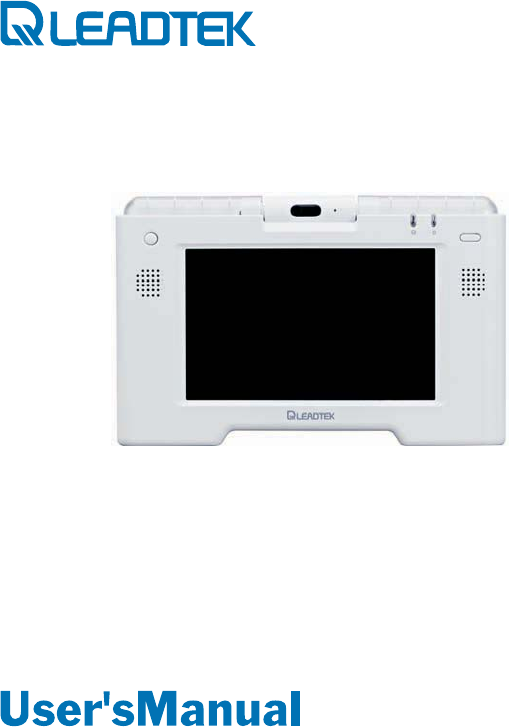
AMOR 8A10

AMOR 8A10 User's Manual
Version C Code: LR8A10
January 2010 P/N: W05G0388
International Headquarters
18F, No. 166, Chien Yi Rd., Chung Ho,
Taipei County, Taiwan, (23511)
Tel:+886 2 8226 5800 Fax: +886 2 8226 5801
http://www.leadtek.com.tw E-Mail: videophonefae@leadtek.com.tw
Copyright 2010 Leadtek Research Inc. All rights reserved.
No part of this document may be copied or reproduced in any form or by any means without the prior written
consent of Leadtek Research Inc.
Leadtek makes no warranties with respect to this documentation and disclaims any implied warranties of
merchantability, quality, or fitness for any particular purpose. The information in this document is subject to
change without notice. Leatek reserves the right to make revisions to this publication without obligation to notify
any person or entity of any such changes.
Trademarks or brand names mentioned herein are trademarks or registered trademarks of their respective owners.

Important Notes
Important product safety informationand
1. Although has undergone several safety tests and
conforms to a number of national security standards, using the
device could become risky in certain abnormal climatic or seismic
conditions without correct operation. Please read the manual
carefully before operating the device.
2. For your safety, please keep power off when aboard
an aircraft.
3. In restricted areas such as gas stations or in the vicinity of
explosives, please shut down the . Under no
conditions should you use the near fuel or flammable
materials. (and its internal battery) has not been
certified as an intrinsic safe device.
4. Only Leadtek authorized service providers have the authority to
repair the .
5. As the is not water-proof, make sure to take
appropriate precautions in humid or rainy weather and keep it dry
at all times.
6. Before connecting any other device to the product, please read
detailed instructions in the user manual. To avoid any possible
damage do not connect the to any incompatible
product.
7. It is normal for the to become slightly warm during
operation.
8. Specification and functions vary in different areas.
AMOR 8A10
AMOR 8A10
AMOR 8A10
AMOR 8A10
AMOR 8A10
AMOR 8A10
AMOR 8A10
AMOR 8A10
AMOR 8A10
Battery safety notices
Failing to use the battery correctly could be hazardous. Please pay
attention to the following.
1. Your is powered by a rechargeable battery that can
be frequently charged and discharged. All batteries have a limited
usage lifetime. When the device’s uptime and standby time
becomes significantly shorter than normal, it is time to replace the
battery.
2. Use only batteries approved and authorized by Leadtek. If other
makes are used, damage to the product may result and voids the
warranty. Do not service the battery yourself. You should contact
Leadtek or its authorized service providers.
3. When removing the battery from the , make sure
is powered off first.
4. Please do not disassemble, alter, or solder the battery. This could
damage insulation, cause gas leakage, and damage to the battery
protection circuit and internal cells.
5. When the battery is not installed, place it in a water-proof and
insulated container. Under no circumstance should you use any
metal to connect the positive and negative terminals or place the
battery in a metal container. Do not place the battery in a
microwave or in a high-pressure container. This could cause a
short circuiting and fire.
6. Do not heat the battery or place it close to the source of fire, a
stove, or any heated environment over 45°C; short circuiting could
result in smoke emission or a fire.
7. Do not place the battery in a damp or humid place. This could also
cause short circuiting, smoke and eventually fire.
8. Charge the battery in normal temperature conditions. Avoid direct
exposure to the sun, stove, or any other environment where the
temperature exceeds 45°C. Follow the manual for proper battery
charging procedure and pay close attention while this takes place.
AMOR 8A10
AMOR 8A10
AMOR 8A10
9. Do not connect the battery to a vehicle cigarette lighter or any
electrical plug.
10. If the battery is charged in an abnormal environment the battery
protection device will fail. An adverse chemical reaction will result
as well as a potentially hazardous surge in electrical current.
11. If the battery is not fully charged within the specified duration, stop
charging immediately to avoid fire or damage to the battery.
12. Do not use the battery for any other purpose - it could shorten
battery life. Any surge of electrical current could result in fire.
13. Avoid direct physical contact with any battery leakage. If there is
any contact with battery leakage, make sure there is no contact
between hands and eyes. Wash eyes with running water and
consult with a doctor immediately if any contact accidentally
occurs.
14. If the battery gives off a strange smell, changes color or shows
evidence of an abnormal condition, remove it from the
housing and discard it properly. Consult your local agency or
check your local regulations on how to properly dispose a Lithium-
Ion battery.
15. Leadtek and its supplier are not responsible for any damage or
casualty as a result of mis-using the battery or not following the
conditions described in this Battery Safety Notice.
AMOR
8A10
Table of Contents
1 Quick Start
11 Introduction
12 What’s in the Package
13 Getting to Know Your AMOR 8A10
13 Front View
15
17 Using the Cradle
20 Using the Remote Control
22 How to Make and Receive a Video Call
22 Dialing Out
23 Direct Dialing
26 Speed Dialing
28 Dialing from the Call Log
29 Dialing from the Contact
30 Operations During a Call
42 How to Make 3-way Conference Call
44 How to Use the Call Log
Rear View
16 Side View
Table of Contents
47 How to Use the Contact
47 Creating a Contact
51 Editing a Contact
52 Deleting a Contact
53 Settings Menu
54 General Settings
60 Network Settings
66 Call Settings
68 Photo Settings
70 Product Information
71 Photo Displaying
72
77 Weather
79 News
81 Service
82 FCC Statement
Browsing Photos
76 Capturing Photos
This chapter will help you to quickly start using the AMOR 8A10 to
make a video call.
1. Quick Start
Before you begin
Using the 8A10 requires a
(e.g., a Cable modem or ADSL modem with a router). If you are
sharing your Internet connection with another device (such as a
PC), you will also need a broadband router or residential gateway.
The AMOR 8A10 also supports wireless connection. You can
connect the AMOR 8A10 to the Internet through a wireless AP /
router.
AMOR Broadband Internet connection
Setting up
Connect one end of the Ethernet cable (RJ-45), supplied with your
AMOR 8A10, to the AMOR
Connect the other end to an open Ethernet port on your router.
port marked “WAN” on the back of the
8A10.
Step 1. Connect the Ethernet cable
AMOR 8A10 Your Router
Ethernet Cable
1

Step 3. Extending the stand
Gently pull out the stand on the back of the AMOR 8A10 and extend it
to a 45-degree angle so that the AMOR 8A10 can stand on its own.
Connect the Power Adapter to the Power jack (
AMOR and then plug the Power Adapter into an electrical
outlet.
DC IN) on the back of
the 8A10
Step 2. Connecting the power adapter
Power Adapter
AMOR 8A10
2
Turning on the AMOR 8A10
The Power button is located at the upper right hand corner of the unit.
Press and hold the power button for three seconds, and the AMOR
8A10 will be turned on.
After 1 or 2 minutes, the 8A10 boots up, and you will see a
screen like the picture shown below. This means that you have to
calibrate the input. Please see page 59 for the detailed instructions on
how to proceed.
AMOR
3
Using the wizard
Before making your first video call, you first have to choose and set up
your network settings correctly. When you use 8A10 for the
first time, a built-in wizard will automatically start to help you quickly
set up your network connection and other settings, as the picture
shown below. Please follow the step-by-step instructions.
AMOR
Step 1: Tap on the “Start” button.
Step 2: Tap on the language to select it.
4
Step 3: Tap on the bar to make time zone selection.
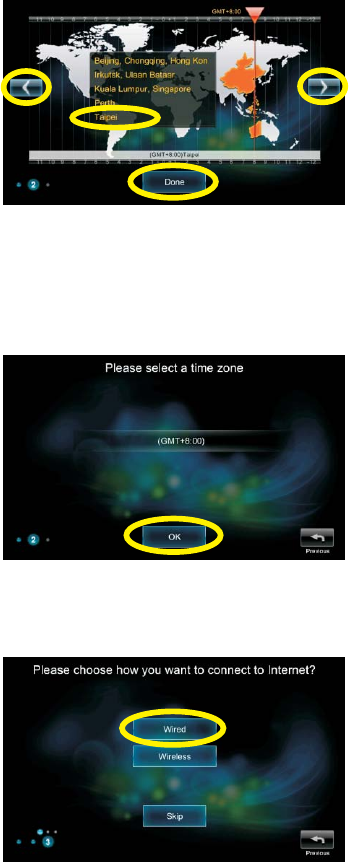
Step 4: Tap on the left and right directional buttons to select the time
zone, and then tap on the city in the list to represent your
residence. Tap on the “Done” button when done.
Step 5: Tap on the “OK” button.
5
Step 6: Choose whether you are using a wired or a wireless network
connection by tapping on the corresponding button.
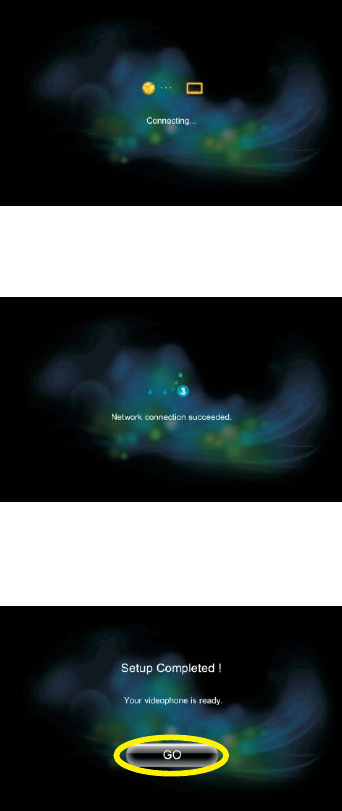
Step 7: The wizard is trying to connect to the Internet.
6
Step 8: After a few seconds, a message tells you that the connection
is successful.
Step 9: 8A10 is ready for use. Tap on the “GO” button.AMOR
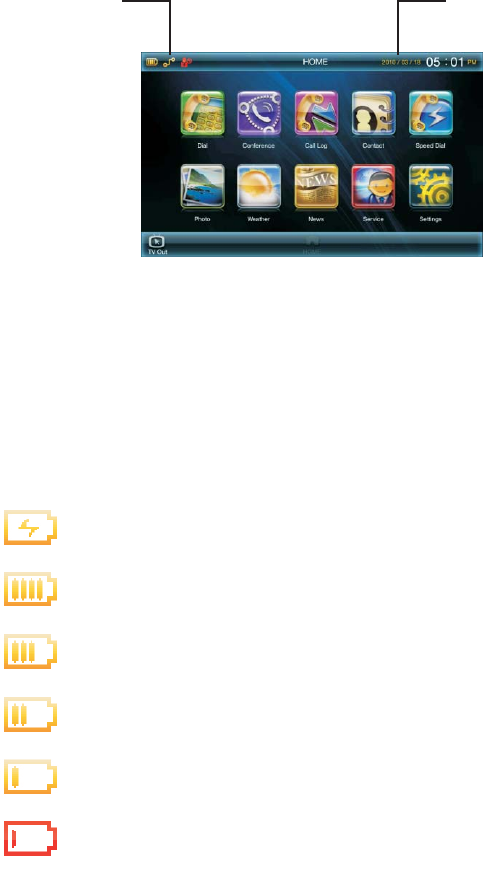
Current date and
time
Icons
There are several icons at the top of the screen. Their meanings are
described below.
Note: The TV Out icon at the lower left corner only appears when
AMOR 8A10 is inserted into the cradle (see page 17).
After successfully setting up your 8A10, you will see the home
screen like this:
AMOR
7
Battery status
Battery is full
Battery is being recharged
Battery has 75% remaining power
Low battery warning
Battery has 50% remaining power
Battery has 25% remaining power

8
Internet connection status
AMOR 8A10 is not connected to the Internet
AMOR 8A10 is using a wired Internet connection
AMOR 8A10 is using a wireless Internet connection
SIP service status
AMOR 8A10 is not connected to the SIP service
AMOR 8A10 is connected to the SIP service
Call settings
Do Not Disturb is ON
Auto Answer is ON
Call Forward is ON
Mute
Ring off
Missed call
Displays the number of missed calls
Message
Get message
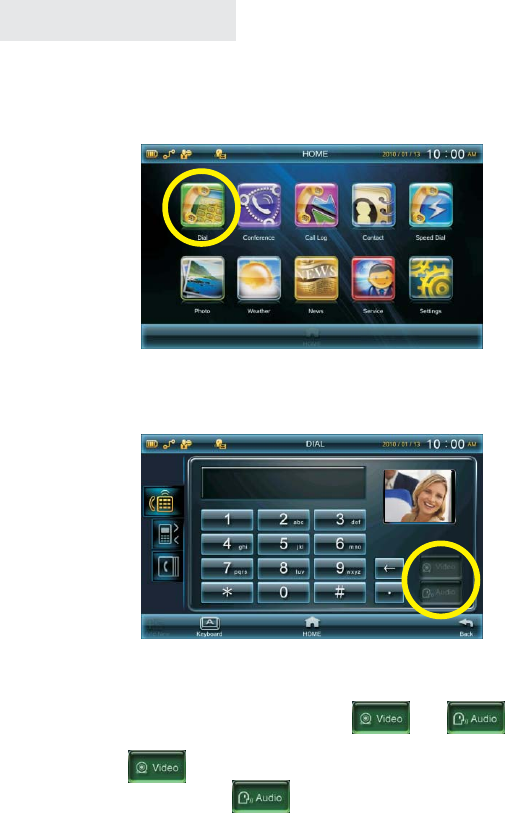
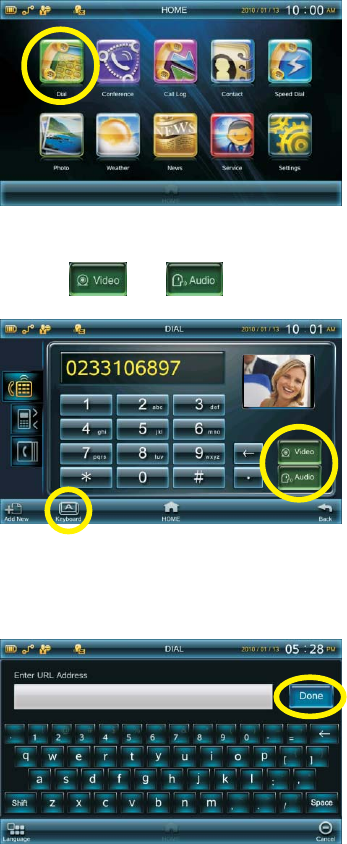
Making a video call
The easiest way to make a video call is with Direct Dial. Simply tap on
the Dial icon on the home screen.
You will see the following screen:
Tap on the virtual keyboard on the screen to input the desired phone
number or IP address, and then tap on or to dial out.
When the other party answers the call, the connection is established,
and you can start the conversation.
If you choose , the recipient and you can see each other on
the screen. If you choose , the video function is disabled.
10

The 8A10 is a portable touch-screen videophone supporting
Video and Voice applications. It is an intuitive, easy-to-use and easy-
to-configure IP video communication solution. Its major functions
include IP Telephony, IP Camera Viewer (SIP based) and Digital
Photo Frame.
The 8A10 is a next generation IP videophone based on the
SIP protocol and the H.264 video codec. Using advanced video
compression technology, the 8A10 maximizes the image and
audio quality within the available bandwidth.
AMOR
AMOR
AMOR
2. Introduction
11
Built-in high quality CMOS camera
Built-in 7” TFT LCD (800 x 480) with touch screen
Built-in Wi-Fi
Built-in Lithium Ion polymer rechargeable battery
Strobe light call indicator
SIP-based VoIP and video IP telephony
Photo-enabled Caller ID display, Call logs, Contact and Speed Dial
Photo sharing during video call
3-way conference for IP call
Digital photo frame function
Weather
RSS News
Secure Digital (SD) flash memory slot
USB 2.0 host port
Pop-out tilt-stand
Dock to an optional cradle for additional features
Firmware upgradable
Features
Remote Control
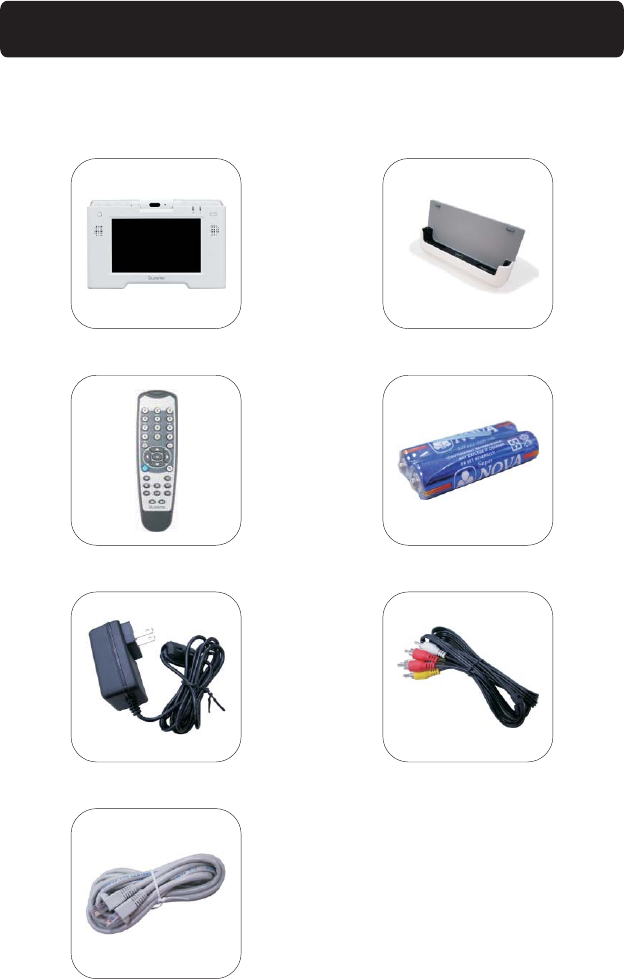
3. What’s in the Package
Please make sure all of these items are included in your 8A10
package. If any item is missing, please contact your local dealer.
AMOR
AMOR 8A10
Batteries
AV Cable
12
Ethernet Cable
Power Adapter
Cradle
4. Getting to Know Your AMOR 8A10
Front View
Rotatable camera
Light flasher
SpeakerSpeaker
Power button
Microphone
Touch screen
13
Incoming calls cause the top of the to flash. The flash
patterns may be selected through the settings menu, enabling you to
customize what flash pattern displays when you receive a call.
Flashing continues for 60 seconds for incoming calls.
AMOR 8A10
Light flasher
The camera may be rotated up to 135 degrees by swiveling it up or
down. You can adjust the camera position depending on how you use
the .AMOR 8A10
Rotatable camera
Event indicator
Power indicator
14
There is a built-in microphone next to the camera. All audio input is
received by the built-in microphone. The volume of the microphone
can be adjusted in the settings menu.
Microphone
The power indicator is located to the right of the event indicator. It
indicates the power status as per the following:
!Green: Power is on
!Flashing Green: Battery is being recharged
!Red: Battery is low and requires recharging
Power indicator
This button turns the unit on and off when held down for 3 seconds.
Power button
The audio output is transmitted through the built-in speakers on each
side of the screen. The volume of the speaker can be adjusted in the
settings menu.
Speakers
Your has a seven-inch touch screen display panel,
providing you with the ability to control your without a
remote control, mouse, or keyboard. The touch screen allows you to
make or receive a call with the fewest steps possible.
AMOR 8A10
AMOR 8A10
Touch screen
Event indicator
Event Flashing Frequency
New Message
Missed call
Unread / unheard message
Sleep mode
0.7 second on / 0.7 second off
0.1 second on / 1 second off
When some events occur, this indicator will light in the following
pattern:
!Flashing Blue: See the table below.
!Flashing Blue twice: When the power button is pressed for 2
seconds to turn on / off AMOR 8A10.
!Amber: Network or SIP is disconnected.
!Flash blue and amber alternately: Firmware is being updated.
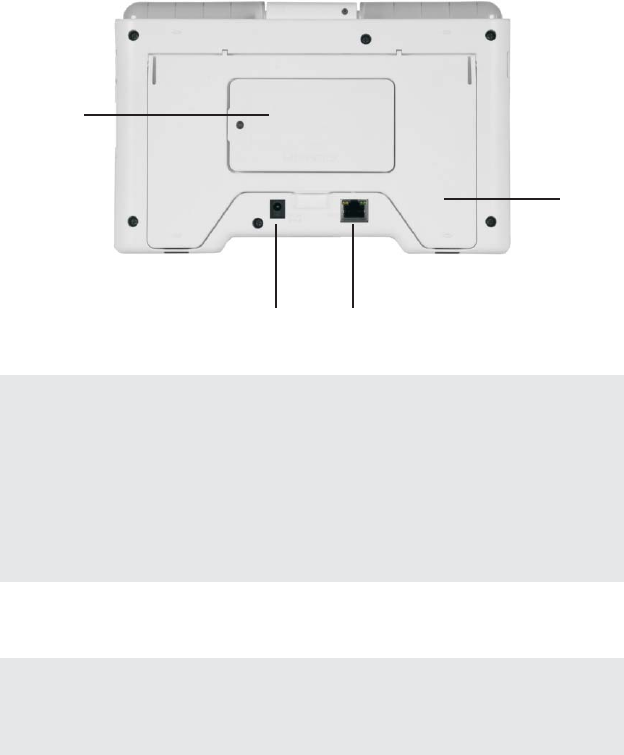
Rear View
Internal
battery
Stand
Power jack Ethernet port
15
The has a built-in rechargeable battery, supporting up to
two hours of video conversation, and up to 3.5 hours of power in the
standby mode (see note). When the battery power gets low, the power
indicator on the front panel will flash red, reminding you to connect the
power adapter to recharge the battery. The battery indicator in the
status bar will also indicate the amount of battery power left.
AMOR 8A10
Internal battery
Insert the power cord into this jack to recharge the .AMOR 8A10
Power jack
Insert the Ethernet cable into this port to connect the to
the Internet.
AMOR 8A10
Ethernet port
Gently pull out the stand on the back of the AMOR 8A10 and extend it
to a 45-degree angle so that the AMOR 8A10 can stand on its own.
Stand
Note: The battery life is based on Ethernet connection.
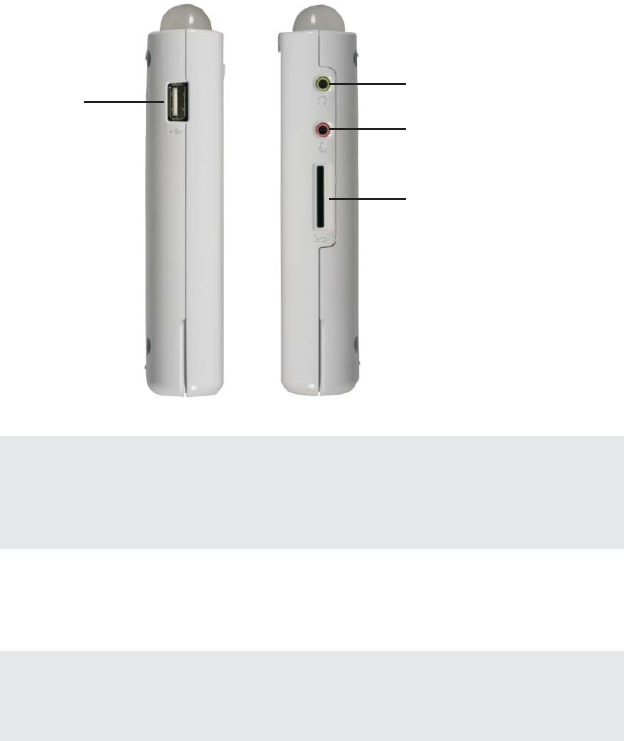
Side View
USB 2.0
connector
External headphone/
speaker jack
External microphone
jack
SD memory card slot
16
You can plug a USB flash drive or other supported devices into this
connector.
USB 2.0 connector
You can connect external speakers or headphones for audio output.
External headphone / speaker jack
The AMOR 8A10 can be used as a digital photo frame to display the
pictures on an SD memory card when it is inserted into this slot.
SD memory card slot
You can connect an external microphone to input audio.
External microphone jack

5. Using the Cradle
The cradle can be used for many purposes:
!To connect your AMOR 8A10 to your TV and use it like a classic
videophone on your big screen.
!As a docking station on your desk or counter and to easily connect
your AMOR 8A10 to a power and Internet source and to other
devices quickly and conveniently.
!Mounted on the wall in a kitchen or another room where you may
want to make calls, in the same way that hearing people have a
phone on the kitchen wall.
!To connect, via AV cables (yellow, white, and red), to an external
monitor such as a television.
!To connect to Internet through the Ethernet port. The AMOR 8A10
unit can also be connected directly to the Ethernet cord.
!To remove the AMOR 8A10 from the cradle, gently pull on the unit
and separate it from the cradle.
!To insert the AMOR 8A10 into the cradle, make sure that the AMOR
8A10 is face-up and that the cradle’s port is fully inserted into the
AMOR 8A10. If it is not fully inserted, the battery will not charge.
AMOR 8A10 inserted into the cradle
17

Ethernet port
Telephone jack Power cord jack
Recessed mounting holes A/V ports
RCA / A/V ports
Audio/Video Output Jacks on the back of the cradle which are used to
connect to a television or other external monitor.
Ethernet port
Insert an RJ-45 Ethernet cord into the jack to connect the unit directly
to the Internet.
Telephone jack
You can connect the telephone cord from your telephone set to the
Telephone jack on the back of the cradle. Then you will be able to dial
phone numbers with the telephone set.
18
AC power cord jack
Insert the power cord into the power port on the back of the cradle to
recharge the AMOR 8A10. The power cord can also be connected
directly to the AMOR 8A10.
Recessed mounting holes
These holes may be used to mount the cradle on a wall in a location
in your home or office where you frequently make or receive calls.
Make sure the cradle is properly secured, when you place in above a
flat screen television.
19
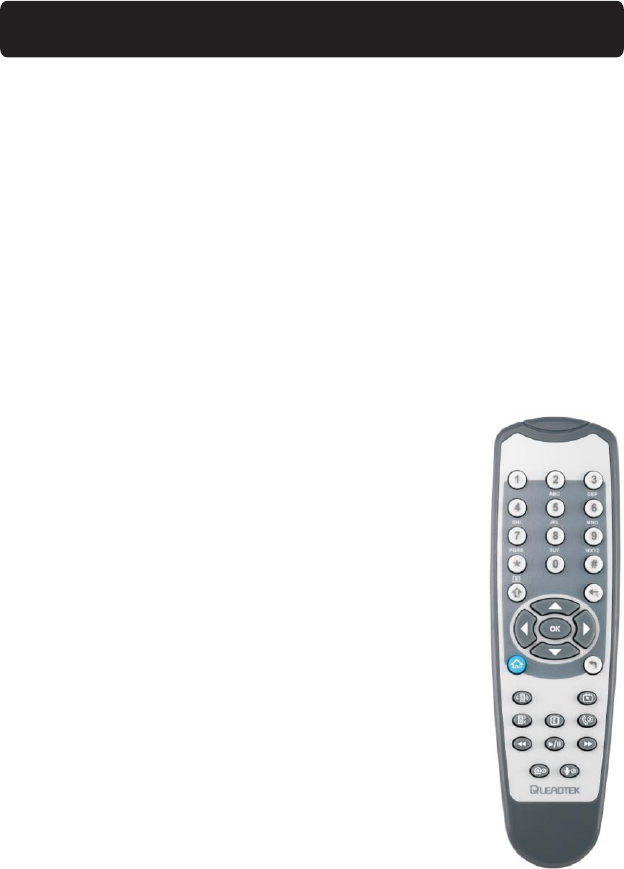
You may control AMOR 8A10 with the remote control from a distance
just like you do when you use the touch screen. You can highlight any
icon or button on the AMOR 8A10 screen by navigating with the
directional buttons (up, down, left, and right) on the remote. Press the
“OK” button to select it.
Selecting a text field will make the on-screen keyboard appear. You
can select letters from the keys by navigating the pointer among the
letters with the remote and pressing “OK” to select a single letter. You
may activate the AMOR 8A10 from the standby mode at any time by
pressing any button on the remote.
6. Using the Remote Control
20
Numeric buttons on the remote control
Use the numeric buttons to input numbers.
You can also move the pointer with the directional
buttons to a number key of the on-screen keyboard
and press the “OK” button to input a number.
Directional buttons on the remote control
Use the directional buttons to navigate between
icons and buttons on the AMOR 8A10 screen. Move
the cursor with the directional buttons on the remote,
and press the “OK” button to select the icon or item
of choice.
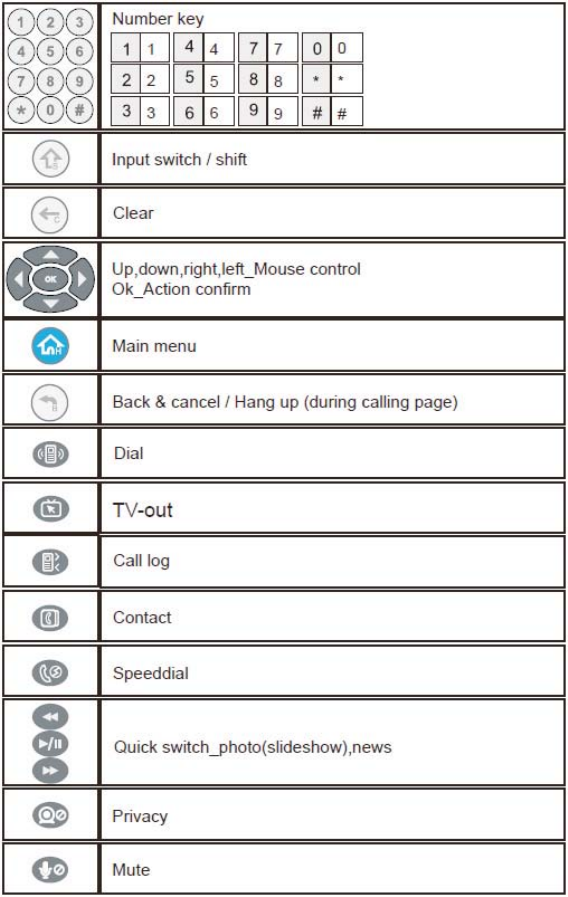
The definition of buttons on the remote control
21
7. How to Make and Receive a Video Call
Dialing Out
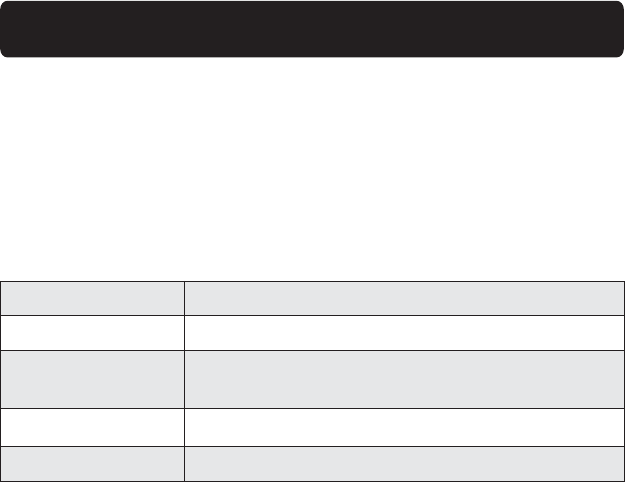
There are four methods to dial a number: Direct Dial, Speed Dial, Dial
from Call Log, and Dial from Contact. The only difference among the
four methods is how the phone number is obtained.
Dialing Method How the Phone Number is Obtained
Direct Dial Enter directly using the touch screen.
Speed Dial Phone numbers are stored in the Speed Dial
menu.
Dial from Call Log
Dial from Contact
Retrieve phone number from the Call Log.
Retrieve phone number from the Contact.
22
A virtual number pad will appear. Enter the desired phone number or
IP address, and tap on or to make a call.
Direct Dialing
To Direct Dial, tap on the Dial icon on the home screen.
If you want to enter a URL, tap on the “Keyboard” icon at the bottom
of the screen. A virtual keyboard will appear. Type the URL address
and tap on the “Done” button.
23
You can choose either Video call or Audio call by tapping on the
respective button.
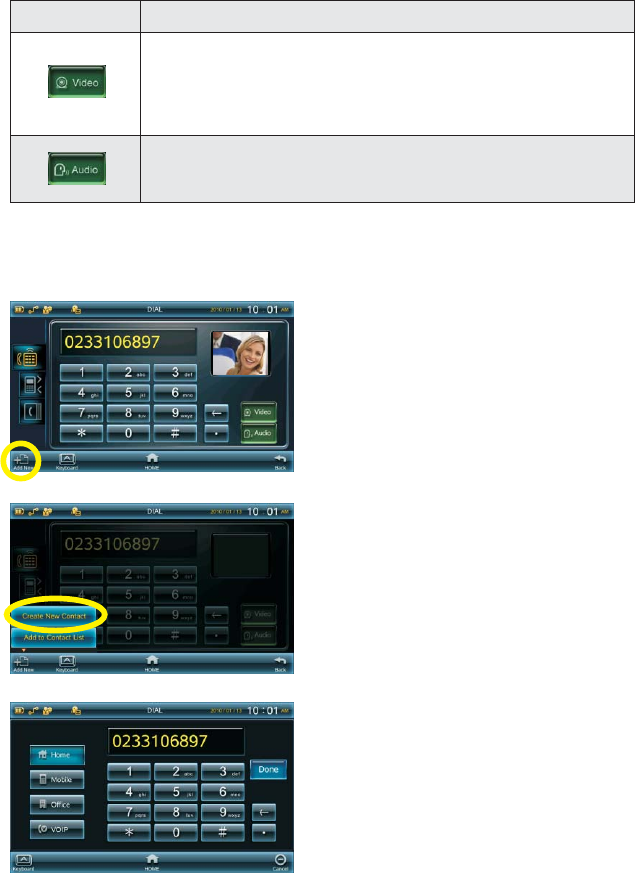
Option Function
Initiate the call with both video and voice. However,
you may not see video images of the recipient if
the recipient answers the call with voice only.
Initiate the call with voice only. Recipient will not
be able to see you.
Create a new contact with the phone number
1. Tap on the “Add New” icon.
2. A sub-menu will appear. Tap on
the “Create New Contact”
button.
3. Please see page 47 for the
detailed instructions on how to
create a new contact.
24
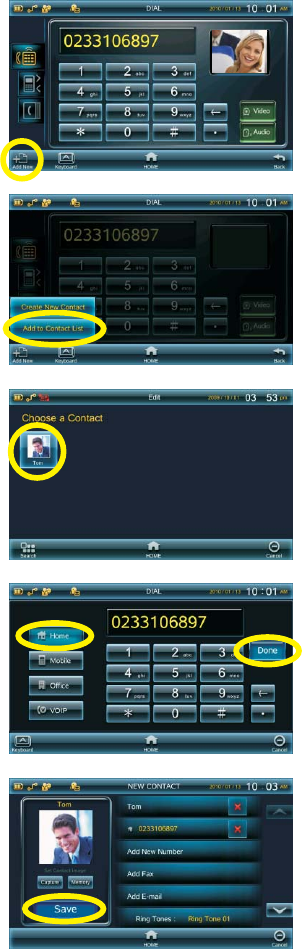
Add the phone number to a contact
1. Tap on the “Add New” icon.
2. A sub-menu will appear. Tap on
the “Add to Contact List” button.
3. The contacts are listed. Tap on
a contact for the phone number.
4. Choose a type of phone
number and tap on the “Done”
button.
5. The phone number is added to
the contact. Tap on the “Save”
button to save the contact.
25
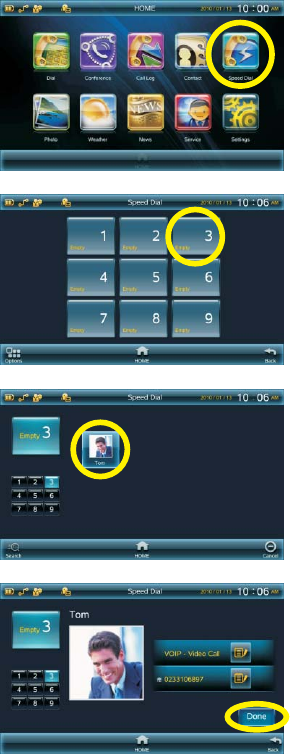
Speed Dialing
To use Speed Dial, the contact must be in the Contact list and saved
into a slot first. Up to nine contacts in the Contact list can be saved in
the Speed Dial slots. Please follow the steps below.
1. Tap on the Speed Dial icon on
the home screen.
2. You will see the speed dial slot
list. Please tap on an empty slot
to assign a contact.
3. The contacts will be listed. Tap
on the contact you would like to
add to Speed Dial.
4. The contact is added to the
slot. Tap on the “Done” button.
26
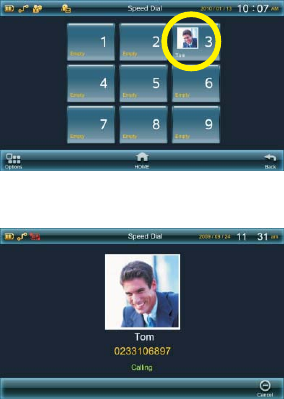
5.
Speed Dial numbers to make a
call.
Now you can tap on one of the
6. AMOR 8A10 is calling out.
27
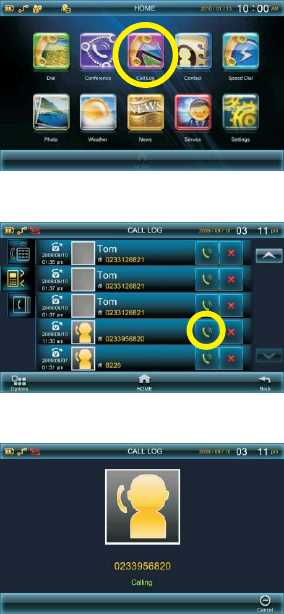
Dialing from the Call Log
1. Tap on the Call Log icon on the
home screen.
2. The contents of the Call Log
are displayed. Tap on the “Call”
icon next to the desired record
to make the call.
You can tap on the up or down
directional buttons on the right
of the screen to find a specific
record.
3. 8A10 is calling out.AMOR
28
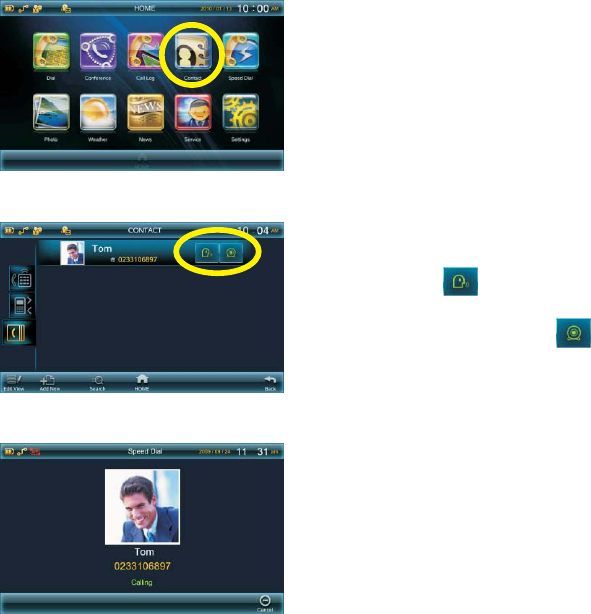
Dialing from the Contact
1. Tap on the Contact icon on the
home screen.
2. The Contacts are displayed.
Tap on the icon next to
the desired contact to make an
audio call, or tap on the
icon to make a video call.
3. 8A10 is calling out.AMOR
29
30
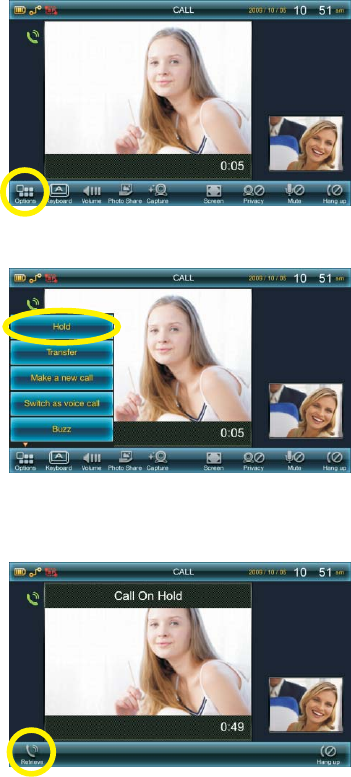
Operations During a Call
During a call, there are several icons at the bottom. Their functions will
be explained below.
0286532618
Options – Call on Hold
Tap on the “Options” icon, and a sub-menu will appear.
If you would like to hold the call, tap on the “Hold” button. The one you
talked to will be held for waiting
To resume the conversation, tap on the “Retrieve” icon.
8
0286532618
31
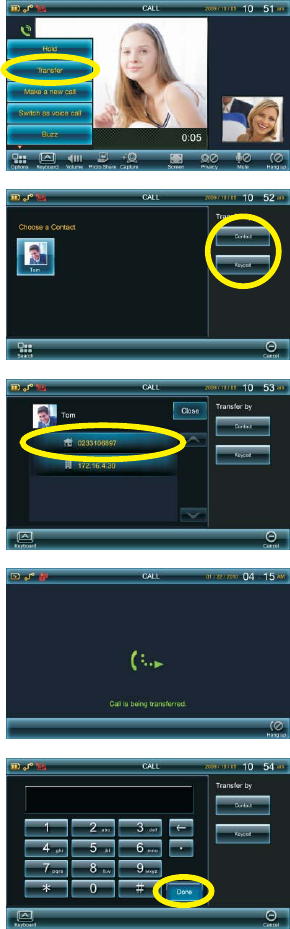
Options – Call Transfer
0223706495
8
If you need to transfer the call to a
new recipient, tap on the “Transfer”
button.
If the contact has more than one
phone numbers, you have to
choose one of them.
The call is being transferred.
If you choose to transfer to a
phone number, enter the phone
number and tap on the “Done”
button.
You can choose to transfer to a
contact or a phone number.
32
8
0223706495
If you need to enter a URL, you
can tap on the “Keyboard” icon.
A virtual keyboard will appear.
Enter the information and tap on
the “Done” button.
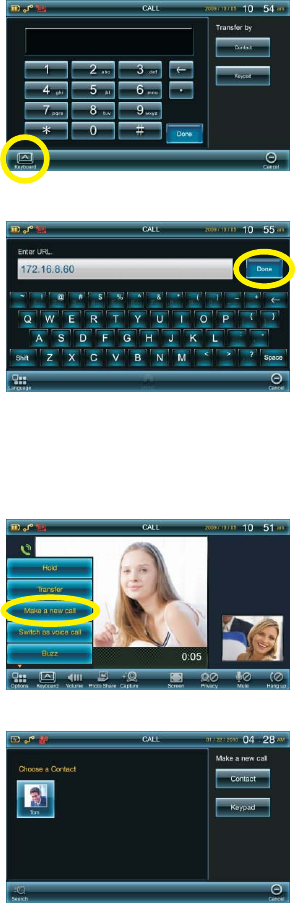
Options – Make a new call
During a call, if you wish to make
another call, you can tap on the
“Make a new call” button.
You have to choose a contact or
enter the phone number of the new
call.
Tap on the icon to make an
audio call, or tap on the icon
to make a video call.
When the second call is in
progress, the first call will be held
for waiting.
0286532618
8
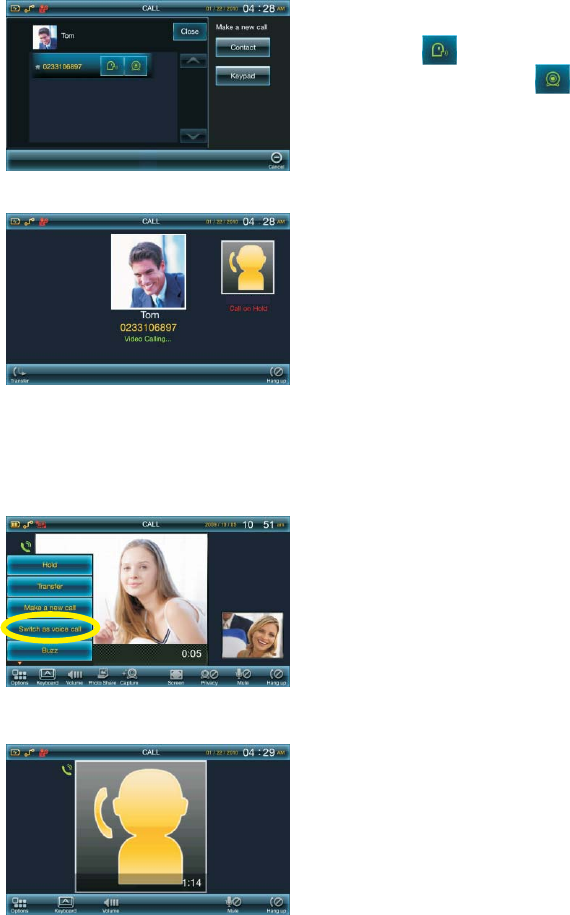
Options – Switch as voice call
If you want to talk with only voice,
you can tap on the “Switch as
voice call” button.
0286532618
The video is disabled. You will not
be able to see each other.
33
8
6532618
To resume the video, tap on the
“Switch as video call” button in the
“Options” menu.
8
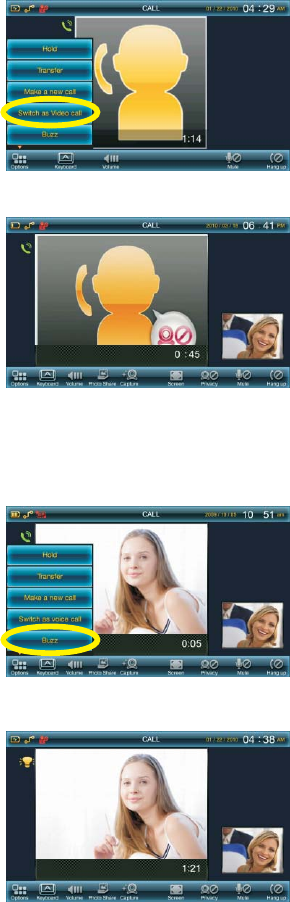
Options – Buzz
If you want to catch the attention of
the other party, you can tap on the
“Buzz” button.
A light bulb symbol will show up at
the upper left corner, and the top of
the video phone of the other party
will flash.
0286532618
34
0286532618
The other party will be able to see
you, while you won’t see him or
her until the other party selects the
same “Switch as video call” option
in the “Options” menu.
0286532618
0286532618
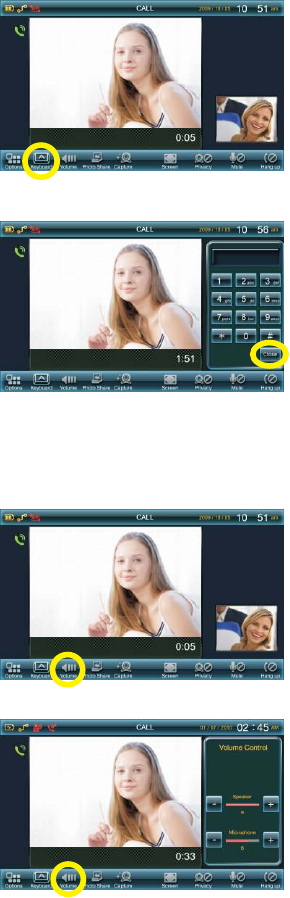
Volume Control
Numeric Keypad
You can tap on the “Keyboard”
icon to invoke a virtual numeric
keypad if you need to input
numbers during the call such like
extension numbers or password.
Tap on the number buttons when
necessary.
When you don’t need the keypad,
tap on the “Close” button to hide it.
During a call, you can tap on the
“Volume” icon to adjust the
volume.
Tap on the “+” button to increase
the volume, and the “-” button to
decrease the volume.
Tap on the “Volume” icon again to
finish the setting.
0286532618
0286532618
35
0286532618
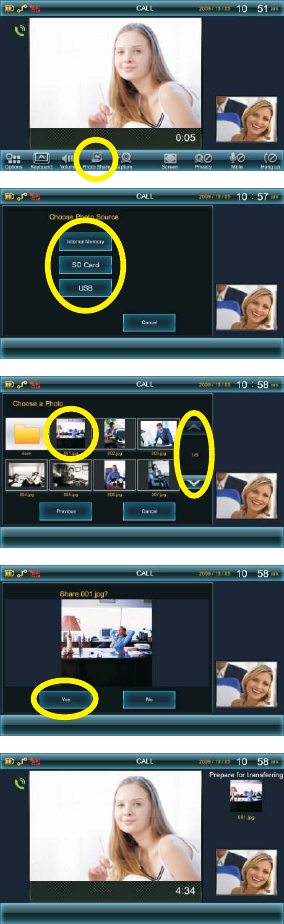
Share a Photo
During a call, you can share a
photo with the other party.
To use this function, tap on the
“Photo Share” icon.
You have to choose the photo
source. The photo can be stored in
the internal memory, the SD card,
or the external USB device.
Tap on the photo you would to
share.
You can tap on the up and down
directional buttons to browse the
photos in the device.
Tap on the “Yes” button to confirm
the selection.
The photo will be shown to the
other party shortly.
0286532618
36
0286532618
0286532618
The photo is waiting to be received
by the other party.
To stop sharing the photo, tap on
the “Close” button.
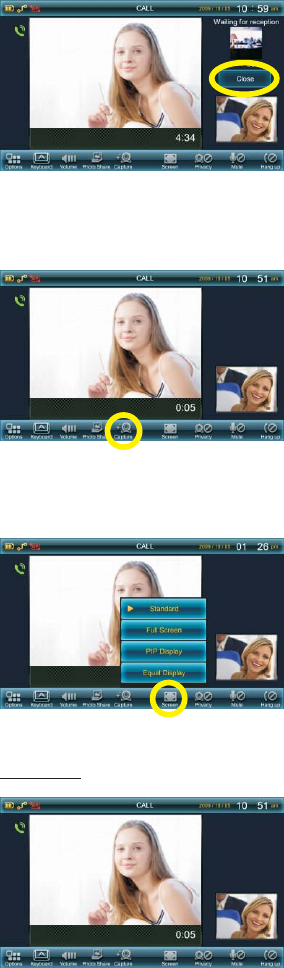
Capture a Photo
During a call, you can tap on the
“Capture” icon to take a snapshot
of the image of the other party and
save it to the internal memory.
You can see page 76 for related
information.
Screen Adjustment During a call, you can adjust the
sizes of the images of both parties,
and how they are displayed on the
screen.
To use this function, tap on the
“Screen” icon and a sub-menu will
appear with four options. Tap on
the respective button to switch to
the display mode of your choice.
Standard:
This is the default display mode.
The image of the other party
occupies the majority of the
screen, and your image is at the
lower-right corner.
0286532618
0286532618
37
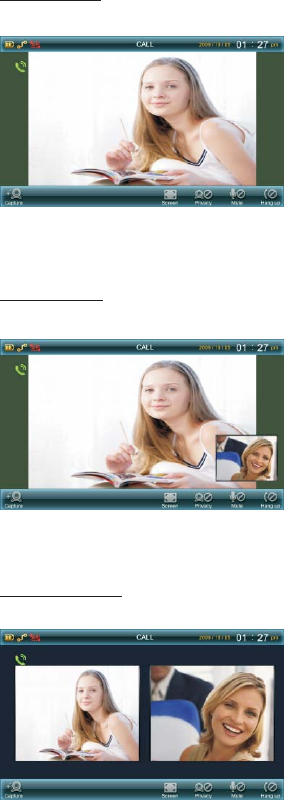
Full Screen:
PIP Display:
Equal Display:
The image of the other party is
enlarged to full screen, and your
image is hidden.
The image of the other party
occupies the full screen, and your
image appears as a sub-picture at
the lower-right corner.
The image of the other party is on
the left half of the screen, while
your image is on the right half.
Both images are equal in size.
38
0286532618
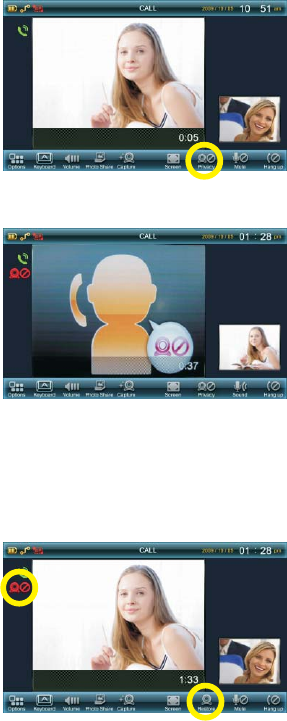
Video Privacy
When you tap on the “Privacy”
icon, the video privacy is turned on
and 8A10 stops sending
your video to the other party during
the video call, and you will not be
seen by the one you talk to.
AMOR
An icon on the left will show up
indicating Video Privacy mode.
To turn off video privacy, tap on the
“Restore” icon. Video transmission
will resume immediately. You can
think of video privacy as a video
mute.
The other party will see a picture
which replaces your video.
Video Privacy on
(The screen of the other party)
0227603518
0286532618
39
0286532618
0286532618
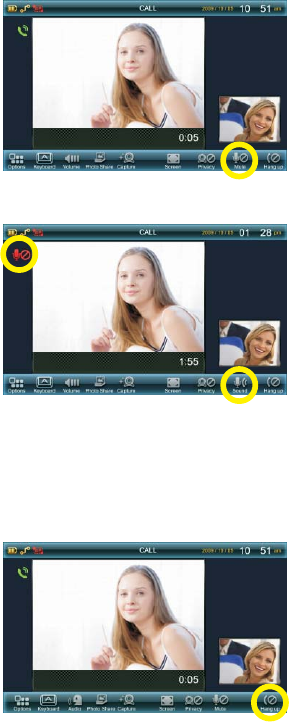
Hang Up
To end the call, tap on the “Hang
up” icon.
Audio Mute
When you tap on the “Mute” icon,
the audio mute is turned on and
8A10 stops sending your
audio to the other party during the
call. You will not be heard by the
one you talk to.
AMOR
An icon on the left will show up
indicating Audio Mute mode.
To turn off audio mute, tap on the
“Sound” icon. Audio transmission
will resume immediately.
0286532618
40
0286532618
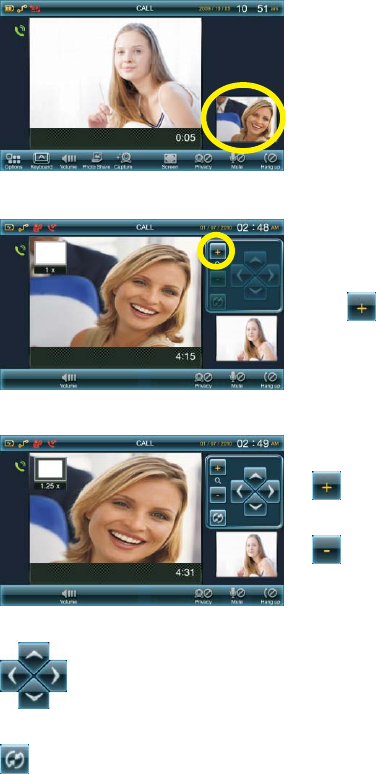
PTZ function
During a video call, you can tap on
your local image to enable the PTZ
function.
0286532618
The positions of the images of both
parties will be exchanged. Tap on
the button to start adjusting
your local image with the PTZ
function.
0286532618
: Zoom in your image
: Zoom out your image
: Adjust the area of your image that you want to be seen by
the other party
: Reset your image to the original size
41
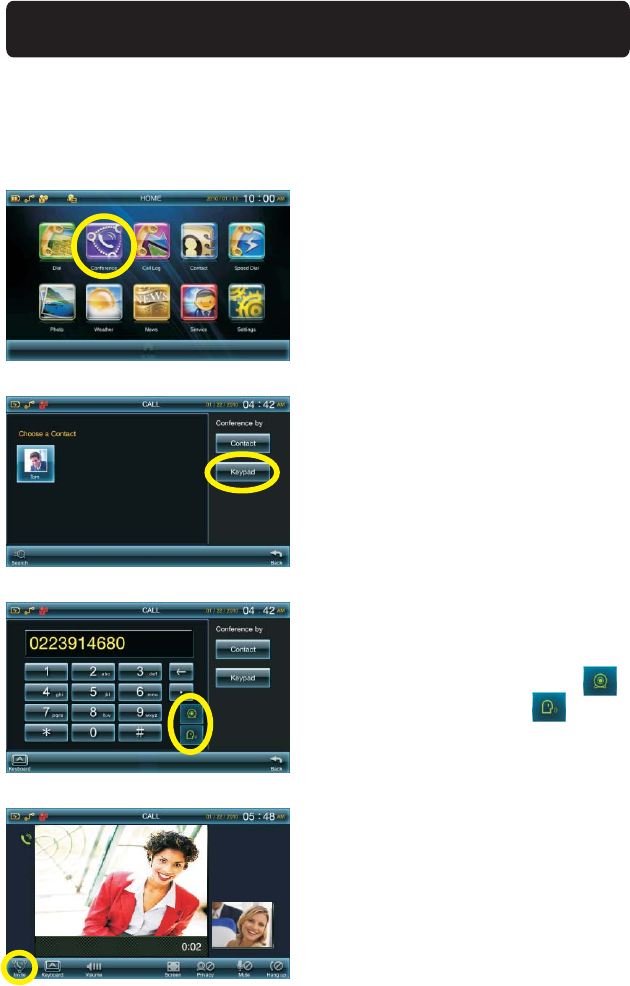
8. How to Make 3-way Conference Call
You can make a 3-way conference call with 8A10. Please
follow the steps below to start a conference.
AMOR
1. Tap on the Conference icon on
the home screen.
3. Enter the phone number of the
other party and tap on the
icon for video call or for
audio call.
2. Select the members in the
Contact list, or you can tap on
the “Keypad” button to enter the
phone number.
4. When the other party answers
the call, the video connection is
established.
If you wish to invite the third
party to the conference, tap on
the “Invite” icon.
0223914680
42
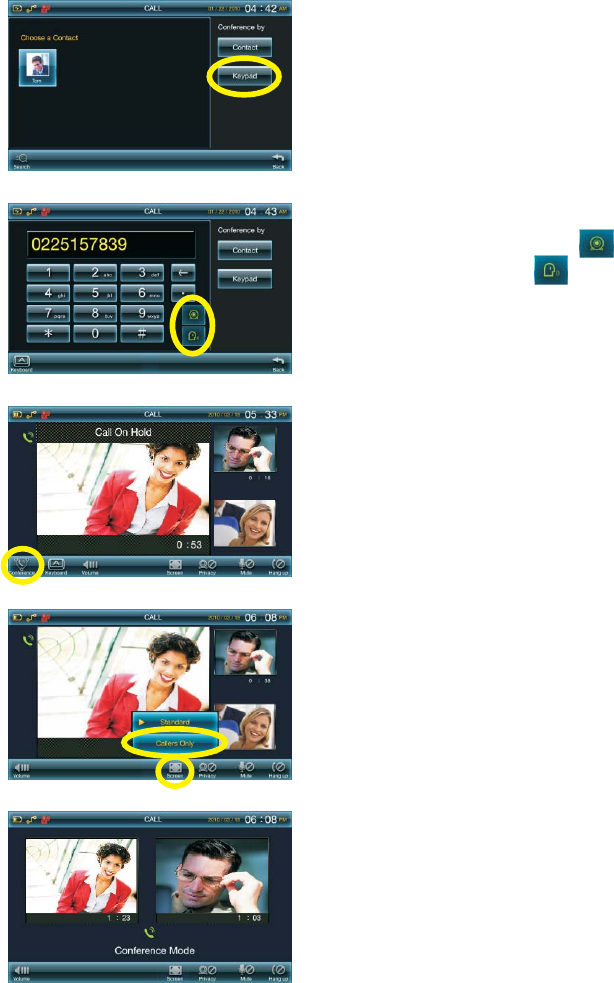
7. When the third party answers
the call, the second party will
be held. Tap on the
“Conference” icon at the lower
left corner to resume the call,
and a 3-way video conference
is established.
In a video conference, the host
can see all three members on
the screen, while the other two
members can only see
him/herself and the host.
To end the conference, tap on
the “Hang up” icon.
8. You can choose to view the
other two members only. Tap on
the “Screen” icon and choose
“Callers Only”.
0223914680
0225157839
0223914
0225157839
9. Only the images of the other
two parties are displayed.
0223914680 0225157839
6. Enter the phone number of the
third party and tap on the
icon for video call or for
audio call.
43
5. Select the members in the
Contact list, or you can tap on
the “Keypad” button to enter the
phone number.
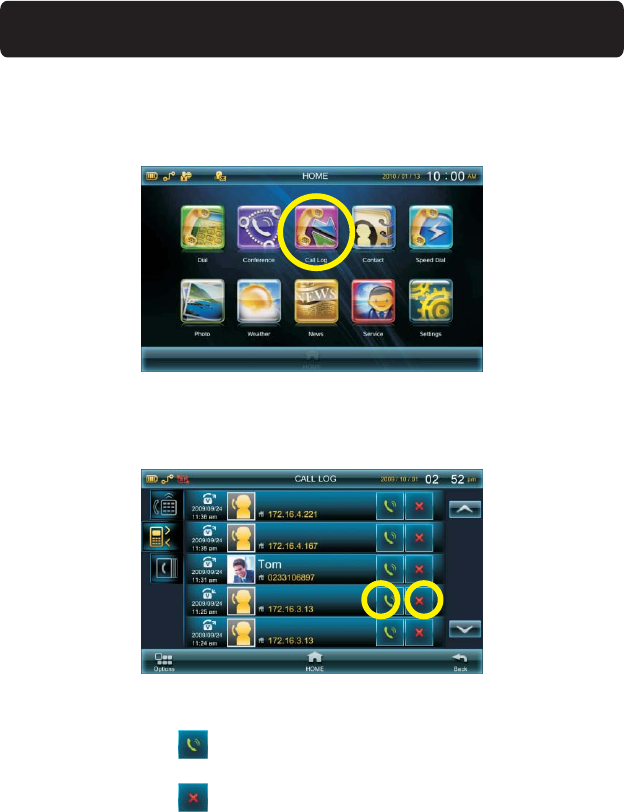
9. How to Use the Call Log
To enter Call Log, please tap on the Call Log icon on the Home
Screen.
The contents of the Call Log are displayed.
You can tap on the icon next to a record to make the call.
You can tap on the icon next to a record to delete it.
44
The Call Log contains three types of information: Missed Calls,
Received Calls, and Dialed Calls.
!“Missed Calls”: stores information about incoming calls that have
been missed (unanswered).
!“Received Calls”: stores information about incoming answered calls.
!“Dialed Calls”: stores information about dialed calls.
The kind of information in all three logs is the same, and the three logs
can be displayed together or separately. The default is to displayed all
logs together. To view a specific type of call log, follow the steps
below.
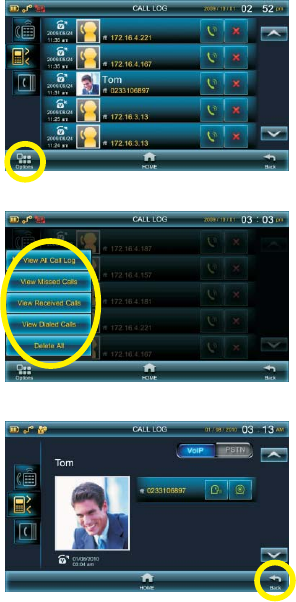
1. Tap on the “Options” icon.
2. A sub-menu will appear. Tap on
the type of call log you would
like to see.
3. Tap on each call log and its
contents are displayed.
To return to the Call Log menu,
tap on the “Back” icon.
45
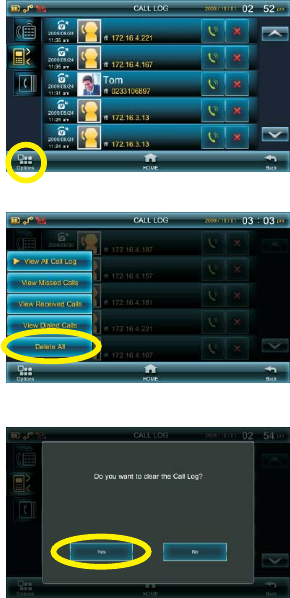
Deleting all call logs
1. Tap on the “Options” icon.
2. A sub-menu will appear. Tap on
the “Delete All” button.
3. You will be asked for
confirmation. Tap on the “Yes”
button.
46
10. How to Use the Contact
The Contact menu is where you store your contact information. When
you enter the Contact menu, you will see a contact list with names
and their photos, or you can add new contacts if the phonebook is
empty.
Contacts can be created manually, or extracted from the Call List.
Each contact can store 100 sets of numbers, and you can define the
phone number type to be the default.
To navigate and make selections in the Contact menu and its sub-
menus, simply tap on the corresponding area on the screen.
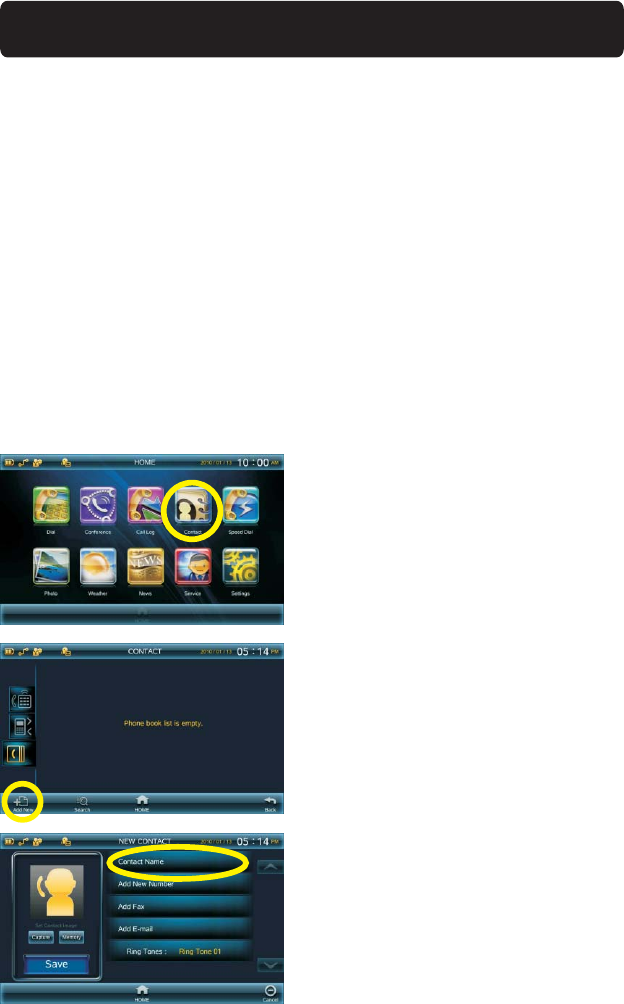
1. To enter the Contact menu,
please tap on the “Contact”
icon on the Home screen.
2. Tap on the “Add New” icon.
3. Tap on the “Contact Name” tab
to enter the name for the
contact.
Creating a Contact
47
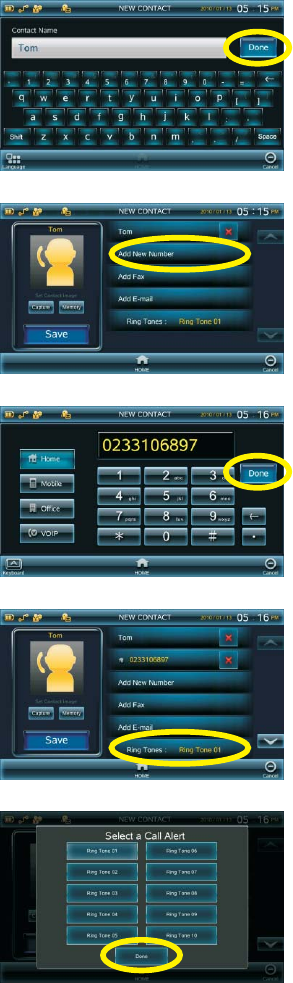
4. Type the name of the contact
and tap on the “Done” button.
5.
Tap on the “Add New Number”
tab to input the phone number
for the contact.
6. Enter the phone number and
tap on the “Done” button.
You can assign the phone
number type to be Home,
Mobile, Office, or VOIP.
7. You may choose a specific ring
tone for the contact. Tap on the
“Ring Tones” tab.
8. Choose the ring tone you prefer
and tap on the “Done” button.
48
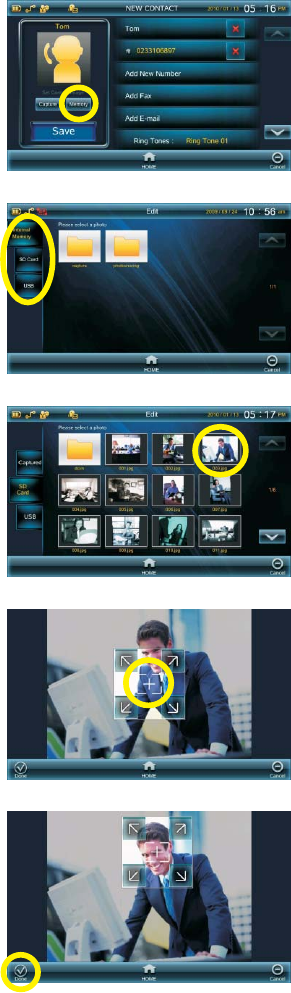
10.
Captured (the internal
memory), the SD card, or the
USB device.
You can choose a photo from
11. Tap on a photo to select it.
12. The part of the photo selected
as the avatar is denoted by the
square. You can drag the cross
at the center to move the
square around the photo.
13. Tap on the “Done” icon when
you are satisfied with the
photo.
9. You can select a corresponding
photo for the contact. Tap on
the “Memory” button to choose
a photo.
49
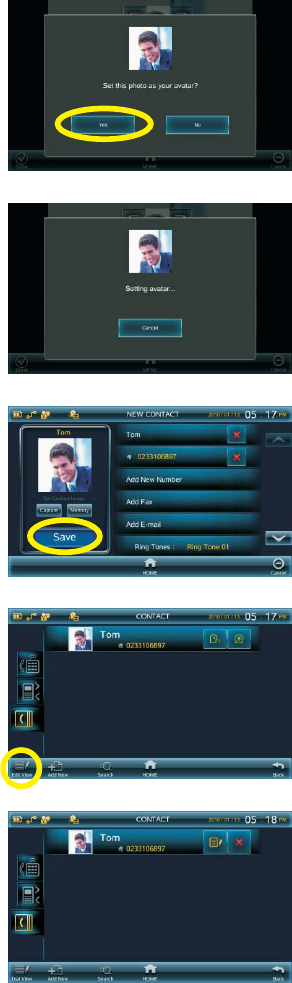
16. Tap on the “Save” button to
save the contact.
17. You can switch to “Edit View”
by tapping on the icon.
18. In Edit View, you can edit or
delete the contact.
14. Tap on the “Yes” button to set
the photo as the avatar.
15. The system is setting the
avatar.
50
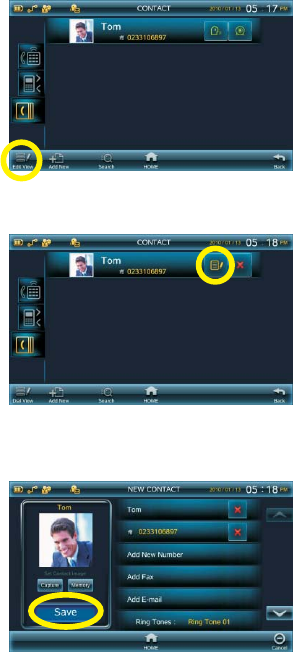
Editing a Contact
1. In the Contact menu, tap on the
“Edit View” icon.
2. Tap on the “Edit” button next to
the contact you wish to edit.
3. Tap on the fields and change
the contents.
When you finish all changes,
tap on the “Save” button to
update the contact.
51
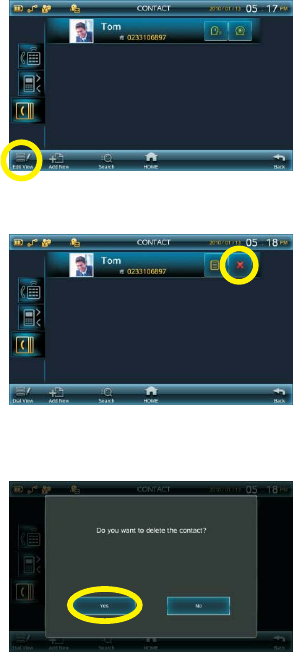
Deleting a Contact
3. You will be asked for
confirmation. Tap on the “Yes”
button.
1. In the Contact menu, tap on the
“Edit View” icon.
2. Tap on the “Delete” button next
to the contact you wish to
delete.
52
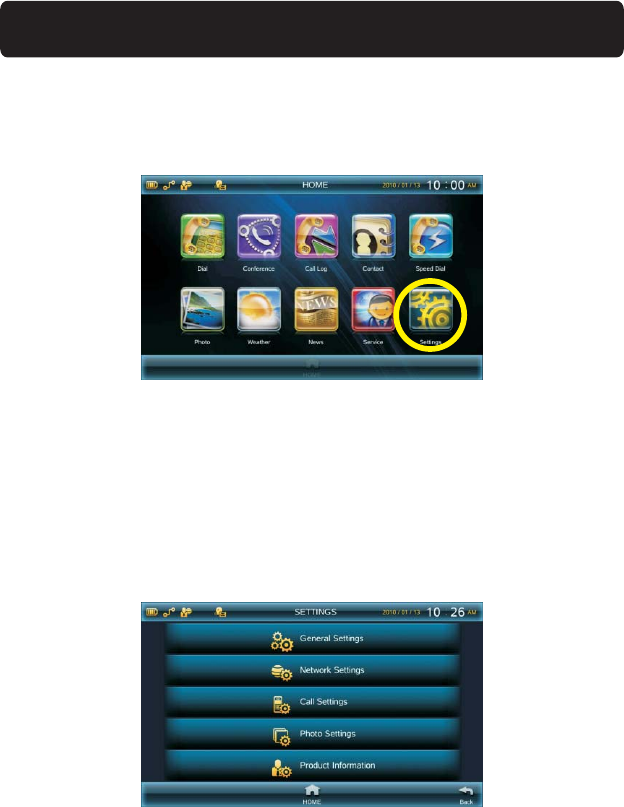
The Settings menu is where you set up the 8A10 for your
network and to work with your service provider. It is also where you
configure it according to your preferences.
There are five tabs corresponding to five sub-menus. To enter a sub-
menu, tap on the respective tab.
AMOR
11. Settings Menu
Tap on the Settings icon on the Home screen to enter the settings
menu.
53
General Settings
The General Settings menu contains the general settings for the
videophone, including Language, Date / Time, Sound, Display, and
Security.
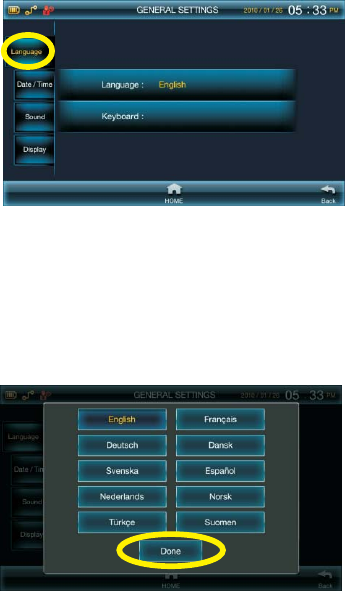
Language
You can choose a language for the on-screen menu with this function.
Tap on the Language tab, and the following screen will appear.
Select a language you prefer and tap on the “Done” button.
54
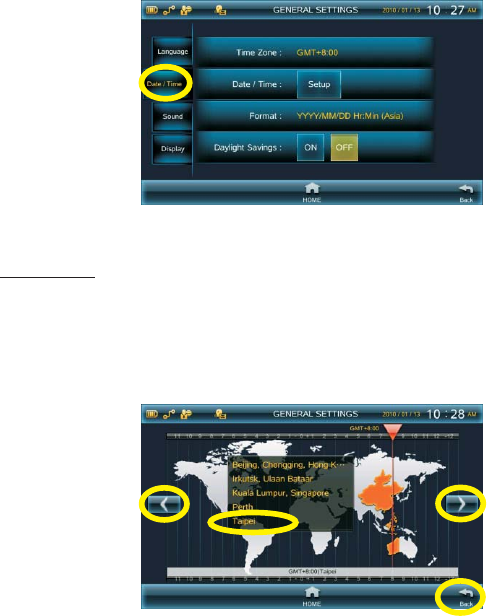
Date / Time
You can set the date and time for 8A10 with this function. Tap
on the Date / Time tab, and the following screen will appear.
AMOR
You can select the time zone in which you are using 8A10. Tap
on the “Time Zone” tab and the following screen appears.
AMOR
Time Zone:
Tap on the left and right directional buttons to select the time zone,
and then tap on the city in the list to represent your residence. Tap on
the “Back” icon when done.
55
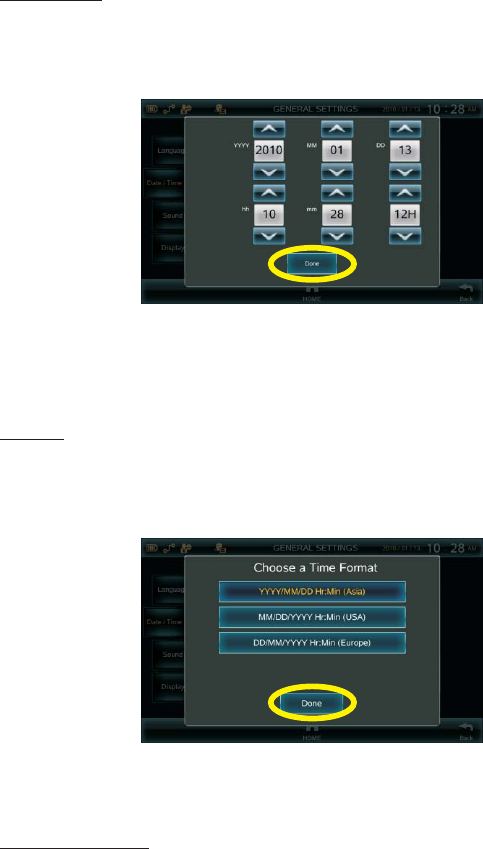
Date / Time:
Use this function to set the date and time for 8A10. Tap on the
“Setup” button, and the following screen will appear.
AMOR
Tap on the up and down directional buttons to enter the date and time.
Tap on the “Done” button when done.
Format:
You can choose a time format by your preference with this function.
Tap on the “Format” tab and the following screen will appear.
Tap on the perferred time format and tap on the “Done” button.
Daylight Savings:
If the area you live is using Daylight saving time, you can configure
8A10 accordingly with this option.AMOR
56

Sound
You can adjust the volume and select the ring tone for 8A10
with this function. Tap on the Sound tab, and the following screen will
appear.
AMOR
Volume:
Tap on the “+” button to increase the volume, and tap on the “-” button
to decrease the volume.
Audio Call Ringtone / Video Call Ringtone:
Tap on the “Audio Call Ringtone” or “Video Call Ringtone” tab, and the
following screen will appear.
Tap on the ring tone you like and tap on the “Done” button.
57
Screen Flash:
You can choose ON or OFF by tapping on the respective button.
Light Flash:
Incoming calls cause the top of the 8A10 to flash. You can tap
on this tab to choose a flash pattern you prefer.
AMOR
Display
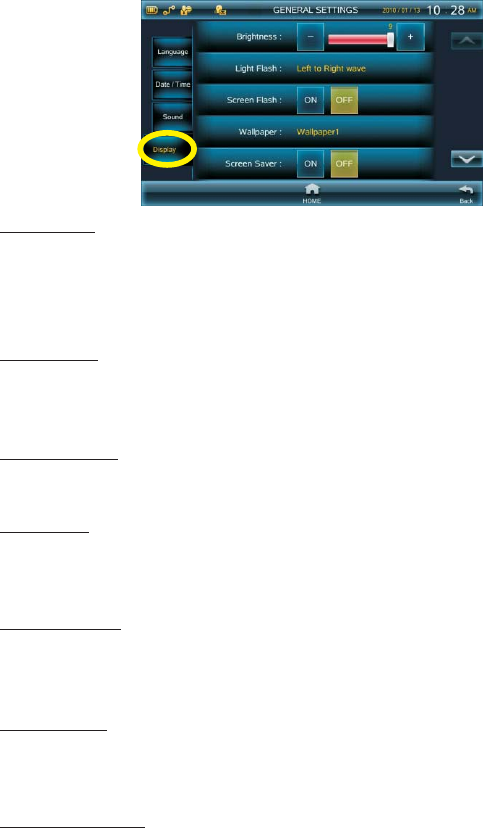
You can configure several display options for 8A10 with this
function. Tap on the Display tab, and the following screen will appear.
AMOR
Brightness:
Tap on the “+” button to increase the brightness of the LCD screen,
and tap on the “-” button to decrease the brightness.
Alternatively, you can drag the slider to adjust the brightness.
Wallpaper:
You can tap on this tab to choose one of the three built-in wallpapers,
or use a custom wallpaper from a photo stored in the devices.
Screen Saver:
If this option is ON, you can choose what 8A10 will display
after the specified idle time.
AMOR
Sleep Mode:
If this option is ON, 8A10 will be automatically turned off after a
specified period of time.
AMOR
Show Phone No:
If this option is ON, the phone number of your 8A10 will be
displayed on the screen of the other party when you make a call.
AMOR
58
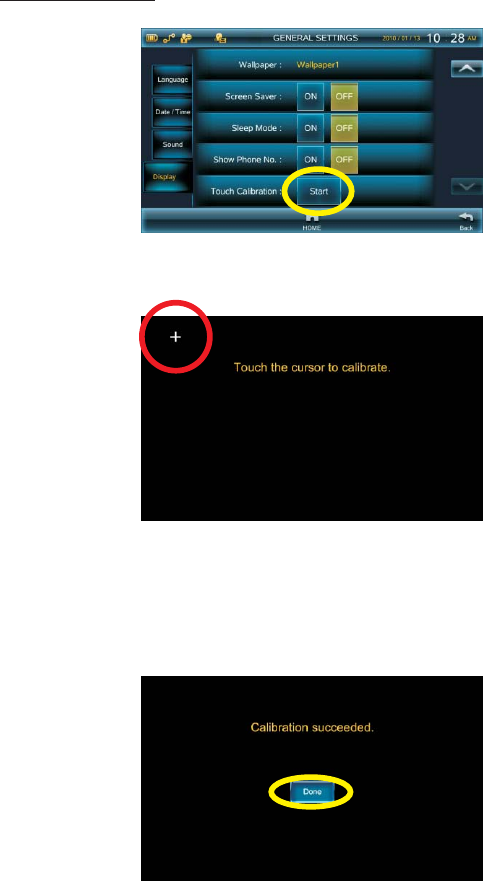
Touch Calibration:
This function can be used to calibrate input via the touch screen.
Tap on the “Start” button to start the calibration.
The screen will turn blank, with a crosshair at the upper-left corner.
Tap on the center of the crosshair.
Four more crosshairs will appear in the following sequence: lower-left
corner, lower-right corner, upper-right corner, and center. Tap on the
center of each of the crosshairs.
When you have tapped on the five crosshairs, you will be asked to tap
on the five places again. Follow the instructions on the screen. Then
tap on the “Done” button to finish the calibration.
59
Network Settings
You can create multiple network configuration profiles and
conveniently switch to the one that works with the current network
environment.
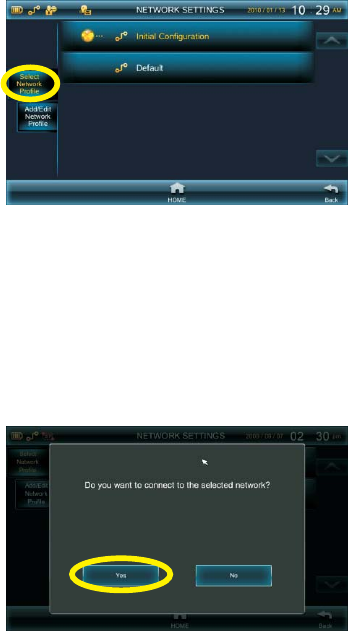
In the “Select Network Profile” tab, if you choose an existing profile,
you will be asked if you want to connect to the selected network. Tap
on the “Yes” button if you wish to use it.
Select Network Profile
60
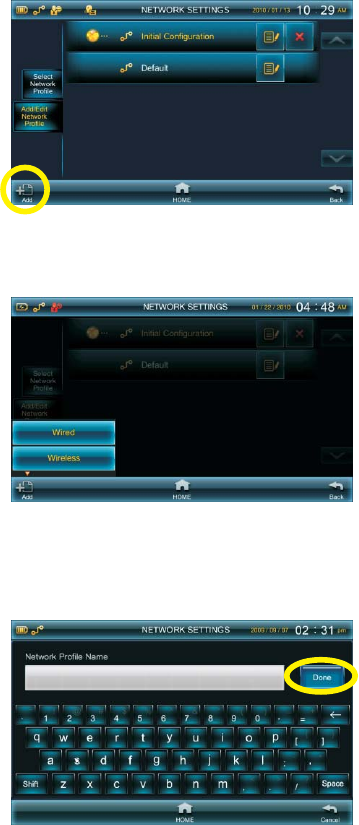
Add / Edit Network Profile
To create a new network profile, tap on the “Add” icon.
Type the name for the profile and tap on the “Done” button.
Choose “Wired” or “Wireless” according to your network environment.
If you choose “Wireless”, please see page 65 for the setting.
61

Tap on the “Connect Type” tab to choose the type of network
connection.
Choose the connect type and tap on the “Done” button.
The details for each connect type are described below.
AMOR 8A10
Ethernet Device / Cable modem
Internet
DHCP
The 8A10 will acquire the IP address / Subnet Mask / Gateway
/ DNS address via the DHCP mechanism from an upstream device,
such as a cable modem or a router.
AMOR
62
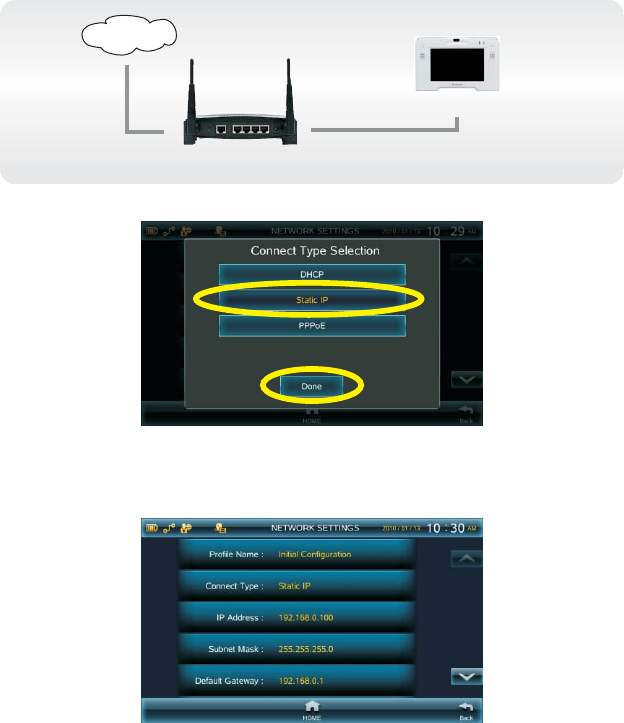
Enter IP address / Subnet Mask / Gateway / DNS address manually.
Ethernet Device
Static IP
Internet
AMOR 8A10
Tap on the “IP Address”, “Subnet Mask”, “Default Gateway”, “Primary
DNS”, and “Secondary DNS” tabs to input the respective information.
Tap on the “Done” button when you finish the setting.
Tap on the “Static IP” tab and tap on the “Done” button.
63
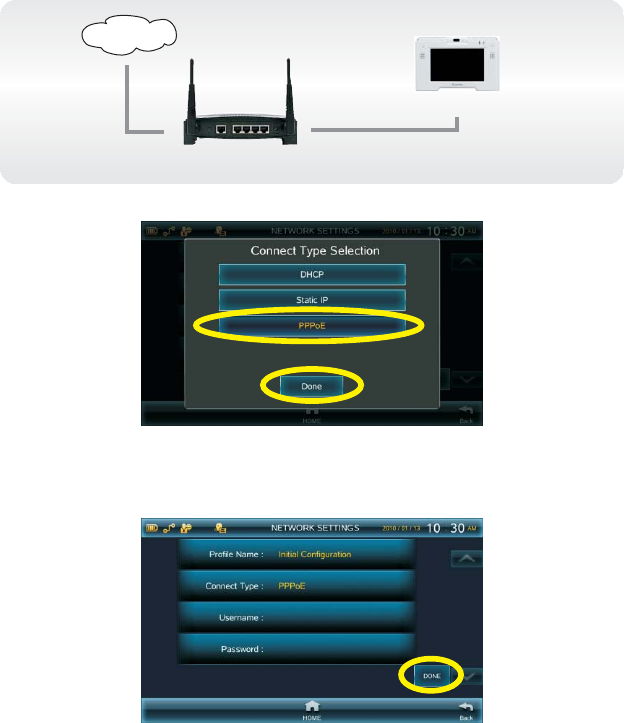
PPPoE Username and Password are assigned by your ISP.
Ethernet Device
PPPoE
Internet
AMOR 8A10
Tap on the “PPPoE” tab and tap on the “Done” button.
Tap on the “Username” and “Password” tabs to input the respective
information.
Tap on the “Done” button when you finish the setting.
64
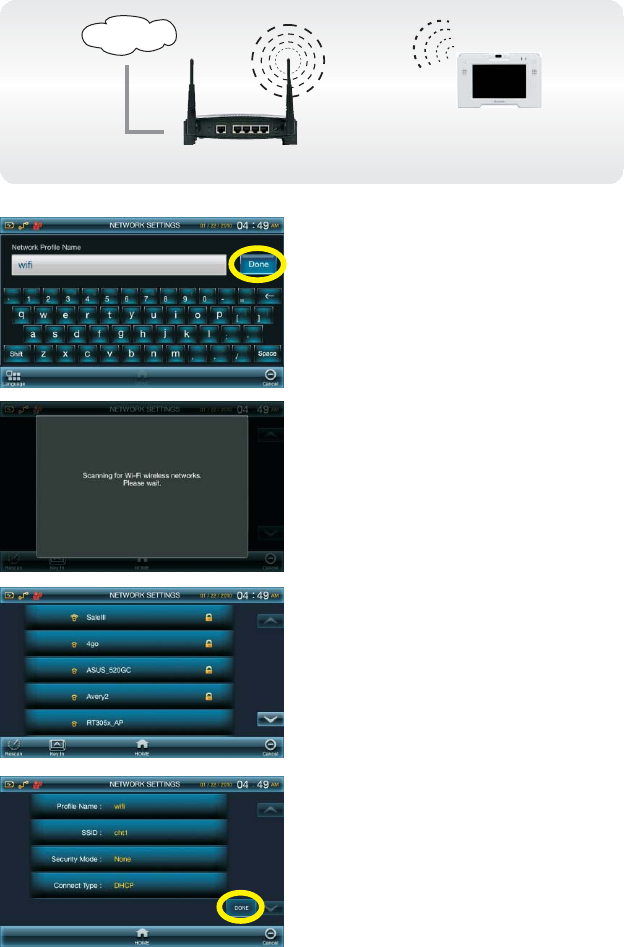
Wi-Fi Setting
Type the name for the profile and
tap on the “Done” button.
Wireless AP or Router
Internet
The signal sources are listed. Tap
on the one you would like to use.
AMOR
available wireless signals nearby.
8A10 will search for
Tap on each tab to edit the
settings.
Tap on the “Done” button when
you finish the settings.
AMOR 8A10
65
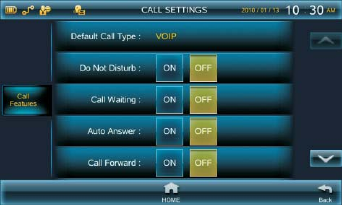
Call Settings
The Call Setting menu contains the call-related settings for the
8A10. You can tap on the up and down directional buttons to view and
access the options.
AMOR
Tap on the buttons to toggle "ON" or "OFF".
Disturb is enabled.
When it is on, Do Not
Do Not Disturb
Tap on the buttons to toggle "ON" or "OFF". you will see
a message on the screen when another call comes in during a call.
You may answer the second call and then switch between these two
calls.
When it is on,
Call Waiting
Auto Answer
Tap on the buttons to toggle "ON" or "OFF". When it is on, you have to
input a password and specify a value in “Auto Answer Rings”.
66

Tap on the buttons to toggle "ON" or "OFF".
If the option is ON, you have to choose “Forwarding Method” and
input the “Forward Number”.
Forwarding Method:
!Always: Forward call to the number you assign directly.
!When Busy: Forward call to the number you assign when
videophone is busy.
!No Answer_5s ... 25s: Forward call to the number you assign if
there is no answer after the specified time period.
Call Forward
Video Bandwidth
Tap on this tab to
gets better when given more bandwidth.
choose a proper video bandwidth. The video quality
67
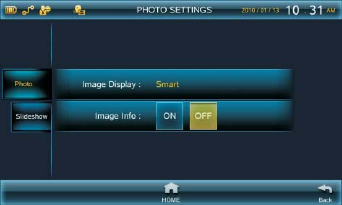
Photo Settings
The Photo Setting menu contains the settings for displaying photos in
the photo browser. The settings here are effective for all the photos
from internal memory, SD memory card and USB device connected to
8A10.AMOR
Image Display
Choose a image display mode with function. The options are Smart
and Stretch.
Image Info
Choose whether to display the information of the photo at the lower
right corner.
68
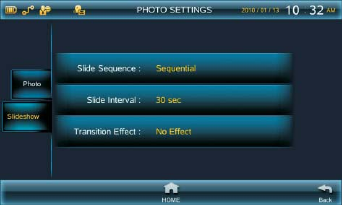
Slide Sequence
Choose the pattern to display the photos in the slideshow. The options
are Sequential and Random.
Slide Interval
Choose the interval of the slideshow. The options are 15 sec, 30 sec,
5 min, 15 min, and 60 min.
Transition Effect
Choose the transition effect between the photos in the slideshow. The
options are No Effect, Sliding, and Dissolve.
69
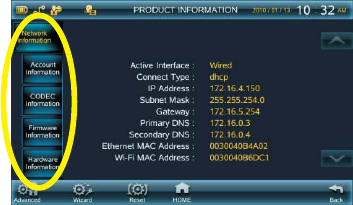
Product Information
The Product Information menu contains information on Network, SIP,
CODEC, Firmware, and Hardware. Tap on the “Product Information”
tab, and the following screen will appear.
You can tap on the tabs on the left of the screen to see the detailed
information in each category.
70
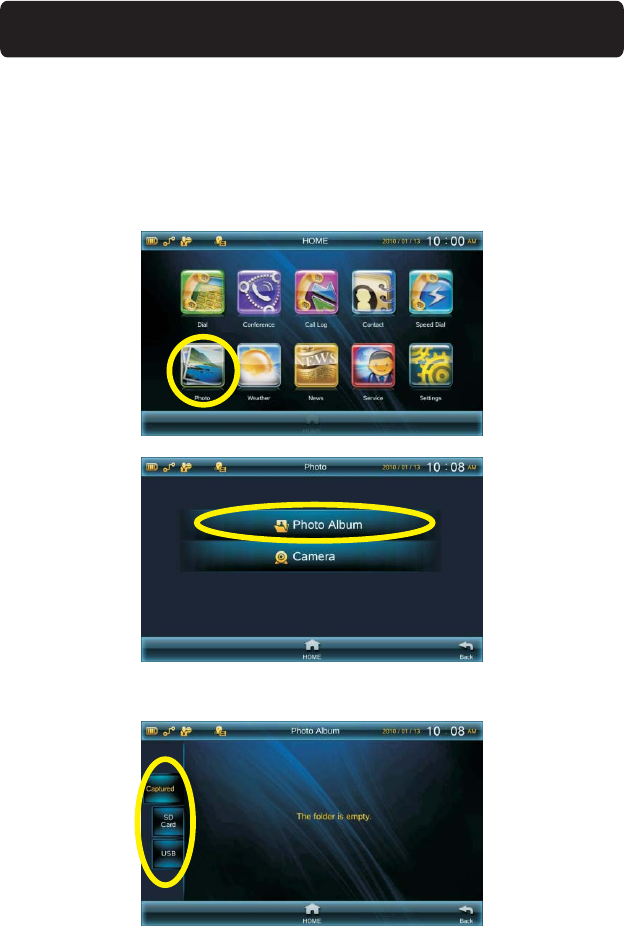
12. Photo Displaying
Tap on the Photo icon on the Home screen to enter the Photo menu.
This is where you browse and capture photos. The system memory
can store up to 100 photos and the capacity of the external memory
depends on the size of the SD memory card and the USB device.
To browse photos, tap on the “Photo Albums” tab.
Tap on the device you want to browse. The method for browsing the
photos are essentially the same across the three devices.
71
Photos in the device are listed as thumbnails. Tap on a thumbnail to
view the photo full size.
Browsing Photos
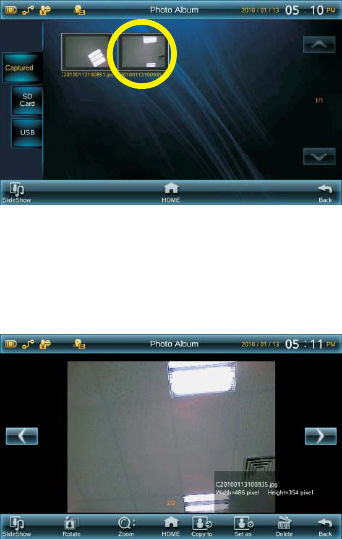
The details of the photo are displayed at the lower right corner.
You can tap on the left and right directional buttons to browse other
photos.
There are several icons at the bottom of the browser. Their functions
are explained in the following pages.
72
SlideShow
Tap on the “SlideShow” icon to start displaying all the photos in the
current device as a slideshow. Tap anywhere on the screen to stop the
slideshow.
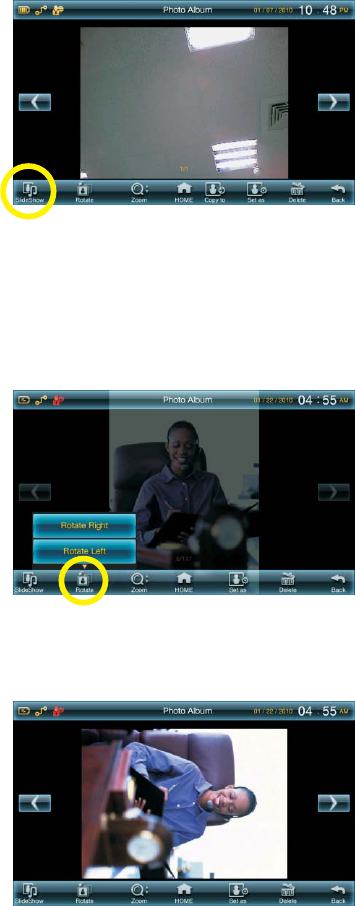
Rotate
When viewing a photo, you can tap on the “Rotate” icon and select
“Rotate Right” (clockwise) or “Rotate Left” (counterclockwise).
73

Zoom
Tap on the “+” button to zoom in the photo, and “-” to zoom out the
photo. Tap on the “Back” button to return to the browser.
Tap on the “Zoom” icon to zoom in and zoom out the photo you are
viewing.
Set as
If you want to set the current photo as the wallpaper or the avatar, tap
on the “Set as” icon.
74
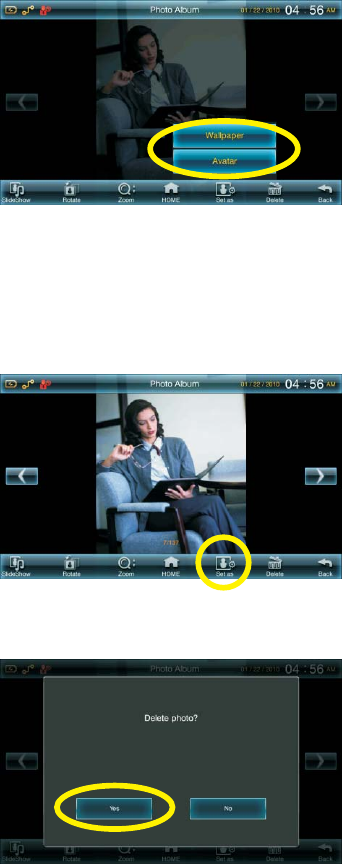
Tap on the “Wallpaper” or “Avatar” button depending on your
preference.
Delete
To delete the current photo, tap on the “Delete” icon.
You will be asked for confirmation. Tap on the “Yes” button.
75
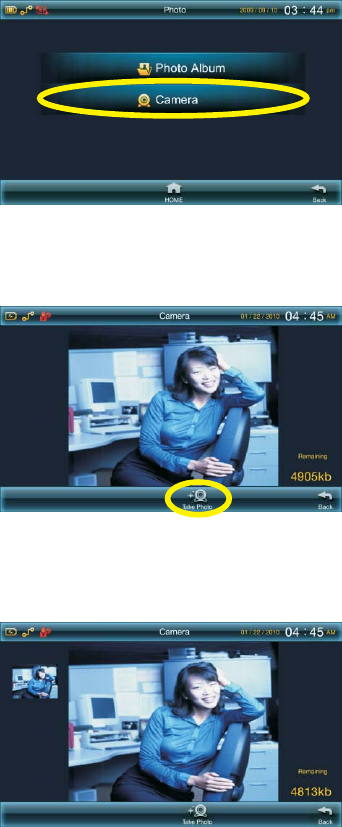
Capturing Photos
To capture photos, tap on the “Camera” tab in the Photo menu to
enter the snapshot window.
Tap on the “Take Photo” icon to capture the video in the snapshot
window and save the image as a photo.
The snapshot is listed on the left. You can browse the captured photos
in the “Photo Album” menu.
76
13. Weather
When connected to the Internet, the 8A10 can provide you
with the weather information of many cities in the world.
AMOR
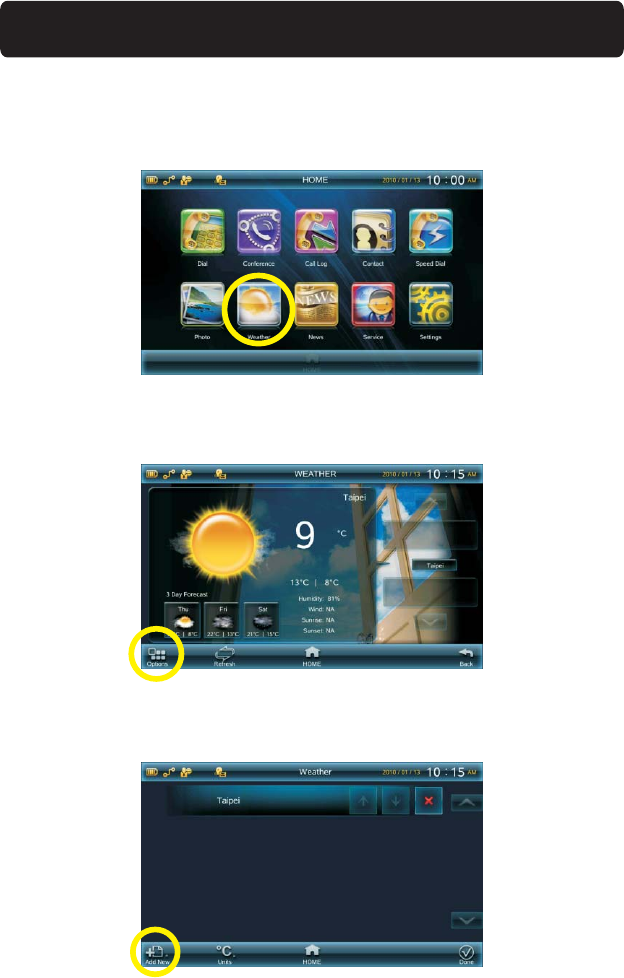
To see the weather information, tap on the “Weather” icon on the
Home screen.
The weather of your city and 3 days forecast are displayed.
To add new cities, tap on the “Options” icon.
Tap on the “Add New” icon.
77
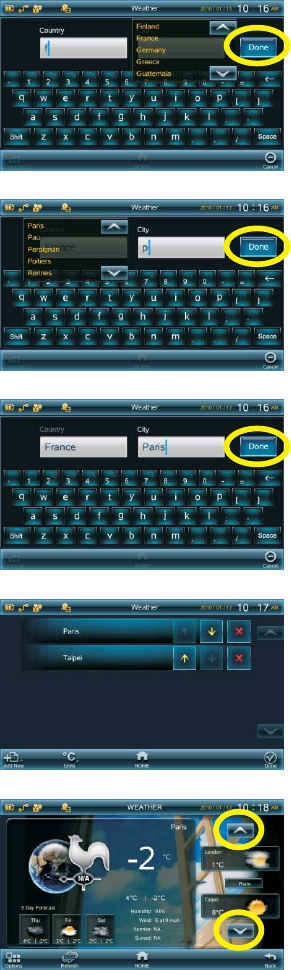
Type the name of the country.
When you type the initial letters,
the matching names are listed. Tap
on the country and tap on the
“Done” button to choose it.
Type the name of the city.
Likewise, when you type the initial
letters, the matching names are
listed. Tap on the city and tap on
the “Done” button to choose it.
Tap on the “Done” button to
confirm the city.
The city is added to the weather
list.
You can tap on the up and down
directional buttons to view the
weather information of the cities in
the list.
78
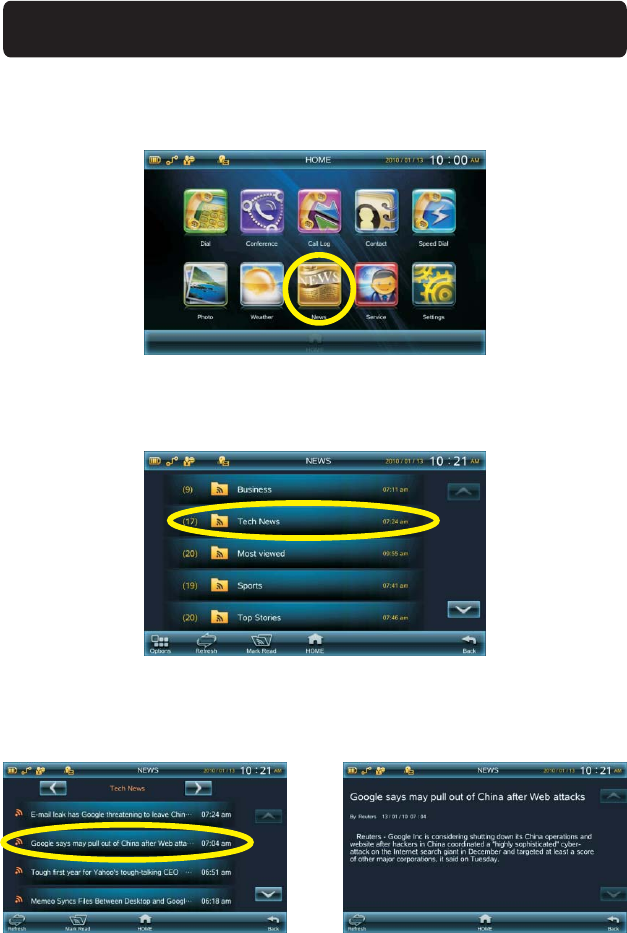
14. News
The 8A10 can also bring you the latest news from all over the
globe.
AMOR
To enter the News channel, tap on the “News” icon on the Home
screen.
News are classified in various categories. Tap the one you are
interested in.
The contents of the News are displayed.
79
AMOR 8A10 can also function as
an RSS reader, with which you can
constantly receive updates from
news sites or blogs without visiting
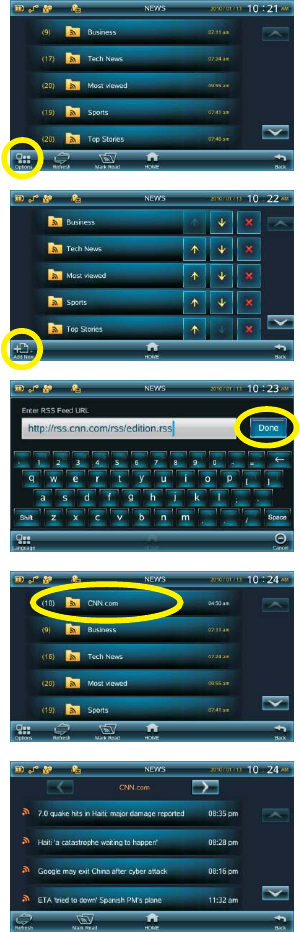
their web pages. To subscribe to
an RSS feed, tap on the “Options”
icon.
Tap on the “Add new” icon.
Enter the RSS Feed URL and tap
on the “Done” button.
After a short while, t
added to the News list.
he RSS feed is
Tap on the new tab and you will be
able to see the information from
the RSS feed.
RSS Reader
80
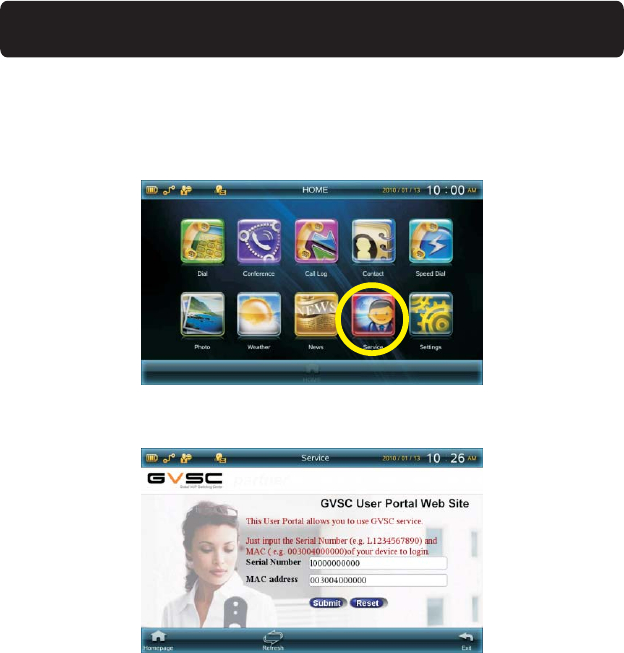
15. Service
Please consult your service provider for this function.
81

16. FCC Statement
This device complies with Part 15 of the FCC Rules. Operation is subject to the
following two conditions:
+This device may not cause harmful interference.
+This device must accept any interference received, including interference that
may cause undesired operation.
This equipment has been tested and found to comply with the limits for a Class B
digital device pursuant to Part 15 of FCC Rules. These limits are designed to
provide reasonable protection against harmful interference in a residential
installation. This equipment generates, uses and can radiate radio frequency
energy and, if not installed and used in accordance with the instructions, may
cause harmful interference to radio communications. However, there is no
guarantee that interference will not occur in a particular installation. If this
equipment does cause harmful interference to radio or television reception, which
can be determined by turning the equipment off and on, the user is encouraged to
try to correct the interference by one or more of the following measures:
+Reorient or relocate the receiving antenna.
+Increase the separation between the equipment and receiver.
+Connect the equipment into an outlet on a circuit different from that to which
the receiver is connected.
+Consult the dealer or an experienced radio/TV technician for help.
+Shielded interface cables must be used in order to comply with emission
limits. Changes or modifications not expressly approved by the party
responsible for compliance could void the user's authority to operate the
equipment.
82
Federal Communication Commission (FCC) Radiation Exposure Statement
This EUT is compliance with SAR for general population/uncontrolled exposure
limits in ANSI/IEEE C95.1-1999 and had been tested in accordance with the
measurement methods and procedures specified in OET Bulletin 65 Supplement
C.