Leadtek Research S202 Wi-Fi Smart Power Plug User Manual
Leadtek Research Inc Wi-Fi Smart Power Plug Users Manual
Users Manual
Leadtek S202
Wi-Fi Smart Power Plug
User Manual
Jun 29, 2016
2
Contents
FCC Statement............................................................................................................................................................ 3
Product Overview ...................................................................................................................................................... 6
Features ..................................................................................................................................................................... 6
Install APP .................................................................................................................................................................. 7
WiFi LED Indicator ...................................................................................................................................................... 8
Network Configuration ............................................................................................................................................ 10
APP Operation Instructions ...................................................................................................................................... 14
Frequently Asked Questions .................................................................................................................................... 26
Manual Update History ............................................................................................................................................ 30
3
FCC Statement
P 15.19(a)(3):
This device complies with part 15 of the FCC Rules. Operation is subject to the following two
conditions: (1) This device may not cause harmful interference, and (2) this device must accept any
interference received, including interference that may cause undesired operation.
15.105(b):
NOTE: This equipment has been tested and found to comply with the limits for a Class B digital
device, pursuant to part 15 of the FCC Rules. These limits are designed to provide reasonable
protection against harmful interference in a residential installation. This equipment generates, uses
and can radiate radio frequency energy and, if not installed and used in accordance with the
instructions, may cause harmful interference to radio communications. However, there is no
guarantee that interference will not occur in a particular installation. If this equipment does cause
harmful interference to radio or television reception, which can be determined by turning the
equipment off and on, the user is encouraged to try to correct the interference by one or more of the
following measures:
- Reorient or relocate the receiving antenna.
- Increase the separation between the equipment and receiver.
5
This device complies with Industry Canada licence-exempt RSS standard(s).
Operation is subject to the following two conditions:
(1) This device may not cause interference, and
(2) This device must accept any interference, including interference that may cause undesired
operation of the device.
Le présent appareil est conforme aux CNR d'Industrie Canada applicables aux appareils radio
exempts de licence.
L'exploitation est autorisée aux deux conditions suivantes:
(1) l'appareil ne doit pas produire de brouillage, et
(2) l'utilisateur de l'appareil doit accepter tout brouillage radioélectrique subi, même si le
brouillage est susceptible d'en compromettre le fonctionnement.
This device complies with RSS 247 of Industry Canada. This Class B device meets all the requirements
of the Canadian interference-causing equipment regulations.
Cet appareil numérique de la Classe B respecte toutes les exigences du Règlement sur le matériel
brouilleur du Canada.
6
Product Overview
Leadtek S202 Wi-Fi Smart Power Plug is a general 2.4 G WiFi (802.11 b/g/n) device we introduced. It
is designed for new home automation systems. It can be used in the Internet or Intranet. When it is
connected to network, users can use mobile APP to remotely control it from anywhere.
Features
Voltage/current/power consumption measurement.
Have four independent controllers to control three power sockets and USB ports.
Support wireless remote control.
Support smart network configuration.
Support up to 36 timer schedule tasks.
7
Install APP
For iOS Users:
Start App Store and key in "amor Power" to search and install the APP.
For Android Users:
Search "amor Power" in the app market to download and install the APP.
8
WiFi LED Indicator
WiFi Status Indicator
LED Indication
Description
Flashing (every 2.6s)
Smart configuration mode (factory default status)
iOS users can use "amor Power" APP to configure the device to the
remote control mode.
Flashing (every 0.5s)
Direct connection mode
The device SSID shows in the WiFi list of the mobile device. And users
can connect it directly through WiFi and control it. In this mode the
device is not connected to the WiFi Router, so it can't be controlled
remotely. You can enter the APP's device settings page to configure it to
the remote mode.
Flashing (every 0.2s)
The device is trying to connect to the Router.
On
Remote control mode. The device has been connected to the Router
successfully, and mobile APP can remotely control it anywhere anytime.

9
Socket On/Off Status Indicators
There are four On/Off status indicators for indicating the three common power sockets and a group
of 5V/1~2A USB ports.
LED Indication
Description
On
The power socket is turned on or the temperature function is enabled.
So the socket will automatically turn on or off when the preset temp is
reached.
Off
The power socket is turned off and the temperature function is
disabled.
10
Network Configuration
Smart Network Configuration
1. Make sure that the mobile device has been connected to a
WiFi Router. Start the "amor Power" APP and touch " " in
the device list page to enter the network configuration page.
2. Plug the device into the power socket, and make sure that
the WiFi indicator is slowly blinking. Then touch "Next".
If the indicator is not slowly blinking or you want to
reconfigure the device, please use the APP to reset it, or
replug it into the socket while holding down the first on/off
button and continue to hold it down for about 4 seconds
until the indicator turns off to reset it.
11
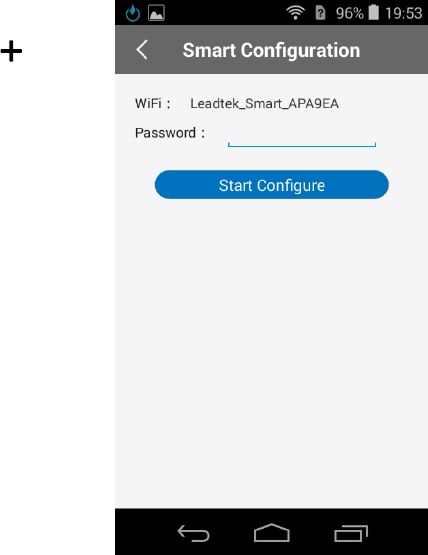
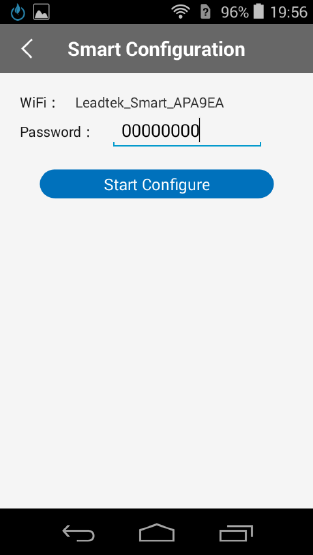
3. Type the current WiFi network's password and touch "Start
Configure".
4. When the success dialog box pops up, the device has been
connected to the same network with the mobile device, and
then you can use the APP to control the device remotely.
(When you configure multiple devices at the same time, if it
failed to configure someone, please reconfigure it in this
page.)

12
Configure via Direct Connection Mode
1. Plug the device into the power socket. Then hold down the on/off button for about 4 seconds
until the indicator turns off, and then release the button.
2. Make sure that the device is in the direct connection mode (flashing once every 0.5s). Touch
"Settings" -> "WiFi" of the mobile device, and then touch the device SSID to connect it. (Not
secured, SSID: S202xxxxxxxx, xxxxxxxx is the last eight characters of its MAC address.)
3. Start the APP, and it will automatically login the device.
Note: For iOS devices, it may take about one minute to connect the device for the first time.
Please start the APP after it displayer the " " icon.
4. In the home page, touch " " -> "Settings" -> "WLAN" and select the WiFi router and type its
password to configure it, and then it will automatically restart.
5. Connect your mobile device to the wireless network, and then you can use the APP to control the
device remotely.

13
Add New Device Which Has Been Configured
1. Connect the mobile device to the same router as the socket device.
2. Start the APP and touch " " in the device list page to search the device.
3. Touch the device name and type its password (default password is the last eight characters of its
default alias) to login it. After that, the device will saved in the Device List and can be controlled
through internet.
14
APP Operation Instructions
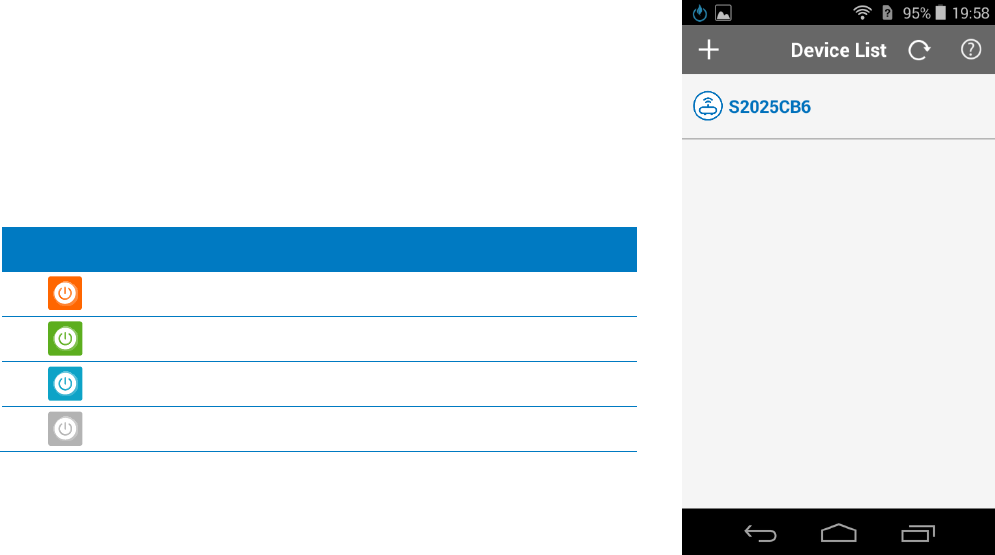
Device List
When you start the APP for the first time, it will enter the device
list page as right. This page is used to display both the new
devices in LAN and the saved devices for you to connect. You
can touch the online device to connect and operate it.
Devices with different status are shown in different color icons:
Icon
Status
Network
New?
Delay
Online
LAN
Yes
Short
Online
LAN
No
Short
Online
WAN
No
Long
Offline
Offline
No
--

15
✍
When login the new device in the local network, you have to enter its password.
Long touch the device alias (Android) or slide it to the left (iOS) to remove it from the device list.
Touch " " to refresh the device status in LAN.
Touch " " to view the online instructions. (Your mobile device must be able to access the Internet
first.).
16
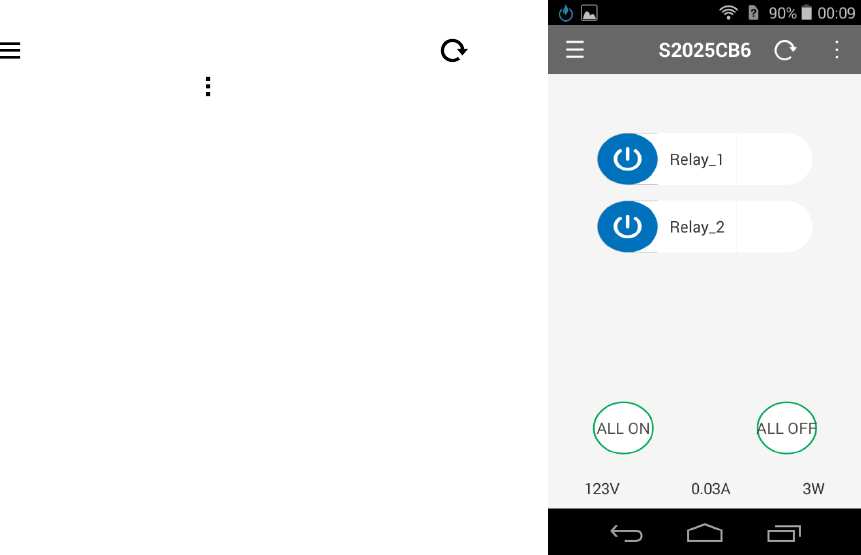
Home Page
Start the APP and login the device to enter the home page as
right. Touch " " to return to the device list page. Touch " " to
refresh the device status. Touch " " to enter the menu page.
Device name
The device alias (such as S2025CB6), which can be modified in
settings page.
Turn on/off
The four left circular buttons are used to turn on or off the three
power sockets and an USB port. The blue icon means the current
status is on and gray means off.
You can touch the socket name to modify its icon and alias.
The "ALL ON" and "ALL OFF" buttons are used to turn on or off
all of the four sockets.
Measurement
17
The value on the bottom means the voltage, current and power
consumption.
18
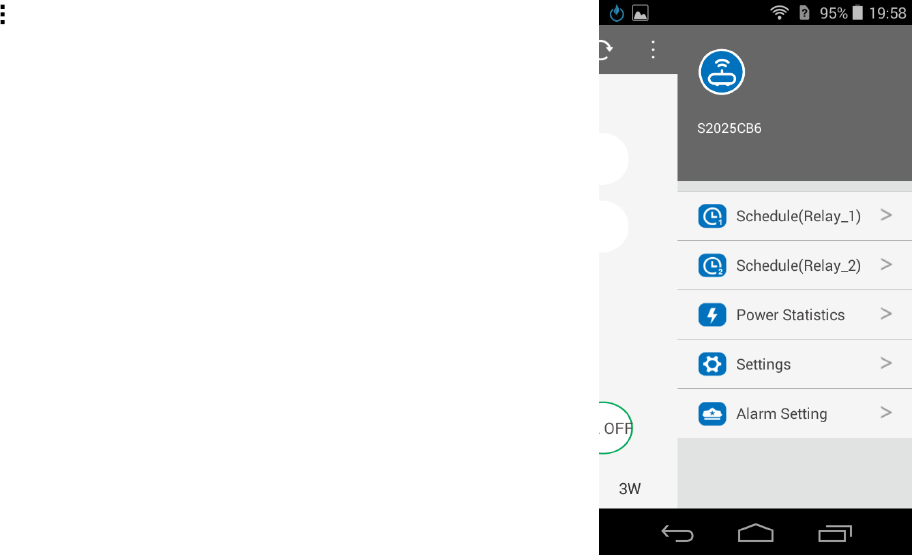
Device Menu
Touch " " to enter into the menu page (as right).
Schedule
Schedule (S1), Schedule (S2), Schedule (S3) and Schedule (USB)
are used to set the on/off time schedules for the four sockets.
S1/S2/S3/USB is the socket name and can be modified.
The total schedule number limit is up to 36.
Power Statistics
Calculate the total power consumption and power fee in the
specified interval.
Settings
Set the device, update firmware, set alarm temp and check
information.
19
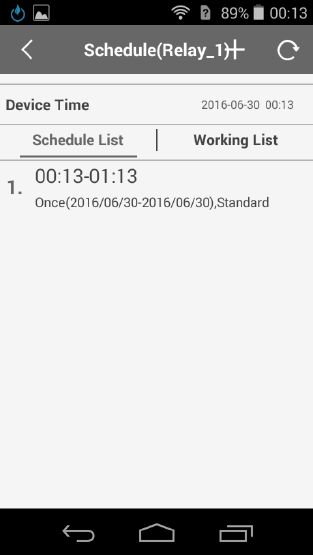
Schedule
Touch "Schedule" to enter the page as right. The page is used to
set the timer schedules, and then the device will turn on or off at
the specified time.
Device Time
Displays the current device time.
Schedule List
Lists all the schedules. Long touch or slide to the left to delete it.
Working List
It lists all the on/off time which will be executed today.
20
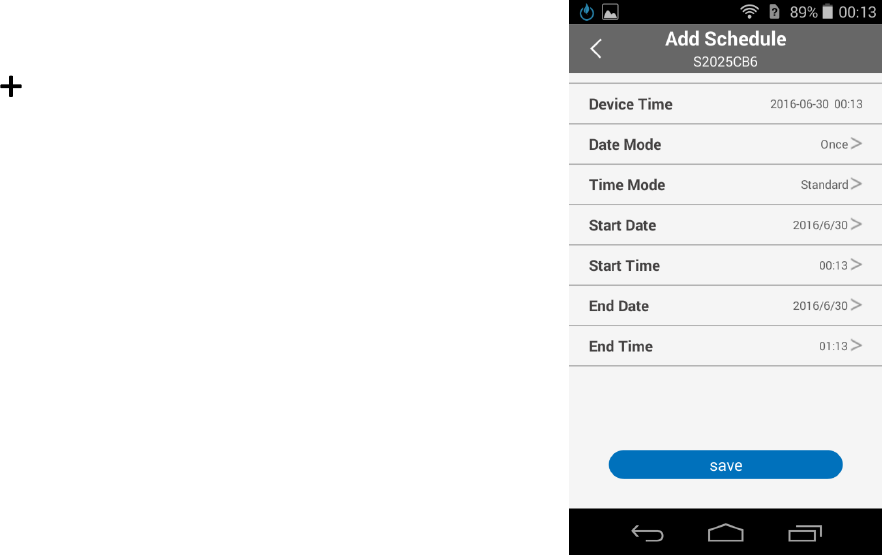
Add Schedule
Follow these steps to add new schedules:
1. Touch " " to enter the Add Schedule page (as right).
2. Select Date Mode: Once, Daily or Weekly. For once please
select Start Date and End Date. For weekly you must choose
the days in a week.
3. Select Time Mode: Standard or Sunup/ Sundown. Standard
means the local area time. Sunup/Sundown means sunrise
and sunset time.
4. Select Start Time and End Time. For Sunup/Sundown, you
have to select the time based sunup or sundown.
5. Enable or disable the temperature control: when enabled,
the device will turn on or off by temperature in the schedule
period.
6. Touch "Save" to add the schedule.
21
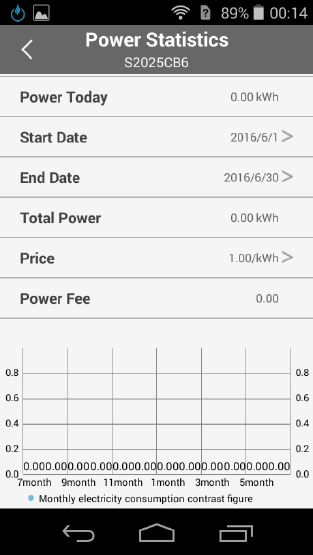
Power Statistics
Touch "Power Statistics" to enter the page as right. This page is
used to calculate the total power consumption and power fee in
the specified interval and display the power consumption for
each month within a year.
Select start date and end date, then it will automatically
calculate the total power consumption in the interval. And if you
key in the electric price, you will get the total electric fee.
22
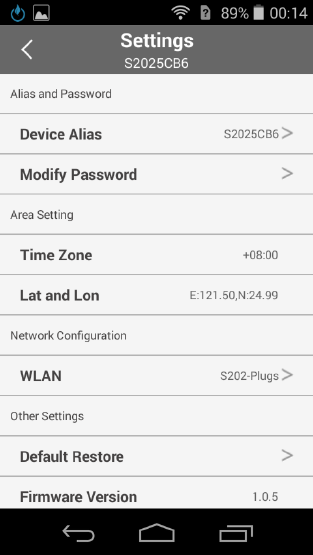
Settings
Touch "Settings" to enter the device settings page as right. It
includes alias/password setting, area setting, router setting,
default restore and firmware update, etc.
Alias and Password
Give the device new alias and connection password (default
alias: S2025CB6, default password is the last eight characters of
its default alias).
When finished, the device name in all APPs will be modified to
the new alias, and other APPs have to enter the new password
when connecting for the first time.
Area Setting
Displays the time zone and Lat & Lon. This setting affects the
actual on/off time of Sunup/Sundown schedule.
23
Network Configuration (Only available when connect directly)
Connect the device to Router so that you can control it via internet. And it can't be changed after
successful connection.
Default Restore
Touch to reset the device to its factory default settings.
Firmware Update(Only available when connect through LAN)
Touch this item to update the device's firmware version. Before update, please make sure that your
mobile device and the device are in the same router and can access the Internet.
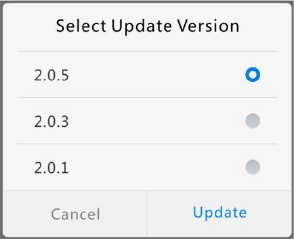
Follow these steps to update firmware:
1. Touch "Firmware Update" to check the new versions.
2. Select the update version in the news versions list as right, then
touch "Update". (It supports updating to lower version, and you
can get the change history in the Online Help page.)
3. The update process will last about 90 seconds, please don't
move or turn off the device during that.
4. When finished, it will pop up the success dialog box and the device will automatically restart,
then you can reconnect it to control. (If there is a failure warning, please redo the above steps.)
24
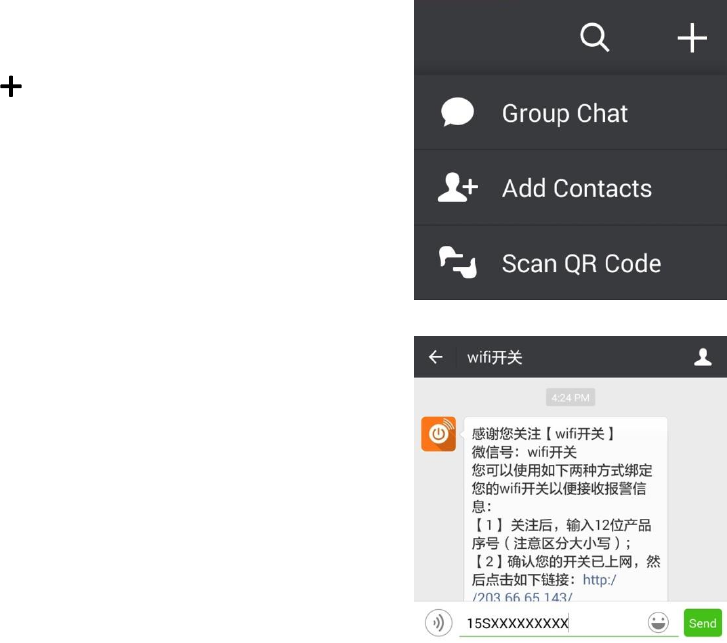
Temperature Alarm (reserved)
Follow these steps to enable the temperature alarm function:
1. Start "WeChat", touch " " -> "Add Contacts" and "wifi开关
" to search and follow it.
ff
2. Select one of the following methods to bind the device to
receipt the alarm messages.
(1) Enter the 12-digit product SSID and touch "Send".
(2) If the mobile and the device are connected to the same
router, touch the link in the dialog box to bind it .

25
3. Start the "amor Power" APP, Set the alarm temperature and
enable the temp alarm switch.
4. When the temperature reaches the preset value, it will send
the alarm message to all the WeChat accounts which
bound the device. For example, if the current alarm temp is
above 20°C, it will alarm when the socket temp is higher
than 20°C.

26
Frequently Asked Questions
What devices will work with the device?
The device works best with devices that have a physical power switch. Devices like lamps, heaters and
fans work great. However, devices with a digital interface, such as televisions, may not turn ON when
power is resumed and instead go into standby mode
What should I do if the local device isn't shown in the device list?
Made sure that your mobile device and the device are connected to the same router.
Try to touch " " on the Device List page to search the devices in LAN.
Try to exit the APP and restart it.
Unplug the device from the power socket and then plug it back in.
What should I do if the device in WAN is shown as LAN in the device list?
Try to exit the APP and restart it.
Unplug the device from the power socket and then plug it back in.
27
What should I do if the device in WAN isn't shown in the device list?
Made sure that your mobile device and the device can both access the Internet.
Try to exit the APP and restart it.
Unplug the device from the power socket and then plug it back in.
Delete the device from the Device List and then resave it in local network.
Why should I modify the connection password?
If you modify the connection password, other people will cannot control your device until they type
in the new password.

28
How to restore my device to its factory default settings?
There are two ways to perform a factory reset on your device, manually and through the amor Power
APP. Restoring your device will erase all the settings and set it back to factory defaults.
Restore through amor Power APP:
1. Start the amor Power and touch the device name you wish to restore.
2. Touch " " -> "Settings" -> "Default Restore".
To manually perform factory reset on your device, follow these steps:
1. Unplug your device from the power socket.
2. Hold down the first on/off button (labeled at the top).
3. While holding the button down, plug it back in and continue to hold the button down for about 4
seconds until the indicator turns off.
4. Release the button.

29
How to update firmware?
1. Connect your mobile device and the device to the same router, and make sure that it can access
the Internet.
2. Start the amor Power APP and connect the device.
3. Touch " " -> "Settings" -> "Firmware Update" to check the new versions.
4. Select the update version in the news versions list as right, then touch "Update". (It supports
updating to lower version, and you can get the change history in the Online Help page.)
5. The update process will last about 90 seconds, please don't move or turn off the device during
that.
6. When finished, it will pop up the success dialog box and the device will automatically restart, then
you can reconnect it to control. (If there is a failure warning, please redo the above steps.)
How to change the router?
First reset your device manually and through the amor Power APP, and then connect the device
through WiFi and set to the other router.
30
Manual Update History
===============================================
2016.02.23
1) Modified some UI images.
2) Firmware version: V2.0.8 or above;
Android APP version: V2.1.1 or above;
iOS APP version: V2.1.7 or above.