Lee Technology Korea LTK-1000 Pager Transmitter User Manual LTK1000 2
Lee Technology Korea Co., Ltd. Pager Transmitter LTK1000 2
Users Manual

LEETEK Model LTK-1000
Transmitter
Operating Manual
.
R020420

LEETEK
- -
2
TABLE OF CONTENTS
1. Warranty ...............................................................................................................................3
2. LEETEK Sales and Service Office ..........................................................................................4
3. Appearance and Accessory Check .........................................................................................4
4. Operating Environment ..........................................................................................................5
5. Storage and Shipment ...........................................................................................................5
6. Specifications ........................................................................................................................6
7. Key Function .........................................................................................................................7
8. Operation Procedure ..............................................................................................................9
9. Function Key Operation.........................................................................................................11
10. Remote Operation Using PC ...............................................................................................12
11. PC Control Using Communication Program .........................................................................12

LEETEK
- -
3
WARRANTY
LEETEK Warrants that this product will be free from defects in materials and workmanship for a period
of one year from the date of shipment. During the warranty period, LEETEK Company will, at its
option, either repair or replace products that prove to be defective.
For warranty service or repair, Customer must notify LEETEK of the defect before the expiration of the
warranty period and make suitable arrangements for the performance of service. Customer shall be
responsible for packaging and shipping the defective product to the service center designated by
LEETEK. Customer shall prepay shipping charge to LEETEK designated service center and LEETEK
shall pay shipping charge to return the product to customer. If customer is located outside of Korea
and returning it to LEETEK for the service, customer is responsible for all shipping charges including
freight, taxes, and any other charge.
This warranty shall not apply to any failure or damage caused by improper use or unauthorized
service. In such cases, LEETEK may refuse to furnish service under the warranty.
LEETEK
- -
4
LEETEK Sales and Service Office
If you have a problem with your Pager Transmitter, call or write to our Technical Support specialists.
Product Support
LEETEK Company Limited
TEL : 82-32-678-8605~6 FAX : 82-32-682-8605
E-mail : leetek2001@yahoo.co.kr
#24-2 Samjeong-dong, Ojeong-gu, Puchon-city, Kyunggi-do, Korea.
Appearance and Accessory Check
When Pager Transmitter is delivered, check for damage in appearance that could have occurred
during its transportation.
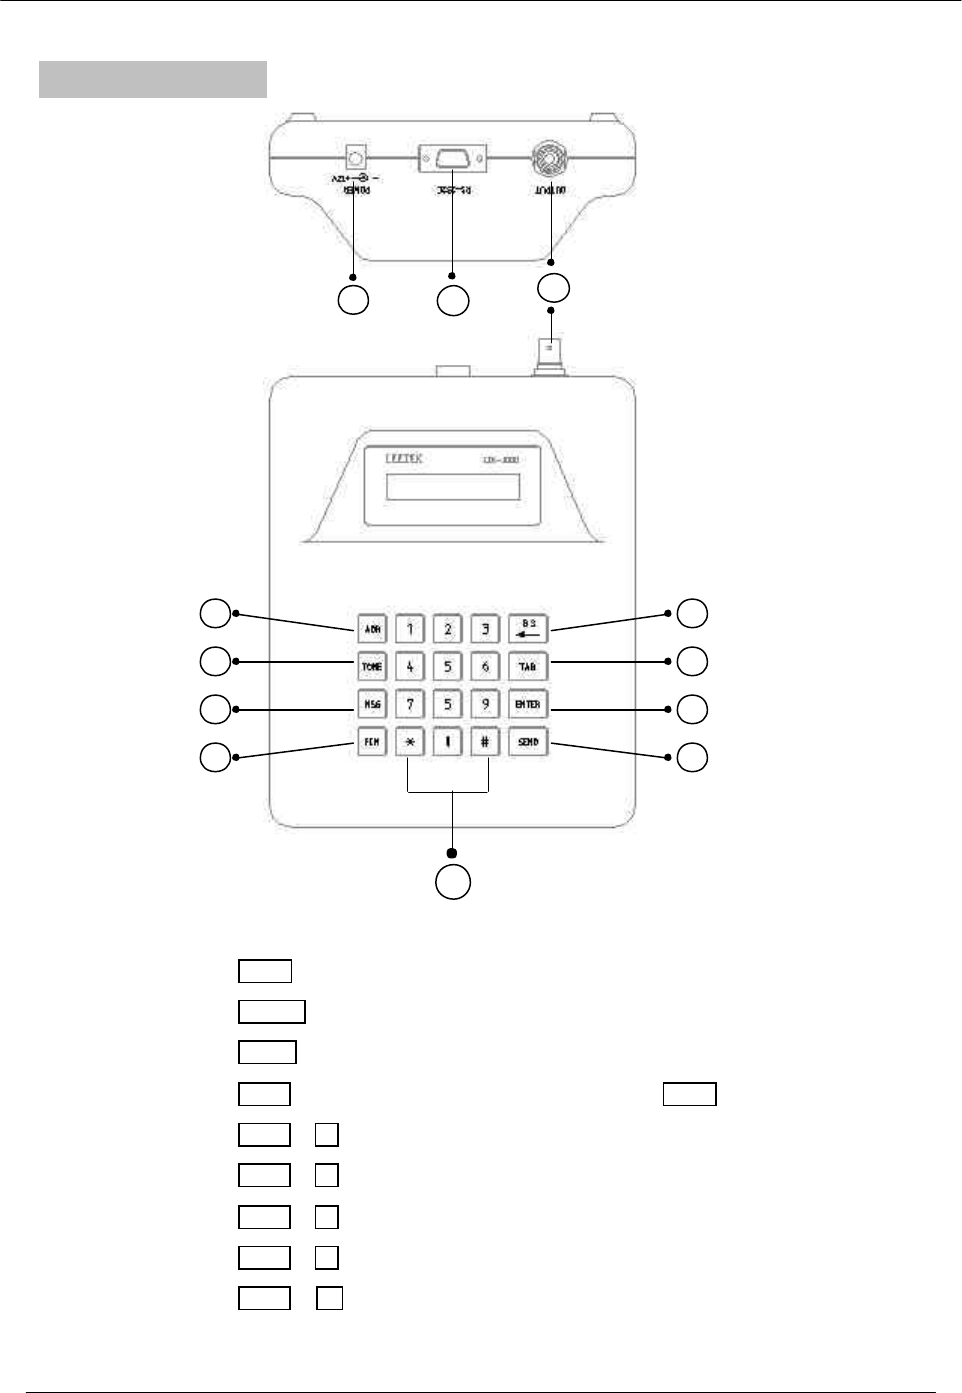
Next, check for the standard accessories, table below, supplied with Pager Transmitter.
Operating Environment
Refrain from using this equipment in a place subject to much vibration, direct sunlight, and where
corrosive gas is generated. Also, do not use it where the ambient temperature is outside -10 °C to
50 °C and relative humidity is more than 85%.
Storage and Shipment
Storage
The storage temperature range for this equipment is –20 °C to 70 °C. When this equipment
is not used for a long period of time, covered with vinyl or placed in a cardboard box, store it
in a dry place away from direct sunlight.
Shipment
When shipping this equipment, use the original packing materials. If they are not available,
pack the equipment as follows :
NO. Name Specification Q’ty
1Adapter DC 9V, 1A 1
2RS-232C Connection Cable 2m D-SUB 9S-9S 1
3Antenna Helical 1
4Operating Manual 1

LEETEK
- -
5
a. Wrap this equipment, in appropriate shock absorbing materials and put it in a
corrugated cardboard box at least 5 mm thick. (If shipping to a LEETEK Service
Office, attach a tag indicating the type of service required, return address, model
number and full serial number.)
b. Wrap its accessories separately in the same shock absorbing material and put
them in the same corrugated cardboard box together with this equipment.
c. Fasten the corrugated cardboard box with packing strings.
d. Mark the shipping container FRAGILE to assume careful handing.
CAUTION : Never use any cleaner other than alcohol for the maintenance of this equipment. Organic
solvent such as benzene, toluene or acetone may spoil the plastic parts of this equipment.
CAUTION:
Changes or modifications made to this equipment not expressly approved by
LEETEK Company Limited may void the FCC authorization to operate this
equipment.
RF Radiation Exposure
This equipment complies with FCC RF radiation exposure limits set forth for an
uncontrolled environment. This equipment must be installed and operated with a
minimum distance of 20 centimeters between the radiator and your body.

LEETEK
- -
6
Specification
Carrier Frequency:
457.575MHz +/-200Hz
Stability : +/-1.5ppm -10? to 50?, +/-1.0ppm/year Aging
FM Modulation:
Deviation: 4.5kHz
FM Accuracy: +/-5% 4.275 < 4.5 < 4.725 kHz
Data Rate: 1200 BPS à 600Hz +/- 5Hz
512 BPS à 256Hz +/- 5Hz
Residual FM: Less than 5Hz, 300Hz HPF and 3kHz LPF
RF Output: 26dBm +/-1dB Maximum (0.4W )
Message: Numeric, 7digit Maximum
Address Range: 0000008-0009992 .capcode 7 figure (increase multiple of 8)
Frequency and data rate setting: Through RS-232C connector. Computer program is included.
Address Abbreviation: Pager Addresses are shortened to 3 digit through RS-232C connector.
Computer program is included.
RF ON/OFF: RF is ON only during the message transmission, ADDRESS entered and SEND key
pressed.
Power: DC 9V, 1A, AC Adapter
Dimension: W(170) x D(210) x H(67)
Weight: 0.7kg
LEETEK
- -
7
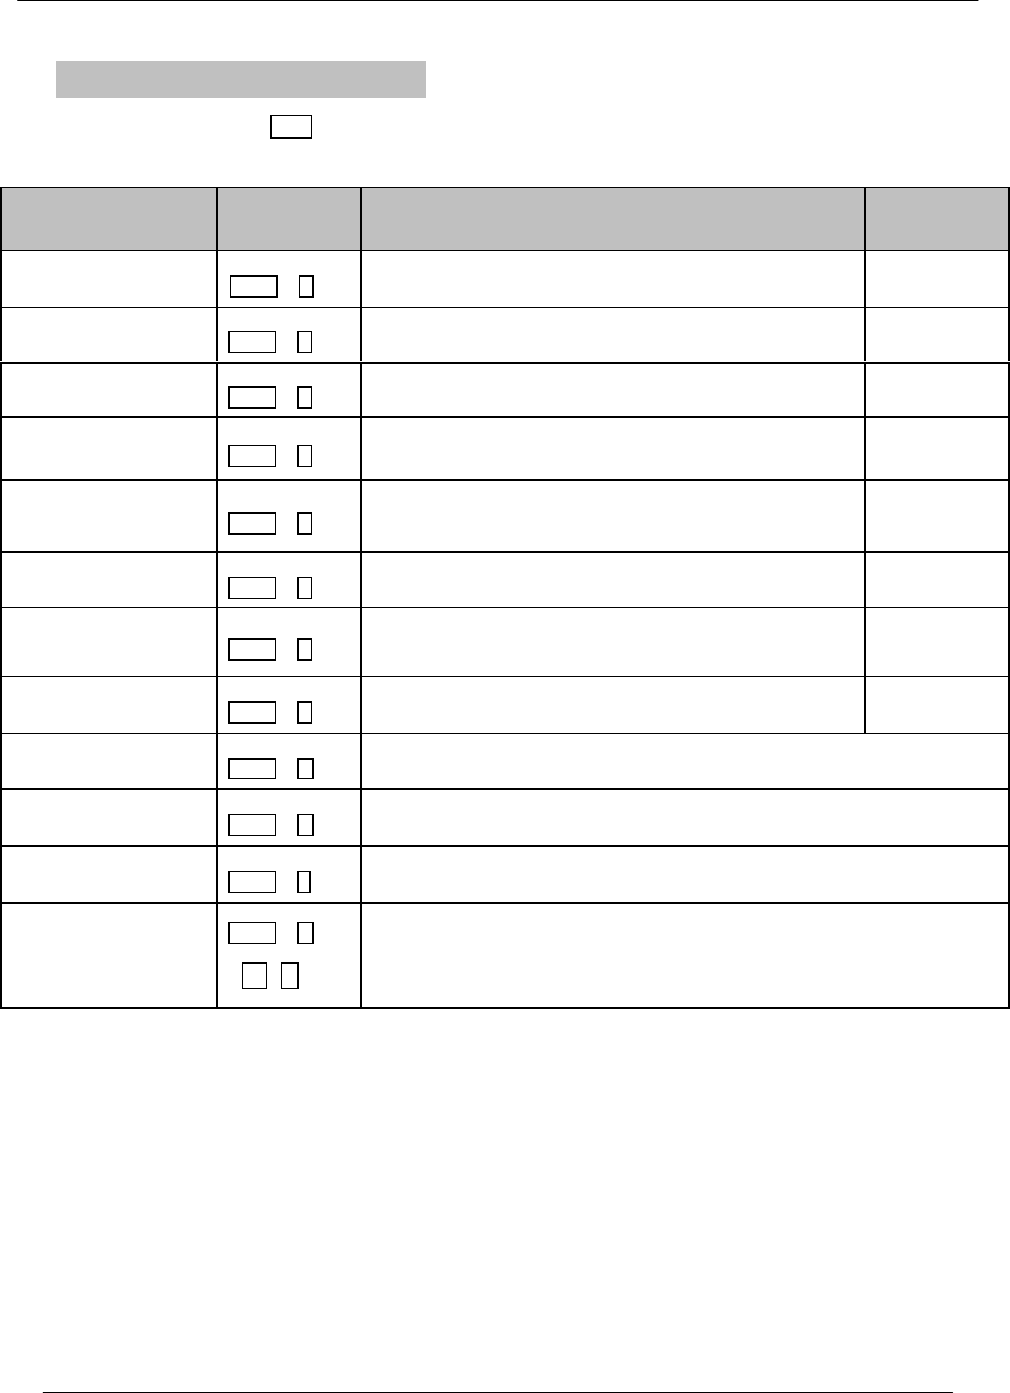
Key Functions
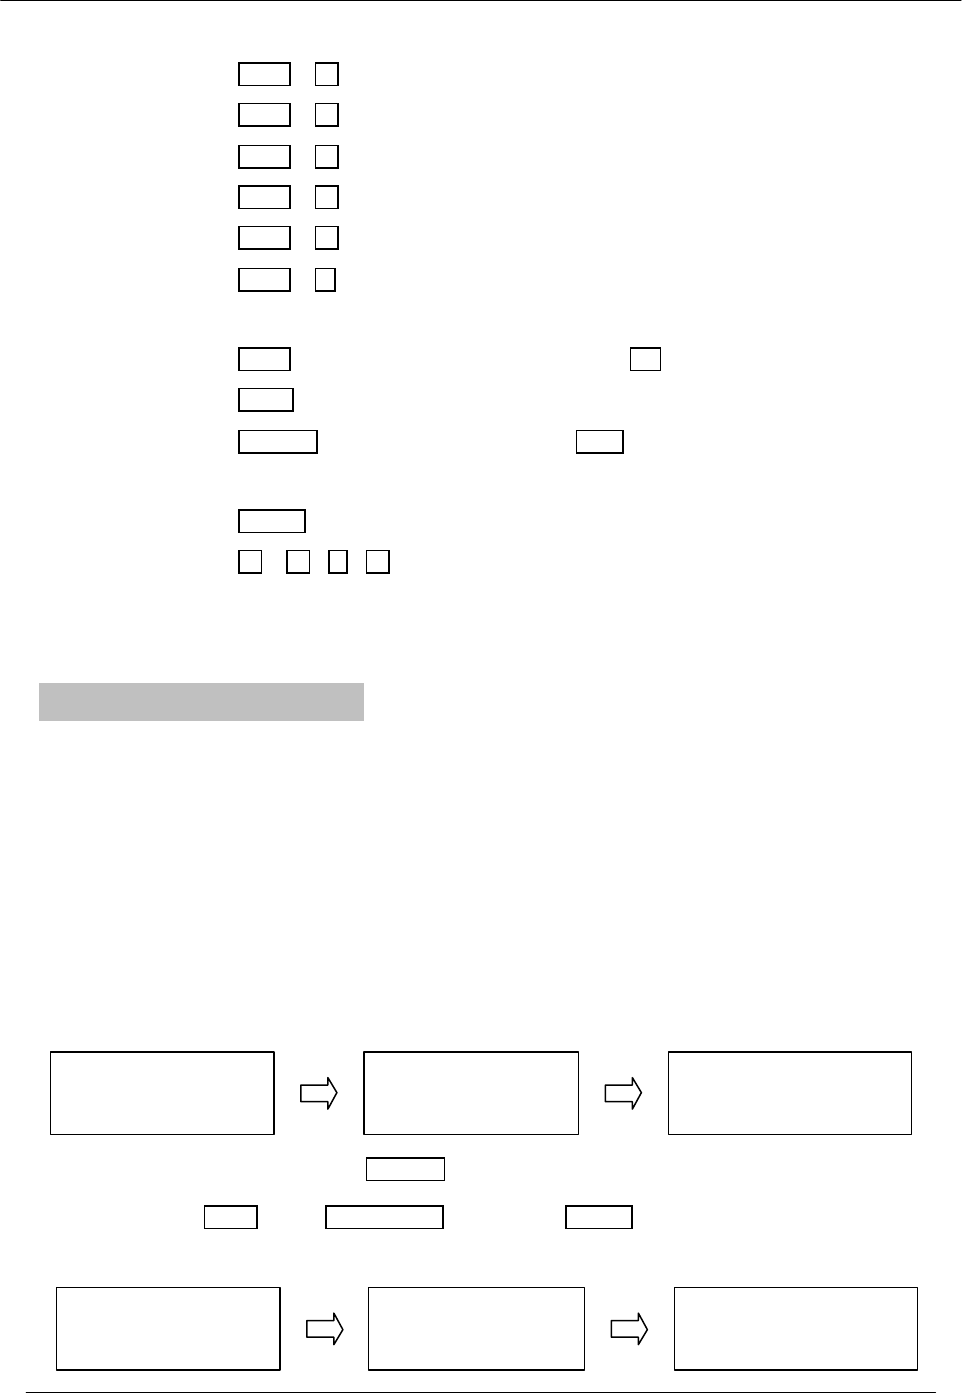
1 DC Input Connector ( 9V Adapter Input )
2 RS-232C Connector (Used for PC connection)
3 RF Output (Connect to Helical Antenna)
4 ADR : Address (CAP Code) entry mode. ( 0 ~ 1248 )
5 TONE : Alert Tone entry mode. ( A, B, C, D )
6 MSG : Message entry mode. (24 digits max )
7 FCN : Access 2nd key Function of a key when FCN key is pressed first.
FCN + 1 : Select “Pulse Vibe 1sec On(3times) 5sec Off 1n Cycle” Mode
FCN + 2 : Select “Flashing Lights & Beep( 10sec Only )” Mode
FCN + 3 : Select “Vibe & Flashing 1sec On(3times) 5sec Off in Cycle” Mode
FCN + 4 : Select “Flashing Lights Only” Mode
FCN + 5 : Select “Flash & Vibe & Beep 1sec On(3times) 5sec Off in Cycle”
Mode
1
3
8
9
10
11
4
5
6
7
12
2
LEETEK
- -
8
FCN + 6 : Select “Out of Range: On” Mode (Pager Mode)
FCN + 7 : Select “Out of Range: Off” Mode (Pager Mode)
FCN + 8 : Sleep Mode all “Off”
FCN + 9 : Select “Out of Range On/Off” Mode (Transmitter Mode)
FCN + 0 : Set value “Transmitter Interval(Out of Range)” 01~15 sec
FCN + * : Select “baud rate 1200/512 BPS”
8 BS : During numeric entry from key pad, ï key works as Back Space.
9 TAB : Move the parameter
10 ENTER : During numeric data entry, Enter key completes the data entry.
If the key is pressed other times, it works as the Send key.
11 SEND : Completes the data entry and start data transmission.
12 0 ~ 9 , * , # : Data input keys
Operation Procedure
LTK-1000 allows and PC RS-232C control. RS-232C operation is explained in chapter 10, page 12.
In remote mode, the front panel operation is not available. The front panel operation use : 1) direct
key entry of numeric data and functions, 2) Tab, and 3) Back Space
Step 1. Power On and Entering Address
Connect the Power Adapter to AC outlet, and DC output connector of the Adapter to LTK-1000 rear
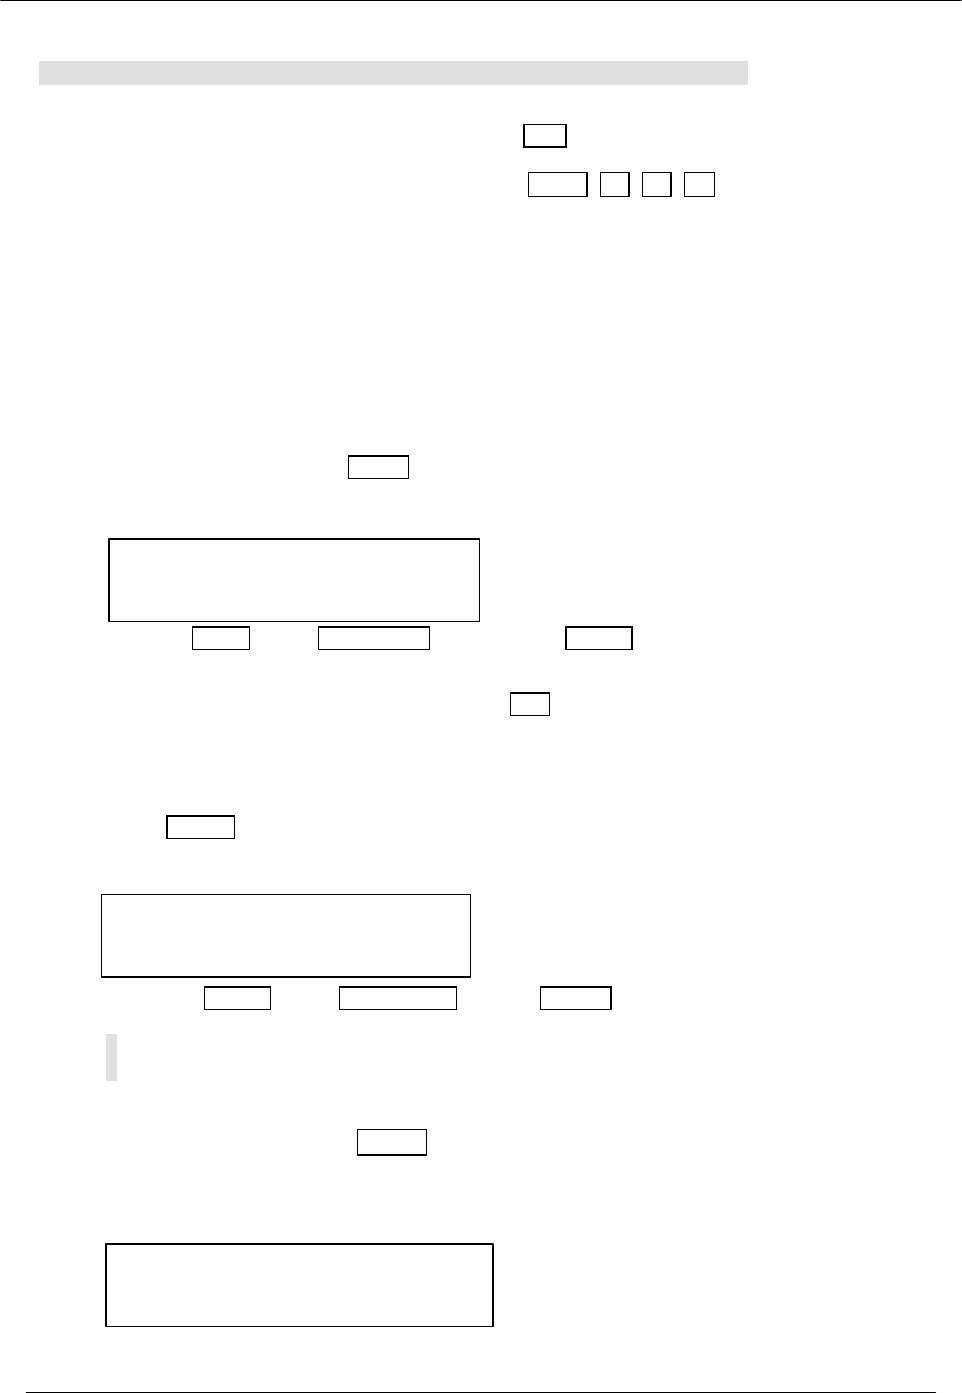
panel DC input connector. When the power is connected to LTK-1000 the system will display the
following.
The cursor invites you to enter a pager address (this is any number between 0000 and 1248). Enter 4
digit receiver unit address and press ENTER .
1) Press ADR key + Number keys (Address) + ENTER Key.
2) Address Range : 0000 ~ 1248
Individual ID :
> 0001
Transmitter ENG
LTK-1000
LEETEK
Date: 2002-xx-xx
ROM VER
No. :
A1. x
Out of Range ID :
> 0001
Individual ID :
> 0001 Group Call ID :
> 0001
LEETEK
- -
9
Use Tab key to set ID Mode . If LTK-1000 power is initialized, Individual ID Mode
l When select “Out Of Range ID” Mode, don’t access “Signal Transmitting”
Note: While entering numeric data from the key pad, BS Key deletes 1 digit. Actually, the receiver
unit address is 7 digits. 3 digits from the front is “fixed address”, which can be used “Receiver group
index”. You can change “Fixed address” by pressing FCN + # + 8 + 0 . Refer to “Function Key
Operation”, page 14.
Step 2. Entering Message
After selecting the address, press MSG . The screen will now prompt for you to enter a message of
up to 24 digits, including the spaces.
1) Press MSG key + Number key ( Message ) + ENTER Key.
2) Message Max. Length : 24 digits
Note: While entering numeric data from the key pad, BS Key deletes 1 digit …
Step 3. Alert Tone ( Tone Type: A, B, C, D )
After pressing TONE , the following screen appears to offer the selection of the tone types. Again, the
cursor invites you to enter a selection, 0 thru 3.
1) Press TONE key + Number key (0~3 ) + ENTER
2) 0 = A, 1 = B, 2 = C, 3 = D
Step 4. Sending Message
After entering the message, press SEND to send the message. The call will now be transmitted to
the receiver unit. Following display will appear on screen during the message transmission.
BEEP TYPE ( 0 ~ 3 ) :
> A
Sending Message
Please wait
Message:12345678
9012345678901234
LEETEK
- -
10
Function Key Operation
Function Selection Key, FCN key + Number Key select a function.
Function Key Description Sending
Message
Pulse Vibe 1SEC FCN + 1Pulse Vibe 1sec ON(3 times) 5sec OFF in Cycle 9292
Lights and Beep FCN + 2Flashing Lights and Beep(10 Sec Only) 9595
Vibe and Lights FCN + 3Vibe and Flashing 1sec ON(3 times) 5sec OFF in Cycle 9696
Lights Only FCN + 4Flash Lights Only 9797
Lights, Vibe, Beep FCN + 5Flashing and Vibe and Beep 1sec ON (3 times) 5sec OFF in
Cycle 9898
Out of Range “ON” FCN + 6Out of Range “ON” ( Pager Mode ) 9494
Out of Range “OFF” FCN + 7Out of Range “OFF” ( Pager Mode ) 9393
Sleep Mode FCN + 8Sleep Mode all “OFF”99
Out of Range ON/OFF FCN + 9Select “Out of Range ON/OFF” (Transmitter Mode)
Repeat Time : XX FCN + 0Set Value “Transmitter Interval 01~15 sec” (Transmitter Mode)
Data Rate 1200/512 FCN + *Select “Baud Rate 1200/512 BPS” (Transmitter Mode)
Group Index
(Fixed Address)
FCN + #
+ 8 + 0
Select Group Index (Fixed Address, 3 digits from the front of “Full address”).
Receiver full address: xxx (fixed address) + xxxx
LEETEK
- -
11
Remote Operation Using PC
LTK-1000 supports high speed RS-232C serial interface for remote operation under PC control. A
standard 9-pin RS-232C connector is located at the left side. Any communication program (such as
WINDOW 95/98 Hyper Terminal) could be used for simple tasks. Complex tasks can be automated
using PC programming.
Remote/Local mode
Control Mode can be changed by RS-232C command, “REMOTE” or “LOCAL”.
- Remote Mode: RS-232C PC Control is only available. Front panel control is not allowed to
operate LTK-1000.
- Local Mode: Both operation methods are available. If LTK-1000 power is initialized, Control Mode
is set to Local Mode.
RS-232C Connection
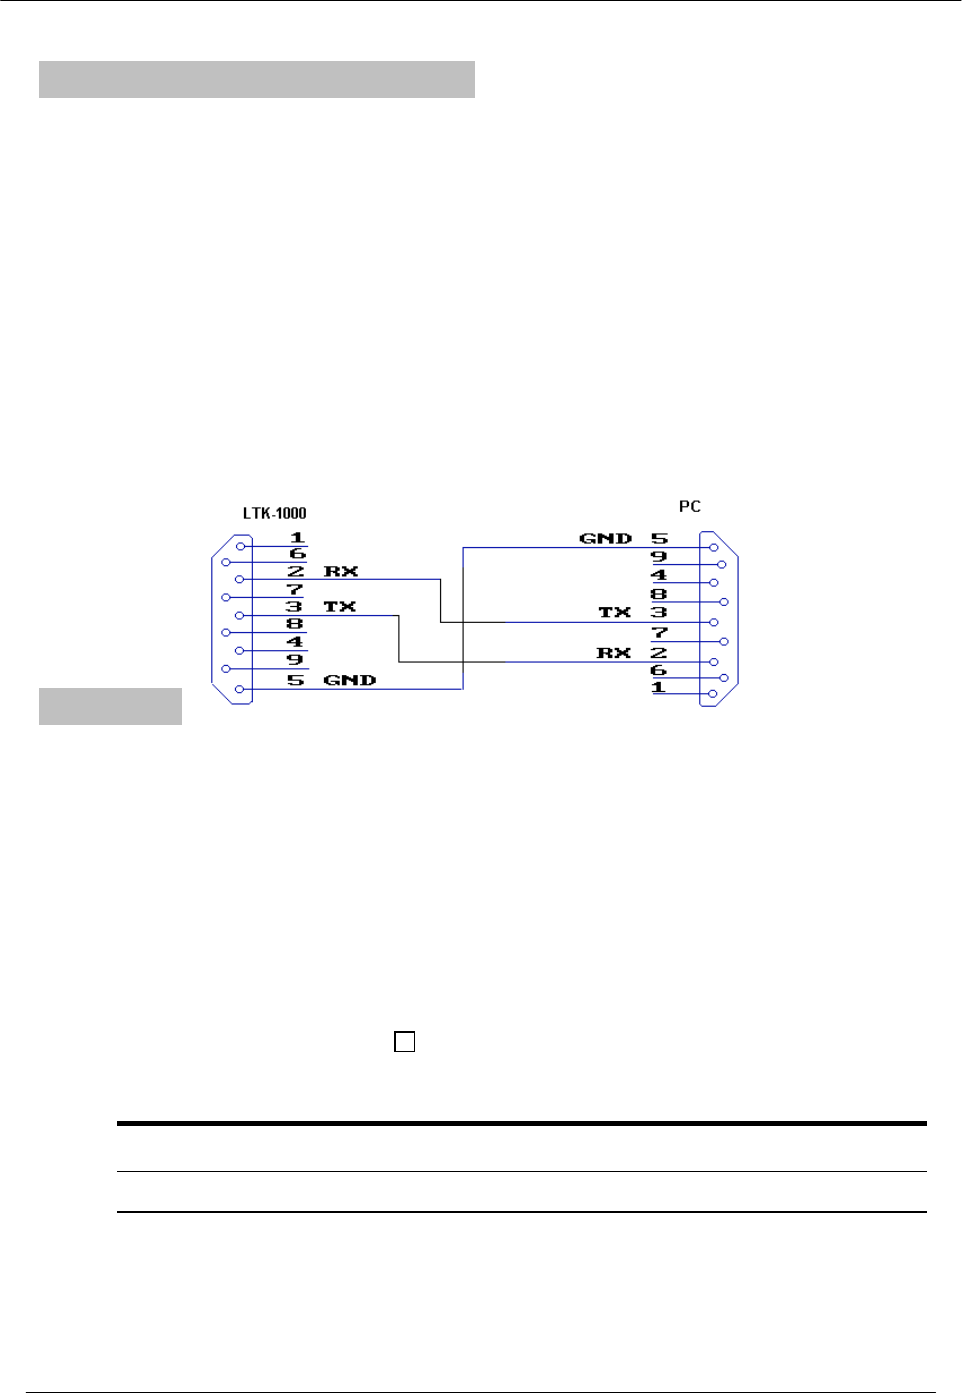
A 9-pin standard connector is used in the LTK-1000 for a RS-232C connection. To make a
connection to the 25-pin RS-232C connector, a 9-pin to 25-pin adapter can be used. The cable pin
configuration is shown below.
RS-232C Connection
PC Control Using Communication Program
Windows 95/98 Hyper Terminal
1. PC Setup
A. Check for the Hyper Terminal installation on your PC. Click Start → Program → Accessories
→ (Communications). If Hyper Terminal folder is not found in the Accessories list, it must be
installed. Insert Windows 95 or 98 CD ROM and install Hyperterminal program.
B. Start Hyper Terminal: Click Start → Program → Accessories→ (Communications) and then
click “Hyper Terminal”.
C. On “Hyper Terminal” screen, double click “Hypertrm” icon.
D. In “Name” block, on “New Connections” screen, enter “LTK1000”. Select a desired icon and
click “OK”.
E. On “Connect To ” screen, click “u” in “Connect Using:” block, select “Direct to COM1” and
then click “OK”.
F. On “COM1 Property” screen, select as following. And then click “OK”.
Bits per Second Data bits Parity Stop bits Flow control
9600 bps 8 bit None 1 bit None
G. Click “FILE” on menu bar and select “Property”. You should see the “LTK-1000 Properties”
screen. Select “Setting” tab. Click “ASCII Setup” button and check “Echo typed characters
locally” and click “OK”. Click “OK” again.
2. LTK-1000 Remote Control.

LEETEK
- -
12
A. Connect 9 pin D type RS-232 cable between PC COM 1 port and LTK-1000.
B. Turn LTK-1000 power on.
C. Type in a RS-232 command (Ex: “Remote”) on “LTK-1000 Hyper Terminal” screen and press
Enter on PC keyboard. LTK-1000 returns “OK” or Error Data signal.
Programming in Windows 95/98
1 Programming Procedure
A. Port select(COM1-COM4)
B. Set-up Baud Rate(9600 bps), Parity Bit(None), Data Bit(8 bit), Stop Bit(1 bit)
C. Open selected COM Port.
D. Send RS-232C Command string to the COM Port.
E. Wait until the response data is received.
F. When confirmed, send the next command
NOTE: Another option is to program sufficient wait time between commands
2 Command and Response Message
l LTK-1000 returns the response message (Response Data + $0A + $0D) after some delay.
l In case of error, LTK-1000 returns the error message (Error Data + $0A + $0D).
Error Data List
Error Data Description
ERR10 Syntax error
ERR20 Out of range
3 Commands
ID xxxx OK Address
MSG xxxxxxxxxxx…OK Message
LOCAL OK Local Mode
REMOTE OK Remote Mode
RS-232C Commands
4 Programming Example
The following examples are written in Visual Basic.
Example 1) Set REMOTE mode
Private Sub Form_Load()
MSComm1.Rthreshold = 1
MSComm1.CommPort = 1 ' select COM1
MSComm1.Settings = "9600, N, 8, 1"
` Baud Rate(9600 bps), Parity Bit(None), Data Bit(8 bit), Stop Bit(1 bit)
MSComm1.PortOpen = True ' Open Com Port.
MSComm1.Output = "REMOTE" + Chr(13) ` send command .
MSComm1.PortOpen = False ` Close Com Port.
End Sub
RS-232C Commands Response Data Description

LEETEK
- -
13
Example 2) Check "OK" is received in input Buffer
Private Sub MSComm1_OnComm()
` Triggers when TX or RX event occurs
If MSComm1.CommEvent = 2 Then ` event in input Buffer
Text1.Text = MSComm1.Input ' read the input string and check later if it is “OK”
End If
End Sub