Lee Technology Korea LTK-UP1 ULTRASONIC DEVICE User Manual
Lee Technology Korea Co., Ltd. ULTRASONIC DEVICE
USERS MANUAL

SCUBuzz (LTK-UP1)
OPERATION MANUAL
Warning: Changes or modifications made to this equipment not expressly approved by LEETEK
may void the FCC authorization to operate this equipment.
LEE TECHNOLOGIES KOREA CO.,LTD
FCC ID : QBTLTK-UP1
Trade Name : ScuBuzz
Model No. : LTK-UP1
THIS DEVICE COMPLIES WITH PART 15 OF THE FCC RULES.
OPERATION IS SUBJECT TO THE FOLLOWING TWO CONDITIONS :
(1) THIS DEVICE MAY NOT CAUSE HARMFUL INTERFERENCE, AND
(2) THIS DEVICE MUST ACCEPT ANY INTERFERENCE RECEIVED,
INCLUDING INTERFERENCE THAT MAY CAUSE UNDESIRED OPERATION.
TABLE OF CONTENTS
1. DESCRIPTION
2. SPECIFICATION
3. TO TURN SCUBUZZ ON
4. SETTING THE SCUBUZZ ID
5. SETTING THE SCUBUZZ ALARM
6. SENDING INDIVIDUAL BUDDY PAGES
7. SENDING TEAM PAGES
8. LIMITED WARRANTY
*. NOTIFICATION

1. DESCRIPTION
2. SPECIFICATION
• Waterproof to 150 ft (45m)
• Communication range 90ft (27m) radius
• Operates in the 37K-200KHz band
• Long - life Replaceable Battery
• 30 different ID codes / 10 Group Codes
• 3 Countdown Timers w/ Alarm
• Vibration and Visual Alert
3. To TURN SCUBUZZ ON
Note: SCUBuzz comes with batteries installed.
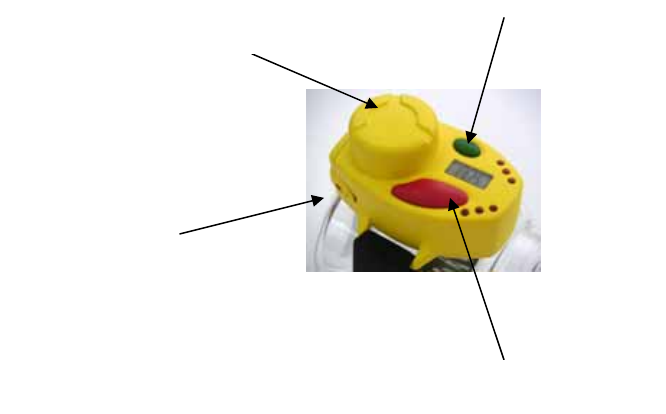
- To turn the pager on, press and hold the A (small) button for 3 seconds. ---The pager will
vibrate and the lights will come on. After the pager stops vibrating it will display the battery
indicator. This will also indicate that the pager is operational.
*b5+ – battery is full & operational
*b4-b2 – pager will function but the battery needs replacement soon
B(Large) Button
A(Small) Button
Ultrasonic Module
Battery Compartment
*b0-b1 & lights blinking – unit may not operate properly & the battery requires replacement
4. SETTING THE SCUBUZZ ID
Each pager needs to be programmed to the same ID as it’s buddy so they may communicate
without interfering with other SCUBuzz users nearby. You can program individual ID’s so two
buddies can communicate as well as a team ID so a group of divers can communicate if needed.
- Press and hold the A & B button for 3 seconds (3 lights will blink in sequence) to enter
programming mode.
- The SCUBuzz ID consists of 4 numeric digits. The first 2 digits are the individual ID (01-30)
and the last 2 digits are the Team ID (81-99).
- Change the first digit by pressing the A button. After the desired ID is set press the B button
to scroll to the next digit.
- After setting the 4 digit numeric ID, press and hold the A button for 3 seconds to save the ID.
- Complete the same process for the buddy pager using the same ID numbers.
5. SETTING THE SCUBUZZ ALARM
SCUBuzz has 3 timer alarms (A1-A3) that you can set to alert you at certain intervals.
- Press the A & B buttons simultaneously. The display will show the first alarm setting “A100”.
A1 is used to set alarm 1 and the last 2 digits (00) are the alarm time in minutes.
- To set the time (in minutes), press the A button. Minutes are set in the multiples of 5. For
example if you want the alarm to be set for 1 hour the display should show “A160”.
- Once the alarm setting is set, press the B button to save it. The display will show the 2nd
alarm setting (A200). Complete the same procedure as above to set the minutes. NOTE: If
you only care to set one alarm, press the B button twice to skip the next 2 next alarms(A2 &
A3).
6. SENDING INDIVIDUAL BUDDY PAGES
- Press and hold the B button for 2 seconds (one light will illuminate). All pagers within range
that have the same ID (individual) will light and vibrate. -The alert will continue for 2 minutes
or until cancelled.
- To cancel the page on the receiving SCUBuzz, press the B button once.
7. SENDING TEAM PAGES
- Press and hold the B button for 5 seconds (three lights will illuminate). All pagers that are
programmed with the same team ID will light and vibrate. -The alert will continue for 2
minutes or until cancelled.
- To cancel the page on the receiving SCUBuzz, press the B button once.
8. LIMITED WARRANTY
This warranty only covers product purchased direct or from authorized resellers. Warranty
coverage is for defects in materials and workmanship only. Physical damage is not covered
under warranty. Broken display screens are treated as physical damage and will not be covered.
The warranty given is for a period of one year from date of purchase. Repairs or replacements
during the warranty period do not increase the original warranty period.
In order to process a warranty claim, send the defective item postage prepaid together with a
dated receipt of purchase to:
3rd FL #499-2 Sang3-dong, Wonmi-gu,
Pucheon-city, Kyunggi-do, Korea
We reserve the right to determine the merits of a warranty claim as well as determine whether
the item will be repaired or replaced. Please allow a minimum of 14 days for repair orders.
Before you call, try some of the following suggestions…
1. Read through the instruction Manual. Answers to most questions can be found there. A
trouble shooting section further assists you in diagnosing the problem.
2. CAUTION
Never use any cleaner other than alcohol for the maintenance of this equipment. Organic
solvent such as benzene, toluene or acetone may spoil the plastic parts of this
equipment.
3. RF Radiation Exposure
This equipment complies with FCC RF radiation exposure limits set forth for an
uncontrolled environment.
4. Do not subject this equipment to:
1) Mechanical shock
2) Extremes of temperature
3) Corrosive liquids