Leetac Electronics Technology LEETACE5209 CD SHELF SYSTEM User Manual E 5209 IM
Zhongshan Leetac Electronics Co., Ltd. CD SHELF SYSTEM E 5209 IM
Manual_2015-5-4_User Manual.pdf
OperatingManual
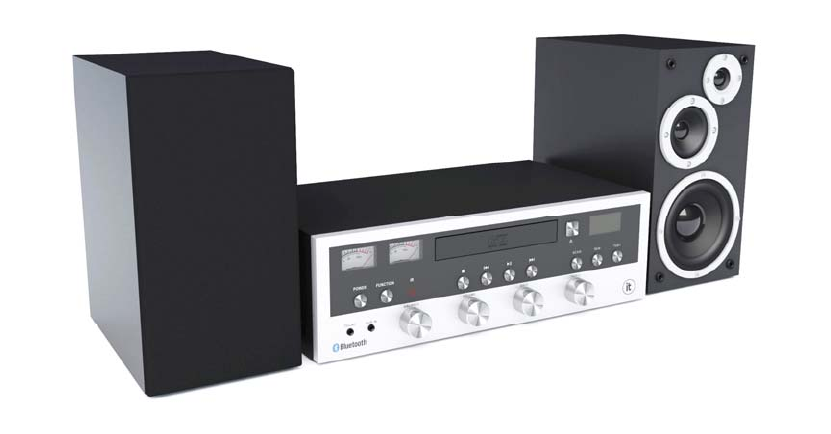
Model:E‐5209
CDSHELFSYSTEM
CONTENT
INTRODUCTION...............................................................................................................................3
IMPORTANTSAFETYINSTRUCTIONS.................................................................................................3
SAFETYINFORMATIONS........................................................................................................................4
BEFOREUSE..........................................................................................................................................5
BEWAREOFCONDENSATION................................................................................................................5
BUTTONSANDCONTROLS...............................................................................................................6
REMOTECONTROLUNIT..................................................................................................................2
GETSTARTED...................................................................................................................................3
CONNECTINGEXTERNALSPEAKERS......................................................................................................3
PRELIMINARY........................................................................................................................................3
LISTENINGTOTHERADIO................................................................................................................3
ADJUSTINGTHEVOLUME.................................................................................................................4
LISTENINGTOACDDISC..................................................................................................................4
DISCSMAINTENANCE...........................................................................................................................5
AUXINOPERATION.........................................................................................................................7
USINGTHEREMOTECONTROL.........................................................................................................8
TROUBLESHOOTINGGUIDE..............................................................................................................9
SPECIFICATIONS.............................................................................................................................10

INTRODUCTION
Thankyouforbuyingthisproduct.
Tohelpyoutohavemorefunwhenusingthisproduct,readtheseinstructionsthoroughly.
Andthensavethisinstructionmanualforfuturereference.
IMPORTANTSAFETYINSTRUCTIONS
1.Readtheseinstructions–Allthesafetyandoperatinginstructionsshouldbereadbeforethis
productisoperated.
2.Keeptheseinstructions‐ Thesafetyandoperatinginstructionsshouldberetainedforfuture
reference.
3.Heedallwarnings–Allwarningsontheapplianceandintheoperatinginstructionsshouldbe
adheredto.
4.Followallinstructions–Alloperatinganduseinstructionsshouldbefollowed.
5.Donotusethisapparatusnearwater–Theapplianceshouldnotbeusednearwateror
moisture–forexample,inawetbasementornearaswimmingpool,andthelike.
6.Cleanonlywithdrycloth.
7.Donotblockanyventilationopenings.Installinaccordancewiththemanufacturer’s
instructions.
8.Donotinstallnearanyheatsourcessuchasradiations,heatregisters,stoves,orother
apparatus(includingamplifiers)thatproduceheat.
9.Donotdefeatthesafetypurposeofthepolarizedorgroundingplug.Apolarizedplughastwo
bladeswithonewiderthantheother.Agroundingplughastwobladesandathirdgrounding
prong.Thewidebladeorthethirdprongisprovidedforyoursafety.Iftheprovidedplugdoesnot
fitintoyouroutlet,consultanelectricianforreplacementoftheobsoleteoutlet.
10.Protectthepowercordfrombeingwalkedonorpinchedparticularlyattheplugs,
conveniencereceptacles,andatthepointwheretheyexitfromtheapparatus.
11.Onlyuseattachments/accessoriesspecifiedbythemanufacturer.
12.Useonlywiththecart,stand,tripod,bracket,ortablespecifiedbythe
manufacturer,orsoldwiththeapparatus.Whenacartorrackisused,use
cautionwhenmovingthecart/apparatuscombinationtoavoidinjuryfrom
tip‐over.
13.Unplugtheapparatusduringlightingstormsorwhenunusedforlongperiodsoftime.
14.Referallservicingtoqualifiedpersonnel.Servicingisrequiredwhentheapparatushasbeen
exposedtorainormoisture,doesnotoperatenormally,orhasbeendropped.
15.Themainsplugisusedasdisconnectdevice,thedisconnectdeviceshallremainreadily
operable.
16.Toreducetheriskoffireorelectricshock,donotexposethisapparatustorainormoisture.
Theapparatusshallnotbeexposedtodrippingorsplashingandthatnoobjectsfilledwithliquids,
suchasvases,shallnotbeplacedonapparatus.
17.Theuseoftheequipmentinmoderateclimate.
18.Thebatteryshallnotbeexposedtoexcessiveheatsuchassunshine,fireorthelike.
CAUTION
Dangerofexplosionifbatteryisincorrectlyreplaced.Replaceonlywiththesameorequivalent
type.
WARNING
DONOTINGESTBATTERY,CHEMICALBURNHAZARD
Theremotecontrolsuppliedwithacoin/buttoncellbattery.Thisproductcontainsa
coin/buttoncellbattery.Ifthecoin/buttoncellbatteryisswallowed,itcancausesevere
internalburnsinjust2hoursandcanleadtodeath.
Keepnewandusedbatteriesawayfromchildren.Ifthebatterycompartmentdoesnotclose
securely,stopusingtheproductandkeepitawayfromchildren.
Ifyouthinkbatteriesmighthavebeenswallowedorplacedinsideanypartofthebody,seek
immediatemedicalattention.
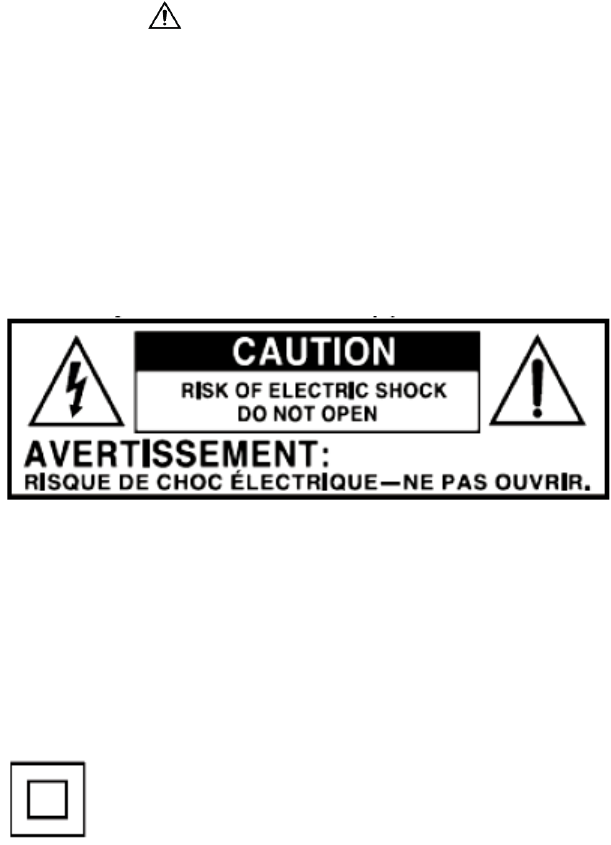
‐Thislightningflashwitharrowheadsymbolwithinanequilateraltriangleisintendedtoalertthe
usertothepresenceofnon‐insulated“dangerousvoltage”withintheproduct’senclosurethat
maybeofsufficientmagnitudetoconstituteariskofelectricshock.
‐Warning:To reducetheriskofelectricshock,donotremovecover(orback)asthereareno
user‐serviceablepartsinside.Referservicingtoqualifiedpersonnel.
‐Theexclamationpointwithinandequilateraltriangleisintendedtoalerttheusertothe
presenceofimportantoperatingandmaintenanceinstructionsintheliteratureaccompanying
theappliance.
ThisequipmentisaClassⅡordoubleinsulatedelectricalappliance.Ithasbeen
designedinsuchawaythatitdoesnotrequireasafetyconnectiontoelectricalearth.
SAFETYINFORMATIONS
1.Inordertoshutoffthepowertothisproductcompletely,unplugthepowercordfromthe
walloutlet.Besuretounplugtheunitifyoudonotintendtouseitforanextendedperiod
oftimesuchasavacation.
2.Useofcontrolsandadjustmentsorperformanceofproceduresotherthanthosespecified
hereinmayresultinhazardousradiationexposure.
3.Ifthisproductdevelopstrouble,contactaqualifiedservicecenter,anddonotusethe
productinadefectivestate.
4.WARNING:Toreducetheriskofelectricshock,thisappliancehasapolarizedplug(one
bladeiswiderthantheother).Thisplugwillfitinapolarizedoutletonlyoneway.Iftheplug
doesnotfitfullyintheoutlet,reversetheplug.Ifitstilldoesnotfit,contactaqualified
electriciantoinstalltheproperoutlet.Donotmodifythepluginanyway.
BEFOREUSE
1.Chooseunitinstallationlocationcarefully.Avoidplacingitindirectsunlightorclosetoa
sourceofheat.Alsoavoidlocationssubjecttovibrationsandexcessivedust,coldor
moisture.Keepawayfromsourcesthathum,suchastransformersormotors.
2.Donotopenthecabinetasthismightresultindamagetothecircuitryorelectricalshock,if
aforeignobjectshouldgetintotheset,contactyourdealer.
3.Besurenottohandlediscswithdirtyfingers.Neverinsertadiscthathasacrackonthe
surface.
4.Whenremovingthepowerplugfromthewalloutlet,alwayspulldirectlyontheplug,never
pullthecord.
5.Tokeepthelaserpickupclean,donottouchit,anddonotforgettoclosethedisctray.
6.Donotattempttocleantheunitwithchemicalsolventsasthismightdamagethefinish.Use
aclean,drycloth.
7.Inordertoshutoffthepowertothisproductcompletely,unplugthepowercordfromthe
walloutlet.Besuretounplugtheunitifyoudonotintendtouseitforanextendedperiod
oftime,suchasavacation.
8.Keepthismanualinasafeplaceforfuturereference.
BEWAREOFCONDENSATION
Whentheplayer(oracompactdisc)ismovedfromacoldtoawarmplaceorisusedaftera
suddentemperaturechange,thereisadangerofcondensation.Watervaporintheaircould
condenseonthemechanismorthelaserpickup.Ifdropletsofwaterformontheseparts,correct
playbackwillbeimpossiblebecausethelasercannotreadtheinformationfromthedisccorrectly.
Topreventthis,ifyouaregoingtousetheplayerinaconditionwherecondensationcouldoccur,
youshouldleavetheplayerfor1or2hoursafterpluggingitintoanACoutletdependingonthe
amountofcondensation.Ifthisisdone,theplayerwillstabilizeatthetemperatureofits
surroundings.
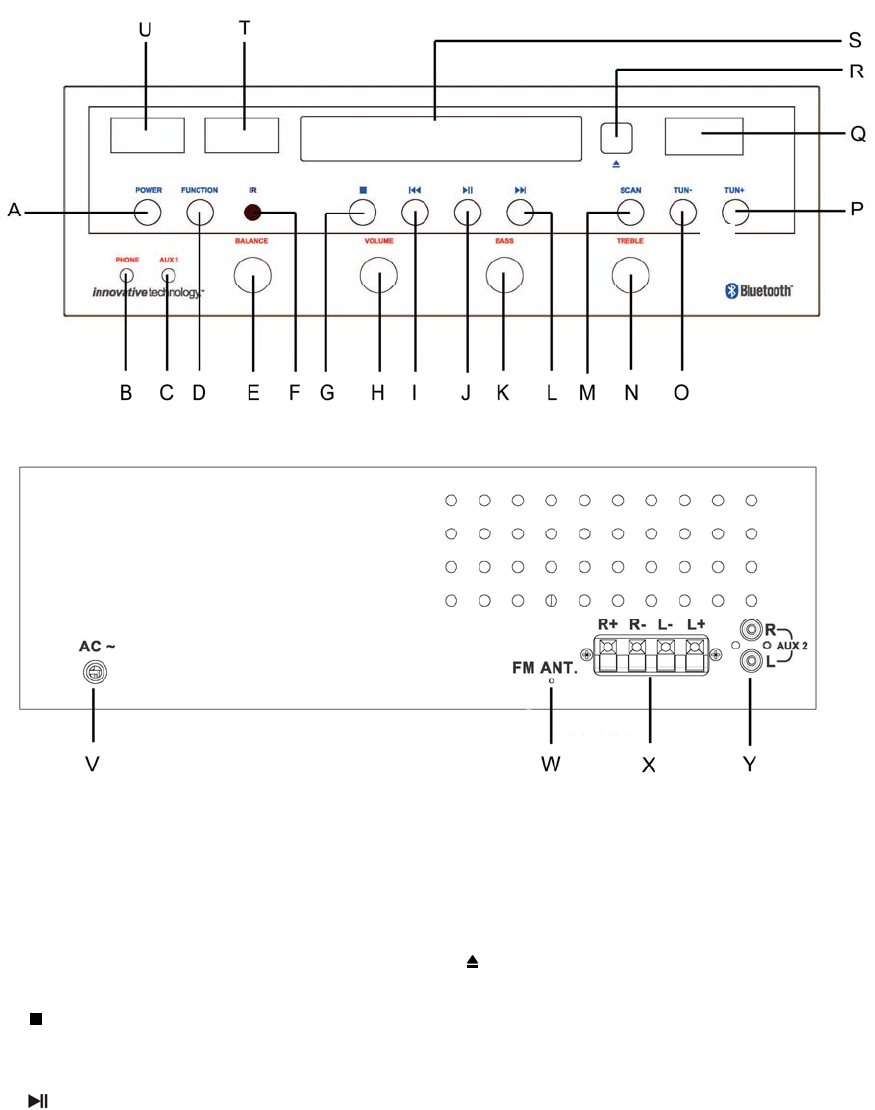
BUTTONSANDCONTROLS
MAINUNIT
A.POWERBUTTON
B.PHONESOCKET
C.AUXIN1SOCKET
D.FUNCTIONBUTTON
E.BALANCEKNOB
F.IR
G.STOPBUTTON
H.VOLUMEKNOB
I.(PREVIOUS)BUTTON
J.PLAY/PAUSEBUTTON
K.BASSKNOB
L.(NEXT)BUTTON
M.SCANBUTTON
N.TREBLEKNOB
O.TUNINGDOWNBUTTON
P. TUNINGUPBUTTON
Q.DISPLAY
R.EJECT/ENTERBUTTON
S.CDCOMPARTMENT
T&U.DISPLAYOFVOLUME
V.ACPOWERCORD
W.FMANTENNA
X.SPEAKERINPUTSOCKET(LEFT&RIGHT)
Y. AUXIN2SOCKET(L/R)
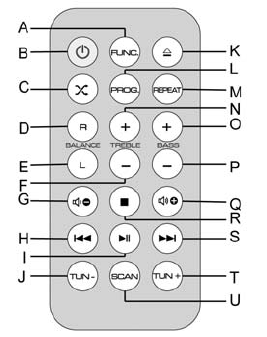
REMOTECONTROLUNIT
A.FUNCTIONBUTTON:Selectasource.
B.ON/STANDBYBUTTON:SettheunitONorSTANDBY.
C.RANDOM:Selecttoarandomplayback.
D.BALANCE(RIGHT):Selecttherightspeakertoadjusttreble
orbass
E.BALANCE(LEFT):Selecttheleftspeakertoadjusttrebleor
bass
F&N.TREBLE(+/‐):Actas“up”or“down”treble
G&Q.VOLUME+/‐BUTTON:Adjustthevolumelevel.
H&S.(NEXT)BUTTON/(PREVIOUS)BUTTON:skip
backwardorforward.
I.PLAY/PAUSEBUTTON:Pauseandresumeplayback.
J&T.TUN‐/TUN+:intheFMmode,adjustthefrequency.
K.EJECT/ENTER:InCDmode,ejectandclosetheCDTray.
L.PROGRAM:Setaprogramplayback.
M.REPEAT:setarepeatplayback
O&P.BASS(+/‐):Actas“up”or“down”bass.
R.(STOP)BUTTON:Stoptheplayback.
U.SCAN:Actas“scan”inthemenu.
GETSTARTED
CONNECTINGEXTERNALSPEAKERS
Thespeakerinputsocketslocateatthebackofthemainunit.
Unwrapthespeakerwirefromtheleftspeakerandplugitintotheleft(L)speakersocketonthe
mainunit.
Unwrapthespeakerwirefromtherightspeakerandplugitintotheright(R)speakersocketon
themainunit.
Makesurethespeakercableswillnotruninareaswheretheycouldcausedanger.
PRELIMINARY
Beforeconnectingpowertoyouraudiosystem,theprotectivepackingshouldberemovedfrom
theCDcompartment.
Toremovetheprotectivepacking:
PresstheFUNCTIONbuttontoselectCDfunction.
PresstheEJECT/ENTERbuttonatthefrontcornertoopentheCDdoor.
RemovetheprotectivepackingfromtheCDcompartment.
ClosetheCDdoorbypressingtheEJECT/ENTERbuttontolatchitshut.
FMANTENNA
UnwraptheFMantennaandextenditfully.Youmayneedtoadjustthepositionoftheantenna
togetoptimumreception.
CONNECTINGTHEPOWER
Checkthatthemainsvoltageintheratingplateonthebackofthemainunitisthesameasthe
voltageinyourarea.
Plugtheelectricplugintothewallsocket.Nowtheaudiosystemisreadyforuse.
STANDBYCONTROL
Toturnthemainuniton:
PressthePOWERbutton.Theunitwillturnon.
Toturnthepoweroff:
PressthePOWERbuttontoturntheunitoff.
NOTE:Whenleavingtheunitunattendedforlongperiod(suchasholidays),pleasedisconnectthe
powerplugfromthemainssupply.
LISTENINGTOTHERADIO
1.PresstheFUNCTIONBUTTONtoSwitchtoFMRADIOfunctionandthedisplaywillshow“FM”.
2.Tunetoadesiredradiostation.Thefrequencyisindicatedonthedisplay.
MANUALTUNING:PresstheTUNING+orTUNINGbuttonbrieflyandthefrequencywillbe
tuningupordownatastep.
AUTOSEARCHING:PresstheTUNING+orTUNING‐buttonformorethan2seconds,radio
frequencywillstarttochangeonthedisplay.Onceastationisfound,theradiowillstop
searching,thedisplaywillshow“ST”andstarttobroadcastimmediately.
3.Re‐positiontheantennaifnecessary.

ADJUSTINGTHEVOLUME
VOLUMEADJUSTMENT
TwisttheVOLUMEKNOBtoadjustthevolume
Thevolumesettingwillbedisplayedbrieflyonascaledisplayontheleftuppercorneroftheunit.
BALANCE
TwisttheBalanceKnobtoadjustthevolumebetweentheleftspeakerandtherightspeaker.The
volumeoftheleftspeakerandrightspeakerisequalwhentheLEDdisplayshows“00”by
switchingthebalanceknob.
TREBLEandBASS
TwisttheTrebleKnobandtheBassKnobtoswitchbetweentrebleandbassfrom“‐3”to“3”
LISTENINGTOACDDISC
PRELIMINARIES:
• PressFUNCTIONbuttonrepeatedlytoselectCDfunctionandthedisplaywillshow“”.
• PresstheEJECT/ENTERbuttontoopentheCDdoor,putaCDdiscontheCDcompartment
withprintedlabelfacingupside(towardsyou).ClosetheCDdoorandpressEJECT/ENTER
buttonagaintolatchitshut.
TOPLAYACDWHENSTOPPED:PressthePLAY/PAUSEbutton.Thediscwillplayfromtrack1.
TOPAUSEACDWHILEPLAYING:PressthePLAY/PAUSEbutton.Thediscwillpauseandpause
indicatorappearsonthedisplay.PressthePLAY/PAUSEbuttonagaintoresumetheplayback.
TOSTOPACDWHILEPLAYING:PresstheSTOPbutton.
TOCHANGETRACKS:Press(PREVIOUS)BUTTONor(NEXT)BUTTON.
TOSEARCHFORAPARTICULARPARTDURINGPLAY:Pressandhold(PREVIOUS)BUTTONor
(NEXT)BUTTONuntilthedesiredpartislocated.Duringsearchingthesoundwillbeplayedat
distortedspeed.Playreturnstonormalwhenthebuttonisreleased.
REPEATING/RANDOMPLAYBACKATRACKORACD:
PressREPEATbuttonontheremotecontroltocircletheplaymode:
• Repeat1‐‐‐PressREPEATbuttonontheremotecontrolonceandthecurrenttrackwillbe
continuouslyplayed.
• Repeatall‐‐‐PressREPEATbuttonagainandAlltracksonthecurrentdiscwillbeplayed
continuously.
• Normalplayback‐‐‐PressREPEATbuttonagaintoresumenormalplayback.
Note:PressSTOPbuttonthediscwillstopplayingandtheplaymodewillbeclear.
PROGRAMPLAY:
ProgramplaymustbesetwhentheCDisstopped.Youcanprogramup‐to‐20tracksinanyorder.
1.PressSTOPbuttonandthenpressPROGRAM
buttonontheremotecontrol.

2.Press(NEXT)BUTTON/(PREVIOUS)
BUTTONtoselectatrack.
Thedisplayshowstheselectedtrack.
3.PressthePROGRAMbuttonontheremote
controltoaddthetrackintotheprogramlist.
4.Repeatsteps2and3totillyouaccomplishthe
programming.
Youcanprogramupto20tracks.
TOSTARTTHEPROGRAMPLAY
PressPLAY/PAUSEbutton.
TOPAUSEORSTOPAPROGRAMPLAY
PressPLAY/PAUSEorSTOPbutton.
TOREPLAYAPROGRAM
PressPLAY/PAUSEbutton.
TOREVIEWTHECONTENTOFAPROGRAM
PressSTOPbuttonthenkeeppressingthe
PROGRAMbuttontoreviewtheprogrammed
tracks.
TOCLEARTHEPRORAM
PressSTOPbuttontwiceandthe“PROG”will
disappearfromthedisplay.
OpenandclosetheCDdoortocleartheprogram
play.
Afterplay,removetheCD.
DISCSMAINTENANCE
Dependingonthequalityofthediscandtheconditionoftherecording,someCD‐R/CD‐RWdisc
maynotbeplayable.
1.Alwaysplacethecompactdiscinthedisctraywiththelabelfacingupward.(Compactdiscs
canbeplayedonlyononeside).
2.Tomoveadiscfromitsstoragecase,pressdownonthecenterofthecaseandliftthediscout,
holdingitcarefullybytheedges.

3.Ifthediscbecomesdirty,wipethesurfacefromthecenterholeoutwardtowardstheouter
edgewithasoft,drycloth.
4.Neverusesuchchemicalsasrecordspray,antistaticspraysorfluid,benzineorthinnerto
cleanthediscs.Suchchemicalswilldoirreparabledamagetothedisc'splasticsurface.
5.Discsshouldbereturnedtotheircasesafterusetoavoidseriousscratchesthatcouldcause
thelaserpickuptoskip.
6.Donotexposediscstodirectsunlightorhighhumidityandtemperatureforextendperiods.
Longexposuretohightemperatureswillwrapthedisc.
7.PrintableCD‐RandCD‐RWdiscsarenotrecommended,asthelabelsidemightbestickyand
damagetheunit.
8.Useasoftoil‐basedfelt‐tippedpentowritetheinformationonthelabelside.Neverusea
ball‐pointorhard‐tippedpen,asthismaycausedamagetotherecordedside.
9.DonotuseCDswithanirregularshape(octagonal,heart‐shaped,businesscardsize,etc).CDs
ofthissortcandamagetheunit.
10.IfyouhaveanydoubtsofusingCD‐R/CD‐RWdisc,readtheprecautionssuppliedwiththedisc,
orcontactthediscmanufacturedirectly.

AUXINOPERATION
Anyexternal(auxiliary)audiosource(i.e.,personalCDplayerorMP3player)connectedtothis
appliancecangetnecessarysignalandchannelthespeakeroutputs.
Theunithas2AUXINs.AUXIN1SOCKETatthefrontoftheunit,AUXIN2SOCKETattherearof
theunit.
1.PressPOWERbuttontoturntheunitONandthenpressFUNCTIONbuttontoselect“AUX1”or
“AUX2”.
2.SetthevolumeleveltotheminimumlevelwiththeVOLUMEKNOB.
3.PlugtheAUXINcable(notincluded)intotheAUXINsocketattheunit.
• ForAUXIN2SOCKET,plugoneendoftheAUXINcable(included)intothecolorcodedAUX
INsocketsatrearoftheunit.Alwaysmakesurethewhiteplugisconnectedtothewhite
socketandtheredplugintheredsocket.
4.PlugtheotherendofthecableintotheheadphoneorLineOutsocketoftheexternalsource.
5.Turnontheexternalaudiodeviceandsetitplay.Turntheexternalaudiodevice’svolumeupto
2/3 . Ifnecessaryadjustthevolumeontheunitbyswitchingthevolumeknob.
BLUETOOTHCONNECTIVITY
Externaldeviceswhichhaveabuilt‐inBluetoothfeaturecanbeconnectedtothisapparatusand
playthroughthespeakers.
GETTINGCONNECTED
1.PressFUNCTIONbuttontoselectBluetoothfunctionandthenthedisplayshows“BLUE”and
“”.
2.SettheBluetoothfunctionofyourexternaldeviceON.
3.SettosearchBluetoothdeviceonyourexternaldevice.
NOTE:Theeffectivedistancebetweenyourexternaldeviceandthisapparatusis10meters.
5.Waitforawhilethenfindthe“ITCDS‐5000a”onthepaireddeviceslistonyourexternaldevice.
6.Ifawindowasksyouapassword.Fillin“0000”or“1234”thenpress“OK”onyourexternal
device.
7.Abeepsoundshouldbeheardthatindicatesaconnectionhasbeenestablished.
8.AfewsecondslateryourBluetoothconnectionshouldbeachieved.
ENJOYMUSICFROMANEXTERNALDEVICE
1.Getyourexternaldevicepaired.(See“Gettingconnected”)
2.Turnonthemusicplayerprogramonyourexternaldeviceandsetitplay.
Normally,youcancontrolmusicplaybackwiththePLAY/PAUSE,and buttononthe
apparatus.However,somebuttonsmaynotworkduetothevariablemusicplayerprogram.
Nowenjoythefun.
USINGTHEREMOTECONTROL
TheRemoteControlUnitcanoperatetheunitfromadistance.Whenoperatingtheremote
controlunit,pointittowardsthefrontpaneloftheunit.
• Eveniftheremotecontrolunitisoperatedwithintheeffectiverange,remotecontrol
operationmaybeimpossibleifthereareanyobstaclesbetweentheunitandtheremote
control.
• Iftheremotecontrolunitisoperatednearotherapplianceswhichgenerateinfraredrays,or
ifotherremotecontroldevicesusinginfraredraysareusedneartheunit,itmayoperate
incorrectly.Conversely,theotherappliancesmayoperateincorrectly.
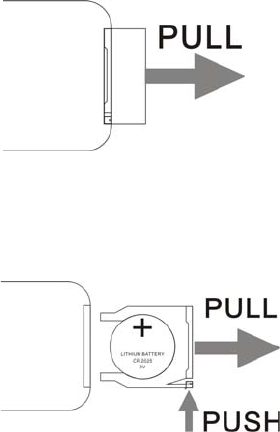
TOACTIVATETHEREMOTECONTROL:
Theremotecontrolisbuiltwithcellbatterybefore
shipment.Toactivatethebattery,removethetransparent
plateatthebottomoftheremotecontrol.
Nowtheremotecontrolisreadytouse.
BATTERYREPLACEMENT:Ifthedistancerequiredbetweentheremotecontrolunitandmainunit
decreases,thebatteryisexhausted.Inthiscase,pleasereplacethebatterywithnewone.
TOREPLACEWITHANEWBATTERY:
1.Removethebatterycompartmentcoverasper
illustrationontheright.
2.Observingthecorrectpolarityandputa3Vdclithium
battery(CR2025).
3.Closethecover.
BatteryPrecautions:
• Besuretoinsertthebatterywithcorrectpositive+andnegative‐polarities.
• Refertotheprecautionsonthebatterylabels.
• Whentheremotecontrolunitisnottobeusedforalongtime(morethanamonth),remove
thebatteryfromtheremotecontrolunittopreventitfromleaking.Ifitleaks,wipeawaythe
liquidinsidethebatterycompartmentandreplacethebatterywithnewone.
• Donotheatordisassemblebatteriesandneverdisposeofoldbatteriesbythrowingthemin
afire.

TROUBLESHOOTINGGUIDE
Incaseoftroublewiththeunit,pleaselookthroughproblemsbelowandseeifyoucansolve
themyourselfbeforecallingyourdealer.
THEWHOLEUNIT
Problem Cause Solution
Powerdoesnotcome
onwhenthepower
switchispressed.
•Unitisunplugged.
•ConnecttheunittotheAC
powersupply.
Nosoundcomesout
ofthespeakers.
•Theexternalspeakersare
disconnected.
•Thevolumeisturneddown
(toMIN).
•Theinputselectordoesnot
matchtheplaybacksource.
•Connecttheexternal
speakers.
•Adjustthevolume.
•Re‐selectthedesiredinput
source.
Thesoundisnoisy.
•TheunitistooclosetoaTV
setoranothersimilar
appliance.
•TurnofftheTVorother
appliance,andrelocatethe
unit.
Theunitdoesnotact
asexpected,or
respond.
•ExternalfactorssuchasESD
(Electro‐staticdischarge)
affecttheunit.
•Removethepowercordand
allpowersupplydevices.
Thenre‐plugtheunitafter
oneminute.
TUNERUNIT
Cannotlistentoany
station,orsignal
appearsweak.
•Thestationisnottuned‐in
properly.
•ATVsetisbeingused
nearbyandisinterferingwith
theradioreception.
•Properlytune‐inthedesired
station.
•Turn‐offtheinterferingTV
set.
Thesoundis
distorted.
•Theantennaisnot
positioned properly.
•Re‐positiontheantenna
untilreceptionimproves.
CDPLAYER
CDstopsimmediately
afterstarting,orunit
pausesorstops
duringplay.
•TheCDisinsertedupside
down.
•TheCDisdustyordirtyor
thereiscondensationonthe
CD.
•InserttheCDwiththe
printedsideright‐sideup.
•Carefullycleananddrythe
CD.
Nosound.•TheCDplayerispaused.•PressthePLAY/PAUSE
button.
SpecificCDisnoisy,or
playbackstopsor
skips.
•TheCDisscratched,
damagedorwarped.
•Thediscisverydirty.
•TheCDshouldbechanged.
•CarefullycleantheCD.

SPECIFICATIONS
AMPLIFIERsection
OutputPower….............................. 25W+25W
FrequencyResponse ….............................. 60to20,000Hz
TUNERsection
FMSection
FrequencyRange….............................. 87.5 to108MHz
CDPLAYERsection
FrequencyResponse ….............................. 60to20,000Hz
Signal‐to‐NoiseRatio ….............................. 55dB(IEC‐A)
SPEAKERSYSTEMsection
Impedance….............................. 8ohms
InputPower….............................. Max.30W
GENERAL
PowerRequirements ….............................. AC120V~60Hz
PowerConsumption ….............................. 60W
Dimensions(LxDxH)….............................. 360mmx222mmx110mm(approx.)
LoudspeakersDimensions(LxD
xH)….............................. 130mmx217.5mmx250mm(approx.)
Weight….............................. 5.53kgs(approx.)
StandardAccessories ….............................. OperatingInstructionBooklet;
Remotecontrolwithbattery;
Apairofexternalspeakers;
NOTE:Asaresultofcontinualimprovements,thedesignandspecificationsofthisproductare
subjecttochangewithoutnotice.
FCCSTATEMENT
Warning:Changesormodificationstothisunitnotexpresslyapprovedbythepartyresponsible
forcompliancecouldvoidtheuser’sauthoritytooperatetheequipment.
NOTE:ThisequipmenthasbeentestedandfoundtocomplywiththelimitsforaClassBdigital
device,pursuanttopart15oftheFCCRules.Theselimitsaredesignedtoprovidereasonable
protectionagainstharmfulinterferenceinaresidentialinstallation.Thisequipmentgenerates,
usesandcanradiateradiofrequencyenergyand,ifnotinstalledandusedinaccordancewiththe
instructions,maycauseharmfulinterferencetoradiocommunications.
However,thereisnoguaranteethatinterferencewillnotoccurinaparticularinstallation.Ifthis
equipmentdoescauseharmfulinterferencetoradioortelevisionreception,whichcanbe
determinedbyturningtheequipmentoffandon,theuserisencouragedtotrytocorrectthe
interferencebyoneormoreofthefollowingmeasures:
‐Reorientorrelocatethereceivingantenna.
‐Increasetheseparationbetweentheequipmentandthereceiver.
‐Connecttheequipmentintoanoutletonacircuitdifferentfromthattowhichthereceiveris
connected.
‐Consultthedealeroranexperiencedradio/TVtechnicianforhelp.