Leetac Electronics Technology LEETACE6H10 Desktop Jukebox User Manual VJB 125 FCC ID
Guangdong Leetac Electronics Technology Co.,Ltd. Desktop Jukebox VJB 125 FCC ID
User Manual
Instruction Manual
MODEL: VJB-125
DESTP UEBX
2
CAUTION: To reduce the risk of fire or electric shock, do not expose this appliance to rain or moisture.
WARNING: To prevent electric shock, do not use this (polarized) plug with an extension cord, receptacle
or other outlet unless the blades can be fully inserted to prevent blade exposure
WARNING: Invisible laser radiation when open and interlock failed or defeated. Avoid direct
exposure to laser beam.
PRODUCT COMPLIES WITH DHHS RULE 21 CFR SUBCHAPTER J IN EFFECT AT DATE
OF MANUFACTURE
Important Safety Instructions
1. Read these instructions – All the safety and operating instructions should be read before this product
is operated.
2. Keep instructions – The safety and operating instructions should be retained for future reference.
3. Heed all warnings – All warnings on the appliance and in the operating instructions should be
adhered to.
4. Follow all instructions – All operating and use instructions should be followed.
5. Do not use this apparatus near water – The appliance should not be used near water or moisture – for
example, in a wet basement or near a swimming pool, and the like.
6. Clean only with dry cloth.
7. Do not block any ventilation openings. Install in accordance with the manufacturer’s instructions.
8. Do not install near any heat sources such as radiations, heat registers, stoves, or other apparatus
(including amplifiers) that produce heat.
9. Do not defeat the safety purpose of the polarized or grounding plug. A polarized plug has two blades
with one wider than the other. A grounding plug has two blades and a third grounding prong. The wide
blade or the third prong is provided for your safety. If the provided plug does not fit into your outlet,
consult an electrician for replacement of the obsolete outlet.
10. Protect the power cord from being walked on or pinched particularly at the plugs, convenience
receptacles, and at the point where they exit from the apparatus.
11. Only use attachments/accessories specified by the manufacturer.
12. Use only with the cart, stand, tripod, bracket, or table specified by the
manufacturer, or sold with the apparatus. When a cart or rack is used, use
caution when moving the cart/apparatus combination to avoid injury from
tip-over.
13. Unplug the apparatus during lighting storms or when unused for long
periods of time.
14. Refer all servicing to qualified personnel. Servicing is required when the apparatus has been
damaged in any way, such as power supply cord or plug is damaged, liquid has been spilled or objects
have fallen into the apparatus has been exposed to rain or moisture, does not operate normally, or has
been dropped.
3
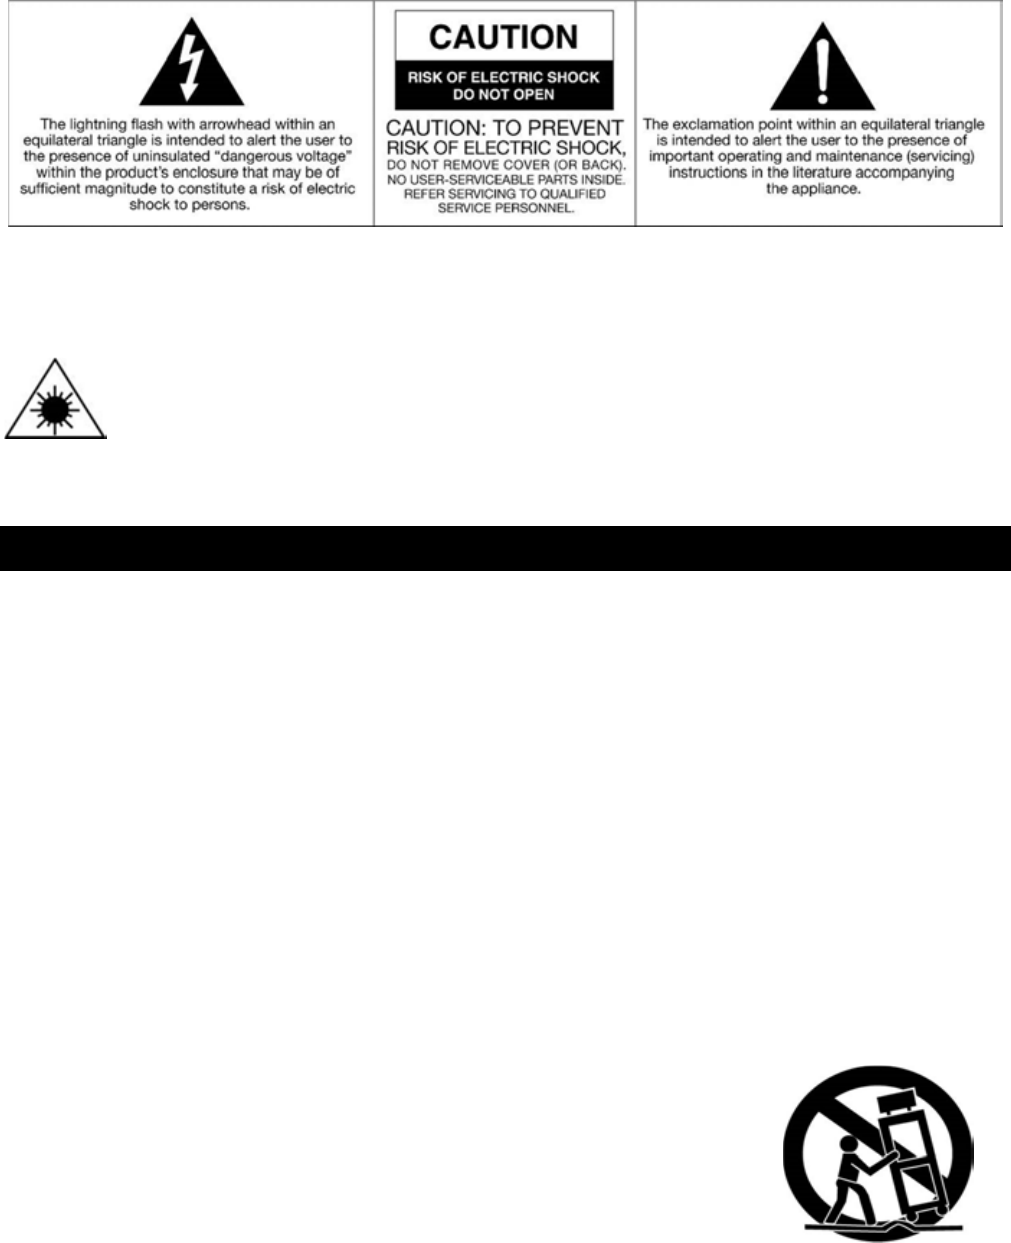
15.
- The lightning flash with arrowhead symbol within an equilateral triangle is intended to alert the user to
the presence of non-insulated “dangerous voltage” within the product’s enclosure that may be of
sufficient magnitude to constitute a risk of electric shock.
- Warning: To reduce the risk of electric shock, do not remove cover (or back) as there are no
user-serviceable parts inside. Refer servicing to qualified personnel.
- The exclamation point within an equilateral triangle is intended to alert the user to the presence of
important operating and maintenance instructions in the literature accompanying the appliance.
16. This equipment is a Class or double insulated electrical appliance. It has been designed
so that it does not require a safety connection to electrical earth.
17. The main plug is used as disconnect device, the disconnect device shall remain readily operable.
18. WARNING
To reduce the risk of fire or electric shock, do not expose this apparatus to rain or moisture. The
apparatus shall not be exposed to dripping or splashing. Objects filled with liquids, such as vases,
shall not be placed on apparatus.
19. The equipment should always be used in a moderate climate.
20. The ventilation should not be impeded by covering the ventilation openings with items, such as
newspapers, table-cloths, curtains, etc.
21. No naked flame sources, such as lighted candles, should be placed on the apparatus.
22. The symbol with Indicates AC voltage.
23. CAUTION, The servicing instructions are for qualified service personnel only. To reduce the risk of
electric shock, do not perform any services other than that stated in the operation manual unless you
are qualified to do so.
ACCESSORIES INCLUDED
• DESKTOP BLUETOOTH JUKEBOX
• INSTRUCTION MANUAL
• WARRANTY (BACK OF MANUAL)
4
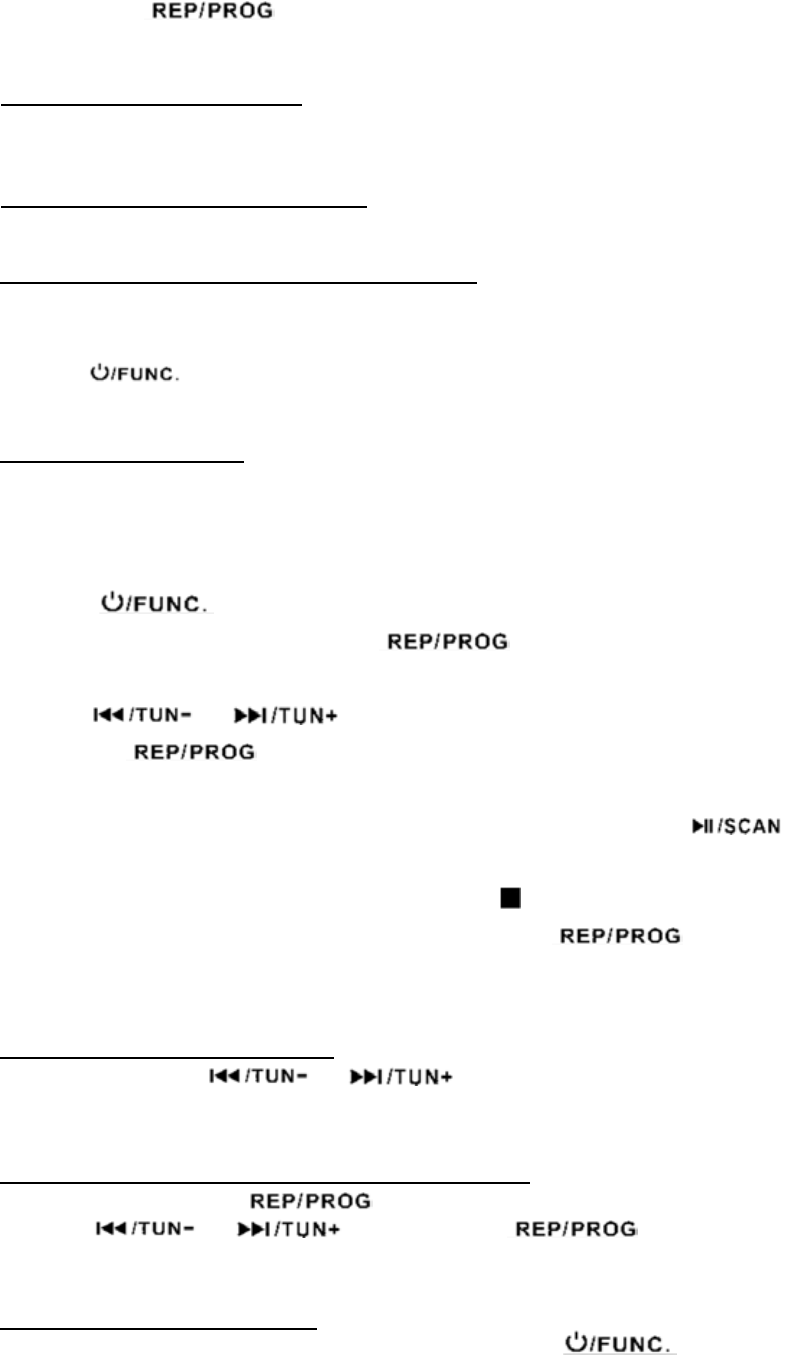
Product Overview
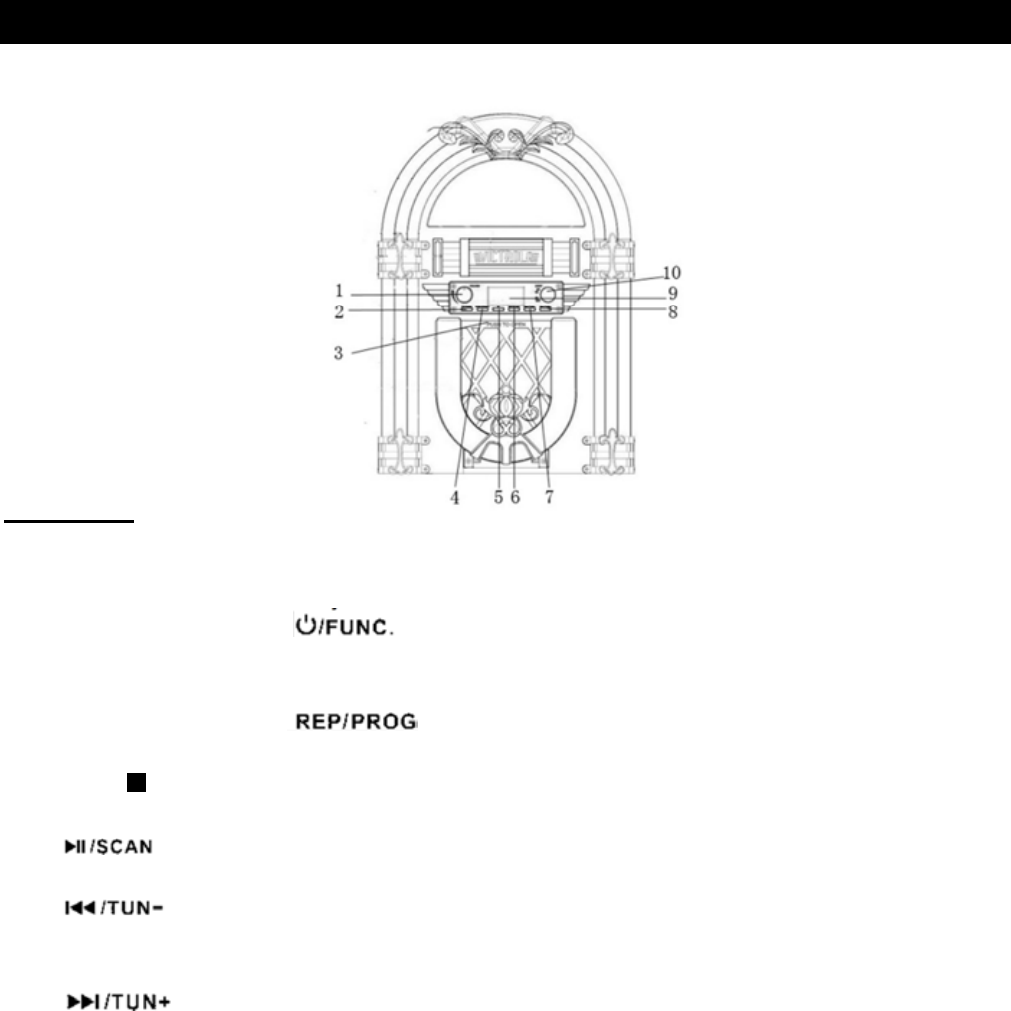
Front View
1. VOLUME KNOB Turn to adjust volume.
2. POWER / FUNCTION Press to turn the unit ON. / Press and hold to turn
the unit OFF. / Once ON, press to select a function mode (CD, FM, AUX-IN or BLUETOOTH)
3. DISC TRAY Push to open the tray.
4. REPEAT / PROGRAM ” In CD play mode, press to repeat a song or whole CD.
/ While in CD stop mode, press to program tracks.
5. STOP In CD mode press to stop playback. / In FM mode, press to select
preset station number.
6. In CD / BLUETOOTH mode, press to play or pause playback. / In FM mode, press
and hold to scan the stations. Press once to select a preset station.
7. In CD mode, press once to restart the current track, press twice in succession to
return to the beginning of the previous track. / Press and hold to fast rewind. / In Radio mode,
press to manually search a station. / Press and hold to auto search a station
8. In CD mode, press once to skip to the next track. / Press and hold to fast forward. /
In Radio mode, press to manually search a station. / Press and hold to auto search a station.
9. LCD DISPLAY
10. LED TUBE ON / OFF Push ON / OFF button for the 5 color changing LED Tube.
5
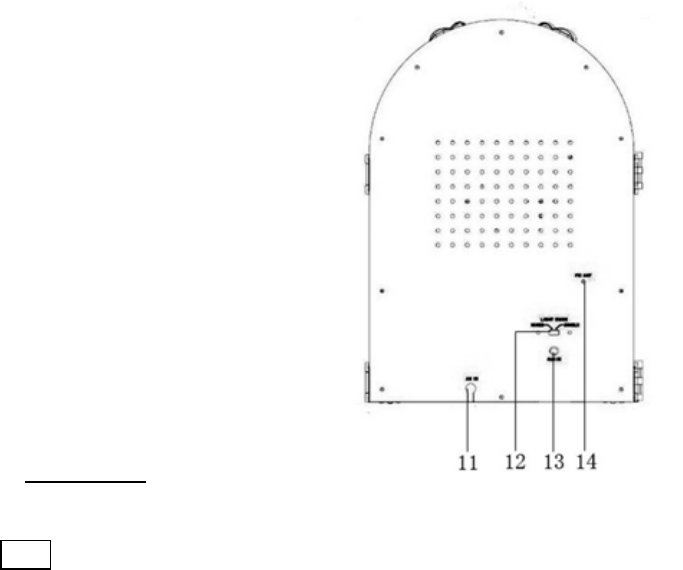
Rear View
11. AC Power Cord
Plugs into a wall outlet or AC Two-Prong power source.
12. LIGHT Mode Switch
Single light mode or mixed light mode for LED Tube.
13. AUX IN Port
Connect an external source to the AUX IN port.
14. FM Wire Antenna
While tuned to a station in FM mode, extend the wire and reposition to adjust for best reception.
6
Setup / Basic Operation
Setup
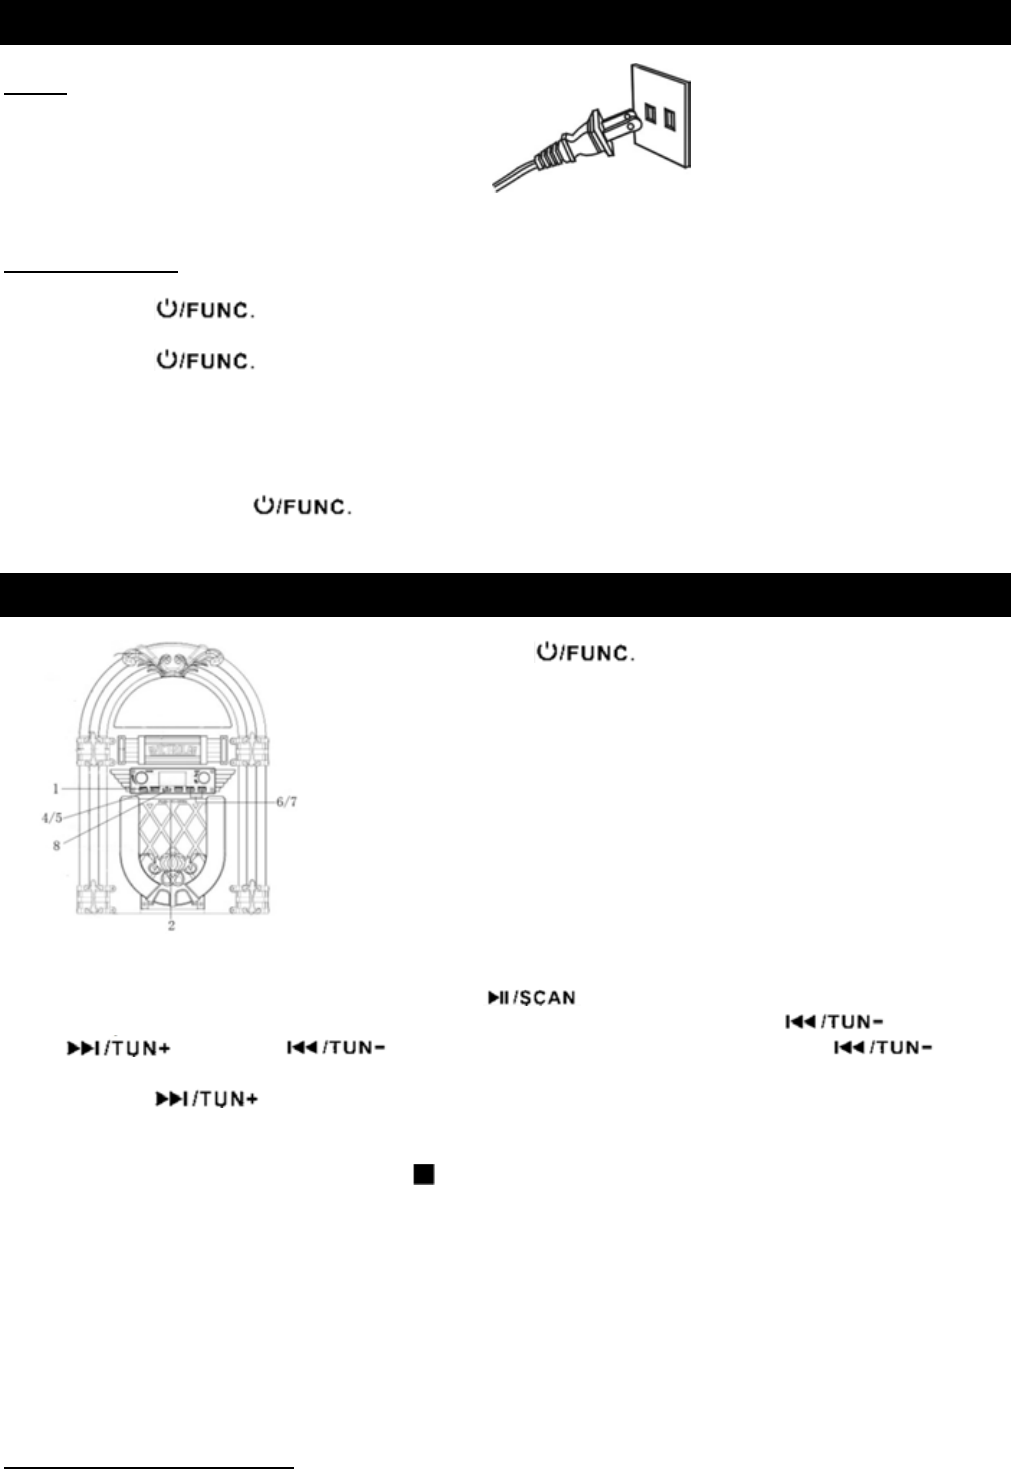
Connect the AC power cord to a wall outlet.
Note: To prevent interference, avoid bundling audio signal cables together with the AC power cord.
Basic Operation
1. Press the button to turn the unit on.
2. Press the button again to select the source
(CD/FM/AUX/BLUETOOTH)
3. Rotate the VOLUME knob to adjust to the desired sound level.
4. Press and hold the button to turn the unit off.
Listening to a CD
1. Press the “ ” button to select CD mode. The unit
will display the “CD”
Note: When no disc is set, “disc” will appear on the
display.
2. Push the CD door to open the tray.
3. Place a disc on the tray with the printed label facing
outward, then close the tray.
4. The unit will automatically start playing from the first track.
5. To temporarily pause playback, press the button. Press again to resume.
6. To skip tracks backward or forward, press the corresponding skip button or
. Pressing once will restart the current track. Pressing twice
in succession will return to the beginning of the previous track.
Pressing button to skip to the next track.
7. To fast forward / rewind within a track, press and hold down the corresponding skip button until
the desired position is reached.
8. To stop playback, press the STOP button
Important:
- Never place more than one disc on the tray.
- The disc must be placed in the center of the disc tray. An incorrectly loaded disc can permanently
damage the tray door mechanism.
- It takes a moment for the unit to load a disc, during which all buttons will be temporarily
deactivated.
Repeat / Random Playback
7
Each time the button is pressed, the repeat / shuffle mode will cycle through the
following options:
REPEAT 1 (Repeat one track)
The current track will be played repeatedly. If you select another track, the track you select will be
play on repeat.
REPEAT ALL (Repeat the entire CD)
The entire CD will be played repeatedly.
RANDOM PLAY (Shuffle through the entire CD)
The entire CD will be played randomly.
Notes:
- Press button, the repeat mode will be cancelled.
Programmed Playback
Program play must be set when the CD is stopped. You can program up to 20 tracks on a CD.
Notes:
- Programmed playback works with finalized disc only.
1. Press button to select CD mode, then load a CD.
2. While the CD is stopped, press the button.
3. PROG indicator will blink, and P01 will appear on the display.
4. Press or to select a track number.
5. Press the button again to set the current track.
6. P02 will then be displayed. Repeat steps 4 thru 5 to program the additional tracks.
7. When the selection of track numbers has been finished, press the button to start
program playback.
8. To cancel the program mode, press the STOP button once.
(Note: when all 20 program tracks are set, press the button and “FI” will appear on
the display as a notification that you’ve filled all 20 programmable tracks.)
To Check the Programmed Order
In stop mode, press or repeatedly to show the track numbers that
have been programmed.
To Add a Track to the End of the Programmed Order:
In stop mode, press the button. Select a track number by
pressing or , then press the button.
The current track will be added to the end of the program.
To clear the programmed order:
Press STOP when the CD is already stopped, or press
8
Listening to FM Radio
1. Press the button to select the FM tuning function.
2. Press the or button to manually tune to a desired station
3. You may also press and hold the or button to auto scan for a station.
4. Using the STOP or button you can scan through your preset stations.
(See how to preset a station in the section below.)
Adjusting for Best Reception
FM broadcast: Extend and reposition the FM antenna located on the back of the unit.
Preset Tuning
You can preset and store up to 20 FM radio stations.
1. Select your desired FM station.
2. To save the FM radio frequency shown, press button, and “P01” will flash on the
display. Then press button again before the indicator stops flashing and the
frequency shown will be saved as “P01”.
3. To continue saving another station, tune to the 2
nd
desired radio frequency:
a) Press button again to bring you to the list of the “P—“ stations.
b) Using the STOP or button, you can manually choose the desired preset
number (P01–P20). The manually selected number will flash on the display
c) Press the button before preset number “P—“ stops flashing.
Once pressed the frequency shown will be stored as the corresponding number “P—“.
4. Press the STOP or button to scan through your preset stations.
Listening to an External Audio Device (Auxiliary Mode)
In AUX (auxiliary) mode, this unit can play audio from an external audio device (iPod, MP3 Player,
Portable CD Player, etc.)
CONNECTING VIA AUXILIARY
1. Press the button to select the AUX-IN function.
2. Plug one end of the AUX IN cable (not included) into the AUX IN jack located
on the back of the unit.
3. Plug the other end of the cable into the headphone jack of your external audio device.
NOTE: Playback functions and operations are only available on your external device.
9
Listening to an External Audio Device (Bluetooth Mode)
In BT (Bluetooth) mode, this unit can play audio from external devices that have a built-in
Bluetooth function.
CONNECTING VIA BLUETOOTH
1. Press button to select the Bluetooth mode, the display will show this symbol: .
2. Turn ON the Bluetooth function on your external device.
NOTE: The effective distance between your external device and this apparatus is 10 meters.
3. Wait a moment until “Victrola Jukebox” appears on the paired devices list, then select “Victrola
Jukebox” and allow it to connect. If a window appears and asks for a password, simply type
“0000”, then press ok on your external device.
4. After a few seconds you will hear an audio tune to indicate that your device has made a
successful connection.
PLAYING MUSIC VIA BLUETOOTH
1. Once your device is connected, open the music player application or program on your external
device. If your devise is not connected yet, see “Connecting Via Bluetooth”
2. You can now control music playback with the , and buttons on the
Bluetooth Jukebox.
3. Enjoy your music!
PLEASE NOTE: Some buttons may not work in certain music player applications or programs.
Light Mode Function
USING THE LED LIGHT TUBE
1. Press the LED Tube On/Off button located on the front of the Jukebox to turn on the 5 color
changing LED Tube.
2. The Outer LED Tube will illuminate the 5 changing colors (depending on the Light mode).
3. Using the Light Mode Switch located on the back of the unit, you can switch between Mixed
Light Mode and Single Light Mode.
- Mixed Light Mode will slowly transition through the 5 LED colors.
- Single Light Mode will remain on the single color that the LED Tube currently displays.
NOTE: The White tube located on the CD Door does not light up.
10
Specifications
GENERAL
Power Requirements AC 120 V~ 60 Hz
Power Consumption 35W
Dimensions (W x H x D)
278mm x 400mm x 168mm
(approx.)
10.9 in x 15.75 in x 6.6 in
Weight
2.8 kgs
(approx.)
6.17 lbs
AMPLIFIER
Output Power 5 W + 5 W
Frequency Response 60 to 20, 000 Hz
SPEAKER SYSTEM
Type 1-way
Impedance 8 ohms
Input Power Max. 10W
FM Radio
Range 88 to 108 MHz
CD PLAYER
Frequency Response 60 to 20, 000 Hz +/-4 dB
Signal-to-Noise Ratio 55 dB (IEC-A)
BLUETOOTH
Bluetooth Version Bluetooth V2.1+EDR
Bluetooth Profiles A2DP, AVRCP
Bluetooth Frequency range 2.402GHz-2.480GHz
Operating Distance 10 meters (33 ft.)
Troubleshooting Guide
GENERAL
Symptom Possible Cause Solution
•
Unit will not power on.
•
Unit is unplugged.
•
Connect the unit to the AC
power supply.
•
No sound output from
speakers.
•
The volume level is set too
low.
•
The input selector does not
match the playback source.
•
Adjust the volume.
•
Select the correct input
source.
•
Noise/Distortion in
sound output.
•
The unit is too close to a TV
set or another interfering
device.
•
Turn off the TV or other
appliance, and relocate the
unit.
•
Unit fails to respond.
•
It might result from external
factors such as ESD
(Electro-static discharge).
•
Disconnect the power cord
and external audio device.
Re-plug the power cord
after one minute.
FM RADIO
•
Cannot listen to any
station, or signal
appears weak.
•
The station is not tuned-in
properly.
•
A TV set is being used nearby
and is interfering with the
radio reception.
•
Properly tune-in the
desired station.
•
Turn-off the interfering TV
set.

11
•
The sound is distorted.
•
The antenna is not oriented
properly.
•
Re-orient the antenna until
reception improves.
CD PLAYER
•
CD stops immediately
after starting, or unit
pauses or stops during
play.
•
The CD is inserted upside
down.
•
The CD is dusty or dirty or
there is condensation on the
CD.
•
Insert the CD with the
printed side right-side up.
•
Carefully clean and dry the
CD.
•
No sound.
•
The CD player is paused.
•
Press the PLAY/PAUSE
button.
•
CD playback is noisy,
or playback stops or
skips.
•
The CD is scratched,
damaged or warped.
•
The disc is very dirty.
•
Replace CD with an
undamaged one.
•
Carefully clean the CD.
•
Buttons are not
functioning correctly.
•
The unit is processing
information
•
The unit needs to be restarted
•
Wait until the unit finishes
processing.
•
Turn the unit off, then on
again.
AUX
•
No sound output with
external audio device
plugged into rear AUX
in jack.
•
AUX in jack is unplugged.
•
Unit is not in proper Mode
•
Make sure the Auxiliary
Cable is plugged into both
sources.
•
Select proper AUX mode
BLUETOOTH
•
No sound
•
The unit is not switched to
Bluetooth mode
•
Your device’s and/or the unit’s
volume is not turned up.
•
Your device is too far from the
unit or there’re some obstacle
between your device and the
unit
•
Ensure the unit is switched
to BT mode.
•
Move your Bluetooth
device closer to unit
•
Turn up the volume on your
portable device and/or the
unit.
•
Turn OFF your Bluetooth
device and unit. Then
power them both back ON
•
Sound has a lot of
static
•
Your device is too far away
•
Bring your device closer to
the turntable
•
Unable to pair with a
Bluetooth device
•
Your device doesn’t have
Bluetooth connectivity.
•
The Bluetooth pairing is not
successful
•
Confirm that your device is
Bluetooth compatible.
•
Re-pair the unit and device
again.
Statement

12
FCC Statement
This device complies with Part 15 of the FCC Rules. Operation is subject to the following two
conditions: (1) This device may not cause harmful interference, and (2) this device must accept any
interference received, including interference that may cause undesired operation.
NOTE: This equipment has been tested and found to comply with the limits for a Class B digital
device, pursuant to Part 15 of the FCC Rules. These limits are designed to provide reasonable
protection against harmful interference in a residential installation. This equipment generates uses
and can radiate radio frequency energy and, if not installed and used in accordance with the
instructions, may cause harmful interference to radio communications. However, there is no
guarantee that interference will not occur in a particular installation. If this equipment does cause
harmful interference to radio or television reception, which can be determined by turning the
equipment off and on, the user is encouraged to try to correct the interference by one of the following
measures:
- Reorient or relocate the receiving antenna.
- Increase the separation between the equipment and receiver.
- Connect the equipment into an outlet on a circuit different from that
to which the receiver is connected.
- Consult the dealer or an experienced radio/TV technician for help.
WARNING: Any changes or modifications not expressly approved by the party responsible for
compliance could void the user's authority to operate this equipment.
The device must not be co-located or operating in conjunction with any other antenna or transmitter.
To maintain compliance with the FCC’s RF exposure guidelines, place the product at least 20cm
from nearby persons.
California PROP 65 Warning
"WARNING" This product contains chemicals known to the State of California to cause birth defects or
other reproductive harm. For more information on these regulations and a list of chemicals, log on the
following website address:
http://www.oehha.ca.gov/prop65.html