Leetac Electronics Technology LEETACE9098 Bluetooth/USB charge tower speaker User Manual BT9090 Instruction Manual

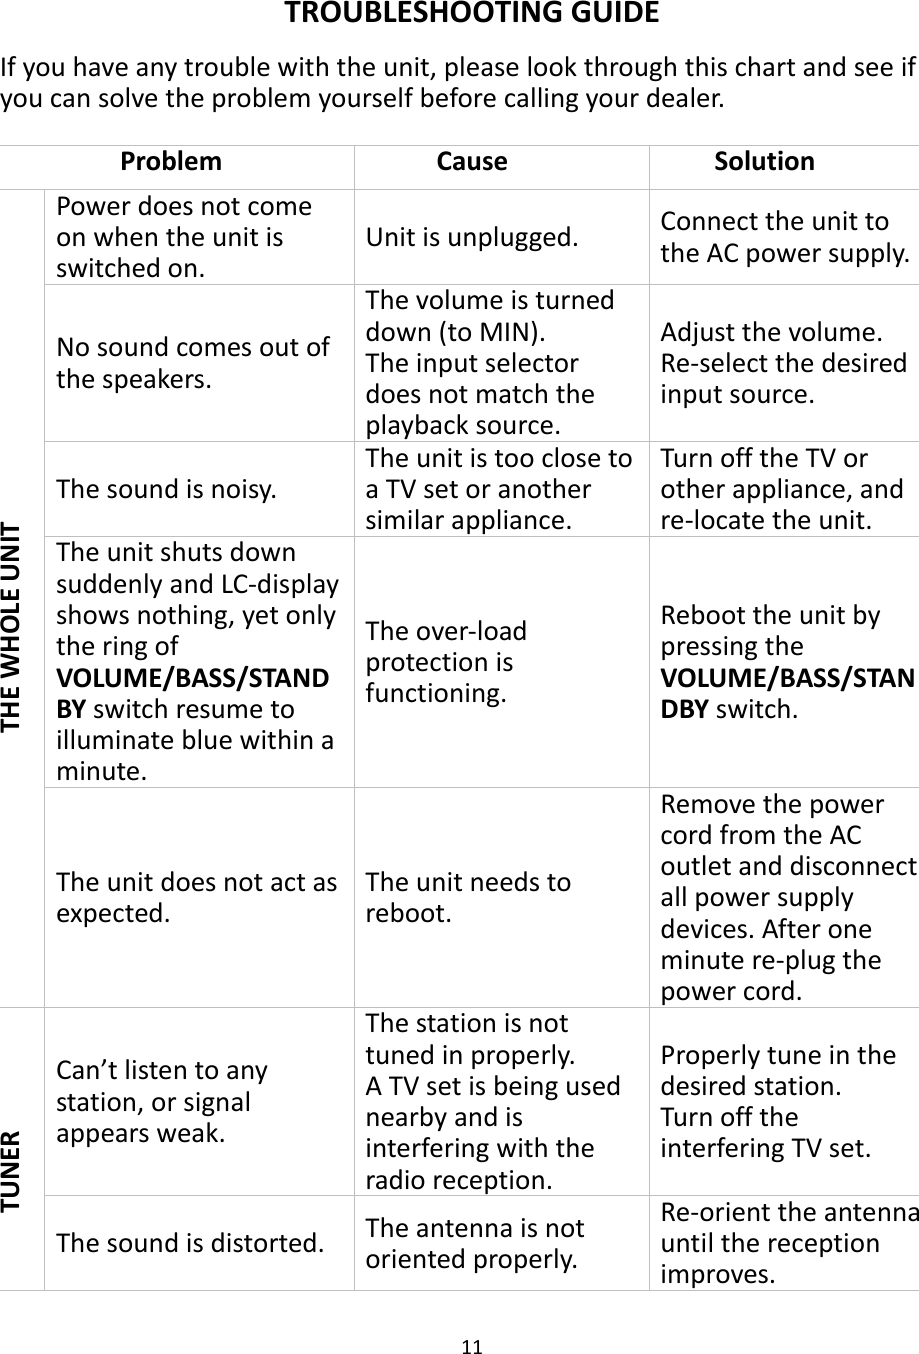
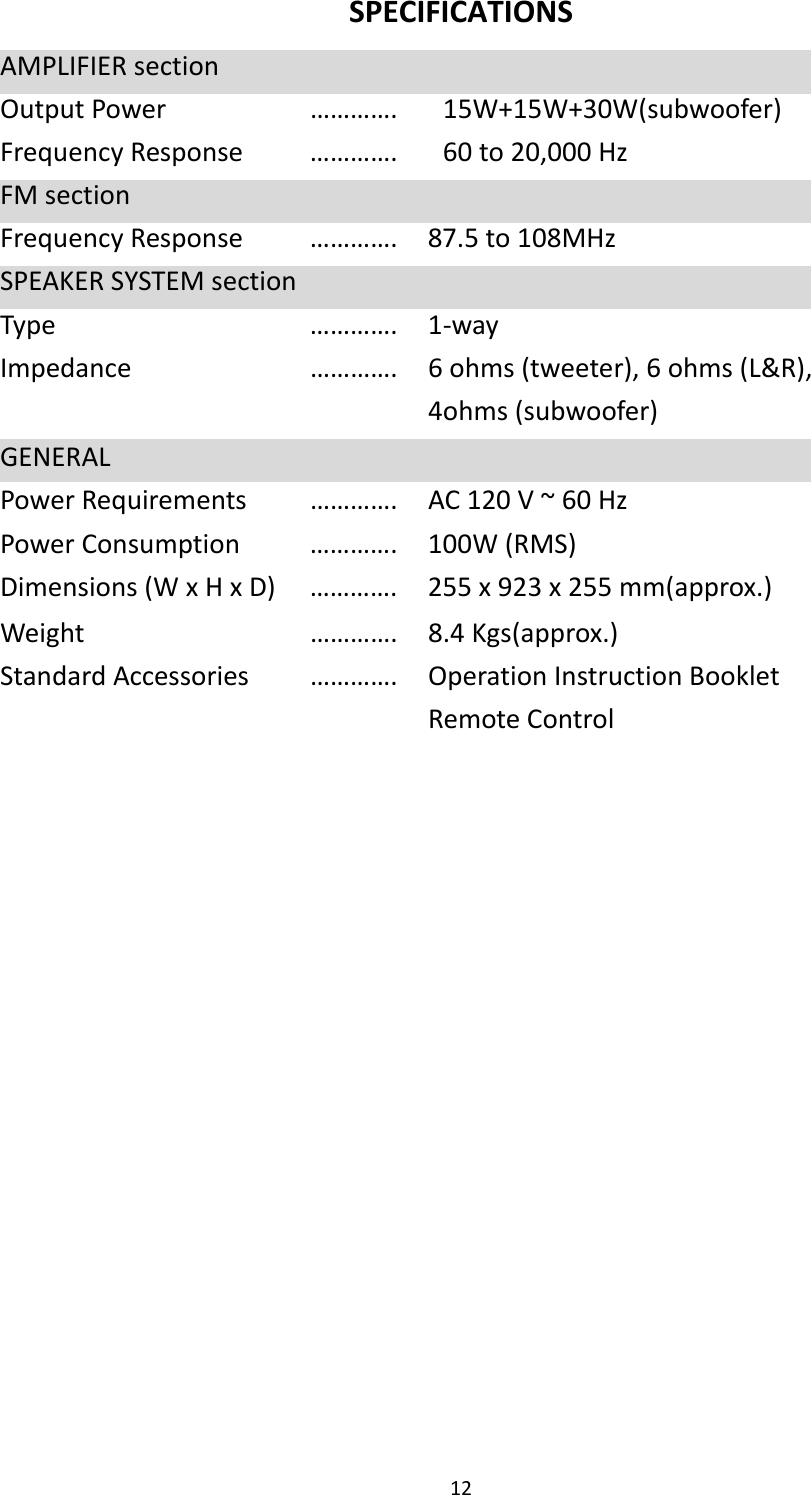
Zhongshan Leetac Electronics Co., Ltd. Bluetooth/USB charge tower speaker BT9090 Instruction Manual

User Manual

          Opera ng Instru on                               Model: BT9090 Ave Speaker: Tower Speakers
2  TABLE OF CONTENTS  IMPORTANT SAFETY INSTRUCTIONS ....................................................................3 BEFORE USE .......................................................................................................5 COPYRIGHT ...........................................................................................................5 LOCATION OF CONTROLS .....................................................................................6 REMOTE CONTROL ............................................................................................6 REMOTE CONTROL UNIT ......................................................................................7 BATTERY INSTALLATION .....................................................................................7 CONNECT TO A MAINS .........................................................................................7 BASIC OPERATION ................................................................................................8 LISTENING TO A RADIO STATION ........................................................................8 STORE FAVORITE STATIONS .............................................................................9  TO LISTEN TO THE STORED STATION ...............................................................9 PLAYING AN EXTERNAL AUDIO SOURCE .............................................................9 BLUETOOTH CONNECTIVITY .............................................................................. 10 USB CHARGE ...................................................................................................... 10 TROUBLESHOOTING GUIDE ............................................................................... 10 SPECIFICATIONS .................................................................................................  12
3  IMPORTANT SAFETY INSTRUCTIONS  - This lightning flash with arrowhead symbol within an equilateral triangle is intended to alert the user to the presence of non-insulated “dangerous voltage” within the product’s enclosure that may be of sufficient magnitude to constitute a risk of electric shock. - Warning: To reduce the risk of electric shock, do not remove cover (or back) as there are no user-serviceable parts inside. Refer servicing to qualified personnel. - The exclamation point within an equilateral triangle is intended to alert the user to the presence of important operating and maintenance instructions in the literature accompanying the appliance.   This equipment is a Class II or double insulated electrical appliance. It has been designed in such a way that it does not require a safety connection to electrical earth. IMPORTANT SAFETY INSTRUCTIONS1.  Read these instructions – All the safety and operating instructions should be read before this product is operated.   2.  Keep these instructions – The safety and operating instructions should be retained for future reference.   3.  Heed all warnings – All warnings on the appliance and in the operating instructions should be adhered to.   4.  Follow all instructions – All operating and use instructions should be followed.   5.  Do not use this apparatus near water – The appliance should not be used near water or moisture – for example, in a wet basement or near a swimming pool, and the like. 6.  Clean only with dry cloth. 7.  Do not block any ventilation openings. Install in accordance with the manufacture’s instructions. 8.  Do not install near any heat sources such as radiators, heat registers, stoves, or other apparatus (including amplifiers) that produce heat.   9.  Do not defeat the safety purpose of the polarized or grounding plug. A polarized plug has two blades with one wider than the other. A grounding plug has two blades and a third grounding prong. The wide blade or the third prong is provided for your safety. If the provided plug does not fit into your outlet, consult an electrician for replacement of the obsolete outlet. 10.  Protect the power cord from being walked on or pinched particularly at the plugs, convenience receptacles, and at the point where they exit from the apparatus. 11.  Only use attachments/accessories specified by the manufacturer. 12.  Use only with the cart, stand, tripod, bracket, or table specified by the manufacturer, or sold with the apparatus. When a cart or rack is used, use caution when moving the cart/apparatus combination to avoid injury from tip-over.
4  Cauon: 1. Warning:  Changes or modifications to this unit not expressly approved by the party responsible for compliance could void the user’s authority to operate the equipment.Use of controls and adjustments or performance of procedures other than those specified herein may result in hazardous radi on exposure. 2. If this product develops trouble, contact qualified service centers, and do not use the product in def ve states.  13.  Unplug the apparatus during lightning storms or when unused for long periods of time. 14.  Refer all servicing to qualified personnel. Servicing is required when the apparatus has been damaged in any way, such as power supply cord or plug is damaged, liquid has been spilled or objects have fallen into the apparatus has been exposed to rain or moisture, does not operate normally, or has been dropped. 15.  Do not install this equipment in a confined or building-in space such as a book case or similar unit, and remain a well ventilation conditions at open site. The ventilation should not be impeded by covering the ventilation openings with items such as newspaper, table-cloths, curtains etc. 16.  WARNING:To reduce the risk of fire or electric shock, do not expose this apparatus to rain or moisture. The apparatus shall not be exposed to dripping or splashing and that objects filled with liquids, such as vases, shall not be placed on apparatus. 17.  WARNING: The battery (battery or batteries or battery pack) shall not be exposed to excessive heat such as sunshine, fire or the like. 18.  WARNING: The mains plug is used as disconnect device, the disconnect device shall remain readily operable. 19.  When not in use and during movement, please take care of the power cordset, e.g. tie up the power cordset with cable tie or something like that. It shall be free from sharp edges and the like that can cause abrasion of the power cordset. When put into use again, please make sure the power cordset being not damaged, If any damages found,    please look for the service person to replace the power cordset specified by the manufacturer or have the same characteristics as the original one. NOTE:  This equipment has been tested and found to comply with the limits for a Class B digital device, pursuant to Part 15 of the FCC Rules.  These limits are designed to provide reasonable protection against harmful interference in a residential installation.  This equipment generates, uses and can radiate radio frequency energy and, if not installed and used in accordance with the instructions, may cause harmful interference to radio communications.However, there is no guarantee that interference will not occur in a particular installation.  If this equipment does cause harmful interference to radio or television reception, which can be determined by turning the equipment off and on, the user is encouraged to try to correct the interference by one or more of the following measures:  Reorient or relocate the receiving antenna.  Increase the separation between the equipment and receiver. Connect the equipment into an outlet on a circuit different from that to which the  receiver is connected.  Consult the dealer or an experienced radio/TV technician for help.FCC RF Radiation Exposure Statement Caution: This Transmitter must be installed to provide a separation distance of at least 20 cm from all persons.
5  BEFORE USE 1. Choose unit installaon locaon carefully. Avoid placing it in direct sunlight or close to a source of heat. Also avoid locaons subject to vibraons and excessive dust, cold or moisture. Keep away from sources that hum, such as transformers or motors. 2. Do not open the cabinet as this might result in damage to the circuitry or electrical shock. If a foreign object should get into the set, contact your dealer. 3. When removing the power plug from the wall outlet, always pull directly on the plug, never pull the cord. 4. Do not aempt to clean the unit with chemical solvents as this might damage the finish. Use a clean, dry cloth. 5. In order to shut off the power to this product completely, unplug the power cord from the wall outlet. Be sure to unplug the unit if you do not intend to use it for an extended period of me, such as while on vacaon.   6. Keep this manual in a safe place for future reference.   COPYRIGHT * iPhone, iPod, iPod classic, iPod nano, and iPod touch are trademarks of Apple Inc., registered in the U.S. and other countries. iPad is a trademark of Apple Inc.
6  LOCATION OF CONTROLS  1. REMOTE SONSOR 2. FUNCTION BUTTON   3. PLAY/PAUSE BUTTON 4. VOLUME/BASS/STANDBY SWITCH 5. PHONE BRACKET and Display 6. FORWARD/TUNING + BUTTON   7. BACKWARD/TUNING - BUTTON 8. SPEAKERS 9. ANTENNA 10. AUX IN 11. USB CHARGE 12. SUBWOOFER 13. POWER CORD   REMOTE CONTROL A  /STANDBY: Turn the unit on or set it to standby.B VOL+/VOL- adjust  the volume on le  and right speakers. CDEQ: Press to select an EQ playback effect.BT: Press to switch to Bluetooth M+/M-:Radio: Press to switch to Radio mode.E MEM: In FM mode, use it to memory a sta on. FMUTE: Mute all the speakers.PLAY/SCAN: In BT mode, press to play/pause the track. In FM mode, G BASS-/BASS+:adjust the subwoofer volume. H J KL/ :I  AUX: Press to switch to AUX-IN mode. DEFGHFGIJJKLACCB
7  REMOTE CONTROL UNIT You may operate the apparatus in a distance with the remote control. Within the effecve range, point the remote control towards the front panel of the apparatus.  BATTERY INSTALLATION 1. Remove the baery compartment cover. 2. Insert two “AAA” size baeries (not included). Install the baeries properly. 3. Close the cover.   NOTE:   If the remote control fails to work, check the following   possibilies: -the baeries in the remote control are drained; -there is an obstacle between the remote control unit and the apparatus; -another appliance which generates infrared rays is being used nearby.  Baery Replacement If the distance required between the remote control unit and main unit decreases, the baeries are exhausted. In this case, please replace the baeries with new ones.  Precauons concerning baeries     Be sure to insert baeries with correct polaries.     Rechargeable and non-re-chargeable baeries can be used. Refer to the precauons on their labels.     When the remote control unit will not be used for a long me (more than a month), remove the baeries from the remote control unit to prevent them from leaking. If they leak, wipe away the liquid inside the baery compartment and replace the dead baeries with new ones.     Do not heat or disassemble baeries and never dispose of old baeries by throwing them in a fire.   CONNECT TO A MAINS Plug the power cord into a standard 120V~60Hz outlet.
8  The ring of the VOLUME/BASS/STANDBY switch goes blue.  BASIC OPERATION 1. Press down the VOLUME/BASS/STANDBY switch briefly to turn the unit ON. 2. Press the FUNCTION button repeatedly to select a desired mode.  3. Rotate the VOLUME/BASS/STANDBY switch to adjust the volume. 4. Press down the VOLUME/BASS/STANDBY switch briefly then goes to subwoofer adjustment mode. Rotate the VOLUME/BASS/STANDBY switch to set the subwoofer volume.    Now the unit is ready to use.  To set the unit into STANDBY - Press and hold the VOLUME/BASS/STANDBY switch. - Press the  /STANDBY on the remote control.  To disconnect the power completely Disconnect the power cord from the working electric outlet especially when the unit is not in user for an extended period.  LISTENING TO A RADIO STATION 1. Select the FM ( ) mode by pressing the FUNCTION button repeatedly.  2. Search a station. To auto search and store stations Press and hold   button on the remote control, the unit will search and save stations automatically.  To auto search a valid station Press and hold /TUN- or /TUN+ button for more than 2 seconds, then release the button if the frequency on the display starts to change. Alternative: Use  or  button on the remote control by holding button then
9  releasing the bu on when the frequency displayed star ng to change.  To search a sta on manually Press  /TUN- or  /TUN+ bu on briefly un l you get the desired sta on. Alterna ve: Use   or   bu on on the remote control by pressing the bu on briefly.  3. Unwind the wire antenna and extend it to full length, orient its  on un l you find the sta on is clear enough. 4. If the signal is strong enough, the unit will turn to stereo broadcas  and you will no e a stereo icon ( ) appeared on the display.  STORE FAVORITE STATIONS Briefly press MEM bu on on the remote control, then use   or   bu on to select a memory address. Press the MEM bu on again and the sta on has been stored. You can store up to 20 sta ons.  TO LISTEN TO THE STORED STATION In FM mode, briefly press   or   bu on to select a memory address. Then the sta on starts to broadcast.    PLAYING AN EXTERNAL AUDIO SOURCE   An external (auxiliary) audio source (i.e., personal CD player or MP3 player) can be connected to this unit.
10  1. Plug one end of the AUX IN cable (included) into the color coded AUX IN sockets at rear of the unit. Always make sure the white plug is connected to the white socket and the red plug in the red socket. 2. Plug the other end of the cable into the headphone or Line Out socket of the external source. 3. Press the FUNCTION button repeatedly to select a respective AUX mode ( ) that you have connected. 4. Turn on the external audio source and adjust volume level. 5. Set the external audio source to normal play.  BLUETOOTH CONNECTIVITY External devices, which have a built-in Bluetooth feature, can be connected to this apparatus and play through the speakers.  1. Change to Bluetooth by pressing the FUNCTION button to the Bluetooth Function and then the display will show “blue”. 2. Set the Bluetooth function of your external device ON. 3. Set to search Bluetooth device on your external device. NOTE: The effective distance between your external device and this apparatus is 10 meters. 5. Wait for a while then find the “Iriver audio BT” on the paired devices list on your external device. 6. If a window asks for a password. Fill in “0000”or“1234” then press “OK” on your external device. 7. A few seconds later your Bluetooth connection should be paired.  USB CHARGE    1.  Connect a USB cable to the USB slot of your device and the other end to the USB slot. Your phone will be charged automatically when the unit is powered up.   The charging voltage is 5V, 2.1A current. NOTE: Your phone will not be charged during the radio is working.
11      TROUBLESHOOTING GUIDE If you have any trouble with the unit, please look through this chart and see if you can solve the problem yourself before calling your dealer.  Problem Cause Solution THE WHOLE UNIT Power does not come on when the unit is switched on. Unit is unplugged.  Connect the unit to the AC power supply. No sound comes out of the speakers. The volume is turned down (to MIN). The input selector does not match the playback source.Adjust the volume. Re-select the desired input source. The sound is noisy. The unit is too close to a TV set or another similar appliance.Turn off the TV or other appliance, and re-locate the unit. The unit shuts down suddenly and LC-display shows nothing, yet only the ring of VOLUME/BASS/STANDBY switch resume to illuminate blue within a minute. The over-load protection is functioning. Reboot the unit by pressing the VOLUME/BASS/STANDBY switch. The unit does not act as expected. The unit needs to reboot. Remove the power cord from the AC outlet and disconnect all power supply devices. After one minute re-plug the power cord. TUNER Can’t listen to any station, or signal appears weak. The station is not tuned in properly. A TV set is being used nearby and is interfering with the radio reception.Properly tune in the desired station. Turn off the interfering TV set. The sound is distorted.  The antenna is not oriented properly. Re-orient the antenna until the reception improves.
12  SPECIFICATIONS AMPLIFIER sectionOutput Power  …………. 15W+15W+30W(subwoofer) Frequency Response  …………. 60 to 20,000 HzFM section Frequency Response  …………. 87.5 to 108MHzSPEAKER SYSTEM section Type …………. 1-wayImpedance  …………. 6 ohms (tweeter), 6 ohms (L&R),   4ohms (subwoofer) GENERAL   Power Requirements  …………. AC 120 V ~ 60 HzPower Consumption  …………. 100W (RMS)Dimensions (W x H x D)  …………. 255 x 923 x 255 mm(approx.) Weight …………. 8.4 Kgs(approx.)Standard Accessories  …………. Operation Instruction Booklet   Remote Control

Navigation menu