Leica Biosystems Nussloch SPECTRACV01 HistoCore SPECTRA CV User Manual Leica SPECTRA CV Instructions for Use V1 2 RevA

Leica Biosystems Nussloch GmbH HistoCore SPECTRA CV Leica SPECTRA CV Instructions for Use V1 2 RevA

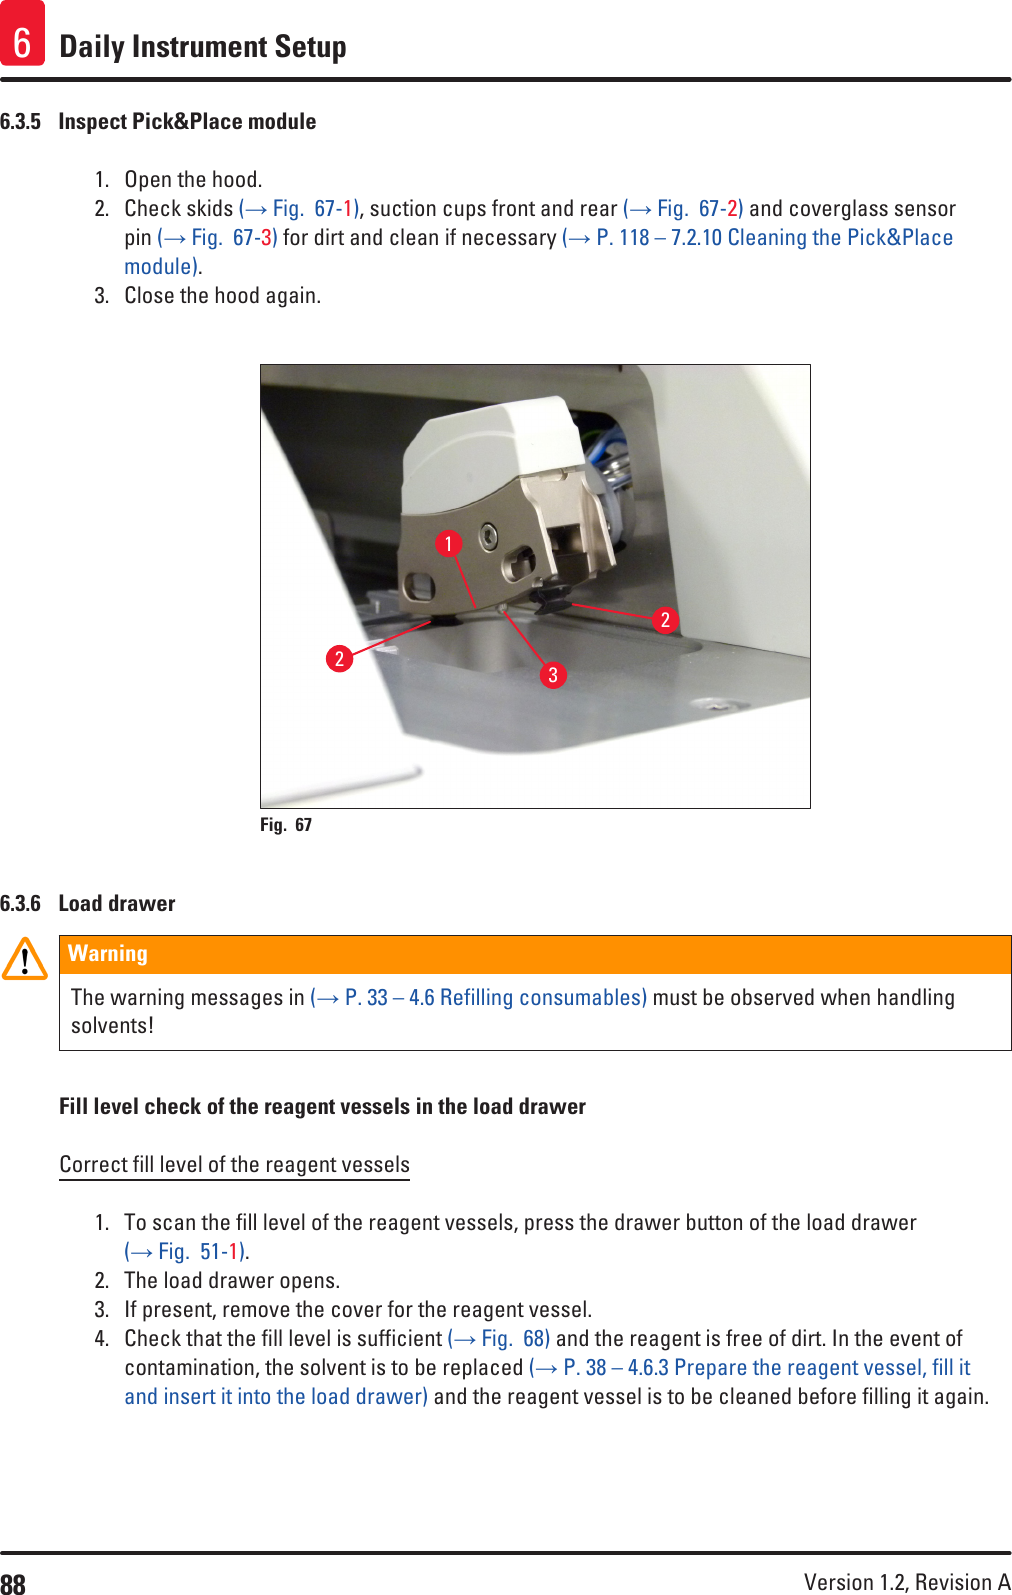
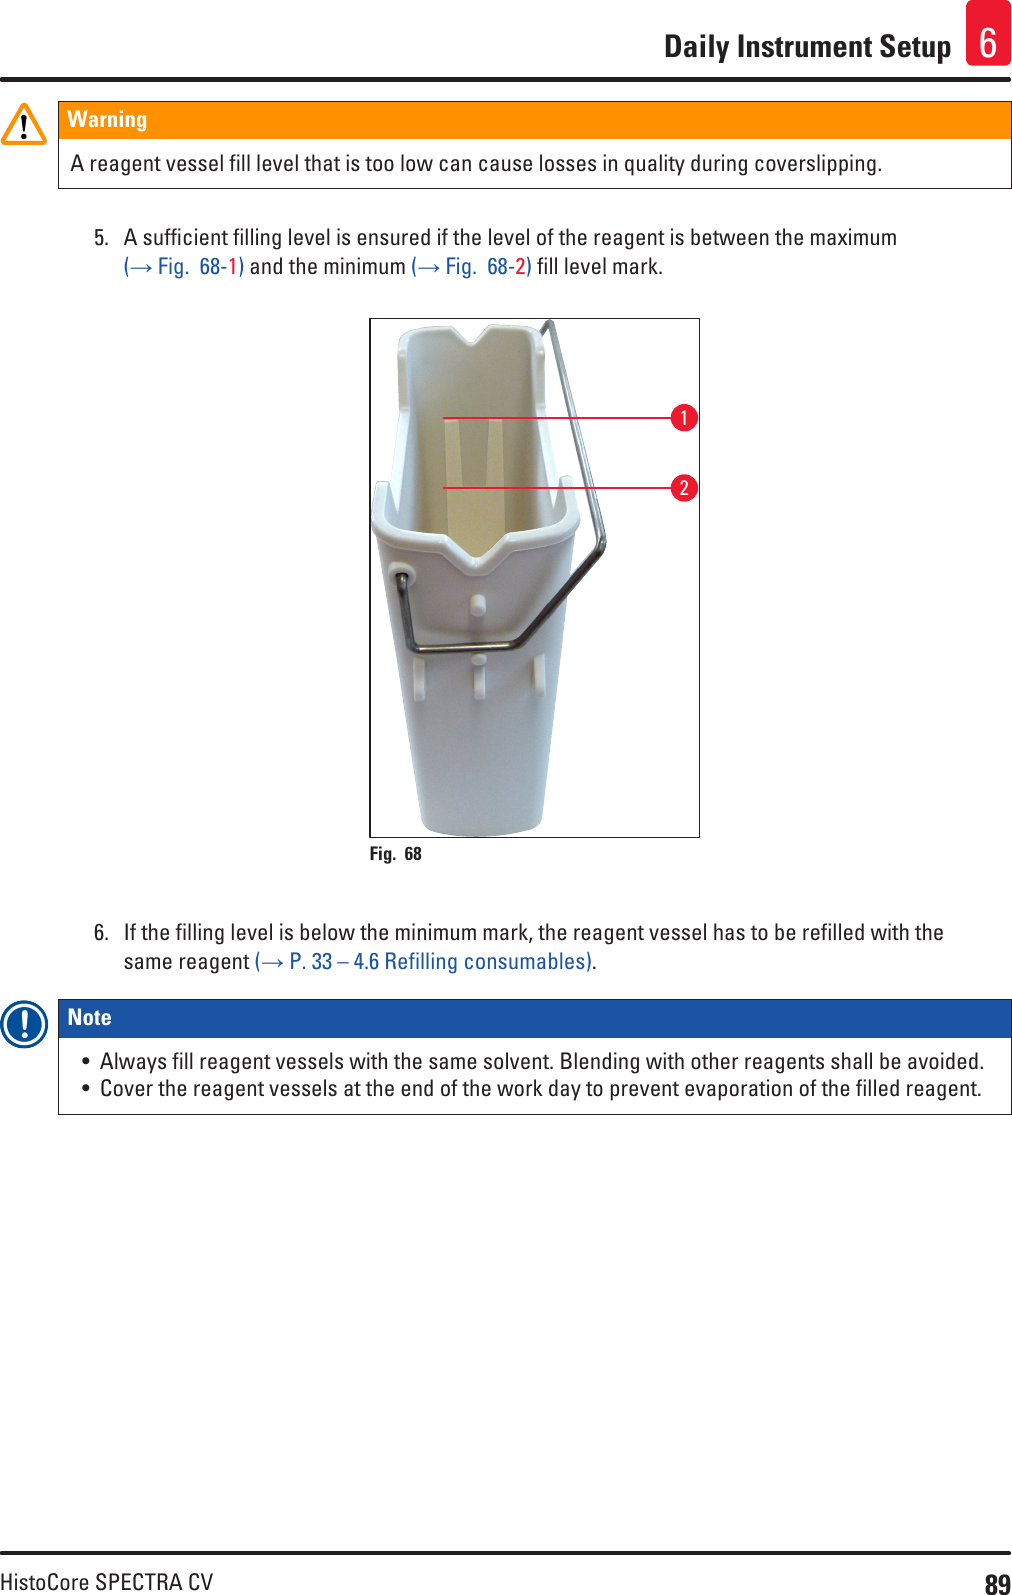
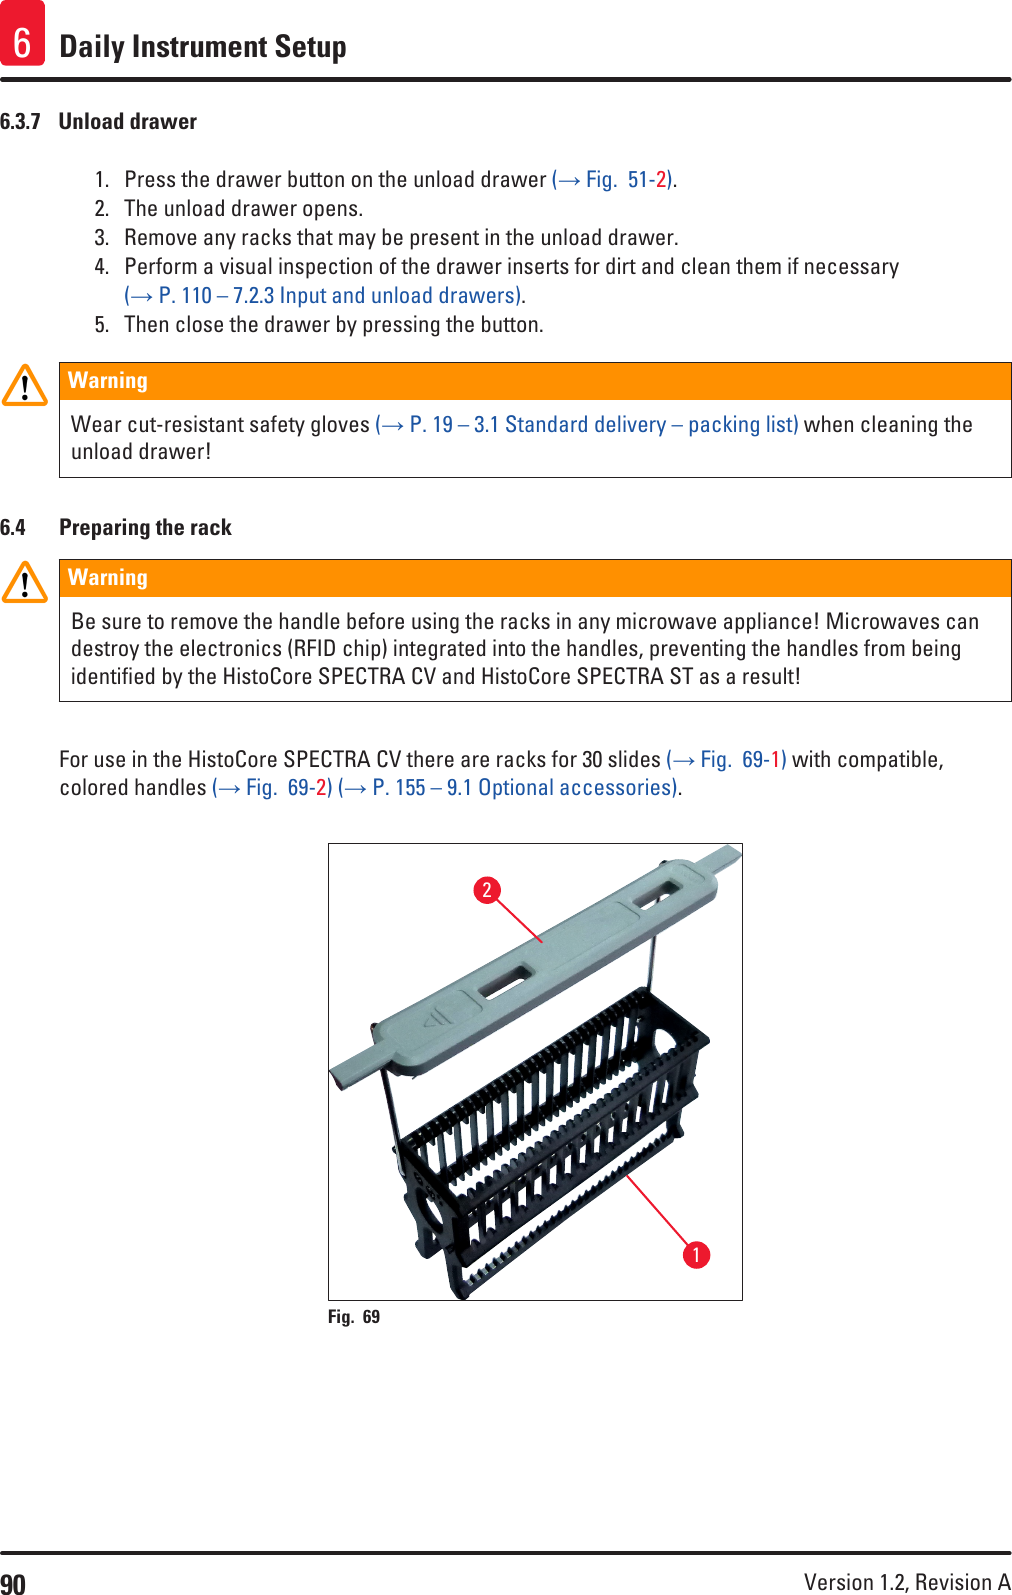
User Manual V1.2 Part 3

76 Version 1.2, Revision A Daily Instrument Setup66.  Daily Instrument Setup6.1  Station overview6734512Fig. 51   1Load drawer 5Waste tray2Unload drawer 6Left coverslip line L13Coverglass cartridge 7Right coverslip line L24Pick&Place moduleWarning• The system does not monitor the levels of the reagent vessels in the load drawer (→ Fig.  51-1). The user is responsible for monitoring.• Before the daily instrument setup, ensure that the covers of the reagent vessels in the load drawer were removed and the drawer inserts are correctly inserted in the unload drawer (→ Fig.  9-1).
77HistoCore SPECTRA CVDaily Instrument Setup 66.2  Switching on and shutting down the instrumentSwitching on the instrument1.  To start the instrument, press the Operating switch (→ Fig.  53-1) illuminated in red.2.  During initialization, a verification of all modules and consumables is carried out automatically. The Operating switch (→ Fig.  53-1) is illuminated in green whenever the instrument is ready to start. LAfter completing the initialization phase, the main menu (→ Fig.  20) appears on the screen. and the user is informed (→ Fig.  52) that a Quick Prime is required for the coverslip line in use. Acknowledge the messages by pressing Ok (→ Fig.  52-1) and follow the instructions that follow (→ P. 122 – 7.3 Preparing the hose system for priming and cleaning).1 1Fig. 52   Shutting down the instrument1.  To switch the instrument into standby mode (e.g. overnight), press the Operating switch twice. It then illuminates in red (→ Fig.  53-1).1Fig. 53    LFor cleaning and maintenance, observe the notes in (→ P. 109 – 7.1 Important notes about cleaning this instrument).
78 Version 1.2, Revision A Daily Instrument Setup66.3  Checking and refilling consumablesDuring initialization of the instrument, the consumables (mounting medium, coverglass, fill level of the needle cleaning container) are checked automatically (→ P. 44 – 5.4 Consumables Management System (CMS)).Fig. 54   • If a consumable is used up, a corresponding warning message is sent to the user, for example (→ Fig.  55).Fig. 55
79HistoCore SPECTRA CVDaily Instrument Setup 6Note In the event that there is insufficient mounting medium available in order to fill the hose after initialization, a new mounting medium bottle must be inserted by the user (→ P. 79 – 6.3.1 Changing the mounting medium bottle).• To avoid air bubbles in the system, prime the system after initialization of the instrument (→ P. 125 – 7.3.1 Quick Prime).6.3.1  Changing the mounting medium bottleWarning• While changing the mounting medium bottle, always wear personal protective clothing (lab coat, cut-resistant gloves, safety goggles)!• The mounting medium may be only used a maximum of 14 days in the instrument and must be exchanged after this period to avoid a deterioration of the coverslip results.• Before the insertion of a mounting medium bottle in the instrument, the expiration date (imprint on the packaging and on the bottle label (→ Fig.  16-3)) is to be checked. If the expiration date has been reached or exceeded, the mounting medium may no longer be used. Expired mounting medium is to be disposed of in accordance with the applicable on-site lab guidelines.• Avoid a delay while changing the mounting medium bottle in order to prevent the cannula from becoming stuck. Thus, do not leave the cannula in the rest position longer than necessary.Note • Changing the mounting medium bottle in the L2 coverslip line is described in the following. The same procedures also apply for the coverslip line L1.• When changing the mounting medium bottle, we recommend that you wait if possible until there are no longer any slides in processing in either coverslip line and the instrument is in sleep mode, in order to prevent the specimens from drying out.• For each inserted rack, the consumable material management system (CMS) calculates whether the available quantity of mounting medium is sufficient. • If there is a rack in processing and the CMS determines that the remaining quantity of mounting medium is no longer sufficient for a newly placed rack, the CMS indicates to the user (→ Fig.  56-1) that a new mounting medium bottle must be inserted upon completion of the rack currently being processed in the instrument.• If the CMS determines that a readjusted rack can no longer be completely coverslipped, an appropriate warning message (→ Fig.  56-2) will be displayed to the user.
80 Version 1.2, Revision A Daily Instrument Setup612Fig. 56   Note New processing in the L2 (→ P. 126 – 7.3.2 Extended Prime) coverslip line is only possible after the insertion of a new mounting medium bottle and the necessary extended priming.To change the mounting medium bottle, proceed as follows:1.  Open the hood (→ Fig.  2-1).2.  Grasp the bottle sledge on the handle and move it forwards (→ Fig.  57-1).3.  Carefully withdraw the cannula (→ Fig.  57-2) L2 from the mounting medium bottle opening and place in the parking location (→ Fig.  57-3).4.  Remove the empty mounting medium bottle (→ Fig.  57-4) and dispose of it in accordance with the laboratory specifications.1243Fig. 57   5.  Take a new mounting medium bottle (→ Fig.  58) out of the packaging and remove the black plastic cap (→ Fig.  58-1).WarningDo not remove the white protective foil (→ Fig.  58-2). It must remain on the bottle.
81HistoCore SPECTRA CVDaily Instrument Setup 6Fig. 58   126.  Insert the new mounting medium bottle (→ Fig.  59-1) into the L2 slot (→ Fig.  59-2) in the bottle sledge and make sure that the RFID chip attached to the bottle is seated in the notch of the slot (→ Fig.  59-3).7.  Take the cannula with the label 2 (→ Fig.  59-4) out of the parking location (→ Fig.  59-5) and carefully insert into the opening of the mounting medium bottle (→ Fig.  59-6) until it noticeably clicks into place (→ Fig.  59-7). In the course of this, the white protective membrane of the bottle is punctured.Note Before inserting the drain tube into the new mounting medium bottle, check the cannula for any dried mounting medium residue and, if necessary, moisten with a compatible solvent and clean with a lint-free cloth.Fig. 59   1627345WarningPuncturing the white protective membrane briefly requires an increase in force. Therefore, proceed carefully to avoid letting it slip from your hand and to avoid bending the cannula.
82 Version 1.2, Revision A Daily Instrument Setup68.  Slide the bottle sledge (→ Fig.  57-1) back into its original position once again until it clicks into place.9.  Close the hood.10. The mounting medium bottles that are reinserted are detected by the instrument software and the Module Status (→ Fig.  54) is updated.Note The CMS detects that a new mounting medium bottle has been inserted, and informs the user that an Extended Prime is required for the coverslip line L2 (→ P. 126 – 7.3.2 Extended Prime). By this means, air and any old mounting medium that is possibly still present is ousted from the hose system. Only afterwards is the instrument ready to start.6.3.2  Monitoring and refilling of the needle cleaning containerNote The HistoCore SPECTRA CV has an automatic fill level scan mechanism in the needle cleaning container. A warning message informs the user if there is not a sufficient quantity of solvent left in the glass vessel. Despite the automated fill level scan, Leica recommends also carrying out a visual inspection during daily startup to ensure that no refilling is necessary during daily routine work.WarningThe warning messages in (→ P. 33 – 4.6 Refilling consumables) must be observed when handling solvents!1.  Select the Module Status (→ P. 74 – 5.11 Module status) menu in the main menu and press the Prime/Clean button in the desired coverslip line.2.  The needle moves automatically to the maintenance position.3.  Open the hood.4.  Take the needle out of the holder sideways and place it in the prime bottle (→ Fig.  4-11).5.  Turn the knurled screw (→ Fig.  60-1) clockwise to lift the needle cleaning container. 6.  The needle cleaning container (→ Fig.  60-2) is lifted upwards and can be removed (→ Fig.  60-3).7.  Dispose remaining solvent in the needle cleaning container according to the laboratory regulations.8.  Outside of the instrument, use a Pasteur pipette to fill a solvent that is compatible with the mounting medium into the glass cylinder (→ Fig.  60-4) up to the edge of the plastic cap (approx. 10 ml).9.  Following this, put the needle cleaning container back into the correct position within the instrument once again and push it completely in. 10. Take the needle out of the prime bottle and reinsert it into the holder.11. In the Maintenance menu, press the Close button.12. Close the hood.13. The needle is automatically immersed in the needle cleaning container.
83HistoCore SPECTRA CVDaily Instrument Setup 612345Fig. 60   6.3.3  Checking and replacing the coverglass cartridgeWarningWhile changing the coverglass cartridge, always wear personal protective clothing (cut-resistant gloves, safety goggles)!Note • For the HistoCore SPECTRA CV Leica-validated coverglass (→ P. 160 – Consumables) are available. The coverglasses are only available in cartridges which are equipped with a RFID chip. Information on the cartridge used (e.g. quantity and size) is automatically read when it is inserted and the hood is closed.• Changing the coverglass cartridge in the L2 coverslip line is described in the following. The same procedures also apply for the coverslip line L1.• For each readjusted rack, the consumable material management system (CMS) calculates whether the available quantity of coverglass in the magazine is sufficient. • If the CMS determines that a readjusted rack can no longer be completely coverslipped, an appropriate warning message (→ Fig.  61-1) will be displayed to the user. • If there is a rack located in the load drawer, or if one is to be placed there, the CMS indicates to the user that a new coverglass cartridge must be inserted (→ Fig.  61-2).
84 Version 1.2, Revision A Daily Instrument Setup612Fig. 61   Note New processing in the L2 coverslip line is only possible after the insertion of a new coverglass cartridge.To change the coverglass cartridge, proceed as follows:1.  Open the hood.2.  The Pick&Place module (→ Fig.  62-1) is located above the waste tray (→ Fig.  62-2).3.  Remove the coverglass cartridge (→ Fig.  62-3) that is present in the instrument from the slot for the cartridge (→ Fig.  62-4).Note • If there are still coverglass present in the magazine, up to 30 slip of remaining cover glass can be inserted in the new coverglass cartridge. These are added on to the new coverglass cartridge and displayed in the Module Status.• Ensure that the coverglass is inserted correctly in the magazine (→ Fig.  65).4.  Dispose of the empty coverglass cartridge in accordance with the laboratory regulations.
85HistoCore SPECTRA CVDaily Instrument Setup 61234Fig. 62   5.  Unpack a new coverglass cartridge (→ Fig.  63-1) and remove both the transport anchor (→ Fig.  63-2) and the silica gel packet (→ Fig.  14-3).6.  Insert the new coverglass cartridge into the slot for the coverglass cartridge (→ Fig.  63-3).1132Fig. 63   7.  Close the instrument hood.8.  After closing the hood, the user is questioned as to whether the remaining coverglass have been inserted into the new coverglass cartridge (→ Fig.  64). If this is the case, acknowledge the information message with Yes (→ Fig.  64-1). If no coverglass have been inserted, acknowledge the information message with No (→ Fig.  64-2).
86 Version 1.2, Revision A Daily Instrument Setup612Fig. 64    The data from the new coverglass cartridge is now imported and the Module Status is updated.Fig. 65   WarningWear cut-resistant safety gloves (→ P. 19 – 3.1 Standard delivery – packing list) when inserting additional coverglass!The maximum filling level of the coverglass cartridge (see marking within the magazine) must not be exceeded in order to prevent instrument faults.
87HistoCore SPECTRA CVDaily Instrument Setup 66.3.4  Emptying the waste trayNote The HistoCore SPECTRA CV automatically detects defective/broken coverglass and places it in the waste tray.WarningWear cut-resistant safety gloves (→ P. 19 – 3.1 Standard delivery – packing list) for emptying the waste tray!1.  Open the hood.2.  Check the waste tray for broken coverglasses.3.  If broken coverglass exist, remove the waste tray (→ Fig.  66-1) and clean it.4.  Then insert the waste tray back in the position provided for it (→ Fig.  66-2).12Fig. 66   5.  Close the hood again.
88 Version 1.2, Revision A Daily Instrument Setup66.3.5  Inspect Pick&Place module1.  Open the hood.2.  Check skids (→ Fig.  67-1), suction cups front and rear (→ Fig.  67-2) and coverglass sensor pin (→ Fig.  67-3) for dirt and clean if necessary (→ P. 118 – 7.2.10 Cleaning the Pick&Place module).3.  Close the hood again.1223Fig. 67   6.3.6  Load drawerWarningThe warning messages in (→ P. 33 – 4.6 Refilling consumables) must be observed when handling solvents!Fill level check of the reagent vessels in the load drawerCorrect fill level of the reagent vessels1.  To scan the fill level of the reagent vessels, press the drawer button of the load drawer (→ Fig.  51-1).2.  The load drawer opens.3.  If present, remove the cover for the reagent vessel.4.  Check that the fill level is sufficient (→ Fig.  68) and the reagent is free of dirt. In the event of contamination, the solvent is to be replaced (→ P. 38 – 4.6.3 Prepare the reagent vessel, fill it and insert it into the load drawer) and the reagent vessel is to be cleaned before filling it again.
89HistoCore SPECTRA CVDaily Instrument Setup 6WarningA reagent vessel fill level that is too low can cause losses in quality during coverslipping. 5.  A sufficient filling level is ensured if the level of the reagent is between the maximum (→ Fig.  68-1) and the minimum (→ Fig.  68-2) fill level mark.12Fig. 68   6.  If the filling level is below the minimum mark, the reagent vessel has to be refilled with the same reagent (→ P. 33 – 4.6 Refilling consumables).Note • Always fill reagent vessels with the same solvent. Blending with other reagents shall be avoided.• Cover the reagent vessels at the end of the work day to prevent evaporation of the filled reagent.
90 Version 1.2, Revision A Daily Instrument Setup66.3.7  Unload drawer1.  Press the drawer button on the unload drawer (→ Fig.  51-2). 2.  The unload drawer opens.3.  Remove any racks that may be present in the unload drawer.4.  Perform a visual inspection of the drawer inserts for dirt and clean them if necessary (→ P. 110 – 7.2.3 Input and unload drawers).5.  Then close the drawer by pressing the button.WarningWear cut-resistant safety gloves (→ P. 19 – 3.1 Standard delivery – packing list) when cleaning the unload drawer!6.4  Preparing the rackWarningBe sure to remove the handle before using the racks in any microwave appliance! Microwaves can destroy the electronics (RFID chip) integrated into the handles, preventing the handles from being identified by the HistoCore SPECTRA CV and HistoCore SPECTRA ST as a result!For use in the HistoCore SPECTRA CV there are racks for 30 slides (→ Fig.  69-1) with compatible, colored handles (→ Fig.  69-2) (→ P. 155 – 9.1 Optional accessories).Fig. 69   12
91HistoCore SPECTRA CVDaily Instrument Setup 6Warning• Note that in workstation mode (→ P. 105 – 6.7 Workstation operation), the HistoCore SPECTRA CV cannot recognize or process any racks for 5 slides.• The instrument software detects the manual insertion of racks for 5 slides in the load drawer of the HistoCore SPECTRA CV, and an information message prompts the user to remove this rack again.• If racks for 5 slides are used for staining in the HistoCore SPECTRA ST, select the unloader as the last station in the program.• Remove the finished stained slides and insert them into a suitable rack for the HistoCore SPECTRA CV.The colored handles must be correctly attached prior to using the rack in the instrument (→ Fig.  69-2).Note Before attaching the colored rack handle, check for any bends or damage. Bent or damaged rack handles must not be used to prevent instrument faults and specimen impairment.The colored handles of the racks must be attached corresponding to the previously defined parameter set color (→ P. 68 – 5.9.2 Assigning a parameter set to a rack handle color).The slide handles are available in 9 colors (8 parameter set colors & white) (→ P. 155 – 9.1 Optional accessories).Note Special function of the white handle:• The white handle cannot be permanently assigned to a parameter set. Corresponding to a "wildcard function", the white handle has to be reassigned to a parameter set each time the program is used. For this purpose, a selection menu opens on the screen automatically after inserting the rack.Proceed as follows to attach or replace the rack handles:Detach the handle from the rack.1.  Slightly pull the handle apart (→ Fig.  70-1) so that the handle wire can be pulled out of the hole in the holder.Attach a handle to the rack. » Lightly pull the handle apart so that the handle wire can snap into the respective holes in the holder.
92 Version 1.2, Revision A Daily Instrument Setup6Note • Be sure that the handle is correctly positioned in the upper position, centered above the rack (→ Fig.  70)• For stable placement when filling, fold the handle to the side as far as it goes (→ Fig.  70-2) so that it can be used as an additional protection to prevent tipping.112Fig. 70   Warning• The front side of the rack is marked with the Leica logo (→ Fig.  71-1). With the handle attached, Front can be read when looking at the handle (→ Fig.  71-2).• When inserting the slides, be absolutely certain that the slide label is pointing upwards and toward the user (→ Fig.  71-3). The side of the slide with the specimen must point toward the front side of the rack.• If the slides are not inserted correctly, the samples can become damaged in the subsequent processing.• The stickers and/or labels used on the slides must be resistant to the solvents used in the instrument.• Labels that are used must not reach into the coverglass support area, and should not overhang over the edge of the slide, in order to avoid specimen impairment or instrument fault during coverslipping.
93HistoCore SPECTRA CVDaily Instrument Setup 6Fig. 71   1132Note • When using printable labels or manual labels on the rack handles and the slides, they must be checked for solvent resistance prior to use.• Make sure that only one slide each is put into the insert and that the slides are not jammed. Inserts must not be empty between the two slides.

Navigation menu