Lenkeng Technology IPF08 Internet Photo Frame User Manual POL Wi Fi Frame manual ai
Shenzhen Lenkeng Technology Co., Ltd Internet Photo Frame POL Wi Fi Frame manual ai
User manual
USER MANUAL
Wi-Fi
Connect the Wi-Fi touchscreen picture frame to
a Wi-Fi network, download the FREE APP, and
begin sharing & updating your moments from
anywhere in the world!
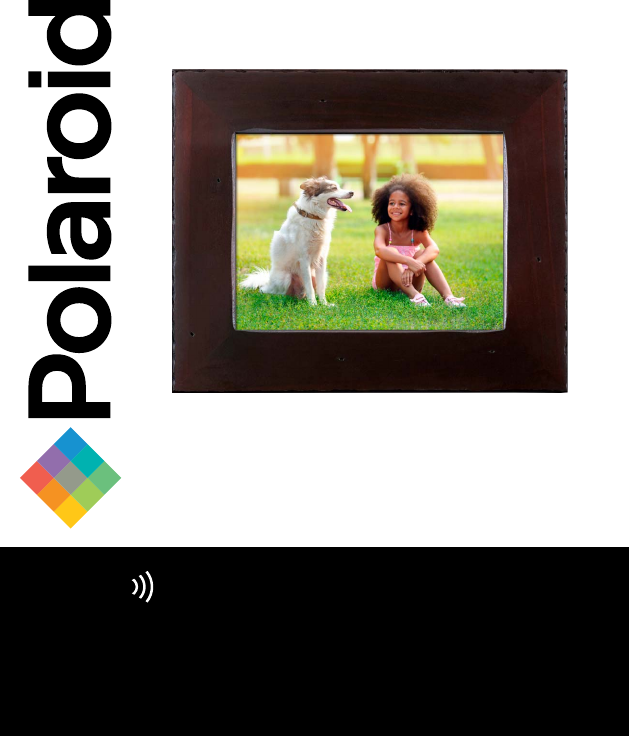
Internet Photo Frame
Model: PDWF-800NT

Available on the App Store or Google Play
for your Android/iOS smartphones and iPad
Download the APP
Polaroid Wi-Fi Photo Frame
2
TABLE OF CONTENTS:
PRODUCT SPECS 4
SYSTEM REQUIREMENTS 4
WHAT'S IN THE BOX 5
PARTS 5
PRODUCT FEATURES 6
IMPORTANT SAFETY PRECAUTIONS 6
SAFETY INSTRUCTIONS 7–8
CARE AND MAINTENANCE 8
SETUP AND INSTALLATION 9–14
SENDING AND VIEWING PHOTOS 15–23
WALL MOUNTING 24
CONNECTING A USB DRIVE 24
INSERTING A MEMORY CARD 24–25
SETTINGS/OPTIONS 26–27
TIPS 28–29
FCC STATEMENT & PRODUCT WARRANTY 30–32
3
Congratulations on purchasing your new Wi-Fi Touchscreen
Digital Photo Frame. With this Digital Photo Frame, you
can easily and quickly receive photos directly from your
Android/iOS smartphones and iPad through the included
(downloadable) App. You can also view photos directly
from an external memory card or USB Flash Drive. The
Digital Photo Frame is compatible with the following
memory cards and flash drive: Secure Digital (SD) card,
Secure Digital High Capacity (SDHC), Multi Media Card
(MMC) and USB Flash Drives.
PRODUCT SPECS:
• Wi-Fi: WLAN built-in Wi-Fi module; supports IEEE
802.11 b/g/n
• File format: supports JPG, BMP, PNG files
• I/O interface: 1-USB 2.0 port; 1-SD/MMC port
• Power: adaptor input (100-240v, 50/60Hz); adaptor
output (DC power output; 5V/2A)
• Screen: touchscreen functionality & intuitive UX design
• Storage: 4GB of internal memory
• Operating temp: 0°C to 40°C; storage temp: -10°F to 60°F
• Operating humidity: 10-90% (non-condensing)
• Resolution: 1024x768 (162 PPI)
• Supported external memory: SD, SDHC, MMC, and USB
flash drive
*Optional external memory (SD card, SDHC card, MMC card, USB Flash
Drive) not included.
SYSTEM REQUIREMENTS
• Wi-Fi router with a 2.4gHz internet connection
• Android mobile device with OS 4.0 or higher, or Apple
mobile device with iOS 8 or higher
NOTE: These products are NOT compatible with Linux or
Windows phones or PCs
4
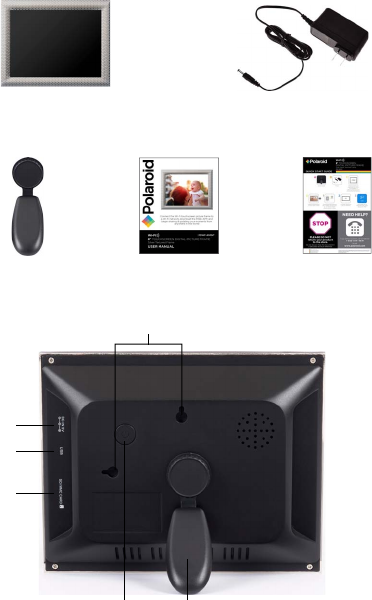
8in Wi-Fi touchscreen
photo frame
NOTE: outer frame may vary by model
Power adapter
Detachable
frame stand User manual /
warranty Quick start
guide
WHAT'S IN THE BOX
5
Power
input
USB port
Power/sleep
button Stand
Wall mounts
Memory
card slot
PARTS

6
PRODUCT FEATURES
• 1024 x 768 hi-resolution IPS touchscreen
• Decorative frame
• Wi-Fi enabled internet photo frame with app
• Wi-Fi internet connected picture frame allows you to
send pictures from Android/iOS smartphones and iPad
• Get notified when new pictures arrive
• Pair multiple phones/devices (Android/iOS) to one frame
or one phone/device to multiple frames
• Programmable sleep timer turns display on/o automatically
• Photos can be stored on frame (4GB of internal memory),
SD/MMC card or USB drive
• Customizable slideshow transition eects
IMPORTANT SAFETY PRECAUTIONS
• High voltage inside. Do not open the casing of the digital
photo frame. Refer servicing to qualified personnel only.
• To reduce the risk of fire or electric shock, do not expose
this product to rain or moisture.
• To avoid permanent loss of data, do not insert or remove
memory cards or USB device when the power is on.
7
SAFETY INSTRUCTIONS
• Do not expose the product to dripping or splashing liquids
or objects filled with liquids, such as vases. Use in a dry
location only.
• Keep product away from open flames, such as candles.
• Keep the digital photo frame clean and never store it near a
heat source or in dirty, humid or wet places. Keep it out of
direct sunlight.
• Touch the touchscreen gently. Pressing the screen too hard
can damage the digital photo frame.
• Do not use the product in an extremely dry environment as
this can lead to static discharge, which can damage the
digital photo frame.
• Do not subject the product to harsh impacts. Do not drop
the product. These may result in damage to the product
and loss of data.
• Do not attempt to repair or disassemble the unit yourself.
Only qualified service personnel should perform repairs.
• The digital photo frame is for indoor use only.
• Use only the DC 5V/2A power adapter supplied with this
product. Do not unplug the adapter while viewing
the pictures.
• Do not block the ventilation holes on the back of the digital
photo frame.
• Children should be supervised to ensure that they do not
play with the product.
• To prevent overheating and damage to the screen, unplug
the product when you do not intend to use it for a long
period of time.
8
• Please insert the plug into the DC IN jack on the unit
completely before connecting the AC adapter to an
electrical outlet.
• This product can only display files with compatible formats.
• Do not use the product in temperatures over 105° F (40° C).
• Do not allow metallic objects to touch the DC plug when
the player is on.
CARE AND MAINTENANCE
• Always turn o the unit and remove the power adaptor from
the electrical outlet before cleaning the unit.
• Use a soft dry cloth to clean this product.
• Never spray or pour liquids directly onto the screen or casing.
• Do not use abrasive materials or chemical cleaners such as
alcohol, benzene, etc. Do not allow any water or other liquid
to enter the device.
• Do not drop the device; it contains complicated electronics
and cannot withstand shock from falls.
• Do not hit or scratch the screen. Handle it with care. The LCD
panel of the photo frame is sensitive to excessive force and
contact with sharp objects.
IMPORTANT: Before you install your Wi-Fi frame
• Peel back and remove plastic screen protector from the
LCD panel using the tab in the upper right corner.
• For ease of installation, install your Wi-Fi frame as close
to your wireless router as possible.
• If you are going to place your frame more than 20 feet
from your router or on another floor you may require a
Wi-Fi extender.
9
SETUP AND INSTALLATION
STEP 1: Wi-Fi Setup
Setup the Wi-Fi Picture Frame and connect to a
Wi-Fi network
1. Locate the picture frame as close to the Wi-Fi router
as possible, preferably within 10 feet.
2. Connect the picture frame to the included wall power
adapter and plug the adapter into the wall (the unit will
automatically turn on).
NOTE: When the frame powers on the Polaroid logo will flash
twice on the screen while system initializes.
3. Touch “Start” to advance to the home screen/main menu.
NOTE: If the frame changes to the slide show, tap anywhere
on the screen to return to the home page.

10
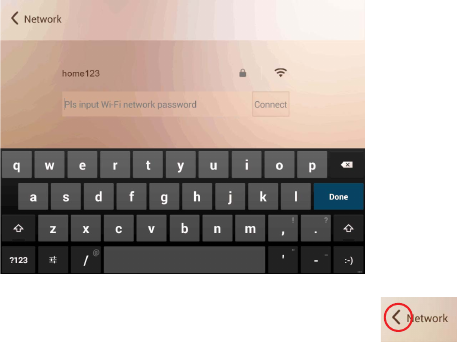
4. On the home screen, tap the "Wi-Fi" icon to reveal
available Wi-Fi networks.
5. Tap the primary network you'd like to connect the Wi-FI
Picture Frame to.
11
Note: The Wi-Fi connection MUST be a 2.4GHz connection.
If your wireless router is setup as a 5GHz network, you will
need to setup a second 2.4GHz network. See your router
manufacturer documentation. There are also many videos
on YouTube.com on how to perform this setup.
6. Enter the Wi-Fi network password and click "Connect"
to finalize the connection.
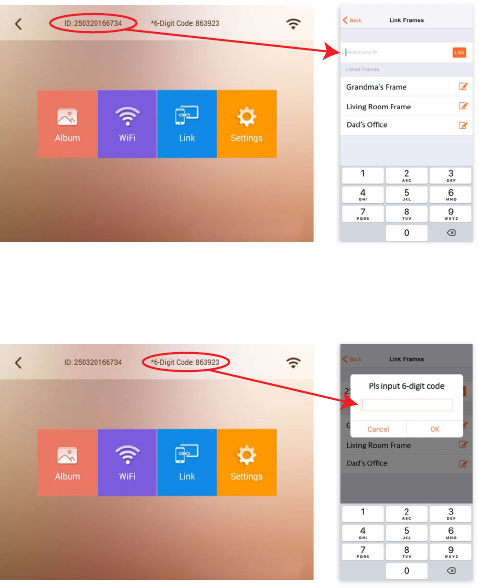
Once connected tap the back arrow in the upper
left corner to return to the home screen where
a secure 6-digit code will be displayed.
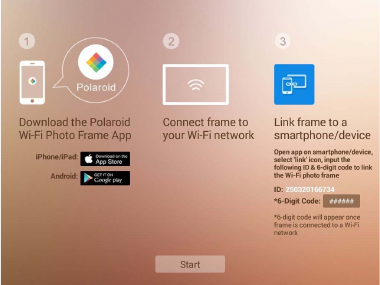
STEP 2: Application Setup
Connecting Your Mobile Device
1. Download the App from the Apple App Store or Google
Play store.
2. Search for “Polaroid Wi-Fi Photo Frame”
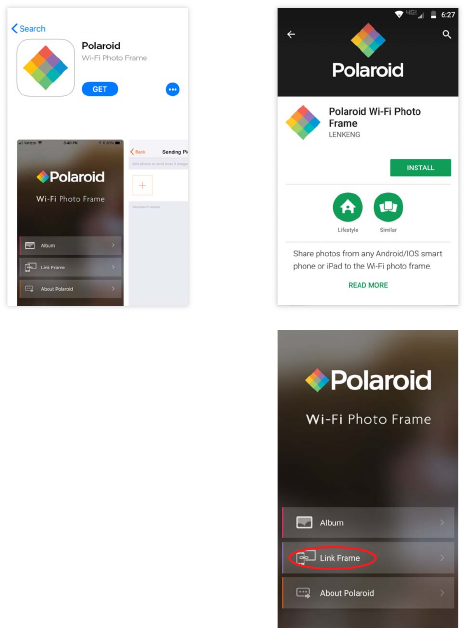
12
Apple Android
3. Click the “Get” icon to install
the App on your Apple device,
or the “Install” icon on your
Android device.
4. Once the installation is complete,
open the App.
5. Next, tap “Link Frame” in
the App.
13
6. Enter the frame ID number from the home screen of the
Wi-Fi photo frame and tap “Link”
7. You will be prompted to enter the secure 6-digit code
from the frame. Enter the code and tap OK.
14
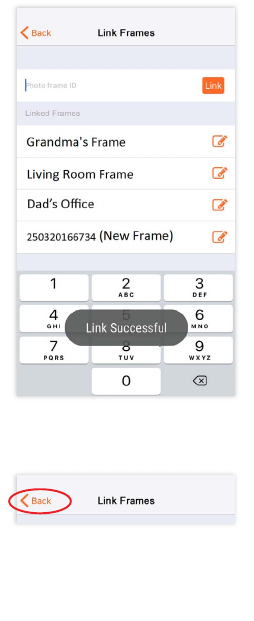
8. The App will respond with the following notice after
a successful secured connection with the frame:
“Link Successful”.
9. Tap the back arrow to return to the main menu.
15
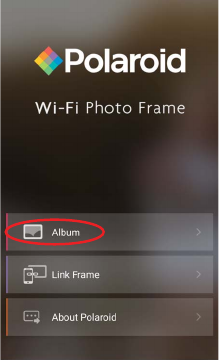
SENDING AND VIEWING PHOTOS
Step 1: Sending Photos to the Wi-Fi Photo Frame
Once Setup is complete you may send photos from your
mobile device to the frame.
1. From the App main menu, tap the “Album” menu item.

16
2. Next, select the frame you want to send the photos to
by checking the circle next to your frame ID number.
If multiple frames have been linked to the App you can
select additional frames by checking the circle next to
each frame.
*See the Tips section to learn how to personalize your frame’s name
in the App.
*
t
he
f
rame you want to send t
h
the circle next to
yo
ur
f
rame I
a
mes have been linked to the
A
o
nal
f
rames b
y
checking the c
17
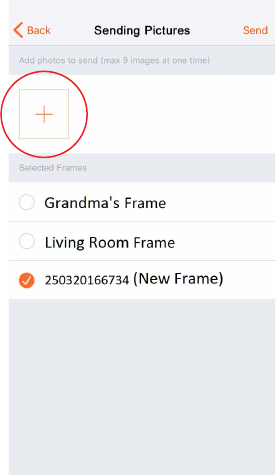
3. Now select the photo(s) you want to send by tapping
the “+” icon.

18
4. Select the photo(s) by tapping each desired photo from
your device's album. A highlighted checkmark will appear
for each photo selected. Tap “Complete” at the top right
corner of the app to complete your selection.
NOTE: You can transfer up to 9 photos to the frame each
time you send.
19
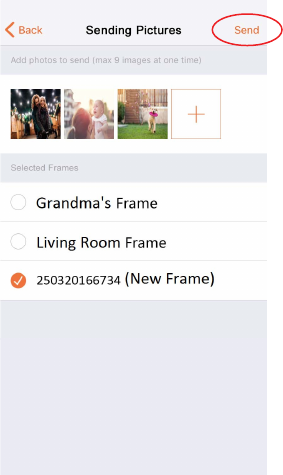
5. The App will return to the “Sending Pictures” screen as
shown. Press “Send” at the top right of the App to send
the photos.
20
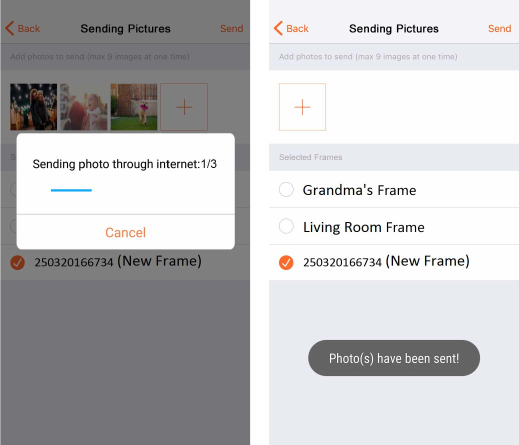
6. The App will display the following messages indicating
the photos were sent to the frame.

21
VIEW THE PHOTOS ON THE WI-FI
PHOTO FRAME
Once the frame receives the photos, you will see a
notification on the display that new photos were received.
The new photos will be inserted at the beginning of the
slide show and be displayed in sequence.
NOTE: outer frame may vary by model
22
SENDING PHOTOS DIRECT FROM
A PHOTO ALBUM
If you choose to send a photo directly from the photo album,
iOS phones and iPad are limited to sending one photo at a
time. Android phones may send more than one photo directly
from the photo album (max 9 images at one time).
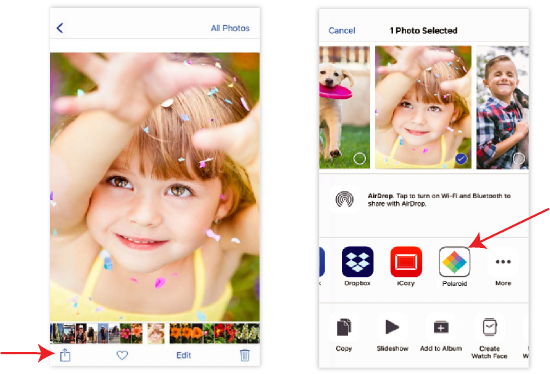
For iOS devices:
Display the camera roll and tap the “Send” icon
Select the photo(s) for transfer, then tap the Polaroid icon
and then tap “Send”.
The Polaroid App will open the Sending Picture screen to
select the frame and send the photo.
If the Polaroid App logo does not initially show, press the
“More“ icon to add it.
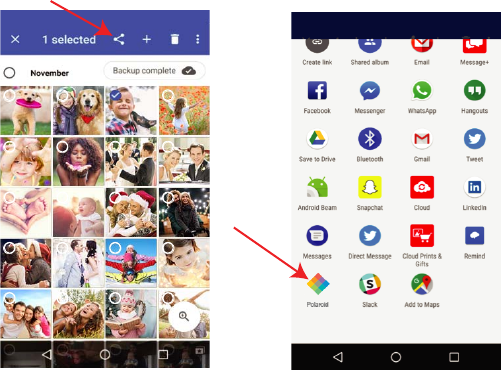
23
For Android devices:
Access the photo album on the device and select the photos
to transfer. Then tap the “Share” icon.
Tap the Polaroid icon and then tap “Send”.
The Polaroid App will open the Sending Picture screen to
select the frame and send the photo.
24
WALL MOUNTING
1. Insert a nail, screw, or hook into the
wall in a location that will support
the frame's weight.
2. Leave at least ½" (about 12mm) of
the nail or screw exposed.
3. Hang the Digital Photo Frame
onto the nail or screw.
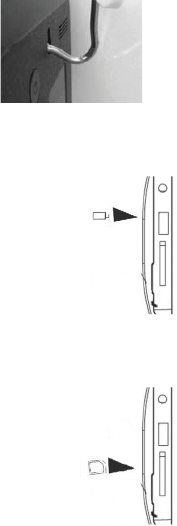
CONNECTING A USB DRIVE
To view photos from a USB flash drive, insert it
into the USB port on the side of the frame.
NOTE:
• Not all USB storage devices are compatible with
this digital photo frame.
• USB drive must be formatted using the FAT32
file system. Drives formatted as NTFS or exFAT
will not be recognized.
INSERTING A MEMORY CARD
To view the pictures from a Secure Digital (SD) or
Multimedia Card (MMC), insert it into the memory
card slot on the side of the Digital Photo Frame
with the metal contacts of the card facing the
LCD Display.
NOTE:
• Do not force the memory card into the slot. If you are
not able to insert the memory card easily, you may have
inserted it incorrectly; turn the card over and try again.
• Do not remove a memory card immediately after inserting
it or when the frame is processing files. Wait until the
screen is stable.
25
26
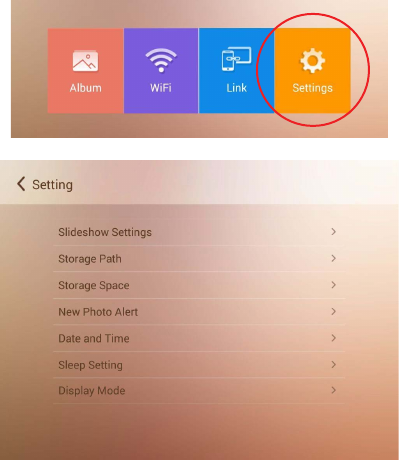
SETTINGS / OPTIONS
Other features and settings can be accessed via the
“Settings” option from the main menu. The main menu
can be obtained by tapping anywhere on the display.
27
Slideshow Settings
• Change the way the frame transitions from one photo to the next.
Choose from: Still photo, Random transition; Fade; Slide from
Right; Slide from Bottom Right; Spin from Center.
• Adjust the amount of time each photo is shown by adjusting the
time on the preview screen, then press Apply to save settings.
• You can also choose to show the date and time on the slideshow.
After selecting the clock icon you can drag the time on the
preview screen to change the position of the date and time on
the display.
Storage Path
Select where photos sent to the frame via Wi-Fi are stored: Choose
from the frame's built-in memory, a USB drive (frame supports up
to 64GB) or SD/MMC/SDHC card (frame supports up to 32GB
SD/SDHC card and up to 1GB MMC card).
Storage Space
• Display the remaining memory in all storage devices. (Note: The
digital photo frame operating system and the sample photos
utilize a portion of the 4GB total internal memory, so available
memory will always be less than 4GB even if all sample photos
are deleted from the frame.)
New Photo Alert
• New Photo Alert will allow you to select how long the “New
Photo” icon is displayed after new photos are received.
Date and Time
• You can select the date and time settings and set the date
and time.
Sleep Settings
• The sleep timer can be set to put the frame to ‘sleep’ to conserve
energy. You can set multiple times or ranges the display will be
automatically turned on/o.
Display Mode
• Display mode allows you to select how your photos are displayed,
either in the original format/size, or full screen
Note: Due to the original photo resolution and format, some photos
may NOT be able to fill the entire screen. We encourage you to
experiment with the settings as there are many options available.
28
TIPS FOR THE FRAME
Power button
• Press the power button on your frame to put it into screen
sleep mode. Tap anywhere on the screen to turn the screen
back on.
• Press and hold the power button to turn the frame o. Press
the power button to turn it back on.
Deleting photos from your frame
From the main menu, select Album, scroll though the album to
find the photo you would like to delete and select the photo.
When the photo is shown in full screen, touch the screen to see
a trash can icon in the upper right corner. To delete the photo,
select the trash can icon and then select OK to confirm delete.
Forget Wi-Fi networks
You can forget networks you have previously connected. From
the main menu, select Wi-Fi, select the name of the network you
would like the frame to forget and select Forget.
Choose memory source for photos
If an external memory card and/or USB flash drive is connected
to the frame, the frame will automatically display photos from all
memory sources connected. This includes the internal memory,
USB flash drive, and memory card. You may choose to limit the
photos shown on the frame by the memory source. From the
main menu, select Album and at the top of the screen you will
see the current source of the photos (Internal Memory, USB, SD
Card, or ALL). Select the memory source shown at the
top center of the album screen and choose the memory source
from which you want the frame to display photos (Internal
Memory, USB, SD Card, or ALL). If no external memory is
connected to the frame you will see an on-screen error message
if you try to select USB or SD card.
29
TIPS FOR THE APP
Personalizing frame names
After you link to a frame using the Photo Frame App, the frame
can be renamed on the link screen in the App. This is especially
useful if you have linked to more than one frame. In the list of
linked frames, select the edit icon next to the Photo Frame ID you
wish to edit. On the edit screen you may delete the numeric photo
frame ID and rename it, select Done/OK.
Delete a linked frame
You can delete a linked frame in the Photo Frame App if needed.
In the list of linked frames, swipe left over the Photo Frame ID you
wish to delete, then select delete. If you accidentally deleted a
linked frame, you will need to link the frame again using the Photo
Frame ID and 6-digit code found in the link screen on the digital
photo frame.
30
FCC WARNING STATEMENT
This equipment has been tested and found to comply with
the limits for a Class B digital device, pursuant to part 15 of
the FCC Rules. These limits are designed to provide
reasonable protection against harmful interference in a
residential installation. This equipment generates, uses and
can radiate radio frequency energy and, if not installed and
used in accordance with the instructions, may cause harmful
interference to radio communications. However, there is no
guarantee that interference will not occur in a particular
installation. If this equipment does cause harmful interference
to radio or television reception, which can be determined by
turning the equipment o and on, the user is encouraged to
try to correct the interference by one or more of the
following measures:
• Reorient or relocate the receiving antenna.
• Increase the separation between the equipment and receiver.
• Connect the equipment into an outlet on a circuit dierent
from that to which the receiver is connected.
• Consult the dealer or an experienced radio/TV technician
for help.
• Caution: Any changes or modifications to this device not
explicitly approved by manufacturer could void your
authority to operate this equipment.
This device complies with part 15 of the FCC Rules. Operation
is subject to the following two conditions: (1) This device may
not cause harmful interference, and (2) this device must
accept any interference received, including interference that
may cause undesired operation.
This equipment complies with FCC RF radiation exposure
limits set forth
This equipment should be installed and operated with
minimum distance 20cm between the radiator and your
body.
31
UNITED STATES LIMITED WARRANTY
TO ORIGINAL CONSUMER
This Product (including any accessories included in the original packag-
ing) as supplied is warranted by PA Brands to the original consumer
purchaser against defects in material and workmanship (" Warranty")
as follows:
Product Type Parts Warranty Labor Warranty
Digital Picture Frames 90 Days 90 Days
To obtain Warranty Service and Troubleshooting information: Visit our
website at www.polaroid.com or contact the Consumer Care Center at
1-855-544-4841
To receive Warranty service, the original consumer purchaser must
contact PA Brands for problem determination and service procedures.
Proof of purchase in the form of a bill of sale or receipted invoice from
PA Brands or its authorized resellers, evidencing that the Product is
within the applicable Warranty period(s), MUST be presented to PA
Brands, in order to obtain the requested service.
Exclusions and Limitations
Shipping expenses to the PA Brands service center are not covered by
this warranty. This Warranty covers manufacturing defects in materials
and workmanship encountered in the normal, noncommercial use of
the Product, and does not cover consumer instruction, delivery, installa-
tion, set-up, adjustments, cosmetic damage or damage due to acts of
nature, accident, misuse, abuse, negligence, commercial use or
modification of, or to any part of the Product. In addition, this Warranty
does not cover images “burnt” into the screen. This Warranty applies to
the original consumer only and does not cover products sold AS IS or
WITH ALL FAULTS, or consumables (e.g., fuses, batteries, bulbs, etc.),
and the Warranty is invalid if the factory-applied serial number has
been altered or removed from the Product. This Warranty is valid only
in the United States, and only applies to products purchased and
serviced in the United States.

32
NO WARRANTIES, WHETHER EXPRESS OR IMPLIED, INCLUDING,
BUT NOT LIMITED TO, ANY IMPLIED WARRANTIES OF MERCHANT-
ABILITY OR FITNESS FOR A PARTICULAR PURPOSE, OTHER THAN
THOSE EXPRESSLY DESCRIBED ABOVE SHALL APPLY. MANUFAC-
TURER FURTHER DISCLAIMS ALL WARRANTIES AFTER THE
EXPRESS WARRANTY PERIOD STATED ABOVE. NO OTHER EXPRESS
WARRANTY OR GUARANTY GIVEN BY ANY PERSON, FIRM OR
ENTITY WITH RESPECT TO THE PRODUCT SHALL BE BINDING ON PA
BRANDS. REPAIR, REPLACEMENT, OR REFUND OF THE ORIGINAL
PURCHASE PRICE—AT PA BRANDS' SOLE DISCRETION—ARE THE
EXCLUSIVE REMEDIES OF THE CONSUMER. PA BRANDS SHALL NOT
BE LIABLE FOR ANY INCIDENTAL OR CONSEQUENTIAL DAMAGES
CAUSED BY THE USE, MISUSE OR INABILITY TO USE THE PRODUCT.
NOTWITHSTANDING THE FOREGOING, CONSUMER'S RECOVERY
AGAINST PA BRANDS SHALL NOT EXCEED THE PURCHASE PRICE
OF THE PRODUCT SOLD BY PA BRANDS. THIS WARRANTY SHALL
NOT EXTEND TO ANYONE OTHER THAN THE ORIGINAL CONSUMER
WHO PURCHASED THE PRODUCT AND IS NOT TRANSFERABLE.
Some states or provinces do not allow the exclusion or limitation of
incidental or consequential damages or allow limitations on warranties,
so limitation or exclusions may not apply to you. This warranty gives
you specific legal rights, and you may have other rights that vary from
state to state or province to province. Outside the 50 United States,
this warranty does not apply. Contact your authorized retailer to
determine if another warranty applies.
This product is manufactured, distributed and sold by PA Brands.
Polaroid and Polaroid & Pixel are trademarks of PLR IP Holdings, LLC,
used under license. PLR IP Holdings, LLC does not manufacture this
product or provide any Manufacturer's Warranty or support.
Polaroid, Polaroid & Pixel, Polaroid Classic Border Logo, and Polaroid
Color Spectrum are trademarks of PLR IP Holdings, LLC, used under
license. All other trademarks are the property of the respective owner,
who has not sponsored, endorsed or approved this product. PLR IP
Holdings, LLC does not manufacture this product or provide any
Manufacturer's Warranty or support.
© 2018 All Rights Reserved
Made In China
Distributed by: PA Brands, Minneapolis, MN 55340