Lenovo U31 70 HMM Hardware Maintenance Manual 330 17ICH Laptop (ideapad) Type 81FL 15ich 330x 201806
2018-06-29
User Manual: Lenovo Hardware Maintenance Manual 330-17ICH Laptop (ideapad) - Type 81FL 81FL
Open the PDF directly: View PDF ![]() .
.
Page Count: 88
- About this manual
- Safety information
- Laser compliance statement
- Grounding requirements
- Handling devices that are sensitive to electrostatic discharge
- Safety inspection guide
- Safety notices: multilingual translations
- Important service information
- General checkout
- Related service information
- Lenovo ideapad 330-15ICH/ideapad 330H-15ICH/ideapad 330L-15ICH/ideapad 330E-15ICH/ideapad 330R-15ICH/ideapad 330-17ICH/ideapad 330H-17ICH/ideapad 330L-17ICH/ideapad 330E-17ICH/ideapad 330R-17ICH
- Notices

Lenovo ideapad 330
ideapad 330-15ICH
ideapad 330H-15ICH
ideapad 330L-15ICH
ideapad 330E-15ICH
ideapad 330R-15ICH
ideapad 330-17ICH
ideapad 330H-17ICH
ideapad 330L-17ICH
ideapad 330E-17ICH
ideapad 330R-17ICH
Hardware Maintenance Manual

Note:
• Before using this information and the product it supports, be sure to read the general information under
“Notices” on page 83.
First Edition (May 2018)
© Copyright Lenovo 2018. All rights reserved.
LIMITEDANDRESTRICTEDRIGHTSNOTICE:IfdataorsoftwareisdeliveredpursuantaGeneral
ServicesAdministration“GSA”contract,use,reproduction,ordisclosureissubjecttorestrictionsset
forthinContractNo.GS-35F-05925.
©2018Lenovo

iii
Contents
About this manual ....................................... iv
Safety information ........................................ 1
Generalsafety................................................ 2
Electricalsafety.............................................. 3
Safetyinspectionguide.................................. 5
Handlingdevicesthataresensitiveto
electrostaticdischarge.................................... 6
Groundingrequirements................................. 6
Safetynotices:multilingualtranslations.......... 7
Lasercompliancestatement......................... 14
Important service information ................... 16
StrategyforreplacingFRUs......................... 16
Strategyforreplacingaharddiskdrive............17
Importantnoticeforreplacingasystem
board................................................................17
Importantinformationaboutreplacing
RoHScompliantFRUs................................. 18
General checkout ...................................... 19
Whattodorst............................................. 20
Powersystemcheckout................................ 21
CheckingtheACadapter.................................21
Checkingoperationalcharging.........................21
Checkingthebatterypack................................22
Related service information ...................... 23
Restoringthefactorycontentsbyusing
Push-buttonreset........................................ 23
Restoreoffactorydefault.................................23
Passwords.................................................... 24
Power-onpassword.......................................... 24
Hard-diskpassword.......................................... 24
Administratorpassword....................................24
Powermanagement..................................... 25
Screenblankstate............................................ 25
Puttingthecomputertosleeporshuttingit
down.................................................................25
Puttingyourcomputertosleep......................... 25
Shuttingdownthecomputer............................. 26
Lenovo ideapad 330-15ICH/ideapad
330H-15ICH/ideapad 330L-15ICH/ideapad
330E-15ICH/ideapad 330R-15ICH/ideapad
330-17ICH/ideapad 330H-17ICH/ideapad
330L-17ICH/ideapad 330E-17ICH/ideapad
330R-17ICH.................................................. 27
Specications............................................... 27
Statusindicators........................................... 29
Hotkeys......................................................... 30
FRUreplacementnotices............................. 31
Screwnotices..................................................31
RemovingandreplacinganFRU................. 32
1010Basecover...............................................33
1020Batterypack.............................................39
1030Harddiskdrive.........................................41
1040PCIExpressMiniCardforwireless
LAN...................................................................43
1050SSDcard.................................................45
1060DIMM.......................................................47
1070Fanandheatsink....................................48
1080Uppercase..............................................50
1090Speakers.................................................54
1100
Systemboard............................................ 55
1110LCDunit...................................................57
1120Integratedcamera....................................62
Locations...................................................... 63
Frontviewandright-sideview..........................63
BottomandLeft-sideview...............................64
Partslist........................................................ 65
Overall..............................................................66
LCDFRUs........................................................78
Miscellaneousparts.......................................... 82
Screws.............................................................. 82
Notices......................................................... 83
Trademarks.................................................. 84
iv
About this manual
Thismanualcontainsservice andreferenceinformation forthefollowing
Lenovoproduct:
Lenovo ideapad 330-15ICH/ideapad 330H-15ICH/ideapad 330L-15ICH/
ideapad 330E-15ICH/ideapad 330R-15ICH/ideapad 330-17ICH/ideapad
330H-17ICH/ideapad 330L-17ICH/ideapad 330E-17ICH/ideapad 330R-17ICH
Theillustrations anddescriptionsin thismanualmay differfrom theactual
product.Pleaserefertotheactualproduct.
Usethismanualtotroubleshootproblems.
Themanualisdividedintothefollowingsections:
• Thecommonsectionsprovidegeneralinformation,guidelines,and safety
informationrequiredforservicingcomputers.
• Theproduct-specicsectionincludesservice,reference,andproduct-specic
partsinformation.
Important:
This manual is intended only for trained servicers who are familiar with Lenovo
products. Use this manual to troubleshoot problems effectively.
Before servicing a Lenovo product, make sure to read all the information under
“Safety information” on page 1 and “Important service information” on page 16.

1
Safety information
Safety information
Thischapterpresentsthefollowing safetyinformationthat youneedto
getfamiliarwithbeforeyouserviceaLenovoideapad330-15ICH/ideapad
330H-15ICH/ideapad330L-15ICH/ideapad330E-15ICH/ideapad330R-15ICH/
ideapad330-17ICH/ideapad330H-17ICH/ideapad 330L-17ICH/ideapad
330E-17ICH/ideapad330R-17ICHcomputer:
• “Generalsafety”onpage2
• “Electricalsafety”onpage3
• “Safetyinspectionguide”onpage5
• “Handlingdevicesthataresensitivetoelectrostaticdischarge”onpage6
• “Groundingrequirements”onpage6
• “Safetynotices:multilingualtranslations”onpage7
• “Lasercompliancestatement”onpage14

2
Hardware Maintenance Manual
General safety
Followtheserulesbelowtoensuregeneralsafety:
• Observeagoodhousekeepingin theareawhere themachinesare put
duringandafterthemaintenance.
• Whenliftinganyheavyobject:
1. Makesurethatyoucanstandsafelywithoutslipping.
2. Distributetheweightoftheobjectequallybetweenyourfeet.
3. Useaslowliftingforce.Nevermovesuddenlyortwistwhenyouattempt
toliftit.
4. Liftitbystandingorpushingupwithyourlegmuscles;thisactioncould
avoidthestrainfromthemusclesinyourback.Donotattempttoliftany
objectthatweighsmorethan16kg(35lb)orthatyouthinkistooheavy
foryou.
• Donotperformanyaction thatcauseshazards tothecustomer,orthat
makesthemachineunsafe.
• Beforeyou startthemachine, makesurethatother servicerepresentatives
andthecustomerarenotinahazardousposition.
• Pleaseremovecoversandotherpartsinasafeplace,away fromall
personnel,whileyouareservicingthemachine.
• Keepyourtoolcaseawayfromwalkareassothat otherpeoplewillnottrip
overit.
• Donotwearloose clothingthatcanbetrapped inthemovingpartsofthe
machine.Makesurethatyoursleevesarefastenedorrolledupaboveyour
elbows.Ifyourhairislong,fastenit.
• Inserttheendsof yournecktieorscarfinside clothingorfastenitwith the
nonconductiveclip,about8centimeters(3inches)fromtheend.
• Donotwearjewelry,chains,metal-frameeyeglasses,ormetalfastenersfor
yourclothing.
Attention:Metalobjectsaregoodelectricalconductors.
• Wearsafetyglasses whenyouare hammering, drilling,soldering,cutting
wire,attachingsprings,using solvents,orworking inanyotherconditions
thatmaybehazardoustoyoureyes.
• Afterservice, reinstallallsafety shields,guards,labels,and groundwires.
Replaceanysafetydevicethatiswornordefective.
• Reinstallallcoverscorrectlybeforereturningthemachinetothecustomer.
• Fanlouversonthemachinehelptopreventtheoverheating ofinternal
components.Donotobstructfanlouversorcoverthemwith labelsor
stickers.

3
Safety information
Electrical safety
Observethefollowingruleswhenworkingonelectricalequipments.
Important:
Use only approved tools and test equipments. Some hand tools have handles
covered with a soft material that does not insulate you when working with live
electrical currents.
Many customers have rubber floor mats near their machines that contain small
conductive bers to decrease electrostatic discharges. Do not use such kind of mat
to protect yourself from electrical shock.
• Findtheroomemergencypower-off(EPO) switch,disconnectingswitchor
electricaloutlet.Ifanelectricalaccidentoccurs,youcanthenoperatethe
switchorunplugthepowercordquickly.
• Donotworkaloneunder hazardousconditionsornear theequipmentthat
hashazardousvoltages.
• Disconnectallpowerbefore:
– Performingamechanicalinspection
– Workingnearpowersupplies
– Removingorinstallingmainunits
• Beforeyoustarttoworkon themachine,unplugthepower cord.Ifyou
cannotunplugit,askthecustomer topower-offthewallboxthat supplies
powertothemachine,andtolockthewallboxintheoffposition.
• Ifyouneedto workona machinethathasexposedelectrical circuits,
observethefollowingprecautions:
– Ensurethatanotherperson,familiarwiththepower-offcontrols,isnear
you.
Attention:Anotherperson mustbethere toswitchoffthepower,if
necessary.
– Useonlyonehandwhenworkingwithpowered-onelectricalequipment;
keeptheotherhandinyourpocketorbehindyourback.
Attention:Anelectricalshockcanoccuronlywhenthereisacomplete
circuit.Byobservingtheaboverule,youmaypreventacurrentfrom
passingthroughyourbody.
– Whenusingtesters,setthe controlscorrectlyandusethe approved
probeleadsandaccessoriesforthattester.
– Standonsuitablerubbermats(obtainedlocally,ifnecessary)toinsulate
youfromgroundssuchasmetaloorstripsandmachineframes.
Observethespecialsafetyprecautionswhenyouworkwithveryhighvoltages;
instructionsfortheseprecautionsarein thesafetysectionsofmaintenance
information.Beextremelycarefulwhenyoumeasurethehighvoltages.
• Regularlyinspectandmaintainyourelectricalhandtoolsforsafeoperational
condition.
• Donotusewornorbrokentoolsandtesters.
• Neverassumethatpowerhasbeendisconnectedfromacircuit.First,check
ittomakesurethatithasbeenpoweredoff.
Safety information

4
Hardware Maintenance Manual
• Alwayslookcarefullyfor possiblehazardsin yourworkarea.Examplesof
thesehazardsaremoistoors,nongroundedpowerextensioncables,power
surges,andmissingsafetygrounds.
• Donottouchliveelectricalcircuitswiththereflectivesurfaceofaplastic
dentalmirror.Thesurfaceisconductive;suchtouchingcan causepersonal
injuryandmachinedamage.
• Donotservicethefollowingpartswiththepoweronwhentheyareremoved
fromtheirnormaloperatingplacesinamachine:
– Powersupplyunits
– Pumps
– Blowersandfans
– Motorgenerators
andsimilarunits.(Thispracticeensurescorrectgroundingoftheunits.)
• Ifanelectricalaccidentoccurs:
– Caution:donotbecomeavictimyourself.
– Switchoffthepower.
– Sendthevictimtogetmedicalaid.

5
Safety information
Safety inspection guide
Thepurpose ofthisinspection guideisto assistyouin identifyingpotential
unsafeconditions.Aseachmachinewasdesignedandbuilt,requiredsafety
itemswereinstalledto protectusersand servicepersonnelfrom injury.This
guideaddressesonlythoseitems.Youshouldusegoodjudgmenttoidentify
potentialsafetyhazardsaccordingtotheattachmentofnon-Lenovofeaturesor
optionsnotcoveredbythisinspectionguide.
Ifanyunsafeconditionsarepresent, youmustdeterminehowserious the
apparenthazardcouldbeandwhetheryoucancontinuewithoutrstcorrecting
theproblem.
Considertheseconditionsandthesafetyhazardstheypresent:
• Electricalhazards,especiallyprimarypower(primaryvoltageontheframe
cancauseseriousorfatalelectricalshock)
• Explosivehazards,suchasadamagedCRTfaceorabulgingcapacitor
• Mechanicalhazards,suchaslooseormissinghardware
Todeterminewhetherthereareany potentialunsafeconditions,usethe
followingchecklistatthebeginningofeveryservicetask.Beginthecheckswith
thepoweroff,andthepowercorddisconnected.
Checklist:
1. Checkexteriorcoversfordamage(loose,broken,orsharpedges).
2. Turnoffthecomputer.Disconnectthepowercord.
3. Checkthepowercordfor:
a. Athird-wiregroundconnectoringoodcondition.Useametertomeasure
third-wiregroundcontinuityfor 0.1ohmor lessbetweentheexternal
groundpinandtheframeground.
b. Thepowercordshouldbethetypespeciedinthepartslist.
c. Insulationmustnotbefrayedorworn.
4. Checkforcrackedorbulgingbatteries.
5. Removethecover.
6. Checkforanyobviousnon-Lenovoalterations.Usegoodjudgmentastothe
safetyofanynon-Lenovoalterations.
7. Checkinsidethe unitforanyobviousunsafeconditions,suchas metal
filings,contamination,wateror otherliquids,or signsoffireorsmoke
damage.
8. Checkforworn,frayed,orpinchedcables.
9. Checkthatthepower-supplycoverfasteners (screwsorrivets)have not
beenremovedortamperedwith.

6
Hardware Maintenance Manual
Handling devices that are sensitive to electrostatic discharge
Anycomputerpartcontaining transistorsorintegrated circuits(ICs)should be
consideredsensitivetoelectrostaticdischarge(ESD).ESDdamagecanoccur
whenthere isadifferenceincharge betweenobjects.Protectagainst ESD
damagebyequalizingthechargesothatthemachine,thepart,theworkmat,
andthepersonhandlingthepartareallatthesamecharge.
Notes:
1. Use product-specic ESD procedures when they exceed the requirements noted
here.
2. Make sure that the ESD protective devices you use have been certied (ISO
9000) as fully effective.
WhenhandlingESD-sensitiveparts:
• Keepthepartsinprotectivepackagesuntiltheyareinsertedintotheproduct.
• Avoidcontactwithotherpeople.
• Wearagroundedwriststrapagainstyour skintoeliminatestaticonyour
body.
• Preventthepartfromtouchingyourclothing.Mostclothingisinsulativeand
retainsachargeevenwhenyouarewearingawriststrap.
• Usetheblackside ofagroundedworkmat toprovideastatic-freework
surface.ThematisespeciallyusefulwhenhandlingESD-sensitivedevices.
• Selectagroundingsystem,suchasthoselistedbelow,toprovideprotection
thatmeetsthespecicservicerequirement.
Note:
The use of a grounding system to guard against ESD damage is desirable but not
necessary.
– AttachtheESDgroundcliptoanyframeground,groundbraid,orgreen-
wireground.
– Whenworkingonadouble-insulatedorbattery-operatedsystem,usean
ESDcommongroundorreferencepoint.Youcanusecoaxorconnector-
outsideshellsonthesesystems.
– Usetheroundgroundprongoftheacplugonac-operatedcomputers.
Grounding requirements
Electricalgroundingofthecomputerisrequiredforoperatorsafetyandcorrect
systemfunction.Propergrounding oftheelectricaloutletcanbeveriedby a
certiedelectrician.

7
Safety information
Safety notices: multilingual translations
Thesafetynoticesinthis sectionareprovided inEnglish,French, German,
Hebrew,Italian,Japanese,andSpanish.
Safety notice 1
Before the computer is powered on after FRU replacement, make sure all screws,
springs, and other small parts are in place and are not left loose inside the computer.
Verify this by shaking the computer and listening for rattling sounds. Metallic parts
or metal akes can cause electrical shorts.
Avant de remettre l’ordinateur sous tension après remplacement d’une unité en
clientèle, vériez que tous les ressorts, vis et autres pièces sont bien en place et
bien xées. Pour ce faire, secouez l’unité et assurez-vous qu’aucun bruit suspect ne
se produit. Des pièces métalliques ou des copeaux de métal pourraient causer un
court-circuit.
Bevor nach einem FRU-Austausch der Computer wieder angeschlossen wird,
muß sichergestellt werden, daß keine Schrauben, Federn oder andere Kleinteile
fehlen oder im Gehäuse vergessen wurden. Der Computer muß geschüttelt und auf
Klappergeräusche geprüft werden. Metallteile oder-splitter können Kurzschlüsse
erzeugen.
Prima di accendere l’elaboratore dopo che é stata effettuata la sostituzione di una
FRU, accertarsi che tutte le viti, le molle e tutte le altri parti di piccole dimensioni
siano nella corretta posizione e non siano sparse all’interno dell’elaboratore.
Vericare ciò scuotendo l’elaboratore e prestando attenzione ad eventuali rumori;
eventuali parti o pezzetti metallici possono provocare cortocircuiti pericolosi.
Antes de encender el sistema despues de sustituir una FRU, compruebe que
todos los tornillos, muelles y demás piezas pequeñas se encuentran en su sitio
y no se encuentran sueltas dentro del sistema. Compruébelo agitando el sistema
y escuchando los posibles ruidos que provocarían. Las piezas metálicas pueden
causar cortocircuitos eléctricos.
8
Hardware Maintenance Manual
Safety notice 2
DANGER
Some standby batteries contain a small amount of nickel and cadmium. Do not
disassemble a standby battery, recharge it, throw it into fire or water, or short-
circuit it. Dispose of the battery as required by local ordinances or regulations.
Use only the battery in the appropriate parts listing. Use of an incorrect battery can
result in ignition or explosion of the battery.
Certaines batteries de secours contiennent du nickel et du cadmium. Ne les
démontez pas, ne les rechargez pas, ne les exposez ni au feu ni à l’eau. Ne
les mettez pas en court-circuit. Pour les mettre au rebut, conformez-vous à la
réglementation en vigueur. Lorsque vous remplacez la pile de sauvegarde ou celle
de l’horloge temps réel, veillez à n’utiliser que les modèles cités dans la liste de
pièces détachées adéquate. Une batterie ou une pile inappropriée risque de prendre
feu ou d’exploser.
Die Bereitschaftsbatterie, die sich unter dem Diskettenlaufwerk befindet,
kann geringe Mengen Nickel und Cadmium enthalten. Sie darf nicht zerlegt,
wiederaufgeladen, kurzgeschlossen, oder Feuer oder Wasser ausgesetzt werden. Bei
der Entsorgung die örtlichen Bestimmungen für Sondermüll beachten. Beim Ersetzen
der Bereitschafts-oder Systembatterie nur Batterien des Typs verwenden, der in der
Ersatzteilliste aufgeführt ist. Der Einsatz falscher Batterien kann zu Entzündung oder
Explosion führen.
Alcune batterie di riserva contengono una piccola quantità di nichel e cadmio. Non
smontarle, ricaricarle, gettarle nel fuoco o nell’acqua né cortocircuitarle. Smaltirle
secondo la normativa in vigore (DPR 915/82, successive disposizioni e disposizioni
locali). Quando si sostituisce la batteria dell’RTC (real time clock) o la batteria di
supporto, utilizzare soltanto i tipi inseriti nell’appropriato Catalogo parti. L’impiego
di una batteria non adatta potrebbe determinare l’incendio o l’esplosione della
batteria stessa.
Algunas baterías de reserva contienen una pequeña cantidad de níquel y cadmio.
No las desmonte, ni recargue, ni las eche al fuego o al agua ni las cortocircuite.
Deséchelas tal como dispone la normativa local. Utilice sólo baterías que se
encuentren en la lista de piezas. La utilización de una batería no apropiada puede
provocar la ignición o explosión de la misma.

9
Safety information
Safety notice 3
DANGER
The battery pack contains small amounts of nickel. Do not disassemble it, throw
it into re or water, or short-circuit it. Dispose of the battery pack as required by
local ordinances or regulations. Use only the battery in the appropriate parts listing
when replacing the battery pack. Use of an incorrect battery can result in ignition
or explosion of the battery.
La batterie contient du nickel. Ne la démontez pas, ne l’exposez ni au feu ni à l’eau.
Ne la mettez pas en court-circuit. Pour la mettre au rebut, conformez-vous à la
réglementation en vigueur. Lorsque vous remplacez la batterie, veillez à n’utiliser
que les modèles cités dans la liste de pièces détachées adéquate. En effet, une
batterie inappropriée risque de prendre feu ou d’exploser.
Akkus enthalten geringe Mengen von Nickel. Sie dürfen nicht zerlegt,
wiederaufgeladen, kurzgeschlossen, oder Feuer oder Wasser ausgesetzt werden.
Bei der Entsorgung die örtlichen Bestimmungen für Sondermüll beachten. Beim
Ersetzen der Batterie nur Batterien des Typs verwenden, der in der Ersatzteilliste
aufgeführt ist. Der Einsatz falscher Batterien kann zu Entzündung oder Explosion
führen.
La batteria contiene piccole quantità di nichel. Non smontarla, gettarla nel fuoco
o nell’acqua né cortocircuitarla. Smaltirla secondo la normativa in vigore (DPR
915/82, successive disposizioni e disposizioni locali). Quando si sostituisce la
batteria, utilizzare soltanto i tipi inseriti nell’appropriato Catalogo parti. L’impiego
di una batteria non adatta potrebbe determinare l’incendio o l’esplosione della
batteria stessa.
Las baterías contienen pequeñas cantidades de níquel. No las desmonte, ni
recargue, ni las eche al fuego o al agua ni las cortocircuite. Deséchelas tal como
dispone la normativa local. Utilice sólo baterías que se encuentren en la lista de
piezas al sustituir la batería. La utilización de una batería no apropiada puede
provocar la ignición o explosión de la misma.

10
Hardware Maintenance Manual
Safety notice 4
DANGER
The lithium battery can cause a re, an explosion, or a severe burn. Do not recharge
it, remove its polarized connector, disassemble it, heat it above 100°C (212°F),
incinerate it, or expose its cell contents to water. Dispose of the battery as required
by local ordinances or regulations. Use only the battery in the appropriate parts
listing. Use of an incorrect battery can result in ignition or explosion of the battery.
La pile de sauvegarde contient du lithium. Elle présente des risques d’incendie,
d’explosion ou de brûlures graves. Ne la rechargez pas, ne retirez pas son
connecteur polarisé et ne la démontez pas. Ne l’exposez pas à une temperature
supérieure à 100°C, ne la faites pas brûler et n’en exposez pas le contenu à l’eau.
Mettez la pile au rebut conformément à la réglementation en vigueur. Une pile
inappropriée risque de prendre feu ou d’exploser.
Die Systembatterie ist eine Lithiumbatterie. Sie kann sich entzünden, explodieren
oder schwere Verbrennungen hervorrufen. Batterien dieses Typs dürfen nicht
aufgeladen, zerlegt, über 100 C erhitzt oder verbrannt werden. Auch darf ihr Inhalt
nicht mit Wasser in Verbindung gebracht oder der zur richtigen Polung angebrachte
Verbindungsstecker entfernt werden. Bei der Entsorgung die örtlichen Bestimmungen
für Sondermüll beachten. Beim Ersetzen der Batterie nur Batterien des Typs
verwenden, der in der Ersatzteilliste aufgeführt ist. Der Einsatz falscher Batterien
kann zu Entzündung oder Explosion führen.
La batteria di supporto e una batteria al litio e puo incendiarsi, esplodere o
procurare gravi ustioni. Evitare di ricaricarla, smontarne il connettore polarizzato,
smontarla, riscaldarla ad una temperatura superiore ai 100 gradi centigradi,
incendiarla o gettarla in acqua. Smaltirla secondo la normativa in vigore (DPR
915/82, successive disposizioni e disposizioni locali). L’impiego di una batteria
non adatta potrebbe determinare l’incendio o l’esplosione della batteria stessa.
La batería de repuesto es una batería de litio y puede provocar incendios,
explosiones o quemaduras graves. No la recargue, ni quite el conector polarizado,
ni la desmonte, ni caliente por encima de los 100°C (212°F), ni la incinere ni
exponga el contenido de sus celdas al agua. Deséchela tal como dispone la
normativa local.
11
Safety information
Safety notice 5
If the LCD breaks and the uid from inside the LCD gets into your eyes or on your
hands, immediately wash the affected areas with water at least for 15 minutes. Seek
medical care if any symptoms caused by the uid are present after washing.
Si le panneau d’afchage à cristaux liquides se brise et que vous recevez dans les
yeux ou sur les mains une partie du fluide, rincez-les abondamment pendant au
moins quinze minutes. Consultez un médecin si des symptômes persistent après le
lavage.
Die Leuchtstoffröhre im LCD-Bildschirm enthält Quecksilber. Bei der Entsorgung
die örtlichen Bestimmungen für Sondermüll beachten. Der LCD-Bildschirm
besteht aus Glas und kann zerbrechen, wenn er unsachgemäß behandelt wird
oder der Computer auf den Boden fällt. Wenn der Bildschirm beschädigt ist und
die darin befindliche Flüssigkeit in Kontakt mit Haut und Augen gerät, sollten
die betroffenen Stellen mindestens 15 Minuten mit Wasser abgespült und bei
Beschwerden anschließend ein Arzt aufgesucht werden.
Nel caso che caso l’LCD si dovesse rompere ed il liquido in esso contenuto
entrasse in contatto con gli occhi o le mani, lavare immediatamente le parti
interessate con acqua corrente per almeno 15 minuti; poi consultare un medico se i
sintomi dovessero permanere.
Si la LCD se rompe y el uido de su interior entra en contacto con sus ojos o sus
manos, lave inmediatamente las áreas afectadas con agua durante 15 minutos como
mínimo. Obtenga atención medica si se presenta algún síntoma del uido despues
de lavarse.

12
Hardware Maintenance Manual
Safety notice 6
DANGER
To avoid shock, do not remove the plastic cover that protects the lower part of the
inverter card.
An d’éviter tout risque de choc électrique, ne retirez pas le cache en plastique
protégeant la partie inférieure de la carte d’alimentation.
Aus Sicherheitsgründen die Kunststoffabdeckung, die den unteren Teil der
Spannungswandlerplatine umgibt, nicht entfernen.
Per evitare scosse elettriche, non rimuovere la copertura in plastica che avvolge la
parte inferiore della scheda invertitore.
Para evitar descargas, no quite la cubierta de plástico que rodea la parte baja de la
tarjeta invertida.
Safety notice 7
DANGER
Though the main batteries have low voltage, a shorted or grounded battery can
produce enough current to burn personnel or combustible materials.
Bien que le voltage des batteries principales soit peu élevé, le court-circuit ou la
mise à la masse d’une batterie peut produire sufsamment de courant pour brûler
des matériaux combustibles ou causer des brûlures corporelles graves.
Obwohl Hauptbatterien eine niedrige Spannung haben, können sie doch bei
Kurzschluß oder Erdung genug Strom abgeben, um brennbare Materialien zu
entzünden oder Verletzungen bei Personen hervorzurufen.
Sebbene le batterie di alimentazione siano a basso voltaggio, una batteria in
corto circuito o a massa può fornire corrente sufficiente da bruciare materiali
combustibili o provocare ustioni ai tecnici di manutenzione.
Aunque las baterías principales tienen un voltaje bajo, una batería cortocircuitada
o con contacto a tierra puede producir la corriente suciente como para quemar
material combustible o provocar quemaduras en el personal.

13
Safety information
Safety notice 8
DANGER
Before removing any FRU, turn off the computer, unplug all power cords from
electrical outlets, remove the battery pack, and then disconnect any interconnecting
cables.
Avant de retirer une unité remplaçable en clientèle, mettez le système hors tension,
débranchez tous les cordons d’alimentation des socles de prise de courant, retirez la
batterie et déconnectez tous les cordons d’interface.
Die Stromzufuhr muß abgeschaltet, alle Stromkabel aus der Steckdose gezogen,
der Akku entfernt und alle Verbindungskabel abgenommen sein, bevor eine FRU
entfernt wird.
Prima di rimuovere qualsiasi FRU, spegnere il sistema, scollegare dalle prese
elettriche tutti i cavi di alimentazione, rimuovere la batteria e poi scollegare i cavi
di interconnessione.
Antes de quitar una FRU, apague el sistema, desenchufe todos los cables de las
tomas de corriente eléctrica, quite la batería y, a continuación, desconecte cualquier
cable de conexión entre dispositivos.

14
Hardware Maintenance Manual
Laser compliance statement
SomemodelsofLenovo computerareequippedfromthe factorywithan
opticalstorage devicesuchasaCD-ROMdriveor aDVD-ROMdrive.Such
devicesarealsosoldseparatelyasoptions.Ifoneofthesedrivesisinstalled,
itiscertiedintheU.S. toconformtotherequirements oftheDepartmentof
HealthandHumanServices21CodeofFederalRegulations(DHHS21CFR)
SubchapterJforClass1laserproducts.Elsewhere,thedriveis certifiedto
conformtotherequirementsoftheInternationalElectrotechnical Commission
(IEC)825andCENELECEN60825forClass1laserproducts.
IfaCD-ROMdrive,aDVD-ROMdrive,oranotherlaserdeviceisinstalled,note
thefollowing:
CAUTION
Use of controls or adjustments or performance of procedures other than those
specied herein might result in hazardous radiation exposure.
O uso de controles, ajustes ou desempenho de procedimentos diferentes daqueles
aqui especicados pode resultar em perigosa exposição à radiação.
Pour éviter tout risque d’exposition au rayon laser, respectez les consignes de
réglage et d’utilisation des commandes, ainsi que les procédures décrites.
Werden Steuer- und Einstellelemente anders als hier festgesetzt verwendet, kann
gefährliche Laserstrahlung auftreten.
L’utilizzo di controlli, regolazioni o l’esecuzione di procedure diverse da quelle
specicate possono provocare l’esposizione a.
El uso de controles o ajustes o la ejecución de procedimientos distintos de los aquí
especicados puede provocar la exposición a radiaciones peligrosas.
OpeningtheCD-ROMdrive,theDVD-ROMdrive,oranyotheropticalstorage
devicecouldresultin exposuretohazardous laserradiation.Thereareno
serviceablepartsinsidethosedrives.Do not open.
15
Safety information
ACD-ROMdrive,aDVD-ROMdrive,oranyotherstoragedeviceinstalledmay
containanembeddedClass3AorClass3Blaserdiode.Notethefollowing:
DANGER
Emits visible and invisible laser radiation when open. Do not stare into the beam,
do not view directly with optical instruments, and avoid direct exposure to the
beam.
Radiação por raio laser ao abrir. Não olhe xo no feixe de luz, não olhe diretamente
por meio de instrumentos óticos e evite exposição direta com o feixe de luz.
Rayonnement laser si carter ouvert. Évitez de fixer le faisceau, de le regarder
directement avec des instruments optiques, ou de vous exposer au rayon.
Laserstrahlung bei geöffnetem Gerät. Nicht direkt oder über optische Instrumente
in den Laserstrahl sehen und den Strahlungsbereich meiden.
Kinyitáskor lézersugár ! Ne nézzen bele se szabad szemmel, se optikai
eszközökkel. Kerülje a sugárnyalábbal való érintkezést!
Aprendo l’unità vengono emesse radiazioni laser. Non fissare il fascio, non
guardarlo direttamente con strumenti ottici e evitare l’esposizione diretta al fascio.
Radiación láser al abrir. No mire jamente ni examine con instrumental óptico el
haz de luz. Evite la exposición directa al haz.
16
Hardware Maintenance Manual
Important service information
Thischapterpresentsthefollowingimportantserviceinformation:
• “StrategyforreplacingFRUs”onpage16
– “Strategyforreplacingaharddiskdrive”onpage17
– “Importantnoticeforreplacingasystemboard”onpage17
• “ImportantinformationaboutreplacingRoHScompliantFRUs”onpage18
Important:
BIOS and device driver xes are customer-installable. The BIOS and device
drivers are posted on the customer support site:
http://support.lenovo.com.
Strategy for replacing FRUs
Before replacing parts:
Makesurethatallsoftware xes,drivers,and BIOSdownloadsare installed
beforereplacinganyFRUslistedinthismanual.
Afterasystemboardisreplaced,ensurethatthelatestBIOSisloadedto the
systemboardbeforecompletingtheserviceaction.
Todownloadsoftwarexes,drivers,andBIOS,followthestepsbelow:
1. Gotohttp://support.lenovo.com.
2. EntertheserialnumberorselectaproductoruseLenovosmart
downloading.
3. SelecttheBIOS/Driver/Applicationsanddownload.
4. Followthedirectionsonthescreenandinstallthenecessarysoftware.
17
Important service information
Usethefollowingstrategy topreventunnecessaryexpenseforreplacingand
servicingFRUs:
• IfyouareinstructedtoreplaceanFRU,butthereplacementdoesnotsolve
theproblem,reinstalltheoriginalFRUbeforeyoucontinue.
• Somecomputers havebotha processor boardanda systemboard.Ifyou
areinstructedtoreplaceeitherofthem,andreplacingoneofthemdoesnot
solvetheproblem,reinstallthatboard,andthenreplacetheotherone.
• IfanadapteroradeviceconsistsofmorethanoneFRU,anyoftheFRUs
maybethecauseoftheerror.Beforereplacingtheadapterordevice,
removetheFRUsonebyonetoseeifthesymptomschange.Replaceonly
theFRUthatchangedthesymptoms.
Attention:Thesetup configurationon thecomputeryouareservicing may
havebeencustomized.RunningAutomaticConfigurationmay alterthe
settings.Notethecurrentcongurationsettings(usingtheViewConguration
option);then,whenservicehasbeencompleted,verify thatthosesettings
remainineffect.
Strategy for replacing a hard disk drive
Alwaystrytorunalow-levelformatbefore replacingahard diskdrive.This
willcauseallcustomerdataon theharddisktobe lost.Makesurethatthe
customerhasacurrentbackupofthedatabeforeperformingthisaction.
Attention:Thedrivestartupsequenceinthecomputeryouareservicingmay
havebeenchanged.Beextremelycarefulduringwriteoperationssuch as
copying,saving,orformatting.Ifyouselectanincorrectdrive,dataorprograms
canbeoverwritten.
Important notice for replacing a system board
Somecomponentsmountedonasystemboardareverysensitive.Improper
handlingcancausedamage tothosecomponents, andmaycause asystem
malfunction.
Attention:Whenhandlingasystemboard:
• Donotdropthesystemboardorapplyanyexcessiveforcetoit.
• Avoidroughhandlingofanykind.
• Avoidbendingthe systemboardand hardpushingtoprevent crackingat
eachBGA(BallGridArray)chipset.

18
Hardware Maintenance Manual
Important information about replacing RoHS compliant FRUs
RoHS, The Restriction of Hazardous Substances in Electrical and
Electronic Equipment Directive (2002/95/EC) is a European Union legal
requirement affecting the global electronics industry. RoHS requirements
must be implemented on Lenovo products placed on the market after
June 2006. Products on the market before June 2006 are not required to
have RoHS compliant parts. If the original FRU parts are non-compliant,
replacement parts can also be non-compliant. In all cases if the original
FRU parts are RoHS compliant, the replacement part must also be RoHS
compliant.
Note:RoHSandnon-RoHSFRUpartnumberswiththesametandfunction
areidentiedwithuniqueFRUpartnumbers.
Lenovoplans totransitto RoHScompliancewellbefore theimplementation
dateandexpectsitssuppliers tobeready tosupportLenovo’srequirements
andscheduleinthe EU.Productssold in2005and 2006willcontainsome
RoHScompliantFRUs.Thefollowingstatementpertainstotheseproductsand
anyproductLenovoproducescontainingRoHScompliantFRUs.
RoHScompliant FRUshaveuniqueFRU partnumbers.Beforeorafterthe
RoHSimplementationdate,failed RoHScompliantparts mustalwaysbe
replacedwithRoHScompliantones,soonlytheFRUsidentiedascompliant
inthesystemHMMordirectsubstitutionsforthoseFRUsmaybeused.
Products marketed before June 2006 Products marketed after June 2006
Current or
original part
Replacement FRU Current or
original part
Replacement FRU
Non-RoHS CanbeNon-RoHS
MustbeRoHS MustbeRoHS
Non-RoHS CanbeRoHS
Non-RoHS CansubtoRoHS
RoHS MustbeRoHS
Note:Adirectsubstitutionisa partwitha differentFRUpartnumberthatis
automaticallyshippedbythedistributioncenteratthetimeoftheorder.

19
General checkout
General checkout
Thischapterpresentsthefollowinginformation:
• “Whattodorst”onpage20
• “Powersystemcheckout”onpage21
Beforeyougotothecheckout,makesuretoreadthefollowingimportantnotes:
Important notes:
• Onlycertiedtrainedpersonnelcanservicethecomputer.
• BeforereplacinganyFRU,readtheentirepage onremovingandreplacing
FRUs.
• CarefullyremovescrewsforreusewhenreplacingFRUs.
• Beextremelycarefulduringsuch writeoperationsascopying,saving,or
formatting. Drives in the computer that you are servicing sequence might
have been altered. If you select an incorrect drive, data or programs might be
overwritten.
• ReplaceanFRUonlywithanotherFRUofthecorrectmodel. When you
replace an FRU, make sure that the machine model and the FRU part number are
correct by referring to the FRU parts list.
• AnFRUshouldnotbereplacedjustbecauseofasingle,unreproduciblefailure.
Single failures can occur for a variety of reasons that have nothing to do with a
hardware defect, such as cosmic radiation, electrostatic discharge, or software
errors. Consider replacing an FRU only when a problem recurs. If you suspect that
an FRU is defective, clear the error logs and run the test again. If the error does
not recur, do not replace the FRU.
• BecarefulnottoreplaceanondefectiveFRU.

20
Hardware Maintenance Manual
What to do rst
WhenyoudoreturnanFRU,youmustincludethefollowinginformationinthe
partsexchangeformorpartsreturnformthatyouattachtoit:
1. Nameandphonenumberofservicer
2. Dateofservice
3. Dateonwhichthemachinefailed
4. Dateofpurchase
5. ProcedureindexandpagenumberinwhichthefailingFRUwasdetected
6. FailingFRUnameandpartnumber
7. Machinetype,modelnumber,andserialnumber
8. Customer’snameandaddress
Note for warranty:During thewarrantyperiod,the customermaybe
responsiblefor repaircostsif thecomputerdamage wascausedbymisuse,
accident,modification,unsuitablephysical oroperatingenvironment, or
impropermaintenancebythecustomer.
Thefollowingisalistofsomecommon itemsthatarenotcoveredunder
warrantyandsomesymptomsthatmightindicatethatthesystemwas
subjectedtostressbeyondnormaluse.
Beforecheckingproblemswiththecomputer,determinewhetherthedamageis
coveredunderthewarrantybyreferringtothefollowinglist:
The following are not covered under warranty:
• LCDpanelcrackedfromtheapplicationof excessiveforceor frombeing
dropped
• Scratched(cosmetic)parts
• Distortion,deformation,ordiscolorationofthecosmeticparts
• Plasticparts,latches,pins,orconnectorsthathavebeencrackedorbroken
byexcessiveforce
• Damagecausedbyliquidspilledintothesystem
• DamagecausedbytheimproperinsertionofaPCCardortheinstallationof
anincompatiblecard
• Improperdiskinsertionoruseofanopticaldrive
• Diskettedrivedamagecausedbypressureonthediskettedrive cover,
foreignmaterialinthedrive,ortheinsertionofadiskettewithmultiplelabels
• Damagedorbentdisketteejectbutton
• Fusesblownbyattachmentofanonsupporteddevice
• Forgottencomputerpassword(makingthecomputerunusable)
• Stickykeyscausedbyspillingaliquidontothekeyboard
• UseofanincorrectACadapteronlaptopproducts
The following symptoms might indicate damage caused by nonwarranted
activities:
• Missingpartsmightbeasymptomofunauthorizedserviceormodication.
• Ifthespindleofaharddiskdrivebecomesnoisy,itmayhavebeensubjected
toexcessiveforce,ordropped.
21
General checkout
Power system checkout
Toverifyasymptom,followthestepsbelow:
1. Turnoffthecomputer.
2. Removethebatterypack.
3. ConnecttheACadapter.
4. Makesurethatpowerissuppliedwhenyouturnonthecomputer.
5. Turnoffthecomputer.
6. DisconnecttheACadapterandinstallthechargedbatterypack.
7. Makesurethatthebattery packsuppliespower whenyouturnonthe
computer.
Ifyoususpectapowerproblem,seetheappropriateoneofthefollowingpower
supplycheckouts:
• “CheckingtheACadapter”onpage21
• “Checkingoperationalcharging”onpage21
• “Checkingthebatterypack”onpage22
Checking the AC adapter
YouareherebecausethecomputerfailsonlywhentheACadapterisused.
• Ifthepower-onindicatordoesnotturnon,checkthepowercordoftheAC
adapterforcorrectcontinuityandinstallation.
• Ifthecomputerdoesnotchargeduringoperation, goto“Checking
operationalcharging”.
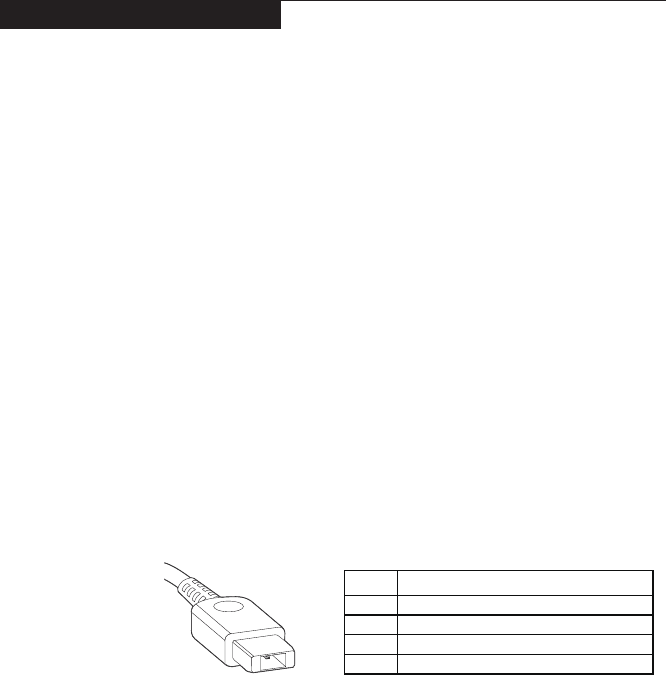
TochecktheACadapter,followthestepsbelow:
1. UnplugtheACadaptercablefromthecomputer.
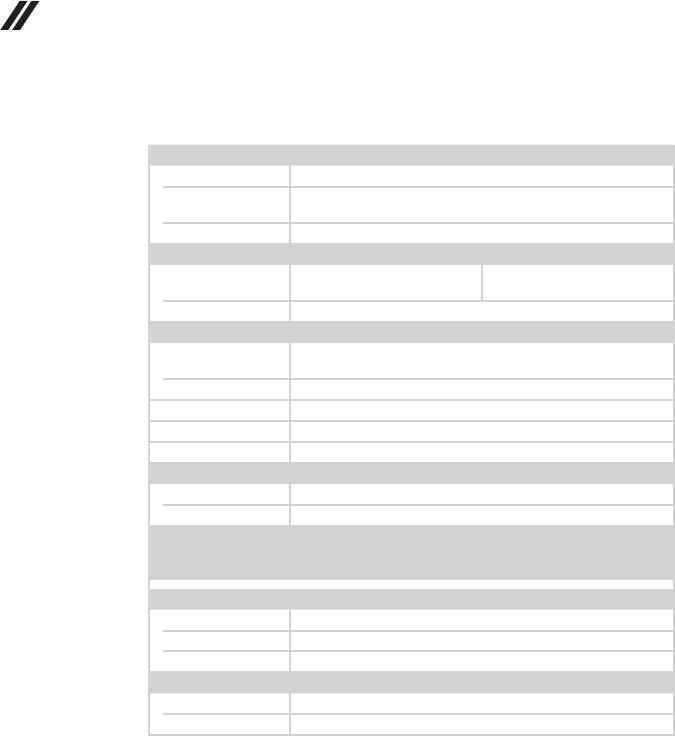
2. Measuretheoutputvoltageat theplugoftheACadapter cable.Seethe
followinggure:
Pin Voltage (V dc)
1 20V/2.25A
2 15V/3A
3 9V/2A
4 5V/2A
Note:OutputvoltagefortheACadapterpinNo.2maydifferfromtheoneyou
areservicing.
3. Ifthevoltageisnotcorrect,replacetheACadapter.
4. Ifthevoltageisacceptable,dothefollowing:
• Replacethesystemboard.
• Iftheproblempersists,goto“Lenovoideapad330-15ICH/ideapad
330H-15ICH/ideapad330L-15ICH/ideapad330E-15ICH/ideapad
330R-15ICH/ideapad330-17ICH/ideapad330H-17ICH/ideapad330L-17ICH/
ideapad330E-17ICH/ideapad330R-17ICH”onpage27
Note:NoisefromtheACadapterdoesnotalwaysindicateadefect.
Checking operational charging
Tocheckwhetherthebatterychargesproperlyduring operation,usea
dischargedbatterypackor abatterypack thathaslessthan50%ofthetotal
powerremainingwheninstalledinthecomputer.

22
Hardware Maintenance Manual
Performoperationalcharging.Ifthebattery statusindicatororicondoes not
lighton,removethebatterypackandletitreturntoroomtemperature.Reinstall
thebatterypack.Ifthecharge indicatororiconisstill off,replacethebattery
pack.
Ifthechargeindicatorstill doesnotlight on,replacethesystemboard.Then
reinstallthebatterypack.Ifitisstillnotcharged,gotothenextsection.
Checking the battery pack
BatterychargingdoesnotstartuntilthePowerMetershowsthatlessthan95%
ofthetotalpowerremains;underthisconditionthebatterypackcanchargeto
100%ofitscapacity.Thisprotectsthebatterypackfrombeingoverchargedor
fromhavingashortenedlife.
Tocheckyourbattery,moveyourcursorto thePowerMetericonin theicon
trayoftheWindows®taskbarandwaitforamoment(butdonotclickit),andthe
percentageofbatterypowerremainingisdisplayed.Togetdetailedinformation
aboutthebattery,double-clickthePowerMetericon.
Note:Ifthebatterypackbecomeshot,itmay notbeabletobe charged.
Removeitfromthecomputerandleaveitatroomtemperatureforawhile.After
itcoolsdown,reinstallandrechargeit.
23
Related service information
Related service information
Thischapterpresentsthefollowinginformation:
• “RestoringthefactorycontentsbyusingOneKeyRecovery”onpage23
• “Passwords”onpage24
• “Powermanagement”onpage25
Restoring the factory contents by using Push-button reset
Restore of factory default
TheLenovo ideapad330-15ICH/ideapad330H-15ICH/ideapad330L-15ICH/
ideapad330E-15ICH/ideapad330R-15ICH/ideapad330-17ICH/ideapad
330H-17ICH/ideapad330L-17ICH/ideapad330E-17ICH/ideapad330R-17ICH
computerscomewithpre-installedPush-buttonreset.Inordertosaveapplication
filesandtheinitialbackedupfilesofthesystem,theharddiskinaLenovo
computerincludesahiddenpartitionwhenitisshipped.Ifyouneedtorestorethe
systemtothepointofyourrstbootup,presstheNovobuttonandrunSystem
Recovery.For detailsofPush-button reset, seethe Recovery system inthe User
Guide.
Note: This will delete all the new data on the system partition (C drive), which
is not recoverable. Make sure to back up your critical data before you perform this
action.
Whenyouusetherecoverydiscstobootyourcomputer,thesystemwillenter
theuserinterfaceforsystemrecoveryautomatically.Pleasefollowtheprompt
toinsertthebackupdiscstocompletethewholerecoveryprocess.
Note:The recovery process might take up to 2 hours.

24
Hardware Maintenance Manual
Passwords
Asmany asthreepasswords maybeneededfor anyLenovocomputer:
thepower-onpassword(POP),the harddiskpassword (HDP),andthe
administratorpassword.
Ifanyofthesepasswordshasbeenset,apromptforitappearsonthescreen
wheneverthecomputeris turnedon.Thecomputer doesnotstartuntilthe
passwordisentered.
Power-on password
Apower-on password(POP)protects thesystemfrom beingpoweredon by
anunauthorized person.The passwordmustbeentered beforeanoperating
systemcanbebooted.
Hard-disk password
Therearetwohard-diskpasswords(HDPs):
+UserHDP-fortheuser
+MasterHDP-forthe systemadministrator,whocan useittogetaccessto
theharddiskdriveeveniftheuserhaschangedtheuserHDP
Attention:Iftheuser HDPhasbeenforgotten,checkwhetheramasterHDP
hasbeenset.If ithas,itcanbe usedforaccesstotheharddiskdrive. If
nomasterHDPisavailable,neither LenovonorLenovo authorizedservice
techniciansprovideanyservicestoreseteithertheuserorthemasterHDP,or
torecoverdatafromthehard diskdrive.Theharddiskdrive canbereplaced
forascheduledfee.
Administrator password
Administratorpasswordcontrolsthe accessofthewholesetup utility.Only
aftertheAdministratorpasswordhasbeensetcantheUserpasswordbeset.If
Administratorpasswordwascleared,theUserpasswordwasclearedtoo.

25
Related service information
Power management
Note:PowermanagementmodesarenotsupportedforAPMoperatingsystem.
Toreduce powerconsumption,the computerhasthreepower management
modes:screenblank,sleep(standby),andhibernation.
Screen blank state
Ifthetimesetonthe “Turnoffmonitor”timerintheoperatingsystem expires,
theLCDbacklightturnsoff.You canalsoturn offtheLCDbacklight by
pressing .
Toendscreenblankstateandresumenormaloperation,pressanykeyonthe
keyboard.
Putting the computer to sleep or shutting it down
Whenyouhavenishedworkingwithyourcomputer,youcanputittosleepor
shutitdown.
Putting your computer to sleep
Ifyouwillbeawayfromyourcomputerforonlyashorttime,putthecomputer
tosleep.
Whenthecomputerisinsleep mode,youcanquicklywakeitto resumeuse,
bypassingthestartupprocess.
Toputthecomputertosleep,dooneofthefollowing:
• Closethedisplaylid.
• Pressthepowerbutton.
• SelecttheStartbutton,thenselectPower → Sleep.
Note:Putyourcomputertosleepbeforeyoumoveit.Movingyourcomputer
whiletheharddiskdriveisspinningcandamagetheharddisk,causing
lossofdata.
Towakeupthecomputer,performthefollowing:
• Pressanykeyonthekeyboard.
• Pressthepowerbutton.
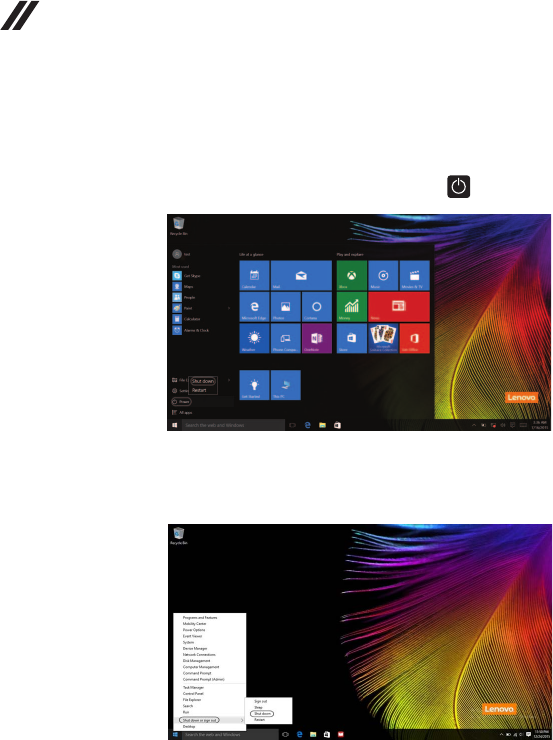
26
Hardware Maintenance Manual
• Right-clickorpresstheStartbuttoninthelower-leftcornerandselectShut
down or sign out→Shut down.
Shutting down the computer
Ifyouarenotgoingtouseyourcomputerforalongtime,shutitdown.
Toshutdownyourcomputer,dooneofthefollowing:
• SelecttheStartbutton,thenselectPower → Shut down.

27
Lenovo ideapad 330-15ICH/ideapad 330H-15ICH/ideapad 330L-15ICH/
ideapad 330E-15ICH/ideapad 330R-15ICH/ideapad 330-17ICH/ideapad 330H-17ICH/
ideapad 330L-17ICH/ideapad 330E-17ICH/ideapad 330R-17ICH
Lenovo ideapad 330-15ICH/ideapad 330H-15ICH/ideapad
330L-15ICH/ideapad 330E-15ICH/ideapad 330R-15ICH/
ideapad 330-17ICH/ideapad 330H-17ICH/ideapad
330L-17ICH/ideapad 330E-17ICH/ideapad 330R-17ICH
Thischapter presentsthefollowingproduct-specific servicereferencesand
product-specicpartsinformation:
• “Specications”onpage27
• “Statusindicators”onpage29
• “Hotkeys”onpage30
• “FRUreplacementnotices”onpage31
• “RemovingandreplacinganFRU”onpage32
• “Locations”onpage63
• “Partslist”onpage65
Specications
ThefollowingtableliststhespecicationsoftheLenovoideapad330-15ICH/
ideapad330H-15ICH/ideapad330L-15ICH/ideapad330E-15ICH/ideapad
330R-15ICH/ideapad330-17ICH/ideapad330H-17ICH/ideapad330L-17ICH/
ideapad330E-17ICH/ideapad330R-17ICH:
Table 1. Specications
ideapad 330-15ICH ideapad 330-17ICH
Form Factor
Dimensions Appr.378mm×260mm×
22.9mm
Appr.418mm×292.6mm×
24.9mm
Weight Appr.2.2kgwithbattery Appr.2.8kgwithbattery
LCDsize 15.6-inch 17.3-inch
Processor
Seethesystempropertiesofyourcomputer,youcandothisasfollows:
ClickControl Panel,thenclickHardware and Sound,clickDevice Manager
underDevices and PrintersanddoubleclickProcessors.
Memory
Typeandspeed DDR4-2400MHz
Maximum
supportedcapacity 16GB
Slots 16GB:SODIMM×1
Lessthan16GB:SODIMM×1,OnBoard×1
Optane(on select models)
Capacity 16GB(2280)
SSD
Interface PCIe
Capacity 128GB(2242)/256GB(2280)
28
Hardware Maintenance Manual
Table 1. Specications (continued)
ideapad 330-15ICH ideapad 330-17ICH
Hard disk drive
Formfactor 2.5-inch,7mm
Capacity HDD:500GB/1TB/2TB,5400rpm
PCIeSSD+SATAHDD(onselectmodels)
Interface SATA2/SATA3
Display
Displayresolution
(LCD)
1366×768pixelsHD/
1920×1080pixelsFHD
1600×900pixelsHD/
1920×1080pixelsFHD
LCDbacklight LED
I/O Ports
USB USB3.0×2,Type-C×1
(SupportUSB3.1Gen1,Output5VDC,0.9ADC)
Audio Comboaudiojack×1
Video/Audio HDMIslot×1
Ethernet RJ-45×1
Memorycardslot 4in1slot×1(SD/SDHC/SDXC/MMC)
Battery pack
Type Polymer
Cells/Capacity 3Cell,45Wh
Note: Thecapacitygivenhereisthetypicaloraveragecapacityasmeasuredina
specictestenvironment.Capacitiesmeasuredinotherenvironmentsmay
differbutarenolowerthantheratedcapacity(seeproductlabel).
AC power adapter
Input 100-240V,50-60HzAC
Outputvoltage 20VDC
Power 90W
Miscellaneous
Camera HD
Security Kensingtonslot×1

29
Lenovo ideapad 330-15ICH/ideapad 330H-15ICH/ideapad 330L-15ICH/
ideapad 330E-15ICH/ideapad 330R-15ICH/ideapad 330-17ICH/ideapad 330H-17ICH/
ideapad 330L-17ICH/ideapad 330E-17ICH/ideapad 330R-17ICH
Status indicators
Thesystemstatusindicatorsbelowshowthecomputerstatus:
ba
Table 2. Status indicators
AC power
adapter status
Indicator status Meaning
Disconnected
Off
Thecomputerisinsleepmodeor
turnedoff;Thebatteryhasmorethan
20%charge.
Solidamber Thebatteryhasbetween5%and20%
charge.
Fastblinkingamber Thebatteryhasbetween1%and5%
charge.
Connected
Slowblinkingamber
Thebatteryisbeingcharged.When
batterychargereaches20%,the
blinkingcolorchangestowhite.
Slowblinkingwhite
Thebatteryhasbetween20%and
80%chargeandisstillcharging.
Whenthebatteryreaches80%charge
thelightwillstopblinking.
Solidwhite
Thebatteryhasmorethan80%
charge,chargingwillcontinueuntilthe
batteryisfullycharged.
Indicator Indicator status Meaning
Power status
indicator
On(solidwhite) Thecomputerispoweredon.
Blinking Thecomputerisinsleepmode.
Off Thecomputerispoweredoff.
30
Hardware Maintenance Manual
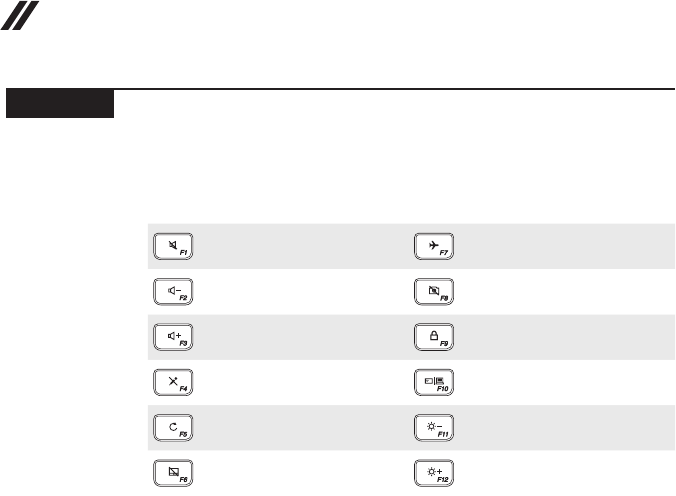
Hotkeys
Youcanaccesscertainsystemsettingsquicklybypressingtheappropriate
hotkeys.
Table 3. Hotkeys
:
Mutes/unmutesthesound.
:Enables/disablesairplane
mode.
:
Decreasesthevolumelevel.
: Enables/disablescamera.
:
Increasesthevolumelevel.
: LockstheLCDscreen.
:
Enables/disables
microphone.
:Enablestheexternal
projector.
:
Refreshespage.
:Decreasesdisplay
brightness.
:
Enables/disablesthetouch
pad.
:Increasesdisplay
brightness.

31
Lenovo ideapad 330-15ICH/ideapad 330H-15ICH/ideapad 330L-15ICH/
ideapad 330E-15ICH/ideapad 330R-15ICH/ideapad 330-17ICH/ideapad 330H-17ICH/
ideapad 330L-17ICH/ideapad 330E-17ICH/ideapad 330R-17ICH
FRU replacement notices
Thissection presentsnoticesrelatedto removingandreplacingparts. Read
thissectioncarefullybeforereplacinganyFRU.
Screw notices
Loosescrewscancauseareliabilityproblem.In theLenovocomputer,this
problemisaddressedwithspecialnylon-coatedscrewsthathavethefollowing
characteristics:
• Theymaintaintightconnections.
• Theydonoteasilycomeloose,evenwithshockorvibration.
• Theyarehardertotighten.
• Eachoneshouldbeusedonlyonce.
Dothefollowingwhenyouservicethismachine:
• Keepthescrewkitinyourtoolbag.
• CarefullyremovescrewsforreusewhenreplacingFRUs.
• Useatorquescrewdriverifyouhaveone.
Tightenscrewsasfollows:
• Plastic to plastic
Turn anadditional90° afterthescrew headtouchesthe surfaceofthe
plasticpart:
more than 90°
(Cross-section)
• Logic card to plastic
Turn anadditional180°afterthe screwheadtouchesthesurface ofthe
logiccard:
more than 180°
(Cross-section)
• Torque driver
Ifyouhaveatorquescrewdriver,refertothe“Torque”columnforeachstep.
• Makesurethatyouusethecorrectscrews.Ifyouhaveatorquescrewdriver,
tightenallscrewsrmlytothetorqueshowninthetable.Carefully remove
screws for reuse when replacing FRUs. Make sure that all screws are
tightened rmly.
• Ensuretorque screwdriversarecalibrated correctly followingcountry
specications.
32
Hardware Maintenance Manual
Removing and replacing an FRU
Thissectionpresentsexplodedgureswiththeinstructions toindicate howto
removeandreplacetheFRU.Makesuretoobservethefollowinggeneralrules:
1. Donotattempttoserviceanycomputerunlessyouhavebeentrainedand
certied.Anuntrainedpersonrunstheriskofdamagingparts.
2. BeforereplacinganyFRU,review“FRUreplacementnotices”onpage31.
3. Beginby removinganyFRUsthathavetoberemoved beforethefailing
FRU.AnyofsuchFRUsarelistedatthetopofthepage.Removethemin
theorderinwhichtheyarelisted.
4. FollowthecorrectsequenceinthestepstoremovetheFRU,asgiveninthe
guresbythenumbersinsquarecallouts.
5. WhenturningascrewtoreplaceanFRU,turnitinthedirectionasgivenby
thearrowinthegure.
6. WhenremovingtheFRU,moveitinthe directionasgivenbythearrowin
thegure.
7. ToputthenewFRU inplace,reversetheremoval proceduresandfollow
anyofthenotesthatpertaintoreplacement.Forinformationabout
connectingandarranginginternalcables,see“Locations”onpage63.
8. WhenreplacinganFRU,usethecorrectscrewasshownintheprocedures.
DANGER
Before removing any FRU, turn off the computer, unplug all power cords from
electrical outlets, remove the battery pack, and then disconnect any of the
interconnecting cables.
Attention:AfterreplacinganFRU,donotturnonthecomputeruntilyouhave
madesurethatallscrews,springs,andothersmallpartsareinplaceandnone
areloose insidethecomputer.Verifythisby shakingthecomputergently and
listeningforrattlingsounds.Metallicpartsormetal akescan causeelectrical
shortcircuits.
Attention:Thesystem boardissensitiveto, andcanbe damagedby,
electrostaticdischarge. Beforetouchingit,establish personalgroundingby
touchingagroundpointwithonehandorusinganelectrostaticdischarge(ESD)
strap(P/N6405959)toremovepotentialshockreasons.
33
Lenovo ideapad 330-15ICH/ideapad 330H-15ICH/ideapad 330L-15ICH/
ideapad 330E-15ICH/ideapad 330R-15ICH/ideapad 330-17ICH/ideapad 330H-17ICH/
ideapad 330L-17ICH/ideapad 330E-17ICH/ideapad 330R-17ICH
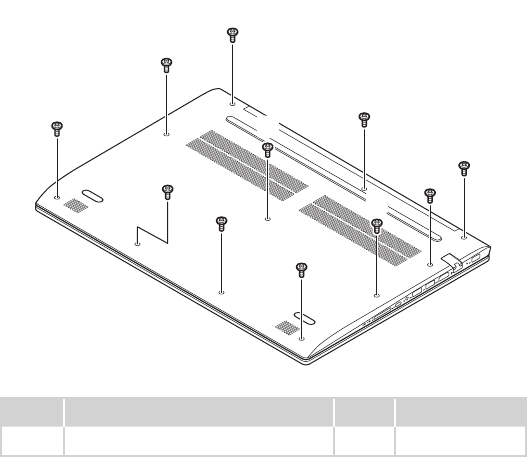
1010 Base cover
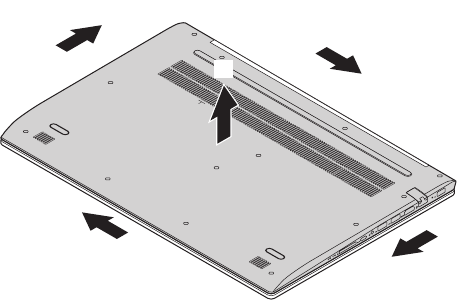
Figure 1. Removal steps of base cover
Removethescrews1.
ideapad 330-15ICH
a
a
a
a
a
a
a
a
a
a
a
Step Screw (quantity) Color Torque
1M2.5xL7mm,Phillips-head(11) Black 2.7-3.3kgf.cm

34
Hardware Maintenance Manual
Figure 1. Removal steps of base cover (continued)
ideapad 330-17ICH
a
a
a
a
a
a
a
a
a
a
a
aa
Step Screw (quantity) Color Torque
1M2.5xL7mm,Phillips-head(13) Black 2.7-3.3kgf.cm
Removethebasecoverinthedirectionsshownbyarrows2and3.
ideapad 330-15ICH
b
b
b
b
c
35
Lenovo ideapad 330-15ICH/ideapad 330H-15ICH/ideapad 330L-15ICH/
ideapad 330E-15ICH/ideapad 330R-15ICH/ideapad 330-17ICH/ideapad 330H-17ICH/
ideapad 330L-17ICH/ideapad 330E-17ICH/ideapad 330R-17ICH
Figure 1. Removal steps of base cover (continued)
ideapad 330-17ICH
b
b
b
b
c

36
Hardware Maintenance Manual
Note: Applying labels to the base cover
ThenewbasecoverFRUisshippedwithakit containinglabelsof several
kinds.Whenyoureplacethebasecover,youneedtoapplythefollowing
labels:
Thefollowinglabelsneedtobepeeledofffromtheoldbasecoverandputon
thenewbasecover.
ForcountriesotherthanChinaandIndia:
a Ratinglabel66×24mm
b Ratinglabelforprint43×24mm
c OSlabel16×22.5mm
d Ofcelable17×21mm
e TWlabel70×10mm
f Argentinalabel68×6mm
g Adapterlabel65×20mm
h WL/BTlabel35×15mm
i Indonesialabel32×10mm
j BISlabel22×30mm
k KCClabel50×16mm
ForChinaandIndia:
a Ratinglabel33×24mm
b Ratinglabelforprint43×24mm
c OSlabel16×22.5mm
d Ofcelable17×21mm
e TWlabel70×10mm
f Argentinalabel68×6mm
g Adapterlabel65×20mm
h WL/BTlabel35×15mm
i Indonesialabel32×10mm
j BISlabel22×30mm
k KCClabel50×16mm
Forsomemodels,youalsoneedtoapplyoneortwoFCClabels.Checkthe
oldbasecover;ifithasoneortwoFCClabels,ndduplicatesoftheminthe
labelkitandapplythemtothenewbasecover.
37
Lenovo ideapad 330-15ICH/ideapad 330H-15ICH/ideapad 330L-15ICH/
ideapad 330E-15ICH/ideapad 330R-15ICH/ideapad 330-17ICH/ideapad 330H-17ICH/
ideapad 330L-17ICH/ideapad 330E-17ICH/ideapad 330R-17ICH
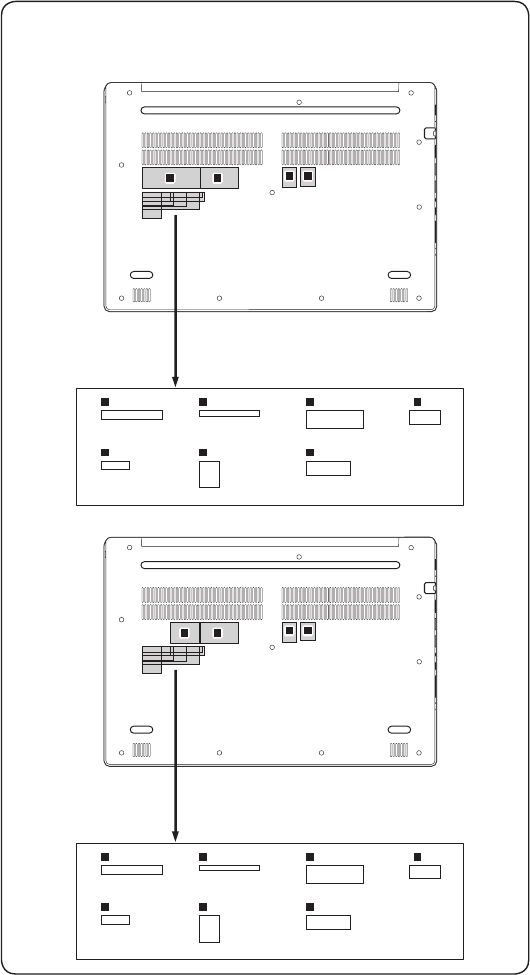
Forthelocationofeachlabel,refertothefollowinggures:
ideapad 330-15ICH
ForcountriesotherthanChinaandIndia:
e
ijk
fgh
a b c d
ForChinaandIndia:
e
ijk
fgh
a b c d
38
Hardware Maintenance Manual
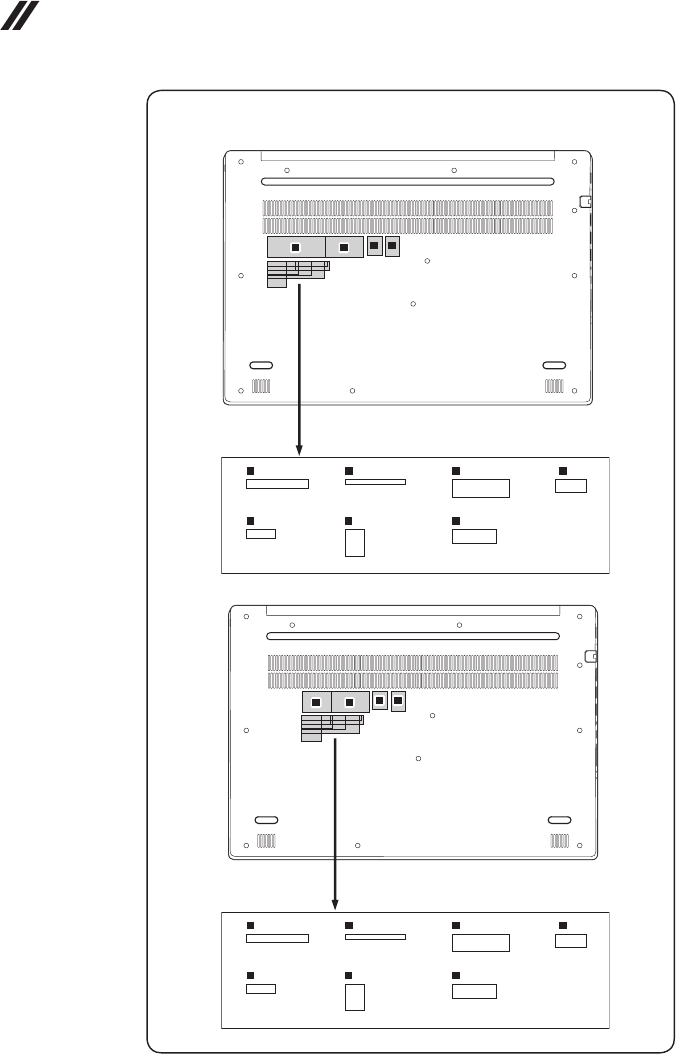
ideapad 330-17ICH
ForcountriesotherthanChinaandIndia:
a b c d
e
ijk
fgh
ForChinaandIndia:
e
ijk
fgh
a b c d

39
Lenovo ideapad 330-15ICH/ideapad 330H-15ICH/ideapad 330L-15ICH/
ideapad 330E-15ICH/ideapad 330R-15ICH/ideapad 330-17ICH/ideapad 330H-17ICH/
ideapad 330L-17ICH/ideapad 330E-17ICH/ideapad 330R-17ICH
1020 Battery pack
DANGER
Only use the battery specied in the parts list for your computer. Any other battery
could ignite or explode.
Foraccess,removethisFRU:
• “1010Basecover”onpage33
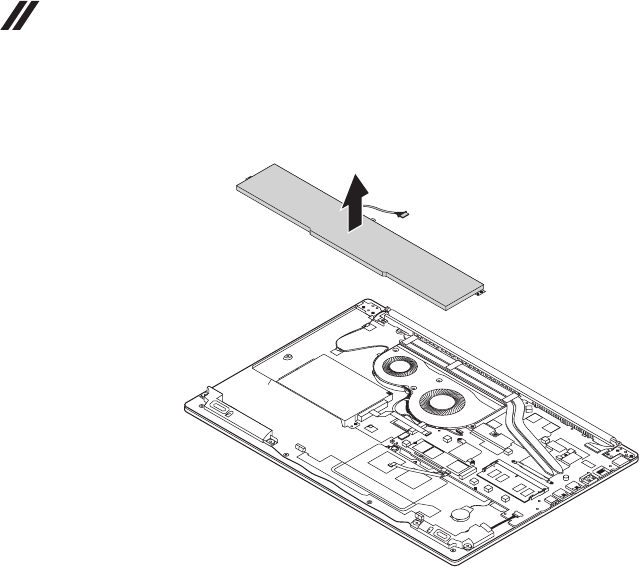
Figure 2. Removal steps of battery pack
Detachthebatterypackconnectorinthedirectionshownbyarrow1,remove
thescrews2.
b
a
b
b
b
ideapad 330-15ICH
Step Screw (quantity) Color Torque
2M2xL6mm,Phillips-head(3) Black 1.7-2.0kgf.cm
ideapad 330-17ICH
Step Screw (quantity) Color Torque
2M2xL3.5mm,Phillips-head(3) Silver 1.7-2.0kgf.cm
40
Hardware Maintenance Manual
Figure 2. Removal steps of battery pack (continued)
Removethebatterypackinthedirectionshownbyarrow3.
c
41
Lenovo ideapad 330-15ICH/ideapad 330H-15ICH/ideapad 330L-15ICH/
ideapad 330E-15ICH/ideapad 330R-15ICH/ideapad 330-17ICH/ideapad 330H-17ICH/
ideapad 330L-17ICH/ideapad 330E-17ICH/ideapad 330R-17ICH
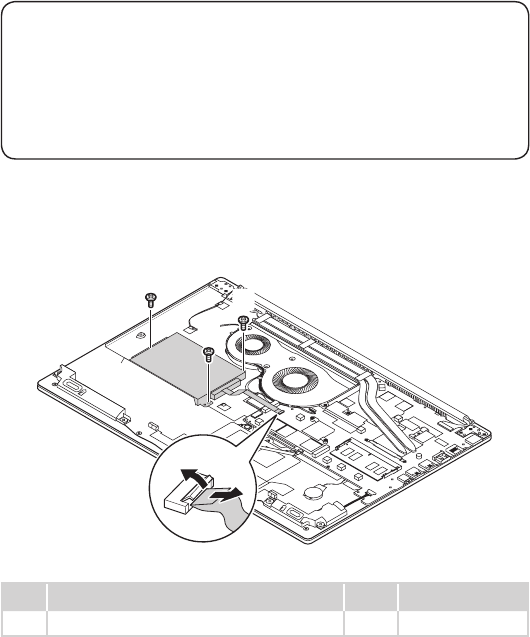
1030 Hard disk drive
Foraccess,removetheseFRUsinorder:
• “1010Basecover”onpage33
• “1020Batterypack”onpage39
Attention:
• Donotdroptheharddiskdriveorapplyany physicalshocktoit. The hard
disk drive is sensitive to physical shock. Improper handling can cause damage and
permanent loss of data.
• Before removing the drive, suggest the customer to backup all the information on
it if possible.
• Never remove the drive while the system is operating or in suspend mode.
Figure 3. Removal steps of hard disk drive
Removethescrews1.Thendisconnecttheconnectorinthedirectionshown
byarrow2.
a
a
a
b
Step Screw (quantity) Color Torque
1M2xL3.5mm,Phillips-head(3) Silver 1.7-2.0kgf.cm

42
Hardware Maintenance Manual
Figure 3. Removal steps of hard disk drive (continued)
Removetheharddiskdrivefromtheslotinthedirectionshownbyarrow3.
c
When installing:Makesurethattheconnectorisattachedrmly.
Removethescrews4anddetachthemetalframefromtheharddiskdrive.
d
d
d
d
Step Screw (quantity) Color Torque
4M3xL3mm,Phillips-head(4) Silver 2.7-3.3kgf.cm
43
Lenovo ideapad 330-15ICH/ideapad 330H-15ICH/ideapad 330L-15ICH/
ideapad 330E-15ICH/ideapad 330R-15ICH/ideapad 330-17ICH/ideapad 330H-17ICH/
ideapad 330L-17ICH/ideapad 330E-17ICH/ideapad 330R-17ICH
1040 PCI Express Mini Card for wireless LAN
Foraccess,removetheseFRUsinorder:
• “1010Basecover”onpage33
• “1020Batterypack”onpage39
• “1030Harddiskdrive”onpage41
Important:
The preinstalled WLAN module may only be replaced with a Lenovo approved
module in order to comply with FCC and IC regulations. Refer to Table 4 “Parts
list—Overall” on page 66 for Lenovo part numbers for the approved modules.
Figure 4. Removal steps of PCI Express Mini Card for wireless LAN
DisconnectthetwowirelessLANcables(black,grey)1,andthenremovethe
screw2.
aa
b
Instep1,unplug thejacksbyusingthe removaltoolantennaRFconnector
(P/N:08K7159),orpickuptheconnectorswithyourngersandgentlyunplug
theminthedirectionshownbythearrows.
Step Screw (quantity) Color Torque
2M2xL3.5mm,Phillips-head(1) Silver 1.7-2.0kgf.cm

44
Hardware Maintenance Manual
Figure 4. Removal steps of PCI Express Mini Card for wireless LAN (continued)
Releasethecablesfromthecableguidesinthedirectionshownbyarrows3.
Thenremovethecardinthedirectionshownbyarrow4.
d
c
c
c
When installing:
InmodelswithawirelessLANcardthathastwoantennaconnectors,plugthe
blackcable(1st)intothejacklabeledMAIN,andthegreycable(2nd)intothe
jacklabeledAUXonthecard.
45
Lenovo ideapad 330-15ICH/ideapad 330H-15ICH/ideapad 330L-15ICH/
ideapad 330E-15ICH/ideapad 330R-15ICH/ideapad 330-17ICH/ideapad 330H-17ICH/
ideapad 330L-17ICH/ideapad 330E-17ICH/ideapad 330R-17ICH
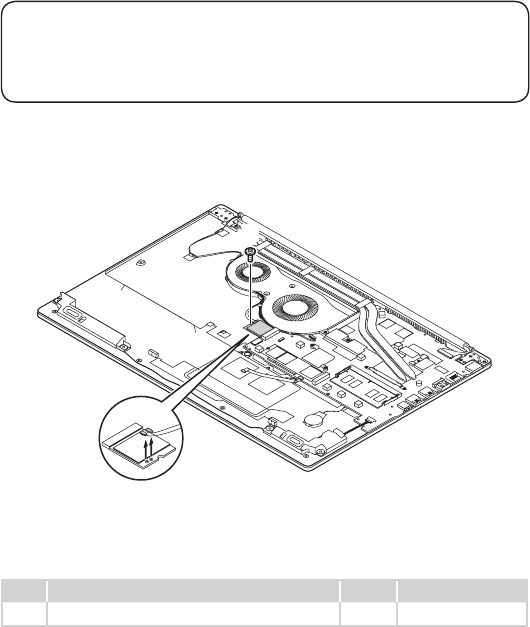
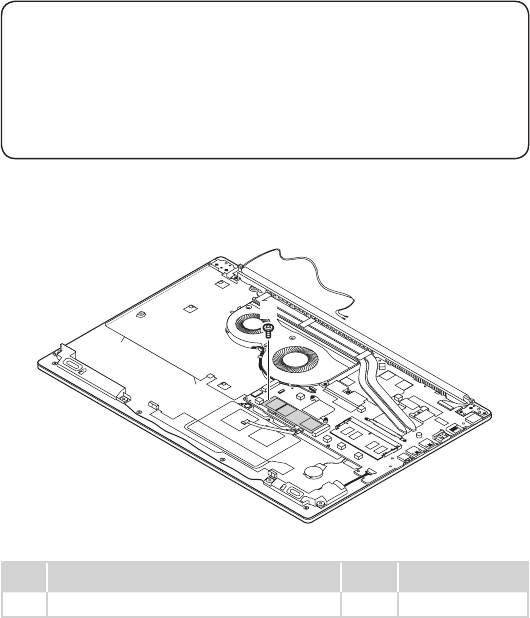
1050 SSD card
Foraccess,removetheseFRUsinorder:
• “1010Basecover”onpage33
• “1020Batterypack”onpage39
• “1030Harddiskdrive”onpage41
• “1040PCIExpressMiniCardforwirelessLAN”onpage43
Attention:
• DonotdroptheSSDcardorapplyanyphysicalshocktoit. The SSD card is
sensitive to physical shock. Improper handling can cause damage and permanent
loss of data.
• Before removing the SSD card, suggest the customer to backup all the
information on it if possible.
• Never remove the SSD card while the system is operating or in suspend mode.
Figure 5. Removal steps of SSD card
RemovethescrewA.
a
Step Screw (quantity) Color Torque
AM2xL3.5mm,Phillips-head(1) Silver 1.7-2.0kgf.cm

46
Hardware Maintenance Manual
Figure 5. Removal steps of SSD card (continued)
RemovetheSSDcardinthedirectionshownbyarrowB.
b
47
Lenovo ideapad 330-15ICH/ideapad 330H-15ICH/ideapad 330L-15ICH/
ideapad 330E-15ICH/ideapad 330R-15ICH/ideapad 330-17ICH/ideapad 330H-17ICH/
ideapad 330L-17ICH/ideapad 330E-17ICH/ideapad 330R-17ICH
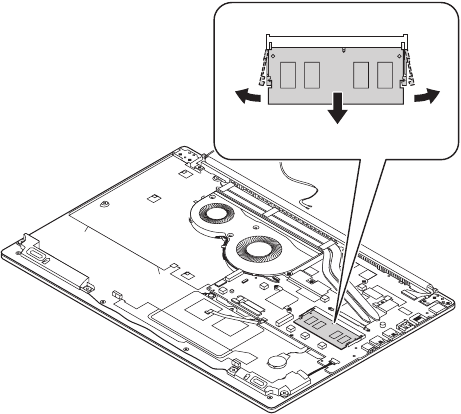
1060 DIMM
Foraccess,removetheseFRUsinorder:
• “1010Basecover”onpage33
• “1020Batterypack”onpage39
• “1030Harddiskdrive”onpage41
• “1040PCIExpressMiniCardforwirelessLAN”onpage43
• “1050SSDcard”onpage45
Figure 6. Removal steps of DIMM
Releasethe twolatcheson bothedgesofthe socketatthe sametimeinthe
directionsshownbyarrows1,and thenunplugtheDIMMinthedirection
shownbyarrow2.
a
a
b
48
Hardware Maintenance Manual
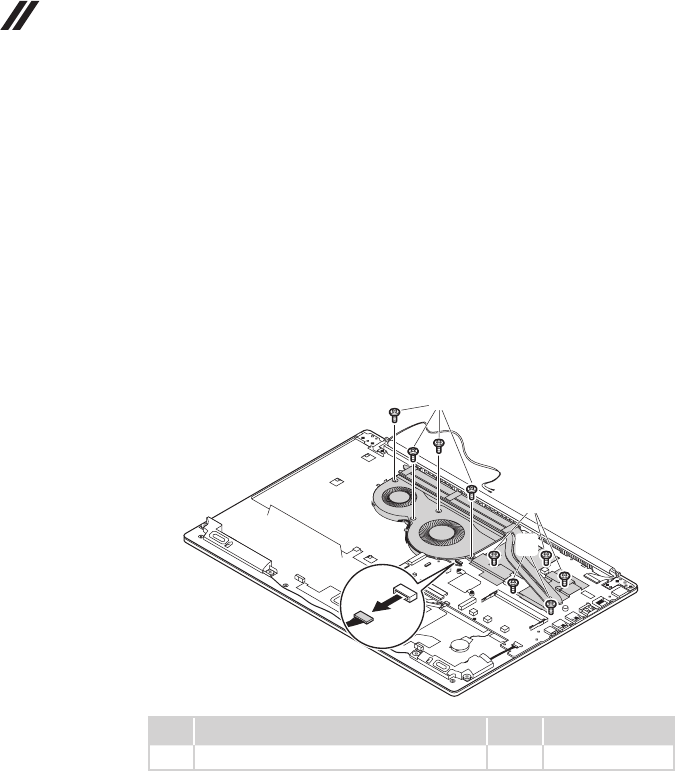
1070 Fan and heat sink
Foraccess,removetheseFRUsinorder:
• “1010Basecover”onpage33
• “1020Batterypack”onpage39
• “1030Harddiskdrive”onpage41
• “1040PCIExpressMiniCardforwirelessLAN”onpage43
• “1050SSDcard”onpage45
• “1060DIMM”onpage47
Figure 7. Removal steps of fan and heat sink
Unplugthefanconnector inthedirection shownbyarrow 1.Removethe
screws2andloosenthescrews3and4.
c
d
b
a
Step Screw (quantity) Color Torque
2M2xL6mm,Phillipshead(4) Black 1.7-2.0kgf.cm
When installing:Route theantennacables along thecableguides.Asyou
routethecables,makesurethattheyarenotsubjectedtoanytension.Tension
couldcausethecables tobedamagedbythe cableguides,orawire tobe
broken.

49
Lenovo ideapad 330-15ICH/ideapad 330H-15ICH/ideapad 330L-15ICH/
ideapad 330E-15ICH/ideapad 330R-15ICH/ideapad 330-17ICH/ideapad 330H-17ICH/
ideapad 330L-17ICH/ideapad 330E-17ICH/ideapad 330R-17ICH
Figure 7. Removal steps of fan and heat sink (continued)
Removethe fanandheat sinkinthe directionshownby arrow5and 6.Be
carefulnottodamagetheconnector.
e
f
b
a
When installing:Beforeyouattachthefanassemblytothe computer,apply
thermalgrease,atanamountof0.2grams,tothe partshowninthegure
above.Eithertoomuch ortoolittle greaseapplicationcancauseathermal
problemduetoimperfectcontactwithacomponent.
50
Hardware Maintenance Manual
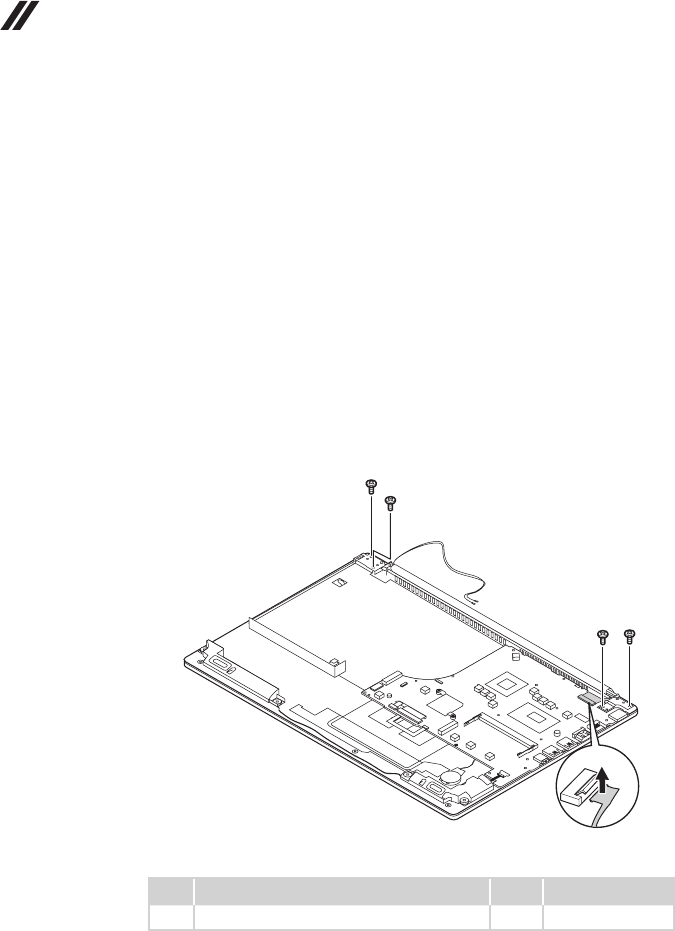
1080 Upper case
Foraccess,removetheseFRUsinorder:
• “1010Basecover”onpage33
• “1020Batterypack”onpage39
• “1030Harddiskdrive”onpage41
• “1040PCIExpressMiniCardforwirelessLAN”onpage43
• “1050SSDcard”onpage45
• “1060DIMM”onpage47
• “1070Fanandheatsink”onpage48
Figure 8. Removal steps of upper case
DetachtheEDPconnectorinthedirectionshownbyarrow1.Thenremovethe
screws2.
ideapad 330-15ICH
b
b
b
b
a
Step Screw (quantity) Color Torque
2M2.5×L5mm,Phillips-head(4) Black 2.7-3.3kgf.cm
51
Lenovo ideapad 330-15ICH/ideapad 330H-15ICH/ideapad 330L-15ICH/
ideapad 330E-15ICH/ideapad 330R-15ICH/ideapad 330-17ICH/ideapad 330H-17ICH/
ideapad 330L-17ICH/ideapad 330E-17ICH/ideapad 330R-17ICH
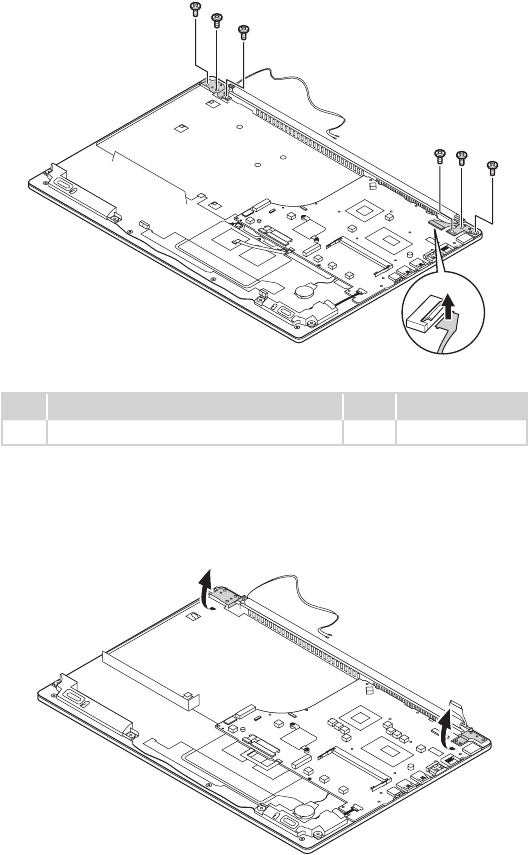
Figure 8. Removal steps of upper case (continued)
ideapad 330-17ICH
bb
b
bb
b
a
Step Screw (quantity) Color Torque
2M2.5×L5mm,Phillips-head(6) Black 2.7-3.3kgf.cm
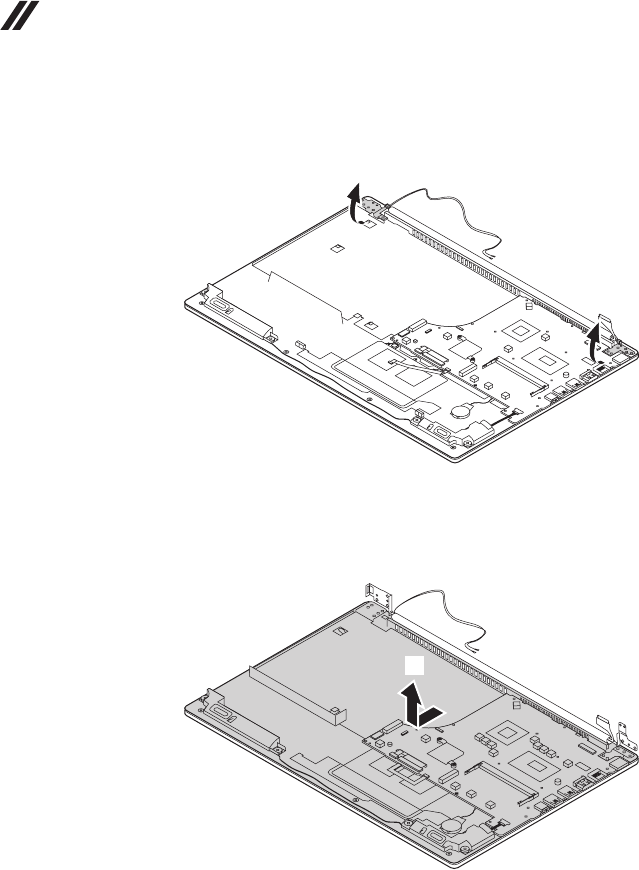
Openthehingeinthedirectionshownbyarrows3.
ideapad 330-15ICH
c
c
52
Hardware Maintenance Manual
Figure 8. Removal steps of upper case (continued)
ideapad 330-17ICH
c
c
Removetheuppercase fromtheLCD moduleinthedirectionsshown by
arrow4.
ideapad 330-15ICH
d
53
Lenovo ideapad 330-15ICH/ideapad 330H-15ICH/ideapad 330L-15ICH/
ideapad 330E-15ICH/ideapad 330R-15ICH/ideapad 330-17ICH/ideapad 330H-17ICH/
ideapad 330L-17ICH/ideapad 330E-17ICH/ideapad 330R-17ICH
Figure 8. Removal steps of upper case (continued)
ideapad 330-17ICH
d

54
Hardware Maintenance Manual
1090 Speakers
Foraccess,removetheseFRUsinorder:
• “1010Basecover”onpage33
• “1020Batterypack”onpage39
• “1030Harddiskdrive”onpage41
• “1040PCIExpressMiniCardforwirelessLAN”onpage43
• “1050SSDcard”onpage45
• “1060DIMM”onpage47
• “1070Fanandheatsink”onpage48
• “1080Uppercase”onpage50
Figure 9. Removal steps of speakers
Unplugthespeakerconnectors1and2.Thenremovethespeakersand
backupbatteryinthedirectionshownbyarrow3and4.
c
c
da
b

55
Lenovo ideapad 330-15ICH/ideapad 330H-15ICH/ideapad 330L-15ICH/
ideapad 330E-15ICH/ideapad 330R-15ICH/ideapad 330-17ICH/ideapad 330H-17ICH/
ideapad 330L-17ICH/ideapad 330E-17ICH/ideapad 330R-17ICH
1100
System board
Important notices for handling the system board:
When handling the system board, bear the following in mind.
• Be careful not to drop the system board on a bench top that has a hard surface,
such as metal, wood, or composite.
• Avoid rough handling of any kind.
• During the whole process, make sure not to drop or stack the system board.
• If you put a system board down, make sure to put it only on a padded surface such
as an ESD mat or conductive corrugated material.
Foraccess,removetheseFRUsinorder:
• “1010Basecover”onpage33
• “1020Batterypack”onpage39
• “1030Harddiskdrive”onpage41
• “1040PCIExpressMiniCardforwirelessLAN”onpage43
• “1050SSDcard”onpage45
• “1060DIMM”onpage47
• “1070Fanandheatsink”onpage48
• “1080Uppercase”onpage50
• “1090Speakers”onpage54
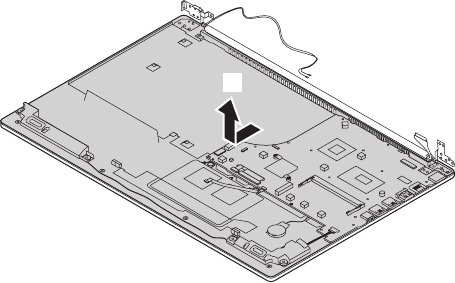
Figure 10. Removal steps of system board
Removethescrews1.Thendisconnecttheconnectorsinthedirectionsshown
byarrows2and3.
c
a
b
Step Screw (quantity) Color Torque
1M2xL3.5mm,Phillips-head(1) Silver 1.7-2.0kgf.cm

56
Hardware Maintenance Manual
Figure 10. Removal steps of system board (continued)
Removethesystemboardinthedirectionshownbyarrows4.
d
57
Lenovo ideapad 330-15ICH/ideapad 330H-15ICH/ideapad 330L-15ICH/
ideapad 330E-15ICH/ideapad 330R-15ICH/ideapad 330-17ICH/ideapad 330H-17ICH/
ideapad 330L-17ICH/ideapad 330E-17ICH/ideapad 330R-17ICH
1110 LCD unit
Foraccess,removetheseFRUsinorder:
• “1010Basecover”onpage33
• “1020Batterypack”onpage39
• “1030Harddiskdrive”onpage41
• “1040PCIExpressMiniCardforwirelessLAN”onpage43
• “1050SSDcard”onpage45
• “1060DIMM”onpage47
• “1070Fanandheatsink”onpage48
• “1080Uppercase”onpage50
• “1090Speakers”onpage54
• “1100Systemboard”onpage55
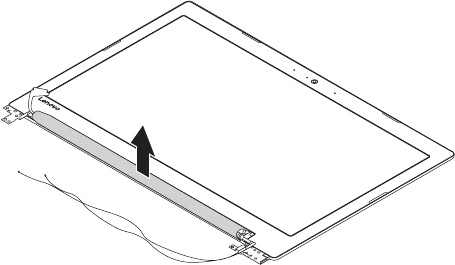
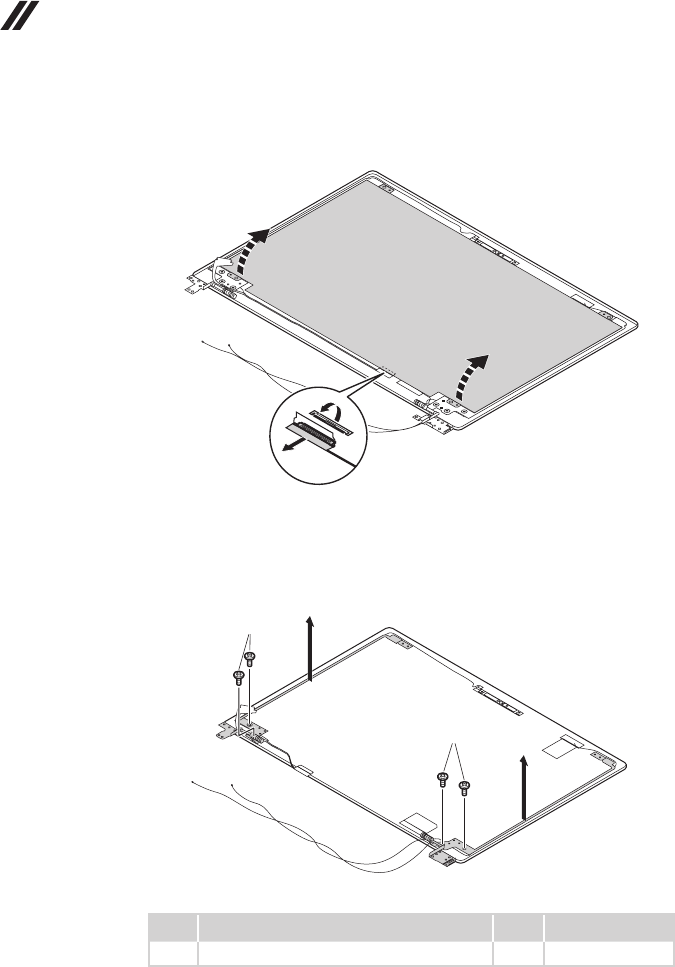
Figure 11. Removal steps of LCD unit
Removethehingecover1.
a
58
Hardware Maintenance Manual
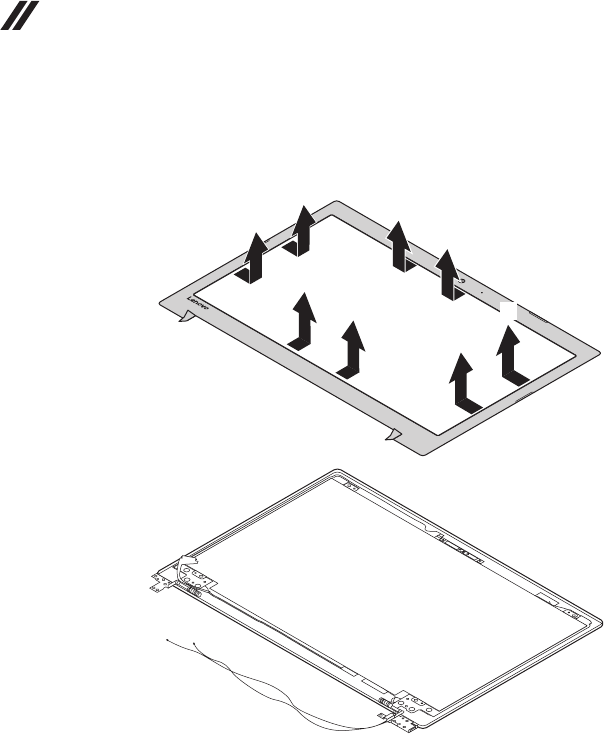
Figure 11. Removal steps of LCD unit (continued)
RemovetheLCDfrontbezelinthedirectionshownbyarrows2.
b
b
b
b
b
b
b
b
59
Lenovo ideapad 330-15ICH/ideapad 330H-15ICH/ideapad 330L-15ICH/
ideapad 330E-15ICH/ideapad 330R-15ICH/ideapad 330-17ICH/ideapad 330H-17ICH/
ideapad 330L-17ICH/ideapad 330E-17ICH/ideapad 330R-17ICH
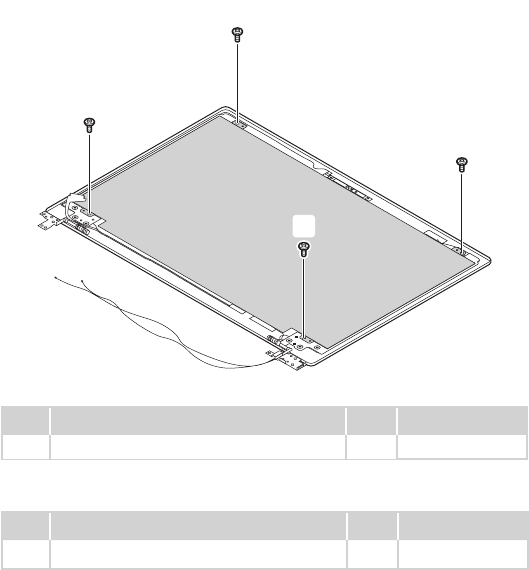
Figure 11. Removal steps of LCD unit (continued)
Removescrews3.
c
c
c
c
ideapad 330-15ICH
Step Screw (quantity) Color Torque
3M2xL3mm,Phillips-head(4) Silver 1.7-2.0kgf.cm
ideapad 330-17ICH
Step Screw (quantity) Color Torque
3M2xL3.5mm,Phillips-head(4) Silver 1.7-2.0kgf.cm
60
Hardware Maintenance Manual
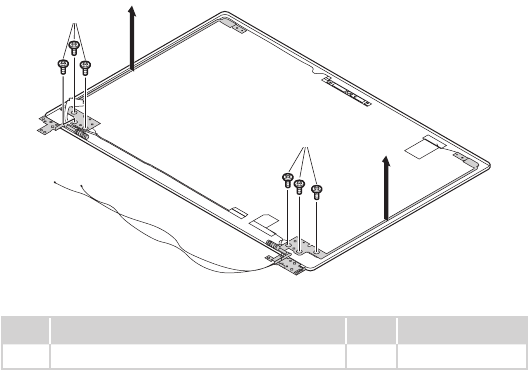
Figure 11. Removal steps of LCD unit (continued)
LifttheLCDmodule slightly.Disconnecttheconnectorin thedirectionshown by
arrow4.ThenremovetheLCDmodule.
d
Removethescrews5.ThenremovetheLCDhingesinthedirectionshownby
arrows6.
ideapad 330-15ICH
e
f
e
f
Step Screw (quantity) Color Torque
5M2.5xL2.5mm,Phillips-head(4) Silver 2.7-3.3kgf.cm
61
Lenovo ideapad 330-15ICH/ideapad 330H-15ICH/ideapad 330L-15ICH/
ideapad 330E-15ICH/ideapad 330R-15ICH/ideapad 330-17ICH/ideapad 330H-17ICH/
ideapad 330L-17ICH/ideapad 330E-17ICH/ideapad 330R-17ICH
Figure 11. Removal steps of LCD unit (continued)
ideapad 330-17ICH
e
f
e
f
Step Screw (quantity) Color Torque
5M2.5xL2.5mm,Phillips-head(6) Sliver 2.7-3.3kgf.cm
62
Hardware Maintenance Manual
1120 Integrated camera
Foraccess,removetheseFRUsinorder:
• “1010Basecover”onpage33
• “1020Batterypack”onpage39
• “1030Harddiskdrive”onpage41
• “1040PCIExpressMiniCardforwirelessLAN”onpage43
• “1050SSDcard”onpage45
• “1060DIMM”onpage47
• “1070Fanandheatsink”onpage48
• “1080Uppercase”onpage50
• “1090Speakers”onpage54
• “1100Systemboard”onpage55
• “1110LCDunit”onpage57
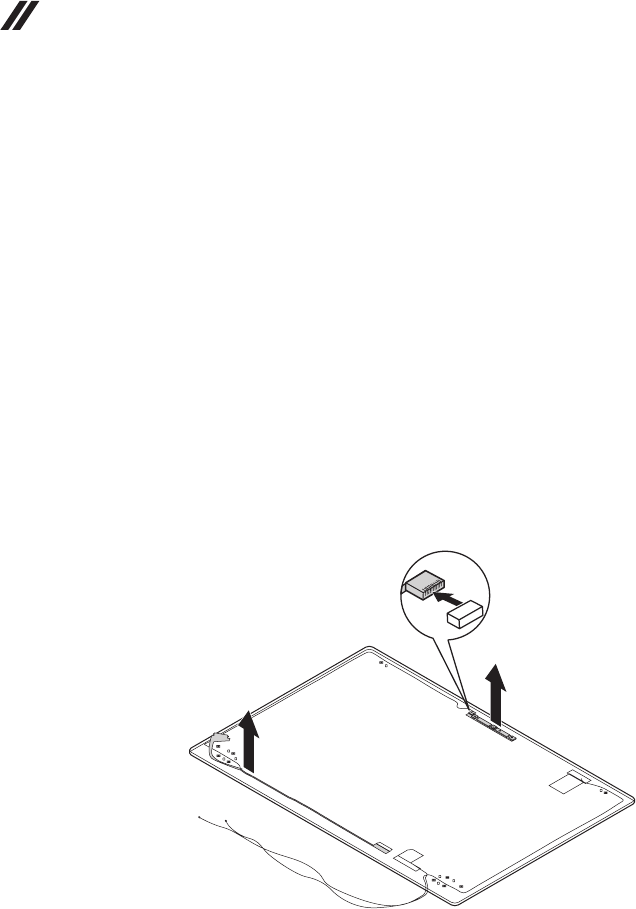
Figure 12. Removal steps of integrated camera
Note:TheintegratedcameraisstuckonthetopcenteroftheLCDcover.
Detachthecameraconnectorinthedirectionshownbyarrow1.
ThenremovetheintegratedcameraandLCDcableinthedirectionshownby
arrows2and3.
a
b
c
When installing:Sticktheintegrated cameratothe topcenteroftheLCD
coverandadjustitsplacementtomakesuretheconnectorisattachedrmly.

63
Lenovo ideapad 330-15ICH/ideapad 330H-15ICH/ideapad 330L-15ICH/
ideapad 330E-15ICH/ideapad 330R-15ICH/ideapad 330-17ICH/ideapad 330H-17ICH/
ideapad 330L-17ICH/ideapad 330E-17ICH/ideapad 330R-17ICH
Locations
Front view and right-side view
1 Integratedcamera
2 Built-inmicrophone
3 Computerdisplay
4 WirelessLANantennas
5 Touchpad
6 Ventilationslots
7 Powerkey
8 KensingtonMiniSecurityslot
9 Numerickeypad
f
d
g
i
c
ab
b
e
h
64
Hardware Maintenance Manual
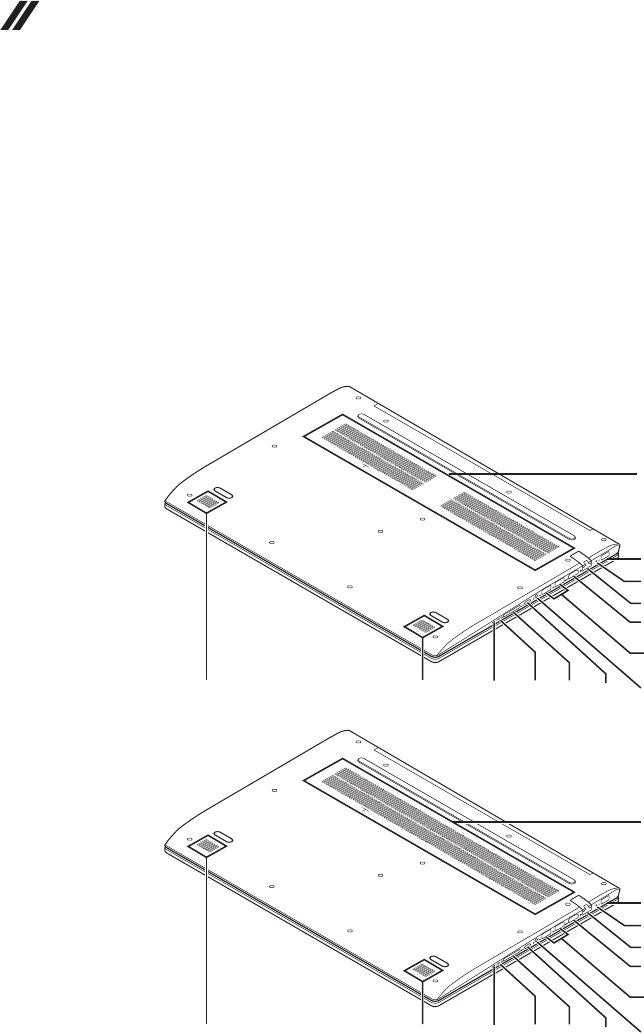
Bottom and Left-side view
1 Speakers
2 Ventilationslots
3 ACpoweradapterjack
4 Battery/Chargingstatusindicator
5 RJ-45port
6 HDMIport
7 USB3.0port
8 Comboaudiojack
9 Type-Cport
0 Memorycardslot
K Novobutton
L Powerstatusindicator
ideapad 330-15ICH
b
c
d
f
e
aah
k
li
j
g
ideapad 330-17ICH
b
c
d
f
e
a
ah
k
li
j
g

65
Lenovo ideapad 330-15ICH/ideapad 330H-15ICH/ideapad 330L-15ICH/
ideapad 330E-15ICH/ideapad 330R-15ICH/ideapad 330-17ICH/ideapad 330H-17ICH/
ideapad 330L-17ICH/ideapad 330E-17ICH/ideapad 330R-17ICH
Parts list
Thissectionpresentsthefollowingserviceparts:
• “Overall”onpage66
• “LCDFRUs”onpage78
• “Miscellaneousparts”onpage82
• “ACadapters”onpage81
• “Screws”onpage82
Note:
Each FRU is available for all types or models, unless specic types or models are
specied.
Attention:
DonotattempttoreplaceanFRUonyourown.IfanFRUisdamaged,contact
aLenovoauthorizedserviceroramarketing representativeforreplacement
orrepair.Onlyqualiedtechnicianscaninspectorrepairthisproduct.
66
Hardware Maintenance Manual
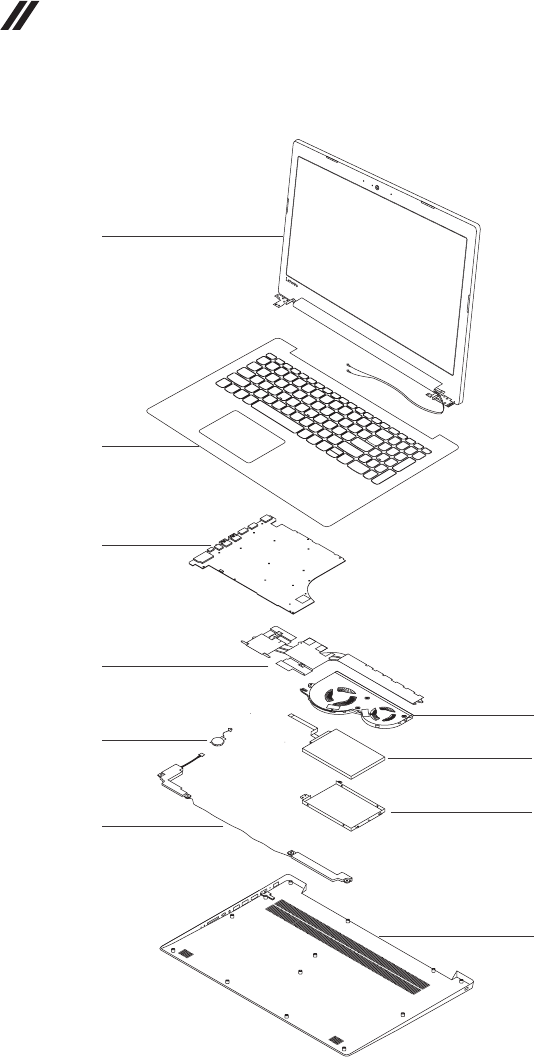
Overall
ideapad 330-15ICH/ideapad 330-17ICH
1
2
3
4
7
6
8
a
5
9

67
Lenovo ideapad 330-15ICH/ideapad 330H-15ICH/ideapad 330L-15ICH/
ideapad 330E-15ICH/ideapad 330R-15ICH/ideapad 330-17ICH/ideapad 330H-17ICH/
ideapad 330L-17ICH/ideapad 330E-17ICH/ideapad 330R-17ICH
Table 4. Parts list—Overall
ideapad 330-15ICH
No. FRU FRU no. CRU
ID.
a See“Miscellaneousparts”onpage82.
1 LCDunit(see“LCDFRUs”onpage78).
2 UpCaASMW/KBL81FKBWBLENG 5CB0R46906
N
2 UpCaASMW/KBL81FKBWBLUKE 5CB0R46767
2 UpCaASMW/KBL81FKBWBLITA 5CB0R46885
2 UpCaASMW/KBL81FKBWBLSPA 5CB0R46905
2 UpCaASMW/KBL81FKBWBLTUR 5CB0R46779
2 UpCaASMW/KBL81FKBWBLTHAI 5CB0R46808
2 UpCaASMW/KBL81FKBWBLPOR 5CB0R46871
2 UpCaASMW/KBL81FKBWBLLASPA 5CB0R46789
2 UpCaASMW/KBL81FKBWBLFRA/ENG 5CB0R46796
2 UpCaASMW/KBL81FKBWBLKOR 5CB0R47027
2 UpCaASMW/KBL81FKBWBLTC 5CB0R46848
2 UpCaASMW/KBL81FKBWBLRUS 5CB0R46783
2 UpCaASMW/KBL81FKBWBLFRA 5CB0R46997
2 UpCaASMW/KBL81FKBWBLGER 5CB0R46928
2 UpCaASMW/KBL81FKBWBLARA 5CB0R46793
2 UpCaASMW/KBL81FKBWBLBRL 5CB0R47045
2 UpCaASMW/KBL81FKBWBLGRE 5CB0R47003
2 UpCaASMW/KBL81FKBWBLHBW 5CB0R46813
2 UpCaASMW/KBL81FKBWBLHUN 5CB0R46955
2 UpCaASMW/KBL81FKBWBLNORDIC 5CB0R46781
2 UpCaASMW/KBL81FKBWBLBEL 5CB0R46788
2 UpCaASMW/KBL81FKBWBLILD 5CB0R46833
2 UpCaASMW/KBL81FKBWBLSL 5CB0R46927
2 UpCaASMW/KBL81FKBWBLSWS 5CB0R46903
2 UpCaASMW/KBL81FKBWBLEURO 5CB0R47020
2 UpCaASMW/KBL81FKBWBLCZE/SLK 5CB0R46756
2 UpCaASMW/KBL81FKBWBLBUL 5CB0R47007
2 UpCaASMW/KBL81FKBWBLHIN 5CB0R46849
2 UpCaASMW/KBL81FKBWBLFRA/ARA 5CB0R47022
2 UpCaASMW/KBL81FKBWBLUKR 5CB0R46838
2 UpCaASMW/KBL81FKBWNBLENG 5CB0R46770
2 UpCaASMW/KBL81FKBWNBLUKE 5CB0R46850
2 UpCaASMW/KBL81FKBWNBLITA 5CB0R47017
2 UpCaASMW/KBL81FKBWNBLSPA 5CB0R46995
2 UpCaASMW/KBL81FKBWNBLTUR 5CB0R46897
2 UpCaASMW/KBL81FKBWNBLTHAI 5CB0R46922
2 UpCaASMW/KBL81FKBWNBLPOR 5CB0R47042
2 UpCaASMW/KBL81FKBWNBLLASPA 5CB0R46872
2 UpCaASMW/KBL81FKBWNBLFRA/ENG 5CB0R46842
2 UpCaASMW/KBL81FKBWNBLKOR 5CB0R46855
2 UpCaASMW/KBL81FKBWNBLTC 5CB0R46794
2 UpCaASMW/KBL81FKBWNBLRUS 5CB0R46983
2 UpCaASMW/KBL81FKBWNBLFRA 5CB0R46824
2 UpCaASMW/KBL81FKBWNBLGER 5CB0R46876

68
Hardware Maintenance Manual
Table 4. Parts list—Overall (continued)
No. FRU FRU no. CRU
ID.
2 UpCaASMW/KBL81FKBWNBLARA 5CB0R46853
N
2 UpCaASMW/KBL81FKBWNBLBRL 5CB0R47012
2 UpCaASMW/KBL81FKBWNBLGRE 5CB0R46877
2 UpCaASMW/KBL81FKBWNBLHBW 5CB0R46752
2 UpCaASMW/KBL81FKBWNBLHUN 5CB0R47039
2 UpCaASMW/KBL81FKBWNBLNORDIC 5CB0R46884
2 UpCaASMW/KBL81FKBWNBLBEL 5CB0R46879
2 UpCaASMW/KBL81FKBWNBLILD 5CB0R47025
2 UpCaASMW/KBL81FKBWNBLSL 5CB0R46799
2 UpCaASMW/KBL81FKBWNBLSWS 5CB0R46801
2 UpCaASMW/KBL81FKBWNBLEURO 5CB0R46819
2 UpCaASMW/KBL81FKBWNBLCZE/SLK 5CB0R46892
2 UpCaASMW/KBL81FKBWNBLBUL 5CB0R46787
2 UpCaASMW/KBL81FKBWNBLHIN 5CB0R46980
2 UpCaASMW/KBL81FKBWNBLFRA/ARA 5CB0R46875
2 UpCaASMW/KBL81FKBWNBLUKR 5CB0R47010
2 UpCaASMW/KBL81FKIGBLENG 5CB0R47036
2 UpCaASMW/KBL81FKIGBLUKE 5CB0R47002
2 UpCaASMW/KBL81FKIGBLITA 5CB0R46867
2 UpCaASMW/KBL81FKIGBLSPA 5CB0R46811
2 UpCaASMW/KBL81FKIGBLTUR 5CB0R46814
2 UpCaASMW/KBL81FKIGBLTHAI 5CB0R47031
2 UpCaASMW/KBL81FKIGBLPOR 5CB0R46999
2 UpCaASMW/KBL81FKIGBLLASPA 5CB0R46862
2 UpCaASMW/KBL81FKIGBLFRA/ENG 5CB0R46880
2 UpCaASMW/KBL81FKIGBLKOR 5CB0R46953
2 UpCaASMW/KBL81FKIGBLTC 5CB0R46896
2 UpCaASMW/KBL81FKIGBLRUS 5CB0R46827
2 UpCaASMW/KBL81FKIGBLFRA 5CB0R46790
2 UpCaASMW/KBL81FKIGBLGER 5CB0R46829
2 UpCaASMW/KBL81FKIGBLARA 5CB0R46765
2 UpCaASMW/KBL81FKIGBLBRL 5CB0R46954
2 UpCaASMW/KBL81FKIGBLGRE 5CB0R46914
2 UpCaASMW/KBL81FKIGBLHBW 5CB0R47013
2 UpCaASMW/KBL81FKIGBLHUN 5CB0R46958
2 UpCaASMW/KBL81FKIGBLNORDIC 5CB0R47029
2 UpCaASMW/KBL81FKIGBLBEL 5CB0R47023
2 UpCaASMW/KBL81FKIGBLILD 5CB0R46856
2 UpCaASMW/KBL81FKIGBLSL 5CB0R46802
2 UpCaASMW/KBL81FKIGBLSWS 5CB0R46778
2 UpCaASMW/KBL81FKIGBLEURO 5CB0R46761
2 UpCaASMW/KBL81FKIGBLCZE/SLK 5CB0R46904
2 UpCaASMW/KBL81FKIGBLBUL 5CB0R46873
2 UpCaASMW/KBL81FKIGBLHIN 5CB0R46806
2 UpCaASMW/KBL81FKIGBLFRA/ARA 5CB0R46889
2 UpCaASMW/KBL81FKIGBLUKR 5CB0R46828
2 UpCaASMW/KBL81FKIGNBLENG 5CB0R46930

69
Lenovo ideapad 330-15ICH/ideapad 330H-15ICH/ideapad 330L-15ICH/
ideapad 330E-15ICH/ideapad 330R-15ICH/ideapad 330-17ICH/ideapad 330H-17ICH/
ideapad 330L-17ICH/ideapad 330E-17ICH/ideapad 330R-17ICH
Table 4. Parts list—Overall (continued)
No. FRU FRU no. CRU
ID.
2 UpCaASMW/KBL81FKIGNBLUKE 5CB0R46962
N
2 UpCaASMW/KBL81FKIGNBLITA 5CB0R46937
2 UpCaASMW/KBL81FKIGNBLSPA 5CB0R46820
2 UpCaASMW/KBL81FKIGNBLTUR 5CB0R46993
2 UpCaASMW/KBL81FKIGNBLTHAI 5CB0R47044
2 UpCaASMW/KBL81FKIGNBLPOR 5CB0R46913
2 UpCaASMW/KBL81FKIGNBLLASPA 5CB0R46759
2 UpCaASMW/KBL81FKIGNBLFRA/ENG 5CB0R46929
2 UpCaASMW/KBL81FKIGNBLKOR 5CB0R46773
2 UpCaASMW/KBL81FKIGNBLTC 5CB0R46882
2 UpCaASMW/KBL81FKIGNBLRUS 5CB0R46932
2 UpCaASMW/KBL81FKIGNBLFRA 5CB0R46836
2 UpCaASMW/KBL81FKIGNBLGER 5CB0R46971
2 UpCaASMW/KBL81FKIGNBLARA 5CB0R46945
2 UpCaASMW/KBL81FKIGNBLBRL 5CB0R46942
2 UpCaASMW/KBL81FKIGNBLGRE 5CB0R46919
2 UpCaASMW/KBL81FKIGNBLHBW 5CB0R46998
2 UpCaASMW/KBL81FKIGNBLHUN 5CB0R46915
2 UpCaASMW/KBL81FKIGNBLNORDIC 5CB0R46975
2 UpCaASMW/KBL81FKIGNBLBEL 5CB0R46924
2 UpCaASMW/KBL81FKIGNBLILD 5CB0R46863
2 UpCaASMW/KBL81FKIGNBLSL 5CB0R46935
2 UpCaASMW/KBL81FKIGNBLSWS 5CB0R46843
2 UpCaASMW/KBL81FKIGNBLEURO 5CB0R47015
2 UpCaASMW/KBL81FKIGNBLCZE/SLK 5CB0R46940
2 UpCaASMW/KBL81FKIGNBLBUL 5CB0R46757
2 UpCaASMW/KBL81FKIGNBLHIN 5CB0R47046
2 UpCaASMW/KBL81FKIGNBLFRA/ARA 5CB0R47004
2 UpCaASMW/KBL81FKIGNBLUKR 5CB0R46771
2 UpCaASMW/KBL81FKPGBLENG 5CB0R46921
2 UpCaASMW/KBL81FKPGBLUKE 5CB0R46943
2 UpCaASMW/KBL81FKPGBLITA 5CB0R46857
2 UpCaASMW/KBL81FKPGBLSPA 5CB0R46956
2 UpCaASMW/KBL81FKPGBLTUR 5CB0R46859
2 UpCaASMW/KBL81FKPGBLTHAI 5CB0R46891
2 UpCaASMW/KBL81FKPGBLPOR 5CB0R46964
2 UpCaASMW/KBL81FKPGBLLASPA 5CB0R46766
2 UpCaASMW/KBL81FKPGBLFRA/ENG 5CB0R47005
2 UpCaASMW/KBL81FKPGBLKOR 5CB0R46886
2 UpCaASMW/KBL81FKPGBLTC 5CB0R46917
2 UpCaASMW/KBL81FKPGBLRUS 5CB0R46818
2 UpCaASMW/KBL81FKPGBLFRA 5CB0R46994
2 UpCaASMW/KBL81FKPGBLGER 5CB0R46845
2 UpCaASMW/KBL81FKPGBLARA 5CB0R47008
2 UpCaASMW/KBL81FKPGBLBRL 5CB0R47032
2 UpCaASMW/KBL81FKPGBLGRE 5CB0R46774
2 UpCaASMW/KBL81FKPGBLHBW 5CB0R46810

70
Hardware Maintenance Manual
No. FRU FRU no. CRU
ID.
2 UpCaASMW/KBL81FKPGBLHUN 5CB0R46795
N
2 UpCaASMW/KBL81FKPGBLNORDIC 5CB0R47019
2 UpCaASMW/KBL81FKPGBLBEL 5CB0R46786
2 UpCaASMW/KBL81FKPGBLILD 5CB0R46758
2 UpCaASMW/KBL81FKPGBLSL 5CB0R46986
2 UpCaASMW/KBL81FKPGBLSWS 5CB0R46925
2 UpCaASMW/KBL81FKPGBLEURO 5CB0R46920
2 UpCaASMW/KBL81FKPGBLCZE/SLK 5CB0R46837
2 UpCaASMW/KBL81FKPGBLBUL 5CB0R46878
2 UpCaASMW/KBL81FKPGBLHIN 5CB0R47047
2 UpCaASMW/KBL81FKPGBLFRA/ARA 5CB0R46988
2 UpCaASMW/KBL81FKPGBLUKR 5CB0R46840
2 UpCaASMW/KBL81FKPGNBLENG 5CB0R46797
2 UpCaASMW/KBL81FKPGNBLUKE 5CB0R46959
2 UpCaASMW/KBL81FKPGNBLITA 5CB0R46750
2 UpCaASMW/KBL81FKPGNBLSPA 5CB0R47014
2 UpCaASMW/KBL81FKPGNBLTUR 5CB0R46835
2 UpCaASMW/KBL81FKPGNBLTHAI 5CB0R46768
2 UpCaASMW/KBL81FKPGNBLPOR 5CB0R47033
2 UpCaASMW/KBL81FKPGNBLLASPA 5CB0R46895
2 UpCaASMW/KBL81FKPGNBLFRA/ENG 5CB0R46865
2 UpCaASMW/KBL81FKPGNBLKOR 5CB0R47038
2 UpCaASMW/KBL81FKPGNBLTC 5CB0R46960
2 UpCaASMW/KBL81FKPGNBLRUS 5CB0R46898
2 UpCaASMW/KBL81FKPGNBLFRA 5CB0R46815
2 UpCaASMW/KBL81FKPGNBLGER 5CB0R46909
2 UpCaASMW/KBL81FKPGNBLARA 5CB0R46772
2 UpCaASMW/KBL81FKPGNBLBRL 5CB0R46822
2 UpCaASMW/KBL81FKPGNBLGRE 5CB0R47009
2 UpCaASMW/KBL81FKPGNBLHBW 5CB0R46839
2 UpCaASMW/KBL81FKPGNBLHUN 5CB0R46972
2 UpCaASMW/KBL81FKPGNBLNORDIC 5CB0R47001
2 UpCaASMW/KBL81FKPGNBLBEL 5CB0R46847
2 UpCaASMW/KBL81FKPGNBLILD 5CB0R46981
2 UpCaASMW/KBL81FKPGNBLSL 5CB0R46785
2 UpCaASMW/KBL81FKPGNBLSWS 5CB0R47048
2 UpCaASMW/KBL81FKPGNBLEURO 5CB0R46858
2 UpCaASMW/KBL81FKPGNBLCZE/SLK 5CB0R46934
2 UpCaASMW/KBL81FKPGNBLBUL 5CB0R46775
2 UpCaASMW/KBL81FKPGNBLHIN 5CB0R46982
2 UpCaASMW/KBL81FKPGNBLFRA/ARA 5CB0R46989
2 UpCaASMW/KBL81FKPGNBLUKR 5CB0R46941
2 UpCaASMW/KBL81FKLBUBLENG 5CB0R46970
2 UpCaASMW/KBL81FKLBUBLUKE 5CB0R46890
2 UpCaASMW/KBL81FKLBUBLITA 5CB0R46899
2 UpCaASMW/KBL81FKLBUBLSPA 5CB0R46854
Table 4. Parts list—Overall (continued)

71
Lenovo ideapad 330-15ICH/ideapad 330H-15ICH/ideapad 330L-15ICH/
ideapad 330E-15ICH/ideapad 330R-15ICH/ideapad 330-17ICH/ideapad 330H-17ICH/
ideapad 330L-17ICH/ideapad 330E-17ICH/ideapad 330R-17ICH
Table 4. Parts list—Overall (continued)
No. FRU FRU no. CRU
ID.
2 UpCaASMW/KBL81FKLBUBLTUR 5CB0R46832
N
2 UpCaASMW/KBL81FKLBUBLTHAI 5CB0R46944
2 UpCaASMW/KBL81FKLBUBLPOR 5CB0R46825
2 UpCaASMW/KBL81FKLBUBLLASPA 5CB0R46926
2 UpCaASMW/KBL81FKLBUBLFRA/ENG 5CB0R46776
2 UpCaASMW/KBL81FKLBUBLKOR 5CB0R46907
2 UpCaASMW/KBL81FKLBUBLTC 5CB0R46900
2 UpCaASMW/KBL81FKLBUBLRUS 5CB0R46823
2 UpCaASMW/KBL81FKLBUBLFRA 5CB0R46851
2 UpCaASMW/KBL81FKLBUBLGER 5CB0R46931
2 UpCaASMW/KBL81FKLBUBLARA 5CB0R46984
2 UpCaASMW/KBL81FKLBUBLBRL 5CB0R46901
2 UpCaASMW/KBL81FKLBUBLGRE 5CB0R46753
2 UpCaASMW/KBL81FKLBUBLHBW 5CB0R47030
2 UpCaASMW/KBL81FKLBUBLHUN 5CB0R47006
2 UpCaASMW/KBL81FKLBUBLNORDIC 5CB0R46868
2 UpCaASMW/KBL81FKLBUBLBEL 5CB0R46902
2 UpCaASMW/KBL81FKLBUBLILD 5CB0R46910
2 UpCaASMW/KBL81FKLBUBLSL 5CB0R46936
2 UpCaASMW/KBL81FKLBUBLSWS 5CB0R46791
2 UpCaASMW/KBL81FKLBUBLEURO 5CB0R46947
2 UpCaASMW/KBL81FKLBUBLCZE/SLK 5CB0R46957
2 UpCaASMW/KBL81FKLBUBLBUL 5CB0R46916
2 UpCaASMW/KBL81FKLBUBLHIN 5CB0R46751
2 UpCaASMW/KBL81FKLBUBLFRA/ARA 5CB0R46950
2 UpCaASMW/KBL81FKLBUBLUKR 5CB0R46864
2 UpCaASMW/KBL81FKLBUNBLENG 5CB0R47043
2 UpCaASMW/KBL81FKLBUNBLUKE 5CB0R46792
2 UpCaASMW/KBL81FKLBUNBLITA 5CB0R46966
2 UpCaASMW/KBL81FKLBUNBLSPA 5CB0R46908
2 UpCaASMW/KBL81FKLBUNBLTUR 5CB0R47024
2 UpCaASMW/KBL81FKLBUNBLTHAI 5CB0R46804
2 UpCaASMW/KBL81FKLBUNBLPOR 5CB0R46887
2 UpCaASMW/KBL81FKLBUNBLLASPA 5CB0R46893
2 UpCaASMW/KBL81FKLBUNBLFRA/ENG 5CB0R47026
2 UpCaASMW/KBL81FKLBUNBLKOR 5CB0R46834
2 UpCaASMW/KBL81FKLBUNBLTC 5CB0R46844
2 UpCaASMW/KBL81FKLBUNBLRUS 5CB0R46990
2 UpCaASMW/KBL81FKLBUNBLFRA 5CB0R46763
2 UpCaASMW/KBL81FKLBUNBLGER 5CB0R47034
2 UpCaASMW/KBL81FKLBUNBLARA 5CB0R46965
2 UpCaASMW/KBL81FKLBUNBLBRL 5CB0R46803
2 UpCaASMW/KBL81FKLBUNBLGRE 5CB0R46911
2 UpCaASMW/KBL81FKLBUNBLHBW 5CB0R46939
2 UpCaASMW/KBL81FKLBUNBLHUN 5CB0R46800
2 UpCaASMW/KBL81FKLBUNBLNORDIC 5CB0R46769
2 UpCaASMW/KBL81FKLBUNBLBEL 5CB0R46866

72
Hardware Maintenance Manual
Table 4. Parts list—Overall (continued)
No. FRU FRU no. CRU
ID.
2 UpCaASMW/KBL81FKLBUNBLILD 5CB0R47016
N
2 UpCaASMW/KBL81FKLBUNBLSL 5CB0R46963
2 UpCaASMW/KBL81FKLBUNBLSWS 5CB0R46979
2 UpCaASMW/KBL81FKLBUNBLEURO 5CB0R46777
2 UpCaASMW/KBL81FKLBUNBLCZE/SLK 5CB0R46798
2 UpCaASMW/KBL81FKLBUNBLBUL 5CB0R46976
2 UpCaASMW/KBL81FKLBUNBLHIN 5CB0R46807
2 UpCaASMW/KBL81FKLBUNBLFRA/ARA 5CB0R46780
2 UpCaASMW/KBL81FKLBUNBLUKR 5CB0R46826
2 UpCaASMW/KBL81FKLCHOBLENG 5CB0R47049
2 UpCaASMW/KBL81FKLCHOBLUKE 5CB0R46881
2 UpCaASMW/KBL81FKLCHOBLITA 5CB0R46869
2 UpCaASMW/KBL81FKLCHOBLSPA 5CB0R46831
2 UpCaASMW/KBL81FKLCHOBLTUR 5CB0R46961
2 UpCaASMW/KBL81FKLCHOBLTHAI 5CB0R46816
2 UpCaASMW/KBL81FKLCHOBLPOR 5CB0R46977
2 UpCaASMW/KBL81FKLCHOBLLASPA 5CB0R46948
2 UpCaASMW/KBL81FKLCHOBLFRA/ENG 5CB0R47040
2 UpCaASMW/KBL81FKLCHOBLKOR 5CB0R46846
2 UpCaASMW/KBL81FKLCHOBLTC 5CB0R46991
2 UpCaASMW/KBL81FKLCHOBLRUS 5CB0R46946
2 UpCaASMW/KBL81FKLCHOBLFRA 5CB0R46987
2 UpCaASMW/KBL81FKLCHOBLGER 5CB0R46764
2 UpCaASMW/KBL81FKLCHOBLARA 5CB0R47000
2 UpCaASMW/KBL81FKLCHOBLBRL 5CB0R46974
2 UpCaASMW/KBL81FKLCHOBLGRE 5CB0R46923
2 UpCaASMW/KBL81FKLCHOBLHBW 5CB0R46754
2 UpCaASMW/KBL81FKLCHOBLHUN 5CB0R46883
2 UpCaASMW/KBL81FKLCHOBLNORDIC 5CB0R46949
2 UpCaASMW/KBL81FKLCHOBLBEL 5CB0R47035
2 UpCaASMW/KBL81FKLCHOBLILD 5CB0R46870
2 UpCaASMW/KBL81FKLCHOBLSL 5CB0R46969
2 UpCaASMW/KBL81FKLCHOBLSWS 5CB0R46760
2 UpCaASMW/KBL81FKLCHOBLEURO 5CB0R46817
2 UpCaASMW/KBL81FKLCHOBLCZE/SLK 5CB0R47018
2 UpCaASMW/KBL81FKLCHOBLBUL 5CB0R46992
2 UpCaASMW/KBL81FKLCHOBLHIN 5CB0R46978
2 UpCaASMW/KBL81FKLCHOBLFRA/ARA 5CB0R46874
2 UpCaASMW/KBL81FKLCHOBLUKR 5CB0R46784
2 UpCaASMW/KBL81FKLCHONBLENG 5CB0R46782
2 UpCaASMW/KBL81FKLCHONBLUKE 5CB0R46951
2 UpCaASMW/KBL81FKLCHONBLITA 5CB0R46888
2 UpCaASMW/KBL81FKLCHONBLSPA 5CB0R46938
2 UpCaASMW/KBL81FKLCHONBLTUR 5CB0R46812
2 UpCaASMW/KBL81FKLCHONBLTHAI 5CB0R47041
2 UpCaASMW/KBL81FKLCHONBLPOR 5CB0R46861
2 UpCaASMW/KBL81FKLCHONBLLASPA 5CB0R46973

73
Lenovo ideapad 330-15ICH/ideapad 330H-15ICH/ideapad 330L-15ICH/
ideapad 330E-15ICH/ideapad 330R-15ICH/ideapad 330-17ICH/ideapad 330H-17ICH/
ideapad 330L-17ICH/ideapad 330E-17ICH/ideapad 330R-17ICH
Table 4. Parts list—Overall (continued)
No. FRU FRU no. CRU
ID.
2 UpCaASMW/KBL81FKLCHONBLFRA/ENG 5CB0R46933
N
2 UpCaASMW/KBL81FKLCHONBLKOR 5CB0R46985
2 UpCaASMW/KBL81FKLCHONBLTC 5CB0R46996
2 UpCaASMW/KBL81FKLCHONBLRUS 5CB0R46809
2 UpCaASMW/KBL81FKLCHONBLFRA 5CB0R46968
2 UpCaASMW/KBL81FKLCHONBLGER 5CB0R46755
2 UpCaASMW/KBL81FKLCHONBLARA 5CB0R46894
2 UpCaASMW/KBL81FKLCHONBLBRL 5CB0R46860
2 UpCaASMW/KBL81FKLCHONBLGRE 5CB0R46918
2 UpCaASMW/KBL81FKLCHONBLHBW 5CB0R46967
2 UpCaASMW/KBL81FKLCHONBLHUN 5CB0R46821
2 UpCaASMW/KBL81FKLCHONBLNORDIC 5CB0R46912
2 UpCaASMW/KBL81FKLCHONBLBEL 5CB0R46830
2 UpCaASMW/KBL81FKLCHONBLILD 5CB0R46762
2 UpCaASMW/KBL81FKLCHONBLSL 5CB0R46952
2 UpCaASMW/KBL81FKLCHONBLSWS 5CB0R47037
2 UpCaASMW/KBL81FKLCHONBLEURO 5CB0R46852
2 UpCaASMW/KBL81FKLCHONBLCZE/SLK 5CB0R46805
2 UpCaASMW/KBL81FKLCHONBLBUL 5CB0R47021
2 UpCaASMW/KBL81FKLCHONBLHIN 5CB0R47011
2 UpCaASMW/KBL81FKLCHONBLFRA/ARA 5CB0R47028
2 UpCaASMW/KBL81FKLCHONBLUKR 5CB0R46841
3 MBL81FKI58300HV4GD4GWIN 5B20R46737
3 MBL81FKI58300HV4GD4GNOK 5B20R46729
3 MBL81FKI58300HV2GNRWIN 5B20R46736
3 MBL81FKI58300HV2GNRNOK 5B20R46739
3 MBL81FKI58300HV4GNRWIN 5B20R46730
3 MBL81FKI58300HV4GNRNOK 5B20R46731
3 MBL81FKI58300HV2GD4GWIN 5B20R46734
3 MBL81FKI58300HV2GD4GNOK 5B20R46726
3 MBL81FKI78750HV4GNRWIN 5B20R46728
3 MBL81FKI78750HV4GNRNOK 5B20R46732
3 MBL81FKI78750HV2GD4GWIN 5B20R46725
3 MBL81FKI78750HV2GD4GNOK 5B20R46735
3 MBL81FKI78750HV4GD4GWIN 5B20R46740
3 MBL81FKI78750HV4GD4GNOK 5B20R46733
3 MBL81FKI78750HV2GNRWIN 5B20R46738
3 MBL81FKI78750HV2GNRNOK 5B20R46727
4 ThermalmoduleDISL81FK 5H40R46700
5 RTCBATTERYL81FK 5B10R46704
6SpeakerL81FKL+R15T 5SB0R46703
7FANL81FK 5F10R46698
8 HDDFFCL81FK 5C10R46696
9 LOWERCASEL81FKWHITE 5CB0R46701
9 LOWERCASEL81FKGRAPHITEGREY 5CB0R46705
9 LOWERCASEL81FKLIGHTBLUE 5CB0R46702
9 LOWERCASEL81FKLIGHTCHOCOLATE 5CB0R46699

74
Hardware Maintenance Manual
Table 4. Parts list—Overall
ideapad 330-17ICH
No. FRU FRU no. CRU
ID.
a See“Miscellaneousparts”onpage82.
1 LCDunit(see“LCDFRUs”onpage78).
2 UpCaASMW/KBL81FLPGNBLENG 5CB0R48065
N
2 UpCaASMW/KBL81FLPGNBLUKE 5CB0R48145
2 UpCaASMW/KBL81FLPGNBLITA 5CB0R48123
2 UpCaASMW/KBL81FLPGNBLSPA 5CB0R48095
2 UpCaASMW/KBL81FLPGNBLTUR 5CB0R48061
2 UpCaASMW/KBL81FLPGNBLTHAI 5CB0R48093
2 UpCaASMW/KBL81FLPGNBLPOR 5CB0R48117
2 UpCaASMW/KBL81FLPGNBLLASPA 5CB0R48142
2 UpCaASMW/KBL81FLPGNBLFRA/ENG 5CB0R48078
2 UpCaASMW/KBL81FLPGNBLKOR 5CB0R48032
2 UpCaASMW/KBL81FLPGNBLTC 5CB0R48033
2 UpCaASMW/KBL81FLPGNBLRUS 5CB0R48052
2 UpCaASMW/KBL81FLPGNBLFRA 5CB0R48128
2 UpCaASMW/KBL81FLPGNBLGER 5CB0R48073
2 UpCaASMW/KBL81FLPGNBLARA 5CB0R48028
2 UpCaASMW/KBL81FLPGNBLBRL 5CB0R48041
2 UpCaASMW/KBL81FLPGNBLGRE 5CB0R48127
2 UpCaASMW/KBL81FLPGNBLHBW 5CB0R48112
2 UpCaASMW/KBL81FLPGNBLHUN 5CB0R48054
2 UpCaASMW/KBL81FLPGNBLNORDIC 5CB0R48098
2 UpCaASMW/KBL81FLPGNBLBEL 5CB0R48131
2 UpCaASMW/KBL81FLPGNBLILD 5CB0R48088
2 UpCaASMW/KBL81FLPGNBLSL 5CB0R48120
2 UpCaASMW/KBL81FLPGNBLSWS 5CB0R48058
2 UpCaASMW/KBL81FLPGNBLEURO 5CB0R48082
2 UpCaASMW/KBL81FLPGNBLCZE/SLK 5CB0R48083
2 UpCaASMW/KBL81FLPGNBLBUL 5CB0R48047
2 UpCaASMW/KBL81FLPGNBLHIN 5CB0R48104
2 UpCaASMW/KBL81FLPGNBLFRA/ARA 5CB0R48029
2 UpCaASMW/KBL81FLPGNBLUKR 5CB0R48099
2 UpCaASMW/KBL81FLIGNBLENG 5CB0R48140
2 UpCaASMW/KBL81FLIGNBLUKE 5CB0R48136
2 UpCaASMW/KBL81FLIGNBLITA 5CB0R48092
2 UpCaASMW/KBL81FLIGNBLSPA 5CB0R48064
2 UpCaASMW/KBL81FLIGNBLTUR 5CB0R48072
2 UpCaASMW/KBL81FLIGNBLTHAI 5CB0R48076
2 UpCaASMW/KBL81FLIGNBLPOR 5CB0R48133
2 UpCaASMW/KBL81FLIGNBLLASPA 5CB0R48086
2 UpCaASMW/KBL81FLIGNBLFRA/ENG 5CB0R48084
2 UpCaASMW/KBL81FLIGNBLKOR 5CB0R48034
2 UpCaASMW/KBL81FLIGNBLTC 5CB0R48046
2 UpCaASMW/KBL81FLIGNBLRUS 5CB0R48066
2 UpCaASMW/KBL81FLIGNBLFRA 5CB0R48101
2 UpCaASMW/KBL81FLIGNBLGER 5CB0R48089

75
Lenovo ideapad 330-15ICH/ideapad 330H-15ICH/ideapad 330L-15ICH/
ideapad 330E-15ICH/ideapad 330R-15ICH/ideapad 330-17ICH/ideapad 330H-17ICH/
ideapad 330L-17ICH/ideapad 330E-17ICH/ideapad 330R-17ICH
Table 4. Parts list—Overall (continued)
No. FRU FRU no. CRU
ID.
2 UpCaASMW/KBL81FLIGNBLARA 5CB0R48030
N
2 UpCaASMW/KBL81FLIGNBLBRL 5CB0R48137
2 UpCaASMW/KBL81FLIGNBLGRE 5CB0R48036
2 UpCaASMW/KBL81FLIGNBLHBW 5CB0R48100
2 UpCaASMW/KBL81FLIGNBLHUN 5CB0R48031
2 UpCaASMW/KBL81FLIGNBLNORDIC 5CB0R48071
2 UpCaASMW/KBL81FLIGNBLBEL 5CB0R48143
2 UpCaASMW/KBL81FLIGNBLILD 5CB0R48105
2 UpCaASMW/KBL81FLIGNBLSL 5CB0R48040
2 UpCaASMW/KBL81FLIGNBLSWS 5CB0R48057
2 UpCaASMW/KBL81FLIGNBLEURO 5CB0R48079
2 UpCaASMW/KBL81FLIGNBLCZE/SLK 5CB0R48043
2 UpCaASMW/KBL81FLIGNBLBUL 5CB0R48125
2 UpCaASMW/KBL81FLIGNBLHIN 5CB0R48060
2 UpCaASMW/KBL81FLIGNBLFRA/ARA 5CB0R48103
2 UpCaASMW/KBL81FLIGNBLUKR 5CB0R48059
2 UpCaASMW/KBL81FLPGBLENG 5CB0R48090
2 UpCaASMW/KBL81FLPGBLGRE 5CB0R48107
2 UpCaASMW/KBL81FLPGBLEURO 5CB0R48044
2 UpCaASMW/KBL81FLPGBLKOR 5CB0R48097
2 UpCaASMW/KBL81FLPGBLTC 5CB0R48110
2 UpCaASMW/KBL81FLPGBLRUS 5CB0R48048
2 UpCaASMW/KBL81FLPGBLARA 5CB0R48124
2 UpCaASMW/KBL81FLPGBLHBW 5CB0R48096
2 UpCaASMW/KBL81FLPGBLTHAI 5CB0R48108
2 UpCaASMW/KBL81FLPGBLHIN 5CB0R48135
2 UpCaASMW/KBL81FLPGBLUKE 5CB0R48035
2 UpCaASMW/KBL81FLPGBLITA 5CB0R48038
2 UpCaASMW/KBL81FLPGBLSPA 5CB0R48126
2 UpCaASMW/KBL81FLPGBLTUR 5CB0R48069
2 UpCaASMW/KBL81FLPGBLPOR 5CB0R48111
2 UpCaASMW/KBL81FLPGBLLASPA 5CB0R48146
2 UpCaASMW/KBL81FLPGBLFRA/ENG 5CB0R48106
2 UpCaASMW/KBL81FLPGBLNORDIC 5CB0R48075
2 UpCaASMW/KBL81FLPGBLFRA 5CB0R48080
2 UpCaASMW/KBL81FLPGBLGER 5CB0R48113
2 UpCaASMW/KBL81FLPGBLHUN 5CB0R48068
2 UpCaASMW/KBL81FLPGBLBEL 5CB0R48063
2 UpCaASMW/KBL81FLPGBLILD 5CB0R48085
2 UpCaASMW/KBL81FLPGBLSL 5CB0R48139
2 UpCaASMW/KBL81FLPGBLSWS 5CB0R48122
2 UpCaASMW/KBL81FLPGBLBUL 5CB0R48119
2 UpCaASMW/KBL81FLPGBLCZE/SLK 5CB0R48114
2 UpCaASMW/KBL81FLPGBLBRL 5CB0R48118
2 UpCaASMW/KBL81FLPGBLFRA/ARA 5CB0R48037
2 UpCaASMW/KBL81FLPGBLUKR 5CB0R48141
2 UpCaASMW/KBL81FLPGBLUSA 5CB0R48903

76
Hardware Maintenance Manual
Table 4. Parts list—Overall (continued)
No. FRU FRU no. CRU
ID.
2 UpCaASMW/KBL81FLIGBLENG 5CB0R48070
N
2 UpCaASMW/KBL81FLIGBLGRE 5CB0R48121
2 UpCaASMW/KBL81FLIGBLEURO 5CB0R48051
2 UpCaASMW/KBL81FLIGBLKOR 5CB0R48081
2 UpCaASMW/KBL81FLIGBLTC 5CB0R48042
2 UpCaASMW/KBL81FLIGBLRUS 5CB0R48132
2 UpCaASMW/KBL81FLIGBLARA 5CB0R48074
2 UpCaASMW/KBL81FLIGBLHBW 5CB0R48091
2 UpCaASMW/KBL81FLIGBLTHAI 5CB0R48055
2 UpCaASMW/KBL81FLIGBLHIN 5CB0R48130
2 UpCaASMW/KBL81FLIGBLUKE 5CB0R48050
2 UpCaASMW/KBL81FLIGBLITA 5CB0R48045
2 UpCaASMW/KBL81FLIGBLSPA 5CB0R48138
2 UpCaASMW/KBL81FLIGBLTUR 5CB0R48087
2 UpCaASMW/KBL81FLIGBLPOR 5CB0R48049
2 UpCaASMW/KBL81FLIGBLLASPA 5CB0R48102
2 UpCaASMW/KBL81FLIGBLFRA/ENG 5CB0R48129
2 UpCaASMW/KBL81FLIGBLNORDIC 5CB0R48039
2 UpCaASMW/KBL81FLIGBLFRA 5CB0R48077
2 UpCaASMW/KBL81FLIGBLGER 5CB0R48144
2 UpCaASMW/KBL81FLIGBLHUN 5CB0R48134
2 UpCaASMW/KBL81FLIGBLBEL 5CB0R48115
2 UpCaASMW/KBL81FLIGBLILD 5CB0R48147
2 UpCaASMW/KBL81FLIGBLSL 5CB0R48109
2 UpCaASMW/KBL81FLIGBLSWS 5CB0R48053
2 UpCaASMW/KBL81FLIGBLBUL 5CB0R48094
2 UpCaASMW/KBL81FLIGBLCZE/SLK 5CB0R48062
2 UpCaASMW/KBL81FLIGBLBRL 5CB0R48116
2 UpCaASMW/KBL81FLIGBLFRA/ARA 5CB0R48056
2 UpCaASMW/KBL81FLIGBLUKR 5CB0R48067
2 UpCaASMW/KBL81FLIGBLUSA 5CB0R48904
3 MBL81FKI58300HV4GD4GWIN 5B20R46737
3 MBL81FKI58300HV4GD4GNOK 5B20R46729
3 MBL81FKI58300HV2GNRWIN 5B20R46736
3 MBL81FKI58300HV2GNRNOK 5B20R46739
3 MBL81FKI58300HV4GNRWIN 5B20R46730
3 MBL81FKI58300HV4GNRNOK 5B20R46731
3 MBL81FKI58300HV2GD4GWIN 5B20R46734
3 MBL81FKI58300HV2GD4GNOK 5B20R46726
3 MBL81FKI78750HV4GNRWIN 5B20R46728
3 MBL81FKI78750HV4GNRNOK 5B20R46732
3 MBL81FKI78750HV2GD4GWIN 5B20R46725
3 MBL81FKI78750HV2GD4GNOK 5B20R46735
3 MBL81FKI78750HV4GD4GWIN 5B20R46740
3 MBL81FKI78750HV4GD4GNOK 5B20R46733
3 MBL81FKI78750HV2GNRWIN 5B20R46738
3 MBL81FKI78750HV2GNRNOK 5B20R46727

77
Lenovo ideapad 330-15ICH/ideapad 330H-15ICH/ideapad 330L-15ICH/
ideapad 330E-15ICH/ideapad 330R-15ICH/ideapad 330-17ICH/ideapad 330H-17ICH/
ideapad 330L-17ICH/ideapad 330E-17ICH/ideapad 330R-17ICH
Table 4. Parts list—Overall (continued)
No. FRU FRU no. CRU
ID.
4 ThermalmoduleDISL81FK 5H40R46700
N
5 RTCBATTERYL81FK 5B10R46704
6SPEAKERL81FL 5SB0R48152
7FANL81FK 5F10R46698
8 HDDFFCL81FL 5C10R48156
9 LOWERCASEL81FLGRAPHITEGREY 5CB0R48151
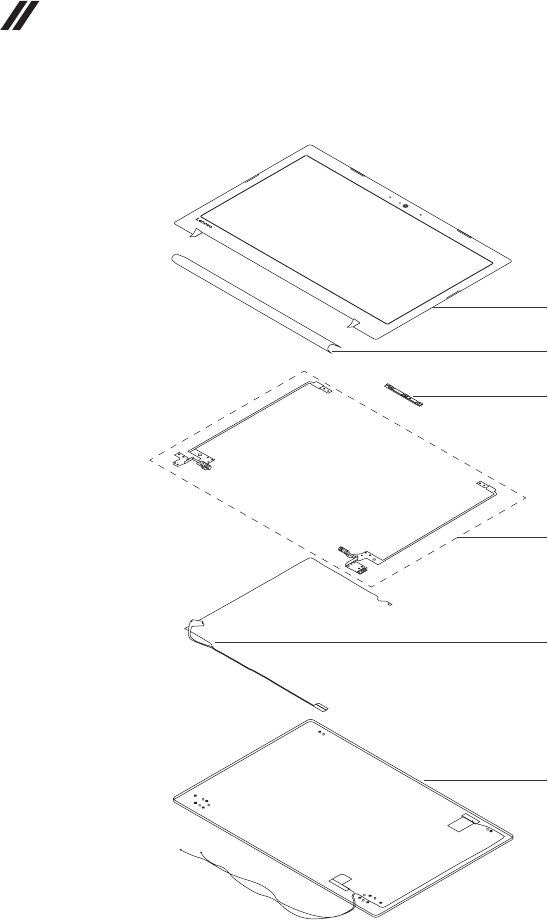
78
Hardware Maintenance Manual
LCD FRUs
ideapad 330-15ICH
1
2
6
4
3
5

79
Lenovo ideapad 330-15ICH/ideapad 330H-15ICH/ideapad 330L-15ICH/
ideapad 330E-15ICH/ideapad 330R-15ICH/ideapad 330-17ICH/ideapad 330H-17ICH/
ideapad 330L-17ICH/ideapad 330E-17ICH/ideapad 330R-17ICH
Table 5. Parts list—LCD FRUs
ideapad 330-15ICH
No. FRU FRU no. CRU
ID.
1 LCDBEZELASSYL81D215TBLACK 5B30R42338
N
2 HINGECAPL81DC15TMNBU 5CB0R16699
2 HINGECAPL81DC15TCHOC 5CB0R16636
2 HINGECAP15TL80XLBWPT 5CB0N86453
2 HINGECAP15TL80XLPGPT 5CB0N86380
2 HINGECAP15TL80XLOBPT 5CB0N86462
3 CAMERAL81FK720PW/2MIC 5C20R46706
4 HINGELR15TL80XL 5H50N86361
5 EDPCABLEL81FK 5C10R48796
6LCDCOVERL81FKWHITEW/ANTEW/EDP 5CB0R48727
6LCDCOVERL81FKPGW/ANTEW/EDP 5CB0R48725
6LCDCOVERL81FKOBW/ANTEW/EDP 5CB0R48728
6LCDCOVERL81FKMNBUW/ANTEW/EDP 5CB0R48724
6LCDCOVERL81FKCHOCW/ANTEW/EDP 5CB0R48726

80
Hardware Maintenance Manual
ideapad 330-17ICH
1
2
6
5
4
3

81
Lenovo ideapad 330-15ICH/ideapad 330H-15ICH/ideapad 330L-15ICH/
ideapad 330E-15ICH/ideapad 330R-15ICH/ideapad 330-17ICH/ideapad 330H-17ICH/
ideapad 330L-17ICH/ideapad 330E-17ICH/ideapad 330R-17ICH
Table 5. Parts list—LCD FRUs
ideapad 330-17ICH
No. FRU FRU no. CRU
ID.
1 LCDBEZELL80XM 5B30N91539
N
2 HINGECAPL80XMOB 5CB0N91547
2 HINGECAPL80XMPG 5CB0N91542
3 CAMERAL81FL720PW/MIC 5C20R47771
4 HINGEL+RL81FL 5H50R48149
5 EDPCABLEL81FL 5C10R48150
6LCDCOVERL81FLOBW/ANTEW/EDP 5CB0R48154
6LCDCOVERL81FLPGW/ANTEW/EDP 5CB0R48153
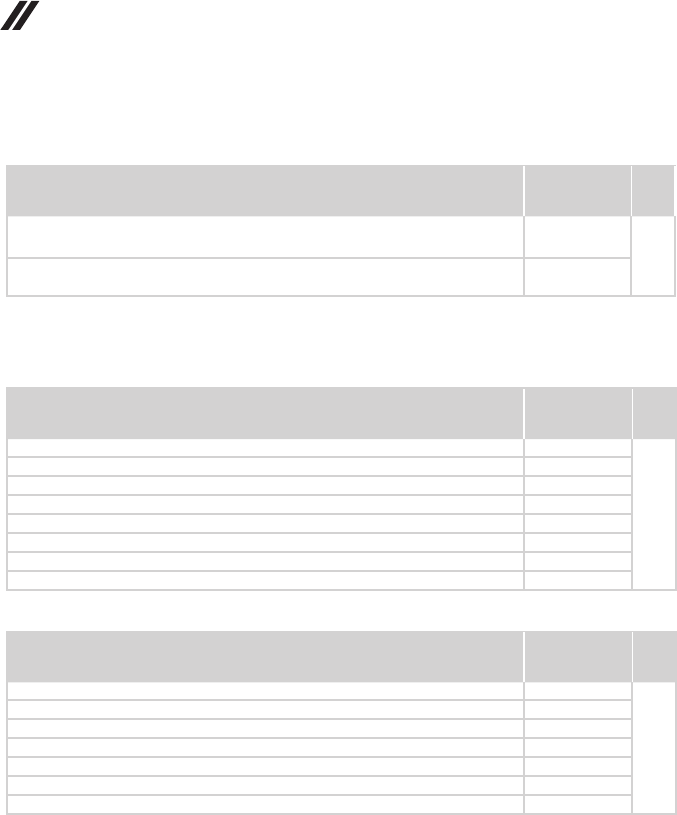
82
Hardware Maintenance Manual
Miscellaneous parts
Table 6. Parts list—Miscellaneous parts
ideapad 330-15ICH/ideapad 330-17ICH
FRU FRU no. CRU
ID.
Systemmiscellaneousparts:
N
• (a)HDDBracketL81FK 5B40R46707
Note:Lettersinparenthesesarereferencestotheexplodedviewin“Overall”on
page66and“LCDFRUs”onpage78.
Screws
Table 7. Parts list—screws
ideapad 330-15ICH
FRU P/N CRU
ID.
SCREWL80T6MM2.5D2.5LK8.0DNI 5S10L45749
N
SCREWLMM1.98D3LK4.5DNINL0.4T 5S10K25435
AILZAScrewMM3.0D3.0LK4.9D 90203986
SCREWL80XKMM2.5D7.0LK4.5D0.8TZKNL 5S10N82242
ScrewLY700-15ACZHingebase 5S10K26861
ACLU1ScrewD-C/D-KB/ODD-D-MB-KB/FAN 90205118
SCREWL80XKMM2.5D7.0LK4.5D0.8TNINL 5S10N82325
ScrewL81A82.7LK4.2D0.3TZK 5S10P19039
ideapad 330-17ICH
FRU P/N CRU
ID.
SCREWL80T6MM2.5D2.5LK8.0DNI 5S10L45749
N
ScrewLY700-15ACZHingebase 5S10K26861
ACLU1ScrewD-C/D-KB/ODD-D-MB-KB/FAN 90205118
SCREWMM2.5D7.0LKTZKL80QH 5S10K61894
AILZAScrewMM3.0D3.0LK4.9D 90203986
ScrewLY700-17ISK2D 5S10K37602
ScrewL81A82.7LK4.2D0.3TZK 5S10P19039

83
Notices
Notices
Lenovomaynotoffertheproducts,services,or featuresdiscussedinthis
documentinallcountries. Consultyourlocal Lenovorepresentativefor
informationontheproductsand servicescurrentlyavailable inyourarea.Any
referencetoaLenovoproduct,program,orserviceisnotintendedtostateor
implythatonlythat Lenovoproduct,program, orservicemaybeused.Any
functionallyequivalent product,program,or servicethatdoes notinfringe
anyLenovo intellectualpropertyrightmay beusedinstead. However,it isthe
user’sresponsibilitytoevaluateand verifytheoperationofanyotherproduct,
program,orservice.
Lenovomayhavepatentsorpendingpatentapplicationscoveringsubjectmatter
describedinthisdocument.Thefurnishing ofthisdocument doesnotgive you
anylicensetothesepatents.
LENOVOGROUPLTD.PROVIDESTHISPUBLICATION“ASIS”
WITHOUTWARRANTYOFANYKIND,EITHEREXPRESS OR IMPLIED,
INCLUDING,BUTNOTLIMITEDTO,THE IMPLIEDWARRANTIESOFNON-
INFRINGEMENT,MERCHANTABILITYORFITNESSFORAPARTICULAR
PURPOSE.Somejurisdictionsdo notallowdisclaimerofexpress orimplied
warrantiesincertaintransactions,therefore,thisstatementmaynotapplytoyou.
Thisinformation couldincludetechnicalinaccuracies ortypographicalerrors.
Changesareperiodicallymadetotheinformationherein;thesechanges
willbeincorporatedinneweditionsofthe publication.Lenovomay make
improvementsand/or changesinthe product(s)and/orthe program(s)
describedinthispublicationatanytimewithoutnotice.
Theproductsdescribedinthisdocumentarenot intendedforuse in
implantationorotherlifesupportapplications wheremalfunctionmayresultin
injuryordeathtopersons.Theinformationcontainedinthisdocumentdoesnot
affectorchange Lenovoproductspecications orwarranties.Nothing inthis
documentshalloperateasanexpressorimpliedlicenseorindemnityunderthe
intellectualpropertyrightsofLenovoor thirdparties.All informationcontained
inthisdocumentwasobtainedinspecicenvironmentsandispresentedasan
illustration.Theresultobtainedinotheroperatingenvironmentsmayvary.
Lenovomayuseor distributeanyof theinformationyousupplyinanywayit
believesappropriatewithoutincurringanyobligationtoyou.
Anyreferencesinthispublicationto non-LenovoWebsitesare providedfor
convenienceonlyanddonotinanymannerserveasanendorsementofthose
Websites.Thematerials atthoseWebsitesare notpartof thematerialsfor
thisLenovoproduct,anduseofthoseWebsitesisatyourownrisk.

84
Hardware Maintenance Manual
Anyperformance datacontainedhereinwas determinedina controlled
environment.Therefore,theresult obtainedinotheroperating environments
mayvarysignificantly.Some measurementsmayhavebeen madeon
development-levelsystemsandthereisnoguaranteethatthesemeasurements
willbethesame ongenerallyavailablesystems.Furthermore,some
measurementsmayhavebeenestimatedthroughextrapolation.Actualresults
mayvary.Usersofthisdocumentshould verifytheapplicable datafortheir
specicenvironment.
Trademarks
ThefollowingtermsaretrademarksorregisteredtrademarksofLenovointhe
UnitedStates,othercountries,orboth.
Lenovo
MicrosoftandWindowsare trademarksofMicrosoftCorporationintheUnited
States,othercountries,orboth.
Othercompany,products,or servicenamesmay betrademarksor service
marksofothers.
