Lenovo A5500F Portable Tablet Computer User Manual
Lenovo (Shanghai) Electronics Technology Co., Ltd Portable Tablet Computer
Lenovo >
Contents
- 1. User Manual (statements)
- 2. User Manual
User Manual
Lenovo TAB A8-50
Quick Start Guide v1.0
Read this guide carefully before using your tablet.
All information labeled with * in this guide refers only to the
WLAN + 3G model (Lenovo A5500-H, Lenovo A5500-HV).
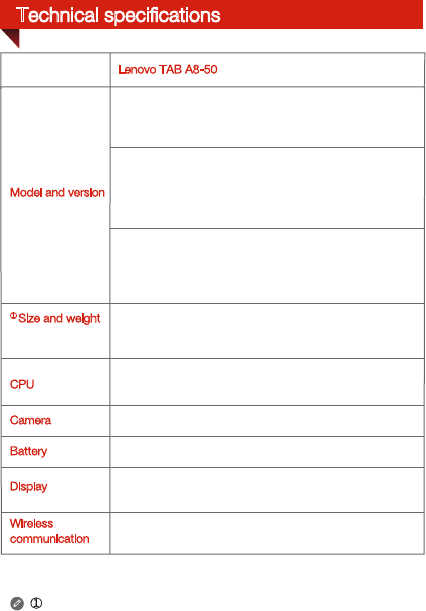
Technical specifications
① Actual product may differ.
Type: CMOS Pixels: 5.0 MP (back) + 2.0 MP (front)
*Version: WLAN + 3G
Bluetooth 4.0 WLAN 802.11 b/g/n GPS
*WCDMA, GSM
4200 mAh
Wireless
communication
Display
Battery
CPU
Camera
Lenovo TAB A8-50
60056
60055
Model and version
Version: WLAN
Height: 217 mm Width: 136 mm Depth: 8.9 mm
Weight: 340g
MTK 8121 Quad Core 1.3 GHz
*MTK 8382 Quad Core 1.3 GHz
*Version: WLAN + 3G
60057
(Data only)
(Voice)
*Model: Lenovo A5500-HV;
*Model: Lenovo A5500-H;
Model: Lenovo A5500-F;
① Size and weight
Size: 8 inches (diagonal) Screen: Multi-touch display
Resolution: 1280 × 800 LCD type: IPS
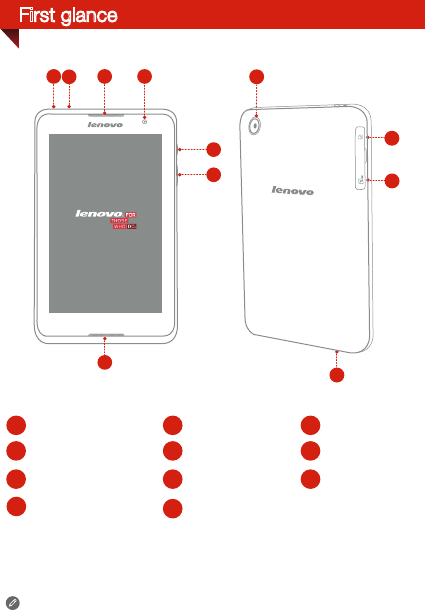
First glance
Back camera
Micro USB
Front camera On/Off button
Earphone jack
5
10
*Receiver / Speaker
2
6
3
78
11
9
4
1
Volume key
microSD card slot
*Micro SIM card slot Microphone
* The WLAN model ( Lenovo A5500-F ) does not have a Micro SIM card
slot.
5
3
2
14
6
8
10
11
7
9
Speaker
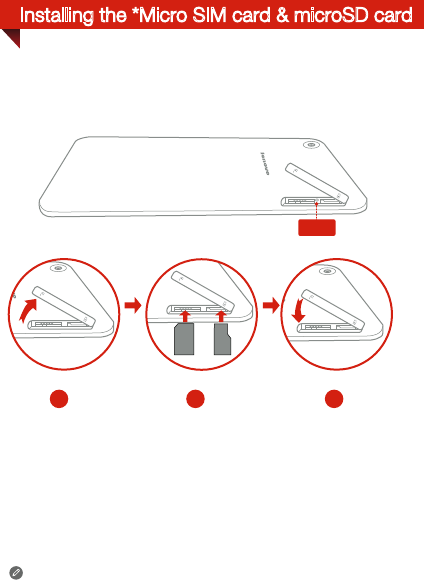
Installing the *Micro SIM card & microSD card
1 2 3
SIM
SIM
microSD
SIM
Step 1. Open the microSD card slot cover as shown.
Step 2. Place the micro SIM card into the micro SIM card slot and the
microSD card into the microSD card slot.
Step 3. Carefully replace the slot cover.
You can use cellular services with the WLAN + 3G model (Lenovo
A5500-H, Lenovo A5500-HV) by inserting the Micro SIM card provided by
your carrier services. Install the Micro SIM card as shown.
Only Micro SIM cards work with your tablet and Micro SIM cards are for
mobile data only.
Do not insert or remove the Micro SIM card while your tablet is turned on.
Doing so may permanently damage your Micro SIM card or tablet.
SIM
SIM
Reset
For more information about battery safety, see the Important
Product Information Guide.
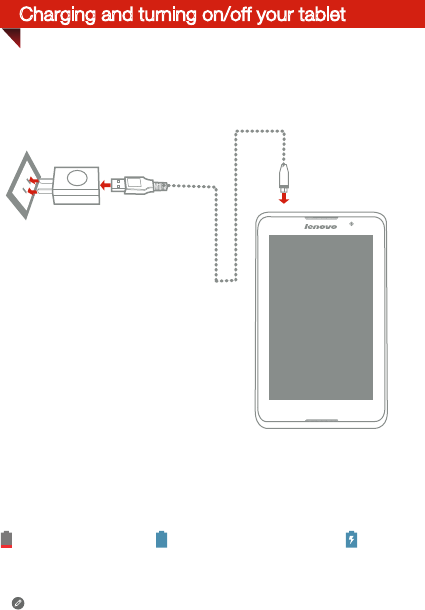
Charging and turning on/off your tablet
Method Connect your tablet to a power outlet using the included
cable and USB power adapter.
Low battery Fully charged Charging
Before using your tablet, you might need to charge the battery.
Charge the battery as shown.
8306LVP502W
Printed in China
Learn more
Legal notices
Lenovo and the Lenovo logo are trademarks of Lenovo in the United States,
other countries, or both.
Other company, product, or service names may be trademarks or service
marks of others.
*Manufactured under license from Dolby Laboratories. Dolby and the
double-D symbol are trademarks of Dolby Laboratories.
First Edition (January 2014) © Copyright Lenovo 2014.
For other useful manuals, please access “User Guide” from the Browser
favorites in your tablet.
For “Regulatory Notices” , please go to http://support.lenovo.com/.
Getting support
For support on network service and billing, please contact your wireless
network operator. For instructions on how to use your tablet, go to
http://support.lenovo.com/.
Radio and Telecommunications Terminal Equipment Directive
This product is in compliance with the essential requirements and other
relevant provisions of the Radio and Telecommunications Terminal
Equipment Directive, 1999/5/EC.
European Union conformity