Lenovo E41 80 Hmm En User Manual Hardware Maintenance Laptop (Lenovo)
2015-10-29
User Manual: Lenovo E41-80 Hmm En Hardware Maintenance Manual - Lenovo E41-80 Laptop E41-80 Laptop (Lenovo) E41-80 Laptop (Lenovo)
Open the PDF directly: View PDF ![]() .
.
Page Count: 90
- About this manual
- Chapter 1. Safety information
- Chapter 2. Important service information
- Chapter 3. General checkout
- Chapter 4. Related service information
- Chapter 5. Passwords
- Chapter 6. Status indicators
- Chapter 7. Function keys
- Chapter 8. Locations
- Chapter 9. FRU replacement notices
- Chapter 10. Removing or replacing a FRU
- General guidelines
- 1010 External battery pack
- 1020 Keyboard
- 1030 Optical disk drive
- 1040 Base cover assembly
- 1050 Hard disk drive or solid-state hybrid drive
- 1060 Wireless-LAN /Bluetooth card
- 1070 Memory module
- 1080 Upper case
- 1090 Audio board, audio board cable, power board, touch pad board cable, finger printer board, LED board and ODD switch board
- 1100 System board
- 1110 Battery Board, Thermal fan assembly and Heat Sink assembly
- 1120 Speaker assembly, docking LED lens and docking bracket
- 1130 LCD unit, docking board, docking cable and DC-in cable
- 1140 LCD front bezel
- 1150 LCD panel, EDP cable and hinges
- 1160 Integrated camera and LCD cable
- 1170 Antenna assembly and LCD cover
- Appendix A. Notices
- Appendix B. Abbreviation table

HardwareMaintenanceManual
LenovoE41–80

Note:Beforeusingthisinformationandtheproductitsupports,besuretoreadthegeneralinformation
underAppendixA“Notices”onpage79.
FirstEdition(September2015)
©CopyrightLenovo2015.
LIMITEDANDRESTRICTEDRIGHTSNOTICE:IfdataorsoftwareisdeliveredpursuantaGeneralServicesAdministration
“GSA”contract,use,reproduction,ordisclosureissubjecttorestrictionssetforthinContractNo.GS-35F-05925.

Contents
Aboutthismanual...........iii
Chapter1.Safetyinformation.....1
Generalsafety...............1
Electricalsafety..............1
Safetyinspectionguide...........2
Handlingdevicesthataresensitivetoelectrostatic
discharge.................3
Groundingrequirements...........4
Safetynotices(multilingualtranslations).....4
Chapter2.Importantservice
information..............19
StrategyforreplacingFRUs.........19
Strategyforreplacingaharddiskdriveora
solid-statedrive............19
Importantnoticeforreplacingasystem
board................20
FRUidentification............20
Chapter3.Generalcheckout.....21
Whattodofirst..............21
Powersystemcheckout...........22
Checkingtheacpoweradapter......22
Checkingtheexternalbatterypackandthe
operationalcharging..........23
Chapter4.Relatedservice
information..............25
RestoringthefactorycontentsbyusingOneKey
Recovery.................25
Powermanagement............25
Screenblankmode(fortheWindows7
operatingsystemonly)..........25
Sleepmode..............25
Hibernationmode...........26
Chapter5.Passwords.........27
Power-onpassword............27
Harddiskpassword............27
Administratorpassword...........27
Chapter6.Statusindicators.....29
Chapter7.Functionkeys.......31
Chapter8.Locations.........33
LocatingFRUsandCRUs..........33
MajorFRUsandCRUs..........34
LCDFRUs..............38
MiscellaneouspartsandotherFRUs....39
Chapter9.FRUreplacement
notices................47
Screwnotices...............47
Chapter10.Removingorreplacinga
FRU..................49
Generalguidelines.............49
1010Externalbatterypack..........50
1020Keyboard..............50
1030Opticaldiskdrive...........52
1040Basecoverassembly..........54
1050Harddiskdriveorsolid-statehybriddrive..56
1060Wireless-LAN/Bluetoothcard......57
1070Memorymodule............58
1080Uppercase..............59
1090Audioboard,audioboardcable,power
board,touchpadboardcable,fingerprinterboard,
LEDboardandODDswitchboard.......61
1100Systemboard.............64
1110BatteryBoard,Thermalfanassemblyand
HeatSinkassembly.............67
1120Speakerassembly,dockingLEDlensand
dockingbracket..............70
1130LCDunit,dockingboard,dockingcableand
DC-incable................71
1140LCDfrontbezel............74
1150LCDpanel,EDPcableandhinges.....74
1160IntegratedcameraandLCDcable.....76
1170AntennaassemblyandLCDcover.....77
AppendixA.Notices..........79
Electronicemissionsnotices.........80
Trademarks................80
AppendixB.Abbreviationtable....81
©CopyrightLenovo2015i

iiHardwareMaintenanceManual

Aboutthismanual
ThismanualcontainsserviceandreferenceinformationforthefollowingLenovo®products.
LenovoE41–80MachineType(MT)80QAand80Q9
Usethismanualalongwiththeadvanceddiagnosticteststotroubleshootproblems.
Important:ThismanualisintendedonlyfortrainedservicetechnicianswhoarefamiliarwithLenovo
products.Usethismanualalongwiththeadvanceddiagnosticteststotroubleshootproblemseffectively.
BeforeservicingaLenovoproduct,besuretoreadalltheinformationunderChapter1“Safetyinformation”
onpage1andChapter2“Importantserviceinformation”onpage19.
©CopyrightLenovo2015iii

ivHardwareMaintenanceManual

Chapter1.Safetyinformation
Thischapterpresentsfollowingsafetyinformationthatyouneedtobefamiliarwithbeforeyouservicea
Lenovonotebookcomputer.
•“Generalsafety”onpage1
•“Electricalsafety”onpage1
•“Safetyinspectionguide”onpage2
•“Handlingdevicesthataresensitivetoelectrostaticdischarge”onpage3
•“Groundingrequirements”onpage4
•“Safetynotices(multilingualtranslations)”onpage4
Generalsafety
Followtheserulestoensuregeneralsafety:
•Observegoodhousekeepingintheareaofthemachinesduringandaftermaintenance.
•Whenliftinganyheavyobject:
1.Makesurethatyoucanstandsafelywithoutslipping.
2.Distributetheweightoftheobjectequallybetweenyourfeet.
3.Useaslowliftingforce.Nevermovesuddenlyortwistwhenyouattempttolift.
4.Liftbystandingorbypushingupwithyourlegmuscles;thisactionremovesthestrainfromthe
musclesinyourback.Donotattempttoliftanyobjectthatweighsmorethan16kg(35lb)orthat
youthinkistooheavyforyou.
•Donotperformanyactionthatcauseshazardstothecustomer,orthatmakestheequipmentunsafe.
•Beforeyoustartthemachine,makesurethatotherservicetechniciansandthecustomer'spersonnelare
notinahazardousposition.
•Placeremovedcoversandotherpartsinasafeplace,awayfromallpersonnel,whileyouareservicing
themachine.
•Keepyourtoolcaseawayfromwalkareassothatotherpeoplewillnottripoverit.
•Donotwearlooseclothingthatcanbetrappedinthemovingpartsofamachine.Makesurethatyour
sleevesarefastenedorrolledupaboveyourelbows.Ifyourhairislong,fastenit.
•Inserttheendsofyournecktieorscarfinsideclothingorfastenitwithanon-conductiveclip,about8
centimeters(3inches)fromtheend.
•Donotwearjewelry,chains,metal-frameeyeglasses,ormetalfastenersforyourclothing.
Attention:Metalobjectsaregoodelectricalconductors.
•Wearsafetyglasseswhenyouarehammering,drilling,soldering,cuttingwire,attachingsprings,using
solvents,orworkinginanyotherconditionsthatmightbehazardoustoyoureyes.
•Afterservice,reinstallallsafetyshields,guards,labels,andgroundwires.Replaceanysafetydevice
thatiswornordefective.
•Reinstallallcoverscorrectlybeforereturningthemachinetothecustomer.
•Fanlouversonthemachinehelptopreventoverheatingofinternalcomponents.Donotobstructfan
louversorcoverthemwithlabelsorstickers.
Electricalsafety
Observethefollowingruleswhenworkingonelectricalequipment.
Important:Useonlyapprovedtoolsandtestequipment.Somehandtoolshavehandlescoveredwithasoft
materialthatdoesnotinsulateyouwhenworkingwithliveelectricalcurrents.Manycustomershave,near
theirequipment,rubberfloormatsthatcontainsmallconductivefiberstodecreaseelectrostaticdischarges.
Donotusethistypeofmattoprotectyourselffromelectricalshock.
©CopyrightLenovo20151

•Findtheroomemergencypower-off(EPO)switch,disconnectingswitch,orelectricaloutlet.Ifanelectrical
accidentoccurs,youcanthenoperatetheswitchorunplugthepowercordquickly.
•Donotworkaloneunderhazardousconditionsornearequipmentthathashazardousvoltages.
•Disconnectallpowerbefore:
–Performingamechanicalinspection
–Workingnearpowersupplies
–Removingorinstallingmainunits
•Beforeyoustarttoworkonthemachine,unplugthepowercord.Ifyoucannotunplugit,askthecustomer
topower-offthewallboxthatsuppliespowertothemachine,andtolockthewallboxintheoffposition.
•Ifyouneedtoworkonamachinethathasexposedelectricalcircuits,observethefollowingprecautions:
–Ensurethatanotherperson,familiarwiththepower-offcontrols,isnearyou.
Attention:Anotherpersonmustbetheretoswitchoffthepower,ifnecessary.
–Useonlyonehandwhenworkingwithpowered-onelectricalequipment;keeptheotherhandinyour
pocketorbehindyourback.
Attention:Anelectricalshockcanoccuronlywhenthereisacompletecircuit.Byobservingtheabove
rule,youmaypreventacurrentfrompassingthroughyourbody.
–Whenusingtesters,setthecontrolscorrectlyandusetheapprovedprobeleadsandaccessoriesfor
thattester.
–Standonsuitablerubbermats(obtainedlocally,ifnecessary)toinsulateyoufromgroundssuchas
metalfloorstripsandmachineframes.
Observethespecialsafetyprecautionswhenyouworkwithveryhighvoltages;Instructionsforthese
precautionsareinthesafetysectionsofmaintenanceinformation.Useextremecarewhenmeasuring
highvoltages.
•Regularlyinspectandmaintainyourelectricalhandtoolsforsafeoperationalcondition.
•Donotusewornorbrokentoolsandtesters.
•Neverassumethatpowerhasbeendisconnectedfromacircuit.First,checkthatithasbeenpoweredoff.
•Alwayslookcarefullyforpossiblehazardsinyourworkarea.Examplesofthesehazardsaremoistfloors,
non-groundedpowerextensioncables,powersurges,andmissingsafetygrounds.
•Donottouchliveelectricalcircuitswiththereflectivesurfaceofaplasticdentalmirror.Thesurfaceis
conductive;suchtouchingcancausepersonalinjuryandmachinedamage.
•Donotservicethefollowingpartswiththepoweronwhentheyareremovedfromtheirnormaloperating
placesinamachine:
–Powersupplyunits
–Pumps
–Blowersandfans
–Motorgenerators
–Similarunitsaslistedabove
Thispracticeensurescorrectgroundingoftheunits.
•Ifanelectricalaccidentoccurs:
–Usecaution;donotbecomeavictimyourself.
–Switchoffpower.
–Sendanotherpersontogetmedicalaid.
Safetyinspectionguide
Thepurposeofthisinspectionguideistoassistyouinidentifyingpotentiallyunsafeconditions.Aseach
machinewasdesignedandbuilt,requiredsafetyitemswereinstalledtoprotectusersandservicetechnicians
frominjury.Thisguideaddressesonlythoseitems.Y oushouldusegoodjudgmenttoidentifypotential
safetyhazardsduetoattachmentofnon-Lenovofeaturesoroptionsnotcoveredbythisinspectionguide.
Ifanyunsafeconditionsarepresent,youmustdeterminehowserioustheapparenthazardcouldbeand
whetheryoucancontinuewithoutfirstcorrectingtheproblem.
2HardwareMaintenanceManual

Considertheseconditionsandthesafetyhazardstheypresent:
•Electricalhazards,especiallyprimarypower(primaryvoltageontheframecancauseseriousorfatal
electricalshock)
•Explosivehazards,suchasadamagedcathoderaytube(CRT)faceorabulgingcapacitor
•Mechanicalhazards,suchaslooseormissinghardware
Todeterminewhetherthereareanypotentiallyunsafeconditions,usethefollowingchecklistatthebeginning
ofeveryservicetask.Beginthecheckswiththepoweroff,andthepowercorddisconnected.
Checklist:
1.Checkexteriorcoversfordamage(loose,broken,orsharpedges).
2.Poweroffthecomputer.Disconnectthepowercord.
3.Checkthepowercordfor:
a.Athird-wiregroundconnectoringoodcondition.Useametertomeasurethird-wireground
continuityfor0.1ohmorlessbetweentheexternalgroundpinandtheframeground.
b.Thepowercordshouldbetheauthorizedtypespecifiedforyourcomputer.
c.Insulationmustnotbefrayedorworn.
4.Checkforcrackedorbulgingbatteries.
5.Removethecover.
6.Checkforanyobviousnon-Lenovoalterations.Usegoodjudgmentastothesafetyofanynon-Lenovo
alterations.
7.Checkinsidetheunitforanyobviousunsafeconditions,suchasmetalfilings,contamination,wateror
otherliquids,orsignsoffireorsmokedamage.
8.Checkforworn,frayed,orpinchedcables.
9.Checkthatthepower-supplycoverfasteners(screwsorrivets)havenotbeenremovedortamperedwith.
Handlingdevicesthataresensitivetoelectrostaticdischarge
Anycomputerpartcontainingtransistorsorintegratedcircuits(ICs)shouldbeconsideredsensitiveto
electrostaticdischarge(ESD).ESDdamagecanoccurwhenthereisadifferenceinchargebetweenobjects.
ProtectagainstESDdamagebyequalizingthechargesothatthemachine,thepart,theworkmat,andthe
personhandlingthepartareallatthesamecharge.
Notes:
1.Useproduct-specificESDprocedureswhentheyexceedtherequirementsnotedhere.
2.MakesurethattheESDprotectivedevicesyouusehavebeencertified(ISO9000)asfullyeffective.
WhenhandlingESD-sensitiveparts:
•Keepthepartsinprotectivepackagesuntiltheyareinsertedintotheproduct.
•Avoidcontactwithotherpeople.
•Wearagroundedwriststrapagainstyourskintoeliminatestaticonyourbody.
•Preventthepartfromtouchingyourclothing.Mostclothingisinsulativeandretainsachargeeven
whenyouarewearingawriststrap.
•Useagroundedworkmattoprovideastatic-freeworksurface.Thematisespeciallyusefulwhen
handlingESD-sensitivedevices.
•Selectagroundingsystem,suchasthoselistedbelow,toprovideprotectionthatmeetsthespecific
servicerequirement.
Note:TheuseofagroundingsystemtoguardagainstESDdamageisdesirablebutnotnecessary.
–AttachtheESDgroundcliptoanyframeground,groundbraid,orgreen-wireground.
–Whenworkingonadouble-insulatedorbattery-operatedsystem,useanESDcommongroundor
referencepoint.Y oucanusecoaxorconnector-outsideshellsonthesesystems.
Chapter1.Safetyinformation3
–Usetheroundgroundprongoftheacplugonac-operatedcomputers.
Groundingrequirements
Electricalgroundingofthecomputerisrequiredforoperatorsafetyandcorrectsystemfunction.Proper
groundingoftheelectricaloutletcanbeverifiedbyacertifiedelectrician.
Safetynotices(multilingualtranslations)
Thesafetynoticesinthissectionareprovidedinthefollowinglanguages:
•English
•Arabic
•BrazilianPortuguese
•French
•German
•Hebrew
•Japanese
•Korean
•Spanish
•TraditionalChinese
DANGER
DANGER
DANGER
4HardwareMaintenanceManual
6HardwareMaintenanceManual
PERIGO
PERIGO
PERIGO
PERIGO
DANGER
8HardwareMaintenanceManual
DANGER
VORSICHT
VORSICHT
VORSICHT
VORSICHT
10HardwareMaintenanceManual
12HardwareMaintenanceManual
14HardwareMaintenanceManual

16HardwareMaintenanceManual
18HardwareMaintenanceManual

Chapter2.Importantserviceinformation
Thischapterintroducesfollowingimportantserviceinformationthatappliestoallmachinetypessupported
bythismanual:
•“StrategyforreplacingFRUs”onpage19
–“Strategyforreplacingaharddiskdriveorasolid-statedrive”onpage19
–“Importantnoticeforreplacingasystemboard”onpage20
–“FRUidentification”onpage20
Important:
•IfthecomputerisequippedwithbothaharddiskdriveandanM.2solid-statedrive,donotusetheM.2
solid-statedriveasabootabledevice.TheM.2solid-statedriveisdesignedanddevelopedfor“cache”
functionpurposeonly.
•AdvisecustomerstocontacttheLenovo®CustomerSupportCenteriftheyneedanyassistancein
obtainingorinstallinganysoftwarefixes,drivers,andUnifiedExtensibleFirmwareInterfacebasic
inputoutputsystem(UEFIBIOS)downloads.TelephonenumbersforLenovoSupportareavailableat:
http://www.lenovo.com/support/phone
•SystemDisassembly/ReassemblyvideosthatshowtheFRUremovalsorreplacementsfortheLenovo
authorizedservicetechniciansareavailableinthefollowingsupportsite:
http://www.lenovoservicetraining.com/ion/
StrategyforreplacingFRUs
Beforereplacingparts:
Ensurethatallsoftwarefixes,drivers,andUEFIBIOSdownloadsareinstalledbeforereplacinganyFRUs
listedinthismanual.
Afterasystemboardisreplaced,ensurethatthelatestUEFIBIOSisloadedtothesystemboardbefore
completingtheserviceaction.
Todownloadsoftwarefixes,drivers,andUEFIBIOS,goto
http://support.lenovo.com/en_US/downloads/detail.page?LegacyDocID=DRVR-MATRIXandfollow
theinstructionsonthescreen.
UsethefollowingstrategytopreventunnecessaryexpenseforreplacingandservicingFRUs:
•IfyouareinstructedtoreplaceaFRUbutthereplacementdoesnotcorrecttheproblem,reinstallthe
originalFRUbeforeyoucontinue.
•Somecomputershavebothaprocessorboardandasystemboard.Ifyouareinstructedtoreplaceeither
theprocessorboardorthesystemboard,andreplacingoneofthemdoesnotcorrecttheproblem,
reinstallthatboard,andthenreplacetheotherone.
•IfanadapteroradeviceconsistsofmorethanoneFRU,anyoftheFRUsmightbethecauseoftheerror.
Beforereplacingtheadapterordevice,removetheFRUs,onebyone,toseeifthesymptomschange.
ReplaceonlytheFRUthatchangedthesymptoms.
Strategyforreplacingaharddiskdriveorasolid-statedrive
Alwaystrytorunalow-levelformatbeforereplacingaharddiskdriveorasolid-statedrive.Thiswillcause
allcustomerdataonthedrivetobelost.Besurethatthecustomerhasacurrentbackupofthedata
beforedoingthistask.
©CopyrightLenovo201519

Attention:Thedrivestartupsequenceinthecomputeryouareservicingmayhavebeenchanged.Be
extremelycarefulduringwriteoperationssuchascopying,saving,orformatting.Ifyouselectanincorrect
drive,dataorprogramscanbeoverwritten.
Importantnoticeforreplacingasystemboard
Somecomponentsmountedonasystemboardareverysensitive.Improperhandlingofasystemboardcan
causedamagetothosecomponents,andmaycauseasystemmalfunction.
Attention:Whenhandlingasystemboard:
•Donotdropasystemboardorapplyanyexcessiveforcetoit.
•Avoidroughhandlingofanykind.
•Avoidbendingasystemboardandhardpushingtopreventcrackingateachball-grid-array(BGA)chipset.
FRUidentification
UseLenovoeSupporttoidentifymajorFRUs,FRUpartnumbers,andFRUdescriptionsforaproductatan
MT-serialnumberlevel.ExamplesofmajorFRUsareharddiskdrive,systemboard,liquidcrystaldisplay
(LCD),andmemorymodule.
ToidentifythemajorFRUsforaproduct,dothefollowing:
1.Goto:
http://www.lenovo.com/support
2.ClickWarranty&Services.
3.ClickCheckWarrantyStatus.
4.OntheWarrantyStatusLookuppage,clickPartsLookup.
5.Typeyourmachinetypeandserialnumber,andthenclickSubmit.
eSupportalsocanbeusedtoviewthegeneralFRUlistforaproduct.
TogetthegeneralFRUlistforaproduct,dothefollowing:
1.Goto:
http://www.lenovo.com/support
2.ClickParts.
3.Followtheinstructionsonthescreentoselectproduct.
4.ClickProductsandPartsDetail.
5.OnthePRODUCTANDPARTSDETAILpage,clickthePartsDetailtabtoviewtheFRUlist.
Note:TheFRUlistisagenerallistofcomponentsanddoesnotcontainspecificmodelinformation.
20HardwareMaintenanceManual

Chapter3.Generalcheckout
Thischapterintroducesfollowinginformation:
•“Whattodofirst”onpage21
•“Powersystemcheckout”onpage22
Beforeyougotothecheckoutguide,besuretoreadthefollowingimportantnotes.
Importantnotes:
•Onlycertifiedtrainedpersonnelshouldservicethecomputer.
•BeforereplacinganyFRU,readtheentirepageonremovingandreplacingFRUs.
•WhenyoureplaceFRUs,carefullyremoveandretainscrewssotheycanbereused.
•Beextremelycarefulduringsuchwriteoperationsascopying,saving,orformatting.Thesequence
ofthedrivesinthecomputerthatyouareservicingmighthavebeenaltered.Ifyouselectanincorrect
drive,dataorprogramsmightbeoverwritten.
•ReplaceaFRUonlywithanotherFRUofthecorrectmodel.WhenyoureplaceaFRU,ensurethatthe
modelofthemachineandtheFRUpartnumberarecorrectbyreferringtotheFRUpartslist.
•AFRUshouldnotbereplacedbecauseofasingle,unreproduciblefailure.Singlefailurescanoccur
foravarietyofreasonsthathavenothingtodowithahardwaredefect,suchascosmicradiation,
electrostaticdischarge,orsoftwareerrors.ConsiderreplacingaFRUonlywhenaproblemrecurs.Ifyou
suspectthataFRUisdefective,cleartheerrorlogandrunthetestagain.Iftheerrordoesnotrecur,do
notreplacetheFRU.
•BecarefulnottoreplaceanondefectiveFRU.
Whattodofirst
WhenyoureturnaFRU,youmustincludethefollowinginformationinthepartsexchangeformorparts
returnformthatyouattachtoit:
1.Nameandphonenumberofservicetechnician
2.Dateofservice
3.Dateonwhichthemachinefailed
4.Dateofpurchase
5.Failuresymptoms,errorcodesappearingonthedisplay,andbeepsymptoms
6.ProcedureindexandpagenumberinwhichthefailingFRUwasdetected
7.FailingFRUnameandpartnumber
8.Machinetype,modelnumber,andserialnumber
9.Customer'snameandaddress
Note:Duringthewarrantyperiod,thecustomermayberesponsibleforrepaircostsifthecomputerdamage
wascausedbymisuse,accident,modification,unsuitablephysicaloroperatingenvironment,orimproper
maintenancebythecustomer.Followingisalistofsomecommonitemsthatarenotcoveredunderwarranty
andsomesymptomsthatmightindicatethatthesystemwassubjectedtostressbeyondnormaluse.
Beforecheckingproblemswiththecomputer,determinewhetherthedamageiscoveredunderthewarranty
byreferringtothefollowinglist:
Thefollowingarenotcoveredunderwarranty:
•LCDpanelcrackedfromtheapplicationofexcessiveforceorfrombeingdropped
•Scratched(cosmetic)parts
•Distortion,deformation,ordiscolorationofthecosmeticparts
©CopyrightLenovo201521
•Plasticparts,latches,pins,orconnectorsthathavebeencrackedorbrokenbyexcessiveforce
•Damagecausedbyliquidspilledintothesystem
•Damagecausedbytheimproperinsertionofapersonal-computercard(PCcard)ortheinstallationof
anincompatiblecard
•Improperdiscinsertionoruseofanexternalopticaldrive
•Fusesblownbyattachmentofanon-supporteddevice
•Forgottencomputerpassword(makingthecomputerunusable)
•Stickykeyscausedbyspillingaliquidontothekeyboard
•Useofanincorrectacpoweradapteronlaptopproducts
Thefollowingsymptomsmightindicatedamagecausedbynon-warrantedactivities:
•Missingpartsmightbeasymptomofunauthorizedserviceormodification.
•Checkforobviousdamagetoaharddiskdrive.Ifthespindleofaharddiskdrivebecomesnoisy,thehard
diskdrivemighthavebeendroppedorsubjecttoexcessiveforce.
Powersystemcheckout
Toverifyifabatterypackoranacpoweradapterisfunctional,dothefollowing:
1.Turnoffthecomputer.
2.Connecttheacpoweradapter.
3.Turnonthecomputer.Ifthecomputercanbeturnedon,itmeansthateitherthebatterypackortheac
poweradapterisfunctional.
4.Insertastraightenedpaperclipintothenovobuttontoresetthecomputer.Ifthecomputerisstill
poweredon,itmeansthattheacpoweradapterisfunctional.
5.Turnoffthecomputer.
6.Disconnecttheacpoweradapterandturnonthecomputer.Ifthecomputercanbeturnedon,it
meansthatthebatterypackisfunctional.
Ifyoususpectapowerproblem,seetheappropriateoneofthefollowingpowersupplycheckouts:
•“Checkingtheacpoweradapter”onpage22
•“Checkingtheexternalbatterypackandtheoperationalcharging”onpage23
Checkingtheacpoweradapter
Youareherebecausethecomputerfailsonlywhentheacpoweradapterisused.
•Ifthepowerproblemoccursonlywhenthedockingstationortheportreplicatorisused,replacethe
dockingstationortheportreplicator.
•Ifthepower-onindicatordoesnotturnon,checkthepowercordoftheACadapterforcorrectcontinuity
andinstallation.
•Ifthecomputerdoesnotchargeduringoperation,goto“Checkingtheexternalbatterypackandthe
operationalcharging”onpage23.
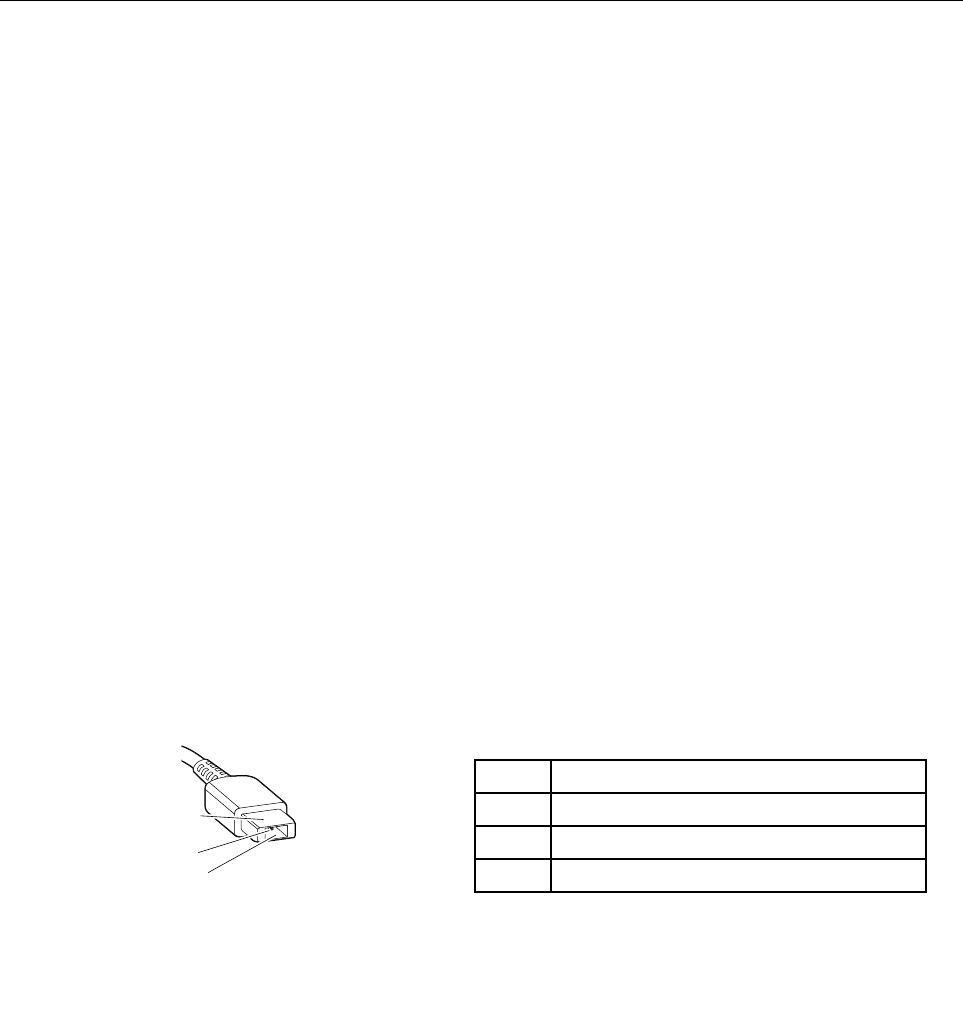
Tochecktheacpoweradapter,dothefollowing:
1.Unplugtheacpoweradaptercablefromthecomputer.
2.Measuretheoutputvoltageattheplugoftheacpoweradaptercable.Seethefollowingillustration:
PinVoltage(Vdc)
1+20
20
3Ground
(20V)
1
3
2
22HardwareMaintenanceManual

Note:Outputvoltageofpin2oftheacpoweradaptermightdifferfromtheoneyouareservicing.
3.Ifthevoltageisnotcorrect,replacetheacpoweradapter.
4.Ifthevoltageisacceptable,replacethesystemboard.
Note:Noisefromtheacpoweradapterdoesnotalwaysindicateadefect.
Checkingtheexternalbatterypackandtheoperationalcharging
Checkingtheexternalbatterypack
Thiscomputersupportsonlybatteriesspeciallydesignedforthisspecificsystemandmanufacturedby
Lenovooranauthorizedbuilder.Thesystemdoesnotsupportunauthorizedbatteriesorbatteriesdesigned
forothersystems.Ifanunauthorizedbatteryorabatterydesignedforanothersystemsisinstalled,the
systemwillnotcharge.
Attention:Lenovohasnoresponsibilityfortheperformanceorsafetyofunauthorizedbatteries,and
providesnowarrantiesforfailuresordamagearisingoutoftheiruse.
ThebatterystatusiconintheWindowsnotificationareadisplaysthepercentageofthebatterypower
remained.
Note:Iftheexternalbatterypackbecomeshot,itmaynotbeabletocharge.Removeitfromthecomputer
andleaveitatroomtemperatureforawhile.Afteritcoolsdown,reinstallandrechargeit.
Checkingtheoperationalcharging
Tocheckwhetherthebatterypackchargesproperlyduringoperation,dothefollowing:
1.Dischargethebatterypackuntiltheremainedbatterypowerislessthan50%.
2.Connectthecomputertoacpowertochargethebatterypack.IfthebatterystatusiconintheWindows
notificationareaindicatesthatthebatterypackisnotcharging,removethebatterypackandletit
returntoroomtemperature.
3.Reinstallthebatterypack.Ifthebatterypackisstillnotcharging,replacethebatterypack.
4.Checkthebatterystatusiconagain.Ifthesameerrorstillexists,replacethesystemboard.
Chapter3.Generalcheckout23

24HardwareMaintenanceManual

Chapter4.Relatedserviceinformation
Thischapterpresentsfollowinginformation:
•“RestoringthefactorycontentsbyusingOneKeyRecovery”onpage25
•“Powermanagement”onpage25
RestoringthefactorycontentsbyusingOneKeyRecovery
Restoreoffactorydefault
TheLenovoE41–80computerscomewithpre-installedOneKeyRecoverySystem.Inordertosave
applicationfilesandtheinitialbackedupfilesofthesystem,theharddiskinaLenovocomputerincludes
ahiddenpartitionwhenitisshipped.Ifyouneedtorestorethesystemtothepointofyourfirstbootup,
justenterLenovoOneKeyRecoverySystemandrunSystemRecovery.FordetailsofOneKeyRecovery
System,seetheUserGuideforLenovoOneKeyRecoverysystem.
Note:Thiswilldeleteallthenewdataonthesystempartition(Cdrive),whichisnotrecoverable.Makesure
tobackupyourcriticaldatabeforeyouperformthisaction.
Whenyouusetherecoverydiscstobootyourcomputer,thesystemwillentertheuserinterfacefor
systemrecoveryautomatically.Pleasefollowtheprompttoinsertthebackupdiscstocompletethewhole
recoveryprocess.
Note:Therecoveryprocessmighttakeupto2hours.
Powermanagement
Toreducepowerconsumption,thecomputerhasthreepowermanagementmodes:screenblank,sleep,
andhibernation.
Screenblankmode(fortheWindows7operatingsystemonly)
Ifthetimesetonthe“Turnoffmonitor”timerintheoperatingsystemexpires,theLCDbacklightturnsoff.
Toputthecomputerintoscreenblankmode,dothefollowing:
1.Right-clickthebatterystatusindicatoronthetaskbar.
2.SelectPoweroffdisplay.
Toendscreenblankmodeandresumenormaloperation,pressanykey.
Sleepmode
Whenthecomputerenterssleepmode,thefollowingeventsoccurinadditiontowhatoccursinscreen
blankmode:
•TheLCDispoweredoff.
•Theharddiskdriveorsolid-statedriveispoweredoff.
•Themicroprocessorstops.
Toputyourcomputerintosleepmode,pressFn+F1ordothefollowing:
•ForWindows7:ClickthearrowbesidetheShutdownicon,andthenselectSleep.
•ForWindows10:ClickStart,andthenselectSleepfromPowermenuoption.
©CopyrightLenovo201525

Toreturntonormaloperation,pressanykey.
Incertaincircumstances,thecomputergoesintosleepmodeautomatically:
•Afteraperiodofinactivityspecifiedinpowerplansettings
•Whenthebatterypowerislow
Hibernationmode
Inhibernationmode,thefollowingoccurs:
•Thesystemstatus,randomaccessmemory(RAM),videorandomaccessmemory(VRAM),andsetup
dataarestoredontheharddiskdriveorsolid-statedrive.
•Thesystemispoweredoff.
Toputyourcomputerintohibernationmode,dothefollowing:
•ForWindows7:ClickthearrowbesidetheShutdownicon,andthenselectHibernate.
•ForWindows10:ClickStart,andthenselectHibernatefromPowermenuoption.
Note:Bydefault,thehibernationoptionisnotshowninthestartmenuunderWindows10.Toenable
thisoption,dothefollowings:
1.Right-clickStarttoenterControlPanel,andthenclickHardwareandsound→Changewhatthe
powerbuttondo
2.ClickChangesettingsthatarecurrentlyunavailable,andthentickHibernationunderShutdown
settigns.
3.ClickSavechanges.
Toreturntonormaloperation,pressthepowerbutton.
Note:Ifthecomputerentersthehibernationmodewhileitisdockedtothedockingstationortheport
replicator,donotundockitbeforeresumingnormaloperation.Ifyoudoundockitandthentrytoresume
normaloperation,youwillgetanerrormessage,andyouwillhavetorestartthesystem.
Ifyouhavedefinedoneofthefollowingactionsastheeventthatcausesthesystemtogointohibernation
mode,performthataction.
•Closingthelid.
•Pressingthepowerbutton.
Also,thecomputergoesintohibernationmodeautomaticallyafteraperiodofinactivityspecifiedinpower
plansettings.
Whenthepoweristurnedon,thecomputerreturnsfromhibernationmodeandresumesoperation.The
hibernationfileinthebootrecordontheharddiskdriveorsolid-statedriveisread,andsystemstatusis
restoredfromtheharddiskdriveorsolid-statedrive.
26HardwareMaintenanceManual

Chapter5.Passwords
AsmanyasthreepasswordsmaybeneededforanyLenovocomputer:thepower-onpassword(POP),the
harddiskpassword(HDP),andtheadministratorpassword.
Ifanyofthesepasswordshasbeenset,apromptforitappearsonthescreenwheneverthecomputeris
turnedon.Thecomputerdoesnotstartuntilthepasswordisentered.
Power-onpassword
Apower-onpasswordprotectsthesystemfrombeingpoweredonbyanunauthorizedperson.The
passwordmustbeenteredbeforeanoperatingsystemcanbestarted.
Harddiskpassword
Therearetwokindsofharddiskpasswords:
•Userharddiskpassword-fortheuser
•Masterharddiskpassword-forthesystemadministrator,whocanuseittogetaccesstotheharddisk
eveniftheuserhaschangedtheuserharddiskpassword
Note:Therearetwomodesfortheharddiskpassword:UseronlyandMaster+User.TheMaster+User
moderequirestwoharddiskpasswords;thesystemadministratorentersbothinthesameoperation.The
systemadministratorthenprovidestheuserharddiskpasswordtothesystemuser.
Attention:Iftheuserharddiskpasswordhasbeenforgotten,checkwhetheramasterharddiskpassword
hasbeenset.Ifithas,itcanbeusedforaccesstotheharddiskdrive.Ifnomasterharddiskpasswordis
available,neitherLenovonorLenovoauthorizedservicetechniciansprovideanyservicestoreseteither
theuserorthemasterharddiskpassword,ortorecoverdatafromtheharddiskdrive.Theharddiskdrive
canbereplacedforascheduledfee.
Administratorpassword
Administratorpasswordcontrolstheaccessofthewholesetuputility.OnlyAdministratorpasswordwasset
thenUserpasswordcanbeset.IfAdministratorpasswordwascleared,theUserpasswordwasclearedtoo.
Attention:Iftheadministratorpasswordhasbeenforgottenandcannotbemadeavailabletotheservice
technician,thereisnoserviceproceduretoresetthepassword.Thesystemboardmustbereplacedfor
ascheduledfee.
©CopyrightLenovo201527

28HardwareMaintenanceManual
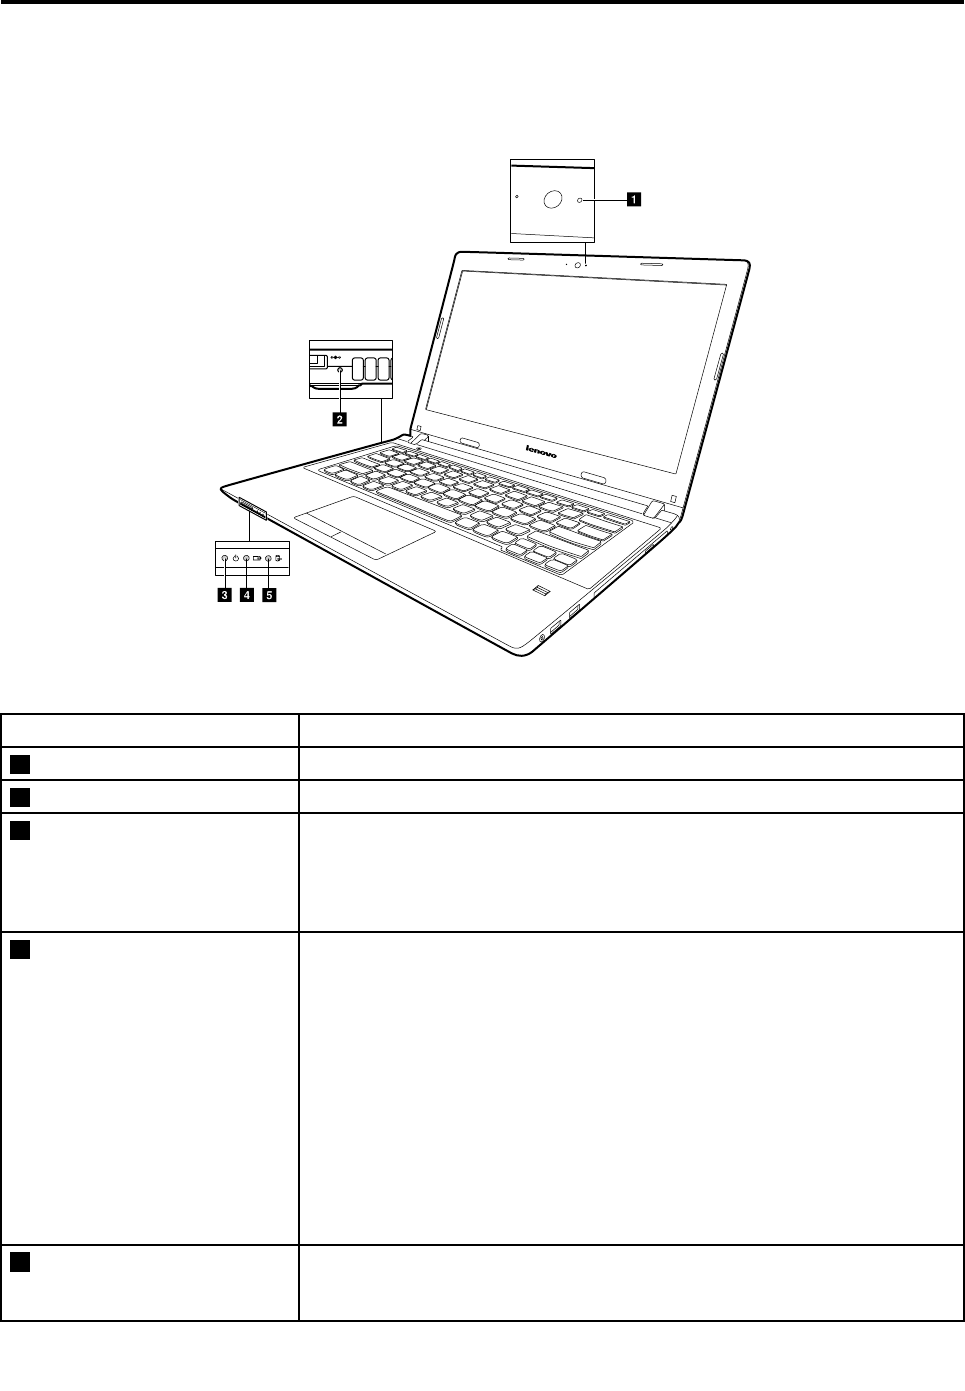
Chapter6.Statusindicators
Thischapterpresentsthestatusindicatorsthatshowthestatusofthecomputer.
cde
a
b
Table1.Statusindicators
IndicatorMeaning
1CamerastatusindicatorOn:Thecameraisinuse.
2dc-inindicatorOn:Thecomputerispluggedintoaworkingelectricaloutlet.
3PowerindicatorOn:Thecomputerispoweredon.
On:Thecomputerispoweredofforinhibernationmode.
Blinks:Thecomputerisinsleepmode.
4BatteryStatusindicatorSolidgreen:Thebatterychargelevelisbetween80%and100%,orthebattery
dischargelevelisbetween20%and100%.
Slow-blinkinggreen:Thebatterychargelevelisbetween20%and80%,and
chargingiscontinuing.
Slow-blinkingamber:Thebatterychargelevelisbetween5%and20%,and
chargingiscontinuing.
Solidamber:Thebatteryhasbetween5%and20%charge.
Fast-blinkingamber:Thebatterychargeordischargelevelis5%orless.
Off:Thebatteryisdetachedorthecomputeristurnedoff.
5DeviceaccessstatusindicatorOn:Theharddiskdriveortheopticaldriveisreadingorwritingdata.
Off:Thecomputerisofforinhibernationmode.
©CopyrightLenovo201529

30HardwareMaintenanceManual

Chapter7.Functionkeys
Thefollowingtabledescribesthefunctionsoffunctionkeys.
Table2.Functionkeys
Functionkeyand
keycombination
Description
Fn+F1Putyourcomputerintosleepmode.
Fn+F2TurnstheLCDbacklightonoroff.
Fn+F3Selectstheactivedisplaydevice.UsethisfunctionkeycombinationtoselecttheLCDofthe
computer,aconnectedexternaldevice,orboth,astheactivedisplaydevice.
Note:YoualsocanusetheWindows+Pcombinationtoachievethesamefunction.
Fn+F4Enablesordisablestheintegratedcamera.
Fn+F5ForWindows7:Changeswirelesssettings.
ForWindows10:Enablesordisablesairplanemode.Whenairplanemodeisenabled,all
wirelesscommunicationfromandtothiscomputerisunavailable.
Fn+F6Cutsofforturnsonthevolume.
Fn+F7Enablesordisablestheintegratedmicrophone.
Fn+F8Enablesordisablesthefunctionofthetouchpadandtouchpadbuttons.
Fn+F9ForWindows7:OpensControlPanel.
ForWindows10:ChangesSettings.
Fn+F10ForWindows7:Openssearchbox.
ForWindows10:Searchesapplications.
Fn+F11Viewsopenapplications.
Fn+F12ForWindows7:OpensComputer.
ForWindows10:OpensFileExplorer.
©CopyrightLenovo201531

32HardwareMaintenanceManual

Chapter8.Locations
Thischapterintroducesthelocationsofthehardwarecomponentsonyourcomputer.
LocatingFRUsandCRUs
Thistopicintroducesthefollowingserviceparts:
•“MajorFRUsandCRUs”onpage34
•“LCDFRUs”onpage38
•“MiscellaneouspartsandotherFRUs”onpage39
Notes:
•EachFRUisavailableforalltypesormodels,unlessotherwisespecified.
•CRUstatementforcustomers:
Youcanresolvesomeproblemswithyourproductwithareplacementpartyoucaninstallyourself,calleda
“CustomerReplaceableUnit”or“CRU.”SomeCRUsaredesignatedasself-serviceCRUsandothersare
designatedasoptional-serviceCRUs.Installationofself-serviceCRUsisyourresponsibility.Foroptional-service
CRUs,youcaneitherinstalltheCRUyourselforyoucanrequestthataServiceProviderinstalltheCRUaccording
tothewarrantyserviceforyourproduct.IfyouintendoninstallingtheCRU,LenovowillshiptheCRUtoyou.CRU
informationandreplacementinstructionsareshippedwithyourproductandareavailablefromLenovoatanytime
uponrequest.YoucanfindalistofCRUsforyourproductinthisHardwareMaintenanceManual.Anelectronic
versionofthismanualcanbefoundathttp://www.lenovo.com/UserManuals.Followtheon-screeninstructions
tofindthemanualforyourproduct.Y oumightberequiredtoreturnthedefectivepartthatisreplacedbythe
CRU.Whenreturnisrequired:(1)returninstructions,aprepaidshippinglabel,andacontainerwillbeincluded
withthereplacementCRU;and(2)youmightbechargedforthereplacementCRUifLenovodoesnotreceivethe
defectiveCRUwithinthirty(30)daysofyourreceiptofthereplacementCRU.SeeyourLenovoLimitedWarranty
documentationforfulldetails.
LenovocomputerscontainthefollowingtypesofCRUs:
–Self-serviceCRUs:TheseCRUsunplugorareheldbynomorethantwoscrews.Examplesofthesetypesof
CRUsincludetheacpoweradapter,powercord,andbattery.Otherself-serviceCRUsdependingonproduct
designmightincludethememorymodule,wirelesscard,keyboard,andpalmrestwithfingerprintreaderand
touchpad.
–Optional-serviceCRUs:TheseCRUsareisolatedpartswithinthecomputerthatareconcealedbyanaccess
panelthatistypicallysecuredbymorethantwoscrews.Oncetheaccesspanelisremoved,thespecific
CRUisvisible.
©CopyrightLenovo201533
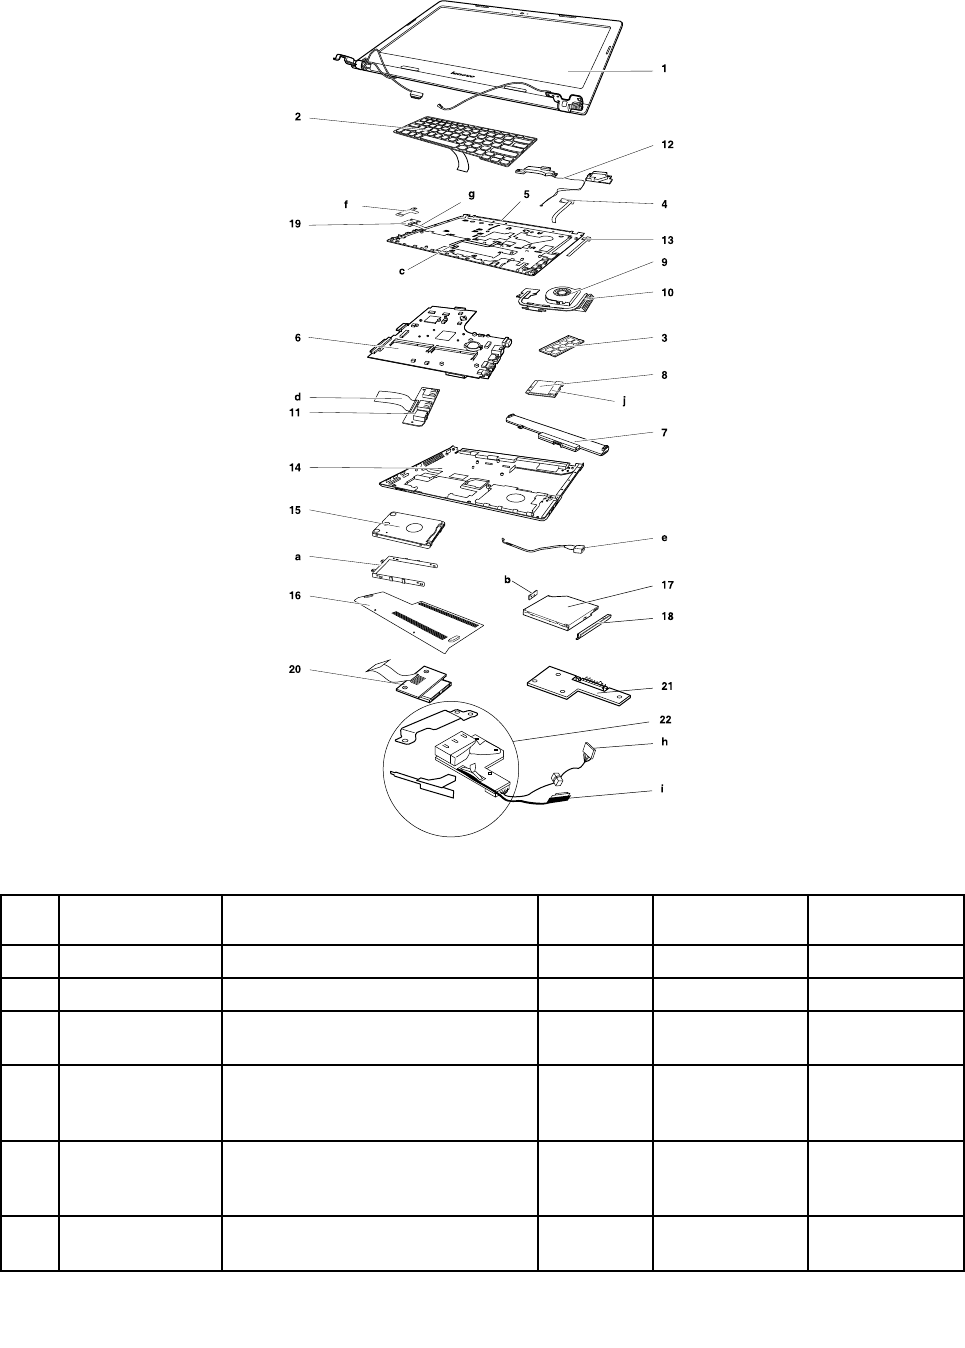
MajorFRUsandCRUs
1
7
e
10
9
3
12
6
2
f
g5
19
11
d
14
15
a
16
20
c
17
18
21
h
22
i
b
4
13
8
j
Table3.MajorFRUs
No.FRUpartsFRUdescriptionsSelf-service
CRU
Optional-service
CRU
FRUNo.
1LCDunitLCDunitNoNo
2KeyboardKeyboardbezelassemblyNoYes
3MemoryModuleMemoryModule:
M471B5674QH0-YK0
YesNo11202451
3MemoryModuleMemoryModule:
HMT425S6CFR6A-PB2GBDDR3L
1600
YesNo5M30G99881
3MemoryModuleMemoryModule:
MT4KTF25664HZ-1G6E12GB
DDR3L
YesNo11201967
3MemoryModuleMemoryModule:
RMT3190ME76F8F-16002GB
YesNo5M30G04992
34HardwareMaintenanceManual

Table3.MajorFRUs(continued)
No.FRUpartsFRUdescriptionsSelf-service
CRU
Optional-service
CRU
FRUNo.
3MemoryModuleMemoryModule:
M471B5173EB0-YK020nm4GB
DDR3L1600
YesNo5M30G18425
3MemoryModuleMemoryModule:DDR3L16004GB
SKHMT451S6BFR8A-PB/RD4GB
DDR3L1600
YesNo11202706
3MemoryModuleMemoryModule:
RMT3170MN68F9F-16004GB
DDR3L1600(MC)
YesNo5M30G75129
3MemoryModuleMemoryModule:DDR3L16004GB
MCMT8KTF51264HZ-1G6E14GB
DDR3L1600
YesNo11202125
3MemoryModuleMemoryModule:
M471B1G73EB0-YK020nm8GB
DDR3L1600
YesNo5M30G18424
3MemoryModuleMemoryModule:DDR3L16008GB
SKHMT41GS6BFR8A-PB/RD8GB
DDR3L1600
YesNo11202707
3MemoryModuleMemoryModule:DDR3L1600
8GBRMT3160ME68FAF-16008GB
DDR3L1600
YesNo11202450
3MemoryModuleMemoryModule:DDR3L1600
8GBMicMT16KTF1G64HZ-1G6E1
DDR3L1600
YesNo11201304
4PowerboardPowerBoardCE40-30W/CableNoNo5C50G07295
5UppercaseUpperCoverCE41-80NFPW/TPNoNo5CB0K74992
5UppercaseUpperCoverCE41-80FPW/TPNoNo5CB0K74983
6SystemboardMBCE41-80NOKI7-6500UUMANoNo5B20K74982
6SystemboardMBCE41-80WINI7-6500UUMANoNo5B20K74995
6SystemboardMBCE41-80NOKI7-6500UEPO1GNoNo5B20K75001
6SystemboardMBCE41-80WINI7-6500UEPO1GNoNo5B20K74987
6SystemboardMBCE41-80NOKI7-6500UEPO2GNoNo5B20K75004
6SystemboardMBCE41-80WINI7-6500UEPO2GNoNo5B20K74994
6SystemboardMBCE41-80NOKI5-6200UEPO2GNoNo5B20K74981
6SystemboardMBCE41-80WINI5-6200UEPO2GNoNo5B20K74990
6SystemboardMBCE41-80NOKI5-6200UEPO1GNoNo5B20K74997
6SystemboardMBCE41-80WINI5-6200UEPO1GNoNo5B20K74979
6SystemboardMBCE41-80NOKI5-6200UUMANoNo5B20K74986
6SystemboardMBCE41-80WINI5-6200UUMANoNo5B20K74978
6SystemboardMBCE41-80NOKI3-6100UEPO2GNoNo5B20K75010
6SystemboardMBCE41-80WINI3-6100UEPO2GNoNo5B20K74984
6SystemboardMBCE41-80NOKI3-6100UEPO1GNoNo5B20K74975
6SystemboardMBCE41-80WINI3-6100UEPO1GNoNo5B20K74989
Chapter8.Locations35

Table3.MajorFRUs(continued)
No.FRUpartsFRUdescriptionsSelf-service
CRU
Optional-service
CRU
FRUNo.
6SystemboardMBCE41-80NOKI3-6100UUMANoNo5B20K74998
6SystemboardMBCE41-80WINI3-6100UUMANoNo5B20K74991
6SystemboardMBCE41-80NOK4405UEPO2GNoNo5B20K74988
6SystemboardMBCE41-80WIN4405UEPO2GNoNo5B20K74999
6SystemboardMBCE41-80NOK4405UEPO1GNoNo5B20K75007
6SystemboardMBCE41-80WIN4405UEPO1GNoNo5B20K74976
6SystemboardMBCE41-80NOK4405UUMANoNo5B20K74980
6SystemboardMBCE41-80WIN4405UUMANoNo5B20K75009
6SystemboardMBCE41-80NOK3855UEPO2GNoNo5B20K74985
6SystemboardMBCE41-80WIN3855UEPO2GNoNo5B20K75003
6SystemboardMBCE41-80NOK3855UEPO1GNoNo5B20K75005
6SystemboardMBCE41-80WIN3855UEPO1GNoNo5B20K74993
6SystemboardMBCE41-80NOK3855UUMANoNo5B20K74996
6SystemboardMBCE41-80WIN3855UUMANoNo5B20K75000
7BatteryBx0SYL12S4E5514.4V41Wh4cell
bty
YesNo121500239
7BatteryBx0LGL12L4E5514.8V41Wh4cell
bty
YesNo121500241
7BatteryBx0SP/LL12M4E5514.88V41Wh
4cellbty
YesNo121500240
7BatteryBattery:4cell2.2AhSYL13S4A01
14.4V32Wh
YesNo121500242
7BatteryBattery:4cell2.2AhSP/LL13M4A01
14.4V32Wh
YesNo121500243
7BatteryBattery:4cell2.2AhLGL13L4A01
14.4V32Wh
YesNo121500244
7BatteryBx0SYL12S4E5514.4V41Wh4cell
GB
YesNo5B10K10194
7BatteryBx0SP/LL12M4E5514.88V41Wh
4cellGB
YesNo5B10K10154
7BatteryBx0LGL12L4E5514.8V41Wh4cell
GB
YesNo5B10K10196
7BatteryBx0SYL13S4A0114.4V32Wh4cell
GB
YesNo5B10K10153
7BatteryBx0SP/LL13M4A0114.4V32Wh
4cellGB
YesNo5B10K10195
7BatteryBx0LGL13L4A0114.4V32Wh4cell
GB
YesNo5B10K10151
8WlanIntel31651x1AC+BTPCIEM.2
WLAN
YesNoSW10H24486
8WlanIntel82602x2AC+BTPCIEM.2
WLANNV
YesNoSW10A11646
36HardwareMaintenanceManual

Table3.MajorFRUs(continued)
No.FRUpartsFRUdescriptionsSelf-service
CRU
Optional-service
CRU
FRUNo.
8WlanLtnBCM43502x2AC+BT4.0PCIE
M.2WLAN
YesNoSW10H24481
8WlanFxnBCM43502x2AC+BT4.0PCIE
M.2WLAN
YesNoSW10H24482
8WlanCbtBCM431621x1AC+BT4.0PCIE
M.2WLANV2
YesNoSW10A11586
8WlanLtnNFA4351x1AC+BT4.0PCIEM.2
WLAN
YesNoSW10A11641
8WlanCbtRTL8821AE1x1AC+BT4.0PCIE
M.2WLAN
YesNoSW10A11648
9CPUFanCPUFanCE40-30NoNo5F10G07296
10ThermalModuleHeatsinkCE41-80UMAW/OFanNoNo5H40K75002
10ThermalModuleHeatsinkCE41-80DISW/OFanNoNo5H40K75006
11IOboardIOBoardCE40-80NoNo5C50K22156
12SpeakerSpeakerCE40-30L+RW/RubberNoNo5SB0G07345
13LEDboard(only
forE41)
LEDBoardCE40-30NoNo5C50G07300
14LowerCoverLowerCaseCE40-30NoNo5CB0G07337
15HDDST500L T0126G7mm5.4K500G
HDD
YesNo16200383
15HDDHTS545050A7E6606G7mm5.4K
500GHDD
YesNo5H20H14223
15HDDWDWD5000LPCX-24VHAT07mm
5400rpm500GHDD
YesNo5H20J35762
15HDDST1000LM0246G9.5mm5.4K1T
HDD
YesNo16200385
15HDDHTS541010A9E6606G9.5mm5.4K
1THDD
YesNo16200400
15HDDWD10JPCX-24UE4T06G9.5mm
5.4K1THDD
YesNo16200393
15HDDST500LM0217mm7200rpm500G
HDD
YesNo5H20K22136
15HDDSeagateKahunaRST1000LM014
9.5mm1T+8G
YesNo5H20H24607
15SSDSamsungMZYLF128HCHP2.5‘’
5mm128GBSSD
YesNo5SD0H45117
16ThermalCoverThermalCoverCE40-30YesNo5CB0G07316
17ODDHLDSGUC0N9.0mmSlimTray
RamboODD
YesNo5DX0F85915
17ODDPLDSDA-8A6SH9.0mmSlimTray
RamboODD
YesNo5DX0F86404
17ODDTSSTSU-228GB9.0RamboODDYesNo5DX0H14227
17DummyODDDummyODDCE40-30Y esNo5M20K38276
Chapter8.Locations37
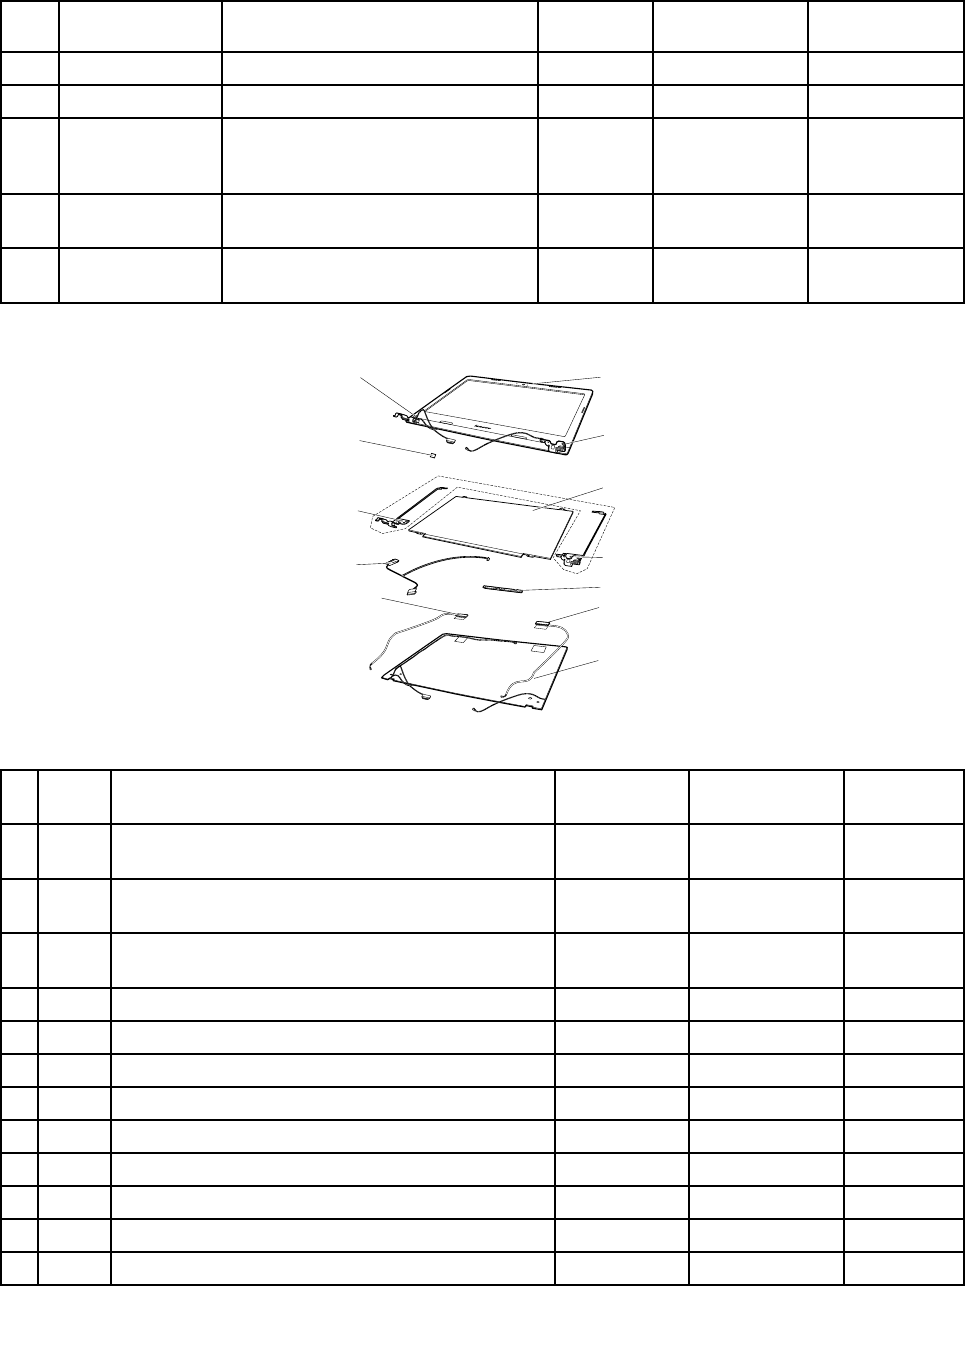
Table3.MajorFRUs(continued)
No.FRUpartsFRUdescriptionsSelf-service
CRU
Optional-service
CRU
FRUNo.
18ODDBezelODDBezelCE40-30NoNo5B30G07332
19FPboardZIWB2FingerprintBoardNoNo90007268
20ODDswitch
board(onlyfor
E51)
ODDSwitchBoardCE50-70NoNo5C50H44762
21BatteryBoard
(onlyforE51)
BatteryBoardCE50-70NoNo5C50H44813
22Dockingboard
(onlyforE51)
DockingBoardCE50-70W/BK/LED
Mat
NoNo5C50H44785
LCDFRUs
1
2
2
6
3
4
4
5
8
7
8
2
Table4.LCDFRUs
No.FRU
parts
FRUdescriptionsSelf-service
CRU
Optional-service
CRU
PNnumber
1LCD
bezel
LCDBezelCE41-80CAMERANoNo5B30K74977
1LCD
bezel
LCDBezelCE41-80NOCAMERANoNo5B30K75008
2Screw
pad
ScrewPadCE40-30NoNo5R60G07299
3PanelLGLP140WH8-TPH1HDTAGFNBNoNo5D10H91343
3PanelAUOB140XTN02.E0AHDAGSNBNoNo5D10G95364
3PanelINXN140BGE-EA3C3HDAGSNBNoNo5D10G94548
3PanelIVOM140NWR4R1HW2.1HDAGFNBNoNo5D10H33162
3PanelAUOB140HTN01.BFHDAGSNBNoNo5D10H20139
3PanelINN140HGE-EAAC3FHDTAGSNBNoNo5D10J33368
3PanelBOHB140FH1-401V4.1FHDTAGSNoNo5D10H56752
4HingeHingeCE40-30L+RNoNo5H50G07334
5CameraBISBNC716YS7HDNBcameraNoNo5C20G89263
38HardwareMaintenanceManual

Table4.LCDFRUs(continued)
No.FRU
parts
FRUdescriptionsSelf-service
CRU
Optional-service
CRU
PNnumber
5CameraAVCHAA-6D0F04HDNBcameraNoNo5C20G89271
5CameraCCYCNFEH37HDNBcameraNoNo5C20G89265
5CameraBISBNC7VTKKT0.3MNBcameraNoNo5C20G89266
5CameraAWAAM-VS0750.3MNBcameraNoNo5C20G89275
5CameraAVCHAA-584B010.3MNBcameraNoNo5C20G89267
5CameraCameraCE40-301MNoNo5C20G07313
5CameraCameraCE40-300.3MNoNo5C20G07312
6LCD
Cover
LCDCoverCE40-70BlackPANNoNo5CB0G97091
7LCD
Cable
LCDCE40-30W/CAMCableUMANoNo5C10G07328
7LCD
Cable
LCDCE40-30W/CAMCableDISNoNo5C10G07305
7LCD
Cable
LCDCE40-30WO/CAMCableUMANoNo5C10G07340
7LCD
Cable
LCDCE40-30WO/CAMCableDISNoNo5C10G07325
8AntennaAntennaCE40-70Main+AUXNoNo5A30G41362
MiscellaneouspartsandotherFRUs
Table5.Miscellaneouspart
FRUdescriptionsSelf-service
CRU
Optional-service
CRU
PNnumber
(a).HDDBracketCE40-30NoNo5B40G07347
(b).ODDbracket:ODDBracketCE40-30NoNo5B40G07338
(c).T ouchPadboardcable:TPBoardCableCE40-30NoNo5C10G07301
(d):Audioboardcable:IOBoardCableCE40-30NoNo5C10G07306
(e):DC-incableandDC-inboard:
DC-INBoardCE50-70W/BK/LEDRubber
NoNo5C50H44829
(f):FingerPrinterbracket:FPBracketCE40-70NoNo5B40G10596
(g):FPBoardCableCE40-70NoNo5C10K26777
(h):DC-INCableCE40-30UMANoNo5C10G07314
(h):DC-INCableCE40-30DISNoNo5C10G07344
(i):DockingCableCE50-70DIS(onlyforE51)NoNo5C10H44781
(i):DockingCableCE50-70UMA(onlyforE51)NoNo5C10H44772
(i):DockingDC-INCableCE50-70W/LED(onlyforE51)NoNo5C10H44780
(j):WLANSpongeCE41-80NoNo5T10K81009
ScrewKitCE40-80NoNo5S10H70733
Chapter8.Locations39

Table6.OtherFRUs
FRUdescriptionsSelf-service
CRU
Optional-service
CRU
PNnumber
acadapter45W3pin:DeltaADLX45NDC3A20V2.25AadapDOEYesNo5A10H03911
acadapter45W3pin:LiteonADLX45DLC3A20V2.25Aadap
DOE
YesNo5A10H03910
acadapter45W3pin:ChiconyADLX45NCC3A20V2.25Aadap
DOE
YesNo5A10H03912
acadapter45W3pin:LiteonADLX45DLC3A20V2.25Aadap
DOE
YesNo5A10H03910
acadapter45W3pin:ChiconyADLX45NCC3A20V2.25Aadap
DOE
YesNo5A10H03912
acadapter45W3pin:ChiconyAcbelADLX45NAC3A20V2.25A
adapter
YesNo5A10K02213
acadapter65W3pin:DeltaADLX65NDC3A20V3.25AadapterYesNo36200249
acadapter65W3pin:LiteonADLX65NLC3A20V3.25Aadapter
Liteon
YesNo36200607
acadapter65W3pin:ChiconyADLX65NCC3A20V3.25A
adapterChicony
YesNo36200611
acadapter65W3pin:DeltaADLX65NDC3A20V3.25ABISYesNo5A10J46692
acadapter65W3pin:LiteonADLX65NLC3A20V3.25AADBISYesNo5A10J75114
acadapter65W3pin:ChiconyADLX65NCC3A20V3.25AADBISYesNo5A10J75111
PowercodeUK3pin:LINETEKLP-61L+H03VV-F+LS151m
code
YesNo145000593
PowercodeUK3pin:LongwellLP-61L+H03VV-F+LS-181m
code
YesNo145000561
PowercodeUK3pin:VOLEXMP5004+H03VV-F+VAC5S1m
code
YesNo145000605
PowercodeUK3pin:lux0031+H03VV-F0.75/3C+00111mcodeY esNo145500000
PowercodeEurope3pin:LINETEKLP-34+H03VV-F+LS151m
code
YesNo145000585
PowercodeEurope3pin:LongwellLP-34A+H03VV-F+LS-18
1mcode
YesNo145000553
PowercodeEurope3pin:VOLEXM2511+HO3VV-F+VAC5S1m
code
YesNo145000525
PowercodeEurope3pin:lux0033+H03VV-F0.75/3C+00111m
code
YesNo145500001
PowercodeUS3pin:LINETEKLP-30B+SPT-2+LS151mcodeYesNo145000594
PowercodeUS3pin:LongwellLP-30B+SPT-218AWG+LS-18
1mcode
YesNo145000562
PowercodeUS3pin:VolexUS15S3+SPT-2+VAC5S1mcodeYesNo145000537
PowercodeUS3pin:lux0014+SPT-260℃18/3C+00161m
code
YesNo145500002
PowercodeChina3pin:LINETEKPC323+RVV300/300+LS15
1mcode
YesNo145000600
40HardwareMaintenanceManual

Table6.OtherFRUs(continued)
FRUdescriptionsSelf-service
CRU
Optional-service
CRU
PNnumber
PowercodeChina3pin:LongwellLSG-31+RVV300/300+LS-18
1mcode
YesNo145000568
PowercodeChina3pin:VOLEXGB10S3+RVV300/500+VAC5S
1mcode
YesNo145000538
PowercodeChina3pin:lux0036+RVV300/3000.75/3C+0002
1mcode
YesNo145500003
PowercodeIndia3pin:LINETEKPE-361+H05VV-F+LS151m
code
YesNo145000592
PowercodeIndia3pin:LongwellLP-67+BIS+LS-181mcodeYesNo145000560
PowercodeIndia3pin:lux0046+IS6940.75/3C+00111mcodeYesNo145500004
PowercodeJapan3pin:LINETEKLS15+VCTF+LP-541mcodeYesNo145000587
PowercodeJapan3pin:LongwellLP-54+VCTF+LS-181mcodeYesNo145000555
PowercodeJapan3pin:VOLEXVAC5S+VCTF+M7551mcodeYesNo145000530
PowercodeJapan3pin:lux0018(E)+VCTF0.75/3C+00211m
code
YesNo145500005
PowercodeAustralia3pin:LINETEKLS15+H03VV-F+LP-23A
1mcode
YesNo145000589
PowercodeAustralia3pin:LongwellLP-23A+LFC-3R+LS-18
1mcode
YesNo145000557
PowercodeAustralia3pin:VOLEXAU10S3+H03VV-F+VAC5S
1mcode
YesNo145000532
PowercodeAustralia3pin:lux0038+H03VV-F0.75/3C+0011
1mcode
YesNo145500006
PowercodeTaiwan3pin:LINETEKLS15+VCTF+LP-531mcodeY esNo145000588
PowercodeT aiwan3pin:LongwellLP-71+VCTF+LS-331mcodeYesNo145000556
PowercodeTaiwan3pin:VOLEXTW15CS3+VCTF+VAC5S1m
code
YesNo145000531
PowercodeTaiwan3pin:lux0019+VCTF0.75/3C+00211m
code
YesNo145500007
PowercodeKorea3pin:LINETEKLS15+H05VV-F+LP-E04A1m
code
YesNo145000590
PowercodeKorea3pin:LongwellLP-486+KTLH03VV-F+LS-5
1mcode
YesNo145000558
PowercodeKorea3pin:VOLEXM2511+KETIIEC+VAC5S1m
code
YesNo145000533
PowercodeKorea3pin:lux0033+H03VV-F0.75/3C+00111m
code
YesNo145500008
PowercodeItaly3pin:LINETEKLS15+H03VV-F+PE-3361m
code
YesNo145000591
PowercodeItaly3pin:LongwellLP-22+H03VV-F+LS-181m
code
YesNo145000559
PowercodeItaly3pin:VOLEXIT10S3+HO3VV-F+VAC5S1m
code
YesNo145000535
Chapter8.Locations41

Table6.OtherFRUs(continued)
FRUdescriptionsSelf-service
CRU
Optional-service
CRU
PNnumber
PowercodeItaly3pin:lux0029+H03VV-F0.75/3C+00111m
code
YesNo145500009
PowercodeSouthAfrica3pin:LINETEKLS15+H03VV-F+PE-364
1mcode
YesNo145000586
PowercodeSouthAfrica3pin:LongwellLP-39+H03VV-F+LS-18
1mcode
YesNo145000554
PowercodeSouthAfrica3pin:lux0044+H03VV-F0.75/3C+0011
1mcode
YesNo145500010
PowercodeBrazil3pin:LINETEKLS15H03VV-FLP26A1mcodeYesNo145000596
PowercodeBrazil3pin:LongwellLP-46+H03VV-F+LS-181m
code
YesNo145000564
PowercodeBrazil3pin:VOLEXCH10S3+H03VV-F+VAC5S1m
code
YesNo145000527
PowercodeBrazil3pin:lux0034+H03VV-F0.75/3C+00111m
code
YesNo145500011
PowercodeIsrael3pin:LINETEKLS15+H03VV-F+LP-411m
code
YesNo145000595
PowercodeIsrael3pin:LongwellLP-41+H03VV-F+LS-181m
code
YesNo145000563
PowercodeIsrael3pin:VOLEXSI16S3+H03VV-F+VAC5S1m
code
YesNo145000526
PowercodeIsrael3pin:lux0041+H03VV-F0.75/3C+00111m
code
YesNo145500012
PowercodeSwitzerland3pin:LINETEKLS15+H03VV-F+LP-37
1mcode
YesNo145000597
PowercodeSwitzerland3pin:LongwellLP-37+H03VV-F+LS-18
1mcode
YesNo145000565
PowercodeSwitzerland3pin:VOLEXMP232+H03VV-F+VAC5S
1mcode
YesNo145000524
PowercodeSwitzerland3pin:lux0027+H03VV-F0.75/3C+0011
1mcode
YesNo145500013
PowercodeDenmark3pin:LINETEKLS15+H03VV-F+LP-38
1mcode
YesNo145000598
PowercodeDenmark3pin:LongwellLP-40+H03VV-F+LS-18
1mcode
YesNo145000566
PowercodeDenmark3pin:VOLEXMP233D+H03VV-F+VAC5S
1mcode
YesNo145000534
PowercodeDenmark3pin:lux0048+H03VV-F0.75/3C+0011
1mcode
YesNo145500014
PowercodeArgentina3pin:lux0014+H03VV-F0.75/3C+0011YesNo5L60J33143
PowercodeArgentina3pin:LINETEKLS15+H03VV-F+LP391m
code
YesNo145000599
PowercodeArgentina3pin:LongwellLP-24+H03VV-F+LS-18
1mcode
YesNo145000567
42HardwareMaintenanceManual

Table6.OtherFRUs(continued)
FRUdescriptionsSelf-service
CRU
Optional-service
CRU
PNnumber
PowercodeArgentina3pin:VOLEXVA2073+H03VV-F+VAC5S
1mcode
YesNo145000528
PowercodeArgentina3pin:lux0040+H03VV-F0.75/3C+0011
1mcode
YesNo145500015
KeyboardSunrex:US102KeyT6G1DFBlkKBlkFrameKBDNoY es25214785
KeyboardSunrex:UK103KeyT6G1DFBlkKBlkFrameKBDNoYes25214786
KeyboardSunrex:Italian103KeyT6G1DFBlkKBlkFrameKBDNoY es25214787
KeyboardSunrex:Spanish103KeyT6G1DFBlkKBlkFrameKBDNoYes25214788
KeyboardSunrex:Turkish103KeyT6G1DFBlkKBlkFrameKBDNoYes25214789
KeyboardSunrex:Thailand102KeyT6G1DFBlkKBlkFrameKBDNoYes25214790
KeyboardSunrex:Portugue103KeyT6G1DFBlkKBlkFrameKBDNoYes25214791
KeyboardSunrex:LatinSpa103KeyT6G1DFBlkKBlkFrameKBDNoY es25214792
KeyboardSunrex:CanadFrEn103KeyT6G1DFBlkKBlkFrameKBDNoYes25214793
KeyboardSunrex:Korean102KeyT6G1DFBlkKBlkFrameKBDNoYes25214794
KeyboardSunrex:TradChine102KeyT6G1DFBlkKBlkFrameKBDNoY es25214795
KeyboardSunrex:Russian102KeyT6G1DFBlkKBlkFrameKBDNoYes25214796
KeyboardSunrex:French103KeyT6G1DFBlkKBlkFrameKBDNoYes25214797
KeyboardSunrex:German103KeyT6G1DFBlkKBlkFrameKBDNoYes25214798
KeyboardSunrex:Arabic102KeyT6G1DFBlkKBlkFrameKBDNoYes25214799
KeyboardSunrex:Brazilian103KeyT6G1DFBlkKBlkFrameKBDNoYes25214800
KeyboardSunrex:Dutch103KeyT6G1DFBlkKBlkFrameKBDNoYes25214802
KeyboardSunrex:Greek102KeyT6G1DFBlkKBlkFrameKBDNoY es25214803
KeyboardSunrex:Hebrew102KeyT6G1DFBlkKBlkFrameKBDNoYes25214804
KeyboardSunrex:Hungarian103KeyT6G1DFBlkKBlkFrameKBDNoYes25214805
KeyboardSunrex:Nordic103KeyT6G1DFBlkKBlkFrameKBDNoYes25214806
KeyboardSunrex:Belgian103KeyT6G1DFBlkKBlkFrameKBDNoYes25214807
KeyboardSunrex:Iceland103KeyT6G1DFBlkKBlkFrameKBDNoYes25214808
KeyboardSunrex:Slovenian103KeyT6G1DFBlkKBlkFrameKBDNoYes25214809
KeyboardSunrex:Swiss103KeyT6G1DFBlkKBlkFrameKBDNoYes25214810
KeyboardSunrex:USInter102KeyT6G1DFBlkKBlkFrameKBDNoY es25214811
KeyboardSunrex:Czh-Slk103KeyT6G1DFBlkKBlkFrameKBDNoYes25214812
KeyboardSunrex:Bulgarian103KeyT6G1DFBlkKBlkFrameKBDNoYes25214813
KeyboardSunrex:India102KeyT6G1DFBlkKBlkFrameKBDNoYes25214814
Keyboard:US102KeyT6G1JMEBlkKBlkFrameKBDNoYes25214755
Keyboard:UK103KeyT6G1JMEBlkKBlkFrameKBDNoY es25214756
Keyboard:Italian103KeyT6G1JMEBlkKBlkFrameKBDNoY es25214757
Keyboard:Spanish103KeyT6G1JMEBlkKBlkFrameKBDNoYes25214758
Keyboard:Turkish103KeyT6G1JMEBlkKBlkFrameKBDNoYes25214759
Chapter8.Locations43

Table6.OtherFRUs(continued)
FRUdescriptionsSelf-service
CRU
Optional-service
CRU
PNnumber
Keyboard:Thailand102KeyT6G1JMEBlkKBlkFrameKBDNoY es25214760
Keyboard:Portugue103KeyT6G1JMEBlkKBlkFrameKBDNoYes25214761
Keyboard:LatinSpa103KeyT6G1JMEBlkKBlkFrameKBDNoYes25214762
Keyboard:CanadFrEn103KeyT6G1JMEBlkKBlkFrameKBDNoY es25214763
Keyboard:Korean102KeyT6G1JMEBlkKBlkFrameKBDNoYes25214764
Keyboard:TradChine102KeyT6G1JMEBlkKBlkFrameKBDNoYes25214765
Keyboard:Russian102KeyT6G1JMEBlkKBlkFrameKBDNoYes25214766
Keyboard:French103KeyT6G1JMEBlkKBlkFrameKBDNoYes25214767
Keyboard:German103KeyT6G1JMEBlkKBlkFrameKBDNoY es25214768
Keyboard:Arabic102KeyT6G1JMEBlkKBlkFrameKBDNoYes25214769
Keyboard:Brazilian103KeyT6G1JMEBlkKBlkFrameKBDNoY es25214770
Keyboard:Dutch103KeyT6G1JMEBlkKBlkFrameKBDNoYes25214772
Keyboard:Greek102KeyT6G1JMEBlkKBlkFrameKBDNoYes25214773
Keyboard:Hebrew102KeyT6G1JMEBlkKBlkFrameKBDNoYes25214774
Keyboard:Hungarian103KeyT6G1JMEBlkKBlkFrameKBDNoYes25214775
Keyboard:Nordic103KeyT6G1JMEBlkKBlkFrameKBDNoYes25214776
Keyboard:Belgian103KeyT6G1JMEBlkKBlkFrameKBDNoYes25214777
Keyboard:Iceland103KeyT6G1JMEBlkKBlkFrameKBDNoYes25214778
Keyboard:Slovenian103KeyT6G1JMEBlkKBlkFrameKBDNoYes25214779
Keyboard:Swiss103KeyT6G1JMEBlkKBlkFrameKBDNoYes25214780
Keyboard:USInter102KeyT6G1JMEBlkKBlkFrameKBDNoYes25214781
Keyboard:Czh-Slk103KeyT6G1JMEBlkKBlkFrameKBDNoYes25214782
Keyboard:Bulgarian103KeyT6G1JMEBlkKBlkFrameKBDNoYes25214783
Keyboard:India102KeyT6G1JMEBlkKBlkFrameKBDNoYes25214784
Keyboard:US102KeyT6G1CCYBlkKBlkFrameKBDNoYes25214725
Keyboard:UK103KeyT6G1CCYBlkKBlkFrameKBDNoYes25214726
Keyboard:Italian103KeyT6G1CCYBlkKBlkFrameKBDNoYes25214727
Keyboard:Spanish103KeyT6G1CCYBlkKBlkFrameKBDNoYes25214728
Keyboard:Turkish103KeyT6G1CCYBlkKBlkFrameKBDNoYes25214729
Keyboard:Thailand102KeyT6G1CCYBlkKBlkFrameKBDNoYes25214730
Keyboard:Portugue103KeyT6G1CCYBlkKBlkFrameKBDNoYes25214731
Keyboard:LatinSpa103KeyT6G1CCYBlkKBlkFrameKBDNoYes25214732
Keyboard:CanadFrEn103KeyT6G1CCYBlkKBlkFrameKBDNoYes25214733
Keyboard:Korean102KeyT6G1CCYBlkKBlkFrameKBDNoY es25214734
Keyboard:TradChine102KeyT6G1CCYBlkKBlkFrameKBDNoYes25214735
Keyboard:Russian102KeyT6G1CCYBlkKBlkFrameKBDNoYes25214736
Keyboard:French103KeyT6G1CCYBlkKBlkFrameKBDNoYes25214737
44HardwareMaintenanceManual

Table6.OtherFRUs(continued)
FRUdescriptionsSelf-service
CRU
Optional-service
CRU
PNnumber
Keyboard:German103KeyT6G1CCYBlkKBlkFrameKBDNoY es25214738
Keyboard:Arabic102KeyT6G1CCYBlkKBlkFrameKBDNoYes25214739
Keyboard:Brazilian103KeyT6G1CCYBlkKBlkFrameKBDNoYes25214740
Keyboard:Dutch103KeyT6G1CCYBlkKBlkFrameKBDNoY es25214742
Keyboard:Greek102KeyT6G1CCYBlkKBlkFrameKBDNoYes25214743
Keyboard:Hebrew102KeyT6G1CCYBlkKBlkFrameKBDNoYes25214744
Keyboard:Hungarian103KeyT6G1CCYBlkKBlkFrameKBDNoYes25214745
Keyboard:Nordic103KeyT6G1CCYBlkKBlkFrameKBDNoYes25214746
Keyboard:Belgian103KeyT6G1CCYBlkKBlkFrameKBDNoY es25214747
Keyboard:Iceland103KeyT6G1CCYBlkKBlkFrameKBDNoYes25214748
Keyboard:Slovenian103KeyT6G1CCYBlkKBlkFrameKBDNoYes25214749
Keyboard:Swiss103KeyT6G1CCYBlkKBlkFrameKBDNoY es25214750
Keyboard:USInter102KeyT6G1CCYBlkKBlkFrameKBDNoYes25214751
Keyboard:Czh-Slk103KeyT6G1CCYBlkKBlkFrameKBDNoYes25214752
Keyboard:Bulgarian103KeyT6G1CCYBlkKBlkFrameKBDNoY es25214753
Keyboard:India102KeyT6G1CCYBlkKBlkFrameKBDNoYes25214754
Keyboard:French-Arabic103KeyT6G1DFBlkKBlkFrameKBD5N20G90518
Keyboard:French-Arabic103KeyT6G1JMEBlkKBlkFrameKBD5N20G90525
Keyboard:French-Arabic103KeyT6G1CCYBlkKBlkFrameKBD5N20G90531
Chapter8.Locations45

46HardwareMaintenanceManual
Chapter9.FRUreplacementnotices
Thischapterpresentsnoticesrelatedtoremovingandreplacingparts.Readthischaptercarefullybefore
replacinganyFRU.
CRUstatementforcustomers:
Youcanresolvesomeproblemswithyourproductwithareplacementpartyoucaninstallyourself,called
a“CustomerReplaceableUnit”or“CRU.”SomeCRUsaredesignatedasself-serviceCRUsandothers
aredesignatedasoptional-serviceCRUs.Installationofself-serviceCRUsisyourresponsibility.For
optional-serviceCRUs,youcaneitherinstalltheCRUyourselforyoucanrequestthataServiceProvider
installtheCRUaccordingtothewarrantyserviceforyourproduct.IfyouintendoninstallingtheCRU,
LenovowillshiptheCRUtoyou.CRUinformationandreplacementinstructionsareshippedwithyour
productandareavailablefromLenovoatanytimeuponrequest.YoucanfindalistofCRUsforyour
productinthisHardwareMaintenanceManual.Anelectronicversionofthismanualcanbefoundat
http://www.lenovo.com/UserManuals.Followtheon-screeninstructionstofindthemanualforyourproduct.
YoumightberequiredtoreturnthedefectivepartthatisreplacedbytheCRU.Whenreturnisrequired:(1)
returninstructions,aprepaidshippinglabel,andacontainerwillbeincludedwiththereplacementCRU;and
(2)youmightbechargedforthereplacementCRUifLenovodoesnotreceivethedefectiveCRUwithinthirty
(30)daysofyourreceiptofthereplacementCRU.SeeyourLenovoLimitedWarrantydocumentationfor
fulldetails.
Screwnotices
Loosescrewscancauseareliabilityproblem.IntheThinkPadnotebookcomputer,thisproblemisaddressed
withspecialnylon-coatedscrewsthathavethefollowingcharacteristics:
•Theymaintaintightconnections.
•Theydonoteasilycomeloose,evenwithshockorvibration.
•Theyarehardertotighten.
Dothefollowingwhenyouservicethismachine:
•Keepthescrewkitinyourtoolbag.crewkit.
•Removescrewscarefullyforreuse.
•Useatorquescrewdriverifyouhaveone.
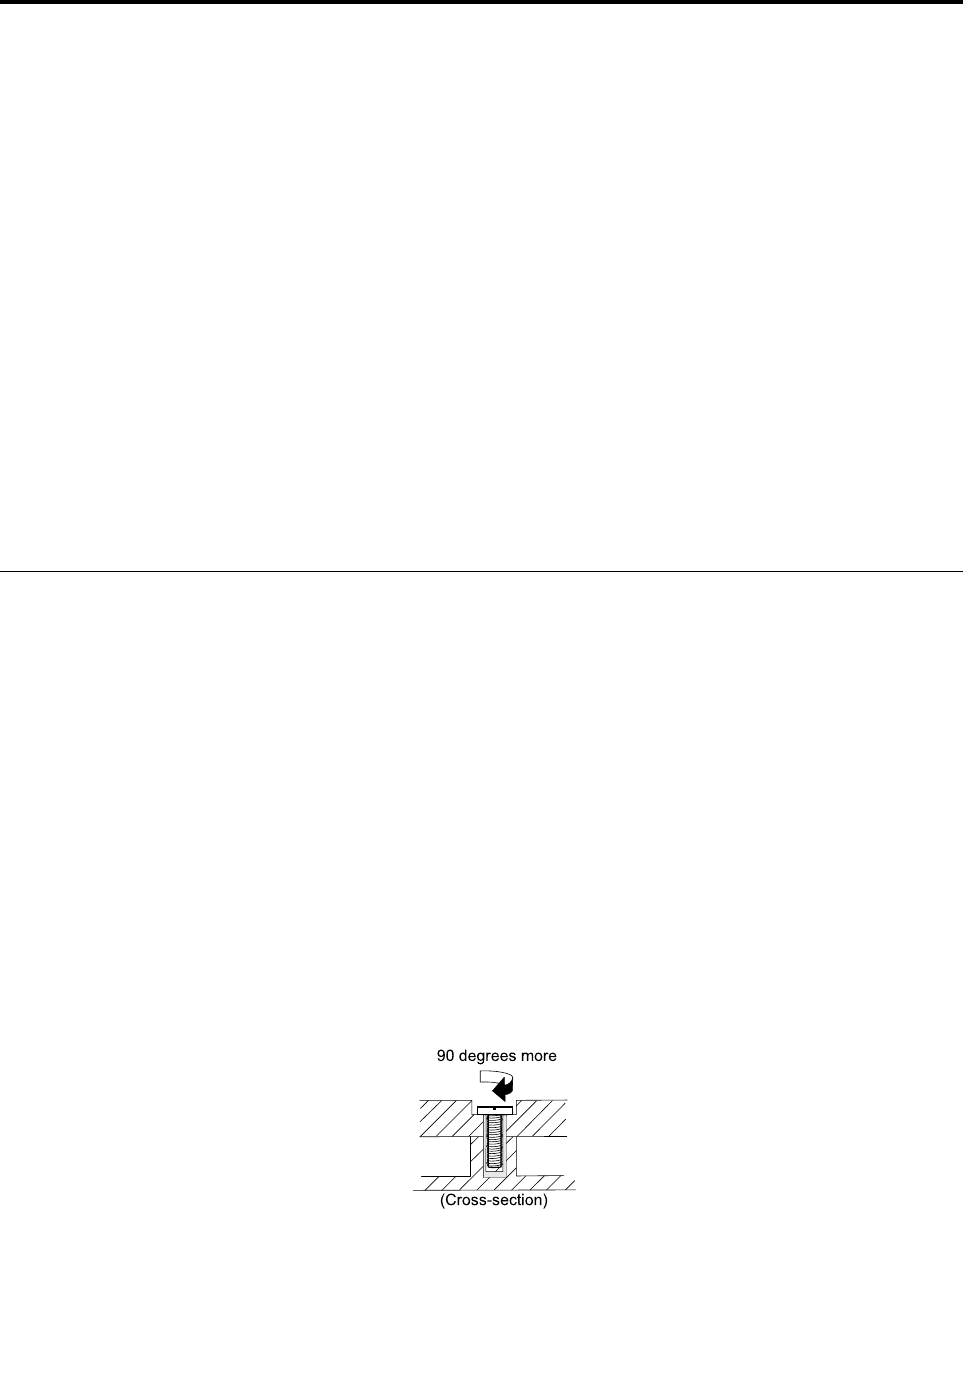
Tightenscrewsasfollows:
•Plastictoplastic
Turnanadditional90degreesafterthescrewheadtouchesthesurfaceoftheplasticpart.
90degreesmore
(Cross-section)
•Logiccardtoplastic
Turnanadditional180degreesafterthescrewheadtouchesthesurfaceofthelogiccard.
©CopyrightLenovo201547
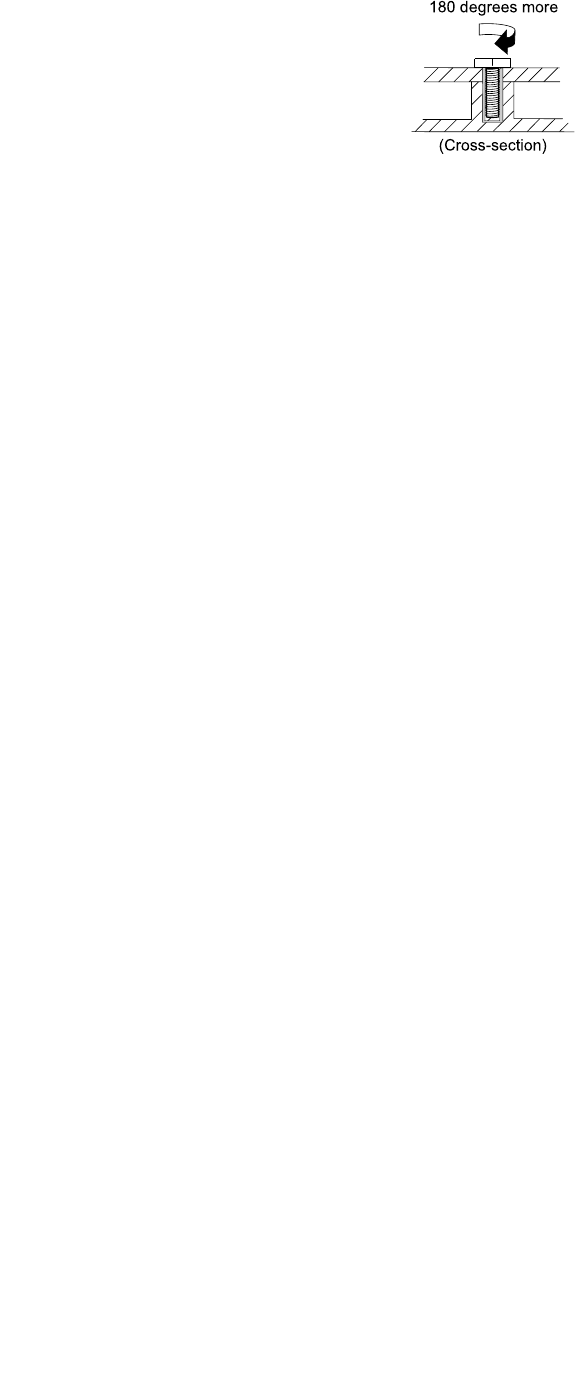
180degreesmore
(Cross-section)
Notes:
•Ensurethatyouusethecorrectscrew.Ifyouhaveatorquescrewdriver,tightenallscrewsfirmlytothe
torquespecifiedinthescrewinformationtableforeachstep.
•Ensurethattorquescrewdriversarecalibratedcorrectlyfollowingcountryspecifications.
48HardwareMaintenanceManual

Chapter10.RemovingorreplacingaFRU
ThischapterprovidesinstructionsonhowtoremoveorreplaceaFRU.
CRUstatementforcustomers:
Youcanresolvesomeproblemswithyourproductwithareplacementpartyoucaninstallyourself,called
a“CustomerReplaceableUnit”or“CRU.”SomeCRUsaredesignatedasself-serviceCRUsandothers
aredesignatedasoptional-serviceCRUs.Installationofself-serviceCRUsisyourresponsibility.For
optional-serviceCRUs,youcaneitherinstalltheCRUyourselforyoucanrequestthataServiceProvider
installtheCRUaccordingtothewarrantyserviceforyourproduct.IfyouintendoninstallingtheCRU,
LenovowillshiptheCRUtoyou.CRUinformationandreplacementinstructionsareshippedwithyour
productandareavailablefromLenovoatanytimeuponrequest.YoucanfindalistofCRUsforyour
productinthisHardwareMaintenanceManual.Anelectronicversionofthismanualcanbefoundat
http://www.lenovo.com/UserManuals.Followtheon-screeninstructionstofindthemanualforyourproduct.
YoumightberequiredtoreturnthedefectivepartthatisreplacedbytheCRU.Whenreturnisrequired:(1)
returninstructions,aprepaidshippinglabel,andacontainerwillbeincludedwiththereplacementCRU;and
(2)youmightbechargedforthereplacementCRUifLenovodoesnotreceivethedefectiveCRUwithinthirty
(30)daysofyourreceiptofthereplacementCRU.SeeyourLenovoLimitedWarrantydocumentationfor
fulldetails.
Note:TheillustrationsusedinthissectionareoftheLenovoE41,unlessotherwisestated.
Generalguidelines
WhenremovingorreplacingaFRU,besuretoobservethefollowinggeneralguidelines:
1.Donottrytoserviceanycomputerunlessyouhavebeentrainedandcertified.Anuntrainedpersonruns
theriskofdamagingparts.
2.BeforereplacinganyFRU,reviewChapter9“FRUreplacementnotices”onpage47.
3.BeginbyremovinganyFRUsthathavetoberemovedbeforereplacingthefailingFRU.AnysuchFRUs
arelistedatthebeginningofeachFRUreplacementsection.Removethemintheorderinwhichthey
arelisted.
4.FollowthecorrectsequenceinthestepsforremovingaFRU,asgivenintheillustrationsbythe
numbersinsquarecallouts.
5.Whenturningascrew,turnitinthedirectionasgivenbythearrowintheillustration.
6.WhenremovingaFRU,moveitinthedirectionasgivenbythearrowintheillustration.
7.ToputthenewFRUinplace,reversetheremovalprocedureandfollowanynotesthatpertainto
replacement.
8.WhenreplacingaFRU,usethecorrectscrewsasshowninthereplacementprocedures.
DANGER
BeforeremovinganyFRU,turnoffthecomputer,unplugallpowercordsfromelectricaloutlets,and
thendisconnectanyinterconnectingcables.
Attention:AfterreplacingaFRU,donotturnonthecomputeruntilyouhavemadesurethatallscrews,
springs,andothersmallpartsareinplaceandnonearelooseinsidethecomputer.Verifythisbyshaking
thecomputergentlyandlisteningforrattlingsounds.Metallicpartsormetalflakescancauseelectrical
shortcircuits.
©CopyrightLenovo201549
Attention:Thesystemboardissensitiveto,andcanbedamagedby,electrostaticdischarge(ESD).
Beforetouchingit,establishpersonalgroundingbytouchingagroundpointwithonehandorbyusingan
electrostaticdischargestrap.
1010Externalbatterypack
Importantnoticesforreplacingabatterypack
Attention:Lenovohasnoresponsibilityfortheperformanceorsafetyofunauthorizedbatteries,and
providesnowarrantiesforfailuresordamagearisingoutoftheiruse.
TheLenovoSolutionCenterprogramprovidesanautomaticbatterydiagnostictestthatdeterminesifthe
batterypackisdefective.AbatterypackFRUshouldnotbereplacedunlessthisdiagnostictestshows
thatthebatteryisdefective.Theonlyexceptiontothisisifthebatterypackisphysicallydamagedora
customerisreportingapossiblesafetyissue.
IftheLenovoSolutionCenterprogramisnotinstalledonthecomputer,thecustomershoulddownloadand
installtheprogramtodiagnosethebatterypack,beforegettinganon-physicallydamagedbatterypack
replaced.Notethatthereplacementofaphysicallydamagedbatterypackisnotcoveredbythewarranty.
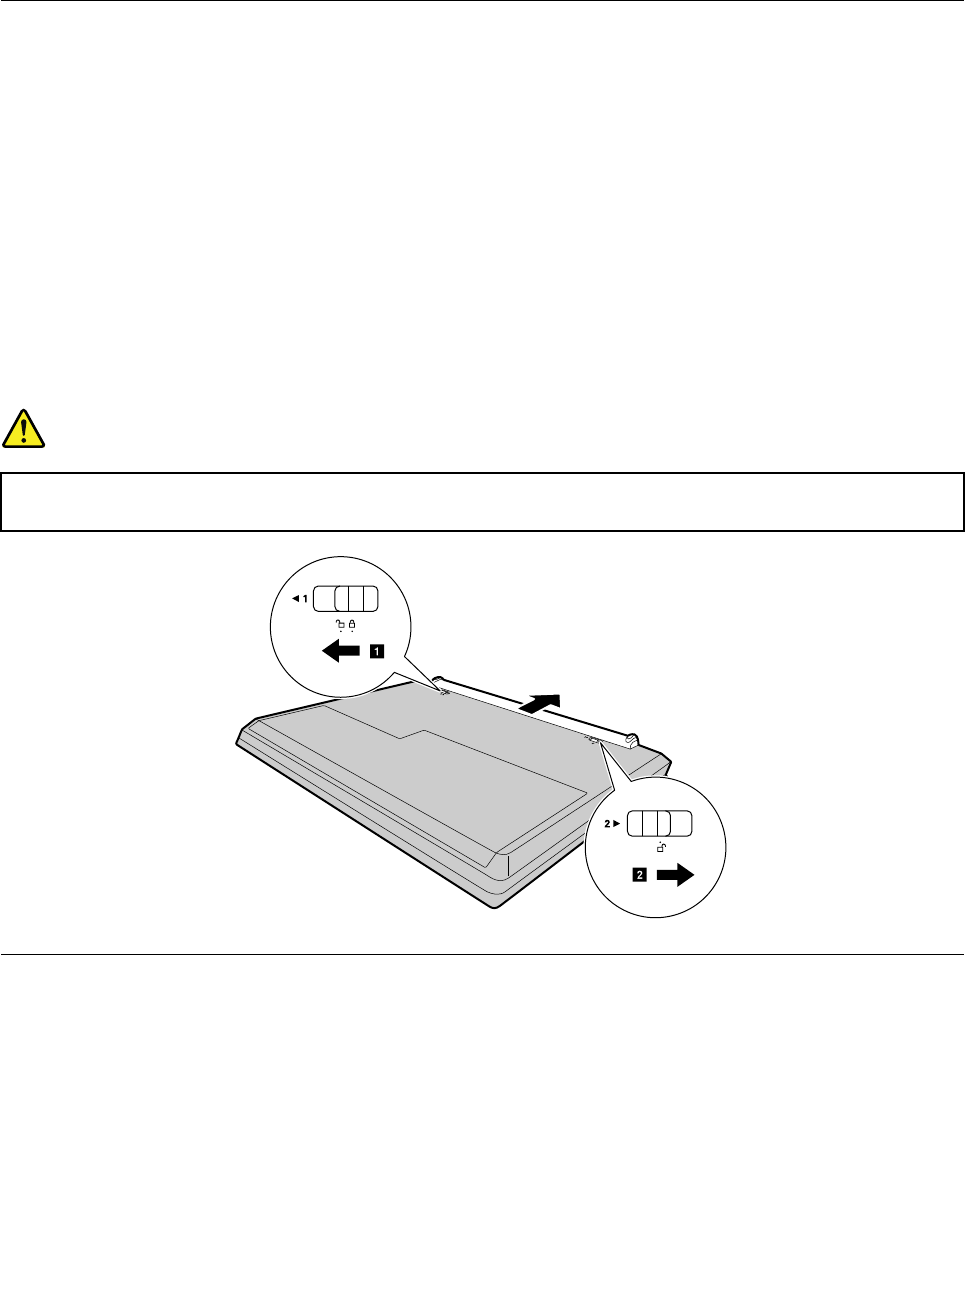
Removalstepsoftheexternalbatterypack
DANGER
Useonlytheauthorizedbatteryspecifiedforyourcomputer.Anyotherbatterycouldigniteor
explode.
1
b
a
1020Keyboard
Foraccess,removetheseFRUs:
•“1010Externalbatterypack”onpage50
50HardwareMaintenanceManual
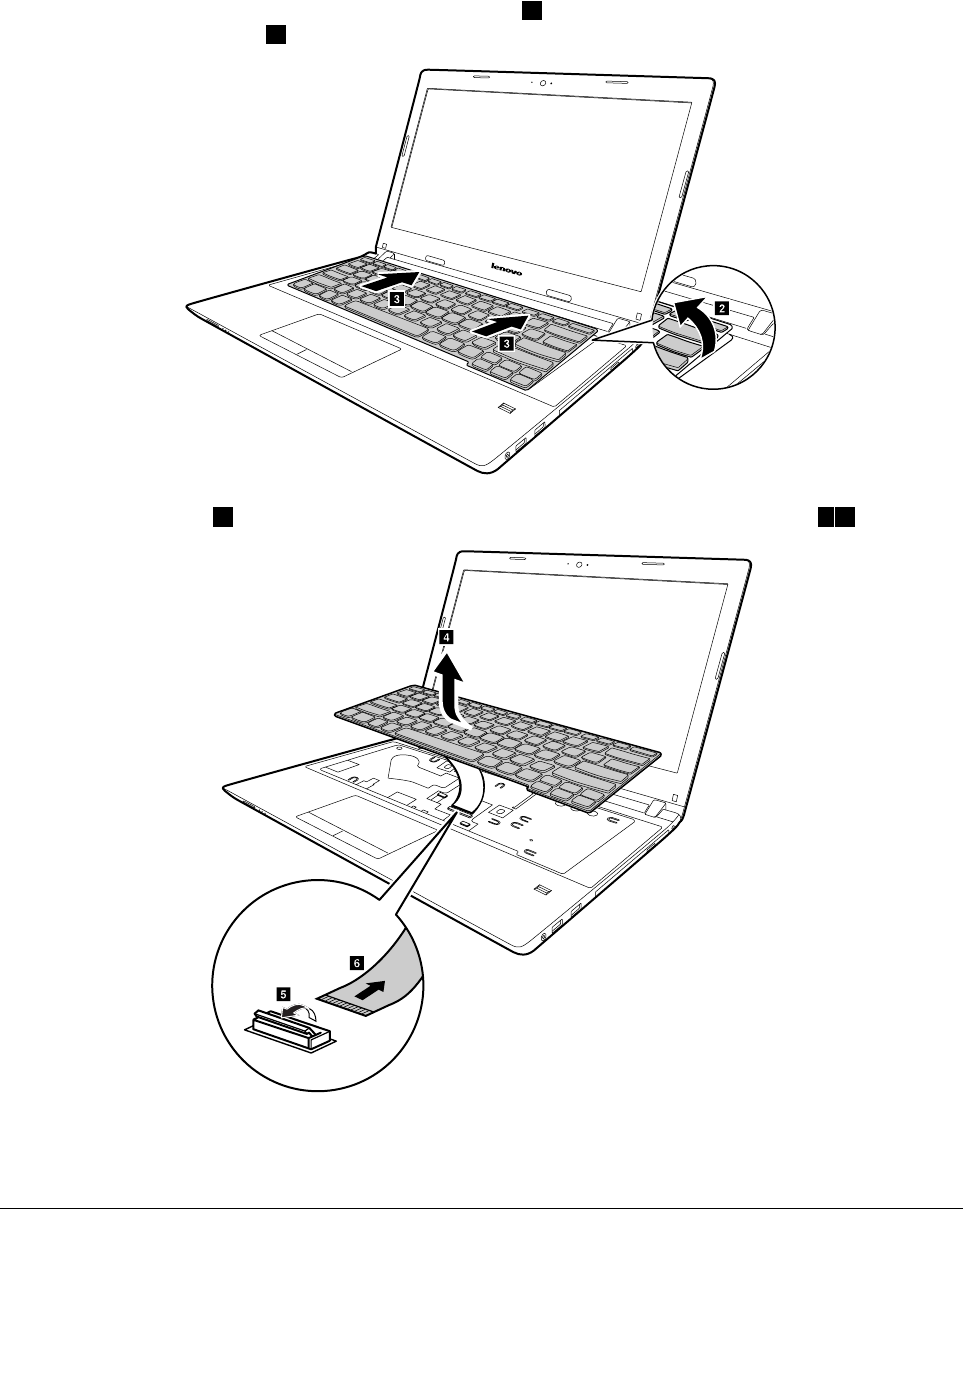
Liftthekeyboardalittlebyitsupperedgewithaflatblade2,andthenslidethekeyboardframeforwardin
thedirectionshownbyarrow3.
b
c
c
Liftthekeyboardalittle4,andthendetachtheconnectorinthedirectionshownbyarrows56.
f
e
d
Wheninstalling
Makesurethattheconnectorisfirmlyattached.
1030Opticaldiskdrive
Foraccess,removetheseFRUsinorder:
•“1010Externalbatterypack”onpage50
52HardwareMaintenanceManual
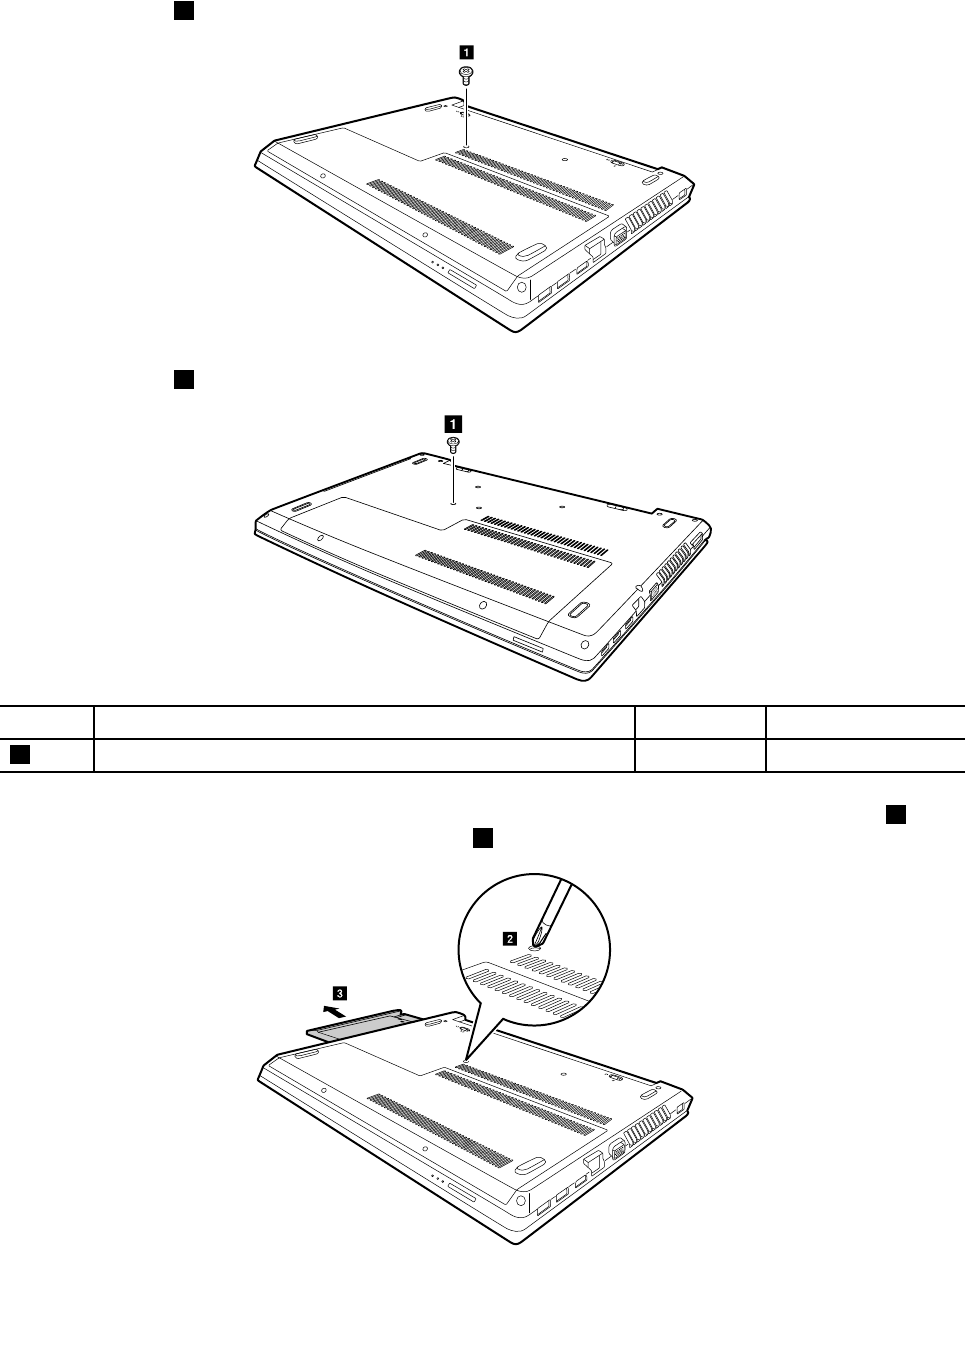
RemovalstepsoftheOpticaldrive
Removethescrew1(E41).
a
Removethescrew1(E51).
a
StepScrew(quantity)ColorTorque
1SCREWM2*6mm,flat-head,nylok-coatedBlack1.85+/-0.15kgf-cm
Insertascrewdriverintothescrewholdandpushtheopticaldriverinthedirectionshownbyarrow2.Pull
theopticaldriveoutinthedirectionshownbyarrow3.
b
c
Chapter10.RemovingorreplacingaFRU53
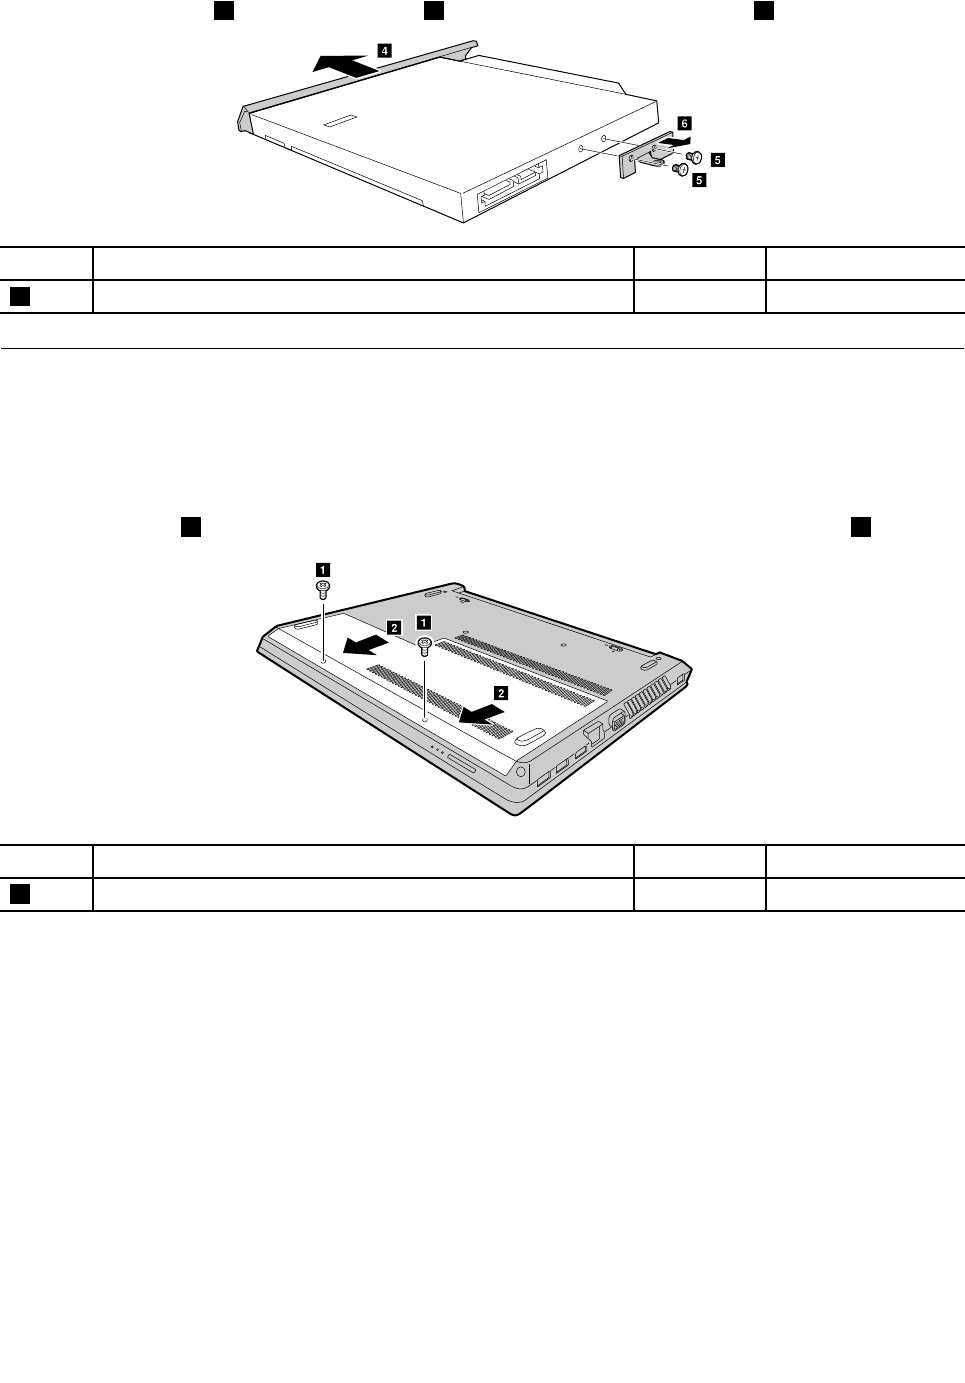
RemovetheODDbezel4.Loosentwoscrews5andthendetachtheODDbracket6.
d
e
f
e
StepScrew(quantity)ColorTorque
5SCREWM2*3mm,flat-head,nylok-coated(2)Black1.85+/-0.15kgf-cm
1040Basecoverassembly
Foraccess,removetheseFRUs:
•“1010Externalbatterypack”onpage50
Removalstepsofthebasecoverassembly
Removethescrews1thatsecurethebasecoverassembly.Removethebasecoverassembly2.
b
a
a
b
StepScrew(quantity)ColorTorque
1SCREWM2.5*6mm,flat-head,nylok-coated(2)Black3.0+/-0.3kgf-cm
54HardwareMaintenanceManual
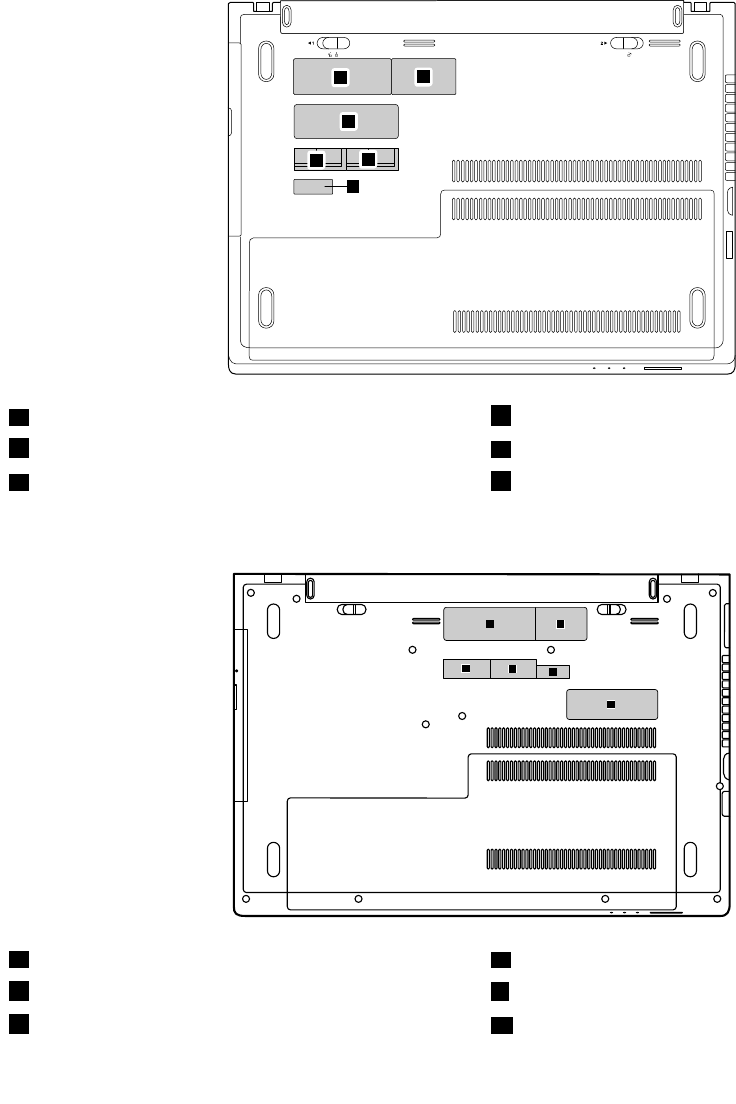
Applyinglabelstothebasecoverassembly:
Thenewbasecoverassemblyisshippedwithakitcontaininglabelsofseveralkinds.Applythoselabels
whenyoureplacethebasecoverassembly.Forthelabelsthatarenotshippedwiththenewbasecover
assembly,peelthemfromtheoldbasecoverassembly,andadherethemtothenewone.
Note:IftheCertificateofAuthenticity(COA)label(b)isattachedtoareplacedpart,returnthereplacedpart
tothecustomer,orprovidealettertothecustomerstatingtheoriginallabelpartnumber,serialnumber,
andproductkey.
ThefollowingillustrationshowsthelocationofeachlabelonE41.
ab
f
c
e
d
aRatinglabeldWlanlabel
bRatingprintlabeleBTlabel
cCOAlabel(windows7)/GMLlabel(forwindows10)fIndonesiaratinglabel
ThefollowingillustrationshowsthelocationofeachlabelonE51.
e
h
m
i
f
g
eRatinglabelgBISlabelforIndia
fRatingprintlabelIIndonesiaratinglabel
hWlan/BTlabelmCOAlabel(windows7)/GMLlabel(windows10)
Chapter10.RemovingorreplacingaFRU55
1050Harddiskdriveorsolid-statehybriddrive
Foraccess,removetheseFRUsinorder:
•“1010Externalbatterypack”onpage50
•“1040Basecoverassembly”onpage54
Attention:
•Donotdropthedriveorapplyanyphysicalshocktoit.Thedriveissensitivetophysicalshock.Improper
handlingcancausedamageandpermanentlossofdata.
•Beforeremovingthedrive,havetheusermakeabackupcopyofalltheinformationonitifpossible.
•Neverremovethedrivewhilethesystemisoperatingorinsuspendmode.
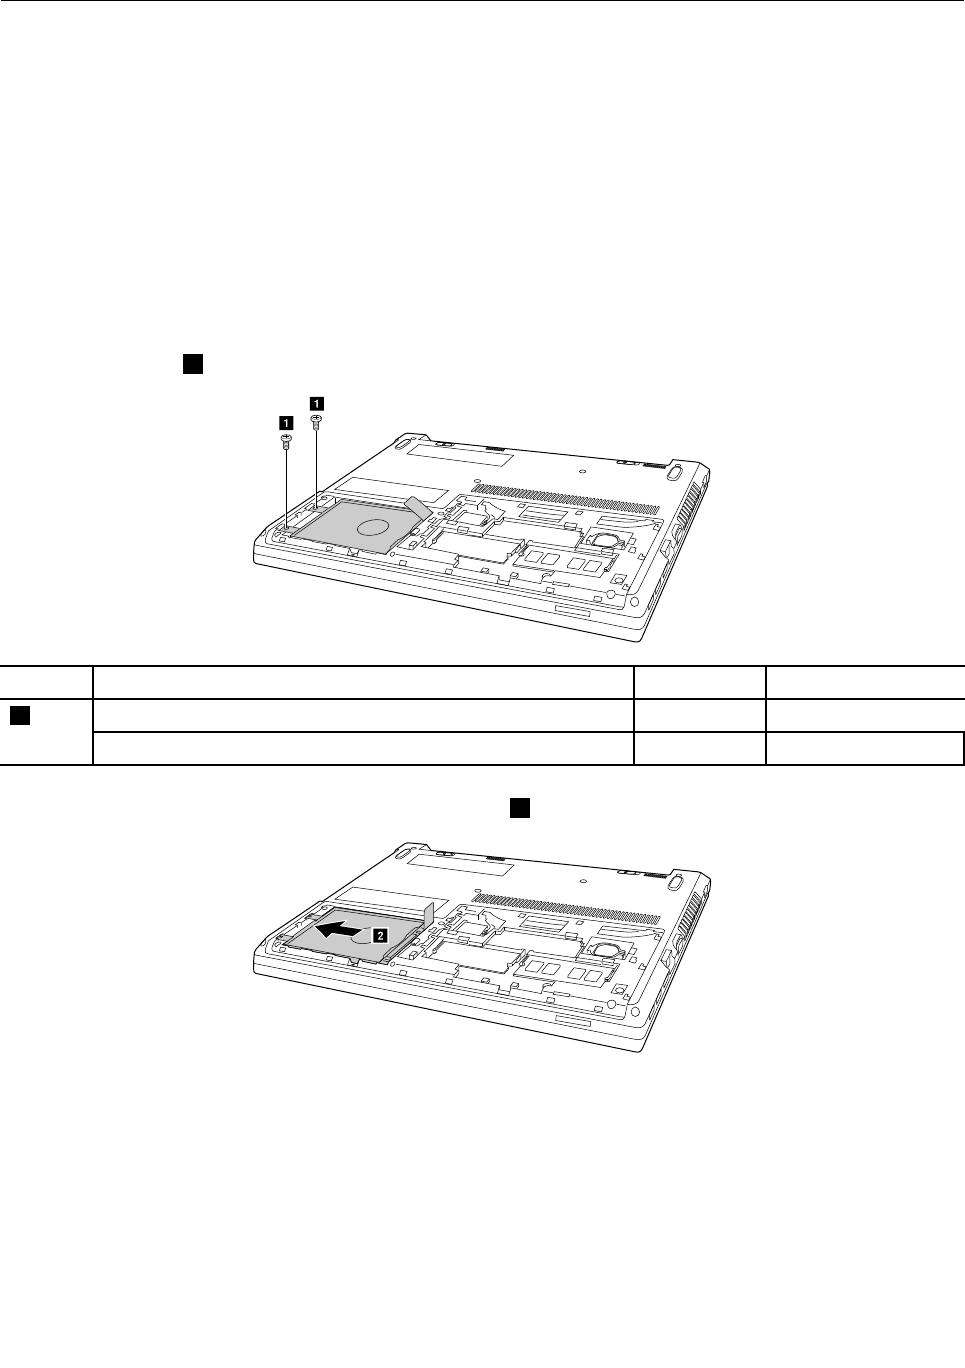
Removalstepsoftheharddiskdriveorthesolid-statedrive
Removethescrews1.
a
a
StepScrew(quantity)ColorTorque
M2.5×6mm,flat-head,nylon-coated(2)(E41)Black3.0+/-0.3kgf-cm
1
M2.5×4mm,flat-head,nylon-coated(2)(E51)White3.0+/-0.3kgf-cm
Slidetheharddiskdriveinthedirectionshownbyarrow2.
b
56HardwareMaintenanceManual
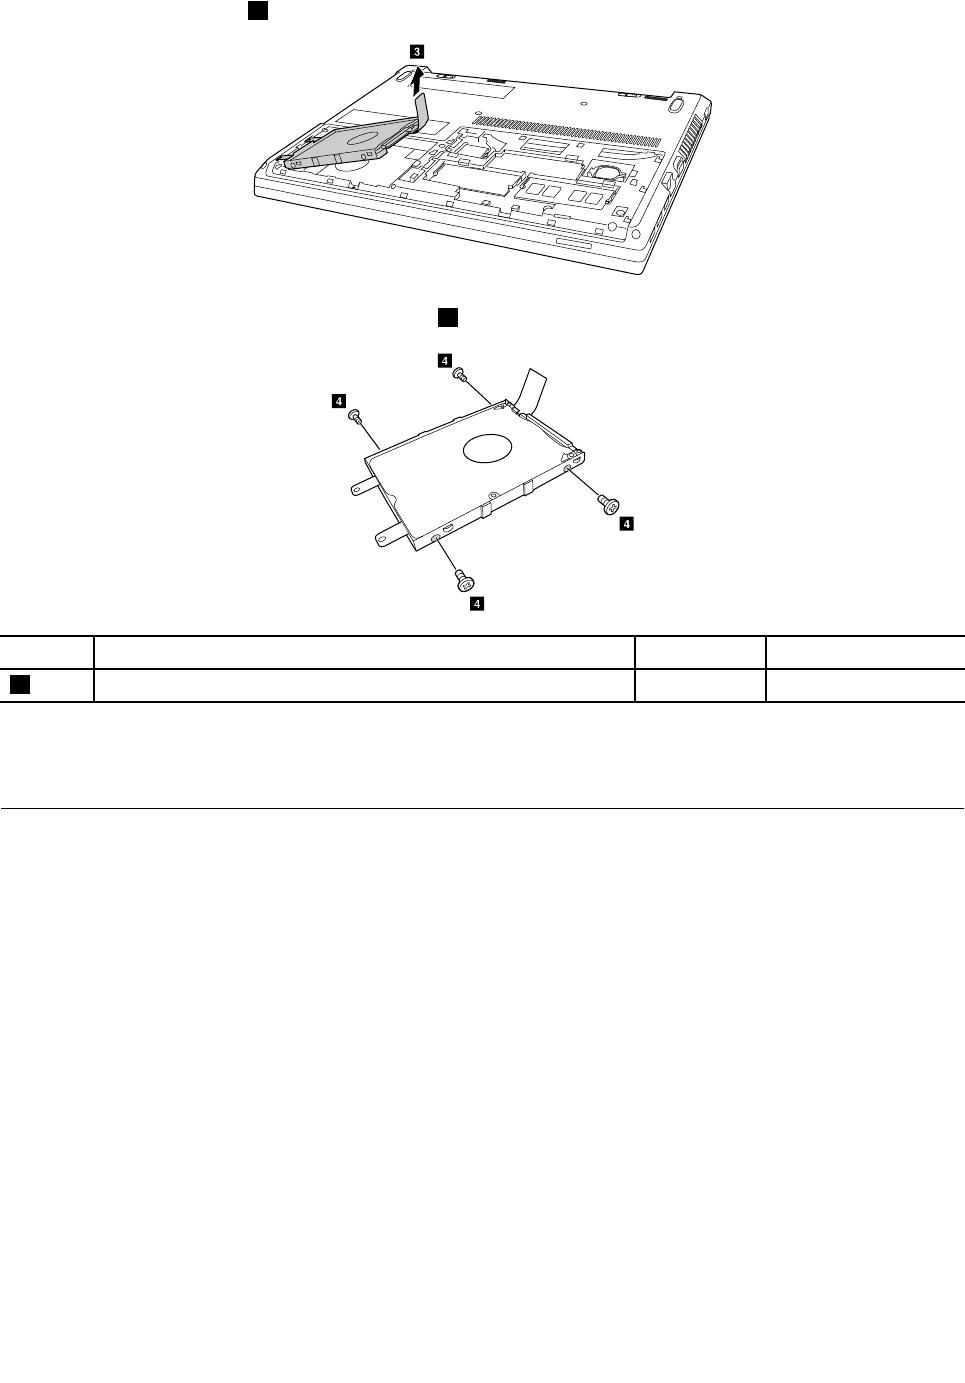
Pulltheharddiskdriveout3.
c
Detachthebracketbyremovingthefourscrews4.
d
d
d
d
StepScrew(quantity)ColorTorque
4M3×3mm,flat-head,nylon-coated(4)Black3.0+/-0.3kgf-cm
Wheninstalling:
Ensurethattheharddiskdriveorsolid-statehybriddriveisfirmlyattached.
1060Wireless-LAN/Bluetoothcard
Foraccess,removetheseFRUsinorder:
•“1010Externalbatterypack”onpage50
•“1040Basecoverassembly”onpage54
Chapter10.RemovingorreplacingaFRU57
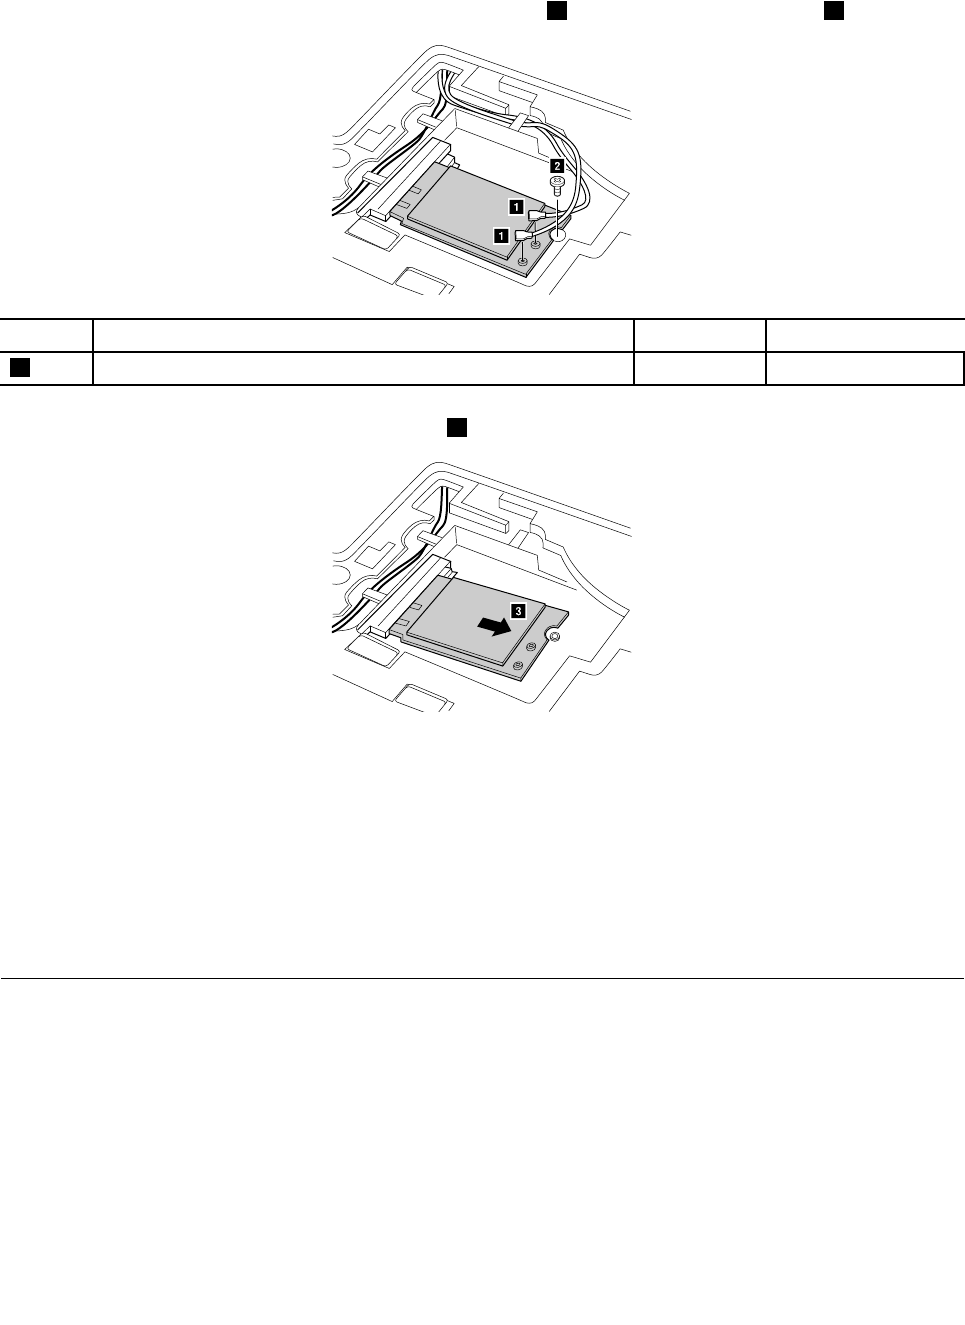
RemovalstepsoftheWireless-LAN/Bluetoothcard
PeeloffthespongethatsecurethewirelessLancableconnectors,unplugthetwowirelessLancable
connectors(blackandwhite)inthedirectionshownbyarrow1,andthenremovethescrew2
a
a
b
StepScrew(quantity)ColorT orque
2M2×3mm,flat-head,nylon-coated(1)Black1.85+/-0.15kgf-cm
Removethecardinthedirectionshownbyarrow3.
c
Wheninstalling:
1.InmodelswithawirelessLANcardthathastwoantennaconnectors,plugtheblackcable(1st)
(MAIN)intothejacklabeledMAINor1onthecard,andthewhitecable(2nd)(AUX)intojacklabeled
AUXor2onthecard.
2.InmodelswithawirelessLANcardthathasthreeantennaconnectors,plugtheblackcable(1st)(MAIN)
intothejacklabeledMAINor1,thegreycable(3rd)intojacklabeled1,andthewhitecable(2nd)
(AUX)intojacklabeled2onthecard.
1070Memorymodule
Foraccess,removetheseFRUsinorder:
•“1010Externalbatterypack”onpage50
•“1040Basecoverassembly”onpage54
58HardwareMaintenanceManual
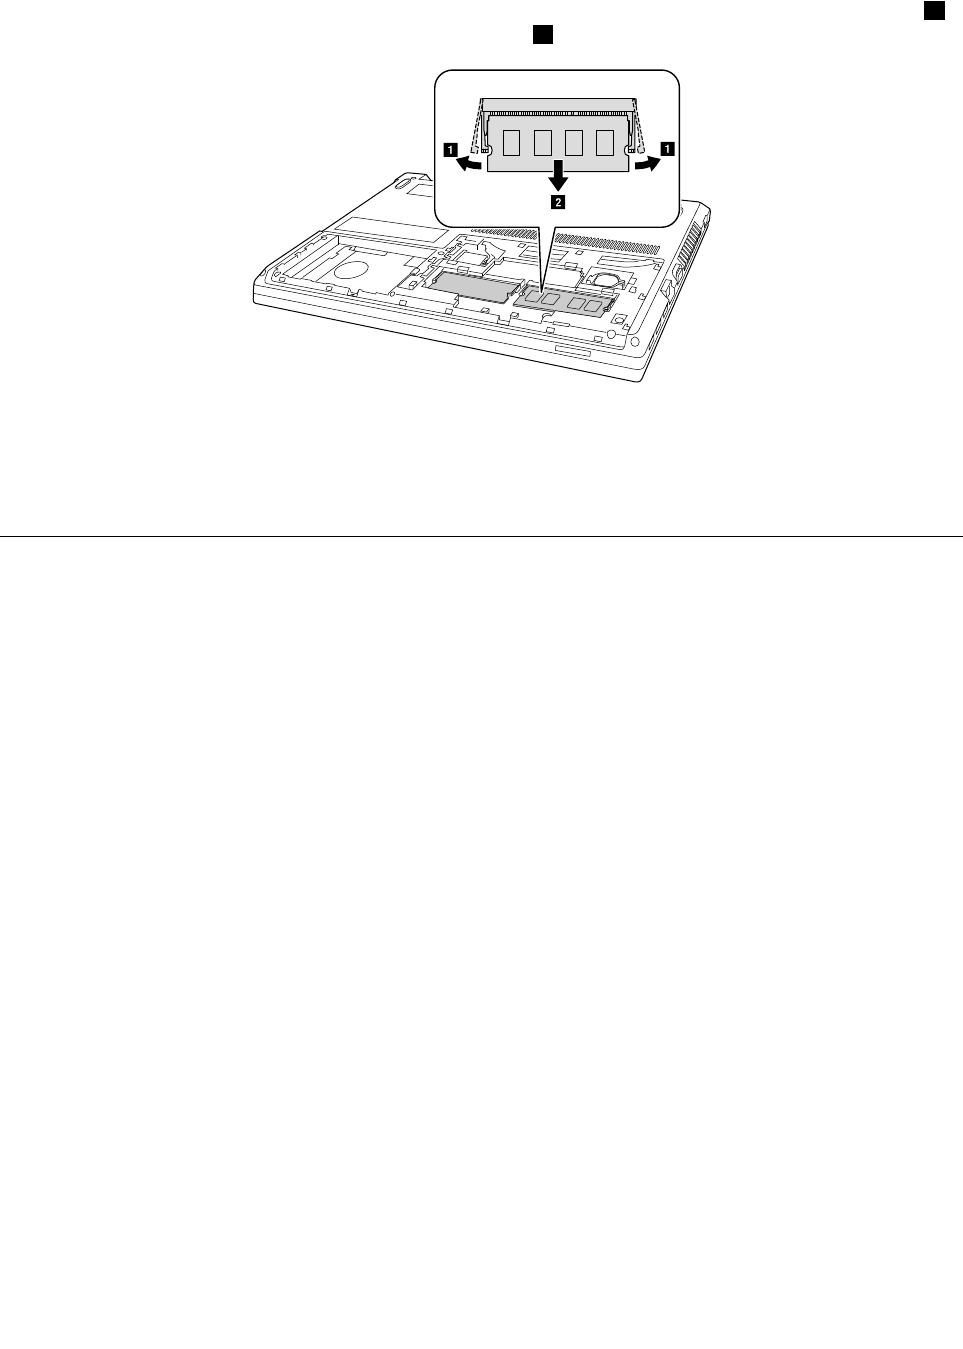
Removalstepsofthememorymodule
Releasethetwolatchesonbothedgesofthesocketatthesametimeinthedirectionshownbyarrows1,
andthenunplugtheDIMMinthedirectionshownbyarrow2.
a
a
b
Wheninstalling:
Insertthenotchedendofthememorymoduleintothememoryslot.Pressthememorymoduleinfirmly,
andpivotitdownwarduntilitsnapsintoplace.Ensurethatthememorymoduleisfirmlyinstalledinthe
slotanddoesnotmoveeasily.
1080Uppercase
Foraccess,removetheseFRUsinorder:
•“1010Externalbatterypack”onpage50
•“1020Keyboard”onpage50
•“1030Opticaldiskdrive”onpage52
•“1040Basecoverassembly”onpage54
•“1050Harddiskdriveorsolid-statehybriddrive”onpage56
•“1060Wireless-LAN/Bluetoothcard”onpage57
Chapter10.RemovingorreplacingaFRU59
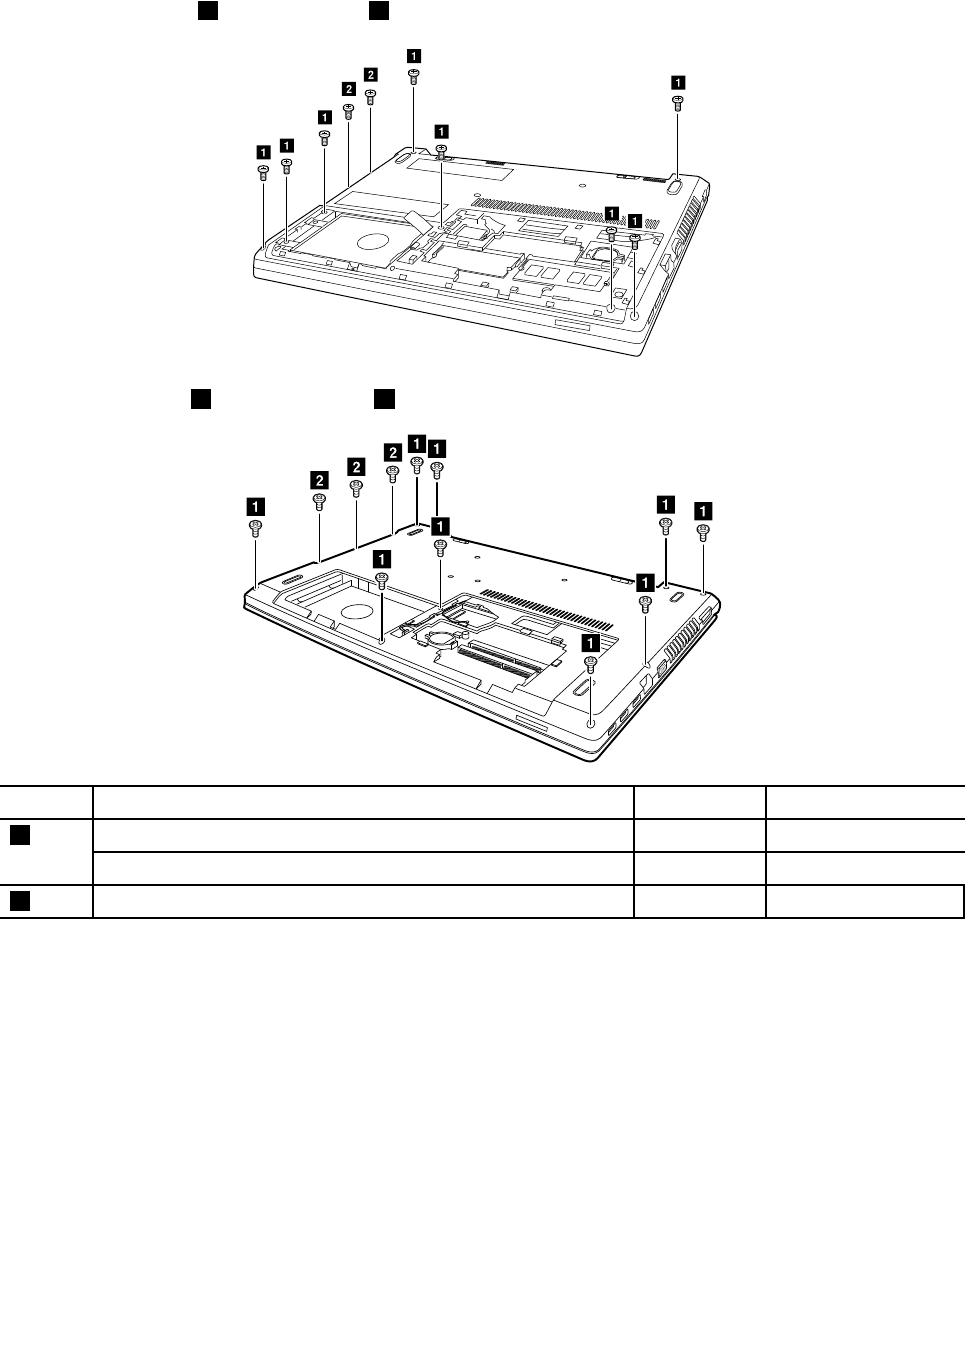
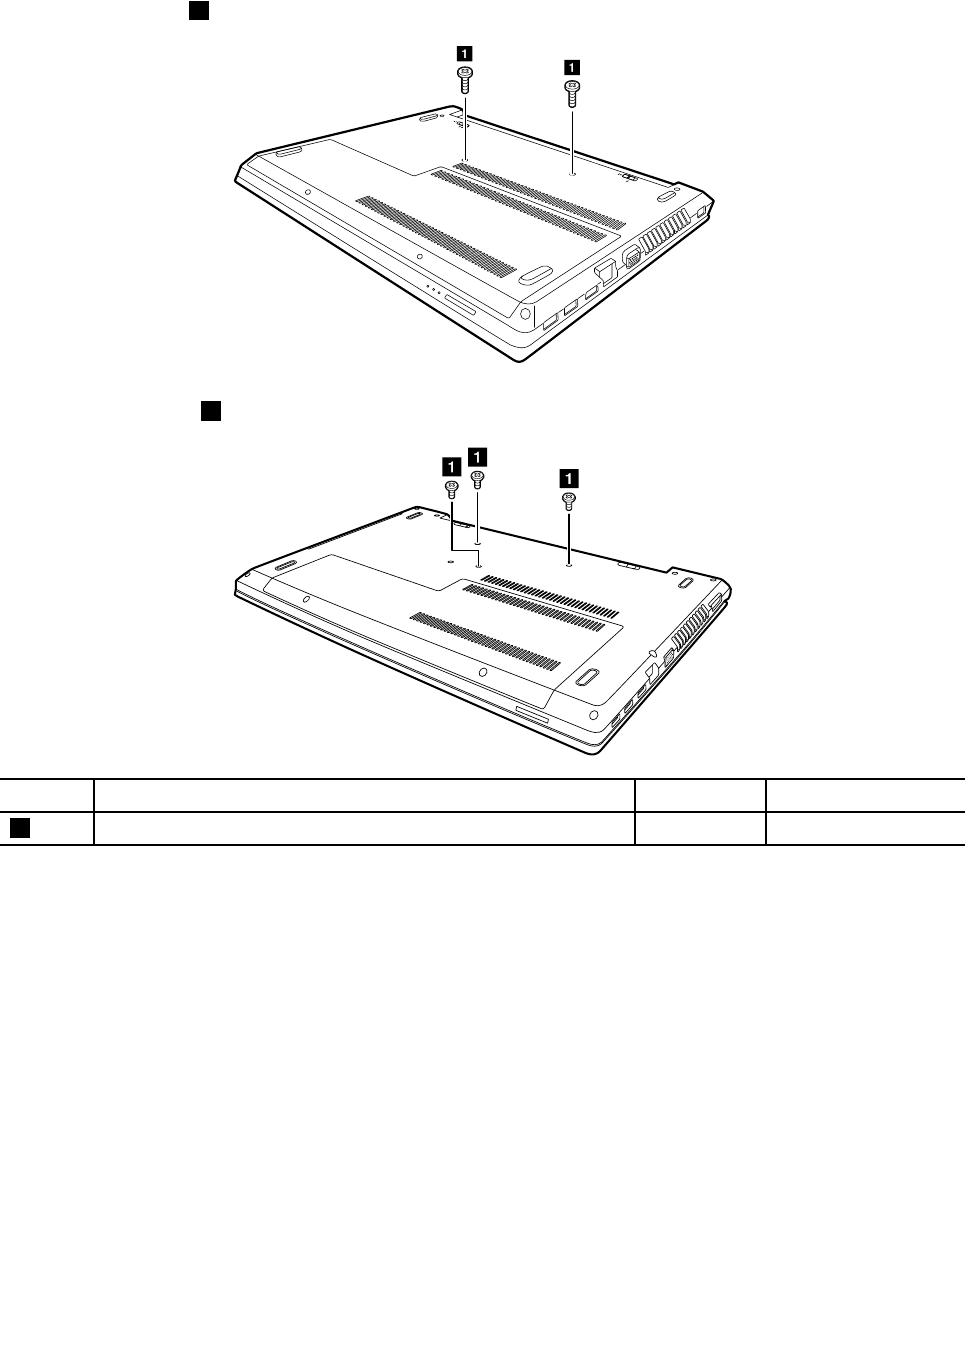
Removalstepsoftheuppercase
Removeeightscrews1andtwoscrews2onthebottom.(E41)
b
b
a
a
a
a
a
a
a
a
Removeninescrews1andthreescrews2onthebottom.(E51)
a
a
a
a
a
a
a
a
b
b
b
a
StepScrew(quantity)ColorT orque
M2.5×6mm,flat-headed,nylon-coated(8)(E41)Black3.0+/-0.3kgf-cm
1
M2.5×7mm,flat-headed,nylon-coated(9)(E51)Black3.0+/-0.3kgf-cm
2M2.0×2mm,flat-headed,nylon-coatedBlack1.85+/-0.15kgf-cm
60HardwareMaintenanceManual
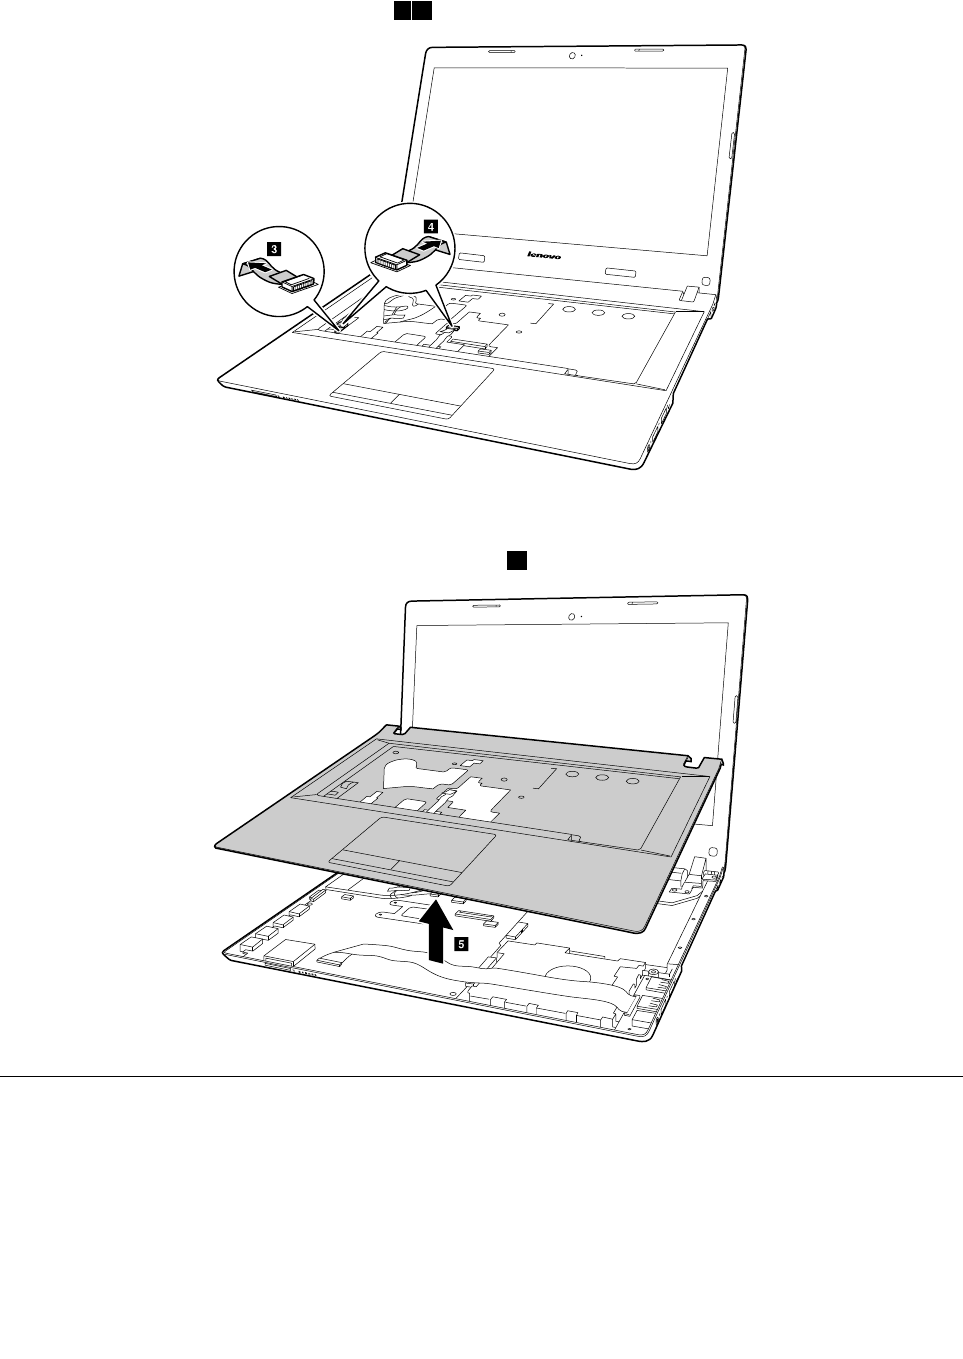
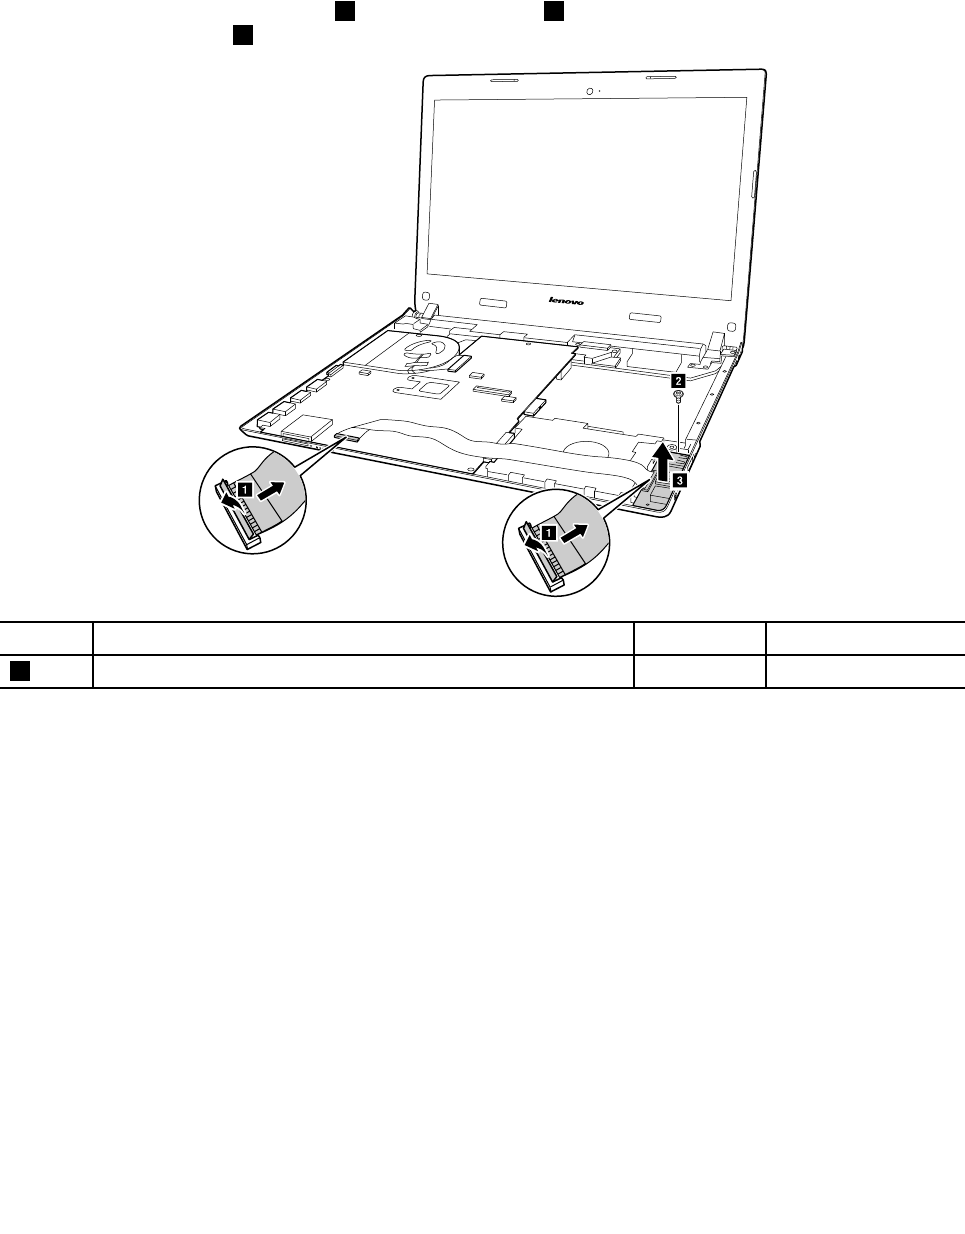
Detachpowerboardconnector,LEDboardconnector,touchpadconnectorandfingerprintreader
connectorinthedirectionshownbyarrows34.
c
d
Wheninstalling:Ensurethatalltheconnectorsareattachedfirmly.
Removetheuppercaseinthedirectionshownbyarrow5.
e
1090Audioboard,audioboardcable,powerboard,touchpadboard
cable,fingerprinterboard,LEDboardandODDswitchboard
Foraccess,removetheseFRUsinorder:
•“1010Externalbatterypack”onpage50
•“1020Keyboard”onpage50
•“1030Opticaldiskdrive”onpage52
•“1040Basecoverassembly”onpage54
Chapter10.RemovingorreplacingaFRU61
•“1050Harddiskdriveorsolid-statehybriddrive”onpage56
•“1060Wireless-LAN/Bluetoothcard”onpage57
•“1080Uppercase”onpage59
Removalstepsofaudioboard,audioboardcable,powerboard,touchpadboardcable,fingerprinter
board,LEDboardandODDswitchboard
DetachAudioboardcableconnector1.Removeonescrew2,andthenremovetheaudioboardinthe
directionshownbyarrow3.
b
c
a
a
StepScrew(quantity)ColorT orque
2M2.5×4mm,flat-head,nylon-coated(1)silver3.0+/-0.3kgf-cm
Wheninstalling:makesurethattheaudioboardcableconnectorisfirmlyattached.
62HardwareMaintenanceManual
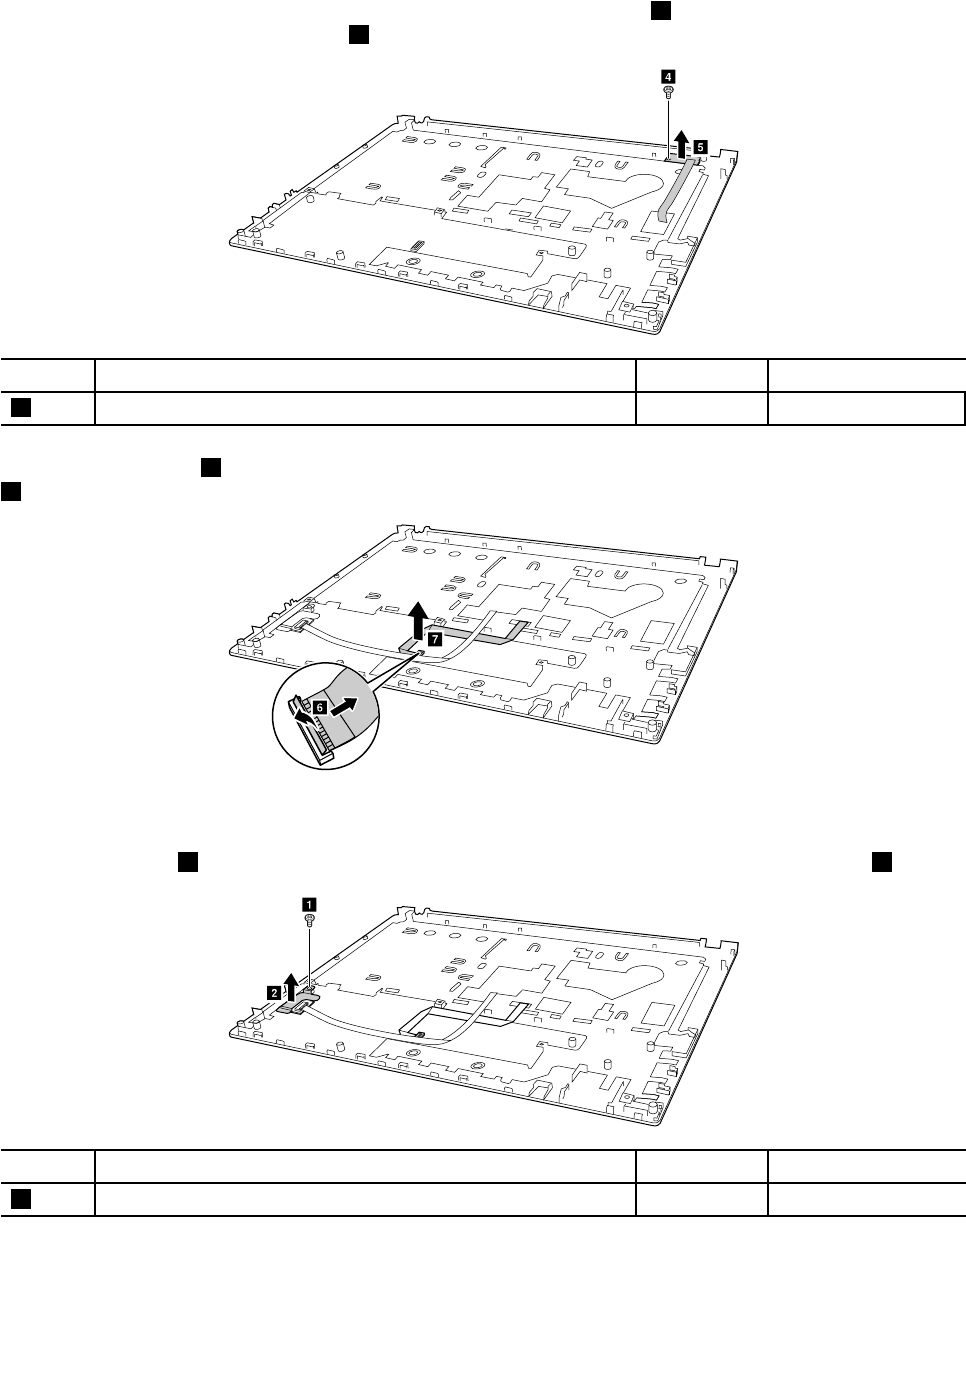
Peelofftheadhesivetapesecuringthepowerboard,removeonescrew4,andthenremovethepower
boardinthedirectionshownbyarrow5.
d
e
StepScrew(quantity)ColorT orque
4M2×3mm,flat-head,nylon-coated(1)black1.85+/-0.15kgf-cm
Detachtheconnector6,andthenremovethetouchpadboardcableinthedirectionshownbyarrow
7(ForE41).
g
f
Wheninstalling:makesurethatthetouchpadboardcableconnectorisfirmlyattached.
Removeonescrew8,andthenremovethefingerprinterbracketinthedirectionshownbyarrow9.
b
a
StepScrew(quantity)ColorT orque
8M2×3mm,flat-head,nylon-coated(1)black1.85+/-0.15kgf-cm
Chapter10.RemovingorreplacingaFRU63
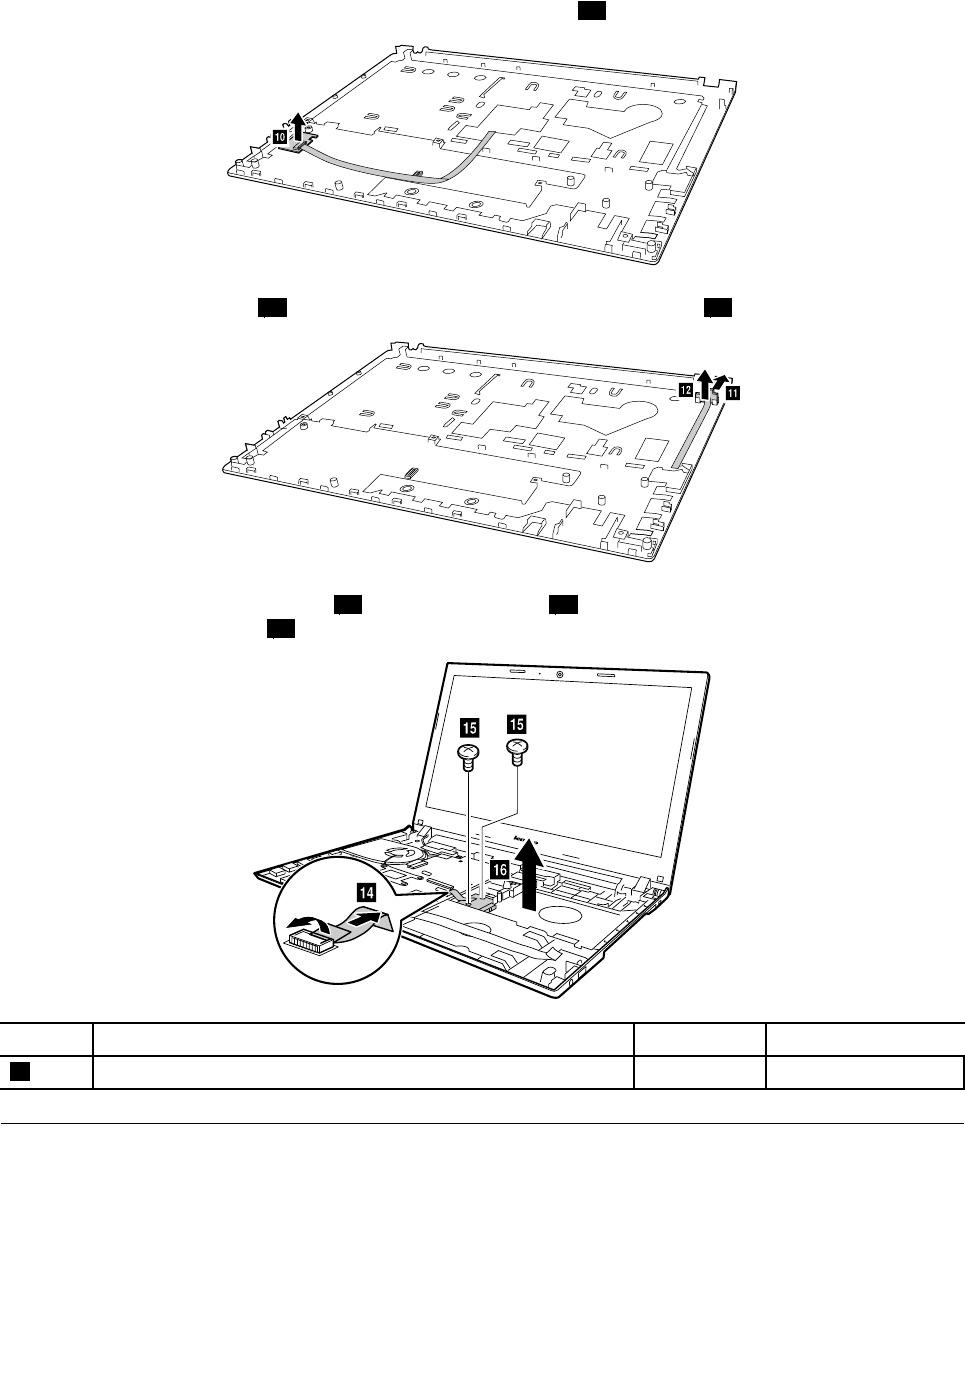
Removethefingerprinterbroadinthedirectionshownbyarrow10.
j
PushforwardtheLEDboard11andremoveitinthedirectionshownbyarrow12(E41).
lk
DetachODDswitchboardconnector14,removetwoscrews15,andthenremovetheODDswitchboardin
thedirectionshownbyarrow16(E51).
oo
p
n
StepScrew(quantity)ColorT orque
4M2.5×4mm,flat-head,nylon-coated(2)silver3.0+/-0.3kgf-cm
1100Systemboard
Importantnoticesforhandlingthesystemboard
Whenhandlingthesystemboard,readthefollowing:
•Becarefulnottodropthesystemboardonabenchtopthathasahardsurface,suchasmetal,wood,or
composite.
64HardwareMaintenanceManual

•Avoidroughhandlingofanykind.
•Ateverypointintheprocess,besurenottodroporstackthesystemboard.
•Ifyouputasystemboarddown,besuretoputitonlyonapaddedsurfacesuchasanESDmatora
corrugatedconductivematerial.
Foraccess,removetheseFRUsinorder:
•“1010Externalbatterypack”onpage50
•“1020Keyboard”onpage50
•“1030Opticaldiskdrive”onpage52
•“1040Basecoverassembly”onpage54
•“1050Harddiskdriveorsolid-statehybriddrive”onpage56
•“1060Wireless-LAN/Bluetoothcard”onpage57
•“1080Uppercase”onpage59
•“1090Audioboard,audioboardcable,powerboard,touchpadboardcable,fingerprinterboard,
LEDboardandODDswitchboard”onpage61
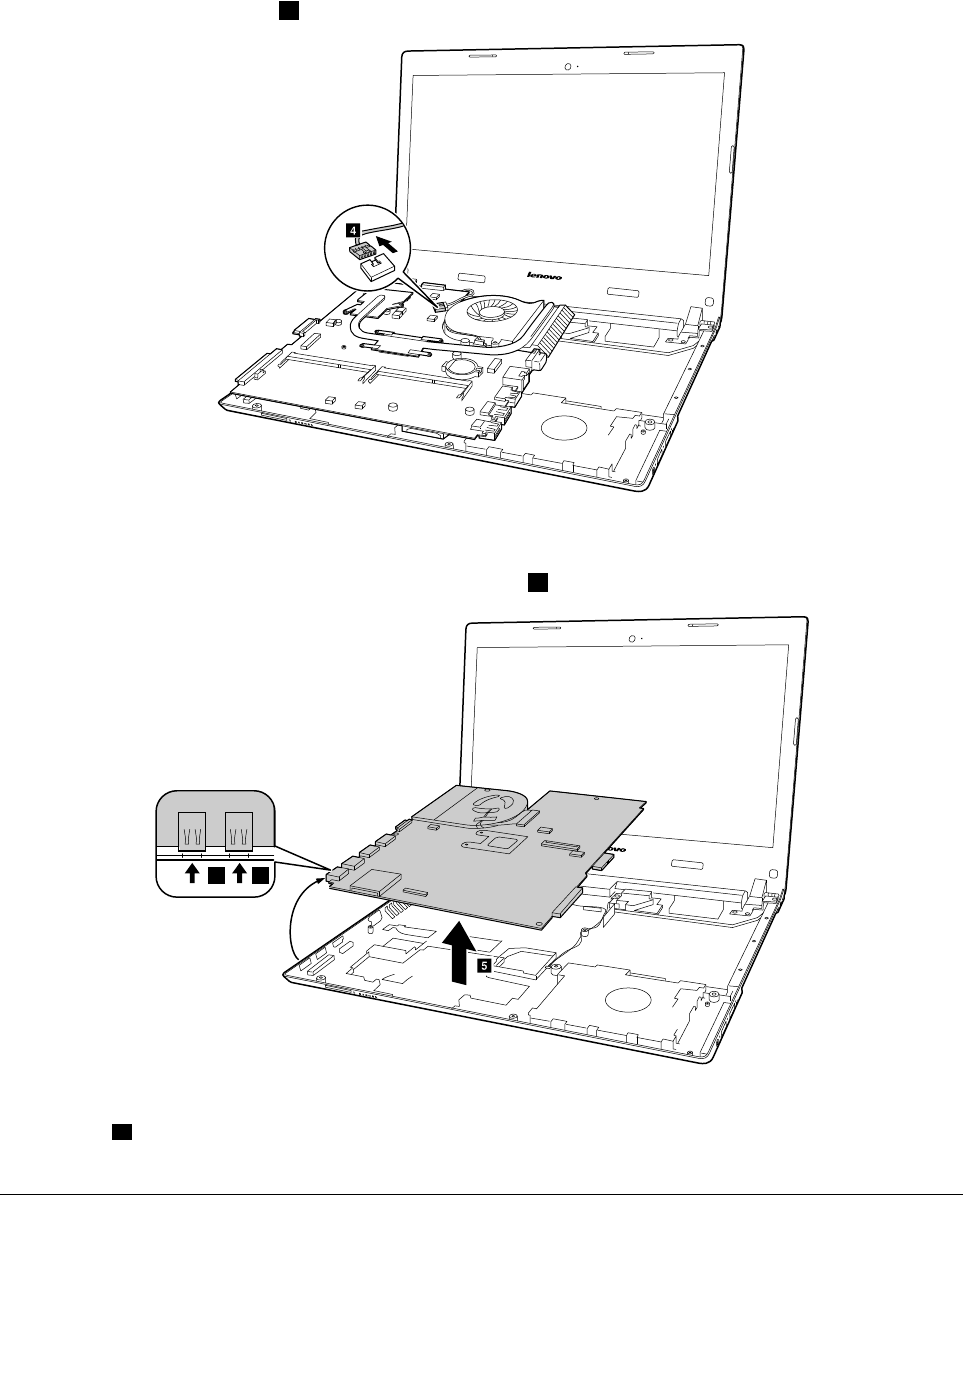
Removalstepsofthesystemboard
DetachEDPcableconnector1.
a
Chapter10.RemovingorreplacingaFRU65
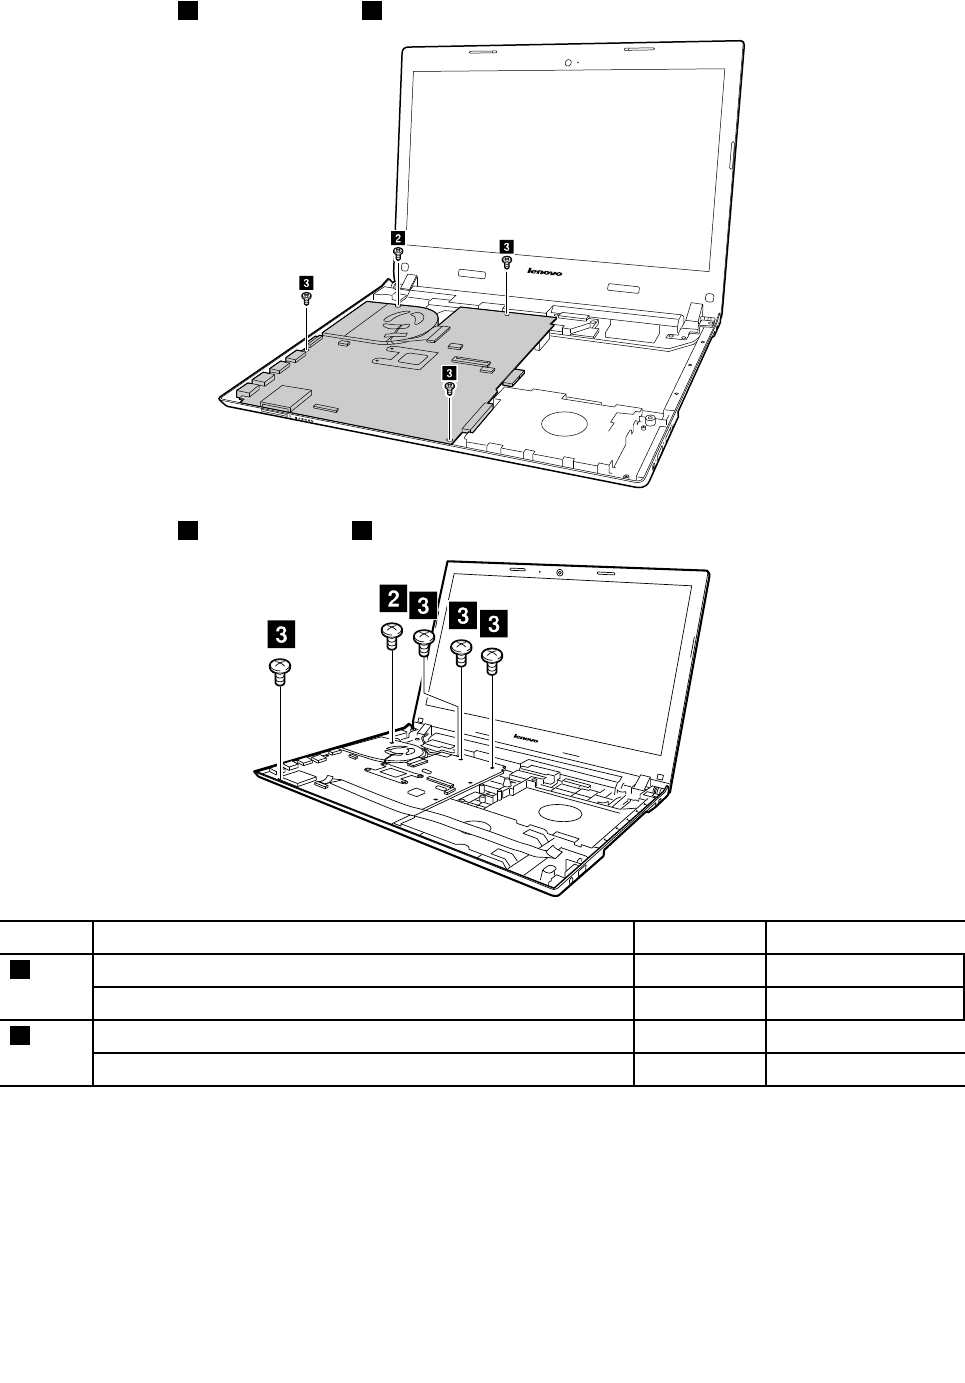
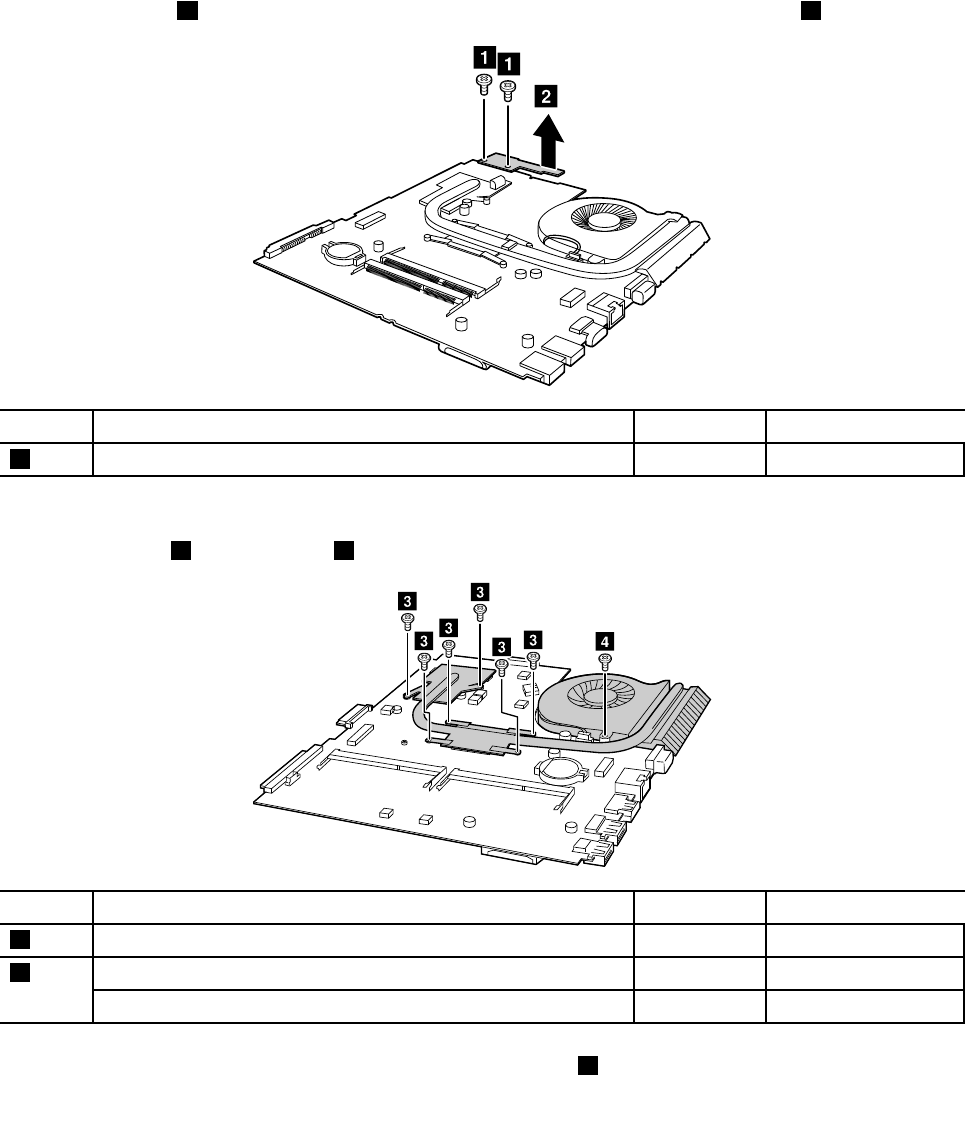
Removeonescrew2andthreescrews3.
b
c
c
c
Removeonescrew2andfourscrews3.
c
bccc
StepScrew(quantity)ColorT orque
M2×5mm,flat-headed,nylon-coated(1)(E41)Silver1.85+/-0.15kgf-cm
2
M2×6mm,flat-headed,nylon-coated(1)(E51)Black1.85+/-0.15kgf-cm
M2.5×6mm,flat-headed,nylon-coated(3)(E41)Black3.0+/-0.3kgf-cm
3
M2.5×4mm,flat-headed,nylon-coated(4)(E51)Silver3.0+/-0.3kgf-cm
66HardwareMaintenanceManual
UnplugDC-incableconnector4.
d
Wheninstalling:Ensurethattheconnectorsareattachedfirmly.
Removethesystemboardinthedirectionshownbyarrow5.
e
a a
Wheninstalling:Whenattachingthesystemboardtothebasecover,adjusttheplacementoftheUSBports
asshownina,andmakesurethattheyareattachedtotheholesonthebasecoverasshown.Improper
placementofthosejacksmightcauseadamage.
1110BatteryBoard,ThermalfanassemblyandHeatSinkassembly
Foraccess,removetheseFRUsinorder:
•“1010Externalbatterypack”onpage50
•“1020Keyboard”onpage50
Chapter10.RemovingorreplacingaFRU67
•“1030Opticaldiskdrive”onpage52
•“1040Basecoverassembly”onpage54
•“1050Harddiskdriveorsolid-statehybriddrive”onpage56
•“1060Wireless-LAN/Bluetoothcard”onpage57
•“1080Uppercase”onpage59
•“1090Audioboard,audioboardcable,powerboard,touchpadboardcable,fingerprinterboard,
LEDboardandODDswitchboard”onpage61
•“1100Systemboard”onpage64
Removalstepsofthebatteryboard
Loosentwoscrews1andthenremovethebatteryboardinthedirectionshownbyarrow2(E51).
aa
b
StepScrew(quantity)ColorT orque
1M2.0×3mm,flat-headed,nylon-coated(2)Black1.85+/-0.15kgf-cm
Removalstepsofthethermalfanassembly
Loosensixscrews3andonescrew4.
d
c
c
c
c
c
c
StepScrew(quantity)ColorT orque
3M2.0×3mm,flat-headed,nylon-coated(6)Black1.85+/-0.15kgf-cm
M2.0×5mm,flat-headed,nylon-coated(1)(E41)Silver1.85+/-0.15kgf-cm
4
M2.0×6mm,flat-headed,nylon-coated(1)(E51)Black1.85+/-0.15kgf-cm
Removetheheatsinkassemblyinthedirectionshownbyarrow5.
68HardwareMaintenanceManual
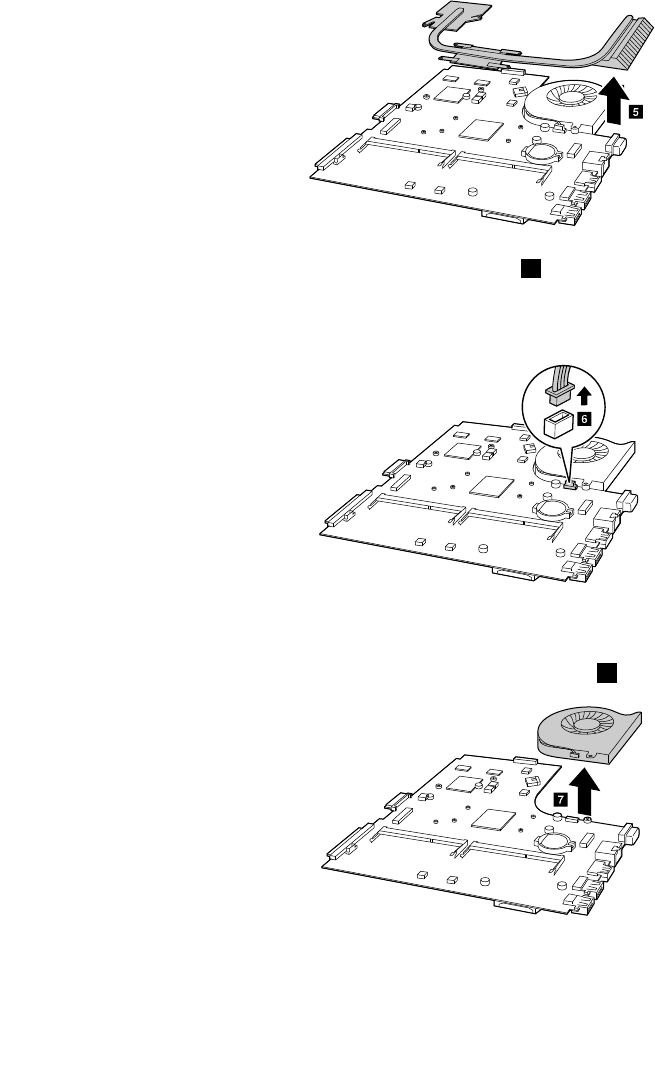
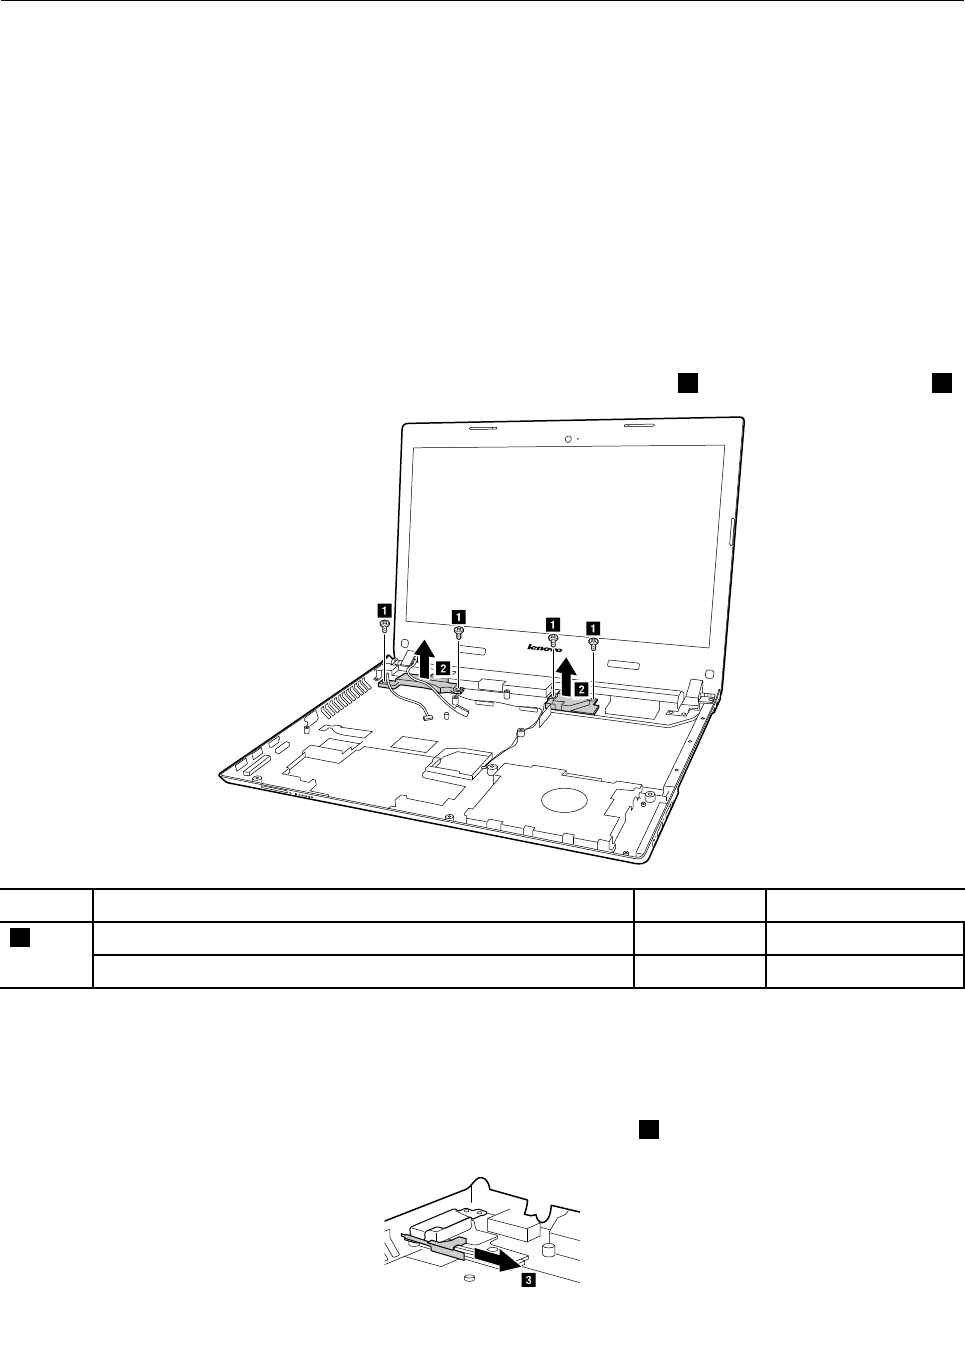
1120Speakerassembly,dockingLEDlensanddockingbracket
Foraccess,removetheseFRUsinorder:
•“1010Externalbatterypack”onpage50
•“1020Keyboard”onpage50
•“1030Opticaldiskdrive”onpage52
•“1040Basecoverassembly”onpage54
•“1050Harddiskdriveorsolid-statehybriddrive”onpage56
•“1060Wireless-LAN/Bluetoothcard”onpage57
•“1080Uppercase”onpage59
•“1090Audioboard,audioboardcable,powerboard,touchpadboardcable,fingerprinterboard,
LEDboardandODDswitchboard”onpage61
•“1100Systemboard”onpage64
Removalstepsofthespeakerassembly,dockingLEDlensanddockingbracket
ReleaseantennaandLVDScablesfromthecableguide,loosenfourscrews1andremovethespeakers2.
a
a
aa
b
b
StepScrew(quantity)ColorT orque
M2×3mm,bighead,nylon-coated(4)(E41)Black1.85+/-0.15kgf-cm
1
M2×3mm,bighead,nylon-coated(4)(E51)Black1.85+/-0.15kgf-cm
Attention:Asyouroutethecables,ensurethattheyarenotsubjecttoanytension.Tensioncouldcausethe
cablestobedamagedbythecableguides,orawiretobebroken.
RemovalstepsofthedockingLEDlensanddockingbracket(E51)
CarefullypulloutthedockingLEDlensinthedirectionshownbyarrow3.
c
70HardwareMaintenanceManual
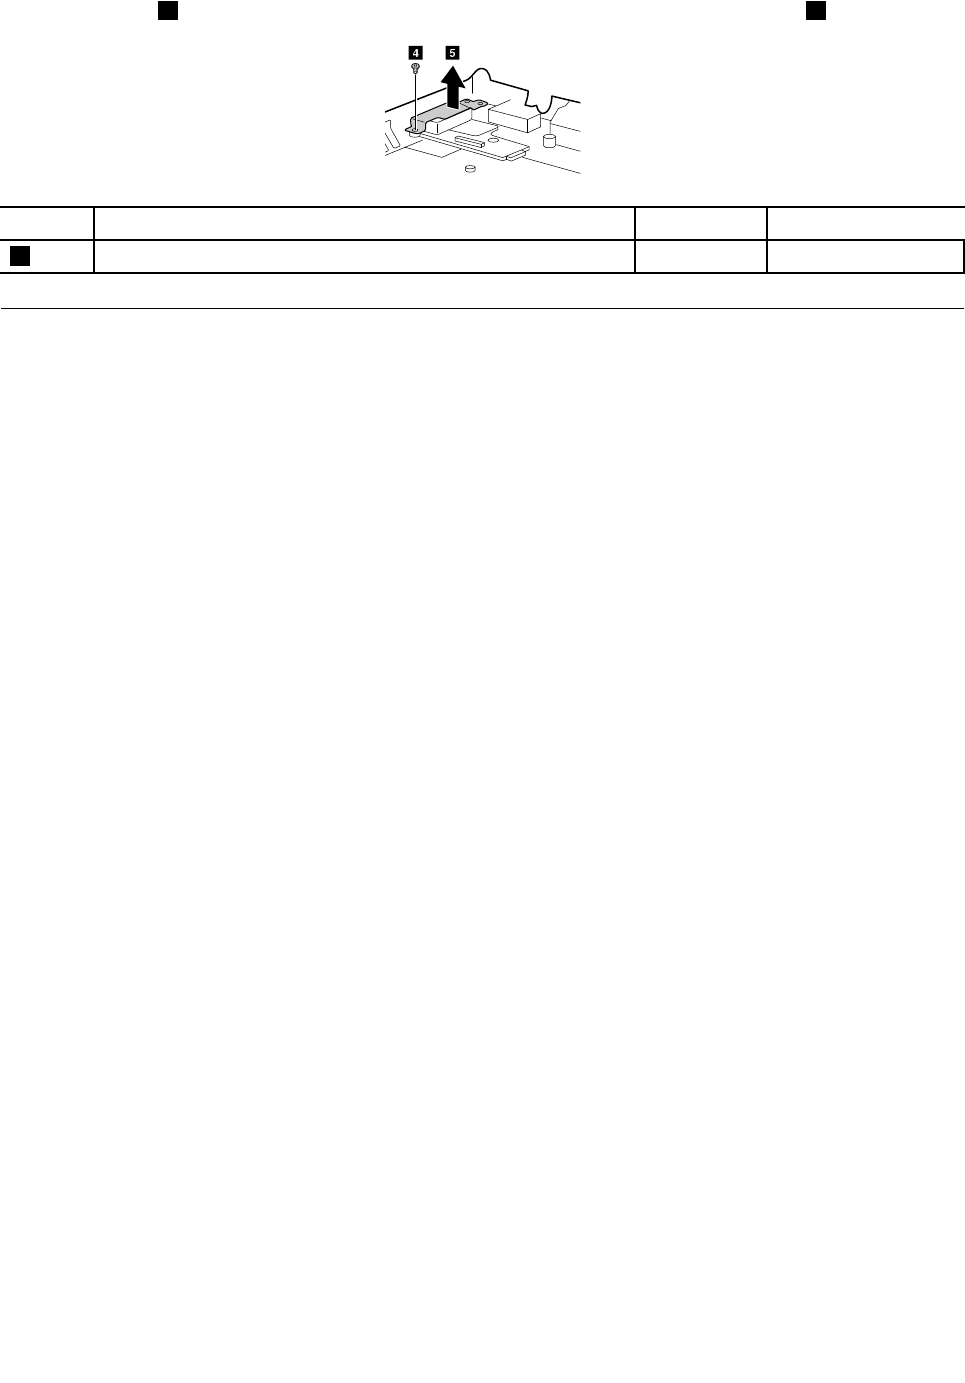
Looseonescrew4andthenremovethedockingbracketinthedirectionshownbyarrow5.
ed
StepScrew(quantity)ColorT orque
4M2.5×5mm,flathead,nylon-coated(1)Black3.0+/-0.3kgf-cm
1130LCDunit,dockingboard,dockingcableandDC-incable
Foraccess,removethisFRU:
•“1010Externalbatterypack”onpage50
•“1020Keyboard”onpage50
•“1030Opticaldiskdrive”onpage52
•“1040Basecoverassembly”onpage54
•“1050Harddiskdriveorsolid-statehybriddrive”onpage56
•“1060Wireless-LAN/Bluetoothcard”onpage57
•“1080Uppercase”onpage59
•“1090Audioboard,audioboardcable,powerboard,touchpadboardcable,fingerprinterboard,
LEDboardandODDswitchboard”onpage61
•“1100Systemboard”onpage64
•“1120Speakerassembly,dockingLEDlensanddockingbracket”onpage70
Chapter10.RemovingorreplacingaFRU71
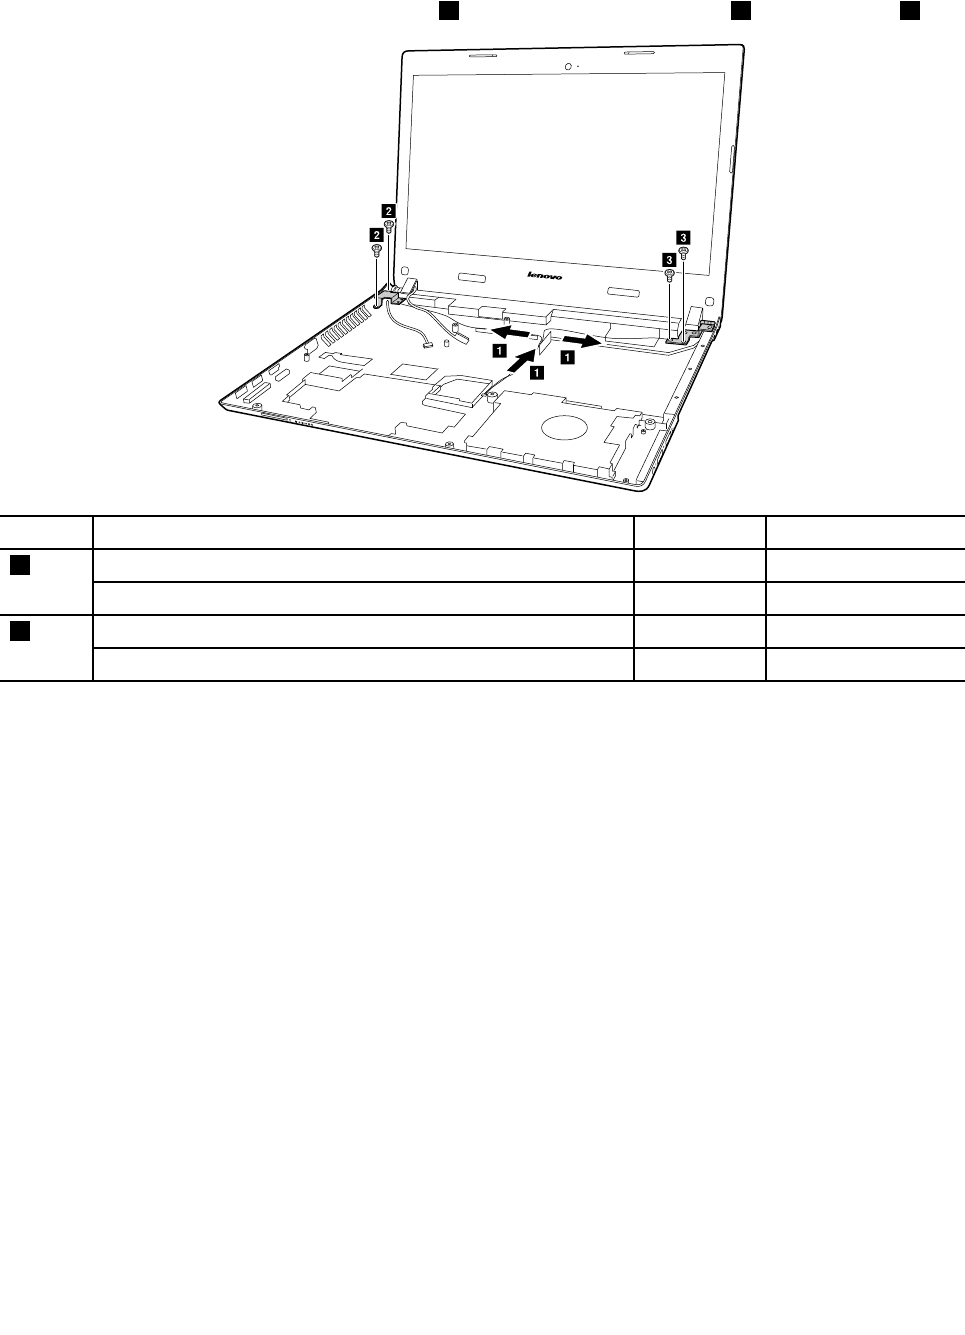
RemovalstepsoftheLCDunit,dockingboard,dockingcableandDC-incable
Releasetheantennacablesfromthecableguide1,andthenremovetwoscrews2andtwoscrews3.
b
b
c
c
a
a
a
StepScrew(quantity)ColorT orque
M2.5×6mm,flat-headed,nylon-coated(2)(E41)Black3.0+/-0.3kgf-cm
2
M2.5×5mm,flat-headed,nylon-coated(2)(E51)Black3.0+/-0.3kgf-cm
M2.5×4mm,flat-headed,nylon-coated(2)(E41)Silver3.0+/-0.3kgf-cm
3
M2.5×5mm,flat-headed,nylon-coated(2)(E51)Black3.0+/-0.3kgf-cm
Wheninstalling:
•Routetheantennacablesalongthecableguides.Asyouroutethecables,makesurethattheyare
notsubjectedtoanytension.Tensioncouldcausethecablestobedamagedbythecableguides,
orawiretobebroken.
•MakesurethattheLCDconnectorisattachedfirmlyandmakesurethatyoudonotpinchtheantenna
cableswhenyouattachtheLCDassembly.RoutetheLCDcablealongthecableguides.
72HardwareMaintenanceManual
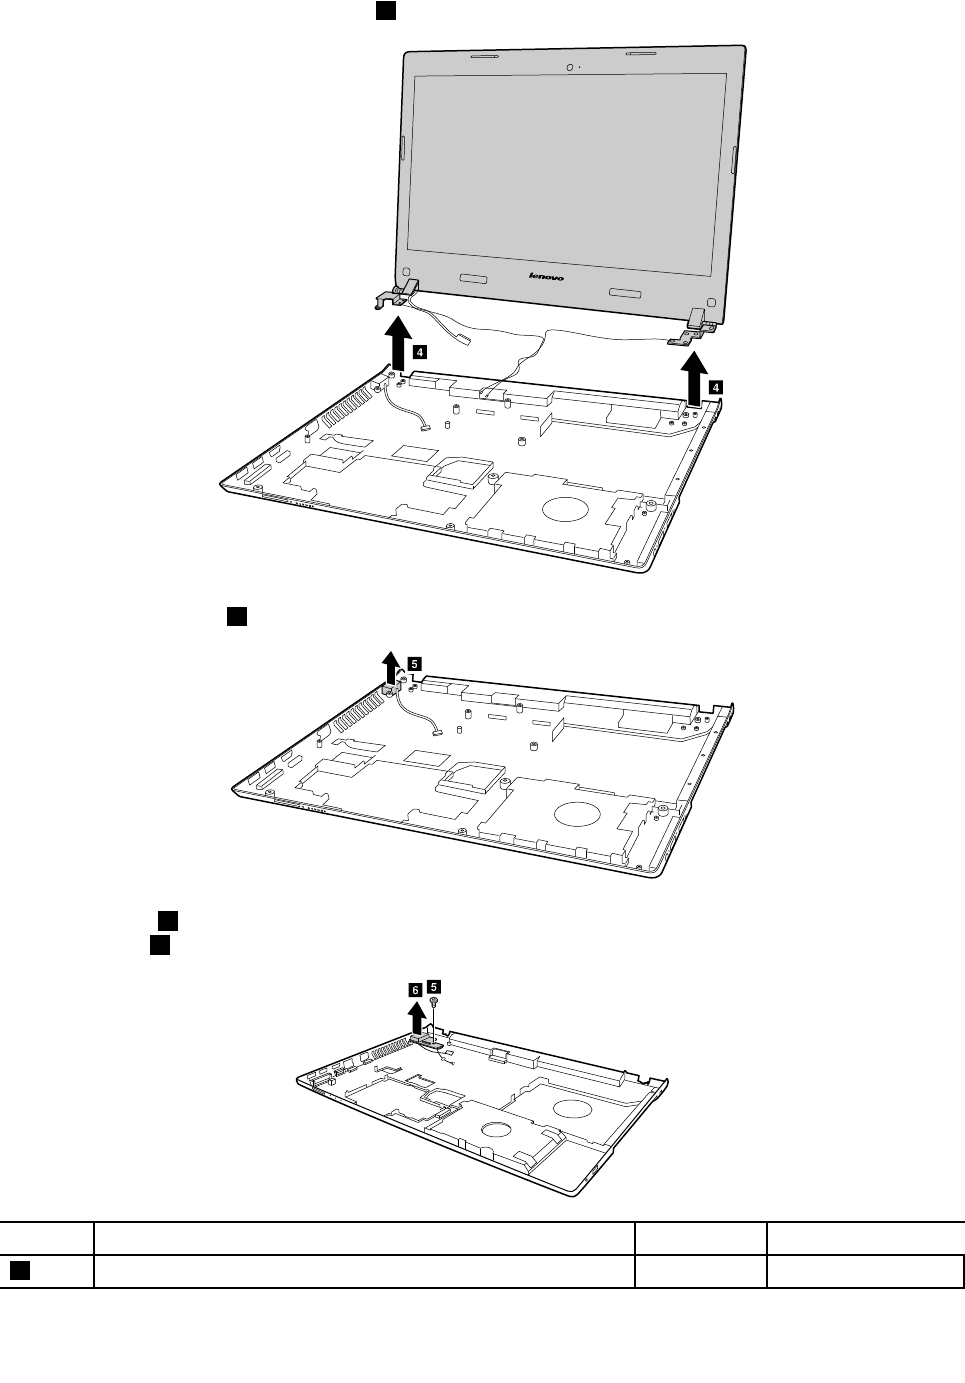
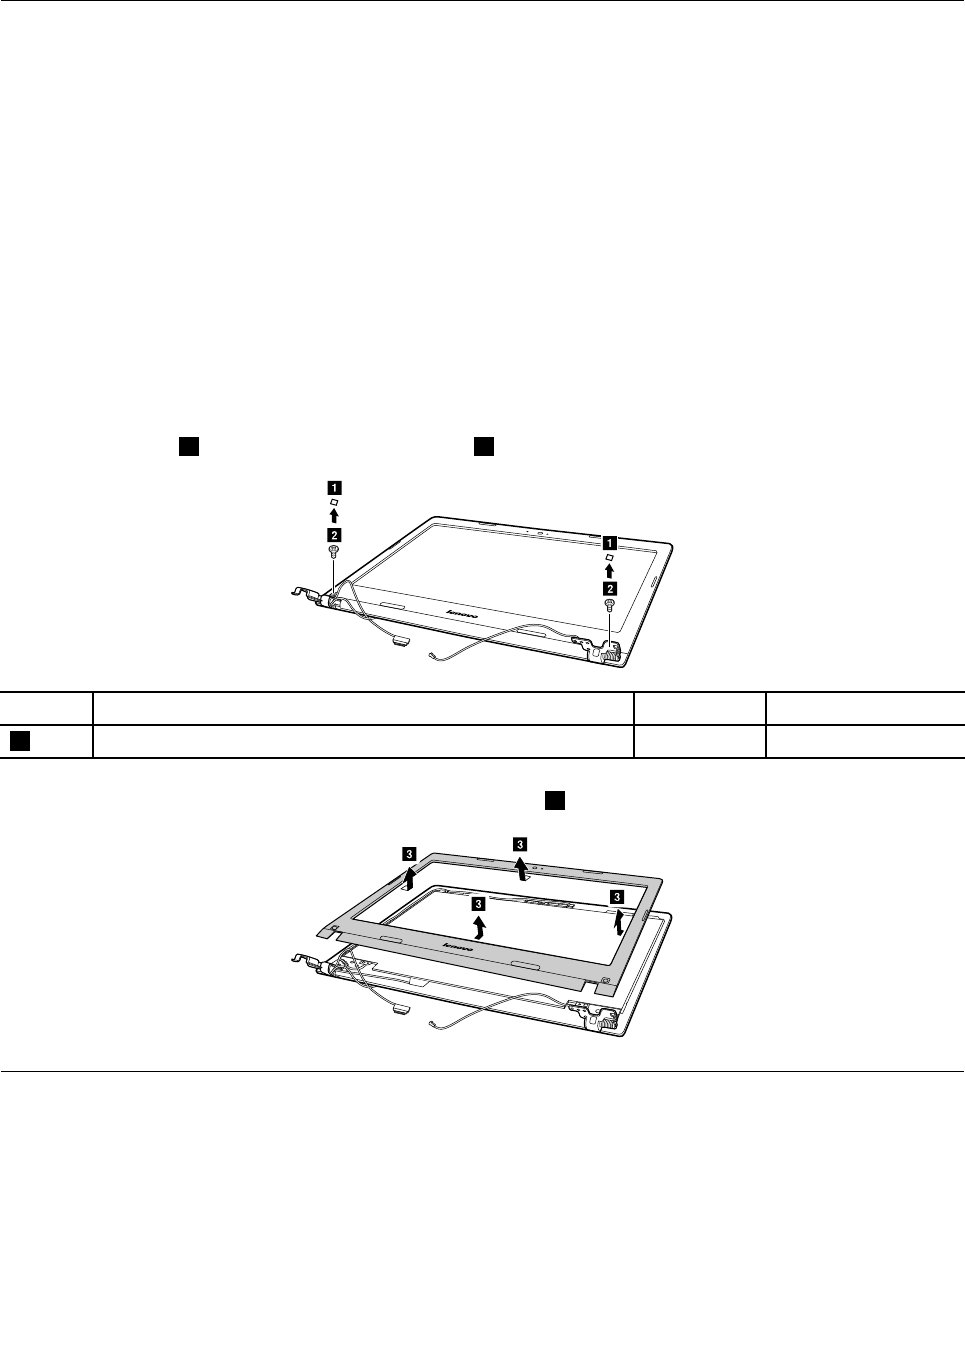
1140LCDfrontbezel
Foraccess,removethisFRU:
•“1010Externalbatterypack”onpage50
•“1020Keyboard”onpage50
•“1030Opticaldiskdrive”onpage52
•“1040Basecoverassembly”onpage54
•“1050Harddiskdriveorsolid-statehybriddrive”onpage56
•“1060Wireless-LAN/Bluetoothcard”onpage57
•“1080Uppercase”onpage59
•“1090Audioboard,audioboardcable,powerboard,touchpadboardcable,fingerprinterboard,
LEDboardandODDswitchboard”onpage61
•“1100Systemboard”onpage64
•“1120Speakerassembly,dockingLEDlensanddockingbracket”onpage70
•“1130LCDunit,dockingboard,dockingcableandDC-incable”onpage71
RemovalstepsoftheLCDfrontbezel
Removethecovers1,andthenremovetwoscrews2.
b
b
a
a
StepScrew(quantity)ColorT orque
2M2.5×4mm,flat-headed,nylon-coated(2)Silver3.0+/-0.3kgf-cm
RemovetheLCDfrontbezelinthedirectionshownbyarrow3.
c
c
c
c
1150LCDpanel,EDPcableandhinges
Foraccess,removetheseFRUsinorder:
•“1010Externalbatterypack”onpage50
•“1020Keyboard”onpage50
•“1030Opticaldiskdrive”onpage52
•“1040Basecoverassembly”onpage54
•“1050Harddiskdriveorsolid-statehybriddrive”onpage56
•“1060Wireless-LAN/Bluetoothcard”onpage57
74HardwareMaintenanceManual
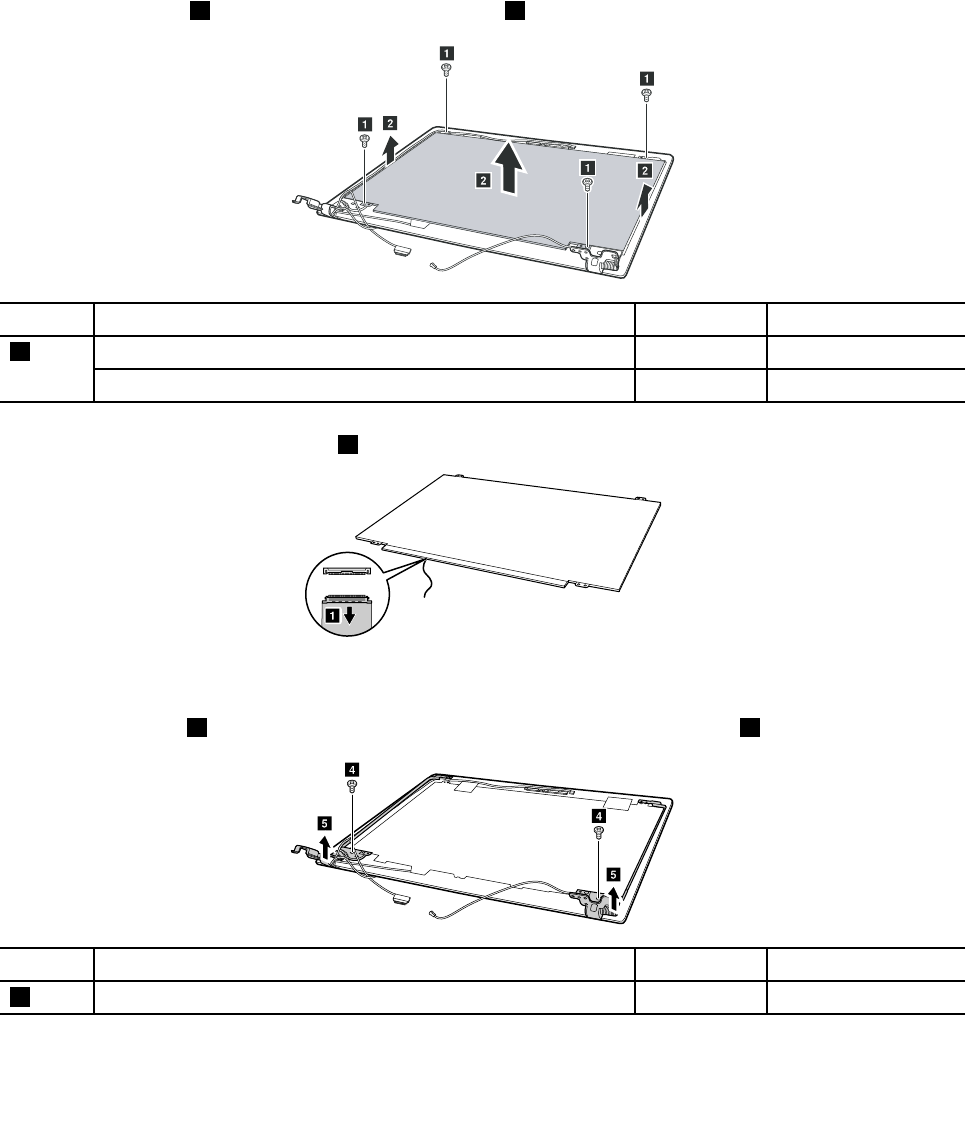
•“1080Uppercase”onpage59
•“1090Audioboard,audioboardcable,powerboard,touchpadboardcable,fingerprinterboard,
LEDboardandODDswitchboard”onpage61
•“1100Systemboard”onpage64
•“1120Speakerassembly,dockingLEDlensanddockingbracket”onpage70
•“1130LCDunit,dockingboard,dockingcableandDC-incable”onpage71
•“1140LCDfrontbezel”onpage74
RemovalstepsoftheLCDpanel,EDPcableandhinges
Removefourscrews1andthenremovetheLCDpanel2.
a
a
a
a
b
b
b
StepScrew(quantity)ColorT orque
M2.5×4mm,flat-headed,nylon-coated(4)(E41)Black3.0+/-0.3kgf-cm
1
M2×3mm,flat-headed,nylon-coated(4)(E51)Black1.85+/-0.15kgf-cm
DisconnecttheEDPcableconnector3.
a
Wheninstalling:Ensurethattheconnectorisattachedfirmly.
Removetwoscrews4andtheremovethehingesinthedirectionshownbyarrow5.
d
d
e
e
StepScrew(quantity)ColorT orque
4M2.5×4mm,flat-headed,nylon-coated(2)Black3.0+/-0.3kgf-cm
Chapter10.RemovingorreplacingaFRU75
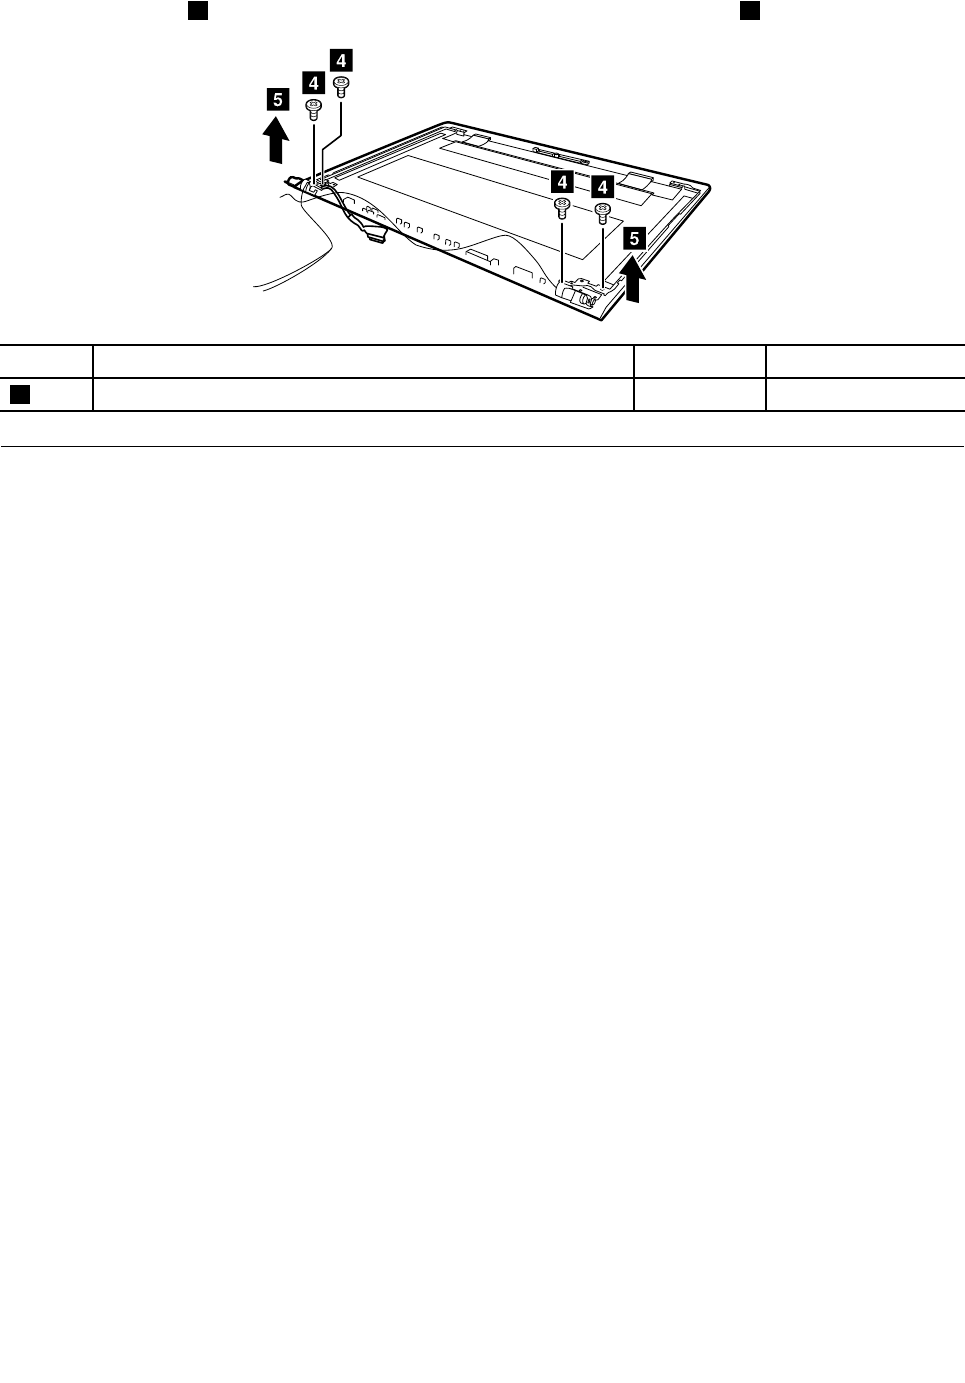
Removefourscrews4andtheremovethehingesinthedirectionshownbyarrow5(E51).
d
d
d
d
e
e
StepScrew(quantity)ColorT orque
4M2.5×4mm,flat-headed,nylon-coated(4)Silver3.0+/-0.3kgf-cm
1160IntegratedcameraandLCDcable
Foraccess,removetheseFRUsinorder:
•“1010Externalbatterypack”onpage50
•“1020Keyboard”onpage50
•“1030Opticaldiskdrive”onpage52
•“1040Basecoverassembly”onpage54
•“1050Harddiskdriveorsolid-statehybriddrive”onpage56
•“1060Wireless-LAN/Bluetoothcard”onpage57
•“1080Uppercase”onpage59
•“1090Audioboard,audioboardcable,powerboard,touchpadboardcable,fingerprinterboard,
LEDboardandODDswitchboard”onpage61
•“1100Systemboard”onpage64
•“1120Speakerassembly,dockingLEDlensanddockingbracket”onpage70
•“1130LCDunit,dockingboard,dockingcableandDC-incable”onpage71
•“1140LCDfrontbezel”onpage74
•“1150LCDpanel,EDPcableandhinges”onpage74
76HardwareMaintenanceManual
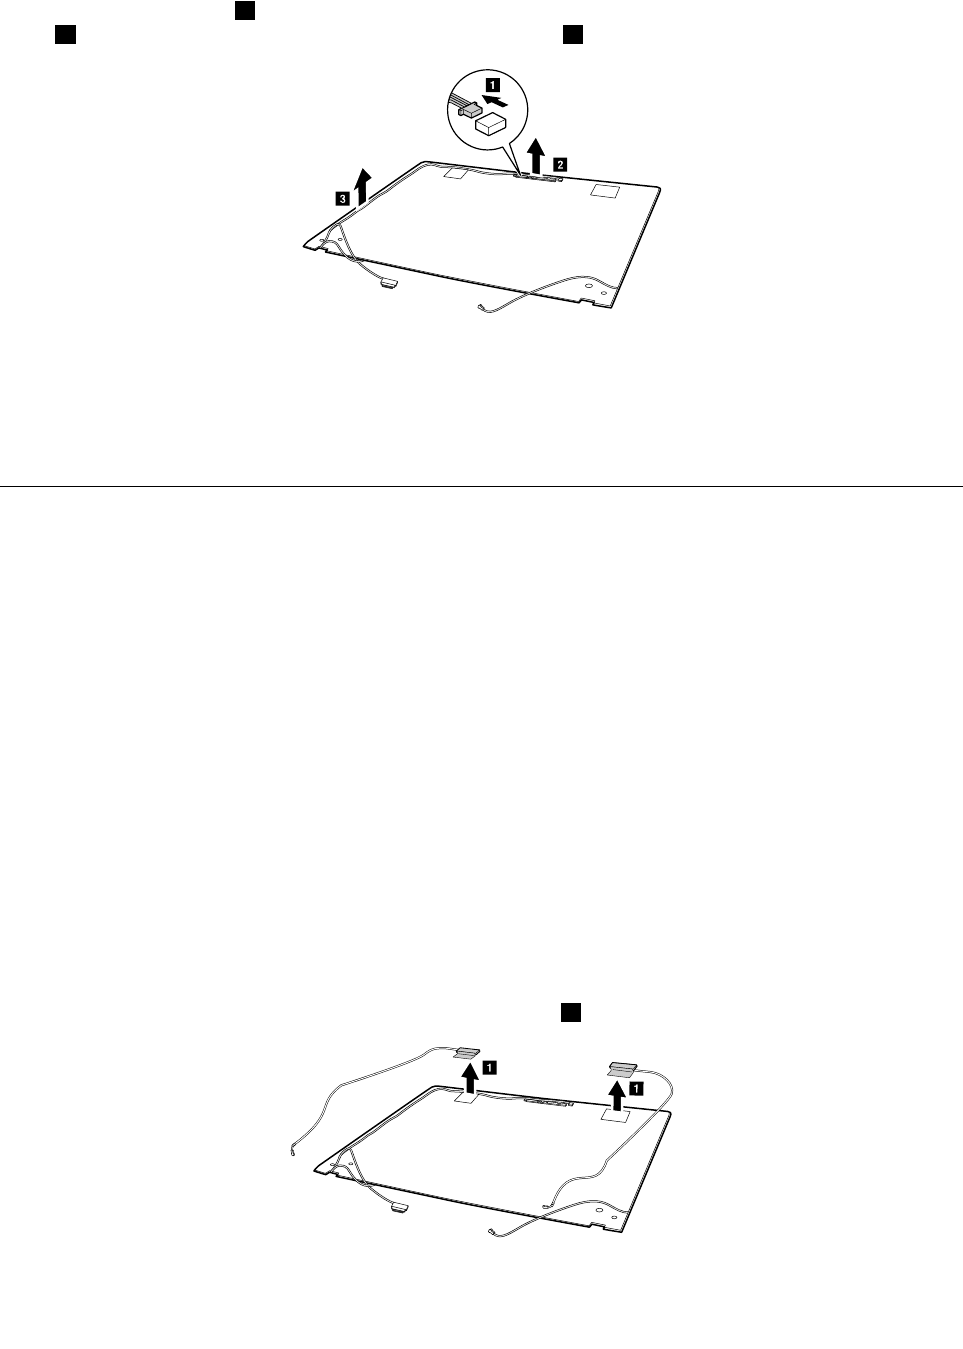
RemovalstepsofthecameraandLCDcable
Disconnecttheconnector1,removetheintegratedcamerafromtheLCDcoverinthedirectionshownby
arrow2,andthenreleasetheLCDcablefromthecableguide3.
b
c
a
Wheninstalling:SticktheintegratedcameratothetopcenteroftheLCDcoverandadjusttheplacementof
ittomakesuretheconnectorisattachedfirmly.
Attention:Asyouroutethecables,ensurethattheyarenotsubjecttoanytension.Tensioncouldcausethe
cablestobedamagedbythecableguides,orawiretobebroken.
1170AntennaassemblyandLCDcover
Foraccess,removetheseFRUsinorder:
•“1010Externalbatterypack”onpage50
•“1020Keyboard”onpage50
•“1030Opticaldiskdrive”onpage52
•“1040Basecoverassembly”onpage54
•“1050Harddiskdriveorsolid-statehybriddrive”onpage56
•“1060Wireless-LAN/Bluetoothcard”onpage57
•“1080Uppercase”onpage59
•“1090Audioboard,audioboardcable,powerboard,touchpadboardcable,fingerprinterboard,
LEDboardandODDswitchboard”onpage61
•“1100Systemboard”onpage64
•“1120Speakerassembly,dockingLEDlensanddockingbracket”onpage70
•“1130LCDunit,dockingboard,dockingcableandDC-incable”onpage71
•“1140LCDfrontbezel”onpage74
•“1150LCDpanel,EDPcableandhinges”onpage74
•“1160IntegratedcameraandLCDcable”onpage76
RemovalstepsoftheantennaassemblyandLCDcover
Peelofftheadhesivetapessecuringtheantennaboards,releasethecablesfromthecableguide,andthen
removetheantennaassemblyinthedirectionshownbyarrow1.
a
a
Chapter10.RemovingorreplacingaFRU77

Wheninstalling:Routetheantennacablesalongthecableguidesandsecuretheantennaboardswith
adhesivetapes.Asyouroutethecables,makesurethattheyarenotsubjectedtoanytension.Tension
couldcausethecablestobedamagedbythecableguides,orawiretobebroken.
78HardwareMaintenanceManual

AppendixA.Notices
Lenovomaynotoffertheproducts,services,orfeaturesdiscussedinthisdocumentinallcountries.Consult
yourlocalLenovorepresentativeforinformationontheproductsandservicescurrentlyavailableinyour
area.AnyreferencetoaLenovoproduct,program,orserviceisnotintendedtostateorimplythatonlythat
Lenovoproduct,program,orservicemaybeused.Anyfunctionallyequivalentproduct,program,orservice
thatdoesnotinfringeanyLenovointellectualpropertyrightmaybeusedinstead.However,itistheuser’s
responsibilitytoevaluateandverifytheoperationofanyotherproduct,program,orservice.
Lenovomayhavepatentsorpendingpatentapplicationscoveringsubjectmatterdescribedinthis
document.Thefurnishingofthisdocumentdoesnotgiveyouanylicensetothesepatents.Y oucansend
licenseinquiries,inwriting,to:
Lenovo(UnitedStates),Inc.
1009ThinkPlace-BuildingOne
Morrisville,NC27560
U.S.A.
Attention:LenovoDirectorofLicensing
LENOVOPROVIDESTHISPUBLICATION“ASIS”WITHOUTWARRANTYOFANYKIND,EITHEREXPRESS
ORIMPLIED,INCLUDING,BUTNOTLIMITEDTO,THEIMPLIEDWARRANTIESOFNON-INFRINGEMENT,
MERCHANTABILITYORFITNESSFORAPARTICULARPURPOSE.Somejurisdictionsdonotallow
disclaimerofexpressorimpliedwarrantiesincertaintransactions,therefore,thisstatementmaynotapply
toyou.
Thisinformationcouldincludetechnicalinaccuraciesortypographicalerrors.Changesareperiodically
madetotheinformationherein;thesechangeswillbeincorporatedinneweditionsofthepublication.
Lenovomaymakeimprovementsand/orchangesintheproduct(s)and/ortheprogram(s)describedinthis
publicationatanytimewithoutnotice.
Theproductsdescribedinthisdocumentarenotintendedforuseinimplantationorotherlifesupport
applicationswheremalfunctionmayresultininjuryordeathtopersons.Theinformationcontainedinthis
documentdoesnotaffectorchangeLenovoproductspecificationsorwarranties.Nothinginthisdocument
shalloperateasanexpressorimpliedlicenseorindemnityundertheintellectualpropertyrightsofLenovo
orthirdparties.Allinformationcontainedinthisdocumentwasobtainedinspecificenvironmentsandis
presentedasanillustration.Theresultobtainedinotheroperatingenvironmentsmayvary.
Lenovomayuseordistributeanyoftheinformationyousupplyinanywayitbelievesappropriatewithout
incurringanyobligationtoyou.
Anyreferencesinthispublicationtonon-LenovoWebsitesareprovidedforconvenienceonlyanddonotin
anymannerserveasanendorsementofthoseWebsites.ThematerialsatthoseWebsitesarenotpartof
thematerialsforthisLenovoproduct,anduseofthoseWebsitesisatyourownrisk.
Anyperformancedatacontainedhereinwasdeterminedinacontrolledenvironment.Therefore,theresult
obtainedinotheroperatingenvironmentsmayvarysignificantly.Somemeasurementsmayhavebeen
madeondevelopment-levelsystemsandthereisnoguaranteethatthesemeasurementswillbethesame
ongenerallyavailablesystems.Furthermore,somemeasurementsmayhavebeenestimatedthrough
extrapolation.Actualresultsmayvary.Usersofthisdocumentshouldverifytheapplicabledatafortheir
specificenvironment.
©CopyrightLenovo201579

Electronicemissionsnotices
ForelectronicemissioninformationonClassBdigitaldevices,refertothecorrespondinginformationin
theUserGuide.
EUcontact:Lenovo,Einsteinova21,85101Bratislava,Slovakia
Trademarks
ThefollowingtermsaretrademarksofLenovointheUnitedStates,othercountriesorboth:
Lenovo
OneKey
Microsoft,Windows,andWindowsServeraretrademarksoftheMicrosoftgroupofcompanies.
DisplayPort,MiniDisplayPort(mDP),andVESAaretrademarksoftheVideoElectronicsStandards
Association.
Othercompany,product,orservicenamesmaybethetrademarksorservicemarksofothers.
80HardwareMaintenanceManual

AppendixB.Abbreviationtable
Thefollowingtablelistsallabbreviationsandacronymsusedinthismanual.
AbbreviationTerm
3Gthirdgenerationofmobiletelecommunicationstechnology
BGABallGridArray
BIOSbasicinput/outputsystem
CMOScomplementarymetal-oxidesemiconductor
COACertificateofAuthentication
CRCcyclicredundancycheck
CRTcathoderaytube
CRUcustomer-replaceableunit
CTOconfiguretoorder
EAIAEnhancedAssetInformationArea
ECAEngineeringChangeAnnouncements
EEPROMElectricallyErasableProgrammableRead-OnlyMemory
EFIExtensibleFirmwareInterface
EPOemergencypower-off
ESDelectrostaticdischarge
EUEuropeanUnion
FCCFederalCommunicationsCommission
FRUFieldReplaceableUnit
GAVGeneralAnnounceVariant
GPUgraphicsprocessingunit
HDDharddiskdrive
HDMIhigh-definitionmultimediainterface
ICsintegratedcircuits
ICCIDintegratecircuitcardidentity
ISOInternationalStandardizationOrganization
LANlocalareanetwork
LCDliquidcrystaldisplay
MACmediaaccesscontrol
MTmachinetype
MTMmachinetypeandmodel
PCpersonalcomputer
PCHPlatformControllerHub
POSTpower-onself-test
RAMrandom-accessmemory
©CopyrightLenovo201581

AbbreviationTerm
RFradiofrequency
RFIDradio-frequencyidentification
RIringindicator
RJregisteredjack
SATASerialAdvancedTechnologyAttachment
SIMsubscriberidentitymodule
SVPsupervisorpassword
TFTsthin-filmtransistors
UEFIUnifiedExtensibleFirmwareInterface
USBUniversalSerialBus
UUIDuniversallyuniqueidentifier
VGAvideographicsarray
VRAMvideorandom-accessmemory
WANwideareanetwork
82HardwareMaintenanceManual