Lenovo E420 E520 Ug En User Manual (English) Guide Think Pad Edge E420, (Think Pad)
Lenovo-Thinkpad-114155U-Users-Manual-329116 lenovo-thinkpad-114155u-users-manual-329116
114155U to the manual 25db4635-b5c6-4e6d-adb8-007220b51397
2011-10-20
User Manual: Lenovo E420 E520 Ug En (English) User Guide - ThinkPad Edge E420, Edge E520 Edge E520 (ThinkPad) ThinkPad Edge E520
Open the PDF directly: View PDF ![]() .
.
Page Count: 194 [warning: Documents this large are best viewed by clicking the View PDF Link!]
- Read this first
- Chapter 1. Product Overview
- Chapter 2. Using your computer
- Chapter 3. You and your computer
- Chapter 4. Security
- Chapter 5. Recovery overview
- Chapter 6. Replacing devices
- Static electricity prevention
- Replacing the battery
- Replacing the hard disk drive
- Replacing the optical drive
- Installing and replacing the PCI Express Mini Card for wireless WAN
- Installing and replacing a PCI Express Mini Card for wireless LAN/WiMAX connection
- Replacing memory
- Replacing the keyboard
- Replacing the SIM card
- Chapter 7. Enhancing your computer
- Chapter 8. Advanced configuration
- Chapter 9. Preventing problems
- Chapter 10. Troubleshooting computer problems
- Chapter 11. Getting support
- Appendix A. Regulatory information
- Wireless related information
- Export classification notice
- Electronic emission notices
- Federal Communications Commission Declaration of Conformity
- Industry Canada Class B emission compliance statement
- European Union - Compliance to the Electromagnetic Compatibility Directive
- German Class B compliance statement
- Korea Class B compliance statement
- Japan VCCI Class B compliance statement
- Japan compliance statement for products which connect to the power mains with rated current less than or equal to 20 A per phase
- Lenovo product service information for Taiwan
- Additional regulatory information
- Appendix B. WEEE and recycling statements
- Appendix C. Notices

UserGuide
ThinkPadEdgeE420andE520

Notes:Beforeusingthisinformationandtheproductitsupports,besuretoreadthefollowing:
•SafetyandWarrantyGuide
•RegulatoryNotice
•“Importantsafetyinformation”onpagevi
•AppendixC“Notices”onpage173
TheSafetyandWarrantyGuideandtheRegulatoryNoticehavebeenuploadedtotheWebsite.Toreferto
them,gotohttp://www.lenovo.com/support,andthenclickUserGuides&Manuals.
ThirdEdition(October2011)
©CopyrightLenovo2011.
LIMITEDANDRESTRICTEDRIGHTSNOTICE:IfdataorsoftwareisdeliveredpursuantaGeneralServicesAdministration
“GSA”contract,use,reproduction,ordisclosureissubjecttorestrictionssetforthinContractNo.GS-35F-05925.

Contents
Readthisrst..............v
Importantsafetyinformation..........vi
Conditionsthatrequireimmediateaction..vii
Safetyguidelines............vii
Chapter1.ProductOverview......1
Locatingcomputercontrols,connectors,and
indicators..................1
Frontview................2
Right-sideview..............6
Left-sideview..............7
Bottomview...............9
Rearview...............10
Statusindicators............11
Locatingimportantproductinformation.....13
Machinetypeandmodellabel.......13
FCCIDandICCerticationnumberlabel..14
CerticateofAuthenticitylabel......15
Features.................15
ThinkPadEdgeE420features.......15
ThinkPadEdgeE520features.......17
Specications...............18
ThinkPadEdgeE420specications.....18
ThinkPadEdgeE520specications.....18
Operatingenvironment...........19
ThinkVantagetechnologiesandsoftware....19
AccessingapplicationsinWindows7....20
AccessConnections..........21
ActiveProtectionSystem.........22
FingerprintSoftware...........22
LenovoSolutionsCenter.........22
LenovoThinkVantageTools........22
LenovoThinkVantageToolbox.......23
MessageCenterPlus..........23
PasswordManager...........23
PowerManager............23
ProductRecovery...........23
RescueandRecovery..........24
SystemUpdate............24
ThinkVantageGPS...........24
Chapter2.Usingyourcomputer...25
Registeringyourcomputer..........25
Frequentlyaskedquestions.........25
Specialkeysandbuttons..........26
ThinkPadEdgeE420specialkeys.....27
ThinkPadEdgeE520specialkeys.....29
UsingtheUltraNavpointingdevice.......31
UsingtheTrackPointpointingdevice....31
Usingthetouchpad...........33
BehavioroftheUltraNavandanexternal
mouse................34
AddingtheUltraNavicontothesystemtray.34
Powermanagement............35
Checkingbatterystatus.........35
Usingtheacpoweradapter........35
Chargingthebattery..........36
Maximizingbatterylife..........36
Managingyourbatterypower.......36
Power-savingmodes..........37
Handlingthebattery...........38
Connectingtothenetwork..........40
Ethernetconnections..........40
Wirelessconnections..........40
Usingaprojectororexternaldisplay......47
Changingdisplaysettings........47
Connectingaprojectororexternaldisplay..48
Usingdualdisplays...........50
Usingaudiofeatures............51
Usinganintegratedcamera.........52
Usingopticaldrive.............52
UsingaashmediaCard..........53
Insertingaashmediacard........53
Removingaashmediacard.......54
Chapter3.Youandyourcomputer..55
Accessibilityandcomfort..........55
Ergonomicinformation..........55
Adjustingyourcomputertotyou.....56
Accessibilityinformation.........57
Travelingwithyourcomputer.........57
Traveltips...............57
Travelaccessories...........58
Chapter4.Security..........59
Attachingamechanicallock.........59
Usingpasswords..............59
Passwordsandsleep(standby)mode....60
Typingpasswords...........60
Power-onpassword...........60
Harddiskpasswords..........61
Supervisorpassword..........63
Harddisksecurity.............64
Usingangerprintreader..........65
©CopyrightLenovo2011i

Noticeondeletingdatafromyourharddiskdrive
....................67
Usingandunderstandingrewalls.......67
Protectingdataagainstviruses........67
Chapter5.Recoveryoverview....69
Creatingandusingrecoverymedia......69
Creatingrecoverymedia.........70
Usingrecoverymedia..........70
Performingbackupandrecoveryoperations...71
Performingabackupoperation......71
Performingarecoveryoperation......71
UsingtheRescueandRecoveryworkspace...72
Creatingandusingarescuemedium......73
Creatingarescuemedium........73
Usingarescuemedium.........73
Reinstallingpreinstalledapplicationsanddevice
drivers..................74
Solvingrecoveryproblems..........75
Chapter6.Replacingdevices.....77
Staticelectricityprevention..........77
Replacingthebattery............77
Replacingtheharddiskdrive.........79
Replacingtheopticaldrive..........82
ThinkPadEdgeE420..........82
ThinkPadEdgeE520..........85
InstallingandreplacingthePCIExpressMiniCard
forwirelessWAN..............86
InstallingandreplacingaPCIExpressMiniCard
forwirelessLAN/WiMAXconnection......90
Replacingmemory.............93
Replacingthekeyboard...........95
ThinkPadEdgeE420..........95
ThinkPadEdgeE520..........99
ReplacingtheSIMcard...........103
Chapter7.Enhancingyour
computer..............105
FindingThinkPadoptions..........105
Chapter8.Advanced
conguration............107
Installinganewoperatingsystem.......107
Beforeyoubegin............107
InstallingWindows7..........108
InstallingWindowsXP..........109
Installingdevicedrivers...........111
Installingthedriverfor4-in-1mediacard
reader................111
InstallingThinkPadMonitorFileforWindows
2000/XP/Vista/7............111
InstallingIntelChipsetSupportforWindows
2000/XP/Vista/7............112
Installingdriversandsoftware.......112
ThinkPadSetup..............113
Congmenu..............113
Dateandtimemenu...........114
Securitymenu.............114
Startupmenu.............115
Restartmenu.............116
ThinkPadSetupitems..........116
UpdatingyoursystemUEFIBIOS.....123
Chapter9.Preventingproblems..125
Generaltipsforpreventingproblems......125
Makingsuredevicedriversarecurrent.....126
GettingthelatestdriversfromtheWebsite..126
GettingthelatestdriversusingSystem
Update................126
Takingcareofyourcomputer.........127
Cleaningthecoverofyourcomputer....128
Chapter10.Troubleshooting
computerproblems.........131
Diagnosingproblems............131
Troubleshooting..............132
Computerstopsresponding.......132
Spillsonthekeyboard..........133
Errormessages............133
Errorswithoutmessages.........137
Beeperrors..............138
Memoryproblems...........138
Networking..............138
Keyboardandotherpointingdevices....143
Displayandmultimediadevices......144
Fingerprintreaderproblems........151
Batteryandpower...........151
Drivesandotherstoragedevices.....154
Softwareproblems...........156
Portsandconnectors..........156
Chapter11.Gettingsupport....159
BeforeyoucontactLenovo..........159
Registeryourcomputer.........159
Downloadsystemupdates........159
Recordinformation...........159
Gettinghelpandservice...........160
Usingdiagnosticprograms........160
LenovosupportWebsite.........160
CallingLenovo.............161
Purchasingadditionalservices........161
iiUserGuide

AppendixA.Regulatory
information.............163
Wirelessrelatedinformation.........163
LocationoftheUltraConnectwireless
antennas...............164
Locatingwirelessregulatorynotices....165
Exportclassicationnotice..........166
Electronicemissionnotices..........166
FederalCommunicationsCommission
DeclarationofConformity........166
IndustryCanadaClassBemissioncompliance
statement...............166
EuropeanUnion-Compliancetothe
ElectromagneticCompatibilityDirective...167
GermanClassBcompliancestatement...167
KoreaClassBcompliancestatement....167
JapanVCCIClassBcompliancestatement..168
Japancompliancestatementforproducts
whichconnecttothepowermainswith
ratedcurrentlessthanorequalto20Aper
phase................168
Lenovoproductserviceinformationfor
Taiwan................168
Additionalregulatoryinformation.......168
AppendixB.WEEEandrecycling
statements.............169
EUWEEEstatements............169
Japanrecyclingstatements.........169
RecyclinginformationforBrazil........170
BatteryrecyclinginformationforTaiwan.....170
BatteryrecyclinginformationfortheUnitedStates
andCanada................171
BatteryrecyclinginformationfortheEuropean
Union..................171
AppendixC.Notices.........173
Trademarks................174
©CopyrightLenovo2011iii

ivUserGuide

Readthisrst
Besuretofollowtheimportanttipsgivenheretocontinuetogetthemostuseandenjoymentoutofyour
computer.Failuretodosomightleadtodiscomfortorinjury,orcauseyourcomputertofail.
Protectyourselffromtheheatthatyourcomputergenerates.
Whenyourcomputeristurnedonorthebatteryischarging,thebase,the
palmrest,andsomeotherpartsmaybecomehot.Thetemperaturethey
reachdependsontheamountofsystemactivityandthelevelofchargein
thebattery.
Extendedcontactwithyourbody,eventhroughclothing,couldcause
discomfortorevenaskinburn.
•Avoidkeepingyourhands,yourlap,oranyotherpartofyourbodyin
contactwithahotsectionofthecomputerforanyextendedtime.
•Periodicallytakehandsfromusingthekeyboardbyliftingyourhandsfrom
thepalmrest.
Protectyourselffromtheheatgeneratedbytheacpoweradapter.
Whentheacpoweradapterisconnectedtoanelectricaloutletandyour
computer,itgeneratesheat.
Extendedcontactwithyourbody,eventhroughclothing,maycauseaskin
burn.
•Toavoidspillsandthedangerofelectricalshock,keepliquidsawayfrom
yourcomputer.
•Neveruseittowarmyourbody.
Preventyourcomputerfromgettingwet.
•Toavoidspillsandthedangerofelectricalshock,keepliquidsawayfrom
yourcomputer.
Protectthecablesfrombeingdamaged.
Applyingstrongforcetocablesmaydamageorbreakthem.
•Routecommunicationlines,orthecablesofanacpoweradapter,amouse,a
keyboard,aprinter,oranyotherelectronicdevice,sothattheycannotbe
walkedon,trippedover,pinchedbyyourcomputerorotherobjects,orin
anywaysubjectedtotreatmentthatcouldinterferewiththeoperationof
yourcomputer.
©CopyrightLenovo2011v
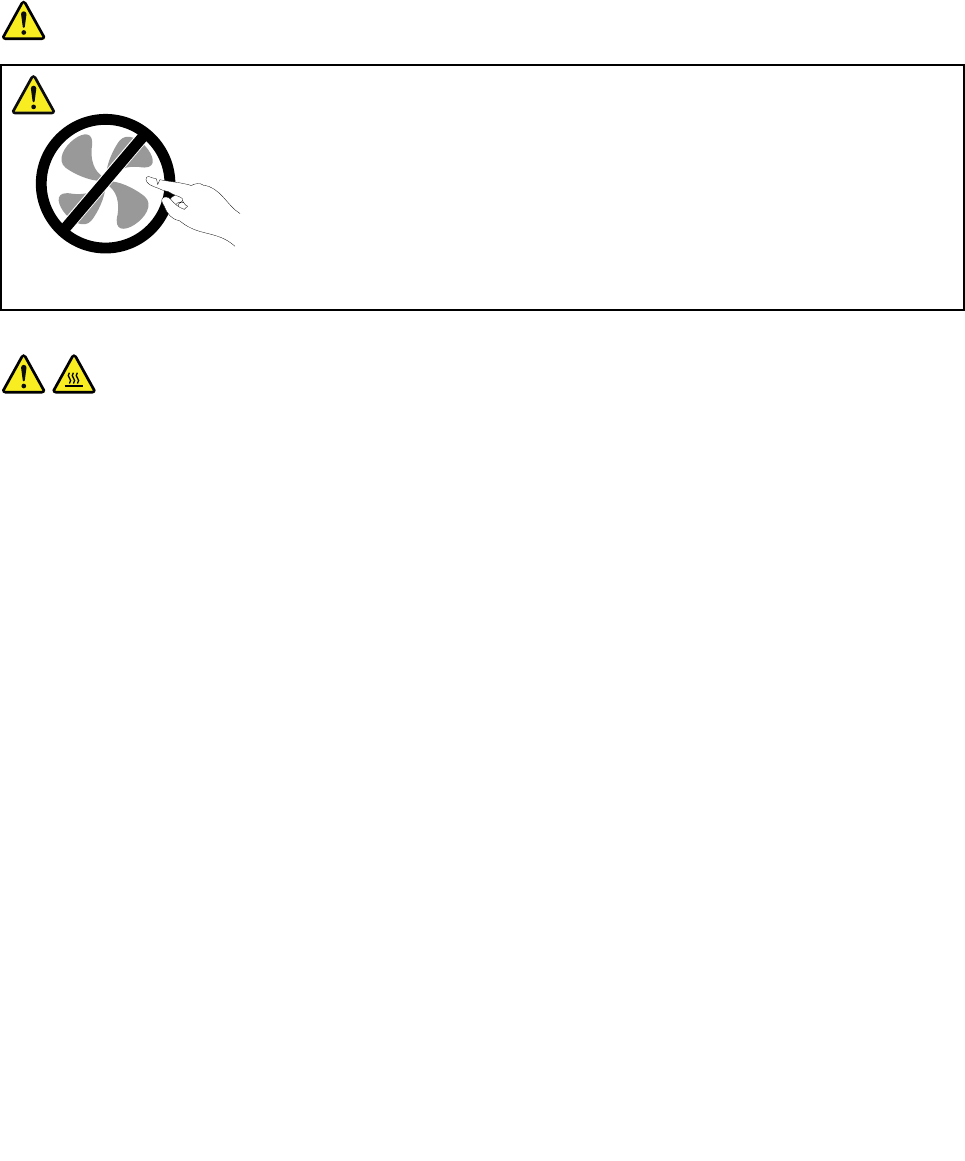
Protectyourcomputeranddatawhenmovingit.
Beforemovingacomputerequippedwithaharddiskdrive,dooneofthe
following,andmakesurethatthepowerswitchisofforisblinking:
•Turnitoff.
•Putitinsleep(standby)mode.
•Putitinhibernationmode.
Thiswillhelptopreventdamagetothecomputer,andpossiblelossofdata.
Handleyourcomputergently.
•Donotdrop,bump,scratch,twist,hit,vibrate,push,orplaceheavyobjectson
yourcomputer,display,orexternaldevices.
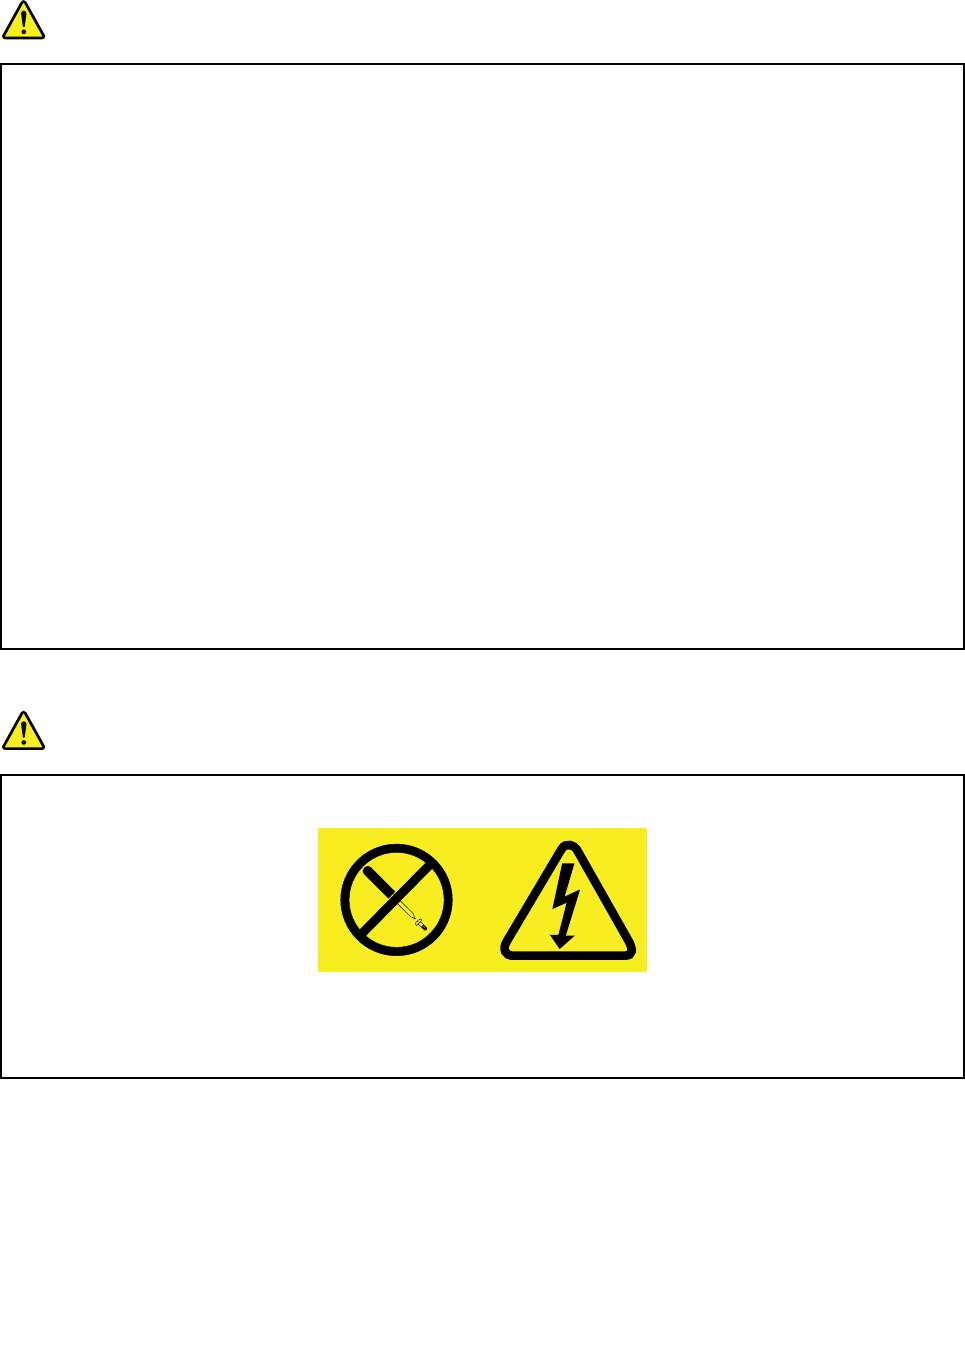
Carryyourcomputercarefully.
•Useaqualitycarryingcasethatprovidesadequatecushioningandprotection.
•Donotpackyourcomputerinatightlypackedsuitcaseorbag.
•Beforeputtingyourcomputerinacarryingcase,makesurethatitisoff,insleep
(standby)mode,orinhibernationmode.Donotputacomputerinacarrying
casewhileitisturnedon.
Importantsafetyinformation
Note:Readimportantsafetyinformationrst.
Thisinformationcanhelpyousafelyuseyournotebookpersonalcomputer.Followandretainallinformation
includedwithyourcomputer.Theinformationinthisdocumentdoesnotalterthetermsofyourpurchase
agreementortheLenovoLimitedWarranty.Formoreinformation,seeChapter3,“WarrantyInformation”in
theSafetyandWarrantyGuide.ThelatestSafetyandWarrantyGuidehasbeenuploadedtotheWebsite.
Customersafetyisimportant.Ourproductsaredevelopedtobesafeandeffective.However,personal
computersareelectronicdevices.Powercords,poweradapters,andotherfeaturescancreatepotential
safetyrisksthatcanresultinphysicalinjuryorpropertydamage,especiallyifmisused.Toreducethese
risks,followtheinstructionsincludedwithyourproduct,observeallwarningsontheproductandinthe
operatinginstructions,andreviewtheinformationincludedinthisdocumentcarefully.Bycarefullyfollowing
theinformationcontainedinthisdocumentandprovidedwithyourproduct,youcanhelpprotectyourself
fromhazardsandcreateasafercomputerworkenvironment.
Note:Thisinformationincludesreferencestopoweradaptersandbatteries.Inadditiontonotebook
computers,someproducts(suchasspeakersandmonitors)shipwithexternalpoweradapters.Ifyouhave
suchaproduct,thisinformationappliestoyourproduct.Inaddition,computerproductscontainacoin-sized
internalbatterythatprovidespowertothesystemclockevenwhenthecomputerisunplugged,sothe
batterysafetyinformationappliestoallcomputerproducts.
viUserGuide

Conditionsthatrequireimmediateaction
Productscanbecomedamagedduetomisuseorneglect.Someproductdamageisseriousenough
thattheproductshouldnotbeusedagainuntilithasbeeninspectedand,ifnecessary,repairedby
anauthorizedservicer.
Aswithanyelectronicdevice,paycloseattentiontotheproductwhenitisturnedon.Onveryrare
occasions,youmightnoticeanodororseeapuffofsmokeorsparksventfromyourproduct.Oryou
mighthearsoundslikepopping,crackingorhissing.Theseconditionsmightmerelymeanthatan
internalelectroniccomponenthasfailedinasafeandcontrolledmanner.Or,theymightindicate
apotentialsafetyissue.However,donottakerisksorattempttodiagnosethesituationyourself.
ContacttheCustomerSupportCenterforfurtherguidance.ForalistofServiceandSupportphone
numbers,seethefollowingWebsite:
http://www.lenovo.com/support/phone
Frequentlyinspectyourcomputeranditscomponentsfordamageorwearorsignsofdanger.Ifyou
haveanyquestionabouttheconditionofacomponent,donotusetheproduct.ContacttheCustomer
SupportCenterortheproductmanufacturerforinstructionsonhowtoinspecttheproductand
haveitrepaired,ifnecessary.
Intheunlikelyeventthatyounoticeanyofthefollowingconditions,orifyouhaveanysafetyconcerns
withyourproduct,stopusingtheproductandunplugitfromthepowersourceandtelecommunication
linesuntilyoucanspeaktotheCustomerSupportCenterforfurtherguidance.
•Powercords,plugs,poweradapters,extensioncords,surgeprotectors,orpowersuppliesthatare
cracked,broken,ordamaged.
•Signsofoverheating,smoke,sparks,orre.
•Damagetoabattery(suchascracks,dents,orcreases),dischargefromabattery,orabuildupofforeign
substancesonthebattery.
•Acracking,hissingorpoppingsound,orstrongodorthatcomesfromtheproduct.
•Signsthatliquidhasbeenspilledoranobjecthasfallenontothecomputerproduct,thepowercordor
poweradapter.
•Thecomputerproduct,powercord,orpoweradapterhasbeenexposedtowater.
•Theproducthasbeendroppedordamagedinanyway.
•Theproductdoesnotoperatenormallywhenyoufollowtheoperatinginstructions.
Note:Ifyounoticetheseconditionswithaproduct(suchasanextensioncord)thatisnotmanufacturedfor
orbyLenovo,stopusingthatproductuntilyoucancontacttheproductmanufacturerforfurtherinstructions,
oruntilyougetasuitablereplacement.
Safetyguidelines
Alwaysobservethefollowingprecautionstoreducetheriskofinjuryandpropertydamage.
Formoreinformation,seeChapter1,ImportantsafetyinformationintheSafetyandWarrantyGuide.The
latestSafetyandWarrantyGuidehasbeenuploadedtotheWebsite.
Serviceandupgrades
DonotattempttoserviceaproductyourselfunlessinstructedtodosobytheCustomerSupportCenteror
yourdocumentation.OnlyuseaServiceProviderwhoisapprovedtorepairyourparticularproduct.
Note:Somecomputerpartscanbeupgradedorreplacedbythecustomer.Upgradestypicallyare
referredtoasoptions.ReplacementpartsapprovedforcustomerinstallationarereferredtoasCustomer
ReplaceableUnits,orCRUs.Lenovoprovidesdocumentationwithinstructionswhenitisappropriatefor
©CopyrightLenovo2011vii
customerstoinstalloptionsorreplaceCRUs.Youmustcloselyfollowallinstructionswheninstallingor
replacingparts.TheOffstateofapowerindicatordoesnotnecessarilymeanthatvoltagelevelsinsidea
productarezero.Beforeyouremovethecoversfromaproductequippedwithapowercord,alwaysmake
surethatthepoweristurnedoffandthattheproductisunpluggedfromanypowersource.Formore
informationonCRUs,refertotheReplacingdevicesforthisproduct.Ifyouhaveanyquestionsorconcerns,
contacttheCustomerSupportCenter.
Althoughtherearenomovingpartsinyourcomputerafterthepowercordhasbeendisconnected,the
followingwarningsarerequiredforyoursafety.
DANGER
Hazardousmovingparts.Keepngersandotherbodypartsaway.
CAUTION:
BeforereplacinganyCRUs,turnoffthecomputerandwaitthreetoveminutestoletthecomputer
coolbeforeopeningthecover.
viiiUserGuide

Powercordsandpoweradapters
DANGER
Useonlythepowercordsandpoweradapterssuppliedbytheproductmanufacturer.
Thepowercordsshallbesafetyapproved.ForGermany,itshallbeH05VV-F,3G,0.75mm2,or
better.Forothercountries,thesuitabletypesshallbeusedaccordingly.
Neverwrapapowercordaroundapoweradapterorotherobject.Doingsocanstressthecordin
waysthatcancausethecordtofray,crack,orcrimp.Thiscanpresentasafetyhazard.
Alwaysroutepowercordssothattheywillnotbewalkedon,trippedover,orpinchedbyobjects.
Protectpowercordandpoweradaptersfromliquids.Forinstance,donotleaveyourpowercordor
poweradapternearsinks,tubs,toilets,oronoorsthatarecleanedwithliquidcleansers.Liquids
cancauseashortcircuit,particularlyifthepowercordorpoweradapterhasbeenstressedby
misuse.Liquidsalsocancausegradualcorrosionofpowercordterminalsand/ortheconnector
terminalsonapoweradapter,whichcaneventuallyresultinoverheating.
Alwaysconnectpowercordsandsignalcablesinthecorrectorderandensurethatallpowercord
connectorsaresecurelyandcompletelypluggedintoreceptacles.
DonotuseanypoweradapterthatshowscorrosionattheACinputpinsorshowssignsof
overheating(suchasdeformedplastic)attheACinputoranywhereonthepoweradapter.
Donotuseanypowercordswheretheelectricalcontactsoneitherendshowsignsofcorrosionor
overheatingorwherethepowercordappearstohavebeendamagedinanyway.
Extensioncordsandrelateddevices
Ensurethatextensioncords,surgeprotectors,uninterruptiblepowersupplies,andpowerstripsthatyouuse
areratedtohandletheelectricalrequirementsoftheproduct.Neveroverloadthesedevices.Ifpowerstrips
areused,theloadshouldnotexceedthepowerstripinputrating.Consultanelectricianformoreinformation
ifyouhavequestionsaboutpowerloads,powerrequirements,andinputratings.
©CopyrightLenovo2011ix
Plugsandoutlets
DANGER
Ifareceptacle(poweroutlet)thatyouintendtousewithyourcomputerequipmentappearstobe
damagedorcorroded,donotusetheoutletuntilitisreplacedbyaqualiedelectrician.
Donotbendormodifytheplug.Iftheplugisdamaged,contactthemanufacturertoobtain
areplacement.
Donotshareanelectricaloutletwithotherhomeorcommercialappliancesthatdrawlargeamounts
ofelectricity;otherwise,unstablevoltagemightdamageyourcomputer,data,orattacheddevices.
Someproductsareequippedwithathree-prongedplug.Thisplugtsonlyintoagrounded
electricaloutlet.Thisisasafetyfeature.Donotdefeatthissafetyfeaturebytryingtoinsertitinto
anon-groundedoutlet.Ifyoucannotinserttheplugintotheoutlet,contactanelectricianforan
approvedoutletadapterortoreplacetheoutletwithonethatenablesthissafetyfeature.Never
overloadanelectricaloutlet.Theoverallsystemloadshouldnotexceed80percentofthebranch
circuitrating.Consultanelectricianformoreinformationifyouhavequestionsaboutpowerloads
andbranchcircuitratings.
Besurethatthepoweroutletyouareusingisproperlywired,easilyaccessible,andlocatedclose
totheequipment.Donotfullyextendpowercordsinawaythatwillstressthecords.
Besurethatthepoweroutletprovidesthecorrectvoltageandcurrentfortheproductyouare
installing.
Carefullyconnectanddisconnecttheequipmentfromtheelectricaloutlet.
Powersupplystatement
DANGER
Neverremovethecoveronapowersupplyoranypartthathasthefollowinglabelattached.
Hazardousvoltage,current,andenergylevelsarepresentinsideanycomponentthathasthislabel
attached.Therearenoserviceablepartsinsidethesecomponents.Ifyoususpectaproblemwith
oneoftheseparts,contactaservicetechnician.
Externaldevices
CAUTION:
DonotconnectordisconnectanyexternaldevicecablesotherthanUniversalSerialBus(USB)
whilethecomputerpowerison;otherwise,youmightdamageyourcomputer.T oavoidpossible
damagetoattacheddevices,waitatleastvesecondsafterthecomputerisshutdowntodisconnect
externaldevices.
xUserGuide

Batteries
DANGER
PersonalcomputersmanufacturedbyLenovocontainacoincellbatterytoprovidepowerto
thesystemclock.Inaddition,manymobileproducts,suchasnotebookcomputers,utilizea
rechargeablebatterypacktoprovidesystempowerwheninportablemode.Batteriessuppliedby
Lenovoforusewithyourproducthavebeentestedforcompatibilityandshouldonlybereplaced
withapprovedparts.
Neverattempttoopenorserviceanybattery.Donotcrush,puncture,orincineratebatteriesor
shortcircuitthemetalcontacts.Donotexposethebatterytowaterorotherliquids.Onlyrecharge
thebatterypackstrictlyaccordingtoinstructionsincludedintheproductdocumentation.
Batteryabuseormishandlingcancausethebatterytooverheat,whichcancausegassesorame
to“vent”fromthebatterypackorcoincell.Ifyourbatteryisdamaged,orifyounoticeany
dischargefromyourbatteryorthebuildupofforeignmaterialsonthebatteryleads,stopusingthe
batteryandobtainareplacementfromthebatterymanufacturer.
Batteriescandegradewhentheyareleftunusedforlongperiodsoftime.Forsomerechargeable
batteries(particularlyLithiumIonbatteries),leavingabatteryunusedinadischargedstatecould
increasetheriskofabatteryshortcircuit,whichcouldshortenthelifeofthebatteryandcanalso
poseasafetyhazard.DonotletrechargeableLithium-Ionbatteriescompletelydischargeorstore
thesebatteriesinadischargedstate.
Rechargeablebatterynotice
DANGER
Donotattempttodisassembleormodifythebatterypack.Attemptingtodosocancausean
explosion,orliquidleakagefromthebatterypack.Abatterypackotherthantheonespeciedby
Lenovo,oradisassembledormodiedbatterypackisnotcoveredbythewarranty.
Iftherechargeablebatterypackisincorrectlyreplaced,thereisdangerofanexplosion.Thebattery
packcontainsasmallamountofharmfulsubstances.T oavoidpossibleinjury:
•ReplaceonlywithabatteryofthetyperecommendedbyLenovo.
•Keepthebatterypackawayfromre.
•Donotexposeittowaterorrain.
•Donotattempttodisassembleit.
•Donotshort-circuitit.
•Keepitawayfromchildren.
•Donotdropthebatterypack.
Donotputthebatterypackintrashthatisdisposedofinlandlls.Whendisposingofthebattery,
complywithlocalordinancesorregulations.
Thebatterypackshouldbestoredatroomtemperature,chargedtoapproximately30to50%
ofcapacity.Werecommendthatbatterypackbechargedaboutonceperyeartoprevent
overdischarge.
©CopyrightLenovo2011xi

Lithiumcoincellbatterynotice
DANGER
Dangerofexplosionifbatteryisincorrectlyreplaced.
Whenreplacingthelithiumcoincellbattery,useonlythesameoranequivalenttypethatis
recommendedbythemanufacturer.Thebatterycontainslithiumandcanexplodeifnotproperly
used,handled,ordisposedof.
Donot:
•Throworimmerseintowater
•Heattomorethan100°C(212°F)
•Repairordisassemble
Disposeofthebatteryasrequiredbylocalordinancesorregulations.
ThefollowingstatementappliestousersinthestateofCalifornia,U.S.A.
CaliforniaPerchlorateInformation:
ProductscontainingCR(manganesedioxide)lithiumcoincellbatteriesmaycontainperchlorate.
PerchlorateMaterial-specialhandlingmayapply.Goto:
http://www.dtsc.ca.gov/hazardouswaste/perchlorate
xiiUserGuide

Heatandproductventilation
DANGER
Computers,acpoweradapters,andmanyaccessoriescangenerateheatwhenturnedonandwhen
batteriesarecharging.Notebookcomputerscangenerateasignicantamountofheatduetotheir
compactsize.Alwaysfollowthesebasicprecautions:
•Whenyourcomputeristurnedonorthebatteryischarging,thebase,thepalmrest,andsome
otherpartsmaybecomehot.Avoidkeepingyourhands,yourlap,oranyotherpartofyour
bodyincontactwithahotsectionofthecomputerforanyextendedlengthoftime.Whenyou
usethekeyboard,avoidkeepingyourpalmsonthepalmrestforaprolongedperiodoftime.
Yourcomputergeneratessomeheatduringnormaloperation.Theamountofheatdependson
theamountofsystemactivityandthebatterychargelevel.Extendedcontactwithyourbody,
eventhroughclothing,couldcausediscomfortorevenaskinburn.Periodicallytakebreaks
fromusingthekeyboardbyliftingyourhandsfromthepalmrest;andbecarefulnottouse
thekeyboardforanyextendedlengthoftime.
•Donotoperateyourcomputerorchargethebatterynearammablematerialsorinexplosive
environments.
•Ventilationslots,fansand/orheatsinksareprovidedwiththeproductforsafety,comfort,and
reliableoperation.Thesefeaturesmightinadvertentlybecomeblockedbyplacingtheproducton
abed,sofa,carpet,orotherexiblesurface.Neverblock,cover,ordisablethesefeatures.
•Whentheacpoweradapterisconnectedtoanelectricaloutletandyourcomputer,itgenerates
heat.Donotplacetheadapterincontactwithanypartofyourbodywhileusingit.Neverusethe
acpoweradaptertowarmyourbody.Extendedcontactwithyourbody,eventhroughclothing,
maycauseaskinburn.
Foryoursafety,alwaysfollowthesebasicprecautionswithyourcomputer:
•Keepthecoverclosedwheneverthecomputerispluggedin.
•Regularlyinspecttheoutsideofthecomputerfordustaccumulation.
•Removedustfromventsandanyperforationsinthebezel.Morefrequentcleaningsmightbe
requiredforcomputersindustyorhigh-trafcareas.
•Donotrestrictorblockanyventilationopenings.
•Donotoperateyourcomputerinsidefurniture,asthismightincreasetheriskofoverheating.
•Airowtemperaturesintothecomputershouldnotexceed35°C(95°F).
©CopyrightLenovo2011xiii

Electricalcurrentsafetyinformation
DANGER
Electriccurrentfrompower,telephone,andcommunicationcablesishazardous.
Toavoidashockhazard:
•Donotuseyourcomputerduringalightningstorm.
•Donotconnectordisconnectanycablesorperforminstallation,maintenance,orreconguration
ofthisproductduringanelectricalstorm.
•Connectallpowercordstoaproperlywiredandgroundedelectricaloutlet.
•Connecttoproperlywiredoutletsanyequipmentthatwillbeattachedtothisproduct.
•Wheneverpossible,useonehandonlytoconnectordisconnectsignalcables.
•Neverturnonanyequipmentwhenthereisevidenceofre,water,orstructuraldamage.
•Disconnecttheattachedpowercords,batterypack,andallthecablesbeforeyouopenthe
devicecovers,unlessinstructedotherwiseintheinstallationandcongurationprocedures.
•Donotuseyoucomputeruntilallinternalpartsenclosuresarefastenedintoplace.Neveruse
thecomputerwheninternalpartsandcircuitsareexposed.
DANGER
Connectanddisconnectcablesasdescribedinthefollowingprocedureswheninstalling,moving,
oropeningcoversonthisproductorattacheddevices.
Toconnect:
1.TurneverythingOFF.
2.First,attachallcablestodevices.
3.Attachsignalcablestoconnectors.
4.Attachpowercordstooutlets.
5.TurndevicesON.
Todisconnect:
1.TurneverythingOFF.
2.First,removepowercordsfromoutlets.
3.Removesignalcablesfromconnectors.
4.Removeallcablesfromdevices.
Thepowercordmustbedisconnectedfromthewalloutletorreceptaclebeforeinstallingallother
electricalcablesconnectedtothecomputer.
Thepowercordmaybereconnectedtothewalloutletorreceptacleonlyafterallotherelectrical
cableshavebeenconnectedtothecomputer.
Lasercompliancestatement
CAUTION:
Whenlaserproducts(suchasCD-ROMs,DVDdrives,beropticdevices,ortransmitters)are
installed,notethefollowing:
•Donotremovethecovers.Removingthecoversofthelaserproductcouldresultinexposureto
hazardouslaserradiation.Therearenoserviceablepartsinsidethedevice.
•Useofcontrolsoradjustmentsorperformanceofproceduresotherthanthosespeciedherein
mightresultinhazardousradiationexposure.
xivUserGuide

DANGER
SomelaserproductscontainanembeddedClass3AorClass3Blaserdiode.Notethefollowing.
Laserradiationwhenopen.Donotstareintothebeam,donotviewdirectlywithoptical
instruments,andavoiddirectexposuretothebeam.
Liquidcrystaldisplay(LCD)notice
CAUTION:
TheLCDismadeofglass,androughhandlingordroppingthecomputercancausetheLCDtobreak.
IftheLCDbreaksandtheinternaluidgetsintoyoureyesoronyourhands,immediatelywashthe
affectedareaswithwaterforatleast15minutes;ifanysymptomsarepresentafterwashing,get
medicalcare.
Usingheadphonesorearphones
Ifyourcomputerhasbothaheadphoneconnectorandanaudio-outconnector,alwaysusetheheadphone
connectorforheadphones(alsocalledaheadset)orearphones.
CAUTION:
Excessivesoundpressurefromearphonesandheadphonescancausehearingloss.Adjustmentof
theequalizertomaximumincreasestheearphonesandheadphonesoutputvoltageandthereforethe
soundpressurelevel.
Excessiveuseofheadphonesorearphonesforalongperiodoftimeathighvolumecanbedangerousifthe
outputoftheheadphoneorearphoneconnectorsdonotcomplywithspecicationsofEN50332-2.The
headphoneoutputconnectorofyourcomputercomplieswithEN50332-2Subclause7.Thisspecication
limitsthecomputer’smaximumwidebandtrueRMSoutputvoltageto150mV.Tohelpprotectagainst
hearingloss,ensurethattheheadphonesorearphonesyouusealsocomplywithEN50332-2(Clause7
limits)forawidebandcharacteristicvoltageof75mV.UsingheadphonesthatdonotcomplywithEN
50332-2canbedangerousduetoexcessivesoundpressurelevels.
IfyourLenovocomputercamewithheadphonesorearphonesinthepackage,asaset,thecombinationof
theheadphonesorearphonesandthecomputeralreadycomplieswiththespecicationsofEN50332-1.
Ifdifferentheadphonesorearphonesareused,ensurethattheycomplywithEN50332-1(Clause6.5
LimitationValues).UsingheadphonesthatdonotcomplywithEN50332-1canbedangerousdueto
excessivesoundpressurelevels.
Additionalsafetyinformation
DANGER
Plasticbagscanbedangerous.Keepplasticbagsawayfrombabiesandchildrentoavoiddanger
ofsuffocation.
NoticeforTabletPCusers
SafetyNoticeforusersinAustralia:
DANGER
Donotconnectphonelinewhileusingtabletmode.
©CopyrightLenovo2011xv

NoticeforusersintheU.S.A.
ManyPCproductsandaccessoriescontaincords,cablesorwires,suchaspowercordsorcordstoconnect
theaccessorytoaPC.Ifthisproducthassuchacord,cableorwire,thenthefollowingwarningapplies:
WARNING
Handlingthecordonthisproductorcordsassociatedwithaccessoriessoldwiththisproductwillexpose
youtolead,achemicalknowntotheStateofCaliforniatocausecancer,andbirthdefectsorother
reproductiveharm.Washhandsafterhandling.
Savetheseinstructions.
xviUserGuide

Chapter1.ProductOverview
Thischapterprovidesinformationaboutthelocationsofconnectors,locatingimportantproductinformation,
computerfeatures,specications,operatingenvironment,andpreinstalledsoftwareprograms.
Thischaptercontainsthefollowingtopics:
•“Locatingcomputercontrols,connectors,andindicators”onpage1
•“Locatingimportantproductinformation”onpage13
•“Features”onpage15
•“Specications”onpage18
•“Operatingenvironment”onpage19
•“ThinkVantagetechnologiesandsoftware”onpage19
Locatingcomputercontrols,connectors,andindicators
Thissectionintroducesyoutothehardwarefeaturesofyourcomputer,andthengivesyouthebasic
informationyou'llneedtostarttakingadvantageofitsfunctions.
•“Frontview”onpage2
•“Right-sideview”onpage6
•“Left-sideview”onpage7
•“Rearview”onpage10
•“Bottomview”onpage9
•“Statusindicators”onpage11
©CopyrightLenovo20111
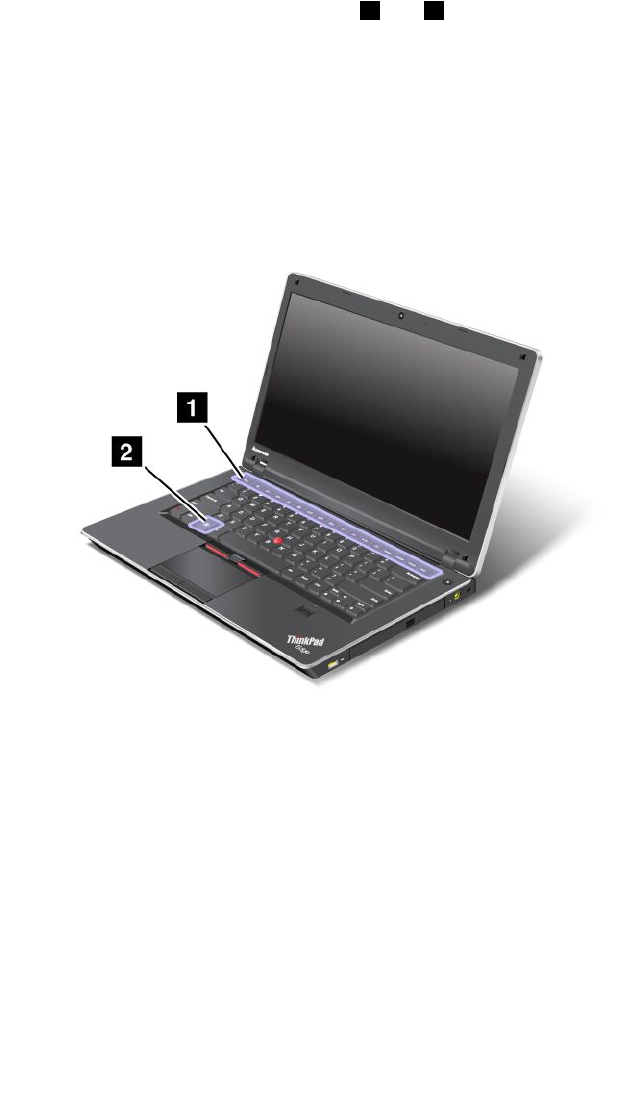
Frontview
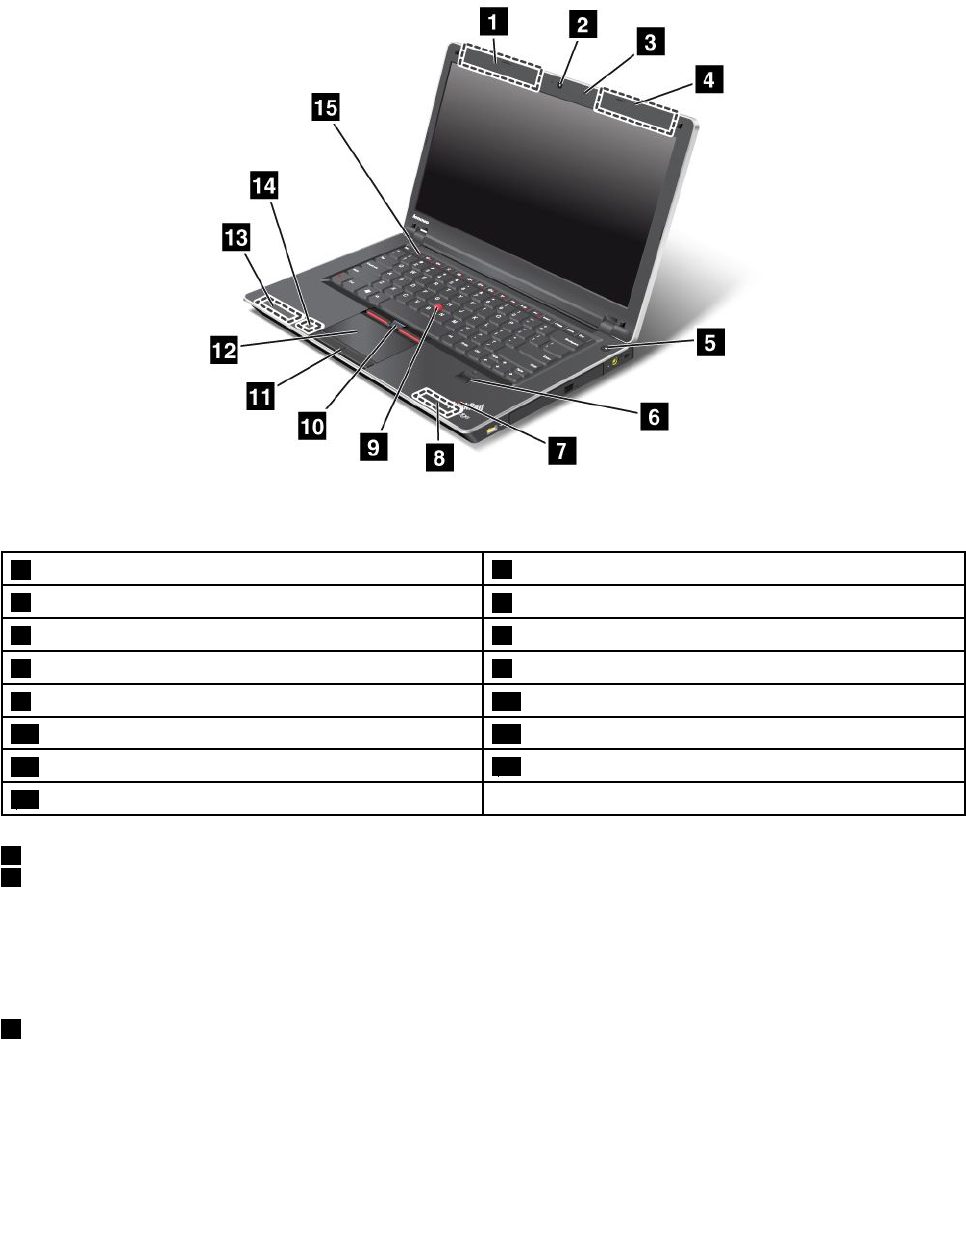
ThinkPadEdgeE420frontview
Figure1.ThinkPadEdgeE420frontview
1UltraConnectwirelessantennas(left)2Integratedhighsensitivitywebcam
3Built-inmicrophone4UltraConnectwirelessantennas(right)
5Powerswitch6Fingerprintreader
7System-statusindicators(illuminatedThinkPadlogo)8Built-instereospeaker(right)
9TrackPointpointingstick10TrackPointbuttons
11Touchpadbuttons12Touchpad
13Built-instereospeaker(left)14Bluetoothantenna
15Volumecontrolbuttons
1UltraConnect™wirelessantennas(left)
4UltraConnectwirelessantennas(right)
Thebuilt-inantennasforthewirelesscommunicationarelocatedatthetopleftandtoprightportionsof
yourcomputerdisplay.
Fordetails,refertotheinstructionsin“LocationoftheUltraConnectwirelessantennas”onpage164.
2Integratedhighsensitivitywebcam
Yourcomputermayhaveanintegratedhighsensitivitywebcam.Byusingthiscamera,youcantakepictures
orholdavideoconference.
2UserGuide

3Built-inmicrophone
Thebuilt-inmicrophonecapturessoundandvoicewhenitisusedwithanapplicationprogramcapable
ofhandlingaudio.
5Powerswitch
Usethepowerswitchtoturnonthecomputer.Toturnoffyourcomputer,usetheStartmenushutdown
options.
Ifyoucannotturnoffthecomputerbythismethod,pressandholdthepowerswitchfor2seconds.
Ifyourcomputerstopsresponding,andyoucannotturnitoff,pressandholdthepowerswitchfor4seconds
ormore.Ifthesystemisstillnotreset,removetheacpoweradapterandthebattery.
ThepowerswitchcanalsobeprogrammedviaPowerManagertoshutdownthecomputerorputitinto
sleep(standby)orhibernation.
6Fingerprintreader
Yourcomputermayhaveanintegratedngerprintreader.Itenablesyoutologontoyourcomputerby
usingyourngerprintwithouttypinganypasswords.
Fordetails,refertotheinstructionsin“Usingangerprintreader”onpage65.
7System-statusindicators(illuminatedThinkPadlogo)
TheilluminateddotintheThinkPad®logoworksasasystem-statusindicatorshowingwhetherthecomputer
isinsleep(standby),hibernation,ornormalmode.
Fordetails,refertotheinstructionsin“System-statusindicators”onpage12.
8Built-instereospeaker(right)
13Built-instereospeaker(left)
Thestereospeakersarebuiltintoyourcomputer.
Fordetails,refertotheinstructionsin“ThinkPadEdgeE420specialkeys”onpage27.
UltraNav®
9TrackPointpointingstick
10TrackPointbuttons
11T ouchpadbuttons
12Touchpad
ThekeyboardcontainstheuniqueTrackPoint®pointingdevice.Pointing,selecting,anddraggingareallpart
ofasingleprocessthatyoucanperformwithoutmovingyourngersfromtypingposition.
MoveyourngertipacrosstheUltraNavtouchpadtomovethepointer.
TheTrackPointandtouchpadbuttonsprovidefunctionssimilartothoseofamouseanditsbuttons.
14Bluetoothantenna
Ifyourcomputerhasintegratedbluetoothfeatures,refertoUsingBluetoothformoreinformation.
15Volumecontrolbuttons
Thebuilt-involumebuttonsenableyoutoquicklyadjustthevolumeormutethesoundfromyourcomputer.
Chapter1.ProductOverview3
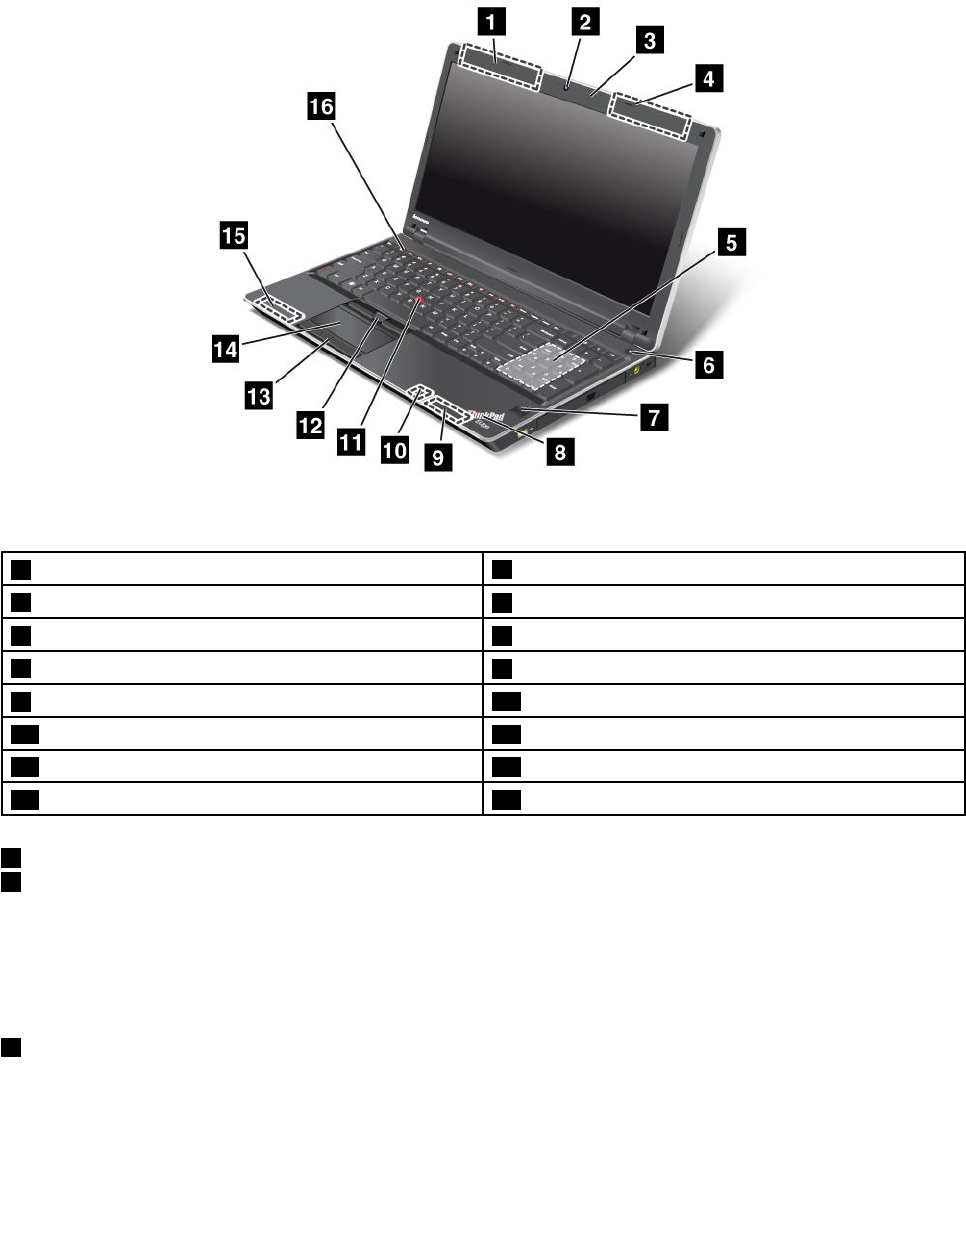
Fordetails,refertotheinstructionsin“ThinkPadEdgeE420specialkeys”onpage27.
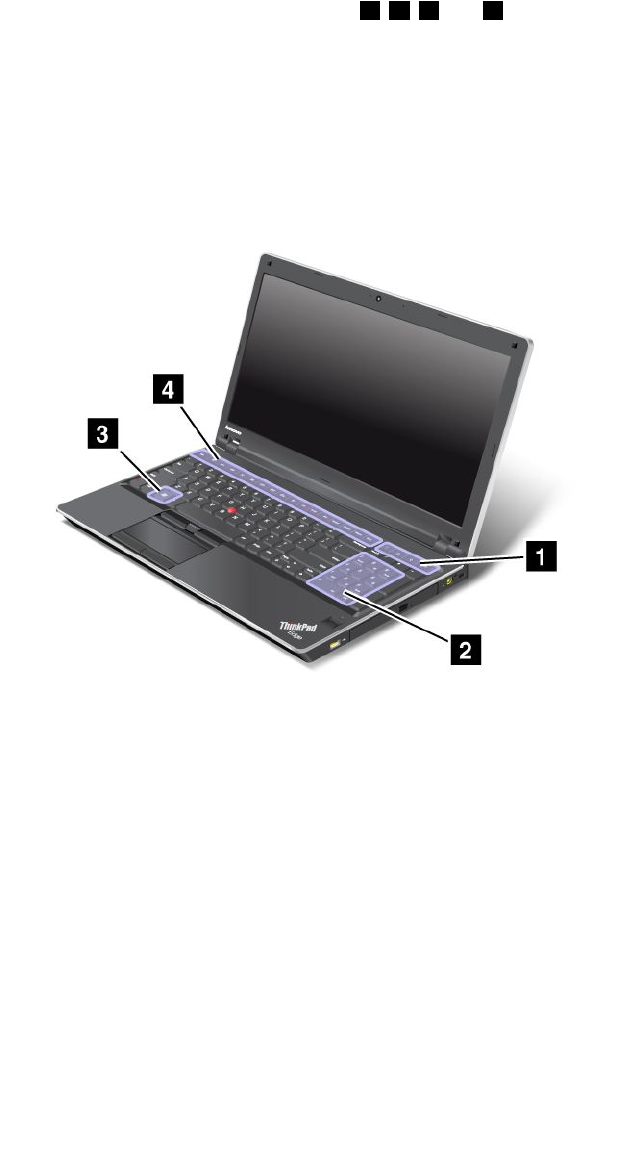
ThinkPadEdgeE520frontview
Figure2.ThinkPadEdgeE520frontview
1UltraConnectwirelessantennas(left)2Integratedhighsensitivitywebcam
3Built-inmicrophone4UltraConnectwirelessantennas(right)
5Numerickeypad6Powerswitch
7Fingerprintreader8System-statusindicators(illuminatedThinkPadlogo)
9Built-instereospeaker(right)10Bluetoothantenna
11TrackPointpointingstick12TrackPointbuttons
13Touchpadbuttons14Touchpad
15Built-instereospeaker(left)16Volumecontrolbuttons
1UltraConnectwirelessLAN/WiMAXantennasandwirelessWANantennas(left)
4UltraConnectwirelessLAN/WiMAXantennasandwirelessWANantennas(right)
Thebuilt-inantennasforthewirelesscommunicationarelocatedatthetopleftandtoprightportionsof
yourcomputerdisplay.
Fordetails,refertotheinstructionsin“LocationoftheUltraConnectwirelessantennas”onpage164.
2Integratedhighsensitivitywebcam
Yourcomputermayhaveanintegratedhighsensitivitywebcam.Byusingthiscamera,youcantakepictures
orholdavideoconference.
4UserGuide

3Built-inmicrophone
Thebuilt-inmicrophonecapturessoundandvoicewhenitisusedwithanapplicationprogramcapable
ofhandlingaudio.
5Numerickeypad
Yourcomputerhasanumerickeypadthatcanbeusedtoquicklyinputnumbers.
6Powerswitch
Usethepowerswitchtoturnonthecomputer.Toturnoffyourcomputer,usetheStartmenushutdown
options.
Ifyoucannotturnoffthecomputerbythismethod,pressandholdthepowerswitchfor2seconds.
Ifyourcomputerstopsresponding,andyoucannotturnitoff,pressandholdthepowerswitchfor4seconds
ormore.Ifthesystemisstillnotreset,removetheacpoweradapterandthebattery.
ThepowerswitchcanalsobeprogrammedviaPowerManagertoshutdownthecomputerorputitinto
sleep(standby)orhibernation.
7Fingerprintreader
Yourcomputermayhaveanintegratedngerprintreader.Itenablesyoutologontoyourcomputerby
usingyourngerprintwithouttypinganypasswords.
Fordetails,refertotheinstructionsin“Usingangerprintreader”onpage65.
8System-statusindicators(illuminatedThinkPadlogo)
TheilluminateddotintheThinkPadlogoworksasasystem-statusindicatorshowingwhetherthecomputer
isinsleep(standby),hibernation,ornormalmode.
Fordetails,refertotheinstructionsin“System-statusindicators”onpage12.
9Built-instereospeaker(right)
15Built-instereospeaker(left)
Thestereospeakersarebuiltintoyourcomputer.
Fordetails,refertotheinstructionsin“ThinkPadEdgeE520specialkeys”onpage29.
10Bluetoothantenna
Ifyourcomputerhasintegratedbluetoothfeatures,referto“UsingBluetooth”onpage42formore
information.
UltraNav
11TrackPointpointingstick
12TrackPointbuttons
13T ouchpadbuttons
14Touchpad
ThekeyboardcontainstheuniqueTrackPointpointingdevice.Pointing,selecting,anddraggingareallpart
ofasingleprocessthatyoucanperformwithoutmovingyourngersfromtypingposition.
MoveyourngertipacrosstheUltraNavtouchpadtomovethepointer.
Chapter1.ProductOverview5
TheTrackPointandtouchpadbuttonsprovidefunctionssimilartothoseofamouseanditsbuttons.
16Volumecontrolbuttons
Thebuilt-involumebuttonsenableyoutoquicklyadjustthevolumeormutethesoundfromyourcomputer.
Fordetails,refertotheinstructionsin“ThinkPadEdgeE520specialkeys”onpage29.
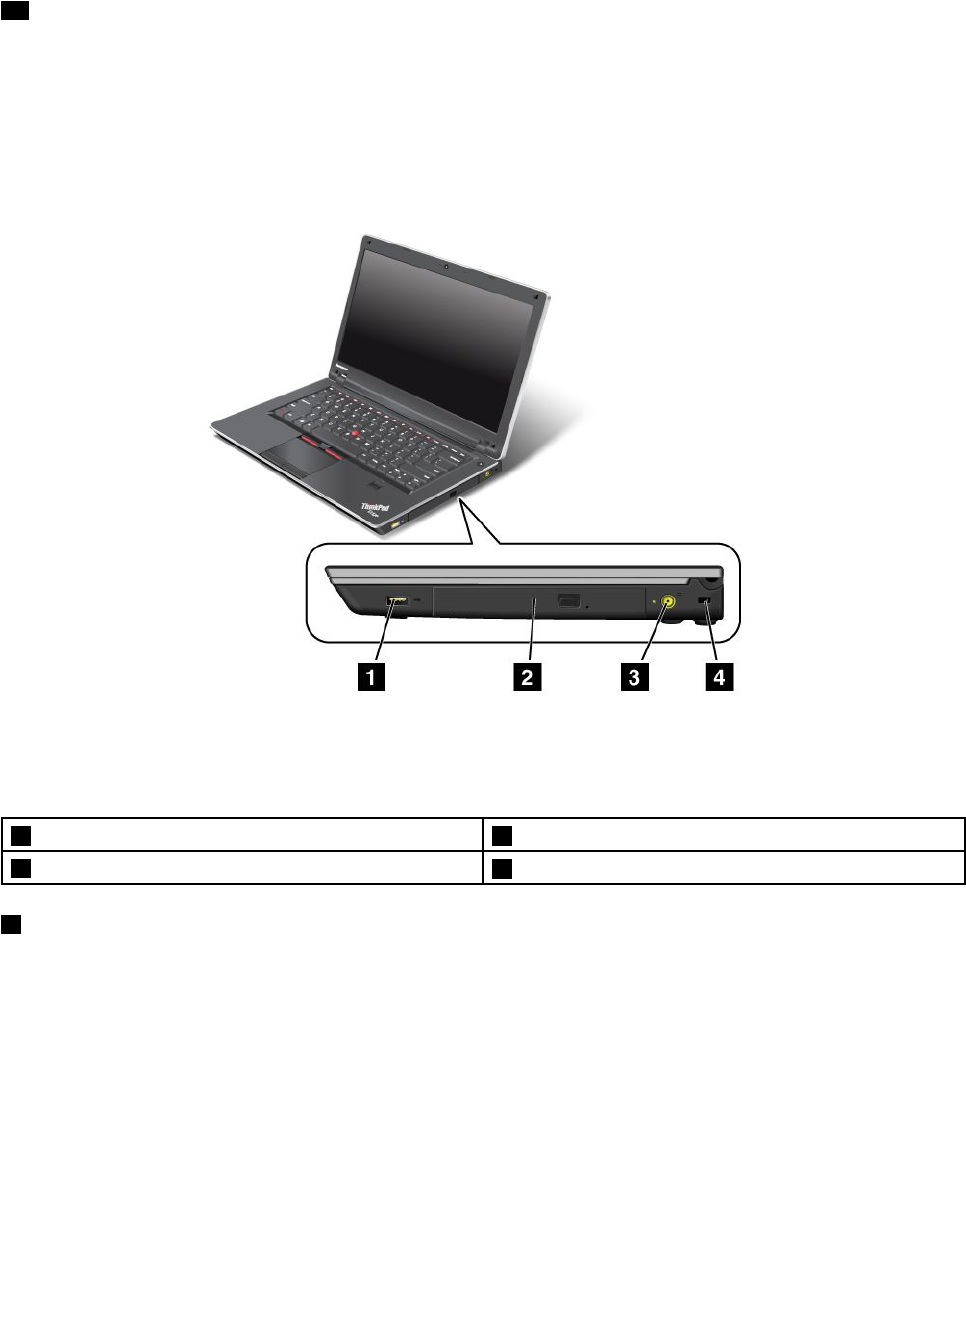
Right-sideview
Figure3.ThinkPadEdgeE420andE520right-sideview
Note:Yourcomputerkeyboardmightlookdifferentfromtheillustrationabove.
1AlwaysOnUSBconnector2Opticaldrive
3Powerjack4Securitykeyhole
1AlwaysOnUSBconnector
TheAlwaysOnUSBconnectorisusedforconnectingdevicescompatiblewithaUSBinterface,suchas
aprinteroradigitalcamera.
Bydefault,evenifyourcomputerisinsleepmode,theAlwaysOnUSBconnectorstillenablesyouto
chargesomedevices,suchasiPod®,iPhone®,andBlackBerry®smartphones,byattachingthedevices
totheconnector.
However,withtheacpoweradapterattached,ifyouwanttochargethesedeviceswhenyourcomputer
isinhibernationmodeorpoweredoff,youwillneedtoopenthePowerManagerprogramandcongure
correspondingsettingstoenabletheAlwaysOnUSBconnector.FordetailsabouthowtoenabletheAlways
OnUSBconnector,refertotheon-linehelpofthePowerManagerprogram.
Note:YourcomputeriscompatiblewithUSB1.1and2.0.
6UserGuide
2Opticaldrive
Yourcomputerhasaslotforanopticaldrive.
3Powerjack
Theacpoweradaptercableconnectstothecomputerpowerjacktoprovidepowertothecomputerand
chargethebattery.
4Securitykeyhole
Yourcomputercomeswithasecuritykeyhole.Youcanpurchaseasecuritycableandlocktotthiskeyhole.
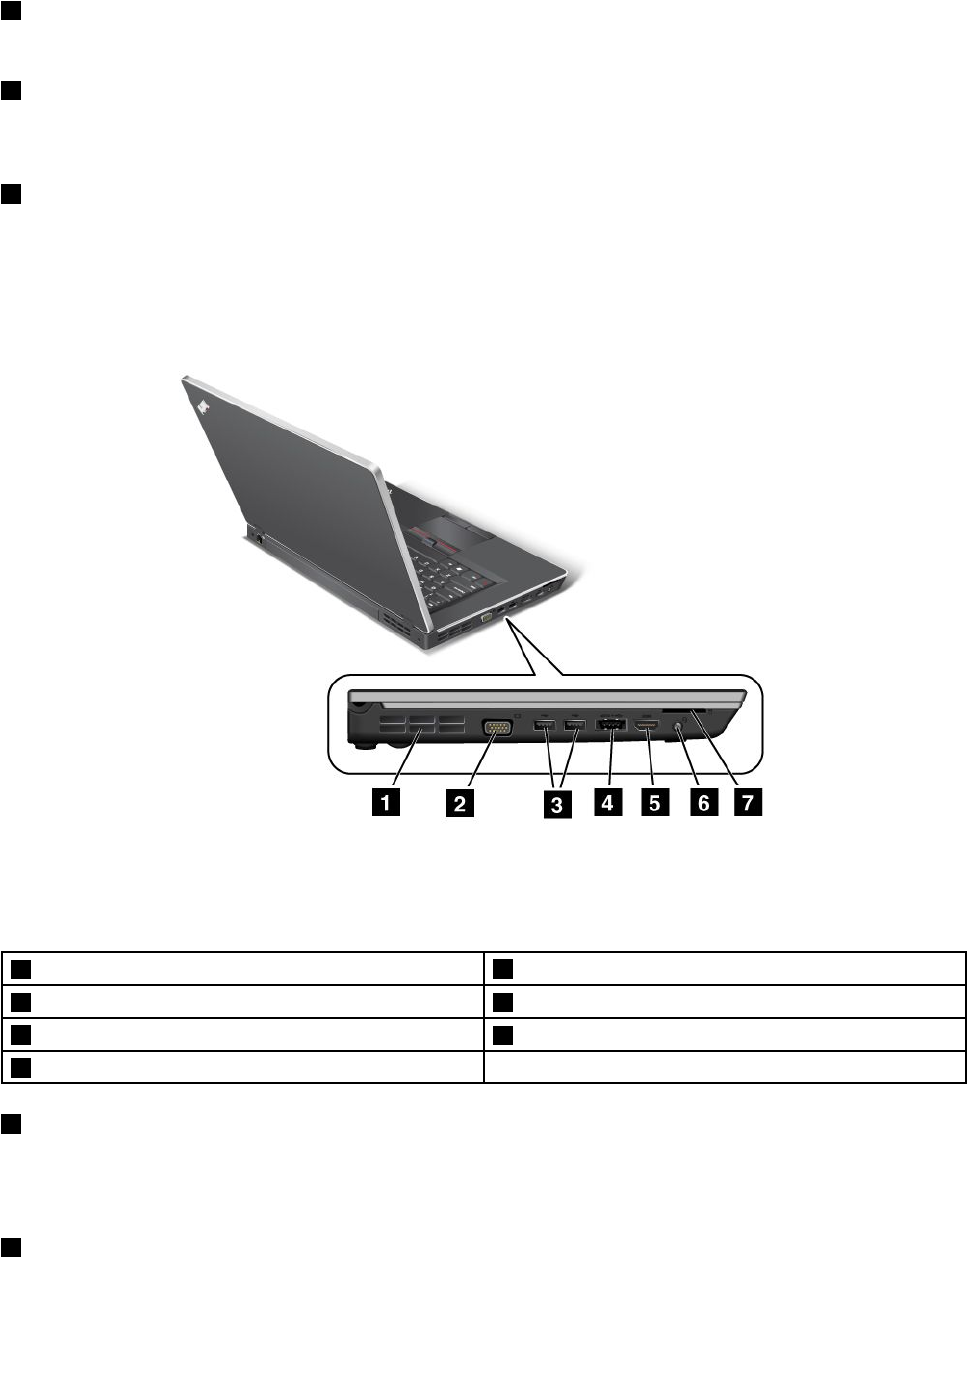
Left-sideview
Figure4.ThinkPadEdgeE420andE520left-sideview
Note:Yourcomputerkeyboardmightlookdifferentfromtheillustrationabove.
1Fanlouvers(left)2Monitorconnector
3USBconnectors4eSATA/USBcomboconnector
5HDMIport6Comboaudiojack
7Mediacardreaderslot
1Fanlouvers(left)
Theinternalfanandlouversenableairtocirculateinthecomputerandcoolthecentralprocessor.
Note:Toavoidimpedingairow,donotplaceanyobstacleinfrontofthefan.
2Monitorconnector
Youcanattachanexternalmonitororaprojectortoyourcomputertodisplaycomputerinformation.
Chapter1.ProductOverview7

Fordetails,refertotheinstructionsin“Attachinganexternalmonitor”onpage48.
3USBconnectors
TheUniversalSerialBusconnectorsareusedforconnectingdevicescompatiblewithaUSBinterface,
suchasaprinteroradigitalcamera.
Note:YourcomputeriscompatiblewithUSB1.1and2.0.
4eSATA/USBcomboconnector
TheUniversalSerialBusconnectorsareusedforconnectingdevicescompatiblewithaUSBinterface,
suchasaprinteroradigitalcamera.
Note:YourcomputeriscompatiblewithUSB1.1and2.0.
YoucanalsoconnectanexternalSATAdevice,suchasanexternalharddiskdrive,tothisconnector
onsomemodels.
Note:Toavoiddamagingtheconnector,becarefulwhenyouattachacablefromtheexternalSATAdevice
totheconnector.
5HDMIport
YourThinkPadNotebooksupportsthehigh-denitionmultimediainterface(HDMI)port,anext-generation
digitalaudio/videointerfacethatenablesyoutoconnectittoacompatibledigitalaudiodeviceorvideo
monitorsuchasanHDTV.
6Comboaudiojack
Tolistentothesoundfromyourcomputer,connectaheadphoneoraheadset,thathasa3.5mm4-pole
plug,tothecomboaudiojack.
Notes:
•Ifyouareusingaheadsetwithafunctionswitch,forexample,aheadsetforaniPhonemobiledigital
device,donotpressthisswitchwhileusingtheheadset.Ifyoupressit,theheadsetmicrophonewill
bedisabled,andtheinternalmicrophonewillbeenabledinstead.
•Thecomboaudiojackdoesnotsupportaconventionalmicrophone.Formoreinformationabouttheaudio
devicessupportedbythecomboaudiojackofyourcomputer,see“Usingaudiofeatures”onpage51.
7Mediacardreaderslot
Dependingonthemodel,yourcomputermayhaveamediacardreaderslot.Themediacardreader
supportsthefollowingcards:
•SDcard
•SDHCcard
•SDXCcard
•MultiMediaCard
Note:YourcomputerdoesnotsupporttheContentProtectionforRecordableMedia(CPRM)featurefor
SDcards.
Fordetails,refertotheinstructionsin“UsingaashmediaCard”onpage53.
8UserGuide
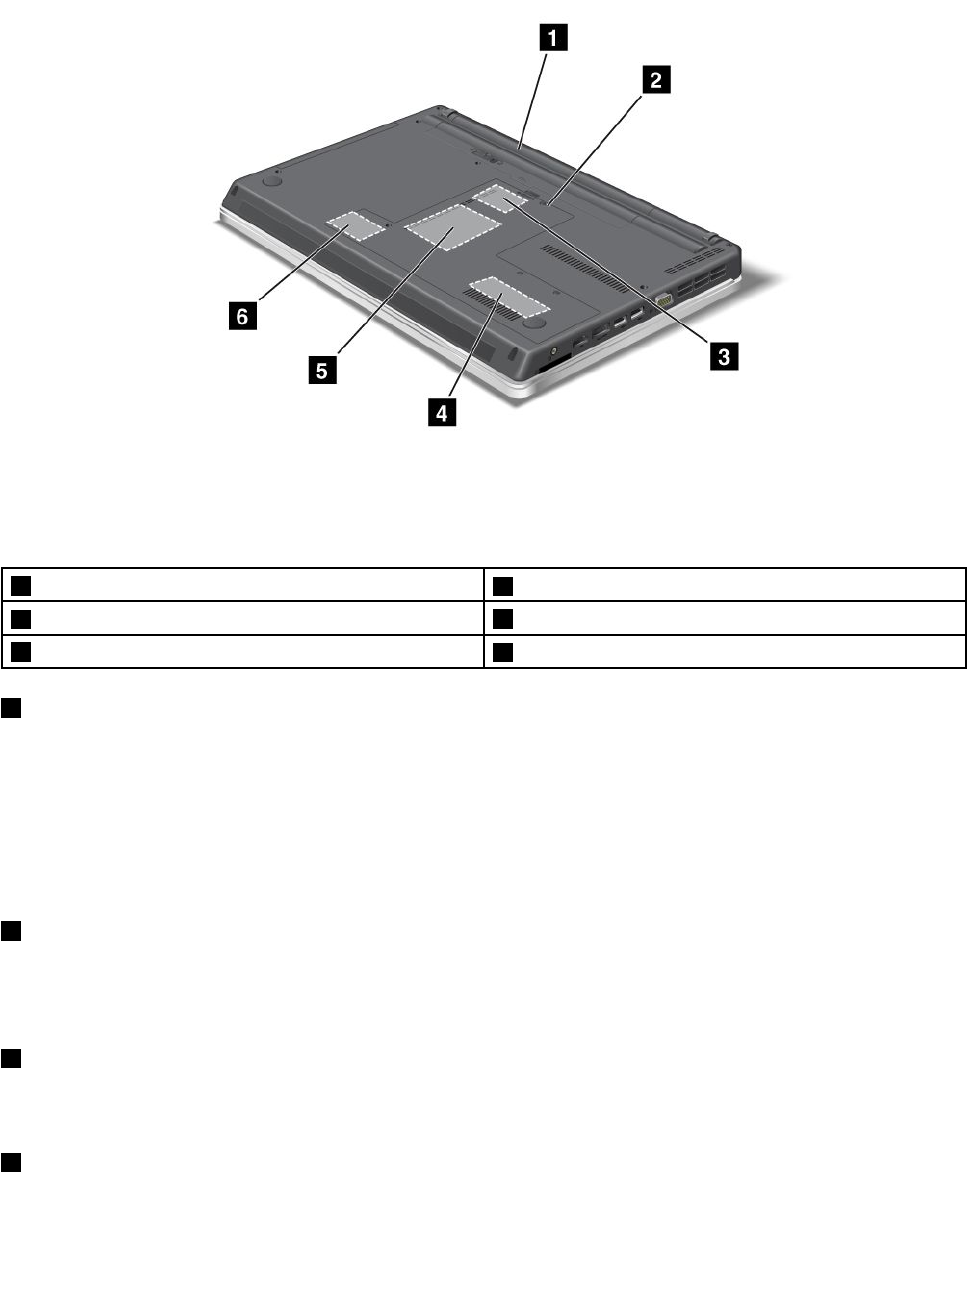
Bottomview
Figure5.ThinkPadEdgeE420andE520bottomview
1Battery2SIMcardslot
3PCIExpressMiniCardslotforwirelessWAN4Memory-upgradeslot
5Harddiskdrive6PCIExpressMiniCardslotforwirelessLAN/WiMAX
1Battery
Useyourcomputerwithbatterypowerwheneveracpowerisunavailable.
Byinstallinganextendedlifebatteryavailableasanoptionyoucanextendtheoperatingtimeofthe
computer.
YoucanalsousePowerManagertoadjustyourpowersettingasneeded.Fordetails,refertotheinstructions
in“PowerManager”onpage23.
2SIMcardslot
IfyourcomputerhasawirelessWANfeature,itmayrequireaSIM(SubscriberIdenticationModule)cardto
establishawirelessWAN(WideAreaNetwork)connections.Dependingonthecountryofdelivery,theSIM
cardmaybealreadyinstalledintheSIMcardslot.
3PCIExpressMiniCardslotforwirelessWAN
YourcomputermightincludeaPCIExpressMiniCardforwirelessWANinthePCIExpressMiniCard
slotwhichenableswirelessWANcommunications.
4Memory-upgradeslot
Youcanincreasetheamountofmemoryinyourcomputerbyinstallingamemorymoduleinthememory
bay.Memorymodulesareavailableasoptions.
Chapter1.ProductOverview9
5Harddiskdrive
Yourcomputermayhavealarge-capacity,customer-upgradableharddiskdrivethatcanmeetavarietyof
storagedemands.Tokeepthedrivesafe,ActiveProtectionSystem™isinstalledonyourcomputer.For
details,referto“ActiveProtectionSystem”onpage22.
Note:ThehiddenservicepartitionisthereasonwhythereislessfreespacethanexpectedonyourHDD.
6PCIExpressMiniCardslotforwirelessLAN/WiMAX
YourcomputermightincludeaPCIExpressMiniCardforwirelessLAN/WiMAXinthePCIExpressMiniCard
slotwhichenableswirelessLAN/WiMAXcommunications.
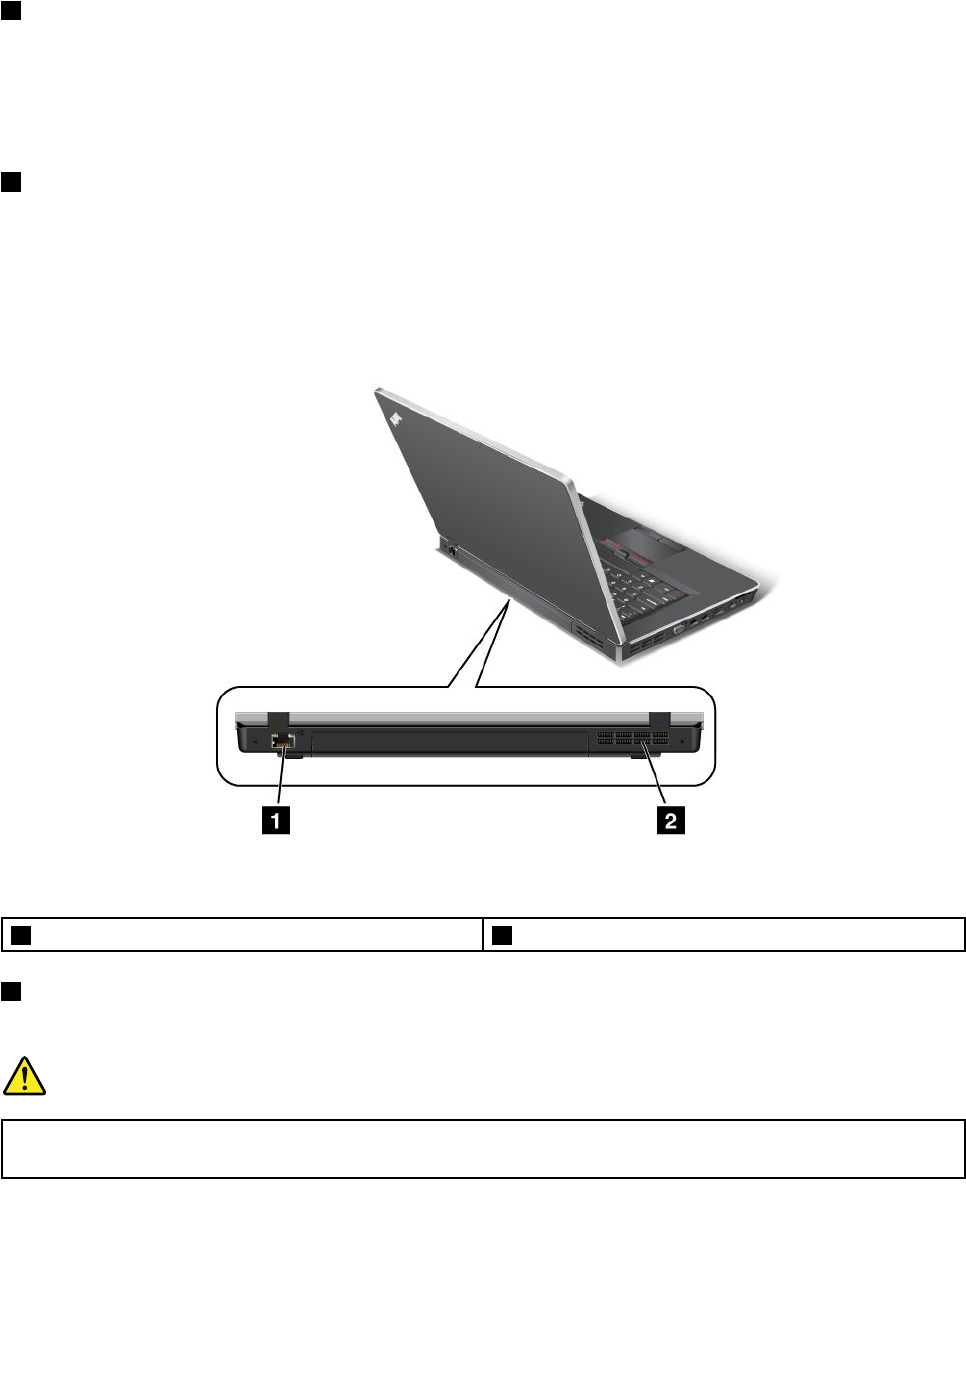
Rearview
Figure6.ThinkPadEdgeE420andE520rearview
1Ethernetconnector2Fanlouvers(rear)
1Ethernetconnector
ConnectyourcomputertoaLANwiththeEthernetconnector.
DANGER
Toavoidtheriskofelectricalshock,donotconnectthetelephonecabletotheEthernetconnector.
YoucanonlyconnectanEthernetcabletothisconnector.
Twoindicators,tothelowerrightandleftoftheconnector,showthestatusofthenetworkconnection.When
yourcomputerconnectstoaLANandasessionwiththenetworkisavailable,thelowerrightindicatoris
solidgreen.Whiledataisbeingtransmitted,thelowerleftindicatorblinksyellow.
10UserGuide

Fordetails,refertotheinstructionsin“AccessConnections”onpage21.
2Fanlouvers(rear)
Theinternalfanandlouversenableairtocirculateinthecomputerandcoolthecentralprocessor.
Note:Toavoidimpedingairow,donotplaceanyobstacleinfrontofthefan.
Statusindicators
Thestatusindicatorsshowthecurrentstatusofyourcomputer.
Chapter1.ProductOverview11
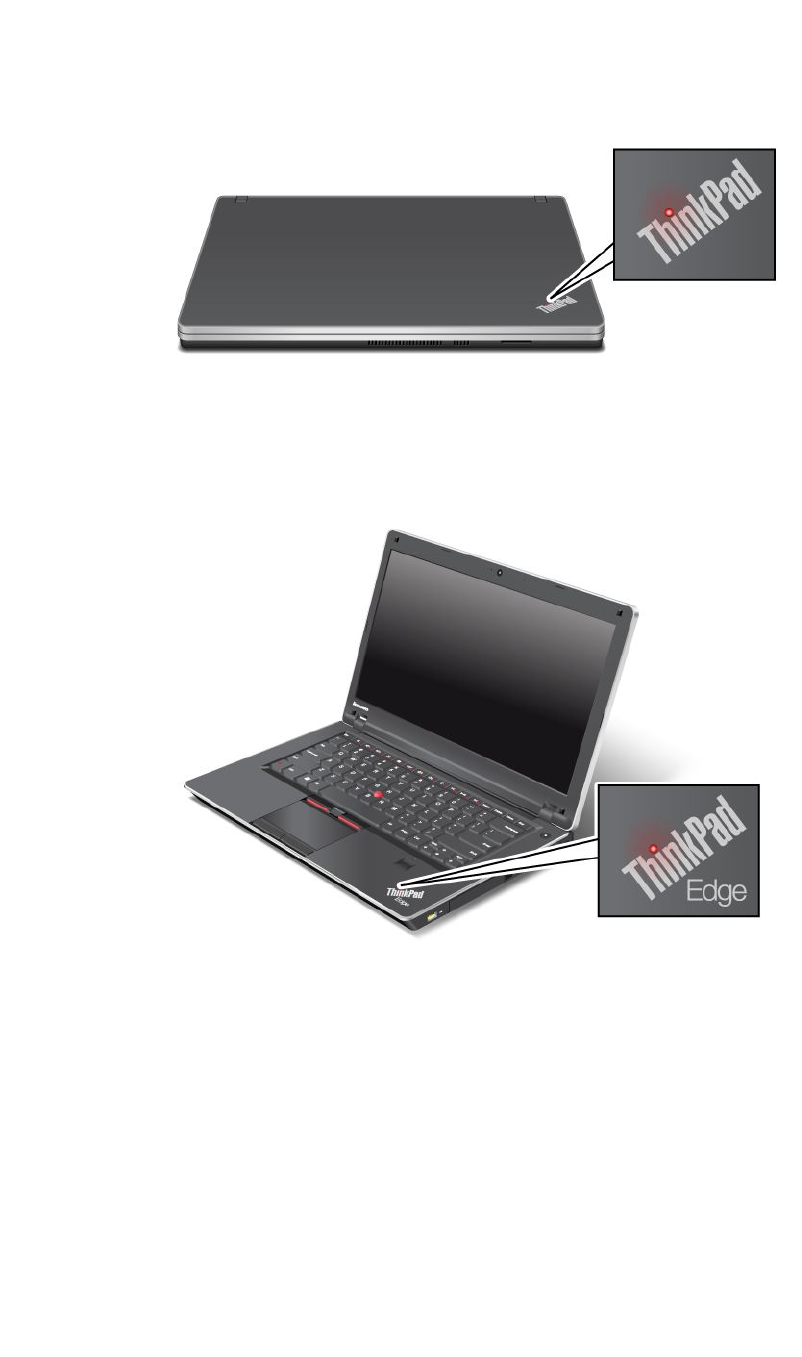
System-statusindicators
Note:Yourcomputerkeyboardmightlookdifferentfromtheillustrationabove.
TheilluminateddotintheThinkPadlogoontheouterlidofyourcomputerandonthepalmrestworksasa
system-statusindicator:itshowswhetherthecomputerisinsleep(standby),hibernation,ornormalmode.
Themeaningoftheindicatorisasfollows:
•Red:Thecomputerison(innormalmode).
•Fastblinkingred:Thecomputerisenteringsleep(standby)orhibernationmode.
•Slowblinkingred:Thecomputerisinsleep(standby)mode.
•Off:Thecomputerisofforinhibernationmode.
12UserGuide
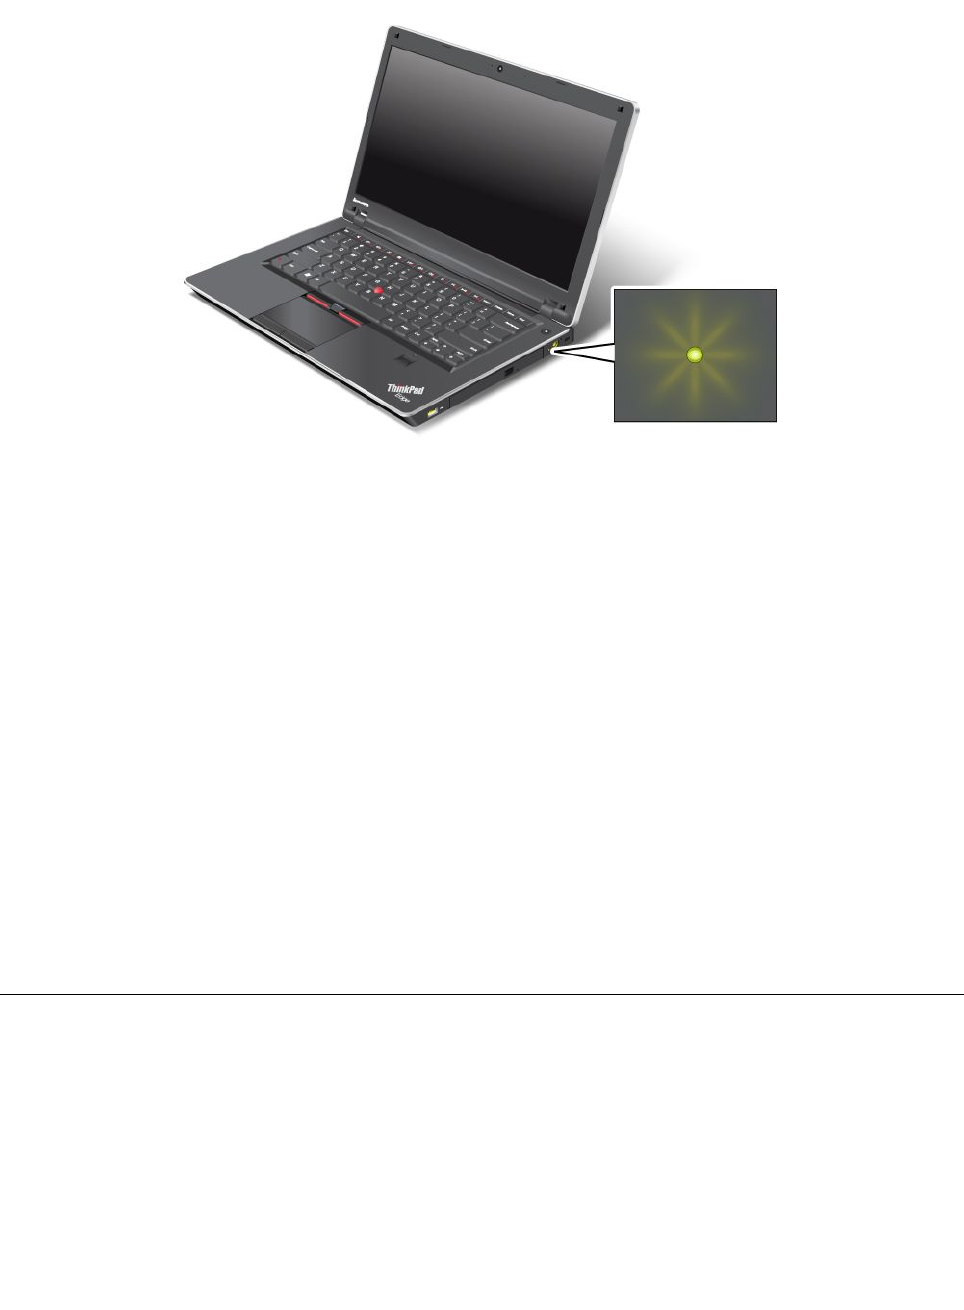
Power-statusindicators
Yourcomputerhasanindicatorthatshowsthestatusofacpower.
Note:Yourcomputerkeyboardmightlookdifferentfromtheillustrationabove.
Themeaningoftheindicatorisasfollows:
•Green:Theacpoweradapterisconnected.
•Off:Theacpoweradapterisnotconnected.
On-screenindicators
Someindicatorsaredisplayedonthescreen.
CapsLock
CapsLockmodeisenabled.Youcanenterallalphabeticcharacters(A-Z)inuppercasewithoutpressing
theShiftkey.
Wirelessstatus
PressF9toenableordisablethewirelessfeatures.Youcanquicklychangethepowerstateofeachfeature
inthelist.Forinformationonthewirelessfeatures,referto“Wirelessconnections”onpage40.
Locatingimportantproductinformation
Thissectionprovidesinformationtohelpyoulocateyourmachinetypeandmodellabel,FCCIDandIC
Certicationlabel,andtheMicrosoft®CerticateofAuthenticity(COA)label.
Machinetypeandmodellabel
Themachinetypeandmodellabelidentiesyourcomputer.IfyoucontactLenovoforhelp,themachine
typeandmodelnumberwillenablesupporttechnicianstoidentifyyourcomputerandprovidethehighest
levelofservice.
Chapter1.ProductOverview13
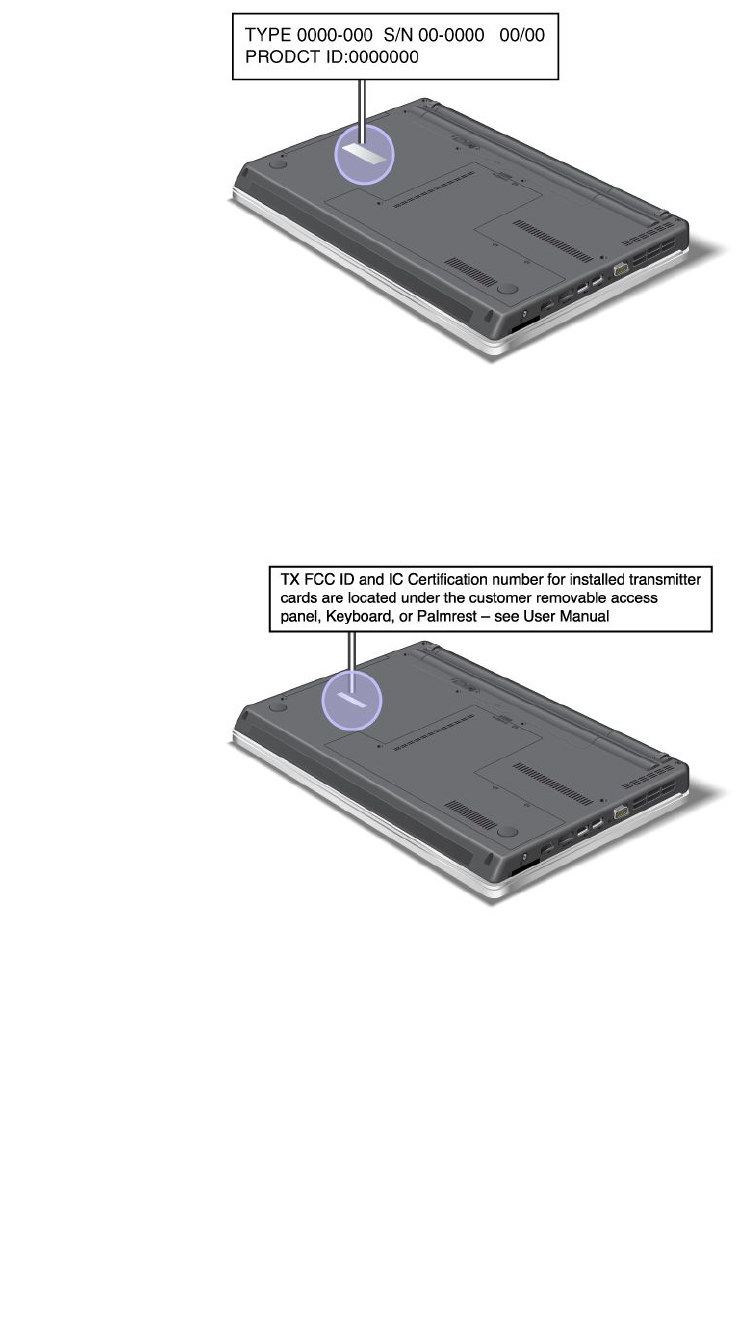
Youcanndthemachinetypeandmodelofyourcomputerinthelabelasshownbelow:
FCCIDandICCerticationnumberlabel
ThereisnoFCCIDorICCerticationnumberforthePCIExpressMiniCardshownontheenclosureof
yourcomputer.TheFCCIDandICCerticationnumberlabelisafxedonthecardinstalledinthePCI
ExpressMiniCardslotofyourcomputer.
14UserGuide

IfnointegratedwirelessPCIExpressMiniCardhasbeenpreinstalledinyourcomputer,youcaninstallone.
Todothis,followtheprocedureinInstallingandreplacingaPCIExpressMiniCardforwirelessLAN/WiMAX
connectionorInstallingandreplacingthePCIExpressMiniCardforwirelessWAN.
CerticateofAuthenticitylabel
TheCerticateofAuthenticitylabelforthepreinstalledoperatingsystemisattached.Printedonthislabelare
theproductIDandtheproductkeyinformationforyourcomputer.Recordthisinformationandkeepitina
safeplace.Youmightneedthesenumbers,tostartyourcomputerorreinstalltheoperatingsystem.
TheCerticateofAuthenticitylabelofyourcomputerisshownasbelow:
Features
ThinkPadEdgeE420features
Processor
•Toseethesystempropertiesofyourcomputer,clickStart,right-clickComputer(inWindows®XP,My
Computer);thenfromthepulldownmenuselectProperties.
Chapter1.ProductOverview15

Memory
•Doubledatarate3(DDR3)synchronousdynamicrandomaccessmemory
Storagedevice
•2.5-inch(64mm)harddiskdrive
Display
ThecolordisplayusesTFTtechnology:
•Size:14.0inch(355.6mm)
•Resolution:
–LCD:Upto1366-by-768
–Externalmonitor:Upto2048-by-1536
•Brightnesscontrol
•Integratedcamera(onsomemodels)
•Built-inmicrophones
Keyboard
•84-key,85-key,or89-key
•UltraNav(TrackPointandmulti-touchtouchpad)
•Fnkeyfunction
Interface
•Externalmonitorconnectors(VGAandHDMIport)
•Comboaudiojack(stereoheadphoneorheadset)
•2UniversalSerialBus(USB)connectors
•1AlwaysOnUSBconnector
•1eSATA/UniversalSerialBusconnector(onsomemodels)
•RJ45Ethernetconnector
•4-in-1digitalmediacardreader
Opticaldrive
•Multi-Burnerdrive
Wirelessfeatures
•IntegratedwirelessLAN
•IntegratedBluetooth(onsomemodels)
•IntegratedwirelessWAN(onsomemodels)
•IntegratedWiMAX(onsomemodels)
Securityfeatures
•Fingerprintreader(onsomemodels)
16UserGuide

ThinkPadEdgeE520features
Processor
•Toseethesystempropertiesofyourcomputer,clickStart,right-clickComputer(inWindowsXP,My
Computer);thenfromthepulldownmenuselectProperties.
Memory
•Doubledatarate3(DDR3)synchronousdynamicrandomaccessmemory
Storagedevice
•2.5-inch(64mm)harddiskdrive
Display
ThecolordisplayusesTFTtechnology:
•Size:15.6inch(396.2mm)
•Resolution:
–LCD:Upto1366-by-768
–Externalmonitor:Upto2048-by-1536
•Brightnesscontrol
•Integratedcamera(onsomemodels)
•Built-inmicrophones
Keyboard
•105-key,106-key,or110-key
•UltraNav(TrackPointandmulti-touchtouchpad)
•Fnkeyfunction
•Numerickeypad
Interface
•Externalmonitorconnectors(VGAandHDMIport)
•Comboaudiojack(stereoheadphoneorheadset)
•2UniversalSerialBus(USB)connectors
•1AlwaysOnUSBconnector
•1eSATA/UniversalSerialBus(USB)connector(onsomemodels)
•RJ45Ethernetconnector
•4-in-1digitalmediacardreader(SD/SDHC/SDXC/MMC)
Opticaldrive
•Multi-Burnerdrive
Wirelessfeatures
•IntegratedwirelessLAN
•IntegratedBluetooth(onsomemodels)
•IntegratedwirelessWAN(onsomemodels)
Chapter1.ProductOverview17

•IntegratedWiMAX(onsomemodels)
Securityfeatures
•Fingerprintreader(onsomemodels)
Specications
ThinkPadEdgeE420specications
Size
•Width:343.4mm(13.52inch)
•Depth:234mm(9.21inch)
•Height:29.3to33.1mm(1.15to1.30inch)
Heatoutput
•65W(222Btu/hr)maximumor90W(307Btu/hr)maximum(dependingonthemodel)
Powersource(acpoweradapter)
•Sine-waveinputat50to60Hz
•Inputratingoftheacpoweradapter:100to240VAC,50to60Hz
Batterypack
•Lithium-ion(Li-Ion)batterypack
Batterylife
•Forpercentageofremainingbatterypower,seethePowerManagerBatteryGaugeinthetaskbar.
•ThePowerManageralsodisplaysagreen,yellowandredindication.Abatteryunderwarrantywithared
indicationiseligibleforawarrantyreplacement.
ThinkPadEdgeE520specications
Size
•Width:380mm(14.96inch)
•Depth:249mm(9.8inch)
•Height:30.4to33.6mm(1.20to1.32inch)
Heatoutput
•65W(222Btu/hr)maximumor90W(307Btu/hr)maximum(dependingonthemodel)
Powersource(acpoweradapter)
•Sine-waveinputat50to60Hz
•Inputratingoftheacpoweradapter:100to240VAC,50to60Hz
Batterypack
•Lithium-ion(Li-Ion)batterypack
18UserGuide

Batterylife
•Forpercentageofremainingbatterypower,seethePowerManagerBatteryGaugeinthetaskbar.
•ThePowerManageralsodisplaysagreen,yellowandredindication.Abatteryunderwarrantywithared
indicationiseligibleforawarrantyreplacement.
Operatingenvironment
Thissectionprovidesinformationaboutyourcomputeroperatingenvironment.
Environment:
•Maximumaltitudewithoutpressurization:3048m(10,000ft)
•Temperature
–Ataltitudesupto2438m(8000ft)
–Operating:5.0°Cto35.0°C(41°Fto95°F)
–Strorage:5.0°Cto43.0°C(41°Fto109°F)
–Ataltitudesabove2438m(8000ft)
–Maximumtemperaturewhenoperatingundertheunpressurizedcondition:31.3°C(88°F)
Note:Whenyouchargethebatterypack,itstemperaturemustbeatleast10°C(50°F).
•Relativehumidity:
–Operating:8%to80%
–Storage:5%to95%
Ifpossible,placeyourcomputerinawell-ventilatedanddryareawithoutdirectexposuretosunshine.
Keepelectricalappliancessuchasanelectricfan,radio,high-poweredspeakers,airconditioner,and
microwaveovenawayfromyourcomputerbecausethestrongmagneticeldsgeneratedbythese
appliancescandamagethemonitoranddataontheharddiskdrive.
Donotplaceanybeveragesontopoforbesidethecomputerorotherattacheddevices.Ifliquidisspilledon
orinthecomputeroranattacheddevice,ashortcircuitorotherdamagemightoccur.
Donoteatorsmokeoveryourkeyboard.Particlesthatfallintoyourkeyboardcancausedamage.
ThinkVantagetechnologiesandsoftware
LenovopreinstallsonyourPCusefulandhelpfulsoftwareapplicationstohelpyougetstarted,tostay
productivewhileonthemoveandtokeepyouandyourcomputerworking.Lenovooffersenhancedsecurity,
wirelesscomputing,data-migrationandothersolutionsforyourcomputer.
FollowingsectionsprovideinformationaboutThinkVantage®technologiesandothercomputingsolutions,
offeredbyLenovo.
•“AccessingapplicationsinWindows7”onpage20
•“AccessConnections”onpage21
•“ActiveProtectionSystem”onpage22
•“FingerprintSoftware”onpage22
•“LenovoSolutionsCenter”onpage22
Chapter1.ProductOverview19

•“LenovoThinkVantageTools”onpage22
•“LenovoThinkVantageToolbox”onpage23
•“MessageCenterPlus”onpage23
•“PasswordManager”onpage23
•“PowerManager”onpage23
•“ProductRecovery”onpage23
•“RescueandRecovery”onpage24
•“SystemUpdate”onpage24
•“ThinkVantageGPS”onpage24
Note:TolearnmoreaboutThinkVantagetechnologiesandothercomputingsolutionsofferedbyLenovo,go
to:
http://www.lenovo.com/support
AccessingapplicationsinWindows7
IfyouareusingtheWindows7operatingsystem,youcanaccessapplicationsbyfollowingoneofthe
methodsbelow:
•YoucangettheapplicationsfromtheLenovoThinkVantageTools.
ClickStart➙AllPrograms➙LenovoThinkVantageTools.Thendependingontheapplicationyou
wanttoaccess,double-clickthecorrespondingicon.
Note:IfanapplicationiconintheLenovoThinkVantageToolsapplicationnavigationwindowisdimmed,it
indicatesthatyouneedtoinstalltheapplicationmanually.Toinstalltheapplicationmanually,double-click
theapplicationicon.Then,followtheinstructionsonthescreen.Whentheinstallationprocesscompletes,
theapplicationiconwillbeactivated.
Table1.ApplicationsonLenovoThinkVantageTools
ApplicationIconname
AccessConnectionsInternetConnection
ActiveProtectionSystemAirbagProtection
FingerprintSoftwareFingerprintReader
LenovoThinkVantageToolbox
or
LenovoSolutionCenter
SystemHealthandDiagnostics
MobileBroadbandActivate3GMobileBroadband
PasswordManagerPasswordVault
PowerManagerPowerControls
RecoveryMediaFactoryRecoveryDisks
RescueandRecoveryEnhancedBackupandRestore
SystemUpdateUpdateandDrivers
ThinkVantageGPSGPS
•YoucanalsogettheapplicationsfromControlPanel.
ClickStart➙ControlPanel.Dependingontheapplicationyouwanttoaccess,clickthecorresponding
sectionandthenclickthecorrespondinggreentext.
20UserGuide

Note:IfyoudonotndtheapplicationyouneedinControlPanel,opentheLenovoThinkVantageTools
applicationnavigationwindowanddouble-clickthedimmedicontoinstalltheapplicationyouneed.
Then,followtheinstructionsonthescreen.Whentheinstallationprocesscompletes,theapplicationicon
willbeactivated,andyoucanndtheapplicationinControlPanel.
ThesectionsinControlPanel,thegreentexts,andtheapplicationsarelistedinthefollowingtable.
Table2.ApplicationsinControlPanel
ApplicationControlPanelsectionGreentextintheControlPanel
AccessConnectionsNetworkandInternetLenovo-InternetConnection
ActiveProtectionSystemSystemandSecurity
HardwareandSound
Lenovo-AirbagProtection
CommunicationsUtilityHardwareandSoundLenovo-WebConferencing
FingerprintSoftwareSystemandSecurity
HardwareandSound
Lenovo-FingerprintReader
or
Lenovo-NotebookFingerprint
Reader
LenovoThinkVantageToolbox
or
LenovoSolutionCenter
SystemandSecurityLenovo-SystemHealthand
Diagnostics
MobileBroadbandActivateNetworkandInternetLenovo-3GMobileBroadband
PasswordManagerSystemandSecurity
UserAccountsandFamilySafety
Lenovo-PasswordVault
PowerManagerHardwareandSound
SystemandSecurity
Lenovo-PowerControls
RecoveryMediaSystemandSecurityLenovo-FactoryRecoveryDisks
SystemUpdateSystemandSecurityLenovo-UpdateandDrivers
RescueandRecoverySystemandSecurityLenovo-EnhancedBackupand
Restore
ThinkVantageGPSNetworkandInternet
SystemandSecurity
Lenovo-GPS
AccessConnections
AccessConnections™isaconnectivityassistantprogramforcreatingandmanaginglocationproles.Each
locationprolestoresallthenetworkandInternetcongurationsettingsneededforconnectingtoanetwork
infrastructurefromaspeciclocationsuchasahomeoranofce.
Byswitchingbetweenlocationprolesasyoumoveyourcomputerfromplacetoplace,youcanquicklyand
easilyconnecttoanetworkwithnoneedtorecongureyoursettingsmanuallyandrestartthecomputer
eachtime.
ToopentheAccessConnectionsprogram,dothefollowing:
•ForWindows7:See“AccessingapplicationsinWindows7”onpage20.
•ForWindowsXP:ClickStart➙AllPrograms➙ThinkVantage➙AccessConnections.
Chapter1.ProductOverview21

ActiveProtectionSystem
TheActiveProtectionSystemprotectsyourharddiskdrivewhentheshocksensorinsideyourcomputer
detectsaconditionthatcoulddamagethedrive,suchassystemtilt,excessivevibration,orshock.Thehard
diskdriveislessvulnerabletodamagewhenitisnotoperating;sothesystemstopsitfromspinning,and
mayalsomovetheread/writeheadsofthedrivetoareasthatdonotcontaindata.Assoonastheshock
sensorsensesthattheenvironmentisstableagain(minimalchangeinsystemtilt,vibration,orshock),it
turnstheharddiskdriveon.
ToopenActiveProtectionSystem,dothefollowing:
•ForWindows7:See“AccessingapplicationsinWindows7”onpage20.
•ForWindowsXP:Toconguretheprotectionsystem,clickStart➙AllPrograms➙ThinkVantage➙
ActiveProtectionSystem.
FingerprintSoftware
Ifyoursystemcomeswithangerprintreader,theFingerprintSoftwareprogramenablesyoutoenrollyour
ngerprintandassociateitwithyourWindowspassword.Asaresult,thengerprintauthenticationcan
replaceyourpasswordandenablesimpleandsecureuseraccess.
Toopenthengerprintsoftware,dothefollowing:
•ForWindows7:See“AccessingapplicationsinWindows7”onpage20.
•ForWindowsXP:ClickStart➙AllPrograms➙ThinkVantage➙ThinkVantageFingerprintSoftware.
LenovoSolutionsCenter
Note:Dependingonthedatewhenyourcomputerwasmanufactured,yourcomputerispreinstalledwith
eithertheLenovoSolutionCenterprogramortheLenovoThinkVantageToolboxprogramfordiagnostic
purposes.ForadditionalinformationabouttheLenovoThinkVantageToolboxprogram,see“Lenovo
ThinkVantageToolbox”onpage23.
TheLenovoSolutionCenterprogramenablesyoutotroubleshootandresolvecomputerproblems.It
combinesdiagnostictests,systeminformationcollection,securitystatus,andsupportinformation,along
withhintsandtipsformaximumsystemperformance.Formoreinformation,see“Diagnosingproblems”on
page131.
TostarttheLenovoSolutionCenterprograminWindows7,see“AccessingapplicationsinWindows7”
onpage20.
LenovoThinkVantageT ools
TheLenovoThinkVantageToolsprogramhelpsyouworkmoreeasilyandsecurelybyprovidingeasyaccess
tovarioustechnologies,suchas:
•LenovoSolutionCenterorLenovoThinkVantageToolbox(dependingonthedateofmanufacture)
•PowerManager
•RescueandRecovery
•SystemUpdate
ToaccesstheLenovoThinkVantageToolsprogram,clickStart➙AllPrograms➙LenovoThinkVantage
Tools.
Note:LenovoThinkVantageToolsisavailableonlyinWindows7.
22UserGuide

LenovoThinkVantageToolbox
Note:Dependingonthedatewhenyourcomputerwasmanufactured,yourcomputerispreinstalledwith
eithertheLenovoSolutionCenterprogramortheLenovoThinkVantageToolboxprogramfordiagnostic
purposes.ForadditionalinformationabouttheLenovoSolutionCenterprogram,see“LenovoSolutions
Center”onpage22.
TheLenovoThinkVantageToolboxprogramenablesyoutoviewsymptomsofcomputerproblemsandnd
solutionsforthem.Italsoincludesautomaticnoticationwhenactionisrequired,computingassistance,
advanceddiagnostics,anddiagnostichistory.
ToopenLenovoThinkVantageToolbox,dothefollowing:
•ForWindows7:See“AccessingapplicationsinWindows7”onpage20.
ForadditionalinformationaboutrunningtheLenovoThinkVantageToolboxprogram,refertotheLenovo
ThinkVantageToolboxhelpsystem.
MessageCenterPlus
TheMessageCenterPlusdisplaysmessagestoinformyouabouthelpfulsoftwarethathasbeenpreinstalled
onyourcomputer.Thesoftwareenablesyoutomanagewiredandwirelessconnections,protectyourdata
intheeventofaproblemandautomaticallydiagnoseandresolvepotentialproblemswithyourcomputer.
TheMessageCenterPluscanalsoprovidemessagesaboutnewupdatesavailabletokeepyourcomputer
current.
PasswordManager
ThePasswordManagerprogramenablesuserstomanageandrememberalltheirsensitiveand
easy-to-forgetapplicationandWebsitelogininformation,suchasuserIDs,passwords,andotherpersonal
information.
ToopenPasswordManager,dothefollowing:
•ForWindows7:SeeAccessingapplicationsinWindows7.
•ForWindowsXP:ClickStart➙AllPrograms➙ThinkVantage➙PasswordManager.
PowerManager
ThePowerManagerprogramprovidesconvenient,exible,andcompletepowermanagementforyour
computer.ByusingthePowerManagerprogram,youcanadjustyourpowersettingstogiveyouthebest
balancebetweenperformanceandpowersaving.
ToopenPowerManager,dothefollowing:
•ForWindows7:See“AccessingapplicationsinWindows7”onpage20.
•ForWindowsXP:ClickStart➙AllPrograms➙ThinkVantage➙PowerManager.
ProductRecovery
Thisprogramenablesyoutocreaterecoverymediatorestorethecontentsofthesystemdriveorharddisk
drivetothesamestateaswhenthecomputerwasoriginallyshippedfromthefactory.
Forinformationabouthowtoopenandusethisprogram,referto“Creatingandusingrecoverymedia”
onpage69.
Chapter1.ProductOverview23

RescueandRecovery
TheRescueandRecovery®programisaonebuttonrecoveryandrestoresolutionthatincludesasetof
self-recoverytoolstohelpyoudiagnosecomputerproblems,gethelp,andrecoverfromsystemcrashes,
evenifyoucannotstarttheWindowsoperatingsystem.
ToopentheRescueandRecoveryprogram,dothefollowing:
•ForWindows7:See“AccessingapplicationsinWindows7”onpage20.
•ForWindowsXP:ClickStart➙AllPrograms➙ThinkVantage➙RescueandRecovery.
SystemUpdate
TheSystemUpdateprogramhelpsyoukeepthesoftwareonyourcomputerup-to-datebydownloadingand
installingsoftwarepackages(ThinkVantageapplications,devicedrivers,UEFIFirmwareupdates,andother
thirdpartyapplications).Someexamplesofsoftwarethatyoushouldkeepupdatedareprogramsprovided
byLenovo,suchastheRescueandRecoveryprogram.
ToopenSystemUpdate,dothefollowing:
•ForWindows7:See“AccessingapplicationsinWindows7”onpage20.
•ForWindowsXP:ClickStart➙AllPrograms➙ThinkVantage➙SystemUpdate.
ThinkVantageGPS
IfthePCIExpressMiniCardinstalledinyourcomputersupportsGPS,yourcomputercanreceivesignals
fromGPSsatellitesanddetermineitslocation.IfyourcomputerisconnectedtotheInternet,youcannd
yourlocationonareal-timemapprovidedbyGoogleMapsorMicrosoftBing™Maps.
ToopenThinkVantageGPS,dothefollowing:
•ForWindows7:See“AccessingapplicationsinWindows7”onpage20.
•ForWindowsXP:ClickStart➙AllPrograms➙ThinkVantage➙ThinkVantageGPS.
24UserGuide

Chapter2.Usingyourcomputer
Thischapterprovidesinformationonusingsomeofthecomputercomponents.
Thischaptercontainsthefollowingtopics:
•“Registeringyourcomputer”onpage25
•“Frequentlyaskedquestions”onpage25
•“Specialkeysandbuttons”onpage26
•“UsingtheUltraNavpointingdevice”onpage31
•“Powermanagement”onpage35
•“Connectingtothenetwork”onpage40
•“Usingaprojectororexternaldisplay”onpage47
•“Usingaudiofeatures”onpage51
•“Usinganintegratedcamera”onpage52
•“Usingopticaldrive”onpage52
•“UsingaashmediaCard”onpage53
Registeringyourcomputer
Whenyouregisteryourcomputer,informationisenteredintoadatabase,whichenablesLenovotocontact
youincaseofarecallorothersevereproblem.Inaddition,somelocationsofferextendedprivilegesand
servicestoregisteredusers.
WhenyouregisteryourcomputerwithLenovo,youwillalsoreceivethefollowingbenets:
•QuickerservicewhenyoucallLenovoforhelp
•Automaticnoticationoffreesoftwareandspecialpromotionaloffers
ToregisteryourcomputerwithLenovo,visitthisWebsite:http://www.lenovo.com/register.Thenfollow
theinstructionsonthescreen.
Frequentlyaskedquestions
HereareafewtipsthatwillhelpyouoptimizetheuseofThinkPadNotebook.
Toensurethatyoureceivethebestperformancefromyourcomputer,browsethefollowingWeb
pagetondinformationsuchasaidsfortroubleshootingandanswerstofrequentlyaskedquestions:
http://www.lenovo.com/support/faq.
CanIgetmyuserguideinanotherlanguage?
•Todownloadtheuserguideinanotherlanguage,goto:http://www.lenovo.com/support.Thenfollow
theinstructionsonthescreen.
Onthegoandneedtousebatterypowermoreeffectively?
•Toconservepower,ortosuspendoperationwithoutexitingapplicationsorsavingles,see“Power-saving
modes”onpage37.
©CopyrightLenovo201125

•Toachievethebestbalancebetweenperformanceandpowersaving,createandapplypowerplans(in
WindowsXP,powerschemes)byuseofPowerManager.
•Ifyourcomputerwillbeturnedoffforanextendedperiodoftime,youcanpreventbatterypowerfrom
drainingbyremovingthebattery.LookformoreinformationaboutusingthebatteryinPowermanagement.
Concernedaboutsecurityorneedtosecurelydisposeofdatastoredonyourharddiskdrive?
•StudytheSecuritysectiontondouthowyoucanprotectyourcomputerfromtheftandunauthorizeduse.
•Beforeyoudisposeofthedataontheharddiskdrive,besuretoread“Noticeondeletingdatafrom
yourharddisk”onpage67.
Gettingconnectedindifferentlocationsisachallenge?
•Totroubleshootawirelessnetworkingissue,seehttp://www.lenovo.com/support/faq
•TakeadvantageofthenetworkingfeaturesbyuseofAccessConnections.
•Tolearnmoreaboutusingthewirelessfeaturesofyourcomputer,referto“Wirelessconnections”on
page40.
•Totravelmorecondently,besuretocheckthetipsin“Travelingwithyourcomputer”onpage57.
•PressF9toenableordisablethewirelessfeatures.
Needtogivepresentationsorattachanexternalmonitoroften?
•Makesurethatyoufollowtheprocedurefor“Attachinganexternalmonitor”onpage48.
•WiththeExtenddesktopfunction,youcandisplayoutputonboththecomputerdisplayandanexternal
monitor.
Needtoattachorreplaceadevice?
•SeeChapter6“Replacingdevices”onpage77formoreinformationaboutreplacingthedevicesof
yourcomputer.
•SeeChapter7“Enhancingyourcomputer”onpage105formoreinformationaboutenhancingthe
featuresofyourcomputer.
You'vebeenusingyourcomputerforsometimealready,anditisgettingslower?
•Followthe“Generaltipsforpreventingproblems”onpage125.
•Youcandiagnoseproblemsyourselfbyusingthepreinstalledsoftware.See“diagnoseproblems”on
page131.
•AlsoRecoverytoolisprovidedonyourcomputerharddiskdrive.Formoreinformation,seeChapter5
“Recoveryoverview”onpage69.
Printthefollowingsectionsandkeepthemwithyourcomputerincaseyouareunabletoaccessthis
onlinehelpwhennecessary.
•“Installinganewoperatingsystem”onpage107
•“Computerstopsresponding”onpage132
•“Powerproblems”onpage152
Specialkeysandbuttons
Yourcomputerhasseveralspecialkeysandbuttonstohelpyouworkmoreeasilyandeffectively.Forthe
Windows7operatingsystem,theOnScreenDisplayprogramispreinstalledonyourcomputertoenableyou
totogglebetweenthedefaultandstandardsettingsoftheThinkPadF1-F12keyfunctionality.
26UserGuide
TotoggletheF1-F12keyfunctionalityontheWindows7operatingsystem,doeitherofthefollowing:
•FromControlPanel:
1.ClickStart➙ControlPanel.
2.Intheiconsview,clickKeyboardandtheKeyboardPropertieswindowisdisplayed.
3.Congurethekeyfunctionalityasdesired.
•PressingFnforfoursecondsandtheThinkPadKeyboardPropertieswindowisdisplayed.Thencongure
thekeyfunctionalityasdesired.
ThinkPadEdgeE420specialkeys
Yourcomputerhasseveralspecialkeys1and2.Totakeadvantageofeachfunction,directlypress
thedesiredkey.
Notes:TouseF1-F12asstandardfunctionkeys,doeitherofthefollowing:
•Inthekeyboardpropertieswindow,clicktheThinkPadF1-F12keystab,selectLegacy,andthenclick
OK.
•OntheThinkPadSetupprogrammainmenu,selectCong➙Keyboard/Mouse➙ChangetoF1-F12
keys➙Legacy.
Volumeandmutekeys
Toquicklyadjustthevolumeofthesoundfromyourcomputer,mutethesoundentirely,setthemicrophone
tomute,orcontrolthevideooutputfromtheintegratedcamera,pressoneofthefollowingkeys.
Speakermute(F1)
Speakervolumedown(F2)
Speakervolumeup(F3)
Ifyoumutethesoundandthenturnoffyourcomputer,thesoundwillremainmutedwhenyouturnonyour
computeragain.Toturnonthesound,presstheSpeakervolumeuporSpeakervolumedownkeys.
Chapter2.Usingyourcomputer27

Microphonemute(F4)
Whenyoupressthemicrophonemutekey,alloftherecordingdevicesaresetonmuteorunmute;thisis
thedefaultsetting.
Cameramute(F5)
Duringavideoconferenceyoucancontrolthevideostreamingfromtheintegratedcamerabypressingthis
key.Thevideooutputwillbegrayedout,andtheaudiostreamingwillcontinue.
Displaymanagementkeys
Switchingadisplayoutputlocation(F6)
Switchbetweenthecomputerdisplayandanexternalmonitor.Windowswillshowthesedisplayoptions:
•Computerdisplayonly(LCD)
•Computerdisplayandexternalmonitor(sameimage)
•Computerdisplayandexternalmonitor(theExtenddesktopfunction)
•Externalmonitoronly
Note:Toswitchbetweenthecomputerdisplayandanexternalmonitor,theWin+Pkeycombination
isalsoavailable.
Note:Thisfunctionisnotsupportedifdifferentdesktopimagesaredisplayedonthecomputerdisplayand
theexternalmonitor(theExtenddesktopfunction).
Note:ThisfunctiondoesnotworkwhileaDVDmovieoravideoclipisplaying.
Displaybrightnessdown(F7)
Thecomputerdisplaybecomesdimmer.Thepurposeofthismethodistochangethebrightnesslevel
temporarily.Tochangethedefaultbrightnesslevel,changethesettingsofthePowerOptionintheControl
PanelorusethePowerManager.
Displaybrightnessup(F8)
Thecomputerdisplaybecomesbrighter.Thepurposeofthismethodistochangethebrightnesslevel
temporarily.Tochangethedefaultbrightnesslevel,changethesettingsofthePowerOptionintheControl
PanelorusethePowerManager.
Wirelessradiocontrolkey(F9)
Enableordisablethebuilt-inwirelessnetworkingfeatures.Ifyoupressthiskey,alistofwirelessfeaturesis
displayed.Youcanquicklychangethepowerstateofeachfeatureinthelist.
Notes:Ifyouwanttousethisbuttontoenableordisablethewirelessfeatures,thefollowingdevicedrivers
mustbeinstalledonyourcomputerbeforehand:
•PowerManagementdriver
•OnScreenDisplayUtility
•Wirelessdevicedrivers
Forinformationonthewirelessfeatures,referto“Wirelessconnections”onpage40.
28UserGuide
Windowskey
Ifyoupressthiskey,theStartmenuofWindowsisdisplayedorhidden.
Ifyoupressthiskeyandanotherkeyatthesametime,theSystemPropertieswindowortheComputer(in
WindowsXP,MyComputer)windowisdisplayed.Fordetails,refertotheHelpintheWindowsoperating
system.
ThinkPadEdgeE520specialkeys
Yourcomputerhasseveralspecialkeys1,2,3and4.Totakeadvantageofeachfunction,directly
pressthedesiredkey.
Notes:TouseF1-F12asstandardfunctionkeys,doeitherofthefollowing:
•Inthekeyboardpropertieswindow,clicktheThinkPadF1-F12keystab,selectLegacy,andthenclick
OK.
•OntheThinkPadSetupprogrammainmenu,selectCong➙Keyboard/Mouse➙ChangetoF1-F12
keys➙Legacy.
Volumeandmutekeys
Toquicklyadjustthevolumeofthesoundfromyourcomputer,mutethesoundentirely,setthemicrophone
tomute,orcontrolthevideooutputfromtheintegratedcamera,pressoneofthefollowingkeys.
Speakermute(F1)
Speakervolumedown(F2)
Speakervolumeup(F3)
Ifyoumutethesoundandthenturnoffyourcomputer,thesoundwillremainmutedwhenyouturnonyour
computeragain.Toturnonthesound,presstheSpeakervolumeuporSpeakervolumedownkeys.
Microphonemute(F4)
Chapter2.Usingyourcomputer29

Whenyoupressthemicrophonemutekey,alloftherecordingdevicesaresetonmuteorunmute;thisis
thedefaultsetting.
Cameramute(F5)
Duringavideoconferenceyoucancontrolthevideostreamingfromtheintegratedcamerabypressingthis
key.Thevideooutputwillbegrayedout,andtheaudiostreamingwillcontinue.
Displaymanagementkeys
Switchingadisplayoutputlocation(F6)
Switchbetweenthecomputerdisplayandanexternalmonitor.Windowswillshowthesedisplayoptions:
•Computerdisplayonly(LCD)
•Computerdisplayandexternalmonitor(sameimage)
•Computerdisplayandexternalmonitor(theExtenddesktopfunction)
•Externalmonitoronly
Note:Toswitchbetweenthecomputerdisplayandanexternalmonitor,theWin+Pkeycombination
isalsoavailable.
Note:Thisfunctionisnotsupportedifdifferentdesktopimagesaredisplayedonthecomputerdisplayand
theexternalmonitor(theExtenddesktopfunction).
Note:ThisfunctiondoesnotworkwhileaDVDmovieoravideoclipisplaying.
Displaybrightnessdown(F7)
Thecomputerdisplaybecomesdimmer.Thepurposeofthismethodistochangethebrightnesslevel
temporarily.Tochangethedefaultbrightnesslevel,changethesettingsofthePowerOptionintheControl
PanelorusethePowerManager.
Displaybrightnessup(F8)
Thecomputerdisplaybecomesbrighter.Thepurposeofthismethodistochangethebrightnesslevel
temporarily.Tochangethedefaultbrightnesslevel,changethesettingsofthePowerOptionintheControl
PanelorusethePowerManager.
Wirelessradiocontrolkey(F9)
Enableordisablethebuilt-inwirelessnetworkingfeatures.Ifyoupressthiskey,alistofwirelessfeaturesis
displayed.Youcanquicklychangethepowerstateofeachfeatureinthelist.
Notes:Ifyouwanttousethisbuttontoenableordisablethewirelessfeatures,thefollowingdevicedrivers
mustbeinstalledonyourcomputerbeforehand:
•PowerManagementdriver
•OnScreenDisplayUtility
•Wirelessdevicedrivers
Forinformationonthewirelessfeatures,referto“Wirelessconnections”onpage40.
Windowskey
Ifyoupressthiskey,theStartmenuofWindowsisdisplayedorhidden.
30UserGuide

Ifyoupressthiskeyandanotherkeyatthesametime,theSystemPropertieswindowortheComputer(in
WindowsXP,MyComputer)windowisdisplayed.Fordetails,refertotheHelpintheWindowsoperating
system.
Numerickeypad
Youcanusethisnumerickeypadtoinputnumbersquickly.
Fourspecialkeys
Yourcomputerhasfourspecialkeysabovethenumerickeypad:
•Launchcalculator
•Lockoperatingsystem
•Openoperatingsystemsearch
•OpenMyComputer
UsingtheUltraNavpointingdevice
YourcomputermaycomewiththeUltraNavpointingdevice.TheUltraNavconsistsoftheTrackPointand
thetouchpad,eachofwhichisitselfapointingdevicewithbothbasicandextendedfunctions.Youcan
congurebothdevicesbychoosingthesettingsyouprefer,asfollows:
•SetboththeTrackPointandthetouchpadaspointingdevices.
ThissettingenablestheuseofallthebasicandextendedfunctionsoftheTrackPointandthetouchpad.
•SettheTrackPointasthemainpointingdeviceandthetouchpadforextendedfunctionsonly.
ThissettingenablestheuseofallbasicandextendedfunctionswiththeTrackPointwhilelimitingtheuse
ofthetouchpadtoscrolling,tapzones,andslow-motionpointerfunctions.
•SetthetouchpadasthemainpointingdeviceandtheTrackPointfortheextendedfunctionsonly.
Thissettingenablestheuseofallbasicandextendedfunctionswiththetouchpadwhilelimitingthe
useoftheTrackPointtoscrollingandMagnifyingGlassfunctions.
•SettheTrackPointasthemainpointingdevice,anddisablethetouchpad.
•Setthetouchpadasthemainpointingdevice,anddisabletheTrackPoint.
ChangingtheUltraNavsettings
YoucanchangeyoursettingsofUltraNavintheUltraNavtaboftheMousePropertieswindow.
•ForWindows7:ClickStart➙ControlPanel➙HardwareandSound➙Mouse➙UltraNav.
•ForWindowsXP:ClickStart➙ControlPanel➙PrintersandOtherHardware➙Mouse➙UltraNav.
YoucanalsochangetheUltraNavsettingsbyclickingtheUltraNavicononthesystemtray.Todisplaythe
UltraNavicononthesystemtray,see“DisplayingUltraNavicon”onpage34.
UsingtheTrackPointpointingdevice
TheTrackPointpointingdeviceconsistsofapointingstick1onthekeyboardandthreeclickbuttonsatthe
bottomofthekeyboard.Tomovethepointer5onthescreen,youapplypressuretothenonslipcaponthe
pointingstickinanydirectionparalleltothekeyboard;thepointingstickitselfdoesnotmove.Thespeedat
whichthepointermovesdependsonthepressureyouapplytothepointingstick.Thefunctionsoftheleft4
andright2clickbuttonscorrespondtothoseoftheleftandrightmousebuttonsonaconventionalmouse.
TheTrackPointcenterbutton3,calledthescrollbar,enablesyoutoscrollWebpagesordocumentsinany
directionwithnoneedtousethegraphicscrollbarsonthesideofthewindow.
Chapter2.Usingyourcomputer31
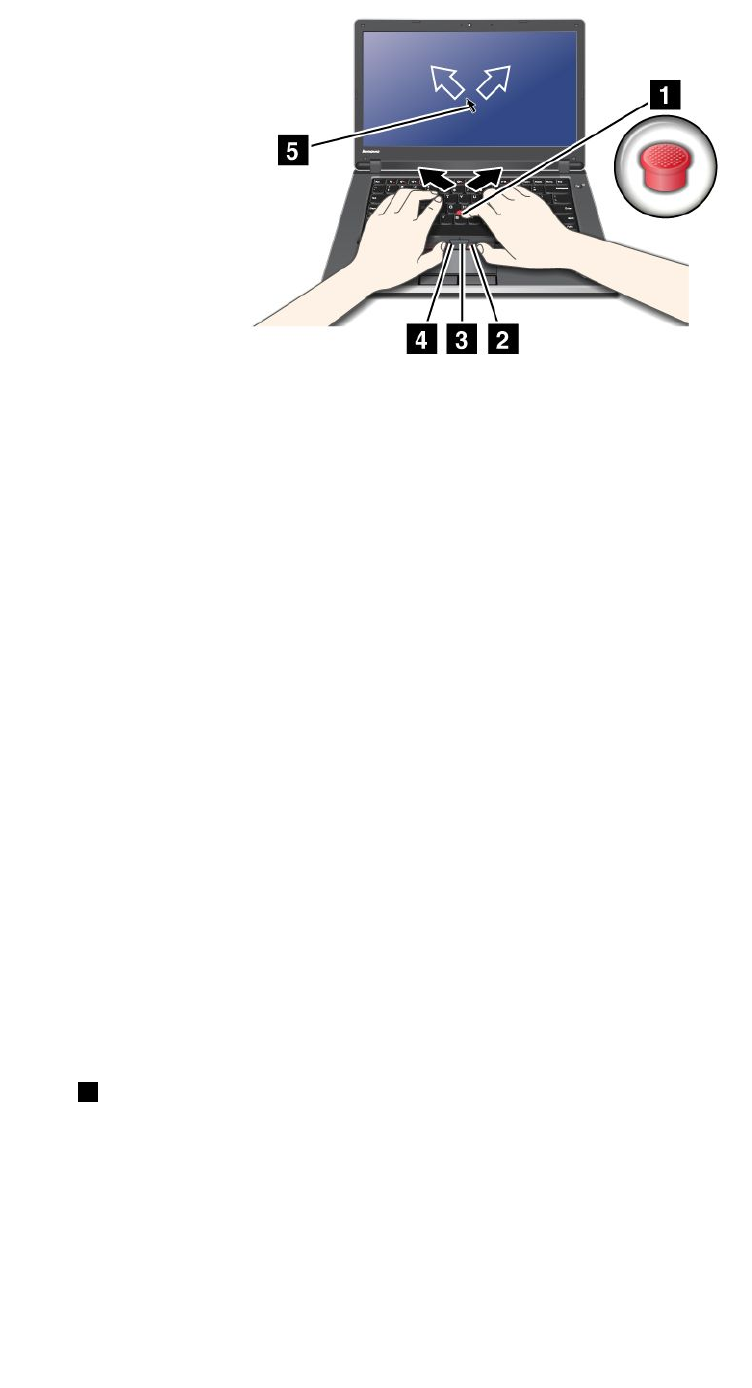
Note:Yourcomputerkeyboardmaylookslightlydifferentfromtheillustrationabove.
IfyouarenotfamiliarwiththeTrackPoint,theseinstructionswillhelpyougetstarted:
1.Placeyourhandsinthetypingposition,andpressgentlywitheitherindexngeronthepointingstickin
thedirectioninwhichyouwantthepointertomove.
Tomovethepointer,pressthepointingstickawayfromyoutomoveitup,towardyoutomoveit
down,toonesideortheothertomoveitsideways.
Note:Thepointermightdrift.Thisisnotadefect.StopusingtheTrackPointforafewseconds;the
pointerwillstopmoving.
2.Toselectanddragasrequiredbyyoursoftware,presstheleftorrightclickbuttonwitheitherthumb
andmovetheTrackPointpointingstick.
ByenablingPress-to-Select,youcanmaketheTrackPointpointingstickfunctionthesameasthe
leftorrightclickbutton.
CustomizingtheTrackPoint
YoucancustomizetheTrackPointpointingdeviceanditsbuttonsasfollows:
•Switchthefunctionsoftheleftandrightbuttons.
•ChangethesensitivityoftheTrackPoint.
•EnablethePress-to-Selectfunction.
•EnabletheMagnifyingGlass.
•EnabletheTrackPointscrollingfunction.
•EnabletheTrackPointScrollingTips.
Changingthecap
Thecap1ontheendoftheTrackPointpointingstickisremovable.Youcanreplaceitasshownin
thedrawing.
32UserGuide
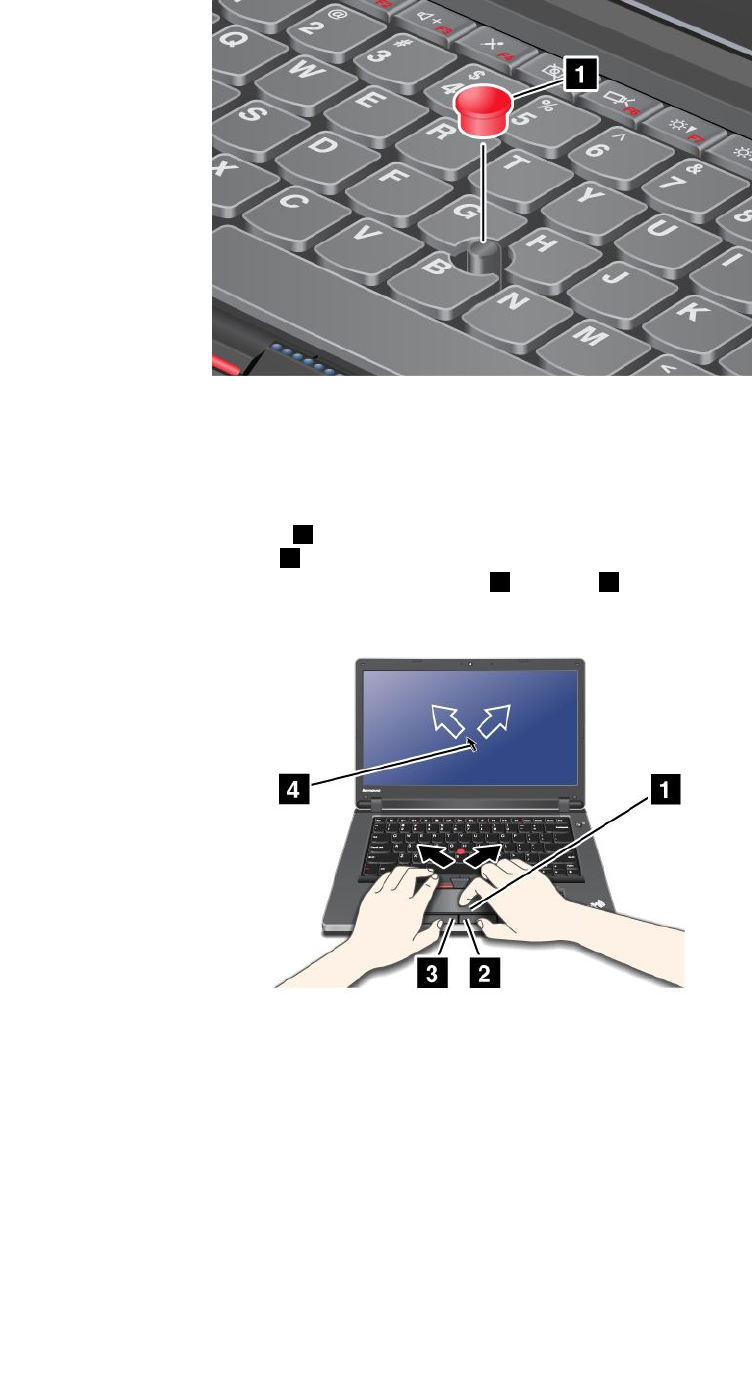
Note:Ifyoureplacethekeyboard,anewkeyboardisshippedwiththedefaultcap.Ifyouwish,youcan
keepthecapfromyouroldkeyboardanduseitonthenewone.
Usingthetouchpad
Thetouchpadconsistsofapad1andtwoclickbuttonsbelowtheTrackPointbuttonsatthebottomofthe
keyboard.Tomovethepointer4onthescreen,slideyourngertipoverthepadinthedirectioninwhich
youwantthepointertomove.Thefunctionsoftheleft3andright2clickbuttonscorrespondtothoseof
theleftandrightmousebuttonsonaconventionalmouse.
Note:Yourcomputerkeyboardmaylookslightlydifferentfromtheillustrationabove.
Usingthemulti-touchtouchpad
Thetouchpadofyourcomputersupportsmulti-touchwithwhichyoucanzoomin,zoomout,scrollorrotate
onthescreenwhilebrowsingtheInternetorreadingoreditingadocument.
Fordetails,refertotheHelpintheUltraNav.
Customizingthetouchpad
Tocustomizethetouchpad,doasfollows:
Chapter2.Usingyourcomputer33

ForWindows7:
1.ClickStart,andthenclickControlPanel.
2.ClickHardwareandSound,andthenclickMouse.
3.ClicktheUltraNavtabandproceedtocustomizingthetouchpad.
ForWindowsXP:
1.ClickStart,andthenclickControlPanel.
2.ClickPrintersandOtherHardware,andthenclickMouse.
3.ClicktheUltraNavtabandproceedtocustomizingthetouchpad.
Fordetails,refertotheHelpintheThinkPadSetUp.
BehavioroftheUltraNavandanexternalmouse
IfyouattachanexternalmousetoaUSBconnector,youcanusetheexternalmousesimultaneouslywiththe
TrackPointandthetouchpad.
DisablingtheTrackPointorthetouchpad
IfyouwanttodisabletheTrackPointorthetouchpad,dothefollowing:
ForWindows7:
1.ClickStart,andthenclickControlPanel.
2.ClickHardwareandSound,andthenclickMouse.
3.ClicktheUltraNavtab.
4.TodisabletheTrackPoint,clearthecheckboxforEnableTrackPoint.Todisablethetouchpad,clear
thecheckboxforEnabletouchpad.
5.ClickOK.
ForWindowsXP:
1.ClickStart,andthenclickControlPanel.
2.ClickPrintersandOtherHardware,andthenclickMouse.
3.ClicktheUltraNavtab.
4.TodisabletheTrackPoint,clearthecheckboxforEnableTrackPoint.Todisablethetouchpad,clear
thecheckboxforEnabletouchpad.
5.ClickOK.
Note:YoucanalsoopentheUltraNavpropertieswindowbyclickingtheUltraNaviconinthetaskbar.For
details,refertotheinstructionsin“DisplayingtheUltraNavicon.”onpage34
AddingtheUltraNavicontothesystemtray
ForeasyaccesstotheUltraNavproperties,youcanenablethedisplayoftheUltraNavicononthesystem
tray.
ToenablethedisplayoftheUltraNavicononthesystemtray,doasfollows:
ForWindows7:
1.ClickStart,andthenclickControlPanel.
2.ClickHardwareandSound,andthenclickMouse.
34UserGuide

3.ClicktheUltraNavtab.
4.SelectthecheckboxforShowUltraNavicononthesystemtray.
5.ClickOKorApply.
ForWindowsXP:
1.ClickStart,andthenclickControlPanel.
2.ClickPrintersandOtherHardware,andthenclickMouse.
3.ClicktheUltraNavtab.
4.SelectthecheckboxforShowUltraNavicononthesystemtray.
5.ClickOKorApply.
YoucannowchangethepropertiesofUltraNavbyclickingtheUltraNavicononthesystemtray.
Powermanagement
Whenyouneedtouseyourcomputerawayfromelectricaloutlets,youdependonbatterypowertokeep
yourcomputerrunning.Differentcomputercomponentsconsumepoweratdifferentrates.Themoreyou
usethepower-intensivecomponents,thefasteryouconsumebatterypower.
Domore,savemoreandspendmoretimeunpluggedwithThinkPadbatteries.Mobilityhasrevolutionized
businessbyallowingyoutotakeyourworkwhereeveryougo.WithThinkPadbatteries,youwillbeableto
worklongerwithoutbeingtiedtoanelectricaloutlet.
Checkingbatterystatus
ThePowerManagerBatteryGaugeinthetasktraydisplaysthepercentageofbatterypowerremaining.
Therateatwhichyouusebatterypowerwilldeterminehowlongyoucanusethebatteryofyourcomputer
betweencharges.Becauseeachcomputeruserhasdifferenthabitsandneeds,itisdifculttopredicthow
longabatterychargewilllast.Therearetwomainfactors:
•Howmuchenergyisstoredinthebatterywhenyoubegintowork.
•Thewayyouuseyourcomputer:howoftenyouaccesstheharddiskdrive,howbrightyoumakethe
computerdisplay.
Usingtheacpoweradapter
Thepowertorunyourcomputercancomeeitherfromthelithium-ion(Li-ion)batterypackprovidedwithit,
orfromacpowerthroughtheacpoweradapter.Whileyouuseacpower,thebatterychargesautomatically.
Theacpoweradapterthatcomeswithyourcomputerhastwobasiccomponents:
•Thetransformerpackthatconvertsacpoweradapterforusewiththecomputer.
•ThepowercordthatplugsintotheACoutletandintothetransformerpack.
Attention:Usinganimproperpowercordcouldcauseseveredamagetoyourcomputer.
Connectingtheacpoweradapter
Tousetheacpoweradapter,dothefollowing.Besuretotakethesestepsintheorderinwhichtheyare
givenhere.
1.Connecttheacpoweradaptertothepowerjackofthecomputer.
2.Connectthepowercordtothetransformerpack.
Chapter2.Usingyourcomputer35

3.Plugthepowercordintoanelectricaloutlet.
Tipsonusingtheacpoweradapter
•Whentheacpoweradapterisnotinuse,disconnectitfromtheelectricaloutlet.
•Donotbindthepowercordtightlyaroundtheacpoweradaptertransformerpackwhenitisconnectedto
thetransformer.
•Beforeyouchargethebattery,makesurethatitstemperatureisatleast10degreesCelsius(50degrees
Fahrenheit).
•Youcanchargethebatterywhentheacpoweradapterisconnectedtothecomputerandthebatteryis
installed.Youneedtochargeitinanyofthefollowingconditions:
–Whenyoupurchaseanewbattery
–Ifthethebatterymeteratthebottomofyourdisplayshowsthebatterychargeislow
–Ifthebatteryhasnotbeenusedforalongtime
Chargingthebattery
Whenyoucheckbatterystatusandndthatthepercentageofpowerremainingisloworwhenthepower
alarmalertsyouthatremainingpowerislow,youneedtochargeyourbatteryorreplaceitwithacharged
battery.
Ifanacoutletisconvenient,plugtheacpoweradapterintoit,andtheninsertthejackintothecomputer.The
batterywillchargeinabout3to6hours.Thisisaffectedbythebatterysizeandthephysicalenvironment.
Thebatterystatusindicatorwillletyouknowthatthebatteryischarging,andwillalsonotifyyouwhenthe
batteryisfullycharged.
Note:Toincreasethelifeofthebattery,thecomputerdoesnotstartrechargingthebatteryiftheremaining
powerisgreaterthan95%.
Maximizingbatterylife
Tomaximizethelifeofthebattery,dothefollowing:
•Usethebatteryuntilthechargeiscompletelydepleted-untilthebatterystatusindicatorstartsblinking
orange.
•Rechargethebatterycompletelybeforeusingit.Thebatteryisfullychargedifthebatteryindicatorshows
greenwhentheacpoweradapterispluggedin.
•Foranewbatteryorabatterythatyouhavenotusedrecently,dooneofthefollowing:
1.Rechargethebatterycompletelybeforeusingit.Thebatteryisfullychargedwhentheacpower
adapterispluggedinandthebatteryindicatorisgreen.
2.Usethebatteryuntilthechargeiscompletelydepleted-untilthebatterystatusindicatorstarts
blinkingorange.
•Alwaysusepowermanagementfeaturessuchaspowermodes,screenblank,sleep(standby),and
hibernation.
Managingyourbatterypower
WithPowerManager,youcanadjustyourpowersettingstogiveyouthebestbalancebetweenperformance
andpowersaving.
Tostarttheutilityprogram,doasfollows:
•ForWindows7:See“AccessingapplicationsinWindows7”onpage20.
36UserGuide

•ForWindowsXP:ClickStart➙AllPrograms➙ThinkVantage➙PowerManager.
FormoreinformationaboutthePowerManagerprogram,refertotheon-linehelpoftheprogram.
Power-savingmodes
Thereareseveralmodesthatyoucanuseatanytimetoconservepower.Thissectionintroduceseach
modeandgivestipsontheeffectiveuseofthebatterypower.
Introducingthepower-savingmodes
•Screenblank.Thecomputerdisplayrequiresconsiderablebatterypower.Toturnoffpowertothe
display,doasfollows:
1.Right-clickthePowerManagerBatteryGaugeinthetaskbar.
2.SelectPoweroffdisplay.
•Sleep(standbyinWindowsXP).Insleep(standby)mode,yourworkissavedtomemory,andthenthe
harddiskdriveandthecomputerdisplayareturnedoff.Whenyourcomputerwakesup,yourworkis
restoredwithinseconds.Toputyourcomputerintosleep(standby)mode,doasfollows.
ForWindows7:
1.ClickStart.
2.ClickthetrianglemarkontherightsideoftheShutdownicon;thenselectSleep.
ForWindowsXP:
1.ClickStart.
2.ClickShutdown;thenselectStandby.
•Hibernation.Byusingthismode,youcanturnoffyourcomputercompletelywithoutsavinglesor
exitingfromanyapplicationsthatarerunning.Whenyouenterhibernation,allopenapplications,folders,
andlesaresavedtotheharddisk,andthenthecomputerturnsoff.Toenterhibernation,doasfollows.
ForWindows7:
1.ClickStart.
2.ClickthetrianglemarkontherightsideoftheShutdownicon;thenselectHibernate.
ForWindowsXP:
1.ClickStart.
2.ClickShutdown;thenSelectHibernate.
Toresumeyoursession,pressthepowerbuttonfornomorethan4seconds.
Whenyouarenotusingthewirelessfeatures,suchasBluetoothorwirelessLAN,turnthemoff.Thiswillhelp
conservepower.Toturnoffthewirelessfeatures,pressF9.
Enablingthewakeupfunction
Ifyouputyourcomputerintohibernationmode,andthewakeupfunctionisdisabled(thisisthedefault
setting),thecomputerdoesnotconsumeanypower.Ifthewakeupfunctionisenabled,itconsumesasmall
amountofpower.Toenablethefunction,doasfollows:
ForWindows7:
1.ClickStart➙ControlPanel➙SystemandSecurity.
2.ClickAdministrativeT ools.
3.Double-clickTaskScheduler.Ifyouarepromptedforanadministratorpasswordorconrmation,type
thepasswordorprovideconrmation.
Chapter2.Usingyourcomputer37

4.Fromtheleftpane,selectthetaskfolderforwhichyouwanttoenablethewakeupfunction.The
scheduledtasksaredisplayed.
5.Clickascheduledtask,andthenclicktheConditionstab.
6.UnderPower,selectthecheckboxforWakethecomputertorunthistask.
ForWindowsXP:
1.ClickStart➙ControlPanel➙PerformanceandMaintenance.
2.ClickScheduledTasks.Thescheduledtasksaredisplayed.
3.Right-clickonascheduledtask.
4.ClickProperties.
5.ClicktheSettingstab.
6.UnderPowerManagement,selectthecheckboxforWakethecomputertorunthistask.
Enablingthebatteryalarm
Youcanprogramyourcomputersothatwhenthebatterypowerfallsbelowacertainlevel,threeevents
occur:thealarmgoesoff,amessageisdisplayed,andtheLCDisturnedoff.Toenablethefunction,do
asfollows:
1.StartPowerManager.
2.ClicktheGlobalPowerSettingstab.
3.ForLowbatteryalarmorCriticallylowbatteryalarm,setthepercentageofthepowerlevelandset
theaction.
Note:Ifyourcomputerenterssleep(standby)orhibernationmodewhenthebatteryislow,butthealarm
messagehasnotyetappeared,themessagewillappearwhenthecomputerresumes.Toresumenormal
operation,pressOK.
Handlingthebattery
DANGER
Donotattempttodisassembleormodifythebatterypack.
Attemptingtodosocancauseanexplosion,orliquidleakagefromthebatterypack.
AbatterypackotherthantheonespeciedbyLenovo,oradisassembledormodiedbattery
packisnotcoveredbythewarranty.
38UserGuide

DANGER
Iftherechargeablebatterypackisincorrectlyreplaced,thereisdangerofanexplosion.Thebattery
packcontainsasmallamountofharmfulsubstances.T oavoidpossibleinjury:
•ReplaceonlywithabatteryofthetyperecommendedbyLenovo.
•Keepthebatterypackawayfromre.
•Donotexposeittoexcessiveheat.
•Donotexposeittowaterorrain.
•Donotshort-circuitit.
•Storeitinacooldryplace.
•Keepitawayfromchildren.
Thebatterypackisaconsumablesupply.
Ifyourbatterybeginstodischargetooquickly,replacethebatterypackwithanewoneofthetype
recommendedbyLenovo.Formoreinformationonreplacingthebatterypack,contactyourCustomer
SupportCenter.
DANGER
Donotdrop,crush,puncture,orsubjecttostrongforces.Batteryabuseormishandlingcancause
thebatterytooverheat,whichcancausegassesorameto“vent”fromthebatterypackorcoin
cell.Ifyourbatteryisdamaged,orifyounoticeanydischargefromyourbatteryorthebuildup
offoreignmaterialsonthebatteryleads,stopusingthebatteryandobtainareplacementfrom
thebatterymanufacturer.
DANGER
Onlyrechargethebatterypackstrictlyaccordingtoinstructionsincludedintheproduct
documentation.
DANGER
Donotputthebatterypackintrashthatisdisposedofinlandlls.Whendisposingofthebattery,
complywithlocalordinancesorregulationsandyourcompany'ssafetystandards.
DANGER
Thereisadangerofanexplosionifthebackupbatteryisincorrectlyplaced.Thelithiumbattery
containslithiumandcanexplodeifitisnotproperlyhandled,ordisposedof.Replaceonlywitha
batteryofthesametype.T oavoidpossibleinjuryordeath,Donot:(1)throworimmerseintowater,
(2)allowittoheattomorethan100°C(212°F),or(3)attempttorepairordisassembleit.Disposeof
itasrequiredbylocalordinancesorregulationsandyourcompany'ssafetystandards.
Chapter2.Usingyourcomputer39

Connectingtothenetwork
YourcomputerhasoneormorenetworkadaptersforconnectingtotheInternetandtoyourcompany's
wiredLANorwirelessLANnetwork.
Note:Somemodelscomewithabuilt-inwirelessWANcardenablingyoutoestablishwirelessconnections
overremotepublicorprivatenetworks.
AccessConnectionsisaconnectivityassistantprogramforcreatingandmanaginglocationproles.Each
locationprolestoresallthenetworkandInternetcongurationsettingsneededforconnectingtoanetwork
infrastructurefromaspeciclocationsuchasahomeoranofce.
Note:AccessConnectionsdoesnotsupportconnectiontowirelessWANnetworkinChina.
Ethernetconnections
Youcanconnecttoyournetworkorabroadbandconnection,suchasDSLorCATV,byuseoftheEthernet
featurebuiltintoyourcomputer.Thisfeatureenablesyoutodo1Gbpshalforfullduplexdatatransmission.
ToconnecttoanetworkviaEthernet,youcanuseAccessConnections.
DANGER
YourcomputerhasanEthernetconnector.T oavoidtheriskofelectricalshock,donotconnect
thetelephonecabletotheEthernetconnector.
Wirelessconnections
Wirelessconnectionisthetransferofdatawithouttheuseofcablesbymeansofradiowavesonly.
Dependingonthefrequencyusedfordatatransmission,theareacovered,orthetypeofthedeviceusedfor
datatransfer,thefollowingcategoriesofwirelessnetworksmaybeavailabletoyou:
WirelessLAN
Awirelesslocalareanetworkcoversarelativelysmallgeographicarea,suchasanofcebuildingorahouse.
Devicesbasedonthe802.11standardscanconnecttothisnetwork.
WirelessWAN
Awirelesswideareanetworkcoversabroadergeographicarea.Cellularnetworksareusedfordata
transmission,andaccessisprovidedbyawirelessservicecarrier.
Bluetooth
Oneofanumberoftechnologiesusedtocreateawirelesspersonalareanetwork.Bluetoothcanconnect
devicesashortdistancefromoneanother,andiscommonlyusedforconnectingperipheraldevicestoa
computer,transferringdatabetweenhand-helddevicesandPC,orremotelycontrollingandcommunicating
withdevicessuchasmobilephones.
WiMAX(WorldwideInteroperabilityforMicrowaveAccess)
Thislong-rangewirelessdatatransmissiontechnologybasedonthe802.16standard,isexpectedtoprovide
theusera“lastmile”broadbandconnectivitysimilartothatprovidedbycableorADSL,butwithouttheneed
tophysicallyconnectacabletothePC.
40UserGuide

MakingwirelessLANconnections
Yourcomputercomeswithabuilt-inwirelessnetworkingcardandacongurationutilitytohelpyoumake
wirelessconnectionsandmonitorthestatusofyourconnection,sothatyoucanstayconnectedtoyour
networkwhileyouareintheofce,inameetingroom,orathome,withnoneedforawiredconnection.
Attention:
•IfyoucarryyourcomputerwiththewirelessLANfeatureintoanairplane,checktheserviceswiththe
airlinebeforeboardingtheairplane.
•Iftherearerestrictionsontheuseofcomputersonanairplanewiththewirelessfeature,youneedto
disableitbeforeboarding.Todisableit,refertotheinstructionsin“Enablingordisablingthewireless
feature”onpage47.
Note:Youcanpurchaseawirelessnetworkingcardasanoption.Formoreinformation,referto“Finding
ThinkPadoptions”onpage105.
TipsforusingthewirelessLANfeature
•PlaceyourcomputersothatthereareasfewobstaclesaspossiblebetweenthewirelessLANaccess
pointandthecomputer.
•ForthebestconnectionofthewirelessLANfeature,openyourcomputerdisplaytoanangleofslightly
morethan90degrees.
•Ifyouusethewirelessfeature(the802.11standard)ofyourcomputersimultaneouslywithaBluetooth
option,datatransmissionspeedcanbedelayedandtheperformanceofthewirelessfeaturecanbe
degraded.
Wirelessnetworkingsetup
Tousethebuilt-inwirelessnetworkingcard(the802.11standard)tocommunicate,startAccessConnections.
Note:BeforeyoustartsettingupwirelessnetworkingconnectionsbyusingAccessConnections,obtaina
NetworkName(SSID)andyourencryptioninformationfromyournetworkadministrator.
AccessConnections,aconnectivityassistantprogram,caneasilyenableonenetworkadapteranddisable
theotheradaptersondemand.Aftersettingupyourwirelessnetworkingconnection,youcanusethe
programtoquicklyswitchthenetworksettings.
UsingwirelessWANconnections
WirelessWideAreaNetwork(wirelessWAN)enablesyoutoestablishwirelessconnectionsoverremote
publicorprivatenetworks.Theseconnectionscanbemaintainedoveralargegeographicalarea,suchas
acityoranentirecountry,byuseofmultipleantennasitesorsatellitesystemsmaintainedbywireless
serviceproviders.
SomeThinkPadnotebookscomewithabuilt-inwirelessWANcardintegratingsomewirelessWAN
technologies,suchas1xEV-DO,HSPA,3GorGPRS.YoucanconnecttotheInternetoryourcompany
networkwiththebuilt-inwirelessWANcardandthecongurationutilitytomakeawirelessWANconnection
andmonitoritsstatus.
Note:WirelessWANserviceisprovidedbyauthorizedserviceprovidersinsomecountries.
TondthelocationofthewirelessWANantennaonyourcomputer,referto“LocationoftheUltraConnect
wirelessantennas”onpage164.
TousethewirelessWANfeature,startAccessConnections.
Chapter2.Usingyourcomputer41

UsingBluetooth
ForWindows7
IfyourcomputerisequippedwiththeIntegratedBluetoothfeatures,youcanenableordisablethefeatures
bypressingF9.IfyoupressF9,alistofwirelessfeaturesisdisplayed.Youcanenableordisablethe
Bluetoothfeatureswithasingleclick.
TocongureaBluetoothdeviceormanageconnectionsettings,youcanuseBluetoothDevicesinControl
Panel.
1.ClickStart➙ControlPanel.
2.ClickHardwareandSound.
3.ClickDevicesandPrinters.
TosenddatatoaBluetooth-enableddevice,doasfollows:
1.Right-clickthedatathatyouwanttosend.
2.SelectSendTo➙BluetoothDevices.
Fordetails,refertotheWindowsonlinehelp.
Note:Ifyouusethewirelessfeature(the802.11standard)ofyourcomputersimultaneouslywithaBluetooth
option,datatransmissionspeedcanbedelayedandtheperformanceofthewirelessfeaturecanbe
degraded.
ForWindowsXP
IfyourcomputerisequippedwiththeIntegratedBluetoothfeatures,youcanenableordisablethefeatures
bypressingF9.
IfyoupressF9,alistofwirelessfeaturesisdisplayed.YoucanenableordisabletheBluetoothfeatures
withasingleclick.
InWindowsXP,youcanuseeitherThinkPadBluetoothwithEnhancedDataRateSoftware,ortheMicrosoft
Bluetoothsoftware.Bydefault,ThinkPadBluetoothwithEnhancedDataRateSoftwareisinstalledonyour
computer.
UsingBluetoothforthersttimeonyourcomputer
IfthisisthersttimeBluetoothhasbeenusedonyourcomputer,useeitherofthefollowingprocedures:
1.Double-clicktheMyBluetoothPlacesicononthedesktop,ortheBluetoothiconinthetaskbar.The
StartUsingBluetoothwindowopens,andsomevirtualdevicedriversareinstalledautomatically.
2.Waituntiltheinstallationofthedriversiscomplete.
OR
1.Right-clicktheMyBluetoothPlacesicononthedesktop,ortheBluetoothiconinthetaskbar.
2.SelectStartUsingBluetooth.TheStartUsingBluetoothwindowopens,andsomevirtualdevice
driversareinstalledautomatically.
3.Waituntiltheinstallationofthedriversiscomplete.
SomeothervirtualdevicedriverswillbeinstalledondemandwhenyouusecertainBluetoothproles
forthersttime.
UsingtheMicrosoftBluetoothsoftware
42UserGuide

IfyouareusingWindowsXPandwanttousetheMicrosoftstandardBluetoothfeatures,installthesoftware
byfollowingtheinstructionsin“InstallingtheMicrosoftBluetoothsoftwareinWindowsXP”onpage44.
ForinformationabouthowtousetheBluetoothfunction,doasfollows:
1.PressF9toturnonBluetooth.
2.ClickStart➙ControlPanel.
3.ClickPrintersandOtherHardware.
4.ClickBluetoothDevices.
5.ClicktheOptionstab.
6.ClickLearnmoreaboutBluetoothSettings.
UsingThinkPadBluetoothwithEnhancedDataRateSoftware
IfThinkPadBluetoothwithEnhancedDataRateSoftwareisinstalledonyourcomputer,twoiconsare
displayedonthescreen:
•MyBluetoothPlacesonthedesktop
•BluetoothCongurationinthesystemtrayofthetaskbar
TousetheBluetoothfeatures,dothefollowing:
1.Double-clicktheMyBluetoothPlacesicononthedesktop.
2.ForWindowsXP,gotoBluetoothTasksanddouble-clickViewdevicesinrange.Alistofthedevices
onwhichBluetoothhasbeenenabledappears.
3.Clickthedevicetowhichyouwantaccess.Alistoftheservicesavailableonthatdeviceappears,
asfollows:
•Bluetoothkeyboardandmouse(Humaninterfacedevices)
•Printer(HCRP)
•Audiogateway
•Headset
•PIMsynchronization
•Fax
•Filetransfer
•PIMitemtransfer
•Dial-upnetworking
•Networkaccess
•Bluetoothserialport
•BluetoothImaging
•HandsFree
•AVprole
4.Clicktheserviceyouwant.
Formoreinformation,presstheF1keytoopentheonlinehelpforBluetooth.
BluetoothConguration
TousethecongurationfeaturesofBluetooth,right-clicktheicon.Apop-upmenuappears.Select
BluetoothSetupWizardorAdvancedConguration.
Chapter2.Usingyourcomputer43

TheBluetoothSetupWizardhasthefollowingcapabilities:
•FindingallBluetooth-enableddevicesthatcanprovideservices
•FindingaspecicBluetooth-enableddevicethatyouwanttouse,andconguringtheservicesonthat
device
•ConguringtheBluetooth-enabledservicesonyourcomputerthatareprovidedforremotedevices
•Conguringthenameanddevicetypeofyourcomputer
TheAdvancedCongurationhasthefollowingfunctions:
•Conguringthenameanddevicetypeofyourcomputer
•ConguringyourcomputersettingssothatremoteBluetooth-enableddevicescanndyourcomputer
•ConguringyourcomputersettingssothatyourcomputercanndremoteBluetooth-enableddevices
•Conguring,onyourcomputer,theBluetooth-enabledservicesprovidedforremotedevices
•ConguringtheservicesonremoteBluetooth-enableddevices
•DisplayinginformationaboutBluetoothhardware
Fordetails,refertothehelpforBluetooth.Toseethehelp,double-clickMyBluetoothPlaces,andclick
HelpandthenBluetoothhelp.Anotherwaytostartthehelpistoright-clickBluetoothCongurationinthe
systemtrayofthetaskbar,andclickAdvancedCongurationandthenHelp.
InstallingtheMicrosoftBluetoothsoftwareinWindowsXP
IfyouwanttousetheMicrosoftBluetoothsoftware,doasfollows:
FirstuninstalltheThinkPadBluetoothwithEnhancedDataRateSoftware.
1.TurnBluetoothpoweroff.
2.ClickStart➙ControlPanel.
3.ClickAddorRemovePrograms.
4.SelectThinkPadBluetoothwithEnhancedDataRateSoftware;thenclickChange/Removeto
uninstallthesoftware.
5.Followtheinstructionsonthescreen.
NextinstalltheMicrosoftBluetoothsoftware,asfollows:
1.TurnBluetoothpoweron.MicrosoftBluetoothsoftwareisloadedautomatically.
2.IftheFoundNewHardwareWizardwindowpopsup,dothefollowing:
a.SelectNo,notthistime,andthenclickNext.
b.SelectInstallfromalistorspeciclocation(Advanced);thenclickNext.
c.SelectSearchforthebestdriverinthoselocations.
d.SelectIncludethislocationinthesearch:,andtypeC:\SWTOOLS\Drivers\MSBTooth,orspecifythe
locationinwhichyouplacedtheextractedINFle.ThenclickNext.
3.ClickFinish.
InstallingThinkPadBluetoothwithEnhancedDataRateSoftwareinWindowsXP
IfyouareusingtheMicrosoftBluetoothsoftwareandwanttouseThinkPadBluetoothwithEnhancedData
RateSoftwareinstead,replacetheMicrosoftBluetoothsoftwarewithThinkPadBluetoothwithEnhanced
DataRateSoftwareasfollows:
1.PressF9toturntheBluetoothpoweron.
44UserGuide

2.ClickStart➙Run.
3.TypeC:\SWTOOLS\Drivers\TPBTooth\Setup.exe(orspecifythefullpathtothesetup.exeleyouhave
downloadedfromhttp://www.lenovo.com/support);thenclickOK.
4.ClickNext.
5.SelectIacceptthetermsinthelicenseagreement;thenclickNext.
6.ClickNexttoselectthedefaultdestinationfolder.
Ifyouneedtochangethedestinationfolder,clickChange,selectorenterthenameofthedestination
folderintheChangecurrentdestinationfolderwindow,andclickOK.
7.ClickInstalltobegininstallation.
8.ClickOKtoacceptthedriversignature.
9.ClickFinish.
10.Restartthecomputerifnecessary.
IfyoudidnotturntheBluetoothpoweronbeforeinstallingThinkPadBluetoothwithEnhancedDataRate
Software,thatis,ifyouskippedstep1-replacetheBluetoothdriver,asfollows:
1.ClickStart➙ControlPanel.
2.ClickPerformanceandMaintenance;thenclickSystem.
3.ClicktheHardwaretab;thenclickDeviceManager.
4.Double-clickBluetoothRadiostoextracttheBluetoothRadiosdevicetree.
5.Double-clicktheThinkPadBluetoothwithEnhancedDataRateicontoopenthePropertieswindow.
6.ClicktheDrivertab;thenclickUpdateDriver.
7.ClickNo,notthistime,andthenclickNext.
8.SelectInstallfromalistorspeciclocation(Advanced),andthenclickNext.
9.SelectDon'tsearch.Iwillchoosethedrivertoinstall;thenclickNext.
10.Selectthedriverthathasno“DigitalSigned”icon;thenclickNext.
11.ClickFinish.
Note:Ifyouusethewirelessfeature(the802.11standard)ofyourcomputersimultaneouslywithaBluetooth
option,datatransmissionspeedcanbedelayedandtheperformanceofthewirelessfeaturecanbe
degraded.
UsingWiMAX
SomeThinkPadnotebookscomewithabuilt-inwirelessLANcardintegratingWiMAXtechnology.
WiMAX,along-rangewirelessdatatransmissiontechnologybasedonthe802.16standard,providesyou
witha“lastmile”broadbandconnectivitysimilartothatofferedbycableorADSL,butwithouttheneedto
physicallyconnectacabletothePC.
TousetheWiMAXfeature,start“AccessConnections”onpage21.
Checkingwirelessconnectionstatus
AccessConnectionsGauge(Windows7)
IfyourcomputerisrunningWindows7,theAccessConnectionsGaugeinthetaskbardisplaysthesignal
strengthandstatusofyourwirelessconnection.
Note:TodisplayAccessConnectionsGaugeinthetaskbar,seetheHelpinAccessConnections.
Chapter2.Usingyourcomputer45

Youcanndmoredetailedinformationaboutthesignalstrengthandstatusofyourwirelessconnection
byopeningAccessConnectionsorbyright-clickingtheAccessConnectionsGaugeinthetaskbarand
selectingViewStatusofWirelessConnection.
•AccessConnectionsGaugestates:wirelessLAN
–Powertothewirelessradioisoffornosignal.
–Powertothewirelessradioison.Thesignalstrengthofthewirelessconnectionispoor.To
improvesignalstrength,moveyoursystemclosertothewirelessaccesspoint.
–Powertothewirelessradioison.Thesignalstrengthofthewirelessconnection
ismarginal.
–Powertothewirelessradioison.Thesignalstrengthofthewirelessconnectionis
excellent.
•AccessConnectionsGaugestates:wirelessWAN
–Nosignal
–Signallevel1
–Signallevel2
–Signallevel3
Note:FormoreinformationaboutAccessConnectionsGauge,seetheHelpinAccessConnections.
AccessConnectionsiconandwirelessstatusicon
TheAccessConnectionsicondisplaysgeneralconnectionstatus.
Thewirelessstatusicondisplaysthesignalstrengthandstatusofyourwirelessconnection.
Youcanndmoredetailedinformationaboutthesignalstrengthandstatusofyourwirelessconnection
eitherbyopeningAccessConnectionsorbydouble-clickingtheAccessConnectionswirelessstatus
iconinthetaskbar.
Note:TodisplaytheAccessConnectionsiconandwirelessstatusiconclickShowhiddeniconsinthetask
bar.Toaddtheiconstothetaskbarpermanently,clickCustomizeandproceedtocustomizethesettings.
Formoreinformationabouttheicons,seetheHelpinAccessConnections.
•AccessConnectionsiconstates
–Nolocationproleisactiveornoneexists.
–Currentlocationproleisdisconnected.
–Currentlocationproleisconnected.
•Wirelessstatusiconstates:wirelessLAN
–Powertothewirelessradioisoff.
–Powertothewirelessradioison.Noassociation.
–Powertothewirelessradioison.Nosignal.
–Powertothewirelessradioison.Thesignalstrengthofthewirelessconnectionisexcellent.
–Powertothewirelessradioison.Thesignalstrengthofthewirelessconnectionismarginal.
46UserGuide

–Powertothewirelessradioison.Thesignalstrengthofthewirelessconnectionispoor.Toimprove
signalstrength,moveyoursystemclosertothewirelessaccesspoint.
•Wirelessstatusiconstates:wirelessWAN
–PowertotheWANradioisoff
–Noassociation
–Nosignal
–Signallevel1
–Signallevel2
–Signallevel3
Note:Ifyouhavetroubleinmakingaconnection,trymovingyourcomputerclosertoyourwirelessaccess
point.
Enablingordisablingthewirelessfeature
Toenableordisablethewirelessfeature,pressF9.Alistofwirelessfeaturesisdisplayed.Youcanturnthe
featureonandoffwithasingleclick.
Youcanalsoenableordisablethefeaturebythefollowingprocedures.
Toenablethewirelessfeature,doasfollows:
1.ClicktheAccessConnectionswirelessstatusiconinthesystemtray.
2.ClickPowerOnWirelessRadio.
Todisablethewirelessfeature,doasfollows:
•ClicktheAccessConnectionswirelessstatusiconinthesystemtray.
•ClickPowerOffWirelessRadio.
Note:IfyourcomputerisaWindows7model,clickShowhiddeniconsinthetaskbar.TheAccess
Connectionswirelessstatusiconisdisplayed.Toaddittothetaskbarpermanently,clickCustomizeand
proceedtocustomizethesettings.Formoreinformationabouttheicon,seetheHelpinAccessConnections.
Usingaprojectororexternaldisplay
Yourcomputercomeswithmanyfeaturestoincreasetheenjoymentofyourcomputerandhelpyougive
presentationswithcondence.
Changingdisplaysettings
Youcanchangethedisplaysettings,suchasfontsizeorcolormodeornumericlock.
Fontsize
Tomakeafontsizelarger,doasfollows:
ForWindows7:
1.Right-clickonthedesktop,andclickPersonalize.
2.ClickDisplayattheleft.
3.SelecttheMediumorLargerradiobutton.
4.ClickApply.Thechangewilltakeeffectafteryoulogoff.
Chapter2.Usingyourcomputer47

ForWindowsXP:
1.Right-clickonthedesktop,andclickProperties.TheDisplayPropertieswindowopens.
2.ClicktheAppearancetab.
3.UnderFontSize,clickLargeFontsorExtraLargeFonts.
4.ClickApplytoapplythesettings.
5.ClickOK.IfyouarepromptedtorestartthecomputerafteryouclickOKorApply,thechangewill
takeeffectafterthecomputerrestarts.
Connectingaprojectororexternaldisplay
Attachinganexternalmonitor
Yourcomputercansupportamaximumvideoresolutionofupto2048x1536,providedthattheexternal
monitoralsosupportsthatresolution.Formoredetails,refertothemanualsprovidedwithyourmonitor.
Youcansetanyresolutionforeitherthecomputerdisplayortheexternalmonitor.Whenyouusebothat
thesametime,theresolutionofbothisthesame.Ifyousetahigherresolutionforthecomputerdisplay,
youcanseeonlypartofthescreenatatime.Youcanseeotherpartsbymovingtheimagewiththe
TrackPointoranotherpointingdevice.
Youcanmovethedisplayoutputtothecomputerdisplay,theexternalmonitor,orbothintheDisplay
Settingswindow(inWindowsXP,DisplayPropertieswindow).
Connectinganexternalmonitor
Toattachanexternalmonitor,doasfollows:
ForWindows7:
1.Connecttheexternalmonitortothemonitorconnector;thenconnectthemonitortoanelectricaloutlet
2.Turnontheexternalmonitor.
3.ChangethedisplayoutputlocationbypressingF6.Thisallowsyoutoswitchbetweenviewingoutput
ontheexternaldisplay,thecomputerdisplay,andbothdisplays.
Note:Ifyourcomputercannotdetecttheexternalmonitor,right-clickonthedesktop,thenselectScreen
resolution.ClicktheDetectbutton.
ForWindowsXP:
1.Turnoffthecomputer.
2.Connecttheexternalmonitortothemonitorconnector;thenconnectthemonitortoanelectricaloutlet.
3.Turnontheexternalmonitorandthecomputer.
4.Changethedisplayoutputlocationbypressing“F6”onpage26.Thisallowsyoutoswitchbetween
viewingoutputontheexternaldisplay,thecomputerdisplay,andbothdisplays.
Notes:
•Donotchangethedisplayoutputlocationwhileamovingpictureisbeingdrawn--forexample,while
playingamovieoragame,orviewingabusinesspresentation.Closetheapplicationbeforechangingthe
displayoutputlocation,orchangethedisplaymodebeforeyouopenanMPEGletoplay.
•IfyouareattachinganexternalmonitorthatsupportsonlyVGAmode(640x480resolution),donotview
outputonboththecomputerdisplayandtheexternalmonitor.Doingsowouldcausetheexternalmonitor
screentobescrambledandtheoutputnottobedisplayed;inaddition,itcouldcausedamagetothe
screen.Usetheexternalmonitoronly.
48UserGuide

•IftheexternalTFTmonitoryouconnecthasananaloginterface,ickersorripplesmayappearonsome
displays,suchastheshutdownscreenofWindows.ThisiscausedbytheexternalTFTmonitor,and
cannotbexedbyadjustingtheexternalTFTmonitororthecomputersidesettings.
Settingthemonitortypes
Tosetyourmonitortype,doasfollows:
ForWindows7:
1.Connecttheexternalmonitortothemonitorconnector,andthenconnectthemonitortoanelectrical
outlet.
2.Turnontheexternalmonitor.
3.Right-clickonthedesktop,andclickScreenresolution.
Note:Ifyourcomputercannotdetecttheexternalmonitor,clicktheDetectbutton.
4.Clicktheiconforthedesiredmonitor(theMonitor-2iconisfortheexternalmonitor).
5.SetResolution.
6.ClickAdvancedSettings.
7.ClicktheMonitortab.Checkthemonitorinformationwindowtomakesurethatthemonitortypeis
correct.Ifitis,clickOKtoclosethewindow;otherwisedoasfollows.
8.Ifmorethantwomonitortypesaredisplayed,selectGenericPnPMonitororGenericNon-PnP
Monitor.
9.ClickProperties.Ifyouarepromptedforanadministratorpasswordorconrmation,typethepassword
orprovideconrmation.
10.ClicktheDrivertab.
11.ClickUpdateDriver.
12.ClickBrowsemycomputerfordriversoftware,andthenclickLetmepickfromalistofdevice
driversonmycomputer.
13.CleartheShowcompatiblehardwarecheckbox.
14.SelectManufacturerandModelforyourmonitor.Ifyoucannotndyourmonitorinthelist,stopthe
installationofthisdriverandusethedrivershippedwithyourmonitor.
15.Afterupdatingthedriver,clickClose.
16.ClickOK.
Note:Tochangethecolorsettings,right-clickonthedesktop,andclickScreenresolution.ClickAdvanced
Settings,selecttheMonitortab,thensetColors.
ForWindowsXP:
1.Connecttheexternalmonitortothemonitorconnector,andthenconnectthemonitortoanelectrical
outlet.
2.Turnontheexternalmonitorandthecomputer.
3.PressF6tochangethedisplayoutputlocationtotheexternalmonitor.
4.Right-clickonthedesktop,andclickPropertiestoopentheDisplayPropertieswindow.
5.ClicktheSettingstab.
6.ClickAdvanced.
7.ClicktheMonitortab.Checkthemonitorinformationwindowtomakesurethatthemonitortypeis
correct.Ifitis,clickOKtoclosethewindow;otherwisedoasfollows.
8.Ifmorethantwomonitortypesaredisplayed,selectDefaultMonitor.
9.ClickProperties.
10.ClicktheDrivertab.
Chapter2.Usingyourcomputer49

11.ClickUpdateDriver.TheHardwareUpdateWizardappears.
12.ClickNo,notthistime,andthenclickNext.
13.SelectInstallfromalistorspeciclocation(Advanced),andthenclickNext.
14.SelectDon'tsearch.Iwillchoosethedrivertoinstall,andthenclickNext.
15.CleartheShowcompatiblehardwarecheckbox.
16.SelectManufacturerandModelforyourmonitor.Ifyoucannotndyourmonitorinthelist,stopthe
installationofthisdriverandusethedrivershippedwithyourmonitor.
17.Afterupdatingthedriver,clickOKtoclosethePropertieswindow.
18.SetColorsandScreenareaintheDisplayPropertieswindow.
19.ClickOK.
Considerationsforattachinganexternalmonitor
•Wheninstallinganoperatingsystem,youmustinstallthedisplaydriverforyourmonitorthatissupplied
withthecomputer,andtheMonitorINFlethatissuppliedwiththeexternalmonitor.
•Ifyousetaresolutionhigherthantheresolutionyouareusingonthepanel,anduseapanelthatdoesnot
supportthatresolution,takeadvantageofthevirtualscreenfunction,whichenablesyoutodisplayonlya
partofthehigh-resolutionscreenimageyourcomputerproduces.Youcanseeotherpartsoftheimage
bymovingthescreenwiththeTrackPointorotherpointingdevice.
Note:ThevirtualscreenfunctionisnotsupportedonWindows7.
•Iftheexternalmonitoryouareusingisoutdated,theresolutionandtherefreshratemaybelimited.
Usingdualdisplays
UsingtheExtenddesktopfunction
YourcomputersupportsafunctionnamedtheExtenddesktop.WiththeExtenddesktopfunction,you
candisplayoutputonboththecomputerdisplayandanexternalmonitor.Youcanalsodisplaydifferent
desktopimagesoneachmonitor.
YoucanusetheExtenddesktopfunctionwithoutchanginganysettings.Ifthefunctiondoesnotwork,refer
to“EnablingtheExtenddesktopfunction”onpage50toenableit.
ConsiderationsforusingtheExtenddesktopfunction
•IfyouwanttoshowDOSfull-screenwhileintheExtenddesktopmode,onlytheprimarydisplayshows
DOS;theotherdisplayisblackedout.
IfyourcomputerhastheIntel®displayadapter,youcandesignatetheotherdisplayastheprimary
displaybydoingthefollowing:
1.PressCtrl+Alt+Fn+F12.TheIntelCUIwindowopens.
2.SelectExtendedDesktop.
3.Changethesettingtodesignatetheprimarydisplay.
•WhenanapplicationusingtheDirectDrawortheDirect3Displayedinfull-screenmode,itisshown
onlyontheprimarydisplay.
•YoucannotusethedisplayswitchingfunctionwhenyouareintheExtenddesktopmode.
EnablingtheExtenddesktopfunction
ToenabletheExtenddesktopfunction,doasfollows:
ForWindows7:
50UserGuide

1.Connecttheexternalmonitortothemonitorconnector;thenconnectthemonitortoanelectricaloutlet.
2.Turnontheexternalmonitor.
3.PressF6,thenselectExtend.
Tochangetheresolutionforeachmonitor,doasfollows:
1.Right-clickonthedesktop,andclickScreenresolution.
2.ClicktheMonitor-1icon(fortheprimarydisplay,thecomputerdisplay).
3.Settheresolutionfortheprimarydisplay.
4.ClicktheMonitor-2icon(forthesecondarydisplay,theexternaldisplay).
5.Settheresolutionforthesecondarydisplay.
6.Placetheiconsforthemonitorssothattheytouch.
Note:Youcansetthemonitorsinanyrelativeposition,buttheiconsmusttoucheachother.
7.ClickOKtoapplythechanges.
Note:Tochangethecolorsettings,right-clickonthedesktop,andclickScreenresolution.ClickAdvanced
Settings,selecttheMonitortab,thensetColors.
ForWindowsXP:
1.Turnoffthecomputer.
2.Connecttheexternalmonitortothemonitorconnector;thenconnectthemonitortoanelectricaloutlet.
3.Turnontheexternalmonitorandthecomputer.
4.Right-clickonthedesktop,andclickPropertiestoopentheDisplayPropertieswindow.
5.ClicktheSettingstab,andclicktheMonitor-2icon.
6.SelecttheExtendmyWindowsdesktopontothismonitorcheckboxandclickApply.(IftheMonitor
Settingswindowopens,clickYes.)
Tochangetheresolutionforeachmonitor,doasfollows:
1.ClicktheMonitor-1icon(fortheprimarydisplay,thecomputerdisplay).
2.Selectthecolorqualityandthescreenresolutionoftheprimarydisplay.
3.ClicktheMonitor-2icon(forthesecondarydisplay,theexternaldisplay).
4.Setthecolorqualityandscreenresolutionforthesecondarydisplay.
5.Placetheiconsforthemonitorssothattheytouch.
Note:Youcansetthemonitorsinanyrelativeposition,buttheiconsmusttoucheachother.
6.ClickOKtoapplythechanges.
Usingaudiofeatures
Yourcomputerisequippedwiththefollowing:
•Comboaudiojack,1/8inch(3.5mm)indiameter
•Built-instereospeakers
•Built-indualarraydigitalmicrophone
Yourcomputeralsohasanaudiochipthatenablesyoutoenjoyvariousmultimediaaudiofeatures:
•CompliantwithIntelHighDenitionAudio.
Chapter2.Usingyourcomputer51

•RecordingandplaybackofPCMandWAVlesin16-bitor24-bitformat.
•PlaybackofaWAVleatasamplerateof44.1KHzto192KHz.
•PlaybackofMIDIlesthroughaWavetablesynthesizerunderMicrosoftWindowsoperatingsystems.
•PlaybackofMP3lesthroughtheWindowsMediaPlayerorasoftwareMP3player.
•Recordingfromvarioussoundsources,suchasaheadsetattachedeithertothecomboaudiojackof
yourcomputer.
Note:Thecomboaudiojackdoesnotsupportaconventionalmicrophone.Ifaconventionalheadphoneis
attachedtoit,theheadphonefunctionissupported.Ifaheadsetwitha3.5mm4-poleplugisattachedtoit,
bothheadphoneandmicrophonefunctionsaresupported.
Thefollowingtableshowswhichfunctionsoftheaudiodevicesattachedtothejacksonyourcomputerare
supported.
Table3.Audiofeaturelist
Headsetwitha3.5mm
4-poleplug
ConventionalheadphoneConventionalmicrophone
ComboaudiojackHeadphoneand
microphonefunctions
supported
Headphonefunction
supported
Notsupported
Conguringforsoundrecording
Tocongurethemicrophoneforoptimizedsoundrecording,opentheSmartAudiowindowasfollows:
ForWindows7:ClickStart➙ControlPanel➙HardwareandSound➙SmartAudio.TheSmartAudio
windowopens.
ForWindowsXP:ClickStart➙ControlPanel➙Sounds,Speech,andAudioDevices➙SmartAudio.
TheSmartAudiowindowopens.
Usinganintegratedcamera
Yourcomputerhasanintegratedlow-lightenhancedcamera(USB2.0Camera).Thefollowingfeatures
maybeavailable:
•Capturevideo
•Takeapicture
•Manageyourphotosandvideos
•Startavideoconference
Usingopticaldrive
Note:YourcomputeronlysupportstheMultiBurnerdrive.
MultiBurnerdrive
ThisdrivecanreadDVD-ROMdiscs,DVD-Rdiscs,DVD-RAMdiscs,DVD-RWdiscs,andalltypesofCDs,
suchasCD-ROMdiscs,CD-RWdiscs,CD-Rdiscs,andaudioCDs.Inaddition,itcanrecordonDVD-R
discs,DVD-RWdiscs,typeIIDVD-RAMdiscs,CD-RWstandardandhighspeeddiscs,andCD-Rdiscs.
52UserGuide

UsingaashmediaCard
YourcomputerhasoneMediaCardReaderslot.
TheMediaCardReaderslotsupportsthefollowingcards:
•SDcard
•SDHCcard
•SDXCcard
•MultiMediaCard(MMC)
Note:Whentransferringdatatoorfromamediacard,suchasanSDcard,donotputyourcomputerin
sleep(standby)orhibernationmodebeforethedatatransferiscomplete.Todosomightcausedamageto
yourdata.
Formoreinformationonashmediacards,refertoanyofthefollowingtopics:
•“Insertingaashmediacard”onpage53
•“Removingaashmediacard”onpage54
Insertingaashmediacard
Attention:Beforeyoustartinstallinganyofthefollowingcards,touchametaltableoragroundedmetal
object.Thisactionreducesanystaticelectricityfromyourbody.Thestaticelectricitycoulddamagethecard.
•SDcard
•SDHCcard
•SDXCcard
•MultiMediaCard
Toinsertaashmediacardintothe4-in-1mediacardreaderslot,dothefollowing:
•Makesurethatthecardiscorrectlyoriented.
•Insertthecardrmlyintothe4-in-1mediacardreaderslot.Thecardmaystopbeforeitiscompletely
installedintotheslot.
IftheashmediacardisnotPlugandPlay,dothefollowing:
•ForWindows7:
1.OpenControlPanel.
2.ClickHardwareandSound.
3.ClickDeviceManager.Ifyouarepromptedforanadministratorpasswordorconrmation,typethe
passwordorprovideconrmation.
4.FromtheActionmenu,selectAddlegacyhardware.TheAddHardwareWizardstarts.
5.Followtheinstructionsonthescreen.
•ForWindowsXP:
–OpenControlPanelandswitchtoClassicview.
–Double-clicktheAddHardwareicon.TheAddHardwareWizardstarts.
–Followtheinstructionsonthescreen.
Chapter2.Usingyourcomputer53

Removingaashmediacard
Toremoveaashmediacard,dothefollowing:
ForWindows7:
•ClicktheShowhiddeniconsinthetaskbar.
•Right-clickSafelyRemoveHardwareandEjectMediaicon.
•SelectcorrespondingitemtoejectthecardfromtheWindowsoperatingsystem.
•Pressthecardtoejectitfromyourcomputer.
•Removethecardfromyourcomputerandstoreitsafelyforfutureuse.
ForWindowsXP:
•ClicktheSafelyRemoveHardwareiconinthetaskbar
•SelectcorrespondingitemtoejectthecardfromtheWindowsoperatingsystem.
•Pressthecardtoejectitfromyourcomputer.
•Removethecardfromyourcomputerandstoreitsafelyforfutureuse.
Note:IfyoudonotremovethecardfromyourcomputerafteryouejectthecardfromtheWindows
operatingsystem,thecardcannolongerbeaccessed.Toaccessthecard,youmustremoveitonce,
theninsertitagain.
54UserGuide
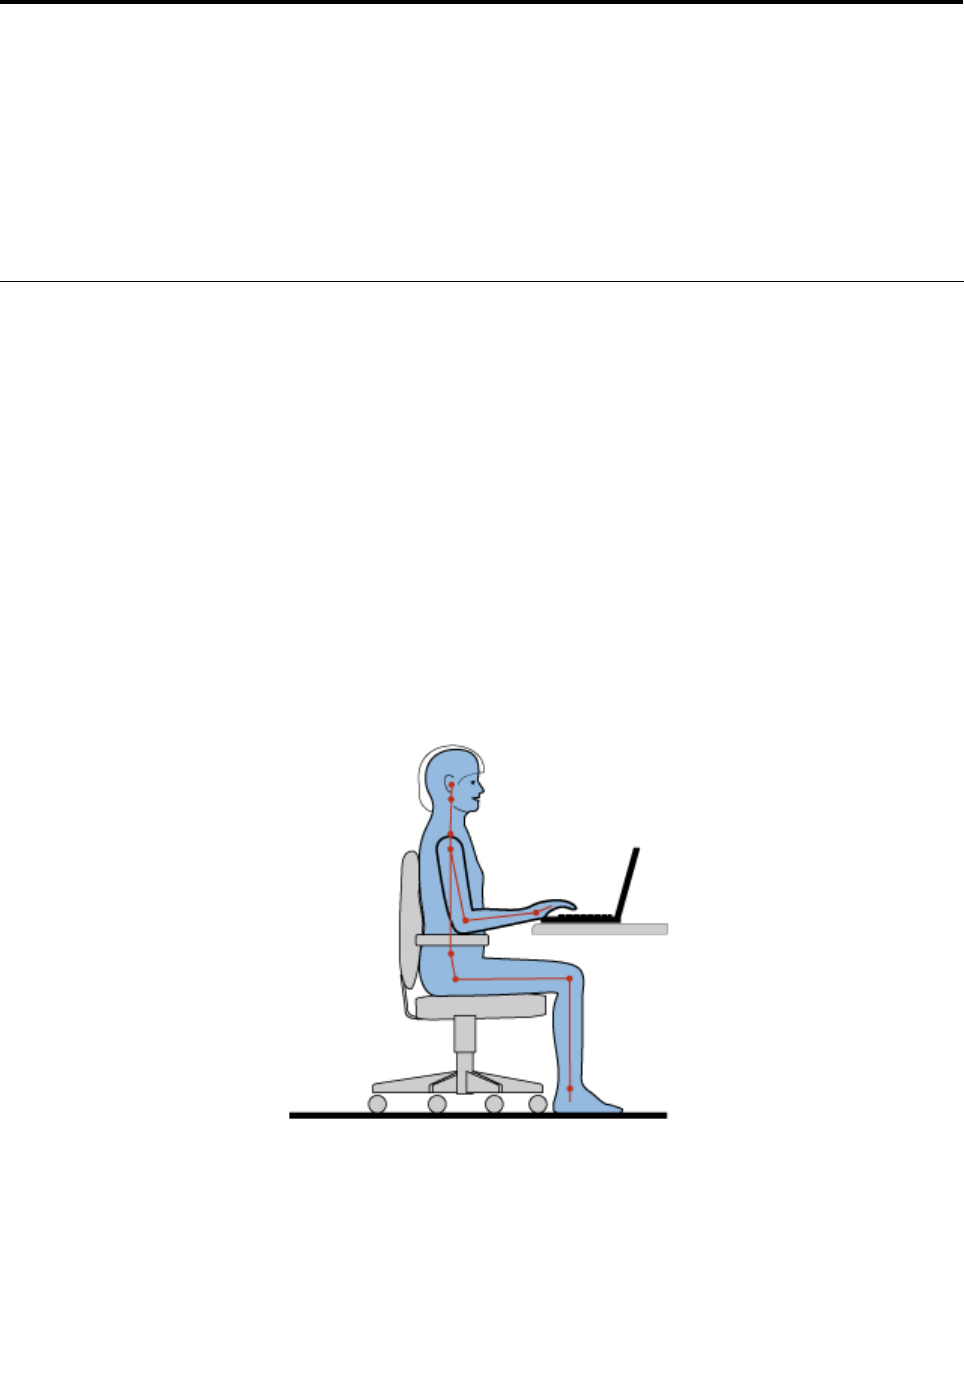
Chapter3.Youandyourcomputer
Thischapterprovidesyouinformationaboutaccessibilityandtravelingwithyourcomputer.
Thischaptercontainsthefollowingtopics:
•“Accessibilityandcomfort”onpage55
•“Travelingwithyourcomputer”onpage57
Accessibilityandcomfort
Becauseyourcomputerenablesyoutoworkinsomanyplaces,itisimportantthatyouremainattentive
togoodposture,goodlightingandproperseating.Bykeepingtheseconsiderationsinmind,youcan
improveperformanceandachievegreatercomfort.
Lenovoiscommittedtoprovidingthelatestinformationandtechnologytoourcustomerswithdisabilities.
Refertoouraccessibilityinformationwhichoutlinesoureffortsinthisarea.
Ergonomicinformation
Workinginthevirtualofcemaymeanadaptingtofrequentchangesinyourenvironment.Followingsome
simpleruleswillmakethingseasierandbringyouthemaximumbenetsofyourcomputer.Keepinginmind
suchbasicsasgoodlightingandproperseating,forexample,canhelpyouimproveyourperformance
andachievegreatercomfort.
Note:Thisexampleshowssomeoneinaconventionalsetting.Evenwhennotinsuchasetting,youcan
followmanyofthesetips.Developgoodhabits,andtheywillserveyouwell.
GeneralPosture:Belowaresomegeneralrecommendationsforassumingahealthyworkingposture.It
isbesttoperiodicallymakeminormodicationsinyourworkingposturetodetertheonsetofdiscomfort
causedbylongperiodsofworkinginthesameposition.Frequent,shortbreaksfromyourworkwillalsohelp
topreventanyminordiscomfortassociatedwithyourworkingposture.
Display:Positionthedisplaytomaintainacomfortableviewingdistanceof510-760mm(20-30inch).Avoid
glareorreectionsonthedisplayfromoverheadlightingoroutsidesourcesoflight.Keepthedisplay
©CopyrightLenovo201155

screencleanandsetthebrightnesstolevelsthatenableyoutoseethescreenclearly.PressHomeorEnd
toadjustdisplaybrightness.
HeadPosition:Keepyourheadandneckinacomfortableandneutral(vertical,orupright)position.
Chair:Useachairthatgivesyougoodbacksupportandseatheightadjustment.Usechairadjustmentsto
bestsuityourdesiredposture.
ArmandHandPosition:Ifavailable,utilizechairarmrestsoranareaonyourworkingsurfacetoprovide
weightsupportforyourarms.Keepyourforearms,wrists,andhandsinarelaxedandneutral(horizontal)
position.Typewithasofttouchwithoutpoundingthekeys.
LegPosition:Keepyourthighsparalleltotheoorandyourfeetatontheoororonafootrest.
Whatifyouaretraveling?
Itmaynotbepossibletoobservethebestergonomicpracticeswhenyouareusingyourcomputerwhileon
themoveorinacasualsetting.Regardlessofthesetting,trytoobserveasmanyofthetipsaspossible.
Sittingproperlyandusingadequatelighting,forexample,willhelpyoumaintaindesirablelevelsofcomfort
andperformance.
Questionsaboutvision?
ThinkPadNotebook'svisualdisplayscreensaredesignedtomeetthehigheststandardsandtoprovideyou
withclear,crispimagesandlarge,brightdisplaysthatareeasytosee,yeteasyontheeyes.Ofcourse,
anyconcentratedandsustainedvisualactivitycanbetiring.Ifyouhavequestionsoneyefatigueorvisual
discomfort,consultavisioncarespecialistforadvice.
Adjustingyourcomputertotyou
Becauseyourcomputerenablesyoutoworkinsomanyplaces,itisimportantthatyouremainattentive
togoodposture,goodlightingandproperseating.Refertothefollowingtipstoimproveperformance
andachievegreatercomfort:
Activesittingandrestbreaks:Thelongeryousitandworkwithyourcomputerthemoreimportantitis
toobserveyourworkingposture.Followinggeneralrecommendationsformaintainingahealthyworking
postureandpracticing“activesitting”arethebestwaystoavoiddiscomfortassociatedwithyourworking
postures.Makingminorvoluntaryposturalchangesandtakingshortfrequentworkbreaksarethekey
ingredientsforhealthycomputing.Yourcomputerisalightandmobilesystem;rememberthatitcaneasilybe
repositionedonyourworkingsurfacetoaccommodatemanyposturemodicationsyoumightwishtomake.
Workareasetupoptions:Familiarizeyourselfwithallofyourofcefurnituresothatyouknowhowtoadjust
yourworksurface,seat,andotherworktoolstoaccommodateyourpreferencesforcomfort.Ifyourwork
areaisnotinanofcesetting,besuretotakespecialnoteofemployingactivesittingandutilizingwork
breaks.NotethattherearemanyThinkPadproductsolutionsavailabletohelpyoumodifyandexpand
yourcomputertobestsuityourneeds.AccessthefollowingWebsitetoviewsomeoftheseoptions:
http://www.lenovo.com/accessories/services/index.html.Exploreyouroptionsforandexternalproducts
thatcanprovidetheadjustabilityandfeaturesthatyouwant.
ThinkPadfeaturesthatpromotecomfort:ThereareeasytouseThinkPadfeaturesthatcanhelpmake
yourcomputermorecomfortabletouse.
56UserGuide

Accessibilityinformation
Lenovoiscommittedtoprovidingpeoplewithdisabilitiesgreateraccesstoinformationandtechnology.
Asaresult,thefollowinginformationprovideswaystohelpusersthathavehearing,vision,andmobility
limitationsgetthemostoutoftheircomputerexperience.
Assistivetechnologiesenableuserstoaccessinformationinthemostappropriateway.Someofthese
technologiesarealreadyprovidedinyouroperatingsystem,otherscanbepurchasedthroughvendors,or
accessedthroughtheWorldWideWeb.
Assistivetechnologies
SomeaccessibilitytechnologiesareavailablethroughtheAccessibilityOptionsprogram.Depending
onyouroperatingsystem,thenumberofaccessibilityoptionsavailablevaries.Ingeneral,accessibility
optionsenhancethewayuserswithhearing,vision,ormobilitylimitationsnavigateandusetheircomputer.
Forexample,someusersmightnothavethenemotorskillsrequiredtouseamouseorselectkey
combinations.Otherusersmightrequirelargerfontsorhigh-contrastdisplaymodes.Insomecases,
magniersandbuilt-inspeechsynthesizersareavailable.Fordetailedinformationabouteachofthese
features,consulttheMicrosofthelpsystem.
TousetheAccessibilityOptionsprogram,doasfollows:
ForWindows7:
1.ClickStart,andthenclickControlPanel.
2.ClickEaseofAccess.
3.ClickEaseofAccessCenter.
ForWindowsXP:
1.ClickStart,andthenclickControlPanel.
2.ClickAccessibilityOptions.
ThishelpsystemsupportstheaccessibilityfeaturesprovidedbyyourWindowsoperatingsystem,screen
readersdesignedtooperateintheWindowsenvironment,andWindowskeyboardnavigation.Fora
completelistingofMicrosoftWindowsKeyboardGuide,goto:
http://www.microsoft.com/enable/Products/altkeyboard.aspx
Screenreadertechnologiesareprimarilyfocusedonsoftwareapplicationinterfaces,helpsystems,anda
varietyofonlinedocuments.However,inthecasewhereascreenreadercannotreaddocuments,the
documentmustrstgothroughaconversionprocess.OnesolutionconvertsAdobePDFlesintoaformat
thatisreadbythescreen-readerprograms.ThissolutionisaWeb-basedserviceprovidedbyAdobe
SystemsIncorporated.Throughhttp://access.adobe.com,AdobePDFdocumentscanbeconvertedto
HTMLorplaintextinmanylanguages.OneconversionoptionsconvertsPDFdocumentsontheInternet.A
secondoptionenablesuserstosubmittheURLofanAdobePDFlethroughe-mailtoconvertittoHTMLor
ASCIItext.AdobePDFlesonalocalharddiskdrive,localCD-ROM,orlocalareanetwork(LAN)canalso
beconvertedbyattachingtheAdobePDFletoane-mailmessage.
Travelingwithyourcomputer
Thistopicprovidesinformationtohelpyouworkwithyourcomputerwhenyouaretravellingwithyour
computerabroad.
Traveltips
Usethefollowingtraveltipstotravelmorecondentlyandefcientlywithyourcomputer.
Chapter3.Youandyourcomputer57

1.Whileitissafetoallowyourcomputertogothroughthexraymachinesatairportsecuritystations,itis
importanttokeepyoureyesonthecomputeratalltimestopreventtheft.
2.Considerbringinganairplaneorautomobileadapterforyourcomputer.
3.Ifyoucarryanacpoweradapter,detachtheaccordfromittoavoiddamagingthecord.
Traveltipsonairplanes
Ifyoucarryyourcomputerintoanairplane,checkthetraveltips.
Attention:
•Forusingonboardcomputerorwireless(suchasInternet,Bluetooth,etc.)service,checktheservices
withtheairlinebeforeboardingtheairplane.
•Iftherearerestrictionsontheuseofcomputerswiththewirelessfeatureonanairplane,youneedto
disableitbeforeboarding.Todisableit,refertotheinstructionsin“Enablingordisablingthewireless
feature”onpage47.
Followthetipsbelow.
1.Becarefulabouttheseatinfrontofyouonairplanes.Angleyourcomputerdisplaysothatitdoesnot
getcaughtwhenthepersoninfrontofyouleansback.
2.Remembertohibernateorturnoffyourcomputerwhentakingoff.
Travelaccessories
Hereisachecklistofthingstoconsiderpackingwhenyouaregoingtobeawayfromtheofce:
TravelEssentials
•ThinkPadacpoweradapter
•Externalmouse,ifyouareaccustomedtousingone
•Ethernetcable
•Standardphonecableandmodularjack(RJ-11)
•Extrabattery,charged
•Aqualitycarryingcasethatprovidesadequatecushionandprotection
Ifyouaretravelingtoanothercountryyoumightwanttoconsidertheseitems
•Anacpoweradapterforthecountrythatyouaretravelingto
•Anadaptertoconnecttoaphonelineinthatcountry
Otheritemsyoumaywishtoconsider
•ThinkPadAC/DCComboAdapter
•Externalstoragedevice
•Phonelinesplitter,incaseyouneedtodialmanually
58UserGuide

Chapter4.Security
Thischapterprovidesinformationabouthowtoprotectyourcomputerfromtheftandunauthorizeduse.
•“Attachingamechanicallock”onpage59
•“Usingpasswords”onpage59
•“Harddisksecurity”onpage64
•“Usingangerprintreader”onpage65
•“Noticeondeletingdatafromyourharddiskdrive”onpage67
•“Usingandunderstandingrewalls”onpage67
•“Protectingdataagainstviruses”onpage67
Attachingamechanicallock
Youcanattachamechanicallocktoyourcomputer,tohelppreventitfrombeingremovedwithoutyour
permission.
Attachamechanicallocktothekeyholeofthecomputer;thensecurethechainonthelocktoastationary
object.Refertotheinstructionsshippedwiththemechanicallock.
Note:Youareresponsibleforevaluating,selecting,andimplementingthelockingdevicesandsecurity
features.Lenovomakesnocomments,judgments,orwarrantiesaboutthefunction,quality,orperformance
oflockingdevicesandsecurityfeatures.
Usingpasswords
Byusingpasswords,youcanhelppreventyourcomputerfrombeingusedbyothers.Onceyouseta
password,apromptappearsonthescreeneachtimeyoupoweronthecomputer.Enteryourpasswordat
theprompt.Youcannotusethecomputerunlessyoutypethecorrectpassword.
Makesurethatonlyauthorizedindividualsaccessyourcomputer.Establishingdifferentkindsofpasswords
requiresthatotherpossibleusersknowtheproperpasswordsinordertoaccessyourcomputeroryourdata.
Ifthisiconappears,enterPower-onpasswordorSupervisorpassword.
Ifthisiconappears,enterHarddiskpassword.
Note:Ifthisiconappears,typeauserharddiskpassword.Ifyouwanttotypeamasterharddiskpassword,
pressF1andtypeamasterharddiskpassword.
Ifthisiconappears,enterSupervisorpassword.
Clickontheitemsbelowtondoutmoreaboutpasswordsandhowtousethemtoprotectyourcomputer.
•“Passwordsandsleep(standby)mode”onpage60
•“Typingpasswords”onpage60
•“Power-onpassword”onpage60
©CopyrightLenovo201159

•“Harddisksecurity”onpage64
•“Supervisorpassword”onpage63
Passwordsandsleep(standby)mode
Ifyouhavesetpasswordsandyouputyourcomputerintosleep(standby)mode,theprocedureforresuming
operationisasfollows:
•Youarenotpromptedtotypethepasswordwhenresumingoperation.
•Ifanyharddiskdrivehasaharddiskpassword,itisunlockedautomaticallywhenyouresumeoperation.
Note:IfaWindowspasswordhasbeenset,youwillbepromptedtoenterit.
Typingpasswords
Ifthisiconappears,typeapower-onpasswordorasupervisorpassword.
Ifthisiconappears,typeauserharddiskpassword.Ifyouwanttotypeamasterharddiskpassword,
dothefollowing:
1.PressF1.Theiconchangestothis:
2.Nowtypethemasterharddiskpassword.
Note:Toreturntothersticon,pressF1again.
Ifthisiconappears,typeasupervisorpassword.
Note:YoucanpressBackspaceifyoupressawrongkeywhileyouaretypingyourpassword.
Power-onpassword
Youcansetapower-onpasswordtohelpprotectyourcomputeragainstaccessbyunauthorizedusers.
Ifyousetapower-onpassword,thepasswordpromptappearsonthescreenwheneveryouturnonthe
computer.Youmustenterthecorrectpasswordtostartusingthecomputer.
Settingapower-onpassword
1.Printtheseinstructions.
2.Saveallopenles,andexitallapplications.
3.Turnyourcomputeroffandthenturnitonagain.
4.Whenthelogoscreenisdisplayed,pressF1.TheThinkPadSetupwindowopens.
5.SelectSecurity,usingthecursordirectionalkeystomovedownthemenu.
6.SelectPassword.
7.SelectPower-onPassword.
8.Chooseyourpower-onpassword,andtypeitwithinthebracketsintheEnterNewPasswordeld.
Note:Youcansettheminimumlengthofapower-onpasswordontheThinkPadSetupmenu.For
details,referto“Securitymenu”onpage114.
9.PressEnteroncetomovetothenextline.Retypethepasswordyoujustentered,toverifyit.
60UserGuide

10.Commityourpasswordtomemory.
Note:Youmightwanttonoteyourpower-onpasswordinasafeplace.Otherwise,ifyouforgetit,you
havetotakeyourcomputertoaLenovoreselleroramarketingrepresentativetohavethepassword
canceled.
11.PressF10toexit.
12.SelectYesintheSetupConrmationwindow.
Changingorremovingthepower-onpassword
Tochangethepower-onpassword,followthesteps1through7.Enteryourcurrentpassword.Whenthe
EnterNewPasswordeldopens,typeanewpasswordintheeldandthenretypeittoverify.Toremove
thepassword,followsteps1through7.Typeyourcurrentpassword.WhentheEnterNewPassword
eldopens,leaveitblankandpressEntertwice.
Harddiskpasswords
Twotypesofharddiskpasswordshelpprotecttheinformationstoredontheharddisk:
•Userharddiskpassword
•Masterharddiskpassword,whichrequiresauserharddiskpassword
Ifauserharddiskpasswordhasbeenset,butnomasterharddiskpasswordhasbeen,theusermustenter
theuserharddiskpasswordinordertogainaccesstolesandapplicationsontheharddisk.
Themasterpasswordcanbesetandusedonlybyasystemadministrator.Likeamasterkey,itenablesthe
administratortogetaccesstoanyharddriveinasystem.Theadministratorsetsthemasterpassword;no
oneelseknowsit.Thentheadministratorsetsauserpasswordforeachcomputerinthenetwork,andtells
eachuserthepasswordforhisorhercomputer.Theusercanthenchangetheuserpasswordasdesired,
buttheadministratorcanstillgetaccessbyusingthemasterpassword.
Settingaharddiskpassword
1.Printtheseinstructions.
2.Saveallopenles,andexitallapplications.
3.Turnyourcomputeroffandthenonagain.
4.Whenthelogoscreenisdisplayed,pressF1.TheThinkPadSetupopens.
5.SelectSecurity,usingthecursordirectionalkeystomovedownthemenu.
6.SelectPassword.
7.SelectHardDisk1Password.
8.Apasswordwindowopens.YouarepromptedtoselectUserorUser+Master.SelectUserifyouwant
tosetonlyoneharddiskpassword.Ifyouareanadministratororsupervisor,youcanselectUser+
Mastertosettwopasswords.(Theusercanchangetheuserpasswordlater.)
9.IfyouselectUser+Master,gotostep12.
10.IfyouselectUseronly,anew-passwordwindowopens.TypeyournewpasswordintheEnterNew
Passwordeld.
Note:YoucansettheminimumlengthofaharddiskpasswordintheThinkPadSetupmenu.For
details,referto“Securitymenu”onpage114.
11.PressEnteroncetomovetothenextline.Retypethepasswordyoujustenteredtoverifyit.Goto
step18tocompletetheprocedure.
Chapter4.Security61

12.IfyouselectUser+Master,amessagewindowopensandpromptsyoutosetupauserharddisk
passwordrst.ClickContinue.
13.Anewharddiskuserpasswordwindowopens.TypeyournewpasswordintheEnterNewPassword
eld.
14.PressEnteroncetomovetothenextline.Retypethepasswordyoujustenteredtoverifyit.
15.Amessagewindowopensandpromptsyoutosetthemasterharddiskpassword.ClickContinue.
16.Anewmasterhard-diskpasswordwindowopens.TypeyournewpasswordintheEnterNew
Passwordeld.
17.PressEnteroncetomovetothenextline.Retypethepasswordyoujustenteredtoverifyit.
18.Commitanypasswordtomemory.
Attention:Youmightwanttonoteyourpasswordsandkeeptheminasafeplace.Otherwise,if
youforgettheuser-onlypassword,orbothuserandmasterpasswords,Lenovocannotresetyour
passwordsorrecoverdatafromtheharddisk.YoumusttakeyourcomputertoaLenovoresellerora
marketingrepresentativetohavetheharddiskdrivereplaced.Proofofpurchaseisrequired,andafee
willbechargedforpartsandservice.
19.PressF10toexit.IntheSetupConrmationwindow,selectYes.
Thenexttimeyouturnonyourcomputer,youwillhavetotypetheuserormasterharddiskpasswordin
ordertostartyourcomputerandgetaccesstoyouroperatingsystem.
Changingorremovingaharddiskpassword
Followsteps1through7in“Settingaharddiskpassword”onpage61,typingyourpasswordtogetaccess
totheThinkPadSetupprogram.
TochangeorremovetheUserharddiskpassword,doasfollows:
•Tochangetheharddiskpassword,typethecurrentpasswordintheEnterCurrentPasswordeld.Then
typethenewpasswordintheEnterNewPasswordeld,andretypethepasswordyoujustenteredto
verifyitintheConrmNewPasswordeld.PressEnter,andaSetupNoticewindowisdisplayed.Press
F10toexitfromtheSetupNoticewindow.Theuserharddiskpasswordswillbechanged.
•Toremovetheharddiskpassword,typethecurrentpasswordintheEnterCurrentPasswordeld.
ThenleavetheEnterNewPasswordandConrmNewPasswordeldsblank,andpressEnter.A
SetupNoticewindowisdisplayed.PressF10toexitfromtheSetupNoticewindow.Theuserharddisk
passwordswillberemoved.
TochangeorremovetheUser+Masterharddiskpassword,selectUserHDPorMasterHDP.
IfyouchooseUserHDP,dooneofthefollowing:
•Tochangetheuserharddiskpassword,typethecurrentuserharddiskpasswordorthecurrentmaster
harddiskpasswordintheEnterCurrentPasswordeld.Thentypethenewuserharddiskpasswordin
theEnterNewPasswordeld,andretypethepasswordyoujustenteredtoverifyitintheConrmNew
Passwordeld.PressEnter,andaSetupNoticewindowisdisplayed.PressF10toexitfromtheSetup
Noticewindow.Boththeuserandmasterharddiskpasswordswillbechanged.
•Toremovetheuserharddiskpassword,typethecurrentmasterharddiskpasswordintheEnterCurrent
Passwordeld.ThenleavetheEnterNewPasswordandConrmNewPasswordeldsblank,and
pressEnter.ASetupNoticewindowisdisplayed.PressF10toexitfromtheSetupNoticewindow.Both
theuserandmasterharddiskpasswordswillberemoved.
IfyouchooseMasterHDP,dooneofthefollowing:
62UserGuide

•Tochangethemasterharddiskpassword,typethecurrentmasterharddiskpasswordintheEnter
CurrentPasswordeld.ThentypethenewmasterharddiskpasswordintheEnterNewPassword
eld,andretypethepasswordyoujustenteredtoverifyitintheConrmNewPasswordeld.Press
Enter,andaSetupNoticewindowisdisplayed.PressF10toexitfromtheSetupNoticewindow.Boththe
userandmasterharddiskpasswordswillbechanged.
•Toremovethemasterharddiskpassword,typethecurrentmasterharddiskpasswordintheEnter
CurrentPasswordeld.ThenleavetheEnterNewPasswordandConrmNewPasswordeldsblank,
andpressEnter.ASetupNoticewindowisdisplayed.PressF10toexitfromtheSetupNoticewindow.
Boththeuserandmasterharddiskpasswordswillberemoved.
Supervisorpassword
ThesupervisorpasswordprotectsthesysteminformationstoredintheThinkPadSetup.Withoutit,noone
canchangethecongurationofthecomputer.Itprovidesthefollowingsecurityfeatures:
•Ifasupervisorpasswordisset,apasswordpromptappearswhenyoutrytostarttheThinkPadSetup.
Unauthorizeduserscannotgetaccesstocongurationdata.
•Thesystemadministratorcanusethesupervisorpasswordtogetaccesstoacomputereveniftheuserof
thatcomputerhassetapower-onpassword.Thesupervisorpasswordoverridesthepower-onpassword.
•Ifbothasupervisorpasswordandapower-onpasswordareset,youcandothefollowingonlyifyou
havethesupervisorpassword:
–Deletingthepower-onpassword
–Changingordeletingthesupervisorpassword
–EnablingordisablingtheInternalNetworkOptionROMfeature
–Changingdateandtime
–EnablingordisablingtheLockUEFIBIOSSettingfeature
–EnablingordisablingthePasswordatunattendedboot
–Specifyingtheminimumlengthforpower-onpasswordsandharddiskpasswords
–EnablingordisablingtheBootDeviceListF12Option
–EnablingordisablingtheBootOrderLock
–EnablingordisablingtheFlashBIOSUpdatingbyEnd-Usersfeature
–EnablingordisablingtheInternalNetworkdevice
–EnablingordisablingtheInternalWirelessdevice
–EnablingordisablingtheInternalBluetoothdevice
–EnablingordisablingtheInternalWirelessWANdevice
–EnablingordisablingtheSecuritymode
–EnablingordisablingtheReaderpriority
–Erasingthengerprintdata
Notes:
•ThesystemadministratorcansetthesamesupervisorpasswordonmanyThinkPadNotebookstomake
administrationeasier.
•ByenablingtheLockUEFISettingsinthePasswordmenuwhenyousetthesupervisorpassword,you
makeitimpossibleforanyonebutyoutomakechanges.
Settingasupervisorpassword
Onlyasystemadministratorwillbeabletoapplythisprocedure.
Chapter4.Security63

1.Printtheseinstructions.
2.Saveallopenles,andexitallapplications.
3.Turnyourcomputeroffandthenturnitonagain.
4.Whenthelogoscreenisdisplayed,pressF1.TheThinkPadSetupwindowopens.
5.SelectSecurity,usingthecursordirectionalkeystomovedownthemenu.
6.SelectPassword.
7.SelectSupervisorPassword.
8.Awindowopensthatpromptsyoutoenteranewpassword.
9.ChooseyoursupervisorpasswordandtypeitintheEnterNewPasswordeld;thenpressEnter.
10.PressEntertomovetothenextline.Retypethepasswordyoujustenteredtoverifyit.
11.CommityourpasswordtomemoryandpressEnter.ASetupNoticewindowisdisplayed.
Attention:Youmightwanttonoteyourpasswordandkeepitinasafeplace.Ifyouforgetyour
supervisorpassword,Lenovocannotresetyourpassword.YoumusttakeyourcomputertoaLenovo
reselleroraLenovomarketingrepresentativetohavethesystemboardreplaced.Proofofpurchaseis
required,andafeewillbechargedforpartsandservice.
12.PressF10toexitfromtheSetupNoticewindow.
ThenexttimeyouopentheThinkPadSetupprogram,youwillbepromptedtotypeyourpasswordtoproceed.
Changingorremovingthesupervisorpassword
Tochangeorremovethesupervisorpassword,followsteps1through8abovein“Settingasupervisor
password”onpage63,typingyourpasswordtogetaccesstotheThinkPadSetup.
Tochangethepassword,dothefollowing:
1.IntheEnterCurrentPasswordeld,typethecurrentsupervisorpassword.
2.IntheEnterNewPasswordeld,typethenewsupervisorpassword;thenretypethepasswordyoujust
enteredtoverifyitintheConrmNewPasswordeld.
3.Followstep11andstep12in“Settingasupervisorpassword”onpage63tochangeyoursupervisor
password.
Toremovethepassword,dothefollowing:
1.IntheEnterCurrentPasswordeld,typethecurrentsupervisorpassword.
2.LeavetheEnterNewPasswordandConrmNewPasswordeldsinblank.
3.Followstep11andstep12in“Settingasupervisorpassword”onpage63toremoveyoursupervisor
password.
Harddisksecurity
Yourcomputersupportsanenhancedsecuritysolutionforharddiskdrive.Toprotectpasswordsfrom
unauthorizedsecurityattacks,severalofthelatesttechnologiesandalgorithmsareintegratedintoUEFI
BIOSandhardwaredesignofThinkPadnotebooks.
Tomaximizesecurity,dothefollowing:
1.Setapower-onpasswordaswellasaharddiskpasswordforyourinternalharddiskdrive.Referto
theproceduresin“Power-onpassword”onpage60and“Harddiskpasswords”onpage61.For
security,alongerpasswordisrecommended.
64UserGuide
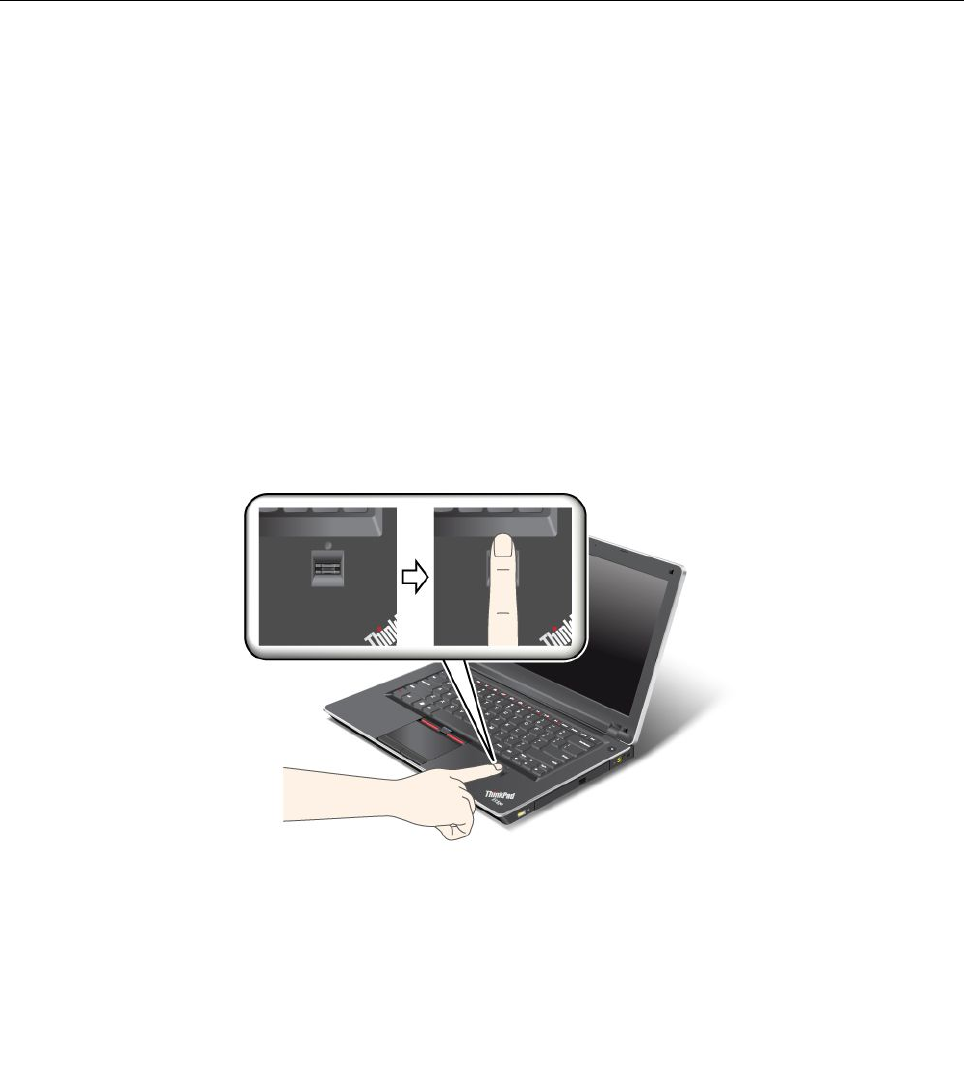
2.IfaDiskEncryptionharddiskdriveisinstalledinyourcomputer,besuretoprotectthecontentsofyour
computermemoryfromunauthorizedaccessbyuseofdriveencryptionsoftware.
3.Beforeyoudisposeof,sell,orhandoveryourcomputer,makesuretodeletedatastoredonit.Referto
“Noticeondeletingdatafromyourharddiskdrive”onpage67.
Note:TheharddiskdrivebuiltintoyourcomputercanbeprotectedbyUEFIBIOS:
DiskEncryptionharddiskdrive
SomemodelscontaintheDiskEncryptionharddiskdrive.Thisfeaturehelpstoprotectyourcomputeragainst
securityattacksonmedia,NANDashordevicecontrollersbyuseofahardwareencryptionchip.Forthe
efcientuseoftheencryptionfeature,besuretosetaHarddiskpasswordsfortheinternalstoragedevice.
Usingangerprintreader
Yourcomputermayhaveanintegratedngerprintreader.Fingerprintauthenticationcanreplacepasswords
andenablesimpleandsecureuseraccess.ByenrollingyourngerprintandassociatingitwithaWindows
passwordyoucanlogontothecomputerbyswipingyourngeroverthereader,withouttypingpasswords.
Enrollingyourngerprint
Tousetheintegratedngerprintreader,beginbyenrollingyourngerprintasfollows:
1.Turnonyourcomputer.
2.TostartLenovoFingerprintsoftware,referto“FingerprintSoftware”onpage22.
3.Followtheinstructionsonthescreentoenrollyourngerprint.Fordetails,refertotheHelpforthe
program.
Swipingyourngeroverthereader
Toswipeyourngeroverthereader,doasfollows:
1.Placetheballofyournger—thatis,thecentralpartofthengerprint—onthesmallcircleabovethe
reader.Makesurethattheentiretopjointofthengerisonthereader.
Note:Yourcomputerkeyboardmightlookdifferentfromtheillustrationabove.
Chapter4.Security65
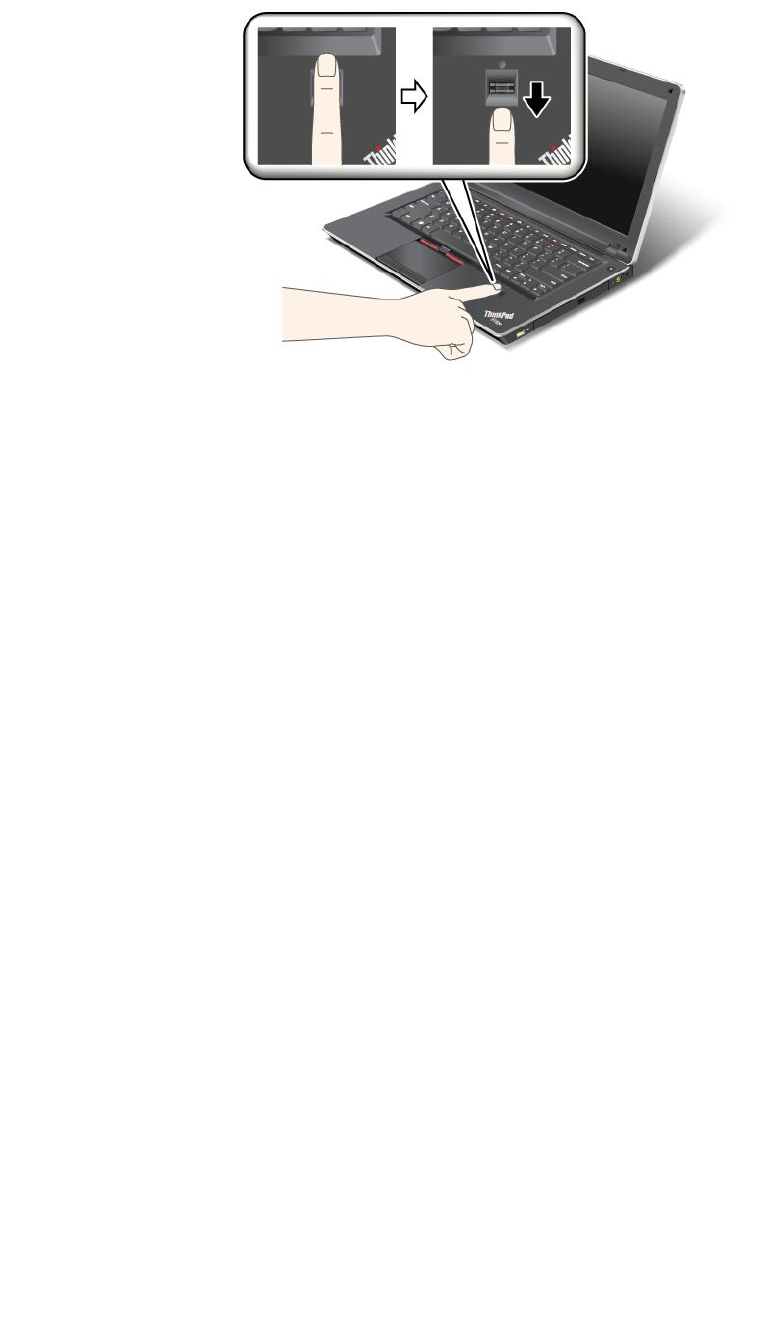
2.Applylightpressureandswipeyourngeracrossthereaderinonesmoothmotion.
Note:Yourcomputerkeyboardmightlookdifferentfromtheillustrationabove.
Careforthengerprintreader
Thefollowingactionscoulddamagethengerprintreaderorcauseitnottoworkproperly:
•Scratchingthesurfaceofthereaderwithahard,pointedobject.
•Scrapingthesurfaceofthereaderwithyourngernailoranythinghard.
•Usingortouchingthereaderwithadirtynger.
Ifyounoticeanyofthefollowingconditions,gentlycleanthesurfaceofthereaderwithadry,soft,lint-free
cloth:
•Thesurfaceofthereaderisdirtyorstained.
•Thesurfaceofthereaderiswet.
•Thereaderoftenfailstoenrollorauthenticateyourngerprint.
Ifyourngerhasanyofthefollowingconditions,youmaynotbeabletoregisterorauthenticateit:
•Yourngeriswrinkled.
•Yourngerisrough,dry,orinjured.
•Yourngerisverydry.
•Yourngerisstainedwithdirt,mud,oroil.
•Thesurfaceofyourngerisverydifferentfromwhenyouenrolledyourngerprint.
•Yourngeriswet.
•Angerisusedthathasnotbeenenrolled.
Toimprovethesituation,trythefollowing:
•Cleanorwipeyourhandstoremoveanyexcessdirtormoisturefromthengers.
•Enrollanduseadifferentngerforauthentication.
•Ifyourhandsaretoodry,applylotiontothem.
66UserGuide

Noticeondeletingdatafromyourharddiskdrive
Ascomputersspreadintoeverycorneroflife,theyprocessmoreandmoreinformation.Thedataonyour
computer,someofwhichissensitive,isstoredonaharddiskdrive(HDD).Beforeyoudisposeof,sell,or
handoveryourcomputer,makesuretodeletedatastoredonit.
Handingyourcomputerovertosomeoneelsewithoutdeletingtheloadedsoftware,suchasoperating
systemsandapplicationsoftware,mayevenviolateLicenseAgreements.Youareadvisedtocheckthe
termsandconditionsofthoseAgreements.
Therearemethodsthatseemtodeletethedata:
•Movethedatatotherecyclebin,andthenchoosetheEmptyrecyclebincommand.
•UsetheDeletecommand.
•Formatyourharddiskdrive,usingthesoftwareforinitializingit.
•Usingtherecoveryprogram,providedbyLenovo,bringtheharddiskdrivebacktofactory-shipstate.
Theseoperations,however,onlychangetheleallocationofthedata;theydonotdeletethedataitself.In
otherwords,thedataretrievalprocessingisdisabledunderanoperatingsystemsuchasWindows.The
dataisstillthere,eventhoughitseemstobelost.Thus,itissometimespossibletoreadthedatabyuseof
specialsoftwarefordatarecovery.Thereisariskthatpeopleofbadfaithmayreadandmisusethecritical
dataonharddiskdrivesforunexpectedpurposes.
Topreventleakageofdata,itbecomesveryimportantthatyoutakeresponsibilityfordeletingallthedata
fromtheharddiskdrivewhenyoudisposeof,sell,orhandoveryourcomputer.Youcandestroythedata
physicallybysmashingtheharddiskdrivewithahammer,ormagneticallybymeansofstrongmagnetic
power,thusmakingthedataunreadable.Butwerecommendthatyoumakeuseofthesoftware(payware)or
service(payservice)specicallydevelopedforthepurpose.
Fordisposingofdataontheharddiskdrive,LenovoprovidestheSecureDataDisposaltool.Todownload
theapplication,goto:
http://www.lenovo.com/support
Note:Runningtheapplicationwilltakeacoupleofhours.
Usingandunderstandingrewalls
Ifyoursystemispreintalledwitharewallprogram,itprotectsagainstcomputerInternetsecuritythreats,
unauthorizedaccess,intrusions,andInternetattacks.Italsoprotectsyourprivacy.
Formoreinformationabouthowtousetherewallprogram,refertotheon-linehelpthatcomeswith
theprogram.
Protectingdataagainstviruses
Yourcomputerispreinstalledwithanantivirusprogramsoyoucandetectandeliminateviruses.The
antivirusprogramisdesignedtohelpyoudetectandeliminateviruses.
Lenovoprovidesafullversionofantivirussoftwareonyourcomputerwithafree30-daysubscription.After
30days,youmustrenewthelicensetocontinuereceivingtheantivirussoftwareupdates.
Formoreinformationabouthowtouseyourantivirussoftware,refertothehelpsystemofyourantivirus
software.
Chapter4.Security67

68UserGuide

Chapter5.Recoveryoverview
ThischapterprovidesinformationabouttherecoverysolutionsprovidedbyLenovo.
Thischaptercontainsthefollowingtopics:
•“Creatingandusingrecoverymedia”onpage69
•“Performingbackupandrecoveryoperations”onpage71
•“UsingtheRescueandRecoveryworkspace”onpage72
•“Creatingandusingarescuemedium”onpage73
•“Reinstallingpreinstalledapplicationsanddevicedrivers”onpage74
•“Solvingrecoveryproblems”onpage75
Notes:
1.Thereareavarietyofmethodstochoosefromwhenconsideringhowtorecoverintheeventofa
software-orhardware-relatedproblem.Somemethodsvarydependingonthetypeofyouroperating
system.
2.Theproductontherecoverymediamaybeusedonlyforthefollowingpurposes:
•Restoretheproductpreinstalledonyourcomputer
•Reinstalltheproduct
•ModifytheproductusingtheAdditionalFiles
Notes:Topreventpotentialperformancerisksorunexpectedbehaviorthatmightbecausedbythenew
harddiskdrivetechnology,itisrecommendedthatyouuseoneofthefollowingback-upsoftwareprograms:
•ThinkVantageRescueandRecoveryversion4.23orlater(forWindowsXP),4.3orlater(forWindows7)
•SymantecNortonGhostversion15orlater
Notes:Tousethisprogram,dothefollowing:
1.ClickStart➙Run.TheRunwindowopens.
2.Typecmdintheeld.ThenclickOK.
3.Typeghost-align=1mbandpressEnter.
•AcronisTrueImage2010orlater
•ParagonBackup&Recovery10Suitorlater,ParagonBackup&Recovery10Homeorlater
Creatingandusingrecoverymedia
Youcanuserecoverymediatorestoretheharddiskdrivetothefactorydefaultsettings.Recoverymedia
areusefulifyoutransferthecomputertoanotherarea,sellthecomputer,recyclethecomputer,orputthe
computerinanoperationalstateafterallothermethodsofrecoveryhavefailed.Asaprecautionarymeasure,
itisimportanttocreaterecoverymediaasearlyaspossible.
Note:Therecoveryoperationsyoucanperformusingrecoverymediavarydependingontheoperating
systemfromwhichtherecoverymediawerecreated.Therecoverymediamightcontainabootmedium
andadatamedium.YourMicrosoftWindowslicensepermitsyoutocreateonlyonedatamedium,soitis
importantthatyoustoretherecoverymediainasafeplaceafteryouhavemadethem.
©CopyrightLenovo201169

Creatingrecoverymedia
ThissectionprovidesinstructionsonhowtocreaterecoverymediaontheWindows7operatingsystem.
Note:OntheWindows7operatingsystem,youcancreaterecoverymediausingdiscsorexternalUSB
storagedevices.OntheWindowsXPoperatingsystem,youcancreaterecoverymediausingonlydiscs,so
thisoperationisalsocalled“creatingProductRecoverydiscs.”
•TocreaterecoverymediaontheWindows7operatingsystem,clickStart➙AllPrograms➙Lenovo
ThinkVantageT ools➙FactoryRecoveryDisks.Then,followtheinstructionsonthescreen.
•TocreateProductRecoverydiscsontheWindowsXPoperatingsystem,clickStart➙AllPrograms➙
ThinkVantage➙CreateRecoveryMedia.Then,followtheinstructionsonthescreen.
Usingrecoverymedia
Thissectionprovidesinstructionsonhowtouserecoverymediaondifferentoperatingsystems.
•OntheWindows7operatingsystem,youcanuserecoverymediatorestorethecomputertothefactory
defaultsettingsonly.Youcanuserecoverymediatoputthecomputerinanoperationalstateafterall
othermethodsofrecoveryhavefailed.
Attention:Whenyouuserecoverymediatorestorethecomputertothefactorydefaultsettings,allthe
lescurrentlyontheharddiskdrivewillbedeletedandreplacedbythefactorydefaultsettings.
TouserecoverymediaontheWindows7operatingsystem,dothefollowing:
1.Dependingonthetypeofyourrecoverymedia,connectthebootmedium(memorykeyorotherUSB
storagedevice)tothecomputer,orinsertthebootdiscintotheopticaldrive.
2.RepeatedlypressandreleasetheF12keywhenturningonthecomputer.WhentheStartupDevice
Menuopens,releasetheF12key.
3.SelectthedesiredstartupdeviceandpressEnter.Therestoreprocessbegins.
4.Followtheinstructionsonthescreentocompletetheoperation.
Notes:
1.Afterrestoringyourcomputertothefactorydefaultsettings,youmighthavetoreinstalldevicedrivers
forsomedevices.See“Reinstallingpreinstalledapplicationsanddevicedrivers”onpage74.
2.SomecomputerscomewithMicrosoftOfceorMicrosoftWorkspreinstalled.Ifyouneedtorecover
orreinstallyourMicrosoftOfceorMicrosoftWorksapplications,youmustusetheMicrosoftOfce
CDorMicrosoftWorksCD.ThesediscsareprovidedonlywithcomputerspreinstalledwithMicrosoft
OfceorMicrosoftWorks.
•OntheWindowsXPoperatingsystem,youcanuseProductRecoverydiscstorestoreyourcomputerto
thefactorydefaultsettings,performacustomfactoryrecovery,orperformotherrescueandrecovery
operationssuchasrescuingindividualles.YouwillbegiventheoptiontoentertheRescueandRecovery
workspaceandchoosefromavarietyofrecoveryoperations.
Attention:WhenyouuseProductRecoverydiscstorestorethecomputertothefactorydefaultsettings,
allthelescurrentlyontheharddiskdrivewillbedeletedandreplacedbythefactorydefaultsettings.
Duringtherestoreprocess,youwillbegiventheoptiontosaveoneormorelescurrentlyonthehard
diskdrivetoothermediabeforethedataisdeleted.
TouseProductRecoverydiscsontheWindowsXPoperatingsystem,dothefollowing:
1.RepeatedlypressandreleasetheF12keywhenturningonthecomputer.WhentheStartupDevice
Menuopens,releasetheF12key.
2.Insertthebootdiscintotheopticaldrive.
70UserGuide

3.SelecttheopticaldrivewiththebootdiscasthestartupdeviceandpressEnter.Afterashortdelay,
theRescueandRecoveryworkspaceopens.
4.OntheRescueandRecoverymenu,clickRestoreyoursystem.
5.Followtheinstructionsonthescreen.InserttheappropriateProductRecoverydiscwhenprompted.
Performingbackupandrecoveryoperations
TheRescueandRecoveryprogramenablesyoutobackupallyourharddiskdrivecontentsincludingthe
operatingsystem,datales,softwareprograms,andpersonalsettings.Youcandesignatewherethe
RescueandRecoveryprogramstoresthebackup:
•Inaprotectedareaofyourharddiskdrive
•Onthesecondaryharddiskdriveifasecondaryharddiskdriveisinstalledinyourcomputer
•OnanattachedexternalUSBharddiskdrive
•Onanetworkdrive
•Onrecordablediscs(arecordableopticaldriveisrequiredforthisoption)
Afteryouhavebackedupthecontentsontheharddiskdrive,youcanrestorethecompletecontentsofthe
harddiskdrive,restoreonlytheselectedles,orrestoreonlytheWindowsoperatingsystemandapplications.
Performingabackupoperation
ThissectionprovidesinstructionsonhowtoperformabackupoperationusingtheRescueandRecovery
programondifferentoperatingsystems.
•ToperformabackupoperationusingtheRescueandRecoveryprogramontheWindows7operating
system,dothefollowing:
1.FromtheWindowsdesktop,clickStart➙AllPrograms➙LenovoThinkVantageTools➙
EnhancedBackupandRestore.TheRescueandRecoveryprogramopens.
2.IntheRescueandRecoverymainwindow,clicktheLaunchadvancedRescueandRecoveryarrow.
3.ClickBackupyourharddriveandselectbackupoperationoptions.Then,followtheinstructionson
thescreentocompletethebackupoperation.
•ToperformabackupoperationusingtheRescueandRecoveryprogramontheWindowsXPoperating
system,dothefollowing:
1.FromtheWindowsdesktop,clickStart➙AllPrograms➙ThinkVantage➙RescueandRecovery.
TheRescueandRecoveryprogramopens.
2.IntheRescueandRecoverymainwindow,clickLaunchadvancedRescueandRecovery➙Back
upyourharddrive,andselectbackupoperationoptions.
3.Followtheinstructionsonthescreentocompletethebackupoperation.
Performingarecoveryoperation
ThissectionprovidesinstructionsonhowtoperformarecoveryoperationusingtheRescueandRecovery
programondifferentoperatingsystems.
•ToperformarecoveryoperationusingtheRescueandRecoveryprogramontheWindows7operating
system,dothefollowing:
1.FromtheWindowsdesktop,clickStart➙AllPrograms➙LenovoThinkVantageTools➙
EnhancedBackupandRestore.TheRescueandRecoveryprogramopens.
2.IntheRescueandRecoverymainwindow,clicktheLaunchadvancedRescueandRecoveryarrow.
3.ClicktheRestoreyoursystemfromabackupicon.
Chapter5.Recoveryoverview71

4.Followtheinstructionsonthescreentocompletetherecoveryoperation.
•ToperformarecoveryoperationusingtheRescueandRecoveryprogramontheWindowsXPoperating
system,dothefollowing:
1.FromtheWindowsdesktop,clickStart➙AllPrograms➙ThinkVantage➙RescueandRecovery.
TheRescueandRecoveryprogramopens.
2.IntheRescueandRecoverymainwindow,clickLaunchadvancedRescueandRecovery.
3.ClicktheRestoreyoursystemfromabackupicon.
4.Followtheinstructionsonthescreentocompletetherecoveryoperation.
FormoreinformationaboutperformingarecoveryoperationfromtheRescueandRecoveryworkspace,see
“UsingtheRescueandRecoveryworkspace”onpage72.
UsingtheRescueandRecoveryworkspace
TheRescueandRecoveryworkspaceresidesinaprotected,hiddenareaofyourharddiskdrivethat
operatesindependentlyfromtheWindowsoperatingsystem.Thisenablesyoutoperformrecovery
operationsevenifyoucannotstarttheWindowsoperatingsystem.Youcanperformthefollowingrecovery
operationsfromtheRescueandRecoveryworkspace:
•RescuelesfromyourharddiskdriveorfromabackupTheRescueandRecoveryworkspace
enablesyoutolocatelesonyourharddiskdriveandtransferthemtoanetworkdriveorotherrecordable
media,suchasaUSBdeviceoradisc.Thissolutionisavailableevenifyoudidnotbackupyourlesorif
changesweremadetothelessinceyourlastbackupoperation.Youcanalsorescueindividuallesfrom
aRescueandRecoverybackuplocatedonyourlocalharddiskdrive,aUSBdevice,oranetworkdrive.
•RestoreyourharddiskdrivefromaRescueandRecoverybackupIfyouhavebackedupyourhard
diskdriveusingtheRescueandRecoveryprogram,youcanrestoretheharddiskdrivefromaRescue
andRecoverybackup,evenifyoucannotstarttheWindowsoperatingsystem.
•RestoreyourharddiskdrivetothefactorydefaultsettingsTheRescueandRecoveryworkspace
enablesyoutorestorethecompletecontentsofyourharddiskdrivetothefactorydefaultsettings.Ifyou
havemultiplepartitionsonyourharddiskdrive,youhavetheoptiontorestorethefactorydefaultsettings
totheC:partitionandleavetheotherpartitionsintact.BecausetheRescueandRecoveryworkspace
operatesindependentlyfromtheWindowsoperatingsystem,youcanrestorethefactorydefaultsettings
evenifyoucannotstarttheWindowsoperatingsystem.
Attention:IfyourestoretheharddiskdrivefromaRescueandRecoverybackuporrestoretheharddisk
drivetothefactorydefaultsettings,alllesontheprimaryharddiskdrivepartition(usuallydriveC:)willbe
deletedintherecoveryprocess.Ifpossible,makecopiesofimportantles.Ifyouareunabletostartthe
Windowsoperatingsystem,youcanusetherescuelesfeatureoftheRescueandRecoveryworkspaceto
copylesfromyourharddiskdrivetoothermedia.
TostarttheRescueandRecoveryworkspace,dothefollowing:
1.Makesurethecomputeristurnedoff.
2.RepeatedlypressandreleasetheF11keywhenturningonthecomputer.Whenyouhearbeepsor
seealogoscreen,releasetheF11key.
3.IfyouhavesetaRescueandRecoverypassword,typeyourpasswordwhenprompted.TheRescue
andRecoveryworkspaceopensafterashortdelay.
Note:IftheRescueandRecoveryworkspacefailstoopen,see“Solvingrecoveryproblems”onpage75.
4.Dooneofthefollowing:
•Torescuelesfromyourharddiskdriveorfromabackup,clickRescuelesandfollowthe
instructionsonthescreen.
72UserGuide

•TorestoreyourharddiskdrivefromaRescueandRecoverybackuportorestoreyourharddiskdrive
tothefactorydefaultsettings,clickRestoreyoursystemandfollowtheinstructionsonthescreen.
FormoreinformationaboutthefeaturesoftheRescueandRecoveryworkspace,clickHelp.
Notes:
1.Afterrestoringyourharddiskdrivetothefactorydefaultsettings,youmighthavetoreinstalldevice
driversforsomedevices.See“Reinstallingpreinstalledapplicationsanddevicedrivers”onpage74.
2.SomecomputerscomewithMicrosoftOfceorMicrosoftWorkspreinstalled.Ifyouneedtorecover
orreinstallyourMicrosoftOfceorMicrosoftWorksapplications,youmustusetheMicrosoftOfce
CDorMicrosoftWorksCD.ThesediscsareprovidedonlywithcomputerspreinstalledwithMicrosoft
OfceorMicrosoftWorks.
Creatingandusingarescuemedium
Witharescuemedium,suchasadiscoraUSBharddiskdrive,youcanrecoverthecomputerfromfailures
thatpreventyoufromgainingaccesstotheRescueandRecoveryworkspaceonyourharddiskdrive.
Notes:
1.Therecoveryoperationsyoucanperformusingarescuemediumvarydependingontheoperating
system.
2.Therescuedisccanbestartedinalltypesofopticaldrives.
Creatingarescuemedium
Thissectionprovidesinstructionsonhowtocreatearescuemediumondifferentoperatingsystems.
•TocreatearescuemediumontheWindows7operatingsystem,dothefollowing:
1.FromtheWindowsdesktop,clickStart➙AllPrograms➙LenovoThinkVantageTools➙
EnhancedBackupandRestore.TheRescueandRecoveryprogramopens.
2.IntheRescueandRecoverymainwindow,clicktheLaunchadvancedRescueandRecoveryarrow.
3.ClicktheCreateRescueMediaicon.TheCreateRescueandRecoveryMediawindowopens.
4.IntheRescueMediaarea,selectthetypeoftherescuemediumyouwanttocreate.Youcancreate
arescuemediumusingadisc,aUSBharddiskdrive,orasecondaryinternalharddiskdrive.
5.ClickOKandfollowtheinstructionsonthescreentocreatearescuemedium.
•TocreatearescuemediumontheWindowsXPoperatingsystem,dothefollowing:
1.FromtheWindowsdesktop,clickStart➙AllPrograms➙ThinkVantage➙CreateRecovery
Media.TheCreateRescueandRecoveryMediawindowopens.
2.IntheRescueMediaarea,selectthetypeoftherescuemediumyouwanttocreate.Youcancreate
arescuemediumusingadisc,aUSBharddiskdrive,orasecondaryinternalharddiskdrive.
3.ClickOKandfollowtheinstructionsonthescreentocreatearescuemedium.
Usingarescuemedium
Thissectionprovidesinstructionsonhowtousetherescuemediumyouhavecreated.
•Ifyouhavecreatedarescuemediumusingadisc,usethefollowinginstructionstousetherescuemedium:
1.Turnoffyourcomputer.
2.RepeatedlypressandreleasetheF12keywhenturningonthecomputer.WhentheStartupDevice
Menuopens,releasetheF12key.
Chapter5.Recoveryoverview73

3.OntheStartupDeviceMenu,selectthedesiredopticaldriveastherstbootdevice.Then,insert
therescuediscintotheopticaldriveandpressEnter.Therescuemediumstarts.
•IfyouhavecreatedarescuemediumusingaUSBharddiskdrive,usethefollowinginstructionsto
usetherescuemedium:
1.AttachtheUSBharddiskdrivetooneoftheUSBconnectorsonyourcomputer.
2.RepeatedlypressandreleasetheF12keywhenturningonthecomputer.WhentheStartupDevice
Menuopens,releasetheF12key.
3.OntheStartupDeviceMenu,selecttheUSBharddiskdriveastherstbootdeviceandpressEnter.
Therescuemediumstarts.
•Ifyouhavecreatedarescuemediumusingthesecondaryinternalharddiskdrive,setthesecondary
internalharddiskdriveastherstbootdeviceinthestartupdevicesequencetostarttherescuemedium.
See“Startupmenu”onpage115.
Whentherescuemediumstarts,theRescueandRecoveryworkspaceopens.Thehelpinformationfor
eachfeatureisavailablefromtheRescueandRecoveryworkspace.Followtheinstructionstocomplete
therecoveryprocess.
Reinstallingpreinstalledapplicationsanddevicedrivers
Yourcomputerhasprovisionsthatenableyoutoreinstallselectedfactory-installedapplicationsanddevice
drivers.
Reinstallingpreinstalledapplications
Toreinstallselectedapplicationprograms,dothefollowing:
1.Turnonyourcomputer.
2.UseWindowsExplorerorComputer(inWindowsXP,MyComputer)todisplaythedirectorystructureof
yourharddisk.
3.OpentheC:\SWTOOLSfolder.
4.OpentheAPPSfolder.Initareseveralsubfoldersnamedforthevariouspreinstalledapplications.
5.Openthesubfolderfortheapplicationyouarereinstalling.
6.Double-clickSetup,andthenfollowtheon-screenstepstoreinstalltheprogram.
Reinstallingpreinstalleddevicedrivers
Attention:Whenyoureinstalldevicedrivers,youarechangingthecurrentcongurationofyourcomputer.
Reinstalldevicedriversonlywhenitisnecessarytocorrectaproblemwithyourcomputer.
Toreinstalladevicedriverforafactory-installeddevice,dothefollowing:
1.Turnonyourcomputer.
2.UseWindowsExplorerorComputer(inWindowsXP,MyComputer)todisplaythedirectorystructureof
yourharddiskdrive.
3.OpentheC:\SWTOOLSfolder.
4.OpentheDRIVERSfolder.WithintheDRIVERSfolderareseveralsubfoldersnamedforthevarious
devicesinstalledinyourcomputer(forexample,AUDIOandVIDEO).
5.Openthesubfolderforthedevice.
6.Reinstallthedevicedriverbyoneofthefollowingmethods:
•Inthesubfolderforthedevice,lookforatextle(alewiththeextension.txt).Thetextlecontains
informationonhowtoreinstallthatdevicedriver.
74UserGuide

-OR-
•Ifthesubfolderforthedevicecontainsaleofsetupinformation(alewiththeextension.inf),you
canusetheAddNewHardwareprogram(intheWindowsControlPanel)toreinstallthedevicedriver.
Notalldevicedriverscanbereinstalledbyuseofthisprogram.IntheAddNewHardwareprogram,
whenpromptedforthedevicedriveryouwanttoinstall,clickHaveDiskandBrowse.Thenselect
thedevicedriverlefromthedevicesubfolder.
-OR-
•Inthesubfolderforthedevice,lookforthelefortheapplication(alewiththeextension.exe).
Double-clickthele,andfollowtheinstructionsonthescreen.
Attention:Ifyouneedupdateddevicedrivers,donotdownloadthemfromtheWindowsUpdateWebsite.
ObtainthemfromLenovo.Formoreinformation,see“Makingsuredevicedriversarecurrent”onpage126.
Solvingrecoveryproblems
IfyouareunabletoaccesstheRescueandRecoveryworkspaceortheWindowsenvironment,doone
ofthefollowing:
•UsearescuemediumtostarttheRescueandRecoveryworkspace.See“Usingarescuemedium”
onpage73.
•Userecoverymediaifallothermethodsofrecoveryhavefailedandyouneedtorestoretheharddisk
drivetothefactorydefaultsettings.See“Usingrecoverymedia”onpage70.
Note:IfyouareunabletoaccesstheRescueandRecoveryworkspaceortheWindowsenvironmentfrom
arescuemediumorrecoverymedia,youmightnothavetherescuedevice(aninternalharddiskdrive,a
disc,aUSBharddiskdrive,orotherexternaldevices)setastherstbootdeviceinthestartupdevice
sequence.Youmustrstmakesurethatyourrescuedeviceissetastherstbootdeviceinthestartup
devicesequenceintheSetupUtilityprogram.See“Startupmenu”onpage115fordetailedinformation
abouttemporarilyorpermanentlychangingthestartupdevicesequence.Formoreinformationaboutthe
SetupUtilityprogram,see“ThinkPadSetup”onpage113.
Itisimportanttocreatearescuemediumandasetofrecoverymediaasearlyaspossibleandstorethem
inasafeplaceforfutureuse.
Chapter5.Recoveryoverview75

76UserGuide

Chapter6.Replacingdevices
Youcanincreasethecapacityofthememoryortheharddiskdrivebyreplacingtheoriginal,built-in
devicewithanoptionalone.Or,ifyouneedto,youcanreplacethePCIExpressMiniCardbyfollowing
theproceduresinthissection.
•“Staticelectricityprevention”onpage77
•“Replacingthebattery”onpage77
•“Replacingtheharddiskdrive”onpage79
•“Replacingtheopticaldrive”onpage82
•“InstallingandreplacingthePCIExpressMiniCardforwirelessWAN”onpage86
•“InstallingandreplacingaPCIExpressMiniCardforwirelessLAN/WiMAXconnection”onpage90
•“Replacingmemory”onpage93
•“Replacingthekeyboard”onpage95
•“ReplacingtheSIMcard”onpage103
Staticelectricityprevention
Staticelectricity,althoughharmlesstoyou,canseriouslydamagecomputercomponentsandoptions.
Improperhandlingofstatic-sensitivepartscancausedamagetothepart.Whenyouunpackanoption
orCRU,donotopenthestatic-protectivepackagecontainingthepartuntiltheinstructionsdirectyou
toinstallit.
WhenyouhandleoptionsorCRUs,orperformanyworkinsidethecomputer,takethefollowingprecautions
toavoidstatic-electricitydamage:
•Limityourmovement.Movementcancausestaticelectricitytobuilduparoundyou.
•Alwayshandlecomponentscarefully.Handleadapters,memorymodules,andothercircuitboardsbythe
edges.Nevertouchexposedcircuitry.
•Preventothersfromtouchingcomponents.
•Whenyouinstallastatic-sensitiveoptionorCRU,touchthestatic-protectivepackagecontainingthe
parttoametalexpansion-slotcoverorotherunpaintedmetalsurfaceonthecomputerforatleasttwo
seconds.Thisreducesstaticelectricityinthepackageandyourbody.
•Whenpossible,removethestatic-sensitivepartfromthestatic-protectivepackagingandinstallthepart
withoutsettingitdown.Whenthisisnotpossible,placethestatic-protectivepackagingonasmooth,
levelsurfaceandplacethepartonit.
•Donotplacethepartonthecomputercoverorothermetalsurface.
Replacingthebattery
Beforeyoustart,printtheseinstructions.
ThissystemmaynotsupportbatteriesthatarenotgenuineLenovo-madeorauthorized.Thesesystemswill
continuetoboot,butmaynotchargeunauthorizedbatteries.
Attention:Lenovohasnoresponsibilityfortheperformanceorsafetyofunauthorizedbatteries,and
providesnowarrantiesforfailuresordamagearisingoutoftheiruse.
Toreplacethebatterywithanewone,readthefollowingprerequisites.
©CopyrightLenovo201177
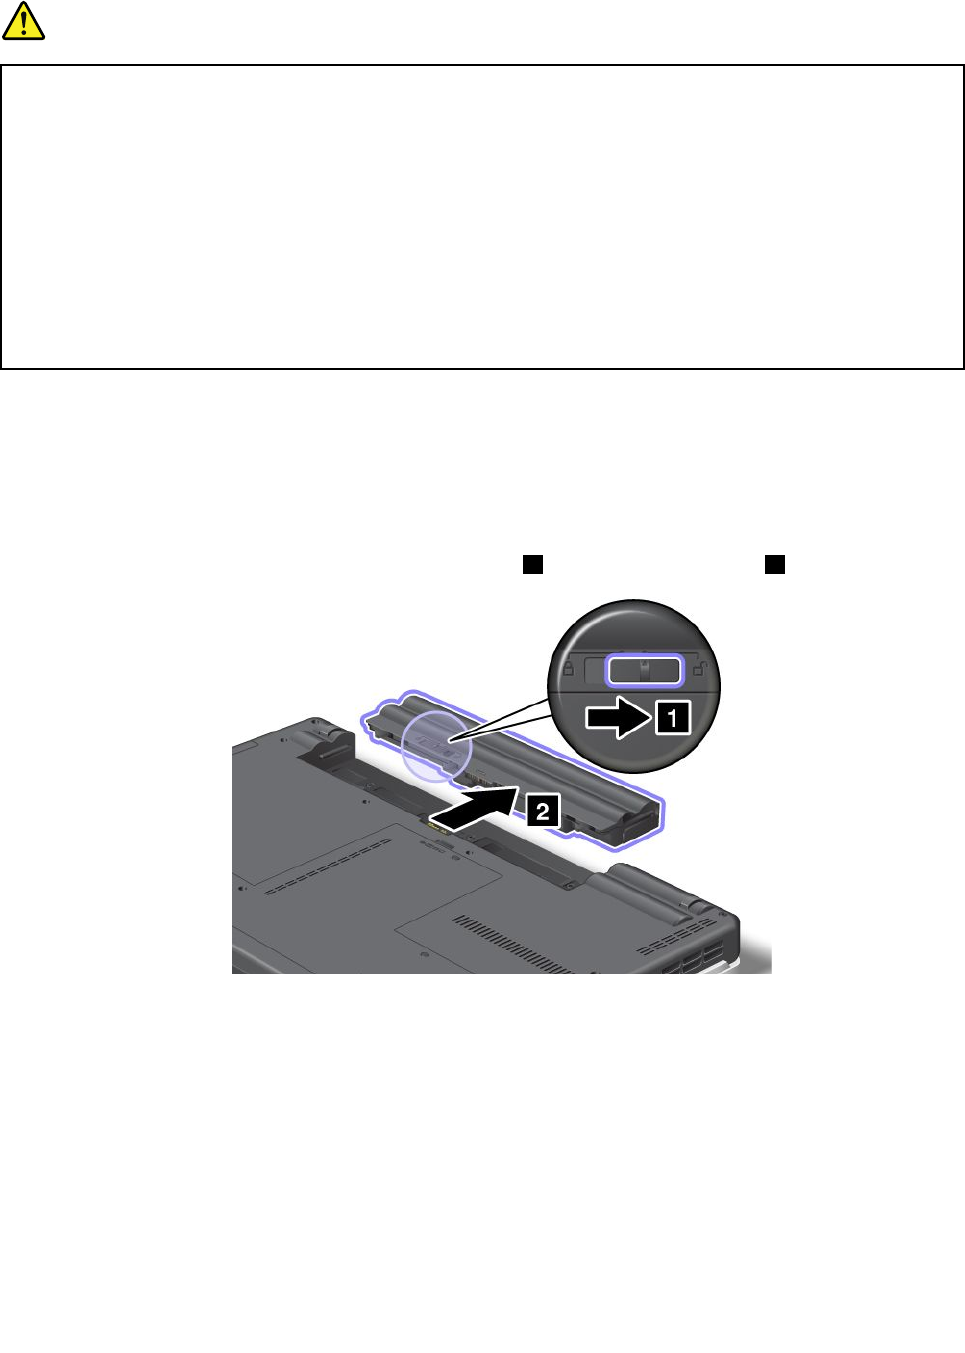
Prerequisitesfortheprocedure
DANGER
Iftherechargeablebatterypackisincorrectlyreplaced,thereisdangerofanexplosion.Thebattery
packcontainsasmallamountofharmfulsubstances.T oavoidpossibleinjury:
•ReplaceonlywithabatteryofthetyperecommendedbyLenovo.
•Keepthebatterypackawayfromre.
•Donotexposeittoexcessiveheat.
•Donotexposeittowaterorrain.
•Donotshort-circuitit.
•Donotdrop,crush,puncture,orsubjecttostrongforces.Batteryabuseormishandlingcan
causethebatterytooverheat,whichcancausegassesorameto“vent”fromthebattery
packorcoincell.
Replacingthebatteryinstalledinthebatteryspaceofyourcomputer
Toreplacethebattery,followtheprocedurebelow.
1.Turnoffthecomputer,orenterhibernationmode.Thendisconnecttheacpoweradapterandallcables
fromthecomputer.
2.Closethecomputerdisplay,andturnthecomputerover.
3.Slideandholdthebatterylatchtotheunlockposition1,andremovethebattery2.
78UserGuide
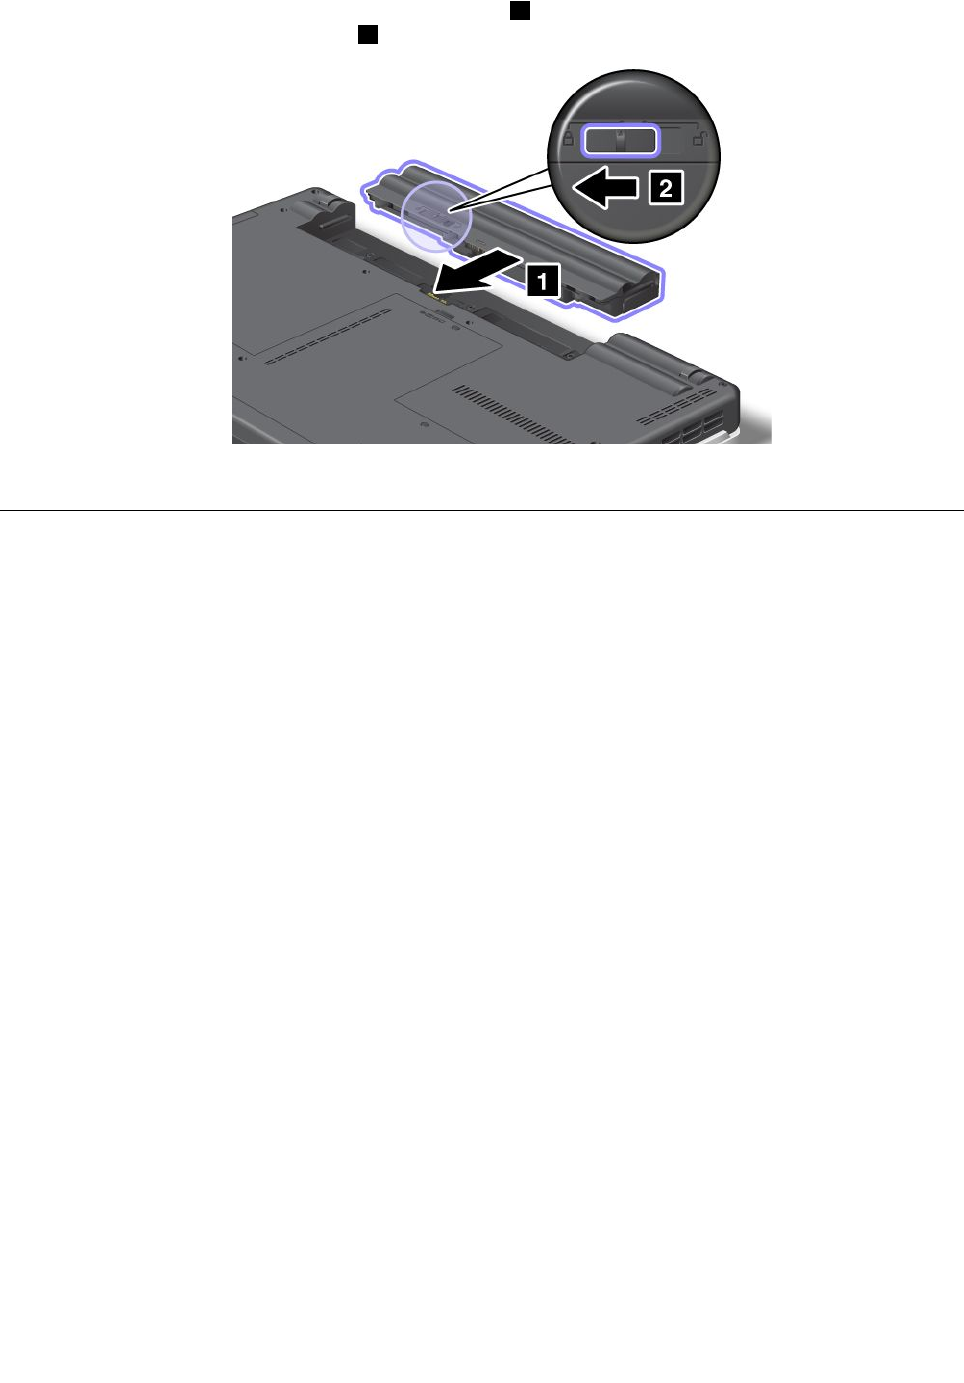
4.Insertafullychargedbatteryuntilitclicksintoplace1asshowninthedrawing,andthenslidethe
batterylatchtothelockedposition2.
5.Turnthecomputeroveragain.Connecttheacpoweradapterandthecablestothecomputer.
Replacingtheharddiskdrive
Beforeyoustart,printtheseinstructions.
YoucanreplacetheharddiskdrivewithanewonewhichcanbepurchasedfromyourLenovoresellerora
marketingrepresentative.Toreplacetheharddiskdrive,readthefollowingprerequisites,andselectyour
modelfromthelistbelowforinstruction.
Note:Replacetheharddiskdriveonlyifyouupgradeitorhaveitrepaired.Theconnectorsandslotofthe
harddiskdrivewerenotdesignedforfrequentchanges,ordriveswapping.
Prerequisitesfortheprocedure
Whenreplacingthedrive,besuretofollowtheprecautions.
Attention:Whenyouarehandlingaharddiskdrive:
•Donotdropthedriveorsubjectittophysicalshocks.Putthedriveonamaterial,suchassoftcloth,that
absorbsanyphysicalshocks.
•Donotapplypressuretothecoverofthedrive.
•Donottouchtheconnector.
Thedriveisverysensitive.Incorrecthandlingcancausedamageandpermanentlossofdata.
Beforeremovingtheharddiskdrive,makeabackupcopyofalltheinformationonit,andthenturnthe
computeroff.
Neverremovethedrivewhilethesystemisoperating,insleep(standby)mode,orinhibernationmode.
Replacementinstructions
Toreplacetheharddiskdrive,doasfollows:
1.Turnoffthecomputer;thendisconnecttheacpoweradapterandallcablesfromthecomputer.
2.Closethecomputerdisplay,andturnthecomputerover.
Chapter6.Replacingdevices79
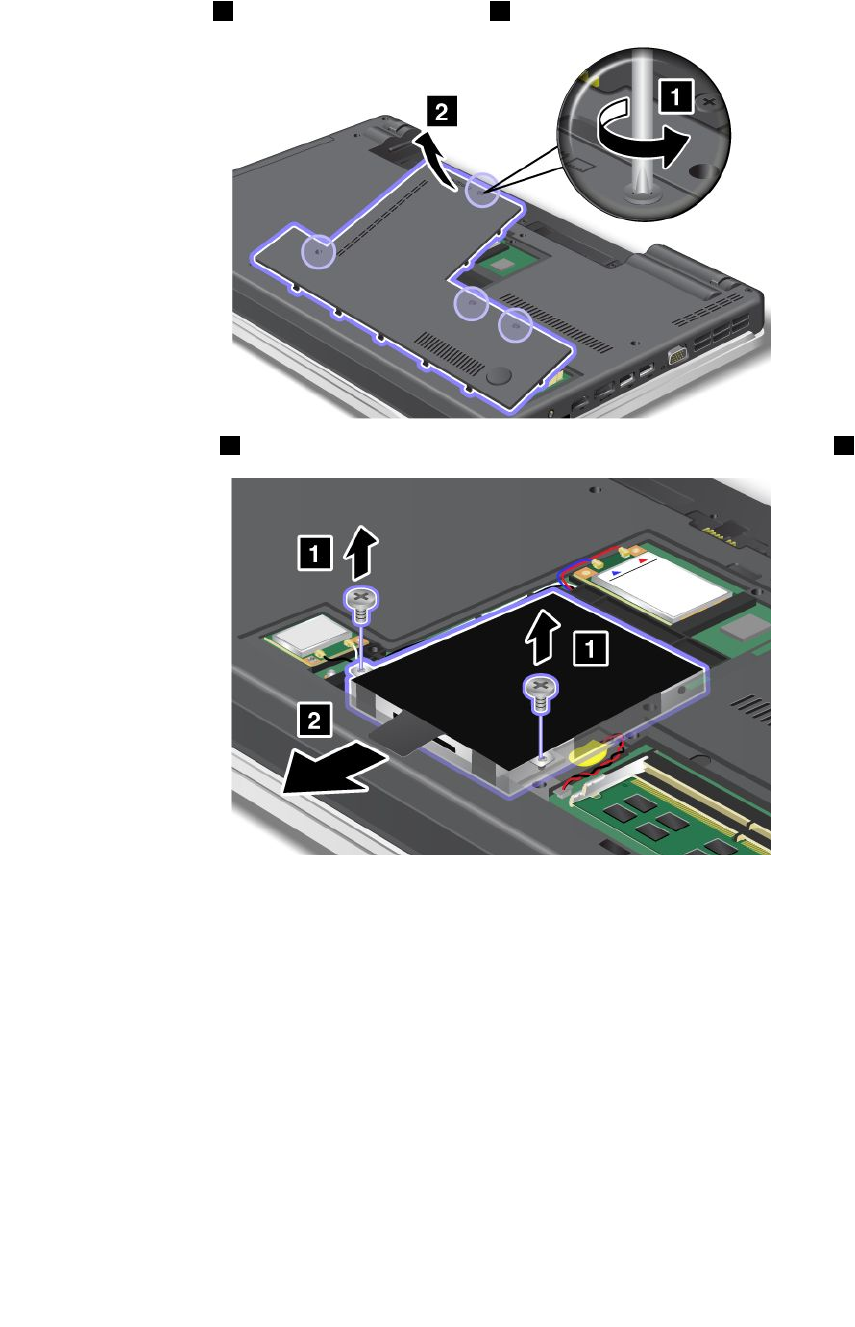
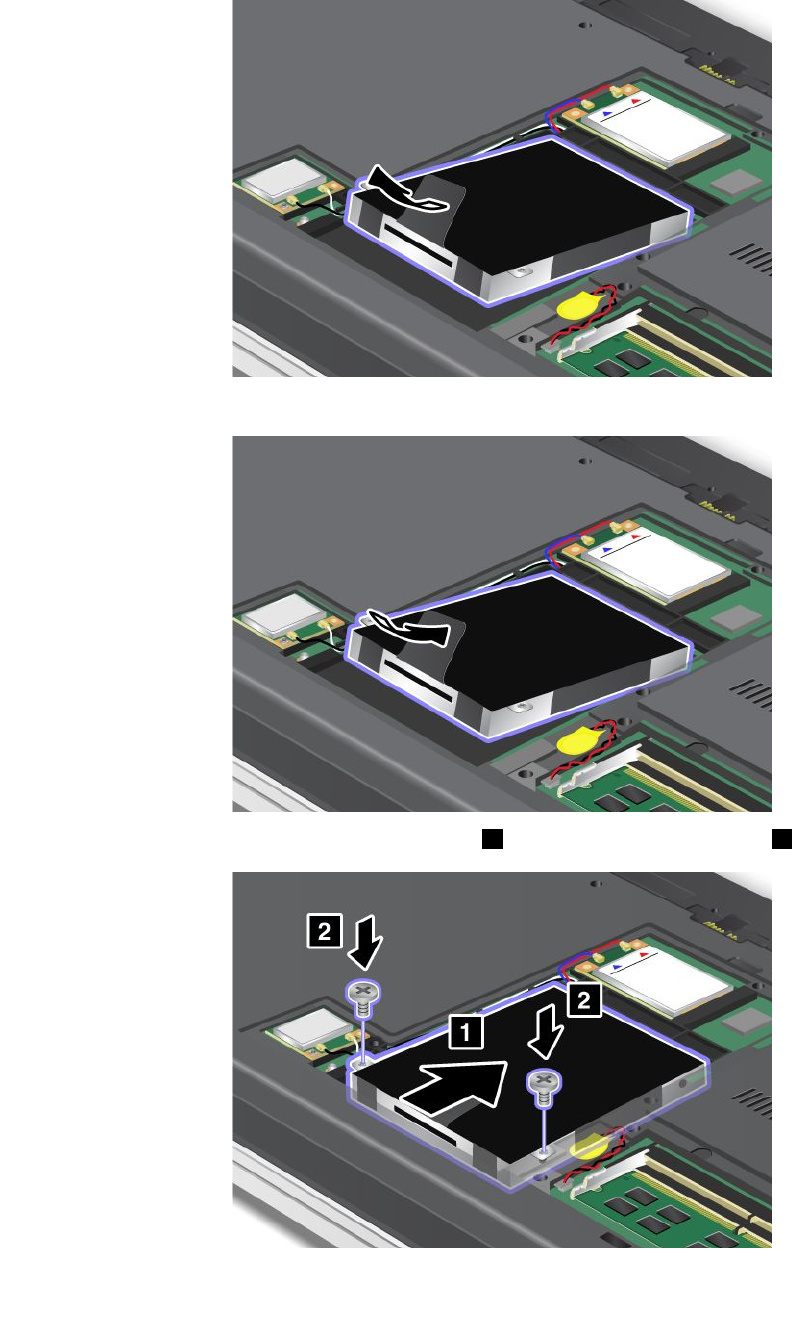
6.Removetheharddiskdrivebyliftingitsupperside.
7.Placethenewharddiskdrivefromthelowersideasshowninthepicture.
8.Slidetheharddiskdrivermlyintotheconnector1,andthenreinstallthescrews2.
Chapter6.Replacingdevices81
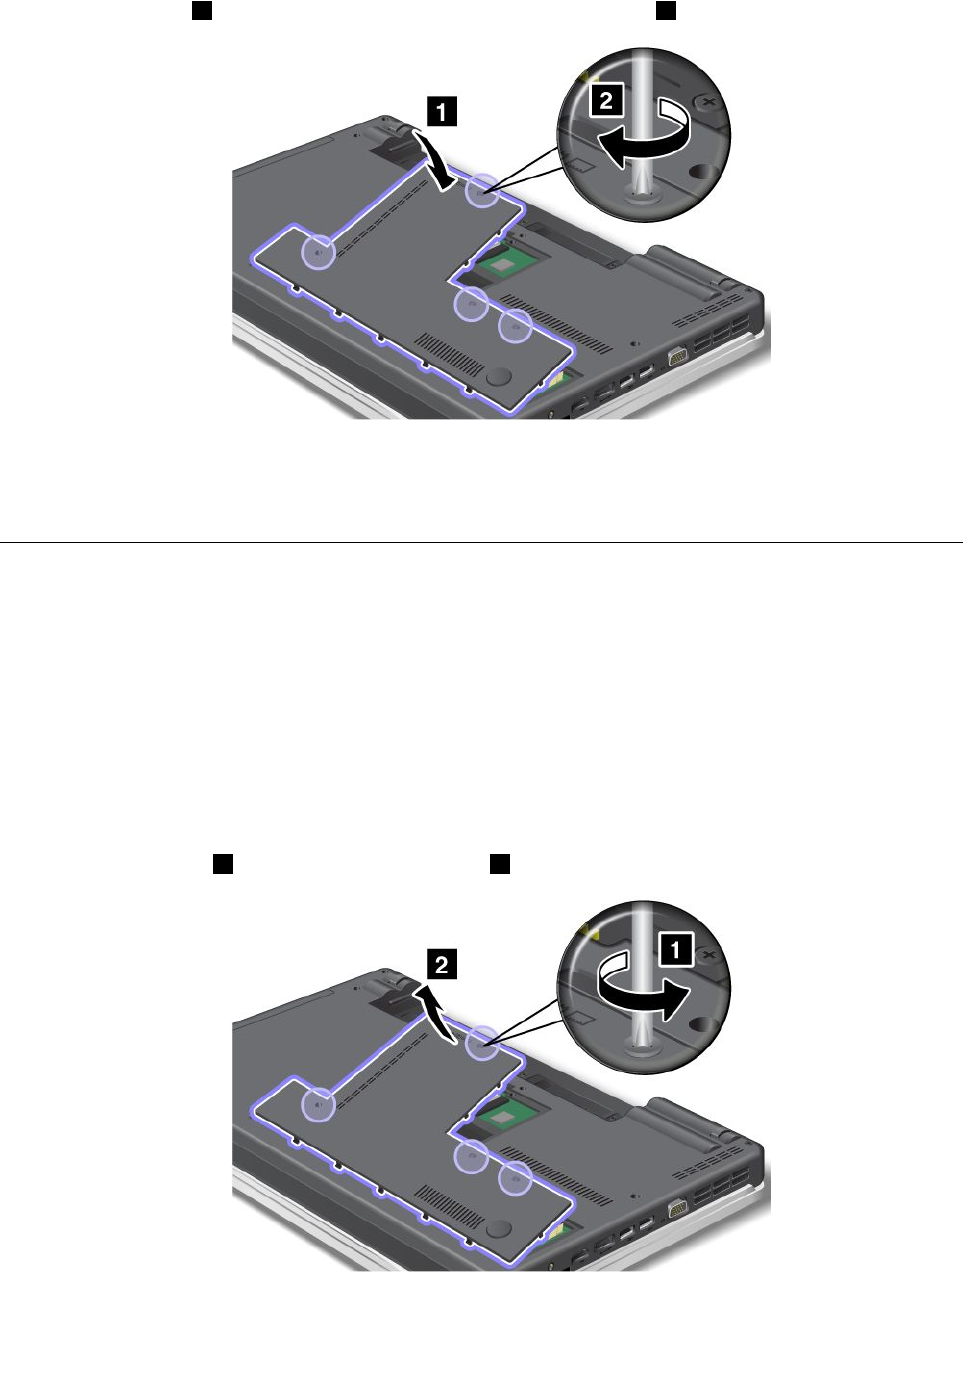
9.Attachthecover1,pivotitdownwards,andthentightenthescrews2.
10.Reinstallthebattery.Formoreinformationabouthowtoreinstallthebattery,referto“Replacingthe
battery”onpage77.
11.Turnthecomputeroveragain.Connecttheacpoweradapterandthecablestothecomputer.
Replacingtheopticaldrive
ThinkPadEdgeE420
Beforeyoustart,printtheseinstructions.
Anopticaldriveispreinstalledinthebay.Ifitneedstoberepaired,removeitasfollows:
1.Turnoffthecomputer;thendisconnecttheacpoweradapterandallcablesfromthecomputer.Waitfor
afewminutes,tilltheinsideofthecomputercools,beforeyoustartthefollowingprocedures.
2.Removethebattery.
3.Closethecomputerdisplay,andturnthecomputerover.
4.Loosenthescrews1,andthenremovethecover2.
82UserGuide
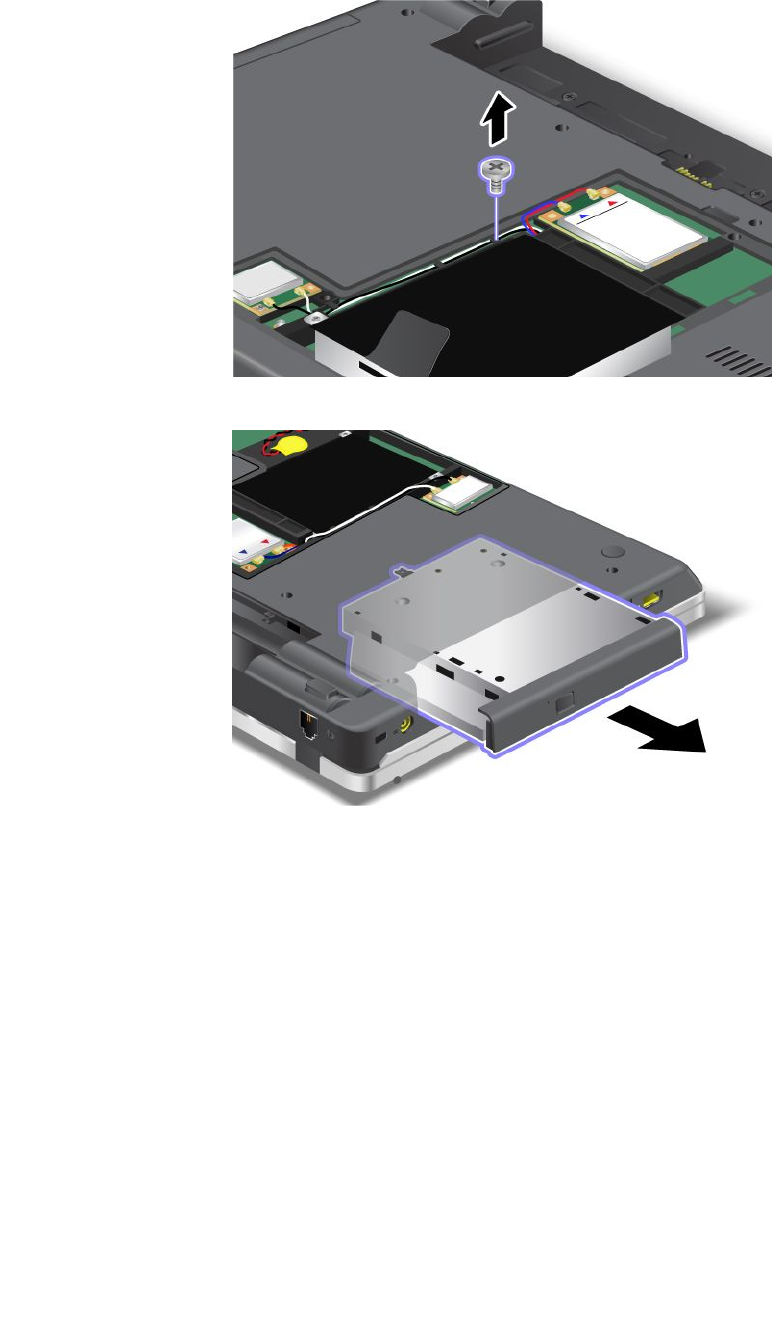
5.Loosenthescrew.
6.Pulloutthedrive.
Toinstallarepaireddriveoranewone,doasfollows:
Chapter6.Replacingdevices83


5.Turnthecomputeroveragain.Connecttheacpoweradapterandthecablestothecomputer;then
turniton.
ThinkPadEdgeE520
Beforeyoustart,printtheseinstructions.
Anopticaldriveispreinstalledinthebay.Ifitneedstoberepaired,removeitasfollows:
1.Turnoffthecomputer;thendisconnecttheacpoweradapterandallcablesfromthecomputer.Waitfor
afewminutes,tilltheinsideofthecomputercools,beforeyoustartthefollowingprocedures.
2.Removethebattery.
3.Closethecomputerdisplay,andturnthecomputerover.
4.Loosenthescrewthatsecuresthedrive1,andremoveit2.
5.Presstheedgeofthedriveoutwards,usingthetipofathinscrewdriverasshowninthedrawing1,
andthenpulloutthedrive2.
Toinstallarepaireddriveoranewone,doasfollows:
Chapter6.Replacingdevices85

1.Insertthedriveinthebay,andthenpressitrmlytotheconnector.
2.Reinstallthescrew1,andtightenit2.
3.Putthebatteryinplace.
4.Turnthecomputeroveragain.Connecttheacpoweradapterandthecablestothecomputer;then
turniton.
InstallingandreplacingthePCIExpressMiniCardforwirelessWAN
Beforeyoustart,printtheseinstructions.
SomeThinkPadmodelshaveaPCIExpressMiniCardslotforconnectiontoawirelessWAN.Toreplacethe
PCIExpressMiniCardwithanewone,readthefollowingprerequisites.
Prerequisitesfortheprocedure
DANGER
Duringelectricalstorms,donotconnectthecabletoordisconnectitfromthetelephoneoutlet
onthewall.
86UserGuide
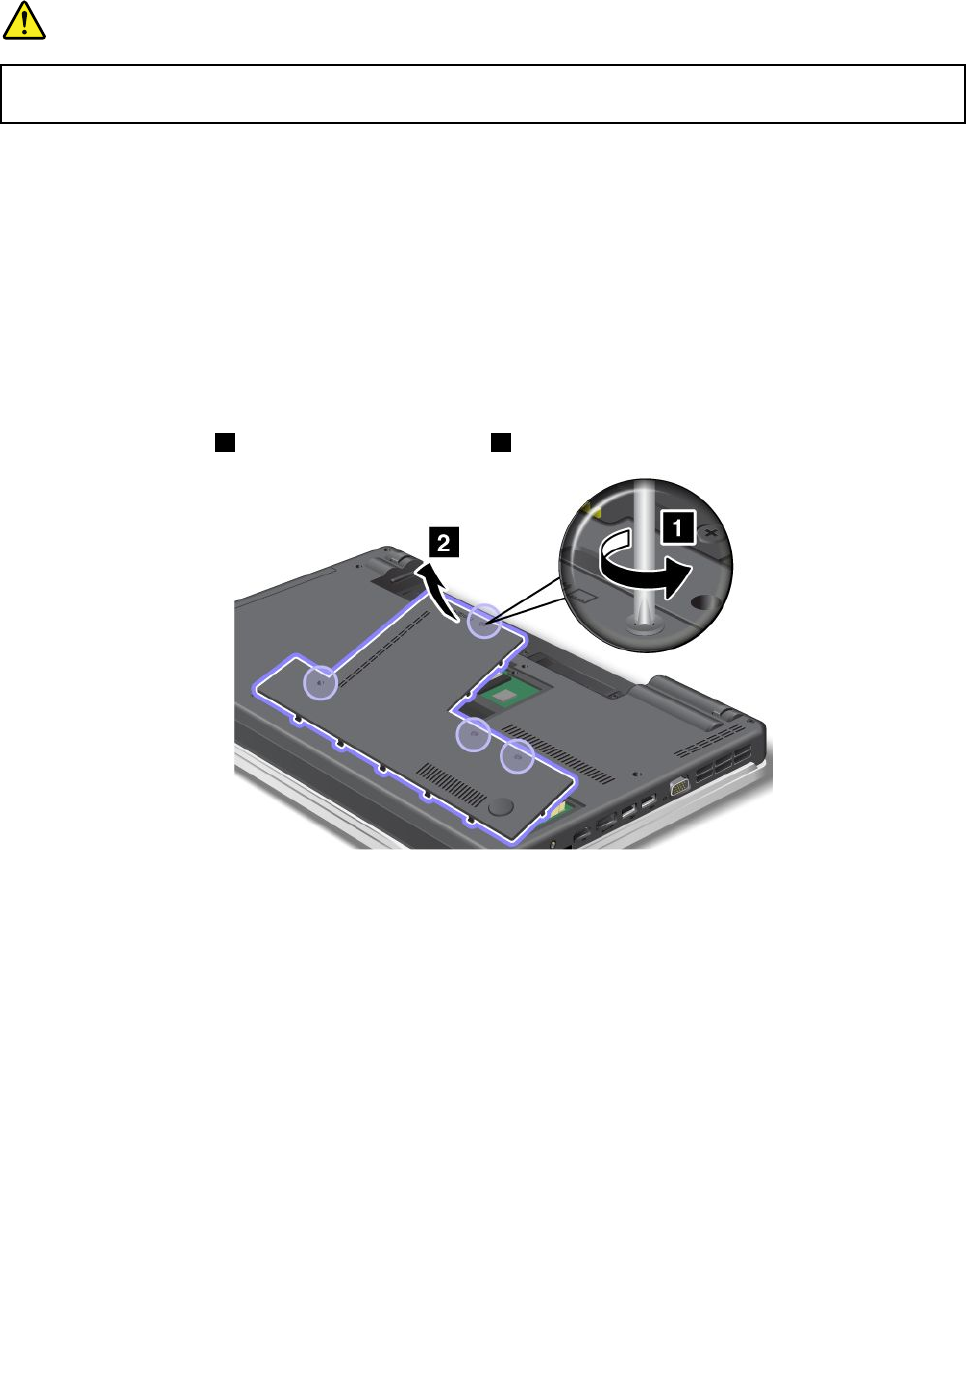
DANGER
Electriccurrentfrompower,telephone,andcommunicationcablesishazardous.Toavoidshock
hazard,disconnectthecablesbeforeopeningthecoverofthisslot.
Attention:BeforeyoustartinstallingaPCIExpressMiniCard,touchametaltableoragroundedmetal
object.Thisactionreducesanystaticelectricityfromyourbody.Thestaticelectricitycoulddamagethecard.
Replacementinstructions
ToreplacethePCIExpressMiniCard,doasfollows:
1.Turnoffthecomputer;thendisconnecttheacpoweradapterandallcablesfromthecomputer.Waitfor
afewminutes,tilltheinsideofthecomputercools,beforeyoustartthefollowingprocedures.
2.Closethecomputerdisplay,andturnthecomputerover.
3.Removethebattery.Formoreinformationabouthowtoremovethebattery,referto“Replacingthe
battery”onpage77.
4.Loosenthescrews1,andthenremovethecover2.
Chapter6.Replacingdevices87
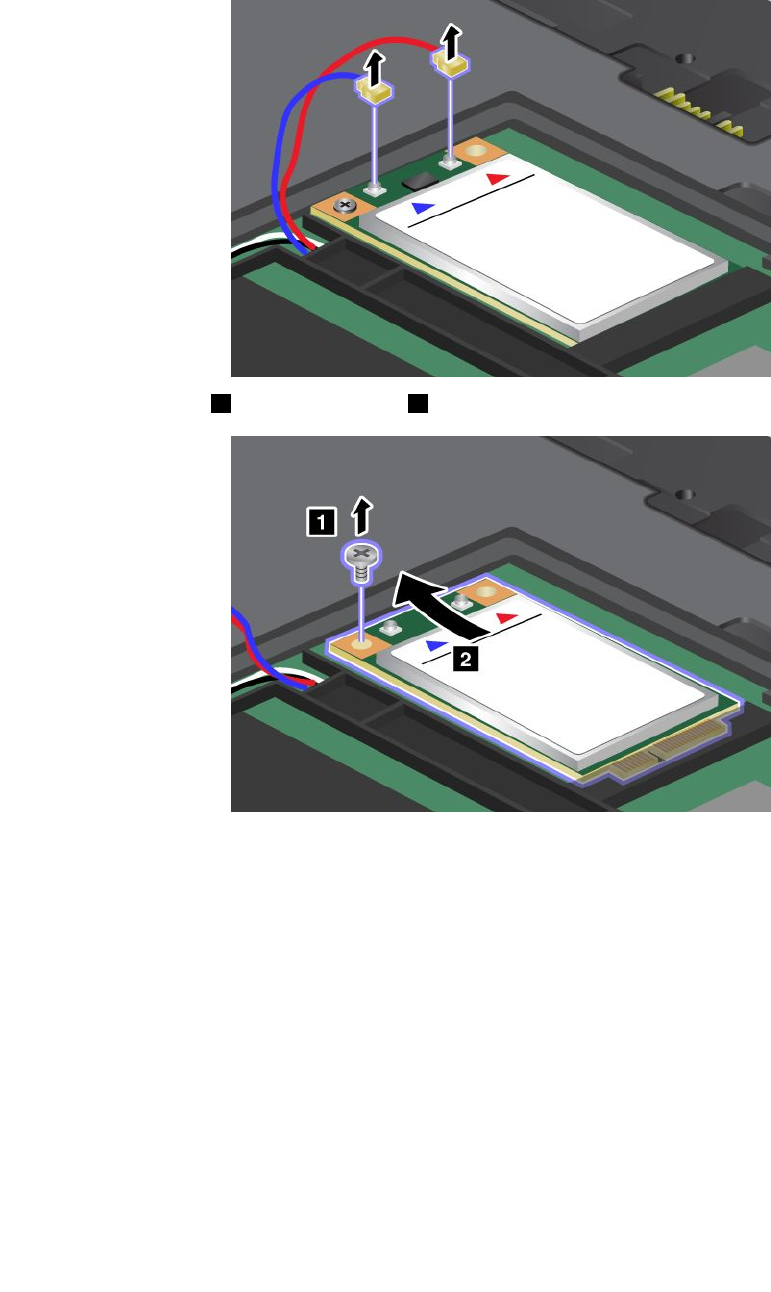
5.Ifatoolforremovingconnectorsisincludedinthepackagewiththenewcard,useittodisconnectthe
cablesfromthecard.Ifnosuchtoolisincluded,disconnectthecablesbypickinguptheconnectors
withyourngersandgentlyunpluggingthem.
6.Removethescrew1.Thecardpopsup2.Removethecard.
88UserGuide
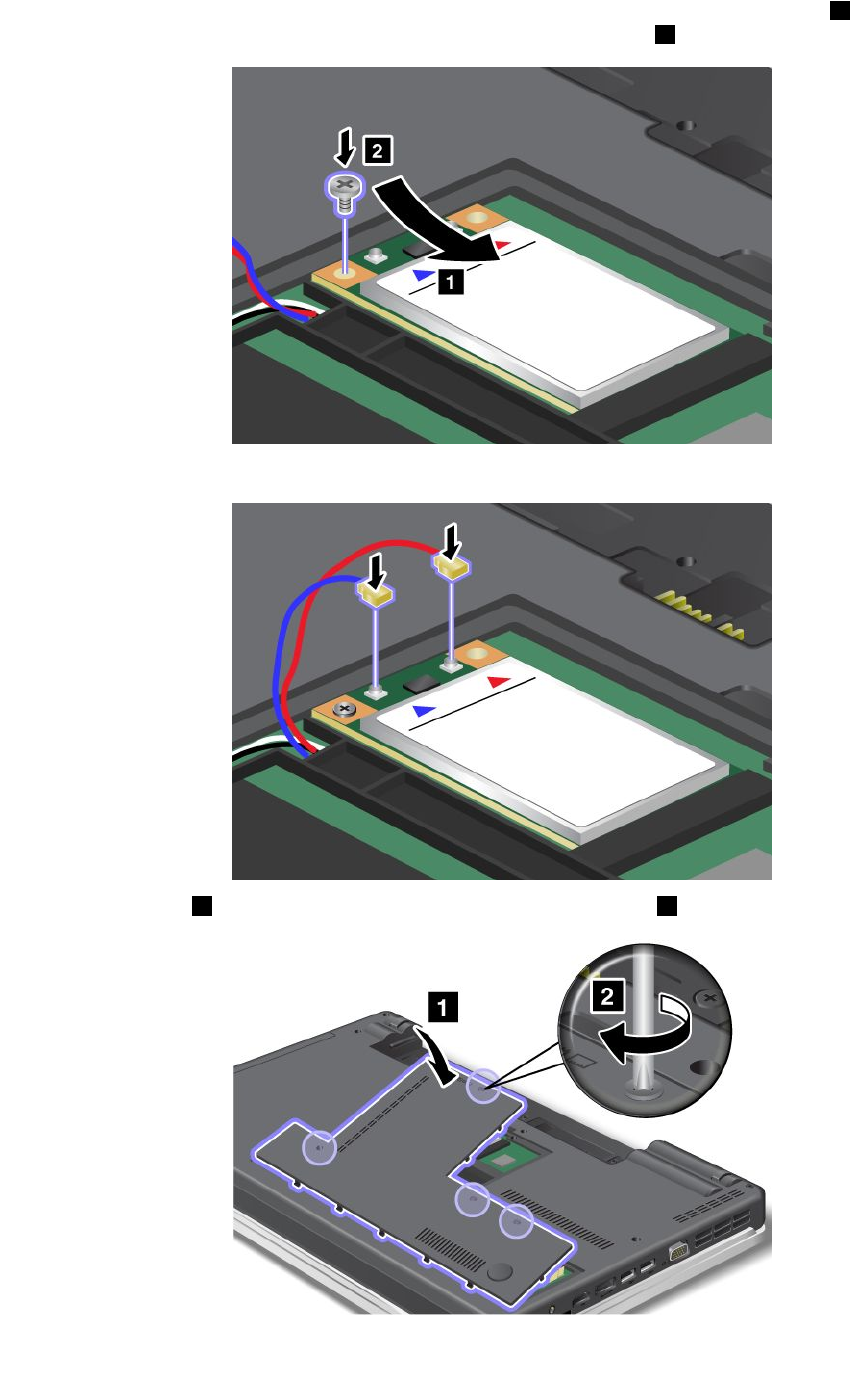
7.AlignthecontactedgeofthenewPCIExpressMiniCardwiththecorrespondingsocket1.Pivotthe
carduntilyoucansnapitintoplace.Securethecardwiththescrew2.
8.ConnecttheantennacablestothenewPCIExpressMiniCardasshowninthedrawing.
9.Attachthecover1,pivotitdownwards,andthentightenthescrews2.
Chapter6.Replacingdevices89
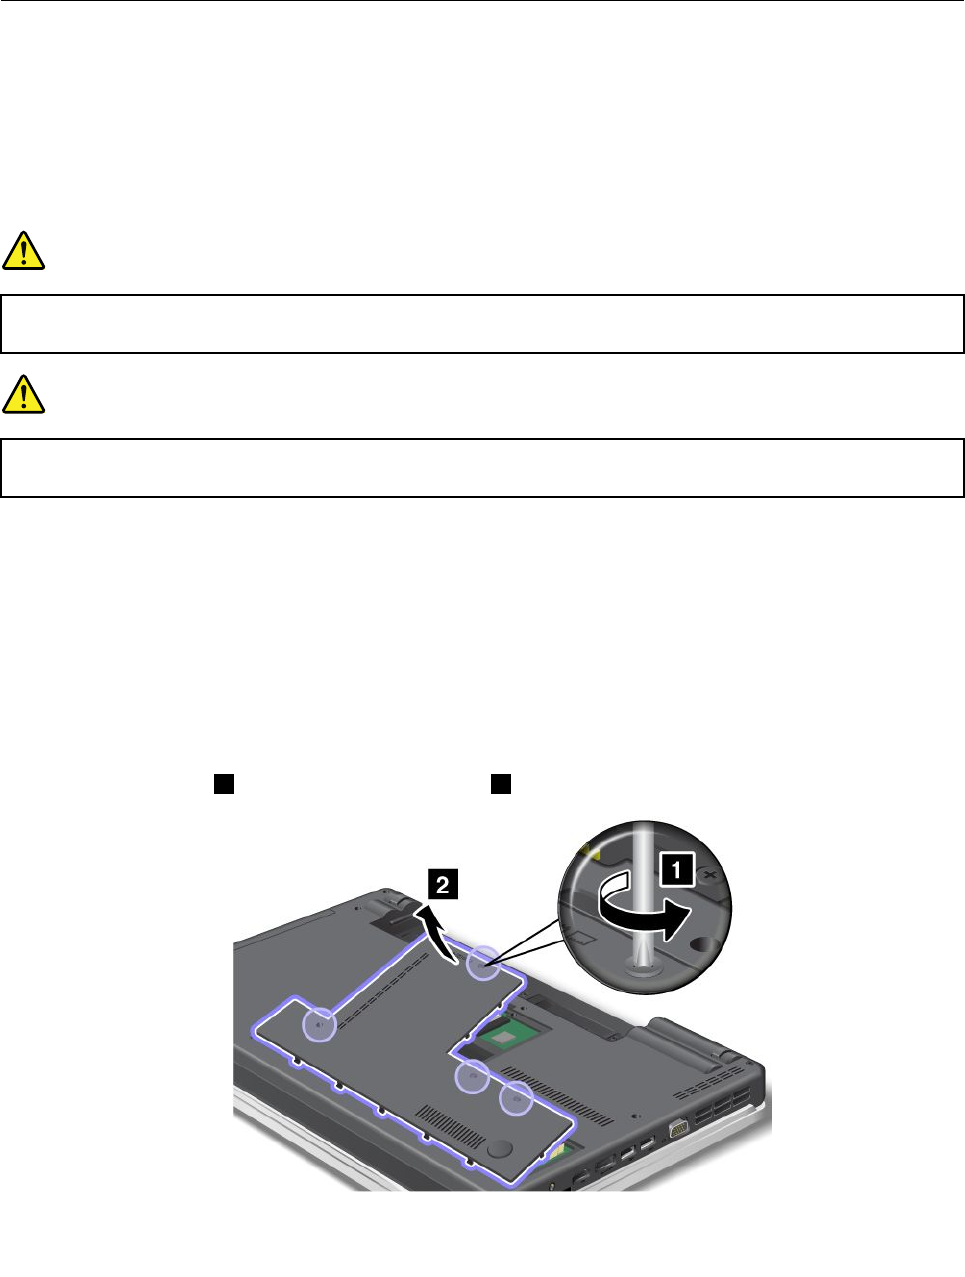
10.Reinstallthebattery.Formoreinformationabouthowtoreinstallthebattery,referto“Replacingthe
battery”onpage77.
11.Turnthecomputeroveragain.Connecttheacpoweradapterandcablestothecomputer;thenturniton.
InstallingandreplacingaPCIExpressMiniCardforwirelessLAN/WiMAX
connection
Beforeyoustart,printtheseinstructions.
YourcomputerhasaPCIExpressMiniCardslotforconnectiontoawirelessLAN/WiMAX.ToreplacethePCI
ExpressMiniCardwithanewone,readthefollowingprerequisites.
Prerequisitesfortheprocedure
DANGER
Duringelectricalstorms,donotconnectthecabletoordisconnectitfromthetelephoneoutlet
onthewall.
DANGER
Electriccurrentfrompower,telephone,andcommunicationcablesishazardous.Toavoidshock
hazard,disconnectthecablesbeforeopeningthecoverofthisslot.
Attention:BeforeyoustartinstallingaPCIExpressMiniCard,touchametaltableoragroundedmetal
object.Thisactionreducesanystaticelectricityfromyourbody.Thestaticelectricitycoulddamagethecard.
ReplacingaPCIExpressMiniCard
1.Turnoffthecomputer;thendisconnecttheacpoweradapterandallcablesfromthecomputer.Waitfor
afewminutes,tilltheinsideofthecomputercools,beforeyoustartthefollowingprocedures.
2.Closethecomputerdisplay,andturnthecomputerover.
3.Removethebattery.Formoreinformationabouthowtoremovethebattery,referto“Replacingthe
battery”onpage77.
4.Loosenthescrews1,andthenremovethecover2.
90UserGuide
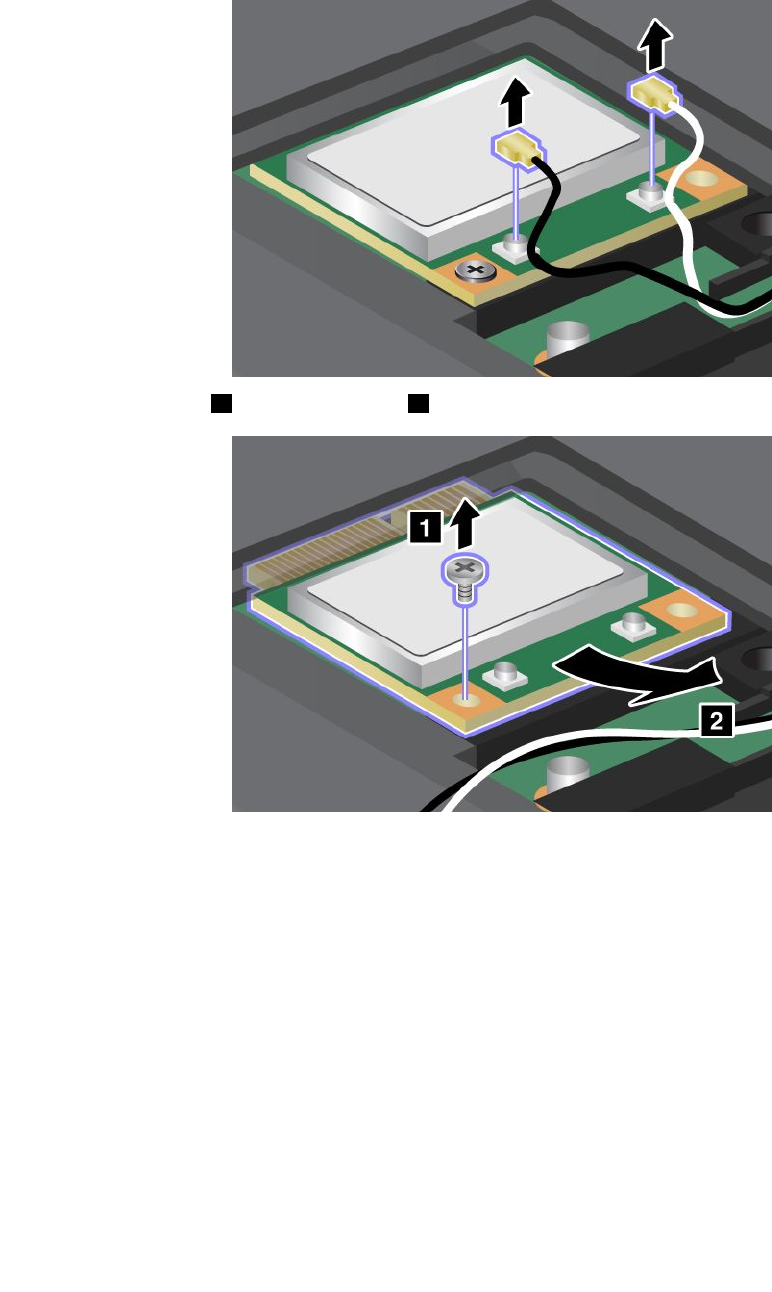
5.Ifatoolforremovingconnectorsisincludedinthepackagewiththenewcard,useittodisconnectthe
cablesfromthecard.Ifnosuchtoolisincluded,disconnectthecablesbypickinguptheconnectors
withyourngersandgentlyunpluggingthem.
6.Removethescrew1.Thecardpopsup2.Removethecard.
Chapter6.Replacingdevices91
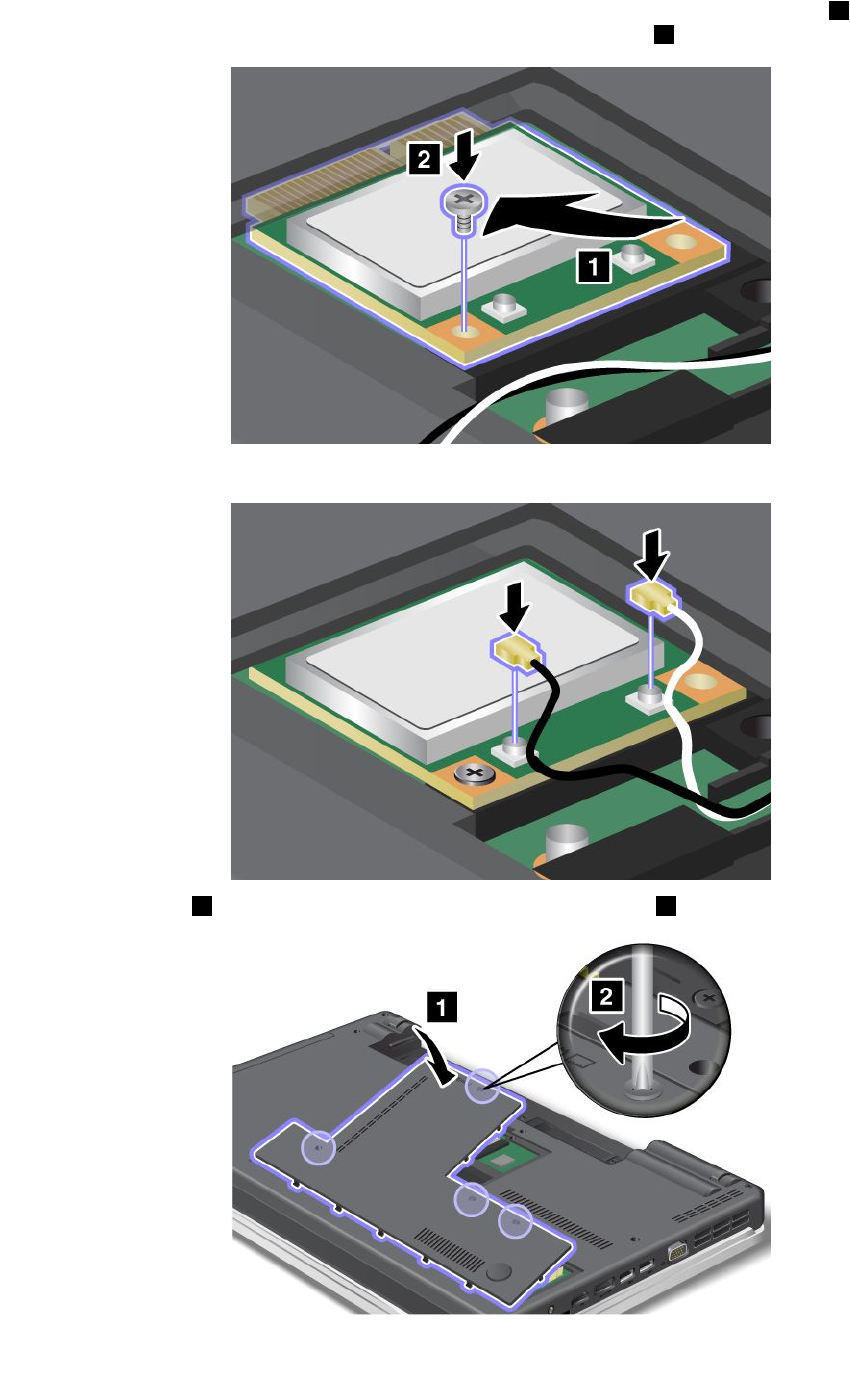
7.AlignthecontactedgeofthenewPCIExpressMiniCardwiththecorrespondingsocket1.Pivotthe
carduntilyoucansnapitintoplace.Securethecardwiththescrew2.
8.ConnecttheantennacablestothenewPCIExpressMiniCardasshowninthedrawing.
9.Attachthecover1,pivotitdownwards,andthentightenthescrews2.
92UserGuide
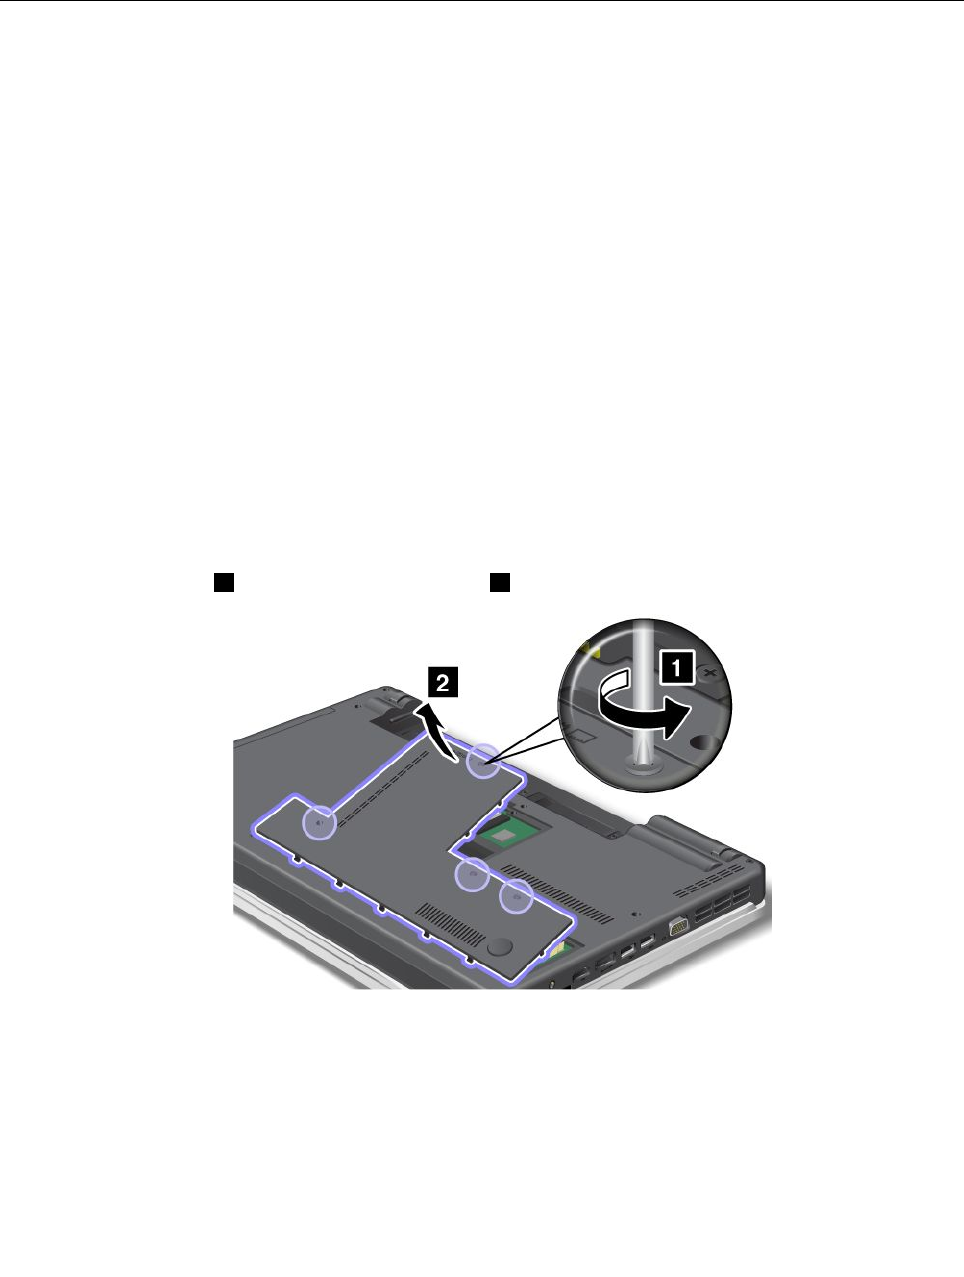
10.Reinstallthebattery.Formoreinformationabouthowtoreinstallthebattery,referto“Replacingthe
battery”onpage77.
11.Turnthecomputeroveragain.Connecttheacpoweradapterandcablestothecomputer;thenturniton.
Replacingmemory
Beforeyoustart,printtheseinstructions.
Increasingmemorycapacityisaneffectivewaytomakeprogramsrunfaster.Toreplaceoraddmemory,
readthefollowingprerequisites,andthentheinstruction.
Prerequisitesfortheprocedure
Whenreplacingthememory,besuretofollowtheprecautions.
Note:Theoperatingspeedofthememorymoduledependsonthesystemcongurationofyourcomputer
anditscombinationwiththememorymoduleinstalledonyourcomputer.Insomeconditions,thememoryin
yourcomputermaynotbeabletooperateatthemaximumspeed.
Attention:Beforeyoustartinstallingamodule,touchametaltableoragroundedmetalobject.Thisaction
reducesanystaticelectricityfromyourbody.ThestaticelectricitycoulddamagetheSO-DIMM.
Replacingmemory
ToinstallanSO-DIMM,dothefollowing:
1.Turnoffthecomputer;thendisconnecttheacpoweradapterandallcablesfromthecomputer.
2.Closethecomputerdisplay,andturnitover.
3.Removethebattery.Formoreinformation,referto“Replacingthebattery”onpage77.
4.Loosenthescrews1,andthenremovethecover2.
Chapter6.Replacingdevices93
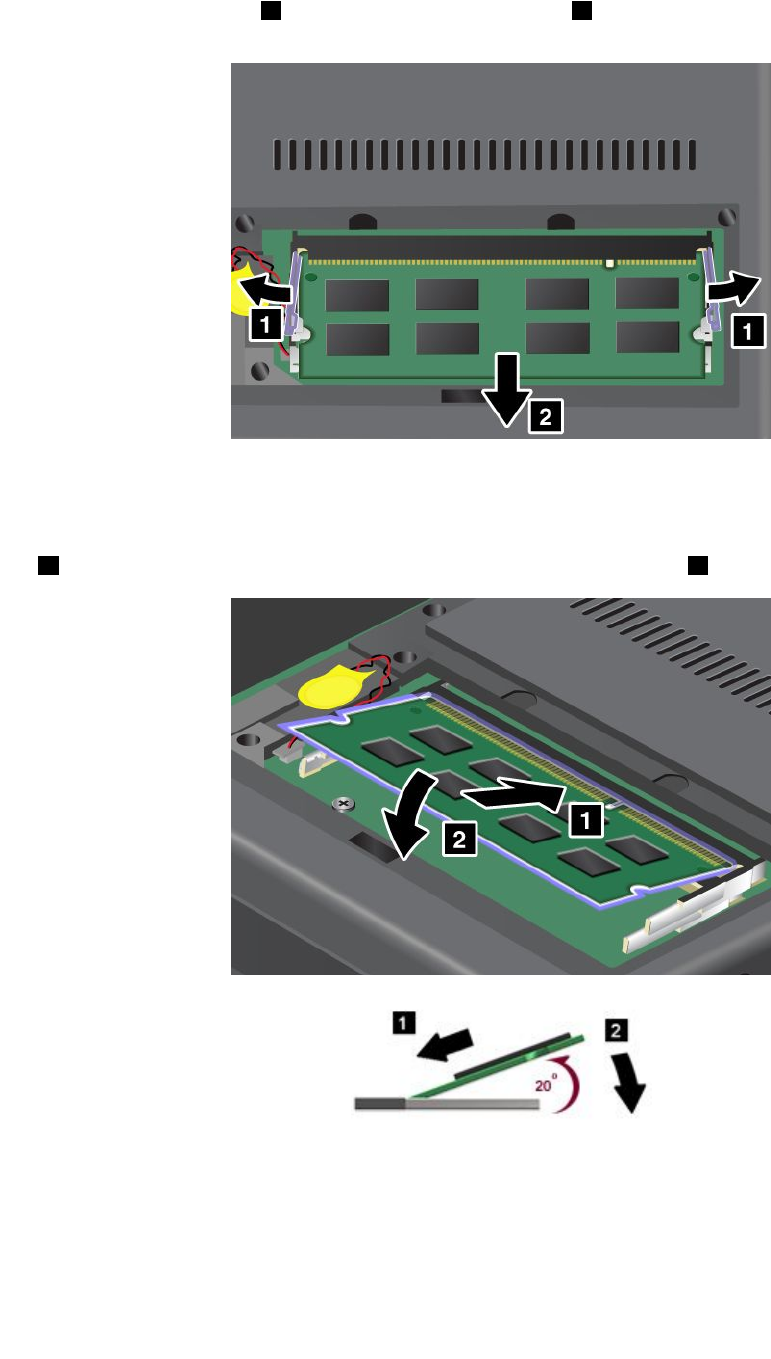
5.IfthetwoSO-DIMMsarealreadyinthememoryslots,pressoutonthelatchesonbothedgesofthe
socketatthesametime1,andthenremoveanSO-DIMM2tomakeroomforthenewone.Be
suretosaveitforfutureuse.
6.FindthenotchonthecontactedgesideoftheSO-DIMMyouareinstalling.
Attention:ToavoiddamagingtheSO-DIMM,donottouchitscontactedge.
7.WiththenotchedendoftheSO-DIMMtowardthecontactedgesideofthesocket,inserttheSO-DIMM
1intothesocketatanangleofabout20degrees;thenpressitinrmly2.
Note:Ifyouinstallamemorymoduleinonlyoneofthetwomemoryslots,installitinthebottomslot.
8.PivottheSO-DIMMdownwarduntilitsnapsintoplace.
9.MakesurethattheSO-DIMMisrmlyxedintheslotandcannotbemovedeasily.
94UserGuide
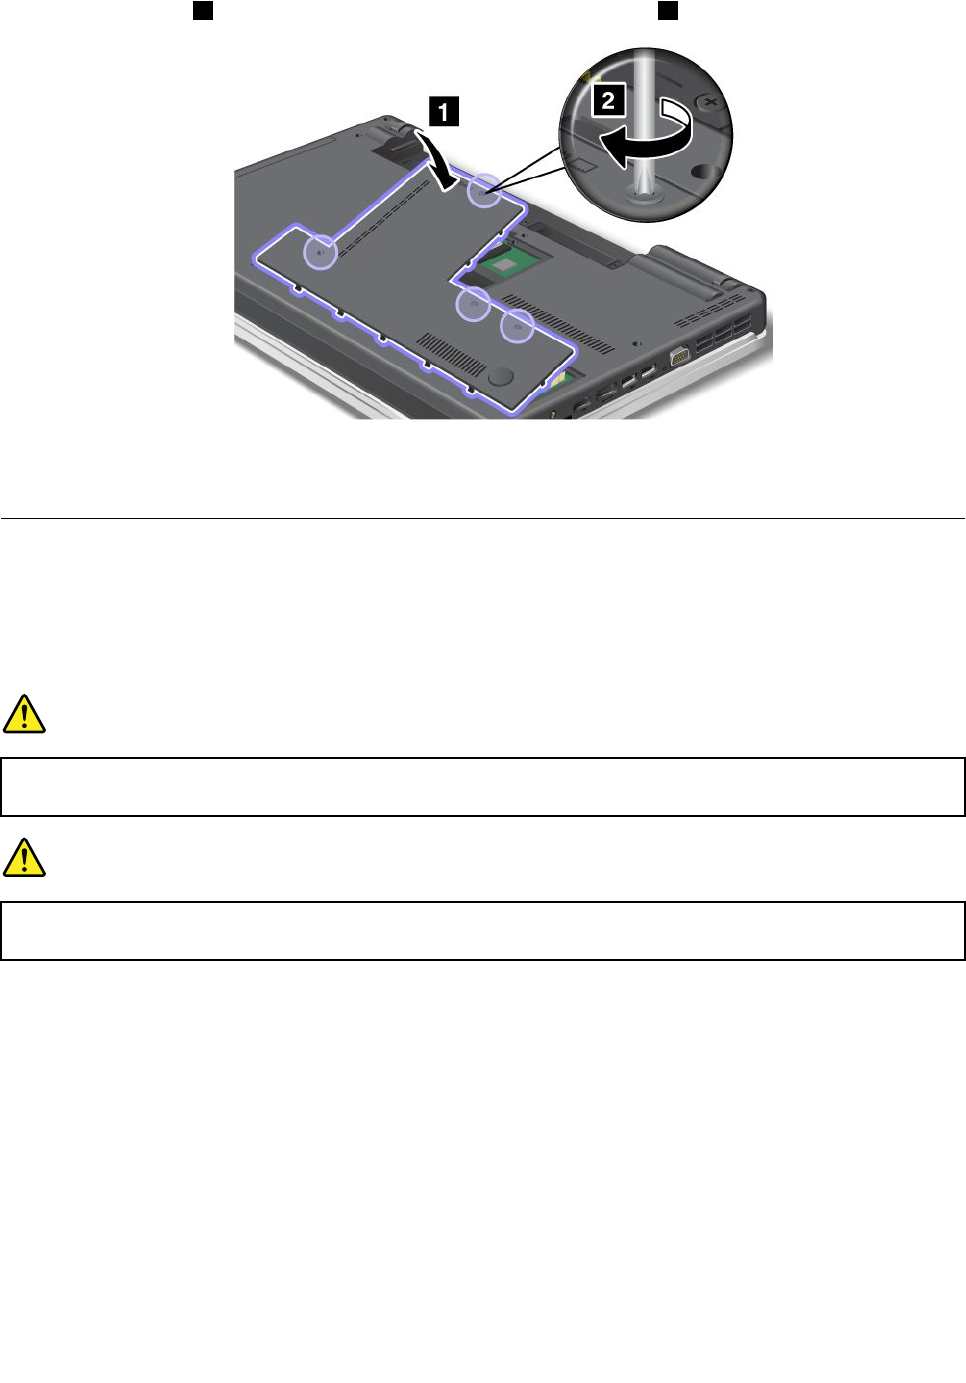
10.Attachthecover1,pivotitdownwards,andthentightenthescrews2.
11.Reinstallthebattery.Formoreinformationabouthowtoreinstallthebattery,refertoReinstallthebattery.
12.Turnthecomputeroveragainandreconnectthecables.
Replacingthekeyboard
Beforeyoustart,printtheseinstructions.
Youcanusethefollowingprocedurestoreplacethekeyboardwithanewone,availableasanoption.
Prerequisitesfortheprocedure
DANGER
Duringelectricalstorms,donotconnectthecabletoordisconnectitfromthetelephoneoutlet
onthewall.
DANGER
Electriccurrentfrompower,telephone,andcommunicationcablesishazardous.Toavoidshock
hazard,disconnectthecablesbeforeopeningthecoverofthisslot.
ThinkPadEdgeE420
Removingthekeyboard
Toremovethekeyboard,dothefollowing:
1.Turnoffthecomputer;thendisconnecttheacpoweradapterandallcablesfromthecomputer.Waitfor
afewminutes,tilltheinsideofthecomputercools,beforeyoustartthefollowingprocedures.
2.Closethecomputerdisplay,andturnthecomputerover.
3.Removethebattery.Formoreinformation,referto“Replacingthebattery”onpage77.
Chapter6.Replacingdevices95
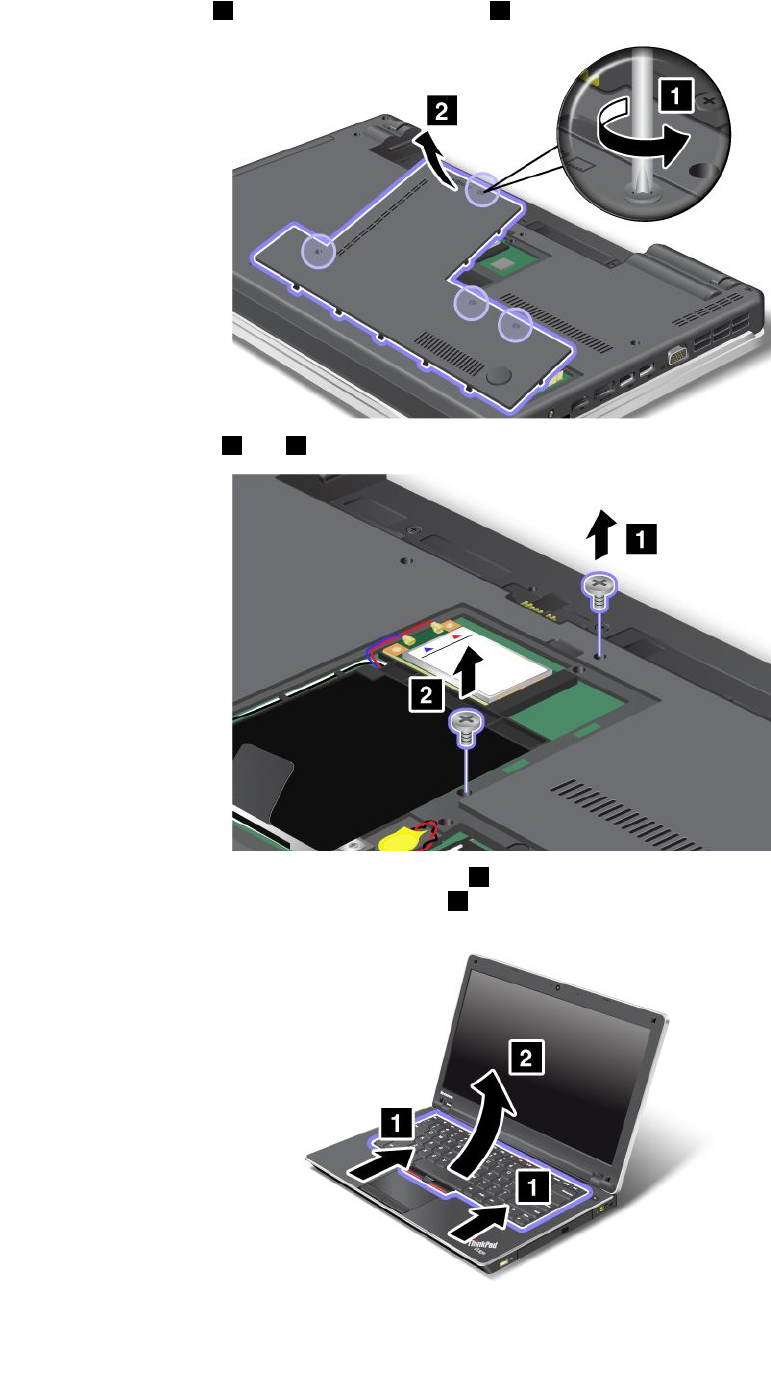
4.Loosenthescrews1,andthenremovethecover2.
5.Removethescrews1and2.
6.Pushhardinthedirectionshownbythearrows1inthedrawingtounlatchthefrontsideofthe
keyboard.Thekeyboardwillopenupslightly2.
96UserGuide
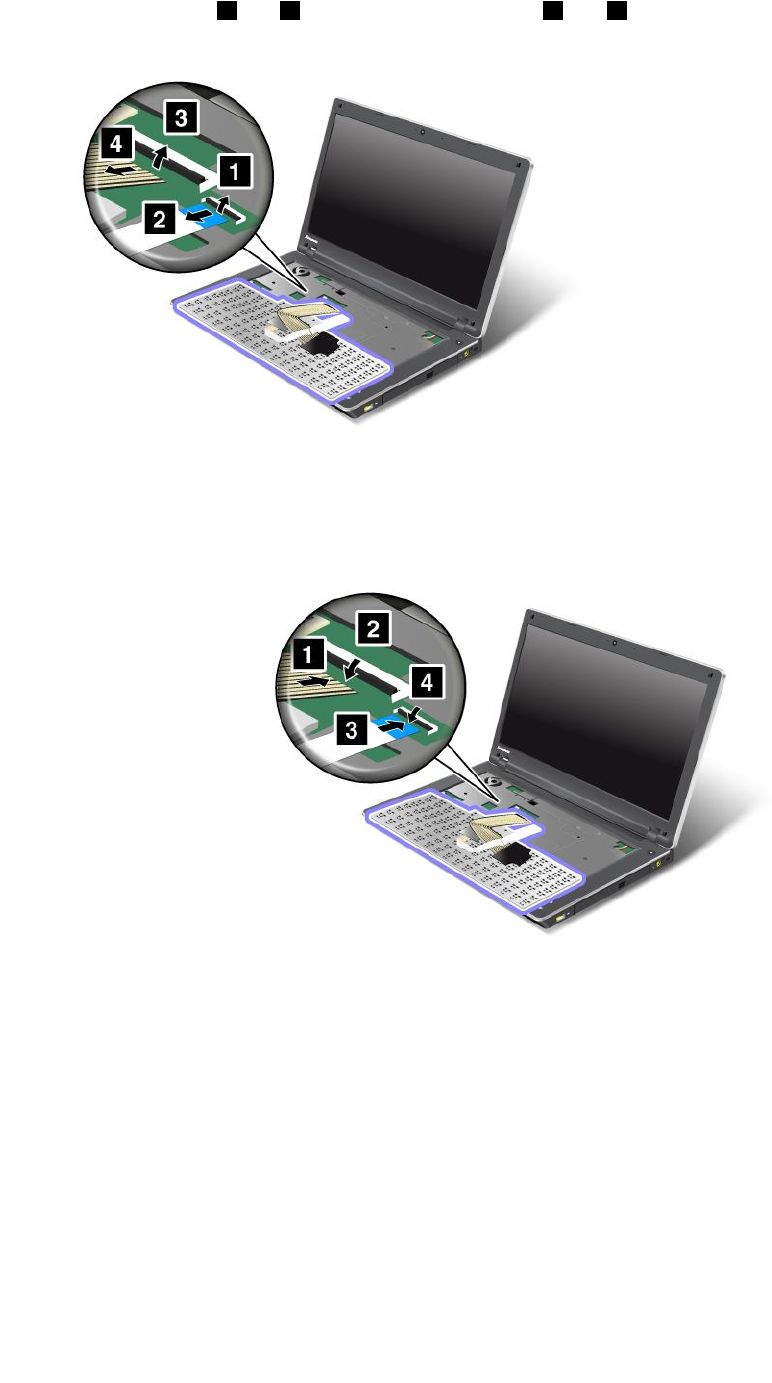
7.Removethecables2and4byippingtheconnectors1and3upwards.Nowthekeyboardhas
beenremoved.
Installingthekeyboard
Toinstallthekeyboard,dothefollowing:
1.Attachthecables.
Chapter6.Replacingdevices97
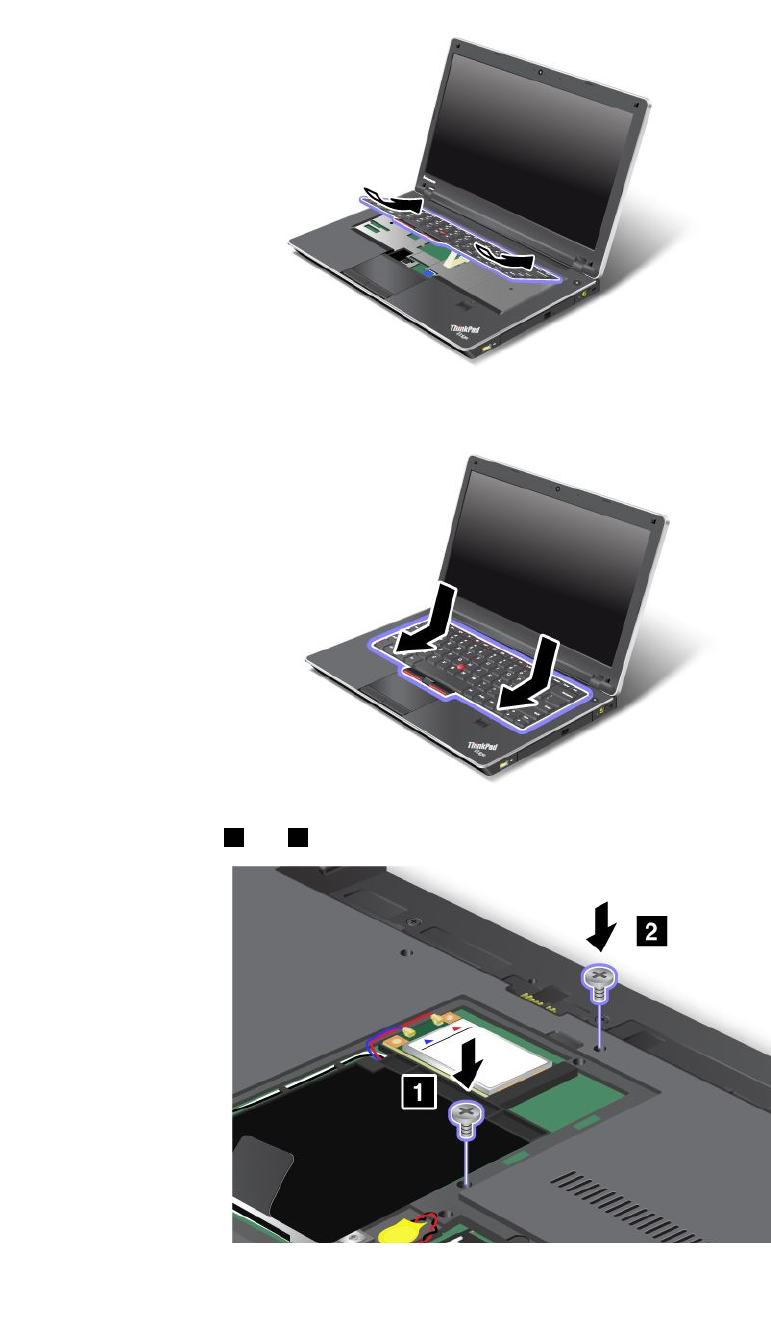
2.Insertthekeyboard.Makesurethattherearedgesofthekeyboardareundertheframe,asshownby
thearrows.
3.Slidethekeyboardasshownbythearrows.
4.Reinstallthescrews1and2.
98UserGuide
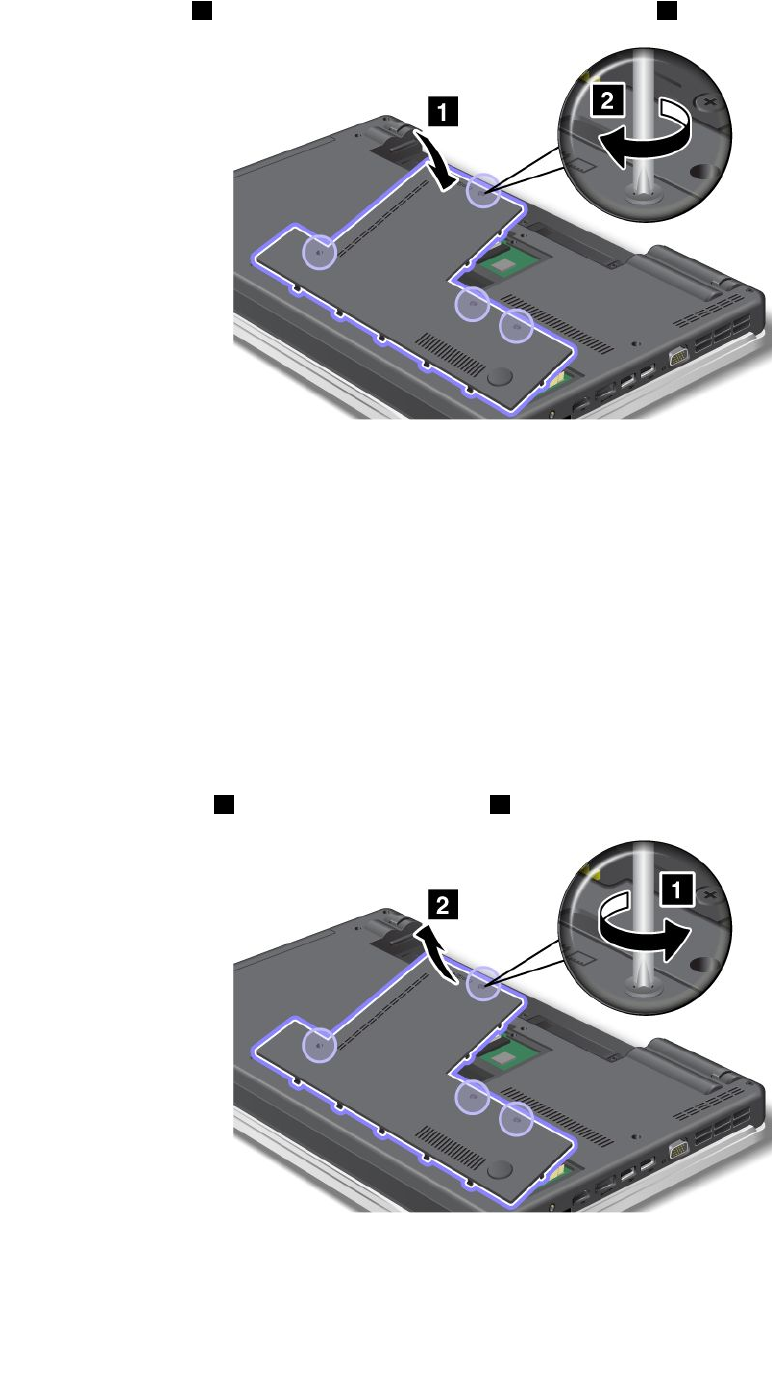
5.Attachthecover1,pivotitdownwards,andthentightenthescrews2.
6.Reinstallthebattery.Formoreinformationabouthowtoreinstallthebattery,referto“Replacingthe
battery”onpage77.
7.Turnthecomputeroveragain.Connecttheacpoweradapterandcablestothecomputer;thenturniton.
ThinkPadEdgeE520
Removingthekeyboard
Toremovethekeyboard,dothefollowing:
1.Turnoffthecomputer;thendisconnecttheacpoweradapterandallcablesfromthecomputer.Waitfor
afewminutes,tilltheinsideofthecomputercools,beforeyoustartthefollowingprocedures.
2.Closethecomputerdisplay,andturnthecomputerover.
3.Removethebattery.Formoreinformation,referto“Replacingthebattery”onpage77.
4.Loosenthescrews1,andthenremovethecover2.
Chapter6.Replacingdevices99
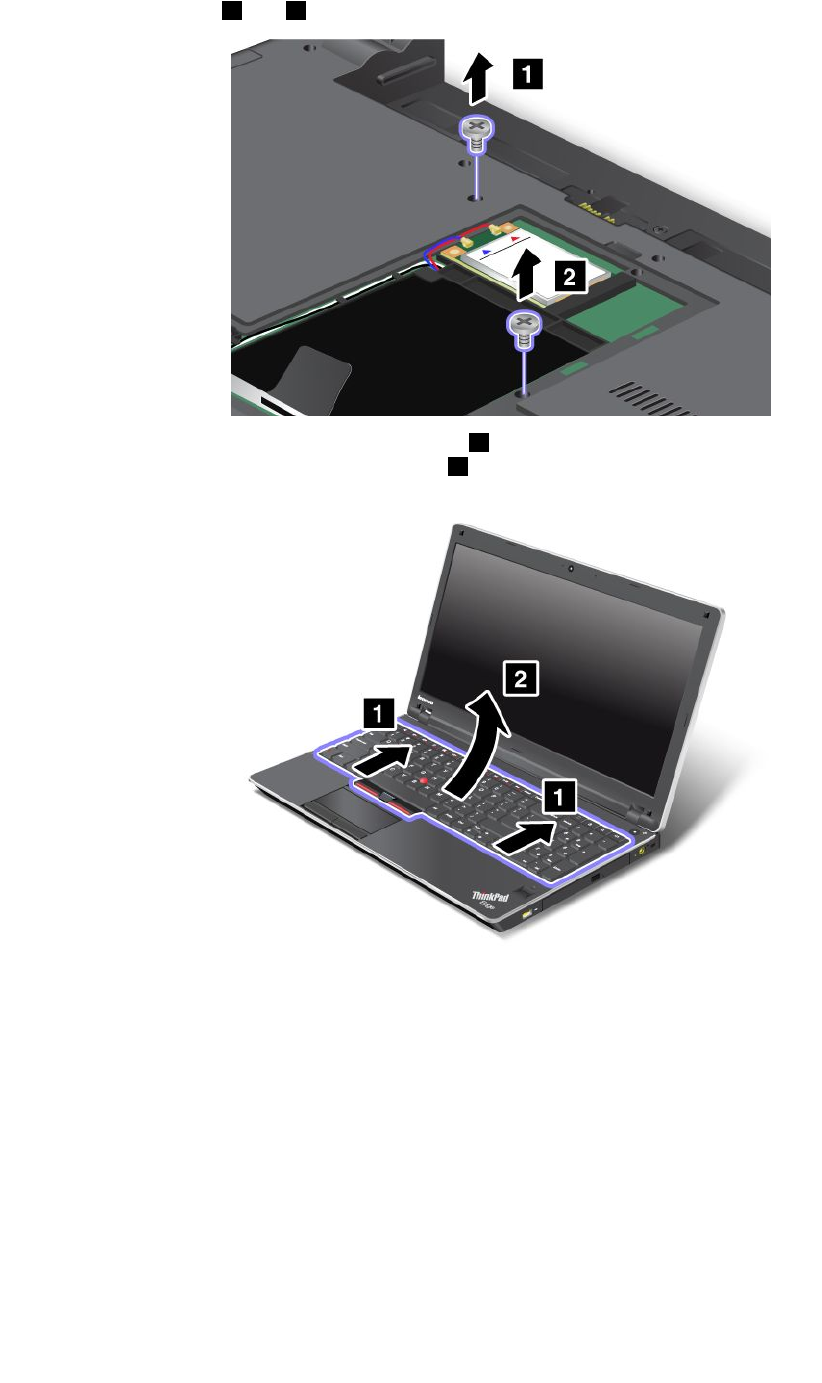
5.Removethescrews1and2.
6.Pushhardinthedirectionshownbythearrows1inthedrawingtounlatchthefrontsideofthe
keyboard.Thekeyboardwillopenupslightly2.
100UserGuide
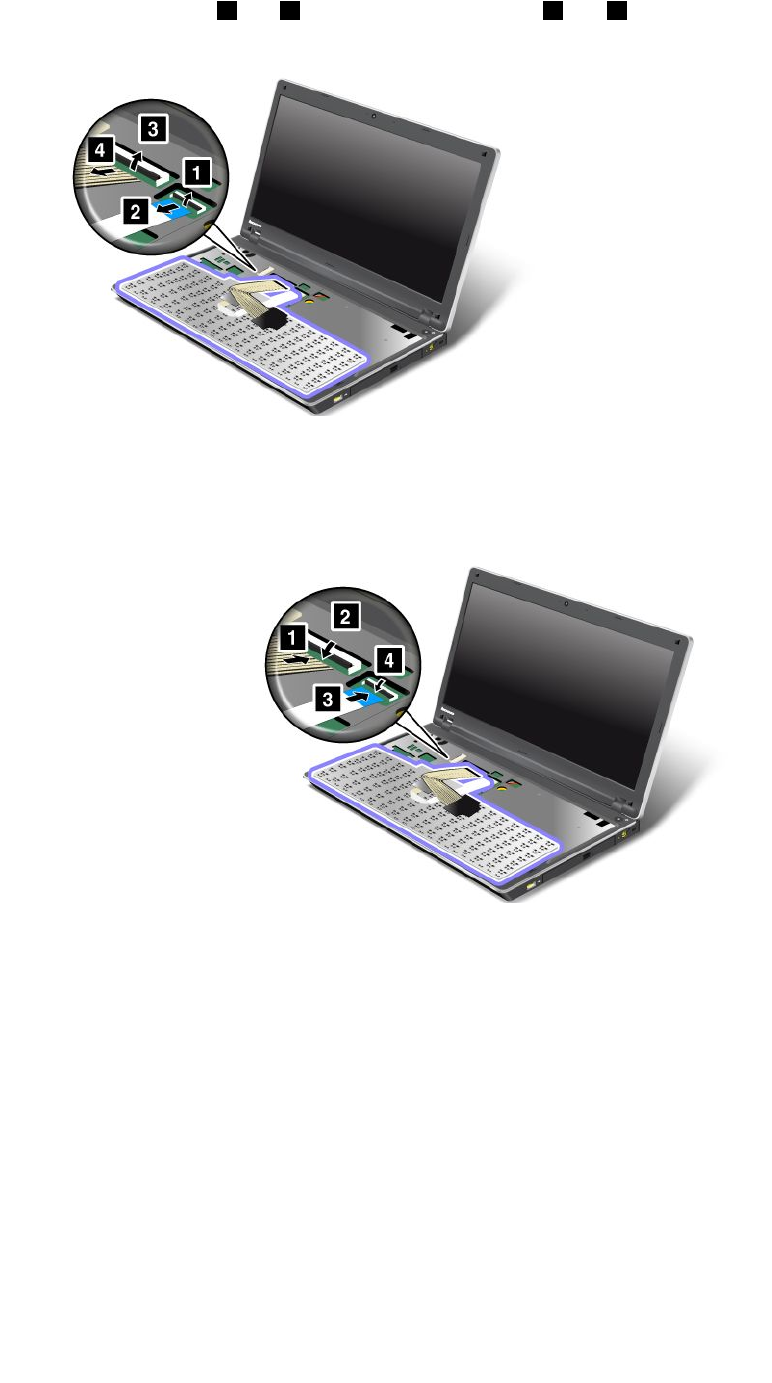
7.Removethecables2and4byippingtheconnectors1and3upwards.Nowthekeyboardhas
beenremoved.
Installingthekeyboard
Toinstallthekeyboard,dothefollowing:
1.Attachthecables.
Chapter6.Replacingdevices101
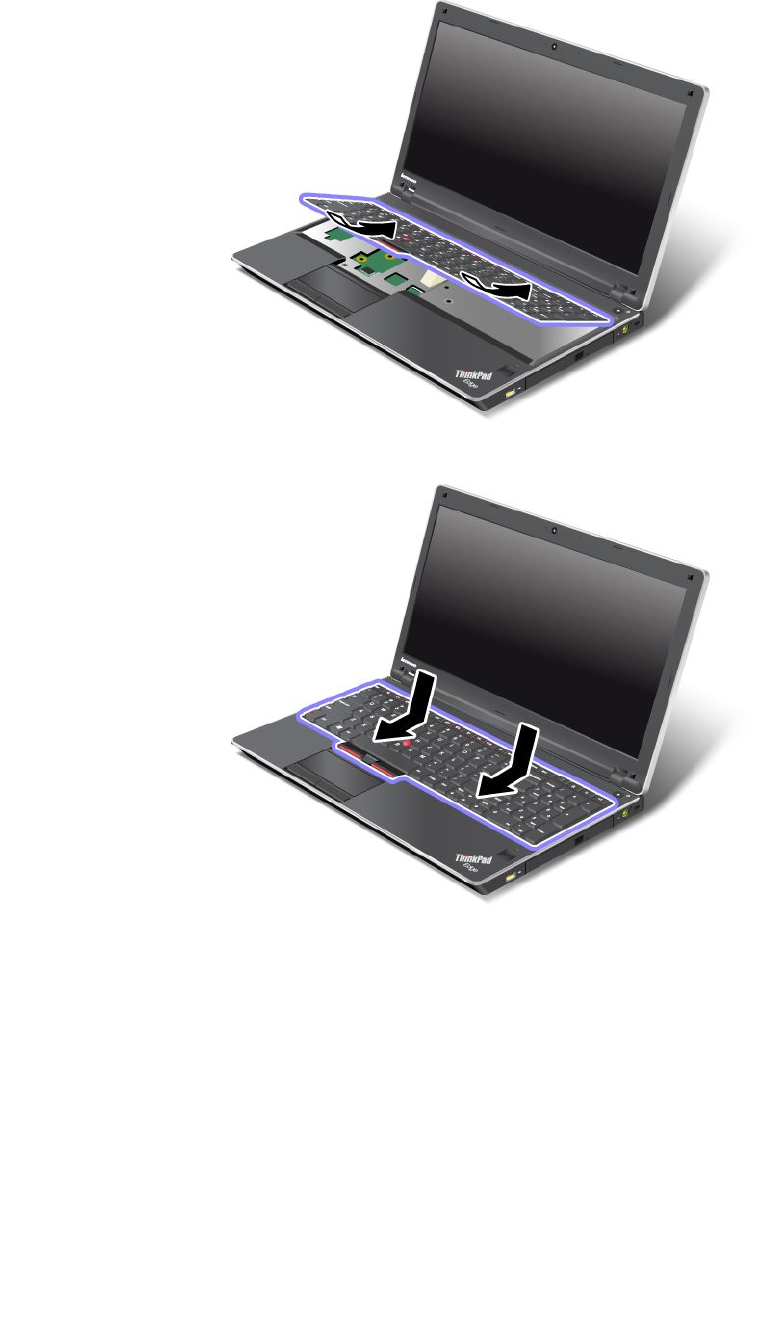
2.Insertthekeyboard.Makesurethattherearedgesofthekeyboardareundertheframe,asshownby
thearrows.
3.Slidethekeyboardasshownbythearrows.
102UserGuide
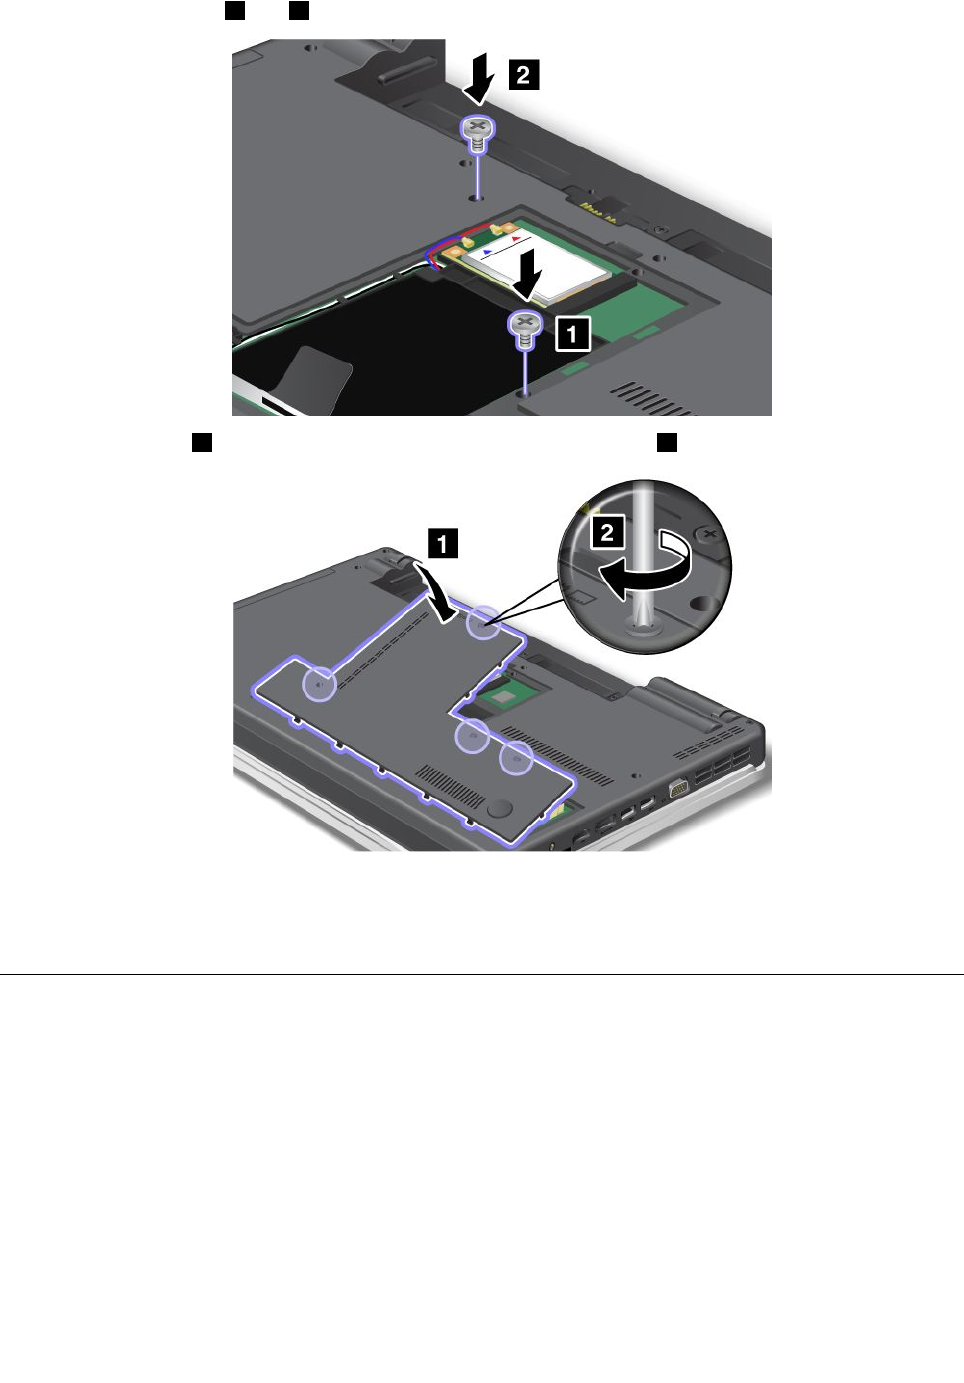
4.Reinstallthescrews1and2.
5.Attachthecover1,pivotitdownwards,andthentightenthescrews2.
6.Reinstallthebattery.Formoreinformationabouthowtoreinstallthebattery,referto“Replacingthe
battery”onpage77.
7.Turnthecomputeroveragain.Connecttheacpoweradapterandcablestothecomputer;thenturniton.
ReplacingtheSIMcard
Beforeyoustart,printtheseinstructions.
YourcomputermayrequireaSIM(SubscriberIdenticationModule)cardtoestablishawirelessWAN(Wide
AreaNetwork)connections.Dependingonthecountryofdelivery,theSIMcardmaybealreadyinstalledin
yourcomputerorwillbepartoftheshippingcontentsthatcamewithyourcomputer.
IfyoundtheSIMcardsincludedintheshippingcontents,adummycardisinstalledintheSIMcard
slot.Thenproceedtothefollowinginstructions.
Ifyoundthedummycardintheshippingcontents,theSIMcardisalreadyinstalledintheSIMcard
slot,andnofurtherinstallationisneeded.
Chapter6.Replacingdevices103
Note:TheSIMcardisidentiedbytheICchipmountedononesideofthecard.
Replacementinstructions
ToreplacetheSIMcard,doasfollows:
1.Turnoffthecomputer;thendisconnecttheacpoweradapterandallcablesfromthecomputer.
2.Closethecomputerdisplay,andturnitover.
3.Removethebattery.Formoreinformation,referto“Replacingthebattery”onpage77.
4.FindtheSIMcardslotinsidetheopenbatterycompartment.PushtheSIMcardinward1,and
removeitoutoftheslot2.
5.InserttheSIMcardrmlyintotheslot.
Note:MakesurethatyouinserttheSIMcardallthewayintotheslot.
6.Putthebatterybackinplace,turnthecomputeroveragain,andreconnectthecables.Formore
informationabouthowtoreinstallthebattery,referto“Replacingthebattery”onpage77.
104UserGuide

Chapter7.Enhancingyourcomputer
Thissectionprovidesinformationoninstallingdevicesandtakingadvantageofyourcomputer's
high-technologyfeatures.
FindingThinkPadoptions
Ifyouwanttoexpandthecapabilitiesofyourcomputer,Lenovohasanumberofhardwareaccessoriesand
upgradestomeetyourneeds.Optionsincludememory,storage,networkingadapters,andportreplicators,
batteries,poweradapters,printers,scanners,keyboards,mice,andmore.
YoucanshopatLenovo24hoursaday,7daysaweekdirectlyovertheWorldWideWeb.Allyouneedisan
Internetconnectionandacreditcard.
ToshopatLenovo,goto:
http://www.lenovo.com/accessories/services/index.html
©CopyrightLenovo2011105

106UserGuide

Chapter8.Advancedconguration
Whileitisimportanttoprotectles,data,andsettingsthatareontheharddiskdrive,youmayalsoneedto
installanewoperatingsystem,installnewdevicedrivers,updateyoursystemUEFI,orrecoverpreinstalled
software.Thisinformationwillhelpyouhandleyourcomputerwithpropercareandkeepitintopworking
shape.
•“Installinganewoperatingsystem”onpage107
•“Installingdevicedrivers”onpage111
•“ThinkPadSetup”onpage113
Installinganewoperatingsystem
Ifyouinstallanewoperatingsysteminyourcomputer,youneedtoinstalltheSupplementlesandThinkPad
devicedriversforitatthesametime.Thenecessarylesarelocatedinthefollowingdirectoriesofyour
harddiskdrive:
•TheSupplementlesfortheoperatingsystemsupportedareintheC:\SWTOOLS\OSFIXESdirectory.
•ThedevicedriversfortheoperatingsystemsupportedareintheC:\SWTOOLS\DRIVERSdirectory.
•ThepreloadedsoftwareapplicationsareintheC:\SWTOOLS\APPSdirectory.
Notes:
•Theprocessofinstallingthenewoperatingsystemdeletesallthedataonyourharddisk,including
backupsorimagesthatwerestoredinahiddenfolderbyuseoftheRescueandRecoveryprogram.
•IfyoucannotndtheSupplementles,thedevicedrivers,andapplicationsoftwareyouneedonyour
harddiskdrive,orifyouwanttoreceiveupdatesandthelatestinformationaboutthem,refertothe
ThinkPadWebsiteathttp://www.lenovo.com/ThinkPadDrivers.
Beforeyoubegin
Beforeyouinstalltheoperatingsystem,dothefollowing:
•CopyallthesubdirectoriesandlesintheC:\SWTOOLSdirectorytoaremovablestoragedevice,toavoid
losinglesduringtheinstallation.
•Printthesectionsyouwillbeusing.Gotothesectionfortheoperatingsystemyouareusing:
–“InstallingWindows7”onpage108
–“InstallingWindowsXP”onpage109
Note:IfyourcomputerisaWindows7model,32-bitversionsofWindowsdonotsupportUEFIBIOS
features.Only64-bitversionsofWindowscantakeadvantageofthefeaturesenabledby64-bitUEFIBIOS.
IfyouwanttostartWindowsRecoveryEnvironment(WinRE)using64-bitversionofMicrosoftWindows
InstallationDVD,youshouldnotchangetheinitialUEFI/LegacyBootsettinginThinkPadSetup.The
UEFI/LegacyBootsettingmustbethesameasitwaswhentheWindowsOSimagewasinstalled.Or,you
willseeanerror.
Forthecountryorregioncoderequiredintheinstallation,useoneofthefollowing:
Countryorregion:Code
•China:SC
©CopyrightLenovo2011107

•Denmark:DK
•Finland:FI
•France:FR
•Germany:GR
•Italy:IT
•Japan:JP
•Netherlands:NL
•Norway:NO
•Spain:SP
•Sweden:SV
•TaiwanandHongKong:TC
•UnitedStates:US
InstallingWindows7
ToinstallWindows7anditsrelatedsoftwareonyourcomputer,doasfollows:
1.StarttheThinkPadSetup.
2.SelectStartupmenu.
3.SelectUEFI/LegacyBoot.
4.Dooneofthefollowing:
•IfyouwanttoinstalltheWindows732–bitoperatingsystem,selectLegacyOnlyorBoth.
•IfyouwanttoinstalltheWindows764–bitoperatingsysteminLegacymode,selectLegacyOnly.
•IfyouwanttoinstalltheWindows764–bitoperatingsysteminUEFImode,selectUEFIOnly.
5.PressF10.
6.InserttheDVDforWindows7intotheDVDdrive,andrestartthecomputer.
7.InstalltheIntelChipsetSupportforWindows2000/XP/Vista/7.Todothis,referto“InstallingIntel
ChipsetSupportforWindows2000/XP/Vista/7”onpage112.
8.ApplythePCMCIAPowerPolicyRegistryPatch.Todothis,gotoC:\SWTOOLS\OSFIXES\PCMCIAPW\,
double-clickinstall.bat,andthenfollowtheinstructionsthatappearonthescreen.
9.Installdevicedrivers.Todothis,referto“Installingdriversandsoftware”onpage112.
InstallingtheWindows7UpdateModulePackage
TheWindows7UpdateModulesareinthefollowingdirectory:
C:\SWTOOLS\OSFIXES\
Thenameofeachsubfolderisthenumberofaxmodule.Forinformationabouteachxmodule,visitthe
MicrosoftKnowledgeBasehomepageathttp://support.microsoft.com/,typethenumberofthexmodule
youneedinthesearcheld,andclickSearch.
Note:TheWebsiteaddressmightchangewithoutnotice.Ifthehomepageisnotdisplayed,searchforit
fromtheMicrosofttoppage.
Toinstallaxmodule,runtheEXEleinasubfolderandfollowtheinstructionsonthescreen.
Note:Ifyouremovetheharddiskdrivefromthecomputerwithasingle-coreprocessorandinstallitona
computerwithadual-coreprocessor,youcangetaccesstotheharddiskdrive.Theopposite,however,is
108UserGuide

nottrue:Ifyouremovetheharddiskdrivefromacomputerwithadual-coreprocessorandinstallitona
computerwithasingle-coreprocessor,youcannotgetaccesstotheharddiskdrive.
InstallingWindowsXP
Beforeyoustart,printtheseinstructions.
Note:YourcomputersupportsWindowsXPwithServicePack3.BeforeyouinstalltheWindowsXPService
Pack3,makesureyouinstalltheWindowsXPServicePack2rst.
Note:
TomakesurethatgraphicsworksnormallyonWindowsXP,changetheThinkPadSetupsettingbefore
installingWindowsXP.
1.StarttheThinkPadSetup.
2.SelectCong.
3.SelectDisplay.
4.SelectIntegratedGraphicsforGraphicsDevice.
5.SelectEnableforOSDetectionforSwitchableGraphics.
6.PressF10tosavethechange.
YoumustinstallIntelRapidStorageTechnologyDriverbeforeinstallingtheoperatingsystem.Toinstallit,you
mayneedtoattachadiskettedrivetoyourcomputer.Ifyouhaveadiskettedrive,followtheprocedurebelow.
Beforeinstallingtheoperatingsystem,installIntelRapidStorageTechnologyDriver,asfollows:
Note:BesuretoinstallIntelRapidStorageTechnologyDriverbeforeinstallingtheoperatingsystem.
Otherwiseyourcomputerwillnotrespond;itwillonlydisplayabluescreen.
1.Attachadiskettedrivetoyourcomputer.
2.CopyIntelRapidStorageTechnologyDriverfromC:\SWTOOLS\DRIVERS\IRSTtoadiskette.
3.TomakesurethatSATAAHCIisenabled,starttheThinkPadSetup.
4.SelectCong.
5.SelectSerialATA(SATA).
6.SelectAHCI.
7.Changethestartupsequenceofyourcomputer.FollowingtheinstructionsontheStartupmenuinthe
ThinkPadSetup,settheCD-ROMdrivetostartrst.
8.PressF10.
9.InserttheCDforWindowsXPintegratedwithServicePack2intotheCDorDVDdrive.
10.Toinstallathird-partySCSIdriverrst,pressF6.
11.Whenprompted,selectSforSpecifyAdditionalDevice.
12.Whenprompted,insertthediskettethatyoucreatedinstep2,andpressEnter.
13.Scrollthelistofdrivers.SelectIntelMobileExpressChipsetSATAAHCIController,andpressEnter.
14.Tocontinuetheinstallation,pressEnteragain.Leavethedisketteinthedriveuntilthenextreboot;the
softwaremayneedtobecopiedfromthedisketteagainwhenthelesarecopiedduringsetup.
15.CompletetheinstallationofWindowsXPServicePack2byfollowingOSinstallinginstructions.
16.InstallWindowsXPServicePack3.YoucaninstalltheWindowsXPServicePack3usingtheWindows
XPServicePack3InstallationCDordownloaditfromeitherMicrosoftDownloadCenterorMicrosoft
WindowsupdateWebsite.
Chapter8.Advancedconguration109

17.InstalltheIntelChipsetSupportforWindows2000/XP/Vista/7.Todothis,referto“InstallingIntel
ChipsetSupportforWindows2000/XP/Vista/7”onpage112.
18.ApplythePCMCIAPowerPolicyRegistryPatch.Todothis,gotoC:\SWTOOLS\OSFIXES\PCMCIAPW\,
double-clickinstall.bat,andthenfollowtheinstructionsthatappearonthescreen.
19.Installdevicedrivers.Todothis,referto“Installingdriversandsoftware”onpage112.
Ifyoudonothaveadiskettedrive,youcaninstallIntelRapidStorageTechnologyDriverbythe
followingalternativeprocedure:
Note:IfyouselectAHCIforSerialATA(SATA)intheThinkPadSetupbeforeinstallingIntelRapidStorage
TechnologyDriver,yourcomputerwillnotrespond;itwillonlydisplayabluescreen.
1.StarttheThinkPadSetupmenu.
2.SelectCong.
3.SelectSerialATA(SATA).
4.SelectCompatibility.
5.Changethestartupsequenceofyourcomputer.FollowingtheinstructionsontheStartupmenuinthe
ThinkPadSetup,settheCD-ROMdrivetostartrst.
6.PressF10.
7.InserttheinstallationCDforWindowsXPintegratedwithServicePack2intotheCDorDVDdrive.After
theinstallationofWindowsXPSP2isnished,restartthecomputer.
8.CompletetheinstallationofWindowsXPServicePack2byfollowingOSinstallinginstructions.
9.InstallWindowsXPServicePack3.YoucaninstalltheWindowsXPServicePack3usingtheWindows
XPServicePack3InstallationCDordownloaditfromeitherMicrosoftDownloadCenterorMicrosoft
WindowsupdateWebsite.
10.RunIntelRapidStorageTechnologyDriver.Todothis,gotoC:\DRIVERS\WIN\IRST\PREPARE,and
double-clickinstall.cmd.
11.Turnthecomputeroffandthenonagain.
12.StarttheThinkPadSetupmenu.
13.SelectCong.
14.SelectSerialATA(SATA).
15.SelectAHCI.
16.StartWindowsXP.TheWelcometotheFoundNewHardwareWizardappears.
17.SelectNo,notthistime,andthenclickNext.
18.SelectInstallfromalistorspeciclocation(Advanced),andthenclickNext.
19.SelectSearchforthebestdriverintheselocations.ThenselectIncludethislocationinthesearch:,
specifythepath,C:\DRIVERS\WIN\IRST,andclickNext.TheCompletingtheFoundNewHardware
Wizardappears.
20.ClickFinish.
21.WhentheSystemSettingsChangewindowappears,clickY es.Thecomputerrestarts.
22.InstalltheIntelChipsetSupportforWindows2000/XP/Vista/7.Todothis,referto“InstallingIntel
ChipsetSupportforWindows2000/XP/Vista/7”onpage112.
23.ApplythePCMCIAPowerPolicyRegistryPatch.Todothis,gotoC:\SWTOOLS\OSFIXES\PCMCIAPW\,
double-clickinstall.bat,andthenfollowtheinstructionsthatappearonthescreen.
24.Installdevicedrivers.Todothis,referto“Installingdriversandsoftware”onpage112.
110UserGuide

Note:Ifyouremovetheharddiskdrivefromthecomputerwithasingle-coreprocessorandinstallitona
computerwithadual-coreprocessor,youcangetaccesstotheharddiskdrive.Theopposite,however,is
nottrue:Ifyouremovetheharddiskdrivefromacomputerwithadual-coreprocessorandinstallitona
computerwithasingle-coreprocessor,youcannotgetaccesstotheharddiskdrive.
Installingdevicedrivers
Toinstalldevicedrivers,refertothefollowingwebsite:
http://www.lenovo.com/support
Installingthedriverfor4-in-1mediacardreader
Tousethe4-in-1mediacardreader,youneedtodownloadandinstalltheRicohMultiCardReaderDriverfor
Windows7/VistaandWindowsXPx86/x64.Todownloadit,gototheLenovoWebsiteat:
http://www.lenovo.com/ThinkPadDrivers
InstallingThinkPadMonitorFileforWindows2000/XP/Vista/7
ThinkPadMonitorFileforWindows2000/XP/Vista/7isinthefollowingdirectory:
C:\SWTOOLS\DRIVERS\MONITOR.
Note:Ifyoucannotndthisdirectoryonyourharddiskdrive,downloadtheThinkPadMonitorFilefor
Windows2000/XP/Vista/7fromtheThinkPadWebsiteat:
http://www.lenovo.com/ThinkPadDrivers
Note:Beforeyouinstallthisle,makesurethatthecorrectvideodriverhasbeeninstalled.
ForWindows7
1.Right-clickonthedesktop,andclickPersonalize.
2.ClickDisplayattheleft.
3.ClickChangedisplaysettings.
4.ClickAdvancedSettings.
5.ClicktheMonitortab.
6.ClickProperties.
7.ClicktheDrivertab.
8.ClickUpdateDriver.
9.SelectBrowsemycomputerfordriversoftware,andthenclickLetmepickfromalistofdevice
driversonmycomputer.
10.ClickHaveDisk.
11.SpecifypathC:\SWTOOLS\DRIVERS\MONITORtothismonitorINF.Then,clickOpen.
12.ClickOK.
13.Conrmthecorrectdisplaytype,thenclickNext.
14.Windowshasnishedinstalling.ClickClose.
15.ClickCloseforDisplayProperties.
16.ClickOKintheMonitortab.
17.ClickOKandclosetheDisplaySettingswindow.
ForWindowsXP
1.Right-clickonthedesktopandselectPropertiesfromthepopupmenu.
Chapter8.Advancedconguration111

2.SelecttheSettingstab.
3.ClicktheAdvancedtab.
4.SelecttheMonitortab.
5.SelectPlugandPlayMonitorfromthemonitortypelist.
6.ClickProperties.
7.SelecttheDrivertabandclickUpdateDriver.TheHardwareUpdateWizardstarts.
8.SelectNo,notthistimeforWindowsUpdateconnection,andthenclickNext.
9.SelectInstallfromalistorspeciclocation(Advanced).
10.ClickNext.
11.SelectDon'tsearch,Iwillchoosethedrivertoinstall.
12.ClickNext.
13.ClickHaveDisk.
14.ClickBrowse.
15.SpecifyC:\SWTOOLS\DRIVERS\MONITORaslocationdirectoryandselectTPLCD.INF.
16.ClickOK.
17.SystemwillshowThinkPadDisplay.ClickNext.SystemwillcopyThinkPadMonitorINFleandcolor
prole.
18.ClickFinishandthenClose.
19.ClicktheColorManagementtab.
20.ClickAdd.
21.SelectTPFLX.ICMorTPLCD.ICMandclickAdd.
22.ClickOKandclosetheDisplayPropertieswindow.
InstallingIntelChipsetSupportforWindows2000/XP/Vista/7
Beforeyoubegin
Beforeyouinstalltheoperatingsystem,CopyallthesubdirectoriesandlesintheC:\SWTOOLSdirectorytoa
removablestoragedevice,toavoidlosinglesduringtheinstallation.
ToinstallIntelChipsetSupportforWindows2000/XP/Vista/7,dothefollowing:
1.RestoreC:\SWTOOLSfromthebackupcopyyoumadebeforestartingtheinstallation.
2.Runinnst_autol.exeinC:\SWTOOLS\DRIVERS\INTELINF.
Installingdriversandsoftware
ThedevicedriversareprovidedintheC:\SWTOOLS\DRIVERSdirectoryonyourharddiskdrive.Youwillalso
needtoinstallapplicationsoftware,whichisprovidedintheC:\SWTOOLS\APPSdirectoryonyourharddisk
drive.Todothis,refertotheinstructionsin“Reinstallingpreinstalledapplicationsanddevicedrivers”
onpage74.
Note:IfyoucannotndtheSupplementles,devicedrivers,andapplicationsoftwareyouneedonyour
harddiskdrive,orifyouwanttoreceiveupdatesandthelatestinformationaboutthem,refertotheThinkPad
Websiteat:
http://www.lenovo.com/ThinkPadDrivers
112UserGuide
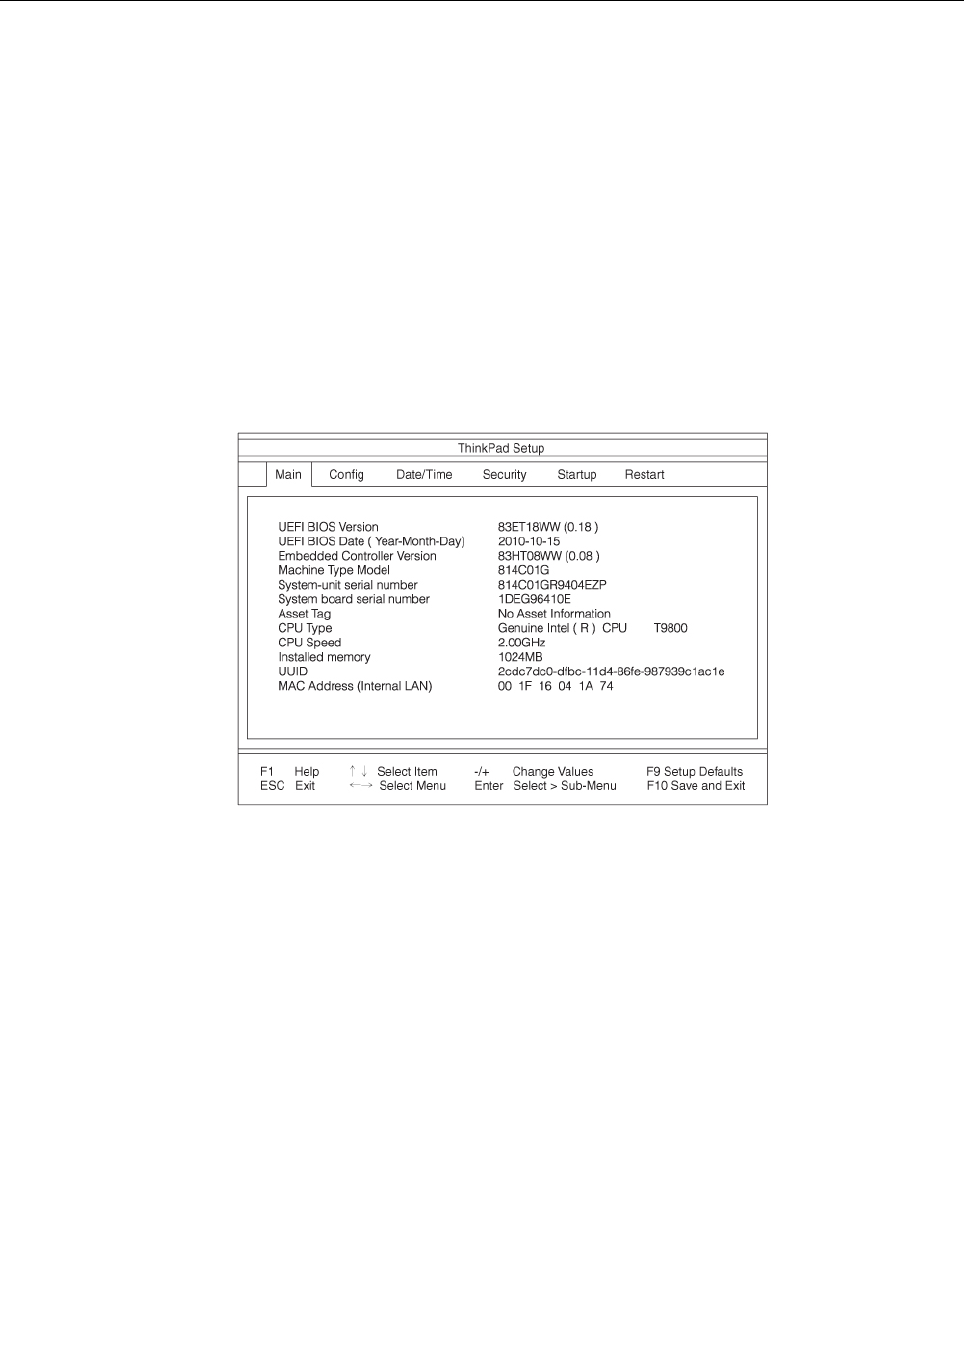
ThinkPadSetup
Yourcomputerprovidesaprogram,calledThinkPadSetup,thatenablesyoutoselectvarioussetup
parameters.
TostartThinkPadSetup,doasfollows:
1.Toprotectyourselfagainstaccidentallossofdata,backupyourcomputerregistry.See“Performing
backupandrecoveryoperations”onpage71.
2.Ifthediskettedriveisconnectedtothecomputer,removeanydiskettefromthediskettedrive,and
thenturnoffthecomputer.
3.Turnonthecomputer.Whenthelogoscreenisdisplayed,presstheF1key.TheThinkPadSetupopens.
Ifyouhavesetasupervisorpassword,theThinkPadSetupmenuappearsafteryouenterthepassword.
YoucanstarttheThinkPadSetupbypressingEnterinsteadofenteringthesupervisorpassword.
However,youcannotchangetheparametersthatareprotectedbythesupervisorpassword.Formore
information,referto“Usingpasswords”onpage59.
AnexampleoftheThinkPadSetupmenuisshownasbelow:
4.Usingthecursorkeys,movetoanitemyouwanttochange.Whentheitemyouwantishighlighted,
pressEnter.Asubmenuisdisplayed.
5.Changetheitemsyouwishtochange.Tochangethevalueofanitem,press+/-.Iftheitemhasa
submenu,youcandisplayitbypressingEnter.
6.PressEsctoexitfromthesubmenu.
7.Ifyouareinanestedsubmenu,pressEscrepeatedlyuntilyoureachtheThinkPadSetupmenu.
Note:Ifyouneedtorestorethesettingstotheiroriginalstateasofthetimeofpurchase,pressF9to
loadthedefaultsettings.YoucanalsoselectanoptionintheRestartsubmenutoloadthedefault
settingsordiscardthechanges.
8.SelectRestart.Movethecursortotheoptionyouwantforrestartingyourcomputer;thenpressEnter.
Yourcomputerrestarts.
Congmenu
Ifyouneedtochangethecongurationofyourcomputer,selectCongfromtheThinkPadSetupmenu.
Notes:
•Thedefaultsettingsarealreadyoptimizedforyou.Ifyouconsiderchangingthecomputerconguration,
proceedwithextremecaution.Settingthecongurationincorrectlymightcauseunexpectedresults.
Chapter8.Advancedconguration113

•Ineachsubmenu,youcanenableafunctionbyselectingEnabled,ordisableitbyselectingDisabled.
Thefollowingsubmenuisdisplayed:
•Network:SettheLANfunction.
•USB:EnableordisableUSBrelatedfunctions.
•Keyboard/Mouse:Setthekeyboardandthemouserelatedfunctions.
•Display:Specifythesettingsfordisplayoutput.
•Power:Setpowermanagementrelatedfunctions.
•BeepandAlarm:Enableordisabletheaudiorelatedfunctions.
•SerialATA(SATA):Specifythesettingsfortheharddiskdrive.
•CPU:SpecifythesettingsfortheCPU.
Dateandtimemenu
Ifyouneedtosetthecurrentdateandtimeofyourcomputer,selectDate/TimefromtheThinkPadSetup
menu.Thefollowingsubmenuisdisplayed:
•SystemDate
•SystemTime
Tochangethedateandtime,dothefollowing:
1.Usingtheupanddownarrowkeys,selecttheitemtochange-dateortime.
2.PressTab,ShiftTab,orEntertoselectaeld.
3.Typethedateortime.
Note:AnotherwaytoadjustdateandtimeispressingF5orF6.
4.PressF10tosavethechangesandrestartthesystem.
Securitymenu
Ifyouneedtosetthesecurityfeaturesofyourcomputer,selectSecurityfromtheThinkPadSetupmenu.
Notes:
•Thedefaultsettingsarealreadyoptimizedforyou.Ifyouconsiderchangingthecomputerconguration,
proceedwithextremecaution.Settingthecongurationincorrectlymightcauseunexpectedresults.
•Ineachsubmenu,youcanenableafunctionbyselectingEnabled,ordisableitbyselectingDisabled.
Thefollowingsubmenuisdisplayed:
•Password:Setapassword.
•UEFIFirmwareUpdateOption:SpecifythesettingsforFlashFirmwareupdate.
•MemoryProtection:SpecifythesettingsfortheDataExecutionPreventionfeature.
•Virtualization:EnableordisablethesettingsforIntelVirtualizationTechnologyandIntelVT-dFeature.
•I/OPortAccess:EnableordisabletheaccesstoindividualI/Oports.
•Anti-Theft:EnableordisableUEFIinterfacetoactivateAnti-Theftservices,suchasIntelAT-pand
Computrace.
Tosetapassword,gototheSecuritymenuandselectPassword.Thefollowingsubmenuisdisplayed:
•SupervisorPassword
114UserGuide

•LockUEFISettings
•SetMinimumLength
•Passwordatunattendedboot
•Passwordatrestart
•Power-OnPassword
•HardDiskxPassword
Notes:
•HardDisk1meanstheharddiskdrivebuiltintoyourcomputer.
LockUEFISettingsenablesordisablesthefunctionthatprotectsitemsintheThinkPadSetupfrombeing
changedbyauserwhodoesnothavethesupervisorpassword.Bydefault,thisissettoEnabled.If
yousetthesupervisorpasswordandenablethisfunction,noonebutyoucanchangeanyitemsinthe
ThinkPadSetup.
IfyouselectSetMinimumLength,youcanspecifyaminimumlengthforpower-onpasswordsandhard
diskpasswords.Bydefault,thisissettoDisabled.Ifyousetthesupervisorpasswordandspecifya
minimumlengthforpasswords,noonebutyoucanchangethelength.
IfyouselectandenablePasswordatunattendedboot,apasswordpromptisdisplayedwhenthecomputer
isturnedon,fromeitherapower-offstateorhibernation.IfyouselectDisabled,nopasswordpromptis
displayed;thecomputergoesaheadandloadstheoperatingsystem.Topreventunauthorizedaccess,set
theuserauthenticationontheoperatingsystem.
IfyouselectandenablePasswordatrestart,apasswordpromptisdisplayedwhenyourestartthe
computer.IfyouselectDisabled,nopasswordpromptisdisplayed;thecomputergoesaheadandloadsthe
operatingsystem.Topreventunauthorizedaccess,settheuserauthenticationontheoperatingsystem.
Startupmenu
Youmayneedtochangethestartupsequenceofyourcomputer.Forexample,ifyouhavedifferentoperating
systemsondifferentdevices,youcanhavethesystemstartupfromeitherofthem.
Attention:Afteryouchangeyourstartupsequence,youmustbeextremelycarefulnottospecifyawrong
deviceduringacopy,asave,oraformatoperation.Ifyouspecifyawrongdevice,yourdataandprograms
mightbeerasedoroverwritten.
Attention:IfyouareusingtheBitLocker®driveencryption,youshouldnotchangethestartupsequence.
BitLockerdriveencryptiondetectsthechangeofstartupsequenceandlocksthecomputerfrombooting.
Changingthestartupsequence
SelectingStartuptodisplaytheBootsubmenu.
Tochangethestartupsequence,dothefollowing:
1.SelectBoot;thenpressEnter.
YoucanusetheBootsubmenutospecifythestartupsequencethatrunswhenyouturnonthepower.
Referto“Bootsubmenu”onpage116.
2.Selectthedeviceyouwanttostartrst.
3.PressF10tosavethechangesandrestartthesystem.
Tochangethestartupsequencetemporarilysothatthesystemstartsupfromadifferentdrive,dothe
following:
Chapter8.Advancedconguration115

1.Turnoffthecomputer.
2.Turnonthecomputer;then,whilethe“Tointerruptnormalstartup,pressEnter”messageisdisplayedat
thelower-leftofthescreen,pressF12.
3.SelectthedeviceyouwanttostartrstfromtheBootmenu.
Note:TheBootmenuwillbeshownwhenthesystemthatcannotbootfromanydevicesoroperating
systemwasnotfound.
Bootsubmenu
Thefollowinglist,showingtheorderinwhichdeviceswillbestartedup,isalwaysdisplayed.Evendevices
thatarenotattachedtoorinstalledonyourcomputerarelisted.Foreachdevicethatisattachedtoor
installedonthecomputer,informationaboutitispresentedafterthecolon.
1.USBCD:
2.USBFDD:
3.ATAPICD0:
4.ATAHDD0:
5.USBHDD:
6.PCILAN:
OtheritemsintheStartupmenu
ThefollowingitemsarealsodisplayedintheStartupmenuoftheThinkPadSetup:
•UEFI/LegacyBoot:Selectsystembootcapability.
•UEFI/LegacyBootPriority:SelectpriorityofbootoptionbetweenUEFIandLegacy.
•BootMode:Enableordisablethediagnosticsbootmode.
•OptionKeyDisplay:Choosewhethertoshowtheoptionkeymessagewhenthesystemisbooted.
•BootdeviceListF12Option:Choosewhethertoshowthepop-uplistofthebootdevices.
•BootOrderLock:EnableordisabletheBootPriorityOrderlock.
Restartmenu
IfyouneedtoclosetheThinkPadSetupandrestartthesystem,selectRestartfromtheThinkPadSetup
menu.Thefollowingsubmenuisdisplayed:
•ExitSavingChanges:Restartthesystemaftersavingthechanges.
•ExitDiscardingChanges:Restartthesystemwithoutsavingthechanges.
•LoadSetupDefaults:Loadthedefaultsettingthatwasineffectatthetimeofpurchase.
•DiscardChanges:Discardthechanges.
•SaveChanges:Savethechanges.
ThinkPadSetupitems
ThefollowingtablesshowthecontentsoftheCongmenuitems,theSecuritymenuitems,andtheStartup
menuoftheThinkPadSetup.
Note:Someitemsaredisplayedonthemenuonlyifthecomputersupportsthecorrespondingfeatures.
Notes:
•Enabledmeansthatthefunctioniscongured.
116UserGuide

•Disabledmeansthatthefunctionisnotcongured.
•Defaultvaluesareinboldface.
Congmenuitems
Table4.Congmenuitems
MenuitemSubmenuitemSelectionComments
NetworkEthernetLANOptionROM•Disabled
•Enabled
LoadstheEthernetLAN
OptionROMtoenable
startupfromanintegrated
networkdevice.
USBUEFISupport•Disabled
•Enabled
Enableordisableboot
supportforUSBdiskette
andUSBCD-ROM.
AlwaysOnUSB•Disabled
•Enabled
Ifyouselect“Disabled,”the
externalUSBdevices
cannotbechargedviaUSB
ports.
USB
AlwaysOnUSBChargein
offmode
•Disabled
•Enabled
Ifyouselect“Enabled,”the
AlwaysOnUSBconnector
enablesyoutochargesome
devices,suchassuchas
iPodandiPhoneand
BlackBerrysmartphones,
byattachingthedevicesto
theconnector.
Note:Ifyouwanttocharge
thesedeviceswhenyour
computerisinhibernation
modeorpoweredoff,you
willneedtoopenthePower
Managerprogramand
congurecorresponding
settingstoenablethe
AlwaysOnUSBconnector
function.Fordetails
abouthowtoenablethe
AlwaysOnUSBconnector
function,refertotheonline
helpofthePowerManager
program.
FnandCtrlKeyswap•Disabled
•Enabled
Ifyouselect“Enabled”,the
FnkeyworksastheCtrl
key,andtheCtrlkeyworks
astheFnkey.
Note:Evenwhen
“Enabled”isselected,
youneedtopresstheFn
keytoreturnthecomputer
fromsleepmodetonormal
operation.
FnKeyLock•Disabled
•Enabled
EnableordisabletheFn
keylock.
Keyboard/Mouse
Chapter8.Advancedconguration117

Table4.Congmenuitems(continued)
MenuitemSubmenuitemSelectionComments
Changeto“F1–F12keys”•Default
•Legacy
Ifyouselect“Default”,
pressingF1–F12initiates
specialfunctionsillustrated
oneachkey.Ifyou
select“Legacy”,youcan
useF1–F12asstandard
functionkeys.
BootDisplayDevice•ThinkPadLCD
•Analog(VGA)
•DigitalonThinkPad
Selectthedisplaydevice
thatistobeactiveatboot
time.Thisselectionis
effectiveforboottime,
passwordprompt,and
ThinkPadSetup.
GraphicsDevice•IntegratedGraphics
•SwitchableGraphics
IntegratedGraphics
provideslongerbatterylife,
andSwitchableGraphics
enhancesperformance.
Display
OSDetectionfor
SwitchableGraphics
•Disabled
•Enabled
Ifyouselect“Enabled,”the
systemUEFIautomatically
switchesthegraphics
devicesettingtoSwitchable
Graphicsmodeifthe
operatingsystemsupports
thisfeature,andto
IntegratedGraphicsmodeif
theoperatingsystemdoes
notsupportthisfeature.
IntelSpeedStep®
technology(Intel
SpeedStepmounted
modelsonly)
•Disabled
•Enabled
ModeforAC
•MaximumPerformance
•BatteryOptimized
ModeforBattery
•MaximumPerformance
•BatteryOptimized
SelectthemodeofIntel
SpeedSteptechnologyin
theuserUEFIatruntime.
OpticalDriveSpeed•HighPerformance
•Normal
•Silent
SettheOpticalDrive
Speed.
CPUPowerManagement•Disabled
•Enabled
Unlessthispower-saving
featureisdisabled,it
stopstheprocessorclock
automaticallywhenthere
isnosystemactivity.You
usuallydon'tneedto
changethisfunction.
Power
PCIExpressPower
management
•Disabled
•Enabled
Enablesordisablesa
featurethatautomatically
adjustspowermanagement
whenthereisnoPCI
118UserGuide

Table4.Congmenuitems(continued)
MenuitemSubmenuitemSelectionComments
Expressactivity.You
usuallydon'tneedto
changethisfunction.
PowerControlBeep•Disabled
•Enabled
Ifthisfunctionisenabled,
abeepsoundswhenthe
computerentersapower
managementmode,whenit
resumesoperationalmode,
andwhentheacpower
adapterisconnectedor
disconnected.
LowBatteryAlarm•Disabled
•Enabled
Enableordisablethelow
batteryalarm.
PasswordBeep•Disabled
•Enabled
Ifyouenablethisfunction,
abeepsoundswhen
apasswordpromptis
displayed,andagainifyou
typeawrongpassword.
BeepandAlarm
KeyboardBeep•Enabled
•Disabled
Enableordisablekeyboard
beepwhenunmanageable
keycombinationsare
pressed.
SerialATA(SATA)SATAControllerMode
Option
•Compatibility
•AHCI
SelectSATAcontroller
operationmode.Ifyou
select“Compatibility
mode”,serialSATA
controlleroperatesin
compatibilitymode.
CoreMulti-Processing•Disabled
•Enabled
Enablesordisables
additionalexecutioncore
unitswithinaCPU.
Note:Ifyouareusinga
computerwithasingle-core
processor,thisitemdoes
notappear.
Note:ForCore
Multi-Processing,refer
totheinstructionsin
“InstallingWindowsXP”on
page109.
CPU
IntelHyper-Threading
Technology
•Disabled
•Enabled
Enablesordisables
additionallogical
processorswithina
processorcore.
Chapter8.Advancedconguration119

Securitymenuitems
Table5.Securitymenuitems
MenuitemSubmenuitemSelectionComments
PasswordReferto“Securitymenu”
onpage114and“Using
passwords”onpage59.
UEFIUpdateOptionFlashUEFIUpdatingby
End-Users
•Disabled
•Enabled
Ifyouselect“Enabled”,
alluserscanupdatethe
FlashUEFI.Ifyouselect
“Disabled”,onlytheperson
whoknowssupervisor
passwordcanupdatethe
FlashUEFI.
MemoryProtectionExecutionPrevention•Disabled
•Enabled
Somecomputerviruses
andwormscausememory
bufferstooverowby
runningcodewhereonly
dataisallowed.Ifthe
DataExecutionPrevention
featurecanbeusedwith
youroperatingsystem,then
byselecting“Enabled”you
canprotectyourcomputer
againstattacksbysuch
virusesandworms.Ifafter
choosing“Enabled”you
ndthatanapplication
programdoesnotrun
correctly,select“Disabled”
andresetthesetting.
IntelVirtualization
Technology
•Disabled
•Enabled
Ifyouselect“Enabled,”
aVMM(VirtualMachine
Monitor)canutilizethe
additionalhardware
capabilitiesprovided
byIntelVirtualization
Technology.
Virtualization
IntelVT-dFeature•Disabled
•Enabled
IntelVT-disIntel
VirtualizationTechnology
forDirectedI/O.When
enabled,aVMMcanutilize
theplatforminfrastructure
forI/Ovirtualization.
EthernetLAN•Disabled
•Enabled
Ifyouselect“Enabled”,you
canusetheEthernetLAN
device.
WirelessLAN•Disabled
•Enabled
Ifyouselect“Enabled”,you
canusetheWirelessLAN
device.
WiMAX•Disabled
•Enabled
Ifyouselect“Enabled”,you
canusetheWiMAXdevice.
WirelessWAN•Disabled
•Enabled
Ifyouselect“Enabled”,you
canusetheWirelessWAN
device.
I/OPortAccess
120UserGuide

Table5.Securitymenuitems(continued)
MenuitemSubmenuitemSelectionComments
Bluetooth•Disabled
•Enabled
Ifyouselect“Enabled”,
youcanusetheBluetooth
device.
USBPort•Disabled
•Enabled
Ifyouselect“Enabled”,you
canusetheUSBport.
Optical•Disabled
•Enabled
Ifyouselect“Enabled”,you
canusetheopticaldevice.
eSATAPort•Disabled
•Enabled
Ifyouselect“Enabled”,you
canusetheeSATAPort.
MemoryCardSlot•Disabled
•Enabled
Ifyouselect“Enabled”,
youcanusethe
MemoryCardslot(SD
Card/MultiMediaCard).
IntegratedCamera•Disabled
•Enabled
Ifyouselect“Enabled”,
youcanusetheIntegrated
Camera.
Microphone•Disabled
•Enabled
Ifyouselect“Enabled”,you
canusetheMicrophone
(Internal/External/Line-In).
FingerprintReader•Disabled
•Enabled
Ifyouselect“Enabled”,
youcanusethengerprint
reader.
IntelATModuleActivation•Disabled
•Enabled
•PermanentlyDisabled
Enablesordisablesthe
UEFIinterfacetoactivate
IntelAT-pmodulethatisan
optionalAnti-Theftservice
fromIntel.
Note:IfyousettheIntel
AT-pmoduleactivationto
“PermanentlyDisabled”,
youwillbeunabletoenable
thissettingagain.
Anti-Theft
ComputraceModule
Activation
•Disabled
•Enabled
•PermanentlyDisabled
Enablesordisablesthe
UEFIinterfacetoactivate
Computracemodule.
Computraceisanoptional
monitoringservicefrom
AbsoluteSoftware.
Note:Ifyousetthe
Computracemodule
activationto“Permanently
Disabled”,youwillbe
unabletoenablethis
settingagain.
Chapter8.Advancedconguration121

Startupmenuitems
Table6.Startupmenuitems
MenuitemSelectionComments
BootReferto“Startupmenu”onpage115.
NetworkBootReferto“Startupmenu”onpage115.
UEFI/LegacyBoot•Both
•UEFIOnly
•LegacyOnly
EnabletheUEFI/Legacyboot.
UEFI/LegacyBootPriority•UEFIFirst
•LegacyFirst
Selectpriorityofbootoptionbetween
UEFIandLegacy.
BootMode•Quick
•Diagnostics
Note:Youcanalsoenterthe
“Diagnostic”modebypressingEsc
duringPOST.
ScreenduringPOST:
•Quick:ThinkPadLogoscreenis
displayed.
•Diagnostics:Testmessagesare
displayed.
BeepatPOSTcompletion:
•Quick:No.Soundonerrorcase
only.
•Diagnostics:Yes.Alwayssounds.
“Ctrl-S”promptforon-board
Ethernet:
•Quick:No.
•Diagnostics:Yes.
MemorytestingduringPOST:
•Quick:Quicktest(ornotest).
•Diagnostics:Fulltest.
TestingotherdevicesduringPOST:
•Quick:Minimumtest(ornotest).
•Diagnostics:Canperform
necessarytestingforcritical
devices.
OptionKeysDisplay•Disabled
•Enabled
Ifyouselect“Disabled”,then“To
interruptnormalstartup,pressEnter”
messageisnotdisplayedduring
POST.
BootDeviceListF12Option•Disabled
•Enabled
Ifyouselect“Enabled”,theF12key
isrecognizedandtheBootMenuis
displayed.
BootOrderLock•Disabled
•Enabled
Ifyouselect“Enabled”,theBoot
PriorityOrderislockedforyourfuture
use.
122UserGuide

UpdatingyoursystemUEFIBIOS
TheUniedExtensibleFirmwareInterface(UEFI)BIOSisapartofthesystemprogramsthatmakeupthe
basiclayerofsoftwarebuiltintoyourcomputer.UEFIBIOStranslatestheinstructionsfromothersoftware
layers.
Yourcomputersystemboardhasamodulecalledelectricallyerasableprogrammableread-onlymemory
(EEPROM,alsoreferredtoasashmemory).YoucanupdateUEFIBIOSandtheConguration/ThinkPad
Setupprogrambystartingyourcomputerwithaashupdateopticaldiscorashupdatetoolapplication
runningontheWindowsenvironment.
Insomeinstanceswhenyouaddsoftware,hardware,oradevicedriver,youmaybeinformedthatyouneed
toupdateyourUEFIBIOSinorderforthenewadditiontoworkproperly.
ToupdateyourUEFIBIOS,gotothefollowingWebsiteandfollowtheinstructionsonthescreen:
http://www.lenovo.com/ThinkPadDrivers
Chapter8.Advancedconguration123

124UserGuide

Chapter9.Preventingproblems
AnimportantpartofowningaThinkPadNotebookismaintenance.Withpropercare,youcanavoid
commonproblems.Thefollowingsectionsprovideinformationthatcanhelpyoutokeepyourcomputer
runningsmoothly.
•“Generaltipsforpreventingproblems”onpage125
•“Makingsuredevicedriversarecurrent”onpage126
•“Takingcareofyourcomputer”onpage127
Generaltipsforpreventingproblems
1.Checkthecapacityofyourharddiskdrivefromtimetotime.Iftheharddiskdrivegetstoofull,Windows
willslowdownandmightproduceerrors.
Note:InWindows7,clickStart➙Computer.InWindowsXP,clickStart➙MyComputer.
2.Emptyyourrecyclebinonaregularbasis.
3.Usediskdefragmenttoolregularlyonyourharddiskdrivetoimprovedataseekandreadtimes.
4.Tofreeupdiskspace,uninstallunusedapplicationprograms.
Note:Youmightalsowanttolookforapplicationprogramduplicationoroverlappingversions.
5.CleanoutyourInbox,Sent,andTrashfoldersfromyoure-mailclientprogram.
6.Atleastonceaweek,makeapointtobackupyourdata.Ifcriticaldataispresent,itisagoodidea
toperformadailybackup.Lenovohasmanybackupoptionsavailableforyourcomputer.Rewritable
opticaldrivesareavailableformostmachinesandareeasilyinstalled.
7.UseorscheduleSystemRestoretotakeasystemsnapshotperiodically.Formoreinformationabout
SystemRestoreseeChapter5“Recoveryoverview”onpage69.
8.UpdatedevicedriversandUEFIwhenneeded.
9.Proleyourmachineathttp://www.lenovo.com/supporttokeepuptodatewithcurrentdriversand
revisions.
10.Keepuptodatefordevicedriversonothernon-Lenovohardware.Youmightwanttoreadthedevice
driverinformationreleasenotespriortoupdatingforcompatibilityorknownissues.
11.Keepalogbook.Entriesmightincludemajorhardwareorsoftwarechanges,driverupdates,minor
issuesyouhaveexperiencedandhowyouresolvedthem.
12.Ifyoueverneedtorunarecoveryonyourcomputertoreturnthepreloadontothemachine,the
followingtipsmighthelpalongtheway:
•Removeallexternaldevicessuchastheprinter,keyboard,etc.
•Makesurethatyourbatteryischargedandthatyouhavetheacpowerconnected.
•BootintotheUEFIandloadthedefaultsettings.
•Restartthemachineandstarttherecovery.
•Ifyourmachineusesdiscsastherecoverymedia,DONOTremovethediscfromthedriveuntil
promptedtodoso.
13.Forsuspectedharddiskdriveissues,referto“Diagnosingproblems”onpage131andruna
diagnostictestofthedrivebeforeyoucalltheCustomerSupportCenter.Ifyourcomputerdoes
notstartup,downloadthelestocreateabootableself-testmediafromthefollowingWebsite:
http://www.lenovo.com/hddtest.Runthetestandrecordanymessagesorerrorcodes.Ifthetest
returnsanyfailingerrorcodesormessages,calltheCustomerSupportCenterwiththecodesor
messagesandthecomputerinfrontofyou.Atechnicianwillassistyoufurther.
©CopyrightLenovo2011125

14.Ifrequired,youcanndyourcountry'sCustomerSupportCenterat:
http://www.lenovo.com/support/phone.WhencallingtheCustomerSupportCenter,pleasemakesure
youhaveyourmachinemodeltype,serialnumberandthecomputerinfrontofyou.Also,ifthemachine
isproducingerrorcodes,itishelpfultohavetheerrorscreenonorthemessagewrittendown.
Makingsuredevicedriversarecurrent
Devicedriversareprogramsthatcontaininstructionsfortheoperatingsystemabouthowtooperateor
“drive”acertainpieceofhardware.Eachhardwarecomponentonyourcomputerhasitsownspecicdriver.
Ifyouaddanewcomponent,theoperatingsystemneedstobeinstructedonhowtooperatethatpiece
ofhardware.Afteryouinstallthedriver,theoperatingsystemcanrecognizethehardwarecomponent
andunderstandhowtouseit.
Note:Becausedriversareprograms,likeanyotherleonyourcomputer,theyaresusceptibletocorruption
andmightnotperformproperlyifcorruptionoccurs.
Itisnotalwaysnecessarytodownloadthelatestdrivers.However,youshoulddownloadthelatestdriver
foracomponentifyounoticepoorperformancefromthatcomponentorifyouaddedanewcomponent.
Thismayeliminatethedriverasthepotentialcauseoftheproblem.
GettingthelatestdriversfromtheWebsite
YoucandownloadandinstallupdateddevicedriversfromtheLenovoWebsitebydoingthefollowing:
1.ConnecttotheInternet.
2.Goto:
http://www.lenovo.com/ThinkPadDrivers
3.Findyourcomputerentryandclickit.
4.Followthedirectionsonthescreenandinstallthenecessarysoftware.
GettingthelatestdriversusingSystemUpdate
TheSystemUpdateprogramhelpsyoukeepthesoftwareonyoursystemup-to-date.Updatepackagesare
storedonLenovoserversandcanbedownloadedfromtheLenovoSupportWebsite.Updatepackagescan
containapplications,devicedrivers,UEFIBIOSashes,orsoftwareupdates.WhentheSystemUpdate
programconnectstotheLenovoSupportWebsite,theSystemUpdateprogramautomaticallyrecognizes
themachinetypeandmodelofyourcomputer,theinstalledoperatingsystem,andthelanguageofthe
operatingsystemtodeterminewhatupdatesareavailableforyourcomputer.TheSystemUpdateprogram
thendisplaysalistofupdatepackagesandcategorizeseachupdateascritical,recommended,and
optionaltohelpyouunderstandtheimportance.Youhavecompletecontrolofwhichupdatestodownload
andinstall.Afteryouselecttheupdatepackagesyouwant,theSystemUpdateprogramautomatically
downloadsandinstallstheupdateswithoutanyfurtherinterventionfromyou.
TheSystemUpdateprogramispreinstalledonyourcomputerandisreadytorun.Theonlyprerequisiteis
anactiveInternetconnection.Youcanstarttheprogrammanually,oryoucanusetheschedulefeature
toenabletheprogramtosearchforupdatesautomaticallyatspeciedintervals.Youalsocanpredene
scheduledupdatestosearchbyseverity(criticalupdates,criticalandrecommendedupdates,orallupdates)
sothelistyouchoosefromcontainsonlythoseupdatetypesthatareofinteresttoyou.
FormoreinformationabouthowtousetheSystemUpdate,referto“SystemUpdate”onpage24.
126UserGuide

Takingcareofyourcomputer
Althoughyourcomputerisdesignedtofunctionreliablyinnormalworkenvironments,youneedtouse
commonsenseinhandlingit.Byfollowingtheseimportanttips,youwillgetthemostuseandenjoyment
outofyourcomputer.
Becarefulaboutwhereandhowyouwork
DANGER
YourcomputerhasanEthernetconnector.T oavoidtheriskofelectricalshock,donotconnect
thetelephonecabletotheEthernetconnector.
•Storepackingmaterialssafelyoutofthereachofchildrentopreventtheriskofsuffocationfromplastic
bags.
•Keepyourcomputerawayfrommagnets,activatedcellularphones,electricalappliances,orspeakers
(within13cmor5inch).
•Avoidsubjectingyourcomputertoextremetemperatures(below5°C/41°Forabove35°C/95°F).
•Someappliances,suchascertainportabledesktopfansorairpuriers,canproducenegativeions.Ifa
computerisclosetosuchanappliance,andisexposedforanextendedtimetoaircontainingnegative
ions,itmaybecomeelectrostaticallycharged.Suchachargemaybedischargedthroughyourhands
whenyoutouchthekeyboardorotherpartsofthecomputer,orthroughconnectorsonI/Odevices
connectedtoit.Eventhoughthiskindofelectrostaticdischarge(ESD)istheoppositeofadischargefrom
yourbodyorclothingtothecomputer,itposesthesameriskofacomputermalfunction.
Yourcomputerisdesignedandmanufacturedtominimizeanyeffectsofelectrostaticcharge.Anelectrostatic
chargeaboveacertainlimit,however,canincreasetheriskofESD.Therefore,whenusingthecomputer
closetoanappliancethatcanproducenegativeions,givespecialattentiontothefollowing:
•Avoiddirectlyexposingyourcomputertotheairfromanappliancethatcanproducenegativeions.
•Keepyourcomputerandperipheralsasfaraspossiblefromsuchanappliance.
•Whereverpossible,groundyourcomputertofacilitatesafeelectrostaticdischarge.
Note:Notallsuchappliancescauseasignicantelectrostaticcharge.
Begentlewithyourcomputer
•Avoidplacinganyobjects(includingpaper)betweenthedisplayandthekeyboardorthepalmrest.
•Yourcomputerdisplayisdesignedtobeopenedandusedatanangleslightlygreaterthan90degrees.
Donotopenthedisplaybeyond180degrees,asthismightdamagethecomputerhinge.
•Donotturnyourcomputeroverwhiletheacpoweradapterispluggedin.Thiscouldbreaktheadapter
plug.
Carryyourcomputerproperly
•Beforemovingyourcomputer,besuretoremoveanymedia,turnoffattacheddevices,anddisconnect
cordsandcables.
•Whenpickingupyouropencomputer,holditbythebottom.Donotpickuporholdyourcomputerby
thedisplay.
Handlestoragemediaanddrivesproperly
•Ifyourcomputercomeswithanopticaldrive,donottouchthesurfaceofadiscorthelensonthetray.
Chapter9.Preventingproblems127

•WaituntilyouheartheCDorDVDclickintothecenterpivotofthedrivebeforeclosingthetray.
•Wheninstallingtheharddiskdriveoropticaldrive,followtheinstructionsshippedwithyourhardware,
andapplypressureonlywhereneededonthedevice.
•Turnoffyourcomputerifyouarereplacingtheharddiskdrive.
•Whenreplacingtheprimaryharddiskdrive,reattachthecoverofthedriveslot.
•Storeyourexternalandremovableharddiskoropticaldrivesintheappropriatecontainersorpackaging
whentheyarenotbeingused.
•Beforeyouinstallanyofthefollowingdevices,touchametaltableoragroundedmetalobject.Thisaction
reducesanystaticelectricityfromyourbody.Thestaticelectricitycoulddamagethedevice.
–Memorymodule
–PCIExpressMiniCar
–Memorycard,suchasSDcard,SDHCcard,SDXCcard,andMultiMediaCard.
Note:Notalllisteddevicesareincludedinyourcomputer.
Thisactionreducesanystaticelectricityfromyourbody.Thestaticelectricitycoulddamagethedevice.
•Whentransferringdatatoorfromaashmediacard,suchasanSDcard,donotputyourcomputer
insleep(standby)orhibernationmodebeforethedatatransferiscomplete.Todosomightcause
damagetoyourdata.
Takecareinsettingpasswords
•Rememberyourpasswords.Ifyouforgetasupervisororharddiskpassword,Lenovowillnotresetit,
andyoumighthavetoreplaceyoursystemboardorharddiskdrive.
Careforthengerprintreader
Thefollowingactionscoulddamagethengerprintreaderorcauseitnottoworkproperly:
•Scratchingthesurfaceofthereaderwithahard,pointedobject.
•Scrapingthesurfaceofthereaderwithyourngernailoranythinghard.
•Usingortouchingthereaderwithadirtynger.
Ifyounoticeanyofthefollowingconditions,gentlycleanthesurfaceofthereaderwithadry,soft,lint-free
cloth:
•Thesurfaceofthereaderisdirtyorstained.
•Thesurfaceofthereaderiswet.
•Thereaderoftenfailstoenrollorauthenticateyourngerprint.
Registeryourcomputer
•RegisteryourThinkPadproductswithLenovo(refertotheWebpage:http://www.lenovo.com/register).
Thiscanhelpauthoritiesreturnyourcomputertoyouifitislostorstolen.Registeringyourcomputeralso
enablesLenovotonotifyyouaboutpossibletechnicalinformationandupgrades.
Besurenottomodifyyourcomputer
•OnlyanauthorizedThinkPadrepairtechnicianshoulddisassembleandrepairyourcomputer.
•Donotmodifyortapethelatchestokeepthedisplayopenorclosed.
Cleaningthecoverofyourcomputer
Occasionallycleanyourcomputerasfollows:
128UserGuide

1.Prepareamixtureofagentlekitchen-usedetergent(onethatdoesnotcontainabrasivepowderor
strongchemicalssuchasacidoralkaline).Use5partswaterto1partdetergent.
2.Absorbthediluteddetergentintoasponge.
3.Squeezeexcessliquidfromthesponge.
4.Wipethecoverwiththesponge,usingacircularmotionandtakingcarenottoletanyexcessliquiddrip.
5.Wipethesurfacetoremovethedetergent.
6.Rinsethespongewithcleanrunningwater.
7.Wipethecoverwiththecleansponge.
8.Wipethesurfaceagainwithadry,softlint-freecloth.
9.Waitforthesurfacetodrycompletelyandremoveanybersfromthecloth.
Cleaningyourcomputerkeyboard
1.Applysomeisopropylrubbingalcoholtoasoft,dust-freecloth.
2.Wipeeachkeytopsurfacewiththecloth.Wipethekeysonebyone;ifyouwipeseveralkeysatatime,
theclothmayhookontoanadjacentkeyandpossiblydamageit.Makesurethatnoliquiddripsonto
orbetweenthekeys.
3.Allowtodry.
4.Toremoveanycrumbsordustfrombeneaththekeys,youcanuseacamerablowerwithabrush
orcoolairfromahairdryer.
Note:Avoidsprayingcleanerdirectlyontothedisplayorthekeyboard.
Cleaningyourcomputerdisplay
1.Gentlywipethedisplaywithadry,softlint-freecloth.Ifyouseeascratchlikemarkonyourdisplay,
itmightbeastaintransferredfromthekeyboardortheTrackPointpointingstickwhenthecoverwas
pressedfromtheoutside.
2.Wipeordustthestaingentlywithasoft,drycloth.
3.Ifthestainremains,moistenasoft,lint-freeclothwithwaterora50-50mixtureofisopropylalcoholand
waterthatdoesnotcontainimpurities.
4.Wringoutasmuchoftheliquidasyoucan.
5.Wipethedisplayagain;donotletanyliquiddripintothecomputer.
6.Besuretodrythedisplaybeforeclosingit.
Chapter9.Preventingproblems129

130UserGuide

Chapter10.Troubleshootingcomputerproblems
Thissectiontellswhattodoifyouhaveacomputerproblem.Itincludestroubleshootingchartswhichare
Troubleshootingprocedure,Troubleshooting,Recoveryoverview,andContactingLenovo.
•“Diagnosingproblems”onpage131
•“Troubleshooting”onpage132
Diagnosingproblems
Ifyouexperienceproblemswithyourcomputer,usediagnosticsolutionsasastartingpointforsolvingthem.
Dependingonthepreinstalledoperatingsystemandthedatewhenyourcomputerwasmanufactured,
Lenovoprovidesoneofthefollowingdiagnosticsolutions:
•LenovoSolutionCenter:See“UsingtheLenovoSolutionCenterprogram”onpage131.
•LenovoThinkVantageToolbox:See“UsingtheLenovoThinkVantageToolboxprogram”onpage131.
•Web-baseddiagnosticsolutions:See“UsingtheLenovoSupportWebsite”onpage132.
UsingtheLenovoSolutionCenterprogram
Note:TheLenovoSolutionCenterprogramisavailableonlyonsomemodelsthatarepreinstalledwiththe
Windows7operatingsystem.IfyourWindows7modelisnotpreinstalledwiththeprogram,youcan
downloaditfromhttp://www.lenovo.com/support.
TheLenovoSolutionCenterprogramenablesyoutotroubleshootandresolvecomputerproblems.It
combinesdiagnostictests,systeminformationcollection,securitystatus,andsupportinformation,along
withhintsandtipsformaximumsystemperformance.
Whenyouaresettingupyourcomputer,theLenovoSolutionCenterprogrampromptsyoutocreaterecovery
media,whichyoucanusetorestoretheharddiskdrivetothefactorydefaultstate.Formoreinformation,
see“Creatingandusingrecoverymedia”onpage69.
ToruntheLenovoSolutionCenterprogram,see“AccessingapplicationsinWindows7”onpage20.
Foradditionalinformation,refertotheLenovoSolutionCenterhelpsystem.
Note:Ifyouareunabletoisolateandrepairtheproblemyourselfafterrunningtheprogram,saveandprint
theloglescreatedbytheprogram.YouwillneedthelogleswhenyouspeaktoaLenovotechnical
supportrepresentative.
UsingtheLenovoThinkVantageToolboxprogram
TheLenovoThinkVantageToolboxprogramenablesyoutoviewsymptomsofcomputerproblemsandnd
solutionsforthem.Italsoincludesautomaticnoticationwhenactionisrequired,computingassistance,
advanceddiagnostics,anddiagnostichistory.
IftheLenovoThinkVantageToolboxprogramisavailableonyourcomputer,doeitherofthefollowingto
runtheprogram:
•ForWindow7:ClickStart➙ControlPanel➙SystemandSecurity➙Lenovo-SystemHealthy
andDiagnostics.
©CopyrightLenovo2011131

Whentheapplicationislaunched,selectadiagnostictesttorun.Ifthereisanyproblem,besidestheerror
messages,aguidancealsowillbedisplayedtoguideyoutoxtheproblem.
Foradditionalinformation,refertotheThinkVantageToolboxhelpsystem.
Note:Ifyouareunabletoisolateandrepairtheproblemyourselfafterrunningtheprogram,saveandprint
theloglescreatedbytheprogram.YouwillneedthelogleswhenyouspeaktoaLenovotechnical
supportrepresentative.
UsingtheLenovoSupportWebsite
IfyourcomputerhasneithertheLenovoSolutionCenterprogramnortheLenovoThinkVantageToolbox
programinstalled,gotohttp://www.lenovo.com/diagnoseforthelatestinformationondiagnosticsforyour
computer.
Note:Runninganytestmighttakeuptoseveralminutesorlonger.Makesurethatyouhavetimetorunthe
entiretest.Donotinterruptthetestwhileitisrunning.
Troubleshooting
Ifyourcomputerhasanerror,ittypicallydisplaysamessageoranerrorcode,orabeepsoundswhenyou
turniton.Tocorrectanerror,rstndthedescriptionoftheerrorintheleft-handcolumnofthechartthat
applies.Thenclickthatdescriptiontogetatroubleshootingprocedure.
Tomakesurethatyourcomputerhasthefeaturesoroptionsthatareintroducedinthefollowingsections,
consulttheonlinehelporthelistshippedwithyourcomputer.
Computerstopsresponding
Printtheseinstructionsnowandkeepitwithyourcomputerforreferencelater.
Ifyourcomputeriscompletelyunresponsive(youcannotusetheUltraNavpointingdeviceorthekeyboard),
dothefollowingsteps:
1.Pushandholdthepowerswitchuntilthemachineturnsoff.Afterthecomputeristurnedoff,restartby
pressingthepowerswitch.Ifthemachinedoesnotturnon,continuetostep2.
Note:Donotremovethebatteryandacpowertoresetthecomputer.
2.Whilethemachineisturnedoff,removeallpowersourcesfromthecomputer(batteryandacpower).
Holddownthepowerbuttonfor10seconds.Plugintheacpowerwhilekeepingthebatteryoutofthe
computer.Ifthecomputerdoesnotturnbackon,continuetostep3.
Note:OncethecomputerstartsupandentersWindows,usethepropershutdownproceduretoturn
thecomputeroff.Oncethemachineisoff,reattachthebatteryandrestartthecomputer.Ifthe
computerdoesnotstartwiththebatteryreattached,removethebatteryandagainstartwithstep2.If
thecomputerstartswithacpowerbutdoesnotstartwhenthebatteryisattached,calltheCustomer
SupportCenterforsupport.
3.Whilethemachineisoff,removeallsourcesofpowerfromthemachine(batteryandacpower).Remove
allexternaldevicesthatareattachedtoyourcomputer(keyboard,mouse,printer,scanner,etc.).Repeat
step2.Ifstep2isunsuccessful,continuetostep4.
Note:Thefollowingstepsinvolveremovingstaticsensitivecomponentsfromyourcomputer.Please
makesurethatyouareproperlygroundedandremoveallsourcesofpowerattachedtothecomputer.
IfyouareuncomfortableorunsureaboutremovingcomponentspleasecalltheCustomerSupport
Centerforassistance.
132UserGuide

4.Whilethecomputerisoff,removeallsourcesofpowerandexternalhardware.Refertotheprocedure
in“Replacingmemory”onpage93onhowtoremoveandreseatthememorymodules.Removeany
non-originalmemorymoduleaddedtoyourcomputer.Afterremovingtheextramemorymoduleand
reseatingtheoriginalmemorymodule,repeatstep2.Ifthecomputerstilldoesnotturnon,consultthe
user'sreferenceguideforothercustomer-replaceablecomponentsthatareattachedtoyourcomputer
Ifthecomputerstilldoesnotstartup,calltheCustomerSupportCenterandaCustomerSupportSpecialist
willassistyou.
Spillsonthekeyboard
Withamobilecomputer,thereareincreasedchancesofspillingliquidsonthekeyboard.Becausemost
liquidsconductelectricity,liquidspilledonthekeyboardcouldcreatenumerousshortcircuits,potentially
causingirreparabledamagetoyourcomputer.
Ifyouspillsomethingonyourcomputer:
Attention:Besurethatnoliquidcreatesashortcircuitbetweenyouandtheacpoweradapter(ifinuse).
Althoughyoumightlosesomedataorworkbyturningoffthecomputerimmediately,leavingthecomputer
onmightmakeyourcomputerunusable.
1.Carefullyunplugtheacpoweradapterimmediately.
2.Turnoffthecomputerimmediately.Ifthecomputerdoesnotturnoff,removethebattery.Themore
quicklyyoustopthecurrentfrompassingthroughthecomputerthemorelikelyyouwillreducedamage
fromshortcircuits.
3.Wipeyourcomputerdrywithapapertowel.
4.Beforeturningonyourcomputer,makesurethatalltheliquidhasdried.
Note:Ifyouwanttoreplaceyourkeyboard,contacttheCustomerSupportCenter.Referto“Calling
Lenovo”onpage161.
Errormessages
•Message:0175:BadCRC1,stopPOSTtask.
Solution:TheEEPROMchecksumisnotcorrect(block#6).Havethecomputerserviced.
•Message:0177:BadSVPdata,stopPOSTtask.
Solution:ChecksumofthesupervisorpasswordintheEEPROMisnotcorrect.Thesystemboard
shouldbereplaced.Havethecomputerserviced.
•Message:0182:BadCRC2.EnterThinkPadSetupandloadSetupdefaults.
Solution:ChecksumoftheCRC2settingintheEEPROMisnotcorrect.PressF1togotoThinkPad
Setup.PressF9andthenpressEntertoloadthedefaultsetting.PressF10andthenpressEnter
torestartthesystem.
•Message:0185:Badstartupsequencesettings.EnterThinkPadSetupandloadSetupdefaults.
Solution:ChecksumofthestartupsequencesettingintheEEPROMisnotcorrect.PressF1togoto
ThinkPadSetup.PressF9andthenpressEntertoloadthedefaultsetting.PressF10andthenpress
Entertorestartthesystem.
•Message:0187:EAIAdataaccesserror.
Solution:TheaccesstoEEPROMisfailed.Havethecomputerserviced.
Chapter10.Troubleshootingcomputerproblems133

•Message:0188:InvalidRFIDSerializationInformationArea.
Solution:TheEEPROMchecksumisnotcorrect(block#0and1).Thesystemboardshouldbereplaced,
andtheboxserialnumberneedstobereinstalled.Havethecomputerserviced.
•Message:0189:InvalidRFIDcongurationinformationarea.
Solution:TheEEPROMchecksumisnotcorrect(block#4and5).Thesystemboardshouldbereplace,
andtheUUIDneedstobereinstalled.Havethecomputerserviced.
•Message:0190:Criticallow-batteryerror.
Solution:Thecomputerturnedoff,becausethebatteryislow.Connecttheacpoweradaptertothe
computerandchargethebattery,orreplacethebatterywithafullychargedone.
•Message:0191:SystemSecurity-Invalidremotechangerequested.
Solution:Thesystemcongurationchangehasfailed.Conrmtheoperationandtryagain.Toclear
theerror,entertheThinkPadSetup.
•Message:0199:SystemSecurity-Securitypasswordretrycountexceeded.
Solution:Thismessageisdisplayedifyouenterawrongsupervisorpasswordmorethanthreetimes.
Conrmthesupervisorpasswordandtryagain.Tocleartheerror,entertheThinkPadSetup.
•Message:0200:Harddiskerror.
Solution:Theharddiskisnotworking.Makesuretheharddiskdriveisattachedrmly.RuntheThinkPad
Setup;thenmakesuretheharddiskdriveisnotdisabledintheStartupmenu.
•Message:021x:Keyboarderror.
Solution:Makesurethattherearenoobjectsplacedonthekeyboard,orifyouhaveone,theexternal
keyboard.Turnoffthecomputer,andturnoffallattacheddevices.Turnonthecomputerrst;then
turnontheattacheddevices.
Ifyoustillseethesameerrorcode,dothefollowing:
Ifanexternalkeyboardisconnected,dothefollowing:
–Turnoffthecomputeranddisconnecttheexternalkeyboard;thenturnonthecomputer.Makesure
thatthebuilt-inkeyboardoperatescorrectly.Ifitwas,havetheexternalkeyboardserviced.
–Makesurethattheexternalkeyboardisconnectedtothecorrectconnector.
Testthecomputerbyusing“LenovoThinkVantageToolbox”onpage131.
–Ifthecomputerstopsduringthetest,havethecomputerserviced.
•Message:0230:ShadowRAMerror.
Solution:TheshadowRAMfailed.Testyourcomputer'smemorywith“LenovoThinkVantageToolbox”
onpage131.Ifyouaddedamemorymodulejustbeforeturningthecomputeron,reinstallit.Thentest
thememorywithLenovoThinkVantageToolbox.
•Message:0231:SystemRAMerror.
Solution:ThesystemRAMfailed.Testyourcomputer'smemorywith“LenovoThinkVantageToolbox”
onpage131.Ifyouaddedamemorymodulejustbeforeturningthecomputeron,reinstallit.Thentest
thememorywithLenovoThinkVantageToolbox.
•Message:0232:ExtendedRAMerror.
134UserGuide

Solution:TheextendedRAMfailed.Testyourcomputer'smemorywith“LenovoThinkVantageToolbox”
onpage131.Ifyouhaveincreasedmemoryjustbeforeturningthecomputeron,reinstallit.Thentest
thememorywithLenovoThinkVantageToolbox.
•Message:0250:Systembatteryerror.
Solution:Thebackupbattery,whichisusedtopreservethecongurationinformation,suchasthedate
andtime,whilethecomputeristunedoff,isdepleted.ReplacethebatteryandrunThinkPadSetupto
verifytheconguration.Ifyoustillhaveaproblem,havethecomputerserviced.
•Message:0251:SystemCMOSchecksumbad.
Solution:ThesystemCMOSmighthavebeencorruptedbyanapplicationprogram.Thecomputeruses
thedefaultsettings.RunThinkPadSetuptorecongurethesettings.Ifyoustillseethesameerrorcode,
havethecomputerserviced.
•Message:0260:Systemtimererror.
Solution:Havethecomputerserviced.
•Message:0270:Realtimeclockerror.
Solution:Havethecomputerserviced.
•Message:0271:Dateandtimeerror.
Solution:Neitherthedatenorthetimeissetinthecomputer.Setthedateandtime,usingtheThinkPad
Setup.
•Message:0280:Previousbootincomplete.
Solution:Yourcomputerwaspreviouslyunabletocompletethebootprocess.
Turnthecomputeroff;thenturnitontostarttheThinkPadSetup.Verifythecongurationandthen
restartthecomputereitherbychoosingtheExitSavingChangesoptionundertheRestartitemor
bypressingF10.
Ifyoustillseethesameerrorcode,havethecomputerserviced.
•Message:02D0:Systemcacheerror.
Solution:Thecacheisdisabled.Havethecomputerserviced.
•Message:02F4:EISACMOSnotwritable.
Solution:Havethecomputerserviced.
•Message:02F5:DMAtestfailed.
Solution:Havethecomputerserviced.
•Message:02F6:SoftwareNMIfailed.
Solution:Havethecomputerserviced.
•Message:02F7:Fail-safetimerNMIfailed
Solution:Havethecomputerserviced.
•Message:1802:Unauthorizednetworkcardispluggedin-Poweroffandremovethenetworkcard.
Solution:TheminiPCIExpressnetworkcardisnotsupportedonthiscomputer.Removeit.
•Message:1803:Unauthorizeddaughtercardispluggedin-Poweroffandremovethedaughtercard.
Chapter10.Troubleshootingcomputerproblems135

Solution:Thedaughtercardisnotsupportedonthiscomputer.Removeit.
•Message:1805:UnauthorizedWirelessUSBcardispluggedin-PoweroffandremovetheWireless
USBcard.
Solution:TheWirelessUSBcardisnotsupportedonthiscomputer.Removeit.
•Message:2100:InitializationerroronHDD0(MainHDD).
Solution:Theharddiskisnotworking.Havetheharddiskserviced.
•Message:2110:ReaderroronHDD0(MainHDD).
Solution:Theharddiskisnotworking.Havetheharddiskserviced.
•Message:Thepower-onpasswordprompt
Solution:Apower-onpasswordorasupervisorpasswordisset.TypethepasswordandpressEnterto
usethecomputer(referto“Usingpasswords”onpage59).Ifthepower-onpasswordisnotaccepted,a
supervisorpasswordmighthavebeenset.TypethesupervisorpasswordandpressEnter.Ifyoustillsee
thesameerrormessage,havethecomputerserviced.
•Message:Theharddiskpasswordprompt
Solution:Aharddiskpasswordisset.TypethepasswordandpressEntertousethecomputer(referto
“Harddiskpasswords”onpage61).
•Message:Hibernationerror
Solution:Thesystemcongurationchangedbetweenthetimeyourcomputerenteredhibernationmode
andthetimeitleftthismode,andyourcomputercannotresumenormaloperation.
–Restorethesystemcongurationtowhatitwasbeforeyourcomputerenteredhibernationmode.
–Ifthememorysizehasbeenchanged,re-createthehibernationle.
•Message:Operatingsystemnotfound.
Solution:Verifythefollowing:
–Theharddiskdriveiscorrectlyinstalled.
–Astartablediscisinthedrive.
Ifyoustillseethesameerrormessage,checkthebootsequenceusingThinkPadSetup.
•Message:Fanerror
Solution:Coolingfanhasfailed.Havethecomputerserviced.
•Message:EMM386NotInstalled-UnabletoSetPageFrameBaseAddress.
Solution:EditC:\CONFIG.SYSandchangealinefromdevice=C:\WINDOWS\EMM386.EXERAMtodevice=
C:\WINDOWS\EMM386.EXENOEMSandsavethisle.
•Message:CardBusCongurationError-DeviceDisabled.
Solution:PressF1togotoThinkPadSetup.PressF9andthenpressEntertoloadthedefaultsetting.
PressF10andthenpressEntertorestartthesystem.
•Message:Thermalsensingerror
Solution:Thethermalsensorisnotfunctioningcorrectly.Havethecomputerserviced.
•Message:Cannotbootfromanydevice.
136UserGuide

Solution:Thethermalsensorisnotfunctioningcorrectly.Havethecomputerserviced.
Devicenotfound
Checkthedeviceyouwanttobootfrom.
Deviceerror
Checkthedeviceyouwanttobootfrom.
Novalidoperatingsystem
Checkthattheoperatingsystemhasnofailureandisinstalledcorrectly.
Excludedfrombootorder
OpentheThinkPadSetupandaddthedevicetobootorder.
Errorswithoutmessages
•Problem:MyscreenkeepsblankingwhenIdonotwantitto.
Solution:Youcandisableanysystemtimers,suchastheLCDturn-offtimerortheblanktimer
1.StartPowerManager.
2.ClickthePowerplantab(inWindowsXP ,Powerscheme),andthenselectMaximumPerformance
fromthepredenedpowerplans(inWindowsXP ,Powerscheme).
•Problem:WhenIturnonthemachine,nothingappearsonthescreenandthemachinedoesnotbeep
whilestartingup.
Note:Ifyouarenotsurewhetheryouheardanybeeps,turnoffthecomputerbypressingandholding
thepowerswitchfor4secondsormore.Turnitonandlistenagain.
Solution:Makesurethat:
–Thebatteryisinstalledcorrectly.
–Theacpoweradapterisconnectedtothecomputerandthepowercordispluggedintoaworking
electricaloutlet.
–Thecomputeristurnedon.(Turnthepowerswitchonagainforconrmation.)
Ifapower-onpasswordisset:
–Pressanykeytodisplaythepromptforthepower-onpassword.Ifthebrightnesslevelofthescreenis
low,increaseitbypressingtheHome.
–TypethecorrectpasswordandpressEnter(refertoPower-onpassword).
Iftheseitemsareproperlyset,andthescreenremainsblank,havethecomputerserviced.
•Problem:WhenIturnonthemachine,onlyawhitecursorappearsonablankscreen.
Solution:Ifyouhavemodiedapartitiononyourharddiskdrivebyusingapartitionsoftware,information
aboutthatpartition,orthemasterbootrecordmayhavebeendestroyed.
1.Turnoffthecomputer,andthenturnitonagain.
2.Ifyoustillseeonlythecursoronthescreen,dothefollowing:
–Ifyouhaveusedthepartitionsoftware,examinethepartitionontheharddiskdrivebyusingthe
software,andrecoverthepartitionifrequired.
–UseeithertheRescueandRecoveryworkspaceortherecoverydiscstorestorethesystemto
thefactorystate.Fordetailsaboutrestoringthesystemtothefactorystate,see“Creatingand
usingrecoverymedia”onpage69.
Iftheproblempersists,havethecomputerserviced.
•Problem:Myscreengoesblankwhilethecomputerison.
Chapter10.Troubleshootingcomputerproblems137

Solution:Yourscreensaverorpowermanagementmaybeenabled.Doeitherofthefollowing:
–TouchtheTrackPointorthetouchpad,orpressakeytoexitthescreensaver.
–Pressthepowerswitchtoresumefromsleep(standby)orhibernation.
Beeperrors
Table7.Beeperrors
ProblemSolution
Oneshortbeep,pause,threeshortbeeps,pause,three
moreshortbeeps,andoneshortbeep
Makesurethatmemorymodulesareinstalledcorrectly.If
theyare,andyoustillhearthebeeps,havethecomputer
serviced.
OnelongandtwoshortbeepsThevideofunctionhasaproblem.Havethecomputer
serviced.
FivebeepsThesystemboardhasaproblem.Havethecomputer
serviced.
Memoryproblems
Printtheseinstructionsnowandkeepitwithyourcomputerforreferencelater.
Ifyourmemoryisnotoperatingproperly,checkthefollowingitems:
1.Verifythatthememoryisinstalledandseatedcorrectlyinyourcomputer.
Itmaybenecessarytoremovealladdedmemoriestotestthecomputerwithonlythefactory-installed
memories,andthenreinstallthememoryoneatatimetoensureaproperconnection.Forthe
procedurestoremoveandreinstallamemory,referto“Replacingmemory”onpage93.
2.Checkforerrormessagesduringstartup.
FollowtheappropriatecorrectiveactionsforPower-onself-test(POST)“Errormessages”onpage133.
3.VerifythatthelatestUEFIforyourmodelhasbeeninstalled.
4.Verifythepropermemorycongurationandcompatibilityincludingthemaximummemorysizeandthe
memoryspeed.
Fordetails,refertotheinstructionsin“Replacingmemory”onpage93.
5.Rundiagnostictest.See“Diagnosingproblems”onpage131.
Networking
Thefollowingarethemostcommonnetworkingproblems:
Ethernetproblems
•Problem:Yourcomputercannotconnecttothenetwork.
Solution:Makesurethat:
–Thecableisinstalledproperly.
ThenetworkcablemustbesecurelyconnectedbothtotheEthernetconnectorofyourcomputerand
totheRJ45connectorofthehub.Themaximumallowabledistancefromthecomputertohubis
100meters.Ifthecableisconnectedandthedistanceiswithinacceptablelimitsbuttheproblem
persists,tryadifferentcable.
–Youareusingthecorrectdevicedriver.
ForWindows7:
1.ClickStart,andthenclickControlPanel.
138UserGuide

2.ClickHardwareandSound.
3.ClickDeviceManager.Ifyouarepromptedforanadministratorpasswordorconrmation,type
thepasswordorprovideconrmation.
4.Ifthe!markistotheleftoftheadapternameunderNetworkadapters,youmightnotusethe
correctdriverorthedriverisnotenabled.Toupdatethedriver,right-clickthehighlightedadapter.
5.ClickUpdateDriverSoftware,andthenfollowtheinstructionsonthescreen.
ForWindowsXP:
1.ClickStart,andthenclickControlPanel.
2.ClickPerformanceandMaintenance,andthenclickSystem.
3.ClicktheHardwaretab,andclicktheDeviceManagerbutton.
4.IfthexmarkistotheleftoftheadapternameunderNetworkadapter,youmightnotusethe
correctdriverorthedriverisnotenabled.Toupdatethedriver,right-clickthehighlightedadapter.
5.ClickProperties.ThePropertieswindowappears.
6.ClicktheDrivertab.
7.ClicktheUpdateDriverbutton.TheUpdateDeviceDriverwizardappears.Followtheinstructions
onthescreen.
–Theswitchportandtheadapterhavethesameduplexsetting.
Ifyouconguredtheadapterforfullduplex,makesuretheswitchportisalsoconguredforfull
duplex.Settingthewrongduplexmodecandegradeperformance,causedataloss,orresultinlost
connections.
–Youhaveinstalledallnetworkingsoftwarethatisnecessaryforyournetworkenvironment.
CheckwithyourLANadministratorforthenecessarynetworkingsoftware.
•Problem:Theadapterstopsworkingfornoapparentreason.
Solution:Thenetworkdriverlesmaybecorruptormissing.Updatethedriverbyreferringtothe
“Solution”descriptionfortheproceduretomakesurethatthecorrectdevicedriverisinstalledinthe
precedingproblem.
•Problem:IfyourcomputerisaGigabitEthernetmodelandyouusetheaspeedof1000Mbps,the
connectionfailsorerrorsoccur.
Solution:
–UseCategory5wiringandmakesurethatthenetworkcableissecurelyconnected.
–Connecttoa1000BASE-Thub/switch(not1000BASE-X).
•Problem:Yourcomputercannotconnecttothenetworkat1000Mbps.Instead,itconnectsat100Mbps.
Solution:
–Tryanothercable.
–Makesurethatthelinkpartnerissettoauto-negotiate.
–Makesurethattheswitchis802.3ab-compliant(gigabitovercopper).
AwirelessLANproblem
•Problem:Youcannotconnectusingthebuilt-inwirelessnetworkingcard.
Solution:MakesurethatyourwirelessLANdriveristhelatestversioninstalled.ChecktheWebsiteand
conrmthedriverversionsupportedbyAccessConnectionsisthelatestdocumentedintheREADMEle.
Makesurethatyourcomputeriswithinrangeofawirelessaccesspoint.
Makesurethatthewirelessradioisenabledbydouble-clickingtheAccessConnectionsiconinthe
taskbar.
Chapter10.Troubleshootingcomputerproblems139

Note:IfyourcomputerisaWindows7model,todisplaytheAccessConnectionsstatusiconandthe
wirelessstatusiconinthesystemtray,refertotheAccessConnectionson-linehelp.
CheckNetworkName(SSID),andyourencryptioninformation.UseAccessConnectionstoverifythis
case-sensitiveinformation.
Note:AccessConnectionsdoesnotsupportconnectiontowirelessWANnetworkinChina.
AwirelessWANproblem
•Message:UnauthorizedWANcardispluggedin-PoweroffandremovetheWANcard.
Solution:TheWANcardisnotsupportedonthiscomputer.Removeit.
Note:Dependingonyourcomputer,somemodelsdonothaveawirelessWAN.
Bluetoothproblems
ForWindows7:
•Problem:SounddoesnotcomefromtheBluetoothheadset/headphonebutcomesfromthelocal
speakereventhoughtheheadset/headphoneisconnectedusingHeadsetproleorAVprole.
Solution:Dothefollowing:
1.Exittheapplicationthatusesthesounddevice(forexample,WindowsMediaPlayer).
2.OpentheControlPanelbyclickingStart➙ControlPanel.
3.ClickHardwareandSound➙Sound.
4.SelectthePlaybacktab.
5.IfyouareusingHeadsetprole,selectBluetoothHands-freeAudioandclicktheSetDefault
button.IfyouareusingAVprole,selectStereoAudioandclicktheSetDefaultbutton.
6.ClickOKtoclosetheSoundwindow.
•Problem:PIM(PersonalInformationManager)itemssentfromWindows7cannotbereceivedcorrectly
intotheaddressbookofanyotherBluetooth-enableddevice.
Solution:Windows7sendPIMitemsinXMLformat,butmostBluetooth-enableddeviceshandlePIM
itemsinvCardformat.IfanotherBluetooth-enableddevicecanreceivealethroughBluetooth,aPIM
itemsentfromWindows7mightbesavedasalewiththeextension.contact.
ForWindowsXP:
Notes:IfyouareusingtheMicrosoftstandardBluetoothfeaturesandyouwanttoaccessinformationabout
howtousetheBluetoothfunction,dothefollowing:
1.PressF9toturnonBluetooth.
2.ClickStart➙ControlPanel.
3.ClickPrintersandOtherHardware.
4.ClickBluetoothDevices.
5.ClicktheOptionstab.
6.ClickLearnmoreaboutBluetoothSettings
Note:IfyouareusingtheThinkPadBluetoothwithEnhancedDataRateSoftware,refertothefollowing
instructions.
Note:CheckyourconnectionanytimeandmakesurethatnootherBluetooth-enableddeviceissearchingfor
thedevicetowhichyouwanttoconnect.SimultaneoussearchingisnotallowedintheBluetoothconnection.
140UserGuide

•Problem:YousearchforaBluetooth-enableddevicebyclickingViewdevicesinrangeinMyBluetooth
Places,butyoucannotndanything.
Solution:MakesurethatthedevicetowhichyouwanttoconnectisenabledfortheBluetoothconnection.
Aftermakingsureoftheabove,turntheBluetoothpoweroffandthenonagain,orrestartyourcomputer.
Thensearchforthedeviceagain.
•Problem:YoucannotconnecttoanyBluetooth-enableddevice.
Solution:MakesurethatbothyourcomputerandthedeviceareturnedonandtheirBluetoothantennas
areenabled.
Aftermakingsureoftheabove,turntheBluetoothpoweroffandthenonagain,orrestartyourcomputer.
Thenre-establishyourconnectiontothedevice.
Iftheproblempersists,re-installtheBluetoothsoftwareandreestablishyourconnectiontothedevice.
•Problem:YourcomputerisconnectedtoaBluetooth-enableddevice,butyoucannotuseanyofthe
servicesofthatdevice.
Solution:MakesurethatthedeviceisenabledfortheBluetoothconnection.
1.Double-clicktheMyBluetoothPlacesicon.
2.GotoBluetoothTasksandclickViewdevicesinrange.
Ifyoucannotndthedevice,itmayhavestoppedresponding.Makesurethatitisenabledforthe
Bluetoothconnection.Ifyoundit,connecttotheservicesyouwant.
Ifyouaresurethatthedeviceisresponding,turntheBluetoothpoweroffandthenonagain,orrestart
yourcomputer.Thentrytoconnectagain.
•Problem:Youcannotpullabusinesscardfromtheconnectedcomputer.
Solution:Makesurethattheconnectedcomputerhasitsowndefaultbusinesscardapplicationandthat
thecardisreadyforcommunication.
Makesurethatthesecuritysettingsontheconnectedcomputerallowyoutodownloadthebusinesscard.
•Problem:Youcannotsendabusinesscardtotheconnectedcomputer.
Solution:Makesurethatyourcomputerhasitsowndefaultbusinesscardapplicationandthatthecard
isreadyforcommunication.
Makesurethatthesecuritysettingsontheconnectedcomputerallowyoutouploadyourbusinesscard.
•Problem:YourcomputerisconnectedtoaBluetooth-enabledcomputerthatworksasanFTPserver,
butyoucannotseeanylesintheFTPserver.
Solution:Checkthenewlysharedlesasfollows:
1.InthemenuofMyBluetoothPlaces,clickView.
2.ClickUpdate.Thestatusisupdatedinthewindow,sothatyoucancheckthenewlysharedles.
Makesurethatthesharedfolderintheconnectedcomputercontainsthelesyouarelookingfor.
Makesurethatthesecuritysettingsontheconnectedcomputerallowyoutoconnectandviewthe
lesinthecomputer.
•Problem:YourcomputerisconnectedtoaBluetooth-enabledcomputer,butyoucannotgainaccess
tothenetwork.
Solution:MakesurethattheBluetooth-enabledcomputerisconnectedtoanetwork.
Makesurethattheconnectedcomputerhasbeensetuptoshareitsnetworkconnectivityandthatthe
securitysettingsallowyoutoconnectandestablishtheremotenetworkaccess.
•Problem:YourcomputercannotconnectaBluetooth-enabledcomputerthatusesserialportapplications.
Solution:ReestablishaconnectionwiththeBluetooth-enabledcomputer,andtrytheserialconnection
again.
Chapter10.Troubleshootingcomputerproblems141

•Problem:Bluetoothserialportwasdisconnectedautomatically.
Solution:Whenanyserial-basedconnectionisestablished,aninactivitytimerstarts.Ifnoapplication
openstheport,theconnectionisendedautomatically.Thisisanormalcharacteristicoftheserial-based
connectionandisnotadefect.IfyouneedtheBluetoothserialport,justreconnectit.
•Problem:PIMSynchronizationfailedwithanerrormessage“TheSynchronizationwithxxx(Bluetooth
devicename)failed.PIM(PersonalInformationManager)Interfacefailed.”
Solution:Startamailapplication,andsetupyoure-mailaccount.OR,modifytheBluetoothconguration
soasnottosynchronizee-mailitems,asfollows:
1.Double-clickMyBluetoothPlaces.
2.ClickBluetooth,andselectBluetoothSetupWizard.
3.SelectIwanttoconguretheBluetoothservicesthatthiscomputerwillprovidetoremote
devices.Then,clickNext.
4.SelectPIMSynchronization,andclickCongure.
5.SelectDoNotSynchronizeinthee-mailsynchronizationselection,andclickOK.
6.ClickFinishtoclosetheBluetoothServiceSelectionwindow.
•Problem:ThinkPadBluetoothwithEnhancedDataRateSoftwaredoesnotfunction.
Solution:Dothefollowing:
1.TurnonBluetoothbypressingF9.
2.ClickStart➙ControlPanel.
3.ClickthePerformanceandMaintenanceicon.
4.ClicktheSystemicon.
5.ClicktheHardwaretab.
6.ClicktheDeviceManagerbutton.TheDeviceManagerwindowopens.
7.Checkwhetherthewords“BluetoothDevice”appearinthedevicelistinginthewindow.
Ifthewords“BluetoothRadio”appearinthedevicelisting,theMicrosoftBluetoothsoftwareisinstalled
onyourcomputer.IfyouwanttouseThinkPadBluetoothwithEnhancedDataRateSoftware,youhaveto
installitandthenreplacetheBluetoothdriver.Formoreinformation,see“UsingBluetooth”onpage42.
•Problem:WhilelookingattheClassicViewoftheControlPanel,youseetwoBluetoothiconsinthe
ControlPanel.
Solution:IfyouhaveinstalledtheMicrosoftBluetoothsoftwarebefore,andyouareusingThinkPad
BluetoothwithEnhancedDataRateSoftware,youmayndtwoBluetoothiconsintheControlPanel.One
istheBluetoothCongurationiconforThinkPadBluetoothwithEnhancedDataRateSoftware,andthe
otheristheBluetoothDevicesiconfortheMicrosoftBluetoothsoftware.
•Problem:SounddoesnotcomefromtheBluetoothheadset/headphonebutcomesfromthelocal
speakereventhoughtheheadset/headphoneisconnectedusingHeadsetproleorAVprole.
Solution:Dothefollowing:
1.Exittheapplicationthatusesthesounddevice(forexample,WindowsMediaPlayer).
2.OpentheControlPanelbyclickingStart➙ControlPanel.
3.Double-clickSoundsandAudioDevicestoopentheSoundsandAudioDevicesPropertieswindow.
4.SelecttheAudiotab.
5.IfyouareusingHeadsetprole,selectBluetoothAudioforbothSoundplaybackandSound
recording.IfyouareusingAVprole,selectBluetoothHighQualityAudioforbothSoundplayback
andSoundrecording.
6.ClickOKtoclosetheSoundsandAudioDevicesPropertieswindow.
142UserGuide

Keyboardandotherpointingdevices
Thefollowingarethemostcommonkeyboardandotherpointingdevicesproblems:
UltraNavproblems
•Problem:Thepointerdriftswhenthecomputeristurnedonorafteritresumesnormaloperation.
Solution:ThepointermightdriftwhenyouarenotusingtheTrackPointduringnormaloperation.This
isanormalcharacteristicoftheTrackPointandisnotadefect.Pointerdriftingmightoccurforseveral
secondsunderthefollowingconditions:
–Whenthecomputeristurnedon.
–Whenthecomputerresumesnormaloperation.
–WhentheTrackPointispressedforalongtime.
–Whenthetemperaturechanges
•Problem:TheTrackPointortouchpaddoesnotwork.
Solution:MakesurethattheTrackPointortouchpadissettoEnabledintheUltraNavDeviceSetting.
Notes:ToopentheUltraNavDeviceSetting,
ForWindows7:
1.ClickStart,andthenclickControlPanel.
2.ClickHardwareandSound.
3.ClickMouse,andthenclicktheUltraNavtab.
ForWindowsXP:
1.ClickStart,andthenclickControlPanel.
2.ClickPrintersandOtherHardware.
3.ClickMouse,andthenclicktheUltraNavtab.
Keyboardproblems
•Problem:Allorsomekeysonthekeyboarddonotwork.
Solution:Makesurethatthecorrectdevicedriverisinstalled.
ForWindows7:
1.ClickStart➙ControlPanel.ChangetheviewoftheControlPanelfromCategorytoLargeicons
orSmallicons.
2.ClickKeyboard.
3.SelecttheHardwaretab.IntheDeviceProperties,makesurethattheDeviceStatusisThisdevice
isworkingproperly.
ForWindowsXP:
1.ClickStart➙ControlPanel.
2.ClickPrintersandOtherHardware,andthenclickKeyboard.
3.SelecttheHardwaretab.IntheIntheDeviceProperties,makesurethattheDeviceStatusisThis
deviceisworkingproperly.
Ifkeysonthekeyboardstilldonotwork,havethecomputerserviced.
•Problem:Anumberappearswhenyoutypealetter.
Solution:Thenumericlockfunctionison.Todisableit,pressShift+ScrLkorNmLk.
Chapter10.Troubleshootingcomputerproblems143

•Problem:Allorsomekeysontheexternalnumerickeypaddonotwork.
Solution:Makesurethattheexternalnumerickeypadiscorrectlyconnectedtothecomputer.
Displayandmultimediadevices
ThissectionincludesthemostcommondisplayandmultimediadevicesproblemswhichareComputer
screen,Externalmonitor,Audio,andOpticaldrive.Checkthesetopicstolearnmoreinformation.
Computerscreenproblems
•Problem:Thescreenisblank.
Solution:Dothefollowing:
–PressF6tobringuptheimage.
–Ifyouareusingtheacpoweradapter,orusingthebatteryandthePowerManagerBatteryGauge
showsthatthebatteryisnotdepleted,pressF8tomakethescreenbrighter.
–Ifyourcomputerisinsleep(standby)mode,pressFntoresumefromthesleep(standby)mode.
–Iftheproblempersists,dotheSolutionintheproblembelow.
•Problem:Thescreenisunreadableordistorted.
Solution:Makesurethat:
–Thedisplaydevicedriverisinstalledcorrectly.
–Thescreenresolutionandcolorqualityarecorrectlyset.
–Themonitortypeiscorrect.
Tocheckthesesettings,dothefollowing:
ForWindows7:
1.Right-clickonthedesktop,andclickScreenresolution.
2.ClickAdvancedSettings.
3.ClicktheAdaptertab.
4.Makesurethatthecorrectdevicedrivernameisshownintheadapterinformationwindow.
Note:Thedevicedrivernamedependsonthevideochipthathasbeeninstalledonyourcomputer.
5.ClickthePropertiesbutton.Ifyouarepromptedforanadministratorpasswordorconrmation,type
thepasswordorprovideconrmation.Checkthe“Devicestatus”boxandmakesurethedeviceis
workingproperly.Ifnot,clicktheTroubleshootbutton.ClosethePropertieswindow.
6.ClicktheMonitortab.Checkwhetherthecolorqualityiscorrectlyset,makesureotherinformation
isalsocorrect.
7.ClickthePropertiesbutton.Ifyouarepromptedforanadministratorpasswordorconrmation,type
thepasswordorprovideconrmation.Checkthe“Devicestatus”boxandmakesurethedeviceis
workingproperly.Ifnot,clicktheTroubleshootbutton.
ForWindowsXP:
1.Right-clickonthedesktop,andclickPropertiestoopentheDisplayPropertieswindow.
2.ClicktheSettingstab.
3.Checkwhetherthescreenresolutionandcolorqualityarecorrectlyset.
4.ClickAdvanced.
5.ClicktheAdaptertab.
6.Makesurethatthecorrectdevicedrivernameisshownintheadapterinformationwindow.
144UserGuide

Note:Thedevicedrivernamedependsonthevideochipthathasbeeninstalledonyourcomputer.
7.ClickthePropertiesbutton.Checkthe“Devicestatus”boxandmakesurethedeviceisworking
properly.Ifnot,clicktheTroubleshootbutton.
8.ClicktheMonitortab.
9.Makesuretheinformationiscorrect.
10.ClickthePropertiesbutton.Checkthe“Devicestatus”boxandmakesurethedeviceisworking
properly.Ifnot,clicktheTroubleshootbutton.
•Problem:Incorrectcharactersappearonthescreen.
Solution:Didyouinstalltheoperatingsystemorapplicationprogramcorrectly?Iftheyareinstalledand
conguredcorrectly,havethecomputerserviced.
•Problem:Thescreenstaysonevenafteryouturnoffyourcomputer.
Solution:Pressandholdthepowerswitchfor4secondsorovertoturnoffyourcomputer;thenturn
itonagain.
•Problem:Missing,discolored,orbrightdotsappearonthescreeneverytimeyouturnonyourcomputer.
Solution:ThisisanintrinsiccharacteristicoftheTFTtechnology.Yourcomputer'sdisplaycontains
multiplethin-lmtransistors(TFTs).Asmallnumberofmissing,discolored,orbrightdotsonthescreen
mightexistallthetime.
Externalmonitorproblems
•Problem:Theexternalmonitorisblank.
Solution:Tobringuptheimage,pressF6andselectthedesiredmonitor.Iftheproblempersists,do
thefollowing:
1.Connecttheexternalmonitortoanothercomputertomakesureitworks.
2.Reconnecttheexternalmonitortoyourcomputer.
3.Refertothemanualshippedwiththeexternalmonitortochecktheresolutionsandrefreshratesthat
aresupported.
–Iftheexternalmonitorsupportsthesameresolutionasthecomputerdisplayorahigherresolution,
viewoutputontheexternalmonitororonboththeexternalmonitorandthecomputerdisplay.
–Iftheexternalmonitorsupportsalowerresolutionthanthecomputerdisplay,viewoutputonthe
externalmonitoronly.(Ifyouviewoutputontheboththecomputerdisplayandtheexternal
monitor,theexternalmonitorscreenwillbeblankordistorted.)
•Problem:Youcannotsetahigherresolutionthanthepresentoneonyourexternalmonitor.
Solution:
–Makesurethatmonitorinformationiscorrect.Dothefollowing:
ForWindows7:
1.Right-clickonthedesktop,andclickScreenresolution.
Note:Ifyourcomputercannotdetecttheexternalmonitor,clicktheDetectbutton.
2.Clicktheiconforthedesiredmonitor(theMonitor-2iconisfortheexternalmonitor).
3.ClickAdvancedSettings.
4.ClicktheAdaptertab.
5.Makesurethatthecorrectdevicedrivernameisshownintheadapterinformationwindow.
Chapter10.Troubleshootingcomputerproblems145

Note:Thedevicedrivernamedependsonthevideochipthathasbeeninstalledonyourcomputer.
6.ClickOK.
Iftheinformationisincorrect,reinstallthedevicedriver.Seebelowformoreinformation.
ForWindowsXP:
1.Right-clickonthedesktop,andclickPropertiestoopentheDisplayPropertieswindow.
2.ClicktheSettingstab.
3.ClickAdvanced.
4.ClicktheAdaptertab.
5.Makesurethatthecorrectdevicedrivernameisshownintheadapterinformationwindow.
Note:Thedevicedrivernamedependsonthevideochipthathasbeeninstalledonyourcomputer.
6.ClickOK.
Iftheinformationisincorrect,reinstallthedevicedriver.Seebelowformoreinformation.
–Checkthemonitortypeand,ifnecessary,updatethedriverbydoingthefollowing:
ForWindows7:
1.Connecttheexternalmonitortothemonitorconnector,andthenconnectthemonitortoan
electricaloutlet.
2.Turnontheexternalmonitorandthecomputer.
3.Right-clickonthedesktop,andclickScreenresolution.
Note:Ifyourcomputercannotdetecttheexternalmonitor,clicktheDetectbutton.
4.Clicktheiconforthedesiredmonitor(theMonitor-2iconisfortheexternalmonitor).
5.ClickAdvancedSettings.
6.ClicktheMonitortab.Checkthemonitorinformationwindowtomakesurethatthemonitortype
iscorrect.Ifitis,clickOKtoclosethewindow;otherwisedoasfollows.
7.Ifmorethanonemonitortypeisdisplayed,selectGenericPnPMonitororGenericNon-PnP
Monitor.
8.ClickProperties.Ifyouarepromptedforanadministratorpasswordorconrmation,typethe
passwordorprovideconrmation.
9.ClicktheDrivertab.
10.ClickUpdateDriver.
11.ClickBrowsemycomputerfordriversoftware,andthenclickLetmepickfromalistof
devicedriversonmycomputer.
12.CleartheShowcompatiblehardwarecheckbox.
13.SelectManufacturerandModelforyourmonitor.
14.Afterupdatingthedriver,clickClose.
15.SetResolution.
Note:Tochangethecolorsettings,selecttheMonitortab,thensetColors.
16.ClickOK.
ForWindowsXP:
1.Connecttheexternalmonitortothemonitorconnector,andthenconnectthemonitortoan
electricaloutlet.
2.Turnontheexternalmonitorandthecomputer.
146UserGuide

3.PressF6tochangethedisplayoutputlocationtotheexternalmonitor.
Note:AfterpressingF6,youwillneedtowaitforamomentbeforetheimageappears.
4.Right-clickonthedesktop,andclickPropertiestoopentheDisplayPropertieswindow.
5.ClicktheSettingstab.
6.ClickAdvanced.
7.ClicktheMonitortab.Checkthemonitorinformationwindowtomakesurethatthemonitortype
iscorrect.Ifitis,clickOKtoclosethewindow;otherwisedoasfollows.
8.Ifmorethanonemonitortypeisdisplayed,selectDefaultMonitor.
9.ClickProperties.
10.ClicktheDrivertab.
11.ClickUpdateDriver.TheHardwareUpdateWizardappears.
12.ClickNo,notthistime,andthenclickNext.
13.SelectInstallfromalistorspeciclocation(Advanced),andthenclickNext.
14.SelectDon'tsearch.Iwillchoosethedrivertoinstall,andthenclickNext.
15.CleartheShowcompatiblehardwarecheckbox.
16.SelectManufacturersandModelsforyourmonitor.
17.Afterupdatingthedriver,clickOKtoclosethePropertieswindow.
18.SetColorsandScreenareaintheDisplayPropertieswindow.
19.ClickOK.
•Problem:Thescreenisunreadableordistorted.
Solution:Makesurethatthemonitorinformationiscorrect.(Refertothe“Solution”forsettingahigher
resolutionontheexternalmonitor.)
Makesurethattheappropriatemonitortypeisselected.(Refertothe“Solution”forsettingahigher
resolutionontheexternalmonitor.)
Makesurethatanappropriaterefreshrateisselectedbydoingthefollowing:
ForWindows7:
1.Connecttheexternalmonitortothemonitorconnector,andthenconnectthemonitortoanelectrical
outlet.
2.Turnontheexternalmonitorandthecomputer.
3.Right-clickonthedesktop,andclickScreenresolution.
Note:Ifyourcomputercannotdetecttheexternalmonitor,clicktheDetectbutton.
4.Clicktheiconforthedesiredmonitor(theMonitor-2iconisfortheexternalmonitor).
5.ClickAdvancedSettings.
6.ClicktheMonitortab.
7.Selectthecorrectscreenrefreshrate.
ForWindowsXP:
1.Connecttheexternalmonitortothemonitorconnector,andthenconnectthemonitortoanelectrical
outlet.
2.Turnontheexternalmonitorandthecomputer.
3.PressF6tochangethedisplayoutputlocationtotheexternalmonitor.
Chapter10.Troubleshootingcomputerproblems147

Note:AfterpressingF6,youwillneedtowaitforamomentbeforetheimageappears.
4.Right-clickonthedesktop,andclickPropertiestoopentheDisplayPropertieswindow.
5.ClicktheSettingstab.
6.ClickAdvanced.
7.ClicktheMonitortab.
8.Selectthecorrectrefreshrate.
•Problem:Wrongcharactersappearonthescreen.
Solution:Didyoufollowthecorrectprocedureininstallingtheoperatingsystemorapplicationprogram?
Ifyoudid,havetheexternalmonitorserviced.
•Problem:TheExtenddesktopfunctiondoesnotwork.
Solution:EnabletheExtenddesktopfunctionbydoingthefollowing:
ForWindows7:
1.Connecttheexternalmonitortothemonitorconnector,andthenconnectthemonitortoanelectrical
outlet.
2.Turnontheexternalmonitorandthecomputer.
3.Right-clickonthedesktop,andclickScreenresolution.
4.ClicktheMonitor-2icon.
5.SelectExtendthesedisplaysforMultipledisplays.
6.ClicktheMonitor-1icon(fortheprimarydisplay,thecomputerdisplay).
7.SelecttheResolutionoftheprimarydisplay.
8.ClicktheMonitor-2icon(fortheexternalmonitor).
9.SelecttheResolutionofthesecondarydisplay.
10.Settherelativepositionoftheeachmonitorbydraggingitsicon.Youcansetthemonitorsinany
relativeposition,buttheiconsmusttoucheachother.
11.ClickOKtoapplythechanges.
Note:Tochangethecolorsettings,right-clickonthedesktop,andclickScreenresolution.Click
AdvancedSettings,selecttheMonitortab,thensetColors.
ForWindowsXP:
1.Attachthecomputertoanexternalmonitor.
2.Right-clickonthedesktop,andclickPropertiestoopentheDisplayPropertieswindow.
3.ClicktheSettingstab.
4.ClicktheMonitor-2icon.
5.SelecttheExtendmyWindowsdesktopontothismonitorcheckbox.
6.ClicktheMonitor-1icon(fortheprimarydisplay,thecomputerdisplay).
7.Selectthescreenresolutionandcolorqualityoftheprimarydisplay.
8.ClicktheMonitor-2icon(fortheexternalmonitor).
9.Selectthescreenresolutionandcolorqualityofthesecondarydisplay.
10.Settherelativepositionoftheeachmonitorbydraggingitsicon.Youcansetthemonitorsinany
relativeposition,buttheiconsmusttoucheachother.
11.ClickOKtoapplythechanges.
148UserGuide

•Problem:Displayswitchingdoesnotwork.
Solution:IfyouusetheExtenddesktopfunction,disableit,andchangethedisplayoutputlocation.If
aDVDmovieoravideoclipisplaying,stoptheplayback,closetheapplication,andthenchangethe
displayoutputlocation.
•Problem:IfyouusetheExtenddesktopfunction,youcannotsetahigherresolutionorhigherrefresh
rateonthesecondarydisplay.
Solution:Changetheresolutionandthecolordepthtolowersettingsfortheprimarydisplaybydoing
thefollowing:
ForWindows7:Changetheresolutiondepthtolowersettingsfortheprimarydisplay.Refertothe
“Solution”for“TheExtenddesktopfunctiondoesnotwork”above.
ForWindowsXP:UsingtheDisplayPropertieswindow,changetheresolutionandthecolordepthtolower
settingsfortheprimarydisplay.TolaunchtheDisplayPropertieswindow,refertothe“Solution”for“The
Extenddesktopfunctiondoesnotwork”above.
•Problem:Thescreenpositionontheexternalmonitorisincorrectwhenthatmonitorissetforahigh
resolution.
Solution:Sometimes,whenyouuseahighresolutionsuchas1600x1200,theimageisshiftedtoleft
orrightonthescreen.Tocorrectthis,rstmakesurethatyourexternalmonitorsupportsthedisplay
mode—thatis,theresolutionandtherefreshrate—thatyouhaveset.Ifitdoesnot,setadisplaymode
thatthemonitorsupports.Ifitdoessupportthedisplaymodeyouhaveset,gotothesetupmenuforthe
monitoritselfandadjustthesettingsthere.Usuallytheexternalmonitorhasbuttonsforaccesstothe
setupmenu.Fordetails,seethereferencemanualforthemonitor.
Audioproblems
•Problem:WaveorMIDIsounddoesnotplaycorrectly.
Solution:Makesurethebuilt-inaudiodeviceisconguredcorrectly.
ForWindows7:
1.ClickStart➙ControlPanel.
2.ClickHardwareandSound.
3.ClickDeviceManager.Ifyouarepromptedforanadministratorpasswordorconrmation,typethe
passwordorprovideconrmation.
4.Double-clickSound,videoandgamecontrollers.
5.Makesurethefollowingdeviceisenabledandconguredcorrectly:
–ConexantPebbleHighDenitionSmartAudio
ForWindowsXP:
1.ClickStart➙ControlPanel.
2.ClickPerformanceandMaintenance
3.ClickSystem.
4.ClicktheHardwaretab,andthenclicktheDeviceManagerbutton.
5.Clickthe+markforSound,videoandgamecontrollers.
6.Makesurethefollowingdeviceisenabledandconguredcorrectly:
–ConexantPebbleHighDenitionSmartAudio
•Problem:RecordingsmadebyusingtheMicrophoneinputarenotloudenough.
Solution:MakesurethatMicrophoneBoostisturnedonandsetasfollows:
Chapter10.Troubleshootingcomputerproblems149

ForWindows7:
1.ClickStart➙ControlPanel.
2.ClickHardwareandSound
3.ClickSound.
4.ClicktheRecordingtabintheSoundwindow.
5.SelectMicrophone,andclickthePropertiesbutton.
6.ClicktheLevelstab,andmovetheMicrophoneBoostsliderupwards.
7.ClickOK.
ForWindowsXP:
1.Double-clickthevolumeiconinthetaskbar.TheVolumeControlwindowopens.
2.ClickOptions.
3.ClickProperties.
4.SelectConexantHDAudioinputintheMixerdevicelist.
5.ClickOK.
6.ClickOptions,andthenclickAdvancedControls.
7.FindtheMicrophonevolumecontrol,andthenclickAdvanced.
8.SelecttheMicrophoneboostcheckbox.
9.ClickClose.
Note:Fordetailsaboutcontrollingvolume,refertoyourWindowsonlinehelp.
•Problem:Avolumeorbalanceslidercannotbemoved.
Solution:Theslidermightbegrayedout.Thismeansthatitspositionisxedbythehardwareand
cannotbechanged.
•Problem:Thevolumeslidersdonotstayinplacewhensomeaudioapplicationsareused.
Solution:Itisnormalforthesliderstochangepositionwhencertainsoundapplicationsareused.The
applicationsareawareoftheVolumeMixerwindow(inWindowsXP,VolumeControlwindow)andare
allowedtochangethesettingsthemselves.AnexampleistheWindowsMediaPlayer.Usuallythe
applicationhasslidersavailabletocontrolthesoundfromwithintheapplication.
•Problem:ThevolumeslidersdonotalltintheVolumeControlwindowinWindowsXP.
Solution:PressCtrl+Skeyswhilethevolumecontrolisinfocus,andtoggletoasmallersize.
•Problem:Thebalanceslidercannotcompletelymuteonechannel.
Solution:Thecontrolisdesignedtocompensateforminordifferencesinbalanceanddoesnot
completelymuteeitherchannel.
•Problem:ThereisnovolumecontrolforMIDIsoundontheVolumeMixerwindow(inWindowsXP ,
VolumeControlwindow).
Solution:Usethehardwarevolumecontrol.InWindowsXP,usethehardwarevolumecontrolorthe
WavevolumecontrolontheVolumeControlwindow.ThisisbecausetheBuilt-InSynthesizerSoftware
doesnotsupportthecontrol.
•Problem:ThesoundcannotbeturnedoffcompletelyevenifyousettheMastervolumecontrolat
minimum.
150UserGuide

Solution:YoucanstillhearsomesoundeventhoughyouhavesettheMastervolumecontrolat
minimum.Toturnoffthesoundcompletely,gototheMastervolumecontrolandselectMutespeakers
(MuteinWindowsXP).
Fingerprintreaderproblems
•Problem:Thesurfaceofthereaderisdirty,stained,orwet.
Solution:Gentlycleanthesurfaceofthereaderwithadry,soft,lint-freecloth.
•Problem:Thereaderoftenfailstoenrollorauthenticateyourngerprint.
Solution:Ifthesurfaceofthereaderisdirty,stained,orwet,gentlycleanthesurfaceofthereader
withadry,soft,lint-freecloth.
Ifyourngerhasanyofthefollowingconditions,youmaynotbeabletoregisterorauthenticateit:
–Yourngeriswrinkled.
–Yourngerisrough,dry,orinjured.
–Yourngerisverydry.
–Yourngerisstainedwithdirt,mud,oroil.
–Thesurfaceofyourngerisverydifferentfromwhenyouenrolledyourngerprint.
–Yourngeriswet.
–Angerisusedthathasnotbeenenrolled.
Toimprovethesituation,trythefollowing:
–Cleanorwipeyourhandstoremoveanyexcessdirtormoisturefromthengers.
–Enrollanduseadifferentngerforauthentication.
–Ifyourhandsaretoodry,applylotiontothem.
Batteryandpower
Thissectiontellswhattodoifyouhaveabatteryandpowerproblem.
Thissectionincludesvetopics:Battery,acpoweradapter,Power,Powerbutton,StartupandSleep
(standby)andhibernation.Checkthesetopicstondtherelatedinformation.
Batteryproblems
•Problem:Thebatterypackcannotbefullychargedbythepower-offmethodinthestandardcharge
timeforyourcomputer.
Solution:Thebatterypackmightbeover-discharged.Dothefollowing:
1.Turnoffthecomputer.
2.Makesurethattheover-dischargedbatterypackisinthecomputer.
3.Connecttheacpoweradaptertothecomputerandletitcharge.
IftheoptionalQuickChargerisavailable,useittochargetheover-dischargedbatterypack.
Ifthebatterypackcannotbefullychargedin24hours,useanewbatterypack.
•Problem:Yourcomputershutsdownbeforethebatterystatusindicatorshowsempty,-or-Your
computeroperatesafterthebatterystatusindicatorshowsempty.
Solution:Dischargeandrechargethebatterypack.
•Problem:Theoperatingtimeforafullychargedbatterypackisshort.
Chapter10.Troubleshootingcomputerproblems151

Solution:Dischargeandrechargethebatterypack.Ifyourbattery'soperatingtimeisstillshort,usea
newbatterypack.
•Problem:Thecomputerdoesnotoperatewithafullychargedbatterypack.
Solution:Thesurgeprotectorinthebatterypackmightbeactive.Turnoffthecomputerforoneminuteto
resettheprotector;thenturnonthecomputeragain.
•Problem:Thebatterypackcannotbecharged.
Solution:Youcannotchargethebatterywhenitistoohot.Ifthebatteryfeelshot,removeitfromthe
computerandallowittocooltoroomtemperature.Afteritcools,reinstallitandrechargethebattery.Ifit
stillcannotbecharged,haveitserviced.
ACpoweradapterproblems
•Problem:Theacpoweradapterisconnectedtothecomputerandtheworkingelectricaloutlet,butthe
poweradapter(powerplug)iconisnotdisplayedinthetaskbar.Alsotheacpowerindicatordoes
notlightup.
Solution:Doasfollows:
1.Makesurethattheconnectionoftheacpoweradapteriscorrect.Forconnectingtheacpower
adapter,seetheSetupInstructionsmanualincludedintheshippingcontentsofyourcomputer.
2.Iftheabovestepiscorrect,turnoffthecomputer,thendisconnecttheacpoweradapteranduninstall
themainbattery.
3.Reinstallthebatteryandreconnecttheacpoweradapter,thenturnonthecomputer.
4.Ifthepoweradaptericonstilldoesnotappearonthetaskbarandtheacpowerindicatordoesnot
lightup,havetheacpoweradapterandyourcomputerserviced.
Note:IfyourcomputerisaWindows7model,todisplaythepoweradapter(powerplug)icon,click
Showhiddeniconsinthetaskbar.
Powerproblems
Printtheseinstructionsnowandkeepitwithyourcomputerforreferencelater.
Ifyourcomputerisgettingnopoweratall,checkthefollowingitems:
1.Verifythepowerswitch.Referto“System-statusindicators”onpage12.Thepowerswitchis
illuminatedwheneverthecomputerison.
2.Checkallpowerconnections.Removeanypowerstripsandsurgeprotectorstoconnecttheacpower
adapterdirectlytotheacpoweroutlet.
3.Inspecttheacpoweradapter.Checkforanyphysicaldamage,andmakesurethatthepowercableis
rmlyattachedtotheadapterbrickandthecomputer.
4.Verifytheacpowersourceisworkingbyattachinganotherdevicetotheoutlet.
5.Removealldevicesandthentestforsystempowerwithminimaldevicesattached.
a.Disconnecttheacpoweradapterandallcablesfromthecomputer.
b.Closethecomputerdisplay,andturnthecomputerover.
c.Removethebattery.Referto“Replacingthebattery”onpage77.
d.Removethememory(SO-DIMM).Referto“Replacingmemory”onpage93.
e.RemovethePCIExpressMiniCard.Referto“InstallingandreplacingaPCIExpressMiniCardfor
wirelessLAN/WiMAXconnection”onpage90.
f.Removetheharddiskdrive.Referto“Replacingtheharddiskdrive”onpage79.
152UserGuide

g.Waitfor30seconds,andthenreinstalltheSO-DIMMandtheknowngoodbatteryortheacpower
adaptertotestthecomputerwithminimaldevicesattachedrst.
h.Reinstalleachdeviceoneatatimethatyouhaveremovedintheearliersteps.
Ifyourcomputerdoesnotrunonbatterypower,checkthefollowingitems:
1.Removeandreseatthebatterytomakesurethatitisproperlyconnected.Referto“Replacingthe
battery”onpage77.
2.Swapbatterieswithanothersimilarmodel,ifavailable.
IfanothersimilarThinkPadmodelisavailable,thenverifythatthebatterypackworksintheother
computerandthatthebatterypackfortheothermodelworksinthiscomputer.
3.Verifythebattery-statusindicator.Referto“Power-statusindicators”onpage13.
Apowerbuttonproblem
•Problem:Thesystemdoesnotrespond,andyoucannotturnoffthecomputer.
Solution:Turnoffthecomputerbypressingandholdingthepowerbuttonfor4secondsormore.Ifthe
systemisstillnotreset,removetheacpoweradapterandthebattery.
Startupproblems
Printtheseinstructionsnowandkeepthemwithyourcomputerforreferencelater.
Ifyoureceiveanerrormessagebeforetheoperatingsystemloads,checkthefollowingitem:
•FollowtheappropriatecorrectiveactionsforPower-onself-testerrormessages.
Ifyoureceiveanerrormessagewhiletheoperatingsystemisloadingthedesktopcongurationafterthe
POSTiscompleted,checkthefollowingitems:
1.VisittheLenovoSupportWebsiteathttp://www.lenovo.com/supportandsearchfortheerrormessage.
2.VisittheMicrosoftKnowledgeBasehomepageathttp://support.microsoft.com/andsearchforthe
errormessage.
Sleep(standby)andhibernationproblems
•Problem:Thecomputerenterssleep(standby)modeunexpectedly.
Solution:Iftheprocessoroverheats,thecomputerautomaticallyentersleep(standby)modetoallow
thecomputertocoolandtoprotecttheprocessorandotherinternalcomponents.Checkthesettings
forsleep(standby)mode,usingPowerManager.
•Problem:Thecomputerenterssleep(standby)mode(thesleep/standbyindicatorturnson)immediately
afterPower-onself-test.
Solution:Makesurethat:
–Thebatteryischarged.
–Theoperatingtemperatureiswithintheacceptablerange.Referto“Features”onpage15,
“Specications”onpage18,and“Operatingenvironment”onpage19.
Ifthebatteryischargedandthetemperatureiswithinrange,havethecomputerserviced.
•Problem:The“criticallow-batteryerror”messageappears,andthecomputerimmediatelyturnsoff.
Solution:Thebatterypowerisgettinglow.Connecttheacpoweradaptertothecomputerandplugit
intoanelectricaloutlet,orreplacethebatterywithachargedone.
•Problem:ThecomputerdisplayremainsblankafteryoupressFntoreturnfromsleep(standby)mode.
Chapter10.Troubleshootingcomputerproblems153

Solution:Checkwhetheranexternalmonitorwasdisconnectedorturnedoffwhilethecomputerwas
insleep(standby)mode.Ifyoudisconnectedorturnedofftheexternalmonitor,connectitorturniton
beforeresumingthecomputerfromthesleep(standby)mode.Whenresumingthecomputerfromthe
sleep(standby)modewithoutattachingtheexternalmonitororturningiton,andthecomputerdisplay
remainsblank,pressF6tobringupthecomputerdisplay.
•Problem:Thecomputerdoesnotreturnfromsleep(standby)mode,orthesystemstatusindicator
(illuminatedThinkPadlogo)blinksslowlyandthecomputerdoesnotwork.
Solution:Ifthesystemdoesnotreturnfromsleep(standby)mode,itmayhaveenteredsleep(standby)or
hibernationmodeautomaticallybecausethebatteryisdepleted.Checkthesleep(standby)indicator.
–Ifthesystemstatusindicator(illuminatedThinkPadlogo)blinksslowly,yourcomputerisinsleep
(standby)mode.Connecttheacpoweradaptertothecomputer;thenpressFn.
–Ifthesystemstatusindicator(illuminatedThinkPadlogo)isoff,yourcomputerisinpower-offstateor
inhibernationmode.Connecttheacpoweradaptertothecomputer;thenpressthepowerbutton
toresumeoperation.
Ifthesystemstilldoesnotreturnfromsleep(standby)mode,yoursystemmaystoprespondingandyou
maynotbeabletoturnoffthecomputer.Inthiscase,youneedtoresetthecomputer.Ifyouhavenot
savedyourdata,itmaybelost.Toresetthecomputer,pressandholdthepowerbuttonfor4secondsor
more.Ifthesystemisstillnotreset,removetheacpoweradapterandthebattery.
•Problem:Yourcomputerdoesnotentersleep(standby)orhibernationmode.
Solution:Checkwhetheranyoptionhasbeenselectedtodisableyourcomputerfromenteringsleep
(standby)orhibernationmode.
Ifyourcomputertriestoentersleep(standby)modebuttherequestisrejected,thedeviceintheUSB
connectormightbedisabled.Ifthisoccurs,doahot-unplug-and-plugoperationfortheUSBdevice.
•Problem:Thebatterydischargesslightlywhilethecomputerisinhibernationmode.
Solution:Ifthewakeupfunctionisenabled,thecomputerconsumessmallamountofpower.Thisisnot
adefect.Fordetails,referto“Power-savingmodes”onpage37.
Drivesandotherstoragedevices
Thissectionincludesharddiskdriveproblemsandopticaldriveproblems.
Harddiskdriveproblems
•Problem:Theharddiskdrivemakesarattlingnoiseintermittently.
Solution:Therattlingnoisemightbeheard:
–Whentheharddiskdrivebeginsornishesgettingaccesstodata.
–Whenyoucarrytheharddiskdrive.
–Whenyoucarryyourcomputer.
Thisisanormalcharacteristicofaharddiskdriveandisnotadefect.
•Problem:Theharddiskdrivedoesnotwork.
Solution:InthestartupmenuintheThinkPadSetup,makesurethattheharddiskdriveisincludedinthe
“Bootpriorityorder”list.Ifitisincludedinthe“Excludedfrombootorder”list,itisdisabled.Selectthe
entryforitinthelistandpressthexkey.Thismovestheentrytothe“Bootpriorityorder”list.
Opticaldriveproblems
•Problem:Theopticaldrive,suchasaCD,DVD,orCD-RWdrive,doesnotwork.
154UserGuide

Solution:MakesurethatthecomputeristurnedonandaCD,DVD,orCD-RWisproperlyloadedonthe
centerpivotofthedrive.(Youshouldhearaclick.)
Makesurethatthedriveconnectorisrmlyconnectedtothecomputer.Ifyouuseanoptionthathasabay
forinstallingthedrive,makesurethattheoptionisrmlyconnectedtothecomputerandworksproperly.
Makesurethatthedrivetrayisrmlyclosed.
Makesurethatthedevicedriversarecorrectlyinstalled.
•Problem:YouhearanoisefromthedrivewhentheCD,DVD,orCD-RWisspinning.
Solution:Ifthediscisnotproperlyloadedonthecenterpivotofthedrive,itmayrubagainstthedrive
coverandmakeanoise.Makesurethatthediscisloadedproperlyinthedrive.
•Problem:Thetraydoesnotopenevenifyoupresstheejectbutton.
Solution:Whenyourcomputerisnotturnedon,pressingtheejectbuttondoesnotcausethedrivetray
toopen.Makesurethatthecomputeristurnedonandthatthedriveconnectorisrmlyconnected
tothecomputer.
Ifthetraystilldoesnotopen,makesurethatthecomputerisrunning,andinserttheendofastraightened
paperclipintotheemergencyejecthole.Thetraywillopen.
•Problem:Anopticalmedium,suchasaCD,aDVD,oraCD-RW,cannotberead.
Solution:MakesurethattheCD,DVD,orCD-RWisnotdirty.Ifitis,cleanitwithacleanerkit.
TestanotherCD,DVD,orCD-RW.IfthecomputercanreadtheotherCD,DVD,orCD-RW,therst
CD,DVD,orCD-RWmightbedefective
MakesurethattheCD,DVD,orCD-RWisloadedonthecenterpivotofthedrivewiththelabelside
up.(Youshouldhearaclick.)
MakesurethattheCD,DVD,orCD-RWisinoneofthefollowingformats:
–MusicCD
–CD-ROMorCD-ROMXA
–MultisessionphotoCD
–VideoCD
–DVD-ROM(DVD-video)
•Problem:WhenyoutrytowritetoaDVD-RAMdiscthathasbeenloadedintoaDVD-RAM/CD-RW
combinationdriveonyourcomputer,thefollowingerrormessagemaybedisplayedinWindowsXP:“The
discinthedriveisnotawritableCDoritisfull.Pleaseinsertablank,writableCDintodriveD:\,orinserta
discwithenoughfreespacetoholdallthelesyouhaveselectedforwritingtoCD.”.
Solution:BeforeyouwritetoaDVD-RAMdisc,enablethewritingfunctionasfollows:
1.ClickStart➙MyComputer.
2.Right-clickDVD-RAMdrive.Amenuforthedriveisdisplayed.TheDVD-RAMdriveisdisplayedin
theDeviceswithRemovableStoragecategory.
3.ClickProperties.
4.ClicktheRecordingtab.
5.ClearthecheckboxforEnableCDrecordingonthisdrive.
6.ClickOK.
YoucangetdetailedinformationfromtheMoreInformationsectionoftheMicrosoftKnowledgeBase
826510.VisittheMicrosoftKnowledgeBasehomepageat:http://support.microsoft.com/,typethe
numberoftheknowledgebasearticleyouneedinthesearcheld,andclicktheSearchbutton.
Chapter10.Troubleshootingcomputerproblems155

•Problem:WhenyoutrytowritetoaDVD-RWdiscthathasbeenloadedintoaDVD-RAM/CD-RW
combinationdriveonyourcomputer,youcannotwritetoit,andthefollowingerrormessagemaybe
displayed:“ThediscinthedriveisnotawritableCDoritisfull.Pleaseinsertablank,writableCDinto
driveD:\,orinsertadiscwithenoughfreespacetoholdallthelesyouhaveselectedforwritingto
CD.”inWindowsXP.
Solution:TowritetoaDVD-RWdisc,useapreinstalledsoftwareapplicationsuchasRecordNowonyour
computer.YoucannotwritetothediscwithonlyaWindowsoperatingsystem,becausetheoperating
systemdoesnothavethefunctiontoenablewritingtothedisc.
•Problem:ThecomputercannotplayaCD,orthesoundqualityisnotgood.
Solution:Besurethatthediskmeetsthestandardsforyourcountry.Usually,adiskthatmeetsthelocal
standardsismarkedwithaCDlogoonthelabel.Ifyouuseadiscthatdoesnotmeetthesestandards,we
cannotguaranteethatitwillplay,orthat,ifitdoesplay,thesoundqualitywillbegood.
•Problem:WinDVD8hasanHDDVDtab,butIcannotuseit.
Solution:YourcomputerdoesnotsupportanHDDVDdrive.
•Problem:OtherproblemsinWindowsXP.
Solution:ForinformationontheapplicationforrunningaDVD-ROM,refertotheInterVideoWinDVDHelp
Guidelines.Toopentheguidelines,clickStartandmovethepointertoAllProgramsandInterVideo
WinDVD;thenclickInterVideoWinDVD.Youcanclickthe?ontheInterVideoWinDVDwindow.
Softwareproblems
•Problem:Anapplicationdoesnotruncorrectly.
Solution:Makesurethattheproblemisnotbeingcausedbytheapplication.
Checkthatyourcomputerhastheminimumrequiredmemorytoruntheapplication.Refertothemanuals
suppliedwiththeapplication.
Checkthefollowing:
–Theapplicationisdesignedtooperatewithyouroperatingsystem.
–Otherapplicationsruncorrectlyonyourcomputer.
–Thenecessarydevicedriversareinstalled.
–Theapplicationworkswhenitisrunonsomeothercomputer.
Ifanerrormessageappearswhileyouareusingtheapplicationprogram,refertothemanualssupplied
withtheapplication.
Iftheapplicationstilldoesnotruncorrectly,contactyourplaceofpurchaseoraservicerepresentativefor
help.
Portsandconnectors
Thefollowingarethemostcommonportsandconnectorsproblems:
UniversalSerialBusproblems
•Problem:AdeviceconnectedtotheUSBconnectordoesnotwork.
Solution:OpentheDeviceManagerwindow.MakesurethattheUSBdevicesetupiscorrect,andthat
theassignmentofcomputerresourceandtheinstallationofthedevicedriverarecorrect.
ForWindows7:
1.ClickStart➙ControlPanel.
2.ClickHardwareandSound.
156UserGuide

3.ClickDeviceManager.Ifyouarepromptedforanadministratorpasswordorconrmation,typethe
passwordorprovideconrmation.
ForWindowsXP:
1.ClickStart➙ControlPanel.
2.ClickPerformanceandMaintenance,andclickSystem.
3.ClicktheHardwaretab,andclicktheDeviceManagerbutton.
Referto“Diagnosingproblems”onpage131andrunadiagnostictestoftheUSBconnector.
Chapter10.Troubleshootingcomputerproblems157

158UserGuide

Chapter11.Gettingsupport
ThereismoretoowningaThinkPadNotebookthanhavingapowerful,portablecomputer.Thischapter
offersinformationaboutwhentocommunicatewithLenovoandhowbesttodoit.
•“BeforeyoucontactLenovo”onpage159
•“Gettinghelpandservice”onpage160
•“Purchasingadditionalservices”onpage161
BeforeyoucontactLenovo
Often,youcansolveyourcomputerproblemsbyreferringtotheinformationintheexplanationsoferror
codes,runningdiagnosticprograms,orbyconsultingtheThinkPadWebsite.
Registeryourcomputer
RegisteryourThinkPadproductswithLenovo,goto:http://www.lenovo.com/register.Thiscanhelp
authoritiesreturnyourcomputertoyouifitislostorstolen.RegisteringyourcomputeralsoenablesLenovo
tonotifyyouaboutpossibletechnicalinformationandupgrades.
Formoreinformationaboutregisteringyourcomputer,referto“Registeringyourcomputer”onpage25.
Downloadsystemupdates
Downloadingupdatedsoftwaremightresolveproblemsyouexperiencewithyourcomputer.
Todownloadupdatedsoftware,goto:http://www.lenovo.com/ThinkPadDrivers.Thenfollowtheinstructions
onthescreen.
Recordinformation
BeforeyoutalktoaLenovorepresentative,recordthefollowingimportantinformationaboutyourcomputer.
Recordproblemsymptomsanddetails
Collecttheanswerstothequestionsbelowbeforeyoucallforhelp.Then,youwillbeabletogethelp
asquicklyaspossible.
•Whatistheproblem?Isitcontinuousorintermittent?
•Isthereanerrormessagethatappears?Whatistheerrorcode,ifany?
•Whatoperatingsystemareyouusing?Whichversion?
•Whichsoftwareapplicationswererunningatthetimeoftheproblem?
•Cantheproblembereproduced?Ifso,how?
Recordsysteminformation
Theserialnumberlabelisonthebottomofyourcomputer.Recordthemachinetypeandtheserialnumber.
•WhatisthenameofyourLenovoproduct?
•Whatisthemachinetype?
•Whatistheserialnumber?
©CopyrightLenovo2011159

Gettinghelpandservice
Ifyouneedhelp,service,technicalassistance,orjustwantmoreinformationaboutLenovoproducts,you
willndawidevarietyofsourcesavailablefromLenovotoassistyou.Thissectioncontainsinformation
aboutwheretogoforadditionalinformationaboutLenovoandourproducts,whattodoifyouexperiencea
problemwithyourcomputer,andwhomtocallforserviceshoulditbenecessary.
Informationaboutyourcomputerandpreinstalledsoftware,ifany,isavailableinthedocumentationthat
comeswithyourcomputer.Thatdocumentationincludesprintedbooks,onlinebooks,READMEles,and
helples.Inaddition,informationaboutLenovoproductsisavailableontheWorldWideWeb.
MicrosoftServicePacksarethelatestsoftwaresourceforWindowsproductupdates.Theyareavailable
viaWebdownload(connectionchargesmayapply)orviadisc.Formorespecicinformationandlinks,go
to:http://www.microsoft.com.LenovooffersUpandRunningtechnicalassistancewithinstallationof,or
questionsrelatedto,ServicePacksforyourLenovo-preloadedMicrosoftWindowsproduct.Forinformation,
pleasecontacttheCustomerSupportCenter.
Usingdiagnosticprograms
Manycomputerproblemscanbesolvedwithoutoutsideassistance.Ifyouexperienceaproblemwithyour
computer,therstplacetostartisthetroubleshootinginformationofyourcomputerdocumentation.Ifyou
suspectasoftwareproblem,seethedocumentation,includingREADMElesandonlinehelp,thatcomes
withtheoperatingsystemorapplicationprogram.
ThinkPadNotebookscomewithasetofdiagnosticprogramsthatyoucanusetohelpyouidentifyhardware
problems.See“Diagnosingproblems”onpage131forinstructionsonusingthediagnosticprograms.
TheTroubleshootinginformationorthediagnosticprogramsmighttellyouthatyouneedadditionalor
updateddevicedriversorothersoftware.LenovomaintainspagesontheWorldWideWebwhereyoucan
getthelatesttechnicalinformationanddownloaddevicedriversandupdates.
LenovosupportWebsite
TechnicalsupportinformationisavailableontheLenovoSupportWebsiteat:
http://www.lenovo.com/support
Thisportalisupdatedwiththelatestinformationaboutthefollowingsubjects:
DownloadDrivers&SoftwareDownloaddrivers,ashtheBIOS,andupdateyour
software.
Diagnose&FixUseself-diagnostictoolstodiagnosetheproblem
yourself,searchcommunityboards,orworkwithour
VirtualAgenttoanswerquestions.
Product&ServiceWarrantyCheckyourwarrantystatusandupgradeyourwarranty.
Product&PartsDetailFindpartnumbersforreplacementparts,learnhowto
replaceparts,andviewotherpartsinformationrelated
toyourproduct.
UserGuides&ManualsReadordownloadthedocumentationrelatedtoyour
product.
KnowledgeBase&FAQSearchthecommunityknowledgebaseforyourcomputer
toshareanddiscoverinformationwithotherusers.
160UserGuide

CallingLenovo
Ifyouhavetriedtocorrecttheproblemyourselfandstillneedhelp,duringthewarrantyperiod,youcan
gethelpandinformationbytelephonethroughtheCustomerSupportCenter.Thefollowingservicesare
availableduringthewarrantyperiod:
•Problemdetermination-Trainedpersonnelareavailabletoassistyouwithdeterminingifyouhavea
hardwareproblemanddecidingwhatactionisnecessarytoxtheproblem.
•Lenovohardwarerepair-IftheproblemisdeterminedtobecausedbyLenovohardwareunderwarranty,
trainedservicepersonnelareavailabletoprovidetheapplicablelevelofservice.
•Engineeringchangemanagement-Occasionally,theremightbechangesthatarerequiredafteraproduct
hasbeensold.Lenovooryourreseller,ifauthorizedbyLenovo,willmakeselectedEngineeringChanges
(ECs)availablethatapplytoyourhardware.
Thefollowingitemsarenotcovered:
•ReplacementoruseofpartsnotmanufacturedfororbyLenovoornonwarrantedparts
Note:Allwarrantedpartscontaina7-characteridenticationintheformatFRUXXXXXXX.
•Identicationofsoftwareproblemsources
•CongurationofUEFIaspartofaninstallationorupgrade
•Changes,modications,orupgradestodevicedrivers
•Installationandmaintenanceofnetworkoperatingsystems(NOS)
•Installationandmaintenanceofapplicationprograms
ForthetermsandconditionsoftheLenovoLimitedWarrantythatappliestoyourLenovohardwareproduct,
seeAppendixA,“Warrantyinformation”intheSafetyandWarrantyGuide.
Ifpossible,benearyourcomputerwhenyoumakeyourcallincasethetechnicalassistancerepresentative
needstohelpyouresolveacomputerproblem.Pleaseensurethatyouhavedownloadedthemostcurrent
driversandsystemupdates,rundiagnostics,andrecordedinformationbeforeyoucall.Whencallingfor
technicalassistance,pleasehavethefollowinginformationavailable:
•MachineTypeandModel
•Serialnumbersofyourcomputer,monitor,andothercomponents,oryourproofofpurchase
•Descriptionoftheproblem
•Exactwordingofanyerrormessages
•Hardwareandsoftwarecongurationinformationforyoursystem
Telephonenumbers
ForalistoftheLenovoSupportphonenumbersforyourcountryorregion,goto
http://www.lenovo.com/support/phoneorrefertotheSafetyandWarrantyGuidethatcomeswithyour
computer.
Note:Phonenumbersaresubjecttochangewithoutnotice.Thelatestphonenumbersareavailableat
http://www.lenovo.com/support/phone.Ifthenumberforyourcountryorregionisnotprovided,contact
yourLenovoresellerorLenovomarketingrepresentative.
Purchasingadditionalservices
Duringandafterthewarrantyperiod,youcanpurchaseadditionalservices,suchassupportforLenovo
andnon-Lenovohardware,operatingsystems,andapplicationprograms;networksetupandconguration;
upgradedorextendedhardwarerepairservices;andcustominstallations.Serviceavailabilityandservice
namemightvarybycountry.
Formoreinformationabouttheseservices,goto:
http://www.lenovo.com/accessories/services/index.html
Chapter11.Gettingsupport161

162UserGuide

AppendixA.Regulatoryinformation
Wirelessrelatedinformation
Wirelessinteroperability
WirelessLANPCIExpressMiniCardisdesignedtobeinteroperablewithanywirelessLANproductthat
isbasedonDirectSequenceSpreadSpectrum(DSSS),ComplementaryCodeKeying(CCK),and/or
OrthogonalFrequencyDivisionMultiplexing(OFDM)radiotechnology,andiscompliantto:
•The802.11b/gStandard,802.11a/b/gor802.11ndraft2.0onWirelessLANs,asdenedandapprovedby
theInstituteofElectricalandElectronicsEngineers.
•TheWirelessFidelity(WiFi)certicationasdenedbytheWi-FiAlliance.
BluetoothdeviceisdesignedtobeinteroperablewithanyBluetoothproductthatiscomplianttoBluetooth
Specication2.1+EDRasdenedbytheBluetoothSIG.FollowingprolesaresupportedbyBluetooth
device:
•GenericAccess
•ServiceDiscovery
•SerialPort
•Dial-upNetworking
•FAX
•LANAccessusingPPP
•PersonalAreaNetwork
•GenericObjectExchange
•GenericObjectPush
•FileTransfer
•Synchronization
•AudioGateway
•Headset
•Printer
•HumanInterfaceDevices(Keyboard/Mouse)
•BasicImage
•Handsfree
•AV
•PhoneBookAccessProle(PBAP)(Windows7only)
•VDP-SyncProle(Windows7only)
Usageenvironmentandyourhealth
Integratedwirelesscardsemitradiofrequencyelectromagneticenergylikeotherradiodevices.However,the
levelofenergyemittedisfarmuchlessthantheelectromagneticenergyemittedbywirelessdeviceslike
forexamplemobilephones.
©CopyrightLenovo2011163
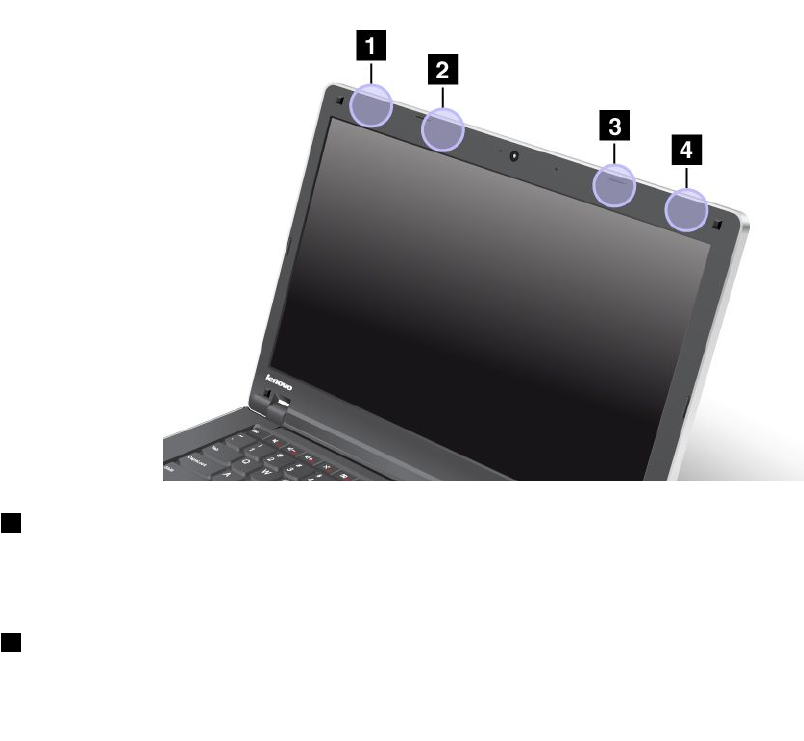
Duetothefactthatintegratedwirelesscardsoperatewithintheguidelinesfoundinradiofrequencysafety
standardsandrecommendations,Lenovobelievestheyaresafeforusebyconsumers.Thesestandardsand
recommendationsreecttheconsensusofthescienticcommunityandresultfromdeliberationsofpanels
andcommitteesofscientistswhocontinuallyreviewandinterprettheextensiveresearchliterature.
Insomesituationorenvironment,theuseofintegratedwirelesscardsmayberestrictedbytheproprietor
ofthebuildingorresponsiblerepresentativesoftheorganization.Thesesituationsandareasmayfor
exampleinclude:
•Usingtheintegratedwirelesscardsonboardofairplanes,inhospitalsornearpetrolstations,blasting
areas(withelectro-explosivedevices),medicalimplantsorbody-wornelectronicmedicaldevices,e.g.
pacemakers.
•Inanyotherenvironmentwheretheriskofinterferencetootherdevicesorservicesisperceivedor
identiedasharmful.
Ifyouareuncertainofthepolicythatappliesontheuseofwirelessdevicesinaspecicorganization(e.g.,
airportorhospital),youareencouragedtoaskforauthorizationtouseintegratedwirelesscardspriorto
turningonthecomputer.
LocationoftheUltraConnectwirelessantennas
ThinkPadmodelsfeatureanintegrateddiversityantennasystembuiltintothedisplayforoptimalreception,
enablingwirelesscommunicationwhereveryouare.
Therearetwotypesofanntenalocations.Yourcomputercorrespondstooneofthefollowing:
Type1:Antennalocation
1WirelessLANandWiMAXcomboantenna(Auxiliary)
TheauxiliaryantennaconnectedtothewirelessLANorWiMAXfeatureislocatedatthetopleftcornerof
thecomputerdisplay.
2WirelessWANantenna(Auxiliary)
164UserGuide
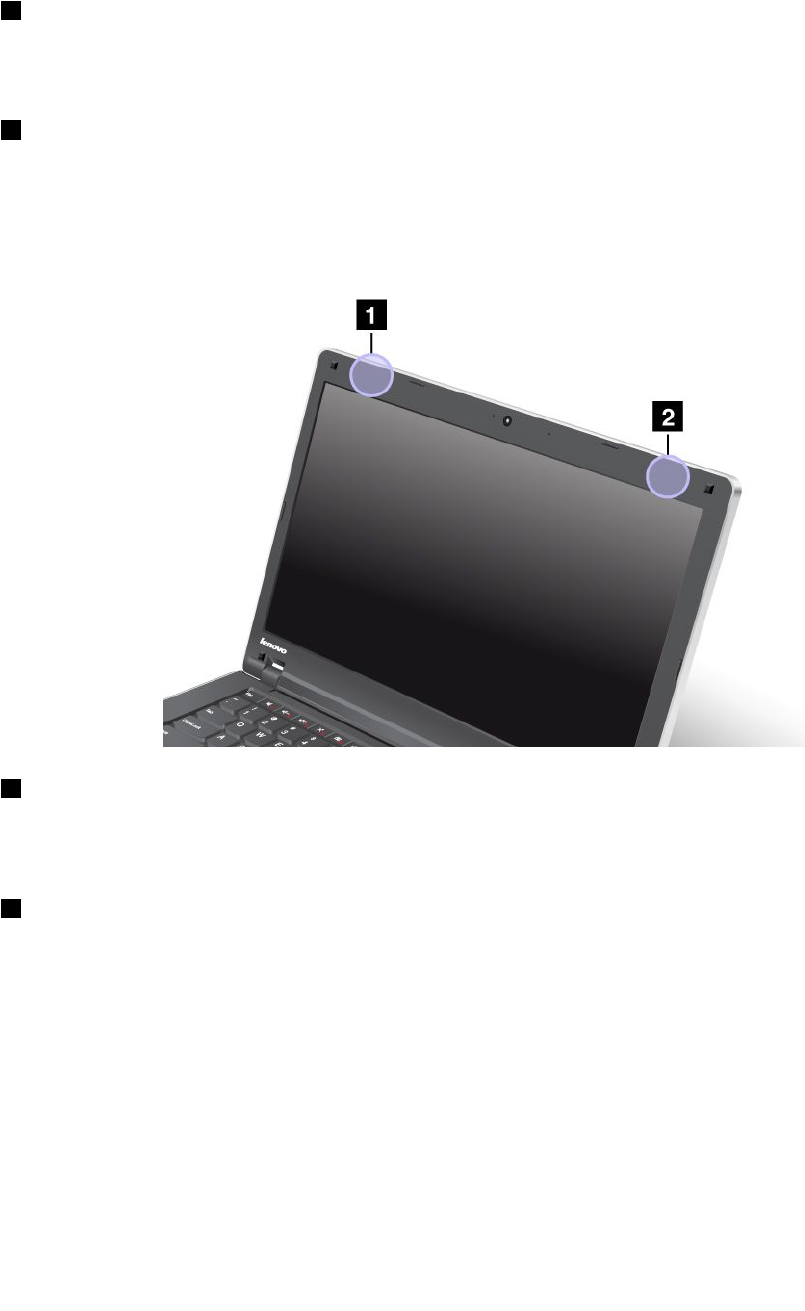
IfyourcomputercomeswithawirelessWANfeature,theauxiliaryantennaislocatedatthetopleftportionof
thecomputerdisplay.
3WirelessWANantenna(Main)
IfyourcomputercomeswithawirelessWANfeature,itstransmitterantennaislocatedatthetopright
portionofthecomputerdisplay.
4WirelessLANandWiMAXcomboantenna(Main)
ThemainantennaconnectedtothewirelessLANorWiMAXfeatureislocatedatthetoprightcornerof
thecomputerdisplay.
Type2:Antennalocation
1WirelessLANandWiMAXcomboantennaandWirelessWANantenna(Auxiliary)
TheauxiliaryantennaconnectedtothewirelessLANorWiMAXfeatureislocatedatthetopleftcornerof
thecomputerdisplay.
2WirelessLANantenna(Main)
ThemainantennaconnectedtothewirelessLANorWiMAXfeatureislocatedatthetoprightcornerof
thecomputerdisplay.
Locatingwirelessregulatorynotices
Formoreinformationaboutthewirelessregulatorynotices,refertotheRegulatoryNoticeshippedwithyour
computer.
IfyourcomputerisshippedwithouttheRegulatoryNotice,youcannditontheWebsiteat:
http://www.lenovo.com/support
ToviewtheRegulatoryNoticeontheWebsite,dothefollowing:
AppendixA.Regulatoryinformation165

1.Goto:
http://www.lenovo.com/support
2.Intherightpane,typeyourcomputernumberintheQuickPathled,andclickGo.
3.ClickUser'sguidesandmanualsintheleftpaneinthenewpage.
4.YoucanthenndtheRegulatoryNoticeinthedisplayedsearchresults.
Exportclassicationnotice
ThisproductissubjecttotheUnitedStatesExportAdministrationRegulations(EAR)andhasanExport
ClassicationControlNumber(ECCN)of4A994.b.Itcanbere-exportedexcepttoanyoftheembargoed
countriesintheEARE1countrylist.
Electronicemissionnotices
ThefollowinginformationreferstotheThinkPadEdgeE420andE520,machinetypes1141,1143,1144,
and1167.
FederalCommunicationsCommissionDeclarationofConformity
ThisequipmenthasbeentestedandfoundtocomplywiththelimitsforaClassBdigitaldevice,pursuant
toPart15oftheFCCRules.Theselimitsaredesignedtoprovidereasonableprotectionagainstharmful
interferenceinaresidentialinstallation.Thisequipmentgenerates,uses,andcanradiateradiofrequency
energyand,ifnotinstalledandusedinaccordancewiththeinstructions,maycauseharmfulinterference
toradiocommunications.However,thereisnoguaranteethatinterferencewillnotoccurinaparticular
installation.Ifthisequipmentdoescauseharmfulinterferencetoradioortelevisionreception,whichcanbe
determinedbyturningtheequipmentoffandon,theuserisencouragedtotrytocorrecttheinterferenceby
oneormoreofthefollowingmeasures:
•Reorientorrelocatethereceivingantenna.
•Increasetheseparationbetweentheequipmentandreceiver.
•Connecttheequipmentintoanoutletonacircuitdifferentfromthattowhichthereceiverisconnected.
•Consultanauthorizeddealerorservicerepresentativeforhelp.
Lenovoisnotresponsibleforanyradioortelevisioninterferencecausedbyusingotherthanspeciedor
recommendedcablesandconnectorsorbyunauthorizedchangesormodicationstothisequipment.
Unauthorizedchangesormodicationscouldvoidtheuser'sauthoritytooperatetheequipment.
ThisdevicecomplieswithPart15oftheFCCRules.Operationissubjecttothefollowingtwoconditions:(1)
thisdevicemaynotcauseharmfulinterference,and(2)thisdevicemustacceptanyinterferencereceived,
includinginterferencethatmaycauseundesiredoperation.
ResponsibleParty:
Lenovo(UnitedStates)Incorporated
1009ThinkPlace-BuildingOne
Morrisville,NC27560
PhoneNumber:919-294-5900
IndustryCanadaClassBemissioncompliancestatement
ThisClassBdigitalapparatuscomplieswithCanadianICES-003.
CetappareilnumériquedelaclasseBestconformeàlanormeNMB-003duCanada.
166UserGuide

EuropeanUnion-CompliancetotheElectromagneticCompatibility
Directive
ThisproductisinconformitywiththeprotectionrequirementsofEUCouncilDirective2004/108/EConthe
approximationofthelawsoftheMemberStatesrelatingtoelectromagneticcompatibility.Lenovocannot
acceptresponsibilityforanyfailuretosatisfytheprotectionrequirementsresultingfromanonrecommended
modicationoftheproduct,includingtheinstallationofoptioncardsfromothermanufacturers.
ThisproducthasbeentestedandfoundtocomplywiththelimitsforClassBInformationTechnology
EquipmentaccordingtoEuropeanStandardEN55022.ThelimitsforClassBequipmentwerederived
fortypicalresidentialenvironmentstoprovidereasonableprotectionagainstinterferencewithlicensed
communicationdevices.
GermanClassBcompliancestatement
DeutschsprachigerEUHinweis:
HinweisfürGerätederKlasseBEU-RichtliniezurElektromagnetischenVerträglichkeit
DiesesProduktentsprichtdenSchutzanforderungenderEU-Richtlinie2004/108/EG(früher89/336/EWG)zur
AngleichungderRechtsvorschriftenüberdieelektromagnetischeVerträglichkeitindenEU-Mitgliedsstaaten
undhältdieGrenzwertederEN55022KlasseBein.
Umdiesessicherzustellen,sinddieGerätewieindenHandbüchernbeschriebenzuinstallierenundzu
betreiben.DesWeiterendürfenauchnurvonderLenovoempfohleneKabelangeschlossenwerden.
LenovoübernimmtkeineVerantwortungfürdieEinhaltungderSchutzanforderungen,wenndasProdukt
ohneZustimmungderLenovoverändertbzw.wennErweiterungskomponentenvonFremdherstellernohne
EmpfehlungderLenovogesteckt/eingebautwerden.
Deutschland:
EinhaltungdesGesetzesüberdieelektromagnetischeVerträglichkeitvonBetriebsmitteln
DiesesProduktentsprichtdem„GesetzüberdieelektromagnetischeVerträglichkeitvonBetriebsmitteln“
EMVG(früher„GesetzüberdieelektromagnetischeVerträglichkeitvonGeräten“).DiesistdieUmsetzungder
EU-Richtlinie2004/108/EG(früher89/336/EWG)inderBundesrepublikDeutschland.
ZulassungsbescheinigunglautdemDeutschenGesetzüberdieelektromagnetischeVerträglichkeit
vonBetriebsmitteln,EMVGvom20.Juli2007(früherGesetzüberdieelektromagnetische
VerträglichkeitvonGeräten),bzw.derEMVEGRichtlinie2004/108/EC(früher89/336/EWG),für
GerätederKlasseB.
DiesesGerätistberechtigt,inÜbereinstimmungmitdemDeutschenEMVGdasEG-Konformitätszeichen
-CE-zuführen.VerantwortlichfürdieKonformitätserklärungnachParagraf5desEMVGistdieLenovo
(Deutschland)GmbH,Gropiusplatz10,D-70563Stuttgart.
InformationeninHinsichtEMVGParagraf4Abs.(1)4:
DasGeräterfülltdieSchutzanforderungennachEN55024undEN55022KlasseB.
KoreaClassBcompliancestatement
AppendixA.Regulatoryinformation167

JapanVCCIClassBcompliancestatement
Japancompliancestatementforproductswhichconnecttothepower
mainswithratedcurrentlessthanorequalto20Aperphase
LenovoproductserviceinformationforTaiwan
Additionalregulatoryinformation
Foradditionalregulatoryinformation,refertotheRegulatoryNoticeshippedwithyourcomputer.
IfyourcomputerisshippedwithouttheRegulatoryNotice,youcannditattheWebsite
http://www.lenovo.com/support.Fordetails,refertotheinstructionson“Locatingwirelessregulatory
notices”onpage165.
168UserGuide

AppendixB.WEEEandrecyclingstatements
Lenovoencouragesownersofinformationtechnologyequipmenttoresponsiblyrecycletheirequipment
whenitisnolongerneeded.Lenovooffersavarietyofprogramsandservicestoassistequipmentownersin
recyclingtheirITproducts.InformationonproductrecyclingofferingscanbefoundonLenovo'sInternetsite
at:http://www.lenovo.com/lenovo/environment/recycling.
EUWEEEstatements
EU Only
TheWasteElectricalandElectronicEquipment(WEEE)markappliesonlytocountrieswithintheEuropean
Union(EU)andNorway.AppliancesarelabeledinaccordancewithEuropeanDirective2002/96/EC
concerningwasteelectricalandelectronicequipment(WEEE).TheDirectivedeterminestheframeworkfor
thereturnandrecyclingofusedappliancesasapplicablethroughouttheEuropeanUnion.Thislabelis
appliedtovariousproductstoindicatethattheproductisnottobethrownaway,butratherreclaimedupon
endoflifeperthisDirective.
Usersofelectricalandelectronicequipment(EEE)withtheWEEEmarkingperAnnexIVoftheWEEE
DirectivemustnotdisposeofendoflifeEEEasunsortedmunicipalwaste,butusethecollectionframework
availabletothemforthereturn,recycle,recoveryofWEEEandminimizeanypotentialeffectsofEEEon
theenvironmentandhumanhealthduetothepresenceofhazardoussubstances.ForadditionalWEEE
informationgoto:
http://www.lenovo.com/lenovo/environment
Japanrecyclingstatements
CollectingandrecyclingadisusedLenovocomputerormonitor
IfyouareacompanyemployeeandneedtodisposeofaLenovocomputerormonitorthatistheproperty
ofthecompany,youmustdosoinaccordancewiththeLawforPromotionofEffectiveUtilizationof
Resources.Computersandmonitorsarecategorizedasindustrialwasteandshouldbeproperlydisposed
ofbyanindustrialwastedisposalcontractorcertiedbyalocalgovernment.InaccordancewiththeLaw
forPromotionofEffectiveUtilizationofResources,LenovoJapanprovides,throughitsPCCollectingand
RecyclingServices,forthecollecting,reuse,andrecyclingofdisusedcomputersandmonitors.Fordetails,
visittheLenovoWebsiteat:http://www.lenovo.com/recycling/japan.
PursuanttotheLawforPromotionofEffectiveUtilizationofResources,thecollectingandrecyclingof
home-usedcomputersandmonitorsbythemanufacturerwasbegunonOctober1,2003.Thisserviceis
providedfreeofchargeforhome-usedcomputerssoldafterOctober1,2003.Fordetails,visittheLenovo
Websiteat:http://www.lenovo.com/services_warranty/jp/ja/recycle/personal/.
©CopyrightLenovo2011169

DisposingofaLenovocomputercomponents
SomeLenovocomputerproductssoldinJapanmayhavecomponentsthatcontainheavymetalsorother
environmentalsensitivesubstances.Toproperlydisposeofdisusedcomponents,suchasaprintedcircuit
boardordrive,usethemethodsdescribedaboveforcollectingandrecyclingadisusedcomputerormonitor.
DisposingofdisusedlithiumbatteriesfromLenovocomputers
Abutton-shapedlithiumbatteryisinstalledonthesystemboardofyourLenovocomputertoprovidepower
tothecomputerclockwhilethecomputerisoffordisconnectedfromthemainpowersource.Ifyouwantto
replaceitwithanewone,contactyourplaceofpurchaseoraskforarepairserviceprovidedbyLenovo.If
youhavereplaceditbyyourselfandwanttodisposeofthedisusedlithiumbattery,insulateitwithvinyltape,
contactyourplaceofpurchase,andfollowtheirinstructions.IfyouuseaLenovocomputerathomeand
needtodisposeofalithiumbattery,youmustcomplywithlocalordinancesandregulations.
DisposingadisusedbatterypackfromLenovonotebookcomputers
YourLenovonotebookcomputerhasalithiumionbatterypackoranickelmetalhydridebatterypack.If
youareacompanyemployeewhousesaLenovonotebookcomputerandneedtodisposeofabattery
pack,contacttheproperpersoninLenovosales,service,ormarketing,andfollowthatperson'sinstructions.
Youalsocanrefertotheinstructionsat:http://www.lenovo.com/jp/ja/environment/recycle/battery/.
IfyouuseaLenovonotebookcomputerathomeandneedtodisposeofabatterypack,you
mustcomplywithlocalordinancesandregulations.Youalsocanrefertotheinstructionsat:
http://www.lenovo.com/jp/ja/environment/recycle/battery/.
RecyclinginformationforBrazil
DeclaraçõesdeReciclagemnoBrasil
DescartedeumProdutoLenovoForadeUso
Equipamentoselétricoseeletrônicosnãodevemserdescartadosemlixocomum,masenviadosàpontosde
coleta,autorizadospelofabricantedoprodutoparaquesejamencaminhadoseprocessadosporempresas
especializadasnomanuseioderesíduosindustriais,devidamentecerticadaspelosorgãosambientais,de
acordocomalegislaçãolocal.
ALenovopossuiumcanalespecícoparaauxiliá-lonodescartedessesprodutos.Casovocêpossua
umprodutoLenovoemsituaçãodedescarte,ligueparaonossoSACouencaminheume-mailpara:
reciclar@lenovo.com,informandoomodelo,númerodesérieecidade,amdeenviarmosasinstruções
paraocorretodescartedoseuprodutoLenovo.
BatteryrecyclinginformationforTaiwan
170UserGuide

BatteryrecyclinginformationfortheUnitedStatesandCanada
BatteryrecyclinginformationfortheEuropeanUnion
Notice:ThismarkappliesonlytocountrieswithintheEuropeanUnion(EU).
BatteriesorpackagingforbatteriesarelabeledinaccordancewithEuropeanDirective2006/66/EC
concerningbatteriesandaccumulatorsandwastebatteriesandaccumulators.TheDirectivedeterminesthe
frameworkforthereturnandrecyclingofusedbatteriesandaccumulatorsasapplicablethroughoutthe
EuropeanUnion.Thislabelisappliedtovariousbatteriestoindicatethatthebatteryisnottobethrown
away,butratherreclaimeduponendoflifeperthisDirective.
InaccordancewiththeEuropeanDirective2006/66/EC,batteriesandaccumulatorsarelabeledtoindicate
thattheyaretobecollectedseparatelyandrecycledatendoflife.Thelabelonthebatterymayalso
includeachemicalsymbolforthemetalconcernedinthebattery(Pbforlead,Hgformercury,andCdfor
cadmium).Usersofbatteriesandaccumulatorsmustnotdisposeofbatteriesandaccumulatorsasunsorted
municipalwaste,butusethecollectionframeworkavailabletocustomersforthereturn,recycling,and
treatmentofbatteriesandaccumulators.Customerparticipationisimportanttominimizeanypotential
effectsofbatteriesandaccumulatorsontheenvironmentandhumanhealthduetothepotentialpresenceof
hazardoussubstances.Forpropercollectionandtreatment,goto:
http://www.lenovo.com/lenovo/environment
AppendixB.WEEEandrecyclingstatements171

172UserGuide

AppendixC.Notices
Lenovomaynotoffertheproducts,services,orfeaturesdiscussedinthisdocumentinallcountries.Consult
yourlocalLenovorepresentativeforinformationontheproductsandservicescurrentlyavailableinyour
area.AnyreferencetoaLenovoproduct,program,orserviceisnotintendedtostateorimplythatonlythat
Lenovoproduct,program,orservicemaybeused.Anyfunctionallyequivalentproduct,program,orservice
thatdoesnotinfringeanyLenovointellectualpropertyrightmaybeusedinstead.However,itistheuser's
responsibilitytoevaluateandverifytheoperationofanyotherproduct,program,orservice.
Lenovomayhavepatentsorpendingpatentapplicationscoveringsubjectmatterdescribedinthis
document.Thefurnishingofthisdocumentdoesnotgiveyouanylicensetothesepatents.Youcansend
licenseinquiries,inwriting,to:
Lenovo(UnitedStates),Inc.
1009ThinkPlace-BuildingOne
Morrisville,NC27560
U.S.A.
Attention:LenovoDirectorofLicensing
LENOVOPROVIDESTHISPUBLICATION“ASIS”WITHOUTWARRANTYOFANYKIND,EITHEREXPRESS
ORIMPLIED,INCLUDING,BUTNOTLIMITEDTO,THEIMPLIEDWARRANTIESOFNON-INFRINGEMENT,
MERCHANTABILITYORFITNESSFORAPARTICULARPURPOSE.Somejurisdictionsdonotallow
disclaimerofexpressorimpliedwarrantiesincertaintransactions,therefore,thisstatementmaynotapply
toyou.
Thisinformationcouldincludetechnicalinaccuraciesortypographicalerrors.Changesareperiodically
madetotheinformationherein;thesechangeswillbeincorporatedinneweditionsofthepublication.
Lenovomaymakeimprovementsand/orchangesintheproduct(s)and/ortheprogram(s)describedinthis
publicationatanytimewithoutnotice.
Theproductsdescribedinthisdocumentarenotintendedforuseinimplantationorotherlifesupport
applicationswheremalfunctionmayresultininjuryordeathtopersons.Theinformationcontainedinthis
documentdoesnotaffectorchangeLenovoproductspecicationsorwarranties.Nothinginthisdocument
shalloperateasanexpressorimpliedlicenseorindemnityundertheintellectualpropertyrightsofLenovo
orthirdparties.Allinformationcontainedinthisdocumentwasobtainedinspecicenvironmentsandis
presentedasanillustration.Theresultobtainedinotheroperatingenvironmentsmayvary.
Lenovomayuseordistributeanyoftheinformationyousupplyinanywayitbelievesappropriatewithout
incurringanyobligationtoyou.
Anyreferencesinthispublicationtonon-LenovoWebsitesareprovidedforconvenienceonlyanddonotin
anymannerserveasanendorsementofthoseWebsites.ThematerialsatthoseWebsitesarenotpartof
thematerialsforthisLenovoproduct,anduseofthoseWebsitesisatyourownrisk.
Anyperformancedatacontainedhereinwasdeterminedinacontrolledenvironment.Therefore,theresult
obtainedinotheroperatingenvironmentsmayvarysignicantly.Somemeasurementsmayhavebeen
madeondevelopment-levelsystemsandthereisnoguaranteethatthesemeasurementswillbethesame
ongenerallyavailablesystems.Furthermore,somemeasurementsmayhavebeenestimatedthrough
extrapolation.Actualresultsmayvary.Usersofthisdocumentshouldverifytheapplicabledatafortheir
specicenvironment.
©CopyrightLenovo2011173

Trademarks
ThefollowingtermsaretrademarksofLenovointheUnitedStates,othercountries,orboth:
Lenovo
AccessConnections
ActiveProtectionSystem
RescueandRecovery
ThinkPad
ThinkVantage
TrackPoint
UltraConnect
UltraNav
IntelandIntelSpeedSteparetrademarksorregisteredtrademarksofIntelCorporationoritssubsidiariesin
theUnitedStatesandothercountries.
Microsoft,Bing,BitLocker,andWindowsaretrademarksoftheMicrosoftgroupofcompanies.
BlackBerry®,RIM®,ResearchInMotion®,SureType®andrelatedtrademarks,namesandlogosarethe
propertyofResearchInMotionLimitedandareregisteredand/orusedintheU.S.andcountriesaroundthe
world.UsedunderlicensefromResearchInMotionLimited.
Othercompany,product,andservicenamesmaybetrademarksorservicemarksofothers.
174UserGuide

PartNumber:
(1P)P/N:
**
