Lenovo Ideapad320 17Ikb 320X 320 17Isk Hmm 201705 User Manual Hardware Maintenance Ideapad 17IKB, (Type 80XM) Laptop (ideapad)
2017-09-19
User Manual: Lenovo Ideapad320-17Ikb 320X-17Ikb 320-17Isk 320X-17Isk Hmm 201705 Hardware Maintenance Manual - ideapad 320-17IKB, 320-17ISK 320-17IKB (Type 80XM) Laptop (ideapad) 320-17IKB (Type 80XM) Laptop
Open the PDF directly: View PDF ![]() .
.
Page Count: 83
- About this manual
- Safety information
- Safety information
- Important service information
- General checkout
- Related service information
- ideapad 320-17IKB/ideapad 320H-17IKB/ideapad 320L-17IKB/ideapad 320R 17IKB/ideapad 320E-17IKB/ideapad 320-17ISK/ideapad 320H-17ISK/ideapad 320L-17ISK/ideapad 320R-17ISK/ideapad 320E-17ISK
- Specifications
- Status indicators
- Hotkeys
- FRU replacement notices
- Removing and replacing an FRU
- 1010 Optical drive
- 1020 Base cover
- 1030 Battery pack
- 1040 PCI Express Mini Card for wireless LAN
- 1050 DIMM
- 1060 Hard disk drive
- 1070 Speakers
- 1080 Fan assembly and Heat Sink assembly
- 1090 ODD transfer board, backup battery and Fingerprint board
- 1100 Upper case
- 1110 System board
- 1120 LCD unit
- 1130 Integrated camera and antenna assembly
- Locations
- Parts list
- Notices

Lenovo ideapad 320
ideapad 320-17IKB/ideapad 320H-17IKB/
ideapad 320L-17IKB/ideapad 320R-17IKB/
ideapad 320E-17IKB/ideapad 320-17ISK/
ideapad 320H-17ISK/ideapad 320L-17ISK/
ideapad 320R-17ISK/ideapad 320E-17ISK
Hardware
Maintenance
Manual

Note:
• Before using this information and the product it supports, be sure to read the general information under
“Notices” on page 78.
First Edition (April 2017)
© Copyright Lenovo 2017. All rights reserved.
LIMITEDANDRESTRICTEDRIGHTSNOTICE:IfdataorsoftwareisdeliveredpursuantaGeneral
ServicesAdministration“GSA”contract,use,reproduction,ordisclosureissubjecttorestrictionsset
forthinContractNo.GS-35F-05925.
©2017Lenovo

iii
Contents
About this manual ....................................... iv
Safety information ........................................ 1
Generalsafety................................................ 2
Electricalsafety.............................................. 3
Safety information ........................................ 3
Safetyinspectionguide.................................. 5
Handlingdevicesthataresensitiveto
electrostaticdischarge.................................... 6
Groundingrequirements................................. 6
Safetynotices:multilingualtranslations.......... 7
Lasercompliancestatement......................... 14
Important service information ................... 16
StrategyforreplacingFRUs......................... 16
Strategyforreplacingaharddiskdrive............17
Importantnoticeforreplacingasystem
board................................................................17
Importantinformationaboutreplacing
RoHScompliantFRUs................................. 18
General checkout ...................................... 19
Whattodorst............................................. 20
Powersystemcheckout................................ 21
CheckingtheACadapter.................................21
Checkingoperationalcharging.........................22
Checkingthebatterypack................................22
Related service information ...................... 23
Restoringthefactorycontentsbyusing
OneKeyRecovery........................................ 23
Restoreoffactorydefault.................................23
Passwords.................................................... 24
Power-onpassword..........................................24
Hard-diskpassword..........................................24
Administratorpassword....................................24
Powermanagement..................................... 25
Puttingthecomputertosleeporshuttingit
down.................................................................25
Puttingyourcomputertosleep.........................25
Shuttingdownthecomputer.............................26
ideapad 320-17IKB/ideapad 320H-17IKB/
ideapad 320L-17IKB/ideapad 320R 17IKB/
ideapad 320E-17IKB/ideapad 320-17ISK/
ideapad 320H-17ISK/ideapad 320L-17ISK/
ideapad 320R-17ISK/ideapad 320E-17ISK
...................................................................... 27
Specications............................................... 27
Statusindicators........................................... 29
Hotkeys......................................................... 30
FRUreplacementnotices............................. 31
Screwnotices.................................................. 31
RemovingandreplacinganFRU................. 32
1010Opticaldrive.............................................33
1020Basecover...............................................34
1030Batterypack.............................................37
1040PCIExpressMiniCardforwireless
LAN...................................................................39
1050DIMM.......................................................41
1060Harddiskdrive.........................................42
1070Speakers.................................................44
1080FanassemblyandHeatSink
assembly...........................................................45
1090ODDtransferboard,backupbattery
andFingerprintboard....................................... 49
1100Uppercase...............................................51
1110
Systemboard............................................ 54
1120LCDunit...................................................56
1130Integratedcameraandantenna
assembly...........................................................60
Locations...................................................... 62
Frontviewandright-sideview..........................62
BottomandLeft-sideview............................... 63
Partslist........................................................ 64
Overall..............................................................65
LCDFRUs........................................................73
Miscellaneousparts..........................................75
ACadapters......................................................75
Screws..............................................................77
Notices......................................................... 78
Trademarks.................................................. 79
iv
About this manual
Thismanualcontainsservice andreferenceinformationforthefollowing
Lenovoproduct:
Lenovo ideapad 320-17IKB/ideapad 320H-17IKB/ideapad 320L-17IKB/
ideapad 320R-17IKB/ideapad 320E-17IKB/ideapad 320-17ISK/ideapad
320H-17ISK/ideapad 320L-17ISK/ideapad 320R-17ISK/ideapad
320E-17ISK
Usethismanualtotroubleshootproblems.
Themanualisdividedintothefollowingsections:
• Thecommonsectionsprovidegeneralinformation,guidelines,andsafety
informationrequiredforservicingcomputers.
• Theproduct-specicsectionincludesservice,reference,andproduct-specic
partsinformation.
Important:
This manual is intended only for trained servicers who are familiar with Lenovo
products. Use this manual to troubleshoot problems effectively.
Before servicing a Lenovo product, make sure to read all the information under
“Safety information” on page 1 and “Important service information” on page 16.

1
Safety information
Safety information
Thischapterpresentsthefollowingsafetyinformationthatyouneedto
getfamiliarwithbeforeyouservice aLenovoideapad320-17IKB/ideapad
320H-17IKB/ideapad320L-17IKB/ideapad 320R-17IKB/ideapad 320E-17IKB/
ideapad320-17ISK/ideapad320H-17ISK/ideapad320L-17ISK/ideapad
320R-17ISK/ideapad320E-17ISKcomputer:
• “Generalsafety”onpage2
• “Electricalsafety”onpage3
• “Safetyinspectionguide”onpage5
• “Handlingdevicesthataresensitivetoelectrostaticdischarge”onpage6
• “Groundingrequirements”onpage6
• “Safetynotices:multilingualtranslations”onpage7
• “Lasercompliancestatement”onpage14

2
ideapad 320-17IKB/ideapad 320H-17IKB/ideapad 320L-17IKB/ideapad 320R-17IKB/
ideapad 320E-17IKB/ideapad 320-17ISK/ideapad 320H-17ISK/ideapad 320L-17ISK/
ideapad 320R-17ISK/ideapad 320E-17ISK Hardware Maintenance Manual
General safety
Followtheserulesbelowtoensuregeneralsafety:
• Observeagoodhousekeepingin theareawhere themachinesare put
duringandafterthemaintenance.
• Whenliftinganyheavyobject:
1. Makesurethatyoucanstandsafelywithoutslipping.
2. Distributetheweightoftheobjectequallybetweenyourfeet.
3. Useaslowliftingforce.Nevermovesuddenlyortwistwhenyouattempt
toliftit.
4. Liftitbystandingorpushingupwithyourlegmuscles;thisactioncould
avoidthestrainfromthemusclesinyourback.Donotattempttoliftany
objectthatweighsmorethan16kg(35lb)orthatyouthinkistooheavy
foryou.
• Donotperformanyaction thatcauseshazards tothecustomer,orthat
makesthemachineunsafe.
• Beforeyou startthemachine, makesurethat otherservicerepresentatives
andthecustomerarenotinahazardousposition.
• Pleaseremovecoversandotherpartsinasafeplace, awayfromall
personnel,whileyouareservicingthemachine.
• Keepyourtoolcaseawayfromwalk areassothatotherpeople willnottrip
overit.
• Donotwearloose clothingthatcanbetrappedinthe movingpartsofthe
machine.Makesurethatyoursleevesarefastenedorrolledupaboveyour
elbows.Ifyourhairislong,fastenit.
• Inserttheendsof yournecktieorscarfinsideclothingor fastenitwiththe
nonconductiveclip,about8centimeters(3inches)fromtheend.
• Donotwearjewelry,chains,metal-frameeyeglasses,ormetalfastenersfor
yourclothing.
Attention:Metalobjectsaregoodelectricalconductors.
• Wearsafetyglasses whenyouare hammering,drilling,soldering,cutting
wire,attachingsprings,using solvents,orworkinginanyotherconditions
thatmaybehazardoustoyoureyes.
• Afterservice, reinstallallsafety shields,guards,labels,andgroundwires.
Replaceanysafetydevicethatiswornordefective.
• Reinstallallcoverscorrectlybeforereturningthemachinetothecustomer.
• Fanlouversonthemachinehelpto preventtheoverheating ofinternal
components.Donotobstructfanlouversor coverthemwith labelsor
stickers.

3
Safety information
Electrical safety
Observethefollowingruleswhenworkingonelectricalequipments.
Important:
Use only approved tools and test equipments. Some hand tools have handles
covered with a soft material that does not insulate you when working with live
electrical currents.
Many customers have rubber floor mats near their machines that contain small
conductive bers to decrease electrostatic discharges. Do not use such kind of mat
to protect yourself from electrical shock.
• Findtheroomemergencypower-off(EPO) switch,disconnectingswitchor
electricaloutlet.Ifanelectricalaccidentoccurs, youcanthen operatethe
switchorunplugthepowercordquickly.
• Donotworkaloneunder hazardousconditionsorneartheequipmentthat
hashazardousvoltages.
• Disconnectallpowerbefore:
– Performingamechanicalinspection
– Workingnearpowersupplies
– Removingorinstallingmainunits
• Beforeyoustarttoworkon themachine,unplugthepower cord.Ifyou
cannotunplugit,askthecustomertopower-offthe wallboxthatsupplies
powertothemachine,andtolockthewallboxintheoffposition.
• Ifyouneedto workonamachinethat hasexposedelectricalcircuits,
observethefollowingprecautions:
– Ensurethatanotherperson,familiarwiththepower-offcontrols,isnear
you.
Attention:Anotherperson mustbethere toswitchoffthepower,if
necessary.
– Useonlyonehandwhenworkingwithpowered-onelectricalequipment;
keeptheotherhandinyourpocketorbehindyourback.
Attention:Anelectricalshockcanoccuronlywhenthereisacomplete
circuit.Byobservingtheaboverule,youmay preventacurrentfrom
passingthroughyourbody.
– Whenusingtesters,setthe controlscorrectlyandusethe approved
probeleadsandaccessoriesforthattester.
– Standonsuitablerubbermats(obtainedlocally,ifnecessary)toinsulate
youfromgroundssuchasmetaloorstripsandmachineframes.
Observethespecialsafetyprecautionswhenyouworkwithveryhighvoltages;
instructionsfortheseprecautionsarein thesafetysectionsofmaintenance
information.Beextremelycarefulwhenyoumeasurethehighvoltages.
• Regularlyinspectandmaintainyourelectricalhandtoolsforsafeoperational
condition.
• Donotusewornorbrokentoolsandtesters.
• Neverassumethatpowerhasbeendisconnectedfromacircuit.First,check
ittomakesurethatithasbeenpoweredoff.
Safety information

4
ideapad 320-17IKB/ideapad 320H-17IKB/ideapad 320L-17IKB/ideapad 320R-17IKB/
ideapad 320E-17IKB/ideapad 320-17ISK/ideapad 320H-17ISK/ideapad 320L-17ISK/
ideapad 320R-17ISK/ideapad 320E-17ISK Hardware Maintenance Manual
• Alwayslookcarefullyfor possiblehazardsinyourworkarea.Examplesof
thesehazardsaremoistoors,nongroundedpowerextensioncables,power
surges,andmissingsafetygrounds.
• Donottouchliveelectricalcircuitswith thereflectivesurface ofaplastic
dentalmirror.Thesurfaceisconductive;suchtouchingcan causepersonal
injuryandmachinedamage.
• Donotservicethefollowingpartswiththepoweronwhentheyareremoved
fromtheirnormaloperatingplacesinamachine:
– Powersupplyunits
– Pumps
– Blowersandfans
– Motorgenerators
andsimilarunits.(Thispracticeensurescorrectgroundingoftheunits.)
• Ifanelectricalaccidentoccurs:
– Caution:donotbecomeavictimyourself.
– Switchoffthepower.
– Sendthevictimtogetmedicalaid.

5
Safety information
Safety inspection guide
Thepurpose ofthisinspection guideisto assistyouin identifyingpotential
unsafeconditions.Aseachmachinewasdesignedand built,requiredsafety
itemswereinstalledto protectusersand servicepersonnelfrominjury.This
guideaddressesonlythoseitems.You shouldusegoodjudgmenttoidentify
potentialsafetyhazardsaccordingtotheattachmentofnon-Lenovofeaturesor
optionsnotcoveredbythisinspectionguide.
Ifanyunsafeconditionsarepresent, youmustdeterminehowseriousthe
apparenthazardcouldbeandwhetheryoucancontinuewithoutrstcorrecting
theproblem.
Considertheseconditionsandthesafetyhazardstheypresent:
• Electricalhazards,especiallyprimarypower(primaryvoltageontheframe
cancauseseriousorfatalelectricalshock)
• Explosivehazards,suchasadamagedCRTfaceorabulgingcapacitor
• Mechanicalhazards,suchaslooseormissinghardware
Todeterminewhetherthereareanypotential unsafeconditions,usethe
followingchecklistatthebeginningofeveryservicetask.Beginthecheckswith
thepoweroff,andthepowercorddisconnected.
Checklist:
1. Checkexteriorcoversfordamage(loose,broken,orsharpedges).
2. Turnoffthecomputer.Disconnectthepowercord.
3. Checkthepowercordfor:
a. Athird-wiregroundconnectoringoodcondition.Useametertomeasure
third-wiregroundcontinuityfor 0.1ohmorlessbetweentheexternal
groundpinandtheframeground.
b. Thepowercordshouldbethetypespeciedinthepartslist.
c. Insulationmustnotbefrayedorworn.
4. Checkforcrackedorbulgingbatteries.
5. Removethecover.
6. Checkforanyobviousnon-Lenovoalterations.Usegoodjudgmentastothe
safetyofanynon-Lenovoalterations.
7. Checkinside theunitfor anyobviousunsafeconditions,suchasmetal
filings,contamination,wateror otherliquids,orsignsoffireorsmoke
damage.
8. Checkforworn,frayed,orpinchedcables.
9. Checkthatthepower-supplycoverfasteners (screwsorrivets) havenot
beenremovedortamperedwith.
6
ideapad 320-17IKB/ideapad 320H-17IKB/ideapad 320L-17IKB/ideapad 320R-17IKB/
ideapad 320E-17IKB/ideapad 320-17ISK/ideapad 320H-17ISK/ideapad 320L-17ISK/
ideapad 320R-17ISK/ideapad 320E-17ISK Hardware Maintenance Manual
Handling devices that are sensitive to electrostatic discharge
Anycomputerpartcontaining transistorsorintegrated circuits(ICs)shouldbe
consideredsensitivetoelectrostaticdischarge(ESD).ESDdamagecanoccur
whenthere isadifferenceincharge betweenobjects.Protect againstESD
damagebyequalizingthechargesothatthemachine,thepart,theworkmat,
andthepersonhandlingthepartareallatthesamecharge.
Notes:
1. Use product-specic ESD procedures when they exceed the requirements noted
here.
2. Make sure that the ESD protective devices you use have been certied (ISO
9000) as fully effective.
WhenhandlingESD-sensitiveparts:
• Keepthepartsinprotectivepackagesuntiltheyareinsertedintotheproduct.
• Avoidcontactwithotherpeople.
• Wearagroundedwriststrapagainstyour skintoeliminatestaticonyour
body.
• Preventthepartfromtouchingyourclothing.Mostclothingisinsulativeand
retainsachargeevenwhenyouarewearingawriststrap.
• Usetheblackside ofagroundedworkmat toprovideastatic-freework
surface.ThematisespeciallyusefulwhenhandlingESD-sensitivedevices.
• Selectagroundingsystem,suchasthoselistedbelow,toprovideprotection
thatmeetsthespecicservicerequirement.
Note:
The use of a grounding system to guard against ESD damage is desirable but not
necessary.
– AttachtheESDgroundcliptoanyframeground,groundbraid,orgreen-
wireground.
– Whenworkingonadouble-insulatedorbattery-operatedsystem,usean
ESDcommongroundorreferencepoint.Youcanusecoaxorconnector-
outsideshellsonthesesystems.
– Usetheroundgroundprongoftheacplugonac-operatedcomputers.
Grounding requirements
Electricalgroundingofthecomputerisrequiredforoperatorsafetyandcorrect
systemfunction.Propergrounding oftheelectricaloutletcan beveriedby a
certiedelectrician.
7
Safety information
Safety notices: multilingual translations
Thesafetynoticesinthissectionareprovided inEnglish,French, German,
Hebrew,Italian,Japanese,andSpanish.
Safety notice 1
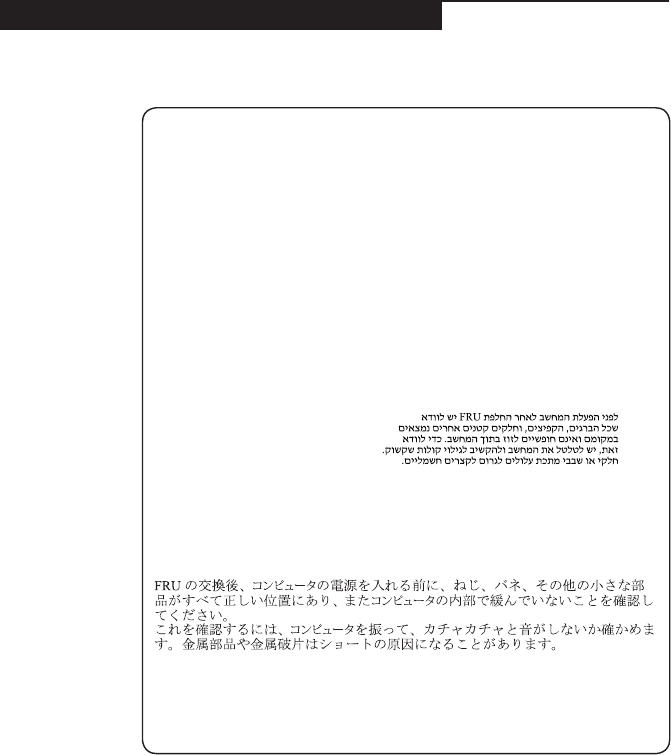
Before the computer is powered on after FRU replacement, make sure all screws,
springs, and other small parts are in place and are not left loose inside the computer.
Verify this by shaking the computer and listening for rattling sounds. Metallic parts
or metal akes can cause electrical shorts.
Avant de remettre l’ordinateur sous tension après remplacement d’une unité en
clientèle, vériez que tous les ressorts, vis et autres pièces sont bien en place et
bien xées. Pour ce faire, secouez l’unité et assurez-vous qu’aucun bruit suspect ne
se produit. Des pièces métalliques ou des copeaux de métal pourraient causer un
court-circuit.
Bevor nach einem FRU-Austausch der Computer wieder angeschlossen wird,
muß sichergestellt werden, daß keine Schrauben, Federn oder andere Kleinteile
fehlen oder im Gehäuse vergessen wurden. Der Computer muß geschüttelt und auf
Klappergeräusche geprüft werden. Metallteile oder-splitter können Kurzschlüsse
erzeugen.
Prima di accendere l’elaboratore dopo che é stata effettuata la sostituzione di una
FRU, accertarsi che tutte le viti, le molle e tutte le altri parti di piccole dimensioni
siano nella corretta posizione e non siano sparse all’interno dell’elaboratore.
Vericare ciò scuotendo l’elaboratore e prestando attenzione ad eventuali rumori;
eventuali parti o pezzetti metallici possono provocare cortocircuiti pericolosi.
Antes de encender el sistema despues de sustituir una FRU, compruebe que
todos los tornillos, muelles y demás piezas pequeñas se encuentran en su sitio
y no se encuentran sueltas dentro del sistema. Compruébelo agitando el sistema
y escuchando los posibles ruidos que provocarían. Las piezas metálicas pueden
causar cortocircuitos eléctricos.
8
ideapad 320-17IKB/ideapad 320H-17IKB/ideapad 320L-17IKB/ideapad 320R-17IKB/
ideapad 320E-17IKB/ideapad 320-17ISK/ideapad 320H-17ISK/ideapad 320L-17ISK/
ideapad 320R-17ISK/ideapad 320E-17ISK Hardware Maintenance Manual
Safety notice 2
DANGER
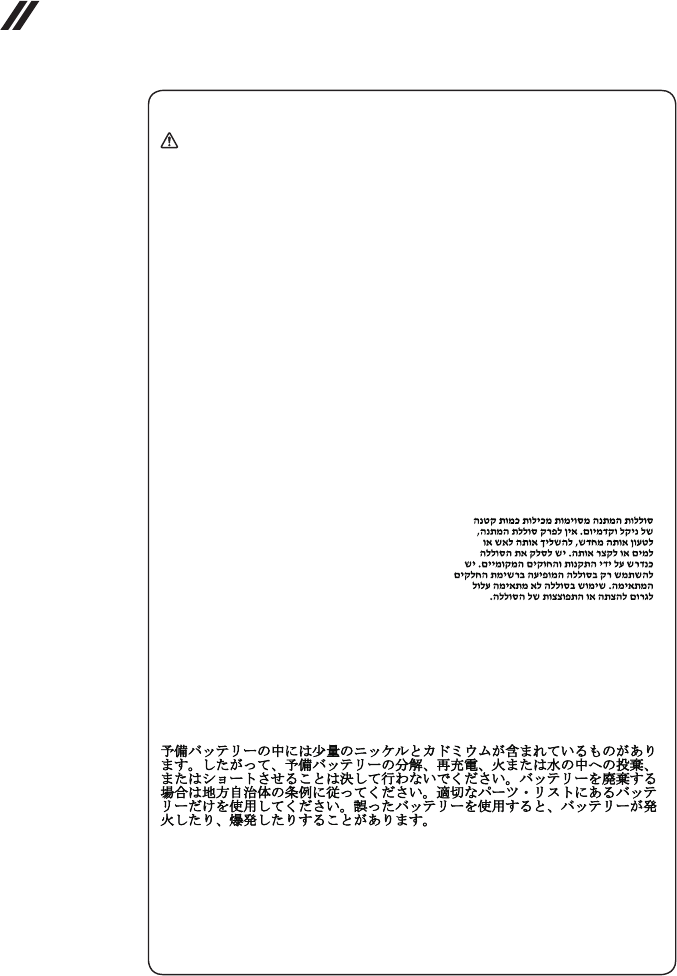
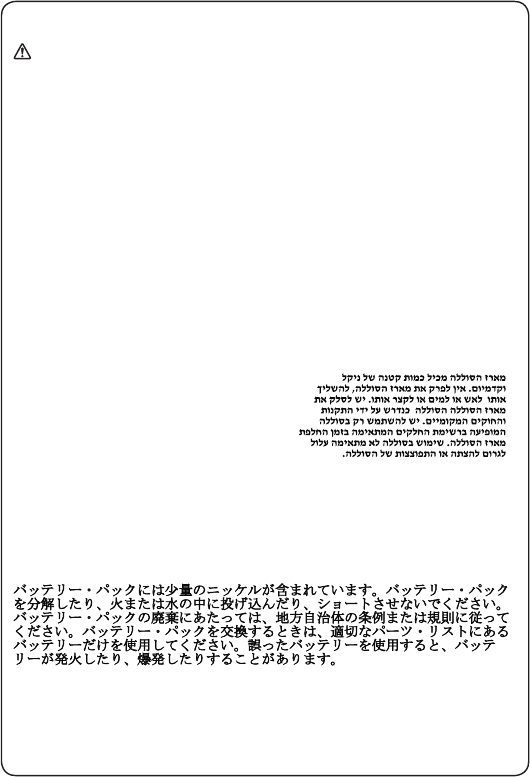
Some standby batteries contain a small amount of nickel and cadmium. Do not
disassemble a standby battery, recharge it, throw it into fire or water, or short-
circuit it. Dispose of the battery as required by local ordinances or regulations.
Use only the battery in the appropriate parts listing. Use of an incorrect battery can
result in ignition or explosion of the battery.
Certaines batteries de secours contiennent du nickel et du cadmium. Ne les
démontez pas, ne les rechargez pas, ne les exposez ni au feu ni à l’eau. Ne
les mettez pas en court-circuit. Pour les mettre au rebut, conformez-vous à la
réglementation en vigueur. Lorsque vous remplacez la pile de sauvegarde ou celle
de l’horloge temps réel, veillez à n’utiliser que les modèles cités dans la liste de
pièces détachées adéquate. Une batterie ou une pile inappropriée risque de prendre
feu ou d’exploser.
Die Bereitschaftsbatterie, die sich unter dem Diskettenlaufwerk befindet,
kann geringe Mengen Nickel und Cadmium enthalten. Sie darf nicht zerlegt,
wiederaufgeladen, kurzgeschlossen, oder Feuer oder Wasser ausgesetzt werden. Bei
der Entsorgung die örtlichen Bestimmungen für Sondermüll beachten. Beim Ersetzen
der Bereitschafts-oder Systembatterie nur Batterien des Typs verwenden, der in der
Ersatzteilliste aufgeführt ist. Der Einsatz falscher Batterien kann zu Entzündung oder
Explosion führen.
Alcune batterie di riserva contengono una piccola quantità di nichel e cadmio. Non
smontarle, ricaricarle, gettarle nel fuoco o nell’acqua né cortocircuitarle. Smaltirle
secondo la normativa in vigore (DPR 915/82, successive disposizioni e disposizioni
locali). Quando si sostituisce la batteria dell’RTC (real time clock) o la batteria di
supporto, utilizzare soltanto i tipi inseriti nell’appropriato Catalogo parti. L’impiego
di una batteria non adatta potrebbe determinare l’incendio o l’esplosione della
batteria stessa.
Algunas baterías de reserva contienen una pequeña cantidad de níquel y cadmio.
No las desmonte, ni recargue, ni las eche al fuego o al agua ni las cortocircuite.
Deséchelas tal como dispone la normativa local. Utilice sólo baterías que se
encuentren en la lista de piezas. La utilización de una batería no apropiada puede
provocar la ignición o explosión de la misma.
9
Safety information
Safety notice 3
DANGER
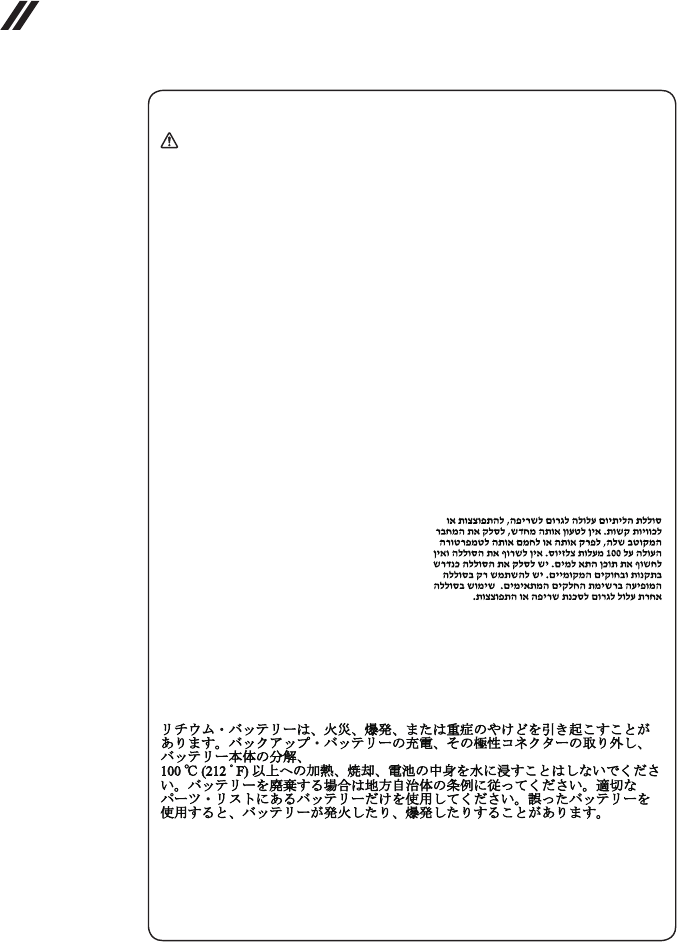
The battery pack contains small amounts of nickel. Do not disassemble it, throw
it into re or water, or short-circuit it. Dispose of the battery pack as required by
local ordinances or regulations. Use only the battery in the appropriate parts listing
when replacing the battery pack. Use of an incorrect battery can result in ignition
or explosion of the battery.
La batterie contient du nickel. Ne la démontez pas, ne l’exposez ni au feu ni à l’eau.
Ne la mettez pas en court-circuit. Pour la mettre au rebut, conformez-vous à la
réglementation en vigueur. Lorsque vous remplacez la batterie, veillez à n’utiliser
que les modèles cités dans la liste de pièces détachées adéquate. En effet, une
batterie inappropriée risque de prendre feu ou d’exploser.
Akkus enthalten geringe Mengen von Nickel. Sie dürfen nicht zerlegt,
wiederaufgeladen, kurzgeschlossen, oder Feuer oder Wasser ausgesetzt werden.
Bei der Entsorgung die örtlichen Bestimmungen für Sondermüll beachten. Beim
Ersetzen der Batterie nur Batterien des Typs verwenden, der in der Ersatzteilliste
aufgeführt ist. Der Einsatz falscher Batterien kann zu Entzündung oder Explosion
führen.
La batteria contiene piccole quantità di nichel. Non smontarla, gettarla nel fuoco
o nell’acqua né cortocircuitarla. Smaltirla secondo la normativa in vigore (DPR
915/82, successive disposizioni e disposizioni locali). Quando si sostituisce la
batteria, utilizzare soltanto i tipi inseriti nell’appropriato Catalogo parti. L’impiego
di una batteria non adatta potrebbe determinare l’incendio o l’esplosione della
batteria stessa.
Las baterías contienen pequeñas cantidades de níquel. No las desmonte, ni
recargue, ni las eche al fuego o al agua ni las cortocircuite. Deséchelas tal como
dispone la normativa local. Utilice sólo baterías que se encuentren en la lista de
piezas al sustituir la batería. La utilización de una batería no apropiada puede
provocar la ignición o explosión de la misma.
10
ideapad 320-17IKB/ideapad 320H-17IKB/ideapad 320L-17IKB/ideapad 320R-17IKB/
ideapad 320E-17IKB/ideapad 320-17ISK/ideapad 320H-17ISK/ideapad 320L-17ISK/
ideapad 320R-17ISK/ideapad 320E-17ISK Hardware Maintenance Manual
Safety notice 4
DANGER
The lithium battery can cause a re, an explosion, or a severe burn. Do not recharge
it, remove its polarized connector, disassemble it, heat it above 100°C (212°F),
incinerate it, or expose its cell contents to water. Dispose of the battery as required
by local ordinances or regulations. Use only the battery in the appropriate parts
listing. Use of an incorrect battery can result in ignition or explosion of the battery.
La pile de sauvegarde contient du lithium. Elle présente des risques d’incendie,
d’explosion ou de brûlures graves. Ne la rechargez pas, ne retirez pas son
connecteur polarisé et ne la démontez pas. Ne l’exposez pas à une temperature
supérieure à 100°C, ne la faites pas brûler et n’en exposez pas le contenu à l’eau.
Mettez la pile au rebut conformément à la réglementation en vigueur. Une pile
inappropriée risque de prendre feu ou d’exploser.
Die Systembatterie ist eine Lithiumbatterie. Sie kann sich entzünden, explodieren
oder schwere Verbrennungen hervorrufen. Batterien dieses Typs dürfen nicht
aufgeladen, zerlegt, über 100 C erhitzt oder verbrannt werden. Auch darf ihr Inhalt
nicht mit Wasser in Verbindung gebracht oder der zur richtigen Polung angebrachte
Verbindungsstecker entfernt werden. Bei der Entsorgung die örtlichen Bestimmungen
für Sondermüll beachten. Beim Ersetzen der Batterie nur Batterien des Typs
verwenden, der in der Ersatzteilliste aufgeführt ist. Der Einsatz falscher Batterien
kann zu Entzündung oder Explosion führen.
La batteria di supporto e una batteria al litio e puo incendiarsi, esplodere o
procurare gravi ustioni. Evitare di ricaricarla, smontarne il connettore polarizzato,
smontarla, riscaldarla ad una temperatura superiore ai 100 gradi centigradi,
incendiarla o gettarla in acqua. Smaltirla secondo la normativa in vigore (DPR
915/82, successive disposizioni e disposizioni locali). L’impiego di una batteria
non adatta potrebbe determinare l’incendio o l’esplosione della batteria stessa.
La batería de repuesto es una batería de litio y puede provocar incendios,
explosiones o quemaduras graves. No la recargue, ni quite el conector polarizado,
ni la desmonte, ni caliente por encima de los 100°C (212°F), ni la incinere ni
exponga el contenido de sus celdas al agua. Deséchela tal como dispone la
normativa local.

11
Safety information
Safety notice 5
If the LCD breaks and the uid from inside the LCD gets into your eyes or on your
hands, immediately wash the affected areas with water at least for 15 minutes. Seek
medical care if any symptoms caused by the uid are present after washing.
Si le panneau d’afchage à cristaux liquides se brise et que vous recevez dans les
yeux ou sur les mains une partie du fluide, rincez-les abondamment pendant au
moins quinze minutes. Consultez un médecin si des symptômes persistent après le
lavage.
Die Leuchtstoffröhre im LCD-Bildschirm enthält Quecksilber. Bei der Entsorgung
die örtlichen Bestimmungen für Sondermüll beachten. Der LCD-Bildschirm
besteht aus Glas und kann zerbrechen, wenn er unsachgemäß behandelt wird
oder der Computer auf den Boden fällt. Wenn der Bildschirm beschädigt ist und
die darin befindliche Flüssigkeit in Kontakt mit Haut und Augen gerät, sollten
die betroffenen Stellen mindestens 15 Minuten mit Wasser abgespült und bei
Beschwerden anschließend ein Arzt aufgesucht werden.
Nel caso che caso l’LCD si dovesse rompere ed il liquido in esso contenuto
entrasse in contatto con gli occhi o le mani, lavare immediatamente le parti
interessate con acqua corrente per almeno 15 minuti; poi consultare un medico se i
sintomi dovessero permanere.
Si la LCD se rompe y el uido de su interior entra en contacto con sus ojos o sus
manos, lave inmediatamente las áreas afectadas con agua durante 15 minutos como
mínimo. Obtenga atención medica si se presenta algún síntoma del uido despues
de lavarse.
12
ideapad 320-17IKB/ideapad 320H-17IKB/ideapad 320L-17IKB/ideapad 320R-17IKB/
ideapad 320E-17IKB/ideapad 320-17ISK/ideapad 320H-17ISK/ideapad 320L-17ISK/
ideapad 320R-17ISK/ideapad 320E-17ISK Hardware Maintenance Manual
Safety notice 6
DANGER
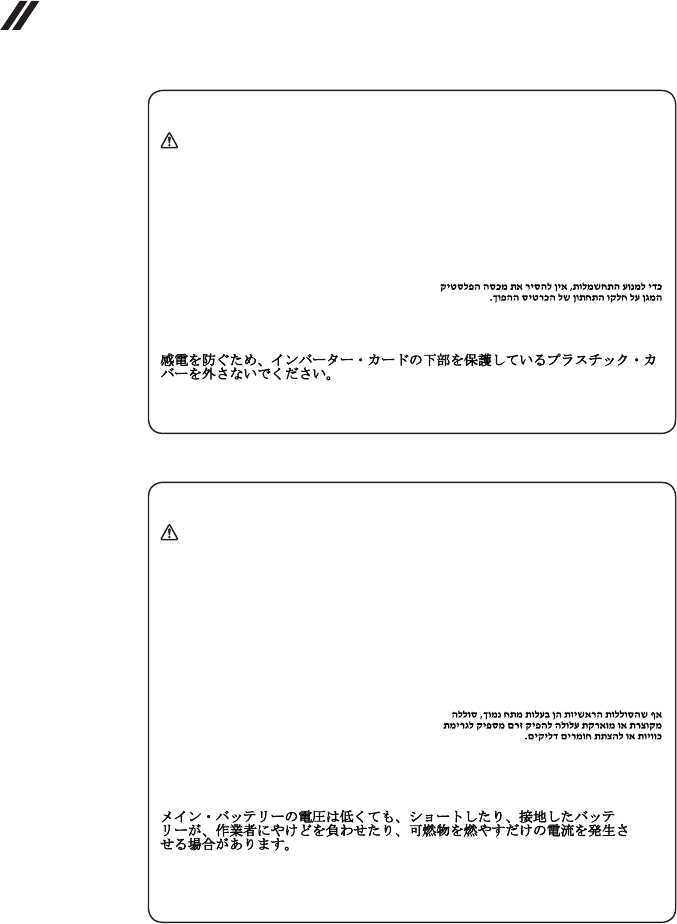
To avoid shock, do not remove the plastic cover that protects the lower part of the
inverter card.
An d’éviter tout risque de choc électrique, ne retirez pas le cache en plastique
protégeant la partie inférieure de la carte d’alimentation.
Aus Sicherheitsgründen die Kunststoffabdeckung, die den unteren Teil der
Spannungswandlerplatine umgibt, nicht entfernen.
Per evitare scosse elettriche, non rimuovere la copertura in plastica che avvolge la
parte inferiore della scheda invertitore.
Para evitar descargas, no quite la cubierta de plástico que rodea la parte baja de la
tarjeta invertida.
Safety notice 7
DANGER
Though the main batteries have low voltage, a shorted or grounded battery can
produce enough current to burn personnel or combustible materials.
Bien que le voltage des batteries principales soit peu élevé, le court-circuit ou la
mise à la masse d’une batterie peut produire sufsamment de courant pour brûler
des matériaux combustibles ou causer des brûlures corporelles graves.
Obwohl Hauptbatterien eine niedrige Spannung haben, können sie doch bei
Kurzschluß oder Erdung genug Strom abgeben, um brennbare Materialien zu
entzünden oder Verletzungen bei Personen hervorzurufen.
Sebbene le batterie di alimentazione siano a basso voltaggio, una batteria in
corto circuito o a massa può fornire corrente sufficiente da bruciare materiali
combustibili o provocare ustioni ai tecnici di manutenzione.
Aunque las baterías principales tienen un voltaje bajo, una batería cortocircuitada
o con contacto a tierra puede producir la corriente suciente como para quemar
material combustible o provocar quemaduras en el personal.

13
Safety information
Safety notice 8
DANGER
Before removing any FRU, turn off the computer, unplug all power cords from
electrical outlets, remove the battery pack, and then disconnect any interconnecting
cables.
Avant de retirer une unité remplaçable en clientèle, mettez le système hors tension,
débranchez tous les cordons d’alimentation des socles de prise de courant, retirez la
batterie et déconnectez tous les cordons d’interface.
Die Stromzufuhr muß abgeschaltet, alle Stromkabel aus der Steckdose gezogen,
der Akku entfernt und alle Verbindungskabel abgenommen sein, bevor eine FRU
entfernt wird.
Prima di rimuovere qualsiasi FRU, spegnere il sistema, scollegare dalle prese
elettriche tutti i cavi di alimentazione, rimuovere la batteria e poi scollegare i cavi
di interconnessione.
Antes de quitar una FRU, apague el sistema, desenchufe todos los cables de las
tomas de corriente eléctrica, quite la batería y, a continuación, desconecte cualquier
cable de conexión entre dispositivos.
14
ideapad 320-17IKB/ideapad 320H-17IKB/ideapad 320L-17IKB/ideapad 320R-17IKB/
ideapad 320E-17IKB/ideapad 320-17ISK/ideapad 320H-17ISK/ideapad 320L-17ISK/
ideapad 320R-17ISK/ideapad 320E-17ISK Hardware Maintenance Manual
Laser compliance statement
SomemodelsofLenovo computerareequippedfromthefactorywith an
opticalstorage devicesuchas aCD-ROMdriveor aDVD-ROMdrive. Such
devicesarealsosoldseparatelyasoptions.Ifoneofthesedrivesisinstalled,
itiscertiedintheU.S. toconformtotherequirementsofthe Departmentof
HealthandHumanServices21CodeofFederalRegulations(DHHS21CFR)
SubchapterJforClass1laserproducts.Elsewhere,thedriveis certifiedto
conformtotherequirementsoftheInternationalElectrotechnical Commission
(IEC)825andCENELECEN60825forClass1laserproducts.
IfaCD-ROMdrive,aDVD-ROMdrive,oranotherlaserdeviceisinstalled,note
thefollowing:
CAUTION
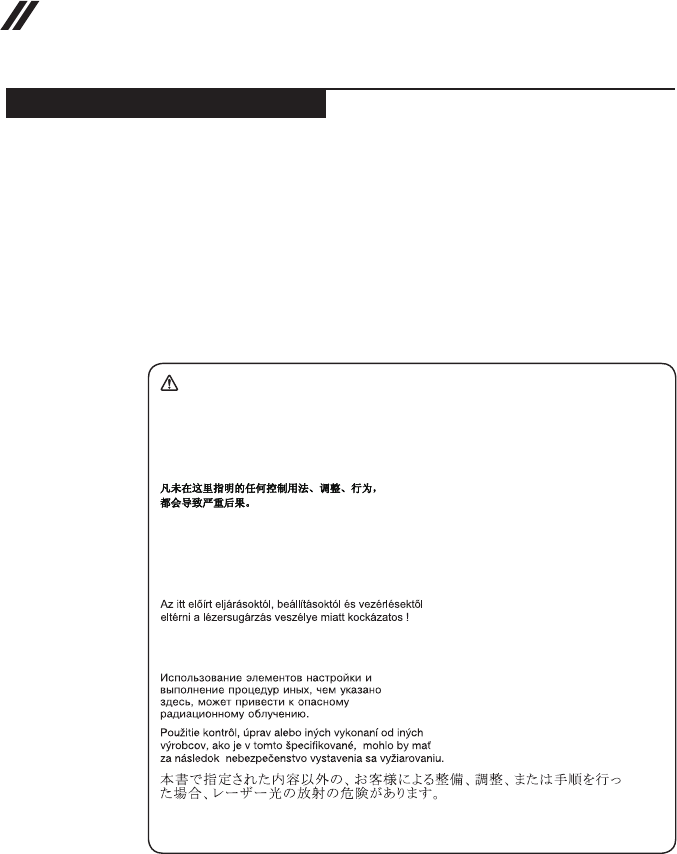
Use of controls or adjustments or performance of procedures other than those
specied herein might result in hazardous radiation exposure.
O uso de controles, ajustes ou desempenho de procedimentos diferentes daqueles
aqui especicados pode resultar em perigosa exposição à radiação.
Pour éviter tout risque d’exposition au rayon laser, respectez les consignes de
réglage et d’utilisation des commandes, ainsi que les procédures décrites.
Werden Steuer- und Einstellelemente anders als hier festgesetzt verwendet, kann
gefährliche Laserstrahlung auftreten.
L’utilizzo di controlli, regolazioni o l’esecuzione di procedure diverse da quelle
specicate possono provocare l’esposizione a.
El uso de controles o ajustes o la ejecución de procedimientos distintos de los aquí
especicados puede provocar la exposición a radiaciones peligrosas.
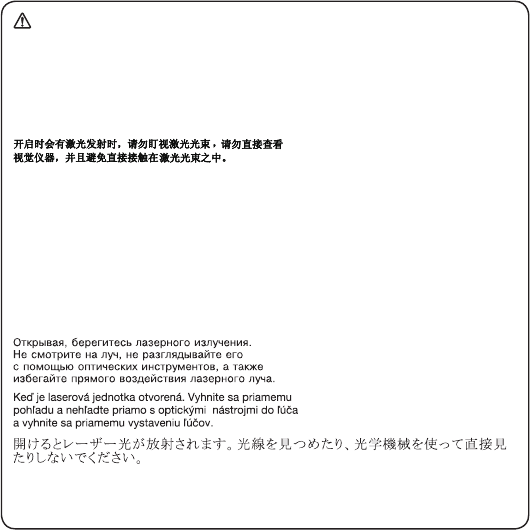
OpeningtheCD-ROMdrive,theDVD-ROMdrive,oranyotheropticalstorage
devicecouldresultin exposuretohazardous laserradiation.Thereare no
serviceablepartsinsidethosedrives.Do not open.
15
Safety information
ACD-ROMdrive,aDVD-ROMdrive,oranyotherstoragedeviceinstalledmay
containanembeddedClass3AorClass3Blaserdiode.Notethefollowing:
DANGER
Emits visible and invisible laser radiation when open. Do not stare into the beam,
do not view directly with optical instruments, and avoid direct exposure to the
beam.
Radiação por raio laser ao abrir. Não olhe xo no feixe de luz, não olhe diretamente
por meio de instrumentos óticos e evite exposição direta com o feixe de luz.
Rayonnement laser si carter ouvert. Évitez de fixer le faisceau, de le regarder
directement avec des instruments optiques, ou de vous exposer au rayon.
Laserstrahlung bei geöffnetem Gerät. Nicht direkt oder über optische Instrumente
in den Laserstrahl sehen und den Strahlungsbereich meiden.
Kinyitáskor lézersugár ! Ne nézzen bele se szabad szemmel, se optikai
eszközökkel. Kerülje a sugárnyalábbal való érintkezést!
Aprendo l’unità vengono emesse radiazioni laser. Non fissare il fascio, non
guardarlo direttamente con strumenti ottici e evitare l’esposizione diretta al fascio.
Radiación láser al abrir. No mire jamente ni examine con instrumental óptico el
haz de luz. Evite la exposición directa al haz.

16
ideapad 320-17IKB/ideapad 320H-17IKB/ideapad 320L-17IKB/ideapad 320R-17IKB/
ideapad 320E-17IKB/ideapad 320-17ISK/ideapad 320H-17ISK/ideapad 320L-17ISK/
ideapad 320R-17ISK/ideapad 320E-17ISK Hardware Maintenance Manual
Important service information
Thischapterpresentsthefollowingimportantserviceinformation:
• “StrategyforreplacingFRUs”onpage16
– “Strategyforreplacingaharddiskdrive”onpage17
– “Importantnoticeforreplacingasystemboard”onpage17
• “ImportantinformationaboutreplacingRoHScompliantFRUs”onpage18
Important:
BIOS and device driver xes are customer-installable. The BIOS and device
drivers are posted on the customer support site:
http://support.lenovo.com.
Strategy for replacing FRUs
Before replacing parts:
Makesurethatallsoftware xes,drivers,and BIOSdownloadsare installed
beforereplacinganyFRUslistedinthismanual.
Afterasystemboardisreplaced,ensurethatthelatestBIOSisloadedtothe
systemboardbeforecompletingtheserviceaction.
Todownloadsoftwarexes,drivers,andBIOS,followthestepsbelow:
1. Gotohttp://support.lenovo.com.
2. Enterthe serialnumberor selectaproduct oruseLenovosmart
downloading.
3. SelecttheBIOS/Driver/Applicationsanddownload.
4. Followthedirectionsonthescreenandinstallthenecessarysoftware.
17
Important service information
Usethefollowingstrategy topreventunnecessaryexpensefor replacingand
servicingFRUs:
• IfyouareinstructedtoreplaceanFRU,butthereplacementdoesnotsolve
theproblem,reinstalltheoriginalFRUbeforeyoucontinue.
• Somecomputers havebotha processorboardanda systemboard.If you
areinstructedtoreplaceeitherofthem,andreplacingoneofthemdoesnot
solvetheproblem,reinstallthatboard,andthenreplacetheotherone.
• IfanadapteroradeviceconsistsofmorethanoneFRU,anyoftheFRUs
maybethecauseoftheerror.Before replacingtheadapter ordevice,
removetheFRUsonebyonetoseeifthesymptomschange.Replaceonly
theFRUthatchangedthesymptoms.
Attention:Thesetup configurationon thecomputeryouareservicingmay
havebeencustomized.RunningAutomaticConfiguration mayalterthe
settings.Notethecurrentcongurationsettings(usingtheViewConguration
option);then,whenservicehasbeencompleted,verify thatthosesettings
remainineffect.
Strategy for replacing a hard disk drive
Alwaystrytorunalow-levelformatbeforereplacingahard diskdrive.This
willcauseallcustomerdataon theharddisktobe lost.Makesurethatthe
customerhasacurrentbackupofthedatabeforeperformingthisaction.
Attention:Thedrivestartupsequenceinthecomputeryouareservicingmay
havebeenchanged.Beextremelycarefulduring writeoperationssuch as
copying,saving,orformatting.Ifyouselectanincorrectdrive,dataorprograms
canbeoverwritten.
Important notice for replacing a system board
Somecomponentsmountedonasystemboard areverysensitive. Improper
handlingcancausedamage tothosecomponents, andmaycauseasystem
malfunction.
Attention:Whenhandlingasystemboard:
• Donotdropthesystemboardorapplyanyexcessiveforcetoit.
• Avoidroughhandlingofanykind.
• Avoidbendingthe systemboardand hardpushingtopreventcrackingat
eachBGA(BallGridArray)chipset.
18
ideapad 320-17IKB/ideapad 320H-17IKB/ideapad 320L-17IKB/ideapad 320R-17IKB/
ideapad 320E-17IKB/ideapad 320-17ISK/ideapad 320H-17ISK/ideapad 320L-17ISK/
ideapad 320R-17ISK/ideapad 320E-17ISK Hardware Maintenance Manual
Important information about replacing RoHS compliant FRUs
RoHS, The Restriction of Hazardous Substances in Electrical and
Electronic Equipment Directive (2002/95/EC) is a European Union legal
requirement affecting the global electronics industry. RoHS requirements
must be implemented on Lenovo products placed on the market after
June 2006. Products on the market before June 2006 are not required to
have RoHS compliant parts. If the original FRU parts are non-compliant,
replacement parts can also be non-compliant. In all cases if the original
FRU parts are RoHS compliant, the replacement part must also be RoHS
compliant.
Note:RoHSandnon-RoHSFRUpartnumberswiththesametandfunction
areidentiedwithuniqueFRUpartnumbers.
Lenovoplans totransitto RoHScompliancewellbefore theimplementation
dateandexpectsitssuppliers tobeready tosupportLenovo’srequirements
andscheduleinthe EU.Productssoldin2005and2006will containsome
RoHScompliantFRUs.Thefollowingstatementpertainstotheseproductsand
anyproductLenovoproducescontainingRoHScompliantFRUs.
RoHScompliant FRUshaveuniqueFRUpartnumbers.Before orafterthe
RoHSimplementationdate,failed RoHScompliantpartsmustalways be
replacedwithRoHScompliantones,soonlytheFRUsidentiedascompliant
inthesystemHMMordirectsubstitutionsforthoseFRUsmaybeused.
Products marketed before June 2006 Products marketed after June 2006
Current or
original part
Replacement FRU Current or
original part
Replacement FRU
Non-RoHS CanbeNon-RoHS
MustbeRoHS MustbeRoHS
Non-RoHS CanbeRoHS
Non-RoHS CansubtoRoHS
RoHS MustbeRoHS
Note:Adirectsubstitutionis apartwith adifferentFRUpartnumberthatis
automaticallyshippedbythedistributioncenteratthetimeoftheorder.

19
General checkout
General checkout
Thischapterpresentsthefollowinginformation:
• “Whattodorst”onpage20
• “Powersystemcheckout”onpage21
Beforeyougotothecheckout,makesuretoreadthefollowingimportantnotes:
Important notes:
• Onlycertiedtrainedpersonnelcanservicethecomputer.
• BeforereplacinganyFRU,readtheentirepage onremovingandreplacing
FRUs.
• CarefullyremovescrewsforreusewhenreplacingFRUs.
• Beextremelycarefulduringsuch writeoperationsascopying,saving, or
formatting. Drives in the computer that you are servicing sequence might
have been altered. If you select an incorrect drive, data or programs might be
overwritten.
• ReplaceanFRUonlywithanotherFRUofthecorrectmodel. When you
replace an FRU, make sure that the machine model and the FRU part number are
correct by referring to the FRU parts list.
• AnFRUshouldnotbereplacedjustbecauseofasingle,unreproduciblefailure.
Single failures can occur for a variety of reasons that have nothing to do with a
hardware defect, such as cosmic radiation, electrostatic discharge, or software
errors. Consider replacing an FRU only when a problem recurs. If you suspect that
an FRU is defective, clear the error logs and run the test again. If the error does
not recur, do not replace the FRU.
• BecarefulnottoreplaceanondefectiveFRU.

20
ideapad 320-17IKB/ideapad 320H-17IKB/ideapad 320L-17IKB/ideapad 320R-17IKB/
ideapad 320E-17IKB/ideapad 320-17ISK/ideapad 320H-17ISK/ideapad 320L-17ISK/
ideapad 320R-17ISK/ideapad 320E-17ISK Hardware Maintenance Manual
What to do rst
WhenyoudoreturnanFRU,youmustincludethefollowinginformationinthe
partsexchangeformorpartsreturnformthatyouattachtoit:
1. Nameandphonenumberofservicer
2. Dateofservice
3. Dateonwhichthemachinefailed
4. Dateofpurchase
5. ProcedureindexandpagenumberinwhichthefailingFRUwasdetected
6. FailingFRUnameandpartnumber
7. Machinetype,modelnumber,andserialnumber
8. Customer’snameandaddress
Note for warranty:During thewarrantyperiod,the customermaybe
responsiblefor repaircostsif thecomputerdamage wascausedby misuse,
accident,modification,unsuitablephysical oroperatingenvironment,or
impropermaintenancebythecustomer.
Thefollowingisalistofsome commonitemsthat arenotcovered under
warrantyandsomesymptomsthatmightindicate thatthesystem was
subjectedtostressbeyondnormaluse.
Beforecheckingproblemswiththecomputer,determinewhetherthedamageis
coveredunderthewarrantybyreferringtothefollowinglist:
The following are not covered under warranty:
• LCDpanelcrackedfromtheapplicationof excessiveforceorfrombeing
dropped
• Scratched(cosmetic)parts
• Distortion,deformation,ordiscolorationofthecosmeticparts
• Plasticparts,latches,pins,orconnectorsthathavebeencrackedorbroken
byexcessiveforce
• Damagecausedbyliquidspilledintothesystem
• DamagecausedbytheimproperinsertionofaPCCardortheinstallationof
anincompatiblecard
• Improperdiskinsertionoruseofanopticaldrive
• Diskettedrivedamagecausedbypressureon thediskettedrive cover,
foreignmaterialinthedrive,ortheinsertionofadiskettewithmultiplelabels
• Damagedorbentdisketteejectbutton
• Fusesblownbyattachmentofanonsupporteddevice
• Forgottencomputerpassword(makingthecomputerunusable)
• Stickykeyscausedbyspillingaliquidontothekeyboard
• UseofanincorrectACadapteronlaptopproducts
The following symptoms might indicate damage caused by nonwarranted
activities:
• Missingpartsmightbeasymptomofunauthorizedserviceormodication.
• Ifthespindleofaharddiskdrivebecomesnoisy,itmayhavebeensubjected
toexcessiveforce,ordropped.

21
General checkout
Power system checkout
Toverifyasymptom,followthestepsbelow:
1. Turnoffthecomputer.
2. Removethebatterypack.
3. ConnecttheACadapter.
4. Makesurethatpowerissuppliedwhenyouturnonthecomputer.
5. Turnoffthecomputer.
6. DisconnecttheACadapterandinstallthechargedbatterypack.
7. Makesurethatthe batterypacksupplies powerwhenyouturnonthe
computer.
Ifyoususpectapowerproblem,seetheappropriateoneofthefollowingpower
supplycheckouts:
• “CheckingtheACadapter”onpage21
• “Checkingoperationalcharging”onpage22
• “Checkingthebatterypack”onpage22
Checking the AC adapter
YouareherebecausethecomputerfailsonlywhentheACadapterisused.
• Ifthepower-onindicatordoesnotturnon,checkthepowercordoftheAC
adapterforcorrectcontinuityandinstallation.
• Ifthecomputerdoesnotchargeduringoperation, goto“Checking
operationalcharging”.
TochecktheACadapter,followthestepsbelow:
1. UnplugtheACadaptercablefromthecomputer.
2. Measuretheoutputvoltageat theplugoftheACadaptercable.See the
followinggure:
2
1
Voltage (V DC)
+20
0
Pin
1
2
Note:OutputvoltagefortheACadapterpinNo.2maydifferfromtheoneyou
areservicing.
3. Ifthevoltageisnotcorrect,replacetheACadapter.
4. Ifthevoltageisacceptable,dothefollowing:
• Replacethesystemboard.
• Iftheproblempersists,goto“Lenovoideapad320-17IKB/ideapad
320H-17IKB/ideapad320L-17IKB/ideapad320R-17IKB/ideapad
320E-17IKB/ideapad320-17ISK/ideapad320H-17ISK/ideapad320L-17ISK/
ideapad320R-17ISK/ideapad320E-17ISK”onpage27.
Note:NoisefromtheACadapterdoesnotalwaysindicateadefect.

22
ideapad 320-17IKB/ideapad 320H-17IKB/ideapad 320L-17IKB/ideapad 320R-17IKB/
ideapad 320E-17IKB/ideapad 320-17ISK/ideapad 320H-17ISK/ideapad 320L-17ISK/
ideapad 320R-17ISK/ideapad 320E-17ISK Hardware Maintenance Manual
Checking operational charging
Tocheckwhetherthe batterychargesproperly duringoperation,usea
dischargedbattery packorabattery packthathas lessthan50%ofthetotal
powerremainingwheninstalledinthecomputer.
Performoperationalcharging.Ifthebattery statusindicator oricondoesnot
lighton,removethebatterypackandletitreturntoroomtemperature.Reinstall
thebatterypack.Ifthecharge indicatororiconisstilloff,replacethe battery
pack.
Ifthechargeindicatorstill doesnotlight on,replacethe systemboard.Then
reinstallthebatterypack.Ifitisstillnotcharged,gotothenextsection.
Checking the battery pack
BatterychargingdoesnotstartuntilthePowerMetershowsthatlessthan95%
ofthetotalpowerremains;underthisconditionthebatterypackcanchargeto
100%ofitscapacity.Thisprotectsthebatterypackfrombeingoverchargedor
fromhavingashortenedlife.
Tocheckyourbattery,moveyour cursortothePowerMeter iconintheicon
trayoftheWindows®taskbarandwaitforamoment(butdonotclickit),andthe
percentageofbatterypowerremainingisdisplayed.Togetdetailedinformation
aboutthebattery,double-clickthePowerMetericon.
Note:Ifthebatterypackbecomes hot,itmaynotbe abletobecharged.
Removeitfromthecomputerandleaveitatroomtemperatureforawhile.After
itcoolsdown,reinstallandrechargeit.
23
Related service information
Related service information
Thischapterpresentsthefollowinginformation:
• “RestoringthefactorycontentsbyusingOneKeyRecovery”onpage23
• “Passwords”onpage24
• “Powermanagement”onpage25
Restoring the factory contents by using OneKey Recovery
Restore of factory default
TheLenovoideapad320-17IKB/ideapad320H-17IKB/ideapad
320L-17IKB/ideapad320R-17IKB/ideapad320E-17IKB/ideapad320-
17ISK/ideapad320H-17ISK/ideapad 320L-17ISK/ideapad320R-17ISK/
ideapad320E-17ISKcomputerscomewithpre-installedOneKeyRecovery
System.Inorderto saveapplicationfilesandthe initialbackedup files
ofthesystem,theharddisk inaLenovocomputerincludes ahidden
partitionwhenitisshipped.Ifyou needtorestore thesystemto the
pointofyourfirst bootup,justenterLenovo OneKeyRecoverySystem
andrunSystem Recovery.For detailsofOneKeyRecoverySystem,
seethe User Guide for Lenovo OneKey Recovery system.
Note: This will delete all the new data on the system partition (C drive), which
is not recoverable. Make sure to back up your critical data before you perform this
action.
Whenyouusetherecoverydiscstobootyourcomputer,thesystemwillenter
theuserinterfaceforsystemrecoveryautomatically.Pleasefollow theprompt
toinsertthebackupdiscstocompletethewholerecoveryprocess.
Note:The recovery process might take up to 2 hours.

24
ideapad 320-17IKB/ideapad 320H-17IKB/ideapad 320L-17IKB/ideapad 320R-17IKB/
ideapad 320E-17IKB/ideapad 320-17ISK/ideapad 320H-17ISK/ideapad 320L-17ISK/
ideapad 320R-17ISK/ideapad 320E-17ISK Hardware Maintenance Manual
Passwords
Asmany asthreepasswords maybeneededforanyLenovocomputer:
thepower-onpassword(POP),the harddiskpassword (HDP),andthe
administratorpassword.
Ifanyofthesepasswordshasbeenset,apromptforitappearsonthescreen
wheneverthecomputeris turnedon.Thecomputerdoesnotstartuntilthe
passwordisentered.
Power-on password
Apower-onpassword(POP)protectsthesystem frombeingpoweredonby
anunauthorized person.The passwordmustbe enteredbeforeanoperating
systemcanbebooted.
Hard-disk password
Therearetwohard-diskpasswords(HDPs):
+UserHDP-fortheuser
+MasterHDP-forthe systemadministrator,who canuseit togetaccess to
theharddiskdriveeveniftheuserhaschangedtheuserHDP
Attention:Iftheuser HDPhasbeenforgotten,checkwhethera masterHDP
hasbeenset.If ithas,itcanbe usedforaccesstothe harddiskdrive.If
nomasterHDPisavailable,neither LenovonorLenovoauthorizedservice
techniciansprovideanyservicestoreseteithertheuserorthemasterHDP,or
torecoverdatafromthehard diskdrive.Theharddiskdrivecanbe replaced
forascheduledfee.
Administrator password
Administratorpasswordcontrolsthe accessofthewholesetup utility.Only
aftertheAdministratorpasswordhasbeensetcantheUserpasswordbeset.If
Administratorpasswordwascleared,theUserpasswordwasclearedtoo.

25
Related service information
Power management
Note:PowermanagementmodesarenotsupportedforAPMoperatingsystem.
Toreducepower consumption,thecomputerhastwopowermanagement
modes:sleep(standby),andhibernation.
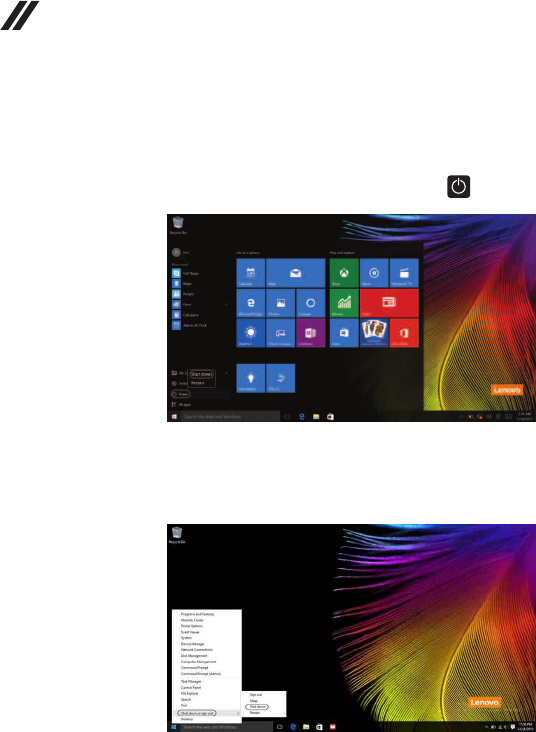
Putting the computer to sleep or shutting it down
Whenyouhavenishedworkingwithyourcomputer,youcanputittosleepor
shutitdown.
Putting your computer to sleep
Ifyouwillbeawayfromyourcomputerforonlyashorttime,putthecomputer
tosleep.
Whenthecomputerisinsleep mode,you canquicklywakeittoresumeuse,
bypassingthestartupprocess.
Toputthecomputertosleep,dooneofthefollowing:
• Closethedisplaylid.
• PressandholdthePowerkeyforabout1to5seconds.
• Movethe cursortothe lower-leftcorner,andthen selecttheStart button.
SelectPower → Sleep.
Note:Putyourcomputertosleepbeforeyoumoveit.Movingyourcomputer
whiletheharddiskdriveisspinningcandamagetheharddisk,causing
lossofdata.
Towakeupthecomputer,performthefollowing:
• Pressanykeyonthekeyboard.
26
ideapad 320-17IKB/ideapad 320H-17IKB/ideapad 320L-17IKB/ideapad 320R-17IKB/
ideapad 320E-17IKB/ideapad 320-17ISK/ideapad 320H-17ISK/ideapad 320L-17ISK/
ideapad 320R-17ISK/ideapad 320E-17ISK Hardware Maintenance Manual
• Right-clickorpresstheStartbuttoninthelower-leftcornerandselectShut
down or sign out→Shut down.
Shutting down the computer
Ifyouarenotgoingtouseyourcomputerforalongtime,shutitdown.
Toshutdownyourcomputer,dooneofthefollowing:
• SelecttheStartbutton,thenselectPower → Shut down.

27
Lenovo ideapad 320-17IKB/ideapad 320H-17IKB/ideapad 320L-17IKB/
ideapad 320R-17IKB/ideapad 320E-17IKB/ideapad 320-17ISK/ideapad
320H-17ISK/ideapad 320L-17ISK/ideapad 320R-17ISK/ideapad 320E-17ISK
Lenovo ideapad 320-17IKB/ideapad 320H-17IKB/ideapad
320L-17IKB/ideapad 320R-17IKB/ideapad 320E-17IKB/
ideapad 320-17ISK/ideapad 320H-17ISK/ideapad
320L-17ISK/ideapad 320R-17ISK/ideapad 320E-17ISK
Thischapter presentsthefollowingproduct-specific servicereferencesand
product-specicpartsinformation:
• “Specications”onpage27
• “Statusindicators”onpage29
• “Hotkeys”onpage30
• “FRUreplacementnotices”onpage31
• “RemovingandreplacinganFRU”onpage32
• “Locations”onpage62
• “Partslist”onpage64
Specications
Thefollowingtablelists thespecificationsoftheLenovoideapad320-
17IKB/ideapad320H-17IKB/ideapad 320L-17IKB/ideapad320R-17IKB/
ideapad320E-17IKB/ideapad320-17ISK/ideapad320H-17ISK/ideapad
320L-17ISK/ideapad320R-17ISK/ideapad320E-17ISK:
Table 1. Specications
Form Factor
Dimensions Appr.418mm×292.6mm×24.9mm
Weight Appr.2.8kgwithbattery
LCDsize 17.3-inch
Processor
Seethesystempropertiesofyourcomputer,youcandothisasfollows:
ClickControl Panel,thenclickHardware and Sound,clickDevice Manager
underDevices and PrintersanddoubleclickProcessors.
Memory
Typeandspeed DDR4-2133MHz
Maximum
supportedcapacity 16GB
Slots SODIMM×1,onboard×1
Hard disk drive
Formfactor 2.5-inch,7mm
Capacity HDD:500GB/1TB/2TB
SSD:128GB/256GB/512GB
Interface SATA3

28
ideapad 320-17IKB/ideapad 320H-17IKB/ideapad 320L-17IKB/ideapad 320R-17IKB/
ideapad 320E-17IKB/ideapad 320-17ISK/ideapad 320H-17ISK/ideapad 320L-17ISK/
ideapad 320R-17ISK/ideapad 320E-17ISK Hardware Maintenance Manual
Table 1. Specications (continued)
Optical Drive
Formfactor 9.0mm
Type Writer
Display
Displayresolution
(LCD) 16:9(1,600×900/1,920×1,080pixels)
LCDbacklight LED
I/O Ports
USB USB3.0×2,Type-C×1
Audio Comboaudiojack×1
Video/Audio HDMIslot×1
Ethernet RJ-45×1
Memorycardslot 4in1slot×1(SD/SDHC/SDXC/MMC)
Battery pack
Type Li-ionbatterypack
Cells/Capacity 2cells,30Wh/35Wh
Note: Thecapacitygivenhereisthetypicaloraveragecapacityasmeasuredina
specictestenvironment.Capacitiesmeasuredinotherenvironmentsmay
differbutarenolowerthantheratedcapacity(seeproductlabel).
AC power adapter
Input 100-240V,50-60Hz
Outputvoltage 20VDC
Power 45/65W
Miscellaneous
Camera 0.3M/HD
Security Kensingtonminisecurityslot×1
29
Lenovo ideapad 320-17IKB/ideapad 320H-17IKB/ideapad 320L-17IKB/
ideapad 320R-17IKB/ideapad 320E-17IKB/ideapad 320-17ISK/ideapad
320H-17ISK/ideapad 320L-17ISK/ideapad 320R-17ISK/ideapad 320E-17ISK
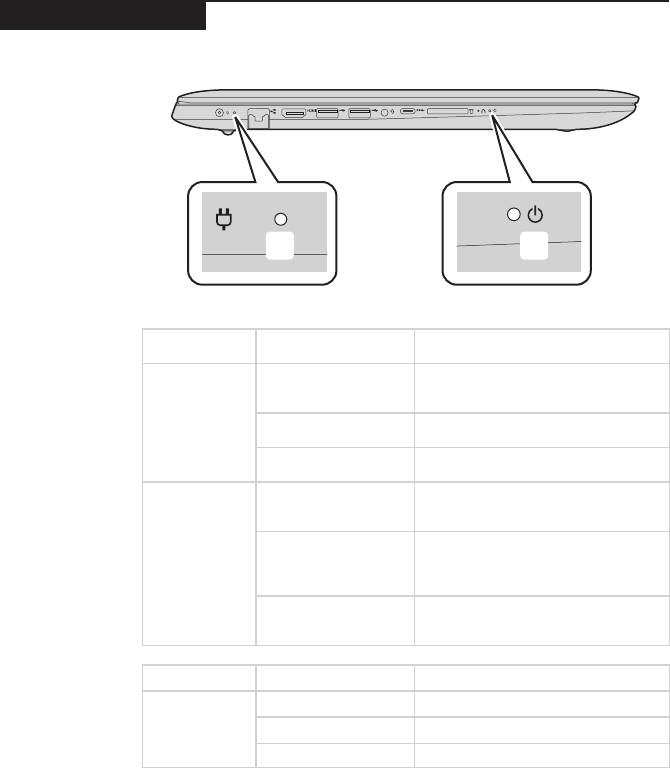
Status indicators
Thesystemstatusindicatorsbelowshowthecomputerstatus:
ba
Table 2. Status indicators
AC power
adapter status
Indicator status Meaning
Disconnected
Off
Thecomputerisinsleepmodeor
turnedoff;Thebatteryhasmorethan
20%charge.
Solidamber Thebatteryhasbetween5%and
20%charge.
Fastblinkingamber Thebatteryhasbetween1%and5%
charge.
Connected
Slowblinkingamber
Thebatteryisbeingcharged.When
batterychargereaches20%,the
blinkingcolorchangestowhite.
Slowblinkingwhite
Thebatteryhasbetween20%and
80%chargeandisstillcharging.
Whenthebatteryreaches80%
chargethelightwillstopblinking.
Solidwhite
Thebatteryhasmorethan80%
charge,chargingwillcontinueuntil
thebatteryisfullycharged.
Indicator Indicator status Meaning
Power status
indicator
On(solidwhite) Thecomputerispoweredon.
Blinking Thecomputerisinsleepmode.
Off Thecomputerispoweredoff.
30
ideapad 320-17IKB/ideapad 320H-17IKB/ideapad 320L-17IKB/ideapad 320R-17IKB/
ideapad 320E-17IKB/ideapad 320-17ISK/ideapad 320H-17ISK/ideapad 320L-17ISK/
ideapad 320R-17ISK/ideapad 320E-17ISK Hardware Maintenance Manual
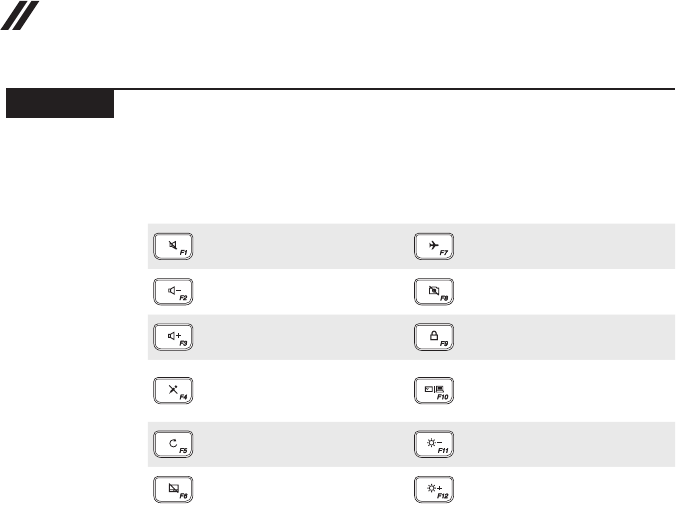
Hotkeys
Youcanaccesscertainsystemsettingsquicklybypressingtheappropriate
hotkeys.
Table 3. Hotkeys
:
Mutes/unmutesthesound.
:Enables/disablesairplane
mode.
:
Decreasesthevolumelevel.
: Enables/disablescamera.
:
Increasesthevolumelevel.
:Locks/unlockstheLCD
screen.
:
Enables/disables
microphone.
:
Enablestheexternal
projectorordanglesthe
externaldisplay.
:
Refreshespage.
:Decreasesdisplay
brightness.
:
Enables/disablesthetouch
pad.
:Increasesdisplay
brightness.
31
Lenovo ideapad 320-17IKB/ideapad 320H-17IKB/ideapad 320L-17IKB/
ideapad 320R-17IKB/ideapad 320E-17IKB/ideapad 320-17ISK/ideapad
320H-17ISK/ideapad 320L-17ISK/ideapad 320R-17ISK/ideapad 320E-17ISK
FRU replacement notices
Thissection presentsnoticesrelatedto removingandreplacingparts. Read
thissectioncarefullybeforereplacinganyFRU.
Screw notices
Loosescrewscancauseareliabilityproblem.In theLenovocomputer,this
problemisaddressedwithspecialnylon-coatedscrewsthathavethefollowing
characteristics:
• Theymaintaintightconnections.
• Theydonoteasilycomeloose,evenwithshockorvibration.
• Theyarehardertotighten.
• Eachoneshouldbeusedonlyonce.
Dothefollowingwhenyouservicethismachine:
• Keepthescrewkitinyourtoolbag.
• CarefullyremovescrewsforreusewhenreplacingFRUs.
• Useatorquescrewdriverifyouhaveone.
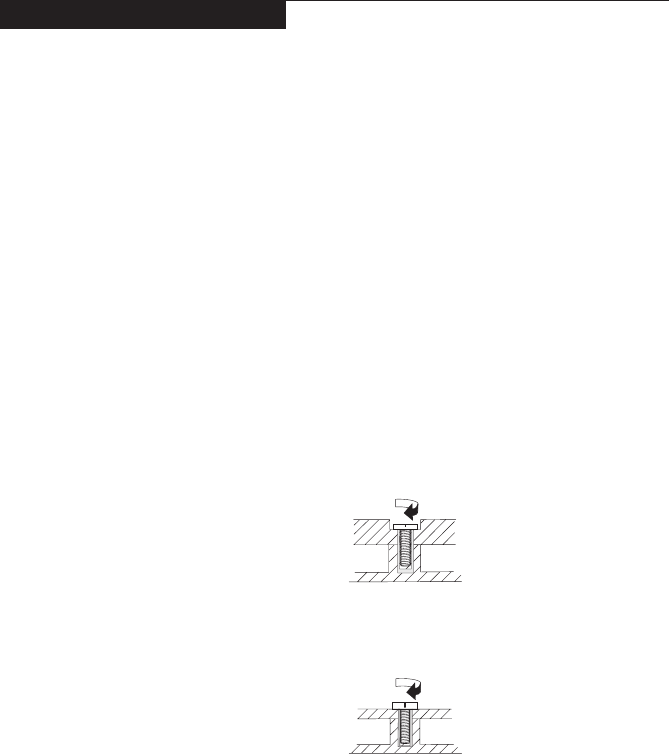
Tightenscrewsasfollows:
• Plastic to plastic
Turnanadditional 90°afterthe screwheadtouchesthesurfaceofthe
plasticpart:
more than 90°
(Cross-section)
• Logic card to plastic
Turnanadditional180°after thescrewheadtouchesthe surfaceofthe
logiccard:
more than 180°
(Cross-section)
• Torque driver
Ifyouhaveatorquescrewdriver,refertothe“Torque”columnforeachstep.
• Makesurethatyouusethecorrectscrews.Ifyouhaveatorquescrewdriver,
tightenallscrewsrmlytothetorqueshowninthetable.Carefully remove
screws for reuse when replacing FRUs. Make sure that all screws are
tightened rmly.
• Ensuretorque screwdriversarecalibrated correctlyfollowingcountry
specications.

32
ideapad 320-17IKB/ideapad 320H-17IKB/ideapad 320L-17IKB/ideapad 320R-17IKB/
ideapad 320E-17IKB/ideapad 320-17ISK/ideapad 320H-17ISK/ideapad 320L-17ISK/
ideapad 320R-17ISK/ideapad 320E-17ISK Hardware Maintenance Manual
Removing and replacing an FRU
Thissectionpresentsexplodedgureswiththeinstructionstoindicate howto
removeandreplacetheFRU.Makesuretoobservethefollowinggeneralrules:
1. Donotattempttoserviceanycomputerunlessyouhavebeentrainedand
certied.Anuntrainedpersonrunstheriskofdamagingparts.
2. BeforereplacinganyFRU,review“FRUreplacementnotices”onpage31.
3. Beginby removinganyFRUsthathave toberemovedbeforethefailing
FRU.AnyofsuchFRUsarelistedatthetopofthepage.Removethemin
theorderinwhichtheyarelisted.
4. FollowthecorrectsequenceinthestepstoremovetheFRU,asgiveninthe
guresbythenumbersinsquarecallouts.
5. WhenturningascrewtoreplaceanFRU,turnitinthedirectionasgivenby
thearrowinthegure.
6. WhenremovingtheFRU,moveitinthedirectionas givenbythearrowin
thegure.
7. Toputthenew FRUinplace,reversetheremovalprocedures andfollow
anyofthenotesthatpertainto replacement.Forinformation about
connectingandarranginginternalcables,see“Locations”onpage62.
8. WhenreplacinganFRU,usethecorrectscrewasshownintheprocedures.
DANGER
Before removing any FRU, turn off the computer, unplug all power cords from
electrical outlets, remove the battery pack, and then disconnect any of the
interconnecting cables.
Attention:AfterreplacinganFRU,donotturnonthecomputeruntilyouhave
madesurethatallscrews,springs,andothersmallpartsareinplaceandnone
areloose insidethecomputer.Verifythis byshakingthe computergentlyand
listeningforrattlingsounds.Metallicpartsormetalakescan causeelectrical
shortcircuits.
Attention:Thesystem boardissensitiveto, andcanbe damagedby,
electrostaticdischarge. Beforetouchingit,establish personalgroundingby
touchingagroundpointwithonehandorusinganelectrostaticdischarge(ESD)
strap(P/N6405959)toremovepotentialshockreasons.
33
Lenovo ideapad 320-17IKB/ideapad 320H-17IKB/ideapad 320L-17IKB/
ideapad 320R-17IKB/ideapad 320E-17IKB/ideapad 320-17ISK/ideapad
320H-17ISK/ideapad 320L-17ISK/ideapad 320R-17ISK/ideapad 320E-17ISK
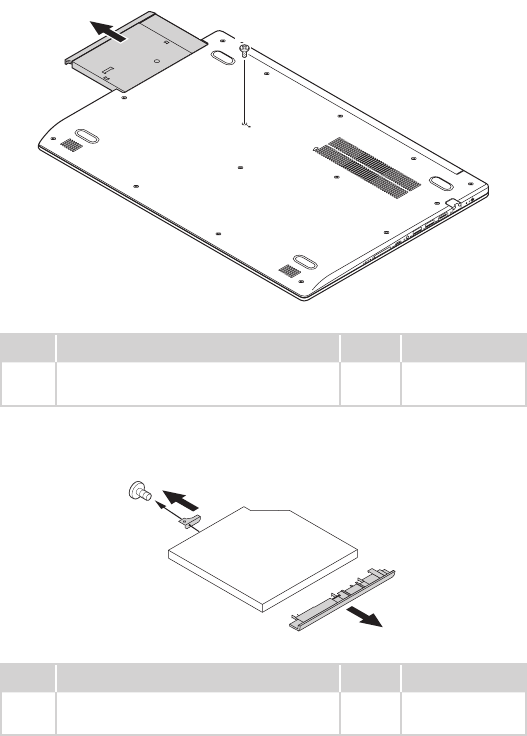
1010 Optical drive
Figure 1. Removal steps of optical drive
Removethescrew1.Thenpulltheopticaldriveoutinthedirectionshownby
arrow2.
a
b
Step Screw (quantity) Color Torque
1M2.5×7mm,Phillipshead,nylok-coated(1)
LOWTOUPPER
Black 1.85+/-0.15kgf/cm
Removethescrew3,thencarefullyremovetheopticaldrivebracketandbezel
inthedirectionsshownbyarrows4and5.
d
c
e
Step Screw (quantity) Color Torque
3M2×3mm,Phillipshead,nylok-coated(1)
ODDBRKTOODDMODULE
Silver 1.85+/-0.15kgf/cm
34
ideapad 320-17IKB/ideapad 320H-17IKB/ideapad 320L-17IKB/ideapad 320R-17IKB/
ideapad 320E-17IKB/ideapad 320-17ISK/ideapad 320H-17ISK/ideapad 320L-17ISK/
ideapad 320R-17ISK/ideapad 320E-17ISK Hardware Maintenance Manual
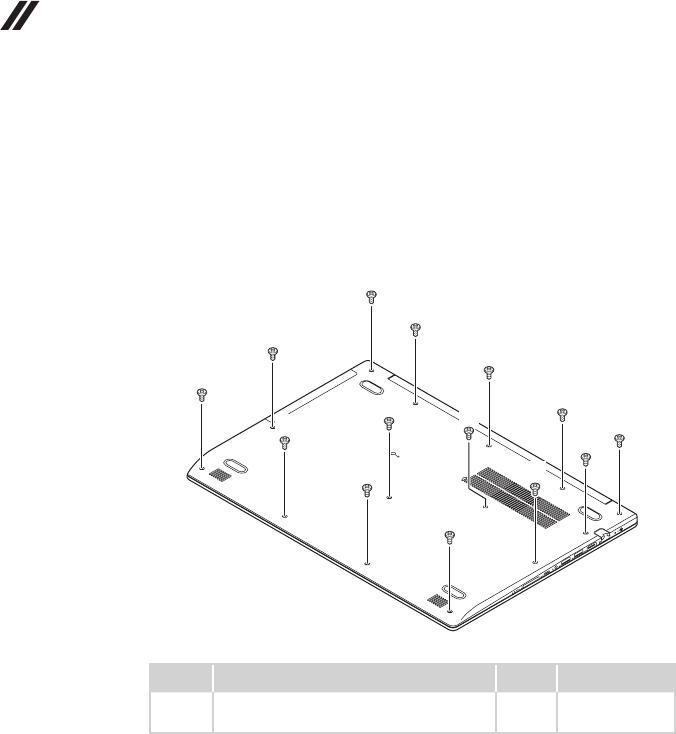
1020 Base cover
Foraccess,removethisFRU:
• “1010Opticaldrive”onpage33
Figure 2. Removal steps of base cover
Removethescrews1.
a
a
a
a
a
a
a
a
a
a
a
a
aa
Step Screw (quantity) Color Torque
1M2.5×7mm,Phillips-head,nylok-coated
(14)
Black 1.85+/-0.15kgf/cm

35
Lenovo ideapad 320-17IKB/ideapad 320H-17IKB/ideapad 320L-17IKB/
ideapad 320R-17IKB/ideapad 320E-17IKB/ideapad 320-17ISK/ideapad
320H-17ISK/ideapad 320L-17ISK/ideapad 320R-17ISK/ideapad 320E-17ISK
Figure 2. Removal steps of base cover (continued)
Removethebasecoverinthedirectionsshownbyarrows2and3.
b
b
b
b
c
36
ideapad 320-17IKB/ideapad 320H-17IKB/ideapad 320L-17IKB/ideapad 320R-17IKB/
ideapad 320E-17IKB/ideapad 320-17ISK/ideapad 320H-17ISK/ideapad 320L-17ISK/
ideapad 320R-17ISK/ideapad 320E-17ISK Hardware Maintenance Manual
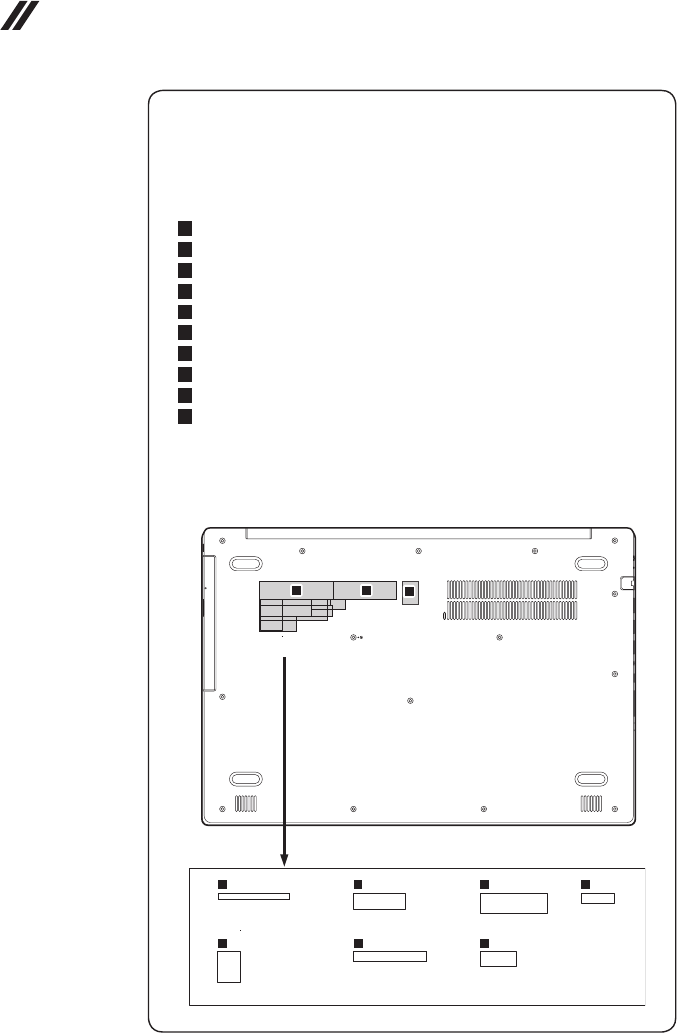
Note: Applying labels to the base cover
ThenewbasecoverFRUisshipped withakit containinglabelsofseveral
kinds.Whenyoureplacethebasecover,youneedtoapplythefollowing
labels:
Thefollowinglabelsneedtobepeeledofffromtheoldbasecoverandputon
thenewbasecover.
a Ratinglabel
b Ratinglabelforprint
c OSlabel
d Argentinalabel68×6mm
e KCClabel50×16mm
f Adapterlabel65×20mm
g Indonesialabel32×10mm
h BISlabel22×30mm
i TWlabel70×10mm
j WL/BTlabel35×15mm
Forsomemodels,youalsoneedtoapplyoneortwoFCClabels.Checkthe
oldbasecover;ifithasoneortwoFCClabels,ndduplicatesoftheminthe
labelkitandapplythemtothenewbasecover.
Forthelocationofeachlabel,refertothefollowinggures:
efg
hij
abc
d

37
Lenovo ideapad 320-17IKB/ideapad 320H-17IKB/ideapad 320L-17IKB/
ideapad 320R-17IKB/ideapad 320E-17IKB/ideapad 320-17ISK/ideapad
320H-17ISK/ideapad 320L-17ISK/ideapad 320R-17ISK/ideapad 320E-17ISK
1030 Battery pack
DANGER
Only use the battery specied in the parts list for your computer. Any other battery
could ignite or explode.
Foraccess,removetheseFRUsinorder:
• “1010Opticaldrive”onpage33
• “1020Basecover”onpage34
Figure 3. Removal steps of battery pack
Detachthebatterypackconnectorinthedirectionshownbyarrow1,remove
thescrews2.
b
b
b
b
b
a
Step Screw (quantity) Color Torque
3M2×6mm,Phillips-head,nylok-coated(4)
battery---logup
Black 1.85+/-0.15kgf/cm

38
ideapad 320-17IKB/ideapad 320H-17IKB/ideapad 320L-17IKB/ideapad 320R-17IKB/
ideapad 320E-17IKB/ideapad 320-17ISK/ideapad 320H-17ISK/ideapad 320L-17ISK/
ideapad 320R-17ISK/ideapad 320E-17ISK Hardware Maintenance Manual
Figure 3. Removal steps of battery pack (continued)
Removethebatterypackinthedirectionshownbyarrow3.
c

39
Lenovo ideapad 320-17IKB/ideapad 320H-17IKB/ideapad 320L-17IKB/
ideapad 320R-17IKB/ideapad 320E-17IKB/ideapad 320-17ISK/ideapad
320H-17ISK/ideapad 320L-17ISK/ideapad 320R-17ISK/ideapad 320E-17ISK
1040 PCI Express Mini Card for wireless LAN
Foraccess,removetheseFRUsinorder:
• “1010Opticaldrive”onpage33
• “1020Basecover”onpage34
• “1030Batterypack”onpage37
Important:
The preinstalled WLAN module may only be replaced with a Lenovo approved
module in order to comply with FCC and IC regulations. Refer to Table 4 “Parts
list—Overall” on page 65 for Lenovo part numbers for the approved modules.
Figure 4. Removal steps of PCI Express Mini Card for wireless LAN
DisconnectthetwowirelessLANcables(black,gray)1,andthenremovethe
screw2.
aa
b
Instep1,unplug thejacksbyusingthe removaltoolantennaRFconnector
(P/N:08K7159),orpickuptheconnectorswithyourngersandgentlyunplug
theminthedirectionshownbythearrows.
Notes:ThewirelessLANcardhas2cablesinstep1.
ThewirelessLANcardinsomemodelsmighthave3cablesinstep1.
Step Screw (quantity) Color Torque
2M2×3mm,Phillips-head,nylok-coated(1)
wirelesscard---logup
Silver 1.85+/-0.15kgf/cm
40
ideapad 320-17IKB/ideapad 320H-17IKB/ideapad 320L-17IKB/ideapad 320R-17IKB/
ideapad 320E-17IKB/ideapad 320-17ISK/ideapad 320H-17ISK/ideapad 320L-17ISK/
ideapad 320R-17ISK/ideapad 320E-17ISK Hardware Maintenance Manual
Figure 4. Removal steps of PCI Express Mini Card for wireless LAN (continued)
Removethecardinthedirectionshownbyarrow3.
c
When installing:
• InmodelswithawirelessLANcardthathastwoantennaconnectors,plug
theblackcable(1st)(MAIN)intothejacklabeledMAIN,andthegreycable
(2nd)(AUX)intothejacklabeledAUXonthecard.
• InmodelswithawirelessLANcardthathasthreeantennaconnectors,plug
theblackcable(1st)(MAIN)intothejacklabeled1,thegreycable(3rd)into
thejacklabeled3,andthewhitecable(2nd)(AUX)intothejacklabeled2on
thecard.
41
Lenovo ideapad 320-17IKB/ideapad 320H-17IKB/ideapad 320L-17IKB/
ideapad 320R-17IKB/ideapad 320E-17IKB/ideapad 320-17ISK/ideapad
320H-17ISK/ideapad 320L-17ISK/ideapad 320R-17ISK/ideapad 320E-17ISK
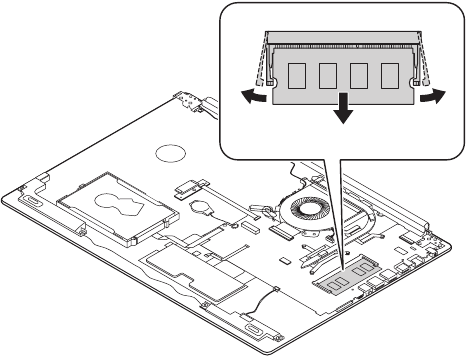
1050 DIMM
Foraccess,removetheseFRUsinorder:
• “1010Opticaldrive”onpage33
• “1020Basecover”onpage34
• “1030Batterypack”onpage37
• “1040PCIExpressMiniCardforwirelessLAN”onpage39
Figure 5. Removal steps of DIMM
Releasethe twolatcheson bothedgesofthesocketatthe sametimein the
directionsshownbyarrows1,and thenunplugtheDIMMin thedirection
shownbyarrow2.
a
a
b

42
ideapad 320-17IKB/ideapad 320H-17IKB/ideapad 320L-17IKB/ideapad 320R-17IKB/
ideapad 320E-17IKB/ideapad 320-17ISK/ideapad 320H-17ISK/ideapad 320L-17ISK/
ideapad 320R-17ISK/ideapad 320E-17ISK Hardware Maintenance Manual
1060 Hard disk drive
Foraccess,removetheseFRUsinorder:
• “1010Opticaldrive”onpage33
• “1020Basecover”onpage34
• “1030Batterypack”onpage37
• “1040PCIExpressMiniCardforwirelessLAN”onpage39
• “1050DIMM”onpage41
Attention:
• Donotdroptheharddiskdriveorapplyanyphysicalshocktoit. The hard
disk drive is sensitive to physical shock. Improper handling can cause damage and
permanent loss of data.
• Before removing the drive, suggest the customer to backup all the information on
it if possible.
• Never remove the drive while the system is operating or in suspend mode.
Figure 6. Removal steps of hard disk drive
DetachtheHDDboardconnectorinthedirectionshownbyarrows1and2.
RemovetheHDDboard.
b
a
When installing:MakesurethattheHDDboardconnectorisattachedrmly.
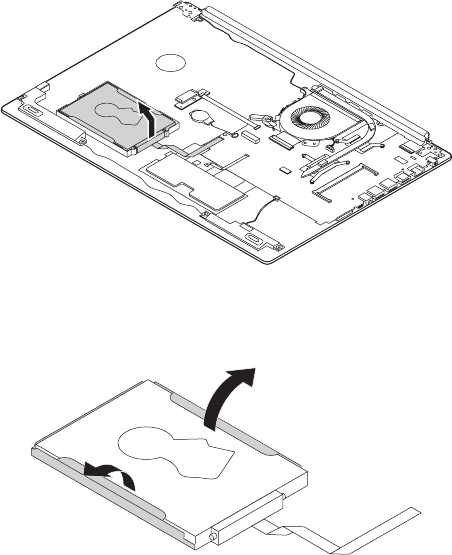
43
Lenovo ideapad 320-17IKB/ideapad 320H-17IKB/ideapad 320L-17IKB/
ideapad 320R-17IKB/ideapad 320E-17IKB/ideapad 320-17ISK/ideapad
320H-17ISK/ideapad 320L-17ISK/ideapad 320R-17ISK/ideapad 320E-17ISK
Figure 6. Removal steps of hard disk drive (continued)
Removetheharddiskdrivefromtheslotinthedirectionshownbyarrow3.
c
Detachthebracketfromtheharddiskdrive.
d
d

44
ideapad 320-17IKB/ideapad 320H-17IKB/ideapad 320L-17IKB/ideapad 320R-17IKB/
ideapad 320E-17IKB/ideapad 320-17ISK/ideapad 320H-17ISK/ideapad 320L-17ISK/
ideapad 320R-17ISK/ideapad 320E-17ISK Hardware Maintenance Manual
1070 Speakers
Foraccess,removetheseFRUsinorder:
• “1010Opticaldrive”onpage33
• “1020Basecover”onpage34
• “1030Batterypack”onpage37
• “1040PCIExpressMiniCardforwirelessLAN”onpage39
• “1050DIMM”onpage41
• “1060Harddiskdrive”onpage42
Figure 7. Removal steps of speakers
Unplugthespeakerconnector1.Thenremovethespeakers2.
b
b
a
When installing:Makesurethattheconnectorisattachedrmly.
45
Lenovo ideapad 320-17IKB/ideapad 320H-17IKB/ideapad 320L-17IKB/
ideapad 320R-17IKB/ideapad 320E-17IKB/ideapad 320-17ISK/ideapad
320H-17ISK/ideapad 320L-17ISK/ideapad 320R-17ISK/ideapad 320E-17ISK
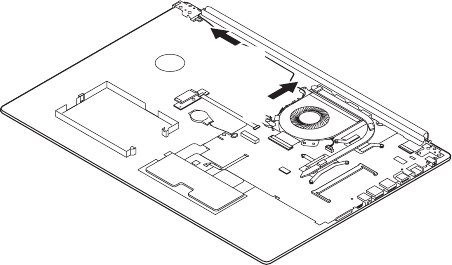
1080 Fan assembly and Heat Sink assembly
Foraccess,removetheseFRUsinorder:
• “1010Opticaldrive”onpage33
• “1020Basecover”onpage34
• “1030Batterypack”onpage37
• “1040PCIExpressMiniCardforwirelessLAN”onpage39
• “1050DIMM”onpage41
• “1060Harddiskdrive”onpage42
• “1070Speakers”onpage44
Figure 8. Removal steps of fan assembly and Heat Sink assembly
Releasethecablesfromthecableguidesinthedirectionshownbyarrows1.
a
a
When installing:Route theantennacables alongthecableguides.As you
routethecables,makesurethattheyarenotsubjectedtoanytension.Tension
couldcausethecables tobedamagedbythe cableguides,orawire tobe
broken.

46
ideapad 320-17IKB/ideapad 320H-17IKB/ideapad 320L-17IKB/ideapad 320R-17IKB/
ideapad 320E-17IKB/ideapad 320-17ISK/ideapad 320H-17ISK/ideapad 320L-17ISK/
ideapad 320R-17ISK/ideapad 320E-17ISK Hardware Maintenance Manual
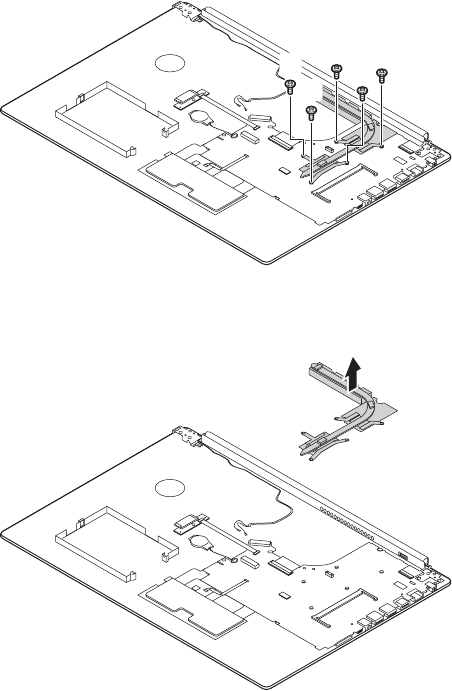
Figure 8. Removal steps of fan assembly and Heat Sink assembly (continued)
Unplugthefanconnector inthedirection shownbyarrow 2.Removethe
screw3.
c
b
Step Screw (quantity) Color Torque
3M2×6mm,Phillipshead,nylok-coated(1)
fan---mb---logup&fan---logup
Black 1.85+/-0.15kgf/cm
When installing:Makesurethattheconnectorisattachedrmly.
Removethefaninthedirectionshownbyarrow4.Becarefulnottodamage
theconnector.
d
47
Lenovo ideapad 320-17IKB/ideapad 320H-17IKB/ideapad 320L-17IKB/
ideapad 320R-17IKB/ideapad 320E-17IKB/ideapad 320-17ISK/ideapad
320H-17ISK/ideapad 320L-17ISK/ideapad 320R-17ISK/ideapad 320E-17ISK
Figure 8. Removal steps of fan assembly and Heat Sink assembly (continued)
Removethescrews5.
e
e
e
e
e
Lifttheheatsinkinthedirectionshownbyarrow6.
f
48
ideapad 320-17IKB/ideapad 320H-17IKB/ideapad 320L-17IKB/ideapad 320R-17IKB/
ideapad 320E-17IKB/ideapad 320-17ISK/ideapad 320H-17ISK/ideapad 320L-17ISK/
ideapad 320R-17ISK/ideapad 320E-17ISK Hardware Maintenance Manual
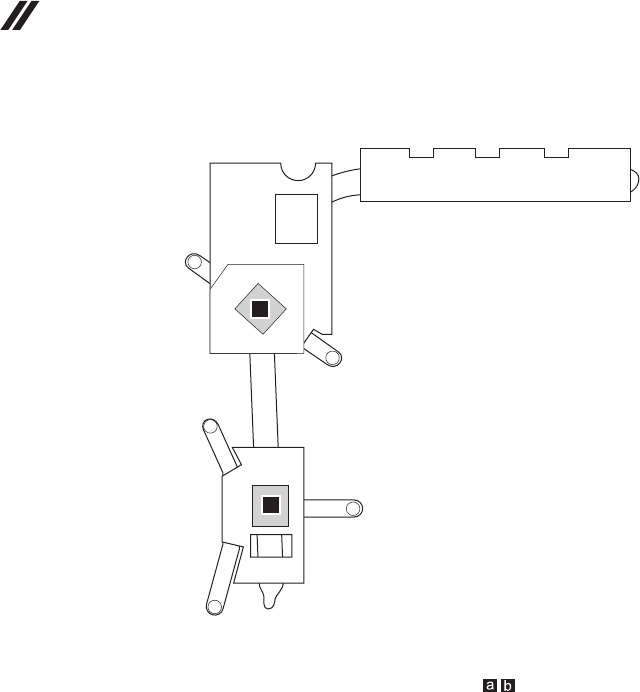
Figure 8. Removal steps of fan assembly and Heat Sink assembly (continued)
a
b
When installing:Beforeyouattachthefanassemblytothecomputer,apply
thermalgrease,atanamountof0.2grams,tothe partshowninthegure
above.Eithertoomuch ortoolittlegreaseapplicationcancausea thermal
problemduetoimperfectcontactwithacomponent.
49
Lenovo ideapad 320-17IKB/ideapad 320H-17IKB/ideapad 320L-17IKB/
ideapad 320R-17IKB/ideapad 320E-17IKB/ideapad 320-17ISK/ideapad
320H-17ISK/ideapad 320L-17ISK/ideapad 320R-17ISK/ideapad 320E-17ISK
1090 ODD transfer board, backup battery and Fingerprint
board
Foraccess,removetheseFRUsinorder:
• “1010Opticaldrive”onpage33
• “1020Basecover”onpage34
• “1030Batterypack”onpage37
• “1040PCIExpressMiniCardforwirelessLAN”onpage39
• “1050DIMM”onpage41
• “1060Harddiskdrive”onpage42
• “1070Speakers”onpage44
• “1080FanassemblyandHeatSinkassembly”onpage45
Figure 9. Removal steps of ODD transfer board, backup battery and Fingerprint
board
Detachthesystemboardconnectorinthedirectionsshownbyarrows1and2.
Unplugthebackupbatteryconnectorinthedirectionshownbyarrow3.
Removethescrew4.RemovetheODDtransferboardinthedirectionshown
byarrow5.
e
d
b
a
c
Step Screw (quantity) Color Torque
DM2×3mm,Phillips-head,nylok-coated(1) Silver 1.85+/-0.15kgf/cm
When installing:Makesurethattheconnectorsareattachedrmly.
50
ideapad 320-17IKB/ideapad 320H-17IKB/ideapad 320L-17IKB/ideapad 320R-17IKB/
ideapad 320E-17IKB/ideapad 320-17ISK/ideapad 320H-17ISK/ideapad 320L-17ISK/
ideapad 320R-17ISK/ideapad 320E-17ISK Hardware Maintenance Manual
Figure 9. Removal steps of ODD transfer board, backup battery and Fingerprint
board (continued)
Removethebackupbatteryinthedirectionshownbyarrow6.
f
When installing:Makesurethattheconnectorisattachedrmly.

51
Lenovo ideapad 320-17IKB/ideapad 320H-17IKB/ideapad 320L-17IKB/
ideapad 320R-17IKB/ideapad 320E-17IKB/ideapad 320-17ISK/ideapad
320H-17ISK/ideapad 320L-17ISK/ideapad 320R-17ISK/ideapad 320E-17ISK
1100 Upper case
Foraccess,removetheseFRUsinorder:
• “1010Opticaldrive”onpage33
• “1020Basecover”onpage34
• “1030Batterypack”onpage37
• “1040PCIExpressMiniCardforwirelessLAN”onpage39
• “1050DIMM”onpage41
• “1060Harddiskdrive”onpage42
• “1070Speakers”onpage44
• “1080FanassemblyandHeatSinkassembly”onpage45
• “1090ODDtransferboard,backupbatteryandFingerprint board”onpage
49
Figure 10. Removal steps of upper case
Removethescrews1.
aa
a
aa
a
Step Screw (quantity) Color Torque
1M2.5×5mm,Phillips-head,nylok-coated(6)
leftsidehinge---logup&rightsidehinge---logup Black
1.85+/-0.15kgf/cm

52
ideapad 320-17IKB/ideapad 320H-17IKB/ideapad 320L-17IKB/ideapad 320R-17IKB/
ideapad 320E-17IKB/ideapad 320-17ISK/ideapad 320H-17ISK/ideapad 320L-17ISK/
ideapad 320R-17ISK/ideapad 320E-17ISK Hardware Maintenance Manual
Figure 10. Removal steps of upper case (continued)
DetachtheLCDunitconnectorinthedirectionsshownbyarrows2toC.
c
b
OpenthehingeinthedirectionshownbyarrowsD.
d
d
53
Lenovo ideapad 320-17IKB/ideapad 320H-17IKB/ideapad 320L-17IKB/
ideapad 320R-17IKB/ideapad 320E-17IKB/ideapad 320-17ISK/ideapad
320H-17ISK/ideapad 320L-17ISK/ideapad 320R-17ISK/ideapad 320E-17ISK
Figure 10. Removal steps of upper case (continued)
Removetheuppercase fromtheLCDmoduleinthedirectionsshown by
arrowE.
e
54
ideapad 320-17IKB/ideapad 320H-17IKB/ideapad 320L-17IKB/ideapad 320R-17IKB/
ideapad 320E-17IKB/ideapad 320-17ISK/ideapad 320H-17ISK/ideapad 320L-17ISK/
ideapad 320R-17ISK/ideapad 320E-17ISK Hardware Maintenance Manual
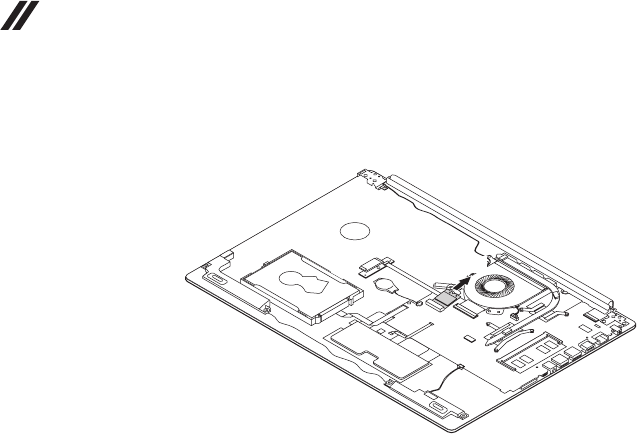
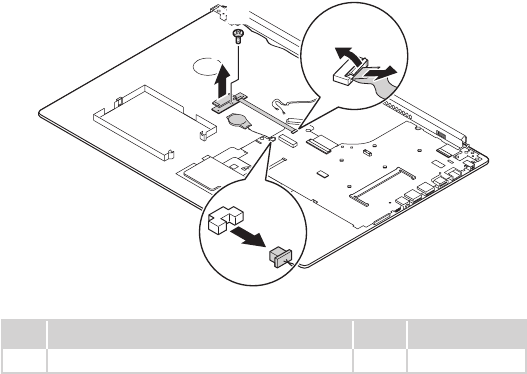
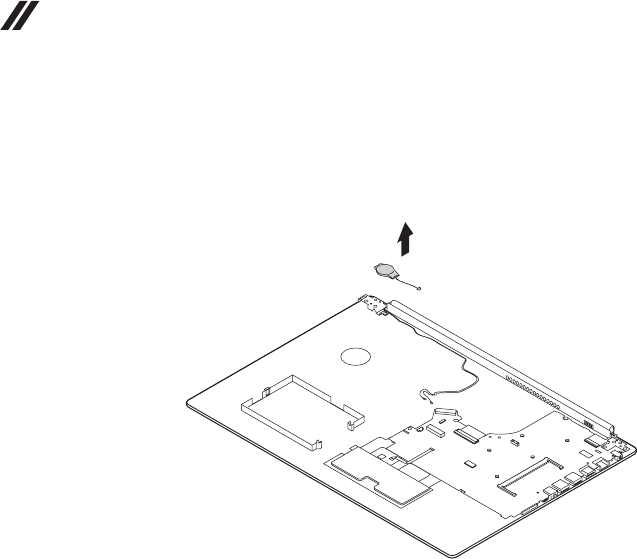
1110
System board
Important notices for handling the system board:
When handling the system board, bear the following in mind.
• Be careful not to drop the system board on a bench top that has a hard surface,
such as metal, wood, or composite.
• Avoid rough handling of any kind.
• During the whole process, make sure not to drop or stack the system board.
• If you put a system board down, make sure to put it only on a padded surface such
as an ESD mat or conductive corrugated material.
Foraccess,removetheseFRUsinorder:
• “1010Opticaldrive”onpage33
• “1020Basecover”onpage34
• “1030Batterypack”onpage37
• “1040PCIExpressMiniCardforwirelessLAN”onpage39
• “1050DIMM”onpage41
• “1060Harddiskdrive”onpage42
• “1070Speakers”onpage44
• “1080FanassemblyandHeatSinkassembly”onpage45
• “1090ODDtransferboard, backupbatteryandFingerprintboard”onpage
49
• “1100Uppercase”onpage51
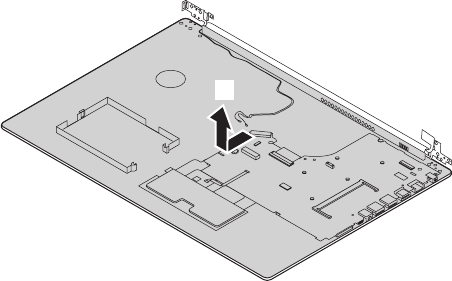
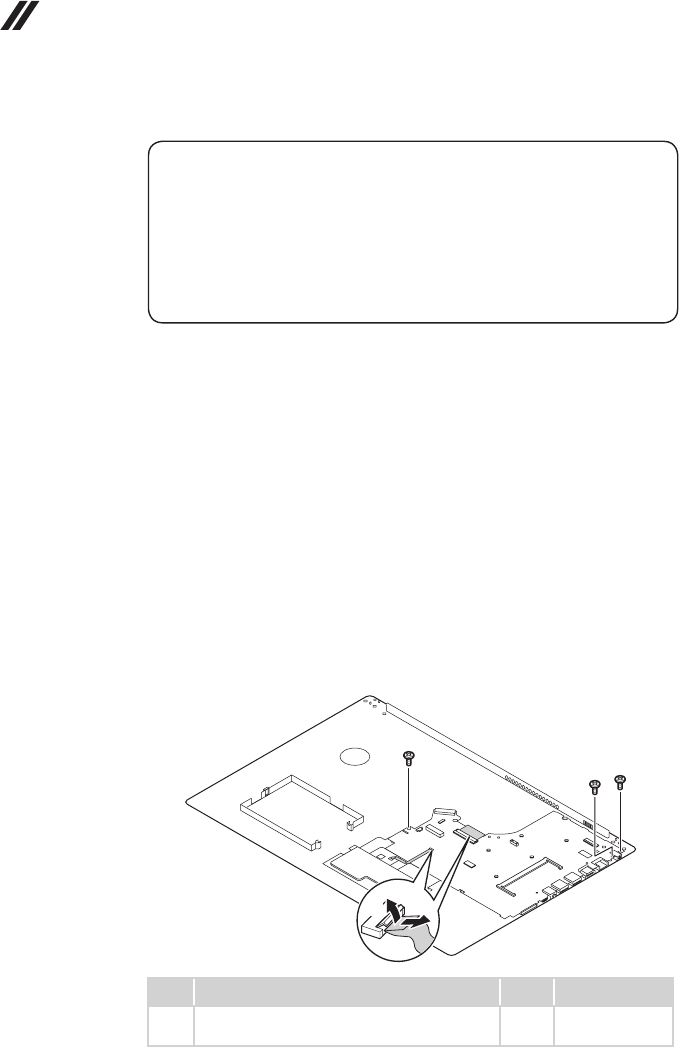
Figure 11. Removal steps of system board
Disconnecttheconnectorsinthedirectionsshownbyarrows1and2.
Thenremovethescrews3.
b
c
c
c
a
Step Screw (quantity) Color Torque
5M2×3mm,Phillips-head,nylok-coated(3)
M/B---logup
Silver 1.85+/-0.15kgf/cm
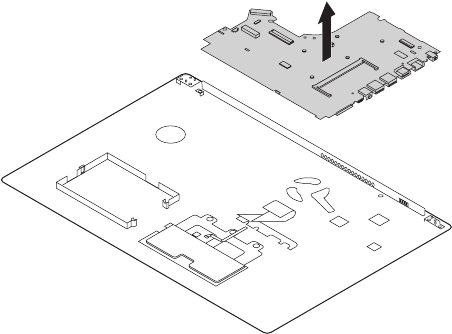
55
Lenovo ideapad 320-17IKB/ideapad 320H-17IKB/ideapad 320L-17IKB/
ideapad 320R-17IKB/ideapad 320E-17IKB/ideapad 320-17ISK/ideapad
320H-17ISK/ideapad 320L-17ISK/ideapad 320R-17ISK/ideapad 320E-17ISK
Figure 11. Removal steps of system board (continued)
Removethesystemboardinthedirectionshownbyarrow4.
d
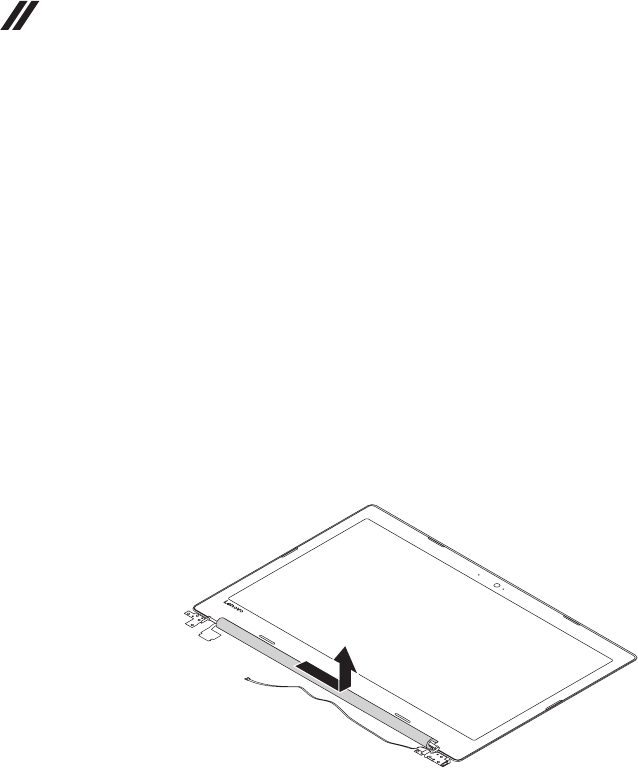
56
ideapad 320-17IKB/ideapad 320H-17IKB/ideapad 320L-17IKB/ideapad 320R-17IKB/
ideapad 320E-17IKB/ideapad 320-17ISK/ideapad 320H-17ISK/ideapad 320L-17ISK/
ideapad 320R-17ISK/ideapad 320E-17ISK Hardware Maintenance Manual
1120 LCD unit
Foraccess,removetheseFRUsinorder:
• “1010Opticaldrive”onpage33
• “1020Basecover”onpage34
• “1030Batterypack”onpage37
• “1040PCIExpressMiniCardforwirelessLAN”onpage39
• “1050DIMM”onpage41
• “1060Harddiskdrive”onpage42
• “1070Speakers”onpage44
• “1080FanassemblyandHeatSinkassembly”onpage45
• “1090ODDtransferboard,backupbatteryandFingerprintboard”onpage
49
• “1100Uppercase”onpage51
• “1110Systemboard”onpage54
Figure 12. Removal steps of LCD unit
Pullthehingecaptotherightsidetoreleasethehooks.
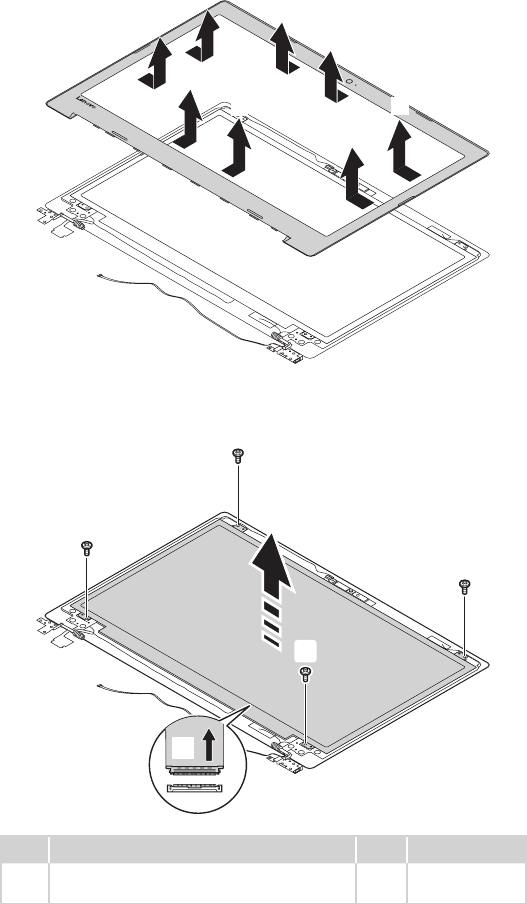
57
Lenovo ideapad 320-17IKB/ideapad 320H-17IKB/ideapad 320L-17IKB/
ideapad 320R-17IKB/ideapad 320E-17IKB/ideapad 320-17ISK/ideapad
320H-17ISK/ideapad 320L-17ISK/ideapad 320R-17ISK/ideapad 320E-17ISK
Figure 12. Removal steps of LCD unit (continued)
RemovetheLCDfrontbezelinthedirectionshownbyarrows1.
a
a
a
a
a
a
a
a
Removethescrews2.LifttheLCDmoduleslightly3.Disconnecttheconnectorin
thedirectionshownbyarrow4.ThenremovetheLCDmodule.
c
b
b
b
b
d
Step Screw (quantity) Color Torque
BM2×3mm,Phillips-head,nylok-coated(4)
lcdpanel---lcdcover
Silver 1.85+/-0.15kgf/cm
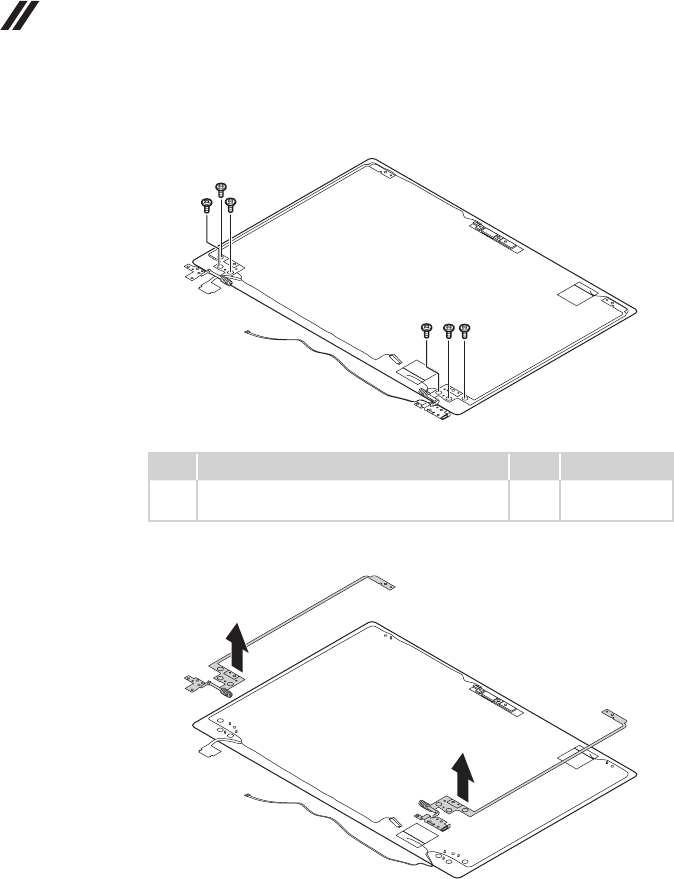
58
ideapad 320-17IKB/ideapad 320H-17IKB/ideapad 320L-17IKB/ideapad 320R-17IKB/
ideapad 320E-17IKB/ideapad 320-17ISK/ideapad 320H-17ISK/ideapad 320L-17ISK/
ideapad 320R-17ISK/ideapad 320E-17ISK Hardware Maintenance Manual
Figure 12. Removal steps of LCD unit (continued)
Removethescrews5.
ee
e
ee
e
Step Screw (quantity) Color Torque
3M2.5×2.5mm,Phillips-head,nylok-coated(6)
lcdbrk---lcdcover
Silver 3+/-0.15kgf/cm
RemovetheLCDhingesinthedirectionshownbyarrows6.
f
f
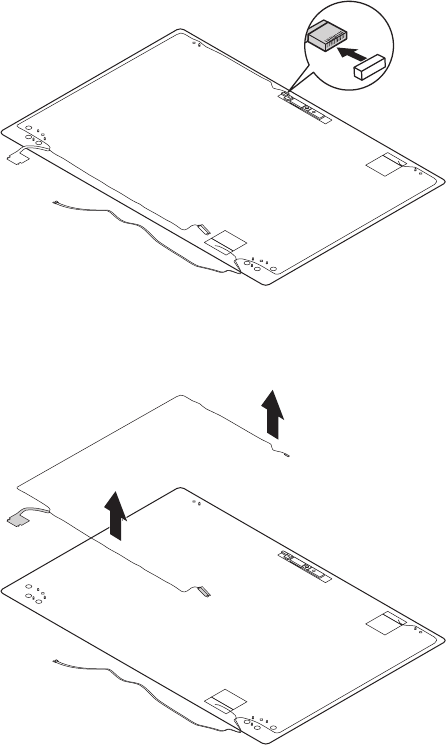
59
Lenovo ideapad 320-17IKB/ideapad 320H-17IKB/ideapad 320L-17IKB/
ideapad 320R-17IKB/ideapad 320E-17IKB/ideapad 320-17ISK/ideapad
320H-17ISK/ideapad 320L-17ISK/ideapad 320R-17ISK/ideapad 320E-17ISK
Figure 12. Removal steps of LCD unit (continued)
Detachthecameraconnectorinthedirectionshownbyarrow1.
a
RemovetheLCDcableinthedirectionshownbyarrows2.
b
b
When installing:Makesurethattheconnectorisattachedrmlyandthatyou
donotpinchtheantennacableswhenyouattachtheLCDassembly.Routethe
LCDcablealongthecableguides.
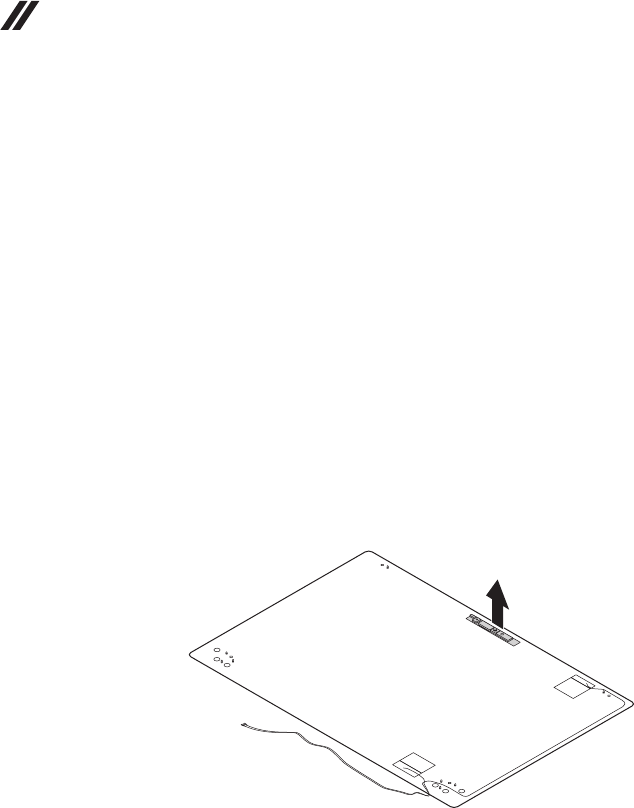
60
ideapad 320-17IKB/ideapad 320H-17IKB/ideapad 320L-17IKB/ideapad 320R-17IKB/
ideapad 320E-17IKB/ideapad 320-17ISK/ideapad 320H-17ISK/ideapad 320L-17ISK/
ideapad 320R-17ISK/ideapad 320E-17ISK Hardware Maintenance Manual
1130 Integrated camera and antenna assembly
Foraccess,removetheseFRUsinorder:
• “1010Opticaldrive”onpage33
• “1020Basecover”onpage34
• “1030Batterypack”onpage37
• “1040PCIExpressMiniCardforwirelessLAN”onpage39
• “1050DIMM”onpage41
• “1060Harddiskdrive”onpage42
• “1070Speakers”onpage44
• “1080FanassemblyandHeatSinkassembly”onpage45
• “1090ODDtransferboard, backupbatteryandFingerprintboard”onpage
49
• “1100Uppercase”onpage51
• “1110Systemboard”onpage54
• “1120LCDunit”onpage56
Figure 13. Removal steps of integrated camera and antenna assembly
Note:TheintegratedcameraisstuckonthetopcenteroftheLCDcover.
Removetheintegratedcamerainthedirectionshownbyarrow1.
a
When installing:Sticktheintegrated cameratothetopcenteroftheLCD
coverandadjustitsplacementtomakesuretheconnectorisattachedrmly.
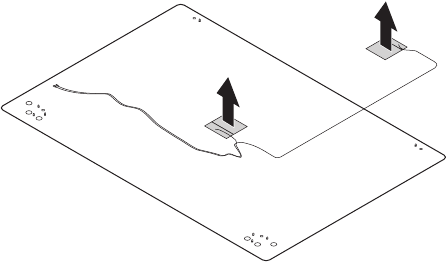
61
Lenovo ideapad 320-17IKB/ideapad 320H-17IKB/ideapad 320L-17IKB/
ideapad 320R-17IKB/ideapad 320E-17IKB/ideapad 320-17ISK/ideapad
320H-17ISK/ideapad 320L-17ISK/ideapad 320R-17ISK/ideapad 320E-17ISK
Figure 13. Removal steps of Integrated camera and antenna assembly (continued)
Peeloffthe adhesivetapesecuringtheantennaboards,releasethe cables
fromthecableguide, andthenremovetheantennaassemblyinthe direction
shownbyarrowsB.
b
b

62
ideapad 320-17IKB/ideapad 320H-17IKB/ideapad 320L-17IKB/ideapad 320R-17IKB/
ideapad 320E-17IKB/ideapad 320-17ISK/ideapad 320H-17ISK/ideapad 320L-17ISK/
ideapad 320R-17ISK/ideapad 320E-17ISK Hardware Maintenance Manual
Locations
Front view and right-side view
1 Integratedcamera
2 Built-inmicrophone
3 Computerdisplay
4 WirelessLANantennas
5 PowerKey
6 Touchpad
7 Fingerprintreader(onselectmodels)
8 Opticaldiscdrive
9 Numerickeypad
J KensingtonMiniSecurityslot
a
b
f
g
c
e
j
h
i
d
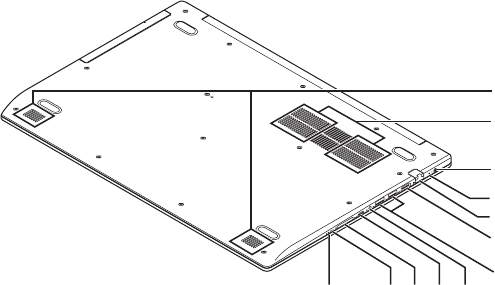
63
Lenovo ideapad 320-17IKB/ideapad 320H-17IKB/ideapad 320L-17IKB/
ideapad 320R-17IKB/ideapad 320E-17IKB/ideapad 320-17ISK/ideapad
320H-17ISK/ideapad 320L-17ISK/ideapad 320R-17ISK/ideapad 320E-17ISK
Bottom and Left-side view
1 Speakers
2 Ventilationslots
3 ACpoweradapterjack
4 Battery/Chargingstatusindicator
5 RJ-45port
6 HDMIport
7 USB3.0port
8 Comboaudiojack
9 Type-Cport
J Memorycardslot
K Novobutton
L Powerstatusindicator
b
c
d
f
e
g
hi
a
jkl
64
ideapad 320-17IKB/ideapad 320H-17IKB/ideapad 320L-17IKB/ideapad 320R-17IKB/
ideapad 320E-17IKB/ideapad 320-17ISK/ideapad 320H-17ISK/ideapad 320L-17ISK/
ideapad 320R-17ISK/ideapad 320E-17ISK Hardware Maintenance Manual
Parts list
Thissectionpresentsthefollowingserviceparts:
• “Overall”onpage65
• “LCDFRUs”onpage73
• “Miscellaneousparts”onpage75
• “ACadapters”onpage75
• “Screws”onpage77
Note:
Each FRU is available for all types or models, unless specic types or models are
specied.
Attention:
DonotattempttoreplaceanFRUonyourown.IfanFRUisdamaged,contact
aLenovoauthorizedserviceroramarketing representativeforreplacement
orrepair.Onlyqualiedtechnicianscaninspectorrepairthisproduct.

65
Lenovo ideapad 320-17IKB/ideapad 320H-17IKB/ideapad 320L-17IKB/
ideapad 320R-17IKB/ideapad 320E-17IKB/ideapad 320-17ISK/ideapad
320H-17ISK/ideapad 320L-17ISK/ideapad 320R-17ISK/ideapad 320E-17ISK
Overall
1
2
3
5
7
10
8
6
9
12
b
a
c
14
13
11
4

66
ideapad 320-17IKB/ideapad 320H-17IKB/ideapad 320L-17IKB/ideapad 320R-17IKB/
ideapad 320E-17IKB/ideapad 320-17ISK/ideapad 320H-17ISK/ideapad 320L-17ISK/
ideapad 320R-17ISK/ideapad 320E-17ISK Hardware Maintenance Manual
Table 4. Parts list—Overall
No. FRU FRU no. CRU
ID.
a-c See“Miscellaneousparts”onpage75.
1 LCDunit(see“LCDFRUs”onpage73).
2 UpperCaseASML80XMIGUSKBNFP 5CB0N96198
N
2 UpperCaseASML80XMIGUKEKBNFP 5CB0N96245
2 UpperCaseASML80XMIGITAKBNFP 5CB0N96243
2 UpperCaseASML80XMIGSPAKBNFP 5CB0N96220
2 UpperCaseASML80XMIGTURKBNFP 5CB0N96310
2 UpperCaseASML80XMIGTHAIKBNFP 5CB0N96205
2 UpperCaseASML80XMIGPORKBNFP 5CB0N96272
2 UpperCaseASML80XMIGLASPAKBNFP 5CB0N96197
2 UpperCaseASML80XMIGFRA/ENGKBNFP 5CB0N96289
2 UpperCaseASML80XMIGKORKBNFP 5CB0N96320
2 UpperCaseASML80XMIGTCKBNFP 5CB0N96264
2 UpperCaseASML80XMIGRUSKBNFP 5CB0N96247
2 UpperCaseASML80XMIGFRAKBNFP 5CB0N96231
2 UpperCaseASML80XMIGGERKBNFP 5CB0N96317
2 UpperCaseASML80XMIGARAKBNFP 5CB0N96208
2 UpperCaseASML80XMIGBRLKBNFP 5CB0N96276
2 UpperCaseASML80XMIGDUTCHKBNFP 5CB0N96296
2 UpperCaseASML80XMIGGREKBNFP 5CB0N96199
2 UpperCaseASML80XMIGHBWKBNFP 5CB0N96202
2 UpperCaseASML80XMIGHUNKBNFP 5CB0N96268
2 UpperCaseASML80XMIGNORDICKBNFP 5CB0N96226
2 UpperCaseASML80XMIGBELKBNFP 5CB0N96207
2 UpperCaseASML80XMIGILDKBNFP 5CB0N96210
2 UpperCaseASML80XMIGSLVKBNFP 5CB0N96274
2 UpperCaseASML80XMIGSWSKBNFP 5CB0N96293
2 UpperCaseASML80XMIGEUROENGKBNFP 5CB0N96228
2 UpperCaseASML80XMIGCZE/SLKKBNFP 5CB0N96286
2 UpperCaseASML80XMIGBULKBNFP 5CB0N96318
2 UpperCaseASML80XMIGHINKBNFP 5CB0N96200
2 UpperCaseASML80XMIGFRA/ARAKBNFP 5CB0N96292
2 UpperCaseASML80XMIGUKRKBNFP 5CB0N96242
2 UpperCaseASML80XMPGUSKBKBNFP 5CB0N96215
2 UpperCaseASML80XMPGUKEKBNFP 5CB0N96316
2 UpperCaseASML80XMPGITAKBNFP 5CB0N96314
2 UpperCaseASML80XMPGSPAKBNFP 5CB0N96275
2 UpperCaseASML80XMPGTURKBNFP 5CB0N96221
2 UpperCaseASML80XMPGTHAIKBNFP 5CB0N96224
2 UpperCaseASML80XMPGPORKBNFP 5CB0N96223
2 UpperCaseASML80XMPGLASPAKBNFP 5CB0N96256
2 UpperCaseASML80XMPGFRA/ENGKBNFP 5CB0N96218
2 UpperCaseASML80XMPGKORKBNFP 5CB0N96203
2 UpperCaseASML80XMPGTCKBNFP 5CB0N96209
2 UpperCaseASML80XMPGRUSKBNFP 5CB0N96244
2 UpperCaseASML80XMPGFRAKBNFP 5CB0N96260
2 UpperCaseASML80XMPGGERKBNFP 5CB0N96307

67
Lenovo ideapad 320-17IKB/ideapad 320H-17IKB/ideapad 320L-17IKB/
ideapad 320R-17IKB/ideapad 320E-17IKB/ideapad 320-17ISK/ideapad
320H-17ISK/ideapad 320L-17ISK/ideapad 320R-17ISK/ideapad 320E-17ISK
Table 4. Parts list—Overall (continued)
No. FRU FRU no. CRU
ID.
2 UpperCaseASML80XMPGARAKBNFP 5CB0N96298
N
2 UpperCaseASML80XMPGBRLKBNFP 5CB0N96222
2 UpperCaseASML80XMPGDUTCHKBNFP 5CB0N96254
2 UpperCaseASML80XMPGGREKBNFP 5CB0N96287
2 UpperCaseASML80XMPGHBWKBNFP 5CB0N96232
2 UpperCaseASML80XMPGHUNKBNFP 5CB0N96252
2 UpperCaseASML80XMPGNORDICKBNFP 5CB0N96216
2 UpperCaseASML80XMPGBELKBNFP 5CB0N96308
2 UpperCaseASML80XMPGILDKBNFP 5CB0N96267
2 UpperCaseASML80XMPGSLVKBNFP 5CB0N96284
2 UpperCaseASML80XMPGSWSKBNFP 5CB0N96212
2 UpperCaseASML80XMPGEUROENGKBNFP 5CB0N96313
2 UpperCaseASML80XMPGCZE/SLKKBNFP 5CB0N96309
2 UpperCaseASML80XMPGBULKBNFP 5CB0N96236
2 UpperCaseASML80XMPGHINKBNFP 5CB0N96239
2 UpperCaseASML80XMPGFRA/ARAKBNFP 5CB0N96250
2 UpperCaseASML80XMPGUKRKBNFP 5CB0N96237
2 UpperCaseASML80XMIGUSKBKBFP 5CB0N96238
2 UpperCaseASML80XMIGUKEKBFP 5CB0N96277
2 UpperCaseASML80XMIGITAKBFP 5CB0N96233
2 UpperCaseASML80XMIGSPAKBFP 5CB0N96261
2 UpperCaseASML80XMIGTURKBFP 5CB0N96234
2 UpperCaseASML80XMIGTHAIKBFP 5CB0N96240
2 UpperCaseASML80XMIGPORKBFP 5CB0N96299
2 UpperCaseASML80XMIGLASPAKBFP 5CB0N96219
2 UpperCaseASML80XMIGFRA/ENGKBFP 5CB0N96211
2 UpperCaseASML80XMIGKORKBFP 5CB0N96291
2 UpperCaseASML80XMIGTCKBFP 5CB0N96248
2 UpperCaseASML80XMIGRUSKBFP 5CB0N96263
2 UpperCaseASML80XMIGFRAKBFP 5CB0N96285
2 UpperCaseASML80XMIGGERKBFP 5CB0N96227
2 UpperCaseASML80XMIGARAKBFP 5CB0N96269
2 UpperCaseASML80XMIGBRLKBFP 5CB0N96253
2 UpperCaseASML80XMIGDUTCHKBFP 5CB0N96302
2 UpperCaseASML80XMIGGREKBFP 5CB0N96319
2 UpperCaseASML80XMIGHBWKBFP 5CB0N96281
2 UpperCaseASML80XMIGHUNKBFP 5CB0N96270
2 UpperCaseASML80XMIGNORDICKBFP 5CB0N96271
2 UpperCaseASML80XMIGBELKBFP 5CB0N96311
2 UpperCaseASML80XMIGILDKBFP 5CB0N96255
2 UpperCaseASML80XMIGSLVKBFP 5CB0N96201
2 UpperCaseASML80XMIGSWSKBFP 5CB0N96262
2 UpperCaseASML80XMIGEUROENGKBFP 5CB0N96280
2 UpperCaseASML80XMIGCZE/SLKKBFP 5CB0N96204
2 UpperCaseASML80XMIGBULKBFP 5CB0N96304
2 UpperCaseASML80XMIGHINKBFP 5CB0N96294
2 UpperCaseASML80XMIGFRA/ARAKBFP 5CB0N96206

68
ideapad 320-17IKB/ideapad 320H-17IKB/ideapad 320L-17IKB/ideapad 320R-17IKB/
ideapad 320E-17IKB/ideapad 320-17ISK/ideapad 320H-17ISK/ideapad 320L-17ISK/
ideapad 320R-17ISK/ideapad 320E-17ISK Hardware Maintenance Manual
No. FRU FRU no. CRU
ID.
2 UpperCaseASML80XMIGUKRKBFP 5CB0N96278
N
2 UpperCaseASML80XMPGUSKBKBFP 5CB0N96266
2 UpperCaseASML80XMPGUKEKBFP 5CB0N96283
2 UpperCaseASML80XMPGITAKBFP 5CB0N96258
2 UpperCaseASML80XMPGSPAKBFP 5CB0N96251
2 UpperCaseASML80XMPGTURKBFP 5CB0N96315
2 UpperCaseASML80XMPGTHAIKBFP 5CB0N96259
2 UpperCaseASML80XMPGPORKBFP 5CB0N96235
2 UpperCaseASML80XMPGLASPAKBFP 5CB0N96230
2 UpperCaseASML80XMPGFRA/ENGKBFP 5CB0N96297
2 UpperCaseASML80XMPGKORKBFP 5CB0N96249
2 UpperCaseASML80XMPGTCKBFP 5CB0N96288
2 UpperCaseASML80XMPGRUSKBFP 5CB0N96279
2 UpperCaseASML80XMPGFRAKBFP 5CB0N96290
2 UpperCaseASML80XMPGGERKBFP 5CB0N96257
2 UpperCaseASML80XMPGARAKBFP 5CB0N96246
2 UpperCaseASML80XMPGBRLKBFP 5CB0N96273
2 UpperCaseASML80XMPGDUTCHKBFP 5CB0N96241
2 UpperCaseASML80XMPGGREKBFP 5CB0N96229
2 UpperCaseASML80XMPGHBWKBFP 5CB0N96303
2 UpperCaseASML80XMPGHUNKBFP 5CB0N96213
2 UpperCaseASML80XMPGNORDICKBFP 5CB0N96295
2 UpperCaseASML80XMPGBELKBFP 5CB0N96301
2 UpperCaseASML80XMPGILDKBFP 5CB0N96225
2 UpperCaseASML80XMPGSLVKBFP 5CB0N96300
2 UpperCaseASML80XMPGSWSKBFP 5CB0N96214
2 UpperCaseASML80XMPGEUROENGKBFP 5CB0N96306
2 UpperCaseASML80XMPGCZE/SLKKBFP 5CB0N96282
2 UpperCaseASML80XMPGBULKBFP 5CB0N96305
2 UpperCaseASML80XMPGHINKBFP 5CB0N96265
2 UpperCaseASML80XMPGFRA/ARAKBFP 5CB0N96312
2 UpperCaseASML80XMPGUKRKBFP 5CB0N96217
3 MBL80XM4415UUMANFPWIN 5B20N95886
3 MBL80XM4415UUMANFPNOK 5B20N95928
3 MBL80XM4415UUMA4GNFPWIN 5B20N95885
3 MBL80XM4415UUMA4GNFPNOK 5B20N95908
3 MBL80XM4415UGMR1_2GNFPWIN 5B20N95907
3 MBL80XM4415UGMR1_2GNFPNOK 5B20N95878
3 MBL80XM4415UGMR1_2G4GNFPWIN 5B20N95976
3 MBL80XM4415UGMR1_2G4GNFPNOK 5B20N95880
3 MBL80XMI37100UHGTR_4G4GNFPWIN 5B20N95982
3 MBL80XMI37100UHGTR_4G4GNFPNOK 5B20N95910
3 MBL80XMI37100UHGTR_4GNFPWIN 5B20N95957
3 MBL80XMI37100UHGTR_4GNFPNOK 5B20N95980
3 MBL80XMI37100UHGTR_4G4GFPWIN 5B20N95937
3 MBL80XMI37100UHGTR_4G4GFPNOK 5B20N95962
3 MBL80XMI37100UHGTR_4GFPWIN 5B20N95949
Table 4. Parts list—Overall (continued)

69
Lenovo ideapad 320-17IKB/ideapad 320H-17IKB/ideapad 320L-17IKB/
ideapad 320R-17IKB/ideapad 320E-17IKB/ideapad 320-17ISK/ideapad
320H-17ISK/ideapad 320L-17ISK/ideapad 320R-17ISK/ideapad 320E-17ISK
Table 4. Parts list—Overall (continued)
No. FRU FRU no. CRU
ID.
3 MBL80XMI37100UHGTR_4GFPNOK 5B20N95913
N
3 MBL80XL242I77500UHV2GVGMR1WIN 5B20N86436
3 MBL80XL242I77500UHV2GVGMR1NOK 5B20N86377
3 MBL80XL242I57200UHV2GGMR1WIN 5B20N86359
3 MBL80XL242I57200UHV2GGMR1NOK 5B20N86470
3 MBL80XL242I57200UHV2GD4GSGTRWIN 5B20N86299
3 MBL80XL242I57200UHV2GD4GSGTRNOK 5B20N86562
3 MBL80XL242I37100UHV2GVGMR1WIN 5B20N86601
3 MBL80XL242I37100UHV2GVGMR1NOK 5B20N86577
3 MBL80XL242I57200UHV4GD4GSGTRWIN 5B20N86450
3 MBL80XL242I57200UHV4GD4GSGTRNOK 5B20N86422
3 MBL80XL242I57200UHV4GSGTRWIN 5B20N86444
3 MBL80XL242I57200UHV4GSGTRNOK 5B20N86628
3 MBL80XL242I77500UHV4GSGTRWIN 5B20N86286
3 MBL80XL242I77500UHV4GSGTRNOK 5B20N86426
3 MBL80XL242I37100UHV2GD4GSGTRWIN 5B20N86370
3 MBL80XL242I37100UHV2GD4GSGTRNOK 5B20N86431
3 MBL80XL242I57200UHV2GSGTRWIN 5B20N86461
3 MBL80XL242I57200UHV2GSGTRNOK 5B20N86314
3 MBL80XL242I57200UHV2GD4GGMR1WIN 5B20N86298
3 MBL80XL242I57200UHV2GD4GGMR1NOK 5B20N86496
3 MBL80XL242I77500UHV2GSGTRWIN 5B20N86427
3 MBL80XL242I77500UHV2GSGTRNOK 5B20N86479
3 MBL80XL242I77500UHV2GD4GSGTRWIN 5B20N86580
3 MBL80XL242I77500UHV2GD4GSGTRNOK 5B20N86339
3 MBL80XL242I77500UHV4GD4GSGTRWIN 5B20N86397
3 MBL80XL242I77500UHV4GD4GSGTRNOK 5B20N86515
3 MBL80XL242I37100UHV2GSGTRWIN 5B20N86473
3 MBL80XL242I37100UHV2GSGTRNOK 5B20N86627
3 MBL80XL242I77500UHV2GD4GGMR1WIN 5B20N86276
3 MBL80XL242I77500UHV2GD4GGMR1NOK 5B20N86602
3 MBL80XL242I37100UHV2GD4GGMR1WIN 5B20N86485
3 MBL80XL242I37100UHV2GD4GGMR1NOK 5B20N86618
3 MBL80XL241I77500UHUMAD4GWIN 5B20N86623
3 MBL80XL241I77500UHUMAD4GNOK 5B20N86510
3 MBL80XL241I37100UHUMAD4GWIN 5B20N86544
3 MBL80XL241I37100UHUMAD4GNOK 5B20N86489
3 MBL80XL241I37100UHUMAWIN 5B20N86471
3 MBL80XL241I37100UHUMANOK 5B20N86494
3 MBL80XL241I77500UHUMAWIN 5B20N86486
3 MBL80XL241I77500UHUMANOK 5B20N86624
3 MBL80XL241I57200UHUMAWIN 5B20N86334
3 MBL80XL241I57200UHUMANOK 5B20N86433
3 MBL80XL241I57200UHUMAD4GWIN 5B20N86620
3 MBL80XL241I57200UHUMAD4GNOK 5B20N86591
3 MBL80XL242I57200UHV2GGMR1FPWIN 5B20N86360
3 MBL80XL242I57200UHV2GGMR1FPNOK 5B20N86531

70
ideapad 320-17IKB/ideapad 320H-17IKB/ideapad 320L-17IKB/ideapad 320R-17IKB/
ideapad 320E-17IKB/ideapad 320-17ISK/ideapad 320H-17ISK/ideapad 320L-17ISK/
ideapad 320R-17ISK/ideapad 320E-17ISK Hardware Maintenance Manual
Table 4. Parts list—Overall (continued)
No. FRU FRU no. CRU
ID.
3 MBL80XL242I57200UH2G4GSGTRFPWIN 5B20N86526
N
3 MBL80XL242I57200UH2G4GSGTRFPNOK 5B20N86503
3 MBL80XL242I77500UHV2GGMR1FPWIN 5B20N86424
3 MBL80XL242I77500UHV2GGMR1FPNOK 5B20N86463
3 MBL80XL242I37100UH2G4GSGTRFPWIN 5B20N86478
3 MBL80XL242I37100UH2G4GSGTRFPNOK 5B20N86443
3 MBL80XL242I57200UHV4GSGTRFPWIN 5B20N86437
3 MBL80XL242I57200UHV4GSGTRFPNOK 5B20N86597
3 MBL80XL242I37100UH2GSGTRFPWIN 5B20N86593
3 MBL80XL242I37100UH2GSGTRFPNOK 5B20N86369
3 MBL80XL242I77500UH2G4GGMR1FPWIN 5B20N86372
3 MBL80XL242I77500UH2G4GGMR1FPNOK 5B20N86362
3 MBL80XL242I57200UH4G4GSGTRFPWIN 5B20N86523
3 MBL80XL242I57200UH4G4GSGTRFPNOK 5B20N86518
3 MBL80XL242I77500UH2G4GSGTRFPWIN 5B20N86293
3 MBL80XL242I77500UH2G4GSGTRFPNOK 5B20N86394
3 MBL80XL242I77500UH4G4GFPSGTRWIN 5B20N86402
3 MBL80XL242I77500UH4G4GFPSGTRNOK 5B20N86568
3 MBL80XL242I37100UH2G4GGMR1FPWIN 5B20N86603
3 MBL80XL242I37100UH2G4GGMR1FPNOK 5B20N86549
3 MBL80XL242I77500UHV2GSGTRFPWIN 5B20N86350
3 MBL80XL242I77500UHV2GSGTRFPNOK 5B20N86583
3 MBL80XL242I77500UHV4GSGTRFPWIN 5B20N86325
3 MBL80XL242I77500UHV4GSGTRFPNOK 5B20N86366
3 MBL80XL242I57200UH2G4GGMR1FPWIN 5B20N86560
3 MBL80XL242I57200UH2G4GGMR1FPNOK 5B20N86617
3 MBL80XL242I57200UHV2GSGTRFPWIN 5B20N86632
3 MBL80XL242I57200UHV2GSGTRFPNOK 5B20N86614
3 MBL80XL242I37100UH2GGMR1FPWIN 5B20N86598
3 MBL80XL242I37100UH2GGMR1FPNOK 5B20N86264
3 MBL80XL241I77500UHUMAFPD4GWIN 5B20N86271
3 MBL80XL241I77500UHUMAFPD4GNOK 5B20N86272
3 MBL80XL241I37100UHUMAFPWIN 5B20N86507
3 MBL80XL241I37100UHUMAFPNOK 5B20N86498
3 MBL80XL241I57200UHUMAFPWIN 5B20N86414
3 MBL80XL241I57200UHUMAFPNOK 5B20N86442
3 MBL80XL241I57200UHUMAFPD4GWIN 5B20N86347
3 MBL80XL241I57200UHUMAFPD4GNOK 5B20N86418
3 MBL80XL241I37100UHUMAFPD4GWIN 5B20N86607
3 MBL80XL241I37100UHUMAFPD4GNOK 5B20N86263
3 MBL80XL241I77500UHUMAFPWIN 5B20N86516
3 MBL80XL241I77500UHUMAFPNOK 5B20N86434
4 THERMALMODULEDISL80XK 5H40N82364
4 THERMALMODULEUMAL80XK 5H40N82349
5 OnBoardDDR4Memory8Gb*16,K4A8G165WB-BCRC SM30L08874
5 OnBoardDDR4Memory8Gb*16,H5AN8G6NAFR-UHC SM30L08875
5 OnBoardDDR4Memory8Gb*16,MT40A512M16JY-083E:B SM30L08877

71
Lenovo ideapad 320-17IKB/ideapad 320H-17IKB/ideapad 320L-17IKB/
ideapad 320R-17IKB/ideapad 320E-17IKB/ideapad 320-17ISK/ideapad
320H-17ISK/ideapad 320L-17ISK/ideapad 320R-17ISK/ideapad 320E-17ISK
Table 4. Parts list—Overall (continued)
No. FRU FRU no. CRU
ID.
5 2GBDDR42400SoDIMM,M471A5644EB0-CRC SM30G16500
N
5 2GBDDR42400SoDIMM,HMA425S6AFR6N-UH SM30G16501
5 2GBDDR42400SoDIMM,MTA4ATF25664HZ-2G3B1 SM30G16502
5 2GBDDR42400SoDIMM,RMSA3270MB76H8F-2400 SM30G16503
5 4GBDDR42400SoDIMM,M471A5244CB0-CRC SM30M49902
5 4GBDDR42400SoDIMM,HMA851S6AFR6N-UH SM30G16505
5 4GBDDR42400SoDIMM,MTA4ATF51264HZ-2G3B1 SM30G16506
5 4GBDDR42400SoDIMM,RMSA3270MB86H9F-2400 SM30G16507
5 8GBDDR42400SoDIMM,M471A1K43CB1-CRC SM30M49901
5 8GBDDR42400SoDIMM,HMA81GS6AFR8N-UH SM30G16509
5 8GBDDR42400SoDIMM,MTA8ATF1G64HZ-2G3B1 SM30G16510
5 8GBDDR42400SoDIMM,RMSA3260MB78HAF-2400 SM30G16511
5 16GBDDR42400SoDIMM,M471A2K43CB1-CRC SM30M49903
5 16GBDDR42400SoDIMM,HMA82GS6AFR8N-UH SM30G16513
5 16GBDDR42400SoDIMM,MTA16ATF2G64H-2G3B1 SM30G16514
6FANDC5VL80XK 5F10N82225
7 Intel31651x1AC+BTPCIEM.2WLAN SW10H24486
7 CbtRTL8821AE1x1AC+BTPCIEM.2WLAN SW10A11648
7 LtnNFA435A1x1AC+BTPCIEM.2WLAN SW10K97461
8 RTCBatteryL80WK 5B10N00276
9Polymer30WNormal(15wh*2cell),320SP/AL16M2PB17.5V30Wh2cell
bty
5B10M86148
9Polymer30WNormal(15wh*2cell),320CP/CL16C2PB27.6V30Wh2cell
bty
5B10M88058
9 Polymer30WNormal(15wh*2cell),320LGL16L2PB27.4V30Wh2cell
bty
5B10M91442
9 Polymer35wNormal(17.5wh*2Cell),320SP/AL16M2PB2
7.5V35Wh2cellbty
5B10M86149
9 Polymer35wNormal(17.5wh*2Cell),320CP/CL16C2PB1
7.6V35Wh2cellbty
5B10M88059
9Polymer35wNormal(17.5wh*2Cell),320SYL16S2PB17.6V35Wh2cell
bty
5B10M90490
9Polymer35wNormal(17.5wh*2Cell),320LGL16L2PB37.6V35Wh2cell
bty
5B10M91443
10 LowerCaseL80XMCOOLGREYTEXTURE 5CB0N91538
11 DUMMYODDfor2ndHDDCGL80XK 5M20N82345 *
11 DUMMYODDCGL80XK 5M20N82244 *
11 HLDSGUE0N9.0mmSlimTrayRamboODD 5DX0J46488 *
11 PLDSDA-8AESH9.0mmSlimTrayRamboODD 5DX0L08424 *
12 ODDBOARDL80XMW/FFC 5C50N91545
N
13 HDDBDL80XMFOR2NDHDDW/FFC 5C50N91537
14 HDD(7mm),500G5400rpm7mm,ST500LT0126G7mm5.4K500G
HDD
16200383
14 HDD(7mm),500G5400rpm7mm,MQ01ABF0506G7mm5.4K500G
HDD
5H20L34560
14 HDD(7mm),500G5400rpm7mm,WD5000LPCX-24VHAT07mm
5400rpm500GHDD
5H20J35762

72
ideapad 320-17IKB/ideapad 320H-17IKB/ideapad 320L-17IKB/ideapad 320R-17IKB/
ideapad 320E-17IKB/ideapad 320-17ISK/ideapad 320H-17ISK/ideapad 320L-17ISK/
ideapad 320R-17ISK/ideapad 320E-17ISK Hardware Maintenance Manual
Table 4. Parts list—Overall (continued)
No. FRU FRU no. CRU
ID.
14 HDD(7mm),1TB5400rpm7mm,SeagateST1000LM0351T2.5"7mm
5400rpmHDD
5H20L22184
N
14 HDD(7mm),1TB5400rpm7mm,WD10SPCX-24HWST16G7mm1T
HDD
16200554
14 HDD(7mm),1TB5400rpm7mm,TSBMQ02ABF1006G7mm5.4k
1TBHDD
5H20G09709
14 HDD(7mm),2TB54rpm(7mm),STRosewood2D7mm2TBHDD 5H20M37521
14 2.5''SataSSD,2.5''sata128G,CV3 5SD0L02317
14 2.5''SataSSD,2.5''sata128G,MZYTY128HDHP-000L22.5''128G
5mmSSD
5SD0L14645
14 2.5''SataSSD,2.5''sata128G,SC308-1282.5"5mm128GB6Gb/s
SATAHFS128G3BTND-N210ASSD
5SD0M38535
14 2.5''SataSSD,2.5''sata128G,5mm128GB2.5"SATA6Gb/s
RTNRB128RFM2KWDLSSD
5SD0M61138
14 2.5''SataSSD,2.5''sata256G,CV3 5SD0L02316
14 2.5''SataSSD,2.5''sata256G,PM871A 5SD0K93729
14 2.5''SataSSD,2.5''sata256G,SC308-2562.5"5mm256GB6Gb/s
SATAHFS256G3BTND-N210ASSD
5SD0M38533
14 2.5''SataSSD,2.5''sata256G,5mm256GB2.5"SATA6Gb/s
RTNRB128RFM2KWDLSSD
5SD0M61139
14 2.5''SataSSD,2.5''sata512G,CV3 5SD0L02321
14 2.5''SataSSD,2.5''sata512G,MZYTN512HDJH2.5"5mmT512G
SSD
5SD0L77695
14 2.5''SataSSD,2.5''sata512G,SC308-5122.5"5mm512GB6Gb/s
SATAHFS512G3BTND-N210ASSD
5SD0M38534
— ACadapter(see“ACadapters”onpage75).
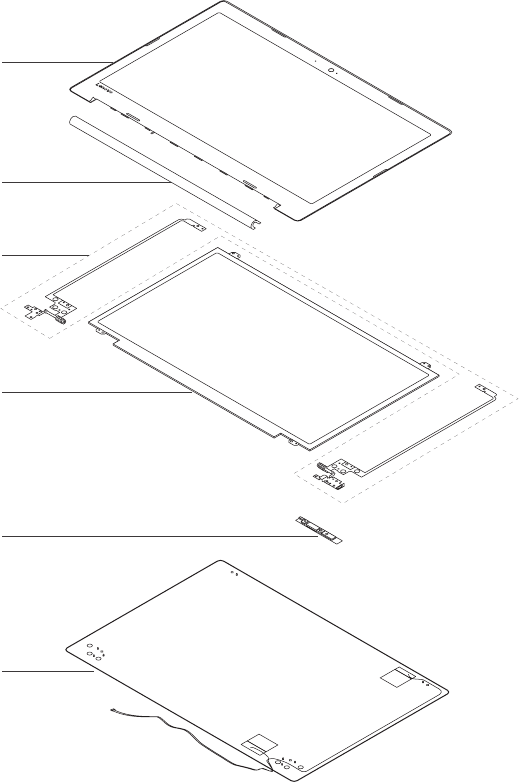
73
Lenovo ideapad 320-17IKB/ideapad 320H-17IKB/ideapad 320L-17IKB/
ideapad 320R-17IKB/ideapad 320E-17IKB/ideapad 320-17ISK/ideapad
320H-17ISK/ideapad 320L-17ISK/ideapad 320R-17ISK/ideapad 320E-17ISK
LCD FRUs
InLenovoideapad320-17IKB/ideapad320H-17IKB/ideapad320L-17IKB/
ideapad320R-17IKB/ideapad320E-17IKB/ideapad320-17ISK/ideapad
320H-17ISK/ideapad320L-17ISK/ideapad320R-17ISK/ideapad320E-17ISK,
thereisfollowingtypeofLCD.
• “17.3-in.HDLED”
1
2
5
4
6
3

74
ideapad 320-17IKB/ideapad 320H-17IKB/ideapad 320L-17IKB/ideapad 320R-17IKB/
ideapad 320E-17IKB/ideapad 320-17ISK/ideapad 320H-17ISK/ideapad 320L-17ISK/
ideapad 320R-17ISK/ideapad 320E-17ISK Hardware Maintenance Manual
Table 5. Parts list—LCD FRUs
No. FRU FRU no. CRU
ID.
1 LCDBEZELL80XM 5B30N91539
N
2 HINGECAPL80XMOB 5CB0N91547
2 HINGECAPL80XMPG 5CB0N91542
3 HINGEL+RL80XM 5H50N91546
4 17‘’Panel,17.3''HD+TNAGFlat(4.0mm),AUB173RTN02.11AHD+T
AGFNB
5D10J46203
4 17‘’Panel,17.3''HD+TNAGFlat(4.0mm),BONT173WDM-N21HD+T
AGFNB
5D10J46202
4 17‘’Panel,17.3''FHDIPSAG,LGLP173WF4-SPF5FHDIAGFNB 5D10M56006
4 17‘’Panel,17.3''FHDIPSAG,AUOB173HAN01.01AFHDAGFNB 5D10H45210
5 Camera,HDW/SingleMIC,BISBNCR1NKSKHDNBcamera SC20M52085
5 Camera,HDW/SingleMIC,CCYCNFGH41HDNBcamera SC20M52089
5 Camera,HDW/SingleMIC,LTN6SF111N2HDNBcamera SC20M52114
5 Camera,HDW/SingleMIC,AVCHAA-8F4A03HDNBcamera SC20M52087
5 Camera,0.3MW/SingleMIC,BISBNCRVTKTL0.3MNBcamera SC20M52088
5 Camera,0.3MW/SingleMIC,CCYCNFG0200.3MNBcamera SC20M52082
5 Camera,0.3MW/SingleMIC,AWAAM-6SF5A020.3MNBcamera SC20M52079
5 Camera,0.3MW/SingleMIC,AVCHAA-93C5010.3MNBcamera SC20M52080
5 CAMERAL80XM0.3MW/MIC 5C20N91541
5 CAMERAL80XM720PW/MIC 5C20N91544
6LCDCoverL80XMOBPTW/ANTEW/EDP 5CB0N91543
6LCDCoverL80XMPGPTW/ANTEW/EDP 5CB0N91540

75
Lenovo ideapad 320-17IKB/ideapad 320H-17IKB/ideapad 320L-17IKB/
ideapad 320R-17IKB/ideapad 320E-17IKB/ideapad 320-17ISK/ideapad
320H-17ISK/ideapad 320L-17ISK/ideapad 320R-17ISK/ideapad 320E-17ISK
Miscellaneous parts
Table 6. Parts list—Miscellaneous parts
FRU FRU no. CRU
ID.
Systemmiscellaneousparts:
N
• (a)ODDBRACKETL80SL 5B40L35764
• (b)ODDBEZELL80XLTEXCG 5B30N86570
• (c)HDDBRACKETL80XK 5B40N82219
Note:Italicized lettersinparenthesesarereferences tothe explodedview in
“Overall”onpage65.
AC adapters
Table 7. Parts list—AC adapters
FRU P/N CRU
ID.
Adapter,45W(New)wallmountwithroundplug(Lowcost45wAdaptor),Delta
ADP-45DWA20V2.25ACOO
SA10M42800
*
Adapter,45W(New)wallmountwithroundplug(Lowcost45wAdaptor),Delta
ADP-45DWJ20V2.25ACOO
SA10M42721
Adapter,45W(New)wallmountwithroundplug(Lowcost45wAdaptor),Delta
ADP-45DWB20V2.25ACOO
SA10M42785
Adapter,45W(New)wallmountwithroundplug(Lowcost45wAdaptor),Delta
ADP-45DWD20V2.25ACOO
SA10M42696
Adapter,45W(New)wallmountwithroundplug(Lowcost45wAdaptor),Delta
ADP-45DWH20V2.25ACOO
SA10M42699
Adapter,45W(New)wallmountwithroundplug(Lowcost45wAdaptor),Delta
ADP-45DWG20V2.25ACOO
SA10M42774
Adapter,45W(New)wallmountwithroundplug(Lowcost45wAdaptor),Delta
ADP-45DWE20V2.25ACOO
SA10M42748
Adapter,45W(New)wallmountwithroundplug(Lowcost45wAdaptor),Delta
ADP-45DWC20V2.25ACOO
SA10M42700
Adapter,45W(New)wallmountwithroundplug(Lowcost45wAdaptor),Delta
ADP-45DWK20V2.25ACOO
SA10M42804
Adapter,45W(New)wallmountwithroundplug(Lowcost45wAdaptor),Liteon
PA-1450-55LN20V2.25ACOO
SA10M42711
Adapter,45W(New)wallmountwithroundplug(Lowcost45wAdaptor),Liteon
PA-1450-55LG20V2.25ACOO
SA10M42709
Adapter,45W(New)wallmountwithroundplug(Lowcost45wAdaptor),Liteon
PA-1450-55LL20V2.25ACOO
SA10M42742
Adapter,45W(New)wallmountwithroundplug(Lowcost45wAdaptor),Liteon
PA-1450-55LK20V2.25ACOO
SA10M42530
Adapter,45W(New)wallmountwithroundplug(Lowcost45wAdaptor),Liteon
PA-1450-55LI20V2.25ACOO
SA10M42734
Adapter,45W(New)wallmountwithroundplug(Lowcost45wAdaptor),Liteon
PA-1450-55LR20V2.25ACOO
SA10M42701

76
ideapad 320-17IKB/ideapad 320H-17IKB/ideapad 320L-17IKB/ideapad 320R-17IKB/
ideapad 320E-17IKB/ideapad 320-17ISK/ideapad 320H-17ISK/ideapad 320L-17ISK/
ideapad 320R-17ISK/ideapad 320E-17ISK Hardware Maintenance Manual
FRU P/N CRU
ID.
Adapter,45W(New)wallmountwithroundplug(Lowcost45wAdaptor),Liteon
PA-1450-55LS20V2.25ACOO
SA10M42736
*
Adapter,45W(New)wallmountwithroundplug(Lowcost45wAdaptor),Liteon
PA-1450-55LU20V2.25ACOO
SA10M42743
Adapter,45W(New)wallmountwithroundplug(Lowcost45wAdaptor),Liteon
PA-1450-55LZ20V2.25ACOO
SA10M42752
Adapter,45W(New)wallmountwithroundplug(Lowcost45wAdaptor),
ChiconyADL45WCA20V2.25ACOO
SA10M42726
Adapter,45W(New)wallmountwithroundplug(Lowcost45wAdaptor),
ChiconyADL45WCB20V2.25ACOO
SA10M42737
Adapter,45W(New)wallmountwithroundplug(Lowcost45wAdaptor),
ChiconyADL45WCC20V2.25ACOO
SA10M42697
Adapter,45W(New)wallmountwithroundplug(Lowcost45wAdaptor),
ChiconyADL45WCD20V2.25ACOO
SA10M42790
Adapter,45W(New)wallmountwithroundplug(Lowcost45wAdaptor),
ChiconyADL45WCK20V2.25ACOO
SA10M42768
Adapter,45W(New)wallmountwithroundplug(Lowcost45wAdaptor),
ChiconyADL45WCE20V2.25ACOO
SA10M42706
Adapter,45W(New)wallmountwithroundplug(Lowcost45wAdaptor),
ChiconyADL45WCF20V2.25ACOO
SA10M42746
Adapter,45W(New)wallmountwithroundplug(Lowcost45wAdaptor),
ChiconyADL45WCG20V2.25ACOO
SA10M42792
Adapter,45W(New)wallmountwithroundplug(Lowcost45wAdaptor),
ChiconyADL45WCH20V2.25ACOO
SA10M42786
Adapter,65W(New)wallmountwithroundplug(Lowcost65WAdaptor),Delta
ADLX65CDGC2A20V3.25ACOO
SA10M42764
Adapter,65W(New)wallmountwithroundplug(Lowcost65WAdaptor),Delta
ADLX65CDGG2A20V3.25ACOO
SA10M42758
Adapter,65W(New)wallmountwithroundplug(Lowcost65WAdaptor),Delta
ADLX65CDGU2A20V3.25ACOO
SA10M42765
Adapter,65W(New)wallmountwithroundplug(Lowcost65WAdaptor),Delta
ADLX65CDGK2A20V3.25ACOO
SA10M42745
Adapter,65W(New)wallmountwithroundplug(Lowcost65WAdaptor),Delta
ADLX65CDGI2A20V3.25ACOO
SA10M42796
Adapter,65W(New)wallmountwithroundplug(Lowcost65WAdaptor),Delta
ADLX65CDGR2A20V3.25ACOO
SA10M42775
Adapter,65W(New)wallmountwithroundplug(Lowcost65WAdaptor),Delta
ADLX65CDGA2A20V3.25ACOO
SA10M42718
Adapter,65W(New)wallmountwithroundplug(Lowcost65WAdaptor),Delta
ADLX65CDGE2A20V3.25ACOO
SA10M42794
Adapter,65W(New)wallmountwithroundplug(Lowcost65WAdaptor),Delta
ADLX65CDGB2A20V3.25ACOO
SA10M42769
Adapter,65W(New)wallmountwithroundplug(Lowcost65WAdaptor),Liteon
ADLX65CLGC2A20V3.25ACOO
SA10M42791
Adapter,65W(New)wallmountwithroundplug(Lowcost65WAdaptor),Liteon
ADLX65CLGG2A20V3.25ACOO
SA10M42714
Adapter,65W(New)wallmountwithroundplug(Lowcost65WAdaptor),Liteon
LiteonADLX65CLGU2A20V3.25ACOO
SA10M42725
Adapter,65W(New)wallmountwithroundplug(Lowcost65WAdaptor),Liteon
ADLX65CLGK2A20V3.25ACOO
SA10M42531
Table 7. Parts list—AC adapters (continued)

77
Lenovo ideapad 320-17IKB/ideapad 320H-17IKB/ideapad 320L-17IKB/
ideapad 320R-17IKB/ideapad 320E-17IKB/ideapad 320-17ISK/ideapad
320H-17ISK/ideapad 320L-17ISK/ideapad 320R-17ISK/ideapad 320E-17ISK
FRU P/N CRU
ID.
Adapter,65W(New)wallmountwithroundplug(Lowcost65WAdaptor),Liteon
ADLX65CLGI2A20V3.25ACOO
SA10M42753
*
Adapter,65W(New)wallmountwithroundplug(Lowcost65WAdaptor),Liteon
ADLX65CLGR2A20V3.25ACOO
SA10M42738
Adapter,65W(New)wallmountwithroundplug(Lowcost65WAdaptor),Liteon
ADLX65CLGA2A20V3.25ACOO
SA10M42793
Adapter,65W(New)wallmountwithroundplug(Lowcost65WAdaptor),Liteon
ADLX65CLGE2A20V3.25ACOO
SA10M42740
Adapter,65W(New)wallmountwithroundplug(Lowcost65WAdaptor),Liteon
ADLX65CLGB2A20V3.25ACOO
SA10M42817
Adapter,65W(New)wallmountwithroundplug(Lowcost65WAdaptor),Chicony
ADLX65CCGC2A20V3.25ACOO
SA10M42805
Adapter,65W(New)wallmountwithroundplug(Lowcost65WAdaptor),Chicony
ADLX65CCGG2A20V3.25ACOO
SA10M42815
Adapter,65W(New)wallmountwithroundplug(Lowcost65WAdaptor),Chicony
ADLX65CCGU2A20V3.25ACOO
SA10M42762
Adapter,65W(New)wallmountwithroundplug(Lowcost65WAdaptor),Chicony
ADLX65CCGK2A20V3.25ACOO
SA10M42735
Adapter,65W(New)wallmountwithroundplug(Lowcost65WAdaptor),Chicony
ADLX65CCGI2A20V3.25ACOO
SA10M42751
Adapter,65W(New)wallmountwithroundplug(Lowcost65WAdaptor),Chicony
ADLX65CCGR2A20V3.25ACOO
SA10M42704
Adapter,65W(New)wallmountwithroundplug(Lowcost65WAdaptor),Chicony
ADLX65CCGA2A20V3.25ACOO
SA10M42766
Adapter,65W(New)wallmountwithroundplug(Lowcost65WAdaptor),Chicony
ADLX65CCGE2A20V3.25ACOO
SA10M42760
Adapter,65W(New)wallmountwithroundplug(Lowcost65WAdaptor),Chicony
ADLX65CCGB2A20V3.25ACOO
SA10M42707
Screws
Table 8. Parts list—screws
FRU P/N CRU
ID.
SCREWL80T6MM2.5D2.5LK8.0DNI 5S10L45749 N
ScrewLY700-15ACZHingebase 5S10K26861 N
ScrewLY700-17ISK1.98D 5S10K37639 N
ScrewL80Q12.0D2.0LK7.0D0.5T 5S10L22121 N
AILZAScrewMM3.0D3.0LK4.9D 90203986 N
ACLU1ScrewD-C/D-KB/ODD-D-MB-KB/FAN 90205118 N
SCREWMM2.5D7.0LKTZKL80QH 5S10K61894 N
Table 7. Parts list—AC adapters (continued)

78
ideapad 320-17IKB/ideapad 320H-17IKB/ideapad 320L-17IKB/ideapad 320R-17IKB/
ideapad 320E-17IKB/ideapad 320-17ISK/ideapad 320H-17ISK/ideapad 320L-17ISK/
ideapad 320R-17ISK/ideapad 320E-17ISK Hardware Maintenance Manual
Notices
Lenovomaynotoffertheproducts,services,orfeaturesdiscussedinthis
documentinallcountries. ConsultyourlocalLenovorepresentativefor
informationontheproductsandservicescurrentlyavailable inyourarea.Any
referencetoaLenovoproduct,program,orserviceisnotintendedtostateor
implythatonlythat Lenovoproduct,program,orservicemaybeused.Any
functionallyequivalent product,program,or servicethatdoes notinfringe
anyLenovo intellectualpropertyrightmaybeusedinstead. However,itisthe
user’sresponsibilitytoevaluateand verifytheoperationofanyotherproduct,
program,orservice.
Lenovomayhavepatentsorpendingpatentapplicationscoveringsubjectmatter
describedinthisdocument.Thefurnishing ofthisdocument doesnotgiveyou
anylicensetothesepatents.
LENOVOGROUPLTD.PROVIDESTHIS PUBLICATION “ASIS”
WITHOUTWARRANTYOFANYKIND,EITHER EXPRESSORIMPLIED,
INCLUDING,BUTNOTLIMITEDTO,THE IMPLIEDWARRANTIESOF NON-
INFRINGEMENT,MERCHANTABILITYORFITNESSFORAPARTICULAR
PURPOSE.Somejurisdictionsdo notallowdisclaimerofexpress orimplied
warrantiesincertaintransactions,therefore,thisstatementmaynotapplytoyou.
Thisinformation couldincludetechnicalinaccuracies ortypographicalerrors.
Changesareperiodicallymadetotheinformation herein;thesechanges
willbeincorporatedinneweditionsofthepublication.Lenovomaymake
improvementsand/or changesinthe product(s)and/orthe program(s)
describedinthispublicationatanytimewithoutnotice.
Theproductsdescribedinthisdocumentarenotintendedforusein
implantationorotherlifesupportapplications wheremalfunctionmayresultin
injuryordeathtopersons.Theinformationcontainedinthisdocumentdoesnot
affectorchange Lenovoproductspecications orwarranties.Nothinginthis
documentshalloperateasanexpressorimpliedlicenseorindemnityunderthe
intellectualpropertyrightsofLenovoorthirdparties.All informationcontained
inthisdocumentwasobtainedinspecicenvironmentsandispresentedasan
illustration.Theresultobtainedinotheroperatingenvironmentsmayvary.
Lenovomayuseor distributeanyoftheinformationyousupplyin anywayit
believesappropriatewithoutincurringanyobligationtoyou.
Anyreferencesinthispublicationto non-LenovoWebsitesareprovidedfor
convenienceonlyanddonotinanymannerserveasanendorsementofthose
Websites.Thematerials atthoseWebsitesarenotpartofthematerials for
thisLenovoproduct,anduseofthoseWebsitesisatyourownrisk.

79
Notices
Anyperformance datacontainedherein wasdeterminedina controlled
environment.Therefore,theresult obtainedinother operatingenvironments
mayvarysignificantly. Somemeasurementsmayhave beenmadeon
development-levelsystemsandthereisnoguaranteethatthesemeasurements
willbethesame ongenerallyavailablesystems.Furthermore,some
measurementsmayhavebeenestimatedthroughextrapolation.Actualresults
mayvary.Users ofthisdocumentshouldverifytheapplicabledatafortheir
specicenvironment.
Trademarks
ThefollowingtermsaretrademarksorregisteredtrademarksofLenovointhe
UnitedStates,othercountries,orboth.
Lenovo
OneKey
MicrosoftandWindowsare trademarksof MicrosoftCorporationintheUnited
States,othercountries,orboth.
Othercompany,products, orservicenames maybetrademarks orservice
marksofothers.
