Lenovo L420 L421 L520 Ug En User Manual (English) Guide Think Pad L420, L421, Laptop (Think Pad) Type 5015
Lenovo-Tp-L520-5016W78-Users-Manual-329155 lenovo-tp-l520-5016w78-users-manual-329155
5016W78 to the manual 3700314d-1693-4678-8959-0934f95f3f0f
2011-01-01
User Manual: Lenovo L420 L421 L520 Ug En (English) User Guide - ThinkPad L420, L421, L520 L520 Laptop (ThinkPad) - Type 5015 5015
Open the PDF directly: View PDF ![]() .
.
Page Count: 225 [warning: Documents this large are best viewed by clicking the View PDF Link!]
- Read this first
- Chapter 1. Product Overview
- Locating computer controls, connectors, features, and indicators
- Locating important product information
- Features
- Specifications
- Operating environment
- ThinkVantage Technologies and software
- Accessing applications in Windows 7
- Access Connections
- Active Protection System
- Fingerprint Software
- Lenovo Solution Center
- Lenovo ThinkVantage Tools
- Lenovo ThinkVantage Toolbox
- Message Center Plus
- Password Manager
- Power Manager
- Product Recovery
- Presentation Director
- Rescue and Recovery
- SimpleTap
- System Update
- ThinkVantage GPS
- ThinkVantage Productivity Center
- Chapter 2. Using your computer
- Chapter 3. You and your computer
- Chapter 4. Security
- Chapter 5. Recovery overview
- Chapter 6. Replacing devices
- Static electricity prevention
- Replacing the battery
- Replacing the memory
- Replacing the hard disk drive
- Replacing the solid state drive
- Installing and replacing the mSATA solid state drive
- Replacing the optical drive
- Replacing the SIM card
- Replacing the palm rest
- Replacing the PCI Express Mini Card for wireless LAN/WiMAX conne
- Installing and replacing the PCI Express Mini Card for wireless
- Replacing the integrated camera
- Chapter 7. Enhancing your computer
- Chapter 8. Advanced configuration
- Chapter 9. Preventing problems
- Chapter 10. Troubleshooting computer problems
- Diagnosing problems
- Troubleshooting
- Computer stops responding
- Spills on the keyboard
- Error messages and beep errors
- Errors without messages
- Memory problems
- Networking
- Keyboard and other pointing devices
- Display and multimedia devices
- Fingerprint reader problems
- Battery and power
- Drives and other storage devices
- Software problems
- Ports and connectors
- Chapter 11. Getting support
- Appendix A. Regulatory information
- Wireless related information
- Export classification notice
- Electronic emission notices
- Federal Communications Commission Declaration of Conformity
- Industry Canada Class B emission compliance statement
- European Union - Compliance to the Electromagnetic Compatibility
- German Class B compliance statement
- Korea Class B compliance statement
- Japan VCCI Class B compliance statement
- Japan compliance statement for products which connect to the pow
- Lenovo product service information for Taiwan
- Additional regulatory information
- Appendix B. WEEE and recycling statements
- Appendix C. Notices
- Appendix D. Restriction of Hazardous Substances Directive (RoHS)

UserGuide
ThinkPadL420,L421,andL520

Notes:Beforeusingthisinformationandtheproductitsupports,besuretoreadthefollowing:
•SafetyandWarrantyGuide
•ThinkPadRegulatoryNotice
•“Importantsafetyinformation”onpagevi
•AppendixC“Notices”onpage201
TheSafetyandWarrantyGuideandtheRegulatoryNoticehavebeenuploadedontheWebsite.Toreferto
them,gotohttp://www.lenovo.com/support,andthenclickUserGuides&Manuals.
ThirdEdition(May2012)
©CopyrightLenovo2012.
LIMITEDANDRESTRICTEDRIGHTSNOTICE:IfdataorsoftwareisdeliveredpursuantaGeneralServicesAdministration
“GSA”contract,use,reproduction,ordisclosureissubjecttorestrictionssetforthinContractNo.GS-35F-05925.

Contents
Readthisrst..............v
Importantsafetyinformation..........vi
Conditionsthatrequireimmediateaction..vii
Safetyguidelines............vii
Chapter1.ProductOverview......1
Locatingcomputercontrols,connectors,features,
andindicators................1
Frontview................2
Right-sideview..............4
Left-sideview..............5
Bottomview...............7
Rearview................8
Statusindicators.............9
Locatingimportantproductinformation.....11
Machinetypeandmodellabel.......11
FCCIDandICCerticationnumberlabel..11
CerticateofAuthenticitylabel......13
Features.................13
Specications...............14
Operatingenvironment...........15
ThinkVantageTechnologiesandsoftware....16
AccessingapplicationsinWindows7....16
AccessConnections..........17
ActiveProtectionSystem.........18
FingerprintSoftware...........18
LenovoSolutionCenter.........18
LenovoThinkVantageTools........18
LenovoThinkVantageToolbox.......19
MessageCenterPlus..........19
PasswordManager...........19
PowerManager............19
ProductRecovery...........19
PresentationDirector..........20
RescueandRecovery..........20
SimpleTap..............20
SystemUpdate............20
ThinkVantageGPS...........20
ThinkVantageProductivityCenter.....21
Chapter2.Usingyourcomputer...23
Registeryourcomputer...........23
Frequentlyaskedquestions.........23
Specialkeysandbuttons..........25
ThinkVantagebutton..........25
Numerickeypad............25
Functionkeycombinations........27
Volumeandmutebuttons........30
WindowskeyandApplicationkey.....31
UsingtheUltraNavpointingdevice.......32
UsingtheTrackPointpointingdevice....33
Usingthetouchpad...........34
BehavioroftheUltraNavandanexternal
mouse................35
AddingtheUltraNavicontothesystemtray.35
Powermanagement............36
Checkingbatterystatus.........36
Usingtheacpoweradapter........36
Chargingthebattery..........37
Maximizingbatterylife..........37
Managingyourbatterypower.......37
Power-savingmodes..........37
Handlingthebattery...........39
Connectingtothenetwork..........40
Ethernetconnections..........40
Wirelessconnections..........40
Usingaprojectororexternaldisplay......48
Changingdisplaysettings........48
Connectingaprojectororexternaldisplay..49
Settingupapresentation.........53
Usingdualdisplays...........54
Usingacolorprole............55
Usingaudiofeatures............56
Usinganintegratedcamera.........56
Usingopticaldrive.............57
Usingthemediacardreader.........57
InsertinganExpressCard,aSmartcard,ora
FlashMediaCard............58
RemovinganExpressCard,aSmartcard,ora
FlashMediaCard............59
Chapter3.Youandyourcomputer..61
Accessibilityandcomfort..........61
Ergonomicinformation..........61
Adjustingyourcomputertotyou.....62
Accessibilityinformation.........63
FullScreenMagnierfunction.......63
Travelingwithyourcomputer.........64
Traveltips...............64
Travelaccessories...........64
Chapter4.Security..........67
Attachingamechanicallock.........67
Usingpasswords..............67
©CopyrightLenovo2012i

Passwordsandsleep(standby)mode....68
UsingPassphrase...........68
Power-onpassword...........70
Harddiskpasswords..........71
Supervisorpassword..........73
Harddisksecurity.............75
Settingthesecuritychip...........75
Usingangerprintreader..........76
Noticeondeletingdatafromyourharddiskdrive
orsolidstatedrive.............78
Usingandunderstandingrewalls.......79
Protectingdataagainstviruses........79
Chapter5.Recoveryoverview....81
Creatingandusingrecoverymedia......81
Creatingrecoverymedia.........82
Usingrecoverymedia..........82
Performingbackupandrecoveryoperations...83
Performingabackupoperation......83
Performingarecoveryoperation......83
UsingtheRescueandRecoveryworkspace...84
Creatingandusingarescuemedium......85
Creatingarescuemedium........85
Usingarescuemedium.........86
Reinstallingpreinstalledapplicationsanddevice
drivers..................86
Solvingrecoveryproblems..........87
Chapter6.Replacingdevices.....89
Staticelectricityprevention..........89
Replacingthebattery............89
Replacingthememory...........91
Replacingtheharddiskdrive.........93
Replacingthesolidstatedrive........97
InstallingandreplacingthemSATAsolidstate
drive...................101
Replacingtheopticaldrive..........103
ReplacingtheSIMcard...........104
Replacingthepalmrest...........106
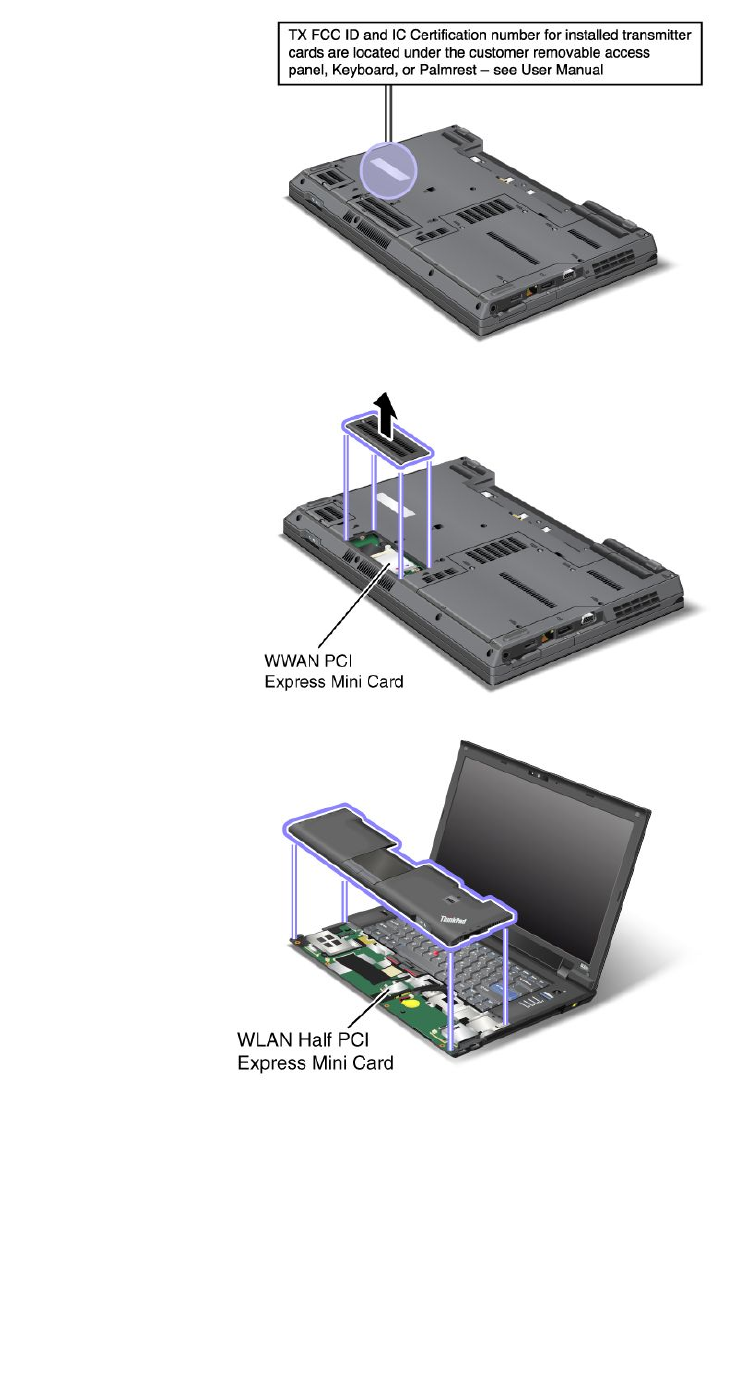
ReplacingthePCIExpressMiniCardforwireless
LAN/WiMAXconnection...........110
InstallingandreplacingthePCIExpressMiniCard
forwirelessWANconnection.........111
Replacingtheintegratedcamera.......114
Chapter7.Enhancingyour
computer..............119
FindingThinkPadoptions..........119
ThinkPadportreplicatoranddockingstation...119
Frontview...............120
Rearview...............122
AttachingaThinkPadportreplicatoror
dockingstation.............125
DetachingaThinkPadportreplicatoror
dockingstation.............127
Securityfeature............128
Usingthesystemlockkey........129
Chapter8.Advanced
conguration............131
Installinganewoperatingsystem.......131
Beforeyoubegin............131
InstallingWindows7..........132
InstallingWindowsVista.........132
InstallingWindowsXP..........133
Installingdevicedrivers...........135
Installingdriverforthe4-in-1Mediacard
reader................135
InstallingThinkPadMonitorFileforWindows
2000/XP/Vista/7............136
InstallingIntelChipsetSupportforWindows
2000/XP/Vista/7............137
Installingotherdevicedrivers.......137
BIOSSetupUtility.............138
Congmenu..............139
Dateandtimemenu...........139
Securitymenu.............139
Startupmenu.............140
Restartmenu.............142
BIOSSetupUtilityitems.........143
UpdatingyoursystemBIOS.......148
Usingsystemmanagement..........149
Systemmanagement..........149
Settingmanagementfeatures.......150
Chapter9.Preventingproblems..151
Generaltipsforpreventingproblems......151
Makingsuredevicedriversarecurrent.....152
GettingthelatestdriversfromtheWebsite..152
GettingthelatestdriversusingThinkVantage
SystemUpdate............152
Takingcareofyourcomputer.........153
Cleaningthecoverofyourcomputer....154
Chapter10.Troubleshooting
computerproblems.........157
Diagnosingproblems............157
UsingtheLenovoSolutionCenterprogram..157
UsingLenovoThinkVantageToolbox....157
UsingtheLenovoSupportWebsite....158
Troubleshooting..............158
Computerstopsresponding.......158
Spillsonthekeyboard..........159
iiUserGuide

Errormessagesandbeeperrors......159
Errorswithoutmessages.........161
Memoryproblems...........162
Networking..............163
Keyboardandotherpointingdevices....167
Displayandmultimediadevices......168
Fingerprintreaderproblems........178
Batteryandpower...........178
Drivesandotherstoragedevices.....182
Softwareproblems...........184
Portsandconnectors..........184
Chapter11.Gettingsupport....187
BeforeyoucontactLenovo..........187
Registeryourcomputer.........187
Downloadsystemupdates........187
Recordinformation...........187
Gettinghelpandservice...........188
Usingdiagnosticprograms........188
LenovoSupportWebsite.........188
CallingLenovo.............188
Purchasingadditionalservices........189
AppendixA.Regulatory
information.............191
Wirelessrelatedinformation.........191
LocationoftheUltraConnectwireless
antennas...............192
Locatingwirelessregulatorynotices....193
Exportclassicationnotice..........193
Electronicemissionnotices..........193
FederalCommunicationsCommission
DeclarationofConformity........193
IndustryCanadaClassBemissioncompliance
statement...............194
EuropeanUnion-Compliancetothe
ElectromagneticCompatibilityDirective...194
GermanClassBcompliancestatement...194
KoreaClassBcompliancestatement....195
JapanVCCIClassBcompliancestatement..195
Japancompliancestatementforproducts
whichconnecttothepowermainswith
ratedcurrentlessthanorequalto20Aper
phase................195
Lenovoproductserviceinformationfor
Taiwan................195
Additionalregulatoryinformation.......195
AppendixB.WEEEandrecycling
statements.............197
ImportantWEEEInformation.........197
Japanrecyclingstatements.........197
RecyclinginformationforBrazil........198
BatteryrecyclinginformationfortheUnitedStates
andCanada................198
BatteryrecyclinginformationfortheEuropean
Union..................199
BatteryrecyclinginformationforTaiwan.....199
AppendixC.Notices.........201
Trademarks................202
AppendixD.RestrictionofHazardous
SubstancesDirective(RoHS)....203
ChinaRoHS................203
TurkishRoHS...............203
UkraineRoHS...............203
IndiaRoHS................204
©CopyrightLenovo2012iii

ivUserGuide
Readthisrst
Besuretofollowtheimportanttipsgivenheretocontinuetogetthemostuseandenjoymentoutofyour
computer.Failuretodosomightleadtodiscomfortorinjury,orcauseyourcomputertofail.
Whenyourcomputeristurnedonorthebatteryischarging,thebase,thepalm
rest,andsomeotherpartsmaybecomehot.Thetemperaturetheyreach
dependsontheamountofsystemactivityandthelevelofchargeinthebattery.
Extendedcontactwithyourbody,eventhroughclothing,couldcause
discomfortorevenaskinburn.
•Avoidkeepingyourhands,yourlap,oranyotherpartofyourbodyin
contactwithahotsectionofthecomputerforanyextendedtime.
•Periodicallytakehandsfromusingthekeyboardbyliftingyourhandsfrom
thepalmrest.
Protectyourselffromtheheatgeneratedbytheacpoweradapter.
Whentheacpoweradapterisconnectedtoanelectricaloutletandyour
computer,itgeneratesheat.
Extendedcontactwithyourbody,eventhroughclothing,maycauseaskin
burn.
•Toavoidspillsandthedangerofelectricalshock,keepliquidsawayfrom
yourcomputer.
•Neveruseittowarmyourbody.
Preventyourcomputerfromgettingwet.
•Toavoidspillsandthedangerofelectricalshock,keepliquidsawayfrom
yourcomputer.
Protectthecablesfrombeingdamaged.
Applyingstrongforcetocablesmaydamageorbreakthem.
•Routecommunicationlines,orthecablesofanacpoweradapter,amouse,a
keyboard,aprinter,oranyotherelectronicdevice,sothattheycannotbe
walkedon,trippedover,pinchedbyyourcomputerorotherobjects,orin
anywaysubjectedtotreatmentthatcouldinterferewiththeoperationof
yourcomputer.
©CopyrightLenovo2012v
Protectyourcomputeranddatawhenmovingit.
Beforemovingacomputerequippedwithaharddiskdrive,dooneofthe
following,andmakesurethatthe“powerswitch”onpage9isofforisblinking:
•Turnitoff.
•PressFn+F4toputitinsleep(standby)mode
•PressFn+F12toputitinhibernationmode.
Thiswillhelptopreventdamagetothecomputer,andpossiblelossofdata.
Handleyourcomputergently.
•Donotdrop,bump,scratch,twist,hit,vibrate,push,orplaceheavyobjectson
yourcomputer,display,orexternaldevices.
Carryyourcomputercarefully.
•Useaqualitycarryingcasethatprovidesadequatecushioningandprotection.
•Donotpackyourcomputerinatightlypackedsuitcaseorbag.
•Beforeputtingyourcomputerinacarryingcase,makesurethatitisoff,insleep
(standby)mode(Fn+F4),orinhibernationmode(Fn+F12).Donotputacomputer
inacarryingcasewhileitisturnedon.
Importantsafetyinformation
Note:Readtheimportantsafetyinformationrst.
Thisinformationcanhelpyousafelyuseyournotebookpersonalcomputer.Followandretainallinformation
includedwithyourcomputer.Theinformationinthisdocumentdoesnotalterthetermsofyourpurchase
agreementortheLenovo®LimitedWarranty.Formoreinformation,seetheSafetyandWarrantyGuide
camewithyourcomputer.ThelatestSafetyandWarrantyGuidehasbeenuploadedontheWebsite
http://www.lenovo.com/support.
Customersafetyisimportant.Ourproductsaredevelopedtobesafeandeffective.However,personal
computersareelectronicdevices.Powercords,poweradapters,andotherfeaturescancreatepotential
safetyrisksthatcanresultinphysicalinjuryorpropertydamage,especiallyifmisused.Toreducethese
risks,followtheinstructionsincludedwithyourproduct,observeallwarningsontheproductandinthe
operatinginstructions,andreviewtheinformationincludedinthisdocumentcarefully.Bycarefullyfollowing
theinformationcontainedinthisdocumentandprovidedwithyourproduct,youcanhelpprotectyourself
fromhazardsandcreateasafercomputerworkenvironment.
Note:Thisinformationincludesreferencestopoweradaptersandbatteries.Inadditiontonotebook
computers,someproducts(suchasspeakersandmonitors)shipwithexternalpoweradapters.Ifyouhave
suchaproduct,thisinformationappliestoyourproduct.Inaddition,computerproductscontainacoin-sized
internalbatterythatprovidespowertothesystemclockevenwhenthecomputerisunplugged,sothe
batterysafetyinformationappliestoallcomputerproducts.
viUserGuide

Conditionsthatrequireimmediateaction
Productscanbecomedamagedduetomisuseorneglect.Someproductdamageisseriousenough
thattheproductshouldnotbeusedagainuntilithasbeeninspectedand,ifnecessary,repairedby
anauthorizedservicer.
Aswithanyelectronicdevice,paycloseattentiontotheproductwhenitisturnedon.Onveryrare
occasions,youmightnoticeanodororseeapuffofsmokeorsparksventfromyourproduct.Oryou
mighthearsoundslikepopping,crackingorhissing.Theseconditionsmightmerelymeanthatan
internalelectroniccomponenthasfailedinasafeandcontrolledmanner.Or,theymightindicate
apotentialsafetyissue.However,donottakerisksorattempttodiagnosethesituationyourself.
ContacttheCustomerSupportCenterforfurtherguidance.ForalistofServiceandSupportphone
numbers,seethefollowingWebsite:
http://www.lenovo.com/support/phone
Frequentlyinspectyourcomputeranditscomponentsfordamageorwearorsignsofdanger.Ifyou
haveanyquestionabouttheconditionofacomponent,donotusetheproduct.ContacttheCustomer
SupportCenterortheproductmanufacturerforinstructionsonhowtoinspecttheproductand
haveitrepaired,ifnecessary.
Intheunlikelyeventthatyounoticeanyofthefollowingconditions,orifyouhaveanysafetyconcerns
withyourproduct,stopusingtheproductandunplugitfromthepowersourceandtelecommunication
linesuntilyoucanspeaktotheCustomerSupportCenterforfurtherguidance.
•Powercords,plugs,poweradapters,extensioncords,surgeprotectors,orpowersuppliesthatare
cracked,broken,ordamaged.
•Signsofoverheating,smoke,sparks,orre.
•Damagetoabattery(suchascracks,dents,orcreases),dischargefromabattery,orabuildupofforeign
substancesonthebattery.
•Acracking,hissingorpoppingsound,orstrongodorthatcomesfromtheproduct.
•Signsthatliquidhasbeenspilledoranobjecthasfallenontothecomputerproduct,thepowercordor
poweradapter.
•Thecomputerproduct,powercord,orpoweradapterhasbeenexposedtowater.
•Theproducthasbeendroppedordamagedinanyway.
•Theproductdoesnotoperatenormallywhenyoufollowtheoperatinginstructions.
Note:Ifyounoticetheseconditionswithaproduct(suchasanextensioncord)thatisnotmanufacturedfor
orbyLenovo,stopusingthatproductuntilyoucancontacttheproductmanufacturerforfurtherinstructions,
oruntilyougetasuitablereplacement.
Safetyguidelines
Alwaysobservethefollowingprecautionstoreducetheriskofinjuryandpropertydamage.
Formoreinformation,seetheSafetyandWarrantyGuidecamewithyourcomputer.ThelatestSafetyand
WarrantyGuidehasbeenuploadedontheWebsitehttp://www.lenovo.com/support.
Serviceandupgrades
DonotattempttoserviceaproductyourselfunlessinstructedtodosobytheCustomerSupportCenteror
yourdocumentation.OnlyuseaServiceProviderwhoisapprovedtorepairyourparticularproduct.
Note:Somecomputerpartscanbeupgradedorreplacedbythecustomer.Upgradestypicallyare
referredtoasoptions.ReplacementpartsapprovedforcustomerinstallationarereferredtoasCustomer
ReplaceableUnits,orCRUs.Lenovoprovidesdocumentationwithinstructionswhenitisappropriatefor
©CopyrightLenovo2012vii
customerstoinstalloptionsorreplaceCRUs.Youmustcloselyfollowallinstructionswheninstallingor
replacingparts.TheOffstateofapowerindicatordoesnotnecessarilymeanthatvoltagelevelsinsidea
productarezero.Beforeyouremovethecoversfromaproductequippedwithapowercord,alwaysmake
surethatthepoweristurnedoffandthattheproductisunpluggedfromanypowersource.Formore
informationonCRUs,refertotheReplacingdevicesforthisproduct.Ifyouhaveanyquestionsorconcerns,
contacttheCustomerSupportCenter.
Althoughtherearenomovingpartsinyourcomputerafterthepowercordhasbeendisconnected,the
followingwarningsarerequiredforyoursafety.
DANGER
Hazardousmovingparts.Keepngersandotherbodypartsaway.
CAUTION:
BeforereplacinganyCRUs,turnoffthecomputerandwaitthreetoveminutestoletthecomputer
coolbeforeopeningthecover.
Powercordsandpoweradapters
DANGER
Useonlythepowercordsandpoweradapterssuppliedbytheproductmanufacturer.
Thepowercordsshallbesafetyapproved.ForGermany,itshallbeH05VV-F,3G,0.75mm2,or
better.Forothercountries,thesuitabletypesshallbeusedaccordingly.
Neverwrapapowercordaroundapoweradapterorotherobject.Doingsocanstressthecordin
waysthatcancausethecordtofray,crack,orcrimp.Thiscanpresentasafetyhazard.
Alwaysroutepowercordssothattheywillnotbewalkedon,trippedover,orpinchedbyobjects.
Protectpowercordandpoweradaptersfromliquids.Forinstance,donotleaveyourpowercordor
poweradapternearsinks,tubs,toilets,oronoorsthatarecleanedwithliquidcleansers.Liquids
cancauseashortcircuit,particularlyifthepowercordorpoweradapterhasbeenstressedby
misuse.Liquidsalsocancausegradualcorrosionofpowercordterminalsand/ortheconnector
terminalsonapoweradapter,whichcaneventuallyresultinoverheating.
Alwaysconnectpowercordsandsignalcablesinthecorrectorderandensurethatallpowercord
connectorsaresecurelyandcompletelypluggedintoreceptacles.
viiiUserGuide

DonotuseanypoweradapterthatshowscorrosionattheACinputpinsorshowssignsof
overheating(suchasdeformedplastic)attheACinputoranywhereonthepoweradapter.
Donotuseanypowercordswheretheelectricalcontactsoneitherendshowsignsofcorrosionor
overheatingorwherethepowercordappearstohavebeendamagedinanyway.
Extensioncordsandrelateddevices
Ensurethatextensioncords,surgeprotectors,uninterruptiblepowersupplies,andpowerstripsthatyouuse
areratedtohandletheelectricalrequirementsoftheproduct.Neveroverloadthesedevices.Ifpowerstrips
areused,theloadshouldnotexceedthepowerstripinputrating.Consultanelectricianformoreinformation
ifyouhavequestionsaboutpowerloads,powerrequirements,andinputratings.
Plugsandoutlets
DANGER
Ifareceptacle(poweroutlet)thatyouintendtousewithyourcomputerequipmentappearstobe
damagedorcorroded,donotusetheoutletuntilitisreplacedbyaqualiedelectrician.
Donotbendormodifytheplug.Iftheplugisdamaged,contactthemanufacturertoobtain
areplacement.
Donotshareanelectricaloutletwithotherhomeorcommercialappliancesthatdrawlargeamounts
ofelectricity;otherwise,unstablevoltagemightdamageyourcomputer,data,orattacheddevices.
Someproductsareequippedwithathree-prongedplug.Thisplugtsonlyintoagrounded
electricaloutlet.Thisisasafetyfeature.Donotdefeatthissafetyfeaturebytryingtoinsertitinto
anon-groundedoutlet.Ifyoucannotinserttheplugintotheoutlet,contactanelectricianforan
approvedoutletadapterortoreplacetheoutletwithonethatenablesthissafetyfeature.Never
overloadanelectricaloutlet.Theoverallsystemloadshouldnotexceed80percentofthebranch
circuitrating.Consultanelectricianformoreinformationifyouhavequestionsaboutpowerloads
andbranchcircuitratings.
Besurethatthepoweroutletyouareusingisproperlywired,easilyaccessible,andlocatedclose
totheequipment.Donotfullyextendpowercordsinawaythatwillstressthecords.
Besurethatthepoweroutletprovidesthecorrectvoltageandcurrentfortheproductyouare
installing.
Carefullyconnectanddisconnecttheequipmentfromtheelectricaloutlet.
Powersupplystatement
DANGER
Neverremovethecoveronapowersupplyoranypartthathasthefollowinglabelattached.
©CopyrightLenovo2012ix

Hazardousvoltage,current,andenergylevelsarepresentinsideanycomponentthathasthislabel
attached.Therearenoserviceablepartsinsidethesecomponents.Ifyoususpectaproblemwith
oneoftheseparts,contactaservicetechnician.
Externaldevices
CAUTION:
DonotconnectordisconnectanyexternaldevicecablesotherthanUniversalSerialBus(USB)and
1394cableswhilethecomputerpowerison;otherwise,youmightdamageyourcomputer.Toavoid
possibledamagetoattacheddevices,waitatleastvesecondsafterthecomputerisshutdownto
disconnectexternaldevices.
Batteries
DANGER
PersonalcomputersmanufacturedbyLenovocontainacoincellbatterytoprovidepowerto
thesystemclock.Inaddition,manymobileproducts,suchasnotebookcomputers,utilizea
rechargeablebatterypacktoprovidesystempowerwheninportablemode.Batteriessuppliedby
Lenovoforusewithyourproducthavebeentestedforcompatibilityandshouldonlybereplaced
withapprovedparts.
Neverattempttoopenorserviceanybattery.Donotcrush,puncture,orincineratebatteriesor
shortcircuitthemetalcontacts.Donotexposethebatterytowaterorotherliquids.Onlyrecharge
thebatterypackstrictlyaccordingtoinstructionsincludedintheproductdocumentation.
Batteryabuseormishandlingcancausethebatterytooverheat,whichcancausegassesorame
to“vent”fromthebatterypackorcoincell.Ifyourbatteryisdamaged,orifyounoticeany
dischargefromyourbatteryorthebuildupofforeignmaterialsonthebatteryleads,stopusingthe
batteryandobtainareplacementfromthebatterymanufacturer.
Batteriescandegradewhentheyareleftunusedforlongperiodsoftime.Forsomerechargeable
batteries(particularlyLithiumIonbatteries),leavingabatteryunusedinadischargedstatecould
increasetheriskofabatteryshortcircuit,whichcouldshortenthelifeofthebatteryandcanalso
poseasafetyhazard.DonotletrechargeableLithium-Ionbatteriescompletelydischargeorstore
thesebatteriesinadischargedstate.
xUserGuide

Rechargeablebatterynotice
DANGER
Donotattempttodisassembleormodifythebatterypack.Attemptingtodosocancausean
explosion,orliquidleakagefromthebatterypack.Abatterypackotherthantheonespeciedby
Lenovo,oradisassembledormodiedbatterypackisnotcoveredbythewarranty.
Iftherechargeablebatterypackisincorrectlyreplaced,thereisdangerofanexplosion.Thebattery
packcontainsasmallamountofharmfulsubstances.Toavoidpossibleinjury:
•ReplaceonlywithabatteryofthetyperecommendedbyLenovo.
•Keepthebatterypackawayfromre.
•Donotexposeittowaterorrain.
•Donotattempttodisassembleit.
•Donotshort-circuitit.
•Keepitawayfromchildren.
•Donotdropthebatterypack.
Donotputthebatterypackintrashthatisdisposedofinlandlls.Whendisposingofthebattery,
complywithlocalordinancesorregulations.
Thebatterypackshouldbestoredatroomtemperature,chargedtoapproximately30to50%
ofcapacity.Werecommendthatbatterypackbechargedaboutonceperyeartoprevent
overdischarge.
Lithiumcoincellbatterynotice
DANGER
Dangerofexplosionifbatteryisincorrectlyreplaced.
Whenreplacingthelithiumcoincellbattery,useonlythesameoranequivalenttypethatis
recommendedbythemanufacturer.Thebatterycontainslithiumandcanexplodeifnotproperly
used,handled,ordisposedof.
Donot:
•Throworimmerseintowater
•Heattomorethan100°C(212°F)
•Repairordisassemble
Disposeofthebatteryasrequiredbylocalordinancesorregulations.
ThefollowingstatementappliestousersinthestateofCalifornia,U.S.A.
CaliforniaPerchlorateInformation:
ProductscontainingCR(manganesedioxide)lithiumcoincellbatteriesmaycontainperchlorate.
PerchlorateMaterial-specialhandlingmayapply.Goto:
http://www.dtsc.ca.gov/hazardouswaste/perchlorate.
©CopyrightLenovo2012xi

Heatandproductventilation
DANGER
Computers,acpoweradapters,andmanyaccessoriescangenerateheatwhenturnedonandwhen
batteriesarecharging.Notebookcomputerscangenerateasignicantamountofheatduetotheir
compactsize.Alwaysfollowthesebasicprecautions:
•Whenyourcomputeristurnedonorthebatteryischarging,thebase,thepalmrest,andsome
otherpartsmaybecomehot.Avoidkeepingyourhands,yourlap,oranyotherpartofyour
bodyincontactwithahotsectionofthecomputerforanyextendedlengthoftime.Whenyou
usethekeyboard,avoidkeepingyourpalmsonthepalmrestforaprolongedperiodoftime.
Yourcomputergeneratessomeheatduringnormaloperation.Theamountofheatdependson
theamountofsystemactivityandthebatterychargelevel.Extendedcontactwithyourbody,
eventhroughclothing,couldcausediscomfortorevenaskinburn.Periodicallytakebreaks
fromusingthekeyboardbyliftingyourhandsfromthepalmrest;andbecarefulnottouse
thekeyboardforanyextendedlengthoftime.
•Donotoperateyourcomputerorchargethebatterynearammablematerialsorinexplosive
environments.
•Ventilationslots,fansand/orheatsinksareprovidedwiththeproductforsafety,comfort,and
reliableoperation.Thesefeaturesmightinadvertentlybecomeblockedbyplacingtheproducton
abed,sofa,carpet,orotherexiblesurface.Neverblock,cover,ordisablethesefeatures.
•Whentheacpoweradapterisconnectedtoanelectricaloutletandyourcomputer,itgenerates
heat.Donotplacetheadapterincontactwithanypartofyourbodywhileusingit.Neverusethe
acpoweradaptertowarmyourbody.Extendedcontactwithyourbody,eventhroughclothing,
maycauseaskinburn.
Foryoursafety,alwaysfollowthesebasicprecautionswithyourcomputer:
•Keepthecoverclosedwheneverthecomputerispluggedin.
•Regularlyinspecttheoutsideofthecomputerfordustaccumulation.
•Removedustfromventsandanyperforationsinthebezel.Morefrequentcleaningsmightbe
requiredforcomputersindustyorhigh-trafcareas.
•Donotrestrictorblockanyventilationopenings.
•Donotoperateyourcomputerinsidefurniture,asthismightincreasetheriskofoverheating.
xiiUserGuide

•Airowtemperaturesintothecomputershouldnotexceed35°C(95°F).
Electricalcurrentsafetyinformation
DANGER
Electriccurrentfrompower,telephone,andcommunicationcablesishazardous.
Toavoidashockhazard:
•Donotuseyourcomputerduringalightningstorm.
•Donotconnectordisconnectanycablesorperforminstallation,maintenance,orreconguration
ofthisproductduringanelectricalstorm.
•Connectallpowercordstoaproperlywiredandgroundedelectricaloutlet.
•Connecttoproperlywiredoutletsanyequipmentthatwillbeattachedtothisproduct.
•Wheneverpossible,useonehandonlytoconnectordisconnectsignalcables.
•Neverturnonanyequipmentwhenthereisevidenceofre,water,orstructuraldamage.
•Disconnecttheattachedpowercords,batterypack,andallthecablesbeforeyouopenthe
devicecovers,unlessinstructedotherwiseintheinstallationandcongurationprocedures.
•Donotuseyoucomputeruntilallinternalpartsenclosuresarefastenedintoplace.Neveruse
thecomputerwheninternalpartsandcircuitsareexposed.
DANGER
•Connectanddisconnectcablesasdescribedinthefollowingprocedureswheninstalling,
moving,oropeningcoversonthisproductorattacheddevices.
Toconnect:
1.TurneverythingOFF .
2.First,attachallcablestodevices.
3.Attachsignalcablestoconnectors.
4.Attachpowercordstooutlets.
5.TurndevicesON.
Todisconnect:
1.TurneverythingOFF .
2.First,removepowercordsfromoutlets.
3.Removesignalcablesfromconnectors.
4.Removeallcablesfromdevices.
Thepowercordmustbedisconnectedfromthewalloutletorreceptaclebeforeinstallingallother
electricalcablesconnectedtothecomputer.
Thepowercordmaybereconnectedtothewalloutletorreceptacleonlyafterallotherelectrical
cableshavebeenconnectedtothecomputer.
Lasercompliancestatement
CAUTION:
Whenlaserproducts(suchasCD-ROMs,DVDdrives,beropticdevices,ortransmitters)are
installed,notethefollowing:
•Donotremovethecovers.Removingthecoversofthelaserproductcouldresultinexposureto
hazardouslaserradiation.Therearenoserviceablepartsinsidethedevice.
©CopyrightLenovo2012xiii

•Useofcontrolsoradjustmentsorperformanceofproceduresotherthanthosespeciedherein
mightresultinhazardousradiationexposure.
DANGER
SomelaserproductscontainanembeddedClass3AorClass3Blaserdiode.Notethefollowing.
Laserradiationwhenopen.Donotstareintothebeam,donotviewdirectlywithoptical
instruments,andavoiddirectexposuretothebeam.
Liquidcrystaldisplaynotice
CAUTION:
Forproductswithmercury-containinguorescentlamps(i.e.,non-LED)
•Theuorescentlampintheliquidcrystaldisplaycontainsmercury;disposeaccordingtolocal,
state,orfederallaws.
•TheLiquidcrystaldisplay(LCD)ismadeofglass,androughhandlingordroppingthecomputer
cancausetheLCDtobreak.IftheLCDbreaksandtheinternaluidgetsintoyoureyesoronyour
hands,immediatelywashtheaffectedareaswithwaterforatleast15minutes;ifanysymptoms
arepresentafterwashing,getmedicalcare.
Usingheadphonesorearphones
Ifyourcomputerhasbothaheadphoneconnectorandanaudio-outconnector,alwaysusetheheadphone
connectorforheadphones(alsocalledaheadset)orearphones.
CAUTION:
Excessivesoundpressurefromearphonesandheadphonescancausehearingloss.Adjustmentof
theequalizertomaximumincreasestheearphonesandheadphonesoutputvoltageandthereforethe
soundpressurelevel.
Excessiveuseofheadphonesorearphonesforalongperiodoftimeathighvolumecanbedangerousifthe
outputoftheheadphoneorearphoneconnectorsdonotcomplywithspecicationsofEN50332-2.The
headphoneoutputconnectorofyourcomputercomplieswithEN50332-2Subclause7.Thisspecication
limitsthecomputer’smaximumwidebandtrueRMSoutputvoltageto150mV.Tohelpprotectagainst
hearingloss,ensurethattheheadphonesorearphonesyouusealsocomplywithEN50332-2(Clause7
limits)forawidebandcharacteristicvoltageof75mV.UsingheadphonesthatdonotcomplywithEN
50332-2canbedangerousduetoexcessivesoundpressurelevels.
IfyourLenovocomputercamewithheadphonesorearphonesinthepackage,asaset,thecombinationof
theheadphonesorearphonesandthecomputeralreadycomplieswiththespecicationsofEN50332-1.
Ifdifferentheadphonesorearphonesareused,ensurethattheycomplywithEN50332-1(Clause6.5
LimitationValues).UsingheadphonesthatdonotcomplywithEN50332-1canbedangerousdueto
excessivesoundpressurelevels.
Additionalsafetyinformation
DANGER
Plasticbagscanbedangerous.Keepplasticbagsawayfrombabiesandchildrentoavoiddanger
ofsuffocation.
NoticeforTabletPCusers
SafetyNoticeforusersinAustralia:
xivUserGuide

DANGER
Donotconnectphonelinewhileusingtabletmode.
NoticeforusersintheU.S.A.
ManyPCproductsandaccessoriescontaincords,cablesorwires,suchaspowercordsorcordstoconnect
theaccessorytoaPC.Ifthisproducthassuchacord,cableorwire,thenthefollowingwarningapplies:
WARNING
Handlingthecordonthisproductorcordsassociatedwithaccessoriessoldwiththisproductwillexpose
youtolead,achemicalknowntotheStateofCaliforniatocausecancer,andbirthdefectsorother
reproductiveharm.Washhandsafterhandling.
Savetheseinstructions.
©CopyrightLenovo2012xv

xviUserGuide

Chapter1.ProductOverview
Thischapterprovidesinformationaboutthelocationsofconnectors,locatingimportantproductinformation,
computerfeatures,specications,operatingenvironment,andpreinstalledsoftwareprograms.
Thischaptercontainsthefollowingtopics:
•“Locatingcomputercontrols,connectors,features,andindicators”onpage1
•“Locatingimportantproductinformation”onpage11
•“Features”onpage13
•“Specications”onpage14
•“Operatingenvironment”onpage15
•“ThinkVantageTechnologiesandsoftware”onpage16
Locatingcomputercontrols,connectors,features,andindicators
Thissectionintroducesyoutothehardwarefeaturesofyourcomputer,andthengivesyouthebasic
informationyou'llneedtostarttakingadvantageofitsfunctions.
•“Frontview”onpage2
•“Right-sideview”onpage4
•“Left-sideview”onpage5
•“Rearview”onpage8
•“Bottomview”onpage7
•“Statusindicators”onpage9
©CopyrightLenovo20121

Frontview
Figure1.ThinkPadL420andL520frontview
1Computerdisplay2Powerswitch
3Built-instereospeakers4TrackPointpointingstick
5TrackPointbuttons6Built-instereospeakers
7UltraConnectwirelessantennas(left)8Integratedcamera
9Built-inmicrophone10UltraConnectwirelessantennas(right)
11ThinkVantagebutton12System-statusindicators
13Fingerprintreader14Power-statusindicators
15Bluetoothantenna16PCIExpressMiniCardslotforwirelessLAN/WiMAX
17Touchpad18Touchpadbuttons
19Fnkey20Volumecontrolbuttons
1Computerdisplay
Thehigh-resolution,thin-lmtransistor(TFT)displayprovidesclearandbrillianttextandgraphics.
Fordetails,refertotheinstructionsin“Changingdisplaysettings”onpage48.
2Powerswitch
Thepowerswitchislitwheneverthecomputerisonandisnotlitwhenthecomputerisinsleep(standby)
mode.
Usethepowerswitchtoturnonthecomputer.Toturnoffyourcomputer,usetheStartmenushutdown
options.
Ifyoucannotturnoffthecomputerbythismethod,pressandholdthepowerswitchfor2seconds.
2UserGuide

Ifyourcomputerstopsresponding,andyoucannotturnitoff,pressandholdthepowerswitchfor4seconds
ormore.Ifthesystemisstillnotreset,removetheacpoweradapterandthebattery.
ThepowerswitchcanalsobeprogrammedviaPowerManagertoshutdownthecomputerorputitinto
sleep(standby)orhibernationmode.
36Built-instereospeakers
Thestereospeakersarebuiltintoyourcomputer.
Fordetails,refertotheinstructionsin“Volumeandmutebuttons”onpage30.
UltraNav®
4TrackPoint®pointingstick5TrackPointbuttons
17Touchpad18Touchpadbuttons
ThekeyboardcontainstheuniqueTrackPointpointingdevice.Pointing,selecting,anddraggingareallpart
ofasingleprocessthatyoucanperformwithoutmovingyourngersfromtypingposition.
MoveyourngertipacrosstheUltraNavtouchpadtomovethepointer.
TheTrackPointandTrackPointbuttonsprovidefunctionssimilartothoseofamouseanditsbuttons.
710UltraConnect™wirelessantennas
Thebuilt-inantennasforthewirelesscommunicationarelocatedatthetopleftandtoprightportionsof
yourcomputerdisplay.
8Integratedcamera(somemodels)
Somemodelshaveanintegratedcamera.Byusingthiscamera,youcantakepicturesorholdavideo
conference.
9Built-inmicrophone
Thebuilt-inmicrophonecapturessoundandvoicewhenusedwithanapplicationprogramcapableof
handlingaudio.
11ThinkVantage®button
YoucanusetheThinkVantagebuttontointerruptthestartupsequenceofyourcomputerandstartthe
RescueandRecovery®workspace,whichrunsindependentlyoftheWindows®operatingsystemand
ishiddenfromit.
12System-statusindicators
YourcomputerhasaharddiskdriveaccessindicatorandaCapsLockindicator.
IfyourcomputerisshippedwithawirelessLANfeature,awirelessWiMAXfeature,awirelessWANfeature,
andaBluetooth,italsohasaWirelessLAN/WAN/WiMAXstatusindicatorandaBluetoothstatusindicator.
13Fingerprintreader(somemodels)
Fordetails,refertotheinstructionsin“Usingangerprintreader”onpage76.
14Power-statusindicators
Thepower-statusindicatorsshowwhetherthecomputerisinsleep(standby),hibernation,ornormalmode
andshowthechargelevelofthebattery.
Chapter1.ProductOverview3
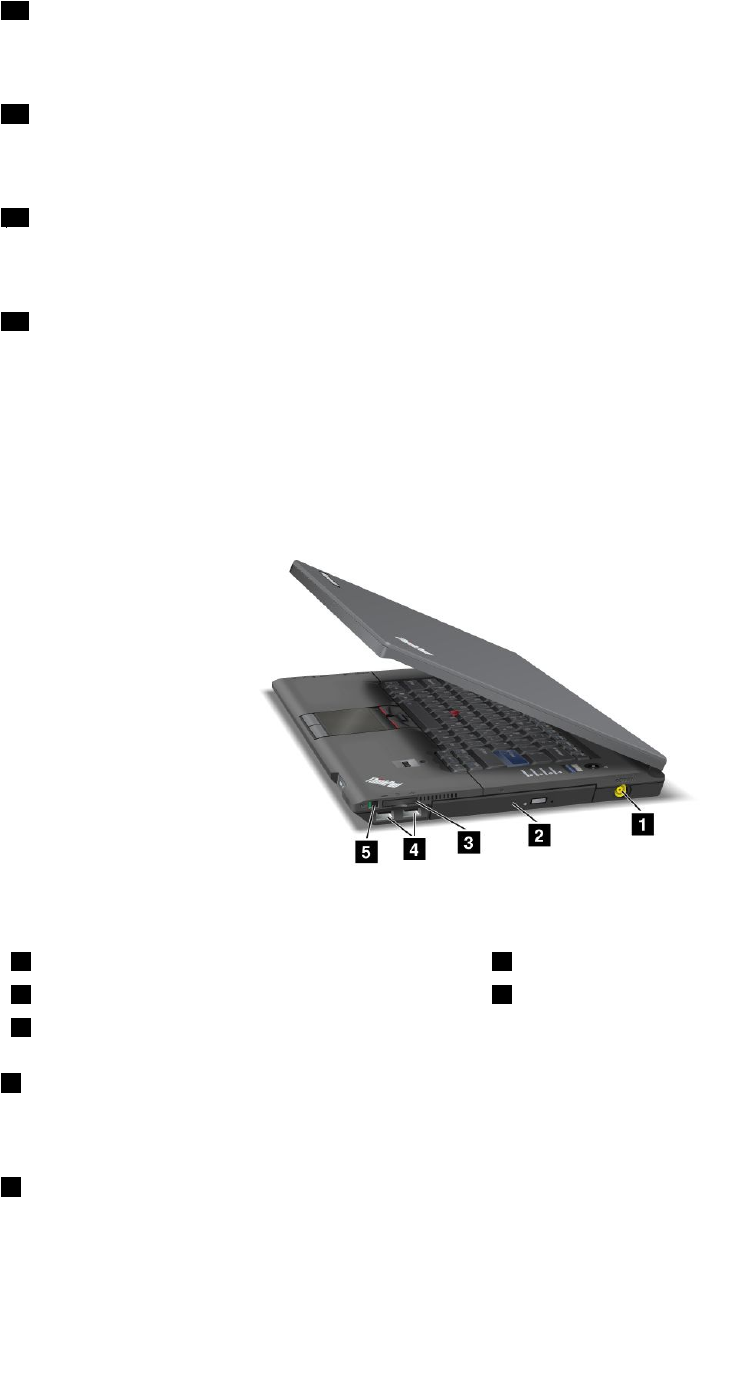
15Bluetoothantenna(somemodels)
IfyourcomputercomeswiththeIntegratedBluetoothfeatures,theantennaislocatedundertheright
sideofthepalmrest.
16PCIExpressMiniCardslotforwirelessLAN/WiMAX(somemodels)
YourcomputermightincludeaPCIExpressMiniCardforwirelessLAN/WiMAXinthePCIExpressMiniCard
slotwhichenableswirelessLAN/WiMAXcommunications.
19Fnkey
UsetheFnkeytotakeadvantageofThinkPad®functions.TouseThinkPadfunctions,pressFn+therequired
functionkeymarkedinblue.
20Volumecontrolbuttons
Thebuilt-involumebuttonsenableyoutoquicklyadjustthevolumeofthesoundfromyourcomputer,mute
thesoundentirely,orsetthemicrophonetomute.
Fordetails,refertotheinstructionsin“Volumeandmutebuttons”onpage30.
Right-sideview
Figure2.ThinkPadL420andL520right-sideview
1Powerjack2Opticaldrive
3Mediacardreader4USBconnectors(right)
5Wirelessradioswitch
1Powerjack
Theacpoweradaptercableconnectstothecomputerpowerjacktoprovidepowertothecomputerand
chargethebattery.
2Opticaldrive
Yourcomputerhasaslotforanopticaldrive.
4UserGuide
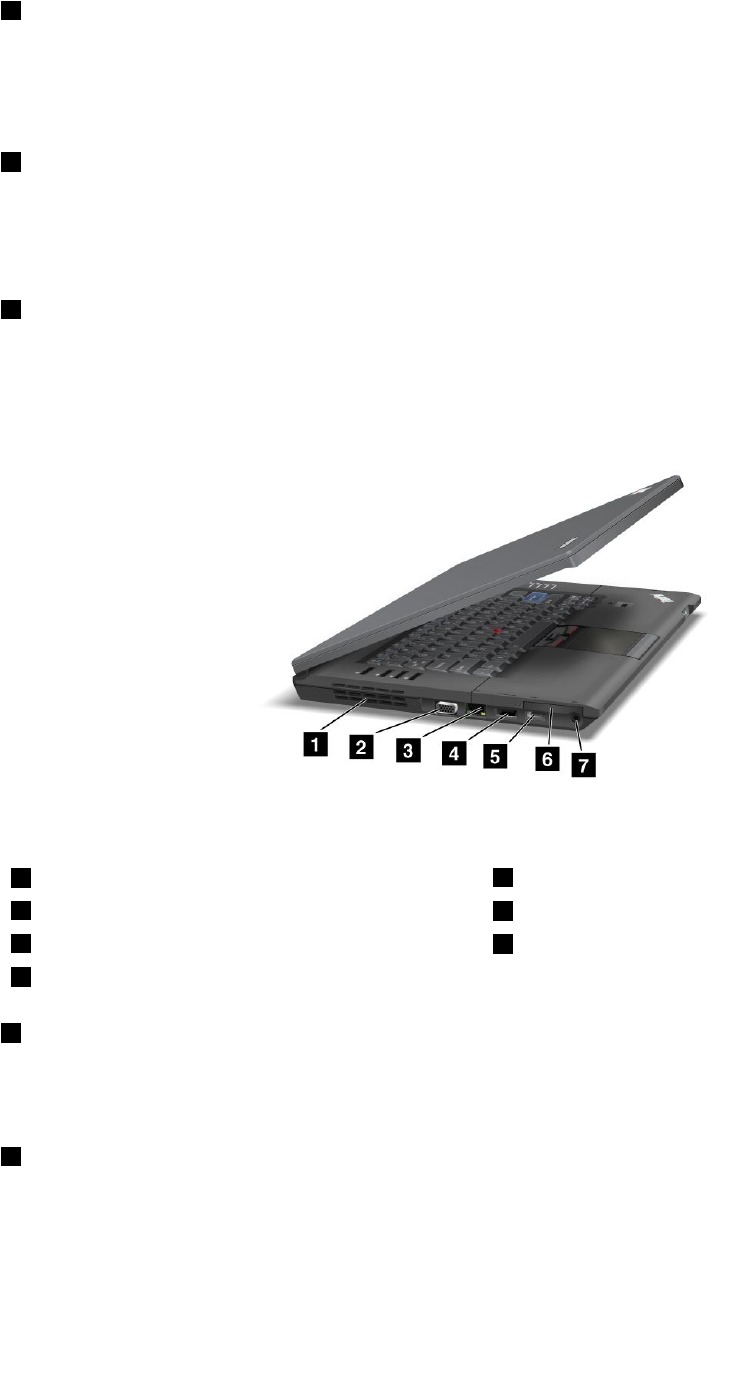
3Mediacardreader
YoucaninstallanSDCard,anSDXCCard,aSDHCCard,andanMMCCard(MultiMediaCard),inthe
Mediacardreaderofyourcomputer.
Fordetails,refertotheinstructionsin“Usingthemediacardreader”onpage57.
4USBconnectors(right)
TheUniversalSerialBus(USB)connectorsareusedforconnectingUSBinterface-compatibledevices,such
asaprinterordigitalcamera.
Note:YourcomputeriscompatiblewithUSB1.1andUSB2.0.
5Wirelessradioswitch
Youcanusethisswitchtodisablethewirelessradioofallthewirelessdevicesonyourcomputer.
Left-sideview
Figure3.ThinkPadL420andL520left-sideview
1Fanlouvers(left)2Monitorconnector
3Ethernetconnector4eSATA/USBcomboconnector(left)
5DisplayPortconnector654mm-wideExpressCardslot
7Comboaudiojack
1Fanlouvers(left)
Theinternalfanandlouversenableairtocirculateinthecomputerandcoolthecentralprocessor.
Note:Toavoidimpedingairow,donotplaceanyobstacleinfrontofthefan.
2Monitorconnector
Youcanattachanexternalmonitororaprojectortoyourcomputertodisplaycomputerinformation.
Fordetails,refertotheinstructionsin“Attachinganexternalmonitor”onpage49.
Chapter1.ProductOverview5

3Ethernetconnector
ConnectyourcomputertoaLANwiththeEthernetconnector.
Twoindicators,tothelowerleftandthelowerrightoftheconnector,showthestatusofthenetwork
connection.WhenyourcomputerconnectstoaLANandasessionwiththenetworkisavailable,thelower
leftindicatorissolidgreen.Whiledataisbeingtransmitted,thelowerrightindicatorblinksyellow.
DANGER
Toavoidtheriskofelectricalshock,donotconnectthetelephonecabletotheEthernetconnector.
YoucanonlyconnectanEthernetcabletothisconnector.
4eSATA/USBcomboconnector(left)
TheUniversalSerialBus(USB)connectorsareusedforconnectingUSBinterface-compatibledevices,such
asaprinterordigitalcamera.
Note:YourcomputeriscompatiblewithUSB1.1orUSB2.0.
YoucanalsoconnectanexternalSATAdevice,suchasanexternalharddiskdrive,tothisconnector.
Note:Toavoiddamagingtheconnector,becarefulwhenyouattachacablefromtheexternalSATAdevice
totheconnector.
5DisplayPortconnector
YourcomputermayhaveaDisplayPortconnector,thelatestdigitaldisplayinterfaceforconnectionto
variousexternaldevices.
TheDisplayPortconnectorsupportsadaptersthatcanplugintoDVIorVGAport.
654mm-wideExpressCardslot
Yourcomputerhasa54mm-wideExpressCardslot.
Fordetails,refertotheinstructionsin“Usingthemediacardreader”onpage57.
7Comboaudiojack
Yourcomputerhasacomboaudiojack.Tolistentothesoundfromyourcomputer,connectaheadphoneor
aheadset,thathasa3.5mm4-poleplug,tothecomboaudiojack.
Thecomboaudiojackdoesnotsupportaconventionalmicrophone.Formoreinformationabouttheaudio
devicessupportedbythecomboaudiojackofyourcomputer,see“Usingaudiofeatures”onpage56.
Note:
Ifyouareusingaheadsetwithafunctionswitch,forexample,aheadsetforaniPhone®mobiledigital
device,donotpressthisswitchwhileusingtheheadset.Ifyoupressit,theheadsetmicrophonewill
bedisabled,andtheinternalmicrophonewillbeenabledinstead.
6UserGuide
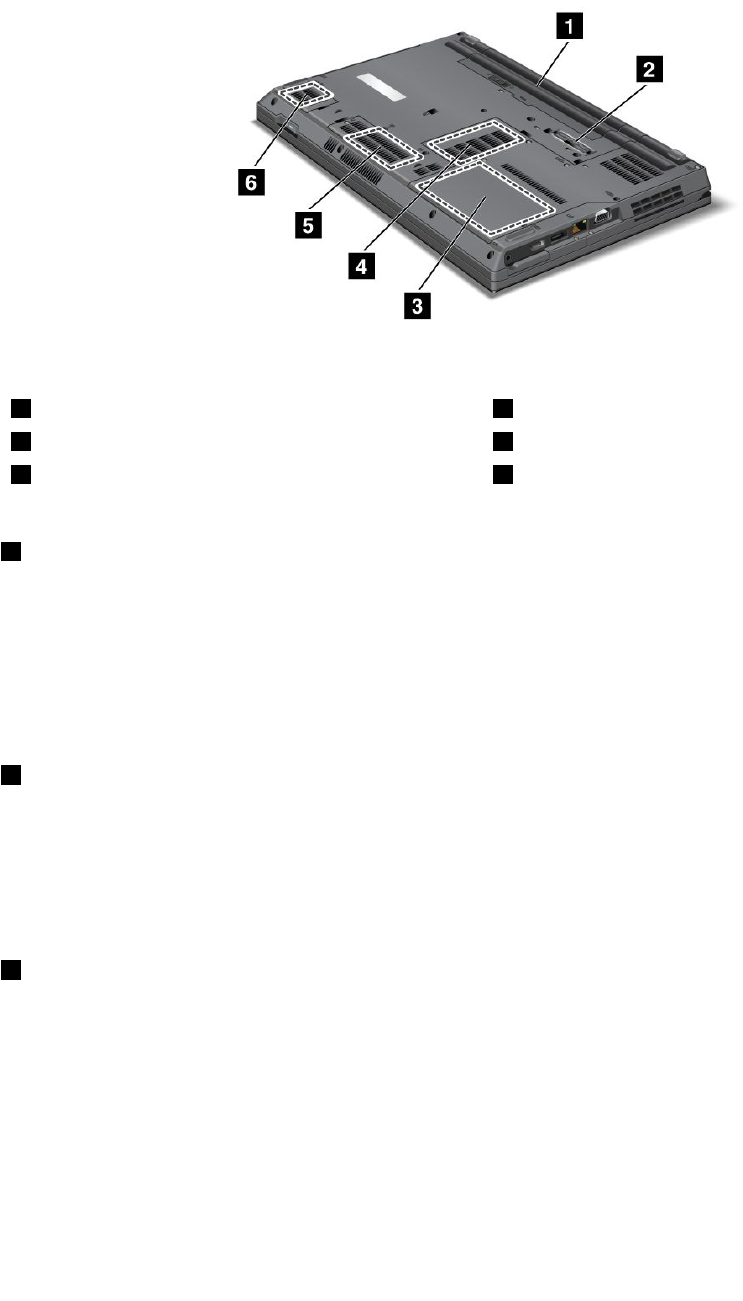
Bottomview
Figure4.ThinkPadL420andL520bottomview
1Battery2Dockingconnector(somemodels)
3Harddiskdriveorsolidstatedrive4Memory-upgradeslotd
5PCIExpressMiniCardslotforwirelessWANcardor
mSATAsolidstatedrive(somemodels)d
6SIMcardslot
1Battery
Useyourcomputerwithbatterypowerwheneveracpoweradapterisunavailable.
Byinstallinganextendedlifebatteryavailableasanoptionyoucanextendtheoperatingtimeofthe
computer.
YoucanalsousePowerManagertoadjustyourpowersettingasneeded.Fordetails,refertotheinstructions
in“PowerManager”onpage19.
2Dockingconnector(somemodels)
Dependingonmodels,yourcomputermayequippedwithadockingconnector.Thedockingconnectorcan
extendthecomputercapabilitieswhenyouareinyourofceorhomewithaThinkPadportreplicatoror
aThinkPaddockingstation.
Note:Ifyourcomputerhasadockingconnector,itsupportsThinkPadPortReplicatorSeries3,ThinkPad
MiniDockSeries3,andThinkPadMiniDockPlusSeries3.
3Harddiskdriveorsolidstatedrive
Yourcomputermayhavealarge-capacity,customer-upgradableharddiskdrivethatcanmeetavariety
ofstoragedemands.Tokeepthedataonyourdrivesafe,ActiveProtectionSystem™isinstalledonyour
computer.Fordetails,referto“ActiveProtectionSystem”onpage18.
WithLenovotechnologiesadvancingtoprovideyouwiththebestengineeredsystems,somemodels
areequippedwithasolidstatedrivefordatastorage.Thiscutting-edgetechnologyenablesnotebook
computerstobelighterandfaster.
Note:Thehiddenservicepartitionisthereasonwhythereislessfreespacethanexpectedonyourhard
diskdrive.
Chapter1.ProductOverview7
4Memory-upgradeslot
Youcanincreasetheamountofmemoryinyourcomputerbyinstallingamemorymoduleinthememory
bay.Memorymodulesareavailableasoptions.
5PCIExpressMiniCardslotforwirelessWANcardormSATAsolidstatedrive(somemodels)
YourcomputermightincludeaPCIExpressMiniCardinthePCIExpressMiniCardslotwhichenables
wirelessWANcommunications.
WithLenovotechnologiesadvancingtoprovideyouwiththebestengineeredsystems,somemodelsare
equippedwithamSATAsolidstatedrivefordatastorage.
6SIMcardslot(somemodels)
IfyourcomputerhasawirelessWAN(WideAreaNetwork)feature,itmayrequireaSIM(Subscriber
IdenticationModule)cardtoestablishawirelessWANconnection.Dependingonthecountryofdelivery,
theSIMcardmaybealreadyinstalledintheSIMcardslot.
Fordetails,refertotheinstructionsin“ReplacingtheSIMcard”onpage104.
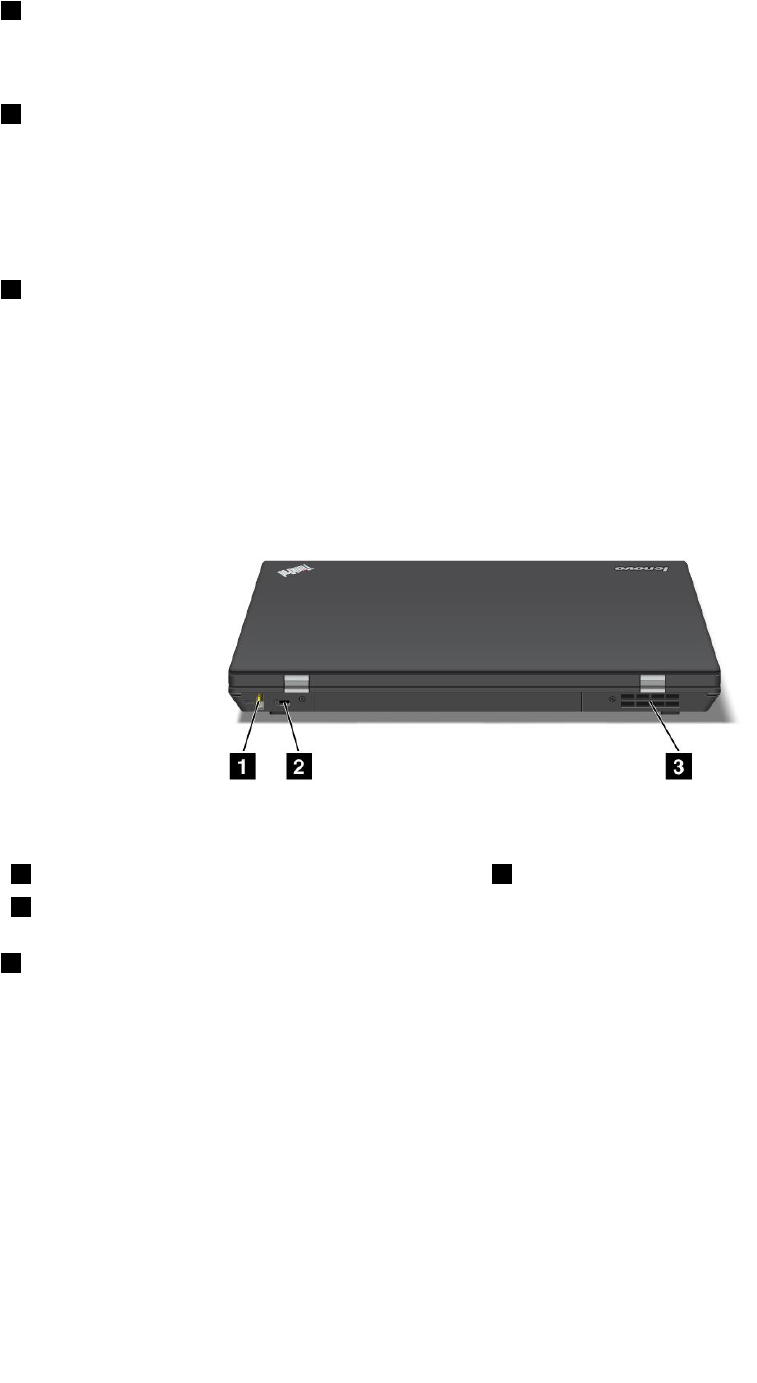
Rearview
Figure5.ThinkPadL420andL520rearview
1AlwaysonUSBconnector2Securitykeyhole
3Fanlouvers(rear)
1AlwaysonUSBconnector
TheUniversalSerialBus(USB)connectorisusedforconnectingUSBinterface-compatibledevices,such
asaprinterordigitalcamera.
Bydefault,evenwhenyourcomputerisinsleep(standby)mode,theAlwaysOnUSBconnectorstillenables
youtochargesomedevices,suchasiPod®andiPhoneandBlackBerry®smartphones,byattachingthe
devicestotheconnector.
However,withtheacpoweradapterattached,ifyouwanttochargethesedeviceswhenyourcomputer
isinhibernationmodeorpoweredoff,youwillneedtoopenthePowerManagerprogramandcongure
correspondingsettingstoenabletheAlwaysOnUSBconnectorfunction.Fordetailsabouthowtoenable
theAlwaysOnUSBconnectorfunction,refertotheonlinehelpofthePowerManagerprogram.
Note:YourcomputeriscompatiblewithUSB1.1orUSB2.0.
8UserGuide
2Securitykeyhole
Yourcomputercomeswithasecuritykeyhole.Youcanpurchaseasecuritycableandlocktotthiskeyhole.
Note:Forsomemodels,thesecuritykeyholeisattherightsideofthecomputer.
3Fanlouvers(rear)
Theinternalfanandlouversenableairtocirculateinthecomputerandcoolthecentralprocessor.
Note:Toavoidimpedingairow,donotplaceanyobstacleinfrontofthefan.
Statusindicators
Thestatusindicatorsshowthecurrentstatusofyourcomputer.
System-statusindicators
Yourcomputerhassystem-statusindicators.Thefollowingshowsthelocationandthemeaningofeach
indicator:
1PowerOn
Thecomputerisonandreadytouse.Thepowerswitchstayslitwheneverthecomputerisonandisnot
litwhenthecomputerisinsleep(standby)mode.
2Numericlock
Bydefault,whenthenumericlockison,thenumericlockindicatorisdisplayedonthescreen.Tochangethe
settingsofthenumericlockindicator,see“Changingdisplaysettings”onpage48.
3DeviceAccess
Aharddiskdriveisbeingusedtoreadorwritedata.Whenthisindicatorisblinking,donotputthe
computerintosleep(standby)modeorturnitoff.
4CapsLock
Chapter1.ProductOverview9
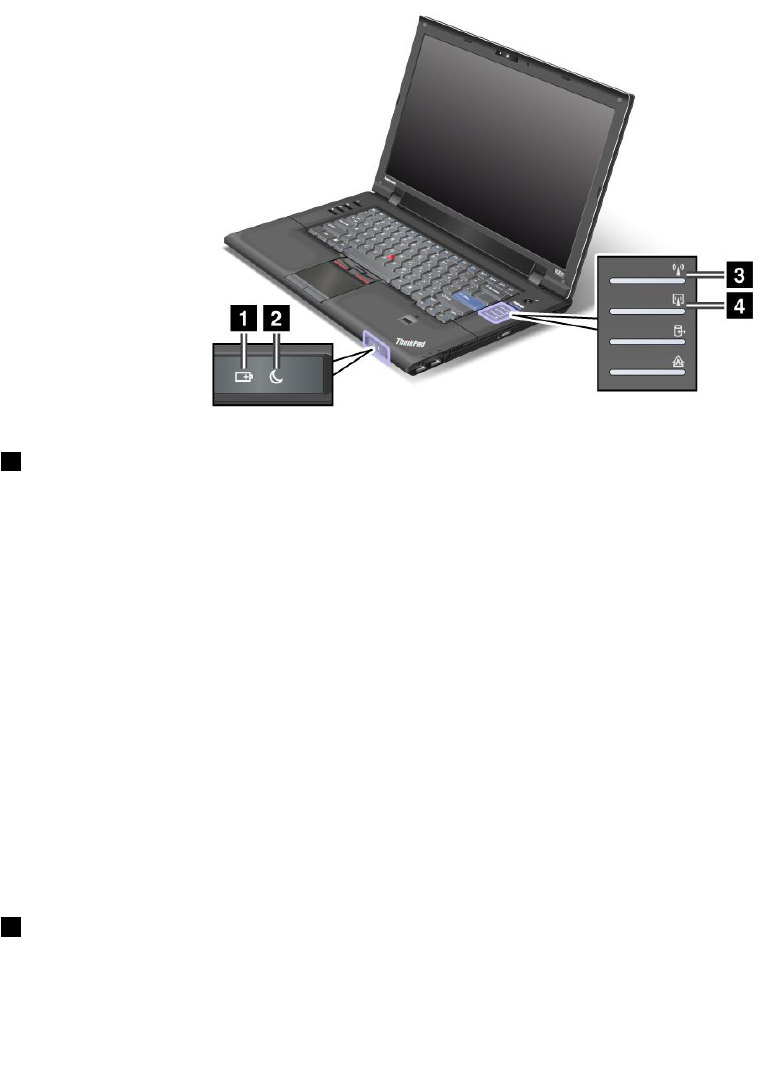
CapsLockmodeisenabled.Youcanenterallalphabeticcharacters(A-Z)inuppercasewithoutpressing
theShiftkey.
Note:Anothermodeavailableforyourcomputer,thoughthereisnoindicatorforit,isScrollLockmode.
Whenthismodeisenabled,thearrowkeyscanbeusedasfunctionkeysforscreen-scrolling,butnotfor
movingthecursor.Toenableordisablethismode,presstheScrLkkey.Notallapplicationprograms
supportthisfunction.
Power-statusindicators
Thecomputerhasstatusindicatorsthatshowthemode(sleep/standby,hibernation,ornormal)andthe
statusofthebattery.Thefollowingshowsthelocationandthemeaningoftheindicators:
1Batterystatus
•Green:Thebatteryhasmorethan20%charge.
•Orange:Thebatteryhasbetween5%and20%charge
•Fastblinkingorange:Thebatteryhaslessthan5%charge.
Note:Thebatterymaybecharging.
•Slowblinkingorange:Thebatteryisbeingcharged.Whenitreaches20%,theblinkingcolorchangesto
green.
•Slowblinkinggreen:Thebatteryhasbetween20%and80%charge,andchargingiscontinuing.
Whenthebatteryreaches80%charge,blinkingstops,butthechargingmaycontinueuntilthebatteryis
100%charged.
•Quickblinkingorange:Anerrorhasoccurredinthebattery.
•Thebatterystatusindicatorisoff:Thebatteryisfullychargedorthebatteryisdetached.
Note:Ifthecomputerisoperatingonbatterypower,thebatterystatusindicatordoesnotworkwhilethe
computeristurnedofforisinsleep(standby)modeorhibernationmode.
2Sleep(standbyinWindowsXP)status
•Green:Thecomputerisinsleep(standby)mode.
10UserGuide
•Blinkinggreen:Thecomputerisenteringsleep(standby)orhibernationmode,orisresumingnormal
operation.
IfyourcomputerisshippedwithawirelessLANfeature,awirelessWANfeature,aWiMAXfeature,anda
Bluetoothfeature,youcanusethefollowingindicators:
3WirelessLAN/WAN/WiMAXstatus
•Green:ThewirelessLAN/WANorWiMAXfeatureison,andtheradiolinkisreadyforuse.
•Blinkinggreen:Dataisbeingtransmittedinsomemodels.
4Bluetoothstatus
•Green:Thefeatureison,andtheradiolinkisreadyforuse.
•Blinkinggreen:Dataisbeingtransmitted.
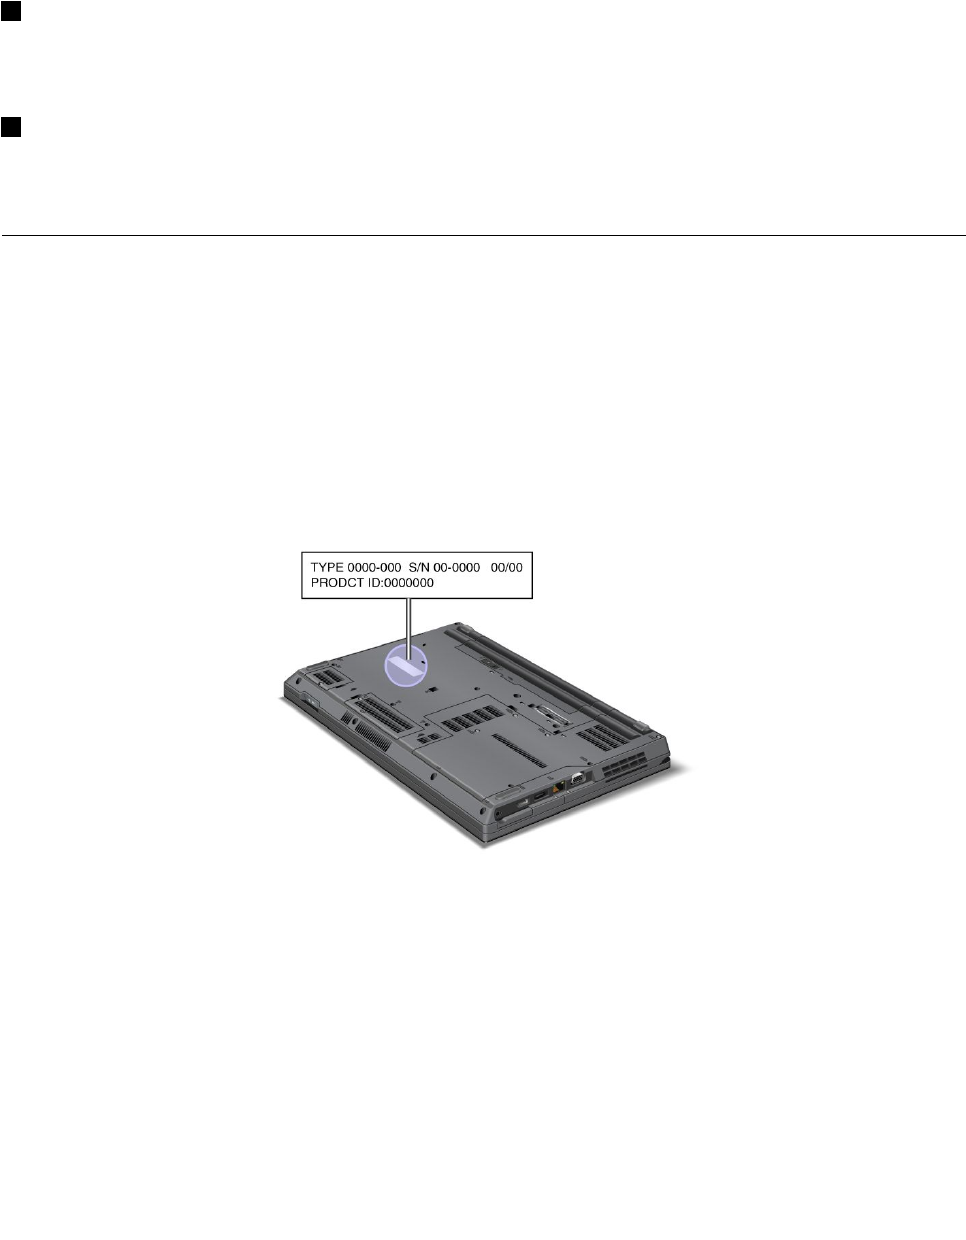
Locatingimportantproductinformation
Thissectionprovidesinformationtohelpyoulocateyourmachinetypeandmodellabel,FCCIDandIC
Certicationlabel,andtheMicrosoft®CerticateofAuthenticity(COA)label.
Machinetypeandmodellabel
Themachinetypeandmodellabelidentiesyourcomputer.IfyoucontactLenovoforhelp,themachine
typeandmodelnumberwillhelpsupporttechnicianstoidentifyyourcomputerandprovidethehighest
levelofservice.
Youcanndthemachinetypeandmodelofyourcomputerinthelabelasshownbelow:
FCCIDandICCerticationnumberlabel
ThereisnoFCCIDorICCerticationnumberforthePCIExpressMiniCardshownontheenclosureof
yourcomputer.TheFCCIDandICCerticationnumberlabelisafxedonthecardinstalledintheMini
PCIExpressCardslotofyourcomputer.
Chapter1.ProductOverview11
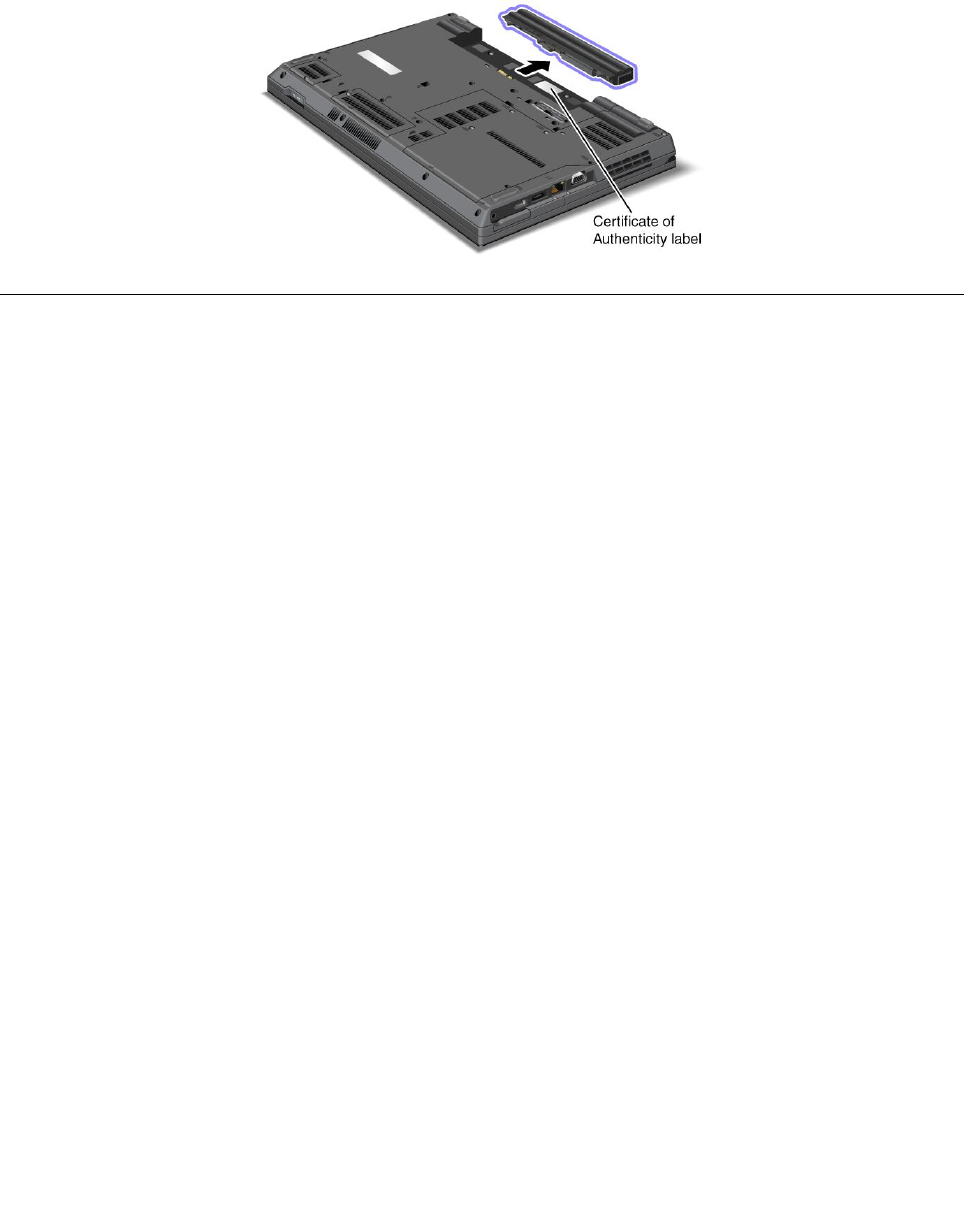
CerticateofAuthenticitylabel
TheMicrosoftCerticateofAuthenticitylabelforthepreinstalledoperatingsystemisattached.Printedonthis
labelaretheproductIDandtheproductkeyinformationforyourcomputer.Recordthisinformationandkeep
itinasafeplace.Youmightneedthesenumbers,tostartyourcomputerorreinstalltheoperatingsystem.
ThelocationoftheCerticateofAuthenticitylabelofyourcomputerisshownasbelow:
Features
Thissectionprovidesinformationaboutthecomputerfeatures.
Processor
•Seethesystempropertiesofyourcomputer.Youcandothisasfollows:ClickStart,right-clickComputer
(inWindowsXP ,MyComputer),thenfromthepulldownmenuselectProperties.
Memory
•Doubledataratethree(DDR3)synchronousdynamicrandomaccessmemory
Storagedevice
•2.5-inch(7mmheightor9.5mmheight)harddiskdrive(somemodels)
•2.5-inch(7mmheight)solidstatedrive(somemodels)
•mSATAsolidstatedrive(somemodels)
Display
ThecolordisplayusesTFTtechnology:
•Size:14.0inch(355mm)model
–Resolution:
–LCD:Upto1366-by-768
–Externalmonitor:Upto2048-by-1536
•Size:15.6inch(396mm)model
–Resolution:
–LCD:Upto1366-by-768or1600-by-900,dependingonthemodel
–Externalmonitor:Upto2048-by-1536
•Brightnesscontrol
•Integratedcamera(onsomemodels)
Chapter1.ProductOverview13

Keyboard
•84-key,85-key,or89-key
•UltraNav(TrackPointandtouchpad)
•Fnkeyfunction
•ThinkVantagebutton
•Volumecontrolbuttons
•Speakermutebutton
•Microphonemutebutton
Interface
•External-monitorconnector
•DisplayPortconnector
•Comboaudiojack
•2UniversalSerialBus(USB)connectors
•1eSATA/UniversalSerialBus(USB)connector
•1AlwaysOnUSBconnector
•Ethernetconnector
•Dockingconnector(onsomemodels)
Cardslot
•54mm-wideExpressCardslot
•Mediacardreader
Opticaldrive
•MultiBurnerDrive,DVD-ROMDrive
Wirelessfeatures
•IntegratedwirelessLAN
•IntegratedBluetooth(onsomemodels)
•IntegratedwirelessWAN(onsomemodels)
•IntegratedWiMAX(onsomemodels)
Securityfeatures
•Fingerprintreader(onsomemodels)
Specications
Size
•14.0inch(355mm)model
–Width:344mm(13.5inch)
–Depth:233mm(9.2inch)
–Height:32.0to36.0mm(1.26inchto1.41inch)
•15.6inch(396mm)model
14UserGuide

–Width:380mm(15inch)
–Depth:247mm(9.7inch)
–Height:32.0to36.0mm(1.26inchto1.41inch)
Heatoutput
•65W(222Btu/hr)maximumor90W(307Btu/hr)maximum(dependingonthemodel)
Powersource(acpoweradapter)
•Sine-waveinputat50to60Hz
•Inputratingoftheacpoweradapter:100to240VAC,50to60Hz
Batterypack
•Lithium-ion(Li-Ion)batterypack
Batterylife
•Forpercentageofremainingbatterypower,seethePowerManagerBatteryGaugeinthetaskbar.
PowerManageralsodisplaysagreen,yellowandredindication.Abatteryunderwarrantywithared
indicationiseligibleforawarrantyreplacement.
Operatingenvironment
Thissectionprovidesinformationaboutyourcomputeroperatingenvironment.
Environment
•Maximumaltitudewithoutpressurization:3048m(10,000ft)
•Temperature
–Ataltitudesupto2438m(8000ft)Operating:5.0degreesto35.0degreesCelsius(41degreesto95
degreesFahrenheit)Non-operating:5.0degreesto43.0degreesCelsius(41degreesto109degrees
Fahrenheit)
–Ataltitudesabove2438m(8000ft)Maximumtemperaturewhenoperatingundertheunpressurized
condition:31.3degreesCelsius(88degreesFahrenheit)
Note:Whenyouchargethebatterypack,itstemperaturemustbeatleast10degreesCelsius(50degrees
Fahrenheit).
•Relativehumidity:
–Operating:8%to80%
–Non-operating:5%to95%
Ifpossible,placeyourcomputerinawell-ventilatedanddryareawithoutdirectexposuretosunshine.
Keepelectricalappliancessuchasanelectricfan,radio,high-poweredspeakers,airconditioner,and
microwaveovenawayfromyourcomputerbecausethestrongmagneticeldsgeneratedbythese
appliancescandamagethemonitoranddataontheharddiskorsolidstatedrive.
Donotplaceanybeveragesontopoforbesidethecomputerorotherattacheddevices.Ifliquidisspilledon
orinthecomputeroranattacheddevice,ashortcircuitorotherdamagemightoccur.
Donoteatorsmokeoveryourkeyboard.Particlesthatfallintoyourkeyboardcancausedamage.
Chapter1.ProductOverview15

ThinkVantageTechnologiesandsoftware
LenovopreinstallsonyourPCusefulandhelpfulsoftwareapplicationstohelpyougetstarted,tostay
productivewhileonthemoveandtokeepyouandyourcomputerworking.Lenovooffersenhancedsecurity,
wirelesscomputing,data-migrationandothersolutionsforyourcomputer.
FollowingsectionsprovideinformationaboutThinkVantagetechnologyandothercomputingsolutions,
offeredbyLenovo.
Note:TolearnmoreaboutThinkVantagetechnologiesandothercomputingsolutionsofferedbyLenovo,
gotohttp://www.lenovo.com/support.
AccessingapplicationsinWindows7
IfyouareusingtheWindows7operatingsystem,youcanaccessapplicationsbyfollowingoneofthe
methodsbelow:
•YoucangettheapplicationsfromtheLenovoThinkVantageTools.
ClickStart➙AllPrograms➙LenovoThinkVantageTools.Thendependingontheapplicationyou
wanttoaccess,double-clickthecorrespondingicon.
Note:IfanapplicationiconintheLenovoThinkVantageToolsapplicationnavigationwindowisdimmed,
itindicatesthatyouneedtoinstalltheapplicationmanually.Toinstalltheapplication,double-clickthe
applicationicon.Then,followtheinstructionsonthescreen.Whentheinstallationprocesscompletes,
theapplicationiconwillbeactivated.
Table1.ApplicationsonLenovoThinkVantageTools
ApplicationIconname
AccessConnectionsInternetConnection
ActiveProtectionSystemAirbagProtection
FingerprintSoftwareFingerprintReader
LenovoSolutionCenter
or
LenovoThinkVantageToolbox
SystemHealthandDiagnostics
MobileBroadbandActivate3GMobileBroadband
PasswordManagerPasswordVault
PowerManagerPowerControls
RecoveryMediaFactoryRecoveryDisks
RescueandRecoveryEnhancedBackupandRestore
SimpleTapSimpleTap
SystemUpdateUpdateandDrivers
ThinkVantageGPSGPS
•YoucanalsogettheapplicationsfromtheControlPanel.
ClickStart➙ControlPanel.Dependingontheapplicationyouwanttoaccess,clickthecorresponding
sectionandthenclickthecorrespondinggreentext.
Note:IfyoudonotndtheapplicationyouneedinControlPanel,opentheLenovoThinkVantageTools
applicationnavigationwindowanddouble-clickthedimmedicontoinstalltheapplicationyouneed.
16UserGuide

Then,followtheinstructionsonthescreen.Whentheinstallationprocesscompletes,theapplicationicon
willbeactivatedandyoucanndtheapplicationinControlPanel.
ThesectionsinControlPanel,thegreentexts,andtheapplicationsarelistedinthefollowingtable.
Table2.ApplicationsinControlPanel
ApplicationControlPanelsectionGreentextintheControlPanel
AccessConnectionsNetworkandInternetLenovo-InternetConnection
ActiveProtectionSystemSystemandSecurity
HardwareandSound
Lenovo-AirbagProtection
CommunicationsUtilityHardwareandSoundLenovo-WebConferencing
FingerprintSoftwareSystemandSecurity
HardwareandSound
Lenovo-FingerprintReader
or
Lenovo-NotebookFingerprint
Reader
LenovoSolutionCenter
or
LenovoThinkVantageToolbox
SystemandSecurityLenovo-SystemHealthand
Diagnostics
MobileBroadbandActivateNetworkandInternetLenovo-3GMobileBroadband
PasswordManagerSystemandSecurity
UserAccountsandFamilySafety
Lenovo-PasswordVault
PowerManagerHardwareandSound
SystemandSecurity
Lenovo-PowerControls
RecoveryMediaSystemandSecurityLenovo-FactoryRecoveryDisks
SimpleTapProgramsLenovo’sSimpleTap
SystemUpdateSystemandSecurityLenovo-UpdateandDrivers
RescueandRecoverySystemandSecurityLenovo-EnhancedBackupand
Restore
ThinkVantageGPSNetworkandInternet
SystemandSecurity
Lenovo-GPS
AccessConnections
AccessConnections™isaconnectivityassistantprogramforcreatingandmanaginglocationproles.Each
locationprolestoresallthenetworkandInternetcongurationsettingsneededforconnectingtoanetwork
infrastructurefromaspeciclocationsuchasahomeoranofce.
Byswitchingbetweenlocationprolesasyoumoveyourcomputerfromplacetoplace,youcanquicklyand
easilyconnecttoanetworkwithnoneedtorecongureyoursettingsmanuallyandrestartthecomputer
eachtime.
ToopentheAccessConnectionsprogram,dothefollowing:
•ForWindows7:See“AccessingapplicationsinWindows7”onpage16.
•ForWindowsVista®andWindowsXP:ClickStart➙AllPrograms➙ThinkVantage➙Access
Connections.
Chapter1.ProductOverview17

ActiveProtectionSystem
TheActiveProtectionSystemprotectsyourharddiskdrivewhentheshocksensorinsideyourcomputer
detectsaconditionthatcoulddamagethedrive,suchassystemtilt,excessivevibration,orshock.Thehard
diskdriveislessvulnerabletodamagewhenitisnotoperating;sothesystemstopsitfromspinning,and
mayalsomovetheread/writeheadsofthedrivetoareasthatdonotcontaindata.Assoonastheshock
sensorsensesthattheenvironmentisstableagain(minimalchangeinsystemtilt,vibration,orshock),it
turnstheharddiskdriveon.
ToopenActiveProtectionSystem,dothefollowing:
•ForWindows7:See“AccessingapplicationsinWindows7”onpage16.
•ForWindowsVistaandWindowsXP:Toconguretheprotectionsystem,clickStart➙AllPrograms
➙ThinkVantage➙ActiveProtectionSystem.
FingerprintSoftware
Ifyoursystemcomeswithangerprintreader,theFingerprintSoftwareprogramisinstalledandenables
youtoenrollyourngerprintandassociateitwithyourWindowspassword.Asaresult,thengerprint
authenticationcanreplaceyourpasswordandenablesimpleandsecureuseraccess.
Toopenthengerprintsoftware,dothefollowing:
•ForWindows7:See“AccessingapplicationsinWindows7”onpage16.
•ForWindowsVistaandWindowsXP:ClickStart➙AllPrograms➙ThinkVantage➙ThinkVantage
FingerprintSoftware.
LenovoSolutionCenter
Note:Dependingonthedatewhenyourcomputerwasmanufactured,yourcomputerispreinstalledwith
eithertheLenovoSolutionCenterprogramortheLenovoThinkVantageToolboxprogramfordiagnostic
purposes.ForadditionalinformationabouttheLenovoThinkVantageToolboxprogram,see“Lenovo
ThinkVantageToolbox”onpage19.
TheLenovoSolutionCenterprogramenablesyoutotroubleshootandresolvecomputerproblems.It
combinesdiagnostictests,systeminformationcollection,securitystatus,andsupportinformation,along
withhintsandtipsformaximumsystemperformance.See“Diagnosingproblems”onpage157fordetailed
information.
LenovoThinkVantageTools
TheLenovoThinkVantageToolsprogramprovidesyoueasyaccesstovarioustechnologies,suchas:
•LenovoSolutionCenterorLenovoThinkVantageToolbox(dependingonthedateofmanufacture)
•PowerManager
•RescueandRecovery
•SystemUpdate
ToaccesstheLenovoThinkVantageToolsprogram,clickStart➙AllPrograms➙LenovoThinkVantage
Tools.
Note:LenovoThinkVantageToolsisavailableonlyonmodelspreinstalledwiththeWindows7operating
system.IfyourWindows7modelisnotpreinstalledwiththeprogram,youcandownloaditfrom
http://www.lenovo.com/support.
18UserGuide

LenovoThinkVantageToolbox
Note:Dependingonthedatewhenyourcomputerwasmanufactured,yourcomputerispreinstalledwith
eithertheLenovoSolutionCenterprogramortheLenovoThinkVantageToolboxprogramfordiagnostic
purposes.ForadditionalinformationabouttheLenovoSolutionCenterprogram,see“LenovoSolution
Center”onpage.
TheLenovoThinkVantageToolboxisadiagnosticprogramthatworksthroughtheWindowsoperating
system.Itenablesyoutoviewsymptomsofcomputerproblemsandsolutionsforthem,andincludes
automaticnoticationwhenactionisrequired,computingassistance,andadvanceddiagnosticsand
diagnostichistory.
ToopenLenovoThinkVantageToolbox,dothefollowing:
•ForWindows7:See“AccessingapplicationsinWindows7”onpage16.
•ForWindowsVistaandWindowsXP:ClickStart➙AllPrograms➙ThinkVantage➙Lenovo
ThinkVantageToolbox.
ForadditionalinformationaboutrunningtheLenovoThinkVantageToolboxprogram,refertotheLenovo
ThinkVantageToolboxhelpsystem.
MessageCenterPlus
TheMessageCenterPlusdisplaysmessagestoinformyouabouthelpfulsoftwarethathasbeenpreinstalled
onyourcomputer.Thesoftwareenablesyoutomanagewiredandwirelessconnections,protectyourdata
intheeventofaproblemandautomaticallydiagnoseandresolvepotentialproblemswithyourcomputer.
TheMessageCenterPluscanalsoprovidemessagesaboutnewupdatesavailabletokeepyourcomputer
current.
PasswordManager
ThePasswordManagerprogramenablesuserstomanageandrememberalltheirsensitiveand
easy-to-forgetapplicationandWebsitelogininformation,suchasuserIDs,passwords,andotherpersonal
information.
ToopenPasswordManager,dothefollowing:
•ForWindows7:See“AccessingapplicationsinWindows7”onpage16.
•ForWindowsVistaandWindowsXP:ClickStart➙AllPrograms➙ThinkVantage➙Password
Manager.
PowerManager
ThePowerManagerprogramprovidesconvenient,exible,andcompletepowermanagementforyour
computer.ByusingthePowerManagerprogram,youcanadjustyourpowersettingstogiveyouthebest
balancebetweenperformanceandpowersaving.
ToopenPowerManager,dothefollowing
•ForWindows7:See“AccessingapplicationsinWindows7”onpage16.
•ForWindowsVistaandWindowsXP:ClickStart➙AllPrograms➙ThinkVantage➙PowerManager.
ProductRecovery
Thisprogramenablesyoutocreaterecoverymediatorestorethecontentsofthesystemdriveorharddisk
drivetothesamestateaswhenthecomputerwasoriginallyshippedfromthefactory.
Chapter1.ProductOverview19

Forinformationabouthowtoopenandusethisprogram,referto“Creatingandusingrecoverymedia”
onpage81.
PresentationDirector
PresentationDirectorisadisplaycongurationutilitythatenablesyoutogivepresentationsconveniently.It
alsoenablesyoutocreateandmanagethedisplayschemes.However,bydefault,PresentationDirectorhas
somepredenedpresentationschemes.Youcanapplythemtoyourpresentationwithnoneedtosetupa
newscheme.Toapplyapresentationscheme,youcanalsousetheFn+F7keycombination.
ToopenPresentationDirector,clickStart➙AllPrograms➙ThinkVantage➙PresentationDirector.
Note:IfyourcomputerisaWindows7model,PresentationDirectorisnotsupportedbecausetheWindows
7operatingsystemhandlestheexternaldisplaysinstead.
RescueandRecovery
TheRescueandRecoveryprogramisaonebuttonrecoveryandrestoresolutionthatincludesasetof
self-recoverytoolstohelpyoudiagnosecomputerproblems,gethelp,andrecoverfromsystemcrashes,
evenifyoucannotstarttheWindowsoperatingsystem.
•ForWindows7:See“AccessingapplicationsinWindows7”onpage16.
•ForWindowsVistaandWindowsXP:ClickStart➙AllPrograms➙ThinkVantage➙Rescueand
Recovery.
SimpleTap
TheSimpleTapprogramprovidesyouwithaquickwaytocustomizesomebasiccomputersettingssuchas
mutingthespeakers,adjustingthevolume,lockingthecomputeroperatingsystem,launchingaprogram,
openingaWebpage,openingale,andsoon.
TostarttheSimpleTapprograminaquickway,doanyofthefollowing:
•ClicktheSimpleTapicononthedesktop.
•Double-taponthetouchpadusingtwongers.
Note:TheSimpleTapprogramisonlyavailableoncertainmodelspreinstalledwiththeWindows7operating
system.IfyourWindows7modelisnotpreinstalledwiththeSimpleTapprogram,youcandownloadit
fromhttp://www.lenovo.com/support.
SystemUpdate
TheSystemUpdateprogramhelpsyoukeepthesoftwareonyourcomputerup-to-datebydownloading
andinstallingsoftwarepackages(ThinkVantageapplications,devicedrivers,BIOSupdates,andotherthird
partyapplications).Someexamplesofsoftwarethatyoushouldkeepupdatedareprogramsprovidedby
Lenovo,suchastheRescueandRecoveryprogram.
ToopenSystemUpdate,dothefollowing:
•Windows7:See“AccessingapplicationsinWindows7”onpage16.
•ForWindowsVistaandWindowsXP:ClickStart➙AllPrograms➙ThinkVantage➙SystemUpdate.
ThinkVantageGPS
IfthePCIExpressMiniCardinstalledinyourcomputersupportsGPS,yourcomputercanreceivesignals
fromGPSsatellitesanddetermineitslocation.IfyourcomputerisconnectedtotheInternet,youcannd
yourlocationonareal-timemapprovidedbyGoogleMapsorMicrosoftBing™Maps.
20UserGuide

ToopenThinkVantageGPS,dothefollowing:
•ForWindows7:See“AccessingapplicationsinWindows7”onpage16.
•ForWindowsVistaandWindowsXP:ClickStart➙AllPrograms➙ThinkVantage➙ThinkVantage
GPS.
ThinkVantageProductivityCenter
TheThinkVantageProductivityCenterprogramprovidesanintegrateduserinterfacetohelpyousetup,
understand,andenhanceyourcomputer.Itisacomprehensive,on-boardhelpandinformationcenterfor
thecomputer.ItenablesyoutoaccessotherThinkVantageTechnologies,viewmessagesfromLenovo,and
performthemostfrequentlyusedtaskssuchasdeviceconguration,wirelessnetworkconguration,and
computermanagementandmaintenance.
ToopentheThinkVantageProductivityCenterprograminWindowsXPorWindowsVista,clickStart➙All
Programs➙ThinkVantage➙ProductivityCenter.
Note:TheThinkVantageProductivityCenterprogramisavailableonmodelspreinstalledwiththeWindows
XPorWindowsVistaoperatingsystem.
Chapter1.ProductOverview21

22UserGuide

Chapter2.Usingyourcomputer
Yourcomputerispowerfulandisloadedwithfeaturesandapplications.Useittoaccomplishanything,
anyday,anytime.
Thischaptercontainsthefollowingtopics:
•“Registeryourcomputer”onpage23
•“Frequentlyaskedquestions”onpage23
•“Specialkeysandbuttons”onpage25
•“UsingtheUltraNavpointingdevice”onpage32
•“Powermanagement”onpage36
•“Connectingtothenetwork”onpage40
•“Usingaprojectororexternaldisplay”onpage48
•“Usingacolorprole”onpage55
•“Usingaudiofeatures”onpage56
•“Usinganintegratedcamera”onpage56
•“Usingopticaldrives”onpage57
•“Usingthemediacardreader”onpage57
Registeryourcomputer
Whenyouregisteryourcomputer,informationisenteredintoadatabase,whichenablesLenovotocontact
youincaseofarecallorothersevereproblem.Inaddition,somelocationsofferextendedprivilegesand
servicestoregisteredusers.
WhenyouregisteryourcomputerwithLenovo,youwillalsoreceivethefollowingbenets:
•QuickerservicewhenyoucallLenovoforhelp
•Automaticnoticationoffreesoftwareandspecialpromotionaloffers
ToregisteryourcomputerwithLenovo,gototheWebsitehttp://www.lenovo.com/register.Thenfollow
theinstructionsonthescreen.
Frequentlyaskedquestions
HereareafewtipsthatwillhelpyouoptimizetheuseofThinkPadNotebook.
Toensurethatyoureceivethebestperformancefromyourcomputer,browsethefollowingWebpagetond
informationsuchasaidsfortroubleshootingandanswerstofrequentlyaskedquestions:
http://www.lenovo.com/support/faq
CanIgetmyuserguideinanotherlanguage?
•Todownloadtheuserguideinanotherlanguage,gotohttp://www.lenovo.com/support.Thenfollow
theinstructionsonthescreen.
©CopyrightLenovo201223

Onthegoandneedtousebatterypowermoreeffectively?
•Toconservepower,ortosuspendoperationwithoutexitingapplicationsorsavingles,seethe
explanationabout“power-savingmodes”onpage37.
•Toachievethebestbalancebetweenperformanceandpowersaving,createandapplypowerplans(in
WindowsXP,powerschemes)byuseofPowerManager.
•Ifyourcomputerwillbeturnedoffforanextendedperiodoftime,youcanpreventbatterypowerfrom
drainingbyremovingthebattery.Formoreinformationaboutusingthebattery,see“Powermanagement”
onpage36.
Concernedaboutsecurityorneedtosecurelydisposeofdatastoredonyourharddiskorsolid
statedrive?
•StudytheSecuritysectiontondouthowyoucanprotectyourcomputerfromtheftandunauthorizeduse.
•Beforeyoudisposeofthedataontheharddiskorthesolidstatedrive,besuretoread“Noticeon
deletingdatafromyourharddiskorsolidstatedrive”onpage78.
Gettingconnectedindifferentlocationsisachallenge?
•TakeadvantageofthenetworkingfeaturesbyuseofAccessConnections.
•Tolearnmoreaboutusingthewirelessfeaturesofyourcomputer,referto“Wirelessconnections”on
page40.
•Totravelmorecondently,besuretocheckthetipsin“Travelingwithyourcomputer”onpage64.
•PressFn+F5,orusethewirelessradioswitchtoenableordisablethewirelessfeatures.
Needtogivepresentationsorattachanexternalmonitoroften?
•UsePresentationDirectortosetupapresentation.
•Makesurethatyoufollowtheprocedurefor“Attachinganexternalmonitor”onpage49.
•WiththeExtenddesktopfunction,youcandisplayoutputonboththecomputerdisplayandanexternal
monitor.
Needtoattachorreplaceadevice?
•SeeChapter6“Replacingdevices”onpage89formoreinformationaboutreplacingthedevicesof
yourcomputer.
•SeeChapter7“Enhancingyourcomputer”onpage119formoreinformationaboutenhancingthe
featuresofyourcomputer.
You'vebeenusingyourcomputerforsometimealready,anditisgettingslower?
•Followthe“Generaltipsforpreventingproblems”onpage151.
•Youcandiagnoseproblemsyourselfbyusingthepreinstalledsoftware.
•AlsoRecoverytoolisprovidedonyourcomputerharddiskorsolidstatedrive.Formoreinformation,
seeChapter5“Recoveryoverview”onpage81.
Printthefollowingsectionsandkeepthemwithyourcomputerincaseyouareunabletoaccessthis
onlinehelpwhennecessary.
•“Installinganewoperatingsystem”onpage131.
•“Computerstopsresponding”onpage158.
•“Powerproblems”onpage179.
24UserGuide
Specialkeysandbuttons
Yourcomputerhasseveralspecialkeysandbuttons.
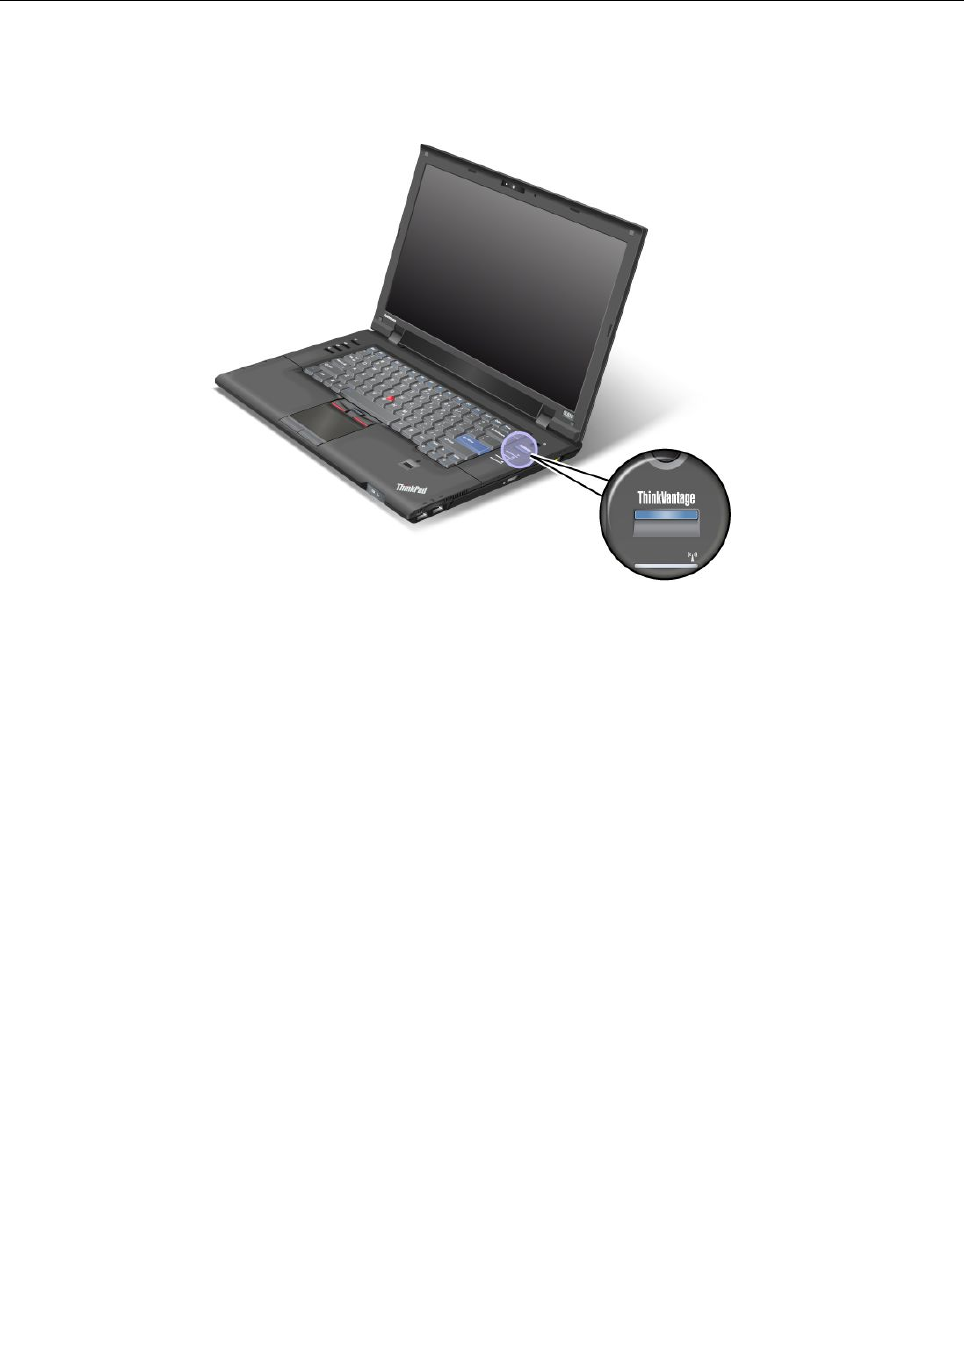
ThinkVantagebutton
YoucanusetheThinkVantagebuttontointerruptthestartupsequenceofyourcomputerandstartthe
RescueandRecoveryworkspace,whichrunsindependentlyoftheWindowsoperatingsystemandishidden
fromit.IfWindowsisnotrunningproperly,youmayneedtodothefollowing:
•Getthecurrentsysteminformation.
•RescuealefromyourWindowsenvironmentorrestoreback-uples,providedyouhavemadebackups
byuseoftheRescueandRecoveryprogram.
•CongureyourcomputerorstarttheBIOSSetupUtility.
AllthiscanbeachievedfromtheRescueandRecoveryworkspace.Turnonthecomputer,then,whilethe
“Tointerruptnormalstartup,presstheblueThinkVantagebutton”messageisdisplayedatthelower-leftof
thescreen,presstheThinkVantagebutton.TheRescueandRecoveryscreenopens.
Numerickeypad
Thekeyboardhaskeysthat,whenenabled,workasa10-keynumerickeypad.
Toenableordisablethenumerickeypad,pressandholdShiftorFnandthenpressNmLk(F10).
Chapter2.Usingyourcomputer25
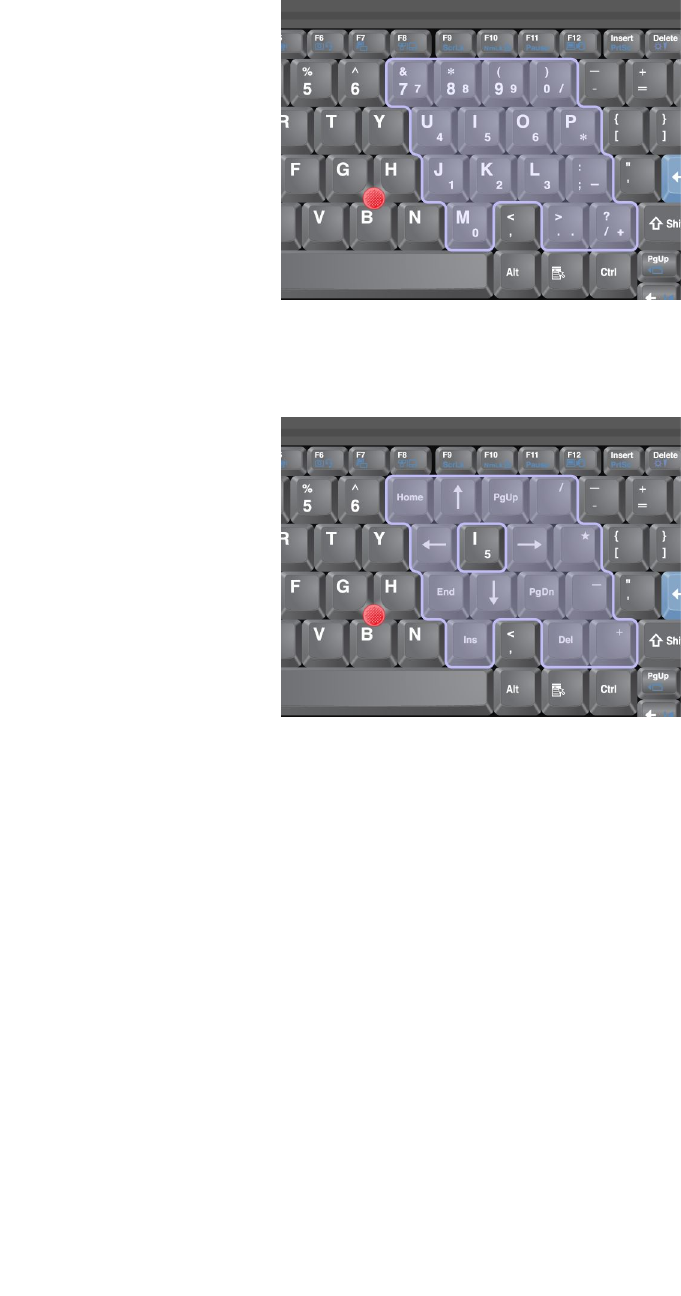
Note:Thenextdrawingshowsthelocationsofthekeysthatserveasthe10-keynumerickeypad.The
locationsofthesekeysarethesameoneverykeyboard,thoughforcomputersusingdifferentlanguages,
differentcharactersareprintedonthekeytops.
Ifthenumerickeypadisenabled,pressandholdShifttousethecursor-andscreen-controlkeystemporarily.
Note:Thefunctionsofthecursor-andscreen-controlkeysarenotprintedonthekeys.
26UserGuide
Functionkeycombinations
Bysettingthefunctionkeys,youcanchangeoperationalfeaturesinstantly.Tousethisfunction,pressand
holdtheFnkey1,thenpressoneofthefunctionkeys2.
Powerconservation
•Fn+F3
Selectapowerplan(inWindowsXP,powerscheme)thathasbeencreatedbyPowerManager,oradjust
thepowerlevelbyusingtheslidercontrol.Whenyoupressthiscombinationofbuttons,awindowfor
choosingapowerplan(inWindowsXP,powerscheme)appears.
Note:IfyouhaveloggedonwithanadministratoruserIDinWindowsXP ,andyoupressFn+F3,the
windowforselectingapowerschemeappears.IfyouhaveloggedonwithanotheruserIDinWindows
XP,andyoupressFn+F3,thewindowdoesnotappear.
•Fn+F4
Putyourcomputerinsleep(standby)mode.Toreturntonormaloperation,presstheFnkeyonly,without
pressingafunctionkey.
Note:Ifyouwanttousethecombinationtoputthecomputerintohibernationmodeordo-nothingmode
(inWindowsXP,shutthecomputerdownorshowthepanelforturningoffthecomputer),changethe
settingsinPowerManager.
•Fn+F12
Putyourcomputerinhibernationmode.Toreturntonormaloperation,pressthepowerbuttonforless
thanfourseconds.
Note:
ThoughthescreenfadesoutimmediatelyafterFn+F12arepressed,thecomputerdoesnotenterthe
hibernationmodeimmediately.DonotmovethesystemuntiltheSleep(standby)statusindicatorstops
blinking.Movingthecomputerwhenitisenteringhibernationmaycausecorruptionoftheharddrive.
TouseFn+F3,Fn+F4,andFn+F12keycombinations,youmusthavetheThinkPadPMdevicedriver
installedonyourcomputer.
Forinformationonthepowermanagementfunction,referto“Powermanagement”onpage36.
Chapter2.Usingyourcomputer27

Applyingapresentationscheme
•Fn+F7
ApplyapresentationschemedirectlywithoutstartingPresentationDirector.
TodisablethisfunctionandusetheFn+F7keycombinationforswitchingadisplayoutputlocation,start
PresentationDirector,andchangethesettings.
ClickStart➙AllPrograms➙ThinkVantage➙PresentationDirector.
Forinformationonapplyingapresentationscheme,referto“PresentationDirector”onpage20.
Note:IfyourcomputerisaWindows7model,itdoesnotsupportpresentationschemes,howeverthe
Fn+F7keycombinationmaystillbeusedtoswitchdisplayoutputlocation.
Switchingadisplayoutputlocation
•Fn+F7
ForWindows7:
Switchbetweenthecomputerdisplayandanexternalmonitor.Windowswillshowthesedisplayoptions:
–Computerdisplayonly(LCD)
–Computerdisplayandexternalmonitor(sameimage)
–Computerdisplayandexternalmonitor(extendeddesktopfunction)
–Externalmonitoronly
Note:Toswitchbetweenthecomputerdisplayandanexternalmonitor,theWin+Pkeycombination
isalsoavailable.
ForWindowsVistaandWindowsXP:
Switchbetweenthecomputerdisplayandanexternalmonitor.Ifanexternalmonitorisattached,
computeroutputisdisplayedinthefollowingthreepatternsbyturns:
–Externalmonitor(CRTdisplay)
–Computerdisplayandexternalmonitor(LCD+CRTdisplay)
–Computerdisplay
Notes:
–Thisfunctionisnotsupportedifdifferentdesktopimagesaredisplayedonthecomputerdisplayand
theexternalmonitor(theExtenddesktopfunction).
–ThisfunctiondoesnotworkwhileaDVDmovieoravideoclipisplaying.
Toenablethisfunction,startPresentationDirector,andchangethesettings.
ClickStart➙AllPrograms➙ThinkVantage➙PresentationDirector,andchangetheFn+F7Settings.
Note:MultipleuserscanlogontoasingleoperatingsystembyusingdifferentuserIDs.Eachuser
needstodothefollowing:
Enablingordisablingthewirelessfeatures
•Fn+F5
Enableordisablethebuilt-inwirelessnetworkingfeatures.IfyoupressFn+F5,alistofwirelessfeaturesis
displayed.Youcanquicklychangethepowerstateofeachfeatureinthelist.
Notes:IfyouwanttouseFn+F5toenableordisablethewirelessfeatures,thefollowingdevicedrivers
mustbeinstalledonyourcomputerbeforehand:
–PowerManagementdriver
28UserGuide

–OnScreenDisplayUtility
–Wirelessdevicedrivers
Forinformationonthewirelessfeatures,referto“Wirelessconnections”onpage40.
Launchingthecameraandaudiosettings
•Fn+F6
IfyoupressFn+F6,thecameraandaudiosettingswindowisopenedandthecamerapreviewisturnedon.
Fromthiswindow,youcanchangethecameraandaudiosettings.
Note:TheCamerasettingsareaonlyappearsifyourcomputerhasanintegratedcamera.Formore
information,see“Usingcamera”onpage56.
Otherfunctions
•Fn+Home:Thecomputerdisplaybecomesbrighter.
Thepurposeofthismethodistochangethebrightnessleveltemporarily.OnWindowsVista,thedefault
brightnesslevelisloadedaftersleep(standby),hibernation,reboot,ordetachingorattachinganac
poweradapter.Tochangethedefaultbrightnesslevel,changethesettingsofthePowerOptioninthe
ControlPanelorusethePowerManager.
•Fn+Delete:Thecomputerdisplaybecomesdimmer.
Thepurposeofthismethodistochangethebrightnessleveltemporarily.OnWindowsVista,thedefault
brightnesslevelisloadedaftersleep(standby),hibernation,reboot,ordetachingorattachinganac
poweradapter.Tochangethedefaultbrightnesslevel,changethesettingsofthePowerOptioninthe
ControlPanelorusethePowerManager.
•Fn+Spacebar:EnabletheFullScreenMagnierfunction.
•Fn+F1:HasthesamefunctionastheSysRqkey.
•Fn+F2:Lockyourcomputer.
•Fn+F8:ChangethesettingsoftheUltraNavpointingdevice.
•Fn+NmLk:Enableordisablethenumerickeypad.Theindicatorofnumericlockisdisplayedonthe
screen.
•Fn+PgUp:Hasthesamefunctionasthebackarrowinthebrowserthatmovesyoubacktopagesyou
haveviewedintheorderthatyouopenedthem.
•Fn+PgDn:Hasthesamefunctionastheforwardarrowinthebrowserthatmovesyouforwardtopages
youhaveviewedintheorderthatyouopenedthem.
•Fn+Esc:HasthesamefunctionastheBreakkey.
•Fn+cursorkeys:ThesekeycombinationsareforusewithWindowsMediaPlayer.Theyhavethe
followingfunctions:
–Fn+downarrowkey:PlayorPause
–Fn+uparrowkey:Stop
–Fn+rightarrowkey:NextTrack
–Fn+leftarrowkey:PreviousTrack
Chapter2.Usingyourcomputer29

Volumeandmutebuttons
Youcanadjustthesoundlevelofthebuilt-inspeakersbyusingthefollowingthreebuttons:
1Microphonemutebutton
2Volumeupbutton
3Volumedownbutton
4Speakermutebutton
Ifyoumutethesoundandthenturnoffyourcomputer,thesoundwillremainmutedwhenyouturnonyour
computeragain.Toturnonthesound,presstheVolumeuporVolumedownbutton.
Settingthevolume
Eachdevicehasvolumecontrols,whichyoucanset.
Toopenthewindowforadjustingtheoutputvolumeortherecordingvolume,dothefollowing:
ForWindows7andWindowsVista:
1.ClickStart➙ControlPanel➙HardwareandSound➙Sound.TheSoundwindowappears.
2.ClickthePlaybacktaborRecordingtab,andthenclickadevice,whichyouwanttocustomize.
3.ClickthePropertiesbutton.
4.ClicktheLevelstab,andthenchangethevolumebymovingtheslider.
ForWindowsXP:
1.ClickStart➙ControlPanel➙Sounds,Speech,andAudioDevices➙SoundsandAudioDevice.
TheSoundsandAudioDevicePropertieswindowappears.
2.ClicktheAudiotab,andthenclicktheVolumebuttoninSoundPlaybackorSoundRecording.
Notes:
30UserGuide
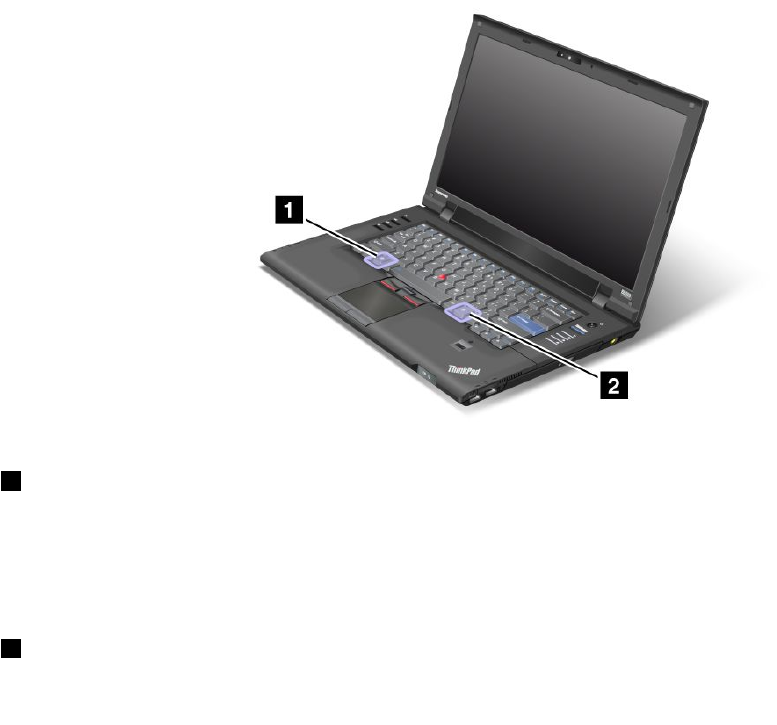
•Youcanalsogetaccesstothedesktopvolumecontrolbyusingthevolumeiconinthetaskbaratthe
lowerrightofthescreen.ToopentheVolumeControlwindow,clickthevolumeicon.Tocontrolthe
volume,movethevolumecontrolsliderupordown.Toturnoffthesound,selectMutespeakers(in
WindowsVistaandWindowsXP ,Mute).
•Thenamesofwindowsoreldsareslightlydifferentdependingontheoperatingsystemyouuse.
•Fordetailsaboutcontrollingvolume,refertoyourWindowsonlinehelp.
SettingthemicrophonemutebuttoninWindows7andWindowsVista
Whenyoupressthemicrophonemutebutton,alloftherecordingdevicesaresetonmuteorunmute;
thisisthedefaultsetting.
Tochangethesetting,dothefollowing:
1.PressFn+F6.TheCommunicationssettingswindowopens.
2.ClicktheManageSettingsbutton.TheCommunicationsUtilitywindowopens.
3.OntheVoIPCallSettingstab,clickMicrophonemutebuttonsettings.TheSettingforMicrophone
Mutewindowopens.
4.SelectOnlytherecordingdeviceselectedbelow:.Thenselecttherecordingdevicefromthe
drop-downlistbox.
5.ClickOK.
WindowskeyandApplicationkey
Thefollowingtwokeysareonyourcomputerkeyboard:
1Windowskey
Ifyoupressthiskey,theStartmenuofWindowsisdisplayedorhidden.
Ifyoupressthiskeyandanotherkeyatthesametime,theSystemPropertieswindowortheComputer(in
WindowsXP,MyComputer)windowisdisplayed.Fordetails,refertotheHelpinWindowsoperatingsystem.
2Applicationkey
Chapter2.Usingyourcomputer31

Todisplaytheshortcutmenuforanobject,selecttheobjectonthedesktoporwithinanapplicationand
thenpressthiskey.
UsingtheUltraNavpointingdevice
YourcomputermaycomewiththeUltraNavpointingdevice.TheUltraNavconsistsoftheTrackPointand
thetouchpad,eachofwhichisitselfapointingdevicewithbothbasicandextendedfunctions.Youcan
congurebothdevicesbychoosingthesettingsyouprefer,asfollows:
•SetboththeTrackPointandthetouchpadaspointingdevices.
ThissettingenablestheuseofallthebasicandextendedfunctionsoftheTrackPointandthetouchpad.
•SettheTrackPointasthemainpointingdeviceandthetouchpadforextendedfunctionsonly.
ThissettingenablestheuseofallbasicandextendedfunctionswiththeTrackPointwhilelimitingtheuse
ofthetouchpadtoscrolling,tapzones,andslow-motionpointerfunctions.
•SetthetouchpadasthemainpointingdeviceandtheTrackPointfortheextendedfunctionsonly.
Thissettingenablestheuseofallbasicandextendedfunctionswiththetouchpadwhilelimitingthe
useoftheTrackPointtoscrollingandMagnifyingGlassfunctions.
•SettheTrackPointasthemainpointingdevice,anddisablethetouchpad.
•Setthetouchpadasthemainpointingdevice,anddisabletheTrackPoint.
ChangingtheUltraNavsettings
YoucanchangeyoursettingsofUltraNavintheUltraNavtaboftheMousePropertieswindow.Toopenit,
useoneofthefollowingmethods:
•PressFn+F8,andtheUltraNavDeviceSettingswindowisdisplayed.InthiswindowclickManage
Settings.Amousepropertieswindowisdisplayed.ClicktheUltraNavtab.
•UsetheStartmenuofyourcomputerasfollows:
–ForWindows7andWindowsVista:ClickStart➙ControlPanel➙HardwareandSound➙
Mouse➙UltraNavtab.
–ForWindowsXP:ClickStart➙ControlPanel➙PrintersandOtherHardware➙Mouse➙
UltraNavtab.
YoucanalsochangetheUltraNavsettingsbyclickingtheUltraNavicononthesystemtray.Todisplaythe
UltraNavicononthesystemtray,see“AddingtheUltraNavicontothesystemtray”onpage35.
32UserGuide
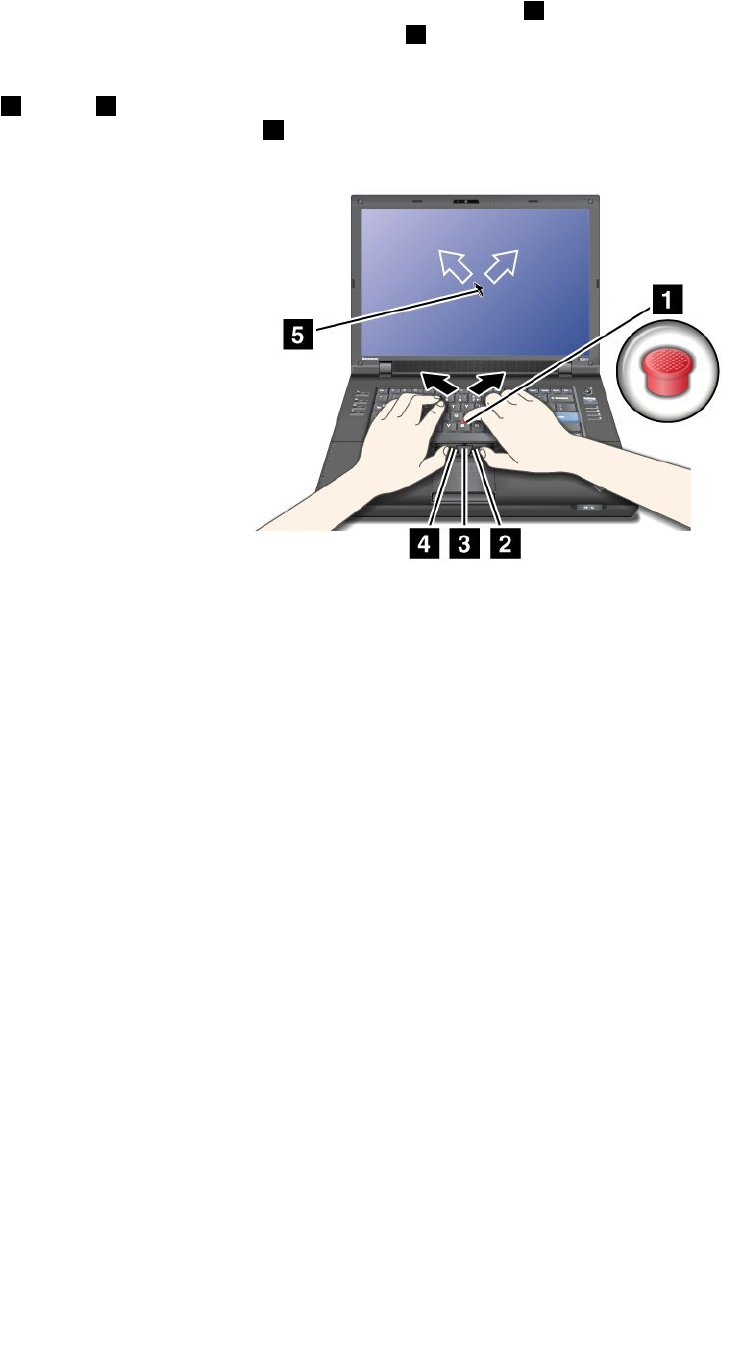
UsingtheTrackPointpointingdevice
TheTrackPointpointingdeviceconsistsofapointingstick1onthekeyboardandthreeclickbuttonsatthe
bottomofthekeyboard.Tomovethepointer5onthescreen,youapplypressuretothenonslipcaponthe
pointingstickinanydirectionparalleltothekeyboard;thepointingstickitselfdoesnotmove.Thespeedat
whichthepointermovesdependsonthepressureyouapplytothepointingstick.Thefunctionsoftheright
2andleft4clickbuttonscorrespondtothoseoftheleftandrightmousebuttonsonaconventionalmouse.
TheTrackPointcenterbutton3,calledthescrollbar,enablesyoutoscrollWebpagesordocumentsinany
directionwithnoneedtousethegraphicscrollbarsonthesideofthewindow.
IfyouarenotfamiliarwiththeTrackPoint,readtheinstructionsthatwillhelpyougetstarted.
1.Placeyourhandsinthetypingposition,andpressgentlywitheitherindexngeronthepointingstickin
thedirectioninwhichyouwantthepointertomove.
Tomovethepointer,pressthepointingstickawayfromyoutomoveitup,towardyoutomoveit
down,toonesideortheothertomoveitsideways.
Note:Thepointermightdrift.Thisisnotadefect.StopusingtheTrackPointforafewseconds,the
pointerwillstopmoving.
2.Toselectanddragasrequiredbyyoursoftware,presstheleftorrightclickbuttonwitheitherthumb
andmovetheTrackPointpointingstick.
CustomizingtheTrackPoint
YoucancustomizetheTrackPointpointingdeviceanditsbuttonsasfollows:
•Switchthefunctionsoftheleftandrightbuttons.
•ChangethesensitivityoftheTrackPoint.
•EnabletheMagnifyingGlass.
•EnabletheTrackPointscrollingfunction.
•EnabletheTrackPointScrollingTips.
TocustomizetheTrackPoint,doasfollows:
•PressFn+F8.ApanelforUltraNavDeviceSettingspopsup.
•ClickManageSettingstoopentheMousepropertieswindow.
•ClicktheUltraNavtab.UnderTrackPoint,proceedtochangingthesettings.
Fordetails,refertotheHelpintheUtility.
Chapter2.Usingyourcomputer33
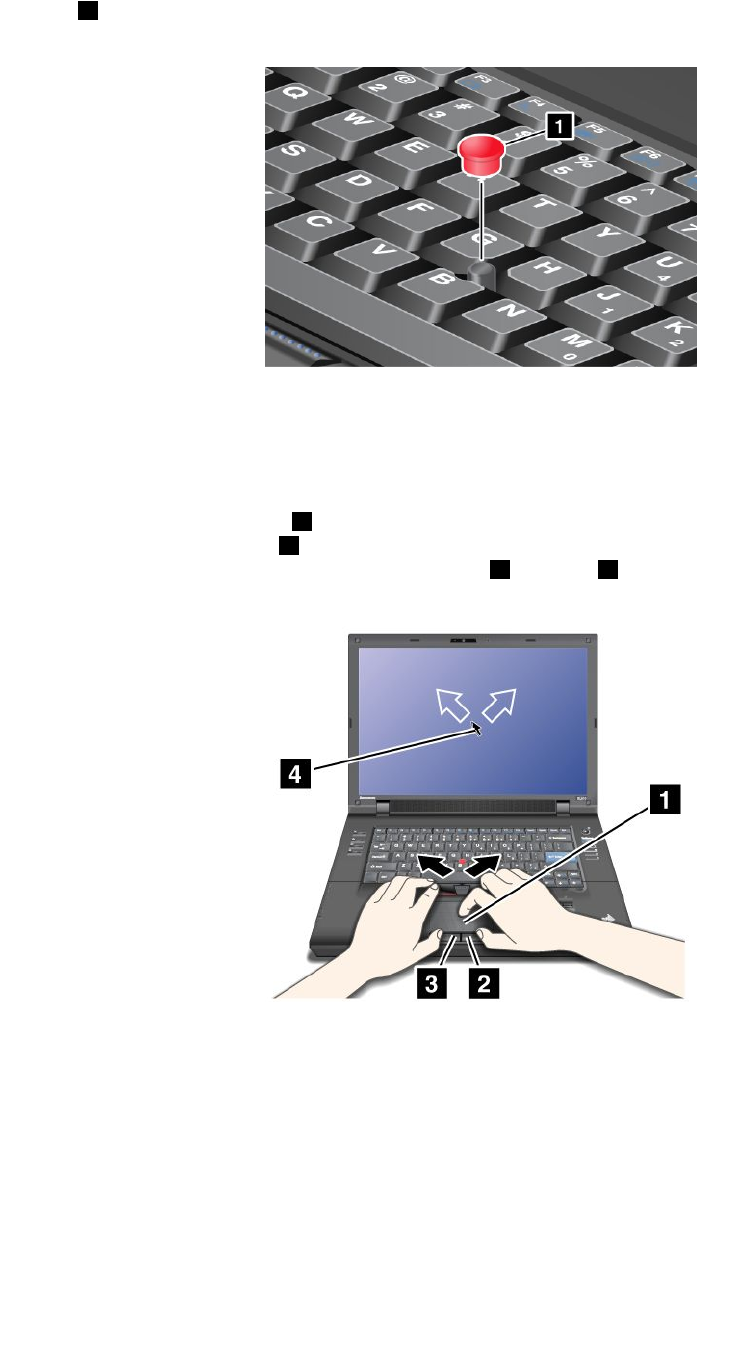
Changingthecap
Thecap1ontheendoftheTrackPointpointingstickisremovable.Youcanreplaceitasshownin
thedrawing.
Note:Ifyoureplacethekeyboard,anewkeyboardisshippedwiththedefaultcap.Ifyouwish,youcan
keepthecapfromyouroldkeyboardanduseitonthenewone.
Usingthetouchpad
Thetouchpadconsistsofapad1andtwoclickbuttonsbelowtheTrackPointbuttonsatthebottomofthe
keyboard.Tomovethepointer4onthescreen,slideyourngertipoverthepadinthedirectioninwhich
youwantthepointertomove.Thefunctionsoftheleft3andright2clickbuttonscorrespondtothoseof
theleftandrightmousebuttonsonaconventionalmouse.
Usingthemulti-touchtouchpad
Thetouchpadofyourcomputersupportsmulti-touchwithwhichyoucanzoomin,zoomout,scrollorrotate
onthescreenwhilebrowsingtheInternetorreadingoreditingadocument.
Fordetails,refertotheHelpintheUltraNav.
Customizingthetouchpad
Tocustomizethetouchpad,doasfollows:
1.PressFn+F8.ApanelforUltraNavDeviceSettingspopsup.
34UserGuide

2.ClickManageSettingstoopentheMousepropertieswindow.
3.ClicktheUltraNavtabandproceedtocustomizingthetouchpad.
Fordetails,refertotheHelpintheUtility.
BehavioroftheUltraNavandanexternalmouse
IfyouattachanexternalmousetoaUSBconnector,youcanusetheexternalmousesimultaneouslywiththe
TrackPointandthetouchpad.
DisablingtheTrackPointorthetouchpad
IfyouwanttodisabletheTrackPointorthetouchpad,doeitherofthefollowing:
UsetheFn+F8keycombination:
1.PressFn+F8.ApanelforUltraNavDeviceSettingspopsup.
2.TodisabletheTrackPoint,selectEnabletouchpadonly(disableTrackPoint).
Todisablethetouchpad,selectEnableTrackPointonly(disabletouchpad).
3.ClickClose.
ConguresettingsinUltraNavpropertieswindow:
ForWindows7andWindowsVista:
1.ClickStart➙ControlPanel➙HardwareandSound➙Mouse.
2.ClickUltraNavtab.
3.TodisabletheTrackPoint,clearthecheckboxforEnableTrackPoint.
Todisablethetouchpad,clearthecheckboxforEnabletouchpad.
4.ClickOK.
ForWindowsXP:
1.ClickStart➙ControlPanel➙PrintersandOtherHardware➙Mouse.
2.ClickUltraNavtab.
3.TodisabletheTrackPoint,clearthecheckboxforEnableTrackPoint.
Todisablethetouchpad,clearthecheckboxforEnabletouchpad.
4.ClickOK.
Note:YoucanalsoopentheUltraNavpropertieswindowbyclickingtheUltraNaviconinthetaskbar.For
details,refertotheinstructionsin“AddingtheUltraNavicontothesystemtray”onpage35.
AddingtheUltraNavicontothesystemtray
ForeasyaccesstotheUltraNavproperties,youcanaddtheUltraNavicononthesystemtray.
TodisplaytheUltraNavicononthesystemtray,doasfollows:
1.PressFn+F8.ApanelheadedUltraNavDeviceSettingspopsup.
2.ClickManageSettingstoopentheMousepropertieswindow.
3.ClicktheUltraNavtab.
4.SelectthecheckboxforShowUltraNavicononthesystemtray.
5.ClickOKorApply.
Chapter2.Usingyourcomputer35

6.IfyourcomputerisaWindows7model,clickShowhiddeniconsinthetaskbar.TheUltraNaviconis
displayed.Toaddittothetaskbarpermanently,clickCustomizeandproceedtocustomizethesettings.
YoucannowchangethepropertiesofUltraNavbyclickingtheUltraNavicononthesystemtray.
Powermanagement
Whenyouneedtouseyourcomputerawayfromelectricaloutlets,youdependonbatterypowertokeep
yourcomputerrunning.Differentcomputercomponentsconsumepoweratdifferentrates.Themoreyou
usethepower-intensivecomponents,thefasteryouconsumebatterypower.
Domore,savemoreandspendmoretimeunpluggedwithThinkPadbatteries.Mobilityhasrevolutionized
businessbyallowingyoutotakeyourworkwhereeveryougo.WithThinkPadbatteries,youwillbeableto
worklongerwithoutbeingtiedtoanelectricaloutlet.
Checkingbatterystatus
ThePowerManagerBatteryGaugeinthetasktraydisplaysthepercentageofbatterypowerremaining.
Therateatwhichyouusebatterypowerwilldeterminehowlongyoucanusethebatteryofyourcomputer
betweencharges.Becauseeachcomputeruserhasdifferenthabitsandneeds,itisdifculttopredicthow
longabatterychargewilllast.Therearetwomainfactors:
•Howmuchenergyisstoredinthebatterywhenyoubegintowork.
•Thewayyouuseyourcomputer:howoftenyouaccesstheharddiskdriveorthesolidstatedrive,how
brightyoumakethecomputerdisplay.
Usingtheacpoweradapter
Thepowertorunyourcomputercancomeeitherfromthelithium-ion(Li-ion)batterypackprovidedwithit,
orfromacpowerthroughtheacpoweradapter.Whileyouuseacpower,thebatterychargesautomatically.
Theacpoweradapterthatcomeswithyourcomputerhastwobasiccomponents:
1.Thetransformerpackthatconvertsacpoweradapterforusewiththecomputer.
2.ThepowercordthatplugsintotheACoutletandintothetransformerpack.
Attention:Usinganimproperpowercordcouldcauseseveredamagetoyourcomputer.
Tousetheacpoweradapter,dothefollowing.Besuretotakethesestepsintheorderinwhichtheyare
givenhere.
1.Connecttheacpoweradaptertothepowerjackofthecomputer.
2.Connectthepowercordtothetransformerpack.
3.Plugthepowercordintoanelectricaloutlet.
Youcancheckthestatusofyourbatteryatanytimebylookingatthebatterymeteratthebottomofyour
display.
Notes:
•Whentheacpoweradapterisnotinuse,disconnectitfromtheelectricaloutlet.
•Donotbindthepowercordtightlyaroundtheacpowertransformerpackwhenitisconnectedtothe
transformer.
•Youcanchargethebatterywhentheacpoweradapterisconnectedtothecomputerandthebatteryis
installed.Youneedtochargeitinanyofthefollowingconditions:
36UserGuide

–Whenyoupurchaseanewbattery
–Ifthebatterystatusindicatorstartsblinking
–Ifthebatteryhasnotbeenusedforalongtime
Beforeyouchargethebattery,makesurethatitstemperatureisatleast10°C(50°F).
Chargingthebattery
Whenyoucheckbatterystatusandndthatthepercentageofpowerremainingisloworwhenthepower
alarmalertsyouthatremainingpowerislow,youneedtochargeyourbatteryorreplaceitwithacharged
battery.
Ifanacoutletisconvenient,plugtheacpoweradapterintoit,andtheninsertthejackintothecomputer.
Thebatterywillchargeinaboutthreetosixhours.Thisisaffectedbythebatterysizeandthephysical
environment.Thebatterystatusindicatorwillletyouknowthatthebatteryischarging,andwillalsonotify
youwhenthebatteryisfullycharged.
Note:Toincreasethelifeofthebattery,thecomputerdoesnotstartrechargingthebatteryiftheremaining
powerisgreaterthan95%.
Maximizingbatterylife
Tomaximizethelifeofthebattery,dothefollowing:
•Usethebatteryuntilthechargeiscompletelydepletedorthebatterystatusindicatorstartsblinking
orange.
•Rechargethebatterycompletelybeforeusingit.Thebatteryisfullychargedifthebatteryindicatorshows
greenwhentheacpoweradapterispluggedin.
•Foranewbatteryorabatterythatyouhavenotusedrecently,dooneofthefollowing:
1.Rechargethebatterycompletelybeforeusingit.Thebatteryisfullychargedwhentheacpower
adapterispluggedinandthebatteryindicatorisgreen.
2.Usethebatteryuntilthechargeiscompletelydepleted—untilthebatterystatusindicatorstarts
blinkingorange.
•Alwaysusepowermanagementfeaturessuchaspowermodes,screenblank,sleep(standby),and
hibernation.
Managingyourbatterypower
WithPowerManager,youcanadjustyourpowersettingstogiveyouthebestbalancebetweenperformance
andpowersaving.
Tostarttheutilityprogram,doasfollows:
•ForWindows7:See“AccessingapplicationsinWindows7”onpage16.
•ForWindowsVistaandWindowsXP:ClickStart➙AllPrograms➙ThinkVantage➙PowerManager.
FormoreinformationaboutthePowerManagerprogram,refertotheon-linehelpoftheprogram.
Power-savingmodes
Thereareseveralmodesthatyoucanuseatanytimetoconservepower.Thissectionintroduceseach
modeandgivestipsontheeffectiveuseofthebatterypower.
Chapter2.Usingyourcomputer37

Introducingthepower-savingmodes
•Screenblank.Thecomputerdisplayrequiresconsiderablebatterypower.Toturnoffpowertothe
display,doasfollows:
1.PressFn+F3.Apanelforselectingapowerplan(inWindowsXP,powerscheme)appears.
2.SelectPoweroffdisplay(keepcurrentpowerplan)(inWindowsXP,keepcurrentpowerscheme).
Notes:Youcanalsoturnoffthecomputerdisplayasfollows:
1.PressFn+F3.Apanelforselectingapowerplan(inWindowsXP,powerscheme)appears.
2.SelectFn+F3Settings.
3.SelectPoweroffdisplay.
4.ClickOK.ThenexttimeyoupressFn+F3,youcanturnoffthecomputerdisplay.
•Sleep(standbyinWindowsXP).Insleep(standby)mode,yourworkissavedtomemory,andthenthe
solidstatedriveortheharddiskdriveandthecomputerdisplayareturnedoff.Whenyourcomputer
wakesup,yourworkisrestoredwithinseconds.
Toputyourcomputerintosleep(standby)mode,pressFn+F4.Toreturnfromsleep(standby)mode,
presstheFnkey.
•Hibernation.Byusingthismode,youcanturnoffyourcomputercompletelywithoutsavinglesor
exitingfromanyapplicationsthatarerunning.Whenyouenterhibernation,allopenapplications,folders,
andlesaresavedtotheharddisk,andthenthecomputerturnsoff.Toenterhibernation,pressFn+F12.
Toresumeyoursession,pressthepowerbuttonfornomorethan4seconds.
Whenyouarenotusingthewirelessfeatures,suchasBluetoothorwirelessLAN,turnthemoff.Thiswill
helpconservepower.Toturnoffthewirelessfeatures,pressFn+F5.
Enablingthewakeupfunction
Ifyouputyourcomputerintohibernationmode,andthewakeupfunctionisdisabled(thisisthedefault
setting),thecomputerdoesnotconsumeanypower.Ifthewakeupfunctionisenabled,itconsumesasmall
amountofpower.Toenablethefunction,doasfollows:
ForWindows7andWindowsVista:
1.ClickStart➙ControlPanel➙SystemandSecurity(inWindowsVista,SystemandMaintenance).
2.ClickAdministrativeTools.
3.ClickTaskScheduler.Ifyouarepromptedforanadministratorpasswordorconrmation,typethe
passwordorprovideconrmation.
4.Fromtheleftpane,selectthetaskfolderforwhichyouwanttoenablethewakeupfunction.The
scheduledtasksaredisplayed.
5.Clickascheduledtask,andthenclicktheConditionstab.
6.UnderPower,selectthecheckboxforWakethecomputertorunthistask.
ForWindowsXP:
1.ClickStart➙ControlPanel➙PerformanceandMaintenance.
2.ClickScheduledT asks.Thescheduledtasksaredisplayed.
3.Right-clickonascheduledtask.
4.ClickProperties.
5.ClicktheSettingstab.
6.UnderPowerManagement,selectthecheckboxforWakethecomputertorunthistask.
38UserGuide

Enablingthebatteryalarm
Youcanprogramyourcomputersothatwhenthebatterypowerfallsbelowacertainlevel,threeevents
occur:thealarmgoesoff,amessageisdisplayed,andtheLCDisturnedoff.Doasfollows:
1.StartPowerManager.
2.ClicktheGlobalPowerSettingstab.
3.ForLowbatteryalarmorCriticallylowbatteryalarm,setthepercentageofthepowerlevelandset
theaction.
Note:Ifyourcomputerenterssleep(standby)orhibernationmodewhenthebatteryislow,butthealarm
messagehasnotyetappeared,themessagewillappearwhenthecomputerresumes.Toresumenormal
operation,pressOK.
Handlingthebattery
DANGER
Donotattempttodisassembleormodifythebatterypack.
Attemptingtodosocancauseanexplosion,orliquidleakagefromthebatterypack.
AbatterypackotherthantheonespeciedbyLenovo,oradisassembledormodiedbattery
packisnotcoveredbythewarranty.
DANGER
Iftherechargeablebatterypackisincorrectlyreplaced,thereisdangerofanexplosion.Thebattery
packcontainsasmallamountofharmfulsubstances.Toavoidpossibleinjury:
•ReplaceonlywithabatteryofthetyperecommendedbyLenovo.
•Keepthebatterypackawayfromre.
•Donotexposeittoexcessiveheat.
•Donotexposeittowaterorrain.
•Donotshort-circuitit.
•Storeitinacooldryplace.
•Keepitawayfromchildren.
Thebatterypackisaconsumablesupply.
Ifyourbatterybeginstodischargetooquickly,replacethebatterypackwithanewoneofthetype
recommendedbyLenovo.Formoreinformationonreplacingthebatterypack,contactyourCustomer
SupportCenter.
DANGER
Donotdrop,crush,puncture,orsubjecttostrongforces.Batteryabuseormishandlingcancause
thebatterytooverheat,whichcancausegassesorameto“vent”fromthebatterypackorcoin
cell.Ifyourbatteryisdamaged,orifyounoticeanydischargefromyourbatteryorthebuildup
offoreignmaterialsonthebatteryleads,stopusingthebatteryandobtainareplacementfrom
thebatterymanufacturer.
Chapter2.Usingyourcomputer39

DANGER
Onlyrechargethebatterypackstrictlyaccordingtoinstructionsincludedintheproduct
documentation.
DANGER
Donotputthebatterypackintrashthatisdisposedofinlandlls.Whendisposingofthebattery,
complywithlocalordinancesorregulationsandyourcompany'ssafetystandards.
DANGER
Thereisadangerofanexplosionifthebackupbatteryisincorrectlyplaced.Thelithiumbattery
containslithiumandcanexplodeifitisnotproperlyhandled,ordisposedof.Replaceonlywitha
batteryofthesametype.T oavoidpossibleinjuryordeath,Donot:(1)throworimmerseintowater,
(2)allowittoheattomorethan100°C(212°F),or(3)attempttorepairordisassembleit.Disposeof
itasrequiredbylocalordinancesorregulationsandyourcompany'ssafetystandards.
Connectingtothenetwork
YourcomputerhasoneormorenetworkadaptersforconnectingtotheInternetandtoyourcompany's
wiredLANorwirelessLANnetwork.
Note:SomeThinkPadNotebookscomewithabuilt-inwirelessWANcardenablingyoutoestablishwireless
connectionsoverremotepublicorprivatenetworks.
AccessConnectionsisaconnectivityassistantprogramforcreatingandmanaginglocationproles.Each
locationprolestoresallthenetworkandInternetcongurationsettingsneededforconnectingtoanetwork
infrastructurefromaspeciclocationsuchasahomeoranofce.
Formoreinformation,referto“AccessConnections”onpage17.
Ethernetconnections
Youcanconnecttoyournetworkorabroadbandconnection,suchasDSLorCATV,byuseoftheEthernet
featurebuiltintoyourcomputer.Thisfeatureenablesyoutodo1Gbpshalforfullduplexdatatransmission.
ToconnecttoanetworkviaEthernet,youcanuseAccessConnections.
Wirelessconnections
Wirelessconnectionisthetransferofdatawithouttheuseofcablesbymeansofradiowavesonly.
Dependingonthefrequencyusedfordatatransmission,theareacovered,orthetypeofthedeviceusedfor
datatransfer,thefollowingcategoriesofwirelessnetworksmaybeavailabletoyou:
WirelessLAN
Awirelesslocalareanetworkcoversarelativelysmallgeographicarea,suchasanofcebuildingorahouse.
Devicesbasedonthe802.11standardscanconnecttothisnetwork.
40UserGuide

WirelessWAN
Awirelesswideareanetworkcoversabroadergeographicarea.Cellularnetworksareusedfordata
transmission,andaccessisprovidedbyawirelessservicecarrier.
Bluetooth
Oneofanumberoftechnologiesusedtocreateawirelesspersonalareanetwork.Bluetoothcanconnect
devicesashortdistancefromoneanother,andiscommonlyusedforconnectingperipheraldevicestoa
computer,transferringdatabetweenhand-helddevicesandPC,orremotelycontrollingandcommunicating
withdevicessuchasmobilephones.
WiMAX(WorldwideInteroperabilityforMicrowaveAccess)
Thislong-rangewirelessdatatransmissiontechnologybasedonthe802.16standard,isexpectedtoprovide
theusera“lastmile”broadbandconnectivitysimilartothatprovidedbycableorADSL,butwithouttheneed
tophysicallyconnectacabletothePC.
MakingwirelessLANconnections
Yourcomputercomeswithabuilt-inwirelessnetworkingcardandacongurationutilitytohelpyoumake
wirelessconnectionsandmonitorthestatusofyourconnection,sothatyoucanstayconnectedtoyour
networkwhileyouareintheofce,inameetingroom,orathome,withnoneedforawiredconnection.
Attention:
•IfyoucarryyourcomputerwiththewirelessLANfeatureintoanairplane,checktheserviceswiththe
airlinebeforeboardingtheairplane.
•Iftherearerestrictionsontheuseofcomputersonanairplanewiththewirelessfeature,youneedto
disableitbeforeboarding.Todisableit,refertotheinstructionsin“Enablingordisablingthewireless
feature”onpage47.
Note:Youcanpurchaseawirelessnetworkingcardasanoption.Formoreinformation,referto“Finding
ThinkPadoptions”onpage119.
TipsforusingthewirelessLANfeature
•PlaceyourcomputersothatthereareasfewobstaclesaspossiblebetweenthewirelessLANaccess
pointandthecomputer.
•ForthebestconnectionofthewirelessLANfeature,openyourcomputerdisplaytoanangleofslightly
morethan90degrees.
•Ifyouusethewirelessfeature(the802.11standard)ofyourcomputersimultaneouslywithaBluetooth
option,datatransmissionspeedcanbedelayedandtheperformanceofthewirelessfeaturecanbe
degraded.
Wirelessnetworkingsetup
Tousethebuilt-inwirelessnetworkingcard(the802.11standard)tocommunicate,startAccessConnections.
Note:BeforeyoustartsettingupwirelessnetworkingconnectionsbyusingAccessConnections,obtaina
NetworkName(SSID)andyourencryptioninformationfromyournetworkadministrator.
AccessConnections,aconnectivityassistantprogram,caneasilyenableonenetworkadapteranddisable
theotheradaptersondemand.Aftersettingupyourwirelessnetworkingconnection,youcanusethe
programtoquicklyswitchthenetworksettings.Formoreinformation,referto“AccessConnections”on
page17
Chapter2.Usingyourcomputer41

WirelessupgradeableThinkPadmodels
Yourcomputercanbewirelessupgradeable.Thismeansthatyourcomputerhasanantennathatcan
supportwirelessLANaccesswhenwirelessLANaccesspointsareavailable.Wirelessdevicesareavailable
fromLenovo,see“FindingThinkPadoptions”onpage119.
UsingwirelessWANconnections
WirelessWideAreaNetwork(wirelessWAN)enablesyoutoestablishwirelessconnectionsoverremote
publicorprivatenetworks.Theseconnectionscanbemaintainedoveralargegeographicalarea,suchas
acityoranentirecountry,byuseofmultipleantennasitesorsatellitesystemsmaintainedbywireless
serviceproviders.
SomeThinkPadNotebookscomewithabuilt-inwirelessWANcardintegratingsomewirelessWAN
technologies,suchas1xEV-DO,HSPA,3GorGPRS.YoucanconnecttotheInternetoryourcompany
networkwiththebuilt-inwirelessWANcardandthecongurationutilitytomakeawirelessWANconnection
andmonitoritsstatus.
Note:WirelessWANserviceisprovidedbyauthorizedserviceprovidersinsomecountries.
TondthelocationofthewirelessWANantennaonyourcomputer,referto“LocationoftheUltraConnect
wirelessantennas”onpage192.
TousethewirelessWANfeature,startAccessConnections.
UsingBluetooth
ForWindows7andWindowsVista
IfyourcomputerisequippedwiththeIntegratedBluetoothfeatures,youcanenableordisablethefeatures
bypressingFn+F5.IfyoupressFn+F5,alistofwirelessfeaturesisdisplayed.Youcanenableordisablethe
Bluetoothfeatureswithasingleclick.
TocongureaBluetoothdeviceormanageconnectionsettings,youcanuseBluetoothDevicesinControl
Panel.
1.ClickStart➙ControlPanel.
2.ClickHardwareandSound.
3.ClickDevicesandPrinters(inWindowsVista,BluetoothDevices).
TosenddatatoaBluetooth-enableddevice,doasfollows:
1.Right-clickdatathatyouwanttosend.
2.SelectSendTo➙BluetoothDevices.
Fordetails,refertotheWindowsonlinehelp.
Note:Ifyouusethewirelessfeature(the802.11standard)ofyourcomputersimultaneouslywithaBluetooth
option,datatransmissionspeedcanbedelayedandtheperformanceofthewirelessfeaturecanbe
degraded.
ForWindowsXP
IfyourcomputerisequippedwiththeIntegratedBluetoothfeatures,youcanenableordisablethefeatures
bypressingFn+F5.
IfyoupressFn+F5,alistofwirelessfeaturesisdisplayed.YoucanenableordisabletheBluetoothfeatures
withasingleclick.
42UserGuide

InWindowsXP,youcanuseeitherThinkPadBluetoothwithEnhancedDataRateSoftware,ortheMicrosoft
Bluetoothsoftware.Bydefault,ThinkPadBluetoothwithEnhancedDataRateSoftwareisinstalledonyour
computer.
UsingBluetoothforthersttimeonyourcomputer
IfthisisthersttimeBluetoothhasbeenusedonyourcomputer,useeitherofthefollowingprocedures:
1.Double-clicktheMyBluetoothPlacesicononthedesktop,ortheBluetoothiconinthetaskbar.The
StartUsingBluetoothwindowopens,andsomevirtualdevicedriversareinstalledautomatically.
2.Waituntiltheinstallationofthedriversiscomplete.
OR
1.Right-clicktheMyBluetoothPlacesicononthedesktop,ortheBluetoothiconinthetaskbar.
2.SelectStartUsingBluetooth.TheStartUsingBluetoothwindowopens,andsomevirtualdevice
driversareinstalledautomatically.
3.Waituntiltheinstallationofthedriversiscomplete.
SomeothervirtualdevicedriverswillbeinstalledondemandwhenyouusecertainBluetoothproles
forthersttime.
UsingtheMicrosoftBluetoothsoftware
IfyouareusingWindowsXPandwanttousetheMicrosoftstandardBluetoothfeatures,installthesoftware
byfollowingtheinstructionsin“InstallingtheMicrosoftBluetoothsoftwareinWindowsXP”onpage44.
ForinformationabouthowtousetheBluetoothfunction,doasfollows:
1.PressFn+F5toturnonBluetooth.
2.ClickStart➙ControlPanel.
3.ClickPrintersandOtherHardware.
4.ClickBluetoothDevices.
5.ClicktheOptionstab.
6.ClickLearnmoreaboutBluetoothSettings.
UsingThinkPadBluetoothwithEnhancedDataRateSoftware
IfThinkPadBluetoothwithEnhancedDataRateSoftwareisinstalledonyourcomputer,twoiconsare
displayedonthescreen:
•TheMyBluetoothPlacesicononthedesktop
•TheBluetoothCongurationiconinthesystemtrayofthetaskbar
MyBluetoothPlaces
TousetheBluetoothfeatures,dothefollowing:
1.Double-clicktheMyBluetoothPlacesicononthedesktoptoopentheMyBluetoothPlaceswindow.
2.GotoBluetoothTasks(ontherightsideofthewindow)anddouble-clickViewdevicesinrange.A
listofthedevicesonwhichBluetoothhasbeenenabledappears.
3.Clickthedevicetowhichyouwantaccess.Alistoftheservicesavailableonthatdeviceappears,
asfollows:
•Bluetoothkeyboardandmouse(Humaninterfacedevices)
•Printer(HCRP)
•Audiogateway
Chapter2.Usingyourcomputer43

•Headset
•PIMsynchronization
•Fax
•Filetransfer
•PIMitemtransfer
•Dial-upnetworking
•Networkaccess
•Bluetoothserialport
•BluetoothImaging
•HandsFree
•AVprole
4.Clicktheserviceyouwant.
Formoreinformation,presstheF1keytoopentheonlinehelpforBluetooth.
BluetoothConguration
TousethecongurationfeaturesofBluetooth,right-clicktheicon.Apop-upmenuappears.Select
BluetoothSetupWizardorAdvancedConguration.
TheBluetoothSetupWizardhasthefollowingcapabilities:
•FindingallBluetooth-enableddevicesthatcanprovideservices
•FindingaspecicBluetooth-enableddevicethatyouwanttouse,andconguringtheservicesonthat
device
•ConguringtheBluetooth-enabledservicesonyourcomputerthatareprovidedforremotedevices
•Conguringthenameanddevicetypeofyourcomputer
TheAdvancedCongurationhasthefollowingfunctions:
•Conguringthenameanddevicetypeofyourcomputer
•ConguringyourcomputersettingssothatremoteBluetooth-enableddevicescanndyourcomputer
•ConguringyourcomputersettingssothatyourcomputercanndremoteBluetooth-enableddevices
•Conguring,onyourcomputer,theBluetooth-enabledservicesprovidedforremotedevices
•ConguringtheservicesonremoteBluetooth-enableddevices
•DisplayinginformationaboutBluetoothhardware
Fordetails,refertothehelpforBluetooth.Toseethehelp,right-clickMyBluetoothPlacesinthesystem
trayofthetaskbar,andclickHelpandthenBluetoothhelp.Anotherwaytostartthehelpistoright-click
BluetoothCongurationinthesystemtrayofthetaskbar,andclickAdvancedCongurationandthen
Help.
InstallingtheMicrosoftBluetoothsoftwareinWindowsXP
IfyouwanttousetheMicrosoftBluetoothsoftware,doasfollows:
FirstuninstalltheThinkPadBluetoothwithEnhancedDataRateSoftware.
1.TurnBluetoothpoweroff.
2.ClickStart➙ControlPanel.
3.ClickAddorRemovePrograms.
44UserGuide

4.SelectThinkPadBluetoothwithEnhancedDataRateSoftware,thenclickChange/Removeto
uninstallthesoftware.
5.Followtheinstructionsonthescreen.
NextinstalltheMicrosoftBluetoothsoftware,asfollows:
1.TurnBluetoothpoweron.MicrosoftBluetoothsoftwareisloadedautomatically.
2.IftheFoundNewHardwareWizardwindowpopsup,dothefollowing:
a.SelectNo,notthistime,andthenclickNext.
b.SelectInstallfromalistorspeciclocation(Advanced),thenclickNext.
c.SelectSearchforthebestdriverinthoselocations.
d.SelectIncludethislocationinthesearch:,andtypeC:\SWTOOLS\Drivers\MSBTooth,orspecifythe
locationinwhichyouplacedtheextractedINFle.ThenclickNext.
3.ClickFinish.
InstallingThinkPadBluetoothwithEnhancedDataRateSoftwareinWindowsXP
IfyouareusingtheMicrosoftBluetoothsoftwareandwanttouseThinkPadBluetoothwithEnhancedData
RateSoftwareinstead,replacetheMicrosoftBluetoothsoftwarewithThinkPadBluetoothwithEnhanced
DataRateSoftwareasfollows:
1.PressFn+F5toturntheBluetoothpoweron.
2.ClickStart➙Run.
3.TypeC:\SWTOOLS\Drivers\TPBTooth\Setup.exe(orspecifythefullpathtothesetup.exeleyouhave
downloadedfromhttp://www.lenovo.com/think/support),thenclickOK.
4.ClickNext.
5.SelectIacceptthetermsinthelicenseagreement,thenclickNext.
6.ClickNexttoselectthedefaultdestinationfolder.
Ifyouneedtochangethedestinationfolder,clickChange,selectorenterthenameofthedestination
folderintheChangecurrentdestinationfolderwindow,andclickOK.
7.ClickInstalltobegininstallation.
8.ClickOKtoacceptthedriversignature.
9.ClickFinish.
10.Restartthecomputerifnecessary.
IfyoudidnotturntheBluetoothpoweronbeforeinstallingThinkPadBluetoothwithEnhancedDataRate
Software,thatis,ifyouskippedstep1,replacetheBluetoothdriverasfollows:
1.ClickStart➙ControlPanel.
2.ClickPerformanceandMaintenance,thenclickSystem.
3.ClicktheHardwaretab,thenclickDeviceManager.
4.Double-clickBluetoothRadiostoextracttheBluetoothRadiosdevicetree.
5.Double-clicktheThinkPadBluetoothwithEnhancedDataRateicontoopenthePropertieswindow.
6.ClicktheDrivertab,thenclickUpdateDriver.
7.ClickNo,notthistime,andthenclickNext.
8.SelectInstallfromalistorspeciclocation(Advanced),andthenclickNext.
9.SelectDon'tsearch.Iwillchoosethedrivertoinstall,thenclickNext.
10.Selectthedriverthathasno“DigitalSigned”icon,thenclickNext.
Chapter2.Usingyourcomputer45

11.ClickFinish.
Note:Ifyouusethewirelessfeature(the802.11standard)ofyourcomputersimultaneouslywithaBluetooth
option,datatransmissionspeedcanbedelayedandtheperformanceofthewirelessfeaturecanbe
degraded.
UsingWiMAX
SomeThinkPadNotebookscomewithabuilt-inwirelessLANcardintegratingWiMAXtechnology.
WiMAX,along-rangewirelessdatatransmissiontechnologybasedonthe802.16standard,providesyou
witha“lastmile”broadbandconnectivitysimilartothatofferedbycableorADSL,butwithouttheneedto
physicallyconnectacabletothePC.
TousetheWiMAXfeature,startAccessConnections.
Checkingwirelessconnectionstatus
AccessConnectionsGauge(Windows7)
IfyourcomputerisrunningWindows7,theAccessConnectionsGaugeinthetaskbardisplaysthesignal
strengthandstatusofyourwirelessconnection.
Note:TodisplayAccessConnectionsGaugeinthetaskbar,seetheHelpinAccessConnections.
Youcanndmoredetailedinformationaboutthesignalstrengthandstatusofyourwirelessconnection
byopeningAccessConnectionsorbyright-clickingtheAccessConnectionsGaugeinthetaskbarand
selectingViewStatusofWirelessConnection.
•AccessConnectionsGaugestates:wirelessLAN
–Powertothewirelessradioisoffornosignal.
–Powertothewirelessradioison.Thesignalstrengthofthewirelessconnectionispoor.To
improvesignalstrength,moveyoursystemclosertothewirelessaccesspoint.
–Powertothewirelessradioison.Thesignalstrengthofthewirelessconnection
ismarginal.
–Powertothewirelessradioison.Thesignalstrengthofthewirelessconnectionis
excellent.
•AccessConnectionsGaugestates:wirelessWAN
–Nosignal
–Signallevel1
–Signallevel2
–Signallevel3
Note:FormoreinformationaboutAccessConnectionsGauge,seetheHelpinAccessConnections.
AccessConnectionsiconandwirelessstatusicon
TheAccessConnectionsicondisplaysgeneralconnectionstatus.
Thewirelessstatusicondisplaysthesignalstrengthandstatusofyourwirelessconnection.
46UserGuide

Youcanndmoredetailedinformationaboutthesignalstrengthandstatusofyourwirelessconnection
eitherbyopeningAccessConnectionsorbydouble-clickingtheAccessConnectionswirelessstatus
iconinthetaskbar.
Note:IfyourcomputerisaWindows7model,todisplaytheAccessConnectionsstatusiconandthe
wirelessstatusiconinthesystemtray,refertotheAccessConnectionson-linehelp.
•AccessConnectionsiconstates
–Nolocationproleisactiveornoneexists.
–Currentlocationproleisdisconnected.
–Currentlocationproleisconnected.
•Wirelessstatusiconstates:wirelessLAN
–Powertothewirelessradioisoff.
–Powertothewirelessradioison.Noassociation.
–Powertothewirelessradioison.Nosignal.
–Powertothewirelessradioison.Thesignalstrengthofthewirelessconnectionisexcellent.
–Powertothewirelessradioison.Thesignalstrengthofthewirelessconnectionismarginal.
–Powertothewirelessradioison.Thesignalstrengthofthewirelessconnectionispoor.Toimprove
signalstrength,moveyoursystemclosertothewirelessaccesspoint.
•Wirelessstatusiconstates:wirelessWAN
–PowertotheWANradioisoff
–Noassociation
–Nosignal
–Signallevel1
–Signallevel2
–Signallevel3
Note:Ifyouhavetroubleinmakingaconnection,trymovingyourcomputerclosertoyourwirelessaccess
point.
Enablingordisablingthewirelessfeature
Toenableordisablethewirelessfeature,pressFn+F5.Alistofwirelessfeaturesisdisplayed.Youcanturn
thefeatureonandoffwithasingleclick.
Youcanalsoenableordisablethefeaturebythefollowingprocedures.
Toenablethewirelessfeature,doasfollows:
1.ClicktheAccessConnectionswirelessstatusiconinthesystemtray.
2.ClickPowerOnWirelessRadio.
Todisablethewirelessfeature,doasfollows:
•ClicktheAccessConnectionswirelessstatusiconinthesystemtray.
•ClickPowerOffWirelessRadio.
Note:Youcanusethewirelessradioswitchtodisablethewirelessradioofallthewirelessdevicesonyour
computer.
Chapter2.Usingyourcomputer47

Usingaprojectororexternaldisplay
Yourcomputercomeswithmanyfeaturestoincreasetheenjoymentofyourcomputerandhelpyougive
presentationswithcondence.Someoftheseoptionsareasfollows:
•“Changingdisplaysettings”onpage48
•“Connectingaprojectororexternaldisplay”onpage49
•“Settingupapresentation”onpage53
•“Usingdualdisplays”onpage54
Changingdisplaysettings
Youcanchangethedisplaysettings,suchasfontsizeorcolormode.
Fontsize
Tochangethefontsize,doasfollows:
ForWindows7:
1.Right-clickonthedesktop,andclickPersonalize.
2.ClickDisplayattheleft.
3.SelecttheSmaller,Medium,orLargerradiobutton.
4.ClickApply.Thechangewilltakeeffectafteryoulogoff.
ForWindowsVista:
1.Right-clickonthedesktop,andclickPersonalize.
2.ClickAdjustfontsize(DPI)underTasksattheleft.Ifyouarepromptedforanadministratorpassword
orconrmation,typethepasswordorprovideconrmation.
3.SelecttheLargerscale(120DPI)-maketextmorereadablecheckbox.
4.ClickOK.Thechangewilltakeeffectafterthecomputerrestarts.Youarepromptedtorestartthe
computerafteryouclickOKorApply.
ForWindowsXP:
1.Right-clickonthedesktop,andclickProperties.TheDisplayPropertieswindowopens.
2.ClicktheAppearancetab.
3.UnderFontSize,clickLargeFontsorExtraLargeFonts.
4.ClickApplytoapplythesettings.
5.ClickOK.IfyouarepromptedtorestartthecomputerafteryouclickOKorApply,thechangewill
takeeffectafterthecomputerrestarts.
Numericlock
Tochangethenumericlocksetting,doasfollows:
ForWindows7:
1.Right-clickonthedesktop,andclickPersonalize.
2.ClickDisplayattheleft.
3.ClickChangedisplaysettings.
4.ClickAdvancedsettings,selecttheOnScreenDisplaytab,andthenclickNumLockSettings.
48UserGuide

5.Thesettingwindowopens.
6.Followtheinstructionsonthescreen.
ForWindowsVista:
1.Right-clickonthedesktop,andclickPersonalize.
2.ClickDisplaySettings.
3.ClickAdvancedSettings,selecttheOnScreenDisplaytab,andthenclickNumLockSettings.
4.Thesettingwindowopens.
5.Followtheinstructionsonthescreen.
ForWindowsXP:
1.Right-clickonthedesktop,andclickProperties.TheDisplayPropertieswindowopens.
2.ClicktheSettingstab.
3.ClickAdvanced,selecttheOnScreenDisplaytab,andthenclickNumLockSettings.
4.Thesettingwindowopens.
5.Followtheinstructionsonthescreen.
Connectingaprojectororexternaldisplay
Thissectionincludesthefollowingtopics:
•“Attachinganexternalmonitor”onpage49
•“UsingtheDVImonitor”onpage52
•“UsingtheDisplayPortconnector”onpage53
Attachinganexternalmonitor
Yourcomputercansupportamaximumvideoresolutionofupto2048x1536,providedthattheexternal
monitoralsosupportsthatresolution.Formoredetails,refertothemanualsprovidedwithyourmonitor.
Youcansetanyresolutionforeitherthecomputerdisplayortheexternalmonitor.Whenyouusebothat
thesametime,theresolutionofbothisthesame.Ifyousetahigherresolutionforthecomputerdisplay,
youcanseeonlypartofthescreenatatime.Youcanseeotherpartsbymovingtheimagewiththe
TrackPointoranotherpointingdevice.
Youcanmovethedisplayoutputtothecomputerdisplay,theexternalmonitor,orbothintheDisplay
Settingswindow(inWindowsXPDisplayPropertieswindow).
Connectinganexternalmonitor
Toattachanexternalmonitor,doasfollows:
ForWindows7:
1.Connecttheexternalmonitortothemonitorconnector,thenconnectthemonitortoanelectricaloutlet
2.Turnontheexternalmonitor.
3.ChangethedisplayoutputlocationbypressingFn+F7.Thisallowsyoutoswitchbetweenviewing
outputontheexternaldisplay,thecomputerdisplay,andbothdisplays.
Note:Ifyourcomputercannotdetecttheexternalmonitor,right-clickonthedesktop,thenselectScreen
resolution.ClicktheDetectbutton.
ForWindowsVista:
Chapter2.Usingyourcomputer49

1.Connecttheexternalmonitortothemonitorconnector,thenconnectthemonitortoanelectricaloutlet.
2.Turnontheexternalmonitor.
3.Ifthisisthersttimetheexternalmonitorhasbeenconnected,theNewDisplayDetecteddialogbox
opens.Selectoneofthefollowing,andthenclickOK.
•Duplicatemydesktoponalldisplays(mirrored)
•Showdifferentpartsofmydesktoponeachdisplay(extended)
•Showmydesktopontheexternalmonitoronly
Note:Ifyourcomputercannotdetecttheexternalmonitor,theNewDisplayDetecteddialogboxdoesnot
open.Fordetails,refertotheWindowsonlinehelp.
ForWindowsXP:
1.Turnoffthecomputer.
2.Connecttheexternalmonitortothemonitorconnector,thenconnectthemonitortoanelectricaloutlet.
3.Turnontheexternalmonitorandthecomputer.
4.ChangethedisplayoutputlocationbypressingFn+F7.Thisallowsyoutoswitchbetweenviewing
outputontheexternaldisplay,thecomputerdisplay,andbothdisplays.
Notes:
•Donotchangethedisplayoutputlocationwhileamovingpictureisbeingdrawn--forexample,while
playingamovieoragame,orviewingabusinesspresentation.Closetheapplicationbeforechangingthe
displayoutputlocation,orchangethedisplaymodebeforeyouopenanMPEGletoplay.
•IfyouareattachinganexternalmonitorthatsupportsonlyVGAmode(640x480resolution),donotview
outputonboththecomputerdisplayandtheexternalmonitor.Doingsowouldcausetheexternalmonitor
screentobescrambledandtheoutputnottobedisplayed;inaddition,itcouldcausedamagetothe
screen.Usetheexternalmonitoronly.
•IftheexternalTFTmonitoryouconnecthasananaloginterface,ickersorripplesmayappearonsome
displays,suchastheshutdownscreenofWindows.ThisiscausedbytheexternalTFTmonitor,and
cannotbexedbyadjustingtheexternalTFTmonitororthecomputersidesettings.
Settingthemonitortypes
Tosetyourmonitortype,doasfollows:
ForWindows7:
1.Connecttheexternalmonitortothemonitorconnector,andthenconnectthemonitortoanelectrical
outlet.
2.Turnontheexternalmonitor.
3.Right-clickonthedesktop,andclickScreenresolution.
Note:Ifyourcomputercannotdetecttheexternalmonitor,clicktheDetectbutton.
4.Clicktheiconforthedesiredmonitor(theMonitor-2iconisfortheexternalmonitor).
5.SetResolution.
6.ClickAdvancedSettings.
7.ClicktheMonitortab.Checkthemonitorinformationwindowtomakesurethatthemonitortypeis
correct.Ifitis,clickOKtoclosethewindow;otherwisedoasfollows.
8.Ifmorethantwomonitortypesaredisplayed,selectGenericPnPMonitororGenericNon-PnP
Monitor.
9.ClickProperties.Ifyouarepromptedforanadministratorpasswordorconrmation,typethepassword
orprovideconrmation.
50UserGuide

10.ClicktheDrivertab.
11.ClickUpdateDriver.
12.ClickBrowsemycomputerfordriversoftware,andthenclickLetmepickfromalistofdevice
driversonmycomputer.
13.CleartheShowcompatiblehardwarecheckbox.
14.SelectManufacturerandModelforyourmonitor.Ifyoucannotndyourmonitorinthelist,stopthe
installationofthisdriverandusethedrivershippedwithyourmonitor.
15.Afterupdatingthedriver,clickClose.
16.ClickOK.
Note:Tochangethecolorsettings,right-clickonthedesktop,andclickScreenresolution.ClickAdvanced
Settings,selecttheMonitortab,thensetColors.
ForWindowsVista:
Note:IfyouselectShowdifferentpartsofmydesktoponeachdisplay(extended),referto“Usingthe
Extenddesktopfunction”onpage54.
1.Connecttheexternalmonitortothemonitorconnector,andthenconnectthemonitortoanelectrical
outlet.
2.Turnontheexternalmonitor.
3.PressFn+F7tochangethedisplayoutputlocationtotheexternalmonitor.
4.Right-clickonthedesktop,andclickPersonalize.
5.ClickDisplaySettings.TheDisplaySettingswindowopens.
6.ClickAdvancedSettings.
7.ClicktheMonitortab.Checkthemonitorinformationwindowtomakesurethatthemonitortypeis
correct.Ifitis,clickOKtoclosethewindow;otherwisedoasfollows.
8.Ifmorethantwomonitortypesaredisplayed,selectGenericPnPMonitororGenericNon-PnP
Monitor.
9.ClickProperties.Ifyouarepromptedforanadministratorpasswordorconrmation,typethepassword
orprovideconrmation.
10.ClicktheDrivertab.
11.ClickUpdateDriver.
12.ClickBrowsemycomputerfordriversoftware,andthenclickLetmepickfromalistofdevice
driversonmycomputer.
13.CleartheShowcompatiblehardwarecheckbox.
14.SelectManufacturerandModelforyourmonitor.Ifyoucannotndyourmonitorinthelist,stopthe
installationofthisdriverandusethedrivershippedwithyourmonitor.
15.Afterupdatingthedriver,clickClose.
16.SetResolutionandColorsintheDisplaySettingswindow.
17.ClickOK.
ForWindowsXP:
1.Connecttheexternalmonitortothemonitorconnector,andthenconnectthemonitortoanelectrical
outlet.
2.Turnontheexternalmonitorandthecomputer.
3.PressFn+F7tochangethedisplayoutputlocationtotheexternalmonitor.
4.Right-clickonthedesktop,andclickPropertiestoopentheDisplayPropertieswindow.
5.ClicktheSettingstab.
6.ClickAdvanced.
Chapter2.Usingyourcomputer51

7.ClicktheMonitortab.Checkthemonitorinformationwindowtomakesurethatthemonitortypeis
correct.Ifitis,clickOKtoclosethewindow;otherwisedoasfollows.
8.Ifmorethantwomonitortypesaredisplayed,selectDefaultMonitor.
9.ClickProperties.
10.ClicktheDrivertab.
11.ClickUpdateDriver.TheHardwareUpdateWizardappears.
12.ClickNo,notthistime,andthenclickNext.
13.SelectInstallfromalistorspeciclocation(Advanced),andthenclickNext.
14.SelectDon'tsearch.Iwillchoosethedrivertoinstall,andthenclickNext.
15.CleartheShowcompatiblehardwarecheckbox.
16.SelectManufacturerandModelforyourmonitor.Ifyoucannotndyourmonitorinthelist,stopthe
installationofthisdriverandusethedrivershippedwithyourmonitor.
17.Afterupdatingthedriver,clickOKtoclosethePropertieswindow.
18.SetColorsandScreenareaintheDisplayPropertieswindow.
19.ClickOK.
Considerationsforattachinganexternalmonitor
•Wheninstallinganoperatingsystem,youmustinstallthedisplaydriverforyourmonitorthatissupplied
withthecomputer,andtheMonitorINFlethatissuppliedwiththeexternalmonitor.
•Ifyousetaresolutionhigherthantheresolutionyouareusingonthepanel,anduseapanelthatdoesnot
supportthatresolution,takeadvantageofthevirtualscreenfunction,whichenablesyoutodisplayonlya
partofthehigh-resolutionscreenimageyourcomputerproduces.Youcanseeotherpartsoftheimage
bymovingthescreenwiththeTrackPointorotherpointingdevice.
•Iftheexternalmonitoryouareusingisoutdated,theresolutionandtherefreshratemaybelimited.
UsingtheDVImonitor
Ifyourcomputerhasoneoftheoptionalexpansionunits,aThinkPadMiniDockPlusSeries3oraThinkPad
MiniDockSeries3,youcanusetheDigitalVisualInterface(DVI)monitorthroughtheDVIconnector
ofthatunit.
Notes:
•ThescreenmodethatcanbeuseddependsonthespecicationsoftheDVImonitor.
•BeforeyouattachtheDVImonitor,makesurethatthecomputerisattachedtotheexpansionunitand
thesystemworksproperly.
ToattachtheDVImonitor,doasfollows:
1.Turnoffthecomputer.
2.ConnecttheDVImonitortotheDVIconnectoroftheexpansionunit,andthenconnectthemonitor
toanelectricaloutlet.
3.TurnontheDVImonitorandthecomputer.Thesystemstarts.
IfthecomputeroutputdoesnotappearontheDVImonitor,doasfollows:
ForacomputerthathastheIntel®displayadapter:
1.PressCtrl+Alt+F12.The“IntelGraphicsMediaAcceleratorDriverformobile”windowappears.
2.SelectDigitalDisplay,IntelDualDisplayClone,orExtendedDesktop.IfyouselectDigitalDisplay,
thecomputeroutputappearsontheDVImonitoronly.IfyouselectIntelDualDisplayCloneor
ExtendedDesktop,theoutputappearsbothonthecomputerdisplayandontheDVImonitor.
3.ClickOK.
52UserGuide

ForacomputerthathastheAMD®displayadapter:
1.Right-clickonthedesktopandselectAMDCatalystControlCenterfromthepopupmenu.The“ATI
CatalystControlCenter”windowopens.
2.ClickGraphics➙DesktopandDisplays➙DesktopManagement➙CreatingandArranging
Desktops.The“CreatingandArrangingDesktops”windowwillopen.
3.SelectDisableLCD,DuplicateorExtend.IfyouselectDisableLCD,thecomputeroutputappears
ontheDVImonitoronly.IfyouselectDuplicateorExtend,thecomputeroutputappearsbothon
thecomputerdisplayandontheDVImonitor.
4.ClickYestoapplythesetting.
ConsiderationsforattachingaDVImonitor
ConnecttheDVImonitortotheexpansionunit,andturniton,beforeyouturnonthecomputer.Otherwise
thesystemcannotrecognizethatthemonitorisconnected.IftheoptionforenablingtheDVImonitorinthe
DisplayPropertieswindowdoesnotappear,tryclosingthewindowandopeningitagain.Iftheoptionstill
doesnotappear,makesurethattheconnectorofthemonitorisattachedrmly,andrepeattheprocedure
forattachingthemonitor.
UsingtheDisplayPortconnector
YourcomputerhasaDisplayPortconnector,thelatestdigitaldisplayinterfaceforconnectiontovarious
externaldevices,suchasCRTmonitors,projectors,orevenHDTV.
Thiscompactconnectorenablesaplug-and-playsetupandsupportsadaptorsthatcanplugintoDVIor
VGAport.
Settingupapresentation
Note:IfyourcomputerisaWindows7model,itdoesnotsupportPresentationDirector,buttheFn+F7or
Win+Pkeycombinationisavailableforswitchingdisplayoutputtoaconnectedprojector.
PresentationDirectorprovidesaneasywaytosetupyourcomputertohelpyougivepresentationswith
condence,evenwhenyouareawayfromyourofce.
UsePresentationDirectortoadjustresolutionsettingsandtemporarilydisablepowermanagementtimersto
ensureanuninterruptedpresentation.
PresentationDirectorhassomepredenedpresentationschemes.Toapplyapresentationscheme,youcan
usetheFn+F7keycombination.
TostartPresentationDirector,clickStart➙AllPrograms➙ThinkVantage➙PresentationDirector,and
followtheinstructionsonthescreen.
Projectingvideo
Todisplayinformationandmakepresentations,youcanattachadataprojectortoyourcomputer.Attachthe
dataprojectortothemonitorconnectoronyourcomputer.
Note:Itmaytakeseveralsecondsbeforetheprojectordisplaystheimage.Ifyoudonotseeyourdesktop
displayedafter60seconds,trypressingFn+F7toswitchbetweendifferentdisplayoutputlocations.
IfyourcomputerisrunningWindowsVistaorWindowsXP,youcancreateapresentationschemeby
followingtheinstructionsofthePresentationDirector,withtheprojectorattachedtoyourcomputer.Youcan
savetheschemeforafuturepresentationwiththesameequipment.
Chapter2.Usingyourcomputer53

Playingsound
Yourprojectormighthaveoneormoreaudio-inputconnectors.Toprojectsound,youwillneedtoattachthe
comboaudiojackonyourcomputertotheseconnectors,usinganaudiocable(commerciallyavailable).
Usingdualdisplays
ThissectionintroducestheExtenddesktopfunctionwhichenablesyoutodisplayoutput(thesameor
different)onboththecomputerdisplayandanexternalmonitor.
UsingtheExtenddesktopfunction
YourcomputersupportsafunctionnamedtheExtenddesktop.Withit,youcandisplayoutputonboththe
computerdisplayandanexternalmonitor.Youcanalsodisplaydifferentdesktopimagesoneachmonitor.
YoucanusetheExtenddesktopfunctionwithoutchanginganysettings.Ifthefunctiondoesnotwork,refer
to“EnablingtheExtenddesktopfunction”onpage54toenableit.
ConsiderationsforusingtheExtenddesktopfunction
•IfyouwanttoshowDOSfull-screenwhileintheExtenddesktopmode,onlytheprimarydisplayshows
DOS;theotherdisplayisblackedout.
IfyourcomputerhastheInteldisplayadapter,youcandesignatetheotherdisplayastheprimarydisplay.
Dothefollowing:
1.PressCtrl+Alt+F12.TheIntelCUIwindowopens.
2.SelectExtendedDesktop.
3.Changethesettingtodesignatetheprimarydisplay.
•WhenanapplicationusingtheDirectDrawortheDirect3Displayedinfull-screenmode,itisshown
onlyontheprimarydisplay.
•YoucannotusethedisplayswitchingfunctionwhenyouareintheExtenddesktopmode.
EnablingtheExtenddesktopfunction
ToenabletheExtenddesktopfunction,doasfollows:
ForWindows7:
1.Connecttheexternalmonitortothemonitorconnector,thenconnectthemonitortoanelectricaloutlet.
2.Turnontheexternalmonitor.
3.PressFn+F7,thenselectExtend.
Tochangetheresolutionforeachmonitor,doasfollows:
1.Right-clickonthedesktop,andclickScreenresolution.
2.ClicktheMonitor-1icon(fortheprimarydisplay,thecomputerdisplay).
3.SelecttheResolutionoftheprimarydisplay.
4.ClicktheMonitor-2icon(forthesecondarydisplay,theexternaldisplay).
5.SelecttheResolutionofthesecondarydisplay.
6.Placetheiconsforthemonitorssothattheytouch.
Note:Youcansetthemonitorsinanyrelativeposition,buttheiconsmusttoucheachother.
7.ClickOKtoapplythechanges.
Note:Tochangethecolorsettings,right-clickonthedesktop,andclickScreenresolution.ClickAdvanced
Settings,selecttheMonitortab,thensetColors
54UserGuide

ForWindowsVista:
1.Connecttheexternalmonitortothemonitorconnector,thenconnectthemonitortoanelectricaloutlet.
2.Turnontheexternalmonitor.
3.Ifthisisthersttimetheexternalmonitorhasbeenconnected,theNewDisplayDetecteddialogbox
opens.SelectShowdifferentpartsofmydesktoponeachdisplay(extended),andthenclickOK.
Tochangetheresolutionforeachmonitor,doasfollows:
1.Right-clickonthedesktop,andclickPersonalize.
2.ClickDisplaySettings.TheDisplaySettingswindowopens.
3.ClicktheMonitor-1icon(fortheprimarydisplay,thecomputerdisplay).
4.SelecttheResolutionandtheColorsoftheprimarydisplay.
5.ClicktheMonitor-2icon(forthesecondarydisplay,theexternaldisplay).
6.SelecttheResolutionandtheColorsofthesecondarydisplay.
7.Placetheiconsforthemonitorssothattheytouch.
Note:Youcansetthemonitorsinanyrelativeposition,buttheiconsmusttoucheachother.
8.ClickOKtoapplythechanges.
ForWindowsXP:
1.Turnoffthecomputer.
2.Connecttheexternalmonitortothemonitorconnector,thenconnectthemonitortoanelectricaloutlet.
3.Turnontheexternalmonitorandthecomputer.
4.Right-clickonthedesktop,andclickPropertiestoopentheDisplayPropertieswindow.
5.ClicktheSettingstab,andclicktheMonitor-2icon.
6.SelecttheExtendmyWindowsdesktopontothismonitorcheckboxandclickApply.(IftheMonitor
Settingswindowopens,clickYes.)
Tochangetheresolutionforeachmonitor,doasfollows:
1.ClicktheMonitor-1icon(fortheprimarydisplay,thecomputerdisplay).
2.Selectthecolorqualityandthescreenresolutionoftheprimarydisplay.
3.ClicktheMonitor-2icon(forthesecondarydisplay,theexternaldisplay).
4.Selectthecolorqualityandthescreenresolutionofthesecondarydisplay.
5.Placetheiconsforthemonitorssothattheytouch.
Note:Youcansetthemonitorsinanyrelativeposition,buttheiconsmusttoucheachother.
6.ClickOKtoapplythechanges.
Usingacolorprole
ThedisplayprovidesacolorprolethatcanworkwiththeMicrosoftImageColorManagement(ICM)
function.IfthegraphicssoftwareyouareusingiscompatiblewithICM,youcandisplayacolorimageon
yourmonitorandmatchit,withthesamequality,onanotherdevice,suchasascanneroraprinter.
FordetailsonMicrosoftICM,refertothemanualsprovidedwiththeWindowsoperatingsystem.
Note:ThecolorproleforThinkPadLCDhasbeenpre-installedinyourcomputeralready.Ifyouneedto
installadifferentcolorprole,seeInstallingThinkPadMonitorFileforWindows2000/XP/Vista/7.
Chapter2.Usingyourcomputer55

Usingaudiofeatures
Yourcomputerisequippedwiththefollowing:
•Comboaudiojack,1/8inch(3.5mm)indiameter
•Built-instereospeakers
•Built-inmonauraldigitalmicrophone
Yourcomputeralsohasanaudiochipthatenablesyoutoenjoyvariousmultimediaaudiofeatures:
•CompliantwithIntelHighDenitionAudio.
•RecordingandplaybackofPCMandWAVlesin16-bitor24-bitformat.
•PlaybackofaWAVleatasamplerateof44.1KHzto192KHz.
•PlaybackofMIDIlesthroughaWavetablesynthesizerunderMicrosoftWindowsoperatingsystems.
•PlaybackofMP3lesthroughtheWindowsMediaPlayerorasoftwareMP3player.
•Recordingfromvarioussoundsources,suchasaheadsetattachedeithertothecomboaudiojackof
yourcomputerortothemicrophonejackoftheThinkPadPortReplicatorSeries3,ThinkPadMiniDock
Series3,ortheThinkPadMiniDockPlusSeries3.
Thefollowingtableshowswhichfunctionsoftheaudiodevicesattachedtothejacksonyourcomputeror
dockingstationaresupported.
Table3.Audiofeaturelist
AudiodeviceHeadsetwitha3.5mm
4-poleplug
ConventionalheadphoneConventional
microphone
ComboaudiojackHeadphoneand
microphonefunctions
supported
Headphonefunction
supported
Notsupported
Headphonejackofthe
dockingstation
Onlyheadphonefunction
supported.Microphone
functionnotsupported
Headphonefunction
supported
Notsupported
Microphonejackofthe
dockingstation
NotsupportedNotsupportedMicrophonefunction
supported
Conguringforsoundrecording
Tocongurethemicrophoneforoptimizedsoundrecording,opentheRealtekHDsoundEffectManager
asfollows:
ForWindows7andWindowsVista:ClickStart➙ControlPanel➙HardwareandSound➙RealtekHD
soundEffectManager.TheRealtekHDsoundEffectManagerwindowopens.
ForWindowsXP:ClickStart➙ControlPanel.SwitchtoClassicViewandclickRealtekHDsoundEffect
Manager.TheRealtekHDsoundEffectManagerwindowopens.
Usinganintegratedcamera
Ifyourcomputerhasanintegratedcamera,youcanpressFn+F6toopentheCommunicationssettings
window,thecamerawillbelaunchedandthegreencamera-in-useindicatorwillturnonautomatically.
Ifyourcomputerhasanintegratedcamera,whenyoupressFn+F6toopentheCommunicationssettings
window,thecamerawillbelaunchedandthegreencamera-in-useindicatorwillturnonautomatically.In
56UserGuide

theCommunicationssettingswindow,youcanpreviewyourvideoimageandtakeasnapshotofyour
currentimage.
Youcanalsousetheintegratedcamerawithotherprogramsthatprovidefeaturessuchasphotographing,
videocapturing,andvideoconferencing.Tousetheintegratedcamerawithotherprograms,openoneofthe
programsandstartthephotographing,videocapturing,orvideoconferencingfunction.Then,thecamerawill
startautomaticallyandthegreencamera-in-useindicatorwillturnon.Formoreinformationaboutusingthe
camerawithaprogram,refertothedocumentationthatcamewiththeprogram.
IfyoudonotwantthecameratobelaunchedautomaticallywhenyoupressFn+F6orwhenyouusea
program,pressFn+F6toopentheCommunicationssettingswindowandclicktheHidemycameraimage
buttontodisablethecamera.
Conguringcamerasettings
Youcancongurethecamerasettingstomeetyourneeds,suchasadjustingthequalityofthevideooutput.
Tocongurethecamerasettings,dothefollowing:
1.PressFn+F6.TheCommunicationssettingswindowopens.
2.ClicktheManageSettingsbutton.TheCommunicationsUtilitywindowisdisplayed.
3.IntheCommunicationsUtilitywindow,congurethecamerasettingsdependingonyourindividual
needs.
Usingopticaldrive
YourcomputersupportMultiBurnerDriveandDVD-ROMDrive.
MultiBurnerDrive
ThisdrivecanreadDVD-ROMdiscs,DVD-Rdiscs,DVD-RAMdiscs,DVD-RWdiscs,andalltypesofCDs,
suchasCD-ROMdiscs,CD-RWdiscs,CD-Rdiscs,andaudioCDs.Inaddition,itcanrecordonDVD-R
discs,DVD-RWdiscs,typeIIDVD-RAMdiscs,CD-RWstandardandhighspeeddiscs,andCD-Rdiscs.
DVD-ROMDrive
ThisdrivecanreadDVD-ROMdiscsandalltypesofCDs,suchasCD-ROMdiscs,CD-RWdiscs,CD-R
discs,andaudioCDs.Thisdrivehasnorecordingcapability.
Usingthemediacardreader
Yourcomputerhasthefollowingcardslots:
•One54mm-wideExpressCardslot
•OneMediacardreaderslot
The54mm-wideExpressCardslotsupportsthefollowingcards:
•34mm-wideExpressCard
•54mm-wideExpressCard
•Smartcard
TheMediacardreaderslotsupportsthefollowingcards:
•SDCard
•SDHCCard
Chapter2.Usingyourcomputer57

•SDXCCard
•MMC(MultiMediaCard)
Note:WhentransferringdatatoorfromaFlashMediaCard,suchasanSDcard,donotputyourcomputer
insleep(standby)orhibernationmodebeforethedatatransferiscomplete.Todosomightcausedamageto
yourdata.
InsertinganExpressCard,aSmartcard,oraFlashMediaCard
Attention:
•DonotinsertanExpressCardwhilethecomputerisinsleep(standby)modeorhibernationmode.Ifyou
do,thecomputermaynotrespondwhenyoutrytoresumeusingit.
•Beforeyoustartinstallinganyofthefollowingcards,touchametaltableoragroundedmetalobject.This
actionreducesanystaticelectricityfromyourbody.Thestaticelectricitycoulddamagethecard.
–34mm-wideExpressCard
–54mm-wideExpressCard
–Smartcard
–FlashMediaCard,suchasanSDCard,anSDHCCard,anSDXCCard,andaMultiMediaCard
ForinformationaboutthelocationoftheExpressCardslot,ashmediacardreaderslot,andsmartcardslot,
see“Locatingcomputercontrols,connectors,features,andindicators”onpage1.
Toinserta34mm-wideExpressCardora54mm-wideExpressCard,dothefollowing:
1.Makesurethatthecardiscorrectlyoriented.
2.Insertthecardintotheslotwiththenotchededgefacingupward.Thenpressthecardrmlyintothe
connector.
ToinsertaSmartcardintotheExpressCardslot,dothefollowing:
1.InserttheSmartcardreaderintothe54mm-wideExpressCardslot.
2.InserttheSmartcardintotheSmartcardreader.MakesurethattheSmartcardiscorrectlyoriented.
Notes:
•TheSmartcardmustbeinstalledwithaSmartcardreader.TheSmartcardreadershouldbein
compliancewiththeFIPS2.0.
•YoucangetaSmartcardreaderfromLenovo.See“FindingThinkPadoptions”onpage119.
ToinsertaFlashMediaCardintothe4-in-1Mediacardreader,doasfollows:
1.Makesurethatthecardiscorrectlyoriented.
2.InsertthecardrmlyintotheMediacardreaderslot.Thecardmaystopbeforeitiscompletely
installedintotheslot.
IftheExpressCard,FlashMediaCard,orSmartcardisnotPlug-and-Play,dothefollowing:
ForWindows7:
1.OpenControlPanel.
2.ClickHardwareandSound.
3.ClickDeviceManager.Ifyouarepromptedforanadministratorpasswordorconrmation,typethe
passwordorprovideconrmation.
4.FromtheActionmenu,selectAddlegacyhardware.TheAddHardwareWizardstarts.
58UserGuide

5.Followtheinstructionsonthescreen.
ForWindowsVistaandWindowsXP:
1.OpenControlPanelandswitchtoClassicview.
2.Double-clicktheAddHardwareicon.TheAddHardwareWizardstarts.
3.Followtheinstructionsonthescreen.
RemovinganExpressCard,aSmartcard,oraFlashMediaCard
Attention:
•BeforeremovingastorageExpressCard,suchasaashmemoryExpressCard,asolidstateExpressCard,
oramemorycardreaderExpressCard,fromanExpressCardslot,youmuststoptheExpressCard.
Otherwise,dataontheExpressCardmightbecorruptedorlost.
•DonotremoveanExpressCardwhilethecomputerisinsleep(standby)modeorhibernationmode.Ifyou
do,thesystemwillnotrespondwhenyoutrytoresumeoperation.
ForinformationaboutthelocationoftheExpressCardslot,ashmediacardreaderslot,andsmartcardslot,
see“Locatingcomputercontrols,connectors,features,andindicators”onpage1.
ToremoveanExpressCard,oraFlashMediaCard,dothefollowing:
ForWindows7:
1.ClickShowhiddeniconsinthetaskbar.
2.Right-clicktheSafelyRemoveHardwareandEjectMediaicon.
3.Selecttheitemyouwanttoremovetostopthecard.
4.Pressthecardtoejectitfromyourcomputer.
5.Removethecardfromyourcomputerandstoreitsafelyforfutureuse.
ForWindowsVistaandWindowsXP:
1.ClicktheSafelyRemoveHardwareiconinthetaskbar
2.Selecttheitemyouwanttoremovetostopthecard.
3.Pressthecardtoejectitfromyourcomputer.
4.Removethecardfromyourcomputerandstoreitsafelyforfutureuse.
ToremoveaSmartcard,dothefollowing:
ForWindows7:
1.ClicktheShowhiddeniconsinthetaskbar.
2.Right-clickSafelyRemoveHardwareandEjectMediaicon.
3.SelecttheitemforSmartcardtostopit.
4.PullthecardoutoftheSmartcardreader.
5.PresstheSmartcardreadertoejectitfromyourcomputer.
6.StoretheSmartcardandtheSmartcardreadersafelyforfutureuse.
ForWindowsVistaandWindowsXP:
1.ClicktheSafelyRemoveHardwareiconinthetaskbar.
2.SelecttheitemforSmartcardtostopit.
3.PulltheSmartcardoutoftheSmartcardreader.
Chapter2.Usingyourcomputer59

4.PresstheSmartcardreadertoejectitfromyourcomputer.
5.StoretheSmartcardandtheSmartcardreadersafelyforfutureuse.
Note:Ifyoudonotremovethecardfromyourcomputerafteryoustopthecard,thecardcannolongerbe
accessed.Toaccessthecard,youmustremoveitrst,theninsertitagain.
60UserGuide
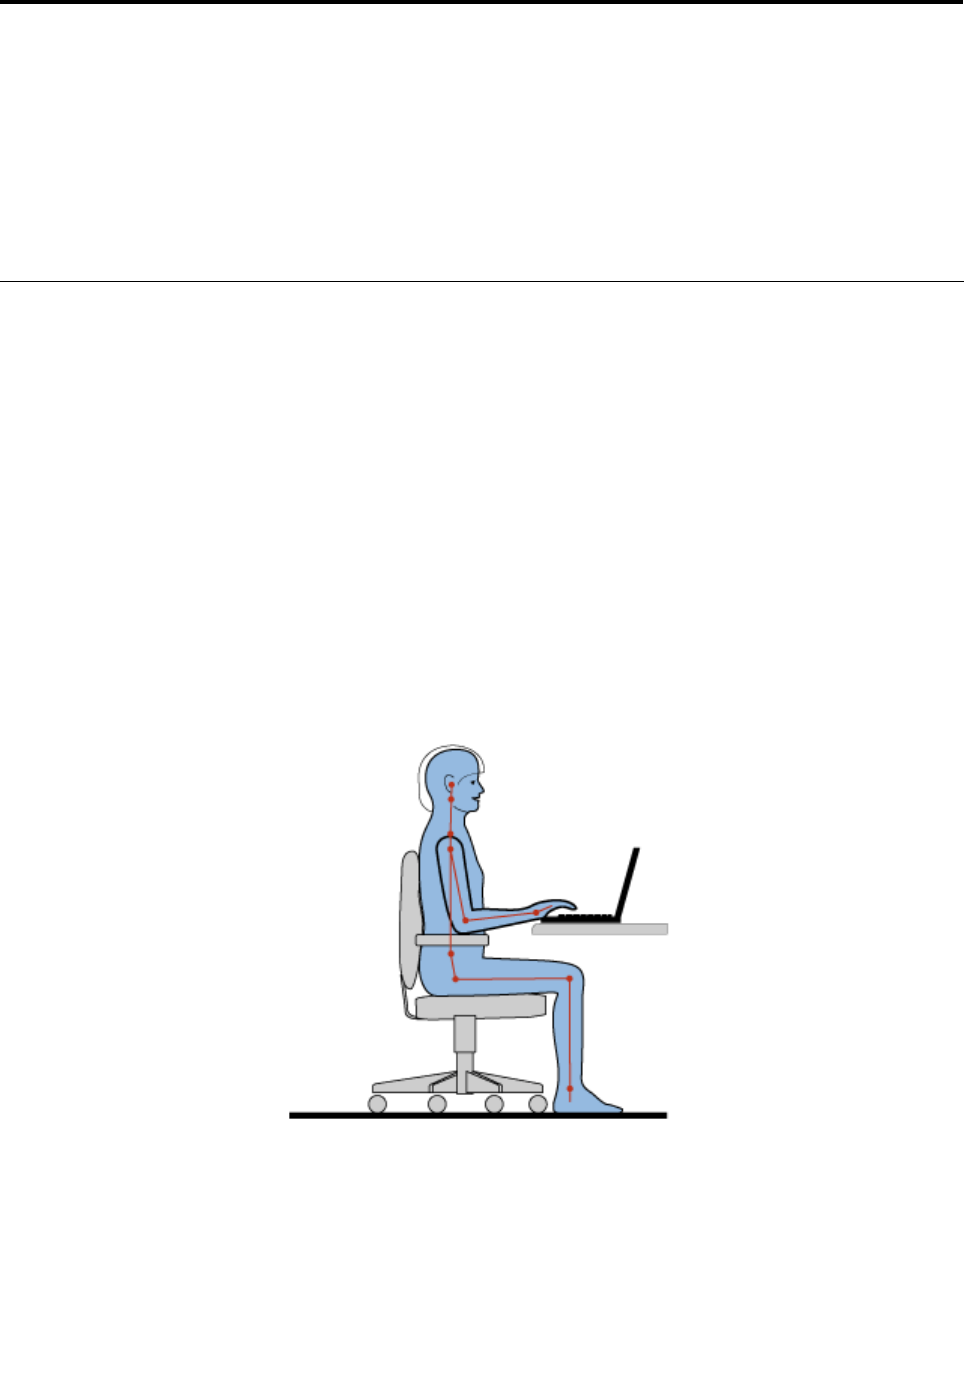
Chapter3.Youandyourcomputer
Thischapterprovidesyouinformationaboutaccessibilityandtravelingwithyourcomputer.
Thischaptercontainsthefollowingtopics:
•“Accessibilityandcomfort”onpage61
•“Travelingwithyourcomputer”onpage64
Accessibilityandcomfort
Becauseyourcomputerenablesyoutoworkinsomanyplaces,itisimportantthatyouremainattentive
togoodposture,goodlightingandproperseating.Bykeepingtheseconsiderationsinmind,youcan
improveperformanceandachievegreatercomfort.
Lenovoiscommittedtoprovidingthelatestinformationandtechnologytoourcustomerswithdisabilities.
Refertoouraccessibilityinformationwhichoutlinesoureffortsinthisarea.
Ergonomicinformation
Workinginthevirtualofcemaymeanadaptingtofrequentchangesinyourenvironment.Followingsome
simpleruleswillmakethingseasierandbringyouthemaximumbenetsofyourcomputer.Keepinginmind
suchbasicsasgoodlightingandproperseating,forexample,canhelpyouimproveyourperformance
andachievegreatercomfort.
Note:Thisexampleshowssomeoneinaconventionalsetting.Evenwhennotinsuchasetting,youcan
followmanyofthesetips.Developgoodhabits,andtheywillserveyouwell.
GeneralPosture:Belowaresomegeneralrecommendationsforassumingahealthyworkingposture.It
isbesttoperiodicallymakeminormodicationsinyourworkingposturetodetertheonsetofdiscomfort
causedbylongperiodsofworkinginthesameposition.Frequent,shortbreaksfromyourworkwillalsohelp
topreventanyminordiscomfortassociatedwithyourworkingposture.
Display:Positionthedisplaytomaintainacomfortableviewingdistanceof510-760mm(20-30in).Avoid
glareorreectionsonthedisplayfromoverheadlightingoroutsidesourcesoflight.Keepthedisplayscreen
©CopyrightLenovo201261

cleanandsetthebrightnesstolevelsthatenableyoutoseethescreenclearly.PressFn+HomeorEnd
toadjustdisplaybrightness.
HeadPosition:Keepyourheadandneckinacomfortableandneutral(vertical,orupright)position.
Chair:Useachairthatgivesyougoodbacksupportandseatheightadjustment.Usechairadjustmentsto
bestsuityourdesiredposture.
ArmandHandPosition:Ifavailable,utilizechairarmrestsoranareaonyourworkingsurfacetoprovide
weightsupportforyourarms.Keepyourforearms,wrists,andhandsinarelaxedandneutral(horizontal)
position.Typewithasofttouchwithoutpoundingthekeys.
LegPosition:Keepyourthighsparalleltotheoorandyourfeetatontheoororonafootrest.
Whatifyouaretraveling?
Itmaynotbepossibletoobservethebestergonomicpracticeswhenyouareusingyourcomputerwhileon
themoveorinacasualsetting.Regardlessofthesetting,trytoobserveasmanyofthetipsaspossible.
Sittingproperlyandusingadequatelighting,forexample,willhelpyoumaintaindesirablelevelsofcomfort
andperformance.
Questionsaboutvision?
ThinkPadNotebook'svisualdisplayscreensaredesignedtomeetthehigheststandardsandtoprovideyou
withclear,crispimagesandlarge,brightdisplaysthatareeasytosee,yeteasyontheeyes.Ofcourse,
anyconcentratedandsustainedvisualactivitycanbetiring.Ifyouhavequestionsoneyefatigueorvisual
discomfort,consultavisioncarespecialistforadvice.
Adjustingyourcomputertotyou
Becauseyourcomputerenablesyoutoworkinsomanyplaces,itisimportantthatyouremainattentive
togoodposture,goodlightingandproperseating.Refertothefollowingtipstoimproveperformance
andachievegreatercomfort:
Activesittingandrestbreaks:Thelongeryousitandworkwithyourcomputerthemoreimportantitis
toobserveyourworkingposture.Followinggeneralrecommendationsformaintainingahealthyworking
postureandpracticing“activesitting”arethebestwaystoavoiddiscomfortassociatedwithyourworking
postures.Makingminorvoluntaryposturalchangesandtakingshortfrequentworkbreaksarethekey
ingredientsforhealthycomputing.Yourcomputerisalightandmobilesystem;rememberthatitcaneasilybe
repositionedonyourworkingsurfacetoaccommodatemanyposturemodicationsyoumightwishtomake.
Workareasetupoptions:Familiarizeyourselfwithallofyourofcefurnituresothatyouknowhowtoadjust
yourworksurface,seat,andotherworktoolstoaccommodateyourpreferencesforcomfort.Ifyourwork
areaisnotinanofcesetting,besuretotakespecialnoteofemployingactivesittingandutilizingwork
breaks.NotethattherearemanyThinkPadproductsolutionsavailabletohelpyoumodifyandexpandyour
computertobestsuityourneeds.AccessthefollowingWebsitetoviewsomeoftheseoptions:
http://www.lenovo.com/accessories/services/index.htmlExploreyouroptionsfordockingsolutionsand
externalproductsthatcanprovidetheadjustabilityandfeaturesthatyouwant.
ThinkPadfeaturesthatpromotecomfort:ThereareeasytouseThinkPadfeaturesthatcanhelpmake
yourcomputermorecomfortabletouse.
62UserGuide

Accessibilityinformation
Lenovoiscommittedtoprovidingpeoplewithdisabilitiesgreateraccesstoinformationandtechnology.
Asaresult,thefollowinginformationprovideswaystohelpusersthathavehearing,vision,andmobility
limitationsgetthemostoutoftheircomputerexperience.
Assistivetechnologiesenableuserstoaccessinformationinthemostappropriateway.Someofthese
technologiesarealreadyprovidedinyouroperatingsystem,otherscanbepurchasedthroughvendors,or
accessedthroughtheWorldWideWeb.
Assistivetechnologies
SomeaccessibilitytechnologiesareavailablethroughtheAccessibilityOptionsprogram.Depending
onyouroperatingsystem,thenumberofaccessibilityoptionsavailablevaries.Ingeneral,accessibility
optionsenhancethewayuserswithhearing,vision,ormobilitylimitationsnavigateandusetheircomputer.
Forexample,someusersmightnothavethenemotorskillsrequiredtouseamouseorselectkey
combinations.Otherusersmightrequirelargerfontsorhigh-contrastdisplaymodes.Insomecases,
magniersandbuilt-inspeechsynthesizersareavailable.Fordetailedinformationabouteachofthese
features,consulttheMicrosofthelpsystem.
TousetheAccessibilityOptionsprogram,doasfollows:
ForWindows7andWindowsVista:
1.ClickStart,andthenclickControlPanel.
2.ClickEaseofAccess.
3.ClickEaseofAccessCenter.
ForWindowsXP:
1.ClickStart,andthenclickControlPanel.
2.ClickAccessibilityOptions.
ThishelpsystemsupportstheaccessibilityfeaturesprovidedbyyourWindowsoperating
system,screenreadersdesignedtooperateintheWindowsenvironment,andWindows
keyboardnavigation.ForacompletelistingofMicrosoftWindowsKeyboardGuide,goto
http://www.microsoft.com/enable/Products/altkeyboard.aspx
Screenreadertechnologiesareprimarilyfocusedonsoftwareapplicationinterfaces,helpsystems,anda
varietyofonlinedocuments.However,inthecasewhereascreenreadercannotreaddocuments,the
documentmustrstgothroughaconversionprocess.OnesolutionconvertsAdobePDFlesintoaformat
thatisreadbythescreen-readerprograms.ThissolutionisaWeb-basedserviceprovidedbyAdobe
SystemsIncorporated.Throughhttp://access.adobe.com,AdobePDFdocumentscanbeconvertedto
HTMLorplaintextinmanylanguages.OneconversionoptionsconvertsPDFdocumentsontheInternet.A
secondoptionenablesuserstosubmittheURLofanAdobePDFlethroughe-mailtoconvertittoHTMLor
ASCIItext.AdobePDFlesonalocalharddiskdrive,localCD-ROM,orlocalareanetwork(LAN)canalso
beconvertedbyattachingtheAdobePDFletoane-mailmessage.
FullScreenMagnierfunction
SomemodelssupporttheFullScreenMagnierfunction,whichenlargestheactivewindowandmakesit
easierforyoutousethecomputerdisplay.
ToenabletheFullScreenMagnierfunction,pressFn+Spacebar.Theactivewindowismagniedandthe
FullScreenMagniericonisdisplayedinthesystemtrayatbottomrightofyourscreen.Thenyoucan
changethezoomresolution.ClicktheFullScreenMagniericonandmakeyourchoice.
Chapter3.Youandyourcomputer63

TodisabletheFullScreenMagnierfunction,clicktheFullScreenMagniericonandselectExitorpress
Fn+Spacebar.
Travelingwithyourcomputer
Whenyoutravelabroad,yourcomputercanhelpyoufeelmoreathomeandatease.Withyourowncomputer
anditsles,youcanbecondentaboutgatheringandofferinginformationtoclientsandcoworkers.
Attendingtosomeimportantdetailsthatcanhelpforeigntravelgosmoothly:
•“Traveltips”onpage64
•“Travelaccessories”onpage64
Traveltips
Usethefollowingtraveltipstotravelmorecondentlyandefcientlywithyourcomputer.
1.Whileitissafetoallowyourcomputertogothroughthexraymachinesatairportsecuritystations,itis
importanttokeepyoureyesonthecomputeratalltimestopreventtheft.
2.Considerbringinganairplaneorautomobileadapterforyourcomputer.
3.Ifyoucarryanacpoweradapter,detachtheaccordfromittoavoiddamagingthecord.
Traveltipsonairplanes
Ifyoucarryyourcomputerintoanairplane,checkthetraveltips.
Attention:
•Forusingonboardcomputerorwireless(suchasInternet,Bluetooth,etc.)service,checktheservices
withtheairlinebeforeboardingtheairplane.
•Iftherearerestrictionsontheuseofcomputerswiththewirelessfeatureonanairplane,youneedto
disableitbeforeboarding.Todisableit,refertotheinstructionsinEnablingordisablingthewireless
feature.
Followthetipsbelow.
1.Becarefulabouttheseatinfrontofyouonairplanes.Angleyourcomputerdisplaysothatitdoesnot
getcaughtwhenthepersoninfrontofyouleansback.
2.Remembertohibernateorturnoffyourcomputerwhentakingoff.
Travelaccessories
Hereisachecklistofthingstoconsiderpackingwhenyouaregoingtobeawayfromtheofce:
TravelEssentials
•ThinkPadacpoweradapter
•Externalmouse,ifyouareaccustomedtousingone
•Ethernetcable
•Extrabattery,charged
•Aqualitycarryingcasethatprovidesadequatecushionandprotection
Ifyouaretravelingtoanothercountryyoumightwanttoconsidertheseitems
•Anacpoweradapterforthecountrythatyouaretravelingto
•Anadaptertoconnecttoaphonelineinthatcountry
64UserGuide

Otheritemsyoumaywishtoconsider
•ThinkPadAC/DCComboAdapter
•Externalstoragedevice
Chapter3.Youandyourcomputer65

66UserGuide

Chapter4.Security
Thischapterprovidesinformationabouthowtoprotectyourcomputerfromtheftandunauthorizeduse.
•“Attachingamechanicallock”onpage67
•“Usingpasswords”onpage67
•“Harddisksecurity”onpage75
•“Settingthesecuritychip”onpage75
•“Usingangerprintreader”onpage76
•“Noticeondeletingdatafromyourharddiskdriveorsolidstatedrive”onpage78
•“Usingandunderstandingrewalls”onpage79
•“Protectingdataagainstviruses”onpage79
Attachingamechanicallock
Youcanattachamechanicallocktoyourcomputer,tohelppreventitfrombeingremovedwithoutyour
permission.
Attachamechanicallocktothekeyholeofthecomputer,thensecurethechainonthelocktoastationary
object.Refertotheinstructionsshippedwiththemechanicallock.
Note:Youareresponsibleforevaluating,selecting,andimplementingthelockingdevicesandsecurity
features.Lenovomakesnocomments,judgments,orwarrantiesaboutthefunction,quality,orperformance
oflockingdevicesandsecurityfeatures.
Usingpasswords
Byusingpasswords,youcanhelppreventyourcomputerfrombeingusedbyothers.Onceyouseta
password,apromptappearsonthescreeneachtimeyoupoweronthecomputer.Enteryourpasswordat
theprompt.Youcannotusethecomputerunlessyoutypethecorrectpassword.
Makesurethatonlyauthorizedindividualsaccessyourcomputer.Establishingdifferentkindsofpasswords
requiresthatotherpossibleusersknowtheproperpasswordsinordertoaccessyourcomputeroryourdata.
Ifthisiconappears,enterPower-onpasswordorSupervisorpassword.
Ifthisiconappears,enterHarddiskpassword.
Note:Ifthisiconappears,typeauserharddiskpassword.Ifyouwanttotypeamasterharddiskpassword,
pressF1andtypeamasterharddiskpassword.Fordetails,refertotheinstructionsin“UsingPassphrase”
onpage68.
Ifthisiconappears,enterSupervisorpassword.
©CopyrightLenovo201267

Clickontheitemsbelowtondoutmoreaboutpasswordsandhowtousethemtoprotectyourcomputer.
“Passwordsandsleep(standby)mode”onpage68
“UsingPassphrase”onpage68
“Power-onpassword”onpage70
“Harddisksecurity”onpage75
“Supervisorpassword”onpage73
Passwordsandsleep(standby)mode
Ifyouhavesetpasswordsandyouputyourcomputerintosleep(standby)modebypressingFn+F4,the
procedureforresumingoperationisasfollows:
•Youarenotpromptedtotypethepasswordwhenresumingoperation.
•Ifanyharddiskorthesolidstatedrivehasaharddiskpassword,itisunlockedautomaticallywhen
youresumeoperation.
UsingPassphrase
WhenthePassphrasefunctionisenabled,youcansetapower-onpassword,harddiskpasswords,anda
supervisorpassword,eachcontainingupto64characters.
EnablingthePassphrasefunctionimprovestheprotectionoftheharddiskpasswordandthusimproves
thesecurityofyourcomputer.
ThePassphrasefunctionisenabledbydefault.
FormoreinformationaboutusingthePassphrasefunctionseethefollowingsections.
TipsonusingthePassphrasefunction
IfthePassphrasefunctionisenabledonyourcomputer,andyousettheharddiskpassword,andthen
removetheharddiskdrivefromyourcomputerandinstallitononeofthecomputerslistedabove,that
computerwillnotaccepttheharddiskpassword.
IfthePassphrasefunctionisenabledonyourcomputer,andyousettheharddiskpassword,andthen
removetheharddiskdrivefromyourcomputerandinstallitonacomputerthatisnotoneofthemodels
listedabove,buthasthePassphrasefunctiondisabled,youwillnotbeabletochangetheharddisk
passwordonthatcomputer.Ifyouneedtochangetheharddiskpassword,dothefollowing.
1.Removetheharddiskdrive.
2.Removethepower-onandsupervisorpasswordsiftheyhavebeensetonthatcomputer.
3.EnablingthePassphrasefunction.
4.Reinstalltheharddiskdrive.Nowyoucanchangetheharddiskpassword.
IfthePassphrasefunctionisdisabledonyourcomputer,andyousettheharddiskpassword,andthen
removetheharddiskdrivefromyourcomputerandinstallitonacomputerthatisnotoneofthemodels
listedabove,buthasthePassphrasefunctionenabled,youwillnotbeabletochangetheharddisk
passwordonthatcomputer.Ifyouneedtochangetheharddiskpassword,dothefollowing.
1.Removetheharddiskdrive.
2.Removethepower-onandsupervisorpasswordsiftheyhavebeensetonthatcomputer.
3.DisablethePassphrasefunction.
4.Reinstalltheharddiskdrive.Nowyoucanchangetheharddiskpassword.
68UserGuide

DisablingthePassphrasefunction
TodisablethePassphrasefunction,usetheBIOSSetupUtilityasfollows.
Note:Beforeenablingordisablingthefunction,removethepower-on,allharddiskandsupervisor
passwords.Ifanypasswordisset,youcannotenableordisablethefunction.Refertotheprocedures
in“Power-onpassword”onpage70,“Harddiskpasswords”onpage71,and“Supervisorpassword”
onpage73
1.Turnyourcomputeroff,andthenturnitonagain.
2.Whenthelogoscreenisdisplayed,pressF1.TheBIOSSetupUtilitywindowopens.
3.SelectSecurity,usingthecursordirectionalkeystomovedownthemenu.
4.SelectPassword.
5.SelectUsingPassphrase.
6.SelectDisabled.Anoticeisdisplayed,sayingthatthechangeshavebeensaved.
7.SelectContinue.
8.PressF10toexit.
9.IntheSetupConrmationwindow,clickY es.
EnablingthePassphrasefunction
ToenablethePassphrasefunction,usetheBIOSSetupUtilityasfollows.
Note:Beforeenablingordisablingthefunction,removethepower-on,allharddiskandsupervisor
passwords.Ifanypasswordisset,youcannotenableordisablethefunction.Refertotheprocedures
in“Power-onpassword”onpage70,“Harddiskpasswords”onpage71,and“Supervisorpassword”
onpage73
1.Turnyourcomputeroff,andthenturnitonagain.
2.Whenthelogoscreenisdisplayed,pressF1.TheBIOSSetupUtilitywindowopens.
3.SelectSecurity,usingthecursordirectionalkeystomovedownthemenu.
4.SelectPassword.
5.SelectUsingPassphrase.
6.SelectEnabled.Awarningmessageisdisplayed,sayingthatifthePassphrasefunctionisenabled,
yourcomputerwillhaveonlylimitedinteroperabilitywithanycomputersthatarenotcompatiblewith
computersthatdonothavethatfunction.
7.SelectYes.
8.PressF10toexit.
9.IntheSetupConrmationwindow,clickY es.
Settingapower-onpassword,aharddiskpasswords,andasupervisorpassword
IfyouenablethePassphrasefunction,youcansetapasswordcontaining64characters.Tosetapassword,
youcanusealphanumericcharacterkeysandthespacebar.
Note:Ifthefunctionisdisabled,apower-onpasswordandaharddiskpasswordcancontainonly12
charactersandasupervisorpasswordcancontainonly7characters,allalphanumeric;youcannotusethe
spacebar.
Tosetapower-onpassword,harddiskpasswords,andasupervisorpassword,refertotheprocedures
in“Power-onpassword”onpage70,“Harddiskpasswords”onpage71,and“Supervisorpassword”
onpage73.
Chapter4.Security69

Typingpasswords
Ifthisiconappears,typeapower-onpasswordorasupervisorpassword.
Ifthisiconappears,typeauserharddiskpassword.Ifyouwanttotypeamasterharddiskpassword,
dothefollowing:
1.PressF1.Theiconchangestothis:
2.Nowtypethemasterharddiskpassword.
Note:Toreturntothersticon,pressF1again.
Ifthisiconappears,typeasupervisorpassword.
Note:YoucanpressBackspaceifyoupressawrongkeywhileyouaretypingyourpassword.
Power-onpassword
Youcansetapower-onpasswordtohelpprotectyourcomputeragainstaccessbyunauthorizedusers.
Ifyousetapower-onpassword,thepasswordpromptappearsonthescreenwheneveryouturnonthe
computer.Youmustenterthecorrectpasswordtostartusingthecomputer.
Settingapower-onpassword
1.Printtheseinstructions.
2.Saveallopenles,andexitallapplications.
3.Turnyourcomputeroffandthenturnitonagain.
4.Whenthelogoscreenisdisplayed,pressF1.TheBIOSSetupUtilitywindowopens.
5.SelectSecurity,usingthecursordirectionalkeystomovedownthemenu.
6.SelectPassword.
7.SelectPower-onPassword.
8.TypeyourpasswordintheEnterNewPasswordeld.
Notes:
•IfthePassphrasefunctionisenabled,yourpower-onpasswordcanconsistof1to64charactersin
anycombination.IfthePassphrasefunctionisdisabled,yourpasswordcanbefromonetotwelve
alphanumericcharactersinanycombination.Fordetails,referto“UsingPassphrase”onpage68.
•Youcansettheminimumlengthofapower-onpasswordintheBIOSSetupUtilitymenu.For
details,referto“Securitymenu”onpage139.
9.PressEnteroncetomovetothenextline.Retypethepasswordyoujustenteredtoverifyit.
10.Commityourpasswordtomemory.ASetupNoticewindowisdisplayed.
Note:Youmightwanttonoteyourpower-onpasswordinasafeplace.Otherwise,ifyouforgetit,you
havetotakeyourcomputertoaLenovoreselleroramarketingrepresentativetohavethepassword
canceled.
11.PressF10toexit.
12.SelectYesintheSetupConrmationwindow.
70UserGuide

Changingorremovingthepower-onpassword
Tochangeorremovethepower-onpassword,followthesteps1through7abovein“Settingapower-on
password”onpage70.
Note:WhenyoupressF1toentertheBIOSSetupUtility,thesystemwillrequirethepower-onpassword.
Typeyourpower-onpasswordandpressenter,thentheBIOSSetupUtilitywindowopens.
Tochangethepower-onpassword,dothefollowing:
1.IntheEnterCurrentPasswordeld,typethecurrentpower-onpassword.
2.WhentheEnterNewPasswordeldopens,typeanewpasswordintheeldandthenretypeittoverify.
Toremovethepower-onpassword,doasfollows:
1.IntheEnterCurrentPasswordeld,typethecurrentpower-onpassword.
2.WhentheEnterNewPasswordeldopens,leaveitblankandpressEntertwice.
Harddiskpasswords
Twotypesofharddiskpasswordshelpprotecttheinformationstoredontheharddisk:
•Userharddiskpassword
•Masterharddiskpassword,whichrequiresauserharddiskpassword
Ifauserharddiskpasswordhasbeenset,butnomasterharddiskpasswordhasbeen,theusermustenter
theuserharddiskpasswordinordertogainaccesstolesandapplicationsontheharddisk.
Themasterpasswordcanbesetandusedonlybyasystemadministrator.Likeamasterkey,itenablesthe
administratortogetaccesstoanyharddriveinasystem.Theadministratorsetsthemasterpassword;no
oneelseknowsit.Thentheadministratorsetsauserpasswordforeachcomputerinthenetwork,andtells
eachuserthepasswordforhisorhercomputer.Theusercanthenchangetheuserpasswordasdesired,
buttheadministratorcanstillgetaccessbyusingthemasterpassword.
Settingaharddiskpassword
1.Printtheseinstructions.
2.Saveallopenles,andexitallapplications.
3.Turnyourcomputeroffandthenonagain.
4.Whenthelogoscreenisdisplayed,pressF1.TheBIOSSetupUtilityopens.
5.SelectSecurity,usingthecursordirectionalkeystomovedownthemenu.
6.SelectPassword.
7.SelectHardDiskxPassword,wherexisthenumberoftheharddiskdriveforwhichyouwantto
setapassword.
8.Apasswordwindowopens.YouarepromptedtoselectUserorUser+Master.SelectUserifyouwant
tosetonlyoneharddiskpassword.Ifyouareanadministratororsupervisor,youcanselectUser+
Mastertosettwopasswords.(Theusercanchangetheuserpasswordlater.)
9.IfyouselectUser+Master,gotostep12.
10.IfyouselectUseronly,anew-passwordwindowopens.TypeyournewpasswordintheEnterNew
Passwordeld.
Notes:
•IfthePassphrasefunctionisenabled,youcanchooseyourharddiskpassword,whichcanconsistof
1to64charactersinanycombination.IfthePassphrasefunctionisdisabled,youcanchooseahard
Chapter4.Security71

diskpassword,whichcanbefromonetotwelvealphanumericcharactersinanycombination.For
details,referto“UsingPassphrase”onpage68.
•YoucansettheminimumlengthofaharddiskpasswordintheBIOSSetupUtilitymenu.Fordetails,
referto“Securitymenu”onpage139.
•Ifyousetaharddiskpasswordofoversevencharacters,theharddiskdrivecanbeusedonlywitha
computerthatcanrecognizeaharddiskpasswordofoversevencharacters.Ifyoutheninstallthe
harddiskdriveinacomputerthatcannotrecognizeaharddiskpasswordthatcontainsmorethan
sevencharacters,youcannotgetaccesstothedrive.
11.PressEnteroncetomovetothenextline.Retypethepasswordyoujustenteredtoverifyit.Goto
step18tocompletetheprocedure.
12.IfyouselectUser+Master,amessagewindowopensandpromptsyoutosetupauserharddisk
passwordrst.ClickContinue.
13.Anewharddiskuserpasswordwindowopens.TypeyournewpasswordintheEnterNewPassword
eld.
14.PressEnteroncetomovetothenextline.Retypethepasswordyoujustenteredtoverifyit.
15.Amessagewindowopensandpromptsyoutosetthemasterharddiskpassword.ClickContinue.
16.Anewmasterhard-diskpasswordwindowopens.TypeyournewpasswordintheEnterNew
Passwordeld.
17.PressEnteroncetomovetothenextline.Retypethepasswordyoujustenteredtoverifyit.
18.CommityourpasswordtomemoryandpressEnter.ASetupNoticewindowisdisplayed.
Attention:Youmightwanttonoteyourpasswordsandkeeptheminasafeplace.Otherwise,if
youforgettheuser-onlypassword,orbothuserandmasterpasswords,Lenovocannotresetyour
passwordsorrecoverdatafromtheharddisk.YoumusttakeyourcomputertoaLenovoresellerora
marketingrepresentativetohavetheharddiskdrivereplaced.Proofofpurchaseisrequired,andafee
willbechargedforpartsandservice.
19.PressF10toexitfromtheSetupNoticewindow.
Thenexttimeyouturnonyourcomputer,youwillhavetotypetheuserormasterharddiskpasswordin
ordertostartyourcomputerandgetaccesstoyouroperatingsystem.
Changingorremovingaharddiskpassword
IfthePassphrasefunctionisenabledonyourcomputer,andyousettheharddiskpassword,andthen
removetheharddiskdrivefromyourcomputerandinstallitonacomputerthathasthePassphrasefunction
disabled,youwillnotbeabletochangetheharddiskpasswordonthatcomputer.Ifyouneedtochange
theharddiskpassword,removetheharddiskdrive,removethepower-onandsupervisorpasswords
iftheyhavebeensetonthatcomputer,disablethePassphrasefunction,andthenreinstalltheharddisk
drive.Referto“UsingPassphrase”onpage68.
IfthePassphrasefunctionisdisabledonyourcomputer,andyousettheharddiskpassword,andthen
removetheharddiskdrivefromyourcomputerandinstallitonacomputerthathasthePassphrasefunction
enabled,youwillnotbeabletochangetheharddiskpasswordonthatcomputer.Ifyouneedtochange
theharddiskpassword,removetheharddiskdrive,removethepower-onandsupervisorpasswords
iftheyhavebeensetonthatcomputer,disablethePassphrasefunction,andthenreinstalltheharddisk
drive.Referto“UsingPassphrase”onpage68.
Followsteps1through7inSettingaharddiskpasswordabove,typingyourpasswordtogetaccesstothe
BIOSSetupUtilityprogram.
TochangeorremovetheUseronlyharddiskpassword,doasfollows:
72UserGuide

•Tochangetheharddiskpassword,typethecurrentpasswordintheEnterCurrentPasswordeld.
ThentypethenewpasswordintheEnterNewPasswordeld,andretypeittoverifyitintheConrm
NewPasswordeld.
•Toremovetheharddiskpassword,typethecurrentpasswordintheEnterCurrentPasswordeld.Then
leavetheEnterNewPasswordeldblank,andpressEntertwice.
TochangeorremovetheUser+Masterharddiskpassword,selectUserHDPorMasterHDP.
IfyouchooseUserHDP,dooneofthefollowing:
•Tochangetheuserharddiskpassword,typethecurrentuserharddiskpasswordorthecurrentmaster
harddiskpasswordintheEnterCurrentPasswordeld.Thentypethenewuserharddiskpasswordin
theEnterNewPasswordeld,andretypeittoverifyitintheConrmNewPasswordeld.
•Toremovetheuserharddiskpassword,typethecurrentmasterharddiskpasswordintheEnterCurrent
Passwordeld.ThenleavetheEnterNewPasswordeldblank,andpressEntertwice.Bothuser
andmasterharddiskpasswordswillberemoved.
IfyouchooseMasterHDP,dooneofthefollowing:
•Tochangethemasterharddiskpassword,typethecurrentmasterharddiskpasswordintheEnter
CurrentPasswordeld.ThentypethenewmasterharddiskpasswordintheEnterNewPassword
eld,andretypeittoverifyitintheConrmNewPasswordeld.
•Toremovethemasterharddiskpassword,typethecurrentmasterharddiskpasswordintheEnter
CurrentPasswordeld.ThenleavetheEnterNewPasswordeldblank,andpressEntertwice.Both
userandmasterharddiskpasswordswillberemoved.
Supervisorpassword
ThesupervisorpasswordprotectsthesysteminformationstoredintheBIOSSetupUtility.Withoutit,noone
canchangethecongurationofthecomputer.Itprovidesthefollowingsecurityfeatures:
•Ifasupervisorpasswordisset,apasswordpromptappearswhenyoutrytostarttheBIOSSetupUtility.
Unauthorizeduserscannotgetaccesstocongurationdata.
•Thesystemadministratorcanusethesupervisorpasswordtogetaccesstoacomputereveniftheuserof
thatcomputerhassetapower-onpassword.Thesupervisorpasswordoverridesthepower-onpassword.
•Ifbothasupervisorpasswordandapower-onpasswordareset,youcandothefollowingonlyifyou
havethesupervisorpassword:
–Changingthebootsequence
–Deletingthepower-onpassword
–Changingordeletingthesupervisorpassword
–EnablingordisablingtheWakeonLAN®andFlashoverLANfeatures
–EnablingordisablingtheInternalNetworkOptionROMfeature
–Changingdateandtime
–EnablingordisablingtheLockBIOSSettingfeature
–EnablingordisablingtheBIOSpasswordatunattendedboot
–Specifyingtheminimumlengthforpower-onpasswordsandharddiskpasswords
–Changingthesettingforthesecuritychip
–EnablingordisablingtheBootDeviceListF12Option
–EnablingordisablingtheFlashBIOSUpdatingbyEnd-Usersfeature
–EnablingordisablingtheInternalNetworkdevice
Chapter4.Security73

–EnablingordisablingtheInternalWirelessdevice
–EnablingordisablingtheInternalBluetoothdevice
–EnablingordisablingtheInternalWirelessWANdevice
–EnablingordisablingtheSecuritymode
–EnablingordisablingtheReaderpriority
–Erasingthengerprintdata
Notes:
•ThesystemadministratorcansetthesamesupervisorpasswordonmanyThinkPadNotebookstomake
administrationeasier.
•ByenablingtheLockBIOSSettingsinthePasswordmenuwhenyousetthesupervisorpassword,you
makeitimpossibleforanyonebutyoutomakechanges.
Settingasupervisorpassword
Onlyasystemadministratorwillbeabletoapplythisprocedure.
1.Printtheseinstructions.
2.Saveallopenles,andexitallapplications.
3.Turnyourcomputeroffandthenturnitonagain.
4.Whenthelogoscreenisdisplayed,pressF1.TheBIOSSetupUtilitywindowopens.
5.SelectSecurity,usingthecursordirectionalkeystomovedownthemenu.
6.SelectPassword.
7.SelectSupervisorPassword.
8.Awindowopensthatpromptsyoutoenteranewpassword.
9.ChooseyoursupervisorpasswordandtypeitintheEnterNewPasswordeld,thenpressEnter.
Note:IfthePassphrasefunctionisenabled,youcanchooseyoursupervisorpassword,whichcan
consistof1to64charactersinanycombination.IfthePassphrasefunctionisdisabled,thesupervisor
passwordcanbefromonetosevenalphanumericcharactersinanycombination.Fordetails,refer
to“UsingPassphrase”onpage68.
10.PressEntertomovetothenextline.Retypethepasswordyoujustenteredtoverifyit.
11.Commityourpasswordtomemory.
Attention:Youmightwanttonoteyourpasswordandkeepitinasafeplace.Ifyouforgetyour
supervisorpassword,Lenovocannotresetyourpassword.YoumusttakeyourcomputertoaLenovo
reselleroraLenovomarketingrepresentativetohavethesystemboardreplaced.Proofofpurchaseis
required,andafeewillbechargedforpartsandservice.
12.PressF10toexit.IntheSetupConrmationwindow,clickYes.
ThenexttimeyouopentheBIOSSetupUtilityprogram,youwillbepromptedtotypeyourpassword
toproceed.
Changingorremovingthesupervisorpassword
Tochangeorremovethesupervisorpassword,followsteps1through7aboveinSettingasupervisor
password.
Note:WhenyoupressF1toentertheBIOSSetupUtility,thesystemwillrequirethesupervisorpassword.
Typethesupervisorpasswordandpressenter,thentheBIOSSetupUtilitywindowopens.
74UserGuide

Tochangethepassword,dothefollowing:
1.IntheEnterCurrentPasswordeld,typethecurrentsupervisorpassword.
2.IntheEnterNewPasswordeld,typethenewsupervisorpassword,thenretypeittoverify.
Toremovethepassword,dothefollowing:
1.IntheEnterCurrentPasswordeld,typethecurrentsupervisorpassword.
2.LeavetheEnterNewPasswordeldblank,andthenpressEnter.
3.PressEnteragain.
Harddisksecurity
Yourcomputersupportsanenhancedsecuritysolutionforthesolidstatedriveortheharddiskdrive.To
protectpasswordsfromunauthorizedsecurityattacks,severalofthelatesttechnologiesandalgorithmsare
integratedintoBIOSandhardwaredesignofThinkPadNotebooks.
Tomaximizesecurity,dothefollowing:
1.SetUsingPassphrasetoEnabled.See“UsingPassphrase”onpage68.
2.Setapower-onpasswordaswellasaharddiskpasswordforyourinternalsolidstatedriveorharddisk
drive.Refertotheproceduresin“Power-onpassword”onpage70and“Harddiskpasswords”onpage
71.Forsecurity,alongerpasswordisrecommended.
3.IfyourcomputersupporttheTrustedPlatformModule(TPM)managementfeature,useitwiththe
securitychiptoprovidereliablesecurityforBIOS.Referto“Settingthesecuritychip”onpage75.
Note:MicrosoftWindows7andWindowsVistasupportTPMmanagementfeature
4.Beforeyoudisposeof,sell,orhandoveryourcomputer,makesuretodeletedatastoredonit.Referto
“Noticeondeletingdatafromyourharddiskdrive”onpage78.
Settingthesecuritychip
Strictsecurityrequirementsareimposedonnetworkclientcomputersthattransfercondentialinformation
electronically.Dependingontheoptionsyouordered,yourcomputermighthaveanembeddedsecuritychip,
acryptographicmicroprocessor.WiththesecuritychipandClientSecuritySolution,youcandothefollowing:
•Protectyourdataandsystem
•Strengthenaccesscontrols
•Securecommunications
ClientSecuritySolution
TheClientSecuritySolutionprogramhelpsprotectyourcomputerandyourpersonalinformationsothat
youknowthatyoursensitivedataissecure.Itcanalsohelpmanageyourpasswords,helprecovera
forgottenpassword,orhelpyoumonitorsecuritysettingsonyourcomputerandsuggesthowtoenhance
yourcomputersecurity.
Theseconvenientfeaturesaremademoresecurebyabuilt-insecuritychip,apowerfulcomputerchip
dedicatedtothesecurityfunctionsofyourcomputer.
TostarttheClientSecuritySolution,clickStart➙AllPrograms➙ThinkVantage➙ClientSecurity
Solution.
Fordetails,refertotheHelpfortheprogram.
Chapter4.Security75

YoucandownloadthelatestClientSecuritySolutionfromthefollowingWebsite:
http://www.lenovo.com/support
SettingtheSecurityChip
ThechoicesofferedintheSecurityChipsubmenuundertheSecuritymenuoftheBIOSSetupUtilityare
asfollows:
•SecurityChip:activates,inactivates,ordisablestheSecurityChip.
•SecurityReportingOptions:enablesordisableseachSecurityReportingOption.
•ClearSecurityChip:clearstheencryptionkey.
Notes:
1.BesurethattheSupervisorpasswordhasbeensetintheBIOSSetupUtility.Otherwiseanyonecan
changethesettingsfortheSecurityChip.
2.IfyouareusingClientSecuritySolution,handletheSecurityChipasfollows:
•DonotcleartheSecurityChip.Ifyoudo,thefunctionsassignedtothekeyswillbeerased.
•DonotdisabletheSecurityChip.Ifyoudo,ClientSecuritySolutionwillnotwork.
3.IftheSecurityChipisremovedorreplaced,oranewonehasbeenadded,thecomputerwillnotstart.
Youwillhear4cyclesof4beepseach,oryouseeerrormessage0176or0192.
4.IftheSecurityChipisinactiveordisabled,ClearSecurityChipwillnotbedisplayed.
5.WhenyoucleartheSecuritychip,besuretoturnyourcomputeroffandthenturnitonagainafteryou
settheSecuritychiptoActive.Otherwise,thechoiceofClearSecurityChipisnotdisplayed.
TosetanitemintheSecurityChipsubmenu:
•Printtheseinstructions.TosettheSecurityChip,youmustturnyourcomputeroffandthenonagain.
•Saveallopenles,andexitallapplications.
•Turnyourcomputeroffandthenturnitonagain.
•Whenthelogoscreenisdisplayed,pressF1.TheBIOSSetupUtilitywindowopens.
•Usingthecursorkeys,movetoSecurity,andpressEnter.TheSecuritymenuopens.
•Usingthecursorkeys,movetoSecurityChip,andpressEnter.TheSecurityChipsubmenuopens.
•Usingthecursorkeys,movetoanitemyouwanttoset.Whentheitemyouwantishighlighted,press
Enter.
•Settheitemsyouwanttoset.
•PressF10toexit.
•ClickYesintheSetupConrmationwindow.
TosettheSecurityChip,youhavetoopentheClientSecuritySolution.See“ClientSecuritySolution”
onpage75.
Note:IfClientSecuritySolutionisnotpreinstalledinyourcomputer,youcandownloadthelatestversion
ofClientSecuritySolutionfromtheLenovoWebsite.TodownloadClientSecuritySolution,goto
www.lenovo.com/support.Thenfollowtheinstructionsonthescreen.
Usingangerprintreader
Dependingontheoptionsyouordered,yourcomputermayhaveanintegratedngerprintreader.By
enrollingyourngerprintandassociatingitwithawindowspassword,youcanlogontothesystemby
76UserGuide
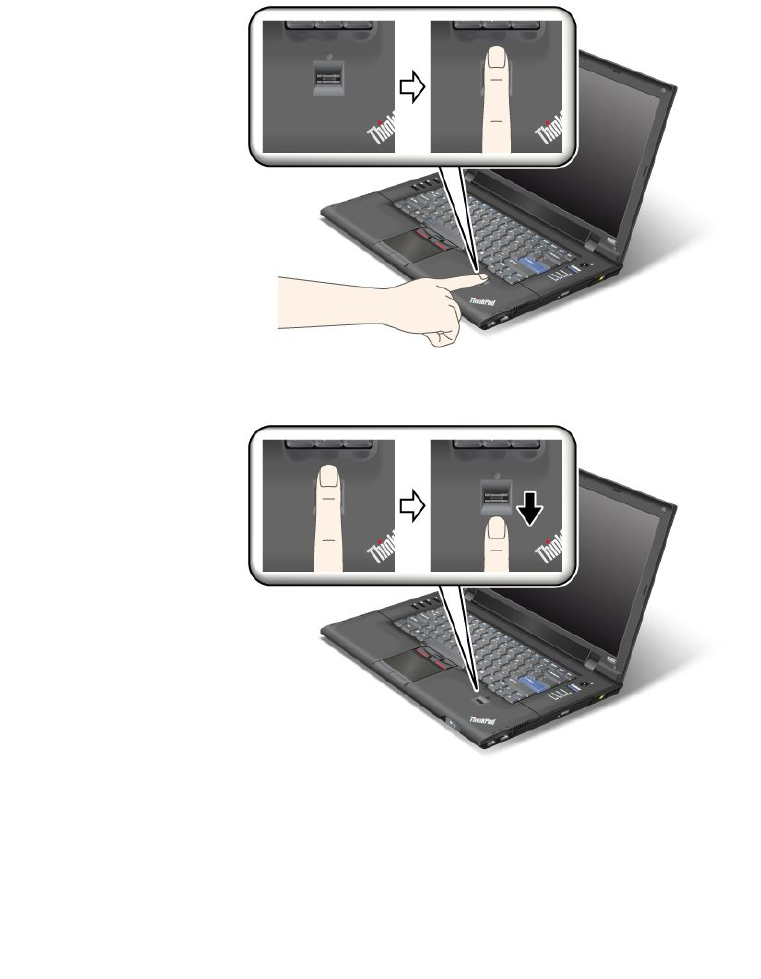
swipingyourngeroverthereader,withouttypingapassword.Thusngerprintauthenticationcanreplace
passwordsandenablesimpleandsecureuseraccess.
Enrollingyourngerprint
Tousetheintegratedngerprintreader,beginbyenrollingyourngerprintasfollows.
1.Turnonyourcomputer.
2.StartThinkVantageFingerprintsoftware.SeeFingerprintSoftware.
3.Followtheinstructionsonthescreentoenrollyourngerprint.Fordetails,refertotheHelpforthe
program.
Swipingyourngeroverthereader
Toswipeyourngeroverthereader,doasfollows:
1.Placetheballofyournger,thatis,thecentralpartofthengerprint,onthesmallcircleabovethe
reader.Makesurethattheentiretopjointofthengerisonthereader.
2.Applylightpressureandswipeyourngeracrossthereaderinonesmoothmotion.
Loggingontothesystem
Afteryouenrollyourngerprint,logontothesystemasfollows:
1.Turnyourcomputeroffandthenonagain.
Chapter4.Security77

2.Whenprompted,swipeyourngeroverthereader.
3.Onrequest,typeyourwindowspassword.Theenrolledngerprintisnowassociatedwithyourwindows
password.
Thenexttimeyoustartthecomputer,youcanlogontothesystembyswipingyourngeroverthe
readeronce.
Attention:Ifyoualwaysuseyourngerprinttologontothesystem,youmayforgetyourpassword.Write
downyourpassword,andkeepitinasafeplace.
Careforthengerprintreader
Thefollowingactionscoulddamagethengerprintreaderorcauseitnottoworkproperly:
•Scratchingthesurfaceofthereaderwithahard,pointedobject.
•Scrapingthesurfaceofthereaderwithyourngernailoranythinghard.
•Usingortouchingthereaderwithadirtynger.
Ifyounoticeanyofthefollowingconditions,gentlycleanthesurfaceofthereaderwithadry,soft,lint-free
cloth:
•Thesurfaceofthereaderisdirtyorstained.
•Thesurfaceofthereaderiswet.
•Thereaderoftenfailstoenrollorauthenticateyourngerprint.
Ifyourngerhasanyofthefollowingconditions,youmaynotbeabletoregisterorauthenticateit:
•Yourngeriswrinkled.
•Yourngerisrough,dry,orinjured.
•Yourngerisverydry.
•Yourngerisstainedwithdirt,mud,oroil.
•Thesurfaceofyourngerisverydifferentfromwhenyouenrolledyourngerprint.
•Yourngeriswet.
•Angerisusedthathasnotbeenenrolled.
Toimprovethesituation,trythefollowing:
•Cleanorwipeyourhandstoremoveanyexcessdirtormoisturefromthengers.
•Enrollanduseadifferentngerforauthentication.
•Ifyourhandsaretoodry,applylotiontothem.
Noticeondeletingdatafromyourharddiskdriveorsolidstatedrive
Ascomputersspreadintoeverycorneroflife,theyprocessmoreandmoreinformation.Thedataonyour
computer,someofwhichissensitive,isstoredonastoragedevice,eitheraharddiskdriveorthesolidstate
drive.Beforeyoudisposeof,sell,orhandoveryourcomputer,makesuretodeletedatastoredonit.
Handingyourcomputerovertosomeoneelsewithoutdeletingtheloadedsoftware,suchasoperating
systemsandapplicationsoftware,mayevenviolateLicenseAgreements.Youareadvisedtocheckthe
termsandconditionsofthoseAgreements.
Therearemethodsthatseemtodeletethedata:
•Movethedatatotherecyclebin,andthenchoosetheEmptyrecyclebincommand.
78UserGuide

•UsetheDeletecommand.
•Formatyourharddiskdriveorsolidstatedrive,usingthesoftwareforinitializingit.
•Usingtherecoveryprogram,providedbyLenovo,bringtheharddiskdriveorthesolidstatedriveback
tofactory-shipstate.
Theseoperations,however,onlychangetheleallocationofthedata;theydonotdeletethedataitself.In
otherwords,thedataretrievalprocessingisdisabledunderanoperatingsystemsuchasWindows.The
dataisstillthere,eventhoughitseemstobelost.Thus,itissometimespossibletoreadthedatabyuseof
specialsoftwarefordatarecovery.Thereisariskthatpeopleofbadfaithmayreadandmisusethecritical
dataonharddiskdrivesorsolidstatedrivesforunexpectedpurposes.
Topreventleakageofdata,itbecomesveryimportantthatyoutakeresponsibilityfordeletingallthedata
fromtheharddiskdriveorsolidstatedrivewhenyoudisposeof,sell,orhandoveryourcomputer.Youcan
destroythedataphysicallybysmashingtheharddiskdrivewithahammer,ormagneticallybymeansof
strongmagneticpower,thusmakingthedataunreadable.Butwerecommendthatyoumakeuseofthe
software(payware)orservice(payservice)specicallydevelopedforthepurpose.
Fordisposingofdataontheharddiskdrive,LenovoprovidestheSecureDataDisposaltool.Todownload
thetool,gototheLenovoWebsiteathttp://www.lenovo.com/support.
Note:Runningtheapplicationwilltakeacoupleofhours.
Usingandunderstandingrewalls
Ifyoursystemispreintalledwitharewallprogram,itprotectsagainstcomputerInternetsecuritythreats,
unauthorizedaccess,intrusions,andInternetattacks.Italsoprotectsyourprivacy.
Formoreinformationabouthowtousetherewallprogram,refertotheon-linehelpthatcomeswith
theprogram.
Protectingdataagainstviruses
Yourcomputerispreinstalledwithanantivirusprogramsoyoucandetectandeliminateviruses.The
antivirusprogramisdesignedtohelpyoudetectandeliminateviruses.
Lenovoprovidesafullversionofantivirussoftwareonyourcomputerwithafree30-daysubscription.After
30days,youmustrenewthelicensetocontinuereceivingtheantivirussoftwareupdates.
Formoreinformationabouthowtouseyourantivirussoftware,refertothehelpsystemofyourantivirus
software.
Chapter4.Security79

80UserGuide

Chapter5.Recoveryoverview
ThischapterprovidesinformationabouttherecoverysolutionsprovidedbyLenovo.
Thischaptercontainsthefollowingtopics:
•“Creatingandusingrecoverymedia”onpage81
•“Performingbackupandrecoveryoperations”onpage83
•“UsingtheRescueandRecoveryworkspace”onpage84
•“Creatingandusingarescuemedium”onpage85
•“Reinstallingpreinstalledapplicationsanddevicedrivers”onpage86
•“Solvingrecoveryproblems”onpage87
Notes:
1.Thereareavarietyofmethodstochoosefromwhenconsideringhowtorecoverintheeventofa
software-orhardware-relatedproblem.Somemethodsvarydependingonthetypeofyouroperating
system.
2.Theproductontherecoverymediamaybeusedonlyforthefollowingpurposes:
•Restoretheproductpreinstalledonyourcomputer
•Reinstalltheproduct
•ModifytheproductusingtheAdditionalFiles
Notes:Topreventpotentialperformancerisksorunexpectedbehaviorthatmightbecausedbythenew
harddiskdrivetechnology,itisrecommendedthatyouuseoneofthefollowingback-upsoftwareprograms:
•ThinkVantageRescueandRecoveryversion4.23orlater(forWindowsXPandWindowsVista),4.3or
later(forWindows7)
•SymantecNortonGhostversion15.0orlater
Notes:Tousethisprogram,dothefollowing:
1.ClickStart➙Run.TheRunwindowopens.
2.Typecmdintheeld.ThenclickOK.
3.Typeghost-align=1mbandpressEnter.
•AcronisTrueImage2010orlater
•ParagonBackup&Recovery10Suitorlater,ParagonBackup&Recovery10Homeorlater
Creatingandusingrecoverymedia
Youcanuserecoverymediatorestoretheharddiskdrivetothefactorydefaultsettings.Recoverymedia
areusefulifyoutransferthecomputertoanotherarea,sellthecomputer,recyclethecomputer,orputthe
computerinanoperationalstateafterallothermethodsofrecoveryhavefailed.Asaprecautionarymeasure,
itisimportanttocreaterecoverymediaasearlyaspossible.
Note:Therecoveryoperationsyoucanperformusingrecoverymediavarydependingontheoperating
systemfromwhichtherecoverymediawerecreated.Therecoverymediamightcontainabootmedium
andadatamedium.YourMicrosoftWindowslicensepermitsyoutocreateonlyonedatamedium,soitis
importantthatyoustoretherecoverymediainasafeplaceafteryouhavemadethem.
©CopyrightLenovo201281

Creatingrecoverymedia
ThissectionprovidesinstructionsonhowtocreaterecoverymediaontheWindows7operatingsystem.
Note:OntheWindows7operatingsystem,youcancreaterecoverymediausingdiscsorexternalUSB
storagedevices.OntheWindowsVistaandWindowsXPoperatingsystems,youcancreaterecoverymedia
usingonlydiscs,sothisoperationisalsocalled“creatingProductRecoverydiscs”.
•TocreaterecoverymediaontheWindows7operatingsystem,clickStart➙AllPrograms➙Lenovo
ThinkVantageTools➙FactoryRecoveryDisks.Then,followtheinstructionsonthescreen.
•TocreateProductRecoverydiscsontheWindowsVistaoperatingsystem,clickStart➙AllPrograms➙
ThinkVantage➙CreateProductRecoveryMedia.Then,followtheinstructionsonthescreen.
•TocreateProductRecoverydiscsontheWindowsXPoperatingsystem,clickStart➙AllPrograms➙
ThinkVantage➙CreateRecoveryMedia.Then,followtheinstructionsonthescreen.
Usingrecoverymedia
Thissectionprovidesinstructionsonhowtouserecoverymediaondifferentoperatingsystems.
•OntheWindows7operatingsystemandtheWindowsVistaoperatingsystem,youcanuserecovery
mediatorestorethecomputertothefactorydefaultsettingsonly.Youcanuserecoverymediatoputthe
computerinanoperationalstateafterallothermethodsofrecoveryhavefailed.
Attention:Whenyouuserecoverymediatorestorethecomputertothefactorydefaultsettings,allthe
lescurrentlyontheharddiskdrivewillbedeletedandreplacedbythefactorydefaultsettings.
TouserecoverymediaontheWindows7operatingsystemortheWindowsVistaoperatingsystem,
dothefollowing:
1.Dependingonthetypeofyourrecoverymedia,connectthebootmedium(memorykeyorotherUSB
storagedevice)tothecomputer,orinsertthebootdiscintotheopticaldrive.
2.RepeatedlypressandreleasetheF12keywhenturningonthecomputer.WhentheStartupDevice
Menuopens,releasetheF12key.
3.SelectthedesiredstartupdeviceandpressEnter.Therestoreprocessbegins.
4.Followtheinstructionsonthescreentocompletetheoperation.
Notes:
1.Afterrestoringyourcomputertothefactorydefaultsettings,youmighthavetoreinstalldevicedrivers
forsomedevices.See“Reinstallingpreinstalledapplicationsanddevicedrivers”onpage86.
2.SomecomputerscomewithMicrosoftOfceorMicrosoftWorkspreinstalled.Ifyouneedtorecover
orreinstallyourMicrosoftOfceorMicrosoftWorksapplications,youmustusetheMicrosoftOfce
CDorMicrosoftWorksCD.ThesediscsareprovidedonlywithcomputerspreinstalledwithMicrosoft
OfceorMicrosoftWorks.
•OntheWindowsXPoperatingsystem,youcanuseProductRecoverydiscstorestoreyourcomputerto
thefactorydefaultsettings,performacustomfactoryrecovery,orperformotherrescueandrecovery
operationssuchasrescuingindividualles.YouwillbegiventheoptiontoentertheRescueandRecovery
workspaceandchoosefromavarietyofrecoveryoperations.
Attention:WhenyouuseProductRecoverydiscstorestorethecomputertothefactorydefaultsettings,
allthelescurrentlyontheharddiskdrivewillbedeletedandreplacedbythefactorydefaultsettings.
Duringtherestoreprocess,youwillbegiventheoptiontosaveoneormorelescurrentlyonthehard
diskdrivetoothermediabeforethedataisdeleted.
82UserGuide

TouseProductRecoverydiscsontheWindowsXPoperatingsystem,dothefollowing:
1.RepeatedlypressandreleasetheF12keywhenturningonthecomputer.WhentheStartupDevice
Menuopens,releasetheF12key.
2.Insertthebootdiscintotheopticaldrive.
3.SelecttheopticaldrivewiththebootdiscasthestartupdeviceandpressEnter.Afterashortdelay,
theRescueandRecoveryworkspaceopens.
4.OntheRescueandRecoverymenu,clickRestoreyoursystem.
5.Followtheinstructionsonthescreen.InserttheappropriateProductRecoverydiscwhenprompted.
Performingbackupandrecoveryoperations
TheRescueandRecoveryprogramenablesyoutobackupallyourharddiskdrivecontentsincludingthe
operatingsystem,datales,softwareprograms,andpersonalsettings.Youcandesignatewherethe
RescueandRecoveryprogramstoresthebackup:
•Inaprotectedareaofyourharddiskdrive
•OnanattachedexternalUSBharddiskdrive
•Onanetworkdrive
•Onrecordablediscs(arecordableopticaldriveisrequiredforthisoption)
Afteryouhavebackedupthecontentsontheharddiskdrive,youcanrestorethecompletecontentsofthe
harddiskdrive,restoreonlytheselectedles,orrestoreonlytheWindowsoperatingsystemandapplications.
Performingabackupoperation
ThissectionprovidesinstructionsonhowtoperformabackupoperationusingtheRescueandRecovery
programondifferentoperatingsystems.
•ToperformabackupoperationusingtheRescueandRecoveryprogramontheWindows7operating
system,dothefollowing:
1.FromtheWindowsdesktop,clickStart➙AllPrograms➙LenovoThinkVantageTools➙
EnhancedBackupandRestore.TheRescueandRecoveryprogramopens.
2.IntheRescueandRecoverymainwindow,clicktheLaunchadvancedRescueandRecoveryarrow.
3.ClickBackupyourharddriveandselectbackupoperationoptions.Then,followtheinstructionson
thescreentocompletethebackupoperation.
•ToperformabackupoperationusingtheRescueandRecoveryprogramontheWindowsVistaoperating
systemortheWindowsXPoperatingsystem,dothefollowing:
1.FromtheWindowsdesktop,clickStart➙AllPrograms➙ThinkVantage➙RescueandRecovery.
TheRescueandRecoveryprogramopens.
2.IntheRescueandRecoverymainwindow,clickLaunchadvancedRescueandRecovery➙Back
upyourharddrive,andselectbackupoperationoptions.
3.Followtheinstructionsonthescreentocompletethebackupoperation.
Performingarecoveryoperation
ThissectionprovidesinstructionsonhowtoperformarecoveryoperationusingtheRescueandRecovery
programondifferentoperatingsystems.
•ToperformarecoveryoperationusingtheRescueandRecoveryprogramontheWindows7operating
system,dothefollowing:
Chapter5.Recoveryoverview83

1.FromtheWindowsdesktop,clickStart➙AllPrograms➙LenovoThinkVantageTools➙
EnhancedBackupandRestore.TheRescueandRecoveryprogramopens.
2.IntheRescueandRecoverymainwindow,clicktheLaunchadvancedRescueandRecoveryarrow.
3.ClicktheRestoreyoursystemfromabackupicon.
4.Followtheinstructionsonthescreentocompletetherecoveryoperation.
•ToperformarecoveryoperationusingtheRescueandRecoveryprogramontheWindowsVistaoperating
systemortheWindowsXPoperatingsystem,dothefollowing:
1.FromtheWindowsdesktop,clickStart➙AllPrograms➙ThinkVantage➙RescueandRecovery.
TheRescueandRecoveryprogramopens.
2.IntheRescueandRecoverymainwindow,clickLaunchadvancedRescueandRecovery.
3.ClicktheRestoreyoursystemfromabackupicon.
4.Followtheinstructionsonthescreentocompletetherecoveryoperation.
FormoreinformationaboutperformingarecoveryoperationfromtheRescueandRecoveryworkspace,see
“UsingtheRescueandRecoveryworkspace”onpage84.
UsingtheRescueandRecoveryworkspace
TheRescueandRecoveryworkspaceresidesinaprotected,hiddenareaofyourharddiskdrivethat
operatesindependentlyfromtheWindowsoperatingsystem.Thisenablesyoutoperformrecovery
operationsevenifyoucannotstarttheWindowsoperatingsystem.Youcanperformthefollowingrecovery
operationsfromtheRescueandRecoveryworkspace:
•Rescuelesfromyourharddiskdriveorfromabackup
TheRescueandRecoveryworkspaceenablesyoutolocatelesonyourharddiskdriveandtransfer
themtoanetworkdriveorotherrecordablemedia,suchasaUSBdeviceoradisc.Thissolutionis
availableevenifyoudidnotbackupyourlesorifchangesweremadetothelessinceyourlastbackup
operation.YoucanalsorescueindividuallesfromaRescueandRecoverybackuplocatedonyourlocal
harddiskdrive,aUSBdevice,oranetworkdrive.
•RestoreyourharddiskdrivefromaRescueandRecoverybackup
IfyouhavebackedupyourharddiskdriveusingtheRescueandRecoveryprogram,youcanrestorethe
harddiskdrivefromaRescueandRecoverybackup,evenifyoucannotstarttheWindowsoperating
system.
•Restoreyourharddiskdrivetothefactorydefaultsettings
TheRescueandRecoveryworkspaceenablesyoutorestorethecompletecontentsofyourharddiskdrive
tothefactorydefaultsettings.Ifyouhavemultiplepartitionsonyourharddiskdrive,youhavetheoption
torestorethefactorydefaultsettingstotheC:partitionandleavetheotherpartitionsintact.Becausethe
RescueandRecoveryworkspaceoperatesindependentlyfromtheWindowsoperatingsystem,youcan
restorethefactorydefaultsettingsevenifyoucannotstarttheWindowsoperatingsystem.
Attention:IfyourestoretheharddiskdrivefromaRescueandRecoverybackuporrestoretheharddisk
drivetothefactorydefaultsettings,alllesontheprimaryharddiskdrivepartition(usuallydriveC:)willbe
deletedintherecoveryprocess.Ifpossible,makecopiesofimportantles.Ifyouareunabletostartthe
Windowsoperatingsystem,youcanusetherescuelesfeatureoftheRescueandRecoveryworkspaceto
copylesfromyourharddiskdrivetoothermedia.
TostarttheRescueandRecoveryworkspace,dothefollowing:
1.Makesurethecomputeristurnedoff.
2.RepeatedlypressandreleasetheF11keywhenturningonthecomputer.Whenyouhearbeepsor
seealogoscreen,releasetheF11key.
84UserGuide

3.IfyouhavesetaRescueandRecoverypassword,typeyourpasswordwhenprompted.TheRescue
andRecoveryworkspaceopensafterashortdelay.
Note:IftheRescueandRecoveryworkspacefailstoopen,see“Solvingrecoveryproblems”onpage87.
4.Dooneofthefollowing:
•Torescuelesfromyourharddiskdriveorfromabackup,clickRescuelesandfollowthe
instructionsonthescreen.
•TorestoreyourharddiskdrivefromaRescueandRecoverybackuportorestoreyourharddiskdrive
tothefactorydefaultsettings,clickRestoreyoursystemandfollowtheinstructionsonthescreen.
FormoreinformationaboutthefeaturesoftheRescueandRecoveryworkspace,clickHelp.
Notes:
1.Afterrestoringyourharddiskdrivetothefactorydefaultsettings,youmighthavetoreinstalldevice
driversforsomedevices.See“Reinstallingpreinstalledapplicationsanddevicedrivers”onpage86.
2.SomecomputerscomewithMicrosoftOfceorMicrosoftWorkspreinstalled.Ifyouneedtorecover
orreinstallyourMicrosoftOfceorMicrosoftWorksapplications,youmustusetheMicrosoftOfce
CDorMicrosoftWorksCD.ThesediscsareprovidedonlywithcomputerspreinstalledwithMicrosoft
OfceorMicrosoftWorks.
Creatingandusingarescuemedium
Witharescuemedium,suchasadiscoraUSBharddiskdrive,youcanrecoverthecomputerfromfailures
thatpreventyoufromgainingaccesstotheRescueandRecoveryworkspaceonyourharddiskdrive.
Notes:
1.Therecoveryoperationsyoucanperformusingarescuemediumvarydependingontheoperating
system.
2.Therescuedisccanbestartedinalltypesofopticaldrives.
Creatingarescuemedium
Thissectionprovidesinstructionsonhowtocreatearescuemediumondifferentoperatingsystems.
•TocreatearescuemediumontheWindows7operatingsystem,dothefollowing:
1.FromtheWindowsdesktop,clickStart➙AllPrograms➙LenovoThinkVantageTools➙
EnhancedBackupandRestore.TheRescueandRecoveryprogramopens.
2.IntheRescueandRecoverymainwindow,clicktheLaunchadvancedRescueandRecoveryarrow.
3.ClicktheCreateRescueMediaicon.TheCreateRescueandRecoveryMediawindowopens.
4.IntheRescueMediaarea,selectthetypeoftherescuemediumyouwanttocreate.Youcancreate
arescuemediumusingadisc,aUSBharddiskdrive,orasecondaryinternalharddiskdrive.
5.ClickOKandfollowtheinstructionsonthescreentocreatearescuemedium.
•TocreatearescuemediumontheWindowsVistaoperatingsystemortheWindowsXPoperatingsystem,
dothefollowing:
1.FromtheWindowsdesktop,clickStart➙AllPrograms➙ThinkVantage➙CreateRecovery
Media.TheCreateRescueandRecoveryMediawindowopens.
2.IntheRescueMediaarea,selectthetypeoftherescuemediumyouwanttocreate.Youcancreate
arescuemediumusingadisc,aUSBharddiskdrive,orasecondaryinternalharddiskdrive.
3.ClickOKandfollowtheinstructionsonthescreentocreatearescuemedium.
Chapter5.Recoveryoverview85

Usingarescuemedium
Thissectionprovidesinstructionsonhowtousetherescuemediumyouhavecreated.
•Ifyouhavecreatedarescuemediumusingadisc,usethefollowinginstructionstousetherescuemedium:
1.Turnoffyourcomputer.
2.RepeatedlypressandreleasetheF12keywhenturningonthecomputer.WhentheStartupDevice
Menuopens,releasetheF12key.
3.OntheStartupDeviceMenu,selectthedesiredopticaldriveastherstbootdevice.Then,insert
therescuediscintotheopticaldriveandpressEnter.Therescuemediumstarts.
•IfyouhavecreatedarescuemediumusingaUSBharddiskdrive,usethefollowinginstructionsto
usetherescuemedium:
1.AttachtheUSBharddiskdrivetooneoftheUSBconnectorsonyourcomputer.
2.RepeatedlypressandreleasetheF12keywhenturningonthecomputer.WhentheStartupDevice
Menuopens,releasetheF12key.
3.OntheStartupDeviceMenu,selecttheUSBharddiskdriveastherstbootdeviceandpressEnter.
Therescuemediumstarts.
•Ifyouhavecreatedarescuemediumusingthesecondaryinternalharddiskdrive,setthesecondary
internalharddiskdriveastherstbootdeviceinthestartupdevicesequencetostarttherescuemedium.
See“Startupmenu”onpage140.
Whentherescuemediumstarts,theRescueandRecoveryworkspaceopens.Thehelpinformationfor
eachfeatureisavailablefromtheRescueandRecoveryworkspace.Followtheinstructionstocomplete
therecoveryprocess.
Reinstallingpreinstalledapplicationsanddevicedrivers
Yourcomputerhasprovisionsthatenableyoutoreinstallselectedfactory-installedapplicationsanddevice
drivers.
Reinstallingpreinstalledapplications
Toreinstallselectedapplicationprograms,dothefollowing:
1.Turnonyourcomputer.
2.UseWindowsExplorerorComputer(inWindowsXP,MyComputer)todisplaythedirectorystructureof
yourharddisk.
3.OpentheC:\SWTOOLSfolder.
4.OpentheAPPSfolder.Initareseveralsubfoldersnamedforthevariouspreinstalledapplications.
5.Openthesubfolderfortheapplicationyouarereinstalling.
6.Double-clickSetup,andthenfollowtheon-screenstepstoreinstalltheprogram.
Reinstallingpreinstalleddevicedrivers
Attention:Whenyoureinstalldevicedrivers,youarechangingthecurrentcongurationofyourcomputer.
Reinstalldevicedriversonlywhenitisnecessarytocorrectaproblemwithyourcomputer.
Toreinstalladevicedriverforafactory-installeddevice,dothefollowing:
1.Turnonyourcomputer.
2.UseWindowsExplorerorComputer(inWindowsXP,MyComputer)todisplaythedirectorystructureof
yourharddiskdrive.
3.OpentheC:\SWTOOLSfolder.
86UserGuide

4.OpentheDRIVERSfolder.WithintheDRIVERSfolderareseveralsubfoldersnamedforthevarious
devicesinstalledinyourcomputer(forexample,AUDIOandVIDEO).
5.Openthesubfolderforthedevice.
6.Reinstallthedevicedriverbyoneofthefollowingmethods:
•Inthesubfolderforthedevice,lookforatextle(alewiththeextension.txt).Thetextlecontains
informationonhowtoreinstallthatdevicedriver.
-OR-
•Ifthesubfolderforthedevicecontainsaleofsetupinformation(alewiththeextension.inf),you
canusetheAddNewHardwareprogram(intheWindowsControlPanel)toreinstallthedevicedriver.
Notalldevicedriverscanbereinstalledbyuseofthisprogram.IntheAddNewHardwareprogram,
whenpromptedforthedevicedriveryouwanttoinstall,clickHaveDiskandBrowse.Thenselect
thedevicedriverlefromthedevicesubfolder.
-OR-
•Inthesubfolderforthedevice,lookforthelefortheapplication(alewiththeextension.exe).
Double-clickthele,andfollowtheinstructionsonthescreen.
Attention:Ifyouneedupdateddevicedrivers,donotdownloadthemfromtheWindowsUpdateWebsite.
ObtainthemfromLenovo.Formoreinformation,seeMakingsuredevicedriversarecurrent.
Solvingrecoveryproblems
IfyouareunabletoaccesstheRescueandRecoveryworkspaceortheWindowsenvironment,doone
ofthefollowing:
•UsearescuemediumtostarttheRescueandRecoveryworkspace.See“Usingarescuemedium”
onpage86.
•Userecoverymediaifallothermethodsofrecoveryhavefailedandyouneedtorestoretheharddisk
drivetothefactorydefaultsettings.See“Usingrecoverymedia”onpage82.
Note:IfyouareunabletoaccesstheRescueandRecoveryworkspaceortheWindowsenvironmentfrom
arescuemediumorrecoverymedia,youmightnothavetherescuedevice(aninternalharddiskdrive,a
disc,aUSBharddiskdrive,orotherexternaldevices)setastherstbootdeviceinthestartupdevice
sequence.Youmustrstmakesurethatyourrescuedeviceissetastherstbootdeviceinthestartup
devicesequenceintheSetupUtilityprogram.See“Startupmenu”onpage140fordetailedinformation
abouttemporarilyorpermanentlychangingthestartupdevicesequence.Formoreinformationaboutthe
SetupUtilityprogram,see“BIOSSetupUtility”onpage138.
Itisimportanttocreatearescuemediumandasetofrecoverymediaasearlyaspossibleandstorethem
inasafeplaceforfutureuse.
Chapter5.Recoveryoverview87

88UserGuide

Chapter6.Replacingdevices
Youcanincreasethecapacityofthememoryortheharddiskdrivebyreplacingtheoriginal,built-in
devicewithanoptionalone.Or,ifyouneedto,youcanreplacethePCIExpressMiniCardbyfollowing
theproceduresinthissection.
•“Staticelectricityprevention”onpage89
•“Replacingthebattery”onpage89
•“Replacingthememory”onpage91
•“Replacingtheharddiskdrive”onpage93
•“Replacingthesolidstatedrive”onpage97
•“InstallingandreplacingthemSATAsolidstatedrive”onpage101
•“Replacingtheopticaldrive”onpage103
•“ReplacingtheSIMcard”onpage104
•“Replacingthepalmrest”onpage106
•“ReplacingthePCIExpressMiniCardforwirelessLAN/WiMAXconnection”onpage110
•“InstallingandreplacingthePCIExpressMiniCardforwirelessWANconnection”onpage111
•“Replacingtheintegratedcamera”onpage114
Staticelectricityprevention
Staticelectricity,althoughharmlesstoyou,canseriouslydamagecomputercomponentsandoptions.
Improperhandlingofstatic-sensitivepartscancausedamagetothepart.Whenyouunpackanoption
orCRU,donotopenthestatic-protectivepackagecontainingthepartuntiltheinstructionsdirectyou
toinstallit.
WhenyouhandleoptionsorCRUs,orperformanyworkinsidethecomputer,takethefollowingprecautions
toavoidstatic-electricitydamage:
•Limityourmovement.Movementcancausestaticelectricitytobuilduparoundyou.
•Alwayshandlecomponentscarefully.Handleadapters,memorymodules,andothercircuitboardsbythe
edges.Nevertouchexposedcircuitry.
•Preventothersfromtouchingcomponents.
•Whenyouinstallastatic-sensitiveoptionorCRU,touchthestatic-protectivepackagecontainingthe
parttoametalexpansion-slotcoverorotherunpaintedmetalsurfaceonthecomputerforatleasttwo
seconds.Thisreducesstaticelectricityinthepackageandyourbody.
•Whenpossible,removethestatic-sensitivepartfromthestatic-protectivepackagingandinstallthepart
withoutsettingitdown.Whenthisisnotpossible,placethestatic-protectivepackagingonasmooth,
levelsurfaceandplacethepartonit.
•Donotplacethepartonthecomputercoverorothermetalsurface.
Replacingthebattery
Beforeyoustart,printtheseinstructions.
ThissystemdoesnotsupportbatteriesthatarenotgenuineLenovo-madeorauthorized.Thesystemwill
continuetoboot,butmaynotchargeunauthorizedbatteries.Attention:Lenovohasnoresponsibilityfor
©CopyrightLenovo201289
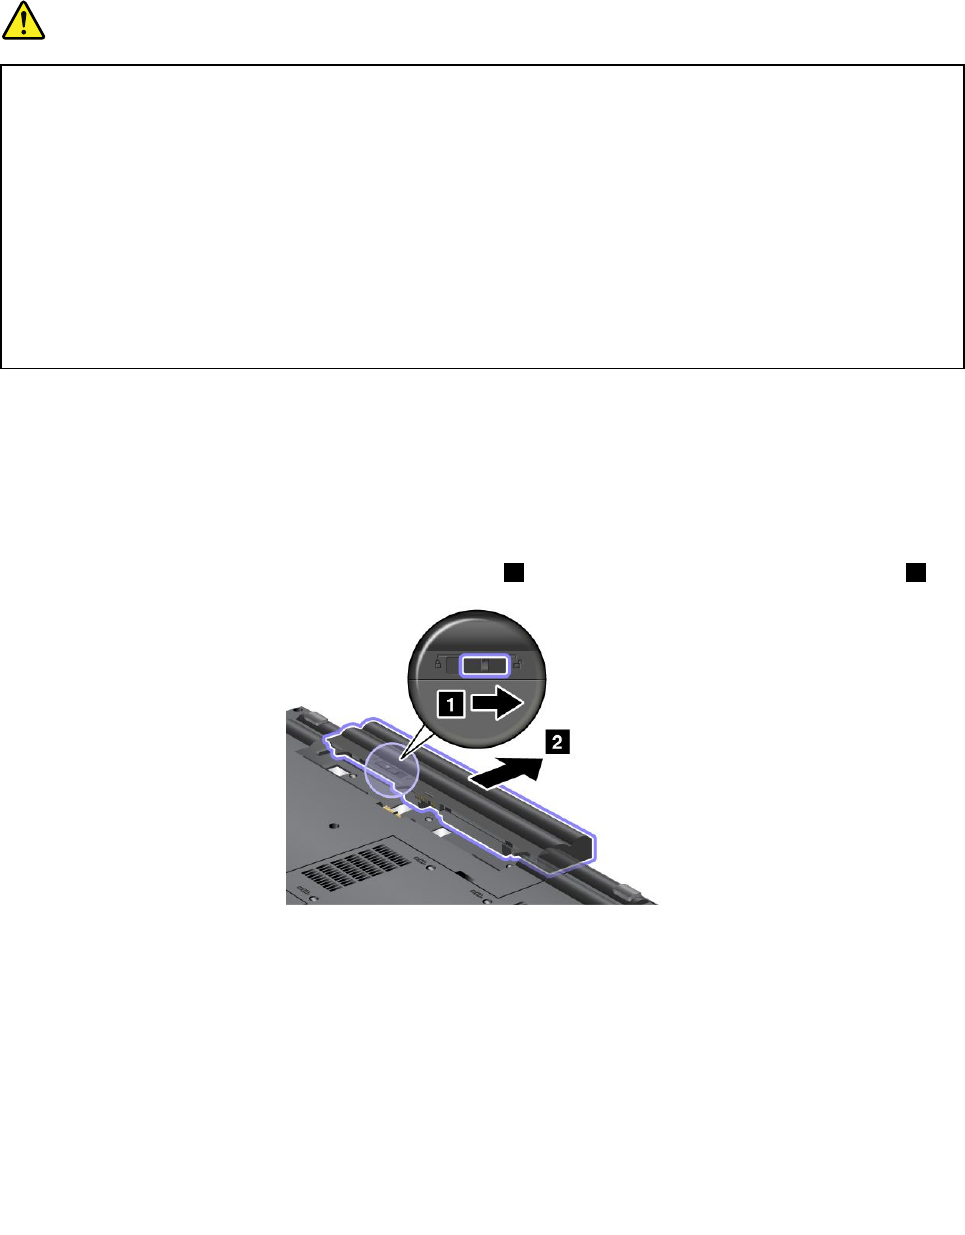
theperformanceorsafetyofunauthorizedbatteries,andprovidesnowarrantiesforfailuresordamage
arisingoutoftheiruse.
Readthefollowingprerequisitesbeforeyoureplacethebattery.
Prerequisitesfortheprocedure
DANGER
Iftherechargeablebatterypackisincorrectlyreplaced,thereisdangerofanexplosion.Thebattery
packcontainsasmallamountofharmfulsubstances.Toavoidpossibleinjury:
•ReplaceonlywithabatteryofthetyperecommendedbyLenovo.
•Keepthebatterypackawayfromre.
•Donotexposeittoexcessiveheat.
•Donotexposeittowaterorrain.
•Donotshort-circuitit.
•Donotdrop,crush,puncture,orsubjecttostrongforces.Batteryabuseormishandlingcan
causethebatterytooverheat,whichcancausegassesorameto“vent”fromthebattery
packorcoincell.
Replacingthebattery
Toreplacethebattery,dothefollowing:
1.Turnoffthecomputer.
2.Closethecomputerdisplay.
3.Disconnecttheacpoweradapterandallcablesfromthecomputer.
4.Holdthebatteryreleaselatchtotheunlockposition1,andremovethebatteryinthedirectionof2.
90UserGuide

5.Insertafullychargedbatteryuntilitclicksintoplace1asshowninthedrawing,andthenslidethe
batterylatchtothelockedposition2.
6.Turnthecomputeroveragain.Connecttheacpoweradapterandthecablestothecomputer
Replacingthememory
Beforeyoustart,printtheseinstructions.
Increasingmemorycapacityisaneffectivewaytomakeprogramsrunfaster.Youcanincreasetheamount
ofmemoryinyourcomputerbyinstallingadoubledataratethree(DDR3)synchronousdynamicrandom
accessmemory(SDRAM)unbufferedsmalloutlinedualinlinememorymodule(SO-DIMM),availableasan
option,inthememoryslotofthecomputer.SO-DIMMswithdifferentcapacitiesareavailable.Toreplaceor
addmemory,readthefollowingprerequisites,andthentheinstruction.
Prerequisitesfortheprocedure
Whenreplacingthememory,besuretofollowtheprecautions.
Note:Theoperatingspeedofthememorymoduledependsonthesystemcongurationofyourcomputer
anditscombinationwiththememorymoduleinstalledonyourcomputer.Insomeconditions,thememoryin
yourcomputermaynotbeabletooperateatthemaximumspeed.
Attention:Beforeyoustartinstallingamodule,touchametaltableoragroundedmetalobject.Thisaction
reducesanystaticelectricityfromyourbody.ThestaticelectricitycoulddamagetheSO-DIMM.
Replacingthememory
ToinstallanSO-DIMM,dothefollowing:
1.Turnoffthecomputer,thendisconnecttheacpoweradapterandallcablesfromthecomputer.
2.Closethecomputerdisplay,andturnitover.
3.Removethebattery.See“Replacingthebattery”onpage89.
Chapter6.Replacingdevices91
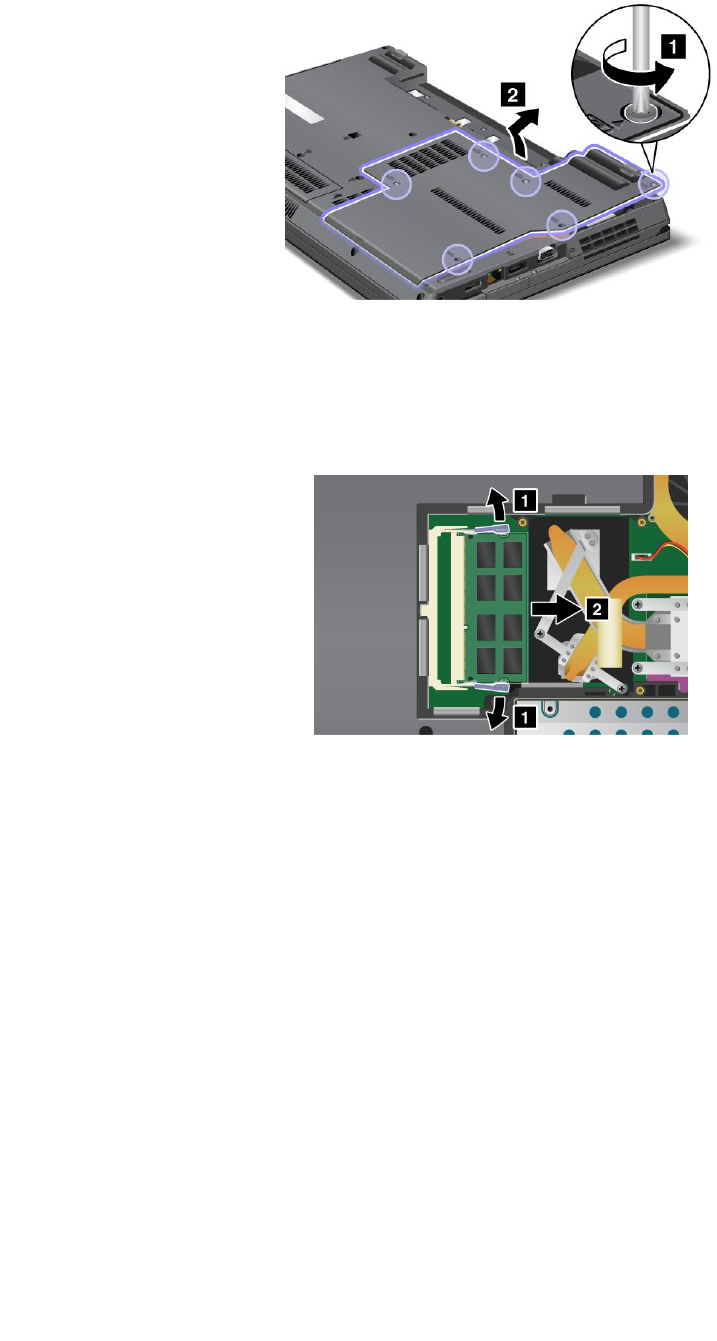
4.Loosenthescrews,andthenremovethecover.
Attention:Donottouchanyexposedpartsotherthanthosereferredtointhisprocedure.Unnecessary
contactswiththeelectricandelectroniccomponentsmightcauseyourcomputertomalfunction.
5.IfthetwoSO-DIMMsarealreadyinthememoryslots,releasethelatchesonbothedgesofthesocket
atthesametime,andthenremovetheSO-DIMMtomakeroomforthenewone.Besuretosave
theremovedmemoryforfutureuse.
6.FindthenotchonthecontactedgesideoftheSO-DIMM.
Attention:ToavoiddamagingtheSO-DIMM,donottouchitscontactedge.
92UserGuide
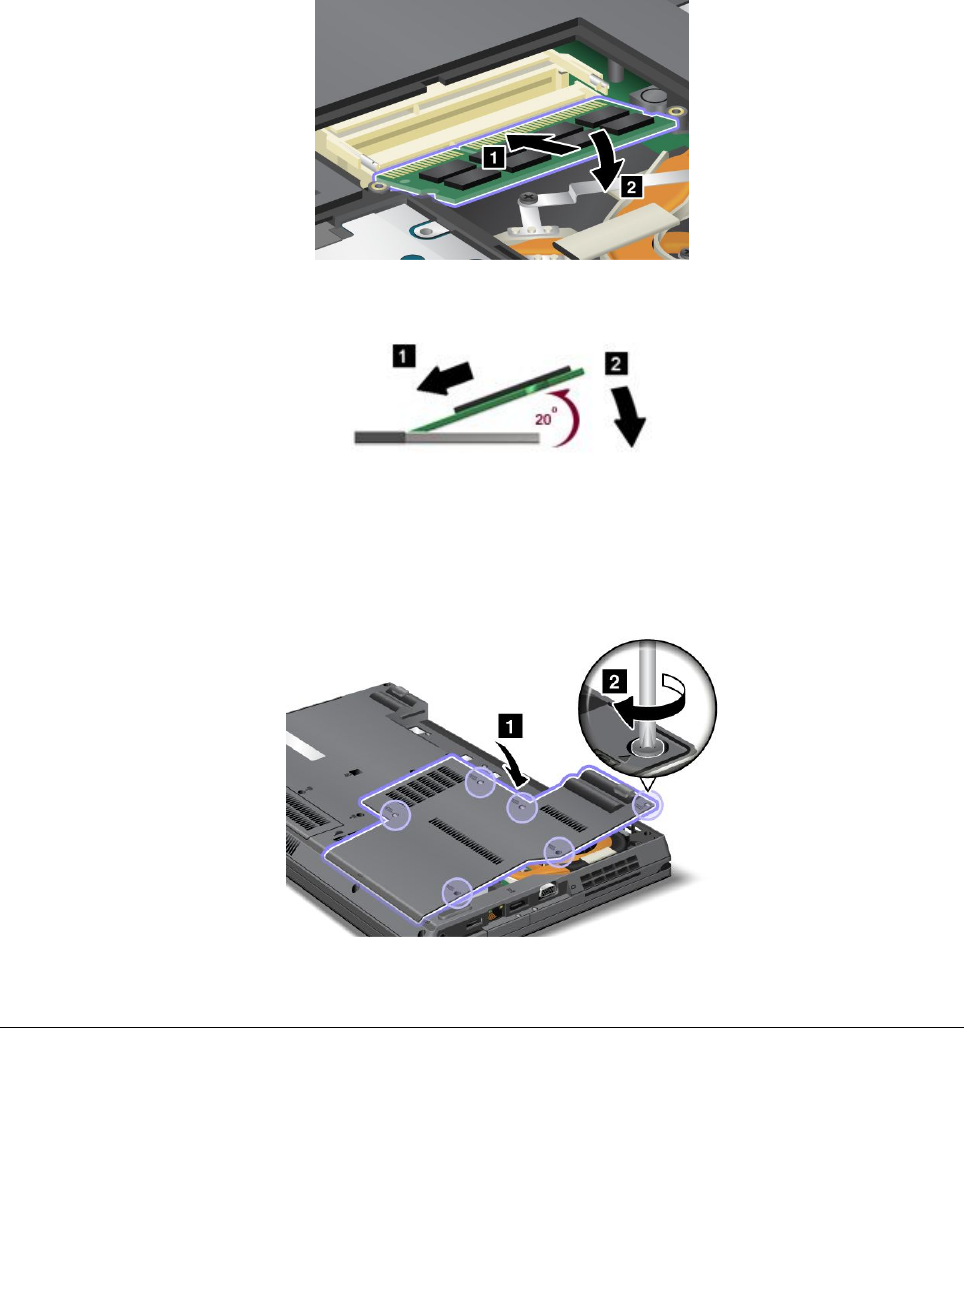
7.WiththenotchedendoftheSO-DIMMtowardthecontactedgesideofthesocket,inserttheSO-DIMM
intothesocket,thenpressitrmly.
Note:InserttheSO-DIMMintothesocketatanangleofabout20degrees.
Note:Ifyouinstallamemorymoduleinonlyoneofthetwomemoryslots,installitinthelowerslot.
8.PivottheSO-DIMMdownwarduntilitsnapsintoplace.
9.Makesurethatthecardisrmlyxedintheslotanddoesnotmoveeasily.
10.Putthecoverbackinplace,andtightenthescrews.
11.Reinstallthebatteryandturnthecomputeroveragain.Thenreconnecttheacpoweradapterand
thecables.
Replacingtheharddiskdrive
YoucanreplacetheharddiskdrivewithanewonewhichcanbepurchasedfromyourLenovoresellerora
marketingrepresentative.Readthefollowingprerequisitesbeforeyoureplacetheharddiskdrive.
Note:Replacetheharddiskdriveonlyifyouupgradeitorhaveitrepaired.Theconnectorsandslotofthe
harddiskdrivewerenotdesignedforfrequentchanges,ordriveswapping.
Chapter6.Replacingdevices93
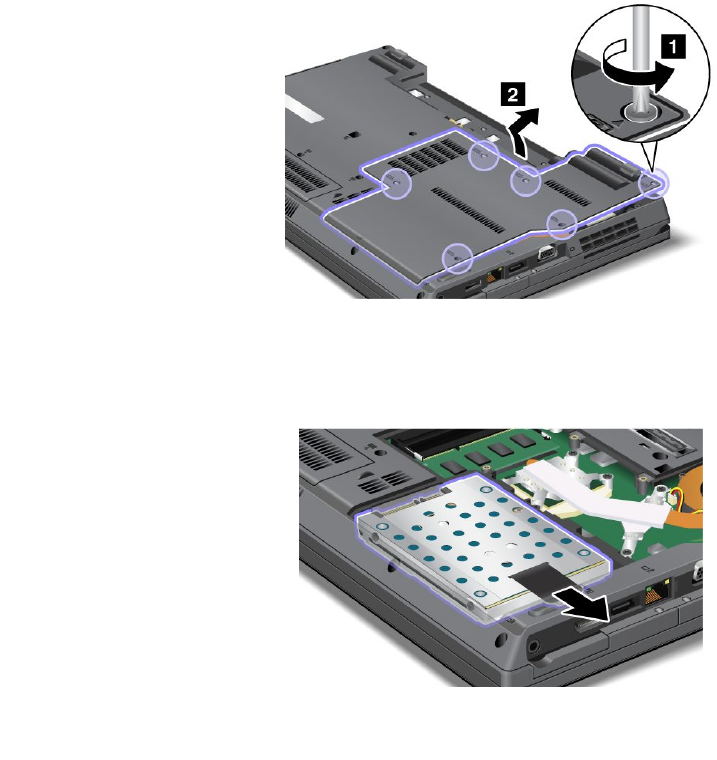
Prerequisitesfortheprocedure
Whenreplacingthedrive,besuretofollowtheprecautions.
Attention:
•Donotdroptheharddiskdriveorsubjectittophysicalshocks.Putthedriveonamaterial,suchassoft
cloth,thatabsorbsanyphysicalshocks.
•Donotapplypressuretothecoverofthedrive.
•Donottouchtheconnector.
Thedriveisverysensitive.Incorrecthandlingcancausedamageandpermanentlossofdata.
Beforeremovingtheharddiskdrive,makeabackupcopyofalltheinformationonit,andthenturnthe
computeroff.
Neverremovethedrivewhilethesystemisoperating,insleep(standby)mode,orinhibernationmode.
Replacingtheharddiskdrive
Toreplacetheharddiskdrive,dothefollowing:
1.Turnoffthecomputer,thendisconnecttheacpoweradapterandallcablesfromthecomputer.
2.Closethecomputerdisplay,andturnthecomputerover.
3.Removethebattery.See“Replacingthebattery”onpage89.
4.Loosenthescrewsandremovethecover.
Attention:Donottouchanyexposedpartsotherthanthosereferredtointhisprocedure.Unnecessary
contactswiththeelectricandelectroniccomponentsmightcauseyourcomputertomalfunction.
5.Pulltheharddiskdrivetotheright.
94UserGuide
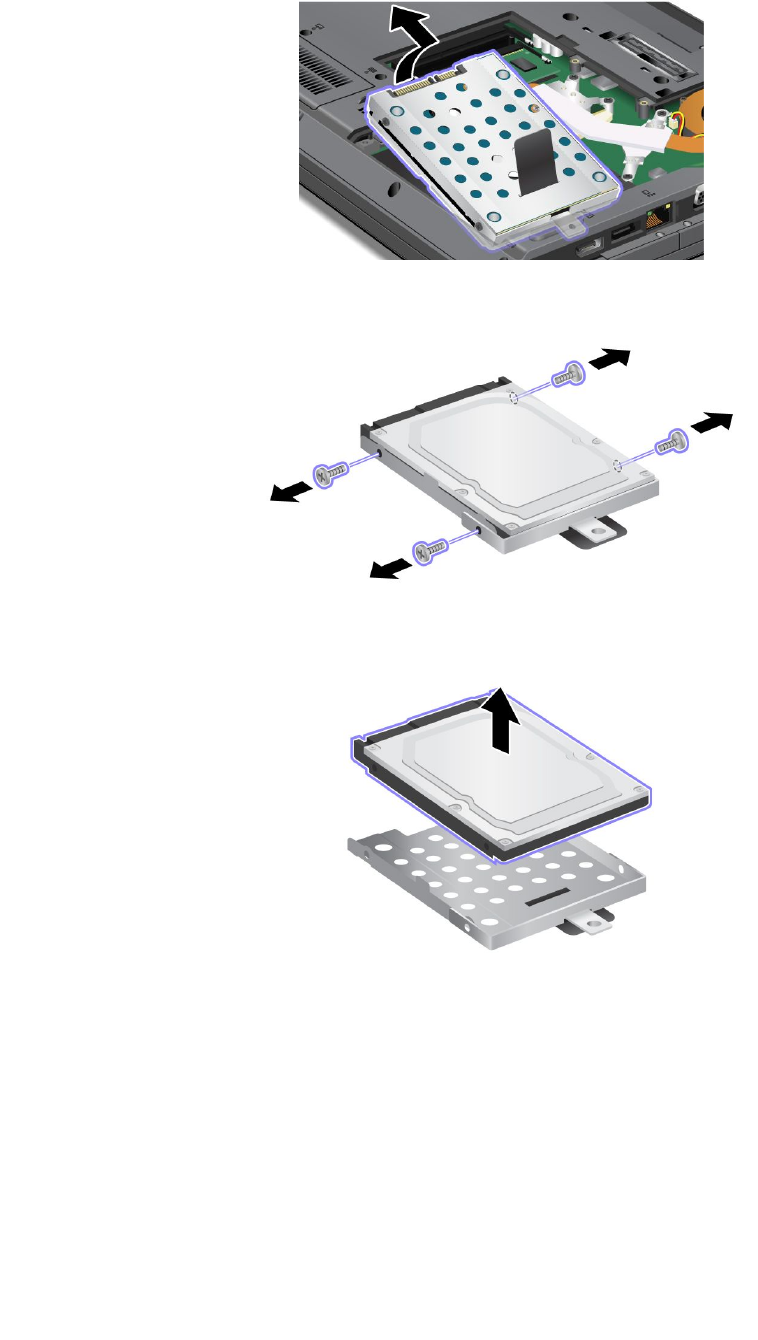
6.Removetheharddiskdrivebyliftingitsleftside.
7.Turntheharddiskdriveoverandremovethefourscrewsthatsecurethebracket.
8.Liftthedriveoutofthebracket.
Chapter6.Replacingdevices95

9.Placethenewdriveintothebracketasshowninthedrawing.
10.Reinstallthescrewstosecurethebracket.
11.Turntheharddiskdriveoveragainandplacetheharddiskdrivefromtherightsideasshowninthe
picture.
96UserGuide
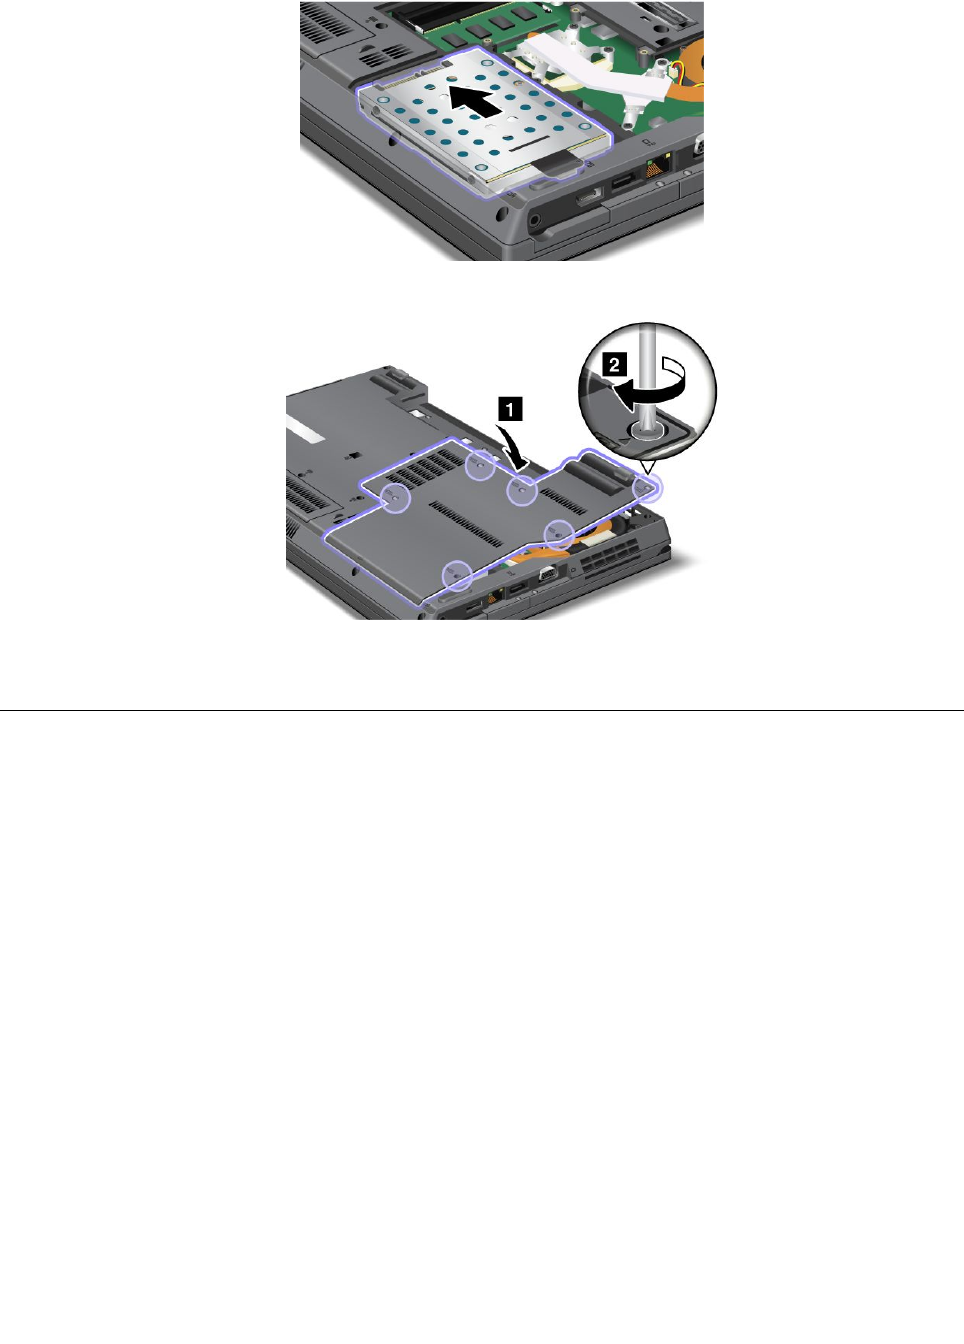
12.Pullthenewharddiskdrivetotheleft.
13.Putthecoverbackinplace,andtightenthescrews.
14.Reinstallthebatteryandturnthecomputeroveragain.Thenreconnecttheacpoweradapterand
thecables.
Replacingthesolidstatedrive
YoucanreplacethesolidstatedrivewithanewonewhichcanbepurchasedfromyourLenovoresellerora
marketingrepresentative.Readthefollowingprerequisitesbeforeyoureplacethesolidstatedrive.
Note:Replacethesolidstatedriveonlyifyouneedtohaveitrepaired.Theconnectorsandslotofthesolid
statedrivewerenotdesignedforfrequentchanges,ordriveswapping.
Prerequisitesfortheprocedure
Whenreplacingthedrive,besuretofollowtheprecautions.
Attention:
•Donotdropthesolidstatedriveorsubjectittophysicalshocks.Putthedriveonamaterial,such
assoftcloth,thatabsorbsanyphysicalshocks.
•Donotapplypressuretothecoverofthedrive.
•Donottouchtheconnector.
Thedriveisverysensitive.Incorrecthandlingcancausedamageandpermanentlossofdata.
Beforeremovingthesolidstatedrive,makeabackupcopyofalltheinformationonit,andthenturnthe
computeroff.
Neverremovethedrivewhilethesystemisoperating,insleep(standby)mode,orinhibernationmode.
Chapter6.Replacingdevices97
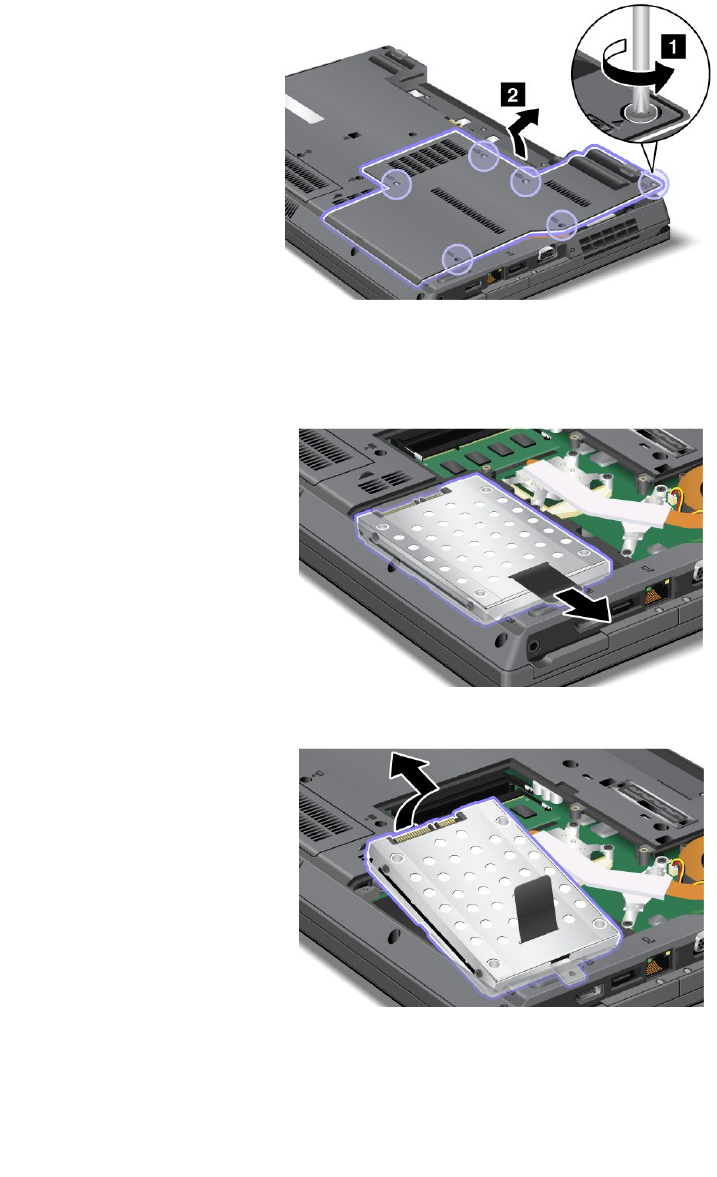
Replacingthesolidstatedrive
Toreplacethesolidstatedrive,dothefollowing:
1.Turnoffthecomputer,thendisconnecttheacpoweradapterandallcablesfromthecomputer.
2.Closethecomputerdisplay,andturnthecomputerover.
3.Removethebattery.See“Replacingthebattery”onpage89.
4.Loosenthescrews,andthenremovethecover.
Attention:Donottouchanyexposedpartsotherthanthosereferredtointhisprocedure.Unnecessary
contactswiththeelectricandelectroniccomponentsmightcauseyourcomputertomalfunction.
5.Pullthesolidstatedrivetotheright.
6.Removethesolidstatedrivebyliftingitsleftside.
98UserGuide
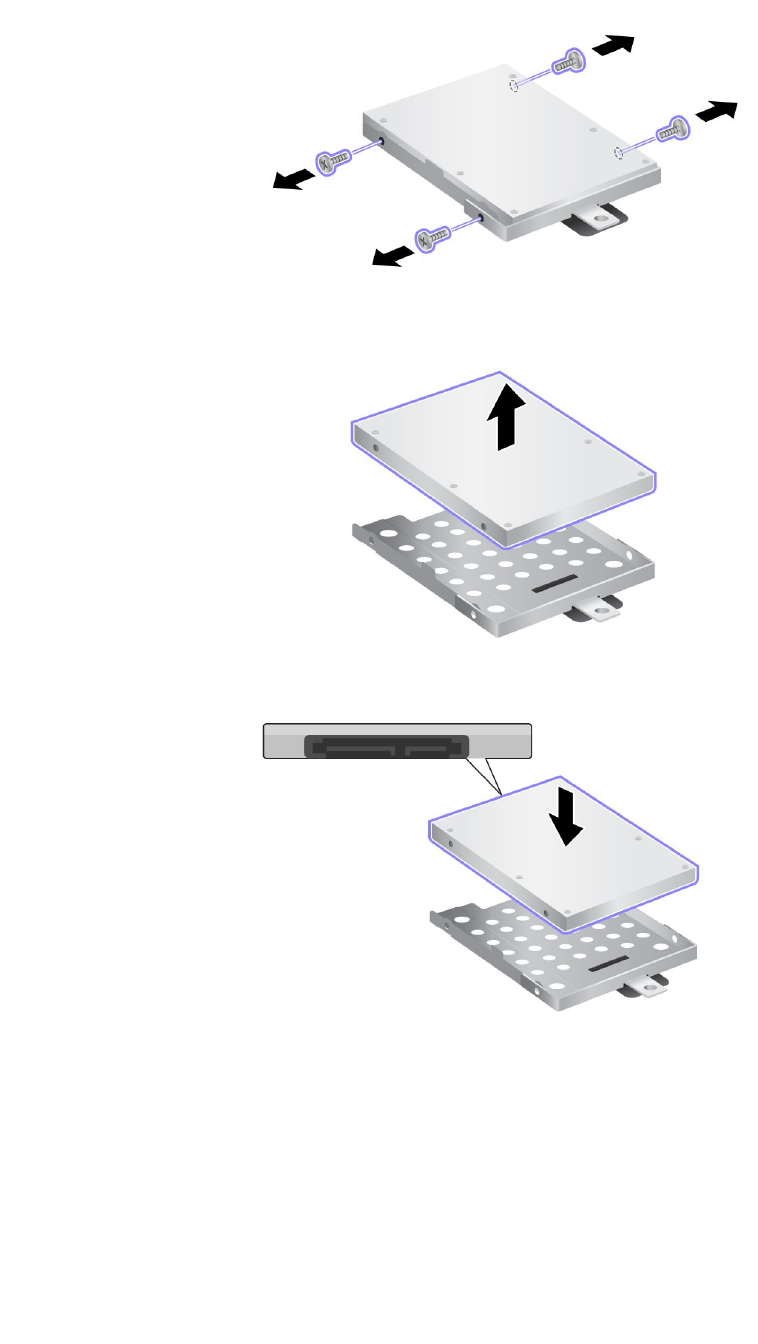
7.Turnthesolidstatedriveoverandremovethefourscrewsthatsecurethebracket.
8.Liftthedriveoutofthebracket.
9.Placethenewdriveintothebracketasshowninthedrawing.
Chapter6.Replacingdevices99
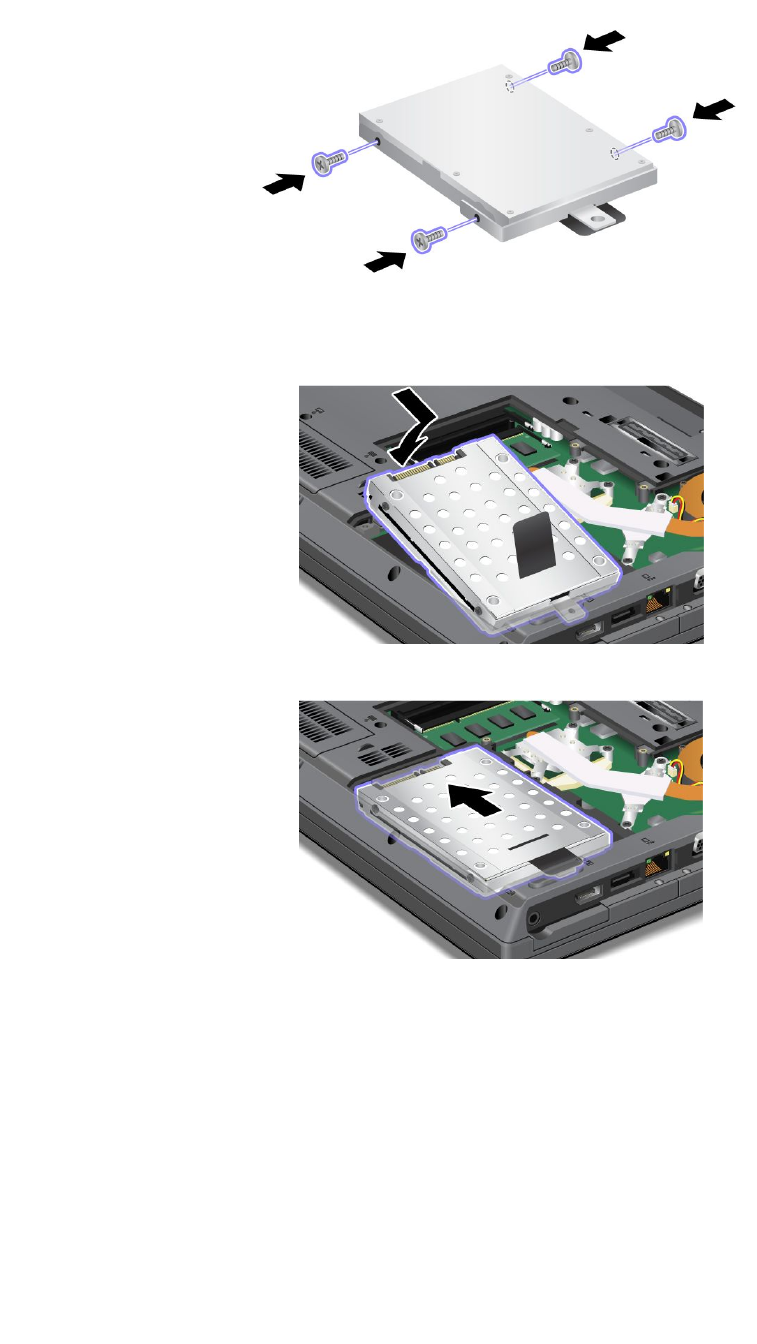
10.Reinstallthescrewstosecurethebracket.
11.Turnthesolidstatedriveoveragainandplacethesolidstatedrivefromtherightsideasshownin
thepicture.
12.Pullthenewsolidstatedrivetotheleft.
100UserGuide
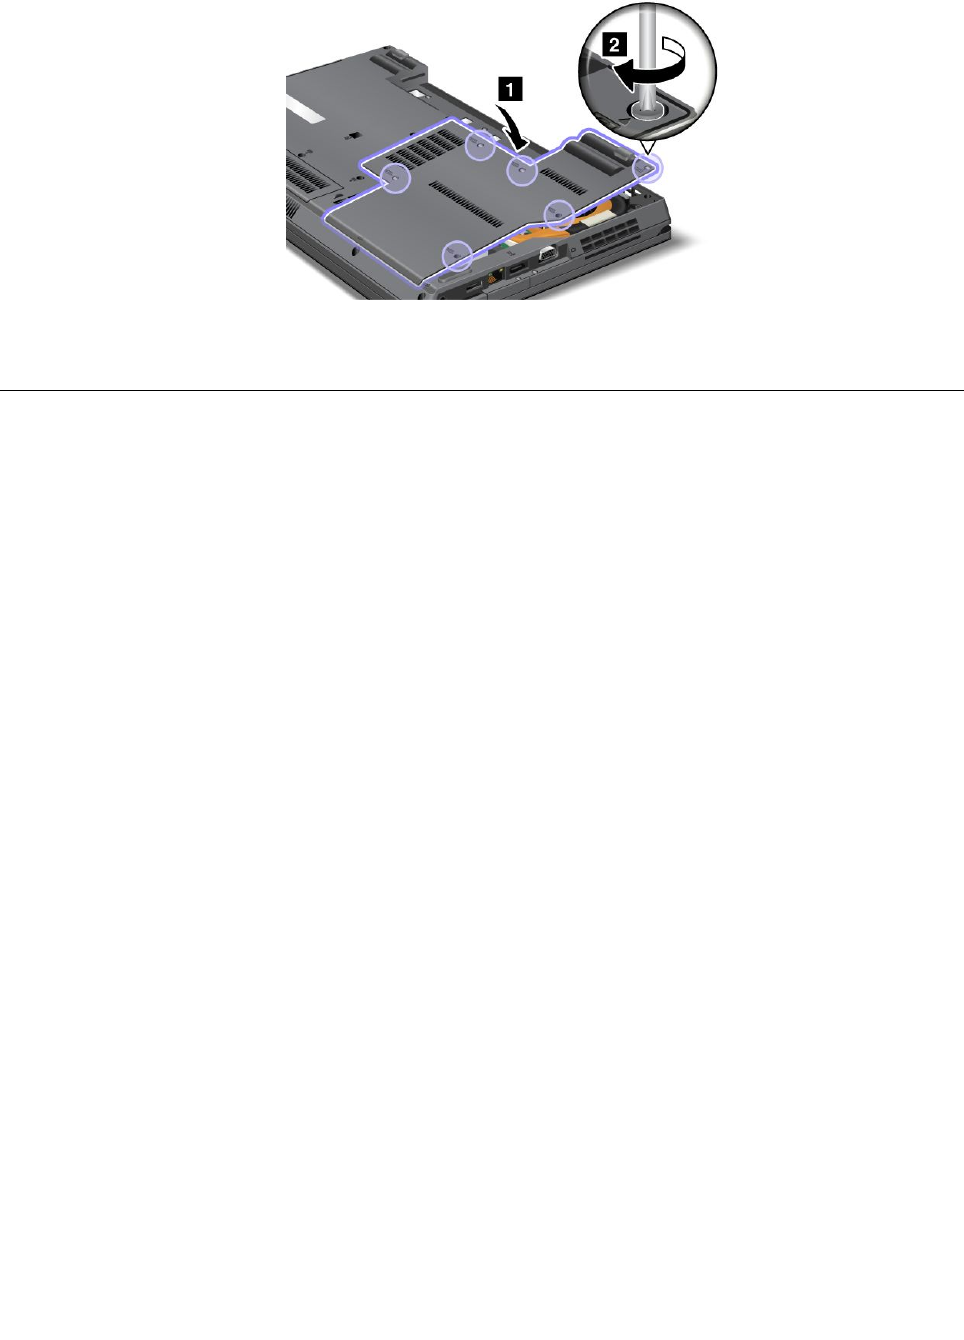
13.Putthecoverbackinplace,andtightenthescrews.
14.Reinstallthebatteryandturnthecomputeroveragain.Thenreconnecttheacpoweradapterand
thecables.
InstallingandreplacingthemSATAsolidstatedrive
SomeThinkPadmodelshaveanmSATAsolidstatedrive,whichisinstalledatthePCIExpressMiniCard
slot.YoucanreplacethemSATAsolidstatedrivewithanewonewhichcanbepurchasedfromyour
Lenovoreselleroramarketingrepresentative.ToreplacethemSATAsolidstatedrivewithanewone,
readthefollowingprerequisites.
Notes:
•YoucanalsoreplacethemSATAsolidstatedrivewithaWirelessPCIExpressMiniCardforWirelessWAN.
•ReplacethemSATAsolidstatedriveonlyifyouneedtohaveitrepaired.TheslotofthemSATAsolidstate
drivewerenotdesignedforfrequentchanges,ordriveswapping.
Prerequisitesfortheprocedure
Whenreplacingthedrive,besuretofollowtheprecautions.
Attention:HandlinganmSATAsolidstatedrive
•Donotdropthedriveorsubjectittophysicalshocks.Putthedriveonamaterial,suchassoftcloth,that
absorbsanyphysicalshocks.
•Donotapplypressuretothecoverofthedrive.
Thedriveisverysensitive.Incorrecthandlingcancausedamageandpermanentlossofdata.
BeforeremovingthemSATAsolidstatedrive,makeabackupcopyofalltheinformationonit,andthen
turnthecomputeroff.
Neverremovethedrivewhilethesystemisoperating,insleep(standby)mode,orinhibernationmode.
ReplacingthemSATAsolidstatedrive
Beforeyoustart,printtheseinstructions.
ToreplacethemSATAsolidstatedrive,dothefollowing:
1.Turnoffthecomputer,thendisconnecttheacpoweradapterandallcablesfromthecomputer.Before
youstartthefollowingprocedures,waitforafewminutestilltheinsideofthecomputercools.
Chapter6.Replacingdevices101
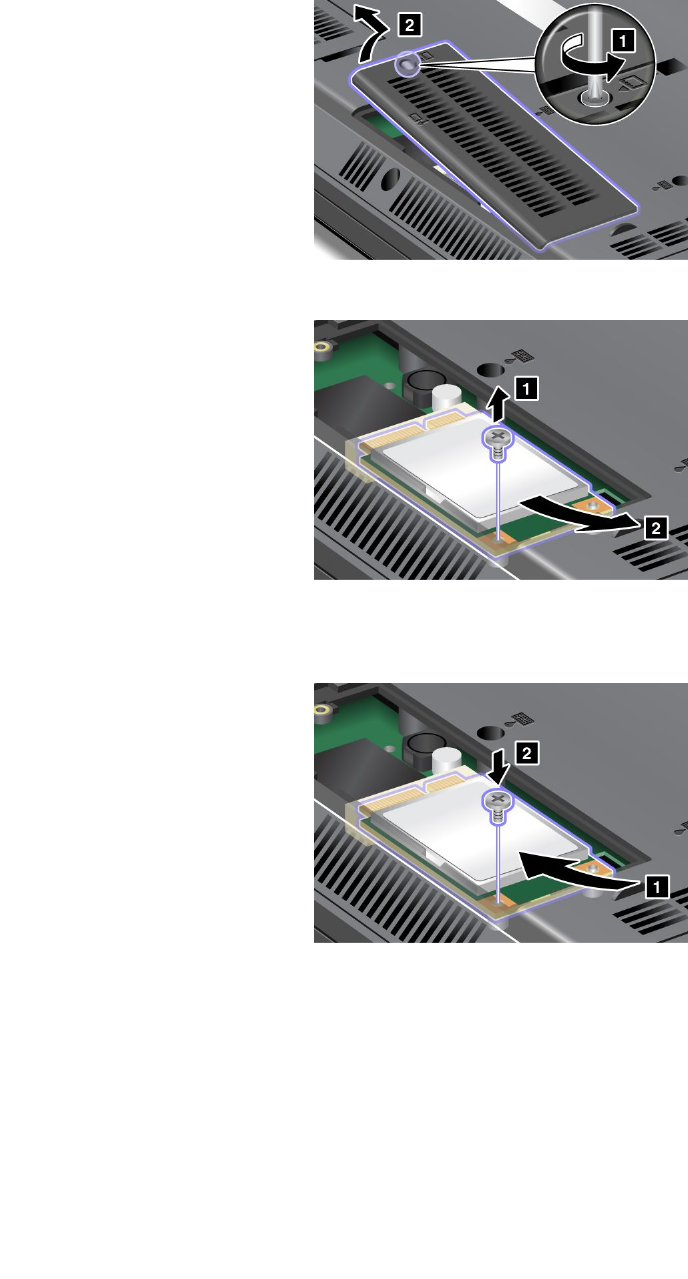
2.Closethecomputerdisplay,andturnthecomputerover.
3.Removethebattery.See“Replacingthebattery”onpage89.
4.Loosenthescrewontheslotcoverandremovetheslotcover.
5.RemovethescrewandthemSATAsolidstatedrivepopsup.RemovethemSATAsolidstatedrive.
6.AlignthecontactedgeofthenewmSATAsolidstatedrivewiththecorrespondingsocketandpivot
themSATAsolidstatedriveuntilyoucansnapitintoplace.SecurethemSATAsolidstatedrivewith
thescrew.
102UserGuide
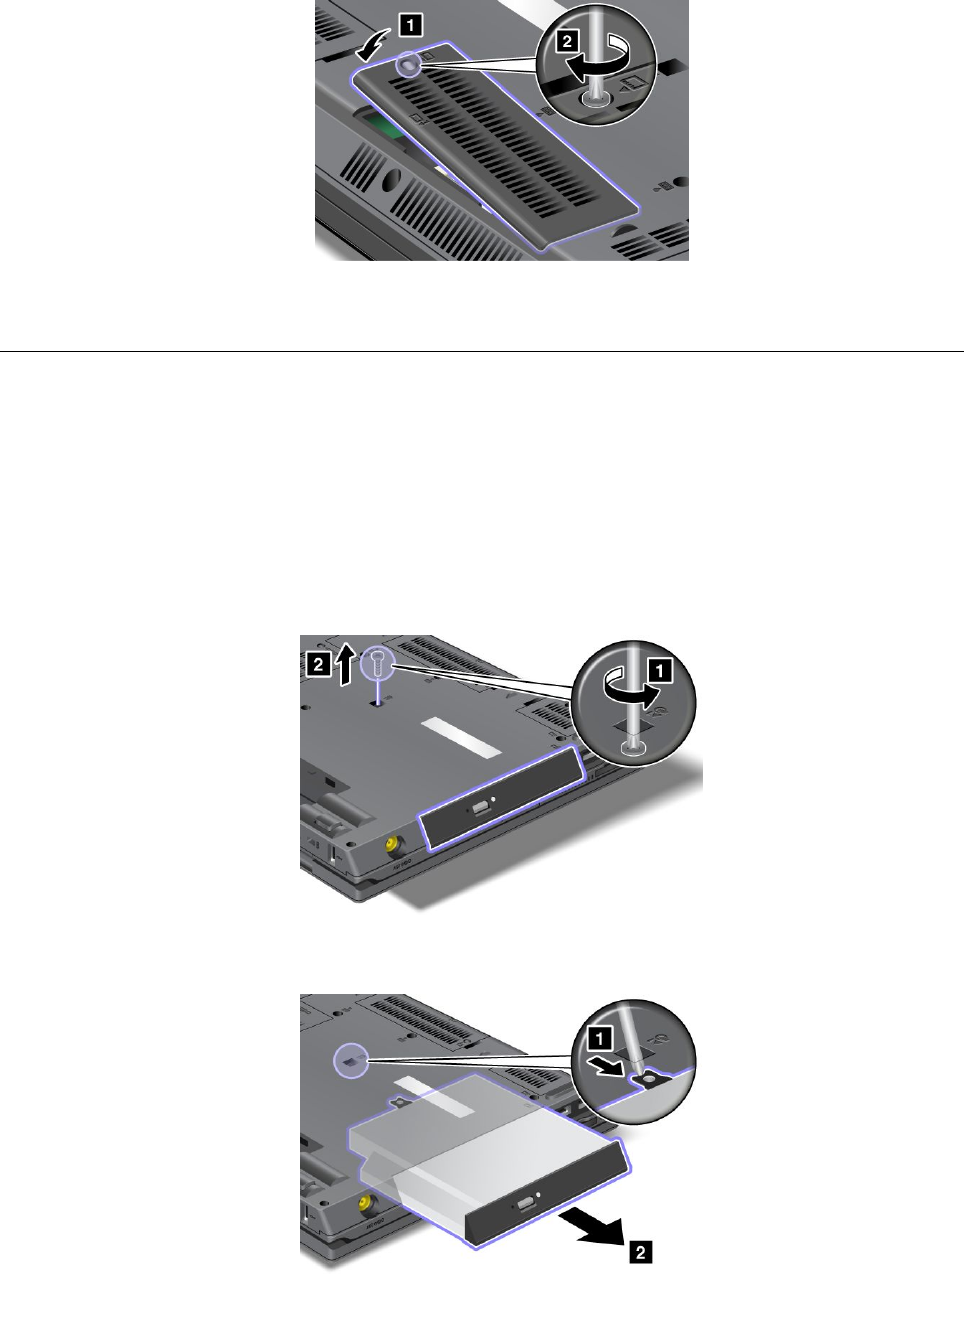
7.Reinstalltheslotcover.
8.Reinstallthebatteryandturnthecomputeroveragain.Thenreconnecttheacpoweradapterand
thecables.
Replacingtheopticaldrive
Beforeyoustart,printtheseinstructions.
Anopticaldriveispreinstalledinthebay.Ifitneedstoberepaired,removeitasfollows:
1.Turnoffthecomputer,thendisconnecttheacpoweradapterandallcablesfromthecomputer.Waitfor
afewminutes,tilltheinsideofthecomputercools,beforeyoustartthefollowingprocedures.
2.Removethebattery.See“Replacingthebattery”onpage89.
3.Closethecomputerdisplay,andturnthecomputerover.
4.Loosenthescrewthatsecuresthedriveandremoveit.
5.Presstheedgeofthedriveoutwards,usingthetipofathinscrewdriverasshowninthedrawing
andthenpulloutthedrive.
Chapter6.Replacingdevices103
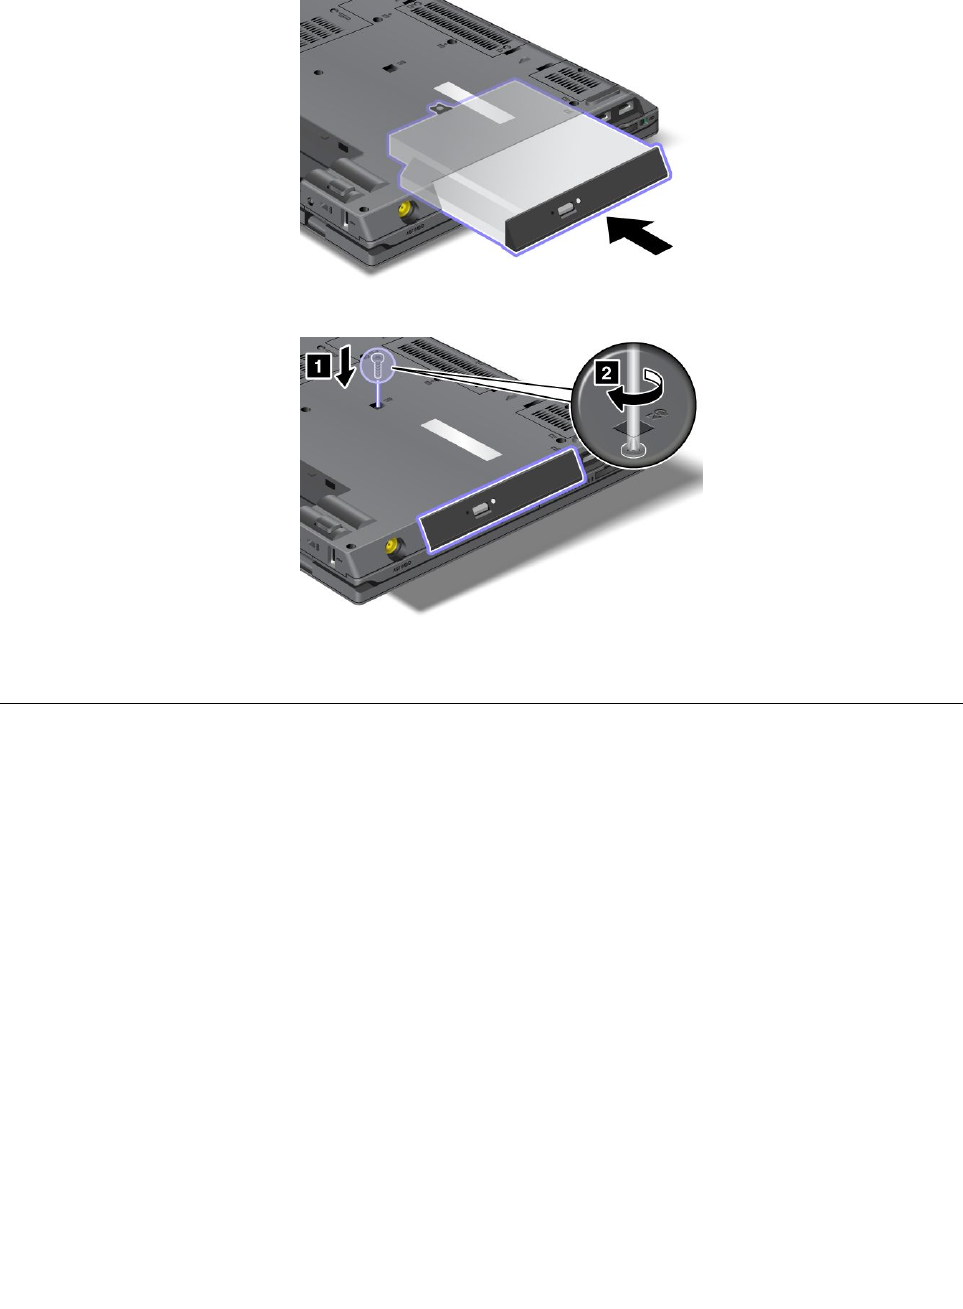
Toinstallarepaireddriveoranewone,doasfollows:
1.Insertthedriveinthebay,andthenpressitrmlytotheconnector.
2.Reinstallthescrewandtightenit.
3.Reinstallthebatteryandturnthecomputeroveragain.Thenreconnecttheacpoweradapterand
thecables.
ReplacingtheSIMcard
YourcomputermayrequireaSIM(SubscriberIdenticationModule)cardtoestablishawirelessWAN(Wide
AreaNetwork)connections.Dependingonthecountryofdelivery,theSIMcardmaybealreadyinstalledin
yourcomputerorwillbepartoftheshippingcontentsthatcamewithyourcomputer.
IfyoundtheSIMcardsincludedintheshippingcontents,adummycardisinstalledintheSIMcard
slot.Thenproceedtothefollowinginstructions.
Ifyoundthedummycardintheshippingcontents,theSIMcardisalreadyinstalledintheSIMcard
slot,andnofurtherinstallationisneeded.
Note:TheSIMcardisidentiedbytheICchipmountedononesideofthecard.
Beforeyoustart,printtheseinstructions.
Replacingthecard
ToreplacetheSIMcard,dothefollowing:
1.Turnoffthecomputer,thendisconnecttheacpoweradapterandallcablesfromthecomputer.
2.Closethecomputerdisplay,andturnitover.
3.Removethebattery.See“Replacingthebattery”onpage89.
104UserGuide
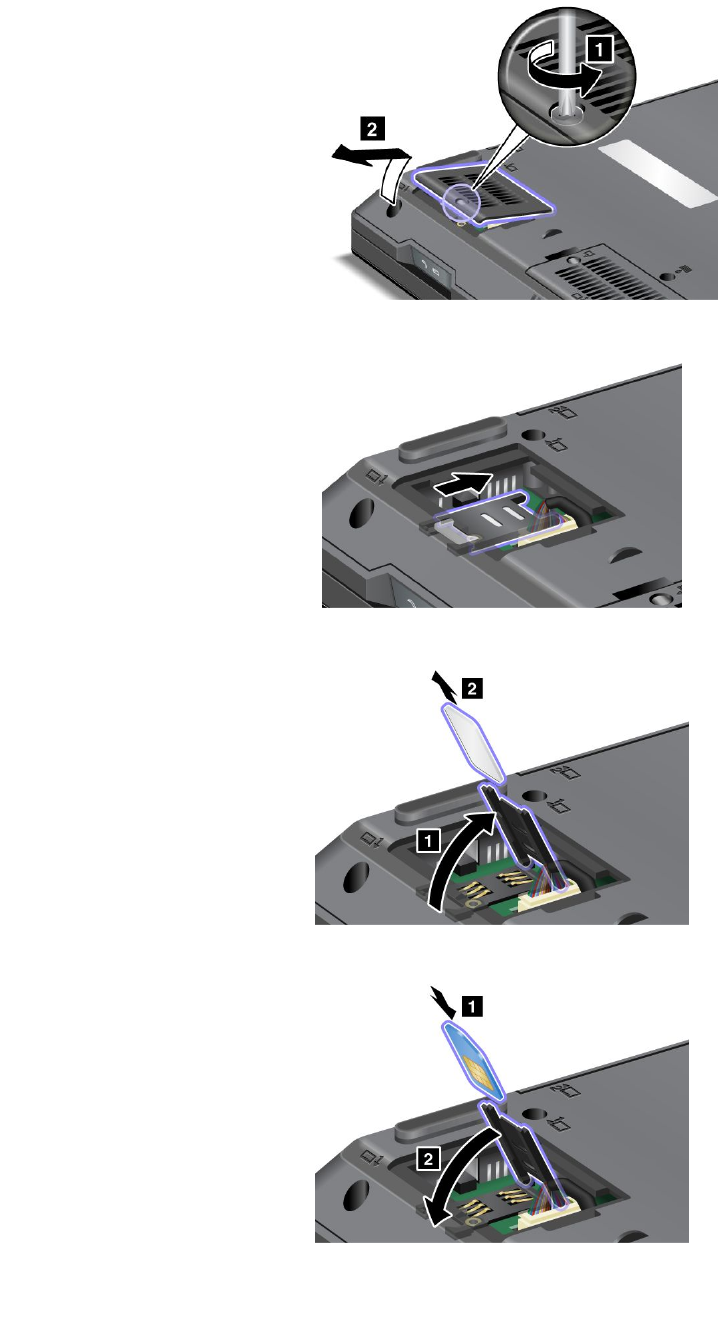
4.Loosenthescrewsecuringtheslotcoverandthenremovetheslotcoveritself.
5.FindtheSIMcardholderinside.Slidethecardholderasshowninthedrawingtounlockit.
6.Liftupthecardholderandthenremovethedummycard.Keepthedummycardforfutureuse.
7.InserttheSIMcardrmlyintothecardholderandpivotthecardholderdownward.
Chapter6.Replacingdevices105
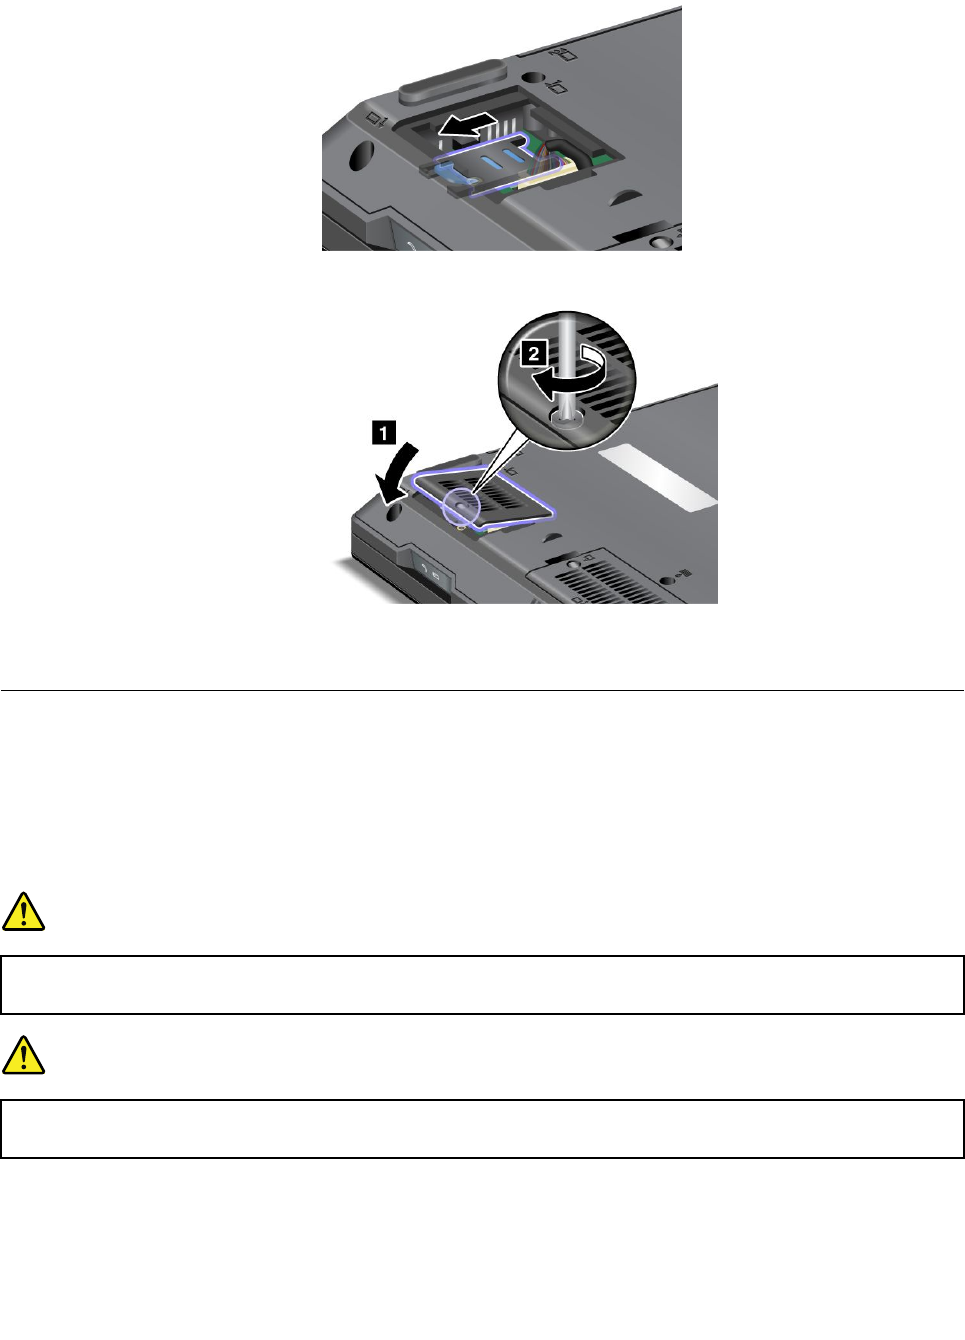
8.Tolockthecardholder,slideitasshowninthedrawing.
9.Reinstalltheslotcover.
10.Reinstallthebatteryandturnthecomputeroveragain.Thenreconnecttheacpoweradapterand
thecables.
Replacingthepalmrest
Beforeyoustart,printtheseinstructions.
ToremovesomeofthePCIExpressCards,youmayneedtoremovethepalmrestrst.Readthefollowing
prerequisitesandthentheinstruction.
Prerequisitesfortheprocedure
DANGER
Duringelectricalstorms,donotconnectthecabletoordisconnectitfromthetelephoneoutlet
onthewall.
DANGER
Electriccurrentfrompower,telephone,andcommunicationcablesishazardous.T oavoidshock
hazard,disconnectthecablesbeforeopeningthecoverofthisslot.
Removingthepalmrest
Toremovethepalmrest,dothefollowing:
106UserGuide
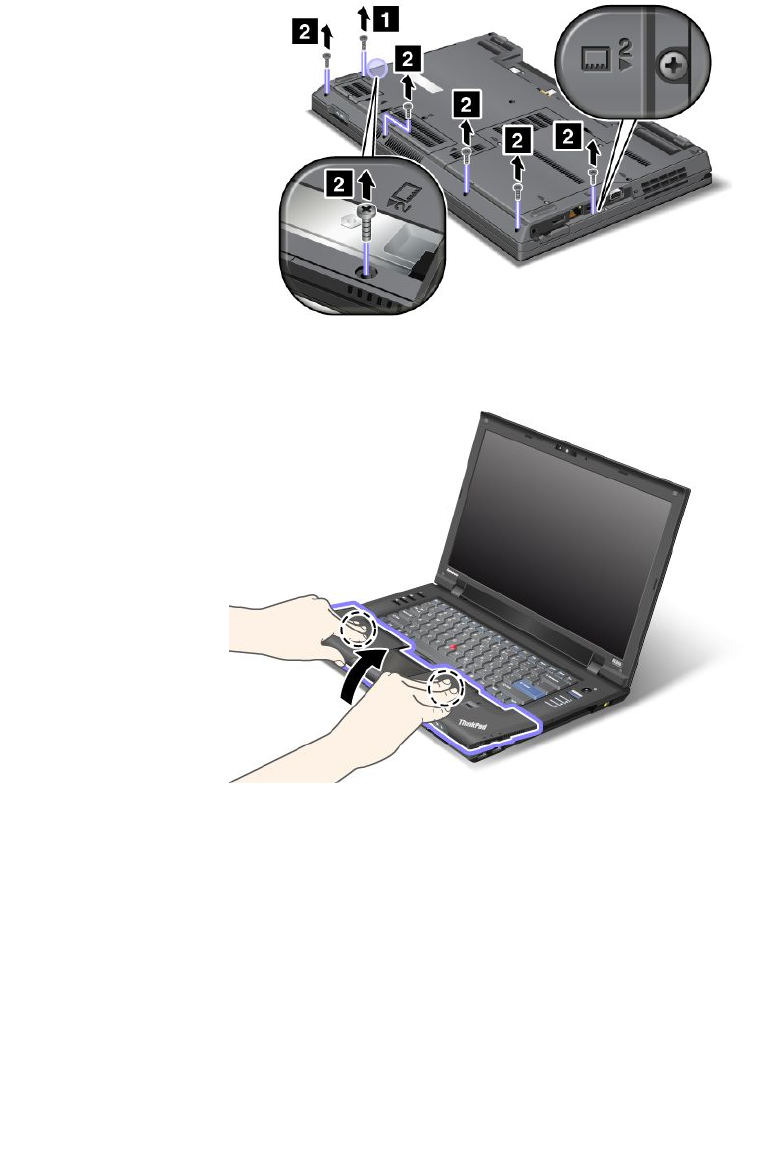
1.Turnoffthecomputer,thendisconnecttheacpoweradapterandallcablesfromthecomputer.Waitfor
afewminutes,tilltheinsideofthecomputercools,beforeyoustartthefollowingprocedures.
2.BesuretoremoveanycardinsertedintheMediacardreader.Closethecomputerdisplay,andturnthe
computerover.
3.Removethebattery.See“Replacingthebattery”onpage89.
4.Removetheopticaldrive.See“Replacingtheopticaldrive”onpage103.
5.Removethescrewsthatsecurethepalmrestfromthebottomsideofthecomputer.
6.Turnthecomputeroverandopenthedisplay.Todetachthepalmrest,presstheareasmarkedinthe
drawingwithyourngerswhileliftingthefrontedgewithyourthumbs.
Chapter6.Replacingdevices107

7.Detachtheip-lockconnectors1and2.Detachtheconnector3bypullingitoutofthesocket.
8.Releasethepalmrestfromthecomputer.Nowthepalmresthasbeenremoved.
Installingthepalmrest
1.Attachtheip-lockconnectors1and2,andthenattachtheconnector3.
108UserGuide

2.Attachthepalmrestasshowninthedrawing.
3.Pushthefrontsideofthepalmrestuntilitclicksintoplace.
4.Closethecomputerdisplay,andturnthecomputerover.
5.Onthebottomside,reinstallthescrewsforthepalmrest.
6.Reinstalltheopticaldrive.
Chapter6.Replacingdevices109
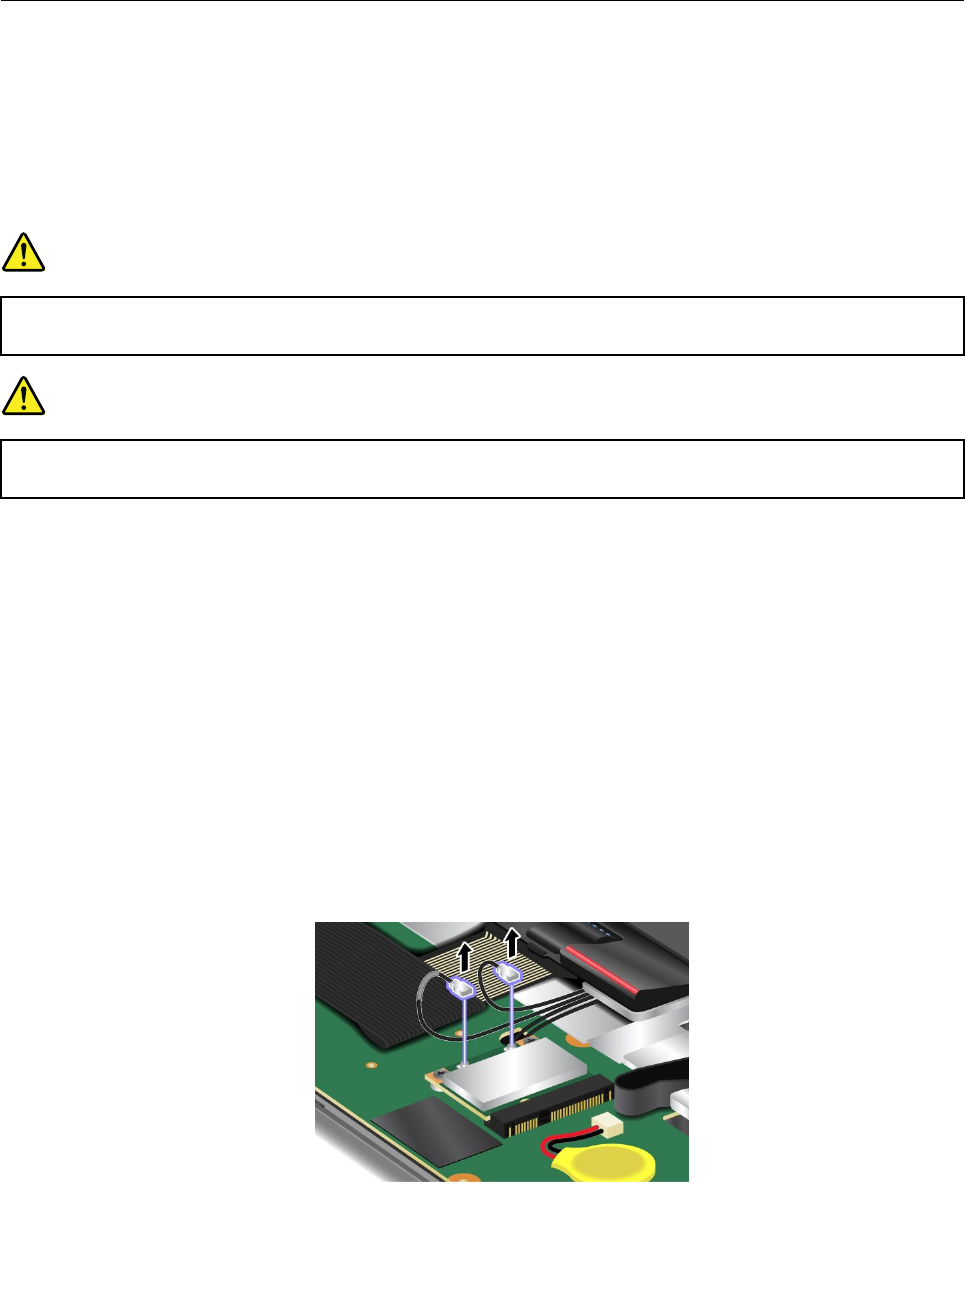
7.Reinstallthebatteryandturnthecomputeroveragain.Thenreconnecttheacpoweradapterand
thecables.
ReplacingthePCIExpressMiniCardforwirelessLAN/WiMAX
connection
Beforeyoustart,printtheseinstructions.
YourcomputerhasaPCIExpressMiniCardslotforconnectiontoawirelessLAN/WiMAX.ToreplacethePCI
ExpressMiniCardwithanewone,readthefollowingprerequisitesrst.
Prerequisitesfortheprocedure
DANGER
Duringelectricalstorms,donotconnectthecabletoordisconnectitfromthetelephoneoutlet
onthewall.
DANGER
Electriccurrentfrompower,telephone,andcommunicationcablesishazardous.T oavoidshock
hazard,disconnectthecablesbeforeopeningthecoverofthisslot.
Note:BeforeyoustartinstallingaPCIExpressMiniCard,touchametaltableoragroundedmetalobject.
Thisactionreducesanystaticelectricityfromyourbody.Thestaticelectricitycoulddamagethecard.
Replacingthecard
Toreplacethecard,doasfollows:
1.Turnoffthecomputer,thendisconnecttheacpoweradapterandallcablesfromthecomputer.Waitfor
afewminutes,tilltheinsideofthecomputercools,beforeyoustartthefollowingprocedures.
2.Closethecomputerdisplay,andturnthecomputerover.
3.Removethebattery.See“Replacingthebattery”onpage89.
4.Removetheopticaldrive.See“Replacingtheopticaldrive”onpage103.
5.Removethepalmrest.See“Replacingthepalmrest”onpage106.
6.Ifatoolforremovingconnectorsisincludedinthepackagewiththenewcard,useittodisconnectthe
cablesfromthecard.Ifnosuchtoolisincluded,disconnectthecablesbypickinguptheconnectors
withyourngersandgentlyunpluggingthem.
110UserGuide
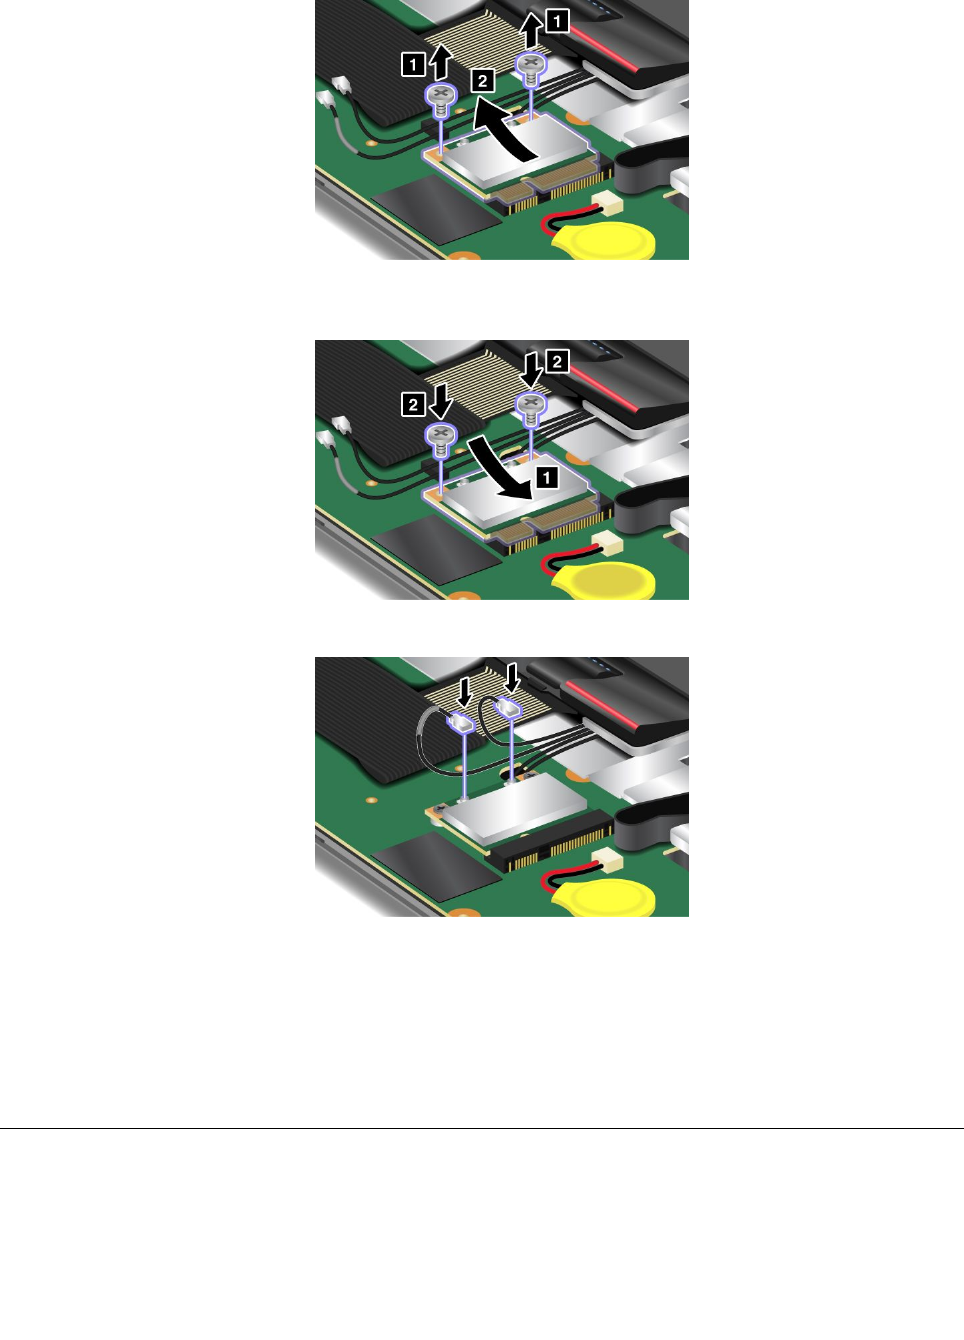
7.Removethescrewsandthecardpopsup.Removethecard.
8.Alignthecontactedgeofthenewcardwiththecorrespondingsocketcontactofthecomputer.Pivot
thecarduntilyoucansnapitintoplaceandsecurethecardwiththetwoscrews.
9.ConnectthecablestothenewPCIExpressMiniCard.
Note:Besuretoattachthegraycabletotheconnectormarked“MAIN”onthecardandtheblack
cabletotheconnectormarked“AUX”.
10.Reinstallthepalmrest.
11.Reinstalltheopticaldrive.
12.Reinstallthebatteryandturnthecomputeroveragain.Thenreconnecttheacpoweradapterand
thecables.
InstallingandreplacingthePCIExpressMiniCardforwirelessWAN
connection
SomeThinkPadmodelshaveaPCIExpressMiniCardslotforconnectiontoawirelessWAN.Toreplacethe
PCIExpressMiniCardwithanewone,readthefollowingprerequisitesrst.
Chapter6.Replacingdevices111
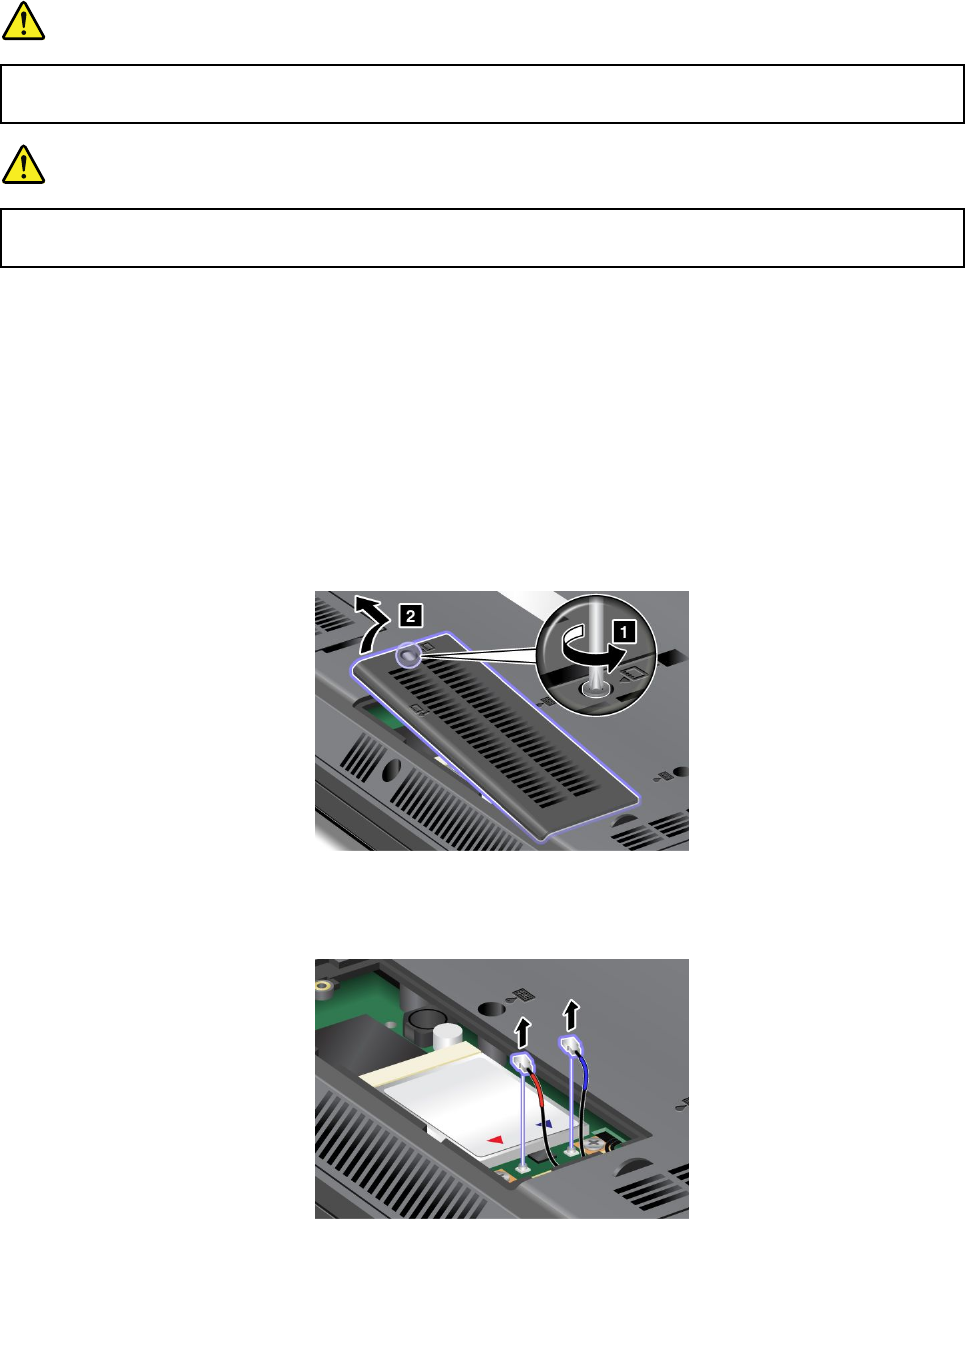
Prerequisitesfortheprocedure
DANGER
Duringelectricalstorms,donotconnectthecabletoordisconnectitfromthetelephoneoutlet
onthewall.
DANGER
Electriccurrentfrompower,telephone,andcommunicationcablesishazardous.T oavoidshock
hazard,disconnectthecablesbeforeopeningthecoverofthisslot.
Attention:BeforeyoustartinstallingaPCIExpressMiniCard,touchametaltableoragroundedmetal
object.Thisactionreducesanystaticelectricityfromyourbody.Thestaticelectricitycoulddamagethecard.
Replacingthecard
ToreplacethePCIExpressMiniCard,dothefollowing:
1.Turnoffthecomputer,thendisconnecttheacpoweradapterandallcablesfromthecomputer.Before
youstartthefollowingprocedures,waitforafewminutestilltheinsideofthecomputercools.
2.Closethecomputerdisplay,andturnthecomputerover.
3.Removethebattery.See“Replacingthebattery”onpage89.
4.Loosenthescrewandremovethecover.
5.Ifatoolforremovingconnectorsisincludedinthepackagewiththenewcard,useittodisconnect
theantennacablesfromthecard.Ifnosuchtoolisincluded,pickuptheantennacableswithyour
ngersandgentlyunplugthem.
112UserGuide
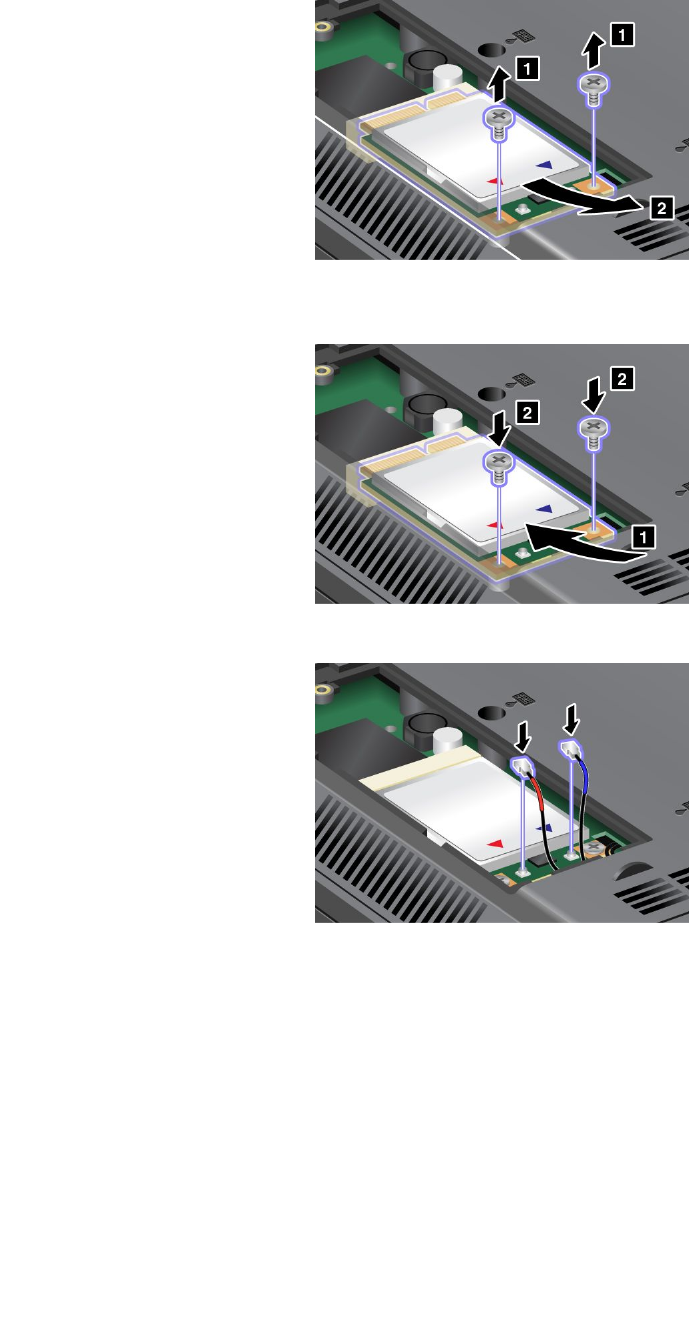
6.Removethescrewsandthecardpopsup.Removethecard.
7.AlignthecontactedgeofthenewPCIExpressMiniCardwiththecorrespondingsocket.Pivotthecard
untilyoucansnapitintoplace.Securethecardwiththetwoscrews.
8.ConnecttheantennacablestothenewPCIExpressMiniCardasshowninthedrawing.
Note:BesuretoattachtheredcabletotheMainconnector,andthebluecabletotheAUXconnector.
Chapter6.Replacingdevices113
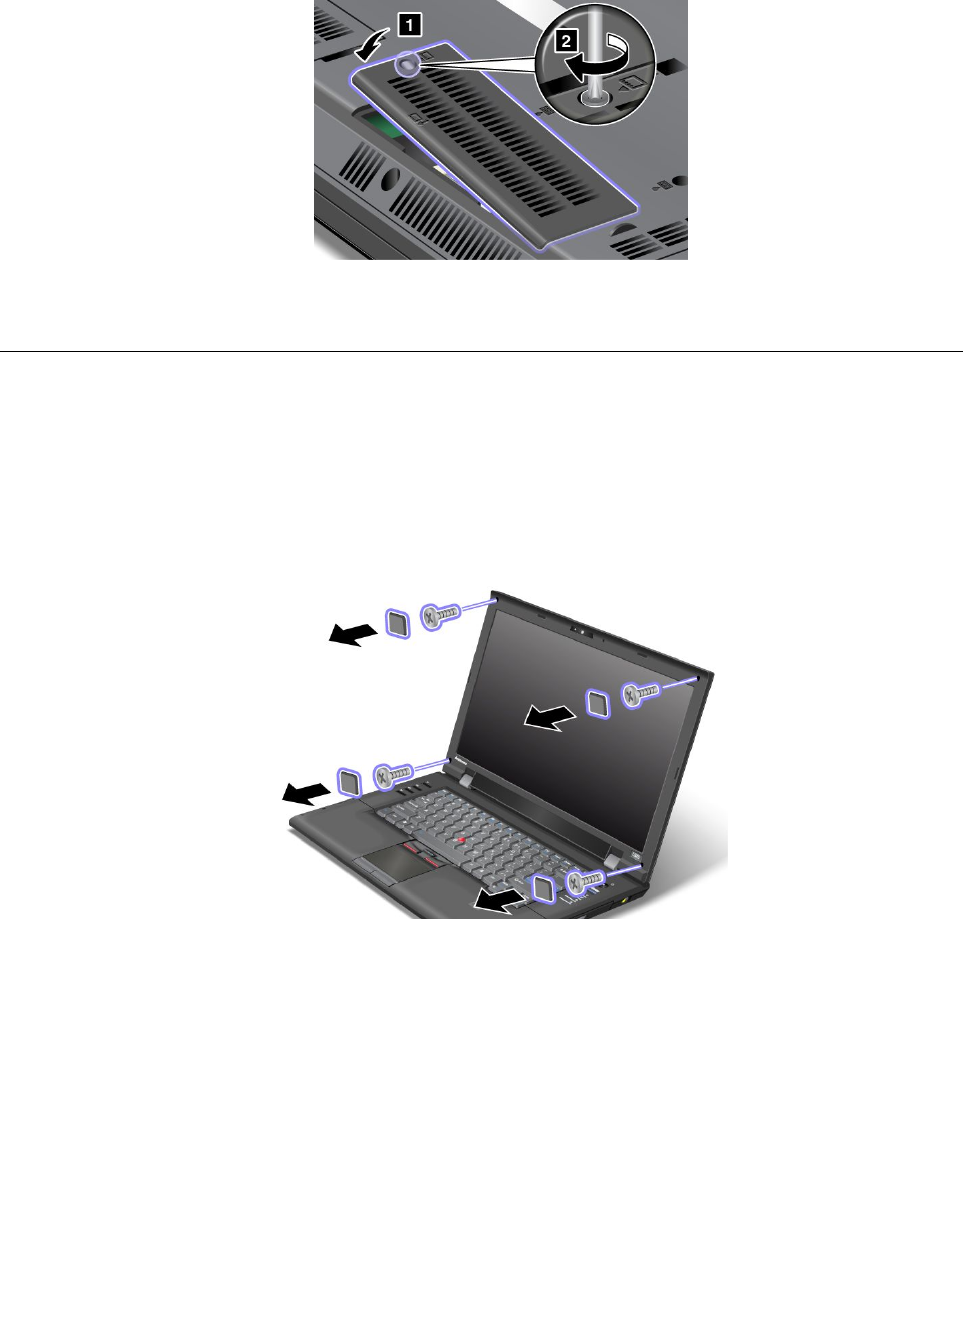
9.Reinstalltheslotcoverandtightenthescrew.
10.Reinstallthebatteryandturnthecomputeroveragain.Thenreconnecttheacpoweradapterand
thecables.
Replacingtheintegratedcamera
Ifyourcomputerisequippedwithanintegratedcamera,youcanreplaceitifyouneedtohaveitrepaired.
Toreplacetheintegratedcamera,dothefollowing:
1.Turnoffthecomputer,thendisconnecttheacpoweradapterandallcablesfromthecomputer.
2.LocatethescrewsthatsecuretheLCDbezelassembly.Removethescrewcapsandthenremove
thescrews.
114UserGuide
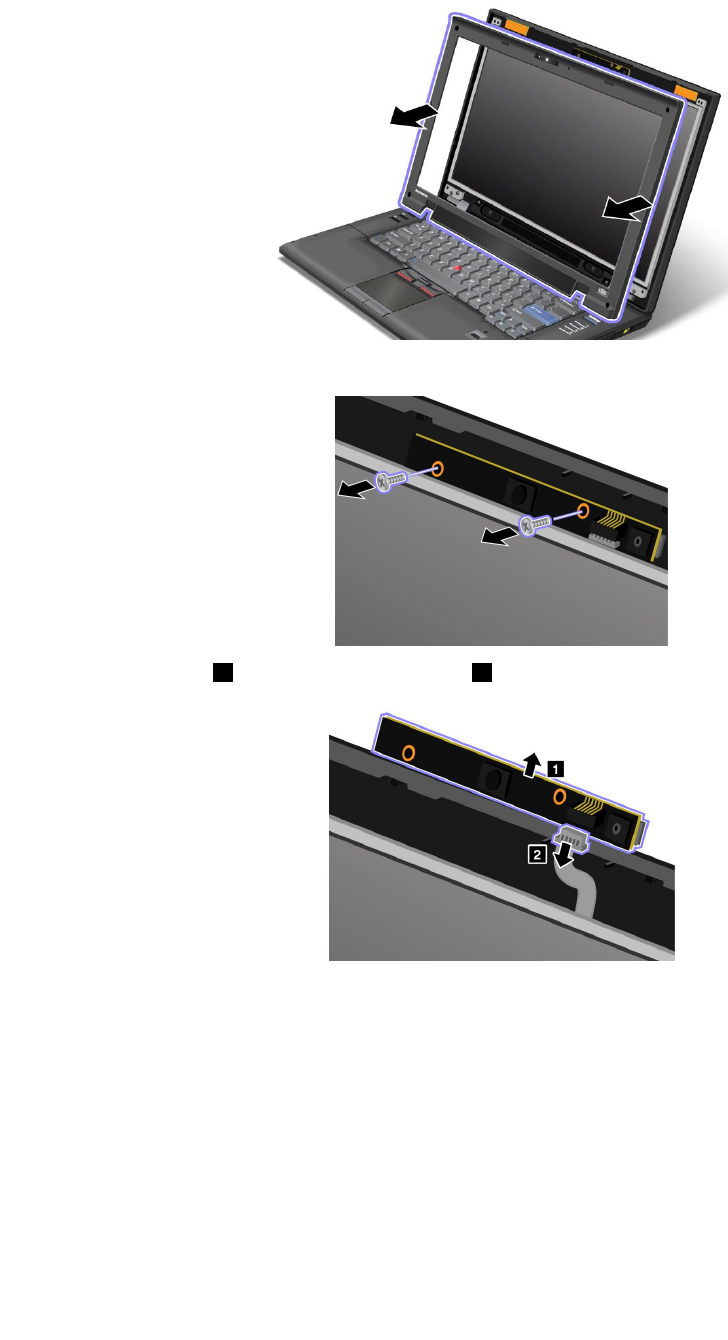
3.RemovetheLCDbezelassembly.
4.Removethescrewsthatsecurethecamera.
5.Liftthecameraout1anddetachtheconnector2.Thenremovethefailedcamera.
Chapter6.Replacingdevices115
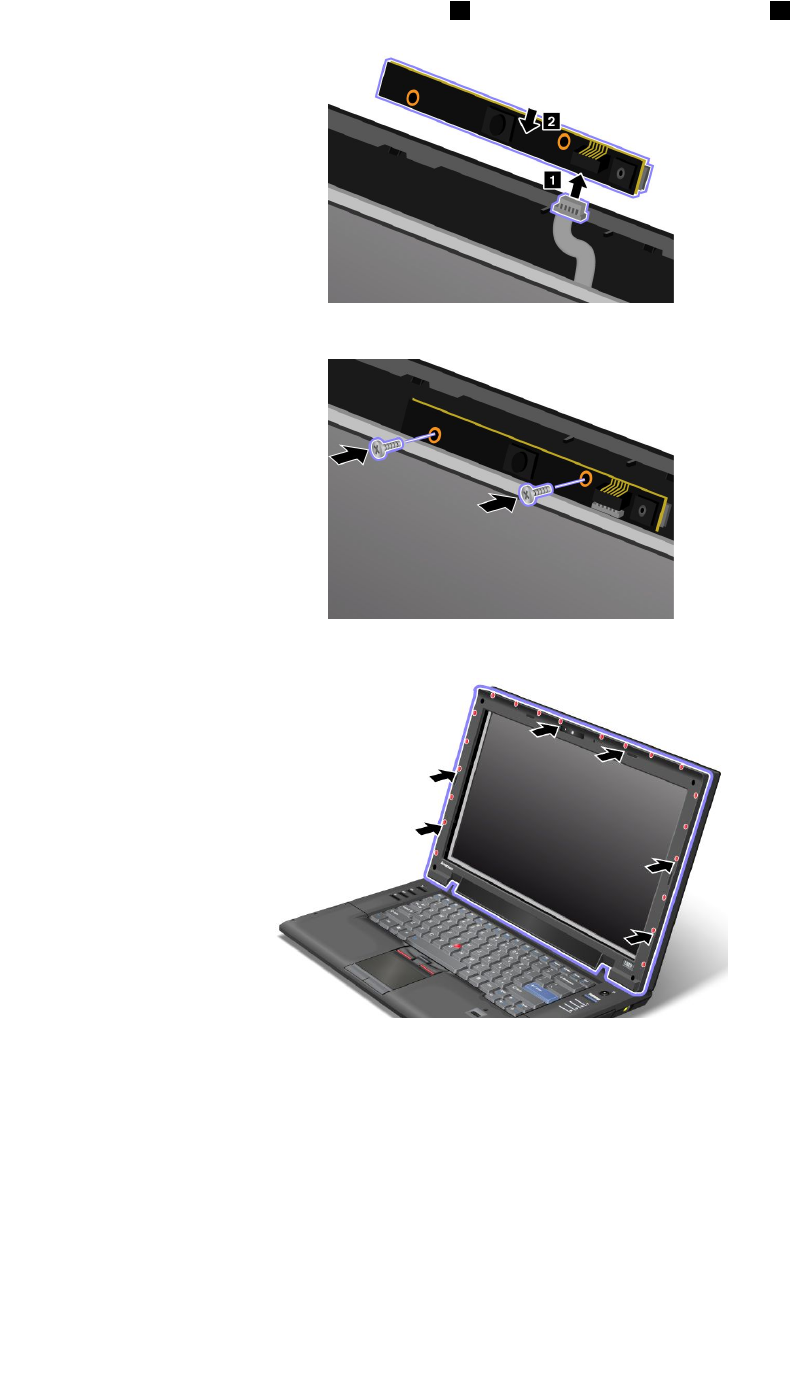
6.Toinstallanewcamera,attachtheconnector1andpositionthecamerainplace2.
7.Reinstallthescrewstosecurethecamera.
8.ReinstalltheLCDbezelassembly.
116UserGuide

9.ReinstallthescrewstosecuretheLCDbezelassembly.Then,reinstallthefourscrewcaps.
10.Reinstallthebatteryandturnthecomputeroveragain.Thenreconnecttheacpoweradapterand
thecables.
Chapter6.Replacingdevices117

118UserGuide

Chapter7.Enhancingyourcomputer
Thissectionprovidesinformationoninstallingdevicesandtakingadvantageofyourcomputer's
high-technologyfeatures.
•“FindingThinkPadoptions”onpage119
•“ThinkPadportreplicatoranddockingstation”onpage119
FindingThinkPadoptions
Ifyouwanttoexpandthecapabilitiesofyourcomputer,Lenovohasanumberofhardwareaccessoriesand
upgradestomeetyourneeds.Optionsincludememory,storage,modems,networkingadapters,docking
stationsandportreplicators,batteries,poweradapters,printers,scanners,keyboards,mice,andmore.
YoucanshopatLenovo24hoursaday,7daysaweekdirectlyovertheWorldWideWeb.Allyouneedisan
Internetconnectionandacreditcard.
ToshopatLenovogoto:
http://www.lenovo.com/accessories/services/index.html
ThinkPadportreplicatoranddockingstation
Ifyourcomputerhasadockingconnector,youcanattachittoaThinkPadportreplicatororadocking
station.YourcomputersupportsThinkPadPortReplicatorSeries3,ThinkPadMiniDockSeries3,and
ThinkPadMiniDockPlusSeries3.
WhenthecomputerisattachedtotheThinkPadportreplicatororthedockingstation,neverpickupthe
assemblybytakingholdofthecomputeralone.Alwaysholdthewholeassembly.
FormoredetailsabouttheThinkPadPortReplicatorSeries3,theThinkPadMiniDockSeries3,andthe
ThinkPadMiniDockPlusSeries3,refertothefollowing:
•“Frontview”onpage120
•“Rearview”onpage122
•“AttachingaThinkPadportreplicatorordockingstation”onpage125
•“DetachingaThinkPadportreplicatorordockingstation”onpage127
•“Securityfeature”onpage128
•“Usingthesystemlockkey”onpage129
©CopyrightLenovo2012119
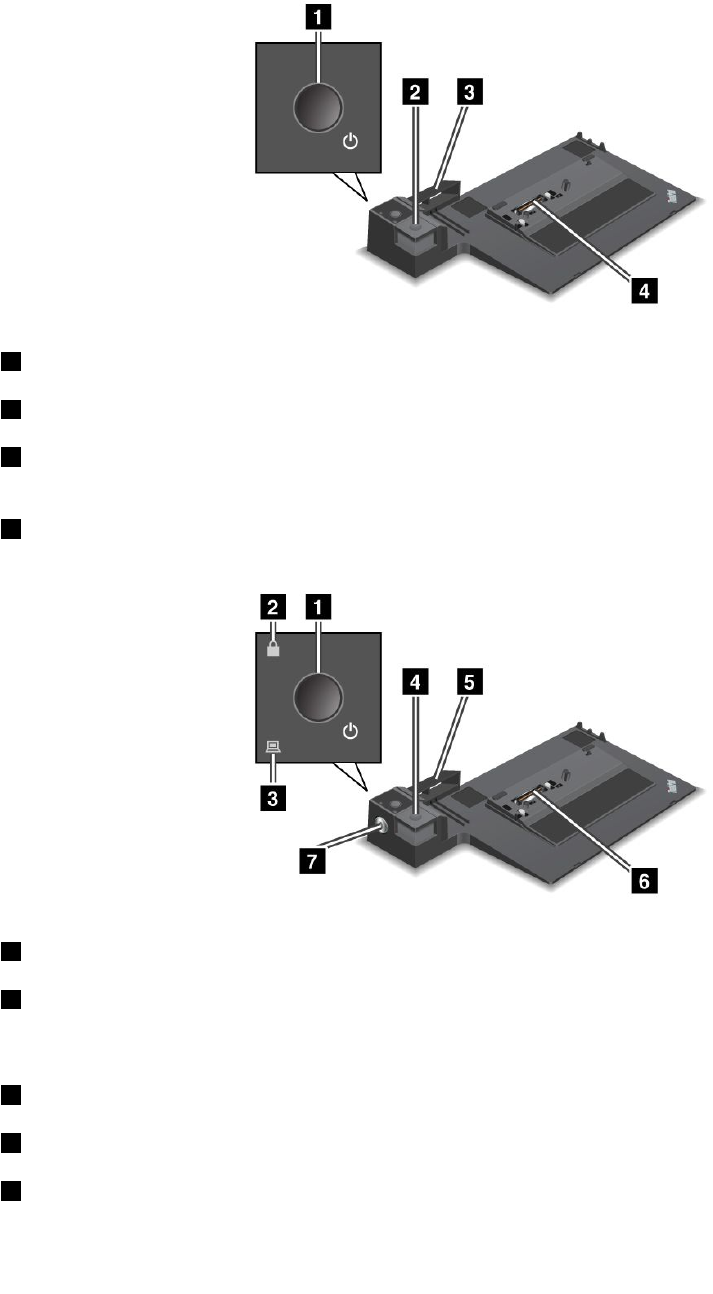
Frontview
ThinkPadPortReplicatorSeries3
1Thepowerswitchturnsthecomputeronoroff.
2TheejectbuttonreleasesthecomputerfromtheThinkPadPortReplicatorSeries3whenpressed.
3Theslidingadjusterisaguideusedtoalignthedockingconnectoronyourcomputerasyouattach
theThinkPadPortReplicatorSeries3.
4Thedockingconnectoriswhereyouattachyourcomputer.
ThinkPadMiniDockSeries3
1Thepowerswitchturnsthecomputeronandoff.
2Thekeylockindicatorlightswhenthesystemlockkeyisinthelockedposition.Whenthesystemlock
keyisinthelockedposition,theejectbuttonoftheThinkPadMiniDockSeries3islocked;youcannot
attachorremoveyourcomputer.
3Thedockingindicatorlightswhenyourcomputerisdocked.
4TheejectbuttonreleasesthecomputerfromtheThinkPadMiniDockSeries3whenpressed.
5Theslidingadjusterisaguideusedtoalignthedockingconnectoronyourcomputerasyouattach
theThinkPadPortReplicatorSeries3.
120UserGuide
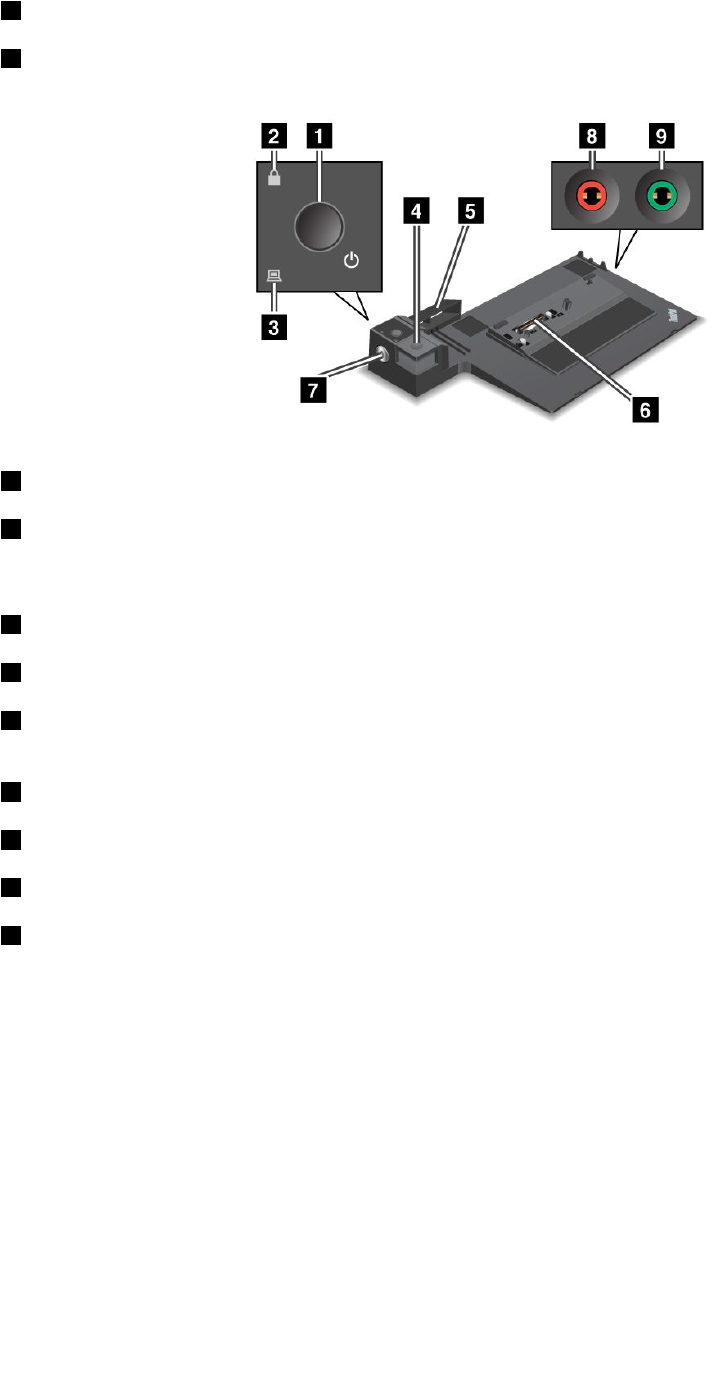
6Thedockingconnectoriswhereyouattachyourcomputer.
7Thesystemlockkeyisforlockingtheejectbutton.
ThinkPadMiniDockPlusSeries3
1Thepowerswitchturnsthecomputeronandoff.
2Thekeylockindicatorlightswhenthesystemlockkeyisinthelockedposition.Whenthesystem
lockkeyisinthelockedposition,theejectbuttonoftheThinkPadMiniDockPlusSeries3islocked;you
cannotattachorremoveyourcomputer.
3Thedockingindicatorlightswhenyourcomputerisdocked.
4TheejectbuttonreleasesthecomputerfromtheThinkPadMiniDockPlusSeries3whenpressed.
5Theslidingadjusterisaguideusedtoalignthedockingconnectoronyourcomputerasyouattach
theThinkPadPortReplicatorSeries3.
6Thedockingconnectoriswhereyouattachyourcomputer.
7Thesystemlockkeyisforlockingtheejectbutton.
8Themicrophonejack,ajack1/8inch(3.5mm)indiameter,isforconnectinganexternalmicrophone.
9Theheadphonejack,ajack1/8inch(3.5mm)indiameter,isforconnectinganexternalstereoheadphone.
Chapter7.Enhancingyourcomputer121
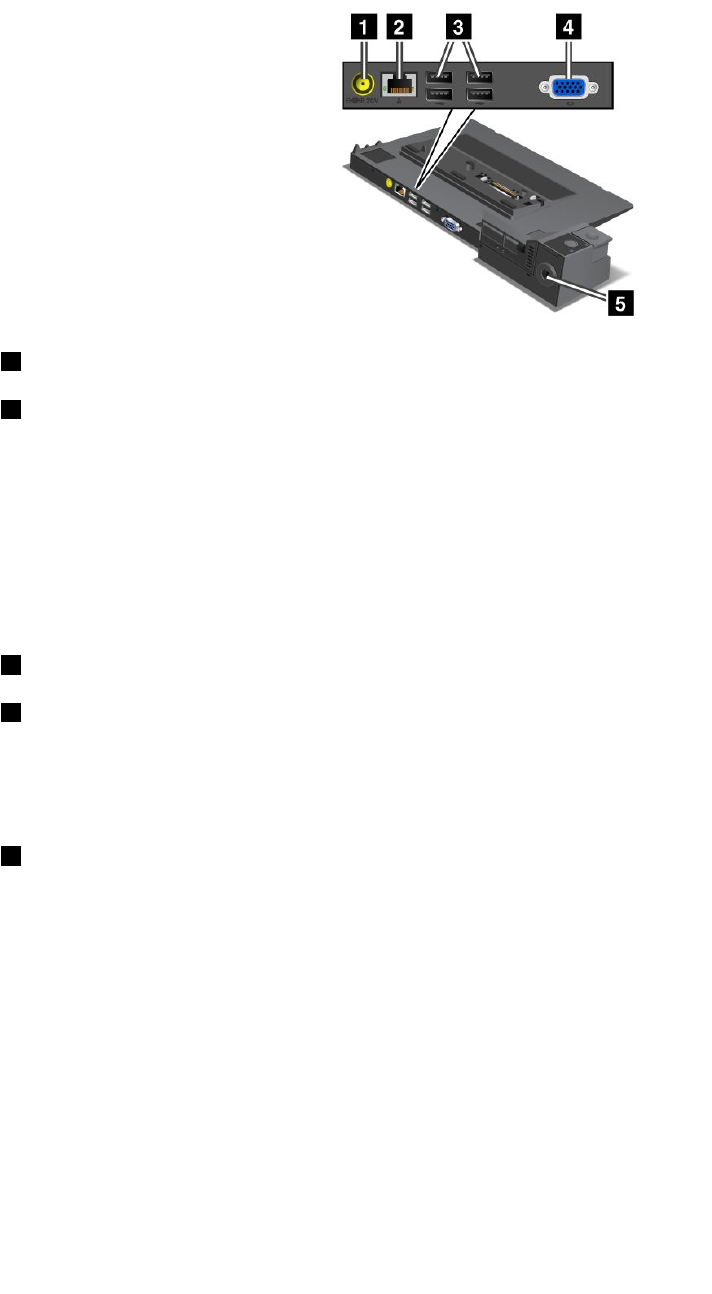
Rearview
ThinkPadPortReplicatorSeries3
1Thepowerjackisforconnectingtheacpoweradapter.
2TheEthernetconnectorisforconnectingtheThinkPadPortReplicatorSeries3toanEthernetLAN.
Theindicatorontheconnectoristhesameasthatonthecomputer.
Notes:
•YoucannotusetheTokenRingcableforthisconnector.
•Youcanusethisconnectorfora10BASE-T/100BASE-TX/1000BASE-TEthernet.
Note:IfyouattachyourcomputertotheThinkPadPortReplicatorSeries3anduseanEthernetconnector,
usetheEthernetconnectorontheThinkPadPortReplicatorSeries3,nottheoneonthecomputer.
3TheUniversalSerialBusconnectorsareforconnectingUSB1.1andUSB2.0devices.
4Theexternalmonitorconnectorisforconnectinganexternalmonitor.
Note:IfyouattachyourcomputertotheThinkPadPortReplicatorSeries3anduseanexternalmonitor
connector,usetheexternalmonitorconnectorontheThinkPadPortReplicatorSeries3,nottheoneonthe
computer.
5Whenyouattachamechanicallocktothesecuritykeyhole,theejectbuttonislockedsothatthe
computercannotberemovedfromtheThinkPadPortReplicatorSeries3.
122UserGuide
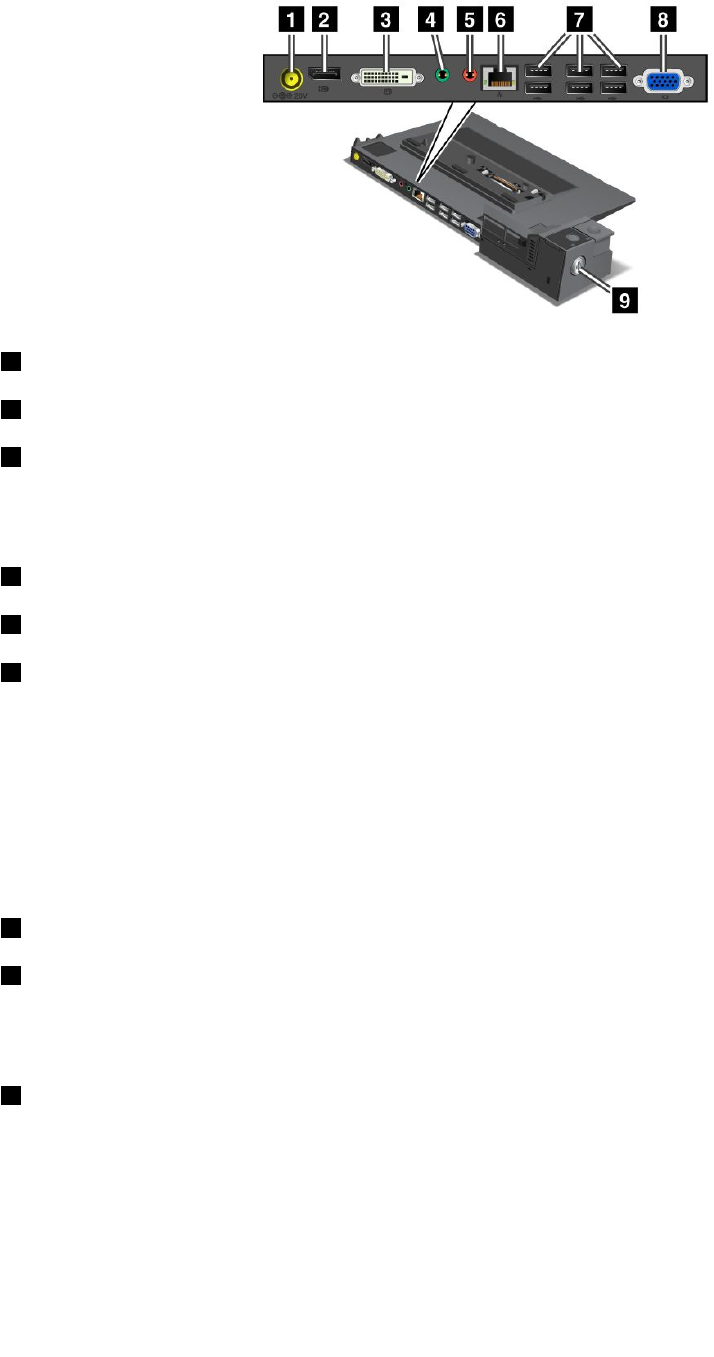
ThinkPadMiniDockSeries3
1Thepowerjackisforconnectingtheacpoweradapter.
2TheDisplayPortisforconnectingadisplaydevice.
3ThedigitalvisualinterfaceconnectorisforconnectingamonitorthatsupportsSingle-LinkDVI.
Note:TheDVIconnectorprovidesadigitalinterfaceonly.Thisconnectorcanbeusedwithacomputerthat
supportsDVIviadockingonly.
4Theheadphonejack,ajack1/8inch(3.5mm)indiameter,isforconnectinganexternalstereoheadphone.
5Themicrophonejack,ajack1/8inch(3.5mm)indiameter,isforconnectinganexternalmicrophone.
6TheEthernetconnectorisforconnectingtheThinkPadMiniDockSeries3toanEthernetLAN.The
indicatorontheconnectoristhesameasthatonthecomputer.
Notes:
•YoucannotusetheTokenRingcableforthisconnector.
•Youcanusethisconnectorfora10BASE-T/100BASE-TX/1000BASE-TEthernet.
Note:IfyouattachyourcomputertotheThinkPadMiniDockSeries3anduseanEthernetconnector,use
theEthernetconnectorontheThinkPadMiniDockSeries3,nottheoneonthecomputer.
7TheUniversalSerialBusconnectorsareforconnectingUSB1.1andUSB2.0devices.
8Theexternalmonitorconnectorisforconnectinganexternalmonitor.
Note:IfyouattachyourcomputertotheThinkPadMiniDockSeries3anduseanexternalmonitorconnector,
usetheexternalmonitorconnectorontheThinkPadMiniDockSeries3,nottheoneonthecomputer.
9Whenyouattachamechanicallocktothesecuritykeyhole,theejectbuttonislockedsothatthe
computercannotberemovedfromtheThinkPadMiniDockSeries3.
Chapter7.Enhancingyourcomputer123
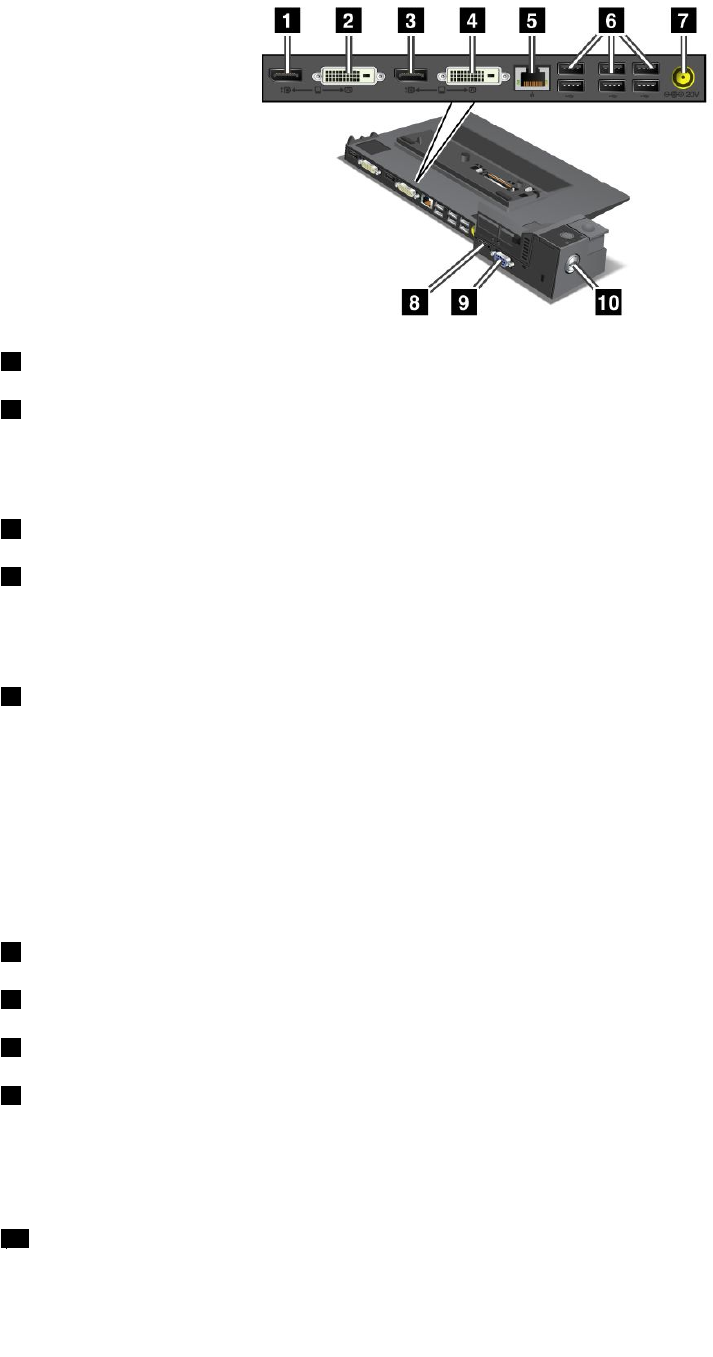
ThinkPadMiniDockPlusSeries3
1TheDisplayPortisforconnectingadisplaydevice.
2ThedigitalvisualinterfaceconnectorisforconnectingamonitorthatsupportsSingle-LinkDVI.
Note:TheDVIconnectorprovidesadigitalinterfaceonly.Thisconnectorcanbeusedwithacomputerthat
supportsDVIviadockingonly.
3TheDisplayPortisforconnectingadisplaydevice.
4ThedigitalvisualinterfaceconnectorisforconnectingamonitorthatsupportsSingle-LinkDVI.
Note:TheDVIconnectorprovidesadigitalinterfaceonly.Thisconnectorcanbeusedwithacomputerthat
supportsDVIviadockingonly.
5TheEthernetconnectorisforconnectingtheThinkPadMiniDockPlusSeries3toanEthernetLAN.
Theindicatorontheconnectoristhesameasthatonthecomputer.
Notes:
•YoucannotusetheTokenRingcableforthisconnector.
•Youcanusethisconnectorfora10BASE-T/100BASE-TX/1000BASE-TEthernet.
Note:IfyouattachyourcomputertotheThinkPadMiniDockPlusSeries3anduseanEthernetconnector,
usetheEthernetconnectorontheThinkPadMiniDockPlusSeries3,nottheoneonthecomputer.
6TheUniversalSerialBusconnectorsareforconnectingUSB1.1andUSB2.0devices.
7Thepowerjackisforconnectingtheacpoweradapter.
8TheeSATAisforconnectingtheeSATA.
9Theexternalmonitorconnectorisforconnectinganexternalmonitor.
Note:IfyouattachyourcomputertotheThinkPadMiniDockPlusSeries3anduseanexternalmonitor
connector,usetheexternalmonitorconnectorontheThinkPadMiniDockPlusSeries3,nottheoneonthe
computer.
10Whenyouattachamechanicallocktothesecuritykeyhole,theejectbuttonislockedsothatthe
computercannotberemovedfromtheThinkPadMiniDockPlusSeries3.
124UserGuide
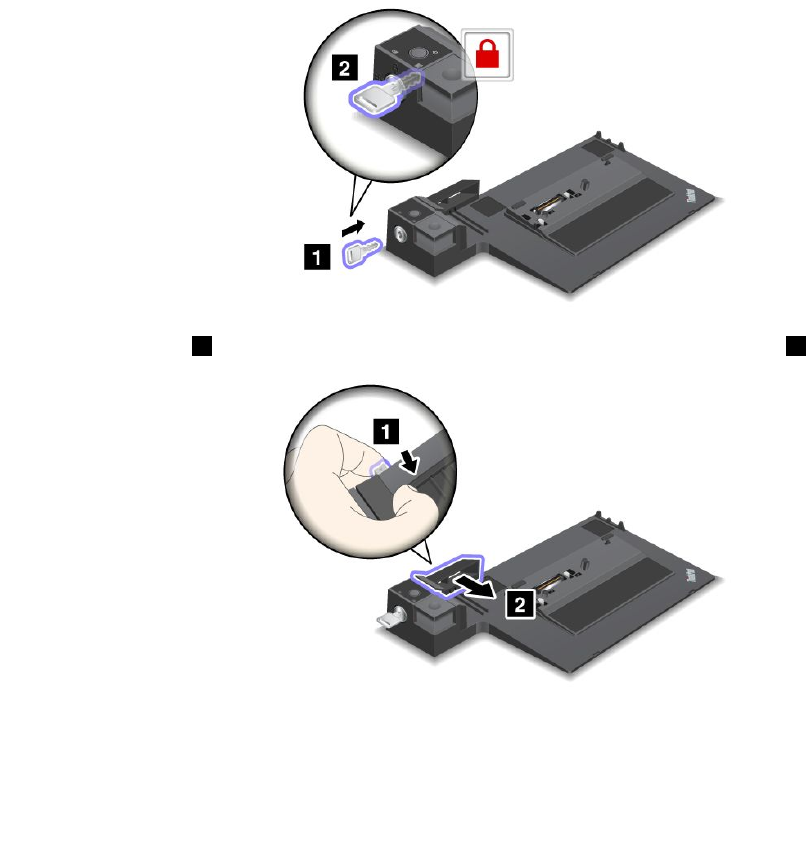
AttachingaThinkPadportreplicatorordockingstation
Notes:
•BeforeyouattachthecomputertoaThinkPadPortReplicatorSeries3,aThinkPadMiniDockSeries3,or
aThinkPadMiniDockPlusSeries3,disconnectanacpoweradapterfromthecomputer.
•Ifyourcomputerisoperating,makesurethatithasnishedanyoperationsinvolvingdevicesthatare
connectedtoaUSBconnectorandaUSB/eSATAconnector.Alsomakesurethatanyconnectionto
anEthernetporthasended.
•BeforeyouattachyourcomputertoaThinkPadMiniDockSeries3,oraThinkPadMiniDockPlusSeries
3,makesurethatthesystemlockkeyisinplaceandintheunlocked(horizontal)position.
ThefollowingdrawingsarefortheThinkPadMiniDockSeries3,ortheThinkPadMiniDockPlusSeries3.
TheprocedureisthesamefortheThinkPadPortReplicatorSeries3.
ToattachyourcomputertoaThinkPadPortReplicatorSeries3,aThinkPadMiniDockSeries3,ora
ThinkPadMiniDockPlusSeries3,dothefollowing:
1.Toattachyourcomputer,makesurethatthesystemlockkeyisinplaceandintheunlocked(horizontal)
positionfortheThinkPadMiniDockSeries3,ortheThinkPadMiniDockPlusSeries3.Makesurethat
themechanicallockisdetachedfortheThinkPadPortReplicatorSeries3.
2.Pressthebutton1andpulltheslidingadjusterinthedirectionshownbythearrow2.
Chapter7.Enhancingyourcomputer125
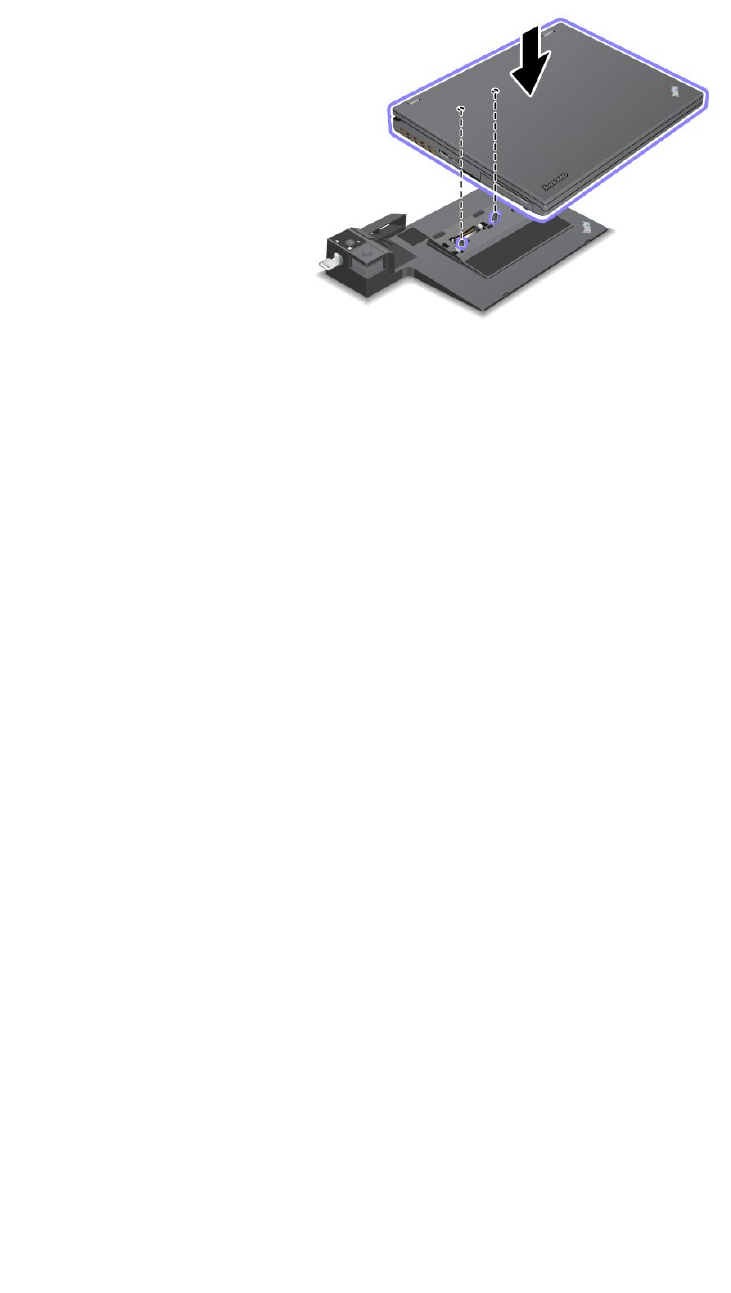
3.PutyourcomputerontheplatformoftheThinkPadMiniDockSeries3,ortheThinkPadMiniDockPlus
Series3,makingsurethatthetop-leftcornerofthecomputerisalignedtotheguideplateonthe
ThinkPadMiniDockSeries3,ortheThinkPadMiniDockPlusSeries3.
4.InsertyourcomputerintotheThinkPadMiniDockSeries3,ortheThinkPadMiniDockPlusSeries3,
alongthesurface,untilyouhearaclick.ThecomputerisnowattachedtotheThinkPadMiniDock
Series3,ortheThinkPadMiniDockPlusSeries3.
Note:IfthedockingindicatorisnotlightedafteryouattachtheThinkPadMiniDockSeries3,orthe
ThinkPadMiniDockPlusSeries3,yourcomputerisnotproperlyconnectedtothedock.Checkthe
acpoweradapterofthedock,ordisconnectandre-attachtheacpoweradapter.Thenattachyour
computertothedock.
Notes:
•IfyouattachtheThinkPadPortReplicatorSeries3,theThinkPadMiniDockSeries3,ortheThinkPad
MiniDockPlusSeries3,butdonotconnecttheacpoweradapterofthatattachmenttothepowerjack,
yourcomputergoesintobatterymode.
•IfyourcomputerandtheThinkPadPortReplicatorSeries3,theThinkPadMiniDockSeries3,orthe
ThinkPadMiniDockPlusSeries3areconnectedtoseparateacpoweradapters,yourcomputergoesinto
batterymoderst,andthenshiftsintoacmode.
•Ifineitherofthetwoprecedingsituationsthebatteryofyourcomputerisdetached,orhasnobattery
charge,yourcomputershutsdown.
126UserGuide
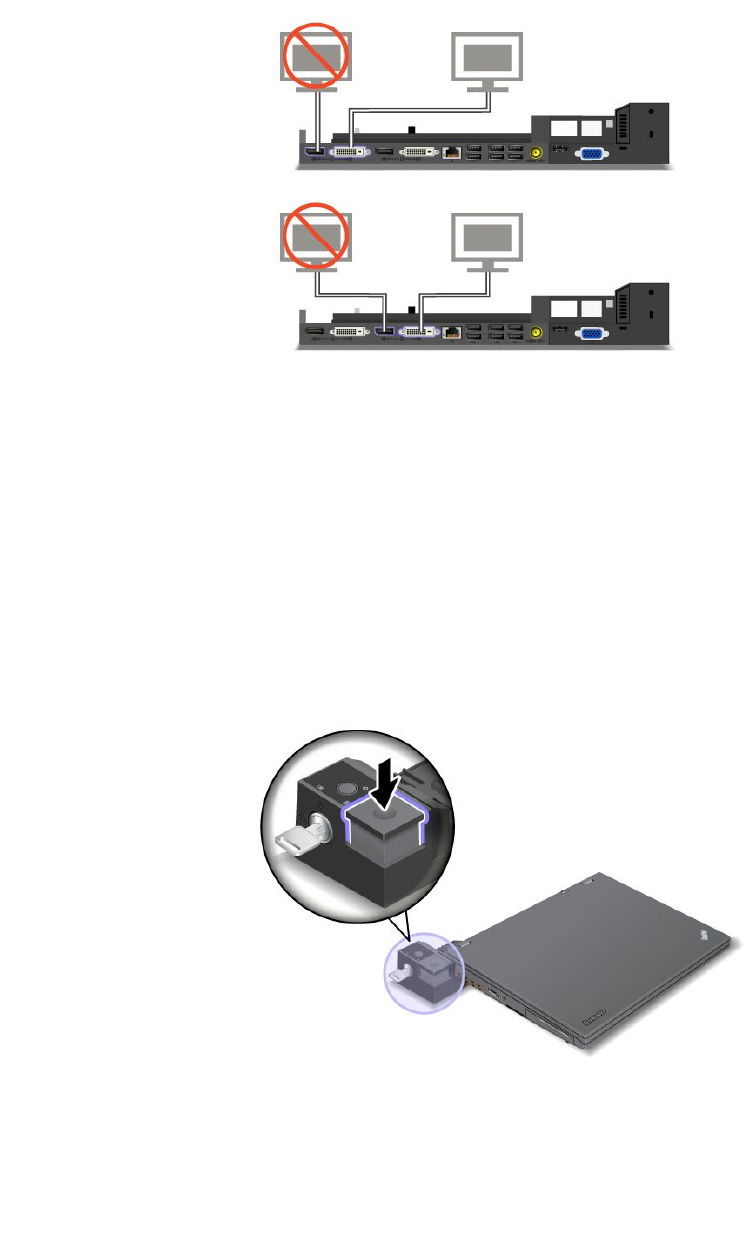
ConnectinganexternaldisplaytotheThinkPadMiniDockPlusSeries3
Group1(topgure)andGroup2(lowergure)areindependentofeachother.EachhasaDisplayPortanda
digitalvisualinterface.IfyouconnectadisplaytoaDisplayPortandaDVIthatareinthesamegroup,the
DisplayPortisinactive.
DetachingaThinkPadportreplicatorordockingstation
TodetachyourcomputerfromtheThinkPadMiniDockSeries3,ortheThinkPadMiniDockPlusSeries3,
dothefollowing:
1.Makesurethat:
•ThedevicesconnectedtoUSBconnectorsarenotinuse.
•TheconnectiontoanEthernetporthasbeenended.
•ThedevicesconnectedtoaneSATAportarenotinuse.
2.MakesurethatthesystemlockkeyoftheThinkPadMiniDockSeries3,ortheThinkPadMiniDock
PlusSeries3isinplaceandintheunlocked(horizontal)position.
Chapter7.Enhancingyourcomputer127
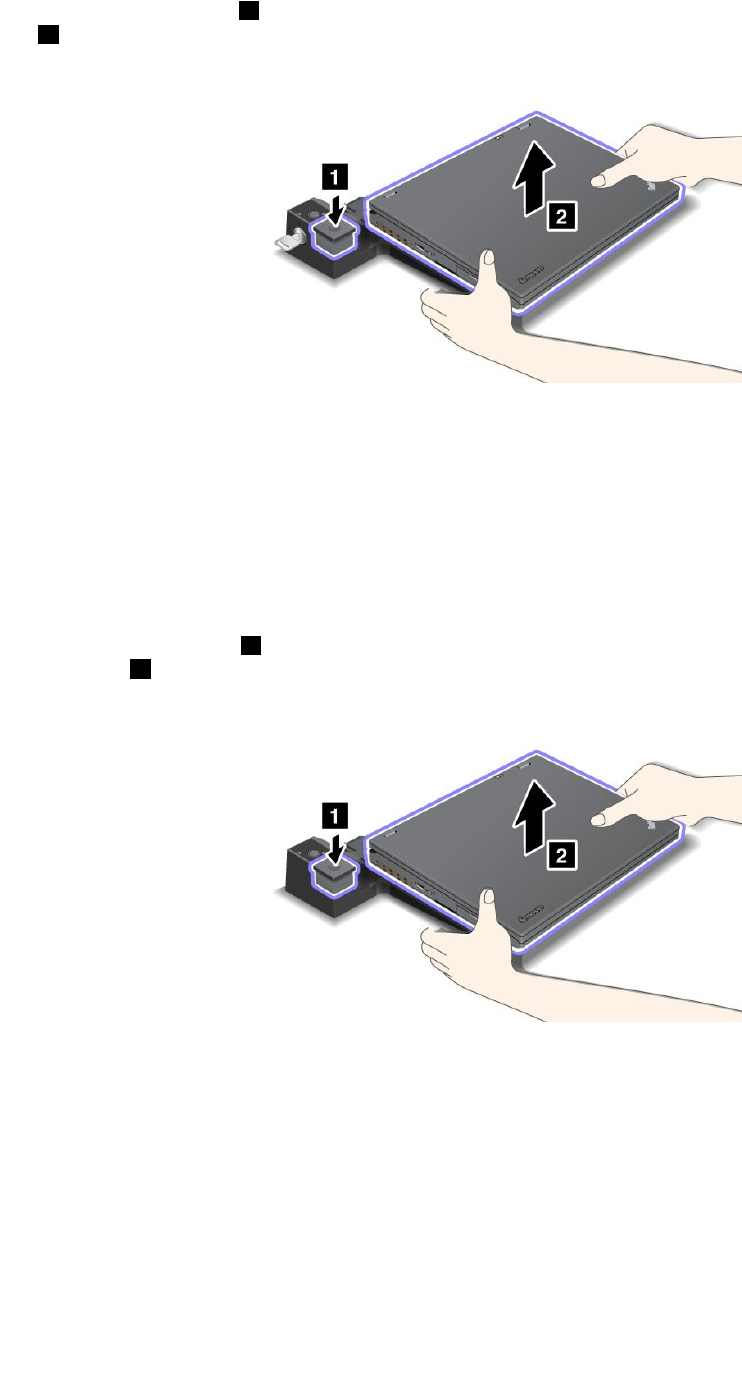
3.Presstheejectbutton1untilthecomputermovesup,then,graspingbothsides,removethecomputer
2.
TodetachyourcomputerfromtheThinkPadPortReplicatorSeries3,dothefollowing:
Notes:
•Ifyourcomputerisoperating,makesurethatithasnishedoperationsinvolvingdevicesthatare
connectedtotheUSBconnector.AlsomakesurethatanyconnectiontoanEthernetisstopped.
•Makesurethatthebatterypackisfullycharged.
1.MakesurethatallejectabledevicesconnectedtotheThinkPadPortReplicatorSeries3arestopped.
2.Presstheejectbutton1untilthecomputermovesup,then,graspingbothsidesandremovethe
computer2.
Securityfeature
TheThinkPadPortReplicatorSeries3,theThinkPadMiniDockSeries3,ortheThinkPadMiniDockPlus
Series3hasasecuritykeyholeforamechanicallock.Byattachingamechanicallockwithcablethere,you
cansecuretheThinkPadPortReplicatorSeries3,theThinkPadMiniDockSeries3,ortheThinkPadMini
DockPlusSeries3toaheavyobject,suchasadesk.
IfyouusetheThinkPadPortReplicatorSeries3,andattachamechanicallockwiththeejectbuttonlocked,
thecomputercannotbedetachedfromtheThinkPadPortReplicatorSeries3.
128UserGuide
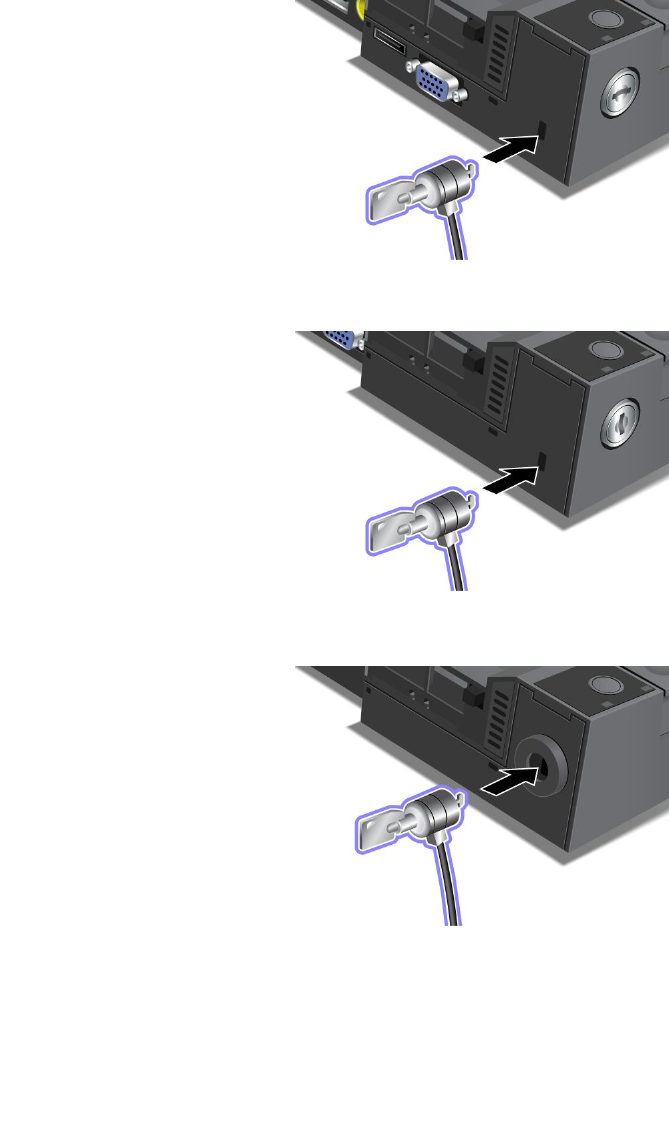
IfyouusetheThinkPadMiniDockSeries3,ortheThinkPadMiniDockPlusSeries3,andattacha
mechanicallockwiththeejectbuttonunlocked,tolocktheejectbutton,usethesystemlockkey.See
“Usingthesystemlockkey”onpage129.
Lenovodoesnotofferamechanicallock.Youwillneedtopurchaseoneelsewhere.Youareresponsible
forevaluating,selecting,andimplementinganylockingdeviceandsecurityfeature.Lenovomakesno
comments,judgments,orwarrantiesaboutthefunction,quality,orperformanceofanylockingdeviceor
securityfeatures.
AttachamechanicallocktotheThinkPadMiniDockPlusSeries3asfollows:
AttachamechanicallocktotheThinkPadMiniDockSeries3asfollows:
AttachamechanicallocktotheThinkPadPortReplicatorSeries3asfollows:
Usingthesystemlockkey
Thesystemlockkeyhastwopositions,unlockedandlocked.
Chapter7.Enhancingyourcomputer129
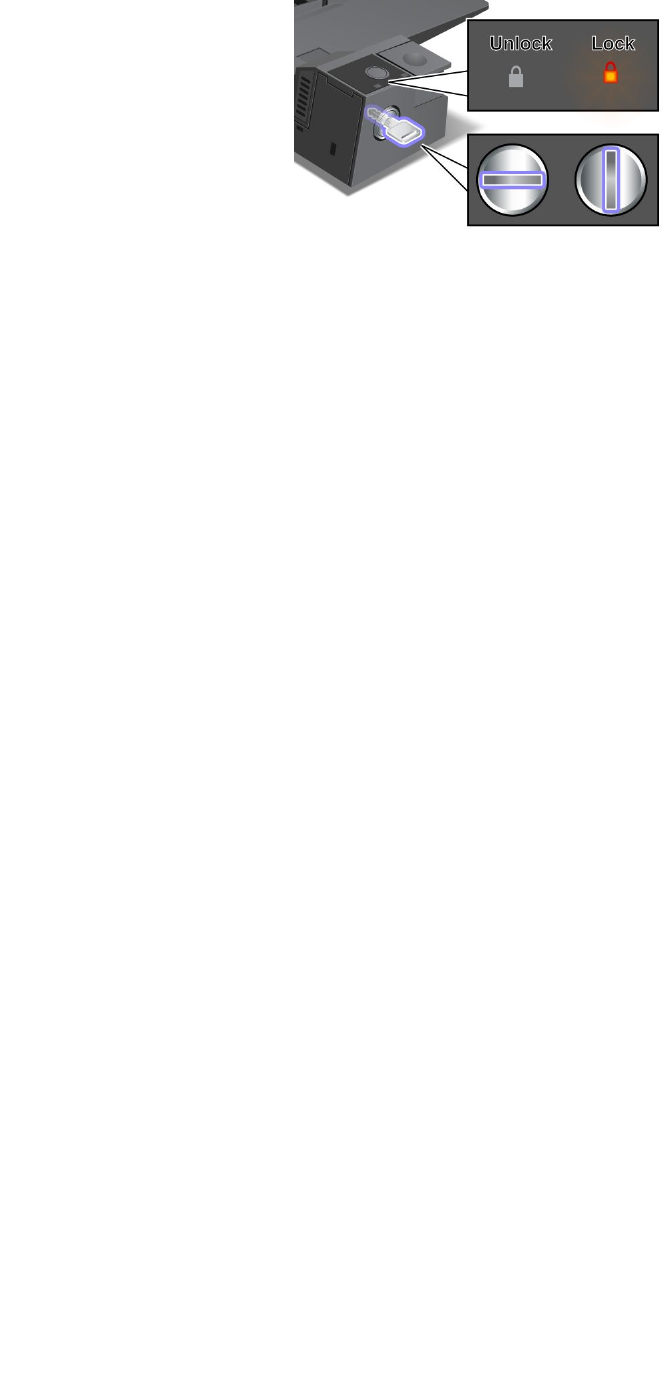
Whenthekeyisinthelockedposition,theejectbuttonoftheThinkPadMiniDockSeries3,ortheThinkPad
MiniDockPlusSeries3islocked,andyoucannotremoveyourcomputer.Thekeylockindicatorlights
whentheejectbuttonislocked.
130UserGuide

Chapter8.Advancedconguration
Whileitisimportanttoprotectles,data,andsettingsthatareontheharddiskoronthesolidstatedrive,
youmayalsoneedtoinstallanewoperatingsystem,installnewdevicedrivers,updateyoursystemBIOS,or
recoverpreinstalledsoftware.Thisinformationwillhelpyouhandleyourcomputerwithpropercareand
keepitintopworkingshape.
•“Installinganewoperatingsystem”onpage131
•“Installingdevicedrivers”onpage135
•“BIOSSetupUtility”onpage138
•“Usingsystemmanagement”onpage149
Installinganewoperatingsystem
Ifyouinstallanewoperatingsysteminyourcomputer,youneedtoinstalltheSupplementlesandThinkPad
devicedriversforitatthesametime.Thenecessarylesarelocatedinthefollowingdirectoriesofyoursolid
statedriveorharddiskdrive:
•TheSupplementlesfortheoperatingsystemsupportedareintheC:\SWTOOLS\OSFIXESdirectory.
•ThedevicedriversfortheoperatingsystemsupportedareintheC:\SWTOOLS\DRIVERSdirectory.
•ThepreloadedsoftwareapplicationsareintheC:\SWTOOLS\APPSdirectory.
Notes:
•Theprocessofinstallingthenewoperatingsystemdeletesallthedataonyourharddisk,including
backupsorimagesthatwerestoredinahiddenfolderbyuseoftheRescueandRecoveryprogram.
•IfyoucannotndtheSupplementles,thedevicedrivers,andapplicationsoftwareyouneedonyour
harddiskdrive,orifyouwanttoreceiveupdatesandthelatestinformationaboutthem,refertothe
ThinkPadWebsiteat:
http://www.lenovo.com/support/site.wss/document.do?sitestyle=lenovo&lndocid=tpad-matrix
Beforeyoubegin
Beforeyouinstalltheoperatingsystem,dothefollowing:
•CopyallthesubdirectoriesandlesintheC:\SWTOOLSdirectorytoaremovablestoragedevice,toavoid
losinglesduringtheinstallation.
•Printthesectionsyouwillbeusing.Gotothesectionfortheoperatingsystemyouareusing:
“InstallingWindows7”onpage132
“InstallingWindowsVista”onpage132
“InstallingWindowsXP”onpage133
Forthecountryorregioncoderequiredintheinstallation,useoneofthefollowing:
Countryorregion:Code
China:SC
Denmark:DK
Finland:FI
France:FR
Germany:GR
Italy:IT
©CopyrightLenovo2012131

Japan:JP
Netherlands:NL
Netherlands:NL
Norway:NO
Spain:SP
Sweden:SV
TaiwanandHongKong:TC
UnitedStates:US
InstallingWindows7
ToinstallWindows7anditsrelatedsoftwareonyourcomputer,doasfollows:
1.InserttheDVDforWindows7intotheDVDdrive,andrestartthecomputer.Followtheinstallinstructions
onthescreen.
2.RestoreC:\SWTOOLSfromthebackupcopyyoumadebeforestartingtheinstallation.
3.InstallingIntelChipsetSupportforWindows2000/XP/Vista/7.See“InstallingIntelChipsetSupportfor
Windows2000/XP/Vista/7”onpage137.
4.Installdevicedrivers.See“Installingotherdevicedrivers”onpage137.
InstallingRegistryPatchforWindows7
InstallthefollowingRegistryPatch:
•RegistryPatchforenablingWOLonEnergyStarV4fromS3
ToinstalltheRegistryPatch,refertothefollowingwebsite:
http://www.lenovo.com/support
InstallingtheWindows7UpdateModulePackage
TheWindows7UpdateModulesareinthefollowingdirectory:
C:\SWTOOLS\OSFIXES\
Thenameofeachsubfolderisthenumberofaxmodule.Forinformationabouteachxmodule,visitthe
MicrosoftKnowledgeBasehomepageathttp://support.microsoft.com/,typethenumberofthexmodule
youneedinthesearcheld,andclickSearch.
Note:TheWebsiteaddressmightchangewithoutnotice.Ifthehomepageisnotdisplayed,searchforit
fromtheMicrosofttoppage.
Toinstallaxmodule,runthe.exeleinasubfolderandfollowtheinstructionsonthescreen.
Note:Ifyouremovetheharddiskdrivefromthecomputerwithasingle-coreprocessorandinstallitona
computerwithadual-coreprocessor,youcangetaccesstotheharddiskdrive.Theopposite,however,is
nottrue:Ifyouremovetheharddiskdrivefromacomputerwithadual-coreprocessorandinstallitona
computerwithasingle-coreprocessor,youcannotgetaccesstotheharddiskdrive.
InstallingWindowsVista
Beforeyoustart,printtheseinstructions.
Note:YourcomputersupportsWindowsVistawithServicePack2.BeforeyouinstallWindowsVistaService
Pack2,makesureyouinstalltheWindowsVistaServicePack1rst.
ToinstallWindowsVistaanditsrelatedsoftwareonyourcomputer,doasfollows:
132UserGuide

1.InserttheDVDforWindowsVistaintegratedwithServicePack1intotheDVDdrive,andrestartthe
computer.
2.InstallWindowsVistaServicePack1andcompletetheinstallation.
3.InstalltheWindowsVistaServicePack2.YoucaninstalltheWindowsVistaServicePack2usingthe
WindowsVistaServicePack2InstallationCDordownloaditfromeitherMicrosoftDownloadCenteror
MicrosoftWindowsupdateWebsite.
4.RestoreC:\SWTOOLSfromthebackupcopyyoumadebeforestartingtheinstallation.
5.InstallingIntelChipsetSupportforWindows2000/XP/Vista/7.See“InstallingIntelChipsetSupportfor
Windows2000/XP/Vista/7”onpage137.
6.Installdevicedrivers.See“Installingotherdevicedrivers”onpage137.
InstallingRegistryPatchesforWindowsVista
InstallthefollowingRegistryPatches:
•RegistryPatchforEnablingDeviceInitiatedPowerManagementonSATAforWindowsVista
•RegistryPatchforWindowsVistaUSBS3PMEnablement
•RegistryPatchforChangingIDLEIRPtimingbyFPRDriverforWindowsVista
•RegistrypatchenablingWakeUPonLANfromStandbyforEnergyStar
•RegistrypatchtoimproveUSBdevicedetectiononresumefromsleep
ToinstalltheseRegistryPatches,refertothefollowingwebsite:
http://www.lenovo.com/support
InstallingtheWindowsVistaUpdateModulePackage
TheWindowsVistaUpdateModulesareinthefollowingdirectory:
C:\SWTOOLS\OSFIXES\VISTA
Thenameofeachsubfolderisthenumberofaxmodule.Forinformationabouteachxmodule,visitthe
MicrosoftKnowledgeBasehomepageathttp://support.microsoft.com/,typethenumberofthexmodule
youneedinthesearcheld,andclickSearch.
Note:TheWebsiteaddressmightchangewithoutnotice.Ifthehomepageisnotdisplayed,searchforit
fromtheMicrosofttoppage.
Toinstallaxmodule,runthe.exeleinasubfolderandfollowtheinstructionsonthescreen.
Note:Ifyouremovetheharddiskdrivefromthecomputerwithasingle-coreprocessorandinstallitona
computerwithadual-coreprocessor,youcangetaccesstotheharddiskdrive.Theopposite,however,is
nottrue:Ifyouremovetheharddiskdrivefromacomputerwithadual-coreprocessorandinstallitona
computerwithasingle-coreprocessor,youcannotgetaccesstotheharddiskdrive.
InstallingWindowsXP
Beforeyoustart,printtheseinstructions.
Note:YourcomputersupportsWindowsXPServicePack3.BeforeyouinstalltheWindowsXPService
Pack3,makesureyouinstalltheWindowsXPServicePack2rst.
YoumustinstallIntelRapidStorageManagerDriverbeforeinstallingtheoperatingsystem.Toinstallit,you
mayneedtoattachadiskettedrivetoyourcomputer.Ifyouhaveadiskettedrive,followtheprocedurebelow.
Chapter8.Advancedconguration133

Beforeinstallingtheoperatingsystem,installIntelRapidStorageManagerDriverasfollows:
Note:BesuretoinstallIntelRapidStorageManagerDriverbeforeinstallingtheoperatingsystem.Otherwise
yourcomputerwillnotrespond;itwillonlydisplayabluescreen.
1.Attachadiskettedrivetoyourcomputer.
2.CopyIntelRapidStorageManagerDriverfromC:\SWTOOLS\DRIVERS\IRSTtoadiskette.
3.TomakesurethatSATAAHCIisenabled,starttheBIOSSetupUtilitymenu.
4.SelectCong.
5.SelectSerialATA(SATA).
6.SelectAHCI.
7.Changethestartupsequenceofyourcomputer.FollowingtheinstructionsontheStartupmenuinthe
BIOSSetupUtility,settheCD-ROMdrivetostartrst.
8.PressF10.
9.InserttheCDforWindowsXPintegratedwithServicePack2intotheCDorDVDdrive,andrestartthe
computer.
10.Toinstallathird-partySCSIorRAIDdriverrst,pressF6.
11.Whenprompted,selectSforSpecifyAdditionalDevice.
12.Whenprompted,insertthediskettethatyoucreatedinstep2,andpressEnter.
13.ScrollthelistofdriverstoselectIntel®MobileExpressChipsetSATAAHCIController(Mobile),
andpressEnter.
14.Tocontinuetheinstallation,pressEnteragain.Leavethedisketteinthedriveuntilthenextreboot;the
softwaremayneedtobecopiedfromthedisketteagainwhenthelesarecopiedduringsetup.
15.CompletetheWindowsXPServicePack2installation.
16.InstallWindowsXPServicePack3byusingMicrosoftWindowsupdate,MicrosoftDownloadCenter,
orWindowsXPServicePack3installationCD.
17.RestoreC:\SWTOOLSfromthebackupcopyyoumadebeforestartingtheinstallation.
18.ApplythePCMCIAPowerPolicyRegistryPatch.Todothis,gotoC:\SWTOOLS\OSFIXES\PCMCIAPW\,
double-clickinstall.bat.Thenfollowtheinstructionsthatappearonthescreen.
19.InstallingIntelChipsetSupportforWindows2000/XP/Vista/7.See“InstallingIntelChipsetSupportfor
Windows2000/XP/Vista/7”onpage137.
20.Installdevicedrivers.See“Installingotherdevicedrivers”onpage137.
Ifyoudonothaveadiskettedrive,youcaninstallIntelRapidStorageManagerDriverbythefollowing
alternativeprocedure:
Note:IfyouselectAHCIforSerialATA(SATA)intheBIOSSetupUtilitybeforeinstallingIntelRapidStorage
ManagerDriver,yourcomputerwillnotrespond;itwillonlydisplayabluescreen.
1.StarttheBIOSSetupUtilitymenu.
2.SelectCong.
3.SelectSerialATA(SATA).
4.SelectCompatibility.
5.Changethestartupsequenceofyourcomputer.FollowingtheinstructionsontheStartupmenuinthe
BIOSSetupUtility,settheCD-ROMdrivetostartrst.
6.PressF10.
7.InserttheinstallationCDforWindowsXPintegratedwithServicePack2intotheCDorDVDdrive,and
restartthecomputer.
134UserGuide

8.CompletetheWindowsXPServicePack2installation.
9.InstallWindowsXPServicePack3.YoucaninstalltheWindowsXPServicePack3usingtheWindows
XPServicePack3InstallationCDordownloaditfromeitherMicrosoftDownloadCenterorMicrosoft
WindowsupdateWebsite.
10.GotoC:\DRIVERS\WIN\IRST\PREPARE\PREPAREanddouble-clickinstall.cmdtorunIntelRapidStorage
ManagerDriver.
Note:IfyoucannotndtheIntelRapidStorageManagerDriver,youcandownloaditfromtheLenovo
Website:
http://www.lenovo.com/support/site.wss/document.do?sitestyle=lenovo&lndocid=tpad-matrix.
11.Turnthecomputeroffandthenonagain.
12.StarttheBIOSSetupUtilitymenu.
13.SelectCong.
14.SelectSerialATA(SATA).
15.SelectAHCI.
16.StartWindowsXP.TheWelcometotheFoundNewHardwareWizardappears.
17.ClickNo,notthistime,andthenclickNext.
18.SelectInstallfromalistorspeciclocation(Advanced),andthenclickNext.
19.SelectSearchforthebestdriverintheselocations.ThenselectIncludethislocationinthesearch:,
specifythepath,C:\DRIVERS\WIN\IRST\PREPARE,andclickNext.TheCompletingtheFoundNew
HardwareWizardappears.
20.ClickFinish.
21.WhentheSystemSettingsChangewindowappears,clickYes.Thecomputerrestarts.
22.InthedevicelistingontheDeviceManagerwindow,ayellowmarkmayappearattheleftsideofthe
UniversalSerialBus(USB)controller.Ifitdoesappear,openitspropertiesandclicktheReinstall
driverbuttontoinstalltheUSB2.0driver.
23.RestoreC:\SWTOOLSfromthebackupcopyyoumadebeforestartingtheinstallation.
24.ApplythePCMCIAPowerPolicyRegistryPatch.Todothis,gotoC:\SWTOOLS\OSFIXES\PCMCIAPW\,
double-clickinstall.bat,andthenfollowtheinstructionsthatappearonthescreen.
25.InstallingIntelChipsetSupportforWindows2000/XP/Vista/7.See“InstallingIntelChipsetSupportfor
Windows2000/XP/Vista/7”onpage137.
26.Installdevicedrivers.See“Installingotherdevicedrivers”onpage137.
Note:Ifyouremovetheharddiskdrivefromthecomputerwithasingle-coreprocessorandinstallitona
computerwithadual-coreprocessor,youcangetaccesstotheharddiskdrive.Theopposite,however,is
nottrue:Ifyouremovetheharddiskdrivefromacomputerwithadual-coreprocessorandinstallitona
computerwithasingle-coreprocessor,youcannotgetaccesstotheharddiskdrive.
Installingdevicedrivers
Toinstalldevicedrivers,gotothewebsitehttp://www.lenovo.com/support.
Installingdriverforthe4-in-1Mediacardreader
Tousethe4-in-1Mediacardreader,youneedtodownloadandinstalltheRealtekPCIECardReaderDriver
forWindowsXP/Vistax86/x64.Todownloadit,gotoLenovoWebsiteat:
http://www.lenovo.com/support/site.wss/document.do?sitestyle=lenovo&lndocid=tpad-matrix
Toinstallthedriver,doasfollows:
Chapter8.Advancedconguration135

•ClickStart➙AllPrograms➙Accessories➙CommandPrompt.TheDOSpromptwindowappears.
•Typesetup.exeattheDOSprompt.TheWelcometotheDeviceDriverInstallationWizardfortheRealtek
MediaDriveropens.
•ClickNext.Ifthedevicedriverisalreadyinstalled,clickNo.Otherwise,followtheinstructionsonthe
screen.
InstallingThinkPadMonitorFileforWindows2000/XP/Vista/7
ThinkPadMonitorFileforWindows2000/XP/Vista/7isusuallyinthedefaultdirectory
C:\SWTOOLS\DRIVERS\MONITOR.
Note:Ifyoucannotndthisdirectoryonyourharddiskdriveorsolidstatedrive,downloadtheThinkPad
MonitorFileforWindows2000/XP/Vista/7fromtheThinkPadWebsiteat:
http://www.lenovo.com/support/site.wss/document.do?sitestyle=lenovo&lndocid=tpad-matrix
Note:Beforeyouinstallthisle,makesurethatthecorrectvideodriverhasbeeninstalled.
ForWindows7
1.Right-clickonthedesktop,andclickPersonalize.
2.ClickDisplayattheleft.
3.ClickChangedisplaysettings.
4.ClickAdvancedSettings.
5.ClicktheMonitortab.
6.ClickProperties.
7.ClicktheDrivertab.
8.ClickUpdateDriver.
9.SelectBrowsemycomputerfordriversoftware,andthenclickLetmepickfromalistofdevice
driversonmycomputer.
10.ClickHaveDisk.
11.SpecifythepathwherethemonitorINFleissaved,thenclickOpen.
12.ClickOK.
13.Conrmthecorrectdisplaytype,thenclickNext.
14.Windowshasnishedinstalling.ClickClose.
15.ClickCloseforDisplayProperties.
16.ClickOKintheMonitortab.
17.ClickOKandclosetheDisplaySettingswindow.
ForWindowsVista
1.Right-clickonthedesktop,andclickPersonalize.
2.ClickDisplaySettings.TheDisplaySettingswindowopens.
3.ClickAdvancedSettings.
4.ClicktheMonitortab.
5.ClickProperties.(ForWindowsVista,alsoclickContinue.)
6.ClicktheDrivertab.
7.ClickUpdateDriver.
136UserGuide

8.SelectBrowsemycomputerfordriversoftware,andthenclickLetmepickfromalistofdevice
driversonmycomputer.
9.ClickHaveDisk.
10.SpecifythepathwherethemonitorINFleissaved,thenclickOpen.
11.ClickOK.
12.Conrmthecorrectdisplaytype,thenclickNext.
13.Windowshasnishedinstalling.ClickClose.
14.ClickCloseforDisplayProperties.
15.ClickOKintheMonitortab.
16.ClickOKandclosetheDisplaySettingswindow.
ForWindowsXP
1.Right-clickonthedesktopandselectPropertiesfromthepopupmenu.
2.SelecttheSettingstab.
3.ClicktheAdvancedtab.
4.SelecttheMonitortab.
5.SelectPlugandPlayMonitorfromthemonitortypelist.
6.ClickProperties.
7.SelecttheDrivertabandclickUpdateDriver.TheHardwareUpdateWizardstarts.
8.SelectNo,notthistimeforWindowsUpdateconnection,andthenclickNext.
9.SelectInstallfromalistorspeciclocation(Advanced).
10.ClickNext.
11.SelectDon'tsearch,Iwillchoosethedrivertoinstall.
12.ClickNext.
13.ClickHaveDisk.
14.ClickBrowse.
15.SpecifythepathwherethemonitorINFleissavedandselectTPLCD.INF.
16.ClickOK.
17.SystemwillshowThinkPadDisplay.ClickNext.SystemwillcopyThinkPadMonitorINFleandcolor
prole.
18.ClickFinishandthenClose.
19.ClicktheColorManagementtab.
20.ClickAdd.
21.SelectTPFLX.ICMorTPLCD.ICMandclickAdd.
22.ClickOKandclosetheDisplayPropertieswindow.
InstallingIntelChipsetSupportforWindows2000/XP/Vista/7
TheIntelChipsetSupportforWindows2000/XP/Vista/7islocatedintheC:\SWTOOLS\DRIVERS\CHIPINF
directory.Toinstallit,gotothedirectoryandrunsetup.exe.
Installingotherdevicedrivers
TheotherdevicedriversareprovidedintheC:\SWTOOLS\DRIVERSdirectoryonyourharddiskdrive.
Chapter8.Advancedconguration137
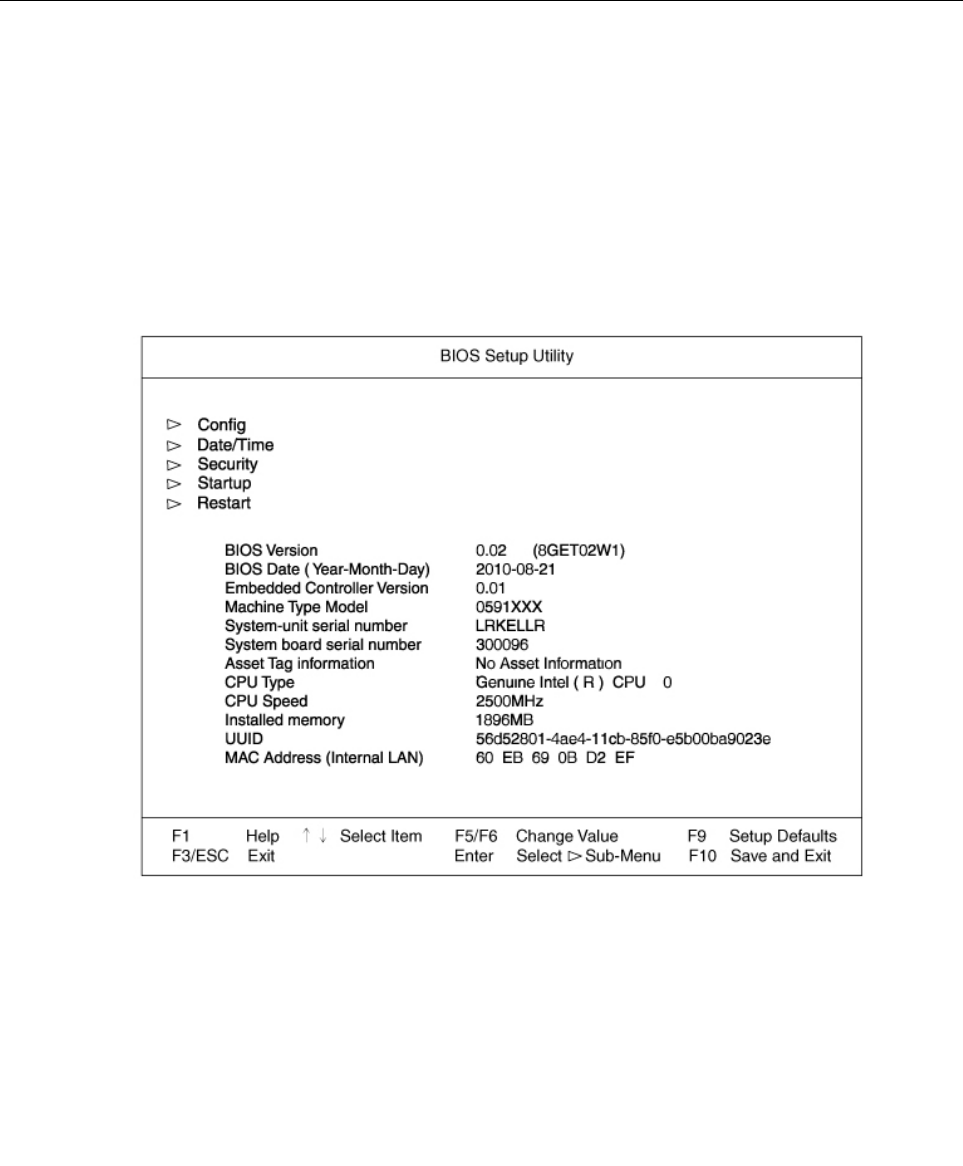
Youwillalsoneedtoinstallapplicationsoftware,whichisprovidedintheC:\SWTOOLS\APPSdirectory
onyourharddiskdrive.Todothis,refertotheinstructionsin“Reinstallingpreinstalledapplicationsand
devicedrivers”onpage86.
Note:IfyoucannotndtheSupplementles,devicedrivers,andapplicationsoftwareyouneedonyour
harddiskdrive,orifyouwanttoreceiveupdatesandthelatestinformationaboutthem,refertotheThinkPad
Website:
http://www.lenovo.com/support/site.wss/document.do?sitestyle=lenovo&lndocid=tpad-matrix
BIOSSetupUtility
Yourcomputerprovidesaprogram,calledBIOSSetupUtility,thatenablesyoutoselectvarioussetup
parameters.
TostartBIOSSetupUtility,doasfollows:
1.Toprotectyourselfagainstaccidentallossofdata,backupyourcomputerregistry.See“Performing
backupandrecoveryoperations”onpage83.
2.Ifthediskettedriveisconnectedtothecomputer,removeanydiskettefromthediskettedrive,and
thenturnoffthecomputer.
3.Turnonthecomputer.Whenthelogoscreenisdisplayed,presstheF1key.TheBIOSSetupUtility
opens.Awindowsuchasthefollowingappears:
Ifyouhavesetasupervisorpassword,theBIOSSetupUtilitymenuappearsafteryouenterthe
password.YoucanstarttheutilitybypressingEnterinsteadofenteringthesupervisorpassword;
however,youcannotchangetheparametersthatareprotectedbythesupervisorpassword.Formore
information,referto“Usingpasswords”onpage67.
4.Usingthecursorkeys,movetoanitemyouwanttochange.Whentheitemyouwantishighlighted,
pressEnter.Asubmenuisdisplayed.
5.Changetheitemsyouwishtochange.Tochangethevalueofanitem,usetheF5orF6key.Iftheitem
hasasubmenu,youcandisplayitbypressingEnter.
138UserGuide

6.PressF3orEsctoexitfromthesubmenu.
Ifyouareinanestedsubmenu,pressEscrepeatedlyuntilyoureachtheBIOSSetupUtilitymenu.
Note:Ifyouneedtorestorethesettingstotheiroriginalstateasofthetimeofpurchase,pressF9key
toloadthedefaultsettings.YoucanalsoselectanoptionintheRestartsubmenutoloadthedefault
settingsordiscardthechanges.
7.SelectRestart,thenpressEnter.Movethecursortotheoptionyouwantforrestartingyourcomputer,
thenpressEnter.Yourcomputerrestarts.
Congmenu
Ifyouneedtochangethecongurationofyourcomputer,selectCongfromtheBIOSSetupUtilitymenu.
Notes:
•Thedefaultsettingsarealreadyoptimizedforyou.Ifyouconsiderchangingthecomputerconguration,
proceedwithextremecaution.Settingthecongurationincorrectlymightcauseunexpectedresults.
•Ineachsubmenu,youcanenableafunctionbyselectingEnabled,ordisableitbyselectingDisabled.
Thefollowingsubmenuisdisplayed:
•Network:SettheLANrelatedfunctions.
•USB:EnableordisableUSBrelatedfunctions.
•Keyboard/Mouse:Setthekeyboardandthemouserelatedfunctions.
•Display:Specifythesettingsfordisplayoutput.
•Power:Setpowermanagementrelatedfunctions.
•BeepandAlarm:Enableordisabletheaudiorelatedfunctions.
•Memory:EnableordisabletheExtendedMemoryTest.
•SerialATA(SATA):Specifythesettingsfortheharddiskdrive.
•CPU:SpecifythesettingsfortheCPU.
Dateandtimemenu
Ifyouneedtosetthecurrentdateandtimeofyourcomputer,selectDate/TimefromtheBIOSSetup
Utilitymenu.Thefollowingsubmenuisdisplayed:
•SystemDate
•SystemTime
Tochangethedateandtime,dothefollowing:
1.Usingtheupanddownarrowkeys,selecttheitemtochange,dateortime.
2.PressTab,ShiftTab,orEntertoselectaeld.
3.Typethedateortime.
Note:AnotherwaytoadjustdateandtimeispresstheF5orF6key.
4.PressF10tosavethechangesandrestartthesystem.
Securitymenu
Ifyouneedtosetthesecurityfeaturesofyourcomputer,selectSecurityfromtheBIOSSetupUtilitymenu.
Notes:
Chapter8.Advancedconguration139

•Thedefaultsettingsarealreadyoptimizedforyou.Ifyouconsiderchangingthecomputerconguration,
proceedwithextremecaution.Settingthecongurationincorrectlymightcauseunexpectedresults.
•Ineachsubmenu,youcanenableafunctionbyselectingEnabled,ordisableitbyselectingDisabled.
Thefollowingsubmenuisdisplayed:
•Password:Setapasswordrelatedfunctions.
•SecurityChip:Setthesecuritychiprelatedfunctions.
•BIOSUpdateOption:SpecifythesettingsforFlashBIOSupdate.
•MemoryProtection:SpecifythesettingsfortheDataExecutionPreventionfeature.
•I/OPortAccess:EnableordisabletheaccesstoindividualI/Oports.
•Computrace:EnableordisableBIOSinterfacetoactivateComputracemodule.
Tosetpasswordrelatedfunctions,gototheSecuritymenuandselectPassword.Thefollowingsubmenuis
displayed:
•UsingPassphrase
•SupervisorPassword
•LockBIOSSettings
•SetMinimumLength
•BIOSpasswordatunattendedboot
•Power-OnPassword
•HardDisk1Password
Note:HardDisk1meanstheharddiskdrivebuiltintoyourcomputer.
IfyouselectUsingPassphraseandenableit,youcansetapasswordcontainingupto64characters.
Fordetails,refertoUsingPassphrase.
LockBIOSSettingsenablesordisablesthefunctionthatprotectsitemsintheBIOSSetupUtilityfrom
beingchangedbyauserwhodoesnothavethesupervisorpassword.Bydefault,thissettingisdisabled.
Ifyousetthesupervisorpasswordandenablethisfunction,noonebutyoucanchangeanyitemsin
theBIOSSetupUtility.
IfyouselectSetMinimumLength,youcanspecifyaminimumlengthforpower-onpasswordsandhard
diskpasswords.Ifyousetthesupervisorpasswordandspecifyaminimumlengthforpasswords,noone
butyoucanchangethelength.
IfyouselectandenableBIOSpasswordatunattendedboot,apasswordpromptisdisplayedwhenthe
computeristurnedon,fromeitherapower-offstateorhibernation,byanunattendedeventsuchasWakeon
LAN.IfyouselectDisabled,nopasswordpromptisdisplayed;thecomputergoesaheadandloadsthe
operatingsystem.Topreventunauthorizedaccess,settheuserauthenticationontheoperatingsystem.
Startupmenu
Youmayneedtochangethestartupsequenceofyourcomputer.Forexample,ifyouhavedifferentoperating
systemsondifferentdevices,youcanhavethesystemstartupfromeitherofthem.
Attention:Afteryouchangeyourstartupsequence,youmustbeextremelycarefulnottospecifyawrong
deviceduringacopy,asave,oraformatoperation.Ifyouspecifyawrongdevice,yourdataandprograms
mightbeerasedoroverwritten.
140UserGuide

Changingthestartupsequence
SelectingtheStartuptodisplaythefollowingsubmenu:
•Boot
•Network
•BootMode
•OptionKeysDisplay
•BootDeviceListF12Option
Tochangethestartupsequence,dothefollowing:
1.SelectBootorNetwork,thenpressEnter.
•YoucanusetheBootsubmenutospecifythestartupsequencethatrunswhenyouturnonthe
power.Referto“Bootsubmenu”onpage141.
•YoucanusetheNetworksubmenutospecifythestartupsequencethatrunswhenWakeonLANis
started.WakeonLANiscommonlyusedbyLANadministratorsincorporatenetworkstogetremote
accesstoyourcomputer.Referto“NetworkBootsubmenu”onpage142.
2.Selectthedeviceyouwanttostartrst.
UsethesekeystosettheorderthattheBIOSwillusewhenstartinganoperatingsystem:
•F6orF5movesthedeviceupordown.
•xexcludesorincludesthedevicetostart.
•1loadsthedefaultstartupsequence.
3.PressF10tosavethechangesandrestartthesystem.
Tochangethestartupsequencetemporarilysothatthesystemstartsupfromadifferentdrive,dothe
following:
1.Turnoffthecomputer.
2.Turnonthecomputer,then,whilethe“Tointerruptnormalstartup,pressthebluebutton”messageis
displayedatthelower-leftofthescreen,pressF12.
3.SelectthedeviceyouwanttostartrstfromtheBootmenu.
Note:TheBootmenuwillbeshownwhenthesystemcannotbootfromanydeviceornooperatingsystem
wasfound.
Bootsubmenu
Thefollowinglist,showingtheorderinwhichdeviceswillbestartedup,isalwaysdisplayed.Evendevices
thatarenotattachedtoorinstalledonyourcomputerarelisted.Foreachdevicethatisattachedtoor
installedonthecomputer,informationaboutitispresentedafterthecolon.
1.USBFDD:
2.ATAPICD0:
3.USBCD:
4.ATAHDD0:
5.ATAHDD2:
6.PCILAN:
7.USBHDD:
8.ATAHDD4:
Chapter8.Advancedconguration141
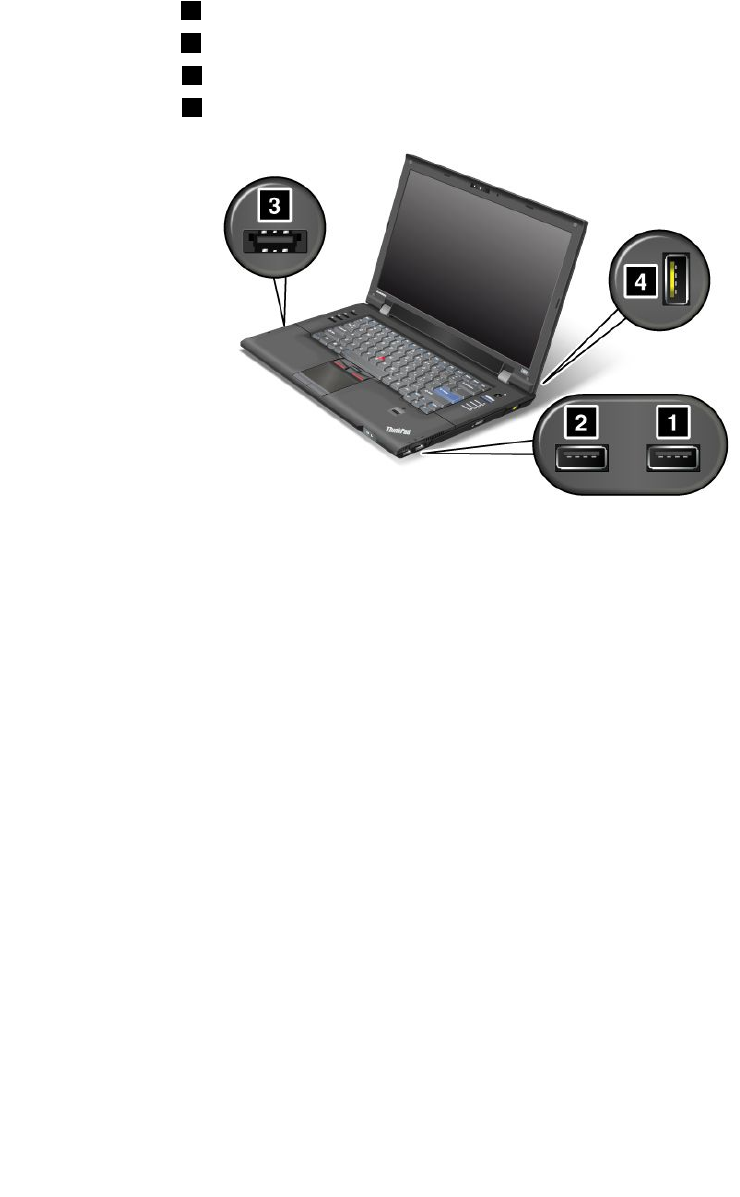
PriorityforbootingUSBdevices
IfyouattachtwoormoreUSBdevicesofthesametypetothecomputer,forexample,twoUSBCD-ROM
drivesortwoUSBdiskettedrives,thecomputerstartsthedevicesinaccordancewiththebootpriority
orderspeciedfortheUSBconnectors.
IfyouareusingUSBconnectorsonyourcomputeronly,withoutattachingthecomputertoaThinkPadPort
ReplicatorSeries3,thebootpriorityorderisasfollows:
1.USBconnector1ontherightside(rear)ofyourcomputer
2.USBconnector2ontherightside(front)ofyourcomputer
3.USBconnector3ontheleftsideofyourcomputer
4.USBconnector4ontherearsideofyourcomputer
NetworkBootsubmenu
UsetheNetworksubmenutoselectthebootdevicewhenthesystemwakesfromLAN.IfWakeonLANis
enabled,thenetworkadministratorcanturnonallofthecomputersinaLANremotelybyuseofnetwork
managementsoftware.
OtheritemsintheStartupmenu
•BootMode:Enableordisablethediagnosticsbootmode.
•OptionKeysDisplay:Choosewhethertoshowtheoptionkeymessagewhenthesystemisbooted.
•BootdeviceListF12Option:Choosewhethertoshowthelistofthebootdevices.
Restartmenu
IfyouneedtoclosetheBIOSSetupUtilityandrestartthesystem,selectRestartfromtheBIOSSetup
Utilitymenu.Thefollowingsubmenuisdisplayed:
•ExitSavingChanges:Restartthesystemaftersavingthechanges.
•ExitDiscardingChanges:Restartthesystemwithoutsavingthechanges.
•LoadSetupDefaults:Loadthesetupdefaultsettings.
•DiscardChanges:Discardthechanges.
•SaveChanges:Savethechanges.
142UserGuide

BIOSSetupUtilityitems
ThefollowingtablesshowthecontentsoftheCongmenuitems,theSecuritymenuitems,andtheStartup
menuitemsoftheBIOSSetupUtility.
Note:Someitemsaredisplayedonthemenuonlyifthecomputersupportsthecorrespondingfeatures.
Notes:
•Enabledmeansthatthefunctioniscongured.
•Disabledmeansthatthefunctionisnotcongured.
•Defaultvaluesareinboldface.
Congmenuitems
Table4.Congmenuitems
FunctionSelectionComments
Network
WakeOnLAN•Enabled
•Disabled
EnablesthesystemtoPoweronwhentheEthernet
controllerreceivesamagicpacket.
Note:WakeOnLANfunctiondoesnotworkwhena
harddiskpasswordisset.
EthernetLANOptionROM•Enabled
•Disabled
LoadstheEthernetLANOptionROMtoenable
startupfromanintegratednetworkdevice.
WirelessLANandWiMAX
Radios
•On
•Off
Ifyouselect“On,”theinternalwirelessradioisturned
on.Ifyouselect“Off,”theinternalwirelessradiois
turnedoff.
USB
USBBIOSSupport•Enabled
•Disabled
EnableordisablebootsupportforUSBoppydisk
driveandUSBCD-ROM.
AlwaysOnUSB•Enabled
•Disabled
Ifyouselect“Enabled,”theexternalUSBdevicescan
bechargedviaUSBportsevenwhenthesystemisin
lowpowermode(standby,hibernation,orpower-off).
AlwaysOnUSBChargeinOff
Mode
•Enabled
•Disabled
Ifyouselect“Enabled,”theAlwaysOnUSB
connectorenablesyoutochargesomedevices,
suchasiPod,iPhoneandBlackBerrysmartphones.
Note:Ifyouwanttochargethesedeviceswhen
yourcomputerisinhibernationmodeorpowered
off,youwillneedtoopenthePowerManager
programandcongurecorrespondingsettingsto
enabletheAlwaysOnUSBconnectorfunction.For
detailsabouthowtoenabletheAlwaysOnUSB
connectorfunction,refertotheonlinehelpofthe
PowerManagerprogram.
Keyboard/Mouse
FnKeyLock•Enabled
•Disabled
Whenenabled,youcanpresstheFnkeytokeep
itinapressedcondition,thenpressthedesired
functionkey.Theactionisequivalenttopressingthe
requiredkeyandtheFnkeysimultaneously.When
youpressedtheFnkeytwice,thestateislocked
untilyoupresstheFnkeyagain.
Chapter8.Advancedconguration143

Table4.Congmenuitems(continued)
FunctionSelectionComments
ThinkPadNumLock•Independent
•Synchronized
Ifyouselect“Independent,”NumLockonyour
computercanbedisabledindependentlyregardless
oftheNumLockstateoftheexternalkeyboard.If
NumLockonthecomputerisenabled,NumLockon
theexternalkeyboardwillalsobeenabled.
Ifyouselect“Synchronized,”NumLockonyour
computerandNumLockontheexternalkeyboard
aresynchronized.
Power-OnNumLock•Auto
•On
•Off
Ifyouselect“Auto”,NumLockisenabledwhenfull
sizekeyboardisattached.
Ifyouselect“On”,NumLockisalwaysenabled.
Ifyouselect“Off”,NumLockisalwaysdisabled.
Note:Power-OnNumlockwillbedisplayedwhen
“Synchronized”isselectedatthe“ThinkPad
NumLock”.
Display
BootDisplayDevice•ThinkPadLCD
•Analog(VGA)
•DigitalonThinkPad
(DisplayPort)
•Digital1ondock
•Digital2ondock
Selectthedisplaydevicethatistobeactiveat
boottime.Thisselectioniseffectiveforboottime,
passwordprompt,andBIOSsetup.
“DigitalonThinkpad”istheDisplayPortonyour
computer.
“Digial1ondock”and“Digital2ondock”arethe
DisplayPortorDVIondockingstation.
Power
TimerWakewithBattery
Operation
•Enabled
•Disabled
Ifyoudisablethisfunction,thecomputerignoresany
scheduledwakeupifthecomputerisnotconnected
toanACpowersource.
Ifyouenablethisfunction,thecomputermaywake
upwhileitisbeingcarried,anditsharddiskdrive
maybedamaged.Suchdamagemaynotbecovered
underthewarranty.Also,ifaprogramthatissetto
runafterthescheduledwakeuprequiresyourinput,
thebatterymaybedrainedwhilethecomputeris
waitingforyourinput.
Attention:Ifyouhavesetatimertowakeupthe
computer,andifyoumaycarrythecomputerwhile
itisturnedoff,donotenablethisfunction.Ifthe
computerwakesupwhileyoucarryit,itsharddisk
drivemaybedamaged;anditsbatterymaybe
drainedifitisnotconnectedtoanACpowersource.
Intel®SpeedSteptechnology
(IntelSpeedStepmounted
modelsonly)
•Enabled
•Disabled
SelectthemodeofIntelSpeedSteptechnologyat
runtime.
144UserGuide

Table4.Congmenuitems(continued)
FunctionSelectionComments
CPUPowerManagement•Disable
•Automatic
Unlessthispower-savingfeatureisdisabled,itstops
theprocessorclockautomaticallywhenthereisno
systemactivity.Youusuallydon'tneedtochange
thisfunction.
PCIBusPowerManagement•Disable
•Automatic
Unlessthispower-savingfeatureisdisabled,itstops
thePCIbusclockautomaticallywhenthereisno
systemactivity.Youusuallydon'tneedtochange
thisfunction.
PowerOnwithACAttach•Enabled
•Disabled
Enablesordisablesafeaturethatpowersonthe
systemwhenacpoweradapterisattached.
Ifenabled,thesystemispoweredonwhenacpower
adapterisattached.Whenthesystemisinhibernate
state,thesystemresumes.
Ifdisabled,thesystemisnotpoweredonnor
resumedwhenacpoweradapterisattached.
BeepandAlarm
PowerControlBeep•Enabled
•Disabled
Ifthisfunctionisenabled,abeepsoundswhenthe
computerentersapowermanagementmode,when
itresumesoperationalmode,andwhentheacpower
adapterisconnectedordisconnected.
LowBatteryAlarm•Enabled
•Disabled
EnableordisabletheLowBatteryAlarm.
PasswordBeep•Enabled
•Disabled
Enablethisoptiontohaveabeepsoundwhen
thesystemiswaitingforapower-on,harddisk,
orsupervisorpassword.Differentbeepswillbe
soundedwhentheenteredpasswordmatchesor
doesnotmatchtheconguredpassword.
KeyboardBeep•Enabled
•Disabled
Enableordisablekeyboardbeepwhen
unmanageablekeycombinationsarepressed.
Memory
ExtendedMemoryTest•Enabled
•Disabled
EnableordisabletheExtendedMemoryTestand
initializationduringboot.Enablingthisfunction
willincreaseboottime.Recentoperatingsystems
usuallydonotrequireExtendedMemoryInitialization.
SerialATA(SATA)
SATAControllerModeOption:•AHCI
•Compatibility
Ifyouselect“AHCI,”theSerialATAcontroller
operatesinAHCImode.Ifyouselect“Compatibility,”
theSerialATAcontrolleroperatesincompatibility
mode.
CPU
Chapter8.Advancedconguration145

Table4.Congmenuitems(continued)
FunctionSelectionComments
CoreMulti-Processing•Enabled
•Disabled
Enablesordisablesadditionalexecutioncoreunits
withinaCPU.
Note:Ifyouareusingacomputerwithasingle-core
processor,thisitemdoesnotappear.
Note:ForCoreMulti-Processing,refertothe
instructionsin“InstallingWindowsXP”onpage133
Intel®VirtualizationTechnology•Enabled
•Disabled
Ifyouselect“Enabled,”aVMM(VirtualMachine
Monitor)canutilizetheadditionalhardware
capabilitiesprovidedbyIntelVirtualization
Technology.
Securitymenuitems
Table5.Securitymenuitems
FunctionSelectionComments
PasswordReferto“Securitymenu”onpage139and“Usingpasswords”onpage67.
SecurityChip
SecurityChip•Active
•Inactive
•Disabled
Ifyouselect“Active,”SecurityChipisfunctional.If
youselect“Inactive,”SecurityChipisvisible,butis
notfunctional.Ifyouselect“Disabled,”SecurityChip
ishiddenandisnotfunctional.
SecurityReportingOptions•Enabled
•Disabled
EnableordisablethefollowingSecurityReporting
Options.
•BIOSROMString:BIOStextstring
•ESCD:Extendedsystemcongurationdata
•CMOS:CMOSdata
•NVRAM:SecuritydatastoredintheAssetID
•SMBIOS:SMBIOSdata
Note:Onlyifyouselect“Active”forSecurityChip,
thisitemappears.
ClearSecurityChip•EnterCleartheencryptionkey.
Note:Onlyifyouselect“Active”forSecurityChip,
thisitemappears.
BIOSUpdateOption
FlashBIOSUpdatingby
End-Users
•Enabled
•Disabled
Ifyouselect“Enabled,”alluserscanupdatethe
FlashBIOS.Ifyouselect“Disabled,”onlytheperson
whoknowssupervisorpasswordcanupdatethe
FlashBIOS.
MemoryProtection
146UserGuide

Table5.Securitymenuitems(continued)
FunctionSelectionComments
ExecutionPrevention•Enabled
•Disabled
Somecomputervirusesandwormscausememory
bufferstooverowbyrunningcodewhereonlydata
isallowed.IftheDataExecutionPreventionfeature
canbeusedwithyouroperatingsystem,thenby
selecting“Enabled”youcanprotectyourcomputer
againstattacksbysuchvirusesandworms.Ifafter
choosing“Enabled”youndthatanapplication
programdoesnotruncorrectly,select“Disabled”
andresetthesetting.
I/OPortAccess
EthernetLAN•Enabled
•Disabled
Ifyouselect“Enabled,”youcanusetheEthernet
LANdevice.
Note:IfyourcomputersupportsIntelAMTandIntel
AMT'sfunctionisenabled,youcannotchangethe
EthernetLANsettingto“Disable.,”
WirelessLAN•Enabled
•Disabled
Ifyouselect“Enabled,”youcanusetheWireless
LANdevice.
WiMAX•Enabled
•Disabled
Ifyouselect“Enabled,”youcanusetheWiMAX
device.
WirelessWAN•Enabled
•Disabled
Ifyouselect“Enabled,”youcanusetheWireless
WANdevice.
Bluetooth•Enabled
•Disabled
Ifyouselect“Enabled,”youcanusetheBluetooth
device.
USBPort•Enabled
•Disabled
Ifyouselect“Enabled,”youcanusetheUSBport.
ExpressCardSlot•Enabled
•Disabled
Ifyouselect“Enabled,”youcanusetheExpressCard
Slot.
OpticalDevice•Enabled
•Disabled
Ifyouselect“Enabled,”youcanusetheoptical
device.
MemoryCardSlot•Enabled
•Disabled
Ifyouselect“Enabled,”youcanusetheMemory
Cardslot.
eSATAPort•Enabled
•Disabled
Ifyouselect“Enabled,”youcanusetheeSATAport.
IntegratedCamera•Enabled
•Disabled
Ifyouselect“Enabled,”youcanusetheIntegrated
Camera.
Microphone•Enabled
•Disabled
Ifyouselect“Enabled,”youcanusetheMicrophone
(Internal/External/Line-In).
FingerprintReader•Enabled
•Disabled
Ifyouselect“Enabled,”youcanusetheFingerprint
Reader.
Chapter8.Advancedconguration147

Table5.Securitymenuitems(continued)
FunctionSelectionComments
Computrace
ComputraceModuleActivation•Enabled
•Disabled
•PermanentlyDisabled
EnablesordisablestheBIOSinterfacetoactivate
Computracemodule.Computraceisanoptional
monitoringservicefromAbsoluteSoftware.
Note:IfyousettheComputracemoduleactivation
to“PermanentlyDisabled,”youwillbeunableto
enablethissettingagain.
Startupmenuitems
Table6.Startupmenuitems
FunctionSelectionComments
BootReferto“Startupmenu”onpage140.
NetworkReferto“Startupmenu”onpage140.
BootMode•Quick
•Diagnostics
Note:Youcanalsoenter
the“Diagnostic”modeby
pressingEscduringPOST.
ScreenduringPOST:
•Quick:ThinkPadLogoscreenisdisplayed.
•Diagnostics:Testmessagesaredisplayed.
BeepatPOSTcompletion:
•Quick:No.Soundonerrorcaseonly
•Diagnostics:Yes.Alwayssounds.
“Ctrl-S”promptforon-boardEthernet:
•Quick:No.
•Diagnostics:Yes.
MemorytestingduringPOST:
•Quick:Quicktest(ornotest).
•Diagnostics:Fulltest.
TestingotherdevicesduringPOST:
•Quick:Minimumtest(ornotest).
•Diagnostics:Canperformnecessarytestingfor
criticaldevices
OptionKeysDisplay•Enabled
•Disabled
Ifyouselect“Disabled,”the“Tointerruptnormal
startup,pressthebluebutton.”messageisnot
displayedduringPOST.
BootDeviceListF12Option•Enabled
•Disabled
Ifyouselect“Enabled,”theF12keyisrecognized
andtheBootMenuisdisplayed.
UpdatingyoursystemBIOS
Thebasicinput/outputsystem(BIOS)isapartofthesystemprogramsthatmakeupthebasiclayerof
softwarebuiltintoyourcomputer.BIOStranslatestheinstructionsfromothersoftwarelayers.
Yourcomputersystemboardhasamodulecalledelectricallyerasableprogrammableread-onlymemory
(EEPROM,alsoreferredtoasashmemory).YoucanupdateBIOSandtheConguration/SetupUtility
148UserGuide

Programbystartingyourcomputerwithaashupdateopticaldiscorashupdatetoolapplicationrunning
ontheWindowsenvironment.
Insomeinstanceswhenyouaddsoftware,hardware,oradevicedriver,youmaybeinformedthatyouneed
toupdateyourBIOSinorderforthenewadditiontoworkproperly.
ToupdateyoursystemBIOS,visitbelowWebsiteandfollowtheinstructionsonthescreen:
http://www.lenovo.com/support/site.wss/document.do?sitestyle=lenovo&lndocid=tpad-matrix
Usingsystemmanagement
Thissectionisintendedprimarilyfornetworkadministrators.
Yourcomputerisdesignedformanageability,sothatyoucanredirectmoreofyourresourcestobetter
meetyourbusinessobjectives.
Thismanageability,or“TotalCostofOwnership”(TCO),enablesyoutoremotelypoweronyourcomputer,
formattheharddiskdrive,installthesoftwareofyourchoice(forexample,WindowsXPwithuserand
system-managementapplications),andhavethecomputerstartupandfunctioninthesamewayasan
ordinarydesktopPC.
Oncethecomputerisconguredandoperational,youcanmanageitbyuseofsoftwareandmanageability
featuresalreadyintegratedintotheclientsystemandthenetwork.
Systemmanagement
CheckthefollowingtopicstolearnmoreaboutfeaturesofSystemManagement:
•DesktopManagementInterface
•PrebooteXecutionEnvironment
•WakeonLAN
DesktopManagementInterface
Thebasicinput/outputsystem(BIOS)ofyourcomputersupportsaninterfacecalledSystemManagement
BIOSReferenceSpecication(SMBIOS)Version2.4.SMBIOSprovidesinformationaboutthehardware
componentsofyoursystem.ItistheresponsibilityoftheBIOStosupplythisdatabasewithinformation
aboutitselfandthedevicesonthesystemboard.Thisspecicationdocumentsthestandardsforgetting
accesstothisBIOSinformation.
PrebooteXecutionEnvironment
PrebooteXecutionEnvironment(PXE)technologymakesyourcomputermoremanageable(itisPXE
2.1-compliant)byenablingittoboot(loadanoperatingsystemoranotherexecutableimage)fromaserver.
YourcomputersupportsthePCfunctionsthatPXErequires.Forexample,withtheappropriateLANcard,
yourcomputercanbebootedfromthePXEserver.
Note:RemoteProgramLoad(RPL)cannotbeusedwithyourcomputer.
WakeonLAN
AnetworkadministratorcanuseWakeonLANtoturnonacomputerfromamanagementconsole.
WhenWakeonLANisusedwithnetworkmanagementsoftware,manyfunctions,suchasdatatransfer,
softwareupdates,andFlash(POST/BIOS)updates,canbeperformedremotelywithoutremoteattendance.
Thisupdatingcanbedoneafternormalworkinghoursandonweekends,tosavetimeandincrease
productivity.Usersarenotinterruptedduringnormalworkinghours,andLANtrafciskepttoaminimum.
Chapter8.Advancedconguration149

IfacomputeristurnedonbytheWakeonLANfunction,theNetworkbootsequenceisused.
Settingmanagementfeatures
Toenablethenetworkadministratortocontrolyourcomputerremotely,youmustcongurethenetwork
interfacebysettingthesystem-managementfeaturesinBIOSSetupUtility.Thatutilitycontainsthefollowing
functions:
•WakeonLAN
•Startupsequence
Ifanadministrator'spassword(supervisorpassword)hasbeenset,youwillneedtospecifyitwhenyoustart
BIOSSetupUtility,sothatyoucanusethesefunctions.
WakeonLAN
WhentheWakeonLANfeatureisenabledonacomputerthatisconnectedtoaLAN,anetworkadministrator
canstartthecomputerremotelyfromamanagementconsole,usingremotenetwork-managementsoftware.
SettingupinBIOSSetupUtility
ToenableordisableWakeonLAN,gototheBIOSSetupUtilitymenu.Whenyourcomputerisnotunderthe
networkadministrator'ssystemmanagement,youcandisableWakeonLAN.
Tosetthisfunction,dothefollowing:
1.StarttheBIOSSetupUtilitymenu.
2.SelectCong.
3.TheCongsubmenuappears.
4.SelectNetwork.
5.TheNetworkitemsubmenuappears.
6.ForWakeOnLAN,selecteitherEnabledorDisabled.
7.PressF10.
Networkbootsequence
Whenyourcomputeristurnedonremotely,systemwilltrytobootfromthedevicethatisselectedby
Networkbootsetting,thenitwillfollowthebootorderlistintheBootmenu.
Todeneasequence:
1.OntheBIOSSetupUtilitymenu,selectStartup.TheStartupsubmenuappears.
2.SelectNetworkandpressEntertodisplaythebootdevicelist.
3.TosetthestartupsequencethattheBIOSwilluse,pressF5orF6tomovethedeviceupordown.
4.PressF10.
Note:Ifyouwanttoinitializethesettingtoreturntothedefaultstartupsequence,pressF9.Thedefault
settingsareautomaticallyreloaded.
150UserGuide

Chapter9.Preventingproblems
AnimportantpartofowningaThinkPadNotebookismaintenance.Withpropercare,youcanavoid
commonproblems.Thefollowingsectionsprovideinformationthatcanhelpyoutokeepyourcomputer
runningsmoothly.
•“Generaltipsforpreventingproblems”onpage151
•“Makingsuredevicedriversarecurrent”onpage152
•“Takingcareofyourcomputer”onpage153
Generaltipsforpreventingproblems
1.Checkthecapacityofyourharddiskdrivefromtimetotime.Iftheharddiskdrivegetstoofull,Windows
willslowdownandmightproduceerrors.
Note:InWindows7andWindowsVista,clickStart➙Computer.InWindowsXP,clickStart➙
MyComputer.
2.Emptyyourrecyclebinonaregularbasis.
3.Usediskdefragmenttoolregularlyonyourharddiskdrivetoimprovedataseekandreadtimes.
4.Tofreeupdiskspace,uninstallunusedapplicationprograms.
Note:Youmightalsowanttolookforapplicationprogramduplicationoroverlappingversions.
5.CleanoutyourInbox,Sent,andTrashfoldersfromyoure-mailclientprogram.
6.Atleastonceaweek,makeapointtobackupyourdata.Ifcriticaldataispresent,itisagoodidea
toperformadailybackup.Lenovohasmanybackupoptionsavailableforyourcomputer.Rewritable
opticaldrivesareavailableformostmachinesandareeasilyinstalled.
7.UseorscheduleSystemRestoretotakeasystemsnapshotperiodically.Formoreinformationabout
SystemRestore,see“Performingbackupandrecoveryoperations”onpage83.
8.UpdatedevicedriversandBIOSwhenneeded.
9.Proleyourmachineathttp://www.lenovo.com/think/supporttokeepuptodatewithcurrentdrivers
andrevisions.
10.Keepuptodatefordevicedriversonothernon-Lenovohardware.Youmightwanttoreadthedevice
driverinformationreleasenotespriortoupdatingforcompatibilityorknownissues.
11.Keepalogbook.Entriesmightincludemajorhardwareorsoftwarechanges,driverupdates,minor
issuesyouhaveexperiencedandhowyouresolvedthem.
12.Ifyoueverneedtorunarecoveryonyourcomputertoreturnthepreloadontothemachine,the
followingtipsmighthelpalongtheway:
•Removeallexternaldevicessuchastheprinter,keyboard,etc.
•Makesurethatyourbatteryischargedandthatyouhavetheacpowerconnected.
•BootintotheBIOSandloadthedefaultsettings.
•Restartthemachineandstarttherecovery.
•Ifyourmachineusesdiscsastherecoverymedia,DONOTremovethediscfromthedriveuntil
promptedtodoso.
13.Forsuspectedharddiskdriveissues,referto“Diagnosingproblems”onpage157andrunadiagnostic
testofthedrivepriortocallingtheCustomerSupportCenter.Ifyourcomputerdoesnotstartup,
downloadthelestocreateabootableself-testmediafromthefollowingWebsite:
http://www.lenovo.com/hddtest
Runthetestandrecordanymessagesorerrorcodes.Ifthetestreturnsanyfailingerrorcodesor
©CopyrightLenovo2012151

messages,calltheCustomerSupportCenterwiththecodesormessagesandthecomputerinfrontof
you.Atechnicianwillassistyoufurther.
14.Ifrequired,youcanndyourcountry'sCustomerSupportCenteratthefollowingWebaddress:
http://www.lenovo.com/support/site.wss/document.do?sitestyle=lenovo&lndocid=migr-4hwse3.When
callingtheCustomerSupportCenter,pleasemakesureyouhaveyourmachinemodeltype,serial
numberandthecomputerinfrontofyou.Also,ifthemachineisproducingerrorcodes,itishelpfulto
havetheerrorscreenonorthemessagewrittendown.
Makingsuredevicedriversarecurrent
Devicedriversareprogramsthatcontaininstructionsfortheoperatingsystemabouthowtooperateor
“drive”acertainpieceofhardware.Eachhardwarecomponentonyourcomputerhasitsownspecicdriver.
Ifyouaddanewcomponent,theoperatingsystemneedstobeinstructedonhowtooperatethatpiece
ofhardware.Afteryouinstallthedriver,theoperatingsystemcanrecognizethehardwarecomponent
andunderstandhowtouseit.
Note:Becausedriversareprograms,likeanyotherleonyourcomputer,theyaresusceptibletocorruption
andmightnotperformproperlyifcorruptionoccurs.
Itisnotalwaysnecessarytodownloadthelatestdrivers.However,youshoulddownloadthelatestdriver
foracomponentifyounoticepoorperformancefromthatcomponentorifyouaddedanewcomponent.
Thismayeliminatethedriverasthepotentialcauseoftheproblem.
GettingthelatestdriversfromtheWebsite
YoucandownloadandinstallupdateddevicedriversfromtheLenovoWebsitebydoingthefollowing:
1.ConnecttotheInternet.
2.Gotohttp://www.lenovo.com/support/site.wss/document.do?sitestyle=lenovo&lndocid=tpad-matrix.
3.EntertheproductnumberofthecomputerorclickDetectmysystemonthescreen.
4.ClickDownloadsanddrivers.
5.Followthedirectionsonthescreenandinstallthenecessarysoftware.
GettingthelatestdriversusingThinkVantageSystemUpdate
TheSystemUpdateprogramhelpsyoukeepthesoftwareonyoursystemup-to-date.Updatepackagesare
storedonLenovoserversandcanbedownloadedfromtheLenovoSupportWebsite.Updatepackagescan
containapplications,devicedrivers,BIOSashes,orsoftwareupdates.WhentheSystemUpdateprogram
connectstotheLenovoSupportWebsite,theSystemUpdateprogramautomaticallyrecognizesthe
machinetypeandmodelofyourcomputer,theinstalledoperatingsystem,andthelanguageoftheoperating
systemtodeterminewhatupdatesareavailableforyourcomputer.TheSystemUpdateprogramthen
displaysalistofupdatepackagesandcategorizeseachupdateascritical,recommended,andoptionalto
helpyouunderstandtheimportance.Youhavecompletecontrolofwhichupdatestodownloadandinstall.
Afteryouselecttheupdatepackagesyouwant,theSystemUpdateprogramautomaticallydownloadsand
installstheupdateswithoutanyfurtherinterventionfromyou.
TheSystemUpdateprogramispreinstalledonyourcomputerandisreadytorun.Theonlyprerequisiteis
anactiveInternetconnection.Youcanstarttheprogrammanually,oryoucanusetheschedulefeature
toenabletheprogramtosearchforupdatesautomaticallyatspeciedintervals.Youalsocanpredene
scheduledupdatestosearchbyseverity(criticalupdates,criticalandrecommendedupdates,orallupdates)
sothelistyouchoosefromcontainsonlythoseupdatetypesthatareofinteresttoyou.
FormoreinformationabouthowtousetheThinkVantageSystemUpdate,refertoThinkVantageSystem
Update.
152UserGuide

Takingcareofyourcomputer
Althoughyourcomputerisdesignedtofunctionreliablyinnormalworkenvironments,youneedtouse
commonsenseinhandlingit.Byfollowingtheseimportanttips,youwillgetthemostuseandenjoyment
outofyourcomputer.
Becarefulaboutwhereandhowyouwork
•Storepackingmaterialssafelyoutofthereachofchildrentopreventtheriskofsuffocationfromplastic
bags.
•Keepyourcomputerawayfrommagnets,activatedcellularphones,electricalappliances,orspeakers
(within13cmor5in).
•Avoidsubjectingyourcomputertoextremetemperatures(below5°C/41°Forabove35°C/95°F).
•Someappliances,suchascertainportabledesktopfansorairpuriers,canproducenegativeions.Ifa
computerisclosetosuchanappliance,andisexposedforanextendedtimetoaircontainingnegative
ions,itmaybecomeelectrostaticallycharged.Suchachargemaybedischargedthroughyourhands
whenyoutouchthekeyboardorotherpartsofthecomputer,orthroughconnectorsonI/Odevices
connectedtoit.Eventhoughthiskindofelectrostaticdischarge(ESD)istheoppositeofadischargefrom
yourbodyorclothingtothecomputer,itposesthesameriskofacomputermalfunction.
Yourcomputerisdesignedandmanufacturedtominimizeanyeffectsofelectrostaticcharge.Anelectrostatic
chargeaboveacertainlimit,however,canincreasetheriskofESD.Therefore,whenusingthecomputer
closetoanappliancethatcanproducenegativeions,givespecialattentiontothefollowing:
•Avoiddirectlyexposingyourcomputertotheairfromanappliancethatcanproducenegativeions.
•Keepyourcomputerandperipheralsasfaraspossiblefromsuchanappliance.
•Whereverpossible,groundyourcomputertofacilitatesafeelectrostaticdischarge.
Note:Notallsuchappliancescauseasignicantelectrostaticcharge.
Begentlewithyourcomputer
•Avoidplacinganyobjects(includingpaper)betweenthedisplayandthekeyboardorthepalmrest.
•Yourcomputerdisplayisdesignedtobeopenedandusedatanangleslightlygreaterthan90degrees.
Donotopenthedisplaybeyond180degrees,asthismightdamagethecomputerhinge.
•Donotturnyourcomputeroverwhiletheacpoweradapterispluggedin.Thiscouldbreaktheadapter
plug.
Carryyourcomputerproperly
•Beforemovingyourcomputer,besuretoremoveanymedia,turnoffattacheddevices,anddisconnect
cordsandcables.
•Whenpickingupyouropencomputer,holditbythebottom.Donotpickuporholdyourcomputerby
thedisplay.
Handlestoragemediaanddrivesproperly
•Ifyourcomputercomeswithanopticaldrive,donottouchthesurfaceofadiscorthelensonthetray.
•WaituntilyouheartheCD,orDVDclickintothecenterpivotofthedrivebeforeclosingthetray.
•Wheninstallingtheharddiskdrive,solidstatedrive,oropticaldrive,followtheinstructionsshippedwith
yourhardware,andapplypressureonlywhereneededonthedevice.
•Turnoffyourcomputerifyouarereplacingtheharddiskdriveorsolidstatedrive.
•Whenreplacingtheprimaryharddiskdriveorsolidstatedrive,reattachthecoverofthedriveslot.
Chapter9.Preventingproblems153

•Storeyourexternalandremovableharddiskoropticaldrivesintheappropriatecontainersorpackaging
whentheyarenotbeingused.
•Beforeyouinstallanyofthefollowingdevices,touchametaltableoragroundedmetalobject.Thisaction
reducesanystaticelectricityfromyourbody.Thestaticelectricitycoulddamagethedevice.
–Memorymodule
–Mini-PCICard
–ExpressCard
–Smartcard
–MemoryCard,suchasSDCard,andMultiMediaCard
Note:Notalllisteddevicesareincludedinyourcomputer.
Thisactionreducesanystaticelectricityfromyourbody.Thestaticelectricitycoulddamagethedevice.
•WhentransferringdatatoorfromaFlashMediaCard,suchasanSDcard,donotputyourcomputer
insleep(standby)orhibernationmodebeforethedatatransferiscomplete.Todosomightcause
damagetoyourdata.
Takecareinsettingpasswords
•Rememberyourpasswords.Ifyouforgetasupervisororharddiskpassword,Lenovowillnotresetit,and
youmighthavetoreplaceyoursystemboard,orharddiskdriveorsolidstatedrive.
Careforthengerprintreader
Thefollowingactionscoulddamagethengerprintreaderorcauseitnottoworkproperly:
•Scratchingthesurfaceofthereaderwithahard,pointedobject.
•Scrapingthesurfaceofthereaderwithyourngernailoranythinghard.
•Usingortouchingthereaderwithadirtynger.
Ifyounoticeanyofthefollowingconditions,gentlycleanthesurfaceofthereaderwithadry,soft,lint-free
cloth:
•Thesurfaceofthereaderisdirtyorstained.
•Thesurfaceofthereaderiswet.
•Thereaderoftenfailstoenrollorauthenticateyourngerprint.
Registeryourcomputer
•RegisteryourThinkPadproductswithLenovo(refertotheWebsitehttp://www.lenovo.com/register).This
canhelpauthoritiesreturnyourcomputertoyouifitislostorstolen.Registeringyourcomputeralso
enablesLenovotonotifyyouaboutpossibletechnicalinformationandupgrades.
Besurenottomodifyyourcomputer
•OnlyanauthorizedThinkPadrepairtechnicianshoulddisassembleandrepairyourcomputer.
•Donotmodifyortapethelatchestokeepthedisplayopenorclosed.
Cleaningthecoverofyourcomputer
Occasionallycleanyourcomputerasfollows:
1.Prepareamixtureofagentlekitchen-usedetergent(onethatdoesnotcontainabrasivepowderor
strongchemicalssuchasacidoralkaline).Use5partswaterto1partdetergent.
2.Absorbthediluteddetergentintoasponge.
154UserGuide

3.Squeezeexcessliquidfromthesponge.
4.Wipethecoverwiththesponge,usingacircularmotionandtakingcarenottoletanyexcessliquiddrip.
5.Wipethesurfacetoremovethedetergent.
6.Rinsethespongewithcleanrunningwater.
7.Wipethecoverwiththecleansponge.
8.Wipethesurfaceagainwithadry,softlint-freecloth.
9.Waitforthesurfacetodrycompletelyandremoveanybersfromthecloth.
Cleaningyourcomputerkeyboard
1.Applysomeisopropylrubbingalcoholtoasoft,dust-freecloth.
2.Wipeeachkeytopsurfacewiththecloth.Wipethekeysonebyone;ifyouwipeseveralkeysatatime,
theclothmayhookontoanadjacentkeyandpossiblydamageit.Makesurethatnoliquiddripsonto
orbetweenthekeys.
3.Allowtodry.
4.Toremoveanycrumbsordustfrombeneaththekeys,youcanuseacamerablowerwithabrush
orcoolairfromahairdryer.
Note:Avoidsprayingcleanerdirectlyontothedisplayorthekeyboard.
Cleaningyourcomputerdisplay
1.Gentlywipethedisplaywithadry,softlint-freecloth.Ifyouseeascratchlikemarkonyourdisplay,
itmightbeastaintransferredfromthekeyboardortheTrackPointpointingstickwhenthecoverwas
pressedfromtheoutside.
2.Wipeordustthestaingentlywithasoft,drycloth.
3.Ifthestainremains,moistenasoft,lint-freeclothwithwaterora50-50mixtureofisopropylalcoholand
waterthatdoesnotcontainimpurities.
4.Wringoutasmuchoftheliquidasyoucan.
5.Wipethedisplayagain;donotletanyliquiddripintothecomputer.
6.Besuretodrythedisplaybeforeclosingit.
Chapter9.Preventingproblems155

156UserGuide

Chapter10.Troubleshootingcomputerproblems
Thissectiontellswhattodoifyouhaveacomputerproblem.
•“Diagnosingproblems”onpage157
•“Troubleshooting”onpage158
Diagnosingproblems
UsingtheLenovoSolutionCenterprogram
Note:TheLenovoSolutionCenterprogramisavailableonlyonsomemodelsthatarepreinstalledwiththe
Windows7operatingsystem.IfyourWindows7modelisnotpreinstalledwiththeprogram,youcan
downloaditfromhttp://www.lenovo.com/support.
TheLenovoSolutionCenterprogramenablesyoutotroubleshootandresolvecomputerproblems.It
combinesdiagnostictests,systeminformationcollection,securitystatus,andsupportinformation,along
withhintsandtipsformaximumsystemperformance.
Whenyouaresettingupyourcomputer,theLenovoSolutionCenterprogrampromptsyoutocreaterecovery
media,whichyoucanusetorestoretheharddiskdrivetothefactorydefaultstate.Formoreinformation,
see“Creatingandusingrecoverymedia”onpage81.
ToruntheLenovoSolutionCenterprogram,clickStart➙AllPrograms➙LenovoSolutionCenter.Then
followtheinstructionsonthescreen.
Foradditionalinformation,refertotheLenovoSolutionCenterhelpsystem.
Note:Ifyouareunabletoisolateandrepairtheproblemyourselfafterrunningtheprogram,saveandprint
theloglescreatedbytheprogram.YouwillneedthelogleswhenyouspeaktoaLenovotechnical
supportrepresentative.
UsingLenovoThinkVantageToolbox
TheLenovoThinkVantageToolboxprogramenablesyoutoviewsymptomsofcomputerproblemsandnd
solutionsforthem.Italsoincludesautomaticnoticationwhenactionisrequired,computingassistance,
advanceddiagnostics,anddiagnostichistory.
Tostartthisprogram,doasfollows:
ForWindows7:ClickStart➙ControlPanel➙SystemandSecurity➙Lenovo-SystemHealthand
Diagnostics.
ForWindowsVistaandXP:ClickStart➙AllPrograms➙ThinkVantage➙LenovoThinkVantageToolbox.
Whentheapplicationislaunched,selectadiagnostictesttorun.Ifthereisanyproblem,besidestheerror
messages,aguidancealsowillbedisplayedtoguideyoutoxtheproblem.
Foradditionalinformation,refertotheThinkVantageToolboxhelpsystem.
Note:Ifyouareunabletoisolateandrepairtheproblemyourselfafterrunningtheprogram,saveandprint
theloglescreatedbytheprogram.YouwillneedthelogleswhenyouspeaktoaLenovotechnical
supportrepresentative.
©CopyrightLenovo2012157

UsingtheLenovoSupportWebsite
IfyourcomputerhasneithertheLenovoSolutionCenterprogramnortheLenovoThinkVantageToolbox
programinstalled,gotohttp://www.lenovo.com/diagnoseforthelatestinformationondiagnosticsforyour
computer.
Note:Runninganytestmighttakeuptoseveralminutesorlonger.Makesurethatyouhavetimetorunthe
entiretest.Donotinterruptthetestwhileitisrunning.
Troubleshooting
Ifyourcomputerhasanerror,ittypicallydisplaysamessageoranerrorcode,orabeepsoundswhenyou
turniton.Tocorrectanerror,rstndthedescriptionoftheerrorintheleft-handcolumnofthechartthat
applies.Thenclickthatdescriptiontogetatroubleshootingprocedure.
Tomakesurethatyourcomputerhasthefeaturesoroptionsthatareintroducedinthefollowingsections,
consulttheonlinehelporthelistshippedwithyourcomputer.
Computerstopsresponding
Printtheseinstructionsnowandkeepitwithyourcomputerforreferencelater.
Ifyourcomputeriscompletelyunresponsive(youcannotusetheUltraNavpointingdeviceorthekeyboard),
dothefollowingsteps:
1.Pushandholdthepowerswitchuntilthemachineturnsoff.Afterthecomputeristurnedoff,restartby
pressingthepowerswitch.Ifthemachinedoesnotturnon,continuetostep2.
Note:Donotremovethebatteryandacpowertoresetthecomputer.
2.Whilethemachineisturnedoff,removeallpowersourcesfromthecomputer(batteryandacpower).
Holddownthepowerbuttonfor10seconds.Plugintheacpowerwhilekeepingthebatteryoutofthe
computer.Ifthecomputerdoesnotturnbackon,continuetostep3.
Note:OncethecomputerstartsupandentersWindows,usethepropershutdownproceduretoturn
thecomputeroff.Oncethemachineisoff,reattachthebatteryandrestartthecomputer.Ifthe
computerdoesnotstartwiththebatteryreattached,removethebatteryandagainstartwithstep2.If
thecomputerstartswithacpowerbutdoesnotstartwhenthebatteryisattached,calltheCustomer
SupportCenterforsupport.
3.Whilethemachineisoff,removeallsourcesofpowerfromthemachine(batteryandacpower).Remove
allexternaldevicesthatareattachedtoyourcomputer(keyboard,mouse,printer,scanner,etc.).Repeat
step2.Ifstep2isunsuccessful,continuetostep4.
Note:Thefollowingstepsinvolveremovingstaticsensitivecomponentsfromyourcomputer.Please
makesurethatyouareproperlygroundedandremoveallsourcesofpowerattachedtothecomputer.
IfyouareuncomfortableorunsureaboutremovingcomponentspleasecalltheCustomerSupport
Centerforassistance.
4.Whilethecomputerisoff,removeallsourcesofpowerandexternalhardware.Refertotheprocedure
inReplacingmemoryonhowtoremoveandreseatthememorymodules.Removeanynon-original
memorymoduleaddedtoyourcomputer.Afterremovingtheextramemorymoduleandreseating
theoriginalmemorymodule,repeatstep2.Ifthecomputerstilldoesnotturnon,consulttheuser's
referenceguideforothercustomer-replaceablecomponentsthatareattachedtoyourcomputer
Ifthecomputerstilldoesnotstartup,calltheCustomerSupportCenterandaCustomerSupportSpecialist
willassistyou.
158UserGuide

Spillsonthekeyboard
Withamobilecomputer,thereareincreasedchancesofspillingliquidsonthekeyboard.Becausemost
liquidsconductelectricity,liquidspilledonthekeyboardcouldcreatenumerousshortcircuits,potentially
causingirreparabledamagetoyourcomputer.
Ifyouspillsomethingonyourcomputer:
Attention:Besurethatnoliquidcreatesashortcircuitbetweenyouandtheacpoweradapter(ifinuse).
Althoughyoumightlosesomedataorworkbyturningoffthecomputerimmediately,leavingthecomputer
onmightmakeyourcomputerunusable.
1.Carefullyunplugtheacpoweradapterimmediately.
2.Turnoffthecomputerimmediately.Ifthecomputerdoesnotturnoff,removethebattery.Themore
quicklyyoustopthecurrentfrompassingthroughthecomputerthemorelikelyyouwillreducedamage
fromshortcircuits.
3.Waituntilyouarecertainthatalltheliquidisdrybeforeturningonyourcomputer.
Note:Ifyouwanttoreplaceyourkeyboard,youcanpurchaseanewone.
Errormessagesandbeeperrors
Error
code
BeepsymptomErrormessageSolution
0182TwoshortbeepsBadCRC2.EnterBIOSSetupand
loadSetupdefaults.
Turnoffthecomputer.Turnonthe
computer.PressF1toenterinto
BIOSSetupUtilitywhenThinkPad
logoappears.PressF9toload
defaultsettings.PressF10toexit.
Restartthecomputer.
0183Fourshortbeeps,onelongbeepFanerrorCoolingfanhasfailed.Havethe
computerserviced.
0184Fourshortbeeps,pause,three
shortbeeps,pause,oneshort
beep,pause,oneshortbeep
DramisunpluggedMemoryisnotinstalled.Install
memory.
0185Sevenshortbeeps,onelong
beep,fourshortbeeps,one
longbeep,oneshortbeep,one
longbeep,oneshortbeep,one
longbeep.Thecomputerkeeps
beeping.
DramisnotwellpluggedReinstallmemory.
0187Twoshortbeeps0187:EAIAdataaccesserrorTheaccesstoEEPROMhasfailed.
Havethecomputerserviced.
0189Twoshortbeeps0189:InvalidRFIDconguration
informationarea
TheEEPROMchecksumisnot
correct(block#4and5).The
systemboardshouldbereplaced,
andtheUUIDneedstobe
reinstalled.Havethecomputer
serviced.
0190Twoshortbeeps0190:Criticallow-batteryerrorThecomputerturnedoff,because
thebatteryislow.Connecttheac
poweradaptertothecomputer
andchargethebattery,orreplace
thebatterywithafullycharged
one.
Chapter10.Troubleshootingcomputerproblems159

Error
code
BeepsymptomErrormessageSolution
0191noneOperatingsystemnotfound.Makesurethat:
•Theharddiskdriveiscorrectly
installed.
•Astartablediscisinthedrive.
Ifyoustillseethesameerror
message,checktheboot
sequenceusingBIOSSetup
Utility.
0200Twoshortbeeps0200:FailureFixedDiskTheharddiskdriveisnotworking.
Havetheharddiskdriveserviced.
0210Twoshortbeeps0210:StuckKeyReplacethekeyboardandrestart
yourcomputer.
0211Twoshortbeeps0211:KeyboarderrorRuntheinteractivetestsofthe
keyboardandtheauxiliaryinput
device.
0212Twoshortbeeps0212:KeyboardControllerFailedReplacekeyboardcontroller.
0213Twoshortbeeps0213:Keyboardlocked–Unlock
keyswitch
Unlockthesystemtoproceed.
0220Twoshortbeeps0220:Monitortypedoesnot
matchCMOS–RunSETUP.
LoadSetupdefaultsettingsin
BIOSSetupUtility.
0230Twoshortbeeps0230:SystemRAMFailedat
offset:
Systemboard.
0231Twoshortbeeps0231:ShadowRamFailedat
offset:
Memoryisnotworkingcorrectly.
Havethememoryserviced.
Ifyoustillseethesameerror
message,havethecomputer
serviced.
0232Twoshortbeeps0232:ExtendedRAMFailedat
addressline:
Memoryisnotworkingcorrectly.
Havethememoryserviced.
Ifyoustillseethesameerror
message,havethecomputer
serviced.
0250Twoshortbeeps0250:Systembatteryisdead-
ReplaceandrunSETUP
1.Chargethebackupbattery
formorethan8hoursby
connectingtheacpower
adapter.
2.Replacethebackupbattery
andrunBIOSSetupUtilityto
resetthetimeanddate
0251Twoshortbeeps0251:SystemCMOSchecksum
bad-Defaultcongurationused
ThesystemCMOSmighthave
beencorruptedbyanapplication
program.Thecomputerusesthe
defaultsettings.RunBIOSSetup
Utilitytorecongurethesettings.
Ifyoustillseethesameerrorcode,
havethecomputerserviced.
160UserGuide

Error
code
BeepsymptomErrormessageSolution
0254Twoshortbeeps0254:SystemNV7Volume
checksumbad-Default
congurationused
PowerofftodischargeCMOS,and
thenrestartyourcomputer.
0260Twoshortbeeps0260:SystemtimererrorHavethecomputerserviced.
0270Twoshortbeeps0270:RealtimeclockerrorHavethecomputerserviced.
0271Twoshortbeeps0271:Checkdateandtime
settings
PressF1toenterintotheBIOS
Setupmenu,pressF9toloadthe
defultsettings,pressF10toexit
andrestartyourcomputer.
0280Twoshortbeeps0280:Previousbootincomplete-
Defaultcongurationused
LoaddefaultsettingsinBIOS
SetupUtility.
Ifyoustillseethesameerror
message,havethecomputer
serviced.
02D0Twoshortbeeps02D0:Systemcacheerror-Cache
disabled
Thecacheisdisabled.Havethe
computerserviced.
02D2TwoshortbeepsCPUVariableMTRRcongure
failed.
Havethecomputerserviced
02F0none02F0:CPUID:InvalidCPUisinstalled.Install
correctCPU.
Ifyoustillseethesameerror
message,havethecomputer
serviced.
1802Twoshortbeeps1802:Unauthorizednetworkcard
ispluggedin-Poweroffand
removetheminiPCInetworkcard.
Poweroffyourcomputerand
removethePCIExpressMiniCard.
1804TwoshortbeepsUnauthorizedWANcardis
pluggedin-Poweroffandremove
theWANcard.
PoweroffandremovetheWAN
card.
noneTwoshortbeepsSystemCongurationDataRead
Error
PressF1toentertheBIOSSetup
menu.PressF9toloadthedefault
settings.PressF10toexit.Restart
thecomputer.
2200none2200:MachineTypeandSerial
Numberareinvalid.
MachineTypeandSerialNumber
areinvalid.Havethecomputer
serviced
2201none2201:MachineUUIDisinvalid.MachineUUIDisinvalid.Havethe
computerserviced.
Errorswithoutmessages
•Problem:MyscreenkeepsblankingwhenIdonotwantitto.
Solution:Youcandisableanysystemtimers,suchastheLCDturn-offtimerortheblanktimer.
ForWindows7andWindowsVista:
–StartPowerManager.SwitchtoAdvancedview.
–ClickthePowerplantab,andthenselectMaximumPerformancefromthepredenedpowerplans.
ForWindowsXP:
Chapter10.Troubleshootingcomputerproblems161

–StartPowerManager.
–ClickthePowerschemetab,andthenselectMaximumPerformancefromthepredenedpower
schemes.
•Problem:WhenIturnonthemachine,nothingappearsonthescreenandthemachinedoesnotbeep
whilestartingup.
Note:Ifyouarenotsurewhetheryouheardanybeeps,turnoffthecomputerbypressingandholding
thepowerswitchfor4secondsormore.Turnitonandlistenagain.
Solution:Makesurethat:
–Thebatteryisinstalledcorrectly.
–Theacpoweradapterisconnectedtothecomputerandthepowercordispluggedintoaworking
electricaloutlet.
–Thecomputeristurnedon.(Turnthepowerswitchonagainforconrmation.)
Ifapower-onpasswordisset:
–Pressanykeytodisplaythepromptforthepower-onpassword.Ifthebrightnesslevelofthescreenis
low,increaseitbypressingtheFn+Home.
–TypethecorrectpasswordandpressEnter(refertoPower-onpassword).
Iftheseitemsareproperlyset,andthescreenremainsblank,havethecomputerserviced.
•Problem:WhenIturnonthemachine,onlyawhitecursorappearsonablankscreen.
Solution:Ifyouhavemodiedapartitiononyourharddiskdrivebyusingapartitionsoftware,information
aboutthatpartition,orthemasterbootrecordmayhavebeendestroyed.
1.Turnoffthecomputer,andthenturnitonagain.
2.Ifyoustillseeonlythecursoronthescreen,dothefollowing:
–Ifyouhaveusedthepartitionsoftware,examinethepartitionontheharddiskdrivebyusingthe
software,andrecoverthepartitionifrequired.
–UseeithertheRescueandRecoverworkspaceortherecoverydiscstorestorethesystemtothe
factorystate.Fordetailsaboutrestoringthesystemtothefactorystate,see“Performingbackup
andrecoveryoperations”onpage83.
Iftheproblempersists,havethecomputerserviced.
•Problem:Myscreengoesblankwhilethecomputerison.
Solution:Yourscreensaverorpowermanagementmaybeenabled.Doeitherofthefollowing:
–MovetheTrackPointorthetouchpad,orpressakeytoexitthescreensaver.
–Pressthepowerswitchtoresumefromsleep(standby)orhibernation.
Memoryproblems
Printtheseinstructionsnowandkeepitwithyourcomputerforreferencelater.
Ifyourmemoryisnotoperatingproperly,checkthefollowingitems:
1.Verifythatthememoryisinstalledandseatedcorrectlyinyourcomputer.
Itmaybenecessarytoremovealladdedmemoriestotestthecomputerwithonlythefactory-installed
memories,andthenreinstallthememoryoneatatimetoensureaproperconnection.Forthe
procedurestoremoveandreinstallamemory,referto“Replacingthememory”onpage91.
2.Checkforerrormessagesduringstartup.
162UserGuide

FollowtheappropriatecorrectiveactionsforPower-onself-test(POST).See“Errormessagesandbeep
errors”onpage159.
3.VerifythatthelatestBIOSforyourmodelhasbeeninstalled.
4.Verifythepropermemorycongurationandcompatibilityincludingthemaximummemorysizeandthe
memoryspeed.Fordetails,refertotheinstructionsin“Replacingthememory”onpage91
5.Rundiagnosticprograms,see“Diagnosingproblems”onpage157.
Networking
Thefollowingarethemostcommonnetworkingproblems:
Ethernetproblems
•Problem:Yourcomputercannotconnecttothenetwork.
Solution:Makesurethat:
–Thecableisinstalledproperly.
ThenetworkcablemustbesecurelyconnectedbothtotheEthernetconnectorofyourcomputerand
totheRJ45connectorofthehub.Themaximumallowabledistancefromthecomputertohubis
100meters.Ifthecableisconnectedandthedistanceiswithinacceptablelimitsbuttheproblem
persists,tryadifferentcable.
–Youareusingthecorrectdevicedriver.
ForWindows7andWindowsVista:
1.ClickStart,andthenclickControlPanel.
2.ClickHardwareandSound.
3.ClickDeviceManager.Ifyouarepromptedforanadministratorpasswordorconrmation,type
thepasswordorprovideconrmation.
4.Ifthe!markistotheleftoftheadapternameunderNetworkadapters,youmightnotusethe
correctdriverorthedriverisnotenabled.Toupdatethedriver,right-clickthehighlightedadapter.
5.ClickUpdateDriverSoftware,andthenfollowtheinstructionsonthescreen.
ForWindowsXP:
1.ClickStart,andthenclickControlPanel.
2.ClickPerformanceandMaintenance,andthenclickSystem.
3.ClicktheHardwaretab,andclicktheDeviceManagerbutton.
4.IfthexmarkistotheleftoftheadapternameunderNetworkadapter,youmightnotusethe
correctdriverorthedriverisnotenabled.Toupdatethedriver,right-clickthehighlightedadapter.
5.ClickProperties.ThePropertieswindowappears.
6.ClicktheDrivertab.
7.ClicktheUpdateDriverbutton.TheUpdateDeviceDriverwizardappears.Followtheinstructions
onthescreen.
–Theswitchportandtheadapterhavethesameduplexsetting.
Ifyouconguredtheadapterforfullduplex,makesuretheswitchportisalsoconguredforfull
duplex.Settingthewrongduplexmodecandegradeperformance,causedataloss,orresultinlost
connections.
–Youhaveinstalledallnetworkingsoftwarethatisnecessaryforyournetworkenvironment.
CheckwithyourLANadministratorforthenecessarynetworkingsoftware.
•Problem:Theadapterstopsworkingfornoapparentreason.
Chapter10.Troubleshootingcomputerproblems163

Solution:Thenetworkdriverlesmaybecorruptormissing.Updatethedriverbyreferringtothe
“Solution”descriptionfortheproceduretomakesurethatthecorrectdevicedriverisinstalledinthe
precedingproblem.
•Problem:IfyourcomputerisaGigabitEthernetmodelandyouusetheaspeedof1000Mbps,the
connectionfailsorerrorsoccur.
Solution:
–UseCategory5wiringandmakesurethatthenetworkcableissecurelyconnected.
–Connecttoa1000BASE-Thub/switch(not1000BASE-X).
•Problem:YourcomputerisaFastEthernetmodelandyouusethespeedof100Mbps,butthe
connectionfailsorerrorsoccur.
Solution:
–UseCategory5wiringandmakesurethatthenetworkcableissecurelyconnected.
–Connecttoa100BASE-TXhub/switch(not100BASE-T4).
•Problem:TheWakeonLAN(WOL)featureisnotworking.
Solution:
–MakesurethatWOLisenabledintheBIOSSetupUtility.
–Ifitis,checkwithyourLANadministratorforthenecessarysettings.
•Problem:Yourcomputercannotconnecttothenetworkat1000Mbps.Instead,itconnectsat100Mbps.
Solution:
–Tryanothercable.
–Makesurethatthelinkpartnerissettoauto-negotiate.
–Makesurethattheswitchis802.3ab-compliant(gigabitovercopper).
AwirelessLANproblem
•Problem:Youcannotconnectusingthebuilt-inwirelessnetworkingcard.
Solution:MakesurethatyourwirelessLANdriveristhelatestversioninstalled.ChecktheWebsiteand
conrmthedriverversionsupportedbyAccessConnectionsisthelatestdocumentedintheREADMEle.
Makesurethatyourcomputeriswithinrangeofawirelessaccesspoint.
Makesurethatthewirelessradioisenabledbydouble-clickingtheAccessConnectionsiconinthe
taskbar.
Note:IfyourcomputerisaWindows7model,clickShowhiddeniconsinthetaskbar.TheAccess
Connectionsiconisdisplayed.Formoreinformationabouttheicon,seetheHelpinAccessConnections.
CheckNetworkName(SSID),andyourencryptioninformation.UseAccessConnectionstoverifythis
case-sensitiveinformation.
AwirelessWANproblem
•Message:UnauthorizedWANcardispluggedin-PoweroffandremovetheWANcard.
Solution:TheWANcardisnotsupportedonthiscomputer.Removeit.
Note:Dependingonyourcomputer,somemodelsdonothaveawirelessWAN.
164UserGuide

Bluetoothproblems
ForWindows7andWindowsVista
•Problem:SounddoesnotcomefromtheBluetoothheadset/headphonebutcomesfromthelocal
speakereventhoughtheheadset/headphoneisconnectedusingHeadsetproleorAVprole.
Solution:Dothefollowing:
1.Exittheapplicationthatusesthesounddevice(forexample,WindowsMediaPlayer).
2.OpentheControlPanelbyclickingStart➙ControlPanel.
3.ClickHardwareandSound➙Sound.
4.SelectthePlaybacktab.
5.IfyouareusingHeadsetprole,selectBluetoothHands-freeAudioandclicktheSetDefault
button.IfyouareusingAVprole,selectStereoAudioandclicktheSetDefaultbutton.
6.ClickOKtoclosetheSoundwindow.
•Problem:PIM(PersonalInformationManager)itemssentfromWindows7andWindowsVistacannotbe
receivedcorrectlyintotheaddressbookofanyotherBluetooth-enableddevice.
Solution:Windows7andWindowsVistasendPIMitemsinXMLformat,butmostBluetooth-enabled
deviceshandlePIMitemsinvCardformat.IfanotherBluetooth-enableddevicecanreceiveale
throughBluetooth,aPIMitemsentfromWindows7andWindowsVistamightbesavedasalewith
theextension.contact.
ForWindowsXP
Notes:IfyouareusingtheMicrosoftstandardBluetoothfeaturesandyouwanttoaccessinformationabout
howtousetheBluetoothfunction,dothefollowing:
1.PressFn+F5toturnonBluetooth.
2.ClickStart➙ControlPanel.
3.ClickPrintersandOtherHardware.
4.ClickBluetoothDevices.
5.ClicktheOptionstab.
6.ClickLearnmoreaboutBluetoothSettings
Note:IfyouareusingtheThinkPadBluetoothwithEnhancedDataRateSoftware,refertothefollowing
instructions.
Note:CheckyourconnectionanytimeandmakesurethatnootherBluetooth-enableddeviceissearchingfor
thedevicetowhichyouwanttoconnect.SimultaneoussearchingisnotallowedintheBluetoothconnection.
•Problem:YousearchforaBluetooth-enableddevicebyclickingViewdevicesinrangeinMyBluetooth
Places,butyoucannotndanything.
Solution:MakesurethatthedevicetowhichyouwanttoconnectisenabledfortheBluetoothconnection.
Aftermakingsureoftheabove,turntheBluetoothpoweroffandthenonagain,orrestartyourcomputer.
Thensearchforthedeviceagain.
•Problem:YoucannotconnecttoanyBluetooth-enableddevice.
Solution:MakesurethatbothyourcomputerandthedeviceareturnedonandtheirBluetoothantennas
areenabled.
Aftermakingsureoftheabove,turntheBluetoothpoweroffandthenonagain,orrestartyourcomputer.
Thenre-establishyourconnectiontothedevice.
Iftheproblempersists,re-installtheBluetoothsoftwareandreestablishyourconnectiontothedevice.
Chapter10.Troubleshootingcomputerproblems165

•Problem:YourcomputerisconnectedtoaBluetooth-enableddevice,butyoucannotuseanyofthe
servicesofthatdevice.
Solution:MakesurethatthedeviceisenabledfortheBluetoothconnection.
1.Double-clicktheMyBluetoothPlacesicon.
2.GotoBluetoothTasksandclickViewdevicesinrange.
Ifyoucannotndthedevice,itmayhavestoppedresponding.Makesurethatitisenabledforthe
Bluetoothconnection.Ifyoundit,connecttotheservicesyouwant.
Ifyouaresurethatthedeviceisresponding,turntheBluetoothpoweroffandthenonagain,orrestart
yourcomputer.Thentrytoconnectagain.
•Problem:Youcannotpullabusinesscardfromtheconnectedcomputer.
Solution:Makesurethattheconnectedcomputerhasitsowndefaultbusinesscardapplicationandthat
thecardisreadyforcommunication.
Makesurethatthesecuritysettingsontheconnectedcomputerallowyoutodownloadthebusinesscard.
•Problem:Youcannotsendabusinesscardtotheconnectedcomputer.
Solution:Makesurethatyourcomputerhasitsowndefaultbusinesscardapplicationandthatthecard
isreadyforcommunication.
Makesurethatthesecuritysettingsontheconnectedcomputerallowyoutouploadyourbusinesscard.
•Problem:YourcomputerisconnectedtoaBluetooth-enabledcomputerthatworksasanFTPserver,
butyoucannotseeanylesintheFTPserver.
Solution:Checkthenewlysharedlesasfollows:
1.InthemenuofMyBluetoothPlaces,clickView.
2.ClickUpdate.Thestatusisupdatedinthewindow,sothatyoucancheckthenewlysharedles.
Makesurethatthesharedfolderintheconnectedcomputercontainsthelesyouarelookingfor.
Makesurethatthesecuritysettingsontheconnectedcomputerallowyoutoconnectandviewthe
lesinthecomputer.
•Problem:YourcomputerisconnectedtoaBluetooth-enabledcomputer,butyoucannotgainaccess
tothenetwork.
Solution:MakesurethattheBluetooth-enabledcomputerisconnectedtoanetwork.
Makesurethattheconnectedcomputerhasbeensetuptoshareitsnetworkconnectivityandthatthe
securitysettingsallowyoutoconnectandestablishtheremotenetworkaccess.
•Problem:YourcomputercannotconnectaBluetooth-enabledcomputerthatusesserialportapplications.
Solution:ReestablishaconnectionwiththeBluetooth-enabledcomputer,andtrytheserialconnection
again.
•Problem:Bluetoothserialportwasdisconnectedautomatically.
Solution:Whenanyserial-basedconnectionisestablished,aninactivitytimerstarts.Ifnoapplication
openstheport,theconnectionisendedautomatically.Thisisanormalcharacteristicoftheserial-based
connectionandisnotadefect.IfyouneedtheBluetoothserialport,justreconnectit.
•Problem:PIMSynchronizationfailedwithanerrormessage“TheSynchronizationwithxxx(Bluetooth
devicename)failed.PIM(PersonalInformationManager)Interfacefailed.”
Solution:Startamailapplication,andsetupyoure-mailaccount.OR,modifytheBluetoothconguration
soasnottosynchronizee-mailitems,asfollows:
1.Double-clickMyBluetoothPlaces.
2.ClickBluetooth,andselectBluetoothSetupWizard.
166UserGuide

3.SelectIwanttoconguretheBluetoothservicesthatthiscomputerwillprovidetoremote
devices.,andclickNext.
4.SelectPIMSynchronization,andclickCongure.
5.SelectDoNotSynchronizeinthee-mailsynchronizationselection,andclickOK.
6.ClickFinishtoclosetheBluetoothServiceSelectionwindow.
•Problem:ThinkPadBluetoothwithEnhancedDataRateSoftwaredoesnotfunction.
Solution:Dothefollowing:
1.TurnonBluetoothbypressingFn+F5.
2.ClickStart➙ControlPanel.
3.ClickthePerformanceandMaintenanceicon.
4.ClicktheSystemicon.
5.ClicktheHardwaretab.
6.ClicktheDeviceManagerbutton.TheDeviceManagerwindowopens.
7.Checkwhetherthewords“BluetoothDevice”appearinthedevicelistinginthewindow.
Ifthewords“BluetoothRadio”appearinthedevicelisting,theMicrosoftBluetoothsoftwareisinstalled
onyourcomputer.IfyouwanttouseThinkPadBluetoothwithEnhancedDataRateSoftware,youhaveto
installitandthenreplacetheBluetoothdriver.Formoreinformation,seeUsingBluetooth.
•Problem:WhilelookingattheClassicViewoftheControlPanel,youseetwoBluetoothiconsinthe
ControlPanel.
Solution:IfyouhaveinstalledtheMicrosoftBluetoothsoftwarebefore,andyouareusingThinkPad
BluetoothwithEnhancedDataRateSoftware,youmayndtwoBluetoothiconsintheControlPanel.One
istheBluetoothCongurationiconforThinkPadBluetoothwithEnhancedDataRateSoftware,andthe
otheristheBluetoothDevicesiconfortheMicrosoftBluetoothsoftware.
•Problem:SounddoesnotcomefromtheBluetoothheadset/headphonebutcomesfromthelocal
speakereventhoughtheheadset/headphoneisconnectedusingHeadsetproleorAVprole.
Solution:Dothefollowing:
1.Exittheapplicationthatusesthesounddevice(forexample,WindowsMediaPlayer).
2.OpentheControlPanelbyclickingStart➙ControlPanel.
3.Double-clickSoundsandAudioDevicestoopentheSoundsandAudioDevicesPropertieswindow.
4.SelecttheAudiotab.
5.IfyouareusingHeadsetprole,selectBluetoothAudioforbothSoundplaybackandSound
recording.IfyouareusingAVprole,selectBluetoothHighQualityAudioforbothSoundplayback
andSoundrecording.
6.ClickOKtoclosetheSoundsandAudioDevicesPropertieswindow.
Keyboardandotherpointingdevices
Thefollowingarethemostcommonkeyboardandotherpointingdevicesproblems.
UltraNavproblems
•Problem:Thepointerdriftswhenthecomputeristurnedonorafteritresumesnormaloperation.
Solution:ThepointermightdriftwhenyouarenotusingtheTrackPointduringnormaloperation.This
isanormalcharacteristicoftheTrackPointandisnotadefect.Pointerdriftingmightoccurforseveral
secondsunderthefollowingconditions:
–Whenthecomputeristurnedon.
Chapter10.Troubleshootingcomputerproblems167

–Whenthecomputerresumesnormaloperation.
–WhentheTrackPointispressedforalongtime.
–Whenthetemperaturechanges
•Problem:TheTrackPointortouchpaddoesnotwork.
Solution:MakesurethattheTrackPointortouchpadissettoEnabledintheUltraNavDeviceSetting.
Note:ToopentheUltraNavDeviceSetting,pressFn+F8.
Keyboardproblems
•Problem:Allorsomekeysonthekeyboarddonotwork.
Solution:Ifanexternalnumerickeypadisconnected:
1.Turnoffthecomputer.
2.Removetheexternalnumerickeypad.
3.Turnonthecomputerandtryusingthekeyboardagain.
Ifthekeyboardproblemisresolved,carefullyreconnecttheexternalnumerickeypad,externalkeyboard,
makingsurethatyouhaveseatedtheconnectorsproperly.
Iftheproblemremains,makesurethatthecorrectdevicedriverisinstalled.
ForWindows7:
1.ClickStart➙ControlPanel.ChangetheviewoftheControlPanelfromCategorytoLargeicons
orSmallicons.
2.ClickKeyboard.
3.SelecttheHardwaretab.IntheDeviceProperties,makesurethattheDeviceStatusisThisdevice
isworkingproperly.
ForWindowsVista:
1.ClickStart➙ControlPanel.
2.ClickHardwareandSound,andthenclickKeyboard.
3.SelecttheHardwaretab.IntheDeviceProperties,makesurethattheDeviceStatusisThisdevice
isworkingproperly.
ForWindowsXP:
1.ClickStart➙ControlPanel.
2.ClickPrintersandOtherHardware,andthenclickKeyboard.
3.SelecttheHardwaretab.IntheIntheDeviceProperties,makesurethattheDeviceStatusisThis
deviceisworkingproperly.
Ifkeysonthekeyboardstilldonotwork,havethecomputerserviced.
•Problem:Anumberappearswhenyoutypealetter.
Solution:Thenumericlockfunctionison.Todisableit,pressShift+ScrLkorFn+NmLk.
•Problem:Allorsomekeysontheexternalnumerickeypaddonotwork.
Solution:Makesurethattheexternalnumerickeypadiscorrectlyconnectedtothecomputer.
Displayandmultimediadevices
Thissectionincludesthemostcommondisplayandmultimediadevicesproblems.
168UserGuide

Computerscreenproblems
•Problem:Thescreenisblank.
Solution:Dothefollowing:
–PressFn+F7tobringuptheimage.
Note:IfyouusetheFn+F7keycombinationtoapplyapresentationscheme,pressFn+F7atleast
threetimesinthreeseconds,andtheimageisdisplayedonthecomputerscreen.
–Ifyouareusingtheacpoweradapter,orusingthebatteryandthebatterystatusindicatorison(is
green),pressFn+Hometomakethescreenbrighter.
–Ifthesleep(standby)statusindicatorison(isgreen),pressFntoresumefromthesleep(standby)mode.
–Iftheproblempersists,dotheSolutionintheproblembelow.
Note:IfyourcomputerisaWindows7model,itdoesnotsupportthepresentationscheme.
•Problem:Thescreenisunreadableordistorted.
Solution:Makesurethat:
–Thedisplaydevicedriverisinstalledcorrectly.
–Thescreenresolutionandcolorqualityarecorrectlyset.
–Themonitortypeiscorrect.
Tocheckthesesettings,doasfollows:
ForWindows7:
1.Right-clickonthedesktop,andclickPersonalize.
2.ClickDisplayattheleft.
3.SelectChangedisplaysettings.Checkwhetherthescreenresolutioniscorrectlyset.
4.ClickAdvancedSettings.
5.ClicktheAdaptertab.
6.Makesurethatthecorrectdevicedrivernameisshownintheadapterinformationwindow.
Note:Thedevicedrivernamedependsonthevideochipthathasbeeninstalledonyourcomputer.
7.ClickthePropertiesbutton.Ifyouarepromptedforanadministratorpasswordorconrmation,type
thepasswordorprovideconrmation.Checkthe“Devicestatus”boxandmakesurethedeviceis
workingproperly.Ifnot,clicktheTroubleshootbutton.ClosethePropertieswindow.
8.ClicktheMonitortab.Checkwhetherthecolorqualityiscorrectlyset,makesureotherinformation
isalsocorrect.
9.ClickthePropertiesbutton.Ifyouarepromptedforanadministratorpasswordorconrmation,type
thepasswordorprovideconrmation.Checkthe“Devicestatus”boxandmakesurethedeviceis
workingproperly.Ifnot,clicktheTroubleshootbutton.
ForWindowsVista:
1.Right-clickonthedesktop,andclickPersonalize.
2.ClickDisplaySettingsandcheckwhetherthescreenresolutionandcolorqualityarecorrectlyset.
3.ClickAdvancedSettings.
4.ClicktheAdaptertab.
5.Makesurethatthecorrectdevicedrivernameisshownintheadapterinformationwindow.
Note:Thedevicedrivernamedependsonthevideochipthathasbeeninstalledonyourcomputer.
Chapter10.Troubleshootingcomputerproblems169

6.ClickthePropertiesbutton.Ifyouarepromptedforanadministratorpasswordorconrmation,type
thepasswordorprovideconrmation.Checkthe“Devicestatus”boxandmakesurethedeviceis
workingproperly.Ifnot,clicktheTroubleshootbutton.
7.ClicktheMonitortab.
8.Makesuretheinformationiscorrect.
9.ClickthePropertiesbutton.Ifyouarepromptedforanadministratorpasswordorconrmation,type
thepasswordorprovideconrmation.Checkthe“Devicestatus”boxandmakesurethedeviceis
workingproperly.Ifnot,clicktheTroubleshootbutton.
ForWindowsXP:
1.Right-clickonthedesktop,andclickPropertiestoopentheDisplayPropertieswindow.
2.ClicktheSettingstab.
3.Checkwhetherthescreenresolutionandcolorqualityarecorrectlyset.
4.ClickAdvanced.
5.ClicktheAdaptertab.
6.Makesurethatthecorrectdevicedrivernameisshownintheadapterinformationwindow.
Note:Thedevicedrivernamedependsonthevideochipthathasbeeninstalledonyourcomputer.
7.ClickthePropertiesbutton.Checkthe“Devicestatus”boxandmakesurethedeviceisworking
properly.Ifnot,clicktheTroubleshootbutton.
8.ClicktheMonitortab.
9.Makesuretheinformationiscorrect.
10.ClickthePropertiesbutton.Checkthe“Devicestatus”boxandmakesurethedeviceisworking
properly.Ifnot,clicktheTroubleshootbutton.
•Problem:Incorrectcharactersappearonthescreen.
Solution:Didyouinstalltheoperatingsystemorapplicationprogramcorrectly?Iftheyareinstalledand
conguredcorrectly,havethecomputerserviced.
•Problem:Thescreenstaysonevenafteryouturnoffyourcomputer.
Solution:Pressandholdthepowerswitchfor4secondsorovertoturnoffyourcomputer,thenturn
itonagain.
•Problem:Missing,discolored,orbrightdotsappearonthescreeneverytimeyouturnonyourcomputer.
Solution:ThisisanintrinsiccharacteristicoftheTFTtechnology.Yourcomputer'sdisplaycontains
multiplethin-lmtransistors(TFTs).Asmallnumberofmissing,discolored,orbrightdotsonthescreen
mightexistallthetime.
Externalmonitorproblems
•Problem:Theexternalmonitorisblank.
Solution:Tobringuptheimage,pressFn+F7andselectthedesiredmonitor.Iftheproblempersists,
dothefollowing:
1.Connecttheexternalmonitortoanothercomputertomakesureitworks.
2.Reconnecttheexternalmonitortoyourcomputer.
3.Refertothemanualshippedwiththeexternalmonitortochecktheresolutionsandrefreshratesthat
aresupported.
–Iftheexternalmonitorsupportsthesameresolutionasthecomputerdisplayorahigherresolution,
viewoutputontheexternalmonitororonboththeexternalmonitorandthecomputerdisplay.
170UserGuide

–Iftheexternalmonitorsupportsalowerresolutionthanthecomputerdisplay,viewoutputonthe
externalmonitoronly.(Ifyouviewoutputontheboththecomputerdisplayandtheexternal
monitor,theexternalmonitorscreenwillbeblankordistorted.)
•Problem:Youcannotsetahigherresolutionthanthepresentoneonyourexternalmonitor.
Solution:
–Makesurethatmonitorinformationiscorrect.Dothefollowing:
ForWindows7:
1.Right-clickonthedesktop,andclickScreenresolution.
Note:Ifyourcomputercannotdetecttheexternalmonitor,clicktheDetectbutton.
2.Clicktheiconforthedesiredmonitor(theMonitor-2iconisfortheexternalmonitor).
3.ClickAdvancedSettings.
4.ClicktheAdaptertab.
5.Makesurethatthecorrectdevicedrivernameisshownintheadapterinformationwindow.
Note:Thedevicedrivernamedependsonthevideochipthathasbeeninstalledonyourcomputer.
6.ClickOK.
Iftheinformationisincorrect,reinstallthedevicedriver.Seebelowformoreinformation.
ForWindowsVista:
1.Right-clickonthedesktopandclickPersonalize.
2.ClickDisplaySettings.
3.ClicktheAdvancedSettingsbutton.
4.ClicktheAdaptertab.
5.Makesurethatthecorrectdevicedrivernameisshownintheadapterinformationwindow.
Note:Thedevicedrivernamedependsonthevideochipthathasbeeninstalledonyourcomputer.
6.ClickOK.
Iftheinformationisincorrect,reinstallthedevicedriver.Seebelowformoreinformation.
ForWindowsXP:
1.Right-clickonthedesktop,andclickPropertiestoopentheDisplayPropertieswindow.
2.ClicktheSettingstab.
3.ClickAdvanced.
4.ClicktheAdaptertab.
5.Makesurethatthecorrectdevicedrivernameisshownintheadapterinformationwindow.
Note:Thedevicedrivernamedependsonthevideochipthathasbeeninstalledonyourcomputer.
6.ClickOK.
Iftheinformationisincorrect,reinstallthedevicedriver.Seebelowformoreinformation.
–Checkthemonitortypeand,ifnecessary,updatethedriverbydoingthefollowing:
ForWindows7:
1.Connecttheexternalmonitortothemonitorconnector,andthenconnectthemonitortoan
electricaloutlet.
2.Turnontheexternalmonitorandthecomputer.
Chapter10.Troubleshootingcomputerproblems171

3.Right-clickonthedesktop,andclickScreenresolution.
Note:Ifyourcomputercannotdetecttheexternalmonitor,clicktheDetectbutton.
4.Clicktheiconforthedesiredmonitor(theMonitor-2iconisfortheexternalmonitor).
5.ClickAdvancedSettings.
6.ClicktheMonitortab.Checkthemonitorinformationwindowtomakesurethatthemonitortype
iscorrect.Ifitis,clickOKtoclosethewindow;otherwisedoasfollows.
7.Ifmorethanonemonitortypeisdisplayed,selectGenericPnPMonitororGenericNon-PnP
Monitor.
8.ClickProperties.Ifyouarepromptedforanadministratorpasswordorconrmation,typethe
passwordorprovideconrmation.
9.ClicktheDrivertab.
10.ClickUpdateDriver.
11.ClickBrowsemycomputerfordriversoftware,andthenclickLetmepickfromalistof
devicedriversonmycomputer.
12.CleartheShowcompatiblehardwarecheckbox.
13.SelectManufacturerandModelforyourmonitor.
14.Afterupdatingthedriver,clickClose.
15.SetResolution.
Note:Tochangethecolorsettings,selecttheMonitortab,thensetColors.
16.ClickOK.
ForWindowsVista:
1.Connecttheexternalmonitortothemonitorconnector,andthenconnectthemonitortoan
electricaloutlet.
2.Turnontheexternalmonitorandthecomputer.
3.PressFn+F7tochangethedisplayoutputlocationtotheexternalmonitor.
Note:AfterpressingFn+F7,youwillneedtowaitforamomentbeforetheimageappears.
4.Right-clickonthedesktop,andclickPersonalize.
5.ClickDisplaySettings.
6.ClicktheAdvancedSettingsbutton.
7.ClicktheMonitortab.Checkthemonitorinformationwindowtomakesurethatthemonitortype
iscorrect.Ifitis,clickOKtoclosethewindow;otherwisedoasfollows.
8.Ifmorethanonemonitortypeisdisplayed,selectGenericPnPMonitororGenericNon-PnP
Monitor.
9.ClickProperties.Ifyouarepromptedforanadministratorpasswordorconrmation,typethe
passwordorprovideconrmation.
10.ClicktheDrivertab.
11.ClickUpdateDriver.
12.ClickBrowsemycomputerfordriversoftware,andthenclickLetmepickfromalistof
devicedriversonmycomputer.
13.CleartheShowcompatiblehardwarecheckbox.
14.SelectManufacturerandModelforyourmonitor.
15.Afterupdatingthedriver,clickClose.
172UserGuide

16.SetResolutionandColorsintheDisplaySettingswindow.
17.ClickOK.
ForWindowsXP:
1.Connecttheexternalmonitortothemonitorconnector,andthenconnectthemonitortoan
electricaloutlet.
2.Turnontheexternalmonitorandthecomputer.
3.PressFn+F7tochangethedisplayoutputlocationtotheexternalmonitor.
Note:AfterpressingFn+F7,youwillneedtowaitforamomentbeforetheimageappears.
4.Right-clickonthedesktop,andclickPropertiestoopentheDisplayPropertieswindow.
5.ClicktheSettingstab.
6.ClickAdvanced.
7.ClicktheMonitortab.Checkthemonitorinformationwindowtomakesurethatthemonitortype
iscorrect.Ifitis,clickOKtoclosethewindow;otherwisedoasfollows.
8.Ifmorethanonemonitortypeisdisplayed,selectDefaultMonitor.
9.ClickProperties.
10.ClicktheDrivertab.
11.ClickUpdateDriver.TheHardwareUpdateWizardappears.
12.ClickNo,notthistime,andthenclickNext.
13.SelectInstallfromalistorspeciclocation(Advanced),andthenclickNext.
14.SelectDon'tsearch.Iwillchoosethedrivertoinstall,andthenclickNext.
15.CleartheShowcompatiblehardwarecheckbox.
16.SelectManufacturersandModelsforyourmonitor.
17.Afterupdatingthedriver,clickOKtoclosethePropertieswindow.
18.SetColorsandScreenareaintheDisplayPropertieswindow.
19.ClickOK.
•Problem:Thescreenisunreadableordistorted.
Solution:
–Makesurethatthemonitorinformationiscorrect.(Refertothe“Solution”forsettingahigherresolution
ontheexternalmonitor.)
–Makesurethattheappropriatemonitortypeisselected.(Refertothe“Solution”forsettingahigher
resolutionontheexternalmonitor.)
Makesurethatanappropriaterefreshrateisselectedbydoingthefollowing:
ForWindows7:
1.Connecttheexternalmonitortothemonitorconnector,andthenconnectthemonitortoanelectrical
outlet.
2.Turnontheexternalmonitorandthecomputer.
3.Right-clickonthedesktop,andclickScreenresolution.
Note:Ifyourcomputercannotdetecttheexternalmonitor,clicktheDetectbutton.
4.Clicktheiconforthedesiredmonitor(theMonitor-2iconisfortheexternalmonitor).
5.ClickAdvancedSettings.
6.ClicktheMonitortab.
Chapter10.Troubleshootingcomputerproblems173

7.Selectthecorrectscreenrefreshrate.
ForWindowsVista:
1.Connecttheexternalmonitortothemonitorconnector,andthenconnectthemonitortoanelectrical
outlet.
2.Turnontheexternalmonitorandthecomputer.
3.PressFn+F7tochangethedisplayoutputlocationtotheexternalmonitor.
Note:AfterpressingFn+F7,youwillneedtowaitforamomentbeforetheimageappears.
4.Right-clickonthedesktop,andclickPersonalize.
5.ClickDisplaySettings.
6.ClicktheAdvancedSettingsbutton.
7.ClicktheMonitortab.
8.Selectthecorrectscreenrefreshrate.
ForWindowsXP:
1.Connecttheexternalmonitortothemonitorconnector,andthenconnectthemonitortoanelectrical
outlet.
2.Turnontheexternalmonitorandthecomputer.
3.PressFn+F7tochangethedisplayoutputlocationtotheexternalmonitor.
Note:AfterpressingFn+F7,youwillneedtowaitforamomentbeforetheimageappears.
4.Right-clickonthedesktop,andclickPropertiestoopentheDisplayPropertieswindow.
5.ClicktheSettingstab.
6.ClickAdvanced.
7.ClicktheMonitortab.
8.Selectthecorrectrefreshrate.
•Problem:Wrongcharactersappearonthescreen.
Solution:Didyoufollowthecorrectprocedureininstallingtheoperatingsystemorapplicationprogram?
Ifyoudid,havetheexternalmonitorserviced.
•Problem:TheExtenddesktopfunctiondoesnotwork.
Solution:EnabletheExtenddesktopfunctionbydoingthefollowing:
ForWindows7:
1.Connecttheexternalmonitortothemonitorconnector,andthenconnectthemonitortoanelectrical
outlet.
2.Turnontheexternalmonitorandthecomputer.
3.Right-clickonthedesktop,andclickScreenresolution.
4.ClicktheMonitor-2icon.
5.SelectExtendthesedisplaysforMultipledisplays.
6.ClicktheMonitor-1icon(fortheprimarydisplay,thecomputerdisplay).
7.SelecttheResolutionoftheprimarydisplay.
8.ClicktheMonitor-2icon(fortheexternalmonitor).
9.SelecttheResolutionofthesecondarydisplay.
174UserGuide

10.Settherelativepositionoftheeachmonitorbydraggingitsicon.Youcansetthemonitorsinany
relativeposition,buttheiconsmusttoucheachother.
11.ClickOKtoapplythechanges.
Note:Tochangethecolorsettings,right-clickonthedesktop,andclickScreenresolution.Click
AdvancedSettings,selecttheMonitortab,thensetColors.
ForWindowsVista:
1.Attachthecomputertoanexternalmonitor.
2.Right-clickonthedesktop,andclickPersonalize.
3.ClickDisplaySettings.
4.ClicktheMonitor-2icon.
5.SelecttheExtendthedesktopontothismonitorcheckbox.
6.ClicktheMonitor-1icon(fortheprimarydisplay,thecomputerdisplay).
7.SelecttheResolutionandColorsoftheprimarydisplay.
8.ClicktheMonitor-2icon(fortheexternalmonitor).
9.SelecttheResolutionandColorsofthesecondarydisplay.
10.Settherelativepositionoftheeachmonitorbydraggingitsicon.Youcansetthemonitorsinany
relativeposition,buttheiconsmusttoucheachother.
11.ClickOKtoapplythechanges.
ForWindowsXP:
1.Attachthecomputertoanexternalmonitor.
2.Right-clickonthedesktop,andclickPropertiestoopentheDisplayPropertieswindow.
3.ClicktheSettingstab.
4.ClicktheMonitor-2icon.
5.SelecttheExtendmyWindowsdesktopontothismonitorcheckbox.
6.ClicktheMonitor-1icon(fortheprimarydisplay,thecomputerdisplay).
7.Selectthescreenresolutionandcolorqualityoftheprimarydisplay.
8.ClicktheMonitor-2icon(fortheexternalmonitor).
9.Selectthescreenresolutionandcolorqualityofthesecondarydisplay.
10.Settherelativepositionoftheeachmonitorbydraggingitsicon.Youcansetthemonitorsinany
relativeposition,buttheiconsmusttoucheachother.
11.ClickOKtoapplythechanges.
•Problem:Displayswitchingdoesnotwork.
Solution:IfyouusetheExtenddesktopfunction,disableit,andchangethedisplayoutputlocation.If
aDVDmovieoravideoclipisplaying,stoptheplayback,closetheapplication,andthenchangethe
displayoutputlocation.
•Problem:IfyouusetheExtenddesktopfunction,youcannotsetahigherresolutionorhigherrefresh
rateonthesecondarydisplay.
Solution:Changetheresolutionandthecolordepthtolowersettingsfortheprimarydisplaybydoing
thefollowing:
ForWindows7:Changetheresolutiondepthtolowersettingsfortheprimarydisplay.Refertothe
“Solution”for“TheExtenddesktopfunctiondoesnotwork”above.
Chapter10.Troubleshootingcomputerproblems175

ForWindowsVista:UsingtheDisplaySettingswindow,changetheresolutionandthecolordepthto
lowersettingsfortheprimarydisplay.TolaunchtheDisplaySettingswindow,refertothe“Solution”for
“TheExtenddesktopfunctiondoesnotwork”above.
ForWindowsXP:UsingtheDisplayPropertieswindow,changetheresolutionandthecolordepthtolower
settingsfortheprimarydisplay.TolaunchtheDisplayPropertieswindow,refertothe“Solution”for“The
Extenddesktopfunctiondoesnotwork”above.
•Problem:Thescreenpositionontheexternalmonitorisincorrectwhenthatmonitorissetforahigh
resolution.
Solution:Sometimes,whenyouuseahighresolutionsuchas1600x1200,theimageisshiftedtoleft
orrightonthescreen.Tocorrectthis,rstmakesurethatyourexternalmonitorsupportsthedisplay
mode,thatis,theresolutionandtherefreshrate,thatyouhaveset.Ifitdoesnot,setadisplaymodethat
themonitorsupports.Ifitdoessupportthedisplaymodeyouhaveset,gotothesetupmenuforthe
monitoritselfandadjustthesettingsthere.Usuallytheexternalmonitorhasbuttonsforaccesstothe
setupmenu.Fordetails,seethereferencemanualforthemonitor.
Audioproblems
•Problem:WaveorMIDIsounddoesnotplaycorrectly.
Solution:Makesurethebuilt-inaudiodeviceisconguredcorrectly.
ForWindows7andWindowsVista:
1.ClickStart➙ControlPanel.
2.ClickHardwareandSound.
3.ClickDeviceManager.Ifyouarepromptedforanadministratorpasswordorconrmation,typethe
passwordorprovideconrmation.
4.Double-clickSound,videoandgamecontrollers(inWindowsVista,clickthe+markforSound,
videoandgamecontrollers.
5.Makesurethefollowingdeviceisenabledandconguredcorrectly:
–RealtekHighDenitionAudio
ForWindowsXP:
1.ClickStart➙ControlPanel.
2.ClickPerformanceandMaintenance
3.ClickSystem.
4.ClicktheHardwaretab,andthenclicktheDeviceManagerbutton.
5.Clickthe+markforSound,videoandgamecontrollers.
6.Makesurethefollowingdeviceisenabledandconguredcorrectly:
–RealtekHighDenitionAudio
•Problem:RecordingsmadebyusingtheMicrophoneinputarenotloudenough.
Solution:MakesurethatMicrophoneBoostisturnedonandsetasfollows:
ForWindows7andWindowsVista:
1.ClickStart➙ControlPanel.
2.ClickHardwareandSound
3.ClickSound.
4.ClicktheRecordingtabintheSoundwindow.
5.SelectMicrophone,andclickthePropertiesbutton.
176UserGuide

6.ClicktheLevelstab,andmovetheMicrophoneBoostsliderupwards.
7.ClickOK.
ForWindowsXP:
1.Double-clickthevolumeiconinthetaskbar.TheVolumeControlwindowopens.
2.ClickOptions.
3.ClickProperties.
4.SelectRealtekHDAudioinputintheMixerdevicelist.
5.ClickOK.
6.ClickOptions,andthenclickAdvancedControls.
7.FindtheMicrophonevolumecontrol,andthenclickAdvanced.
8.SelecttheMicrophoneboostcheckbox.
9.ClickClose.
Notes:
–Thenamesofwindowsoreldsareslightlydifferentdependingontheoperatingsystemyouuse.
–Fordetailsaboutcontrollingvolume,refertoyourWindowsonlinehelp.
•Problem:Avolumeorbalanceslidercannotbemoved.
Solution:Theslidermightbegrayedout.Thismeansthatitspositionisxedbythehardwareand
cannotbechanged.
•Problem:Thevolumeslidersdonotstayinplacewhensomeaudioapplicationsareused.
Solution:Itisnormalforthesliderstochangepositionwhencertainsoundapplicationsareused.The
applicationsareawareoftheVolumeMixerwindow(inWindowsXP,VolumeControlwindow)andare
allowedtochangethesettingsthemselves.AnexampleistheWindowsMediaPlayer.Usuallythe
applicationhasslidersavailabletocontrolthesoundfromwithintheapplication.
•Problem:ThevolumeslidersdonotalltintheVolumeControlwindowinWindowsXP.
Solution:PressCtrl+Skeyswhilethevolumecontrolisinfocus,andtoggletoasmallersize.
•Problem:Thebalanceslidercannotcompletelymuteonechannel.
Solution:Thecontrolisdesignedtocompensateforminordifferencesinbalanceanddoesnot
completelymuteeitherchannel.
•Problem:ThereisnovolumecontrolforMIDIsoundontheVolumeMixerwindow(inWindowsXP,
VolumeControlwindow).
Solution:Usethehardwarevolumecontrol.InWindowsXP,usethehardwarevolumecontrolorthe
WavevolumecontrolontheVolumeControlwindow.ThisisbecausetheBuilt-InSynthesizerSoftware
doesnotsupportthecontrol.
•Problem:ThesoundcannotbeturnedoffcompletelyevenifyousettheMastervolumecontrolat
minimum.
Solution:YoucanstillhearsomesoundeventhoughyouhavesettheMastervolumecontrolatminimum.
Toturnoffthesoundcompletely,gototheMastervolumecontrolandselectMutespeakers(Mute
inWindowsVistaandWindowsXP).
Chapter10.Troubleshootingcomputerproblems177

Fingerprintreaderproblems
•Problem:Thesurfaceofthereaderisdirty,stained,orwet.
Solution:Gentlycleanthesurfaceofthereaderwithadry,soft,lint-freecloth.
•Problem:Thereaderoftenfailstoenrollorauthenticateyourngerprint.
Solution:Ifthesurfaceofthereaderisdirty,stained,orwet,gentlycleanthesurfaceofthereader
withadry,soft,lint-freecloth.
Ifyourngerhasanyofthefollowingconditions,youmaynotbeabletoregisterorauthenticateit:
–Yourngeriswrinkled.
–Yourngerisrough,dry,orinjured.
–Yourngerisverydry.
–Yourngerisstainedwithdirt,mud,oroil.
–Thesurfaceofyourngerisverydifferentfromwhenyouenrolledyourngerprint.
–Yourngeriswet.
–Angerisusedthathasnotbeenenrolled.
Toimprovethesituation,trythefollowing:
–Cleanorwipeyourhandstoremoveanyexcessdirtormoisturefromthengers.
–Enrollanduseadifferentngerforauthentication.
–Ifyourhandsaretoodry,applylotiontothem.
Batteryandpower
Thissectiontellswhattodoifyouhaveabatteryandpowerproblem.
Batteryproblems
•Problem:Thebatterypackcannotbefullychargedbythepower-offmethodinthestandardcharge
timeforyourcomputer.
Solution:Thebatterypackmightbeover-discharged.Dothefollowing:
1.Turnoffthecomputer.
2.Makesurethattheover-dischargedbatterypackisinthecomputer.
3.Connecttheacpoweradaptertothecomputerandletitcharge.
IftheoptionalQuickChargerisavailable,useittochargetheover-dischargedbatterypack.
Ifthebatterypackcannotbefullychargedin24hours,useanewbatterypack.
•Problem:Yourcomputershutsdownbeforethebatterystatusindicatorshowsempty.
OR
Yourcomputeroperatesafterthebatterystatusindicatorshowsempty.
Solution:Dischargeandrechargethebatterypack.
•Problem:Theoperatingtimeforafullychargedbatterypackisshort.
Solution:Dischargeandrechargethebatterypack.Ifyourbattery'soperatingtimeisstillshort,usea
newbatterypack.
•Problem:Thecomputerdoesnotoperatewithafullychargedbatterypack.
Solution:Thesurgeprotectorinthebatterypackmightbeactive.Turnoffthecomputerforoneminuteto
resettheprotector,thenturnonthecomputeragain.
178UserGuide

•Problem:Thebatterypackcannotbecharged.
Solution:Youcannotchargethebatterywhenitistoohot.Ifthebatteryfeelshot,removeitfromthe
computerandallowittocooltoroomtemperature.Afteritcools,reinstallitandrechargethebattery.Ifit
stillcannotbecharged,haveitserviced.
ACpoweradapterproblems
•Problem:Theacpoweradapterisconnectedtothecomputerandtheworkingelectricaloutlet,butthe
poweradapter(powerplug)iconisnotdisplayedinthetaskbar.Alsotheacpowerindicatordoes
notlightup.
Solution:Doasfollows:
1.Makesurethattheconnectionoftheacpoweradapteriscorrect.Forconnectingtheacpower
adapter,seetheSetupInstructionsmanualincludedintheshippingcontentsofyourcomputer.
2.Iftheabovestepiscorrect,turnoffthecomputer,thendisconnecttheacpoweradapteranduninstall
themainbattery.
3.Reinstallthebatteryandreconnecttheacpoweradapter,thenturnonthecomputer.
4.Ifthepoweradaptericonstilldoesnotappearonthetaskbarandtheacpowerindicatordoesnot
lightup,havetheacpoweradapterandyourcomputerserviced.
Note:IfyourcomputerisaWindows7model,todisplaythepoweradapter(powerplug)icon,click
Showhiddeniconsinthetaskbar.
Powerproblems
Printtheseinstructionsnowandkeepitwithyourcomputerforreferencelater.
Ifyourcomputerisgettingnopoweratall,checkthefollowingitems:
1.Verifythepowerswitch.Referto“System-statusindicators”onpage9.Thepowerswitchbuttonis
illuminatedwheneverthecomputerison.Itisnotilluminatedinsleep(standby)orhibernationmode.
2.Checkallpowerconnections.Removeanypowerstripsandsurgeprotectorstoconnecttheacpower
adapterdirectlytotheacpoweroutlet.
3.Inspecttheacpoweradapter.Checkforanyphysicaldamage,andmakesurethatthepowercableis
rmlyattachedtotheadapterbrickandthecomputer.
4.Verifytheacpowersourceisworkingbyattachinganotherdevicetotheoutlet.
5.RemovethecomputerfromaThinkPadPortReplicatorSeries3,ThinkPadMiniDockSeries3or
ThinkPadMiniDockPlusSeries3.
6.Removealldevicesandthentestforsystempowerwithminimaldevicesattached.
a.Disconnecttheacpoweradapterandallcablesfromthecomputer.
b.Closethecomputerdisplay,andturnthecomputerover.
c.Removethebattery.Referto“Replacingthebattery”onpage89.
d.Removethememory(SO-DIMM).Referto“Replacingthememory”onpage91.
e.RemovethePCIExpressMiniCard.Referto“ReplacingthePCIExpressMiniCardforwireless
LAN/WiMAXconnection”onpage110and“InstallingandreplacingthePCIExpressMiniCardfor
wirelessWANconnection”onpage111.
f.Removetheopticaldrive.Referto“Replacingtheopticaldrive”onpage103
g.Removetheharddiskdriveandsolidstatedrive.Referto“Replacingtheharddiskdrive”onpage
93and“Replacingthesolidstatedrive”onpage97.
h.Waitfor30seconds,andthenreinstalltheSO-DIMMandtheknowngoodbatteryortheacpower
adaptertotestthecomputerwithminimaldevicesattachedrst.
Chapter10.Troubleshootingcomputerproblems179

i.Reinstalleachdeviceoneatatimethatyouhaveremovedintheearliersteps.
Ifyourcomputerdoesnotrunonbatterypower,checkthefollowingitems:
1.Removeandresetthebatterytomakesurethatitisproperlyconnected.Referto“Replacingthe
battery”onpage89.
2.Swapbatterieswithanothersimilarmodel,ifavailable.
IfanothersimilarThinkPadmodelisavailable,thenverifythatthebatterypackworksintheother
computerandthatthebatterypackfortheothermodelworksinthiscomputer.
3.Verifythebattery-statusindicator.Referto“Power-statusindicators”onpage10.
Thebattery-statusindicatorisnormallyilluminatedwheneverthebatteryisinstalledandthecomputeris
on,ortheacpoweradapterisconnectedandthebatteryischarging.Thisindicatormaybeblinkingor
solidineitherorangeorgreencolordependingonthestatusofthebattery.
Apowerbuttonproblem
•Problem:Thesystemdoesnotrespond,andyoucannotturnoffthecomputer.
Solution:Turnoffthecomputerbypressingandholdingthepowerbuttonfor4secondsormore.Ifthe
systemisstillnotreset,removetheacpoweradapterandthebattery.
Startupproblems
Printtheseinstructionsnowandkeepthemwithyourcomputerforreferencelater.
Ifyoureceiveanerrormessagebeforetheoperatingsystemloads,checkthefollowingitem:
•FollowtheappropriatecorrectiveactionsforPower-onself-test.Referto“Errormessagesandbeep
errors”onpage159.
Ifyoureceiveanerrormessagewhiletheoperatingsystemisloadingthedesktopcongurationafterthe
POSTiscompleted,checkthefollowingitems:
1.VisittheLenovoSupportWebsiteathttp://www.lenovo.com/think/supportandsearchfortheerror
message.
2.VisittheMicrosoftKnowledgeBasehomepageathttp://support.microsoft.com/andsearchforthe
errormessage.
Sleep(standby)andhibernationproblems
•Problem:Thecomputerenterssleep(standby)modeunexpectedly.
Solution:Iftheprocessoroverheats,thecomputerautomaticallyentersleep(standby)modetoallow
thecomputertocoolandtoprotecttheprocessorandotherinternalcomponents.Checkthesettings
forsleep(standby)mode,usingPowerManager.
•Problem:Thecomputerenterssleep(standby)mode(thesleep/standbyindicatorturnson)immediately
afterPower-onself-test.
Solution:Makesurethat:
–Thebatteryischarged.
–Theoperatingtemperatureiswithintheacceptablerange.Referto“Features”onpage13,
“Specications”onpage14,and“Operatingenvironment”onpage15.
Ifthebatteryischargedandthetemperatureiswithinrange,havethecomputerserviced.
•Problem:The“criticallow-batteryerror”messageappears,andthecomputerimmediatelyturnsoff.
180UserGuide

Solution:Thebatterypowerisgettinglow.Connecttheacpoweradaptertothecomputerandplugit
intoanelectricaloutlet,orreplacethebatterywithachargedone.
•Problem:ThecomputerdisplayremainsblankafteryoupressFntoreturnfromsleep(standby)mode.
Solution:Checkwhetheranexternalmonitorwasdisconnectedorturnedoffwhilethecomputerwas
insleep(standby)mode.Ifyoudisconnectedorturnedofftheexternalmonitor,connectitorturniton
beforeresumingthecomputerfromthesleep(standby)mode.Whenresumingthecomputerfromthe
sleep(standby)modewithoutattachingtheexternalmonitororturningiton,andthecomputerdisplay
remainsblank,pressFn+F7tobringupthecomputerdisplay.
Note:IfyouareusingFn+F7toapplyapresentationscheme,youwillneedtopressFn+F7atleastthree
timesinthreesecondstobringupthecomputerdisplay.
Note:IfyourcomputerisaWindows7model,itdoesnotsupportthepresentationscheme.
•Problem:Thecomputerdoesnotreturnfromsleep(standby)mode,orthesleep(standby)indicatorstays
onandthecomputerdoesnotwork.
Solution:Ifthesystemdoesnotreturnfromsleep(standby)mode,itmayhaveenteredsleep(standby)or
hibernationmodeautomaticallybecausethebatteryisdepleted.Checkthesleep(standby)indicator.
–Ifthesleep(standby)indicatorison,yourcomputerisinsleep(standby)mode.Connecttheac
poweradaptertothecomputer,thenpressFn.
–Ifthesleep(standby)indicatorisoff,yourcomputerisinhibernationmodeorpower-offstate.Connect
theacpoweradaptertothecomputer,thenpressthepowerbuttontoresumeoperation.
Ifthesystemstilldoesnotreturnfromsleep(standby)mode,yoursystemmaystoprespondingandyou
maynotbeabletoturnoffthecomputer.Inthiscase,youneedtoresetthecomputer.Ifyouhavenot
savedyourdata,itmaybelost.Toresetthecomputer,pressandholdthepowerbuttonfor4secondsor
more.Ifthesystemisstillnotreset,removetheacpoweradapterandthebattery.
•Problem:Yourcomputerdoesnotentersleep(standby)orhibernationmode.
Solution:Checkwhetheranyoptionhasbeenselectedtodisableyourcomputerfromenteringsleep
(standby)orhibernationmode.
Ifyourcomputertriestoentersleep(standby)modebuttherequestisrejected,thedeviceintheUSB
connectormightbedisabled.Ifthisoccurs,doahot-unplug-and-plugoperationfortheUSBdevice.
•Problem:TheFn+F12keycombinationdoesnotmakethecomputerenterhibernationmode.
Solution:Thecomputercannotenterhibernationmode:
–IfthehibernationmodeisnotenabledinWindowsXP.Toenableit,doasfollows:
1.ClickStart➙Controlpanel.
2.ClickPerformanceandMaintenance.
3.ClickPowerOptions.
4.ClicktheHibernatetab.
5.ClicktheEnablehibernationcheckbox.
6.ClickOK.
IfyouwanttobeabletoenterhibernationmodebypressingFn+F12,youneedtoinstallThinkPad
PMdriver.
•Problem:Thebatterydischargesslightlywhilethecomputerisinhibernationmode.
Solution:Ifthewakeupfunctionisenabled,thecomputerconsumessmallamountofpower.Thisisnot
adefect.Fordetails,referto“Power-savingmodes”onpage37.
Chapter10.Troubleshootingcomputerproblems181

Drivesandotherstoragedevices
Thissectionintroducesthecommonproblemsandsolutionsthattheharddiskdrive,thesolidstatedrive,
andtheopticaldrivemightencounter.
Harddiskdriveproblems
•Problem:Theharddiskdrivemakesarattlingnoiseintermittently.
Solution:Therattlingnoisemightbeheard:
–Whentheharddiskdrivebeginsornishesgettingaccesstodata.
–Whenyoucarrytheharddiskdrive.
–Whenyoucarryyourcomputer.
Thisisanormalcharacteristicofaharddiskdriveandisnotadefect.
•Problem:Theharddiskdrivedoesnotwork.
Solution:InthestartupmenuintheBIOSSetupUtility,makesurethattheharddiskdriveisincludedin
the“Bootpriorityorder”list.Ifitisincludedinthe“Excludedfrombootorder”list,itisdisabled.Select
theentryforitinthelistandpressthexkey.Thismovestheentrytothe“Bootpriorityorder”list.
•Problem:Aftersettingaharddiskpasswordontheharddiskdriveofthecomputer,youmovedthedrive
toanothercomputer.Nowyoucannotunlocktheharddiskpassword.
Solution:Yourcomputersupportsanenhancedpasswordalgorithm.Computersolderthanyoursmay
notsupportsuchasecurityfunction.
Solidstatedriveproblems
•Problem:WhenyoucompresslesorfoldersbyuseofthedatacompressionfunctioninWindows,and
thendecompressthem,theprocessofwritingtoorreadingfromthelesorfoldersisslow.
Solution:ApplythediskdefragmentationtoolinWindowsforfasteraccesstothedata.
Opticaldriveproblems
•Problem:Theopticaldrive,suchasaCD,DVD,orCD-RWdrive,doesnotwork.
Solution:MakesurethatthecomputeristurnedonandaCD,DVD,orCD-RWisproperlyloadedonthe
centerpivotofthedrive.(Youshouldhearaclick.)
Makesurethatthedriveconnectorisrmlyconnectedtothecomputer.Ifyouuseanoptionthathasabay
forinstallingthedrive,makesurethattheoptionisrmlyconnectedtothecomputerandworksproperly.
Makesurethatthedrivetrayisrmlyclosed.
Makesurethatthedevicedriversarecorrectlyinstalled.
•Problem:YouhearanoisefromthedrivewhentheCD,DVD,orCD-RWisspinning.
Solution:Ifthediscisnotproperlyloadedonthecenterpivotofthedrive,itmayrubagainstthedrive
coverandmakeanoise.Makesurethatthediscisloadedproperlyinthedrive.
•Problem:Thedisctrayoftheopticaldrivedoesnotcomeoutatoncewhenyoupresstheejectbutton.
Solution:Theemptydisctraymaynotcomeoutasquicklyasyouexpect,butthedelayisnormal.When
nodiscisintheopticaldrive,thedriveisautomaticallyturnedofftosaveenergy.Then,whenyoupress
theejectbutton,ittakesalittlewhiletoturnontheopticaldriveandpulloutthedisctray.Ifyouneedto
pulloutthetrayimmediately,presstheejectbuttonagain.
•Problem:Thetraydoesnotopenevenifyoupresstheejectbutton.
182UserGuide

Solution:Whenyourcomputerisnotturnedon,pressingtheejectbuttondoesnotcausethedrivetray
toopen.Makesurethatthecomputeristurnedonandthatthedriveconnectorisrmlyconnected
tothecomputer.
Ifthetraystilldoesnotopen,makesurethatthecomputerisrunning,andinserttheendofastraightened
paperclipintotheemergencyejecthole.Thetraywillopen.
•Problem:Anopticalmedium,suchasaCD,aDVD,oraCD-RW,cannotberead.
Solution:Makesurethatthediscisnotdirty.Ifitis,cleanitwithacleanerkit.
Testanotherdisc.Ifthecomputercanreadtheotherdisc,therstonemightbedefective.
Makesurethatthediscisloadedonthecenterpivotofthedrivewiththelabelsideup.(Youshould
hearaclick.)
Makesurethattheformatofthedisciscompatiblewithyouropticaldrive.
•Problem:WhenyoutrytowritetoaDVD-RAMdiscthathasbeenloadedintoaDVD-RAM/CD-RW
combinationdriveonyourcomputer,thefollowingerrormessagemaybedisplayed:“Thediscinthe
driveisnotawritableCDoritisfull.Pleaseinsertablank,writableCDintodriveD:\,orinsertadiscwith
enoughfreespacetoholdallthelesyouhaveselectedforwritingtoCD.”inWindowsXP.
Solution:BeforeyouwritetoaDVD-RAMdisc,enablethewritingfunctionasfollows:
1.ClickStart➙MyComputer
2.Right-clickDVD-RAMdrive.Amenuforthedriveisdisplayed.TheDVD-RAMdriveisdisplayedin
theDeviceswithRemovableStoragecategory.
3.ClickProperties.
4.ClicktheRecordingtab.
5.ClearthecheckboxforEnableCDrecordingonthisdrive.
6.ClickOK.
YoucangetdetailedinformationfromtheMoreInformationsectionoftheMicrosoftKnowledgeBase
826510.VisittheMicrosoftKnowledgeBasehomepageat:http://support.microsoft.com/,typethe
numberoftheknowledgebasearticleyouneedinthesearcheld,andclicktheSearchbutton.
•Problem:WhenyoutrytowritetoaDVD-RWdiscthathasbeenloadedintoaDVD-RAM/CD-RW
combinationdriveonyourcomputer,youcannotwritetoit,andthefollowingerrormessagemaybe
displayed:“ThediscinthedriveisnotawritableCDoritisfull.Pleaseinsertablank,writableCDinto
driveD:\,orinsertadiscwithenoughfreespacetoholdallthelesyouhaveselectedforwritingto
CD.”inWindowsXP .
Solution:TowritetoaDVD-RWdisc,useapreinstalledsoftwareapplicationsuchasRecordNowonyour
computer.YoucannotwritetothediscwithonlyaWindowsoperatingsystem,becausetheoperating
systemdoesnothavethefunctiontoenablewritingtothedisc.
•Problem:ThecomputercannotplayaCD,orthesoundqualityisnotgood.
Solution:Besurethatthediskmeetsthestandardsforyourcountry.Usually,adiskthatmeetsthelocal
standardsismarkedwithaCDlogoonthelabel.Ifyouuseadiscthatdoesnotmeetthesestandards,we
cannotguaranteethatitwillplay,orthat,ifitdoesplay,thesoundqualitywillbegood.
•Problem:OtherproblemsinWindowsXP.
Solution:ForinformationontheapplicationforrunningaDVD-ROM,refertotheInterVideoWinDVDHelp
Guidelines.Toopentheguidelines,clickStartandmovethepointertoAllProgramsandInterVideo
WinDVD,thenclickInterVideoWinDVD.Youcanclickthe?ontheInterVideoWinDVDwindow.
Chapter10.Troubleshootingcomputerproblems183

Softwareproblems
•Problem:Anapplicationdoesnotruncorrectly.
Solution:Makesurethattheproblemisnotbeingcausedbytheapplication.
Checkthatyourcomputerhastheminimumrequiredmemorytoruntheapplication.Refertothemanuals
suppliedwiththeapplication.
Checkthefollowing:
–Theapplicationisdesignedtooperatewithyouroperatingsystem.
–Otherapplicationsruncorrectlyonyourcomputer.
–Thenecessarydevicedriversareinstalled.
–Theapplicationworkswhenitisrunonsomeothercomputer.
Ifanerrormessageappearswhileyouareusingtheapplicationprogram,refertothemanualssupplied
withtheapplication.
Iftheapplicationstilldoesnotruncorrectly,contactyourplaceofpurchaseoraservicerepresentativefor
help.
Portsandconnectors
Thefollowingarethemostcommonportsandconnectorsproblems:
USBproblems
•Problem:AdeviceconnectedtotheUSBconnectordoesnotwork.
Solution:OpentheDeviceManagerwindow.MakesurethattheUSBdevicesetupiscorrect,andthat
theassignmentofcomputerresourceandtheinstallationofthedevicedriverarecorrect.
ForWindows7andWindowsVista:
1.ClickStart➙ControlPanel.
2.ClickHardwareandSound.
3.ClickDeviceManager.Ifyouarepromptedforanadministratorpasswordorconrmation,typethe
passwordorprovideconrmation.
ForWindowsXP:
1.ClickStart➙ControlPanel.
2.ClickPerformanceandMaintenance,andclickSystem.
3.ClicktheHardwaretab,andclicktheDeviceManagerbutton.
Referto“Diagnosingproblems”onpage157andrunadiagnostictestoftheUSBconnector.
Adockingstationorportreplicatorproblem
•Problem:Thecomputerdoesnotstartwhenyoutrytoturniton,anddoesnotrespondwhenyoutry
toresumeoperation.
Solution:Makesurethat:
–Theacpoweradapterisconnectedtotheportreplicator.
–Thecomputerissecurelyattachedtotheportreplicator.
•Problem:Somefunctionsoftheportreplicatordonotwork.
Solution:Makesurethat:
–Theacpoweradapterisconnectedtotheportreplicator.
–Thecomputerissecurelyattachedtotheportreplicator.
184UserGuide

–TheportreplicatorattachedtoyourcomputerisaThinkPadPortReplicatorSeries3,aThinkPadMini
DockSeries3,oraThinkPadMiniDockPlusSeries3.
Chapter10.Troubleshootingcomputerproblems185

186UserGuide

Chapter11.Gettingsupport
ThereismoretoowningaThinkPadNotebookthanhavingapowerful,portablecomputer.Thischapter
offersinformationaboutwhentocommunicatewithLenovoandhowbesttodoit.
•“BeforeyoucontactLenovo”onpage187
•“Gettinghelpandservice”onpage188
•“Purchasingadditionalservices”onpage189
BeforeyoucontactLenovo
Often,youcansolveyourcomputerproblemsbyreferringtotheinformationintheexplanationsoferror
codes,runningdiagnosticprogramsorbyconsultingtheThinkPadWebsite.
Registeryourcomputer
ToregisteryourThinkPadproductswithLenovo.gotohttp://www.lenovo.com/register.
RegisteringyourcomputerenablesLenovotonotifyyouaboutpossibletechnicalinformationandupgrades.
Formoreinformationaboutregisteringyourcomputer,referto“Registeryourcomputer”onpage23.
Downloadsystemupdates
Downloadingupdatedsoftwaremightresolveproblemsyouexperiencewithyourcomputer.
Todownloadupdatedsoftware,visitbelowWebsiteandfollowtheinstructionsonthescreen:
http://www.lenovo.com/support/site.wss/document.do?sitestyle=lenovo&lndocid=tpad-matrix
Recordinformation
BeforeyoutalktoaLenovorepresentative,recordthefollowingimportantinformationaboutyourcomputer.
Recordproblemsymptomsanddetails
Collecttheanswerstothequestionsbelowbeforeyoucallforhelp.Then,youwillbeabletogethelp
asquicklyaspossible.
•Whatistheproblem?Isitcontinuousorintermittent?
•Isthereanerrormessagethatappears?Whatistheerrorcode,ifany?
•Whatoperatingsystemareyouusing?Whichversion?
•Whichsoftwareapplicationswererunningatthetimeoftheproblem?
•Cantheproblembereproduced?Ifso,how?
Recordsysteminformation
Theserialnumberlabelisonthebottomofyourcomputer.Recordthemachinetypeandtheserialnumber.
•WhatisthenameofyourLenovoproduct?
•Whatisthemachinetype?
•Whatistheserialnumber?
©CopyrightLenovo2012187

Gettinghelpandservice
Ifyouneedhelp,service,technicalassistance,orjustwantmoreinformationaboutLenovoproducts,you
willndawidevarietyofsourcesavailablefromLenovotoassistyou.Thissectioncontainsinformation
aboutwheretogoforadditionalinformationaboutLenovoandourproducts,whattodoifyouexperiencea
problemwithyourcomputer,andwhomtocallforserviceshoulditbenecessary.
Informationaboutyourcomputerandpreinstalledsoftware,ifany,isavailableinthedocumentationthat
comeswithyourcomputer.Thatdocumentationincludesprintedbooks,onlinebooks,READMEles,and
helples.Inaddition,informationaboutLenovoproductsisavailableontheWorldWideWeb.
MicrosoftServicePacksarethelatestsoftwaresourceforWindowsproductupdates.Theyareavailablevia
Webdownload(connectionchargesmayapply)orviadisc.Formorespecicinformationandlinks,please
gotohttp://www.microsoft.com.LenovooffersUpandRunningtechnicalassistancewithinstallationof,or
questionsrelatedto,ServicePacksforyourLenovo-preloadedMicrosoftWindowsproduct.Forinformation,
pleasecontacttheCustomerSupportCenter.
Usingdiagnosticprograms
Manycomputerproblemscanbesolvedwithoutoutsideassistance.Ifyouexperienceaproblemwithyour
computer,therstplacetostartisthetroubleshootinginformationofyourcomputerdocumentation.Ifyou
suspectasoftwareproblem,seethedocumentation,includingREADMElesandonlinehelp,thatcomes
withtheoperatingsystemorapplicationprogram.
ThinkPadNotebookscomewithasetofdiagnosticprogramsthatyoucanusetohelpyouidentifyhardware
problems.See“Diagnosingproblems”onpage157forinstructionsonusingthediagnosticprograms.
TheTroubleshootinginformationorthediagnosticprogramsmighttellyouthatyouneedadditionalor
updateddevicedriversorothersoftware.LenovomaintainspagesontheLenovoSupportWebsitewhere
youcangetthelatesttechnicalinformationanddownloaddevicedriversandupdates.
LenovoSupportWebsite
Technicalsupportinformationisavailableat:
http://www.lenovo.com/support
Thisportalisupdatedwiththelatestinformationaboutthefollowingsubjects:
•Downloads&Drivers:Downloaddrivers,ashBIOS,andupdateyoursoftware.
•Warranty:Checkyourwarrantystatusandupgradeyourwarranty.
•TechnicalSupport:ClickNeedHelp?forself-helptipstohelpdiagnoseaproblem.
•ThinkVantage:LearnmoreaboutThinkVantagesoftwaretoimproveproductivityandreducecost.
•LenovoForums:Searchthecommunityknowledgebaseforyourcomputertoshareanddiscover
informationwithotherusers.
•UserGuides&Manuals:Readorprintanypublicationsrelatedtoyourproduct.
CallingLenovo
Ifyouhavetriedtocorrecttheproblemyourselfandstillneedhelp,duringthewarrantyperiod,youcan
gethelpandinformationbytelephonethroughtheCustomerSupportCenter.Thefollowingservicesare
availableduringthewarrantyperiod:
•Problemdetermination-Trainedpersonnelareavailabletoassistyouwithdeterminingifyouhavea
hardwareproblemanddecidingwhatactionisnecessarytoxtheproblem.
188UserGuide

•Lenovohardwarerepair-IftheproblemisdeterminedtobecausedbyLenovohardwareunderwarranty,
trainedservicepersonnelareavailabletoprovidetheapplicablelevelofservice.
•Engineeringchangemanagement-Occasionally,theremightbechangesthatarerequiredafteraproduct
hasbeensold.Lenovooryourreseller,ifauthorizedbyLenovo,willmakeselectedEngineeringChanges
(ECs)thatapplytoyourhardwareavailable.
Thefollowingitemsarenotcovered:
•ReplacementoruseofpartsnotmanufacturedfororbyLenovoornonwarrantedparts
Note:Allwarrantedpartscontaina7-characteridenticationintheformatFRUXXXXXXX.
•Identicationofsoftwareproblemsources
•CongurationofUEFIBIOSaspartofaninstallationorupgrade
•Changes,modications,orupgradestodevicedrivers
•Installationandmaintenanceofnetworkoperatingsystems(NOS)
•Installationandmaintenanceofapplicationprograms
ForthetermsandconditionsoftheLenovoLimitedWarrantythatappliestoyourLenovohardwareproduct,
see“Warrantyinformation”intheSafetyandWarrantyGuidethatcomeswithyourcomputer.
Ifpossible,benearyourcomputerwhenyoumakeyourcallincasethetechnicalassistancerepresentative
needstohelpyouresolveacomputerproblem.Ensurethatyouhavedownloadedthemostcurrentdrivers
andsystemupdates,rundiagnostics,andrecordedinformationbeforeyoucall.Whencallingfortechnical
assistance,havethefollowinginformationavailable:
•Machinetypeandmodel
•Serialnumbersofyourcomputer,monitor,andothercomponents,oryourproofofpurchase
•Descriptionoftheproblem
•Exactwordingofanyerrormessages
•Hardwareandsoftwarecongurationinformationforyoursystem
Telephonenumbers
ForalistoftheLenovoSupportphonenumbersforyourcountryorregion,goto
http://www.lenovo.com/support/phoneorrefertotheSafetyandWarrantyGuidethatcomeswithyour
computer.
Note:Phonenumbersaresubjecttochangewithoutnotice.Thelatestphonenumbersareavailableat
http://www.lenovo.com/support/phone.Ifthenumberforyourcountryorregionisnotprovided,contact
yourLenovoresellerorLenovomarketingrepresentative.
Purchasingadditionalservices
Duringandafterthewarrantyperiod,youcanpurchaseadditionalservices,suchassupportforLenovo
andnon-Lenovohardware,operatingsystems,andapplicationprograms;networksetupandconguration;
upgradedorextendedhardwarerepairservices;andcustominstallations.Serviceavailabilityandservice
namemightvarybycountry.
Formoreinformationabouttheseservices,goto:
http://www.lenovo.com/accessories/services/index.html
Chapter11.Gettingsupport189

190UserGuide

AppendixA.Regulatoryinformation
Thissectionintroducesregulatoryinformationforusers.
Wirelessrelatedinformation
Wirelessinteroperability
WirelessLANPCIExpressMiniCardisdesignedtobeinteroperablewithanywirelessLANproductthat
isbasedonDirectSequenceSpreadSpectrum(DSSS),ComplementaryCodeKeying(CCK),and/or
OrthogonalFrequencyDivisionMultiplexing(OFDM)radiotechnology,andiscompliantto:
•The802.11b/gStandard,802.11a/b/gor802.11ndraft2.0onWirelessLANs,asdenedandapprovedby
theInstituteofElectricalandElectronicsEngineers.
•TheWirelessFidelity(WiFi)certicationasdenedbytheWi-FiAlliance.
BluetoothdeviceisdesignedtobeinteroperablewithanyBluetoothproductthatiscomplianttoBluetooth
Specication2.1+EDRasdenedbytheBluetoothSIG.FollowingprolesaresupportedbyBluetooth
device:
•GenericAccess
•ServiceDiscovery
•SerialPort
•Dial-upNetworking
•FAX
•LANAccessusingPPP
•PersonalAreaNetwork
•GenericObjectExchange
•GenericObjectPush
•FileTransfer
•Synchronization
•AudioGateway
•Headset
•Printer
•HumanInterfaceDevices(Keyboard/Mouse)
•BasicImage
•Handsfree
•AV
•PhoneBookAccessProle(PBAP)(Windows7andWindowsVistaonly)
•VDP-SyncProle(Windows7andWindowsVistaonly)
Usageenvironmentandyourhealth
WirelessLANPCIExpressMiniCard,WirelessWANPCIExpressMiniCard,andBluetoothdeviceemitradio
frequencyelectromagneticenergylikeotherradiodevices.However,thelevelofenergyemittedisfarmuch
lessthantheelectromagneticenergyemittedbywirelessdeviceslikeforexamplemobilephones.
©CopyrightLenovo2012191
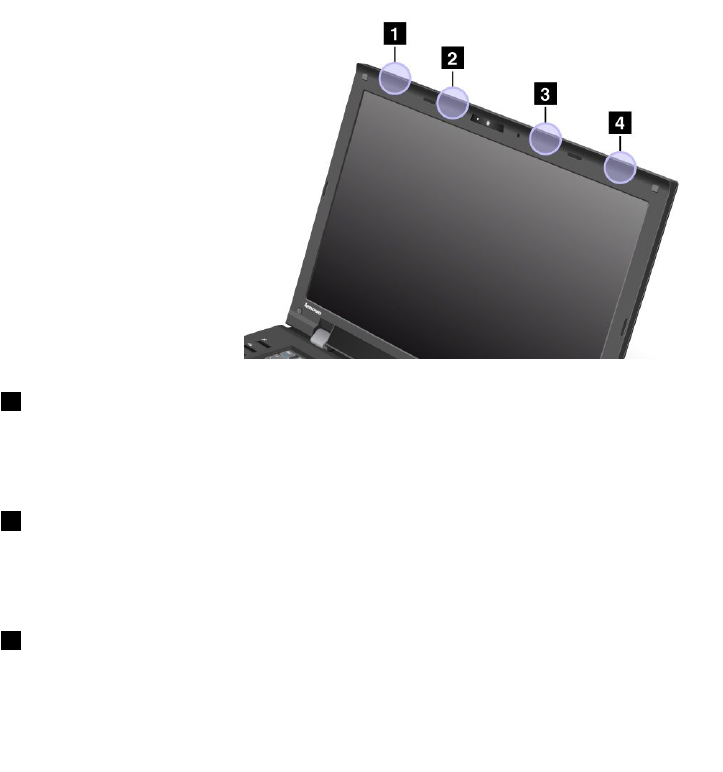
Duetothefactthatintegratedwirelesscardsoperatewithintheguidelinesfoundinradiofrequencysafety
standardsandrecommendations,Lenovobelievestheyaresafeforusebyconsumers.Thesestandardsand
recommendationsreecttheconsensusofthescienticcommunityandresultfromdeliberationsofpanels
andcommitteesofscientistswhocontinuallyreviewandinterprettheextensiveresearchliterature.
Insomesituationorenvironment,theuseofintegratedwirelesscardsmayberestrictedbytheproprietor
ofthebuildingorresponsiblerepresentativesoftheorganization.Thesesituationsandareasmayfor
exampleinclude:
•Usingtheintegratedwirelesscardsonboardofairplanes,inhospitalsornearpetrolstations,blasting
areas(withelectro-explosivedevices),medicalimplantsorbody-wornelectronicmedicaldevices,e.g.
pacemakers.
•Inanyotherenvironmentwheretheriskofinterferencetootherdevicesorservicesisperceivedor
identiedasharmful.
Ifyouareuncertainofthepolicythatappliesontheuseofwirelessdevicesinaspecicorganization(e.g.,
airportorhospital),youareencouragedtoaskforauthorizationtouseWirelessLANPCIExpressMiniCard,
WirelessWANPCIExpressMiniCardorBluetoothdevicepriortoturningonthecomputer.
LocationoftheUltraConnectwirelessantennas
ThinkPadmodelsfeatureanintegrateddiversityantennasystembuiltintothedisplayforoptimalreception,
enablingwirelesscommunicationwhereveryouare.
Thefollowingshowsthelocationofeachbuilt-inwirelessantenna.
1WirelessLANandWiMAXcomboantenna(Auxiliary)
TheauxiliaryantennaconnectedtothewirelessLANorWiMAXfeatureislocatedatthetopleftcornerof
thecomputerdisplay.
2WirelessWANantenna(Auxiliary)
IfyourcomputercomeswithawirelessWANfeature,itsauxiliarytransmitterantennaislocatedatthe
topleftsideofthecomputerdisplay.
3WirelessWANantenna(Main)
192UserGuide

IfyourcomputercomeswithawirelessWANfeature,itsmaintransmitterantennaislocatedatthetopright
sideofthecomputerdisplay.
4WirelessLANandWiMAXcomboantenna(Main)
ThemainantennaconnectedtothewirelessLANorWiMAXfeatureislocatedatthetoprightcornerof
thecomputerdisplay.
Locatingwirelessregulatorynotices
Formoreinformationaboutthewirelessregulatorynotices,refertotheThinkPadRegulatoryNoticeshipped
withyourcomputer.
IfyourcomputerisshippedwithouttheThinkPadRegulatoryNotice,youcannditontheWebsite
http://www.lenovo.com/support.
ToviewtheThinkPadRegulatoryNoticeontheWebsite,dothefollowing:
1.Goto:
http://www.lenovo.com/support
2.ClicktheSupport&downloadssection,anewpageisdisplayed.
3.Intherightpane,typeyourcomputernumberintheEnteraproductnumberled,andclickGo.
4.YoucanthenndtheThinkPadRegulatoryNoticeinthedisplayedsearchresults.
Exportclassicationnotice
ThisproductissubjecttotheUnitedStatesExportAdministrationRegulations(EAR)andhasanExport
ClassicationControlNumber(ECCN)of4A994.b.Itcanbere-exportedexcepttoanyoftheembargoed
countriesintheEARE1countrylist.
Electronicemissionnotices
ThefollowinginformationreferstotheThinkPadL420andL520,machinetype5015,5016,5017,5019,7826,
7827,7829,7853,7854,7856,7859,and7860.
FederalCommunicationsCommissionDeclarationofConformity
ThisequipmenthasbeentestedandfoundtocomplywiththelimitsforaClassBdigitaldevice,pursuant
toPart15oftheFCCRules.Theselimitsaredesignedtoprovidereasonableprotectionagainstharmful
interferenceinaresidentialinstallation.Thisequipmentgenerates,uses,andcanradiateradiofrequency
energyand,ifnotinstalledandusedinaccordancewiththeinstructions,maycauseharmfulinterference
toradiocommunications.However,thereisnoguaranteethatinterferencewillnotoccurinaparticular
installation.Ifthisequipmentdoescauseharmfulinterferencetoradioortelevisionreception,whichcanbe
determinedbyturningtheequipmentoffandon,theuserisencouragedtotrytocorrecttheinterferenceby
oneormoreofthefollowingmeasures:
•Reorientorrelocatethereceivingantenna.
•Increasetheseparationbetweentheequipmentandreceiver.
•Connecttheequipmentintoanoutletonacircuitdifferentfromthattowhichthereceiverisconnected.
•Consultanauthorizeddealerorservicerepresentativeforhelp.
Lenovoisnotresponsibleforanyradioortelevisioninterferencecausedbyusingotherthanspeciedor
recommendedcablesandconnectorsorbyunauthorizedchangesormodicationstothisequipment.
Unauthorizedchangesormodicationscouldvoidtheuser'sauthoritytooperatetheequipment.
AppendixA.Regulatoryinformation193

ThisdevicecomplieswithPart15oftheFCCRules.Operationissubjecttothefollowingtwoconditions:(1)
thisdevicemaynotcauseharmfulinterference,and(2)thisdevicemustacceptanyinterferencereceived,
includinginterferencethatmaycauseundesiredoperation.
ResponsibleParty:
Lenovo(UnitedStates)Incorporated
1009ThinkPlace-BuildingOne
Morrisville,NC27560
PhoneNumber:919-294-5900
IndustryCanadaClassBemissioncompliancestatement
ThisClassBdigitalapparatuscomplieswithCanadianICES-003.
CetappareilnumériquedelaclasseBestconformeàlanormeNMB-003duCanada.
EuropeanUnion-CompliancetotheElectromagneticCompatibility
Directive
ThisproductisinconformitywiththeprotectionrequirementsofEUCouncilDirective2004/108/EConthe
approximationofthelawsoftheMemberStatesrelatingtoelectromagneticcompatibility.Lenovocannot
acceptresponsibilityforanyfailuretosatisfytheprotectionrequirementsresultingfromanonrecommended
modicationoftheproduct,includingtheinstallationofoptioncardsfromothermanufacturers.
ThisproducthasbeentestedandfoundtocomplywiththelimitsforClassBInformationTechnology
EquipmentaccordingtoEuropeanStandardEN55022.ThelimitsforClassBequipmentwerederived
fortypicalresidentialenvironmentstoprovidereasonableprotectionagainstinterferencewithlicensed
communicationdevices.
GermanClassBcompliancestatement
DeutschsprachigerEUHinweis:
HinweisfürGerätederKlasseBEU-RichtliniezurElektromagnetischenVerträglichkeit
DiesesProduktentsprichtdenSchutzanforderungenderEU-Richtlinie2004/108/EG(früher89/336/EWG)zur
AngleichungderRechtsvorschriftenüberdieelektromagnetischeVerträglichkeitindenEU-Mitgliedsstaaten
undhältdieGrenzwertederEN55022KlasseBein.
Umdiesessicherzustellen,sinddieGerätewieindenHandbüchernbeschriebenzuinstallierenundzu
betreiben.DesWeiterendürfenauchnurvonderLenovoempfohleneKabelangeschlossenwerden.
LenovoübernimmtkeineVerantwortungfürdieEinhaltungderSchutzanforderungen,wenndasProdukt
ohneZustimmungderLenovoverändertbzw.wennErweiterungskomponentenvonFremdherstellernohne
EmpfehlungderLenovogesteckt/eingebautwerden.
Deutschland:
EinhaltungdesGesetzesüberdieelektromagnetischeVerträglichkeitvonBetriebsmitteln
DiesesProduktentsprichtdem„GesetzüberdieelektromagnetischeVerträglichkeitvonBetriebsmitteln“
194UserGuide
EMVG(früher„GesetzüberdieelektromagnetischeVerträglichkeitvonGeräten“).DiesistdieUmsetzungder
EU-Richtlinie2004/108/EG(früher89/336/EWG)inderBundesrepublikDeutschland.
ZulassungsbescheinigunglautdemDeutschenGesetzüberdieelektromagnetischeVerträglichkeit
vonBetriebsmitteln,EMVGvom20.Juli2007(früherGesetzüberdieelektromagnetische
VerträglichkeitvonGeräten),bzw.derEMVEGRichtlinie2004/108/EC(früher89/336/EWG),für
GerätederKlasseB.
DiesesGerätistberechtigt,inÜbereinstimmungmitdemDeutschenEMVGdasEG-Konformitätszeichen
-CE-zuführen.VerantwortlichfürdieKonformitätserklärungnachParagraf5desEMVGistdieLenovo
(Deutschland)GmbH,Gropiusplatz10,D-70563Stuttgart.
InformationeninHinsichtEMVGParagraf4Abs.(1)4:
DasGeräterfülltdieSchutzanforderungennachEN55024undEN55022KlasseB.
KoreaClassBcompliancestatement
JapanVCCIClassBcompliancestatement
Japancompliancestatementforproductswhichconnecttothepower
mainswithratedcurrentlessthanorequalto20Aperphase
LenovoproductserviceinformationforTaiwan
Additionalregulatoryinformation
Foradditionalregulatoryinformation,refertotheThinkPadRegulatoryNoticeshippedwithyourcomputer.
IfyourcomputerisshippedwithouttheThinkPadRegulatoryNotice,youcannditattheWebsite
http://www.lenovo.com/support.Fordetails,refertotheinstructionsin“Locatingwirelessregulatory
notices”onpage193.
AppendixA.Regulatoryinformation195

196UserGuide

AppendixB.WEEEandrecyclingstatements
Lenovoencouragesownersofinformationtechnologyequipmenttoresponsiblyrecycletheirequipment
whenitisnolongerneeded.Lenovooffersavarietyofprogramsandservicestoassistequipmentownersin
recyclingtheirITproducts.ForinformationonrecyclingLenovoproducts,goto:
http://www.lenovo.com/lenovo/environment/recycling
ImportantWEEEInformation
TheWEEEmarkingonLenovoproductsappliestocountrieswithWEEEande-wasteregulations(forexample,
EuropeanDirective2002/96/EC,IndiaE-WasteManagement&HandlingRules,2011).Appliancesare
labeledinaccordancewithlocalregulationsconcerningwasteelectricalandelectronicequipment(WEEE).
Theseregulationsdeterminetheframeworkforthereturnandrecyclingofusedappliancesasapplicable
withineachgeography.Thislabelisappliedtovariousproductstoindicatethattheproductisnottobe
thrownaway,butratherputintheestablishedcollectivesystemsforreclaimingtheseendoflifeproducts.
Usersofelectricalandelectronicequipment(EEE)withtheWEEEmarkingmustnotdisposeofendof
lifeEEEasunsortedmunicipalwaste,butusethecollectionframeworkavailabletothemforthereturn,
recycle,andrecoveryofWEEEandtominimizeanypotentialeffectsofEEEontheenvironmentand
humanhealthduetothepresenceofhazardoussubstances.ForadditionalWEEEinformationgoto:
http://www.lenovo.com/recycling
Japanrecyclingstatements
CollectingandrecyclingadisusedLenovocomputerormonitor
IfyouareacompanyemployeeandneedtodisposeofaLenovocomputerormonitorthatistheproperty
ofthecompany,youmustdosoinaccordancewiththeLawforPromotionofEffectiveUtilizationof
Resources.Computersandmonitorsarecategorizedasindustrialwasteandshouldbeproperlydisposed
ofbyanindustrialwastedisposalcontractorcertiedbyalocalgovernment.InaccordancewiththeLaw
forPromotionofEffectiveUtilizationofResources,LenovoJapanprovides,throughitsPCCollecting
andRecyclingServices,forthecollecting,reuse,andrecyclingofdisusedcomputersandmonitors.
Fordetails,visittheLenovoWebsiteatwww.ibm.com/jp/pc/service/recycle/pcrecycle/.Pursuantto
theLawforPromotionofEffectiveUtilizationofResources,thecollectingandrecyclingofhome-used
computersandmonitorsbythemanufacturerwasbegunonOctober1,2003.Thisserviceisprovidedfree
ofchargeforhome-usedcomputerssoldafterOctober1,2003.Fordetails,visittheLenovoWebsite
atwww.ibm.com/jp/pc/service/recycle/personal/.
©CopyrightLenovo2012197

DisposingofaLenovocomputercomponents
SomeLenovocomputerproductssoldinJapanmayhavecomponentsthatcontainheavymetalsorother
environmentalsensitivesubstances.Toproperlydisposeofdisusedcomponents,suchasaprintedcircuit
boardordrive,usethemethodsdescribedaboveforcollectingandrecyclingadisusedcomputerormonitor.
DisposingofdisusedlithiumbatteriesfromLenovocomputers
Abutton-shapedlithiumbatteryisinstalledonthesystemboardofyourLenovocomputertoprovidepower
tothecomputerclockwhilethecomputerisoffordisconnectedfromthemainpowersource.Ifyouwantto
replaceitwithanewone,contactyourplaceofpurchaseoraskforarepairserviceprovidedbyLenovo.If
youhavereplaceditbyyourselfandwanttodisposeofthedisusedlithiumbattery,insulateitwithvinyltape,
contactyourplaceofpurchase,andfollowtheirinstructions.IfyouuseaLenovocomputerathomeand
needtodisposeofalithiumbattery,youmustcomplywithlocalordinancesandregulations.
DisposingadisusedbatterypackfromLenovonotebookcomputers
YourLenovonotebookcomputerhasalithiumionbatterypackoranickelmetalhydridebatterypack.Ifyou
areacompanyemployeewhousesaLenovonotebookcomputerandneedtodisposeofabatterypack,
contacttheproperpersoninLenovosales,service,ormarketing,andfollowthatperson'sinstructions.You
alsocanrefertotheinstructionsatwww.ibm.com/jp/pc/environment/recycle/battery/.
IfyouuseaLenovonotebookcomputerathomeandneedtodisposeofabatterypack,you
mustcomplywithlocalordinancesandregulations.Youalsocanrefertotheinstructionsat
www.ibm.com/jp/pc/environment/recycle/battery/.
RecyclinginformationforBrazil
DeclaraçõesdeReciclagemnoBrasil
DescartedeumProdutoLenovoForadeUso
Equipamentoselétricoseeletrônicosnãodevemserdescartadosemlixocomum,masenviadosàpontosde
coleta,autorizadospelofabricantedoprodutoparaquesejamencaminhadoseprocessadosporempresas
especializadasnomanuseioderesíduosindustriais,devidamentecerticadaspelosorgãosambientais,de
acordocomalegislaçãolocal.
ALenovopossuiumcanalespecícoparaauxiliá-lonodescartedessesprodutos.Casovocêpossua
umprodutoLenovoemsituaçãodedescarte,ligueparaonossoSACouencaminheume-mailpara:
reciclar@lenovo.com,informandoomodelo,númerodesérieecidade,amdeenviarmosasinstruções
paraocorretodescartedoseuprodutoLenovo.
BatteryrecyclinginformationfortheUnitedStatesandCanada
198UserGuide

BatteryrecyclinginformationfortheEuropeanUnion
Notice:ThismarkappliesonlytocountrieswithintheEuropeanUnion(EU).
BatteriesorpackagingforbatteriesarelabeledinaccordancewithEuropeanDirective2006/66/EC
concerningbatteriesandaccumulatorsandwastebatteriesandaccumulators.TheDirectivedeterminesthe
frameworkforthereturnandrecyclingofusedbatteriesandaccumulatorsasapplicablethroughoutthe
EuropeanUnion.Thislabelisappliedtovariousbatteriestoindicatethatthebatteryisnottobethrown
away,butratherreclaimeduponendoflifeperthisDirective.
InaccordancewiththeEuropeanDirective2006/66/EC,batteriesandaccumulatorsarelabeledtoindicate
thattheyaretobecollectedseparatelyandrecycledatendoflife.Thelabelonthebatterymayalso
includeachemicalsymbolforthemetalconcernedinthebattery(Pbforlead,Hgformercury,andCdfor
cadmium).Usersofbatteriesandaccumulatorsmustnotdisposeofbatteriesandaccumulatorsasunsorted
municipalwaste,butusethecollectionframeworkavailabletocustomersforthereturn,recycling,and
treatmentofbatteriesandaccumulators.Customerparticipationisimportanttominimizeanypotential
effectsofbatteriesandaccumulatorsontheenvironmentandhumanhealthduetothepotentialpresenceof
hazardoussubstances.Forpropercollectionandtreatment,goto:
http://www.lenovo.com/lenovo/environment
BatteryrecyclinginformationforTaiwan
AppendixB.WEEEandrecyclingstatements199

200UserGuide

AppendixC.Notices
Lenovomaynotoffertheproducts,services,orfeaturesdiscussedinthisdocumentinallcountries.Consult
yourlocalLenovorepresentativeforinformationontheproductsandservicescurrentlyavailableinyour
area.AnyreferencetoaLenovoproduct,program,orserviceisnotintendedtostateorimplythatonlythat
Lenovoproduct,program,orservicemaybeused.Anyfunctionallyequivalentproduct,program,orservice
thatdoesnotinfringeanyLenovointellectualpropertyrightmaybeusedinstead.However,itistheuser's
responsibilitytoevaluateandverifytheoperationofanyotherproduct,program,orservice.
Lenovomayhavepatentsorpendingpatentapplicationscoveringsubjectmatterdescribedinthis
document.Thefurnishingofthisdocumentdoesnotgiveyouanylicensetothesepatents.Youcansend
licenseinquiries,inwriting,to:
Lenovo(UnitedStates),Inc.
1009ThinkPlace-BuildingOne
Morrisville,NC27560
U.S.A.
Attention:LenovoDirectorofLicensing
LENOVOPROVIDESTHISPUBLICATION“ASIS”WITHOUTWARRANTYOFANYKIND,EITHEREXPRESS
ORIMPLIED,INCLUDING,BUTNOTLIMITEDTO,THEIMPLIEDWARRANTIESOFNON-INFRINGEMENT,
MERCHANTABILITYORFITNESSFORAPARTICULARPURPOSE.Somejurisdictionsdonotallow
disclaimerofexpressorimpliedwarrantiesincertaintransactions,therefore,thisstatementmaynotapply
toyou.
Thisinformationcouldincludetechnicalinaccuraciesortypographicalerrors.Changesareperiodically
madetotheinformationherein;thesechangeswillbeincorporatedinneweditionsofthepublication.
Lenovomaymakeimprovementsand/orchangesintheproduct(s)and/ortheprogram(s)describedinthis
publicationatanytimewithoutnotice.
Theproductsdescribedinthisdocumentarenotintendedforuseinimplantationorotherlifesupport
applicationswheremalfunctionmayresultininjuryordeathtopersons.Theinformationcontainedinthis
documentdoesnotaffectorchangeLenovoproductspecicationsorwarranties.Nothinginthisdocument
shalloperateasanexpressorimpliedlicenseorindemnityundertheintellectualpropertyrightsofLenovo
orthirdparties.Allinformationcontainedinthisdocumentwasobtainedinspecicenvironmentsandis
presentedasanillustration.Theresultobtainedinotheroperatingenvironmentsmayvary.
Lenovomayuseordistributeanyoftheinformationyousupplyinanywayitbelievesappropriatewithout
incurringanyobligationtoyou.
Anyreferencesinthispublicationtonon-LenovoWebsitesareprovidedforconvenienceonlyanddonotin
anymannerserveasanendorsementofthoseWebsites.ThematerialsatthoseWebsitesarenotpartof
thematerialsforthisLenovoproduct,anduseofthoseWebsitesisatyourownrisk.
Anyperformancedatacontainedhereinwasdeterminedinacontrolledenvironment.Therefore,theresult
obtainedinotheroperatingenvironmentsmayvarysignicantly.Somemeasurementsmayhavebeen
madeondevelopment-levelsystemsandthereisnoguaranteethatthesemeasurementswillbethesame
ongenerallyavailablesystems.Furthermore,somemeasurementsmayhavebeenestimatedthrough
extrapolation.Actualresultsmayvary.Usersofthisdocumentshouldverifytheapplicabledatafortheir
specicenvironment.
©CopyrightLenovo2012201

Trademarks
ThefollowingtermsaretrademarksofLenovointheUnitedStates,othercountries,orboth:
AccessConnections
ActiveProtectionSystem
Lenovo
RescueandRecovery
ThinkPad
ThinkVantage
TrackPoint
UltraNav
UltraConnect
AMD,ATI,ATICatalystandCatalystaretrademarksorregisteredtrademarksofAdvancedMicroDevices,Inc.
WakeonLANisatrademarkoftheInternationalBusinessMachinesCorporationintheUnitedStates,
othercountries,orboth.
IntelandIntelSpeedSteparetrademarksorregisteredtrademarksofIntelCorporationoritssubsidiariesin
theUnitedStatesandothercountries.
Bing,Microsoft,Windows,WindowsVistaaretrademarksorregisteredtrademarksoftheMicrosoftgroupof
companies.
BlackBerry®,RIM®,ResearchInMotion®,SureType®andrelatedtrademarks,namesandlogosarethe
propertyofResearchInMotionLimitedandareregisteredand/orusedintheU.S.andcountriesaroundthe
world.UsedunderlicensefromResearchInMotionLimited.
Othercompany,product,andservicenamesmaybetrademarksorservicemarksofothers.
202UserGuide
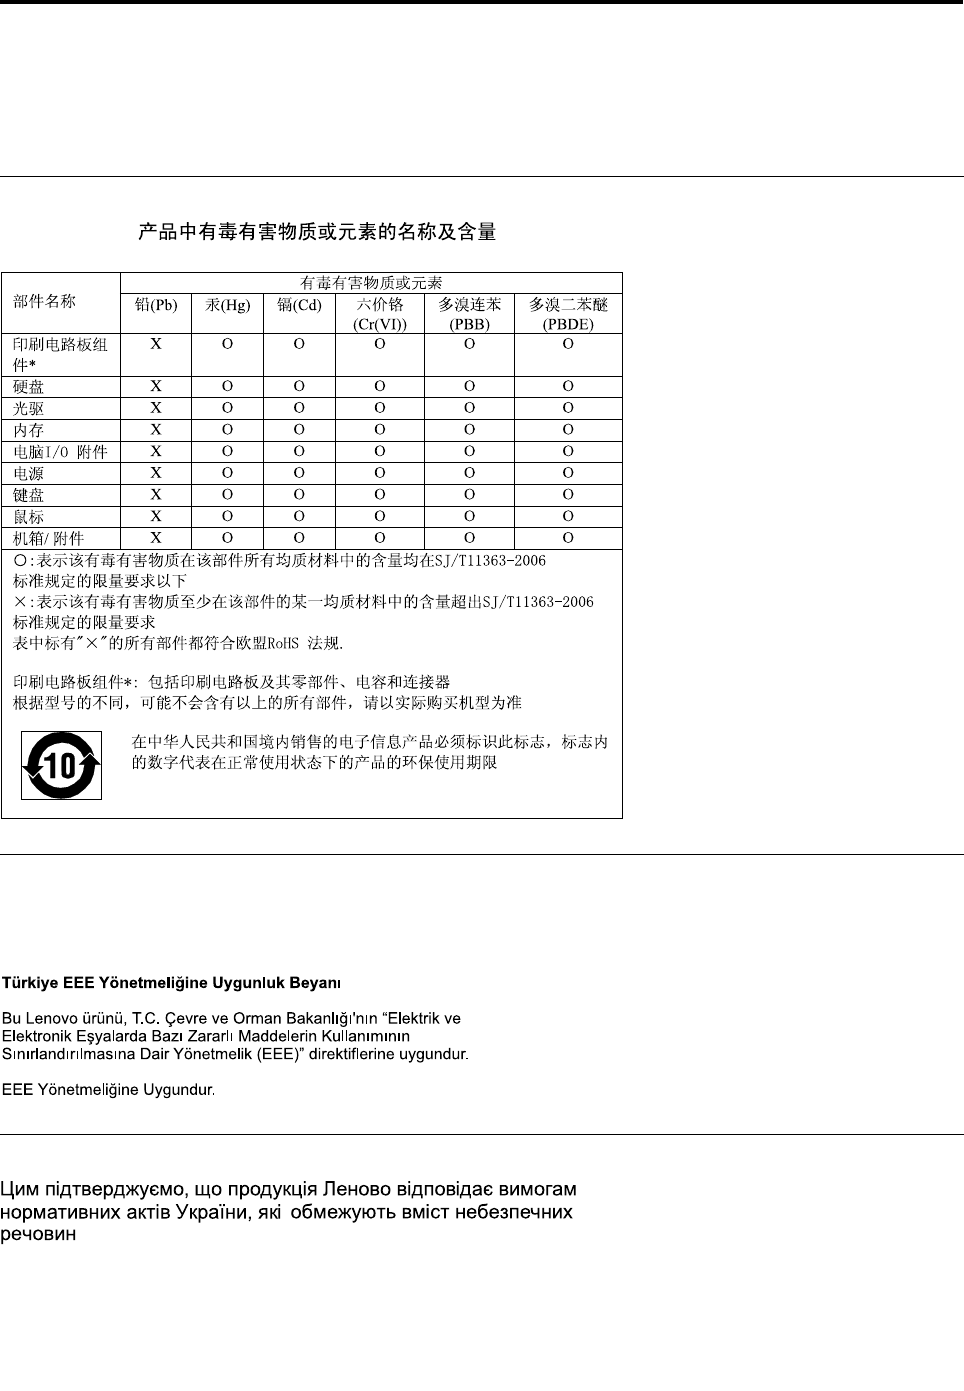
AppendixD.RestrictionofHazardousSubstancesDirective
(RoHS)
ChinaRoHS
TurkishRoHS
TheLenovoproductmeetstherequirementsoftheRepublicofTurkeyDirectiveontheRestrictionoftheUse
ofCertainHazardousSubstancesinElectricalandElectronicEquipment(EEE).
UkraineRoHS
©CopyrightLenovo2012203

IndiaRoHS
RoHScompliantasperE-Waste(Management&Handling)Rules,2011.
204UserGuide

PartNumber:
(1P)P/N:
*1P*
