Lenovo L440 L540 Hmm En Sp40A26004 04 User Manual (English) Hardware Maintenance Think Pad L440, Laptop (Think Pad) Type 20AT
2017-01-12
User Manual: Lenovo L440 L540 Hmm En Sp40A26004 04 (English) Hardware Maintenance Manual - ThinkPad L440, L540 L440 Laptop (ThinkPad) - Type 20AT ThinkPad L440, 20AT
Open the PDF directly: View PDF ![]() .
.
Page Count: 142 [warning: Documents this large are best viewed by clicking the View PDF Link!]
- About this manual
- Chapter 1. Safety information
- Chapter 2. Important service information
- Chapter 3. General checkout
- Chapter 4. Related service information
- Chapter 5. Status indicators
- Chapter 6. Fn key combinations
- Chapter 7. Locations
- Chapter 8. FRU replacement notices
- Chapter 9. Removing or replacing a FRU
- Before servicing the computer
- 1010 Battery pack
- 1020 Bottom door
- 1030 Optical drive
- 1040 Hard disk drive or solid-state drive
- 1050 Memory module
- 1060 WWAN card or M.2 solid-state drive
- 1070 WLAN card
- 1080 Coin-cell battery
- 1090 Thermal-fan assembly
- 1100 Keyboard
- 1110 Keyboard bezel assembly, fingerprint reader, and power button card
- 1120 Smart card reader, smart card door, and dummy smart card
- 1130 Microprocessor
- 1140 System board assembly
- 1150 Audio board
- 1160 Speaker assembly
- 1170 Hinge bracket, dc-in cable assembly, RJ45 card, and base cover assembly
- 2010 LCD unit
- 2020 LCD front bezel
- 2030 Camera/microphone combo card
- 2040 Hinges, LCD panel, and LCD cable
- 2050 LED card and cable assembly
- 2060 Antenna assembly and LCD rear cover assembly
- Appendix A. Notices
- Appendix B. Abbreviation table

HardwareMaintenanceManual
ThinkPadL440andL540

Note:Beforeusingthisinformationandtheproductitsupports,besuretoreadthegeneralinformation
underAppendixA“Notices”onpage131.
SixthEdition(January2017)
©CopyrightLenovo2013,2017.
LIMITEDANDRESTRICTEDRIGHTSNOTICE:IfdataorsoftwareisdeliveredpursuantaGeneralServicesAdministration
“GSA”contract,use,reproduction,ordisclosureissubjecttorestrictionssetforthinContractNo.GS-35F-05925.

Contents
Aboutthismanual...........iii
Chapter1.Safetyinformation......1
Generalsafety................1
Electricalsafety...............2
Safetyinspectionguide............3
Handlingdevicesthataresensitivetoelectrostatic
discharge..................3
Groundingrequirements............4
Safetynotices(multilingualtranslations)......4
Lasercompliancestatement(multilingual
translations)................19
Chapter2.Importantservice
information..............25
StrategyforreplacingFRUs.........25
Strategyforreplacingaharddiskdrive,a
solid-statedrive,oranM.2solid-statedrive.26
Importantnoticeforreplacingasystem
board................26
Howtouseerrormessage........26
StrategyforreplacingFRUsforCTO,special-bid,
andstandardmodels............26
Productdefinition............26
FRUidentification...........27
Chapter3.Generalcheckout.....29
Whattodofirst..............29
Checkoutguide..............30
LenovoSolutionCenter.........30
Quicktestprograms...........30
UEFIdiagnosticprogram.........31
Bootablediagnosticprograms.......31
Powersystemcheckout...........32
Checkingtheacpoweradapter......33
Checkingoperationalcharging......33
Checkingthebatterypack........33
Checkingthecoin-cellbattery.......34
Chapter4.Relatedservice
information..............35
Restoringthefactorycontentsbyusingthe
RecoveryDiscSet.............35
UsingtheWindowsrecoveryprogramsonthe
Windows8andWindows8.1operatingsystem..36
Refreshingyourcomputer........36
Resettingyourcomputertothefactorydefault
settings................36
Usingtheadvancedstartupoptions....37
RecoveringyouroperatingsystemifWindows
8orWindows8.1failstostart.......37
Creatingandusingrecoverymedia.....37
RecoveryoverviewfortheWindows10operating
system..................39
Resettingyourcomputer.........39
Usingadvancedstartupoptions......39
RecoveringyouroperatingsystemifWindows
10failstostart.............39
CreatingandusingarecoveryUSBdrive..40
Passwords................40
Power-onpassword...........41
Hard-diskpassword...........41
Supervisorpassword..........41
Howtoremovethepower-onpassword...41
Howtoremovethehard-diskpassword...42
Powermanagement............42
Screenblankmode(fortheWindows7
operatingsystemonly)..........42
Sleepmode..............42
Hibernationmode...........43
Symptom-to-FRUindex...........43
Numericerrorcodes..........44
Errormessages............45
Beeperrors..............46
LCD-relatedsymptoms.........46
Intermittentproblems..........47
Undeterminedproblems.........47
Chapter5.Statusindicators.....49
Chapter6.Fnkeycombinations...51
Chapter7.Locations.........53
Locatingcomputercontrols,connectors,and
indicators.................53
ThinkPadL440overview.........53
ThinkPadL540overview.........55
LocatingFRUsandCRUs..........56
MajorFRUsandCRUs..........58
LCDFRUsandCRUs..........60
MiscellaneouskitsandotherFRUs.....61
LookingupFRUinformation.......62
Chapter8.FRUreplacement
notices................63
Screwnotices...............63
Retainingserialnumbers...........64
©CopyrightLenovo2013,2017i

Restoringtheserialnumberofthesystem
unit.................64
RetainingtheUUID...........65
ReadingorwritingtheECAinformation...65
Chapter9.Removingorreplacinga
FRU..................67
Beforeservicingthecomputer........68
1010Batterypack.............68
1020Bottomdoor.............69
1030Opticaldrive.............70
1040Harddiskdriveorsolid-statedrive....72
1050Memorymodule............73
1060WWANcardorM.2solid-statedrive....74
1070WLANcard..............76
1080Coin-cellbattery............77
1090Thermal-fanassembly.........78
1100Keyboard..............82
1110Keyboardbezelassembly,fingerprintreader,
andpowerbuttoncard...........92
1120Smartcardreader,smartcarddoor,and
dummysmartcard.............103
1130Microprocessor............105
1140Systemboardassembly.........106
1150Audioboard.............111
1160Speakerassembly...........112
1170Hingebracket,dc-incableassembly,RJ45
card,andbasecoverassembly........114
2010LCDunit...............117
2020LCDfrontbezel............121
2030Camera/microphonecombocard.....122
2040Hinges,LCDpanel,andLCDcable....123
2050LEDcardandcableassembly......128
2060AntennaassemblyandLCDrearcover
assembly.................128
AppendixA.Notices.........131
Electronicemissionsnotices.........132
Trademarks................132
AppendixB.Abbreviationtable...133
iiHardwareMaintenanceManual

Aboutthismanual
ThismanualcontainsserviceandreferenceinformationforthefollowingThinkPad®notebookcomputers.
ThinkPadL440
MachineType(MT)20ASand20AT
ThinkPadL540
MT20AUand20AV
Usethismanualalongwiththeadvanceddiagnosticteststotroubleshootproblems.
Important:
ThismanualisintendedonlyfortrainedservicetechnicianswhoarefamiliarwithThinkPadproducts.Use
thismanualalongwiththeadvanceddiagnosticteststotroubleshootproblemseffectively.
BeforeservicingaThinkPadproduct,besuretoreadalltheinformationunderChapter1“Safety
information”onpage1andChapter2“Importantserviceinformation”onpage25.
©CopyrightLenovo2013,2017iii

ivHardwareMaintenanceManual

Chapter1.Safetyinformation
Thischapterpresentsfollowingsafetyinformationthatyouneedtobefamiliarwithbeforeyouservicea
ThinkPadnotebookcomputer.
•“Generalsafety”onpage1
•“Electricalsafety”onpage2
•“Safetyinspectionguide”onpage3
•“Handlingdevicesthataresensitivetoelectrostaticdischarge”onpage3
•“Groundingrequirements”onpage4
•“Safetynotices(multilingualtranslations)”onpage4
•“Lasercompliancestatement(multilingualtranslations)”onpage19
Generalsafety
Followtheserulestoensuregeneralsafety:
•Observegoodhousekeepingintheareaofthemachinesduringandaftermaintenance.
•Whenliftinganyheavyobject:
1.Ensurethatyoustandsafelywithoutslipping.
2.Distributetheweightoftheobjectequallybetweenyourfeet.
3.Useaslowliftingforce.Nevermovesuddenlyortwistwhenyouattempttolift.
4.Liftbystandingorbypushingupwithyourlegmuscles;thisactionremovesthestrainfromthe
musclesinyourback.Donotattempttoliftanyobjectthatweighsmorethan16kg(35lb)orthat
youthinkistooheavyforyou.
•Donotperformanyactionthatcauseshazardstothecustomer,orthatmakestheequipmentunsafe.
•Beforeyoustartthemachine,ensurethatotherservicetechniciansandthecustomer'spersonnelare
notinahazardousposition.
•Placeremovedcoversandotherpartsinasafeplace,awayfromallpersonnel,whileyouareservicing
themachine.
•Keepyourtoolcaseawayfromwalkareassothatotherpeoplewillnottripoverit.
•Donotwearlooseclothingthatcanbetrappedinthemovingpartsofamachine.Ensurethatyoursleeves
arefastenedorrolledupaboveyourelbows.Ifyourhairislong,fastenit.
•Inserttheendsofyournecktieorscarfinsideclothingorfastenitwithanonconductiveclip,about8
centimeters(3inches)fromtheend.
•Donotwearjewelry,chains,metal-frameeyeglasses,ormetalfastenersforyourclothing.
Attention:Metalobjectsaregoodelectricalconductors.
•Wearsafetyglasseswhenyouarehammering,drilling,soldering,cuttingwire,attachingsprings,using
solvents,orworkinginanyotherconditionsthatmightbehazardoustoyoureyes.
•Afterservice,reinstallallsafetyshields,guards,labels,andgroundwires.Replaceanysafetydevice
thatiswornordefective.
•Reinstallallcoverscorrectlybeforereturningthemachinetothecustomer.
•Fanlouversonthemachinehelptopreventoverheatingofinternalcomponents.Donotobstructfan
louversorcoverthemwithlabelsorstickers.
©CopyrightLenovo2013,20171

Electricalsafety
Observethefollowingruleswhenworkingonelectricalequipment.
Important:
Useonlyapprovedtoolsandtestequipment.Somehandtoolshavehandlescoveredwithasoftmaterial
thatdoesnotinsulateyouwhenworkingwithliveelectricalcurrents.
Manycustomershave,neartheirequipment,rubberfloormatsthatcontainsmallconductivefibersto
decreaseelectrostaticdischarges.Donotusethistypeofmattoprotectyourselffromelectricalshock.
•Findtheroomemergencypower-off(EPO)switch,disconnectingswitch,orelectricaloutlet.Ifanelectrical
accidentoccurs,youcanthenoperatetheswitchorunplugthepowercordquickly.
•Donotworkaloneunderhazardousconditionsornearequipmentthathashazardousvoltages.
•Disconnectallpowerbefore:
–Performingamechanicalinspection
–Workingnearpowersupplies
–Removingorinstallingmainunits
•Beforeyoustarttoworkonthemachine,unplugthepowercord.Ifyoucannotunplugit,askthecustomer
topower-offthewallboxthatsuppliespowertothemachine,andtolockthewallboxintheoffposition.
•Ifyouneedtoworkonamachinethathasexposedelectricalcircuits,observethefollowingprecautions:
–Ensurethatanotherperson,familiarwiththepower-offcontrols,isnearyoutoswitchoffthepower,if
necessary.
–Useonlyonehandwhenworkingwithpowered-onelectricalequipment;keeptheotherhandinyour
pocketorbehindyourback.
Attention:Anelectricalshockcanoccuronlywhenthereisacompletecircuit.Byobservingtheabove
rule,youcanpreventacurrentfrompassingthroughyourbody.
–Whenusingtesters,setthecontrolscorrectlyandusetheapprovedprobeleadsandaccessoriesfor
thattester.
–Standonsuitablerubbermats(obtainedlocally,ifnecessary)toinsulateyoufromgroundssuchas
metalfloorstripsandmachineframes.
Observethespecialsafetyprecautionswhenyouworkwithveryhighvoltages;Instructionsforthese
precautionsareinthesafetysectionsofmaintenanceinformation.Useextremecarewhenmeasuring
highvoltages.
•Regularlyinspectandmaintainyourelectricalhandtoolsforsafeoperationalcondition.
•Donotusewornorbrokentoolsandtesters.
•Neverassumethatpowerhasbeendisconnectedfromacircuit.First,checkthatithasbeenpoweredoff.
•Alwayslookcarefullyforpossiblehazardsinyourworkarea.Examplesofthesehazardsaremoistfloors,
nongroundedpowerextensioncables,powersurges,andmissingsafetygrounds.
•Donottouchliveelectricalcircuitswiththereflectivesurfaceofaplasticdentalmirror.Thesurfaceis
conductive;suchtouchingcancausepersonalinjuryandmachinedamage.
•Donotservicethefollowingpartswiththepoweronwhentheyareremovedfromtheirnormaloperating
placesinamachine:
–Powersupplyunits
–Pumps
–Blowersandfans
–Motorgenerators
–Similarunitstolistedabove
Thispracticeensurescorrectgroundingoftheunits.
•Ifanelectricalaccidentoccurs:
2HardwareMaintenanceManual

–Usecaution;donotbecomeavictimyourself.
–Switchoffpower.
–Sendanotherpersontogetmedicalaid.
Safetyinspectionguide
Thepurposeofthisinspectionguideistoassistyouinidentifyingpotentiallyunsafeconditions.Aseach
machinewasdesignedandbuilt,requiredsafetyitemswereinstalledtoprotectusersandservicetechnicians
frominjury.Thisguideaddressesonlythoseitems.Y oushouldusegoodjudgmenttoidentifypotential
safetyhazardsduetoattachmentofnon-ThinkPadfeaturesoroptionsnotcoveredbythisinspectionguide.
Ifanyunsafeconditionsarepresent,youmustdeterminehowserioustheapparenthazardcouldbeand
whetheryoucancontinuewithoutfirstcorrectingtheproblem.
Considertheseconditionsandthesafetyhazardstheypresent:
•Electricalhazards,especiallyprimarypower(primaryvoltageontheframecancauseseriousorfatal
electricalshock)
•Explosivehazards,suchasadamagedCRTfaceorabulgingcapacitor
•Mechanicalhazards,suchaslooseormissinghardware
Todeterminewhetherthereareanypotentiallyunsafeconditions,usethefollowingchecklistatthebeginning
ofeveryservicetask.Beginthecheckswiththepoweroff,andthepowercorddisconnected.
Checklist:
1.Checkexteriorcoversfordamage(loose,broken,orsharpedges).
2.Poweroffthecomputer.Disconnectthepowercord.
3.Checkthepowercordfor:
a.Athird-wiregroundconnectoringoodcondition.Useametertomeasurethird-wireground
continuityfor0.1ohmorlessbetweentheexternalgroundpinandtheframeground.
b.Thepowercordshouldbetheauthorizedtypespecifiedforyourcomputer.Goto:
http://www.lenovo.com/serviceparts-lookup.
c.Insulationmustnotbefrayedorworn.
4.Checkforcrackedorbulgingbatteries.
5.Removethecover.
6.Checkforanyobviousnon-ThinkPadalterations.Usegoodjudgmentastothesafetyofany
non-ThinkPadalterations.
7.Checkinsidetheunitforanyobviousunsafeconditions,suchasmetalfilings,contamination,wateror
otherliquids,orsignsoffireorsmokedamage.
8.Checkforworn,frayed,orpinchedcables.
9.Checkthatthepower-supplycoverfasteners(screwsorrivets)havenotbeenremovedortamperedwith.
Handlingdevicesthataresensitivetoelectrostaticdischarge
Anycomputerpartcontainingtransistorsorintegratedcircuits(ICs)shouldbeconsideredsensitiveto
electrostaticdischarge(ESD.)ESDdamagecanoccurwhenthereisadifferenceinchargebetweenobjects.
ProtectagainstESDdamagebyequalizingthechargesothatthemachine,thepart,theworkmat,andthe
personhandlingthepartareallatthesamecharge.
Notes:
Chapter1.Safetyinformation3
1.Useproduct-specificESDprocedureswhentheyexceedtherequirementsnotedhere.
2.EnsurethattheESDprotectivedevicesyouusehavebeencertified(ISO9000)asfullyeffective.
WhenhandlingESD-sensitiveparts:
•Keepthepartsinprotectivepackagesuntiltheyareinsertedintotheproduct.
•Avoidcontactwithotherpeople.
•Wearagroundedwriststrapagainstyourskintoeliminatestaticonyourbody.
•Preventthepartfromtouchingyourclothing.Mostclothingisinsulativeandretainsachargeeven
whenyouarewearingawriststrap.
•Useagroundedworkmattoprovideastatic-freeworksurface.Thematisespeciallyusefulwhen
handlingESD-sensitivedevices.
•Selectagroundingsystem,suchasthoselistedbelow,toprovideprotectionthatmeetsthespecific
servicerequirement.
Note:TheuseofagroundingsystemtoguardagainstESDdamageisdesirablebutnotnecessary.
–AttachtheESDgroundcliptoanyframeground,groundbraid,orgreen-wireground.
–Whenworkingonadouble-insulatedorbattery-operatedsystem,useanESDcommongroundor
referencepoint.Y oucanusecoaxorconnector-outsideshellsonthesesystems.
–Usetheroundgroundprongoftheacplugonac-operatedcomputers.
Groundingrequirements
Electricalgroundingofthecomputerisrequiredforoperatorsafetyandcorrectsystemfunction.Proper
groundingoftheelectricaloutletcanbeverifiedbyacertifiedelectrician.
Safetynotices(multilingualtranslations)
Thesafetynoticesinthissectionareprovidedinthefollowinglanguages:
•English
•Arabic
•BrazilianPortuguese
•French
•German
•Hebrew
•Japanese
•Korean
•Spanish
•TraditionalChinese
DANGER
4HardwareMaintenanceManual

DANGER
6HardwareMaintenanceManual

PERIGO
PERIGO
PERIGO
PERIGO
PERIGO
8HardwareMaintenanceManual

DANGER
DANGER
DANGER
DANGER
VORSICHT
10HardwareMaintenanceManual

VORSICHT
VORSICHT
VORSICHT
12HardwareMaintenanceManual

14HardwareMaintenanceManual

16HardwareMaintenanceManual


18HardwareMaintenanceManual

20HardwareMaintenanceManual

22HardwareMaintenanceManual


24HardwareMaintenanceManual

Chapter2.Importantserviceinformation
Thischapterpresentsfollowingimportantserviceinformationthatappliestoallmachinetypessupportedby
thismanual:
•“StrategyforreplacingFRUs”onpage25
–“Strategyforreplacingaharddiskdrive,asolid-statedrive,oranM.2solid-statedrive”onpage26
–“Importantnoticeforreplacingasystemboard”onpage26
–“Howtouseerrormessage”onpage26
•“StrategyforreplacingFRUsforCTO,special-bid,andstandardmodels”onpage26
–“Productdefinition”onpage26
–“FRUidentification”onpage27
Important:
•IfthecomputerisequippedwithbothaharddiskdriveandanM.2solid-statedrive,donotusetheM.2
solid-statedriveasabootabledevice.TheM.2solid-statedriveisusedfor“cache”functiononly.
•AdvisecustomerstocontacttheLenovoCustomerSupportCenteriftheyneedanyassistancein
obtainingorinstallinganysoftwarefixes,drivers,andUEFIBIOSdownloads.Telephonenumbersfor
LenovoSupportareavailableat:
http://www.lenovo.com/support/phone
•SystemDisassembly/ReassemblyvideosthatshowtheFRUremovalsorreplacementsfortheLenovo®
authorizedservicetechniciansareavailableinthefollowingsupportsite:
http://www.lenovoservicetraining.com/ion/
StrategyforreplacingFRUs
Beforereplacingparts:
Ensurethatallsoftwarefixes,drivers,andUEFIBIOSdownloadsareinstalledbeforereplacinganyFRUs
listedinthismanual.
Afterasystemboardisreplaced,ensurethatthelatestUEFIBIOSisloadedtothesystemboardbefore
completingtheserviceaction.
Todownloadsoftwarefixes,drivers,andUEFIBIOS,gotohttp://www.lenovo.com/ThinkPadDriversand
followtheinstructionsonthescreen.
UsethefollowingstrategytopreventunnecessaryexpenseforreplacingandservicingFRUs:
•IfyouareinstructedtoreplaceaFRUbutthereplacementdoesnotcorrecttheproblem,reinstall
theoriginalFRUbeforeyoucontinue.
•Somecomputershavebothaprocessorboardandasystemboard.Ifyouareinstructedtoreplaceeither
theprocessorboardorthesystemboard,andreplacingoneofthemdoesnotcorrecttheproblem,
reinstallthatboard,andthenreplacetheotherone.
•IfanadapteroradeviceconsistsofmorethanoneFRU,anyoftheFRUsmightbethecauseoftheerror.
Beforereplacingtheadapterordevice,removetheFRUs,onebyone,toseeifthesymptomschange.
ReplaceonlytheFRUthatchangedthesymptoms.
Attention:Thesetupconfigurationonthecomputeryouareservicingmighthavebeencustomized.Running
AutomaticConfigurationmightalterthesettings.Notethecurrentconfigurationsettings(usingtheView
Configurationoption);then,whenservicehasbeencompleted,verifythatthosesettingsremainineffect.
©CopyrightLenovo2013,201725

Strategyforreplacingaharddiskdrive,asolid-statedrive,oranM.2
solid-statedrive
Alwaystrytorunalow-levelformatoperationbeforereplacingaharddiskdriveorasolid-statedrive.This
willcauseallcustomerdataonthedrivetobelost.Besurethatthecustomerhasacurrentbackupof
thedatabeforeyouperformthistask.
Attention:Thedrivestartupsequenceinthecomputeryouareservicingmighthavebeenchanged.Be
extremelycarefulduringwriteoperationssuchascopying,saving,orformatting.Ifyouselectanincorrect
drive,dataorprogramscanbeoverwritten.
IfthecomputerisshippedwithbothanM.2solid-statedriveandaharddiskdrive,theM.2solid-statedrive
isusedforthe“cache”functionandtosupporttheIntel®RapidStartTechnology.Werecommendthatusers
donotreplacetheM.2solid-statedrivebythemselves.Otherwise,the“cache”functionwillnotworkand
theIntelRapidStartTechnologycannotbeusedanymore.
Attention:EnsurethatyoupartitiontheM.2solid-statedriveafterinstallingitonthecomputeryouare
servicing.Otherwise,theM.2solid-statedrivewillnotfunctioncorrectly.Forinstructionsonhowtopartition
anM.2solid-statedrive,gotohttp://www.lenovo.com/support/msata-fru.
Importantnoticeforreplacingasystemboard
Somecomponentsmountedonasystemboardareverysensitive.Improperhandlingofasystemboardcan
causedamagetothosecomponents,andmightcauseasystemmalfunction.
Attention:Whenhandlingasystemboard:
•Donotdropasystemboardorapplyanyexcessiveforcetoit.
•Avoidroughhandlingofanykind.
•AvoidbendingasystemboardandpushingithardtopreventcrackingateachBallGridArray(BGA)
chipset.
Howtouseerrormessage
Usetheerrorcodesdisplayedonthescreentodiagnosefailures.Ifmorethanoneerrorcodeisdisplayed,
beginthediagnosiswiththefirsterrorcode.Whatevercausesthefirsterrorcodemightalsocausefalse
errorcodes.Ifnoerrorcodeisdisplayed,seewhethertheerrorsymptomislistedintheSymptom-to-FRU
Indexforthecomputeryouareservicing.
StrategyforreplacingFRUsforCTO,special-bid,andstandardmodels
ThistopicprovidesinformationaboutthemodeltypesandFRUidentification.
Productdefinition
Thistopicintroducesdifferentmodeltypesandhowtoidentifyeachtype.
DynamicConfigureToOrder(CTO)model
ThismodelprovidestheabilityforacustomertoconfigureaLenovosolutionfromaWebsite,andhavethis
configurationsenttofulfillment,whereitisbuiltandshippeddirectlytothecustomer.Themachinelabeland
eSupportwillloadtheseproductsasthe4-characterMT,4-charactermodel,and2-charactercountrycode.
Themodelis“CTO1”andthedefaultcountrycodeis“WW”(example:20AACTO1WW).
26HardwareMaintenanceManual

Special-bidmodel
ThismodelisauniqueconfigurationthathasbeennegotiatedbetweenLenovoandthecustomer.Aunique
MTMconsistsofa4-characterMT,a4-charactermodel,andanumeric2-charactercountrycodeisprovided
tothecustomertoplaceorders(example:20AA000955).Thecountrycodeassignedisnumericanddoes
notdesignateaspecificcountryorregion.ThecustommodelfactsheetfortheMTMindicateswhichcountry
thespecial-bidMTMissetupfor.Special-bidofferingisnotgenerallyannounced.
Standardmodel
Standardmodels(fixedconfiguration)areannouncedandofferedtoallcustomers.TheMTMportionofthe
machinelabelconsistsofa4-characterMT,a4-charactermodel,andanalphabetic2-charactercountry
code.Thecountrycodeassignedisalphabeticandrepresentsadesignatedcountryorregion(example:
20AA0009UK).
FRUidentification
UseLenovoeSupporttoidentifymajorFRUs,FRUpartnumbers,andFRUdescriptionsforaproductatan
MT-serialnumberlevel.ExamplesofmajorFRUsareharddiskdrive,systemboard,liquidcrystaldisplay
(LCD),andmemorymodule.
ToidentifythemajorFRUsforaproduct,dothefollowing:
1.Goto:
http://www.lenovo.com/support
2.ClickWarranty&Services.
3.ClickCheckWarrantyStatus.
4.OntheWarrantyStatusLookuppage,clickPartsLookup.
5.Typeyourmachinetypeandserialnumber,andthenclickSubmit.
eSupportalsocanbeusedtoviewthegeneralFRUlistforaproduct.
TogetthegeneralFRUlistforaproduct,dothefollowing:
1.Goto:
http://www.lenovo.com/support
2.ClickParts&Accessories.
3.Followtheinstructionsonthescreentoselectproduct.
4.ClickProductsandPartsDetail.
5.OnthePRODUCTANDPARTSDETAILpage,clickthePartsDetailtabtoviewtheFRUlist.
Note:TheFRUlistisagenerallistofcomponentsanddoesnotcontainspecificmodelinformation.
Chapter2.Importantserviceinformation27

28HardwareMaintenanceManual

Chapter3.Generalcheckout
Thischapterpresentsfollowinginformation:
•“Whattodofirst”onpage29
•“Checkoutguide”onpage30
–“LenovoSolutionCenter”onpage30
–“Quicktestprograms”onpage30
–“UEFIdiagnosticprogram”onpage31
–“Bootablediagnosticprograms”onpage31
•“Powersystemcheckout”onpage32
Somedescriptionsinthischaptermightnotapplytoyourparticularcomputer.
Beforeyougotothecheckoutguide,besuretoreadthefollowingimportantnotes.
Importantnotes:
•Onlycertifiedtrainedpersonnelshouldservicethecomputer.
•BeforereplacinganyFRU,readtheentirepageonremovingandreplacingFRUs.
•WhenyoureplaceFRUs,itisrecommendedtousenewnylon-coatedscrews.
•Beextremelycarefulduringsuchwriteoperationsascopying,saving,orformatting.Thesequenceofthe
drivesinthecomputerthatyouareservicingmighthavebeenaltered.Ifyouselectanincorrectdrive,dataor
programsmightbeoverwritten.
•ReplaceaFRUonlywithanotherFRUofthecorrectmodel.WhenyoureplaceaFRU,ensurethatthemodelof
themachineandtheFRUpartnumberarecorrect.
•AFRUshouldnotbereplacedbecauseofasingle,unreproduciblefailure.Singlefailurescanoccurfora
varietyofreasonsthathavenothingtodowithahardwaredefect,suchascosmicradiation,electrostaticdischarge,
orsoftwareerrors.ConsiderreplacingaFRUonlywhenaproblemrecurs.IfyoususpectthataFRUisdefective,
cleartheerrorlogandrunthetestagain.Iftheerrordoesnotrecur,donotreplacetheFRU.
•BecarefulnottoreplaceanondefectiveFRU.
Whattodofirst
WhenyoudoreturnaFRU,youmustincludethefollowinginformationinthepartsexchangeformor
partsreturnformthatyouattachtoit:
1.Nameandphonenumberofservicetechnician
2.Dateofservice
3.Dateonwhichthemachinefailed
4.Dateofpurchase
5.Failuresymptoms,errorcodesappearingonthedisplay,andbeepsymptoms
6.ProcedureindexandpagenumberinwhichthefailingFRUwasdetected
7.FailingFRUnameandpartnumber
8.Machinetype,modelnumber,andserialnumber
9.Customer'snameandaddress
Note:Duringthewarrantyperiod,thecustomerisresponsibleforrepaircostsifthecomputerdamage
wascausedbymisuse,accident,modification,unsuitablephysicaloroperatingenvironment,orimproper
maintenancebythecustomer.Followingisalistofsomecommonitemsthatarenotcoveredunderwarranty
andsomesymptomsindicatethatthesystemhasbeensubjectedtostressbeyondnormaluse.
Beforecheckingproblemswiththecomputer,determinewhetherthedamageiscoveredunderthewarranty
byreferringtothefollowinglist:
Thefollowingarenotcoveredunderwarranty:
•LCDpanelcrackedfromtheapplicationofexcessiveforceorfrombeingdropped
©CopyrightLenovo2013,201729

•Scratched(cosmetic)parts
•Distortion,deformation,ordiscolorationofthecosmeticparts
•Plasticparts,latches,pins,orconnectorsthathavebeencrackedorbrokenbyexcessiveforce
•Damagecausedbyliquidspilledintothesystem
•DamagecausedbytheimproperinsertionofaPCCardortheinstallationofanincompatiblecard
•Improperdiscinsertionoruseofanopticaldrive
•Fusesblownbyattachmentofanonsupporteddevice
•Forgottencomputerpassword(makingthecomputerunusable)
•Stickykeyscausedbyspillingaliquidontothekeyboard
•Useofanincorrectacpoweradapteronlaptopproducts
Thefollowingsymptomsmightindicatedamagecausedbynonwarrantedactivities:
•Missingpartsmightbeasymptomofunauthorizedserviceormodification.
•Checkforobviousdamagetoaharddiskdrive.Ifthespindleofaharddiskdrivebecomesnoisy,thehard
diskdrivemighthavebeendroppedorsubjecttoexcessiveforce.
Checkoutguide
UsethefollowingproceduresasaguidetoidentifyandcorrectproblemswiththeThinkPadnotebook
computers.
Note:ThediagnostictestsareintendedtotestonlyThinkPadproducts.Theuseofnon-ThinkPadproducts,
prototypecards,ormodifiedoptionscanleadtofalseindicationsoferrorsandinvalidsystemresponses.
1.Identifythefailingsymptomsinasmuchdetailaspossible.
2.Verifythesymptoms.Trytore-createthefailurebyrunningthediagnostictestorbyrepeatingthe
operation.
LenovoSolutionCenter
TheLenovoSolutionCenterprogramenablesyoutotroubleshootandresolvecomputerproblems.It
combinesdiagnostictests,systeminformationcollection,securitystatus,andsupportinformation,along
withhintsandtipsformaximumsystemperformance.
TheLenovoSolutionCenterprogramisavailablefordownloadathttp://www.lenovo.com/diags.
ToruntheLenovoSolutionCenterprogram,gotoControlPanelandclickSystemandSecurity➙Lenovo-
SystemHealthandDiagnostics,andthenfollowtheinstructionsonthescreen.
FormoreinformationabouttheLenovoSolutionCenterprogram,refertothehelpinformationsystem
oftheprogram.
Quicktestprograms
Youcanrunquicktestprogramstotroubleshootandresolvecomputerproblems,especiallywhenthe
computerdoesnothavetheLenovoSolutionCenterprograminstalled.
Lenovoprovidesthefollowingquicktestprograms:
•LenovoHardDriveQuickT est:Usethisprogramtotroubleshootandresolveinternalstorageproblems.
•LenovoMemoryQuickT est:Usethisprogramtotroubleshootandresolvememorymoduleproblems.
Thequicktestprogramsareapplicableonthefollowingoperatingsystems:
•Microsoft®Windows®10
•MicrosoftWindows8.1
30HardwareMaintenanceManual

•MicrosoftWindows8
•MicrosoftWindows7
•MicrosoftWindowsXP
•MicrosoftWindowsServer®2003
•MicrosoftWindowsServer2008
Todownloadandinstallaquicktestprogram,gotohttp://www.lenovo.com/diagsandfollowtheinstructions
ontheWebsite.
Torunatestusingaquicktestprogram,dothefollowing:
1.GototheC:\SWTOOLS\ldiagdirectory.
2.Double-clickthegui_lsc_lite.exefile.
3.WhentheUserAccountControlwindowopens,clickYes.
4.Selectthedeviceclasstobetested.
5.Selectthedevicestobetested.
6.Selectthetesttobeperformed.
7.Followtheinstructionsonthescreentostartthetest.Whenaproblemisdetected,information
messagesaredisplayed.Refertothemessagestotroubleshoottheproblem.
UEFIdiagnosticprogram
AUEFIdiagnosticprogramispreinstalledonthecomputer.Itenablesyoutotestmemorymodulesand
internalstoragedevices,viewsysteminformation,andcheckandrecoverbadsectorsoninternalstorage
devices.
ToruntheUEFIdiagnosticprogram,dothefollowing:
1.Turnonthecomputer.Ifthecomputercannotbeturnedon,goto“Powersystemcheckout”onpage32,
andcheckthepowersources.Ifanerrorcodeisdisplayed,goto“Symptom-to-FRUindex”onpage43
forerrorcodedescriptionsandtroubleshootinghints.
2.WhentheThinkPadlogoisdisplayed,repeatedlypressandreleasetheF10key.Themainscreenofthe
UEFIdiagnosticprogramisdisplayed.
3.Followtheinstructionsonthescreentousethediagnosticprogram.
Theoptionsonthemainscreenareasfollows:
Table1.ItemsonthemainscreenoftheUEFIdiagnosticprogram
TestsTools
•QuickMemoryTest
•QuickStorageDeviceTest
•LCDtest
•PCI-etest
•ExitApplication
•SystemInformation
•Generateconfigurationfile
•Executefromconfigurationfile
•RecoverBadSectorsTool*
*RecoverBadSectorsToolisonlyavailableoncomputersthathaveharddiskdrivesinstalled.
Bootablediagnosticprograms
IfthecomputeryouareservicingisnotinstalledwiththeUEFIdiagnosticprogram,youcandownloada
bootablediagnosticprogramfromtheLenovoSupportWebsite.Thebootablediagnosticprogramsenable
youtotestcomputermemoryandinternalstoragedevices,viewsysteminformation,andcheckandrecover
Chapter3.Generalcheckout31

theinternalstoragedevices.Tousethebootablediagnosticprograms,youcancreateabootablediagnostic
mediumonaUSBdeviceorCD.
Tocreateabootablediagnosticmedium,dothefollowing:
1.Gotohttp://www.lenovo.com/diagnose.
2.ClickLenovoBootableDiagnostics.
3.FollowtheinstructionsontheWebsitetocreateabootablediagnosticmediumonaUSBdeviceorCD.
Tousethediagnosticmediumyouhavecreated,dooneofthefollowing:
•IfyouhavecreatedthebootablediagnosticmediumonaUSBdevice,dothefollowing:
1.AttachtheUSBdevicetothecomputer.
2.Turnonthecomputer.Ifthecomputercannotbeturnedon,goto“Powersystemcheckout”onpage
32,andcheckthepowersources.Ifanerrorcodeisdisplayed,goto“Symptom-to-FRUindex”on
page43forerrorcodedescriptionsandtroubleshootinghints.
3.WhentheThinkPadlogoisdisplayed,repeatedlypressandreleasetheF12key.WhentheBoot
Menuwindowopens,releasetheF12key.
4.UsethearrowkeystoselectUSBHDDandthenpressEnter.Thediagnosticprogramwillbe
launchedautomatically.
5.Followtheinstructionsonthescreentousethediagnosticprogram.
•IfyouhavecreatedthebootablediagnosticmediumonaCD,dothefollowing:
1.Turnonthecomputer.Ifthecomputercannotbeturnedon,goto“Powersystemcheckout”onpage
32,andcheckthepowersources.Ifanerrorcodeisdisplayed,goto“Symptom-to-FRUindex”on
page43forerrorcodedescriptionsandtroubleshootinghints.
2.InserttheCDintotheopticaldrive.
3.Restartthecomputer.
4.WhentheThinkPadlogoisdisplayed,repeatedlypressandreleasetheF12key.WhentheBoot
Menuwindowopens,releasetheF12key.
5.UsethearrowkeystoselectATAPICDx(x:0,1,...)andthenpressEnter.Thediagnosticprogram
willbelaunchedautomatically.
6.Followtheinstructionsonthescreentousethediagnosticprogram.
Powersystemcheckout
Toverifyasymptom,dothefollowing:
1.Turnoffthecomputer.
2.Removethebatterypack.
3.Connecttheacpoweradapter.
4.Checkthatpowerissuppliedwhenyouturnonthecomputer.
5.Turnoffthecomputer.
6.Disconnecttheacpoweradapterandinstallthechargedbatterypack.
7.Checkthatthebatterypacksuppliespowerwhenyouturnonthecomputer.
Ifyoususpectapowerproblem,seetheappropriateoneofthefollowingpowersupplycheckouts:
•“Checkingtheacpoweradapter”onpage33
•“Checkingoperationalcharging”onpage33
•“Checkingthebatterypack”onpage33
•“Checkingthecoin-cellbattery”onpage34
32HardwareMaintenanceManual
Checkingtheacpoweradapter
Youareherebecausethecomputerfailsonlywhentheacpoweradapterisused.
•Ifthepowerproblemoccursonlywhenthedockingstationortheportreplicatorisused,replacethe
dockingstationortheportreplicator.
•Ifthepower-onindicatordoesnotturnon,checkthepowercordoftheacpoweradapterforcorrect
continuityandinstallation.
•Ifthecomputerdoesnotchargeduringoperation,goto“Checkingoperationalcharging”onpage33.
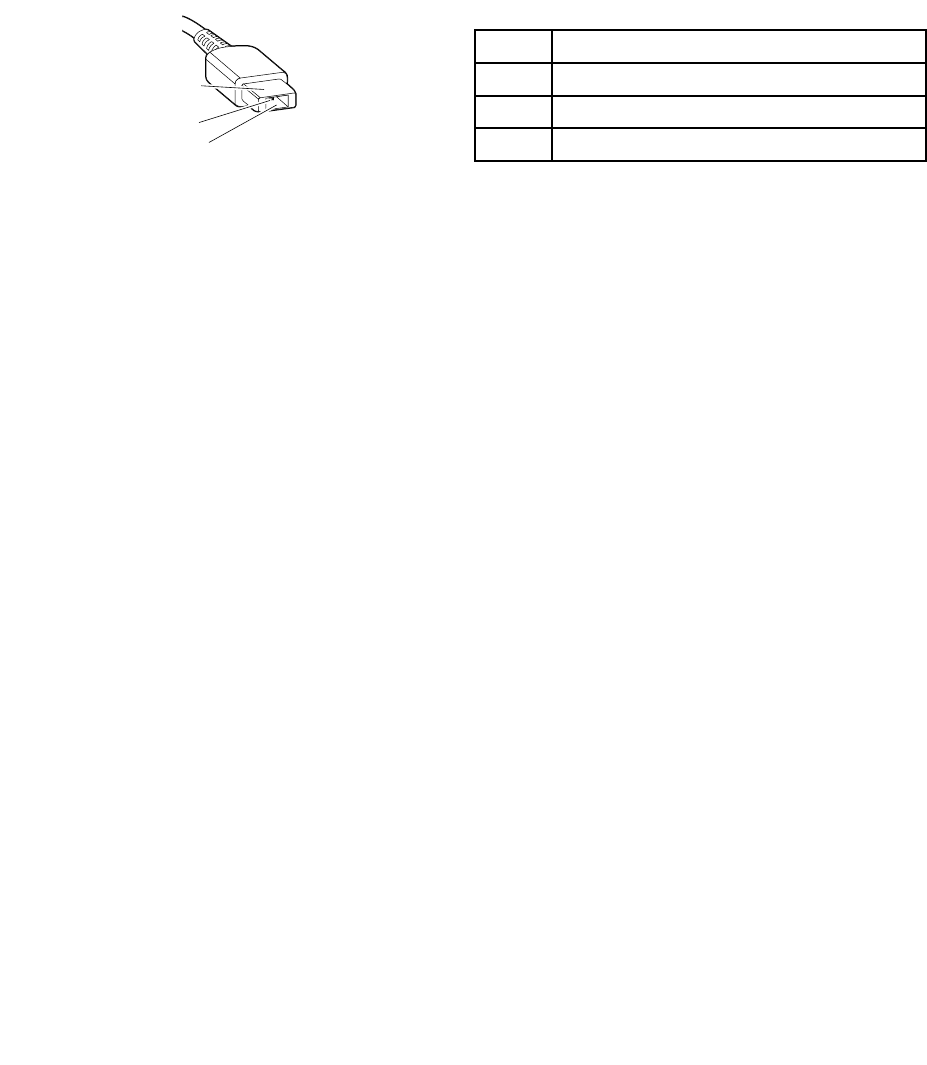
Tochecktheacpoweradapter,dothefollowing:
1.Unplugtheacpoweradaptercablefromthecomputer.
2.Measuretheoutputvoltageattheplugoftheacpoweradaptercable.Seethefollowingfigure:
PinVoltage(Vdc)
1+20
20
3Ground
(20V)
1
3
2
Note:Outputvoltageacrosspin2oftheacpoweradaptermightdifferfromtheoneyouareservicing.
3.Ifthevoltageisnotcorrect,replacetheacpoweradapter.
4.Ifthevoltageisacceptable,replacethesystemboard.
Note:Noisefromtheacpoweradapterdoesnotalwaysindicateadefect.
Checkingoperationalcharging
Tocheckwhetherthebatterychargesproperlyduringoperation,dothefollowing:
Note:Beforeyoubegin,installadischargedbatterypackorabatterypackthathaslessthan50%ofthe
totalpowerremaininginthecomputer.
1.Dischargethebatteryuntiltheremainedbatterypowerislessthan50%.
2.Connectthecomputertoacpowertochargethebattery.IfthebatterystatusiconintheWindows
notificationareaindicatesthatthebatteryisnotcharging,removethebatteryandletitreturntoroom
temperature.
3.Reinstallthebattery.Ifthebatteryisstillnotcharging,replacethebatterypackandreferto“Checking
thebatterypack”onpage33tochecktheoriginalbatterypack.
4.Checkthebatterystatusiconagain.Ifthesameerrorstillexists,replacethesystemboard.
Checkingthebatterypack
ThebatterystatusiconintheWindowsnotificationareadisplaysthepercentageofbatterypowerremaining.
Moveyourpointertothebattery-statusiconintheWindowsnotificationareatocheckthebatterystatus.
Thebattery-statusicondisplaysthepercentageofbatterypowerremainingandhowlongyoucanuse
yourcomputerbeforeyoumustchargethebattery.
Note:Ifthebatterypackbecomeshot,itmaynotbeabletocharge.Removeitfromthecomputerandleave
itatroomtemperatureforawhile.Afteritcoolsdown,reinstallandrechargeit.
Tocheckthebatterypack,dothefollowing:
Chapter3.Generalcheckout33
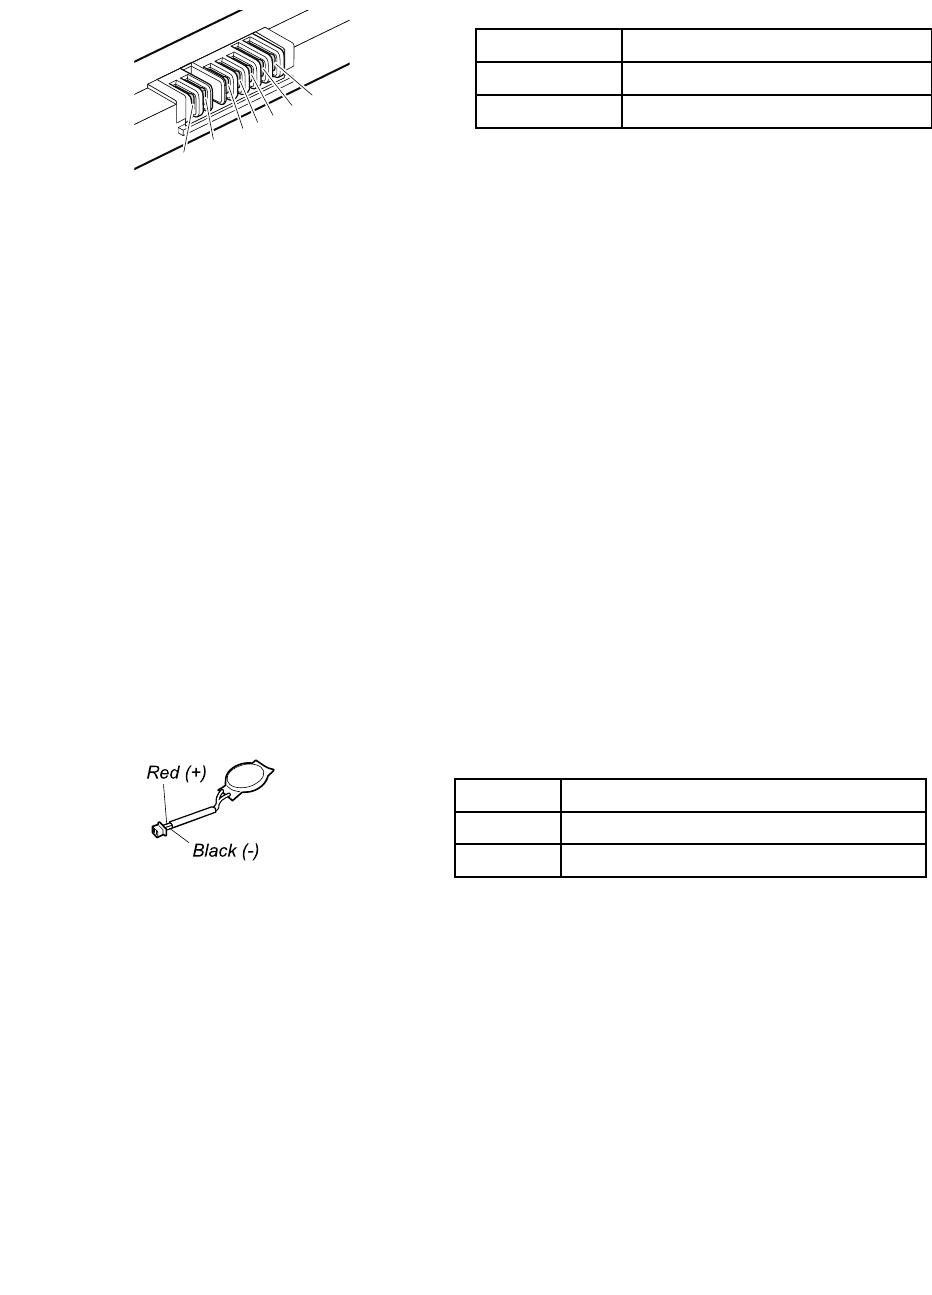
1.Turnoffthecomputeranddisconnecttheacpoweradapter.
2.Removethebatterypackandmeasurethevoltagebetweenbatteryterminals1(+)and7(-).The
correctvoltagesareshowninthefollowingtable.
TerminalVoltage(Vdc)
1+0to+16.8
7Ground(-)
1(+)2(+)
3456(-)7(-)
3.Measuretheresistancebetweenbatteryterminal5and7(-).Theresistanceshouldbe4to30KΩ.Ifthe
resistanceisnotcorrect,replacethebatterypack.
4.Dependingonthevoltagethatyoumeasure,dooneofthefollowing:
•Ifthevoltageislessthan+11.0Vdc,rechargethebattery.Ifthevoltageisstilllessthan+11.0V
dcafterrecharging,replacethebatterypack.
•Ifthevoltageismorethan+11.0Vdc,dischargethebatterypackuntilthevoltagebecomesless
than+11.0Vdc.Thenrechargethebatterypack.Ifthevoltageisstilllessthan+11.0Vdc,replace
thebatterypack.
Note:Rechargingwilltakeatleastthreehours,evenifthebatterystatusindicatordoesnotturnon.
5.Replacethesystemboardifthenewbatterypackisnotcharged.
Checkingthecoin-cellbattery
Tocheckthecoin-cellbattery,dothefollowing:
1.Turnoffthecomputer,andunplugtheacpoweradapterfromit.
2.Turnthecomputerupsidedown.
3.Removethebatterypack(see“1010Batterypack”onpage68).
4.Removethecoin-cellbattery(see“1080Coin-cellbattery”onpage77).
5.Measurethevoltageofthecoin-cellbattery.Seethefollowingfigure.
WireVoltage(Vdc)
Red+2.5to+3.2
BlackGround
•Ifthevoltageiscorrect,replacethesystemboard.
•Ifthevoltageisnotcorrect,replacethecoin-cellbattery.
•Ifthecoin-cellbatterydischargesquicklyafterreplacement,replacethesystemboard.
34HardwareMaintenanceManual

Chapter4.Relatedserviceinformation
Thischapterpresentsfollowinginformation:
•“RestoringthefactorycontentsbyusingtheRecoveryDiscSet”onpage35
•“UsingtheWindowsrecoveryprogramsontheWindows8andWindows8.1operatingsystem”on
page36
•“RecoveryoverviewfortheWindows10operatingsystem”onpage39
•“Passwords”onpage40
•“Powermanagement”onpage42
•“Symptom-to-FRUindex”onpage43
ServiceWebsite:
Whenthelatestmaintenancedisketteandthesystemprogramservicediskettebecomeavailable,they
willbepostedonhttp://www.lenovo.com/support.
RestoringthefactorycontentsbyusingtheRecoveryDiscSet
Whenthemainstoragedriveisreplacedbecauseofafailure,noproductrecoveryprogramisonthenew
drive.Inthiscase,thecustomermustusetheRecoveryDiscSettorecoverthecomputer.Orderthe
RecoveryDiscSetandthedriveatthesametimesothatthecustomercanrestorethecomputertothe
factorydefaultsettingsbyusingtheRecoveryDiscSetafterthenewdriveisinstalled.Forinformationabout
whichdiscstoorder,goto:
http://www.lenovo.com/serviceparts-lookup
Dependingonthemodel,thenumberofrecoverydiscsincludedintheRecoveryDiscSetdiffers.Torestore
thefactorycontentsbyusingtheproductRecoveryDiscSet,dothefollowing:
Notes:
•Duringtherecoveryprocess,alldataonthedrivewillbedeleted.Ifpossible,copyanyimportantdata
orpersonalfilesthatyouwanttokeepontoremovablemediaoranetworkdrivebeforeyoustartthe
recoveryprocess.
•Therecoveryprocesstakesonetotwohourstocomplete.Thelengthoftimedependsonthemethodyou
use.IfyouuseproductRecoveryDiscSet,therecoveryprocesstakesabouttwohours.
1.MaketheCD/DVDdrivethefirststartupdeviceinthestartupsequenceusingthefollowingprocedure:
a.OpentheThinkPadSetupprogramandselectStartup➙Boot.
b.SelecttheCD/DVDdriveasthe1stBootDevice.
2.InsertthebootablerecoverydiscintotheCD/DVDdrive.
3.StartthecomputerfromtheCD/DVDdrive.
4.Whenpromoted,selectyourlanguageandclickNext.
5.Readthelicenseandacceptthetermsandconditions.Thenfollowtheinstructionsonthescreen.
6.IftheRecoveryDiscSetcontainsaSupplementalRecoveryDisc,insertitwhenpromptedandclickYes.
Note:NotallRecoveryDiscSetscomewithaSupplementalRecoveryDisc.IfthereisaSupplemental
RecoveryDisc,itwillbeclearlymarkedassuch.
7.Whenallofthedatahasbeencopiedfromthelastdiscinthesetandhasbeenprocessed,removethe
recoverydiscandrestartthecomputer.Followtheinstructionsonthescreentofinishtherecovery.
Note:Therestoftherecoveryprocessisfullyautomatedandnoactionfromyouisrequired.The
computerwillrestartintotheMicrosoftWindowsdesktopseveraltimesandyoumightexperience
periodswhennoactivityisapparentonthescreenforseveralminutesatatime.Thisisnormal.
©CopyrightLenovo2013,201735

8.Whentherecoveryprocesscompletes,theWelcometoMicrosoftWindowsscreenisdisplayed.Follow
theinstructionsonthescreentocompletetheWindowssetup.
9.AfteryouhavecompletedtheWindowssetup,youmightwanttorestoretheoriginalstartupsequence.
StarttheThinkPadSetupprogramandthenpressF9torestorethedefaultsettings.PressF10tosave
changesandexittheThinkPadSetupprogram.
Note:Afterrestoringadrivetothefactorydefaultsettings,youmightneedtoreinstallsomedevicedrivers.
UsingtheWindowsrecoveryprogramsontheWindows8andWindows
8.1operatingsystem
ThissectionprovidesinformationabouttherecoverysolutionsfortheWindows8andWindows8.1
operatingsystem.
AWindowsrecoveryimageispreinstalledintherecoverypartitiononyourcomputer.TheWindowsrecovery
imageenablesyoutorefreshyourcomputer,orresetyourcomputertothefactorydefaultsettings.
YoucancreaterecoverymediaasbackupsorreplacementfortheWindowsrecoveryimage.Withthe
recoverymedia,youcantroubleshootandfixtheproblemsonyourcomputerevenifyoucannotstartthe
Windows8orWindows8.1operatingsystem.Itisrecommendedthatyoucreaterecoverymediaasearlyas
possible.Formoreinformation,see“Creatingandusingrecoverymedia”onpage37.
Refreshingyourcomputer
Ifyourcomputerdoesnotperformwellandtheproblemmightbecausedbyarecentlyinstalledprogram,
youcanrefreshyourcomputerwithoutlosingyourpersonalfilesorchangingyoursettings.
Attention:Ifyourefreshyourcomputer,theprogramsthatcamewithyourcomputerandtheprogramsthat
youinstalledfromWindowsStorewillbereinstalled,butallotherprogramswillberemoved.
Torefreshyourcomputer,dothefollowing:
1.Dependingontheoperatingsystem,dooneofthefollowing:
•ForWindows8:
Moveyourpointertothetop-rightorbottom-rightcornerofthescreentobringupthecharms.Click
Settings➙ChangePCsettings➙General.
•ForWindows8.1:
Moveyourpointertothetop-rightorbottom-rightcornerofthescreentobringupthecharms.Click
Settings➙ChangePCsettings➙Updateandrecovery➙Recovery.
2.IntheRefreshyourPCwithoutaffectingyourfilessection,clickGetstarted.
3.Followtheinstructionsonthescreentorefreshyourcomputer.
Resettingyourcomputertothefactorydefaultsettings
Ifyouwanttorecycleyourcomputerorjuststartover,youcanresetyourcomputertothefactorydefault
settings.Resettingthecomputerwillreinstalltheoperatingsystem,reinstallalltheprogramsthatcamewith
yourcomputer,andresetallthesettingstothefactorydefaultsettings.
Attention:Ifyouresetthecomputertothefactorydefaultsettings,allyourpersonalfilesandsettingswillbe
deleted.Toavoiddataloss,makeabackupcopyofallthedatathatyouwanttokeep.
Toresetyourcomputertothefactorydefaultsettings,dothefollowing:
1.Dependingontheoperatingsystem,dooneofthefollowing:
36HardwareMaintenanceManual

•ForWindows8:
Moveyourpointertothetop-rightorbottom-rightcornerofthescreentobringupthecharms.Click
Settings➙ChangePCsettings➙General.
•ForWindows8.1:
Moveyourpointertothetop-rightorbottom-rightcornerofthescreentobringupthecharms.Click
Settings➙ChangePCsettings➙Updateandrecovery➙Recovery.
2.IntheRemoveeverythingandreinstallWindowssection,clickGetstarted.ThenclickNextto
confirmtheoperation.
3.Dependingonyourneeds,dooneofthefollowing:
•Toperformaquickformat,clickJustremovemyfilestostarttheprocess.Theprocesswilltake
severalminutes.
•Toperformacompleteformat,clickFullycleanthedrivetostarttheprocess.Theprocesswill
takeseveralhours.
4.Followtheinstructionsonthescreentoresetyourcomputertothefactorydefaultsettings.
Usingtheadvancedstartupoptions
Withtheadvancedstartupoptions,youcanchangethefirmwaresettingsofthecomputer,changethe
startupsettingsoftheWindowsoperatingsystem,startthecomputerfromanexternaldevice,orrestorethe
Windowsoperatingsystemfromasystemimage.
Tousetheadvancedstartupoptions,dothefollowing:
1.Dependingontheoperatingsystem,dooneofthefollowing:
•ForWindows8:
Moveyourpointertothetop-rightorbottom-rightcornerofthescreentobringupthecharms.Click
Settings➙ChangePCsettings➙General.
•ForWindows8.1:
Moveyourpointertothetop-rightorbottom-rightcornerofthescreentobringupthecharms.Click
Settings➙ChangePCsettings➙Updateandrecovery➙Recovery.
2.IntheAdvancedstartupsection,clickRestartnow➙Troubleshoot➙Advancedoptions.
3.Selectadesiredstartupoption,thenfollowtheinstructionsonthescreen.
RecoveringyouroperatingsystemifWindows8orWindows8.1fails
tostart
TheWindowsrecoveryenvironmentonyourcomputeriscapableofoperatingindependentlyfromthe
Windows8orWindows8.1operatingsystem.Thisenablesyoutorecoverorrepairtheoperatingsystem
eveniftheWindows8orWindows8.1operatingsystemfailstostart.
Aftertwoconsecutivefailedbootattempts,theWindowsrecoveryenvironmentstartsautomatically.Then
youcanchooserepairandrecoveryoptionsbyfollowingtheinstructionsonthescreen.
Note:Ensurethatyourcomputerisconnectedtoacpowerduringtherecoveryprocess.
Creatingandusingrecoverymedia
YoucancreaterecoverymediaasbackupsfortheWindowsrecoveryenvironmentandtheWindows
recoveryimage.Ifyoucannotstartthecomputer,youcanuserecoverymediatotroubleshootandfixthe
problemsonyourcomputer.
Chapter4.Relatedserviceinformation37

Itisrecommendedthatyoucreaterecoverymediaasearlyaspossible.Onceyoucreaterecoverymedia,
keeptheminasafeplaceanddonotusethemtostoreotherdata.
Creatingrecoverymedia
Tocreaterecoverymedia,youneedaUSBdrivewithatleast16GBofstorage.TherequiredUSBcapacity
dependsonthesizeoftherecoveryimage.
Attention:CreatingrecoverymediawilldeleteanythingstoredontheUSBdrive.Toavoiddataloss,makea
backupcopyofallthedatathatyouwanttokeep.
Tocreaterecoverymedia,dothefollowing:
Note:Ensurethatyourcomputerisconnectedtoacpower.
1.Moveyourpointertothetop-rightorbottom-rightcornerofthescreentobringupthecharms,and
clickSearch.
2.Dependingontheoperatingsystem,dooneofthefollowing:
•ForWindows8:
TyperecoveryintheSearchfieldandclickSettings.ThenclickCreatearecoverydrive.
•ForWindows8.1:
TyperecoveryintheSearchfieldandclicktheSearchbutton.ThenclickCreatearecoverydrive.
3.ClickYesintheUserAccountControlwindowtoallowtheRecoveryMediaCreatorprogramtostart.
4.EnsurethatyouselecttheCopytherecoverypartitionfromthePCtotherecoverydrive.option.
ThenclickNext.
Important:IfyoucleartheCopytherecoverypartitionfromthePCtotherecoverydrive.option,
youwillcreaterecoverymediawithouttherecoverypartitioncontent.Youstillcanstartthecomputer
fromtherecoverymedia,butyoumightbeunabletorecoveryourcomputeriftherecoverypartitionon
yourcomputerisdamaged.
5.ConnectaproperUSBdrivethenclickNext.
6.ClickCreateintheRecoveryDrivewindow.Thecreationoftherecoverymediastarts.
7.Whenthecreationoftherecoverymediafinishes,dooneofthefollowing:
•Tokeeptherecoverypartitiononyourcomputer,clickFinish.
•Todeletetherecoverypartitiononyourcomputer,clickDeletetherecoverypartition.
Attention:Ifyoudeletetherecoverypartitiononyourcomputer,dokeeptherecoverymediaina
safeplace.TheWindowsrecoveryimagewillnotbestoredinyourcomputeranymore,andyouwill
needtherecoverymediatorefreshorresetyourcomputer.
8.RemovetheUSBdrive.Therecoverymediaarecreatedsuccessfully.
Usingrecoverymedia
Ifyoucannotstartyourcomputer,orifyoucannotstarttheWindowsrecoveryimageonyourcomputer,use
recoverymediatorecoveryourcomputer.
Touserecoverymedia,dothefollowing:
Note:Ensurethatyourcomputerisconnectedtoacpower.
1.Turnonorrestartthecomputer.BeforetheWindowsoperatingsystemstarts,repeatedlypresstheF12
key.TheBootMenuwindowopens.
2.Selecttherecoverydriveasthebootdevice.
38HardwareMaintenanceManual

3.Selectapreferredlanguageandthenselectapreferredkeyboardlayout.
4.ClickTroubleshoottodisplaytheoptionalrecoverysolutions.
5.Selectacorrespondingrecoverysolutionaccordingtoyoursituation.Forexample,selectResetyour
PCifyouwanttoresetyourcomputertothefactorydefaultsettings.
FormoreinformationabouttherecoverysolutionsprovidedbytheWindows8andWindows8.1operating
system,goto:
http://go.microsoft.com/fwlink/?LinkID=263800
RecoveryoverviewfortheWindows10operatingsystem
TheWindowsrecoveryprogramsenableyoutoresetyourcomputeroruseadvancedstartupoptions.
ItisrecommendedthatyoucreatearecoveryUSBdriveasearlyaspossible.StoretherecoveryUSBdrive
asabackuporreplacementfortheWindowsrecoveryprograms.
Formoreinformation,see“CreatingandusingarecoveryUSBdrive”onpage40.
Resettingyourcomputer
Ifyourcomputerdoesnotperformwell,youmightconsiderresettingyourcomputer.Intheresettingprocess,
youcanchoosetokeepyourfilesorremovethem,andthenreinstalltheWindowsoperatingsystem.
Toresetyourcomputer,dothefollowing:
Note:Thegraphicaluserinterface(GUI)itemsoftheoperatingsystemmightchangewithoutnotice.
1.OpentheStartmenuandthenclickSettings.IfSettingsisnotdisplayed,clickAllappstodisplayall
programs,andthenclickSettings➙Update&security➙Recovery.
2.IntheResetthisPCsection,clickGetstarted.
3.Followtheinstructionsonthescreentoresetyourcomputer.
Usingadvancedstartupoptions
Withadvancedstartupoptions,youcanchangethefirmwaresettingsofthecomputer,changethestartup
settingsoftheWindowsoperatingsystem,startthecomputerfromanexternaldevice,orrestorethe
Windowsoperatingsystemfromasystemimage.
Touseadvancedstartupoptions,dothefollowing:
Note:TheGUIitemsoftheoperatingsystemmightchangewithoutnotice.
1.OpentheStartmenuandthenclickSettings.IfSettingsisnotdisplayed,clickAllappstodisplayall
programs,andthenclickSettings➙Update&security➙Recovery.
2.IntheAdvancedstartupsection,clickRestartnow➙Troubleshoot➙Advancedoptions.
3.Selectadesiredstartupoption,thenfollowtheinstructionsonthescreen.
RecoveringyouroperatingsystemifWindows10failstostart
TheWindowsrecoveryenvironmentonyourcomputeriscapableofoperatingindependentlyfromthe
Windows10operatingsystem.Thisenablesyoutorecoverorrepairtheoperatingsystemevenifthe
Windows10operatingsystemfailstostart.
Aftertwoconsecutivefailedbootattempts,theWindowsrecoveryenvironmentstartsautomatically.Then
youcanchooserepairandrecoveryoptionsbyfollowingtheinstructionsonthescreen.
Chapter4.Relatedserviceinformation39

Note:Ensurethatyourcomputerisconnectedtoacpowerduringtherecoveryprocess.
CreatingandusingarecoveryUSBdrive
YoucancreatearecoveryUSBdriveasabackupfortheWindowsrecoveryprograms.Withtherecovery
USBdrive,youcantroubleshootandfixtheproblemsevenifthepreinstalledWindowsrecoveryprograms
aredamaged.
CreatingarecoveryUSBdrive
TheUSBdrivethatyouusetocreatetherecoveryUSBdrivemustbeatleast16GBofstorage.Theactual
USBcapacitythatisrequireddependsonthesizeoftherecoveryimage.
Attention:ThecreationprocessdeletesanythingstoredontheUSBdrive.Toavoiddataloss,makea
backupcopyofallthedatathatyouwanttokeep.
TocreatearecoveryUSBdrive,dothefollowing:
Note:Ensurethatyourcomputerisconnectedtoacpowerduringthefollowingprocess.
1.ConnectaproperUSBdrive(atleast16GBofstorage).
2.Typerecoveryinthesearchboxonthetaskbar.ThenclickCreatearecoverydrive.
3.ClickYesintheUserAccountControlwindowtoallowtheRecoveryMediaCreatorprogramtostart.
4.IntheRecoveryDrivewindow,followtheon-screeninstructionstocreatearecoveryUSBdrive.
UsingtherecoveryUSBdrive
Ifyoucannotstartyourcomputer,usetherecoveryUSBdrivetorecoveryourcomputer.
TousearecoveryUSBdrive,dothefollowing:
Note:Ensurethatyourcomputerisconnectedtoacpower.
1.ConnecttherecoveryUSBdrivetothecomputer.
2.Turnonorrestartthecomputer.BeforetheWindowsoperatingsystemstarts,repeatedlypresstheF12
key.TheBootMenuwindowopens.
3.SelecttherecoveryUSBdriveasthebootdevice.
4.Selectapreferredkeyboardlayout.
5.ClickTroubleshoottodisplaytheoptionalrecoverysolutions.
6.Selectacorrespondingrecoverysolutionaccordingtoyoursituation.Thenfollowtheinstructionson
thescreentocompletetheprocess.
Passwords
AsmanyasthreepasswordsmightbeneededforanyThinkPadnotebookcomputer:thepower-on
password,theharddiskpassword,andthesupervisorpassword.
Ifanyofthesepasswordshasbeenset,apromptforitappearsonthescreenwheneverthecomputeris
turnedon.Thecomputerdoesnotstartuntilthepasswordisentered.
Note:Ifonlyansupervisorpasswordisinstalled,thepasswordpromptdoesnotappearwhentheoperating
systemisbooted.
40HardwareMaintenanceManual

Power-onpassword
Apower-onpasswordprotectsthesystemfrombeingpoweredonbyanunauthorizedperson.The
passwordmustbeenteredbeforeanoperatingsystemcanbebooted.Forhowtoremovethepower-on
password,see“Howtoremovethepower-onpassword”onpage41.
Hard-diskpassword
Therearetwohard-diskpasswords:
•Userharddiskpassword—fortheuser
•Masterharddiskpassword—forthesystemadministrator,whocanuseittogetaccesstotheharddisk
eveniftheuserhaschangedtheuserharddiskpassword
Note:Therearetwomodesfortheharddiskpassword:UseronlyandMaster+User.TheMaster+User
moderequirestwoharddiskpasswords;thesystemadministratorentersbothinthesameoperation.The
systemadministratorthenprovidestheuserharddiskpasswordtothesystemuser.
Attention:Iftheuserharddiskpasswordhasbeenforgotten,checkwhetheramasterharddiskpassword
hasbeenset.Ifithas,itcanbeusedforaccesstotheharddiskdrive.Ifnomasterharddiskpasswordis
available,neitherLenovonorLenovoauthorizedservicetechniciansprovideanyservicestoreseteitherthe
userorthemasterharddiskpassword,ortorecoverdatafromtheharddiskdrive.Toputthesystemback
tooperationalstatus,theonlyLenovoandLenovo-authorizedservicesolutionwouldbetoreplacethehard
diskdriveorsolid-statedrivewithascheduledfee.
Forhowtoremovethepower-onpassword,see“Howtoremovethehard-diskpassword”onpage42.
Supervisorpassword
AsupervisorpasswordprotectsthesysteminformationstoredintheBIOSSetupUtility.Theusermustenter
thesupervisorpasswordinordertogetaccesstoThinkPadSetupandchangethesystemconfiguration.
Attention:Ifthesupervisorpasswordhasbeenforgottenandcannotbemadeavailabletotheservice
technician,thereisnoserviceproceduretoresetthepassword.Thesystemboardmustbereplacedfor
ascheduledfee.
Howtoremovethepower-onpassword
Toremoveapower-onpasswordthatyouhaveforgotten,dothefollowing:
(A)Ifnosupervisorpasswordhasbeenset:
1.Turnoffthecomputeranddisconnecttheacpoweradapter.
2.Removethebatterypack.Forhowtoremovethebatterypack,see“1010Batterypack”onpage68.
3.Removethecoin-cellbattery.Forhowtoremovethecoin-cellbattery,see“1080Coin-cellbattery”
onpage77.
4.Connecttheacpoweradapter.TurnonthecomputerandwaituntilthePOSTends.AfterthePOST
ends,thepasswordpromptdoesnotappear.Thepower-onpasswordhasbeenremoved.
5.Reinstallthecoin-cellbatteryandthebatterypack.
(B)Ifansupervisorpasswordhasbeensetandisknownbytheservicetechnician:
1.Turnonthecomputer.
2.WhentheThinkPadlogocomesup,immediatelypressF1.
3.TypethesupervisorpasswordtoentertheThinkPadSetupprogram.
4.SelectSecurity,usingthecursorkeystomovedownthemenu.
Chapter4.Relatedserviceinformation41

5.SelectPassword.
6.SelectPower-OnPassword.
7.TypethecurrentsupervisorpasswordintheEnterCurrentPasswordfield.ThenleavetheEnter
NewPasswordfieldblank,andpressEntertwice.
8.IntheChangeshavebeensavedwindow,pressEnter.
9.PressF10;then,intheSetupconfirmationwindow,selectYes.
Howtoremovethehard-diskpassword
Attention:IfUseronlymodeisselectedandtheuserharddiskpasswordhasbeenforgottenandcannotbe
madeavailabletotheservicetechnician,neitherLenovonorLenovoauthorizedservicetechniciansprovide
anyservicestoresettheuserharddiskpassword,ortorecoverdatafromtheharddiskdrive.Toputthe
systembacktooperationalstatus,theonlyLenovoandLenovo-authorizedservicesolutionwouldbeto
replacetheharddiskdriveorsolid-statedrivewithascheduledfee.
Toremoveauserharddiskpasswordthathasbeenforgotten,whenthesupervisorpasswordandthemaster
harddiskpasswordareknown,dothefollowing:
1.Turnonthecomputer.
2.WhentheThinkPadlogocomesup,immediatelypressF1toenterThinkPadSetup.
3.SelectSecurity,usingthecursorkeystomovedownthemenu.
4.SelectPassword.
5.SelectHard-diskxpassword,wherexistheletteroftheharddiskdrive.Apop-upwindowopens.
6.SelectMasterHDP.
7.TypethecurrentmasterharddiskpasswordintheEnterCurrentPasswordfield.ThenleavetheEnter
NewPasswordfieldblank,andpressEntertwice.
8.PressF10.
9.SelectY esintheSetupconfirmationwindow.Bothuserharddiskpasswordandmasterharddisk
passwordwillhavebeenremoved.
Powermanagement
Toreducepowerconsumption,thecomputerhasthreepowermanagementmodes:screenblank,sleep,
andhibernation.
Screenblankmode(fortheWindows7operatingsystemonly)
Ifthetimesetonthe“Turnoffmonitor”timerintheoperatingsystemexpires,theLCDbacklightturnsoff.
Toputthecomputerintoscreenblankmode,dothefollowing:
1.Right-clickthebatterygaugeinthetaskbar.
2.SelectPoweroffdisplay.
Toendscreenblankmodeandresumenormaloperation,pressanykey.
Sleepmode
Whenthecomputerenterssleepmode,thefollowingeventsoccurinadditiontowhatoccursinscreen
blankmode:
•TheLCDispoweredoff.
•Theharddiskdriveispoweredoff.
•Themicroprocessorstops.
42HardwareMaintenanceManual

Toentersleepmode,dothefollowing:
•ForWindows7:OpentheStartmenu,thenclickthearrownexttotheShutdownbutton.ClickSleep
fromthemenudisplayed.
•ForWindows8andWindows8.1:GototheStartscreenbypressingtheWindowskey,clickthe
powericon,thenclickSleep.
•ForWindows10:OpentheStartmenu,clickPower,andthenclickSleep.
Incertaincircumstances,thecomputergoesintosleepmodeautomatically:
•Afteraperiodofinactivityspecifiedinpowerplansettings
•Whenthebatteryindicatorblinksorange,indicatingthatthebatterypowerislow
Tocausethecomputertoreturnfromsleepmodeandresumeoperation,dooneofthefollowing:
•PresstheFnkey.
•OpentheLCDcover.
•Turnonthepowerbutton.
Also,ineitherofthefollowingevents,thecomputerautomaticallyreturnsfromsleepmodeandresumes
operation:
•Theringindicator(RI)issignaledbyaserialdeviceoraPCCarddevice.
•Thetimesetontheresumetimerelapses.
Note:Thecomputerdoesnotacceptanyinputimmediatelyafteritenterssleepmode.Waitafew
secondsbeforetakinganyactiontoreenteroperationmode.
Hibernationmode
Inhibernationmode,thefollowingoccurs:
•Thesystemstatus,RAM,VRAM,andsetupdataarestoredontheharddisk.
•Thesystemispoweredoff.
Note:Ifthecomputerentersthehibernationmodewhileitisdockedtothedockingstation,donotundockit
beforeresumingnormaloperation.Ifyoudoundockitandthentrytoresumenormaloperation,youwillget
anerrormessage,andyouwillhavetorestartthesystem.
Ifyouhavedefinedoneofthefollowingactionsastheeventthatcausesthesystemtogointohibernation
mode,performthataction.
•Closingthelid.
•Pressingthepowerbutton.
Also,thecomputergoesintohibernationmodeautomaticallyafteraperiodofinactivityspecifiedinpower
plansettings.
Whenthepoweristurnedon,thecomputerreturnsfromhibernationmodeandresumesoperation.The
hibernationfileinthebootrecordontheharddiskdriveisread,andsystemstatusisrestoredfromthe
harddiskdrive.
Symptom-to-FRUindex
Thissectioncontainsfollowinginformation:
•“Numericerrorcodes”onpage44
•“Errormessages”onpage45
Chapter4.Relatedserviceinformation43

•“LCD-relatedsymptoms”onpage46
•“Intermittentproblems”onpage47
•“Undeterminedproblems”onpage47
Thesymptom-to-FRUindexinthissectionlistssymptomsanderrorsandtheirpossiblecauses.Themost
likelycauseislistedfirst,inboldfacetype.
Note:DotheFRUreplacementorotheractionsinthesequenceshowninthecolumnheaded“FRUor
action,insequence.”IfreplacingaFRUdoesnotsolvetheproblem,puttheoriginalpartbackinthe
computer.DonotreplaceanondefectiveFRU.
Thisindexcanalsohelpyoudetermine,duringregularservicing,whatFRUsarelikelytoneedtobe
replacednext.
AnumericerrorisdisplayedforeacherrordetectedinPOSTorsystemoperation.Inthedisplays,ncan
beanynumber.
Ifnonumericcodeisdisplayed,checkthenarrativedescriptionsofsymptoms.Ifthesymptomisnot
describedthere,goto“Intermittentproblems”onpage47.
Note:ForadevicenotsupportedbydiagnosticcodesintheThinkPadnotebookcomputers,seethe
manualforthatdevice.
Numericerrorcodes
Table2.Numericerrorcodes
Symptomorerror(beeps,ifany)FRUoraction,insequence
0177
BadSVPdata,stopPOSTtask.
Replacethesystemboard.
0183
BadCRCofSecuritySettingsinEFIVariable.Enter
ThinkPadSetup.
1.RunThinkPadSetuptocheckthesecurity
settings,andthensavethesettingsbypressing
F10.
2.Systemboard.
0187
EAIAdataaccesserror.
1.RunThinkPadSetuptocheckthesecurity
settings,andthensavethesettingsbypressing
F10.
2.Systemboard.
0188
InvalidRFIDSerializationInformationArea
1.RunThinkPadSetuptoresettheS/NorUUID.
2.Systemboard.
0189
InvalidRFIDConfigurationinformationarea
1.RunThinkPadSetuptoresettheS/NorUUID.
2.Systemboard.
0190
Criticallow-batteryerror
1.Chargethebatterypack.
2.Batterypack.
0191
SystemSecurity-InvalidRemoteChangerequested.
1.RunThinkPadSetup,andthensavecurrent
settingbypressingF10.
2.Systemboard.
0199
SystemSecurity-Securitypasswordretrycount
exceeded.
1.RunThinkPadSetupandcheckthesupervisor
password.
2.Systemboard.
44HardwareMaintenanceManual

Table2.Numericerrorcodes(continued)
Symptomorerror(beeps,ifany)FRUoraction,insequence
0251
SystemCMOSchecksumbad-Defaultconfiguration
used
1.RunThinkPadSetupandresetthesettings.
2.coin-cellbattery
0253
EFIVariableBlockDatawasdestroyed.
ThesystemEFIVariableBlockDatamighthavebeen
corrupted.
0271
RealTimeClockError-CheckDateandTimesettings.
RunThinkPadSetupandresetthedateandtime.
1802
Unauthorizednetworkcardispluggedin-Poweroffand
removethenetworkcard.
1.Removethenetworkcard.
2.Systemboard.
1820
Morethanoneexternalfingerprintreadersareattached.
Poweroffandremoveallbutthereaderthatyousetup
withinyourmainoperatingsystem.
Poweroffandremoveallbutthereaderthatyouset
upwithinyourmainoperatingsystem.
2100
DetectionerroronHDD0(MainHDD)
1.Reseattheharddiskdrive.
2.Replacethemainharddiskdrive.
3.Replacethesystemboard.
2102
DetectionerroronSSD(M.2)
1.ReseattheM.2solidstatedrive.
2.ReplacetheM.2solidstatedrive.
3.Replacethesystemboard.
2110
ReaderroronHDD0(MainHDD)
1.Reseattheharddiskdrive.
2.Replacethemainharddiskdrive.
3.Replacethesystemboard.
2112
ReaderroronSSD(M.2)
1.ReseattheM.2solidstatedrive.
2.ReplacetheM.2solidstatedrive.
3.Replacethesystemboard.
2200
MachineTypeandSerialNumberareinvalid.
Systemboard.
2201
MachineUUIDisinvalid.
Systemboard.
Errormessages
Table3.Errormessages
Symptomorerror(beeps,ifany)FRUoraction,insequence
Fanerror1.Thermal-fanassembly.
2.Thermalgrease.
3.Systemboard.
ThermalsensingerrorThethermalsensorhasproblem.Shutdownthe
computerimmediatelyandhavethecomputer
serviced.
TheconnectedACadapterhasalowerwattagethan
therecommendedmodelwhichwasshippedwiththe
system.T obootwiththeACadapter,pleaseconnectthe
ACadapterwhichwasshippedwiththesystem.
PressEsctocontinue.
Usetheacadaptershippedwiththecomputer.
Chapter4.Relatedserviceinformation45

Table3.Errormessages(continued)
Symptomorerror(beeps,ifany)FRUoraction,insequence
TheconnectedACadapterhasalowerwattagethanthe
recommendedmodelwhichwasshippedwiththesystem.
Systemisgoingtoshutdown...
Usetheacadaptershippedwiththecomputer.
Unknownadapterisconnectedsystem.Tobootwiththe
ACadapter,pleaseconnectcorrectACadapterwiththe
system.
PressEsctocontinue.
Usetheacadaptershippedwiththecomputer.
Unknownadapterisconnectedthesystem.Please
connectcorrectACadapterwiththesystem.
Systemisgoingtoshutdown....
Usetheacadaptershippedwiththecomputer.
Thebatteryinstalledisnotsupportedbythissystemand
willnotcharge.Pleasereplacethebatterywiththecorrect
Lenovobatteryforthissystem.
PresstheESCkeytocontinue.
ReplacethebatterywiththecorrectLenovobattery
forthissystem.
Thissystemdoesnotsupportbatteriesthatarenot
genuineLenovo-madeorauthorized.Thesystemwill
continuetoboot,butmaynotchargeunauthorized
batteries.
Attention:Lenovohasnoresponsibilityforthe
performanceorsafetyofunauthorizedbatteries,and
providesnowarrantiesforfailuresordamagearisingout
oftheiruse.
ReplacethebatterywiththecorrectLenovobattery
forthissystem.
Beeperrors
Table4.Beeperrors
ProblemSolution
Oneshortbeep,pause,threeshortbeeps,pause,three
moreshortbeeps,pause,andoneshortbeep
Shutdownthecomputerimmediately.Ensurethat
memorymodulesareinstalledcorrectly.Iftheyare,and
youstillhearthebeeps,havethecomputerserviced.
OnelongandtwoshortbeepsThevideofunctionhasaproblem.Havethecomputer
serviced.
FourcyclesoffourshortbeepsShutdownthecomputerimmediatelyandhavethe
computerserviced.
Fiveshortbeeps,pause,fivemoreshortbeeps,pauseContinuetobootimmediatelywhentheerrorisdetected
FiveshortbeepsShutdownthecomputerimmediatelyandhavethe
computerserviced.
Threeshortbeeps,pause,oneshortbeep,pause,one
moreshortbeep,pause,andthreeshortbeeps
Shutdownthecomputerimmediately.Ensurethat
wirelesscardsareinstalledcorrectly.Iftheyare,andyou
stillhearthebeeps,havethecomputerserviced.
LCD-relatedsymptoms
Important:TheTFTLCDforthenotebookcomputercontainsmanythin-filmtransistors(TFTs).The
presenceofasmallnumberofdotsthataremissing,discolored,oralwayslightedischaracteristicofTFT
LCDtechnology,butexcessivepixelproblemscancauseviewingconcerns.
IftheLCDyouareservicinghastwoorlessvisibledefectivepixels,itshouldnotbeconsideredfaulty.
However,iftheLCDhasthreeormorevisibledefectivepixels,itwillbedeemedasdefectivebyLenovoand
itshouldbereplaced.
46HardwareMaintenanceManual

Notes:
•ThispolicyappliestoallThinkPadnotebookcomputerspurchasedon1January,2008orlater.
•LenovowillnotprovidewarrantyreplacementiftheLCDiswithinspecificationsbecausewecannot
guaranteethatanyreplacementLCDwillhavezeropixeldefects.
•OnepixelconsistsofR,G,Bsub-pixels.
Table5.LCD-relatedsymptoms
SymptomorerrorFRUoraction,insequence
Nobeep,power-onindicatoron,andablankLCDduring
POST.
Systemboard.
•LCDbacklightnotworking.
•LCDtoodark.
•LCDbrightnesscannotbeadjusted.
•LCDcontrastcannotbeadjusted.
1.ReseattheLCDconnectors.
2.LCDassembly.
3.Systemboard.
•LCDscreenunreadable.
•Charactersmissingpixels.
•Screenabnormal.
•Wrongcolordisplayed.
1.Seeimportantnotefor“LCD-relatedsymptoms.”
2.ReseatallLCDconnectors.
3.LCDassembly.
4.Systemboard.
HorizontalorverticallinesdisplayedonLCD.LCDassembly.
Intermittentproblems
Intermittentsystemhangproblemscanbeduetoavarietyofcausesthathavenothingtodowithahardware
defect,suchascosmicradiation,electrostaticdischarge,orsoftwareerrors.FRUreplacementshouldbe
consideredonlywhenaproblemrecurs.
Undeterminedproblems
Ifthediagnostictestsdidnotidentifythedevicethathasfailed,ifwrongdevicesareinstalled,orifthe
systemsimplyisnotoperating,followtheseprocedurestoisolatethefailingFRU(donotisolateFRUs
thathavenodefects).
Verifythatallattacheddevicesaresupportedbythecomputer.
Verifythatthepowersupplybeingusedatthetimeofthefailureisoperatingcorrectly.(See“Powersystem
checkout”onpage32.)
1.Turnoffthecomputer.
2.VisuallycheckeachFRUfordamage.ReplaceanydamagedFRU.
3.Removeordisconnectallofthefollowingdevices:
a.Non-ThinkPaddevices
b.Devicesattachedtothedockingstationortheportreplicator
c.Printer,mouse,andotherexternaldevices
d.Batterypack
e.Harddiskdrive
f.Opticaldrive
g.Memorymoduleunderthebottomcover(ifthereisone)
h.PCcards
4.Turnonthecomputer.
5.Determinewhethertheproblemhasbeensolved.
6.Iftheproblemdoesnotrecur,reconnecttheremoveddevicesoneatatimeuntilyoufindthefailingFRU.
7.Iftheproblemremains,replacethefollowingFRUsoneatatime(donotreplaceanon-defectiveFRU):
Chapter4.Relatedserviceinformation47

a.Systemboard
b.LCDassembly
48HardwareMaintenanceManual

Chapter5.Statusindicators
Thischapterpresentsthesystemstatusindicatorsthatshowthestatusofthecomputer.
ThinkPadL440statusindicators
32
4
1
5
6
©CopyrightLenovo2013,201749
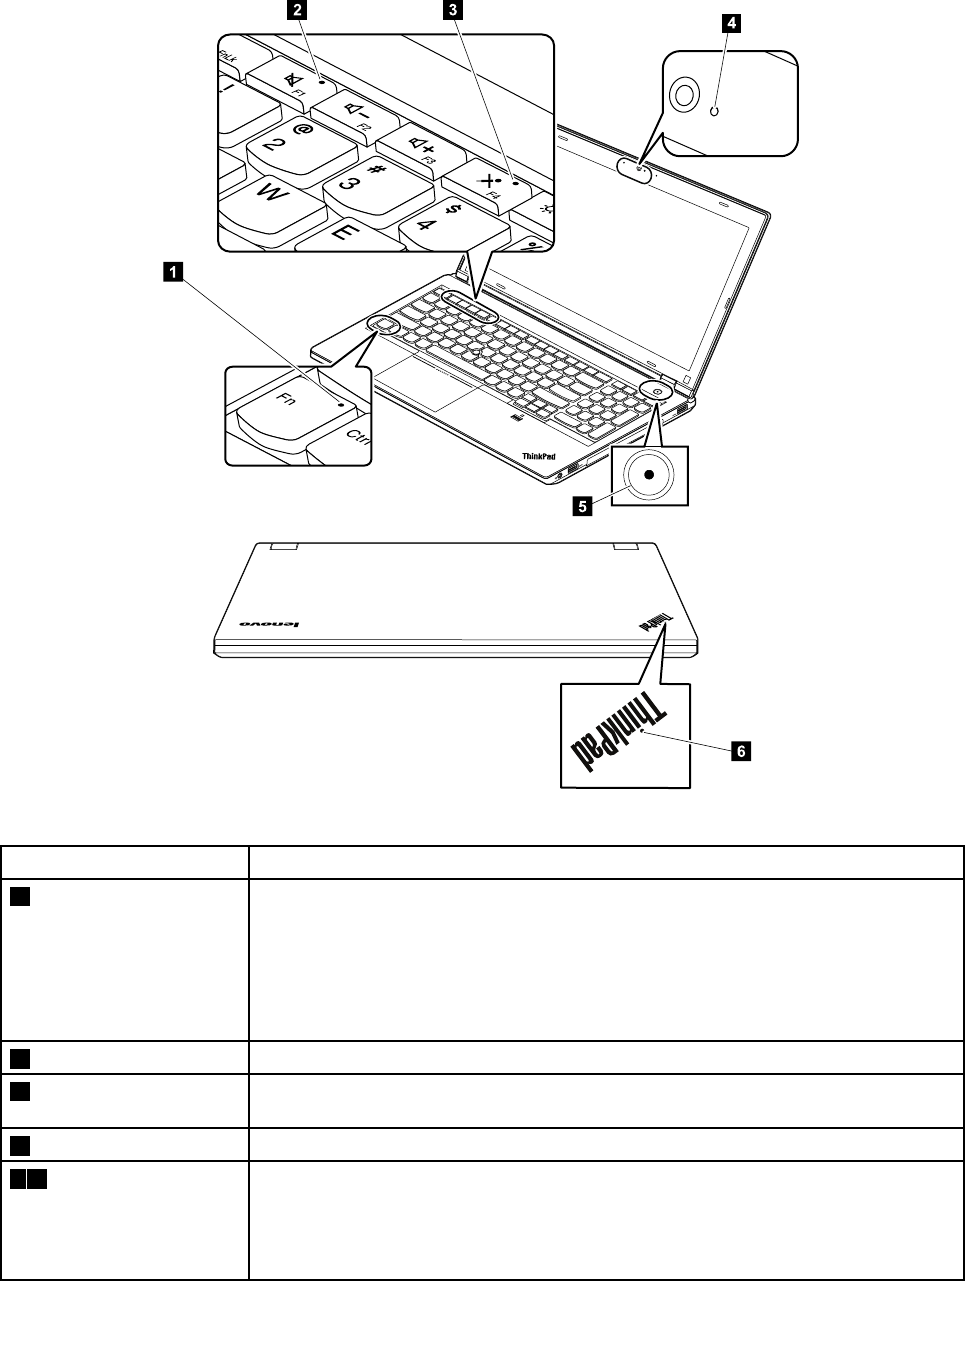
ThinkPadL540statusindicators
32
4
1
5
6
Table6.Statusindicators
IndicatorIndicatorbehavioranddescription
1FnLockindicatorOff(defaultmode):TheFnLockfunctionisdisabled.T oinitiatethespecialfunction
ofeachkey,pressthefunctionkeydirectly.ToinputF1-F12,presstheFnkeyand
thecorrespondingfunctionkey.
On(legacymode):TheFnLockfunctionisenabled.ToinputF1-F12,pressthe
correspondingfunctionkeydirectly.Toinitiatethespecialfunctionofeachfunction
key,presstheFnkeyandthecorrespondingfunctionkey.
2Speaker-muteindicatorWhenthespeaker-muteindicatorison,thespeakersaremuted.
3Microphone-mute
indicator
Whenthemicrophone-muteindicatorison,themicrophonesaremuted.
4CamerastatusindicatorWhenthecamerastatusindicatorison,thecameraisinuse.
56SystemstatusindicatorBlinksforthreetimes:Thecomputerisinitiallyconnectedtopower.
On:Thecomputerison(innormalmode).
Blinksfast:Thecomputerisenteringsleeporhibernationmode.
Blinksslowly:Thecomputerisinsleepmode.
Off:Thecomputerisofforinhibernationmode.
50HardwareMaintenanceManual

Chapter6.Fnkeycombinations
ThefollowingtabledescribesthefunctionsofFnkeycombinations.
Table7.Functionkeysandkeycombinations
Functionkeysand
keycombinations
Description
Fn+EscYoucanconfiguretheFnkeyandfunctionkeysintheKeyboardPropertieswindowby
doingthefollowing:
1.GotoControlPanel.ChangetheviewofControlPanelfromCategorytoLargeicons
orSmallicons.
2.ClickKeyboard.IntheKeyboardPropertieswindow,clicktheFnandfunctionkeys
orThinkPadF1–F12keystab.
3.Selecttheoptionsofyourpreference.
PressFn+EsctoenableordisabletheFnLockfunction.
•WhentheFnLockfunctionisdisabled:TheFnLockindicatorisoff.Toinitiatethespecial
functionprintedasanicononeachfunctionkey,pressthecorrespondingfunctionkey
directly.ToinputF1-F12,presstheFnkeyandthecorrespondingfunctionkey.
•WhentheFnLockfunctionisenabled:TheFnLockindicatorturnson.ToinputF1-F12,
pressthecorrespondingfunctionkeydirectly.Toinitiatethespecialfunctionprintedasan
icononeachfunctionkey,presstheFnkeyandthecorrespondingfunctionkey.
F1Speakermute
F2Speakervolumedown
F3Speakervolumeup
F4Microphonemute
F5Brightnessdown
F6Brightnessup
F7Switchesadisplayoutputlocation.
F8Enablesordisableswirelessfeatures.
F9ForWindows10:OpenstheSettingswindow.
ForWindows8andWindows8.1:OpenstheSettingscharm.
ForWindows7:OpensControlPanel.
F10ForWindows10:OpenstheCortana®searchbox.
ForWindows8andWindows8.1:OpenstheSearchcharm.
ForWindows7:OpensWindowsSearch.
F11Viewsallapplicationsthatarecurrentlyopen.
F12ForWindows10,Windows8.1,andWindows8:Viewsalltheprograms.
ForWindows7:OpensComputer.
Fn+SpacebarControlsthekeyboardbacklight.
Therearethreemodesforthekeyboardbacklight:Off,Low,andHigh.PressFn+Spacebarto
changethemodesofthekeyboardbacklight.
Fn+BHasthesamefunctionastheBreakkeyonaconventionalkeyboard.
Fn+PHasthesamefunctionasthePausekeyonaconventionalkeyboard.
Fn+SHasthesamefunctionastheSysRqkeyonaconventionalkeyboard.
©CopyrightLenovo2013,201751

Table7.Functionkeysandkeycombinations(continued)
Functionkeysand
keycombinations
Description
Fn+KHasthesamefunctionastheScrLKkeyonaconventionalkeyboard.
Fn+EndHasthesamefunctionastheInsertkeyonaconventionalkeyboard.
Fn+4Putsyourcomputerintosleepmode.Toreturntonormaloperation,presstheFnkeyonly.
52HardwareMaintenanceManual
Chapter7.Locations
Thischapterintroducesthelocationsofsomecomputerhardwarecomponents.
Locatingcomputercontrols,connectors,andindicators
Thissectionintroducesthelocationsofthecomputercontrols,connectors,andindicators.
ThinkPadL440overview
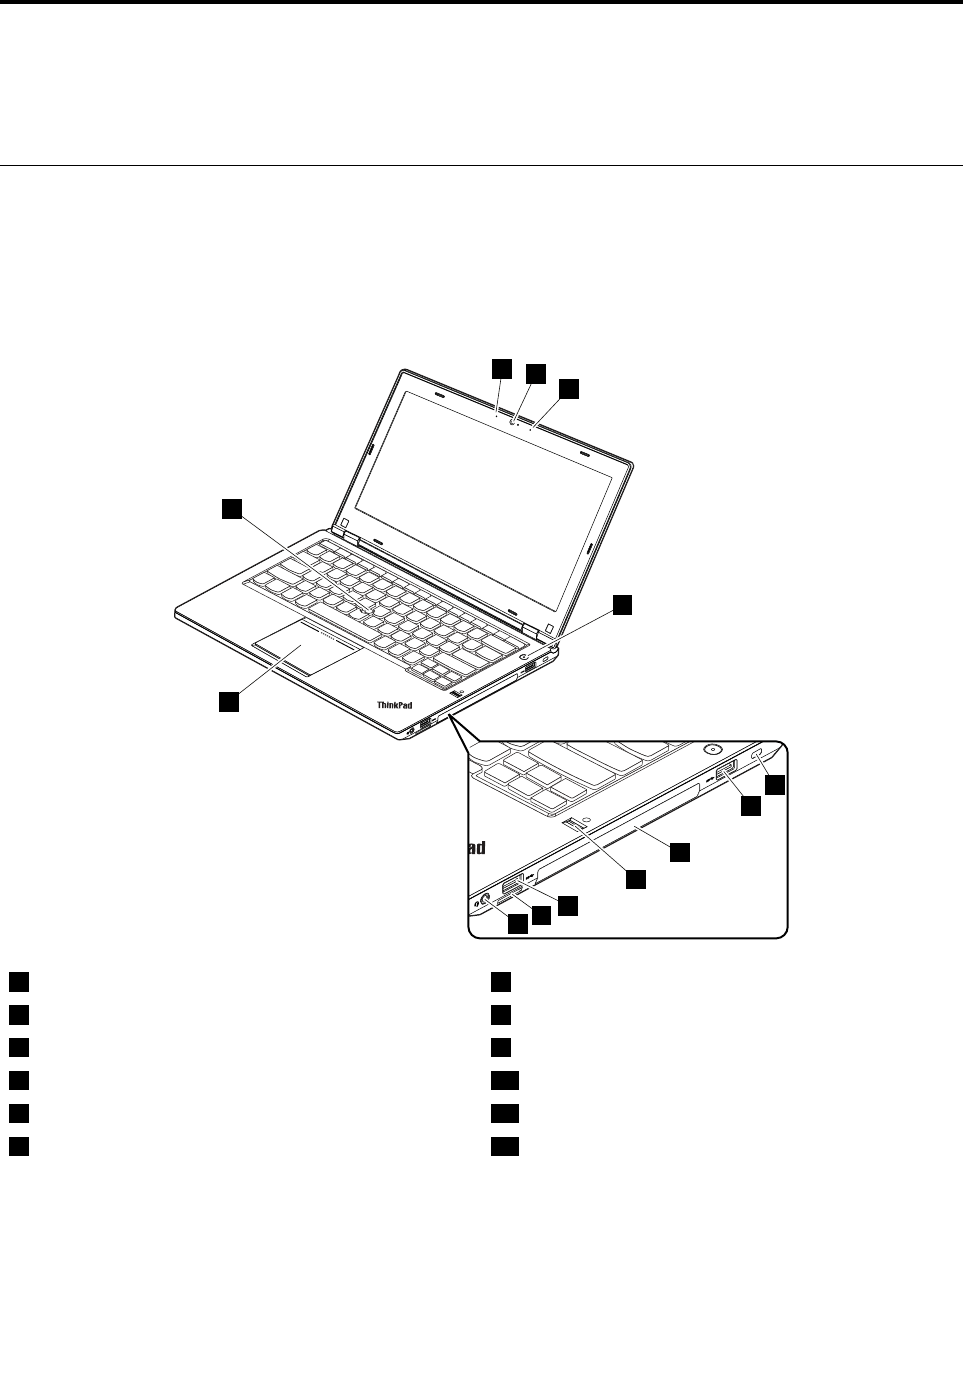
ThinkPadL440frontview
2
2
1
3
4
5
6
8
7
10
11
12
9
1Camera(onsomemodels)7Fingerprintreader(onsomemodels)
2Microphones(onsomemodels)8USB2.0connector
3Powerbutton9Mediacardreader
4Security-lockslot10Audioconnector
5USB2.0connector11ThinkPadtrackpad
6Opticaldrive(onsomemodels)12TrackPoint®pointingstick
©CopyrightLenovo2013,201753
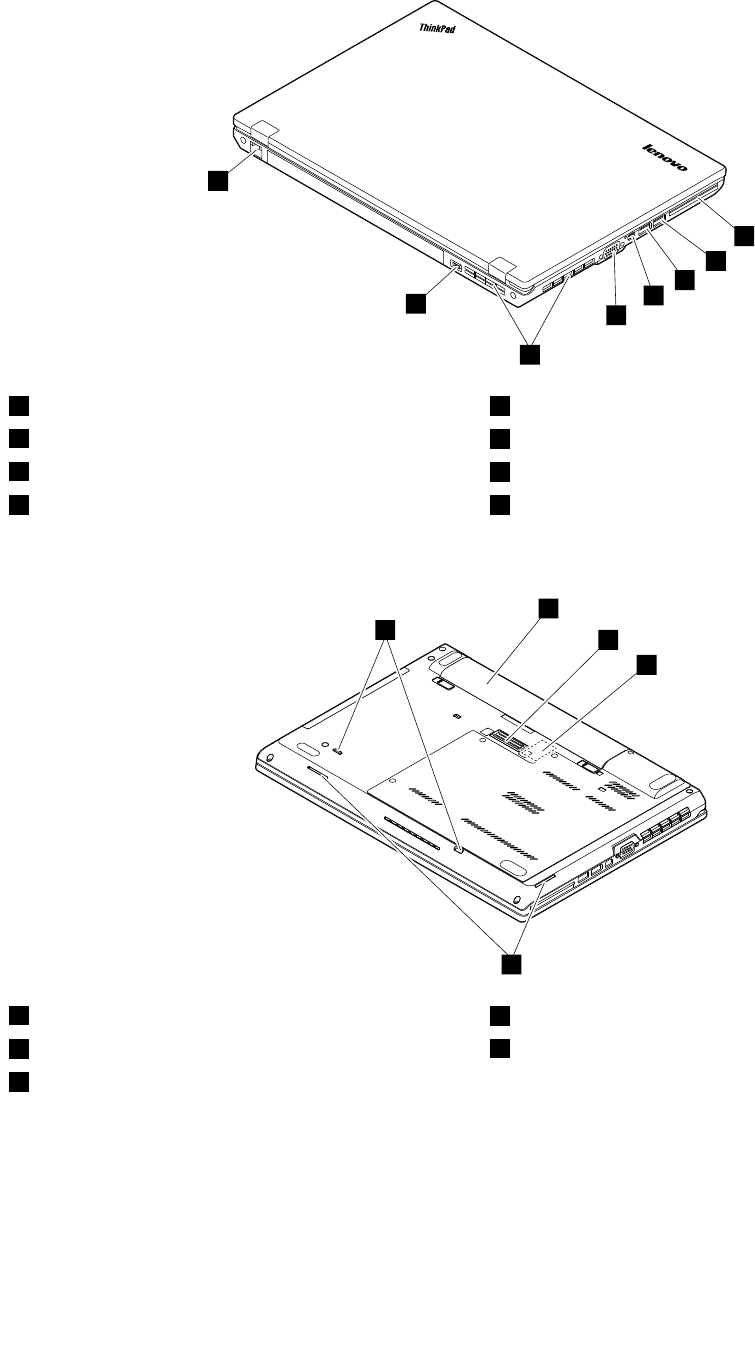
ThinkPadL440rearview
1
2
4
5
6
7
8
3
1Ethernetconnector5MiniDisplayPort®connector
2Powerconnector6Always-onUSB3.0connector
3Fanlouvers7USB2.0connector
4Videographicsarray(VGA)connector8ExpressCardreaderorsmartcardreader(onsome
models)
ThinkPadL440bottomview
1
2
3
4
5
1Batterypack4Speakers
2Dockingstationconnector(onsomemodels)5Keyboarddrainageholes
3SIMcardreader(onsomemodels)
54HardwareMaintenanceManual

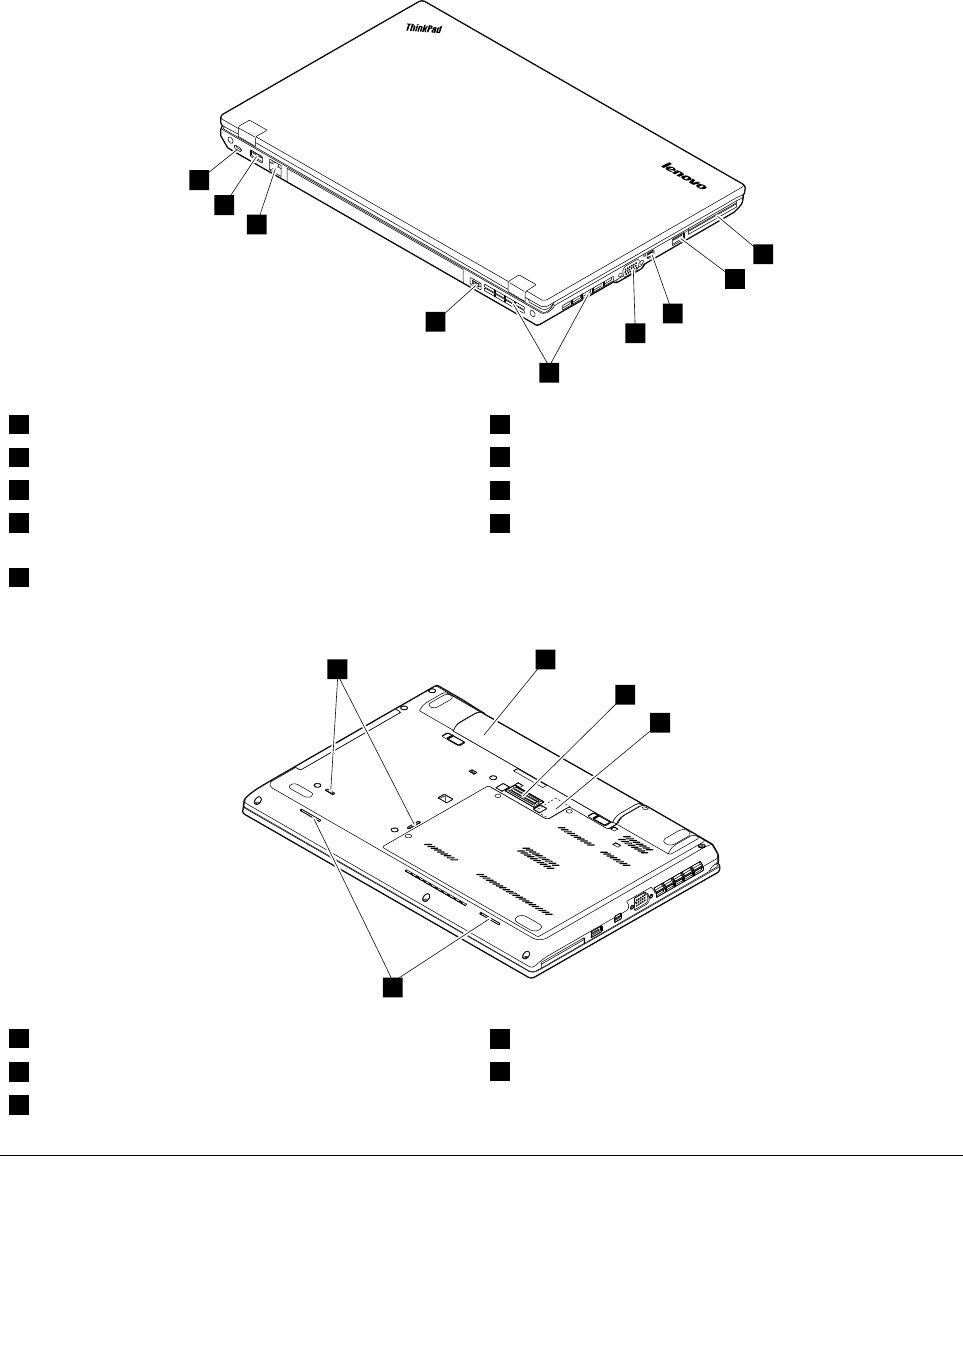
ThinkPadL540rearview
1
2
3
4
6
7
8
9
5
1Security-lockslot6VGAconnector
2USB2.0connector7MiniDisplayPortconnector
3Ethernetconnector8Always-onUSB3.0connector
4Powerconnector9ExpressCardreaderorsmartcardreader(onsome
models)
5Fanlouvers
ThinkPadL540bottomview
4
1
2
3
5
1Batterypack4Speakers
2Dockingstationconnector(onsomemodels)5Keyboarddrainageholes
3SIMcardreader(onsomemodels)
LocatingFRUsandCRUs
Thistopicintroducesthefollowingserviceparts:
•“MajorFRUsandCRUs”onpage58
•“LCDFRUsandCRUs”onpage60
56HardwareMaintenanceManual

Notes:
•EachFRUisavailableforalltypesormodels,unlessotherwisespecified.
•FRUsmarkedwithOPareavailableasoptions.
•CRUstatementforcustomers:
Youcanresolvesomeproblemswithyourproductwithareplacementpartyoucaninstallyourself,calleda
“CustomerReplaceableUnit”or“CRU.”SomeCRUsaredesignatedasself-serviceCRUsandothersare
designatedasoptional-serviceCRUs.Installationofself-serviceCRUsisyourresponsibility.Foroptional-service
CRUs,youcaneitherinstalltheCRUyourselforyoucanrequestthataServiceProviderinstalltheCRUaccording
tothewarrantyserviceforyourproduct.IfyouintendoninstallingtheCRU,LenovowillshiptheCRUtoyou.CRU
informationandreplacementinstructionsareshippedwithyourproductandareavailablefromLenovoatanytime
uponrequest.YoucanfindalistofCRUsforyourproductinthisHardwareMaintenanceManual.Anelectronic
versionofthismanualcanbefoundathttp://www.lenovo.com/support.ClickUserGuides&Manualsandthen
followtheon-screeninstructionstofindthemanualforyourproduct.Youmightberequiredtoreturnthedefective
partthatisreplacedbytheCRU.Whenreturnisrequired:(1)returninstructions,aprepaidshippinglabel,anda
containerwillbeincludedwiththereplacementCRU;and(2)youmightbechargedforthereplacementCRUif
LenovodoesnotreceivethedefectiveCRUwithinthirty(30)daysofyourreceiptofthereplacementCRU.Seeyour
LenovoLimitedWarrantydocumentationforfulldetails.
ThinkPadcomputerscontainthefollowingtypesofCRUs:
–Self-serviceCRUs:TheseCRUsunplugorareheldbynomorethantwoscrews.Examplesofthesetypes
ofCRUsincludetheacpoweradapter,powercord,battery,andharddiskdrive.Otherself-serviceCRUs
dependingonproductdesignmightincludethememorymodule,wirelesscard,keyboard,andpalmrest
withfingerprintreaderandtouchpad.
–Optional-serviceCRUs:TheseCRUsareisolatedpartswithinthecomputerthatareconcealedbyanaccess
panelthatistypicallysecuredbymorethantwoscrews.Oncetheaccesspanelisremoved,thespecific
CRUisvisible.
Chapter7.Locations57
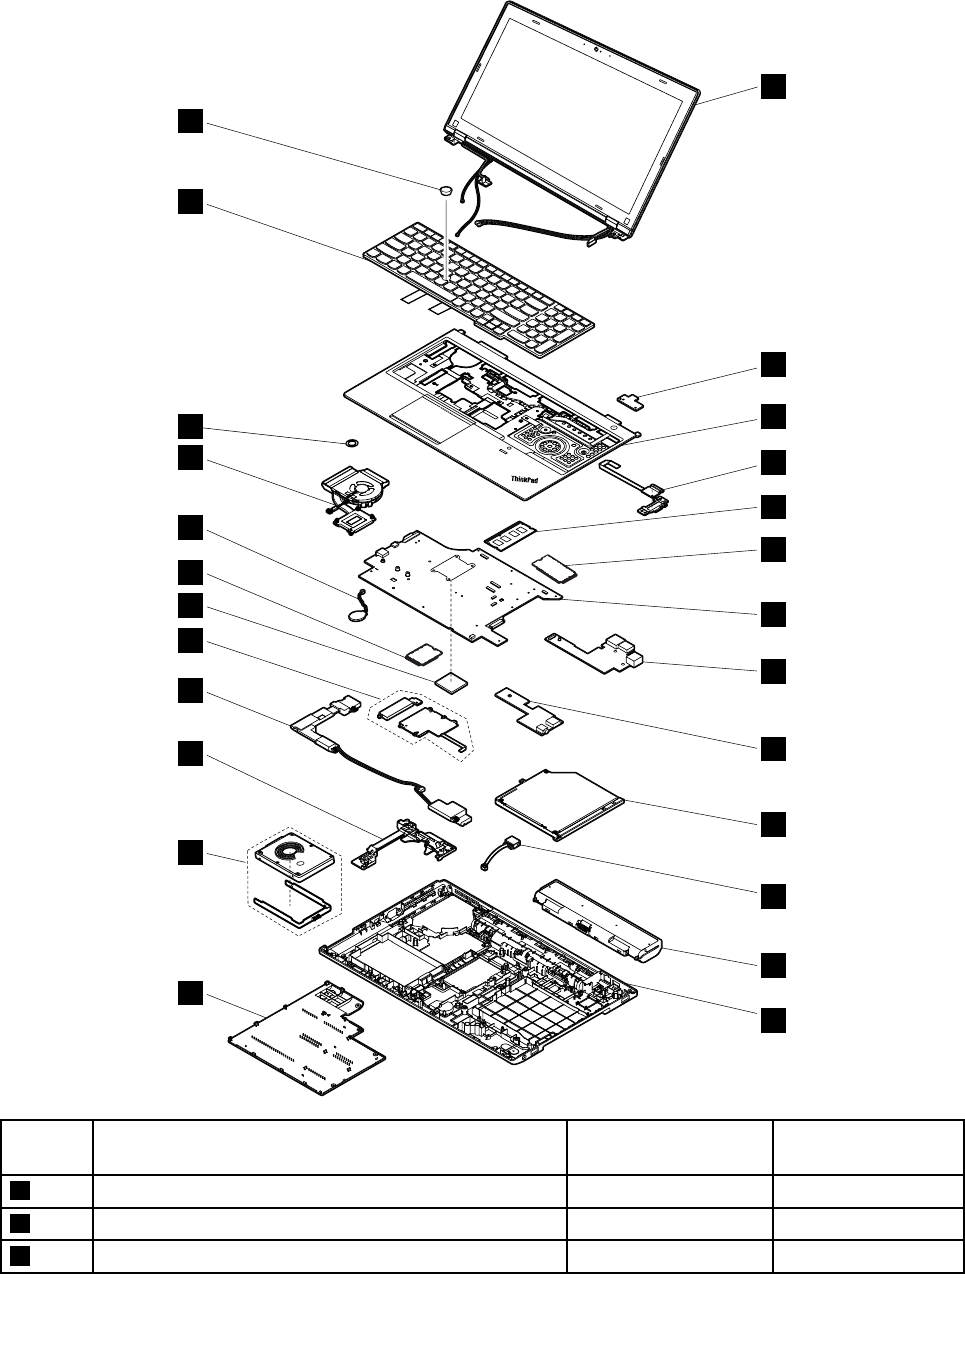
MajorFRUsandCRUs
22
21
24
23
25
18
19
20
14
15
16
17
1
5
6
2
4
3
7
8
9
11
10
12
13
No.DescriptionSelf-serviceCRUOptional-service
CRU
1LCDunitNoNo
2PowerbuttoncardNoNo
3KeyboardbezelassemblyNoNo
58HardwareMaintenanceManual

No.DescriptionSelf-serviceCRUOptional-service
CRU
4Fingerprintreaderassembly(fingerprintreader,finger
printreadercable,andfingerprintreaderbracket)
NoNo
5MemorymoduleYesNo
6Wireless-wide-area-network(WWAN)cardYesNo
6M.2solid-statedriveNoNo
7SystemboardassemblyNoNo
8RJ45cardNoNo
9AudioboardNoNo
10OpticaldriveordummyopticaldriveYesNo
11dc-incableassemblyNoNo
12BatterypackYesNo
13BasecoverassemblyNoNo
14BottomdoorYesNo
15Harddiskdriveassemblyorsolid-statedriveassemblyYesNo
16Hingebracket(left)NoNo
17SpeakerassemblyNoNo
18Smartcardassembly(smartcardreaderandsmartcard
door)ordummysmartcard
NoNo
19MicroprocessorNoNo
20Wireless-local-area-network(WLAN)cardYesNo
21Coin-cellbatteryYesNo
22Thermal-fanassemblyNoNo
23Rubberringforthermal-fanassembly,ThinkPadL540
only
NoNo
24KeyboardNoYes
25TrackpointcapYesNo
Chapter7.Locations59
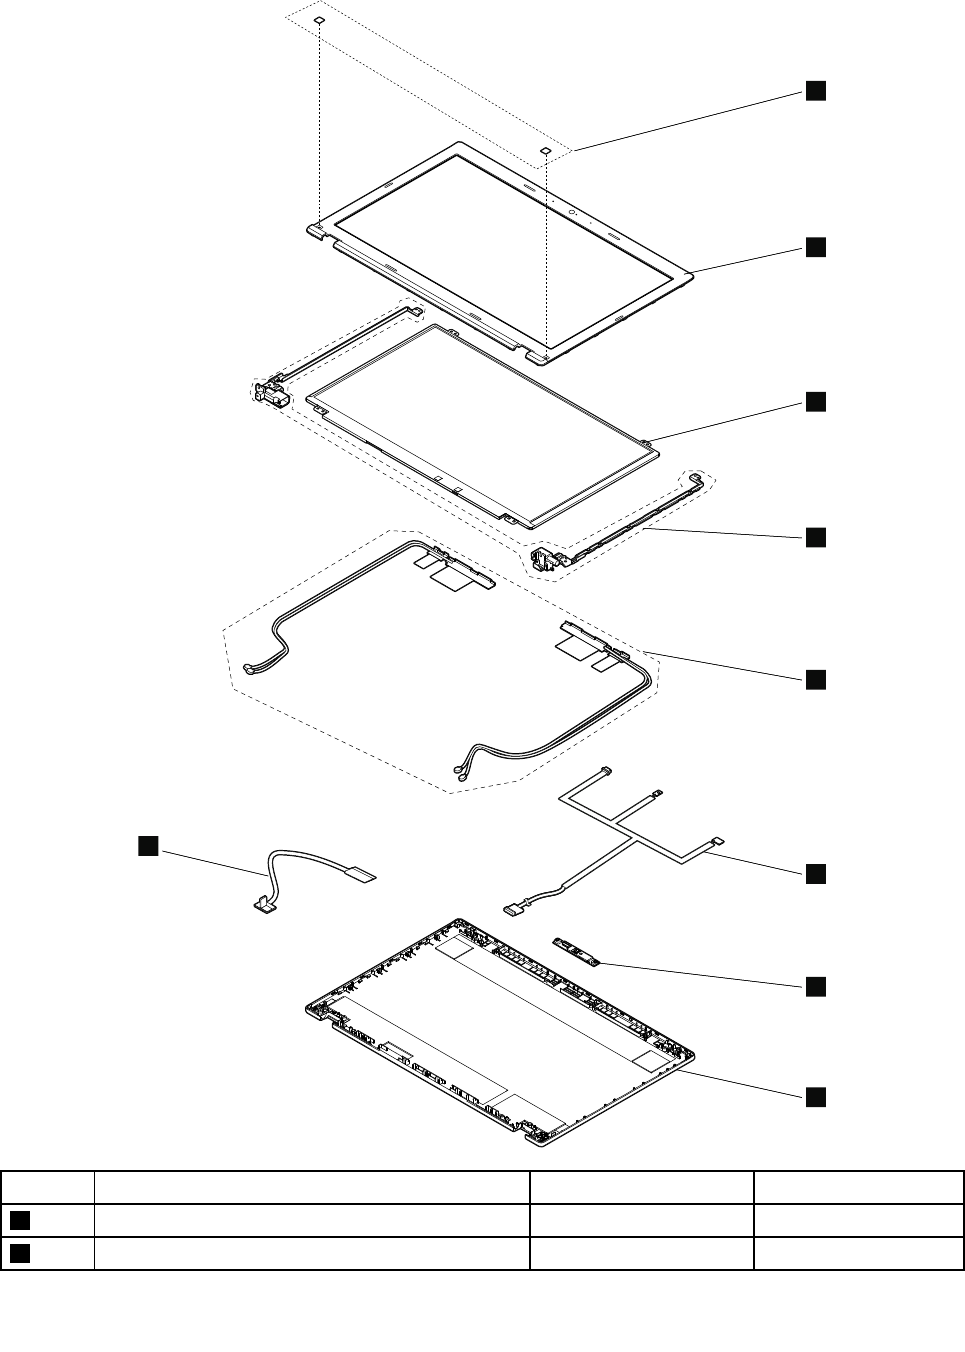
LCDFRUsandCRUs
2
8
2
9
2
2
2
1
2
3
2
4
2
5
2
6
2
7
No.DescriptionSelf-serviceCRUOptional-serviceCRU
1ScrewcapsNoNo
2LCDfrontbezelNoNo
60HardwareMaintenanceManual

No.DescriptionSelf-serviceCRUOptional-serviceCRU
3LCDpanelNoNo
4HingesNoNo
5WLANantennaassemblyorWLAN/WWANantenna
assembly(dependingonthemodel)
NoNo
6LEDboardandcableassemblyNoNo
7Cameracard,camera/microphonecombocard,or
microphonecard(dependingonthemodel)
NoNo
8LCDrearcoverassemblyNoNo
9LCDcableNoNo
MiscellaneouskitsandotherFRUs
Miscellaneouskits
FRUdescriptionSelf-serviceCRUOptionalservice
CRU
ScrewcapkitNN
ScrewkitforThinkPadL440
•M2*L3.5mm(27)
•M2.5*L5mm(7)
•M2*L3.5mm(2)
•HEXScrew(2)
•M2.5*L4.4+2.5mm(4)
•M2*L2mm(2)
•M2*L6mm(10)
•M2*L12mm(3)
•M2*L4.9mm(4)
•M2*L2mm(5)
•M2.5*L3.5mm(4)
•M2*L3mm(2)
NN
ScrewkitforThinkPadL540
•M2*L6mm(11)
•M2*L4.9mm(4)
•M2*L3.5mm(23)
•M2.5*L4mm(6)
•M2.5*L5mm(8)
•M2*L2mm(5)
•M2*L2mm(2)
•HEXScrew(2)
•M2*L12mm(2)
•M2*L5mm(7)
•M2*L3mm(2)
•M2*L2.5mm(4)
•M2*L3.5mm(2)
•M2*L3mm(2)
•M2.5*L4.4+2.5mm(4)
NN
Chapter7.Locations61

Chapter8.FRUreplacementnotices
Thischapterpresentsnoticesrelatedtoremovingandreplacingparts.Readthischaptercarefullybefore
replacinganyFRU.
CRUstatementforcustomers:
Youcanresolvesomeproblemswithyourproductwithareplacementpartyoucaninstallyourself,calleda“Customer
ReplaceableUnit”or“CRU.”SomeCRUsaredesignatedasself-serviceCRUsandothersaredesignatedas
optional-serviceCRUs.Installationofself-serviceCRUsisyourresponsibility.Foroptional-serviceCRUs,youcan
eitherinstalltheCRUyourselforyoucanrequestthataServiceProviderinstalltheCRUaccordingtothewarranty
serviceforyourproduct.IfyouintendoninstallingtheCRU,LenovowillshiptheCRUtoyou.CRUinformationand
replacementinstructionsareshippedwithyourproductandareavailablefromLenovoatanytimeuponrequest.
YoucanfindalistofCRUsforyourproductinthisHardwareMaintenanceManual.Anelectronicversionofthis
manualcanbefoundathttp://www.lenovo.com/support.ClickUserGuides&Manualsandthenfollowthe
on-screeninstructionstofindthemanualforyourproduct.Y oumightberequiredtoreturnthedefectivepartthat
isreplacedbytheCRU.Whenreturnisrequired:(1)returninstructions,aprepaidshippinglabel,andacontainer
willbeincludedwiththereplacementCRU;and(2)youmightbechargedforthereplacementCRUifLenovodoes
notreceivethedefectiveCRUwithinthirty(30)daysofyourreceiptofthereplacementCRU.SeeyourLenovo
LimitedWarrantydocumentationforfulldetails.
Screwnotices
Loosescrewscancauseareliabilityproblem.IntheThinkPadnotebookcomputer,thisproblemisaddressed
withspecialnylon-coatedscrewsthathavethefollowingcharacteristics:
•Theymaintaintightconnections.
•Theydonoteasilycomeloose,evenwithshockorvibration.
•Theyarehardertotighten.
Dothefollowingwhenyouservicethismachine:
•Keepthescrewkitinyourtoolbag.Forthepartnumberofthescrewkit,goto
http://www.lenovo.com/serviceparts-lookup.
•Itisrecommendedtousenewscrews.
•Itisrecommendedtouseeachscrewonlyonce.
•Useatorquescrewdriverifyouhaveone.
Tightenscrewsasfollows:
•Plastictoplastic
Turnanadditional90degreesafterthescrewheadtouchesthesurfaceoftheplasticpart.
•Logiccardtoplastic
Turnanadditional180degreesafterthescrewheadtouchesthesurfaceofthelogiccard.
©CopyrightLenovo2013,201763

Notes:
•Ensurethatyouusethecorrectscrew.Itisrecommendedtousenewscrewsforreplacements.Ifyou
haveatorquescrewdriver,tightenallscrewsfirmlytothetorquespecifiedinthescrewinformation
tableforeachstep.
•Ensuretorquescrewdriversarecalibratedcorrectlyfollowingcountryspecifications.
Retainingserialnumbers
Thistopicprovidesinstructionsonthefollowing:
•“Restoringtheserialnumberofthesystemunit”onpage64
•“RetainingtheUUID”onpage65
Restoringtheserialnumberofthesystemunit
Whenthecomputerwasmanufactured,theEEPROMonthesystemboardwasloadedwiththeserial
numbersofthesystemandallmajorcomponents.Thesenumbersneedtoremainthesamethroughout
thelifeofthecomputer.
Ifyoureplacethesystemboard,youmustrestoretheserialnumberofthesystemunittoitsoriginalvalue.
Theserialnumberofthesystemunitiswrittenonthelabelattachedtothebottomofthecomputer.
Ifyoucannotfindtheserialnumberofthesystemunitonthebottomofthecomputer,trythefollowing
methodtogetthenumber:
Note:Beforeyouperformtheoperation,ensurethattheUEFI/LegacysettingwithintheStartupmenuin
theThinkPadSetupprogramissettoUEFIOnly.
1.ConnectaUSBmemorykeytothecomputer.
2.Gotohttp://www.lenovo.com/maintenanceutilitiesandfollowtheinstructionsonthescreentocreatea
MaintenanceKey.
Note:OnlyanauthorizedLenovoservicetechniciancanaccesstheaboveWebsite.
3.Restartthecomputer.
4.Whenthelogoisdisplayed,pressEsc.TheThinkPadConfigInformationUpdateUtilityinterfaceis
displayed.
5.Type1underEntertheactiondesired,thenpressEnter.TheThinkPadSerialNumberUpdateUtilityfor
AssetIDscreenisdisplayed.
6.Type2underEntertheactiondesired,thenpressEnter.Theserialnumberofeachdeviceinyour
computerisdisplayed;theserialnumberofthesystemunitislistedasfollow:
20-Serialnumber
7.Recordtheserialnumberofthesystemunit.
Afteryoureplacethesystemboard,dothefollowingtorestoretheserialnumberofthesystemunit:
1.ConnecttheMaintenanceKeytothecomputer.
64HardwareMaintenanceManual

2.Whenthelogoisdisplayed,pressEsc.TheThinkPadConfigInformationUpdateUtilityinterfaceis
displayed.
3.Type1underEntertheactiondesired,thenpressEnter.TheThinkPadSerialNumberUpdateUtilityfor
AssetIDscreenisdisplayed.
4.Type1underEntertheactiondesired,thenpressEnter.Thenfollowtheinstructionsonthescreen
torestoretheserialnumberofthesystemunit.
RetainingtheUUID
TheUniversallyUniqueIdentifier(UUID)isa128-bitnumberuniquelyassignedtoyourcomputerat
productionandstoredintheEEPROMofyoursystemboard.
ThealgorithmthatgeneratesthenumberisdesignedtoprovideuniqueIDsuntiltheyearA.D.3400.Notwo
computersintheworldhavethesamenumber.
Whenyoureplacethesystemboard,performthefollowingstepstocreateanewUUIDforthesystem
boardifthesystemboarddoesnothaveaUUID:
Note:Beforeyouperformtheoperation,ensurethattheUEFI/LegacysettingwithintheStartupmenuin
theThinkPadSetupprogramissettoUEFIOnly.
1.ConnectaUSBmemorykeytothecomputer.
2.Gotohttp://www.lenovo.com/maintenanceutilitiesandfollowtheinstructionsonthescreentocreatea
MaintenanceKey.
Note:OnlyanauthorizedLenovoservicetechniciancanaccesstheaboveWebsite.
3.Restartthecomputer.
4.Whenthelogoscreenisdisplayed,pressEsc.TheThinkPadConfigInformationUpdateUtilityinterface
isdisplayed.
5.Type2underEntertheactiondesired,thenpressEnter.TheAutoUUIDgenerationutilityinterfaceis
displayed.
6.TypeyunderChangeUUID.OK?[Y/N],thenpressEnter.AnewUUIDiscreatedandwritten.Ifa
validUUIDalreadyexists,itisnotoverwritten.
ReadingorwritingtheECAinformation
InformationonEngineeringChangeAnnouncements(ECA)arestoredintheEEPROMofthesystemboard.
TheelectronicstorageofthisinformationsimplifiestheproceduretocheckiftheECAhasbeenpreviously
appliedtoamachine.ThemachinedoesnotneedtobedisassembledtocheckfortheECAapplication.
TocheckwhatECAshavebeenpreviouslyappliedtothemachine,dothefollowing:
1.ConnectaUSBmemorykeytothecomputer.
2.Gotohttp://www.lenovo.com/maintenanceutilitiesandfollowtheinstructionsonthescreentocreatea
MaintenanceKey.
Note:OnlyanauthorizedLenovoservicetechniciancanaccesstheaboveWebsite.
3.Restartthecomputer.
4.Whenthelogoscreenisdisplayed,pressEsc.TheThinkPadConfigInformationUpdateUtilityinterface
isdisplayed.
5.Fromthemainmenu,select6.SetECAInformation.
6.ToreadtheECAinformation,select2.ReadECA/reworknumberfromEEPROMandfollowthe
instructionsonthescreen;Toreadboxbuilddate,select5.ReadboxbuilddatefromEEPROM,and
followtheinstructionsonthescreen.
Chapter8.FRUreplacementnotices65

AfteranECAhasbeenappliedtothemachine,theEEPROMmustbeupdatedtoreflecttheECA's
application.UsetheMaintenanceKeytoupdatetheEEPROM.
Note:OnlytheECAnumberisstoredintheEEPROM.ThemachinetypeoftheECAisassumedtobethe
sameasthemachinetypeofthemachinethathadtheECAappliedtoit.
1.InserttheMaintenanceKey,andthenrestartthecomputer.
2.Fromthemainmenu,select6.SetECAInformation.
3.TowritetheECAinformation,select1.WriteECA/reworknumberfromEEPROM,andfollowthe
instruction;Towriteboxbuilddate,select4.WriteboxbuilddatefromEEPROM,andfollowthe
instructiononthescreen.
Ifthesystemboardisbeingreplaced,trytoreadtheECAinformationfromtheoldsystemboardandtransfer
theinformationtothenewsystem.Ifthesystemboardisinoperable,thiswillnotbepossible.
66HardwareMaintenanceManual

Chapter9.RemovingorreplacingaFRU
ThischapterprovidesinstructionsonhowtoremoveorreplaceaFRU.
CRUstatementforcustomers:
Youcanresolvesomeproblemswithyourproductwithareplacementpartyoucaninstallyourself,calleda“Customer
ReplaceableUnit”or“CRU.”SomeCRUsaredesignatedasself-serviceCRUsandothersaredesignatedas
optional-serviceCRUs.Installationofself-serviceCRUsisyourresponsibility.Foroptional-serviceCRUs,youcan
eitherinstalltheCRUyourselforyoucanrequestthataServiceProviderinstalltheCRUaccordingtothewarranty
serviceforyourproduct.IfyouintendoninstallingtheCRU,LenovowillshiptheCRUtoyou.CRUinformationand
replacementinstructionsareshippedwithyourproductandareavailablefromLenovoatanytimeuponrequest.
YoucanfindalistofCRUsforyourproductinthisHardwareMaintenanceManual.Anelectronicversionofthis
manualcanbefoundathttp://www.lenovo.com/support.ClickUserGuides&Manualsandthenfollowthe
on-screeninstructionstofindthemanualforyourproduct.Y oumightberequiredtoreturnthedefectivepartthat
isreplacedbytheCRU.Whenreturnisrequired:(1)returninstructions,aprepaidshippinglabel,andacontainer
willbeincludedwiththereplacementCRU;and(2)youmightbechargedforthereplacementCRUifLenovodoes
notreceivethedefectiveCRUwithinthirty(30)daysofyourreceiptofthereplacementCRU.SeeyourLenovo
LimitedWarrantydocumentationforfulldetails.
Generalguidelines:
WhenremovingorreplacingaFRU,besuretoobservethefollowinggeneralguidelines:
1.Donottrytoserviceanycomputerunlessyouhavebeentrainedandcertified.Anuntrainedpersonruns
theriskofdamagingparts.
2.BeforereplacinganyFRU,reviewChapter8“FRUreplacementnotices”onpage63.
3.BeginbyremovinganyFRUsthathavetoberemovedbeforereplacingthefailingFRU.SuchFRUsare
listedatthebeginningofeachFRUreplacementprocedure.Removethemintheorderinwhichthey
arelisted.
4.FollowthecorrectsequenceinthestepsforremovingaFRU,asgiveninthedrawingsbythenumbers
insquarecallouts.
5.Whenturningascrew,turnitinthedirectionasshownbythearrowinthedrawing.
6.WhenremovingaFRU,moveitinthedirectionasshownbythearrowinthedrawing.
7.ToputthenewFRUinplace,reversetheremovalprocedureandfollowthenotesthatpertainto
replacement.
8.WhenreplacingaFRU,usethecorrectscrewsasshowninthereplacementprocedure.
DANGER
BeforeremovinganyFRU,turnoffthecomputer,unplugallpowercordsfromelectricaloutlets,
removethebatterypack,andthendisconnectanyinterconnectingcables.
Attention:AfterreplacingaFRU,donotturnonthecomputeruntilyouhavemadesurethatallscrews,
springs,andothersmallpartsareinplaceandnonearelooseinsidethecomputer.Verifythisbyshaking
thecomputergentlyandlisteningforrattlingsounds.Metallicpartsormetalflakescancauseelectrical
shortcircuits.
Attention:Thesystemboardissensitiveto,andcanbedamagedby,electrostaticdischarge(ESD).Before
touchingit,establishpersonalgroundingbytouchingagroundpointwithonehandorbyusinganESDstrap.
©CopyrightLenovo2013,201767
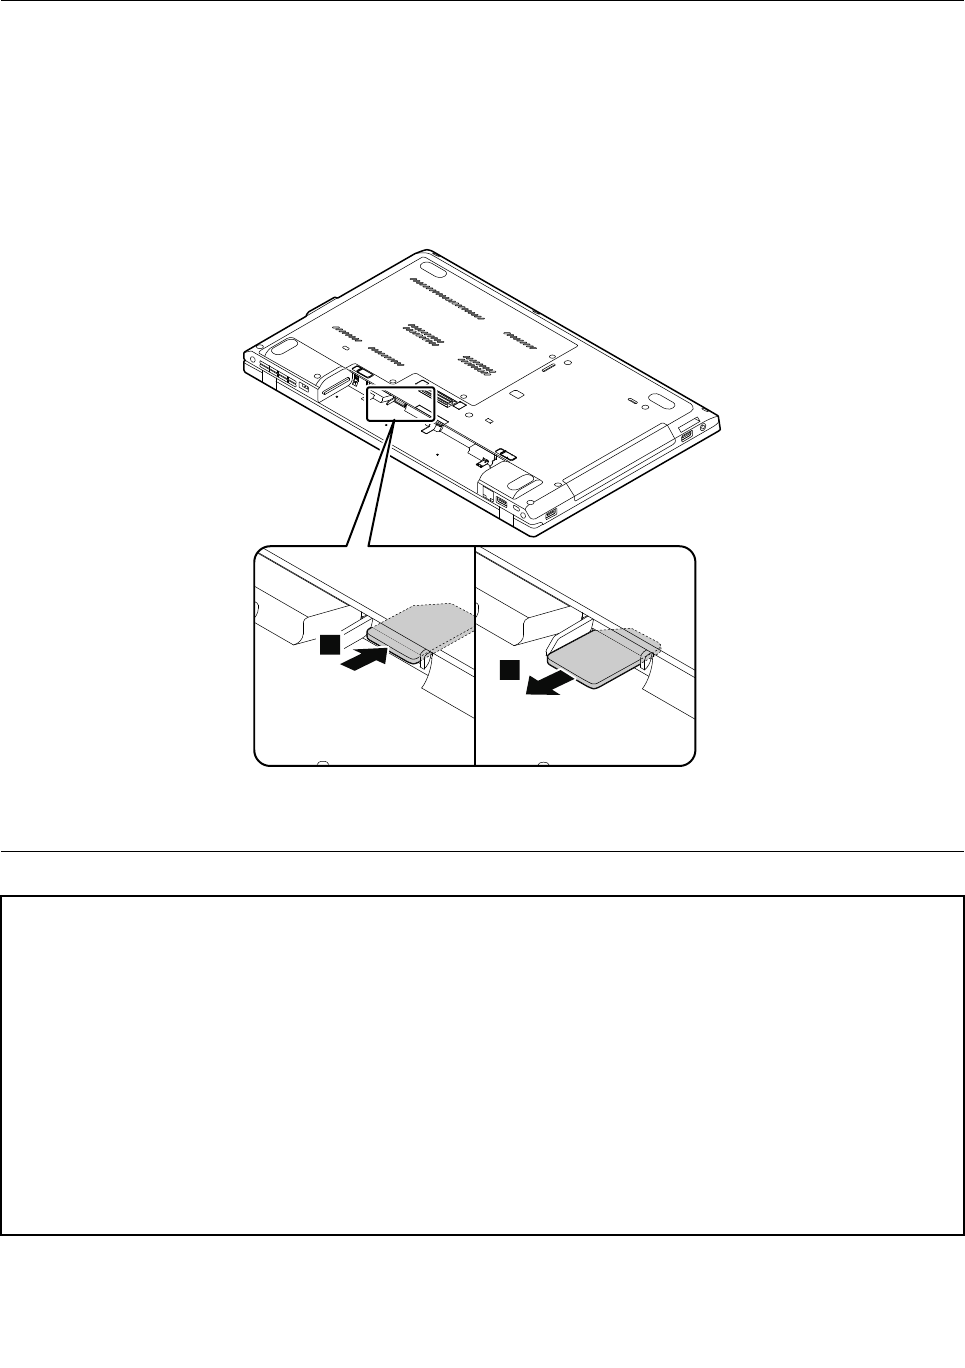
Beforeservicingthecomputer
Carefullyreadthistopicbeforeservicingthecomputer.
RemovingtheSIMcard
Dependingonthemodel,thecomputeryouareservicingmighthaveaSIMcardslot.Ifthecustomerhas
installedaSIMcardintheslot,removeitbeforeservicing.
ToremovetheSIMcard,youmustremovethebatterypackfirst.See“1010Batterypack”onpage68.
2
1
Afteryoufinishtheservice,insertthecardbackintotheslot.
1010Batterypack
Importantnoticesforreplacingabatterypack:
•ThissystemsupportsonlybatteriesspeciallydesignedforthisspecificsystemandmanufacturedbyLenovooran
authorizedbuilder.Thesystemdoesnotsupportunauthorizedbatteriesorbatteriesdesignedforothersystems.If
anunauthorizedbatteryorabatterydesignedforanothersystemisinstalled,thesystemwillnotcharge.
Attention:Lenovohasnoresponsibilityfortheperformanceorsafetyofunauthorizedbatteries,andprovidesno
warrantiesforfailuresordamagearisingoutoftheiruse.
•TheLenovoSolutionCenterprogramprovidesanautomaticbatterydiagnostictestthatdeterminesifthebattery
packisdefective.AbatterypackFRUshouldnotbereplacedunlessthisdiagnostictestshowsthatthebatteryis
defective.Theonlyexceptiontothisisifthebatterypackisphysicallydamagedoracustomerisreporting
apossiblesafetyissue.
•IftheLenovoSolutionCenterprogramisnotinstalledinthecomputer,thecustomershoulddownloadthisprogram
beforeanon-physicallydamagedbatterypackisreplaced.Notethataphysicallydamagedbatterypackis
anotcoveredbythewarranty.
68HardwareMaintenanceManual
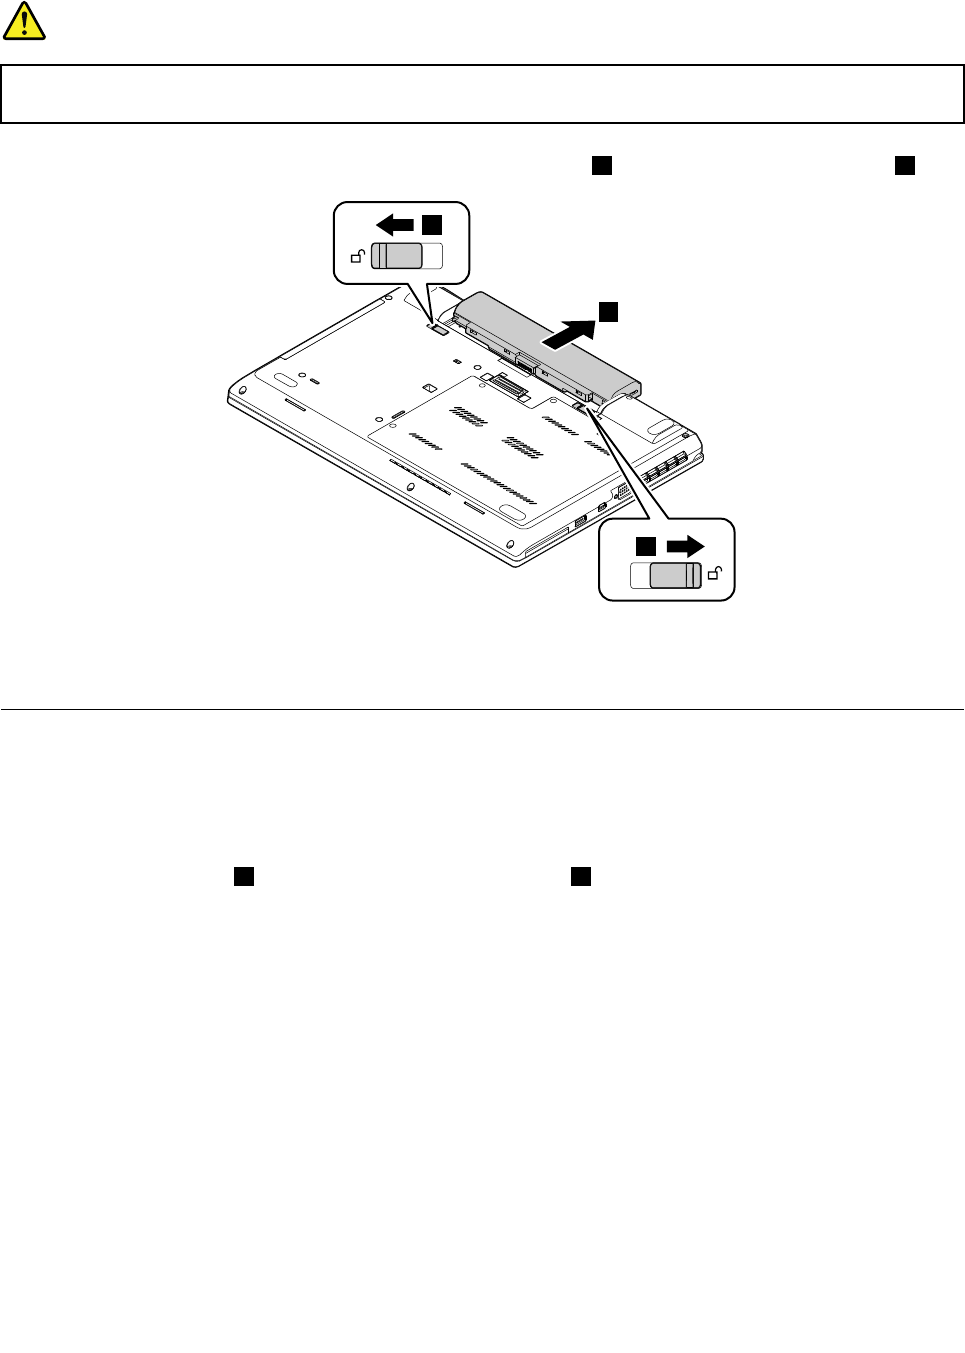
Removalstepsofthebatterypack
DANGER
Useonlytheauthorizedbatteryspecifiedforyourcomputer.Anyotherbatterycouldigniteor
explode.
Unlockthebatterylatchesandholdthemintheunlockedposition1.Thenremovethebatterypack2.
2
1
1
Wheninstalling:Installthebatterypackalongthesliderailsoftheslot.Ensurethatthebatterylatchesare
inthelockedposition.
1020Bottomdoor
Foraccess,removethisFRU:
•“1010Batterypack”onpage68
Removalstepsofthebottomdoor
Note:Loosenthescrews1,andthenremovethebottomdoor2.
Chapter9.RemovingorreplacingaFRU69


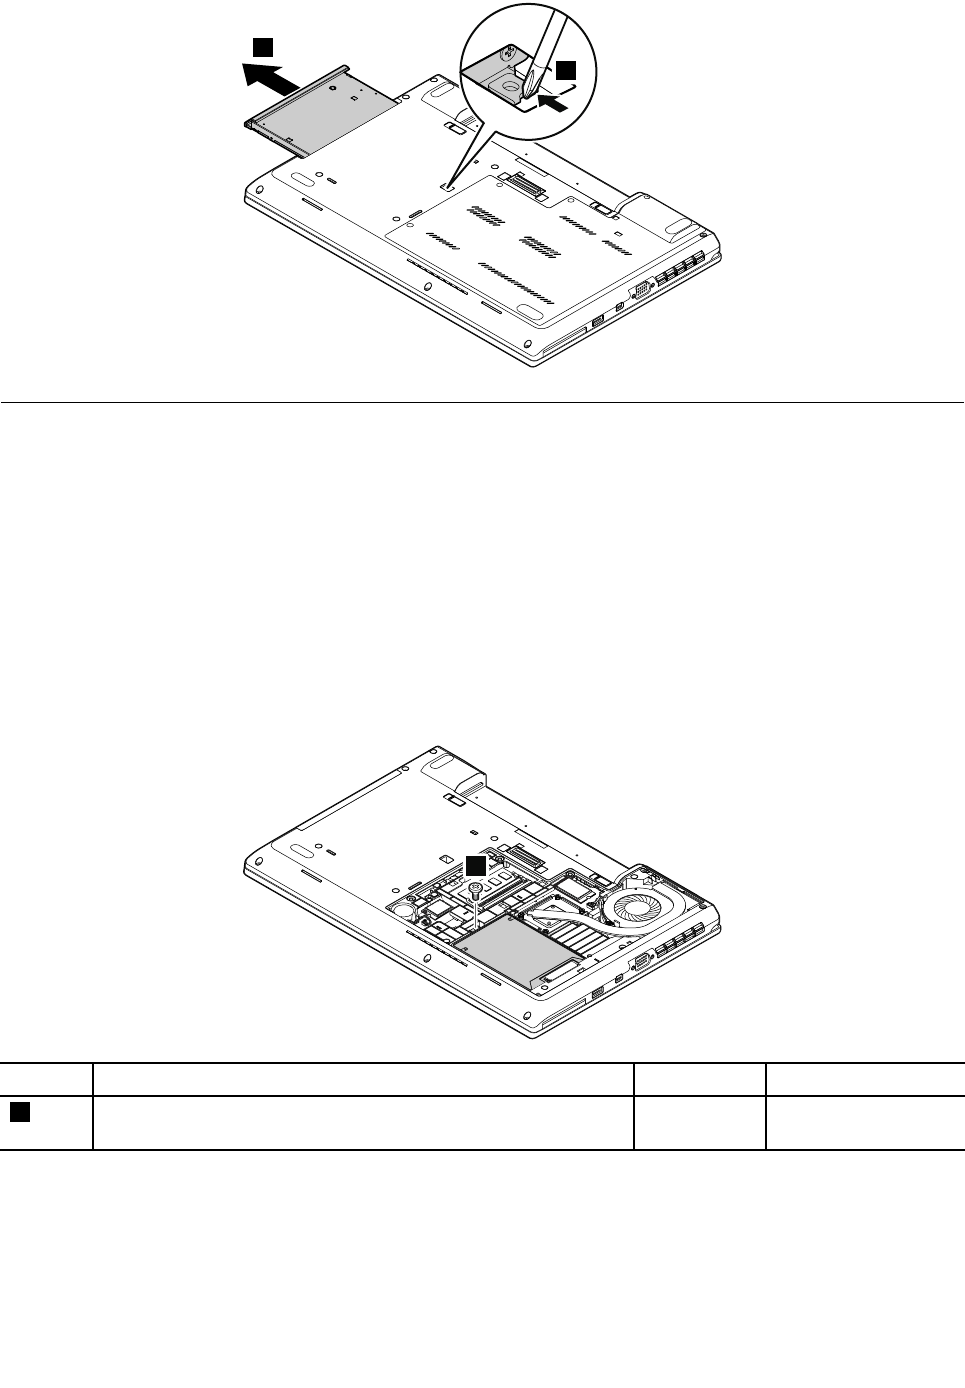
3
2
1040Harddiskdriveorsolid-statedrive
Foraccess,removetheseFRUsinorder:
•“1010Batterypack”onpage68
•“1020Bottomdoor”onpage69
Attention:
•Donotdropthedriveorapplyanyphysicalshocktoit.Thedriveissensitivetophysicalshock.Improper
handlingcancausedamageandpermanentlossofdata.
•Beforeremovingthedrive,havetheusermakeabackupcopyofalltheinformationonitifpossible.
•Neverremovethedrivewhilethecomputerisoperatingorisinsuspendmode.
Removalstepsoftheharddiskdriveorsolid-statedrive
1
StepScrew(quantity)ColorT orque
1M2×3.5mm,flat-head,nylon-coated(3)Silver0.181Nm
(1.85kgf-cm)
72HardwareMaintenanceManual

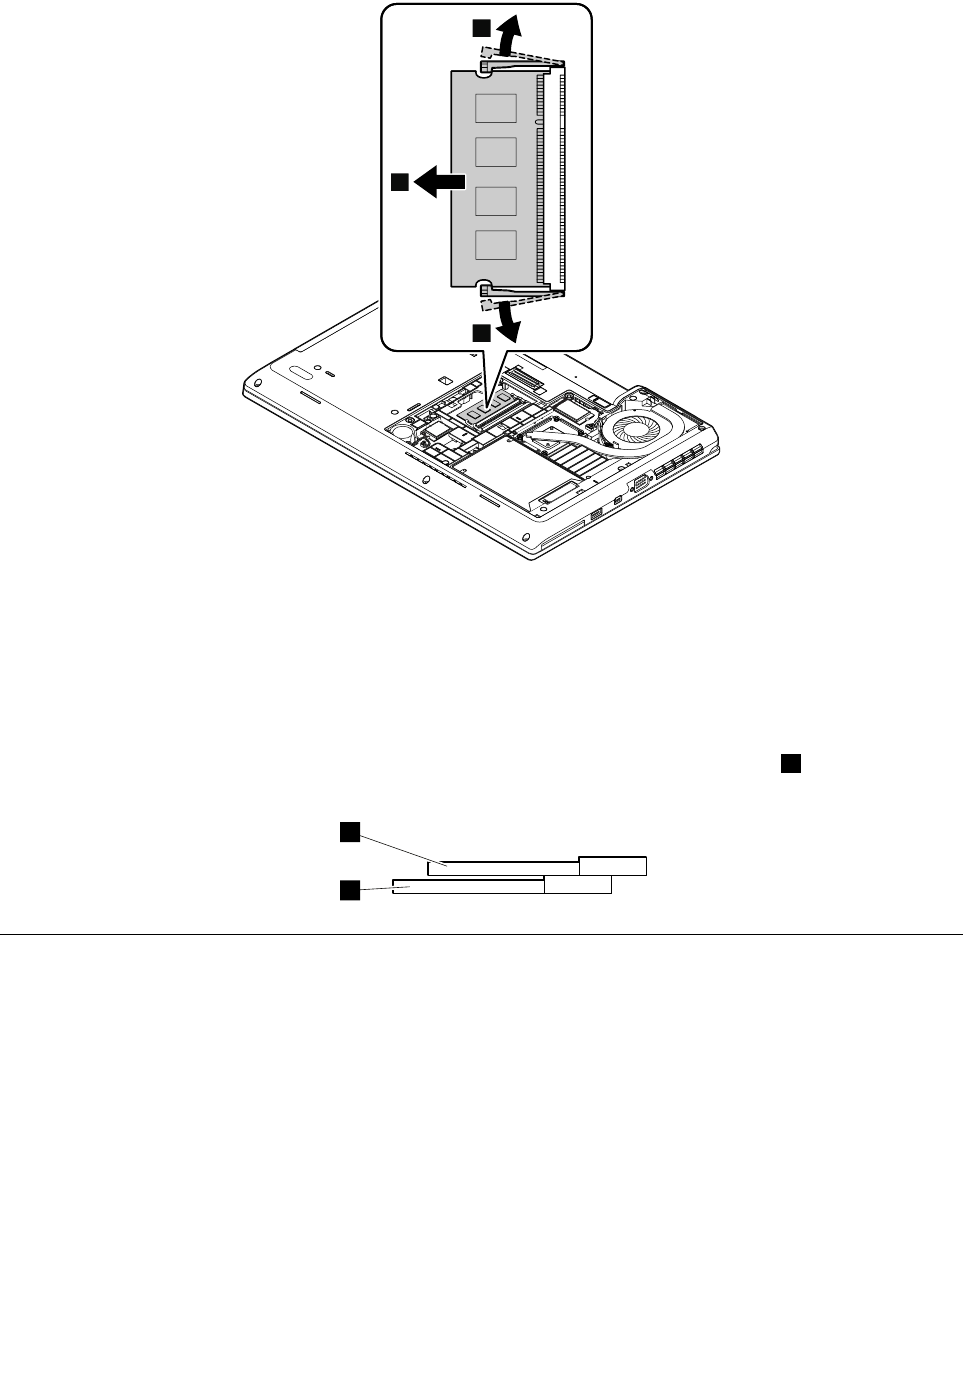
1
1
2
Wheninstalling:
•Insertthenotchedendofthememorymoduleintothememoryslotatanangleofabout20degrees.
Pressthememorymodulefirmly,andpivotitdownwarduntilitsnapsintoplace.Ensurethatthememory
moduleisfirmlyinstalledanddoesnotmoveeasily.
Note:Donotapplyanypressuretothememorymodule.
•Ifonlyonememorymoduleisinstalled,ensurethatyouinstallitintothebottomslot2,whichisthe
primaryslot.
1
2
1060WWANcardorM.2solid-statedrive
Foraccess,removetheseFRUsinorder:
•“1010Batterypack”onpage68
•“1020Bottomdoor”onpage69
Dependingonthemodel,thecomputeryouareservicingmighthaveoneofthefollowingcardsinstalled:
•WWANcard
•M.2solid-statedrive
74HardwareMaintenanceManual
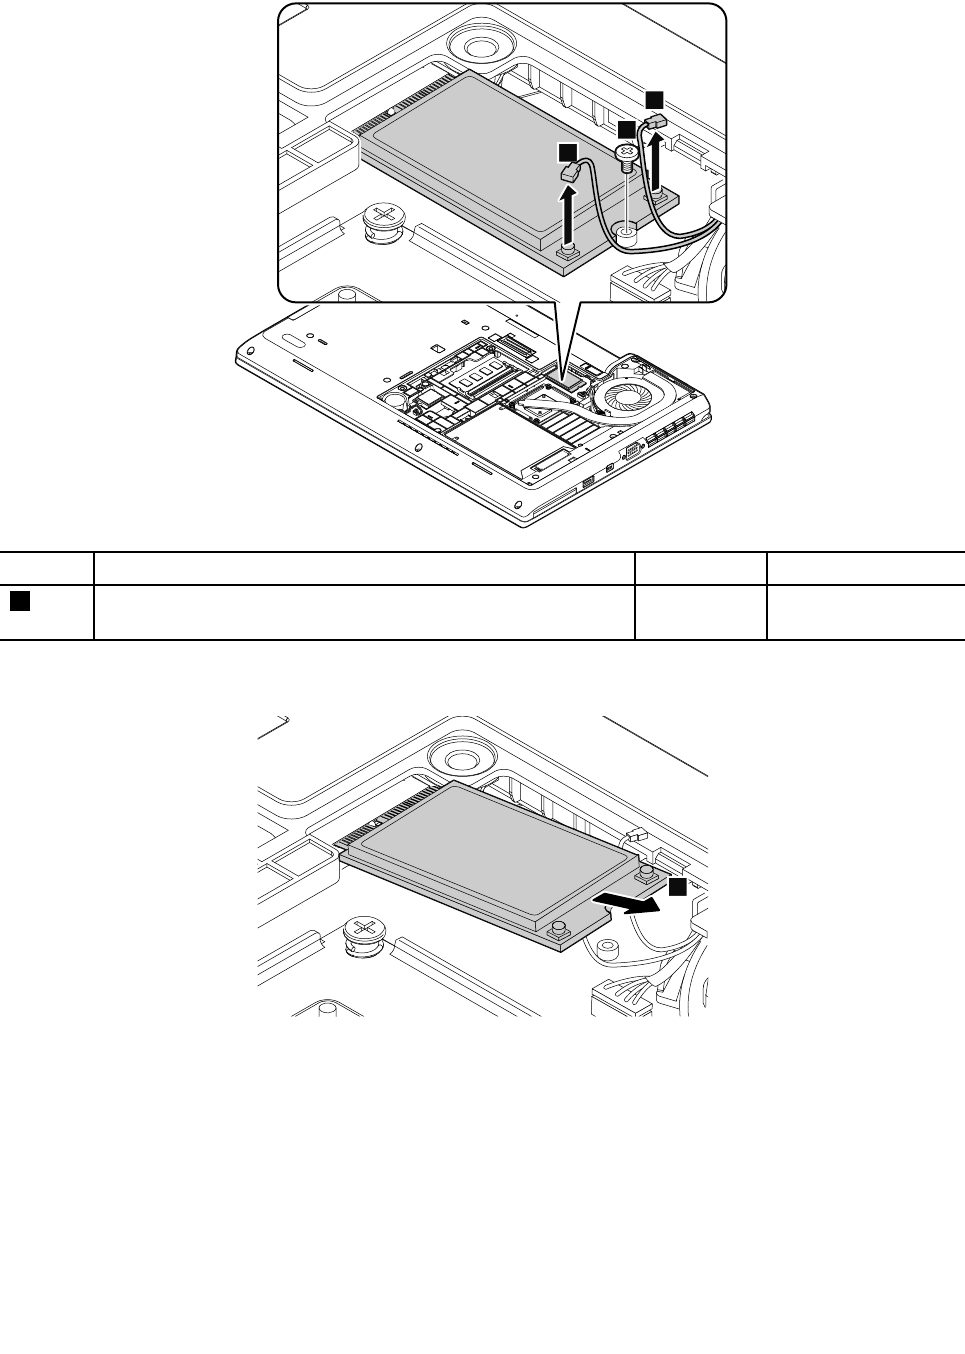
RemovalstepsoftheWWANcard
2
1
1
StepScrew(quantity)ColorT orque
2M2×3mm,flat-head,nylon-coated(1)Silver0.181Nm
(1.85kgf-cm)
Wheninstalling:Plugtheredcableintothemainconnectorandthebluecableintotheauxiliaryconnector.
3
RemovalstepsoftheM.2solid-statedrive
IfthecomputerisequippedwithanM.2solid-statedrive,theM.2solid-statedriveisinstalledinthe
WWANcardslot.
Attention:
•Donotdropthedriveorapplyanyphysicalshocktoit.Thedriveissensitivetophysicalshock.Improper
handlingcancausedamageandpermanentlossofdata.
•Beforeremovingthedrive,havetheusermakeabackupcopyofalltheinformationonitifpossible.
•Neverremovethedrivewhilethecomputerisoperatingorinsuspendmode.
Chapter9.RemovingorreplacingaFRU75
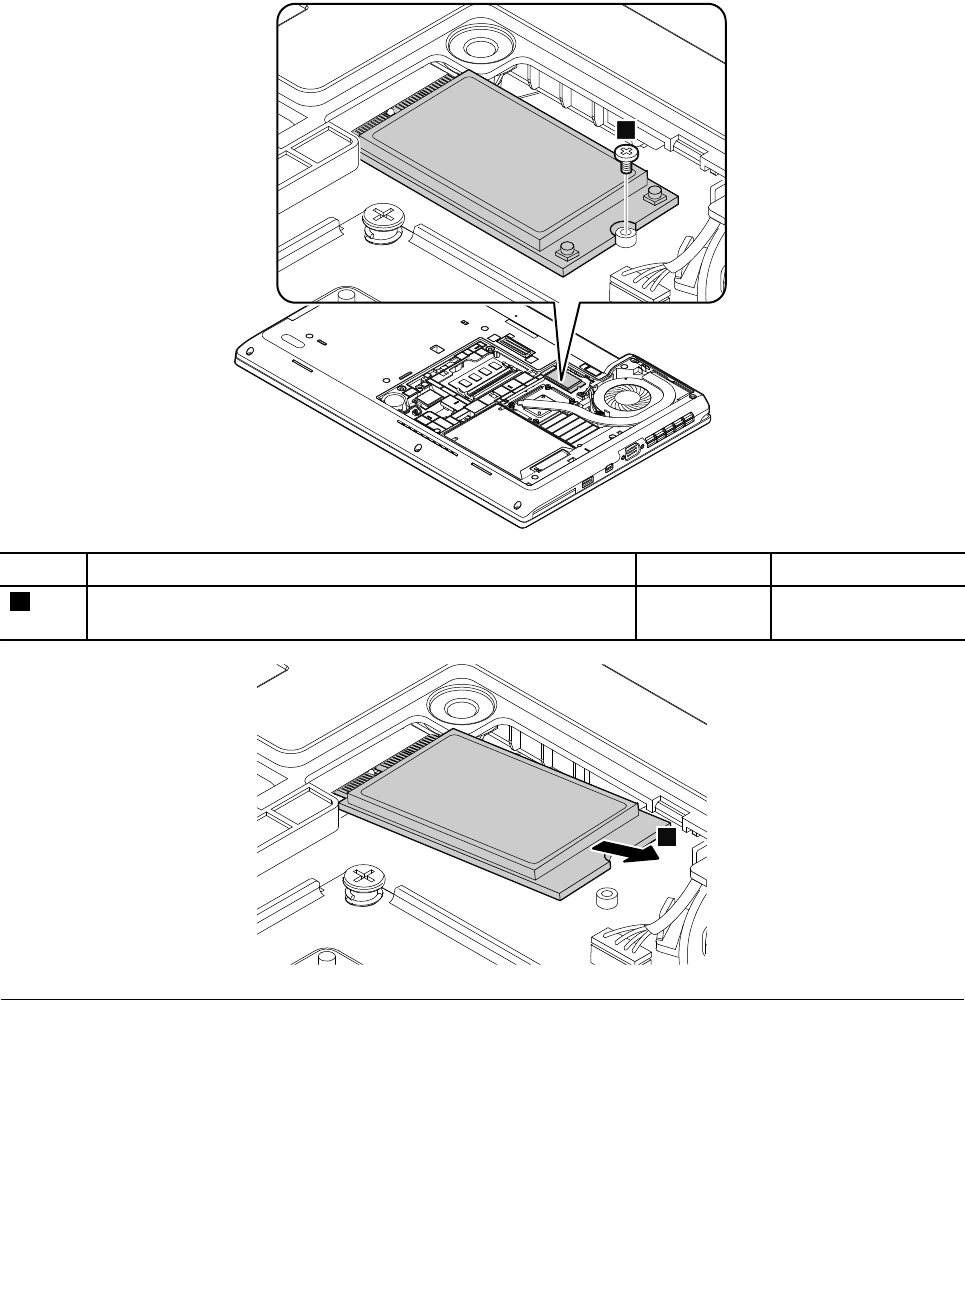
•EnsurethatyoupartitiontheM.2solid-statedriveafterinstallingitonthecomputeryouareservicing.
Otherwise,theM.2solid-statedrivewillnotfunctioncorrectly.Forinstructionsononhowtopartitionan
M.2solid-statedrive,gotohttp://www.lenovo.com/support/msata-fru.
1
StepScrew(quantity)ColorTorque
1M2×3mm,flat-head,nylon-coated(1)Silver0.181Nm
(1.85kgf-cm)
2
1070WLANcard
Foraccess,removetheseFRUsinorder:
•“1010Batterypack”onpage68
•“1020Bottomdoor”onpage69
76HardwareMaintenanceManual
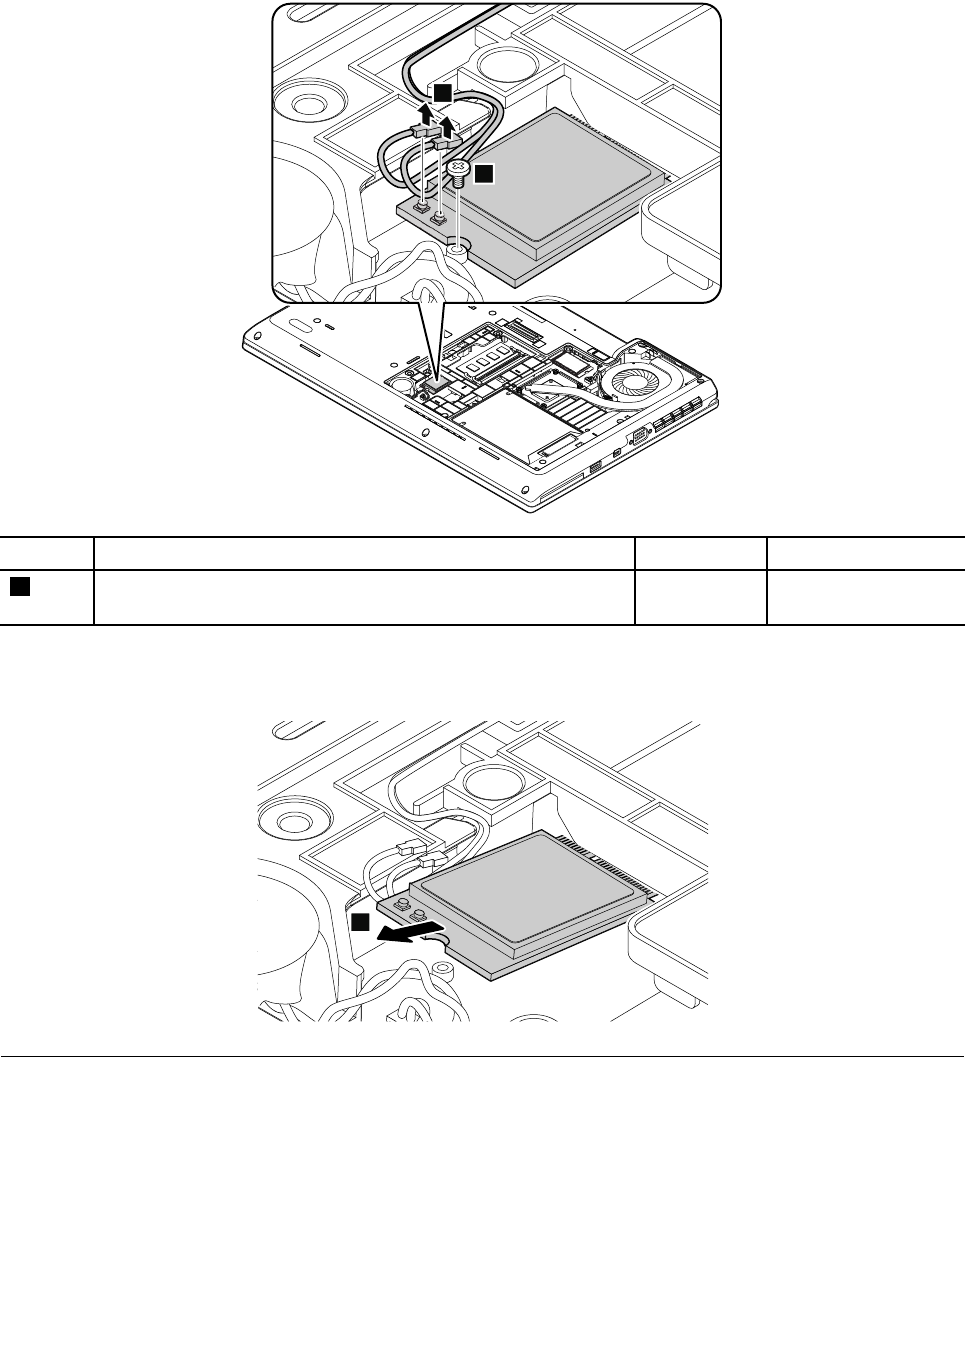
RemovalstepsoftheWLANcard
2
1
StepScrew(quantity)ColorT orque
2M2×3mm,flat-head,nylon-coated(1)Silver0.181Nm
(1.85kgf-cm)
Wheninstalling:PlugthegraycableintotheconnectorlabeledMAINonthecard;andplugtheblack
cableintotheconnectorlabeledAUXonthecard.
3
1080Coin-cellbattery
Foraccess,removetheseFRUsinorder:
•“1010Batterypack”onpage68
•“1020Bottomdoor”onpage69
Chapter9.RemovingorreplacingaFRU77
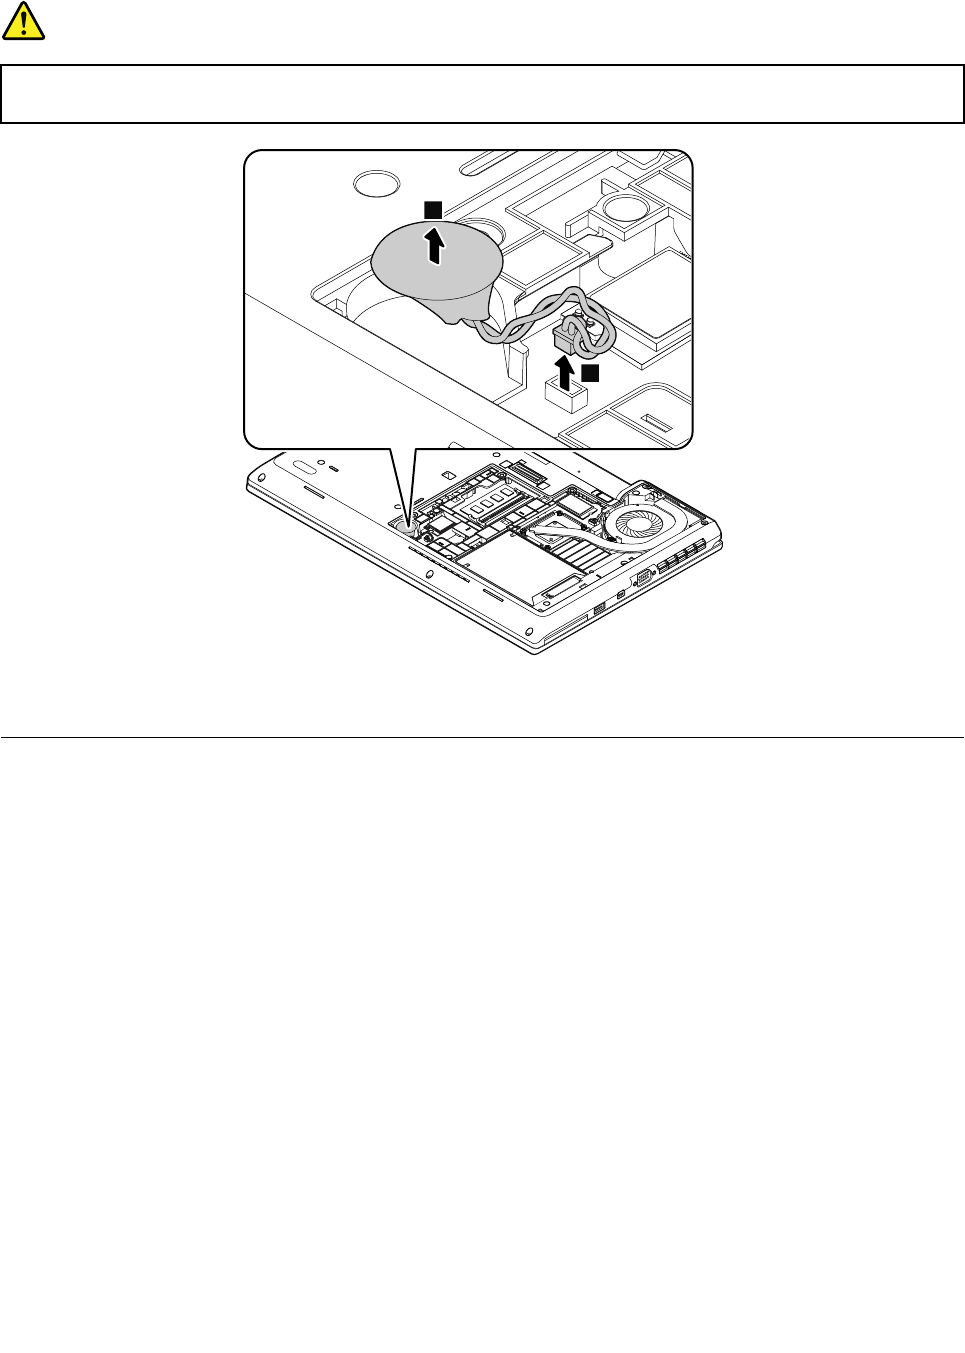
Removalstepsofthecoin-cellbattery
DANGER
Useonlytheauthorizedbatteryspecifiedforyourcomputer.Anyotherbatterycouldigniteor
explode.
1
2
Wheninstalling:Ensurethatthebatteryconnectorisattachedfirmlytothesystemboard.
1090Thermal-fanassembly
Foraccess,removetheseFRUsinorder:
•“1010Batterypack”onpage68
•“1020Bottomdoor”onpage69
Attention:
•Donothandlethethermal-fanassemblyroughly.Improperhandlingofthethermal-fanassemblycan
causedistortionordeformationandimperfectcontactwithcomponents.
•Donottouchorapplyanyexcessiveforcetothefanmotor.Itmightcausedamagetothethermal-fan
assemblyormightcausethecomputertomalfunction.
Removalstepsofthethermal-fanassembly
Formodelsthathaveanintegratedgraphicsmodule:
78HardwareMaintenanceManual
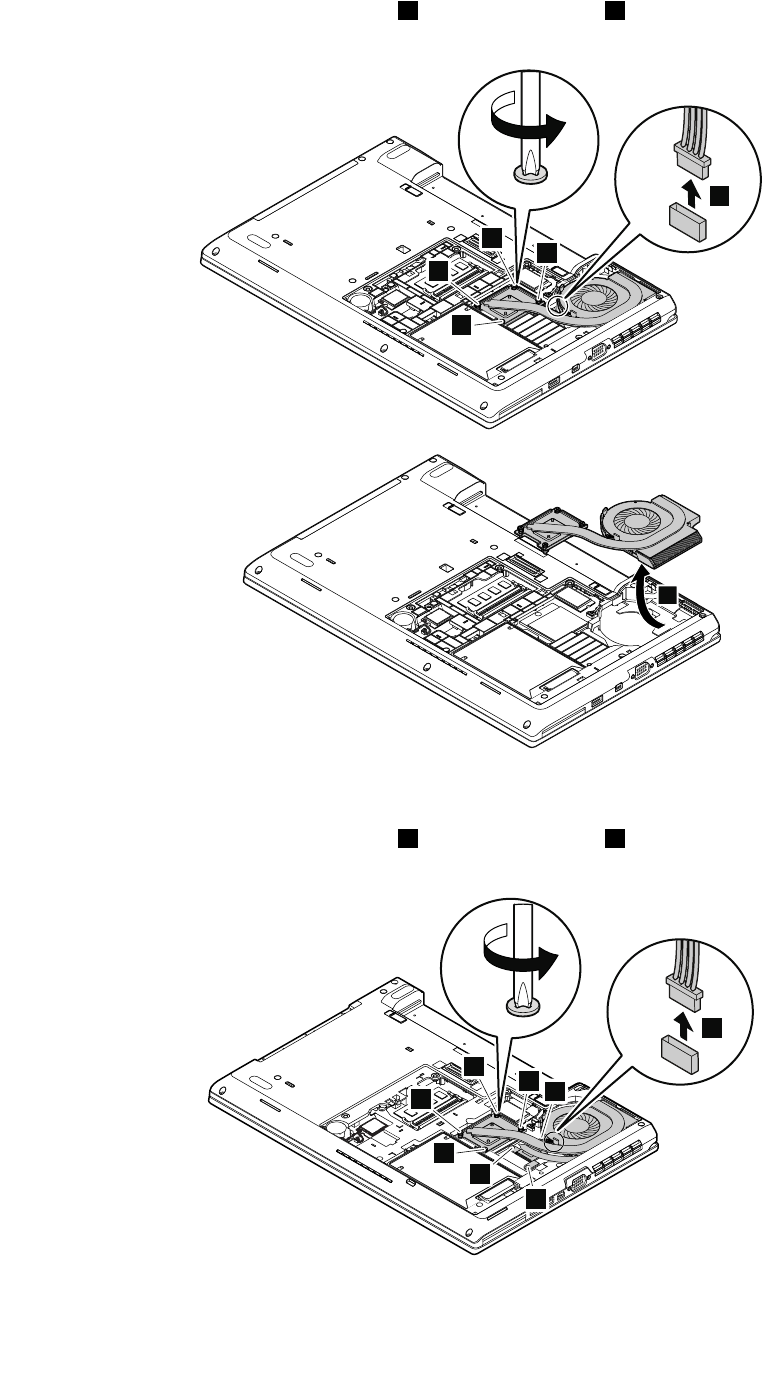
Detachthethermal-fanassemblyconnector1.Loosenthescrews2inascendingalphabeticalorder
asillustrated,butdonotremovethem.
2d
2b
2a
2c
1
3
Formodelsthathaveadiscretegraphicsmodule:
Detachthethermal-fanassemblyconnector1.Loosenthescrews2inascendingalphabeticalorder
asillustrated,butdonotremovethem.
2d
2b
2a 2g
2c
2e
2f
1
Chapter9.RemovingorreplacingaFRU79
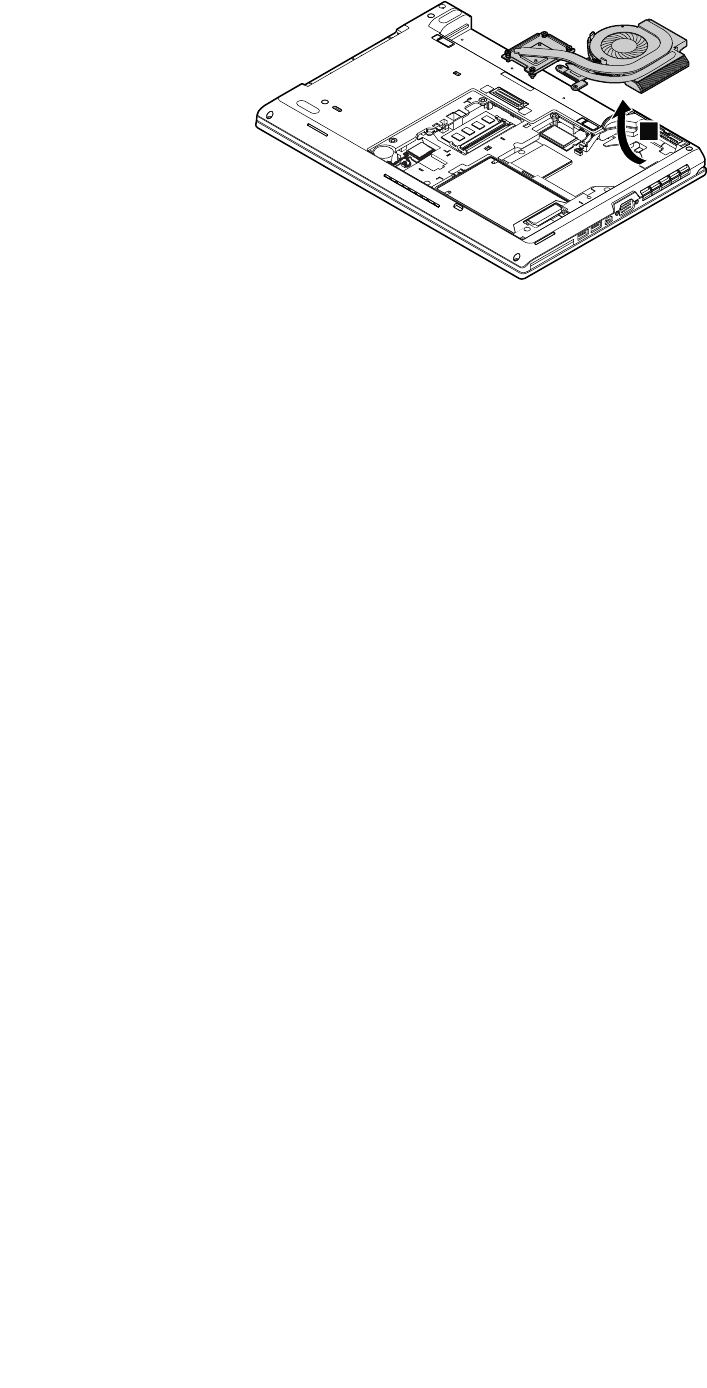
3
80HardwareMaintenanceManual
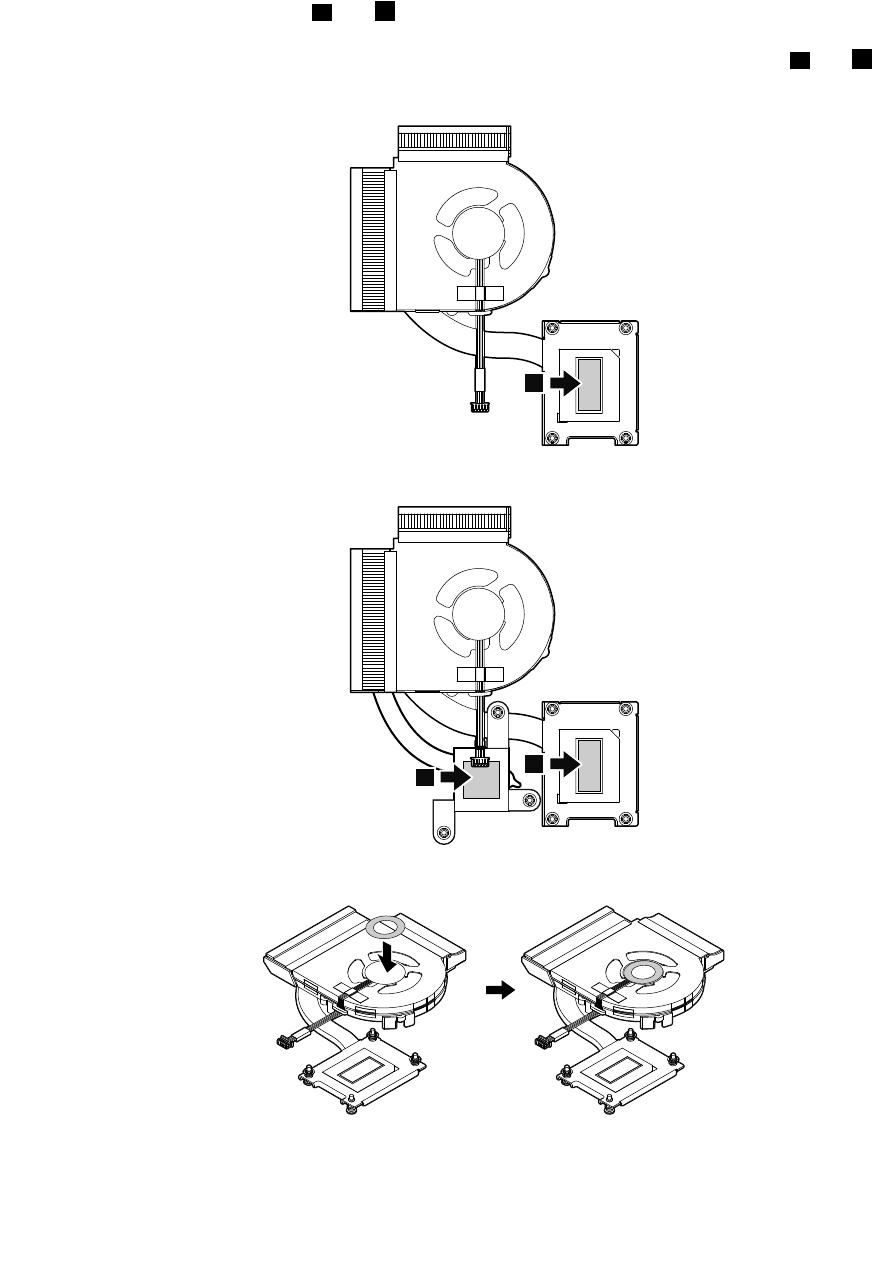
Wheninstalling:
•Attachthethermal-fanassemblyconnectortothesystemboardandtightenthescrewsinascending
alphabeticalorder.
•Beforeyouattachtheoldthermal-fanassemblytothecomputer,applythermalgrease,atanamountof
0.2grams,onthepartsmarkedaandbasinthefollowingillustrations.Eithertoomuchortooless
applicationofgreasemightcauseathermalproblemduetoimperfectcontactwithacomponent.Ifyou
areinstallinganewthermal-fanassembly,peelthethinfilmofffromthepartsmarkedaandb.
Formodelsthathaveanintegratedgraphicsmodule:
a
Formodelsthathaveadiscretegraphicsmodule:
a
b
•ForThinkPadL540,pastetherubberringtothenewthermal-fanassemblyasshown:
Chapter9.RemovingorreplacingaFRU81
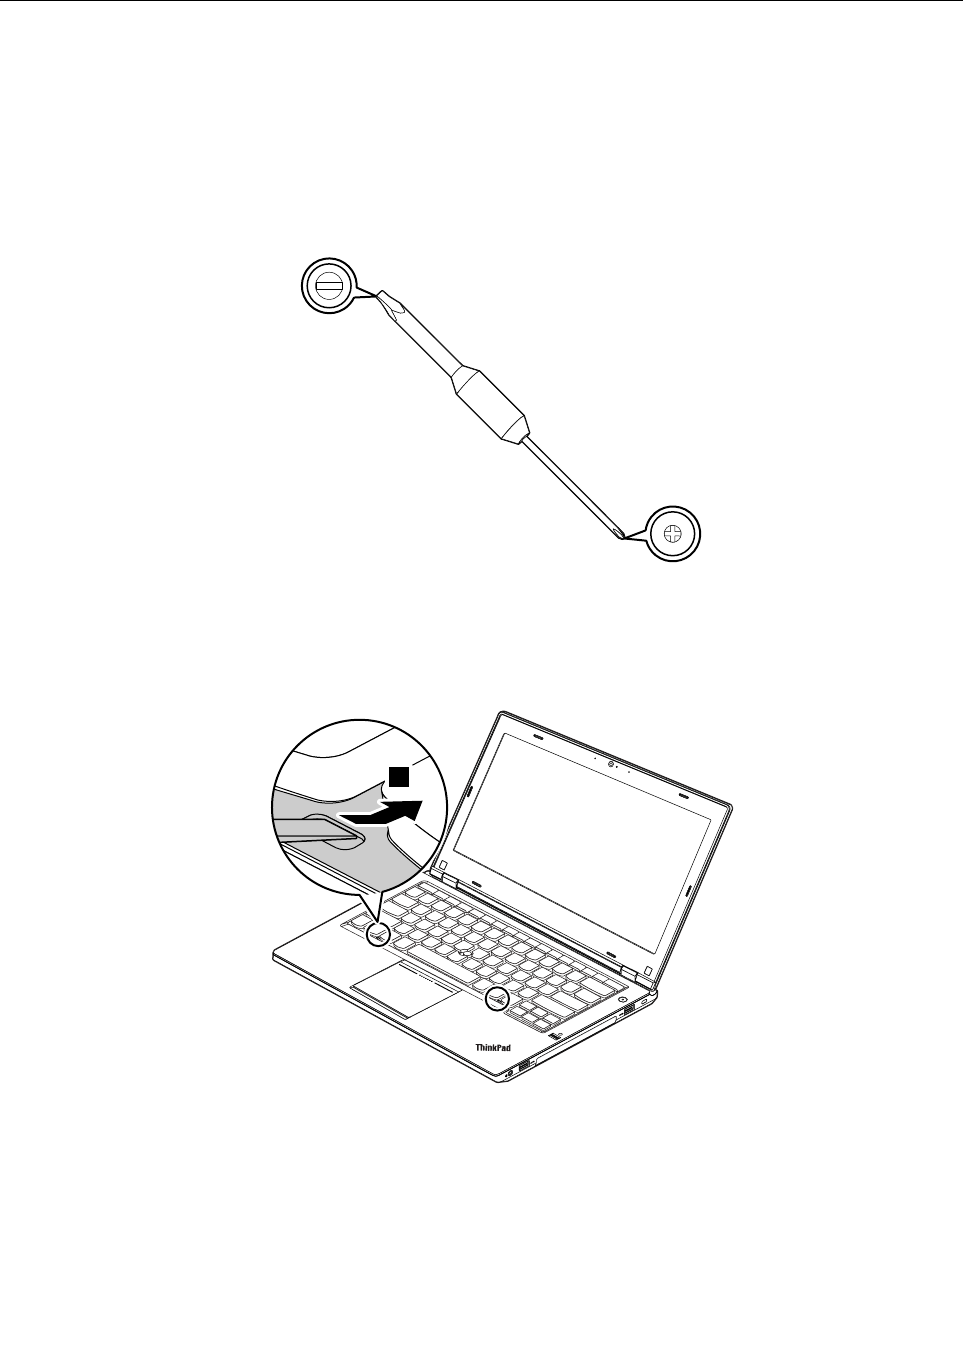
1100Keyboard
Foraccess,removetheseFRUsinorder:
•“1010Batterypack”onpage68
•“1020Bottomdoor”onpage69
Removalstepsofthekeyboard
ForThinkPadL440
1.Locatethekeyboardmulti-toolintheshippingpackageofthenewkeyboard.
2.Thescrewsthatsecurethekeyboardarebeneaththekeyboardframe.Torevealthescrewheads,use
theflatendofthemulti-tooltoslidethekeyboardforwardby2.5mm(0.1inch).
Note:Donotpressorholdthekeyswhileslidingthekeyboardframe,otherwisethekeyboardframe
cannotbemoved.
1
82HardwareMaintenanceManual

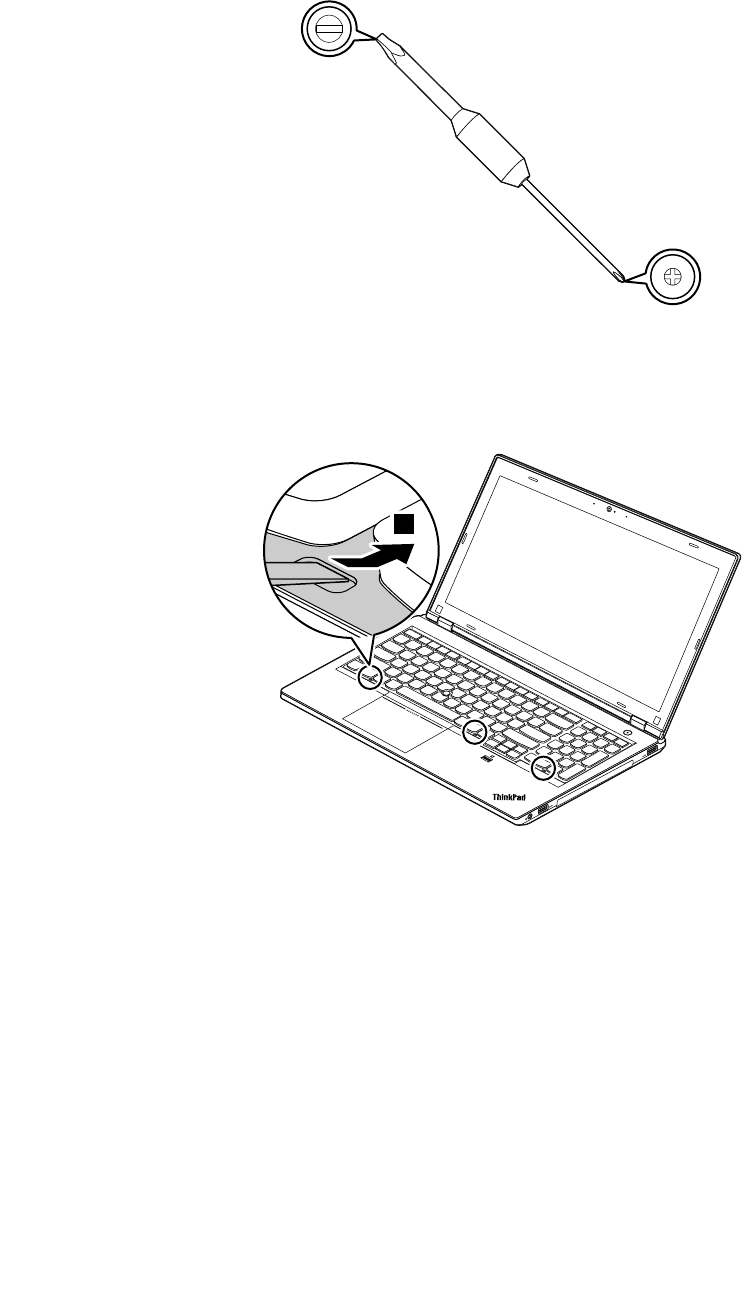
ForThinkPadL540
1.Locatethekeyboardmulti-toolintheshippingpackageofthenewkeyboard.
2.Thescrewsthatsecuresthekeyboardarebeneaththekeyboardframe.Torevealthescrewheads,use
theflatendofthemulti-tooltoslidethekeyboardforwardby2.5mm(0.1inch).
Note:Donotpressorholdthekeyswhileslidingthekeyboardframe,otherwisethekeyboardframe
cannotbemoved.
1
84HardwareMaintenanceManual

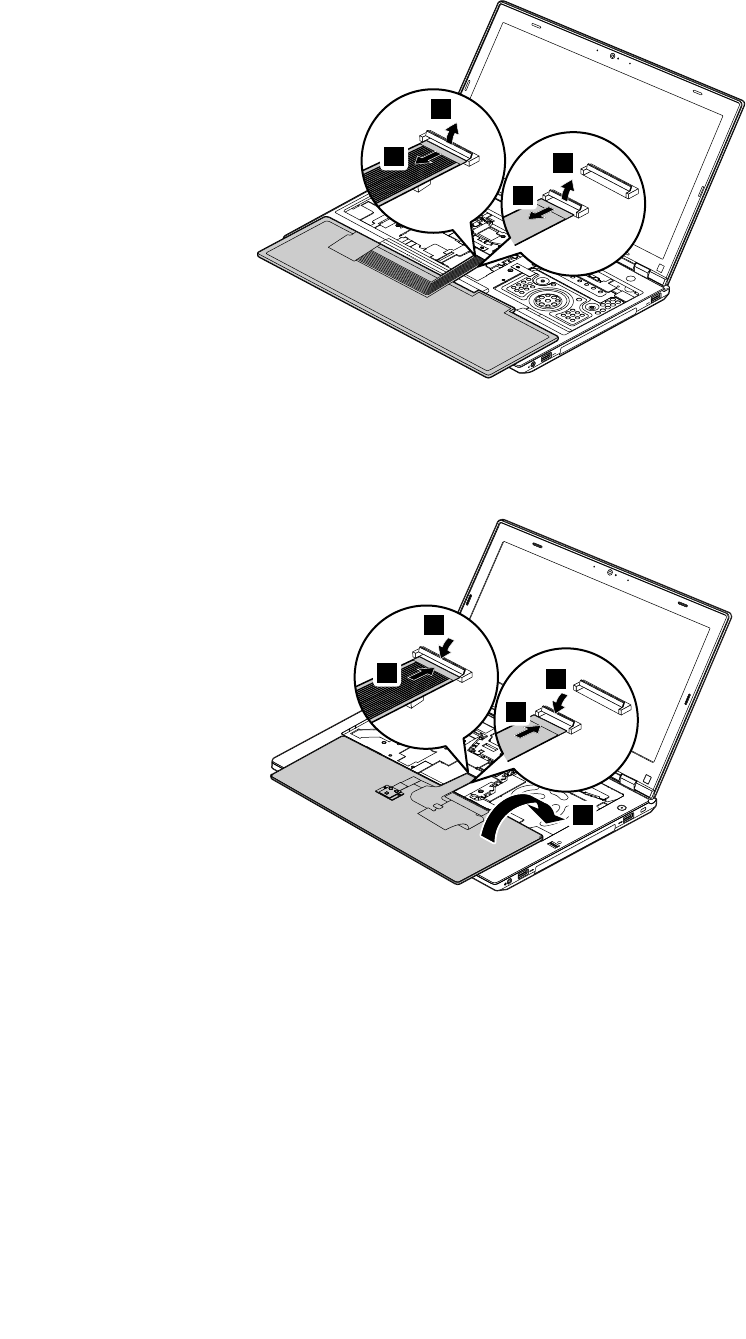
5.Detachtheconnectors.Thenremovethekeyboard.
5
67
8
Installingthekeyboard
ForThinkPadL440
1.Attachtheconnectors,andthenturnoverthekeyboard.
5
3
42
1
86HardwareMaintenanceManual


4.Tightenthescrewswiththecrossendofthekeyboardmulti-tooltosecurethekeyboardinplace.
8
5.Slidethekeyboardframebackwardby2.5mm(0.1inch)withtheflatendofthekeyboardmulti-toolto
hidethescrewheads.Ensurethatthelatchesofthekeyboardframeareunderthekeyboardbezel.
Note:Donotpressorholdthekeyswhileslidingthekeyboardframe,otherwisethekeyboardframe
cannotbemoved.
9
9
88HardwareMaintenanceManual


2.Putthekeyboardbackintoplace.Ensurethatthefrontedgeofthekeyboardisundertheframeofthe
keyboardbezel.
6
6
3.Revealthescrewheadsbyslidingthekeyboardframeforwardwiththeflatendofthekeyboard
multi-tool.
7
90HardwareMaintenanceManual
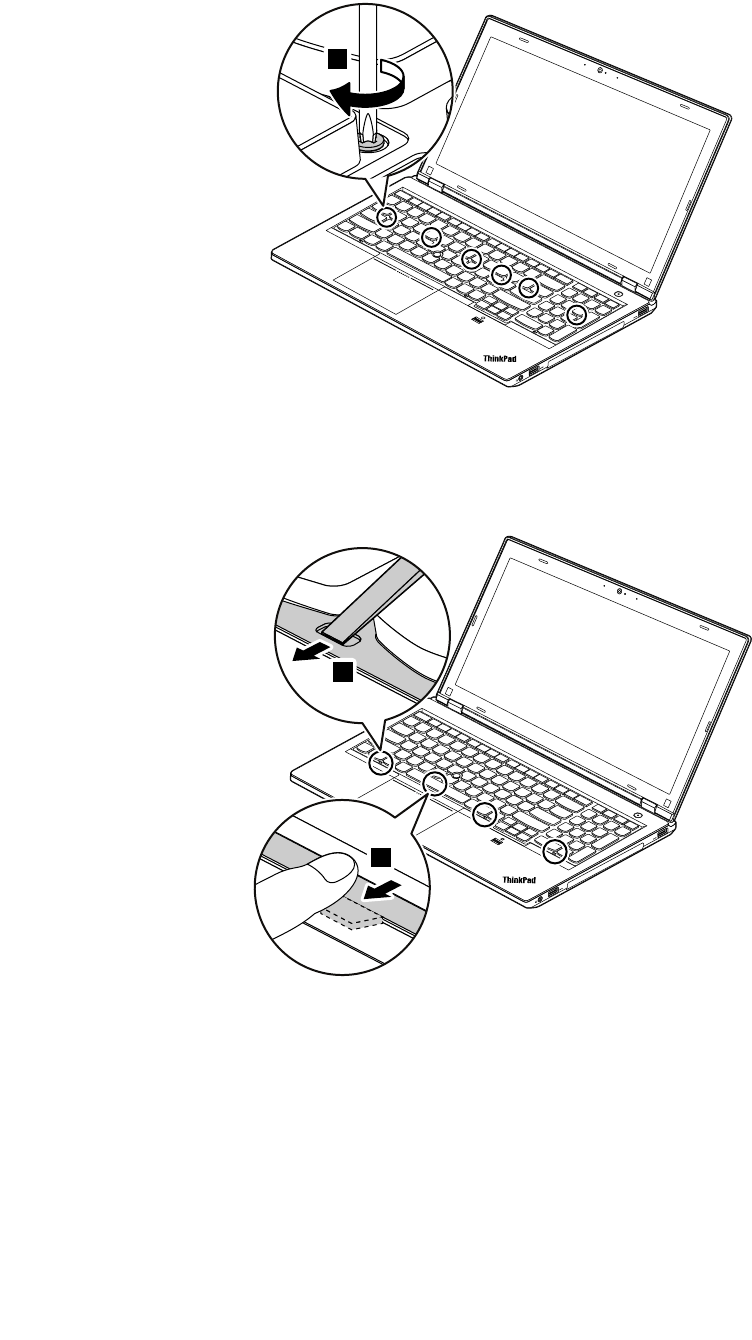
4.Tightenthescrewswiththecrossendofthekeyboardmulti-tooltosecurethekeyboardinplace.
8
5.Slidethekeyboardframebackwardby2.5mm(0.1inch)withtheflatendofthekeyboardmulti-toolto
hidethescrewheads.Ensurethatthelatchesofthekeyboardframeareunderthekeyboardbezel.
Note:Donotpressorholdthekeyswhileslidingthekeyboardframe,otherwisethekeyboardframe
cannotbemoved.
9
9
Chapter9.RemovingorreplacingaFRU91
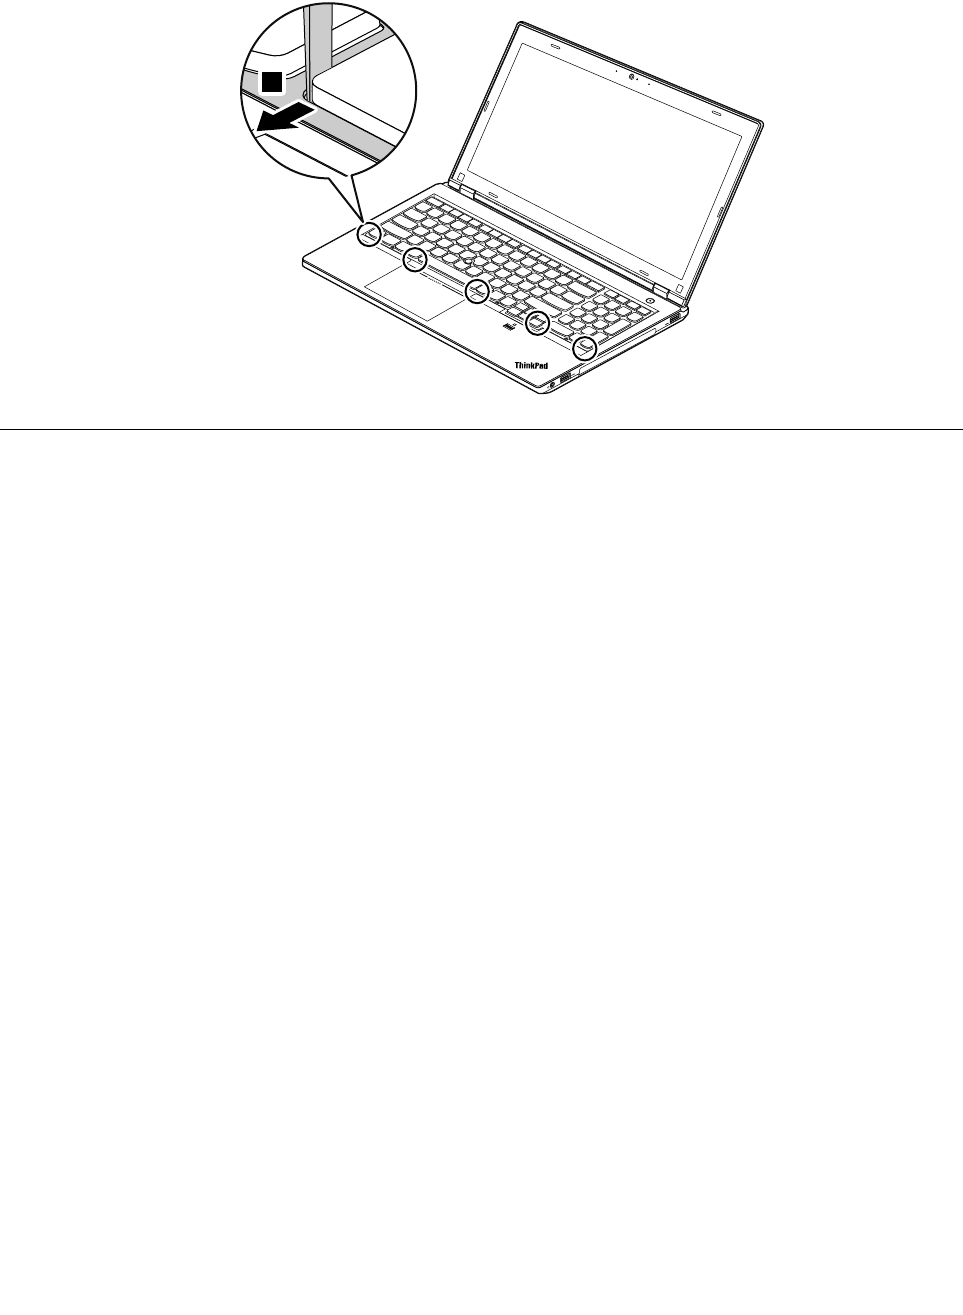
6.Toensurethatthereisnogapbetweenthekeyboardframeandkeyboardbezel,inserttheflatendofthe
keyboardmulti-toolintothegapsaroundthekeysasshowntoslidethekeyboardframebackward.
10
1110Keyboardbezelassembly,fingerprintreader,andpowerbuttoncard
Foraccess,removetheseFRUsinorder:
•“1010Batterypack”onpage68
•“1020Bottomdoor”onpage69
•“1030Opticaldrive”onpage70
•“1040Harddiskdriveorsolid-statedrive”onpage72
•“1060WWANcardorM.2solid-statedrive”onpage74
•“1070WLANcard”onpage76
•“1100Keyboard”onpage82
92HardwareMaintenanceManual
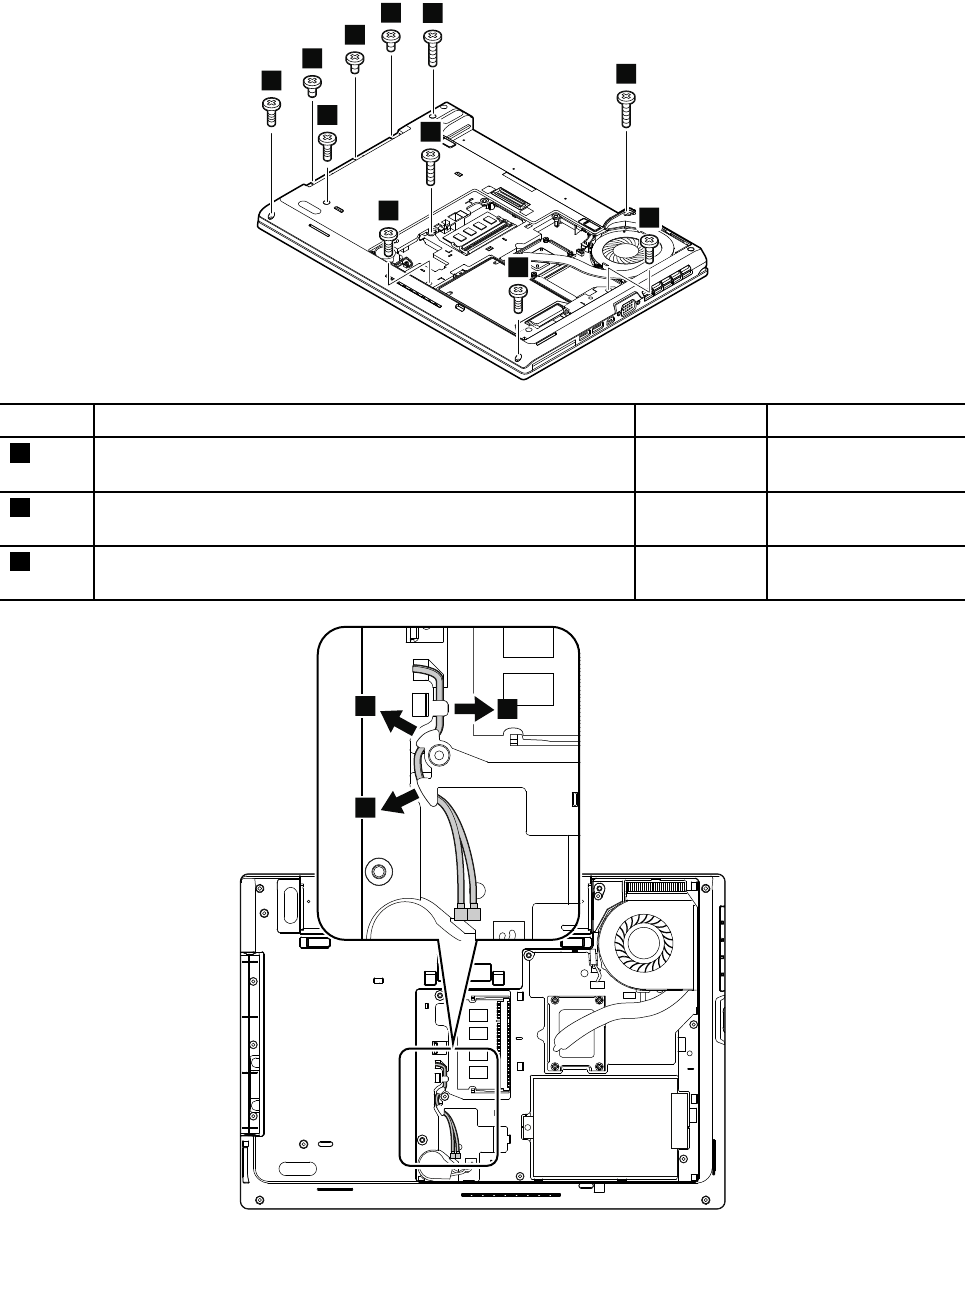
Removalstepsofthekeyboardbezelassembly
ForThinkPadL440
3
3
3
1
1
2
2
2
1
1
1
StepScrew(quantity)ColorT orque
1M2×6mm,flat-head,nylon-coated(5)Black0.181Nm
(1.85kgf-cm)
2M2×12mm,flat-head,nylon-coated(3)Black0.181Nm
(1.85kgf-cm)
3M2×3.5mm,flat-head,nylon-coated(3)Silver0.181Nm
(1.85kgf-cm)
4
4
4
Chapter9.RemovingorreplacingaFRU93
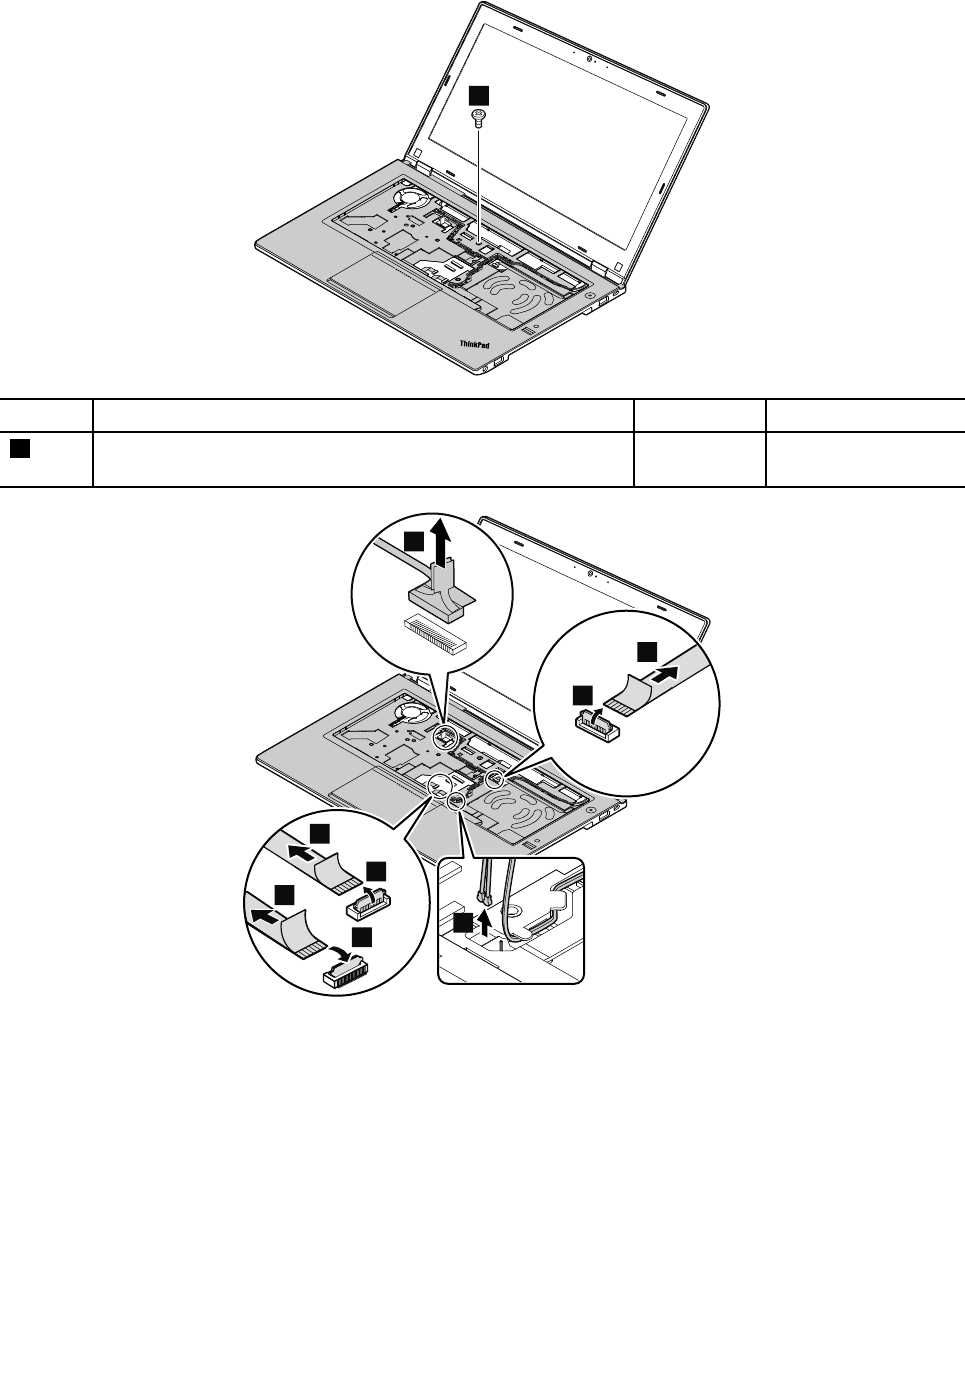
5
StepScrew(quantity)ColorT orque
5M2×6mm,flat-head,nylon-coated(1)Black0.181Nm
(1.85kgf-cm)
13
11
12
10
6
9
7
8
Wheninstalling:Ensurethattheconnectorsareattachedfirmlytothesystemboard.
94HardwareMaintenanceManual

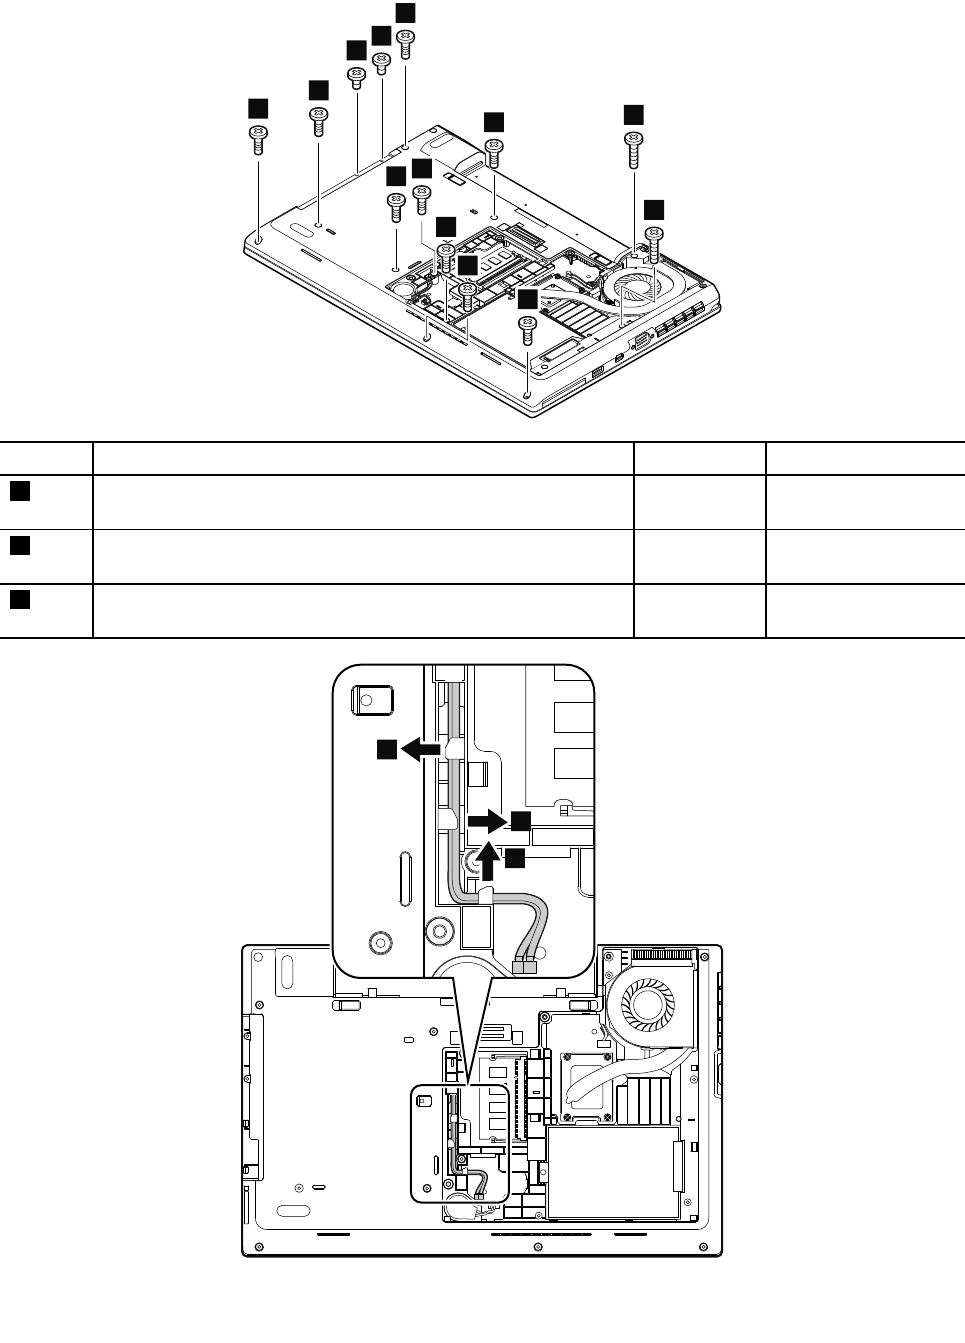
ForThinkPadL540
3
1
1
1
1
1
1
1
1
1
3
2
2
StepScrew(quantity)ColorT orque
1M2×6mm,flat-head,nylon-coated(9)Black0.181Nm
(1.85kgf-cm)
2M2×12mm,flat-head,nylon-coated(2)Black0.181Nm
(1.85kgf-cm)
3M2×3mm,flat-head,nylon-coated(2)Silver0.181Nm
(1.85kgf-cm)
4
4
4
96HardwareMaintenanceManual

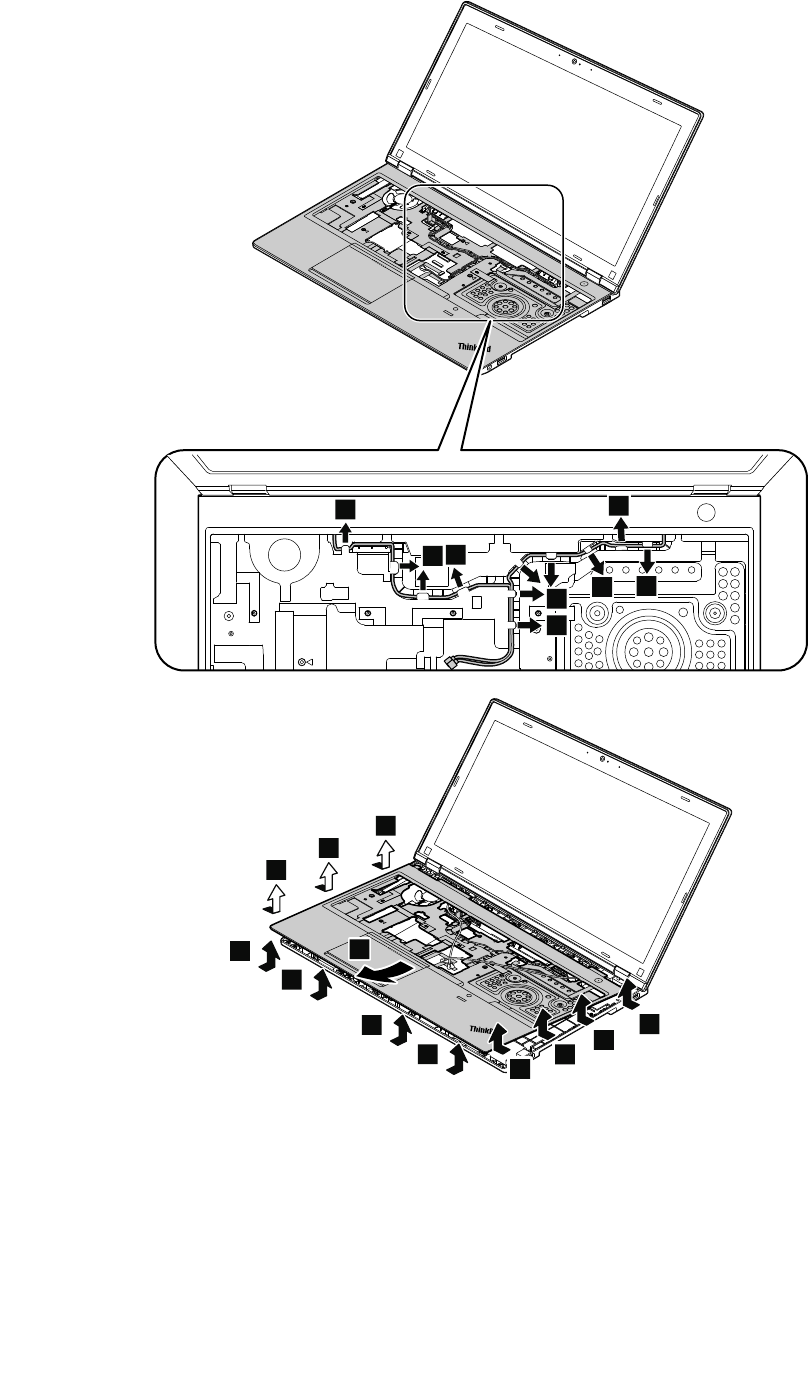
14
14
14 14
14
14
14
14
15
15
15
15
15
16
15
15
15
15
15
15
98HardwareMaintenanceManual
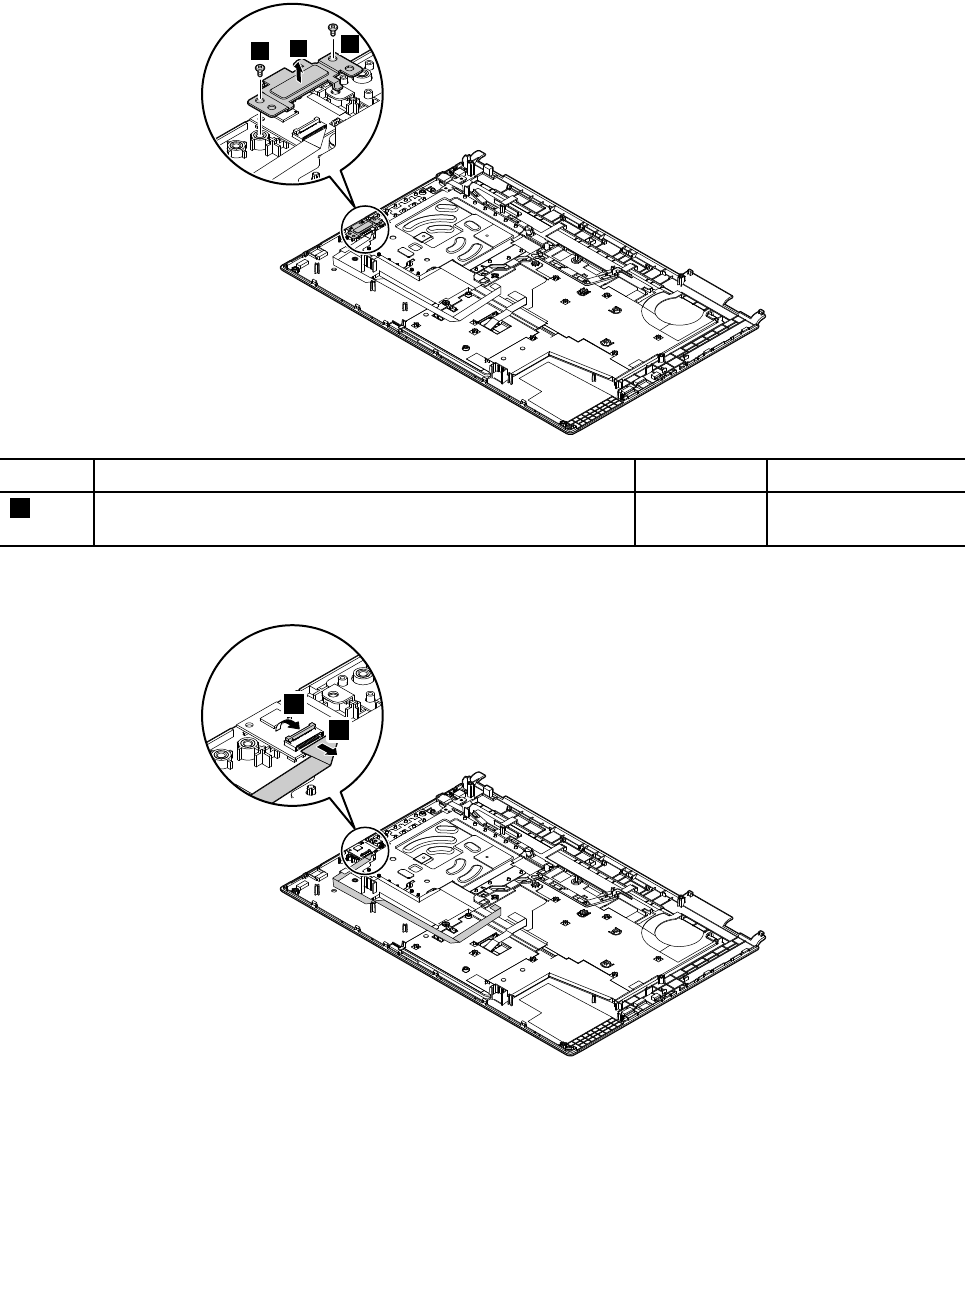
Removalstepsofthefingerprintreader
ForThinkPadL440
11
2
StepScrew(quantity)ColorT orque
1M2×3.5mm,flat-head,nylon-coated(2)Black0.181Nm
(1.85kgf-cm)
Wheninstalling:Ensurethatmylarisappliedontheinsideofthefingerprintbracket.
3
4
Wheninstalling:Ensurethattheconnectorisattachedfirmly.
Chapter9.RemovingorreplacingaFRU99
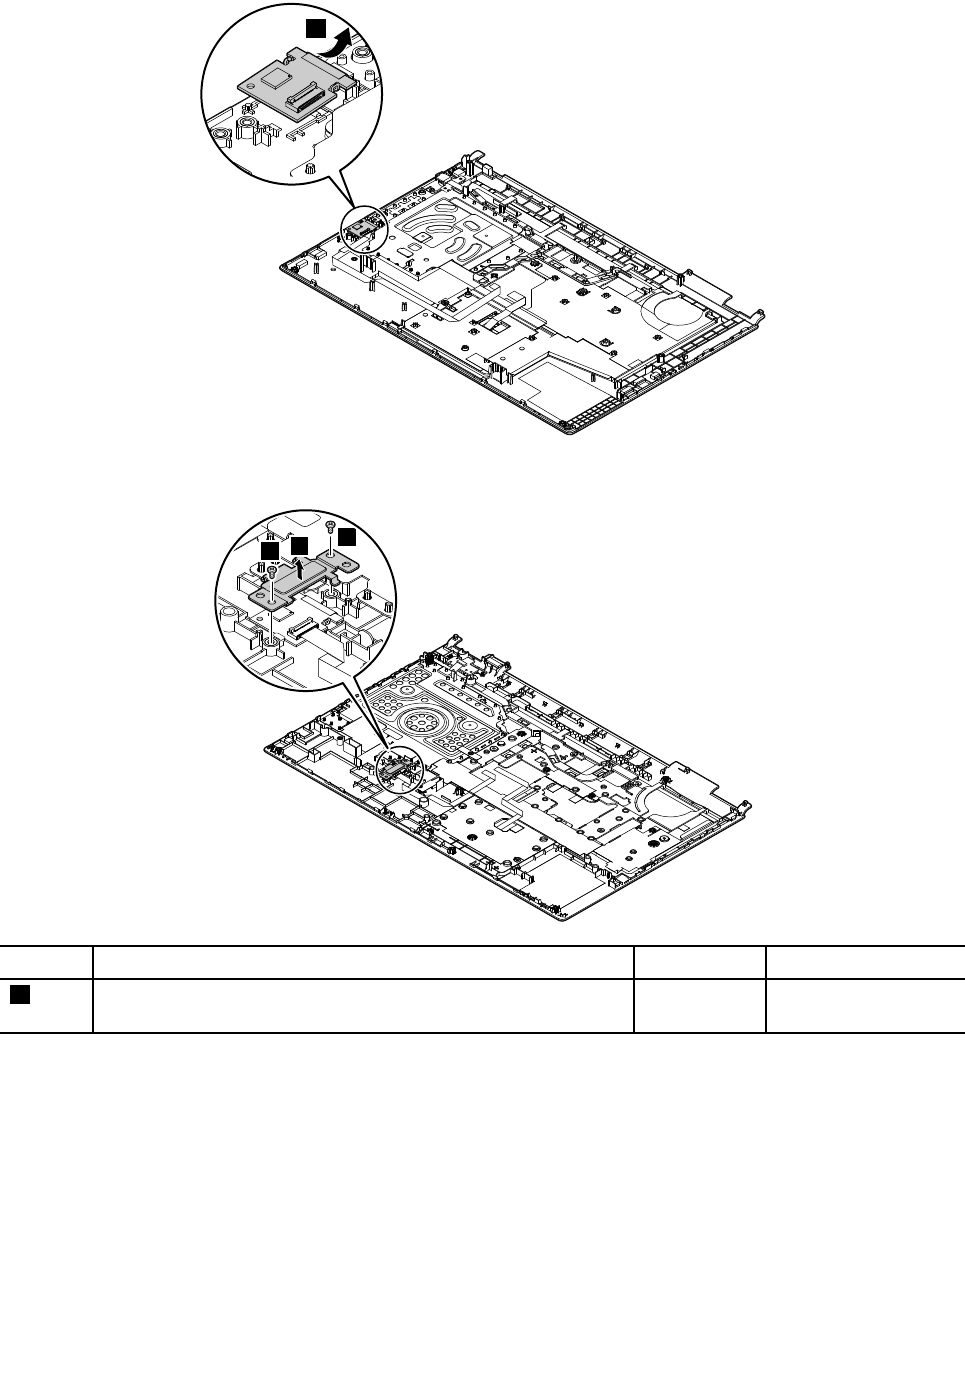
5
ForThinkPadL540
1
2
1
StepScrew(quantity)ColorT orque
1M2×3.5mm,flat-head,nylon-coated(2)Black0.181Nm
(1.85kgf-cm)
Wheninstalling:Ensurethatmylarisappliedontheinsideofthefingerprintbracket.
100HardwareMaintenanceManual

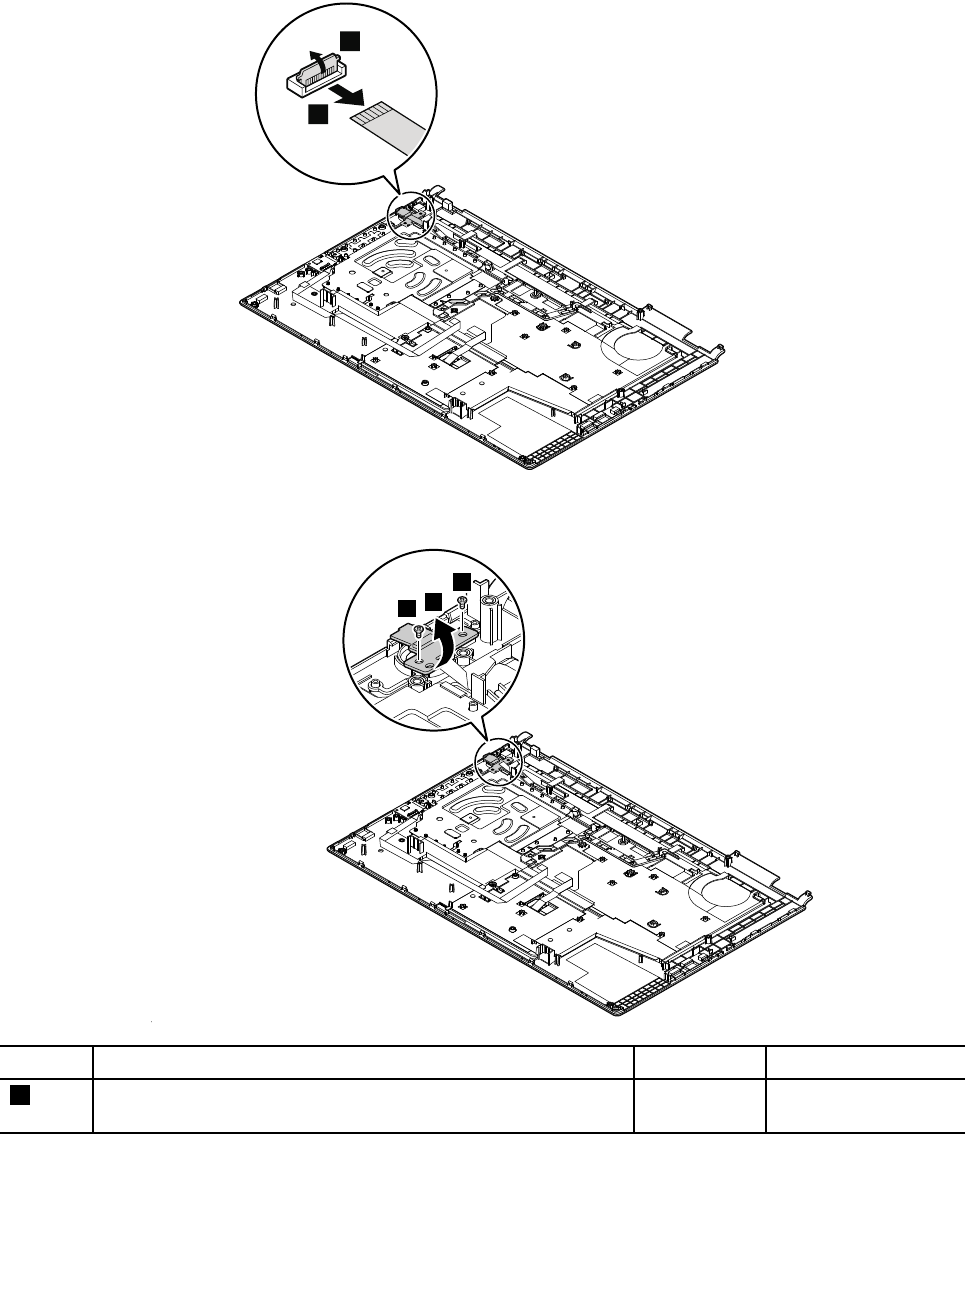
Removalstepsofthepowerbuttoncard
ForThinkPadL440
1
2
Wheninstalling:Ensurethattheconnectorisattachedfirmly.
4
3
3
StepScrew(quantity)ColorT orque
3M2×3.5mm,flat-head,nylon-coated(2)Black0.181Nm
(1.85kgf-cm)
102HardwareMaintenanceManual
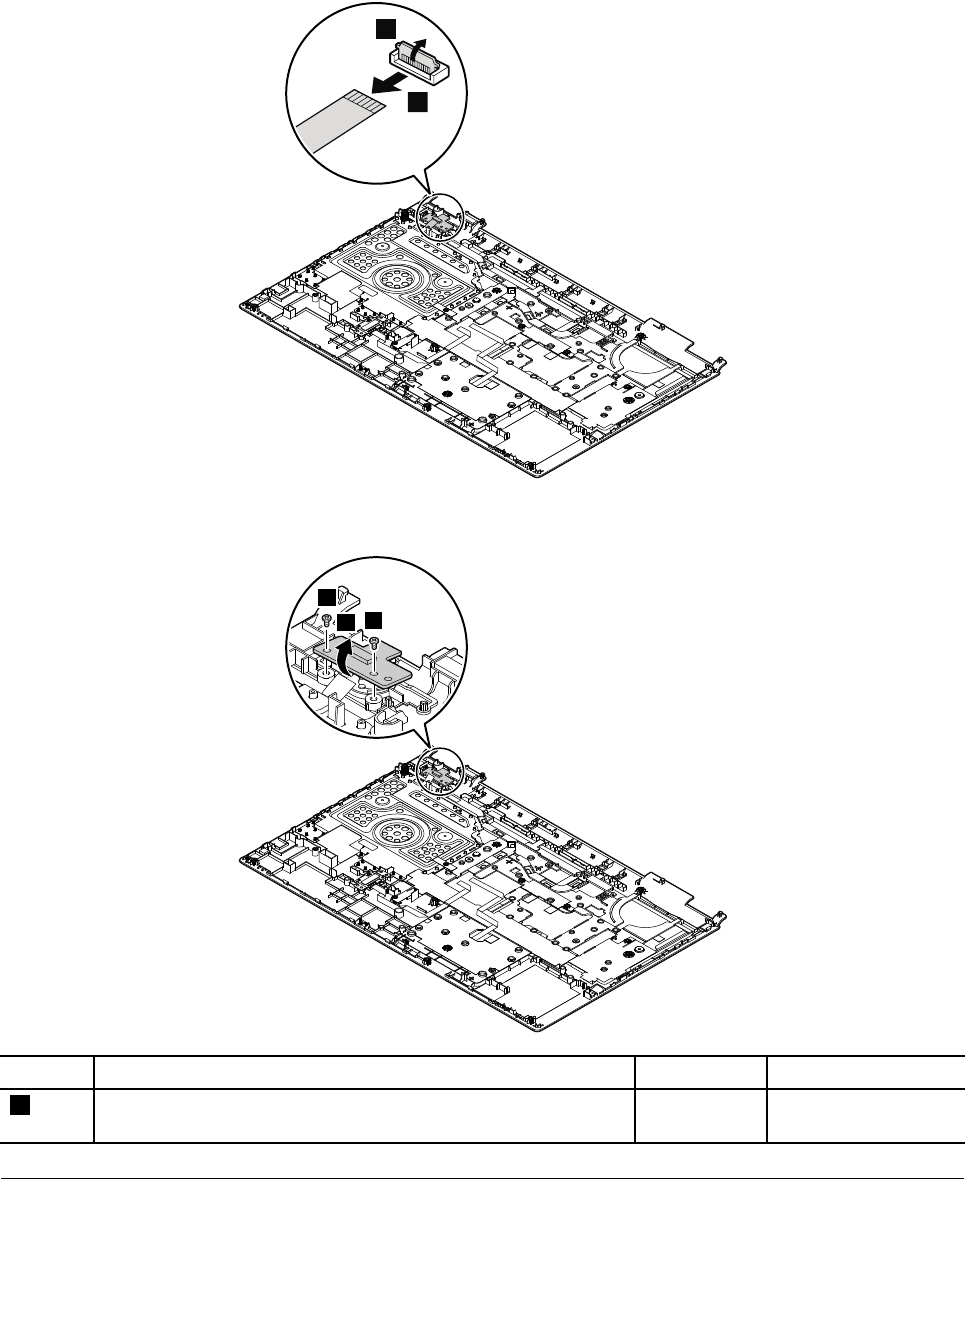
ForThinkPadL540
1
2
Wheninstalling:Ensurethattheconnectorisattachedfirmly.
3
3
4
StepScrew(quantity)ColorT orque
3M2×3.5mm,flat-head,nylon-coated(2)Black0.181Nm
(1.85kgf-cm)
1120Smartcardreader,smartcarddoor,anddummysmartcard
Foraccess,removetheseFRUsinorder:
•“1010Batterypack”onpage68
Chapter9.RemovingorreplacingaFRU103
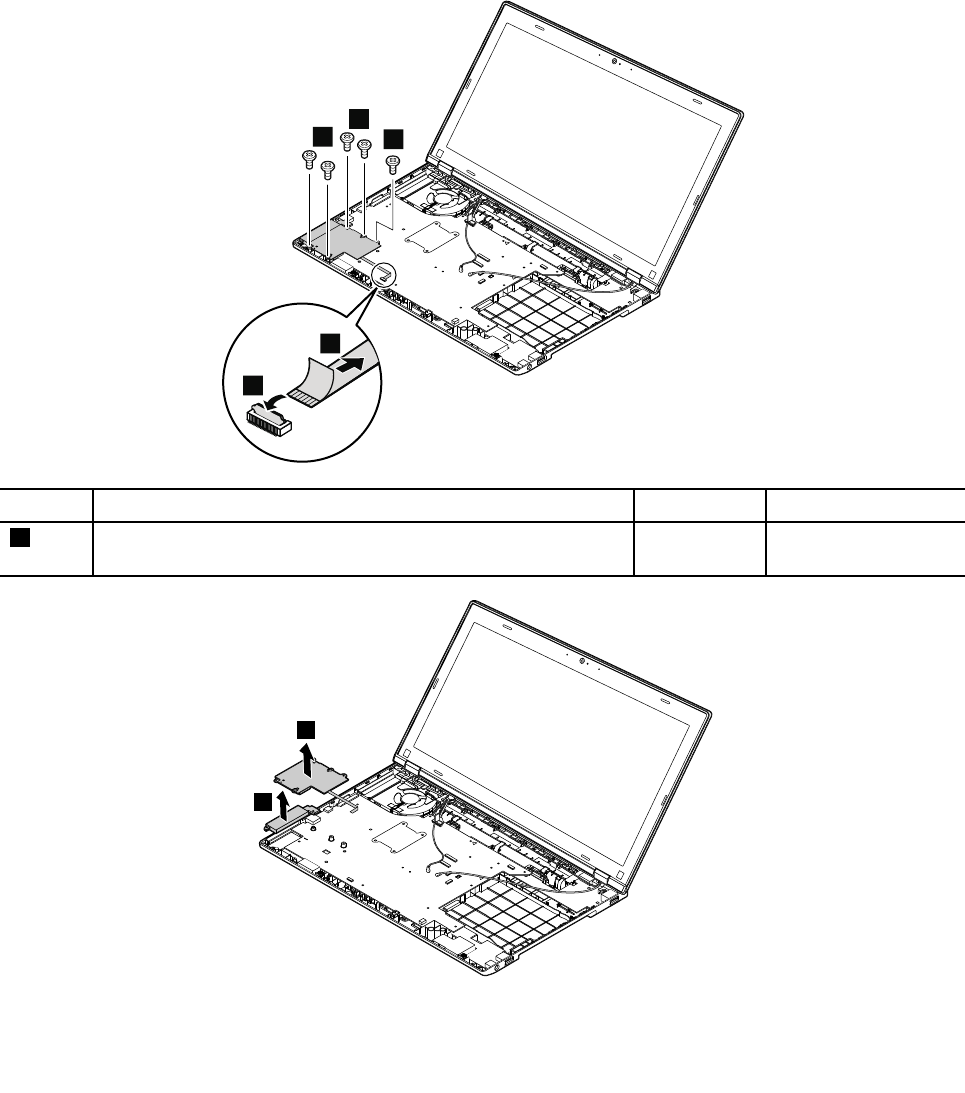
•“1020Bottomdoor”onpage69
•“1030Opticaldrive”onpage70
•“1040Harddiskdriveorsolid-statedrive”onpage72
•“1060WWANcardorM.2solid-statedrive”onpage74
•“1070WLANcard”onpage76
•“1100Keyboard”onpage82
•“1110Keyboardbezelassembly,fingerprintreader,andpowerbuttoncard”onpage92
Ifthecomputeryouareservicingsupportsthesmartcard,followthefollowinginstructionstoremoveor
replacethesmartcardreaderandsmartcarddoor.
Removalstepsofthesmartcardreaderandsmartcarddoor
2
1
3
3
3
StepScrew(quantity)ColorT orque
3M2×3.5mm,flat-head,nylon-coated(5)Silver0.181Nm
(1.85kgf-cm)
4
5
104HardwareMaintenanceManual
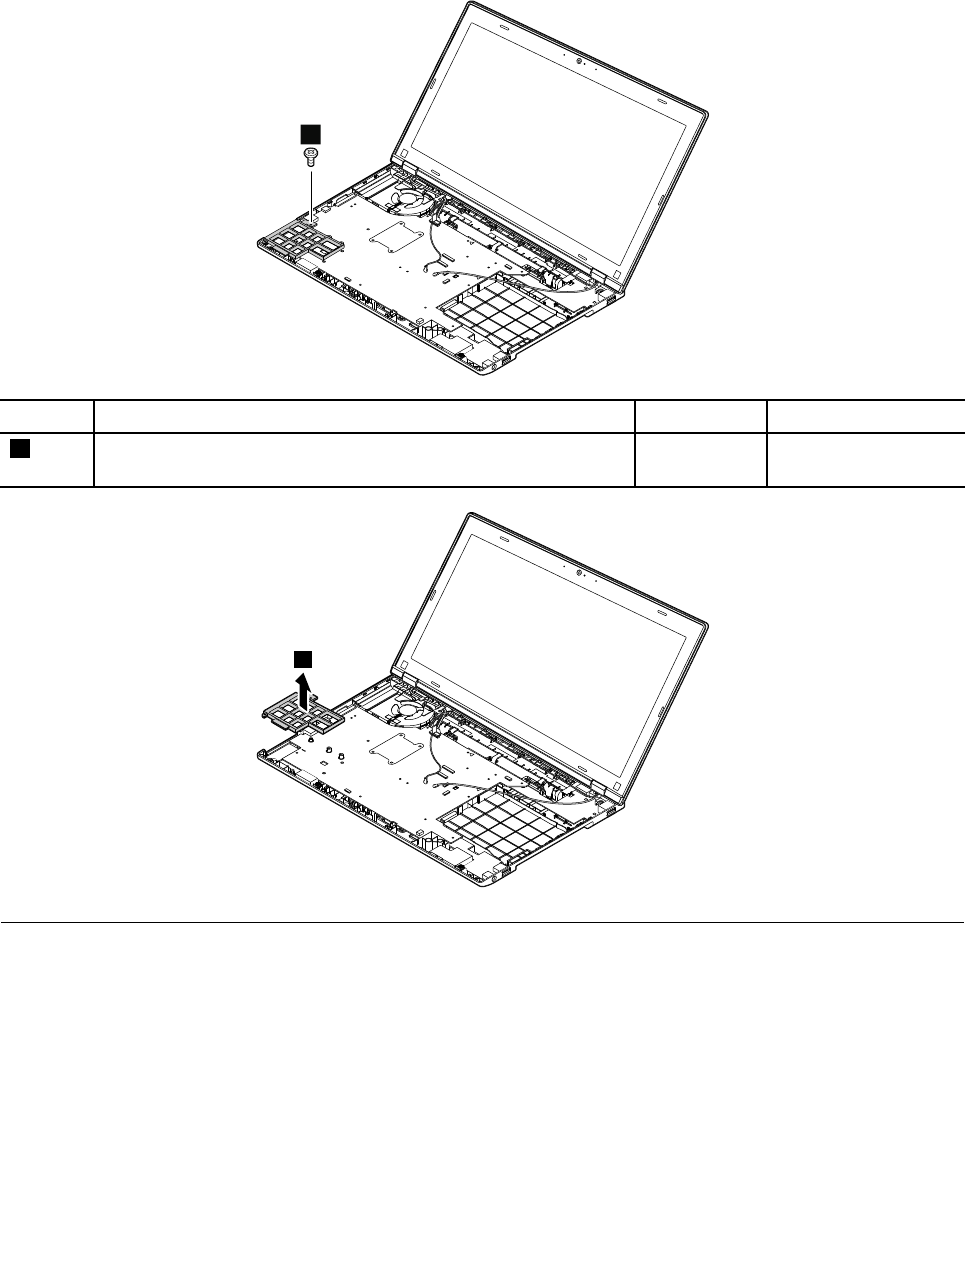
Ifthecomputeryouareservicinghasadummysmartcardinstalled.Followthefollowinginstructionsto
removeorreplacethedummysmartcard.
Removalstepsofthedummysmartcard
1
StepScrew(quantity)ColorT orque
1M2×3mm,flat-head,nylon-coated(1)Silver0.181Nm
(1.85kgf-cm)
2
1130Microprocessor
Foraccess,removetheseFRUsinorder:
•“1010Batterypack”onpage68
•“1020Bottomdoor”onpage69
•“1090Thermal-fanassembly”onpage78
Attention:Themicroprocessorisextremelysensitive.Whenyouservicethemicroprocessor,avoidany
kindofroughhandling.
Chapter9.RemovingorreplacingaFRU105
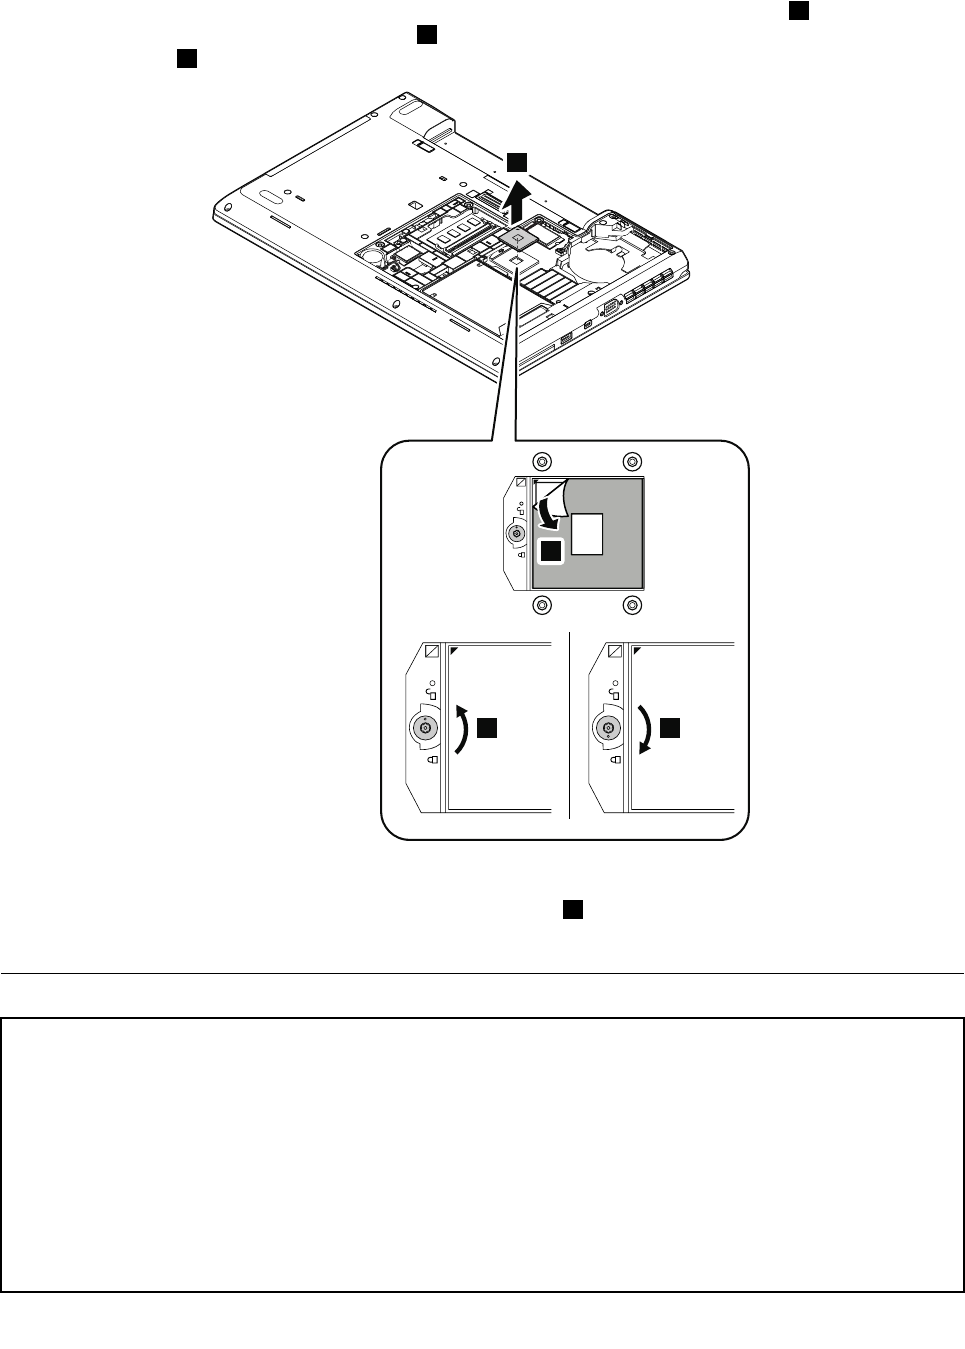
Removalstepsofthemicroprocessor
Openthesocketlockbyrotatingtheheadofthescrewinthedirectionshownbyarrow1withaTorx
screwdriver.Thenremovethemicroprocessor2.Afterthat,peeloffthemylarfromthemicroprocessor
asshownbyarrow3.
2
3
14
Wheninstalling:Placethemicroprocessorinthemicroprocessorsocket,andthenclosethelockby
rotatingtheheadofthescrewinthedirectionshownbyarrow4withaTorxscrewdriver.Ensurethat
themicroprocessorissecuredinplace.
1140Systemboardassembly
Importantnoticesforhandlingthesystemboard:
Whenhandlingthesystemboard,bearthefollowinginmind:
•Thesystemboardhasanaccelerometer,whichcanbebrokenifseveralthousandsofG-forcesareapplied.
Note:Droppingasystemboardfromaheightofaslittleas6inchessothatitfallsflatonahardbenchcansubject
theaccelerometertoasmuchas6000G'sofshock.
•Becarefulnottodropthesystemboardonabenchtopthathasahardsurface,suchasmetal,wood,orcomposite.
•Ifasystemboardisdropped,besuretodocumentthedropinanyrejectreport,andreplacethesystemboard.
•Avoidroughhandlingofanykind.
•Ateverypointintheprocess,besurenottodroporstackthesystemboard.
106HardwareMaintenanceManual
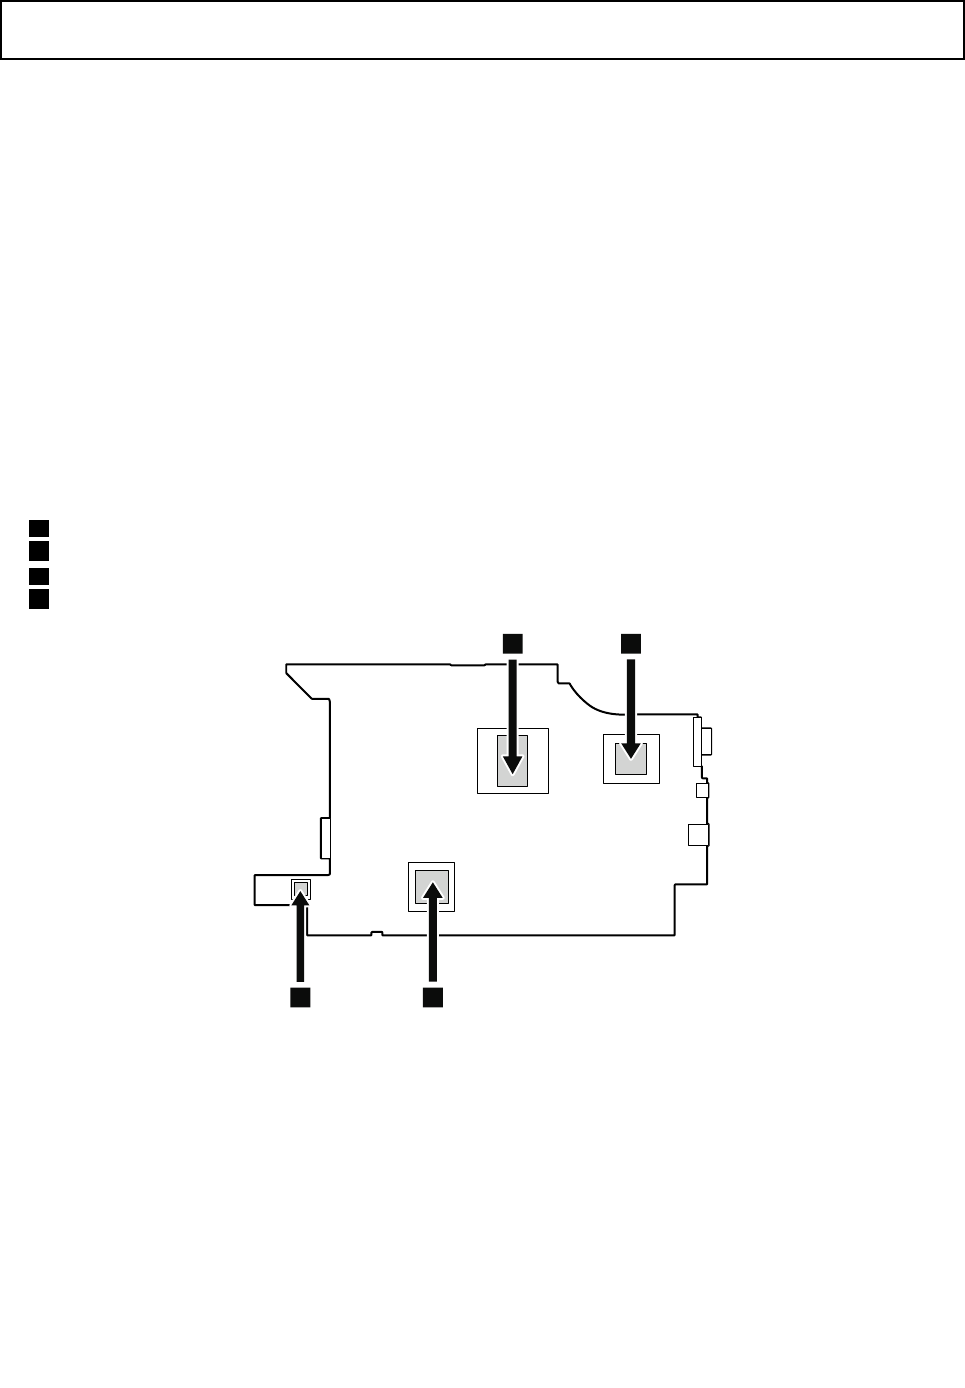
•Ifyouputasystemboarddown,besuretoputitonlyonapaddedsurfacesuchasanESDmatoracorrugated
conductivesurface.
Foraccess,removetheseFRUsinorder:
•“1010Batterypack”onpage68
•“1020Bottomdoor”onpage69
•“1030Opticaldrive”onpage70
•“1040Harddiskdriveorsolid-statedrive”onpage72
•“1050Memorymodule”onpage73
•“1060WWANcardorM.2solid-statedrive”onpage74
•“1070WLANcard”onpage76
•“1080Coin-cellbattery”onpage77
•“1090Thermal-fanassembly”onpage78
•“1100Keyboard”onpage82
•“1110Keyboardbezelassembly,fingerprintreader,andpowerbuttoncard”onpage92
•“1120Smartcardreader,smartcarddoor,anddummysmartcard”onpage103
Locationsofthemajorsensitivecomponentsonthesystemboard
Attention:Thefollowingcomponentsonthesystemboardareextremelysensitive.Whenyouservicethe
systemboard,avoidanykindofroughhandling.
aMicroprocessor
bGraphicProcessingUnit(GPU),availableonlyinmodelsthathaveadiscretegraphicscard
cPlatformControllerHub(PCH)
dAccelerometerchipfortheharddiskdriveActiveProtectionSystem®(APS)
b
c
d
a
Chapter9.RemovingorreplacingaFRU107
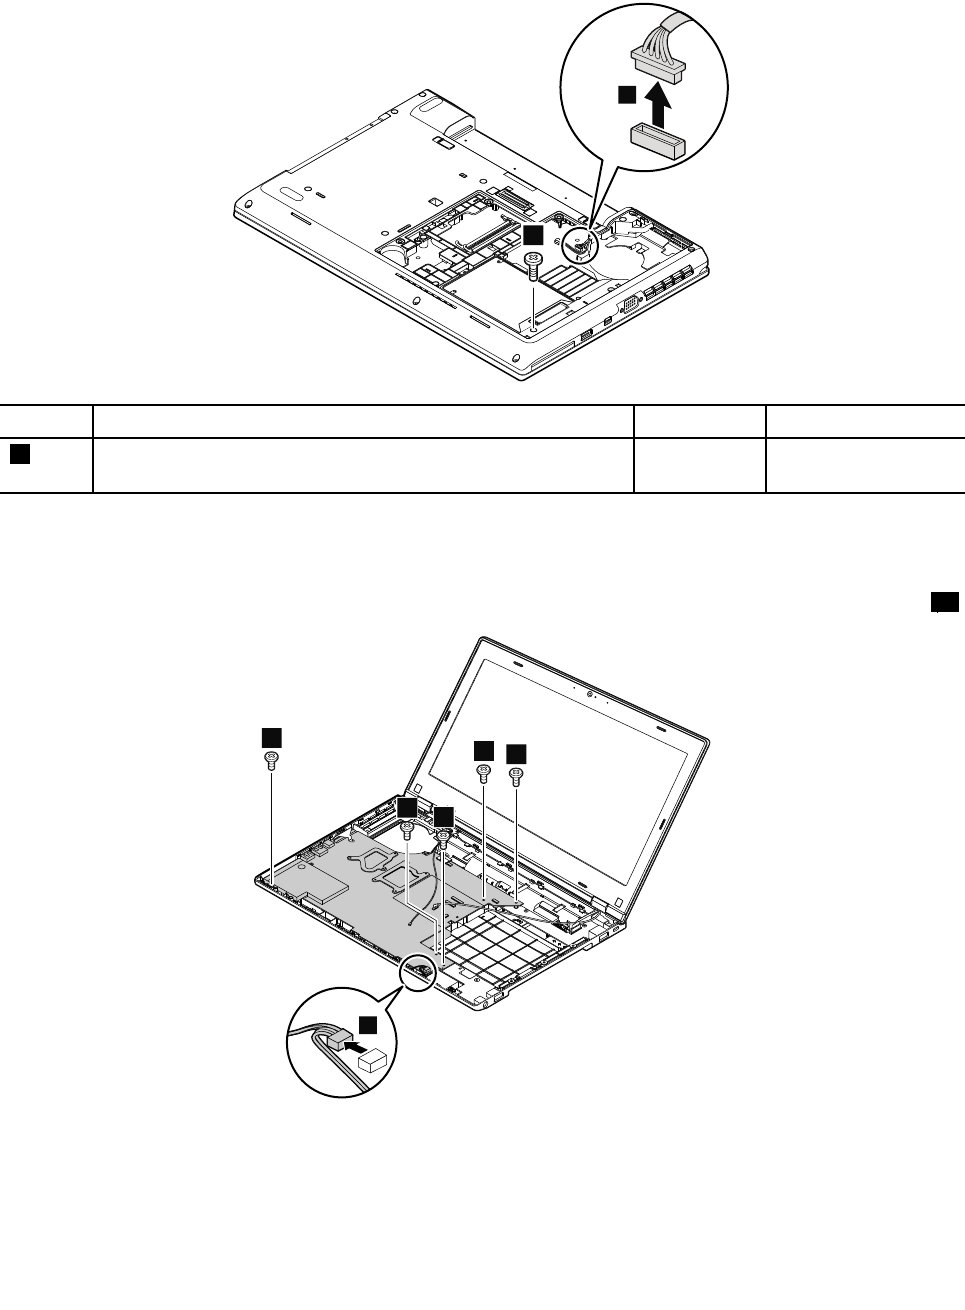
Removalstepsofthesystemboardassembly
ForThinkPadL440
2
1
StepScrew(quantity)ColorT orque
2M2×6mm,flat-head,nylon-coated(1)Black0.181Nm
(1.85kgf-cm)
Wheninstalling:Ensurethattheconnectorisattachedfirmlytothesystemboardassembly.
Note:Dependingonthemodel,thecomputeryouareservicingmightbeequippedwitheitheran
ExpressCardreaderorasmartcardreader.OnlythemodelswithanExpressCardreaderhavethescrew3b.
4
3a
3b
3a
3a
3a
108HardwareMaintenanceManual
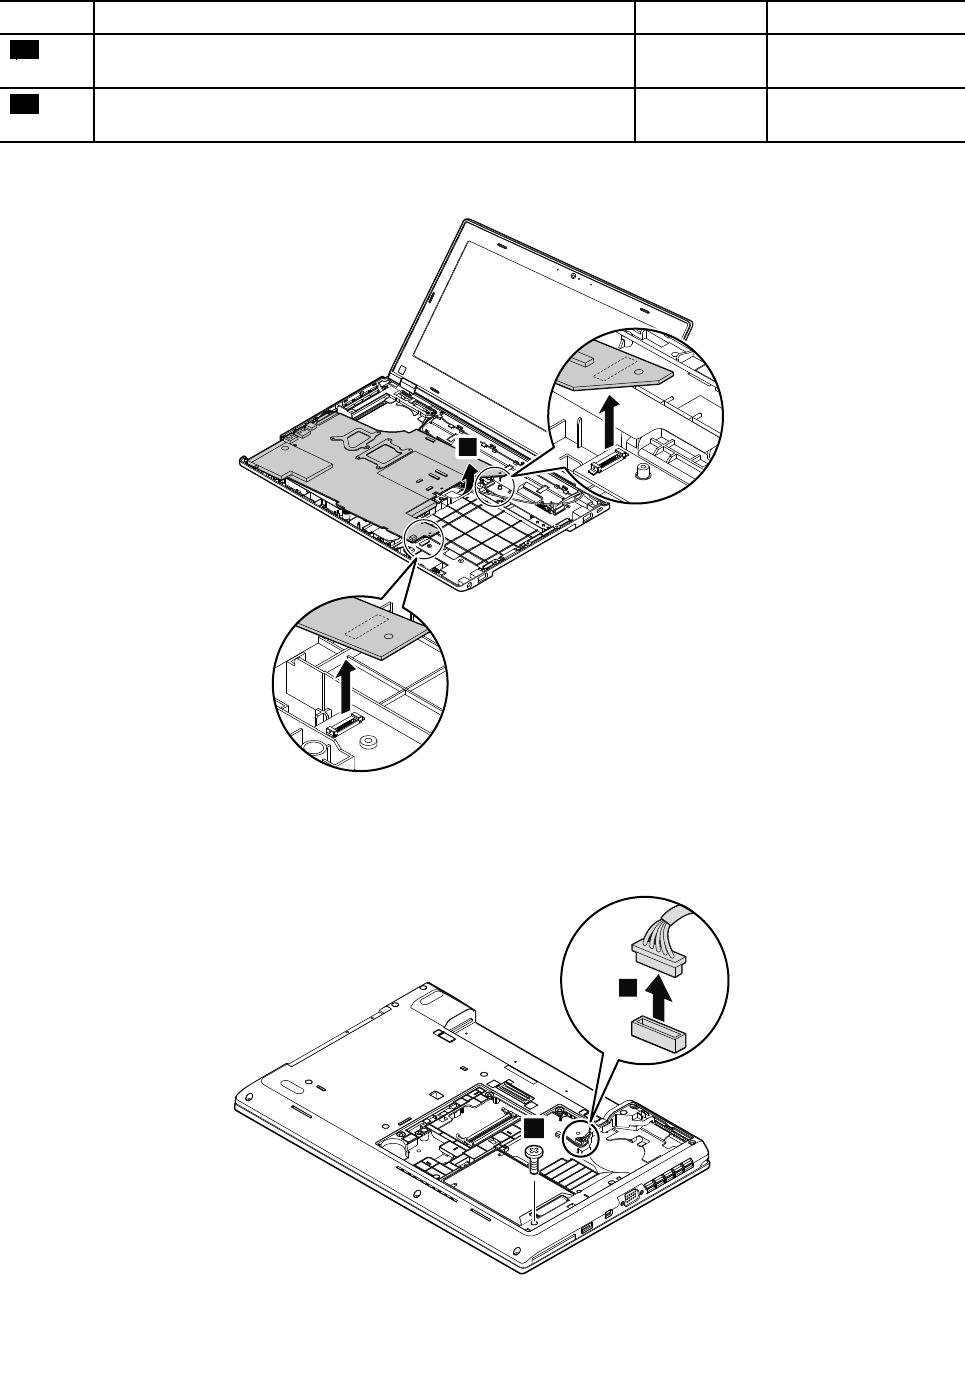
StepScrew(quantity)ColorT orque
3aM2×3.5mm,flat-head,nylon-coated(4)Silver0.181Nm
(1.85kgf-cm)
3bM2×3.5mm,flat-head,nylon-coated(1)Silver0.181Nm
(1.85kgf-cm)
Wheninstalling:Ensurethattheconnectorisattachedfirmlytothesystemboardassembly.
5
Wheninstalling:Ensurethattheconnectorsareattachedfirmlytothesystemboardassembly.
ForThinkPadL540
2
1
Chapter9.RemovingorreplacingaFRU109
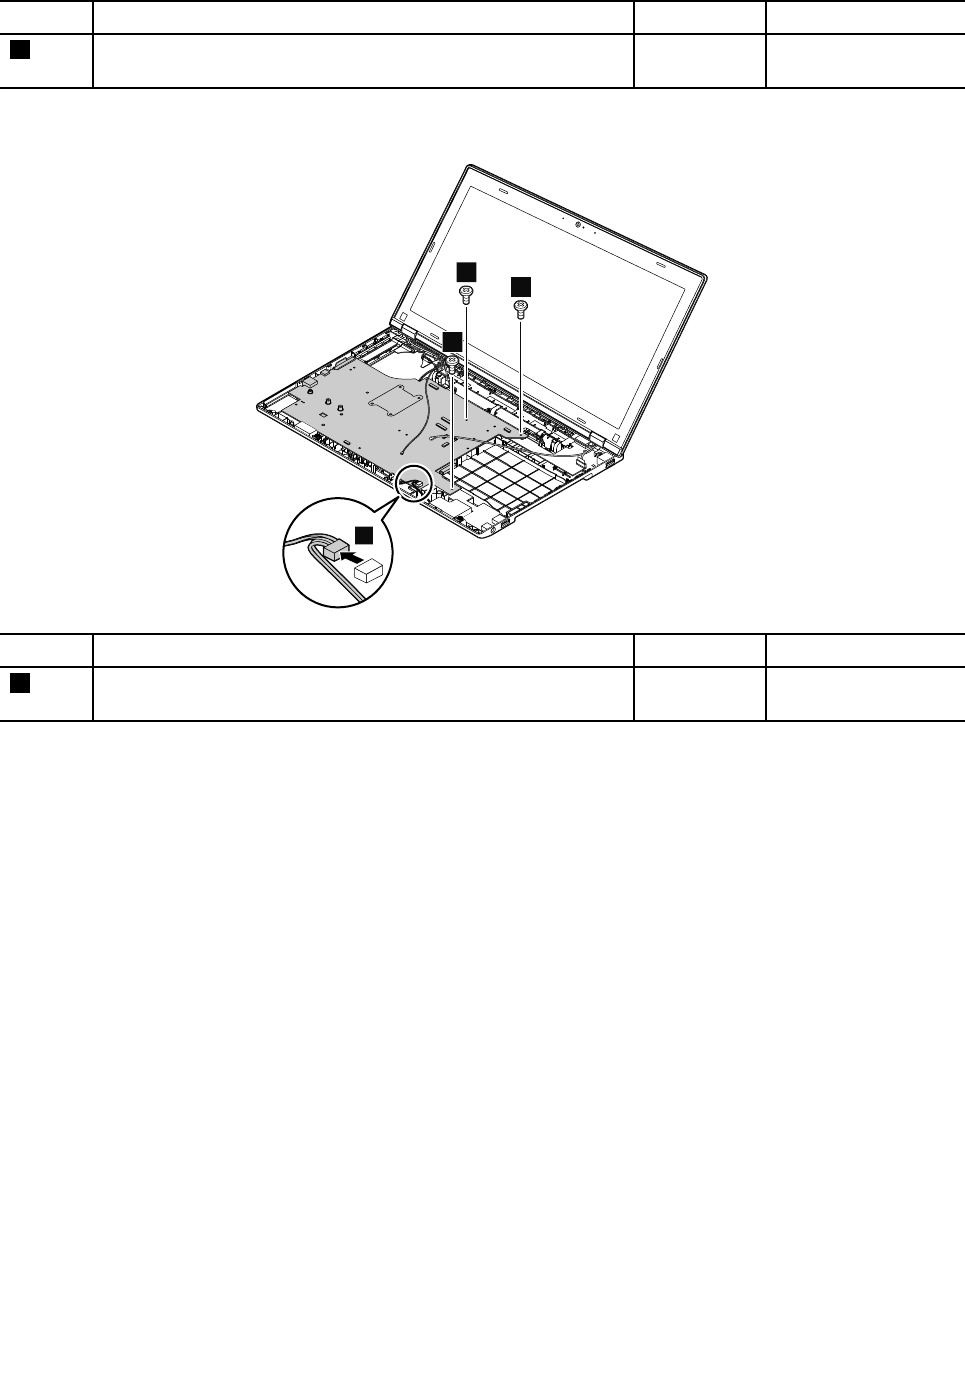
StepScrew(quantity)ColorT orque
2M2×6mm,flat-head,nylon-coated(1)Black0.181Nm
(1.85kgf-cm)
Wheninstalling:Ensurethattheconnectorisattachedfirmlytothesystemboardassembly.
3
3
3
4
StepScrew(quantity)ColorT orque
3M2×3.5mm,flat-head,nylon-coated(3)Silver0.181Nm
(1.85kgf-cm)
Wheninstalling:Ensurethattheconnectorisattachedfirmlytothesystemboardassembly.
110HardwareMaintenanceManual
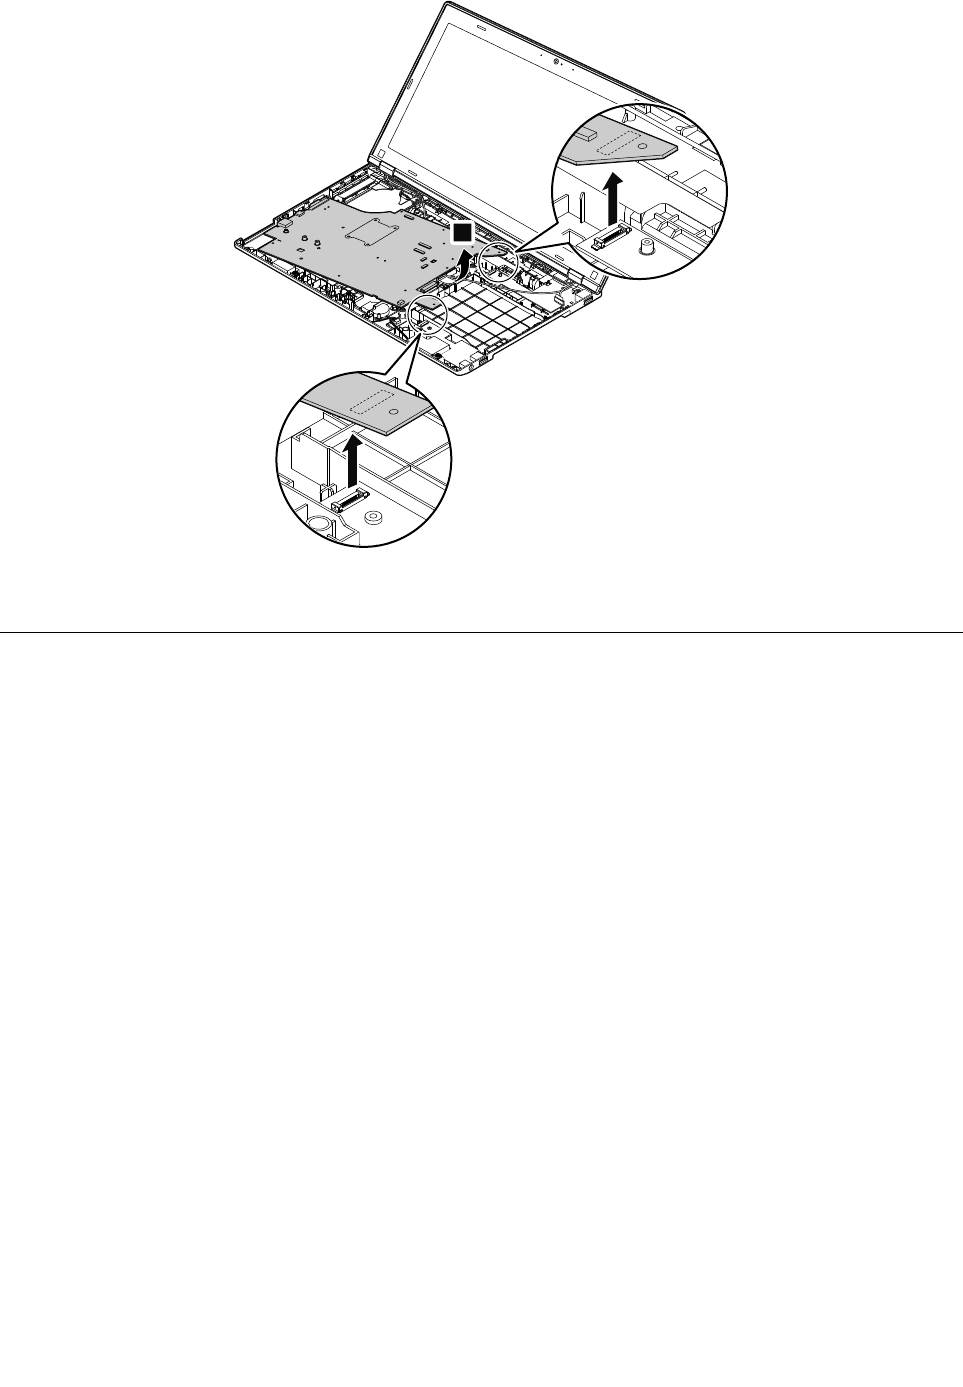
5
Wheninstalling:Ensurethattheconnectorsareattachedfirmlytothesystemboardassembly.
1150Audioboard
Foraccess,removetheseFRUsinorder:
•“1010Batterypack”onpage68
•“1020Bottomdoor”onpage69
•“1030Opticaldrive”onpage70
•“1040Harddiskdriveorsolid-statedrive”onpage72
•“1050Memorymodule”onpage73
•“1060WWANcardorM.2solid-statedrive”onpage74
•“1070WLANcard”onpage76
•“1080Coin-cellbattery”onpage77
•“1090Thermal-fanassembly”onpage78
•“1100Keyboard”onpage82
•“1110Keyboardbezelassembly,fingerprintreader,andpowerbuttoncard”onpage92
•“1120Smartcardreader,smartcarddoor,anddummysmartcard”onpage103
•“1140Systemboardassembly”onpage106
Chapter9.RemovingorreplacingaFRU111
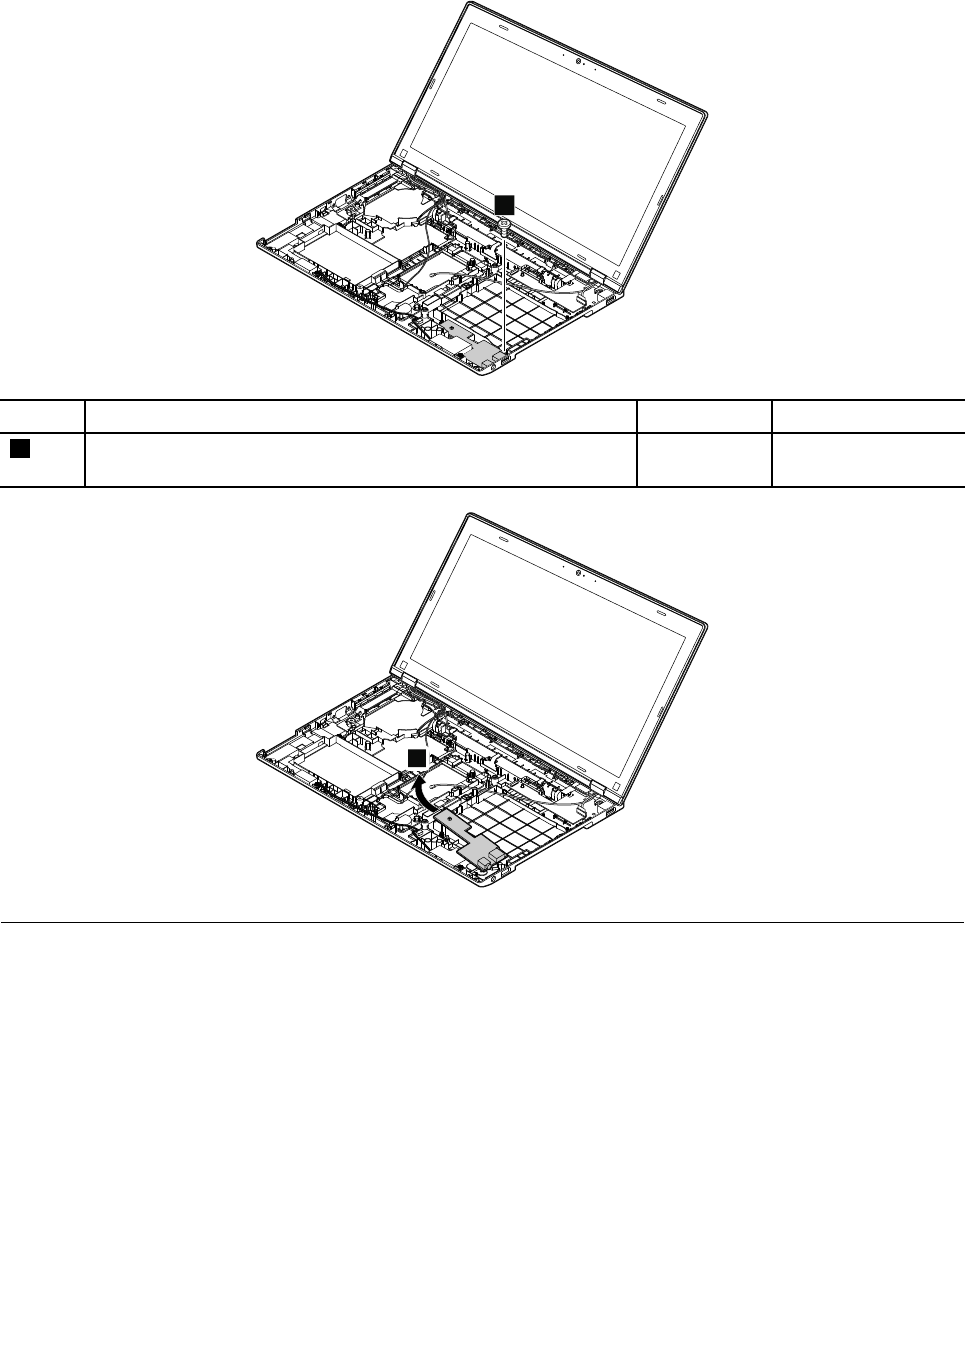
Removalstepsoftheaudioboard
1
StepScrew(quantity)ColorTorque
1M2×3.5mm,flat-head,nylon-coated(1)Silver0.181Nm
(1.85kgf-cm)
2
1160Speakerassembly
RemovalstepsofthespeakerassemblyforThinkPadL440
Foraccess,removetheseFRUsinorder:
•“1010Batterypack”onpage68
•“1020Bottomdoor”onpage69
•“1030Opticaldrive”onpage70
•“1040Harddiskdriveorsolid-statedrive”onpage72
•“1050Memorymodule”onpage73
•“1060WWANcardorM.2solid-statedrive”onpage74
•“1070WLANcard”onpage76
•“1080Coin-cellbattery”onpage77
•“1090Thermal-fanassembly”onpage78
•“1100Keyboard”onpage82
112HardwareMaintenanceManual
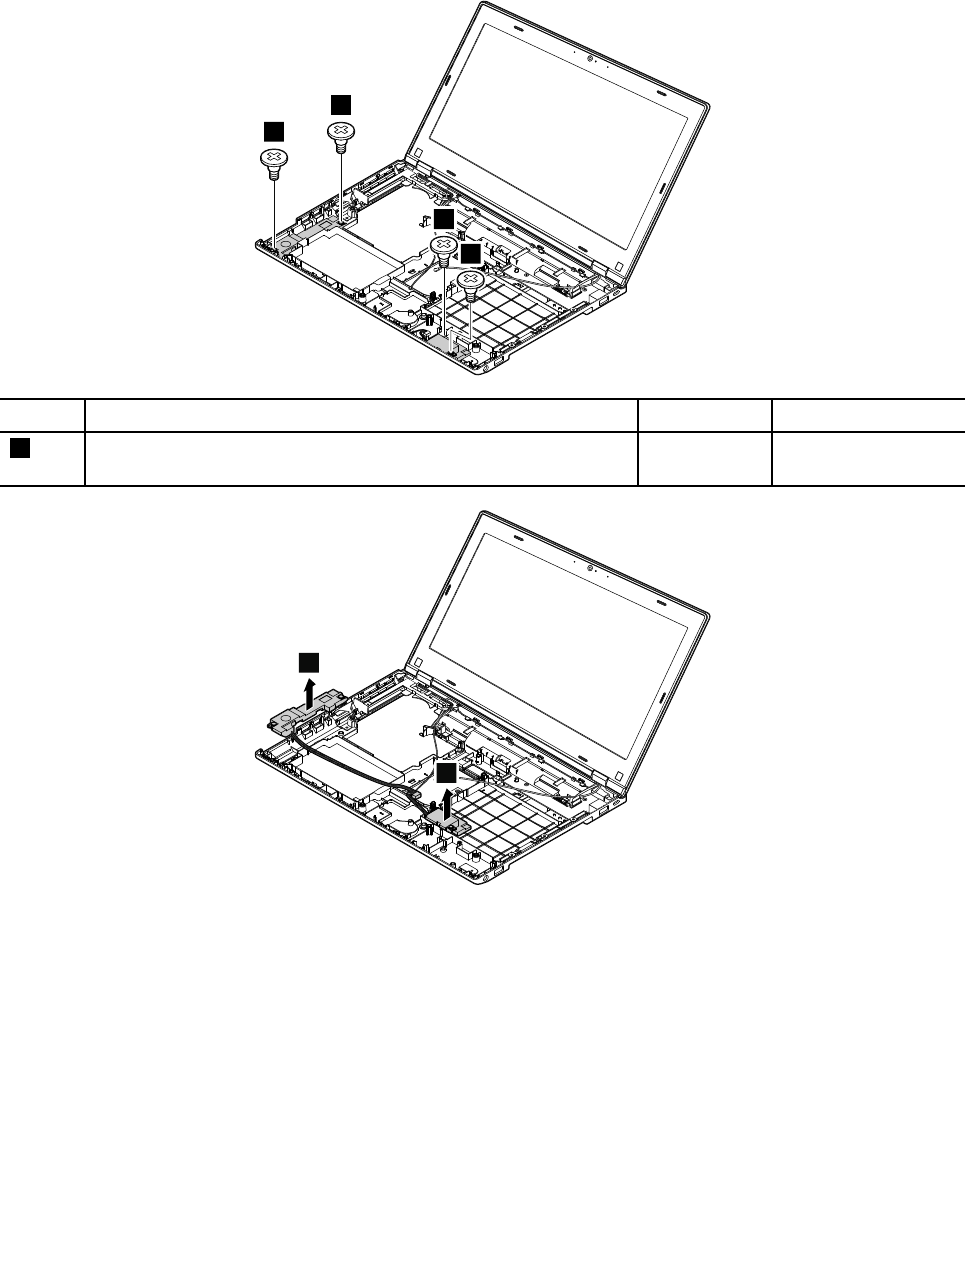
•“1110Keyboardbezelassembly,fingerprintreader,andpowerbuttoncard”onpage92
•“1120Smartcardreader,smartcarddoor,anddummysmartcard”onpage103
•“1140Systemboardassembly”onpage106
•“1150Audioboard”onpage111
1
1
1
1
StepScrew(quantity)ColorTorque
1M2.5×L4.4mm,flat-head,nylon-coated(4)Black0.392Nm
(4.00kgf-cm)
2
2
RemovalstepsofthespeakerassemblyforThinkPadL540
Foraccess,removetheseFRUsinorder:
•“1010Batterypack”onpage68
•“1020Bottomdoor”onpage69
•“1030Opticaldrive”onpage70
•“1040Harddiskdriveorsolid-statedrive”onpage72
•“1050Memorymodule”onpage73
•“1060WWANcardorM.2solid-statedrive”onpage74
•“1070WLANcard”onpage76
•“1080Coin-cellbattery”onpage77
•“1090Thermal-fanassembly”onpage78
•“1100Keyboard”onpage82
Chapter9.RemovingorreplacingaFRU113
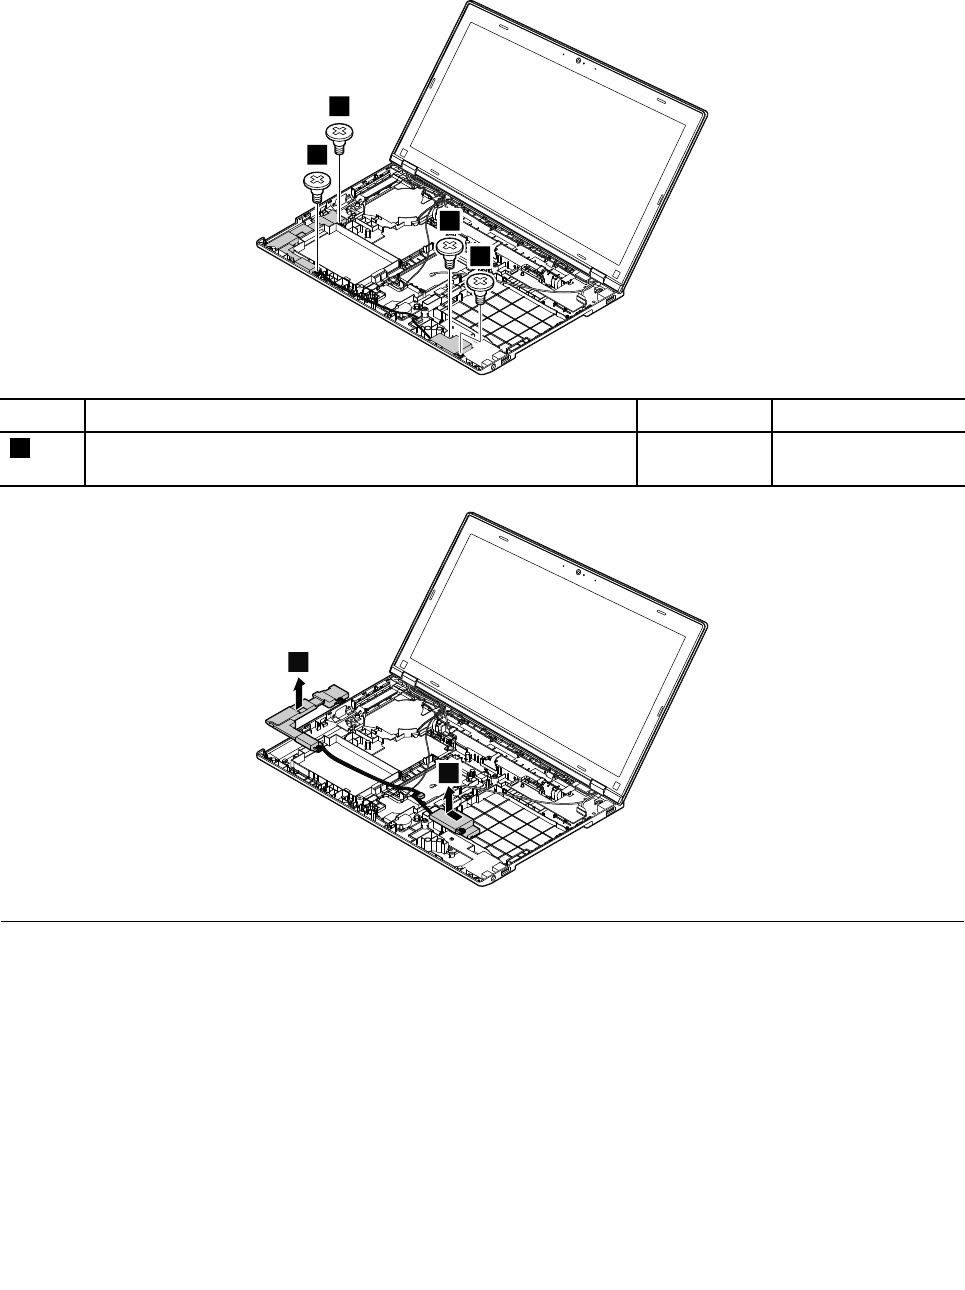
•“1110Keyboardbezelassembly,fingerprintreader,andpowerbuttoncard”onpage92
•“1120Smartcardreader,smartcarddoor,anddummysmartcard”onpage103
•“1140Systemboardassembly”onpage106
1
1
1
1
StepScrew(quantity)ColorTorque
1M2.5×L4.4mm,flat-head,nylon-coated(4)Black0.392Nm
(4.00kgf-cm)
2
3
1170Hingebracket,dc-incableassembly,RJ45card,andbasecover
assembly
Foraccess,removetheseFRUsinorder:
•“1010Batterypack”onpage68
•“1020Bottomdoor”onpage69
•“1030Opticaldrive”onpage70
•“1040Harddiskdriveorsolid-statedrive”onpage72
•“1050Memorymodule”onpage73
•“1060WWANcardorM.2solid-statedrive”onpage74
•“1070WLANcard”onpage76
•“1080Coin-cellbattery”onpage77
114HardwareMaintenanceManual
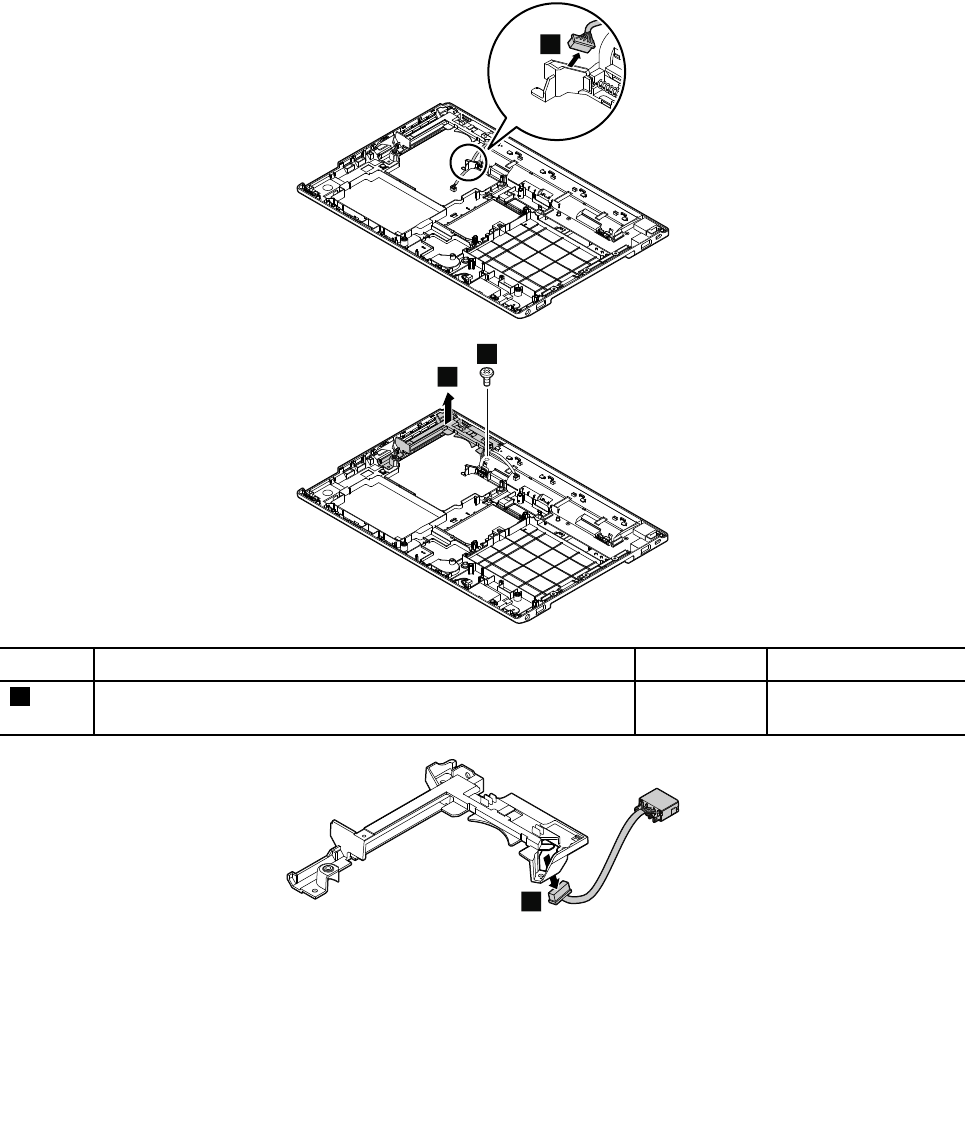
•“1090Thermal-fanassembly”onpage78
•“1100Keyboard”onpage82
•“1110Keyboardbezelassembly,fingerprintreader,andpowerbuttoncard”onpage92
•“1120Smartcardreader,smartcarddoor,anddummysmartcard”onpage103
•“1140Systemboardassembly”onpage106
•“2010LCDunit”onpage117
Removalstepsofthehingebracketandthedc-incableassembly
ForThinkPadL440
1
2
3
StepScrew(quantity)ColorT orque
2M2×3.5mm,flat-head,nylon-coated(1)Silver0.181Nm
(1.85kgf-cm)
4
ForThinkPadL440
Chapter9.RemovingorreplacingaFRU115
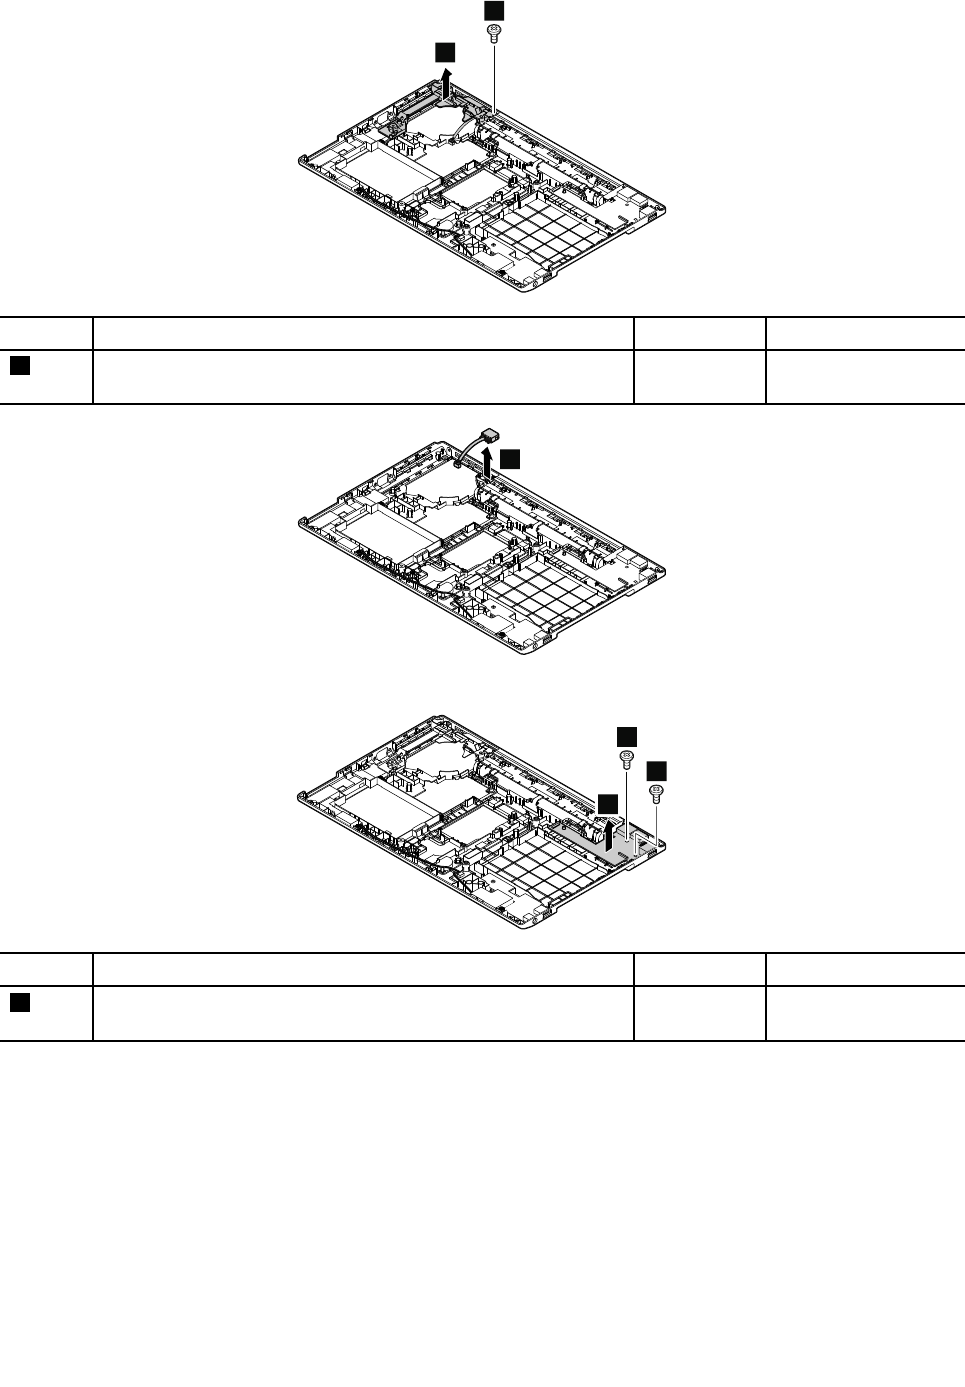
1
2
StepScrew(quantity)ColorT orque
1M2×3.5mm,flat-head,nylon-coated(1)Silver0.181Nm
(1.85kgf-cm)
3
RemovalstepsoftheRJ45cardandthebasecoverassembly
1
1
2
StepScrew(quantity)ColorT orque
2M2×3.5mm,flat-head,nylon-coated(2)Silver0.181Nm
(1.85kgf-cm)
Applyinglabelstothebasecover
ThenewbasecoverFRUisshippedwithakitcontaininglabelsofseveralkinds.Applythoselabelswhen
youreplacethebasecover.ForthelabelsthatarenotshippedwiththenewbasecoverFRU,peelthem
fromtheoldbasecoverassembly,andadherethemtothenewone.
Thefollowingillustrationshowsthelocationofeachlabel.
116HardwareMaintenanceManual
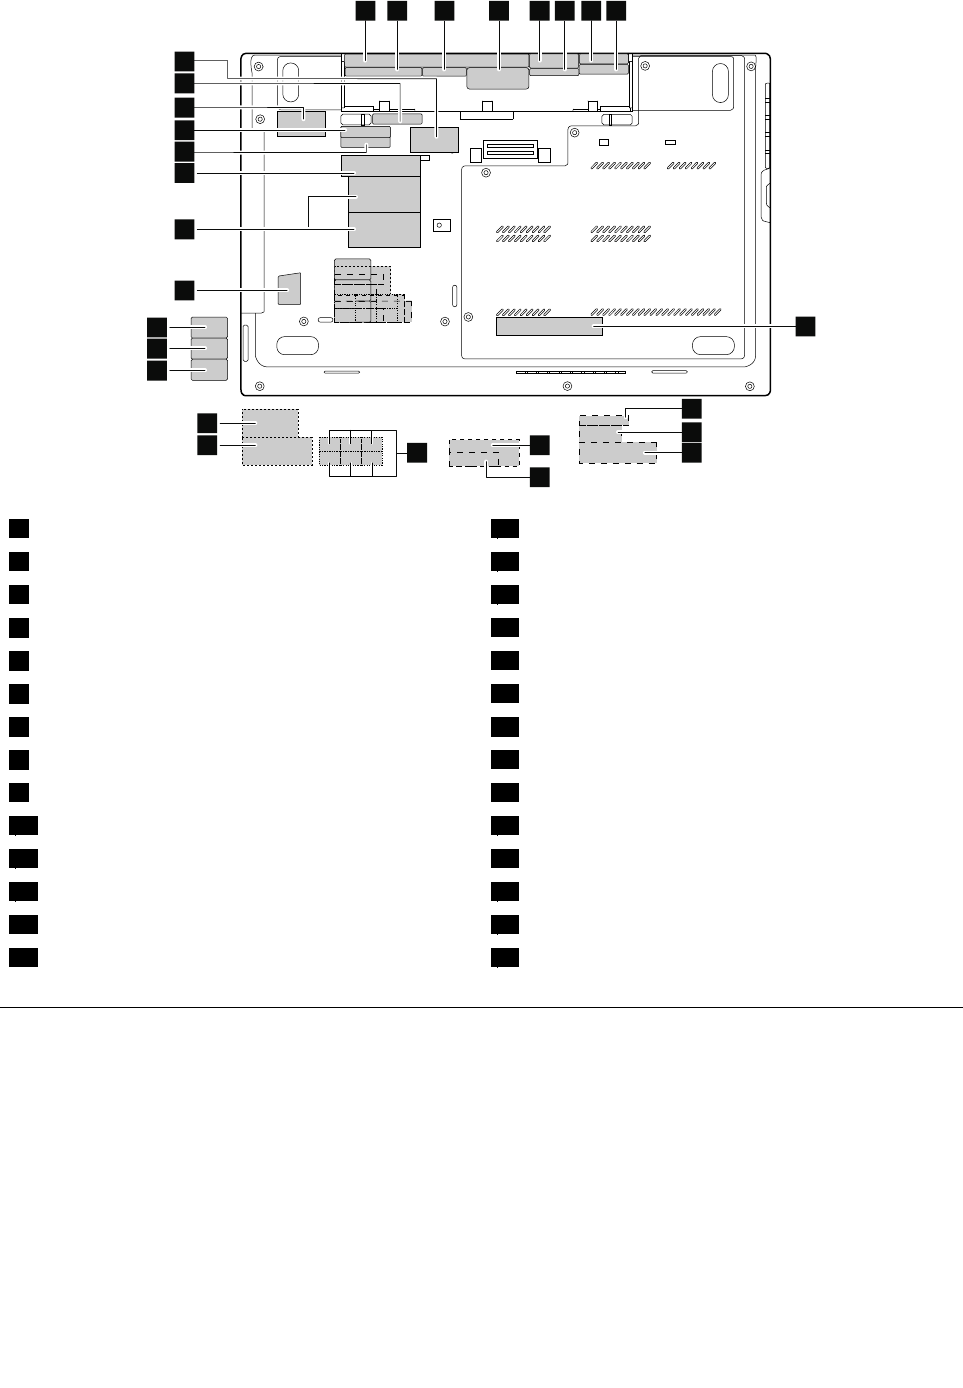
15234678
23
21
20
19
18
17
16
9
12
14
13
11
10
25
28
27
26
24
15
22
1Systemlabel15SIRIMlabelorIndonesiaPOSTELlabel
2Informationlabel16China3GlogoWWANlabel
3WWANMAClabel17China3GWWANlabel
4WindowsCOAlabel18BrazilWLANlabel
5GEOlabel19BrazilBluetoothlabel
6WWANlabelforT aiwan/Korea20BrazilWWANlabel
7MachinetypeandS/Nlabel21GenuineMicrosoftlabel
8FCClabel22Assettag
9Wirelesslabelforspecial-bidproduct23Indonesiaratinglabel
10Chinamodellabel24ChinaGEOlabel
11ChinaWWANlabel25ProductlabelforKorea
12Chinatelcomlabel26IMEIlabelforThinkPadL540
13Israellabel27Chinamodellabel
14KoreaWWANlabel28IMEIlabelforThinkPadL440
2010LCDunit
Foraccess,removetheseFRUsinorder:
•“1010Batterypack”onpage68
•“1020Bottomdoor”onpage69
•“1030Opticaldrive”onpage70
•“1050Memorymodule”onpage73
•“1060WWANcardorM.2solid-statedrive”onpage74
•“1070WLANcard”onpage76
•“1100Keyboard”onpage82
•“1110Keyboardbezelassembly,fingerprintreader,andpowerbuttoncard”onpage92
Chapter9.RemovingorreplacingaFRU117
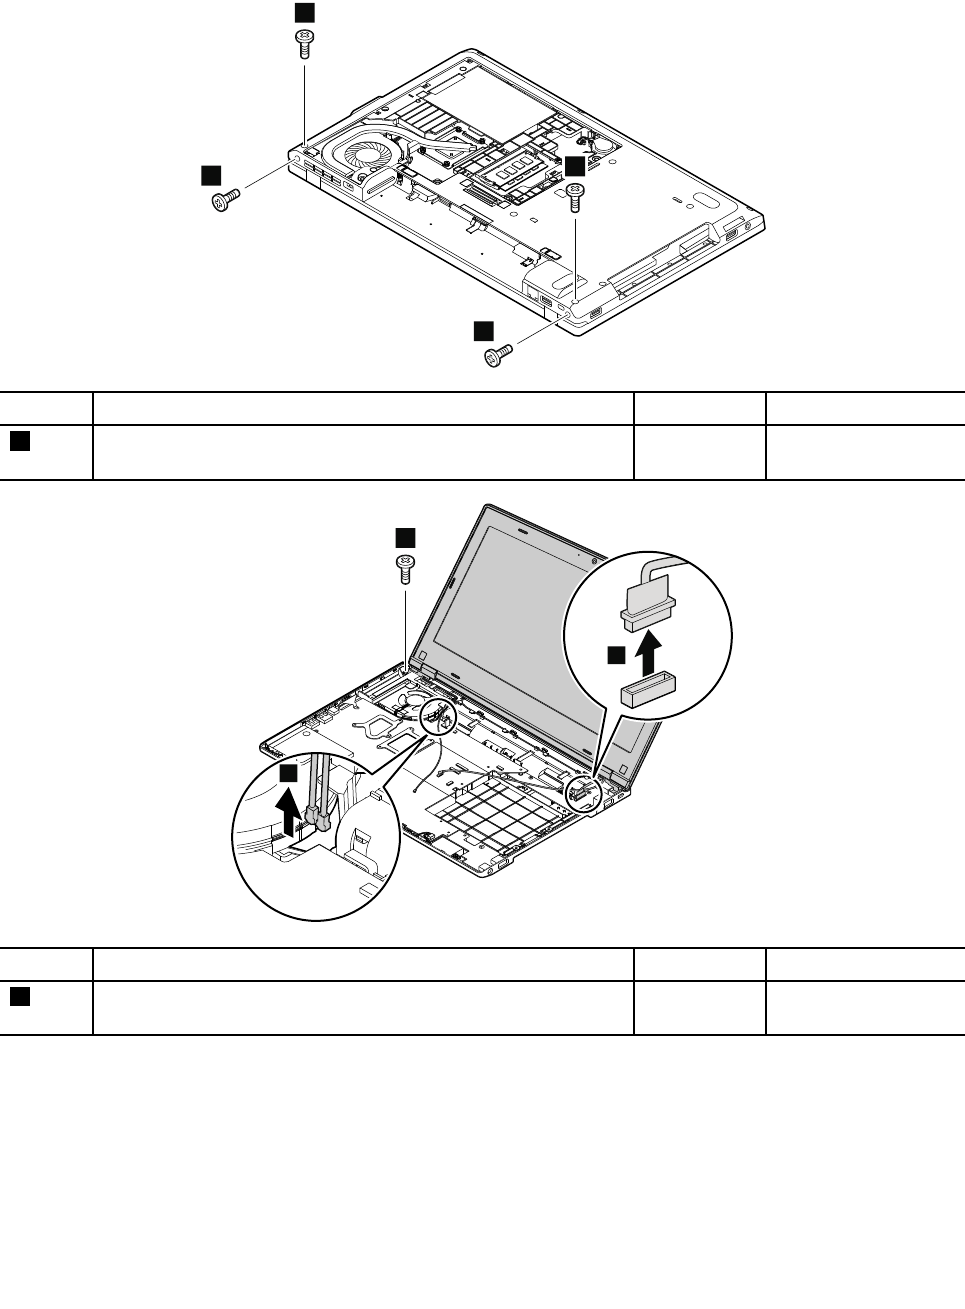
RemovalstepsoftheLCDunit
ForThinkPadL440
1
1
1
1
StepScrew(quantity)ColorT orque
1M2.5×5mm,flat-head,nylon-coated(4)Black0.392Nm
(4.00kgf-cm)
3
2
4
StepScrew(quantity)ColorT orque
2M2.5×5mm,flat-head,nylon-coated(1)Black0.392Nm
(4.00kgf-cm)
Wheninstalling:Ensurethatyouattachtheconnectorfirmly.
118HardwareMaintenanceManual

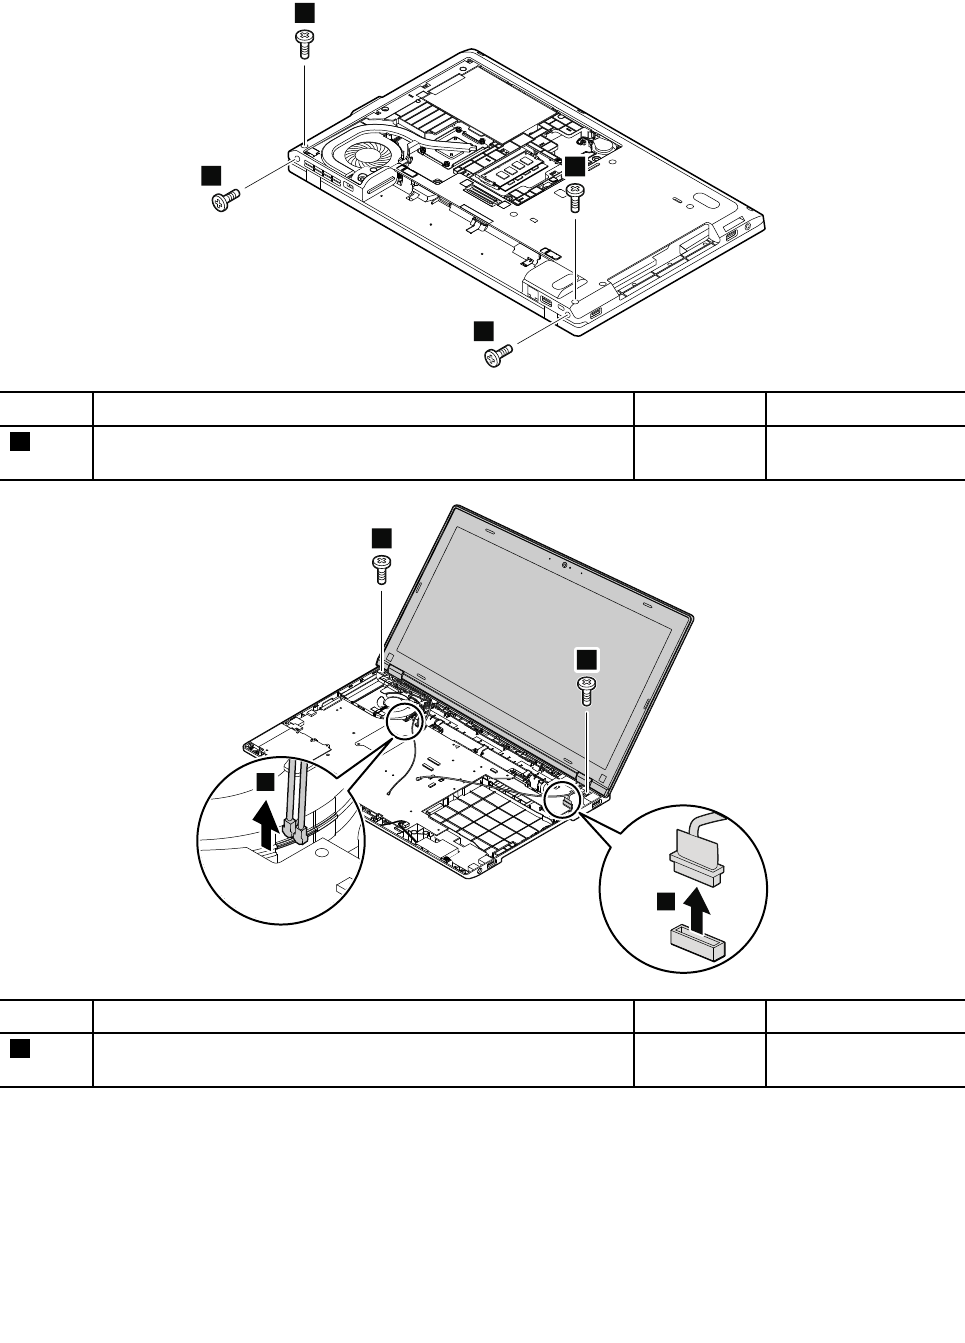
ForThinkPadL540
1
1
1
1
StepScrew(quantity)ColorT orque
1M2.5×5mm,flat-head,nylon-coated(4)Black0.392Nm
(4.00kgf-cm)
3
2
2
4
StepScrew(quantity)ColorT orque
2M2.5×5mm,flat-head,nylon-coated(2)Black0.392Nm
(4.00kgf-cm)
Wheninstalling:Ensurethatyouattachtheconnectorfirmly.
120HardwareMaintenanceManual
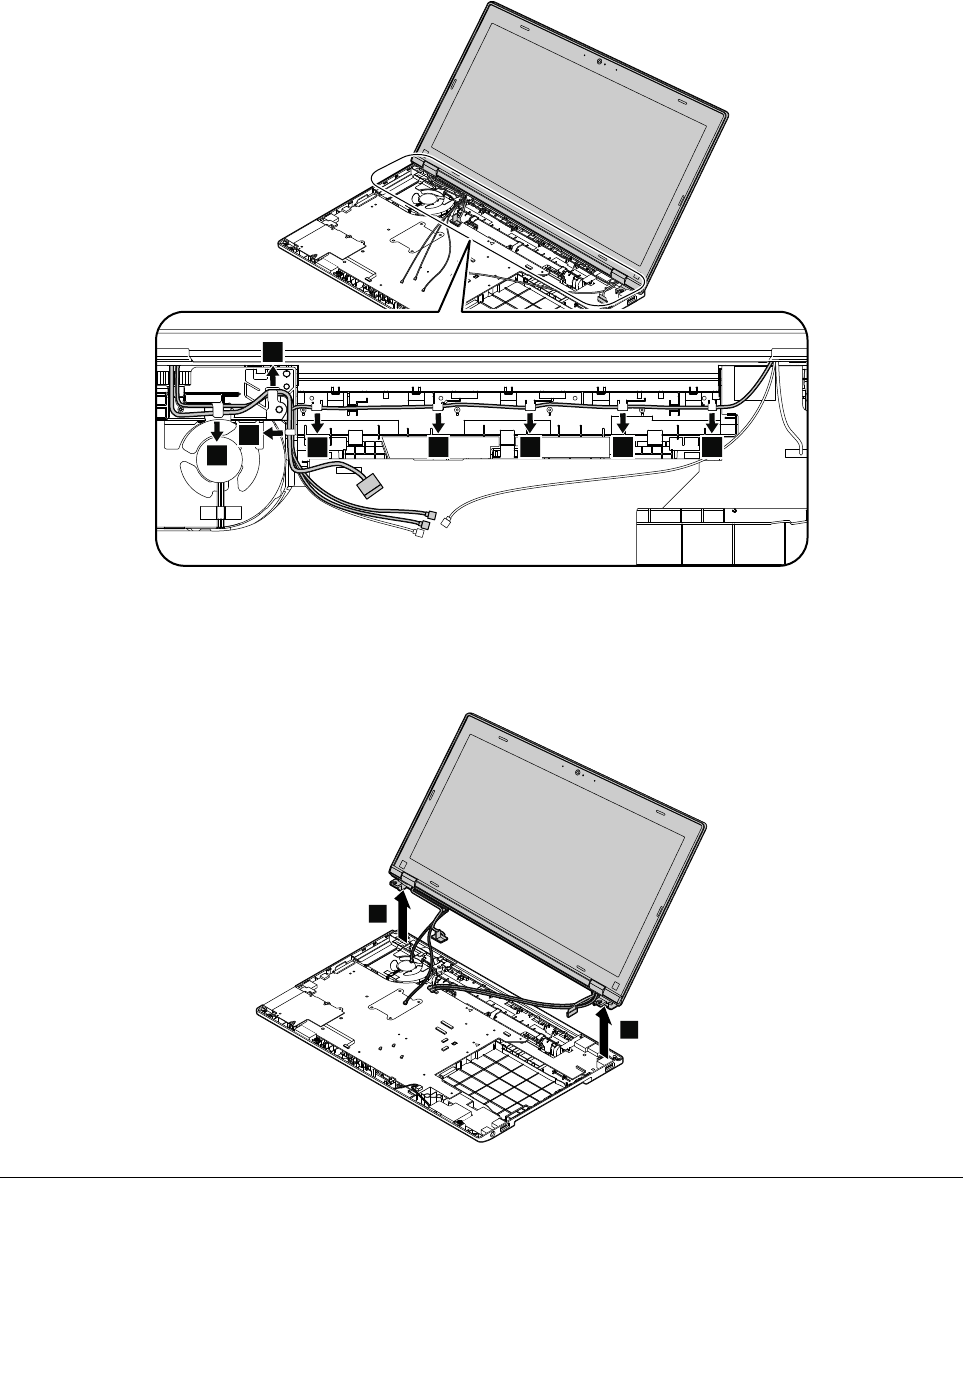
5555
5
5
5
5
Wheninstalling:Ensurethatyouroutethecablesfirmlyinthecorrectposition.
Attention:Whenyouroutethecables,ensurethattheyarenotsubjecttoanytension.Tensioncouldcause
thecablestobedamagedbythecableguides,orawiretobebroken.
6
6
2020LCDfrontbezel
Foraccess,removethisFRU:
•“1010Batterypack”onpage68
Chapter9.RemovingorreplacingaFRU121
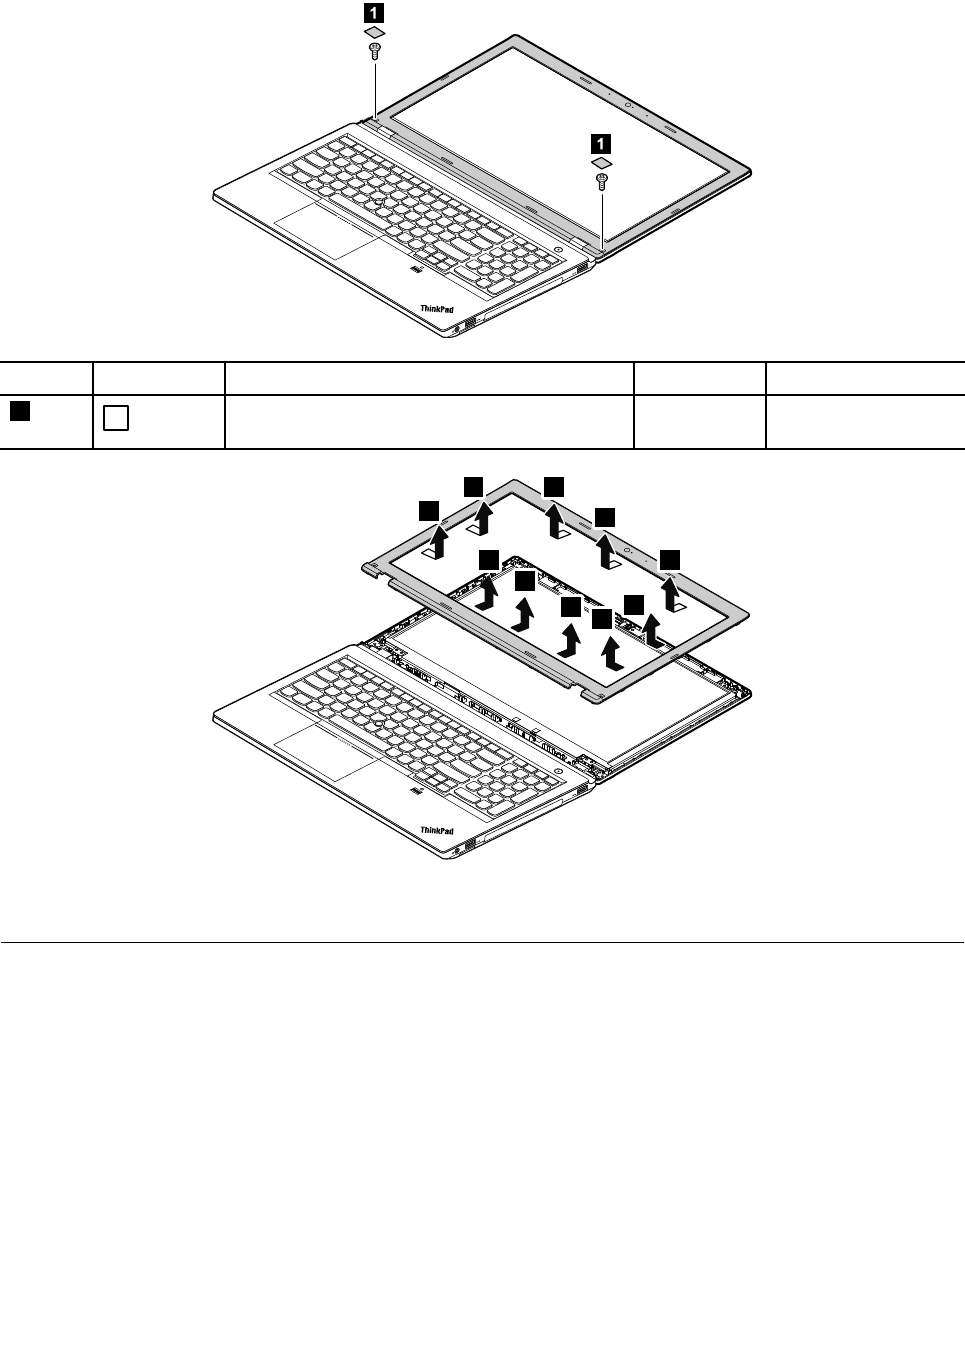
RemovalstepsofLCDfrontbezel
1
1
StepScrewcapScrew(quantity)ColorT orque
1M2.5×5mm,flat-head,nylon-coated(2)Black0.392Nm
(4.00kgf-cm)
2
2
2
2
2
2
2
2
2
2
Wheninstalling:Ensurethatallthelatchesareattachedfirmly.Thensecurethebezelwiththescrews.
2030Camera/microphonecombocard
Foraccess,removetheseFRUsinorder:
•“1010Batterypack”onpage68
•“2020LCDfrontbezel”onpage121
122HardwareMaintenanceManual
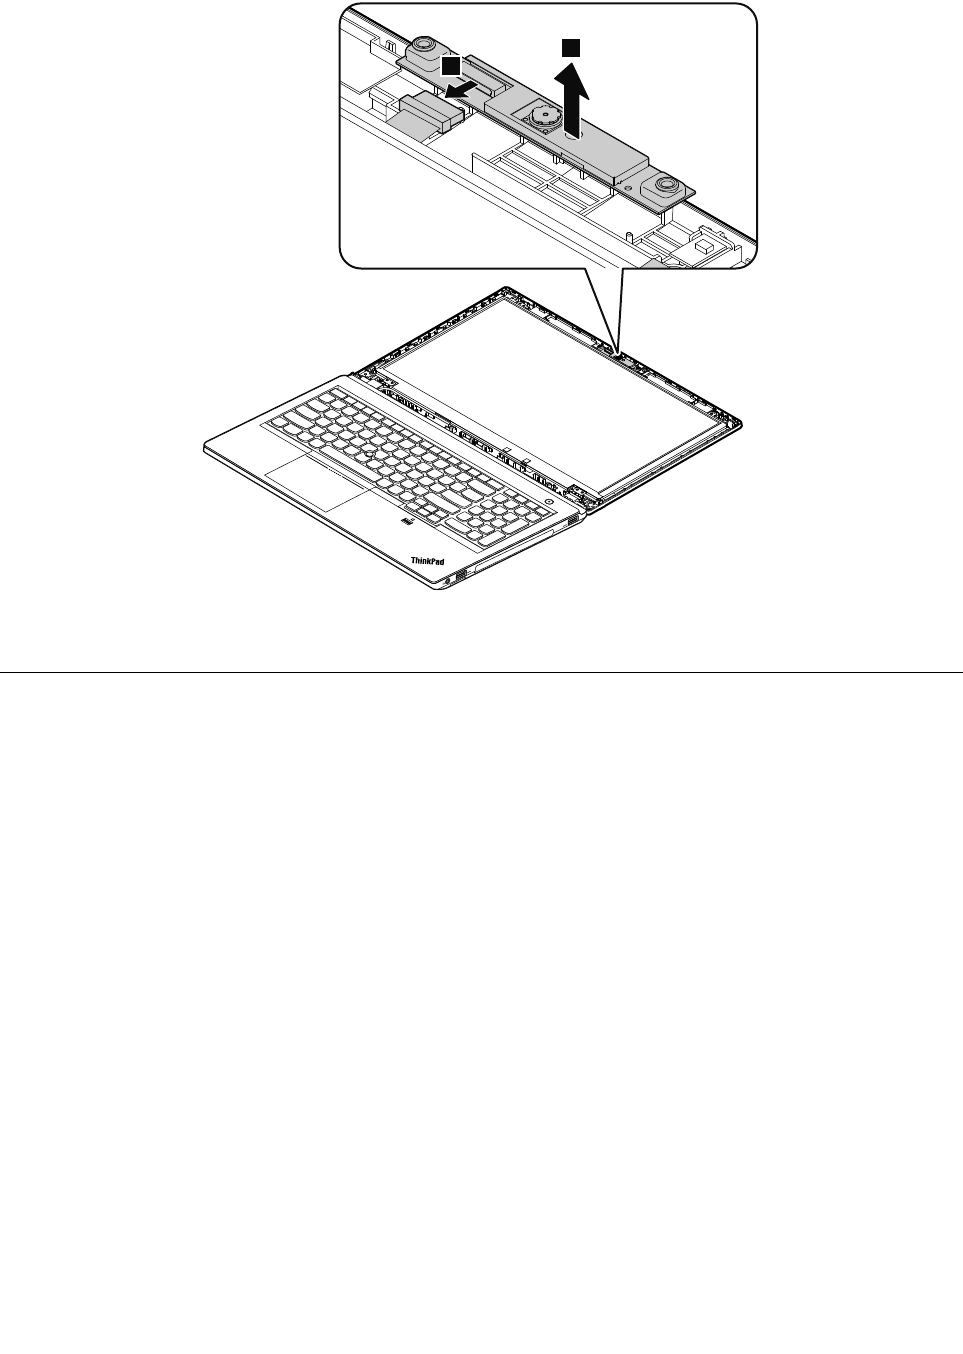
Removalstepsofthecamera/microphonecombocard
2
1
Wheninstalling:Ensurethattheconnectorisattachedfirmly.
2040Hinges,LCDpanel,andLCDcable
Foraccess,removetheseFRUsinorder:
•“1010Batterypack”onpage68
•“1020Bottomdoor”onpage69
•“1030Opticaldrive”onpage70
•“1050Memorymodule”onpage73
•“1060WWANcardorM.2solid-statedrive”onpage74
•“1070WLANcard”onpage76
•“1100Keyboard”onpage82
•“1110Keyboardbezelassembly,fingerprintreader,andpowerbuttoncard”onpage92
•“2010LCDunit”onpage117
•“2020LCDfrontbezel”onpage121
Chapter9.RemovingorreplacingaFRU123
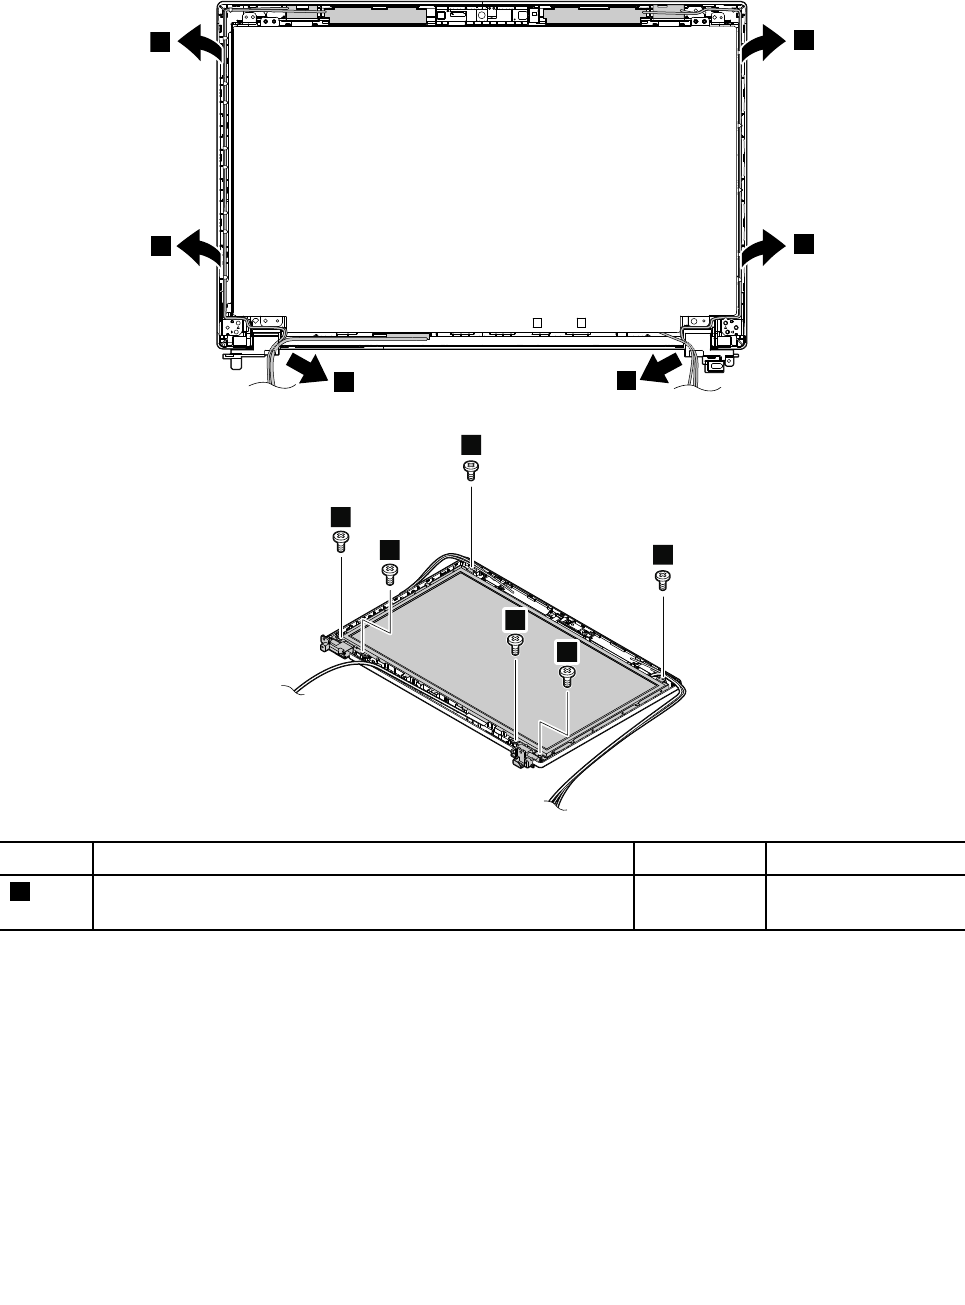
Removalstepsofthehinges,LCDpanel,andLCDcable
FormodelswithwedgeLCD
11
1
1
1
1
2
2
2
2
2
2
StepScrew(quantity)ColorT orque
2M2.5×4mm,flat-head,nylon-coated(6)Black0.392Nm
(4.0kgf-cm)
124HardwareMaintenanceManual

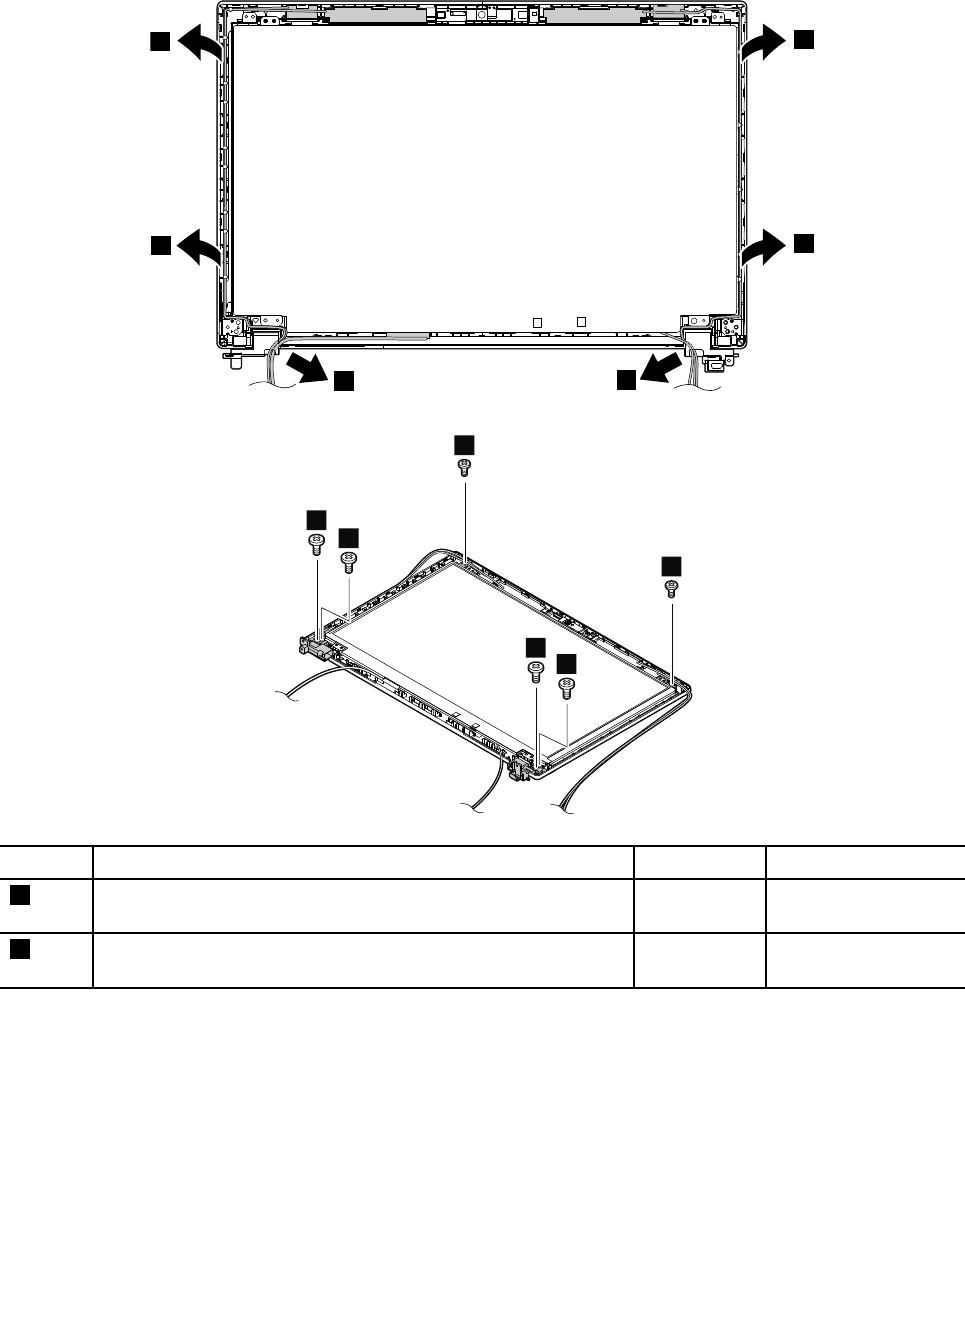
FormodelswithslimLCD
11
1
1
1
1
2
2
3
3
3
3
StepScrew(quantity)ColorT orque
2M2×3.5mm,flat-head,nylon-coated(2)Black0.181Nm
(1.85kgf-cm)
3ForThinkPadL540:M2.5×4mm,flat-head,nylon-coated(4)
ForThinkPadL440:M2.5×3.5mm,flat-head,nylon-coated(4)
Black0.392Nm
(4.0kgf-cm)
126HardwareMaintenanceManual

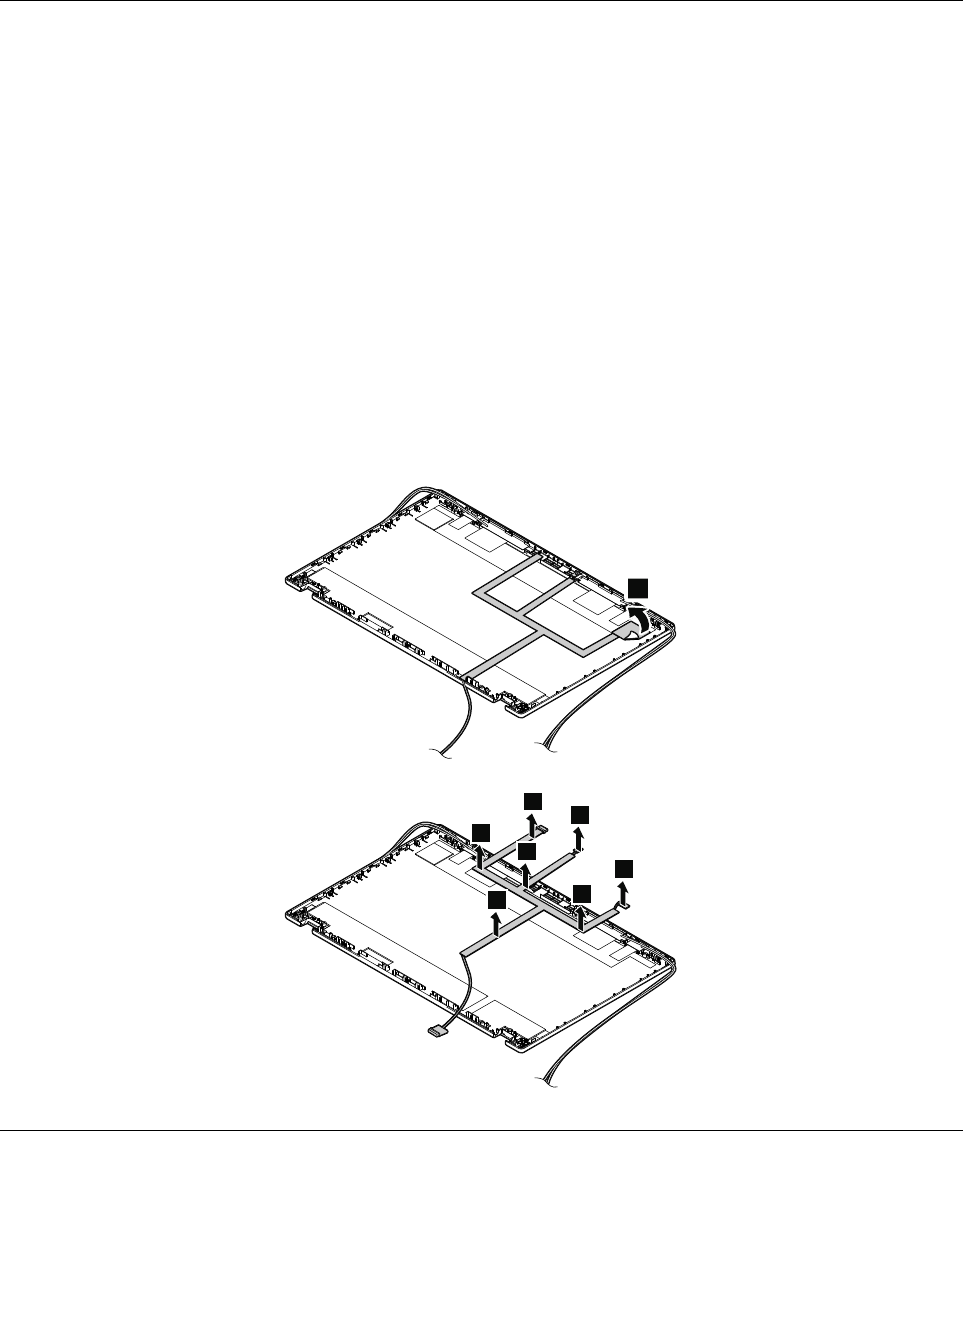
Wheninstalling:EnsurethattheLCDconnectorisattachedfirmly.
2050LEDcardandcableassembly
Foraccess,removetheseFRUsinorder:
•“1010Batterypack”onpage68
•“1020Bottomdoor”onpage69
•“1030Opticaldrive”onpage70
•“1050Memorymodule”onpage73
•“1060WWANcardorM.2solid-statedrive”onpage74
•“1070WLANcard”onpage76
•“1100Keyboard”onpage82
•“1110Keyboardbezelassembly,fingerprintreader,andpowerbuttoncard”onpage92
•“2010LCDunit”onpage117
•“2020LCDfrontbezel”onpage121
•“2030Camera/microphonecombocard”onpage122
•“2040Hinges,LCDpanel,andLCDcable”onpage123
RemovalstepsoftheLEDcardandcableassembly
Note:Dependingonthemodel,theshapeandlocationoftheLEDcardandcableassemblymightbe
differentfromtheillustration.
1
2
2
2
2
2
2
2
2060AntennaassemblyandLCDrearcoverassembly
Foraccess,removetheseFRUsinorder:
•“1010Batterypack”onpage68
•“1020Bottomdoor”onpage69
128HardwareMaintenanceManual
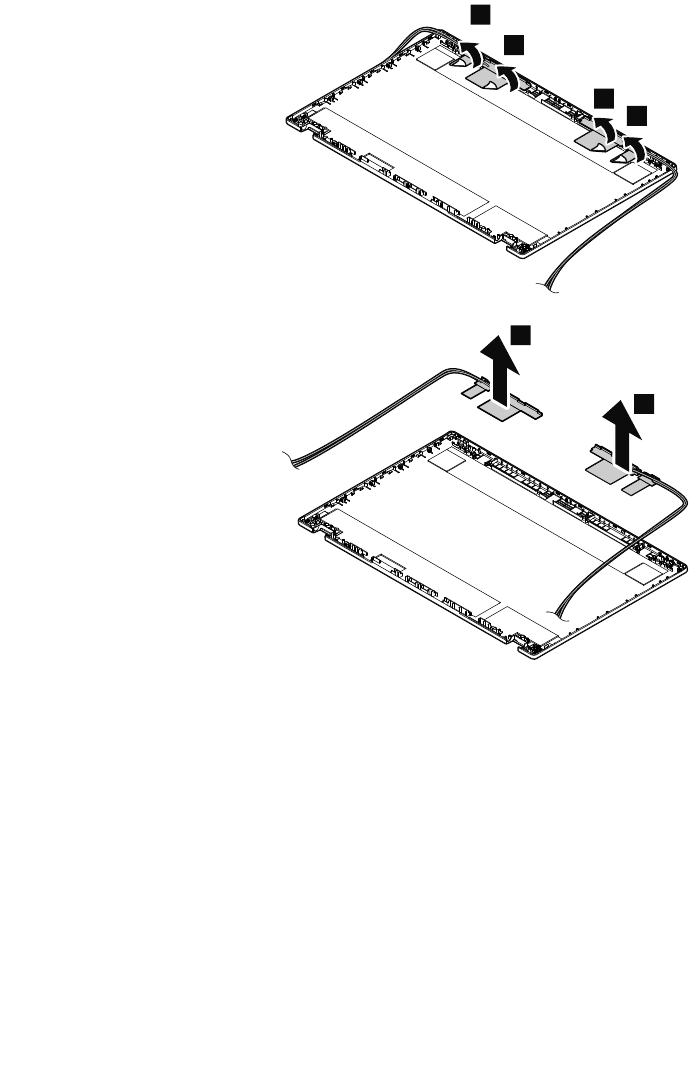
•“1030Opticaldrive”onpage70
•“1050Memorymodule”onpage73
•“1060WWANcardorM.2solid-statedrive”onpage74
•“1070WLANcard”onpage76
•“1100Keyboard”onpage82
•“1110Keyboardbezelassembly,fingerprintreader,andpowerbuttoncard”onpage92
•“2010LCDunit”onpage117
•“2020LCDfrontbezel”onpage121
•“2030Camera/microphonecombocard”onpage122
•“2040Hinges,LCDpanel,andLCDcable”onpage123
•“2050LEDcardandcableassembly”onpage128
RemovalstepsoftheantennaassemblyandtheLCDrearcoverassembly
1
1
1
1
2
2
Attention:Wheninstalling:Whenyouroutethecables,ensurethattheyarenotsubjecttoanytension.
Tensioncouldcausethecablestobedamagedbythecableguides,orawiretobebroken.
Chapter9.RemovingorreplacingaFRU129
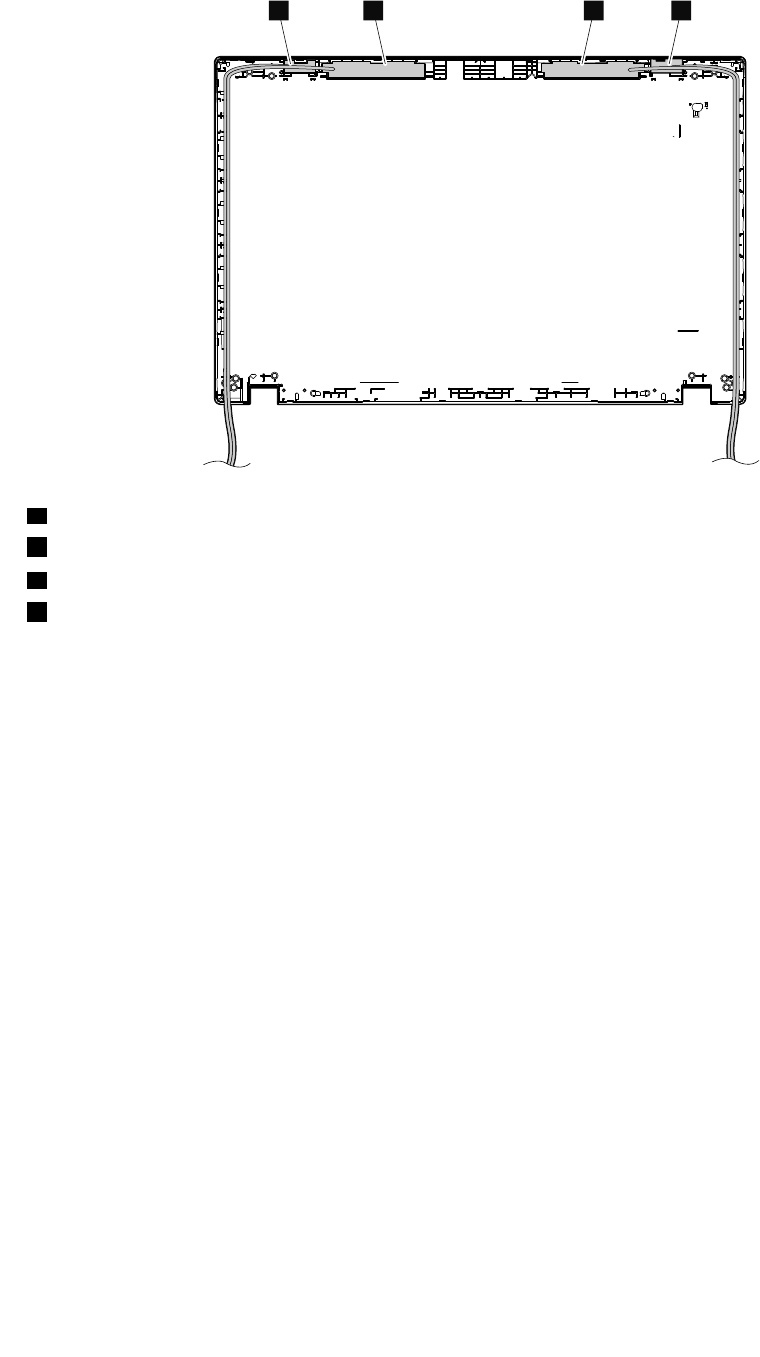
Antennalocations
abcd
aWLANantenna(main,gray)
bWWANantenna(main,red)
cWWANantenna(auxiliary,blue)
dWLANantenna(auxiliary,black)
130HardwareMaintenanceManual

AppendixA.Notices
Lenovomaynotoffertheproducts,services,orfeaturesdiscussedinthisdocumentinallcountries.Consult
yourlocalLenovorepresentativeforinformationontheproductsandservicescurrentlyavailableinyour
area.AnyreferencetoaLenovoproduct,program,orserviceisnotintendedtostateorimplythatonlythat
Lenovoproduct,program,orservicemaybeused.Anyfunctionallyequivalentproduct,program,orservice
thatdoesnotinfringeanyLenovointellectualpropertyrightmaybeusedinstead.However,itistheuser’s
responsibilitytoevaluateandverifytheoperationofanyotherproduct,program,orservice.
Lenovomayhavepatentsorpendingpatentapplicationscoveringsubjectmatterdescribedinthis
document.Thefurnishingofthisdocumentdoesnotgiveyouanylicensetothesepatents.Y oucansend
licenseinquiries,inwriting,to:
Lenovo(UnitedStates),Inc.
1009ThinkPlace-BuildingOne
Morrisville,NC27560
U.S.A.
Attention:LenovoDirectorofLicensing
LENOVOPROVIDESTHISPUBLICATION“ASIS”WITHOUTWARRANTYOFANYKIND,EITHEREXPRESS
ORIMPLIED,INCLUDING,BUTNOTLIMITEDTO,THEIMPLIEDWARRANTIESOFNON-INFRINGEMENT,
MERCHANTABILITYORFITNESSFORAPARTICULARPURPOSE.Somejurisdictionsdonotallow
disclaimerofexpressorimpliedwarrantiesincertaintransactions,therefore,thisstatementmaynotapply
toyou.
Thisinformationcouldincludetechnicalinaccuraciesortypographicalerrors.Changesareperiodically
madetotheinformationherein;thesechangeswillbeincorporatedinneweditionsofthepublication.
Lenovomaymakeimprovementsand/orchangesintheproduct(s)and/ortheprogram(s)describedinthis
publicationatanytimewithoutnotice.
Theproductsdescribedinthisdocumentarenotintendedforuseinimplantationorotherlifesupport
applicationswheremalfunctionmayresultininjuryordeathtopersons.Theinformationcontainedinthis
documentdoesnotaffectorchangeLenovoproductspecificationsorwarranties.Nothinginthisdocument
shalloperateasanexpressorimpliedlicenseorindemnityundertheintellectualpropertyrightsofLenovo
orthirdparties.Allinformationcontainedinthisdocumentwasobtainedinspecificenvironmentsandis
presentedasanillustration.Theresultobtainedinotheroperatingenvironmentsmayvary.
Lenovomayuseordistributeanyoftheinformationyousupplyinanywayitbelievesappropriatewithout
incurringanyobligationtoyou.
Anyreferencesinthispublicationtonon-LenovoWebsitesareprovidedforconvenienceonlyanddonotin
anymannerserveasanendorsementofthoseWebsites.ThematerialsatthoseWebsitesarenotpartof
thematerialsforthisLenovoproduct,anduseofthoseWebsitesisatyourownrisk.
Anyperformancedatacontainedhereinwasdeterminedinacontrolledenvironment.Therefore,theresult
obtainedinotheroperatingenvironmentsmayvarysignificantly.Somemeasurementsmayhavebeen
madeondevelopment-levelsystemsandthereisnoguaranteethatthesemeasurementswillbethesame
ongenerallyavailablesystems.Furthermore,somemeasurementsmayhavebeenestimatedthrough
extrapolation.Actualresultsmayvary.Usersofthisdocumentshouldverifytheapplicabledatafortheir
specificenvironment.
©CopyrightLenovo2013,2017131

Electronicemissionsnotices
ForelectronicemissioninformationonClassBdigitaldevices,refertothecorrespondinginformationin
theUserGuide.
Trademarks
ThefollowingtermsaretrademarksofLenovointheUnitedStates,othercountriesorboth:
ActiveProtectionSystem
Lenovo
ThinkPad
TrackPoint
UltraNav
MiniDisplayPort(mDP)isaTrademarkoftheVideoElectronicsStandardsAssociation.
Microsoft,Windows,WindowsServerandCortanaaretrademarksoftheMicrosoftgroupofcompanies.
IntelisatrademarkofIntelCorporationintheU.S.and/orothercountries.
Othercompany,product,orservicenamesmaybethetrademarksorservicemarksofothers.
132HardwareMaintenanceManual

AppendixB.Abbreviationtable
Thefollowingtablelistsallabbreviationsusedinthismanual.
AbbreviationTerm
BGABallGridArray
CMOSComplementaryMetalOxideSemiconductor
CMVCustomModelVariant
CRCCyclicredundancycheck
CRTCathoderaytube
CRUCustomerReplaceableUnit
CTOConfigureToOrder
EAIAEnhancedAssetInformationArea
EEPROMElectricallyErasableProgrammableRead-OnlyMemory
EFIExtensibleFirmwareInterface
ESDElectrostaticdischarge
FRUFieldReplaceableUnit
GAVGeneralAnnounceVariant
ICIntegratedcircuits
LCDLiquidCrystalDisplay
MTMMachinetypeandmodel
POSTPower-onself-test
RFIDRadio-frequencyidentification
SVPSupervisorpassword
UUIDUniversallyuniqueidentifier
©CopyrightLenovo2013,2017133

134HardwareMaintenanceManual

PartNumber:SP40A26004_04
PrintedinChina
(1P)P/N:SP40A26004_04
*1PSP40A26004_04*
